Sleep Performance 123-SBV2 SBV2 User Manual
Sleep Performance, Inc. (dba Fatigue Science) SBV2
User Manual
1
ReadiBand® Hardware User Guide

2
Table of Contents
Table of Contents 2
Warnings and Safety Information 3
Technical Specifications 4
Introduction 6
Purpose of this Guide 6
ReadiBand Overview 6
Getting Started 7
Included Contents 7
Using ReadiBand 8
LED Status Indicators 8
Wearing the ReadiBand 8
Cleaning the ReadiBand 8
Basic ReadiBand Functionality 9
Date / Time Display 9
Communicating with SleepAnalyzer Software 9
Menu Navigation 10
Status 10
Battery Level 11
Time Set 11
About 11
Starting a Recording Session 12
Downloading a Recorded Session 12
Battery Charging 13
Battery Information 13
When to Charge 13
How to Charge 13
Support 14
Frequently Asked Questions 14
Troubleshooting 14
Contact Information 16
3
Warnings & Safety Information
• Do not wear ReadiBand on broken, damaged, or irritated skin. Remove immediately if
skin irritation or rash occurs.
• Do not dispose of the ReadiBand by incinerating it or by placing it in the trash.
• If pod is punctured or damaged, immediately cease use.
• Do not wear ReadiBand while playing very rough contact sports.
• Battery charging should always be monitored.
• Charge indoors only.
• Clean ReadiBand with soap and warm water or an isopropyl alcohol wipe. Do not
submerge ReadiBand in alcohol or other solvent.
WARNING: Changes or modifications not expressly approved by the party
responsible for compliance could void the user’s authority to operate the
ReadiBand and charger.
WARNING: The charger is designed with adequate safeguards to protect
you from shock and other hazards when used as specified within this
documentation. If you use the charger in a manner not specified by this
document, the protection provided by the charger may be impaired. Please
read the documentation before using the charger.
WARNING: If you transport the charger in checked baggage, be sure to
remove the ReadiBand from the charger before packing it.
Battery
Temperature
• The temperature of the air around the ReadiBand being charged
should be between 0°C and +55°C (+32°F to +131°F). Charging the
ReadiBand outside this range may increase charge time, harm battery
performance, or reduce battery life.
Charge time • The charger will charge a ReadiBand in less than 1 hour if the
ambient temperature is inside the operating ambient temperature
specification.
• If the ambient temperature is above or below the operating ambient
temperature range, the charger may eventually charge the ReadiBand,
but the charge time will be longer than 1 hour.
Power Input
Power the charger only with the AC/DC power supply provided with the
charger. Failure to do so could damage the charger, void the warranty, and
cause a safety hazard.
User
Serviceability
Do not disassemble the charger or the ReadiBand. There are no user-
serviceable parts.
Liquids Avoid spilling liquids on the charger. Liquids spilled onto the charger could
cause it to short circuit. If liquids are accidentally spilled, let the charger dry
before use.
ReadiBand
Disposal
Dispose of used ReadiBands according to the manufacturer’s instructions
and local or national regulations.

4
Cleaning Wash the ReadiBand with warm water and mild soap. If additional cleaning is
necessary, wipe the entire ReadiBand with an isopropyl alcohol wipe. Do not
use liquid alcohol or other harsh cleaners to clean the ReadiBand.
NOTE: The ReadiBand device complies with part 15 of the FCC Rules. Operation is
subject to the following two conditions: (1) This device may not cause
harmful interference, and (2) this device must accept any interference
received, including interference that may cause undesired operation.
NOTE: The ReadiBand has been tested and found to comply with the limits for a
Class B digital device, pursuant to Part 15 of the FCC Rules. These limits are
designed to provide reasonable protection against harmful interference in a
residential installation. The ReadiBand generates, uses and can radiate radio
frequency energy and, if not installed and used in accordance with the
instructions, may cause harmful interference to radio communications.
However, there is no guarantee that interference will not occur in a particular
installation. If the ReadiBand does cause harmful interference to radio or
television reception, which can be determined by turning the ReadiBand off
and on, the user is encouraged to try to correct the interference by one or
more of the following measures:
- Reorient or relocate the receiving antenna.
- Increase the separation between the ReadiBand and receiver.
- Connect the ReadiBand into an outlet on a circuit different from that
to which the receiver is connected.
- Contact support or consult an experienced radio/TV technician for
help.
NOTE: This Class B digital apparatus complies with Canadian ICES-003.
Cet appareil numériqué de la classe [*] est conformé à la norme NMB-003 du Canada.

5
Technical Specifications
Model SBV2 ReadiBand Actigraph
Power Input: Individual charger 5 VDC, 0.25 amp MAX
Power Input: Multi-charger 5 VDC, 2 amp MAX
Internal Battery Li-ion rechargeable coin cell
Transmitter 2.4 GHz ISM Band
Operating Environment 0°C to +55°C (+32°F to +131°F), 0-95%
relative humidity (non-condensing)
Storage Environment -40°C to +75°C (-40°F to +167°F), 0-95%
relative humidity (non-condensing)
6
Introduction
Purpose of this guide
This guide covers key aspects for ReadiBand users, including:
- How to start using ReadiBand
- How to wear ReadiBand
- Recording and downloading data
- How to charge ReadiBand
- Troubleshooting information
ReadiBand Overview
The ReadiBand is a wrist-worn device that collects actigraphy data to determine how active
an individual is during the course of a day. Actigraphy data measures movement using an
accelerometer. With this movement information, the ReadiBand is able to determine when a
user goes to bed and a general fatigue or rest score over time. The ReadiBand uses the ANT
wireless protocol to send data and obtain configuration information from a PC.
The ReadiBand uses only an accelerometer sensor to collect movement data. There is no
GPS, no audio monitoring, no video, and no tracking devices. The ReadiBand only measures
wrist movement.
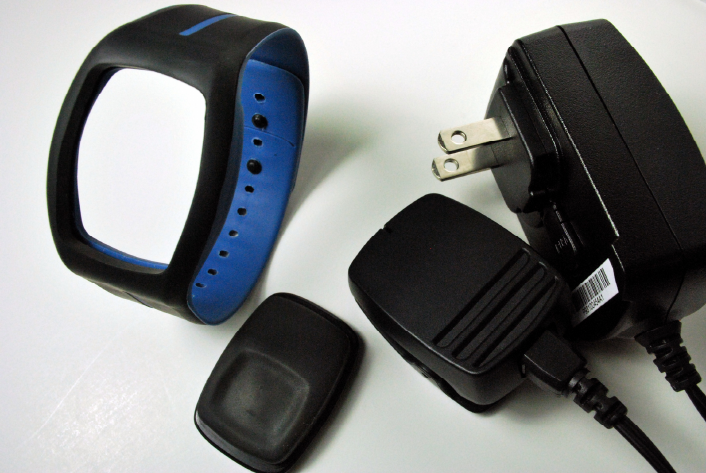
The ReadiBand system is made up of several parts: a pod with the electronics and sensors, a
soft and flexible wrist strap, a multi or individual charger, and the software.
7
Getting Started
Included contents
Before getting started wearing the ReadiBand, please inspect and verify that all of the
following components are included. If any items are missing, please contact Fatigue Science
support staff immediately.
• ReadiBand pod (installed in strap)
• ReadiBand rubber wrist strap
Optional accessories:
• USB ANT dongle with extension cord
• Individual charger with power adapter or multi-charger
• Software installation CD
8
Using the ReadiBand
LED Status Indicators
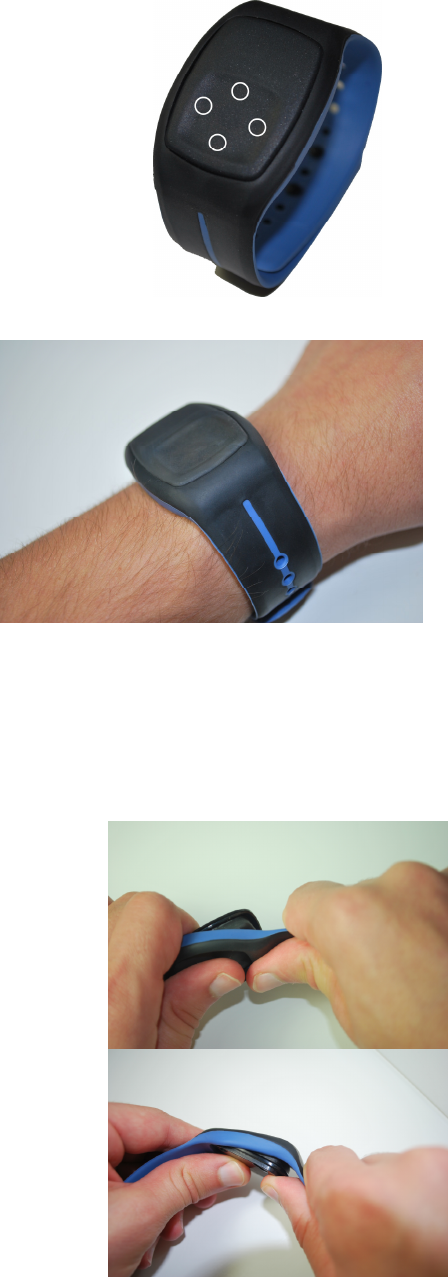
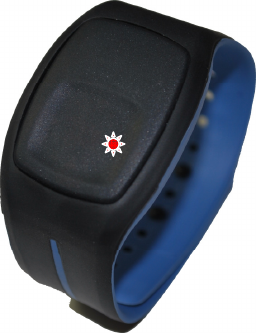
The ReadiBand has four LEDs to notify users of the state of the
ReadiBand.
Top LED – Communicating with PC
Right LED – Low battery warning
Bottom LED – Communicating with charger
Left LED – Device Error
Wearing the ReadiBand
The ReadiBand should be worn on the wrist of
the non-dominant hand on the tightest setting
that feels comfortable. It should not cut off
circulation; if there is any discomfort, move to a
larger setting. If the device is too loose on the
smallest setting, use a sharp pair of scissors to cut
off the end of the strap with the marking on the
inside to be able to use the smallest settings. If
the device is too tight on the largest setting, use a
strap extender.
The ReadiBand is made of high-grade flexible plastic and is completely waterproof. The
device may be worn in the shower, bath, or while swimming. It should be taken off when
playing rough contact sports but otherwise should be worn at all times, including during light
exercise. If the ReadiBand pod is damaged, the entire ReadiBand should be replaced
immediately.
The ReadiBand can be used as a wrist watch to display the
current date and time. This is presented through a 5 x 19
pixel LED display on the top of the pod.
Cleaning the ReadiBand
During normal wear, clean the ReadiBand with soap and
warm water or an isopropyl alcohol wipe. If dirt and stains
do not come off, use a mild, non-abrasive cleaning pad or
cloth to remove any stains. Never submerge the ReadiBand
in alcohol or other solvents.
If excessive residue or dirt becomes trapped between the pod
and the band, the pod can be removed from the band. To
remove the pod from the ReadiBand, hold the pod in one
hand and push back against the band to strip off the band.
To place the pod back in the band, put the pod on the band
as shown at right and pull the band over the pod.
9
Basic ReadiBand Functionality
Date/Time Display
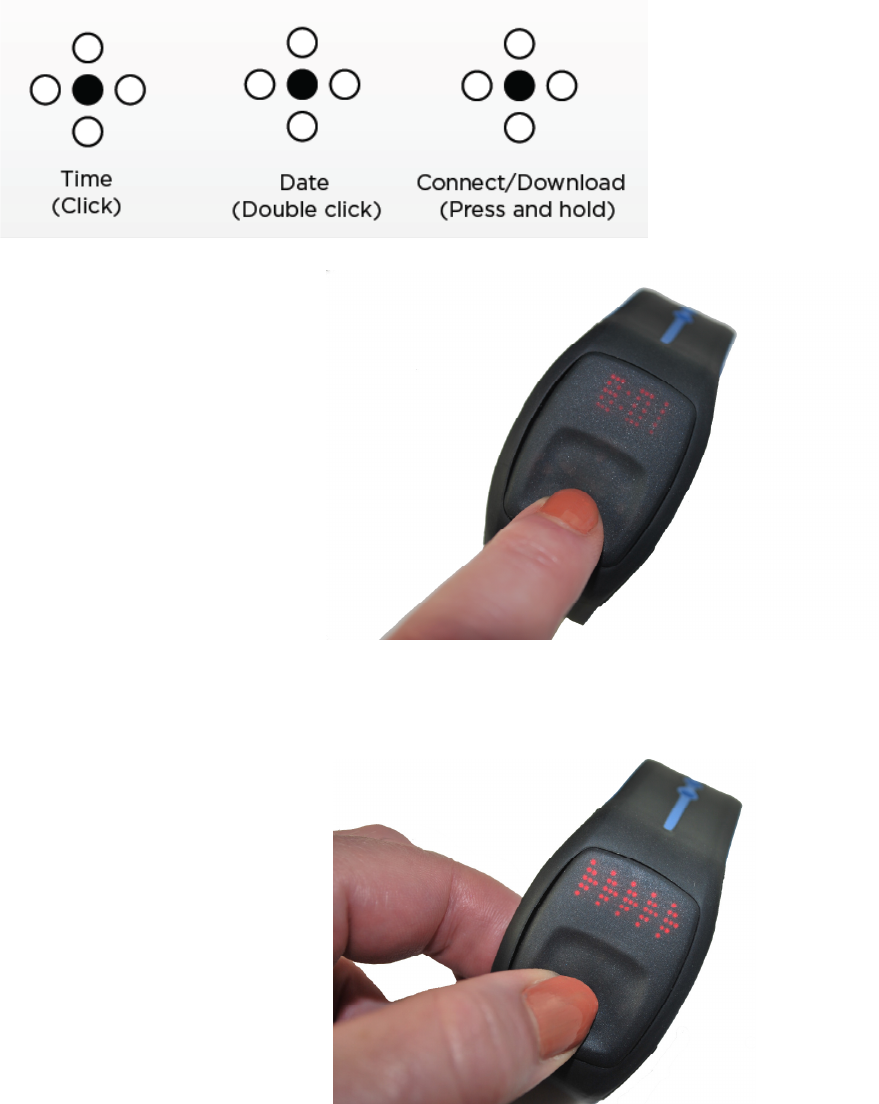
To display the current time, press the middle
button once and the time will be displayed
for one second. To display the time for up
to three seconds, hold the button down.
To display the current date, double click the
middle button and the date will scroll across
the screen.
Communicating with PC software
The ReadiBand uses ANT wireless
connection to communicate with the PC.
This is used to start and download a
recording session.
To wirelessly sync with a PC, press and hold
down the middle button for more than three
seconds. When arrows scroll across the
display, release the button. [Note: attempting
to sync with the PC on a continuous basis
when it is not available will decrease battery
life. Sync is disabled when the battery level is
below 60%. Charge the ReadiBand above
60% charge to sync.]
10
Menu Navigation
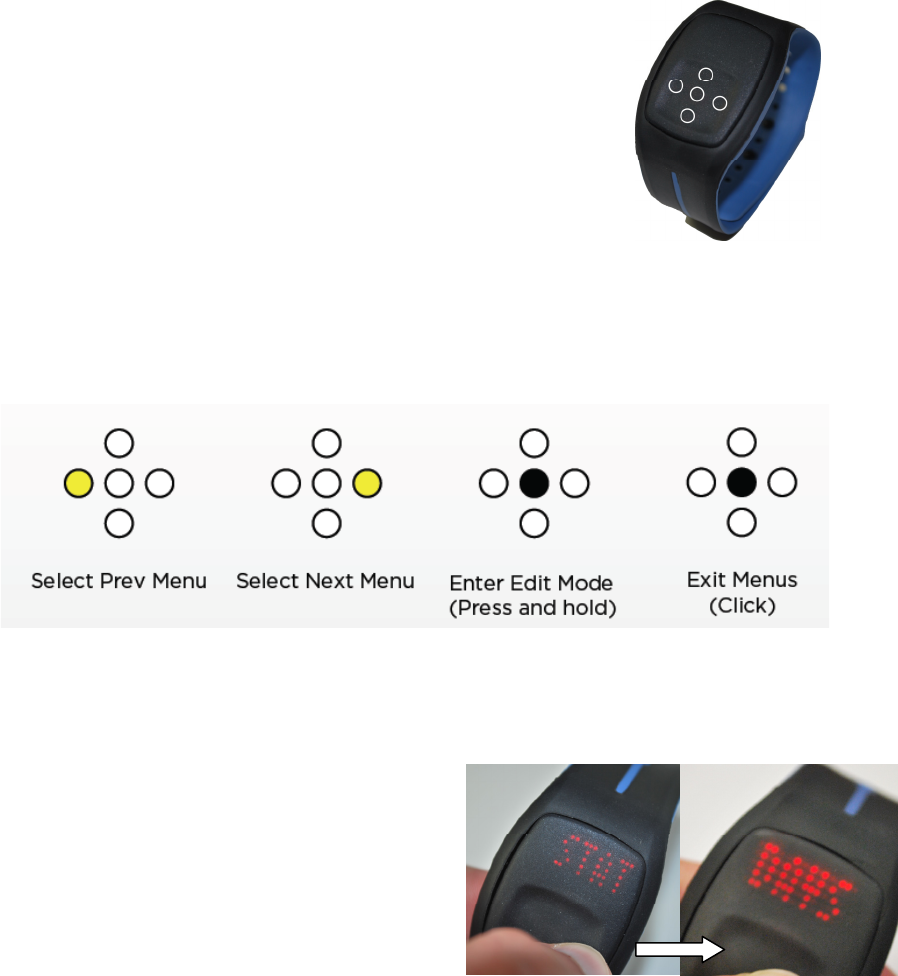
The ReadiBand has five buttons used for menu navigation. The
right button displays next menu items, the left displays the
previous menu items and the center button selects the current
menu item displayed. The first four letters of the menu item will be
displayed for two seconds before the entire text scrolls across.
[Note: push the center button during time or date scroll to terminate scrolling text. When a
menu heading is scrolling, pressing the center button will select that menu.]
Press up or down to adjust the LED brightness.
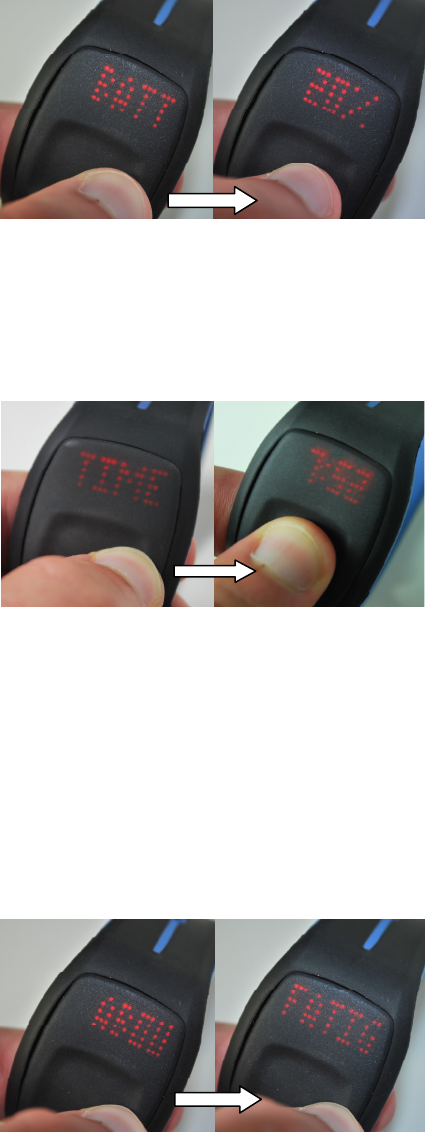
The four menu items include Status, Battery Level, Time Set and About
1) Status – This menu item displays
the current mode that the
ReadiBand is operating on. It will
display one of the following modes.
• SESSION IS IDLE – This
indicates that the ReadiBand is
idle and not actively recording
any data. This occurs when a
session has not been configured with the PC software or a previous session
has been stopped.
• X HOURS/DAYS/MONTHS RECORDED – This indicates that the
ReadiBand is actively recording data and for how long. This occurs when a
session has been configured with the PC software.
• SESSION IS STARTING IN TIME/DATE – This indicates that the
ReadiBand is waiting to start a recording session on the time or date
displayed. The ReadiBand has been configured with the PC software but the
start date/time has not been reached yet.
11
2) Battery Level – This menu item
displays the percentage of battery
remaining on the ReadiBand in
increments of 10%.
3) Time Set – This menu item allows
the user to modify the current
time displayed on the ReadiBand.
After selecting it, press up/down
to increment/decrement the
hours/minutes and right/left to
select between modifying the
hours/minutes. When the time has
been adjusted, press the middle button to confirm the new time. The current
time will flash along with AM or PM followed by the date. To select a new date,
increment or decrement the time to the correct time on the correct date, like
selecting the date on an analog watch.
4) About – This menu item displays
a configurable scrolling message,
such as the user name or a contact
website. This message may be
modified through the ReadiBand
PC software.
12
Starting a recording session
Before recording a data session, configure the ReadiBand and set a recording session start
time using the PC software. The software also allows the user to specify a custom About tag
or user name to identify the ReadiBand.
1) Plug the ANT dongle with extension cord into an available USB port and the
device will be automatically recognized. If the device is not recognized, restart
the computer or reinstall the driver software. Driver software only needs to be
installed once.
2) Launch the PC software.
3) Select “Start Session.”
4) Customize the following startup requirements if desired and click “Connect.”
• Start time – To start immediately, do not modify the default field. Specify a
date and time in this field for a delayed start.
• Wearer’s name – Input a custom name to help identify the ReadiBand.
5) Hold down the middle button on the ReadiBand until arrows flash through the
display for approximately 4 seconds.
6) “SESSION STARTING” will scroll across the ReadiBand display.
7) Verify that the session has started properly by checking the Status Menu. Press
the right button then the middle button. If the session has started, the screen
will display “0 Hours Recorded.”
8) Refer to “Downloading a recorded session” when ready to download and analyze
recorded data.
Downloading a recorded session
The ReadiBand allows downloading recorded data at anytime during a recording session.
Downloading recorded data will NOT stop the recording process. After downloading, all
prior data will be preserved and recording will continue.
1) Plug the ANT dongle with extension cord into an available USB port and the
device will be automatically recognized. If the device is not recognized, restart
the computer or reinstall the driver software. Driver software only needs to be
installed once.
2) Launch the PC software.
3) Select “Download Data.”
4) Hold down the middle button on the ReadiBand until arrows flash though the
display for four seconds.
5) Wait for the progress bar on the computer and the ReadiBand display to
complete. The ReadiBand LEDs will flash green when download is finished
successfully. Push the middle button to stop the flashing green LEDs.
“Download Complete” will scroll across the ReadiBand display. [Note: if button
is not pressed within one minute, LEDs will stop flashing and device will return
to normal state.]
6) Data has been saved to the PC.
7) Refer to the software manual for analysis instructions.
8) If there is a download error, red LEDs will flash for one hour or until a button is
pressed. If a button has not been pressed after one hour, the flashing will stop
and a “Download Unsuccessful” message will display when the center button is
pressed. To dismiss the message, press the center button again.
13
Battery Charging
Battery Information
An internal rechargeable lithium-ion coin cell battery powers the ReadiBand. Under typical
use, a fully charged ReadiBand can run for more than 30 days before a recharge is required.
The battery life of a fully charged battery is dependent on how often the menu display is
used and how often it is synced with a computer. The ReadiBand battery is not user
replaceable.
Charge the ReadiBand for one hour before using it for the first time.
When to Charge
The ReadiBand may be recharged at anytime. Charge the
ReadiBand prior to starting a new record session when the
battery is below 60% (see Menu Navigation to display
battery level). A fully charged battery displays 100%.
The ReadiBand displays a low battery warning when the
battery level drops to 10% battery level or less. This
warning will be displayed only after a user presses the
middle button to display the time/date. This indication
notifies the user to immediately charge the ReadiBand.
The ReadiBand will stop an active recording session if the
battery level drops to 5%. The ReadiBand will go into a low
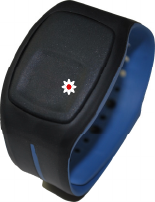
battery mode by disabling all menu items and flashing a red LED. While the ReadiBand may
sync up with a PC to offload recorded data, it is highly recommended to recharge the battery
first in order to avoid connection problems.
• A full charge lasts for more than 30 days
• Charges in one hour from fully depleted.
How to Charge
• Use the individual or multi-charger to recharge the ReadiBand battery (see appropriate
charger user guide).
• Do not charge the ReadiBand when attached to the body.
14
Support
Frequently Asked Questions
Please refer to the following frequently asked questions about the ReadiBand.
Question: “Does the ReadiBand come in different colors?”
Answer: Yes, the ReadiBand is available in a variety of colors, please contact support for
special order information.
Question: “Is it safe to take the ReadiBand on an airplane?”
Answer: Yes, the wireless transmitter on the ReadiBand is normally disabled. Wireless
transmitting is only enabled when the middle button is held down for over three seconds.
Transmission lasts for less than 10 seconds when a PC receiver is not present. Consider the
ReadiBand as always being in a default “Airplane Mode.”
Question: “Can I change the display name or about information after a session has already
started?”
Answer: No, the display name can only be set when a recording session is initialized. To set
a new display name, the session must be restarted.
Question: “How long does it take to charge the ReadiBand?”
Answer: The ReadiBand takes about one hour to charge from fully depleted.
Troubleshooting
Please refer to the following troubleshooting guide before contacting support.
Problem: “My ReadiBand is not responding to left or right button presses and
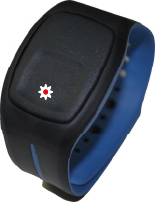
has a blinking red light.”
Solution: The ReadiBand is in low power mode and will not allow access to
any menu items. Recharge the device in order to gain access to the menus
again.
Problem: “My ReadiBand is not responding to any button presses.”
Solution: The ReadiBand battery has completely drained and must be
recharged before further use. If the problem persists after recharging the device for over an
hour, disconnect the ReadiBand from the charger and contact support.
Problem: “My ReadiBand does not display my name when I select it.”
Solution: The ReadiBand has not been configured with a name or has been set incorrectly.
Reconfigure the band by starting a new session. [Note: this will delete all recorded data.]
15
Problem: “The date is incorrect on my ReadiBand after I set a new time.”
Solution: The ReadiBand functions similar to an analog wrist watch; when the hour is
increased beyond midnight, the date will jump one day in advance. For example, if traveling
to a time zone two hours behind (e.g. EST to RMT) and the ReadiBand time is currently set
to 10am, decrement two hours to 8am. Do not increment ten hours to 8pm.
Problem: “My ReadiBand cannot connect to the SleepAnalyzer software.”
Solution:
1) Remove ReadiBand and place it next to the USB ANT dongle. Radio
interference may cause wireless communication problems at a distance. If this
still does not work, try step 2.
2) Be sure that the middle button is firmly pressed for more than 4 seconds.
3) Be sure that the battery level remaining on the ReadiBand is above 20%. If it is
not, recharge ReadiBand before attempting to reconnect.
4) Shut down SleepAnalyzer software, unplug USB ANT dongle, plug USB ANT
dongle back in and start up SleepAnalyzer software again. If this still doesn’t
work, try step 3.
5) Restart computer and software and try again.
6) Contact support
Problem: “My ReadiBand appears to be having a short battery life.”
Solution: The battery life is greatly dependent on the display usage of the ReadiBand. Try to
fully charge the battery and access the menu displays only when needed. If the battery life is
still significantly short, please contact support.
Problem: “The download time seems to be taking forever.”
Solution: The download time is dependent on the amount of data that it needs to download
from the ReadiBand. Expect 30 days of data to take several minutes to download.
Problem: “There is a RED LED blinking on the charger when I clip it onto
the ReadiBand.”
Solution: The charger pin contacts are not aligned with the ReadiBand
contacts. Adjust the device until a GREEN LED appears. If this does not
work, unplug and then re-plug the AC adaptor into the wall outlet and try to
realign the contact pins again until a GREEN LED appears. If the problem
persists, DO NOT leave the charger clipped on to the ReadiBand.
Disconnect and contact support. See below for contact details.
Problem: “The ReadiBand does not respond to button presses and there are no LEDs
blinking to indicate low battery.”
Solution: The battery is completely depleted. Please contact technical support for
replacements. Do not charge the ReadiBand.

16
Contact Information
Fatigue Science
700 Bishop Street, Suite 2000
Honolulu, Hawaii, 96813
USA
www.fatiguescience.com
Tel: 808-537-5337
Fax: 1-800-650-0993
General Enquiries: info@fatiguescience.com