Slick Edit V3 3 Users Manual SlickEdit Core V3.3 For Eclipse User Guide
EDIT V3.3 slickeditcore_v3.3_userguide
V3.3 to the manual 61b6ae76-3f03-4f29-8e20-69785c6e4612
2015-02-05
: Slick Slick-Edit-V3-3-Users-Manual-533047 slick-edit-v3-3-users-manual-533047 slick pdf
Open the PDF directly: View PDF ![]() .
.
Page Count: 568 [warning: Documents this large are best viewed by clicking the View PDF Link!]
- SlickEdit® Core v3.3 for Eclipse™
- Table of Contents
- List of Figures
- List of Tables
- Chapter 1. Introduction
- Chapter 2. Quick Start
- Chapter 3. User Interface
- Screen Layout
- SlickEdit Views
- The SlickEdit® Core Command Line
- Using the Mouse and Keyboard
- Chapter 4. User Preferences
- Chapter 5. Context Tagging®
- Chapter 6. Editing Features
- Navigation
- Symbol Browsing
- Code Templates
- Text Editing
- Color Coding
- Syntax Indent and SmartPaste®
- Completions
- Aliases
- Syntax Expansion
- Dynamic Surround and Surround With
- Bookmarks
- Setting Breakpoints
- Commenting
- Find and Replace
- Beautifying Code
- Refactoring
- Quick Refactoring
- C++ Refactoring
- Available C++ Refactorings
- Rename
- Extract Method
- Modify Parameter List
- Push Down to Derived Class
- Pull Up to Super Class
- Encapsulate Field
- Extract Class
- Extract Super Class
- Move Method
- Move Static Field
- Convert Static to Instance Method
- Convert Global to Static Field
- Convert Local to Field
- Replace Literal with Constant
- Create Standard Methods
- Test Parsing Configuration
- Available C++ Refactorings
- Reviewing Refactoring Changes
- Java Refactoring
- Viewing and Displaying
- Chapter 7. Language-Specific Editing
- Chapter 8. Tools and Utilities
- Chapter 9. Macros and Macro Programming
- Chapter 10. SlickEdit Core Dialogs
- Editing Dialogs
- Search Dialogs
- Dialogs Related to Viewing and Displaying
- Macro Dialogs
- Tools Dialogs
- Options Dialogs
- General Options Dialog
- Extension Options Dialog
- Select a Tag Dialog
- File Options Dialog
- Key Bindings Dialog
- Bind Key Dialog
- Redefine Common Keys Dialog
- Context Tagging® Options Dialog
- Color Coding Setup Dialog
- Color Settings Dialog
- Font Configuration Dialog
- XML/HTML Formatting Dialog
- URL Mappings Dialog
- Proxy Settings Dialog
- Network Options Dialog
- Web Browser Setup Dialog
- FTP Options Dialog
- Reflow Comment Dialog
- Current Document Options Dialog
- Chapter 11. Appendix
- Encoding
- Environment Variables
- Configuration Variables
- Directories and Files
- File Search Order
- VLX File and Color Coding
- Editing the Key Binding Source
- Menu Editing
- Using the ISPF and XEDIT Emulations
- ISPF Options Dialog
- ISPF Primary Commands
- ISPF Line Commands
- ISPF Line Command Documentation
- ISPF Line Labels .label
- ISPF Shift Lines Left or Right
- ISPF Insert After A
- ISPF Insert Before B
- ISPF Insert Bounds Ruler BNDS
- ISPF Copy Lines C and CC for blocks
- ISPF Insert Columns Ruler COLS or SCALE
- ISPF Delete Lines D and DD for blocks
- ISPF Expose First Lines F and FF
- ISPF Insert Lines
- ISPF Lowercase Lines LC, LCC and LCLC for blocks
- ISPF Expose Last Lines L and LL
- ISPF Move Lines M and MM for blocks
- ISPF Insert Mask Line MASK
- ISPF Make Data Lines MD, MDD and MDMD for blocks
- ISPF Overlay Lines O and OO for blocks
- ISPF Repeat Lines
- ISPF Expose Next Level of Code S and SS
- ISPF Insert Tabs Ruler TABS or TABL
- ISPF Insert Text TE
- ISPF Insert Lines TF
- ISPF Join Lines TJ
- ISPF Split Line TS
- ISPF Uppercase Lines UC, UCC and UCUC for blocks
- ISPF Exclude Lines X and XX for blocks
- ISPF Select Lines Z and ZZ for blocks
- XEDIT Line Commands
- ISPF Unsupported Primary Commands
- ISPF Line Command Documentation
- Regular Expression Syntax

Code Quick | Think Slick®
SlickEdit Inc.
3000 Aerial Center Parkway, Suite 120
Morrisville, NC 27560
USA
1.919.473.0070
1.800.934.EDIT
1.919.473.0080 fax
info@slickedit.com
www.slickedit.com
SlickEdit
®Core v3.3 for Eclipse™
SlickEdit, Visual SlickEdit, Clipboard Inheritance, DIFFzilla, SmartPaste,
Context Tagging, Slick-C, and Code Quick | Think Slick are registered
trademarks of SlickEdit Inc. All other products or company names are
used for identification purposes only and may be trademarks of their
respective owners. Protected by U.S. Patent 5,710,926.
Copyright 1988-2008 SlickEdit Inc. All rights reserved.
SlickEdit®Core v3.3
for Eclipse™
08SLICK0011_CORE_upd 1/24/08 11:05 AM Page 1

SlickEdit®Core v3.3 for Eclipse™

SlickEdit®Core v3.3 for Eclipse™
Information in this documentation is subject to change without notice and does not represent a commitment on the part of SlickEdit
Inc. The software described in this document is protected by U.S. and international copyright laws and by other applicable laws, and
may be used or copied only in accordance with the terms of the license or nondisclosure agreement that accompanies the software.
It is against the law to copy the software on any medium except as specifically allowed in the license or nondisclosure agreement.
The licensee may make one copy of the software for backup purposes. No part of this documentation may be reproduced or trans-
mitted in any form or by any means, electronic or mechanical, including photocopying, recording, or information storage and retrieval
systems, for any purpose other than the licensee's personal use, without the express written permission of SlickEdit Inc.
Copyright 1988-2008 SlickEdit Inc.
SlickEdit, Visual SlickEdit, Clipboard Inheritance, DIFFzilla, SmartPaste, Context Tagging, Slick-C, and Code Quick | Think Slick are
registered trademarks of SlickEdit Inc. All other products or company names are used for identification purposes only and may be
trademarks of their respective owners. Protected by U.S. Patent 5,710,926.


Table of Contents
1. Introduction ................................................................................................................... 1
Getting the Most Out of SlickEdit®Core ....................................................................................2
Cool Features ....................................................................................................................2
Write More Code, Faster ...................................................................................................2
Get Started ........................................................................................................................3
Documentation and Conventions ..............................................................................................4
Accessing Documentation ................................................................................................4
Documentation Conventions .............................................................................................4
Supported Languages and Environments .................................................................................6
Supported Languages and File Types ..............................................................................6
Supported Editor Emulations ............................................................................................9
Install/Uninstall .........................................................................................................................10
System Requirements .....................................................................................................10
Installing SlickEdit®Core ................................................................................................10
Licensing .........................................................................................................................11
Uninstalling SlickEdit®Core ............................................................................................13
Help and Product Support .......................................................................................................14
Using the Help System ...................................................................................................14
Product Support ..............................................................................................................14
2. Quick Start ................................................................................................................... 15
General Options .......................................................................................................................16
Extension-Specific Options ......................................................................................................17
3. User Interface .............................................................................................................. 19
Screen Layout ..........................................................................................................................20
The Workbench ...............................................................................................................20
The Workspace ...............................................................................................................21
Perspectives ....................................................................................................................21
The SlickEdit®Core Editor ..............................................................................................21
Switching Between the SlickEdit®Core Editor and Eclipse Editors ................................23
Menus .............................................................................................................................24
Views ...............................................................................................................................25
Status Area .....................................................................................................................25
Dialogs ............................................................................................................................25
Command Line ................................................................................................................26
SlickEdit Views ........................................................................................................................27
Opening SlickEdit Core Views ........................................................................................27
Available SlickEdit®Core Views .....................................................................................27
The SlickEdit®Core Command Line .......................................................................................30
Activating the Command Line .........................................................................................30
Command Line History ...................................................................................................31
Command Line Completions ...........................................................................................31
Using Shortcuts Inside the Command Line .....................................................................31
v

Using the Command Line to View Key Binding Associations .........................................31
Starting a Program from the Command Line (Shelling) ..................................................32
Command Line Prompting ..............................................................................................32
Common SlickEdit®Core Commands ............................................................................33
Using the Mouse and Keyboard ..............................................................................................35
Key Shortcuts in Text Boxes ...........................................................................................35
Redefining Common Keys ..............................................................................................37
4. User Preferences ......................................................................................................... 39
Introduction to User Preferences .............................................................................................40
Global Preferences .........................................................................................................40
Extension-Specific Preferences ......................................................................................40
Emulations ...............................................................................................................................41
Supported Emulations .....................................................................................................41
Changing Emulations ......................................................................................................42
Determining Keys/Functions ...........................................................................................43
Key and Mouse Bindings .........................................................................................................44
What is a Binding? ..........................................................................................................44
Managing Bindings .........................................................................................................45
Key Binding Settings .......................................................................................................50
Cursor, Mouse, and Scroll Settings .........................................................................................52
Setting the Cursor Style ..................................................................................................52
Hiding the Mouse Pointer ................................................................................................52
Displaying Tool Tips ........................................................................................................52
Scroll Style Settings ........................................................................................................52
Setting Fonts and Colors .........................................................................................................53
Fonts ...............................................................................................................................53
Colors ..............................................................................................................................55
Setting Colors for Screen Elements ................................................................................56
Restoring Settings on Startup ..................................................................................................59
5. Context Tagging®........................................................................................................ 61
Context Tagging®Overview ....................................................................................................62
Tag-Driven Navigation ....................................................................................................62
List Members ...................................................................................................................62
Parameter Information ....................................................................................................63
Auto List Compatible Parameters ...................................................................................64
Completions ....................................................................................................................65
Symbol Browsing ............................................................................................................65
Statement Level Tagging ................................................................................................66
Building and Managing Tag Files ............................................................................................67
Building Tag Files ............................................................................................................67
Managing Tag Files ........................................................................................................70
Context Tagging®Options ..............................................................................................73
6. Editing Features .......................................................................................................... 75
Navigation ................................................................................................................................76
Code Navigation .............................................................................................................76
Cursor Navigation ...........................................................................................................79
Symbol Browsing .....................................................................................................................81
SlickEdit®Core v3.3 for Eclipse™
vi

Class View ......................................................................................................................82
Outline View ....................................................................................................................86
Find Symbol View ...........................................................................................................88
Preview View ...................................................................................................................89
References View .............................................................................................................91
Symbols View ..................................................................................................................93
Symbol Properties View ................................................................................................101
Code Templates ....................................................................................................................103
Instantiating a Template ................................................................................................103
Creating Templates .......................................................................................................105
Substitution Parameters ................................................................................................106
Organizing Templates ...................................................................................................108
Template Manager Operations .....................................................................................109
Template Manager Dialog .............................................................................................110
Template Options Dialog ..............................................................................................111
Add File Dialog ..............................................................................................................111
Add Parameter Dialog ...................................................................................................111
Add New Item Dialog ....................................................................................................112
Locating Templates .......................................................................................................113
Manually Creating a Template ......................................................................................113
Code Template Metadata File Reference .....................................................................116
Text Editing ............................................................................................................................126
Selections ......................................................................................................................126
Cutting, Copying, and Moving Text ...............................................................................134
Working with Lines ........................................................................................................135
Sorting Text ...................................................................................................................136
Inserting Literal Characters ...........................................................................................138
Color Coding ..........................................................................................................................139
Resetting Modified Lines on Save ................................................................................139
Adding Color-Coded Keywords to Supported Languages ............................................139
Creating Color Coding for a New Language .................................................................140
Color Coding Configuration ...........................................................................................140
Color Coding Settings ...................................................................................................142
Syntax Indent and SmartPaste®............................................................................................143
Syntax Indent ................................................................................................................143
SmartPaste®.................................................................................................................144
Completions ...........................................................................................................................146
Auto-Complete ..............................................................................................................146
Word Completion ..........................................................................................................148
Configuring Completion Settings ..................................................................................148
Aliases ...................................................................................................................................150
Directory Aliases ...........................................................................................................150
Extension-Specific Aliases ............................................................................................152
Syntax Expansion ..................................................................................................................159
Syntax Expansion Settings ...........................................................................................159
Modifying Syntax Expansion Templates .......................................................................160
Adding Syntax Expansion for Other Languages ...........................................................160
Dynamic Surround and Surround With ..................................................................................162
Dynamic Surround ........................................................................................................162
SlickEdit®Core v3.3 for Eclipse™
vii

Surround With ...............................................................................................................166
Unsurround ...................................................................................................................170
Bookmarks .............................................................................................................................172
Named Bookmarks .......................................................................................................172
Pushed Bookmarks .......................................................................................................174
Setting Bookmark Options ............................................................................................174
Setting Breakpoints ................................................................................................................176
Setting Conditional Breakpoints ....................................................................................176
Setting Java Exception Breakpoints .............................................................................176
Commenting ..........................................................................................................................177
Commenting Blocks and Lines .....................................................................................177
Creating Doc Comments ...............................................................................................178
String Editing .................................................................................................................180
Comment Wrapping ......................................................................................................180
Find and Replace ...................................................................................................................182
Quick Search and Replace ...........................................................................................182
Incremental Searching ..................................................................................................182
Find and Replace Commands ......................................................................................184
Find and Replace View .................................................................................................190
Find Symbol View .........................................................................................................192
Find and Replace with Regular Expressions ................................................................192
Undoing/Redoing Replacements ..................................................................................196
Beautifying Code ...................................................................................................................197
Code Beautifiers ............................................................................................................197
Reflowing Text ..............................................................................................................197
Refactoring ............................................................................................................................198
Quick Refactoring .........................................................................................................198
C++ Refactoring ............................................................................................................200
Reviewing Refactoring Changes ...................................................................................220
Java Refactoring ...........................................................................................................221
Viewing and Displaying ..........................................................................................................223
Hexadecimal View and Edit Mode ................................................................................223
Viewing Special Characters ..........................................................................................223
Selective Display ...........................................................................................................224
Other Display Options ...................................................................................................227
7. Language-Specific Editing ....................................................................................... 229
Language-Specific Editing Overview .....................................................................................230
Language Editing Modes ..............................................................................................230
Extension Options .........................................................................................................231
C and C++ .............................................................................................................................233
C/C++ Formatting Options ............................................................................................233
C/C++ Beautifier ............................................................................................................237
C/C++ Compiler Settings ..............................................................................................244
C/C++ Preprocessing ....................................................................................................245
Java .......................................................................................................................................248
Java Formatting Options ...............................................................................................248
Java Beautifier ..............................................................................................................251
Javadoc Beautifier ........................................................................................................251
SlickEdit®Core v3.3 for Eclipse™
viii

Javadoc Editor ..............................................................................................................252
Organizing Java Imports ...............................................................................................252
Java Refactoring ...........................................................................................................253
XML and HTML ......................................................................................................................254
XML ...............................................................................................................................254
HTML ............................................................................................................................266
XML/HTML Formatting ..........................................................................................................279
Enabling/Disabling XML/HTML Formatting ...................................................................279
Working with Schemes .................................................................................................281
Working with Tags .........................................................................................................284
Formatting Settings .......................................................................................................285
Ada ........................................................................................................................................292
Ada Formatting Options ................................................................................................292
Ada Beautifier ................................................................................................................292
COBOL ..................................................................................................................................299
COBOL Formatting Options ..........................................................................................299
Pascal ....................................................................................................................................301
Pascal Formatting Options ............................................................................................301
PL/I ........................................................................................................................................303
PL/I Formatting Options ................................................................................................303
Python ....................................................................................................................................305
Begin/End Structure Matching for Python .....................................................................305
8. Tools and Utilities ..................................................................................................... 307
Comparing and Merging ........................................................................................................308
DIFFzilla®......................................................................................................................308
3-Way Merge .................................................................................................................314
File History and Backups .......................................................................................................317
Compare Two Backup History Elements Using DIFFzilla .............................................317
Compare a Local Backup History Element with the Current Version Using DIFFzilla ..317
FTP ........................................................................................................................................318
Working with FTP ..........................................................................................................318
Setting FTP Options ......................................................................................................320
The Regex Evaluator .............................................................................................................321
Using the Regex Evaluator ...........................................................................................321
Using the Calculator and Math Commands ...........................................................................323
The Calculator ...............................................................................................................323
Math Commands ...........................................................................................................324
OS File Browser .....................................................................................................................327
9. Macros and Macro Programming ............................................................................ 329
Recorded Macros ..................................................................................................................330
Recorded Macro Operations .........................................................................................330
Using Macros to Discover and Control Options ............................................................335
Programmable Macros ..........................................................................................................336
Loading Macros ............................................................................................................336
Setting Macro Variables ................................................................................................336
10. SlickEdit Core Dialogs ............................................................................................ 339
Editing Dialogs .......................................................................................................................339
SlickEdit®Core v3.3 for Eclipse™
ix

Select Text to Paste Dialog ...........................................................................................340
Enumerate Dialog .........................................................................................................340
Filter Selection: Command Dialog ................................................................................341
Search Dialogs ......................................................................................................................343
Find and Replace View .................................................................................................343
Find Symbol View .........................................................................................................354
Go to Definition Dialog ..................................................................................................357
Dialogs Related to Viewing and Displaying ...........................................................................358
Selective Display Dialog ...............................................................................................358
Macro Dialogs ........................................................................................................................361
Save Macro Dialog ........................................................................................................361
List Macros Dialog ........................................................................................................361
Variable Editor Dialog ...................................................................................................362
Grid Settings Dialog ......................................................................................................364
Menu Editor Dialog .......................................................................................................364
Auto Enable Properties Dialog ......................................................................................366
Tools Dialogs .........................................................................................................................369
Organize Imports Options Dialog ..................................................................................369
3-Way Merge Dialog .....................................................................................................370
DIFFzilla®Dialog ...........................................................................................................372
Multi-File Diff Output Dialog ..........................................................................................377
Context Tagging®- Tag Files Dialog ............................................................................378
Options Dialogs .....................................................................................................................380
General Options Dialog .................................................................................................380
Extension Options Dialog ..............................................................................................398
Select a Tag Dialog .......................................................................................................420
File Options Dialog ........................................................................................................421
Key Bindings Dialog ......................................................................................................429
Bind Key Dialog .............................................................................................................432
Redefine Common Keys Dialog ....................................................................................433
Context Tagging®Options Dialog .................................................................................436
Color Coding Setup Dialog ...........................................................................................439
Color Settings Dialog ....................................................................................................453
Font Configuration Dialog .............................................................................................454
XML/HTML Formatting Dialog ......................................................................................456
URL Mappings Dialog ...................................................................................................457
Proxy Settings Dialog ....................................................................................................458
Network Options Dialog ................................................................................................459
Web Browser Setup Dialog ...........................................................................................459
FTP Options Dialog .......................................................................................................461
Reflow Comment Dialog ...............................................................................................466
Current Document Options Dialog ................................................................................467
11. Appendix .................................................................................................................. 469
Encoding ................................................................................................................................470
Using Unicode ...............................................................................................................470
Environment Variables ...........................................................................................................475
Setting Environment Variables in vslick.ini ...................................................................477
Using the set Command ...............................................................................................477
SlickEdit®Core v3.3 for Eclipse™
x

Configuration Variables .........................................................................................................479
Viewing Configuration Variables ...................................................................................479
Setting/Changing Configuration Variables ....................................................................479
Table of Configuration Variables ...................................................................................479
Directories and Files ..............................................................................................................484
Configuration Directory .................................................................................................484
System Configuration Files ...........................................................................................487
File Search Order ..................................................................................................................489
Search Order for Configuration Files ............................................................................489
Search Order for Executable Files ................................................................................489
VLX File and Color Coding ....................................................................................................490
Modifying the VLX File to Change a Color Definition ....................................................491
Creating a Lexer Name and a New VLX File ................................................................491
Editing the Key Binding Source .............................................................................................498
Menu Editing ..........................................................................................................................499
Creating and Editing Menus ..........................................................................................499
Using the ISPF and XEDIT Emulations .................................................................................501
ISPF Options Dialog .....................................................................................................501
ISPF Primary Commands .............................................................................................503
ISPF Line Commands ...................................................................................................505
Regular Expression Syntax ...................................................................................................520
UNIX Regular Expressions ...........................................................................................520
SlickEdit®Regular Expressions ....................................................................................526
Brief Regular Expressions ............................................................................................531
Unicode Category Specifications for Regular Expressions ...........................................537
Unicode Character Blocks for Regular Expressions .....................................................539
SlickEdit®Core v3.3 for Eclipse™
xi

xii

List of Figures
1.1. Embedded Languages in HTML ..................................................................................................8
1.2. HTML Embedded in Perl .............................................................................................................9
3.1. The Workbench .........................................................................................................................20
3.2. Managing File Associations .......................................................................................................21
3.3. Opening Source Files with SlickEdit Core .................................................................................23
3.4. Status Area ................................................................................................................................25
3.5. Redefine Common Keys Dialog ................................................................................................37
4.1. Emulation Options .....................................................................................................................42
4.2. Emulation Prompt ......................................................................................................................42
4.3. Key Bindings Dialog ..................................................................................................................45
4.4. Bind Key Dialog .........................................................................................................................48
4.5. Font Configuration Dialog ..........................................................................................................53
4.6. Color Settings Dialog .................................................................................................................56
5.1. List Members: Example 1 ..........................................................................................................63
5.2. List Members: Example 2 ..........................................................................................................63
5.3. Parameter Info: Example 1 ........................................................................................................64
5.4. Parameter Info: Example 1 ........................................................................................................64
5.5. Auto List Compatible Parameters ..............................................................................................65
5.6. Automatic Tagging Dialog .........................................................................................................67
5.7. Add Tag File Dialog ...................................................................................................................68
5.8. Add Tags Database Dialog .......................................................................................................69
5.9. Context Tagging®- Tag Files Dialog .........................................................................................70
5.10. Rebuild Tag File Dialog ...........................................................................................................72
6.1. Class View .................................................................................................................................82
6.2. Class Exclusion Manager Dialog ...............................................................................................84
6.3. Outline View ..............................................................................................................................86
6.4. Preview View .............................................................................................................................89
6.5. References View .......................................................................................................................91
6.6. Symbols View ............................................................................................................................93
6.7. Symbol Uses/Calling Tree Dialog ..............................................................................................96
6.8. Base Classes Dialog .................................................................................................................97
6.9. Symbol Browser Filter Options Dialog .......................................................................................98
6.10. Symbol Properties View ........................................................................................................101
6.11. Add New Item Dialog .............................................................................................................103
6.12. Parameter Entry Dialog .........................................................................................................104
6.13. Block Insert Mode: Example 1 ...............................................................................................127
6.14. Block Insert Mode: Example 2 ...............................................................................................127
6.15. Block Insert Mode: Example 3 ...............................................................................................128
6.16. Sort Dialog .............................................................................................................................136
6.17. Color Coding Setup: Tokens Tab ..........................................................................................140
6.18. Example of Auto-Complete ...................................................................................................146
6.19. Select Alias File Dialog ..........................................................................................................150
6.20. Alias Editor Dialog .................................................................................................................153
6.21. Dynamic Surround: Example 1 ..............................................................................................162
xiii

6.22. Dynamic Surround: Example 2 ..............................................................................................163
6.23. Dynamic Surround: Example 3 ..............................................................................................164
6.24. Dynamic Surround: Example 4 ..............................................................................................165
6.25. Surround With Dialog ............................................................................................................167
6.26. Alias Editor Dialog for Surround With ....................................................................................167
6.27. Delete Code Block Dialog .....................................................................................................170
6.28. Find and Replace View .........................................................................................................190
6.29. Quick Rename Refactoring ...................................................................................................198
6.30. Quick Extract Method Refactoring .........................................................................................199
6.31. C++ Refactoring: Rename .....................................................................................................201
6.32. C++ Refactoring: Extract Method ..........................................................................................201
6.33. C++ Refactoring: Modify Parameter List ...............................................................................202
6.34. C++ Refactoring: Push Down to Derived Class ....................................................................203
6.35. C++ Refactoring: Push Down - Selecting Members to Move ................................................204
6.36. C++ Refactoring: Pull Up to Super Class ..............................................................................205
6.37. C++ Refactoring: Pull Up - Selecting Members to Move .......................................................206
6.38. C++ Refactoring: Encapsulate Field ......................................................................................207
6.39. C++ Refactoring: Extract Class 1 ..........................................................................................208
6.40. C++ Refactoring: Extract Class 2 ..........................................................................................208
6.41. C++ Refactoring: Extract Super Class ..................................................................................209
6.42. C++ Refactoring: Move Method 1 .........................................................................................210
6.43. C++ Refactoring: Move Method 2 .........................................................................................211
6.44. C++ Refactoring: Move Static Field .......................................................................................211
6.45. C++ Refactoring: Convert Global to Static Field ...................................................................212
6.46. C++ Refactoring: Convert Local to Field ...............................................................................213
6.47. C++ Refactoring: Replace Literal with Constant ...................................................................213
6.48. C++ Refactoring: Create Standard Methods .........................................................................214
6.49. Test Parsing Configuration: Example 1 .................................................................................216
6.50. Test Parsing Configuration: Example 2 .................................................................................217
6.51. Test Parsing Configuration: Example 3 .................................................................................219
6.52. Refactoring Results ...............................................................................................................220
6.53. Selective Display ...................................................................................................................225
7.1. Extension Options Dialog ........................................................................................................231
7.2. New Extension Dialog .............................................................................................................232
7.3. C/C++ Formatting Options: Begin-end style Tab ....................................................................233
7.4. C/C++ Formatting Options: Indentation Tab ...........................................................................234
7.5. C/C++ Formatting Options: Other Tab ....................................................................................236
7.6. C/C++ Beautifier: Begin-End Style Tab ...................................................................................238
7.7. C/C++ Beautifier: Indenting Tab ..............................................................................................239
7.8. C/C++ Beautifier: Comments Tab ...........................................................................................240
7.9. C/C++ Beautifier: Other Tab ....................................................................................................242
7.10. C/C++ Beautifier: Schemes Tab ............................................................................................243
7.11. C/C++ Compiler Properties Dialog ........................................................................................244
7.12. C/C++ Preprocessing Dialog .................................................................................................246
7.13. Java Options Dialog ..............................................................................................................248
7.14. Organize Imports Dialog ........................................................................................................252
7.15. XML Formatting Options Dialog ............................................................................................254
7.16. XML Beautifier: Indent Tab ....................................................................................................256
7.17. XML Beautifier: Tags Tab ......................................................................................................258
SlickEdit®Core v3.3 for Eclipse™
xiv

7.18. XML Beautifier: Attributes/Values Tab ..................................................................................260
7.19. XML Beautifier: Comments Tab ............................................................................................262
7.20. XML Beautifier: Advanced Tab ..............................................................................................263
7.21. XML Beautifier: Schemes Tab ...............................................................................................264
7.22. URL Mappings Dialog ...........................................................................................................265
7.23. Web Browser Setup Dialog ...................................................................................................266
7.24. HTML Formatting Options Dialog ..........................................................................................268
7.25. HTML Beautifier: Indent Tab .................................................................................................271
7.26. HTML Beautifier: Tags Tab ...................................................................................................272
7.27. HTML Beautifier: Attributes/Values Tab ................................................................................274
7.28. HTML Beautifier: Comments Tab ..........................................................................................275
7.29. HTML Beautifier: Advanced Tab ...........................................................................................277
7.30. XML/HTML Formatting Menu ................................................................................................279
7.31. Current Document Options Dialog ........................................................................................280
7.32. XML/HTML Formatting Scheme Configuration Dialog ..........................................................281
7.33. New Formatting Scheme Dialog ............................................................................................283
7.34. XML/HTML Formatting: General Tab ....................................................................................285
7.35. XML/HTML Formatting: Content Wrap Tab ...........................................................................287
7.36. XML/HTML Formatting: Tag Layout Tab ...............................................................................289
7.37. COBOL Formatting Options Dialog .......................................................................................299
7.38. Pascal Formatting Options Dialog .........................................................................................301
7.39. PL/I Formatting Options Dialog .............................................................................................303
8.1. DIFFzilla®Dialog .....................................................................................................................309
8.2. Multi-File Diff Output Dialog ....................................................................................................311
8.3. Save Multi-File Output Dialog ..................................................................................................312
8.4. 3-Way Merge Setup Dialog .....................................................................................................314
8.5. 3-Way Merge Results Dialog ...................................................................................................315
8.6. FTP Profile Manager Dialog ....................................................................................................318
8.7. Regex Evaluator View .............................................................................................................321
8.8. The SlickEdit®Calculator ........................................................................................................323
9.1. Binding Recorded Macros .......................................................................................................332
9.2. Set Variable Dialog ..................................................................................................................336
9.3. Variable Editor Dialog ..............................................................................................................336
10.1. Select Text to Paste Dialog ...................................................................................................340
10.2. Enumerate Dialog ..................................................................................................................341
10.3. Filter Selection: Command Dialog .........................................................................................342
10.4. Find and Replace View .........................................................................................................343
10.5. Find and Replace: Find Tab ..................................................................................................344
10.6. Find and Replace: Find in Files Tab ......................................................................................347
10.7. Find and Replace Replace Tab .............................................................................................350
10.8. Find and Replace: Replace in Files Tab ...............................................................................352
10.9. Find Symbol View ..................................................................................................................354
10.10. Go to Definition Dialog ........................................................................................................357
10.11. Selective Display Dialog ......................................................................................................358
10.12. List Macros Dialog ...............................................................................................................361
10.13. Variable Editor Dialog ..........................................................................................................362
10.14. Grid Settings Dialog ............................................................................................................364
10.15. Menu Editor Dialog ..............................................................................................................364
10.16. Auto Enable Properties Dialog ............................................................................................366
SlickEdit®Core v3.3 for Eclipse™
xv

10.17. Organize Imports Options Dialog ........................................................................................369
10.18. 3-Way Merge Dialog ............................................................................................................370
10.19. DIFFzilla®: Files Tab ...........................................................................................................372
10.20. DIFFzilla®: File Compare Options .......................................................................................374
10.21. DIFFzilla®: Dialog Setup Options ........................................................................................376
10.22. Multi-File Diff Output Dialog ................................................................................................377
10.23. Context Tagging®- Tag Files Dialog ...................................................................................378
10.24. General Options: General Tab ............................................................................................380
10.25. General Options: Search Tab ..............................................................................................383
10.26. General Options: Selections Tab ........................................................................................386
10.27. General Options: Special Characters Tab ...........................................................................389
10.28. General Options: More Tab .................................................................................................391
10.29. General Options: Exit Tab ...................................................................................................394
10.30. General Options: Virtual Memory Tab .................................................................................396
10.31. Extension Options Dialog ....................................................................................................398
10.32. Extension Options: Indent Tab ............................................................................................400
10.33. Extension Options: Word Wrap Tab ....................................................................................402
10.34. Extension Options: General Tab .........................................................................................404
10.35. Extension Options: Comments Tab .....................................................................................406
10.36. Extension Options: Comment Wrap Tab .............................................................................411
10.37. Extension Options: Advanced Tab ......................................................................................413
10.38. Extension Options: Auto-Complete Tab ..............................................................................415
10.39. Extension Options: Context Tagging®Tab .........................................................................417
10.40. Select a Tag Dialog .............................................................................................................421
10.41. File Options: Load Tab ........................................................................................................422
10.42. File Options: Save Tab ........................................................................................................424
10.43. File Options: AutoSave Tab ................................................................................................426
10.44. File Options: File Filters Tab ...............................................................................................428
10.45. Key Bindings Dialog ............................................................................................................429
10.46. Bind Key Dialog ...................................................................................................................432
10.47. Redefine Common Keys Dialog ..........................................................................................433
10.48. Context Tagging®Options Dialog .......................................................................................436
10.49. Color Coding Setup Dialog ..................................................................................................439
10.50. Color Coding Setup: Tokens Tab ........................................................................................441
10.51. Color Coding Setup: Numbers Tab .....................................................................................443
10.52. Color Coding Setup: Strings Tab .........................................................................................445
10.53. Color Coding Setup: Language Tab ....................................................................................447
10.54. Color Coding Setup: Comments Tab ..................................................................................449
10.55. Color Coding Setup: Tags Tab ............................................................................................451
10.56. Color Settings Dialog ...........................................................................................................453
10.57. Font Configuration Dialog ....................................................................................................455
10.58. XML/HTML Formatting Dialog .............................................................................................457
10.59. Proxy Settings Dialog ..........................................................................................................458
10.60. Network Options Dialog .......................................................................................................459
10.61. Web Browser Setup Dialog .................................................................................................460
10.62. FTP Options: General Tab ..................................................................................................461
10.63. FTP Options: Advanced Tab ...............................................................................................462
10.64. FTP Options: Firewall/Proxy Tab ........................................................................................463
10.65. FTP Options: SSH/SFTP Tab .............................................................................................465
SlickEdit®Core v3.3 for Eclipse™
xvi

10.66. FTP Options: Debug Tab ....................................................................................................465
10.67. Reflow Comment Dialog ......................................................................................................466
10.68. Current Document Options Dialog ......................................................................................468
11.1. Configuration Directory Preferences .....................................................................................484
11.2. ISPF Options Dialog ..............................................................................................................501
SlickEdit®Core v3.3 for Eclipse™
xvii

xviii

List of Tables
1.1. Supported Languages and File Types ........................................................................................6
3.1. UI Commands vs. Command Line Counterpart ........................................................................33
3.2. Common SlickEdit Core Commands .........................................................................................33
3.3. Text Box Editing Key .................................................................................................................35
4.1. Command Line Font Recommendations ...................................................................................55
6.1. Preview View Information ..........................................................................................................91
6.2. Predefined Substitution Parameters ........................................................................................107
6.3. Summary of Metadata Element ...............................................................................................116
6.4. Selection Key ..........................................................................................................................128
6.5. Operations for Selected Text ...................................................................................................129
6.6. Sorting Options ........................................................................................................................138
6.7. Alias Escape Sequences .........................................................................................................155
6.8. Escape Sequence Examples ..................................................................................................156
6.9. Incremental Search Key ..........................................................................................................183
6.10. OptionCharacters for find and Slash (/) Commands ............................................................184
6.11. Replace Key ..........................................................................................................................187
6.12. Replace Command Search Examples ..................................................................................189
6.13. Examples of Replacing Using Regular Expressions .............................................................193
6.14. Examples of Tagged Search Expressions ............................................................................194
6.15. Hex Mode Key .......................................................................................................................223
8.1. Binary Operators .....................................................................................................................324
8.2. Math Command Examples ......................................................................................................325
11.1. Environment Variables ..........................................................................................................475
11.2. Configuration Variable ...........................................................................................................479
11.3. User Configuration Files ........................................................................................................485
11.4. System Configuration File .....................................................................................................487
11.5. VLX File Statement ...............................................................................................................491
11.6. Table of style Value ...........................................................................................................494
11.7. ISPF Primary Commands ......................................................................................................503
11.8. ISPF Line Commands ...........................................................................................................506
11.9. XEDIT Line Commands .........................................................................................................516
11.10. Unsupported ISPF Primary Commands ..............................................................................517
11.11. Supported ISPF Commands ...............................................................................................518
11.12. UNIX Regular Expression ...................................................................................................520
11.13. UNIX Regular Expression Examples ...................................................................................525
11.14. SlickEdit Regular Expressions ............................................................................................526
11.15. SlickEdit Regular Expression Examples .............................................................................531
11.16. Brief Regular Expressions ...................................................................................................532
11.17. Brief Regular Expression Examples ....................................................................................536
11.18. Unicode SubCategories for Regular Expressions ...............................................................538
11.19. Unicode Character Blocks for Regular Expressions ...........................................................540
xix

xx

Chapter 1. Introduction
1

Getting the Most Out of SlickEdit®Core
At SlickEdit, we take great pride in delivering unparalleled power, speed, and flexibility to our customers.
Our goal is to remove the tedious tasks involved with programming, allowing you to focus on the reason
you first got into programming: the thrill of writing great code.
SlickEdit Core brings the rich history of excellence of SlickEdit to the Eclipse framework. It delivers the
power programming capabilities needed to write more code faster and more accurately, making it an in-
dispensable plug-in for developers.
Cool Features
SlickEdit®Core contains powerful editing features and capabilities. Some of our coolest features are lis-
ted in the Cool Features dialog. Using this dialog, you can read a description of each feature and watch a
short demo of the feature in action. By default, the Cool Features dialog appears each time Eclipse is
started. It can also be displayed anytime by clicking Help →SlickEdit Cool Features.
Write More Code, Faster
These keys to programming efficiency will help you write more code, faster than you ever have before:
•Keep your hands on the keyboard - Time is wasted each time you reach for the mouse. SlickEdit®
Core contains 13 editor emulations with predefined key bindings that are ready for use in performing
common tasks. Define your own key bindings or invoke editor operations from the SlickEdit Core com-
mand line. For more information, see Using the Mouse and Keyboard.
•Type as little as possible - SlickEdit Core contains many features that reduce the number of key-
strokes you type, including automatic completions, syntax expansion, aliases, macros, code templates,
and code generators. For information about these features, see the topics in Chapter 6, Editing Fea-
tures.
•Rapidly navigate code - Instantly jump from a symbol to its definition or view a list of references. Pre-
view definitions for the current symbol without having to open the file. Use bookmarks to mark important
locations in the code. SlickEdit Core includes powerful browse and search capabilities, allowing you to
quickly find the code you want. See Navigation for more information.
•Access information quickly - SlickEdit Core uses visual indicators to provide you with information
about your code, including syntax highlighting and color coding. Special views are also available for
looking up information about files, classes, symbols, definitions, and more. To learn more, see SlickEdit
Views,Symbol Browsing, and other topics in Chapter 6, Editing Features.
•Let SlickEdit Core do the formatting - Syntax indenting, SmartPaste®, and code beautifiers are just a
few of the automatic formatting features in SlickEdit Core. For more information, see the topics in
Chapter 6, Editing Features.
•Utilize utilities - SlickEdit Core provides many utilities for working with your code, such as DIFFzilla®,
3-Way Merge, a RegEx Evaluator, math commands, and even a calculator. See the topics in Chapter 8,
Cool Features
2


Documentation and Conventions
Accessing Documentation
Documentation is located in the SlickEdit®Core installation directory at
<PathToSlickEditCore>/eclipse/plugins/com.slickedit.core_VERSION/docs. The docs
directory contains PDFs of the following items:
• The User Guide - This guide provides comprehensive information about using SlickEdit Core.
• The Slick-C®Macro Programming Guide - This guide contains details about how to write macros using
the Slick-C macro programming language.
• Emulation charts for the following editors: BBEdit, Brief, CodeWarrior™, CodeWright®, CUA (default),
Epsilon, GNU Emacs, ISPF, SlickEdit (Text Mode edition), Vim, Visual C++ ®6, Visual Studio®, and
Xcode®.
In addition to the documentation, SlickEdit Core provides a built-in Help system. The contents of the Help
system is the same as the contents of the User Guide.
Documentation Feedback
We welcome your comments and suggestions regarding our documentation. Please send feedback to
<docs@slickedit.com>.
Documentation Conventions
The subsequent topics describe conventions that are used in the SlickEdit®Core documentation.
Default Emulation/Key Binding Mode
CUA is the default editor emulation mode. Therefore, key bindings and shortcuts listed in the documenta-
tion follow the CUA emulation.
Platform-Specific Notes
Platform-specific notes for for Microsoft Windows and Linux®are listed throughout the documentation
where applicable.
Menus and Dialogs
Instructions for navigating to items accessed from the main menu are written in the form:
MainMenuItem >SubMenuItem
For example, the text "click Window →Preferences" indicates that you should first select Window from
Accessing Documentation
4

the main menu, then select Preferences from the Window submenu.
Our documentation structure is set up so that instructions for using the product make up the bulk of the
content, while listings of dialog boxes and options can be found in Chapter 10, SlickEdit Core Dialogs.
Buttons on dialogs, such as OK and Close, are not usually documented since the meaning is obvious.
Code Syntax Conventions
• Commands, switches, keywords, properties, operators, options, variables, and text to be typed by the
user are shown in bold type.
• User-input variables and placeholders are shown in bold italic type.
• Code samples and file names are displayed in a monospaced font.
• File extensions and environment variables are written with an UPPERCASE font.
• SlickEdit®Core commands that contain two or more words are written with underscore separators: for
example, cursor_down. Note that in the user interface, however, these commands are displayed with
hyphen separators: for example, cursor-down. Both of these forms work, so you can use whichever
style you prefer.
Supported Languages and En-
vironments
5

Supported Languages and Environments
This section lists the languages and file types supported by each SlickEdit®Core feature as well as the
supported emulations.
Supported Languages and File Types
The table below indicates the languages and file types that support key SlickEdit®Core features. Fea-
tures that are not language-specific, such as DIFFzilla®, are not listed here.
Table 1.1. Supported Languages and File Types
Feature Languages
Automatic Syntax Expansion ActionScript, Ada, AWK, C, C#, C++, CFML, CF-
Script, Ch, COBOL, DTD, Fortran, HTML, IDL, In-
stallScript, J#, Java, JavaScript™, JSP™, Object-
ive-C, Pascal, Perl, PHP, PL/SQL, PV-WAVE ®, Py-
thon™, REXX, Ruby, SAS®, Slick-C®, Tcl, Trans-
act-SQL®, VBScript, Verilog®, VHDL, Visual Basic®,
Visual Basic .NET™, XML, XSD
Code Beautifier ActionScript, Ada, C, C#, C++, CFML, HTML, Java,
JavaScript, JSP, Slick-C, XML, XSD
Color Coding ActionScript, Ada, ANTLR, AppleScript®, Assembly
Language, AWK, Bourne shell scripts, C, C Shell,
C#, C++, CFML, CFScript, Ch, CICS®, COBOL,
DB2®, DTD, Fortran, High Level Assembler, HTML,
IDL, InstallScript, J#, Java, JavaScript, JCL, JSP,
Lex, Modula-2, Objective-C, Pascal, Perl, PHP, PL/
I, PL/SQL, PowerNP™Assembler, Progress®4GL,
PV-WAVE, Python, REXX, Ruby, SAS, Slick-C, Tcl,
Transact-SQL, VBScript, Verilog, VHDL, Visual Ba-
sic, Visual Basic .NET, Windows batch files, x86
Assembly, XML, XSD, Yacc
Context Tagging®: Auto List Members, Auto
Parameter Info
ActionScript, Ada, C, C#, C++, CFML, CFScript,
Ch, CICS, COBOL, DTD, High Level Assembler,
HTML, IDL, InstallScript, J#, Java, JavaScript, JSP,
Objective-C, Pascal, Perl, PHP, PL/I, PV-WAVE,
Python, Ruby, Slick-C, VBScript, Verilog, VHDL,
Visual Basic .NET, XML, XSD
Context Tagging: Auto List Parameters ActionScript, C, C++, Ch, J#, Java, Slick-C
Supported Languages and File
Types
6

Feature Languages
Javadoc™Editor ActionScript, C, C#, C++, J#, Java, JavaScript,
Slick-C
Select/Hide Code Block ActionScript, Ada, C, C#, C++, CFML, Ch, COBOL,
DB2, Fortran, High Level Assembler, HTML, IDL,
InstallScript, J#, Java, JavaScript, Modula-2, Ob-
jective-C, Pascal, Perl, PHP, PL/SQL, Slick-C, Tcl,
Visual Basic, Visual Basic .NET, XML, XSD
Selective Display
Collapsible code block and function bodies.
ActionScript, Ada, ANTLR, C, C#, C++, CFML, CF-
Script, Ch, CICS, COBOL, DB2, DTD, Fortran, High
Level Assembler, HTML, IDL, InstallScript, J#,
Java, JavaScript, JCL, JSP, Lex, Modula-2, Object-
ive-C, Pascal, Perl, PHP, PL/I, PL/SQL, PowerNP
Assembler, PV-WAVE, Python, REXX, Ruby, SAS,
Slick-C, Tcl, Transact-SQL, VBScript, Verilog,
VHDL, Visual Basic, Visual Basic .NET, x86 As-
sembly, XML, XSD, Yacc
SmartPaste®
Pasted code re-indents to correct level.
ActionScript, AWK, C, C#, C++, IDL, InstallScript,
J#, Java, JavaScript, JSP, Objective-C, Pascal,
Perl, PHP, PL/I, PV-WAVE, Python, Ruby, Slick-C,
Tcl
Source Code Navigation and Lookup
Includes Class, Outline, Preview, References, and
Symbols views, as well as symbol navigation.
ActionScript, Ada, ANTLR, Assembly Language,
AWK, Bourne shell scripts, C, C Shell, C#, C++,
CFML, CFScript, Ch, CICS, COBOL, DB2, DTD,
Fortran, High Level Assembler, HTML, IDL, Install-
Script, J#, Java, JavaScript, JCL, JSP, Lex, Make-
file, Modula-2, Objective-C, Pascal, Perl, PHP, PL/I,
PL/SQL, PowerNP Assembler, Progress 4GL, PV-
WAVE, Python, REXX, Ruby, SAS, Slick-C, Tcl,
Transact-SQL, VBScript, Verilog, VHDL, Visual Ba-
sic, Visual Basic .NET, Windows batch files, x86
Assembly, XML, XSD, Yacc
Syntax Indenting
Cursor is placed at correct indent level.
ActionScript, Ada, AWK, C, C#, C++, CFML, CF-
Script, Ch, COBOL, Fortran, HTML, IDL, Install-
Script, J#, Java, JavaScript, JSP, Objective-C, Pas-
cal, Perl, PHP, PL/SQL, PV-WAVE, Python, REXX,
Ruby, SAS, Slick-C, Tcl, Transact-SQL, VBScript,
Verilog, VHDL, Visual Basic, Visual Basic .NET,
XML, XSD
Supported Languages and File
Types
7
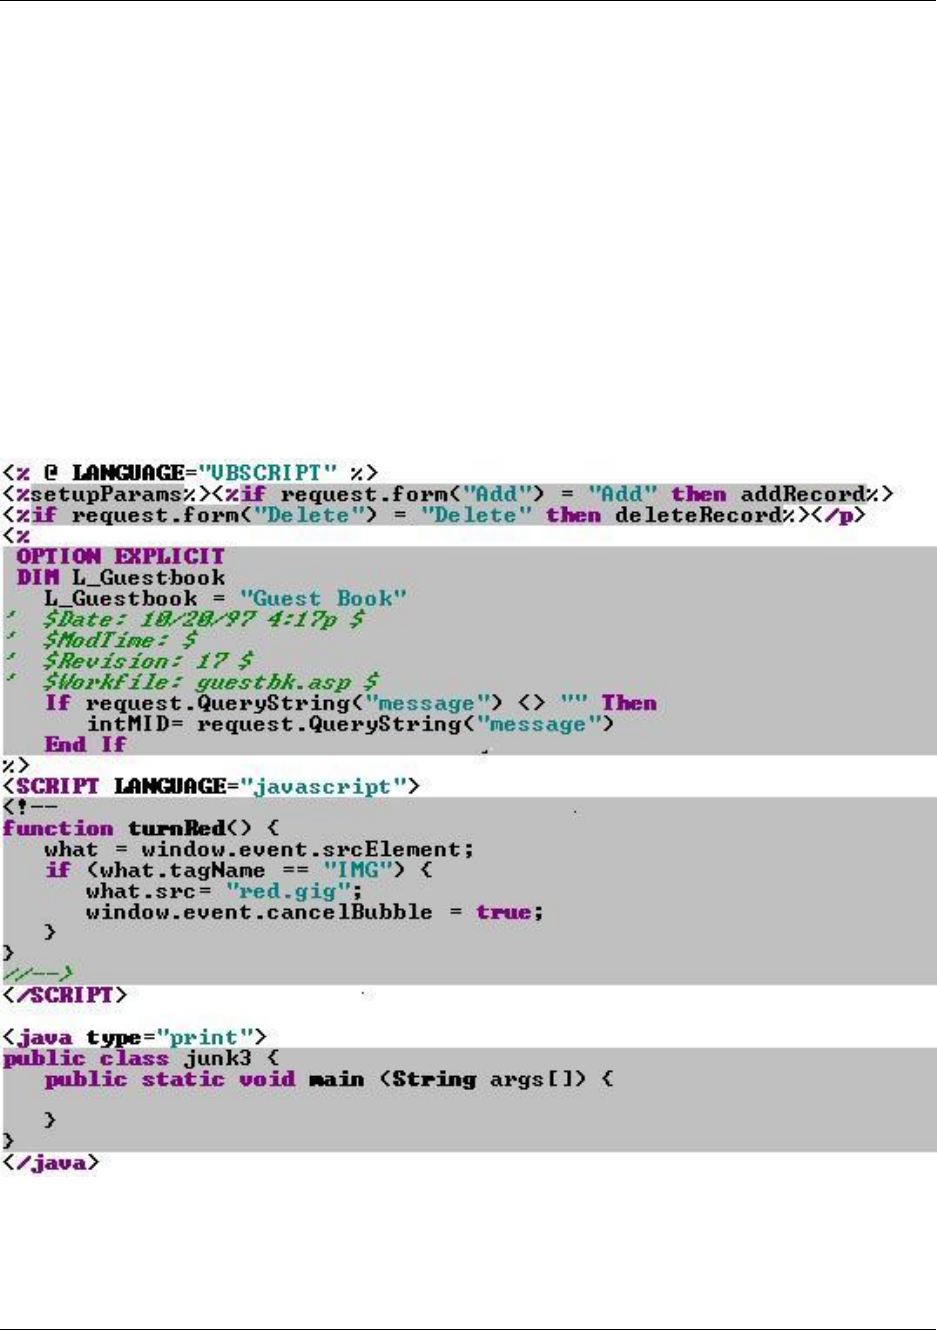
Embedded Languages
SlickEdit®Core recognizes languages embedded in HTML, COBOL, Perl scripts, and UNIX shell scripts.
When editing embedded languages, all language-sensitive features are supported, including Context Tag-
ging®, SmartPaste®, Syntax Expansion, Syntax Indenting, and Color Coding. In fact, Context Tagging
picks up embedded tags. For example, the Outline view displays function names if any exist. Embedded
language colors are user-defined.
Embedded Languages in HTML
SlickEdit®Core supports any embedded language in HTML. However, Web browsers usually only sup-
port VBScript, JavaScript, and/or Java, while Web servers typically support VBScript, Java, or PHP. The
following screen is an example of VBScript, JavaScript, and Java embedded in HTML:
Figure 1.1. Embedded Languages in HTML
Embedded Languages in Perl and Other Scripting Languages
To allow SlickEdit®Core to recognize embedded source in a Perl script or UNIX shell, prefix the HERE
Supported Languages and File
Types
8
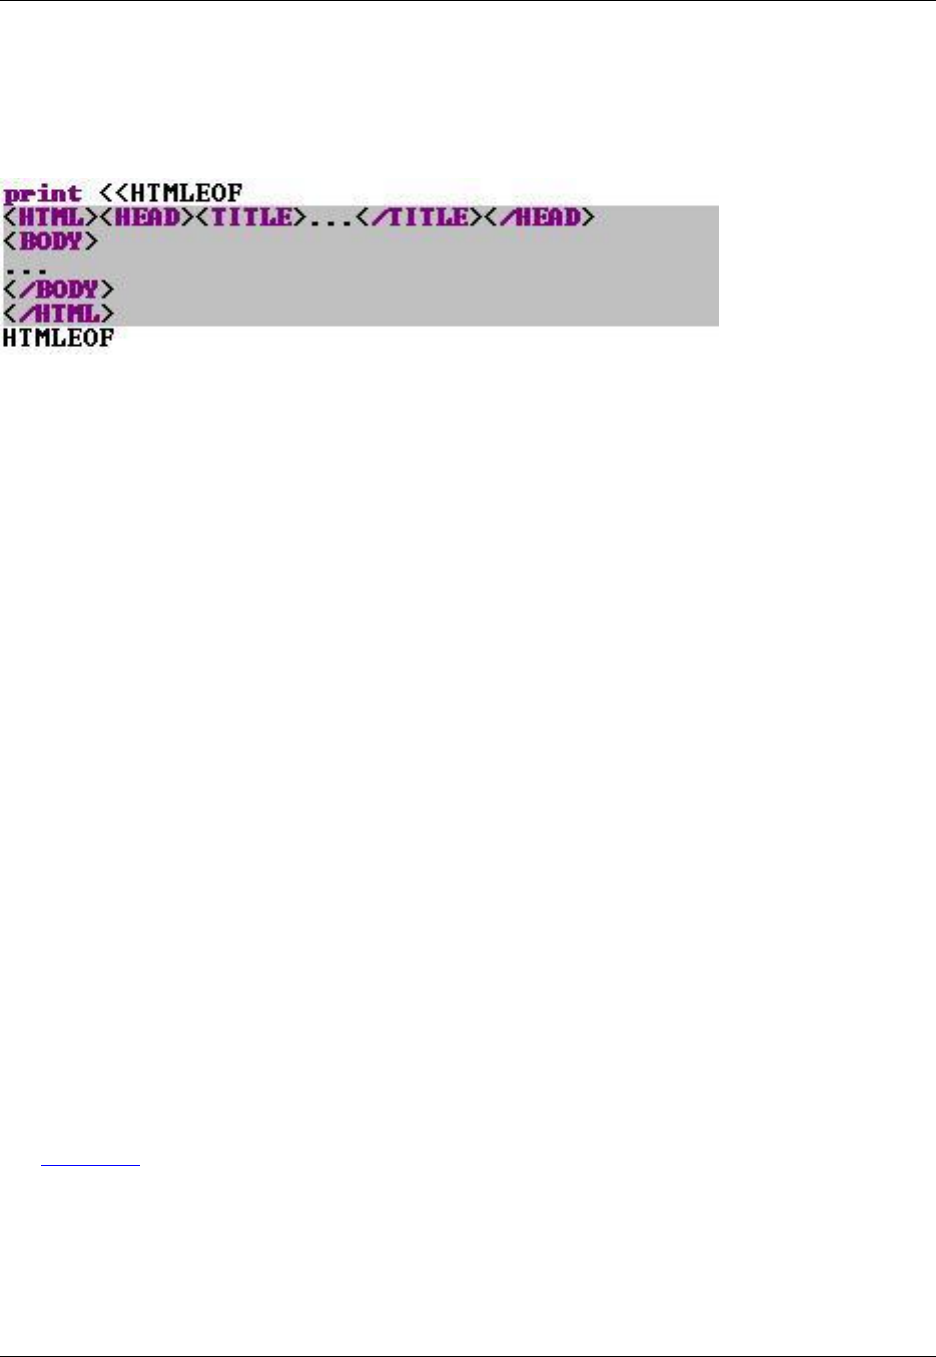
document terminator with the color coding lexer name. The following Perl example shows HTML embed-
ded in a Perl script. Unknown languages are color-coded in string color.
Figure 1.2. HTML Embedded in Perl
Supported Editor Emulations
SlickEdit®Core provides keyboard emulations for the following editors:
• BBEdit
• Brief
• CodeWarrior
• CodeWright
• CUA (the SlickEdit Core default)
• Epsilon
• GNU Emacs
• ISPF
• SlickEdit®(text mode edition)
• Vim
• Visual C++ 6
• Visual Studio default
• Xcode
See Emulations for more information.
Supported Editor Emulations
9

Install/Uninstall
System Requirements
SlickEdit®Core runs on Microsoft®Vista™, Windows®XP, or Windows 2000 as well as Linux®x86/GTK
2 (kernel 2.4 or later), with the following requirements:
• 256 MB minimum recommended memory
• 150 MB available hard disk space on Windows, 200 MB on Linux
• Eclipse 3.3, including JDT
• Java 5 or later (Linux only)
• Internet connection required to activate license
Optionally, CDT 3.1 is needed to run, compile, and debug C and C++ programs.
Installing SlickEdit®Core
SlickEdit Core is provided as an annual subscription that includes support. Installation can be performed
by using the Eclipse Update Manager, or you can download ZIP files.
Installing with the Update Manager
To install the SlickEdit®Core with the Eclipse Update Manager:
1. In Eclipse, select Help →Software Updates →Find and Install.
2. Select Search for new features to install.
3. Click the New Remote Site button on the Update sites to visit screen.
4. Enter a name for the plug-in, like "SlickEdit Core", and enter the following for the URL:
http://www.slickedit.com/updates/secore
5. Select SlickEdit Core in the list of features to install, and click Next.
6. Accept the license agreement to continue.
7. Click Finish.
Installing with ZIP Files
SlickEdit also provides ZIP files for installing SlickEdit®Core. Unzip the files to your Eclipse installation
directory, then follow the instructions below to complete setup.
System Requirements
10

Setup on Windows
1. Open a command line utility and change to the SlickEditCoreSetup subdirectory of your Eclipse
installation.
2. Run the following command as a user with administrator privileges:
.\ias add SlickEditCore3.3.0
Setup on Linux
1. Open a command line utility and change to the SlickEditCoreSetup subdirectory of your Eclipse
installation.
2. Change to the root directory of your Eclipse installation, and run the following command:
chmod -R +x plugins/com.slickedit.linux.libs_3.3.0/slickedit
3. Run the following command as a user with root access:
sh install_fnp.sh FNPLicensingService
Finding Updates
To find updates for SlickEdit®Core:
1. In Eclipse, select Help →Software Updates →Find and Install.
2. Select Search for updates of the currently installed features.
3. Select the SlickEdit update site from the list of sites, and click Next.
4. Accept the license agreement to continue.
5. Click Finish.
Licensing
SlickEdit®Core v3.3 uses FLEXnet™Publisher from Macrovision to manage licenses.
When Eclipse with SlickEdit®Core is run, it checks for an activated license. If one can't be found, the
SlickEdit License Manager wizard is run. This gives you the option to get a trial license, buy a license, or
enter a license key. You can also manually run the SlickEdit License Manager by selecting Help →
SlickEdit License Manager.
• To try out SlickEdit Core, click the option to obtain a trial license. This will take you to a Web page
where you can register for a trial. A license key will be e-mailed to you to activate the product. A trial
can be converted to full license by entering a full license key at any time in the SlickEdit License Man-
ager.
Licensing
11

• To buy a full license, visit the SlickEdit Web site at http://www.slickedit.com or select the Purchase a
License option. That will take you directly to the product page for SlickEdit Core.
• To enter a license key for an existing license, select Enter a license key.
Activation
After you enter a license key to activate the product, SlickEdit®Core contacts the license server over the
Internet.
You are permitted up to five concurrent activations of SlickEdit Core, initially. You can contact SlickEdit
Sales to get additional activations at no additional cost if you need more. Activating SlickEdit Core en-
ables your subscription to run on a particular machine. You can deactivate a license if you want to use it
on a different machine. Uninstalling SlickEdit Core does not automatically deactivate the license.
Your license key is good for one year. Any new versions of SlickEdit Core that are released will work with
the existing key. You will not need to reactivate a machine when installing a new version of SlickEdit
Core. When your subscription expires, you will need a new license key. Each machine will need to be re-
activated using that key.
Deactivation
Once you have activated SlickEdit®Core on five machines, you will not be able to activate it on another
machine until you have deactivated one of the other five. If you need more than five machines activated at
one time, you can contact SlickEdit Sales to request additional activations at no cost. You can deactivate
a license using the SlickEdit License Manager. Select Help →SlickEdit License Manager and then se-
lect the Deactivate a license option.
You can also deactivate a license using a stand-alone utility shipped with SlickEdit Core: vsact.exe in
the flex subdirectory of your SlickEdit Core installation directory. You can copy the flex directory from
one machine to another and run vsact.exe. You can also download these utilities from the SlickEdit
Web site.
To deactivate a license with vsact.exe, type:
vsact deactivate
If you have more than one license active on this machine, perhaps for other SlickEdit products, you will
need to specify an ID for the license to deactivate. Run vsact list to display a list of the licenses and their
IDs.
Note
Uninstalling SlickEdit Core does not deactivate the license. If you have uninstalled SlickEdit Core,
you can copy the utilities in the flex subdirectory of another installation and run vsact to deactiv-
ate this license.
Repairing a License
Licensing
12

FLEXnet Publisher identifies your machine using a combination of information about the hardware on this
machine. No personal data is used in creating this ID. Small changes to your machine, like switching dis-
play cards, upgrading memory, or changing hard drives can cause the license to become "damaged". A li-
cense can also be damaged by changing the system date by more than one day. When this happens you
will need to repair the license.
SlickEdit®Core automatically detects damaged licenses and launches the SlickEdit License Manager.
You will be prompted to enter your license key. The number of repairs is limited, but enough are available
to handle any reasonable hardware changes. If you run out of repairs, please contact Product Support.
If enough hardware is changed, then this will appear to be a different machine and you will have to activ-
ate the license as though this was the first time Eclipse with SlickEdit Core was run. In that case, you will
lose the activation you had previously. Therefore, we strongly recommend that you deactivate your li-
cense prior to making substantial changes to your computer's hardware.
Adjusting the System Date
Changing the system date on your computer could damage your license. The SlickEdit®License Manager
records the date each time the product is run. If you run Eclipse with SlickEdit Core with a system date
that is more than one day earlier than a previous run then your license will be damaged. This is part of the
tamper protection on time-limited licenses, like a trial license or the SlickEdit Core subscription.
Changing your system date is a normal part of testing time-based behavior in the software you are devel-
oping. For example, you may need to set your clock ahead to test alerts on a task management program.
As long as you don't run Eclipse with SlickEdit Core (or another FLEXnet Publisher licensed product)
while your clock is set ahead, you will not have any repair issues. If you do need to run SlickEdit Core,
your license will be damaged when you run again at the current date. When this occurs, you can repair
the license as described in Repairing a License. The number of repairs is limited, so you should be cau-
tious about running SlickEdit Core when your clock is set ahead. If you run out of repairs, please contact
Product Support.
Daylight savings time will not cause this to occur since it is only adjusting the date by one day. Only
changes larger than one day will trigger this.
Uninstalling SlickEdit®Core
To uninstall SlickEdit®Core:
1. In Eclipse, select Help →Software Updates →Manage Configuration.
2. Select SlickEdit Core from the list.
3. Right-click and select Uninstall.
Uninstalling SlickEdit®Core
13

Help and Product Support
There are several ways to get help about SlickEdit®Core:
•Use the Help system - See Using the Help System below.
•Search the FAQ - A list of frequently asked questions and answers is available from the Product Sup-
port section of our Web site at http://www.slickedit.com.
•Use the Community Forums - Search for or post your question on the SlickEdit Community Forums to
seek help from other SlickEdit Core users. The forums are located at http://community.slickedit.com.
•Contact Product Support - See Contacting Product Support below.
Using the Help System
When SlickEdit®Core is installed, the searchable Help system is installed with the product. The contents
of the Help system are the same as the contents of the User Guide located in the docs installation subdir-
ectory (see Accessing Documentation).
To access the Help system, from the main menu, click Help →Help Contents, then expand SlickEdit
Core v3.3 for Eclipse in the tree.
Note
Context-sensitive Help is currently not available in SlickEdit Core.
Product Support
Patches, macros, FAQs, and more are available on the Product Support section of our Web site at ht-
tp://www.slickedit.com. From within Eclipse, you can click Help →SlickEdit Support Web Site to launch
the site in a browser window.
Contacting Product Support
Use the SlickEdit Community Forums at http://community.slickedit.com to report all defects and share any
feedback you have on this release. For problem reports, please provide the following information:
• A description of the problem.
• The language you are working in (C/C++, Java, etc.).
• SlickEdit Core program information. Select Help →About SlickEdit Core, then select the Program In-
formation tab, click Copy To Clipboard and paste the information in the problem report.
• A code snippet to help us reproduce it (if possible).
Using the Help System
14

Chapter 2. Quick Start
SlickEdit®Core provides numerous configuration options so you can customize your environment accord-
ing to your working style and preferences. To help get you up and running as quickly as possible, the
Quick Start describes commonly used option settings that are found in most programming editors. The
options fall into two categories: General Options and Extension-Specific Options.
15

General Options
General options affect all language extensions. You may want to look through all of the dialogs mentioned
to see if there are any other settings you want to make. To see a listing of all of the option dialogs and
their descriptions, see the appropriate topics in Chapter 10, SlickEdit Core Dialogs.
Use the Preferences dialog to access SlickEdit®Core options described below. To display the Prefer-
ences dialog, from the main menu, click Window →Preferences. In the tree, expand SlickEdit and click
General.
•Changing the emulation - During the product installation, you are prompted to choose the editor emu-
lation. The default is CUA. To change the emulation at any time, double-click the Emulation setting
and specify the desired emulation.
•Expanding/collapsing with a single click - Selective Display Plus and Minus bitmaps can be expan-
ded or collapsed with a single click rather than a double-click. To specify this option, double-click the
General setting. On the General Options dialog, select the General tab, then select the option Expand/
collapse single click.
•Clicking past the end of a line - To have the ability to place the cursor past the end of a line, double-
click the General setting. On the General Options dialog, select the General tab, then select the option
Click past end of line.
•Specifying cursor up/down behavior - By default, cursor_up and cursor_down commands go to
the same column of the next or previous line, unless that line is shorter than the current column, in
which case the cursor is placed at the end of the line. To have the cursor placed in virtual space at the
end of the line, double-click the Redefine Common Keys setting. Uncheck the option Up/Down on
text.
•Changing the line insert style - In code, a line of text is a meaningful unit of functionality. SlickEdit®
Core treats line selections differently than character selections. Line selections are pasted either above
or below the current line, saving you from tediously positioning the cursor at the beginning or end of a
line prior to pasting. To specify where line selections are pasted, double-click the General setting. On
the General Options dialog, select the More tab, then set the Line insert style option to Before or
After. The default is After.
•Setting color schemes and fonts - Predefined color schemes, as well as individual settings, are avail-
able for changing the colors of screen elements. To use a different color scheme, double-click the Col-
or setting. Click the Schemes button, and select a scheme that you like from the Color scheme drop-
down list. To change the fonts used for screen elements, go back to the Preferences dialog and double-
click the Font setting.
Extension-Specific Options
16
Extension-Specific Options
These options are specific to file extensions, and are available on the Extension Options dialog (open the
Preferences dialog, expand SlickEdit and click General in the tree, then double-click the File Extension
Setup setting). When the Extension Options dialog is displayed, before setting the options, select the ex-
tension you wish to affect from the Extension drop-down list.
In addition to the options described below, more settings for the selected language extension are avail-
able by pressing the Options button on the Extension Options dialog. Because each of these dialogs is
different based on the selected extension, we recommend that you look through these dialogs for any set-
tings that you may want to make.
To see a listing of all of the option dialogs and their descriptions, see topics in Chapter 10, SlickEdit Core
Dialogs.
•Changing the brace style - To change the brace style used for C, C++, C#, Java, and other languages
that use braces, click the Options button on the Extension Options dialog, then specify the Begin-End
Style that you want to use.
•Changing the tab and indent styles:
•Indenting with spaces - By default, when you press the Tab key to indent, literal spaces are inser-
ted. This is a feature called Syntax Indent. To change the amount of spaces, select the Indent tab,
make sure the Indent style is set to Auto, then specify the amount of spaces in the Syntax indent
text box.
•Indenting with tabs - If you plan to indent your code using tabs, or if you will be editing files that
already contain tabs, specify your tab preferences on the Indent tab. Select the option Indent with
tabs, then specify the amount of spaces tab characters should have in the Tabs text box.
Note
For C, C++, Java, and similar languages, you can find more indenting options by clicking the Op-
tions button on the Extension Options dialog.
•Enabling/disabling Syntax Expansion - When you type a keyword, such as if or for, press the space-
bar to expand that syntax element, inserting the rest of the if or for statement. This feature is called
Syntax Expansion. To turn it off, select the Indent tab, then deselect the option Syntax expansion.
•Setting symbol navigation - For C and C++, by default, with each attempt to navigate to a definition
(Ctrl+Dot or Search →Go to Definition), you will be prompted for whether you wish to navigate to the
definition (proc) or the declaration (proto). To specify that Go to Definition always navigates to one or
the other, select the Context Tagging®tab, then select one of the Go to Definition options.
•Showing the info for a symbol under the mouse - By default, as the mouse cursor floats over a sym-
bol, the information and comments for that symbol are displayed. To turn this behavior off, select the
Context Tagging®tab, then deselect the option Show info for symbol under mouse.
•Configuring C/C++ preprocessing - For C and C++, your source code base will typically include pre-
Extension-Specific Options
17

processor macros that you use in your code for portability or convenience. For performance considera-
tions, Context Tagging does not do full preprocessing, so preprocessing that interferes with normal C++
syntax can cause the parser to miss certain symbols. To configure your preprocessing to avoid these
omissions, see C/C++ Preprocessing.
Extension-Specific Options
18

Chapter 3. User Interface
19
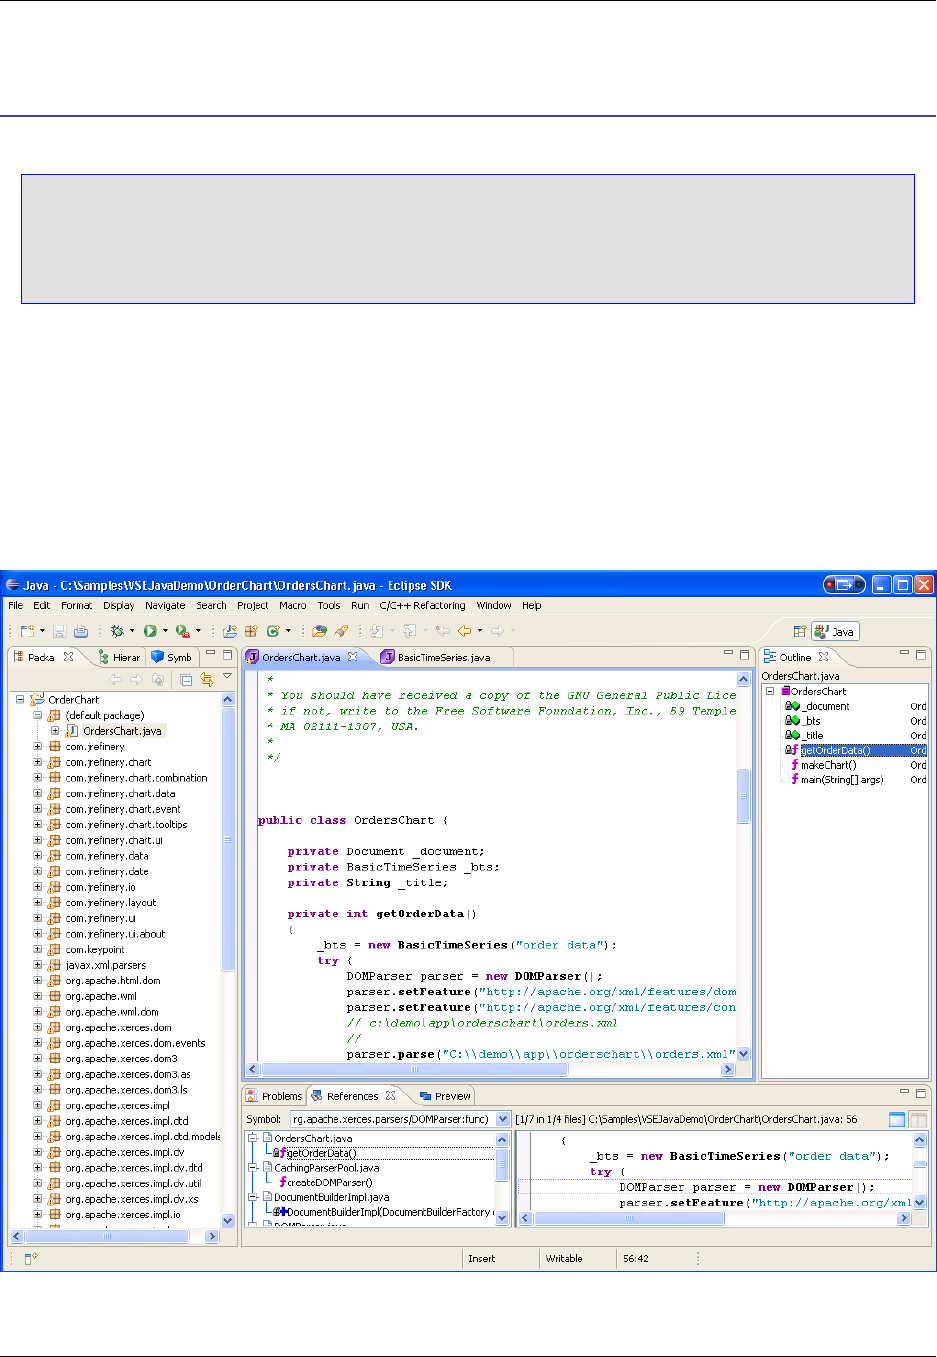
Screen Layout
Note
SlickEdit®Core does not modify the Eclipse screen layout, so this information is intended only as
a brief overview. See "Workbench User Guide" in the Eclipse Help for more details about the Ec-
lipse layout.
The Workbench
The workbench is the area where the workspace, projects, and programs are contained. Use the work-
bench to manage and edit all projects in various perspectives, views, or editors. Work may only occur in
one workbench at a time.
Figure 3.1. The Workbench
The Workbench
20

The Workspace
The workspace is a collection of projects. A project contains all resources such as source files, sub-
folders, icons, and generated code.
By default, the workspace files are placed in a workspace subdirectory under the install directory.
Perspectives
A perspective in Eclipse is a set of views and editors. For example, the Java perspective has a much dif-
ferent set of views than the Debug perspective. You can customize each perspective's layout by dragging
and dropping.
The SlickEdit®Core Editor
Use the SlickEdit Core editor to create and change projects, folders, files, and classes. To edit files and
classes in SlickEdit Core, first associate those files or classes with the editor or open the source file using
the editor.
Figure 3.2. Managing File Associations
Perspectives
21
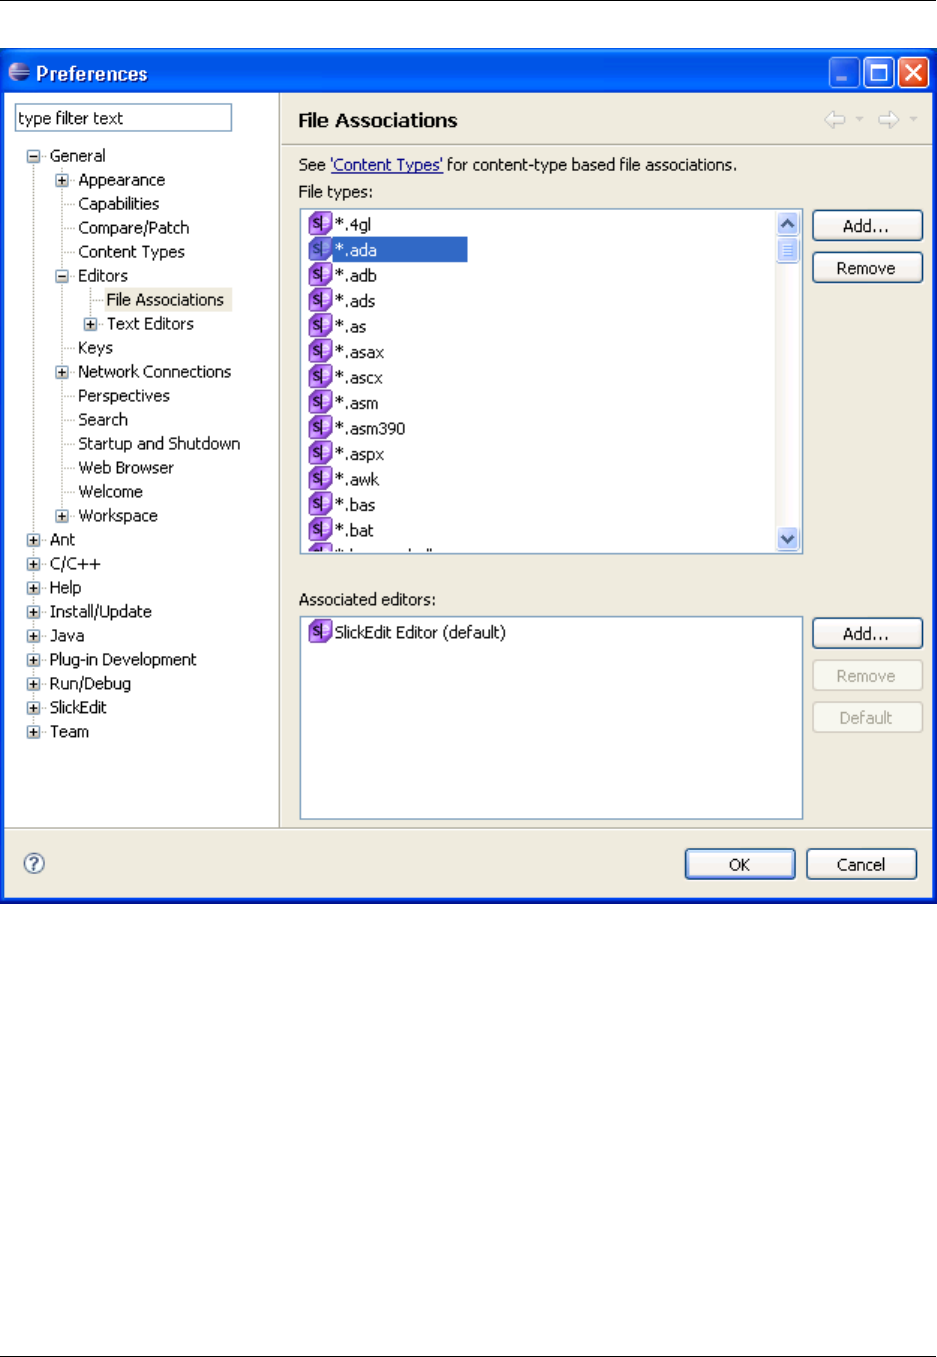
To associate files to edit, complete the following steps:
1. From the main menu, click Window →Preferences.
2. Expand General, then expand Editors and select File Associations.
3. From the File Types list, select the desired file type. Or, to add an extension, click Add.
4. From the Associated Editors list, select the desired editor.
5. To make this the default editor for this file type, click the Default button.
6. Click OK.
Source files can be opened with the SlickEdit Core editor in the following ways:
The SlickEdit®Core Editor
22

• To open a source file in the workspace, from the Navigator view, select the desired file. Right-click the
file, then select Open.
• To open a file using a specific editor, from the Navigator view, select the desired file. Right-click the file,
then select Open With.
• To open a file that is outside of the workspace, from the main menu, click File →Open.
Figure 3.3. Opening Source Files with SlickEdit Core
Switching Between the SlickEdit®Core Editor and Eclipse
Editors
SlickEdit Core provides the ability to switch from the SlickEdit Core editor to several other Eclipse editors,
for the current buffer. These commands are provided in the right-click context menu of the editor:
•Switch to Java Editor – Changes to the JDT editor. Visible only for Java files.
Switching Between the
SlickEdit®Core Editor and Ec-
23

•Switch to C/C++ Editor – Changes to the CDT editor. Visible only for C/C++ files.
•Switch to Ant Editor – Changes to the Eclipse Ant build.xml editor. Visible only for build.xml
files.
•Switch to Plug-in Manifest Editor – Changes to the Eclipse plugin.xml editor. Visible only for plu-
gin.xml files.
Similarly, you can also switch from any Eclipse editor to the SlickEdit Core editor for the current buffer. To
do this, use the Switch To SlickEdit, accessible from the right-click context menu in the Eclipse editor.
Menus
If a menu specific to SlickEdit Core is not visible, such as the Format menu, then close the open files or
classes and re-open with the SlickEdit Core editor.
To open with the SlickEdit Core editor, complete the following steps:
1. Right-click on the desired file or class and select Open With.
2. Select the SlickEdit Core editor, even if it appears to have already been chosen.
3. If this is the first time opening the editor, prompts appear to tag the run-time libraries.
4. Follow the remaining prompts.
The following menus are specific to or affected by SlickEdit Core:
• File
• Edit
• Format
• Display
• Navigate
• Search
• Macro
• Tools
• C/C++ Refactoring
• Window
• Help
Menus
24
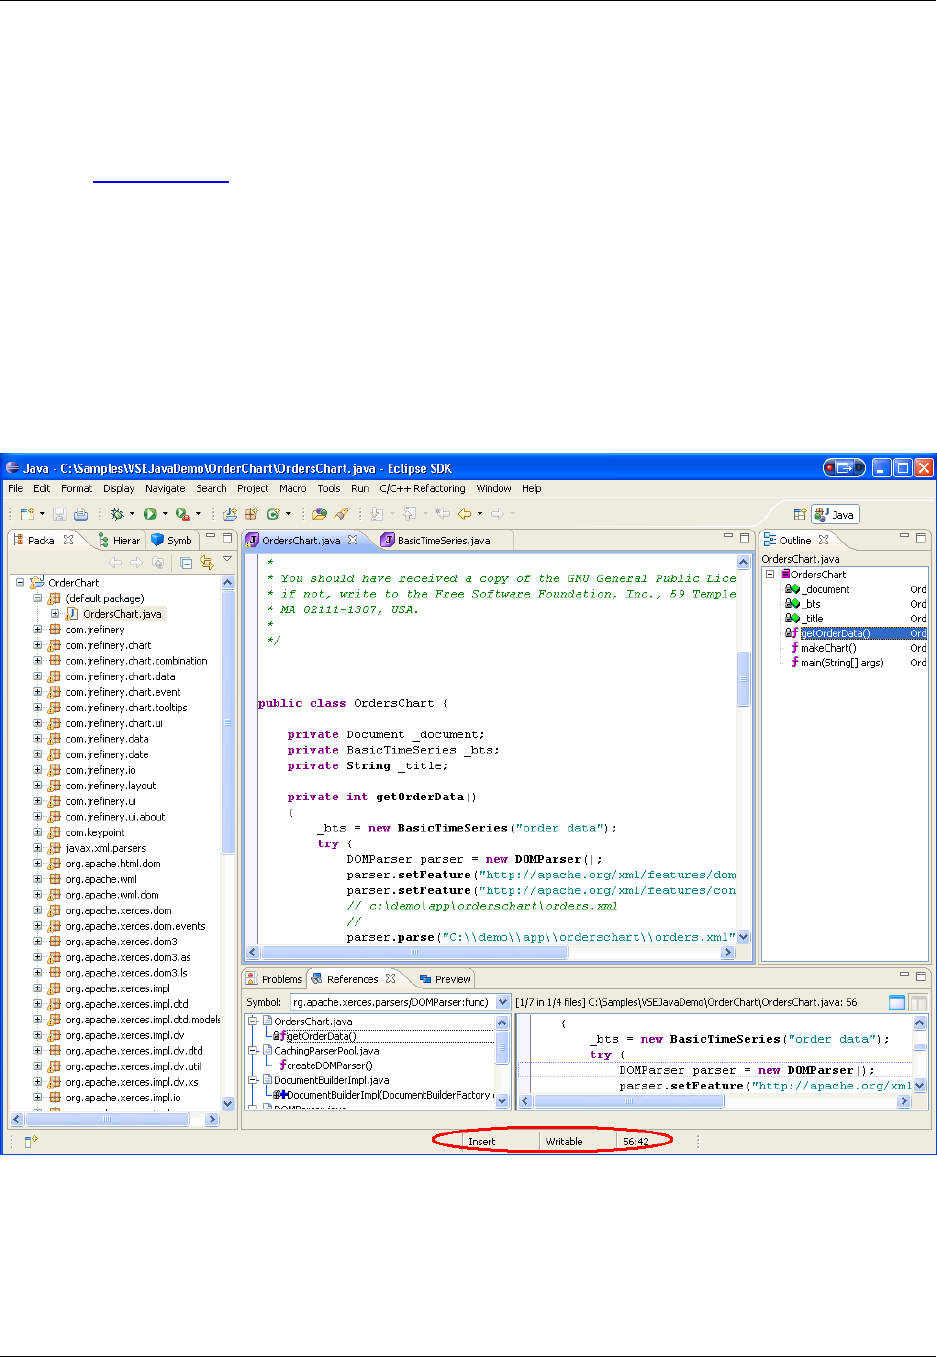
Views
Views are windows that show various types of information that you can move around and dock within Ec-
lipse. See SlickEdit Views for information.
Status Area
The status area for a perspective and an editor displays text messages. It indicates if the current mode is
insert, overwrite, or replace, and if a file is read-only. The editor status area also displays the line and
column number for the cursor location.
Figure 3.4. Status Area
Dialogs
Although SlickEdit®Core shares a heritage with our stand-alone editor, SlickEdit, dialogs within SlickEdit
Core may contain options that are not available when the functionality is not applicable to the Eclipse en-
lipse Editors
25

vironment. By the same token, some SlickEdit commands may not be available.
See Chapter 10, SlickEdit Core Dialogs for descriptions of each dialog specific to SlickEdit Core, broken
into the following categories:
•Editing Dialogs
•Search Dialogs
•Editing Dialogs
•Dialogs Related to Viewing and Displaying
•Macro Dialogs
•Tools Dialogs
•Options Dialogs
Command Line
To activate the SlickEdit Core command line, press Esc in CUA emulation, Ctrl+Ain Vim emulation, or
Alt+Xin GNU Emacs emulation.
See The SlickEdit Core Command Line for more information.
Command Line
26

SlickEdit Views
Views complement the file opened in the editor. You can move, resize, and customize views easily. All
the views and perspectives have live connectivity, meaning that if a file name or property in one view is
modified, then that change stays true for that item in every area of the workspace.
Views support editors and provide alternative presentations as well as ways to navigate the information in
your workbench.
Views also have their own menus. To open the menu for a view, click the icon at the left end of the view's
title bar. Some views also have their own toolbars. The actions represented by buttons on view toolbars
only affect the items within that view.
A view might appear by itself, or stacked with other views in a tabbed notebook. You can change the lay-
out of a perspective by opening and closing views and by docking them in different positions in the work-
bench window.
Opening SlickEdit Core Views
Perspectives offer pre-defined combinations of views and editors. To open a view that is not included in
the current perspective, from the main menu, click Window →Show View. To open a SlickEdit Core
view, click Window →Show View →Other, expand SlickEdit Views and double-click the view you want
to open.
Tip
• You can create fast views to provide a shortcut to views that you use often.
• After adding a view to the current perspective, you may want to save your new layout by click-
ing Window →Save Perspective As.
For more information on views and the multiple operations they allow, see the Eclipse online
Help.
Available SlickEdit®Core Views
The views below are made available by SlickEdit®Core.
Bookmarks
Displays a list of bookmarks that have been set. Note that the bookmark functionality in SlickEdit®Core
integrates with the Eclipse Bookmarks view. For more details, see Bookmarks.
Breakpoints
Opening SlickEdit Core Views
27

Lists breakpoints (and exception breakpoints for Java) and allows you to modify them. You must use this
view to set breakpoint properties. It can be used when you are not in debug mode. Right-click within the
view window to display a context menu which allows you to jump to the location of a breakpoint or modify
breakpoints. Note that the breakpoints functionality in SlickEdit®Core integrates with the Eclipse Break-
points view. For more details on this topic, see Setting Breakpoints.
Class
Provides an outline of both the members of the current class as well as any visible inherited members.
This view also shows the inheritance hierarchy of the current class, useful for object-oriented program-
ming languages such as Java. See Class View for more information.
Outline
Provides an outline of symbols in the current workspace. See Outline View for more information.
Find and Replace
Used to perform search and replace operations. This view can also be displayed by using the key binding
Ctrl+F. See Find and Replace for more information.
Find Symbol
Used to locate symbols which are declared or defined in your code. It allows you to search for symbols by
name using a regular expression, substring, or fast prefix match. See Find Symbol View for more informa-
tion.
FTP
Used to connect to FTP servers and open files. Right-click on files to display a menu of FTP operations.
See FTP for more information.
SlickEdit Output
Displays output from various operations within the editor, such as errors.
Preview
Provides a portal for viewing information in other files without having to open them in the editor. It auto-
matically shows this information when you are working with certain features. See Preview View for more
information.
References
Displays the list of symbol references (uses) found the last time that you used the Go to Reference fea-
ture (Ctrl+/or push_ref command—see Symbol Navigation for more information). See References View
for more information.
Regex Evaluator
Available SlickEdit®Core Views
28

Provides the capability to interactively create and test regular expressions. See The Regex Evaluator for
more details.
SlickEdit Search
Displays the results of multi-file searches, or when the option List all occurrences is selected on the
Find and Replace View. See Find and Replace for more information about searching and replacing.
Slick-C®Stack
Displays errors that occur within the editor. If errors occur during normal use, you can send this informa-
tion to Product Support as a reference (see Contacting Product Support). If an error occurs in one of your
macros, you can use this information to help debug it. Double-clicking on a line of code in this window will
open the file and go to the line in the file that contains the error.
Symbols
Contains the symbol browser, which lists the symbols from all of the tag files. See Symbols View for more
information.
The SlickEdit®Core Command
Line
29
The SlickEdit®Core Command Line
SlickEdit Core provides its own command line as a means to execute most SlickEdit Core operations so
you can work without taking your hands off of the keyboard. This is useful for less frequently used opera-
tions that may not warrant a key binding, or complex commands that require arguments.
Note
• SlickEdit®Core commands that contain two or more words are written throughout our docu-
mentation with underscore separators: for example, cursor_down. Note that in the user inter-
face, however, these commands are displayed with hyphen separators: for example, cursor-
down. Both of these forms work, so you can use whichever style you prefer.
• Although SlickEdit®Core shares a heritage with our stand-alone editor, SlickEdit, some
SlickEdit commands may not available when the functionality is not applicable to the Eclipse
environment.
Activating the Command Line
To activate or toggle the command line, press the key or key sequence for your emulation:
• BBEdit - Esc
• Brief - Esc
• CodeWarrior - Esc
• CodeWright - F9
• Epsilon - Alt+Xor F2
• GNU Emacs - Alt+Xor F2
• ISPF - Esc
• SlickEdit (Text Mode edition) - Esc
• Vim - Ctrl+A
• Visual C++ - Esc
• Visual Studio - Esc
• Xcode - Esc
See Emulations for more information.
Activating the Command Line
30

Command Line History
The command line maintains a command history, allowing you to quickly reuse previously entered com-
mands. Once the command line is open, use the arrow keys to scroll up and down in the command his-
tory.
Command Line Completions
As you type a command, a list of matching completions is displayed, including any command line argu-
ments used in a previous command. Use Tab or the Down arrow to move to the next command in the list,
and Shift+Tab or the Up arrow to move to the previous command. Press the Enter key to select the cur-
rent command.
Some commands, like set_var, prompt for arguments. SlickEdit®Core maintains a history of arguments
used for each command. Use the same completion and history mechanism as described above for com-
mands to complete arguments. Typically, the most recent argument you typed is automatically displayed.
Tip
Command completions are useful for discovering other useful operations. For instance, to find all
operations that begin with "find", type find in the command line, and a list of those commands is
displayed. Some search commands do not begin with "find", like gui_find, so you may not dis-
cover all related commands this way. To find all commands containing the word "find," use the
Key Bindings dialog (click Window →Preferences, expand SlickEdit and click General in the
tree, then double-click the Key Bindings setting; alternatively, use the gui_keybindings com-
mand). See Key and Mouse Bindings for more information.
For information about other items that can be automatically completed, see Completions.
Disabling Command Line Completions
To disable command line completions, from the main menu, click Window →Preferences, expand
SlickEdit and click General in the tree, then double-click the General setting. On the General Options
dialog, select the General Tab. Uncheck the option List command line completions. Note that this op-
tion does not apply to the Vim command line.
Using Shortcuts Inside the Command Line
The command line is a text box control just like the text boxes that appear in various dialog boxes. For a
list of key shortcuts that can be used inside the command line and other text boxes within SlickEdit®Core,
see Key Shortcuts in Text Boxes.
Using the Command Line to View Key Binding Associations
Command Line Completions
31

You can use the SlickEdit®Core command line to determine what keys are associated with what com-
mands, and vice-versa.
Tip
Alternatively, you can use the Key Bindings dialog (click Window →Preferences, expand
SlickEdit and click General in the tree, then double-click the Key Bindings setting, or, use the
gui_keybindings command) to see a list of command/key binding associations. See Key Bind-
ings Dialog for more information.
Determining the Command of a Key Binding
To determine the function of a key or key binding, use the what_is command (Help →What Is Key). For
example:
1. Click Help →What Is Key, or activate the SlickEdit®Core command line (by pressing Esc) and type
what_is (or type what and press the spacebar for auto-completion), then press Enter.
2. The message line will prompt with the text What is key. Enter the key sequence in question, and the
message line will display the information. If the key or key sequence is not bound to a command, no
message will appear.
Determining the Key Binding of a Command
To determine the key to which a command is bound, use the where_is command (Help →Where Is
Command). For example:
1. Click Help →Where Is Command, or activate the command line and type where_is, then press
Enter.
2. A dialog will prompt with the text Where is command. Enter the command in question. The Eclipse
message area will display the key binding or state that the command is not bound to a key.
Starting a Program from the Command Line (Shelling)
You can use the command line to start a program. Press Esc to toggle the cursor to the command line.
Type the program name and arguments and press Enter. When entering a command that the editor does
not recognize as an internal command, a path search is performed to find an external program to execute.
To use a program whose name contains space characters, enclose the name in double quotes. For ex-
ample, "this is" will start a program named this is.exe if it exists.
To get an operating system prompt, type the command dos with no arguments or from the main menu,
click Tools →OS Shell.
Command Line Prompting
Starting a Program from the
Command Line (Shelling)
32

Many commands that display dialog boxes have equivalent commands that prompt for arguments on the
command line or on the Eclipse message area. For faster prompting than the dialog boxes allow, you can
choose to be prompted for arguments on the command line instead. To set this option, from the main
menu, click Window →Preferences, expand SlickEdit and click General in the tree, then double-click
the General setting. On the General Options dialog, select the General Tab, then select the option Com-
mand line prompting. To be more selective than this option permits, change the key bindings. For ex-
ample, to be prompted only on the command line when opening files, bind the edit command to Ctrl+O,
which is bound to the gui_open command by default.
The following table contains a partial list of user interface commands and their command line counter-
parts.
Table 3.1. UI Commands vs. Command Line Counterpart
Graphical Command Command Line Version
gui_open edit
gui_find find
gui_replace replace
gui_write_selection put
gui_append_selection append
gui_margins margins
gui_tabs tabs
gui_find_proc find_proc
Common SlickEdit®Core Commands
Commands are essentially the names of functions. The following is a list of commands that we use fre-
quently in our own work, which you may also find useful.
Table 3.2. Common SlickEdit Core Commands
Command Description
efile Edit a file
number Go to line number
Common SlickEdit®Core Com-
mands
33

Command Description
fsymbol Find a symbol
/search_string/options Search for a string
c/search/replace/options Replace a string
sb name Set a bookmark
gb name Jump to a bookmark
man command Show UNIX man page
del filename Delete file
dos command Execute command outside of editor
math expr Evaluate expression
Using the Mouse and Keyboard
34
Using the Mouse and Keyboard
SlickEdit®Core provides four ways to launch operations: commands, menu items, key bindings, and but-
tons. For example, to launch the Open dialog box in order to open a file, you could use any of the follow-
ing methods:
• Type the gui_open command on the SlickEdit command line.
• Click File →Open File.
• Press the key binding F7 or Ctrl+O.
The command forms the basis of each method. As you can see, commands are often bound to more than
one key sequence. They can also be bound to mouse events, including the spin wheel. Key bindings are
the fastest and most efficient means of executing operations.
See The SlickEdit Core Command Line for more information about commands, and Key and Mouse Bind-
ings for more information about bindings.
Key Shortcuts in Text Boxes
Key shortcuts for text operations (such as Cut, Copy, and Paste) can be used inside of all text boxes with-
in SlickEdit®Core (including the command line).
Tip
The CUA emulation contains the shortcuts Ctrl+X,Ctrl+C, and Ctrl+Vfor Cut, Copy, and Paste,
respectively. If you are not using the CUA emulation, by default, these key bindings still work in-
side of text boxes. To deactivate this feature, from the main menu, click Window →Preferences,
expand SlickEdit and click General in the tree, then double-click the General setting. On the
General Options dialog, select the More Tab, then clear the option CUA Text Box.
Text Box Editing Keys
The table below contains a list of the key shortcuts (based on the CUA emulation) that can be used inside
the command line and other text boxes within SlickEdit Core.
Table 3.3. Text Box Editing Key
Key or Key Sequence Operation
Insert Insert mode toggle
Spacebar Expand partially-typed parameter or insert a space
Key Shortcuts in Text Boxes
35

Key or Key Sequence Operation
?List matches to partially-typed parameter
Ctrl+Shift+OExpand alias
Ctrl+ECut to end of line
Ctrl+Backspace Cut line
Ctrl+KCopy word to clipboard
Ctrl+Shift+KCut word
Ctrl+Shift+LLowercase word
Ctrl+Left arrow Previous word
Ctrl+Right arrow Next word
Ctrl+VPaste
Ctrl+XCut
Ctrl+CCopy
Ctrl+Shift+XAppend cut
Ctrl+Shift+CAppend to clipboard
Ctrl+Shift+VList clipboards
Shift+Home Select text between cursor and beginning of line
Shift+End Select text between cursor and end of line
Shift+Click Extend selection to mouse position
Backspace Delete previous character or selection
Delete Delete character under cursor or selection
Left arrow Move cursor left
Right arrow Move cursor right
Key Shortcuts in Text Boxes
36
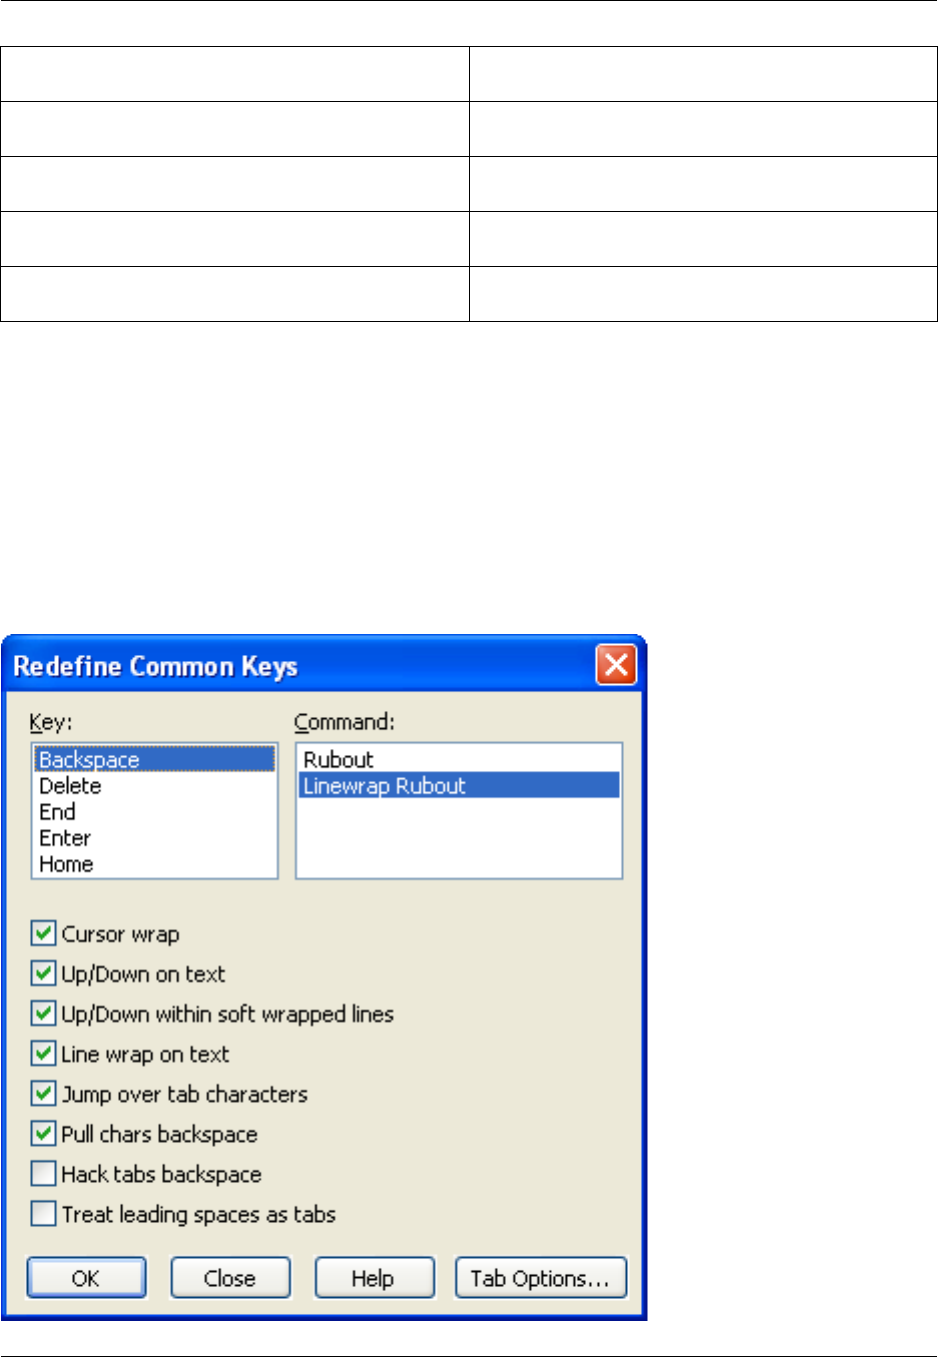
Key or Key Sequence Operation
End Move cursor to end of line
Home Move cursor to beginning of line
Double-click Select word
Triple-click Select line
Redefining Common Keys
Many users have a preference for the functions of the keys Backspace,Delete,Enter,Tab, and Home.
The Redefine Common Keys dialog is designed for changing the function of these keys. To access this
dialog, from the main menu, click Window →Preferences, expand SlickEdit and click General in the
tree, then double-click the Redefine Common Keys setting.
Figure 3.5. Redefine Common Keys Dialog
Redefining Common Keys
37

In the Key list box, select the name of the key that you want to configure. The commands available for
that key are then displayed in the Command list box. Additional options can be set using the check
boxes.
Click the Tab Options button to change the function of the Tab key. The Indent tab of the Extension Op-
tions dialog box is displayed. For more information on changing Tab key functions, see Indenting with
Tabs.
For descriptions of all the elements on the Redefine Common Keys dialog, see Redefine Common Keys
Dialog.
Redefining Common Keys
38

Chapter 4. User Preferences
39

Introduction to User Preferences
SlickEdit®Core can be customized to accommodate your own individual preferences. Most user prefer-
ence information is available by clicking Window →Preferences, expanding SlickEdit and clicking Gen-
eral in the tree.
User preferences are broken into two categories: preferences that apply to all languages (global prefer-
ences), and preferences that apply to specific language extensions.
Tip
If you are using SlickEdit Core in a multiple user environment, each user must pass a local direct-
ory to eclipse using the command line flag -vsconfig. This allows each user to have their own
configuration. If making modifications to vslick.ini, make a local copy of this file and place it
in the -vsconfig directory file. See Changing the Configuration Directory for more information.
Global Preferences
Global preferences that can be set include the following:
• Emulation modes (see Emulations)
• Fonts and colors (see Setting Fonts and Colors)
• Auto Restore settings (see Restoring Settings on Startup)
Other global preferences, such as search settings, selection styles, etc., can be configured by using the
General Options dialog (click Window →Preferences, expand SlickEdit and click General in the tree,
then double-click the General setting). These options are described in the documentation on a contextual
basis. For a flat listing of the options on the General Options dialog, see General Options Dialog.
Extension-Specific Preferences
The behavior of the editor can be customized for files based on specific language extensions. Indent,
Word Wrap, Commenting, Auto-Complete, Context Tagging ®, and other code-style settings are all exten-
sion-specific. These settings are located on the Extension Options dialog (click Window →Preferences,
expand SlickEdit and click General in the tree, then double-click the File Extension Setup setting). The
options are described in the documentation on a contextual basis. For a flat listing of the options on the
Extension Options dialog, see Extension Options Dialog.
For more information about working with language extensions, see Language-Specific Editing Overview.
Global Preferences
40

Emulations
Emulation is the process of imitating another program. SlickEdit®Core provides emulations of key bind-
ings for 13 editors so that you can use the style to which you are accustomed, making your coding experi-
ence as efficient as possible.
The Key Bindings dialog allows you see what keys or key sequences are bound to what commands.
Emulation charts are also available as printable PDF documents in the docs subdirectory of your SlickEd-
it Core installation directory. See Key and Mouse Bindings for more information.
Supported Emulations
This section lists each emulation mode and any special notes.
•BBEdit
•Brief - This emulation relies heavily on Alt key bindings. In addition to Brief emulation support,
SlickEdit®Core also supports Brief regular expressions. See Regular Expression Syntax for more in-
formation.
•CodeWarrior
•CodeWright
•CUA - CUA is an acronym for Common User Interface, a standard set of user interface guidelines simil-
ar to those used in Microsoft products. This is the default emulation mode used by SlickEdit Core.
•Epsilon - This emulation relies heavily on Ctrl+Xand Escape (meta) key bindings.
•GNU Emacs - This emulation relies heavily on Ctrl+Xand Escape (meta) key bindings. It does not in-
clude an Emacs Lisp emulator.
•ISPF - Support is included for ISPF prefix line commands, the ISPF command line, rulers, line number-
ing, and some XEDIT extensions. In addition to the ISPF emulation charts, additional documentation
about using this emulation is available—see Using the ISPF and XEDIT Emulations.
•SlickEdit®(Text Mode Edition)
•Vim - The Vim emulation contains special keys and key sequences that are case-sensitive. A plus (+)
sign separates the simultaneous key presses. For example, the key binding Ctrl+x,k, which closes the
current file, indicates to press at the same time the Ctrl key and lowercase x, release, then press kto
insert the lowercase k. Another example is the key binding gP, which pastes the text before the cursor.
Press the Gkey (which inserts a lowercase g), release, then press Shift plus pat the same time (which
inserts the uppercase P).
•Visual C++ 6
•Visual Studio - The key bindings provided for the Visual Studio emulation are not the same as the key
bindings used in Visual C++, but there might be some overlap. If Microsoft Visual Studio does not
Supported Emulations
41
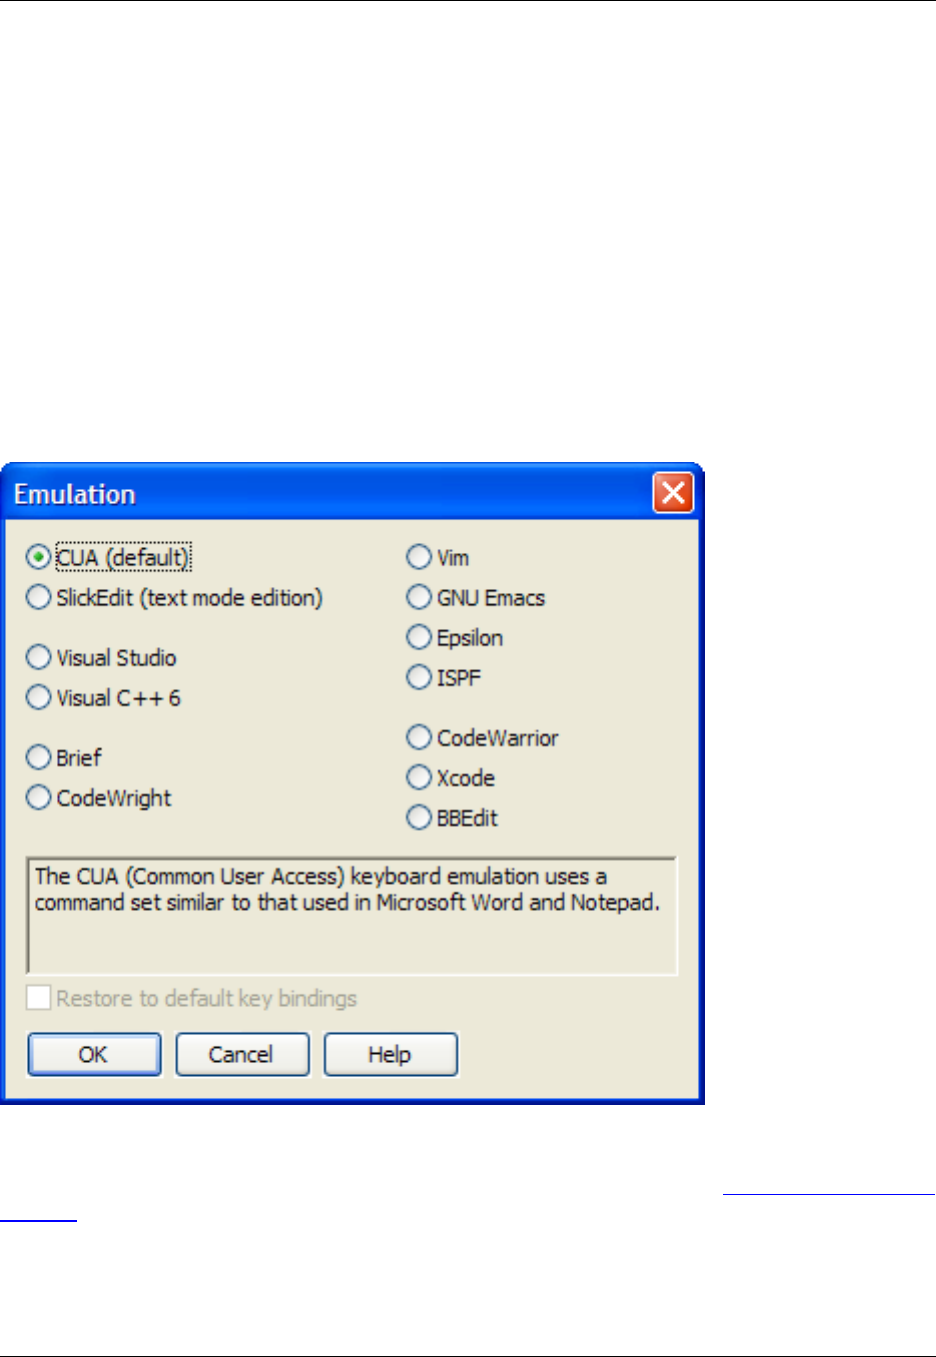
provide a default key binding for a particular SlickEdit Core command, the corresponding Visual C++
key binding is used.
•Xcode
Changing Emulations
After SlickEdit®Core is installed, you are prompted to choose an emulation. CUA is the default emulation
mode. Key bindings and shortcuts mentioned in our documentation are based on this emulation. You can
change emulation modes at any time: Click Window →Preferences, expand SlickEdit and click Gener-
al in the tree, then double-click the Emulation setting.
Figure 4.1. Emulation Options
You should save custom key/mouse bindings for the current emulation before switching emulations. You
can do this by exporting your custom bindings using the Key Bindings dialog (see Exporting and Importing
Bindings), or you can save using the prompt that appears when switching emulations.
Figure 4.2. Emulation Prompt
Changing Emulations
42
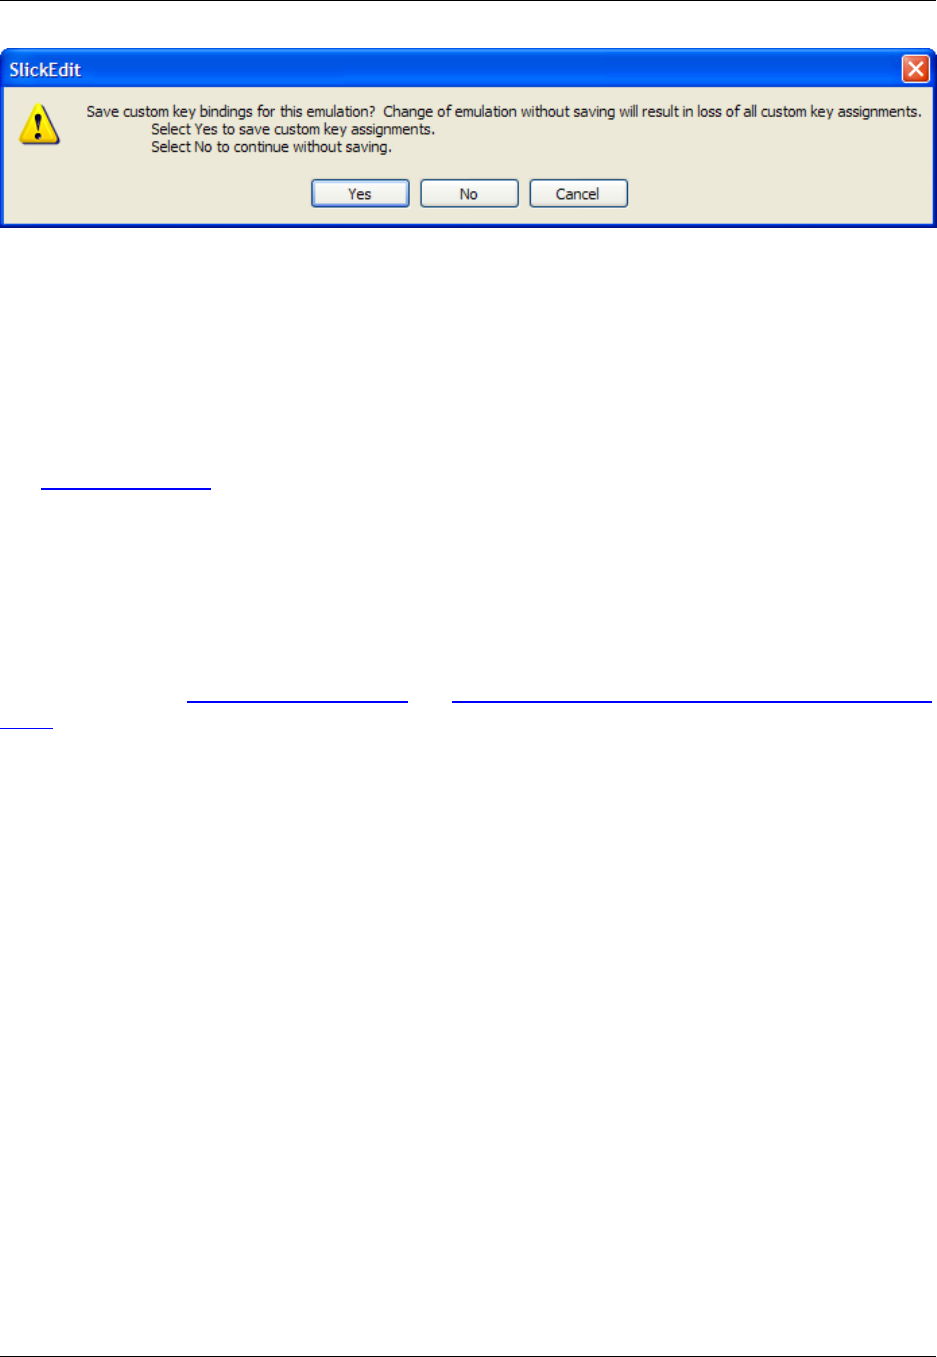
By saving your custom key bindings when you switch emulations, when you return to the original emula-
tion those bindings are automatically available. For example, if you have created and saved custom bind-
ings in the CUA emulation, and then switch to Vim, switching back to CUA will make your custom bind-
ings for CUA available again.
To remove custom key bindings for an emulation, resetting to the defaults, select the Restore to default
key bindings option in the Emulation settings.
See Managing Bindings for more information on working with custom bindings.
Determining Keys/Functions
When/if you switch emulations, the key bindings that are assigned to commands change according to the
emulation chosen. You can use the Key Bindings dialog to look up what command is bound to what key
or key sequence (or vice-versa), or you can use the SlickEdit®Core menu and command line to determ-
ine these items. See Key and Mouse Bindings and Using the Command Line to View Key Binding Associ-
ations for more information.
Determining Keys/Functions
43

Key and Mouse Bindings
Key and mouse bindings are quick ways to execute operations in SlickEdit®Core. Key bindings are the
most efficient. Time is wasted each time you lift your hand from the keyboard to grab the mouse, and
more time is wasted when you move your hand back to the keyboard in preparation for more typing.
Therefore, if you learn the key bindings associated with operations that you use most frequently, you will
save time coding. If an operation you use frequently isn’t already bound by default, create your own easy-
to-remember binding.
What is a Binding?
A key or mouse binding is a key sequence or mouse event associated with a command. Key terms are
defined as follows:
•Mouse event - The clicking of any button or motion of the mouse wheel.
•Key sequence - A series of one or more keys or key combinations. For example, Ctrl+X,R.
•Key combination - Two or more keys pressed simultaneously. For example, Ctrl+O.
•Key - Any single key on the keyboard.
An example of a key binding with one key combination is Ctrl+O(in CUA emulation, associated with the
gui_open command and File →Open File). The plus (+) sign between the keys indicates that these keys
must be pressed simultaneously: press the Ctrl and Okeys at the same time. Note that the last key is
case-insensitive. You do not need to press Shift.
An example of a key binding with a key sequence is Ctrl+X,R(in Vim emulation, this binding is associated
with the redo command and Edit →Redo). The comma (,) indicates that each key must be pressed con-
secutively: press Ctrl and Xat the same time, release, then press the Rkey.
To view or change bindings, create new bindings, and export/import custom bindings, see Managing
Bindings.
The available key bindings change depending on the selected emulation. While SlickEdit®Core provides
emulations for 13 editors, CUA is the default emulation, so key bindings listed throughout the documenta-
tion will be for the CUA emulation. To change the emulation mode, click Window →Preferences, expand
SlickEdit and click General in the tree, then double-click the Emulation setting. For more information,
see Emulations.
Note
• For documentation purposes, both mouse events and keys that are bound to commands are of-
ten referred to collectively as key bindings.
• The main menu displays the key bindings for commands associated with each menu entry. See
Menus Accessing Menus and Creating and Editing Menus for more information.
What is a Binding?
44

• A menu hotkey is a key sequence that corresponds to an underlined letter on a menu name.
Managing Bindings
Create and manage key bindings using the Key Bindings dialog. The dialog displays a list of all SlickEdit®
Core commands, including macros that you have recorded, their associated key sequences, and the lan-
guage editing mode in which the key binding can be used. Documentation for the selected command, if
available, is also displayed. The Key Bindings dialog provides capabilities to incrementally search by
command or by key sequence, export and import custom bindings, save an HTML chart of your bindings,
and run a selected command or user-recorded macro.
To access the Key Bindings dialog, click Window →Preferences, expand SlickEdit and click General in
the tree, then double-click the Key Bindings setting, or use the gui_keybindings command.
The first time the Key Bindings dialog is invoked, the Building Tag File progress bar may be displayed
while Slick-C®macro code is tagged.
Figure 4.3. Key Bindings Dialog
Managing Bindings
45
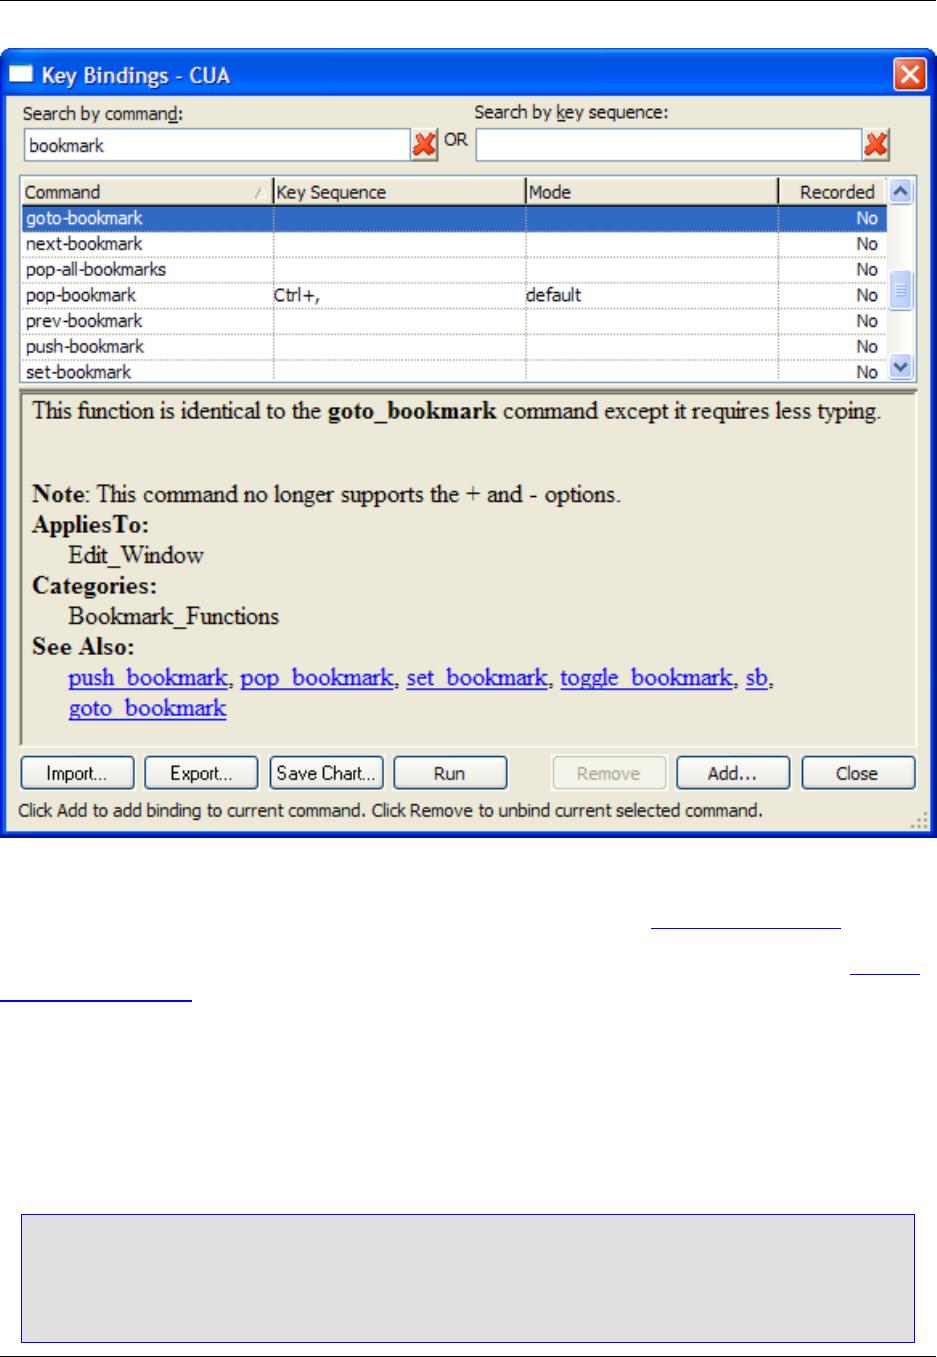
Bindings are based on the editor emulation mode (CUA is the default). The title bar of the Key Bindings
dialog shows the current emulation. (To change the emulation mode, see Changing Emulations.)
The Search by command and Search by key sequence boxes are used to filter the data. See Viewing
and Filtering Bindings.
The Command column shows all of the SlickEdit Core commands including macros that you have recor-
ded. The Key Sequence column shows the key sequence or mouse event to which the command/macro
is bound. If there is no binding, this field is empty. The Mode column shows the language editing mode to
which the binding is assigned. The Recorded column indicates if the item is a command (No) or user-
recorded macro (Yes).
Tip
What is a language editing mode? SlickEdit Core uses the extension of the current file to determ-
ine what language you are using, thereby only making available the options and features that are
possible or useful in that language. You can also manually set the language editing mode. See
Managing Bindings
46

Language Editing Modes for more information.
The bottom of the dialog contains documentation (if available) for the selected command.
Columns can be sorted by clicking on the column headers. An up or down arrow in the column header in-
dicates ascending or descending sort order. All of the columns as well as the documentation pane can be
resized by dragging the separator bars.
The sections below describe different ways to use the Key Bindings dialog. For a listing and descriptions
of elements on this dialog, see Key Bindings Dialog.
Viewing and Filtering Bindings
You can filter the data in the Key Bindings dialog by using the Search by command and Search by key
sequence boxes at the top. This is useful for finding a command/macro for creating, editing, or removing
a binding, and for determining what key sequences are associated with a command/macro and vice-
versa.
• To find a command/macro, search for it by entering a string in the Search by command box. The
column of commands is filtered incrementally as you type, to show only commands that contain the
specified string. Commands that have more than one key sequence associated with them are listed on
separate rows. For example, in CUA emulation, the command gui_open is bound to F7 and Ctrl+O.
Therefore, gui_open appears in the Command column three times–one row per key sequence.
• To find a key sequence, place the focus in the Search by key sequence box (by tabbing or using the
mouse) and then press the actual key or key sequence. The column of key sequences is filtered to
show only bound sequences that contain the specified key(s). For example, to see all commands/mac-
ros that are bound to Ctrl+O, with the focus in the search box, simply press Ctrl+O.
To clear either field, click the red Xbutton to the right of each box. This is especially handy for the key se-
quence search, due to the fact that the field recognizes any keyboard/mouse input including Backspace.
Alternatively, you can use the what_is and where_is commands (Help →What Is Key and Help →
Where Is Command) on the SlickEdit Core command line to determine binding associations. See Using
the Command Line to View Key Binding Associations for more information.
Creating Bindings
You can work more efficiently if you create key/mouse bindings for commands or user-recorded macros
that you use frequently. To create a new key or mouse binding:
1. Using the Key Bindings dialog, find the command or user macro you want to bind. You can search for a
command/macro by entering a string in the Search by command box (see Viewing and Filtering Bind-
ings).
2. Initiate the binding by using one of the following methods:
• Select the row, then click the Add button.
• Select the row, then press Enter.
Managing Bindings
47
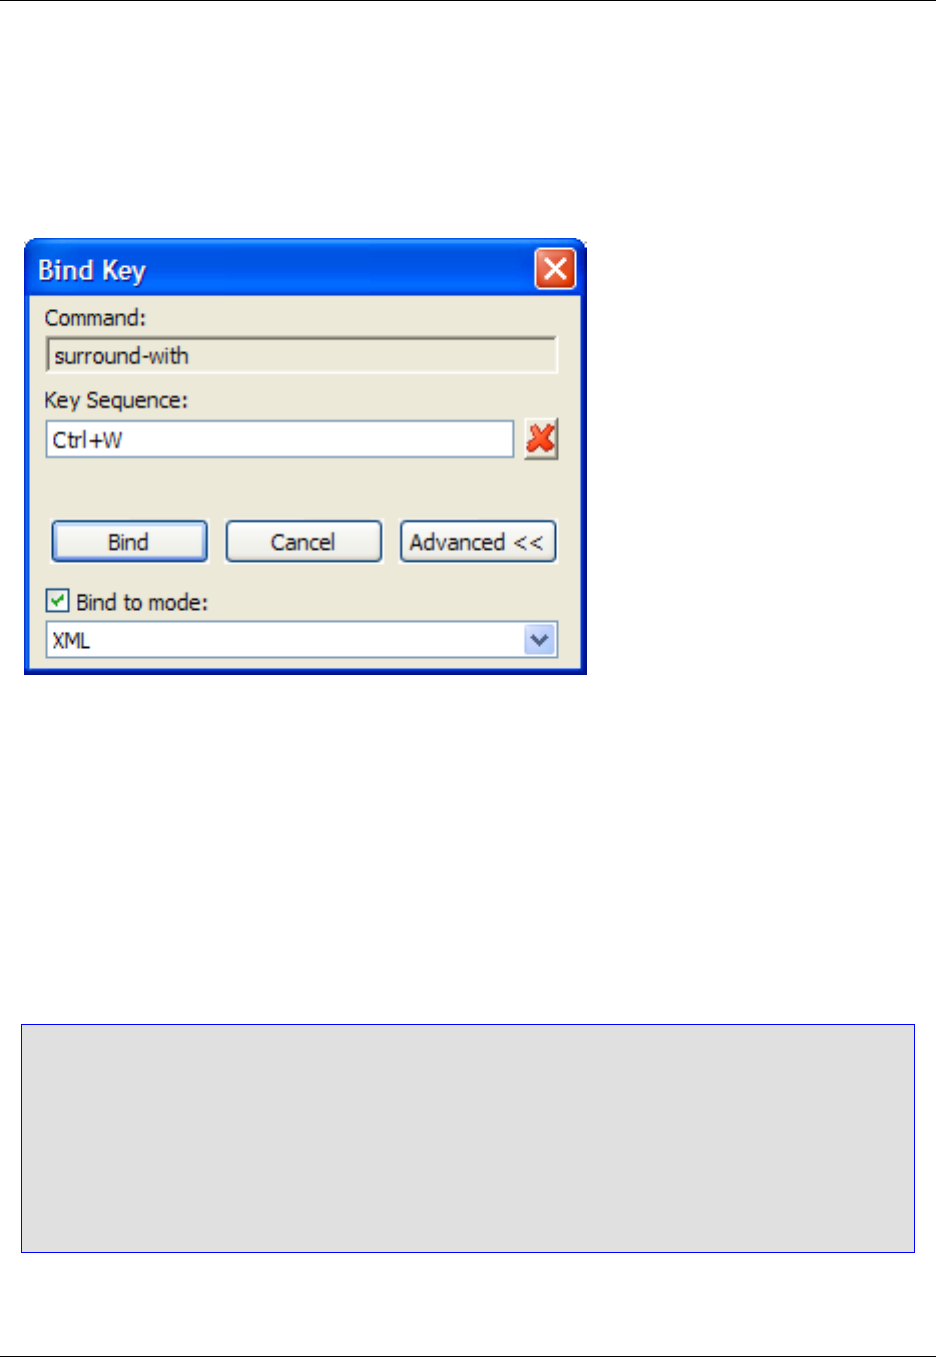
• Double-click on the row.
3. When you initiate a binding, the Bind Key dialog is displayed with focus in the Key Sequence box.
Figure 4.4. Bind Key Dialog
• For a key binding, press the key sequence just as you would to use it. For example, to bind sur-
round_with to Ctrl+W, simply press Ctrl+W. The key sequence you pressed is displayed in the box.
• For a mouse binding, click the mouse button you want to use. For example, to bind surround_with
to the right-click mouse event, simply right-click with the mouse, and RButtonDn is displayed in the
box.
Use the red Xbutton to clear the input field if you make a mistake. If you enter a key sequence or
mouse event that is already assigned to another command/macro, a warning prompt is displayed. If
you continue, the previous binding is unbound and reassigned.
Tip
• SlickEdit Core allows key sequences that are very long, but shorter sequences are easier to re-
member and more practical to use.
• Do not begin key sequences with keys that are normally used in typing. Otherwise, these keys
will launch the operation and not appear when you type. For example, binding a command to
the Akey will prevent you from using that letter in your code. It is best to always begin your key
sequences with a Ctrl or Alt key combination.
4. The default language editing mode is the default language editing mode for new bindings, which
means the binding will work in all language editing modes. If you want the binding to work only in a
Managing Bindings
48

specific language editing mode, you can change it now by clicking the Advanced button on the Bind
Key dialog. Click Bind to mode, then from the drop-down list, select the mode for which the binding
should apply. Bindings assigned to a specific language editing mode override those assigned to de-
fault.
Tip
You can create multiple bindings for the same command/macro and have one binding set to de-
fault and the others set to specific modes. In this case, when you are editing in a specified mode,
that binding is in effect, and when editing in any other language editing mode not specified, the
default binding will be in effect. For example, in CUA emulation, Ctrl+Lis bound to select_line by
default, but when in HTML mode, you may want to use Ctrl+Lto insert an HTML link instead (in-
sert_html_link command). Therefore, you can bind Ctrl+Lto insert_html_link and specify the
HTML mode for use only when editing HTML files.
5. When finished, click Bind. The key sequence or mouse event now appears in the Key Sequence
column on the Key Bindings dialog.
Editing Bindings
To change the binding or language editing mode for a command/macro that is already bound, you will
need to first unbind the command/macro, then recreate it. See Removing Bindings and Creating Bindings.
If you have advanced knowledge of SlickEdit®Core, you can edit the Slick-C®key binding source directly.
See Editing the Key Binding Source for more information.
Removing Bindings
To remove a binding:
1. Using the Key Bindings dialog, find the command/user macro or key sequence that you want to unbind.
You can search by using the search boxes at the top (see Viewing and Filtering Bindings).
2. With the command/macro row selected, click Remove, or press Delete. You are prompted to confirm
the unbind operation.
Exporting and Importing Bindings
Key and mouse bindings can be exported out of the editor and imported in, useful for creating backups,
sharing with other team members, or taking with you should you switch computers.
Exporting Bindings
When you export bindings using the Key Bindings dialog, custom bindings for all language editing modes
in the current emulation are exported into an XML file with a name and location that you can specify.
To export your bindings:
1. Click the Export button on the Key Bindings dialog. The Save As dialog is displayed.
Managing Bindings
49

2. If you want, change the directory location and change the file name to something more meaningful to
you, such as myname_cua.xml.
3. Click Save.
Importing Bindings
Imported bindings override any existing bindings for the selected emulation. For example, if you have the
surround_with command bound to Ctrl+W, and import surround_with bound to Ctrl+Q, then Ctrl+Qis
now the binding for that command in the selected emulation. When you import for the selected emulation,
SlickEdit®Core resets the key bindings to the default, then loads the user key bindings.
If you import a key bindings file from a different emulation than the one currently selected, a warning is
displayed that prompts whether or not you want to continue. If you continue, the emulation mode is
changed and the key bindings are loaded for that emulation.
To import bindings:
1. Click the Import button on the Key Bindings dialog. The Open dialog is displayed.
2. Find and select a bindings file that was previously exported, then click Open.
Saving a Bindings Chart
Click the Save Chart button on the Key Bindings dialog to save an HTML reference chart of all current
bindings for all language editing modes in the selected emulation. Commands and user macros that are
not bound are not included.
Running a Command/Macro using the Key Bindings Dialog
If you have the Key Bindings dialog open, you can conveniently run a selected command or user-re-
corded macro by clicking the Run button.
Resetting Default Bindings
To reset bindings for the selected emulation to the SlickEdit®Core defaults, from the main menu, click
Window →Preferences, expand SlickEdit and click Emulation in the tree, then select the Restore to
default key bindings option. See Emulations for more information.
Key Binding Settings
The following are settings that you can make pertaining to key bindings.
Key Message Delay
For key bindings that contain multiple key combinations, like Ctrl+X,Ctrl+C, you can specify the maxim-
um delay between the two combinations. If that time limit is exceeded, this key sequence will be inter-
preted as two separate bindings, executing the command bound to Ctrl+Xfollowed by the command
Key Binding Settings
50

bound to Ctrl+C, rather than the command bound to Ctrl+X,Ctrl+C.
To change this option, click Window →Preferences, expand SlickEdit and click General in the tree,
then double-click the General setting. On the General Options dialog, select the More Tab. In the Key
message delay spin box, enter the amount to delay before a prefix key in tenths of a second. The prefix
key is not displayed if the next key is pressed before the delay specified in this text box.
Using Shorter Key Names in Menus
The main menu displays the key bindings for commands associated with each menu entry. These bind-
ings can be condensed for non-CUA emulations. See Menus for more information.
Cursor, Mouse, and Scroll Set-
tings
51

Cursor, Mouse, and Scroll Settings
This section describes settings for the cursor, mouse, and scroll style. For cursor navigation information,
see Cursor Navigation.
Setting the Cursor Style
You can use a text mode style cursor instead of a vertical cursor. To set this option, from the main menu,
click Window →Preferences, expand SlickEdit and click General in the tree, then double-click the Gen-
eral setting. On the General Options dialog, select the More Tab, then select the option Use block curs-
or.
Hiding the Mouse Pointer
To hide the mouse pointer when typing, from the main menu, click Window →Preferences, expand
SlickEdit and click General in the tree, then double-click the General setting. On the General Options
dialog, select the More Tab, then select the option Hide mouse pointer. The mouse pointer is then only
displayed when moving the mouse or when a dialog box is displayed.
Displaying Tool Tips
By default, hovering the mouse pointer over a button displays a tool tip about the item. To turn tool tips off
or to change the amount of time before tool tips are displayed, from the main menu, click Window →
Preferences, expand SlickEdit and click General in the tree, then double-click the General setting. On
the General Options dialog, select the More Tab, then clear the option Show tool tips, or change the
value in the Delay spin box. The Delay value is in tenths of a second.
Scroll Style Settings
To set the scroll style, select the More Tab on the General Options dialog, then select the Scroll style
setting that you wish to use. Commands that move the cursor more than one page of text, such as
searching, always center scroll text into view. The following scroll settings are available:
•Center - When center scrolling is on and the cursor moves out of view the cursor will be centered and
the text will move by half the height or width of the window.
•Smooth - Smooth scrolling is a line by line scroll of the screen that occurs when the cursor moves out
of view. Smooth scrolling is the default configuration.
•Scroll when - Specifies how close (in number of lines) the cursor may get to the top or bottom of the
window before scrolling occurs. Does not affect horizontal scrolling.
Setting the Cursor Style
52

Setting Fonts and Colors
The SlickEdit®Core editor and views do not use the Eclipse color and font settings. To change the fonts
and colors in the SlickEdit Core editor and views, change the color and font settings using the SlickEdit
Core options.
For information about changing the colors of code, such as colors used for keywords, see Color Coding.
Fonts
SlickEdit®Core provides the capability to change the fonts used by edit windows, the command line,
status text, and other screen elements. Recommended fonts are listed. You can also set fonts for editor
windows.
Tip
Xft fonts are supported on Linux.
Setting Fonts for Screen Elements
To configure font settings for screen elements, use the Font Configuration dialog. To access this dialog,
from the main menu, click Window →Preferences, expand SlickEdit and click General in the tree, then
double-click the Font setting.
Figure 4.5. Font Configuration Dialog
Fonts
53
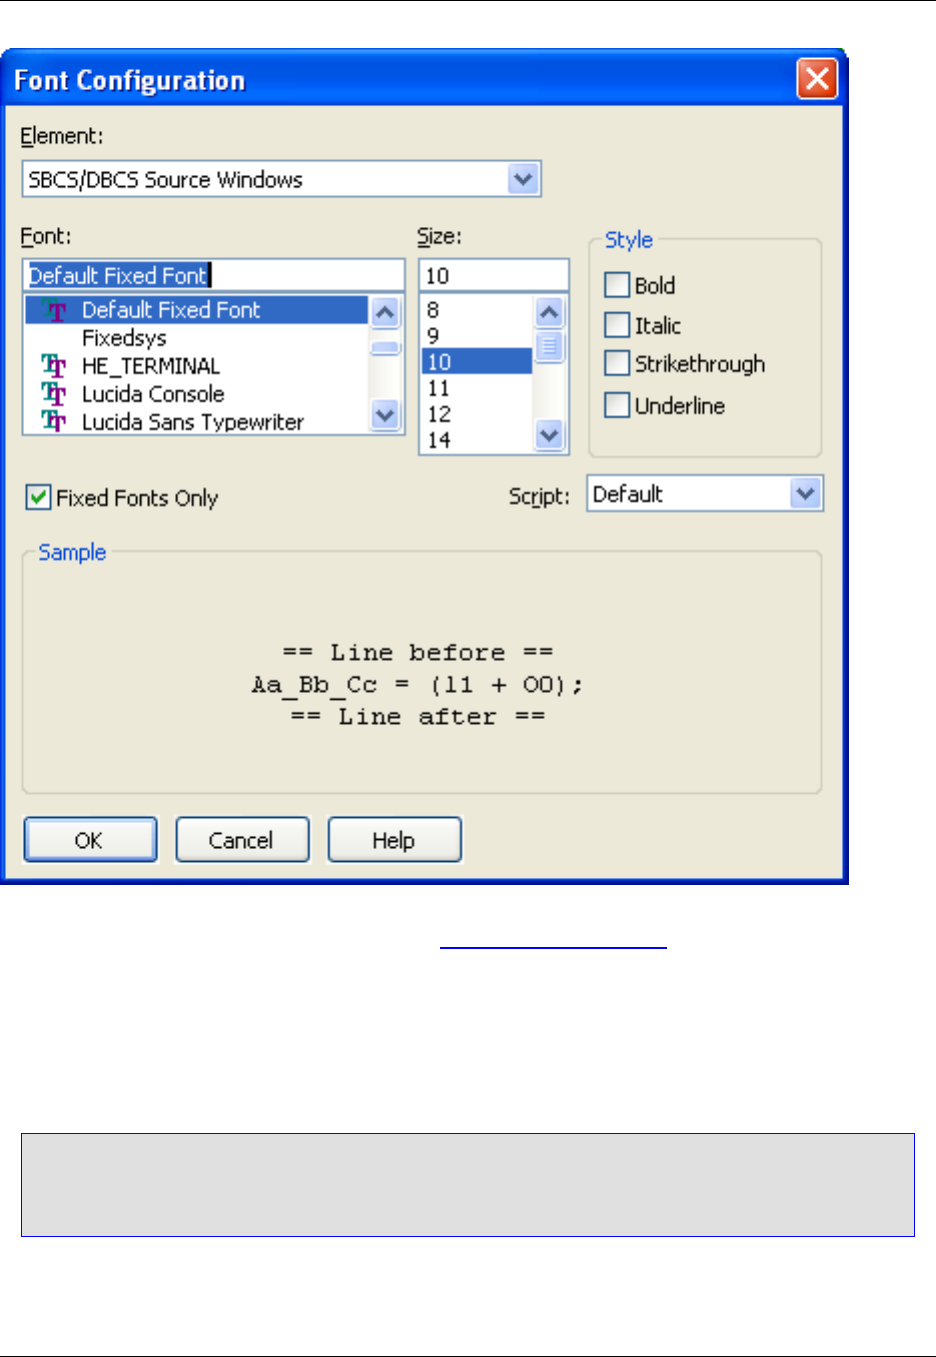
For descriptions of the options on this dialog, see Font Configuration Dialog.
Recommended Fonts for Elements
Font recommendations are given for the best screen display. The information below contains recommen-
ded fonts for some of the screen elements.
Note
Some font names are portable font names which are translated into other fonts. This allows Slick-
C®macros and dialog boxes to be portable across Windows and UNIX.
Command Line Fonts
The following table contains recommendations, based on the operating system, for the Command Line
Fonts
54

font element:
Table 4.1. Command Line Font Recommendations
Platform Font Recommendation
Windows Choose Courier, Courier New, OEM Fixed Font, or
Terminal fonts for the most visually appealing char-
acter displays.
Linux Choose Courier, Lucida Sans Typewriter or a con-
sole font for the most visually appealing character
displays. If these fonts are not visible, look for the
UNIX fonts below.
UNIX Choose Adobe Courier, B&H Lucida Typewriter, or
Width x Height family fonts for the most visually ap-
pealing fixed fonts.
Selection List Fonts
Choose Courier for best display of selection lists that need a fixed font.
Dialog Box Fonts
Choose MS Sans Serif as an attractive font for dialogs.
Text Box Fonts
Choose System or MS Sans Serif for fonts used in text boxes.
SBCS/DBCS Source Window Fonts
This is the element used for all non-Unicode source windows. Choose Terminal for the most attractive
visual display.
Unicode Source Window Fonts
Default Unicode Font is the default font for the Unicode Source Windows element. When this font is se-
lected, the Arial Unicode MS font is used if it is installed. Otherwise, the ANSI Fixed Font is used, which
only supports the English character set. Arial Unicode MS is a fairly complete font which is included with
Microsoft Office. Currently, no version of Windows ships with a complete Unicode font. For more informa-
tion on Unicode support, see Using Unicode.
Colors
Use the Color Settings dialog (click Window →Preferences, expand SlickEdit and click General in the
tree, then double-click the Color setting; alternatively, use the color command) to set the color for differ-
Colors
55

ent screen elements in SlickEdit®Core. This includes syntactic elements in the editor window, like
keywords, comments, strings, etc. as well as other user interface elements like the message area or the
status line. Window colors and backgrounds are set using the facilities provided by the operating system.
Color and Color Coding are different. Color Coding is a feature that combines current line coloring, modi-
fied line coloring, and language-specific coloring. SlickEdit Core recognizes and automatically displays
color support for many languages. See Color Coding for more information.
Setting Colors for Screen Elements
Colors can be customized in the user interface. Colors can be set either individually or by editing a
scheme. To change the default colors, complete the following steps:
1. From the main menu, click Window →Preferences, expand SlickEdit and click General in the tree,
then double-click the Color setting (or use the color command). The Color Settings dialog box is dis-
played.
Figure 4.6. Color Settings Dialog
2. Select the element you want to change from the Screen element list box (for descriptions of some of
these elements, see Color Settings Dialog).
3. Set the Foreground and Background colors by clicking on the color squares. The Color Picker dialog
Setting Colors for Screen Ele-
ments
56

is displayed, allowing you to pick a color from the palette, or set your own custom color using RGB val-
ues.
Note
If you have chosen the Selection screen element, note that SlickEdit Core will attempt to render
selections using your normal color settings for the Foreground color. The selected foreground
color will only be used if there is not enough contrast between the font colors to be readable. It is
best to specify a Background color for selections that is as close as possible to your normal
background color, ensuring that the color-coded fonts are still easy to read.
4. If you change the background color for an element in the editor window, you can use the Sync Back-
grounds button to propagate the background color for the currently selected element to other related
elements. For example, if you change the background color for Keywords you will probably want that
same color used for Strings, Comments, Numbers, etc. The Sync Backgrounds button prevents you
from having to manually make all these changes.
5. If you want, choose a Font Style for the text.
6. Click Apply to update the colors that you have modified without closing the dialog box, or click OK to
apply the changes and close the dialog.
For a complete list of all of the options available on the Color Settings dialog, see Color Settings Dialog.
Using Color Schemes
Color schemes store the settings for all screen elements, allowing you to quickly change the look of your
editing environment. Several predefined color schemes are provided, and you can create your own.
To use color schemes, click the Schemes button on the Color Settings dialog (see the previous screen
shot). To try a different color scheme, from the Color scheme drop down text box, select a color scheme
and click Apply. A sample of the color scheme is displayed in the Sample text box. To use this color
scheme, click OK.
To define a new color scheme, set your colors for the various screen elements and click Save Scheme.
User-defined color schemes are stored in the uscheme.ini file located in your configuration directory.
You can change the name of a scheme by clicking Rename Scheme.
Setting an Embedded Language Color
The option Set embedded language color allows you to specify the colors used for embedded lan-
guages. These occur when a file of one type embeds a language of another type within it, like HTML files
containing JavaScript. For HTML, the syntax color coding recognizes the <script language="???"> tag
and uses embedded language colors for the new language. In addition, for Perl and UNIX shell scripts,
you can prefix your HERE document terminator with one of the color coding lexer names to get embed-
ded language color coding. The following is an example for Perl:
print <<HTMLEOF
<HTML><HEAD><TITLE>...</TITLE></HEAD>
Setting Colors for Screen Ele-
ments
57

<BODY>
...
</BODY>
</HTML>
HTMLEOF
Restoring Settings on Startup
58

Restoring Settings on Startup
By default, the files, current directory, and more from the previous edit session are automatically restored
when you switch workspaces or close and re-open the editor.
To access auto restore settings, from the main menu, click Window →Preferences, expand SlickEdit
and click General in the tree, then double-click the General setting. On the General Options dialog, select
the General Tab. The Auto restore options, listed below, control which elements of your SlickEdit Core
environment that are restored.
•Files - (Unavailable in SlickEdit Core) If checked, the files and windows that were opened in your last
edit session are restored and re-opened when you start the editor.
•Clipboards - If checked, clipboards are saved across edit sessions.
•Working directory - (Unavailable in SlickEdit Core) If checked, the working directory is saved across
edit sessions.
•Workspace files - (Unavailable in SlickEdit Core) If checked, when switching workspaces, the files and
windows that were opened for a workspace when it was last closed will be restored.
•Line modify - If checked, the line modification flags are saved and restored when you save and open
files, respectively. Line modification information for the last 200 files is saved. SlickEdit Core stores line
modification information in temporary files placed in the SelDisp directory. This option works best
when the Modified Lines color coding option is selected (click Window →Preferences, expand
SlickEdit and click General in the tree, double-click the File Extension Setup setting and select the
Advanced Tab).
•Selective display - If checked, Selective Display is saved and restored when saving and opening files,
respectively. Selective Display for the last 200 files is saved. See Selective Display for more informa-
tion.
•Symbol browser tree - If checked, the symbol browser tree (see Symbols View) is restored across edit
sessions. The current position (displayed selected) is always restored regardless of this setting.
Restoring Settings on Startup
59

60

Chapter 5. Context Tagging®
61
Context Tagging®Overview
Context Tagging is a feature set that performs expression type, scope, and inheritance analysis as well as
symbol look-up within the current context to help you navigate and write code. Context Tagging uses an
engine that parses your code and builds a database of symbol definitions and declarations—commonly
referred to as tags. Context Tagging features work with your source code, not just standard APIs
(application program interfaces), and the features are dynamic, in the sense that symbols are updated im-
mediately or in the background as you edit your source code.
The Context Tagging feature set includes:
•Tag-Driven Navigation
•List Members
•Parameter Information
•Auto List Compatible Parameters
•Completions
•Symbol Browsing
•Statement Level Tagging
Before you begin working with these features, some configuration is required. See Building Tag Files.
Tag-Driven Navigation
The Context Tagging®database allows you to navigate your code, jumping from a symbol to its definition
or its references. For more information, see Symbol Navigation.
List Members
When typing a member access operator (Dot,Comma,->, and :for C++; Dot for Java; IN and OF for
COBOL), members are automatically listed. You can access this feature on demand by pressing Alt+Dot,
finding identifiers when there is no member operator (list locals, global variables, current class members,
etc.). For example, for the C language, to find a string function, type the string on the command line and
press Alt+Dot. If you want to disable automatic listing and only list members on demand, turn List Mem-
bers off, as follows:
1. From the main menu, click Window →Preferences, expand SlickEdit and click General in the tree,
then double-click the File Extension Setup setting.
2. On the Extension Options dialog, select the extension you want to affect from the Extension drop-
down list.
3. Select the Context Tagging Tab.
Tag-Driven Navigation
62
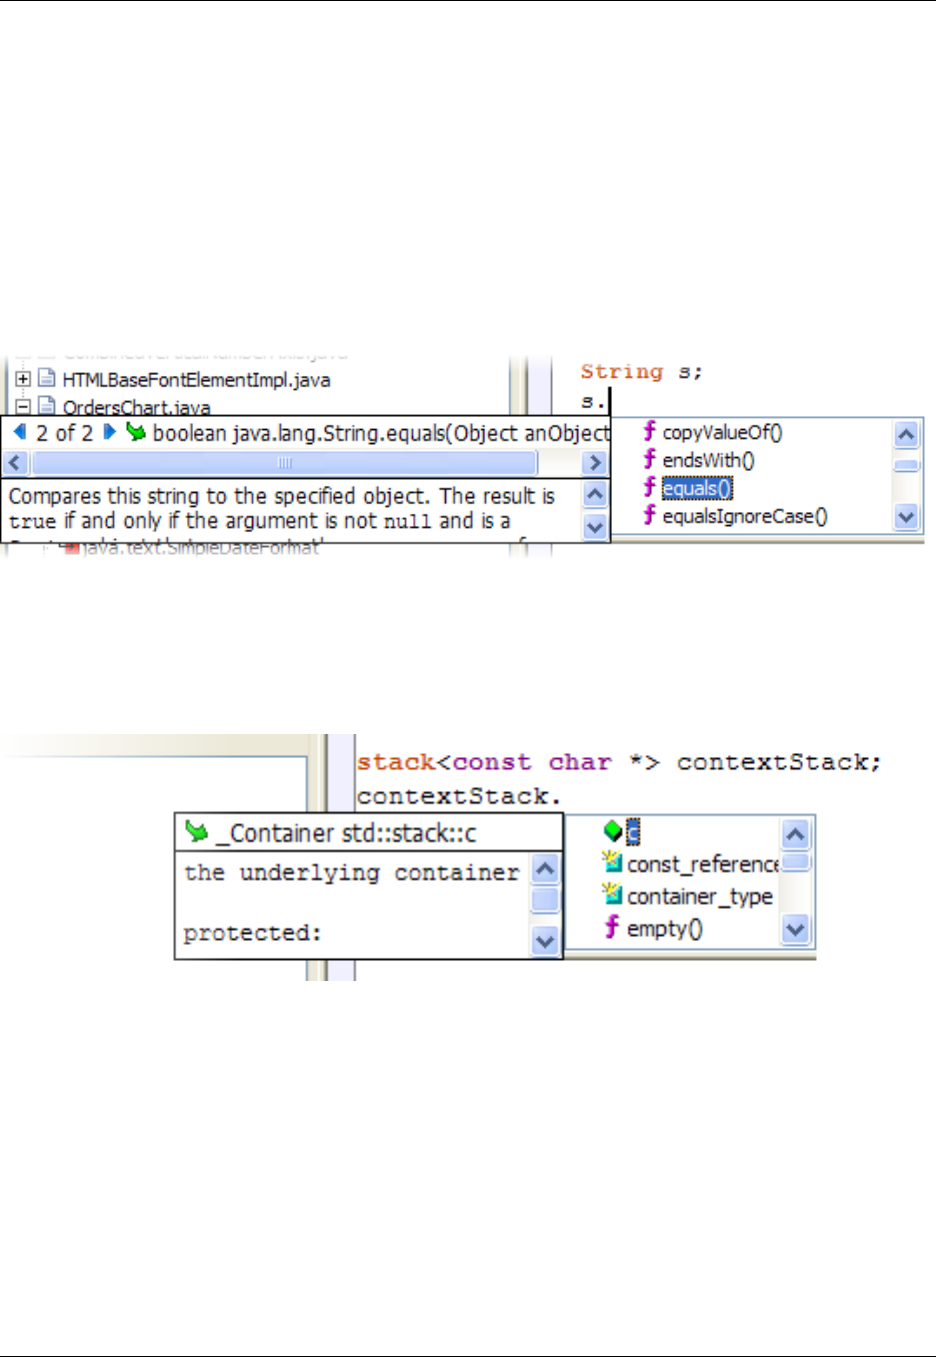
4. Clear the Auto-list members check box.
The following example shows the results of what is displayed after typing a Dot when entering Java
source. Notice that the Javadoc comments are displayed in a mini-HTML browser. To view documenta-
tion for Java APIs, you must install the source files as part of the JDK. If clicking on a URL, the default
HTML browser starts. Clicking on other hypertext links navigates within the comment window. The equals
method in the example below has two occurrences, one in the String class and one in the Object class.
Press Ctrl+PgDn or Ctrl+PgUp to select the next or previous occurrence.
Figure 5.1. List Members: Example 1
The example below shows the display after typing a Dot when entering C++ source code. The stack class
is one of the C++ standard template library classes.
Figure 5.2. List Members: Example 2
Parameter Information
The prototype for a function is automatically displayed when typing a function operator such as the open
parenthesis. This also highlights the current argument within the displayed prototype. When working with
C++, parameter info is also automatically displayed when typing a template argument operator such as <.
The following example shows the result of pressing Alt+Comma inside the argument list of the Java API
String method startsWith. The Javadoc comments are displayed in a mini-HTML browser. To view docu-
mentation for Java APIs, you must install the source files as part of the JDK. If clicking on a URL, the de-
fault HTML browser starts. Clicking on other hypertext links will navigate within the comment window. The
startsWith method has two overloads that accept different arguments. Press Ctrl+PgDn or Ctrl+PgUp to
Parameter Information
63

select the next or previous occurrence.
Figure 5.3. Parameter Info: Example 1
The example below shows the result of pressing Alt+Comma inside the argument list of the WIN32 API
function CreateWindowEx.
Figure 5.4. Parameter Info: Example 1
Auto List Compatible Parameters
When typing a function operator such as the open parenthesis, (, a list of compatible variables and ex-
pressions for the current argument is displayed. Auto List Compatible Parameters can also be used in-
stead of List Members, in assignment statements (x=<Alt+Comma>) and when listing members of a
class or struct. Keep in mind, not all possible variables and expressions are listed. Press Alt+Dot if the
symbol that you want is not listed. To access Auto List Compatible Parameters on demand, press
Alt+Comma. If you want to disable automatic listing and only list parameters on demand, turn Auto List
Compatible Parameters off, as follows:
1. From the main menu, click Window →Preferences, expand SlickEdit and click General in the tree,
then double-click the File Extension Setup setting.
2. On the Extension Options dialog, select the extension you want to affect from the Extension drop-
down list.
3. Select the Context Tagging Tab.
Auto List Compatible Paramet-
ers
64
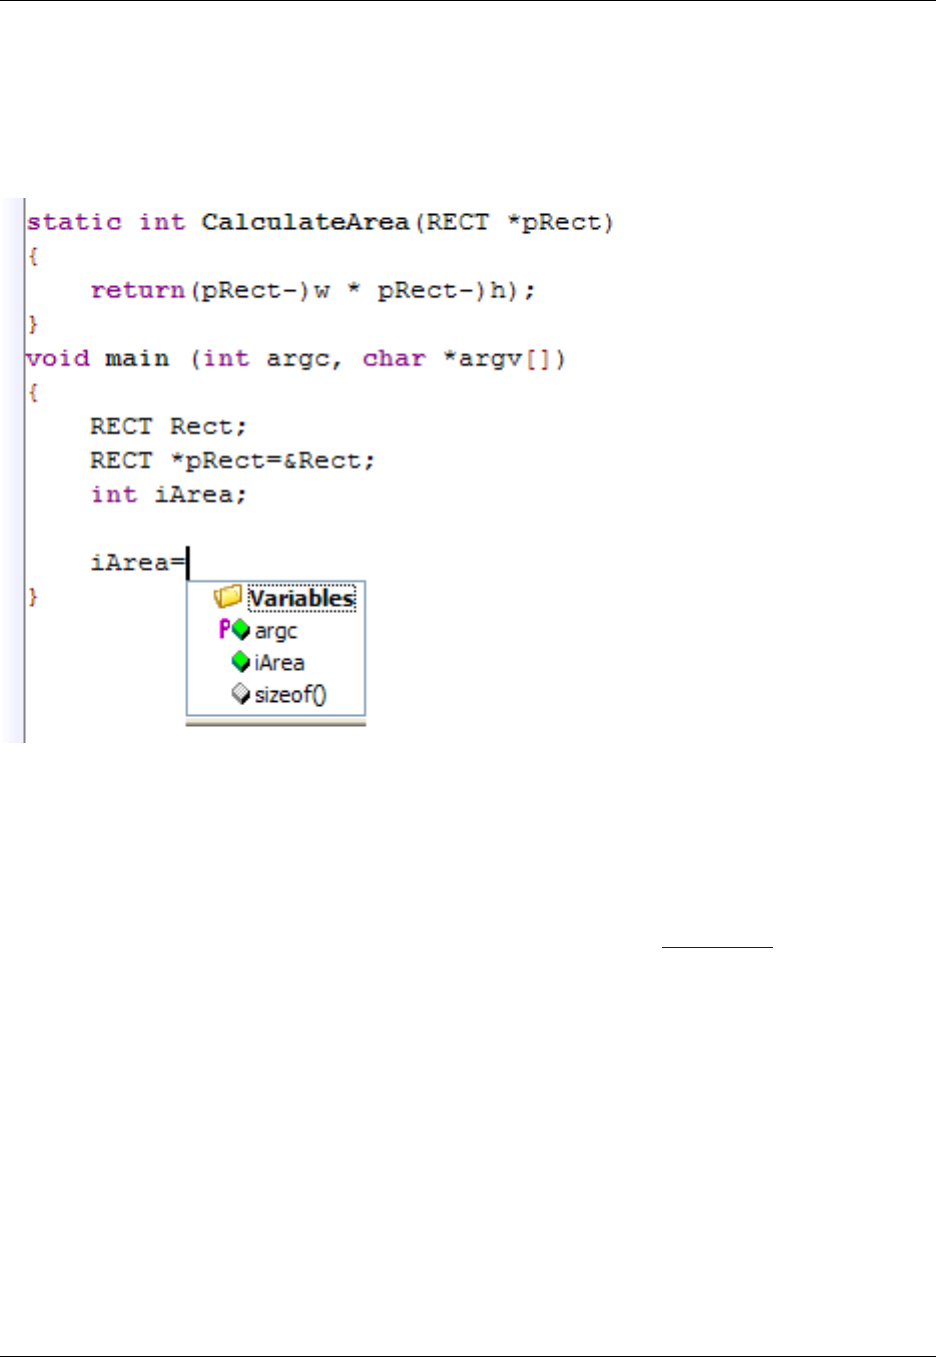
The following example displays the results of pressing Alt+Comma after an assignment operator. The
Rect,pRect, and argv are not listed because their types do not match.
Figure 5.5. Auto List Compatible Parameters
Completions
Completions save keystrokes as you are typing code by providing a way to automatically complete par-
tially-typed text. Press Ctrl+Space to complete (type the rest of) the current symbol. If a unique match is
not found, a list is displayed allowing the selection of the exact match. See Completions for more informa-
tion about working with this feature.
Symbol Browsing
SlickEdit®Core gives you the ability to browse and view symbols in your files or workspaces. There are
several views that display information as you work to help you find what you need exactly when you need
it. To open one of these views, click Window →Show View →Other, expand SlickEdit Views and
double-click the view you want to see.
•Class - This view provides an outline of both the members of the current class as well as any visible in-
herited members. It also shows the inheritance hierarchy of the current class.
•Outline - The Outline view provides an outline of symbols in the current workspace.
Completions
65

•Find Symbol - This view is used to locate symbols (tags) in your code. It allows you to search for sym-
bols by name using either a regular expression, substring, or fast prefix match. A quicker way to access
this view is to use the Search →Find Symbol menu item.
•Preview - Preview provides a portal for viewing information in other files without having to open them in
the editor. It automatically shows this information when you are working with certain features.
•References - This view displays the list of symbol references (uses) found the last time that you used
the Go to Reference feature (Ctrl+/or push_ref command—see Symbol Navigation for more informa-
tion).
•Symbols - The Symbols view contains the symbol browser, which lists symbols from all of the tag files.
For more detailed information about these views and how SlickEdit Core can help you browse symbols,
see Symbol Browsing. For information about how to navigate between symbols in files, see Symbol Nav-
igation.
Statement Level Tagging
Statement Level Tagging is a feature of Context Tagging ®that provides a more detailed view of items in
the Outline view for C/C++, Java, Python, and Visual Basic .NET. Along with definitions, view constructs
like if,while, and for statements. It also displays every non-comment line of code. To see this feature in
action, from the Outline View, right-click and select Show Statements.
Statement Level Tagging
66

Building and Managing Tag Files
Context Tagging®creates tag files to store information about symbols and, optionally, cross-reference in-
formation from your source code. Many of the most powerful SlickEdit®Core features use this information
to speed your coding.
Building Tag Files
Tag files are automatically created and maintained for files in the workspace (see Creating Tag Files for
Run-Time Libraries). You may need to create extension-specific tag files for compiler includes or other lib-
raries that you have (see Tagging Run-Time Libraries).
After a tag file is created, it is updated in the background when you make modifications. If you modify
some source files using a different application, you will need to rebuild the tag file. Tag file names have
the extension .vtg. By separating tag files for different languages, the Context Tagging features can
identify symbol information for the file that you are currently editing.
Creating Tag Files for Run-Time Libraries
The Create Tag Files for Run-Time Libraries dialog appears when SlickEdit®Core is run for the first time.
It allows you to build tag files for commonly used languages and their libraries, including C, C++, Java,
and .NET. You can access this dialog at any time in order to create tag files, from the Context Tagging -
Tag Files Dialog (click Tools →Tag Files, then click Auto Tag).
Figure 5.6. Automatic Tagging Dialog
Building Tag Files
67
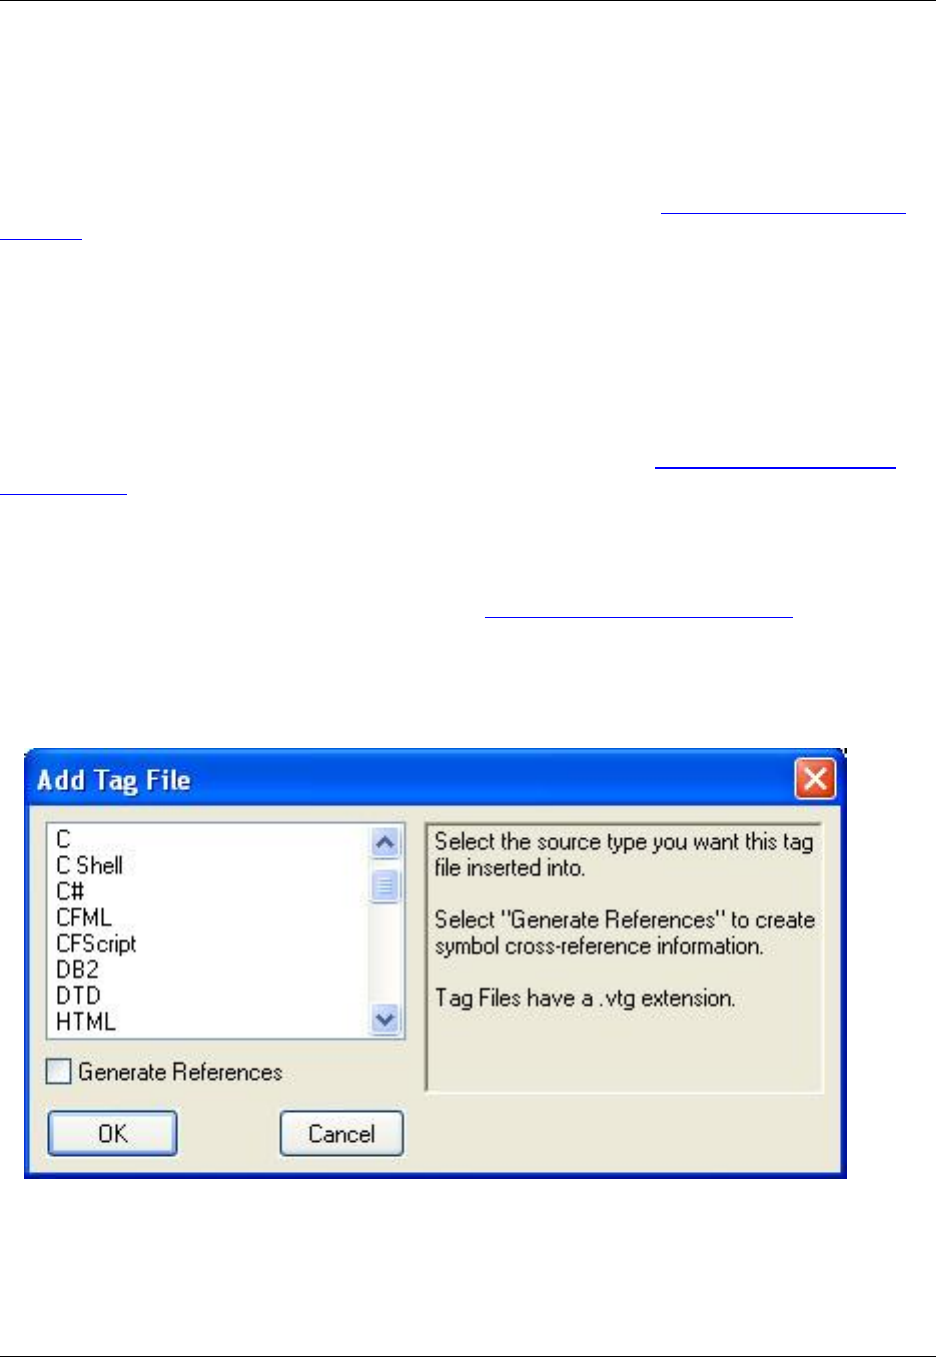
To create tag files for the languages listed, enter the base directory for your package (if it is not already
filled in), as well as the destination of your tag file. Click Create tag file(s) and the Building Tag Files dia-
log box opens showing the progress as the tag file is built.
For source files other than these languages, use the Add Tag File dialog, which allows you to choose
from a list of languages the source type for which to insert the tag file. See Creating Extension-Specific
Tag Files below.
Creating Extension-Specific Tag Files
Extension-specific tag files provide the same symbolic information for libraries that is provided for code in
your projects. A library is a pre-built unit of code that is not edited as part of this development effort.
These tag files are accessible from any project written in the same language.
You need to create an extension-specific tag file if your project uses a compiler whose standard libraries
are not tagged by the Create Tag Files for Run-Time Libraries dialog (see Creating Tag Files for Run-
Time Libraries) or if you are using a third-party library. Additionally, you may have local libraries that are
reused from project to project.
To create an extension-specific tag file, complete the following steps:
1. From the main menu, click Tools →Tag Files. The Context Tagging - Tag Files Dialog is displayed.
2. Click Add Tag File to open the Add Tag File dialog.
Figure 5.7. Add Tag File Dialog
3. Select the source type into which you want the tag file inserted. Select Generate References only if
you want library functions to be shown when you list references.
Note
Building Tag Files
68
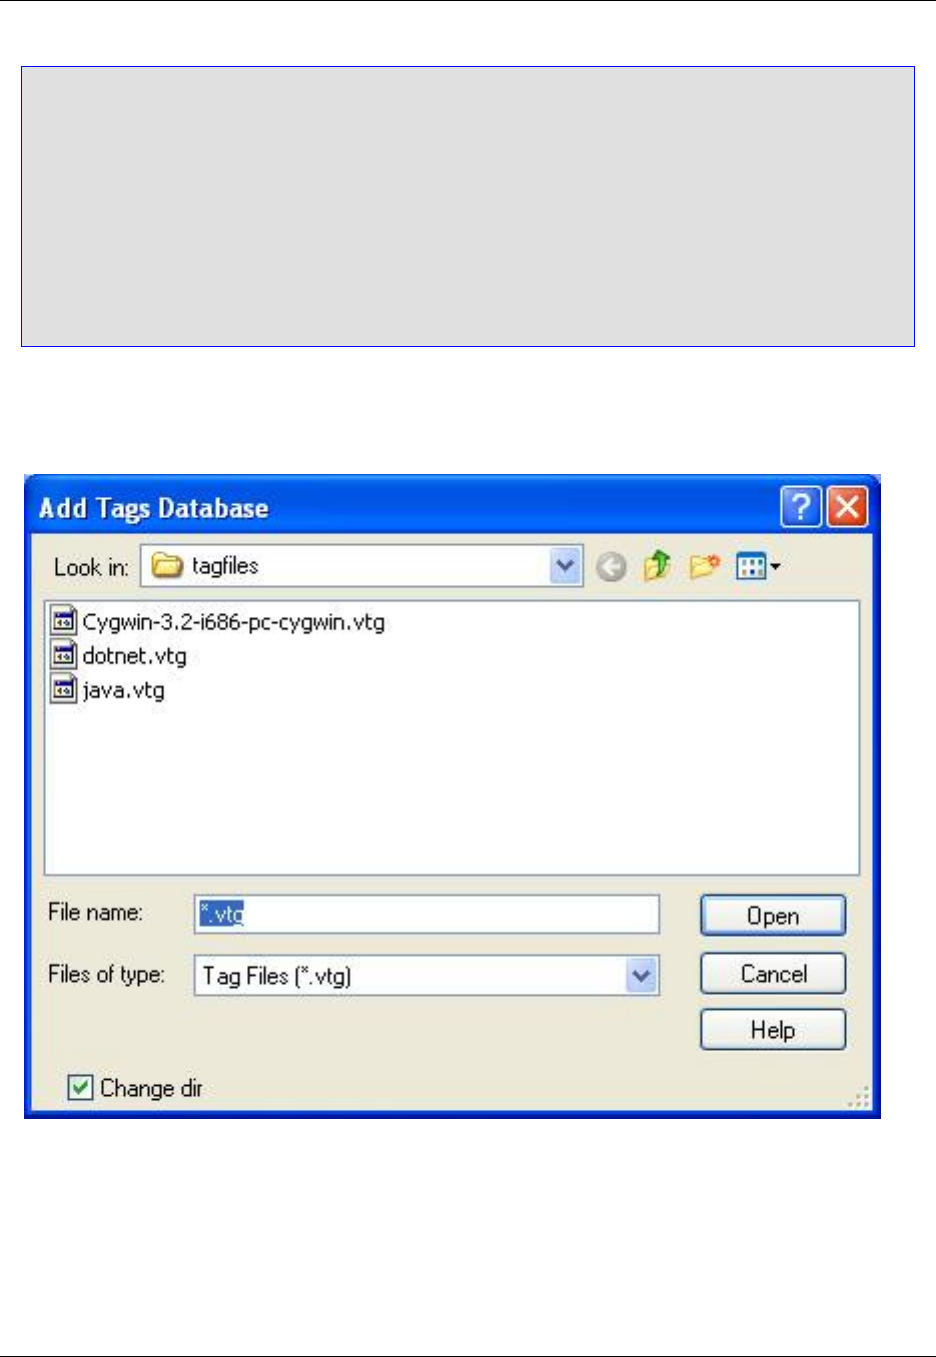
Generate References creates an inverted file index so that you can quickly find which files con-
tain which symbols. Workspace tag files create this index by default. This information is used to
build a list of references (using the push_ref command, bound to Ctrl+/in the CUA emulation). In
general, it’s better to have the reference list contain functions that are part of this workspace and
not in libraries. If Generate References is not checked, you will still be able to jump from a sym-
bol to its definition in a library using Ctrl+Dot (push_tag).
This option is off by default since most programmers do not want to see library functions shown in
the reference list.
4. Click OK. The Add Tags Database dialog opens.
Figure 5.8. Add Tags Database Dialog
5. Select an existing tag file or enter the name for the new tag file. Tag files have the extension .vtg.
6. Click Open to display the Add Tree dialog. Navigate to the root of the library source code and click the
OK button.
7. The Building Tag File dialog opens showing the progress as the tag file is built. When finished, the con-
tents are displayed in the Context Tagging®- Tag Files dialog.
Building Tag Files
69

See Managing Tag Files for more information.
Tagging Run-Time Libraries
Create extension-specific tag files for include files of compiler packages or utility libraries or both. This al-
lows the Context Tagging®feature set to work for all symbols, not just those symbols in the project. Con-
text Tagging needs all symbol information to work properly.
A tag file is automatically built for the run-time libraries of C#, InstallShield, JavaScript, Perl, PV-WAVE,
Slick-C®, Tornado, TCL, and Visual Basic .NET, and usually it is not necessary to build tag files for the
run-times of these languages. If you already built a tag file for run-times during installation, you can skip
this section. If you are using Perl, Python, or TCL, and the compiler cannot be found in PATH (or registry
for Windows), you need to build tag files for these run-time libraries.
Configuring Context Tagging®for COBOL
All of the Context Tagging features for COBOL, except Parameter Information, are provided by scanning
COBOL source file and the copy books that are included. This information is used by List Members, com-
pletions, tag-driven navigation, symbol preview, and in the Outline view. Parameter Information for CO-
BOL commands and intrinsic functions are provided by the COBOL built-ins file created during product in-
stallation. To provide Parameter Information for subroutines, you must build a tag file that will hold linkage
information from the subroutine’s point of view.
Managing Tag Files
The Context Tagging - Tag Files Dialog (Tools →Tag Files) is used to manage your tag files.
Figure 5.9. Context Tagging®- Tag Files Dialog
Managing Tag Files
70
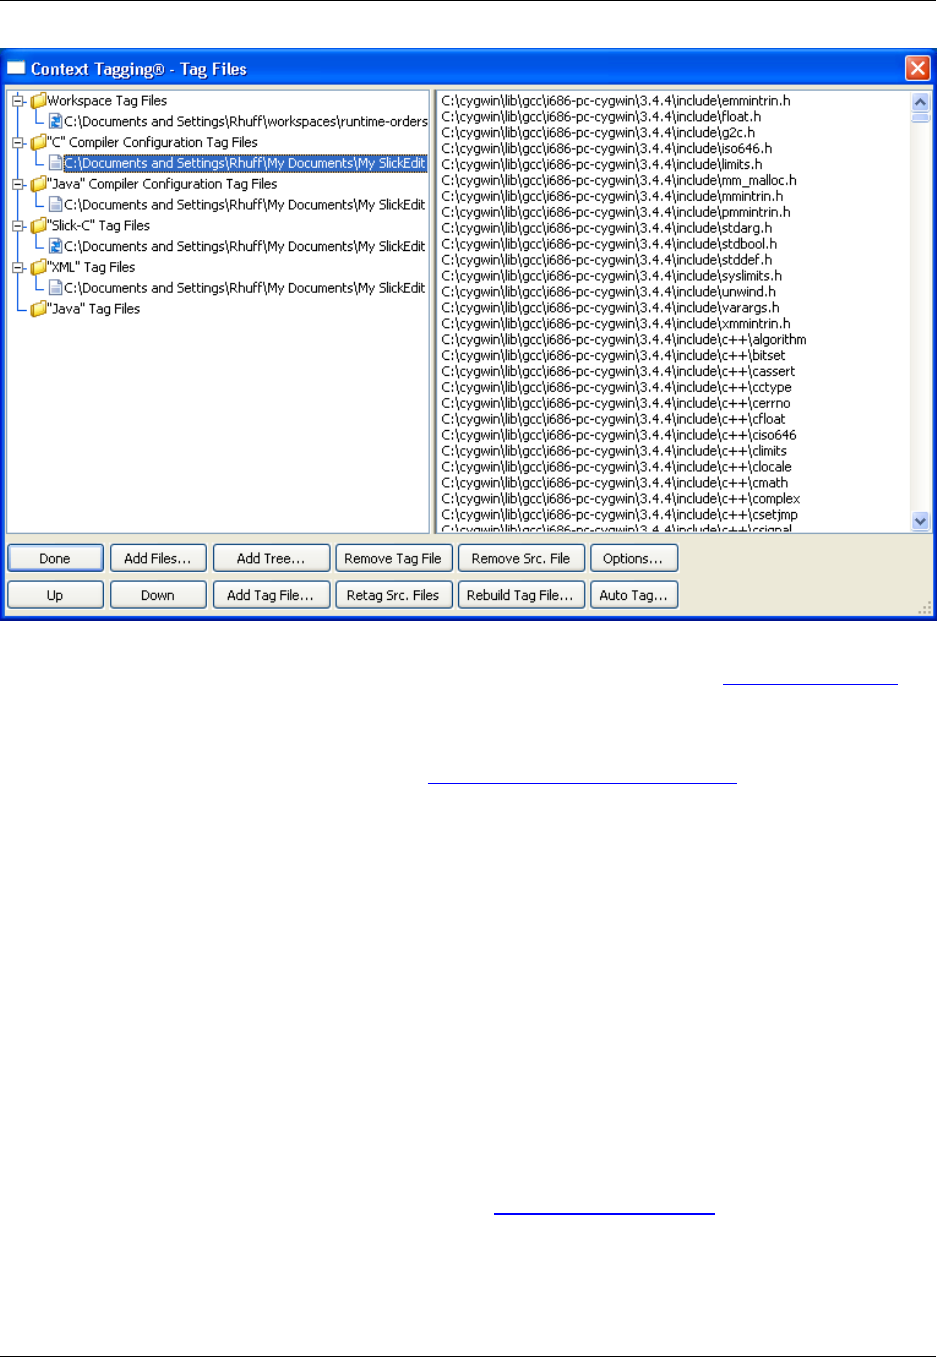
The left pane of the dialog lists all of your tag files, separated into categories (see Tag File Categories be-
low). A tag file having a File bitmap with blue arrows indicates the tag file is built with support for cross-
referencing. The right pane of the dialog lists all the source files indexed by the currently selected tag file.
For information about the buttons available, see Context Tagging - Tag Files Dialog.
Tag File Categories
The Tag File categories, described below, are listed on the left side of the Context Tagging ®- Tag Files
dialog (Tools →Tag Files).
•Workspace Tag Files - The tag files for the current active workspace. Each project in the workspace
has a separate tag file. Visible only if a workspace is open.
•Auto-Updated Tag Files - These tag files are designed to be shared by multiple users of the editor on
a network. You can use the vsmktags utility to rebuild these tag files as part of your nightly build pro-
cess. When SlickEdit®Core detects that a newer version of an auto-updated tag file is available, it will
automatically copy in the newer version and begin using it.
•"C" Compiler Configuration Tag Files - These tag files correspond to one of the C/C++ compiler con-
figurations. These may be configured by using the C/C++ Compiler Properties dialog box (Tools →
C++ Refactoring →C/C++ Compiler Options). See C/C++ Compiler Settings for more information.
•"Java" Compiler Configuration Tag Files - These tag files correspond to one of the Java compiler
configurations. These may be configured by using the Java Compiler Properties dialog box (Tools →
Tag Files →Auto Tag and click the Browse button beside the Java Compiler drop-down menu.
Managing Tag Files
71

•Other Extension-Specific Tag Categories - The tag files listed under each of the other language-spe-
cific categories apply to that language only. Use these categories to add tag files for third-party librar-
ies.
Tag File Search Order
When doing tag lookups, the tag files are searched in a specific order, which affects the tags found. The
following are examples of the order in which tag files are searched.
Example: Java Tag File Search Order
If a Java source file is open, when a tagging-related operation is performed, the tag files are searched in
the following order:
1. Workspace tag file, providing it contains other Java source files.
2. Auto-updated tag files containing other Java source files.
3. The "Java" Compiler Configuration tag file corresponding to the Java environment specified for your
project.
4. Extension-specific Java tag files, in the order that they are listed in the Context Tagging - Tag Files
Dialog.
Example: C/C++ Tag File Search Order
If a C/C++ source file is open, when a tagging-related operation is performed, the tag files are searched in
the following order:
1. Workspace tag file, providing it contains other C/C++ source files.
2. Auto-updated tag files containing other C/C++ source files.
3. The "C" Compiler Configuration tag file corresponding to your default C compiler configuration as spe-
cified in your project (C/C++ Refactoring →C/C++ Compiler Options), or global default.
4. Extension-specific C tag files, in the order that they are listed in the Context Tagging - Tag Files Dialog.
Note that if you have a "C" Compiler Configuration tag file, cpp.vtg will be excluded from this list.
Rebuilding Tag Files
The Rebuild Tag File dialog box contains options for rebuilding the selected file. To display the Rebuild
Tag File dialog, click Tools →Tag Files. When the Context Tagging - Tag Files Dialog is displayed, se-
lect a file to rebuild, then click Rebuild Tag File.
Figure 5.10. Rebuild Tag File Dialog
Managing Tag Files
72
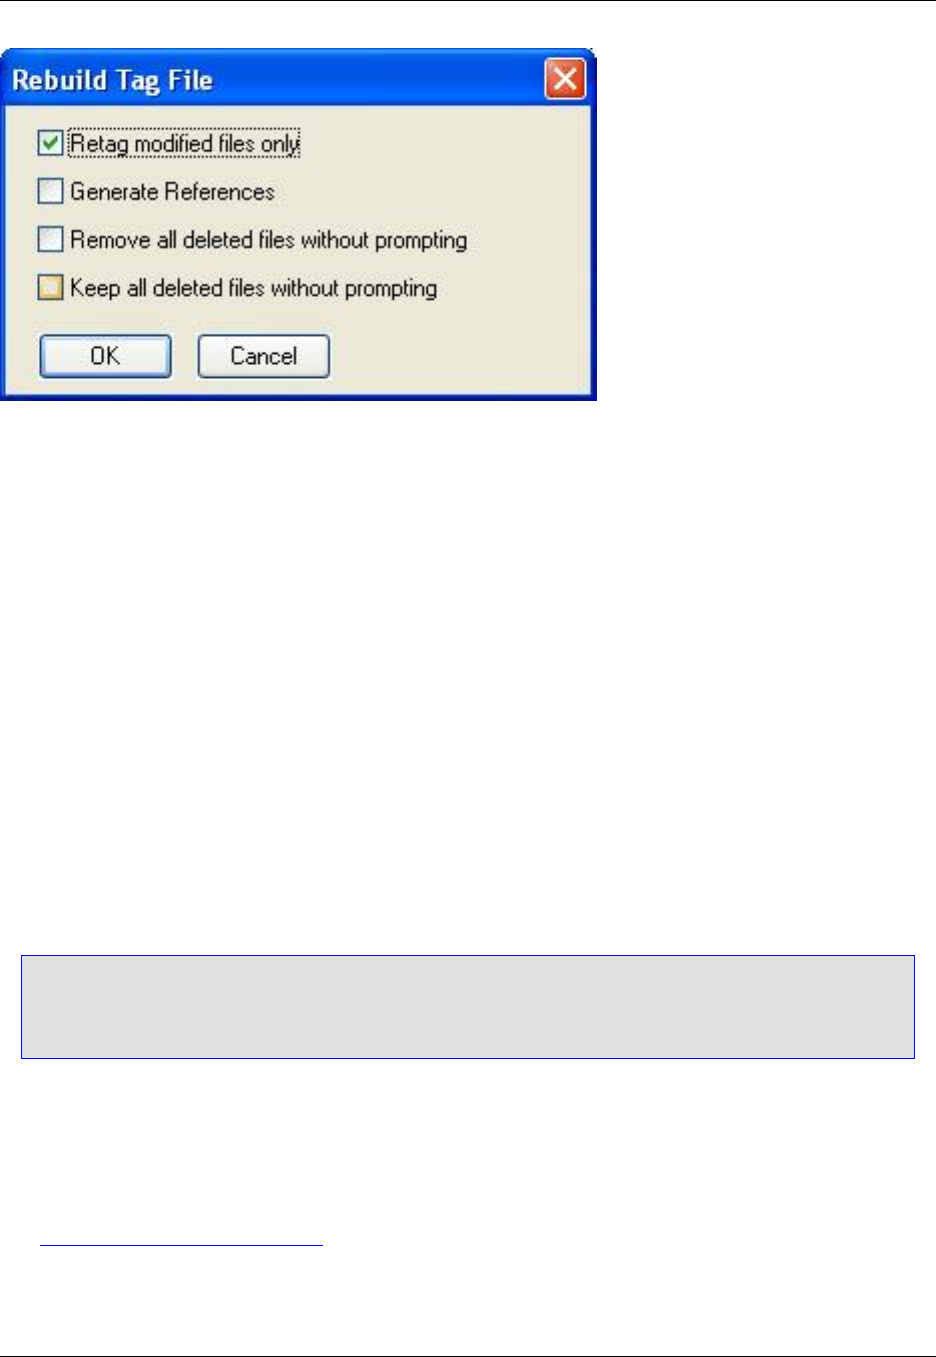
The following settings are available:
•Retag modified files only - If checked, SlickEdit®Core will incrementally rebuild the tag file, only re-
tagging files that have been modified since the last time they were tagged. If not checked, SlickEdit
Core will rebuild the entire tag file from scratch.
•Generate References - If checked, the tag file will be built with support for cross-referencing. Tag files
with support for references are slightly larger and take slightly more time to build. They will also be in-
cluded in all symbol references searches, which may not be necessary, especially for third-party librar-
ies.
•Remove all deleted files without prompting - If checked and the tag file contains a source file which
no longer exists on disk, the source file will be removed from the tag file without prompting for confirma-
tion.
•Keep all deleted files without prompting - If checked and the tag file contains a source file which no
longer exists on disk, the source file will not be removed from the tag file without prompting for confirm-
ation.
Note
The options Remove all deleted files without prompting and Keep all deleted files without
prompting are mutually exclusive—selecting one will deselect the other.
Context Tagging®Options
General Context Tagging®Options
The Context Tagging Options Dialog allows you to set general parameters for the Context Tagging fea-
ture set. Here, you designate how tagging is done, how the references function within the application, and
you can also tune the application to maximize performance. To display this dialog, click Window →Pref-
erences, expand SlickEdit and click General in the tree, then double-click the Context Tagging Op-
Context Tagging®Options
73

tions setting. See Context Tagging Options Dialog for descriptions of the options.
Tip
To improve tagging performance, you may need to adjust the Tag file cache size on the Virtual
Memory tab of the General Options dialog (click Window →Preferences, expand SlickEdit and
click General in the tree, then double-click the General setting). See Virtual Memory Tab for
more information.
Extension-Specific Context Tagging®Options
Context Tagging options can be configured for each file extension type. This allows you to activate and
deactivate particular features on a per-language basis. To set options, from the main menu click Window
→Preferences, expand SlickEdit and click General in the tree, then double-click the File Extension
Setup setting. On the Extension Options dialog, select the Context Tagging®tab, then from the Exten-
sion drop-down list, select the extension you wish to work with. Options are described in the section Con-
text Tagging Tab.
Context Tagging®Options
74

Chapter 6. Editing Features
75

Navigation
There are two types of navigation in SlickEdit®Core: Code Navigation, which provides in-depth symbol
navigation and structure matching, and Cursor Navigation, which pertains to more simple movements
within text and files.
Code Navigation
Some of the most powerful features in SlickEdit®Core are its code navigation methods, particularly Sym-
bol Navigation. These features allow you to navigate your code the way you think about it, rather than just
as a set of files. If you aren’t using the code navigation features in SlickEdit®Core, then you aren’t getting
the most out of the editor.
Symbol Navigation
Symbol Navigation allows you to jump from a symbol to its definition or to a reference with a single key-
stroke. A pushed bookmark is set, allowing you to return to the symbol with another keystroke. You can
chain a series of these navigation operations together, creating a stack of locations. Then pop your way
back to the starting location.
To navigate between symbols use the following operations:
•Go to Definition - To quickly move the cursor from a symbol to its definition, pushing a bookmark in
the process, press Ctrl+Dot. Alternatively, click Navigate →Go to Definition or use the push_tag
command.
•Go to Reference - To create a list of references and optionally jump to the first one, pushing a book-
mark in the process, press Ctrl+/. Alternatively, click Navigate →Go to Reference or use the
push_ref command.
•Pop Bookmark - To pop the bookmark and return to the previous location, press Ctrl+Comma. Altern-
atively, click Search →Pop Bookmark or use the pop_bookmark command. See Pushed Bookmarks
for more information about working with bookmarks.
When you first call these operations, if a tag file does not exist for the current file, it will be built (see Build-
ing Tag Files).
Tip
•Procs and prototypes - In C and C++, navigating from a symbol to its definition will prompt
you to select whether you want to go to the prototype or the function. You can tell SlickEdit®
Core to always go to one or the other by setting one of the options Go to Definition navigates
to symbol definition (proc) or Go to Definition navigates to symbol declaration (proto).
To set these options, click Window →Preferences, expand SlickEdit and click General in the
tree, then double-click the File Extension Setup setting. On the Extension Options dialog, se-
lect the extension you want to affect from the Extension drop-down list, then select the Context
Code Navigation
76

Tagging Tab. When the cursor is in the prototype, pressing Ctrl+Dot will navigate to the func-
tion and vice versa. If you do not set one of these options, you will be prompted with the Select
a Tag Dialog the first time you navigate from a symbol to its definition.
•Auto-close visited files - SlickEdit Core can automatically close a visited file, one that was
opened through symbol navigation but not edited. Click Window →Preferences, expand
SlickEdit and click General in the tree, then double-click the General setting. On the General
Options dialog, select the General Tab, then select the option Automatically close visited
files.
Navigating Between Multiple Instances
If more than one instance of the definition or reference is found, the Select a Tag dialog is displayed, from
which you can select the instance to navigate to. To go to the next occurrence, press Ctrl+Gor use the
find_next command. To go to the previous occurrence, press Ctrl+Shift+Gor use the find_prev com-
mand.
Alternatively, press Ctrl+Down (next_tag command) or Ctrl+Up (prev_tag command) to place the curs-
or on the next or previous symbol definition.
Using the Find Symbol View
The Find Symbol view (Search →Find Symbol) is used to locate symbols (tags) which are declared or
defined in your code. It allows you to search for symbols by name using either a regular expression, sub-
string, or fast prefix match. See Find Symbol View for descriptions of the options that are available.
More Symbol Navigation Methods
There are several other methods for navigating to symbols:
• The Symbols View shows the symbols for all tag files. Right-click in the view window and select Find
Tag to search for a specific symbol. You can also use the cb_find command to find the symbol under
the cursor and display it in the Symbols view.
• At the SlickEdit®Core command line, use the fcommand and completion keys (Space and ?) to enter
a tag name. For example, if tagging the C run-time library, type f str? on the command line for a list of
tag names starting with "str" (such as strcpy,strcmp, etc.).
• To navigate to a Slick-C®symbol, you can use the fp command (a shortcut for find_proc). If editing a
Slick-C macro, then enter the push_tag command (Ctrl+Dot) to find the symbol at the cursor. The
push_tag command actually calls the find_proc command with the symbol name at the cursor to per-
form the task.
Begin/End Structure Matching
Begin/End Structure Matching moves the cursor from the beginning of a code structure to the end, or vice
versa. This works for languages using curly braces "{ }", "begin" and "end", or any other defined begin/end
pairs.
Code Navigation
77

To place the cursor on the opposite end of the structure when the cursor is on a begin or end keyword
pair, press Ctrl+](find_matching_paren command or from the menu click Navigate →Go to Matching
Parenthesis). The find_matching_paren command supports matching parenthesis pairs { }, [ ] and ( ).
Tip
For Python, SlickEdit®Core supports the matching of the colon (:) token and the end of context.
See Begin/End Structure Matching for Python for more information.
Viewing and Defining Begin/End Pairs
Use the Extension Options Dialog to view or define the begin/end pairs for any language. To access this
dialog, click Window →Preferences, expand SlickEdit and click General in the tree, then double-click
the File Extension Setup setting. On the Extension Options dialog, select the extension you wish to work
with from the Extension drop-down list, then select the Advanced Tab.
In the Begin/end pairs text field, specify the pairs in a format similar to a regular expression.
Note
This text box is unavailable for languages that have special begin/end matching built-in.
The examples below illustrate the syntax for defining the begin/end pairs. The begin and end pair match-
ing option is case-sensitive by default. Append ;I to ignore case.
Example 1
(begin),(case)|(end);|
The above begin/end pairs are for the Pascal language. The Pascal language requires a more sophistic-
ated expression. This expression indicates the keywords begin or case start a block and the keyword
end terminates the block. The ,(comma) is used to specify multiple begins or multiple ends. The |operat-
or is used to separate begins from ends.
Example 2
(#ifdef),(#ifndef),(#if)|(#endif)
The above pairs are for the C language. The C language has the added complication that #if is a sub-
string of #ifdef. Due to the implementation of begin/end matching, #ifdef must appear before #if.
More settings for begin/end pairs can be found on the Formatting Options dialog specific to the extension
you are working with. From the main menu, click Window →Preferences, expand SlickEdit and click
General in the tree, then double-click the File Extension Setup setting. On the Extension Options dialog,
select the extension you wish to work with from the Extension drop-down list, then click the Options but-
ton. See the individual language sections in the chapter Chapter 7, Language-Specific Editing for more in-
formation about these options.
Code Navigation
78

Setting the Paren Match Style
As you type a closing parenthesis, highlight and matching options are available. To specify these options,
click Window →Preferences, expand SlickEdit and click General in the tree, then double-click the Gen-
eral setting. On the General Options dialog, select the More Tab, then select one of the Paren match
style options.
The Highlight style option temporarily block-selects the text within the parenthesis pair. The Cursor to
Begin Pair style option temporarily places the cursor on the matching begin parenthesis.
Select Highlight matching blocks to automatically highlight the corresponding parenthesis, brace,
bracket, or begin/end word pairs under the cursor. To customize the highlighting color, click Window →
Preferences, expand SlickEdit and click General in the tree, then double-click the Color setting. Select
the Block Matching screen element. To adjust the delay in milliseconds before the highlighting is up-
dated, go to Macro →Set Macro Variable and modify the variable def_match_paren_idle. See Setting
Colors for Screen Elements and Setting Macro Variables for more information.
Cursor Navigation
These cursor navigation methods pertain to simple cursor movement within files. We recommend creating
key bindings for commands that you use frequently (if a key binding doesn’t already exist by default).
Navigating in Pages and Files
The following commands control cursor navigation in pages and files:
•top_of_window/bottom_of_window (Ctrl+PgUp/Ctrl+PgDn) - Places the cursor at the top/bottom of
the current editor window.
•top_of_buffer/bottom_of_buffer (Ctrl+Home/Ctrl+End)-Thetop_of_buffer command places the
cursor at the first line and first column of the current buffer. The bottom_of_buffer command places
the cursor at the end of the last line of the current buffer. If the option Preserve column on top/bottom
is on (click Window →Preferences, expand SlickEdit and click General in the tree, double-click the
General setting and select the More Tab), the cursor is placed at the first line/last line of the buffer and
the column position is unchanged.
Tip
There is an option to make top_of_buffer/bottom_of_buffer push a bookmark, providing quick
navigation between the top/bottom of the buffer and the previous location. See Setting Bookmark
Options for more information.
•top_left_of_window/bottom_left_of_window - Places the cursor at the top left/bottom right of the cur-
rent editor window.
•page_up/page_down (PgUp/PgDn) - Moves the cursor to the previous/next page of text.
•page_left/page_right - Changes the left edge scroll position by half the window width to the left/right.
Cursor Navigation
79

The cursor is moved half the window width to the left/right as well.
Navigating in Statements and Tags
The following navigation commands are available for languages that support statement tagging:
•next_tag/prev_tag - Places the cursor on the next/previous tag definition, skipping any tags filtered out
by the Outline view.
•next_proc/prev_proc - Places the cursor on the next/previous function heading.
•find_tag - Displays a list of tags in the Select a Tag dialog, allowing you to pick the tag to which you
want to navigate.
•goto_tag - Prompts for a procedure tag name and places the cursor on the definition of the procedure
name specified. This command is available in GNU Emacs emulation mode only.
•end_tag - Places the cursor at the end of the current symbol definition. This is useful if you are in the
middle of a large function or class definition and you want to jump to the end of it. In a class definition in
C++, the end is where inline function definitions are usually stored.
•end_proc - Moves the cursor to the end of the current procedure.
•next_statement/prev_statement - Moves the cursor to the beginning of the next/previous statement.
•begin_statement/end_statement - Places the cursor at the beginning/end of the current statement.
•next_sibling/prev_sibling - Moves the cursor to the beginning of the next/previous sibling. These are
similar to the next_statement/prev_statement commands except they stay at one level of nesting.
•goto_parent - Moves the cursor to the beginning of the enclosing statement or symbol scope relative
to the current cursor position.
•begin_statement_block/end_statement_block - Moves the cursor to the beginning/end of the current
statement block.
Navigating Between Words
To navigate between words, use the next_word (Ctrl+Right) and prev_word (Ctrl+Left) commands.
The next_word command moves the cursor to the beginning of the next word. The prev_word command
moves the cursor to the beginning of the previous word.
You can specify whether the cursor moves to the beginning or the end of the next/previous word. Click
Window →Preferences, expand SlickEdit and click General in the tree, then double-click the General
setting. On the General Options dialog, select the More Tab. Set the Next word style to Begin or End.
This affects both next_word and prev_word commands.
Navigating to a Specific Line
To view and place the cursor on a specific line number, from the main menu, click Search →Go to Line.
Enter the line number and click OK. Alternatively, you can use the goto_line command in the syntax
Cursor Navigation
80

goto_line <linenumber>.
Navigating to an Offset
To seek to a byte offset in the current buffer, from the main menu click Navigate →Go to Offset, or use
the gui_seek command. This function is the same as the C lseek function. However, if you have opened
the file with tab expansion, the seek position on disk may be different.
When the Seek dialog appears, enter the position to seek for. You may specify a C syntax expression. In
addition, you may prefix the expression with a plus or minus sign (+ or -) to specify a relative seek posi-
tion.
Some examples are:
•0x10+10 - Seek to offset 26
•+8+4 - Seek to current offset + 12
•-8+4 - Seek to current offset - 12
Select the Decimal option to enter the seek position in decimal number format. Select the Hex option to
enter the seek position in hexadecimal number format. You can type an "x" as the first character in the
Position to seek for text box and this option will automatically be selected.
Symbol Browsing
81
Symbol Browsing
SlickEdit®Core gives you the ability to browse and view symbols in your files or workspaces. Symbol
browsing relies on Context Tagging®, so symbols are updated immediately or in the background as you
edit. There are several views that display information as you work to help you find what you need at ex-
actly the time you need it:
•Class View
•Outline View
•Find Symbol View
•Preview View
•References View
•Symbols View
•Symbol Properties View
See also Symbol Navigation for information about how to navigate between symbols in files.
Class View
Note
The Class view is new in SlickEdit®Core v3.3, and not to be confused with the view named
"Classes" in previous versions. The formerly named "Classes view" has been renamed to "Sym-
bols view".
The Class view provides an outline view of both the members of the current class as well as any visible
inherited members. This view also shows the inheritance hierarchy of the current class. This is useful for
object-oriented programming languages such as Java.
To open the Class view, click Window →Show View →Other, expand SlickEdit Views and double-click
Class.
Figure 6.1. Class View
Class View
82
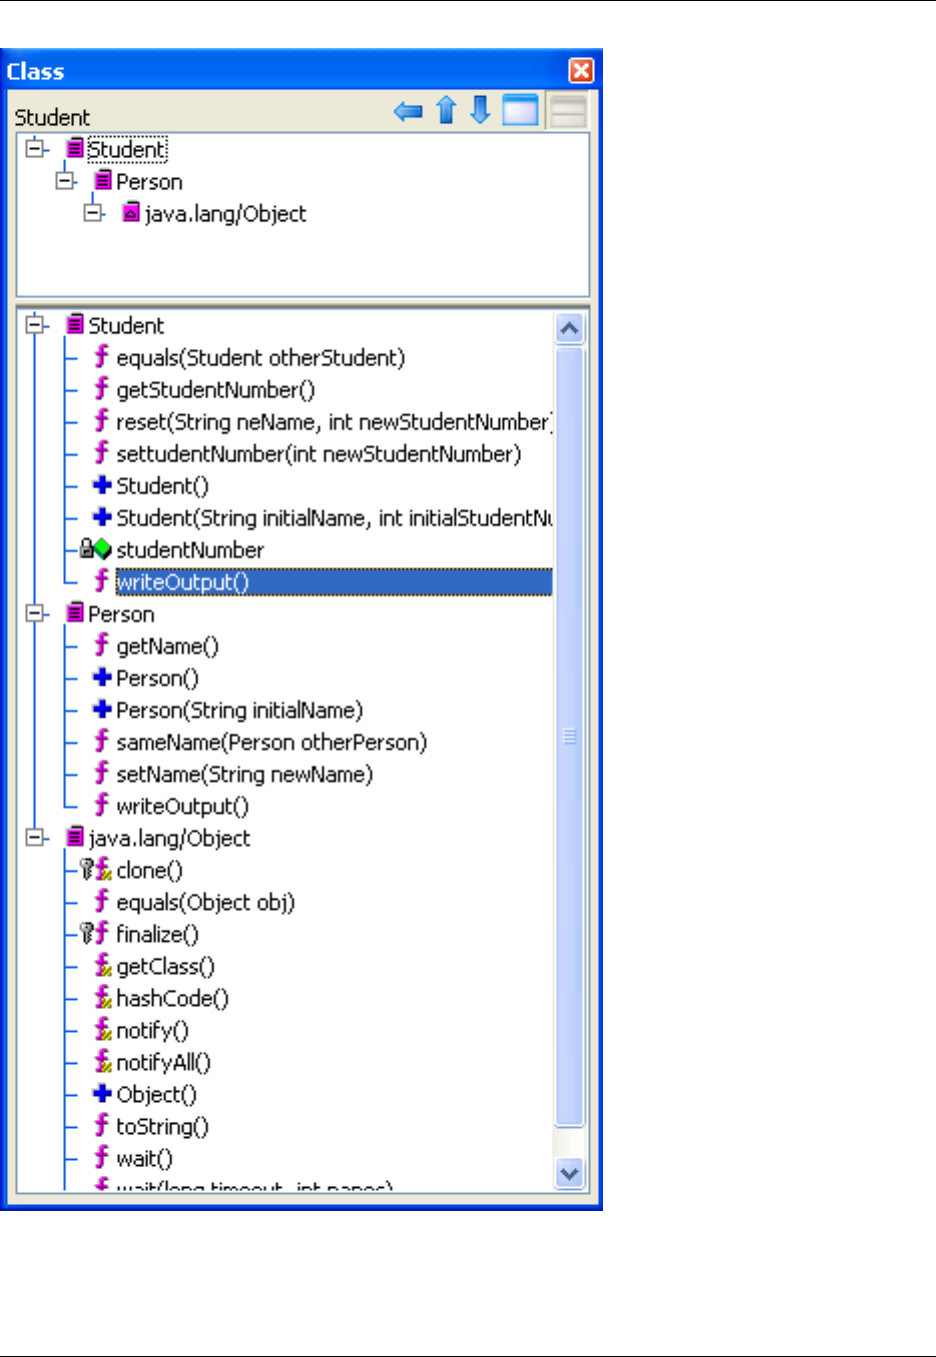
If you are coding within a class, the top pane (hierarchy pane) of the view window shows the base class
hierarchy for the current class. The bottom pane (members pane) shows all members of the current class,
as well as all members visible from inherited superclass(es) and implemented interface(s). The name of
Class View
83

the current class is displayed at the top of the view window.
If you are not currently in a class (or enum or interface), the hierarchy pane is blank and the members
pane shows the symbols in the current file. The name of the current file is displayed at the top of the view
window.
Hover the mouse over the bitmap of any item in the hierarchy or members panes to see a tooltip that
shows the symbol’s signature and scope.
To show or hide the hierarchy pane, use the two buttons located at the top-right of the view window. If the
hierarchy pane is hidden, the members pane is resized to take up the entire space of the window. Use the
size bar to resize either pane.
Use the Up/Down buttons located to the left of the pane buttons to navigate up or down the class hier-
archy. The Up arrow button will allow you to navigate to a child class (derived class or subclass) of the
current class. The Down arrow allows you to navigate to a parent class (superclass or interface) of the
current class. When using these buttons to navigate through code, the active buffer will switch to the des-
tination class, and the hierarchy and members panes will update.
To jump to the definition of a class in the code, pushing a bookmark in the process, double-click on any
member or class. Left-click or press Ctrl+Comma to go back.
Filtering in the Hierarchy Pane
Right-click on a class in the hierarchy pane to display a list of filtering options. You can exclude entire
namespaces or packages, anything above a certain level in the hierarchy, and anything outside of the
current workspace. You can always include any class(es) you have excluded via the "Include" options.
By excluding a class or interface in the hierarchy view, the members of this class or interface are no
longer displayed in the members pane, but they are still visible in the hierarchy as gray text.
Select Show in Symbol Browser to jump to the class in the symbol browser.
Class Exclusion Manager
The Class Exclusion Manager, accessed by right-clicking on a class in the hierarchy pane, displays a list
of any currently excluded classes, interfaces, namespaces, and packages. Exclusions are kept on a per-
workspace basis.
Figure 6.2. Class Exclusion Manager Dialog
Class View
84
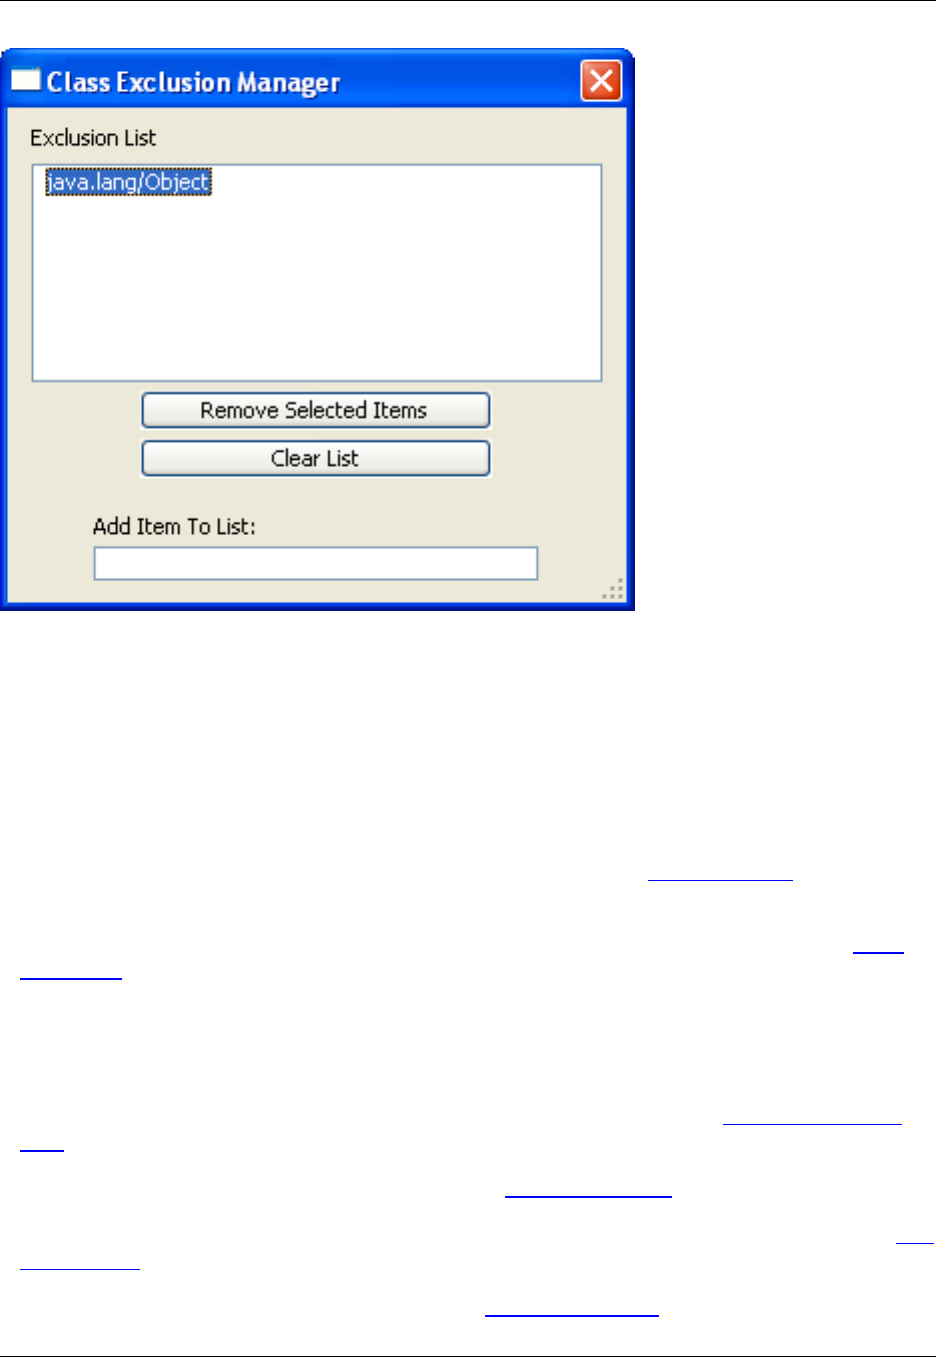
To add an item to the list, type the name in the Add Item To List text box, then press Enter. Click the
buttons to remove selected items or to clear the list.
Filtering and Sorting in the Members Pane
Right-click on a member in the members pane to access a list of filtering and sorting options as well as
options for code navigation and modification. The following options are available:
•C++ Refactoring - Displays a menu of C/C++ refactoring options. See C++ Refactoring for more in-
formation.
•Quick Refactoring - Offers two Quick Refactorings: Rename and Modify Parameter List. See Quick
Refactoring for more information.
•Add Member Function,Add Member Variable, and Add Virtual Function - (C/C++ only) When these
options are selected for a class, you are prompted with a dialog to type a member function, member
variable, or virtual function to be added into the source code at the top of the current class.
•Organize imports - (Java only) Organizes import statements in Java files. See Organizing Java Im-
ports for more information.
•Go to Tag - Moves the cursor to the selected tag. See Symbol Navigation for more information.
•References - Brings the References view into focus, displaying the references for the symbol. See Ref-
erences View for more information.
•Set Breakpoint - Sets a debugging breakpoint. See Setting Breakpoints for more information.
Class View
85

•Show in Symbol Browser - Jumps to the member in the symbol browser. See Symbols View for more
information.
•Increase/Decrease Listed Members Limit - Controls the number of members displayed in the mem-
bers pane. When this option is selected, the command line will prompt you for a variable value. The de-
fault is 400.
•Sort Classes By Hierarchy and Sort Classes By Name - These options toggle the display of classes
sorted either by hierarchy or alphabetically by name.
•Sort Members By Line Number and Sort Members By Name - These options toggle the display of
members sorted either by line number or alphabetically by name.
•Organize Members By Class - Groups the members in the members pane by their class (or interface).
When this option is selected, all "Sort" options are available. When this option is not selected, visible
members in this pane will not be grouped at all. They will instead be displayed in one list, sorted by
name.
•Auto Expand All Top Level Classes - Expands all top level class nodes in the members pane
whenever the current class changes. The default behavior is to only auto-expand the node of the cur-
rent class.
•Auto Expand All Structs/Enums/Inner Classes - Expands all struct, enum, and inner class nodes
displayed in the members pane whenever the content is refreshed. By default this option is turned off,
and these nodes are collapsed.
•Quick Filters and Scope Filters - Quick filters allow you to display only certain items in the members
pane, such as functions, prototypes, etc. Scope filters allow you to display members only in certain
scopes, such as public or global, private, protected, etc.
Outline View
The Outline view provides an outline of symbols in the current file.
To open the Outline view, click Window →Show View →Other, expand SlickEdit Views and double-
click Outline.
Figure 6.3. Outline View
Outline View
86
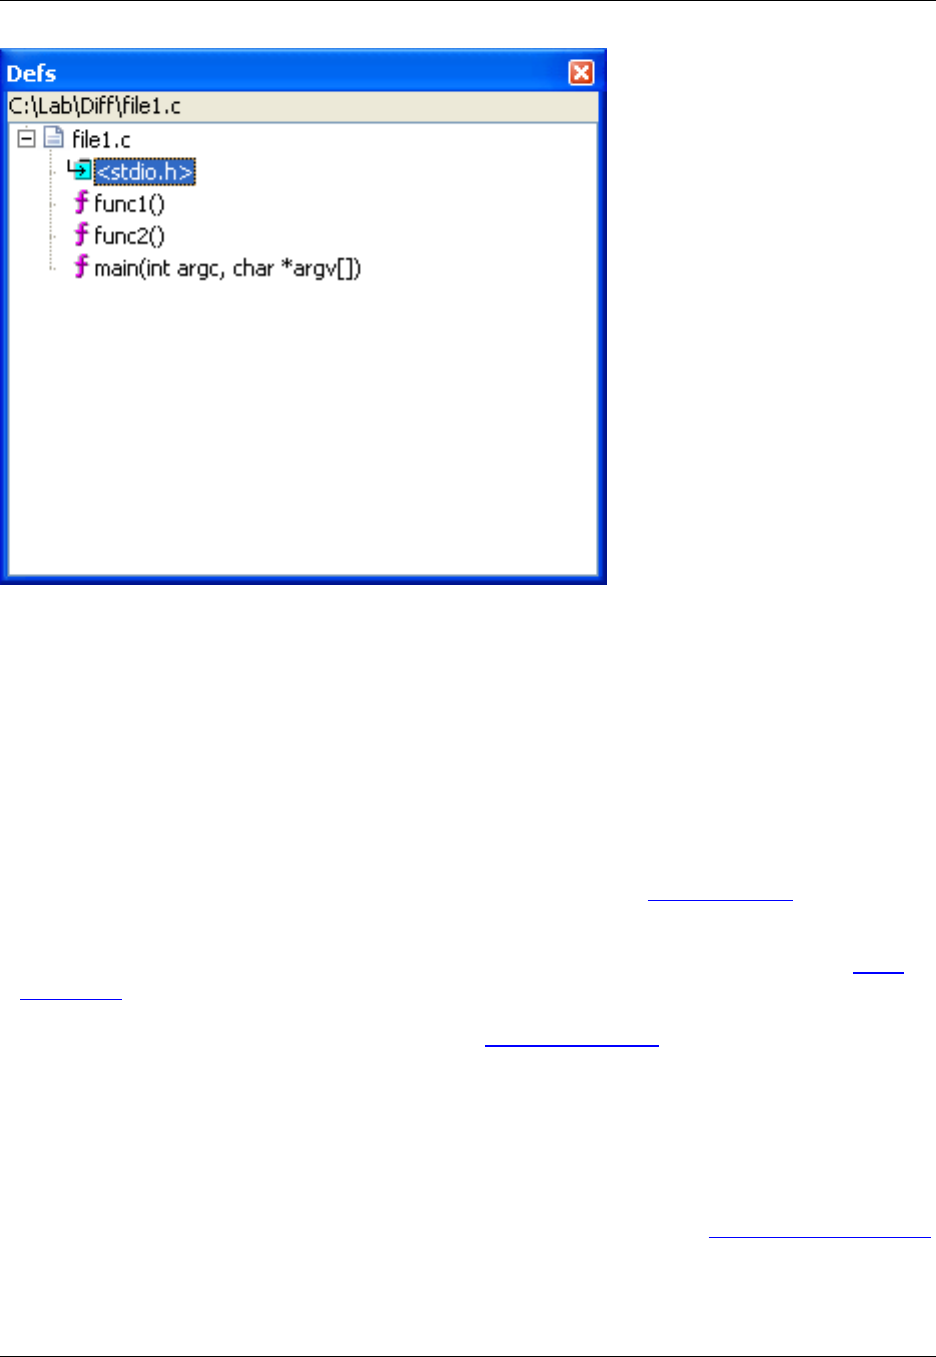
The name of the file is displayed at the top of the view window. Hover the mouse over the bitmap of any
symbol in the window to see a tooltip that shows the symbol’s signature and scope.
To jump to the definition of the symbol in the code, pushing a bookmark in the process, double-click on
any symbol. Press Ctrl+Comma to go back.
Outline View Options
Right-click on any symbol in the Outline view to access the following options:
•C++ Refactoring - Displays a menu of C/C++ refactoring options. See C++ Refactoring for more in-
formation.
•Quick Refactoring - Offers two Quick Refactorings: Rename and Modify Parameter List. See Quick
Refactoring for more information.
•Set Breakpoint - Sets a debugging breakpoint. See Setting Breakpoints for more information.
•Sort by Function Name and Sort by Line Number - These options toggle the display of symbols sor-
ted either alphabetically by function name or by line number.
•Show Hierarchy - Organizes symbols by their scope within the current file. Deselect this option to dis-
play all of the symbols in one flat list.
•Show Statements - (C/C++, Java, Visual Basic only) This option controls the Statement Level Tagging
feature. When selected, the view shows an outline of all statements in each function within the current
file. This allows you to see a primitive function flowchart or to navigate to a specific statement within a
function.
Outline View
87

•Display Files - (Disabled in SlickEdit Core) Displays the names of the files that are open in the editor.
Deselect this option to only show symbols in the current file, allowing you to use the window as a true
outline view.
•Auto Expand - Automatically expands all levels within the current file. If this option is deselected, you
will need to click to expand items manually.
•Expand All - Expands all symbols or levels in the current file.
•Expand 1 Level - Expands everything one level below the current symbol.
•Expand 2 Levels - Expands everything two levels below the current symbol.
•Display Non-taggable Files - (Disabled in SlickEdit Core) Displays files that are open in the editor that
are not taggable, such as text files.
•Properties - Displays the Symbol Properties View, showing the properties of the selected item, such as
visibility, whether it's static or final, etc. Note that you cannot use this window to change the properties.
•Arguments - Displays the return type and arguments for functions/methods in the Symbol Properties
View.
•References - Displays the list of references for the selected symbol, just as if you pressed Ctrl+/in the
editor window. See Symbol Navigation for more information.
•Show Call Tree - Displays a tree of symbols used by the selected symbol, for example, other functions
called by the current function. See Viewing Symbol Uses with the Calling Tree for more information.
•Contents - Displays the following menu of save and print operations for the Outline view tree:
•Save - Writes the items displayed in the Outline view to a text file, prompting you for a file name and
directory location. The text file will then be displayed in the editor.
•Print - Displays the Print dialog, where you can configure options for printing the tree.
•Save Subtree and Print Subtree - These options function similarly to the above except they apply to
the selected subtree.
•Quick filters,Scope,Functions,Variables,Data Types,Statements, and Others - All of these items
are for filtering the data displayed in the Outline view.
Find Symbol View
The Find Symbol view is used to locate symbols in your code. It allows you to search for symbols by
name using either a regular expression, substring, or fast prefix match. To open this view, click Search →
Find Symbol.
Searching for a symbol is faster than a normal text search because it is executed against the Context
Tagging®database, rather than searching through your source files. Find Symbol also avoids false hits in
comments or string literals. Though Syntax-Driven Searching in the regular Find and Replace View
Find Symbol View
88
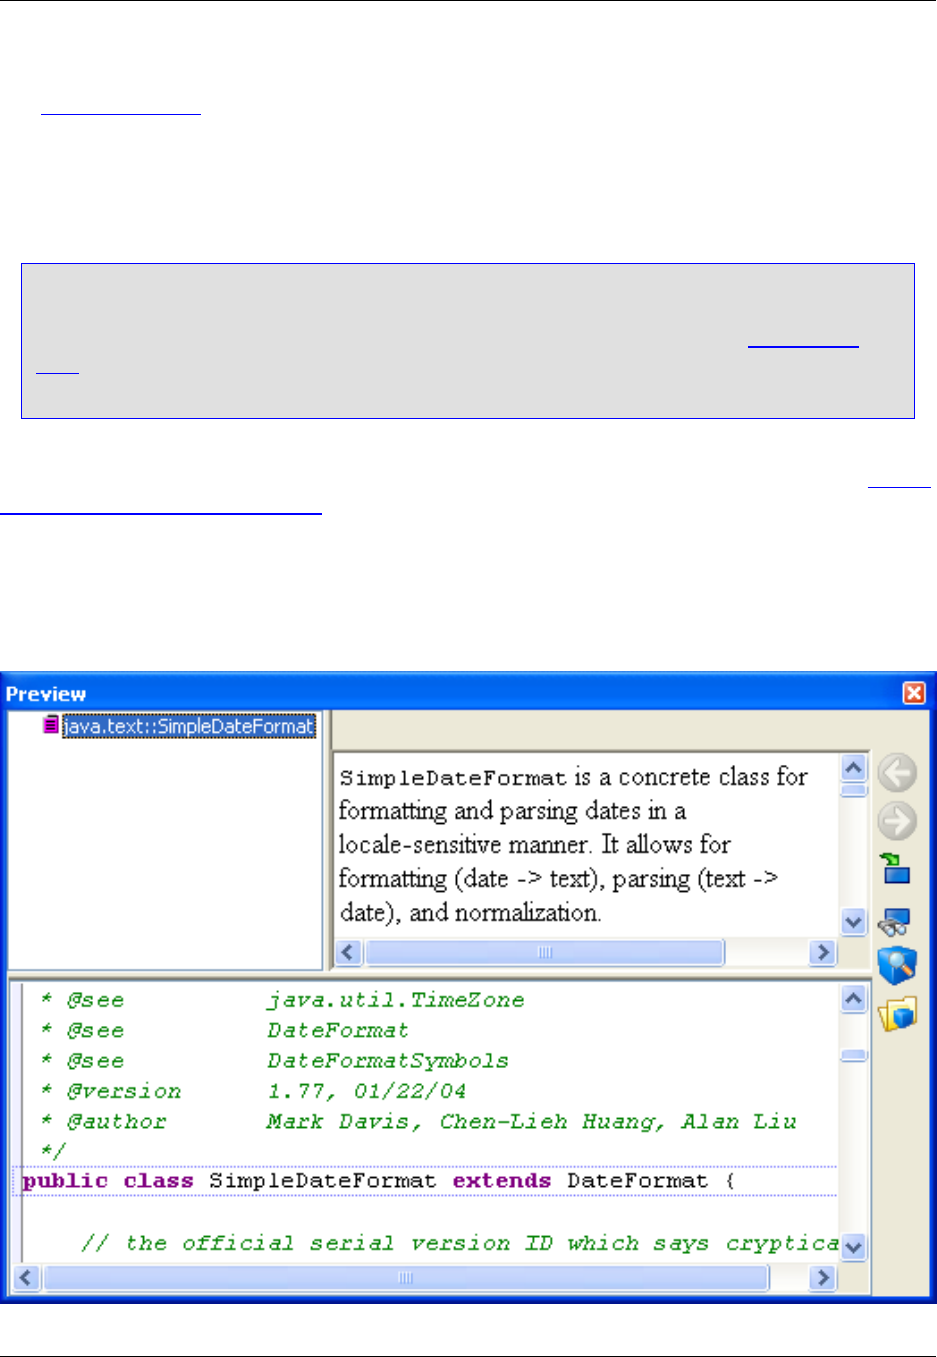
provides this same capability, it cannot match the speed of Find Symbol.
See Find Symbol View for information about the options that are available on this view window.
Preview View
Note
In SlickEdit®Core v3.3, the Preview view replaces the Symbol view found in previous versions.
The Preview view does not have a search capability, so you should use the new Find Symbol
View to search for symbols. This provides you with more power and more control over your sym-
bol searching.
The Preview view provides a portal for viewing information in other files without having to open them in
the editor. It automatically shows this information when you are working with certain features. See Inform-
ation Displayed by the Preview View for more information.
To open the Preview view, click Window →Show View →Other, expand SlickEdit Views and double-
click Preview.
Figure 6.4. Preview View
Preview View
89

The Preview view contains the following components:
•Symbol list - This is the list of all symbols which are currently being previewed. In most cases, this is a
single symbol. In some cases, such as for the symbol under the cursor, multiple matches are shown,
such as the definition and declaration of a symbol. You can do a few things with the symbol list:
• Hover the mouse over the bitmap of any item to see a tooltip that shows the symbol’s signature and
scope.
• Click on any symbol to preview that specific symbol or it's comments.
• Right-click to adjust symbol search filtering options.
• Double-click to jump to a symbol. Press Ctrl+Comma to go back.
• You can create key bindings for the preview_next and/or preview_prev commands in order to scroll
through the items in the symbol list without using your mouse. See Creating Bindings for more in-
formation.
•File and line label - Shows the file name and line number of the selected symbol.
•Documentation comments pane - This pane displays any existing comments for the symbol that is
selected in the symbol list. If the comments are in Javadoc or XMLdoc format, they will be formatted in
HTML. You can single-click on hypertext links within the comments to follow the links, such as "See
also" sections.
•Editor preview window - Shows the contents of the actual source file at the line number of the selec-
ted symbol. Double-click to open the code in the editor. Right-click to adjust symbol search filtering op-
tions.
•Size bars - Use the size bars to adjust the width of the symbol list and/or the height of the documenta-
tion comments area.
•Buttons - The following buttons are found along the right edge of the Preview view window:
•Back and Forward - Allow you to navigate among the hypertext links that you have traversed in the
documentation comments.
•Go to definition - Opens the selected symbol in the editor.
•Go to reference - Finds references to the selected symbol.
•Show in symbol browser - Locates the selected symbol in the Symbols View (formerly known as
the Classes view).
•Manage Tag Files - Opens the Context Tagging - Tag Files Dialog for building and maintaining tag
files for indexing symbol information.
Information Displayed by the Preview View
The table below describes what the Preview view displays under different circumstances.
Preview View
90
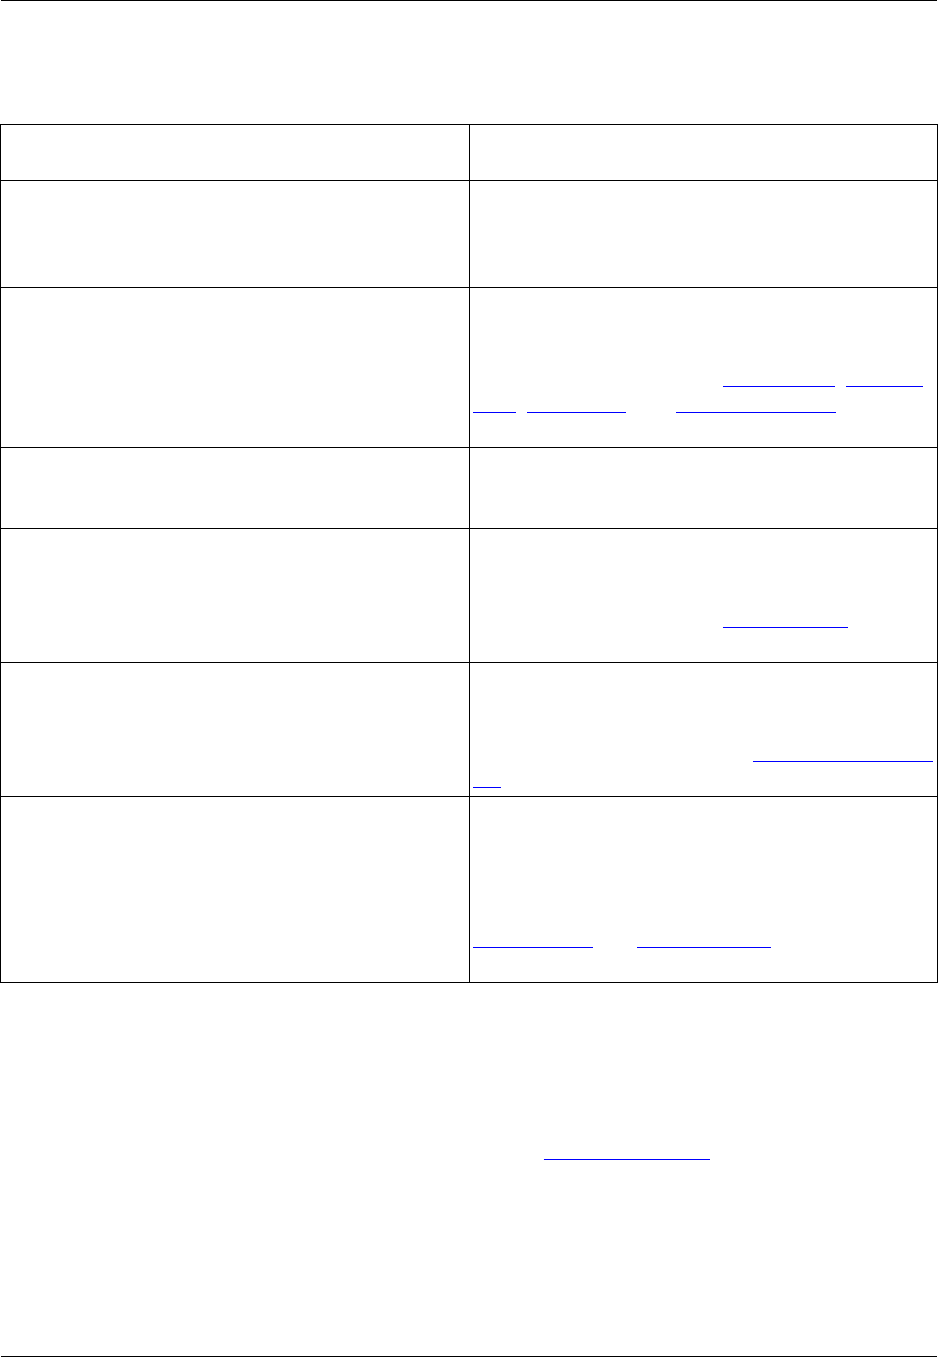
Table 6.1. Preview View Information
Editor Element in Use Preview View Display
Any source file open in the editor The Preview view shows the definition or declara-
tion of the symbol under the cursor, along with the
symbol’s documentation comments, if any exist.
The Outline, Symbols, Class, and Find Symbol
views
Single-click on a symbol and the Preview view dis-
plays the selected symbol and its documentation
comments, if any exist. See Outline View,Symbols
View,Class View, and Find Symbol View for more
information.
Call Tree dialog and References view The Preview view shows the location of the symbol
references or use.
The Base Classes and Derived Classes symbol
browser dialogs
Single-click on a symbol and the Preview view dis-
plays the selected symbol and its documentation
comments, if any exist. See Symbols View for more
information.
The SlickEdit Core Search view Single-click on a line in the SlickEdit Core Search
view and the Preview view displays the location of
the selected search result. See Search Results Out-
put for more information.
List Members and Auto-Complete results Cursor up or down through the list of items in auto-
complete or list-members results and the Preview
view displays the location of the selected symbol
and its documentation comments, if any exist. See
List Members and Auto-Complete for more informa-
tion.
References View
The References view displays the list of symbol references (uses) found the last time that you used the
Go to Reference feature (Ctrl+/or push_ref command—see Symbol Navigation for more information).
To open the References view, click Window →Show View →Other, expand SlickEdit Views and
double-click References.
Figure 6.5. References View
References View
91
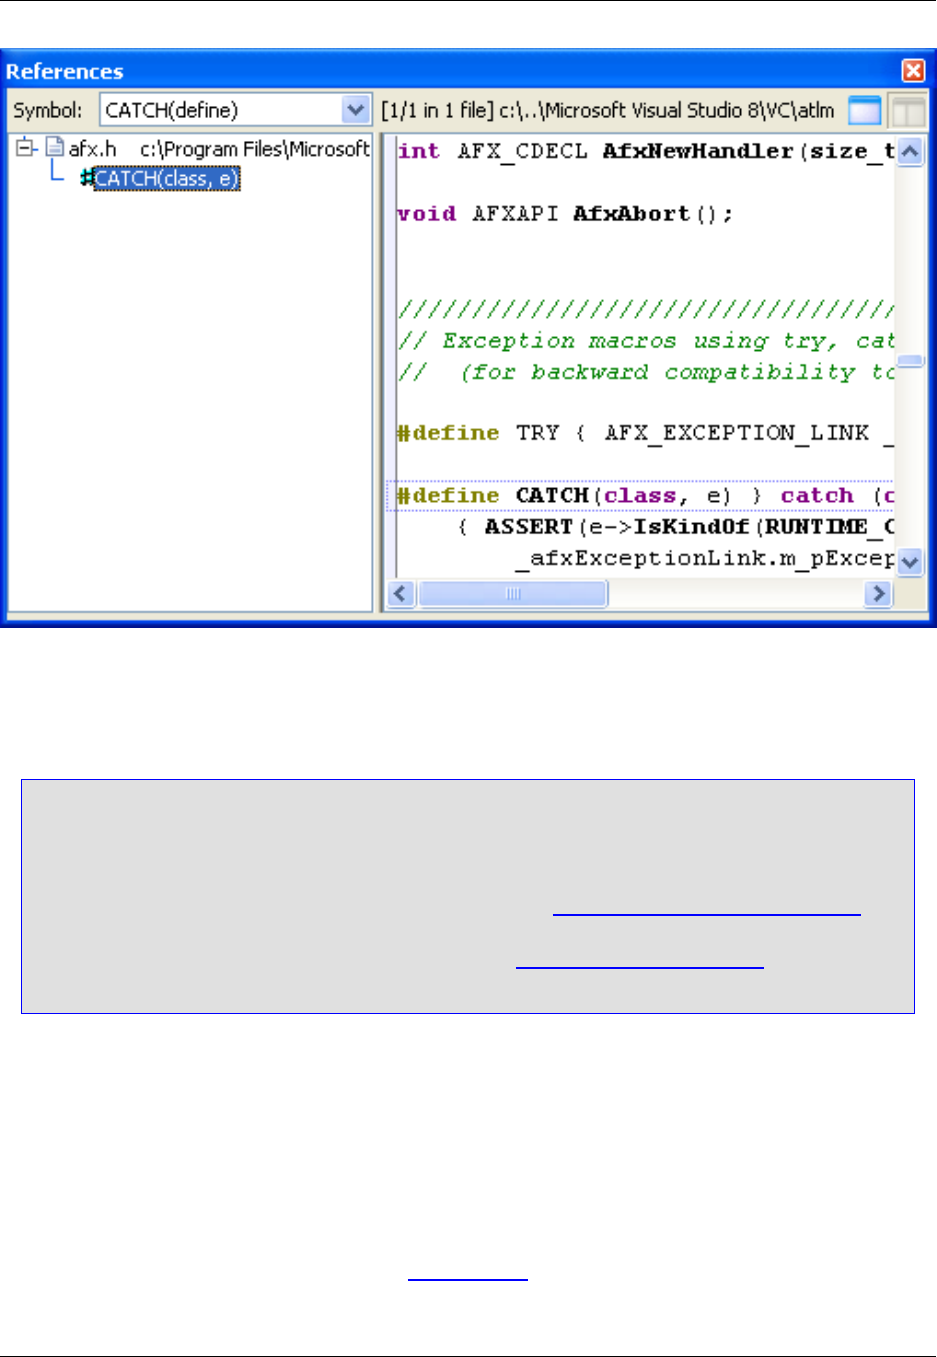
The References view automatically comes into focus when you use the Go to Reference feature or when
you select References from the right-click menu of the Class, Outline, or Symbols view windows.
Note
Typically, you only want to view references that occur in project files, and not run-time libraries,
which can be very large. For this reason, references are not generated automatically for run-time
library tag files. If you want to view references that occur in a run-time library tag file, you need to
generate references for the tag file. To do this, display the Context Tagging - Tag Files Dialog
(Tools →Tag Files or gui_make_tags command), choose the tag file, right-click to display the
context menu, and select Generate References. See Tagging Run-Time Libraries for more in-
formation.
The left pane displays a tree view of the files and locations that contain the symbol references. Hover the
mouse over the bitmap of a symbol to see a tooltip that shows the symbol’s signature and scope. To jump
to the location of a symbol reference in the code, pushing a bookmark in the process, double-click on it.
Press Ctrl+Comma to go back.
The right pane displays a preview of that location in the source. The number of instances found and the
file name and line number are displayed at the top. Use the size bar to resize either pane.
Use the buttons located at the top right corner of the view window to toggle the preview pane on and off.
Because source can also be previewed in the Preview View, you may find it more efficient to use the Ref-
erences view with the preview pane off.
References View
92
References View Options
Right-click on a symbol or file in the left pane of the References view to display the following options:
•Contents - Displays the following menu of save and print operations for the references browser tree:
•Save - Writes the items displayed in the references browser to a text file, prompting you for a file
name and directory location. The text file will then be displayed in the editor.
•Print - Displays the Print dialog, where you can configure options for printing the tree.
•Save Subtree and Print Subtree - These options function similarly to the above except they apply to
the selected subtree.
•Quick filters,Scope,Functions,Variables,Data Types,Statements, and Others - All of these items
are for filtering the data displayed in the References view.
Symbols View
Note
In SlickEdit®Core v3.3, the Symbols view replaces the Classes view found in previous versions.
A new Class View is available.
The Symbols view contains the symbol browser, which lists symbols from all of the tag files.
To open the Symbols view, click Window →Show View →Other, expand SlickEdit Views and double-
click Symbols.
Figure 6.6. Symbols View
Symbols View
93
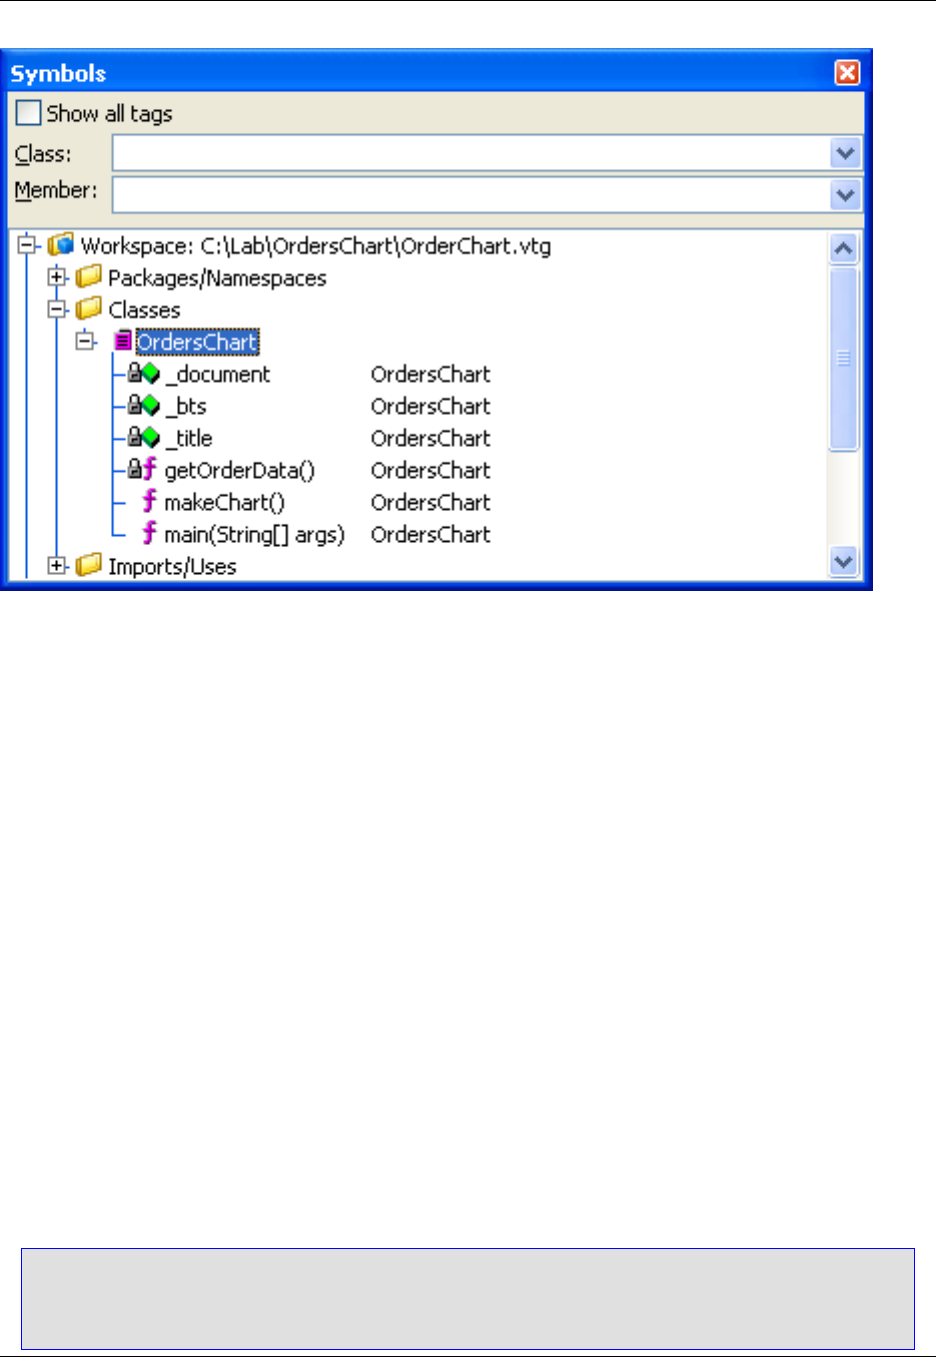
The top part of the view window contains an option and combo boxes that are used for filtering. The bot-
tom part of the window lists the symbols grouped by category. Symbols in your workspace are listed in
the top group labeled "Workspace." The rest of the symbols are grouped by language or compiler.
Hover the mouse over the bitmap of a symbol to see a tooltip that shows the symbol’s signature and
scope. To jump to the definition of a symbol in the code, pushing a bookmark in the process, double-click
on any symbol. Press Ctrl+Comma to go back.
Filtering Symbols in the Symbols View
The symbols listed in the symbol browser can be filtered using the Class and Member combo boxes. The
Class combo box filters the items listed under the Classes folder. The Member combo box filters the
items listed under any displayed classes or under any of the other folders, like Global Variables, Static
Variables, Defines, etc. Enter multiple words in either combo box to search for items containing either
word.
For example:
• Enter person into the Class combo box to find all classes containing the word "person".
• Enter person manager into the Member combo box to find all members, variables, etc. containing the
word "person" or "manager".
Note
• The filters are case-sensitive, so be sure to type the values in the same case.
Symbols View
94

• The items listed under the Classes folder are global classes that are not part of a namespace
or package.
To clear the filters and see all items again, select the Show all tags option.
For non-object-oriented languages, use the Member combo box to search, since there are no classes.
You can hide the combo boxes to save space by right-clicking and selecting Filters, then unchecking the
corresponding check box.
Symbols View Options
Right-click on a symbol in the Symbols view to access the following additional filtering options as well as
code management options:
•Go to Definition - Moves the cursor to the symbol’s definition (proc). See Symbol Navigation for more
information.
•Go to Declaration - Moves the cursor to the symbol’s declaration (proto). See Symbol Navigation for
more information.
•Quick Refactoring - Offers two Quick Refactorings: Rename and Modify Parameter List. See Quick
Refactoring for more information.
•Organize imports - (Java only) Organizes import statements in Java files. See Organizing Java Im-
ports for more information.
•Set Breakpoint - Sets a debugging breakpoint. See Setting Breakpoints for more information.
•Find Tag - Searches for symbols and displays them in the symbol browser. Note that the Find Symbol
view also provides this functionality.
•Manage Tag Files - Displays the Context Tagging - Tag Files Dialog for use in managing your tag files.
•Expand and Collapse options - Expands/collapses symbols as specified.
•Sort by - Sorts symbols displayed by tag name, line number, or containers to top, which puts classes,
structs, etc. at the top of the list.
•Filters - Filter by class or member, or select Filtering Options to display the Symbol Browser Filter
Options dialog. See Symbol Browser Filter Options for information on the available options.
•Contents - Displays the following menu of save and print operations for the symbol browser tree:
•Save - Writes the items displayed in the symbol browser to a text file, prompting you for a file name
and directory location. The text file will then be displayed in the editor.
•Print - Displays the Print dialog, where you can configure options for printing the tree.
•Save Subtree and Print Subtree - These options function similarly to the above except they apply to
the selected subtree.
Symbols View
95

•Base Classes - Displays the Base Classes dialog, which shows a list of base classes for the selected
class on the left with the list of that class’s members on the right. Base classes are displayed in a tree
view, allowing you to explore up the inheritance hierarchy. See Viewing Base and Derived Classes for
more information. Note that the Class View provides this same functionality.
•Derived Classes - Displays the Derived Classes dialog, which works the same as above but for de-
rived classes. See Viewing Base and Derived Classes for more information.
•Properties - Displays the Symbol Properties View, showing the properties of the selected item, such as
visibility, whether it's static or final, etc. Note that this window is read-only, so you can’t use it to change
the properties.
•Arguments - Displays the return type and arguments for functions/methods in the Symbol Properties
View.
•References - Displays the list of references for the selected symbol in the References View, just as if
you pressed Ctrl+/in the editor window. See Symbol Navigation for more information.
•Calls/Uses - Displays a tree of symbols that are used by this symbol or called by this function. See
Viewing Symbol Uses with the Calling Tree for more information.
Viewing Symbol Uses with the Calling Tree
View symbol uses to see what symbols (variables, functions, methods, classes, etc.) are used by a spe-
cific function or method.
To view the symbols that a particular function or method uses, first create a project or open an existing
project. Then from the Symbols view, right-click on the desired function or method and select Calls or
uses. The Symbol Uses/Calling Tree dialog will be displayed.
Tip
You can also access the Symbol Uses/Calling Tree from within the Outline View by right-clicking
on a symbol and selecting Show Call Tree.
Figure 6.7. Symbol Uses/Calling Tree Dialog
Symbols View
96
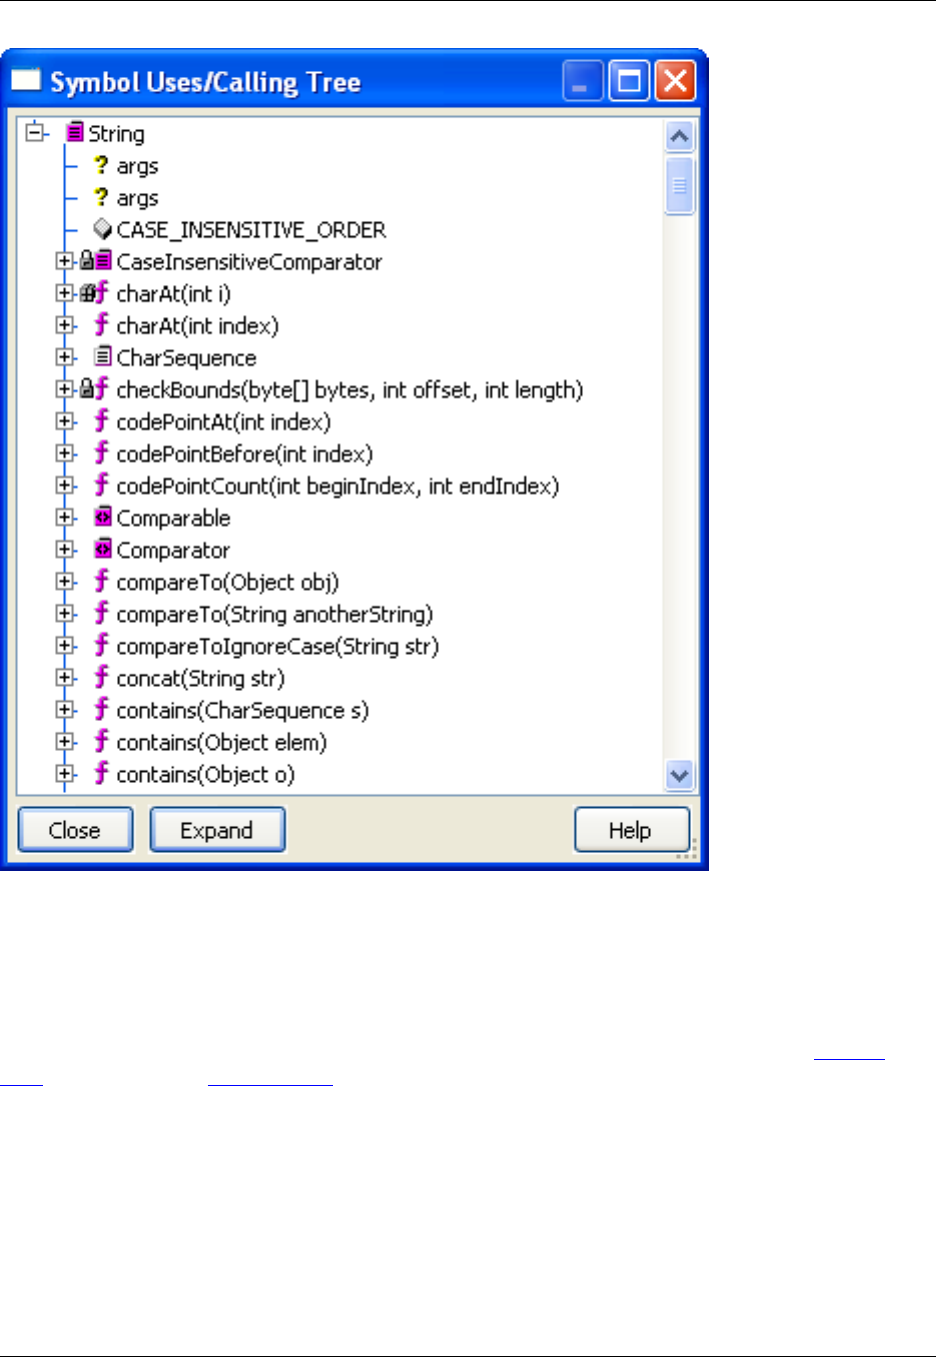
Right-click in this tree to display/modify the symbol filters. Items in the tree can be expanded to view uses
recursively. Double-click or press the spacebar on an item in the tree list to go to an item. Double-click
and Space are the same except when the item is a prototype that has a corresponding code section.
Double-clicking will then go to the prototype’s corresponding code section.
If the focus is in the Symbol Uses/Calling Tree dialog, the selected item will be shown in the Preview
View, just as it is in the Symbols View.
Viewing Base and Derived Classes
To see what classes are inherited by a particular class, right-click on the class in the Symbols view and
select Base Classes. To see what classes are derived from a particular class, right-click on the class in
the Symbols view and select Derived Classes. Both dialogs have the same interface.
Figure 6.8. Base Classes Dialog
Symbols View
97
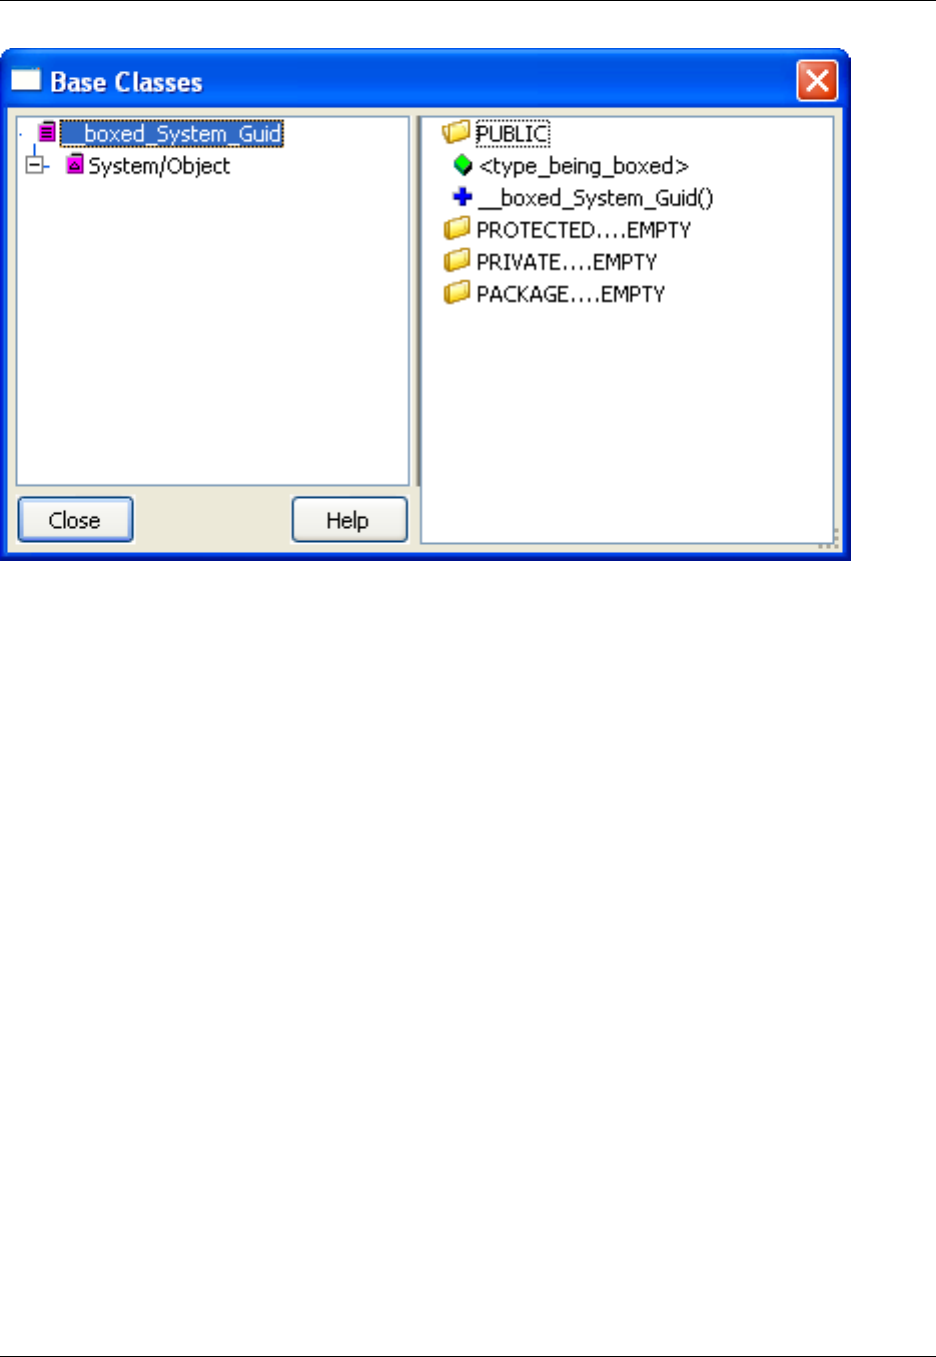
The left pane of each dialog contains a tree showing the class inheritance hierarchy (the class list). The
right pane shows a list of the members of the selected class (the member list).
If the focus is in the class list, the selected class will be displayed in the member list, if it can be resolved.
If the focus is in the member list, the selected item will be shown in the Preview view, and is the name as
it appears within the class definition.
To jump to the symbol in the code, pushing a bookmark in the process, double-click on a symbol in either
pane. Press Ctrl+Comma to go back. Right-click on a symbol for filtering options.
Symbol Browser Filter Options
To access symbol browser filter options, right-click in the Symbols view and click Filters →Filtering Op-
tions.
Figure 6.9. Symbol Browser Filter Options Dialog
Symbols View
98
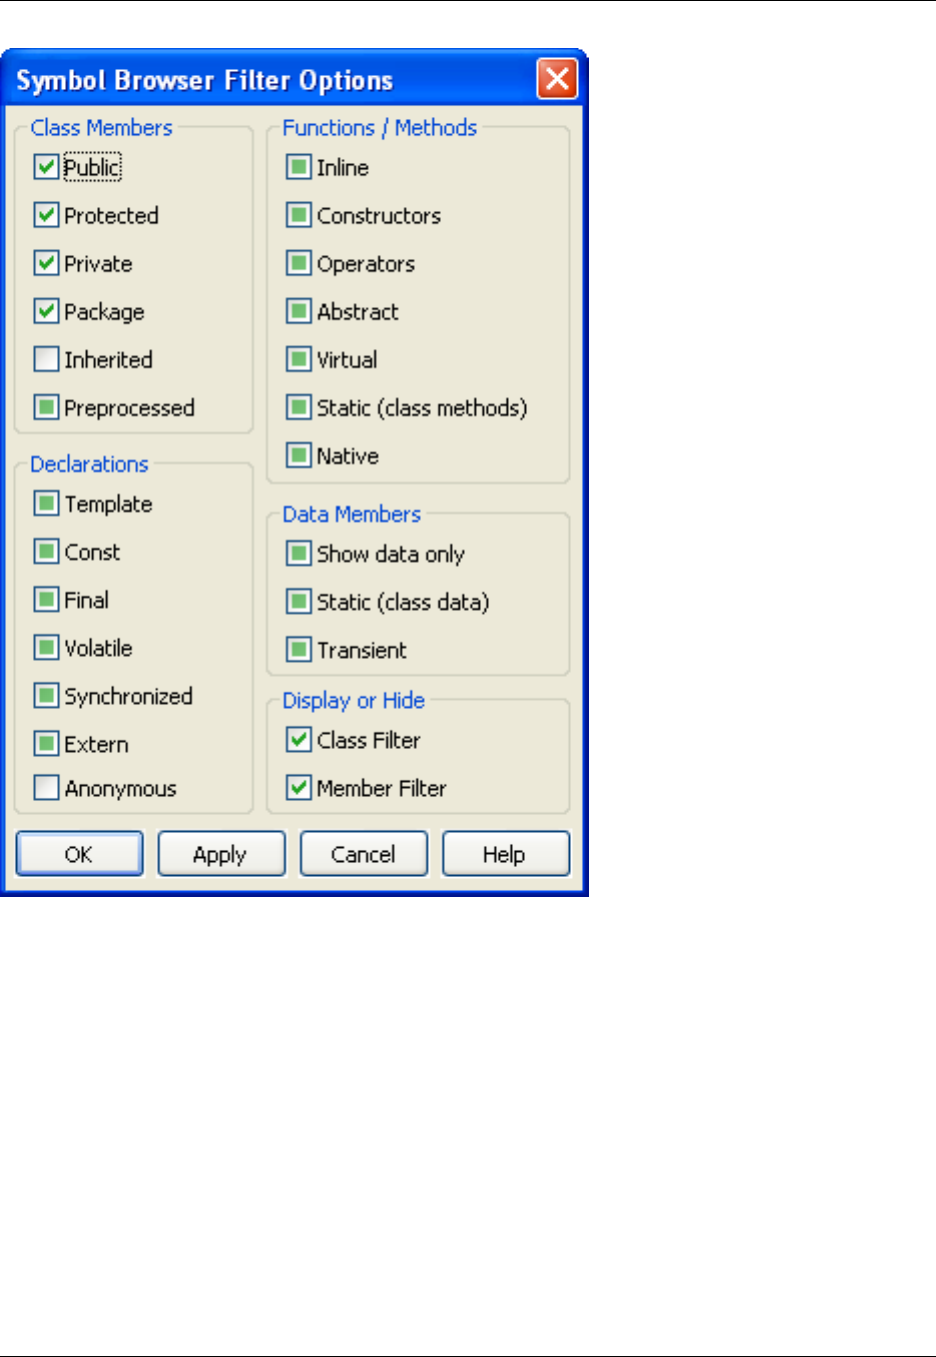
Each option has three states: If the option is selected, only the specified items will be displayed. If the op-
tion is deselected, the specified item will not be displayed. If the option is in a neutral state, the item will
not be considered in the filter.
The following options are available:
•Class Members
•Public - When selected, public members are displayed.
•Protected - When selected, protected members are displayed.
•Private - When selected, private members are displayed.
•Package - (Java only) When selected, package members are displayed. Java members have pack-
age scope if they do not specify public, protected, or private.
Symbols View
99

•Inherited - When selected, only inherited members that this class can access are displayed. When
unselected, only members of this class are displayed.
•Preprocessed - When selected, only members expanded by pre-processing are displayed. This is
specifically useful for MFC classes. When unselected, only non-preprocess members displayed.
•Declarations
•Template - (C++ only) When selected, only template classes are displayed. When unselected, only
non-template classes are displayed.
•Const - (C++ only) When selected, only methods which do not modify members (method1() const)
are displayed. When unselected, only non-const methods are displayed.
Use the Symbol Properties View (right-click in the Symbols view and choose Arguments, or from the
main menu click Window →Show View →Other, expand SlickEdit Views and double-click Sym-
bol Properties) to view other const information for declarations (for example, int const * const
*pcpcvariable;).
•Final - (Java only) When selected, only final members are displayed. When unselected, only non-fi-
nal members are displayed.
•Volatile - (C++ only) When selected, only volatile method members (method1() volatile) are dis-
played. When unselected, only non-volatile members are displayed.
•Synchronized - (Java only) When selected, only synchronized members are displayed. When unse-
lected, only non-synchronized members are displayed.
•Extern - When selected, only identifiers defined explicitly using the extern keyword are displayed.
When unselected, only identifiers defined which do not explicitly use the extern keyword are dis-
played.
•Anonymous - When selected, only class names which are automatically generated by Context Tag-
ging®are displayed. When unselected, only explicitly named classes are displayed.
•Functions/Methods
•Inline - When selected, inline functions or methods are displayed.
•Constructors - When selected, constructors are displayed.
•Operators - When selected, overloaded operators are displayed.
•Abstract - When selected, only abstract methods are displayed. When unselected, only non-abstract
methods are displayed.
•Virtual - When selected, only virtual methods are displayed. When unselected, only non-virtual meth-
ods are displayed. All non-static Java methods are implicitly virtual.
•Static (class methods) - When selected, only static methods are displayed. When unselected, only
non-static methods are displayed.
Symbols View
100

•Native - When selected, only methods explicitly defined with the native keyword are displayed. When
unselected, only non-native methods are displayed.
•Data Members
•Show data only - When selected, only data members are displayed. When unselected, only meth-
ods are displayed.
•Static (class data) - When selected, only static data members are displayed. When unselected, only
non-static data members are displayed.
•Transient - (Java only) When selected, only transient data members are displayed. When unselec-
ted, only non-transient data members are displayed.
•Display or Hide
•Class Filter - When selected, the class filter is displayed in the Symbols view.
•Member Filter - When selected, the member filter is displayed in the Symbols view.
Symbol Properties View
The Symbol Properties view displays detailed information (properties and arguments) for the symbol at
the cursor location. Note that this window is read-only, so you can’t use it to change the properties.
To open the Symbol Properties view, right-click on a symbol in the Symbols view and click Properties.
Figure 6.10. Symbol Properties View
Symbol Properties View
101
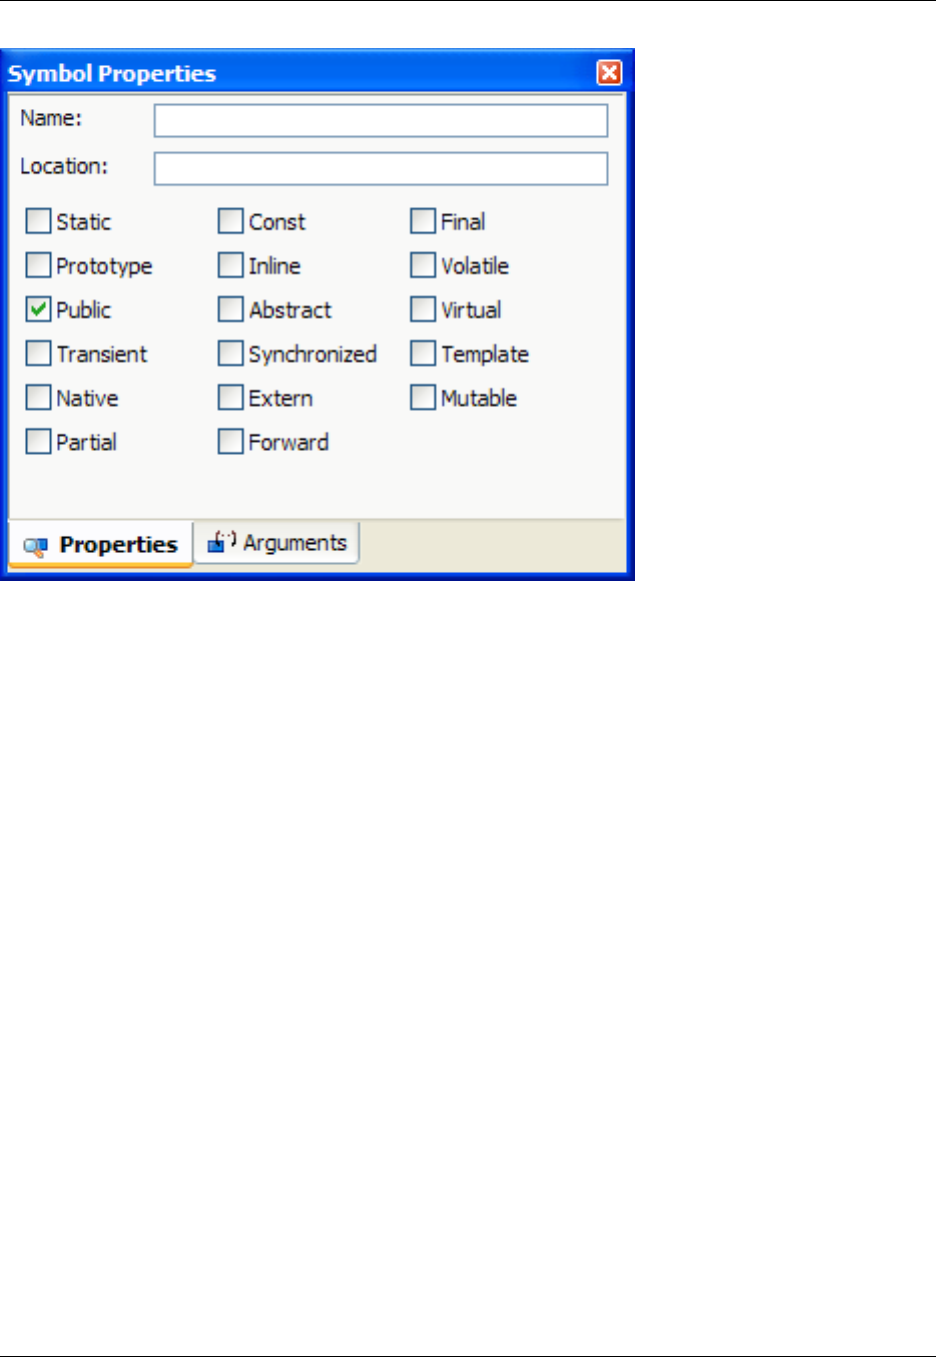
Code Templates
102

Code Templates
Code templates are pre-defined units of code that you can use to automate the creation of common code
elements, like a standard class implementation or design patterns. You can create templates for a whole
file or multiple files. Templates can contain substitution parameters that are replaced when the template is
instantiated—when a new element is created from that template. Some parameters are replaced with cal-
culated or pre-defined values, like date or author. If a value is not known, you will be prompted for a value
when the template is instantiated.
Code templates are composed of one or more template source files and a metadata file providing addi-
tional information, like the name of the template, a description of the template, prompts for substitution
parameters, and default values for substitution parameters. The following is an example of a single file
source template. The items surrounded by dollar signs ($) are the substitution parameters.
/*
* $copyright$
*/
package $package$;
/**
* @author $author$
* @version $version$
*/
public class $safeitemname$ {
/**
* Default constructor.
*/
public $safeitemname$(){
}
}
Templates can be organized into Categories to make them easier to manage. The templates shipped with
SlickEdit®Core are organized into categories by language and then by purpose. Use the Template Man-
ager dialog to add, edit, and delete user templates. The Template Manager dialog is accessed by clicking
File →SlickEdit Template Manager.
Instantiating a Template
You can add an item to your current project by clicking File →New Item from SlickEdit Template. If you
want to create a new item from a template without adding it to your current project, then click File →New
Item from SlickEdit Template. The Add New Item dialog box is shown below.
Figure 6.11. Add New Item Dialog
Instantiating a Template
103
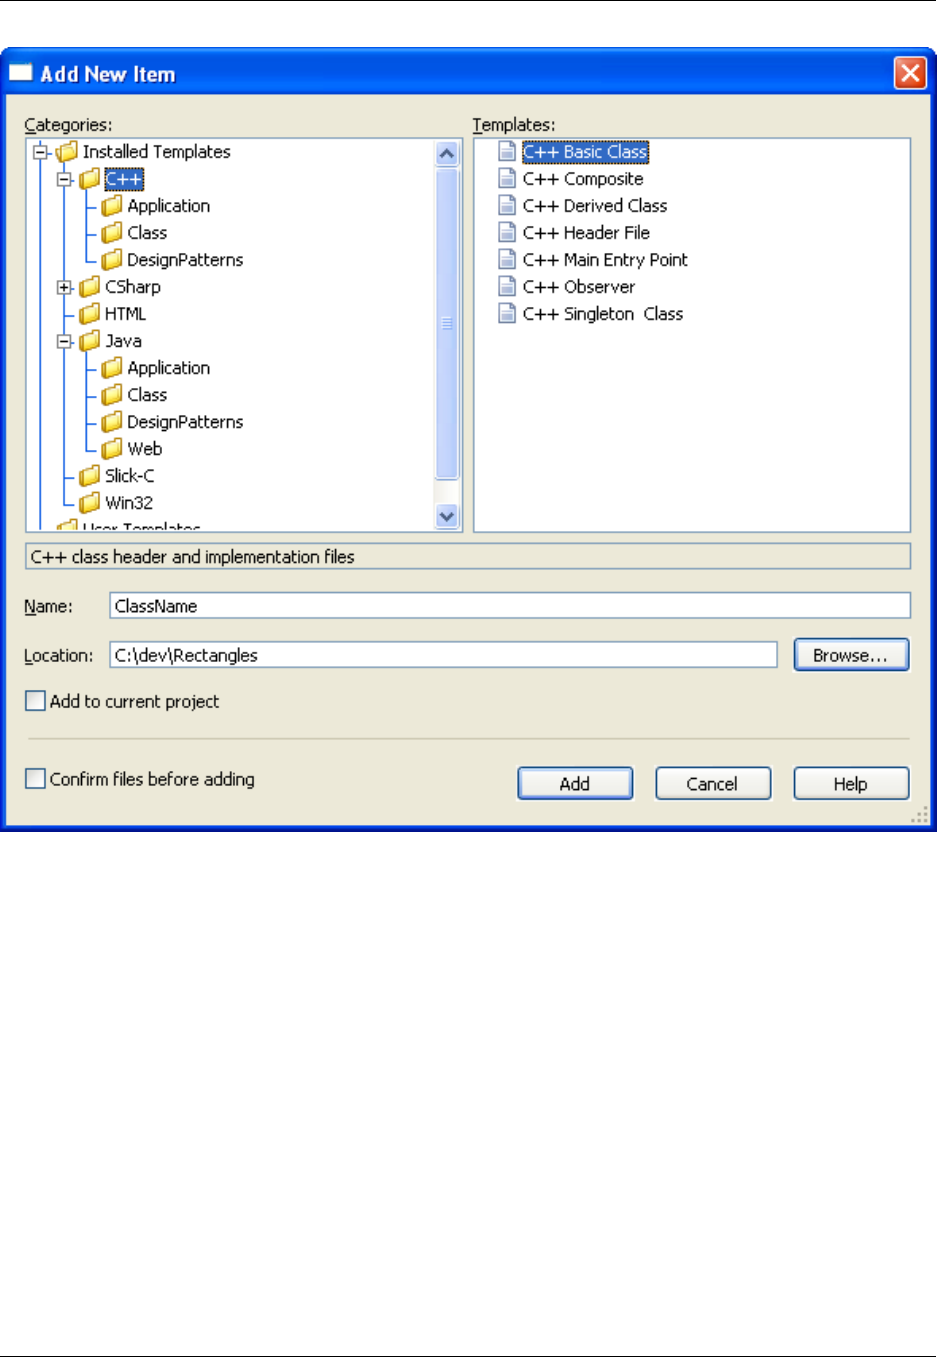
We call the process of creating new files from a template "instantiating a template". When a template is
instantiated, you are prompted for the name of the new item. This name is often used heavily in the tem-
plate. For a class template, the name will likely be the class name or a part of the class name. In the
sample template, $safeitemname$ is a form of this name that strips out any spaces, making it safe to
use as part of an identifier. This value can even be used as part of the file name when the template is in-
stantiated.
If any of the values in the template are not known at instantiation time, the Parameter Entry dialog box,
shown below, will prompt you for values.
Figure 6.12. Parameter Entry Dialog
Instantiating a Template
104
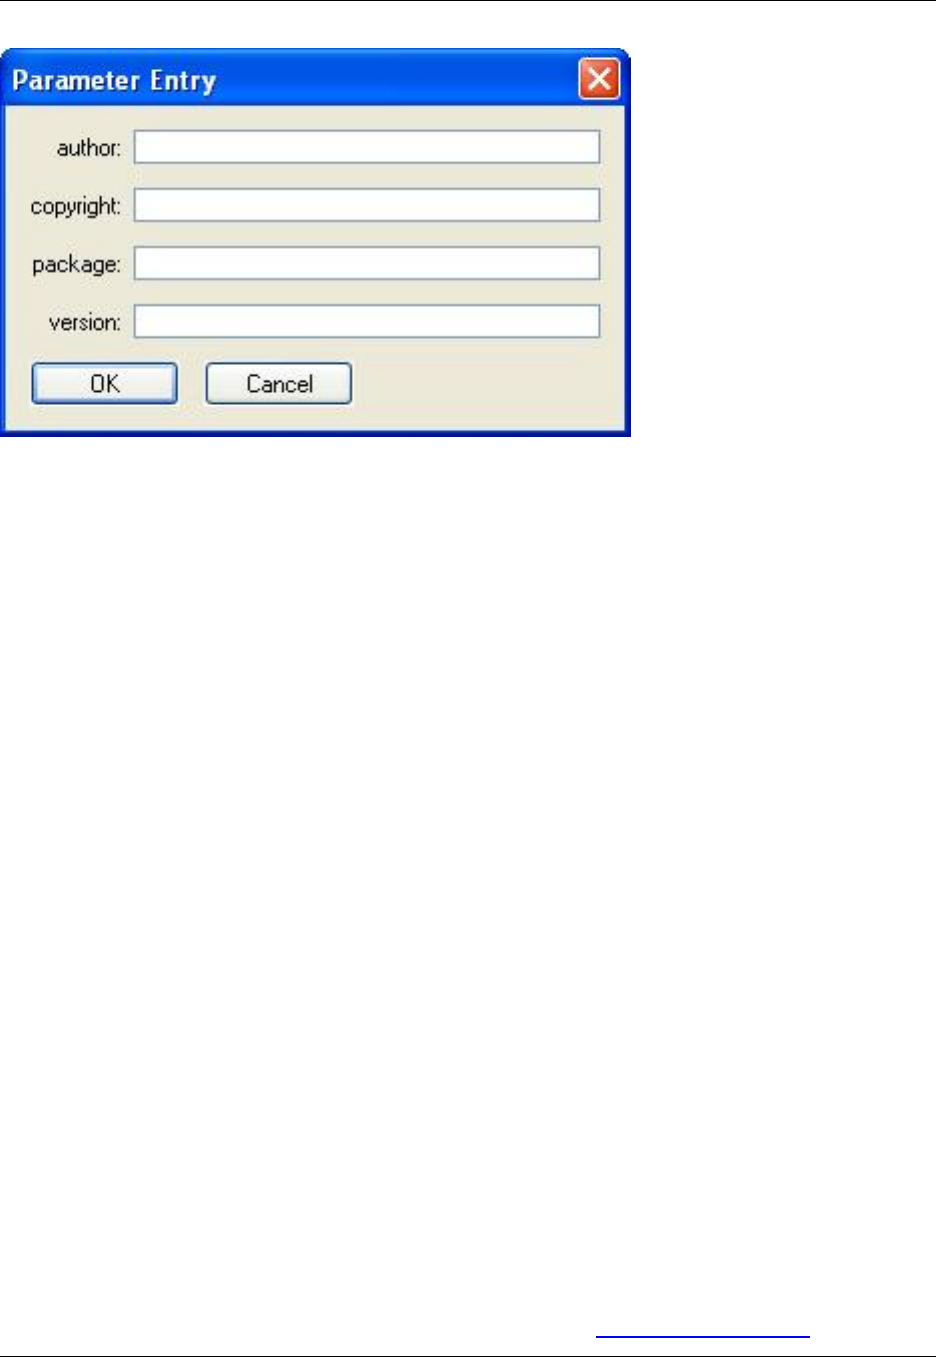
Creating Templates
Creating templates is very much like writing code. To create a new code template, complete the following
steps:
1. Create the template source files.
2. Insert substitution parameters into the template files.
3. Use the Template Manager to create a new template.
4. Add the template files to the newly-defined template.
Create the Template Source Files
This is the same process as writing any source file. Use SlickEdit®Core to write a file from scratch or to
modify an existing file. Make sure your file is syntactically correct to minimize compile errors after it is in-
stantiated.
In many languages, the $name$ syntax used by Code Templates is legal for identifiers, so you will be
able to compile and run your template source files prior to instantiating them. In other languages, you will
have to use temporary identifier names while writing the templates, and then put in the substitution para-
meters once you are sure the source is correct.
You can store these source files in any directory and copy them to the templates directory during Step 4.
Insert Substitution Parameters into the Template Files
Use substitution parameters for any part of the source code that can differ from instantiation to instanti-
ation. This includes class names, author names (if several people are sharing the same template files), or
creation dates.
In our sample, we put in a substitution for copyright statement. See Substitution Parameters for more de-
Creating Templates
105

tails.
Use the Template Manager to Create a New Template
Click File →SlickEdit Template Manager to bring up the Template Manager. Select the User Template
folder in the tree, and right-click in either the Categories pane or the Templates pane to create a new
template.
There are different operations based on whether you want to create a new category or not. You will be
prompted for the name of the new template. Fill in a name and click OK. Now you can use the Template
Manager to enter a description, add files, or set values for Custom Parameters.
Add the Template Files to the Newly-Defined Template
Select the Files tab on the Template Manager dialog and click the Plus (+) button to add the files you cre-
ated in Step 1 to this template. You will have the option to link to the source in its current location or copy
it to the template directory. You will also be prompted for a target file name. If you want the name of the
instantiated template to appear in the file name, you should use a substitution variable in the name, like
My$safeitemname$Class.java.
Substitution Parameters
Substitution parameters provide the real power in Code Templates. Without them, you would simply be
making copies of static files. You can use substitution parameters to replace any text in the template's
source code. You can also use substitution parameters in file names, which is useful in Java where a
class must be defined in a file by the same name.
Substitution parameters are written as identifiers surrounded by a delimiter. The default delimiter is $. Use
a double delimiter to represent the delimiter character in a template source file, $$. You can specify a dif-
ferent character to use as the delimiter. Click File →SlickEdit Template Manager and click on the Cus-
tom Parameters tab to change the value for the Delimiter field.
We provide a set of predefined substitution parameters for items related to item name, project name, dir-
ectories, date, and time. We can determine the value for these items rather than having to prompt for
them. See the list at the end of this section for all the predefined substitution parameters.
You can define substitution parameters that are common to all templates. For example, you might want to
define an "author" parameter where the parameter value is your name. You could then create code tem-
plates that fill in a header comment with the author's (your) name. You would only have to define the sub-
stitution parameter once. To define these parameters, open the Template Manager and select the Cus-
tom Parameters tab.
If no value is provided for a substitution parameter, you will be prompted for one when the template is in-
stantiated. This is useful for things like class name or other values that are different each time the tem-
plate is instantiated.
Predefined Substitution Parameters
The following substitution parameter names and values are pre-defined for use in an item template. The
Substitution Parameters
106

default delimiter $is used:
Table 6.2. Predefined Substitution Parameters
Parameter Name Description
$itemname$ Name of item entered, as on the Add New Item dia-
log.
$fileinputname$ Name of item entered, as on the Add New Item dia-
log, without file extension.
$safeitemname$ Name of item entered, as on the Add New Item dia-
log, with all unsafe characters replaced with safe
characters. For example, if the item name was My
Custom Class, then the $safeitemname$ would
evaluate to My_Custom_Class for a C++ source
code file.
$upcasesafeitemname$ Same as $safeitemname$ with all characters up-
percased.
$lowcasesafeitemname$ Same as $safeitemname$ with all characters
lowercased.
$tempdir$ Location of operating system temp directory. No
trailing file separator.
$rootnamespace$ Root namespace or package for the current project.
This is typically used for C# and Java projects to
find the namespace containing Main() (or main() in
the case of Java).
$ampmtime$ Time of day in the form hh:mm[am|pm]. Example:
11:34pm
$localtime$ Time of day in locale-specific format.
$time$ Time of day in the form hh:mm:ss.
$localdate$ Current date in locale-specific format.
$date$ Current date in the form mm/dd/yyyy.
$projectname$ Current project name (no path, no extension).
Substitution Parameters
107

Parameter Name Description
$safeprojectname$ Current project name (no path, no extension), with
all unsafe characters replaced with safe characters.
For example, if the project name was: My
Project.vpj, then $safeprojectname$ would
evaluate to My_Project for a C++ source code file.
$workspacename$ Current workspace name (no path, no extension).
$safeworkspacename$ Current workspace name (no path, no extension),
with all unsafe characters replaced with safe char-
acters. For example, if the workspace name was:
My Workspace.vpw, then
$safeworkspacename$ would evaluate to
My_Workspace for a C++ source code file.
$projectworkingdir$ Current project working directory. No trailing file
separator.
$projectbuilddir$ Current project build (output) directory. No trailing
file separator.
$projectconfigname$ Current project configuration name.
$workspaceconfigname$ Current workspace configuration name. This will be
the same as $projectconfigname$ except for MS
Visual Studio workspace which will have a separate
workspace/solution configuration name.
$projectdir$ Location of current project file. No trailing file separ-
ator.
$workspacedir$ Location of current workspace file. No trailing file
separator.
$username$ Operating system login name.
Organizing Templates
Templates are organized into category hierarchies as shown on the Add New Item dialog. These category
hierarchies map exactly to the directory structure under the locations for installed and user templates.
To create a new template item category:
Organizing Templates
108

1. Create a new folder under the user templates directory. For example, if you wanted to create a Dialogs
category for Java project items, you would create the following directory:
<ConfigDir>/templates/ItemTemplates/Java/Dialogs/
2. Place all templates for the category under this directory.
3. Create a new project or open an existing one.
4. From the main menu click File →New Item from SlickEdit Template.
5. Verify that your new category appears in the Categories list on the Add New Item dialog box.
Caution
We do not recommend creating new categories or re-organizing categories under installed tem-
plates since the next patch or upgrade would overwrite any customizations you have made. If you
want to customize an installed template, then we suggest you copy it to the user templates direct-
ory and perform your customization on the copy.
Template Manager Operations
Use the Template Manager dialog to add, edit, and delete templates. You can show this dialog by clicking
File →SlickEdit Template Manager. Use the Categories list to select a category. Selecting a category
populates the Templates list with templates for that category.
Creating a New Category
To create a new category under the selected category, right-click in the Categories tree and select New
Category. You will be prompted for a category name. After clicking OK, you can add templates in the
new category.
Creating a New Template
To create a new template, select the category in which to create the template, then right-click in the Tem-
plates list and select New Template. You will be prompted for a template name which is used to create
the new template file. After clicking OK, you can edit the new template the lower half of the dialog.
Editing an Existing Template
To edit an existing template, select a template from the Templates list, and edit its properties in the lower
half of the dialog.
Deleting a Template
To delete a template, select the template you want to delete from the Templates list, right-click and select
Delete Template from the context menu.
Template Manager Operations
109

Template Manager Dialog
The Template Manager dialog is made up of the following elements:
•Categories - Lists a hierarchy of item categories for installed and user template items.
Note
Installed templates can be viewed but not modified.
•Templates - Lists the templates for the currently selected category. When you select a template, you
are able to edit its properties in the lower half of the dialog.
•Template file - File name of the currently selected template.
Details Tab
The Details tab of the Template Manager dialog contains the following:
•Name - Specifies the name for the template item. The name is used in the Templates list of the Add
New Item dialog.
•Description - Specifies the description for the template item. The description is displayed on the Add
New Item dialog when the template is selected.
•Default name - Specifies the default item name when using the Add New Item dialog box.
•Sort order - Specifies an order number that is used to sort the template item in relation to other tem-
plate items in a list. Used to sort template items in a category on the Add New Item dialog box. Lower
sort orders are placed ahead of higher sort order values in a sorted list.
Files Tab
Use the Files tab of the Template Manager dialog to add, edit, order, and delete files in a template. Files
are created from a template when using the Add New Item dialog, as when adding an item template to a
project.
Add, Edit, Order, and Delete operations are accessible from the buttons on the right side or from the con-
text menu inside the list of files.
Custom Parameters Tab
Use the Custom Parameters tab of the Template Manager dialog to add, edit, and delete substitution
parameters in a template. Substitution parameters are used to replace parameter names in the content of
files created from a template with a pre-defined value. Substitution parameters can also be used to form
target file names (Files tab).
Add, Edit, and Delete operations are accessible from the buttons on the right side or from the context
Template Manager Dialog
110

menu inside the list of parameters.
Template Options Dialog
Use this dialog to edit options that are common to all templates. You can launch this dialog from the Tem-
plate Manager dialog by clicking the Options button.
Global Substitution Parameters
The Global substitution parameters area on the Template Options dialog lists the substitution paramet-
ers that are common to all templates. A common substitution parameter, for example, could be "author"
where the parameter value is your name. You could then create code templates that automatically fill in a
header comment with the author's (your) name.
Add, Edit, and Delete operations are accessible from the buttons on the right side or from the context
menu inside the list of parameters.
Add File Dialog
Used to add a file to a template. To launch this dialog, right-click on a file in the Files tab of the Template
Manager dialog, and select Add File, or use the Add File button. The dialog contains the following:
•Source file name - When a file is created from a template, as when adding an item template from the
Add New Item dialog, it is created from the source file with this file name.
•Copy source file to template directory - Check this option to place a copy of the file in the current
template's directory and change the source file name to point to the new file in the template. The file is
not copied until you click OK.
•Target file name - When a file is created from a template, as when adding an item template from the
Add New Item dialog, the file name of the file that is created on disk is formed from the target file name
in the location you specify. Use the menu button to the right of this field to insert common pre-defined
substitution parameters. For example, $fileinputname$ is the item name provided on the Add New
Item dialog when adding an item template to your project.
•Replace parameters in target file content - Check this option if you want substitution parameters em-
bedded in the content of the target file to be replaced when the file is created from the template, as
when adding an item template to your project from the Add New Item dialog.
•Preview - Previews how the file would be copied when creating the file from a template as if the source
file name and target file name were fully resolved.
Add Parameter Dialog
Used to add a custom substitution parameter to a template. This dialog is launched when performing an
Add operation from the Custom Parameters tab of the Template Manager Dialog. When files are created
Template Options Dialog
111

from a template, as when adding an item template to your project from the Add New Item dialog box, you
can configure your template to replace all substitution parameters with values. For a list of pre-defined
substitution parameters, see Predefined Substitution Parameters.
The Add Parameter dialog contains the following:
•Name - This is the name of the substitution parameter WITHOUT delimiters. For example, if the delim-
iter is $(the default), then a substitution parameter that inserts a copyright string would have a name of
"copyright" and NOT "$copyright$". Do not use quotes in the name. Valid characters for a parameter
name are: A-Za-z0-9_
•Value - This is the value that the substitution parameter evaluates to when a string or file is created
from the template and has its substitution parameters replaced with values.
•Prompt for value - Check this option if you always want to be prompted for the value of a substitution
parameter. When set, the Value field becomes a default value field and is used to pre-populate the
value when you are prompted.
•Prompt string - Specifies the prompt string to display when being prompted for a substitution paramet-
er value.
Add New Item Dialog
Used to add an item to your current project, the Add New Item dialog is displayed when you click File →
New Item from SlickEdit Template.
Use the Categories list to select a category. Selecting a category populates the Templates list with tem-
plate items for that category. You can then select an item from the Templates list, enter a unique Name
for the item, and enter a Location. Click Add to instantiate the template with the name and location you
provided.
You can manage your templates from the Template Manager dialog box by choosing File →SlickEdit
Template Manager.
The Add New Item dialog contains the following:
•Categories - Lists a hierarchy of item categories for installed and user template items.
•Templates - Lists the template items for the currently selected category. When you select a template
item, a brief description for that item is displayed just above the Name field.
•Name - Enter the name of the file you want to create.
Note
For single file templates (templates that create a single file) this is the name of the file. Multi-file
templates use the name of the item entered to form names of files in the template. For more in-
formation about creating multi-file templates, see Creating a Multi-file Template.
Add New Item Dialog
112

•Location - Enter the location to which to save the item.
•Add to current project - When selected, the new item is added to the current project.
•Add - After you have selected a template item, provided a name and a location, click Add to instantiate
the template item.
Locating Templates
Installed Templates
Templates that are installed with the product are located at:
<SlickEditCoreInstallDir>/eclipse/plugins/com.slickedit.core_VERSION/sysconfig
/templates/ItemTemplates/
For example, the following directory under Windows contains item templates for the C++ language:
c:\SlickEdit
Core\eclipse\plugins\com.slickedit.core_VERSION\sysconfig\templates\ItemTempla
tes\C++\
User Templates
User templates are templates that the user creates and are located at:
<ConfigDir>/templates/ItemTemplates/
Tip
You can locate your configuration directory by clicking Help →About SlickEdit Core.
Manually Creating a Template
Code Templates are represented as files stored in specific directories. A template is composed of the
source file or files for the template and a metadata template file that provides additional information. Since
these are just files, you can write them using SlickEdit®Core.
To manually create an item template:
1. Choose a category folder under the user templates directory. Your user templates directory is at:
<ConfigDir>/templates/ItemTemplates/
Tip
You can locate your configuration directory by clicking Help →About SlickEdit Core.
All files will be created relative to the folder you choose. For more information about how templates are
Locating Templates
113

organized, see Organizing Templates.
2. Create or edit a code file (e.g. *.cpp,*.java, etc.). Replace occurrences of substitutable text with
substitution parameter names. For example, you might want to make the name of a C++ or Java class
into a substitution parameter, in which case you could use the $safeitemname$ substitution paramet-
er. For more information on substitution parameters, see Substitution Parameters.
3. Create an XML file and give it an extension of .setemplate.
4. Insert template metadata into the .setemplate file. See the example below. For more information on
template metadata elements, see Code Template Metadata File Reference.
5. Create a new project or open an existing one.
6. From the main menu, click File →New Item from SlickEdit Template.
7. Verify that your new template item appears in the Templates list on the Add New Item dialog box.
Example
The following example illustrates the metadata for an item template for a custom Java class, along with
the content of the Java source code file.
From the Add New Item dialog box, if the user entered Foo.java for the item name, then
$fileinputname$ would be replaced with "Foo" in the file name of the file created, and $safeitemname$
would be replaced with "Foo" in the Java source code file.
MyClass.setemplate:
<?xml version="1.0" ?>
<!DOCTYPE SETemplate SYSTEM
"http://www.slickedit.com/dtd/vse/setemplate/1.0/setemplate.dtd">
<SETemplate Version="1.0" Type="Item">
<TemplateDetails>
<Name>My Java Class</Name>
<Description>My custom Java class</Description>
<DefaultName>MyClass.java</DefaultName>
</TemplateDetails>
<TemplateContent>
<Files>
<File TargetFilename="$fileinputname$.java">MyClass.java</File>
</Files>
</TemplateContent>
</SETemplate>
MyClass.java:
Manually Creating a Template
114

class $safeitemname$ {
};
Creating a Multi-file Template
A multi-file template is a template item that creates more than one file.
Multi-file templates require the use of substitution parameters to ensure that file name and extension parts
are used when creating each file of the template item. For example, a C++ class typically consists of:
• A .h file that contains the class definition.
• A .cpp file that contains the class implementation.
Since you can only enter one name into the Name field on the Add New Item dialog box, you need a way
to specify the target file name for each file created by the multi-file template. In the C++ class example be-
low, the .h and .cpp files are created with the name you provide, while their extensions are preserved.
To create a multi-file item template from the Template Manager dialog, click File →SlickEdit Template
Manager.
To manually create a multi-file item template:
1. Create the item template the same way a single file template would be created. For more information
on manually creating a template item, see Manually Creating a Template.
2. Add TargetFilename attributes to each of the File elements in your template metadata file
(.setemplate). Set the value of each TargetFilename attribute to $fileinputname$.<extension>,
where <extension> is the file extension of the target file name being created. When the files are cre-
ated, their names will be based on the name you entered in the Name field of the Add New Item dialog
box. See the example below.
Example
The following example demonstrates a multi-file item template .setemplate file. The item creates C++
class header (.h) and implementation (.cpp) files.
<?xml version="1.0" ?>
<!DOCTYPE SETemplate SYSTEM
"http://www.slickedit.com/dtd/vse/setemplate/1.0/setemplate.dtd">
<SETemplate Version="1.0" Type="Item">
<TemplateDetails>
<Name>My C++ Class</Name>
<Description>My complete C++ class header and implementation</Description>
<DefaultName>MyClass.cpp</DefaultName>
</TemplateDetails>
<TemplateContent>
<Files>
Manually Creating a Template
115
<File TargetFilename="$fileinputname$.cpp">MyClass.cpp</File>
<File TargetFilename="$fileinputname$.h">MyClass.h</File>
</Files>
</TemplateContent>
</SETemplate>
Code Template Metadata File Reference
Template metadata describes the template item, its files, and how to create the template. Template
metadata files have a .setemplate extension.
The SETemplate element is the root element of a template file.
Table 6.3. Summary of Metadata Element
Element Child Elements Attributes
DefaultName - -
Description - -
File - ReplaceParamet-
ers,TargetFilename
Files File -
Name - -
Parameter - Name,Value
Parameters Parameter -
SETemplate TemplateContent,TemplateDetails Type,Version
SortOrder - -
TemplateContent Files,Parameters Delimiter
TemplateDetails Default-
Name,Description,Name,SortOrd
er
-
Code Template Metadata File
Reference
116

Elements
DefaultName
DefaultName is an optional child element of TemplateDetails. Specifies the default item name when us-
ing the Add New Item dialog box. This element becomes more important in multi-file templates where you
need to specify a DefaultName element in order to create file names from parts of the input item name.
See the example below.
•Attributes - None.
•Child elements - None.
•Parent elements -TemplateDetails.
•Value - Text value is required. The text value specifies the default name of the template item. Used to
populate the name field with an initial value on the Add New Item dialog box.
Example
The following example illustrates the metadata for an item template for a C++ class that creates a header
file (.h) and implementation file (.cpp).
<?xml version="1.0" ?>
<!DOCTYPE SETemplate SYSTEM
"http://www.slickedit.com/dtd/vse/setemplate/1.0/setemplate.dtd">
<SETemplate Version="1.0" Type="Item">
<TemplateDetails>
<Name>My C++ Class</Name>
<Description>My complete C++ class header and implementation</Description>
<DefaultName>MyClass.cpp</DefaultName>
</TemplateDetails>
<TemplateContent>
<Files>
<File TargetFilename="$fileinputname$.cpp">MyClass.cpp</File>
<File TargetFilename="$fileinputname$.h">MyClass.h</File>
</Files>
</TemplateContent>
</SETemplate>
Description
Description is a required child element of TemplateDetails. Specifies the description for the template
item. See the example below.
•Attributes - None.
Code Template Metadata File
Reference
117

•Child elements - None.
•Parent elements -TemplateDetails.
•Value - Text value is required. The text value specifies the description of the template item. The de-
scription is shown on the Add New Item dialog box.
Example
The following example illustrates the metadata for an item template for a custom Java class.
<?xml version="1.0" ?>
<!DOCTYPE SETemplate SYSTEM
"http://www.slickedit.com/dtd/vse/setemplate/1.0/setemplate.dtd">
<SETemplate Version="1.0" Type="Item">
<TemplateDetails>
<Name>My Java Class</Name>
<Description>My custom Java class</Description>
<DefaultName>MyClass.java</DefaultName>
</TemplateDetails>
<TemplateContent>
<Files>
<File>MyClass.java</File>
</Files>
</TemplateContent>
</SETemplate>
File
File is an optional child element of Files. Specifies a file for the template item. See the example below.
•Attributes:
•ReplaceParameters - Optional. Specifies whether parameter substitution takes place on the file con-
tents when the file is created from the template. Note that parameter substitution always takes place
on the TargetFilename attribute value (example: TargetFilename="$fileinputname$.cpp"). Pos-
sible values are 1(true) or 0(false). Defaults to 1(true).
•TargetFilename - Optional. Specifies the actual name of the item that is created from the template.
This attribute is especially useful when creating a multi-file template where file names of files created
from the template are assembled by parameter substitution.
•Child elements - None.
•Parent elements -TemplateContent.
•Value - Text value is required. Value is the path of a file in the template item.
Code Template Metadata File
Reference
118

Example
The following example illustrates the metadata for an item template for a C++ class that creates a header
file (.h) and implementation file (.cpp).
<?xml version="1.0" ?>
<!DOCTYPE SETemplate SYSTEM
"http://www.slickedit.com/dtd/vse/setemplate/1.0/setemplate.dtd">
<SETemplate Version="1.0" Type="Item">
<TemplateDetails>
<Name>My C++ Class</Name>
<Description>My complete C++ class header and implementation</Description>
<DefaultName>MyClass.cpp</DefaultName>
</TemplateDetails>
<TemplateContent>
<Files>
<File TargetFilename="$fileinputname$.cpp">MyClass.cpp</File>
<File TargetFilename="$fileinputname$.h">MyClass.h</File>
</Files>
</TemplateContent>
</SETemplate>
Files
Files is a required child element of TemplateContent. Specifies files for the template item. See the ex-
ample below.
•Attributes - None.
•Child elements - File.
•Parent elements -TemplateContent.
•Value - N/A.
Example
The following example illustrates the metadata for an item template for a C++ class that creates a header
file (.h) and implementation file (.cpp).
<?xml version="1.0" ?>
<!DOCTYPE SETemplate SYSTEM
"http://www.slickedit.com/dtd/vse/setemplate/1.0/setemplate.dtd">
<SETemplate Version="1.0" Type="Item">
<TemplateDetails>
<Name>My C++ Class</Name>
Code Template Metadata File
Reference
119

<Description>My complete C++ class header and implementation</Description>
<DefaultName>MyClass.cpp</DefaultName>
</TemplateDetails>
<TemplateContent>
<Files>
<File TargetFilename="$fileinputname$.cpp">MyClass.cpp</File>
<File TargetFilename="$fileinputname$.h">MyClass.h</File>
</Files>
</TemplateContent>
</SETemplate>
Name
Name is a required child element of TemplateDetails. Specifies the name for the template item. See the
example below.
•Attributes - None.
•Child elements - None.
•Parent elements -TemplateDetails.
•Value - Text value is required. The text value specifies the name of the template item. The name is
shown in the Templates list on the Add New Item dialog box.
Example
The following example illustrates the metadata for an item template for a custom Java class.
<?xml version="1.0" ?>
<!DOCTYPE SETemplate SYSTEM
"http://www.slickedit.com/dtd/vse/setemplate/1.0/setemplate.dtd">
<SETemplate Version="1.0" Type="Item">
<TemplateDetails>
<Name>My Java Class</Name>
<Description>My custom Java class</Description>
<DefaultName>MyClass.java</DefaultName>
</TemplateDetails>
<TemplateContent>
<Files>
<File>MyClass.java</File>
</Files>
</TemplateContent>
</SETemplate>
Code Template Metadata File
Reference
120

Parameter
Parameter is an optional child element of Parameters. Specifies a custom substitution parameter for the
template item. For a list of pre-defined substitution parameters, see Predefined Substitution Parameters.
See the example below.
•Attributes:
•Name - Parameter name. This is the name of the substitution parameter WITHOUT delimiters. For
example, if the delimiter is $ (the default), then a substitution parameter that inserts a copyright string
would be defined as "copyright" and NOT as "$copyright$".
•Value - Parameter value. This is the value that the substitution parameter evaluates to when a string
or File is created from the template.
•Child elements - None.
•Parent elements -Parameters.
•Value - N/A.
Example
The following example illustrates the metadata for an item template for a custom Java class.
When MyClass.java is used to create the file from the template, all occurrences of $copyright$ in the
created file will be replaced with "(c)2005-2006".
<?xml version="1.0" ?>
<!DOCTYPE SETemplate SYSTEM
"http://www.slickedit.com/dtd/vse/setemplate/1.0/setemplate.dtd">
<SETemplate Version="1.0" Type="Item">
<TemplateDetails>
<Name>My Java Class</Name>
<Description>My custom Java class</Description>
<DefaultName>MyClass.java</DefaultName>
</TemplateDetails>
<TemplateContent>
<Parameters>
<Parameter Name="copyright" Value="(c)2005-2006" />
<Parameters>
<Files>
<File>MyClass.java</File>
</Files>
</TemplateContent>
</SETemplate>
Code Template Metadata File
Reference
121

Parameters
Parameters is a required child element of TemplateContent. Specifies custom substitution parameters
for the template item. For a list of pre-defined substitution parameters, see Predefined Substitution Para-
meters.
See the example below.
•Attributes - None.
•Child elements -Parameter.
•Parent elements -TemplateContent.
•Value - N/A.
Example
The following example illustrates the metadata for an item template for a custom Java class.
When MyClass.java is used to create the file from the template, all occurrences of $copyright$ in the
created file will be replaced with "(c)2005-2006".
<?xml version="1.0" ?>
<!DOCTYPE SETemplate SYSTEM
"http://www.slickedit.com/dtd/vse/setemplate/1.0/setemplate.dtd">
<SETemplate Version="1.0" Type="Item">
<TemplateDetails>
<Name>My Java Class</Name>
<Description>My custom Java class</Description>
<DefaultName>MyClass.java</DefaultName>
</TemplateDetails>
<TemplateContent>
<Parameters>
<Parameter Name="copyright" Value="(c)2005-2006" />
<Parameters>
<Files>
<File>MyClass.java</File>
</Files>
</TemplateContent>
</SETemplate>
SETemplate
Root element. Contains all metadata about template item.
•Attributes:
Code Template Metadata File
Reference
122

•Version - Template version number. The current version is "1.0".
•Type - Template type. Valid types are: "Item".
•Child elements -TemplateDetails,TemplateContent.
•Parent elements - None.
•Value - N/A.
Example
The following example illustrates the metadata for an item template for a custom Java class.
<?xml version="1.0" ?>
<!DOCTYPE SETemplate SYSTEM
"http://www.slickedit.com/dtd/vse/setemplate/1.0/setemplate.dtd">
<SETemplate Version="1.0" Type="Item">
<TemplateDetails>
<Name>My Java Class</Name>
<Description>My custom Java class</Description>
<DefaultName>MyClass.java</DefaultName>
</TemplateDetails>
<TemplateContent>
<Files>
<File>MyClass.java</File>
</Files>
</TemplateContent>
</SETemplate>
SortOrder
SortOrder is an optional child element of TemplateDetails. Specifies an order number that is used to
sort the template item in relation to other template items in a list. Used to sort template items in a category
on the Add New Item dialog box.
If no SortOrder is specified for a template item, then the SortOrder value defaults to "0".
•Attributes - None.
•Child elements - None.
•Parent elements -TemplateDetails.
•Value - Text value is required. An integer that is greater than or equal to 0. When sorting in relation to
other template items, low SortOrder values are placed ahead of higher values in a sorted list.
Code Template Metadata File
Reference
123

Example
The following example illustrates the metadata for an item template for a custom Java class.
<?xml version="1.0" ?>
<!DOCTYPE SETemplate SYSTEM
"http://www.slickedit.com/dtd/vse/setemplate/1.0/setemplate.dtd">
<SETemplate Version="1.0" Type="Item">
<TemplateDetails>
<Name>My Java Class</Name>
<Description>My custom Java class</Description>
<DefaultName>MyClass.java</DefaultName>
<SortOrder>100</SortOrder>
</TemplateDetails>
<TemplateContent>
<Files>
<File>MyClass.java</File>
</Files>
</TemplateContent>
</SETemplate>
TemplateContent
TemplateContent is a required child element of SETemplate. Specifies the contents of a template item.
•Attributes - Optional. Delimiter used when replacing substitution parameters in content. Defaults to $.
•Child elements -Files,Parameters.
•Parent elements -SETemplate.
•Value - N/A.
Example
The following example illustrates the metadata for an item template for a custom Java class.
<?xml version="1.0" ?>
<!DOCTYPE SETemplate SYSTEM
"http://www.slickedit.com/dtd/vse/setemplate/1.0/setemplate.dtd">
<SETemplate Version="1.0" Type="Item">
<TemplateDetails>
<Name>My Java Class</Name>
<Description>My custom Java class</Description>
<DefaultName>MyClass.java</DefaultName>
</TemplateDetails>
Code Template Metadata File
Reference
124

<TemplateContent>
<Files>
<File>MyClass.java</File>
</Files>
</TemplateContent>
</SETemplate>
TemplateDetails
TemplateDetails is a required child element of SETemplate. Describes the template item. Details are
used to display the template item on the Add New Item dialog box.
•Attributes - None.
•Child elements -DefaultName,Description,Name,SortOrder.
•Parent elements -SETemplate.
•Value - N/A.
Example
The following example illustrates the metadata for an item template for a custom Java class.
<?xml version="1.0" ?>
<!DOCTYPE SETemplate SYSTEM
"http://www.slickedit.com/dtd/vse/setemplate/1.0/setemplate.dtd">
<SETemplate Version="1.0" Type="Item">
<TemplateDetails>
<Name>My Java Class</Name>
<Description>My custom Java class</Description>
<DefaultName>MyClass.java</DefaultName>
</TemplateDetails>
<TemplateContent>
<Files>
<File>MyClass.java</File>
</Files>
</TemplateContent>
</SETemplate>
Text Editing
125

Text Editing
SlickEdit®Core provides familiar operations for selecting, copying, moving, and operating on text, with en-
hanced capabilities to meet the needs of developers. This section also describes how to work with lines,
sort text, and insert literal characters into your text.
Selections
SlickEdit®Core supports three kinds of selections: character,line, and block. Each provides different
capabilities for different editing situations, and easy access for those who like to work using the keyboard
only or the mouse. For a table of keyboard shortcuts, see Selection Keys.
Selected text is rendered with a shaded background. To change the selection color, use the Color Set-
tings dialog box (click Window →Preferences, expand SlickEdit and click General in the tree, double-
click the Color setting). See Setting Colors for Screen Elements for more information on changing colors.
Tip
When using the mouse for selections, you can switch the selection type from character to block or
to line. While the left button is down, click the right button to toggle through the selection types.
Character Selections
Character selections are used to select words, parts of a line, or a range of text between a starting loca-
tion and an ending location. To create a character selection, use one of the following methods:
•Keyboard method - Position the cursor at the beginning of the text to be selected. Next, enter the se-
lect_char command (F8 or Edit →Select →Char). Then, move the cursor to the end of the text to be
selected by using the arrow keys (or by using the mouse).
•Cursor method - Press and hold Shift with any cursor key, including PgUp,PgDn,Home, and End, to
create a quick character selection. For example, Shift+Home will create a character selection from the
cursor position to the beginning of the line. Shift+End will create a selection from the cursor to the end
of the line. You can also use Ctrl+Shift+Home to create a character selection from the cursor position
to the top of the file, or Ctrl+Shift+End to create a selection from the cursor to the end of the file.
•Mouse method - Left-click and drag the text to be selected, or double-click to select a whole word. To
extend a selection to the cursor, hold down the Shift key and left-click.
Note
The key bindings are different if using the Vim emulation. See the Vim emulation chart (located in
the /docs subdirectory of your installation directory) for a listing of selection keys.
Block Selections
Selections
126

Block selections, also known as column selections, are used to process columns of text. To select a
block, use one of the following methods:
•Keyboard method - Position the cursor at the beginning of the text to be selected. Next, enter the se-
lect_block command (Ctrl+Bor Edit →Select →Block). Then, move the cursor to the end of the
block to be selected by using the arrow keys (or by using the mouse).
•Mouse method - Right-click and drag the text to be selected.
Editing a Block of Text: Block Insert Mode
Block insert mode is useful when you need to edit a block of text instead of just copying or deleting it. Ad-
ditionally, when in this mode, characters you type, as well as other edits (such as backspacing and delet-
ing), apply to the entire block/column selection.
After a block selection is created, you can enter block insert mode by simply typing some characters to in-
sert, or by entering the block_insert_mode command (Edit →Other →Block Insert Mode). If the block
selection is more than one column wide, then the initial block selection will be deleted when you type the
first character. This mode also supports use of the keys Tab,Shift+Tab, and Backspace.
To cancel out of block insert mode, press the Esc key.
The figure below shows an example of a block selection created by right-clicking and dragging to select a
block. Notice the cursor position.
Figure 6.13. Block Insert Mode: Example 1
The figure below shows how the above example changes when you type "i" at the cursor while the block
is selected.
Figure 6.14. Block Insert Mode: Example 2
Selections
127
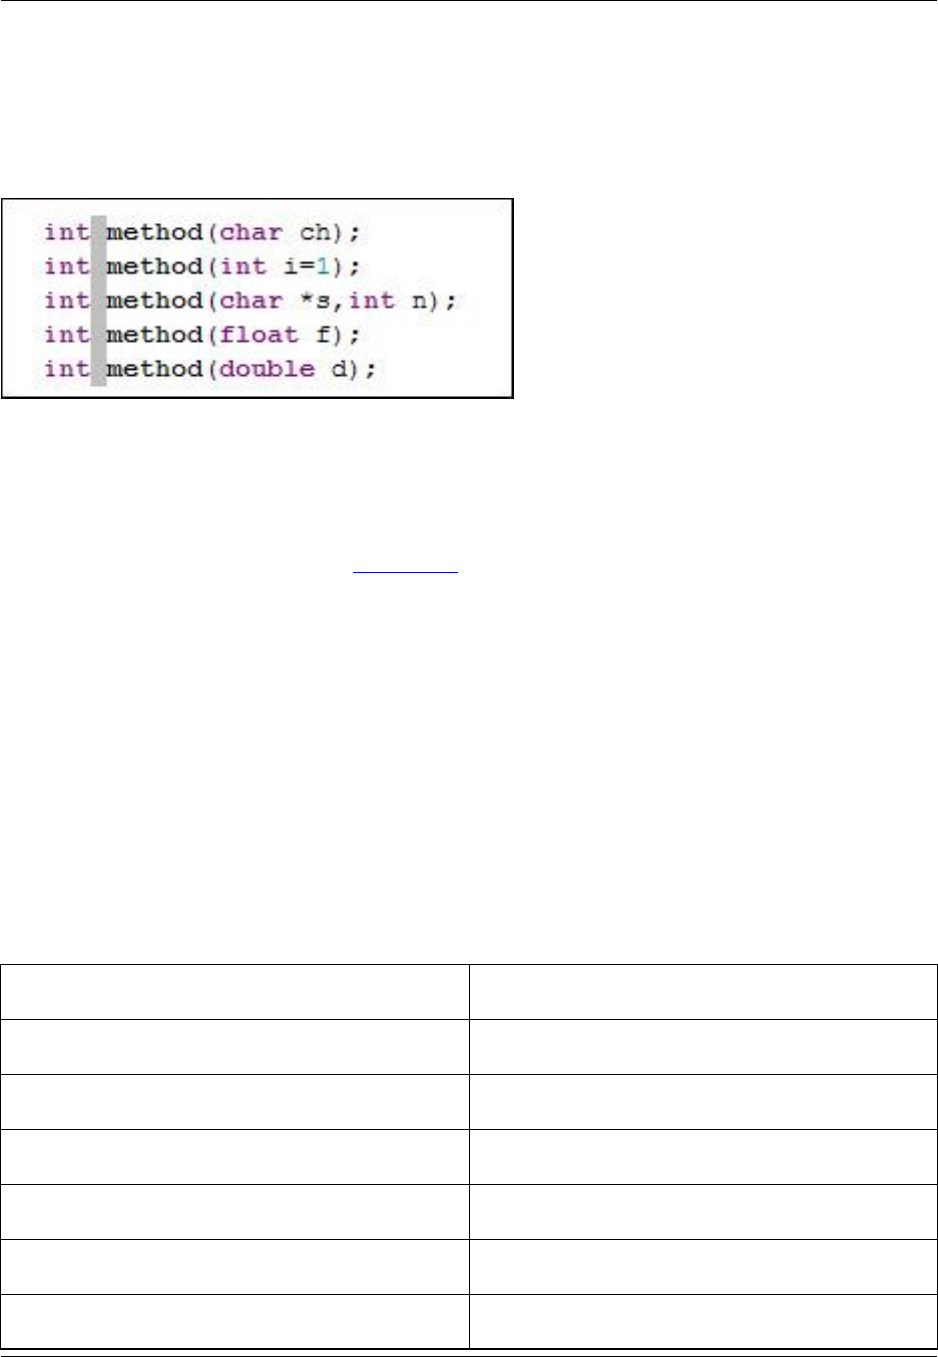
The figure below shows how the original example changes when you type "int" at the cursor while the
block is selected.
Figure 6.15. Block Insert Mode: Example 3
Line Selections
A line selection is any selection that includes one or more complete lines of text. Line selections are usu-
ally the best way to edit lines of code, and they also work with SmartPaste®, which reindents pasted lines
according to the surrounding code (see SmartPaste). To select lines, use one of the following methods:
•Keyboard method - Position the cursor at the beginning of the line to be selected. Next, enter the se-
lect_line command (Ctrl+Lor Edit →Select →Line). Then, move the cursor to the last line to be se-
lected by using the arrow keys (or by using the mouse).
•Mouse method - To select the current line, triple-left-click within a line (or click Edit →Select →Line).
To select multiple lines, left-click and drag in the space between the left edge of the buffer and the edit
window border. The mouse cursor changes to point to the upper right instead of the upper left.
Selection Keys
The following table contains the default keyboard shortcuts (CUA emulation) for selection functions.
Table 6.4. Selection Key
Key or Key Sequence Function
Ctrl+UDeselect text.
F8 Start character selection.
Ctrl+LStart line selection.
Ctrl+BStart block or column selection.
Shift+Right Start or extend selection to right.
Shift+Left Start or extend selection to left.
Selections
128

Key or Key Sequence Function
Shift+Up Start or extend selection up one line.
Shift+Down Start or extend selection down one line.
Shift+PgUp Start or extend selection up one page.
Shift+PgDn Start or extend selection down one page.
Ctrl+Shift+Home Start or extend selection to top of buffer.
Ctrl+Shift+End Start or extend selection to bottom of buffer.
Ctrl+XCut selected text.
Ctrl+CCopy selected text to clipboard.
Ctrl+VPaste clipboard.
Ctrl+Shift+VList clipboards.
Different selection styles found in non-CUA compliant editors, such as Brief, are also provided. To use a
different selection style, use the Selections Tab of the General Options dialog box (click Window →Pref-
erences, expand SlickEdit and click General in the tree, double-click the General setting).
Modifying Selected Text
After you select text, you can invoke a key or type a command that modifies the selected text. Use the in-
formation in the following table to assist you when making modifications to selected text. When two com-
mands are displayed, the first command is the command line version of the command, and the second is
the graphical version of the command.
Table 6.5. Operations for Selected Text
Command Key Sequence or Menu Item Description
mou_click_copy Ctrl+LDrags and copies the selected
text. Click within the selected text
and hold the left button down
while moving the mouse to a new
location. Line selections are inser-
ted after the current line by de-
fault. If you want line selections
inserted before the current line,
Selections
129

Command Key Sequence or Menu Item Description
change the line insert style. To
access the line insert style, click
Window →Preferences, expand
SlickEdit and click General in the
tree, then double-click the Gener-
al setting. On the General Options
dialog, select the More Tab.
mou_move_to_cursor Ctrl+RMoves the selected text to the
cursor.
mou_copy_to_cursor Ctrl+Shift+RCopies the selected text to the
cursor.
mou_click L Left click Drags and moves the selected
text. You must click within the se-
lected text, and keep the left but-
ton down while moving the mouse
to a new location.
list_clipboards Ctrl+Shift+VAllows you to select a clipboard
from a list of the most recently
used (15 is the default maximum)
clipboards to insert at the cursor.
copy_to_clipboard Ctrl+CCopies selected text to the clip-
board.
append_to_clipboard Ctrl+Shift+CAppends selected text to the clip-
board.
append_cut Ctrl+Shift+XDeletes the selected text and ap-
pends it to the clipboard.
copy_to_cursor None Copies selected text to the cursor.
Line selections are inserted after
the current line by default. If you
want line selections inserted be-
fore the current line, change the
line insert style. You can change
the line insert style: Click Window
→Preferences, expand SlickEd-
it and click General in the tree,
then double-click the General set-
ting. On the General Options dia-
Selections
130

Command Key Sequence or Menu Item Description
log, click the More Tab, then set
the Line insert style to Before.
fill_selection,gui_fill_selection Edit →Fill Fills the selected text with a char-
acter.
indent_selection Tab Indents the selected text by the
indent for each level or by one tab
stop. Indenting will be with tab or
space characters depending upon
whether the Indent with tabs
check box is on.
unindent_selection Shift+Tab Unindents each line of selected
text by the indent for each level or
by one tab stop. Not all editing
modes have an indent for each
level.
lowcase_selection Edit →Other →Lowcase Converts the selected text to
lowercase.
upcase_selection Edit →Other →Upcase Converts the selected text to up-
percase.
shift_selection_left Shift+F7 Shifts the text within the selection
to the left. Supports the line and
block text selection methods. If a
character selection is used, it is
converted to a line selection.
shift_selection_right Shift+F8 Shifts the text within the selection
to the right. Supports line and
block selections. If a character se-
lection is used, it is converted to a
line selection.
overlay_block Edit →Other →Overlay block Overlays selected text at the curs-
or. Supports block selection only.
adjust_block Edit →Other →Adjust block Overlays selected text at cursor
and fills the source selected text
with blanks. Supports block selec-
tion only.
reflow_selection Source →Format Selection Word-wraps the text within the se-
Selections
131

Command Key Sequence or Menu Item Description
lected area. Line selections are
word-wrapped with current margin
settings. Block selections are
word-wrapped within the columns
of the block. Character selection
is not supported.
execute_selection Alt+=Executes each line or sub-line of
the selected text as if entered on
the command line.
put <filename>,
gui_write_selection
None Writes the selected text to file
name. Use File →Insert a File to
insert a file.
append <filename>,
gui_append_selection
None Appends the selected text to the
file’s file name.
sort_within_selection None Sorts lines within a selected area.
sort_on_selection None Sorts lines of text based on text
within columns specified.
add None Adds selected text and inserts
result below the last line of the se-
lection. Addition is performed for
each adjacent line. If no operator
exists between two adjacent num-
bers, addition is assumed.
align_selection_left None For block selections only (see
Block Selections), aligns the text
enclosed in the selection to the
left edge of the selection.
align_selection_center None For block selections only (see
Block Selections), centers the text
enclosed in the selection.
align_selection_right None For block selections only (see
Block Selections), aligns the text
enclosed in the selection to the
right edge of the selection.
Selections
132

Adding Numbers to a Selection: Enumeration
You can automatically add incrementing numbers to a selection of code by using the enumerate com-
mand. To configure enumeration properties, from the main menu click Edit →Other →Enumerate. For a
list of the options that are available on the Enumerate dialog, see Enumerate Dialog.
Counting Selected Lines and Characters
SlickEdit®Core automatically counts the number of lines and characters in a selection. This is useful to
measure the length of a word or string, or the number of lines in a function. An indicator, located in the
bottom edge of the editor, displays the following information based on your current selection:
• When nothing is selected, the indicator is dimmed and displays the text "No Selection."
• When the current selection is a character selection:
• If the character selection is contained on one line, the indicator displays the number of columns se-
lected.
Note
Because columns are "virtual", the number of columns displayed by the indicator is not necessar-
ily the actual number of characters or bytes in the selection, if the selection includes tab charac-
ters, unicode characters, or extends beyond the end of the line.
• If the character selection spans more than one line, the indicator shows the number of lines, with a
plus sign (+) to indicate if there are "extra" characters selected, or a minus sign (-) to indicate if there
are fewer characters selected, depending on the start and end columns of the selection.
• When the current selection is a line selection, the indicator displays the number of lines.
• When the current selection is a block selection, the indicator displays the size of the block in the
format Lines x Columns.
Click on the indicator, or use the select_toggle command on the SlickEdit Core command line, to create
successively larger common selections. For example, if you have a character selection, you can click on
the indicator or use select_toggle to extend the selection to include the entire word. Selections are
cycled in the following order, starting with no selection:
1. Create empty character selection
2. Select current word
3. Select current line
4. Select current code block
5. Select larger code block
6. Select current function
Selections
133

7. Select entire file
8. Deselect
Except for empty character selections and line selections, the selections are locked so that the cursor re-
mains stationary.
Setting Selection Options
Many options are available for setting your selection preferences. To access these options, from the main
menu, click Window →Preferences, expand SlickEdit and click General in the tree, then double-click
the General setting. On the General Options dialog, select the Selections Tab.
Cutting, Copying, and Moving Text
Dragging and Dropping
Selected text can be copied or moved by dragging and dropping the selected text using the left mouse
button. To set this functionality, from the main menu, click Window →Preferences, expand SlickEdit
and click General in the tree, then double-click the General setting. On the General Options dialog, select
the More Tab. Select the option Allow drag drop text.
Using Clipboards
Use clipboards to copy or move text among files that are being edited. This includes files that are being
edited, the command line, a dialog text box, or another application that supports text clipboards, such as a
word processor. When using a cut or copy command, a clipboard is created. Insert this clipboard back in-
to the buffer by pressing Ctrl+V.
Press Ctrl+Kto copy the current word to the clipboard. Then use Ctrl+Vto paste it anywhere. Pressing
Ctrl+Kmultiple times in succession creates one clipboard. All clipboard-related commands are available
on the Edit drop-down menu.
To move text between clipboards, complete the following steps:
1. Go to the beginning of a line with some text and press Ctrl+Eto erase the text to the end of that line.
2. Press Ctrl+Vto paste the text back in.
3. Move the cursor somewhere else in the buffer and press Ctrl+V. You have just made a copy of a line
of text without selecting anything first.
Pressing the same cut key multiple times in succession creates one clipboard. If you press Ctrl+Shift+K
three times to cut three words, one clipboard is created that you can insert with Ctrl+V. This is true for cut
line (Ctrl+Backspace) and erase to end of line (Ctrl+E) as well.
Tip
Cutting, Copying, and Moving
Text
134

If using Brief emulation and a clipboard is wanted when cutting text, bind the commands
cut_word,cut_end_line, and cut_line to the appropriate keys.
A stack of the last 15 (default maximum) of the most recently used clipboards is kept. You can change the
maximum number of clipboards in the General Options dialog box (click Window →Preferences, expand
SlickEdit and click General in the tree, then double-click the General setting. On the General Options
dialog, select the General Tab). To see a list of clipboards you have created, press Ctrl+Shift+V(Edit →
List Clipboards or list_clipboards command). The Select Text to Paste dialog box appears.
The numbers on the far left are used to help move the selection cursor. The number following the clip-
board type indicates the number for complete or partial lines of text in the clipboard.
Only clipboards of one line can be inserted into the command line or text box. Both Ctrl+Vand
Ctrl+Shift+Vkey sequences insert clipboard text into the text area or the command line. The result of in-
serting a clipboard into the text area varies depending on the clipboard type.
A LINE type clipboard is inserted after the current line by default. If you want LINE type clipboards inser-
ted before the current line, change the line insert style (click Window →Preferences, expand SlickEdit
and click General in the tree, then double-click the General setting. On the General Options dialog, select
the More Tab). A BLOCK type clipboard is inserted before the current character and pushes over all text
intersecting with the block. No lines are inserted. A CHAR type clipboard is inserted before the current
character.
Use the View button to look at the complete text for the selected condensed clipboard. While viewing the
clipboard, you can copy all or part of it to the operating system clipboard.
Setting the Maximum Number of Clipboards
By default, a stack of your last 50 clipboards are kept, any one of which can be pasted with Ctrl+Shift+V.
To change the maximum number of clipboards saved, from the main menu, click Window →Prefer-
ences, expand SlickEdit and click General in the tree, then double-click the General setting. On the
General Options dialog, select the More Tab. Enter a value in the Max clipboards spin box.
Working with Lines
There are several options for working with lines as described in the following sections.
Clicking Past the End of a Line
To have the ability to place the cursor past the end of a line, from the main menu, click Window →Pref-
erences, expand SlickEdit and click General in the tree, then double-click the General setting. On the
General Options dialog, select the General Tab. Select the option Click past end of line.
Highlighting the Current Line
The current line can be highlighted by having a dotted box drawn around it, making the cursor easier to
see. You can choose to make the highlight a box only, or you can choose a box with tab stops, syntax in-
Working with Lines
135

dent levels, or decimal points shown. To set these options, from the main menu, click Window →Prefer-
ences, expand SlickEdit and click General in the tree, then double-click the General setting. On the
General Options dialog, select the General Tab. Select one of the Current line highlight options. Click
on the color boxes to change the box color or the column marker color.
Preserving the Column on Top/Bottom
You can specify that the top_of_buffer (Ctrl+Home) and bottom_of_buffer (Ctrl+End) commands do
not change the column position unless already at the top or bottom of the buffer. To set this option, from
the main menu, click Window →Preferences, expand SlickEdit and click General in the tree, then
double-click the General setting. On the General Options dialog, select the More Tab. Select the option
Preserve column on top/bottom.
Setting the Line Insert Style
To set the line insert style, from the main menu, click Window →Preferences, expand SlickEdit and
click General in the tree, then double-click the General setting. On the General Options dialog, select the
More Tab. Set the Line insert style to Before or After. When the line insert style is set to Before, lines
of text are inserted before the current line. When the line insert style is set to After, lines of text are inser-
ted after the current line.
Sorting Text
SlickEdit®Core uses a stable quicksort algorithm to sort text. It is recommended that at least half the text
be in memory for best speed results. To sort text, from the main menu, click Tools →Sort. The Sort dia-
log box is displayed.
Figure 6.16. Sort Dialog
Sorting Text
136

The following options are available:
•Type of sort - Choose the type of sort that you prefer from the following options:
•Sort buffer - When this option is selected, the entire contents of the buffer that you are working in
are sorted.
•Sort on selection - When this option is selected, each line intersecting with the selection is sorted
based on the selected column. Sort on selection and Sort within selection have the same effect
except when sorting a block or column selection.
•Sort within selection - When this option is selected, the selected text is sorted. Text outside a block
or column selection is not moved. The Sort on selection and Sort within selection options have
the same effect except when sorting a block or column selection.
•Order - Choose Ascending or Descending. In an ascending sort, the lowest text item sorted is placed
at the top.
•Numeric sort - When this option is selected, a numeric comparison is performed.
•Remove duplicate lines - When this option is selected, it removes adjacent lines that are identical.
This option does not fully support column selection (it always compares complete lines).
•Case sensitive - When this option is selected, the sort is case-sensitive.
Sort Commands
Sorting Text
137

To use the command line for sorting, first activate the command line by pressing Esc. Sort command syn-
tax is in the form SortCommandOptionLetter(s). The following sort commands are available:
•sort_buffer - Sorts the current buffer.
•sort_within_selection - Sorts text within a selected area. This command supports line and block se-
lections only.
•sort_on_selection - To sort on a column field, press Ctrl+Bto select an area of text, then invoke the
command sort_on_selection. This command supports line and block selections only.
The table below describes the OptionLetter(s) that you can use with each command.
Table 6.6. Sorting Options
Option Description
ASort in ascending order.
DSort in descending order.
ICase insensitive sort (ignore case).
ECase sensitive sort (exact case which is the de-
fault).
-N Numeric sort. C-style floating point numbers with up
to 32-digit mantissa are supported.
-F File name sort.
Inserting Literal Characters
Characters can be inserted at the cursor location in the current buffer. This is useful if you wish to insert
non-ASCII characters (keys not on the keyboard). To insert a literal character, from the main menu, click
Edit →Insert Literal, or use the insert_literal command. The Insert Literal dialog is displayed.
The text box to the right of the Character Code label displays the character. The spin box displays the
decimal character code, hex character code, or ASCII character depending on which of those options is
selected.
Inserting Literal Characters
138

Color Coding
This feature is designed to combine current line coloring, modified line coloring, and language-specific
coloring. By default, the fundamental mode colors the current line. Languages with specific support
already defined (i.e. keywords, comments, etc.) use language-specific coloring.
If modified line coloring is active, the left edge of the window displays a different color depending on
whether the line was inserted or modified. To change the colors, use the Color Settings dialog box. For
more information see, Colors.
When current line color coding is active, language-specific color coding for the current line is not view-
able.
If you want to know what lines have been modified, bind the command color_modified_toggle to a key.
It will toggle display of modified lines in a different color on/off. You can bind the color_toggle command
to a key as well. This command toggles between current line, modified line, and language specific color-
ing individually.
Resetting Modified Lines on Save
SlickEdit®Core can clear the modified and inserted line color when you save a file. To activate this fea-
ture, select the Reset line modify option on the Save Tab of the File Options dialog (Window →Prefer-
ences, expand SlickEdit and click General in the tree, then double-click the File Options setting.
Adding Color-Coded Keywords to Supported Languages
You can add color-coded keywords to a supported language. To add color-coded keywords to a suppor-
ted language, complete the following steps.
1. From the main menu, click Window →Preferences, expand SlickEdit and click General in the tree,
then double-click the Color Coding setting.
2. Select the Tokens Tab.
3. Choose the language you want to modify from the Lexer Name combo box list.
4. Click New.
5. Enter the new keywords separated with a space character.
6. Click OK.
7. Click OK on the Color Coding Setup dialog box.
For more information, see Color Coding Configuration.
Resetting Modified Lines on
Save
139

Creating Color Coding for a New Language
To create color coding support for your language, complete the following steps:
1. From the main menu, click Window →Preferences, expand SlickEdit and click General in the tree,
then double-click the Color Coding setting. The Color Coding Setup dialog box is displayed.
2. Select the Tokens Tab, then click New. The Enter New Keywords dialog box is displayed.
3. Enter the new lexer name. Usually this is a language name such as C or Java. Click OK.
4. On the Tokens tab, make sure the new keyword is selected, then correct the ID start characters.
These are valid characters which can be the start of an identifier.
5. Correct the ID follow characters. These are additional characters which are valid after the start ID
character. For example, digits are usually allowed in identifiers, but not as the first character of an iden-
tifier.
6. Select the Comments Tab. This lists the comments currently defined and allows you to define new
multi-line and line comments. For each comment, click New to add a line or multi-line comment.
7. Select the Numbers Tab to display various numeric style options.
8. Select the Strings Tab to display various string literal options.
9. If you have not found all the options you need, click the Language Tab. This displays some more ad-
vanced language-specific options.
1
0.
Click OK on the Color Coding Setup dialog box.
Color Coding Configuration
The Color Coding Setup dialog provides the capability to specify colors for identifying your code. To con-
figure color coding, from the main menu, click Window →Preferences, expand SlickEdit and click Gen-
eral in the tree, then double-click the Color Coding setting. The Color Coding Setup box is displayed.
Figure 6.17. Color Coding Setup: Tokens Tab
Color Coding Configuration
140

Select the language that you wish to work with from the Lexer name drop-down list.
Click New to prompt for a lexer name to start a new language-specific color coding definition (see Creat-
ing Color Coding for a New Language).
Click Colors at the bottom of the dialog to display the Color Settings dialog, which allows you to specify
the color for color coding elements and other editor elements (see Setting Colors for Screen Elements).
The tabs on the Color Coding Setup dialog are described in the section Color Coding Setup Dialog.
Advanced Color Coding Configuration
The vslick.vlx file defines language-specific coloring support. For information about modifying this file,
Color Coding Configuration
141

and how to create a new lexer name, see VLX File and Color Coding.
Color Coding Settings
There are several extension-specific settings that can be made to affect Color Coding. To access these
options, from the main menu, click Window →Preferences →SlickEdit →General, then double-click
the File Extension Setup setting. On the Extension Options dialog, select the extension you wish to work
with from the Extension drop-down list, then select the Advanced Tab.
Select from the following options:
•Lexer name - Specifies which lexer to use to recognize elements to use to be colored.
•Color Coding - Displays the Color Coding Setup dialog box allowing modification of language-specific
color coding for the current language. For more information, see Color Coding Setup Dialog.
•Modified lines - Color-codes the modified lines.
•Current line - Color-codes the current line.
Color Coding Settings
142

Syntax Indent and SmartPaste®
Syntax Indent and SmartPaste are two of the many SlickEdit®features designed to decrease typing, im-
proving your coding efficiency. Syntax Indent automatically indents code to the correct levels. There are
two ways that code can be indented: by using the automatic Syntax Indent feature, and/or by using tabs.
SmartPaste reindents pasted text to the correct level based on surrounding code.
Syntax Indent
By default, if you press Enter while you are editing a source file, Syntax Indent automatically indents the
cursor to the next level if it is moved inside a structure block. For example, if you edit a C file and the
cursor is on a line containing the text for (:){ and you press Enter, a new line is inserted and the cursor is
indented four spaces in from the letter "f" in the word "for".
To change the Syntax Indent spacing, complete the following steps:
1. Click Window →Preferences, expand SlickEdit and click General in the tree, then double-click the
File Extension Setup setting. The Extension Options dialog is displayed.
2. From the Extension drop-down list box, select the file extension that you wish to affect.
3. Select the Indent Tab.
4. Change the value in the Syntax indent text box.
Indenting with Tabs
By default, when you press the Tab key to indent, literal spaces are inserted. If you plan to indent your
code using tab characters, or if you will be editing files that already contain tabs, you will need to specify
these preferences.
To activate tab indenting, from the main menu, click Window →Preferences, expand SlickEdit and click
General in the tree, then double-click the File Extension Setup setting. On the Extension Options dialog,
select the Indent Tab. From the Extension drop-down list box, select the file extension that you wish to
affect. Then select the option Indent with tabs.
Setting Tab Spacing
The default value of the Tab key is eight spaces. You can change this value in the Tabs text box. In gen-
eral, the Tabs setting should match the Syntax indent value. For example, by default for the C language
extension, the Syntax indent value is set to 4, and the Tabs setting is set to +4. The plus sign (+) indic-
ates that the editor will automatically expand the stops by four. By default, the Tabs setting is "+4", which
indicates that the default tab setting is eight spaces.
To work properly with the Sun Java API source code, the tab stops need to be in increments of eight, but
the syntax indent must be set to four. The Syntax Indent affects not only the Tab key, but also the number
of spaces to indent for each code block level.
Syntax Indent
143

Note
• When you change the tab stops and indent for all languages except COBOL, change the Tabs
text box to +<value> where value is the same value used for the Syntax indent text box.
The Tabs text box only affects how tab characters are expanded on the screen. This does not
affect the indent when pressing Tab, or the amount of indent for statements inside a code
block.
• For COBOL files, the Tabs text box also affects the Tab key. Syntax Indent still affects the in-
dent for each code block level.
Setting Tab to Indent Selections
For the Tab key to indent the selection when text is selected, select the option Indent selection when
text selected.
Setting Tabs for the Current File
To set tabs for the current buffer only, use the Tabs dialog box ( Format →Tabs or gui_tabs command).
You can set tabs in increments or at specific column positions. For example, to specify an increment of
three, enter +3 in the text box. To specify columns, you could enter 182744to specify tab stops that
have absolute locations.
By default, the Tab key inserts enough spaces to move the text to the next tab stop. The Shift+Tab key
combination deletes enough spaces to move the text to the previous tab stop. See Redefine Common
Keys Dialog for information on other Tab and Shift+Tab key bindings. Regardless of the Tab key binding,
if the extension-specific setting Indent with tabs is on, a physical tab character is inserted (see Indenting
with Tabs).
Setting the Backspace Unindent Style
By default, pressing the Backspace key when the previous character is a tab, causes the rest of the line
to be moved to the previous tab stop. If you want your Backspace key to delete through tab characters
one column at a time, click Window →Preferences, expand SlickEdit and click General in the tree, then
double-click the Redefine Common Keys setting. Select the Hack tabs backspace option. See Redefin-
ing Common Keys for more information.
SmartPaste®
When pasting lines of text into a source file, SmartPaste reindents the added lines according to the sur-
rounding code. For example, if editing a C or C++ file, select some lines with a line selection (Ctrl+L),
copy them to the clipboard (Ctrl+C), then paste them inside a for loop block (Ctrl+V). The added lines
are correctly indented according to the for loop's indent level. SmartPaste will work for character/stream
selections; however, the last line of the selection must include the end-of-line character. Use the mouse to
copy and move lines and still take advantage of SmartPaste.
SmartPaste®
144


Completions
Completions save keystrokes as you are typing code by providing a way to automatically complete par-
tially-typed text. There are several types of completions in SlickEdit®Core:
•Auto-Complete - A feature set that includes syntax, keyword, and symbol completions.
•Word Completion - Completions that work for any text in an editor window.
•Command Line Completions - Completions for command line entries.
Auto-Complete
Auto-Complete offers suggestions for how syntax, keywords, symbols, and lines of code may be com-
pleted by the editor. It works by looking at the word prefix under the cursor and using several different
queries to find and suggest completion options. Each of these types of suggestions can be individually
turned on or off, allowing you to customize auto-completion to your liking.
Using Auto-Complete
Auto-Complete is activated when the editor is idle for a short period of time and there is a partially-typed
word under the cursor. When Auto-Complete is active, the available completions are indicated in several
ways:
• A light bulb appears on the left edge of the editor.
• A list of completions appears under the word being typed.
• The rest of the completed word or statement appears to the right of the cursor.
Figure 6.18. Example of Auto-Complete
Auto-Complete
146
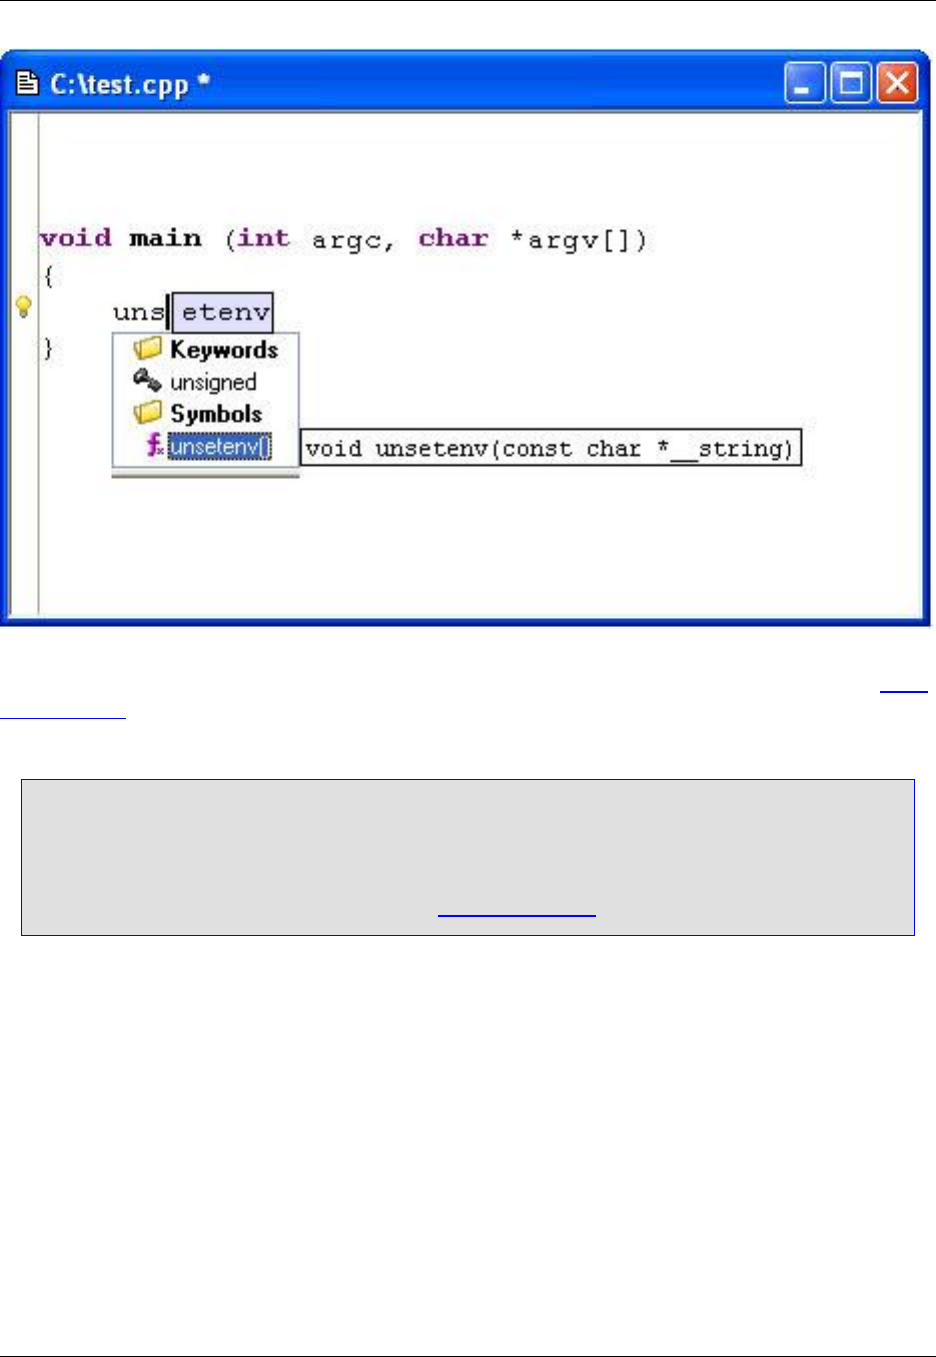
These visual hints can also be individually turned on or off through the Auto-Complete options. See Auto-
Complete Tab.
Tip
Auto-Complete can be activated manually by using the autocomplete command. By default, this
command is not bound to a key. Key bindings can be set with the Key Bindings dialog (click Win-
dow →Preferences, expand SlickEdit and click General in the tree, then double-click the Key
Bindings setting). For more information, see Creating Bindings.
To cancel out of Auto-Complete mode, use the Escape key.
To scroll through the items in the completion list, use the Up,Down,PgUp, and PgDn keys. Optionally,
you can use Tab and Shift+Tab to cycle through the choices.
If a completion is selected, you can press Space,Enter, or any non-identifier key to cause the selected
completion to be inserted along with the character typed (except for Enter).
Use Shift+Space to insert a real space rather than the completion. Use Ctrl+Shift+Space to insert the
next character of the currently selected completion. This can be useful if you only want part of the word
being completed and you do not want to type it yourself. Optionally, pressing Tab will cause auto-
completion to attempt to insert the longest unique prefix match of all its completions.
If the completion has comments, you can use Shift+PgDn,Shift+PgUp,Shift+Home,orShift+End to
page through the comments. Use Ctrl+Cto copy the comments for the current item to the clipboard.
Auto-Complete
147

Auto-Complete options can be configured for each file extension type. This allows you to activate and de-
activate particular features on a per-language basis. To change Auto-Complete options, see Auto-
Complete Tab.
Word Completion
Word Completions search the current editor window for text matching the prefix at the current cursor posi-
tion. Most completions are driven by Context Tagging®, matching symbols such as function names and
variables. Word Completions can match any text in the current editor window, including comments.
Auto-Complete also lists word completions, but it is often faster to use key bindings to search for and in-
sert Word Completions. The following is a list of commands for these operations and the key bindings in
the CUA emulation. See Creating Bindings to change them.
•complete_prev (Ctrl+Shift+Comma) – Searches backwards through the current editor window to find
a match.
•complete_next (Ctrl+Shift+Dot) – Searches forwards through the current editor window to find a
match.
•complete_more (Ctrl+Shift+Space) – Adds subsequently more text from the matched line to the curs-
or position, allowing you to extend the amount of text inserted.
The following example of code shows how word completion is used:
if (pWindowView->pBuffer->LineNum>100) {
pW<Cursor is Here>
}
Press Ctrl+Shift+Comma,Ctrl+Shift+Space,Ctrl+Shift+Space to obtain the following result:
if (pWindowView->pBuffer->LineNum >100) {
pWindowView->pBuffer->LineNum <Cursor is Here>
}
Pressing Ctrl+Shift+Comma matched "pWindowView" in the previous line. If you wanted to match an
earlier occurrence beginning with "pW", press Ctrl+Shift+Comma to find the next previous match. This
also changed "pW" on the second line to the matching text, "pWindowView". Pressing Ctrl+Shift+Space
extends that selection, matching "pWindow->pBuffer". Pressing Ctrl+Shift+Space, again, extends the se-
lection to include "pWindow->pBuffer->LineNum".
You can easily see how this would save time typing in multiple lines that access structs, class members,
arrays, etc.
Configuring Completion Settings
Word Completion
148

To configure Auto-Complete settings, from the main menu, click Window →Preferences, expand
SlickEdit and click General in the tree, then double-click the File Extension Setup setting. Choose the
extension you wish to work with from the Extension drop-down list, then select the Auto-Complete tab.
For a listing of these options and descriptions, see Auto-Complete Tab.
Aliases
149
Aliases
Aliases are identifiers that you can quickly type which are then expanded into snippets of text. You can
use aliases for commonly typed function names, statements, or to insert several lines of code. There are
two types of aliases in SlickEdit®Core:
•Directory Aliases - Directory aliases are short identifiers for long directory names. They save you from
having to type long path names when you are prompted for a file name or directory.
•Extension-Specific Aliases - These aliases are set up on a per-language basis, and are useful for in-
serting frequently used text, such as comment headers, into your code.
Directory Aliases
Directory aliases take advantage of the fact that most users are constantly opening files from a small
number of directories throughout the day. By using a directory alias when opening a file or changing dir-
ectories, you do not have to type in long paths or click the mouse repeatedly in the Directory list box.
After typing the alias identifier, directory aliases can be expanded by pressing Ctrl+Space. These aliases
are stored in the file alias.slk.
Note
SlickEdit Core doesn't modify Eclipse's file management-related dialogs such as File →Open,
File →Save As. Therefore, directory aliases are not available in these dialogs.
Defining a New Directory Alias
Directory aliases typically consist of a short abbreviation of the last name in a long directory path. For ex-
ample, if you had a directory called c:\version20\src\project2\, a good alias name might be p2.
For compiler include files, define an alias called inc (vinc in Microsoft Visual C++, binc in C++ Builder®,
or ginc for GCC) if you have multiple compilers.
To define a new directory alias, complete the following steps:
1. From the main menu, click Window →Preferences, expand SlickEdit and click General in the tree,
then double click the Alias setting. The Select Alias File dialog appears.
Figure 6.19. Select Alias File Dialog
Directory Aliases
150
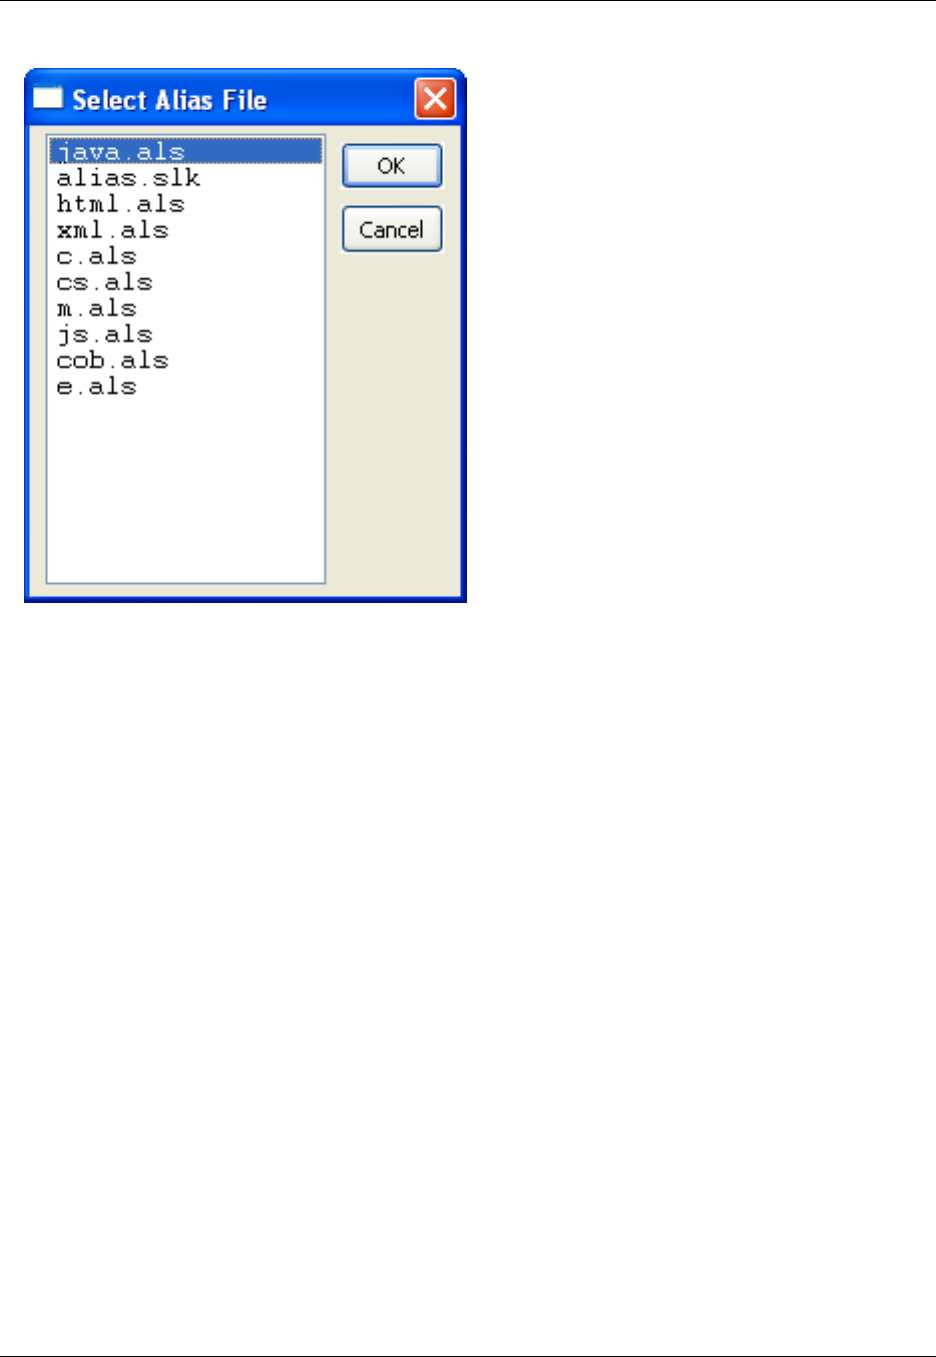
2. Select alias.slk and click OK. The Alias Editor dialog appears.
3. Click New, then type the characters you wish to use for an identifier in the Alias Name text box.
4. Click OK. The identifier you entered is now displayed in the list box in the Alias Editor dialog.
5. Make sure your new identifier is selected, then in the large text box to the right, enter the alias value by
typing in the directory path that you want the identifier substituted with.
6. Click OK.
Using Directory Aliases
After the directory aliases are defined, you can use them in any text box or buffer, including the command
line and fields on the Open and Change Directory dialogs. For example, to open a file from the command
line using a directory alias, complete the following steps:
1. On the command line, type e(for "edit").
2. Type the alias name (identifier) for the directory where the file resides.
3. Press Ctrl+Space to expand the alias.
4. Type the name of the file to open.
5. Press Enter.
Embedding Environment Variables in Directory Aliases
Directory Aliases
151

If you keep source code in a version directory tree, you might want to set an environment variable and
embed the environment variable in the alias value. For example, if you have a directory named
c:\version20\src\project2\, define a p2 alias and give it a value such as
%VERSION%\src\project2\. Type the following command on the command line to set or create the VER-
SION environment variable:
set VERSION=c:\version20
For more information about setting environment variables, see Environment Variables.
Extension-Specific Aliases
You can set up aliases for any frequently used text, such as comment headers. Extension-specific aliases
are set up on a per-language basis. Each extension can have one alias file, allowing aliases to be defined
that do not affect other extensions.
After typing the alias identifier, extension-specific aliases can be expanded by pressing Ctrl+Space
(codehelp_complete command). Extension-specific aliases are stored in a file that you can specify and
typically have the extension .als.
Tip
• If the alias is a Syntax Expansion modification, you can simply press Space to expand the ali-
as. See Syntax Expansion for more information.
• An Auto-Complete option is available to show a tooltip of the matching alias for the word under
the cursor. Click Window →Preferences, expand SlickEdit and click General in the tree, then
double-click the File Extension Setup setting. Choose the Extension from the drop-down list,
then select the Auto-Complete Tab and check the option Alias expansion. See Completions
for more information.
Creating an Extension-Specific Alias
When you define a new alias for a file extension, each time that you open or create a file with that exten-
sion, the aliases will be available.
Choosing the Alias File
Before defining a new alias, you must specify the file in which the alias is to be stored. The quickest way
to do this is to click Window →Preferences, expand SlickEdit and click General in the tree, then
double-click the Alias setting and pick an alias file from the predefined list. After you select the alias file,
the Alias Editor dialog appears, allowing you to create the aliases.
If you wish to specify your own file to store aliases, or if you are using an extension that does not have a
predefined file in the list, complete the following steps:
Extension-Specific Aliases
152

1. From the main menu, click Window →Preferences, expand SlickEdit and click General in the tree,
then double-click the File Extension Setup setting. The Extension Options dialog appears.
2. Select the General Tab.
3. In the Extension drop-down list, select the file extension that you wish to work with.
4. Note the Alias file name. If you wish to store the aliases in another file, type a new file name with the
.als extension here.
5. Click Aliases. The Alias Editor dialog appears.
Using the Alias Editor
After choosing the file used to store aliases, use the Alias Editor dialog to create or edit extension-specific
aliases. The dialog is pictured below.
Figure 6.20. Alias Editor Dialog
Extension-Specific Aliases
153

Alias names are displayed in the list box at the top left of this dialog box. The value for the selected alias
name is displayed in the large text box at the top right of this dialog. Click Delete to remove a selected ali-
as and its value.
To create a new alias, complete the following steps:
1. Click New, then type the characters you wish to use for an identifier in the Alias Name text box.
2. Click OK. The identifier you entered is now displayed in the list box in the Alias Editor dialog.
3. Make sure your new identifier is selected, then in the large text box to the right, enter the alias value by
typing in the text that you want the identifier substituted with.
Tip
Extension-Specific Aliases
154

• You can use special escape sequences in your aliases, which will be substituted upon expan-
sion with certain values. See Alias Escape Sequences for more information.
• You can also specify parameters in alias values. When the alias is expanded, you are promp-
ted with a dialog to input the values. See Parameter Prompting for more information.
4. Click OK.
Alias Escape Sequences
Alias escape sequences can be used in alias values. When the aliases are expanded, the sequences are
replaced with their values. The following table contains a list of the escape sequences that can be used
for aliases. For examples, see Escape Sequence Examples below.
Table 6.7. Alias Escape Sequences
Escape Sequence Description
%\c Places the cursor. This sequence can be used mul-
tiple times in the same alias value in order to create
a series of "hot spots" within the alias. After the ali-
as is expanded, press Ctrl+[(next_hotspot com-
mand) to jump to the next cursor stop.
%\d Inserts the date (locale-dependent).
%\e Inserts the date in MMDDYY format.
%\t Inserts the time (locale-dependent).
%% Inserts a percent character.
%\f Inserts the current file name.
%\n Inserts the current function name.
%\o Inserts the current function name with signature.
%\i Indents.
%\b Unindents.
%\xColumnNumber Moves the cursor to the specified column number.
%\x+Increment Increment column by ddd.
Extension-Specific Aliases
155

Escape Sequence Description
%\x-Increment Decrement column by ddd.
%\s Preserves trailing spaces - place at the end of a
line.
%\l Preserves leading spaces - place at the beginning
of the first alias line.
%(ParameterName)Parameter replacement. See Parameter Prompting.
%\m MacroName ArgumentList%Calls the specified Slick-C®macro with a specified
optional argument.
%EnvironmentVariable%Inserts the value of the environment variable spe-
cified.
%\m sur_text% Indicates where the text to be surrounded will be
placed. See Dynamic Surround and Surround With
for more information.
Escape Sequence Examples
The following table contains some examples of using escape sequences in alias values:
Table 6.8. Escape Sequence Examples
Alias Name and Description Value
comment - A header comment to have the date
and time inserted.
/************************************************/
/* Date: %\d Time: %\t */
/***********************************************/
if - A simple if statement, with indenting, support for
surround, and a cursor position.
if(%\c){
%\i// Comment goes here
%\i%\m sur_text%
}
ifelse -Anif/else statement with indenting and sev-
eral cursor hot spots.
if(%\c){
%\i%\c
} else {
%\i%\c
}
Extension-Specific Aliases
156
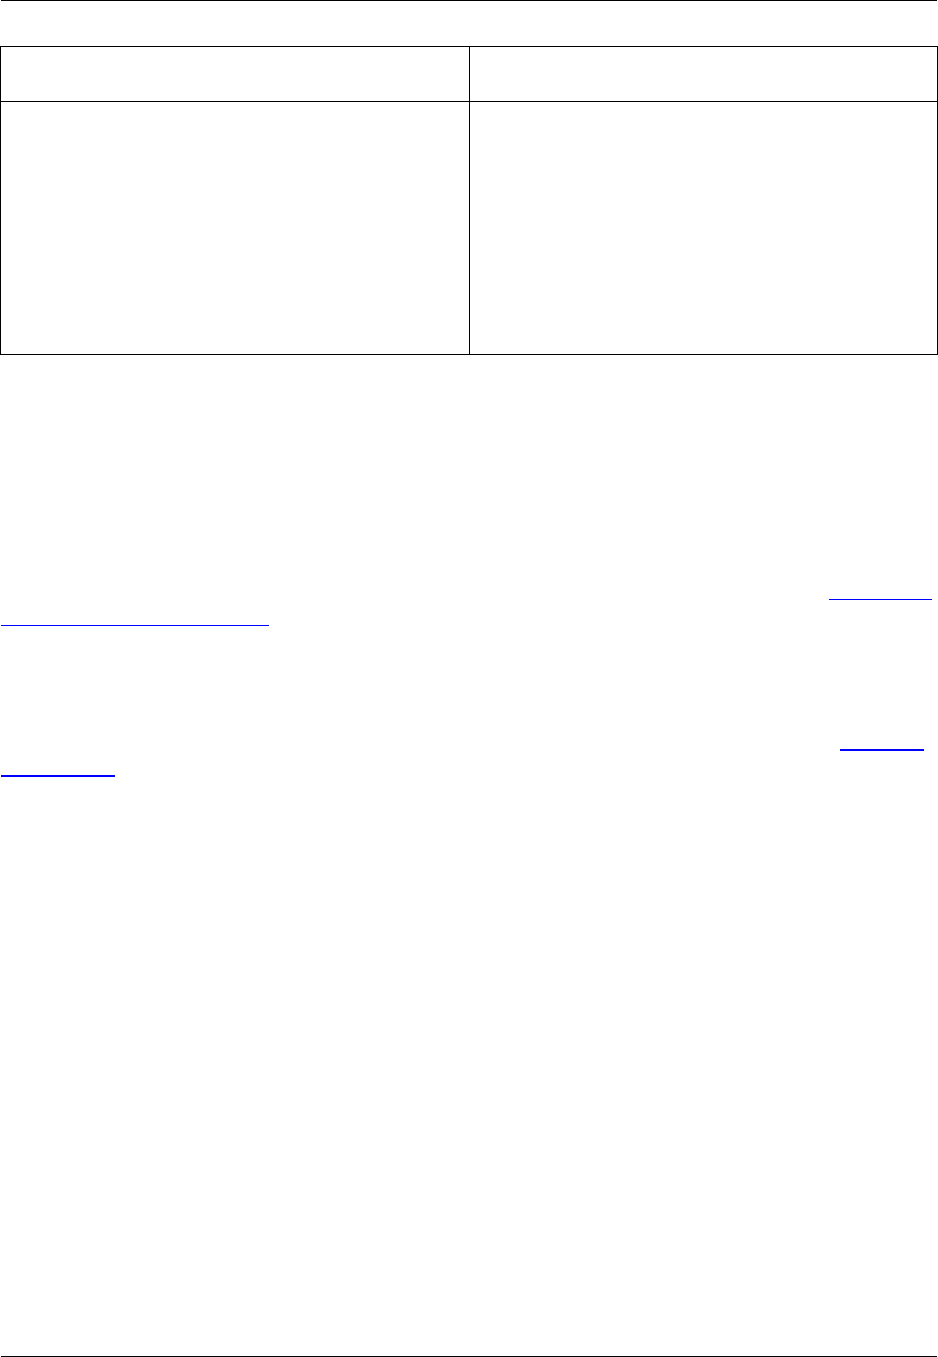
Alias Name and Description Value
wm - A WinMain function template with indenting
and a cursor position. int APIENTRY WinMain(HANDLE hInstance,
HANDLE hPrevInstance,
LPSTR lpszCmdParam,
int nCmdShow)
{
%\i%\c
}
Parameter Prompting
Parameters can be set up for aliases, so that when the alias is expanded, you are prompted with a dialog
to input the values. This is useful for reducing even more key strokes for repetitive tasks when using ali-
ases that may require different values each time they are used.
To use parameter prompting, first define the parameters, then use them in your alias values by typing
%(ParamName) where ParamName is the name of the parameter that you have defined (see Creating an
Alias for Parameter Prompting below). When the alias is used and expanded, the Parameter Entry dialog
will appear, prompting you for the parameter values, which will then be inserted into your text.
Creating an Alias for Parameter Prompting
To create an alias for parameter prompting, first select the alias file as described in the section Choosing
the Alias File, then use the Alias Editor to complete the following steps:
1. Click New, then enter the new alias name. In the aliases list box (on the left side of the Alias Editor),
make sure the new alias is selected.
2. Click the Add button below the Parameters group box. The Enter Alias Parameter dialog is displayed.
3. Enter the following values:
•Parameter Name - Enter the name that you wish to use in the alias value.
•Prompt - Enter the text that you wish to be prompted with. This is the label that will appear on the
Parameter Entry dialog that prompts for values after the alias is expanded.
•Initial Value - (Optional) Enter the initial value of the parameter. This text will appear in the text field
of the Parameter Entry dialog that prompts for values after the alias is expanded.
4. Click OK.
5. If you wish to add more parameters, repeat Steps 2 through 4.
6. On the Alias Editor dialog, the Parameters group box will now display a list of the parameters that you
have added.
Extension-Specific Aliases
157

7. In the large text field on the right side of the Alias Editor, you can now type the alias value. In the
places where you want parameter prompting to occur, type %(ParamName), where ParamName is the
parameter name that you entered in Step 3.
8. Click OK when you are finished.
Example: Instantiating a Variable in Java with Parameter Prompting
In Java, instantiating variables can be a repetitive task. The following code shows a common Java code
snippet:
public class {
public static void main (String args[]) {
String x = new String( arg[0] );
}
}
You could define an alias for entering new class names with variables and arguments. That way, when
you press Enter after the third line and type and expand the alias, you will be prompted for the values.
For this alias, in the Alias Editor dialog, first define three parameters: class_name,var_name, and
arg_list. Then, enter the following text for the alias value:
%(class_name) %(var_name) = new %(class_name)( %(arg_list) );
Creating an Extension-Specific Alias from a Selection
You can create an extension-specific alias from a selection by following the steps below.
1. Select some code.
2. Right-click and select Create Alias.
3. Give the alias a name and click OK.
4. The Alias Editor dialog appears, from which you can edit the code to fine-tune, or add parameters.
Syntax Expansion
158

Syntax Expansion
Syntax Expansion is a feature designed to minimize keystrokes, increasing your code editing efficiency.
When you type certain keywords and then press the spacebar, Syntax Expansion inserts a default tem-
plate that is specifically designed for this statement. For example, if you are using the C language and
type for, press Space and the following text expansion is inserted, with the cursor location between the
parentheses:
for() {
}
Additionally, for C, C#, C++, J#, Java, and Slick-C®, after the statement is expanded, you can use the
next_hotspot command (Ctrl+[) to jump the cursor to the next part of the statement. In the case of the
for loop above, Ctrl+[would move the cursor from the group in parentheses to the code block.
The structures loop,if, and switch or case are also expanded. You do not have to type the entire
keyword for Syntax Expansion to occur. If there is more than one keyword that matches what you type, a
list of possible keyword matches is displayed. To get the C template displayed above, type ffollowed by
pressing Space.
To override the insertion of braces immediately for one line if,for,orwhile statements, type a semicolon
immediately after the keyword. For example:
if; => if ( <cursor here> ) <next hotspot>;
To override non-insertion of braces immediately for if,for,while,foreach,with,lock,fixed, and switch
statements, type an open brace immediately after the keyword. For example:
if{ => if ( <cursor here> ) { <next hotspot> }
If the default behavior of Syntax Expansion does not match your coding style, for most languages, it can
be customized. From the main menu, click Window →Preferences, expand SlickEdit and click General
in the tree, then double-click the File Extension Setup setting. Select your language extension, then click
the Options button. For more information on these options, see the topic for your language in the
Chapter 7, Language-Specific Editing chapter.
For further customization, for most languages, you can override the default keyword expansion by defin-
ing an alias for that keyword. See Extension-Specific Aliases for more information.
Syntax Expansion Settings
To access Syntax Expansion settings, from the main menu, click Window →Preferences, expand
SlickEdit and click General in the tree, then double-click the File Extension Setup setting. Choose the
extension you wish to affect from the Extension drop-down list, then select the Indent Tab.
To turn Syntax Expansion on or off, select or deselect the option Syntax expansion.
Syntax Expansion Settings
159

To change the minimum expandable keyword length, enter the value by using the Minimum expandable
keyword length spin box.
To set options such as brace style, click the Options button on the Extension Options dialog.
Tip
SlickEdit®Core can display Syntax Expansion choices for the word prefix under the cursor. To
turn this option on/off, select the Auto-Complete Tab on the Extension Options dialog, and select/
deselect the Syntax expansion option. See Completions for more information.
Modifying Syntax Expansion Templates
Syntax Expansion templates are essentially extension-specific aliases that have been pre-defined. You
can modify these templates by replacing them with your own.
For example, to add a comment to the end of C for,while,if, and switch statements:
1. From the main menu, click Window →Preferences, expand SlickEdit and click General in the tree,
then double-click the File Extension Setup. The Extension Options dialog is displayed.
2. From the Extension drop-down list, select the cextension.
3. Select the General Tab.
4. Click Aliases to display the Alias Editor dialog.
5. Click New and then type for as the alias name.
6. Type the following lines in the text box to the right of the alias name:
for (%\c;;) {
} /* for */
The %\c escape sequence above specifies the cursor placement after expansion is performed.
7. Repeat Steps 5 and 6 for the while,if, and switch keywords.
8. Click OK to save new aliases.
The above steps replace the default Syntax Expansion templates for these keywords. The C brace style
options will not affect defined aliases.
For more information on working with aliases, using the Alias Editor, or using alias escape sequences,
see Extension-Specific Aliases.
Adding Syntax Expansion for Other Languages
Modifying Syntax Expansion
Templates
160

To add syntax expansion and indenting for other languages, complete the following steps:
1. Use the prg.e macro as a template. This file is located in the macros subdirectory of your installation
directory. Make a copy of it and give it another name.
2. Change the #define constants EXTENSION and MODE_NAME near the top of the file to reflect the
new extension and mode name respectively. Do not use any spaces in these constants.
3. Change the name of the first five characters of the _command functions dbase_mode,dbase_enter,
and dbase_space to use the value given to the MODE_NAME constant in Step 2.
4. Modify the prg_expand_enter function to provide the Enter key the desired support.
5. Modify the prg_expand_space function to provide the spacebar key the desired support. If you can
rely on extension-specific aliases, follow the comment in this function.
6. Use the load command Macro →Load Module to load new macro modules.
Steps 4 and 5 require a good understanding of the Slick-C®language and what this specific macro is do-
ing. See the Slick-C®Macro Programming Guide for more information.
Dynamic Surround and Sur-
round With
161

Dynamic Surround and Surround With
Two SlickEdit®Core features that allow you to surround text with text are Dynamic Surround, which lets
you surround existing statements with block statements, and Surround With, which lets you surround any
selected text with predefined language structures, or any text that you specify. Unsurround is also avail-
able to remove outer code block structures from statements.
Dynamic Surround
Dynamic Surround provides a convenient way to surround a group of statements with a block statement,
indented to the correct levels according to your preferences. This feature works in conjunction with the
syntax and alias expansion features (see Syntax Expansion and Extension-Specific Aliases), and is de-
signed to help you keep your hands on the keyboard, thereby improving your speed and efficiency.
Dynamic Surround is supported for any language that uses block statements. Note that this feature is
line-oriented and will not work for character or block selections.
SlickEdit®Core enters Dynamic Surround mode automatically, immediately after you expand a block
statement (for instance, by typing if then pressing Space). After expanding the statement, a box is drawn
around it as a visual guide, and you can pull the subsequent lines of code or whole statements into the
block by using the Up,Down,PgUp,orPgDn keys. Pressing any other key or clicking with the mouse
will exit Dynamic Surround mode.
The following screen shot shows the Syntax Expansion menu that appears after typing if in a C++ file:
Figure 6.21. Dynamic Surround: Example 1
Dynamic Surround
162
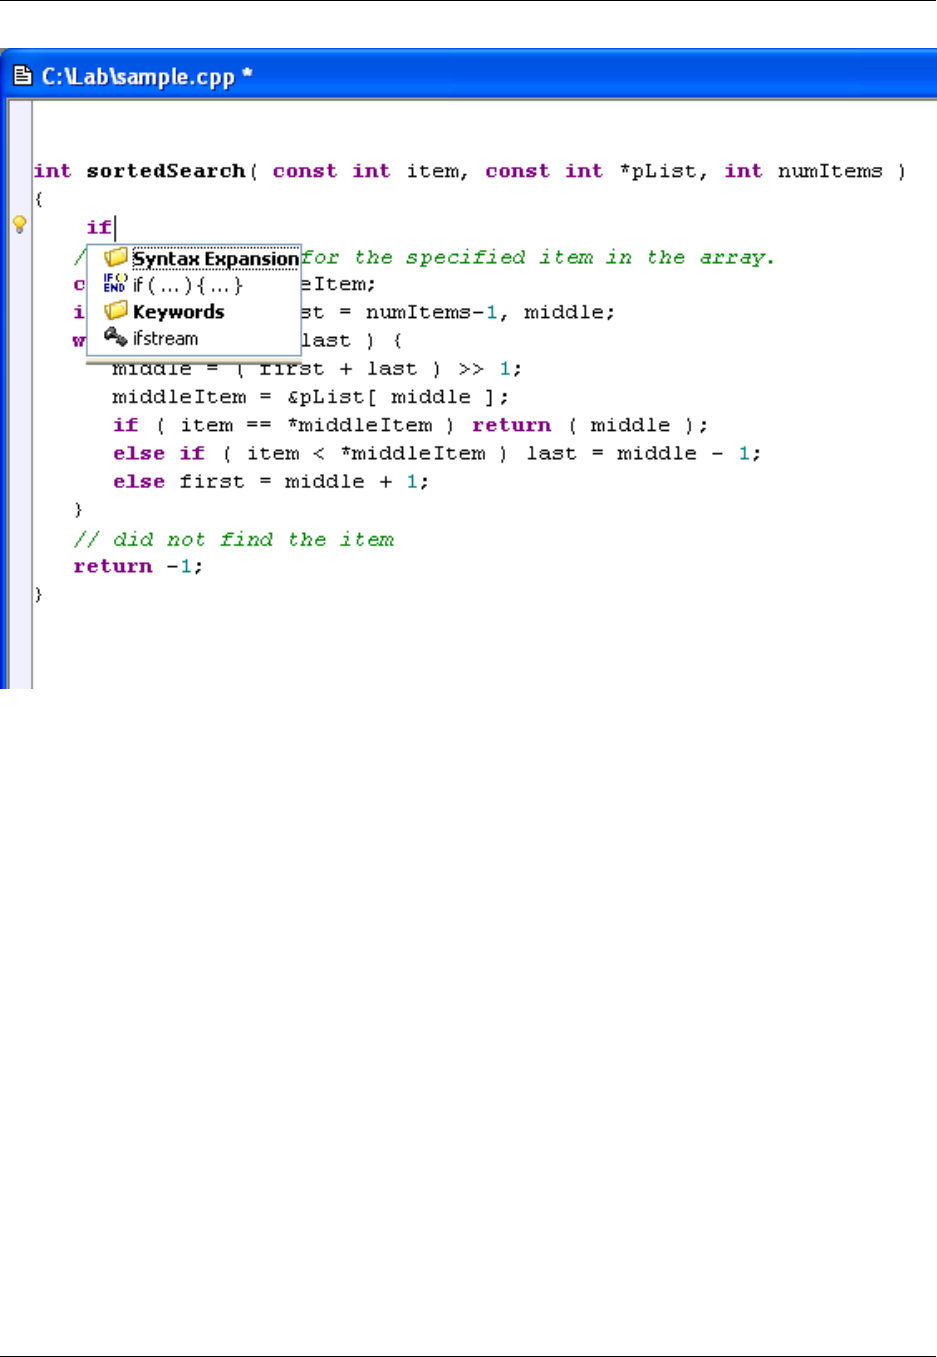
After pressing Space to expand the template, Dynamic Surround is activated, with a blue rectangle drawn
around the expanded statement, as shown below:
Figure 6.22. Dynamic Surround: Example 2
Dynamic Surround
163
Pressing the Down arrow key pulls the code block into the statement, indented to the correct levels, as
shown below:
Figure 6.23. Dynamic Surround: Example 3
Dynamic Surround
164
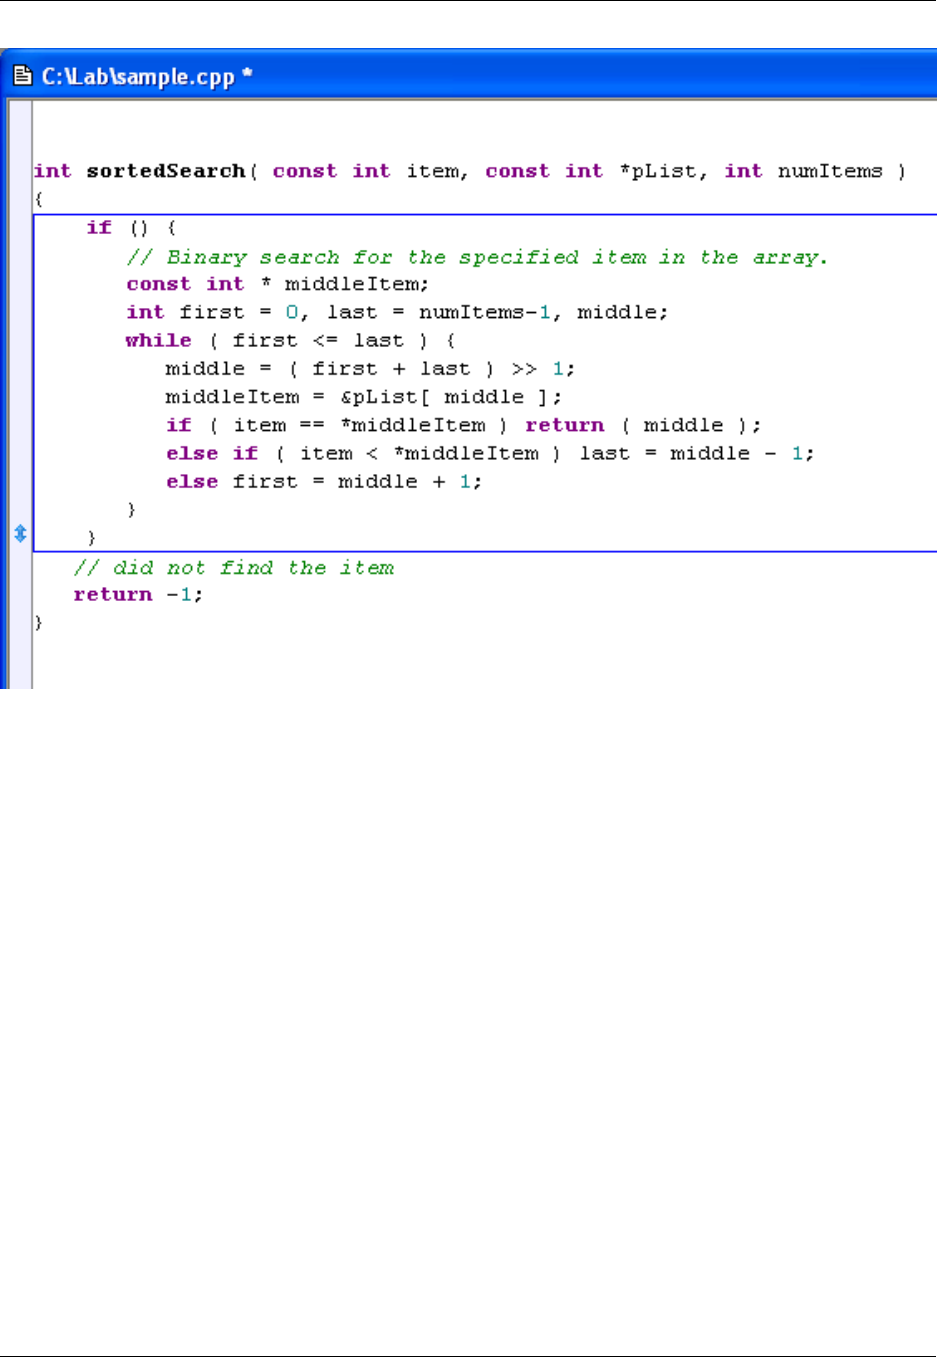
The finished code is shown as follows:
Figure 6.24. Dynamic Surround: Example 4
Dynamic Surround
165
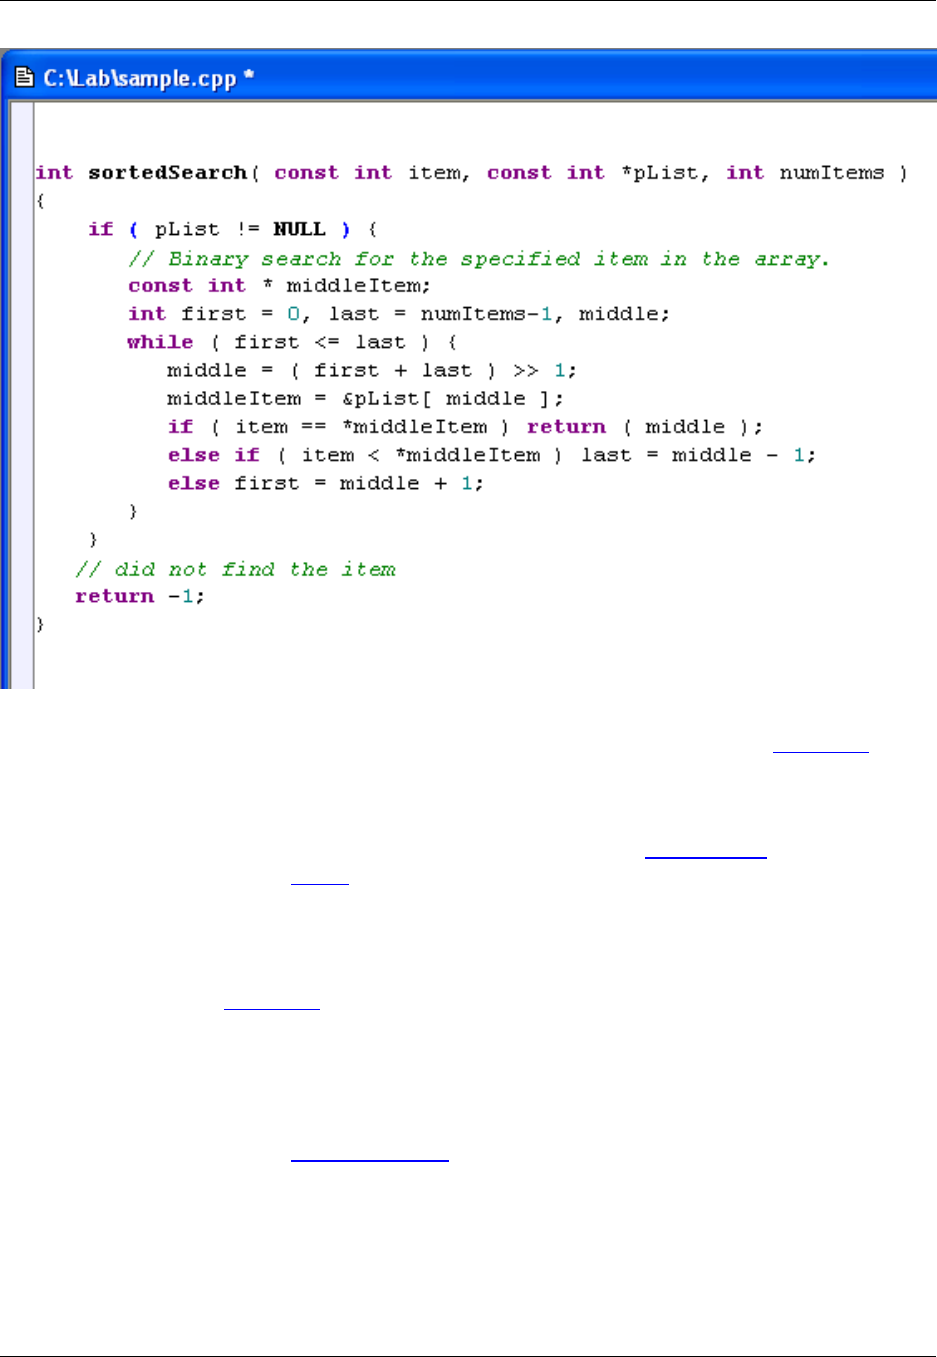
Statements that are pulled into the block are indented according to your settings on the Indent Tab of the
Extension Options dialog (Window →Preferences, expand SlickEdit and click General in the tree, then
double-click the File Extension Setup setting). The color of the rectangle box guide is controlled by the
Block Matching screen element on the Color Settings dialog (Window →Preferences, expand SlickEd-
it and click General in the tree, then double-click the Color setting). See Syntax Indent for more informa-
tion on setting indent styles, and Colors for more information on changing the colors of screen elements.
Syntax Expansion must be on for Dynamic Surround to work. Both options are on by default. To turn off
either of these options, click Window →Preferences, expand SlickEdit and click General in the tree,
then double-click the File Extension Setup setting. Choose your extension from the Extension drop-
down list, then select the Indent Tab. Deselect the option(s) Use Dynamic Surround and/or Syntax ex-
pansion.
If you need to move or modify existing text, you can manually enter Dynamic Surround mode by using the
dynamic_surround command. This will cause the code block under the cursor to be selected, and you
can use the navigation keys as described above to pull in statements. By default, this command is not as-
sociated with a key binding. See Creating Bindings for information on creating your own.
Surround With
Surround With makes it fast and easy to wrap existing lines of code in a new block structure. Surround
With is supported for the languages C, C++, C#, HTML, Java, JavaScript, and XML. Highlight the lines to
Surround With
166
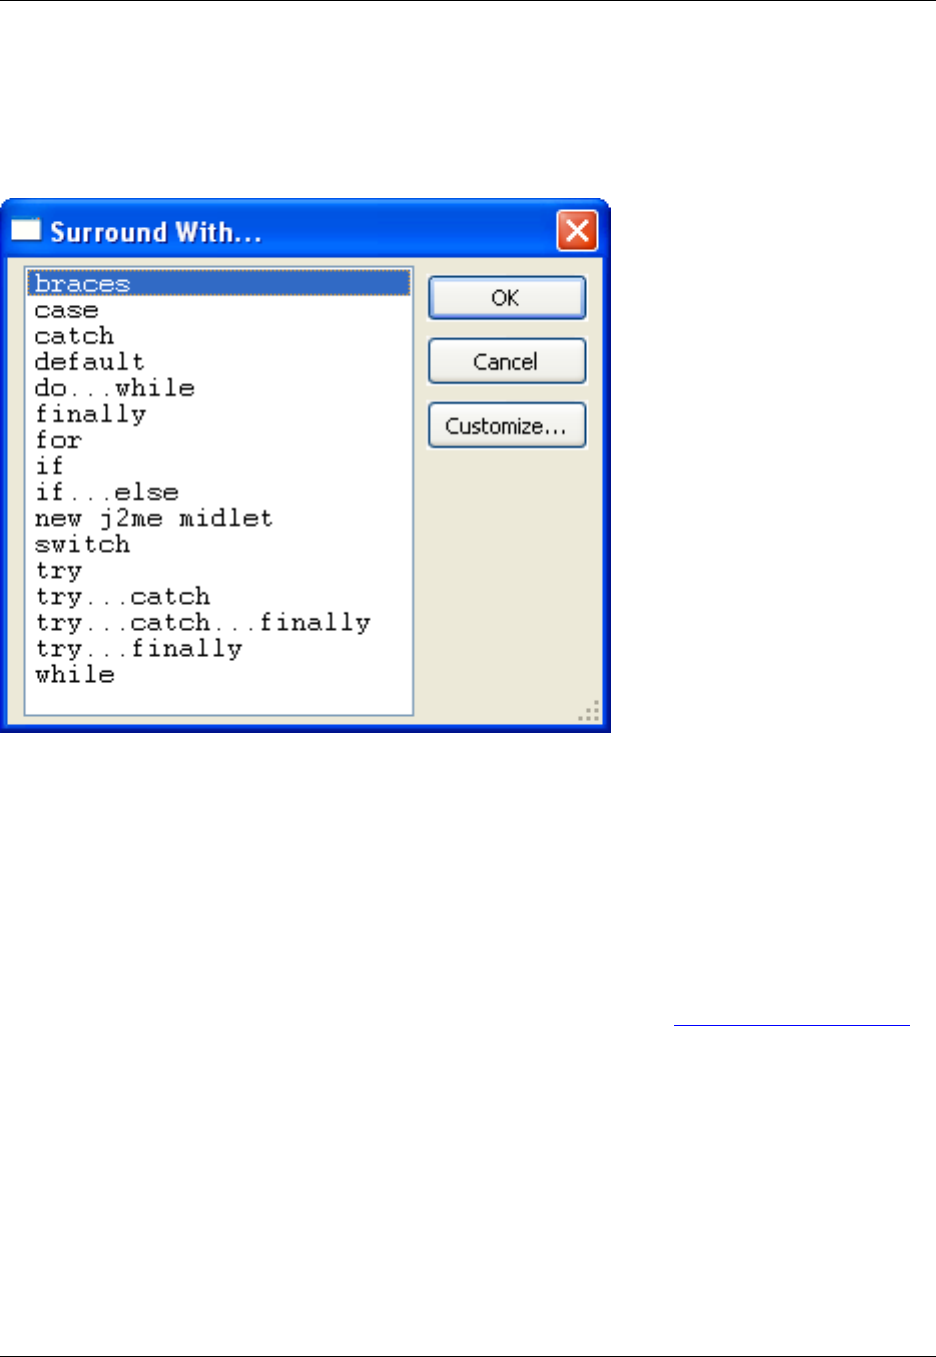
surround, right-click, and select Surround Selection With, or use the surround_with command. The
Surround With dialog appears, with a pre-defined list of structures based on the current file extension.
Figure 6.25. Surround With Dialog
Select the structure you wish to surround with, then click OK.
If there is no selection and you activate Surround With, the current line or code block will be automatically
highlighted for surrounding (the same function performed by the select_code_block command).
Modifying Surround With Templates
Surround With templates are created and modified the same way as other aliases, with the addition of the
%\m sur_text% escape sequence. This sequence indicates where the selected text should be placed,
and can be used multiple times within a single Surround With template. See Surround With Commands
for more information on sur_text.
To view or modify the Surround With templates, use the surround_with command to display the Sur-
round With dialog, then click the Customize button. This will display the Alias Editor dialog with the Sur-
round With option selected. The list of Surround With structures for the chosen language is shown in the
list box on the left.
Figure 6.26. Alias Editor Dialog for Surround With
Surround With
167
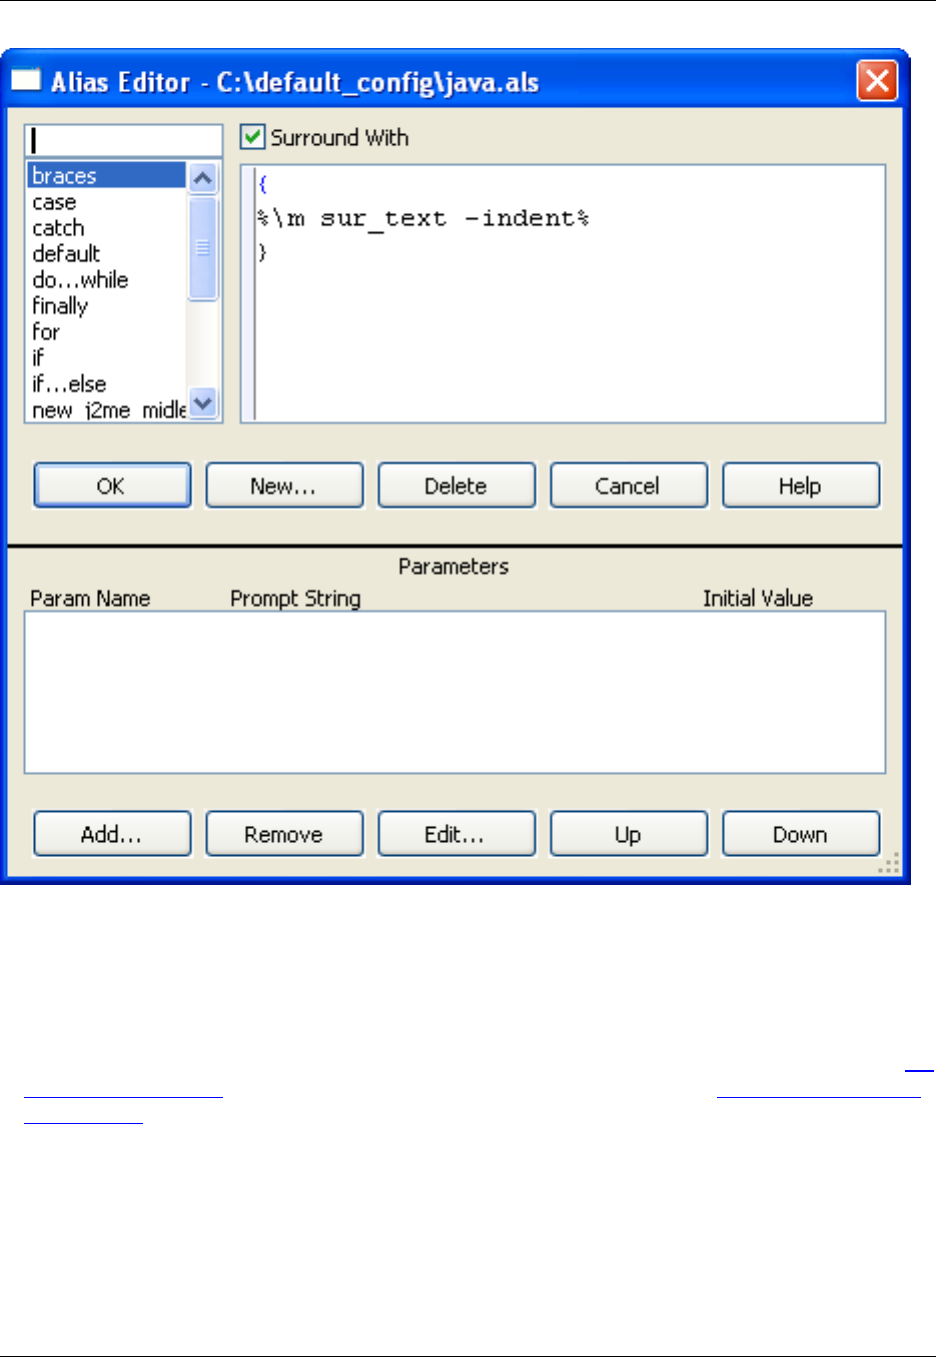
To modify one of the Surround With structures, complete the following steps:
1. Select the structure that you wish to modify. Notice the template for the structure that appears in the
text box on the right side of the Alias Editor.
2. Modify the template to suit your needs. For a list of escape sequences and template examples, see Ali-
as Escape Sequences. For more information about using the Alias Editor, see Creating an Extension-
Specific Alias.
3. When you are finished, click OK on the Alias Editor dialog.
4. Click OK on the Surround With dialog.
Surround With Commands
There are three commands available for working with Surround With:
Surround With
168

•surround_with - This command is used to display the Surround With dialog, allowing you to pick a
structure to surround selected text with. This command can be bound to a key—see Creating Bindings
for more information.
•sur_text - This is a Slick-C®function that can only be used inside of a Surround With template. It is
used to indicate where the selected text should be placed and can be used multiple times within a
single Surround With template. sur_text can take several parameters, which can appear in any order.
The available parameters are:
•-beautify - This is the default for C, Java, and others. It beautifies the results of the template expan-
sion.
•-begin <text> - Prefixes each line of the selection with text.
•-deselect - This is the default parameter. It specifies to leave the text deselected.
•-end <text> - Suffixes each line of the selection with text.
•-ignore <chars> - The -begin,-indent, and -stripbegin options will ignore any chars when finding
the beginning of the selected line.
•-indent - Indents each line of the selection.
•-nobeautify - This is the default for HTML, XML, and others. It specifies that the editor should not at-
tempt to beautify the results of the template expansion.
•-notext - Specifies that no text should be pasted.
•-select - Leaves the text selected.
•-stripbegin <text> - If any line begins with text,text is removed from the line. This option is ap-
plied before -begin.
•-stripend <text> - If any line ends with text,text is removed from the line. This option is applied
before -end.
•surround_with_if - This is a wrapper command that expands the if template for the selected text. This
command can be bound to a key—see Creating Bindings for more information.
The use of Surround With can be streamlined by using wrapper commands and key bindings. You can
create your own wrapper commands. The following example is the definition of surround_with_if
_command void surround_with_if() name_info(',':
VSARG2_REQUIRES_EDITORCTL | VSARG2_MARK | VSARG2_REQUIRES_AB_SELECTION)
{
surround_with('if');
}
You must change the name of the command and the argument passed to surround_with. The argument
does not have to be an exact match with the template name. For instance, calling surround_with('i') will
prompt you to select the if,if...else,orinclude once template. If there is an exact match, that template
Surround With
169

will be used. In the case of surround_with_if, "if" matches the beginning of both the if and if...else tem-
plates, but the if template is used because it is an exact match.
After you create your wrapper command, you can bind it a key or invoke it from the command line.
For more information on working with commands, see the Slick-C®Macro Programming Guide.
Unsurround
Unsurround is a feature that lets you remove the surrounding text from a code block. This is particularly
effective when used with Dynamic Surround. Unsurround is supported for the following languages: Action-
Script, AWK, C#, C++, CFML, HTML, Java, JavaScript, Perl, PHP, Slick-C ®, Tcl, and XML.
To use Unsurround, right-click on a selected code block and select Unsurround, or use the unsurround
command.
For example, to remove the if statement structure from a code block, select the code block or part of the
code block, then right-click and select Unsurround (or use the unsurround command). The entire code
block under the cursor is automatically highlighted and a dialog prompt appears to confirm the unsurround
operation. Click OK, and the if line of the code block as well as the line containing the closing brace are
removed. The remaining code is unindented to the correct level.
Deleting Code Blocks
Unsurround is also associated with the cut_line (Ctrl+Backspace) and delete_line (Ctrl+Del) com-
mands. When one of these commands is invoked while the cursor is on the first line of a block statement,
the Delete Code Block dialog appears, from which you can choose to delete the line, delete the entire
block, or unsurround the block.
Figure 6.27. Delete Code Block Dialog
Each of these operations copies the removed text to the clipboard. This is useful if you want to paste the
Unsurround
170

structure into a different location, because as soon as the text is pasted, SlickEdit®Core enters Dynamic
Surround mode, allowing you to pull statements into the pasted block.
The Delete Code Block dialog also contains an option to Always just delete line when cut_line or de-
lete_line operations are invoked. Selecting this option will prevent the dialog from appearing when these
operations are used. To see the dialog again, use the cut_code_block command.
Bookmarks
171

Bookmarks
Bookmarks are used to save the current edit location, so you can quickly return to it later. There are two
types of bookmarks:
•Named Bookmarks - Used to mark long-term, meaningful locations in the code, or to quickly set a tem-
porary, named bookmark on the current line.
•Pushed Bookmarks - Used to set temporary "breadcrumbs" as you explore the code.
Named Bookmarks
There are various ways to use named bookmarks:
•Give them a specific name - This is the best way to mark long-term, meaningful locations in the code.
For example, you could set a bookmark named "main" to save the location of the main function.
•Allow automatic naming - This is the quickest way to set temporary, named bookmarks if you don’t
care to spend the time naming them yourself.
•Use a key binding shortcut for the name - Bookmarks can be named according to a specific key
binding. For example, you could bind Ctrl+1so that it instantly sets a bookmark named "1".
Bookmarks can be set through a variety of methods, depending on which way you want to use them. A
green Bookmark bitmap, displayed in the left margin of the editor window, indicates a set bookmark.
Naming Bookmarks
To set a bookmark on the current line and give it a name, click Search →Set Bookmark (set_bookmark
command). The Bookmarks dialog is displayed. Type the name of the bookmark in the combo box, then
click Add.
Command Line Shortcut - sb
Power programmers may prefer to use the sb command, which is a shortcut for set_bookmark. You can
append sb or set_bookmark with any character or text string, and the bookmark will be instantly set us-
ing the value for the name. For example, sb1will allow you to create an instant bookmark named "1",
and sb main will let you create an instant bookmark named "main". See also Command Line Shortcut -
gb.
Allowing Automatic Naming
If you want to quickly set a named bookmark, and you would prefer the editor to automatically name them
for you, press Ctrl+Shift+J, or click Search →Toggle Bookmark (toggle_bookmark command). This
command also instantly toggles the new named bookmark on/off.
When a bookmark is set in this manner, the name is automatically generated and appears in the Eclipse
Bookmarks view in one of two formats: SymbolName:LineNumber,orFileName:LineNumber. The symbol
Named Bookmarks
172

name is used if the bookmark is inside of a symbol. The file name is used if there is no symbol on the line
or if the file does not support Context Tagging®.
Using a Key Binding for the Name
You can set a bookmark that takes its name from the key used to set it. There are two commands that
can be used: alt_bookmark, for setting a bookmark, and alt_gtbookmark, for navigating to the book-
mark.
The purpose of these commands is so that you can bind them to keys, providing a way for you to have
one type of keyboard shortcut for setting the bookmarks, naming them in the process, and another for
navigating to the bookmarks. These commands can be bound to any of the following keys/ranges:
•Ctrl+0-9,Ctrl+A-Z,Ctrl+F1-F12
•Alt+0-9,Alt+A-Z,Alt+F1-F12
•Ctrl+Alt+0-9,Ctrl+Alt+A-Z,Ctrl+Alt+F1-F12
•Shift+F1-F12
For example, you could bind alt_bookmark to Ctrl+0-9 and alt_gtbookmark to Alt+0-9, for a more effi-
cient means of setting bookmarks named 0-9, and navigating back to them.
Navigating Named Bookmarks
To navigate between the set bookmarks, use the prev_bookmark and next_bookmark commands.
Command Line Shortcut - gb
Power programmers may prefer to use the gb command, a shortcut for goto_bookmark. This will display
the Go to Bookmark dialog, from which you can select a specific bookmark to navigate to. Append gb
with the name value to go directly to that named bookmark. For example, if you set a bookmark named
"1" (for instance, by using the command sb 1), type gb1to navigate back to that location. See also Com-
mand Line Shortcut - sb.
Deleting Named Bookmarks
To remove a named bookmark, when the cursor is on the bookmark line, press Ctrl+Shift+J(or use the
toggle_bookmark command) to toggle the bookmark off. To remove all named bookmarks at once, use
the clear_bookmarks command.
Alternatively, the Bookmarks View contains options for deleting named bookmarks.
Bookmarks View
The bookmark functionality in SlickEdit Core integrates with the Eclipse Bookmarks view. This view
shows a list of bookmarks that have been set, with each bookmark's name, file location, and line number.
To open the Bookmarks view, click Window →Show View →Other, expand General and double-click
Bookmarks. See "Bookmarks view" in the Eclipse online Help for more information.
Pushed Bookmarks
173

Pushed Bookmarks
Pushed bookmarks are stored on a stack. New bookmarks can be pushed onto the stack, preserving the
current location. Popping the stack removes the top bookmark and navigates the cursor to the location of
the previous bookmark. Pushed bookmarks do not have names and cannot be manipulated on the Book-
marks view.
Pushing a Bookmark
To push a bookmark for the current line, click Search →Push Bookmark or use the push_bookmark
command. Additionally, you can use the key binding Ctrl+Dot (push_tag command) to move the cursor
from a symbol to its definition, or Ctrl+/(push_ref command) to navigate from a symbol to its reference,
pushing a bookmark in the process. Pushing a bookmark will place the current line on the bookmark
stack. A bookmark stack is simply an internal list of pushed bookmarks.
Note
By default, push_bookmark is not bound to a key. Key bindings can be set with the Key Bind-
ings dialog (click Window →Preferences, expand SlickEdit and click General in the tree, then
double-click the Key Bindings setting). For more information, see Creating Bindings.
Popping a Bookmark
Popping a bookmark will "pop back," or return to, the location of the top bookmark pushed on the book-
mark stack, removing the bookmark in the process. To pop a bookmark, press Ctrl+Comma. You can
also use the menu item Search →Pop Bookmark or the pop_bookmark command.
Note
If the option Automatically close visited files is selected in the General Options dialog (Win-
dow →Preferences, expand SlickEdit and click General in the tree, then double-click the Gen-
eral setting and select the General Tab), the file will be closed if it is unmodified and the book-
mark was created through symbol navigation. See Symbol Navigation for more information.
Viewing Pushed Bookmarks
Pushed bookmarks do not appear in the Bookmarks view, and by default, no visual indicator is displayed
in the editor window. To display a visual indicator, click Window →Preferences, expand SlickEdit and
click General in the tree, then double-click on the General setting. Select the Search Tab, then select the
option Show pushed bookmarks. This will display a blue Bookmark bitmap in the left margin of the edit-
or window for each new pushed bookmark.
Setting Bookmark Options
Setting Bookmark Options
174

Most bookmark options are located on the Search Tab of the General Options dialog (click Window →
Preferences, expand SlickEdit and click General in the tree, then double-click the General setting). See
Search Tab for a listing of the available options.
Another option is available by setting a macro variable. SlickEdit®Core can push a bookmark whenever
you jump to the top or bottom of the buffer (Ctrl+Home/Ctrl+End,ortop_of_buffer/bottom_of_buffer
commands, respectively). This is convenient, for example, in C++: if you jump to the top of the buffer to
add a #include statement, a bookmark is pushed, so you can use Ctrl+Comma (pop_bookmark com-
mand) to get back to your previous position. To use this option, click Macro →Set Macro Variable, and
in the Variable combo box, select or type def_top_bottom_push_bookmark, then click OK. To turn off
this option off, unset the variable by changing the Value to 0.
Setting Breakpoints
175

Setting Breakpoints
The quickest way to set or clear a breakpoint is to press F9. This toggles the breakpoint for the current
line.
The breakpoints functionality in SlickEdit®Core integrates with the Eclipse Breakpoints view. This view
displays a list of breakpoints and lets you easily add, remove, and activate them. To display the Break-
points view, click Window →Show View →Other, expand Debug and double-click Breakpoints. See
"Breakpoints view" in the Eclipse online Help for more information.
Setting Conditional Breakpoints
For help on setting conditional breakpoints, see the Eclipse Help on "Managing conditional breakpoints".
Setting Java Exception Breakpoints
For help on setting Java Exception breakpoints, see the Eclipse Help section "Add Java Exception Break-
point".
Setting Conditional Breakpoints
176

Commenting
SlickEdit®Core makes commenting your code easy. You can comment out selected text, or type the start
characters for a new doc comment and have the doc comment skeleton automatically expanded. SlickEd-
it Core also makes your comments easier to read by automatically wrapping them as you type. Existing
comments can be "reflowed" to match current comment wrap settings.
Commenting Blocks and Lines
Existing text in your code can be commented out (or uncommented) as follows:
• To comment out a selected code block, from the main menu, click Format →Comment Block (or use
the box command). This comments out the entire selection as a single block comment by surrounding
the block with comment characters you have specified in your comment settings.
• To comment out selected lines, from the main menu, click Format →Comment Lines (or use the
comment command). Each line in the selection is commented out as a single line comment. If there is
no selection, the current line is commented out. If using a block selection where there are partially se-
lected lines, comment characters are placed at the beginning and end of the selection. If using a char-
acter selection where there are partially selected lines, comment characters are placed based on your
settings. The comment characters that are placed to the left and right of the text are also specified in
your comment settings.
• To uncomment lines in a selection, from the main menu, click Format →Uncomment Line (or use the
comment_erase command). Surrounding line comment characters are removed from the line. If there
is no active selection, the current line will be uncommented. Uncomment Line only works for well-
formed comments, which means that every line in the selection is commented and that the comment
characters occur in the same column.
Whether you are creating a comment block or a comment line, if the selected text already contains com-
ments, another set of comment characters is added. SlickEdit®Core attempts to preserve the indentation
level of the code and any existing comments when adding or removing comment characters.
Comment Block and Line Settings
To specify the characters and other settings used for comment blocks and lines, from the main menu,
click Format →Comment Setup (or use the comment_setup command). The Extension Options dialog
is displayed open to the Comments Tab. Select the extension you wish to affect from the Extension drop-
down list.
The Comment block group box provides eight fields to specify the characters used in your commenting
style. If you want to apply a comment with no additional decoration, fill in the upper-left and lower-right
fields with the characters to begin and end a block comment. To draw a box around the comment, fill in
additional characters in the other fields. For example, you might put an asterisk in each of the other fields
to draw a box of asterisks around the block comment.
The Comment line group box contains fields for you to specify the characters to be inserted at left and
Commenting Blocks and Lines
177

right sides of a line comment.
For code examples and descriptions of the other available options, see Comments Tab.
Creating Doc Comments
Doc comments are specially formatted comments that are processed by tools that extract and present the
information in a formatted manner. Doc comments follow a predefined structure, based on the program-
ming language and the tool processing the comments.
SlickEdit®Core supports the most common doc comment formats (Javadoc, XMLdoc, and Doxygen).
When you type the start characters for one of these comment formats and press Enter on a line directly
above a function, class, or variable, SlickEdit Core can automatically insert a skeleton doc comment for
that style.
Note
In C#, you do not need to press Enter, as the skeleton comment is inserted after you type the
third slash.
To activate and configure automatic completion of doc comment skeletons, complete the following steps:
1. From the main menu, click Format →Comment Setup (or use the comment_setup command). The
Extension Options dialog is displayed, open to the Comments Tab.
2. Select the extension you want to affect from the Extension drop-down list.
3. In the Doc comments box, check the option Automatically expand doc comments.
4. In the For start characters box, select the start characters for the doc comment style you plan to use
for the selected extension. These are the characters that you type that will trigger automatic completion
of the doc comment skeleton. For comments formatted in Javadoc, select /**. For XMLdoc, select ///.
For Doxygen, select /*! or //!.
5. In the Use style box, select the tag style to use for the corresponding start characters that you selected
in Step 4. This tag style is used when SlickEdit Core creates skeleton doc comments beginning with
the matching start characters. Comments formatted in Javadoc usually use the @param style. XMLdoc
uses the <param> style. Doxygen can read the \param style.
Tip
You can repeat Steps 4 and 5 to assign a style for each start character set, and the setting will be
remembered.
6. Click OK on the Extension Options dialog.
Doc Comment Examples
Creating Doc Comments
178

Javadoc Format
To use the Javadoc commenting format, select the start characters /** and use style @param. Check In-
sert leading *. Using the following code sample:
/**[CURSOR_HERE]*/
int setDimensions(int length, int width, int height) {
...
}
Pressing Enter at the "cursor here" location results in the following automatic completion:
/**
* [CURSOR_HERE]
*
* @param length
* @param width
* @param height
*
* @return int
*/
int setDimensions(int length, int width, int height) {
...
}
XMLdoc Format
To use the XMLdoc comment format, select the start characters /// and the <param> style. Using the fol-
lowing code sample:
///[CURSOR_HERE]
int setDimensions(int length, int width, int height) {
...
}
Pressing Enter at the "cursor here" location results in the following automatic completion:
/// <summary>
/// [CURSOR_HERE]
/// </summary>
/// <param name="length"></param>
/// <param name="width"></param>
/// <param name="height"></param>
/// <returns>int</returns>
int setDimensions(int length, int width, int height) {
...
}
Creating Doc Comments
179

Doxygen Format
To use a Doxygen comment format, select the start characters /*! or //! (based on your preference) and
the \param style. Using the following code sample:
/*![CURSOR_HERE]*/
int setDimensions(int length, int width, int height) {
...
}
Pressing Enter at the "cursor here" location results in the following automatic completion:
/*!
* [CURSOR_HERE]
*
* \param length
* \param width
* \param height
*
* \return int
*/
int setDimensions(int length, int width, int height) {
...
}
String Editing
When the cursor is inside of a string, if you press Enter to split the line, SlickEdit®Core can automatically
align the string with the original string as well as insert the closing and opening quotes and, if necessary,
operators. To set this option, click Format →Comment Setup (comment_setup command). The Exten-
sion Options dialog is displayed, open to the Comments Tab. Select the extension you wish to affect from
the Extension drop-down list, then select Split strings on Enter.
Comment Wrapping
Comments can be set to automatically wrap to the next line as you type. This feature is available for C,
C++, C#, Java, and Slick-C®files.
To activate comment wrapping, from the main menu, click Window →Preferences, expand SlickEdit
and click General, then double-click the File Extension Setup setting. Select the extension you want to
affect from the Extension drop-down list, then select the Comment Wrap tab. Check the option Enable
comment wrap, then select the type of comments you want wrapped (block comments, line comments,
and/or doc comments).
The Comment Wrap tab also provides options to control how comments are wrapped. There are three
String Editing
180

types of width settings:
•Fixed - Comments will be formatted to a specified width.
•Automatic - Comments will be formatted according to the width of existing comments.
•Fixed right margin - Lines will break before a specified number of columns has been reached.
For more details on comment wrapping configuration, see Comment Wrap Tab.
Reflowing Comments
After configuring comment wrap settings, you can use the Reflow Comment dialog to reflow block com-
ments, paragraphs, or a selection of the current file. To display this dialog, click Format →Reflow Com-
ment. For more information on the available options, see Reflow Comment Dialog.
Find and Replace
181

Find and Replace
SlickEdit®Core provides several different ways to search and replace:
• For the fastest method of searching and replacing, use Quick Search and Replace .
• To find and replace text "on the fly," or, as you type, use Incremental Searching.
• If you are more comfortable with keystrokes, you may prefer command line searching with Find and Re-
place Commands.
• Use the Find and Replace View if you prefer working within an interface.
• To search for symbols, use the Find Symbol View.
Both the Find and Replace view and command line searching provide the same search and replace op-
tions for single or multiple files, and for searching and replacing text, wildcards and regular expressions,
so you can choose which method works best for you.
This section also includes the topics Find and Replace with Regular Expressions and Undoing/Redoing
Replacements.
Quick Search and Replace
Quick Search
The fastest way to search is by using Quick Search. Quick Search looks through the current buffer for the
word or selection at the cursor. You can find the next occurrence of a search item by selecting a string in
an existing buffer or SlickEdit Core Search view, then selecting Quick Search from the right-click menu
(or by using the quick_search command). The commands find_next (Ctrl+G) and find_prev
(Ctrl+Shift+G) will find the next and previous instances of the item, respectively.
Quick Replace
Quick Replace gets the current word or selection at the cursor, prompts for replacement text on the com-
mand line, then highlights each occurrence of the word and prompts if you want to replace the text.
To use Quick Replace, right-click on any word or selection and select Quick Replace (or use the
quick_replace command).
The quick_replace command has a command line alias, qr. The qr command takes the replace string as
an argument. For example, if the cursor is on the word "cat," the command qr dog will prompt you to re-
place all the instances of "cat" with "dog" in the current buffer.
Incremental Searching
During incremental searching, a string is searched for as it is typed. To start a forward incremental search
Quick Search and Replace
182

using the command line, use the i_search command (Ctrl+I). To start a reverse incremental search, use
the reverse_i_search command (Ctrl+Shift+I).
The following key combinations (based on the default CUA emulation) take on a different definition during
an incremental search:
Table 6.9. Incremental Search Key
Keys Function
Ctrl+RSearch in reverse for the next occurrence of the
search string.
Ctrl+SSearch forward for the next occurrence of the
search string.
Ctrl+TToggle regular expression pattern matching on/off.
Ctrl+WToggle word searching on and off. To change the
word characters for a specific extension, from the
main menu, click Window →Preferences, expand
SlickEdit and click General in the tree, then
double-click the File Extension Setup setting.
Choose your extension from the Extension drop-
down list, then select the Advanced Tab.
Ctrl+Shift+WCopy complete word at cursor to search string.
Ctrl+CToggle case sensitivity. The key bound to the Brief
emulation command case_toggle will also toggle
the case sensitivity.
Ctrl+MToggle searching within selection.
Ctrl+OToggle incremental search mode.
Ctrl+QQuote the next character typed.
Ctrl+Sor F5 (Brief emulation) Search forward for the next occur-
rence of the search string.
Ctrl+Ror Alt+F5 (Brief emulation) Search in reverse for the next oc-
currence of the search string.
Ctrl+W(GNU Emacs emulation) Copy complete word at
cursor to search string.
Incremental Searching
183

Keys Function
Ctrl+Shift+W(GNU Emacs emulation) Toggle word searching on
and off.
Incremental searching stops when you press a key that does not insert a character. You can press Esc to
terminate an incremental search (only during prompting). Press and hold Ctrl+Alt+Shift to terminate a
long search.
You can retrieve your previous search string by invoking the i_search or reverse_i_search command
and pressing Ctrl+Sor Ctrl+R, respectively, before entering a search string.
Find and Replace Commands
Find and Slash (/) Commands
The command line is available for performing searches. You can use the forward slash (/)orfind com-
mands which provide the same functionality as the Find and Replace view. Press Esc to toggle the cursor
to the command line.
The syntax of the slash (/) command is:
/string[/OptionCharacters]
The syntax of the find command is:
find /string/[OptionCharacters]
OptionCharacters is one or more of the following option characters:
Table 6.10. OptionCharacters for find and Slash (/) Commands
Option Description
EExact case.
IIgnore case.
-Reverse search.
MLimit search to selection.
<If found, place cursor at beginning of word.
>If found, place cursor at end of word.
Find and Replace Commands
184

Option Description
RInterpret search string as a SlickEdit®regular ex-
pression.
UInterpret search string as UNIX regular expression.
BInterpret string as a Brief regular expression.
NDo not interpret search string as a regular expres-
sion.
PWrap to beginning/end when string not found.
WLimit search to words. Used to search for variables.
W=SlickEdit-regular-expression Specifies the valid characters in a word. The default
value is [A-Za-z0-9_$]. To change the word charac-
ters for a specific extension, from the main menu
click Window →Preferences, expand SlickEdit
and click General in the tree, then double-click the
File Extension Setup setting. Select your exten-
sion from the Extension drop-down list, then select
the Advanced Tab.
W:P Limit search to word prefix. For example, a search
for “pre” matches “pre” and “prefix” but not
“supreme” or “supre”.
W:PS Limit search to strict word prefix. For example, a
search for “pre” matches “prefix” but not “pre,”
“supreme” or “supre”.
W:S Limit search to word suffix. For example, a search
for “fix” matches “fix” and “suffix” but not “fixit”.
W:SS Limit search to strict word suffix. For example, a
search for “fix” matches “suffix” but not “fix” or “fixit”.
HAllow finding search string in hidden lines.
YBinary search. This allows start positions in the
middle of a DBCS or UTF-8 character. This option
is useful when editing binary files (in SBCS/DBCS
mode) which may contain characters which look like
DBCS but are not. For example, if you search for
the character “a”, it will not be found as the second
Find and Replace Commands
185

Option Description
character of a DBCS sequence unless this option is
specified.
,(Comma) Delimiter to separate ambiguous options.
XCCLetters Requires the first character of search string NOT be
one of the color coding elements specified. For ex-
ample, XCS requires that the first character not be
in a comment or string. CCLetters is a string of
one or more of the following color coding element
letters:
•O- Other
•K- Keyword
•N- Number
•S- String
•C- Comment
•P- Preprocessing
•L- Line number
•1- Symbol 1
•2- Symbol 2
•3- Symbol 3
•4- Symbol 4
•F- Function color
•V- No save line
•A- Attribute
CCCLetters Requires the first character of search string to be
one of the color coding elements specified. See
CCLetters above.
#Highlight matched patterns with highlight color. The
buffer is not automatically cleared when executing a
new search, like it is with the Find and Replace
view.
Find and Replace Commands
186

Option Description
*Used with the “Search hidden text” (H) or “Highlight
matches” (#) options to find all matches and un-hide
or highlight them.
&Use Wildcard regular expression syntax (*, ?).
#Highlight matched patterns with highlight color.
V(Replace commands only) Preserve case. When
specified, each occurrence found is checked for all
lowercase, all uppercase, first word capitalized, or
mixed case. The replace string is converted to the
same case as the occurrence found except when
the occurrence found is mixed case (possibly mul-
tiple capitalized words). In this case, the replace
string is used without modification.
$(Replace commands only) Replaced occurrences
are highlighted with modified color.
To set default search options, see Search Tab.
If the *option is not specified, you will be prompted with the message Yes/
No/Last/Go/Quit/Suspend? for each occurrence of the "Search for" string.
Replace and c Commands
The replace commands, replace and c, can be used in the command line. The syntax of these com-
mands is:
c/string1/string2[/options]
or
replace/string1/string2[/options]
The available options are the same as for the find and slash(/) commands (see Find and Slash (/) Com-
mands above).
You can perform one of the following actions with the replace command (c) by pressing the correspond-
ing key:
Table 6.11. Replace Key
Find and Replace Commands
187

Key Action
Yor Space Make change and continue searching.
Nor Backspace No change and continue searching.
Lor Dot Make change and stop searching.
Gor !Make change and change the rest without prompt-
ing.
Qor Esc Exit command. By default, the cursor is NOT re-
stored to its original position. If you want the cursor
restored to its original position, from the main menu
click Window →Preferences, expand SlickEdit
and click General in the tree, then double-click the
General setting. Select the Search Tab. Select the
Restore cursor after replace option.
Ctrl+GExit command and restore cursor to its original pos-
ition.
Ctrl+RSearch in reverse for next occurrence of search
string.
Ctrl+SSearch forward for next occurrence of search string.
Ctrl+TToggle regular expression pattern matching on/off.
The key bound to the Brief emulation command
re_toggle will also toggle regular expression pat-
tern matching.
Ctrl+WToggle word searching on/off. To change the word
characters for a specific extension, from the main
menu click Window →Preferences, expand
SlickEdit and click General in the tree, then
double-click the File Extension Setup setting. Se-
lect your extension from the Extension drop-down
list, then select the Advanced Tab.
Ctrl+CToggle case-sensitivity. The key bound to the Brief
emulation command case_toggle will also toggle
the case-sensitivity.
Ctrl+MToggle searching within selection.
F1 or ?Display Help on Find and Replace view.
Find and Replace Commands
188

Key Action
Replace Command Search Examples
The table below provides examples of using command line replace.
Table 6.12. Replace Command Search Examples
Example Description
c $/$\$ Replace occurrences of forward slashes with back
slashes.
c/x/y/m Replace occurrences of "x" in the selected area
with "y" using default search case sensitivity.
c $x$y$m Replace occurrences of "x" in the selected area
with "y" using default search case sensitivity. The
string delimiter "$" has been used requiring a space
character after the "c."
c/x/y/e* Replace lowercase occurrences of "x" with "y"
without prompting.
c/i/something_more_meaningful/w Replace occurrences of the variable "i" with
"something_more_meaningful."
c/i/j/w=[A-Za-z] Replace occurrences of the word "i" with "j" and
specify valid characters in a word to be alphabetic
characters.
replace/Test/TEMP/v Replace occurrences of the word "test" with the
word "temp", with the case preserved. For example:
• Occurrences of "Test" are replaced with "Temp".
• Occurrences of "test" are replaced with "temp".
• Occurrences of "tesT" are replaced with "TEMP"
(because a mixed case will retain the actual re-
placement that you typed).
• Occurrences of "TEST" are replaced with
"TEMP".
Find and Replace View
189
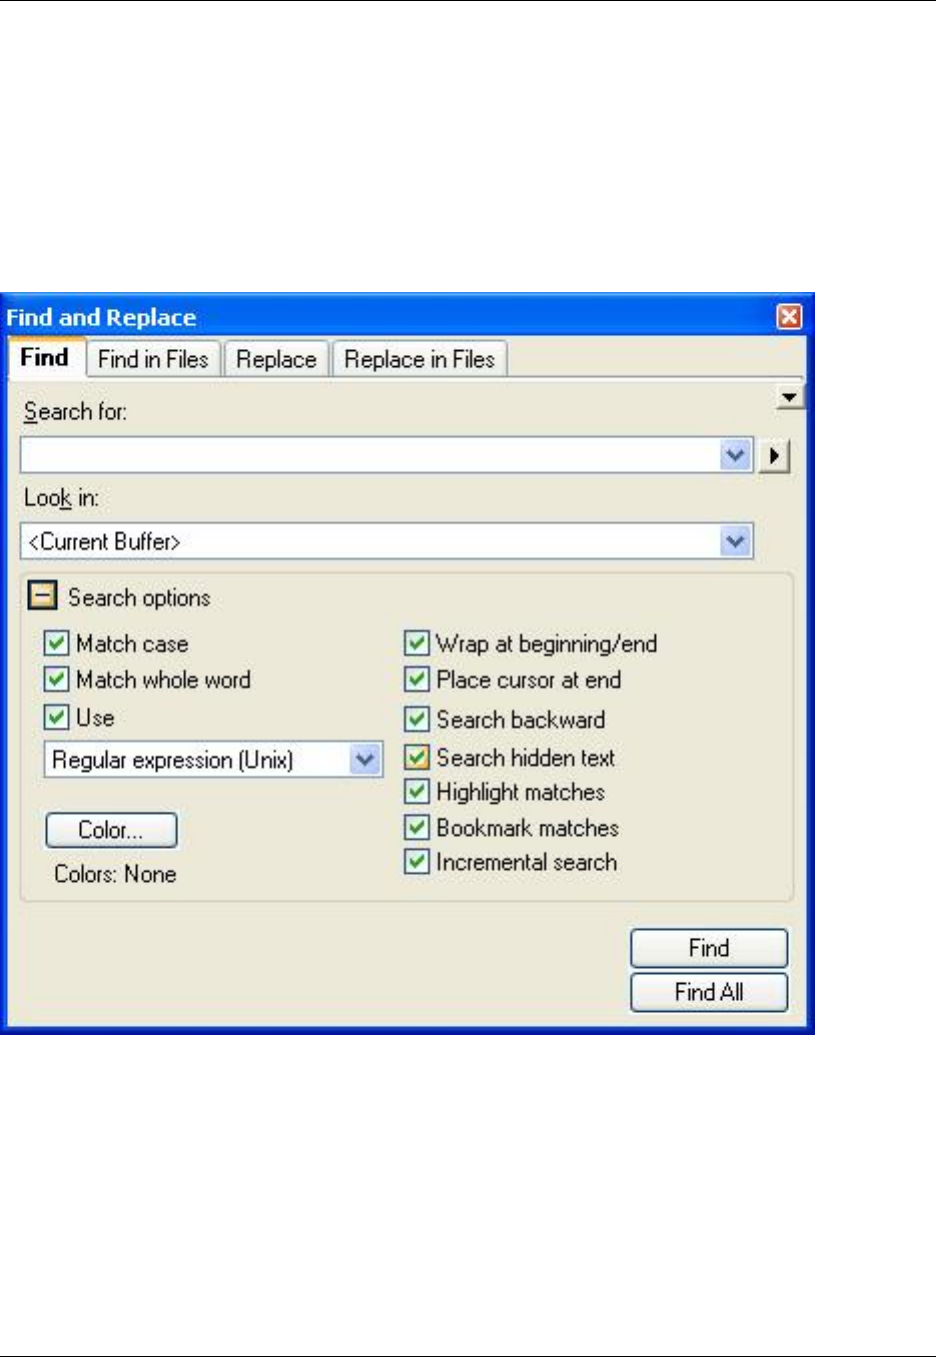
Find and Replace View
You can use the Find and Replace view (Ctrl+For Search →SlickEdit Search/Replace) to specify
search and replace options and conduct search and replace operations on selections, single files, or mul-
tiple files.
Figure 6.28. Find and Replace View
Saving Search and Replace Values
When the Find and Replace view is invoked, the options that were used for your last search are dis-
played, providing a way to repeat the last search. Options also persist when switching between the tabs.
Pressing F7 and F8 retrieves previous and next responses, respectively.
Search and replace values can be saved as named operations. Saving preserves the values of all of the
fields in the Find and Replace view so that the search and/or replace operation can be repeated in the fu-
ture with the same results. To save the search/replace, right-click in the Find and Replace view. Select
Saved Search Expressions, then select Save Search Expression from the submenu. You will be
Find and Replace View
190

prompted to name the operation. To access a saved operation, select Saved List from the submenu,
then pick the saved operation to load.
Syntax-Driven Searching
To reduce the number of false positives in your searches, you can restrict the search based on program
syntax. Click the Color button on the Find tab of the Find and Replace view to specify the syntactic ele-
ments for filtering. Each check box has three states:
•Neutral (the default) - All check boxes start in the neutral state. These elements will be used in a
search until deselected or until one or more other elements are selected. Putting a check in any check-
box essentially deselects all non-checked boxes.
•Selected - If the check box is selected, the search will be restricted to this element and any other selec-
ted elements. There is no need to deselect any other elements if any elements are selected. If any ele-
ments are selected, only selected elements will be searched. For example, to search for the word "res-
ult" only in comments, put a check only in the Comment check box. All other syntactic elements will be
ignored as part of this search.
•Deselected - If the check box is clear, these elements will not be searched. For example, if you want to
find the word "result" anywhere in your code except for in comments, clear the Comment check box.
Setting Options
Options for individual search and replace operations are located on the Find and Replace view. Alternat-
ively, you can set default options that are always used instead. To set the default options, right-click on
the background of the view window and select Configure Options. The default search options will always
be used when the Find and Replace view is invoked, unless settings are changed on the Find and Re-
place view. If you change settings on the view window and want to use the default options instead, right-
click in the view window and select Use Default Options. For information on each option on the Find and
Replace view, see Find and Replace View. For a listing of the default search options, see Search Tab.
Search Results Output
You can specify that multi-file search results are displayed in a new editor window or in a new SlickEdit
Core Search view.
To send the results to a new editor window, select the Find in Files tab, click the Result options button
to expand the options, then select Output to editor window.
To send the results of a multi-file search to a specific SlickEdit Core Search view, select the Find in Files
tab, click the Results options button to expand the options, then use the Search Results Window drop-
down list to select the window to be used. These are labeled starting at Search<0>. A new results view
window can be added with the <New> option up to a pre-set limit of open SlickEdit Core Search views.
If <Auto Increment> is selected from the Search Results Window drop-down list, the search results will
cycle through all of the open Search Results tabs in the SlickEdit Core Search view with each new
search. For example, if you have Search<0>, Search<1>, and Search<2> open, then for each search op-
eration, the results will be displayed in this order: Search<0>, Search<1>, Search<2>, Search<0>,
Search<1>, and so on. If you only have one SlickEdit Core Search view open, then all results will go into
Find and Replace View
191

the only open search view windows. You can open and close search results view windows by right-
clicking on the Search Results tab in the SlickEdit Core Search view.
Right-click in the SlickEdit Core Search view to access more options. See Find in Files Tab for more in-
formation.
Find Symbol View
The Find Symbol view (Search →Find Symbol) is used to locate symbols in your code. It allows you to
search for symbols by name using either a regular expression, substring, or fast prefix match.
Searching for a symbol is faster than a normal text search because it is executed against the Context
Tagging®database, rather than searching through your source files. Find Symbol also avoids false hits in
comments or string literals. Though Syntax-Driven Searching in the regular Find and Replace View
provides this same capability, it cannot match the speed of Find Symbol.
See Find Symbol View for information about the options that are available.
Find and Replace with Regular Expressions
Sometimes searching for a string literal is too limiting. For instance, you cannot search for a quoted string,
a blank line, a word starting at the beginning of a line, or two words separated by any number of spaces.
A regular expression can describe these search strings and many more.
All search commands support regular expressions. The Find and Replace view contains options for turn-
ing on regular expression searching (see Find and Replace View). The key binding Ctrl+Ttoggles regular
expression searching on/off while an incremental search is in progress (see Incremental Searching). The
search commands slash (/) and find take Rand Uoptions to interpret the search string as a regular ex-
pression (see Find and Slash (/) Commands). The search and replace command calso takes R,U, and B
options to specify a regular expression (see Replace Command Search Examples).
SlickEdit®Core supports four types of syntax:
• UNIX (see UNIX Regular Expressions
• SlickEdit (see SlickEdit Regular Expressions)
• Brief (see Brief Regular Expressions)
• Wildcards (*, ?)
All syntax types have the same features. In order to accomplish this, we have made several enhance-
ments to the UNIX and Brief syntaxes. To select the regular expression syntax, from the main menu, click
Window →Preferences, expand SlickEdit and click General in the tree, double-click the General set-
ting, then select the Search Tab. Select the option Regular expression, then pick the syntax from the
drop-down list.
Special Characters in Regular Expression Find/Replace
Find Symbol View
192
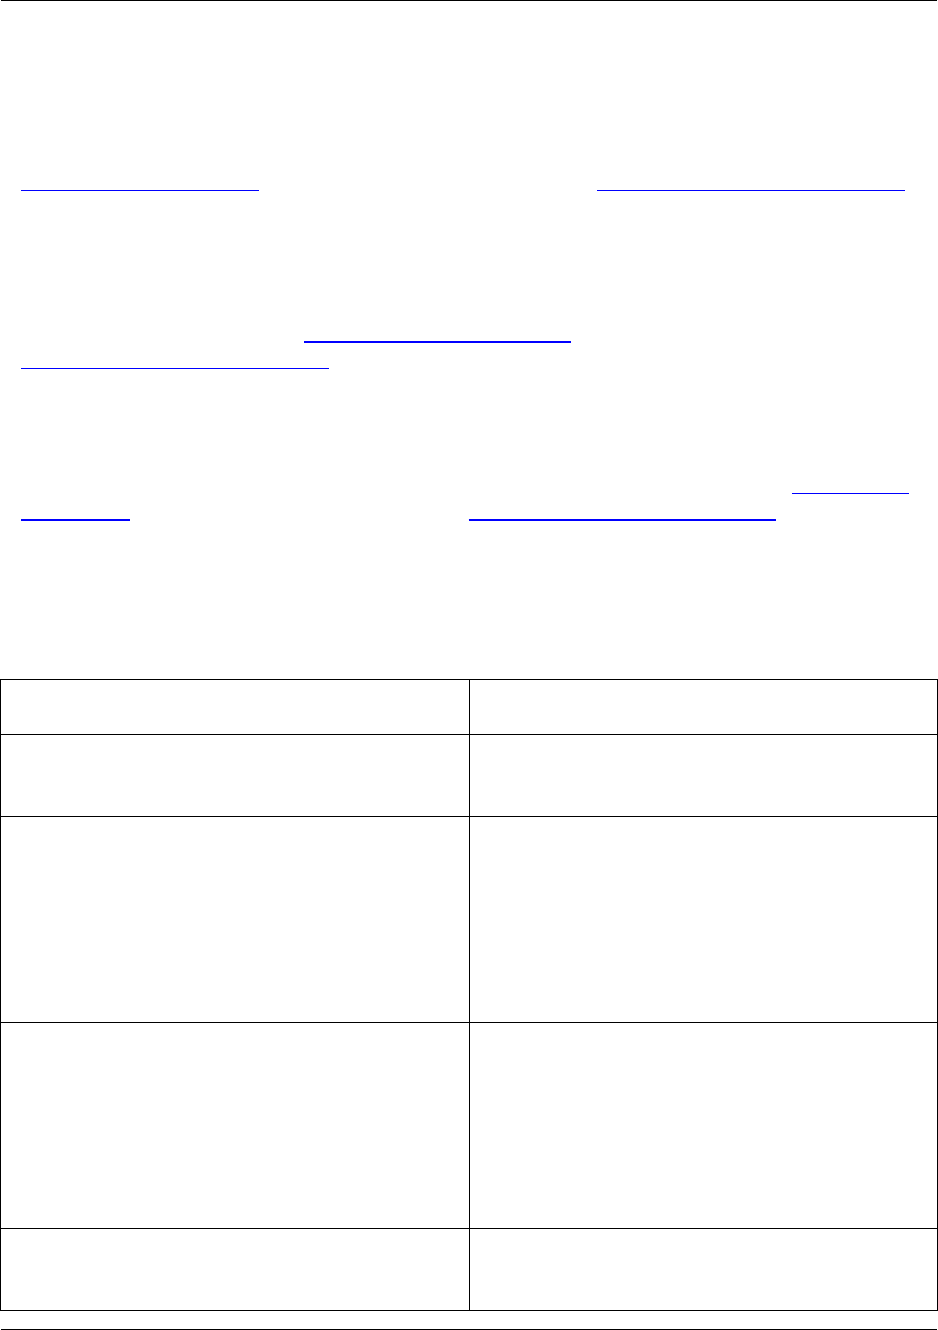
Characters have special meaning during search and replace operations.
•UNIX regular expressions - When regular expressions are turned on for a search and replace com-
mand, the backslash character (\) has special meaning in the replace string. A backslash in the replace
string has the same meaning as in the search string except that \c and \:char are not supported. See
UNIX Regular Expressions for a list of backslash (\) options. See Using Tagged Search Expressions for
information on specifying tagged expressions in the replace string.
•SlickEdit®regular expressions - When regular expressions are turned on for a search and replace
command, the number sign character (#) and backslash (\) have special meaning in the replace string.
A backslash in the replace string has the same meaning as in the search string except that \c,:char,
and \gd are not supported. See SlickEdit Regular Expressions for a list of backslash (\) options. See
Using Tagged Search Expressions for information on specifying tagged expressions in the replace
string using the number sign (#) character.
•Brief regular expressions - When regular expressions are turned on for a search and replace com-
mand, the backslash character (\) has special meaning in that backslash in the replace string has the
same meaning as in the search string except that \c and \:char are not supported. See Brief Regular
Expressions for a list of backslash (\) options. See Using Tagged Search Expressions for information
on specifying tagged expressions in the replace string.
The following table contains some examples of replace operations using regular expressions:
Table 6.13. Examples of Replacing Using Regular Expressions
Example Description
Search For: hat$
Replace With: cat
Search for occurrences of the string "hat" that occur
at the end of a line and replace it with "cat".
UNIX and SlickEdit®regular expression:
Search For: ^\n
Replace With:
Brief regular expression:
Search For: <\n
Replace With:
Delete blank lines.
UNIX and SlickEdit regular expression:
Search For: ^\n\n
Replace With: \n
Brief regular expression:
Search For: <\n\n
Replace With: \n
Replace occurrences of two consecutive blank lines
with one.
UNIX regular expression:
Search for: ^a+$
Search for lines containing "a" and replace the "a"
with a formfeed character.
Find and Replace with Regular
Expressions
193

Example Description
Replace with: \d12
SlickEdit regular expression:
Search for: ^a+$
Replace with: \12
Brief regular expression:
Search for: <a+$
Replace with: \d12
Using Expressions to Search for Binary Characters
Search for a sequence of binary characters by using regular expressions to specify hex or decimal char-
acters. Some examples are:
•UNIX or Brief search expressions:
\x0d\x0a\x01\x02
\d13\d10\d1\d2
•SlickEdit®search expressions:
\x0d\x0a\x01\x02
\13\10\1\2
Using Tagged Search Expressions
When you use regular expressions to search for a string, you will often want the replace string to depend
on what was found. Use tagged search expressions to insert parts of what is found into the replace string.
•UNIX regular expressions - Use parentheses ()to denote a tagged expression in the search string.
The replace string specifies tagged expressions with a backslash (\) followed by a tag group number
1-9. Count the left parenthesis (in the search string to determine a tagged expression number. The first
tagged expression is \1 and the last is \0.
•SlickEdit®regular expressions - Use curly braces {}to denote a tagged expression in the search
string. The replace string specifies tagged expressions with a #followed by a tagged expression num-
ber 0-9. Count the left braces {in the search string to determine a tagged expression number. The first
tagged expression is #0.
•Brief regular expressions - Use curly braces {}to denote a tagged expression in the search string.
The replace string specifies tagged expressions with a backslash (\) followed by a tagged expression
number 0-9. Count the left braces {in the search string to determine a tagged expression number. The
first tagged expression is \0.
The following table contains examples of using tagged search expressions:
Table 6.14. Examples of Tagged Search Expressions
Find and Replace with Regular
Expressions
194

Example Description
UNIX regular expression:
Search for: (if|while)
Replace with: x\1y\2
SlickEdit®regular expression:
Search for: {if|while}
Replace with: x#0y#1
Brief regular expression:
Search for: {{if}|while}}
Replace with: x\0y\1
Replace occurrences of "if" and "while" with "xify"
and "xwhiley." Unmatched groups are null. Note:
The UNIX syntax \2 (SlickEdit syntax #1, Brief syn-
tax \1) is replaced with null.
UNIX regular expression:
Search for: ^(.*?),(.*)$
Replace with: \2,\1
SlickEdit regular expression:
Search for: ^{?*},{?*}$
Replace with: #1,#0
Brief regular expression:
Search for: ^{*},{*}$
Replace with: \1,\0
Reverse text on lines containing a comma. Lines
with "abc,def" will be changed to "def,abc." Notice
that the UNIX regular expression search string uses
a minimal matching operator *? so that the comma
actually matches the first comma in the line and not
the last.
Minimal versus Maximal Matching
If you are using tagged expressions or regular expressions to perform a search and replace, you need to
understand the difference between the minimal and maximal operators.
Take, for example, a line of text which contains a DOS file name: \path1\path2\path3\name.ext.
The regular expression ^\\.*?\\ (UNIX), ^\\?*\\ (SlickEdit®), or <\\*\\ (Brief) will match the string \path1\.
The regular expression ^\\.*\\ (UNIX), ^\\?@\\ (SlickEdit), or <\\\:*\\ (Brief), which uses the maximal oper-
ator, matches the string \path\path2\path3\.
As a rule of thumb, you will usually want to use the minimal matching operators *? (UNIX), *(SlickEdit), or
@(Brief) and +? (UNIX), +(SlickEdit/Brief) after a less-specific regular expression such as .(UNIX) or ?
(SlickEdit/Brief).
You will usually want to use the maximal matching operators after a regular expression which matches
something more specific. For example, to search for a string of digits and prefix each string of digits with
the character $, you would specify the following in the Replace tab of the Find and Replace view:
•UNIX regular expression:
Search for: ([0-9]+)
Replace with: $\1
Find and Replace with Regular
Expressions
195

•SlickEdit regular expression:
Search for: {[0-9]#}
Replace with: $#0
•Brief regular expression:
Search for: {[0-9]\:+}
Replace with: $\0
If the minimal matching operator (UNIX +?, SlickEdit and Brief syntax +) was used in the search string in-
stead of the maximal matching operator (UNIX +, SlickEdit syntax #, Brief syntax \:@), the above search
and replace would prefix each digit in the file with a "$" character, which is probably not what you want.
Undoing/Redoing Replacements
To undo a replacement, click Edit →Undo, press Ctrl+Z, or use the undo command. To redo a replace-
ment, click Edit →Redo, press Ctrl+Y, or use the redo command.
To undo replacements in multiple files, click Edit →Multi-File Undo or use the mfundo command. To
redo replacements in multiple files, click Edit →Multi-File Redo or use the mfredo command.
Undoing/Redoing Replacements
196

Beautifying Code
Code Beautifiers
Code beautifiers, available for many languages, reformat the layout of existing text based on settings that
you specify, such as begin/end styles and indenting.
To beautify selected lines of code, or to beautify the entire buffer, from the main menu, click Format →
Beautify (or use the gui_beautify command). A dialog box is displayed with functions specific to the type
of project that is active. If an HTML project is active, then the HTML Beautifier dialog appears with op-
tions. If a GNU C/C++ project is active, then the C/C++ Beautifier dialog opens, and so on. Beautifying is
supported for the languages listed below. Follow the cross-reference links to learn more about working
with each beautifier.
• Ada - See Ada Beautifier.
• C/C++, C#, Java, JavaScript, Slick-C®- These beautifiers contain the same options and settings. See
C/C++ Beautifier.
• CFML, HTML - These beautifiers contain the same options and settings. See HTML Beautifier.
• Javadoc - See Javadoc Beautifier.
• XML, XSD - These beautifiers contain the same options and settings. See XML Beautifier.
Reflowing Text
To reflow text in the current paragraph according to your margin settings, click Format →Format Para-
graph or use the reflow_paragraph command. Margin settings are defined on the Word Wrap Tab (Win-
dow →Preferences, expand SlickEdit and click General in the tree, then double-click the File Exten-
sion Setup setting).
When you reflow a paragraph, the cursor will be kept at the same location within the current paragraph
after reflow has occurred, unless the Reflow next option is selected (Window →Preferences, expand
SlickEdit and click General in the tree, then double-click the General setting and select the More Tab). If
Reflow next is selected, the reflow_paragraph command places the cursor on the next paragraph after
it has reformatted the current paragraph.
Comments can also be reflowed according to the comment wrap settings. See Reflowing Comments for
more information.
Code Beautifiers
197

Refactoring
Refactoring is a precise code editing feature that you can use to clean up and improve the understandab-
ility of your source code. Refactoring allows you to make disciplined, system-wide changes to code
without affecting the external behavior.
There are two types of refactoring available within SlickEdit®Core: C++ Refactoring and Quick Refactor-
ing. C++ Refactoring supports the C++ language only, while Quick Refactoring supports C++, C#, Java,
and Slick-C®. Quick Refactoring is generally faster and less stringent than C++ Refactoring.
For information about refactoring results, see Reviewing Refactoring Changes.
Quick Refactoring
Quick Refactoring supports C++, C#, Java, and Slick-C®, and performs refactorings using Context Tag-
ging®rather than a formal language parser. Quick Refactoring is generally faster and less stringent than
C++ Refactoring.
Available Quick Refactorings
To access the Quick Refactorings, use the right-click context menu in the editor and select Quick Refact-
oring. The Quick Refactoring menu can be also be accessed from the right-click menus within the Sym-
bols and Outline views.
Quick Rename
Quick Rename uses the Context Tagging®to rename a symbol under the cursor or any symbol selected
in the Outline or Symbols views. This operation works for all tagged languages. It is faster than the re-
name provided by C++ Refactoring, but less stringent. Quick Rename does not treat renaming classes,
constructors, and destructors as a special case. Quick Rename will rename all of the overloads of a func-
tion. Quick Rename does not rename overridden methods (in parent and child classes).
Figure 6.29. Quick Rename Refactoring
Quick Refactoring
198
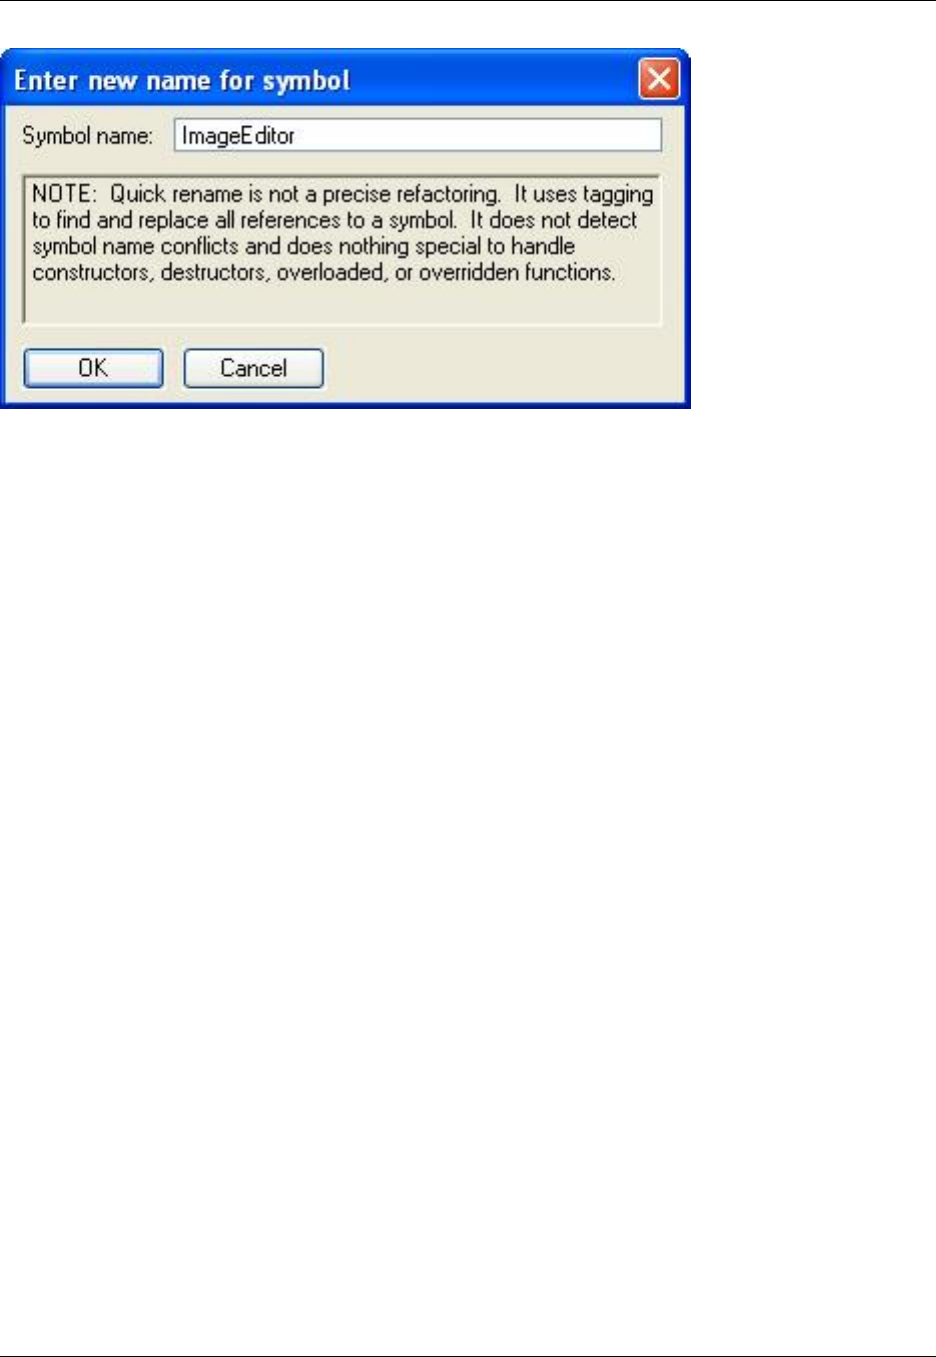
Quick Extract Method
After selecting a set of lines, Quick Extract Method creates a new method with the selected lines as the
body. It discovers any undeclared variables and creates them as parameters to the new method. The ex-
tracted method is created in the same scope as the original method. Quick Extract Method is only avail-
able for C++, C#, Java, and Slick-C®.
Figure 6.30. Quick Extract Method Refactoring
Quick Refactoring
199
Quick Modify Parameter List
This refactoring allows you to add, delete, and re-order parameters for a selected function. The refactor-
ing will modify the parameter list for the selected function and all of its counterparts within the class hier-
archy. Quick Modify Parameter List is only available for C++, C#, Java, and Slick-C®.
Quick Replace Literal with Constant
Replaces the selected literal with a constant, replacing use of the literal with the new constant. Quick Re-
place Literal with Constant is only available for C++, C#, Java, and Slick-C®.
C++ Refactoring
You can apply many commonly used refactorings in C++.
Note
C++ Refactoring is not supported for Objective-C or Objective C++. While Objective-C is closely
related to C++, the refactoring engine cannot accommodate the syntactic differences.
C++ Refactoring
200
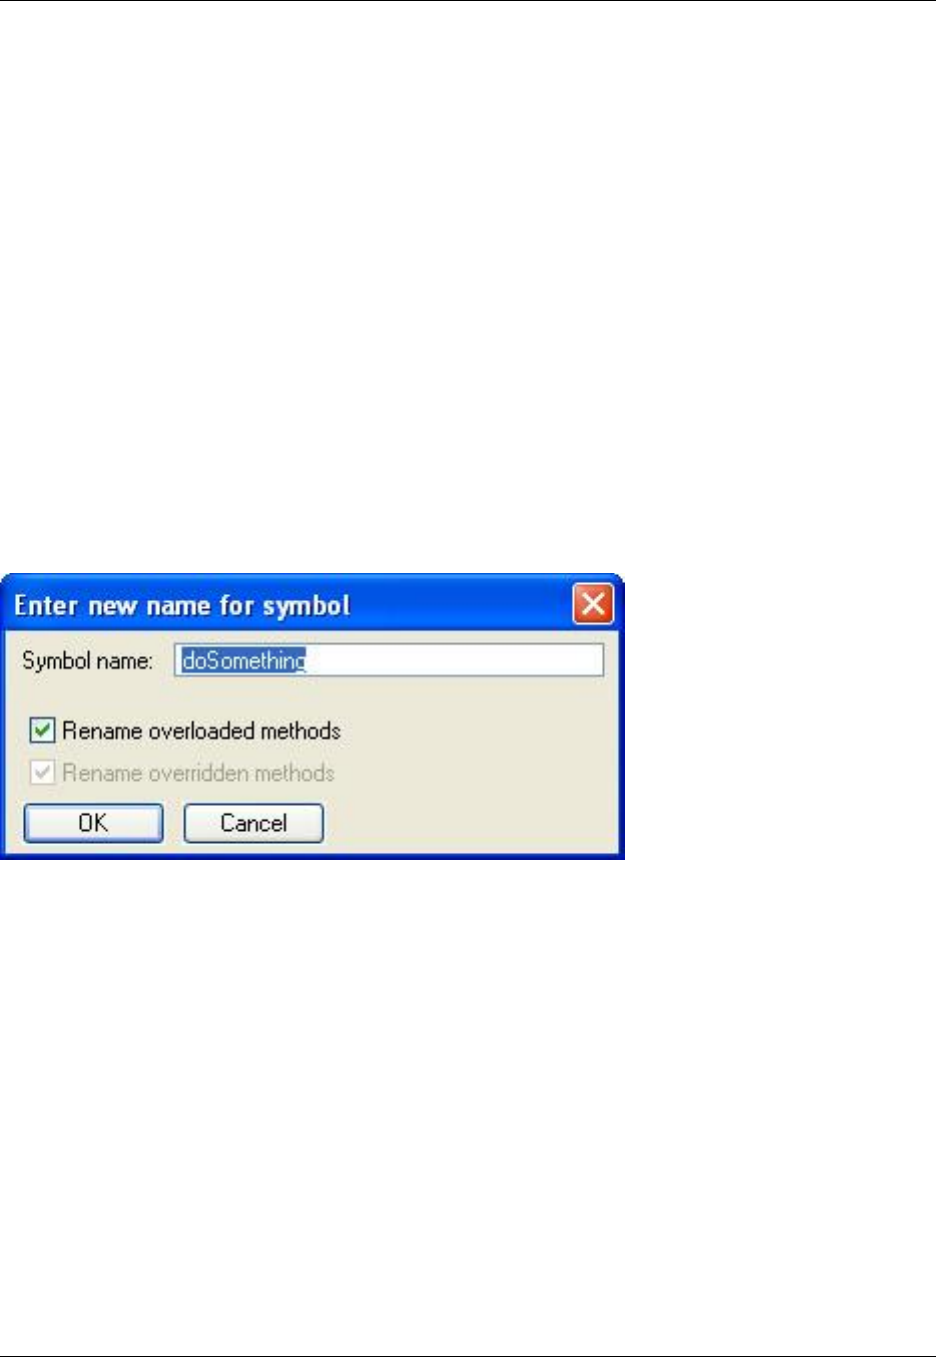
Available C++ Refactorings
To access the C++ refactorings, from the main menu, click C/C++ Refactoring. The C++ Refactoring
menu can be also be accessed from the right-click menus within the Symbols and Outline views.
Rename
Rename is used to rename variables, methods, and classes. It uses Context Tagging®to identify:
• The symbol under the cursor (or any symbol selected in the Symbols or Outline views).
• All of the symbol overloads.
• All other instances of the symbol within the class hierarchy.
It then parses each file containing references to the selected symbol(s), and updates the rest of the code
to use the changed name.
Figure 6.31. C++ Refactoring: Rename
Extract Method
After selecting a set of lines, Extract Method creates a new method with the selected lines as the body. It
discovers any undeclared variables and creates them as parameters to the new method. The extracted
method is created in the same scope as the original method.
Figure 6.32. C++ Refactoring: Extract Method
C++ Refactoring
201
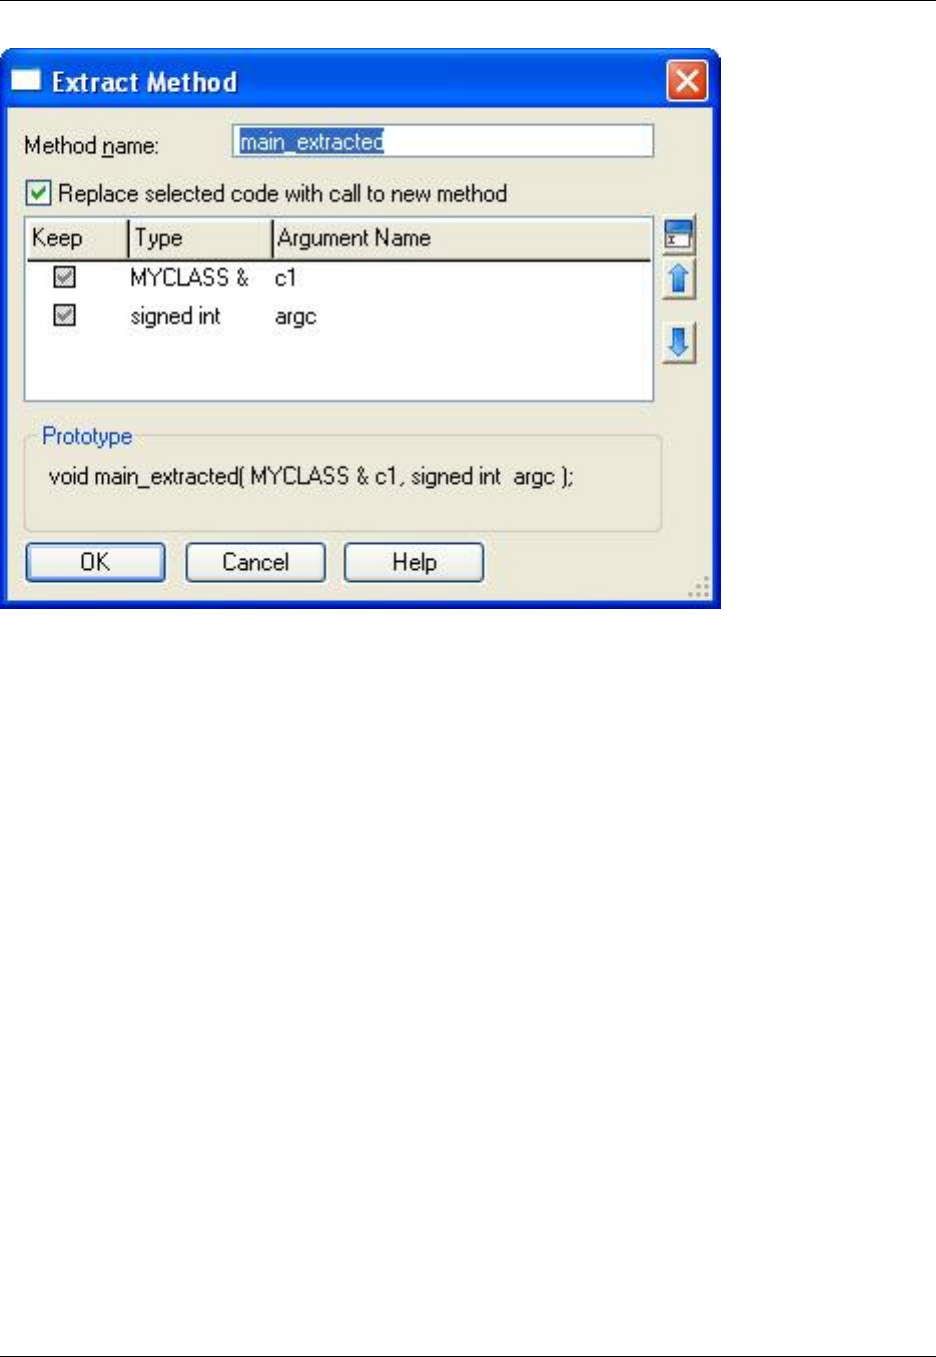
The Method name text box allows you to choose the name of the newly extracted method. Uncheck Re-
place selected code with call to new method if you do not want the original method to be modified.
This option is unavailable if the selected block contains a return, continue, or break statement.
Modify Parameter List
Modify Parameter List allows you to add, delete, and re-order parameters for a selected function. The re-
factoring will modify the parameter list for the selected function and all of its counterparts within the class
hierarchy.
Figure 6.33. C++ Refactoring: Modify Parameter List
C++ Refactoring
202
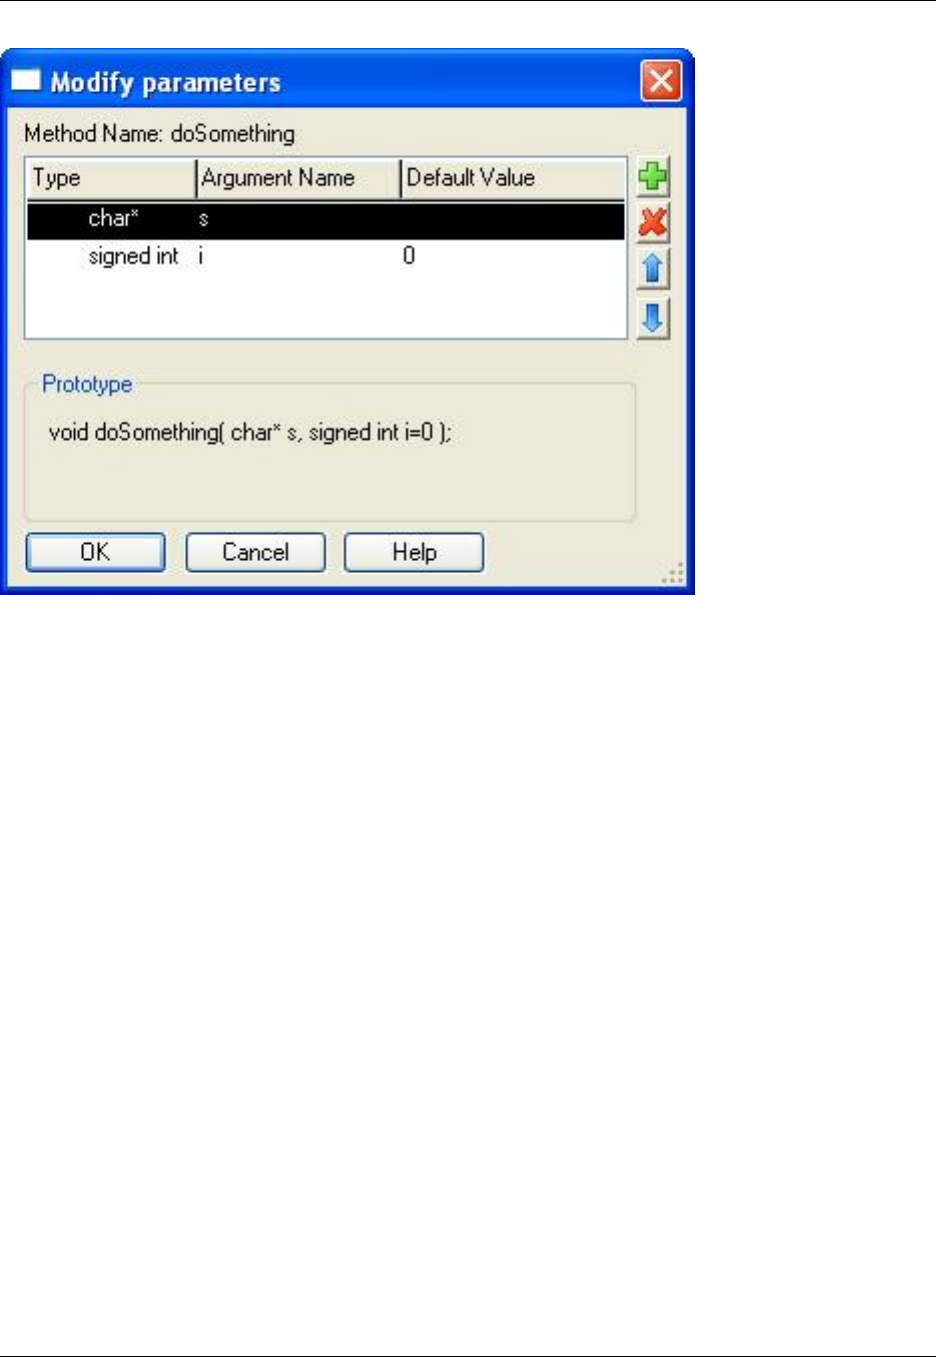
Push Down to Derived Class
Moves class members to a class that inherits from the selected class.
Figure 6.34. C++ Refactoring: Push Down to Derived Class
C++ Refactoring
203
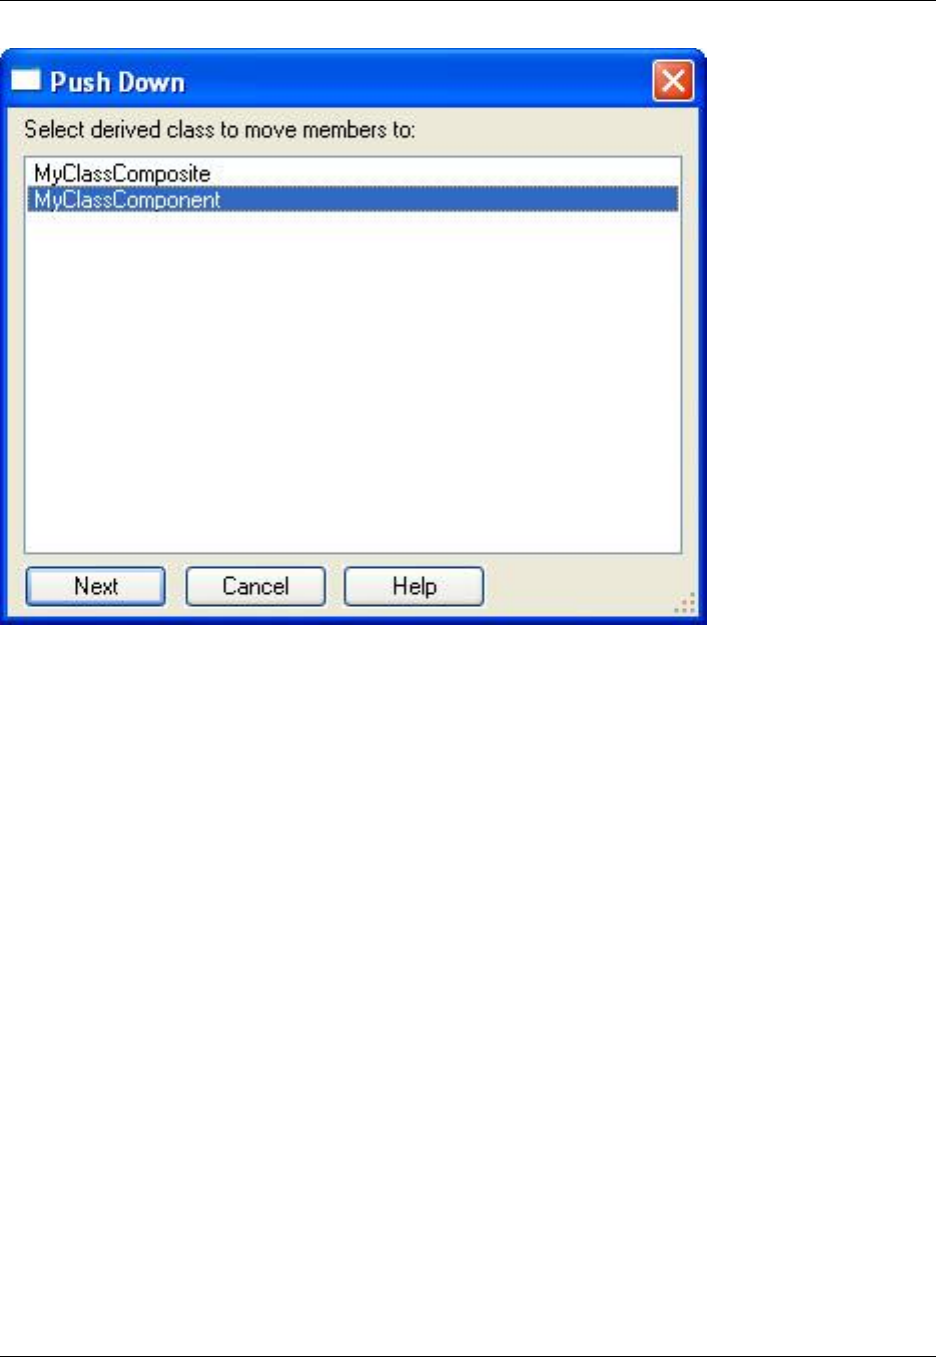
If a member of the super class is used by multiple subclasses, then the member is moved to all of the
subclasses that access that member, so that when the refactoring is done, everything will compile. Any
member that is explicitly accessed through an instance of the super class (or an instance that is cast to
the super class) cannot be moved. Moving this will break the code.
Constructors and destructors cannot be moved. Members can only be moved one level at a time.
Figure 6.35. C++ Refactoring: Push Down - Selecting Members to Move
C++ Refactoring
204
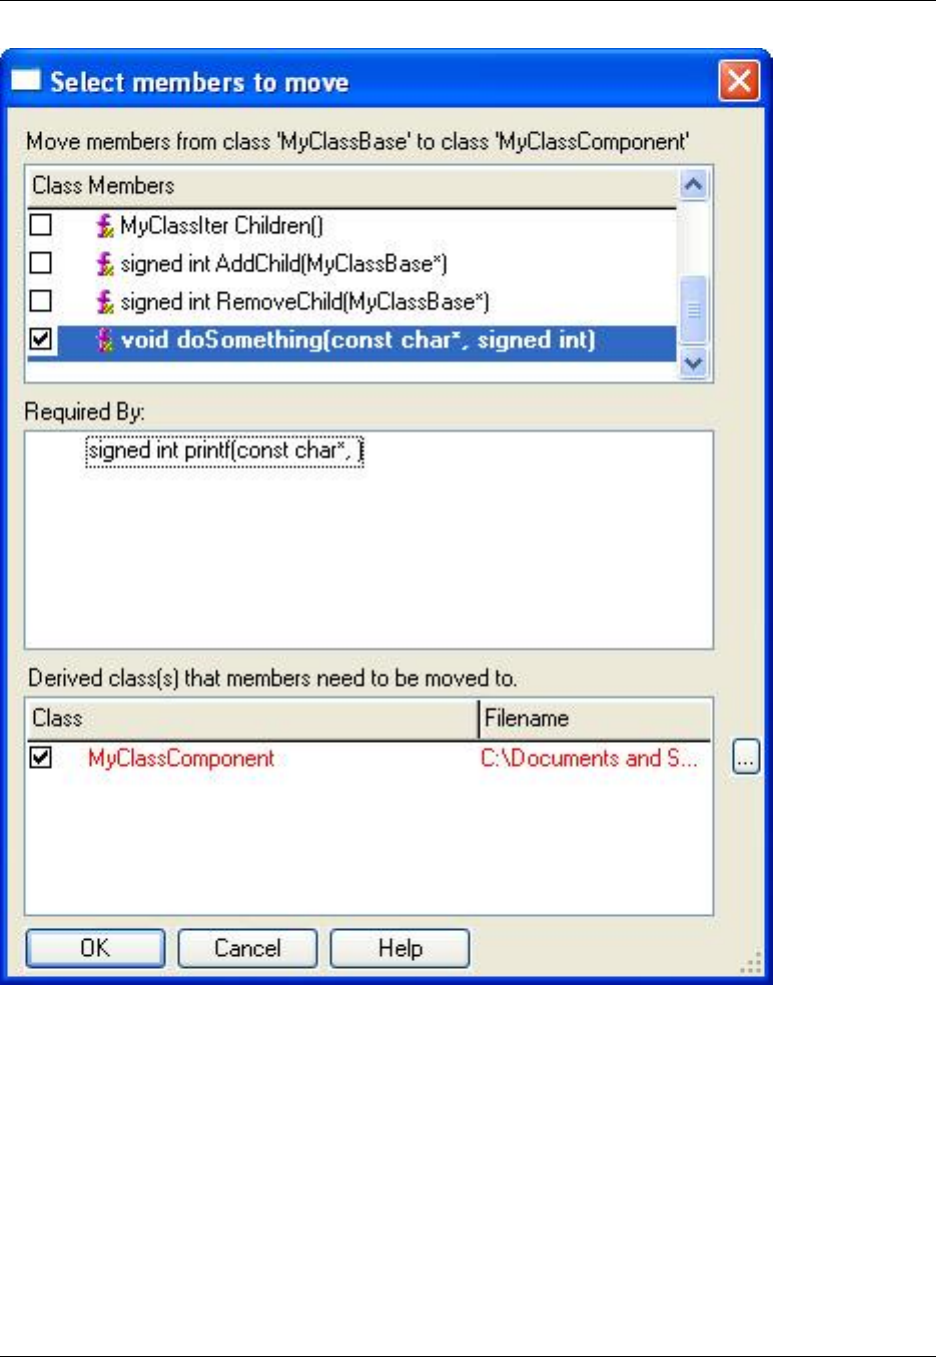
Pull Up to Super Class
Automates moving members from a selected class to one of its directly-inherited base classes.
Figure 6.36. C++ Refactoring: Pull Up to Super Class
C++ Refactoring
205
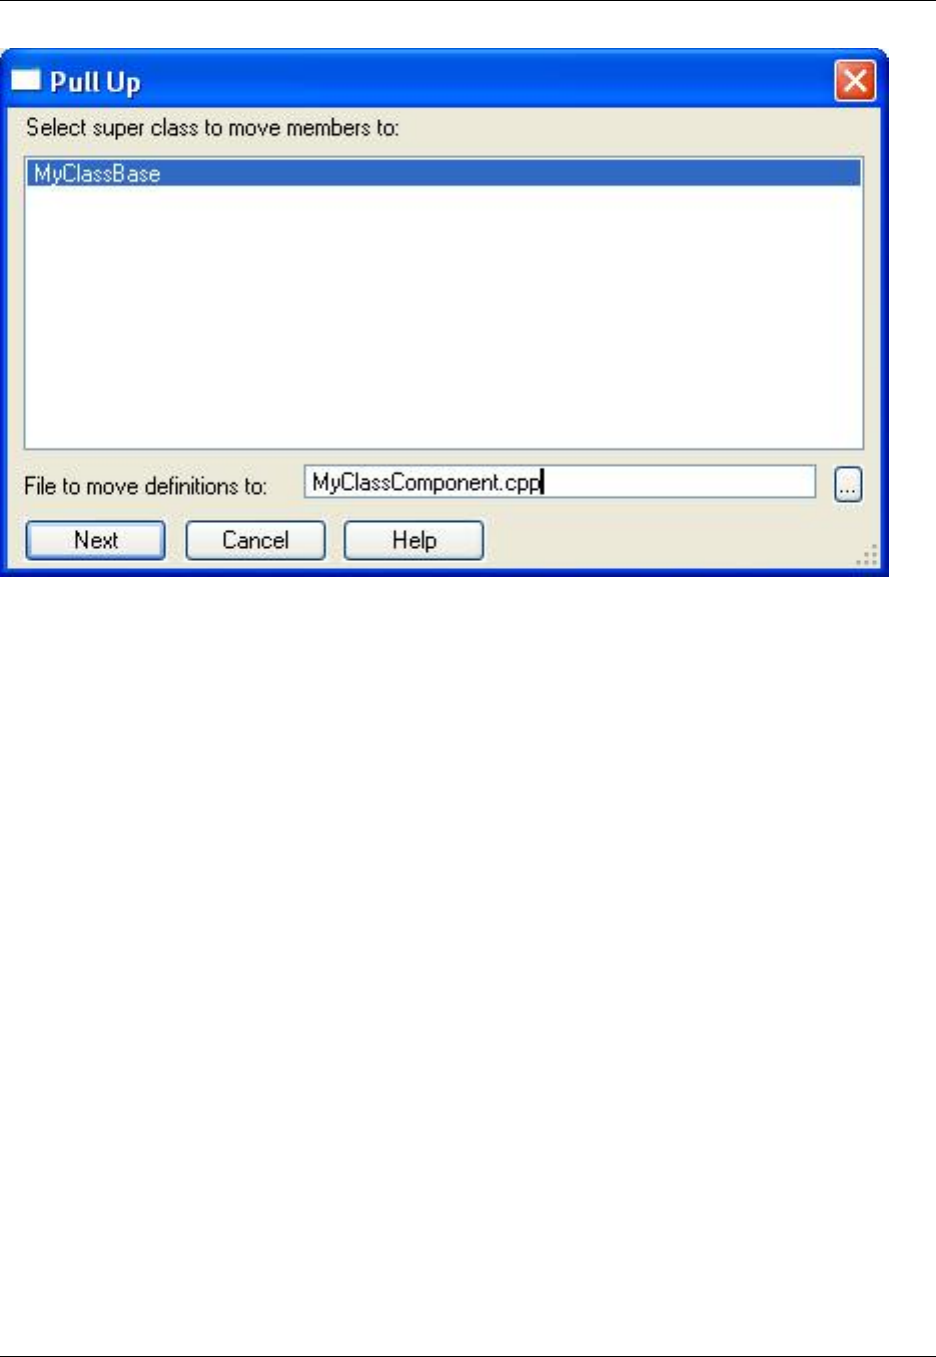
Class members are pulled up one level at a time. Constructors and destructors cannot be moved. Any de-
pendencies that are not part of the original class will not be moved to the new base class, and might not
be accessible, thereby causing compilation errors. This occurs, for example, when a function being
moved uses a static global variable that is defined in the original class' .cpp file when the definitions are
moved to a different .cpp file.
Figure 6.37. C++ Refactoring: Pull Up - Selecting Members to Move
C++ Refactoring
206
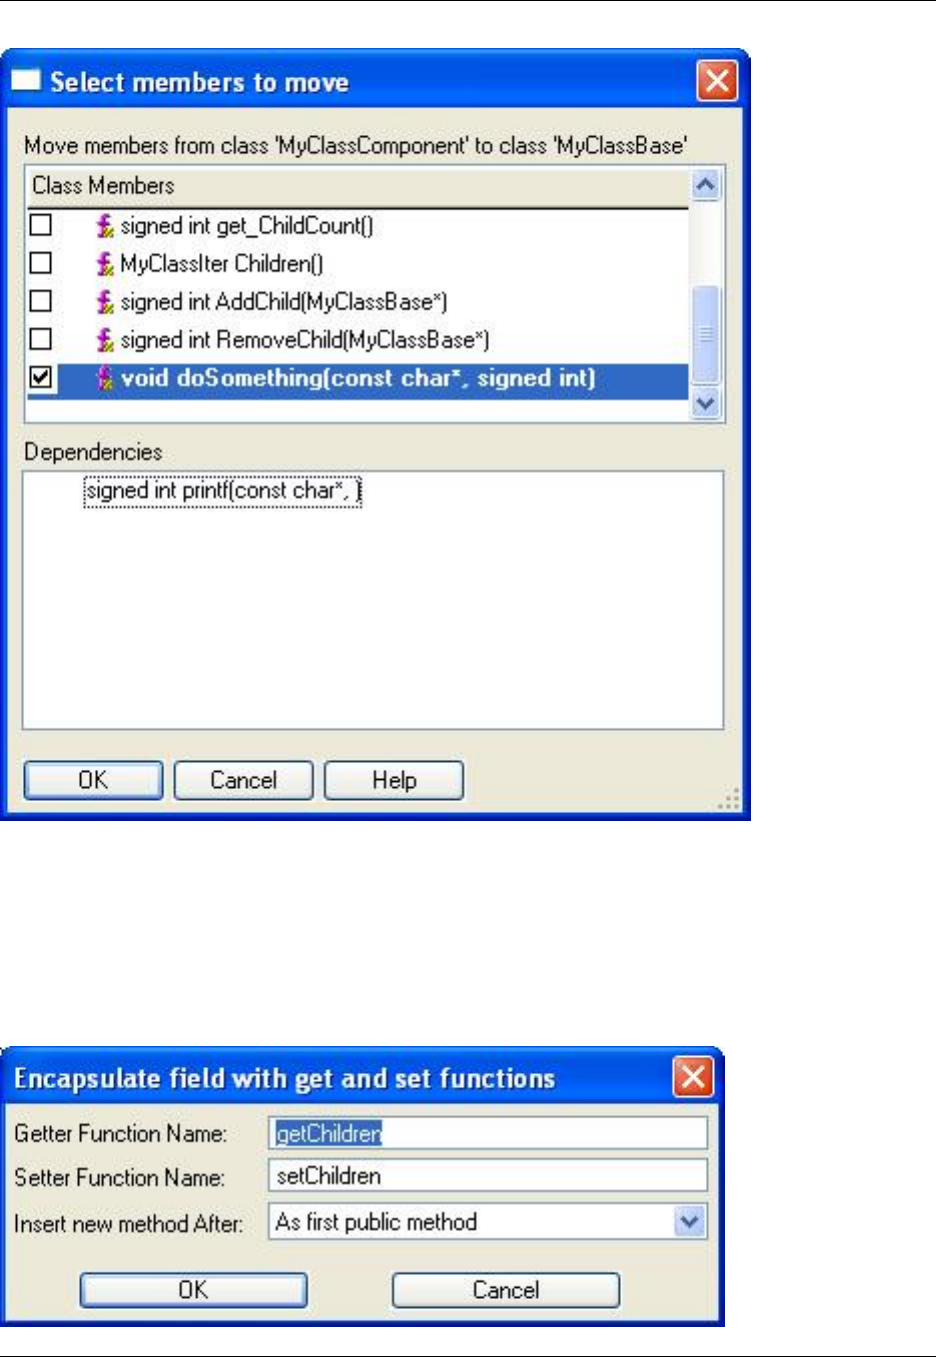
Encapsulate Field
Generates get and set functions for the specified variable and makes that variable private. All references
to the variable are replaced with references to the getter or setter, as appropriate.
Figure 6.38. C++ Refactoring: Encapsulate Field
C++ Refactoring
207

Extract Class
Breaks a large class into a better abstraction by moving some responsibilities into a new class or inter-
face. This refactoring creates new files. When using the Extract Class refactoring, keep in mind the follow-
ing information:
• The default path uses the same directory as the original class.
• The default file names are the <class_name>.(cpp/h).
• Default paths and file names can be changed.
• The files will be added to the current project.
• If version control is enabled, you are prompted to add the files to the version control system.
• The new class will generate a default constructor, and a constructor that takes a parameter per mem-
ber variable moved. Initializers in the original class' constructors for moved member variables are
moved to the new class' constructors.
Figure 6.39. C++ Refactoring: Extract Class 1
Figure 6.40. C++ Refactoring: Extract Class 2
C++ Refactoring
208
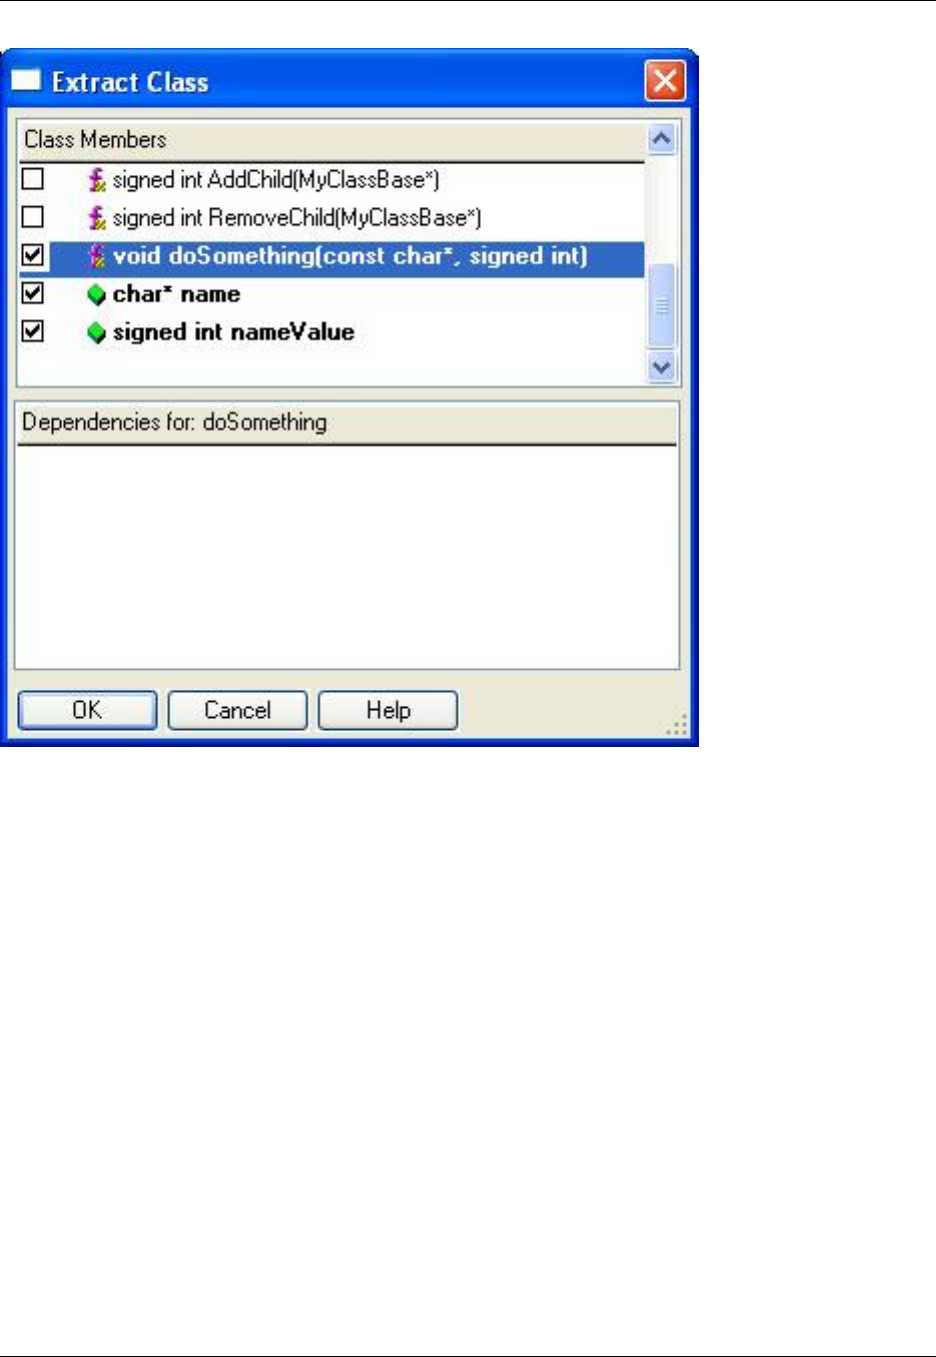
Extract Super Class
Breaks a large class into a better abstraction by moving some responsibilities into a new class/interface.
The extracted class becomes the super class of the original class.
Figure 6.41. C++ Refactoring: Extract Super Class
C++ Refactoring
209
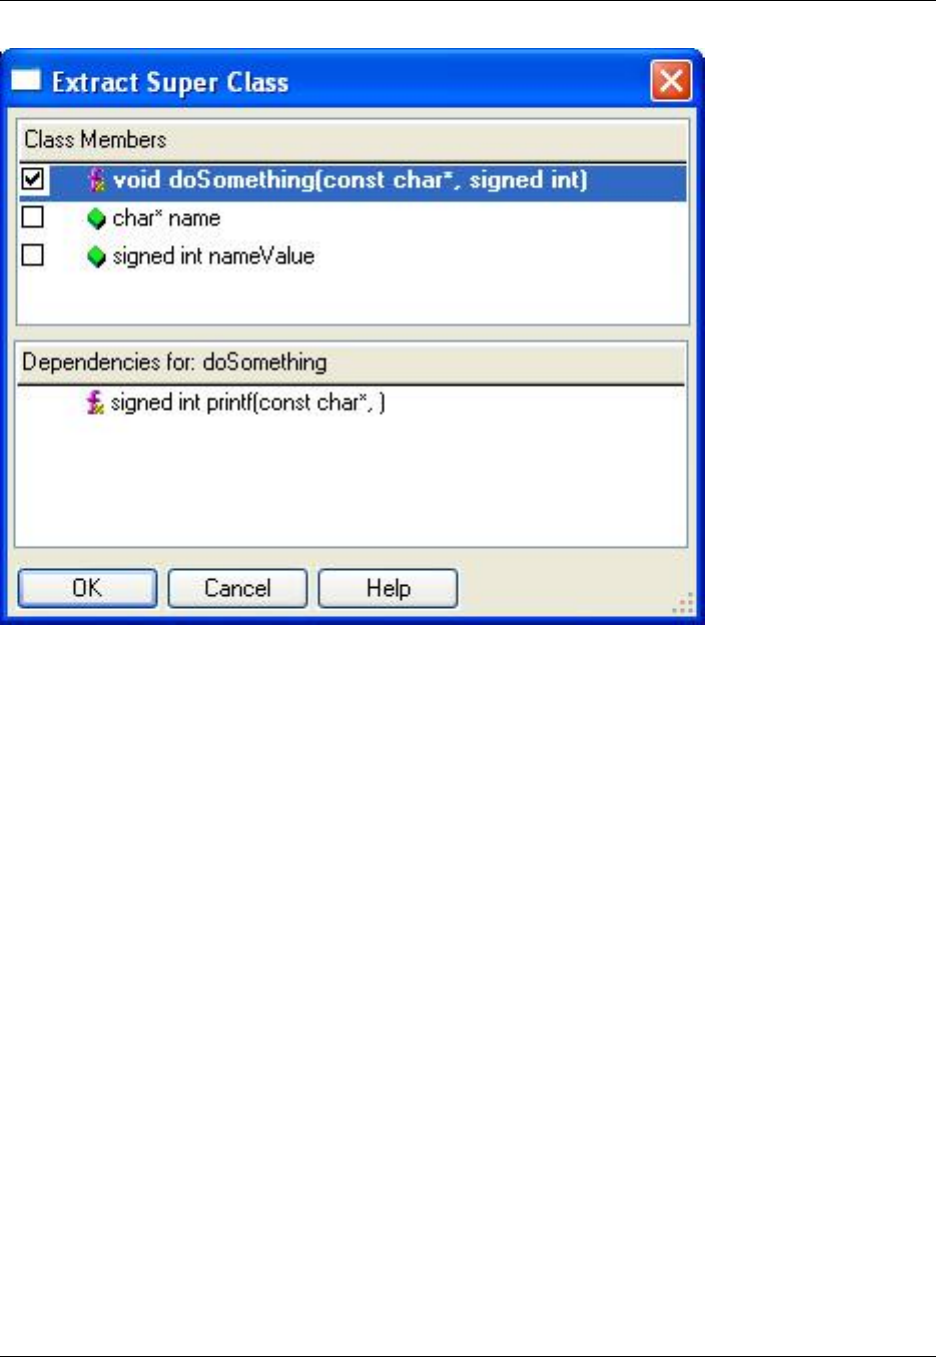
Move Method
Moves a method from one class to another and updates references accordingly.
The original method may be converted to a delegate method if there are references to the original method
that cannot be converted to a reference to the moved method.
Figure 6.42. C++ Refactoring: Move Method 1
C++ Refactoring
210
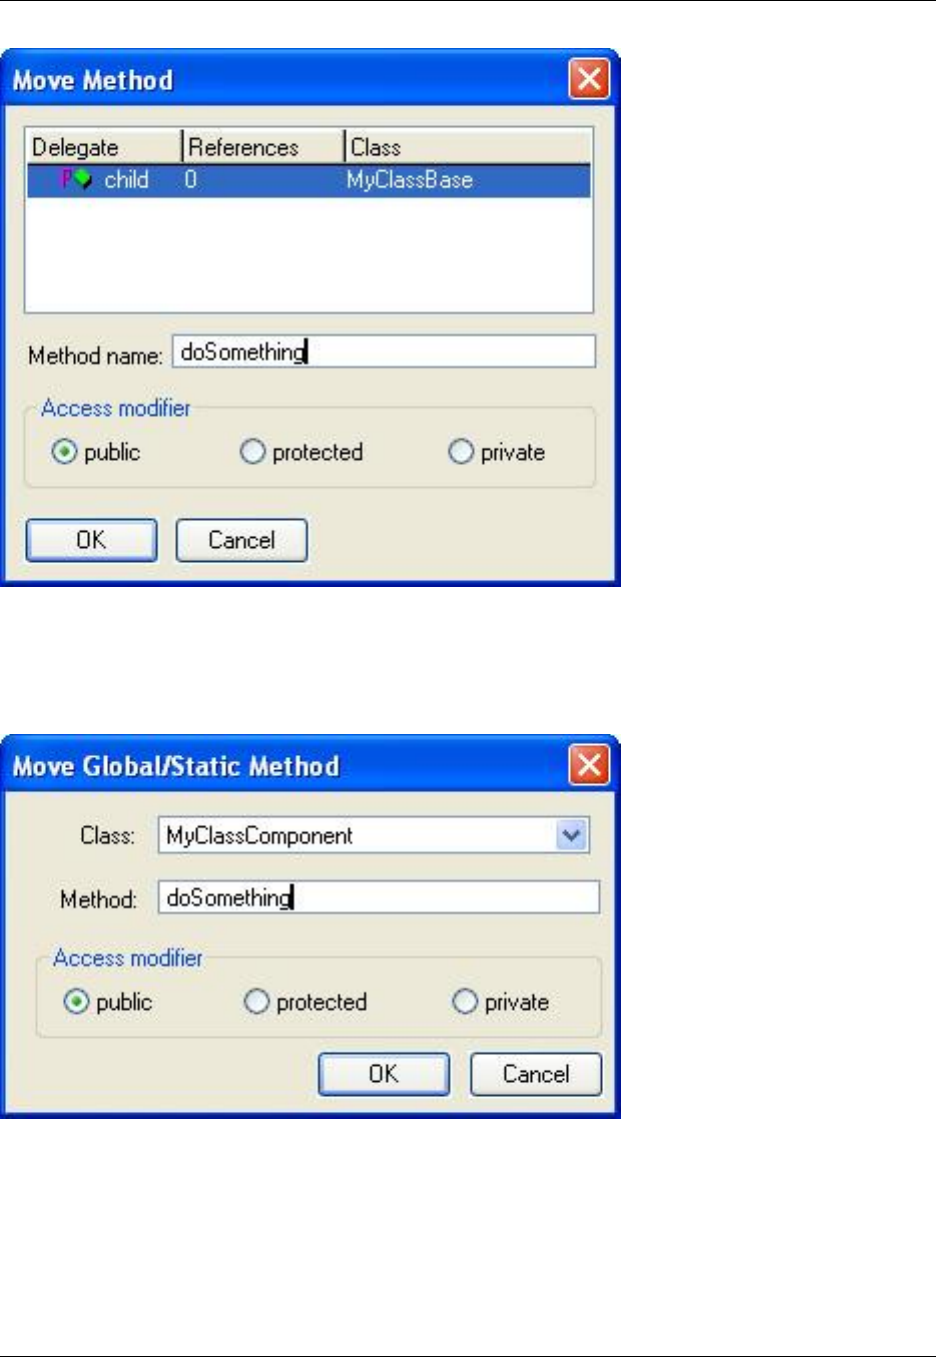
If the method is static, you will be prompted for the target class.
Figure 6.43. C++ Refactoring: Move Method 2
Move Static Field
Moves a static data member from one class to another and updates references accordingly.
Figure 6.44. C++ Refactoring: Move Static Field
C++ Refactoring
211
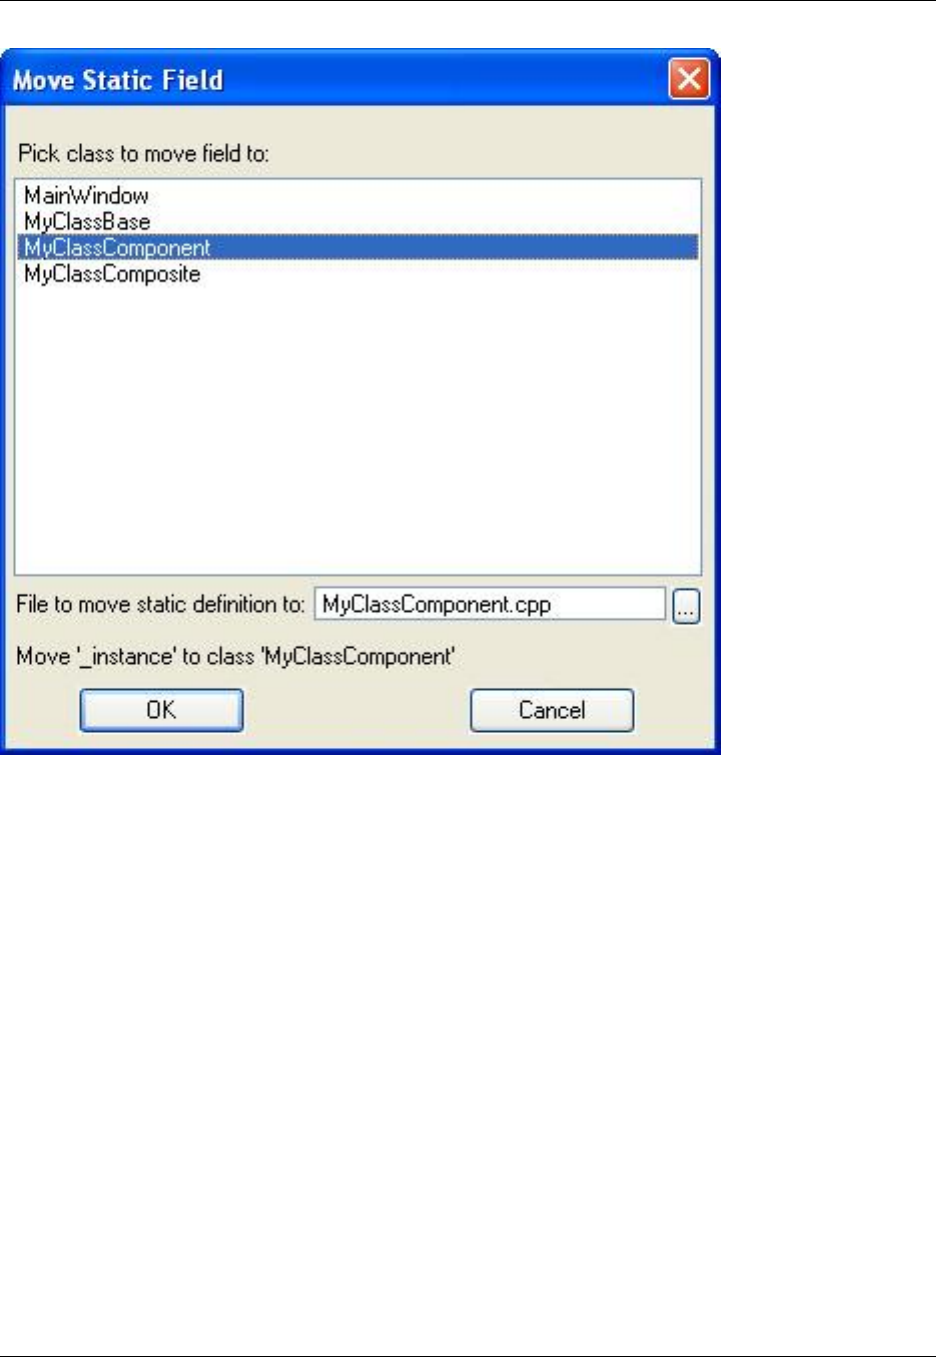
Convert Static to Instance Method
Changes a static method to an instance method and updates any references to change how the method
is accessed.
Convert Global to Static Field
Moves globally-declared variables into a static field in a class, and updates references to refer to the new
static variable.
Figure 6.45. C++ Refactoring: Convert Global to Static Field
C++ Refactoring
212
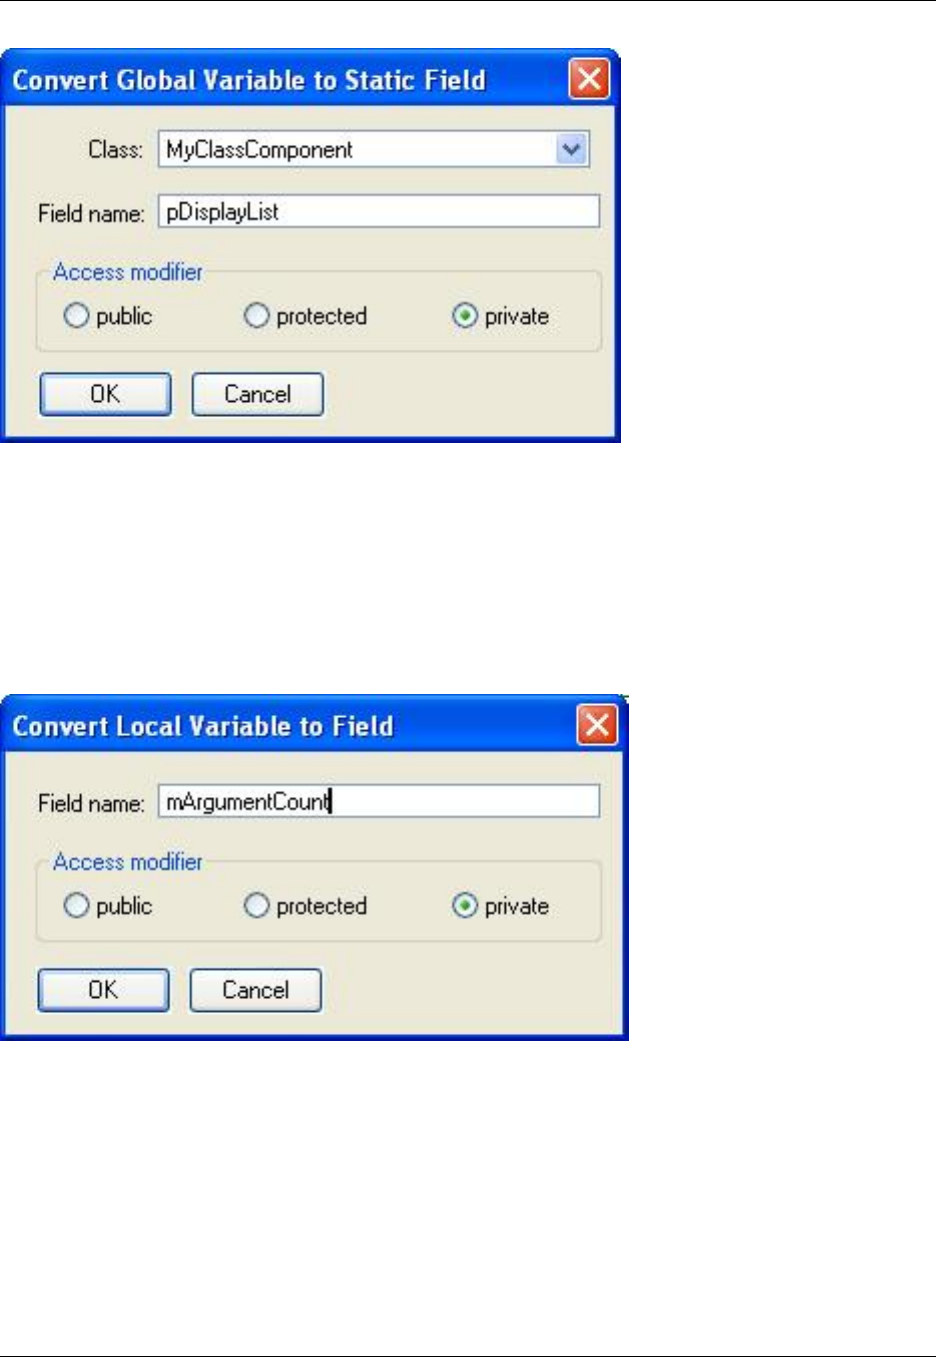
Convert Local to Field
Moves a local variable from the body of a method into an instance member variable in the current class.
References to the local variable are replaced with references to the new data member. This refactoring
cannot be used to convert a method parameter to a field.
Figure 6.46. C++ Refactoring: Convert Local to Field
Replace Literal with Constant
Replaces the selected literal with a constant, replacing use of the literal with the new constant.
Figure 6.47. C++ Refactoring: Replace Literal with Constant
C++ Refactoring
213
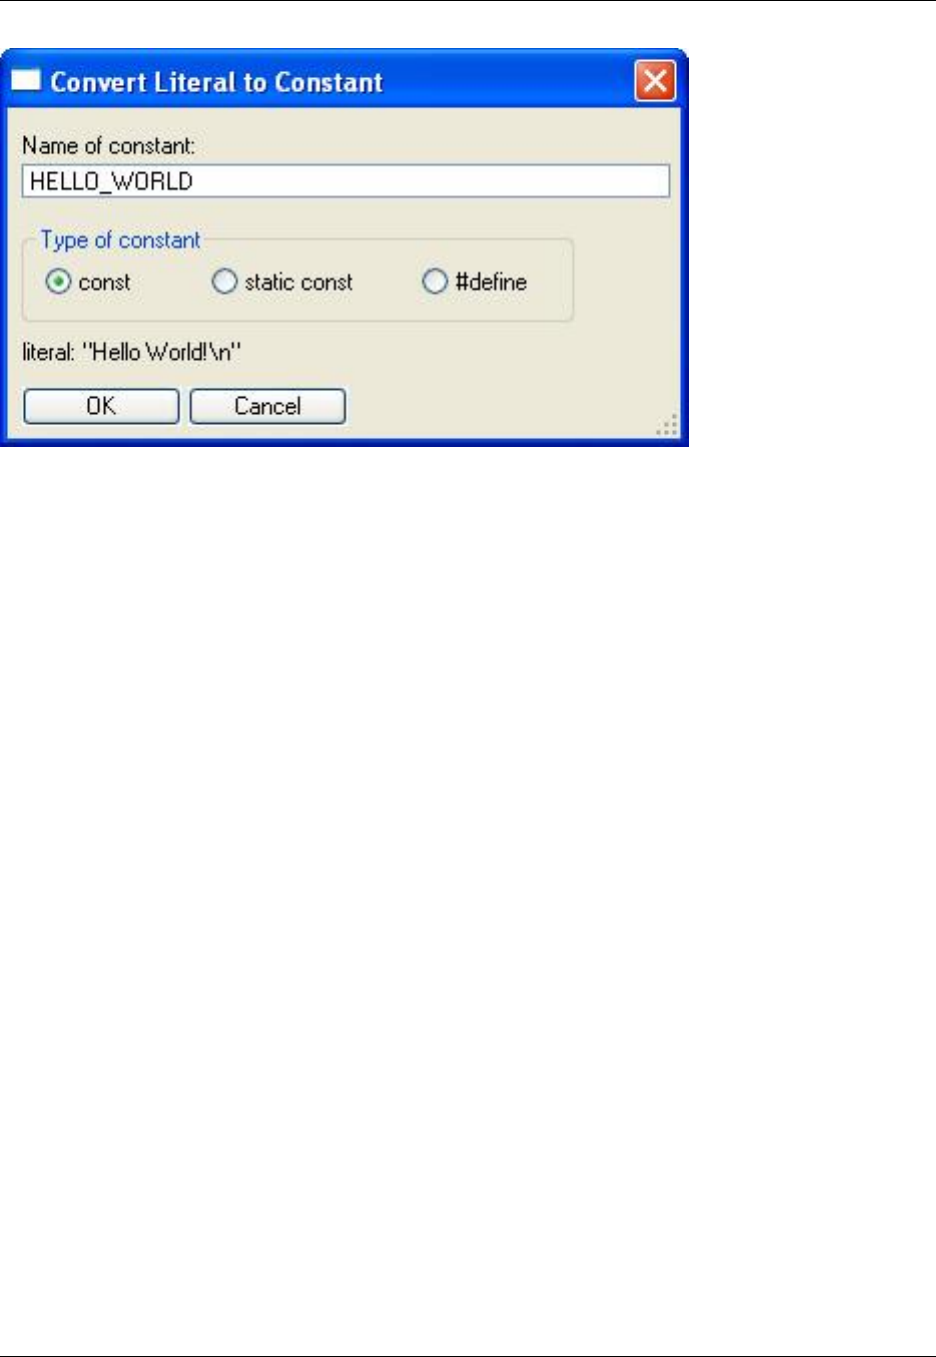
Create Standard Methods
Creates an assignment operator, copy constructor, default constructor, and destructor for the selected
class.
Figure 6.48. C++ Refactoring: Create Standard Methods
C++ Refactoring
214
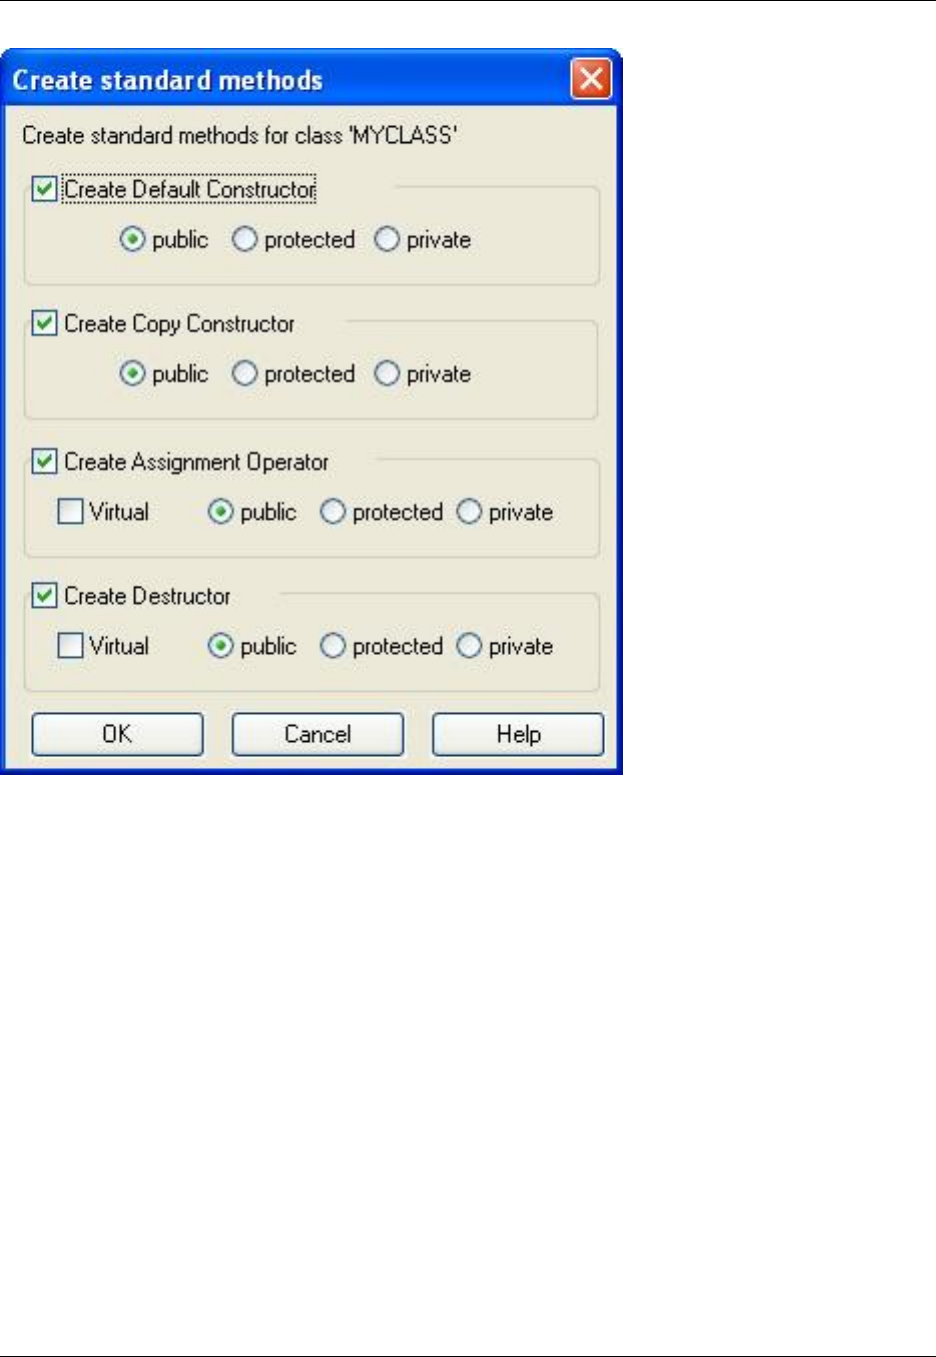
Test Parsing Configuration
Test Parsing Configuration analyzes the C++ refactoring configuration that has been set up and reports
key information and errors. Generally, it is designed as a debugging aid when a refactoring fails, but it can
also be valuable as a means to view the parameters that are set for a refactoring. You can verify the re-
factoring setup before proceeding to avoid errors.
To access Test Parsing Configuration, from the main menu click C/C++ Refactoring →Test Parsing
Configuration (refactor_parse command), or right-click within the editor window and click C++ Refact-
oring →Test Parsing Configuration. On the Test Parsing Configuration dialog, click Parse File to parse
the file. Any errors are displayed in the SlickEdit®Core Output view. Click Preprocess File to preprocess
the file, sending the results to a new editor window. Click Copy to Clipboard to copy the entire display
shown in the window. This is useful for sending to SlickEdit Support if it is necessary to diagnose a prob-
lem.
The following example of the Test Parsing Configuration window shows an error stating that there is no
open workspace, as well as various other warnings. These are severe enough to prevent parsing the file,
which is why the Parse File button is unavailable.
C++ Refactoring
215
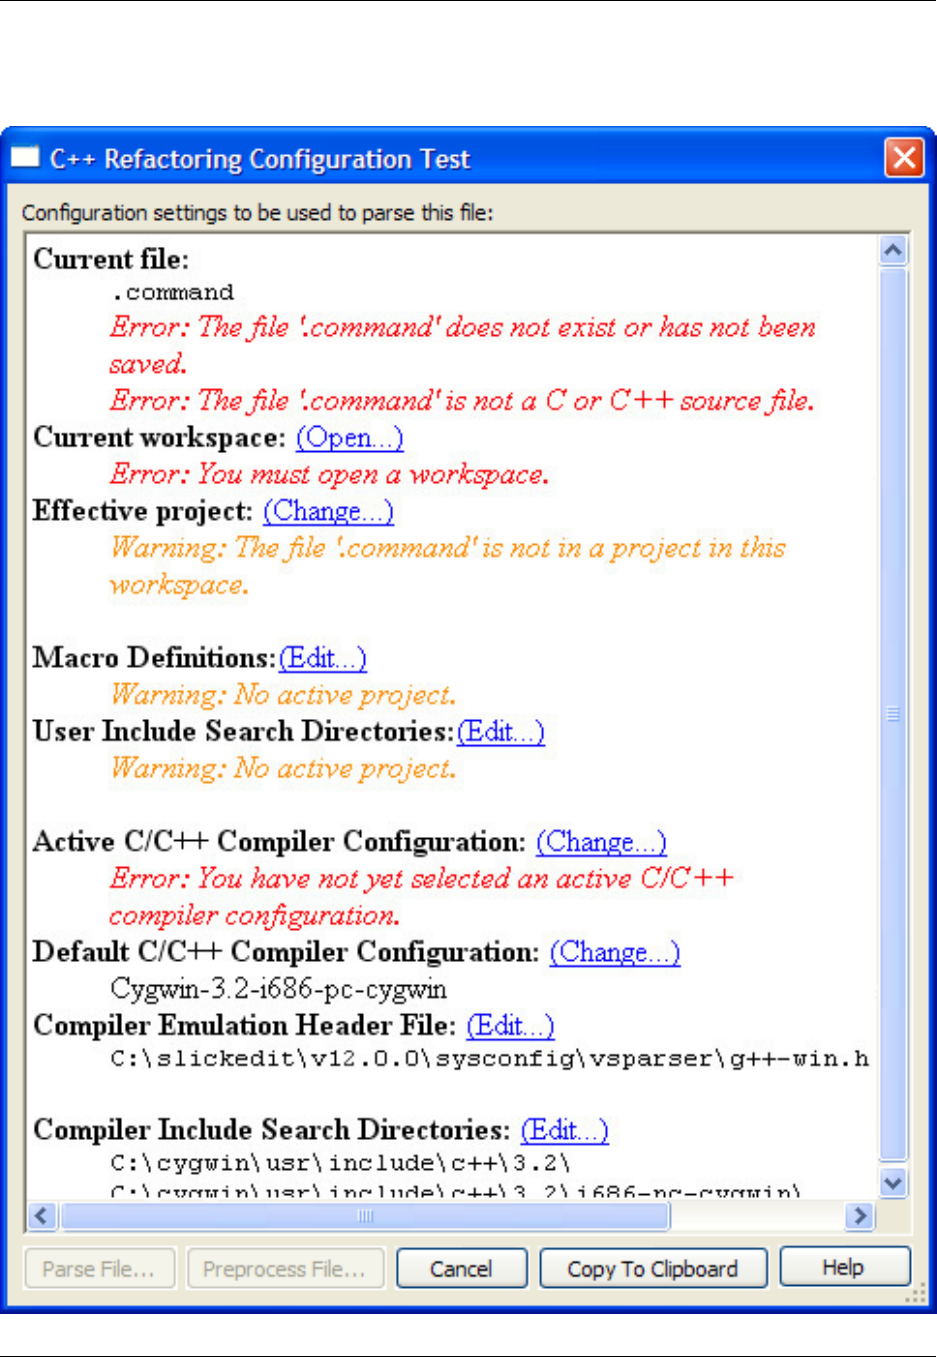
Figure 6.49. Test Parsing Configuration: Example 1
C++ Refactoring
216

The following example shows a warning that is not severe enough to prevent parsing of the file.
Figure 6.50. Test Parsing Configuration: Example 2
C++ Refactoring
217
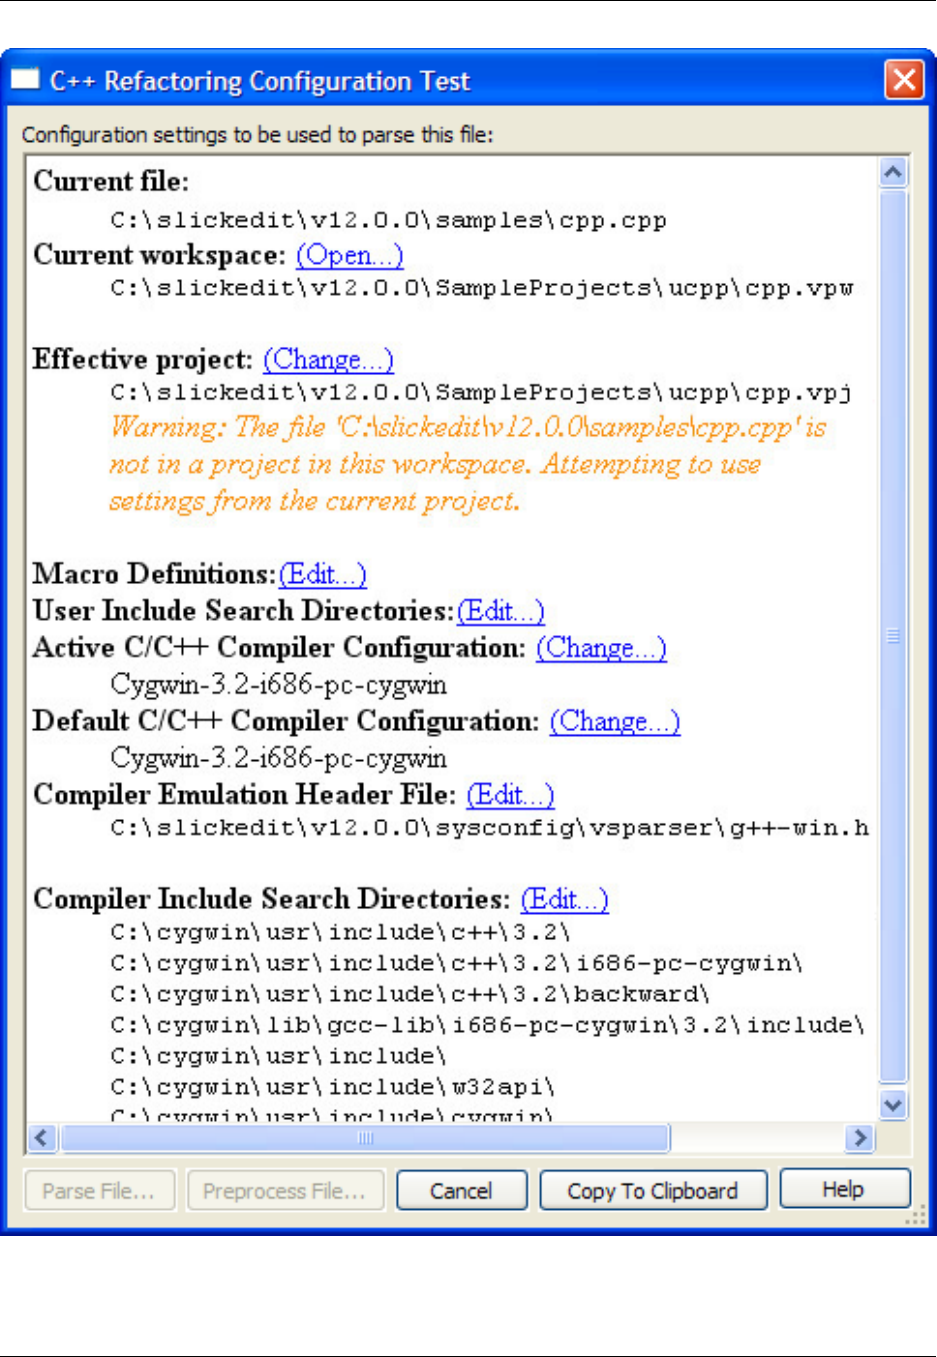
Finally, the following example shows a test resulting in no errors or warnings.
C++ Refactoring
218
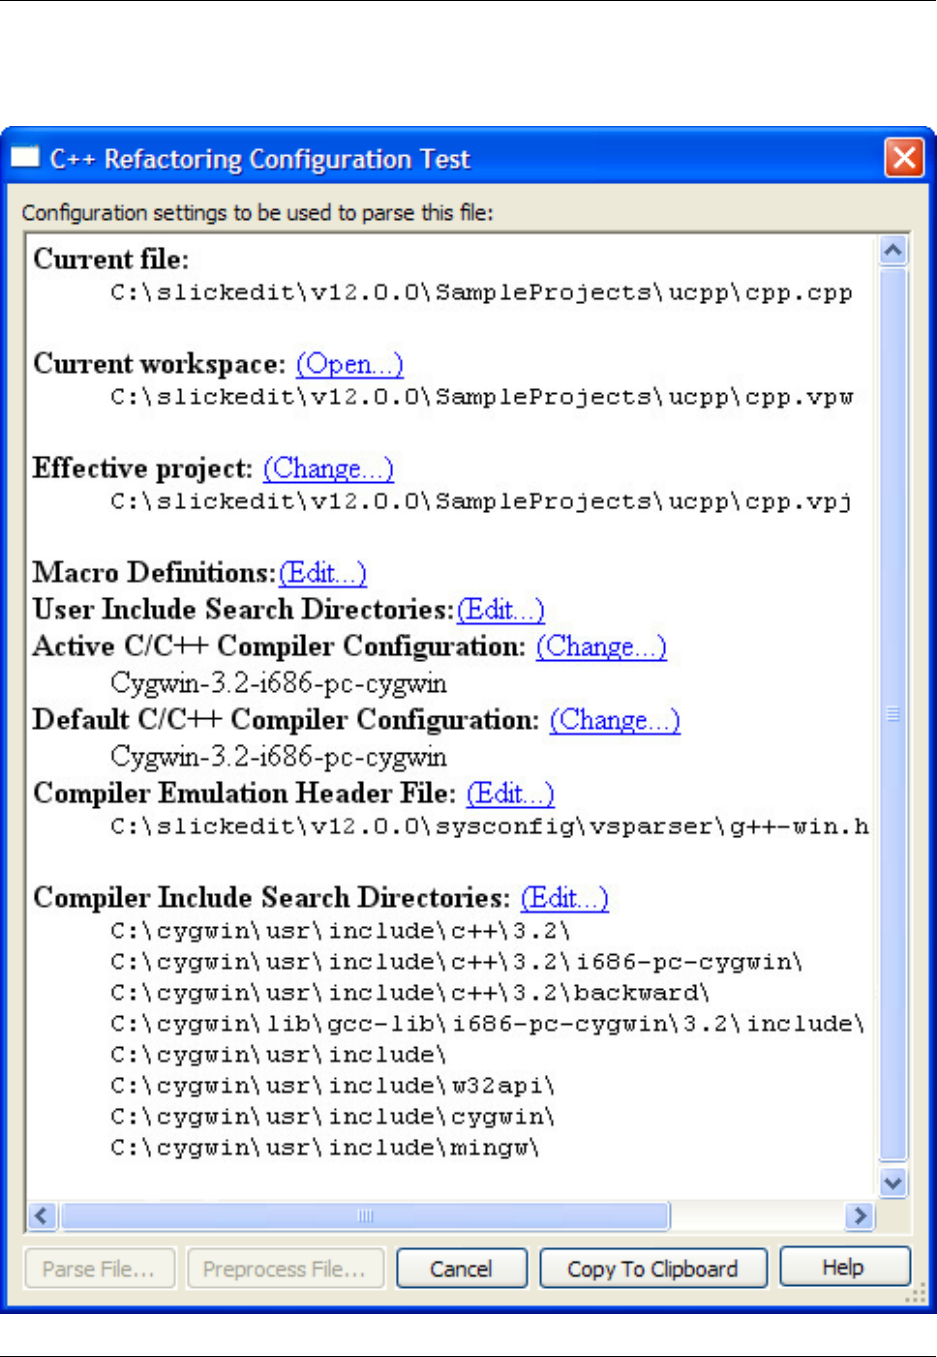
Figure 6.51. Test Parsing Configuration: Example 3
Reviewing Refactoring Changes
219
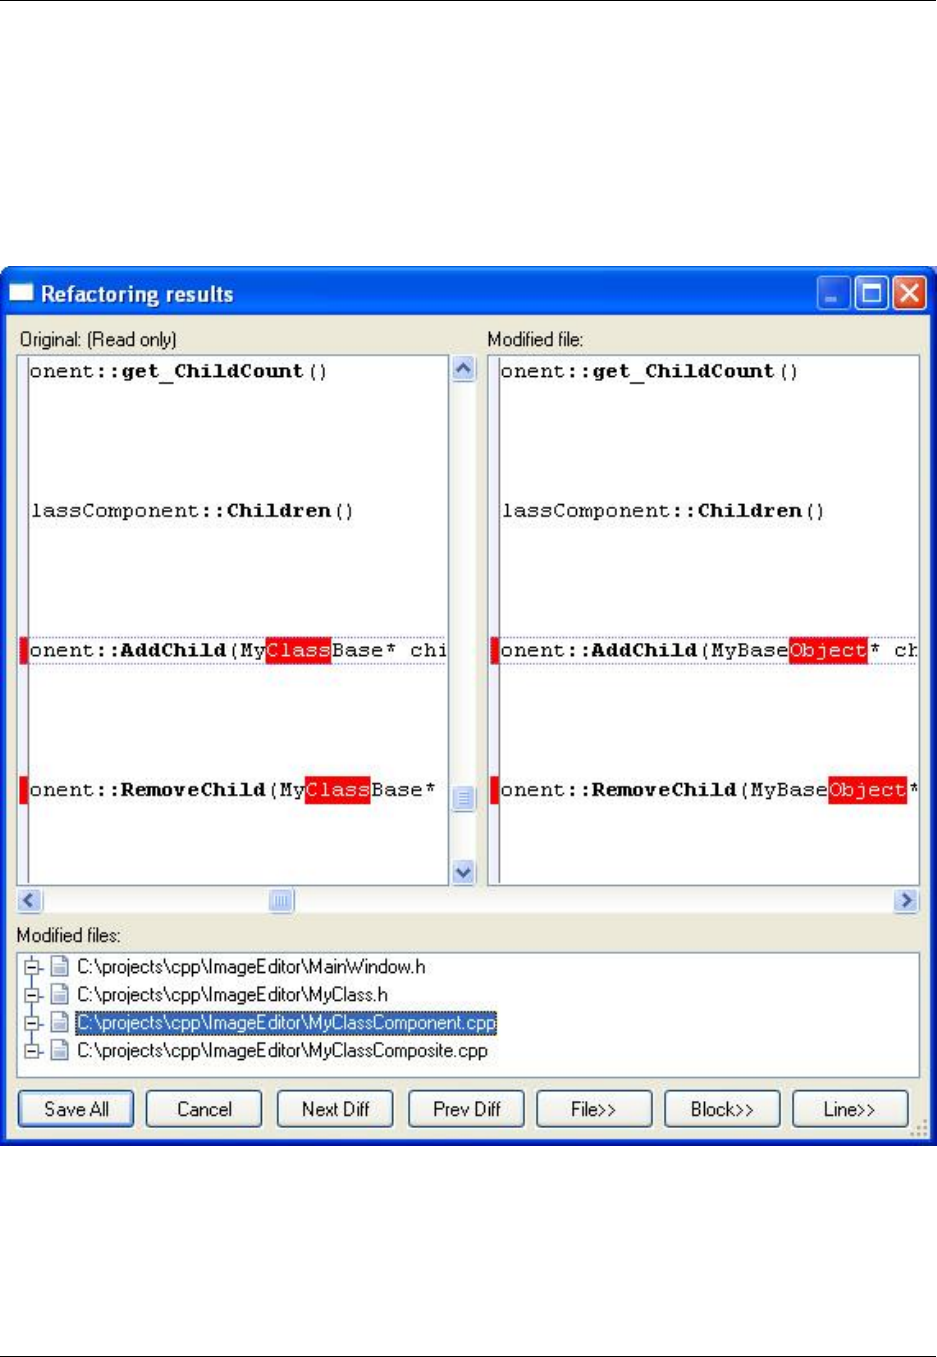
Reviewing Refactoring Changes
When a refactoring finishes, the Refactoring results dialog box is displayed, allowing you to review the
changes.
Figure 6.52. Refactoring Results
There are three panes in this window:
• The left pane is read-only and shows the original file(s).
• The right pane shows the refactored file(s). For convenience, this pane can be edited.
Reviewing Refactoring Changes
220

• The bottom pane lists all files that have been modified by the refactoring. Clicking on any file in this list
brings that file into view, where it can be reviewed and edited.
Click Save All at the bottom of this window to save all the refactoring and editing changes that were
made on all files. Click Cancel to discard changes and have all files remain the way they were before the
refactoring process.
Click Next Diff or Prev Diff to advance to the next or previous change made by the refactoring. Click
File>> to restore the contents of the current selected file to its original contents.
Click Block>> to restore an entire block of changes to the original contents. Click Del Block to remove a
block of code inserted by the refactoring. Click Line>> to restore the current line to its original contents.
Some refactorings, in particular Modify Parameter List, may require further user input. In this case each
input will be displayed under the file it is in, and there will be two additional buttons: Next Input and Prev
Input. You will not be able to save the refactoring results until you have resolved all of the input requests.
Java Refactoring
The Eclipse JDT Refactor main menu item for Java refactoring disappears when you are not using the
JDT Editor. SlickEdit Core has made several of these refactorings available in the editor’s right-click
menu, under the Source menu item:
•Override/Implement Methods
•Implement Getters and Setters
•Generate Delegate Methods
•Add Constructors from Superclass
•Generate Constructor Using Fields
•Externalize Strings
There are also other Java refactorings from the JDT accessible from the Refactor menu item of the edit-
or’s right-click menu:
•Move
•Change Method Signature
•Convert Anonymous Class to Nested
•Move Member Type to New File
•Pull Up
•Push Down
•Extract Interface
Java Refactoring
221

•User Supertype Where Possible
•Inline
•Introduce Factory
•Encapsulate Field
See the Eclipse Help for descriptions and other information regarding Java refactoring (Java Develop-
ment User Guide →Reference →Refactoring).
Viewing and Displaying
222

Viewing and Displaying
SlickEdit®Core offers several features for viewing and displaying.
Hexadecimal View and Edit Mode
To view a binary or text file in a hex/text view mode, click Display →Hex or Display →Line Hex (or use
the commands hex or linehex). If closing a file while viewing it in hex mode, then the next time the file is
edited, it will be displayed in hex/text view mode. When the cursor is in the hex data, it can be overwritten
or hex nibbles (characters 0through F) can be inserted. When the cursor is in the text data, overwrite it if
you want, or insert text characters the same as if editing a text file. All of the search and replace com-
mands work while hex editing. Only character selections are displayed when in hex editing mode.
Hex Mode Key Bindings
Hex mode key bindings override normal key bindings for the emulation. Most of the other emulation keys
will perform the same operation. However, keys that are bound to the commands top_of_buffer,bot-
tom_of_buffer,page_up,page_down,begin_line,end_line,begin_line_text_toggle,cursor_left, or
cursor_right will perform hex/text cursor motion.
Table 6.15. Hex Mode Key
Key Function
Tab and Shift+Tab Toggle cursor between hex data on left and text
data on right.
Home Move cursor to beginning of hex/text line.
End Move cursor to last character of hex/text line.
Backspace Delete a byte to the left of the cursor and move the
cursor to the left.
Delete Delete the byte under the cursor.
Viewing Special Characters
By default, many important characters are not visible in the editor, like tabs, spaces, and line-ending char-
acters. To view these, click Display →Special Chars. SlickEdit®Core will then display a visible charac-
ter to represent these invisible characters. When using this option with Display →Line Hex, the hex
value for the actual character (like space) will be displayed, not the value for the character used to repres-
ent it (like a dot).
Hexadecimal View and Edit
Mode
223

To define which characters to display, from the main menu click Window →Preferences, expand
SlickEdit and click General in the tree, then double-click the General setting and select the Special
Characters tab. See Defining Special Characters below.
Note
Viewing special characters is only available for ASCII files.
Special Character Toggles
The following toggles are available on the view menu:
• Hex Toggle
• Line Hex Toggle
• Special Characters Toggle
• New Line Characters Toggle
• Tab Characters Toggle
• Space Characters Toggle
• Line Numbers Toggle
Defining Special Characters
To define what characters to display when viewing special characters, from the main menu, click Window
→Preferences, expand SlickEdit and click General in the tree, then double-click the General setting
and select the Special Characters Tab. Enter the character codes that you wish to use.
To view the differences between a DOS format text file and another format when View →New Line
Chars is active, choose something other than a space for the End-Of-Line (2) character. Under Win-
dows, the recommended choices are 13 for End-Of-Line (1) and 10 for End-Of-Line (2).
To change the colors and styles of special characters, from the main menu click Window →
Preferences, expand SlickEdit and click General in the tree, then double-click the Color setting. Select
Special Characters from the screen element drop-down list. For more information on color settings, see
Setting Fonts and Colors.
Selective Display
Selective Display (also known as code folding) is a convenient way to display or hide regions of your
code, so that you can view and manage only those regions that are relevant to your current editing ses-
sion.
Use the Selective Display dialog to activate this feature and to specify the type of regions to display or
Selective Display
224
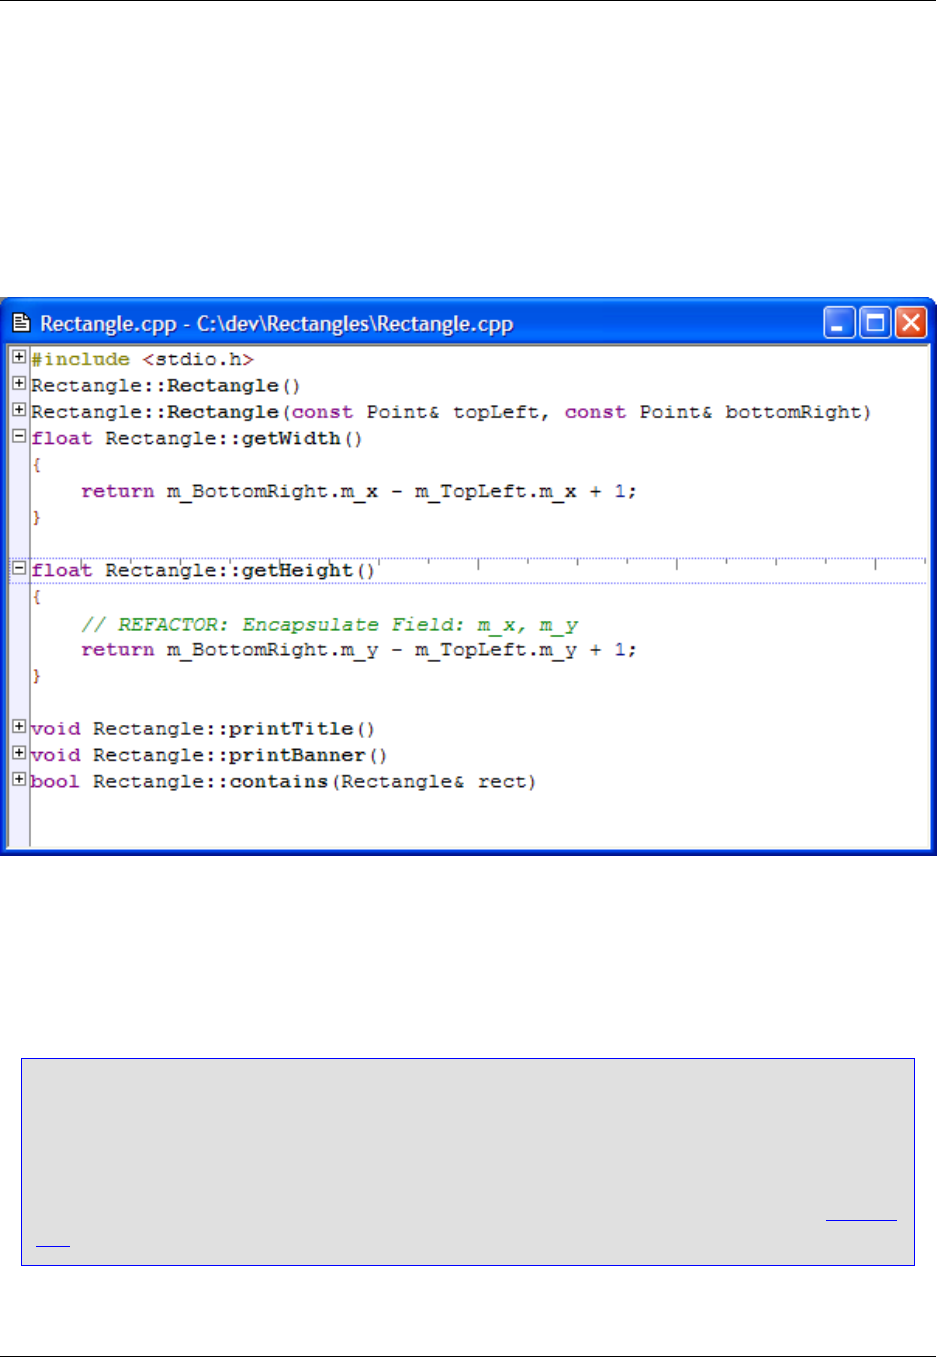
hide. This dialog is displayed by clicking Display →Selective Display, or by using the selective_display
command.
When Selective Display is active, a Plus (+) or Minus (-) bitmap is placed before hidden or expanded
lines in the editor window margin. The following screenshot shows a sample file with two function defini-
tions expanded and the rest collapsed.
Figure 6.53. Selective Display
When Selective Display is active, you can perform the following operations:
• To display or hide lines: Double-click on the Plus (+) or Minus (-) bitmaps. Alternatively, click Display
→Expand/Collapse Block, press Ctrl+\, or use the plusminus command.
Tip
Selective Display bitmaps can be expanded or collapsed with a single click, causing Selective
Display to operate similar to Windows Explorer. Note, however, that you will not be able to select
a line by clicking to the left of a text line which contains a Selective Display bitmap. To set this op-
tion, from the main menu, click Window →Preferences, expand SlickEdit and click General in
the tree, then double-click the General setting. On the General Options dialog, select the General
Tab. Select the option Expand/collapse single click.
• To copy visible text to the clipboard: Click View →Copy Visible or use the copy_selective_display
command. Normally when you copy a selection that spans multiple lines, hidden lines are copied as
Selective Display
225

well. This command ignores hidden lines and only copies visible text. This operation does not work with
block selections.
• To redisplay all lines and remove the Plus and Minus bitmaps: From the main menu click View →
Show All (show_all command).
Expanding/Collapsing Code Blocks
SlickEdit®Core provides a way to expand and collapse code blocks without having to clutter the gutter
with Selective Display bitmaps. You can expand or collapse blocks of code by using the plusminus com-
mand, whether or not Selective Display Plus or Minus bitmaps are displayed.
The plusminus command expands or collapses code blocks under the following conditions:
• If the cursor is on the first line of a code block, the block is collapsed, creating a new Selective Display
region.
• If the cursor is on a line that contains a Plus (+) bitmap, the block is expanded.
• If the cursor is on a line that contains a Minus (-) bitmap, the expanded block is collapsed.
Note
• The definition of a "code block" is based on your language.
• The plusminus command is controlled by the def_plusminus_blocks configuration variable.
The value is set to true (1) by default. For more information, see ConfigurationVariables.
• The plusminus command uses the same logic to identify code blocks as the command
cut_code_block. See Deleting Code Blocks for more information.
Selective Display Regions
Using the Selective Display dialog, you can choose the regions you want to display or hide. Specific set-
tings are provided for each region.
•Search Text - Displays lines that contain the specified search string or lines that do not contain the spe-
cified string.
•Function Definitions - Displays only function headings and optionally, function heading comments.
•Preprocessor Directives - Displays a source file as if it were preprocessed according to the define val-
ues specified here. If you do not remember your defines, use the Scan for Defines button.
•Multi-Level - Select this option to set multiple levels of Selective Display based on braces or indent.
•Paragraphs - Displays the first line of each paragraph. A paragraph is defined by a group of lines fol-
lowed by one or more blank lines.
•Hide Selection - Select this option to hide the lines in the current selection.
Selective Display
226

The Selective Display dialog also contains static options for expanding/collapsing sub-levels. See Select-
ive Display Dialog for more information and details about the available settings.
Other Display Options
This section describes other general display options that you might find useful.
Displaying a Vertical Line
You can choose to display a vertical line in all files that are open for editing. To access this setting, from
the main menu click Window →Preferences, expand SlickEdit and click General in the tree, then
double-click the General setting. On the General Options dialog, select the General Tab. In the Vertical
line column spin box, specify the column number at which you want the vertical line displayed. A value of
0 (default) displays no vertical line. Click on the colored box to the right of this option to change the color
of the vertical line.
Viewing Line Numbers
The line number of the current cursor position is always shown in the status line of SlickEdit®Core (along
the bottom right edge of the editor). You can also choose to display line numbers in the left gutter of editor
windows.
To toggle display of line numbers for the current document, from the main menu click Display →Line
Numbers, or use the view_line_numbers_toggle command on the SlickEdit Core command line.
To always display line numbers for any file with a specific extension, complete the following steps:
1. From the main menu, click Window →Preferences, expand SlickEdit and click General in the tree,
then double-click the File Extension Setup setting.
2. From the Extension drop-down list, select the extension to work with.
3. Click the General Tab, then click the Display line numbers check box.
Other Display Options
227

228

Chapter 7. Language-Specific Editing
229

Language-Specific Editing Overview
Many features in SlickEdit®Core are language-specific and based on the language editing mode. You
can also configure different settings for different languages. See Language Editing Modes and Extension
Options below for more information.
This chapter also includes specific information about extension options, beautifiers, and more for the fol-
lowing languages:
•Ada
•C and C++
•COBOL
•Java
•Pascal
•PL/I
•Python
•XML and HTML
Language Editing Modes
SlickEdit®Core uses the extension of the current file to determine what language you are using, thereby
only making available the options and features that are possible in that language. If you have a file with a
non-standard extension or no extension at all, you will need to manually specify the editing mode. To spe-
cify a mode, from the main menu click Format →Select Mode (or use the select_mode command). The
Select Mode dialog is displayed with a list of modes from which to select.
Changing and Creating Modes
To change or create modes, from the main menu click Window →Preferences, expand SlickEdit and
click General in the tree, then double-click the File Extension Setup setting. Select the General Tab. If
you want to change the name of an existing mode, select the language extension from the Extension
drop-down list. Then enter the new name in the Mode name text box.
If your language is not listed in the Select Mode dialog or in the Extension drop-down list, you can create
a new mode. Click the New button on the Extension Options dialog, then type the language extension
(without the Dot) in the Extension text box. If the language is similar to another language that is already
available, you can select it from the Refer to combo box. This will cause the new extension’s configura-
tion to match the configuration of the referred existing language. See Referring to Extensions for more in-
formation.
Language Editing Modes
230
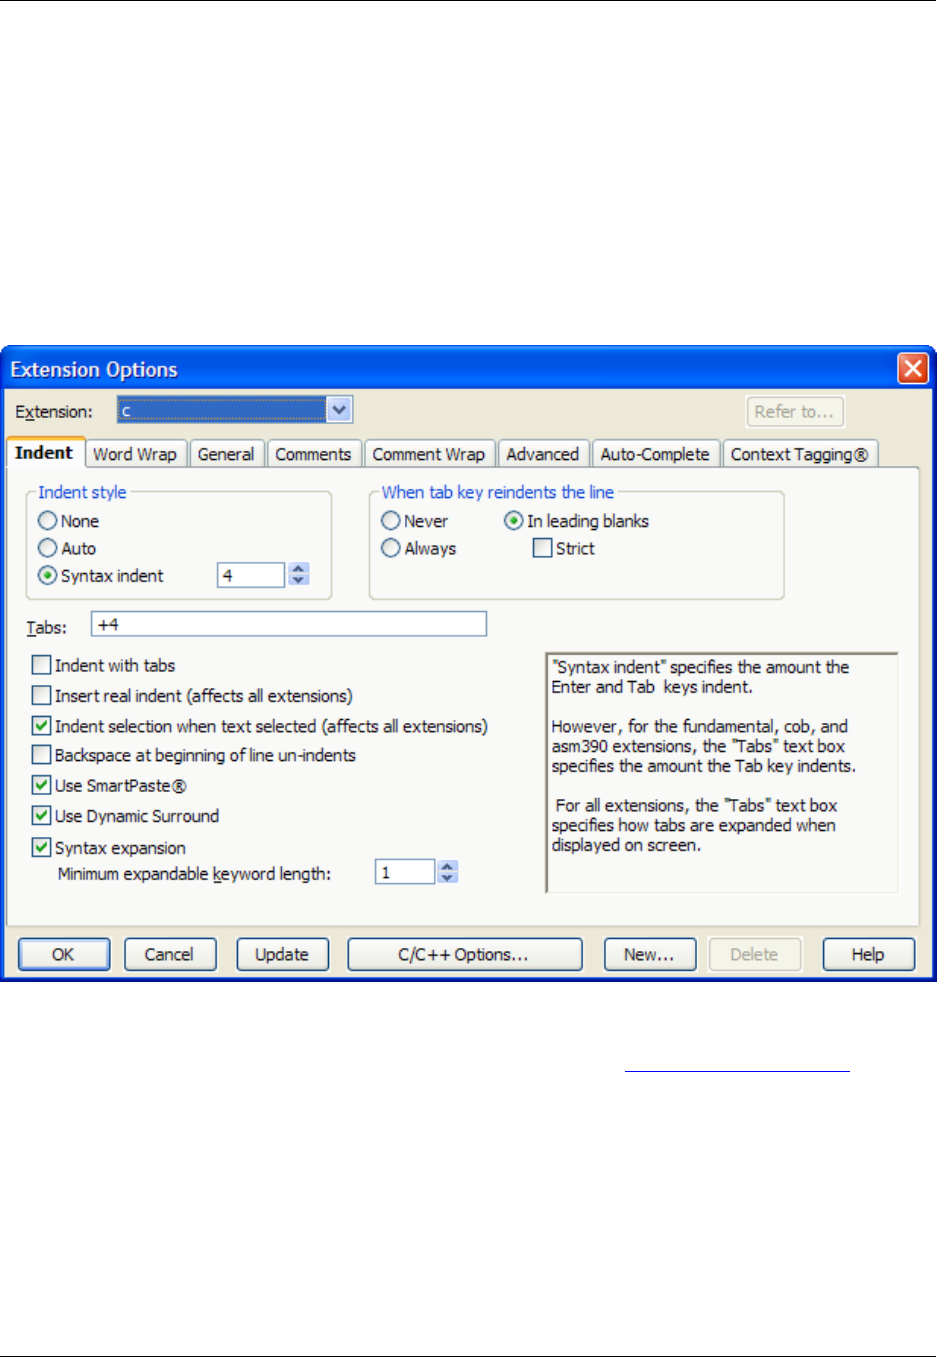
Extension Options
The behavior of the editor can be customized for files based on specific language extensions. The Exten-
sion Options dialog box (shown below) contains the settings that can be configured for file extensions. To
display this dialog, from the main menu, click Window →Preferences, expand SlickEdit and click Gen-
eral in the tree, then double-click the File Extension Setup setting. Alternatively, display the dialog by
using the setupext command.
Figure 7.1. Extension Options Dialog
Be sure to select the extension you want to affect from the Extension drop-down list before configuring
any settings. For a complete of options and buttons on this dialog, see Extension Options Dialog.
Referring to Extensions
When an extension refers to another extension, both extensions operate exactly the same. That is, all
Context Tagging®, template editing, word processing options, and all other extension options are the
same. In addition, modifying the extension option information for either extension updates both exten-
sions. For example, by default, the H and CPP extensions refer to the C file extension. Modify the H or
CPP extension setup to modify the extension setup for all three extensions. In addition, the H and CPP
extensions use the same Context Tagging settings as the C extension.
Extension Options
231
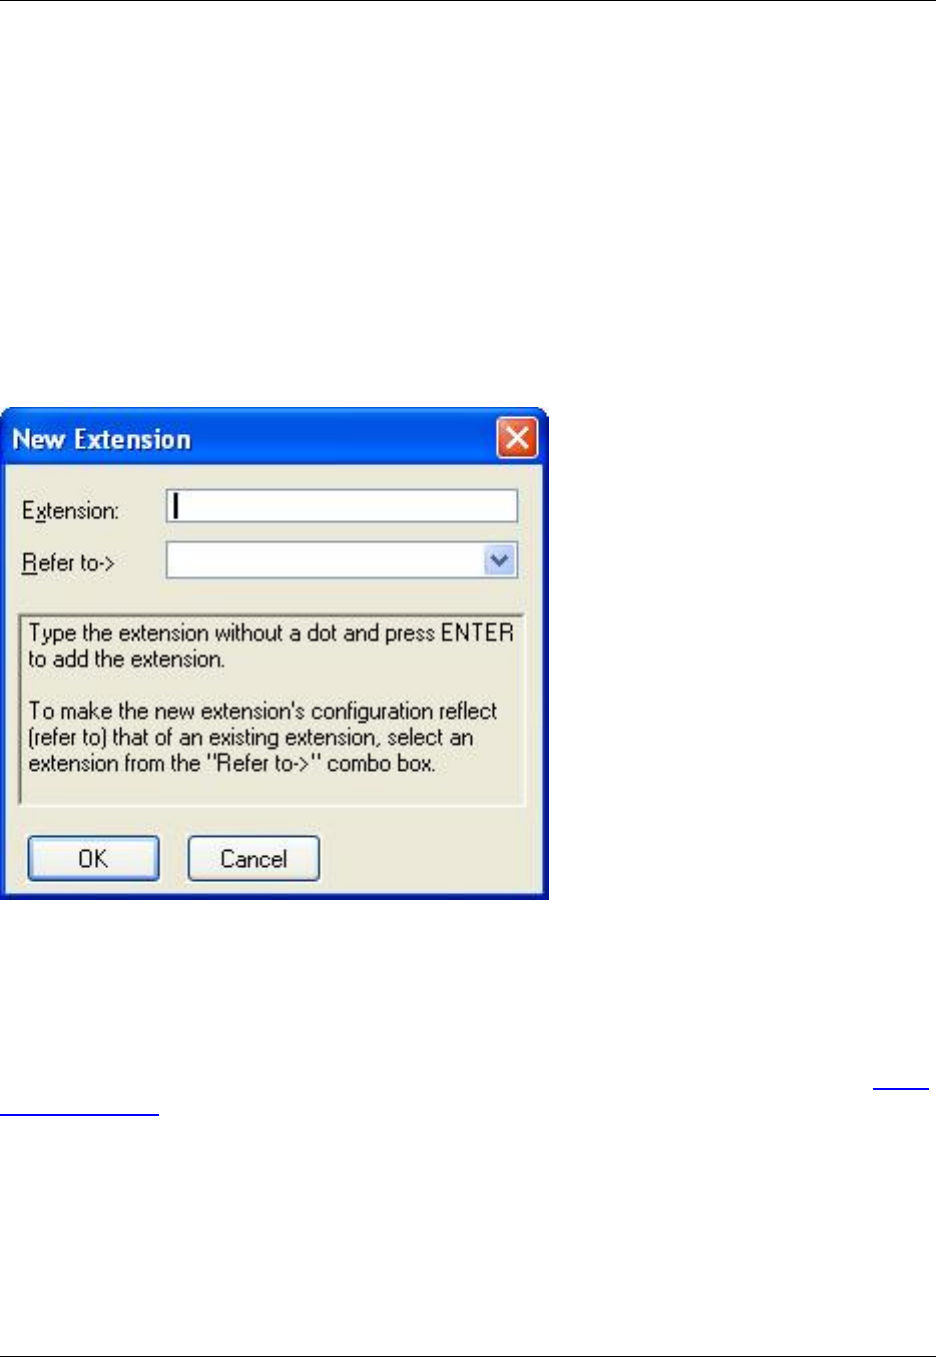
To have the setup data for one extension refer to another extension, click the Refer to button (located at
the top right corner of the Extension Options dialog box). This button is unavailable if other extensions
already refer to this one. Refer to is also available on the New Extension dialog box to set when adding a
new extension.
Creating a New Extension
If SlickEdit®Core does not provide options for a language extension that you are working with, you can
add the extension. On the Extension Options dialog, click the New button, and the following dialog is dis-
played.
Figure 7.2. New Extension Dialog
Enter the new extension in the Extension text box (without the Dot). If the language is similar to another
language that is already available, and you wish to have the new language configuration the same as an
existing one, you can select the language to refer to from the Refer to combo box.
After a new extension is added, you can change its reference at any time by selecting it from the Exten-
sion drop-down list on the Extension Options dialog, and then by clicking the Refer to button. See Refer-
ring to Extensions for more information.
Deleting an Extension
To delete the selected file extension’s setup information, click the Delete button (located at the bottom of
the Extension Options dialog box). The Fundamental extension setup information cannot be deleted. An
extension such as C, that has other extensions (such as H and CPP) that refer to it, also cannot be de-
leted until all of the extensions that refer to it are deleted.
C and C++
232

C and C++
This section describes some of the advanced features and options that are available in SlickEdit®Core
for C and C++, including extension-specific formatting options, the C/C++ Beautifier, compiler settings,
and preprocessing.
The default editing mode in SlickEdit Core for C and C++ allows for programming in either language. If
you are coding to strict ANSI C standards, you should configure the value of the macro variable
def_ansic_exts to contain a space-delimited list of extensions for files you want interpreted as ANSI C.
To set the macro variable, press Esc to bring up the SlickEdit Core command line, then type set-var
def_ansic_exts "<extensions>", where <extensions> is the space-delimited list of extensions.
For example:
set-var def_ansic_exts "c h"
Please note that if you also code in C++ and any of these extensions are used for C++, they will be inter-
preted as ANSI C.
C/C++ Formatting Options
Options are available for C and C++ language file extensions for changing smart indenting and styles for
template editing. To access these options, from the main menu, click Window →Preferences, expand
SlickEdit and click General in the tree, then double-click the File Extension Setup setting. Make sure
the C/C++ language extension you want to work with is selected in the Extension drop-down list, then
click the Options button. The Formatting Options dialog specific to the file extension you have selected is
displayed.
Note
Languages similar to C/C++ have similar Formatting Options dialogs which are not specifically
documented.
The tabs on the C/C++ Formatting Options dialog are described below.
Begin-End Style Tab
Figure 7.3. C/C++ Formatting Options: Begin-end style Tab
C/C++ Formatting Options
233
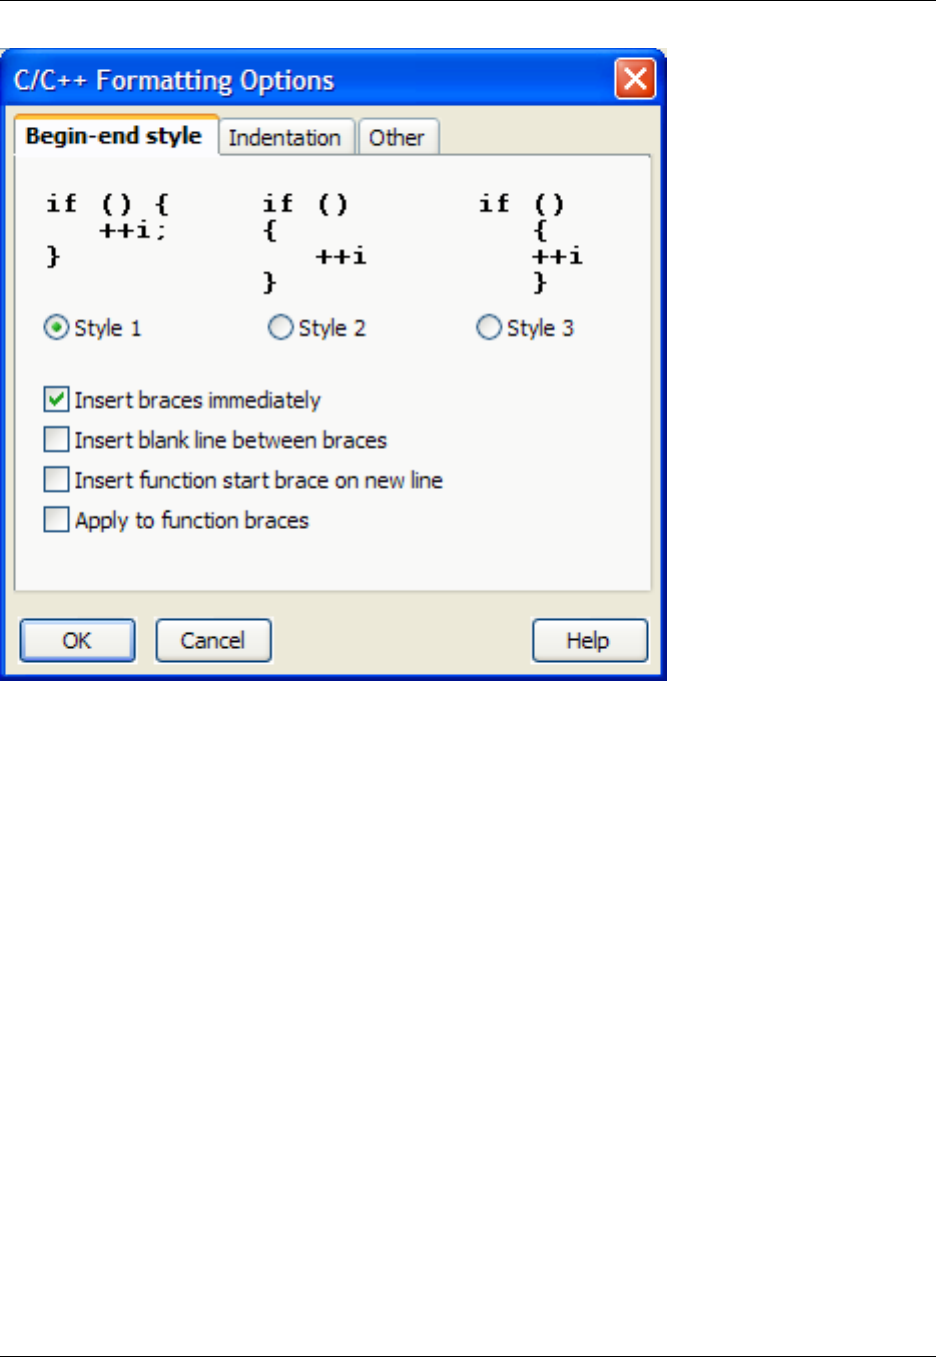
Use this tab to specify the brace style used by template editing and smart indenting. Choose the style you
want to use then select from the following options:
•Insert braces immediately - Specifies whether template should be inserted with braces.
•Insert blank line between braces - Specifies whether a blank line should be inserted between braces
when a template expands with braces.
•Insert function start brace on new line - Specifies whether a function start brace should be inserted
after Enter is pressed to start a new line.
•Apply to function braces - When this option is selected, the your begin/end style will be applied to
braces for function definition.
Indentation Tab
This tab is used to specify indentation options.
Figure 7.4. C/C++ Formatting Options: Indentation Tab
C/C++ Formatting Options
234
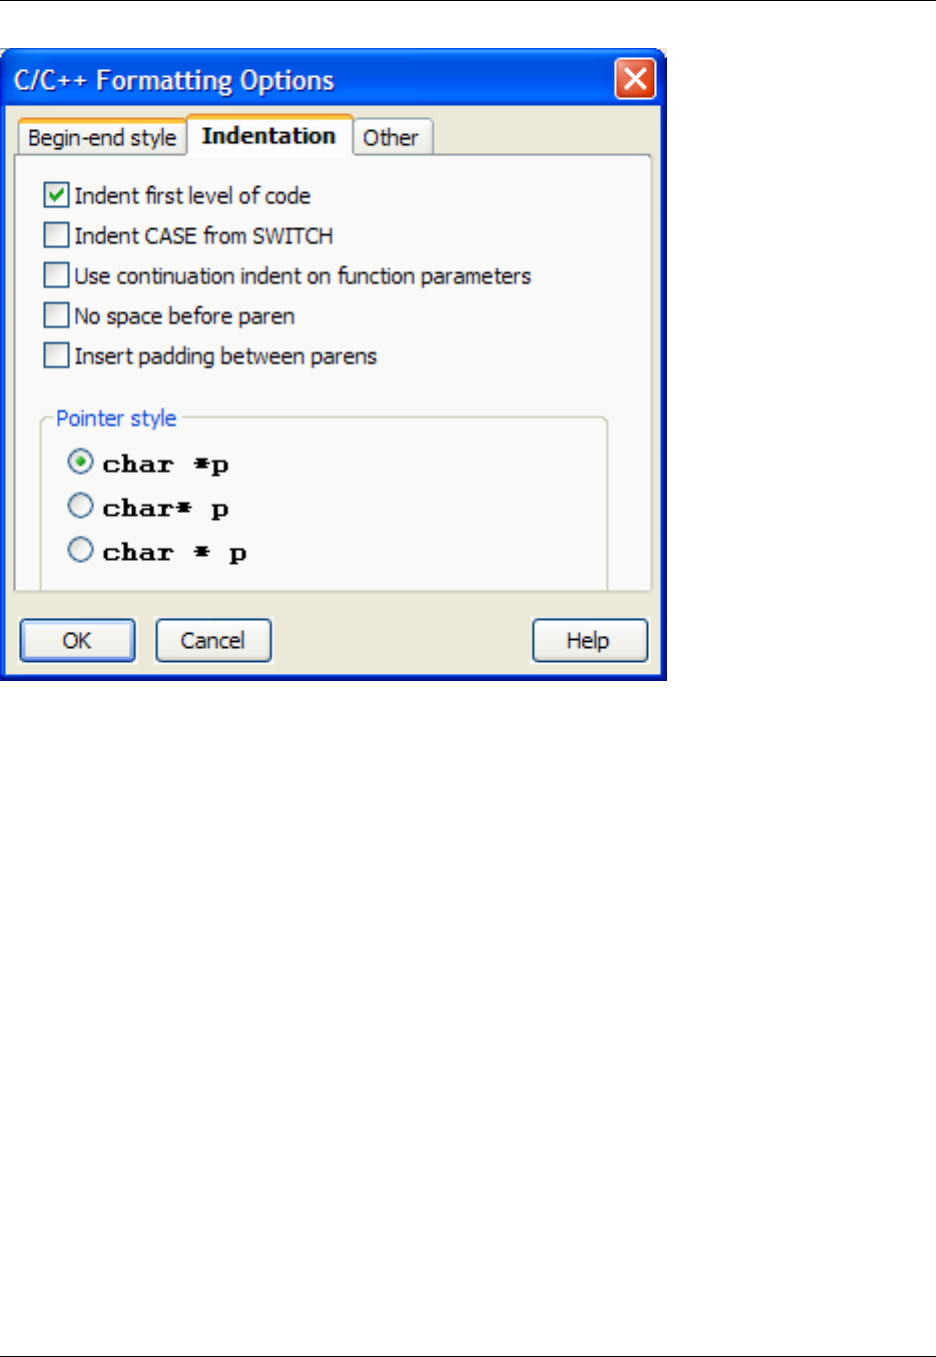
The following options are available:
•Indent first level of code - Specifies whether smart indenting should indent the cursor after declara-
tions such as functions.
•Indent CASE from SWITCH - When checked, template editing places the case statement indented
from the switch statement column.
•Use continuation indent on function parameters - Determines whether function parameters should
always use the continuation indent.
By default, we format multi-line function parameters as follows:
myLongMethodName(firstarg,
secondarg,
thirdarg
);
myLongMethodName(
firstarg,
secondarg,
thirdarg
);
If Always use continuation indent on function parameters is selected, the format will change as fol-
C/C++ Formatting Options
235
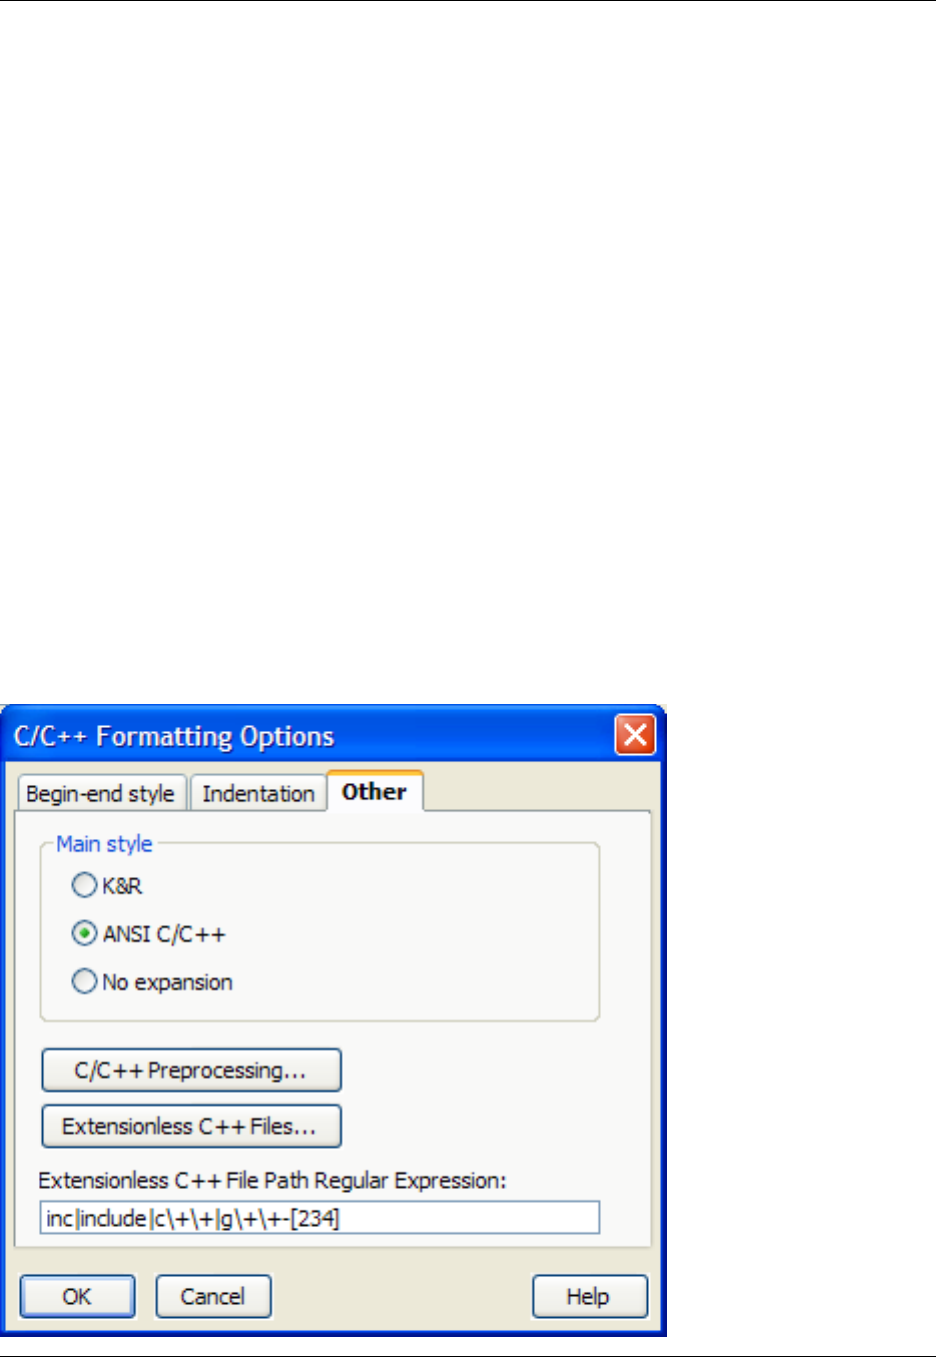
lows:
myLongMethodName(firstarg,
secondarg,
thirdarg
);
myLongMethodName(
firstarg,
secondarg,
thirdarg,
);
•No space before paren - Determines whether a space is placed between a keyword such as if,for, or
while and the open paren when syntax expansion occurs. Example: (if( or if ().
•Insert padding between parens - When checked, a space is placed after the open paren, and before
the close paren, providing padding for the enclosed text. For example, if () becomes if ( ).
•Pointer style - Specify the pointer style you wish to use.
Other Tab
Figure 7.5. C/C++ Formatting Options: Other Tab
C/C++ Formatting Options
236

The following options are available:
•Main style - Specifies the main function declaration template inserted. Select ANSI C/C++ if you want
an old ANSI C main declaration inserted. You can define a template by using aliases, or you can write a
replacement function for c_insert_main. The command find-proc c_insert_main will locate the macro
source for this function.
•C/C++ Preprocessing - Click this button to customize the global preprocessing that is used when Con-
text Tagging®creates tag files for C or C++. See C/C++ Preprocessing.
•Extensionless C++ Files - Click this button to add names of extensionless C++ header files. SlickEdit®
Core takes care of the standard STL headers automatically, but you can use this to add additional com-
piler specific headers, such as unodered_set or regex. Note, this setting works in combination with the
extensionless header file path regular expression (see below).
•Extensionless C++ File Path Regular Expression - In order for SlickEdit Core to safely recognize an
extensionless C++ header file as C++ automatically, without accidently attempting to open other exten-
sionless files (such as executables) as if they were C++, in addition to requiring that you specify the
names of the files (see above), the path that the files are located in must match this regular expression.
C/C++ Beautifier
To beautify a C or C++ document, open the file you want to beautify, then from the main menu, click
Format →Beautify (or use the gui_beautify command). The C/C++ Beautifier will be displayed, which
allows you to make settings for how the code will be beautified.
You can use the commands c_beautify or c_beautify_selection to instantly beautify the file or the selec-
tion according to the settings on the Beautifier dialog.
Currently, this beautifier supports beautifying Slick-C®source if the statements are terminated with semi-
colons like C.
Note
The C#, Java, JavaScript, and Slick-C Beautifiers contain the same options and settings as the
C/C++ Beautifier.
The following buttons and settings are available on the Beautifier:
•Beautify - Beautifies current selection or buffer and closes the dialog box.
•Reset - Restores the dialog box settings to the values that appeared when you invoked the dialog.
•Save Settings - Saves beautify options in uformat.ini file. These settings are used by the
c_beautify command.
•Restrict to selection - When this option is selected, only lines in the selection are beautified.
C/C++ Beautifier
237
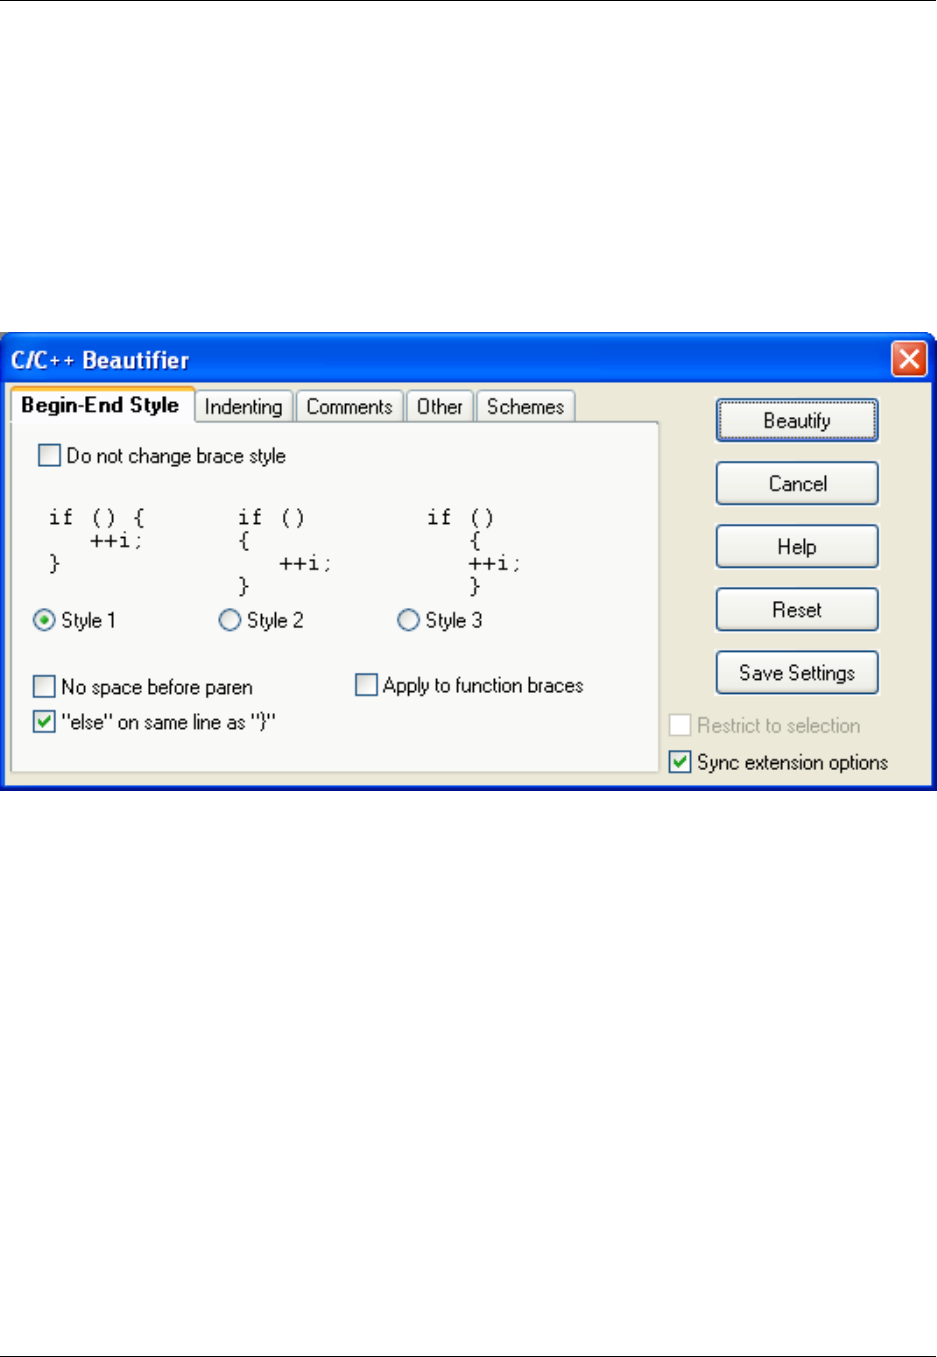
•Sync extension options - When this option is selected, the extension options are updated to reflect
any changes that these dialogs have in common. For example, changing the begin-end style to Style 2
will update your brace style for Syntax Expansion.
The tabs on the C/C++ Beautifier are described in the sections below.
Begin-End Style Tab
Figure 7.6. C/C++ Beautifier: Begin-End Style Tab
The following options and settings are available:
•Do not change brace style - Select this option if you do not want your brace style changed. This is
useful if you are using a brace style that is not supported by SlickEdit®Core.
•No space before paren - Determines whether a space is placed between a keyword such as if,for, or
while and the open paren.
•else on same line as } - When this option is selected, the beautifier will place }else on the same line.
This is typical when using brace Style 1. The following is an example of using Style 1 with an else
clause:
if (i<j) {
} else {
}
•Apply to function braces - When this option is selected, the beautifier will apply your begin/end style
to braces for function definition.
C/C++ Beautifier
238
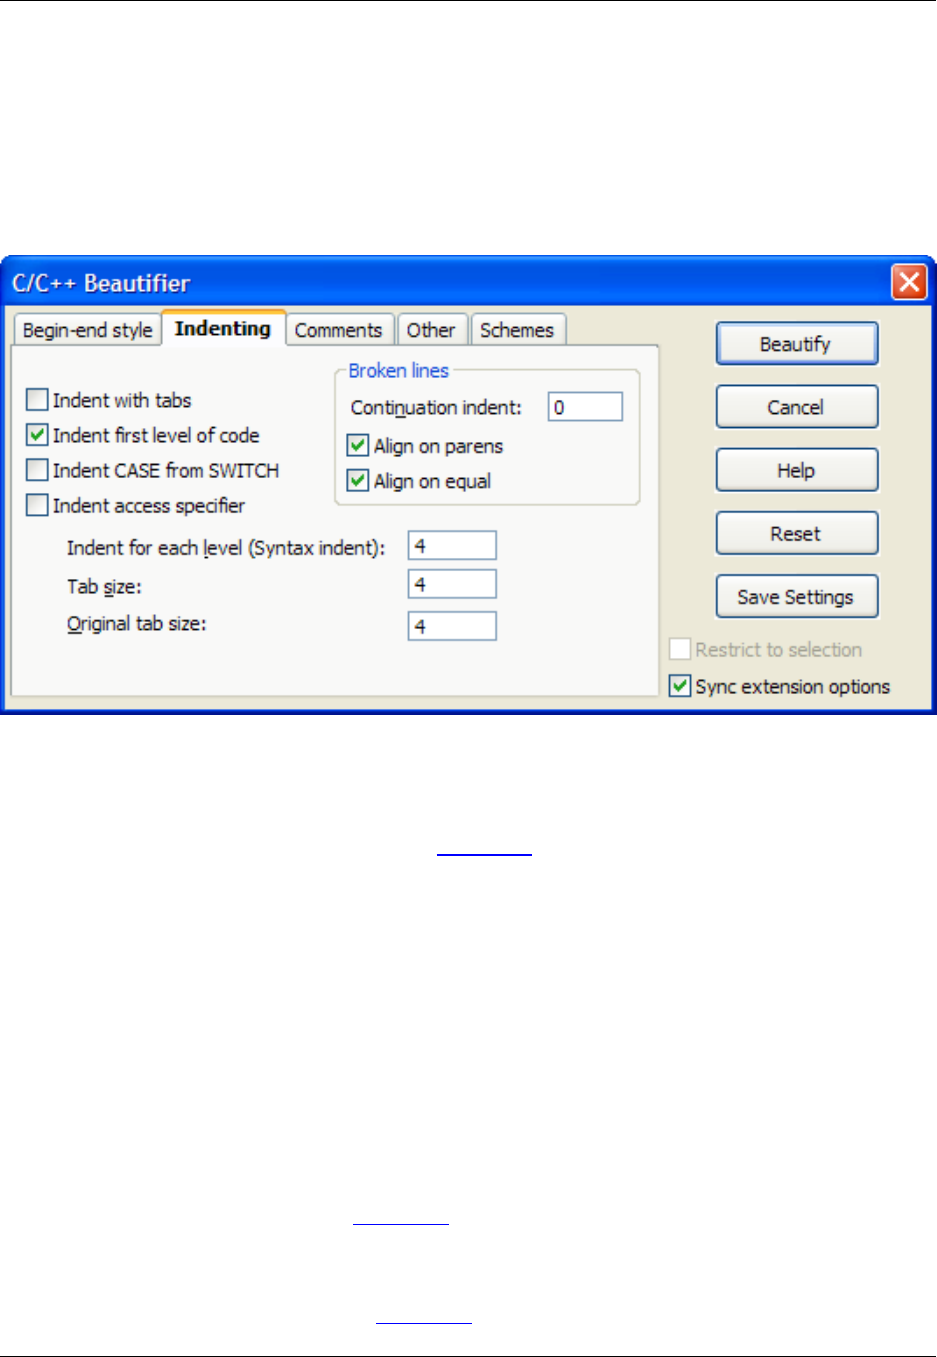
Indenting Tab
This tab provides indenting parameters that you can use when working with C/C++ files in SlickEdit®
Core.
Figure 7.7. C/C++ Beautifier: Indenting Tab
The following options and settings are available:
•Indent with tabs - When this option is selected, tab characters are used for the leading indent of lines.
This value defaults to the Tabs text box on the Indent Tab of the Extension Options dialog box (Win-
dow →Preferences, expand SlickEdit and click General in the tree, then double-click the File Exten-
sion Setup setting).
•Indent first level of code - Do not clear this check box. When this check box is selected, the first level
of code inside a function or method definition is not indented.
•Indent CASE from SWITCH - When this option is selected, the case and default statements found in-
side switch statements are indented from the switch.
•Indent access specifier - When this option is selected, specifiers are indented under the class. When
not selected, specifiers are aligned directly underneath the class.
•Indent for each level (Syntax indent) - The amount to indent for each new nesting level of code. We
have put the words "Syntax indent" in parenthesis to help indicate that this field has the same meaning
as the Syntax indent text box on the Indent Tab of the Extension Options dialog. By default, we initial-
ize this text box with your current extension setup setting.
•Tab size - The value in this field specifies the output tab size. The output tab size is only used if the op-
tion Indent with tabs is selected on the Indent Tab of the Extension Options dialog. This value defaults
C/C++ Beautifier
239

to the Syntax indent text box on the Indent Tab of the Extension Options dialog.
•Original tab size - The value in this field specifies the size of the original expansion tab. SlickEdit Core
uses the expansion size of your original file to handle reusing indent amounts from your original file.
Currently the beautifier only reuses the original source files indenting for comments. This option has no
effect if the original file has no tab characters.
•Continuation indent - The value in this field specifies how much to indent lines of statements that con-
tinue to the next line. This has no effect on assignment statements or parenthesized expressions. Lines
that are a continuation of an assignment statement are indented after the first equal sign. Lines that are
a continuation of a parenthesized expression are indented after the open paren. Given the following ex-
ample:
unsigned
int i;
The result would be:
unsigned
<Continuation Indent>int i;
•Align on parens - When this option is selected, the text for parenthesized expressions that spans mul-
tiple lines is aligned on the first non-blank after the parenthesis or on the parenthesis itself.
•Align on equal - When this option is selected, the text for multi-line assignment is aligned on the first
non-blank after the equals sign (=) or on the equal sign itself.
Comments Tab
This tab contains options for setting the parameters that you want for the trailing comments.
Figure 7.8. C/C++ Beautifier: Comments Tab
C/C++ Beautifier
240
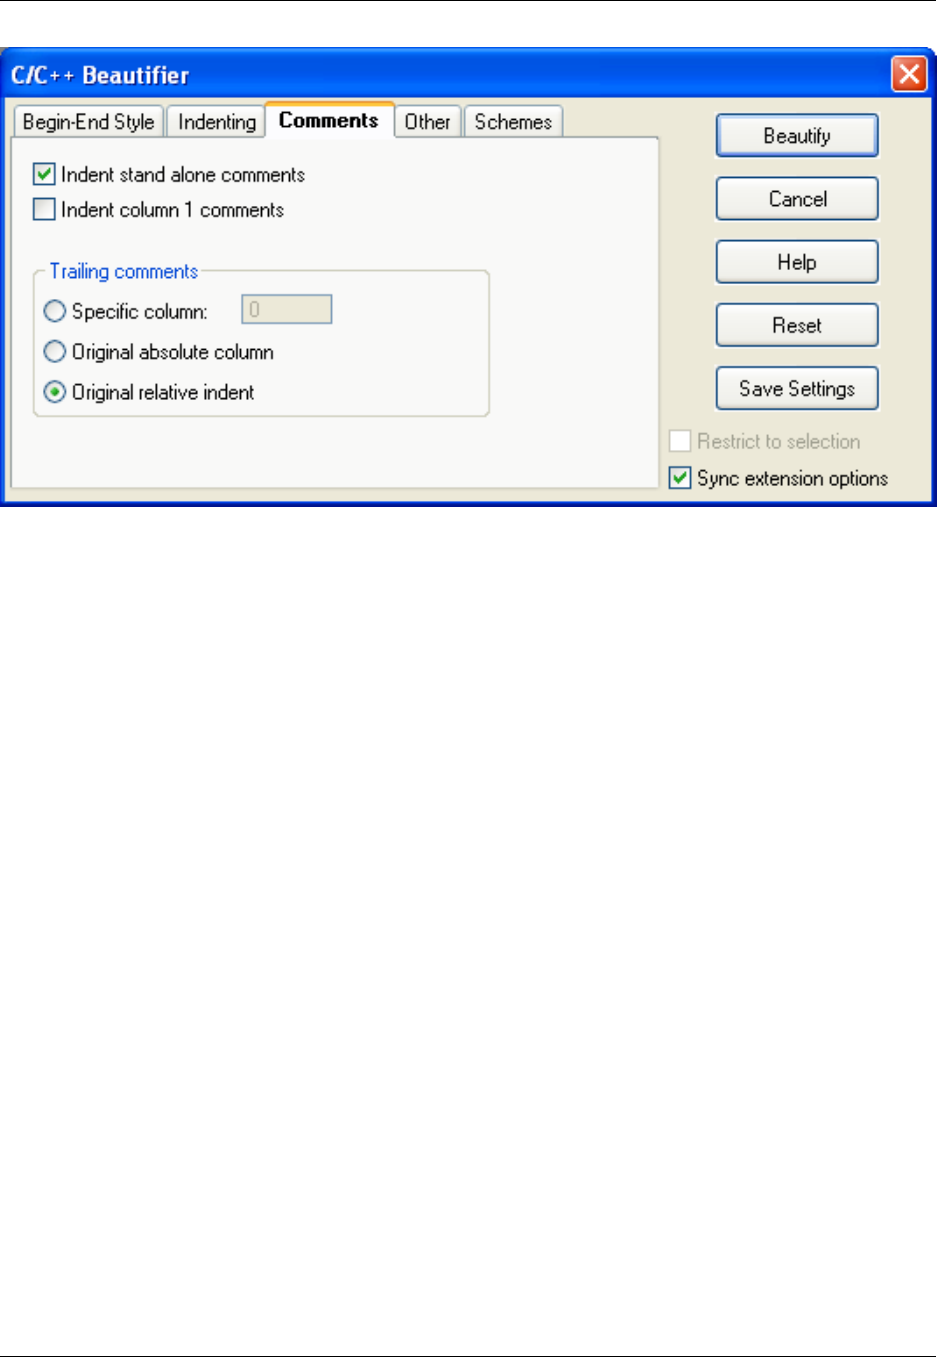
The following options are available:
•Indent stand alone comments - Indicates whether comments that appear on lines by themselves with
no statement text to the left are indented to the current statement indent level. For example:
/* stand alone
comment
*/
// another stand alone comment
i=1; // trailing comment
•Indent column 1 comments - Normally comments that start in column 1 are left alone. Select this op-
tion if you want the indent for these comments to be adjusted.
•Specific column - This text box specifies the column in which trailing comments should be placed.
Trailing comments are comments that appear at the end of lines that contain statements or declara-
tions. For example:
// another stand alone comment
/* stand alone
comment
*/
i=1; // trailing comment
if (x) { /* trailing
comment.
*/
}
•Original absolute column - When this option is selected, trailing comments are placed at the same
C/C++ Beautifier
241
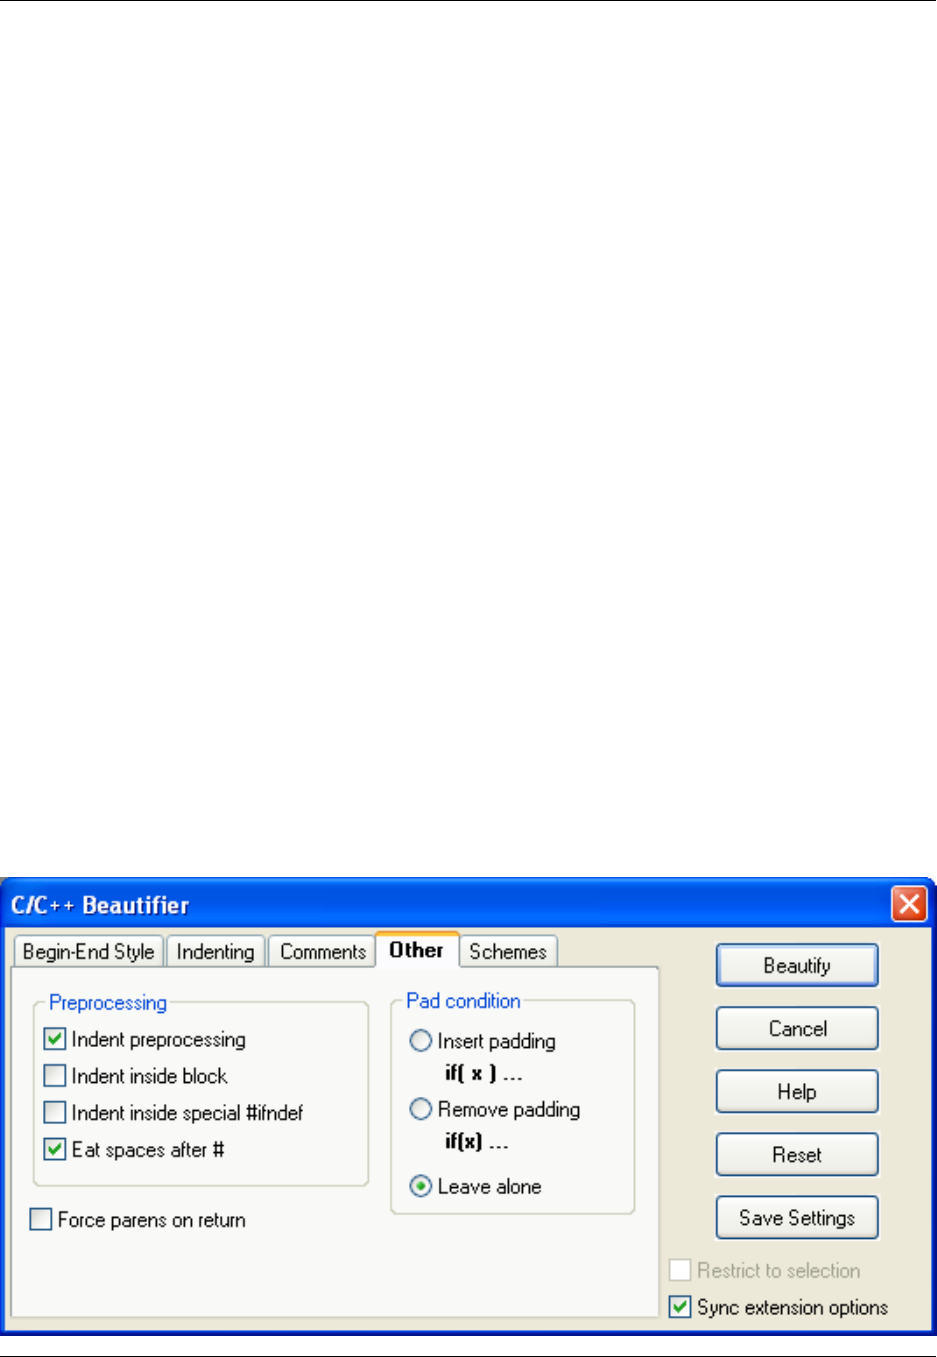
column as the original source file. Trailing comments are comments that appear at the end of lines that
contain statements or declarations.
•Original relative column - When this option is selected, trailing comments are indented by reusing the
indent after the last character of the end of the statement or declaration of the original source file. Trail-
ing comments are comments that are displayed at the end of lines that contain statements or declara-
tions. For example, if the original code is as follows:
if () {
i=1;<four characters>//trailing comment
i=4;<four characters>/* trailing
comment.
*/
}
The resulting code would be:
if () {
i=1;<four characters>//trailing comment
i=4;<four characters>/* trailing
<four characters> comment.
<four characters>*/
}
Other Tab
This tab contains the preprocessing and pad condition options.
Figure 7.9. C/C++ Beautifier: Other Tab
C/C++ Beautifier
242
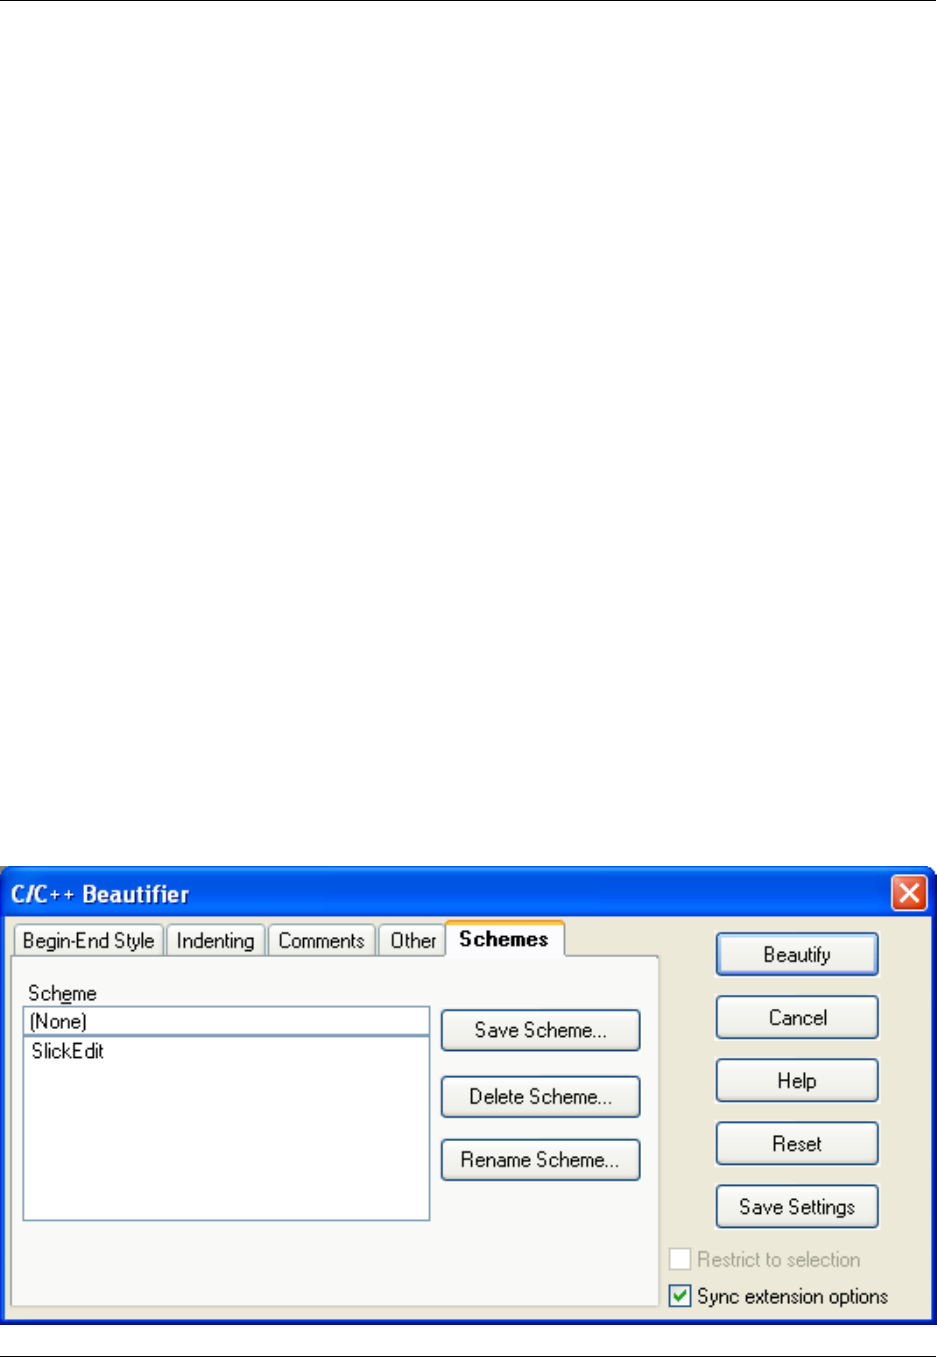
The following options are available:
•Indent preprocessing - When this option is selected, the indent before the # character of prepro-
cessing is set to indicate the preprocessing nesting level.
•Indent inside block - When this option is selected, preprocessing inside brace block is indented when
inside preprocessing. Otherwise, preprocessing within a brace block start in column 1.
•Indent inside special #ifndef - Many C/C++ header files starts with the following lines of code:
#ifndef myheader_h
#define myheader_h
#endif
When this option is selected, preprocessing inside this special #ifndef case is indented.
•Eat spaces after # - When this option is selected, the spaces after a preprocessor #, but before the
keyword (if,ifdef,else,elif,endif, etc.), are removed. This is useful for fixing old C code where the #
character had to start in column 1 and spaces were used after the #to indicate the nesting level.
•Force parens on return - When this option is selected, parentheses are added to returns statements
which do not have parentheses.
•Pad condition - These options indicate if parenthesized conditional expressions should have their spa-
cing adjusted.
Schemes Tab
Figure 7.10. C/C++ Beautifier: Schemes Tab
C/C++ Beautifier
243
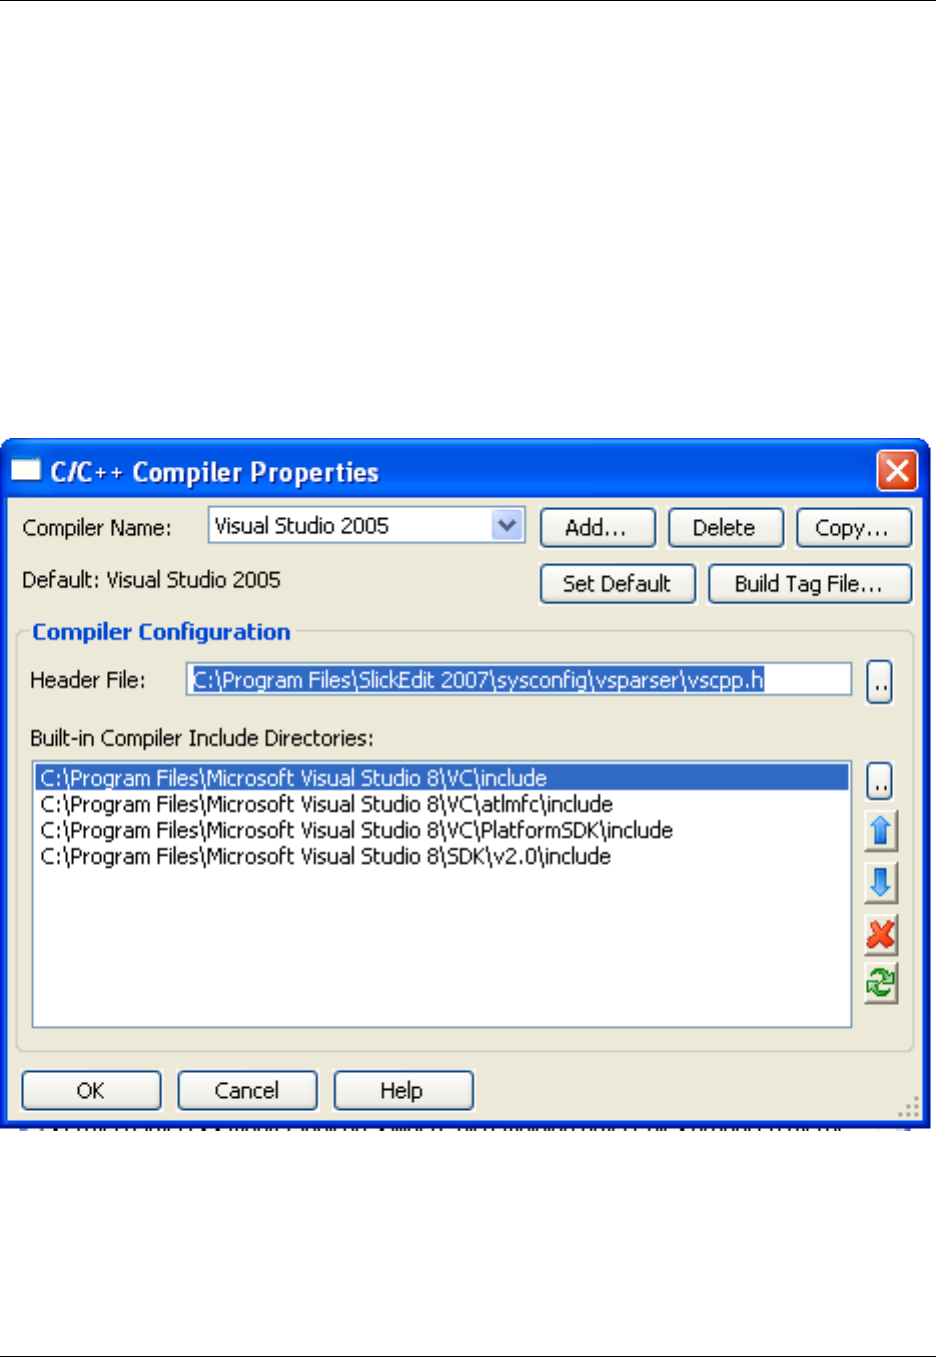
To define a new scheme, set the various beautify options, and press the Save Scheme button. User
defined schemes are stored in uformat.ini.
C/C++ Compiler Settings
In order to correctly perform full preprocessing, parsing, symbol analysis, and cross-referencing,
SlickEdit®Core needs to emulate the implementation-specific parsing behavior of your compiler, including
built-in functions, preset #defines, and include directories. This is accomplished by using the C/C++ Com-
piler Properties dialog box, shown below. To access the dialog, click C/C++ Refactoring →C/C++ Com-
piler Options.
Figure 7.11. C/C++ Compiler Properties Dialog
The C/C++ Compiler Properties dialog displays not only the chosen compiler, but also the associated
header file and include directories. Collectively, this is a configuration. Configurations can be created and
modified as needed.
In the Compiler Name drop-down list, select the compiler you wish to use. If this is to be the global de-
fault compiler for all projects, click the Set Default button.
C/C++ Compiler Settings
244

Note
It is possible to select other compilers for individual projects. In those cases, the project-specific
compiler is used and overrides the global default.
SlickEdit Core ships with header files for each compiler, and the correct header file will appear in the
Header File field. The header file configures the parser to emulate the compiler that is chosen in the
Compiler Name field.
Creating New Configurations
There are two ways to begin a new configuration. In both cases, a dialog box will be invoked, prompting
for the name of the new configuration.
• Click Copy to copy the selected compiler configuration. This can be used as a template for creating a
new configuration and makes the process of creating similar configurations more convenient.
• Or, click Add to create a configuration from scratch or to add a newly installed compiler.
If you wish to remove the selected compiler and associated configuration from the list, click Delete. This
does not delete any files from disk.
Building the Tag File
The Build tag file button on the C/C++ Compiler Properties dialog is used to build tag files from the head-
er file found in the include directories for the selected compiler configuration. This is especially useful
when new configurations are created. If you do not build the tag file here manually, it will be built on de-
mand.
C/C++ Preprocessing
Typically your source code base will include preprocessor macros that you use in your code for portability
or convenience. For performance considerations, Context Tagging®does not do full preprocessing, so
macros that interfere with normal C++ syntax can cause the parser to miss symbols. For example:
MYNAMESPACEDECL(my)
struct MYPACKEDMACRO BinaryTree {
MYTYPELESS data;
MYPOINTER(BinaryTree) next;
MYPOINTER(BinaryTree) prev;
};
MYPOINTER(BinaryTree) proot = MYNULL;
MYENDNAMESPACE
This example uses the following preprocessor macros:
C/C++ Preprocessing
245
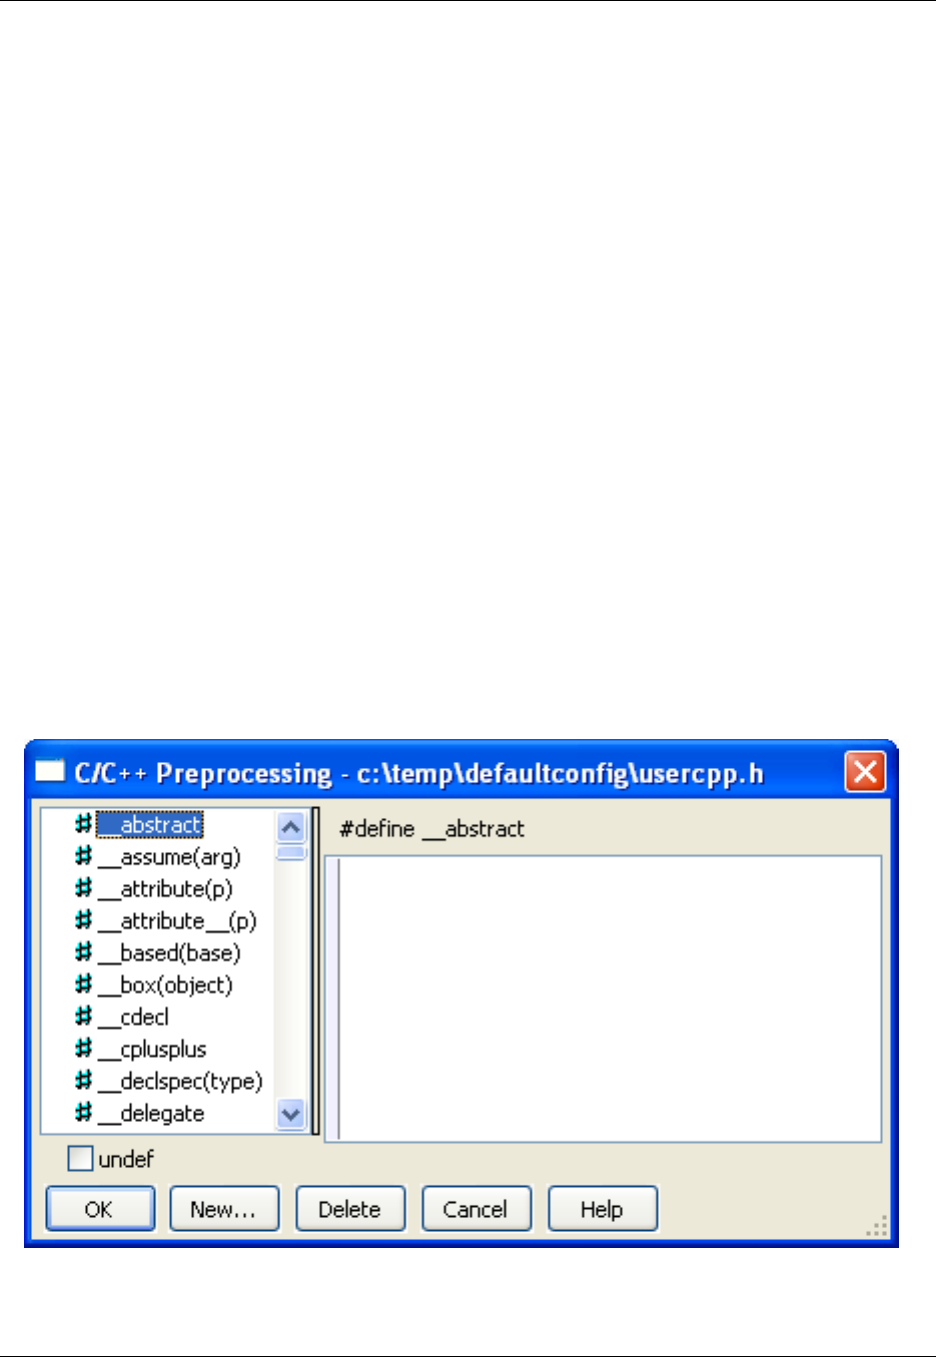
#define MYNAMESPACEDECL(name) namespace name {
#define MYPACKEDMACRO __packed
#define MTYPELESS void*
#define MYPOINTER(t) t*
#define MYNULL ((void*)0)
#define MYENDNAMESPACE }
Among them, the only two that are harmless are MYTYPELESS and MYNULL, because they just create
name aliases for types or constants. However, the other four are troublesome and cause the entire code
snippet to be unparsable unless you configure SlickEdit Core to be aware of these preprocessor macros.
To do so, complete the following steps:
1. From the main menu, click Window →Preferences, expand SlickEdit and click General in the tree,
then double-click the File Extension Setup setting. The Extension Options dialog is displayed.
2. From the Extension drop-down list, select the Cextension.
3. Click the Options button at the bottom of the dialog. The C/C++ Formatting Options dialog is dis-
played.
4. Select the Other tab.
5. Click the C/C++ Preprocessing button to display the C/C++ Preprocessing dialog.
Figure 7.12. C/C++ Preprocessing Dialog
6. Click New to add new preprocessing macros. Arguments are allowed; for example, mymacro(a,b,c)
C/C++ Preprocessing
246

7. When finished, click OK.
8. A prompt appears asking whether to rebuild your workspace tag file. Click Yes.
Preprocessor macros are stored in usercpp.h, located in your configuration directory. Rather than using
the dialog, you can add large numbers of #defines directly to this file. You may want to make sure that
your entire development team has an up-to-date copy of this configuration file once you have added all of
your local preprocessor macros.
Note
The usercpp.h file should only be used for #defines and #undefs—not #includes.
Java
247

Java
This section describes some of the features and options that are available for Java, including extension-
specific options, the Javadoc Editor, and more.
Java Formatting Options
Options are available for Java language file extensions for changing the smart indenting and template
editing style settings. To access these options, from the main menu, click Window →Preferences, ex-
pand SlickEdit and click General in the tree, then double-click the File Extension Setup setting. Choose
the language extension you wish to work with from the Extension drop-down list, then click the Options
button. The Formatting Options dialog specific to the file extension you have selected will be displayed.
Note
Languages similar to Java have similar Formatting Options dialogs which are not specifically doc-
umented.
The Java Formatting Options dialog is pictured below.
Figure 7.13. Java Options Dialog
Java Formatting Options
248
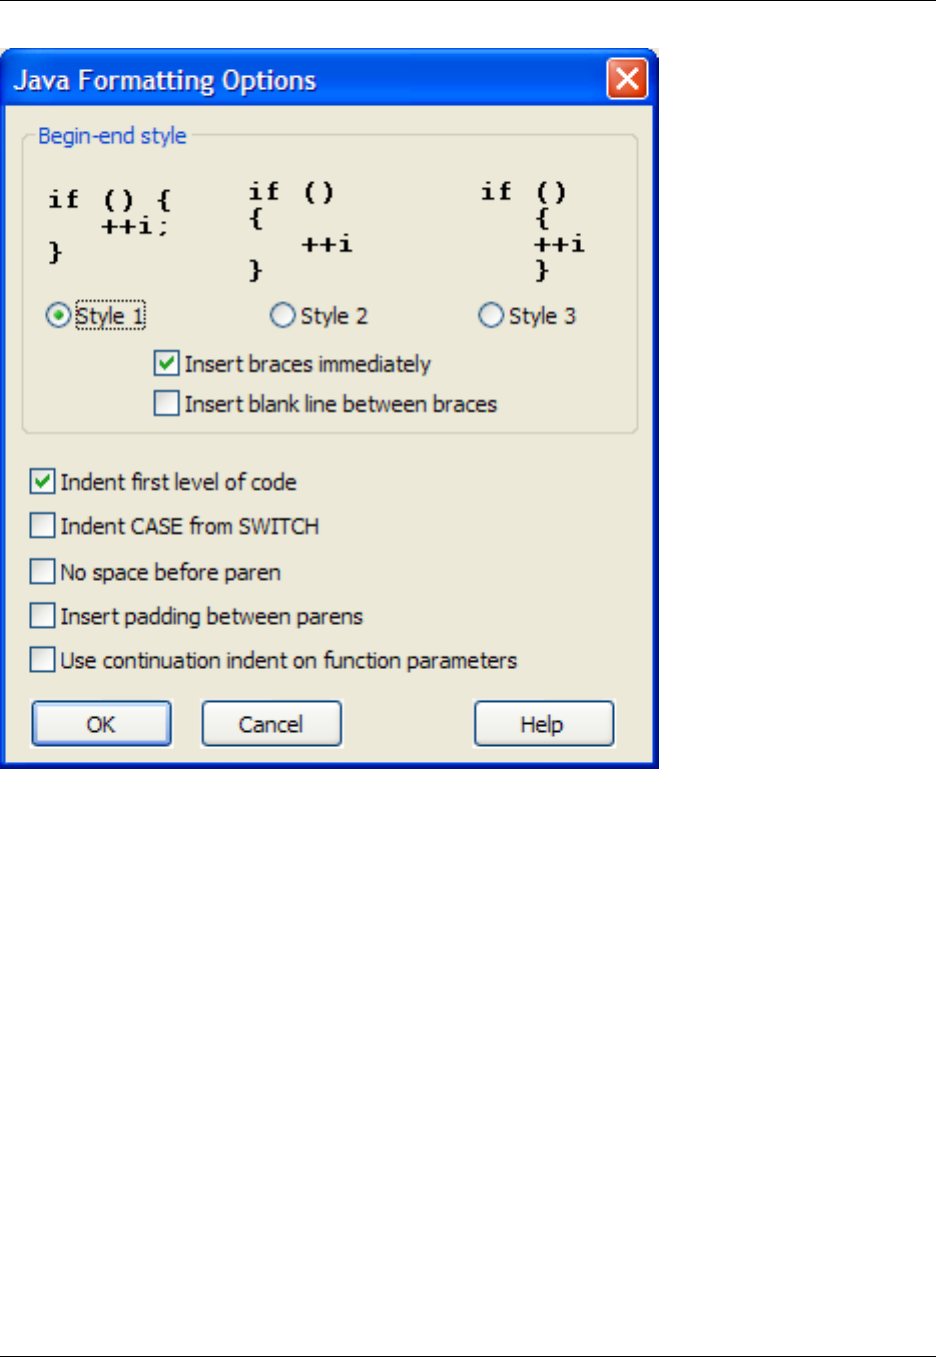
The following settings are available:
•Begin-End Styles - Specify the brace style to be used for template editing and smart indenting, then
choose from the following options:
•Insert braces immediately - Specifies whether template should be inserted with braces.
•Insert blank line between braces - Specifies whether a blank line should be inserted between
braces when a template expands with braces.
•Indent first level of code - Specifies whether smart indenting should indent the cursor after declara-
tions such as functions.
•Indent CASE from SWITCH - When checked, template editing places the case statement indented
from the switch statement column.
•No space before paren - Determines whether a space is placed between a keyword such as if,for, or
while and the open paren when syntax expansion occurs. Example: (if( or if ()
•Insert padding between parens - When checked, a space is placed after the open paren, and before
the close paren, providing padding for the enclosed text. For example, if () becomes if ( ).
Java Formatting Options
249

•Use continuation indent on function parameters - Determines whether function parameters should
always use the continuation indent.
By default, we format multi-line function parameters as follows:
myLongMethodName(firstarg,
secondarg,
thirdarg
);
myLongMethodName(
firstarg,
new ActionListener() {
public void actionPerformed(ActionEvent e) {
createdButtonFired(buttonIndex);
}
},
thirdarg
);
myLongMethodName(new ActionListener() { // special case anonymous class
first argument
public void actionPerformed(ActionEvent e) {
createdButtonFired(buttonIndex);
}
},
secondarg,
thirdarg
);
myLongMethodName(
secondarg,
new ActionListener() {
public void actionPerformed(ActionEvent e) {
createdButtonFired(buttonIndex);
}
},
thirdarg
);
If Use continuation indent on function parameters is selected, the format will change as follows:
myLongMethodName(firstarg,
secondarg,
thirdarg
);
myLongMethodName(
firstarg,
new ActionListener() {
public void actionPerformed(ActionEvent e) {
createdButtonFired(buttonIndex);
Java Formatting Options
250

}
},
thirdarg
);
myLongMethodName(new ActionListener() { // special case anonymous class
first argument
public void actionPerformed(ActionEvent e) {
createdButtonFired(buttonIndex);
}
},
secondarg,
thirdarg
);
Java Beautifier
To beautify Java source code, from the main menu click Format →Beautify (or use the gui_beautify
command). The Java Beautifier dialog appears, where you can specify preferences for how the code is
beautified. The Java Beautifier contains the same options and settings as the C/C++ Beautifier. See C/
C++ Beautifier for more information.
Javadoc Beautifier
To beautify Javadoc comments or set up Javadoc Beautifier options, first invoke the Javadoc Editor by
right-clicking within the edit window and selecting Edit Javadoc Comments. Then click the Options but-
ton. The Javadoc Beautifier Options dialog is displayed. The following settings are available:
•Align parameter comments to longest parameter name - If checked, the parameters are aligned to
the length of the longest parameter name. If the parameter name length is less than the minimum
length, the minimum length is used. If the parameter length is longer than the maximum parameter
length, the description for the parameter will start on the next line.
•Align exception comments to longest exception name - If checked, the exceptions are aligned to
the length of the longest exception name. If the exception name length is less than the minimum length,
the minimum length is used. If the exception length is longer than the maximum exception length, the
description of the parameter will start on the next line.
•Align return comments - Indicates whether @return comments should be aligned to the first line of
comment text. No alignment is performed if tags which are indent-sensitive such as the <pre> tag are
used.
•Align deprecated comments - Indicates whether @return comments should be aligned to the first line
of comment text. No alignment is performed if tags which are indent-sensitive such as the <pre> tag
are used.
Java Beautifier
251

•Add blank line after parameter comment - If checked, a blank line is added if a tag follows an
@param tag.
•Add blank line after parameter comment group - If checked, a blank line is added if a tag follows an
@param group.
•Add blank line after return comment - If checked, a blank line is added if a tag follows the @return
tag.
•Add blank line after description - If checked, a blank line is added between the description and the
first @ tag. This option is ignored if the description contains a custom or unsupported @ tag.
•Add blank line after example - If checked, a blank line is added if a tag follows the @example tag.
Javadoc Editor
Use the Javadoc Editor to generate Javadoc syntax comments for Java, C, C++, JavaScript, and
Slick-C®. To access the Javadoc Editor, right-click within the edit window and select Edit Javadoc Com-
ments.
To add a custom or unsupported tag, append the tag (with an @ prefix) and its description into the De-
scription text box. You can add @serial, @serialField, and @serialData fields this way.
For more information, see Sun’s Javadoc documentation at http://java.sun.com.
Organizing Java Imports
Organizing imports automates the management of import statements in Java files. This feature minimizes
the amount of time that it takes to compile code by only importing the classes that are used. Existing im-
port statements are also sorted in a readable format and are more consistent between different Java
packages in the same project. Organizing of imports is applied to an entire file. To organize imports, from
the right-click context menu in the editor, click Imports →Organize Imports.
Adding Imports
Add Import is used to add an import statement for the class name under the cursor in Java code. To in-
voke this feature, move the cursor to the class name you want to import, then on the editor's right-click
context menu, click Import →Add Import.
Import Options
The behavior of the Organize Imports and Add Import features is controlled by the options on the Organ-
ize Imports Options dialog box, pictured below. To open this dialog, on the editor's right-click context
menu, click Imports →Options. For a list with descriptions of the options on this dialog, see Organize
Imports Options Dialog.
Figure 7.14. Organize Imports Dialog
Javadoc Editor
252
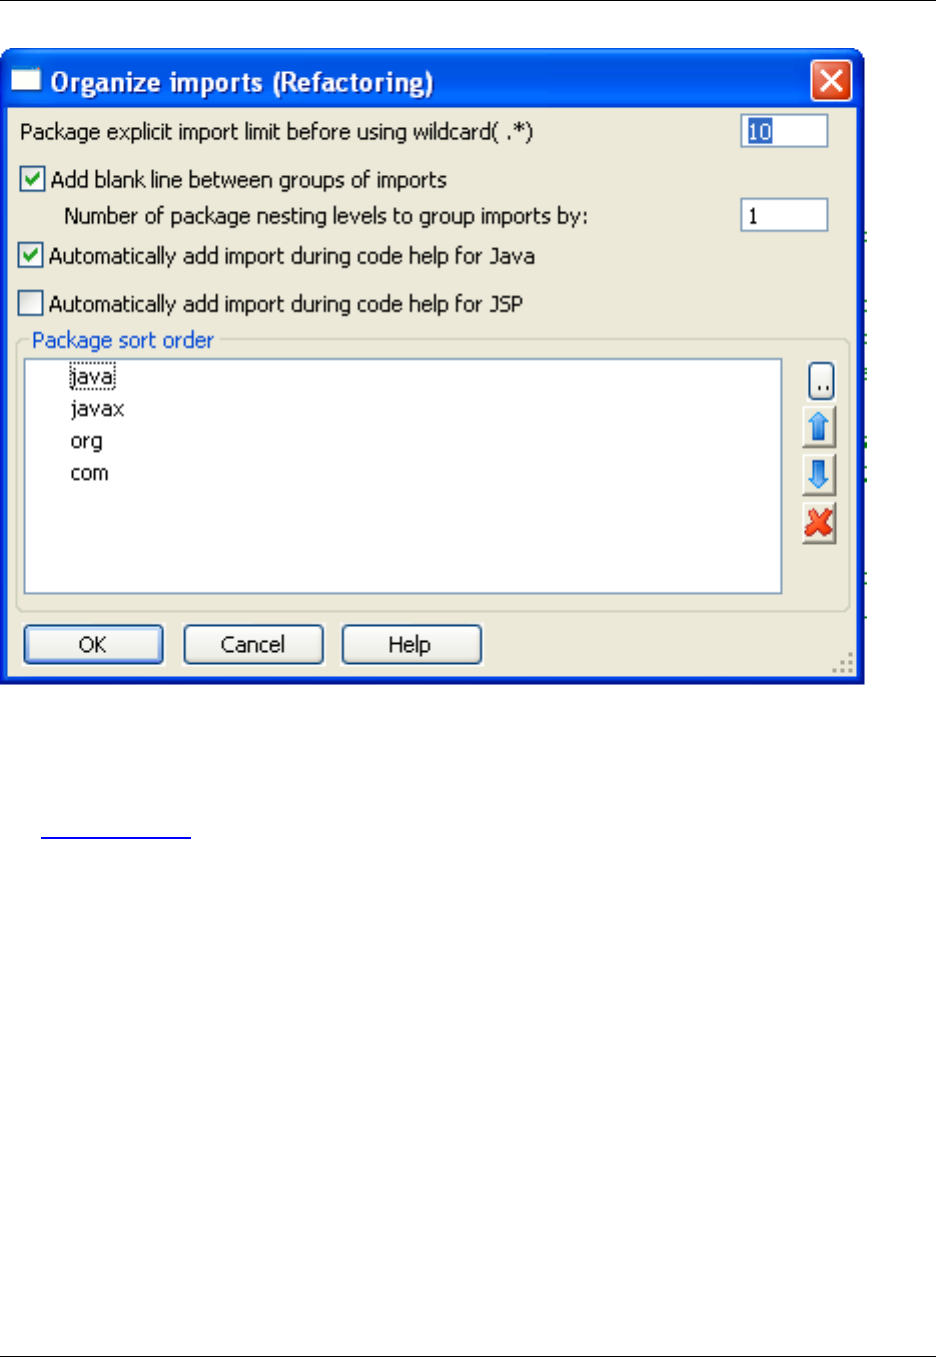

XML and HTML
Features for XML and HTML are described below. See also XML/HTML Formatting.
XML
XML features in SlickEdit®Core include Context Tagging®, validation, well-formedness checking, a beau-
tifier, Color Coding, URL Mapping, Syntax Expansion, and Syntax Indenting for XML, XSLT, and schemas
(DTD or XSD).
XML Formatting Options
Content in XML and HTML files may be set to automatically wrap and format as you edit, through the
XML/HTML Formatting feature. See XML/HTML Formatting for complete information.
Other miscellaneous tag and attribute options are still provided through the XML Formatting Options dia-
log. To access these options, click Window →Preferences, expand SlickEdit and click General in the
tree, then double-click the File Extension Setup setting. On the Extension Options dialog, choose xml
from the Extension drop-down list, then click the Options button. The XML Formatting Options dialog is
displayed.
Tip
You can also display the XML Formatting Options dialog by clicking the XML Options button on
the XML/HTML Formatting Scheme Configuration dialog (click Window →Preferences, expand
Slickedit and click General in the tree, then double-click the XML/HTML Formatting setting.
The XML Formatting Options dialog is shown below.
Figure 7.15. XML Formatting Options Dialog
XML
254
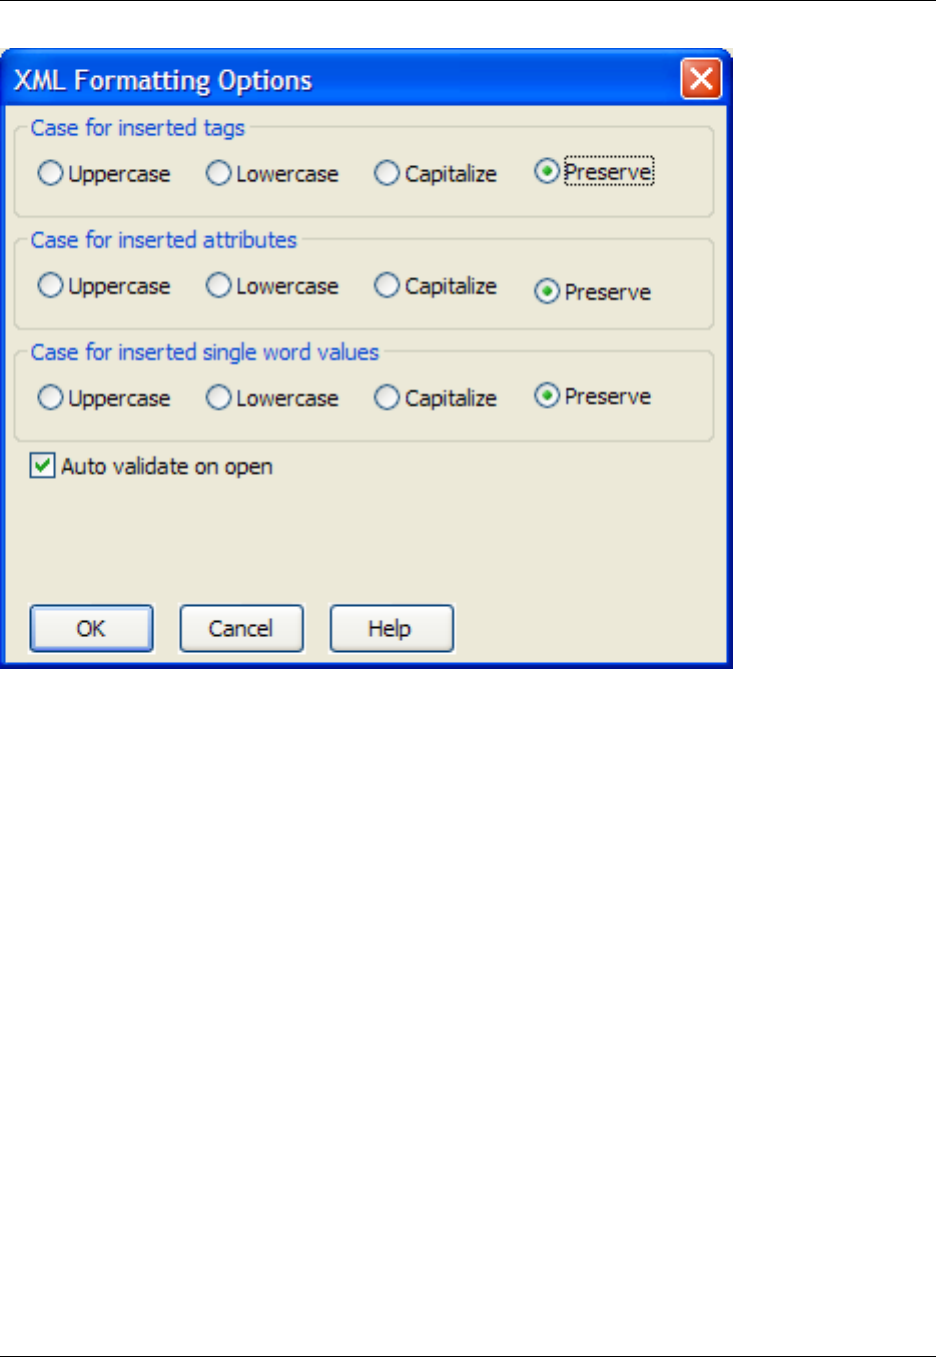
The following settings are available:
•Case for inserted tags - This option is to specify if you want your tag names to be lowercase or upper-
case. For example, if you select Uppercase, then <tag> would become <TAG>. Under normal circum-
stances, preserve the case of your XML tags, but for certain special cases (e.g. XHTML) you might
want to change this setting.
•Case for inserted attributes - This option is to specify if you want attributes cased inside the body of a
tag. For example, if you select Uppercase, then <td align=right> becomes <td ALIGN=right>. Under
normal circumstances, preserve the case of your XML attributes, but for certain special cases (e.g.
XHTML) you might want to change this setting.
•Case for inserted single word values - This option is to specify if the case used when inserting the
single word values that appear after the equals sign of an attribute inside the body of a tag. This affects
any attribute that has an enumerated type for its attribute values. Under normal circumstances you will
want to preserve the case of your XML single word values, but for certain special cases (e.g. XHTML)
you may want to change this setting.
•Auto validate on open - When this option is selected, XML files are automatically validated when they
are opened. The result of the validation is displayed on the SlickEdit Core Output view.
XMLdoc Editor
Use the XMLdoc Editor to generate Microsoft XML syntax comments for C#, C, C++, Java, JavaScript,
XML
255
and Slick-C®. Note that by default, when creating a new comment, the Javadoc Editor is displayed for all
file types except C#. To work around this limitation, start an XML comment with "///" and then right-click in
the edit window and select Edit XML Comments.
Unknown XML tags are left "as is" and not removed.
XML Beautifier
To beautify XML source code, from the main menu click Format →Beautify (or use the gui_beautify
command). The XML Beautifier dialog appears, where you can specify preferences for how the code is
beautified.
Caution
The XML Beautifier is not affected by XML/HTML Formatting. If you run the beautifier on docu-
ments that have been automatically formatted through XML/HTML Formatting, you may find un-
expected results.
You can use the commands xml_beautify or xml_beautify_selection to instantly beautify the file or the
selection according to the settings on the Beautifier dialog.
Note
The XSD Beautifier contains the same options and settings as the XML Beautifier.
The following buttons and options are available on the Beautifier:
•Beautify - Beautifies current selection or buffer and closes the dialog box.
•Reset - Restores the dialog box settings to the values that appeared when you invoked the dialog.
•Save Settings - Saves beautify options in uformat.ini file. These settings are used by the
xml_beautify command.
•Restrict to selection - When on, only lines in the selection are beautified.
•Sync extension options - When on, the extension options are updated to reflect any changes that
these dialogs have in common.
The tabs on the XML Beautifier are described in the sections below.
Indent Tab
Figure 7.16. XML Beautifier: Indent Tab
XML
256
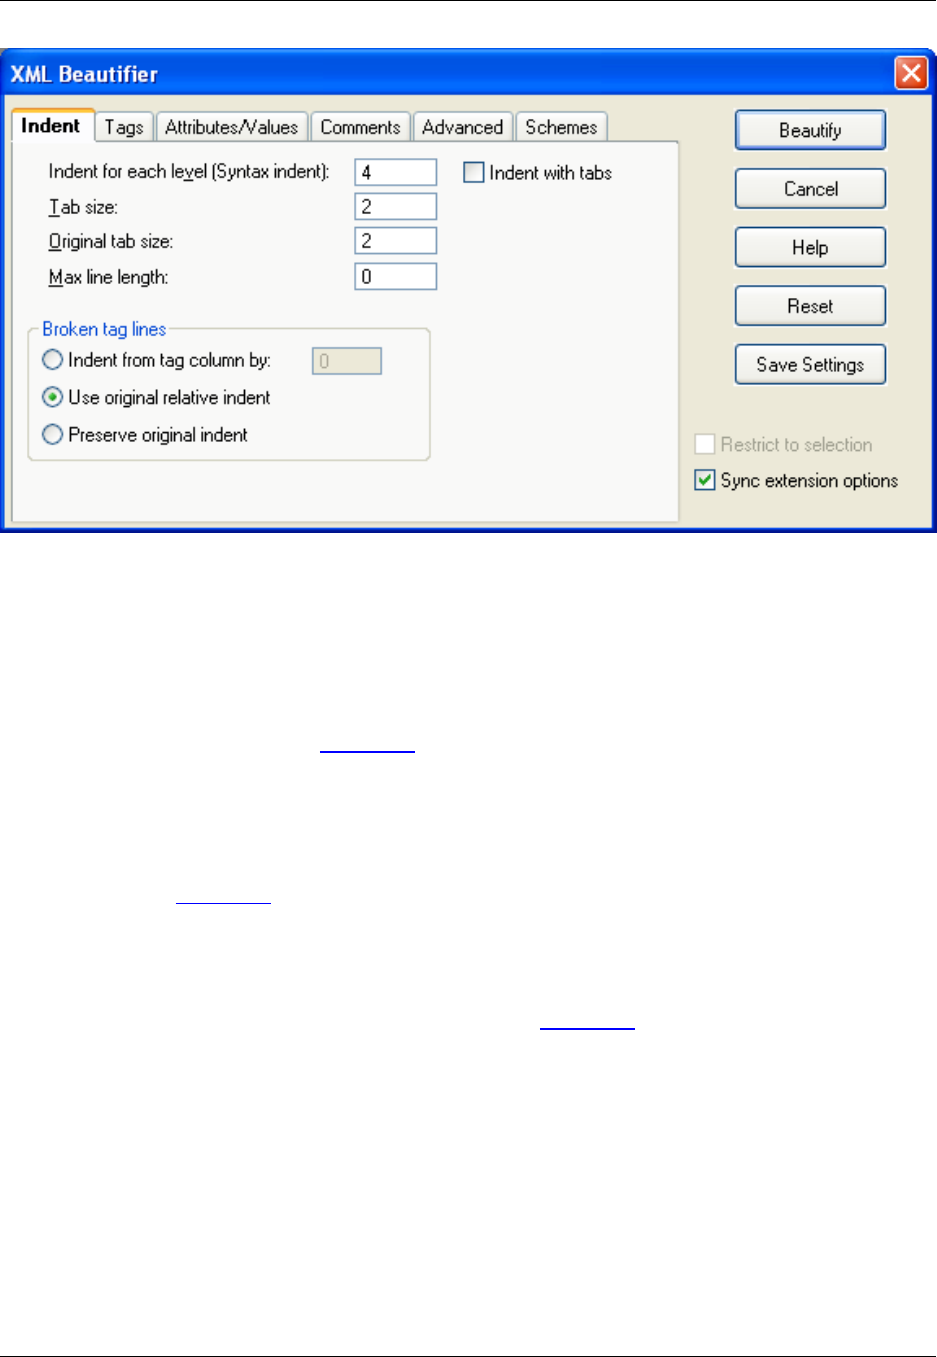
The following settings are available:
•Indent for each level (Syntax indent) - The amount to indent for each new nesting level of tags. We
have put the words "Syntax indent" in parenthesis to help indicate that this field has the same meaning
as the Syntax indent text box in the Extension Options dialog box (Window →Preferences, expand
SlickEdit and click General in the tree, then double-click the File Extension Setup setting. On the Ex-
tension Options dialog, select the Indent Tab). By default, we initialize this text box with your current ex-
tension setup setting.
•Indent with tabs - When on, tab characters are used for leading indent of lines. This value defaults to
the Tabs text box in the Extension Options dialog box (Window →Preferences, expand SlickEdit and
click General in the tree, then double-click the File Extension Setup setting. On the Extension Options
dialog, select the Indent Tab).
•Tab size - Specifies output tab size. The output tab size is only used if the Indent with tabs check box
is on. This value defaults to the Syntax indent text box in the Extension Options dialog box (Window
→Preferences, expand SlickEdit and click General in the tree, then double-click the File Extension
Setup setting. On the Extension Options dialog, select the Indent Tab).
•Original tab size - Specifies what the original file's tab expansion size was. We need to know the tab
expansion size of your original file to handle reusing indent amounts from your original file. Currently
the beautifier only reuses the original source file's indenting for comments. This option has no effect if
the original file has no tab characters.
•Max line length - Specifies the maximum length a line can be before it is wrapped to a new line. This
max line length is relative to the current indent level. For example, if you were inside an XHTML <td>
block which was at an indent level of 30, and your max line length was set to 80, then that line would
not be wrapped until it reached a total length of 30+80=110 characters. Set this value to 0if you want
your line breaks preserved.
XML
257
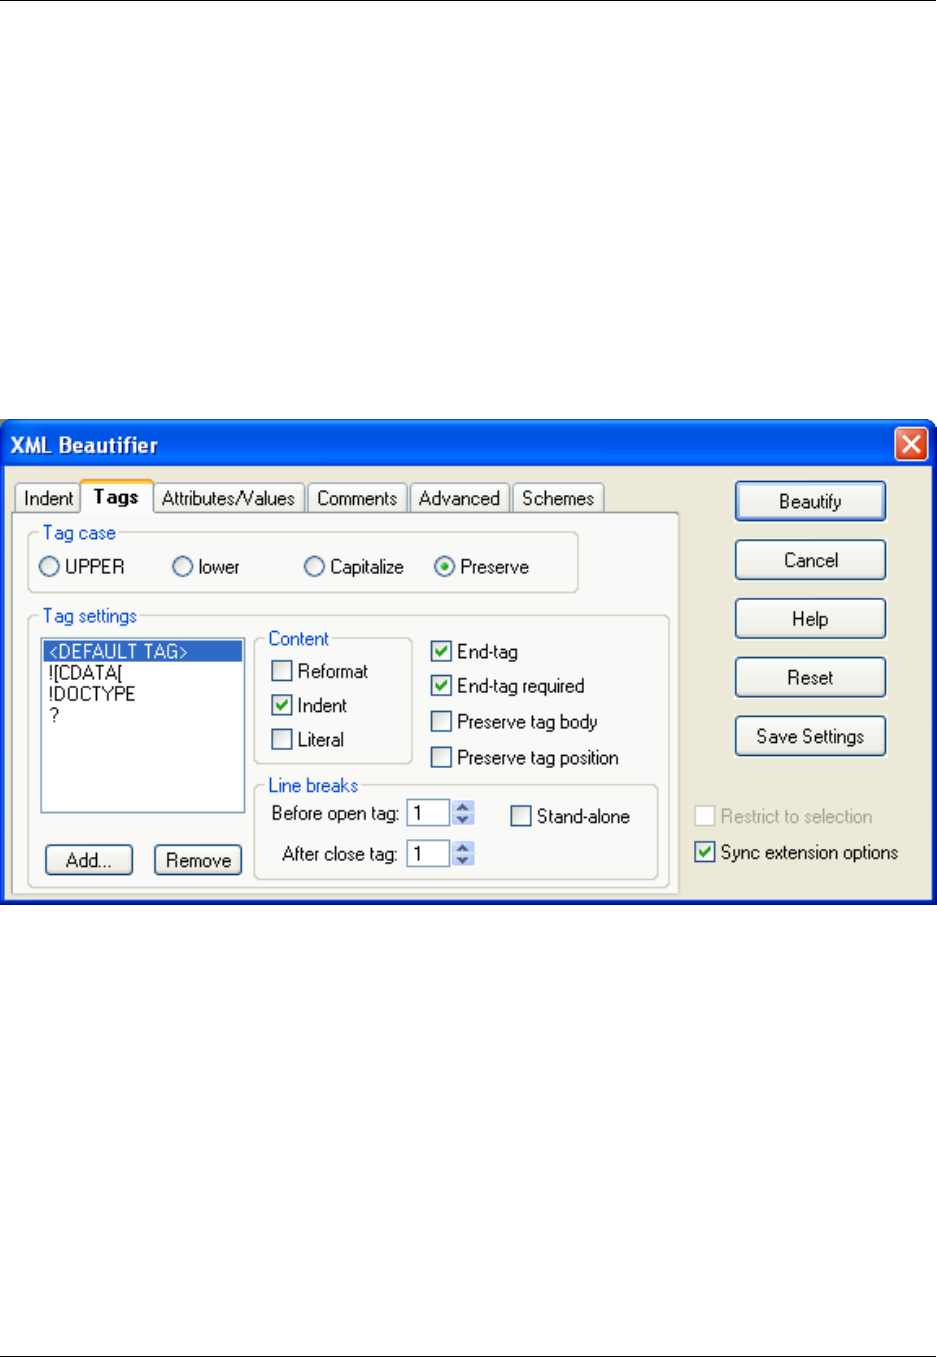
•Broken tag lines - Specify how broken tag lines are treated from the following options:
•Indent from tag column by - Specifies the amount to indent for broken tag lines from the starting
column of the tag. Specify 0to align broken tag lines with the starting column of the tag.
•Use original relative indent - Reindent broken tag lines using the original relative indent amount
from the starting column of the tag.
•Preserve original indent - Preserve the original absolute indent amount on broken tag lines.
Tags Tab
Figure 7.17. XML Beautifier: Tags Tab
The Tags tab contains the following options and settings:
•Tag case - Specifies how you want your tag names cased. For example, if you choose UPPER, then
<tag> would be beautified to <TAG>. Under normal circumstances you will want to preserve the case of
your XML tags, but for certain special cases (e.g. XHTML) you may want to change this setting.
•Tag settings - The settings in this group box apply to the tag that is selected in the list box. The
<DEFAULT TAG> tag item in the list of tags specifies settings to use when no settings exist for a tag
found during beautification.
•Add - Display the Add Tag dialog. This dialog allows you to add a tag definition to the list and specify
how it will be beautified.
•Remove - Used to remove the currently selected tag.
•Content - Specify how to beautify content from the following options:
XML
258

•Reformat - When off, all white space and line breaks are preserved. However, tags are formatted
(tag case, attribute case, etc.).
•Indent - When on, nested tags will be indented one syntax indent level. Furthermore, if Reformat is
on, the selected tag's CDATA content (i.e. plain text), bounded by the opening and closing tag, will be
indented one syntax indent level.
•Literal - When on, all white space and line breaks are preserved. In addition, tags within the content
are treated as literal text. If Reformat is on, then leading indent is adjusted. This option is useful for
XHTML.
Tip
Some examples of content settings for specific tags are:
•style -Literal (content is indented to the same level as the <style> open tag)
•style -Reformat,Literal (content is indented one syntax indent level from the <style> open
tag)
•pre - All Content check boxes off
•blockquote -Reformat,Indent
•End tag - When on, the selected tag has an end tag. For XML you will normally want this to remain on.
•End tag required - When on, the selected tag's ending tag is required. For XML you will normally want
this to remain on.
•Preserve tag body - When on, all properties of the body of the tag selected will be preserved. This is
especially useful for processing instructions like <?xml ... ?> where you do not want the embedded text
to be beautified.
•Preserve tag position - When on, the position of the tag within the document is preserved. This is es-
pecially useful with JSP/ASP tags where reindenting the tag would interrupt the flow of the script code.
•Line breaks - Select the way lines are broken:
•Before open tag - Specify the number of line breaks before the opening tag. For example, if you
were to set the number of line breaks before the opening tag to 3for the XHTML <td> tag, and the
original content was:
<tr>
<td>
</td>
</tr>
The resulting content would be:
XML
259

<tr>
<td>
</td>
</tr>
Please note that the number of line breaks is not the same as the number of blank lines. If you
wanted three blank lines, then you would set the number of line breaks to 4.
•After close tag - Specify the number of line breaks after the closing tag. For example, if you were to
set the number of line breaks after the closing tag to 3for the XHTML <td> tag, and the original con-
tent was:
<TR>
<TD>
</TD>
</TR>
The resulting content would be:
<TR>
<TD>
</TD>
</TR>
Please note that the number of line breaks is not the same as the number of blank lines. If you
wanted three blank lines, then you would set the number of line breaks to 4.
•Stand-alone - When on, the selected tag will always have at least one preceding and trailing line
break on both its opening and ending tag when beautified. You can specify that there be more than
one line break by setting Line breaks for the opening and closing tags.
Attributes/Values Tab
Figure 7.18. XML Beautifier: Attributes/Values Tab
XML
260
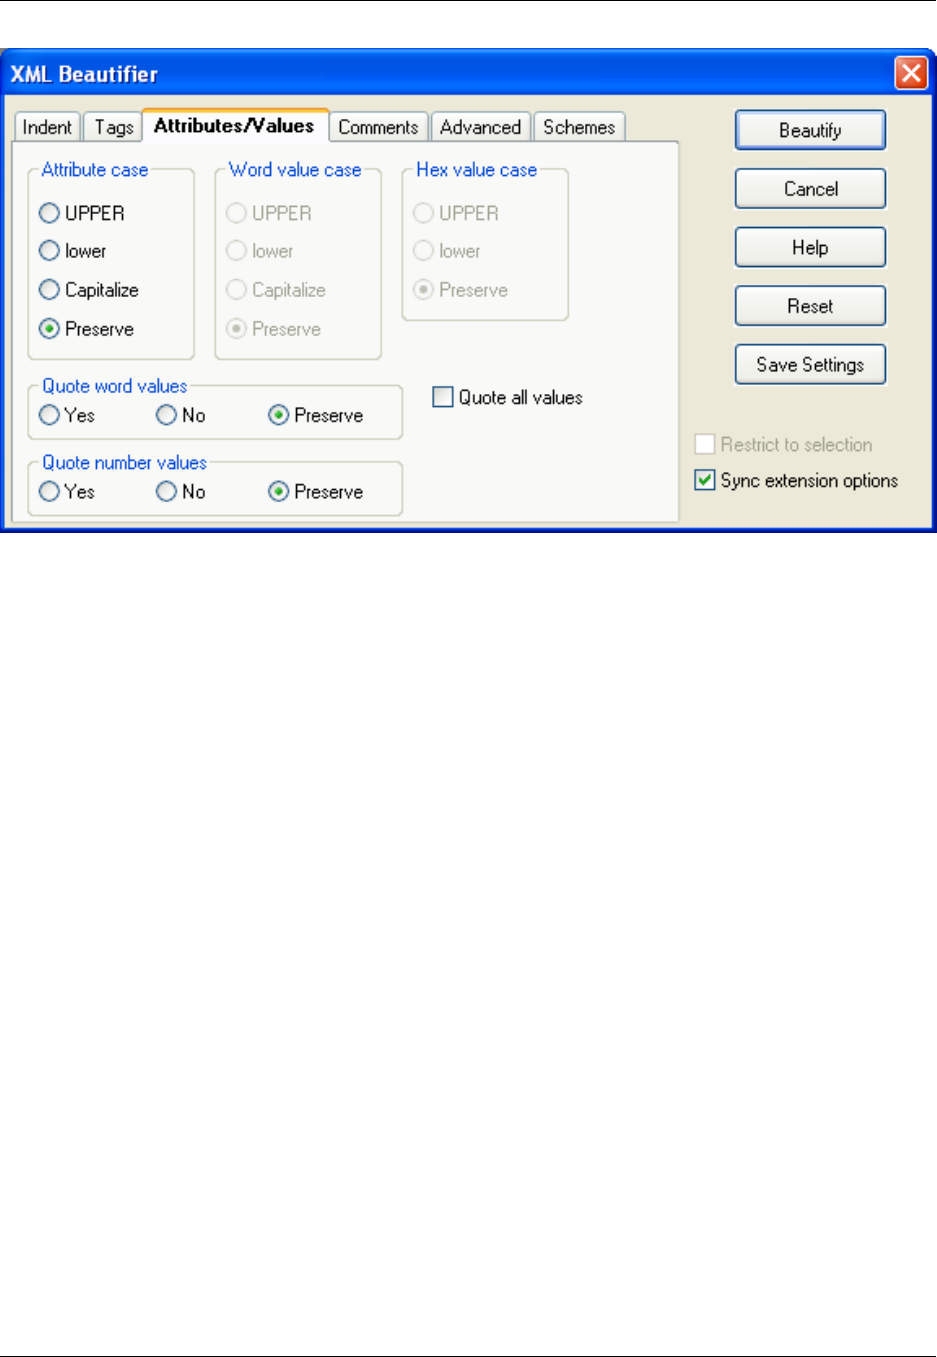
The Attributes/Values tab contains the following settings:
•Attribute case - Specifies how you want attributes cased inside the body of a tag. For example, if you
choose UPPER, then <td align="right"> would be beautified to <td ALIGN="right">. Under normal cir-
cumstances you will want to preserve the case of your XML attributes, but for certain special cases
(e.g. XHTML) you may want to change this setting.
•Word value case - Not available for XML.
•Hex value case - Not available for XML.
•Quote word values - Specifies whether you want word values enclosed in double quotes after the = of
an attribute inside the body of a tag. For example, <td align=right> would be beautified to <td
align="right">. Select Preserve if you want word values left alone. Under normal circumstances you will
want to preserve your XML values, but for certain special cases (e.g. XHTML) you may want to change
this setting.
•Quote number values - Specifies whether you want number values enclosed in double quotes after
the =of an attribute inside the body of a tag. For example, <td width=590> would be beautified to <td
width="590">. Select Preserve if you want number values left alone. Under normal circumstances you
will want to preserve your XML values, but for certain special cases (e.g. XHTML) you may want to
change this setting.
•Quote all values - When on, all values will be quoted after the =of an attribute inside the body of a tag.
For example, <td align=right> would be beautified to <td align="right">.Under normal circumstances
you will want to preserve your XML values, but for certain special cases (e.g. XHTML) you may want to
change this setting.
Comments Tab
XML
261
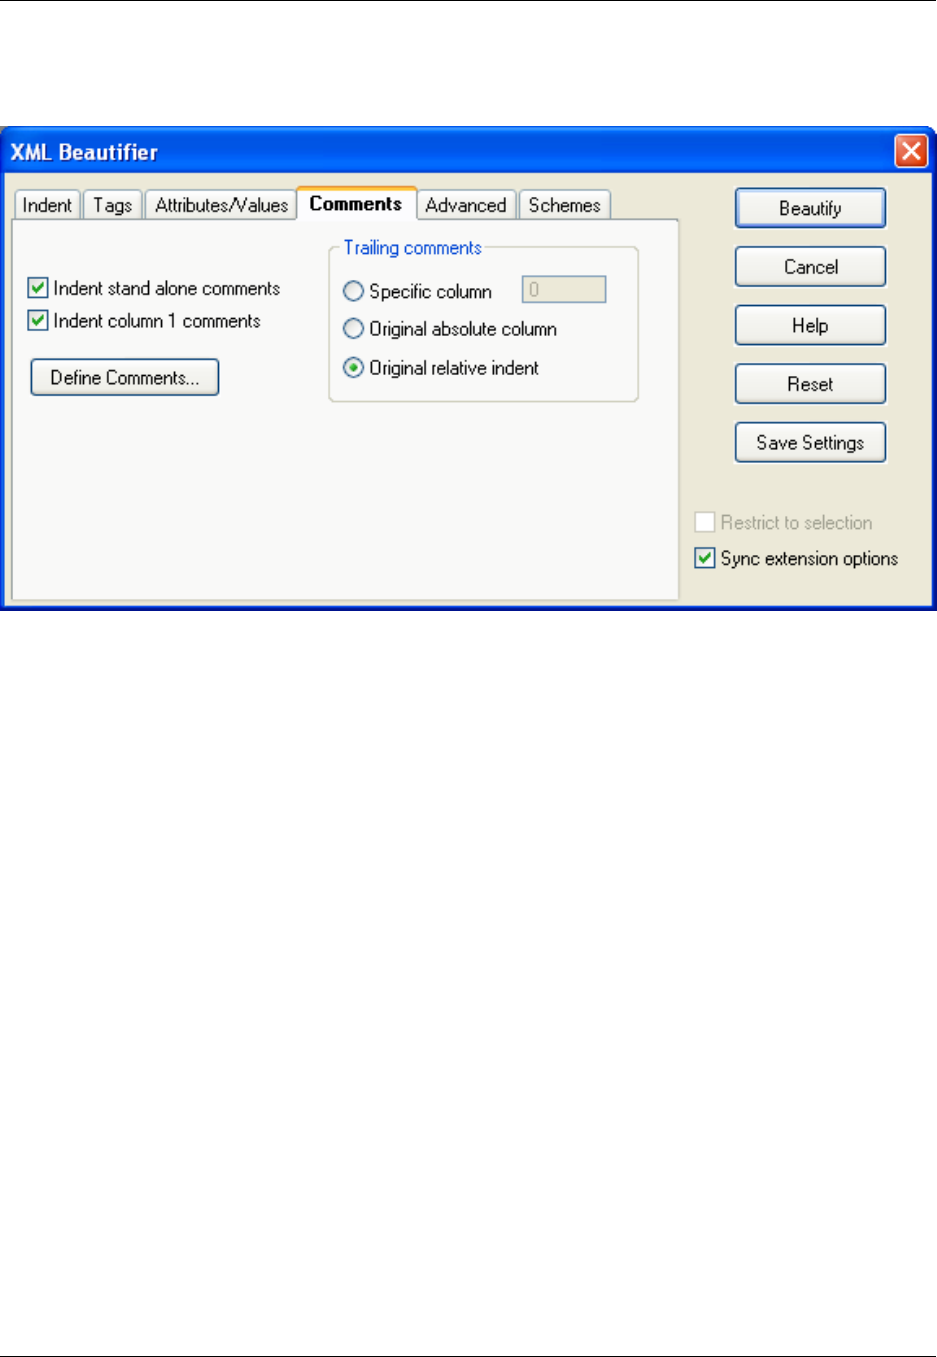
Figure 7.19. XML Beautifier: Comments Tab
The Comments tab contains the following options and settings:
•Indent stand alone comments - When on, indicates whether comments which appear on lines by
themselves with no content to the left are indented to the current content indent level. The following is
an example of a stand-alone comment:
<!-- stand alone
comment
-->
•Indent column 1 comments - Normally comments that start in column 1 are left alone. Turn this on if
you want the indent for these comments to be adjusted as well.
•Define Comments - Displays the XML Comments dialog. This dialog allows you to define what the
beautifier recognizes as a comment. The sequence <!-- --> is defined as the XML comment by default.
If you delete all comment definitions then all comments will be parsed as content.
•Trailing comments - Specify how trailing comments are treated from the following options:
•Specific column - This text box specifies the column that "trailing comments" should be placed at.
By trailing comments, we mean comments which appear at the end of lines which contain tags. An
example of a trailing comment is:
<TD> <!-- trailing comment -->
•Original absolute column - When on, "trailing comments" are placed at the same column as the ori-
XML
262
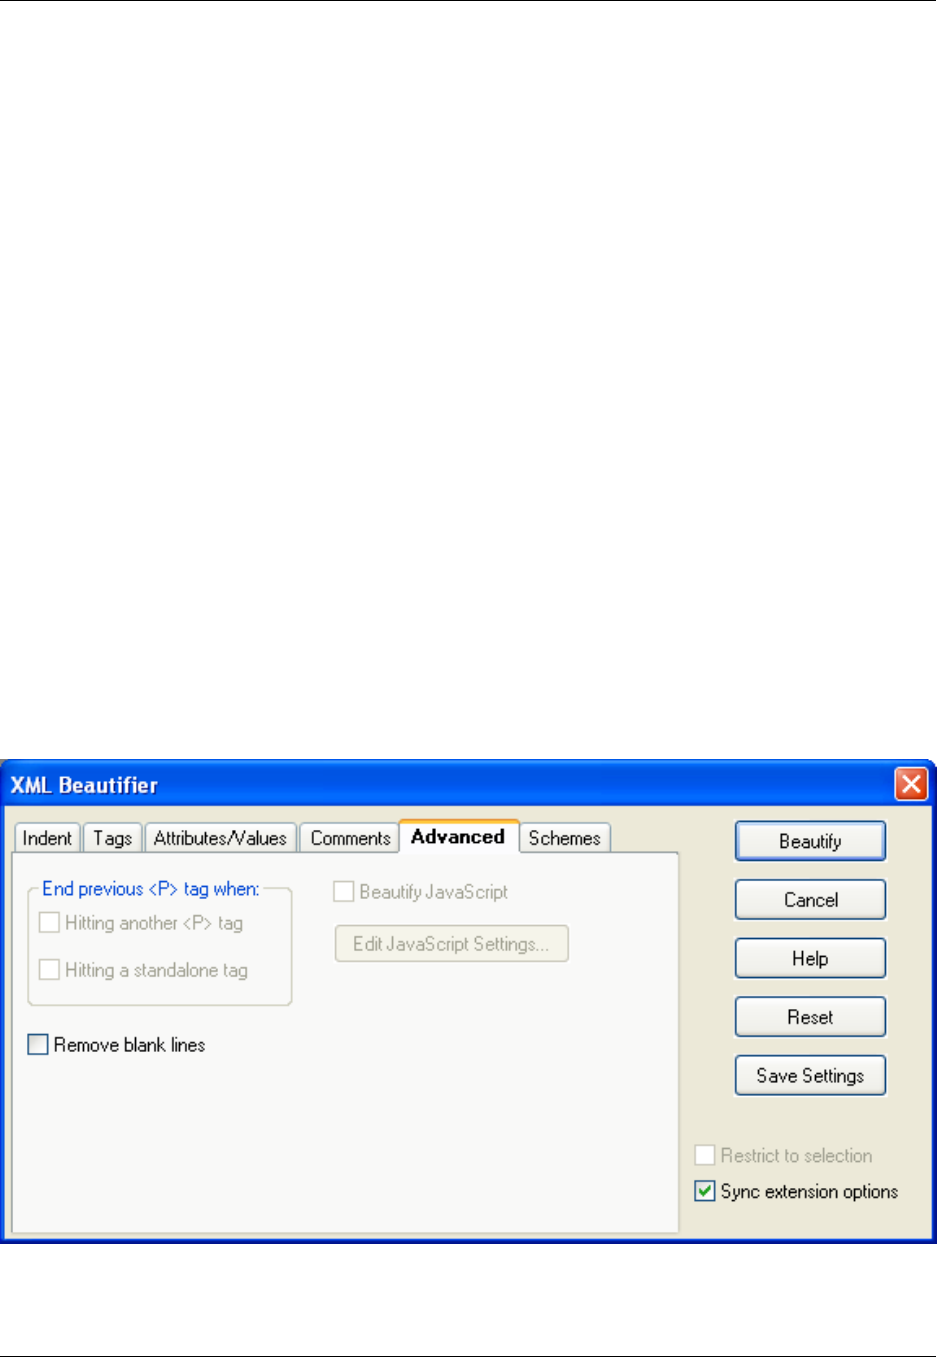
ginal source file. By trailing comments, we mean comments which appear at the end of lines which
contain tags.
•Original relative column - When on, "trailing comments" are indented by reusing the indent after the
last character of the end of the statement or declaration of the original source file. By trailing com-
ments, we mean comments which appear at the end of lines which contain tags.
The following is an example of code before beautifying trailing comments:
<Outer>
<Inner><four characters><!-- trailing comment -->
</Inner>
</Outer>
The resulting code would be:
<Outer>
<Inner><four characters><!-- trailing comment -->
</Inner>
</Outer>
Advanced Tab
Figure 7.20. XML Beautifier: Advanced Tab
The following option is available on the Advanced tab:
XML
263
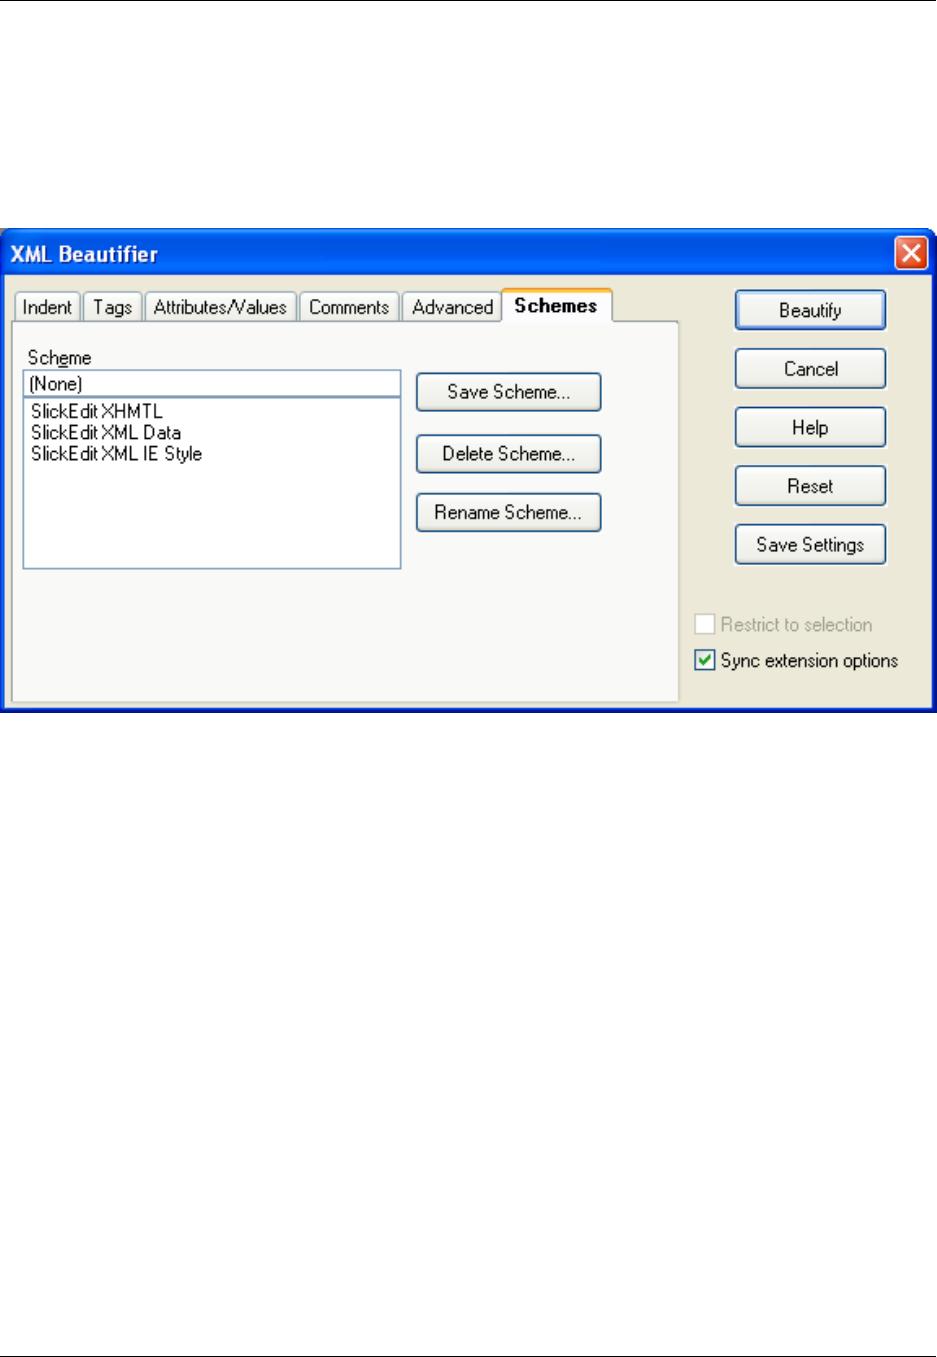
•Remove blank lines - When on, blank lines are deleted.
Schemes Tab
Figure 7.21. XML Beautifier: Schemes Tab
To define a new scheme, use the Beautifier to set the various beautify options and then press the Save
Scheme button on the Schemes tab. User defined schemes are stored in uformat.ini.
DTD Caching
When you open an XML document that has a document type definition of (!DOCTYPE) that refers to a re-
mote external DTD, the DTD file is downloaded and cached locally. The DTD is processed to provide
Context Tagging®and better color coding. Currently, only HTTP (and not FTP) remote files are suppor-
ted. This automatic caching allows you to work offline and edit XML documents that reference remote
DTDs when you do not have an Internet connection. If you want to force re-caching of the DTD for the
current XML document, right-click to open the context menu and select Apply DTD changes. Applying
DTD changes is necessary after you create a new XML document and complete the document type defin-
ition (!DOCTYPE).
Opening DTD Files from XML
To open the external DTD referenced by document type definition (!DOCTYPE), place the cursor any-
where on the !DOCTYPE tag and press Alt+1(or right-click to display the context menu and select Go to
Error/Include File).
URL Mappings
XML
264
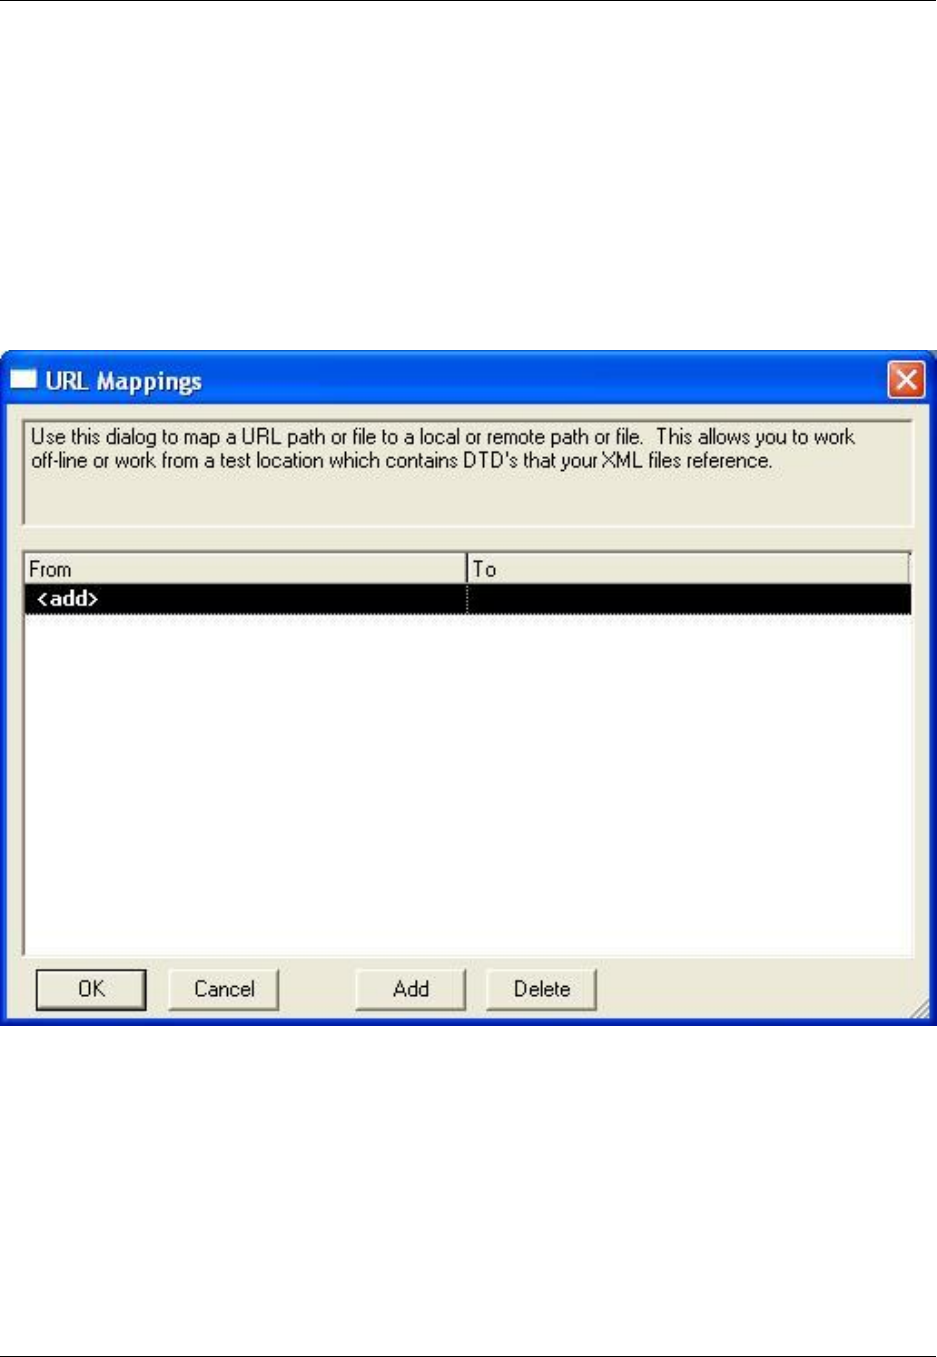
Map URLs to a different location. Whenever opening a URL, the URL map is examined to see if this URL
is mapped to a different location. If the URL is mapped to a different location, then that mapped location is
used.
This feature allows you to work offline or from a test location. For example, if you need to work with XML
documents that contain external DTDs while offline you can map the URL to the DTD to a local file. Simil-
arly, if you wanted to test changes to a DTD without modifying every XML documents DTD references,
you can map the URL to the test DTD location.
Figure 7.22. URL Mappings Dialog
To map a URL, complete the following steps:
1. From the main menu, click Window →Preferences, expand SlickEdit and click General in the tree,
then double-click the URL Mappings setting.
2. Click in the From text box that reads <add>.
3. Type in the URL that will be mapped to a different location.
4. Click on the To text box and type in the location to use for this URL.
XML
265

5. Click OK.
Toggling Between Begin and End XML Tags
Place the cursor anywhere on the begin or end tag and press Ctrl+]to find the corresponding end or be-
gin tag respectively.
HTML
This section describes some of the features and options that are available for HTML, including extension-
specific options, the HTML Beautifier, and more.
HTML support includes Context Tagging®, a beautifier, Color Coding, Syntax Expansion, and Syntax In-
denting for HTML, JSP, and ASP. Many of the language features in SlickEdit ®Core are supported for lan-
guages embedded in HTML, including Context Tagging, Color Coding, SmartPaste®, Syntax Expansion,
and Syntax Indenting.
Tip
When working with HTML files, you can toggle between the begin and end HTML tags by press-
ing Ctrl+].
Exporting to HTML
To save the current open buffer as HTML file with formatting and color coding, use the export_html com-
mand.
Configuring the Web Browser
To specify the Web browser that is used for previewing, from the main menu click Window →Prefer-
ences, expand SlickEdit and click General in the tree, then double-click the Web Browser Setup set-
ting. The Web Browser Setup dialog is displayed, as shown below. See Web Browser Setup Dialog for a
list of option descriptions.
Figure 7.23. Web Browser Setup Dialog
HTML
266
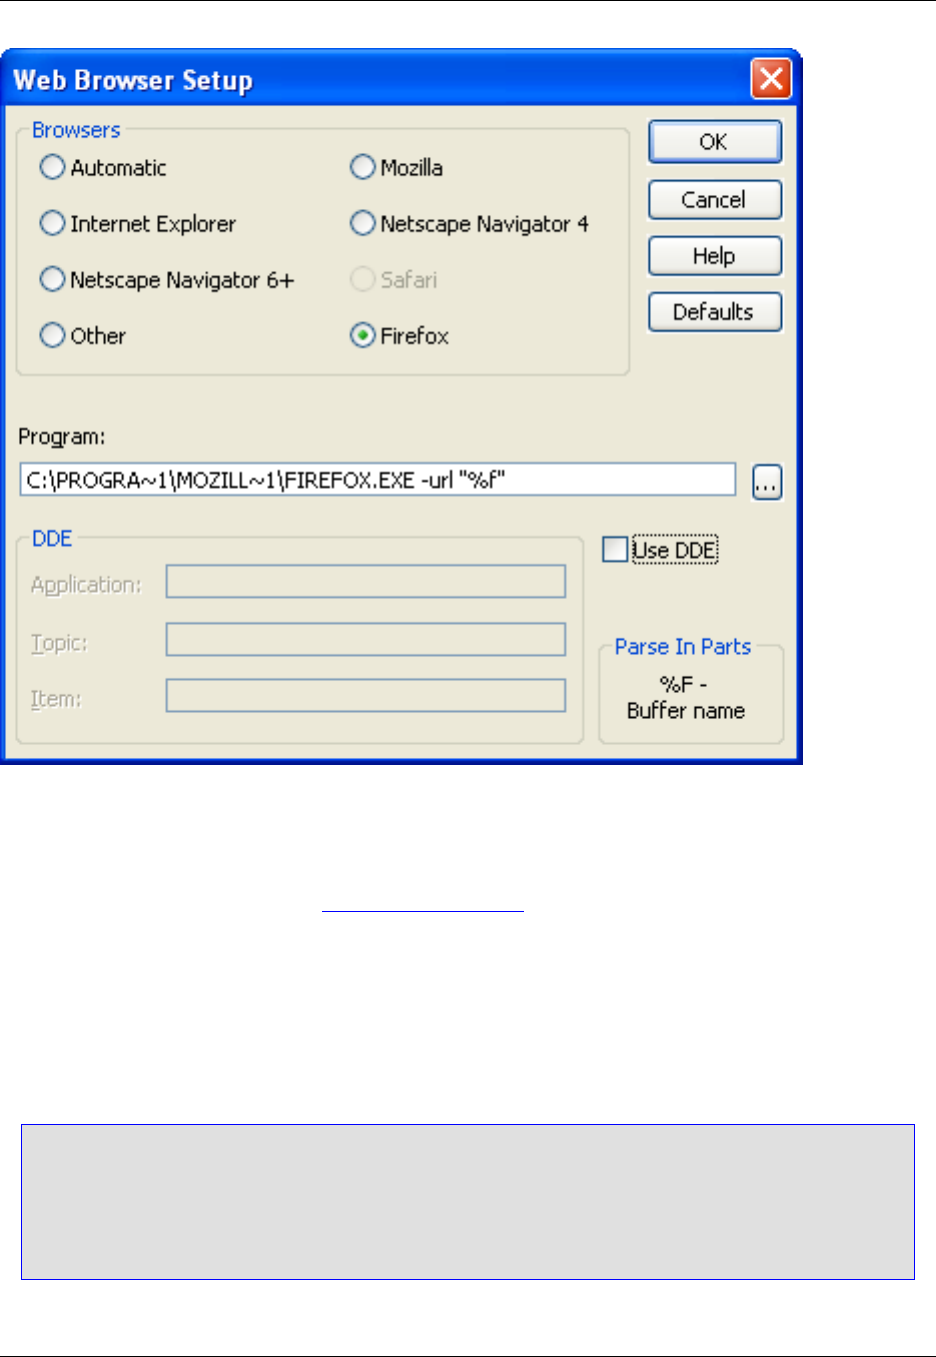
HTML Formatting Options
Content in XML and HTML files may be set to automatically wrap and format as you edit, through the
XML/HTML Formatting feature. See XML/HTML Formatting for complete information.
Other miscellaneous tag and attribute options are still provided through the HTML Formatting Options dia-
log. To access these options, click Window →Preferences, expand SlickEdit and click General in the
tree, then double-click the File Extension Setup setting. On the Extension Options dialog, choose html
from the Extension drop-down list, then click the Options button. The HTML Formatting Options dialog is
displayed.
Tip
You can also display the HTML Formatting Options dialog by clicking the HTML Options button
on the XML/HTML Formatting Scheme Configuration dialog (click Window →Preferences, ex-
pand SlickEdit and click General in the tree, then double-click the XML/HTML Formatting set-
ting).
Note
HTML
267
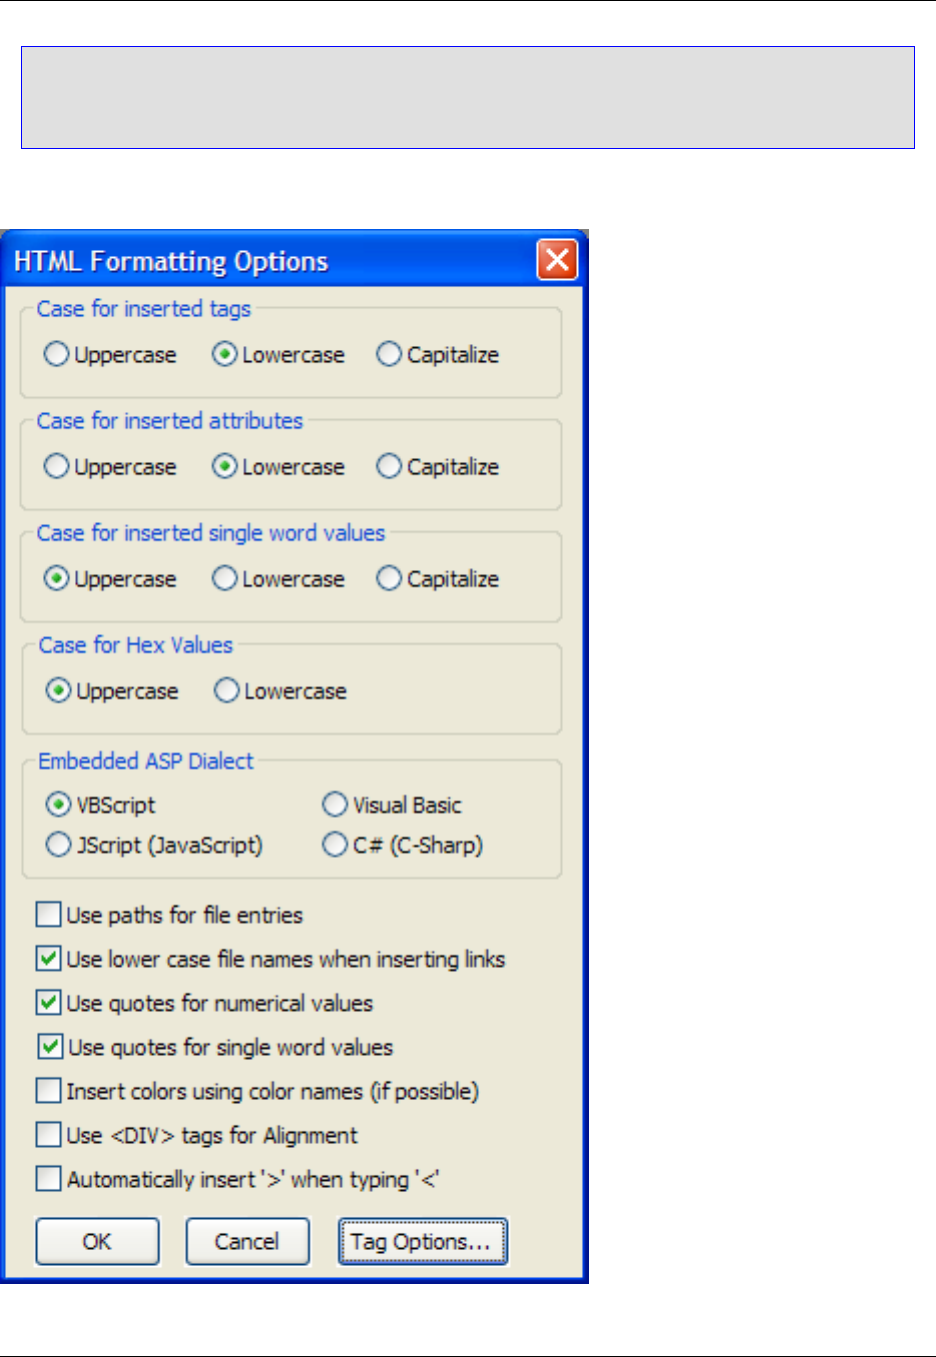
Languages similar to HTML have similar Formatting Options dialogs which are not specifically
documented.
Figure 7.24. HTML Formatting Options Dialog
HTML
268

The following settings are available:
•Case for inserted tags - This option is where you specify if you want the tag names to be lowercase or
uppercase. For example, if you select Uppercase, then <td> becomes <TD>.
•Case for inserted attributes - This option is where you specify if you want attributes to be lowercase
or uppercase inside the body of a tag. For example, if you select Uppercase, then <td align=right>
would become <td ALIGN=right>.
•Case for inserted single word values - This option is where you specify if you want word values to be
uppercase or lowercase when the = of an attribute is inside the body of a tag. For example, if you select
Uppercase, then <td align=right> becomes <td align=RIGHT>.
•Case for hex values - This option is where you specify if you want hex values to be uppercase or
lowercase after the = of an attribute inside the body of a tag. For example, if you select Uppercase,
then <body bgcolor=#ffffff> would become <body bgcolor=#FFFFFF>.
•Embedded ASP dialect - The language that you select here determines the default embedded lan-
guage mode for ASP files.
•Use path for file entries - (Not available in SlickEdit Core.) This option is used by the HTML toolbar.
When this attribute is selected, path information is included when inserting file names into the value of
an attribute. For example, creating a link with this option turned on might result in the following ex-
ample.
<A HREF=file://c|/dev/html/index.htm#>sample link</A>
When this option is not selected, the result is the following example.
<A HREF= index.htm#>sample link</A>
•Use lower case file names when inserting links - (Not available in SlickEdit Core.) This option is
used by the HTML toolbar. When this option is selected, the lowercase file names are used when in-
serting links into the value of an attribute. See the example for Use paths for file entries.
•Use quotes for numerical values - When this option is selected, word values are enclosed in double
quotes after the = of an attribute inside the body of a tag.
•Use quotes for single word values - When this option is selected, number values are enclosed in
double quotes after the = of an attribute inside the body of a tag.
•Insert colors using color names (if possible) - When this option is selected, colors are inserted by
using the color names if possible. For example, instead of using #ff0000 to represent the color red, the
color name red is used.
<BODY bgcolor=#ff0000>
<!-- and -->
<BODY bgcolor=red>
<!-- are identical -->
HTML
269
•Use <DIV> tags for alignment - (Not available in SlickEdit Core.) This option is used by the HTML
toolbar. When this option is selected, the <DIV> tag is used for aligning text. For example, rather than
using a <CENTER> tag to designate alignment, use the following tagging:
<DIV ALIGN=CENTER>
</DIV>
•Tag Options - Opens the XML/HTML Formatting Scheme Configuration dialog. See XML/HTML
Formatting for more information.
HTML Beautifier
To beautify an HTML document, open the document you want to beautify, then from the main menu, click
Format →Beautify (or use the gui_beautify command). The HTML Beautifier dialog will be displayed,
which allows you to make settings for how the code will be beautified.
Caution
The HTML Beautifier is not affected by XML/HTML Formatting. If you run the beautifier on docu-
ments that have been automatically formatted through XML/HTML Formatting, you may find un-
expected results.
You can use the commands h_beautify or h_beautify_selection to instantly beautify the file or the se-
lection according to the settings on the Beautifier dialog.
Note
The CFML Beautifier contains the same options and settings as the HTML Beautifier.
The following buttons and options are available on the Beautifier:
•Beautify - Beautifies current selection or buffer and closes the dialog box.
•Reset - Restores the dialog box settings to the values that appeared when you invoked the dialog.
•Save Settings - Saves beautify options in uformat.ini file. These settings are used by the
h_beautify command.
•Restrict to selection - When on, only lines in the selection are beautified.
•Sync extension options - When on, the extension options are updated to reflect any changes that
these dialogs have in common.
The tabs on the HTML Beautifier are described in the sections below.
Indent Tab
HTML
270
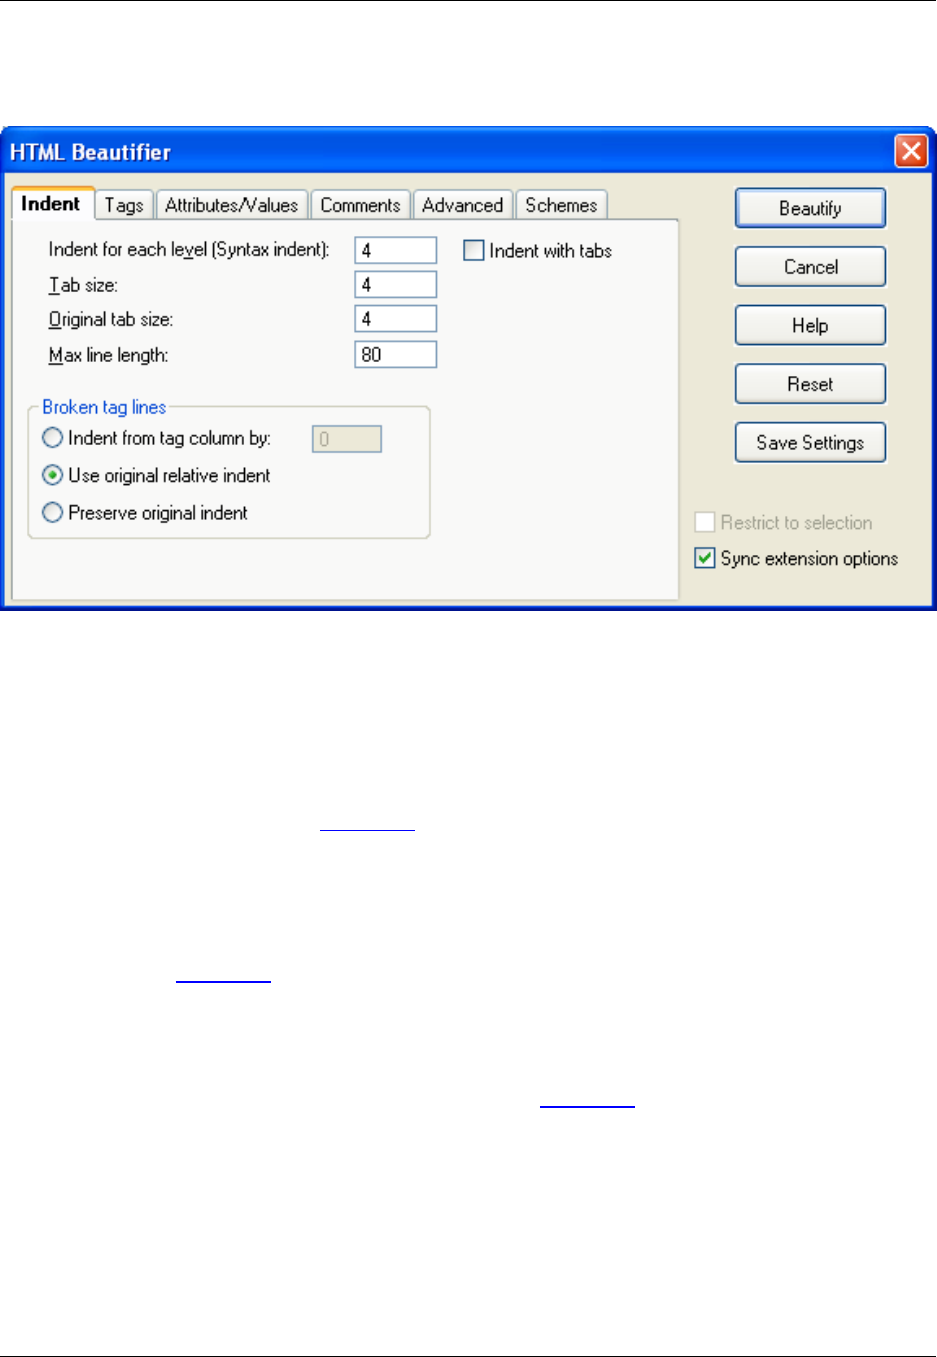
Figure 7.25. HTML Beautifier: Indent Tab
The following settings are available:
•Indent for each level (Syntax indent) - The amount to indent for each new nesting level. We have put
the words "Syntax indent" in parenthesis to help indicate that this field has the same meaning as the
Syntax indent text box in the Extension Options dialog box (Window →Preferences, expand
SlickEdit and click General in the tree, then double-click the File Extension Setup setting. On the Ex-
tension Options dialog, select the Indent Tab). By default, we initialize this text box with your current ex-
tension setup setting.
•Indent with tabs - When on, tab characters are used for leading indent of lines. This value defaults to
the Tabs text box in the Extension Options dialog box (Window →Preferences, expand SlickEdit and
click General in the tree, then double-click the File Extension Setup setting. On the Extension Options
dialog, select the Indent Tab).
•Tab size - Specifies output tab size. The output tab size is only used if Indent with tabs check box is
on. This value defaults to the Syntax indent text box in the Extension Options dialog box (Window →
Preferences, expand SlickEdit and click General in the tree, then double-click the File Extension
Setup setting. On the Extension Options dialog, select the Indent Tab).
•Original tab size - Specifies what the original file's tab expansion size was. We need to know the tab
expansion size of your original file to handle reusing indent amounts from your original file. Currently
the beautifier only reuses the original source file's indenting for comments. This option has no effect if
the original file has no tab characters.
•Max line length - Specifies the maximum length a line can be before it is wrapped to a new line. This
max line length is relative to the current indent level. For example, if you were inside a <TD> block
which was at an indent level of 30, and your max line length was set to 80, then that line would not be
HTML
271

wrapped until it reached a total length of 30+80=110 characters. Set this value to 0if you want your line
breaks preserved.
•Broken tag lines - Specify how broken tag lines are treated from the following options:
•Indent from tag column by - Specifies the amount to indent for broken tag lines from the starting
column of the tag. Specify 0to align broken tag lines with the starting column of the tag.
•Use original relative indent - Reindent broken tag lines using the original relative indent amount
from the starting column of the tag.
•Preserve original indent - Preserve the original absolute indent amount on broken tag lines.
Tags Tab
Figure 7.26. HTML Beautifier: Tags Tab
The Tags tab contains the following options and settings:
•Tag case - Specifies how you want your tag names cased. For example, if you choose UPPER, then
<td> would be beautified to <TD>.
•Tag settings - The settings in this group box apply to the tag that is selected in the list box. The
<DEFAULT TAG> tag item in the list of tags specifies settings to use when no settings exist for a tag
found during beautification.
•Add - Display the Add Tag dialog. This dialog allows you to add a tag definition to the list and specify
how it will be beautified.
•Remove - Used to remove the currently selected tag.
HTML
272

•Content - Specify how to beautify content from the following options:
•Reformat - When off, all white space and line breaks are preserved. However, tags are formatted
(tag case, attribute case, etc.).
•Indent - When on, the selected tag's content, bounded by the opening and closing tag, will be inden-
ted one syntax indent level.
•Literal - When on, all white space and line breaks are preserved. In addition, tags within the content
are treated as literal text. If Reformat is on, then leading indent is adjusted.
Tip
Some examples of content settings for specific tags are:
•XMP -Literal
•PRE - All Content check boxes off
•BLOCKQUOTE -Reformat,Indent
•STYLE -Reformat,Literal
•End tag - When on, the selected tag has an end tag. For example, the tag <TD> has a ending tag tag
that is </TD>, so End tag would be checked in this case.
•End tag required - When on, the selected tag's ending tag is required. This means that the ending tag
is not optional. An example of a tag whose ending tag could be optional is <P>.
•Preserve tag body - When on, all properties of the body of the tag selected will be preserved. This is
especially useful for JSP/ASP tags where you do not want the embedded Java or VBScript inside the
<% ... %> to be beautified.
•Preserve tag position - When on, the position of the tag within the document is preserved. This is es-
pecially useful with JSP/ASP tags where reindenting the tag would interrupt the flow of the script code.
•Line breaks - Select the way lines are broken:
•Before open tag - Specify the number of line breaks before the opening tag. For example, if you
were to set the number of line breaks before the opening tag to 3for the <TD> tag, and the original
content was:
<TR>
<TD>
</TD>
</TR>
The resulting content would be:
<TR>
HTML
273

<TD>
</TD>
</TR>
Please note that the number of line breaks is not the same as the number of blank lines. If you
wanted three blank lines, then you would set the number of line breaks to 4.
•After close tag - Specify the number of line breaks after the closing tag. For example, if you were to
set the number of line breaks after the closing tag to 3for the <TD> tag, and the original content was:
<TR>
<TD>
</TD>
</TR>
The resulting content would be:
<TR>
<TD>
</TD>
</TR>
Please note that the number of line breaks is not the same as the number of blank lines. If you
wanted three blank lines, then you would set the number of line breaks to 4.
•Stand-alone - When on, the selected tag will always have at least one preceding and trailing line
break on both its opening and ending tag when beautified. You can specify that there be more than
one line break by setting Line breaks for the opening and closing tags.
Attributes/Values Tab
Figure 7.27. HTML Beautifier: Attributes/Values Tab
HTML
274
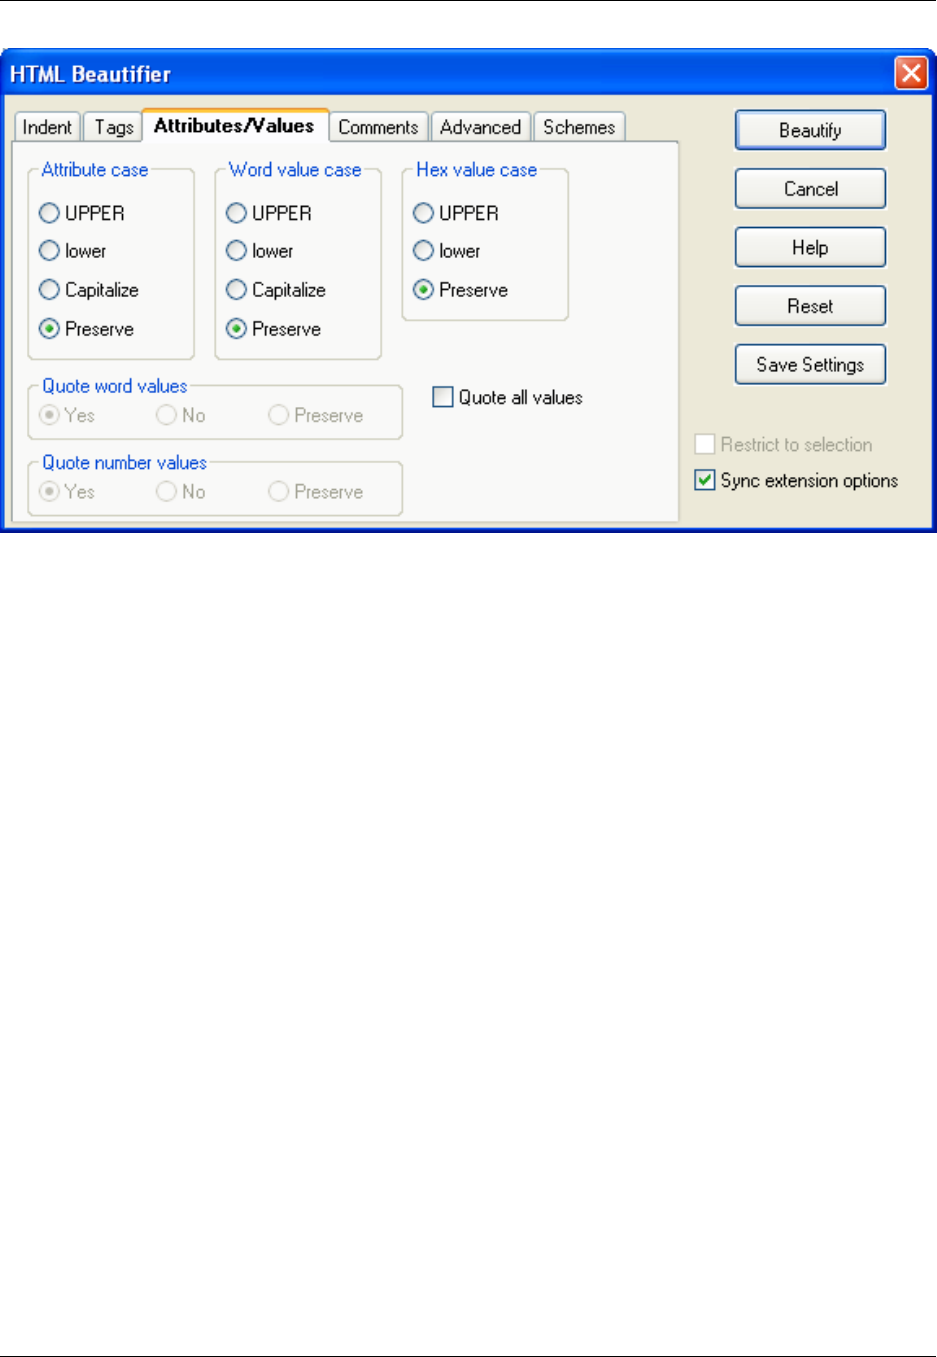
The Attributes/Values tab contains the following settings:
•Attribute case - Specifies how you want attributes cased inside the body of a tag. For example, if you
choose UPPER, then <td align="right"> would be beautified to <td ALIGN="right">.
•Word value case - Specifies how you want word values cased after the = of an attribute inside the
body of a tag. For example, if you choose UPPER, then <td align="right"> would be beautified to <td
align=RIGHT>.
•Hex value case - Specifies how you want hex values cased after the = of an attribute inside the body of
a tag. For example, if you choose UPPER, then <body bgcolor="#ffffff"> would be beautified to <body
bgcolor="#FFFFFF">.
•Quote word values - Specifies whether you want word values enclosed in double quotes after the = of
an attribute inside the body of a tag. For example, <td align=right> would be beautified to <td
align="right">. Select Preserve if you want word values left alone.
•Quote number values - Specifies whether you want number values enclosed in double quotes after
the = of an attribute inside the body of a tag. For example, <td width=590> would be beautified to <td
width="590">. Select Preserve if you want number values left alone.
•Quote all values - When on, all values will be quoted after the = of an attribute inside the body of a tag.
For example, <td align=right> would be beautified to <td align="right">.
Comments Tab
Figure 7.28. HTML Beautifier: Comments Tab
HTML
275
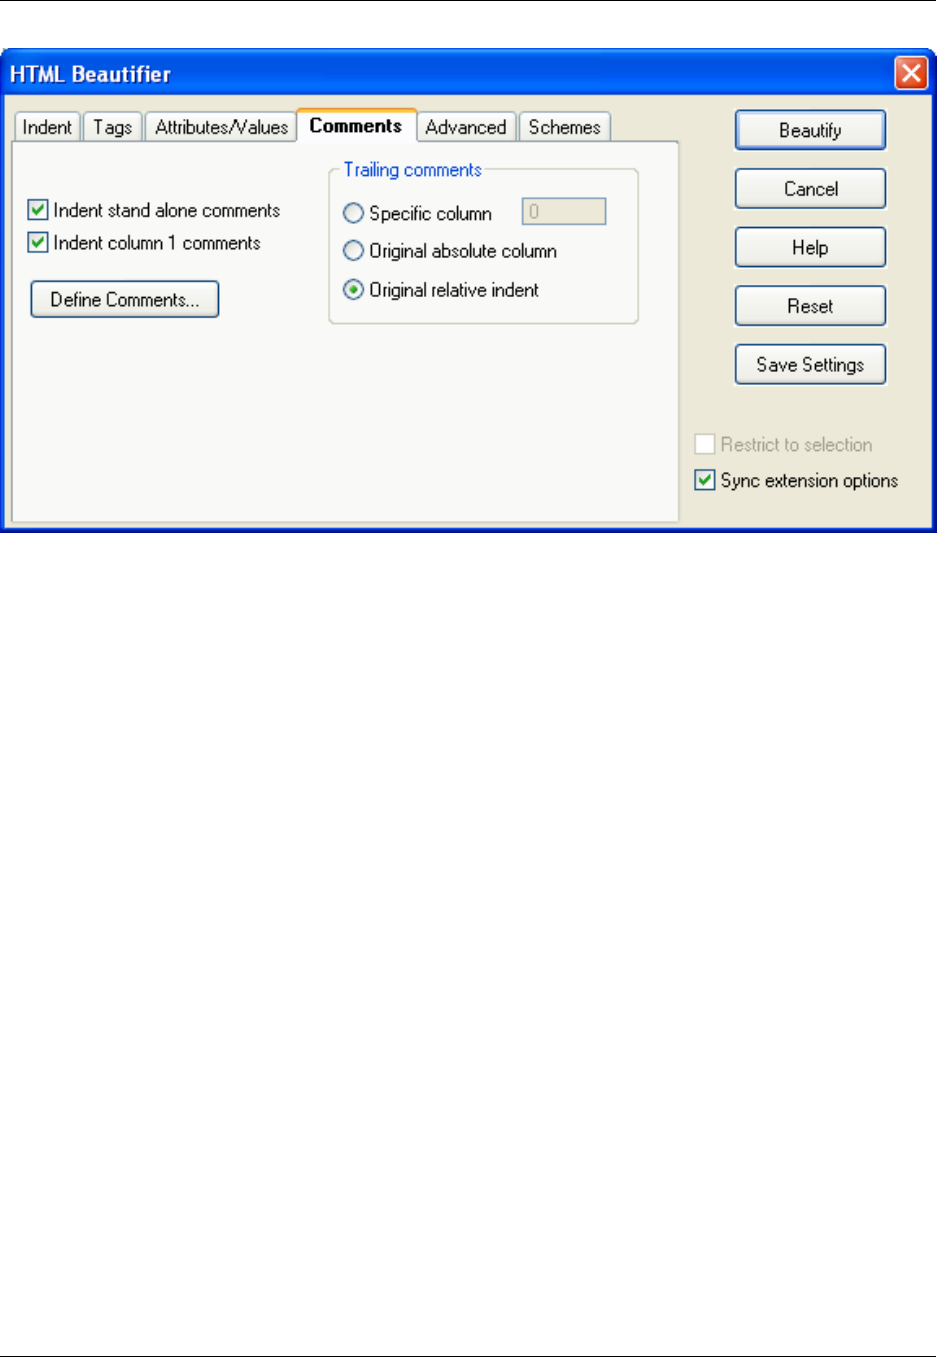
The Comments tab contains the following options and settings:
•Indent stand alone comments - When on, indicates whether comments which appear on lines by
themselves with no content to the left are indented to the current content indent level. The following is
an example of a stand-alone comment:
<!-- stand alone
comment
-->
•Indent column 1 comments - Normally comments that start in column 1 are left alone. Turn this on if
you want the indent for these comments to be adjusted as well.
•Define Comments - Displays the HTML Comments dialog. This dialog allows you to define what the
beautifier recognizes as a comment. The sequence <!-- --> is defined as the HTML comment by de-
fault. If you delete all comment definitions then all comments will be parsed as content and possibly
word-wrapped.
•Trailing comments - Specify how trailing comments are treated from the following options:
•Specific column - This text box specifies the column that "trailing comments" should be placed at.
By trailing comments, we mean comments which appear at the end of lines which contain tags. An
example of a trailing comment is:
<TD> <!-- trailing comment -->
•Original absolute column - When on, "trailing comments" are placed at the same column as the ori-
ginal source file. By trailing comments, we mean comments which appear at the end of lines which
contain tags.
HTML
276
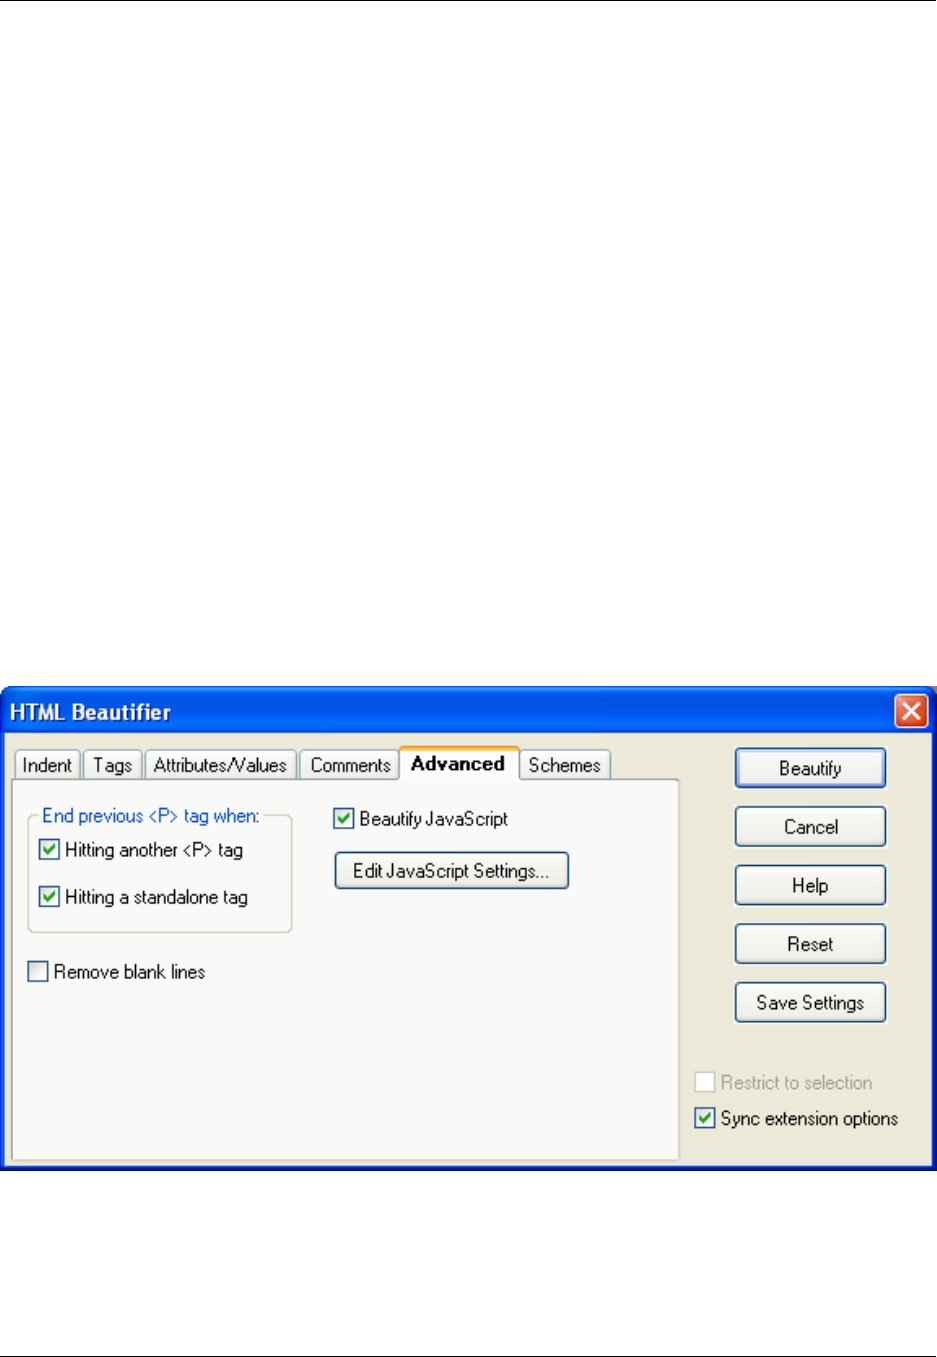
•Original relative column - When on, "trailing comments" are indented by reusing the indent after the
last character of the end of the statement or declaration of the original source file. By trailing com-
ments, we mean comments which appear at the end of lines which contain tags.
The following is an example of code before beautifying trailing comments:
<TR>
<TD><four characters><!-- trailing comment -->
</TD>
</TR>
The resulting code would be:
<TR>
<TD><four characters><!-- trailing comment -->
</TD>
</TR>
Advanced Tab
Figure 7.29. HTML Beautifier: Advanced Tab
The following options are available on the Advanced tab:
•End previous <P> tag when - Select from the following options:
•Hitting another <P> tag - When on, the beautifier will interpret a <P> tag as a signal of the end of
HTML
277

any previous paragraphs.
•Hitting a standalone tag - When on, the beautifier will interpret a standalone tag as a signal of the
end of any previous paragraphs. For example, in the following content, the <TABLE> tag (assuming
that the <TABLE> tag is a standalone tag) signals the end of the previous <P> paragraph. This has
the benefit of cleaning up unwanted (and unexpected) indenting. For example:
<P>
This is a paragraph of content. The paragraph will be ended by the
start of the table below it.
<TABLE>
<TR>
<TD>a table cell</TD>
</TR>
</TABLE>
•Remove blank lines - When on, blank lines are deleted.
•Beautify JavaScript - When on, embedded JavaScript is beautified according to your JavaScript beau-
tifier settings.
•Edit JavaScript Settings - Click on this button to configure the JavaScript Beautifier settings. The
JavaScript Beautifier is the same as the C/C++ Beautifier - see C/C++ Beautifier for more information.
Schemes Tab
To define a new scheme, set the various beautify options and press the Save Scheme button. User
defined schemes are stored in uformat.ini.
XML/HTML Formatting
278
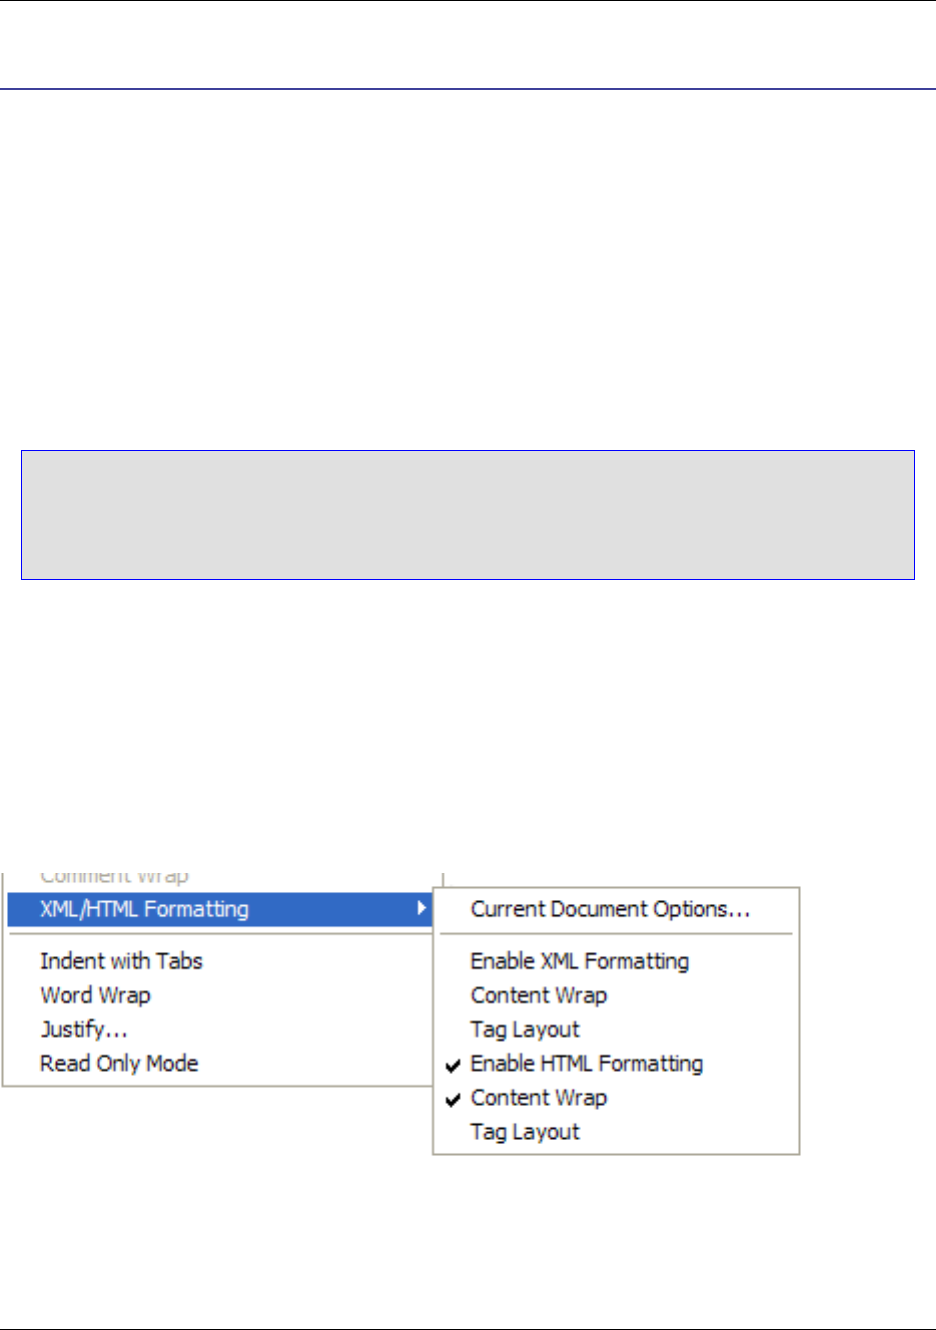
XML/HTML Formatting
Content in XML and HTML files may be set to automatically wrap and format as you edit. XML/HTML
Formatting is essentially comprised of two features: Content Wrap, which wraps the content between
tags, and Tag Layout, which formats tags according to a specified layout. Both can be activated individu-
ally for all XML and HTML files that are opened in SlickEdit®, or just for the current document.
Formatting schemes form the basis for how tags and content are formatted. A formatting scheme contains
any number of XML or HTML tags, each of which can be configured individually for indent levels, wrap-
ping, and tag structure. Multiple schemes can be defined—for example, you may want one scheme for
HTML files and another for XML files, or perhaps you are required to code certain files to various stand-
ards. Schemes can be saved and imported, so they can be shared with your team. Tags for each scheme
can be entered manually or you can import tags from the current file.
Caution
XML/HTML Formatting does not currently affect XML or HTML Beautifier settings. If you run the
beautifier on documents that have been automatically formatted through XML/HTML Formatting,
you may find unexpected results.
Enabling/Disabling XML/HTML Formatting
XML/HTML Formatting is on by default for XML and HTML files that you open in SlickEdit®. You can ac-
tivate and/or deactivate Tag Layout and/or Content Wrap for either file type on a global basis or on a per
document basis. Options to turn these features on/off are located on the Format →XML/HTML Format-
ting menu.
Figure 7.30. XML/HTML Formatting Menu
Enabling/Disabling Globally
Automatic formatting can be enabled or disabled for every XML and/or HTML file that is created or
opened in SlickEdit. These XML- and HTML-specific global options are toggled on/off by placing a check
Enabling/Disabling XML/HTML
Formatting
279
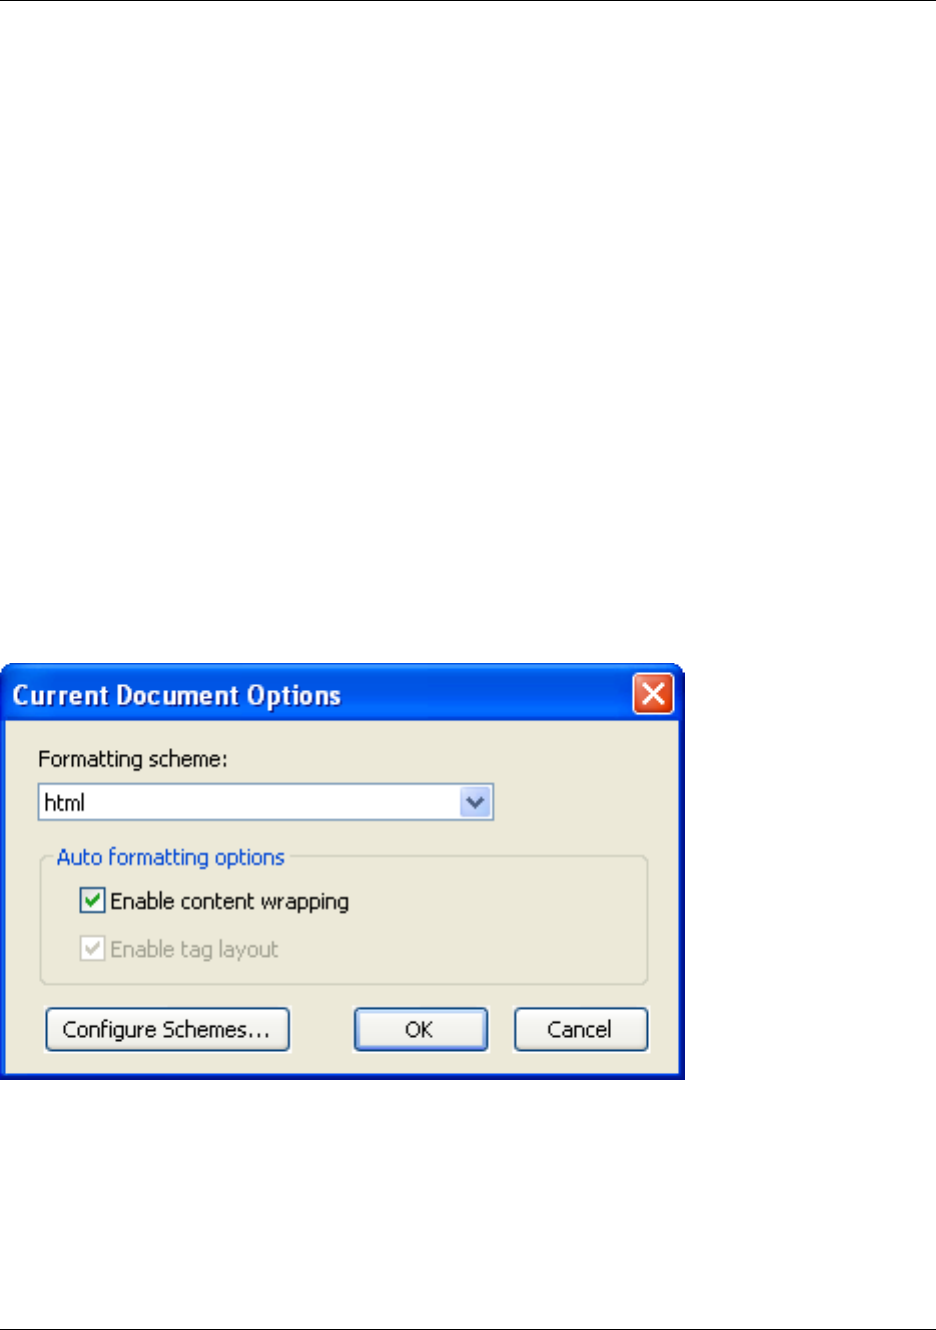
next to Enable XML Formatting and/or Enable HTML Formatting. To toggle Tag Layout and/or Con-
tent Wrap on or off for either file type, check or uncheck those items. For example, if you want both Tag
Layout and Content Wrap enabled for XML files, but you only want Content Wrap enabled for HTML files,
place a check next to Enable XML Formatting and its submenu items Tag Layout and Content Wrap,
then place a check next to Enable HTML Formatting and its submenu item Content Wrap.
The xml_formatting_toggle and html_formatting_toggle commands can also be used to toggle all re-
spective formatting features on/off. For use in macros, two more commands are available:
xml_formatting and html_formatting. When you use any of these commands, the command line
prompts for yes (Y) or no (N). When these commands are used to enable/disable XML/HTML Formatting,
both Tag Layout and Content Wrap are enabled/disabled for both XML and HTML files on a global basis.
Enabling/Disabling for the Current Document
Current document options are available so that you can turn off aspects of global formatting for just the
current document. For example, if you have both aspects of HTML formatting enabled globally, but you
need to edit an old HTML file and do not want automatic tag layout to occur, you can disable HTML Tag
Layout for that specific file. The current document settings are remembered each time you open that file.
To change XML or HTML formatting for just the current document, click Format →XML/HTML Format-
ting →Current Document Options, or use the xml_html_document_options command. The Current
Document Options dialog is displayed.
Figure 7.31. Current Document Options Dialog
Select the Formatting scheme that you want applied, then check or uncheck the Auto formatting op-
tions that you want enabled or disabled. Click Configure Schemes if you want to modify or create a new
scheme to apply to the current document.
Global formatting must be enabled for the current file type in order for these options to be available. For
example, see the two screen shots shown previously. The menu screen shot shows that global HTML
formatting is enabled for Content Wrap only. This means that tag content for every HTML file that you cre-
Enabling/Disabling XML/HTML
Formatting
280

ate or open in SlickEdit®Core will be wrapped, but no Tag Layout settings will be applied. The second
screen shot (the Current Document Options dialog) reflects that the global setting for Tag Layout is dis-
abled. Therefore it cannot be enabled for the current document. To enable it for the current document,
you would first need to enable the global setting by placing a check next to Format →XML/HTML
Formatting →Enable HTML Formatting →Tag Layout. Then you can use the Current Document Op-
tions dialog to enable it for the current document.
Working with Schemes
A formatting scheme is comprised of any number of individually-configurable XML or HTML tags and con-
trols the formatting of your text when XML/HTML Formatting is enabled. You can create different
schemes for use with either XML or HTML, and/or different schemes for use with different individual files.
For example, you may want one scheme for HTML and a different scheme for XML. Or, you may want
one scheme for creating new files and another for editing existing files.
Schemes are stored as XML files in the format <SchemeName>.xml, and are located in the formats-
chemes/xwschemes subdirectory of your user configuration directory. Scheme files can be shared or
checked into version control to ensure consistency in the formatting of your team’s XML/HTML files.
Use the XML/HTML Formatting Scheme Configuration dialog to work with schemes. You can access the
dialog from Window →Preferences →SlickEdit →General →XML/HTML Formatting, or by using the
xml_html_options command. Available schemes are listed in the Schemes column. The tags that make
up each scheme are listed in the Tags column.
Figure 7.32. XML/HTML Formatting Scheme Configuration Dialog
Working with Schemes
281
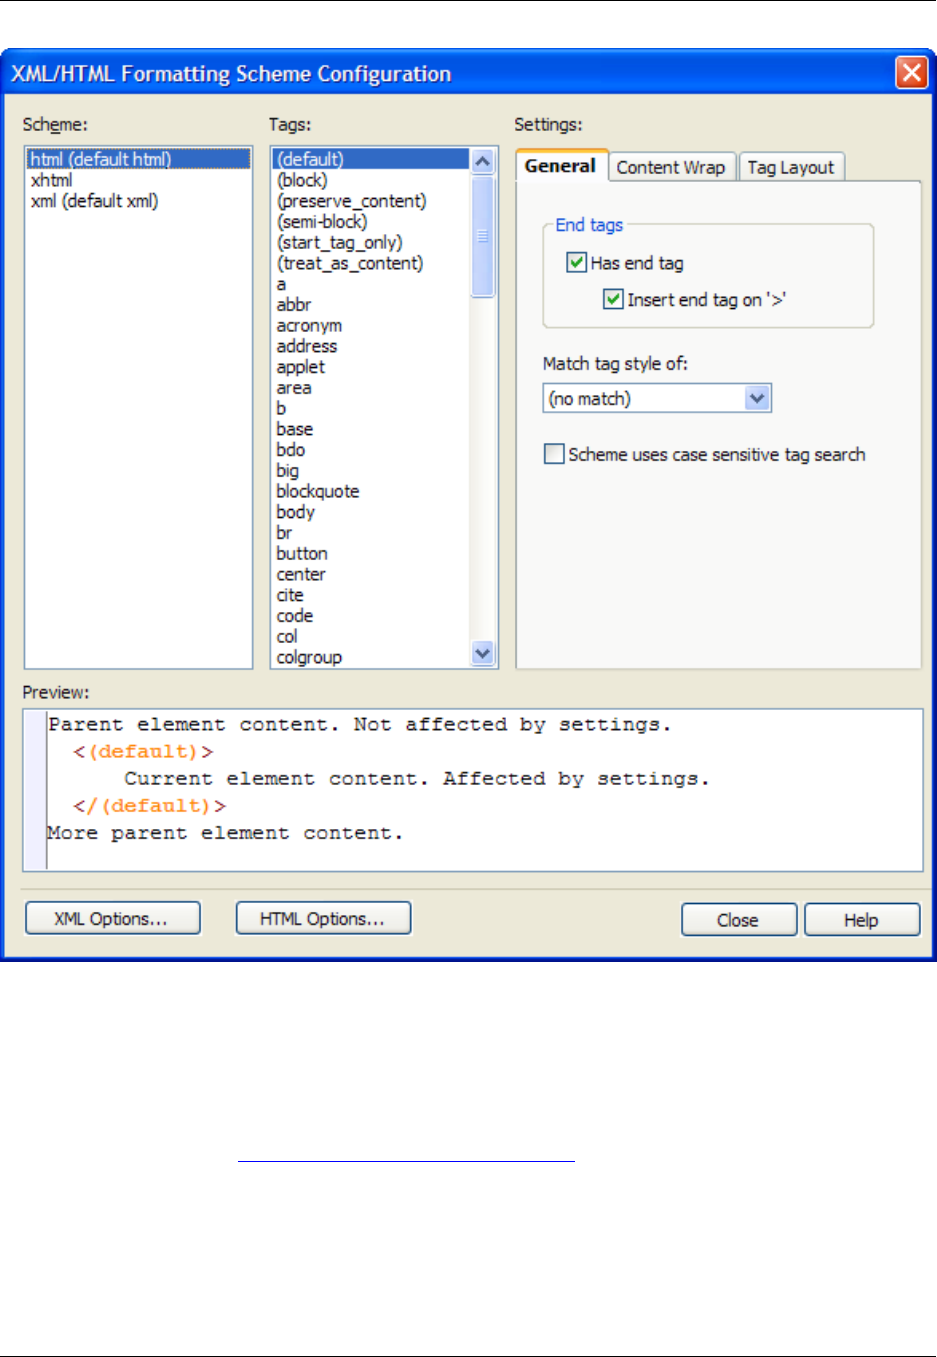
Default Schemes
XML/HTML Formatting comes with two default schemes. Each time that you open an HTML file for edit-
ing, by default, the html (default html) scheme is used. Each time an XML file is opened, the xml
(default xml) scheme is used. You can configure the settings for each default scheme or specify your
own default schemes (see Specifying a Different Default Scheme).
The html (default html) scheme is comprised of a (default) tag as well as a list of commonly used HTML
tags, that are preconfigured with standard settings. The xml (default xml) scheme is comprised of one
(default) tag preconfigured with standard settings.
For any tag that does not appear in the Tags list, the (default) tag settings are used.
Working with Schemes
282
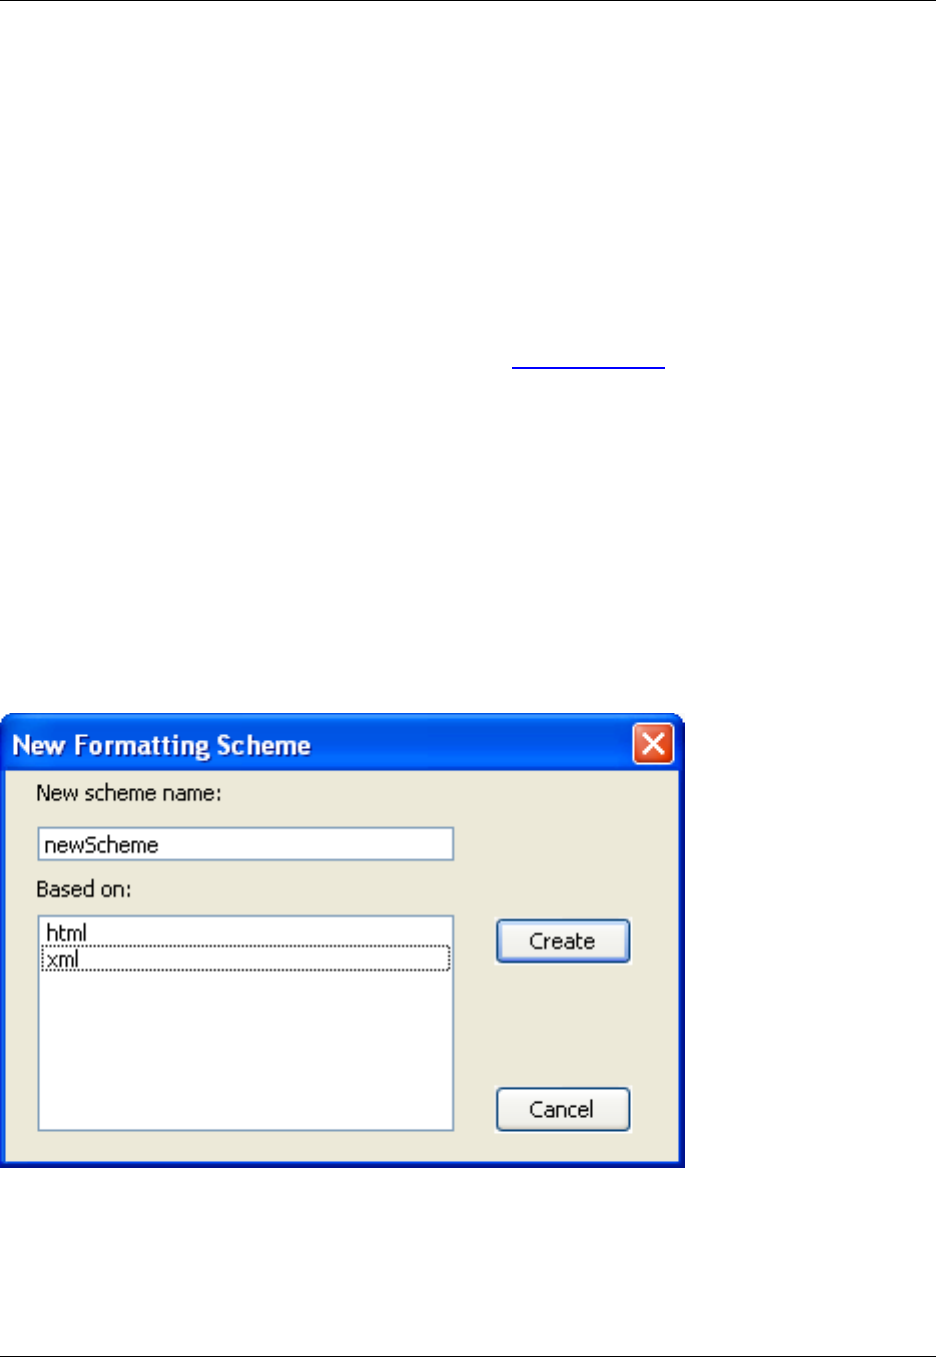
Specifying the Scheme to Use
You can specify a scheme to use for just the current document, or a default scheme to use for all HTML
and/or XML files that are created or opened in SlickEdit®Core.
To specify the scheme for the current document, click Format →XML/HTML Formatting →Current
Document Options, and pick the scheme to use from the drop-down list. The scheme you choose is re-
membered the next time that the document is opened.
Specifying a Different Default Scheme
SlickEdit®Core has two predefined default schemes (see Default Schemes). You can specify your own
default scheme for new XML or HTML files by selecting a scheme, then from the right-click context menu,
choose Set as Default XML Scheme or Set as Default HTML Scheme. The name in the Scheme list
will be appended with the text "(default xml)" or "(default html)". For example, if you have an HTML
scheme named readmes and set it as the default, the name in the Schemes list will change to readmes
(default html).
Creating Schemes
To create your own scheme, right-click in the Scheme column of the XML/HTML Formatting dialog, and
select New Scheme.
Figure 7.33. New Formatting Scheme Dialog
Type a name for your scheme, then select an existing scheme on which it should be based. This will
"copy" all of the tags and settings from the selected existing scheme to your new scheme. Click Create
when finished.
Working with Schemes
283

Saving and Deleting Schemes
In the XML/HTML Formatting Scheme Configuration dialog, modified schemes are denoted by asterisks
around the name (for example, *html*). To save a modified scheme, right-click on it and select Save
Scheme Changes. Alternatively, when you close the XML/HTML Formatting dialog, you are prompted
whether to save modified schemes.
To delete a selected scheme, right-click and choose Delete Scheme.
Working with Tags
As described previously, formatting schemes are comprised of individual tags with associated formatting
settings. For example, in HTML, you may want start and end <div> tags to be on separate lines above/be-
low the text, while start/end style tags (such as <b> and <i>) are formatted inline with the text.
In order to configure formatting for individual tags, you must first define a scheme (see Creating
Schemes), or you can use one of the default schemes (see Default Schemes). The Tags column of the
XML/HTML Formatting dialog shows a list of tags associated with the selected scheme.
Default Tags
For all schemes, a (default) tag is included. It defines the settings that are applied to tags that are not
specifically listed in the Tags list. It can also be used as a basis for other tags when you use the Match
tag style of option on the General tab.
The default settings for the (default) tag are based on a block-style tag, in that the start and end tags are
on separate lines, content and nested tags are indented according to your extension indent style, and
content is wrapped to a fixed right margin at column 80. Use the Preview area at the bottom of the dialog
to see how tags based on the (default) tag will be formatted in your code.
Base Tags
Base tags are used to define groups of tags with similar behaviors. By creating a base tag and associat-
ing a set of actual tags with that tag, you can configure that set of tags by changing the settings for the
base tag. The sample HTML schemes included with SlickEdit®Core include two base tags: (block) and
(semi-block). When creating your own base tags, be sure to use unique tag names that are not used in
formatting to make it easy to spot them.
The (block) tag is useful as a base tag for tags like <div>, where you want the start and end tags on sep-
arate lines from the content and aligned vertically. By default, this style indents nested tags and content
according to your extension indent style, and content is wrapped to a fixed right margin at column 80. Be-
cause this is a common style in HTML, the (block) tag has the same settings as the (default) tag.
The (semi-block) tag is useful as a base tag for tags such as <h1>, where you want the start and end
tags on the same line as the content. The default settings for (semi-block) are the same as for (block),
except for the start and end tags.
Use the Preview area at the bottom of the dialog to see how tags based on these base tags will be
Working with Tags
284

formatted in your code. The following are examples:
<div>
Sample text of a tag set to (block) style.
</div>
<h1>Sample text of a tag set to (semi-block) style. Notice how wrapping
occurs within this tag.</h1>
Adding and Deleting Tags
To add individual tags to a selected scheme, right-click in the Tags column and select New Tag. Type the
name of the tag without angle brackets or attributes. Click OK and the new tag is now listed in the Tags
column.
Note
Tag names cannot have spaces. If you create a new tag with spaces, SlickEdit®converts the
spaces to underscores in the dialog.
To add all of the tags from the current file to a selected scheme, right-click in the Tags column and select
Add Tags from Current File.
To remove a tag from a selected scheme, right-click on the tag and select Delete Tag. Deleting SlickEdit
Core (default) tags, or any tag that is based on another, is not recommended. If you attempt to do this,
you will be prompted whether to continue.
Formatting Settings
The tabs on the XML/HTML Formatting dialog contain settings that control how your text is formatted
when XML/HTML Formatting is enabled. The following sections describe the tabs and how each setting
works. Before configuring settings, be sure the scheme and tag(s) that you want to affect are selected.
Caution
XML/HTML Formatting does not currently affect XML or HTML Beautifier settings. If you run the
beautifier on documents that have been automatically formatted through XML/HTML Formatting,
you may find unexpected results.
General Settings
The General tab of the XML/HTML Formatting dialog is shown below.
Figure 7.34. XML/HTML Formatting: General Tab
Formatting Settings
285
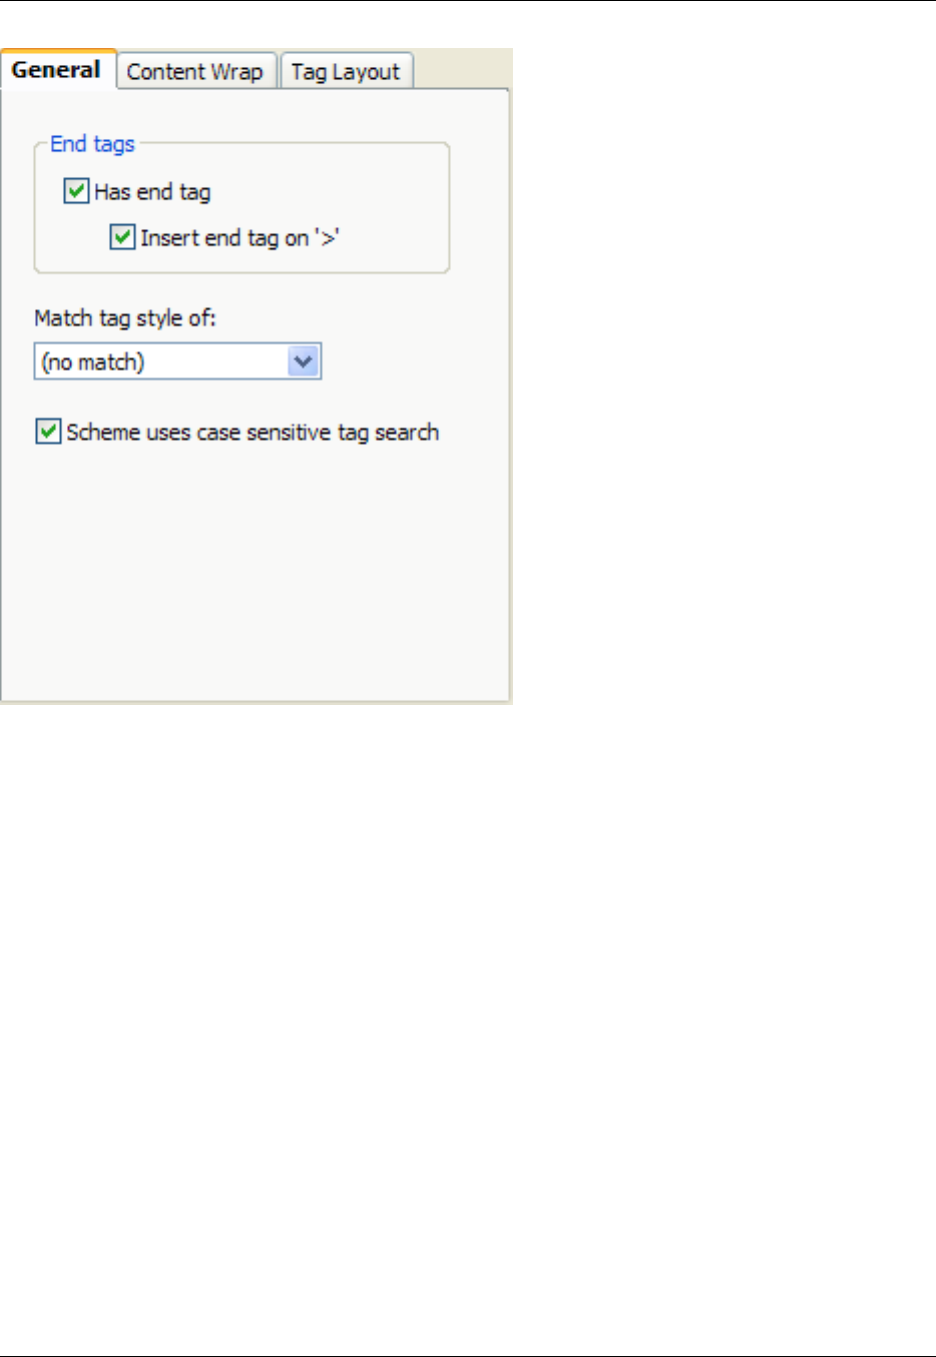
It contains the following general settings:
•End tags settings - These options control how the end tags for the selected tag are formatted:
•Has end tag - This option tells SlickEdit®Core whether or not the specified tag is intended to be
closed with an end tag. This information is used for SlickEdit Core to know when to start or stop cal-
culating information based on the tag. For example, the <div> tag in HTML has a start and end tag,
while the <br> tag does not have an end tag.
•Insert end tags on ‘>’ - When selected, SlickEdit Core automatically inserts the end tag after you
type the closing brace (>) of the start tag. For example, when you type <div>,</div> is automatically
inserted. The placement of the inserted tag depends on other settings you have specified, such as
whether or not the end tag should be on a separate line (specified on the Tag Layout tab).
•Match tag style of - Select this option if you want the selected tag’s settings to match the style of an-
other tag, then pick the tag to use from the drop-down list. This can be a time-saver when adding a
batch of new tags that should all have the same settings.
•Scheme uses case-sensitive tag search - When this option is selected, tags in the Tags column are
displayed in the list exactly as you have typed them, with the case preserved. When you type the tags
in the editor, the case must match exactly or the tag will not be recognized (and the (default) tag set-
tings will be applied). This option is appropriate for XML. HTML is not case-sensitive.
Formatting Settings
286
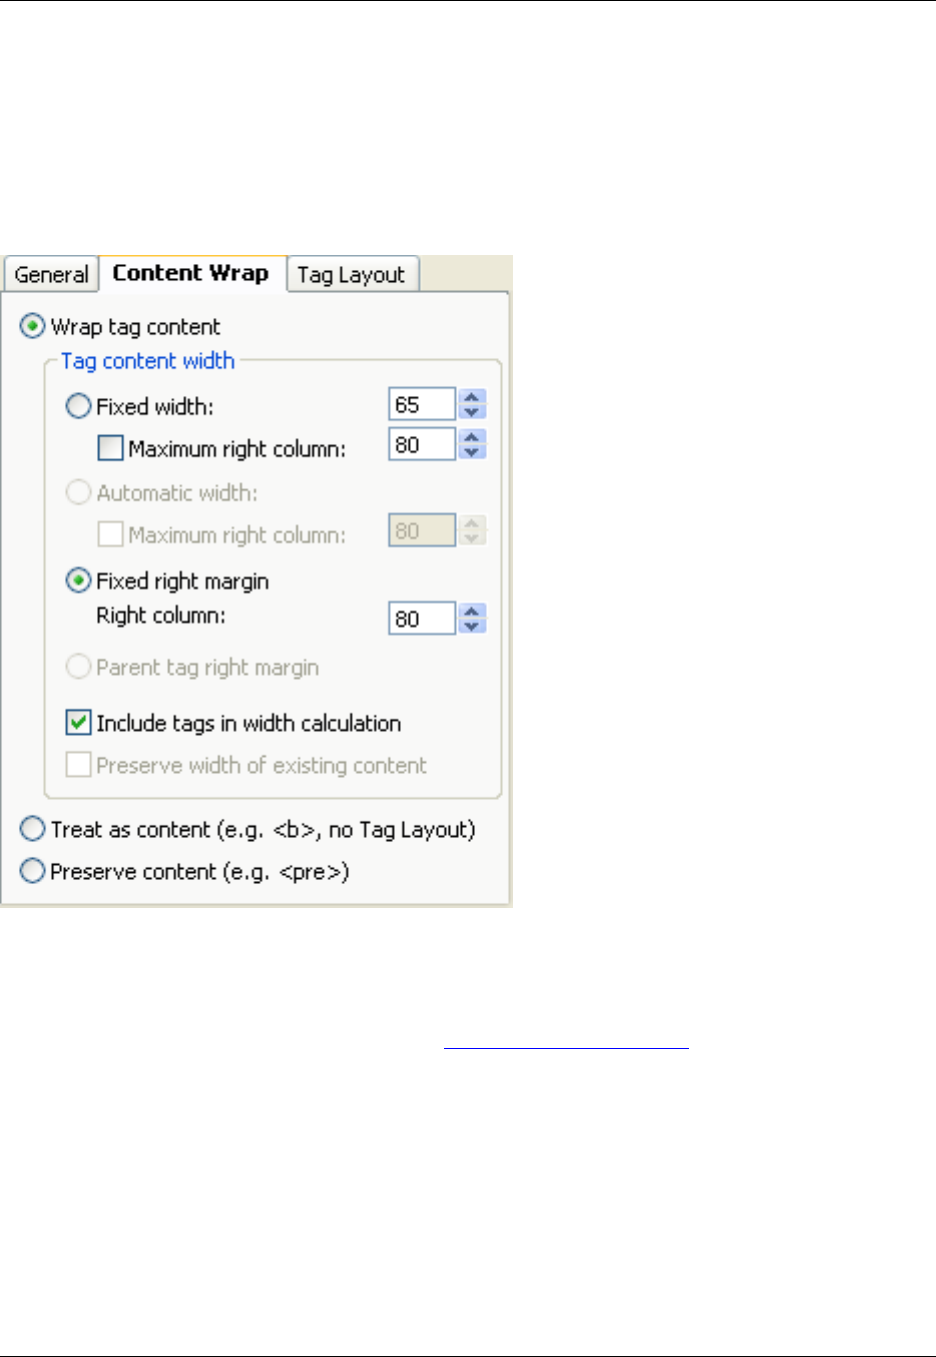
Content Wrap Settings
The Content Wrap tab of the XML/HTML Formatting dialog contains options for specifying how wrapping
should occur for the selected tag’s content.
Figure 7.35. XML/HTML Formatting: Content Wrap Tab
There are three main (mutually-exclusive) options:
•Wrap tag content - When selected, content between tags is wrapped according to the settings spe-
cified in the Tag content width group box. See Tag Content Width Settings below for details.
•Treat as content - When selected, the tag as well as its content is wrapped according to the parent tag
content. The tag is treated as "inline" with the surrounding text. This could be useful for style tags such
as <b> or <i> that you want to appear "inline" with the content. For example:
<div>
This is a sample paragraph with the <b>bold tags</b> being treated as
content, "inline" with the rest of the text.
</div>
Formatting Settings
287

•Preserve content - When selected, content between start and end tags is not wrapped, but the tags
are laid out properly with the parent tag. This could be useful for tags such as <pre>, where the content
needs to be rendered exactly as it appears in the code.
Note
• When Treat as content is selected, the wrapping options in the Tag content width group box,
as well as options on the Tag Layout tab, are unavailable.
• When Preserve content is selected, the wrapping options in the Tag content width group box
are unavailable.
Tag Content Width Settings
When Wrap tag content is selected, content between tags is wrapped according to the settings specified
in this group box. The options Fixed width,Automatic width, and Fixed right margin are mutually ex-
clusive.
•Fixed width - When selected, tag content is formatted to the specified width. The original left margin of
the content is maintained, and the right margin is adjusted to meet the target width.
If Maximum right column is used, lines will be wrapped when they reach the specified column, even if
they have not reached the specified fixed width. This is useful if coding standards mandate that text
should not exceed a specified column.
•Automatic width - When selected, the width of the longest multi-line paragraph in the tag’s content is
used as the width. This is useful for preserving the formatting of existing content.
If Maximum right column is used, lines will be wrapped when they reach the specified column, even if
they have not reached the specified automatic width. This is useful if coding standards mandate that
text should not exceed a specified column.
•Fixed right margin - When selected, lines will break before the specified number of columns in the
Right column field has been reached.
Tip
If coding standards mandate that text should not exceed a specified column, you can still use
Fixed or Automatic width settings. Select and set the Maximum right column, and lines will be
wrapped when they reach the specified column, even if they have not reached the specified fixed
or automatic width.
•Parent tag right margin - When selected, tag content is wrapped at the right margin to the width of the
parent tag.
•Include tags in width calculation - When selected, the start and end tag characters are counted in
addition to the content. The number of characters and spaces (including attributes) within tags are cal-
Formatting Settings
288
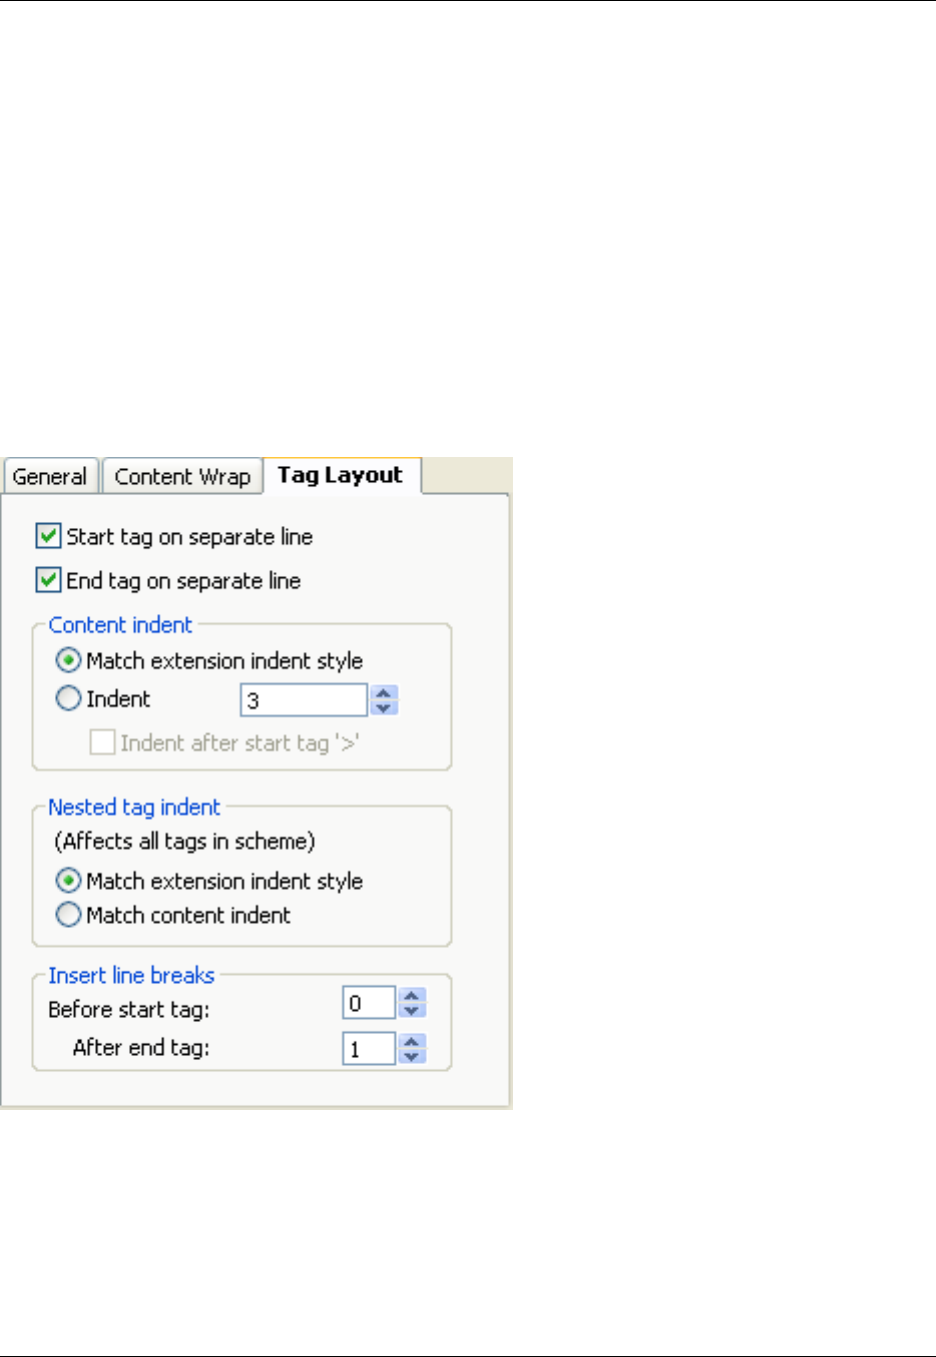
culated, and the specified width is adjusted accordingly. This is useful for producing uniform blocks of
text.
•Preserve width of existing content - When selected, SlickEdit®Core preserves the width of the exist-
ing content while editing. The width is determined by the length of the longest multi-line paragraph. If
the width of the existing content cannot be determined, the formatting option specified (Fixed,Auto-
matic,orFixed right) will be used instead.
Tag Layout Settings
The Tag Layout tab of the XML/HTML Formatting dialog contains options to control the location of the
start tag, end tag, and the content between them.
Figure 7.36. XML/HTML Formatting: Tag Layout Tab
•Start tag on separate line - When selected, the start tag occurs on a separate line, and the cursor will
be placed on the line below for you to type the content. Note the cursor location (|) in the examples be-
low.
•End tag on separate line - When selected, the end tag placed on a separate line below the content.
Example of both settings checked:
Formatting Settings
289

<div>
|
</div>
Example of both settings unchecked:
<div>|</div>
Example of start checked and end unchecked:
<div>
|</div>
Note
Dynamic Surround is triggered when you type a tag that has both options Start and End tag on
separate line checked. Note that Dynamic Surround cannot wrap content and only indents to
match the indent style you have specified on the Indent Tab of the Extension Options dialog
(Window →Preferences, expand SlickEdit and click General in the tree, then double-click the
File Extension Setup setting). See Syntax Indent for more information.
•Content indent group settings - These mutually-exclusive options control how content between tags
is indented:
•Match extension indent style - When selected, tag content is indented according to the settings on
the Indent Tab of the Extension Options dialog (Window →Preferences, expand SlickEdit and click
General in the tree, then double-click the File Extension Setup setting). See Syntax Indent for more
information on setting extension-specific indent styles.
•Indent - When selected, indenting for the tag occurs at the column number specified in the spin box.
When Indent after start tag ‘>’ is selected, indenting is relative to the close bracket. Otherwise in-
denting is relative to the open bracket.
•Nested tag indent settings - Indenting is activated after the end tag is typed (or automatically inserted
if Insert end tags on ‘>’ is checked on the General tab). These mutually-exclusive settings apply to all
tags in the selected scheme:
•Match extension indent style - When selected, SlickEdit®Core indents the selected tag according
to the indent style you have specified on the Indent Tab of the Extension Options dialog (Window →
Preferences, expand SlickEdit and click General in the tree, then double-click the File Extension
Setup setting). See Syntax Indent for more information on setting extension-specific indent styles.
•Match content indent - When selected, SlickEdit Core indents the selected tag to the same level as
its parent content.
•Insert line breaks settings - The values for Before open tag and After close tag specify the number
of line breaks that are inserted before and after begin and end tags. Note that in order to insert one or
Formatting Settings
290

more blank lines, the values should be set to 2or higher.
More Settings
The XML/HTML Formatting dialog contains two buttons along the bottom that allow you to configure even
more settings for these languages. These buttons are shortcuts to the extension options that are usually
accessed through the Options button on the Extension Options dialog. See XML Formatting Options and
HTML Formatting Options for more information on these dialogs.
Ada
291

Ada
This section describes some of the features and options that are available for Ada, including extension-spe-
cific options and the Ada Beautifier.
Ada Formatting Options
Keyword casing options are available for Ada language file extensions. To access these options, from the
main menu, click Window →Preferences, expand SlickEdit and click General in the tree, then double-
click the File Extension Setup setting. On the Extension Options dialog, choose the language extension
you wish to work with from the Extension drop-down list, then click the Options button. The Formatting
Options dialog specific to the file extension you have selected will be displayed.
Note
Languages similar to Ada have similar Formatting Options dialogs which are not specifically doc-
umented.
Keyword case specifies the case of keywords used by template editing. If Auto case keywords is selec-
ted, the case of keywords are changed to the keyword case specified when you type them. For example,
when you type the word "procedure" and the Keyword case is set to Upper case, the editor changes
"procedure" to "PROCEDURE".
Ada Beautifier
You can beautify Ada files and change the beautify settings by using the Ada Beautifier dialog box. This
dialog box can be accessed from the main menu by clicking Format →Beautify, or by using the
gui_beautify command.
To instantly beautify Ada code according to the settings that are selected on the Ada Beautifier dialog
box, use the ada_beautify or ada_beautify_selection commands.
The following settings and operations are available on the Ada Beautifier:
•Restrict to selection - When checked, only lines in the selection are beautified.
•Sync extension options - When checked, the extension options are updated to reflect any changes
that these dialogs have in common.
•Beautify - Beautifies current selection or buffer and closes the dialog box.
•Reset - Restores the dialog box settings to the values that appeared when you invoked the dialog.
•Save Settings - Saves beautify options in the uformat.ini file. These settings are used by the
ada_beautify command.
Ada Formatting Options
292

The tabs on the Ada Beautifier are described in the sections below.
Indent Tab
The following settings are available:
•Indent with tabs - When checked, tab characters are used for leading indent of lines. This value de-
faults to the Tabs text box on the Indent Tab of the Extension Options dialog box (Window →Prefer-
ences, expand SlickEdit and click General in the tree, then double-click the File Extension Setup
setting).
•Indent for each level (Syntax indent) - The amount to indent for each new nesting level. The words
"Syntax indent" are in parenthesis to help indicate that this field has the same meaning as the Syntax
indent text box on the Indent Tab of the Extension Options dialog box (Window →Preferences, ex-
pand SlickEdit and click General in the tree, then double-click the File Extension Setup setting). By
default, this text box is initialized with the current extension setup setting.
•Tab size - Specifies output tab size. The output tab size is only used if the Indent with tabs check box
is selected on the Indent Tab of the Extension Options dialog box (Window →Preferences, expand
SlickEdit and click General in the tree, then double-click the File Extension Setup setting). This value
defaults to the Syntax indent text box on the Indent Tab of the Extension Options dialog box.
•Original tab size - Specifies what the original file's tab expansion size was. It is necessary to know the
tab expansion size of your original file to handle reusing indent amounts from your original file. Cur-
rently the beautifier only reuses the original source file’s indenting for comments. This option has no ef-
fect if the original file has no tab characters.
•Continued Lines
•Max line length - Specifies the maximum length a statement line can be before it is wrapped to a
new line. Set this value to 0to preserve line breaks.
•Continuation indent - Specifies how much to indent lines of statements which continue to the next
line. This has no affect on assignment statements or parenthesized expressions. Lines which are a
continuation of an assignment statement are indented after the first equal sign (=). Lines which are a
continuation of a parenthesized expression are indented after the open paren.
•Operator position - Specify where the operator should be positioned when breaking a statement
across multiple lines. For example, given the statement:
Seconds := Days * Hours_Per_Day * Minutes_Per_Hour * Seconds_Per_Minute ;
An operator position setting of End of same line would result in:
Seconds := Days *
Hours_Per_Day *
Minutes_Per_Hour *
Seconds_Per_Minute ;
Ada Beautifier
293

An operator position setting of Beginning of next line would result in:
Seconds := Days
* Hours_Per_Day
* Minutes_Per_Hour
* Seconds_Per_Minute ;
Statements/Declarations Tab
The following options are available on the Statements/Declarations tab:
•Reserved word case - Specifies the case for reserved words. For example, if you choose UPPER,
then the Ada reserved word "procedure" would be beautified to "PROCEDURE".
•One statement per line - When checked, only one statement is allowed per line of code.
•One declaration per line - When checked, only one declaration is allowed per line of code.
•One parameter per line - When checked, only one parameter is allowed per line of code in a formal
parameter list of a subprogram specification.
•One enumeration per line - When checked, only one enumeration is allowed per line of code in an
enumerated type definition.
Horizontal Spacing Tab
This tab allows you to specify how certain operators and separators are padded. The following options
are available:
•Item - Syntactic item to which padding settings get applied.
Note
The "Binary operators" item includes: +-*/**:==/==><=>=<>
•Padding Before - When checked, one space is placed before the item.
•Padding After - When checked, one space is placed after the item.
•Padding Preserve - When checked, the original padding (or lack of padding) around the item is pre-
served.
Vertical Alignment Tab
The following options are available on the Vertical Alignment tab:
•Align on declaration colon - When checked, adjacent declaration lines (including parameter specifica-
Ada Beautifier
294

tions) have their colons vertically aligned. For example, before beautify:
procedure foo ( A_Var : Boolean ;
Another_Var : Boolean) ;
After beautify:
procedure foo ( A_Var : Boolean ;
Another_Var : Boolean ) ;
•Align on declaration in-out - When checked, the modes of parameter specifications in the formal part
of a subprogram declaration are vertically aligned. For example, before beautify:
procedure foo ( A_Var : in Boolean ;
Another_Var : in out Boolean);
After beautify:
procedure foo ( A_Var : in Boolean ;
Another_Var : in out Boolean ) ;
Blank Lines Tab
The following options are available on the Blank Lines tab:
•Item - Syntactic item to which blank lines settings get applied.
•Subprogram declaration - Procedure or Function declaration.
•Subprogram body - Procedure or Function body.
•Type declaration - Any declaration that begins with the reserved word "TYPE".
•for…use - Aspect clause. For example:
for Medium'Size use 2*Byte;
•Subunit comment header - The comment block that appears just before a subunit (e.g. Procedure
body, etc.).
•begin/end - Any line that starts with the reserved words "begin" or "end."
•if/elsif/else - The if,elsif, and else parts of an if statement.
•return - Any line that starts with the reserved word "return."
•Loops - Loop statements (e.g. loop,while,for).
Ada Beautifier
295

•Nested paren list item - A parenthesized item that is itself enclosed in a larger parenthesized list.
For example, before beautify:
Default_Data : constant Data_Type :=
( A_Set => ( others => ( Item1 => false ,
Item2 => false ,
Item3 => false ) ) , -- Paren’d item enclosed
in larger paren’d list
B_Set => ( others => ( Item1 => false ,
Item2 => false ,
Item3 => false ) ) ) ;
After beautify:
Default_Data : constant Data_Type :=
( A_Set => ( others => ( Item1 => false ,
Item2 => false ,
Item3 => false ) ) , -- Paren’d item enclosed
in larger paren’d list
B_Set => ( others => ( Item1 => false ,
Item2 => false ,
Item3 => false ) ) ) ;
•Before - Specify how many blank lines are inserted before item.
•After - Specify how many blank lines are inserted after item.
•Between - Specify how many blank lines are inserted between like items.
Comments Tab
The following options are available on the Comments tab:
•Comment lines immediately below a type declaration indented by - The amount to indent a com-
ment appearing immediately below a TYPE declaration.
•Trailing comments - Trailing comments appear at the end of lines which contain statements or declar-
ations. For example:
A := B + C ; -- This is a trailing comment
-- This is not a trailing comment
procedure foo ( A_Var : Boolean ) ;
•Specific column - When selected, trailing comments are placed at the specified column.
•Indent by - When selected, trailing comments are indented by the specified number of columns after
Ada Beautifier
296

the last character of the end of the statement or declaration.
•Original relative indent - When selected, trailing comments are indented by reusing the indent after
the last character of the end of the statement or declaration of the original source file.
•Force type declaration comments to next line - When selected, trailing comments appearing at
the end of a TYPE declaration line are forced onto the next line.
Advanced Tab
The following options are available on the Advanced tab:
•if-then-else continued lines - Use these advanced options to customize how multi-line conditional ex-
pressions of an if-then-else statement are indented.
•Force a linebreak on logical operators - A line break is forced before/after (depending on your Op-
erator position setting) every logical operator in the condition of an if/elseif. For example, before
beautify:
-- Indent per level = 3
-- Operator position = Beginning of next line
ifA=BandC=Dthen
null ;
end if ;
After beautify:
ifA=B
and C = D then
null ;
end if ;
•Additional indent for logical operator - Additional indent amount for a line broken on a logical op-
erator. This amount is in addition to the current indent level. For example, before beautify (Indent per
level = 3; Operator position = Beginning of next line; Additional indent for logical operator = 3):
-- Indent per level = 3
-- Operator position = Beginning of next line
-- Additional indent for logical operator = 3
ifA=BandC=Dthen
null ;
end if ;
After beautify:
Ada Beautifier
297

ifA=B
and C = D then
null ;
end if ;
•Additional indent for logical operator when followed by another line that begins with logical
operator - Additional indent amount for a line broken on a logical operator that is followed by another
line that also is broken on a logical operator that is different. This amount is in addition to the current
indent level, and in addition to the Additional indent for logical operator setting.
For example, before beautify (Indent per level = 3; Additional indent for logical operator = 3; Addition-
al indent for logical operator when followed by another line that begins with different logical operator
= 3):
-- Indent per level = 3
-- Operator position = Beginning of next line
-- Additional indent for logical operator = 3
-- Additional indent for logical operator when
-- followed by another line that begins with different logical operator
= 3
if A = B and then C = D or else E = F then
null ;
end if ;
After beautify:
ifA=B
and then C = D
or else E = F then
null ;
end if ;
Schemes Tab
To define a new scheme, set the various beautify options then click the Save Scheme button. User-
defined schemes are stored in uformat.ini.
COBOL
298
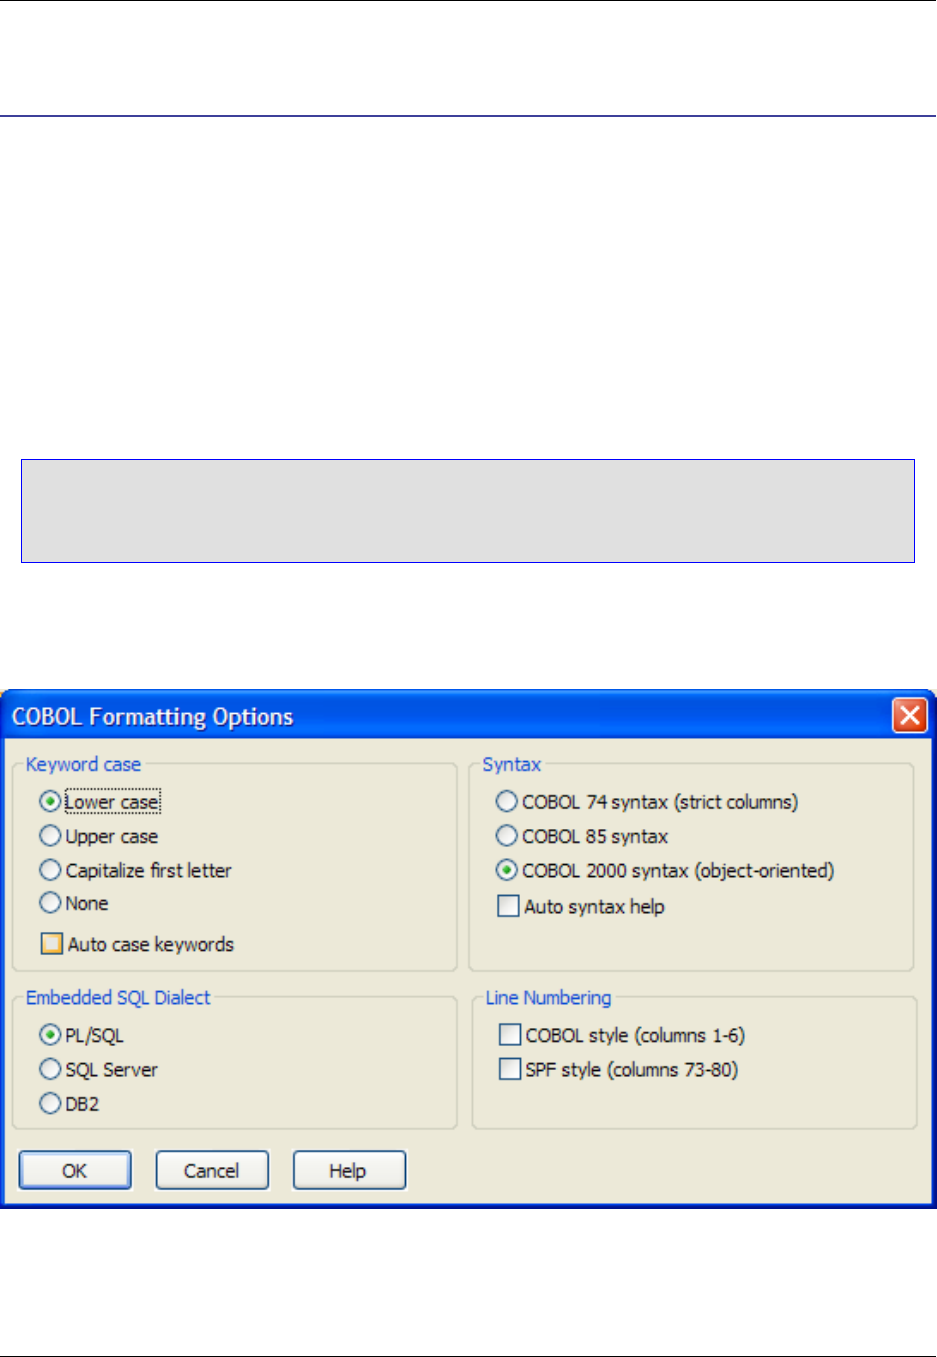
COBOL
This section describes some of the advanced options that are available for COBOL.
COBOL Formatting Options
Options are available for the COBOL language file extension, for changing smart indenting and styles for
template editing. To access these options, from the main menu, click Window →Preferences, expand
SlickEdit and click General in the tree, then double-click the File Extension Setup setting. Choose the
language extension you wish to work with from the Extension drop-down list, then click the Options but-
ton. The Formatting Options dialog specific to the file extension you have selected will be displayed.
Note
Languages similar to COBOL have similar Formatting Options dialogs which are not specifically
documented.
The COBOL Formatting Options dialog is pictured below.
Figure 7.37. COBOL Formatting Options Dialog
The following options are available:
•Keyword case - Specifies the case of keywords used by template editing. If Auto case keywords is
COBOL Formatting Options
299

selected, the case of keywords are changed to the keyword case specified when you type them. For
example, when you type the word "procedure" and the Keyword case is set to Upper case, the editor
changes "procedure" to "PROCEDURE".
•Syntax - Select the type of syntax to use. COBOL 74 and COBOL 2000 syntax are mutually exclusive
options.
•Embedded SQL Dialect - Specifies the specific type of SQL that is embedded in your COBOL source.
This affects embedded SQL-language color coding.
•Line Numbering - Choose the line numbering style from the following options:
•COBOL style line numbering - When selected, expect line numbers in columns one through six
when renumbering lines.
•SPF style line numbering - When selected, expect line numbers in columns 73 through 80 when re-
numbering lines.
Pascal
300

Pascal
This section describes some of the advanced options that are available for Pascal.
Pascal Formatting Options
Options are available for the Pascal language file extension, for changing smart indenting and styles for
template editing. To access these options, from the main menu, click Window →Preferences, expand
SlickEdit and click General in the tree, then double-click the File Extension Setup setting. Choose the
Pascal language extension you wish to work with from the Extension drop-down list, then click the Op-
tions button. The Formatting Options dialog specific to the file extension you have selected will be dis-
played.
Note
Languages similar to Pascal have similar Formatting Options dialogs which are not specifically
documented.
The Pascal Formatting Options dialog is pictured below.
Figure 7.38. Pascal Formatting Options Dialog
Pascal Formatting Options
301

The following options are available:
•Begin-end style - Specify the begin/end style used by template editing and smart indenting. For each
style, select from the following options:
•Insert begin/end pairs - Specifies whether template should be inserted with begin and end.
•Begin/End comments - Specifies whether a comment is appended after the end keyword to indicate
the type of loop or case it terminates. In addition the begin and end for procedures and functions are
commented. No comment is appended to the begin/end pair of an if statement.
•Keyword case - Specifies the case of keywords used by template editing.
•Indent constant from case - Specifies whether constants of a case statement are indented or aligned
to the case keyword.
•Use Delphi expansions - Specify whether Delphi®-style expansions should be used.
PL/I
302

PL/I
This section describes some of the advanced options that are available for the PL/I language.
PL/I Formatting Options
Options are available for the PL/I language file extension, for changing smart indenting and styles for tem-
plate editing. To access these options, from the main menu, click Window →Preferences, expand
SlickEdit and click General in the tree, then double-click the File Extension Setup setting. Choose the
PL/I language extension you wish to work with from the Extension drop-down list, then click the Options
button. The Formatting Options dialog specific to the file extension you have selected will be displayed.
Note
Languages similar to PL/I have similar Formatting Options dialogs which are not specifically doc-
umented.
The PL/I Formatting Options dialog is pictured below.
Figure 7.39. PL/I Formatting Options Dialog
PL/I Formatting Options
303
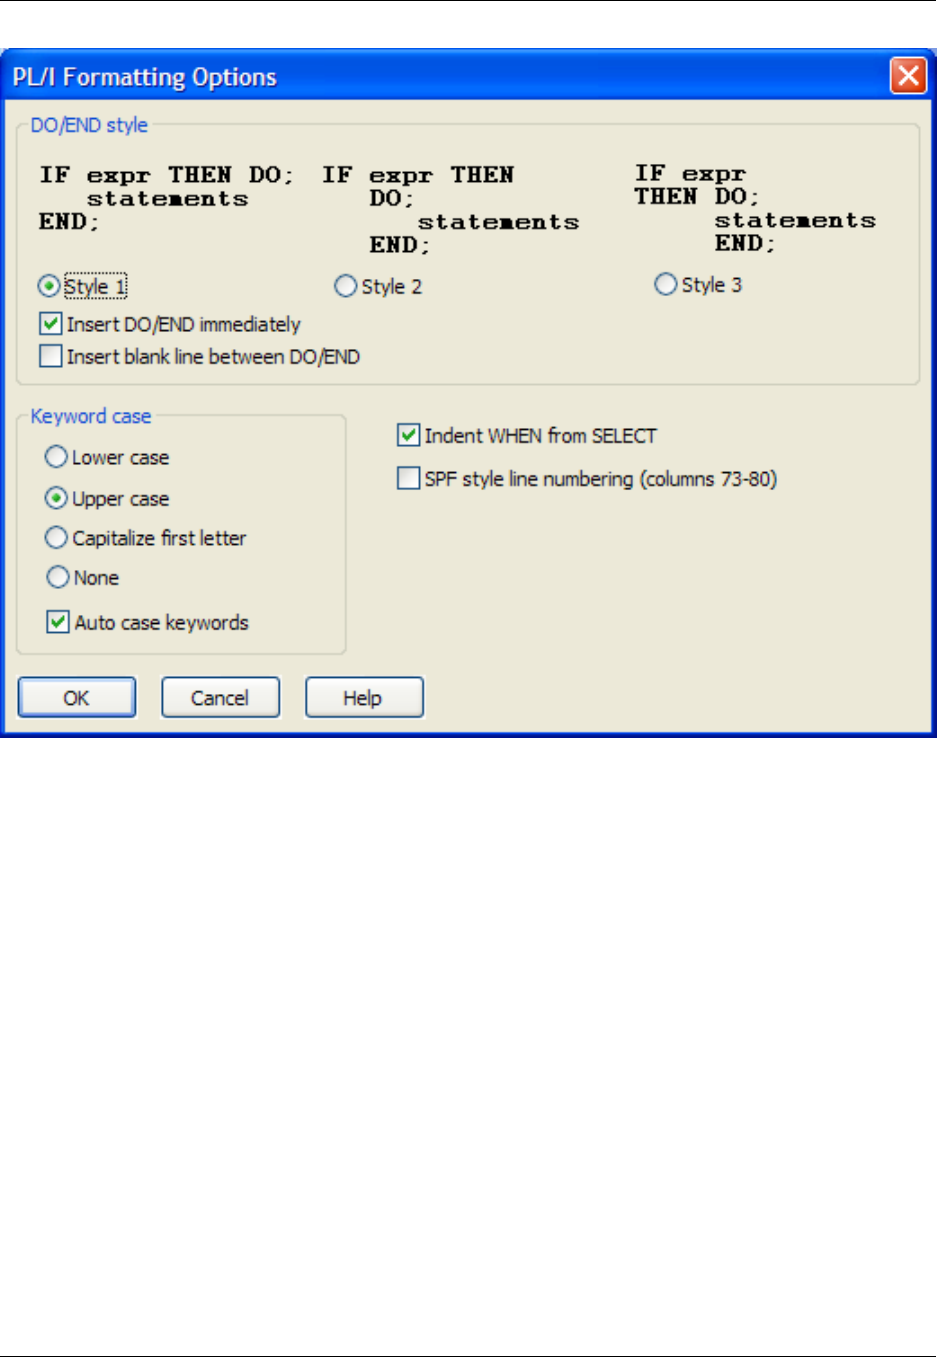
The following options are available:
•DO/END style - Select the syntax expansion style that indicates whether syntax expansion should
place the DO on a separate line, then select from the following options:
•Insert DO/END immediately - Indicates whether syntax expansion should automatically add a DO/
END block.
•Insert blank line between DO/END - Indicates whether syntax expansion should insert a blank line
when a DO/END block is inserted.
•Keyword case - Specifies the case of keywords used by template editing. If Auto case keywords is
selected, the case of keywords are changed to the keyword case specified when you type them. For
example, when you type the word "procedure" and the Keyword case is set to Upper case, the editor
changes "procedure" to "PROCEDURE".
•Indent WHEN from SELECT - Indicates whether the WHEN clause inside a SELECT statement should
be indented.
•SPF style line numbering (columns 73-80) - When selected, expect line numbers in columns 73
through 80 when renumbering lines.
Python
304

Python
This section describes some of the advanced features that are available for the Python language.
Begin/End Structure Matching for Python
Begin/End Structure Matching moves the cursor from the beginning of a code structure to the end, or vice
versa.
To place the cursor on the opposite end of the structure when the cursor is on a begin or end keyword
pair, press Ctrl+](find_matching_paren command or from the menu click Search →Go to Matching
Parenthesis). The find_matching_paren command supports matching parenthesis pairs { },[]and ( ).
For Python, SlickEdit®Core supports the matching of the colon (:) token and the end of context.
Note the cursor location in the code block below:
def function_foo(arg):| <- cursor
....
return 0| <- destination
Executing find_matching_paren will move the cursor to the end of line containing the return 0 state-
ment. Executing it while the cursor is at the end of the return 0 statement will bring the cursor back to the
colon (:) position of the function signature line (def function_foo(arg):).
This works on function,class,for,while,if, and try statements.
There is one limitation of this feature. Note the following code block:
for i in xrange(0, 10):| <- A
for j in xrange(0, 10):| <- B
for k in xrange(0, 10):| <- C
print i, j, k| <- D
Invoking find_matching_paren at position A, B, or C will move the cursor to D, but doing so while the
cursor is at D will only move the cursor back to C (not A nor B). This is because the Python language
doesn't have the notion of end-of-scope token (such as }in C/C++, Java, etc.), so it's impossible to de-
termine the correct destination when jumping from D. Therefore we pick the nearest possible destination
in this scenario.
See Begin/End Structure Matching for more information about this feature.
Begin/End Structure Matching
for Python
305

306

Chapter 8. Tools and Utilities
307

Comparing and Merging
SlickEdit®Core provides two powerful ways to compare and merge files: DIFFzilla and 3-Way Merge.
DIFFzilla®
DIFFzilla provides powerful differencing capabilities that let you compare files or directories and view the
differences side-by-side. You can make edits, merge changes, and save modified files easily within the
results windows. As edits are made, the diff view is updated as you type, so you don't have to re-run the
comparison. And, switching from a directory comparison to an individual file difference is as simple as a
mouse click.
With DIFFzilla, you can:
• View differences between two files. See Comparing Two Files.
• View differences between symbols and parts of files. See Comparing Symbols or Parts of Files.
• View differences between all of the symbols in two files. See Comparing All Symbols of Two Files.
• View differences between source trees. See Comparing Two Directories.
• See intra-line differences, color-coded as you type. See Dynamic Difference Editing.
• Generate file lists. See Generating File Lists.
• Specify automatic directory mapping. See Automatic Directory Mapping.
• Save/restore multi-file results.
• Utilize dialog box history (wild cards, paths, file specifications).
Using the DIFFzilla®Dialog
The following sections describe how to use DIFFzilla and the differencing features in SlickEdit®Core. For
more details on the specific options available on the DIFFzilla dialog (Tools →File Difference or diff
command), see DIFFzilla Dialog.
Dynamic Difference Editing
DIFFzilla®allows you to diff, or compare, files, and provides the ability to view the differences side-by-side
or interleaved (one on top of the other). The output is color-coded. The side-by-side output differences
can be merged from one file to the other, and you can edit the files directly inside the DIFFzilla dia-
log—this is called Dynamic Difference Editing.
Undo, copy/paste, Syntax Expansion/indenting, SmartPaste®, Auto List Members, Auto Parameter Info
and many emulation key mappings work when editing in the DIFFzilla dialog box. When you type or make
any edit, lines are re-diffed (compared again) so that you can view the new intra-line differences easily.
DIFFzilla®
308
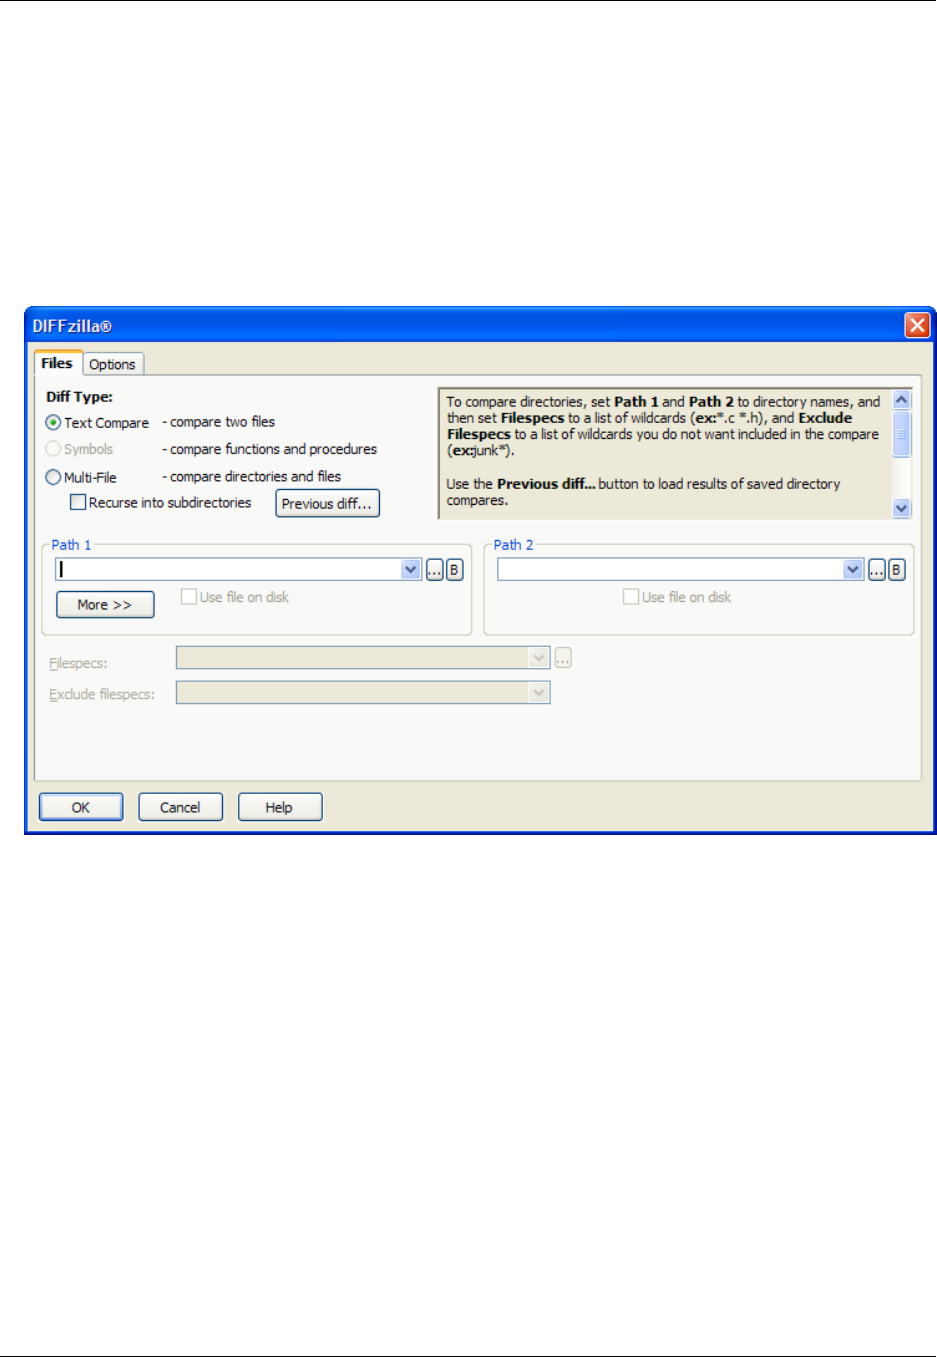
Comparing Two Files
To diff two source files, complete the following steps:
1. From the main menu click Tools →File Difference, or use the diff command. The DIFFzilla®dialog
appears, as pictured below.
Figure 8.1. DIFFzilla®Dialog
2. Under Diff Type, select the Text Compare option.
3. Enter the name of the first file to compare in the Path 1 text box. Enter the name of the second file in
the Path 2 text box. If the file names only differ by path, you only need to specify the path for Path 2.
4. Click OK.
Alternatively, you can use DIFFzilla to diff files from several Eclipse views, including the Package Explorer
and the Project Explorer:
1. From the Eclipse view, select the two files that you want to diff and right-click.
2. From the Compare With submenu, click Each Other (DIFFzilla).
Comparing Symbols or Parts of Files
DIFFzilla®provides the ability to diff (compare) a selected range of lines from two files or the same file.
This is very useful for comparing a piece of code that has been moved into a different part of a different
DIFFzilla®
309

file.
Note
You can only use the interactive dialog output style when diffing a selected range of lines. There-
fore, the option Instead of an interactive dialog, output one buffer with the differences
labeled, on the DIFFzilla dialog Options tab, will have no effect.
To compare symbols, select the Symbols option under Diff Type on the DIFFzilla dialog, and all symbols
from Path 1 will be diffed against all symbols from Path 2. If Multi-File is selected as the Diff Type, it al-
ways allows you to diff all symbols. Be sure to be careful when diffing all symbols. Some symbol blocks
are not yet picked up correctly. For example, for C++, C#, and Java, variable initializations are not yet
handled correctly, as shown in the code below:
struct MYSTRUCT {
int x;
int y;
};
MYSTRUCT VariableDefinition= { // symbol definition stops here
0,1
}; // really should end here
To diff a selected range of lines from two source files, complete the following steps:
1. From the main menu, click Tools →File Difference.
2. Select the Multi-File diff type.
3. Type the name of the first file in the Path 1 text box.
4. Click More, and type the start and end line numbers next to Line range label.
5. Type the name of the second file in the Path 2 text box and type the start and end line numbers next to
Line range label. If the file names only differ by path, you need to specify the path for Path 2 only.
6. When differencing a symbol definition, click Symbols to enter the line number range.
Comparing All Symbols of Two Files
DIFFzilla®allows you to diff all the symbols of two different files. This feature is most useful for diffing files
with symbols that have been moved around. To diff all the symbols of two source files, complete the fol-
lowing steps.
1. From the main menu, click Tools →File Difference (or use the diff command).
2. Enter the first file in the Path 1 text box.
3. Enter the second file in the Path 2 text box. If the file names only differ by path, you need to specify the
DIFFzilla®
310

path for Path 2 only.
4. In the Diff type, select Symbols and click OK. You do not need to turn on the Diff all symbols check
box when performing a multi-file diff because mismatching files will have a plus sign (+) in front of them
so that you can diff all of the symbols.
Comparing Two Directories
You can differences two source trees to determine what files have been added or removed and generate
a list of file names. When the source tree difference is complete, click Save to generate a list file. To diff
two source trees, complete the following steps:
1. From the main menu, click Tools →File Difference, or use the diff command.
2. Mark the Recurse into subdirectories check box to compare subdirectories.
3. Enter the two directories in the Path 1 and Path 2 text boxes.
4. Fill in the Filespecs text box with the files that you want processed.
5. Click OK. The Multi-File Diff Output dialog is displayed.
If a file exists in one tree but not the other, a plus sign (+) is displayed in the one tree and a minus sign (-)
in the other. You can customize the files to view with the context menu. To display the context menu,
right-click in the left or right tree. If you move the mouse over the Plus or Minus bitmap next to the item in
the tool tree, a tooltip is displayed indicating what the bitmap means.
For descriptions of the buttons on the Multi-File Diff Output dialog, see Multi-File Diff Output Dialog.
Generating File Lists
DIFFzilla®can be used to find only the files that have been changed, and can generate file lists. The
Save button in the Multi-File Diff Output dialog can create a list of files that includes different files, match-
ing files, and files that do not exist in the other tree. Use the DIFFzilla dialog box to compare the new
source tree with the original source tree.
1. From the main menu, click Tools →File Difference, or use the diff command.
2. On the Files tab, select Multi-File.
3. Enter the first file in the Path 1 text box.
4. Enter the second file in the Path 2 text box. If the file names only differ by path, you only need to spe-
cify the path for Path 2.
5. Click OK. The Multi-File Diff Output Dialog box opens.
Figure 8.2. Multi-File Diff Output Dialog
DIFFzilla®
311
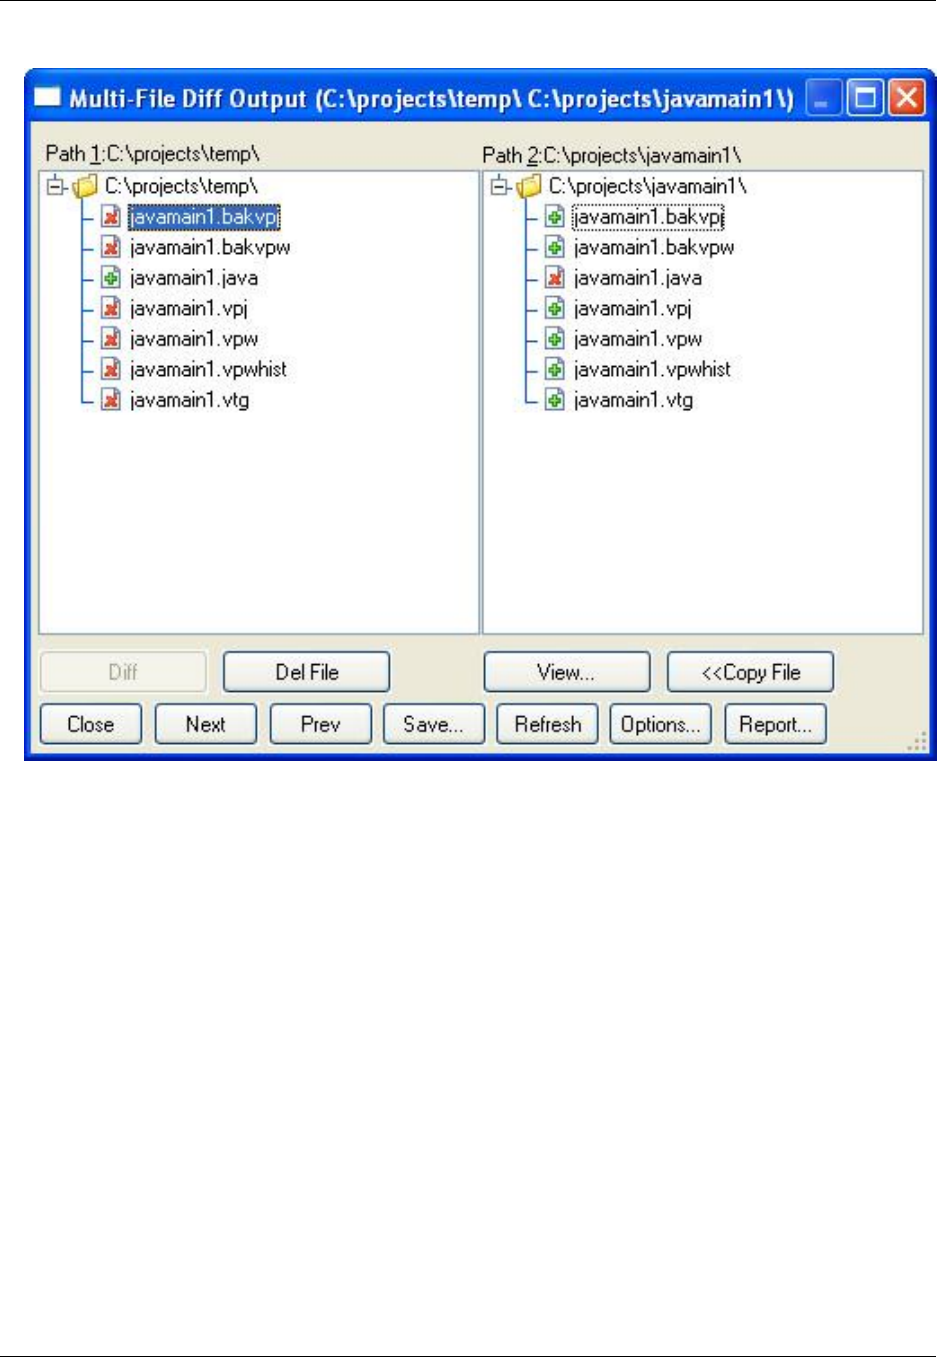
6. Click Save. The Save Multi-File Output dialog box opens.
Figure 8.3. Save Multi-File Output Dialog
DIFFzilla®
312
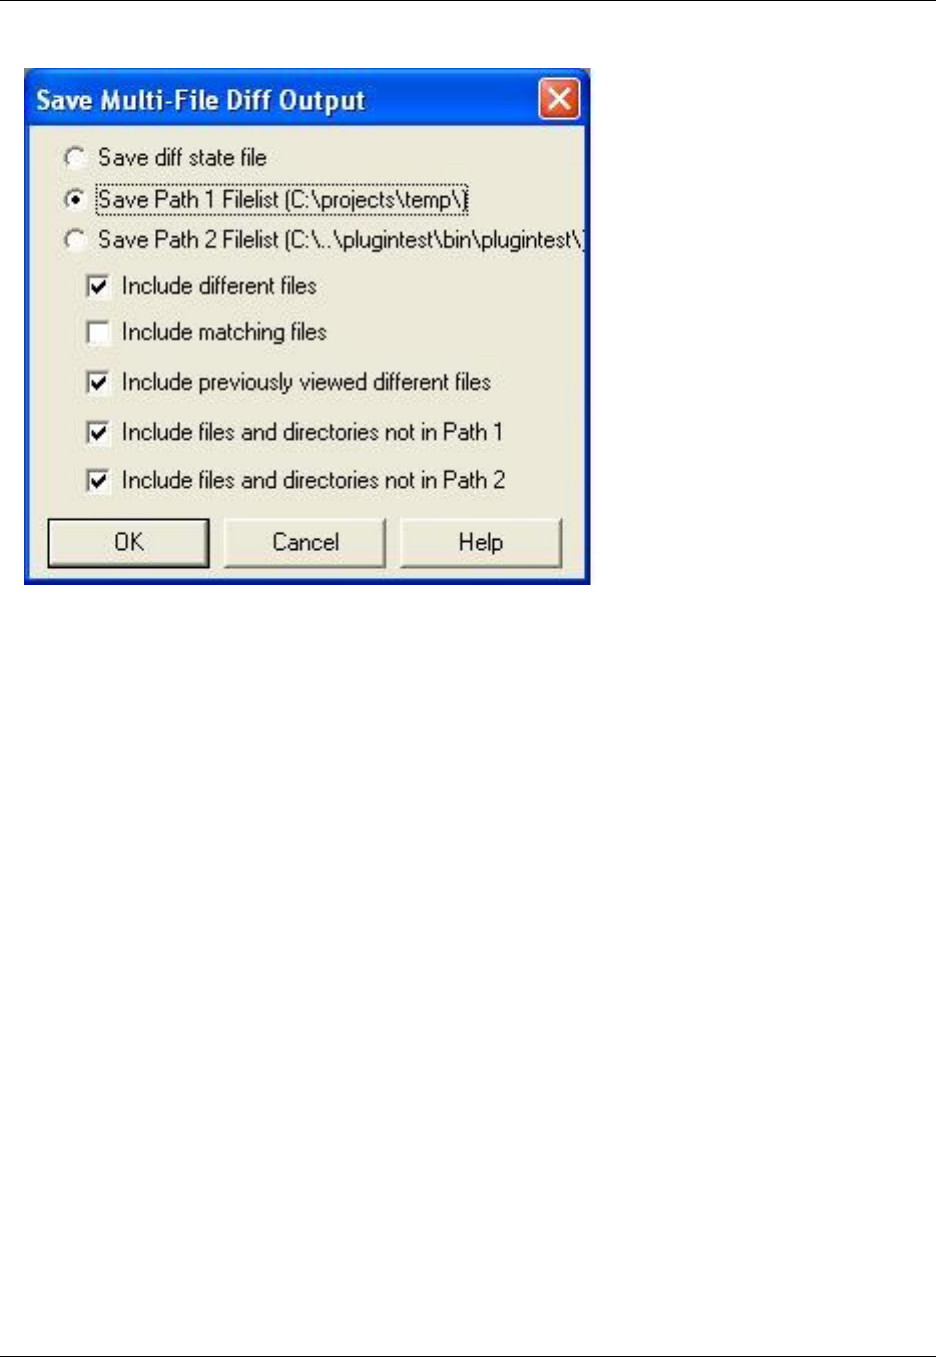
7. Select Save Path 1 Filelist,Include different files, and Include files not in Path2. All other check
boxes should be clear.
8. Click OK and select an output file for the list. The file you save will have the .lst extension appended
to the output file name.
9. Zip the files if you want.
Automatic Directory Mapping
The DIFFzilla®dialog box automatically updates the Path 2 text box with a directory, based on file paths
that you previously typed in this field. For example, if you previously typed f:\slick12\bitmaps\ into the
Path 1 text box and \\server\user\slick12\bitmaps\ into the Path 2 text box, then f:\slick12\ is
mapped to \\server\user\slick12\. The next time that you type f:\slick12\macros\ in the Path 1
text box, \\server\user\slick12\macros\ is automatically entered into the Path 2 text box.
To turn this option off, complete the following steps:
1. From the main menu, click Tools →File Difference, or use the diff command.
2. Select the Options tab.
3. Click Dialog Setup.
4. Clear the Automatic directory mapping check box.
Diffing File History
DIFFzilla®
313

The Backup History feature is available for viewing and comparing the differences between the current
and previous versions of an open file. It utilizes the DIFFzilla®dialog for diffs (see Using the DIFFzilla Dia-
log). For more information about this working with Backup History, see File History and Backups.
3-Way Merge
The 3-Way Merge editing feature can be used after two people make a local copy of the same source file,
and each makes modifications to their local copy. The 3-Way Merge takes both sets of changes and cre-
ates a new source file. If there are any differences, a dialog box is displayed that lets you select the
changes that you want in the output file. The output file can be viewed side-by-side or interleaved.
Performing a Three-Way Merge
To perform a three-way merge, complete the following steps:
1. From the main menu, click Tools →File Merge (or use the merge command). The 3-Way Merge
Setup dialog is displayed.
Figure 8.4. 3-Way Merge Setup Dialog
3-Way Merge
314
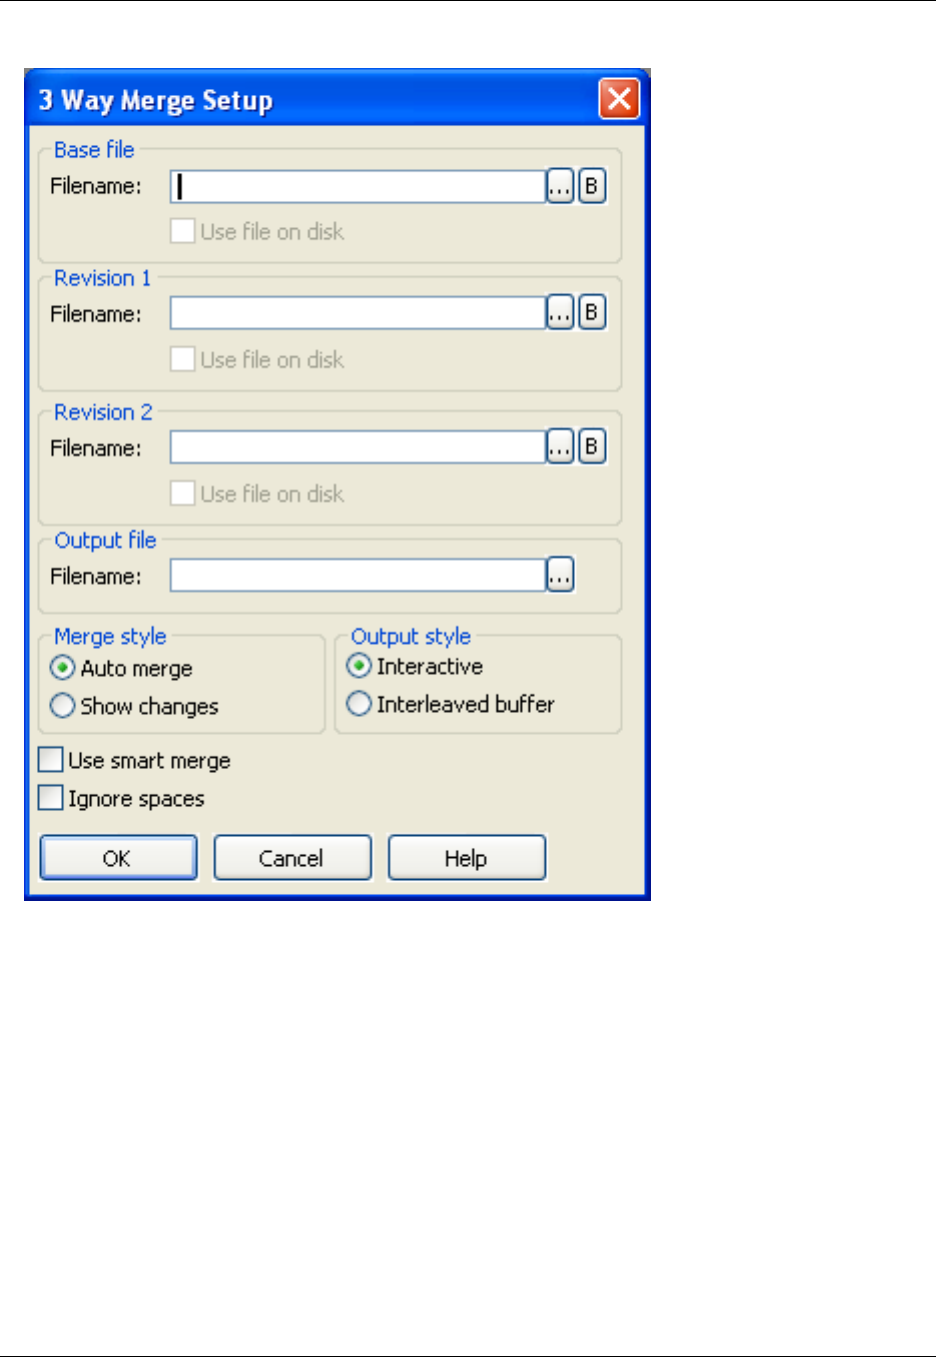
2. In the Filename text box, enter the baseline (original) file name. Click the Ellipses button to the right of
the text box to select files. Click the Bbutton to select from the open buffers.
3. Enter the other names of the files to be merged in the Revision 1 and 2text boxes.
4. In the Output file Filename text box, enter the name of the output file, or click the Ellipses button to
select from an existing file.
5. Select any Merge style or Output style that you want.
6. Click OK. The following dialog box is displayed with the results of the 3-Way Merge:
Figure 8.5. 3-Way Merge Results Dialog
3-Way Merge
315
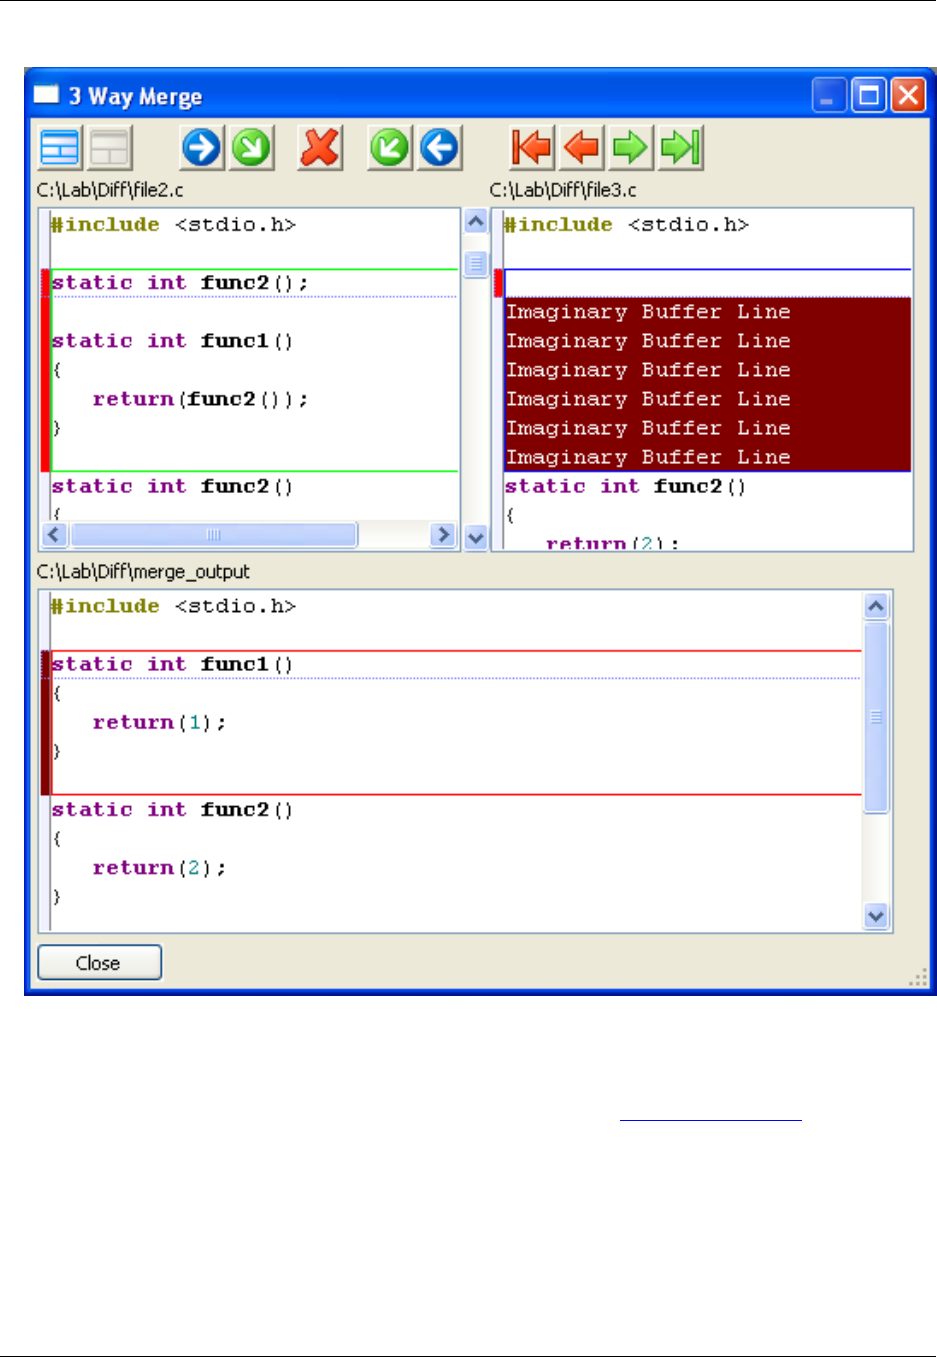

File History and Backups
SlickEdit's Backup History is disabled in SlickEdit Core. Eclipse maintains their own backup history which
you can access using the History view (Window →Show View →Other, expand Team and click
History).
You can, however, use DIFFzilla ®to compare and merge with the History view, instead of using the de-
fault Eclipse compare tool.
Compare Two Backup History Elements Using DIFFzilla
• Right-click on a file in an Eclipse explorer view (Package Explorer, Project Explorer, etc.) and select
Compare With →Local History. This will activate the History view if necessary.
• Select the two revisions that you want to compare, right-click, and select Compare with Each Other
(DIFFzilla).
Compare a Local Backup History Element with the Current
Version Using DIFFzilla
• Right-click on a file in an Eclipse explorer view (Package Explorer, Project Explorer, etc.) and select
Compare With →Local History. This will activate the History view if necessary.
• Select the revision that you want to compare, right-click, and select Compare Current with Local
(DIFFzilla).
Compare Two Backup History
Elements Using DIFFzilla
317
FTP
FTP support includes an FTP view window and the ability to easily open and edit FTP files.
Working with FTP
Before you can access FTP files, you must create an FTP profile, then start that connection. FTP opera-
tions can be accessed from the FTP view window or by right-clicking on FTP files after a connection is
active.
FTP View
The FTP view can be used to connect to FTP servers and open files. To access this view, from the main
menu, click Window →Show View →Other, expand SlickEdit Views and double-click FTP. Right-click
on files to display a menu of FTP operations.
Creating a New FTP Profile
To create a new FTP connection profile, complete the following steps:
1. Display the FTP view and click the button labeled Start a New Session . The FTP Profile Man-
ager dialog box is displayed, as pictured below.
Figure 8.6. FTP Profile Manager Dialog
Working with FTP
318
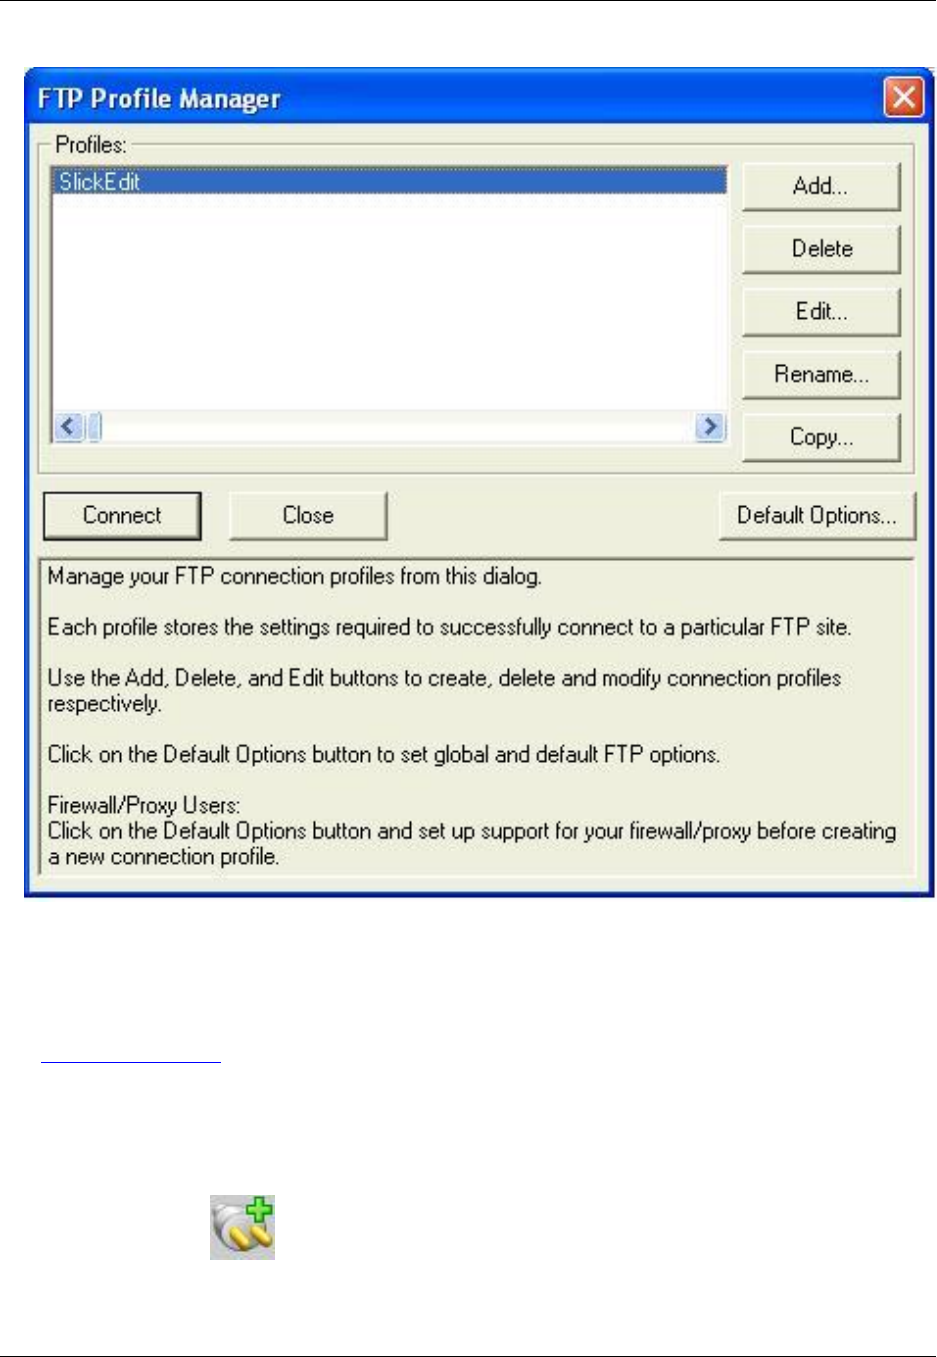
2. Click Add to create a new profile. The Add FTP Profile dialog box is displayed.
3. Click Edit to Edit a profile. The Edit FTP Profile dialog box is displayed.
See Setting FTP Options for information about the options on the Add or Edit FTP Profile dialogs.
Starting a Connection
To start a new connection, use the FTP view described above, and complete the following steps:
1. Click the FTP button to start a new session.
2. The FTP Profile Manager dialog box appears. From the Profiles list, select the profile name to connect
to.
Working with FTP
319
3. Click Connect. The FTP view displays the content of the remote directory.
4. Toggle the ASCII Transfer mode button to transfer text files. When in ASCII transfer mode, line ending
characters may be translated.
5. Toggle the Binary Transfer mode button to transfer images and executables.
6. To stop the current operation, click the Stoplight button .
Stopping a Connection
To stop a connection, use the FTP view and complete the following steps:
1. Select the connection that you want from the drop-down list at the top of the view window.
2. Click the Disconnect Current Session button .
Opening FTP Files
Before you can open FTP files, you need to start a connection. See Starting a Connection above for more
information. After your connection starts, from the FTP view window, right-click on selected files to open
them, to change the directory, or to access more options.
Setting FTP Options
To access FTP options, on the FTP view window, click the button to start a new session. When the Con-
nect dialog is displayed, click the Default Options button. The FTP Options dialog will be displayed. See
FTP Options Dialog for a list of the available options.
Setting FTP Options
320

The Regex Evaluator
Regular expressions are used to express text patterns for searching. The Regex Evaluator provides the
capability to interactively create, save, and re-use tests of regular expressions.
In SlickEdit®Core, the Regex Evaluator is a view. To open it, click Tools →Regex Evaluator.
Using the Regex Evaluator
Type some samples of the text you are trying to match in the top portion of the view window labeled Test
Cases. Enter your regular expression pattern in the bottom field. The Regex Evaluator will highlight
matched portions of your sample text and identify groups.
Figure 8.7. Regex Evaluator View
Entering Test Cases
Type your test cases in the Test Cases text box. These test cases will be evaluated as you type your reg-
ular expression in the bottom field. A wavy underline will indicate the ranges of text that match the entire
Using the Regex Evaluator
321

expression. Matches are also marked with a yellow arrow that appears in the gutter to the left of the test
case. You can hover your mouse on this arrow to see a tooltip which displays the matched expression de-
tails. When groups (tagged expressions) are used in your regular expression pattern, the groups will be
boxed and highlighted in yellow in the Test Cases section.
Entering a Regular Expression
Enter the regular expression to test in the text field. Use the radio buttons to select the expression syntax
that you wish to use: UNIX, SlickEdit®, or Brief. Click the arrow to the right of the regular expression field
to pick from a menu of common syntax and operators.
Regex Evaluator Options
The following options and buttons are available on the Regex Evaluator view:
•Multiline mode -IfMultiline mode is selected, rather than searching through the test cases line-
by-line, regular expressions will be searched on all lines at once. This is useful for test cases that wrap
to the next line. This works just as if you had entered \om on the SlickEdit®Core command line.
•Case sensitive -IfCase sensitive is selected, the regular expression search will be case sensitive.
This option is on by default.
•New expression button - To clear the view window of all entries in order to start a new evaluation,
click the button at the top of the view window labeled New expression.
•Open a saved expression button - To open an expression that you have already saved, click the
folder button at the top of the view window labeled Open a saved expression.
•Save the current expression button - To save the current expression, click the diskette button at the
top of the view window labeled Save the current expression. Both the expression and the test cases
will be saved to a file. The default extension is .regx.
•Save as button - To save the current expression with a different file name than what has previously
been saved, click the button at the top of the view window labeled Save the current expression as.
Using the Calculator and Math
Commands
322
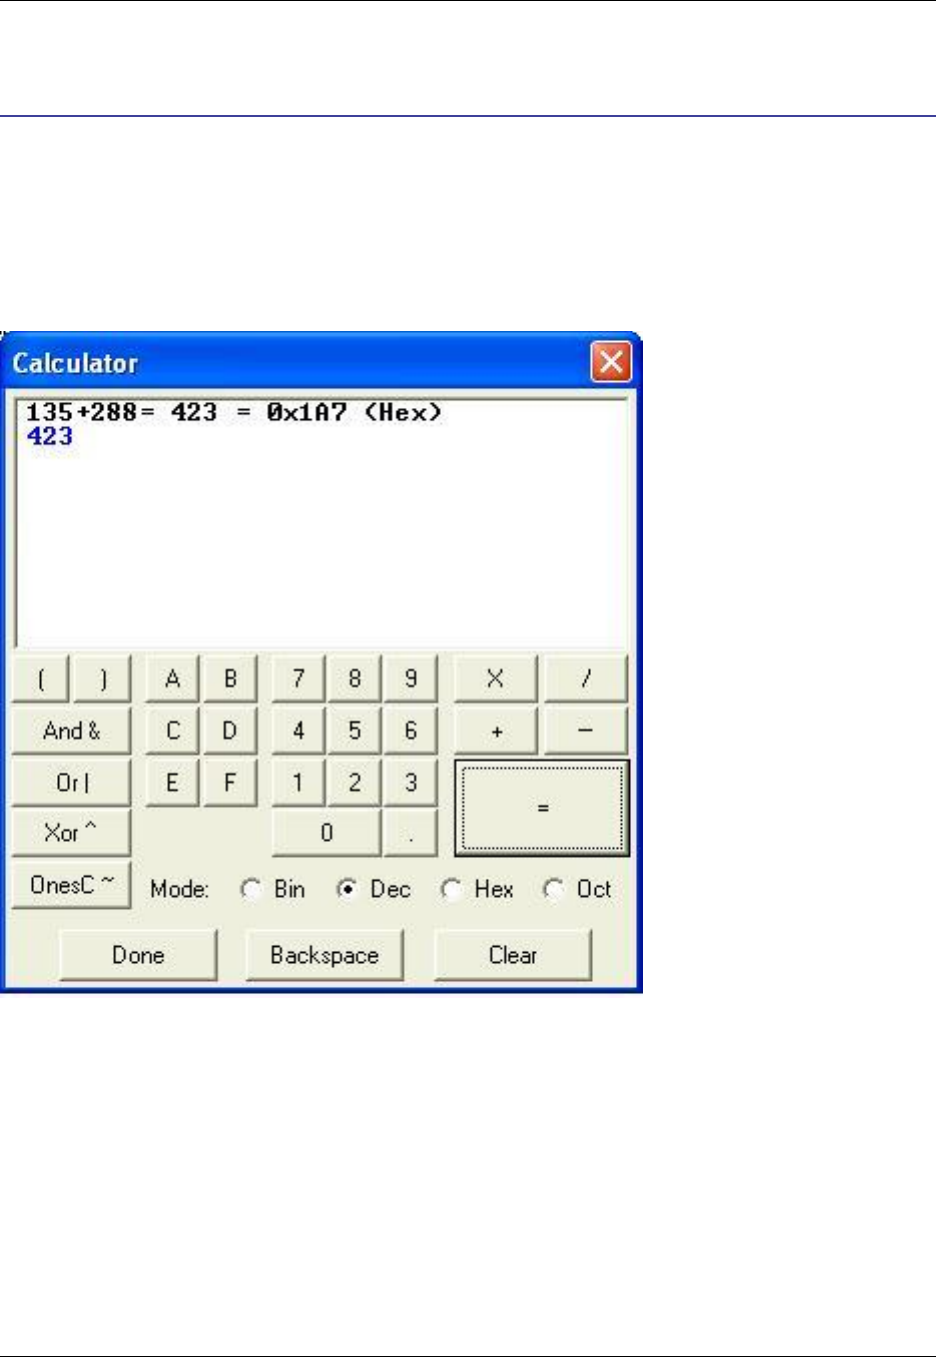
Using the Calculator and Math Commands
The Calculator
To access the calculator, click Tools →Calculator, or use the calculator command.
Figure 8.8. The SlickEdit®Calculator
You can use the calculator in various ways. Type in mathematical expressions from the keyboard or by
clicking buttons, including parentheses. Almost all the editing keys including undo, next word, and previ-
ous word are supported. The calculator uses a slightly enhanced C expression syntax. The calculator
supports specifying binary numbers and allows just an xprefix when specifying hexadecimal numbers.
For example, to add the decimal numbers 135 and 288, type 135+288=. Press the =character to evaluate
the expression and place the result on the next line. To see the result in a different base, click Hex,Dec,
Oct,orBin.
Calculating Expressions with Mixed Bases
The Calculator
323

To add hex FF with octal 77 with binary 111 with decimal 99, complete the following steps:
1. Click Hex then type or click FF.
2. Click +.
3. Click Octal, and type or click 77.
4. Click +.
5. Click Bin, and type or click 111.
6. Click +.
7. Click Dec, and type or click 99.
8. Select the output base by clicking one of the base buttons and type or click =to compute the result.
Math Commands
Evaluate mathematical expressions by selecting expressions in a buffer and executing the add command
or by executing one of the math commands on the command line followed by an expression.
These commands support the same expression input. The syntax of the math command is:
math expression
The math command evaluates the Slick-C®language expression given and places the results in the mes-
sage line. You can specify octal numbers by prefixing the number with a zero and specify binary numbers
by prefixing the number with the character b. If no operator is specified between two unary expressions,
addition is assumed. The characters $and comma (,) are stripped from the expression before it is evalu-
ated. The mathx,matho, and mathb commands evaluate the Slick-C language expression given and
places the result in the message line in hexadecimal, octal, and binary respectively. The expression
can have the following unary operators:
• ~ bitwise complement
• - negation
• + no change
The available binary operators are listed below, from lowest to highest precedence. A comma after the
operator indicates that the next operator is of the same precedence.
Table 8.1. Binary Operators
Operator Description
&,|bitwise AND, bitwise OR
Math Commands
324

Operator Description
^xor
+,blank(s),-addition, implied addition, subtraction
*,/,%multiplication, division, remainder
** power
Hexadecimal numbers are prefixed with the characters 0x or just x. Octal numbers are prefixed with the
character Oor digit 0.
Note
Not all Slick-C language operators are supported.
Math Command Examples
The following table shows some examples of math commands:
Table 8.2. Math Command Examples
Example Description
math 2.5*2 Multiplies 2.5 times 2
math 5/2 Divides 5 by 2
mathx 255 Converts 255 to hexadecimal
math xFF Converts hexadecimal FF to decimal
math o77 Converts octal 77 to decimal
matho 255 Converts 255 to octal
math 077+0xff+10 Adds octal 77, hex FF, and 10
Overflow/Underflow
If overflow or underflow occurs, the message Numeric overflow or underflow is displayed on the
message line. Floating point numbers may have up to a 32-digit mantissa and a 9-digit exponent.
Math Commands
325

Document Math
Type mathematical expressions into a buffer and evaluate them with the add command. This feature is
called document math. The add command adds selected text and inserts the result below the last line of
the selection. If no operator exists between two adjacent numbers on the same line, addition is assumed.
The result of each adjacent line is added.
Prime Numbers
Prime numbers are often useful for sizing hash tables. The isprime command (used from the command
line) takes a decimal number as an argument and tells you if it is prime, and if not, its first divisor. The
nextprime command takes a decimal number as an argument and finds the next greater prime number.
OS File Browser
326

OS File Browser
SlickEdit®Core provides a way to display the operating system’s (OS) file manager/browser. For ex-
ample, Windows Explorer is displayed on Windows, Konquerer on Linux KDE desktop, etc.
To display the OS file browser, click Tools →OS File Browser, or use the explore or finder command
(the finder command is the same as the explore command).
If you are editing a document, the file manager will be rooted in that file's directory, otherwise it will default
to the current working directory. Using the -option after the command (for example, explore -) will ignore
any file directory or working directory and go to the system root.
OS File Browser
327

328

Chapter 9. Macros and Macro
Programming
329

Recorded Macros
There are two types of macros in SlickEdit®Core: macros that you record, described below, and macros
that are available for programming (see Programmable Macros).
You can automate repetitive tasks by recording a series of SlickEdit Core operations in a macro. After you
create a macro, you can run it, save it, bind it to a key sequence, and/or modify the macro’s source code.
Recording a macro generates Slick-C®code for performing the action being recorded. Therefore, record-
ing a macro is also a useful way to discover and implement Slick-C code that controls the behavior of
SlickEdit Core. See Using Macros to Discover and Control Options for information.
Recorded Macro Operations
Macros can be recorded, executed, and saved from the Macro menu, or you can use commands or pre-
defined key bindings to perform macro operations:
• To start or end macro recording, from the main menu, click Macro →Record Macro or Macro →Stop
Recording Macro, respectively. Alternately, you can toggle recording on and off with one of the follow-
ing methods:
• Click the recording indicator REC, located along the bottom edge of the editor. When a macro is be-
ing recorded, the recording indicator is active (not dimmed).
• In CUA emulation, press Ctrl+F11 (the key binding associated with the record_macro_toggle com-
mand).
• On the SlickEdit Core command line, type record_macro_toggle.
See Recording a Macro for more information.
• To run the last macro that you recorded, click Macro →Execute last-macro, press Ctrl+F12, or use
the record_macro_end_execute command. See Running a Recorded Macro for more information.
• To display a list of your recorded macros, from which you can edit, run, delete, or bind to a key se-
quence, click Macro →List Macros, or use the list_macros command.
Note
List Macros only shows your "saved" macros, not your last recorded macro or macros created us-
ing execute_last_macro_key.
Recording a Macro
To record a macro, simply start the recording, enter the keystrokes you want to record, then end the re-
cording. The instructions below outline the steps.
Recorded Macro Operations
330

1. From the main menu, click Macro →Record Macro (or use one of the toggle methods to start record-
ing, as described under Recorded Macro Operations above).
2. Enter the keystrokes that you want to record. For example, to record a macro of the cursor moving
three spaces to the right, press the right arrow key three times. You can also change a configuration
option, view settings, or expand a code template during macro recording.
3. When you have finished recording the macro, end recording by clicking Macro →Stop Recording
Macro (or the same toggle you used in Step 1). The Save Macro Dialog is displayed.
Tip
For recorded macros you don’t need to track, perhaps for immediate or one-time use, SlickEdit
Core provides a way to stop macro recording and instantly bind the macro to a key sequence.
This allows you to keep a set of recent, unnamed macro recordings instead of having just one
"last recorded macro". See Binding Macros Using execute_last_macro_key for more information.
4. The next step depends on the purpose of your recorded macro. If you want to save the macro for fu-
ture use, continue with the steps below. If you’re just recording it to discover Slick-C®code (see Using
Macros to Discover and Control Options), click Edit (or press Alt+E) at this time to view the source
code. However, you will not be prompted to save the macro and bind it to a key sequence. In order to
do that, you will need to use Macro →Save last-macro prior to recording a new macro or exiting the
editor. See Saving and Editing Recorded Macros for more details.
5. Specify the name for the macro in the Macro Name text box.
6. Select the options that you want from the following, or leave the defaults if you aren’t sure:
•Requires editor control - Check this box if your macro can only operate if the target is an editor
control.
•Allow in read only mode - Check this box if your macro does not modify the current buffer.
•Allow when window is iconized - You will probably NOT want this box checked if your macro modi-
fies the current buffer. Whether to check this box is more a matter of personal taste.
•Allow in non-MDI editor control - Check this box if your macro should be allowed in a non-MDI ed-
itor control. This is typical for commands which require an editor control but do not open or close ed-
itor windows/buffers.
7. Click Save. The List Macros Dialog is displayed, from which you can run the macro, edit the source,
delete it, or choose to bind it to a key sequence. If you plan to use the macro often, it’s best to go
ahead and create a key binding for it now. See Binding Recorded Macros to Keys for more information.
Binding Recorded Macros to Keys
To use recorded macros most effectively, create key bindings for them so they can be executed quickly
when you want to use them. Macros can be bound through the Key Bindings dialog (see Binding Macros
Using the Key Bindings Dialog), or by using the instant "stop recording and bind" method associated with
Recorded Macro Operations
331

the execute_last_macro_key command (see Binding Macros Using execute_last_macro_key).
Binding Macros Using the Key Bindings Dialog
After recording a new macro, the List Macros Dialog is automatically displayed. You can access the List
Macros dialog any time from the main menu by clicking Macro →List Macros, or by using the
list_macros command. Click Bind to Key to open the Key Bindings dialog, showing a listing of only your
recorded macros.
Note
You can also display the Key Bindings dialog by clicking Window →Preferences →SlickEdit →
General →Key Bindings, or by using the gui_keybindings command. However, if you display
the dialog in this manner, it will show a list of all commands and user-recorded macros. To view
your recorded macros, click on theRecorded column header to sort and display items with a
"Yes" (which indicates these are recorded macros). A more convenient method is to use the Bind
to Key button on the List Macros dialog to only show recorded macros in the Key Bindings dialog.
Figure 9.1. Binding Recorded Macros
Recorded Macro Operations
332
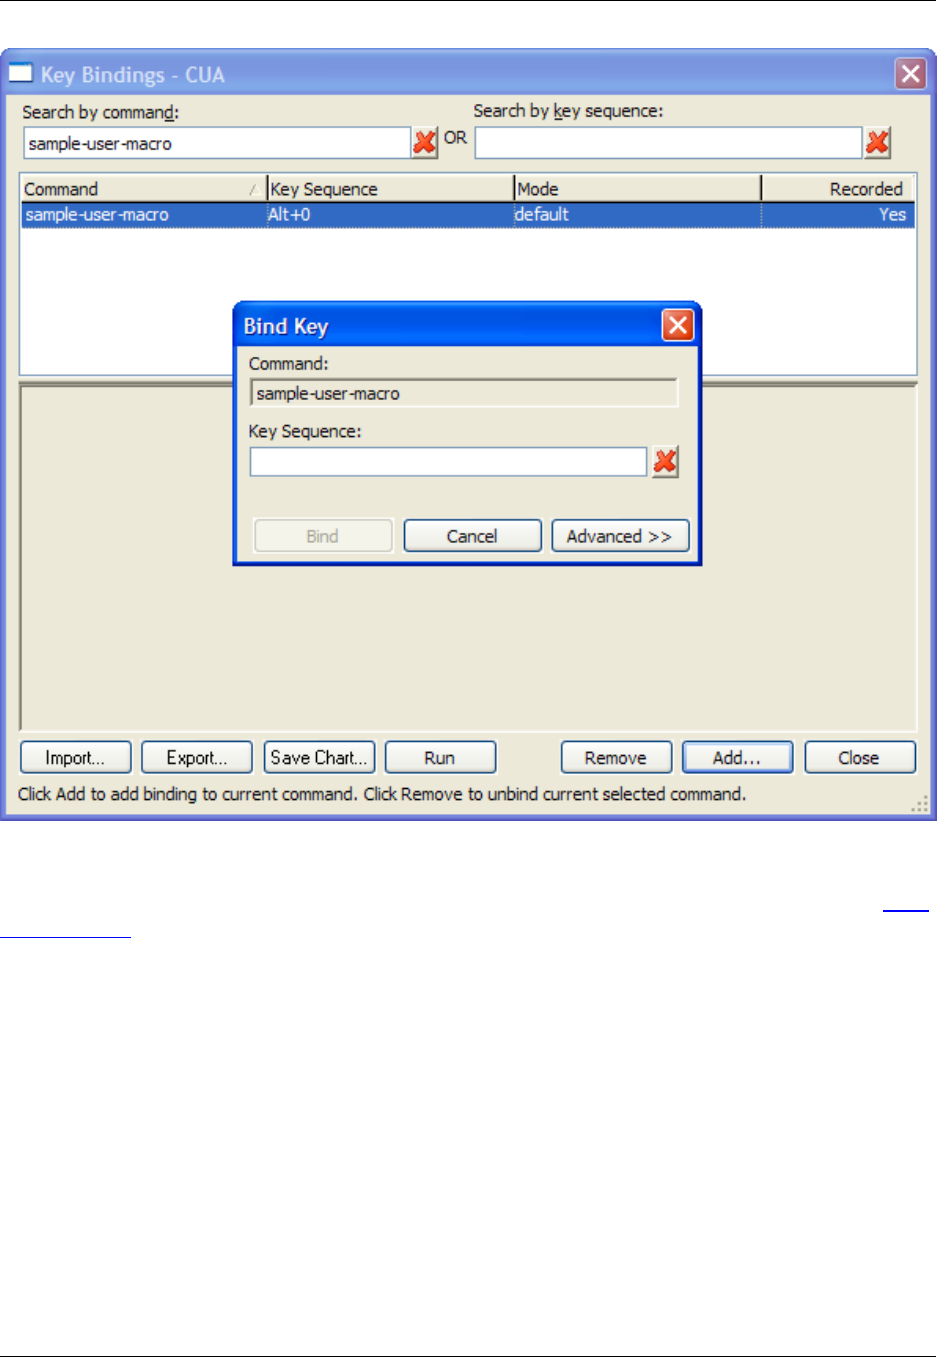
Creating bindings for recorded macros works the same as creating bindings for SlickEdit Core com-
mands. Click Add to initiate the binding, then specify the key sequence or mouse event to use. See Man-
aging Bindings for more information about creating, editing, and removing bindings.
Binding Macros Using execute_last_macro_key
The execute_last_macro_key command provides functionality to stop macro recording and instantly
bind the macro to a key sequence. This feature is convenient for recorded macros you want to use per-
haps immediately or one-time only, and don’t need to track. It allows you to keep a set of recent, un-
named macro recordings instead of having just one "last recorded macro", similar to a feature provided by
early text editors that supported macro recording, such as the EVE and Edt editors on the Vax (VMS).
Unlike other SlickEdit Core commands we document, execute_last_macro_key is not intended to be
used on the command line—instead, you use a key binding that is automatically assigned when you press
it to stop macro recording.
To bind a macro to a key sequence using this method, start recording the macro and enter the keystrokes
you want to record. Then press Ctrl+Shift+F12,key where key stands for keys 0through 9,A-Z, or
F1-F12, to stop recording the macro and instantly bind it to the key sequence you just pressed.
Recorded Macro Operations
333

Note
The prefix key sequence Ctrl+Shift+F12 works in all emulations except SlickEdit text mode edi-
tion. In that emulation, the prefix key sequence is Ctrl+Shift+T.
Each macro that you record and bind using this feature is saved to a new file named lastmac<key>.e,
located in your configuration directory, where <key> matches the key you used when creating the binding
(keys 0-9,A-Z,orF1-F12). These files can be helpful for determining what was recorded, because if you
use this method to bind a recorded macro, you will not have an opportunity to name the macro or see a
list of macros created with this method (they will not appear in the List Macros or Key Bindings dialogs).
Running a Recorded Macro
If you have saved the macro and created a key binding for it, the easiest way to run it is to simply press
the associated key sequence. You can also run it by:
• Typing the name of the macro in the SlickEdit®Core command line then pressing Enter.
• Using the List Macros Dialog (Macro →List Macros or list_macros command)—select the macro and
click Run.
You can run the last macro that you recorded, whether it was saved or not, by clicking Macro →Execute
last-macro (Ctrl+F12 or execute_last_macro command).
Saving and Editing Recorded Macros
When a recorded macro is saved, the source code of the macro is appended to the vusrmacs.e user
macros file located in your configuration directory.
To edit a macro that has previously been recorded and saved, from the main menu, click Macro →List
Macros (or use the list_macros command) to display the List Macros Dialog. The list box on the left dis-
plays a list of your recorded macros. Select the macro you want to edit, then click Edit. The vusrmacs.e
file opens in the editor. Save the file when you’re done making edits.
If you are using recorded macros to discover Slick-C®code (see Using Macros to Discover and Control
Options), you can view/edit the source of a macro that you have just recorded but have not yet saved.
After creating a new recorded macro, you are prompted with the Save Macro Dialog. Instead of naming
the macro and saving it, click Edit (or press Alt+E) to view the source. A new editor window named
lastmac.e, which is the name of the file that contains the source of the last macro that was recorded, is
opened showing the macro’s source code. If you make edits, you will need to save the changes by click-
ing Macro →Save last-macro. The Save Macro dialog is displayed where you can name the macro and
then click Save, which then appends the new code to the user macros file (vusrmacs.e). To bind the
macro to a key, use the Key Bindings dialog, which is not automatically displayed like it is when record-
ing/saving a macro in the normal way (see Binding Macros Using the Key Bindings Dialog).
Each macro recorded and bound using execute_last_macro_key is saved in a file named last-
mac<key>.e, and the corresponding compiled byte code is saved in lastmac<key>.ex, where <key>
matches the key you used when creating the binding (keys 0-9,A-Z,orF1-F12). Both files are located in
Recorded Macro Operations
334

your configuration directory. To edit a macro bound using this method, open the .e file for the macro you
want to edit, make and save the changes, then from the main menu, click Macro →Load Module (F12 or
gui_load command). Find and select the .e file you just edited and click Open. The message Mod-
ule(s) loaded appears on the message line, and SlickEdit Core will now honor the changes you made
to the .e file when you use the corresponding key sequence.
Deleting Recorded Macros
To delete a macro that has been recorded and saved, from the main menu, click Macro →List Macros
(or use the list_macros command). Select the macro you want to delete, and click Delete.
To delete a macro that you recorded and bound to a key sequence using execute_last_macro_key,
browse to your configuration directory and delete lastmac<key>.e and its corresponding last-
mac<key>.ex file, where <key> matches the key you used when creating the binding (keys 0-9,A-Z, or
F1-F12).
Using Macros to Discover and Control Options
Recording macros provides a good starting point for discovering variables in Slick-C®code that control
the behavior of SlickEdit®Core.
Since responses to dialog boxes (such as when you select/deselect options) are recorded as Slick-C
source, you can use recorded macros to discover and change these variables quickly. For example, per-
haps you frequently switch line insert styles. Instead of every time clicking Window →Preferences, ex-
panding SlickEdit and clicking General in the tree, then double-clicking the General setting and selecting
the More tab, then selecting the option, you can record those steps as a macro and bind it to a key se-
quence. Now you have an easy way to toggle a feature on and off.
You can also view the source of a recorded macro without naming or saving it, if you just want to see the
code. See Saving and Editing Recorded Macros for more information.
Using Macros to Discover and
Control Options
335
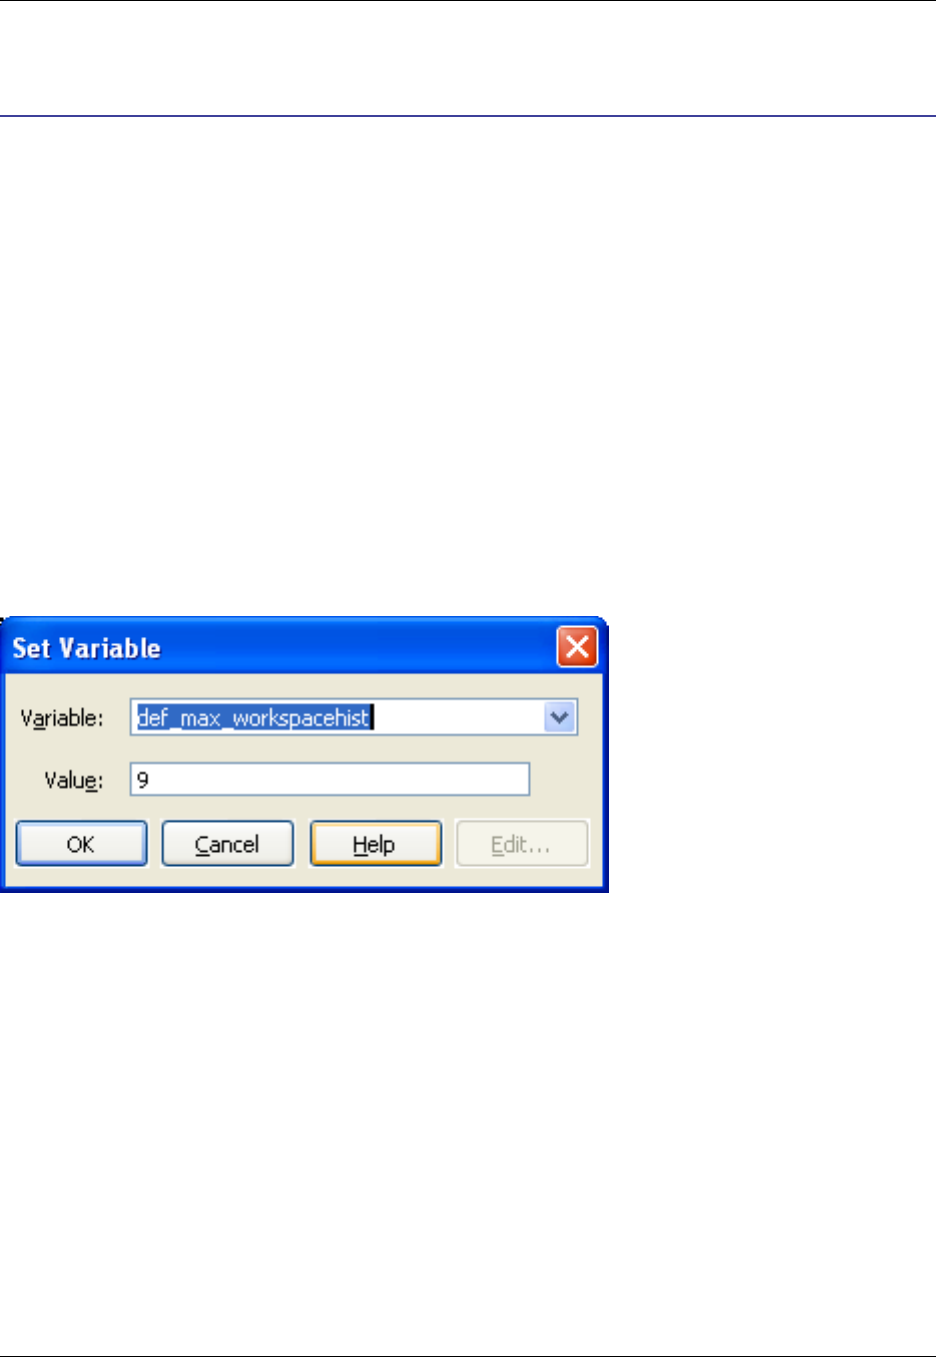
Programmable Macros
Many of the actions performed using SlickEdit®Core are performed using Slick-C®macros. Slick-C func-
tions are mapped to menus, buttons, and keys and perform the action behind an event. Use Slick-C to
customize, modify, and bind functions to other shortcuts.
Loading Macros
To load a Slick-C®macro file, from the main menu click Macro →Load Module, or use the gui_load
command. The Open dialog box is displayed, prompting you for a file.
Setting Macro Variables
You can set Slick-C®macro variables to specific values using the Set Variable dialog box (Macro →Set
Macro Variable or gui_set_var command).
Figure 9.2. Set Variable Dialog
Enter the name of Slick-C global variable in the Variable text field. You may use the spacebar and ?
(completion) to assist you in entering the name. Click the drop-down arrow to select a variable from the
list.
Enter the new value of the variable in the Value text box. Click Edit to display the Variable Editor, used
for editing complex variables such as arrays, hash tables, structures, and unions.
Currently the Variable Editor does not have enough symbolic information to give you member names of
structures or unions. Structures will appear as an array.
Figure 9.3. Variable Editor Dialog
Loading Macros
336


338

Chapter 10. SlickEdit Core Dialogs
339
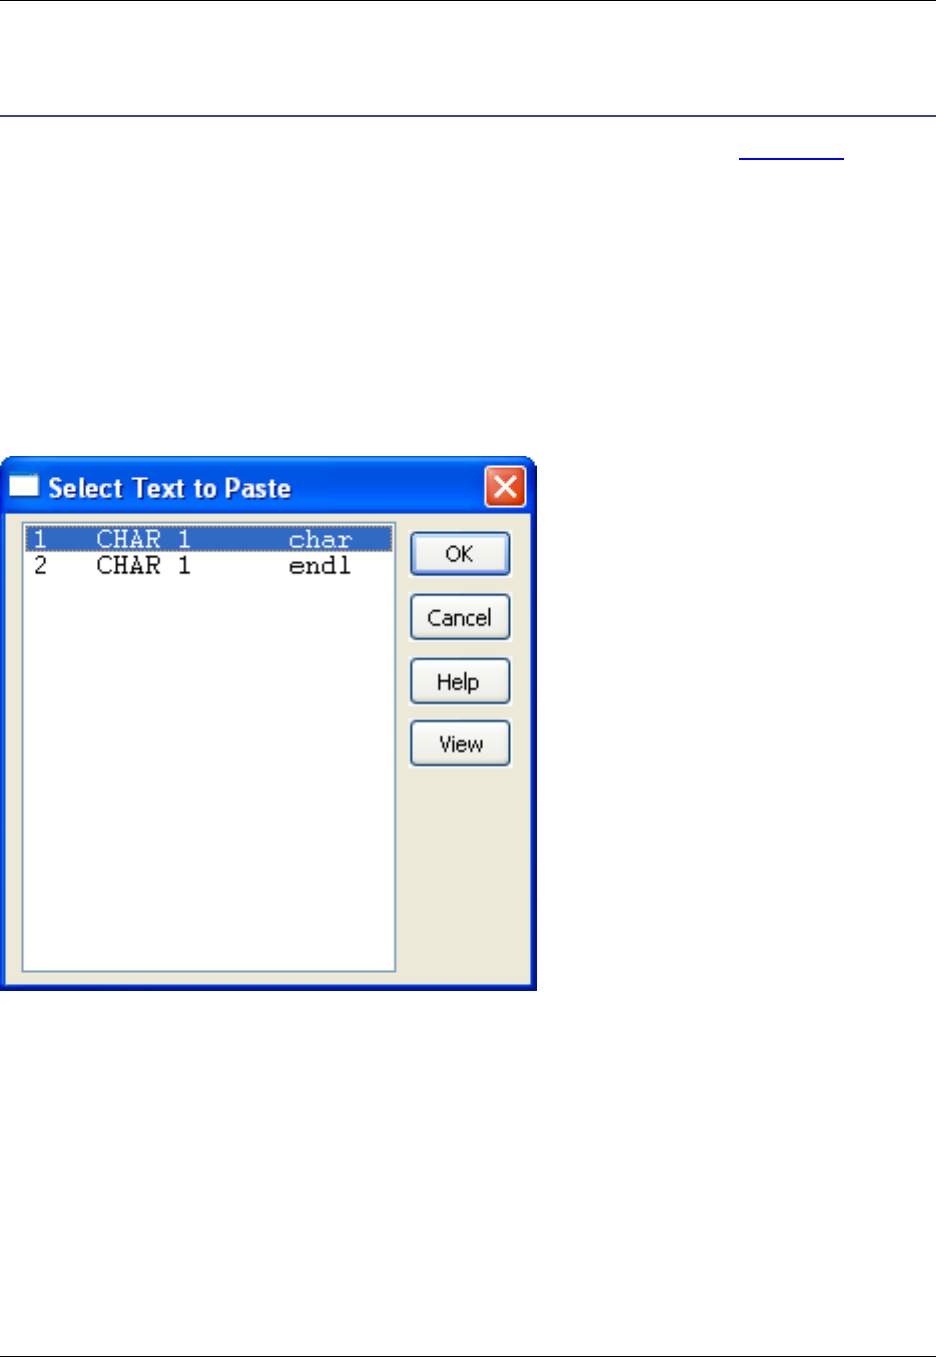
Editing Dialogs
This section describes the SlickEdit®Core dialogs associated with text editing. See Text Editing for more
details about editing operations.
Select Text to Paste Dialog
This dialog is used to view and insert recently used clipboards. It is displayed when you press
Ctrl+Shift+V(in CUA emulation), click Edit →List Clipboards, or use the list_clipboards command. If
there are no clipboards, the message line states No clipboards.
Figure 10.1. Select Text to Paste Dialog
The numbers in the first column of the list box are used to help you move the selection cursor. The
second column indicates the clipboard type. The third column shows all or a portion of the clipboard text
(depending on the length). Click OK to insert the selected clipboard at the cursor location. Click View to
see the complete text in the View Clipboard window. From here you can copy all or part of the text to the
operating system clipboard.
Enumerate Dialog
This dialog contains options for adding incrementing numbers to a selection. It is displayed when you click
Edit →Other →Enumerate or use the gui_enumerate command. Alternatively, you can add increment-
Select Text to Paste Dialog
340
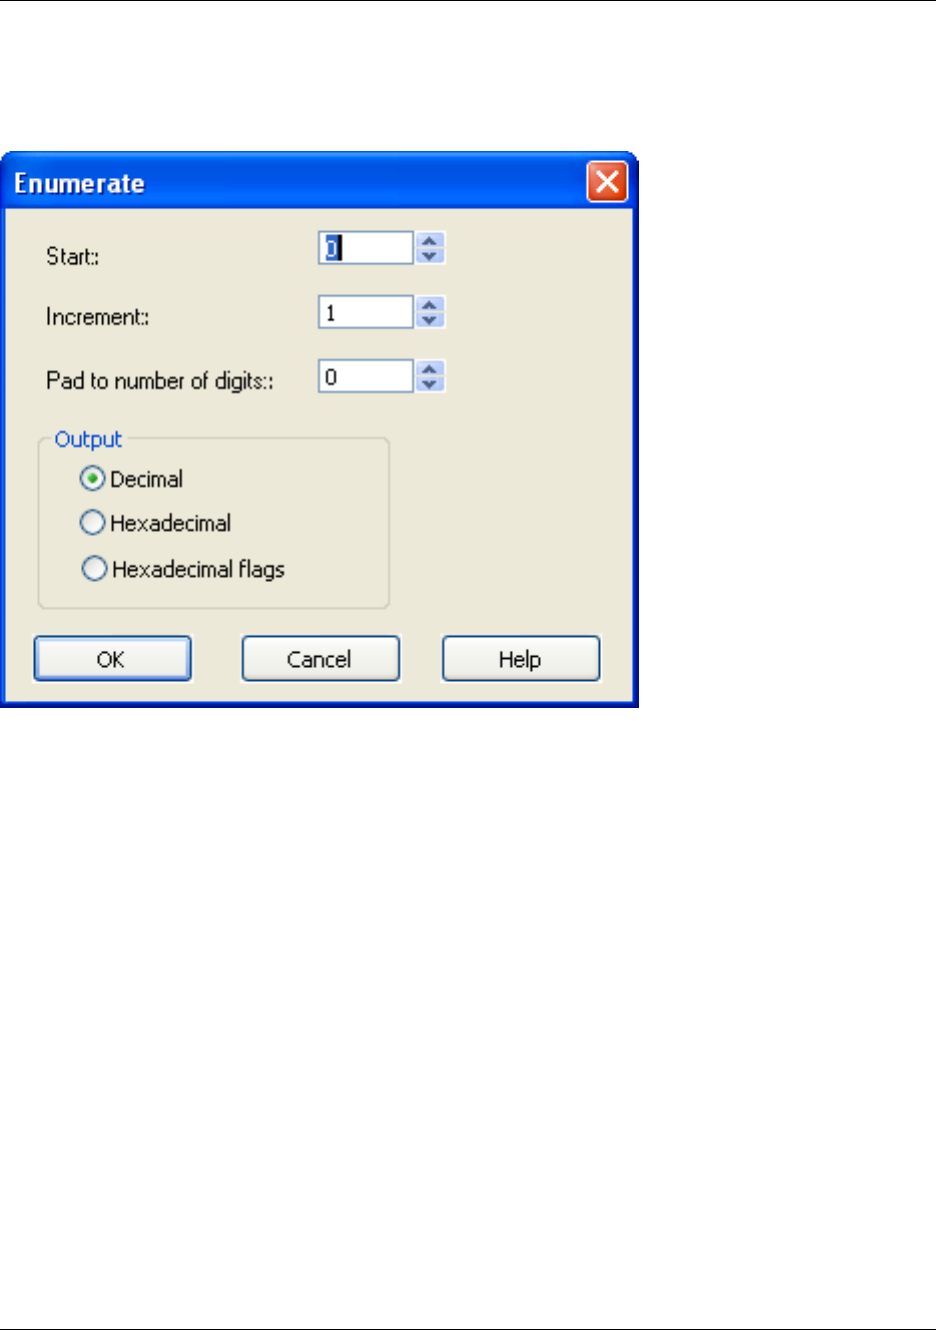
ing numbers to a selection using the enumerate command with options on the command line. See the
Help system for command syntax.
Figure 10.2. Enumerate Dialog
•Start - C syntax expression which evaluates to the number used for first line of selection. However,
when the Hexadecimal flags output style is selected, the start must be an integer bit position or the
first hexadecimal number with which to start.
•Increment - C syntax expression which evaluates to the amount to increment for each line in the selec-
tion. However, when the Hexadecimal flags output style is selected, this specifies the number of bit
positions by which to increment.
•Pad to number of digits - Specifies the digit width for each number. Number is padded to at least this
number of digits by adding leading zeros.
•Output - Both the Hexadecimal and Hexadecimal flags options specify hexadecimal syntax output
based on the buffers extension. We determine the hexadecimal syntax based on the color coding which
supports 0xhhhh (C syntax), &Hdddd (Basic), hhhhH(Intel assembler), and $hhhh (Motorola assem-
bler). If the buffer's extension has no color coding, the hex numbers are prefixed with 0x.
Filter Selection: Command Dialog
The Command dialog is used to specify a command to run against the selected text. It is displayed when
you click Edit →Other →Filter Selection or use the filter_selection command.
Filter Selection: Command Dia-
log
341
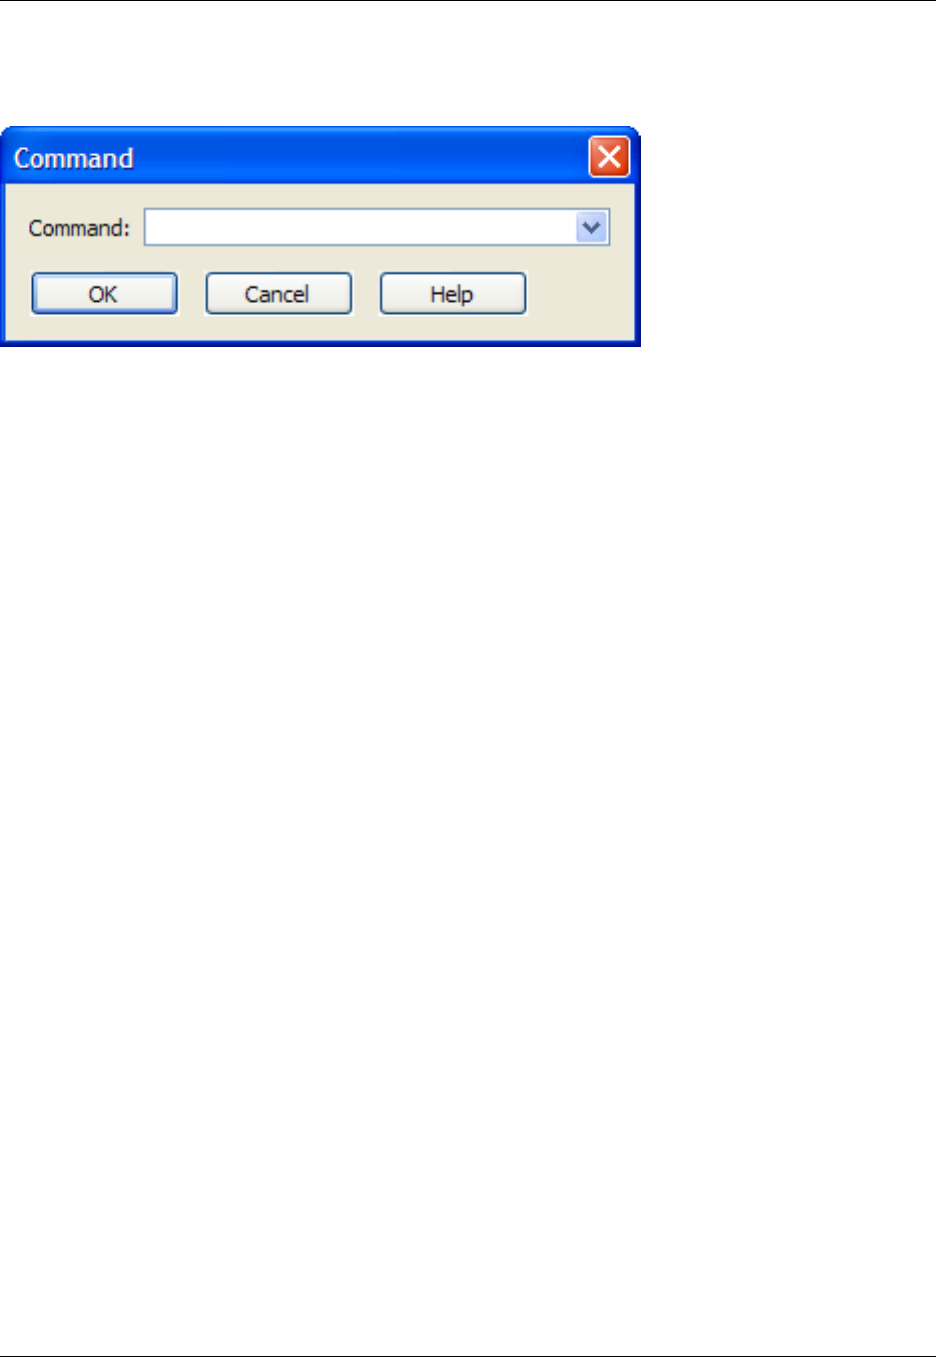
Figure 10.3. Filter Selection: Command Dialog
Enter the command in the Command text box. The selected text will be used as input to the command,
and the output from the command will replace the selected text. Use the drop-down arrow to the right of
the Command text box to select from a history of previously entered commands.
Search Dialogs
342
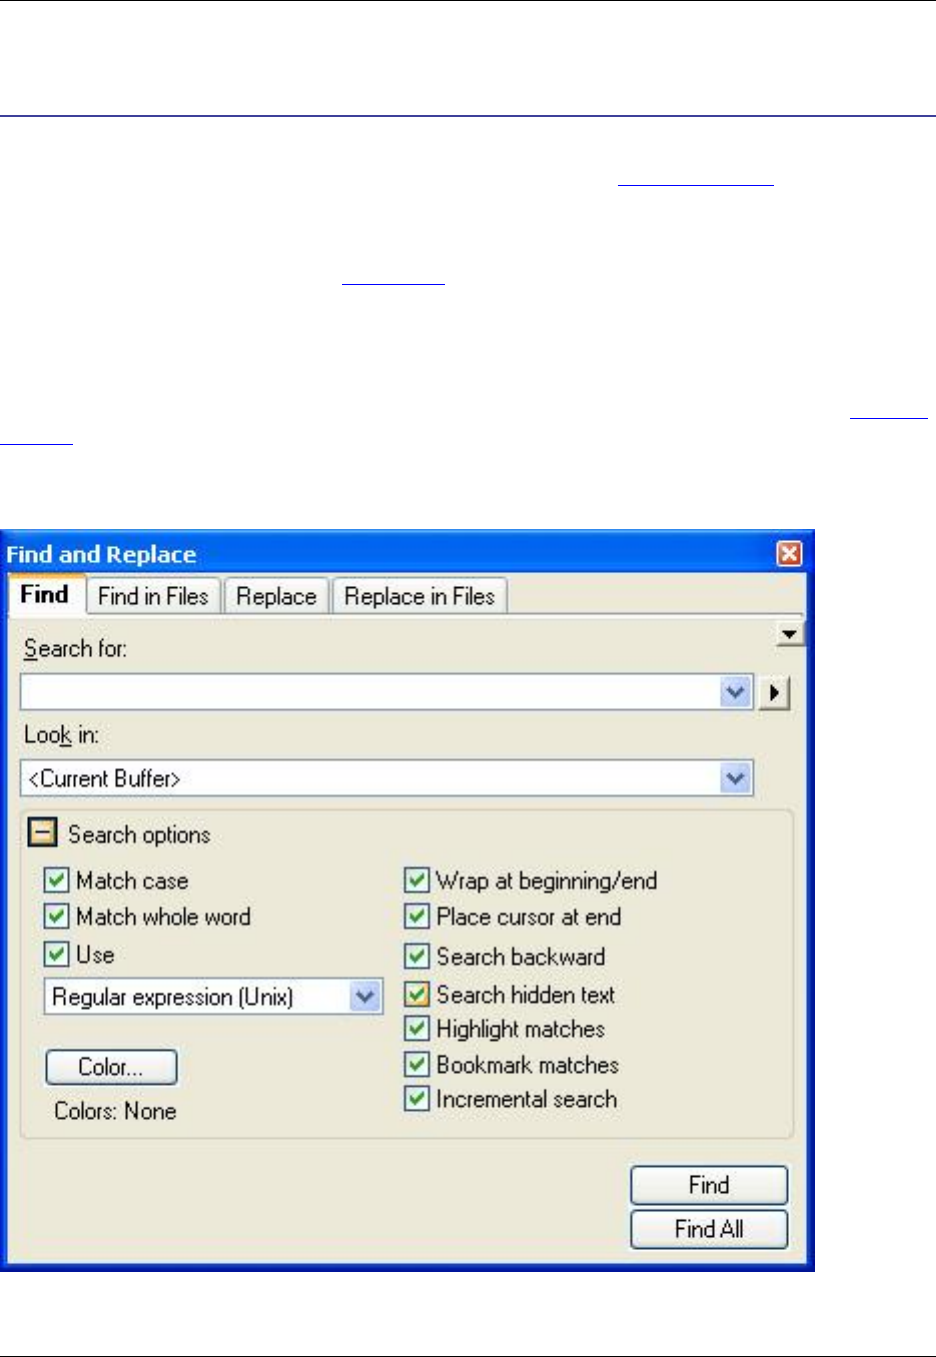
Search Dialogs
This section describes the SlickEdit®Core dialogs and views associated with searching and replacing.
For more information about using search and replace operations, see Find and Replace.
Note that there is an additional dialog not listed here that contains search options—the Search tab of the
General Options dialog (Window →Preferences, expand SlickEdit and click General in the tree, then
double-click the General setting). See Search Tab for a description of these settings.
Find and Replace View
This view is displayed when you click one of the find or replace items on the Search menu. See Find and
Replace for information about searching and replacing.
Figure 10.4. Find and Replace View
The Find and Replace view contains a right-click context menu and four tabs:
Find and Replace View
343

•Find Tab
•Find in Files Tab
•Replace Tab
•Replace in Files Tab
Find and Replace View: Context Menu
Right-click in the background of the Find and Replace View to access the following items:
•Saved Search Expressions - See Saving Search and Replace Values.
•Configure Options - Displays the Search Tab of the General Options dialog, from which you can set
the default search options that the Find and Replace view should use.
•Use Default Options - If selected, the options specified in the Search Tab of the General Options dia-
log are used instead of the options selected in the Find and Replace view.
•Clear All Options - Clears all options that are selected in the Find and Replace view.
•Set Current Options as Default - If selected, the options that are selected on the view window replace
the settings in the Search Tab of the General Options dialog.
•Hide/Show Tabs - Toggles the display of the tabs on the Find and Replace view.
•Clear Highlights - Removes all highlighting from text that was highlighted during a search or replace
operation.
•Allow Docking - If selected, the Find and Replace view can be docked.
Find Tab
This tab on the Find and Replace View provides fields and options for searching and finding text.
Figure 10.5. Find and Replace: Find Tab
Find and Replace View
344
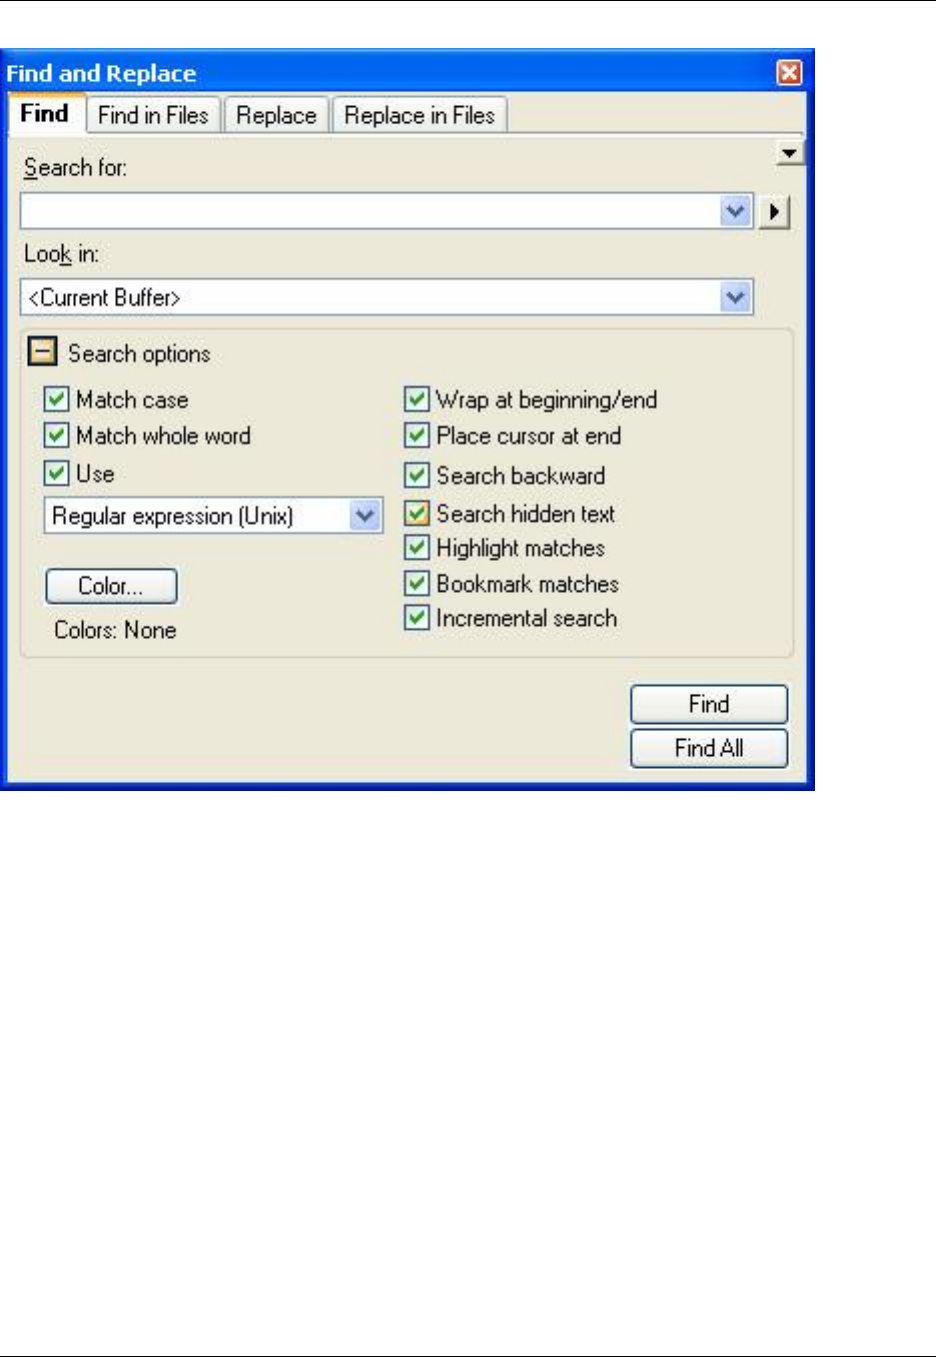
•Search for - Enter the string you want to search for here. You can retrieve previous search strings by
clicking the drop-down list button. Strings may be text or regular expressions and can include wildcards.
Note that ISPF search expressions cannot be used here.
Click the right-pointing arrow button to the right of the Search for field to display a menu containing
specific search syntax options such as Character in Range,Beginning of Line, and Decimal Digit.
•Look in - This field allows you to specify a range for your search to the current selection, current pro-
cedure, current buffer or all buffers.
•Search options - Click this button to expand or contract the search options section of the view window.
When contracted, the options that are selected are summarized in this area.
•Match case - If selected, a case-sensitive search is performed.
•Match whole word - If selected, a word search is performed. Before a search is considered successful,
the characters to the left and right of the occurrence of the search string found are checked to be non-
word characters.
The default word characters are [A-Za-z0-9_$] and can be changed. To change these, from the main
Find and Replace View
345

menu click Window →Preferences, expand SlickEdit and click General in the tree, then double-click
the File Extension Setup setting. On the Extension Options dialog, select the Advanced Tab, and
enter your desired characters in the Word chars field.
•Use - Set this option to select one of the following types of search syntax from the drop-down list:
•Regular expression (UNIX)
•Regular expression (Brief)
•Regular expression (SlickEdit®)
•Wildcards (*,?)
See Find and Replace with Regular Expressions for more information.
•Color - Displays the Color Coding Search Options dialog. This dialog lets you pick various syntactic
elements to filter a search. These are the same elements used by the Color Coding engine. Using
these filters helps to reduce the number of false positives you find in a search. Each check box has
three states:
•Neutral (the default) - All check boxes start in the neutral state. These elements will be used in a
search until deselected or until one or more other elements are selected. Putting a check in any
check box essentially deselects all non-checked boxes.
•Selected - If the check box is selected, the search will be restricted to this element and any other se-
lected elements. There is no need to deselect any other elements if any elements are selected. If any
elements are selected, only selected elements will be searched. For example, to search for the word
"result" only in comments, put a check only in the Comment check box. All other syntactic elements
will be ignored as part of this search.
•Deselected - If the check box is clear, these elements will not be searched. For example, if you want
to find the word "result" anywhere in your code except for in comments, clear the Comment check
box.
Click the Reset button to mark all items as neutral.
Note
Not all languages have all color coding elements defined. For example, dBase and Pascal do not
have preprocessing. Only C++ and Java have function color defined. Only HTML has attributes
(i.e. <img src=.>).
•Wrap at beginning/end - If selected, the search will always be performed on the entire buffer, starting
from the cursor.
•Place cursor at end - If selected, the cursor is placed at the end of the occurrence found.
•Search backward - Select this option to have the search performed from the end to the beginning.
Find and Replace View
346

•Search hidden text - Select this option to search for text hidden by Selective Display. Matches found
that were set to be hidden by Selective Display will be revealed. To set Selective Display options, from
the main menu click View →Selective Display. See Selective Display for more information.
•Highlight matches - Select this option to highlight all matched patterns in the current search range.
Highlight colors for these matches are customizable. To set this color, from the main menu, click Win-
dow →Preferences, expand SlickEdit and click General in the tree, then double-click the Color set-
ting. Select Highlight from the Screen element list. Choose your desired color settings and click OK.
See Colors for more information.
To clear all highlighted text in all buffers, deselect the Highlight matches option or simply close the
Find and Replace view.
•Bookmark matches - Select this option to bookmark lines with matching patterns and display the
Bookmarks view when a match is bookmarked.
•Incremental search - Select this option to search incrementally on patterns being typed into the
Search for field, showing the location of the match at the cursor. See Incremental Searching for more
information on this method of searching.
•Find button - Click this button when you have entered all desired search options and are ready to initi-
ate a search. If no matches are found, the Search for field will turn red, and the text String not
found will be displayed in the status area of the editor.
•Find All button - Click this button to mark all matches in the current search range which have any of
the following options selected: Search hidden text,Highlight matches, and Bookmark matches. If
no matches are found, the Search for field will turn red, and the text String not found will be dis-
played in the status area of the editor.
Find in Files Tab
This tab on the Find and Replace View provides the same functionality as the Find Tab, with the added
ability to conduct multi-file searches. Additional options are described below.
Figure 10.6. Find and Replace: Find in Files Tab
Find and Replace View
347
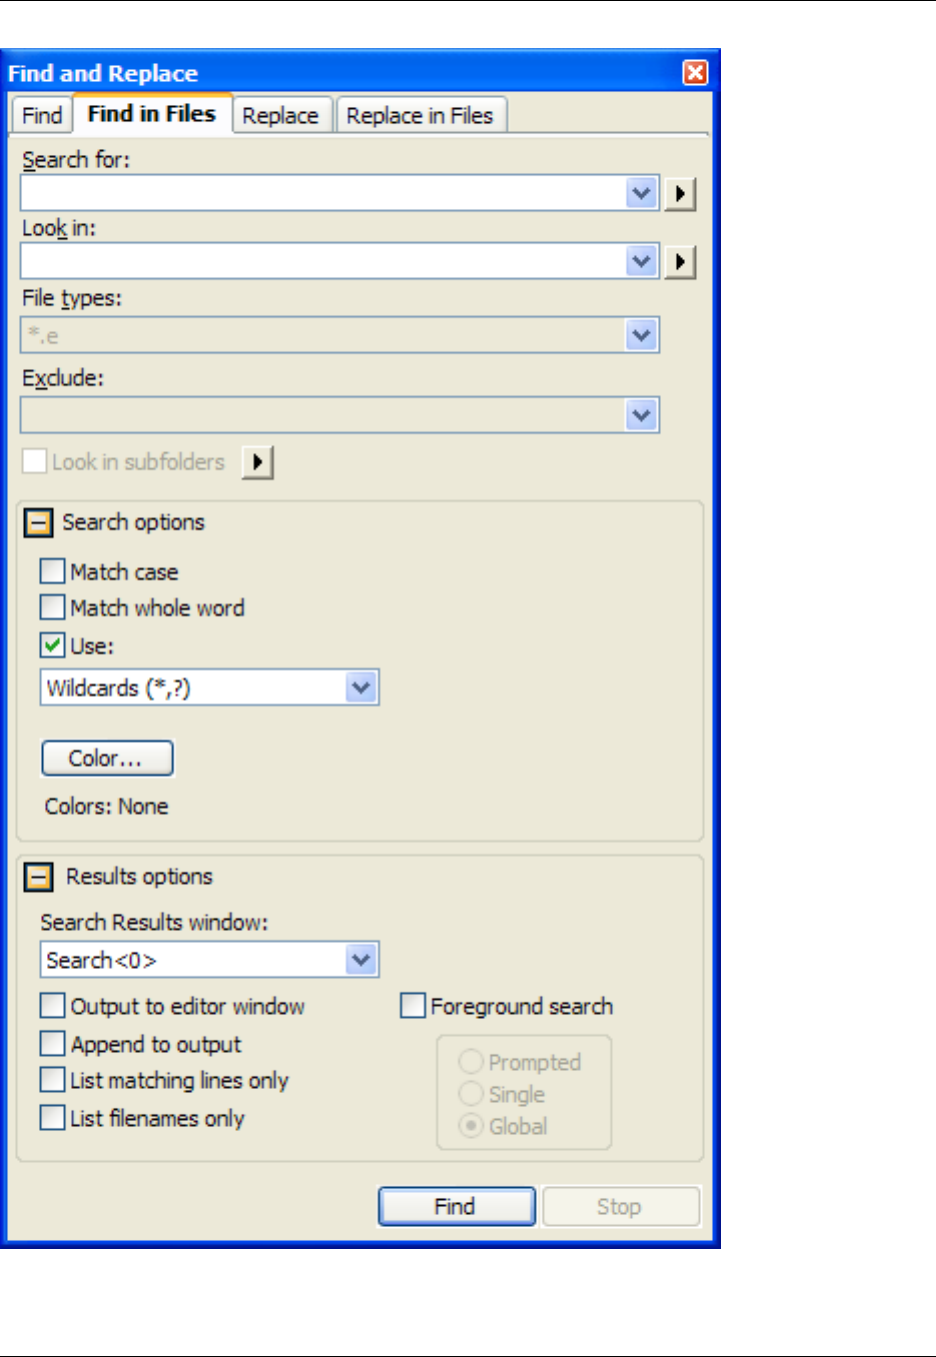
•Look in - This field allows you to specify a range for your search to the current selection, current pro-
Find and Replace View
348

cedure, current buffer or all buffers.
Click the right-pointing arrow button to the right of the Look in field to display a menu containing more
specific range options such as Directory,Project, and All Buffers. From this sub-menu, you may also
select Append and choose an item for which to have the search results appended.
•File types - Specifies one or more file types (extensions) to search for. Type in this field or use the
drop-down list to select the extensions desired. When a file title is specified in the Look in field, the file
types wildcards are ignored.
•Exclude - Paths, files, or file types can be excluded from a multi-file search by specifying them with
wildcards or full path names. No files are searched in a path that is excluded, including any files in sub-
directories beneath.
•Look in subfolders - Select this option to expand the search to sub-directories of the folder specified
in the Look in field.
•Results options - Click this button to expand or contract the Results options section of the view win-
dow. When contracted, the options that are set are summarized in this area.
•Search Results Window - This field allows you to send the search results to a specific SlickEdit Core
Search view. The window to be used can be selected from the drop-down list, and these are labeled
starting at Search<0>. A new results window can be added with the <New> option up to a pre-set limit
of open SlickEdit Core Search views. If <Auto Increment> is selected, the search results will cycle
through all of the open Search Results tabs in the SlickEdit Core Search view with each new search.
See Search Results Output for more information.
Right-click in the SlickEdit Core Search view to access the following options:
•Quick Search - Finds the next occurrence of the text selected.
•Filter Search Results - Select this option to display the Filter Search Results dialog. From here, if a
match is found, you can choose to keep or delete lines with additional searches, match case, limit to
current default regular expression syntax and/or remove matches found on the same line number in
the same file (this can also be accomplished by selecting List matching lines only from the Find in
Files tab).
•Open as Editor window - Opens current search results in a new editor window.
•Go to Line - Goes to the file/line number of the current line in the SlickEdit Search view.
•Bookmark Line - Places a bookmark at the line in the file where the result was found.
•Clear Window - Clears all results in the current SlickEdit Core Search view.
•Align Columns - Aligns the line numbers and column numbers for all search results.
•Collapse All - Collapses all Selective Display levels. See Selective Display for more information.
•Expand All - Expands all Selective Display levels. See Selective Display for more information.
•Output to editor window - If selected, search results are sent to an editor window.
Find and Replace View
349

•Append to output - Select this option to append search results to the search results window that is in
focus.
•List filenames only - If selected, only file names and not occurrences are listed in the search output.
•List matching lines only - Selecting this option will display only one line in the search results window
for each line containing one or more matching patterns on the same line, and will highlight all matching
patterns.
•Foreground search - If selected, activates the three range options listed below. This option offers
slightly better performance than a background search, but prevents you from continuing to work while
the search is being performed. The default search for SlickEdit®Core is background searching unless
this option is selected.
•Prompted - When this option is selected, you are prompted whether to continue searching when an
occurrence is found.
•Single - When this option is selected, your cursor is placed on the first occurrence found, but the re-
maining files are not searched.
•Global - When this option is selected, all files are searched for occurrences without prompting.
•Stop button - Click Stop to terminate a multi-file, background search. Press Esc to terminate a long
foreground search.
Replace Tab
This tab on the Find and Replace View provides options for searching and replacing text. The same
search options from the Find Tab are provided, as well as the additional replace options described below.
Figure 10.7. Find and Replace Replace Tab
Find and Replace View
350
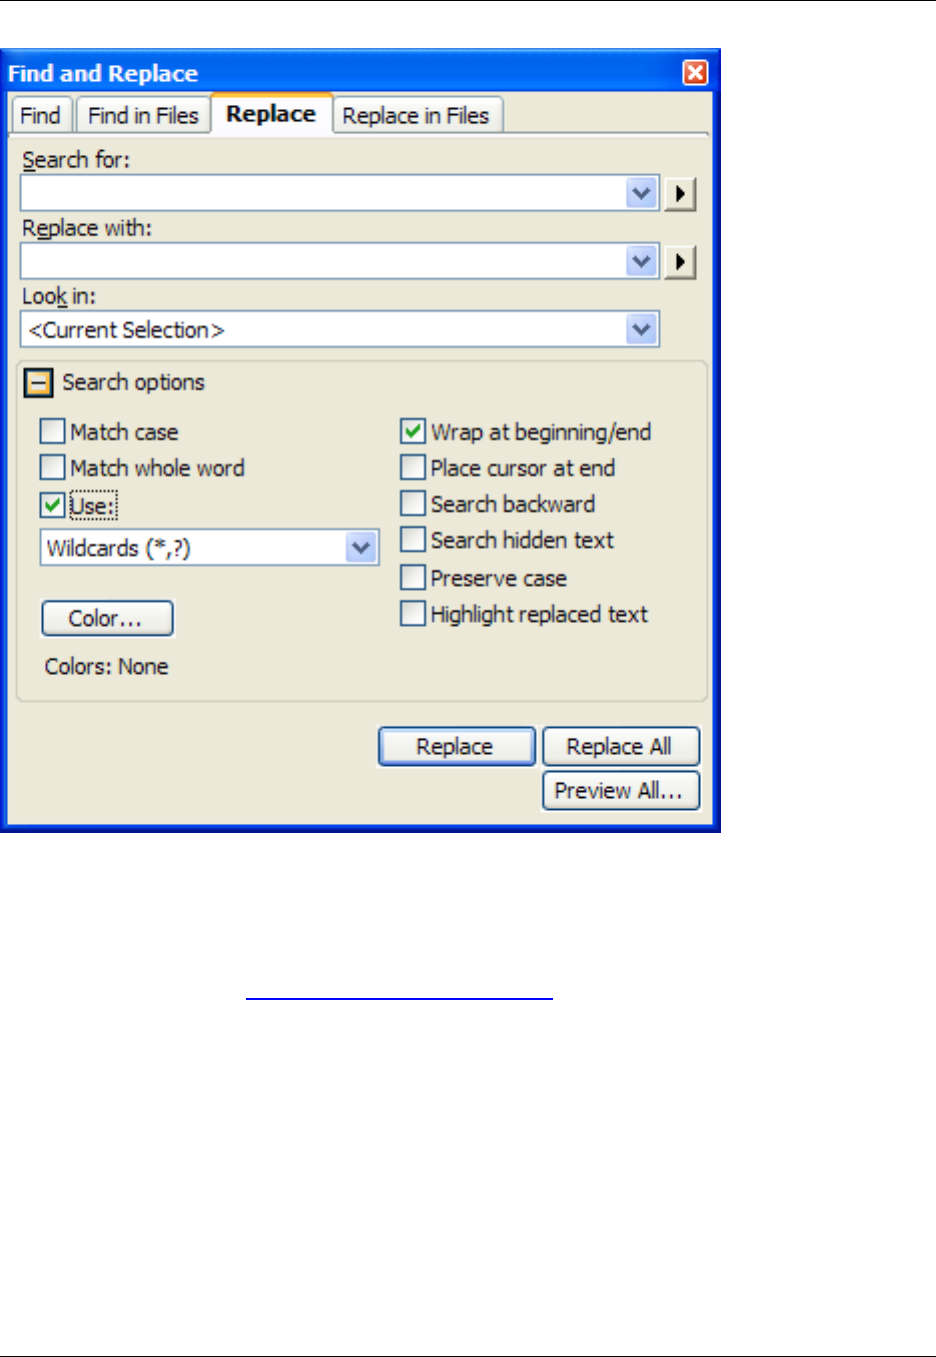
•Replace with - Enter the text or regular expression for which to replace the item that is searched. You
can retrieve previous replacement text or regular expressions by clicking the drop-down list button.
Click the right-pointing arrow button to the right of the Replace with field to display a menu containing
tagged expressions. See Using Tagged Search Expressions for more information.
•Preserve case - Select this option to perform a case-sensitive search and replace operation.
•Highlight replaced text - Select this option to highlight all instances of the text that was replaced.
•Replace button - Click to replace the first instance of the item.
•Replace All button - Click to replace every instance of the item.
•Preview All button - Click to show a side-by-side comparison of the original file and the file with re-
placements made. This lets you see the changes and confirm them before committing the changes to
the file.
Find and Replace View
351

Tip
You can use the menu items Edit →Undo and Edit →Redo to undo/redo replacements.
Replace in Files Tab
This tab on the Find and Replace View provides the same functionality as the Replace Tab, with the ad-
ded ability to conduct multi-file replacements. It contains one additional option, described below.
Figure 10.8. Find and Replace: Replace in Files Tab
Find and Replace View
352
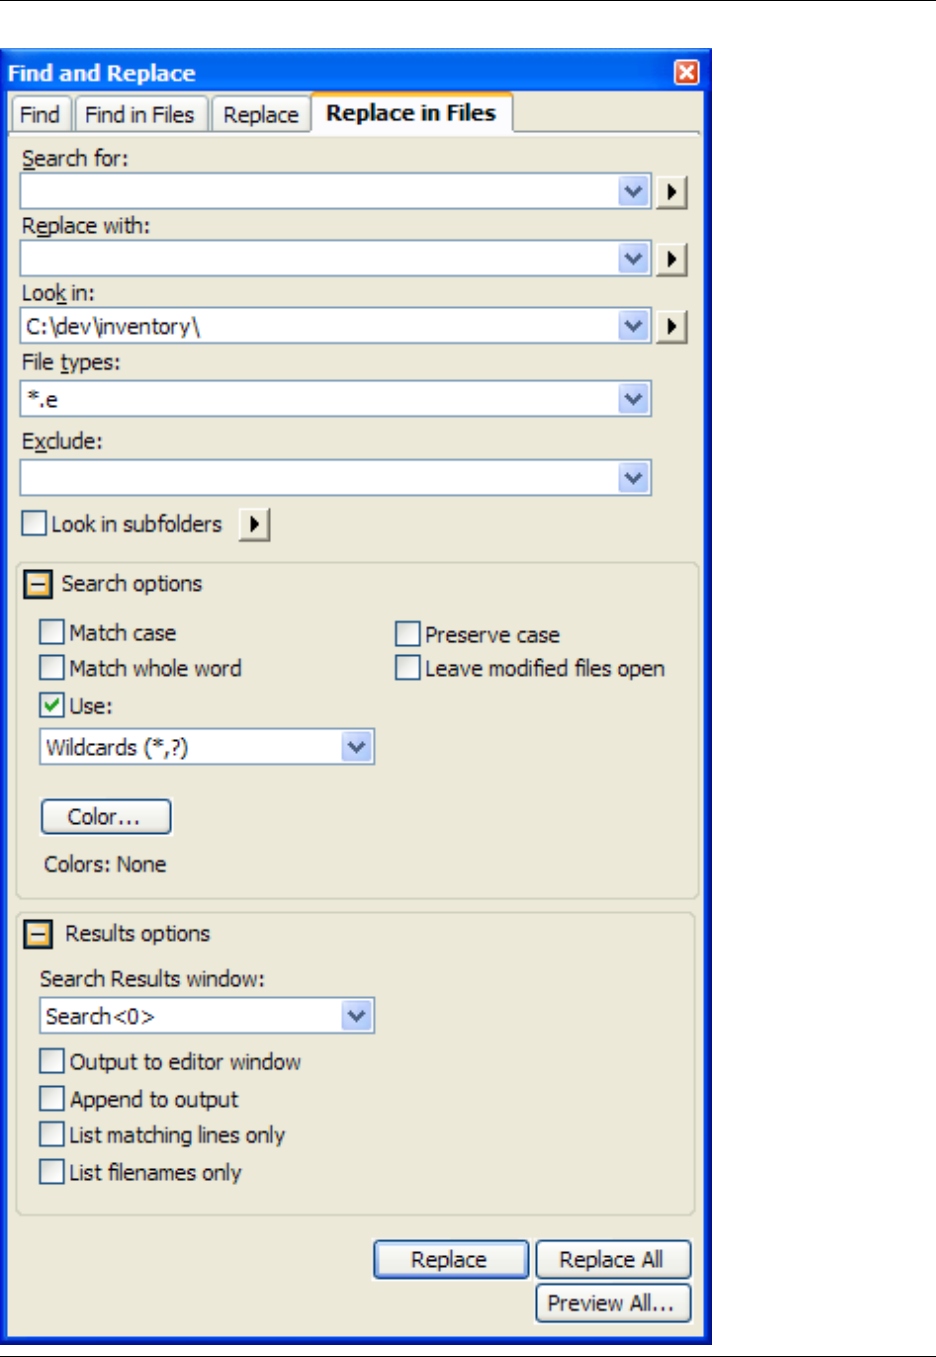
Find and Replace View
353

•Leave modified files open - Select this option to open all of the files on which a replace has been per-
formed.
The Results options are the same as those on the Find in Files Tab.
Tip
You can use the menu items Edit →Multi-File Undo and Edit →Multi-File Redo to undo/redo
replacements in multiple files.
Find Symbol View
The Find Symbol view is used to locate symbols in your code. It allows you to search for symbols by
name using either a regular expression, substring, or fast prefix match. To open this view, click Search →
Find Symbol.
See Find Symbol View under the Symbol Browsing topic for more information.
Figure 10.9. Find Symbol View
Find Symbol View
354
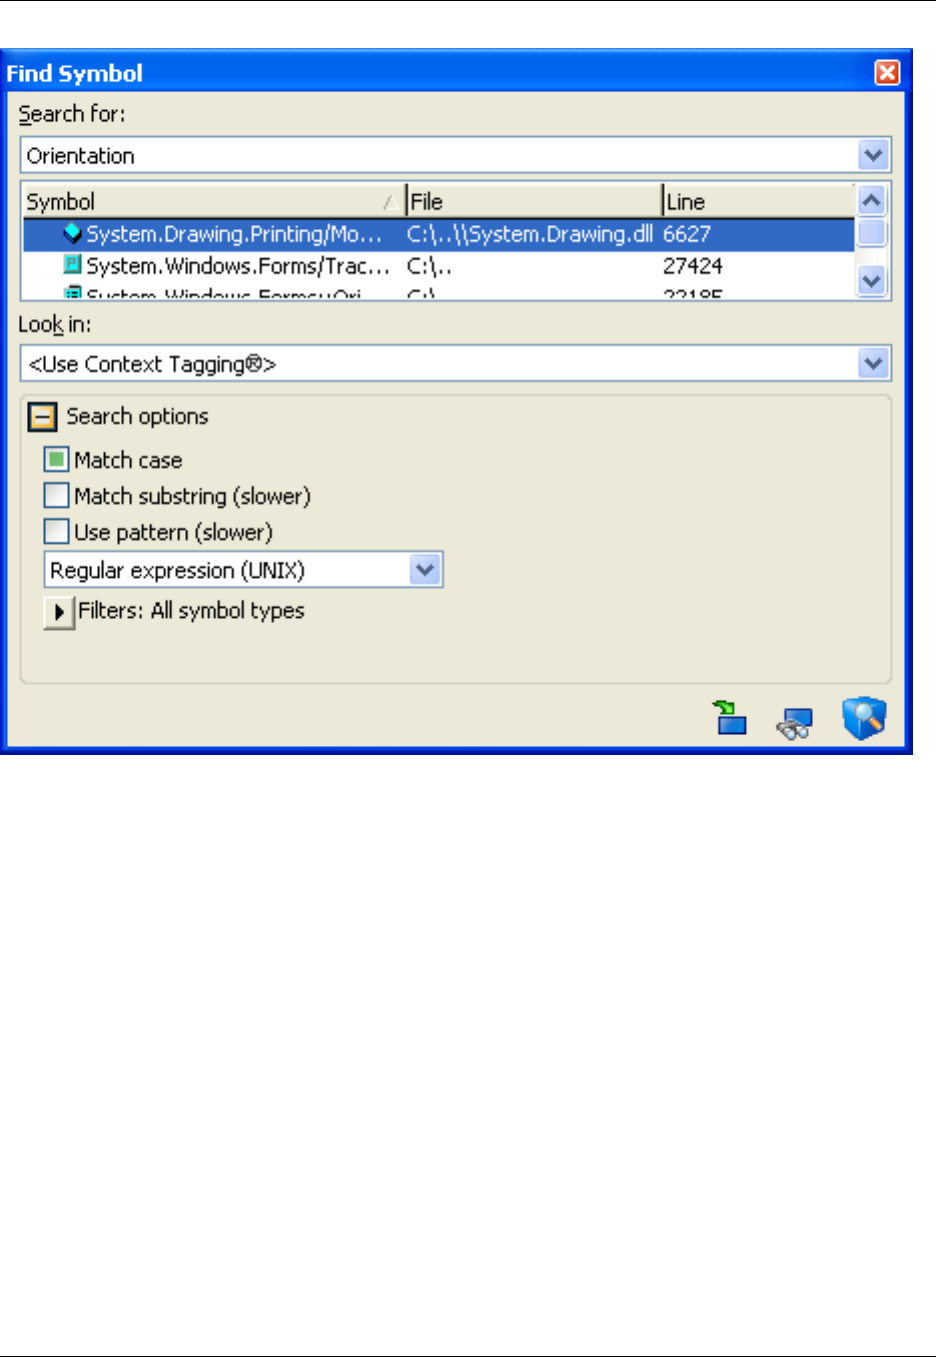
•Search for - Enter the name of the symbol to find. If you select the option Use pattern, you can enter
regular expressions or wildcards in the search field. If you specify <Use Context Tagging®>for the
Look in field, then you can enter language-specific expressions, such as "this->get" to find getters in
your current class. SlickEdit®Core displays a progress bar at the top of this view window while a
search is in progress.
Incremental matches are displayed with each character you type, and the first element in the list is se-
lected. Press Tab to put focus into the list of matches. Press Enter to navigate to the first match. Press
Down to select the next match. Press Escape to stop the search.
•Symbol List - The list of search results are refreshed as you type the search string. They include the
symbol name, the file that contains it, and the line number. You can sort by any of the three columns.
The selected match is highlighted and is displayed in the Preview view. Single-click or use the arrow
keys to select a match. Double-click or press Enter to navigate to that match.
•Look in - Use this control to specify the scope of the symbol search. The options are:
•<Use Context Tagging®>- This is the default setting. It uses Context Tagging to intelligently de-
termine which tag files to search.
•<Current File> - Select this setting to only search the tags in the current file, including local variables
Find Symbol View
355

in the current function scope.
•<Current Project> - Select this setting to only search in files that are in the current project.
•<Current Workspace> - Select this setting to only search in files that are in the current workspace.
•<Extension Tag Files> - Select this setting to search all extension-specific tag files for the indicated
extension. This may also include your workspace tag file.
•Specific tag files - Select one of the specific tag files listed to limit search to that file.
•<All Tag Files> - Select this setting to search all tag files for all languages.
•Search Options - The search options can be expanded or collapsed to save space.
•Match case - When selected, SlickEdit Core uses a case-sensitive search to find symbol matches.
When this option is not selected, SlickEdit Core uses a case-insensitive search. When this option is
in the neutral (mixed) state, SlickEdit Core first searches for case-sensitive matches, and if none are
found, attempts to perform a case-insensitive search. Note that for case-insensitive languages, this
may have no effect.
•Match substring (slower) - When selected, SlickEdit Core searches for the specified string within
the available symbols. For example, finding all symbols containing the word "order," not just those
that begin with "order." Selecting this option causes the search to execute more slowly.
•Use pattern (slower) - When selected, SlickEdit Core interprets the search string as a regular ex-
pression or wildcard expression. This can result in slower search times, since SlickEdit Coremust test
every symbol in the tag file against the regular expression.
•Filters - Use filters to restrict the search to certain types of symbols. The filters are the same the
ones available on the Outline view. See Outline View for more information.
•Buttons - The following buttons are located at the bottom of the view window:
•Go to definition - Navigates to the definition of this symbol in the editor window. If the programming
language allows for separate declaration and definition, you can control which is selected by using
the Extension Options dialog (Window →Preferences, expand SlickEdit and click General in the
tree, then double-click the File Extension Setup setting). Select the appropriate language from the
Extension drop-down list, then select the Context Tagging Tab. Select either Go to Definition nav-
igates to symbol definition (proc) or Go to Definition navigates to symbol declaration (proto).
See Code Navigation for more information.
•Go to reference - Displays a list of references for the selected symbol in the References View and,
optionally, navigates to the first reference. Click Window →Preferences, expand SlickEdit and click
General in the tree, then double-click the Context Tagging®Options setting. Check the option Go
to Reference only lists references if you just want to build the list of references. See Code Naviga-
tion for more information.
•Show in symbol browser - Displays the selected symbol in the Symbols View. Note that this feature
does not work for local variables or symbols from the current file that are not in a tag file.
Find Symbol View
356
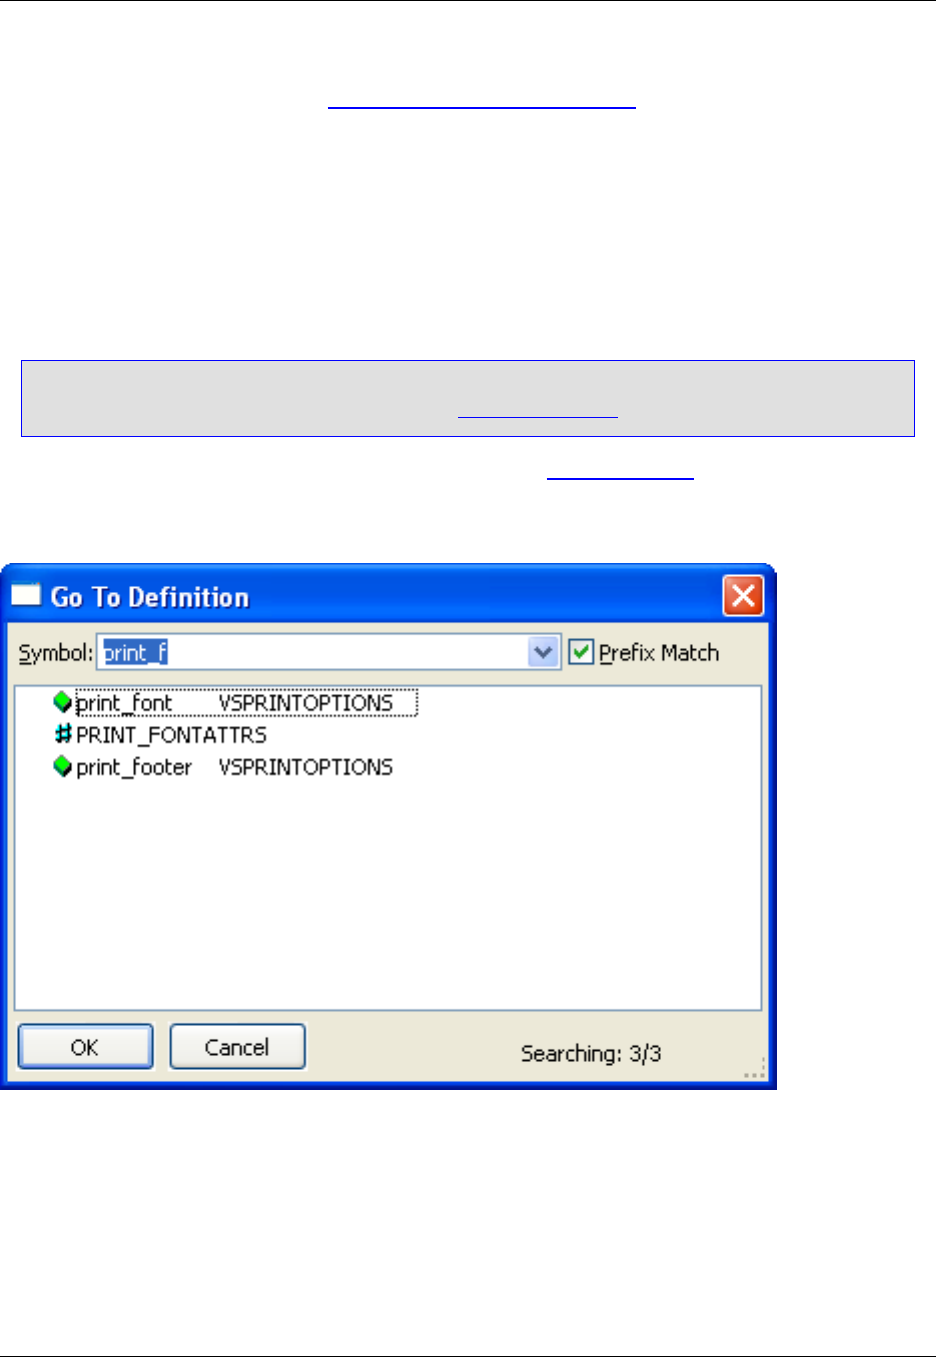
•Manage tag files - Displays the Context Tagging - Tag Files Dialog, which can be used to update
your tag files.
Go to Definition Dialog
The Go to Definition dialog (gui_find_proc command) can be used to navigate to symbols. It lists all tags
that match the prefix you have typed so far. To display the dialog, use the gui_find_proc command.
Tip
This dialog has been deprecated in favor of the Find Symbol View.
For more information about navigating between symbols, see Code Navigation.
Figure 10.10. Go to Definition Dialog
•Symbol - Specifies the symbol to search for.
•Prefix Match - Deselect to match tags using a regular expression or a substring search.
Go to Definition Dialog
357
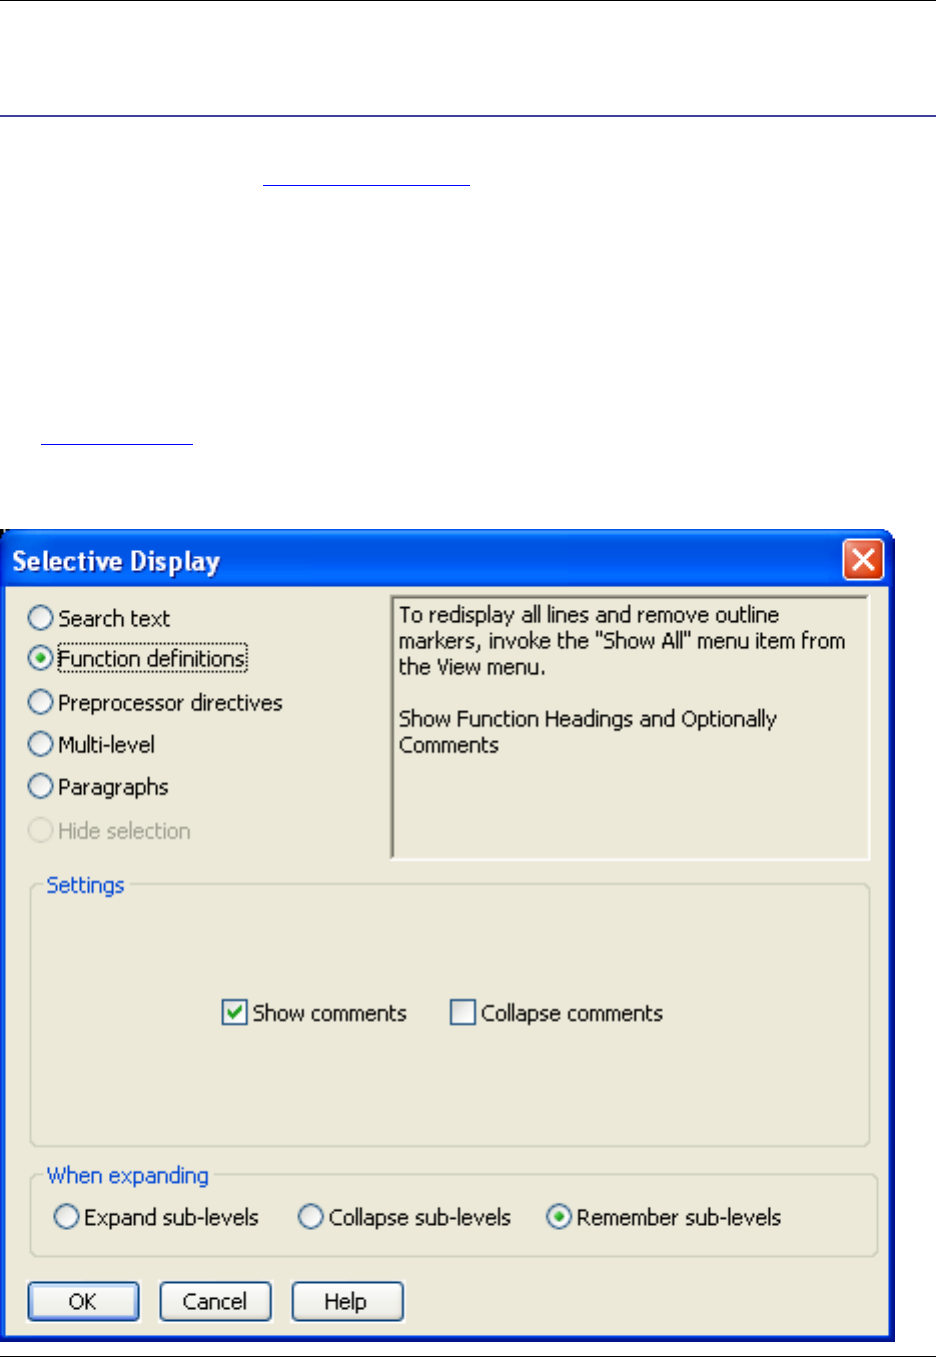
Dialogs Related to Viewing and Displaying
This section describes SlickEdit®Core dialogs and views related to viewing and displaying within the edit-
or. For more information, see Viewing and Displaying.
Selective Display Dialog
The Selective Display dialog (Display →Selective Display or selective_display command) allows you
to activate Selective Display and choose the regions in your code that you want to display or hide. Each
region contains settings that are specific to that region. The dialog also contains static options for expand-
ing.
See Selective Display for more information about working with this feature.
Figure 10.11. Selective Display Dialog
Selective Display Dialog
358

Search Text
Select Search text to specify a search string and display lines containing the search string specified or
lines not containing the search string specified. Click the right-pointing arrow button to the right of the field
to display a menu containing specific search syntax options such as Character in Range,Beginning of
Line, and Decimal Digit. The following settings are available:
•Match case - When checked, a case sensitive search is performed.
•Match whole word - When checked, a word search is performed. Before a search is considered suc-
cessful, the characters to the left and right of the occurrence of the search string found are checked to
be non-word characters. The default word characters are [A-Za-z0-9_$] and may be changed by the
Extension Options dialog box (from the main menu click Window →Preferences, expand SlickEdit
and click General in the tree, then double-click the File Extension Setup setting and select the Ad-
vanced Tab).
•Regular expression - When checked, a regular expression search is performed. See Find and Re-
place with Regular Expressions for more information.
•Reset selective display - When checked, all lines are made visible and Plus and/or Minus bitmaps
are removed before a search is performed.
•Hide matched lines - When checked, lines containing the search pattern are hidden.
Function Definitions
Select Function definitions to display only function headings and optional function heading comments.
The following settings affect how comments before function definitions are handled:
•Show comments - When checked, comments above function definitions are displayed as if they were
part of the function definition.
•Collapse comments - When checked, comments above function definitions are visible but multi-line
comments will require that you expand them to see all comments.
When both check boxes are off, comments will not be visible at all, making it difficult to copy or move
functions and comments.
Preprocessor Directives
Select Preprocessor directives to display a source file as if it were preprocessed according to the define
values you specify. If you do not remember your defines, use the Scan for Defines button. The following
settings are available:
•Defines - Specifies defines and optional values used when you select the Preprocessor Directives
option on the Selective Display dialog box. The syntax is:
name1[=value1]name2[=value2]
For example:
Selective Display Dialog
359

WIN32S VERSION=4
•Warning if Not Defined - If on when you preprocess your source, a message box is displayed for each
define found in an expression which does not have a value.
•Scan for Defines - Searches for define variables in the current source file and lets you specify values.
Resulting values are placed in the Defines combo box.
Multi-Level
Select Multi-level to set multiple levels of selective display based on braces or indent. The following set-
tings are available:
•Braces - When on, multiple levels of selective display are set to correspond to curly brace nesting
levels.
•Indentation - When on, multiple levels of selective display are set to correspond to indentation levels.
•Limit levels - When too many nested levels of selective display get confusing, place a limit on the max-
imum number of nested levels. Nesting deeper than this specified level is ignored.
Paragraphs
Select Paragraphs to display the first line of each paragraph. A paragraph is defined by a group of lines
followed by one or more blank lines.
Hide Selection
Select Hide selection to hide the lines in the current selection.
Expansion Options
The following expansion options can be applied for each region:
•Expand sub-levels - When on, expanding hidden lines expands all nested hidden lines.
•Collapse sub-levels - When on, expanding hidden lines collapses all nesting hidden lines.
•Remember sub-levels - When on, expanding hidden lines displays nested hidden lines the way they
were last displayed.
Macro Dialogs
360

Macro Dialogs
This section describes SlickEdit®Core dialogs related to macros. For more information about working
with macros, see Recorded Macros,Programmable Macros, and the Slick-C®Macro Programming Guide.
Save Macro Dialog
The Save Macro dialog appears when you end macro recording, or when you click Macro →Save last-
macro. You can also display the dialog by using the gui_save_macro command. The following options
are available:
•Macro Name - Specifies the name for the recorded macro.
•Requires editor control - Select this option if your macro can only operate if the target is an editor
control.
•Allow in read only mode - Select this option if your macro does not modify the current buffer.
•Allow when window is iconized - You will probably NOT want this option selected if your macro modi-
fies the current buffer. Whether to select this option is more a matter of personal taste.
•Allow in non-MDI editor control - Select this option if your macro should be allowed in a non-MDI ed-
itor control. This is typical for commands which require an editor control but do not open or close editor
windows/buffers.
•Save - Saves the recorded macro and displays the Key Bindings dialog so you can bind the macro to a
key sequence. See Binding Recorded Macros to Keys for more information.
•Edit - (Alt+E) Displays the macro source code in a new editor window. To save it, click Macro →Save
last-macro. The Key Bindings dialog will not appear automatically if you use this save operation. In-
stead, to bind the macro to a key, use the menu item Macro →List Macros. The Edit button is not
available for saved macros. See Saving and Editing Recorded Macros for more information.
•Delete - Deletes the recorded macro.
List Macros Dialog
The List Macros dialog is used to view and work with a list of macros you have recorded. It is accessed by
clicking Macro →List Macros on the main menu, or by using the list_macros command on the
SlickEdit®Core command line.
Figure 10.12. List Macros Dialog
Save Macro Dialog
361
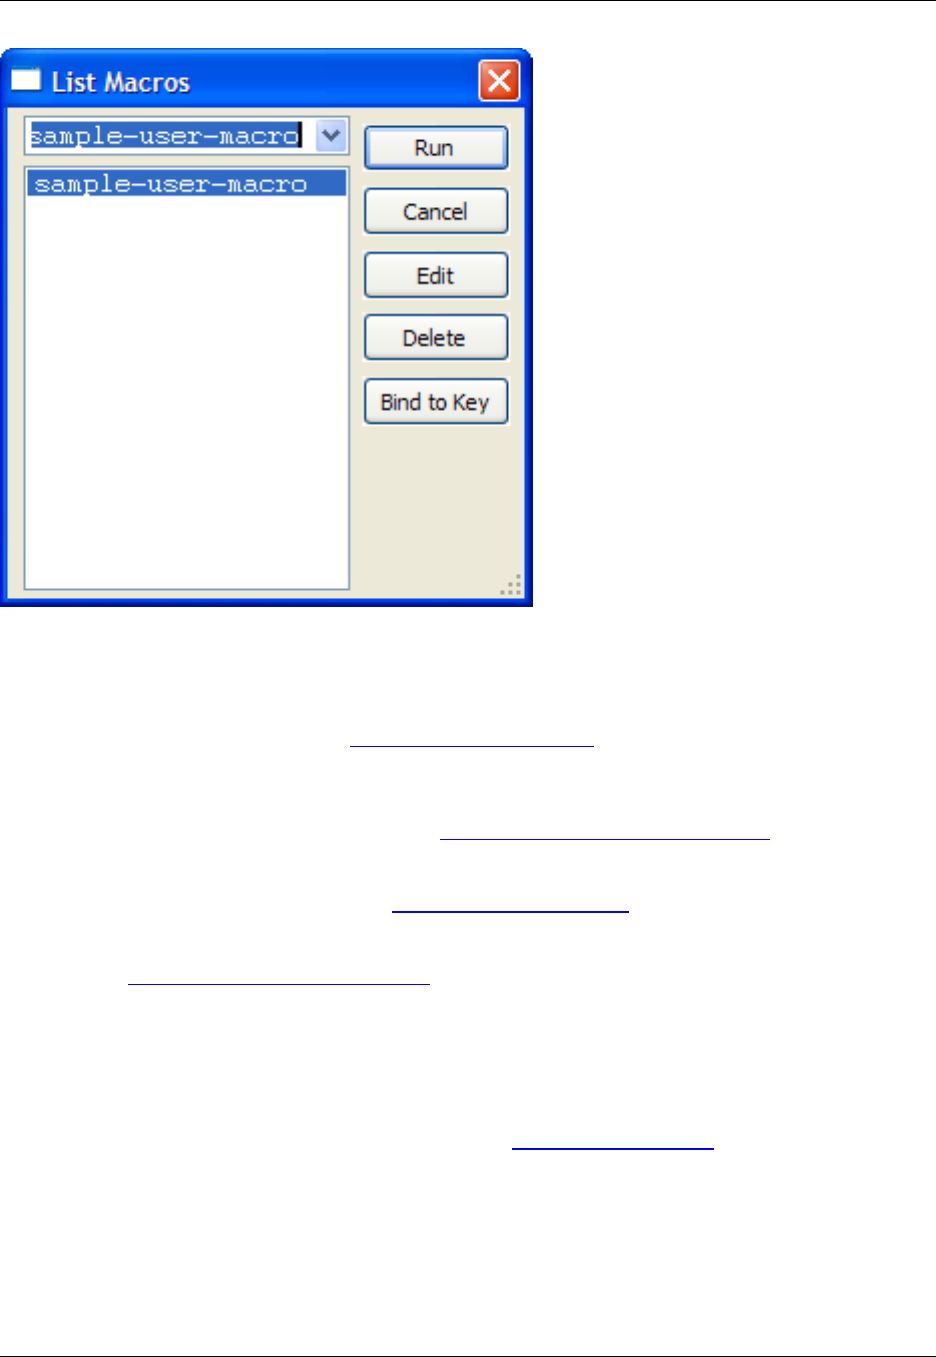
The dialog shows a list of all macros you have recorded. Use the buttons to perform the following opera-
tions:
•Run - Runs the selected macro. See Running a Recorded Macro for more information.
•Cancel - Closes the dialog.
•Edit - Opens the macro source for editing. See Saving and Editing Recorded Macros for more informa-
tion.
•Delete - Deletes the selected macro. See Deleting Recorded Macros for more information.
•Bind to Key - Displays the Key Bindings dialog so you can assign a key or mouse shortcut to the
macro. See Binding Recorded Macros to Keys for more information.
Variable Editor Dialog
The Variable Editor dialog, shown below, is used to edit complex variables for macros. For more informa-
tion about working with these programmable macros, see Programmable Macros. To access the Variable
Editor, click Macro →Set Macro Variable, or use the gui_set_var command, select a variable to edit
from the list, then click the Edit button.
Figure 10.13. Variable Editor Dialog
Variable Editor Dialog
362
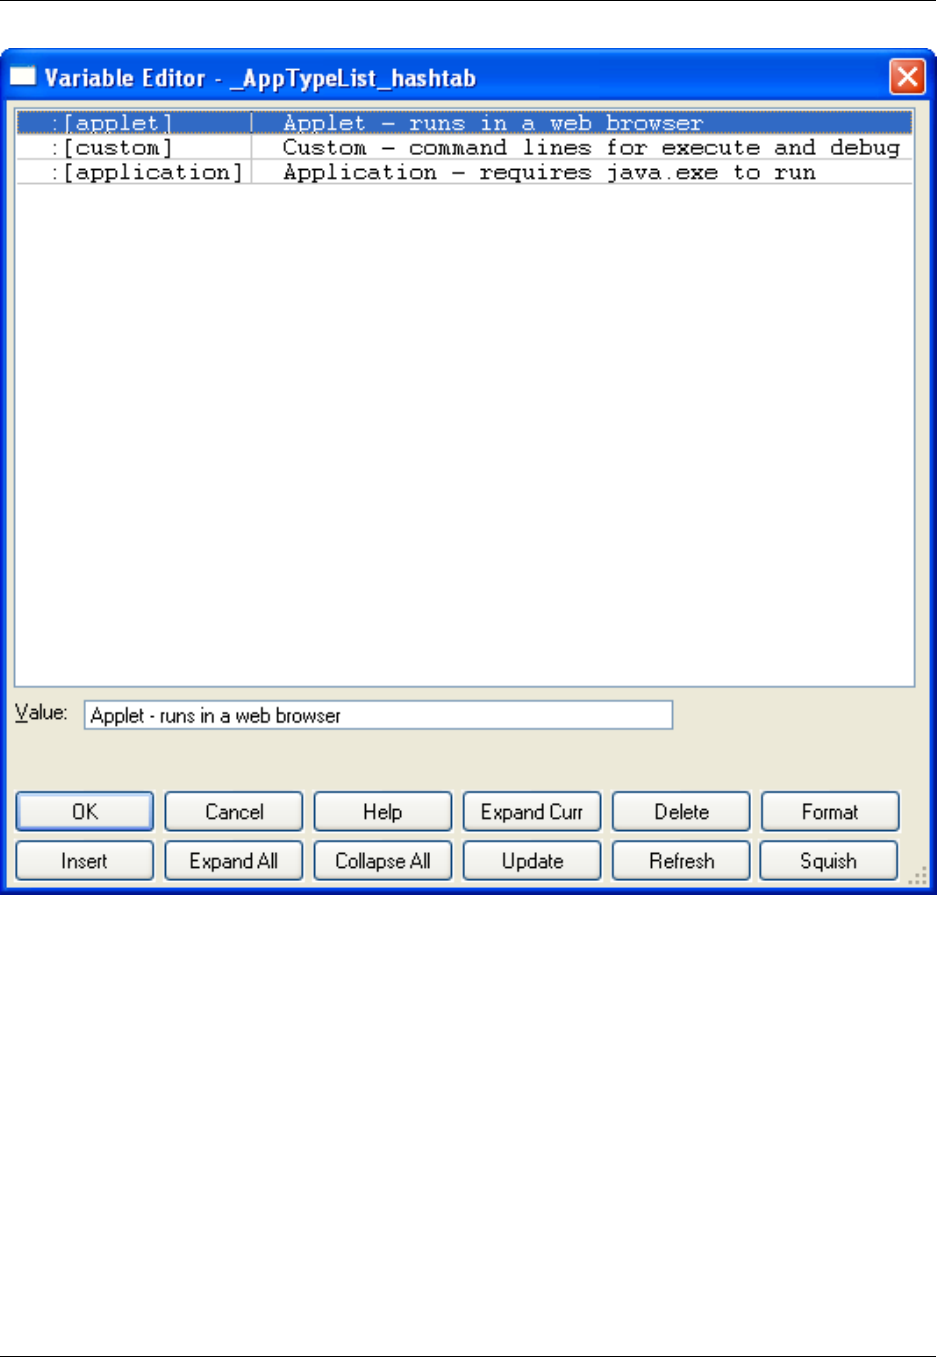
The data structure of the variable is displayed in the list box at the top of the dialog, and the value for
each entry is displayed in the Value text box.
The following buttons are available:
•Expand Curr - Expands current item which has a Plus (+) bitmap.
•Delete - Deletes current item.
•Format - Allows you to change the type of the current item.
•Insert - Inserts a new hash table or array element.
•Expand All - Expands all items so you can see the entire data structure.
•Collapse All - Display first level of variable with nothing expanded.
Variable Editor Dialog
363
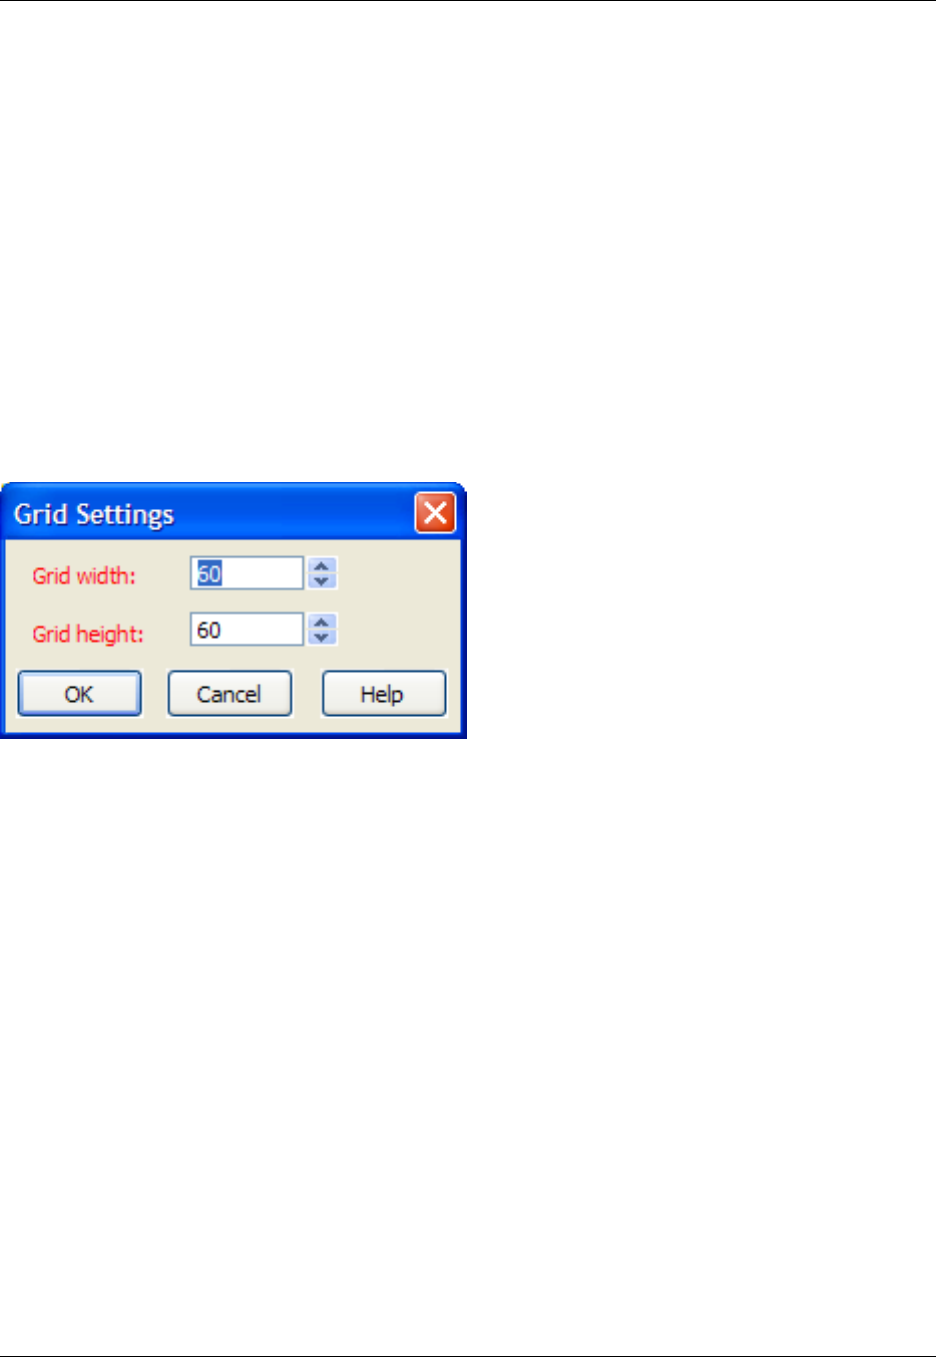
•Update - Sets the contents of the variable to what is currently displayed in the Variable Editor.
•Refresh - Cancels changes and displays current value of variable which is not necessarily the same as
when this dialog box was originally displayed.
•Squish - Deletes array items which have the value _notinit.
Grid Settings Dialog
The Grid Settings dialog (Macro →Grid or gui_grid command) is used to set the width and height of grid
dots displayed on forms when you use the Dialog Editor. These settings affect the distance between the
dots on a form that is being edited.
Figure 10.14. Grid Settings Dialog
The width and height parameters are in twips (1440 twips equal one inch on the display).
Menu Editor Dialog
The Menu Editor dialog, shown below, contains options for editing menus. To access this dialog, click
Macro →Menus, select the menu to edit from the list, then click Open.
Figure 10.15. Menu Editor Dialog
Grid Settings Dialog
364
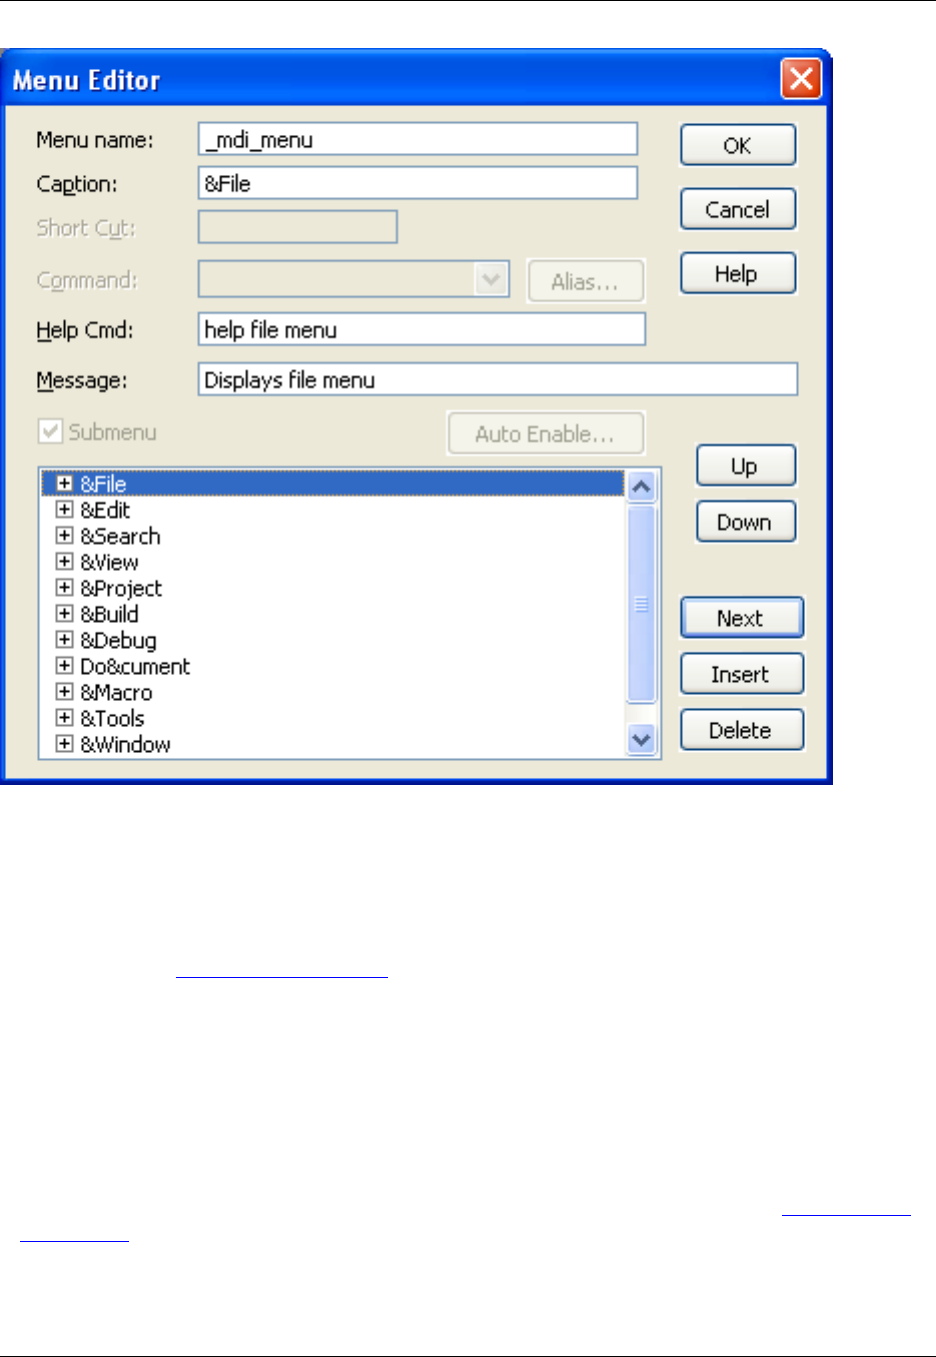
The following fields and settings are available:
•Menu name - Name of the current menu resource. You can define your own menu resource which is
used instead of our menu bar WITHOUT changing the name of our default menu bar _mdi_menu. Use
the -m invocation option (for example, -m mymenu) or set the def_mdi_menu macro variable to your
menu name (see Setting Macro Variables).
•Caption - Title displayed for the menu item. For menu items, set the caption to "-" to specify a line sep-
arator.
•Short Cut - Key binding shortcut for the menu item.
•Command - Macro command executed when the menu item is selected. This may be an internal
macro command or a command line for running an external program.
•Alias - Displays the Menu Item Alias dialog box to set an alias for the menu item. See Defining Menu
Item Aliases.
•Help Cmd - Macro command executed when F1 is pressed when the menu item is selected. Usually it
isahelp or popup_imessage command. For example, if you specified gui_open as the menu item
Menu Editor Dialog
365

command, specify "help open dialog box" as the Help item. If you do not know the name of the dialog
box displayed, search for Help on the command. The Help for each command should indicate the name
of the dialog box displayed. Some commands do not display dialog boxes. For these commands, spe-
cify help command where command is name of the command this menu item executes or help xxxx
menu where xxxx is the name of the drop-down menu this command is on.
•Message - Message text to be displayed when selection cursor is on this menu item. This message is
currently only used when the menu is used as the SlickEdit®Core menu bar.
•Submenu - Check this box if you want to create a menu which contains other menu items.
•Auto Enable - Displays the Auto Enable Properties dialog box to set the properties for the menu item
that should be automatically enabled. See Enabling/Disabling Menu Items and Auto Enable Properties
Dialog.
•Up - Moves the selected menu item above the previous menu item.
•Down - Moves the selected menu item below the next menu item.
•Next - Selects the menu item after the currently selected menu for editing. Use this button to insert a
blank menu item after the last menu item in the list.
•Insert - Inserts a blank menu item before the selected menu item.
•Delete - Deletes the selected menu item.
Auto Enable Properties Dialog
This dialog is used to set the auto-enable properties for a menu item. For example, the screen capture
below shows the Auto Enable Properties dialog for cut on the _textbox_menu. For more information, see
Enabling/Disabling Menu ItemsEnabling/Disabling Menu Items. To access this dialog, click the Auto En-
able button on the Menu Editor dialog.
Figure 10.16. Auto Enable Properties Dialog
Auto Enable Properties Dialog
366
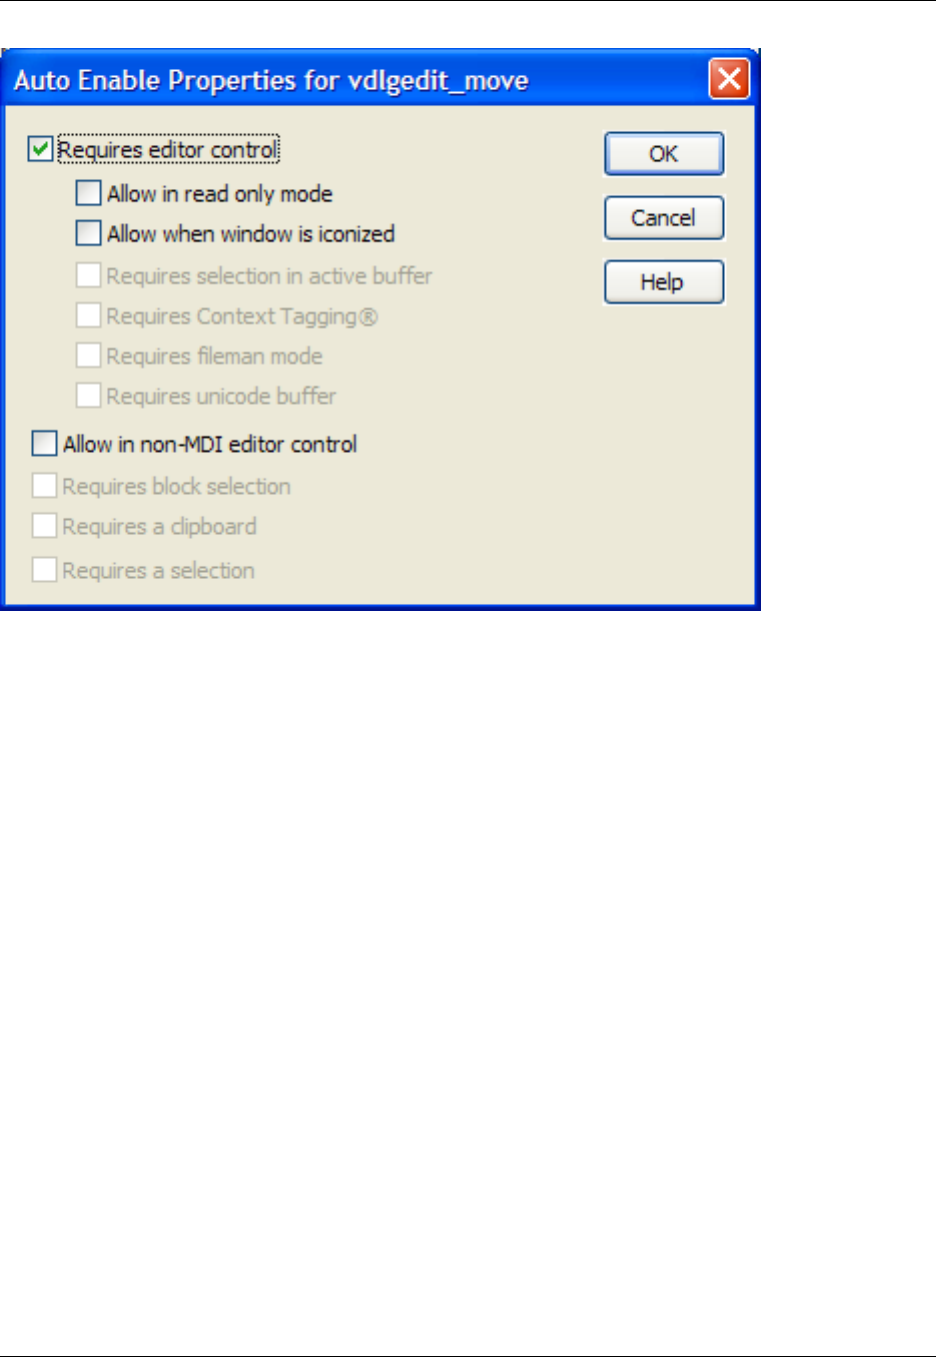
The following settings are available:
•Requires editor control - Indicates that this command should be enabled only if operating on an editor
control.
•Allow in read only mode - Indicates that this command should be enabled if the editor control is in
strict read only mode.
•Allow when window is iconized - Indicates that this command should be enabled if the editor control
is an editor window which is iconized.
•Requires selection in active buffer - Indicates that this command should be disabled if there is no se-
lection in the active buffer.
•Requires Context Tagging®- Indicates that this command should be disabled if Context Tagging does
not support the current buffer language type.
•Requires fileman mode - Indicates that this command should be disabled if the current buffer is not in
Fileman mode.
•Requires unicode buffer - Indicates that this command should be disabled if the current buffer is not
Unicode.
•Allow in non-MDI editor control - Indicates that this command should be allowed in a non-MDI editor
control.
•Requires block selection - Indicates that this command should be disabled if there is no selection or
the current selection is not a type of block or column.
Auto Enable Properties Dialog
367

•Requires a clipboard - Indicates that this command should be disabled if there is no editor control clip-
board available.
•Requires a selection - Indicates that this command should be disabled if there is no selection.
Tools Dialogs
368
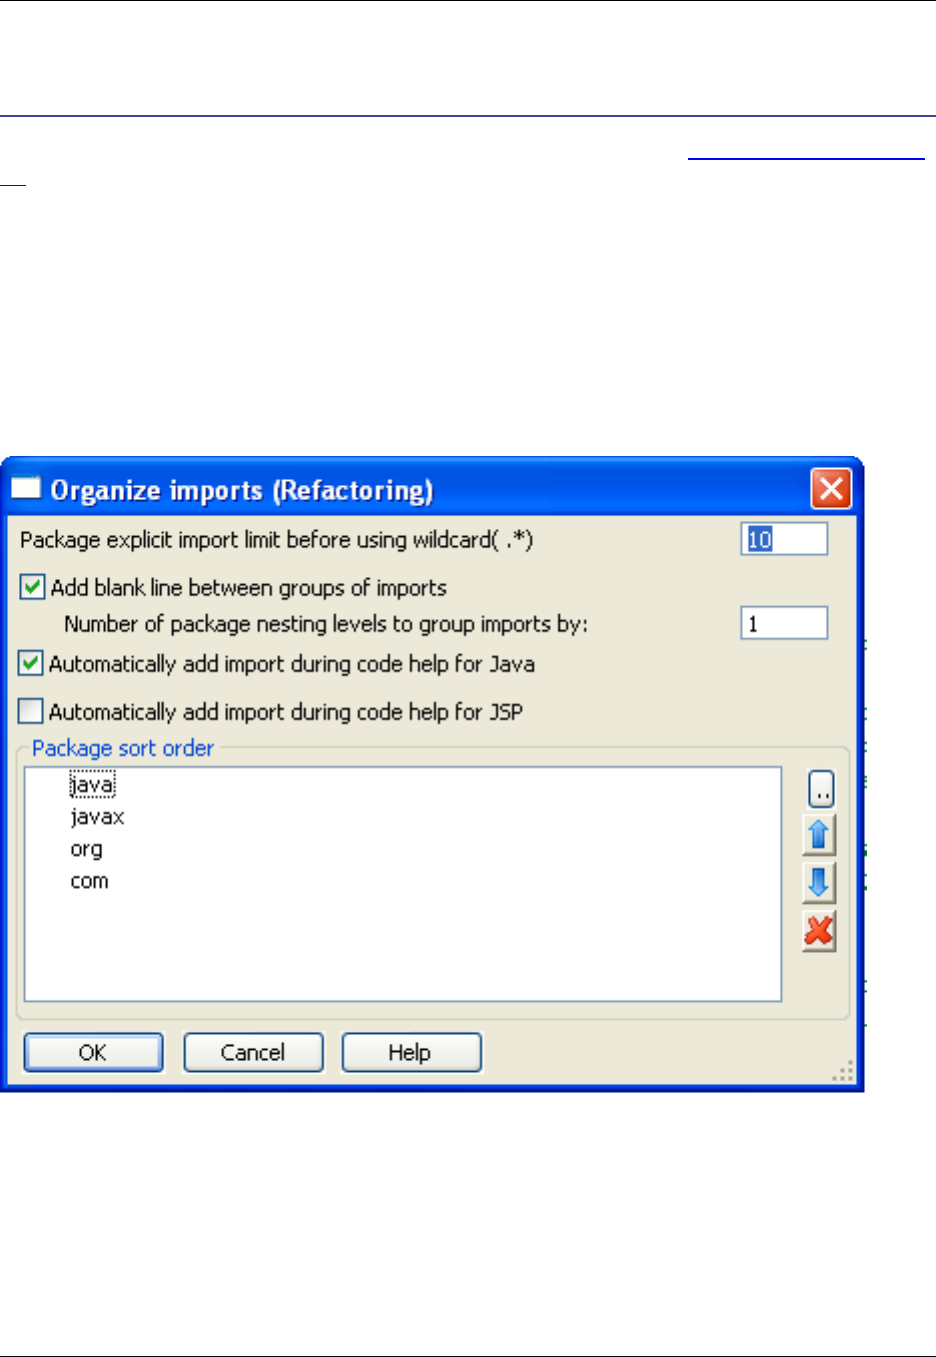
Tools Dialogs
This section describes SlickEdit Core dialogs related to tools and utilties. See Chapter 8, Tools and Utilit-
ies for more information.
Organize Imports Options Dialog
The behavior of the Organize Imports and Add Import features is controlled by the options on the Organ-
ize Imports Options dialog box, pictured below. This dialog can be accessed by right-clicking in the editor
and selecting Imports →Options.
Figure 10.17. Organize Imports Options Dialog
The following settings are available:
•Package explicit import limit before using wildcard(.*) - If more than this number of classes are ex-
plicitly imported from the same package in one file, the imports will be replaced with a single wildcard
import.
•Add blank line between groups of imports - Organize Imports will group imports by package name
or top-level package name. Select this option to force Organize Imports to add a blank line between
Organize Imports Options Dialog
369

these groups instead of having just one flat list of imports.
•Number of package nesting levels to group imports by - If this is set to 1, import statements will be
grouped by top-level package name only. For example, all your imports from java. packages would
be in a separate group from your imports from com. packages. If set to 2, import statements will be
grouped by second level package names. For example, all your imports from java.util would be in a
separate group from your imports from java.awt.
•Automatically add import during code help for Java - If selected, SlickEdit®Core will attempt to
automatically add imports as you edit Java code.
•Automatically add import during code help for JSP - If selected, SlickEdit Core will attempt to auto-
matically add imports as you edit Java code embedded in HTML. JSP imports are added using the fol-
lowing notation: <%@ page import="java.util.Vector"%>.
•Package sort order - This list specifies the order in which package groups are sorted. Use the El-
lipses (...) button to add a new package. Use the Up and Down arrow buttons to move items. Use the
Xbutton to delete the currently selected package from the list.
3-Way Merge Dialog
The 3-Way Merge dialog (Tools →File Merge) is used for merging file differences.
Figure 10.18. 3-Way Merge Dialog
3-Way Merge Dialog
370

The Ellipses buttons to the right of the text boxes are used to select files. The Bbuttons to the right of the
text boxes are used to select from the open buffers.
The list below describes the remaining fields and settings:
•Base file - Specifies the file/buffer name of the original source file before any changes are made.
•Revision 1 and 2- Specifies the file/buffer names of the modified versions of the base file.
•Output file - Specifies the output file name.
•Merge style - The following merge styles are available:
•Auto merge - If selected, if a change does not cause a conflict, the change is automatically applied
to the output file and no indication is made that the change was already applied.
•Show changes - If selected, if a change does not cause a conflict, the change is automatically ap-
3-Way Merge Dialog
371

plied to the output file and the change IS indicated, so that using the Next Conflict button will show
you the change.
•Output style -Output style has no effect if there are no conflicts. The following output styles are avail-
able:
•Interactive - Provides a friendly side-by-side dialog box which lets you pick the change you want in
the output file. It also lets you edit.
•Interleaved buffer - Creates an editor buffer which you must edit to resolve conflicts.
•Use smart merge - If selected, the number of conflicts found is reduced.
•Ignore spaces - If selected, leading and trailing spaces are ignored. The side-by-side output allows
you to easily select the change that you want.
DIFFzilla®Dialog
The DIFFzilla dialog (Tools →File Difference) is used to configure a file differencing operation and begin
the diff. The options are categorized into two tabs:
•DIFFzilla Files Tab
•DIFFzilla Options Tab
DIFFzilla®Files Tab
You can compare two files or two source trees to determine which files have been added or removed and
to generate a list of file names. Use this tab to set up the comparison parameters for the files that you
wish to compare. After configuring your settings, click OK to start the diff.
Figure 10.19. DIFFzilla®: Files Tab
DIFFzilla®Dialog
372
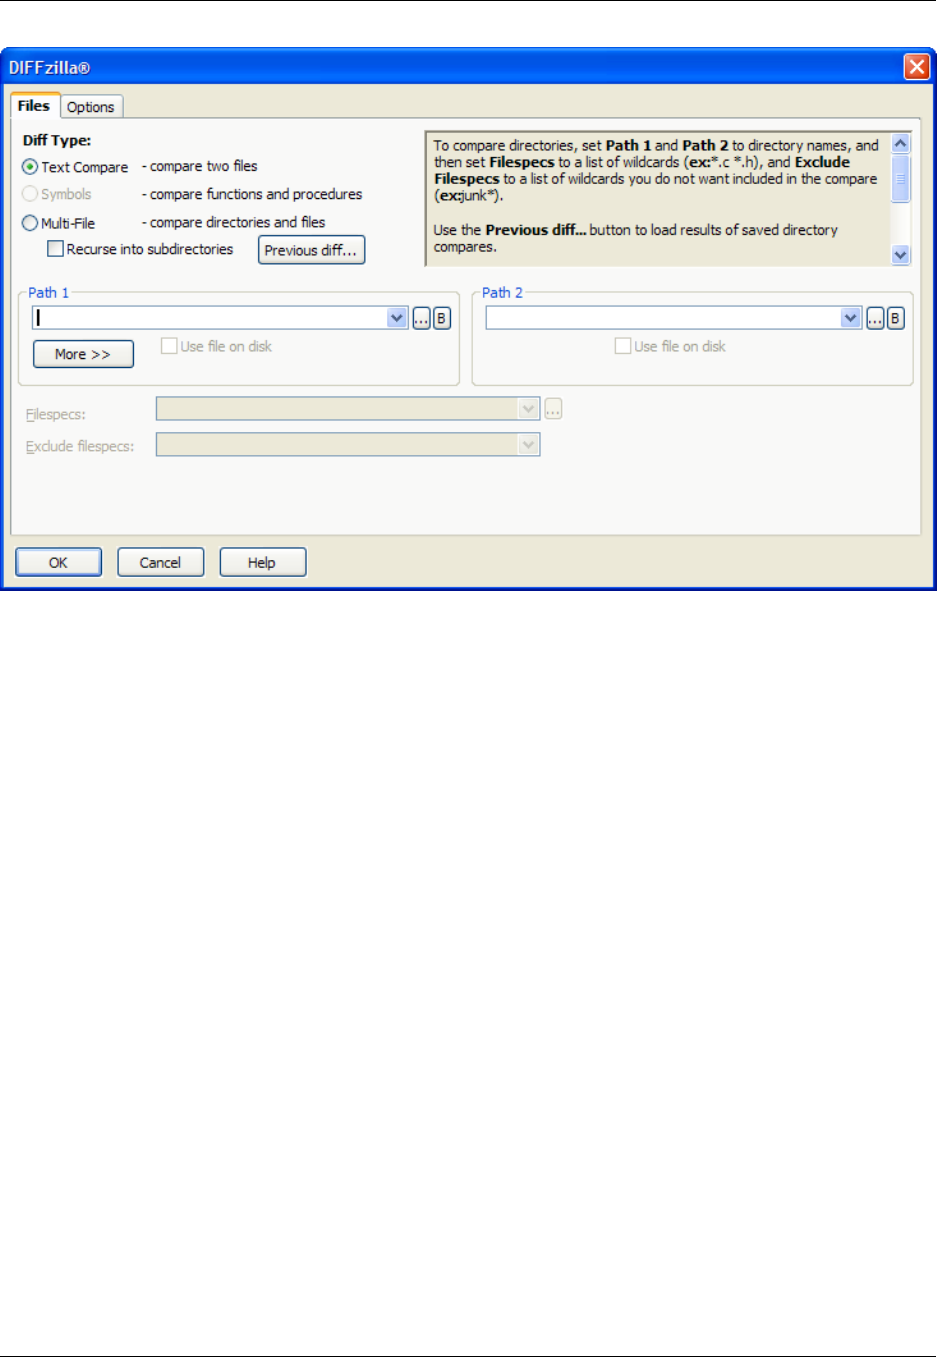
Diff Types
The following Diff types are available:
•Text Compare - Compares two files and shows the differences between them. When this option is se-
lected, after you click OK on this dialog to start the comparison, the interactive Diff dialog is displayed,
allowing you to preview the differences one-by-one before committing.
If the option on the Options tab, Instead of an interactive dialog, output one buffer with the differ-
ences labeled, is checked, a buffer with the differences between the two files marked up will be dis-
played instead.
•Symbols - Allows the selection of a symbol in order to set the Line Range line numbers. Not all symbol
ranges are identified. Ranges for multi-line variable declarations are not identified.
•Multi-File - Compares two directories or directory trees, and shows which files do not match. Select
Recurse into subdirectories to search subdirectories recursively. Click Previous diff to load a diff
state file (.dif), restoring the saved state of a multi-file diff session.
Path Information and Filespecs
The following list describes the path information and filespec settings that can be entered on the
DIFFzilla®dialog:
•Path 1,Path 2 - To compare directories, set Path 1 and Path 2 to directory names. To compare files,
set Path 1 and Path 2 to file names. If the file names only differ by path, you only need to specify a dir-
ectory for Path 2. Click the Ellipses button to browse, or the Bbutton to select an open buffer.
DIFFzilla®Dialog
373

•Use file on disk - Select this option to diff the file on disk and not the file in the buffer.
•More - Click this button to display additional file options.
•Symbols - Click this button to select a symbol to diff. The selected symbol will appear next to the word
"Symbol" under the Line range options. All symbols from Path 1 are diffed against all symbols from
Path 2. Performing a multi-file diff always diffs all symbols. When symbols are diffed, there is a multi-file
diff on just two files which immediately diffs all symbols. Not all symbol blocks are identified correctly.
For an example, see Comparing Symbols or Parts of Files.
•Line range - Specifies the start and end line numbers for the range of lines to compare. If you set the
start line number and leave the end line number blank, the range extends to the end of the file. When
you select a range of lines, you can compare parts of the same file.
•Record file width - Specifies the record width to use when reading a file (optional).
•Filespecs - Enter a space-delimited list of wildcard file specifications to difference. For example, enter
"*.c *.cpp *.h" to difference all files with .c,.cpp, and .h extensions.
•Exclude filespecs - Enter a space-delimited list of wildcard file specifications to be excluded from the
differencing. For example, enter junk* test* to exclude all files with names beginning with the words
"junk" or "test".
DIFFzilla®Options Tab
Use this tab to set up file comparison options and options that affect the interactive Diff dialog. Click Save
to save the options and close this dialog without running DIFFzilla. There are two types of options avail-
able: File Compare Options and Dialog Setup Options.
File Compare Options
Figure 10.20. DIFFzilla®: File Compare Options
DIFFzilla®Dialog
374
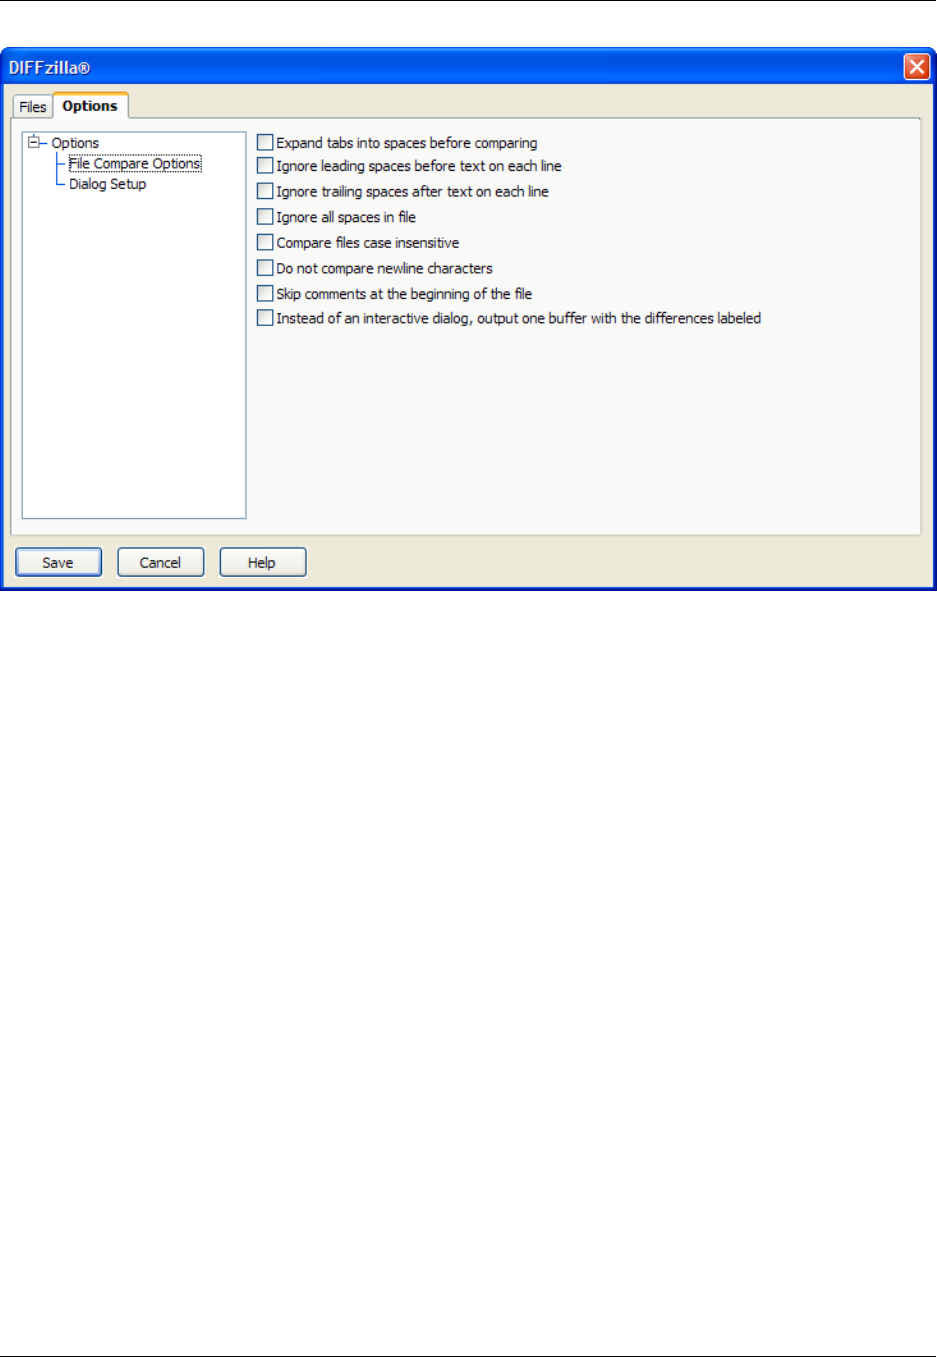
The file compare options, shown above, are described as follows:
•Expand tabs into spaces before comparing - When selected, tabs are expanded to the appropriate
number of spaces before lines from each file that is compared.
•Ignore leading spaces before text on each line - When selected, differences in leading spaces of
lines are ignored.
•Ignore trailing spaces after text on each line - When selected, differences in trailing spaces at the
end of lines are ignored.
•Ignore all spaces in file - When selected, differences in spacing between characters in lines are ig-
nored.
•Compare files case insensitive - When selected, differences in character casing are ignored.
•Do not compare newline characters - When selected, differences in end-of-line characters are ig-
nored. This is useful when comparing UNIX-formatted files with DOS-formatted files.
•Skip comments at the beginning of the file - When selected, leading comments are ignored. This is
useful if you are using a version control system that automatically inserts comment file headers.
•Instead of an interactive dialog, output one buffer with the differences labeled - When selected, a
new buffer is created that contains color-coded difference output. You can edit the output buffer. When
this option is not selected, the Diff dialog box opens displaying the two files side-by-side and the differ-
ences are color-coded.
Dialog Setup Options
DIFFzilla®Dialog
375
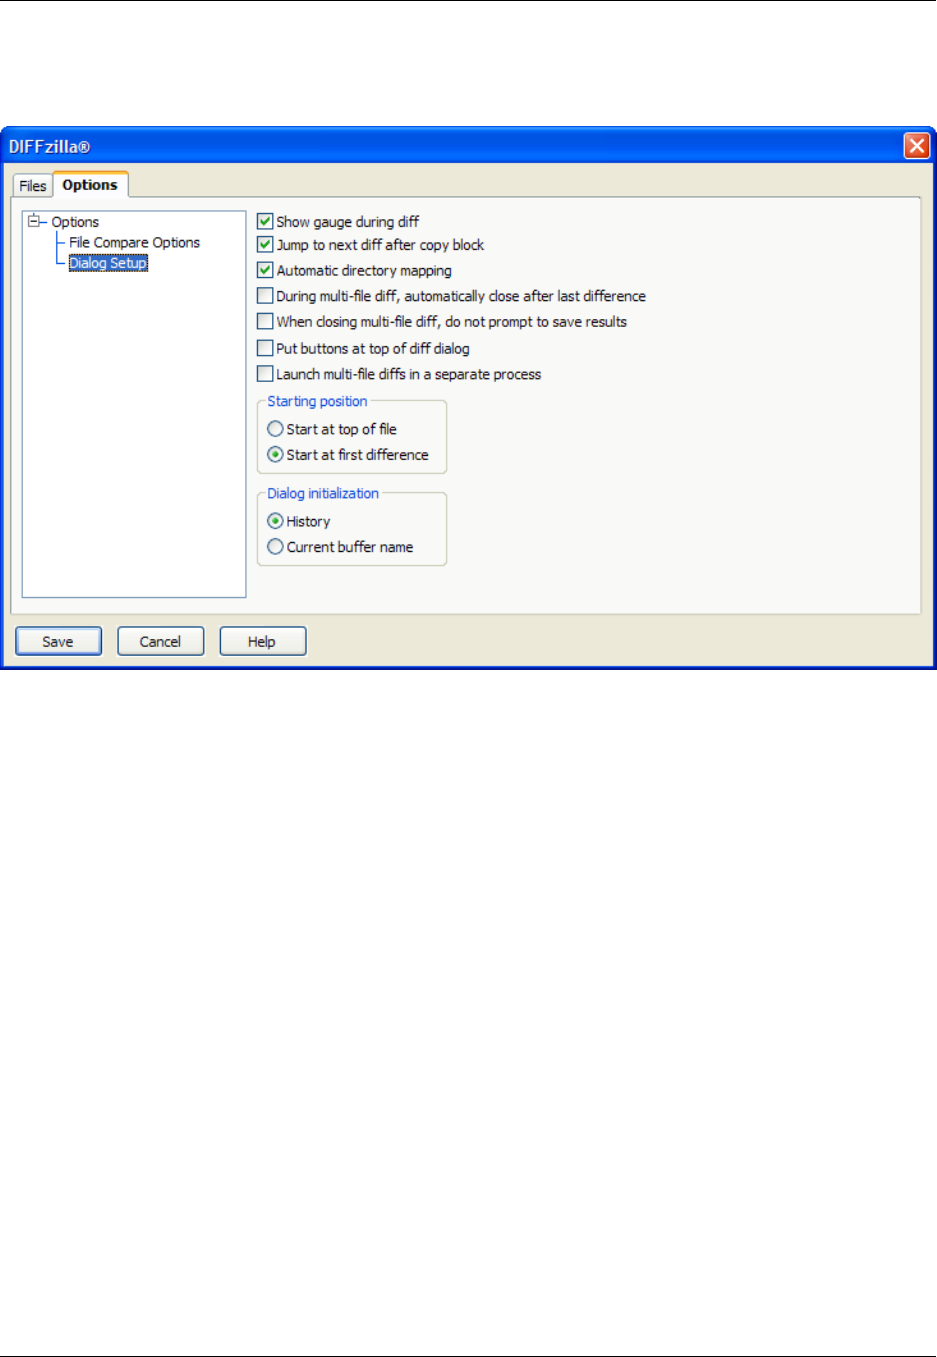
Figure 10.21. DIFFzilla®: Dialog Setup Options
Setup options for the DIFFzilla®dialog are described as follows:
•Show gauge during diff - When selected, a gauge control will show various processing statistics while
you wait for the differences output to complete.
•Jump to next diff after copy block - When selected, the cursor is moved to the next difference when
you apply changes from one file to the other. For example, after clicking Block on the Diff dialog box,
the tab moves to the next difference. This option has no effect on interleaved output.
•Automatic directory mapping - When selected, the Path 2 text box is automatically updated when
you type a directory in the Path 1 text box.
•During multi-file diff, automatically close after last difference - When selected, clicking Next Diff
on the Diff dialog box when there are no more differences, triggers the Close button on that dialog box.
•Put buttons at top of diff dialog - When selected, the buttons that control operations such as Next
Diff,Prev Diff, and Block, are displayed at the top of the Diff dialog box.
•Launch multi-file diffs in a separate process - When selected, source trees are diffed in a separate
process so you can continue working.
•Starting position - Determines whether to place the cursor at the top of the file or at the first difference
when the Diff dialog box is displayed. This option has no effect on interleaved output.
•Dialog initialization - Determines whether the DIFFzilla dialog box restores previous dialog settings
DIFFzilla®Dialog
376
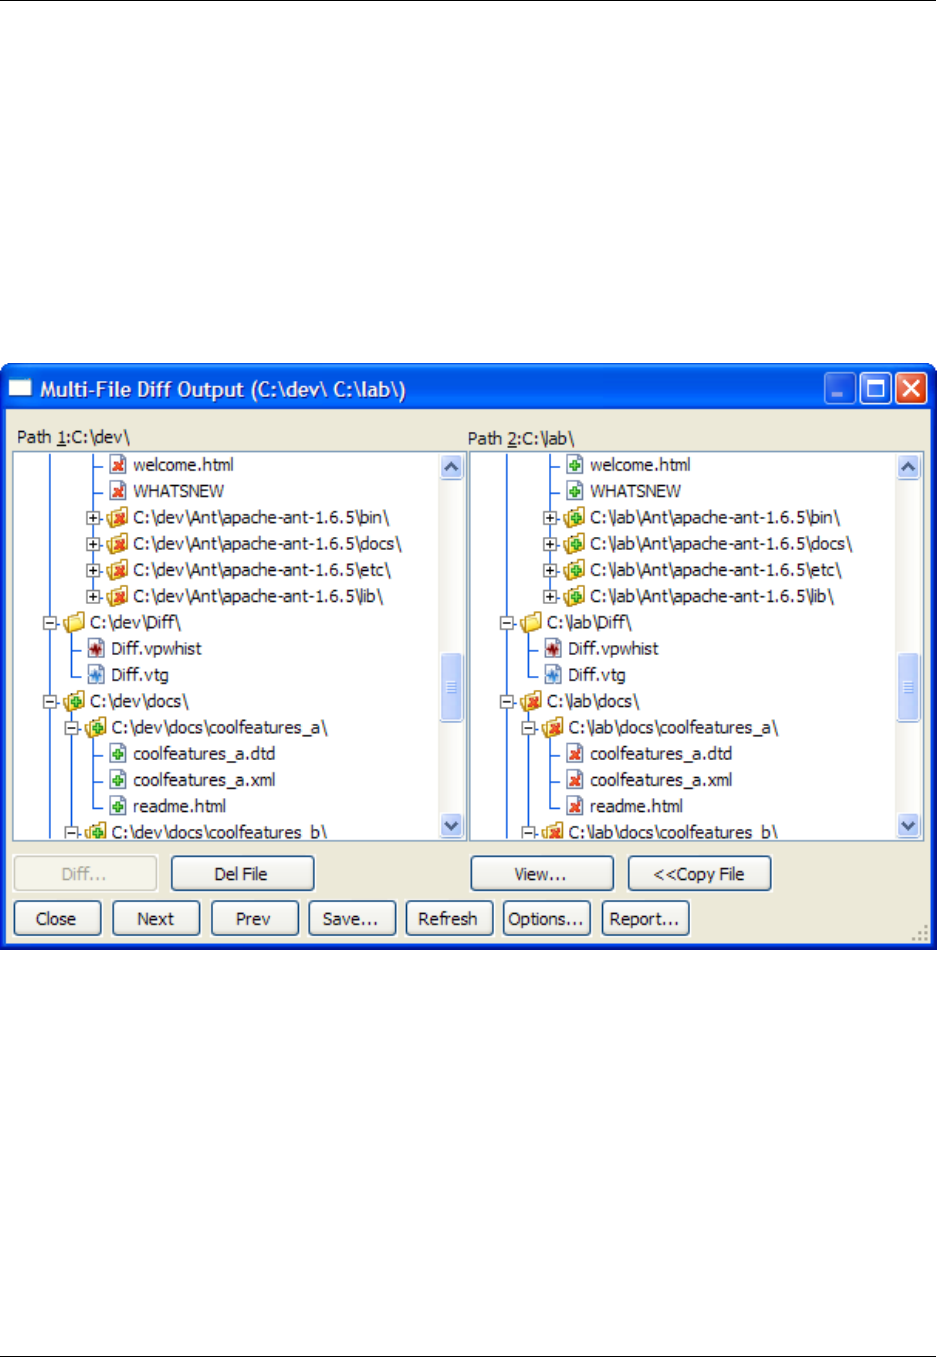
(history) or just places the current buffer name into the Path 1 text box. Press F7/F8 to restore the pre-
vious next dialog settings, respectively.
Multi-File Diff Output Dialog
When using DIFFzilla®to perform a directory comparison (Multi-File diff type), the results are presented
in the Multi-File Diff Output dialog.
Figure 10.22. Multi-File Diff Output Dialog
The Multi-File Diff Output dialog box contains the following elements:
•Diff - Shows current files in the difference editor when the selected files differ.
•Del File - Deletes the selected file(s). Hold Ctrl+Click to multi-select in either tree. The Xbitmap is dis-
played.
•View - Shows current files in the difference editor when the selected files match.
•Copy File/Copy Tree -Copy File is displayed when the selected files differ or when the selected file
only exists in the current source tree. The Plus bitmap is displayed. Copy Tree is displayed when the
selected item is a directory that only exists in the current source tree. When you click Copy Tree, you
are prompted as to whether you want to copy the directory source tree recursively.
Multi-File Diff Output Dialog
377
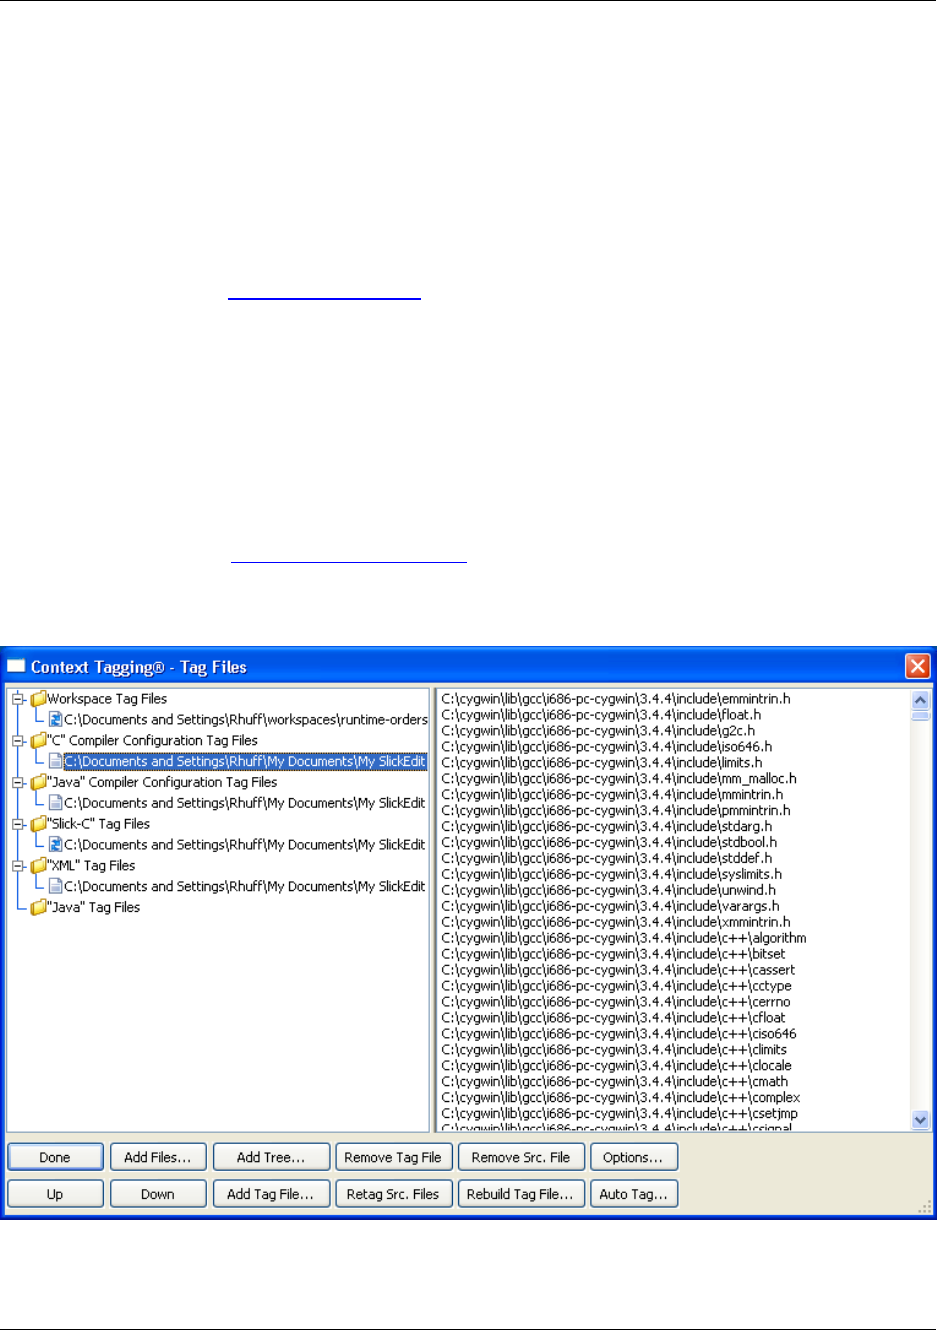
•Next - Moves the cursor to the next set of mismatched files in both source trees.
•Prev - Moves the cursor to the previous set of mismatched files in both source trees.
•Save - Lets you save a diff state file (.dif) that you can load later with the Previous diff button on the
DIFFzilla®dialog box. This is especially useful when you have not completed merging files and you
want to continue at a later time. Also, you can generate a file list.
•Refresh - Rediffs modified files or all files.
•Options - Displays the DIFFzilla Options Tab. Options include ignoring spaces, skipping leading com-
ments, and expanding tabs.
•Report - Displays a report of the operations you performed in this dialog including file copies, file de-
letes, and diffs where changes were saved. In addition, you can save the report.
Context Tagging®- Tag Files Dialog
The Context Tagging®- Tag Files dialog, shown below, is used to manage all your tag files. For more in-
formation on tagging, see Context Tagging Overview. To access the dialog, click Tools →Tag Files.
Figure 10.23. Context Tagging®- Tag Files Dialog
The left section of the dialog lists all of your tag files, separated into categories. A tag file having a File bit-
map with blue arrows indicates the tag file is built with support for cross-referencing. The right section of
Context Tagging®- Tag Files
Dialog
378

the dialog lists all the source files indexed by the currently selected tag file.
For descriptions of the Tag File categories, listed on the left side of the dialog, see Tag File Categories.
The following buttons are available on the Context Tagging®- Tag Files dialog:
•Done - Saves tag file settings and closes the dialog box.
•Add Files - Displays the Add Source Files dialog box, from which you can add a set of files to the cur-
rently selected tag file. This button will be unavailable for read-only tag files and auto-updated tag files.
If you add files to your workspace tag file, you will be prompted if you want to also add the files to your
project.
•Add Tree - Displays the Add Tree dialog box, from which you can recursively add a directory of files to
the currently selected tag file. This button will be unavailable for read-only tag files and auto-updated
tag files. If you add files to your workspace tag file, you will be prompted if you want to also add the files
to your project.
•Remove Tag File - Deletes the currently selected tag file. You will be prompted whether or not to de-
lete the tag file from the list, and then whether or not to permanently delete the tag file from disk. Note
that some extension-specific tag files are automatically generated, and thus will be automatically regen-
erated if you delete them.
•Remove Src. File - Removes the selected files from the currently selected tag file. If no files are selec-
ted, you will be prompted whether or not to remove all source files from the tag file. If you remove files
from your workspace tag file, you will be prompted if you want to also remove the files from your
project.
•Options - Displays the Context Tagging®Options dialog box for you to configure Context Tagging op-
tions. See Context Tagging Options Dialog for more information.
•Up - Moves the selected tag file higher in the search order. This primarily applies to extension-specific
tag files (see Creating Extension-Specific Tag Files).
•Down - Moves the selected tag file lower in the search order. This primarily applies to extension-specif-
ic tag files (see Creating Extension-Specific Tag Files).
•Add Tag File - Displays the Add Tag File dialog box, which allows you to choose from a list of lan-
guages the source type for which to insert the tag file. To automatically create tag files for C++, Java,
and .NET, you can instead use the Create Tag Files for Run-Time Libraries dialog (see Creating Tag
Files for Run-Time Libraries).
•Retag Src. Files - Updates the Context Tagging information for the selected files in the currently selec-
ted tag file. If no files are selected, you will be prompted whether or not to retag all source files.
•Rebuild Tag File - Displays the Rebuild Tag File dialog box containing options for rebuilding the selec-
ted file. See Rebuilding Tag Files.
•Auto Tag - Displays the Create Tag Files for Run-Time Libraries dialog box used to automatically cre-
ate run-time library tag files for C++, Java, and .NET (see Creating Tag Files for Run-Time Libraries).
Options Dialogs
379
Options Dialogs
This section describes SlickEdit®Core dialogs and views related to options.
General Options Dialog
Many common user preferences can be set from the General Options dialog. To work with this dialog,
from the main menu, click Window →Preferences, expand SlickEdit and click General in the tree, then
double-click the General setting.
There are seven categories (tabs) available, listed below. Information about working with these general
options is located throughout the documentation on a contextual basis.
•General Tab - The General tab contains general option settings.
•Search Tab - This tab contains options to control your searching preferences.
•Selections Tab - The Selections tab allows you to set text selection style preferences.
•Special Characters Tab - Activating view of special characters inserts characters into your file to show
such items as tabs, spaces, and line endings. When characters are defined in the Special Characters
tab, they are displayed instead of the original characters when the view options are on. See Viewing
Special Characters for more information.
•More Tab - The More tab contains additional option settings.
•Exit Tab- The Exit tab contains options regarding exiting the program.
•Virtual Memory Tab - This tab stores information for the virtual memory.
General Tab
The General tab is used to set general configuration options in SlickEdit®Core.
Figure 10.24. General Options: General Tab
General Options Dialog
380
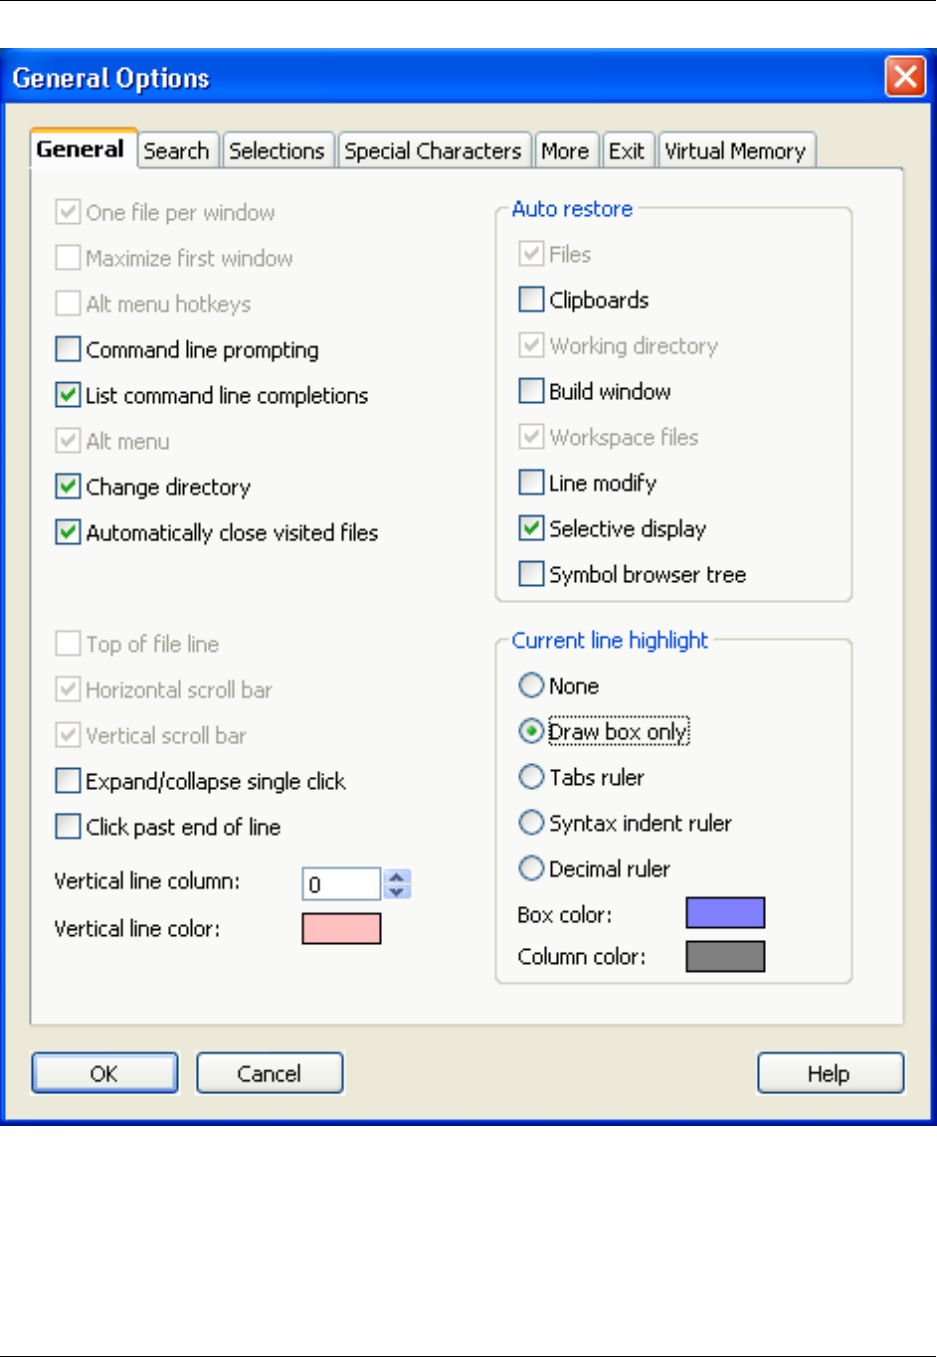
The following options are available:
•One file per window - (Not available in SlickEdit Core.) If checked, each file you open will be allocated
in its own window. If unchecked, each file will open in the same window.
•Maximize first window - (Not available in SlickEdit Core.) If checked, the first editor window opened
will be maximized.
General Options Dialog
381

•Alt menu hotkeys - (Not available in SlickEdit Core.) If checked, Alt-prefixed keyboard shortcuts will
display the corresponding drop-down menu. If unchecked, you can be more selective about key bind-
ings because you are permitted to bind Alt keys you normally could not, such as Alt+F. Do not check
this option if you bind Alt keys that are normally menu keys, because you will lose these key bindings.
This option is unavailable using the CUA emulation.
•Command line prompting - Many commands that display dialog boxes have equivalent commands
that prompt for arguments on the command line. For faster prompting than the dialog boxes allow,
check this option. See Command Line Prompting for more information.
•List command line completions - If checked, when typing a command on the command line, a list of
possible commands and argument completions will be displayed above or below the command line.
See Command Line Completions for more information.
•Alt menu - (Not available in SlickEdit Core.) If checked, when the Alt key is pressed without following it
with another key, the cursor will pop to the menu bar.
•Change directory - (Not available in SlickEdit Core.) If checked, the current directory is changed in the
editor when the directory is changed in the Change Directory dialog (File →Change Directory) and
the Open and Save As dialogs (File →Open and File →Save As).
•Show files beginning with a dot. - (Not available in SlickEdit Core.) This option controls the default
value of the Show hidden files option on the UNIX File Open and Save dialogs (and the Open tool
window for all platforms). Check this option to have the Show hidden files option checked by default
each time the dialogs/tool window are displayed. The value of Show hidden files is controlled by the
global variable def_filelist_show_dotfiles. By default, this option is on for Windows, and off for UNIX
platforms.
•Automatically close visited files - If selected, a visited file will be automatically closed when it is nav-
igated away from. If not selected, the auto-close feature will be turned off. If left in the mixed state, you
will be prompted whether or not you want to close files. A file is considered "visited" if it is opened as a
result of a symbol navigation or search operation, and not modified, and subsequently navigated away
from, for example, by using pop_bookmark (Ctrl+Comma).
•Top of file line - (Not available in SlickEdit Core.) If selected, each buffer displays a line which contains
the text "Top of File". This indicator for the location of the top of the file is displayed at line 0 which does
not affect lines of code.
Rather than using the Top of file line option, you can use Ctrl+Shift+Enter (Ctrl+Enter in Visual C++
and Visual Studio emulation) to insert a new line above the line where the cursor is located.
•Horizontal scroll bar - (Not available in SlickEdit Core.) If checked, each edit window displays a hori-
zontal scroll bar. This does not affect edit window controls on dialog boxes.
•Vertical scroll bar - (Not available in SlickEdit Core.) If checked, each edit window displays a vertical
scroll bar. This does not affect edit window controls on dialog boxes.
•Expand/collapse single click - If checked, Selective Display Plus and Minus bitmaps can be expan-
ded or collapsed with a single click. This causes Selective Display to operate similar to Windows Ex-
plorer. However, you will not be able to select a line by clicking to the left of a text line which contains a
Selective Display bitmap. For more information, see Selective Display.
General Options Dialog
382

•Click past end of line - If checked, the cursor can be placed past the end of a line.
•Vertical line column - Specifies the column in which the editor is to display a vertical line. Specify 0to
display no vertical line.
•Vertical line color - Click on the colored box to change the color of the line.
•Auto restore - The Auto restore options control which elements of your SlickEdit Core environment
are restored when you switch workspaces or close and re-open SlickEdit Core. See Restoring Settings
on Startup for more information about these options.
•Current line highlight - Select from the following options pertaining to the highlight effect of the current
line:
•None - If selected, the current line will not be highlighted.
•Draw box only - If selected, a dotted box will be drawn around the current line.
•Tabs ruler - If selected, a box will be drawn around the current line and tab stops will be marked.
•Syntax indent ruler - If selected, a box will be drawn around the current line with the Syntax Indent
levels marked.
•Decimal ruler - If selected, a box will be drawn around the current line with marks at multiples of five
and 10.
•Box color - Click on the colored box to select the dotted box color.
•Column color - Click on the colored box to select the column marker color. This is the same as the
margin line color.
Search Tab
The Search tab contains default search options. For more information about working with search and re-
place operations, see Find and Replace.
There are two ways to access search options:
• From the Find and Replace view (click Search →SlickEdit Search/Replace), right-click on the back-
ground and select Configure Options. This will display the Search tab of the General Options dialog.
• From the main menu, click Window →Preferences, expand SlickEdit and click General in the tree,
then double-click the General setting. On the General Options dialog, select the Search tab.
Figure 10.25. General Options: Search Tab
General Options Dialog
383
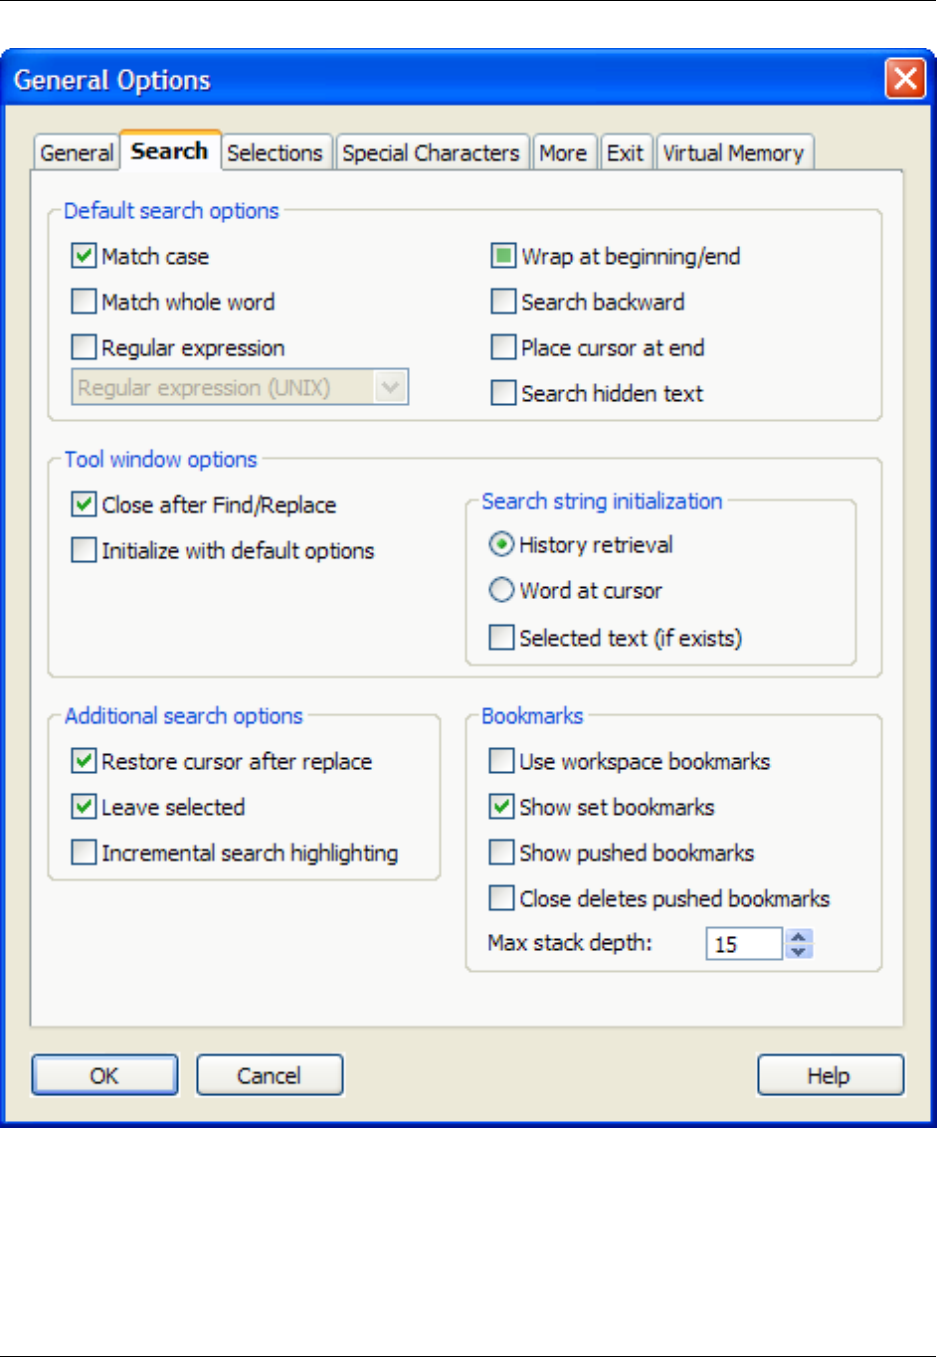
The following options are available:
•Default search options - The following default search options apply to all command line searches,
quick searches and incremental searches, and to the Find and Replace view when the option Initialize
with default options is checked.
General Options Dialog
384

•Match case - If checked, various search commands default to case-sensitive searches.
•Match whole word - If checked, refines search results to match only the word as a whole. By de-
fault, this is unchecked, and search results will match all instances of the word, ignoring characters
that are to the left and right of the occurrence.
•Regular expression - If checked, various search commands (/,find,orc) default to regular expres-
sion searching. Specify which syntax to use from the drop-down list.
•Wrap at beginning/end - If checked, various search commands default to wrapping to the beginning
or end of a buffer to complete a search.
•Search backward - If checked, searches are performed from the end to the beginning.
•Place cursor at end - If checked, the cursor is placed at the end of the occurrence found.
•Search hidden text - Check this option to search for text hidden by Selective Display. Matches
found that were set to be hidden by Selective Display will be revealed. To set Selective Display op-
tions, from the main menu click View →Selective Display. See Selective Display for more informa-
tion.
•Find and Replace view options - The following options on the Search tab pertain to the Find and Re-
place view (see Find and Replace View):
•Close after Find/Replace - If checked, the Find and Replace view is closed after finding text in the
buffer.
•Initialize with default options - If checked, the search options in the Find and Replace view will be
reset to the default options each time it is launched. By default, this option is unchecked, and search
options are retained when the Find and Replace view is closed and re-opened. The window will re-
tain the current set of options as long as it remains open (this includes auto-hide when docked).
•Search string initialization options - The following options on the Search tab provide starting values
for when a search and replace operation is activated:
•History retrieval - If selected, the Find and Replace view uses the last item that was searched, for
the word used when performing a search.
•Word at cursor - If selected, the Find and Replace view uses the word that is at the cursor when
performing a search.
•Selected text (if exists) - If checked, the Find and Replace view uses the text that you have selec-
ted in the editor to perform the search.
•Additional search options - The following additional search options are available on the Search tab:
•Restore cursor after replace - If checked, the cursor is restored to its original position after a search
and replace operation completes and is not canceled.
•Leave selected - If checked, the last occurrence of a search string that was found is left selected.
This also affects whether pressing Esc during a search and replace leaves the search string selec-
General Options Dialog
385

ted.
•Incremental search highlighting - If checked, when an incremental search is performed, matching
occurrences will be highlighted with two colors: one for the current match at the cursor, and one for
all possible matches. Highlights are removed when the incremental search command terminates.
Highlight colors can be set using the Color Settings Dialog (Window →Preferences, expand
SlickEdit and click General in the tree, then double-click the Color setting). Select the items I-
Search Current Match and I-Search Highlight from the element list. See Incremental Searching for
more information.
•Bookmarks - These options provide for the control and viewing of bookmarks. See Bookmarks for
more information.
•Use workspace bookmarks - By default, bookmarks are stored globally and are visible in all work-
spaces. If this option is checked, bookmarks are associated with the workspace used to create them,
even if the files they are in are not part of the workspace. When you switch workspaces, the Book-
marks view will display only the bookmarks associated with this workspace.
•Show set bookmarks - If checked, a green Bookmark bitmap is displayed in the left margin of the
editor control corresponding to the bookmarks you have set.
•Show pushed bookmarks - If checked, a blue Bookmark bitmap is displayed in the left margin of
the editor control corresponding with each location on your bookmark stack. This helps you see
where "Pop Bookmark" will go.
•Close deletes pushed bookmarks - If checked, when a buffer is closed (quit), any pushed book-
marks remaining in that file are removed. This option is helpful for buffer management, because it
prevents buffers which were explicitly closed from coming back when you pop up out of your book-
mark stack.
•Max stack depth - By default, the maximum stack depth for the bookmark stack is set to 15 entries.
If you push more than this number of bookmarks, the oldest bookmark will be removed. Enter the
number of entries that you want the bookmark stack to hold in this field.
Selections Tab
The Selections tab, pictured below, is where you can set preferences for selections. These options are
accessed from the main menu: Click Window →Preferences, expand SlickEdit and click General in the
tree, then double-click the General setting. On the General Options dialog, select the Selections tab. For
more information about working with selections, see Selections.
Figure 10.26. General Options: Selections Tab
General Options Dialog
386
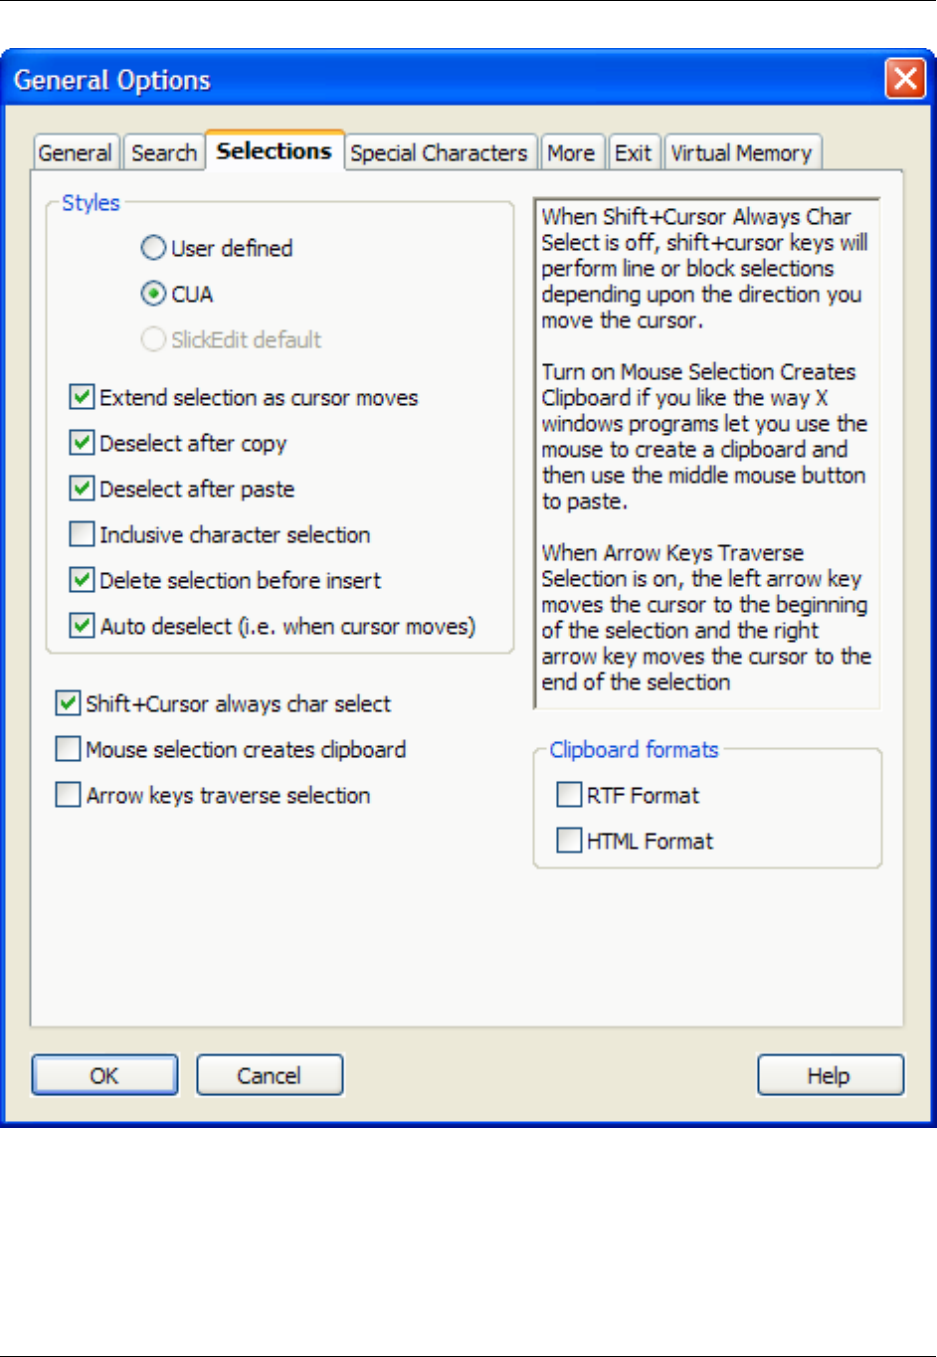
The following settings are available:
•Styles - Choose the selection style you wish to use from the following options:
•User defined - This option is for setting your own selection preferences. Any changes that are made
to the CUA behaviors automatically select User Defined. Selecting CUA automatically resets the se-
General Options Dialog
387

lect behaviors.
•CUA (default) - When this style is selected, selected text is deleted before a paste or character is in-
serted unless the selection is locked. Pressing the Backspace or Delete keys deletes the selection
unless the selection is locked. Advanced selections (those selections not started with the mouse or
Shift+<arrow keys>) are extended as the cursor moves. Locking a selection requires one of the
emulation commands select_line,select_block,orselect_char. To access these commands from
Edit pull-down menu, select this option in any emulation.
•SlickEdit default - When this style is selected, SlickEdit®Core uses the default styles that are en-
abled when the product is installed.
•Extend selection as cursor moves - When checked, the selection is extended to cursor position. This
option is not available if using Brief or Emacs emulation.
•Deselect after copy - Indicates whether copied text is selected. This is not available if using Brief or
Emacs emulation.
•Deselect after paste - Indicates whether pasted text is selected. This is not available if using Brief or
Emacs emulation.
•Inclusive character selection - When checked, a character selection includes the character following
the cursor. This option is not available if using Brief or Emacs emulation.
•Delete selection before insert - Indicates whether a selection is deleted before new text is inserted.
This option is not available if using a Brief or Emacs emulation.
•Auto deselect - Check this box to clear a selection when the cursor moves or one of a few other editor
operations occurs. This option is not available if using a Brief or Emacs emulation.
•Shift+Cursor always char select - When this check box is cleared, pressing the Shift+<arrow keys>
will select line or block selections, depending upon the direction the cursor moves. This is not available
if using a Brief emulation.
•Mouse selection creates clipboard - Select this option to use the left mouse button to create a clip-
board and to use the middle mouse button to paste.
•Arrow keys traverse selection - If checked, the Left arrow key moves the cursor to the beginning of
the selection and the Right arrow key moves the cursor to the end of the selection.
•Clipboard formats - Select the type of editing format for clipboards, allowing you to paste formatted
and color-coded text to other applications (as well as plain text). Choose from Rich Text Format or
HTML.
Special Characters Tab
Activating view of special characters inserts characters into your file to show such items as tabs, spaces
and line endings. Characters defined on the Special Characters tab are displayed instead of the original
characters when the view options are selected.
General Options Dialog
388

Note
Viewing special characters is only available for ASCII files.
To access Special Characters options, from the main menu click Window →Preferences, expand
SlickEdit and click General in the tree, then double-click the General setting. On the General Options
dialog, select the Special Characters tab, which is pictured below. See Viewing Special Characters for
more information about these settings.
Figure 10.27. General Options: Special Characters Tab
General Options Dialog
389
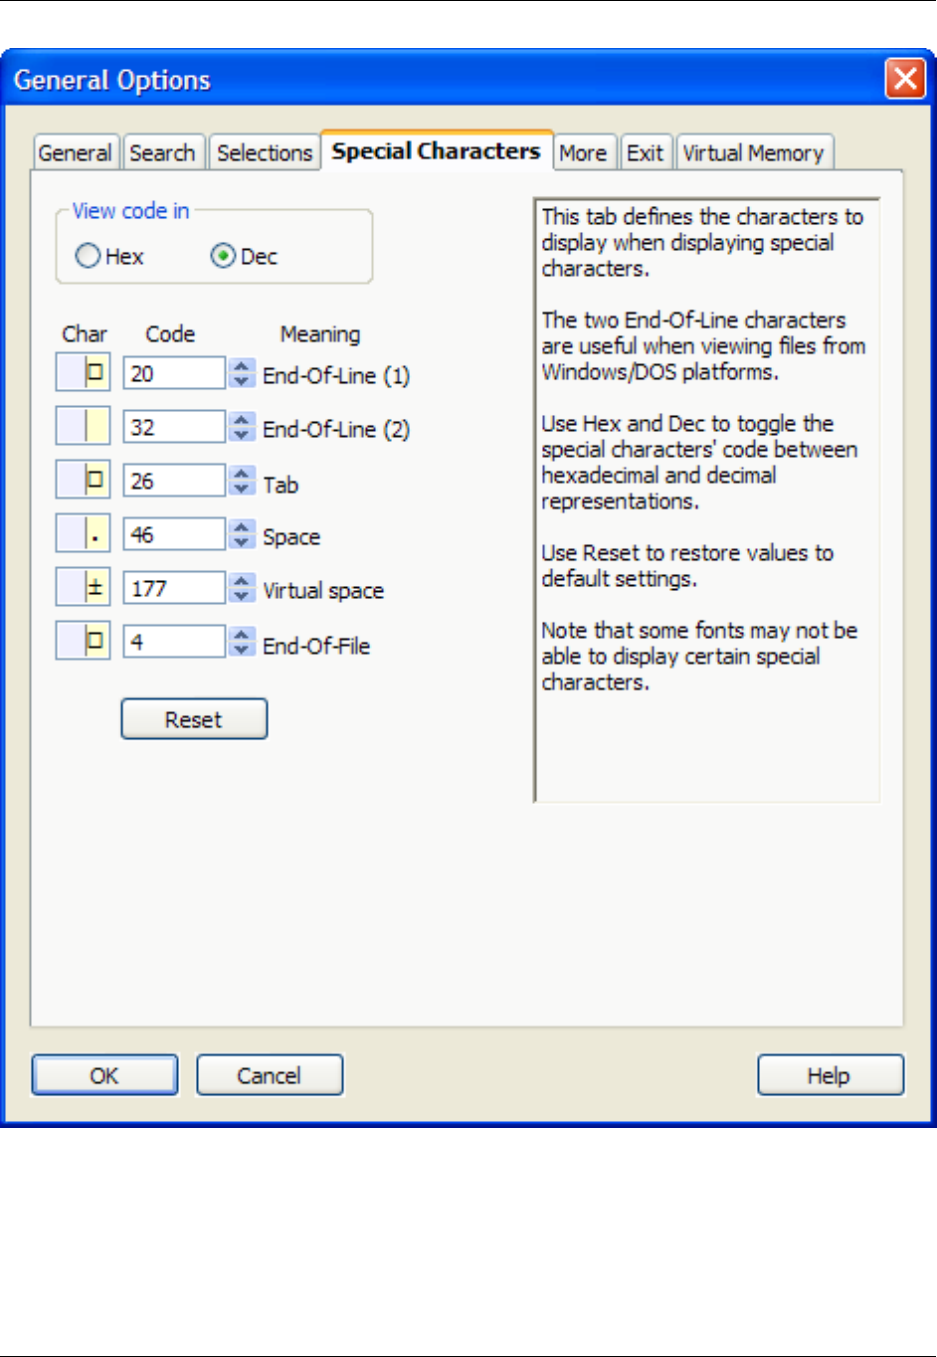
More Tab
The More tab, pictured below, contains additional options that can be set for working with SlickEdit®
Core. To access these options, click Window →Preferences, expand SlickEdit and click General in the
tree, then double-click the General setting. On the General Options dialog, select the More tab.
General Options Dialog
390

Figure 10.28. General Options: More Tab
The following options are available:
•Start in insert mode - If selected, the editing mode is set to insert when the editor is invoked. Other-
General Options Dialog
391

wise, the editing mode is set to replace.
•Throw away file lists - If selected, the modified File Manager file lists can be modified and closed
without being prompted to save.
•Auto exit build window - If selected, the concurrent build window is automatically exited when the buf-
fer is closed or when exiting the editor.
•Edit "A B C" start on file A - If selected, the first file opened becomes the active buffer.
•Short key names - If selected, key names in the MDI menu bar are condensed (non-CUA). For long
CUA key names, clear this check box.
•Reflow next - If selected, the reflow_paragraph command places the cursor on the next paragraph
after it has reformatted the current paragraph. Otherwise, the cursor is kept at the same location within
the current paragraph.
•Protect read-only mode - If selected, the editor will not let you modify a file that is in read-only mode.
The save command always prompts for a different output file name if the file is in read-only mode.
•CUA text box - If selected, the keys Ctrl+X,Ctrl+C, and Ctrl+Vperform cut,copy, and paste com-
mands respectively for a text box other than the command line. In addition, the dialog manager takes
over the keys Alt+Athrough Alt+Zfor selecting controls.
Note
Do not mark this check box if you want all of the keys to operate the same in a text box as they
do in the command line and edit windows.
•Paren match style - This feature always uses fast brace matching. Select from the following options
(the first three are mutually exclusive):
•Highlight - When selected, typing a closing parenthesis temporarily block-selects the text within the
parenthesis pair.
•Cursor to begin paren - When selected, typing a closing parenthesis temporarily places the cursor
on the matching begin parenthesis.
•None - When selected, typing a closing parenthesis just inserts the close parenthesis.
•Highlight matching blocks - When selected, the corresponding parenthesis, brace, bracket, or be-
gin/end word pairs under the cursor are automatically highlighted.
Tip
To customize the highlighting color, go to Window →Preferences, expand SlickEdit and click
General in the tree, then double-click the Color setting. Select the Block Matching screen ele-
ment. To adjust the delay in milliseconds before the highlighting is updated, go to Macro →Set
Macro Variable and modify the variable def_match_paren_idle. See Setting Colors for Screen
General Options Dialog
392

Elements and Setting Macro Variables for more information.
•Scroll style - Select from the following options:
•Smooth horizontal scroll - When selected, this option specifies that the window should be scrolled
column-by-column when the cursor moves out of view. When this option is deselected, the cursor will
be centered and the text will be scrolled one-fourth the width of the window when the cursor moves
out of view.
•Smooth vertical scroll - When selected, this option specifies that the window should be scrolled
line-by-line when the cursor moves out of view. When this option is deselected, the cursor will be
centered and the text will be scrolled half the height of the window when the cursor moves out of
view.
•Scroll when - Specifies how close (in number of lines) the cursor may get to the top or bottom of the
window before scrolling occurs. Does not affect horizontal scrolling.
•Preserve column on top/bottom - If selected, the top_of_buffer (Ctrl+Home) and bottom_of_buffer
(Ctrl+End) commands do not change the column position unless already at the top or bottom of the
buffer.
•Show tool tips - If selected, the pop-up tool tip Help messages are displayed when the mouse pointer
rolls over a button.
•Delay (ms) - Specifies the delay in tenths of a second before tool tip messages are displayed.
•Key message delay - Selecting this option specifies the delay before a prefix key is displayed in tenths
of a second. The prefix key is not displayed if the next key is pressed before the delay specified in this
text box.
•Hide mouse pointer - Selecting this option hides the mouse pointer when typing. The mouse pointer is
displayed when moving the mouse or when a dialog box is displayed.
•Allow drag drop text - If selected, selected text can be copied or moved by dragging and dropping the
selected text using the left mouse button.
•Windows 3.1 style open dialog - (Windows only) When selected, a Windows 3.1-style Open dialog
box is used to open and save files. This dialog does not support all the features of the default Open dia-
log (for example, encoding options are not supported).
•Line insert style - SlickEdit Core treats line selections differently than character selections. Line selec-
tions are pasted either above or below the current line, saving you from tediously positioning the cursor
at the beginning or end of a line prior to pasting. When the style is set to Before, lines of text are inser-
ted before the current line. When the style is set to After (the default), lines of text are inserted after the
current line.
•Next word style - When the next word style is set to Begin, the next_word command (Ctrl+Right)
places the cursor on the beginning of the next word. When the next word style is set to End, the cursor
is placed at the end of the next word.
General Options Dialog
393

•Smart next window - (Not available in SlickEdit Core.) Use this combo box to select from the following
different windowing styles:
•Smart next window - This is the default style. It allows you to press Ctrl+Tab (next_window com-
mand) to switch the focus between the two most frequently used open editor windows, rather than al-
ways going to the next window. Press Ctrl+Shift+Tab (prev_window command) to switch between
all open editor windows. This style is similar to how Ctrl+Tab and Ctrl+Shift+Tab work in other Win-
dows MDI applications, like Visual Studio.
•Reorder windows - If selected, activating an existing window reinserts the window after the current
window. Neither Ctrl+Tab nor Ctrl+Shift+Tab reorders the windows. This option is very good for
switching between more than two files, but it is not the Windows standard (which means you’re prob-
ably not used to it). It's similar to the way SlickEdit Core reorders buffers.
•No window reordering - If selected, newly opened windows are inserted after the current window,
like in all settings. Activating an existing window, pressing Ctrl+Tab, or pressing Ctrl+Shift+Tab
does not reorder windows. This option is best if you like to memorize the hot key numbers on the
Window menu (for example, Alt+W,1 because it attempts to keep the hot key numbers the same.
•Use block cursor - If selected, a text mode-style cursor is used instead of a vertical cursor.
•Window left margin (inch) - If selected, this specifies the space between the left edge of the window
and the editor text in inches. This value has no effect when there are bitmaps displayed in the left mar-
gin, since more space is necessary.
•Max clipboards - Specifies the maximum number of clipboards saved. By default, a stack of your last
50 clipboards are kept, any one of which can be pasted with Ctrl+Shift+V.
•Word help filename - Specifies the Word Help file names used by the wh command (Help →F1 Index
Help or Ctrl+F1), wh2 command (Ctrl+F2), and wh3 command.
Exit Tab
The Exit tab contains settings that occur when exiting the editor. To access these settings, click Window
→Preferences, expand SlickEdit and click General in the tree, then double-click the General setting.
On the General Options dialog, select the Exit tab.
Figure 10.29. General Options: Exit Tab
General Options Dialog
394
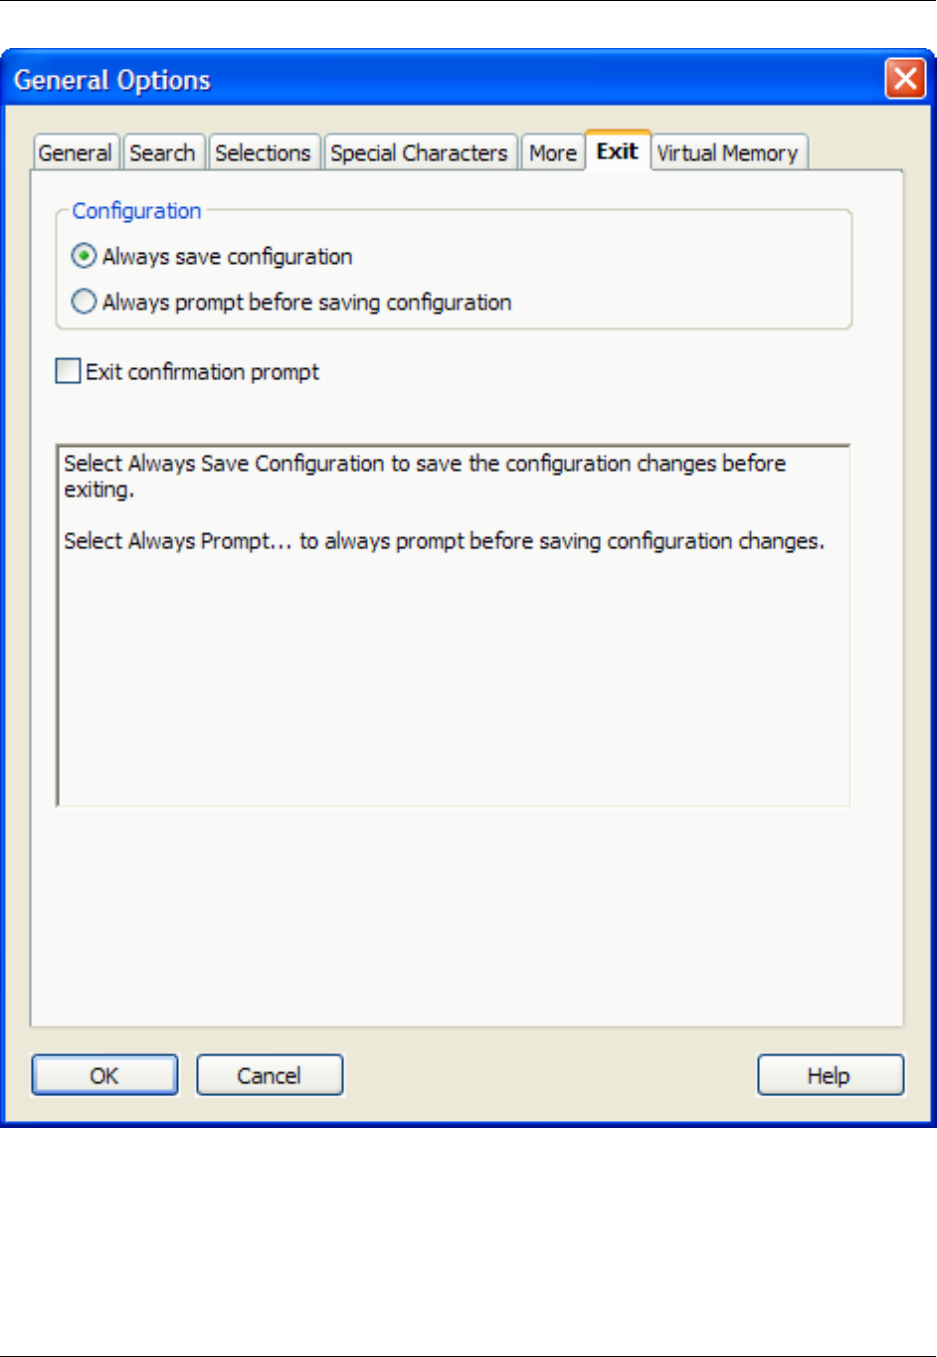
The following options are available on the Exit tab:
•Always save configuration - If selected, configuration changes are saved without prompting.
•Always prompt before saving configuration - Select this option to always receive a prompt before
saving changes that you make to the configuration of the software.
General Options Dialog
395

•Exit confirmation prompt - If selected, you will always be prompted when exiting the editor.
Virtual Memory Tab
To access virtual memory options, click Window →Preferences, expand SlickEdit and click General in
the tree, then double-click the General setting. On the General Options dialog, select the Virtual Memory
tab.
Figure 10.30. General Options: Virtual Memory Tab
General Options Dialog
396

The following options are available:
•Spill file path - This text box specifies a directory where spill files and temporary files should be
placed. On Windows, this defaults to the directory specified the TEMP environment variable. If it does
not exist, the directory specified by the TMP environment variable is used. On UNIX, this defaults to the
directory specified by the TMP environment variable.
General Options Dialog
397

•Buffer cache size - The value in this field, specifies the maximum amount of memory used to store text
buffer data in kilobytes. A value that is less than zero specifies all available memory.
Caution
If the operating system starts the swapping process before the cache is full, performance might
be degraded. The cache size must be smaller than the amount of actual memory available.
•Tag file cache size - You can improve tagging performance by adjusting the tag file cache size to bet-
ter match the size of your tag files. Generally, a tag file cache size that matches the total size of the tag
files being used will provide the best performance. For example, if the tag files for your source code and
libraries adds up to 100 MB, you should set your cache size to 100 MB. You may have to experiment to
find the optimum value. Use the recommendations below as a guide. Note that this is the same option
as found on the Context Tagging Options Dialog. For more information about tagging, see Building and
Managing Tag Files.
• Minimum – 8 MB
• Default – 64 MB
• Ideal – Sum of tag file sizes
• Maximum – 25% of physical system memory
Extension Options Dialog
The behavior of the editor can be customized for files based on specific language extensions. The Exten-
sion Options dialog box (shown below) contains the settings that can be configured for file extensions. To
access this dialog, from the main menu, click Window →Preferences, expand SlickEdit and click Gen-
eral in the tree, then double-click the File Extension Setup setting. You can also display the dialog by
using the setupext command.
Figure 10.31. Extension Options Dialog
Extension Options Dialog
398
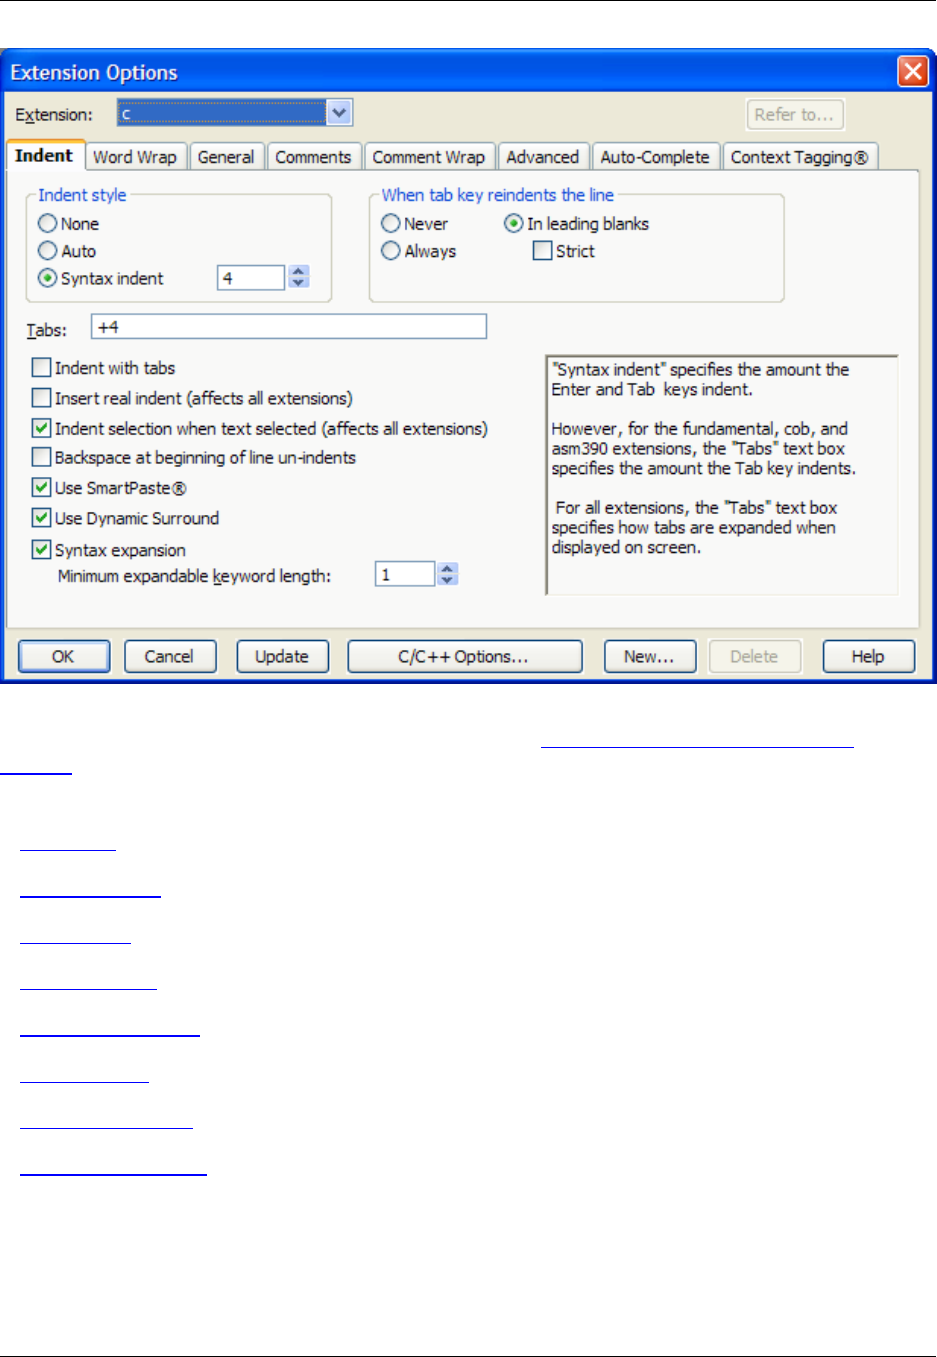
General settings on this dialog box are described below (see Extension Options - General Dialog
Settings). Other options are categorized into the following tabs. Click on an item to go to that section in
the documentation:
•Indent Tab
•Word Wrap Tab
•General Tab
•Comments Tab
•Comment Wrap Tab
•Advanced Tab
•Auto-Complete Tab
•Context Tagging Tab
Extension Options - General Dialog Settings
The following fields and buttons are available on the Extension Options dialog:
•Extension - The Extension drop-down list (located above the tabs) contains a list of pre-loaded exten-
Extension Options Dialog
399

sions that support Extension Options. To configure Extension Options for an extension that is not in the
list, you must first load or create a file with that extension.
Tip
Before configuring any of the Extension Options, always make sure the Extension drop-down list
reflects the extension you wish to affect.
•Refer to - When an extension refers to another extension, both extensions operate exactly the same.
That is, all Context Tagging®, template editing, word processing options, and all other extension options
are the same. In addition, modifying the extension option information for either extension updates both
extensions. For example, by default, the .h and .cpp extensions refer to the .c file extension. Modify
the .h or .cpp extension setup to modify the extension setup for all three extensions. In addition, the
.h and .cpp extensions use the same Context Tagging settings as the .c extension.
To have the setup data for one extension refer to another extension, click the Refer to button (located
at the top right corner of the Extension Options dialog). This button is not available if other extensions
already refer to this one. Refer to is also available on the New Extension dialog box to set when adding
a new extension.
•Update - To update the extension setup, click this button (located at the bottom of the Extension Op-
tions dialog). This is useful when modifying the options for more than one extension, as it keeps the Ex-
tension Options dialog box displayed.
•Options - To access formatting options such as brace styles, indentation, and other code style settings,
click the Options button (located at the bottom of the Extension Options dialog). This will display a
Formatting Options dialog box that contains options specific to the extension that is selected. Each dia-
log is described in the appropriate section in the chapter Chapter 7, Language-Specific Editing.
•New - To create a new extension and assign extension-specific options to it, including Refer to, click
the New button (located at the bottom of the Extension Options dialog). The New Extension dialog box
is displayed. See Creating a New Extension for more information.
•Delete - To delete the selected file extension’s setup information, click the Delete button (located at the
bottom of the Extension Options dialog). Note that the Fundamental extension setup information cannot
be deleted. An extension such as C, that has other extensions (such as H, CPP, and CXX) that refer to
it, cannot be deleted until all of the extensions that refer to it are deleted.
Indent Tab
You can set the indent configurations for specific file types. To access these settings, from the main menu
click Window →Preferences, expand SlickEdit and click General in the tree, then double-click the File
Extension Setup setting. On the Extension Options dialog, select the Indent tab. For more information
about working with the features controlled by these options, see Syntax Indent and SmartPaste®.
Figure 10.32. Extension Options: Indent Tab
Extension Options Dialog
400

The following options and settings are available:
•Indent style - Select from the following indent styles:
•None - When this option is selected, the Enter key will put the cursor at the beginning of the line.
•Auto - When this option is selected, the Enter key indents according to the previous line.
•Syntax indent - When this option is selected, the Enter key indents according to language syntax.
The value in the text box specifies the amount to indent for each level. See Syntax Indent for more in-
formation.
•When tab key reindents the line - These options specify that the Tab key be used to beautify or
reindent the current line. Select from the following settings:
•Never - When this option is selected, pressing Tab will never reindent the line. It will indent to the
next tab stop.
•Always - Pressing the Tab key in any column will reindent the current line.
•In leading blanks - Pressing the Tab key will reindent the line if the cursor is positioned within the
leading white space of the line. Otherwise it will indent to the next tab stop. This option is further con-
trolled by the Strict check box.
•Strict - Strict only applies to the In leading blanks option. When this option is selected, it reindents
Extension Options Dialog
401

the line only if the cursor position is before the intended indent location; otherwise, it will insert an ad-
ditional tab stop. When this option is deselected, it reindents the line when the cursor is located on
the leading whitespace, regardless of whether the column is before or after the intended indent loca-
tion.
•Tabs - Set tabs in increments of a specific value or at specific column positions. To specify an incre-
ment of three, enter 3in the text box. To specify columns, for example, enter 1 8 27 44, to specify tab
stops that are not an increment of a specific value.
•Indent with tabs - Determines whether Tab key, Enter key, and paragraph reformat commands indent
with spaces or tabs. See Indenting with Tabs for more information.
•Insert real indent (affects all extensions) - When this option is selected, the Enter key inserts real
spaces or tabs representing the indent instead of virtual spaces. This check box affects all extensions
when it is selected. This option allows the function for the End key on the keyboard to place the cursor
after blank text where new text can be typed.
•Indent selection when text selected (affects all extensions) - When this option is selected, it affects
all of the extensions, and pressing Tab or Shift+Tab indents or un-indents the selected text.
•Backspace at beginning of line un-indents - When this option is selected and the cursor is located
before the first non-blank character, pressing the Backspace key un-indents the current line by one in-
dent level. See also Setting the Backspace Unindent Style.
•Use SmartPaste®- Specifies whether copied or pasted text should be reindented according to what
the editor thinks is the correct indent level. See SmartPaste for more information.
•Use Dynamic Surround - Provides the ability to surround a group of statements with a block state-
ment, indented to the correct levels according to your indent settings on this tab. In order for Dynamic
Surround to work, the option Syntax Expansion must also be selected (see below). See Dynamic Sur-
round for more information on how to use this feature.
•Syntax expansion - Activates the Syntax Expansion feature. When this option is selected, pressing the
spacebar after typing a keyword such as if or for will cause that syntax element to be expanded, insert-
ing the rest of the if or for statement. Alternately, you can bind a space command to a key other than
the spacebar. See Syntax Expansion for more information on using this feature.
•Minimum expandable keyword length - Sets the minimum length for a keyword that will trigger Syn-
tax Expansion. For example, if this is set to 3, then two-letter keywords such as if will not be expanded.
Word Wrap Tab
The Word Wrap tab contains options for controlling how text is wrapped. To access these options, click
Window →Preferences, expand SlickEdit and click General in the tree, then double-click the File Ex-
tension Setup setting. On the Extension Options dialog, select the Word Wrap tab.
Figure 10.33. Extension Options: Word Wrap Tab
Extension Options Dialog
402
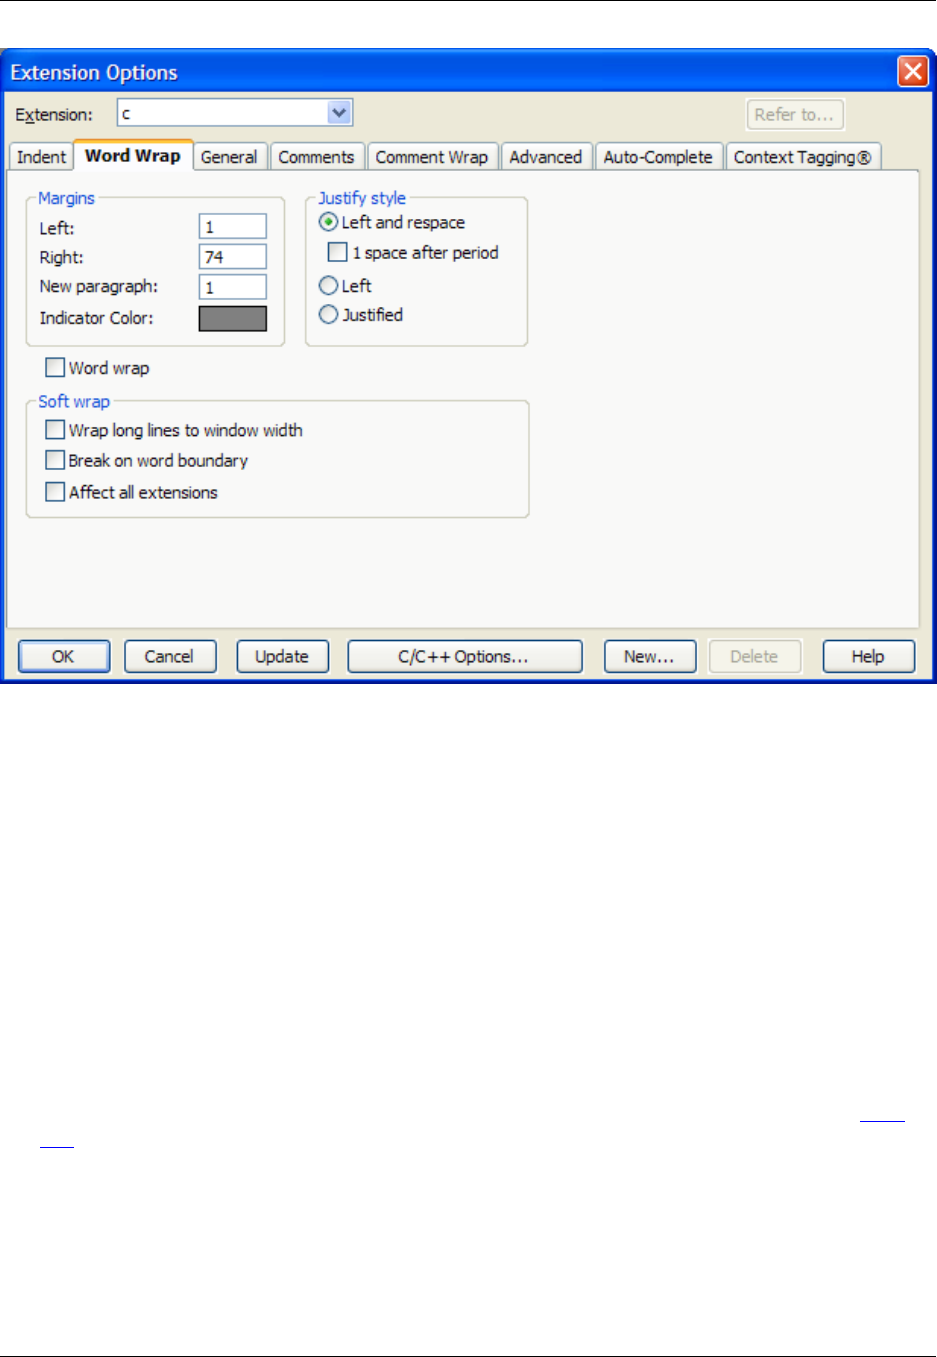
The following settings are available:
•Margins - Sets the left, right, and new paragraph margins. Specify the column number at which each
margin should begin. Click the colored box next to the Indicator Color label to set the color of the mar-
gin indicator. The margin indicator will only appear if the Word wrap option is selected, which activates
word wrapping.
•Justify style - Select from the following justification styles:
•Left and respace - Left justification with space character reformatting. One space is placed between
words except after the punctuation characters (period, ?, and !) that get two spaces. To have only
one space after the period, question mark, and exclamation point punctuation characters, turn on 1
space after period.
•Left - Left justification with respect for space characters between words. This setting requires the
Save options to be set such that trailing spaces are not stripped when a buffer is saved. See Save
Tab for more information on save options.
•Justified - Full justification. Left and right edges of text will align exactly at margins.
•Word wrap - This option activates/deactivates word wrapping. When selected, the editor keeps the
cursor within the margins when entering text, moving the cursor, and deleting characters.
•Soft wrap - Soft Wrap makes it easy to view long lines of code without scrolling. Each line is wrapped
as though a carriage return was inserted, however, the file itself is not modified. The options are as fol-
Extension Options Dialog
403

lows:
•Wrap long lines to window width - This option activates Soft Wrap. A curved arrow is displayed at
the end of each line, along the right-hand border of the edit pane, indicating that the text continues on
the next line. The horizontal scrollbar disappears as it is no longer needed.
•Break on word boundary - Breaks the text at the end of the line so that words are kept whole. This
makes for easier reading, especially in text files.
•Affects all extensions - When selected, this option applies the Soft Wrap configuration that you
want on all extensions without having to manually set up each one. For example, if you want Soft
Wrap turned on for all extension types, complete the following steps:
1. Mark Wrap long lines to window width.
2. Mark Break on word boundary.
3. Then mark Affects all extensions and click either Update or OK. Each time that you open a file,
Soft Wrap is automatically turned on.
To make this feature unavailable for all extensions, clear the Wrap long lines to window width
check box, then click either Update or OK.
General Tab
The General tab on the file extensions tab provides general and Alias options. To access these options,
click Window →Preferences, expand SlickEdit and click General in the tree, then double-click the File
Extension Setup setting. On the Extension Options dialog, select the General tab.
Figure 10.34. Extension Options: General Tab
Extension Options Dialog
404
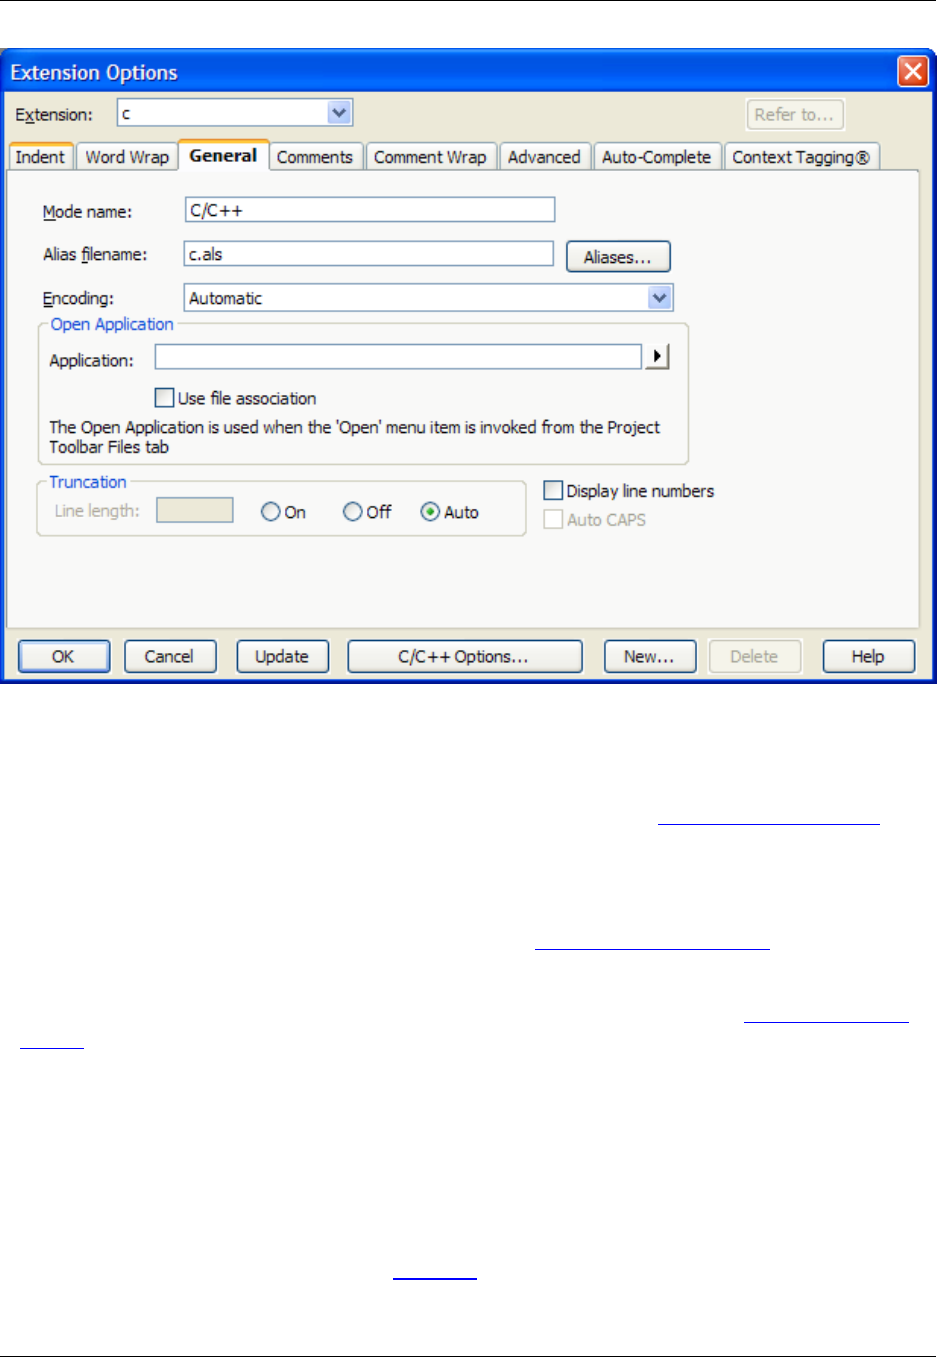
The following options are available:
•Mode name - Allows you to enter a more meaningful name for this extension setup. Define a mode
name here for the Format →Select Mode menu item to work well. See Language Editing Modes for
more information.
•Alias filename - An alias defines a snippet of text that is inserted when the alias is expanded. Each ex-
tension can have one alias file, allowing aliases to be defined that do not affect other extensions. An ex-
ample would be a comment header that is used a lot. See Extension-Specific Aliases for more informa-
tion.
•Aliases - Click the Aliases button to easily define extension-specific aliases. See Extension-Specific
Aliases for more information.
•Encoding - Each extension can have its own encoding specification. Both the extension-specific and
global settings are overridden if an encoding is previously specified in the Open dialog box. The encod-
ing used to override default encoding settings is recorded and this setting is used the next time the
same file is opened. This provides per-file encoding support. If the extension-specific encoding is set to
Default, then the global setting defined in the File Options dialog (Window →Preferences, expand
SlickEdit and click General in the tree, then double-click the File Options setting and select the Load
tab) is used. Note that Unicode support is required to work with encodings. For more information about
working with encodings and Unicode, see Encoding.
•Truncation - When On or Auto is selected, all editor operations prevent the data from the right of the
Extension Options Dialog
405

truncation line length to be moved or to be modified. For example, search and replace operations do
not find data to the right of the truncating line length. In addition, when a replace occurs, the data to the
right of the truncation line length will not move.
Set this to Auto for the editor to determine the truncation line length based on the record format of the
file. For files that do not have a record format, the truncation length is turned off. For example, when
Auto is on and the record width of the file is 80, 72 is used as the truncation line length (the record
length minus eight).
•Display line numbers - When this option is selected, line numbers are displayed for any file with the
selected extension. To toggle the display of line numbers on a per-document basis, from the main
menu, click View →Line Numbers, or use the view_line_numbers_toggle command on the SlickEdit
Core command line.
•Auto CAPS - If selected, and a file is opened that does not contain any lowercase characters, caps
mode is turned on (not the same as caps lock). When caps mode is on, all text is inserted in uppercase.
This feature is intended to emulate ISPF.
Comments Tab
The Comments tab provides options to control the creation of block and line comments. To comment out
selected lines, select text in the editor and then click Format →Comment Block or Format →Comment
Lines (box and comment commands, respectively). These operations will use the matching comment
style to comment out all text on the lines containing the selection. A Comment Block will surround multiple
lines with a single block comment. Comment Lines will comment out each line in the selection with a line
comment. See Commenting for more information.
To access comment options, from the main menu click Format →Comment Setup (comment_setup
command). Alternatively, click Window →Preferences, expand SlickEdit and click General in the tree,
then double-click the File Extension Setup setting. On the Extension Options dialog, select the Com-
ments tab.
Figure 10.35. Extension Options: Comments Tab
Extension Options Dialog
406
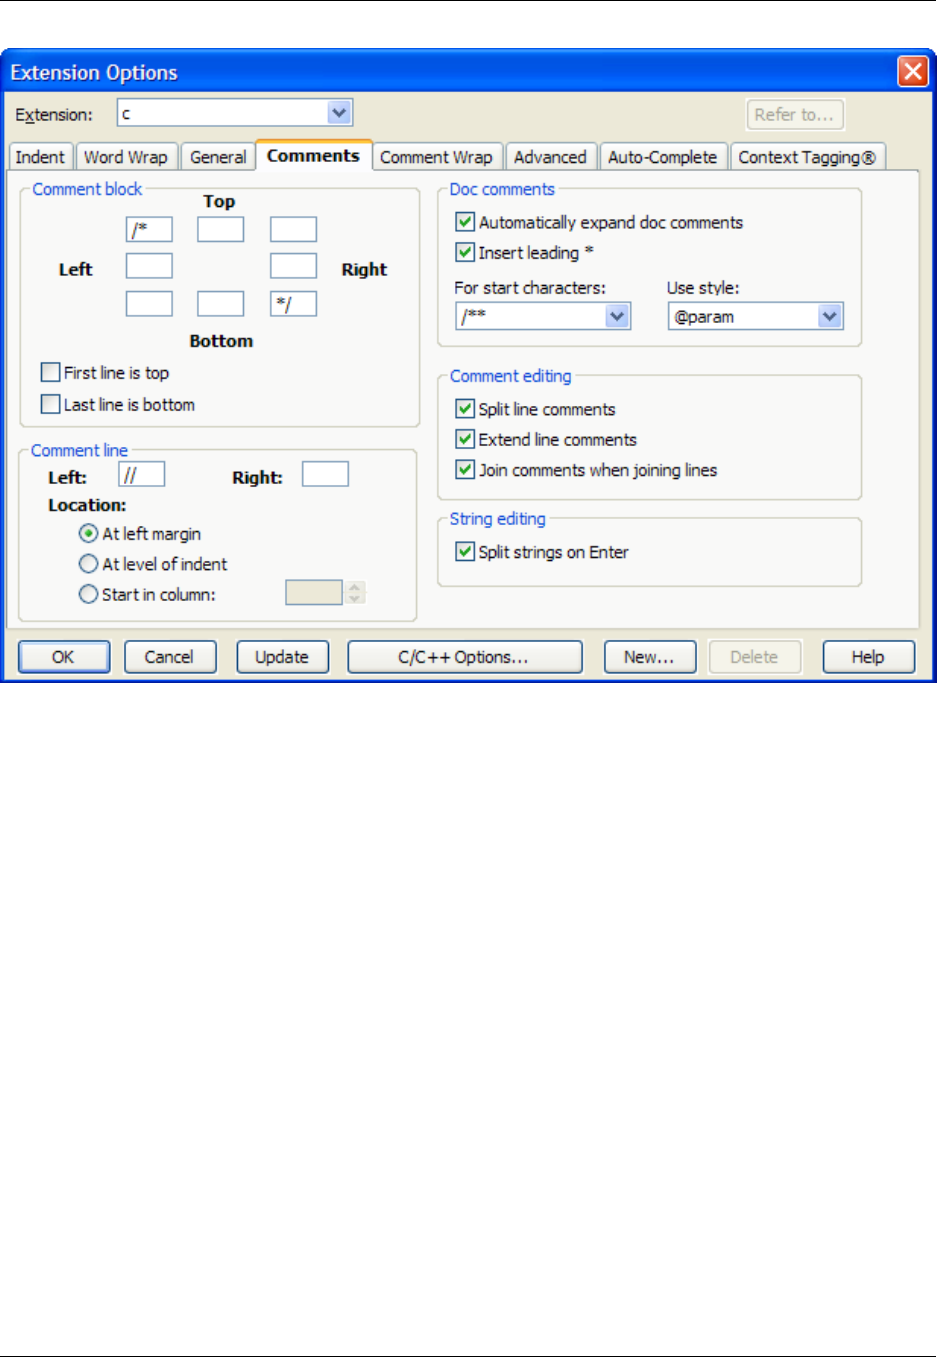
Comment Block
These settings are used when you comment out a selected block of text (Format →Comment Block or
box command). SlickEdit®Core provides eight fields to specify the characters used in your commenting
style. If you want to apply a comment with no additional decoration, fill in the upper-left and lower-right
fields with the characters to begin and end a block comment. To draw a box around the comment, fill in
additional characters in the other fields. For example, you might put an asterisk in each of the other fields
to draw a box of asterisks around the block comment.
SlickEdit Core interprets the contents of these fields literally. If you want the asterisks on the left-hand
side to line up, you need to put a space before the asterisk in the left, middle field. Likewise you would put
a space before the asterisk and slash in the field containing the end of comment characters. Trailing
spaces are ignored on the right-hand fields.
To illustrate, the following code sample is a selection:
if (!enabled) {
tabState = TIS_DISABLED;
}
From the main menu, click Format →Comment Block, and the selection is commented out as follows:
/*
Extension Options Dialog
407

if (!enabled) {
tabState = TIS_DISABLED;
}
*/
Select from the following comment block options:
•First line is top - When this option is selected, the first line of the text selection is used as the first line
of the comment. The top border is not drawn. Otherwise the open comment characters will appear on
their own line.
If this option is selected for the preceding code sample, the comment will instead be formatted as fol-
lows:
/* if (!enabled) {
tabState = TIS_DISABLED;
}
*/
•Last line is bottom - When this option is selected, the last line of the text selection is used as the last
line of the comment. The bottom border is not drawn. Otherwise the open comment characters appear
on their own line.
Using the same example, if this option is selected, the comment will be formatted as follows:
/*
if (!enabled) {
tabState = TIS_DISABLED;
} */
Comment Line
These settings are used when you comment out selected lines (Format →Comment Lines or comment
command).
•Left and Right - Characters that you specify in these boxes are literally inserted to the left and right of
the text on each line of the selection when you use SlickEdit®Core to create a line comment. The
placement of the Left characters can be controlled through the Location options below. Characters
specified in the Right box are placed and aligned vertically at the end of the longest line of text in the
selection. For example, if the Left and Right boxes both contain the characters //, clicking Format →
Comment Line comments out the example code as follows:
// if (!enabled) { //
// tabState = TIS_DISABLED;//
// } //
•Location - Mutually exclusive location options control where characters specified in the Left box are
Extension Options Dialog
408

placed:
•At left margin - Places characters flush against the left margin of the editor window, as shown in the
previous example. The indent levels are not changed. This provides better visibility for your com-
ments and a way to clearly see the indent level relative to lines that are not commented out.
•At level of indent - Places and aligns characters vertically at the current indent level. For example:
//if (!enabled) {
// tabState = TIS_DISABLED;
//}
•Start in column - Specifies in which column to start the comment for a line selection. This is useful
for column-oriented languages such as COBOL. Type or use the spin box to select the desired
column number. The left comment characters are placed at the specified column.
Doc Comments
Select from the following options:
•Automatically expand doc comments - When this option is selected, SlickEdit®Core automatically
inserts a skeleton doc comment when you type comment start characters and then press Enter on a
line directly above a function, class, or variable. The type of skeleton that is inserted is based on your
start characters and style settings (specified in the For start characters and Use style boxes).
Note
In C#, you do not need to press Enter, as the skeleton comment is inserted after you type the
third slash.
•Insert leading * - If selected, when you press Enter inside a doc comment, a leading asterisk is auto-
matically inserted on the next line. For example:
/**
* This is my comment.[CURSOR HERE]
*/
Pressing Enter will result in:
/**
* This is my comment.
* [CURSOR HERE]
*/
•For start characters - Use this box to specify the comment start characters that will trigger the style of
reference tags that are automatically inserted as part of the doc comment skeleton. The characters se-
lected here use the reference tag style specified in the Use style box. For comments formatted in
Extension Options Dialog
409

Javadoc, select /**. For XMLdoc, select ///. For Doxygen, select /*! or //!. See Doc Comment Examples
for more information.
•Use style - Select the tag style to use for the corresponding start characters. This tag style is used
when SlickEdit Core creates skeleton doc comments beginning with the matching start characters. For
comments formatted in Javadoc, select the @param style. For XMLdoc, select the <param> style. For
Doxygen, select the \param style. You can click through the start characters, assigning each one with a
particular style and the settings will be remembered. See Doc Comment Examples for more informa-
tion.
Comment Editing
The following options control comment editing behaviors. These options will be unavailable for non-
applicable extensions.
•Split line comments - If selected, when you press Enter in the middle of a line comment, a new line
comment will automatically be started on the new line. For example:
// The quick brown fox [CURSOR_HERE]jumped over the lazy dog.
Pressing Enter will result in:
// The quick brown fox
// [CURSOR_HERE]jumped over the lazy dog.
•Extend line comments - If selected, when you press Enter at the end of a line containing a line com-
ment, and there is also an aligned line comment on the line before or after the current line, a new line
comment will automatically be started on the new line. For example:
// The quick brown fox
// jumped over the lazy dog.[CURSOR_HERE]
Pressing Enter will result in:
// The quick brown fox
// jumped over the lazy dog.
// [CURSOR_HERE]
•Join comments when joining lines - If selected, when you press Delete at the end of a line contain-
ing a line comment to join the current line with the next line, and the next line is also a line comment,
the line comment characters will automatically be deleted. For example:
// The quick brown fox [CURSOR_HERE]
// jumped over the lazy dog.
Pressing Delete will result in:
Extension Options Dialog
410
// The quick brown fox[CURSOR_HERE] jumped over the lazy dog.
String Editing
If Split strings on Enter is selected, when you press Enter to split a line when the cursor is inside of a
string, the closing and opening quotes and, if necessary, operators, will automatically be inserted, and the
string will be aligned with the original string. For example:
String x = "The quick brown fox [CURSOR_HERE]jumped over the lazy dog.";
Pressing Enter will result in:
String x = "The quick brown fox "+
"[CURSOR_HERE]jumped over the lazy dog.";
Comment Wrap Tab
Comment wrapping options can be configured for C, C++, C#, Java, and Slick-C®files. These options are
currently unavailable for other languages. Use the Comment Wrap tab to activate comment wrapping
and configure options for how block, line, and doc comments are wrapped.
Tip
After configuring comment wrap settings, you can use the Reflow Comment dialog to reflow block
comments, paragraphs, or a selection of the current file. See Reflowing Comments.
To access the Comment Wrap tab, from the main menu click Window →Preferences, expand SlickEd-
it and click General in the tree, then double-click the File Extension Setup setting. On the Extension Op-
tions dialog, make sure the extension you want to work with is selected in the Extension box, then select
the Comment Wrap tab.
Figure 10.36. Extension Options: Comment Wrap Tab
Extension Options Dialog
411
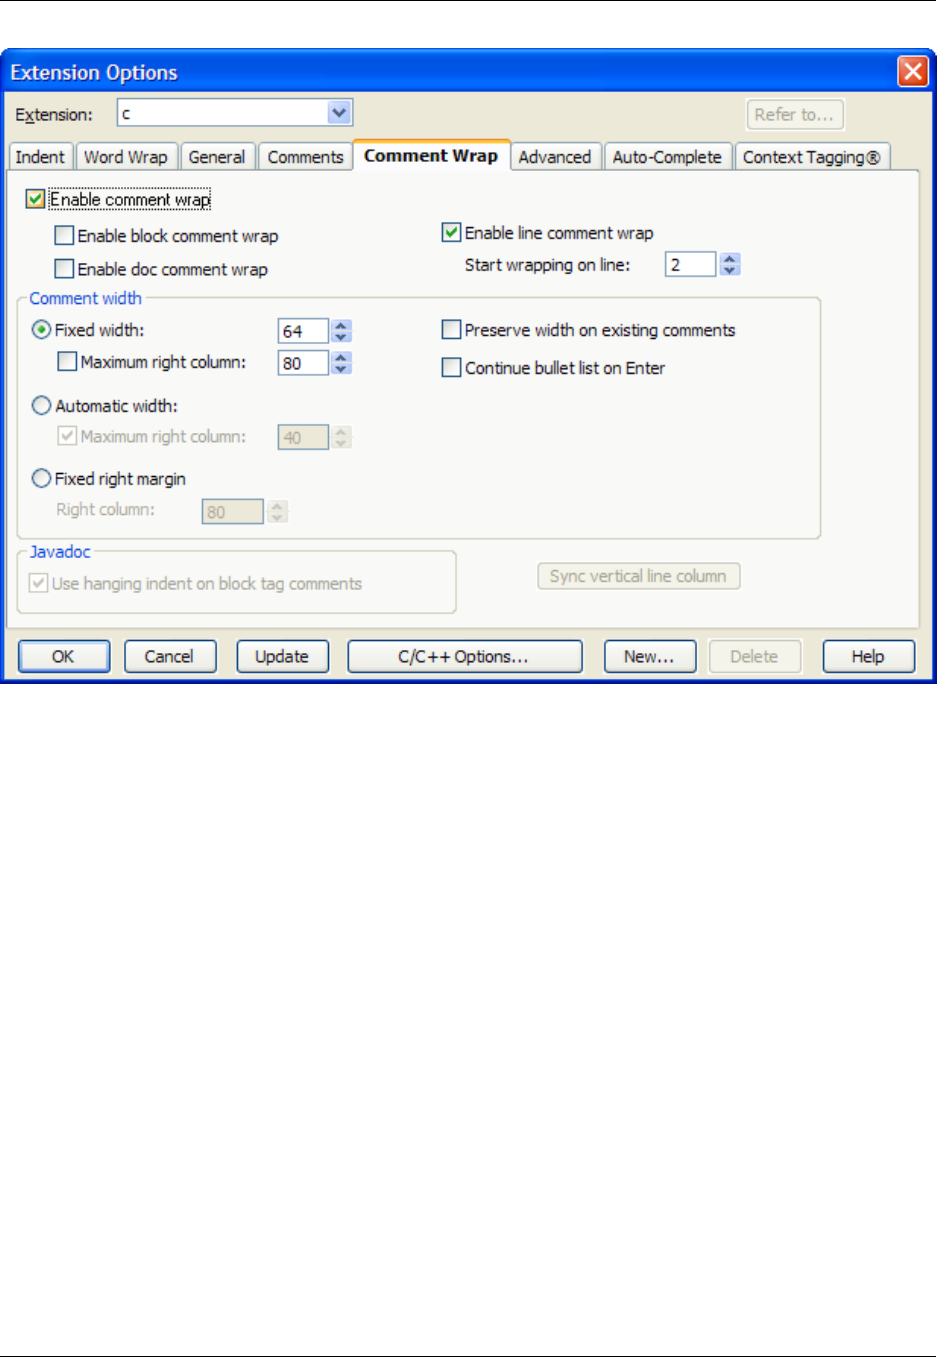
The following options are available:
•Enable comment wrap - When selected, comments are allowed to be wrapped. You must still specify
the type of comments that you want wrapped by selecting one or more of the Enable options for block,
line, and doc comments.
•Start wrapping on line - This setting pertains to line comments only. Make sure line comment wrap-
ping is turned on, then type or select the number of consecutive line comments that must be present
before wrapping is activated. If your code contains many one line descriptive comments, you may
want to set this to 2or more so that comment wrapping will not affect these short line comments.
•Comment width - There are three types of width settings for comments:
•Fixed width - If selected, comments are formatted to the specified width. This is useful since com-
ments are typically indented with the corresponding code. This option maintains the original left mar-
gin of the comment and adjusts the right margin to meet the target width.
If Maximum right column is used, comment lines will be wrapped when they reach the specified
column, even if they have not reached the specified fixed width. This is useful if coding standards
mandate that text should not exceed a specified column.
•Automatic width - If selected, the width of the longest multi-line paragraph in the comment block is
used as the width for block comments. This is useful for preserving the formatting of existing com-
ments.
Extension Options Dialog
412

If Maximum right column is used, comment lines will be wrapped when they reach the specified
column, even if they have not reached the specified fixed width. This is useful if coding standards
mandate that text should not exceed a specified column.
•Fixed right margin - If selected, lines will break before the specified number of columns in the Right
column field has been reached.
•Preserve width on existing comments - If selected, when editing an existing comment, SlickEdit®
Core preserves the width of the existing comment. The width is determined by the length of the
longest multi-line paragraph. If the width of the existing comment cannot be determined, the format-
ting option specified under Comment width will be used instead.
•Continue bullet list on Enter - If selected, when Enter is pressed inside a bulleted paragraph, a
new bullet will be inserted and the cursor will be placed at the text starting position.
•Javadoc -IfUse hanging indent on block tag comments is selected, the second line of a block tag
comment will be automatically aligned to the first non-whitespace character after the first word after the
tag.
•Sync vertical line column - This button will make visible and move the vertical line column to match
the hard margin column (if using fixed right column margins) or the maximum right column (if using
fixed width).
Advanced Tab
The Advanced tab allows you to set color coding, extension-specific project parameters, and more. To
access these settings, click Window →Preferences, expand SlickEdit and click General in the tree,
then double-click the File Extension Setup setting. On the Extension Options dialog, select the Ad-
vanced tab.
Figure 10.37. Extension Options: Advanced Tab
Extension Options Dialog
413
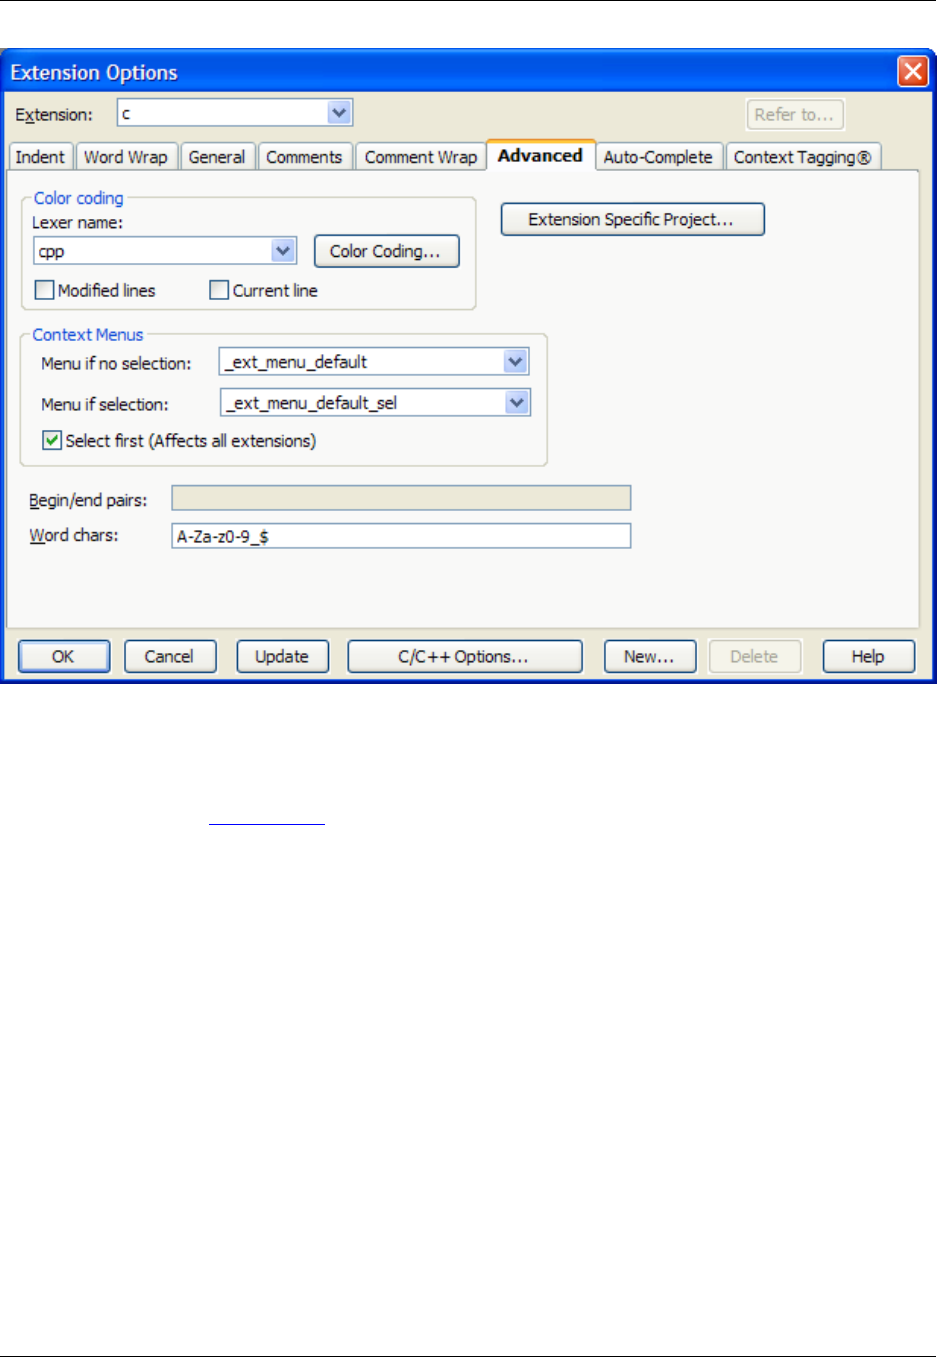
The following options and settings are available:
•Color coding options - The options below affect Color Coding. For more information about working
with this feature, see Color Coding.
•Lexer name - Use the drop-down list to select the lexer to use to recognize elements to be colored.
•Color Coding - Click this button to display the Color Coding Setup dialog, allowing modification of
language-specific color coding for the current language.
•Modified lines - If selected, lines that have been modified are color-coded.
•Current line - Check on Current line to color-code the current line.
•Extension specific project - (Not available in SlickEdit Core.) Click this button to set project properties
specific to a file extension.
•Context Menus - These options specify which context menu to display in the editor window base on
whether a text selection is made in the editor window.
•Menu if no selection - This specifies the menu that is displayed when right-clicking in an edit win-
dow that does not have a selection.
•Menu if selection - This specifies the menu that is displayed when right-clicking in an edit window
that has a selection.
Extension Options Dialog
414
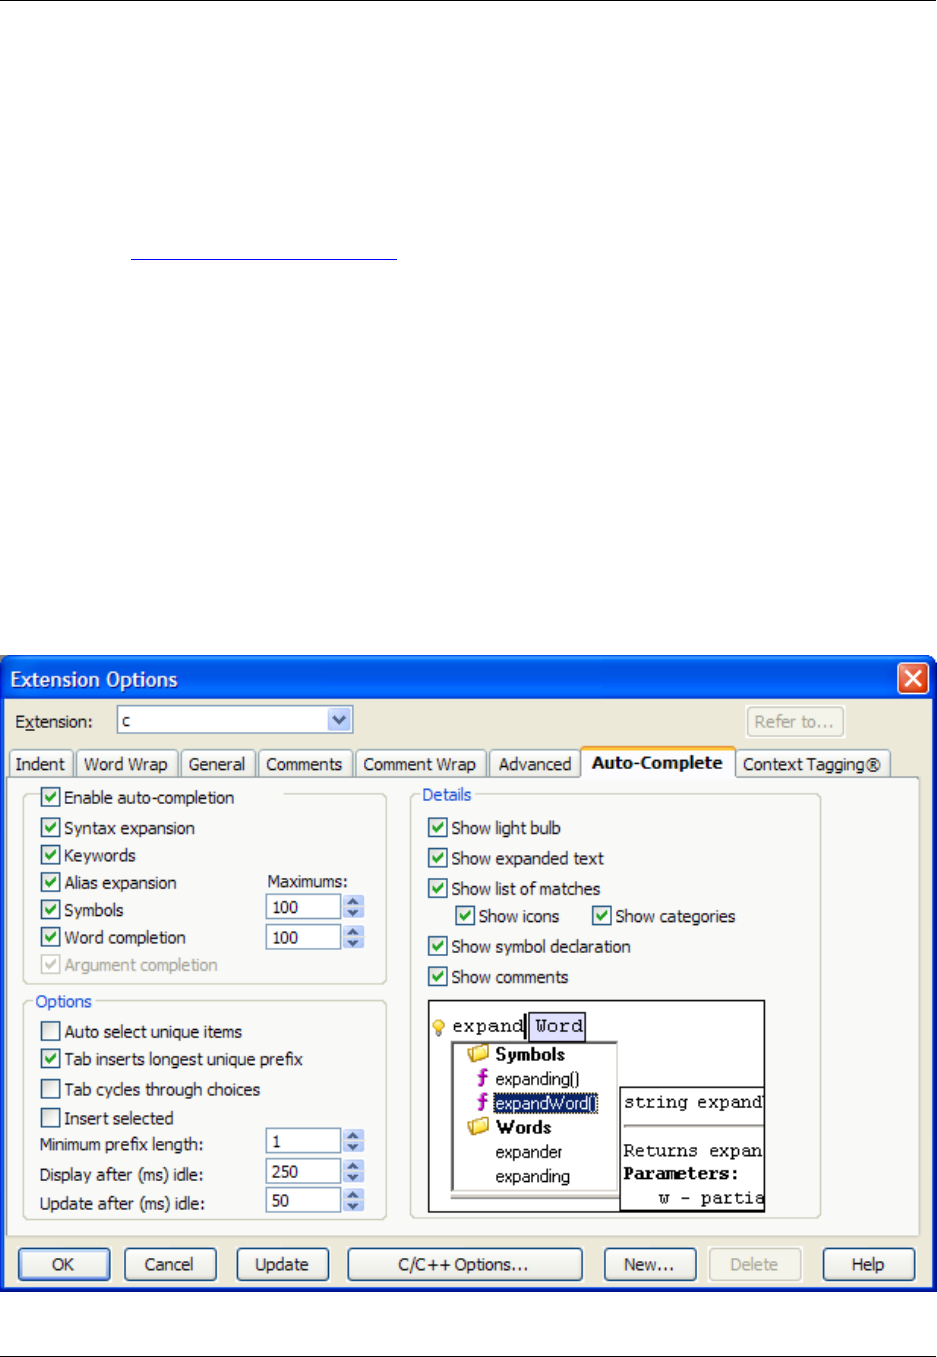
•Select first (affects all extensions) - When checked (default), a selection can be made with the
right mouse button instead of displaying the extension-specific menu. When this is not checked, se-
lect menu items by clicking and dragging the mouse.
•Begin/End pairs - Specify the begin/end pairs to use for the selected extension in a format similar to a
regular expression. This text box is unavailable for languages that have special begin/end matching
built-in. See Begin/End Structure Matching for more information about begin/end pairs and using this
option.
•Word chars - The word characters affect the operation of all word-oriented commands, including word
searching. You can use a dash (-) character to specify a range, such as "A-Z", which specifies upper-
case letters. To specify the dash (-) character as a valid word character, place a dash at the beginning
or end of the word character string.
Auto-Complete Tab
Auto-Complete options in SlickEdit®Core can be configured for each file extension type. To access these
options, click Window →Preferences, expand SlickEdit and click General in the tree, then double-click
the File Extension Setup setting. On the Extension Options dialog, select the Auto-Complete tab.
Figure 10.38. Extension Options: Auto-Complete Tab
Extension Options Dialog
415

The following options are available:
•Enable auto-completion - If selected, activates the Auto-Complete feature. See Auto-Complete for
more information.
•Syntax expansion - If selected, Auto-Complete will show Syntax Expansion choices for the word prefix
under the cursor. Syntax Expansion completes syntactic elements of the language, like if or for state-
ments, putting in the parentheses and braces matching your specified coding style settings. See Syntax
Expansion for more information.
•Keywords - If selected, Auto-Complete will show keyword choices for the word prefix under the cursor,
if it matches one or more keywords in the current language.
•Alias expansion - If selected, Auto-Complete will show the matching alias for the word under the curs-
or. Aliases names require an exact word match, not just a prefix match. For more information on using
aliases, see Aliases.
•Symbols - If selected, symbols will be displayed as completion options if the word prefix at the cursor
matches one or more symbols using a strict, context-sensitive and language-specific tag search.
•Maximums (Symbols) - For performance tuning, you can limit the maximum number of symbols dis-
played by Auto-Complete. This setting affects all file extensions.
•Word completion - If selected, word completions will be displayed if the word prefix under the cursor
matches one or more words in the current file. The strength of this option is that it ties into the word and
line completion features of SlickEdit Core. After you select a word completion, you can press
Ctrl+Shift+Space to complete the rest of the line from which the original word came. See Word Com-
pletion for more information.
•Maximums (Word completion) - For performance tuning, you can limit the maximum number of
word completions displayed by Word Completion. This setting affects all file extensions. This is espe-
cially useful when editing large files.
•Auto-select unique items - If this option is selected and Auto-Complete finds exactly one word match,
it will automatically select that match for completion. If this option is turned off, you must select a word
to complete using the Tab key or the Up or Down arrow keys.
•Tab inserts longest unique prefix - If selected, pressing Tab will cause Auto-Complete to attempt to
insert the longest unique prefix match of all its completions. If the word prefix cannot be extended, Tab
will cycle to the next completion choices.
•Tab cycles through choices - Select this option if you want to use Tab and Shift+Tab to cycle
through completion choices, as is done in some command shells. If deselected, Tab will attempt to in-
sert the longest unique prefix (if selected), or insert the selected completion, or cancel Auto-Complete
and behave normally if there is no completion selected.
•Insert selected - If selected, when cycling through completion choices and a choice is selected, the se-
lected choice will replace the current text. This modifies the file as you work.
•Minimum prefix length - The minimum number of characters the word prefix must contain before auto-
completions will be displayed automatically.
Extension Options Dialog
416

•Display after (ms) idle - The number of milliseconds the editor must be idle before auto-completion
suggestions will be displayed. This setting affects all extensions.
•Update after (ms) idle - The number of milliseconds the editor must be idle before auto-completion
suggestions will be refreshed. This setting affects all extensions.
•Show light bulb - If selected, displays the light bulb as a reminder when Auto-Complete suggestions
are available for the current word prefix.
•Show expanded text - If selected, shows the rest of the word or statement being completed.
•Show list of matches - If selected, shows the list of matches underneath the word prefix.
•Show icons - If selected, displays symbol icons and folder icons. Turn this feature off to get a more
compact list containing only completions.
•Show categories - If selected, shows completions in a categorized list for each type. If not selected,
all completions will be shown in one flat, sorted list.
•Show symbol declaration - If selected, for symbol completions, this will show the symbol declaration
as a comment to the right of the symbol completion.
•Show comments - If selected, for symbol completions, this will display the symbol’s comments to the
right of the symbol completion.
Context Tagging®Tab
Context Tagging options can be configured for each file extension type. This allows you to activate and
deactivate particular features on a per-language basis. To change these options, from the main menu
click Window →Preferences, expand SlickEdit and click General in the tree, then double-click the File
Extension Setup setting. On the Extension Options dialog, select the Context Tagging®.
Figure 10.39. Extension Options: Context Tagging®Tab
Extension Options Dialog
417
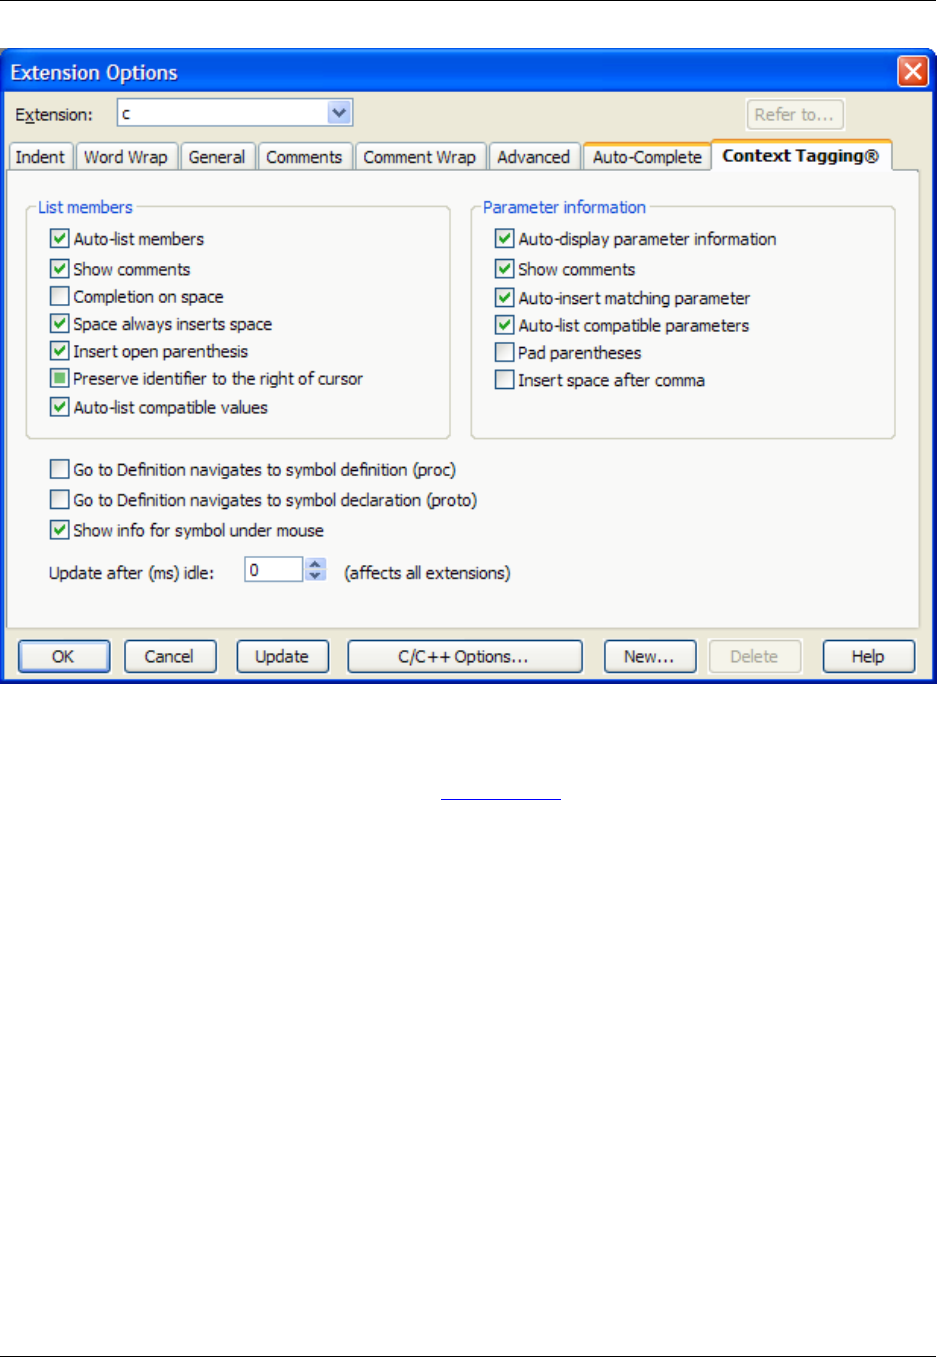
List Members
The following options apply to List Members. See List Members for more information.
•Auto-list members - If selected, typing a member access operator (for example, "." or "->" in C++) will
trigger SlickEdit®Core to display a list of the members for the corresponding type. To access this fea-
ture on demand, press Alt+Dot. If you use this feature on demand, and you are not in a member ex-
pression, this feature will display a list of locals, global variables, current class members, etc.
•Show comments - If selected, the comments are displayed for the currently selected symbol in the list
displayed by List Members. When a symbol has multiple definitions or overloads, and multiple sets of
comments, the comments will indicate that you are looking at item "< 1 of n >". Click on the arrows or
use Ctrl+PgUp and Ctrl+PgDn to cycle through the comment sets.
•Completion on space - If selected, pressing the spacebar when List Members is displayed will insert
the longest unique matching prefix from the symbols in the list. For example, if the list contains
FLAG_CHAR and FLAG_LONG, then typing FL<Alt+Dot><spacebar> completes the line of code up
to FLAG_. If this option is not selected, use Ctrl+Space when List Members is displayed to perform
completion.
•Space always inserts space - If selected, pressing the spacebar when List Members is displayed will
insert the current item and a space in the list after the current item. If unselected, pressing the spacebar
will only insert the current item with no extra space.
Extension Options Dialog
418

•Insert open parenthesis - If selected, selecting an item in the list inserts the current item in the list and
any extra characters that are required by the symbol. For example, an open parenthesis is inserted
after a function name for languages that require an open parenthesis after a function name. For C++,
the less-than symbol (<) is inserted after a template class name.
•Preserve identifier to right of cursor - If selected, only the identifier characters before the cursor are
replaced with an item selected from a List Members dialog. Identifier characters after the cursor are
preserved. When this option is not selected, identifier characters following the cursor are replaced with
the item selected from a list members dialog. When this option is in the mixed state, trailing identifier
characters are preserved for auto list members but not when listing members on demand by pressing
Alt+Dot.
For example, if List Members is active and the current line is as follows:
this->foo<cursor_here>Bar
Then if this option is selected and you choose a symbol named "foodForThought" from the List Mem-
bers list, the line will be changed to:
this->foodForThought<cursor here>Bar
If this option is not selected, doing the same would result in:
this->foodForThoughtBar<cursor here>
•Auto-list compatible values - If selected, compatible variables are automatically listed after you press
the spacebar after assignment operators and return statements. Global (non-module) variables are not
listed. This only affects C, C++, and Java. To access this feature on demand, press Alt+Comma.
Parameter Information
The following options apply to parameters. See Parameter Information for more details.
•Auto-display parameter information - If selected, the prototype and comments for a function are
automatically displayed when a function operator such as the open parenthesis is typed, and the cur-
rent argument is highlighted within the displayed prototype. To access this feature on demand, press
Alt+Comma.
•Show comments - If selected, comments are displayed when Parameter Info is displayed. When a
symbol has multiple definitions, and multiple sets of comments, the comments will indicate that you are
looking at item "< 1 of n >". Click on the arrows or use Ctrl+PgUp and Ctrl+PgDn to cycle through the
comment sets.
•Auto-insert matching parameter - If selected, when Parameter Info is displayed and the name of the
current formal parameter matches the name of a symbol in the current scope of the appropriate type or
class, the name is automatically inserted. When the name is inserted, it is also selected so that you can
type over it, or you can type Comma,Space,Tab, or a closing parenthesis to use the automatically in-
serted parameter.
Extension Options Dialog
419

•Auto-list compatible parameters - If selected, compatible variables are automatically listed when
parameter info is active and typing the arguments to a function call. Global (non-module) variables are
not listed. This only affects C, C++, and Java. To access this feature on demand, press Alt+Comma.
See Auto List Compatible Parameters for more information.
•Pad parentheses - If selected, a space is inserted after the open parenthesis when a parameter name
is automatically inserted. In addition, if you type a close parenthesis after an automatically inserted
parameter, it will insert a space before the close parenthesis.
•Insert space after comma - If selected, a space is inserted after the comma when a parameter name
is automatically inserted, such as myfun(a, b, c).
Miscellaneous Options
The following options appear at the bottom of the Context Tagging®tab:
•Go to Definition navigates to symbol definition (proc) or declaration (proto) - These options are
mutually exclusive. If neither option is selected, the Select a Tag dialog is displayed, prompting you for
both definitions and declarations. In any case, if you use Ctrl+Dot to jump to a symbol, you can cycle
through the alternate symbols by pressing Ctrl+Dot repeatedly. You can step backwards through the
list of matches by pressing Ctrl+Comma. However, once you reach the first match, Ctrl+Comma will
then pop you back to your original location, where you were before you pressed Ctrl+Dot.
Independent of the settings for these options, in the following circumstances, SlickEdit®Core will jump
directly to the definition or declaration.
• If the cursor is on the first line of a symbol's declaration, it will jump directly to the definition, provided
it is unique.
• If the cursor is on the first line of a symbol's definition, it will jump directly to the declaration, provided
it is unique.
This behavior is particularly convenient for C++ programmers to navigate from a function to its proto-
type and vice-versa. See Symbol Navigation for more information about navigating through your code.
•Show info for symbol under mouse - When selected, as the mouse cursor floats over a symbol, the
information and comments for that symbol are displayed.
•Update after (ms) idle - The value that you type in this field contains the idle time in milliseconds be-
fore the List Members feature displays the list. To prevent the List Members list from being displayed
when you are typing fast, set the idle time to 300 milliseconds.
Select a Tag Dialog
The Select a Tag dialog is used to prompt whether you want to navigate to the symbol’s definition or de-
claration when you use Go to Definition (Ctrl+Dot,Navigate →Go to Definition,orpush_tag com-
mand).
Select a Tag Dialog
420
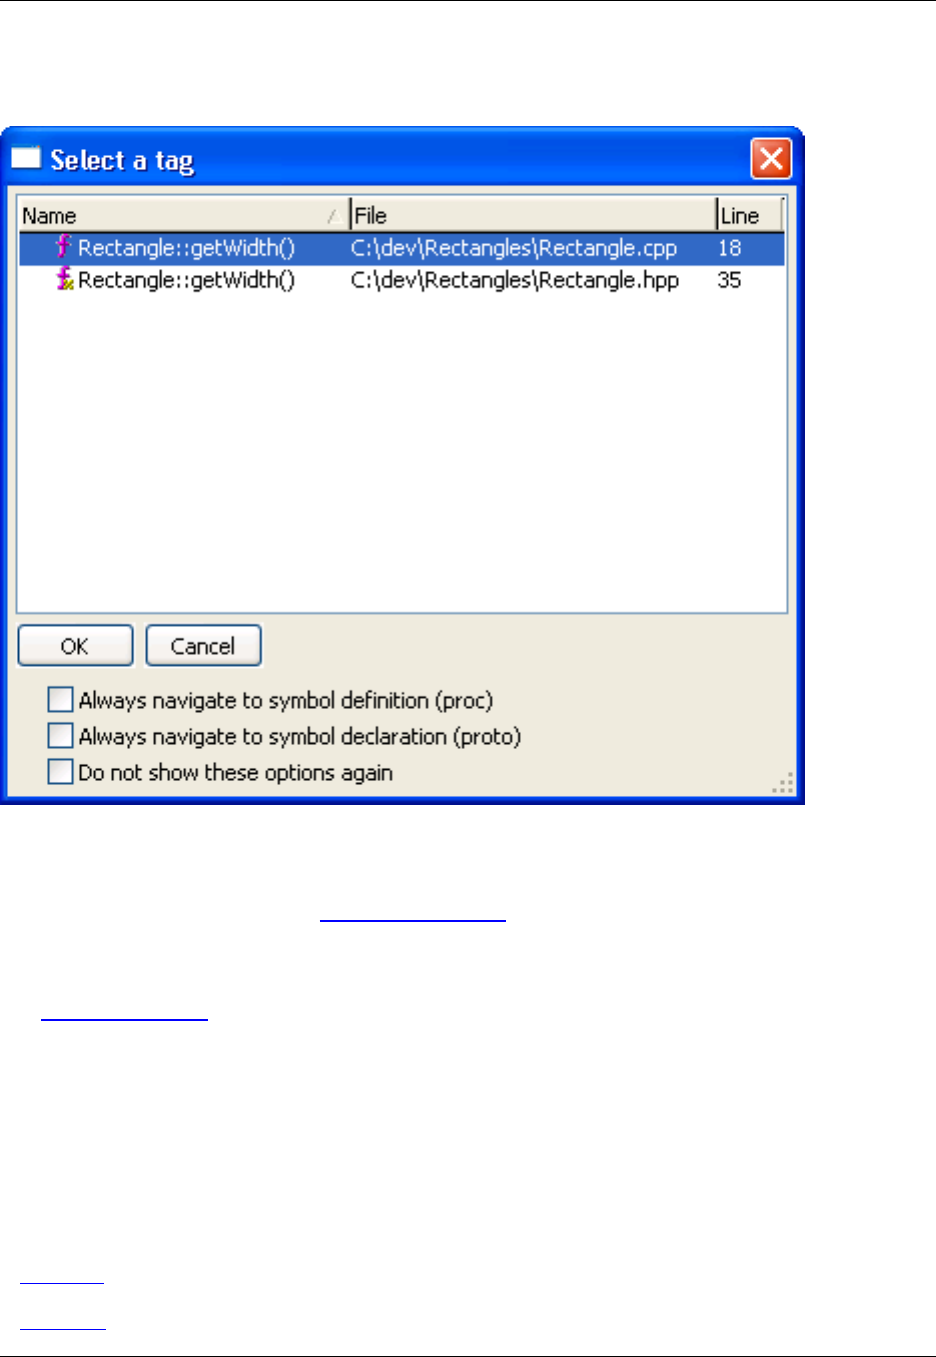
Figure 10.40. Select a Tag Dialog
Select the definition you want to go to. You can also check the options on this dialog to set the behavior
going forward. When you set the Always navigate to symbol options, the settings are also updated for
the Go to Definition options on the Context Tagging Tab of the Extension Options dialog (Window →
Preferences, expand SlickEdit and click General in the tree, double-click the File Extension Setup set-
ting).
See Symbol Navigation for more information.
File Options Dialog
You can set various options that pertain to loading, saving, and other file operations. To access these op-
tions, click Window →Preferences, expand SlickEdit and click General in the tree, then double-click
the File Options setting. The File Options dialog is displayed, containing the following four tabs–click the
links to go to the appropriate descriptions in the documentation:
•Load Tab
•Save Tab
File Options Dialog
421
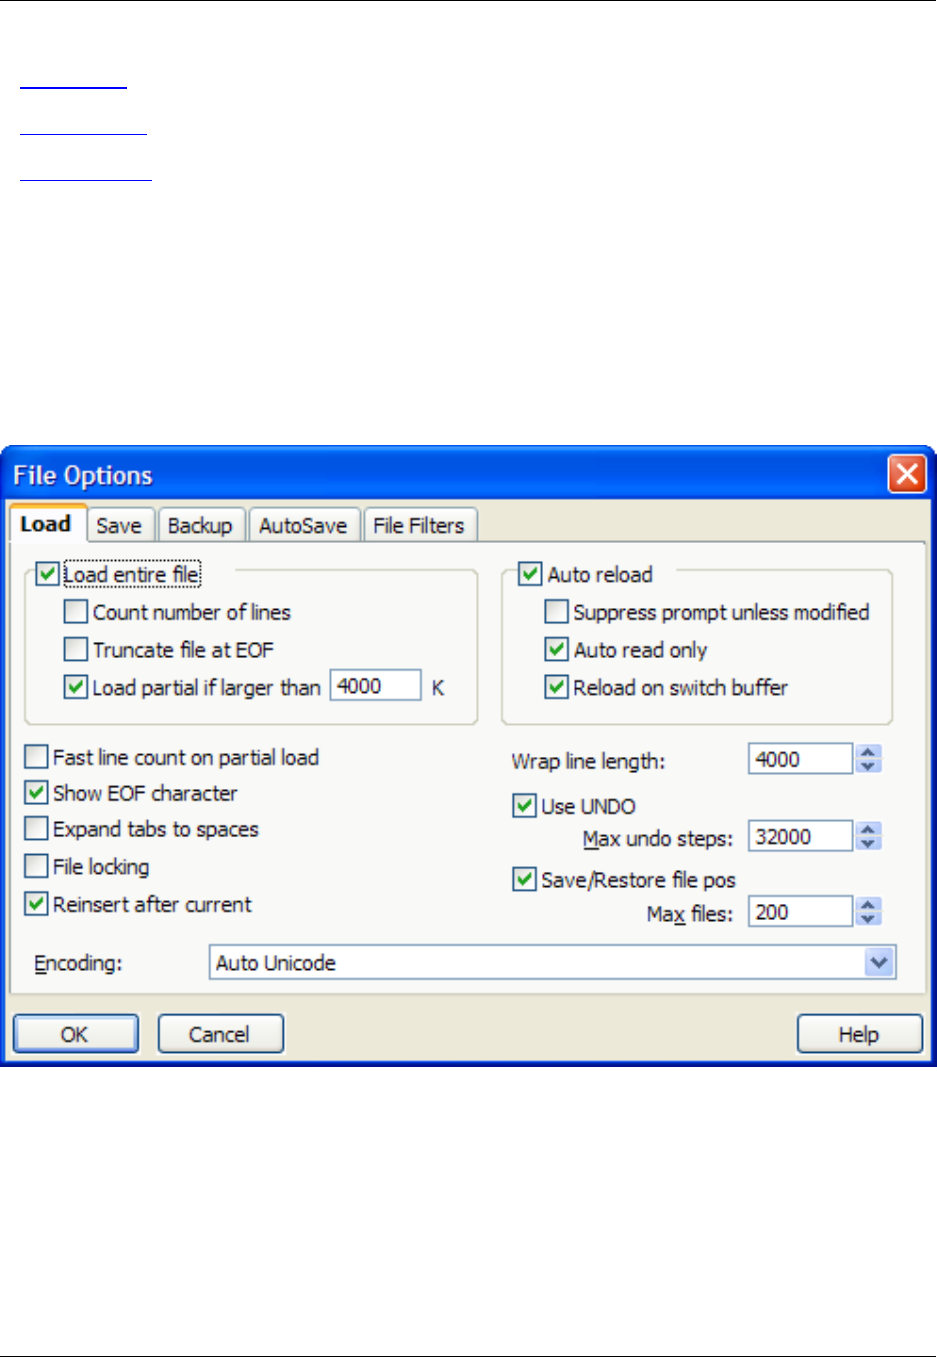
•Backup Tab
•AutoSave Tab
•File Filters Tab
Load Tab
The Load tab, pictured below, offers options to control how files are loaded.
To access the Load tab, click Window →Preferences, expand SlickEdit and click General in the tree,
then double-click the File Options setting and select the Load tab.
Figure 10.41. File Options: Load Tab
The following settings are available:
•Load entire file - When selected, the entire contents of the opened files are read into memory. The line
indicator (located at the bottom right section of the editor) might become blank if the file does not fit in
the editor’s cache (defaults to 2 MB). When this option is not selected, Auto Reload does not work until
the file is saved. If you are using the load command to open files, use the switch +L to specify this op-
tion.
•Count number of lines - When selected, the entire contents of the opened files are read into memory
File Options Dialog
422

and the number of lines in the file are counted. The line number is always displayed in the line indicator
area of the editor. The Load entire file check box will have the same affect as this check box when the
entire file fits within the cache of the editor (defaults to 2 MB) and does not have to be spilled. If you are
using the load command to open files, use the switch +LC to specify this option.
•Truncate file at EOF - When selected, the entire contents of the opened files are read into memory
and the number of lines are counted. In addition, DOS format files are truncated when an EOF charac-
ter is found. The line number is always displayed in the line indicator area of the editor. This option is
useful for REXX .cmd files which can have p-code appended to them after the EOF character. If you
are using the load command to open files, use the switch +LZ to specify this option.
•Load partial if larger than - When selected, if the file being loaded is greater than the size specified in
the Load partial if larger than text box, the entire file is not read into memory. Since the file handle re-
mains open to your file, Auto Reload does not work until the file is saved. The line indicator might be
blank unless the Fast line count on partial load option is selected.
•Auto reload - When selected, the editor detects when files being edited have been modified by other
applications and prompt or automatically replace the file with the new copy on disk.
•Suppress prompt unless modified - When selected, files being edited that have been modified by
other applications will automatically be replaced with the new copy on disk.
•Auto read only - When selected, the editor detects when other applications change the read-only at-
tribute of the file and turns the read-only mode on and off.
•Reload on switch buffer - When selected, the editor will detect when the file has been modified by
other applications when the file is switched to the active editor window. If the option is not selected, the
default check is still performed when you switch from another application.
•Fast line count on partial load - When selected, this option indicates that the editor is to count the
number of lines when files are opened. The line number is always displayed in the line indicator area of
the editor. This option is much faster than the Count number of lines option when editing files larger
than the cache size (2 MB by default), because very little data is written to the spill file. The Auto Re-
load feature does not work until the file is saved. If you are using the load command to open files, use
the switch +LF to specify this option.
•Show EOF character - When selected, the EOF character is not removed when files are loaded. If you
are using the load command to open files, use the switch +LE to specify this option.
•Expand tabs to spaces - When selected, the entire contents of the files are read into memory and
tabs are expanded into spaces. If your tab settings for the file being loaded are of the form
+<increment> (e.g. "+4"), then tabs are expanded in increments of the specified increment. Other-
wise, tabs are expanded in increments of eight. To set tabs in a form +<increment>, click Window →
Preferences, expand SlickEdit and click General in the tree, then double-click the File Extension
Setup setting. On the Extension Options dialog, select your extension from the Extension drop-down
list, then select the Indent Tab. Enter your values in the Tabs text box. For languages such as REXX
and Linux containing shell scripts that require the contents of the file be analyzed before the file type is
known, the Fundamental mode tab settings are used. If you are using the load command to open
files, use the switch +E to specify this option.
File Options Dialog
423

•File locking - When selected, this option ensures that a file handle is kept open to the file for locking
purposes. This detects when another user is editing the same file. If you are using the load command
to open files, use the switch +N to specify this option.
•Reinsert after current - (Not available in SlickEdit Core.) When selected, the editor will switch back to
the previous buffer or window with the prev_buffer or prev_window command. If you are using the
load command to open files, use the switch +BP to specify this option.
•Unmodified block spilling - When selected, unmodified blocks are spilled when the memory/buffer
cache is full. When the spill file destination is faster than the disk the file resides on (such as a floppy
drive), select this option for optimal performance. If you are using the load command to open files, use
the switch +S to specify this option.
•Wrap line length - When selected, this option improves editing performance on large files with very
long lines, by wrapping the long lines at the number of characters specified here. This option is particu-
larly useful for editing very large, single-line XML files.
•Use undo,Max undo steps - When Use undo is selected, modifications to buffers may be undone.
The Max undo steps box specifies the maximum number of steps that are stored. Cursor motion can
be undone but is not counted as a step. If you are using the load command to open files, use the
switch +U to specify this option. For example, +U:32000 turns on undo and specifies a 32000-step
max).
•Save/Restore file pos,Max files - When Save/Restore file pos is selected, when you open a file, the
cursor position is restored to its previous location when the file was closed. The Max files box specifies
the maximum number of cursor positions saved. The most recently closed file positions are stored.
•Encoding - Unicode support required. Specifies the global (non-extension specific) file encoding. This
setting is overridden if an extension-specific encoding is defined. Both the extension-specific and global
setting are overridden if you specify an encoding in the Open dialog. SlickEdit®Core records the en-
coding used to override default encoding settings and reuses this setting the next time you open the
same file. This provides you with per-file encoding support. Encoding is also supported for Microsoft
project files (vcproj,csproj,vbproj) that are XML files but that default to active code page encod-
ing and not UTF-8, like XML. See Encoding for more information.
Save Tab
The Save tab, shown below, contains options that affect how files are saved.
To access save options, click Window →Preferences, expand SlickEdit and click General in the tree,
then double-click the File Options setting. On the File Options dialog, select the Save tab.
Figure 10.42. File Options: Save Tab
File Options Dialog
424

The following options are available:
•Append EOF character - When this option is set, an EOF character is appended to the end of DOS
files when the buffer is saved. This option has no effect on UNIX, Macintosh, or binary files. If you are
using the save command to save files, use the switch +Z to specify this option.
•Remove EOF character - When this option is set, the EOF character is removed from the end of DOS
files when the buffer is saved. This option has no effect on UNIX, Macintosh, or binary files. If you are
using the save command to save files, use the switch +ZR to specify this option.
•Expand tabs to spaces - When this option is set, tabs are expanded to spaces according to the tab
stops when the buffer is saved. If you are using the save command to save files, use the switch +E to
specify this option.
•Strip trailing spaces - When this option is set, trailing spaces at the end of each line are stripped when
the buffer is saved. If you are using the save command to save files, use the switch +S to specify this
option.
•Save files on loss of focus - When this option is set, all modified files will be saved when you switch
to another application.
•Reset line modify - When this option is set, line modify flags are reset when the buffer is saved. If you
are using the save command to save files, use the switch +L to specify this option.
•Add file to project upon Save As - (Not available in SlickEdit Core.) This option controls the default
File Options Dialog
425

value of the Add to project option on the Save As dialog. Check this option on the Save tab to have
the Add to project check box selected by default each time the dialog is invoked. By default, neither
option is set. If you are using the save command to save files, use the switch +P to specify this option.
•Line format - By default, the line format is set to Automatic, which means files are saved "as is" and
there are no changes made to the line end characters. To have line end characters translated when
files are saved, set the file format to DOS,Mac,orUNIX.
When Automatic is set (default), the line breaks are saved automatically in the file format appropriate
to the context in which you are working. However, you can designate a file type for the line breaks. For
example, if you are working in Windows and using CVS, using UNIX line breaks will make using CVS
easier. Therefore, set the file format to UNIX.
Note
Classic Mac line endings are a single carriage return (ASCII 13).
Backup Tab
The Backup tab is not available in SlickEdit Core. See File History and Backups for more information.
AutoSave Tab
The AutoSave tab, shown below, contains settings for automatically saving files.
Figure 10.43. File Options: AutoSave Tab
File Options Dialog
426
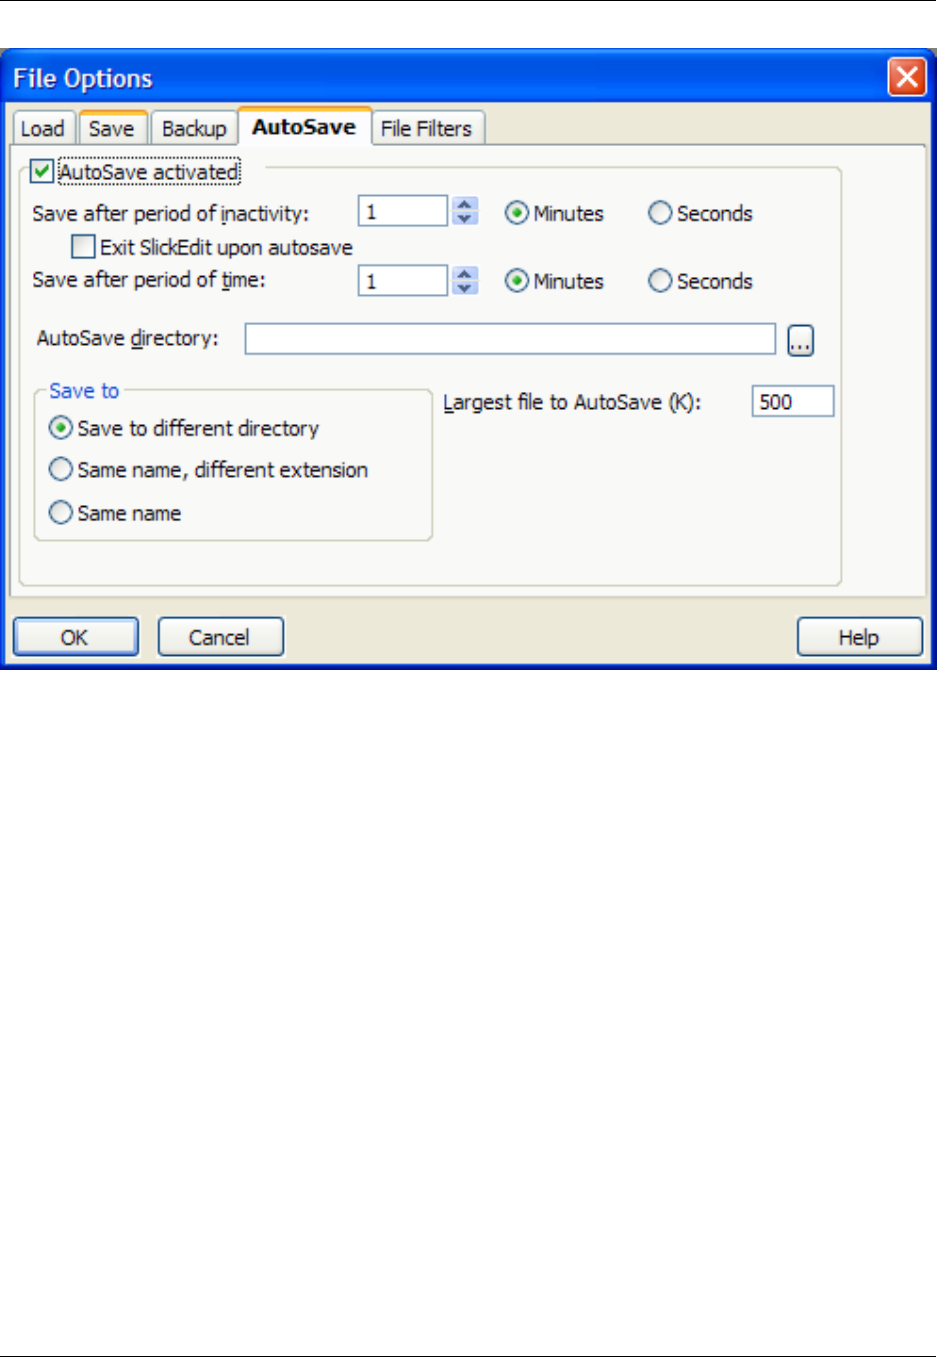
The following options are available:
•AutoSave activated - Activates AutoSave, which prevents you from losing data when an abnormal ed-
itor exit occurs (possibly from a power loss).
The AutoSave temporary files are placed in a directory named autosave in the configuration directory.
Usually, the AutoSave temporary files are deleted when you exit SlickEdit®Core. After a file is saved or
closed, the AutoSave temporary file is deleted the next time AutoSave occurs. AutoSave temporary
files are only needed for files that are modified.
The current implementation of AutoSave does not save files that have are not named. In addition,
AutoRestore does not restore files that do not exist on the disk drive of your system. Save your file at
least one time to ensure that the file has a file name and exists on the disk drive.
•Save after period of inactivity - The value that you enter in this field specifies the amount of idle time,
in minutes or seconds, when modified files should be saved. Set this value to 0if you do not want this
option ignored.
•Exit SlickEdit on AutoSave - When this option is selected, Eclipse with SlickEdit Core closes after an
AutoSave.
•Save after period of time - Specifies amount of time in minutes or seconds when modified files should
be saved. Set this value to 0if you want this option ignored.
•AutoSave directory - The directory that you specify in this field is the AutoSave directory if the Save to
File Options Dialog
427

different directory option has been selected. If the AutoSave directory is blank,
<configuration_directory>\autosave is used. The configuration directory is defined by the
VSLICKCONFIG environment variable. If the VSLICKCONFIG environment variable is not set, the dir-
ectory in the editor executable directory is used as the configuration directory.
•Save to different directory - Setting this option specifies that all AutoSave temporary files be placed in
the directory specified by the AutoSave directory text box. Use this option to clean up or find all of the
AutoSave files if an abnormal editor exit occurs.
Note
When editing two files with the same name but in different directories, one AutoSave temporary
file is overwritten by the other.
•Same name, different extension - This option, when set, specifies that the AutoSave file be placed in
the same directory as the file that is being auto-saved but it is given a different extension. The third
character of the extension is replaced with a ~character. The length of the extension is padded with un-
derscores if the length of the extension is less than three characters. For example, the AutoSave file for
test.c is test.c_~. The AutoSave file for test.prg is test.pr~. If you are editing two files in the
same directory which differ only by the third character, one AutoSave temporary file will be overwritten
by the other.
•Same name - Setting this option specifies that the modified files be automatically saved. No AutoSave
temporary files are created.
•Largest file to AutoSave (K) - Files greater than the value that you type in this field are not automatic-
ally saved. Set this value to 0if you want all files auto saved.
File Filters Tab
The File Filters tab, shown below, contains filtering options for opening and saving files. To access filters,
click Window →Preferences, expand SlickEdit and click General in the tree, then double-click the File
Options setting. On the File Options dialog, select the File Filters tab.
Figure 10.44. File Options: File Filters Tab
File Options Dialog
428

In the File filters text box, enter the filters you wish to assign. Separate each filter with a comma, and
place file patterns in parentheses. Separate file patterns with a semicolon. The first file filter is used to ini-
tialize the file list.
Key Bindings Dialog
The Key Bindings dialog (Window →Preferences, expand SlickEdit and click General in the tree,
double-click the Key Bindings setting, or use the gui_keybindings command) is used for creating and
viewing mouse and key bindings for commands and user-created macros, as well as for importing and ex-
porting your custom bindings. See Managing Bindings for detailed information.
Figure 10.45. Key Bindings Dialog
Key Bindings Dialog
429
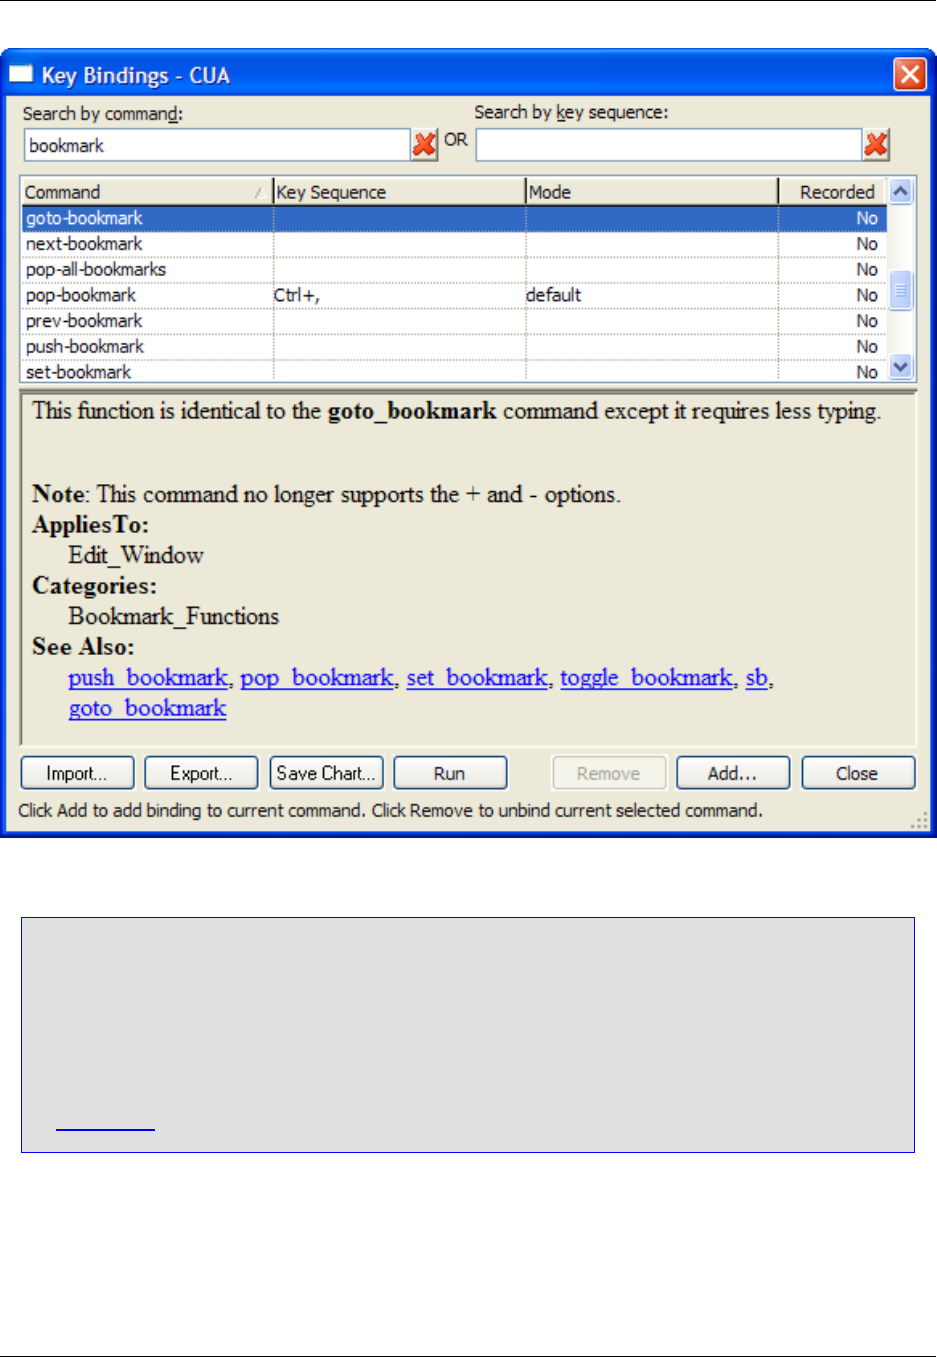
Note
• The first time the Key Bindings dialog is invoked, the Building Tag File progress bar may be
displayed while Slick-C®macro code is tagged.
• Bindings are based on the editor emulation mode (CUA is the default). The title bar of the Key
Bindings dialog shows the current mode. To change the emulation mode, click Window →
Preferences, expand SlickEdit and click Emulation in the tree. For more information, see
Emulations.
The dialog contains the following elements:
•Search by command - This filter is used for searching commands in the Command column. Type a
string in the filter box, and the list of commands is filtered as you type to show only those commands
that contain the specified string. The red Xbutton is used to clear the text box or you can edit inside the
text box manually.
Key Bindings Dialog
430

•Search by key sequence - This filter is used for searching bindings in the Key Sequence column. It
captures literal keyboard input. For example, when the focus is in this filter, press Ctrl and Cat the
same time, and "Ctrl+C" is displayed. Press the Backspace key and "Backspace" is displayed. Mouse
events inside the filter are literal as well. For example, right-clicking within the filter displays the text
"RButtonDn". Because the key sequence filter captures literal keyboard input, you cannot edit the text
or use key functions such as backspacing or tabbing in and out of the field. You must use the red Xbut-
ton to clear the filter.
•Command - This column lists, in alphabetical order by default, the SlickEdit®Core commands and user
macros that are or can be bound to keys or mouse events. Click on the column label to sort bindings by
this column. An arrow in the column header indicates the sort order (ascending or descending).
If a command/macro has more than one binding, each instance is listed on a separate row. For ex-
ample, in CUA emulation, the command gui_open is bound to F7 and Ctrl+O. Therefore, gui_open
appears in the Command column three times, once for each binding.
•Key Sequence - This column shows the mouse event or key sequence associated with the command
or macro. If a Key Sequence cell is empty, no binding is associated with that command/macro. Click
on the column label to sort bindings by this column. An arrow in the column header indicates the sort
order (ascending or descending).
•Mode - This column shows the language editing mode to which the key binding applies. The default
mode causes the binding to work in all language editing modes. However, the default mode will be
overridden by any language-specific mode binding to another command/macro. Click on the column la-
bel to sort bindings by this column. An arrow in the column header indicates the sort order (ascending
or descending).
Note
To change the mode for a command/macro that is already bound, first you should unbind the
command/macro, then recreate the binding with the mode you want to use. See Editing Bindings
for more information. For information about editing modes, see Language Editing Modes.
•Recorded - This column indicates if the item in the Command column is a SlickEdit Core command
(No) or a user-recorded macro (Yes).
•Documentation pane - The bottom pane of the dialog displays the code documentation for the selec-
ted command or macro, if it exists. Click "See Also" hyperlinks (if any exist) to display Help for that item.
For See Also links, if a Help entry does not exist, a message box notification is displayed. The docu-
mentation pane can be resized by dragging the size bar in the middle of the dialog. The size is re-
membered the next time the dialog is displayed.
•Import and Export - These buttons allow you to import and export bindings. This is useful for creating
backups, sharing with other team members, or taking with you should you switch computers. See Ex-
porting and Importing Bindings for details of these features.
•Save Chart - This button allows you to save a reference chart of all current bindings for all language
editing modes in the selected emulation. The chart is saved in HTML format with a name and location
that you specify. Commands/macros that are not bound are not included.
Key Bindings Dialog
431
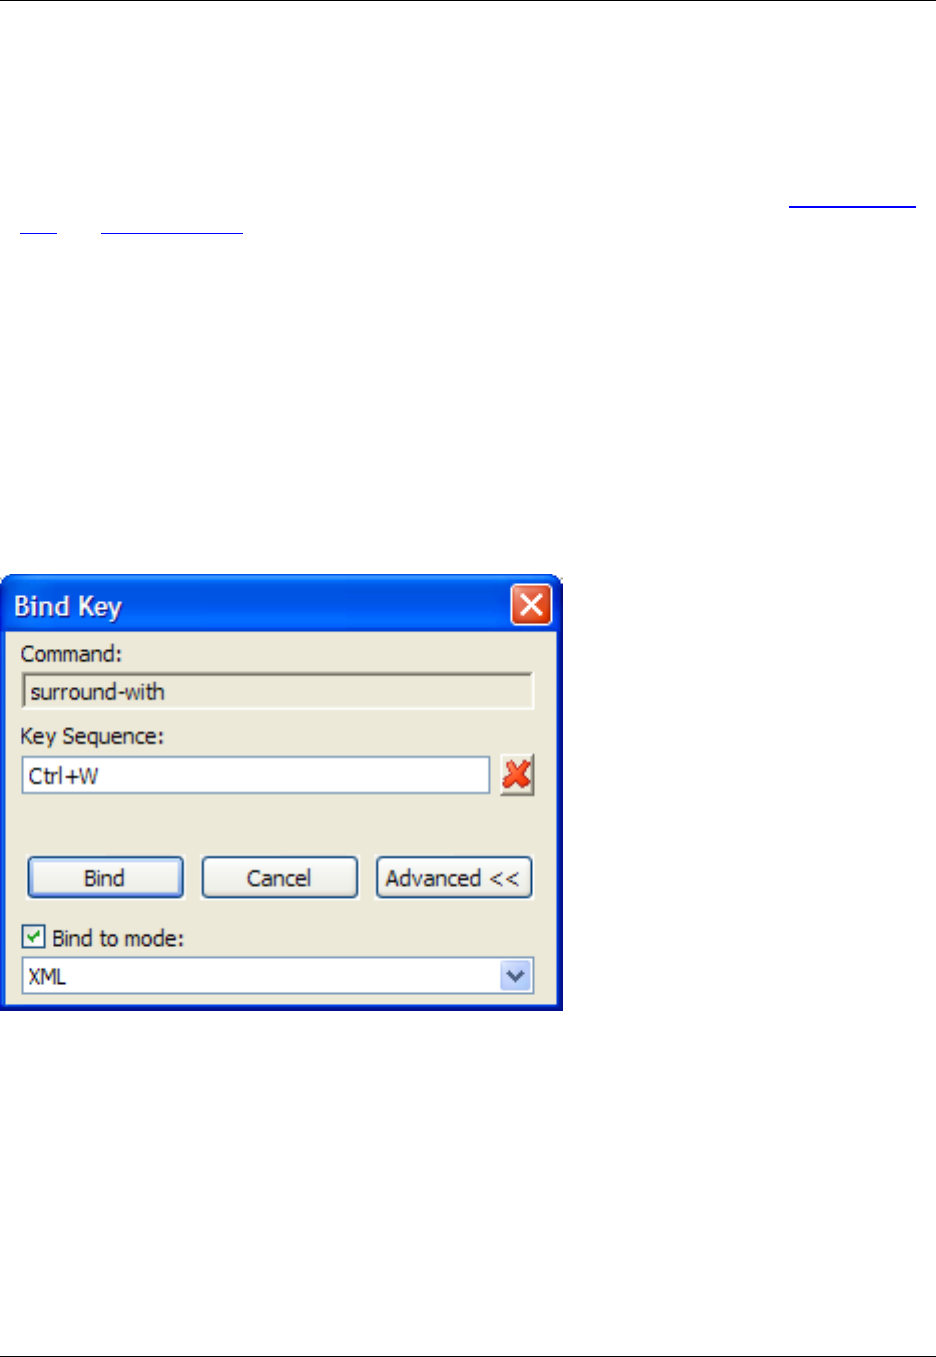
•Run - This button runs the selected command or user-recorded macro.
•Remove - This button clears the binding for the selected command/macro. You can also press Delete
to clear the binding.
•Add - This button is used to initiate a new binding, displaying the Bind Key dialog. See Creating Bind-
ings and Bind Key Dialog for more information.
•Close - Closes the Key Bindings dialog. You can also press Esc to close the dialog.
•Message line - A message line under the buttons displays contextual instructions for using the dialog.
Bind Key Dialog
The Bind Key dialog is used to bind a command to a key sequence or mouse event. It is displayed when
you click Add on the Key Bindings dialog to add a new binding.
Figure 10.46. Bind Key Dialog
The Bind Key dialog contains the following:
•Command - This field shows the command that you have selected to bind.
•Key Sequence - This field is used to enter the key sequence or mouse event that you want bound to
the command. For example, to enter the key sequence Ctrl+W, literally press the Ctrl and Wkeys to-
gether. It accepts literal keyboard/mouse input, so you cannot edit the text or use key functions such as
backspacing or tabbing in and out of the field. You must use the red Xbutton to clear the filter.
•Bind - After entering the key sequence or mouse event, click this button to save the binding and close
the dialog. Prior to clicking Bind, you may want to assign the binding to a specific language editing
Bind Key Dialog
432
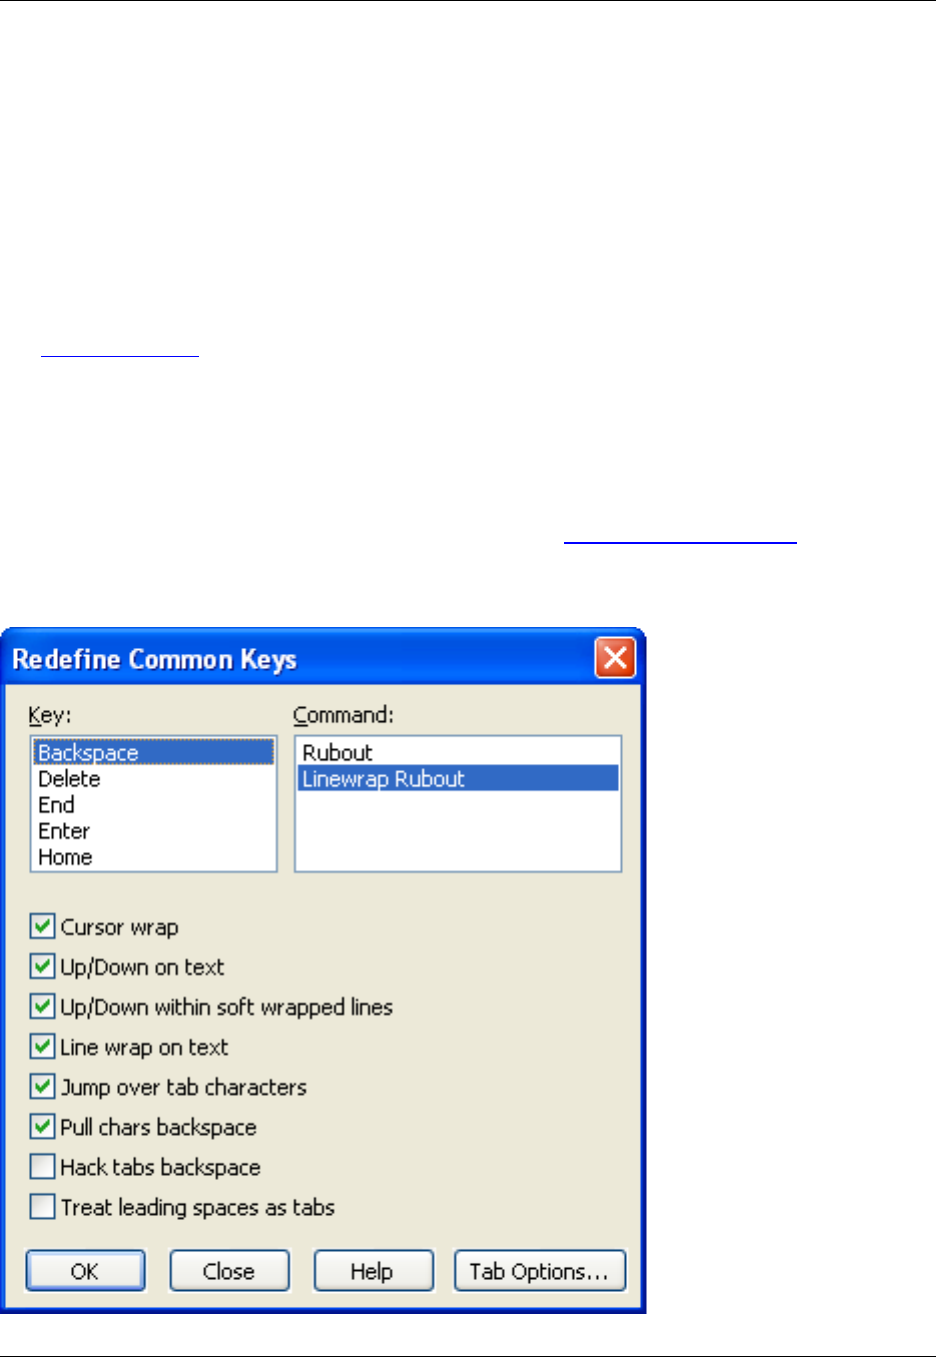
mode (see below).
•Cancel - Click this button to cancel the binding operation and close the dialog.
•Advanced - Click this button to expand the language editing mode settings:
•Bind to mode - By default, all new bindings are assigned to the "default" language editing mode,
which means that the binding will work in all modes. To assign the binding to a specific language
editing mode, select this option and click the language editing mode from the drop-down list. Click
Bind when finished.
See Creating Bindings for more information.
Redefine Common Keys Dialog
The Redefine Common Keys dialog (Window →Preferences, expand SlickEdit and click General in the
tree, then double-click the Redefine Common Keys setting) allows you to change the behavior of certain
common keys. For more information about redefining keys, see Redefining Common Keys.
Figure 10.47. Redefine Common Keys Dialog
Redefine Common Keys Dialog
433

Redefinable Keys
The redefinable keys and their available commands are described below.
•Backspace - The following commands are available for binding to the Backspace key:
•Rubout - Deletes the character to the left of the cursor. If Word Wrap is on (Window →
Preferences, expand SlickEdit and click General in the tree, then double-click the File Extension
Setup setting and select the Word Wrap Tab), the cursor will wrap to the previous line when the left
margin is reached. Otherwise the cursor is not wrapped to the previous line.
•Linewrap Rubout - Deletes the character to the left of the cursor. The cursor always wraps to the
previous line when the left margin is reached. If you want line wrapping to occur when column one is
reached, select the option Line wrap on text on this dialog.
•Delete - The following commands are available for binding to the Delete key:
•Delete Char - Deletes the character at the cursor. If Word Wrap is on (Window →Preferences, ex-
pand SlickEdit and click General in the tree, then double-click the File Extension Setup setting and
select the Word Wrap Tab) and no more characters exist on the current line, the next line is joined to
the current line.
•Linewrap Delete Char - Deletes the character at the cursor. If no more characters exist on the cur-
rent line, the next line is joined to the current line.
•End - The following commands are available for binding to the End key:
•End line - Moves the cursor to the end of the line.
•End Line Text Toggle - Toggles the cursor between the end of the current line and the last non-
whitespace character. This is useful for trimming extra spaces from long lines, because it gives you a
natural and quick way to get to your vertical line column and the last non-blank column.
•Enter - The following commands are available for binding to the Enter key:
•Nosplit Insert Line - Inserts a blank line after the current line and aligns the cursor with the first non-
blank character of the original line. The current line is not split.
•Split Insert Line - Splits the current line at the cursor. Enough blanks are inserted at the beginning of
the new line to align it with the first non-blank character of the original line.
•Maybe Split Insert Line - If the option Start in insert mode is on (Window →Preferences, expand
SlickEdit and click General in the tree, then double-click the General setting and select the More
Tab), the current line is split at the cursor. Enough blanks are appended to the beginning of the new
line to align it with the first non-blank character of the original line. If Start in insert mode is off, the
cursor is moved to column one of the next line.
Note
When changing the key binding for the Enter key, the binding for Ctrl+Enter will automatically
Redefine Common Keys Dialog
434

switch to the opposite setting, depending on whether it is bound to Split Insert Line or Nosplit
Insert Line.
•Home - The following commands are available for binding to the Home key:
•Begin Line - Moves the cursor to column one.
•Begin Line Text Toggle - Toggles the cursor between the first non-blank character of the current
line and column 1.
More Options
The settings listed below appear on the Redefine Common Keys dialog box.
•Cursor wrap - Determines whether the cursor_left and cursor_right commands wrap to the previous
or next line respectively.
•Up/Down on text - Determines whether the cursor_up and cursor_down commands place the cursor
in virtual space. By default, cursor_up and cursor_down go to the same column of the next or previ-
ous line, regardless of the length of the line.
•Up/Down within soft wrapped lines - If selected, when Soft Wrap is on (Window →Preferences, ex-
pand SlickEdit and click General in the tree, then double-click the File Extension Setup setting and
select the Word Wrap Tab), the cursor_down and cursor_up commands move the cursor up to the
next or previous visible line, including line continuations. To force cursor_down and cursor_up to
move the cursor to the next or previous physical line (the same position to which the cursor would move
if Soft Wrap was off), deselect this option.
•Line wrap on text - If selected, line wrapping will occur when column one is reached. If deselected,
line wrapping occurs when the left margin is reached. When Word Wrap is on (Window →Prefer-
ences, expand SlickEdit and click General in the tree, then double-click the File Extension Setup
setting and select the Word Wrap Tab), wrapping occurs when the left margin is reached regardless of
the Left or Backspace key configurations.
•Jump over tab characters - If selected, moving the cursor over a tab character with the Left or Right
arrow key causes the cursor to jump across the virtual space. To allow the Left and Right arrow keys
to cursor into virtual space of tab characters, deselect this option.
This setting also controls whether clicking in the buffer with the mouse to either position the cursor or to
make a selection will align the cursor to the nearest tab character, or allow the cursor to be placed in
virtual space between tab characters.
•Pull chars backspace - If selected, pressing the Backspace key when in Replace mode (when Start
in insert mode is off [Window →Preferences, expand SlickEdit and click General in the tree, then
double-click the General setting and select the More Tab]) removes the previous character and moves
the cursor left. If you want the previous character to be replaced with a space character, deselect this
option.
•Hack tabs backspace - If selected, pressing the Backspace key when the previous character is a tab
Redefine Common Keys Dialog
435
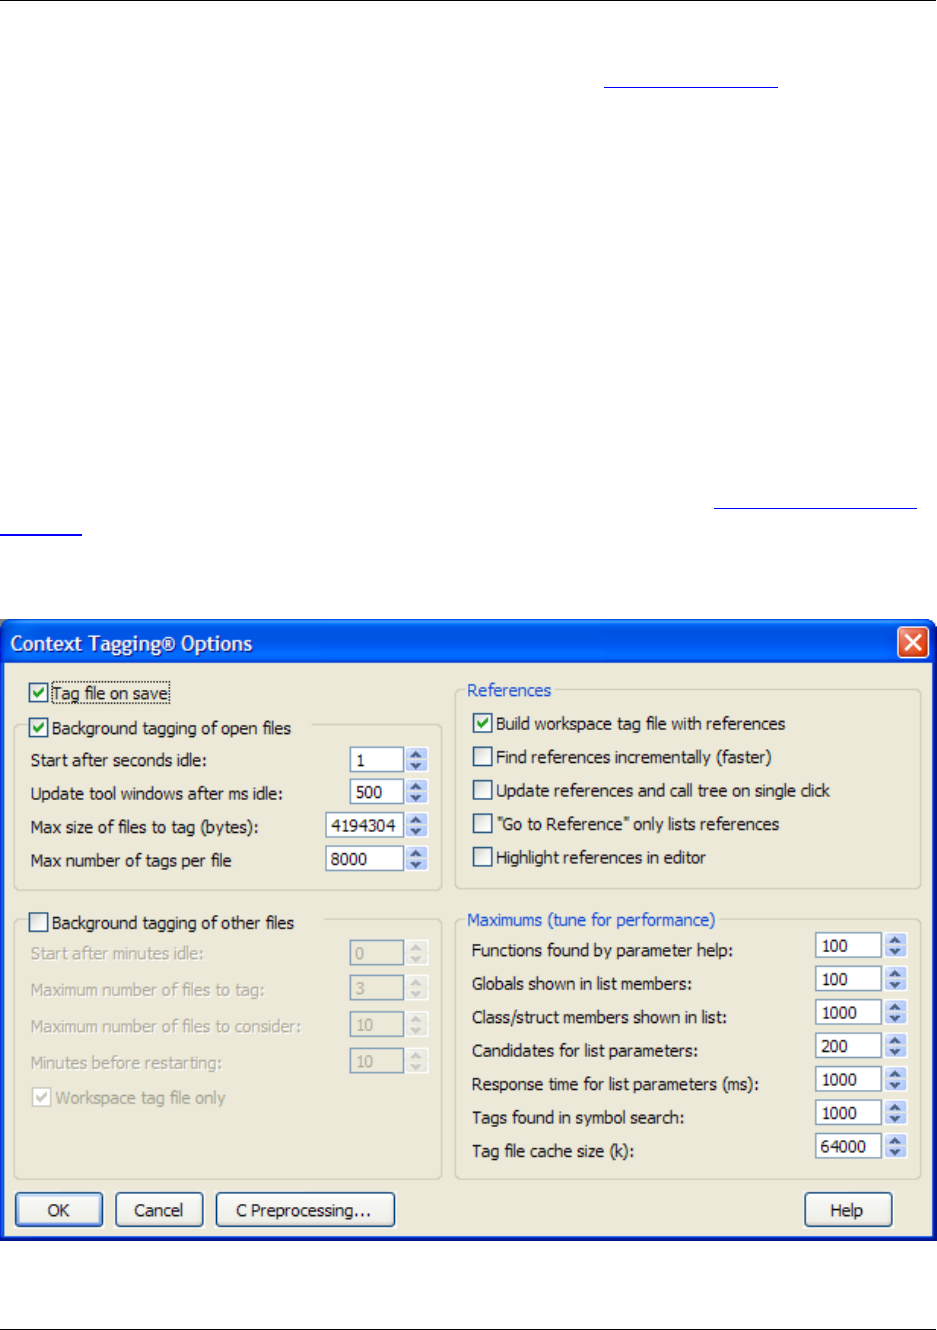
causes the rest of the line to be moved to the previous tab stop. If you are using a mode that has a syn-
tax indent for each level that is different from the tab settings (see Indenting with Tabs), deselect this
option. If you want your Backspace key to delete through tab characters one column at a time, select
this option.
•Treat leading spaces as tabs - If selected, the commands cursor_left and cursor_right will move the
cursor by tab stops when within leading space. If deselected, the cursor_left and cursor_right com-
mands will move the cursor over by one physical character. The purpose of this option is to emulate the
"feel" of real tab characters even if you only use spaces for indentation.
Context Tagging®Options Dialog
The Context Tagging®Options dialog allows you to set general parameters for the Context Tagging fea-
tures. Here, you designate how the Context Tagging is done, how the references function within the ap-
plication, and you can also tune the application to maximize performance. To set options, from the main
menu, click Window →Preferences, expand SlickEdit and click General in the tree, then double-click
the Tagging Options setting. The dialog box is displayed, as shown below. See Building and Managing
Tag Files for more information on this topic.
Figure 10.48. Context Tagging®Options Dialog
The following settings are available:
Context Tagging®Options Dia-
log
436

•Tag file on save - When this option is selected, files are retagged when you save a modified file.
•Background tagging of open files - When this option is selected, all open files are retagged in the
background if they have been modified.
•Start after seconds idle - When Background tagging of buffers is selected, re-tagging of buffers
(opened files) starts after the user has not touched the keyboard or the mouse for this number of
seconds.
•Update view windows after ms idle - Number of milliseconds to wait before updating the Outline and
Preview views.
•Max size of files to tag (bytes) - Limits tagging to the files that have less than this number of bytes.
•Max number of tags per file - Limits the Outline view to files that have less than this number of tags,
including statements if Statement Tagging is on. (See Statement Level Tagging for more information.)
•Background tagging of other files - Select this option if you want your tag files updated when another
application modifies a file. This option is not on by default because it requires SlickEdit®Core to con-
stantly perform disk I/O to check dates of files on disk.
•Start after minutes idle - When Background tagging of files is selected, re-tagging of files on disk
starts after the user has not touched the keyboard or the mouse for this number of idle minutes.
•Maximum number of files to tag - When Background tagging of files is selected, this sets a limit to
the number of files SlickEdit Core will re-tag in one pass.
•Maximum number of files to consider - When background re-tagging of files starts, you cannot use
the editor until it is done with the amount of processing specified by this option or the option Maximum
number of files to tag. The Maximum number of files to consider field specifies the number of file
dates to compare. Specifying smaller maximum values means you will be able to regain access to the
editor quicker and re-tagging will be slower. Specifying larger maximum values means it will take longer
to regain access to the editor, but re-tagging will be quicker.
•Minutes before restarting - Specifies the number of minutes to wait, after background tagging has
fully tagged all files, until background tagging can restart again. The default is 10 minutes.
•Workspace tag file only - When this option is selected, background tagging will cycle through only the
workspace tag file. When not selected, background tagging will cycle through all of your extension-specif-
ic tag files (listed under Tools →Tag Files) in addition to the workspace tag file.
Caution
We do not recommend you run a second copy of the editor to perform tag file updating because it
will cause tag file access problems. Under UNIX the editor will crash if multiple editors are updat-
ing the same tag files.
•References - The following settings apply to references:
•Build workspace tag file with references - When selected, newly-created tag files are built with
Context Tagging®Options Dia-
log
437

support for symbol cross-references.
•Find references incrementally (faster) - When unselected, all files with potential references are
searched and analyzed so that the files which do not contain any references are removed. When this
option is selected, querying references will appear to be faster, since analysis stops when a file is
found containing a valid occurrence. However, you may see files which do not have any references
to the symbol you are looking for listed in the References view.
•Update references and call tree on single click - When this option is selected and you single click
on a new symbol in the Classes, Outline, or Symbols view, the references in the References view are
updated. This option is not on by default because it can cause problems with double-click.
•"Go To Reference" only lists references - When selected, Go To Reference will search for refer-
ences, but it will not jump immediately to the first reference. To find the next reference, invoke the
find_next command (Search →Find Next or Ctrl+G).
•Highlight references in editor - Select this option to have each reference highlighted within the file.
•Maximums (tune for performance) - You can tune Context Tagging ®performance and accuracy by
adjusting these values. Higher values will find more tags but increase search time. Lower values im-
prove performance but may cause tags to be omitted.
•Functions found by parameter help - When you invoke function parameter Help, this setting limits
the number of overloaded functions that will be displayed.
•Globals shown in list members - When you invoke List Members, this setting limits the number of
global symbols that will be inserted into the list.
•Class/struct members shown in list - When you invoke class/struct members, this setting limits the
number of members that will be displayed in the list.
•Candidates for list parameters - When you invoke list parameters, auto-list compatible values are
enabled. This setting limits the number of local variables and class members that will be evaluated to
determine assignment compatibility.
•Response time for list parameters (ms) - This setting is an upper limit on the amount of time
SlickEdit Core will spend finding compatible parameters. Note that this is not a hard limit; in some
cases, evaluating the assignment compatibility of a single variable can be time-consuming, especially
when templates are involved.
•Tags found in search - When you invoke the Find Tag dialog box (right-click in the Symbols View
and select Find Tag) the number of tags found is limited by this setting. This setting also controls
how many duplicate tags are tried when SlickEdit Core is attempting to evaluate the type of a symbol.
•Tag file cache size (k) - You can improve tagging performance by adjusting the tag file cache size to
better match the size of your tag files. Generally, a tag file cache size that matches the total size of
the tag files being used will provide the best performance. For example, if the tag files for your source
code and libraries adds up to 100 MB, you should set your cache size to 100 MB. You may have to
experiment to find the optimum value. Use the recommendations below as a guide. Note that this is
the same option that is found on the Virtual Memory Tab of the General Options dialog.
Context Tagging®Options Dia-
log
438

•Minimum - 8 MB
•Default - 64 MB
•Ideal - Sum of tag file sizes
•Maximum - 25% of physical system memory
•C Preprocessing button - Displays the C/C++ Preprocessing dialog box. Use this dialog to modify
preprocessing so that Context Tagging can better analyze your code. See C/C++ Preprocessing for
more information.
Color Coding Setup Dialog
The Color Coding Setup dialog provides the capability to specify colors for identifying your code. To con-
figure color coding, from the main menu, click Window →Preferences, expand SlickEdit and click Gen-
eral in the tree, then double-click the Color Coding setting. The Color Coding Setup box is displayed.
Figure 10.49. Color Coding Setup Dialog
Color Coding Setup Dialog
439
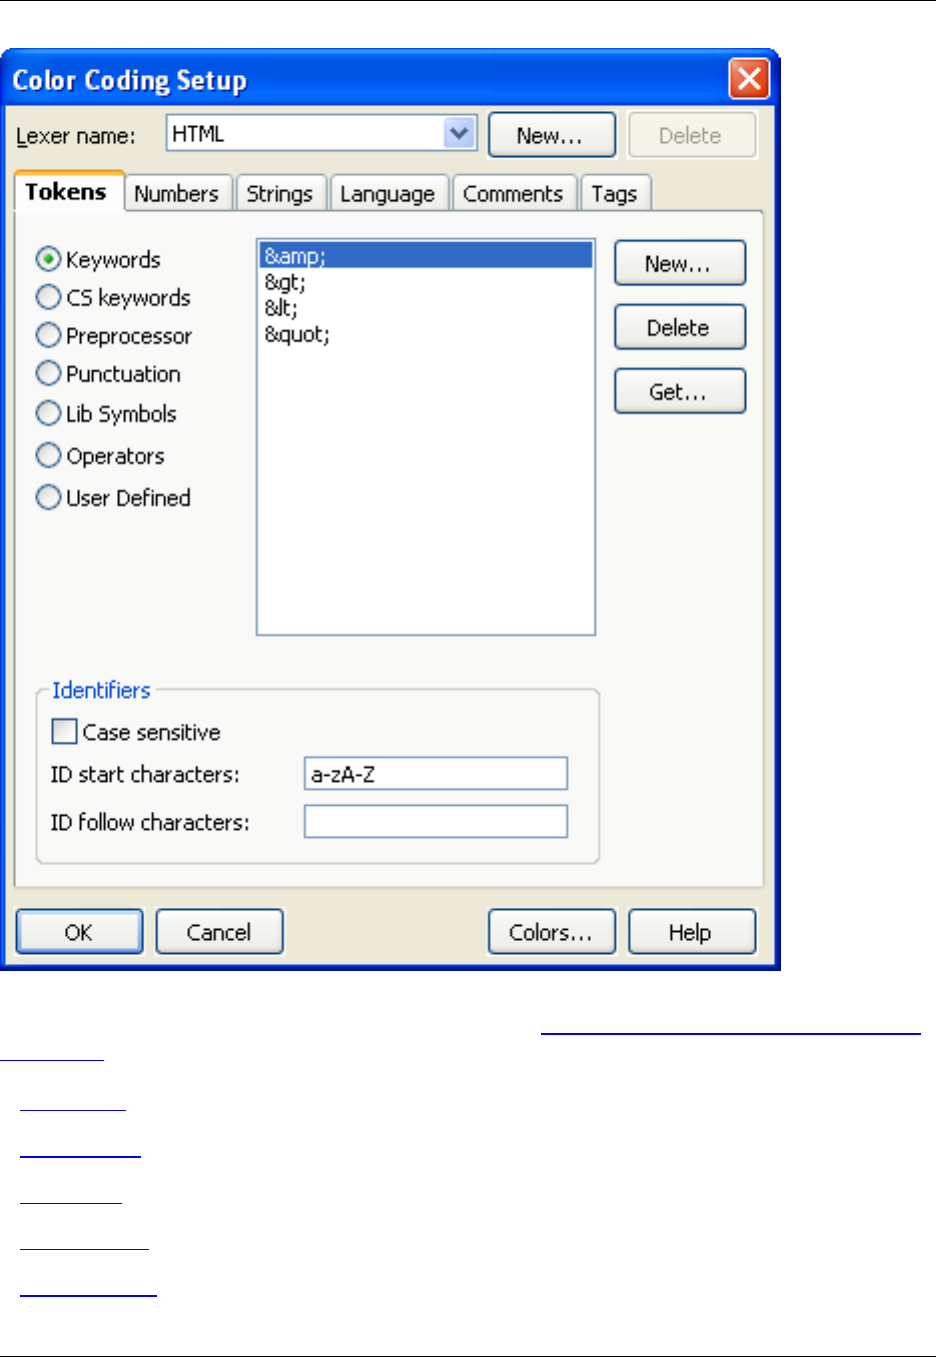

•Tags Tab
Color Coding Setup Options - General Dialog Settings
The following fields and buttons are available on the Color Coding Setup dialog:
•Lexer name - Select the language that you wish to work with from the Lexer name drop-down list. Be
sure to select the lexer you wish to affect before using the tabs to make settings.
•New - Click this button, located next to Lexer name, to prompt for a lexer name to start a new lan-
guage-specific color coding definition (see Creating Color Coding for a New Language).
•Delete - Click this button, located next to Lexer name, to remove a lexer name from the list. You can
only delete user-created lexers.
•Colors - Click this button at the bottom of the dialog to display the Color Settings dialog, which allows
you to specify the color for color coding elements and other editor elements (see Setting Colors for
Screen Elements).
Tokens Tab
The Tokens tab, shown below, provides the capability to specify unique tokens to help you when working
with your code. To access these settings, click Window →Preferences, expand SlickEdit and click
General in the tree, then double-click the Color Coding setting and select the Tokens tab.
Figure 10.50. Color Coding Setup: Tokens Tab
Color Coding Setup Dialog
441
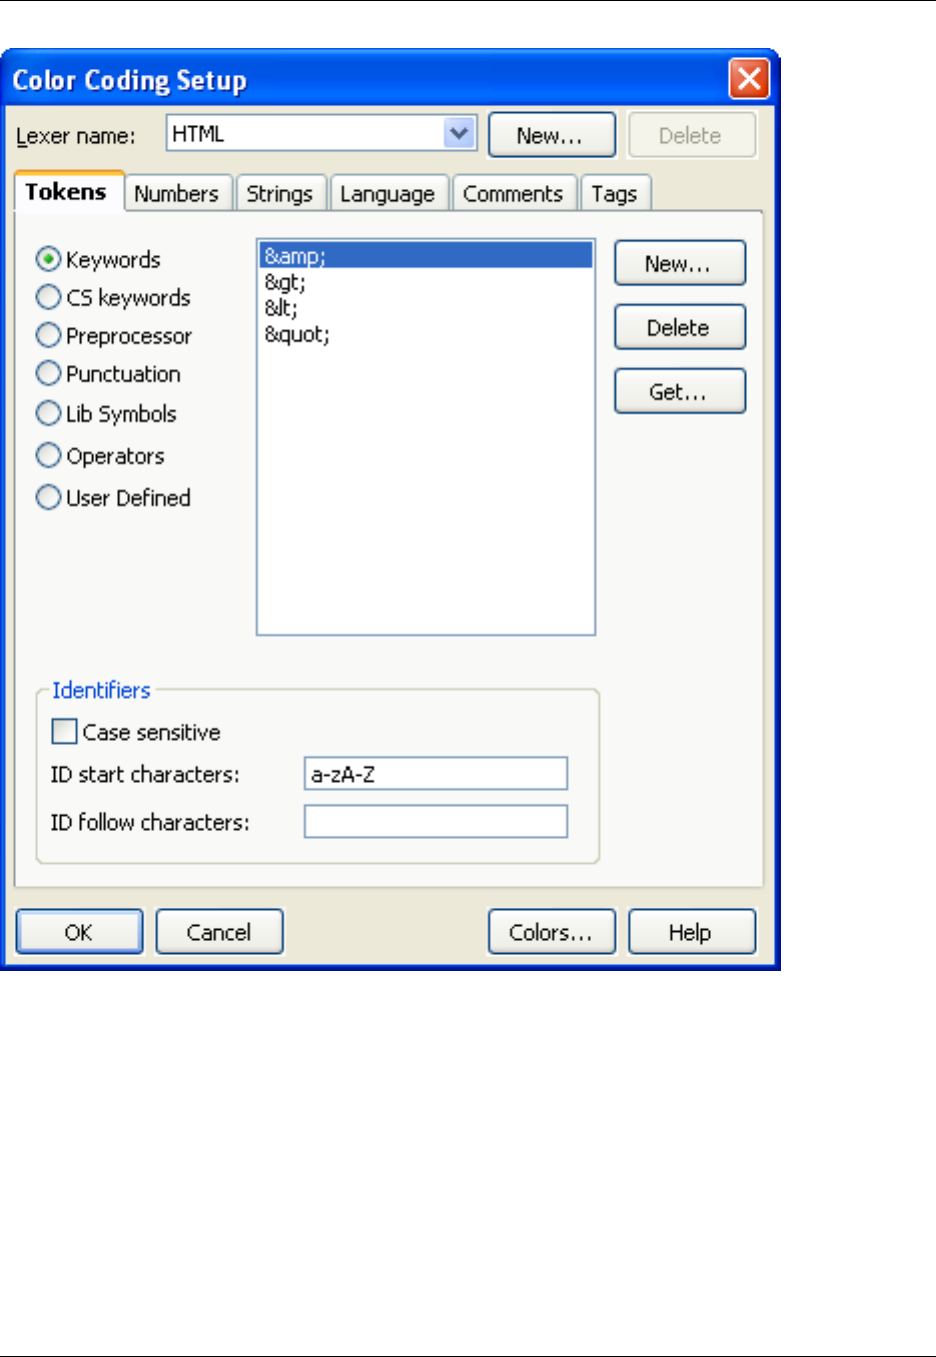
The following options are available:
•Token type - Select from the following token types:
•Keywords - When this option is selected, the list box displays the words that have keyword color.
•CS keywords - When this option is selected, the list box to the right displays case-sensitive words
that have keyword color. These words are always case-sensitive even if the Case Sensitive check
box is not selected.
•Preprocessor - When this option is selected, the list box to the right displays preprocessor keywords
in preprocessor color. All preprocessor keywords must start with the same character.
Color Coding Setup Dialog
442

•Punctuation,Lib Symbols,Operators,User Defined - When one of these options is selected, the
list boxes to the right display the words associated with each.
•Identifiers - Select from the following options:
•Case sensitive - Indicates whether identifiers are case-sensitive.
•ID start characters - Specifies characters which are valid for the start of an identifier or any part of
an identifier.
•ID follow characters - Specifies additional characters which are valid after the first character of an
identifier.
•New - Click this button on the Tokens tab to add one or more words. Separate each word with a space.
•Delete - Deletes selected items in a list box.
•Get - Click this button to add words by selecting the file that contains the keywords that you want to
add.
Numbers Tab
The Numbers tab, shown below, provides options for color-coding numerical values when working with
SlickEdit®Core. To access these options, click Window →Preferences, expand SlickEdit and click
General in the tree, then double-click the Color Coding setting and select the Numbers tab.
Figure 10.51. Color Coding Setup: Numbers Tab
Color Coding Setup Dialog
443

The following options are available:
•Hex numbers
•0x#### (C-Style) - When this option is selected, text such as 0x123ABC is color-coded in number
color.
•####h (Intel assembler) - When this option is selected, text such as 123ABCh is color-coded in
number color.
•$#### (Motorola) - When this option is selected, text such as $123ABC is color-coded in number
color.
Color Coding Setup Dialog
444

•&H#### (Basic) - When this option is selected, text such as &H123ABC is color-coded in number
color.
•"####"X (Rexx) - When this option is selected, strings such as "123ABC"X are color-coded in num-
ber color.
•Z#### (Fortran) - When this option is selected, strings such as Z"123ABC" are color-coded in num-
ber color.
•No Hex (COBOL) - When this option is selected, text such as 123ABC is not color-coded in number
color. By default (for most languages set in Language tab) 123ABC is color-coded in number color.
•Floating point numbers
•#base#number#exponent float (Ada) - When this option is selected, text such as #23#56#67 is col-
or-coded in number color.
•Floating point with E exponent - When this option is selected, text such as 123.4E24 is color-
coded in number color.
•Do not color code numbers (HTML) - When this option is selected, text such as 123.4E24 and
123ABC is not color-coded in number color. By default (for most languages set in the Language tab),
123.4E24 and 123ABC is color-coded in number color.
•Allow underscores in integers (Ada) - When this option is selected, text such as 12_34 is color-
coded in number color.
Strings Tab
The Strings tab contains options for color-coding strings. To access these settings, from the main menu,
click Window →Preferences, expand SlickEdit and click General in the tree, then double-click the Col-
or Coding setting and select the Strings tab.
Figure 10.52. Color Coding Setup: Strings Tab
Color Coding Setup Dialog
445
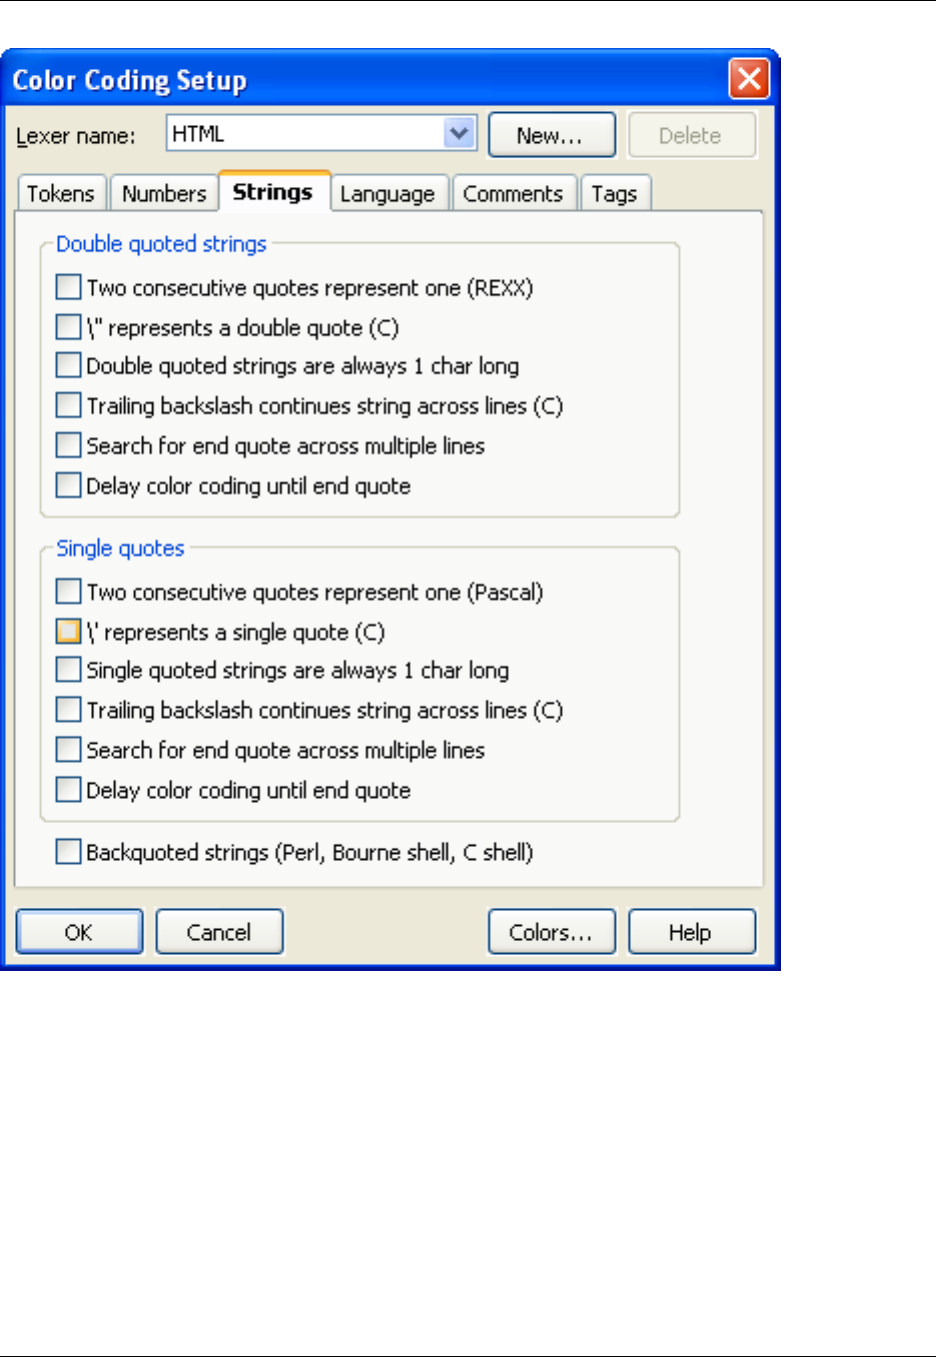
The following options are available:
•Double quoted strings
•Two consecutive quotes represent one -"""" for REXX represents a string of length one which is
a double quote character.
•Backslash double quote represents a double quote -"\"" for C represents a string of length one
which is a double quote character.
•Double quoted strings are always 1 char long - When this option is selected, this means that a
double quote character is followed by an additional character and then the terminating double quote
character. There is never more than one character between the start and end double quote.
Color Coding Setup Dialog
446

•Trailing backslash continues string across lines - When this option is selected, it indicates that
searching for the terminating quote continues to the next line if the lines end with a backslash charac-
ter.
•Search for end quote across multiple lines - When this option is selected, it indicates that the
string does not have to be terminated on the same line as the start quote character.
•Delay color coding until end quote - When this option is selected, a string is not color-coded un-
less an end quote is seen on the same line. This does not support multi-line strings.
•Single quotes
•Two consecutive quotes represent one -'''' (four consecutive single quote characters) for Pascal
represents a string of length one which is a single quote character.
•Backslash single quote represents a single quote -'\'' represents a string of length one which is a
single quote character.
•Single quoted strings are always 1 char long - When this option is selected, a single quote char-
acter is followed by an additional character and then the terminating single quote character. There is
never more than one character between the start and end single quote.
•Trailing backslashes continues string across lines - When this option is selected, it indicates that
searching for the terminating quote continues to the next line if the lines end with a backslash charac-
ter.
•Search for end quote across multiple lines - When this option is selected, it indicates that the
string does not have to be terminated on the same line as the start quote character.
•Delay color coding until end quote - When this option is selected, a string is not color-coded un-
less an end quote is seen on the same line. This does not support multi-line strings.
Language Tab
The Language tab is used to set more language-specific color coding options. To access these settings,
click Window →Preferences, expand SlickEdit and click General in the tree, then double-click the Col-
or Coding setting and select the Language tab.
Figure 10.53. Color Coding Setup: Language Tab
Color Coding Setup Dialog
447
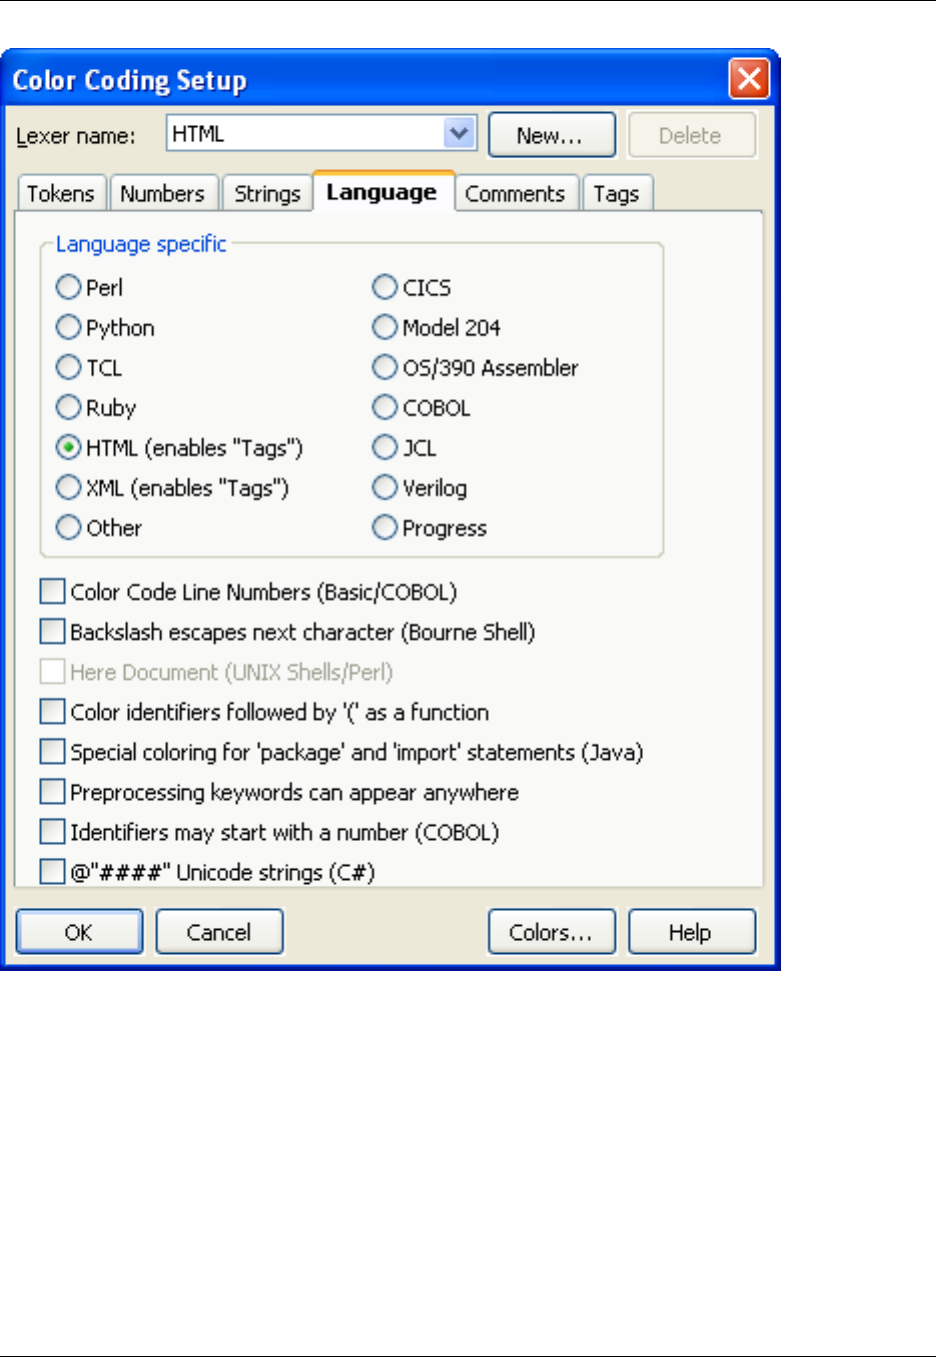
The following options are available:
•Language specific - To avoid requiring complicated BNF for defining color-coding, some hardware
language-specific adjustments have been added. You may be able to use one of these language-specif-
ic settings for another language, but there's no guarantee it will work.
•Color code line numbers (Basic) - When this option is selected, indicates that leading line numbers
should be color-coded in line number color.
•Backslash escapes next character (Bourne Shell) - Backslash escapes the character that follows.
This is useful for UNIX shell scripts which use \" to indicate that the double quote is not the start a
string.
Color Coding Setup Dialog
448

•Here Document (UNIX Shells/Perl) - Activates support for HERE documents. Note that if you prefix
your terminator with one of our lexer names, you will get embedded language color-coding. Example of
aHERE document in Perl, where HTMLEOF is used as the terminator to get HTML embedded lan-
guage color-coding:
print <<HTMLEOF;
<HTML><HEAD><TITLE>...</TITLE></HEAD>
<BODY>
...
</BODY>
</HTML>
HTMLEOF
Unknown languages are color-coded in string color. Embedded language colors are user-definable.
•Color identifiers followed by ( as a function - For language such as C++, Java, and Slick-C®, an
identifier followed by a parenthesis always indicates a function.
•Special coloring for package and import statements (Java) - When this option is selected, the Java
syntax package and import statements are supported. This option is forced on for the lexer name Java.
You must add the package and/or import keywords to your keyword list in order for this option to have
any effect.
•Preprocessing keywords can appear anywhere - When this option is selected, preprocessing
keywords are color-coded even if they are not only preceded by white space.
•Identifiers may start with a number (COBOL) - When this option is selected, identifiers may start with
one or more decimal digits. By default, leading decimal digits indicate a number.
•@"####" Unicode strings (C#) - When this option is selected, text in the form of @"any text" is coded
as a string.
Comments Tab
The Comments tab is used to set comment options for color-coding. To access these settings, click Win-
dow →Preferences, expand SlickEdit and click General in the tree, then double-click the Color Coding
setting and select the Comments tab.
Figure 10.54. Color Coding Setup: Comments Tab
Color Coding Setup Dialog
449
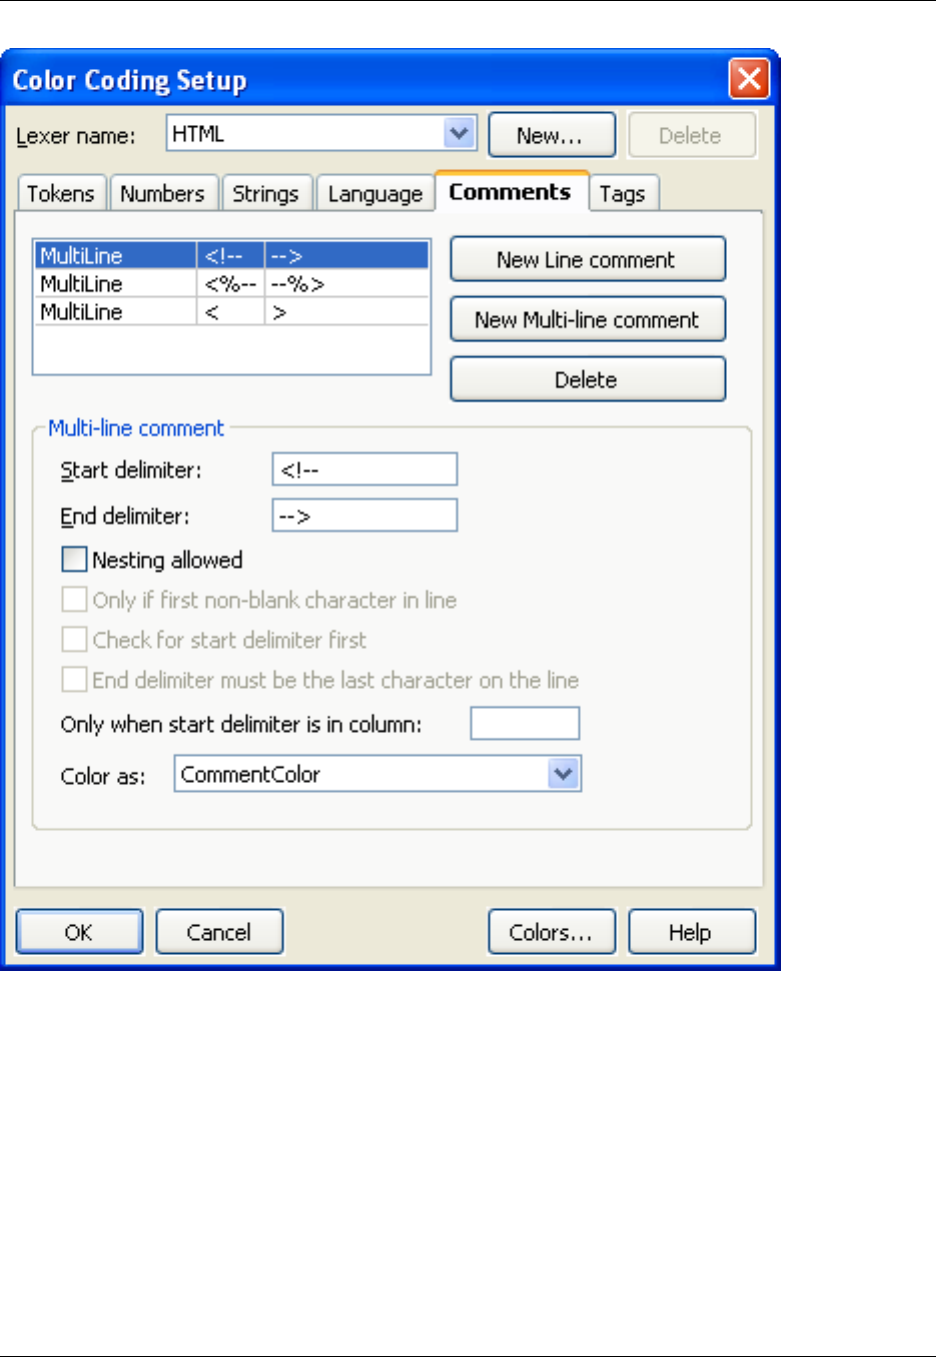
The following options are available:
•New Line comment - Click this button to define new single-line comments.
•New Multi-line comment - Click this button to define new multi-line comments.
•Line comment options - The following line comment options apply to multi-line comments:
•Start delimiter - Delimiter which starts the multi-line comment. Currently, the first character of this
string cannot be a valid identifier character.
•End delimiter - Delimiter which ends the multi-line comment. Currently, the first character of this
string cannot be a valid identifier character.
Color Coding Setup Dialog
450

•Nesting allowed - When this option is selected, this multi-line comment may have this multi-line
comment inside it.
•Only if first non-blank character in line - Indicates the start delimiter must be the first non-blank
character in the line in order to be considered the start of a comment. This check box is available
only when the Only when start delimiter is in column text box is completed.
•Check for start delimiter first - When this option is selected, the lexer checks for the start delimiter
before looking for other items. When this option is specified, the start delimiter is limited to one char-
acter in length.
•End delimiter must be the last character on the line - When this option is selected, the end delim-
iter text must occur at the end of a line to terminate the comment.
•Only when start delimiter is in column - Indicates that the start delimiter text starts a comment only
when found in the column specified.
•Color as - Specifies color used for this comment. This color is not used when the start delimiter is im-
mediately followed by one of the Comment Keywords. When the start delimiter is immediately fol-
lowed by one of the Comment Keywords, keyword color is used.
Tags Tab
The Tags tab is used to set color-coding attributes when working with tagged-based languages such as
HTML and XML. From the main menu, click Window →Preferences, expand SlickEdit and click Gener-
al in the tree, then double-click the Color Coding setting and select the Tags tab.
Figure 10.55. Color Coding Setup: Tags Tab
Color Coding Setup Dialog
451
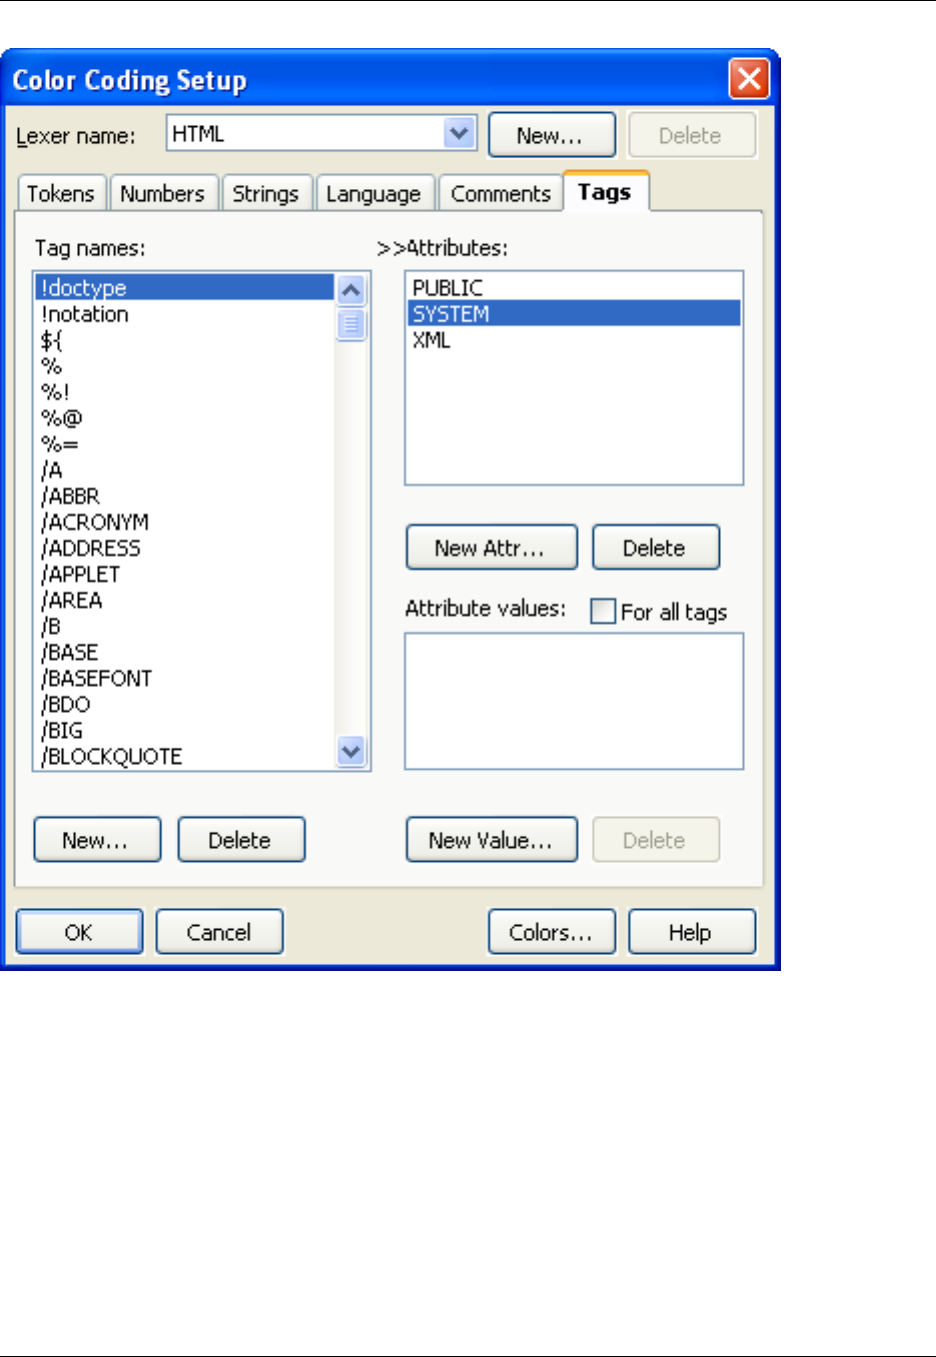
The following fields and settings are available:
•Tag names - List box containing tags for HTML or XML. To add or delete tags, use the New and De-
lete buttons below this list box.
•>>Attributes - List box containing attributes that belong to the tag selected in the Tag names list box.
To add or delete attributes, use the New Attr and Delete buttons below this list box.
•Attribute values - List box contains the values for the specified tag and attribute. To add or delete a
value, use the New Value and Delete buttons below this list box.
•For all tags - When this option is selected, the values in the Attribute value list box are applied to all
tags that have the specified attribute.
Color Settings Dialog
452
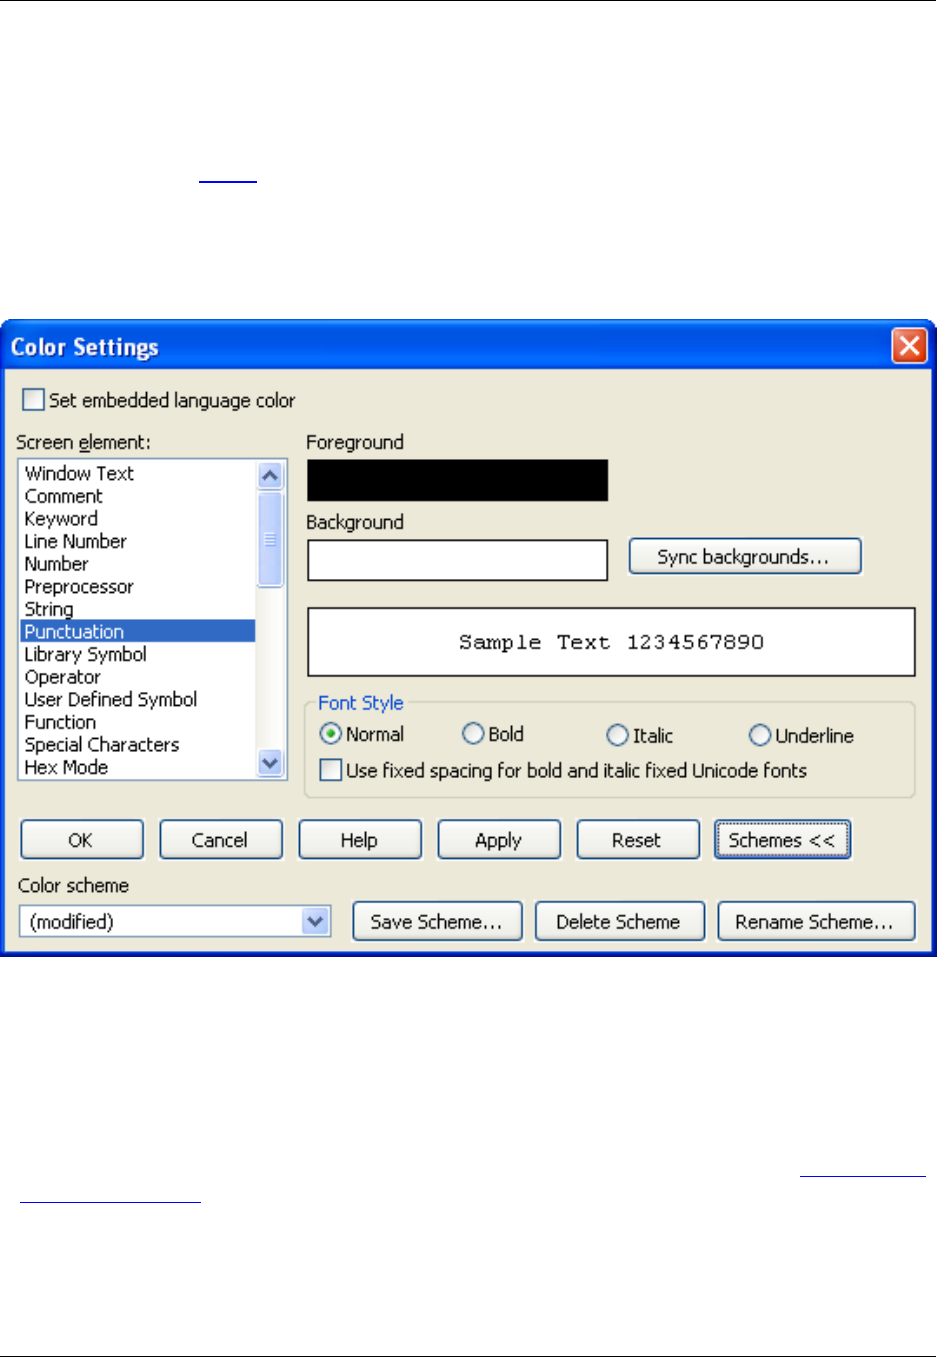
Color Settings Dialog
The Color Settings dialog contains options for changing embedded language colors and the colors of
screen elements. See Colors for more information about changing these colors. To display the Color Set-
tings dialog, click Window →Preferences, expand SlickEdit and click General in the tree, then double-
click the Color setting.
Figure 10.56. Color Settings Dialog
The following options are available:
•Set embedded language color - When this option is selected, you can define the colors for source
code (for example, JavaScript embedded in an HTML file). For HTML, the syntax color-coding recog-
nizes the <script language="???"> tag and uses embedded language colors for the new language. In
addition, for Perl and UNIX shell scripts, you can prefix your HERE document terminator with one of the
color-coding lexer names to get embedded language color-coding. For an example, see Setting Colors
for Screen Elements
•Screen element - Select the screen element before changing the Foreground and Background col-
ors. Most of the screen element items are obvious except for those in the following list:
•Window Text - This is the color of other text which is not a specific syntax element.
Color Settings Dialog
453

•Attribute (HTML only) - This is the color used for a recognized attribute of an HTML tag. For ex-
ample, the src attribute of the img tag gets this color.
•Cursor - This screen element is displayed in the active edit window when the cursor is placed on the
command line. It is not the color of the blinking cursor.
•Current Line,Current Selected Line,Selection - SlickEdit Core will attempt to render these ele-
ments using your normal color settings for the Foreground color. The selected Foreground color
will only be used if there is not enough contrast between the font colors to be readable. It is best to
specify a Background color for these elements that is as close as possible to your normal back-
ground color, ensuring that the color-coded fonts are still easy to read.
•Foreground/Background - Click the color squares to change colors for the selected element. The Col-
or Picker dialog is displayed, allowing you to pick a color from the palette or set your own custom color
using RGB values.
•Use system default - When this option is selected, the operating system’s default colors are used.
Currently, this check box is only available for the Status and Message fields. For UNIX, the system de-
fault colors are selected by the editor and not the operating system.
•Sync backgrounds - Click to apply the current Background color as the Background color for other
elements. The Select Colors to Update dialog appears, from which you can select specific elements to
affect.
•Font Style - For color-coded elements, you may choose whether the element is normal, bolded, it-
alicized, or underlined. For example, keywords are bold by default.
•Use fixed spacing for bold and italic fixed Unicode fonts - (Unicode support required) When this
option is selected, and a fixed font is selected for a Unicode source window, bold and italic color-coding
is supported. Since this requires the Unicode text to be converted to the active code page, some char-
acters may be displayed incorrectly. The current editor display engine ignores bold and italic settings
for proportional fonts or fixed Unicode fonts (which are treated like proportional fonts).
•OK - Applies color changes and closes the Color Settings dialog.
•Cancel - Restores all colors to the values they were when the Color Settings dialog box was first dis-
played in the current editor session.
•Apply - Updates all modified screen elements, useful for previewing what the colors look like. The dia-
log box is not closed so that you can make further changes if you wish.
•Reset - Restores all colors to the values they were when the editor was invoked.
•Schemes - Expands the Color Settings dialog box so you can try different color schemes, or define
your own. See Using Color Schemes for more information.
Font Configuration Dialog
The Font Configuration dialog contains options for changing the fonts and font styles of screen elements.
Font Configuration Dialog
454
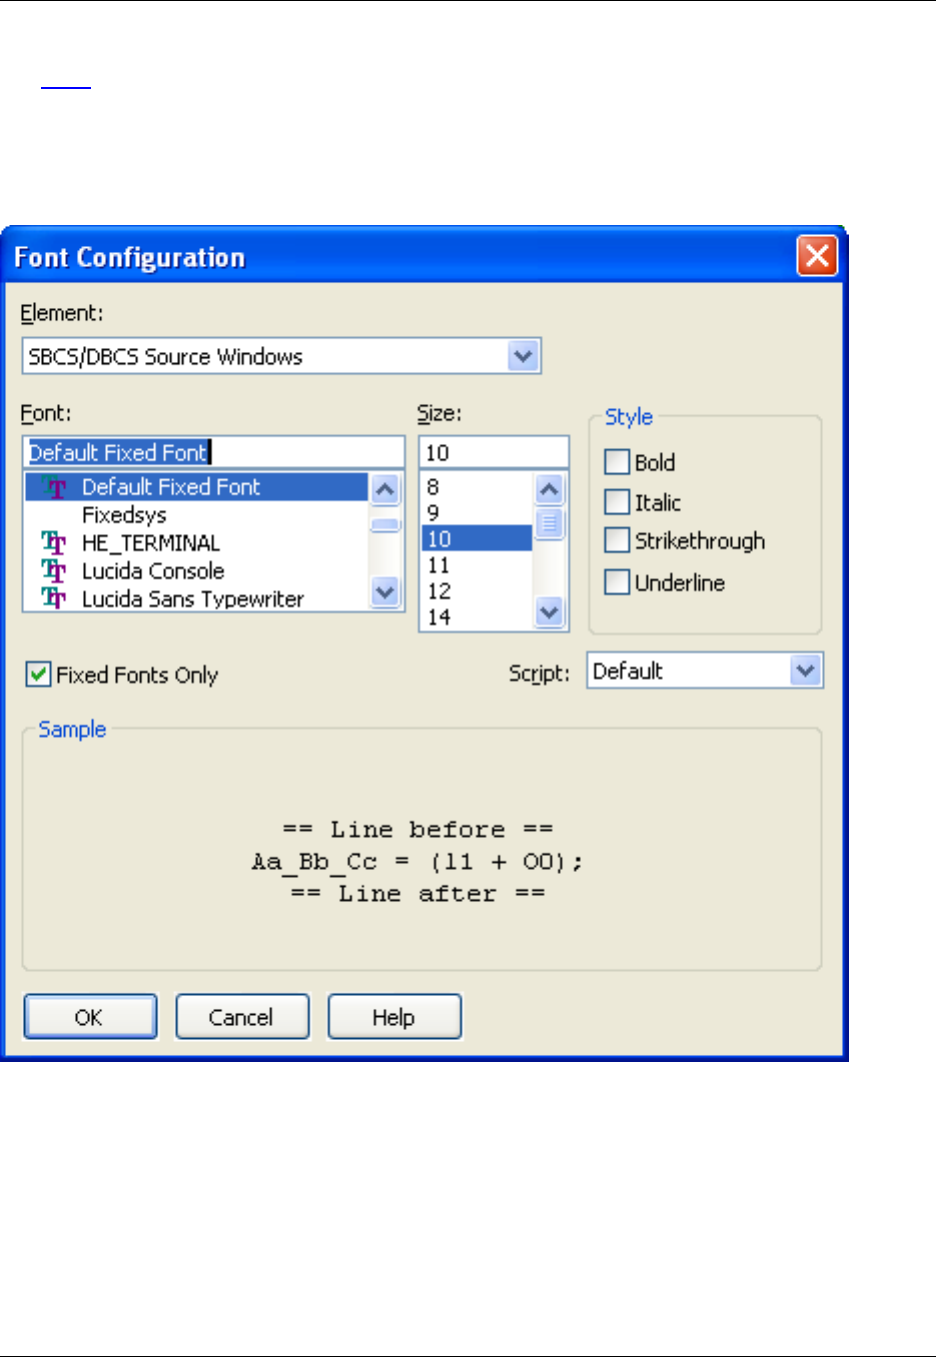
See Fonts for more information about changing fonts and a list of recommended fonts. To display the
Font Configuration dialog, from the main menu click Window →Preferences, expand SlickEdit and click
General in the tree, then double-click the Font setting.
Figure 10.57. Font Configuration Dialog
The following settings are available:
•Screen Elements - The Element drop-down list of the Font Configuration dialog contains the screen
elements for which fonts can be changed. When an element is selected, the font type and size will
automatically adjust to the current settings for that element, and a preview of the font will be displayed
in the Sample area. Select from the following elements:
•Command Line - The SlickEdit®Core command line displayed at the bottom of the application win-
dow.
Font Configuration Dialog
455

•Status Line - For status messages displayed at the bottom of the application window.
•SBCS/DBCS Source Windows - Editor windows that are displaying non-Unicode content (for ex-
ample, plain text).
•Hex Source Windows - Editor windows that are being viewed in Hex mode (View →Hex).
•Unicode Source Windows - Editor windows that are displaying Unicode content (for example,
XML).
•File Manager Windows - Controls the display of the SlickEdit Core File Manager (File →File Man-
ager).
•Diff Editor Source Windows - The editor windows used by DIFFzilla®.
•Parameter Info - Controls the fonts used to display pop-ups with information about symbols and
parameters.
•Parameter Info Fixed - Used when SlickEdit Core needs to display a fixed-width font for parameter
info, such as when displaying example code.
•Selection List - The font used for selection lists, like the buffer list (Document →List Buffers).
•Dialog - Controls the font used in SlickEdit Core dialogs and view windows.
•HTML Proportional - The default font used by HTML controls for proportional fonts. In particular, this
affects the Version Control History dialog, the About SlickEdit Core dialog, and the Cool Features
dialog.
•HTML Fixed - The default font used by HTML controls for fixed-space fonts.
•Font and Size - The Font and Size fields allow you to make typeface and point size changes to the se-
lected screen element. The fonts that are listed are the fonts that are installed on your computer.
•Style - Styles, such as bold and italic, can be set to affect the selected font.
•Sample area - This area provides a preview of the selected font, size, and style.
•Fixed Fonts Only - Select this option to display only fixed fonts in the Font field. By default, this option
is not selected.
•Script (Windows only) - Choose Default unless you are editing files that have characters not in the
active code pages. Choose Western to use the typical English characters.
XML/HTML Formatting Dialog
This dialog is used to configure the way XML and HTML code is automatically formatted as you edit. Note
that XML/HTML Formatting must be enabled in order for these settings to work.
To display the XML/HTML Formatting dialog, click Window →Preferences, expand SlickEdit and click
XML/HTML Formatting Dialog
456
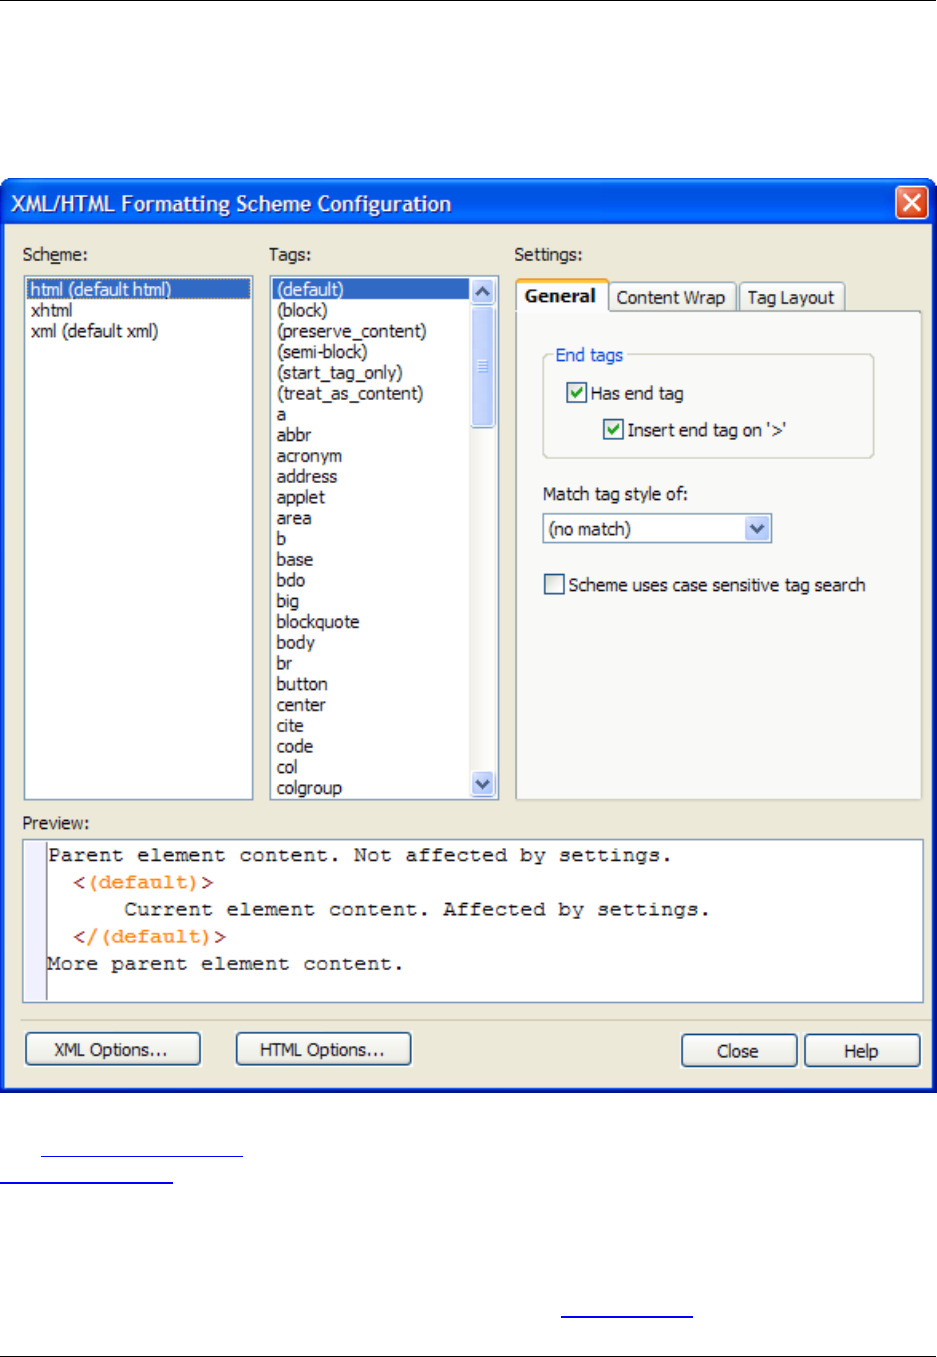
General in the tree, then double-click the XML/HTML Formatting setting. Alternatively, use the
xml_html_options command to display the dialog.
Figure 10.58. XML/HTML Formatting Dialog
See XML/HTML Formatting for information about enabling formatting and working with this feature. See
Formatting Settings for information about the General, Content Wrap, and Tag Layout tabs.
URL Mappings Dialog
This dialog allows you to map URLs to a different location. See URL Mappings for information.
URL Mappings Dialog
457
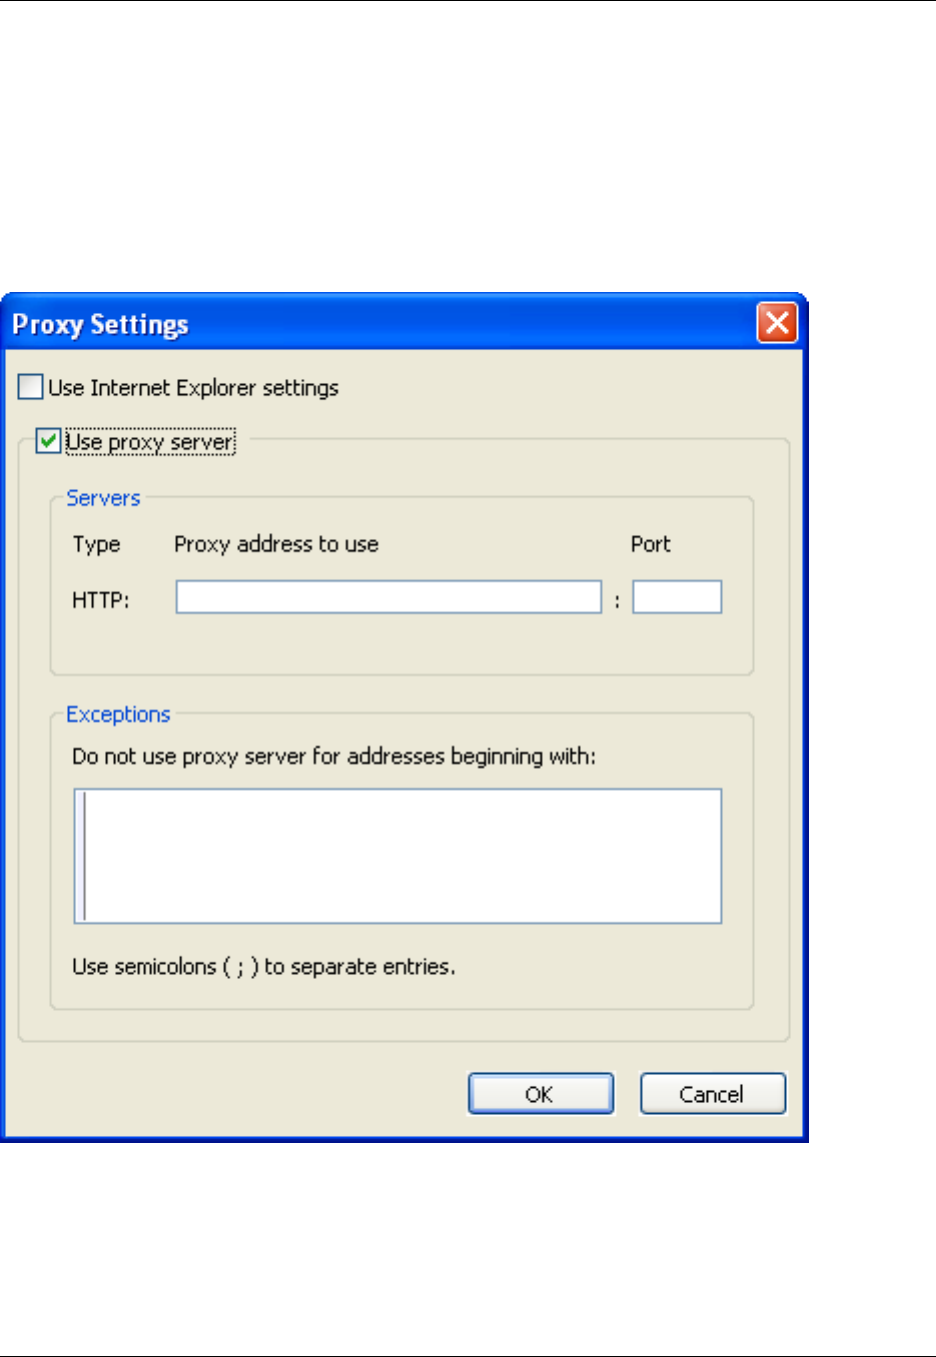
Proxy Settings Dialog
If you need to configure proxy settings for when SlickEdit®Core needs to use an Internet connection, use
the Proxy Settings dialog (Window →Preferences, expand SlickEdit and click General in the tree, then
double-click the Proxy Settings setting).
Figure 10.59. Proxy Settings Dialog
The following options are available:
•Use Internet Explorer settings - If selected, Internet Explorer settings will be used, and the remaining
options and fields on the dialog will be unavailable.
•Use proxy server - If selected, the remaining options and fields will become available.
Proxy Settings Dialog
458
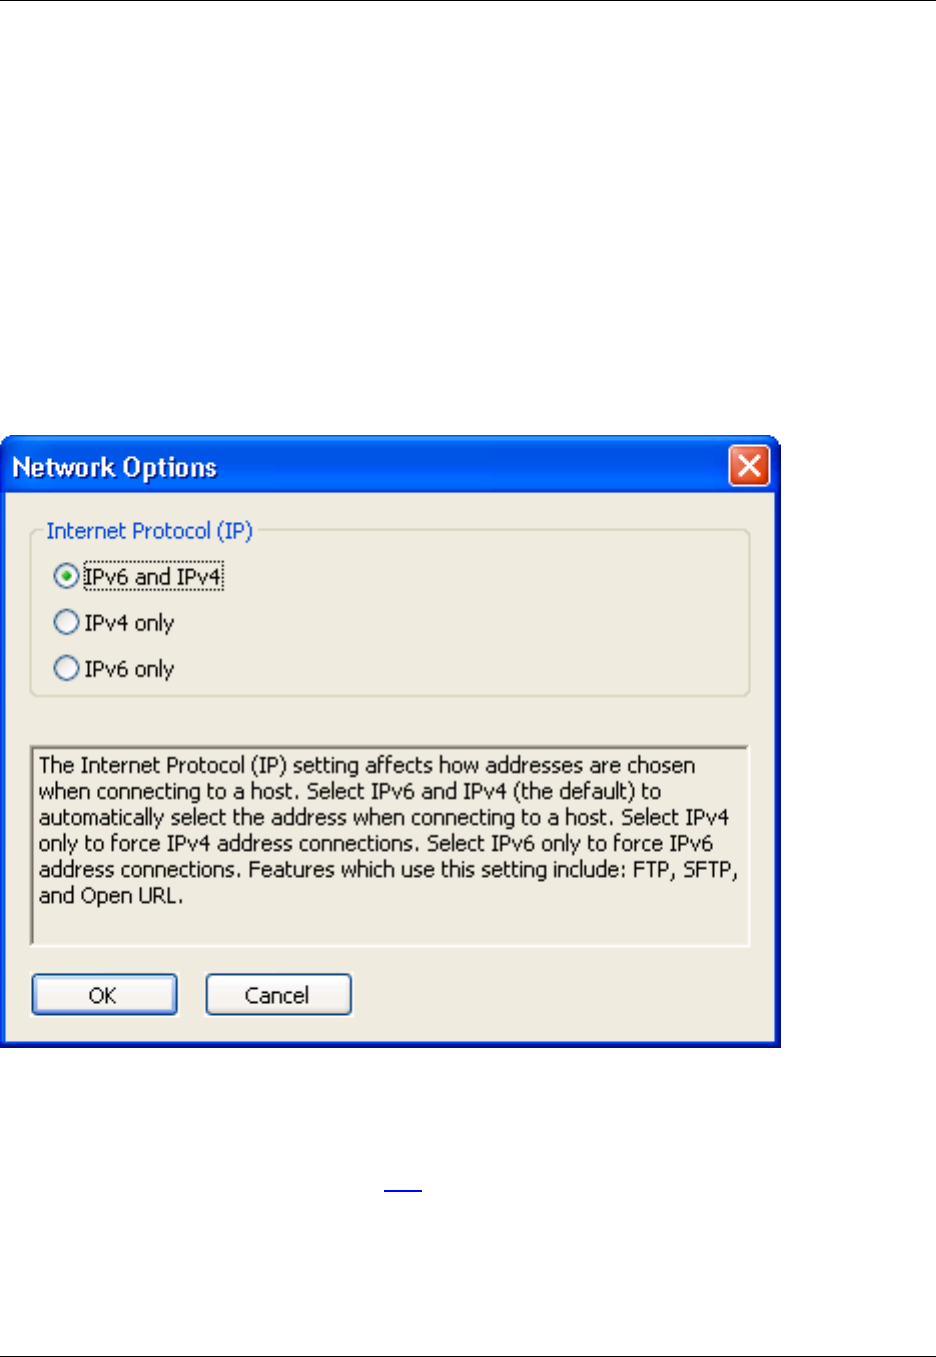
•Servers - Indicates the proxy address and port to use.
•Exceptions - Indicates the Web site addresses that the proxy server should disregard. Separate
entries with semicolons (;).
Network Options Dialog
This dialog allows you to set the Internet Protocol (IP) version. To access it, from the main menu click
Window →Preferences, expand SlickEdit and click General in the tree, then double-click the Network
Options setting.
Figure 10.60. Network Options Dialog
The Internet Protocol (IP) setting affects how addresses are chosen when connecting to a host. Select
IPv6 and IPv4 (the default) for SlickEdit®Core to automatically select the address when connecting to a
host. Select IPv4 only to force IPv4 address connections. Select IPv6 only to force IPv6 address connec-
tions. Features that use this setting include FTP and SFTP.
Web Browser Setup Dialog
The Web Browser Setup dialog contains options for specifying the browser to use when SlickEdit®Core
Network Options Dialog
459
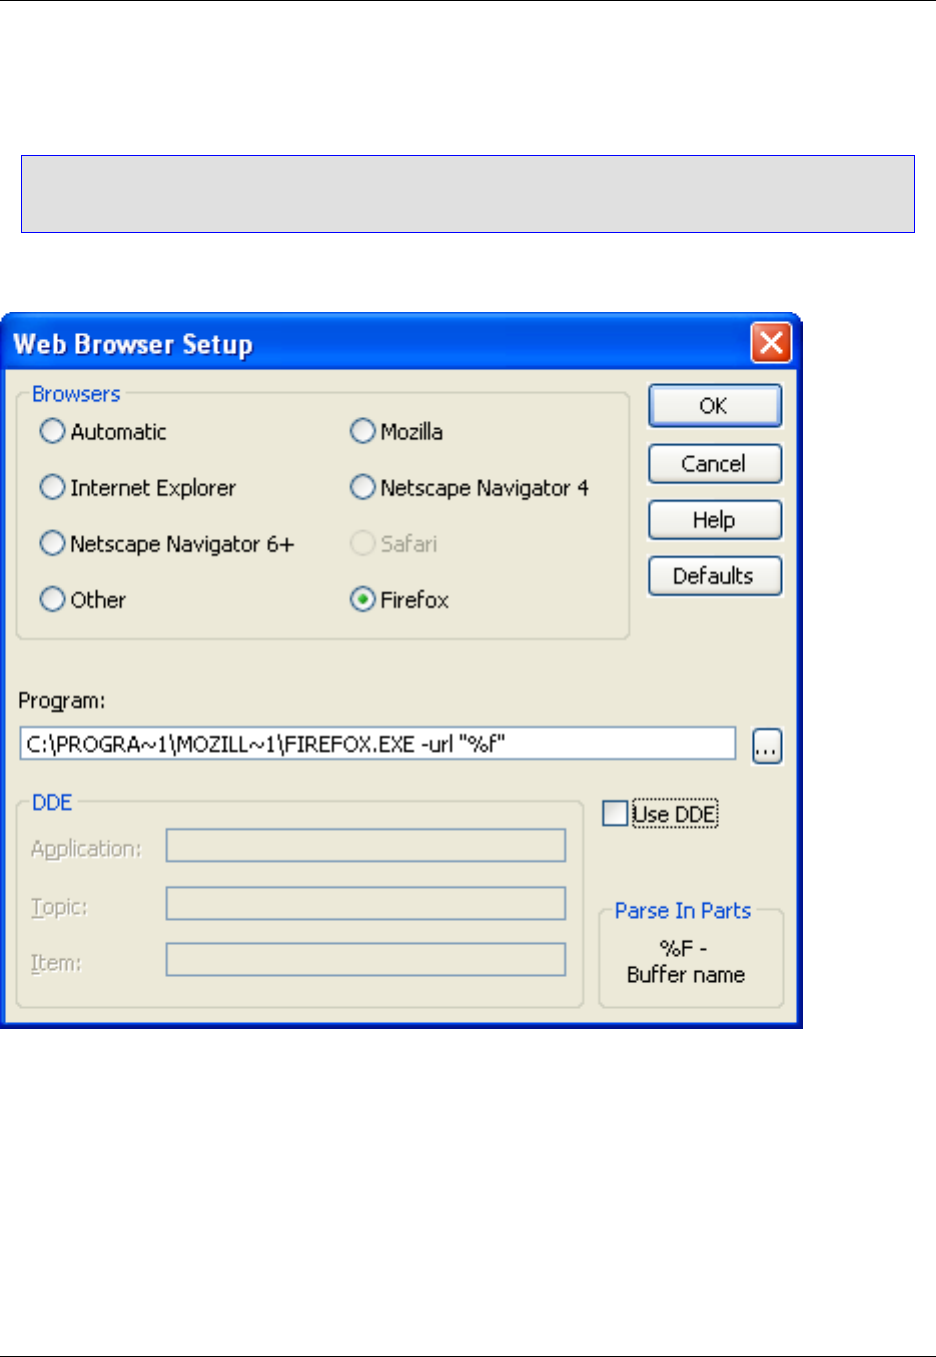
needs to launch one. To access this dialog, click Window →Preferences, expand SlickEdit and click
General in the tree, then double-click the Web Browser Setup setting.
Note
This configuration does not apply to the Help system.
Figure 10.61. Web Browser Setup Dialog
The following settings are available:
•Browsers - Select which Web browser you want to use. Selecting a preferred browser automatically
sets the defaults for the other items in the Web Browser Setup dialog box. Note the following:
•Windows - Your Web browser is automatically detected.
•Linux - You need to specify which Web browser you are using. In addition, you need to give the full
path to the program executable.
•Program - Indicates the program to run. You may specify a %F in this text box or any of the other text
Web Browser Setup Dialog
460

boxes on this dialog box to have the HTML file name inserted into the command that is executed.
•DDE - The Application,Topic, and Item text boxes specify DDE XTYP_REQUEST parameters and
are used only if the Use DDE option is selected.
FTP Options Dialog
This dialog is used to configure default FTP options. To open it, on the FTP view window, click the button
to start a new session. When the Connect dialog is displayed, click the Default Options button. The dia-
log is categorized into the following tabs:
•General Tab
•Advanced Tab
•Firewall/Proxy Tab
•SSH/SFTP Tab
•Debug Tab
General Tab
This tab on the FTP Options Dialog is used to configure general FTP settings.
Figure 10.62. FTP Options: General Tab
FTP Options Dialog
461
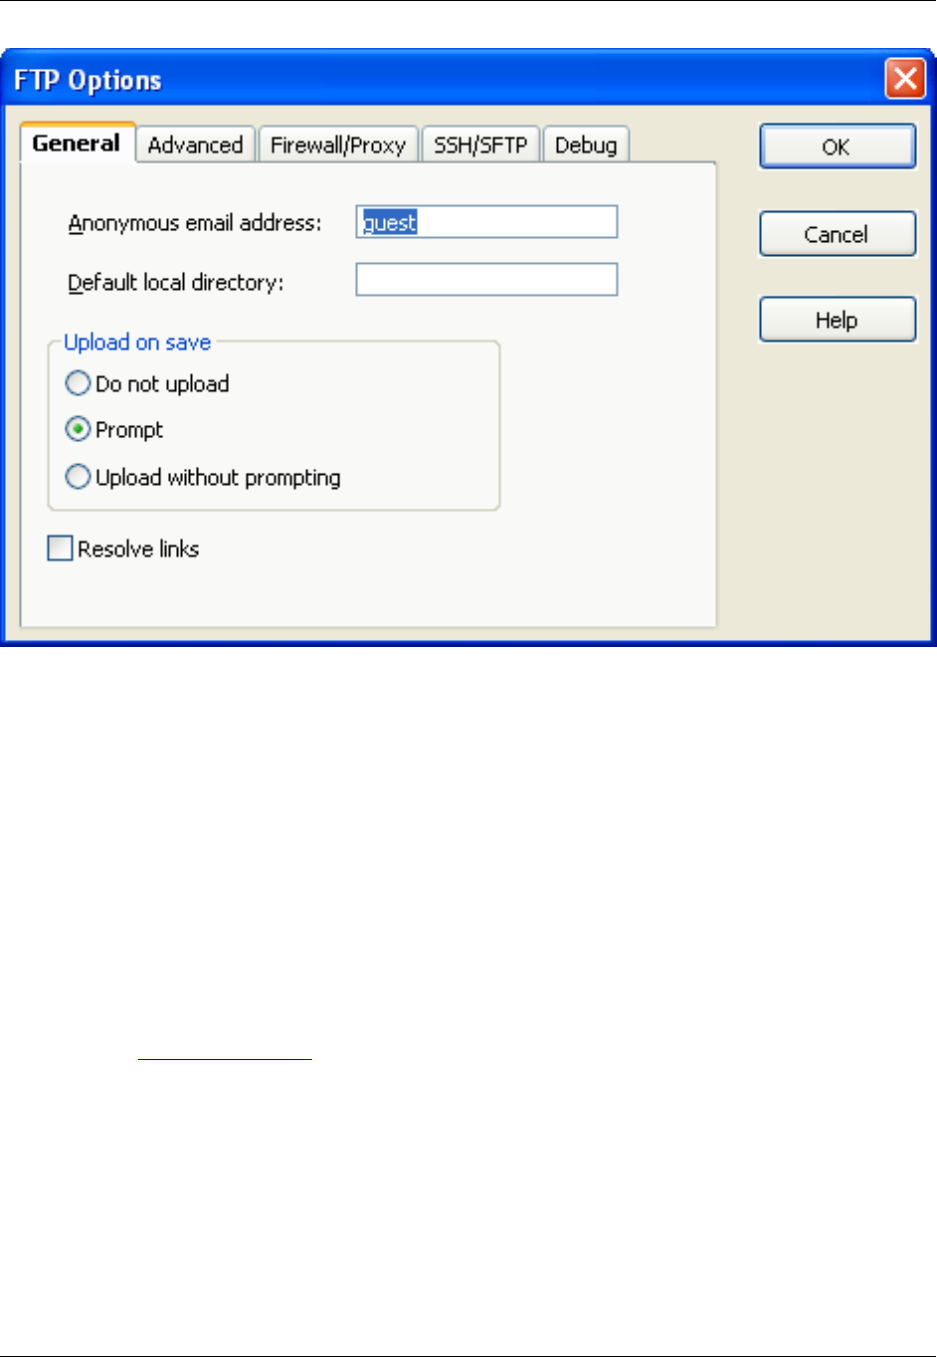
•Anonymous e-mail address - Default password used for anonymous logins.
•Do not upload - When on, saving an FTP file will not upload the file.
•Prompt - When on, a prompt appears to upload when an FTP file is saved to specify ASCII or Binary
transfer type.
•Upload without prompting - When on, saving an FTP file will upload the file. The same transfer type
used to open the file is used to upload the file.
•Resolve links - Default for adding a new connection profile. Resolves symbolic links on remote host.
Advanced Tab
This tab on the FTP Options Dialog is used to configure advanced FTP settings.
Figure 10.63. FTP Options: Advanced Tab
FTP Options Dialog
462

•Timeout (sec) - Default used when adding a new connection profile. Specifies the wait time for a reply
from the FTP server.
•Port - Default used when adding a new connection profile.
•FTP port - By default, this is 21.
•Keep alive - Default used when adding a new connection profile. Keeps a connection alive even when
idle.
•Upload filename case - Default used when adding a new connection profile. Indicates what file case
should be used for the remote file name based on the local file name.
Firewall/Proxy Tab
This tab on the FTP Options Dialog is used to configure firewall and proxy settings for FTP.
Figure 10.64. FTP Options: Firewall/Proxy Tab
FTP Options Dialog
463
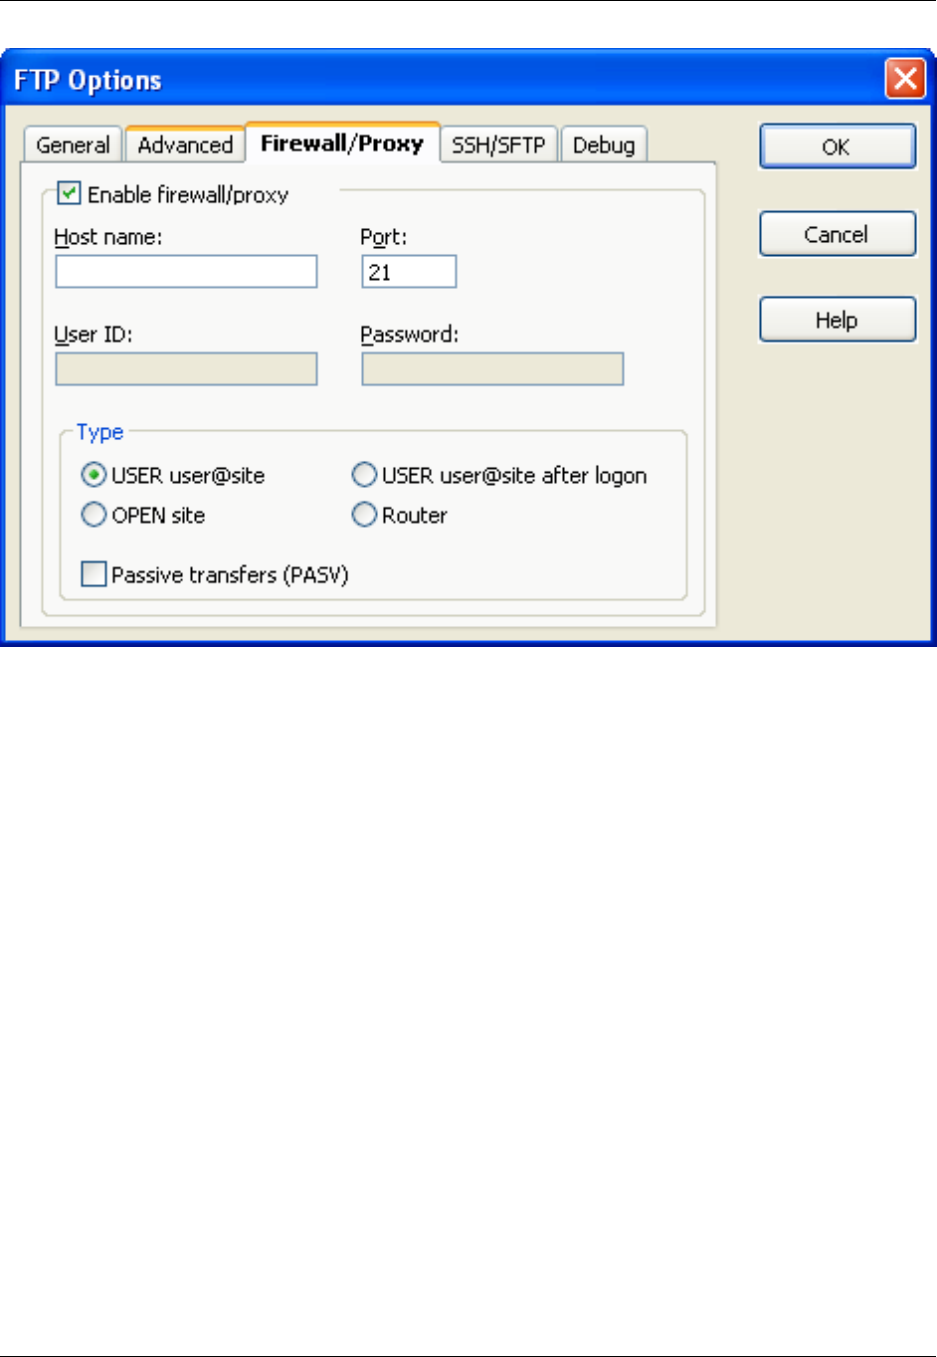
•Enable firewall/proxy - When on, indicates you have a firewall or proxy. You need to turn this on to
add a connection profile that uses a firewall.
•Host name - Host name of firewall.
•Port - Port number of firewall.
•User ID - User ID used when logging into firewall.
•Password - Password used when logging into firewall.
•USER user@site - When this option is selected, host and port are required. User id and password are
ignored. USER @remote_host is sent to the firewall when connecting.
•USER user@site after logon - When this option is selected, host, port, user id, and password are re-
quired. USER remote_userid@remote_host is sent to the firewall after logon.
•OPEN site - When this option is selected, host and port are required. User ID and password are ig-
nored. OPEN remote_host is sent to the firewall when connecting.
•Router - When this option is selected, host, port, user id, and password are ignored. Router based fire-
walls are transparent with the exception that connections can only be established one way (out through
the firewall). Because incoming connections are not allowed, PASV is turned on automatically.
•Passive transfers (PASV) - When this option is selected, transfers are initiated by SlickEdit Core.
FTP Options Dialog
464
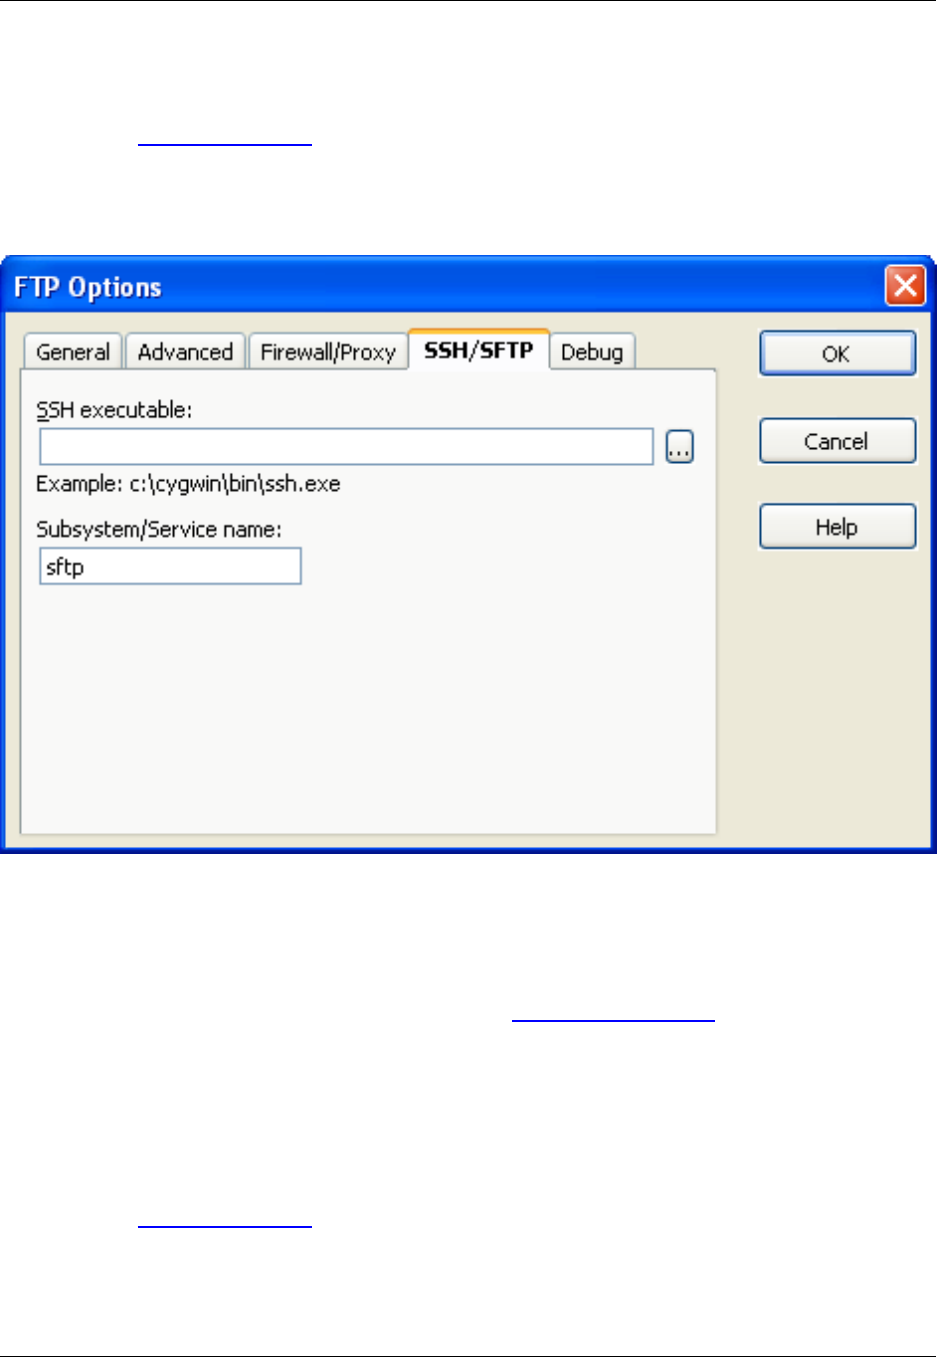
SSH/SFTP Tab
This tab on the FTP Options Dialog is used to set the location of the client program used to establish con-
nections with the SSH server.
Figure 10.65. FTP Options: SSH/SFTP Tab
•SSH executable - The location of the SSH client program that is used to establish the secure connec-
tion with the SSH server.
SFTP support requires the OpenSSH client program to operate. Windows users can obtain the SSH cli-
ent by downloading and installing the Cygwin package (http://www.cygwin.com) and making sure to
choose the openssh package during install.
•Subsystem/Service name - The name of the SFTP service being run by the SSH server. Defaults to
sftp.
Debug Tab
This tab on the FTP Options Dialog is used to set debug options for FTP.
Figure 10.66. FTP Options: Debug Tab
FTP Options Dialog
465
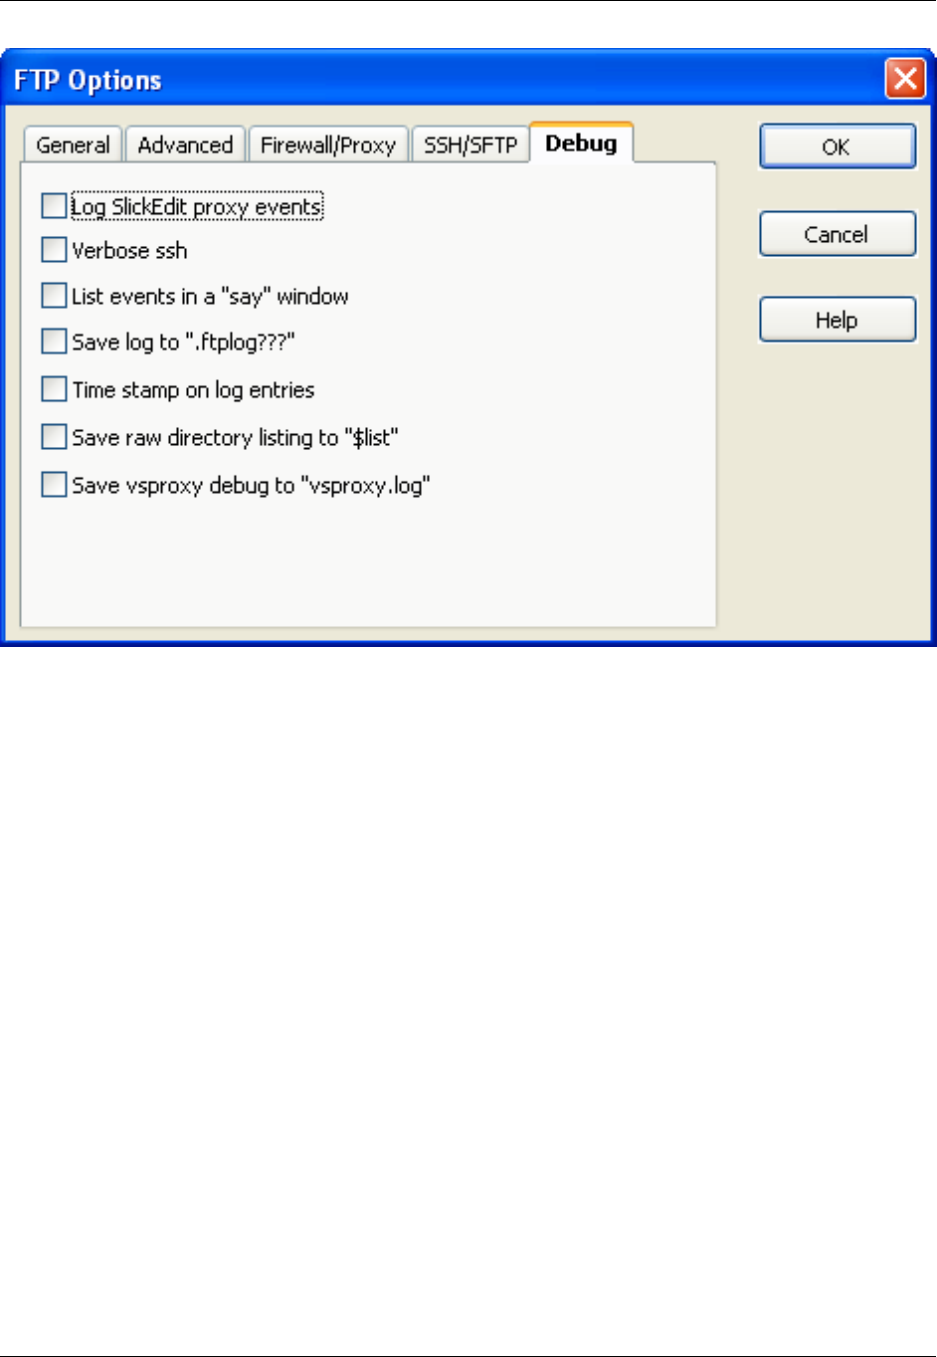
Reflow Comment Dialog
The Reflow Comment dialog (Format →Reflow Comment), shown below, is used to reflow block com-
ments, paragraphs, or a selection of the current file.
Figure 10.67. Reflow Comment Dialog
Reflow Comment Dialog
466
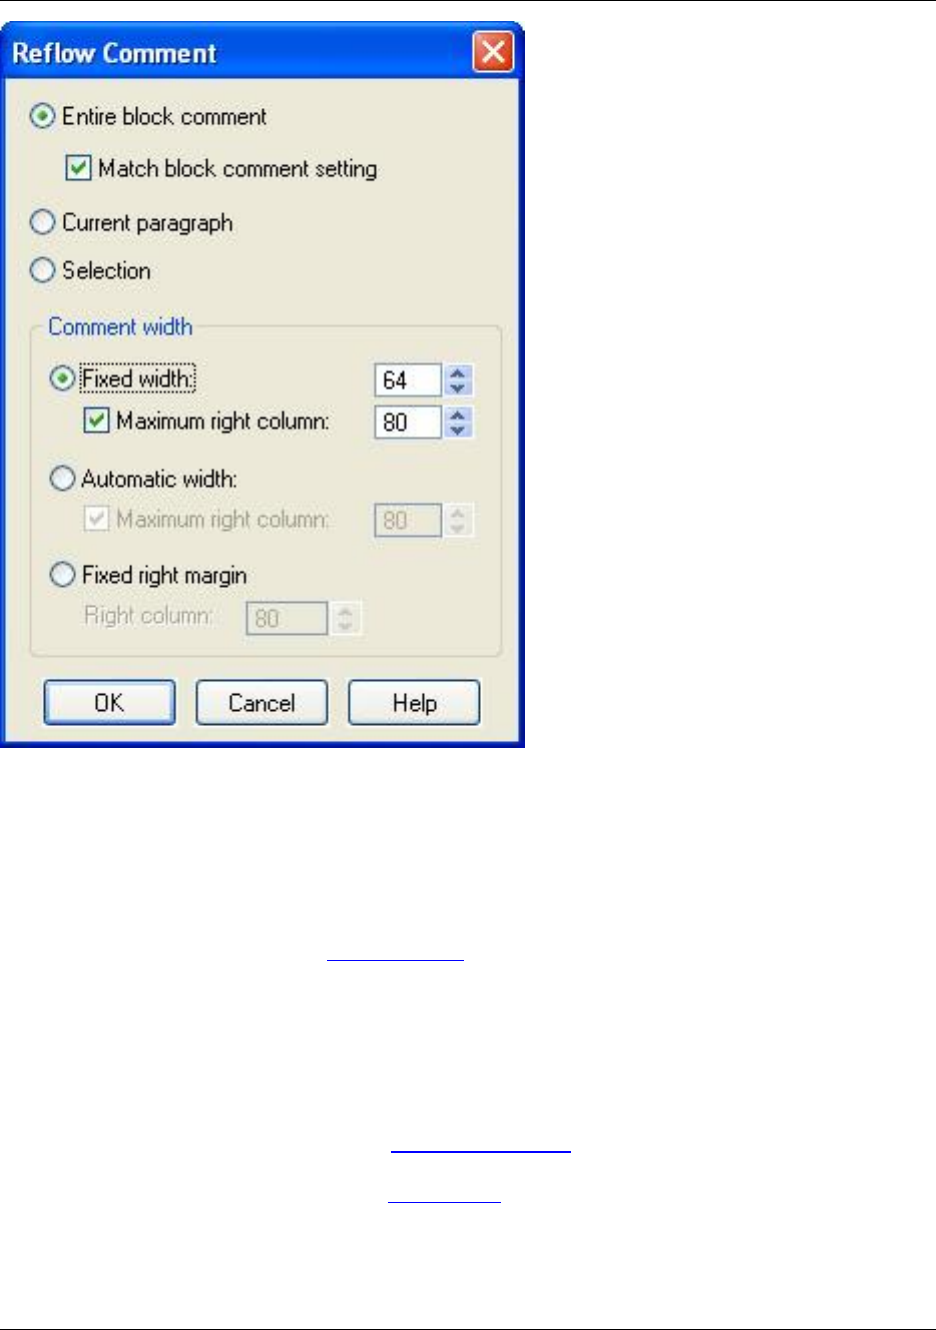
The following options are available:
•Entire block comment - If selected, reflows an entire block comment based on the current width and
border settings for the block comment.
•Match block comment setting - If selected, forces the borders to conform to the comment settings
(Format →Comment Setup- see Comments Tab).
•Current paragraph - If selected, reflows the current paragraph within the block comment.
•Selection - If selected, reflows a selection within a block comment paragraph based on current set-
tings.
•Comment width - Select one of the width options to reflow a block comment to the margins or the
width that you specify in these fields. See Comment Wrap Tab for information on these options.
For more information about comments, see Commenting.
Current Document Options Dialog
Current Document Options Dia-
log
467

The Current Document Options dialog allows you to enable/disable aspects of XML or HTML Formatting
for just the current document. It can be displayed by clicking Format →XML/HTML Formatting →Cur-
rent Document Options, or by using the xml_html_document_options command.
Figure 10.68. Current Document Options Dialog
The dialog contains the following:
•Formatting scheme - This drop-down specifies the formatting scheme applied to this document.
Choose from the list of available schemes.
•Auto formatting options - These are the aspects of XML/HTML Formatting that can be enabled/dis-
abled for the current document.
•Configure Schemes button - Allows you to modify or create a new scheme to apply to the current
document.
For more detailed information, see Enabling/Disabling for the Current Document.
Current Document Options Dia-
log
468

Chapter 11. Appendix
469

Encoding
Encodings are used to convert a file to either SBCS/DBCS for the active code page or Unicode (more
specifically UTF-8) data. By default, XML and Unicode files with signatures (UTF-8, UTF-16 and UTF-32)
files are automatically loaded as Unicode UTF-8 data, while other more common program source files like
.c,.java, and .cs source files are loaded as SBCS/DBCS active code page data.
All file data can be configured to Unicode UTF-8 data, but this would cause some problems. Loading files
containing SBCS/DBCS data would take significantly longer, slowing down parsing by Context Tagging ®
and any other multi-file operations. In addition, Unicode editors cannot support all the features supported
by SBCS/DBCS editors due to font limitations. For more information, see Unicode Limitations.
To provide better support for editing Unicode and non-Unicode files, two modes of editing exist: Unicode
and SBCS/DBCS mode. Files that contain Unicode, XML, or code page data not compatible with the act-
ive code page should be opened as Unicode files.
The following are non-Unicode encodings and put the editor in SBCS/DBCS editing mode: Default,Text,
SBCS/DBCS mode,Binary, SBCS/DBCS mode, and EBCDIC, SBCS/DBCS mode. In addition, the
Auto Unicode,Auto Unicode2,Auto EBCDIC and Unicode, and Auto EBCDIC and Unicode2 encod-
ings put the editor into SBCS/DBCS editing mode when the file is determined not to be Unicode. All other
encodings put the editor in Unicode mode and require that the file data be converted to UTF-8.
There are many encodings available, including:
•Auto XML - This encoding specifies that the file encoding be determined based on XML standards and
that the file be loaded as Unicode data. The encoding is determined based on the encoding specified
by the ?xml tag. If the encoding is not specified by the ?xml, the file data is assumed to be UTF-8 data
which is consistent with XML standards. We applied some modifications to the standard XML encoding
determination to allow for some user error. If the file has a standard Unicode signature, the Unicode
signature is assumed to be correct and the encoding defined by the ?xml tag is ignored.
•Auto Unicode - When this encoding is chosen and the file has a standard Unicode signature, the file is
loaded as Unicode data. Otherwise the file is loaded as SBCS/DBCS data.
•Auto Unicode2 - When this encoding is chosen and the file has a standard Unicode signature or looks
like a Unicode file, the file is loaded as Unicode data. Otherwise the file is loaded as SBCS/DBCS data.
This option is NOT fool-proof and may give incorrect results.
•Auto EBCDIC - When this encoding is chosen and the file looks like an EBCDIC file, the file is loaded
as Unicode data. Otherwise, the file is loaded as SBCS/DBCS data. This option is NOT fool-proof and
may give incorrect results. The option does attempt to support binary EBCDIC files.
•Auto EBCDIC and Unicode2 - This encoding is a combination of the Auto EBCDIC and Auto Unicode2
encodings described above.
Using Unicode
To use encodings, Unicode support is required (OEMs typically turn this feature off). Unicode is supported
Using Unicode
470

for the following list of features:
• All Context Tagging®features.
• Color Coding.
• Level 1 regular expressions as defined by the Unicode consortium.
• Multi-file search and replace.
• Support for many encodings including UTF-8, UTF-16, UTF-32, and many code pages. Automatic en-
coding recognition for XML files. Configure encoding recognition per extension or globally. Optionally
store signatures and specify little endian or big endian. Use the Save As or Write Selection dialog to
convert data to a particular file encoding.
• Support for converting Unicode to UNC data and visa versa. Supported UCN formats include \xHHHH,
\x{HHHH},\uHHHH,&xHHHH;, and &xDDDD;. This is useful for specifying Unicode character strings
in SBCS/DBCS active code page source files. See Converting Unicode to UCN.
• Multiple clipboards.
• Sorting.
• 3-Way Merge.
• Support for composite and surrogate characters.
• Support for storing up to 31-bit Unicode characters.
• SmartPaste®.
• Syntax Expansion and Syntax Indenting.
• Code beautifiers.
• Support for almost all of the SBCS/DBCS active code page features in SlickEdit®Core.
Unicode File Recognition
By default, XML and Unicode files with signatures (UTF-8, UTF-16 and UTF-32) files are automatically
loaded as Unicode. If you have Unicode files that are not XML and do not have signatures, configure de-
fault options to get the best recognition possible. This is important because some features such as drag/
drop files and DIFFzilla®do not prompt you for the file encoding.
Each extension may have its own encoding specification. If the extension-specific encoding is set to De-
fault, then the global setting defined in the File Options dialog (Window →Preferences, expand SlickEd-
it and click General in the tree, then double-click the File Options setting and select the Load Tab) is
used. Both the extension-specific and global setting are overridden if you previously specified an encod-
ing in the Open dialog. The encoding used to override default encoding settings is recorded. The setting
is then reused the next time you open the same file. This provides you with per-file encoding support.
If you have non-XML UTF-16 files that have signatures, then try selecting Auto Unicode2 as an exten-
Using Unicode
471

sion-specific or global encoding. Since there is no option for recognizing UTF-8 or UTF-32 files (other
than Auto XML) by looking at the file contents, you will either need to set an extension-specific encoding,
or specify the encoding in the Open dialog the first time you open the file.
Some compilers (such as Visual C++) let you specify the code page in the source file (in fact, more than
one code page can be used in the file). This is not supported, so the assumption is that the file is SBCS/
DBCS active code page data.
Opening Unicode Files
To open a Unicode file, complete the following steps:
1. Use the Open dialog (File →Open).
2. Specify the encoding if necessary.
3. Press Enter.
Surrogate Support
Unicode data is stored as UTF-8 and not UTF-16. Since the Windows Win32 calls are used to implement
some Unicode features there are some issues. By default, Windows does not support surrogates. You
must use the regedit program to turn on surrogate support.
To turn on surrogate support, run the regedit program and go to the following key location:
HKEY_LOCAL_MACHINE\SOFTWARE\Microsoft\Windows NT\CurrentVersion\LanguagePack
Set the value for SURROGATE to 0x00000002.
Casing features (uppercase, lowercase, ignore case) do not support surrogates. Windows is used for cas-
ing support and Windows casing features do not support surrogates.
Converting Unicode to UCN
You can convert a selection from Unicode to UCN or vice-versa. SlickEdit®Core conversion features are
located on the Edit →Other menu. The Unicode to UCN conversion feature is most useful for specifying
Unicode character strings in SBCS/DBCS active code page source files. For example, here are the steps
to store some UCN in a Java source file:
1. Open the Unicode file containing the Unicode characters or create a new Unicode file and enter the
characters you want to convert.
2. Select the Unicode characters you want to convert.
3. Execute the Java/C# (UTF-16 \uHHHH) menu item (Edit →Other →Copy Unicode As).
4. Open the Java source file and paste (Edit →Paste) the UCN data into the file.
Unicode Limitations
Using Unicode
472

The following is a list of Unicode limitations:
• Bold and italics color-coding is not supported. Support for this will be added in a future version.
• Tab character operations are not fully supported. Tab display, the Expand tabs to spaces save option
(Window →Preferences, expand SlickEdit and click General in the tree, then double-click the File
Options setting and select the Save Tab), and save with tabs (save +t) only work correctly if all the
characters are below 128. The Expand tabs to spaces load option (Window →Preferences, expand
SlickEdit and click General in the tree, then double-click the File Options setting and select the Load
Tab) is ignored.
• Column selections do not fully support Unicode. If all the characters are below 128 and the font is fixed
then it works. Support for this will be added in a future version.
• Word Wrap does not fully support Unicode. If all the characters are below 128 and the font is fixed, then
it works. Support for this will be added in a future version.
• The Unicode line end character 0x2048 is not supported.
• Hex editing is not supported. The current character (Composite character) is displayed on the status
line. Also, use the Open dialog with the Binary, SBCS/DBCS mode encoding to view a Unicode file in
hexadecimal.
• Casing features (uppercase, lowercase, ignore case) do not support surrogates. Windows is relied
upon for casing support, and Windows casing features do not support surrogates. See Surrogate Sup-
port.
• Vertical line column (Window →Preferences, expand SlickEdit and click General in the tree, then
double-click the General setting and select the General Tab) is not supported.
• Truncation line length is not supported.
•Record width on the File Open dialog is not supported.
• DDE is not supported. Unicode DDE does not work with Internet Explorer or Netscape®. You can view
files with Unicode data in Internet Explorer; however, this feature will fail if the file name contains char-
acters not in the active code page.
• Version control supports files containing Unicode data but does not support file names that contain
characters not in the active code page.
• Special character display is not supported for Unicode buffers.
• The grew program does not support Unicode and can only be used on SBCS/DBCS active code page
text.
• If you load the same source file in Unicode and SBCS/DBCS mode, the Context Tagging®database will
have incorrect seek positions. It is important to use the default load options and to always load source
files in the same encoding so that the Context Tagging seek positions match the editor seek positions.
• The install (setup.exe), unionist (uninstall.exe), and update (update.exe) programs are not
Unicode applications so the installation directory must contain characters in the active code page.
Using Unicode
473

Unicode Implementation
Native Unicode and SBCS/DBCS editing modes are supported. When you edit a SBCS/DBCS (active
code page) file such as a .c,.h,or.java file, the data is loaded as SBCS/DBCS data and is not con-
verted to Unicode. When you edit a Unicode file, such as an XML file, the data is converted to UTF-8 that
is one of the standard formats for supporting Unicode files. There are several advantages to this imple-
mentation:
• Since almost all source files for programming are stored as SBCS/DBCS, loading these files is signific-
antly faster. This is very important to our customers who expect superior performance from SlickEdit®
Core.
• Unicode editing modes cannot support all the features you were used to when editing SBCS/DBCS files
(see Unicode Limitations).
• Macros can be written once to support both editing modes. This was very important to us because we
wanted to reduce development time.
• Since Unicode is stored as UTF-8, only one set of binaries is required. Most products that support
SBCS/DBCS and Unicode (UTF-16), use preprocessing. This requires two sets of binaries.
Environment Variables
474
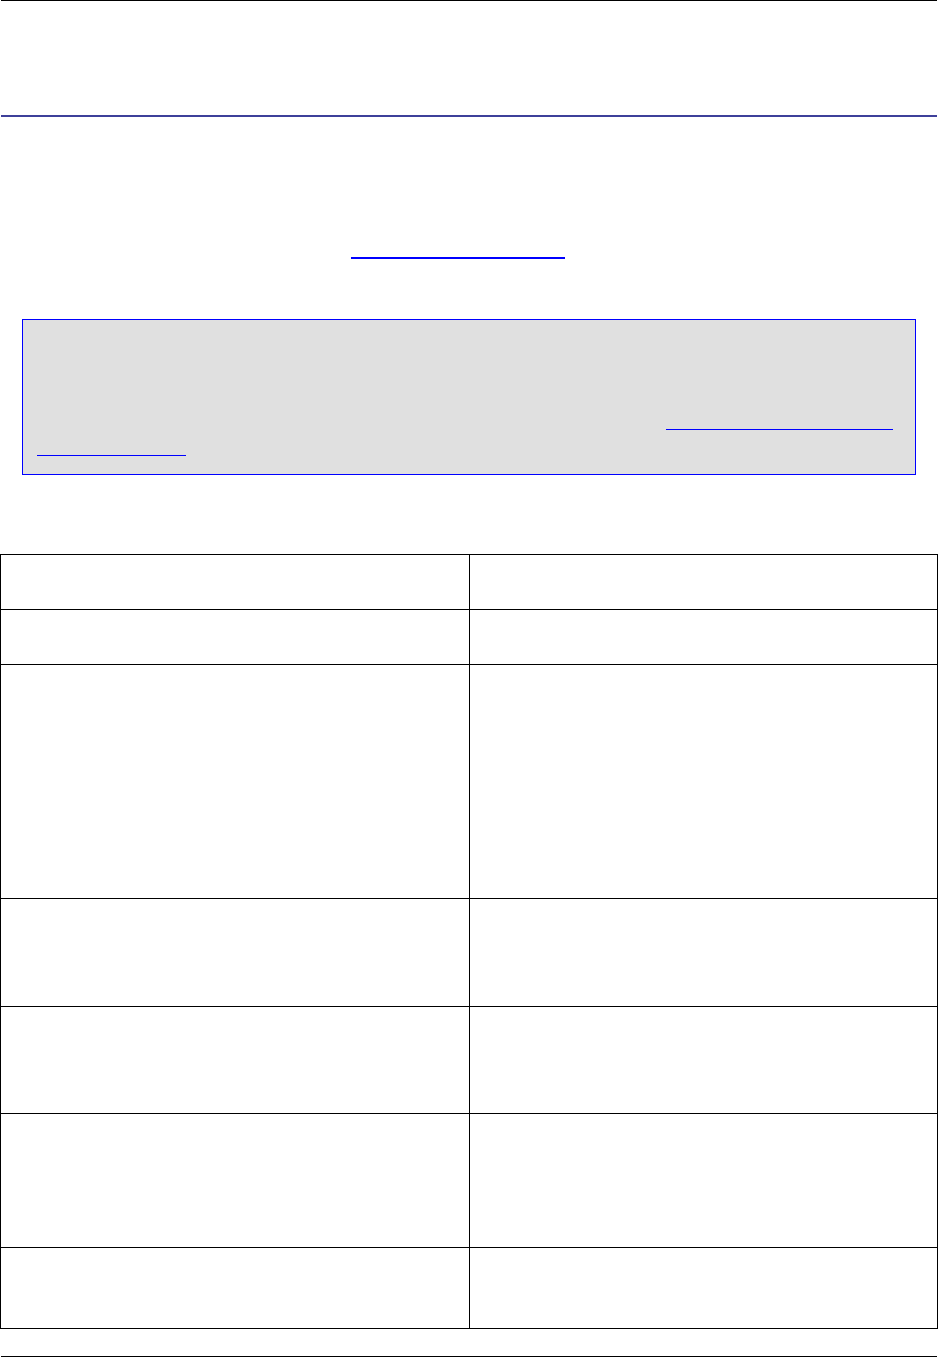
Environment Variables
Below is a list of environment variables that can be used. Configuration environment variables are set in
vslick.ini.
You can also use the set command to temporarily change one of the configuration environment variables
or any other environment variable. See Using the set Command for more information.
Caution
Do not set the VSLICKCONFIG environment variable in vslick.ini.VSLICKCONFIG determ-
ines where the editor looks for vslick.ini. When the editor starts up, it sets the value of envir-
onment variables specified in vslick.ini. For more information, see Setting Environment Vari-
ables in vslick.ini.
Table 11.1. Environment Variables
Environment Variable Description
VSLICKRESTORE Directory to store Auto Restore files.
VSLICKCONFIG Directory where user's local configuration files are
stored. Used in multi-user environments. Defaults
to:
• (Windows) .../My Documents/My SlickEd-
it Core Config/<Editor_Version>/
• (Linux) $HOME/.secore/<editor_version>/
VSLICK Specifies additional command line arguments to ed-
itor as if you were typing them in when invoking the
editor.
VSLICKPATH One or more directories separated with a semicolon
(;) (or a colon [:] on UNIX) where batch macros or
executable files are searched.
VSLICKMACROS One or more directories separated with a semicolon
(;) (or a colon [:] on UNIX) that contain macro files
(*.e). VSLICKPATH must also contain the direct-
ories listed here.
VSLICKBIN One or more directories separated with a semicolon
(;) (or a colon [:] on UNIX) that contain binary files.
Environment Variables
475

Environment Variable Description
VSLICKPATH must also contain the directories lis-
ted here.
VSLICKBITMAPS One or more directories separated with a semicolon
(;) (or a colon [:] on UNIX) that contain bitmap files
(*.bmp). VSLICKPATH must also contain the dir-
ectories listed here.
VSLICKMISC One or more directories separated with a semicolon
(;) (or a colon [:] on UNIX) that contain miscel-
laneous files including *.vlx,*.slk,*.api,
*.idx,vslick.sta (UNIX: vslick.stu),
*.hlp,scommon.lst,main.dct,*.pif,*.ini
(except for vslick.ini), and *.lst.VSLICK-
PATH must also contain the directories listed here.
VSLICKALIAS One or more file names separated with a semicolon
(;) (or a colon [:] on UNIX) that contain alias defini-
tions.
VSLICKTAGS Specifies global tag files. One or more file names
separated with a semicolon (;) (or a colon [:] on
UNIX) that contain tags. Do not put this environ-
ment variable in vslick.ini.
VSLICKBACKUP Directory to place backup files. Affects +D (default)
and -D backup configurations only.
VSLICKSAVE Allows save options to be specified per drive.
VSLICKLOAD Allows load options to be specified per drive.
VSLICKXTERM (UNIX only) Allows you to specify the default xterm
program and arguments used by the dos command
and shell function. The complete path to the xterm
program must be specified. You may not specify the
-e option in the command string. For example, set-
ting VSLICKXTERM to /usr/X11/bin/xterm -
geometry 80x40 will create xterm windows with a
width of 80 characters and a height of 40 charac-
ters.
VSUSER The license manager handles system crashes bet-
ter if each user sets the VSUSER environment vari-
able to a unique name.
Environment Variables
476

Environment Variable Description
VST Specifies additional command line arguments to the
macro compiler as if you typed them in when invok-
ing the compiler.
VSLICKXNOBLINK Suppresses the blinking cursor.
VSLICKXNOPLUSNEWMSG Suppresses a message when starting a second in-
stance of SlickEdit Core.
Setting Environment Variables in vslick.ini
Place configuration environment settings in the file vslick.ini. This file is located in the following de-
fault directory based on your platform (if it does not exist, it can be created manually):
• Windows: .../My Documents/My SlickEdit Core Config/Editor_Version/
• Linux: $HOME/.secore/editor_version/
Below is text from a sample vslick.ini file with an environment section, where vslick is the path to the
root of the core SlickEdit plug-in: /eclipse/plugins/com.slickedit.core_VERSION
[Environment]
VSLICKPATH=c:\vslick\win;c:\vslick\macros;c:\vslick\bitmaps;c:\vmacros
VSLICKALIAS=c:\vmacros\alias.slk
VSLICKINCLUDE=c:\vslick\macros;c:\vmacros
VSLICKLOAD=a: +l b: +l
VSLICKSAVE=a: +o b: +o
MYPROJECTVERSION=c:\myprog4.2
When the editor starts, the following environment variables are created by the editor:
•VSDRIVE - Drive letter followed by a colon (:) where editor executable resides.
•VSDIR - Directory of editor executable with a trailing backslash (UNIX: slash).
Environment variables can be embedded in any line within a section by placing %characters around the
environment variable.
Using the set Command
Change or view the environment while running through the set command. The operation of the built-in set
command is almost identical to the DOS SET command. Use the set command to temporarily change
one of the configuration environment variables or any other environment variable. For a complete listing
Setting Environment Variables
in vslick.ini
477

of configuration environment variables, see the table above. The syntax of the set command is:
set [envvar_name [=value]]
When you invoke the set command with no parameters, a new buffer is created and the current environ-
ment variable settings are inserted. The current value of an individual environment variable may be re-
trieved by executing the set command followed by the name of the environment variable. Specify the
name of the environment variable followed by an equal sign and the new value will replace the value of an
existing environment variable or assign a value to a new environment variable.
To remove an environment variable, specify the name of the environment variable followed by an equal
sign, but omit the value parameter (ex. set classpath=). The DOS command shell removes environment
variables in this way also.
The following steps are a convenient way to change the PATH environment variable:
1. Press Esc to toggle the cursor to the command line.
2. Type set path and press Enter. This will place the current value of the PATH variable on the command
line.
3. Edit the current value and press Enter.
You can use the above steps to change the value of any other environment variable by specifying a differ-
ent environment variable name in the second step. The set command supports completion on the envir-
onment variable name. Typing set ? on the command line will give you a selection list of all of the envir-
onment variable names.
Configuration Variables
478
Configuration Variables
SlickEdit®Core has many behaviors that are controlled through properties not exposed in the options dia-
logs. They are set through global configuration macro variables in Slick-C®, using the set_var command.
The most commonly used of these variables are listed in the table below.
Viewing Configuration Variables
To view the complete list of configuration variables, bring up the SlickEdit®Core command line and type
set_var def- (note the hyphen at the end). The completion list will provide the full list of available vari-
ables. Use the Help system to look up information on a variable by typing the name of the variable into
the Index search field.
Alternatively, you can use the Symbols View to find where the variable is defined in the Slick-C®code.
Expand the Slick-C folder and then expand the Global Variables folder. If Slick-C hasn't already been
tagged, type fp into the SlickEdit Core command line. This is an abbreviation of the find_proc command,
which will trigger tagging if it hasn't already been done.
Setting/Changing Configuration Variables
There are two ways to set/change these macro variables:
• From the SlickEdit menu, click Macro →Set Macro Variable and enter the macro variable in the Vari-
able field. The current value of the variable will be shown in the Value text box. Click Edit to edit this
variable, then click OK to accept the change.
• From the SlickEdit Core command line, invoke the set_var command with the macro variable name (for
example, set_var def_auto_linecomment), then press Enter to view the current value. You can edit
this value, then press Enter to accept the change.
See Programmable Macros for more information on loading macros and setting variables.
Table of Configuration Variables
The table below provides a list of the most commonly used configuration variables.
Table 11.2. Configuration Variable
Configuration Variable Description
def_auto_linecomment Change to 0to turn off automatic line comment in-
sertion.
def_binary_ext This variable is used by the editflst.e macro for
Viewing Configuration Variables
479

Configuration Variable Description
the Brief emulation. When the editflst.e macro
is loaded, the space-delimited extensions listed by
this variable are filtered out by the edit command's
completion. The default is .ex .obj .exe .lib.
def_buflist Change this variable to find the initial file in Buffer
List. The default is 3. This macro variable determ-
ines how the list_buffers commands displays the
buffer list. By default, the buffer list is sorted and
path information is in a separate column to the right
of the name. This macro variable is composed with
the following flags:
•SORT_BUFLIST_FLAG -1
•SEPARATE_PATH_FLAG -2
Add the flags together to select a configuration.
Leaving out a flag removes the features. If the buf-
fer list is not sorted, the list will be in the order of the
buffer ring.
If you set this variable to 1, it will show the full path,
which you can order according to path. The default
(3) will show an alphabetical list of the files in the
left column and the directories in the right column.
def_ctags_flags This variable is a safeguard against parsing past
the end of a proc when the braces mismatch. To
have the editor recognize the second dd, go to
Macro →Set Macro Variable, enter
def_ctags_flags, and set the value to 10.
def_deselect_copy Set to 1in Brief emulation to deselect after a copy.
def_do_block_mode_key Set this variable’s value equal to 0to stop SlickEdit
Core from inserting characters on every line of a
block selection.
def_eclipse_switchbuf Responsible for Eclipse-style buffer switching with
Ctrl+PgUp and Ctrl+PgDn. Set to 0to turn this
functionality off, and be able to bind these keys to
other SlickEdit Core commands. Note that this func-
tionality is currently available for Windows only.
def_error_re2 Edit this variable to change from the SlickEdit Core
regular expression used for compile/build errors.
Table of Configuration Variables
480

Configuration Variable Description
def_filelist_show_dotfiles Controls the global Show hidden files option on
the General Tab of the General Options dialog. On
Windows, the default value of this variable is 1;
change to 0to view Dot files. On UNIX platforms,
the default value is 0; change to 1to hide Dot files.
(Dot files are files with names beginning with a dot
character.)
def_from_cursor Default is 0. If non-zero, the commands up-
case_word,lowcase_word, and cap_word will
start case change from the cursor position instead
of the beginning of the current word.
def_linewrap Default is set to 1. If you are at the end of a line that
has whitespace only on the line below it (spaces or
tabs) and you press Delete, this will bring the
whitespace below it up to the end of the line that
you are on. When the value is set to 0, if you press
Delete while at the end of a line that has
whitespace only on the line below it (spaces or
tabs), the whitespace is removed entirely–acting as
a line delete.
def_linux1_shell To use an alternate shell, set this variable to the
shell that you want to run (for example, /bin/bash
-i). This will cause the editor to use your process
shell.
def_max_filehist Increases the number of files displayed in the file
history of the File menu. Enter the number of files
you want to see in the history.
def_max_mffind_output This variable is set for performance reasons. You
can increase the amount of information displayed in
the SlickEdit Core Output view during a multi-file
search by changing this to your desired setting.
def_max_workspace_hist Increases the length of the Workspace history list in
the Project menu. Enter the number of files you
want to see in the history.
def_modal_paste Default is 0. If non-zero, commands that insert a
BLOCK-type clipboard will overwrite the destination
text if the cursor is in Replace mode.
Table of Configuration Variables
481

Configuration Variable Description
def_plusminus_blocks When the value is set to 1, the plusminus com-
mand will try to find code blocks to expand or col-
lapse if the cursor is on a line that does not have a
Plus or Minus bitmap on it. The default is 1.
def_preplace Default is 1. If the value is set to 0, the save com-
mand will NOT prompt you if you are inadvertently
overwriting a file. For example, if you invoke the
command save xyz, and an xyz file already exists,
and xyz is not the name of the current buffer, you
are prompted by default whether you wish to over-
write the file.
def_rwprompt Default is 1. Change this to 0to suppress the pop-
up that asks: Do you want to update the
read-only attribute of the file on
disk?
def_save_macro Default is 1. Set this variable to 0if you do not want
to be prompted with the Save Macro dialog box
after ending macro recording.
def_shift_updown_line_select Set this value to 1for Shift+Up or Shift+Down to
select the current line.
def_switchbuf_cd Set this variable equal to 1to change the current
working directory to the file that currently has focus
in the editor.
def_top_bottom_push_bookmark Set this variable to 1to push a bookmark whenever
you jump to the top or bottom of the buffer. Note
that even when this variable is set, no bookmarks
are pushed when using the current buffer as a build
window (.process buffer). The default value is 0.
def_undo_with_cursor Set this value to 1to enable the undo of each curs-
or movement.
def_update_context_max_file_size This variable increases the array size in bytes of a
file that is too large. The default size of files that can
be processed by Context Tagging®is 4 MB. The
size can be lowered by changing this variable and
setting it to equal the size that you want (in bytes).
def_vc_advanced_options Set to this variable to 0to remove advanced options
Table of Configuration Variables
482

Configuration Variable Description
that decrease performance when using ClearCase
version control.
def_vtg_tornado Set this variable value to 0to prevent Context Tag-
ging of Tornado files.
def_xml_no_schema_list To prevent the editor from accessing the Internet to
validate and get color coding information from
DTD’s, add your XML extension to this variable. Set
the value to a list of space-delimited extensions that
you want excluded for actual schema validation. For
example: .xml .xsl .xsd. This will prevent the editor
from attempting to connect to the Internet for these
extensions.
Directories and Files
483

Directories and Files
Configuration Directory
Your SlickEdit®Core configuration directory contains configuration files representing the changes you
have made through setting editor options, and it preserves the state of SlickEdit Core by using the state
file, vslick.sta.
Directory Location
By default, the configuration directory is located in My Documents/My SlickEdit Core Config/
<Version> on Windows, and $HOME/.secore/<Version> on Linux. You can view the path to the
config directory by clicking Help →About SlickEdit Core.
Changing the Configuration Directory
If you would like to use a different directory for your config files, you can pass the –vsconfig argument to
Eclipse. This works the same as passing any argument to eclipse.exe (or eclipse on Linux). For ex-
ample: C:\Path_To_Eclipse\eclipse.exe –vsconfig=C:\My_Config.
You can also change the location of the SlickEdit®Core metadata directory by using the –vsmetadata ar-
gument: C:\Path_To_Eclipse \eclipse.exe -vsmetadata=C:\My_Metadata. Both options can be used at
the same time.
You can also change the configuration directory permanently through the SlickEdit Core Preferences
page. Click Window →Preferences →SlickEdit, then use the Configuration Directory and Metadata
Directory group boxes.
Figure 11.1. Configuration Directory Preferences
Configuration Directory
484
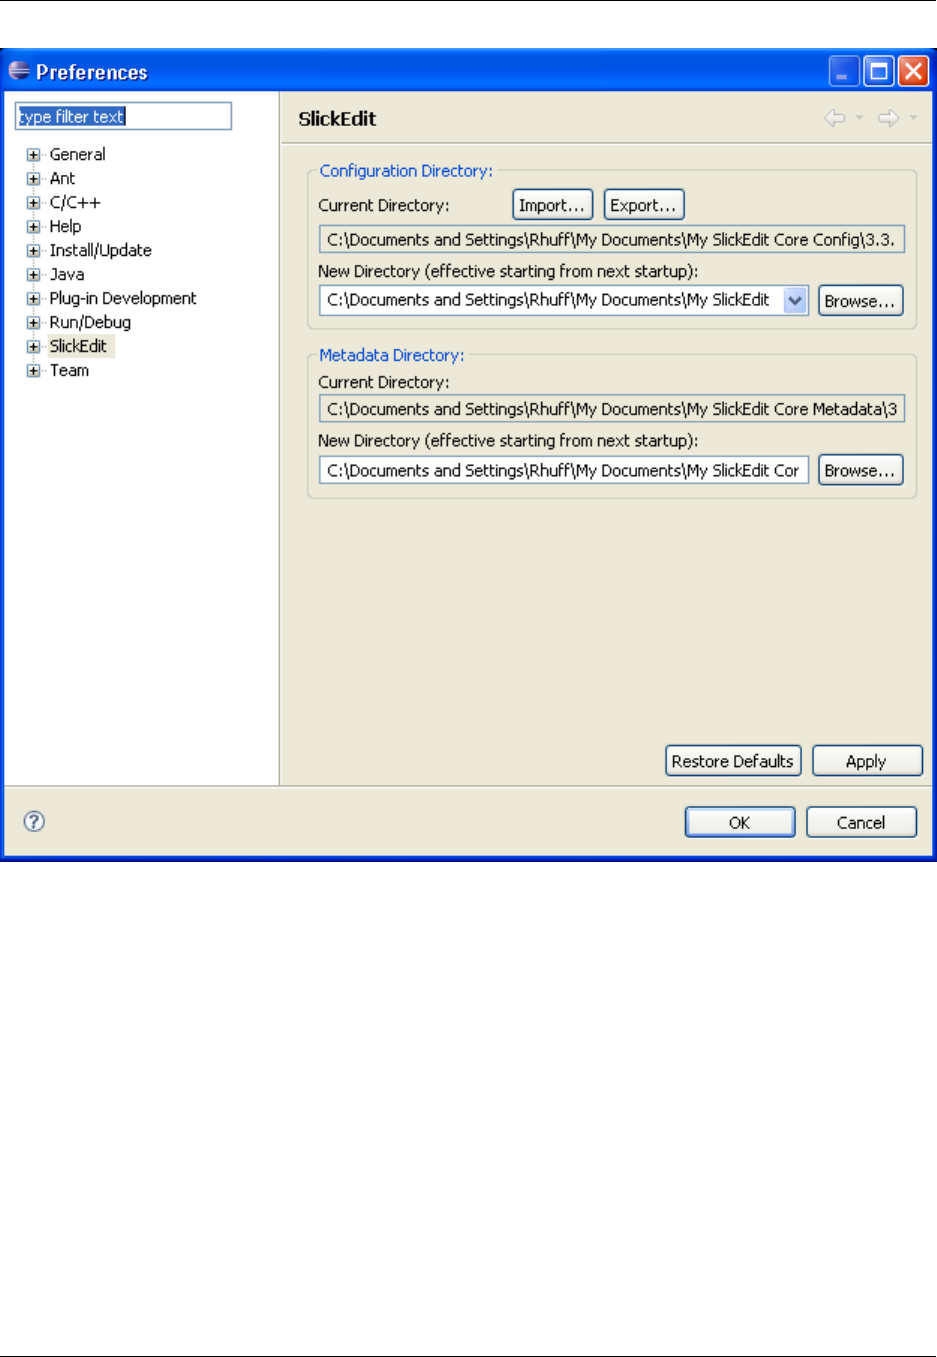
Use the New Directory fields to modify either of these values, and click Apply, and then OK to change
the settings. Note that these changes will not be effective until the next start of Eclipse.
Backing Up the Configuration Directory
You should make periodic backups of your SlickEdit®Core configuration directory. If you experience a
problem in the editor, you can often solve it by using a saved config directory. SlickEdit Core Product
Support may also ask you to use a default configuration to help debug problems. This is accomplished by
backing up your config directory and then deleting its contents.
Table of User Configuration Files
The table below provides a list of the user configuration files.
Table 11.3. User Configuration Files
Configuration Directory
485

User Config File Description
*.als A text file that contains user-defined extension-specif-
ic aliases.
alias.slk A text file that contains user-defined global aliases
(directory aliases).
ftp.ini (UNIX: uftp.ini) A text file that contains user-defined FTP configura-
tions.
project.vpe (UNIX: uproject.vpe) A text file that contains user-defined extension-specif-
ic projects.
ubox.ini A text file that contains user-defined box and line
comment styles.
uformat.ini A text file that contains user-defined beautifier
schemes.
uprint.ini A text file that contains user-defined printing
schemes.
uscheme.ini A text file that contains user-defined color schemes.
user.vlx A text file that contains color coding changes
(keywords, etc.). This file is updated when you
close the Color Coding dialog box.
usercpp.h A text file that contains defines (default prepro-
cessing) for Context Tagging®of C++ and C code.
uservc.slk A text file that contains user-defined version control
systems.
usrprjtemplates.vpt A text file that contains user-defined project pack-
ages.
vrestore.slk A text file that contains auto-restore information.
The workspace files also contain auto-restore in-
formation, but only for the files/windows previously
open.
vslick.ini A text file that contains a few miscellaneous op-
tions. The user-configured backup directory is
stored here. In addition, some customizable envir-
onment variables for path searching for macros, bit-
Configuration Directory
486

User Config File Description
maps, and binary files are stored here as well.
vslick.sta (UNIX: vslick.stu) A binary file that contains dialog boxes, menus,
macro pcode, key bindings, and all other configura-
tion data not stored in one of the other configuration
files. Both user and system configuration informa-
tion is stored here.
vusrdefs.e (UNIX: vunxdefs.e) A Slick-C®text file that contains the emulation set-
ting, key bindings, color settings, file extension
setup information, and some other miscellaneous
options.
vusrobjs.e (UNIX: vunxobjs.e) A text file that contains user-defined dialog boxes
and menus in Slick-C syntax.
vusrs*.e (UNIX: vunxs*.e) A text file that contains system modified dialog
boxes and menus. These changes are NOT auto-
matically transferred unless the version encoding
matches. For example, vusrs10e.e.
System Configuration Files
System configuration files are located in the SlickEdit®Core installation directory.
Typically, these files are only modified by SlickEdit Inc. or OEM customers. OEM customers might want to
modify one of these files to ship a customized version of SlickEdit Core.
Table of System Configuration Files
The table below provides a list of the system configuration files.
Table 11.4. System Configuration File
System Config File Description
alias.slk A text file that contains default global aliases (for
example, directory aliases).
box.ini A text file that contains default box and line com-
ment styles. This file is NOT modified by the dialogs
and is not preserved when a new editor is installed.
System Configuration Files
487

System Config File Description
format.ini A text file that contains default beautifier schemes.
print.ini A text file that contains default printing schemes.
This file is NOT modified by the dialogs and is not
preserved when a new editor is installed.
prjtemplates.vpt A text file that contains default project packages.
This file is NOT modified by the dialogs and is not
preserved when a new editor is installed.
syscpp.h (UNIX: usyscpp.h) A text file that contains system-defined default pre-
processing for Context Tagging®of C++ and C
code.
vcsystem.slk (UNIX: uvcsys.slk) A text file that contains default version control sys-
tems. This file is NOT modified by the dialogs and is
not preserved when a new editor is installed.
vslick.ini A text file that contains a few miscellaneous op-
tions. Some customizable environment variables for
path searching for macros, bitmaps, and binary files
are stored here as well. This file is NOT modified by
the dialogs and is not preserved when a new editor
is installed.
vslick.sta (UNIX: vslick.stu) A binary file that contains default dialog boxes,
menus, macro pcode, key bindings, and all other
configuration data not stored in one of the other
configuration files.
vslick.vlx A text file that contains default color coding lexer
definitions.
vsscheme.ini A text file that contains default color schemes. This
file is NOT modified by the dialogs and is not pre-
served when a new editor is installed.
File Search Order
488

File Search Order
Search Order for Configuration Files
Several files are automatically searched for, either immediately when the editor is invoked or during the
course of operation. The search order for configuration files such as vslick.ini,vslick.sta, and
vrestore.slk is:
1. Configuration directory. The configuration directory is defined by the VSLICKCONFIG environment
variable.
2. If VSLICKCONFIG is not defined, then My Documents\My SlickEdit Core Config is used.
3. Current directory.
4. Paths specified in VSLICKPATH environment variable.
5. Paths specified in PATH environment variable.
Search Order for Executable Files
The search order for executable files, batch macro programs, and miscellaneous files is:
1. Current directory.
2. Configuration directory. The configuration directory is defined by the VSLICKCONFIG environment
variable.
3. If VSLICKCONFIG is not defined, then My Documents\My SlickEdit Core Config is used.
4. Paths specified in VSLICKPATH environment variable.
5. Paths specified in PATH environment variable.
Search Order for Configuration
Files
489

VLX File and Color Coding
For more basic information about using Color Coding, see Color Coding.
To modify the color coding for VLX files, use one of the following methods:
• Use the Color Coding Setup dialog box (Window →Preferences, expand SlickEdit and click General
in the tree, then double-click the Color Coding setting).
• Modify the vslick.vlx file.
• Or, create a new VLX file.
The vslick.vlx file defines language-specific coloring support for the following languages:
• Ada
• Assembler
• AWK
• C
• C++
• CFScript
• CICS
• COBOL
• dBASE
• Delphi
• Fortran
• HTML
• Java
• Modula-2
• Pascal
• Perl
• Python
• REXX
• Slick-C®
VLX File and Color Coding
490

• VHDL
• Visual Basic .NET
Modifying the VLX File to Change a Color Definition
To modify an existing language-specific coloring definition, complete the following steps:
1. Open vslick.vlx for editing.
2. Search for one of the section names: CPP, Java, Delphi, Pascal, AWK, REXX, Perl, HTML, Modula-2,
AWK, COBOL, Python, CICS, Fortran, Visual Basic .NET, Ada, or Slick-C ®.
3. Modify the definition. See below for information on the syntax of definitions.
4. Invoke the cload command from the command line. If the current buffer has a .vlx extension, it will
be loaded. Otherwise you will be prompted to specify a file name. Specify vslick.vlx including path
as the file name.
Creating a Lexer Name and a New VLX File
To create a new lexer name (and thus a new section in the VLX file), first complete all of the preceding
steps under Modifying the VLX File to Change a Color Definition, then complete the steps below.
1. From the main menu, click Window →Preferences, expand SlickEdit and click General in the tree,
then double-click the File Extension Setup setting. The Extension Options dialog box appears.
2. Select the Advanced Tab.
3. If this lexer definition is for a new extension, create the extension with the New button. Otherwise,
choose the appropriate extension.
4. Set the Lexer Name for the new lexer definition you created.
5. Turn on the Language Specific check box.
6. Click Update to commit the changes.
Files with a .vlx extension are text files that have a syntax similar to a .ini file. If the first non-blank
character in a line is a semicolon, the line is considered a comment. Each definition of a language starts
with a section name (the lexer name) enclosed in square brackets. Within each section are statements in
the format name=value.
The table below shows the statements that can be used.
Table 11.5. VLX File Statement
Modifying the VLX File to
Change a Color Definition
491

Statement Description
case-sensitive= [Y | N] Defines the case sensitivity for the language. This
statement must be the first or second statement
within the section.
idchars=start_id_chars after_id_chars Defines the characters that are the start of a valid
identifier and additional valid characters that may
follow. This statement must be the first or second
statement within the section. You may use a dash
(-) character to specify a range, for example, A-Z
specifies uppercase letters. To specify a dash or
backslash (\) character as a valid word character,
place a backslash before the character.
styles= style Defines zero or more styles. See Table of style Val-
ues below for a list of available styles.
mlcomment= start_symbol end_symbol
[nesting] [followedby idchars] [colorname]
Defines a multi-line comment. start_symbol and
end_symbol define strings which start and end the
comment. Specify nesting if the lexer should look
for another occurrence of start_symbol when
looking for the end comment symbol. The fol-
lowedby idchars is used to require certain char-
acters to follow start_symbol. You can use a
dash (-) character to specify a range, such as A-Z,
which specifies uppercase letters. To specify a
dash (-) or backslash (\) character as a valid word
character, place a backslash before the character.
followedby is ignored when the html style is spe-
cified. Currently, start_symbol and end_symbol
may not be valid identifiers. No more than four
multi-line comments may be defined. colorname
can be used to indicate that a different color such
as keyword color be used instead of comment color
when a match is found. colorname may be
keywordcolor,numbercolor,stringcolor,com-
mentcolor,ppkeywordcolor,linenumcolor,sym-
bol1color,symbol2color,symbol3color,orsym-
bol4color.
mlcomment= start_symbol start_col
[checkfirst|leading] end_symbol [lastchar]
Defines a multi-line comment. This construct was
designed to handle comments for the ATLAS lan-
guage. start_symbol and end_symbol define
strings which start and end the comment.
start_symbol is only considered the start of a
comment if it appears in column start_col.
checkfirst specifies that the lexer should check if
Creating a Lexer Name and a
New VLX File
492

Statement Description
the line is a comment before determining the color
coding of symbols in the line. When the checkfirst
option is specified, start_symbol is limited to one
character in length. leading specifies that symbol
is considered a line comment only if it appears as
the first non-blank character. Space or tab charac-
ters are considered blanks. Currently, end_symbol
may not be a valid identifier. lastchar specifies that
end_symbol must appear as the last character on
a line to terminate the comment. No more than two
multi-line comments may be defined.
mlckeywords= [keyword ] [keyword ] ... Defines keywords for the last mlcomment state-
ment. When one of these keywords follows the
start_symbol defined for the last mlcomment
statement, the keyword color is used to color the
comment instead of comment color. Keywords do
not have to be valid identifiers. This statement is
useful for tag languages like HTML. See the HTML
definition in the file vslick.vlx for an example.
keywordattrs= [mlckeyword] [attribute ] [at-
tribute ] ...
Defines attributes for the mlckeyword specified
which belongs to the last mlcomment statement.
Currently this statement only supports HTML syntax
attributes and requires that the HTML style be spe-
cified. For example, keywordattrs=SCRIPT LAN-
GUAGE SRC
linecomment= [symbol ] [col |col+ |
start_col -end_col] [checkfirst|leading]
Defines a line comment. symbol defines the char-
acter(s) which start this line comment. If no column
limits are specified, the remainder of the line is con-
sidered a comment regardless of where symbol
appears. A plus sign (+) after a column specifies an
unlimited end_col.checkfirst specifies that the
lexer should check if the line is a comment before
determining the color coding of symbols in the line.
When the checkfirst option is specified, symbol is
limited to one character in length. If symbol is not
specified, all characters will be ignored at or after
the column specified (ex. linecoment=73+). This is
useful for Fortran which requires that all characters
at or after column 73 be ignored. leading specifies
that symbol is considered a line comment only if it
appears as the first non-blank character. Space or
tab characters are considered blanks.
Creating a Lexer Name and a
New VLX File
493

Statement Description
keywords= [keyword ] [keyword ] ... Defines words that should be displayed in keyword
color. Keywords do not have to be valid identifiers.
cskeywords= [keyword ] [keyword ] ... (Case-sensitive keywords) Defines words that
should be displayed in keyword color only if found
in the case specified. This statement should only be
used for languages such as HTML which are case
insensitive except for a few words. For other lan-
guages, use the case-sensitive and keywords
statements. Keywords do not have to be valid iden-
tifiers.
ppkeywords= [keyword ] [keyword ] ... Defines words that should be displayed in prepro-
cessor color. The first character of a preprocessor
keyword must not be a valid identifer. Prepro-
cessing keywords must appear as the first non-
blank symbol in the line.
symbol1= [ keyword ][keyword ] ... Defines words that should be displayed in symbol1
color. Keywords do not have to be valid identifiers.
symbol2= [keyword ] [keyword ] ... Defines words that should be displayed in symbol2
color. Keywords do not have to be valid identifiers.
symbol3= [keyword ] [keyword ] ... Defines words that should be displayed in symbol3
color. Keywords do not have to be valid identifiers.
symbol4= [keyword ] [keyword ] ... Defines words that should be displayed in symbol4
color. Keywords do not have to be valid identifiers.
Table of style Values
The table below describes the style values that can be used.
Table 11.6. Table of style Value
Value of style Description
linenum Line numbers may be found as the first non-blank
symbol of a line like BASIC.
dqbackslash Color double-quoted strings. Characters following a
backslash in a double-quoted string are included in
the string (like C).
Creating a Lexer Name and a
New VLX File
494

Value of style Description
dqbackslashml Color double-quoted strings. If a double-quoted
string ends in a backslash, it continues the string to
the next line (like C).
dqmultiline Color double-quoted strings. String may span mul-
tiple lines.
dqdoubles Color double-quoted strings. Two double quotes
represent one double quote.
dqterminate Do not color-code a double-quoted string until the
string is terminated. This style does not support
dqmultiline or dqbackslashml.
dqlen1 Color double-quoted strings. Double-quoted strings
contain exactly one character.
sqbackslash Color single-quoted strings. Characters following a
backslash in a single-quoted string are included in
the string (like C).
sqbackslashml Color single-quoted strings. If a double-quoted
string ends in a backslash, it continues the string to
the next line.
sqmultiline Color single-quoted strings. String may span mul-
tiple lines.
sqdoubles Color single-quoted strings. Two consecutive single
quotes represent one single quote (like Pascal).
sqterminate Do not color-code a single-quoted string until the
string is terminated. This style does not support
sqmultiline or sqbackslashml.
sqlen1 Single-quoted strings contain exactly one character
(like Ada).
amphhex Hexadecimal numbers are of the form &Hdddd (like
BASIC).
ampooct Octal numbers are of the form &Odddd (like BA-
SIC).
hexh Hexadecimal numbers are of the form ddddH(like
Creating a Lexer Name and a
New VLX File
495

Value of style Description
Intel Assembler).
octo Octal numbers are of the form ddddO(like Intel As-
sembler).
octq Octal numbers are of the form ddddQ(like Intel As-
sembler).
poundbase Based numbers are of the form
#base#number#exponent (like Ada).
underlineint Numbers may have underlines between the num-
bers (like Ada).
xhex Hexadecimal numbers are of the form 0xhhhh (like
C).
nonumbers Do not color-code numbers. This style is useful for
tag languages like HTML. Using this style with other
number color-coding styles will produce unpredict-
able results.
rexxhex Hexadecimal strings are followed by an upper or
lowercase letter X. For example, '414141'X or
414141X are REXX-style hexadecimal strings that
are both equivalent to the string AAA.
packageimport Language has Java syntax package and import
statement where non-quoted file name follows
package and import keyword.
idparenfunction An identifier followed by an open parenthesis indic-
ates a function (like C++ and Java).
html Enables HTML syntax embedded languages and
attribute coloring.
backslashescapechars Backslash escapes the character that follows.
heredocument Enables support for Here documents. Note that if
you prefix the terminator with one of the lexer
names, you will get embedded language color-
coding.
perl Adds support for Perl format statement and some
other Perl-specific changes.
Creating a Lexer Name and a
New VLX File
496

Value of style Description
tcl Special support for TCL language color-coding.
bquote Perl- and Linux Shell-style backquote (subshell).
model204 Special support for Model 204 language.
cics Special support for CICS embedded in COBOL.
python Special support for Python.
Editing the Key Binding Source
497

Editing the Key Binding Source
If you are creating a new emulation or if you change many key bindings, you might want to edit your key
binding source instead of using the Key Bindings Dialog. To create a Slick-C®batch macro containing
your current key bindings, enter the command list_source on the command line. One of the files gener-
ated by this command is vusrdefs.e. It is placed in your configuration directory if you have changed
this location from the default. Otherwise, it is placed in your macros directory. If you open this file
(Ctrl+O), the first part of the source code is your key binding, which looks like the following:
defeventtab default_keys
def 'A-a'-'A-z'=
def 'A-F6'=
def 'F10'=
def 'C-A'= select all
def 'C-B'= select_block
def 'C-C'= copy_to_clipboard
def 'C-D'= gui_cd
The default_keys are the key bindings that are active in Fundamental mode. The other event tables
defined by the defeventtab primitive are mode event tables containing key bindings which override the
Fundamental mode key bindings. Make changes to this buffer by adding or modifying the def keyname=
command lines and then save the buffer by pressing Ctrl+S. The valid key names are listed in the Help
system under Event Names. You can also list the key names of the keys through the Help by invoking
the command help Event Names. To run this batch program, type the name vusrdefs without the exten-
sion on the command line. The path is not necessary if it is included in your VSLICKPATH or PATH en-
vironment variable.
Menu Editing
498

Menu Editing
For information about accessing SlickEdit®Core menus and associated options, see Menus.
Creating and Editing Menus
SlickEdit®Core menus are controlled by Slick-C®macro files. You can customize menus by editing these
files.
If you plan to customize your menu items, be sure to back up your configuration directory before installing
any updates or new versions of SlickEdit Core, as they will overwrite your changes.
Menus can be managed using the Open Menu dialog. From this dialog, you can pick a menu to edit, cre-
ate a new menu, run a menu as a pop-up. To access the dialog, from the main menu, click Macro →
Menus (or use the open_menu command). The following buttons are available:
•Open - Opens the menu specified in the combo box for editing with the Menu Editor. If the menu spe-
cified does not already exist, it is created.
•New - Creates a new menu with a unique name for editing with the Menu Editor. The Menu Editor al-
lows you to change the name of the menu.
•Delete - Deletes the specified menu from the combo box.
•Show - Runs the menu by displaying it as a pop-up. Use this button during macro recording to create a
command which runs a menu by displaying it as a pop-up. If you bind the command to a left or right
button mouse event, the menu will be displayed at the cursor position.
You can use the Menu Editor to create a new menu, or modify the SlickEdit Core menu bar or an existing
menu resource, which can be displayed as a pop-up or menu bar.
Creating a New Menu Resource
Use the Menu Editor to create a new menu resource. From the main menu, click Macro →Menus (or use
the open_menu command), then click New on the Open Menu dialog. The Menu Editor is displayed. See
Menu Editor Dialog for more information.
To create a command which runs a menu by displaying it as a pop-up, after creating a menu, while macro
recording, click the Show button on the Open Menu dialog box. If you bind the recorded command to a
left or right mouse button event, the menu will be displayed at the cursor position. You DO NOT need to
specify key bindings for menu items because the Menu Editor automatically determines the key bindings
for you. To choose between short and long key names, from the main menu click Window →Prefer-
ences, expand SlickEdit and click General in the tree, then double-click the General setting. On the
General Options dialog, select the More Tab, and change the option Short key names.
See the Slick-C®Macro Programming Guide for information on creating forms with menu bars or ad-
vanced information.
Creating and Editing Menus
499

Editing Menus
To select a menu for editing, from the main menu click Macro →Menus (or use the open_menu com-
mand). Select the menu to edit from the list, then click Open. The Menu Editor will be displayed. See
Menu Editor Dialog for a list of the available options.
Defining Menu Item Aliases
The Menu Item Alias dialog box allows you to define aliases (which are similar commands) for the com-
mand that is being executed. This dialog box can be accessed by clicking the Alias button on the Menu
Editor. Enter each alias command on a separate line. If one of the alias commands are bound to a key,
that key name will be displayed to the right of the menu item. For example, the eand edit commands are
absolutely identically in function except that the ecommand requires fewer characters to type. The
gui_open command is identical to the edit command except that it prompts the user with a dialog box,
whereas the edit command prompts for files on the command line. These two examples illustrate the best
reasons for using aliases.
Enabling/Disabling Menu Items
SlickEdit®Core has some attributes for enabling/disabling predefines that you can specify for any com-
mand. When these predefined auto-enabling attributes are not enough, you need to implement a callback
which determines the enable or disable state of the command. See the Slick-C®Macro Programming
Guide for information on enabling and disabling menu items with your own callback.
The Auto Enable Properties dialog box is used for these settings, and can be accessed from the main
menu by clicking Macro →Menus. When the Open Menu dialog box is displayed, click New to display
the Menu Editor. Click the Auto Enable button, and the Auto Enable Properties dialog is displayed.
For descriptions of the options on this dialog, see Auto Enable Properties Dialog.
Using the ISPF and XEDIT Emu-
lations
500
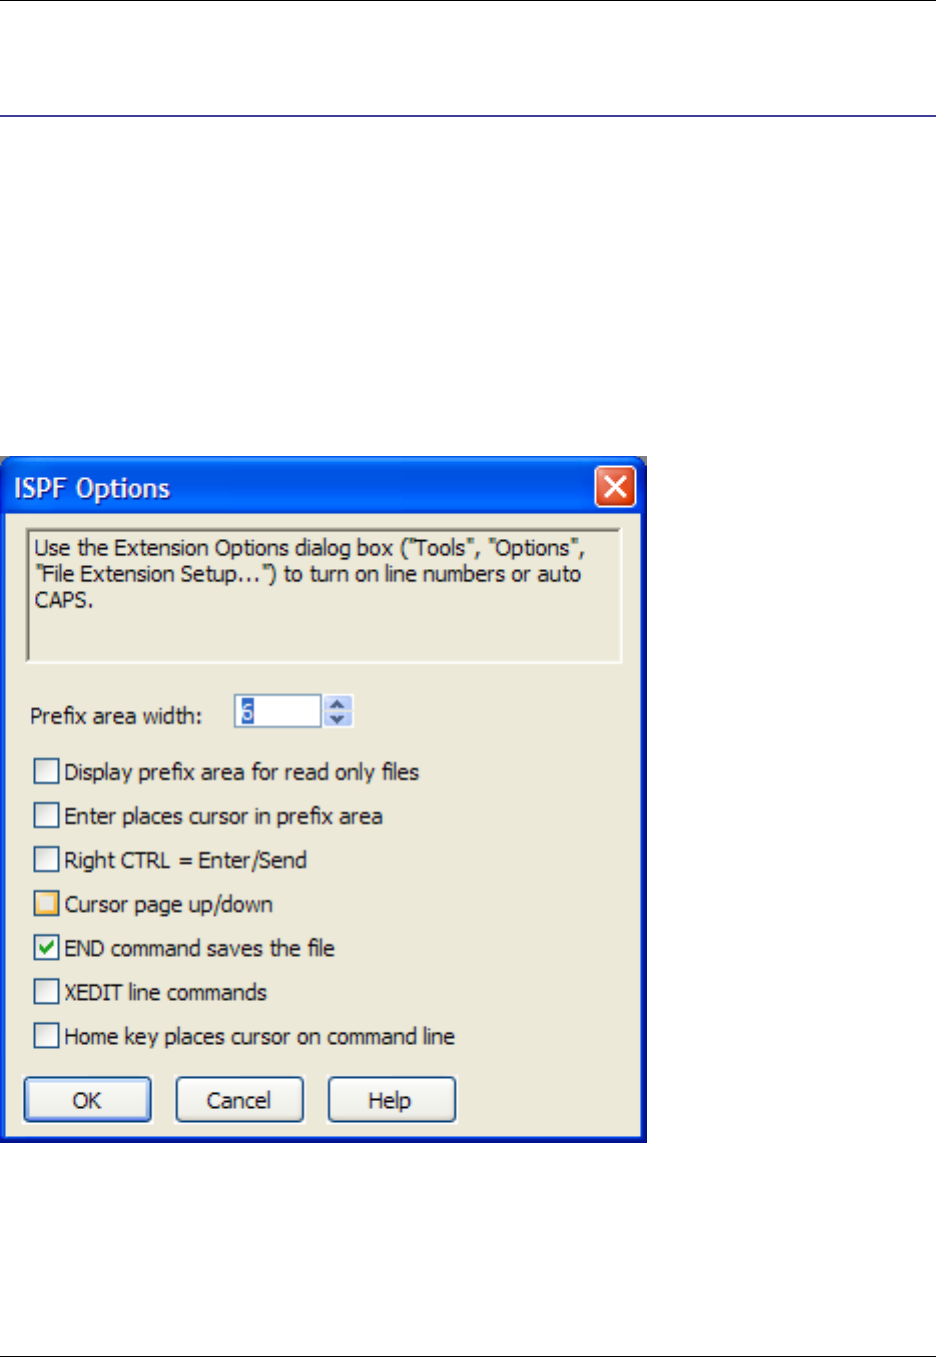
Using the ISPF and XEDIT Emulations
This section describes the features of the ISPF editor emulation and outlines some XEDIT line com-
mands.
ISPF Options Dialog
The ISPF Options dialog is used to tune various ISPF emulation options. When you are in ISPF emula-
tion, you can access this dialog from the main menu by clicking Window →Preferences, expand
SlickEdit and click General in the tree, then double-click the ISPF Options setting.
Figure 11.2. ISPF Options Dialog
The following settings are available:
•Prefix area width - The number of characters to display in the prefix area (default is 6). Note that some
line commands require four characters (e.g. BNDS,TABS,COLS,MASK). To completely remove the
prefix area, set the prefix area width to 0.
ISPF Options Dialog
501

Only the following line commands are allowed in read-only mode:
•ISPF Line Labels - Define a label.
•ISPF Line Command BNDS - Insert a column boundary ruler line.
•ISPF Line Command COLS - Insert a column ruler line.
•ISPF Line Command First - Expose one or more lines at the beginning of a block of excluded lines.
•ISPF Line Command Last - Expose one or more lines at the beginning of a block of excluded lines.
•ISPF Line Command Show - Expose one or more lines having the leftmost indentation level in a
block of excluded lines.
•ISPF Line Command TABS - Displays the tab definition line.
•ISPF Line Command Exclude - Specifies one or more lines to be hidden (excluded).
•ISPF Line Command Select - Select a block of lines.
•Enter places cursor in prefix area - When this check box is selected, the Enter key places the cursor
in the prefix area of the next line. When this check box is cleared, the Enter key places the cursor in
column 1 of the next line.
•Right CTRL = Enter/Send - When this check box is selected, the Enter key places the cursor at the
beginning of the next line, and the Right Ctrl key is used to execute line commands. When this check
box is cleared, the Right Ctrl key acts like a normal control key and the Enter key is used to execute
line commands.
•Cursor page up/down - When this check box is selected, the display is scrolled up/down until the line
the cursor is on becomes the last/first line displayed, respectively. If the cursor is already on the top/
bottom display line, the display is scrolled one page. When this check box is cleared, page up/down al-
ways scrolls one page.
•END command saves the file - When this check box is selected, changes to the buffer are saved
automatically when the ispf_end (F3) command is performed. Otherwise, you will be prompted if you
want to save changes before closing the file.
•XEDIT line commands - When this check box is selected, the prefix area will support XEDIT-style line
commands.
•Home places cursor on command line - When this check box is selected, the Home key places the
cursor on the command line. By default, this option is off, and the Home key simply moves the cursor to
the beginning of the line.
Further ISPF-related options are available on the General Tab of the Extension Options dialog box (Win-
dow →Preferences, expand SlickEdit and click General in the tree, double-click the File Extension
Setup setting). These options include Auto CAPS mode and editing of boundaries and the truncation
column.
ISPF Primary Commands
502

ISPF Primary Commands
The following table of standard ISPF primary commands are supported in the ISPF emulation mode.
Primary commands are entered by placing the cursor on the command line.
To place the cursor on the command line, either press the Esc key, click on the message line, or use is-
pf_retrieve (F12). If configured to do so, the Home key will also place the cursor on the command line.
Once on the command line, you may use the cursor Up/Down keys to retrieve the previous/last command
entered, respectively.
Though primary commands may be typed at the command line explicitly, for convenience you can simply
type the last part of the command name in the command line and it will automatically be mapped to the
ISPF-specific command. For example, to execute the ISPF reset command, simply type reset at the
command line instead of ispf_reset.
Note
Some standard built-in commands conflict with ISPF emulation commands. These conflicts in-
clude copy,cut,delete,find,hex,move, and paste. To access the built-in command, you may
be able to use a menu option or consult the Help for that command for specific instructions.
Table 11.7. ISPF Primary Commands
Command Description
ispf_autosave Turn on or off prompting to save changes.
ispf_bounds Set or reset the left and right edit boundaries.
ispf_bnds Set or reset the left and right edit boundaries
ispf_browse Browse a data set or member.
ispf_cancel Closes the current file or PDS member without sav-
ing changes.
ispf_caps Turn on or off automatic capitalization mode.
ispf_change Replace one string with another within the current
buffer.
ispf_chg Replace one string with another within the current
buffer.
ispf_compare Compare the file you are editing with another file.
ISPF Primary Commands
503

Command Description
ispf_copy Insert the contents of a file or PDS member into the
buffer.
ispf_create Create a new file or PDS member containing the
contents of the buffer.
ispf_cut Cut lines out of the current buffer and place them in
the clipboard.
ispf_delete Delete lines in the given line range, or the entire
buffer.
ispf_edit This command is identical to the built-in edit com-
mand.
ispf_end Close the current file.
ispf_exclude Hide (exclude) lines that match the given search
string.
ispf_find Find occurrences of the given search string in the
current buffer.
ispf_flip Reverse the exclude status of lines.
ispf_hex Toggle display of the document in Hexadecimal
mode.
ispf_hilite Specify the use of color-coding in the editor.
ispf_locate Find lines with a specific line prefix.
ispf_move Move the contents of a file or PDS member into the
buffer.
ispf_nonumber Turn off numbering mode.
ispf_number Controls line numbering mode. Unlike ISPF, this
command does affect how lines are inserted.
ispf_paste Copy lines from the clipboard to the buffer.
ispf_preserve Controls saving of trailing blanks.
ISPF Primary Commands
504

Command Description
ispf_rchange Repeat the change requested by the most recent
change command.
ispf_renumber Immediately update the line numbers in a file.
ispf_replace Save the contents of the current buffer to an exist-
ing file.
ispf_reset Reset the contents of the line prefix area.
ispf_return Close the current file.
ispf_rfind Repeat the last find operation requested.
ispf_save This command is identical to the built-in save com-
mand.
ispf_sort Sort lines of data in a specified order.
ispf_submit Submit the contents of the current buffer for batch
processing.
ispf_swap Switch to the next buffer.
ispf_tabs Define logical tab positions.
ispf_unnumber Blank out the line numbers in a file.
ispf_undo This command is identical to the undo command.
ISPF Line Commands
The table below shows ISPF edit line commands that are supported in the ISPF emulation mode.
Enter line commands by typing over the prefix area (on the left-hand side of the editor control) which con-
tains either ====== or the line number. To place the cursor in the prefix area, click there, or move the
cursor left or backspace until the cursor in is in the prefix area. In addition, Enter will place the cursor in
the prefix area of the next line, unless an insert or text entry command is executed.
Edit line commands operate on either a single line or a block of lines. The commands that operate on
blocks require you to place the command on both the first and last lines of the block.
Line commands are processed using the ispf_do_lc command when you press Enter,Ctrl+Enter or the
ISPF Line Commands
505

Right Control key, depending on your preferences. Several commands or line labels can be entered and
then processed at one time. The ispf_reset command is used to clear the prefix area.
Table 11.8. ISPF Line Commands
Command Description
ISPF Line Labels Define a label.
ISPF Line Command Shift Shift data left or right.
ISPF Line Command A Identify a line after which lines are to be inserted.
ISPF Line Command B Identify a line before which lines are to be inserted.
ISPF Line Command BNDS Insert a column boundary ruler line.
ISPF Line Command Copy S Specify lines to be copied to another location.
ISPF Line Command COL Insert a column ruler line.
ISPF Line Command Delete Delete one or more lines.
ISPF Line Command First Expose one or more lines at the beginning of a
block of excluded lines.
ISPF Line CommandI Insert one or more blank data entry lines.
ISPF Line Command Lowercase Convert all uppercase letter alphabetic characters
in one or more lines to lowercase.
ISPF Line Command Last Expose one or more lines at the beginning of a
block of excluded lines.
ISPF Line Command Move Specify lines to be moved to another location.
ISPF Line Command MASK Display the contents of the mask used with the in-
sert (I) and text entry (TE) line commands.
ISPF Line Command Make Data Convert one or more no-save lines to data so that
they may be saved when the buffer is saved.
ISPF Line Command Overlay Identify one or more lines over which the copy or
move block is to be overlaid.
ISPF Line Command Repeat Specify lines to be repeated immediately following
this line or block.
ISPF Line Commands
506

Command Description
ISPF Line Command Show Expose one or more lines having the left-most in-
dentation level in a block of excluded lines.
ISPF Line Command TABS Display the tab definition line.
ISPF Line Command TE Insert one or more blank lines to allow power typing
for text entry.
ISPF Line Command TF Reflow paragraphs according to the current column
boundary settings.
ISPF Line Command TJ Join this line with the next line.
ISPF Line Command TS Divide a line so that data can be added.
ISPF Line Command Uppercase Convert all lowercase letter alphabetic characters in
one or more lines to uppercase.
ISPF Line Command Exclude Specify one or more lines to be hidden (excluded).
ISPF Line Command Select Select a block of lines.
ISPF Line Command Documentation
ISPF Line Labels .label
Usage
.label, where label does not start with a z
Remarks
Define a label to be used as a marker to identify the given line. Labels are used to specify a particular
line, such as in the ispf_locate command, or to specify a range of lines for an primary command to oper-
ate on. The following labels are built in to the ISPF emulation:
•.zfirst - The first line in the buffer (abbreviated .zf).
•.zlast - The last line in the buffer (abbreviated .zl).
•.zcsr - The current line the cursor is on (abbreviated .zc).
See Also
ispf_change,ispf_copy,ispf_delete,ispf_exclude,ispf_find,ispf_flip,ispf_locate,ispf_paste,is-
pf_reset,ispf_sort
ISPF Line Commands
507

ISPF Shift Lines Left or Right
Usage
•( [n]- Shift the current line ncolumns left, default 2
•(( [n]- Shift the block of lines ncolumns left, default 2
•) [n]- Shift the current line ncolumns right, default 2
•)) [n]- Shift the block of lines ncolumns right, default 2
•< [n]- Data shift the current line ncolumns left, default 2
•<< [n]- Data shift the block of lines ncolumns left, default 2
•> [n]- Data shift the current line ncolumns right, default 2
•>> [n]- Data shift the block of lines ncolumns right, default 2
Remarks
This set of commands is used for shifting data left or right. The versions using parenthesis shift text liter-
ally, while the other versions attempt to intelligently shift text without disturbing line numbers or com-
ments. In all cases, the default number of columns that the text is shifted is two.
There are two forms to these commands. The single character forms (,),<,or>specifies that the line
and the subsequent n-1 lines are to be shifted. The two-character block forms are placed on the first and
last lines of the block to be shifted.
Data is shifted only within the columns defined by the current bounds, or if bounds is turned off, but there
is a truncation column, between column 1 and the truncation column. If the shift operation results in data
moving beyond the right or left margins, it is truncated and there is no warning message.
See Also
ispf_bounds
ISPF Insert After A
Usage
A [n]
Remarks
Identifies a line after which copied or moved lines are to be inserted ntimes. You are allowed to specify
multiple A,B,orOline commands to have the same copy or move block inserted in multiple places.
See Also
ispf_copy,ispf_paste,ISPF Line Command B,ISPF Line Command Copy,ISPF Line Command
Move,ISPF Line Command Overlay
ISPF Line Commands
508

ISPF Insert Before B
Usage
B [n]
Remarks
Identifies a line before which copied or moved lines are to be inserted ntimes. You are allowed to specify
multiple A,B,orOline commands to have the same copy or move block inserted in multiple places.
See Also
ispf_copy,ispf_paste,ISPF Line Command B,ISPF Line Command Copy,ISPF Line Command
Move,ISPF Line Command Overlay
ISPF Insert Bounds Ruler BNDS
Usage
BNDS
Remarks
Insert a column boundary ruler line. After this line is inserted, the <and >marks may be moved in order to
adjust the column boundaries. Note that if you have multiple bounds lines, and you change one, the sub-
sequent bounds lines will also be changed.
A column boundary line with one <sign indicates a left boundary and no right boundary (unbounded). A
column boundary with one >sign indicates a single column boundary (left and right bounds are same).
See Also
ispf_bounds,ISPF Line Command Shift,ISPF Line Command Overlay
ISPF Copy Lines C and CC for blocks
Usage
•C [n]- Copy nlines starting with the line with the command.
•CC - Copy a block of lines, must match another CC.
Remarks
Specify lines to be copied to another location. There are two forms to this command. The first form (C [n])
specifies that the line and the subsequent n-1 lines are to be copied. The second (block) form (CC) is
placed on the first and last lines of the block to be copied. There can be only one copy block specified.
Furthermore, you can not have both a move block and a copy block specified at the same time.
See Also
ISPF Line Commands
509

ISPF Line Command A,ISPF Line Command B,ISPF Line Command Move,ISPF Line Command
Overlay
ISPF Insert Columns Ruler COLS or SCALE
Usage
COLS
SCALE
Remarks
Insert a column ruler line. The column ruler line is read-only.
See Also
ispf_bounds,ispf_tabs,ISPF Line Command BNDS,ISPF Line Command TABS
ISPF Delete Lines D and DD for blocks
Usage
•D [n]- Delete nlines starting with the line with the command.
•DD - Delete a block of lines, must match another DD.
Remarks
Deletes one or more lines. There are two forms to this command. The first form (D [n]) specifies that the
line and the subsequent n-1 lines are to be deleted. The second (block) form (DD) is placed on the first
and last lines of the block to be deleted.
See Also
ispf_delete
ISPF Expose First Lines F and FF
Usage
•F [n]- Unexclude (expose) the first nlines of an excluded block.
•FF - Unexclude (expose) an entire excluded block.
Remarks
Expose one or more lines at the beginning of a block of excluded lines. The FF line command exposes
the entire block of lines and is to F[m]where mis the number of lines in the block of excluded lines.
See Also
ispf_exclude,ispf_reset,ISPF Line Command Last,ISPF Line Command Show,ISPF Line Com-
ISPF Line Commands
510

mand Exclude
ISPF Insert Lines
Usage
I [n]
Remarks
Insert one or more blank data entry lines.
See Also
ispf_enter,ISPF Line Command TE
ISPF Lowercase Lines LC, LCC and LCLC for blocks
Usage
•LC [n]- Lowercase nlines starting with the line with the command.
•LCC - Lowercase a block of lines, must match another LCC or LCLC.
•LCLC - Lowercase a block of lines, must match another LCC or LCLC.
Remarks
Converts all uppercase letter alphabetic characters in one or more lines to lowercase. This command only
operates on text within the edit boundary columns. There are two forms to this command. The first form
(LC [n]) specifies that the line and the subsequent n-1 lines are to be converted. The second (block)
form (LCLC or LCC) is placed on the first and last lines of the block to be converted.
See Also
ispf_caps,ISPF Line Command Uppercase,lowcase,upcase
ISPF Expose Last Lines L and LL
Usage
•L [n]- Unexclude (expose) the last nlines of an excluded block.
•LL - Unexclude (expose) an entire excluded block (identical to FF).
Remarks
Expose one or more lines at the end of a block of excluded lines. The LL line command exposes the en-
tire block of lines and is to L[m]where mis the number of lines in the block of excluded lines.
See Also
ispf_exclude,ispf_reset,ISPF Line Command First,ISPF Line Command Show,ISPF Line Com-
ISPF Line Commands
511

mand Exclude
ISPF Move Lines M and MM for blocks
Usage
•M [n]- Move nlines starting with the line with the command.
•MM - Move a block of lines, must match another MM.
Remarks
Specify lines to be moved to another location. There are two forms to this command. The first form (M [n])
specifies that the line and the subsequent n-1 lines are to be moved. The second (block) form (MM) is
placed on the first and last lines of the block to be moved. There can be only one move block specified.
Furthermore, you cannot have both a move block and a copy block specified at the same time.
See Also
ISPF Line Command A,ISPF Line Command B,ISPF Line Command Copy,ISPF Line Command
Overlay
ISPF Insert Mask Line MASK
Usage
MASK
Remarks
Displays the contents of the mask used with the insert (I) and text entry (TE) line commands. Normally,
when a line is inserted, the line is initially blank. By specifying an insert mask, you can insert a block of
lines with a particular template. The MASK line is editable. Note that if you specify multiple masks in one
file, only the first mask is used.
See Also
ISPF Line Command I,ISPF Line Command TE,ISPF Line Command TS
ISPF Make Data Lines MD, MDD and MDMD for blocks
Usage
•MD [n]- Make ndata lines starting with the line with the command.
•MDD - Make a block of lines data, must match another MDD or MDMD.
•MDMD - Make a block of lines data, must match another MDD or MDMD.
Remarks
Converts one or more no-save lines to data so that they may be saved when the buffer is saved. There
are two forms to this command. The first form (MD [n]) specifies that the line and the subsequent n-1
ISPF Line Commands
512

lines are to be converted. The second (block) form (MDMD or MDD) is placed on the first and last lines of
the block to be converted.
See Also
ISPF Line Commands,ISPF Line Command COLS,ISPF Line Command BNDS,ISPF Line Com-
mand MASK,ISPF Line Command TABS
ISPF Overlay Lines O and OO for blocks
Usage
•O [n]- Overlay nlines starting with the line with the command.
•OO - Overlay a block of lines, must match another OO.
Remarks
Identifies one or more lines over which the copy or move block is to be overlaid. Text is only overlaid with-
in the column boundaries. If the copy or move block has less lines than the overlay, it is repeated until it
fills the entire overlay block.
There are two forms to this command. The first form (O [n]) specifies that the line and the subsequent n-
1lines are to be overlaid. The second (block) form (OO) is placed on the first and last lines of the block to
be overlaid.
You are allowed to specify multiple A,B,orOline commands to have the same copy or move block inser-
ted or overlaid in multiple places.
See Also
ispf_copy,ispf_paste,ISPF Line Command A,ISPF Line Command B,ISPF Line Command Copy,
ISPF Line Command Move,ISPF Line Command Overlay
ISPF Repeat Lines
Usage
•R [n]- Repeat the line with the command ntimes.
•RR [n]- Repeat the block ntimes, must match another RR.
Remarks
Specify lines to be repeated immediately following this line or block. There are two forms to this com-
mand. The first form (R[n]) specifies that the line is to be repeated ntimes. The second (block) form
(RR[n]) is placed on the first and last lines of the block to be repeated ntimes.
See Also
ISPF Line Command A,ISPF Line Command B,ISPF Line Command Copy
ISPF Expose Next Level of Code S and SS
ISPF Line Commands
513

Usage
•S [n]- Unexclude (expose) the first nlines of an excluded block.
•SS - Unexclude (expose) an entire excluded block.
Remarks
Expose one or more lines having the leftmost indentation level in a block of excluded lines. The SS line
command exposes the entire block of lines and is to S[m]where mis the number of lines in the block of
excluded lines.
See Also
ispf_exclude,ispf_reset,ISPF Line Command First,ISPF Line Command Last,ISPF Line Com-
mand Exclude
ISPF Insert Tabs Ruler TABS or TABL
Usage
TABS
TABL
Remarks
Displays the tab definition line. After this line is inserted, the *marks may be moved in order to adjust the
tab positions. Note that if you have multiple tabs lines, and you change one, the subsequent tabs lines will
also be changed.
See Also
ispf_tabs,tabs
ISPF Insert Text TE
Usage
TE [n]
Remarks
Inserts one or more blank lines to allow power typing for text entry. This command is identical to the insert
(I) command, except that it switches the mode to wrap lines.
See Also
ispf_enter,ISPF Line Command I,ISPF Line Command MASK
ISPF Insert Lines TF
Usage
ISPF Line Commands
514

TF
Remarks
Reflows paragraphs according to the current column boundary settings.
See Also
reflow_paragraph
ISPF Join Lines TJ
Usage
TJ
Remarks
Join this line with the next line.
See Also
ISPF Line Command TS,join_line
ISPF Split Line TS
Usage
TS
Remarks
Divides a line so that data can be added. The line is split at the column in which the cursor is in when you
press Enter. This command does not support multiple lines.
See Also
ISPF Line Command TJ,split_insert_line
ISPF Uppercase Lines UC, UCC and UCUC for blocks
Usage
•UC [n]- Uppercase nlines starting with the line with the command.
•UCC - Uppercase a block of lines, must match another UCC or UCC.
•UCUC - Uppercase a block of lines, must match another UCC or UCUC.
Remarks
Converts all lowercase letter alphabetic characters in one or more lines to uppercase. This command only
operates on text within the edit boundary columns. There are two forms to this command. The first form,
ISPF Line Commands
515

UC [n], specifies that the line and the subsequent n-1 lines are to be converted. The second (block) form
(UCUC or UCC) is placed on the first and last lines of the block to be converted.
See Also
ispf_caps,ISPF Line Command Lowercase,lowcase,upcase
ISPF Exclude Lines X and XX for blocks
Usage
•X [n]- Exclude nlines starting with the line with the command.
•XX - Exclude a block of lines, must match another XX.
Remarks
Specifies one or more lines to be hidden (excluded). There are two forms to this command. The first form
(X [n]) specifies that the line and the subsequent n-1 lines are to be excluded. The second (block) form
(XX) is placed on the first and last lines of the block to be excluded.
See Also
ispf_exclude,ispf_reset,ISPF Line Command First,ISPF Line Command Last,ISPF Line Com-
mand Show
ISPF Select Lines Z and ZZ for blocks
Usage
•Z [n]- Select nlines starting with the line with the command.
•ZZ - Select a block of lines, must match another ZZ.
Remarks
Select a block of lines. There are two forms to this command. The first form (Z [n]) specifies that the line
and the subsequent n-1 lines are to be selected. The second (block) form (ZZ) is placed on the first and
last lines of the block to be selected.
See Also
ispf_cut,ispf_paste
XEDIT Line Commands
The following XEDIT line commands are supported and override the like-named ISPF commands when
there is a conflict. XEDIT commands can be enabled using the ISPF Options dialog box (Window →
Preferences, expand SlickEdit and click General in the tree, then double-click the ISPF Options set-
ting).
Table 11.9. XEDIT Line Commands
ISPF Line Commands
516

XEDIT ISPF Description
/ R Repeat the marked line.
F A Paste text following line.
A I Add (insert) line(s).
P B Paste text before line.
L LC Make line lowercase.
LL LCC Make block lowercase.
U UC Make line uppercase.
UU UCC Make block uppercase.
Note the following conflicts with standard ISPF edit line commands:
•Fconflicts with unexclude first (F).
•Aconflicts with paste after (A).
•Lconflicts with unexclude last (L).
•LL conflicts with unexclude block (LL).
ISPF Unsupported Primary Commands
The table below shows ISPF primary commands that are not supported in the ISPF emulation mode. The
unsupported commands fall into two categories. First, some ISPF commands are made obsolete by more
powerful features, such as recovery,profile, and setundo. Second, some commands reflect features
that we chose not to implement for the emulation, such as ISPF macros, PDF statistics, model, and pack.
Table 11.10. Unsupported ISPF Primary Commands
Command Description
autolist Control the automatic printing of data to the ISPF
list data set.
builtin Process a built-in command, even if overloaded by
a macro.
define Define a name as an alias or macro.
ISPF Line Commands
517

Command Description
imacro Save the name of an initial macro in the edit profile.
level Set the modification level number in PDF library
statistics.
model Copy a model into the buffer or defines a model
class.
notes Control whether the MODEL command display
notes or not.
nulls Control null spaces.
pack Control whether data is to be stored compressed or
not.
profile Display edit profile.
recovery Specify edit recovery options.
rmacro Save a recovery macro in the edit profile.
setundo Control the UNDO mode.
stats Generate library statistics.
version Set the version number in the PDF library statistics.
view Save as browse command but prompts on save.
The following commands are supported in ISPF emulation mode.
Table 11.11. Supported ISPF Commands
Command Description
ispf_bottom Move cursor to the end of the buffer.
ispf_down Move cursor to next page of text.
ispf_enter Handle the Enter key or Right Control key in ISPF
emulation.
ISPF Line Commands
518

Command Description
ispf_home Place the focus on the command line in ISPF emu-
lation.
ispf_retrieve Does command line retrieval, getting the next com-
mand line from the list.
ispf_retrieve_back Identical to the ispf_retrieve back command.
ispf_top Move cursor up to the top of the buffer.
ispf_up Move cursor up to the previous page of text.
ispf_do_lc Immediately process all commands found in the line
prefix area.
Regular Expression Syntax
519

Regular Expression Syntax
This section provides lists of the UNIX, SlickEdit®, and Brief regular expression syntaxes, samples, and
Unicode category specifications.
UNIX Regular Expressions
UNIX regular expressions are defined in the following table.
Table 11.12. UNIX Regular Expression
UNIX Regular Expression Definition
^Matches beginning of line.
$Matches end of line.
.Matches any character except newline.
X+ Maximal match of one or more occurrences of X.
See Minimal versus Maximal Matching.
X* Maximal match of zero or more occurrences of X.
X? Maximal match of zero or one occurrences of X.
X{n1}Match exactly n1 occurrences of X.
X{n1,} Maximal match of at least n1 occurrences of X.
X{,n2}Maximal match of at least zero occurrences but not
more than n2 occurrences of X.
X{n1,n2}Maximal match of at least n1 occurrences but not
more than n2 occurrences of X.
X+? Minimal match of one or more occurrences of X.
X*? Minimal match of zero or more occurrences of X.
X?? Minimal match of zero or one occurrences of X.
X{n1}? Matches exactly n1 occurrences of X.
UNIX Regular Expressions
520

UNIX Regular Expression Definition
X{n1,}? Minimal match of at least n1 occurrences of X.
X{,n2}? Minimal match of at least zero occurrences but not
more than n2 occurrences of X.
X{n1,n2}? Minimal match of at least n1 occurrences but not
more than n2 occurrences of X.
(?!X) Search fails if expression X is matched. The ex-
pression ^(?!if) matches the beginning of all lines
that do not start with if.
(X) Matches sub-expression X and specifies a new
tagged expression (see Using Tagged Search Ex-
pressions). No more tagged expressions are
defined once an explicit tagged expression number
is specified as shown below.
(?dX) Matches sub-expression X and specifies to use
tagged expression number dwhere 0<=d<=9. No
more tagged expressions are defined by the sub-
expression syntax (X) once this sub-expression
syntax is used. This is the best way to make sure
you have enough tagged expressions.
(?:X) Matches sub-expression X but does not define a
tagged expression.
X|Y Matches X or Y.
[char-set]Matches any one of the characters specified by
char-set. A dash (-) character may be used to
specify ranges. The expression [A-Z] matches any
uppercase letter. A backslash (\) may be used in-
side the square brackets to define literal characters
or define ASCII characters. For example, \- spe-
cifies a literal dash character. The expression
[\d0-\d27] matches ASCII character codes 0..27.
The expression []] matches a right bracket. In
SlickEdit®regular expressions, [] matches no char-
acters. In both syntaxes, the expression [\]]
matches a right bracket. The expression [^]
matches a caret (^) character but this does not work
for SlickEdit regular expressions. In both syntaxes,
[\^] matches a caret (^) character.
UNIX Regular Expressions
521

UNIX Regular Expression Definition
[^char-set]Matches any character not specified by char-set.
A dash (-) character may be used to specify ranges.
[char-set1 - [char-set2]] Character set subtraction. Matches all characters in
char-set1 except the characters in char-set2.
The expression [^A-Z] matches all characters ex-
cept uppercase letters. For example, [a-z-[qw]]
matches all English lowercase letters except qand
w.[\p{L}-[qw]] matches all Unicode lowercase let-
ters except qand w.
[char-set1 & [char-set2]Character set intersection. Matches all characters in
char-set1 that are also in char-set2. For ex-
ample, [\x{0}-\x{7f}&[\p{L}]] matches all letters
between 0 and 127.
\x{hhhh}Matches up to 31-bit Unicode hexadecimal charac-
ter specified by hhhh.
\p{UnicodeCategorySpec](Only valid in character set) Matches characters in
UnicodeCategorySpec. Where UnicodeCat-
egorySpec uses the standard general categories
specified by the Unicode consortium. For example,
[\p{L}] matches all letters. [\p{Lu}] matches all up-
percase letters. See Unicode Category Specifica-
tions for Regular Expressions.
\P{UnicodeCategorySpec](Only valid in character set) Matches characters not
in UnicodeCategorySpec. For example, [\P{L}]
matches all characters that are not letters. This is
equivalent to [^\p{L}].[\P{Lu}] matches all charac-
ters that are not uppercase letters. See Unicode
Category Specifications for Regular Expressions.
\p{UnicodeIsBlockSpec](Only valid in character set) Matches characters in
UnicodeIsBlockSpec. Where UnicodeIsB-
lockSpec one of the standard character blocks
specified by the Unicode consortium. For example,
[\p{isGreek}] matches Unicode characters in the
Greek block. See Unicode Character Blocks for
Regular Expressions.
\P{UnicodeIsBlockSpec](Only valid in character set) Matches characters not
in UnicodeIsBlockSpec. For example,
[\P{isGreek}] matches all characters that are not in
UNIX Regular Expressions
522

UNIX Regular Expression Definition
the Unicode Greek block. This is equivalent to
[^\p{isGreek}]. See Unicode Character Blocks for
Regular Expressions.
\xhh Matches hexadecimal character hh where
0<=hh<=0xff.
\dddd Matches decimal character ddd where
0<=ddd<=255.
\dDefines a back reference to tagged expression
number d. For example, {abc}def\0 matches the
string abcdefabc. If the tagged expression has not
been set, the search fails.
\c Specifies cursor position if match is found. If the ex-
pression xyz\c is found the cursor is placed after
the z.
\n Matches newline character sequence. Useful for
matching multi-line search strings. What this
matches depends on whether the buffer is a DOS
(ASCII 13,10 or just ASCII 10), UNIX (ASCII 10),
Macintosh (ASCII 13), or user-defined ASCII file.
Use \d10 if you want to match an ASCII 10 charac-
ter.
\r Matches carriage return (ASCII 13). What this
matches depends on whether the buffer is a DOS
(ASCII 13,10 or just ASCII 10), UNIX (ASCII 10),
Macintosh (ASCII 13), or user defined ASCII file.
\t Matches tab character.
\f Matches form feed character.
\od Matches any 2-byte DBCS character. This escape
is only valid in a match set ([...\od...]). [^\od]
matches any single byte character excluding end-
of-line characters. When used to search Unicode
text, this escape does nothing.
\om Turns on multi-line matching. This enhances the
match character set, or match any character primit-
ives to support matching end-of-line characters. For
example, \om.+ matches the rest of the buffer.
UNIX Regular Expressions
523

UNIX Regular Expression Definition
\ol Turns off multi-line matching (default). You can still
use \n to create regular expressions which match
one or more lines. However, expressions like .+ will
not match multiple lines. This is much safer and
usually faster than using the \om option.
\char Declares character after slash to be literal. For ex-
ample, \* represents the star character.
\:char Matches predefined expression corresponding to
char. The pre-defined expressions are:
•\:a [A-Za-z0-9] - Matches an alphanumeric char-
acter.
•\:c [A-Za-z] - Matches an alphabetic character.
•\:b (?:[ \t]+) - Matches blanks.
•\:d [0-9] - Matches a digit.
•\:f (?:[^\[\]\:\\/<>|=+;, \t"’]+) - Windows: Matches
a file name part.
•\:f (?:[^/ \t"’]+) - UNIX: Matches a file name part.
•\:h (?:[0-9A-Fa-f]+) - Matches a hex number.
•\:i (?:[0-9]+) - Matches an integer.
•\:n
(?:(?:[0-9]+(?:\.[0-9]+|)|\.[0-9]+)(?:[Ee](?:\+|-|)[0-
9]+|)) - Matches a floating number.
•\:p (?:(?:[A-Za-z]:|)(?:\\|/|)(?:\:f(?:\\|/))*\:f) - Win-
dows: Matches a path.
•\:p (?:(?:/|)?:(?::f(/))*\:f) - UNIX: Matches a path.
•\:q (?:\"[^\"]*\"|'[^']*') - Matches a quoted string.
•\:v (?:[A-Za-z_$][A-Za-z0-9_$]*) - Matches a C
variable.
•\:w (?:[A-Za-z]+) - Matches a word.
The precedence of operators, from highest to lowest, is as follows:
UNIX Regular Expressions
524

•+,*,?,{},+?,*?,??,{}? (These operators have the same precedence.)
• concatenation
•|
UNIX Regular Expression Examples
The table below shows examples of UNIX regular expressions.
Table 11.13. UNIX Regular Expression Examples
Sample UNIX Expression Description
^defproc Matches lines that begin with the word defproc.
^definit$ Matches lines that only contain the word definit.
^\*name Matches lines that begin with the string *name. No-
tice that the backslash must prefix the special char-
acter *.
[\t ] Matches tab and space characters.
[\d9\d32] Matches tab and space characters.
[\x9\x20] Matches tab and space characters.
p.t Matches any three letter string starting with the let-
ter pand ending with the letter t. Two possible
matches are pot and pat.
s.*?t Matches the letter sfollowed by any number of
characters followed by the nearest letter t. Two pos-
sible matches are seat and st.
for|while Matches the strings for or while.
^\:p Matches lines beginning with a file name.
xy+z Matches xfollowed by one or more occurrences of
yfollowed by z.
[a-z-[qw]] Character set subtraction. Matches all English
lowercase letters except qand w.
[\p{isGreek}&[\p{L}]] Character set intersection. Matches all Unicode let-
UNIX Regular Expressions
525

Sample UNIX Expression Description
ters in the Greek block.
\x{6587} Matches Unicode character with hexadecimal value
6587. Character set intersection. Matches all Uni-
code letters in the Greek block.
[\p{L}-[qw]] Matches all Unicode letters except qand w.
[\p{L}] Matches all Unicode letters.
[\p{Lul}] Matches all Unicode uppercase and lowercase let-
ters.
[\P{L}] Matches all Unicode characters that are not letters.
[\p{isGreek}] Matches all Unicode characters in the Greek block.
SlickEdit®Regular Expressions
SlickEdit regular expressions are defined in the following table.
Table 11.14. SlickEdit Regular Expressions
SlickEdit Regular Expression Definition
^Matches beginning of line.
$Matches end of line.
?Matches any character except newline.
X+ Minimal match of one or more occurrences of X.
See Minimal versus Maximal Matching for more in-
formation.
X# Maximal match of one or more occurrences of X.
X* Minimal match of zero or more occurrences of X.
X@ Maximal match of zero or more occurrences of X.
X:n1 Matches exactly n1 occurrences of X. Use () to
SlickEdit®Regular Expressions
526

SlickEdit Regular Expression Definition
avoid ambiguous expressions. For example a:9()1
searches for nine instance of the letter afollowed
bya1.
X:n1,Maximal match of at least n1 occurrences of X.
X:n1,n2 Maximal match of at least n1 occurrences but not
more than n2 occurrences of X.
X:*n1,Minimal match of at least n1 occurrences of X.
X:*n1,n2 Minimal match of at least n1 occurrences but not
more than n2 occurrences of X.
~X Search fails if expression X is matched. The ex-
pression ^~(if) matches the beginning of all lines
that do not start with if.
(X) Matches sub-expression X.
{X} Matches sub-expression X and specifies a new
tagged expression. See Using Tagged Search Ex-
pressions for more information.
{#dX} Matches sub-expression X and specifies to use
tagged expression number dwhere 0<=d<=9.
X|Y Matches X or Y.
[char-set]Matches any one of the characters specified by
char-set. A dash (-) character may be used to
specify ranges. The expression [A-Z] matches any
uppercase letter. Backslash (\) may be used inside
the square brackets to define literal characters or
define ASCII characters. For example, \- specifies a
literal dash character. The expression [\0-\27]
matches ASCII character codes 0..27. The expres-
sion [] matches no characters. In UNIX regular ex-
pressions, []] matches a right bracket. In both syn-
taxes, the expression [\]] matches a right bracket.
The expression [\^] matches a caret (^) character in
both syntaxes.
[~char-set]Matches any character not specified by char-set.
A dash (-) character may be used to specify ranges.
The expression [~A-Z] matches all characters ex-
SlickEdit®Regular Expressions
527
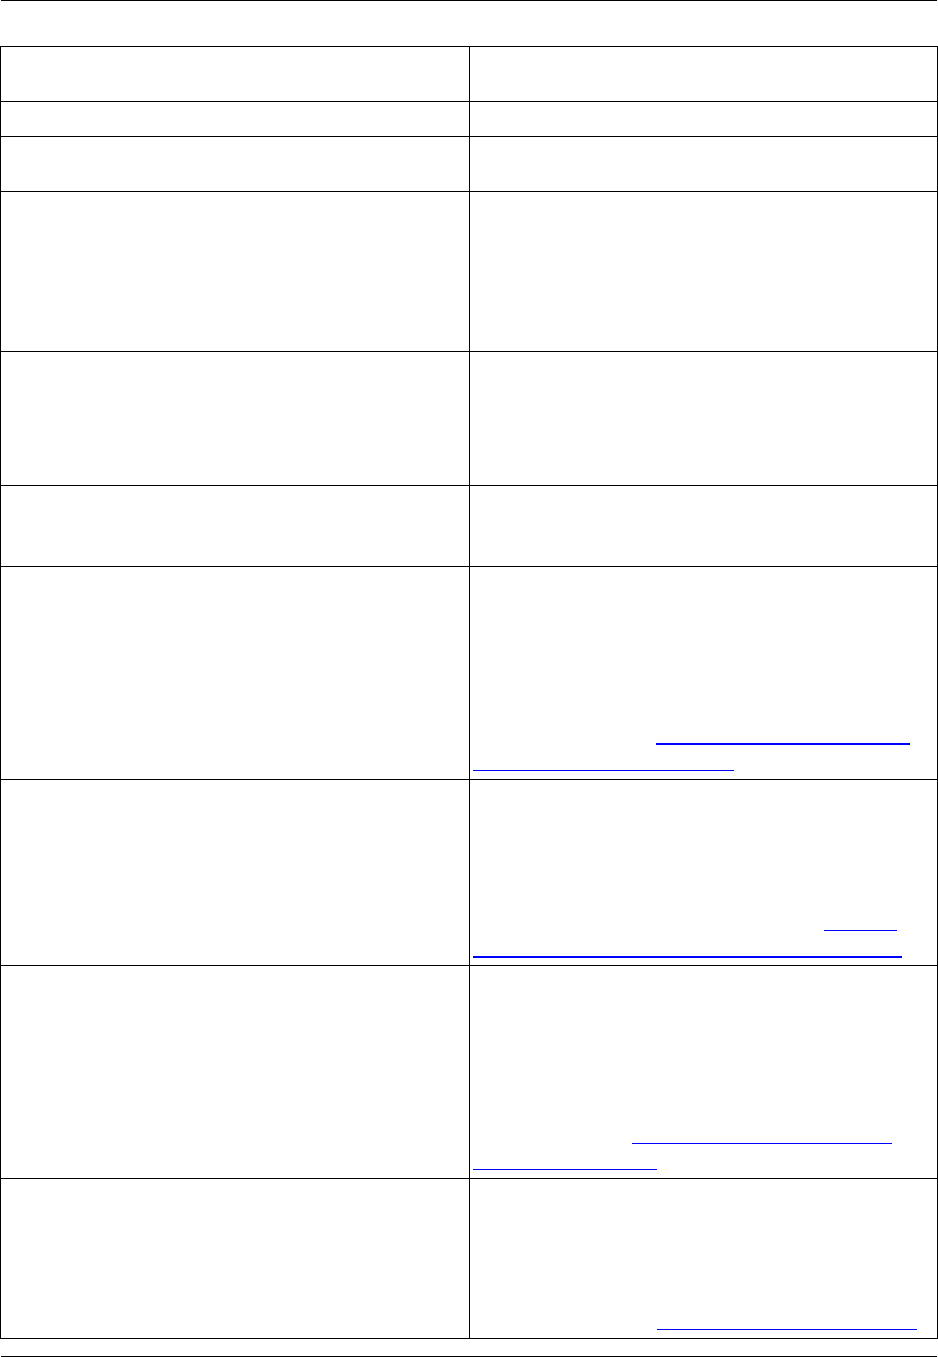
SlickEdit Regular Expression Definition
cept uppercase letters.
[^char-set]Same as [~char-set]above.
[char-set1 - [char-set2]] Character set subtraction. Matches all characters in
char-set1 except the characters in char-set2.
For example, [a-z-[qw]] matches all English lower-
case letters except qand w.[\p{L}-[qw]] matches
all Unicode lowercase letters except qand w.
[char-set1 & [char-set2]] Character set intersection. Matches all characters in
char-set1 that are also in char-set2. For ex-
ample, [\x{0}-\x{7f}&[\p{L}]] matches all letters
between 0 and 127.
\x{hhhh}Matches up to 31-bit Unicode hexadecimal charac-
ter specified by hhhh.
\p{UnicodeCategorySpec](Only valid in character set) Matches characters in
UnicodeCategorySpec. Where UnicodeCat-
egorySpec uses the standard general categories
specified by the Unicode consortium. For example,
[\p{L}] matches all letters. [\p{Lu}] matches all up-
percase letters. See Unicode Category Specifica-
tions for Regular Expressions.
\P{UnicodeCategorySpec](Only valid in character set) Matches characters not
in UnicodeCategorySpec. For example, [\P{L}]
matches all characters that are not letters. This is
equivalent to [^\p{L}].[\P{Lu}] matches all charac-
ters that are not uppercase letters. See Unicode
Category Specifications for Regular Expressions.
\p{UnicodeIsBlockSpec](Only valid in character set) Matches characters in
UnicodeIsBlockSpec. Where UnicodeIsB-
lockSpec one of the standard character blocks
specified by the Unicode consortium. For example,
[\p{isGreek}] matches Unicode characters in the
Greek block. See Unicode Character Blocks for
Regular Expressions.
\P{UnicodeIsBlockSpec](Only valid in character set) Matches characters not
in UnicodeIsBlockSpec. For example,
[\P{isGreek}] matches all characters that are not in
the Unicode Greek block. This is equivalent to
[^\p{isGreek}]. See Unicode Character Blocks for
SlickEdit®Regular Expressions
528

SlickEdit Regular Expression Definition
Regular Expressions.
\xhh Matches hexadecimal character hh where
0<=hh<=0xff.
\ddd Matches decimal character ddd where
0<=ddd<=255.
\gdDefines a back reference to tagged expression
number d. For example, {abc}def\g0 matches the
string abcdefabc. If the tagged expression has not
been set, the search fails.
\c Specifies cursor position if match is found. If the ex-
pression xyz\c is found, the cursor is placed after
the z.
\n Matches newline character sequence. Useful for
matching multi-line search strings. What this
matches depends on whether the buffer is a DOS
(ASCII 13,10 or just ASCII 10), UNIX (ASCII 10),
Macintosh (ASCII 13), or user-defined ASCII file.
Use \d10 if you want to match an ASCII 10 charac-
ter.
\r Matches carriage return.
\t Matches tab character.
\b Matches backspace character.
\f Matches form feed character.
\od Matches any 2-byte DBCS character. This escape
is only valid in a match set ([...\od...]). [^\od]
matches any single byte character excluding end-
of-line characters. When used to search Unicode
text, this escape does nothing.
\om Turns on multi-line matching. This enhances the
match character set, or match any character primit-
ives to support matching end-of-line characters. For
example, \om?# matches the rest of the buffer.
Note: Test the regular expression on a very small
file before using it on a large file. This option may
cause the editor to use a lot of memory.
SlickEdit®Regular Expressions
529

SlickEdit Regular Expression Definition
\ol Turns off multi-line matching (default). You can still
use \n to create regular expressions which match
one or more lines. However, expressions like ?# will
not match multiple lines. This is much safer and
usually faster than using the \om option.
\char Declares character after slash to be literal. For ex-
ample, \: represents the colon character.
:char Matches predefined expression corresponding to
char. The predefined expressions are:
•:a [A-Za-z0-9] - Matches an alphanumeric char-
acter.
•:b ([ \t]#\) - Matches blanks - note that :b is not
like the Perl/.NET \s.
•:c [A-Za-z] - Matches an alphabetic character.
•:d [0-9] - Matches a digit.
•:f ([~\[\]\:\\/<>|=+;, \t"’]#) - Windows: Matches a
file name part.
•:f ([~/ \t"’]#) - UNIX: Matches a file name part.
•:h ([0-9A-Fa-f]#) - Matches a hex number.
•:i ([0-9]#) - Matches an integer.
•:n (([0-9]#(.[0-9]#|)|.[0-9]#)([Ee](\+|-|)[0-9]#|)) -
Matches a floating number.
•:p (([A-Za-z]\:|)(\\|/|)(:f(\\|/))@:f) - Windows:
Matches a path.
•:p ((/|)(:f(/))@:f) - UNIX: Matches a path.
•:q (\"[~\"]@\"|'[~']@') - Matches a quoted string.
•:v ([A-Za-z_$][A-Za-z0-9_$]@) - Matches a C
variable.
•:w ([A-Za-z]#) - Matches a word.
The precedence of operators, from highest to lowest, is as follows:
SlickEdit®Regular Expressions
530

•+,#,*,@,:,:* (These operators have the same precedence.)
• concatenation
•|
SlickEdit®Regular Expression Examples
The table below shows examples of SlickEdit regular expressions.
Table 11.15. SlickEdit Regular Expression Examples
Sample SlickEdit Regular Expression Description
^defproc Matches lines that begin with the word defproc.
^definit$ Matches lines that only contain the word definit.
^\:name Matches lines that begin with the string :name. No-
tice that the backslash must prefix the colon charac-
ter (:).
[\t ] Matches tab and space characters.
[\9\32] Matches tab and space characters.
[\x9\x20] Matches tab and space characters.
p?t Matches any three-letter string starting with the let-
ter pand ending with the letter t. Two possible
matches are pot and pat.
s?*t Matches the letter sfollowed by any number of
characters followed by the nearest letter t. Two pos-
sible matches are seat and st.
for|while Matches the strings for or while.
^:p Matches lines beginning with a file name.
xy+z Matches xfollowed by one or more occurrences of
yfollowed by z.
Brief Regular Expressions
Brief Regular Expressions
531

Brief regular expressions are defined in the following table.
Table 11.16. Brief Regular Expressions
Brief Regular Expression Definition
%Matches beginning of line.
<Matches beginning of line.
$Matches end of line.
>Matches end of line.
?Matches any character except newline.
*Minimal match of zero or more of any character ex-
cept newline. This is the same as ?@.
X+ Minimal match of one or more occurrences of X.
See Minimal versus Maximal Matching for more in-
formation.
X\:* Maximal match of zero or more of any character ex-
cept newline. This is the same as ?\:@.
X\:@ Maximal match of zero or more occurrences of X.
X\:+ Maximal match of one or more occurrences of X.
X\:n1 Matches exactly n1 occurrences of X. Use {} to
avoid ambiguous expressions. For example, a:9{}1
searches for nine instances of the letter afollowed
bya1.
X\:n1,Maximal match of at least n1 occurrences of X.
X\:,n2 Maximal match of at least zero occurrences but not
more than n2 occurrences of X.
X\:n1,n2 Maximal match of at least n1 occurrences but not
more than n2 occurrences of X.
X\:n1?Match exactly n1 occurrences of X.
X\:n1,? Minimal match of at least n1 occurrences of X.
Brief Regular Expressions
532

Brief Regular Expression Definition
X\:,n2?Minimal match of at least zero occurrences but not
more than n2 occurrences of X.
X\:n1,n2?Minimal match of at least n1 occurrences but not
more than n2 occurrences of X.
\(X\) Matches sub-expression X but does not define a
tagged expression.
{X} Matches sub-expression X and specifies a new
tagged expression. See Using Tagged Search Ex-
pressions for more information.
{@dX} Matches sub-expression X and specifies to use
tagged expression number dwhere 0<=d<=9. No
more tagged expressions are defined by the sub-
expression syntax {X} once this sub-expression
syntax is used. This is the best way to make sure
you have enough tagged expressions.
X|Y Matches X or Y.
[char-set]Matches any one of the characters specified by
char-set. A dash (-) character may be used to
specify ranges. The expression [A-Z] matches any
uppercase letter. Backslash (\) can be used inside
the square brackets to define literal characters or
define ASCII characters. For example, \- specifies a
literal dash character. The expression [\0-\27]
matches ASCII character codes 0..27. The expres-
sion []] matches a right bracket. In SlickEdit®regu-
lar expressions, [] matches no characters. In both
syntaxes, the expression [\]] matches a right brack-
et.
[~char-set]Matches any character not specified by char-set.
A dash (-) character may be used to specify ranges.
The expression [~A-Z] matches all characters ex-
cept uppercase letters. The expression [~] matches
any character except newline.
[char-set1 - [char-set2]] Character set subtraction. Matches all characters in
char-set1 except the characters in char-set2.
For example, [a-z-[qw]] matches all English lower-
case letters except qand w.[\p{L}-[qw]] matches
Brief Regular Expressions
533
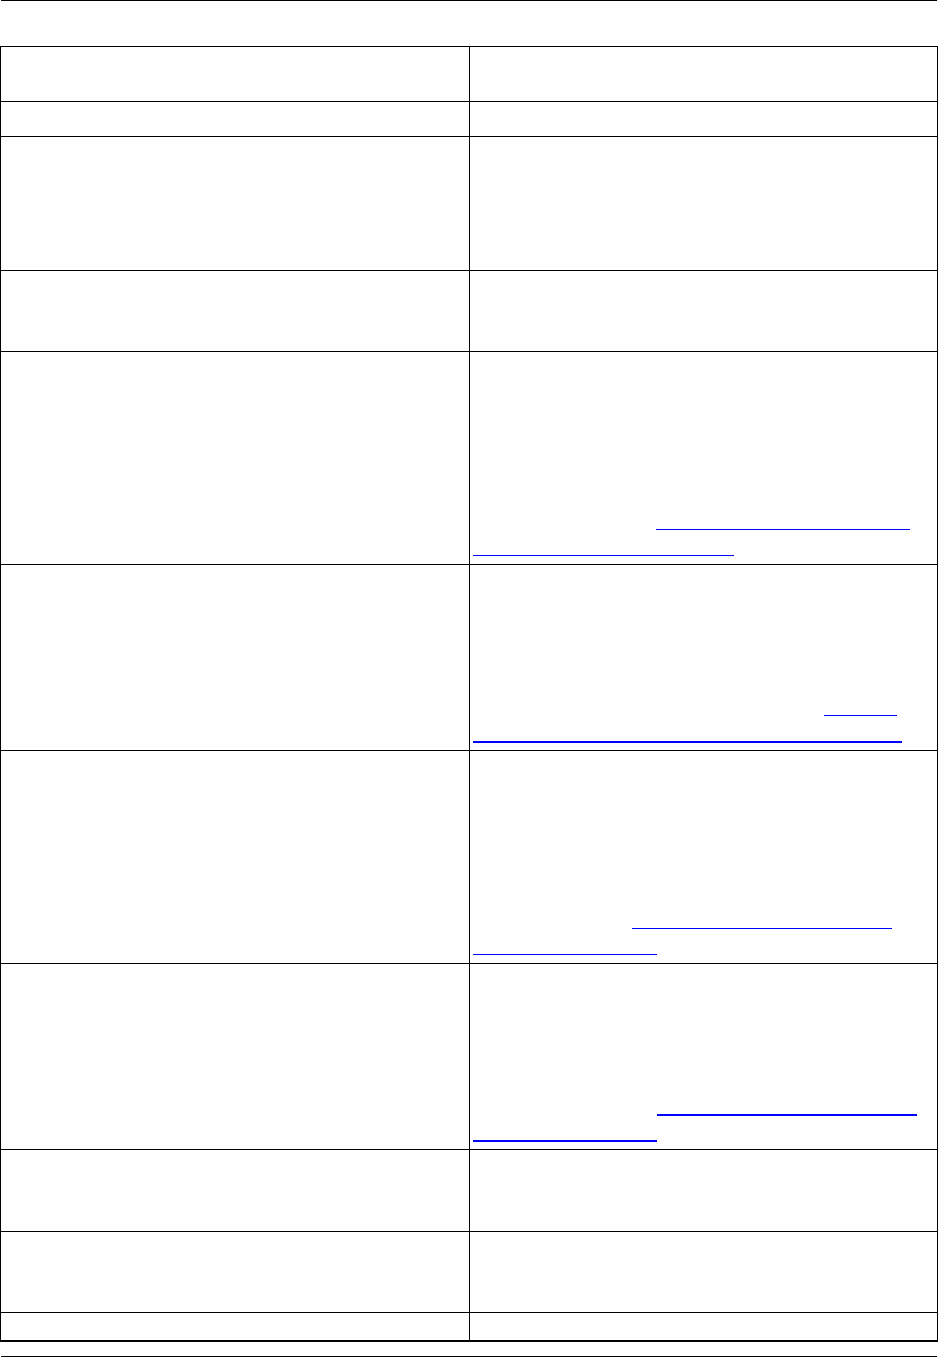
Brief Regular Expression Definition
all Unicode lowercase letters except qand w.
[char-set1 & [char-set2]] Character set intersection. Matches all characters in
char-set1 that are also in char-set2. For ex-
ample, [\x{0}-\x{7f}&[\p{L}]] matches all letters
between 0 and 127.
\x{hhhh}Matches up to 31-bit Unicode hexadecimal charac-
ter specified by hhhh.
\p{UnicodeCategorySpec](Only valid in character set) Matches characters in
UnicodeCategorySpec. Where UnicodeCat-
egorySpec uses the standard general categories
specified by the Unicode consortium. For example,
[\p{L}] matches all letters. [\p{Lu}] matches all up-
percase letters. See Unicode Category Specifica-
tions for Regular Expressions.
\P{UnicodeCategorySpec](Only valid in character set) Matches characters not
in UnicodeCategorySpec. For example, [\P{L}]
matches all characters that are not letters. This is
equivalent to [^\p{L}].[\P{Lu}] matches all charac-
ters that are not uppercase letters. See Unicode
Category Specifications for Regular Expressions.
\p{UnicodeIsBlockSpec](Only valid in character set) Matches characters in
UnicodeIsBlockSpec. Where UnicodeIsB-
lockSpec one of the standard character blocks
specified by the Unicode consortium. For example,
[\p{isGreek}] matches Unicode characters in the
Greek block. See Unicode Character Blocks for
Regular Expressions.
\P{UnicodeIsBlockSpec](Only valid in character set) Matches characters not
in UnicodeIsBlockSpec. For example,
[\P{isGreek}] matches all characters that are not in
the Unicode Greek block. This is equivalent to
[^\p{isGreek}]. See Unicode Character Blocks for
Regular Expressions.
\xhh Matches hexadecimal character hh where
0<=hh<=0xff.
\dddd Matches decimal character ddd where
0<=ddd<=255.
Brief Regular Expressions
534

Brief Regular Expression Definition
\dDefines a back reference to tagged expression
number d. For example, {abc}def\0 matches the
string abcdefabc. If the tagged expression has not
been set, the search fails.
\c Specifies cursor position if match is found. If the ex-
pression xyz\c is found, the cursor is placed after
the z.
\n Matches newline character sequence. Useful for
matching multi-line search strings. What this
matches depends on whether the buffer is a DOS
(ASCII 13,10 or just ASCII 10), UNIX (ASCII 10),
Macintosh (ASCII 13), or user defined ASCII file.
Use \d10 if you want to match a 10 character.
\r Matches carriage return.
\t Matches tab character.
\b Matches backspace character.
\f Matches form feed character.
\od Matches any 2-byte DBCS character. This escape
is only valid in a match set ([...\od...]). [~\od]
matches any single byte character excluding end-
of-line characters. When used to search Unicode
text, this escape does nothing.
\om Turns on multi-line matching. This enhances the
match character set, or match any character primit-
ives to support matching end-of-line characters. For
example, \om?\@ matches the rest of the buffer.
\ol Turns off multi-line matching (default). You can still
use \n to create regular expressions which match
one or more lines. However, expressions like ?\@
will not match multiple lines. This is much safer and
usually faster than using the \om option.
\char Declares character after slash to be literal. For ex-
ample, \* represents the asterisk (*) character.
\:char Matches predefined expression corresponding to
Brief Regular Expressions
535

Brief Regular Expression Definition
char. The predefined expressions are:
•\:a [A-Za-z0-9 - Matches an alphanumeric char-
acter.
•\:b\([ \t]#\) - Matches blanks.
•\:c [A-Za-z] - Matches an alphabetic character.
•\:d [0-9] - Matches a digit.
•\:f \([~\[\]\:\\/<>|=+;, \t"’]#\) - Matches a file name
part.
•\:f \([~/ \t"’]#\) - UNIX: Matches a file name part.
•\:h\([0-9A-Fa-f]#\) - Matches a hex number.
•\:i\([0-9]#\) - Matches an integer.
•\:n\([0-9]#\(.[0-9]#|\)|.[0-9]#\)\([Ee]\(\+|-|\)[0-9]#|\)
\) - Matches a floating number.
•\:p\(\([A-Za-z]\:|\)\(\\|/|\)\(:f\(\\|/\)\)@:f\) - Windows:
Matches a path.
•\:p\(\(/|\)\(:f\(/\)\)@:f\) - UNIX: Matches a path.
•\:q\(\"[~\"]@\"|'[~']@'\) - Matches a quoted string.
•\:v\ ([A-Za-z_$][A-Za-z0-9_$]@\) - Matches a C
variable.
•\:w\ ([A-Za-z]#\) - Matches a word.
Brief Regular Expression Examples
The table below shows example of Brief regular expressions.
Table 11.17. Brief Regular Expression Examples
Sample Brief Regular Expression Description
<defproc Matches lines that begin with the word defproc.
<definit> Matches lines that only contain the word definit.
<\*name Matches lines that begin with the string *name. No-
Brief Regular Expressions
536

Sample Brief Regular Expression Description
tice that the backslash must prefix the special char-
acter *.
[\t ] Matches tab and space characters.
[\d9\d32] Matches tab and space characters.
[\x9\x20] Matches tab and space characters.
p?t Matches any three-letter string starting with the let-
ter pand ending with the letter t. Two possible
matches are pot and pat.
s*t Matches the letter sfollowed by any number of
characters followed by the nearest letter t. Two pos-
sible matches are seat and st.
{for}|{while} Matches the strings for or while.
^\:p Matches lines beginning with a file name.
xy+z Matches xfollowed by one or more occurrences of
yfollowed by z.
Unicode Category Specifications for Regular Expressions
The Unicode consortium standard regular expression categories are supported. The syntax for specifying
categories is:
\p{MainCategoryLetter Subcategories}
The above syntax matches the categories specified. The following syntax matches all characters not in
the categories specified:
\P{MainCategoryLetter Subcategories}
The \p and \P notations can only be used inside a character set specification. MainCategoryLetter
can be L,M,N,P,S,Z,orC. The valid Subcategories depend on the MainCategoryLetter spe-
cified. If no Subcategories are specified, all are assumed. For example:
•[\p{L}] matches all Unicode letters.
•[\p{Lul}] matches all uppercase and lowercase letters.
•[\P{L}] matches all characters that are not letters.
Unicode Category Specifications
for Regular Expressions
537

The following table lists the valid subcategories for a specific main category. These character tables were
generated using the file UnicodeData-3.1.0.txt found on the Unicode Consortium Web site ht-
tp://unicode.org).
Table 11.18. Unicode SubCategories for Regular Expressions
Subcategory Description
Lu Letter, Uppercase
Ll Letter, Lowercase
Lt Letter, Titlecase
Lo Letter, Other
Mn Mark, Non-Spacing
Mc Mark, Spacing Combining
Me Mark, Enclosing
Nd Number, Decimal Digit
Nl Number, Letter
No Number, Other
Pc Punctuation, Connector
Pd Punctuation, Dash
Ps Punctuation, Open
Pe Punctuation, Close
Pi Punctuation, Initial quote (may behave like Ps or Pe
depending on usage)
Pf Punctuation, Final quote (may behave like Ps or Pe
depending on usage)
Po Punctuation, Other
Sm Symbol, Math
Unicode Category Specifications
for Regular Expressions
538

Subcategory Description
Sc Symbol, Currency
Sk Symbol, Modifier
So Symbol, Other
Zs Separator, Space
Zl Separator, Line
Zp Separator, Paragraph
Cc Other, Control
Cf Other, Format
Cs Other, Surrogate
Co Other, Private Use
Cn Other, Not Assigned (no characters in the file have
this property)
Unicode Character Blocks for Regular Expressions
The Unicode consortium standard regular expression block categories are supported. The syntax for spe-
cifying a character block is:
\p{IsBlockName}
The above syntax matches the characters in the block specified. The following syntax matches all charac-
ters not in the block specified:
\P{IsBlockName}
The \p and \P notations may only be used inside a character set specification. For example,
[\p{isBasicLatin}] matches all characters in the Greek block. [\P{isBasicLatin}] matches all characters
that are not in the Greek block.
The following is a list of the non-standard valid character block names. This list was generated from XML
standards found at the World Wide Web Consortium Web site (http://www.w3c.org).
•XMLNameStartChar - All characters that are valid for the start of an XML tag name.
Unicode Character Blocks for
Regular Expressions
539

•XMLNameChar - All characters that are valid in an XML tag name.
The following table lists the valid character block names. These character tables were generated using
the blocks.txt file found on the Unicode Consortium Web site (http://unicode.org).
Table 11.19. Unicode Character Blocks for Regular Expressions
Range Block Name
0000..007F BasicLatin
0080..00FF Latin-1Supplement
0100..017F LatinExtended-A
0180..024F LatinExtended-B
0250..02AF IPAExtensions
02B0..02FF SpacingModifierLetters
0300..036F CombiningDiacriticalMarks
0370..03FF Greek
0400..04FF Cyrillic
0530..058F Armenian
0590..05FF Hebrew
0600..06FF Arabic
0700..074F Syriac
0780..07BF Thaana
0900..097F Devanagari
0980..09FF Bengali
0A00..0A7F Gurmukhi
0A80..0AFF Gujarati
0B00..0B7F Oriya
Unicode Character Blocks for
Regular Expressions
540

Range Block Name
0B80..0BFF Tamil
0C00..0C7F Telugu
0C80..0CFF Kannada
0D00..0D7F Malayalam
0D80..0DFF Sinhala
0E00..0E7F Thai
0E80..0EFF Lao
0F00..0FFF Tibetan
1000..109F Myanmar
10A0..10FF Georgian
1100..11FF HangulJamo
1200..137F Ethiopic
13A0..13FF Cherokee
1400..167F UnifiedCanadianAboriginalSyllabics
1680..169F Ogham
16A0..16FF Runic
1780..17FF Khmer
1800..18AF Mongolian
1E00..1EFF LatinExtendedAdditional
1F00..1FFF GreekExtended
2000..206F GeneralPunctuation
2070..209F SuperscriptsandSubscripts
Unicode Character Blocks for
Regular Expressions
541

Range Block Name
20A0..20CF CurrencySymbols
20D0..20FF CombiningMarksforSymbols
2100..214F LetterlikeSymbols
2150..218F NumberForms
2190..21FF Arrows
2200..22FF MathematicalOperators
2300..23FF MiscellaneousTechnical
2400..243F ControlPictures
2440..245F OpticalCharacterRecognition
2460..24FF EnclosedAlphanumerics
2500..257F BoxDrawing
2580..259F BlockElements
25A0..25FF GeometricShapes
2600..26FF MiscellaneousSymbols
2700..27BF Dingbats
2800..28FF BraillePatterns
2E80..2EFF CJKRadicalsSupplement
2F00..2FDF KangxiRadicals
2FF0..2FFF IdeographicDescriptionCharacters
3000..303F CJKSymbolsandPunctuation
3040..309F Hiragana
30A0..30FF Katakana
Unicode Character Blocks for
Regular Expressions
542

Range Block Name
3100..312F Bopomofo
3130..318F HangulCompatibilityJamo
3190..319F Kanbun
31A0..31BF BopomofoExtended
3200..32FF EnclosedCJKLettersandMonths
3300..33FF CJKCompatibility
3400..4DB5 CJKUnifiedIdeographsExtensionA
4E00..9FFF CJKUnifiedIdeographs
A000..A48F YiSyllables
A490..A4CF YiRadicals
AC00..D7A3 HangulSyllables
D800..DB7F HighSurrogates
DB80..DBFF HighPrivateUseSurrogates
DC00..DFFF LowSurrogates
E000..F8FF PrivateUse
F900..FAFF CJKCompatibilityIdeographs
FB00..FB4F AlphabeticPresentationForms
FB50..FDFF ArabicPresentationForms-A
FE20..FE2F CombiningHalfMarks
FE30..FE4F CJKCompatibilityForms
FE50..FE6F SmallFormVariants
FE70..FEFE ArabicPresentationForms-B
Unicode Character Blocks for
Regular Expressions
543

Range Block Name
FEFF..FEFF Specials
FF00..FFEF HalfwidthandFullwidthForms
FFF0..FFFD Specials
10300..1032F OldItalic
10330..1034F Gothic
10400..1044F Deseret
1D000..1D0FF ByzantineMusicalSymbols
1D100..1D1FF MusicalSymbols
1D400..1D7FF MathematicalAlphanumericSymbols
20000..2A6D6 CJKUnifiedIdeographsExtensionB
2F800..2FA1F CJKCompatibilityIdeographsSupplement
E0000..E007F Tags
Unicode Character Blocks for
Regular Expressions
544


Code Quick | Think Slick®
SlickEdit Inc.
3000 Aerial Center Parkway, Suite 120
Morrisville, NC 27560
USA
1.919.473.0070
1.800.934.EDIT
1.919.473.0080 fax
info@slickedit.com
www.slickedit.com
SlickEdit
®Core v3.3 for Eclipse™
SlickEdit, Visual SlickEdit, Clipboard Inheritance, DIFFzilla, SmartPaste,
Context Tagging, Slick-C, and Code Quick | Think Slick are registered
trademarks of SlickEdit Inc. All other products or company names are
used for identification purposes only and may be trademarks of their
respective owners. Protected by U.S. Patent 5,710,926.
Copyright 1988-2008 SlickEdit Inc. All rights reserved.
SlickEdit®Core v3.3
for Eclipse™
08SLICK0011_CORE_upd 1/24/08 11:05 AM Page 1
