Smart Meter GM291 Glucose Meter with data transfer capability User Manual Manual Version 0330
Smart Meter Corporation Glucose Meter with data transfer capability Manual Version 0330
Manual-0331
Version 2 Date: 3.17.2016
iGlucose™ Blood Glucose Monitoring System
GM291 User Manual
Version 2 Date: 3.17.2016
iGlucose™ Blood Glucose Monitoring System User Manual
iGlucose™ is a trademark of Smart Meter Corporation
iGlucose Blood Glucose Monitoring System is manufactured by Bionime Corporation, No. 100, Sec. 2,
Daqing St., South Dist., Taichung City 40242, Taiwan (R.O.C)
Preface
Thank you for selecting the iGlucose Blood Glucose Monitoring System. This manual provides all the
information you need to operate this product for accurate test results. Please read this entire
manual before you start any testing.
For people living with diabetes, it is important to regularly monitor blood glucose levels to effectively
reduce complications from the disease. The easy-to-use iGlucose Blood Glucose Monitoring System
provides accurate, reliable test results. It can be connected to web portals by GSM technology to
help you better manage your diabetes.
The iGlucose Blood Glucose Monitoring System is intended to be used for the quantitative
measurement of glucose (sugar) in fresh capillary whole blood samples drawn from the fingertips.
The iGlucose Blood Glucose Monitoring System is intended to be used by a single person and should
not be shared.
The iGlucose Blood Glucose Monitoring System is intended for self-testing outside the body (in vitro
diagnostic use) by people with diabetes at home as an aid to monitor the effectiveness of diabetes
control. The iGlucose Blood Glucose Monitoring System should not be used for the diagnosis of, or
screening for diabetes or for neonatal use.
The iGlucose Blood Glucose Test Strips are for use with the iGlucose Blood Glucose Meter to
quantitatively measure glucose (sugar) in fresh capillary whole blood samples drawn from the
fingertips.
The iGlucose Blood Glucose Monitoring System is manufactured and supported by Bionime
Corporation. If you have any questions or concerns, please contact the iGlucose Diabetes Customer
Support Center toll free at 1-555-555-5555 (Monday through Friday 8:00 AM to 5:00 PM PST).. We
will make every effort to assist you.
The iGlucose Blood Glucose Monitoring System is a personal blood glucose monitoring system to be
used for self-testing only. The glucose meter and lancing device are for single patient use. Do not use
on multiple patients. Do not share meter or lancing device with anyone including other family
members.
A healthcare professional should be contacted when Customer Service is not available. Please
forward your warranty card to iGlucose Diabetes Customer Support Center.
iGlucose Diabetes Customer Support Center
12345 Main Street
Any town AA, 12345

Caution
- Before
all of th
e
- Please
- The iG
l
strips s
h
results.
- The iG
l
Blood G
to be e
q
- The iG
l
screen f
- If the i
G
temper
a
- Follow
- The iG
l
meter d
Support
- The iG
l
in the c
r
- The mi
0.75µL:
Blood s
a
Blood s
a
Er4 rea
d
test stri
p
Import
a
- The iG
l
share t
h
- All par
t
even af
t
and Disi
using the i
G
e
instructio
n
perform th
e
l
ucose Bloo
d
h
ould not be
l
ucose Bloo
d
lucose test
r
q
uivalent to
t
l
ucose Bloo
d
or or diagn
o
G
lucose Blo
o
a
ture, pleas
e
all environ
m
l
ucose Bloo
d
isplay show
s
Center. Us
e
l
ucose Bloo
d
r
itically ill.
i
nimum blo
o
a
mple size a
b
a
mple size b
e
d
ing will be
d
p
.
a
nt Safety N
o
l
ucose Bloo
d
h
em with an
y
t
s of the kit
a
t
er followin
g
nfecting Pro
G
lucose Bloo
d
n
s and cond
u
e
quality con
d
Glucose M
e
used under
d
Glucose M
o
r
esults using
t
hat of plas
m
d
Glucose M
o
o
se diabetes
o
d Glucose
m
e
wait 45 mi
n
m
ental prote
d
Glucose m
e
s
“mmol/L”
d
e
of the wro
n
d
Glucose M
o
o
d sample si
z
b
ove 3.0µL
m
e
low 0.75µL
d
isplayed if t
h
o
tes:
d
Glucose m
e
y
one includi
n
a
re consider
g
the cleanin
g
cedures" on
d
Glucose
M
u
ct all of the
t
rol test reg
u
e
ter can be
u
any circums
t
o
nitoring Sy
s
fresh capill
a
m
a samples..
o
nitoring Sy
s
mellitus.
m
eter and T
e
n
utes befor
e
ction regula
t
e
ter will be s
d
uring settin
n
g unit of m
e
o
nitoring Sy
s
z
e to test usi
m
ight conta
m
may cause
a
h
e sample si
e
ter and iGl
u
n
g other fa
m
ed biohazar
d
g
and disinf
e
page XX.
M
onitoring S
y
tests includ
i
u
larly to ma
k
u
sed with iG
tances. The
s
tem is inte
n
a
ry whole bl
o
s
tem is inte
n
e
st Strips ar
e
e
measurem
e
t
ions when
d
s
et as mg/dL
g or test, pl
e
e
asurement
s
tem is not f
o
ng the iGluc
o
m
inate the t
e
a
n inaccurat
e
i
ze is too sm
u
cose Lancin
g
m
ily member
s
d
ous and ca
n
e
cting proce
d
y
stem to tes
t
i
ng the quali
k
e sure the
t
l
ucose Bloo
d
use of othe
r
n
ded for in v
i
o
od samples
n
ded for self
-
e
exposed to
e
nt.
d
isposing of
by default
w
e
ase contact
may cause i
n
o
r use on n
e
o
se Blood G
l
e
st strip por
t
e
result or
m
a
ll. In this c
a
g
Device are
s
.
n
potentiall
y
d
ures. Pleas
e
t
your blood
t
y control t
e
est results a
d
Glucose Te
s
test strips
m
tro diagnos
t
from the fi
n
-
testing. It s
h
a substanti
a
batteries.
w
hen sold in
iGlucose Di
a
n
correct tre
a
onates and
s
l
ucose Moni
t
t
and the me
m
ay prevent
a
se, repeat t
h
for single p
a
y
transmit in
f
e
refer to th
e
glucose, ple
e
st (Refer to
a
re accurate.
st Strips. Ot
h
m
ay give ina
c
t
ic use only.
T
n
gertip are c
a
h
ould not b
e
a
l change in
United Stat
e
a
betes Cust
o
a
tment.
should not
b
toring Syste
m
e
ter.
a
meter rea
d
h
e test with
a
tient use.
D
f
ectious dis
e
e
section "Cl
ase read
page XX).
h
er test
c
curate
T
he
a
librated
used to
e
s. If
o
mer
b
e used
m
is
d
ing. An
a new
D
o not
ases,
e
aning

- Users should wash their hands thoroughly with soap and water before and after handling the
meter, lancing device, or test strips.
Please see the following references for further information.
1."FDA Public Health Notification: Use of Fingerstick Devices on More than One Person Poses Risk for
Transmitting Bloodborne Pathogens: Initial Communication" (2010)
http://www.fda.gov/MedicalDevices/Safety/AlertsandNotices/ucm224025.htm
2."CDC Clinical Reminder: Use of Fingerstick Devices on More than One Person Poses Risk or
Transmitting Bloodborne Pathogens" (2010)
http://www.cdc.gov/injectionsafety/Fingerstick-DevicesBGM.html
Limitations
- Blood glucose meter readings may be significantly lower than "true glucose levels" in a
hyperglycemic- hyperosmolar state, with or without ketosis.
- Caution is advised when glucose values are below 50 mg/dL or above 250 mg/dL. Consult a
Physician as soon as possible, if values in this range are obtained.
- Healthcare professionals should evaluate their patients' technique regarding the use of the
iGlucose Blood Glucose Monitoring System regularly. To accomplish this, it is recommended that
blood glucose monitoring results be compared with a concurrently obtained laboratory
measurement on the same blood sample. A proven clinical laboratory method employing hexokinase
or glucose oxidase should be used as the comparative method.
- Hands and fingers contaminated with sugar from foods or beverages may cause falsely elevated
results.
- The results of blood glucose measurements are different for measurements with whole blood and
plasma.
- Storage of strips near bleach as well as bleach containing products will affect the results of the
iGlucose Blood Glucose Test Strips.
- Inaccurate test results may be obtained at altitudes greater than 10,000 feet (3,048 meters) above
sea level.
- Hematocrits below 20% may cause higher results. Hematocrits above 60% may cause lower results.
- High concentrations of Uric acid ≥10 mg/dL, Cholesterol ≥600 mg/dL, and Ascorbic acid (Vitamin C)
≥5 mg/dL may interfere with the glucose test causing inaccurate test results.
- Do not perform the blood glucose test at temperatures below 10°C (50°F) or above 40°C (104°F),
nor below 10% or above 90% relative humidity.
- iGlucose Blood Glucose Test Strips are designed for use with capillary whole blood samples. Do not
use serum or plasma samples.
- Not for screening or diagnosis of diabetes mellitus.
- Not for use on critically ill patients, patients in shock, dehydrated patients or hyper-osmolar
patients.
- Not for neonatal use.

Table of Contents
PAGE
About the Blood Glucose Monitoring System 2
The iGlucose Blood Glucose System 7
The iGlucose Blood Glucose Meter 8
The iGlucose Test strip 9
Meter Activation and Battery Charging 9
Setting Up Your Meter - Setting the Date, Time 10
Turning On/Off the meter 11
Handling the Blood Glucose Test Strip 11
Getting Ready for Testing 12
Performing a Blood Glucose Test 14
View Appearance of Blood on the Test Strip 16
Understanding Test Results and Messages 16
Setting Meal Markers 17
About Quality Control 18
Performing a quality Control Test 19
Understanding Control Test Results 21
Recalling Test Results 21
Obtaining readings Averages 22
Obtaining Readings History 22
Caring for Your Meter 23
Cleaning and Disinfecting Procedures 23
Error Messages and Troubleshooting 25
FEDERAL COMMUNICATIONS COMMISION (FCC) STATEMENT 27
Specifications 28
Warranty 29
Customer Service 30
Expected Blood Glucose Values Without Diabetes 30
Component Manufacturer Information 30
Log Book 31
Warranty Card 32
Emergency Card 33
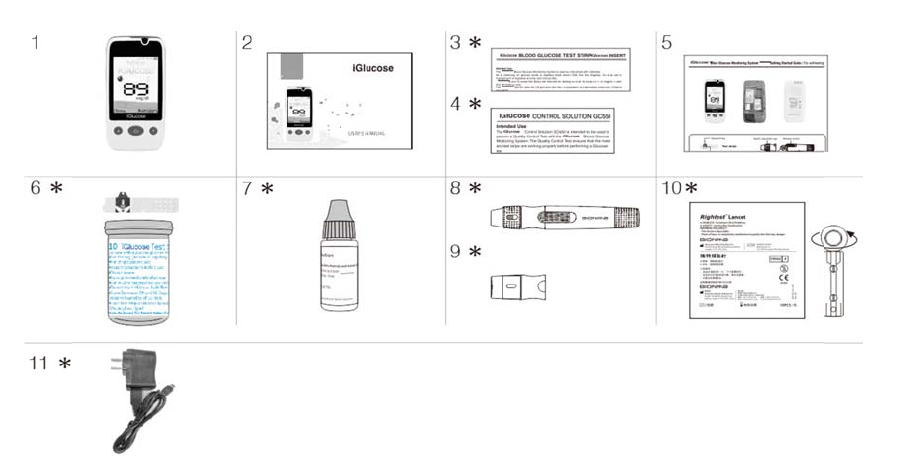
The iGl
u
Your iGl
learn its
Below a
1. iGlu
2. Use
3. iGlu
4. Rig
h
5. Get
t
6. iGlu
7. Lev
e
(Le
v
Glu
c
8. iGlu
9. Cle
a
10. Dis
p
11.Met
e
(* Diffe
r
(By the
n
AC100-
2
(IEC62
1
lon bat
t
u
cose Blood
ucose Blood
name and
h
re the items
cose Blood
G
r's Manual (
i
cose Blood
G
h
test® Contr
o
t
ing Started
cose Blood
G
e
l 2 of Right
e
v
el 2 and Lev
c
ose Monito
cose Lancin
g
a
r Cap*
p
osable Steri
e
r charger a
n
r
ent packag
e
n
eed to use
2
40V, 50 / 6
0
1
33 certifie
d
t
ery of lithiu
Glucose M
o
Glucose M
o
h
ow it is use
d
included in
G
lucose met
i
ncludes Log
G
lucose Tes
t
o
l Solution
G
Guide*
G
lucose Tes
t
e
st Control S
el 4 of Right
ring System
g
Device*
le Lancets (
1
n
d Meter ca
b
e
s have diffe
r
the product
s
0
Hz 0.2A, o
u
d
by the ne
e
m)
o
nitoring Sys
o
nitoring Sys
d
.
your iGluco
s
er (with a Li
Book, Warr
a
t
Strip Packa
g
G
C550 Packa
g
t
strips (10/2
olution GC5
5
e
st Control
S
but must b
e
1
0 pcs)*
b
le (Input:
D
r
ent bundle
d
s
pecification
u
tput DC5V,
e
d to use t
h
s
tem
s
tem consist
s
s
e Blood Glu
rechargeabl
a
nty Card, E
m
g
e Insert*
g
e Insert*
2
5 pcs)*
5
0*
S
olution GC
5
e
purchased
s
D
V5V, 0.5A ;
d
items. So
m
n
s for the inp
u
0.5A of cha
r
h
e product,
s
of several i
t
cose Monit
o
e battery in
s
m
ergency C
a
5
50 are avail
a
s
eparately.)
O
utput:DC5
V
m
e of packag
e
u
t and auth
e
r
ging transfo
r
specificati
o
t
ems. Pleas
e
o
ring System
s
talled)
a
rd)*
a
ble for the
V
, 0,5A)
e
s might no
t
e
ntication iec
6
r
mer )
o
ns for DC3
e
identify ea
c
:
iGlucose Bl
o
t
include * it
e
c
60950-1
3
.7V, 1000
m
c
h item,
o
od
e
ms)
m
Ah Li-
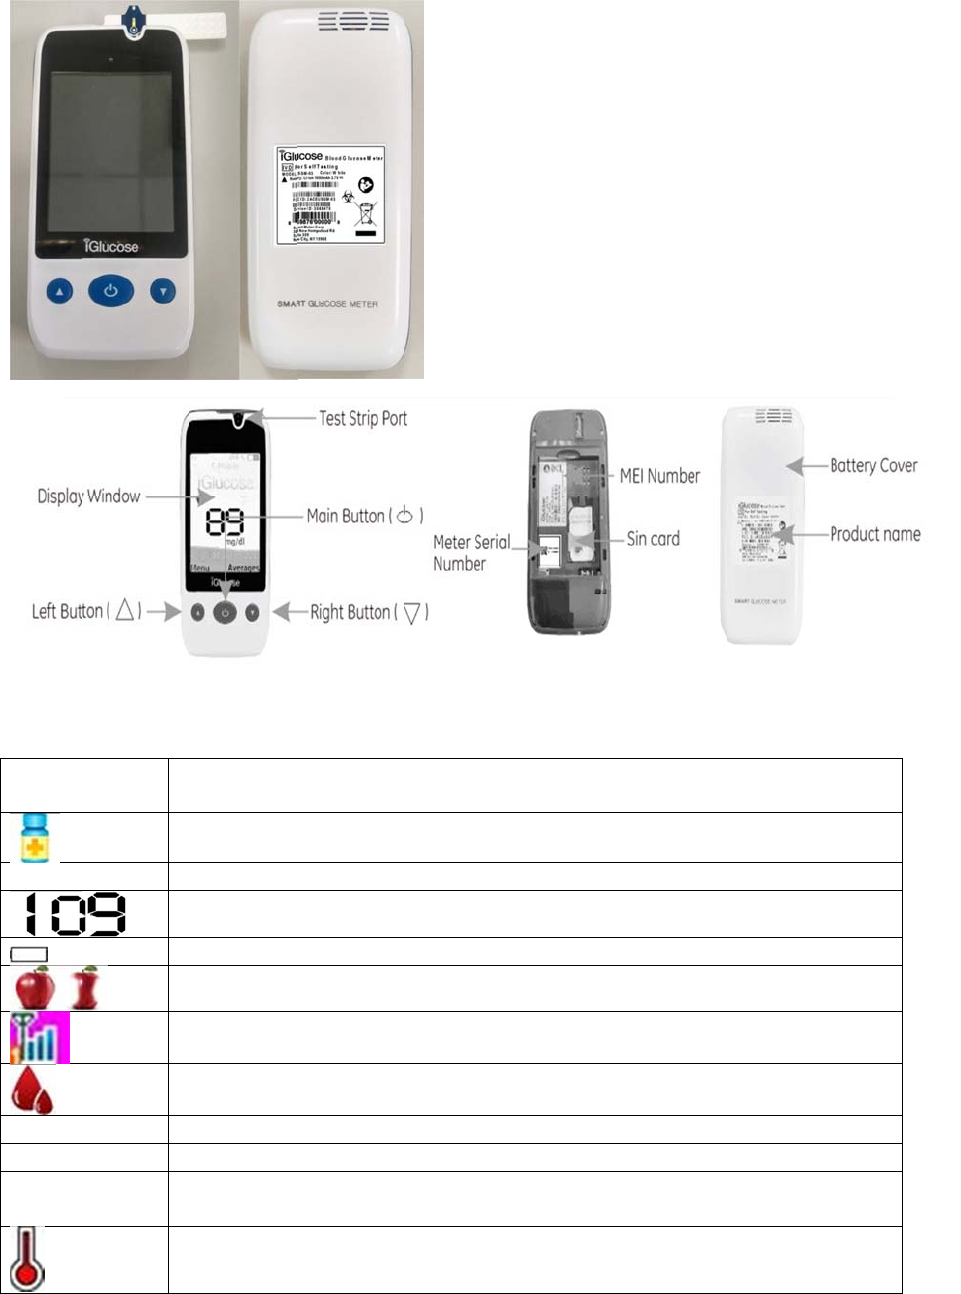
The iGl
u
The iGl
u
Spelled
o
display
mg/dL
“Strip I
n
“Er # (N
u
Spelled
o
display
u
cose Blood
u
cose Blood
out on
A
I
n
U
T
W
I
n
I
n
I
n
n
serted”
A
umber)”
A
out on
C
W
Glucose Me
Glucose Me
A
verage resu
n
dicates a c
o
U
nit of test r
e
T
est result
W
arns when
n
dicates a m
n
dicates tha
t
n
dicates wh
e
A
ppears afte
r
A
ppears whe
C
urrent date
W
arns when
ter
ter Icons
lt
o
ntrol soluti
o
e
sult
t
he batterie
s
eal marker
w
t
the GSM is
e
n to apply t
r
you insert
t
n an error o
c
and time
t
he operati
o
o
n test resul
t
s are low or
w
ith test res
u
turned on
he blood sa
m
t
est strip int
o
c
curs
o
nal temper
a
t
must be rec
u
lts
m
ple
o
meter
a
ture limit is
h
arged
exceeded d
u
uring testin
g
g
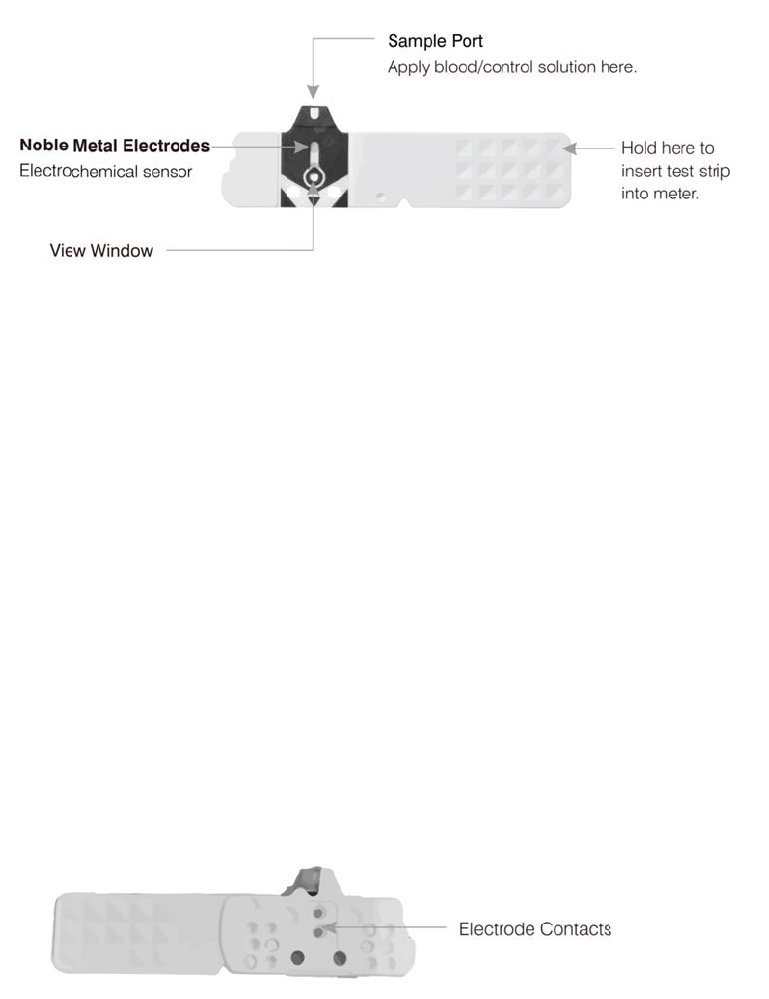
The iGl
u
The iGl
u
Rightes
t
incorre
c
The iGl
u
PRECA
U
- Close
t
- Do no
t
- Do no
t
- When
y
Discard
- Store t
relative
- If the i
G
wait 45
- For de
t
-The us
e
Meter
A
Your iGl
charged
the mai
n
Connec
t
u
cose Blood
u
cose Blood
G
t
® Control S
o
c
t results.
u
cose Blood
U
TION
t
he iGlucose
t
reuse iGluc
o
t
use expire
d
y
ou open a
n
the vial of t
e
t
he iGlucose
humidity. D
o
G
lucose Me
t
minutes bef
t
ailed infor
m
e
of other te
s
A
ctivation a
n
ucose Blood
this batter
y
n
button to
a
t
the chargin
Glucose Te
s
G
lucose me
t
o
lution GC5
5
Glucose Te
s
Blood Gluc
o
o
se Blood G
l
d
Blood Gluc
o
n
ew vial of i
G
e
st strips aft
e
Blood Gluc
o
o
not expos
e
t
er and test
S
ore measur
e
m
ation, plea
s
s
t strips ma
y
n
d Battery C
h
Glucose m
e
y
will provid
e
a
ctivate you
r
g adapter a
n
t Strip
t
er can only
b
0. The use
o
t Strip
o
se Test Stri
p
l
ucose Test
S
o
se Test Stri
p
G
lucose Blo
o
e
r 3 months
o
se Test Stri
p
e
to direct s
u
S
trips are ex
e
ment.
s
e refer to th
y
cause strip
h
arge
e
ter comes
w
e
power to p
e
r
meter or i
n
n
d the cable
.
b
e used wit
h
o
f other test
p
vial immed
S
trips
p
s.
o
d Glucose T
from openi
n
p
s, between
u
nlight or he
posed to a s
h
e iGlucose
B
error. Pleas
e
w
ith an insta
l
e
rform appr
n
sert a strip.
.
h
the iGluco
s
strips or co
n
iately after
r
est Strips, r
e
n
g.
39-86°F (or
4
at.
ubstantial c
h
B
lood Glucos
e
refer to pa
led Li recha
r
oximately 5
0
s
e Blood Glu
c
trol solutio
n
r
emoving a t
e
e
cord the da
t
4
-30°C) and
i
h
ange in te
m
e Test Strip,
ge XX for tr
o
r
geable batt
e
0
0 tests und
e
c
ose Test St
r
n
s can lead t
o
est strip.
t
e on the vi
a
in a location
m
perature, p
Package Ins
o
ubleshooti
n
e
ry. When f
u
e
r normal u
s
r
ips and
o
a
l.
10-90%
l
ease
ert.
n
g.
u
lly
s
e. Press
Insert the battery
1. Take the battery out of the plastic bag.
2. Open the back cover of the device by inserting your thumbnail into the small groove
on the right-hand side near the bottom of the back cover and lifting up the cover.
3. Remove the old battery
4. Install a new battery inside the battery compartment so that the small metal
contacts on the bottom of the battery touch the small metal pins in the battery
compartment.
5. Replace the back cover of the device.
Charge the battery
1. Connect the Meter Charger to its adapter cable
2. Plug the pin into the port at the bottom of unit
3. Plug the Charger into a power outlet. When the unit begins charging, the charging
light illuminates and a charging battery icon flashes on the screen for a short while.
Charging takes between 2-3 hours to complete.
4. When charging is complete, the battery icon on the device screen appears solid
green.
5. Unplug the adapter from the socket.
CAUTION
- Please follow the local regulation to properly recycle rechargeable battery.
- Risk of explosion if battery is replaced by an incorrect type.
Setting Up Your Meter - Setting the Date, Time.
Synchronizing the date and time
To synchronize the date and time manually:
1. Press the “up” (Menu) button on the device. The Menu appears.
2. Select the “Date and Time” option. The “Date and Time” menu appears.
3. Select the “Synch Time” option. A confirmation message appears after a few seconds.
Setting the Time and Date Manually
To set the time and date manually:
1. Press the “up” (Menu) button on the device. The Menu appears.
2. Select the “Date and time” option. The “Date and time” menu appears.
3. Select the “Set Date” option. The year appears. Use the up or down buttons to change
the year as needed. Press the “home” button to move on to the month.
4. Press the up or down buttons to change the month as needed. Press the “home”
button to move to the day.
5. Press the up or down buttons to change the day as needed. Press the “home” button
finish and return to the “Date and time” menu.
6. To exit the menu, press the up or down button to scroll to the “Back” option. Select
the “Back” option to exit the menu.

Set
t
To sele
c
Tur
n
Handlin
g
Insertin
g
1.
2.
3.
t
ing the Dat
e
c
t your form
a
1. Press
2. Selec
t
3. Selec
t
dat
e
4. Selec
t
tim
e
5. To ex
the
n
ing On / O
f
1. How
t
Press th
2. Man
u
To pow
e
sec
o
3. Auto
The iGl
u
but
t
g the iGluc
o
g
the iGluco
s
Hold the Bl
o
window
Put your fo
r
Insert the i
G
e
or Time fo
r
a
t for date o
the “up” (
M
t
the “Date
a
t
the “Date
F
e
format. Pr
e
t
the “Time
F
e
format. Pr
e
it the menu,
“Back” opti
o
f
f the Meter
t
o turn on t
h
e Main butt
o
u
al Power of
f
e
r off the iGl
o
nds.
Power off
u
cose Blood
G
t
ons are pre
s
o
se Blood Gl
u
s
e Blood Glu
o
od Glucose
facing up.
r
efinger on t
h
G
lucose Bloo
d
r
mat
r
time:
M
enu) button
a
nd Time” o
p
F
ormat” opti
e
ss the hom
e
F
ormat” opt
i
e
ss the hom
e
press the u
p
o
n to exit th
e
h
e iGlucose
B
o
n or Insert
a
f
ucose Blood
G
lucose Me
t
s
sed or no s
t
u
cose Test S
t
cose Test St
r
Test Strip b
e
h
e side of th
d
Glucose T
e
n
on the devi
p
tion. The “
D
on. Press th
e
e
button to
s
i
on. Press th
e
button to
s
p
or down b
u
e
menu.
B
lood Gluco
s
a test strip.
d
Glucose M
e
t
er will pow
e
t
rip is insert
e
trip
rip
e
tween your
e strip as sh
o
e
st Strip int
o
ce. The Me
n
D
ate and Ti
m
e
up or dow
n
s
elect. A con
f
e up or dow
s
elect. A con
u
tton to scr
o
s
e Meter
e
ter, press a
n
e
r off autom
e
d.
thumb and
o
wn.
o
test strip p
o
u appears.
m
e” menu ap
n
button to
s
f
irmation m
e
n button to
s
f
irmation m
e
o
ll to the “B
a
n
d hold the
M
a
tically afte
r
middle fing
e
o
rt until it cli
p
pears.
s
croll to the
e
ssage appe
scroll to the
e
ssage appe
a
ck” option.
S
M
ain butto
n
r
2 minutes i
f
e
r with the v
i
cks and fir
m
desired
ars.
desired
ars.
S
elect
for 3
f
no
iew
m
ly stops.

Removi
n
1.
2.
3.
Please f
o
Getting
Before
p
- iGluco
s
- iGluco
s
(Please
c
- iGluco
s
- Sterile
n
g the iGluc
o
Hold the iGl
Rotate the i
G
Take the iGl
o
llow your
h
Ready for T
e
p
erforming
a
s
e Blood Glu
s
e Blood Glu
c
heck the e
x
s
e Lancing d
e
lancet
o
se Blood Gl
ucose Blood
G
lucose Blo
o
ucose Blood
h
ealthcare p
r
e
sting
a
blood gluc
o
cose Meter
cose Test St
x
piration dat
e
vice
ucose Test
S
Glucose Te
s
o
d Glucose
T
Glucose Te
s
r
ofessional's
o
se test, pre
p
rips
e
on the tes
t
S
trip
s
t Strip as sh
T
est Strip co
u
s
t Strip out
o
instruction
s
p
are the ite
m
t
strip vial.
D
own.
u
nterclockw
i
o
f the test st
r
s
and discar
d
m
s below:
D
o not use e
x
se and pull
u
r
ip port.
used strips
x
pired test s
t
u
p simultan
e
properly.
t
rips)
e
ously.
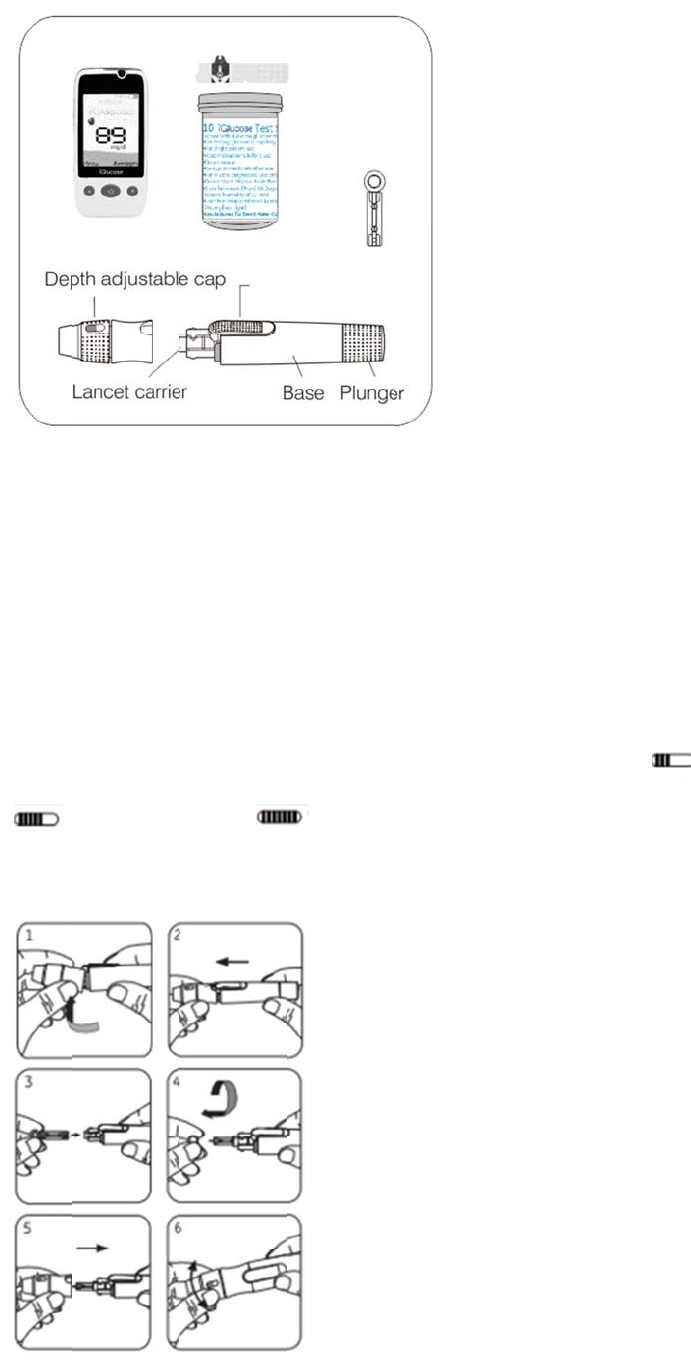
1. Hold
t
other h
a
2. Pull t
h
3. Inser
t
4. Twist
5. Repla
6. Choo
s
desired
"
t
he adjusta
b
a
nd. Slightly
h
e two part
s
t
a new disp
o
off and set
a
ce the dept
h
s
e a depth o
f
setting is vi
s
" for averag
e
b
le depth ca
p
force down
w
s
in opposite
o
sable lance
t
a
side the pr
o
h
adjustable
f
penetratio
n
s
ible in the
w
e
skin; "
p
of the lanci
w
ard.
directions t
o
t
firmly into
o
tective cov
e
cap.
n
by rotatin
g
w
indow. Sett
i
" for thic
k
i
ng device in
o
remove th
lancet carri
e
e
r of the dis
p
g
the top po
r
i
ngs are bas
e
k
or callouse
d
one hand
w
e adjustable
e
r.
p
osable lanc
e
r
tion of the
d
e
d on skin t
y
d
skin.
w
hile holding
depth cap.
e
t.
d
epth adjust
pe " "
f
the base in
able cap un
t
f
or soft or t
h
the
t
il your
h
in skin;
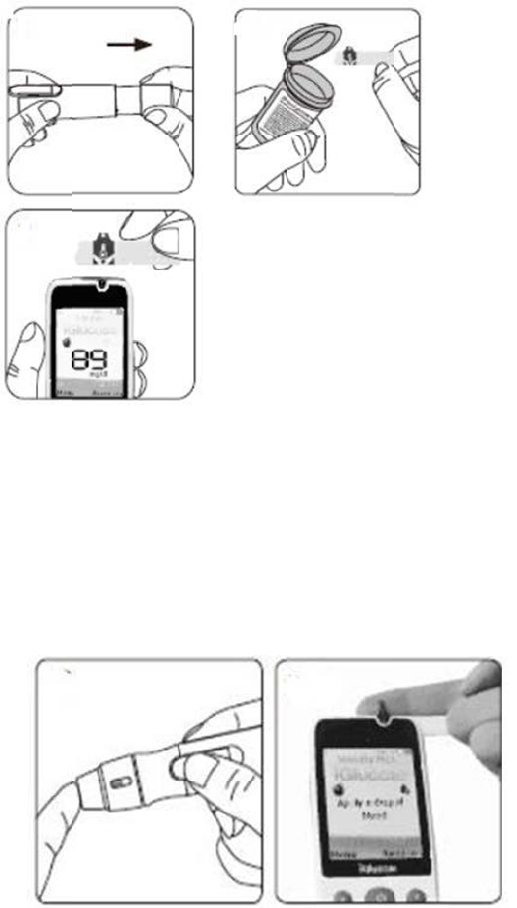
Perfor
m
1. Was
h
2. Hold
devi
c
posit
3. Take
4. Inser
facin
g
5. A bl
o
6. Plac
e
7. Touc
bloo
d
sam
p
Strip
.
8. Cou
n
m
ing a Blood
h
your hand
s
the base of
c
e will be co
c
ion near th
e
one iGlucos
t the strip i
n
g
up. Once t
o
od drop ico
n
e
the lancing
h and hold t
d
. If the vie
w
p
le was insu
f
.
n
tdown Mod
Glucose Te
s
s
thoroughly
the lancing
d
c
ked. Releas
e
e
base.
e Blood Glu
c
n
to the test
s
he strip is in
n
will appea
r
device agai
n
he blood dr
o
w
window is
n
f
ficient, disc
a
e will begin
o
s
t
with soap a
d
evice in on
e
e
the plung
e
c
ose Test St
r
trip port of
t
serted, your
r
on the disp
n
st your fing
o
p to the ed
g
n
ot complet
e
a
rd the test
s
o
n the displ
a
nd water an
e
hand and
p
e
r and it will
r
ip from the
v
t
he iGlucose
r
meter will
b
p
lay window.
ertip and pr
e
g
e of sampl
e
e
ly filled wit
s
trip and re
p
a
y window.
A
d dry well
p
ull on the p
l
automatical
v
ial. Close t
h
Blood Gluc
o
b
e automati
c
Apply the b
e
ss the rele
a
e
port until t
h
h blood the
t
p
eat with a n
A
fter 5 seco
n
l
unger with
t
l
y move bac
k
h
e vial cap i
m
o
se meter w
i
c
ally turn on
.
lood sample
a
se button.
h
e view win
d
t
est will not
ew iGlucose
n
ds, your te
s
t
he other ha
k
to its origi
n
m
mediately.
i
th the view
.
e
within 2 mi
d
ow is filled
start. If the
e
Blood Gluc
o
s
t result will
nd. The
n
al
window
nutes.
with
blood
o
se Test
appear.
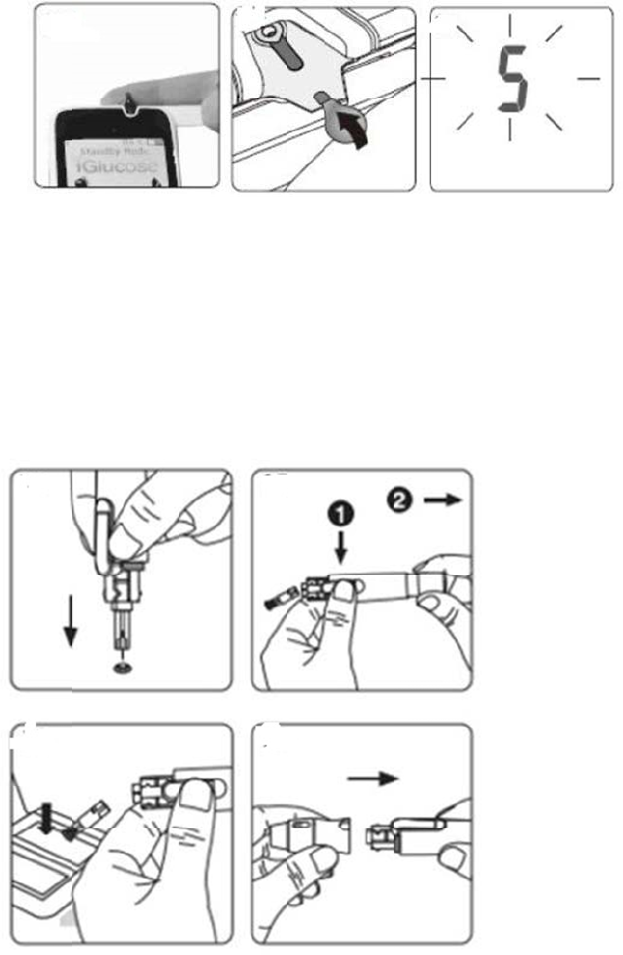
9. Pull
o
tip in
10. Hol
d
the
11. Dis
c
12. Rep
CAUTIO
- Do no
t
blood "
a
The iGl
u
you app
- Recor
d
openin
g
- Alway
s
please c
o
ff the dept
h
to the prot
e
d
the releas
e
used dispos
a
c
ard the use
d
lace the de
p
N
t
apply your
b
appear.
u
cose Blood
G
ly blood too
d
the openin
g
g
.
s
keep the m
c
lean with a
s
h
adjustable
e
ctive lancet
e
button in o
a
ble lancet.
d
disposable
p
th adjustabl
b
lood drop
t
G
lucose Me
t
soon. If thi
s
g
date of a
n
etal contact
s
mall, soft b
r
cap. Withou
cover.
ne hand an
d
lancet into
a
e cap after f
t
o the sampl
e
t
er is perfor
m
occurs, ple
a
ew test stri
p
s of the test
r
ush.
t touching t
h
d
pull on the
a
n appropri
a
f
inishing the
e port on th
e
m
ing an inte
r
a
se repeat t
h
p
vial. Discar
strip port cl
e
h
e used disp
plunger wit
h
a
te punctur
e
test.
e
strip until
y
r
nal test an
d
h
e test with
a
d
the vial of
e
an. If any d
osable lanc
e
h
the other
h
-proof or bi
o
y
ou see the
"
d
will display
a
new test s
t
test strips 3
ust or impu
r
e
t, insert the
h
and to safe
o
hazard con
t
"
Apply a dr
o
an error m
e
t
rip.
months aft
e
r
ities are pr
e
lancet
ly eject
t
ainer.
o
p of
e
ssage if
e
r
e
sent,
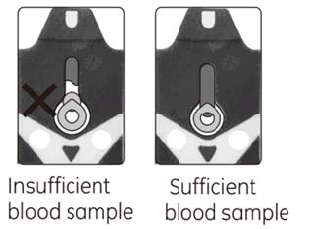
- The iG
l
single u
s
- All par
t
after yo
- Users
s
and tes
t
- For cle
page XX
View A
p
Make s
u
result.
A
test wit
h
CAUTIO
- Check
t
expired
- Use ea
- Do no
t
- Do no
t
after co
m
test stri
p
- Apply
t
Unders
t
Blood gl
If your
b
test wit
h
You can
iGlucos
e
Control
If the te
immedi
a
l
ucose Bloo
d
s
er only. Do
t
s of this kit
u have perf
o
s
hould wash
t
strips.
aning and d
i
.
p
pearance o
f
u
re your blo
o
A
n insufficie
n
h
a new test
N
t
he expirati
o
iGlucose Bl
o
ch iGlucose
t
reuse iGluc
o
t
perform te
s
m
ing indoor
p
s to equilib
t
he blood sa
t
anding Test
ucose test r
e
b
lood glucos
e
h
a new iGlu
also run a
Q
e
Blood Gluc
o
Test” on pa
g
st result still
a
tely.
d
Glucose M
o
not share t
h
are conside
r
o
rmed the cl
e
hands thor
o
i
sinfecting p
l
f
Blood on t
h
o
d sample c
o
n
t blood sa
m
strip.
o
n date prin
t
o
od Glucose
Blood Gluco
o
se Blood G
l
s
ting immed
s from the o
rate.
mple only o
n
Results an
d
e
sults are sh
e
result is u
n
cose Blood
G
Q
uality Cont
r
o
se meter a
n
g
e XX) .
remains un
u
o
nitoring Sy
s
ese devices
r
ed biohazar
e
aning and
d
o
ughly with
s
l
ease refer t
o
h
e strip
o
vers the wh
m
ple will resu
t
ed on the s
t
T
est Strips.
se Test Stri
p
l
ucose Test
S
i
ately after
m
utside). Allo
w
n
the sampl
e
d
Messages
own on the
n
usually high
G
lucose Test
ol Test with
n
d iGlucose
u
sually high
s
tem and iGl
with anyon
e
ds and can
p
d
isinfecting
p
s
oap and wa
o
the sectio
n
h
ole area of
t
u
lt in an erro
t
rip vial ever
p
immediate
l
S
trips.
m
oving from
w 45 minut
e
e
port of the
iGlucose Bl
o
h
or low, or i
f
t
Strip.
the Rightes
t
Blood Gluco
or low, cont
ucose Lanci
n
e
, including
o
p
otentially t
r
p
rocedure.
ter after ha
n
n
"Cleaning
a
t
he view win
r message (
"
y
time you
u
y after rem
o
one ambie
n
e
s for the te
m
test strip.
o
od Glucose
f
you questi
o
t
® Control S
o
se Test Stri
p
act your he
a
n
g Device ar
e
o
ther family
ansmit infe
c
n
dling the m
e
a
nd Disinfec
t
dow to get
a
Er4"). If this
se a test str
i
o
ving it from
n
t temperat
u
m
perature o
f
meter as m
g
o
n your test
r
o
lution GC55
(Refer to “
P
a
lthcare pro
f
e
intended f
o
members.
c
tious diseas
eter, lancin
g
t
ing Proced
u
a
n accurate
t
occurs, rep
e
i
p. Do not u
s
the vial.
u
re to anoth
e
f the meter
a
g
/dL.
results, rep
e
5
0 to check
y
P
erforming a
f
essional
o
r a
es, even
g
device,
res" on
t
est
e
at the
s
e
e
r (e.g.
a
nd the
e
at the
y
our
Quality
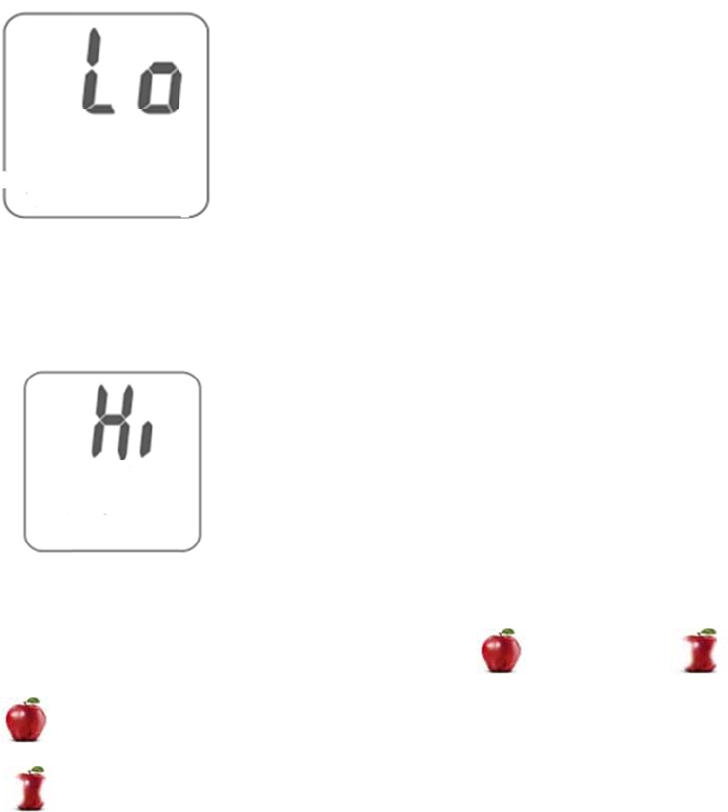
If you a
r
you hav
e
immedi
a
Consult
The iGl
u
If the te
a new t
e
If you st
If the te
with a n
If you st
Setting
M
Press th
B
A
f
Select t
h
r
e experienc
i
e made sur
e
a
tely.
your health
c
u
cose Blood
G
st result is b
e
st strip.
ill get a “LO
st result is a
b
ew test stri
p
ill get a “HI
”
M
eal Mark
e
e main butt
o
B
efore meal:
fter meal: Y
o
h
e appropri
a
Using the m
a. Pre
s
b. Sel
e
c. Scr
o
d. Pre
s
i
ng sympto
m
e
to follow al
c
are provide
G
lucose me
t
elow 20 mg
/
” result, con
b
ove 600 m
g
p
.
”
result, con
t
e
rs:
o
n to choos
e
You execut
e
o
u execute t
a
te test mod
e
enu:
s
s the “up” (
M
e
ct the “Test
o
ll to the “B
e
s
s the middl
e
m
s that are n
l instruction
s
r for appro
p
t
er displays
r
/
dL , “LO ” w
tact your he
g
/dL, “HI” w
i
t
act your he
a
e
among bef
o
e
this blood
g
his blood gl
u
e
: “Before
M
M
enu) butt
o
Mode” opti
o
e
fore Meal”
o
e
button. A
c
ot consiste
n
s
in this ma
n
p
riate dispos
a
r
esults betw
e
w
ill appear o
n
e
althcare pr
o
i
ll appear on
a
lthcare pro
f
o
re meal
g
lucose test
u
cose test af
M
eal” or “Aft
o
n on the de
v
o
n.
o
r “After M
e
c
onfirmatio
n
n
t with your
b
n
ual, contac
t
a
l of used te
e
en 20 and
6
n
the screen.
o
fessional.
the screen.
f
essional.
and afte
before a m
e
t
er a meal.
er Meal” in
o
v
ice. The M
e
e
al” option a
message a
p
b
lood gluco
s
your health
s
t strips and
6
00 mg/dL.
Please rep
e
Please repe
a
r
meal,
e
al.
o
ne of the f
o
e
nu appears
.
s
required.
p
pears.
s
e test resul
t
care profes
s
lancets.
e
at your test
at your test
o
llowing wa
y
.
t
s and
s
ional
with by
again
y
s:
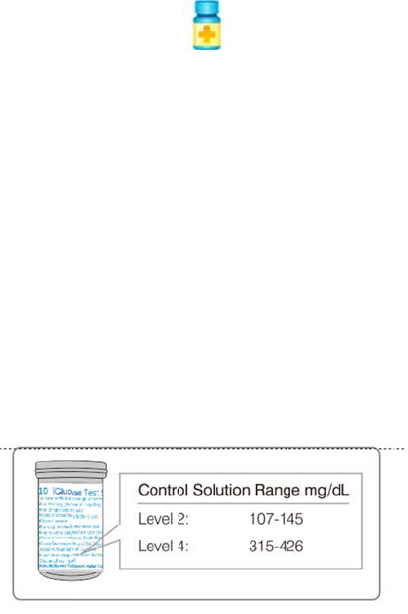
About
Q
What is
To ensu
Use on
e
Monito
r
Range p
Quality
C
Control
Exampl
e
NOTE
- Level
2
Monito
r
please c
When s
h
- To ens
workin
g
- To con
- To pre
p
- To che
- To che
liquids.
- If you
s
way yo
u
Using the m
a. Pre
s
abo
v
b. For
par
t
c. Not
e
ico
n
Q
uality Cont
r
a Quality C
o
re proper m
o
e
of the Righ
t
r
ing System
i
rinted on th
C
ontrol Test
Solution Ra
n
e
of Control
S
2
and Level
4
r
ing System
b
c
ontact the i
G
h
ould a qua
l
ure that yo
u
g
properly.
firm that yo
u
p
are for you
ck the iGluc
o
ck your iGlu
c
s
uspect that
u
feel.
iddle butto
n
s
s the “midd
v
e) on the d
“Before Me
a
t
ially eaten
a
e
: Do not us
e
n
) for a
r
ol Testing
o
ntrol Test?
o
nitoring fu
n
t
est® Contro
i
n the Contr
o
e strip vial l
a
and your iG
n
ge:
S
olution Ra
n
4
of Rightest
®
b
ut must be
G
lucose Dia
b
l
ity control
t
u
r iGlucose B
u
are follow
i
r initial bloo
o
se Blood Gl
c
ose Blood
G
your test re
n
from the h
o
le button o
n
i
splay.
a
l” toggle to
a
pple icon.
e
the “Cont
r
blood test,
a
n
ction, it is
n
l Solution G
C
o
l Solution
M
a
bel, the iGl
u
lucose Bloo
d
n
ge printed
o
®
Control So
l
purchased
s
b
etes Custo
m
t
est be perf
o
lood Glucos
e
i
ng the corr
e
d glucose te
ucose Test
S
G
lucose met
e
s
ults are ina
c
o
me screen
(
n
the device
t
the whole a
r
ol Solution”
a
s the result
n
ecessary to
C
550 when
t
M
ode. If the
t
u
cose Blood
d
Glucose M
o
n your test
s
l
ution GC55
0
s
eparately. I
f
m
er Support
o
rmed?
e
meter and
e
ct testing p
r
st.
S
trip or whe
n
e
r after it ha
ccurate, or i
f
(
when no m
e
t
o toggle th
e
pple icon; f
o
setting (rep
will not be
c
regularly pe
t
esting your
i
t
est result is
Glucose Mo
onitoring Sy
s
s
trip vial lab
e
0
are availab
f
you want t
o
Center.
iGlucose Bl
o
r
ocedures.
n
you open
a
s been drop
f
your test r
e
e
nu is select
e
e
Test Mode
o
r “After Me
a
r
esented by
c
alculated in
t
rform a qua
l
i
Glucose Blo
within the
C
n
itoring Sys
t
s
tem is wor
k
e
l.
le for iGluco
o
purchase L
e
o
od Glucose
a
new vial of
p
ed, damag
e
e
sults are n
o
ed):
icon (#8 in
F
a
l” toggle to
the solutio
n
to averages.
l
ity control t
od Glucose
C
ontrol Solu
t
t
em passes t
k
ing properl
y
o
se Blood Gl
u
evel 2 or Le
v
Test Strip a
r
strips.
e
d or expos
e
o
t consistent
F
igure 1
the
n
bottle
est.
t
ion
he
y
.
u
cose
v
el 4,
r
e
e
d to
with the
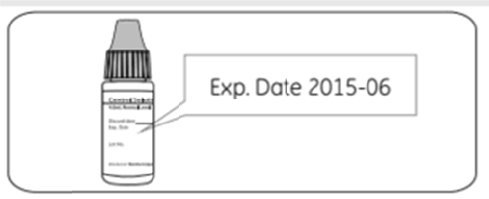
- To pra
c
equired
To perf
o
- iGluco
s
- iGluco
s
- Righte
s
CAUTIO
- Each ti
Rightes
t
expirati
o
Exampl
e
- Wipe t
- Close
t
- Check
t
Insert).
- Keep c
Perfor
m
1. Take
o
2. Inser
t
window
3. Press
4. Selec
t
5. Selec
t
Note:
W
It is imp
test.
5. Shak
e
on a fla
t
c
tice testing
Items for
Q
o
rm a qualit
y
s
e Blood Glu
s
e Blood Glu
s
t® Control
S
N
me you ope
t
® Control S
o
o
n date prin
t
e
he bottle ca
t
he bottle of
t
he expirati
o
ontrol solut
i
m
ing a Quali
t
o
ne iGlucos
e
t
the iGlucos
facing up in
the “up” (
M
t
the “Test
M
t
the “Contr
o
W
hen a test
m
ortant to se
t
e
the bottle
o
t
surface.
.
Q
uality Contr
y
control tes
t
cose Meter
cose Test St
S
olution GC
5
n a new bot
t
o
lution GC5
5
t
ed on the l
a
p with a cle
a
control solu
o
n date bef
o
i
on bottles
o
t
y Control T
e
e
Blood Gluc
e Blood Glu
c
to the test s
M
enu) button
M
ode” optio
n
o
l Solution”
o
m
ode is set f
o
t
the Test M
o
o
f Rightest®
ol Tests
t
, prepare t
h
rips
5
50
t
le of contro
0 is good fo
r
a
bel, whiche
v
a
n tissue bef
o
tion tightly i
re use. (Ref
e
ut of reach
o
e
st
o
se Test Stri
c
ose Test St
r
t
rip port.
on the devi
c
n
. The “Test
o
ption. A co
n
o
r a Control
o
de to “Con
t
Control Sol
u
h
e items bel
o
l solution,
w
r
3 months
a
v
er comes fi
ore tightly c
l
i
mmediatel
y
e
r to the Rig
h
o
f children.
p from the
v
r
ip horizonta
ce and the
M
Mode” men
nfirmation
m
Solution, th
e
t
rol Solution
u
tion GC550
o
w:
w
rite the exp
i
a
fter openin
g
rst.
l
osing the b
o
y
after using.
h
test® Cont
r
v
ial and clos
e
lly (not vert
i
M
enu will ap
u appears.
m
essage app
e
result will
n
” to ensure
t
well before
o
ration date
o
g
the bottle,
o
ttle of cont
r
r
ol Solution
G
e
the vial ca
p
cally) with t
h
p
ear. .
e
ars.
n
ot be calcu
l
t
his when p
e
o
pening the
o
n the label
.
or until the
r
ol solution.
G
C550 Pack
a
p
immediate
h
e colored
v
lated into a
v
e
rforming a
c
cap. Place t
h
.
The
a
ge
ly.
iew
v
erages.
c
ontrol
h
e cap
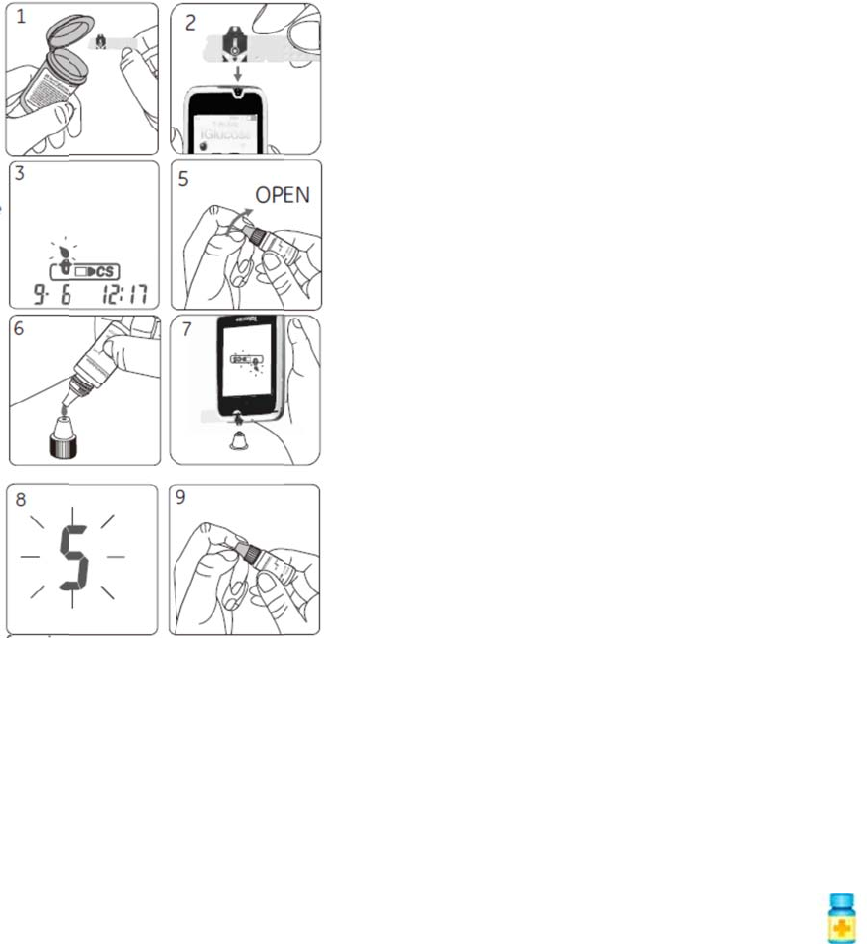
6. Place
7. Gentl
y
8. The s
c
9. Tightl
10. The
Solutio
n
CAUTIO
- Your C
o
can still
control
s
- The C
o
10-90%
- Before
The iGl
u
the sam
- Do no
t
strip mi
g
solution
a drop of c
o
y
touch the
s
c
reen will di
s
y replace th
e
control solu
t
n
Range prin
t
N
o
ntrol Solut
i
can be recal
s
olution ico
n
o
ntrol Soluti
o
RH.
"Apply a dr
o
u
cose Blood
G
ple port bef
o
t
drip the co
n
g
ht leak into
. This could
o
ntrol soluti
o
s
ample port
s
play the co
u
e
cap on the
t
ion result
w
t
ed on the B
i
on Test res
u
led and vie
w
n
on the scr
e
o
n Test shou
o
p of blood
"
G
lucose me
t
o
re prompt
e
n
trol solutio
n
the bottle
o
contaminat
e
o
n onto the
t
of the strip
w
u
nt time sta
r
Rightest® C
o
w
ill appear. C
l
ood Glucos
e
u
lts will not
b
w
ed. The Co
n
e
en.
ld be condu
c
"
, do not to
u
t
er is perfor
m
e
d will result
n
on to the s
o
f control sol
e
the meter
v
t
op of the ca
w
ith the co
n
r
ting from 5
.
ontrol Solut
i
C
ompare yo
u
e
Test Strip
v
b
e included i
n
trol Solutio
n
c
ted betwe
e
u
ch the cont
r
m
ing an inte
r
in an error
m
s
ample port
o
l
ution and
m
v
ia the test
s
p.
n
trol solutio
n
.
i
on GC550 b
o
u
r Quality Co
v
ial label.
n the avera
g
n
Test result
e
n 59-104°F
(
r
ol solution
t
r
nal check.
T
m
essage.
o
f the test s
t
m
ay cause th
e
s
trip port.
n
from the t
o
o
ttle.
ntrol Test re
g
e calculatio
n
will be sho
w
15-40°C) an
d
t
o the sampl
T
ouching the
t
rip directly.
e
degenerati
o
p of the ca
p
e
sult to the
C
ns, however
w
n with the
d in a locati
o
e port on th
control sol
u
The reagen
t
i
on of the c
o
p
.
C
ontrol
,
they
o
n with
e strip.
u
tion to
t
on the
ntrol
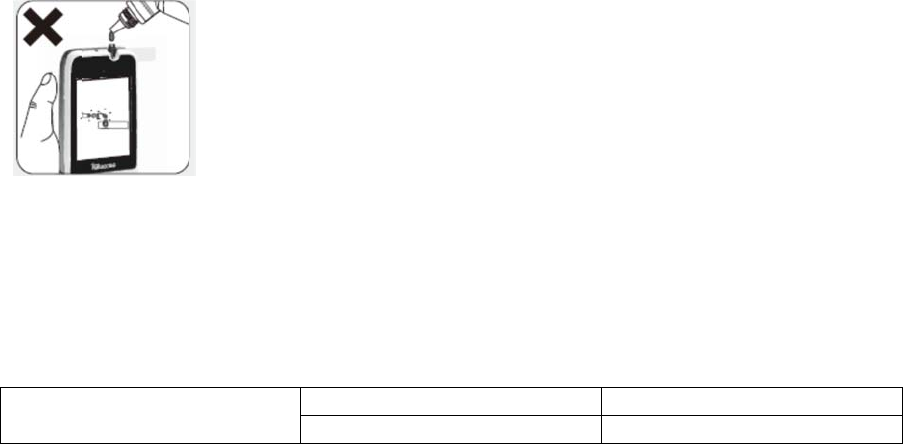
- Keep t
h
expose
d
- Do no
t
out 2 dr
Unders
t
Your co
n
strip via
correctl
y
Exampl
e
Control
Possibl
e
- Your R
- Your B
- You le
f
of time.
- You di
d
- The iG
l
If Right
e
System
m
are still
o
iGlucos
e
Recallin
The iGl
u
time an
d
Obtaini
n
iGlucos
e
memor
y
To obta
i
h
e test strip
d
to moistur
e
t
touch the t
i
ops of contr
t
anding qua
l
n
trol solutio
n
l label. If th
e
y
.
e
of control
s
Solution Ra
n
e
reasons yo
u
ightest® Co
n
lood Glucos
e
f
t the cap of
d
not perfor
m
l
ucose Bloo
d
e
st® Control
may not be
w
out of rang
e
e
Diabetes C
u
g Test Resul
u
cose Blood
G
d
date. If yo
u
n
g Readings
A
e
maintains
t
y
on the dev
i
i
n glucose r
e
port clean a
e
.
i
p of the co
n
ol solution.
l
ity Control
T
n
test result
s
e
results are
w
s
olution ran
g
n
ge
u
r Control S
o
n
trol Solutio
n
e
Test Strip
h
the iGlucos
e
m
the test p
r
d
Glucose m
e
Solution GC
5
w
orking pro
p
e
, do not use
u
stomer Su
p
ts
G
lucose me
t
u
r meter ha
s
A
verages
t
he average
s
i
ce.
e
ading avera
g
nd dry. Clea
trol solutio
n
T
est Results
s
should fall
w
ithin the r
a
g
e printed o
n
8
8
o
lution resul
t
n
GC550 is e
x
h
as expired.
e
Blood Gluc
o
r
ocedure co
r
e
ter or Bloo
d
5
50 results
a
p
erly. Repea
Blood Gluc
o
p
port Center
t
er is able to
s
stored 500
s
of your blo
o
g
es:
n immediat
e
n
bottle. If t
h
within the c
o
a
nge, the Bl
o
n
your test s
t
Level 2
8
-120 mg/d
L
t
s being out
x
pired or w
a
ose Test Stri
r
rectly.
d
Glucose Te
a
re out of ra
n
a
t the Qualit
y
o
se Meter t
o
.
automatica
l
results, the
o
d glucose r
e
e
ly if the tes
t
e tip is touc
h
o
ntrol soluti
o
od Glucose
t
rip vial labe
L
of the rang
e
a
s first open
e
p vial or the
st Strip hav
e
n
ge, your iGl
y
Control Te
s
o
test your bl
l
ly store a m
newest test
e
adings for
t
t
strip port i
s
h
ed, clean
w
on range pri
Monitoring
l.
L
250-
3
e
:
e
d more tha
n
control solu
e
malfunctio
n
ucose Bloo
d
s
t. If your co
n
ood glucose
a
ximum of
5
result will r
e
t
he last 7, 1
4
s
stained or i
w
ith water a
n
i
nted on the
System is w
o
L
evel 4
3
40 mg/dL
n
3 months
a
u
tion off for
a
n
ed.
d
Glucose M
o
ntrol soluti
o
. Please con
t
5
00 test resu
e
place the o
l
4
, 30 and 90
s overly
n
d pour
test
o
rking
a
go.
a
period
o
nitoring
n results
t
act the
lts with
dest one.
d
ays in

1. Pre
s
2. Sel
e
3. The
ret
u
sele
in c
a
Obtaini
n
iGlucos
e
reading
s
To obta
i
1. Pre
s
Fro
m
The “Hi
s
through
s
s the “dow
n
e
ct the desir
e
a. Last 7 D
b. Last 14
D
c. Last 30
D
d. Last 90
D
average blo
u
rn to the “A
ct the “Bac
k
a
lculating th
e
n
g Readings
e
maintains
a
s
.
i
n the list of
s
s and hold (
m
the “Aver
a
s
tory” list ap
the list. Pre
n
” button on
e
d option:
ays
D
ays
D
ays
D
ays
od glucose
r
verages” m
e
k
” button to
e
e
averages.
History
a
record in
m
previous bl
o
“long press
”
a
ges” menu
(
pears showi
ss the middl
the right si
d
eading for t
h
e
nu. Select a
e
xit the me
n
m
emory on t
h
o
od glucose
r
) the “down
(
see above),
ng previous
e button to
e
d
e of the de
v
h
e selected
p
nother item
n
u. Please n
o
h
e device of
r
eadings:
” button on
select the “
readings. Pr
e
xit the list.
v
ice. The “A
v
p
eriod appe
a
from the m
e
o
te “control
s
each blood
g
the right sid
Previous Re
a
ess the “up”
v
erages” me
n
a
rs. Press th
e
e
nu that yo
u
s
olution” re
a
g
lucose rea
d
e of the dev
i
a
dings” opti
o
or “down”
b
n
u appears.
e
middle bu
t
u
wish to vie
w
a
dings do n
o
d
ing for up t
o
ice OR
o
n.
b
uttons to s
c
t
ton to
w
, or
t count
o
500
c
roll
Caring for Your Meter
Maintenance
Keep your meter and test strip free of dust, water or any other liquid. Store the meter in the carrying
case when not in use. If your meter is dropped or damaged, perform a quality control test with the
control solution before performing a blood glucose test.
Cleaning Meter
Clean the outside of the meter with disinfecting wipes listed on next page. Do not get the test strip
port wet.
Cleaning Test Strip Port
If your test strip port is stained with blood, control solution or any liquid, please use disinfecting
wipes listed on next page to clean it immediately. Do not immerse in water. Perform a quality
control test to ensure the iGlucose Blood Glucose meter is working properly.
Cleaning and Disinfecting Procedures
Indirect transmission of Human Immunodeficiency Virus (HIV), Hepatitis B Virus (HBV) and Hepatitis
C Virus (HCV) during the delivery of healthcare services has been increasingly reported. Persons
using blood glucose monitoring systems have been identified as one risk group due to the shared use
of fingerstick (lancing) devices and point of care blood testing devices.
The cleaning procedure is to remove dust, blood and body fluid from the surface and should be
performed whenever the meter or lancing device is visibly dirty. Performing the cleaning procedure
once per week is recommended. The disinfecting procedure is necessary to kill pathogens such as
HBV on the housing materials of the device. The cleaning and disinfecting procedure should be
performed at least once per week. The meter and lancing device should be cleaned before being
disinfected.
If the meter is being operated by a second person who is providing testing assistance to the user, the
meter and lancing device should be cleaned and disinfected prior to use by the second person. NOTE:
the cleaning procedure can only remove visible contaminates from surfaces. Only the disinfecting
procedure can eliminate non-visible pathogens.
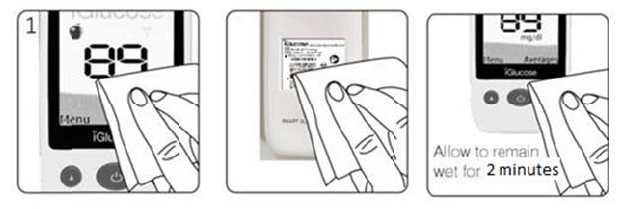
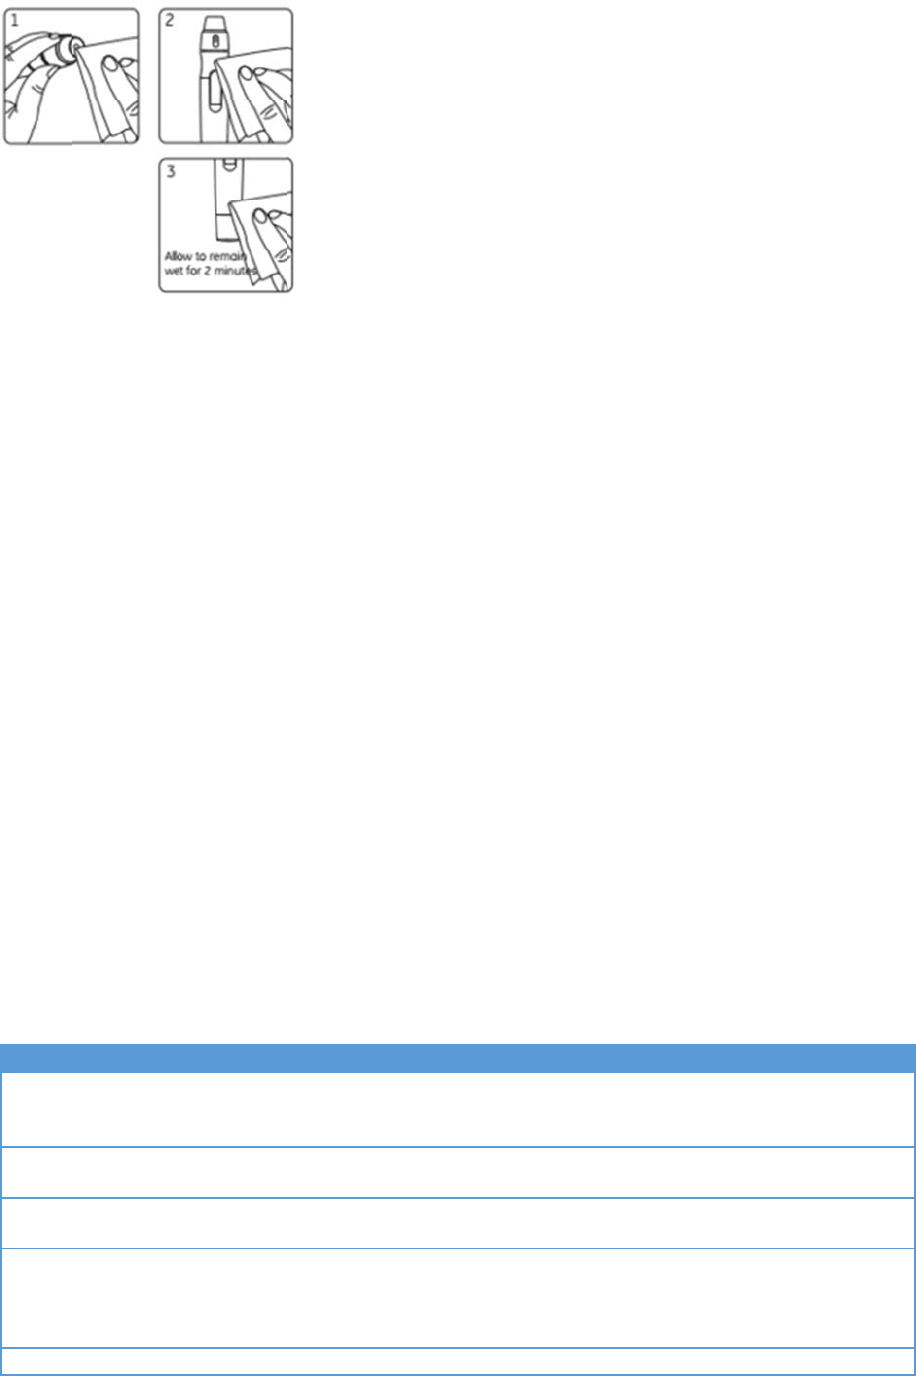
CaviWipes Disinfecting Towelettes has been tested and may be used to clean and disinfect the meter
and lancing device. Users may purchase the disinfecting wipes from the manufacturer (Metrex),
distributors or major on line Users may purchase the disinfecting wipes from the manufacturer
(Metrex), distributors or major on line retail sites such as www.amazon.com and www.ebay.com.
You can contact Metrex customer service at 1-800-841-1428 and info@metrex.com. (Monday
through Friday, between 6 AM and 4 PM PST)
Please see the following references for further information:
-FDA Public Health Notification: Use of Finger stick Devices on More than One Person Poses Risk for
Transmitting Bloodborne Pathogens: Initial Communication” (2010).
http://www.fda.gov/MedicalDevices/Safety/AlertsandNotices/ucm224025.htm
- CDC Clinical Reminder: Use of Finger stick Devices on More than One Person Poses Risk for
Transmitting Bloodborne Pathogens” (2010)
http://
w
NOTE
- Clean
a
disinfec
t
To clea
n
1. Thor
o
buttons
fluids.
To disin
f
2. Take
a
should
b
3. Allo
w
4. Allo
w
NOTE
- Your i
G
perfor
m
The tes
t
years).
To clea
n
1. Thor
o
above t
o
To disin
f
2. Take
a
and bo
d
3. Allo
w
w
ww.cdc.go
v
a
nd disinfec
t
t
ing.
n
the meter:
o
ughly wipe
t
with disinfe
f
ect the met
a
nother disi
n
b
e cleaned f
r
w
the surface
w
to air dry.
G
lucose Blo
o
m
ance or ext
e
t
ing simulat
e
n
the iGluco
s
o
ughly wipe
t
o
clean any
p
f
ect the iGlu
a
nother disi
n
d
y fluids sho
u
w
the surface
v
/injectionsa
t
the outsid
e
t
he entire s
u
cting wipes
l
er:
n
fecting wip
r
om surface
to remain
w
o
d Glucose
m
e
rnal materi
a
e
s 2 cleaning
s
e lancing de
t
he entire s
u
p
ossible dirt
,
cose lancin
g
n
fecting wip
u
ld be clean
e
to remain
w
fety/Fingers
e
of the devi
c
u
rface of the
l
isted above
e
and wipe
t
before perf
o
w
et for 2 min
m
eter has be
e
a
ls of the de
v
and disinfe
c
vice:
u
rface of the
dust, blood
g
device:
e
and wipe
t
e
d from surf
a
w
et for 2 min
s
tick-Devices
c
e only. Do
n
meter, esp
e
to clean an
y
t
he meter th
o
rming the
d
utes.
e
n tested to
v
ice after 5
5
c
ting cycles
p
iGlucose la
n
and other
b
t
he iGlucose
a
ce before
p
utes.
BGM.html
n
ot remove
b
e
cially port,
f
y
possible di
r
oroughly. (
N
d
isinfecting
p
ensure that
5
0 cleaning c
p
er week ov
e
n
cing device
b
ody fluids.
Lancing de
v
p
erforming d
b
attery cove
r
f
ace/display,
r
t, dust, blo
o
N
ote: All blo
o
p
rocedure)
there is no
c
y
cles and 55
e
r the typica
with disinfe
c
ice thoroug
h
isinfecting p
r
when clea
n
,
housing an
d
o
d and othe
r
o
d and body
c
hange in th
e
5
0 disinfecti
n
l life of the
m
cting wipes
l
h
ly. (Note: A
p
rocedure)
n
ing and
d
r
body
fluids
e
n
g cycles.
m
eter (5
isted
ll blood
NOTE
- Your i
G
of the d
e
and disi
n
- Users
s
device
o
- Please
device
a
followin
- Thin, s
- The sc
r
- You ar
e
button
o
- You ar
e
If you h
a
authori
z
Error M
e
Trouble
Potenti
a
Cannot
Cannot
pressin
g
Part of
t
Cannot
No res
p
G
lucose Lan
c
e
vice after
5
n
fecting cyc
l
s
hould wash
o
r test strips
.
examine yo
u
a
fter cleanin
g
g occur:
liver streaks
r
een becom
e
e
unable to
t
o
r depth adj
u
e
unable to
e
a
ve any que
s
z
ed represe
n
e
ssages and
Shooting
a
l problems
a
Proble
m
turn on devi
c
turn off devi
c
g
middle butt
t
he display is
insert strips
p
onse when s
t
c
ing Device
h
5
50 cleaning
l
es per wee
k
their hands
.
u
r LCD scre
e
g
and disinf
e
appear on t
e
s cracked,
s
t
urn on/off
y
u
stable cap.
e
nter meter
s
tions or co
n
n
tative or cal
Troublesh
o
a
nd the rec
o
m
c
e
c
e by
on
not working
t
rip is
as been tes
t
cycles and 5
k
over the ty
p
thoroughly
w
e
n, test strip
e
cting cycles
.
he screen,
s
oft, dissolv
e
y
our meter,
o
settings, fu
n
n
cerns, pleas
l the GE Dia
b
o
oting
o
mmended s
P
No batter
y
Battery no
Battery co
Software
e
Device is
d
Strip inser
t
Damaged
s
Incorrect
m
Damaged
s
Battery is
d
t
ed to ensur
e
5
50 disinfect
i
p
ical life of t
w
ith soap a
n
port, butto
n
.
Stop using
t
e
d, brittle or
o
perate the
n
ction mode
s
e contact y
o
b
etes Suppo
olution(s) a
r
P
ossible reas
o
y
o
t charged
nnection err
o
e
rror
d
amaged
t
ed incorrectl
s
trip.
m
ake of strip.
s
trip slot.
d
ead.
e
that there
i
ng cycles. T
h
he meter (5
n
d water aft
e
n
s and surfa
c
t
he meter a
n
swollen.
left/ right b
u
s
or recall y
o
o
ur Blood Gl
u
rt Center.
r
e listed bel
o
o
n
o
r
y.
is no chang
e
h
e testing si
m
years).CAU
T
e
r handling
t
c
e of your m
e
n
d/or lancin
g
u
tton, the la
n
o
ur testing r
e
u
cose Monit
o
o
w:
S
Check batte
r
Recharge ba
t
Replace bat
t
Press and h
o
“Shutdown”
.
Contact cust
844-IGLUCO
S
Insert the st
r
Use a differ
e
Use correct
m
Repair or re
p
Charge the
b
e
in the perf
o
m
ulates 2 cl
e
T
ION
t
he meter, l
a
e
ter and lan
c
g
device if a
n
n
cing device
e
sults.
oring Syste
m
S
olution(s)
r
y is inserted
c
ttery.
t
ery.
o
ld “up” butt
o
.
t
omer suppor
t
SE (1-555-55
5
r
ip in the cor
r
e
nt strip.
m
ake of strip
.
p
lace device.
b
attery.
o
rmance
e
aning
a
ncing
c
ing
n
y of the
release
m
c
orrectly.
o
n, select
t
at 1-
5
-5555)
r
ect way.
.

inserted into the device. Strip was inserted incorrectly.
Wrong strip was inserted.
Device is damaged.
Insert the test strip in the correct
way.
Insert the right test strip.
Contact customer support.
No response when blood sample
is applied to the strip
Blood sample is not sufficient.
Strip is has been used or is
damaged.
Device is damaged.
Repeat the test with a sufficient
blood sample.
Repeat the test with a new strip.
Check the device with a Control
Solution test.
Cannot send data Weak signal or network error Retry later or in different location.
All unsent data will be sent
together with data for next test
Cannot synchronize time Network error Set manually from device menu:
Date & Time
Contact customer support at (1-555-555-5555) for any unresolved issues.
Display Messages and Problem-Solving Guide
When any of the following messages appears, there is a problem that requires your attention.
Display Description Action to Take
HI Blood glucose result may be
higher than 600 mg/dL.
Review proper testing procedure and
perform a quality check with control
solution. Repeat blood test; if “HI” still
appears, call your doctor or seek medical
attention immediately.
LO Blood glucose result may be
lower than 20 mg/dL.
Review proper testing procedure and
perform a quality check with control
solution. Repeat test; if “LO” still appears,
call your doctor or seek medical attention
immediately.
Temperature out of
range
Temperature is above or below
the operating range of test strips
or the device.
The result you have obtained may not be
accurate. Move to an area with temperature
between 50ºF - 104ºF (10ºC to 40ºC). Do
not artificially heat or cool the device.
Repeat the test with a new test strip.
Low Battery Battery is low on charge. Charge the battery.
Unknown strip Test strip unknown or may be
damaged.
Perform the test with new test strip.
Discarded strip Test strip is used or test was not
performed correctly.
Discard the strip and repeat the procedure
with a new strip from the vial or package
Perform the test with a new test strip and
follow the test procedure correctly.
If error messages appear that are not listed above, or for any unresolved issues, contact customer
support at (1-555 555 5555).
1. In order to get accurate testing results, please test between 50-104 °F (10-40 °C).
2. When the temperature is below 50 °F (10 °C) or over 104 °F (40 °C), the meter will not function
and the " " symbol will blink.
3. If the iGlucose Blood Glucose meter and Test Strips are exposed to a substantial change in
temperature, please wait 45 minutes before measurement.
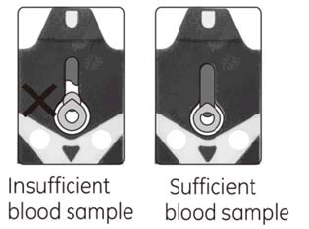
Sampli
n
Please
d
drop of
use the
Er1- Th
e
Er2- Th
e
meter
w
Er3- Th
e
Er4- Th
e
Er5- An
(1) Rem
o
(2) Turn
(3) Pres
s
If after
t
perfor
m
If one o
f
at 1-55-
5
Meter
M
If the iG
1. Open
2. Wait
f
Activati
o
The me
t
please c
CAUTIO
A blood
correctl
y
symbol.
n
g Error
d
o not apply
blood”. Oth
e
new one.
e
inserted te
s
e
meter has
m
w
orks prope
r
e
signal tran
s
e
blood sam
p
issue calibra
o
ve the test
off the met
e
s
the main b
t
urning on t
h
m
a test.
f
the above
e
5
55-5555.
M
alfunction
lucose Bloo
d
the battery
f
or 5 minut
e
o
n and Chan
t
er should w
c
ontact iGlu
c
N
sample sho
u
y
and the M
e
If the blood
the blood t
o
e
rwise, the
m
s
t strip has
b
m
alfunction
e
r
ly.
s
mission is d
i
p
le volume i
s
ting the Me
t
strip from t
h
e
r (press an
d
utton to tur
n
h
e Meter, yo
e
rror messa
g
d
Glucose M
e
cover and r
e
e
s and reins
e
ging the Bat
ork normall
y
c
ose Diabete
u
ld ONLY be
e
ter's scree
n
drop flashi
n
o
the sample
m
eter will di
s
b
een used o
r
e
d. Do a Qu
a
i
srupted. Re
p
s
insufficien
t
t
er has occu
r
h
e meter.
d
hold the
M
n
ON the m
e
u do not se
e
g
es still app
e
e
ter will not
e
move the b
rt the batte
r
tery).
y
after finish
s
Customer
S
applied to t
h
n
is showing
t
n
g symbol is
port of the
t
s
play an err
o
r
damaged.
P
a
lity Control
peat the tes
t
t
. Repeat th
e
rred. Please
M
ain button
f
e
ter.
e
Er5, your
m
e
ars, please
c
turn on, pl
e
atteries.
r
ies as descr
ing the abo
v
S
upport Cen
he test strip
the image o
f
NOT showin
t
est strip be
f
o
r message.
P
lease use a
Test or rein
s
t
using a ne
w
e
test using
a
follow the s
t
f
or 3 second
s
m
eter is func
t
c
ontact iGlu
c
e
ase follow t
h
i
bed as instr
v
e steps. If t
h
ter.
after the te
s
f
the test st
r
g on the scr
e
f
ore the me
t
Please disca
r
new test str
i
s
tall the batt
w
test strip.
new test st
r
t
eps below:
s
).
t
ioning prop
e
c
ose Diabet
e
h
e steps bel
o
ucted on pa
g
h
e meter stil
l
s
t strip has
b
ip and a blo
o
e
en, do not
a
t
er displays:
rd the test s
t
i
p.
t
eries to che
c
r
ip.
erly and abl
e
e
s Customer
o
w:
g
e 19, (Met
e
l does not
w
b
een inserte
d
o
d drop flas
h
a
pply a sam
p
“apply a
t
rip and
c
k if the
e
to
Service
e
r
ork,
d
h
ing
p
le to

the test strip. Please re-insert the unused test strip correctly. The screen MUST show the image of
the test strip accompanied by the blood drop symbol flashing (this symbol take 3 seconds to show
after correctly inserting the test strip) in order for a sample to be applied. Please consult your User
Manual and/or contact Customer Service for support on how to correctly insert a Blood Glucose Test
strip.
FEDERAL COMMUNICATIONS COMMISION (FCC) STATEMENT
You are cautioned that changes or modifications not expressly approved by the part responsible for
compliance could void the user's authority to operate the equipment.
15.105(b)
This equipment has been tested and found to comply with the limits for a Class B digital device,
pursuant to part 15 of the FCC rules. These limits are designed to provide reasonable protection
against harmful interference in a residential installation. This equipment generates, uses and can
radiate radio frequency energy and, if not installed and used in accordance with the instructions,
may cause harmful interference to radio communications. However, there is no guarantee that
interference will not occur in a particular installation. If this equipment does cause harmful
interference to radio or television reception, which can be determined by turning the equipment off
and on, the user is encouraged to try to correct the interference by one or more of the following
measures:
Reorient or relocate the receiving antenna.
Increase the separation between the equipment and receiver.
Connect the equipment into an outlet on a circuit different from that to which the receiver is
connected.
Consult the dealer or an experienced radio/TV technician for help.
This device complies with Part 15 of the FCC Rules.
Operation is subject to the following two conditions:
1) this device may not cause harmful interference and
2) this device must accept any interference received, including interference that may cause
undesired operation of the device.
Specifications
GSM
GSM Platform MT6260
Mode GSM+GPRS
Frequency GSM 850/900/1800/1900
Antenna Interior on the bottom
Glucose
Type Module mounted
IC Fujitsu MB95F378E
Test Sample Fresh capillary whole blood
Test Result Plasma / Serum glucose
Sample Size Less than 0.5 μL
Measuring Time Less than 5 seconds
Measuring Range 20mg/dL~600mg/dL
Hematocrit Range 20% ~ 60%
Working temp 10℃ ~ 40℃,
General
LCM
Size - 2.4" QVGA
Hi contrast TFT
Colors 260K
Resolution - 320 * 240 pixels
Button pad (3 Buttons)
Left - Menu, information menu
Middle - ON/OFF; Enter, test mode change
Right - Averages, readings history
Meter Dimension 100* 49.8 * 16.5mm
Meter weight 85g+/-5g With battery
meter input DC5V, 0.5A
Port Micro USB - Charging, software download
Speaker 15MM mini-speaker as buzzer or vocal reminding
Battery Capacity
Battery
3.7V, 1,000mAh Li-Ion
Life - 25-30 days for normal use (2-3 tests per day)
Data entry 500 Entries
Main standby page GSM signal strength, battery level, carrier name, date/time
Languages English
software name and
version Bionime X.X
Warranty
Smart Meter Corporation warrants that this product will be free from defects in materials and
workmanship for five years from the date of purchase.

This warranty does not apply to the performance of an iGlucose Blood Glucose meter that has been
altered, misused, tampered with or abused in any way.
This warranty applies only to the original purchaser of the iGlucose Blood Glucose Monitoring
System.
Please complete and return the enclosed warranty card.
Different models have different specifications. This warranty applies only to the iGlucose Blood
Glucose Monitoring System; other models are not covered with this warranty card.
iGlucose is a trademark of Smart Meter Corporation.
NOTE
- During blood glucose measurement, the iGlucose Blood Glucose meter itself may come into contact
with blood. All parts of the iGlucose Blood Glucose Monitoring System are considered biohazardous
and can potentially transmit infectious diseases. Please follow your healthcare professional's
direction to properly dispose of the used iGlucose Blood Glucose Monitoring System after removing
the batteries.
Customer Service
Please review all of the instructions to make sure you are performing the steps correctly. If you have
any questions or concerns, please contact the iGlucose Diabetes Support Center toll free at 1-555-
555-5555 or visit our web site:
www.gediabetes.com. (Monday through Friday 8:00 AM to 5:00 PM PST. If you have questions or
need assistance outside the operational days and times, please contact your healthcare provider.)
Expected glucose values for persons without diabetes ⁽¹⁾
Status Range (mg/dL)
Fasting < 100 mg/dL
Two hours after meals < 140 mg/dL
References
1) American Diabetes Association: Diabetes Care, January 2015, volume 38 (Suppl. 1) S8-S16.
Component Manufacturer Information
iGlucose Blood Glucose Meter, Test Strip, Control Solution
Manufacturer: Bionime Corporation
No. 100, Sec. 2, Daqing St., South Dist., Taichung City 40242, Taiwan
Lancing Device
Manufacturer: Bionime Corporation
No. 100, Sec. 2, Daqing St., South Dist., Taichung City 40242, Taiwan
Disposable Sterile Lancets
Manufacturer: SteriLance Medical (SuZhou) Inc.
No.68 LiTangHe RD, XiangCheng, SuZhou, JiangSu 215133, P.R. China
General Electric Company and is under license by Bionime Corporation,
No. 100, Sec. 2, Daqing St., South Dist., Taichung City 40242, Taiwan (R.O.C)
Log Book
Name:
Address:
Home Phone: Work Phone:
Doctor: Doctor’s Phone:
Pharmacy: Pharmacy Phone:
Insulin/Pills: Log book date From: To:
In case of emergency contact:
Date M T W T F S S
Breakfast
Blood Glucose
Insulin/
Medication
Lunch
Blood Glucose
Insulin/
Medication
Dinner
Blood Glucose
Insulin/
Medication
Bedtime
Blood Glucose
Insulin/
Medication
Other
Blood Glucose
Insulin/
Medication
Comments

Warranty Card
Distributor name and address
PLACE
STAMP
HERE
Warranty Card
Name: Tel: Distributor name and address
Address:
Serial No.: Model
Date of Purchase:
(Please present this card for product replacement)
Limited warranty:
1. Bionime warrants to the original purchaser only, that the iGlucose Blood Glucose meter shall be
free of any defects in materials or workmanship and, provided it is not modified, altered or misused,
will perform in accordance with specifications for a period of five (5) years from the original date of
purchase.
2. Bionime guarantees the performance of the iGlucose Blood Glucose meter only if used as directed
and provided that the failure to perform has not been caused in whole or in part by the use of test
strips that are not iGlucose Blood Glucose Test Strips manufactured by Bionime. Use only iGlucose
Blood Glucose Test Strips in your iGlucose Blood Glucose Meter.
3. The sole obligation of Bionime under this warranty shall be to replace any defective iGlucose
Blood Glucose Meter. No other warranties, express or implied, are made. Bionime shall not be
responsible for any incidental or consequential damages.
4. You must contact your distributor for assistance and/or instructions for obtaining a replacement
iGlucose Blood Glucose meter is a trademark of Smart Meter Corporation.

Emerge
n
iGlucos
e
• User
N
• Emer
g
• Blood
• Docto
r
I am a p
services
*Pleas
e
n
cy Card
e
Blood Gluc
o
N
ame:
g
ency Conta
c
Type:
r
/Hospital:
erson with
d
immediatel
y
e
fill out this
o
se Monito
r
c
t Phone No
.
d
iabetes. If y
o
y
. Or call:
card and ca
r
ing System
:
o
u find me i
n
rry with you
n
a coma or
u
at all times
.
stupor, plea
.
se contact nearest eme
r
r
gency