Smart Technologies and Investment SMARTWS210 Wireless GSM dialer (Smart Control) User Manual users manual
Smart Technologies & Investment Ltd Wireless GSM dialer (Smart Control) users manual
users manual

RED SHIELD GSM SMART CONTROL
– INSTALLATION AND OPERATING INSTRUCTIONS
For use with RedShield Wire-free Home Protection System
Type of product: GSM Smart Control
Keep this manual safe for reference and future maintenance
1. Introduction
The GSM Smart Control worksjustlikeasecuritysystemkeypadallowingyoutoaccessandoperateyour
systemremotelyfromanywhereintheworldwhenusingyourSmartphoneorothercompatiblewireless
handhelddevices.It'sneverbeeneasiertostayintheknowandstayincontrol.
• Manage up to three premises
• Alert up to 8 specific individuals using GSM network to manage the system
• Listen to immediate vicinity using built in microphone
• Activate, deactivate or home security system from afar
• Applicable for universal 850/900/1800/1900Mhz GSM frequency
2. Choosing a Location
To ensure that installation proceeds smoothly please select a suitable location. This location would ideally be
close to a mains power outlet that is accessible to the user and yet not accessible to unauthorized personnel.
• Fasten the device on a smooth, dry and secure foundation. Ensure that a clear GSM signal reception is
present at the point of installation prior to assembly.
• Avoid locations near extreme temperature sources (radiators, ovens, stoves) and large metal objects that could
interfere with radio signals.
3. Installation
The easiest way to get to know the system and get it up and running quickly is to have all the devices
and accessories laid out before mounting them. You will need following devices to complete the set up:
1 x GSM Smart Control
1 x AC Adaptor
2 x series of screws
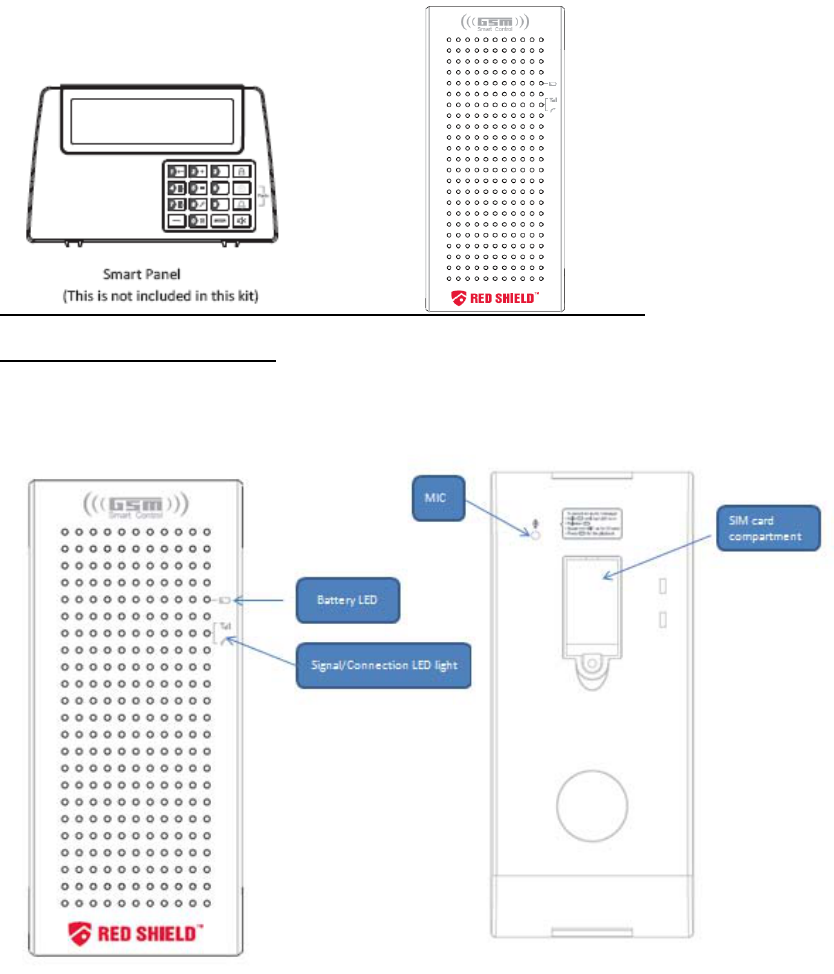
(WS210B GSM Smart Control)Smart Panel does not come with this kit. You may contact the local distributor to
purchase the full security kit)
3.1 First time installation:
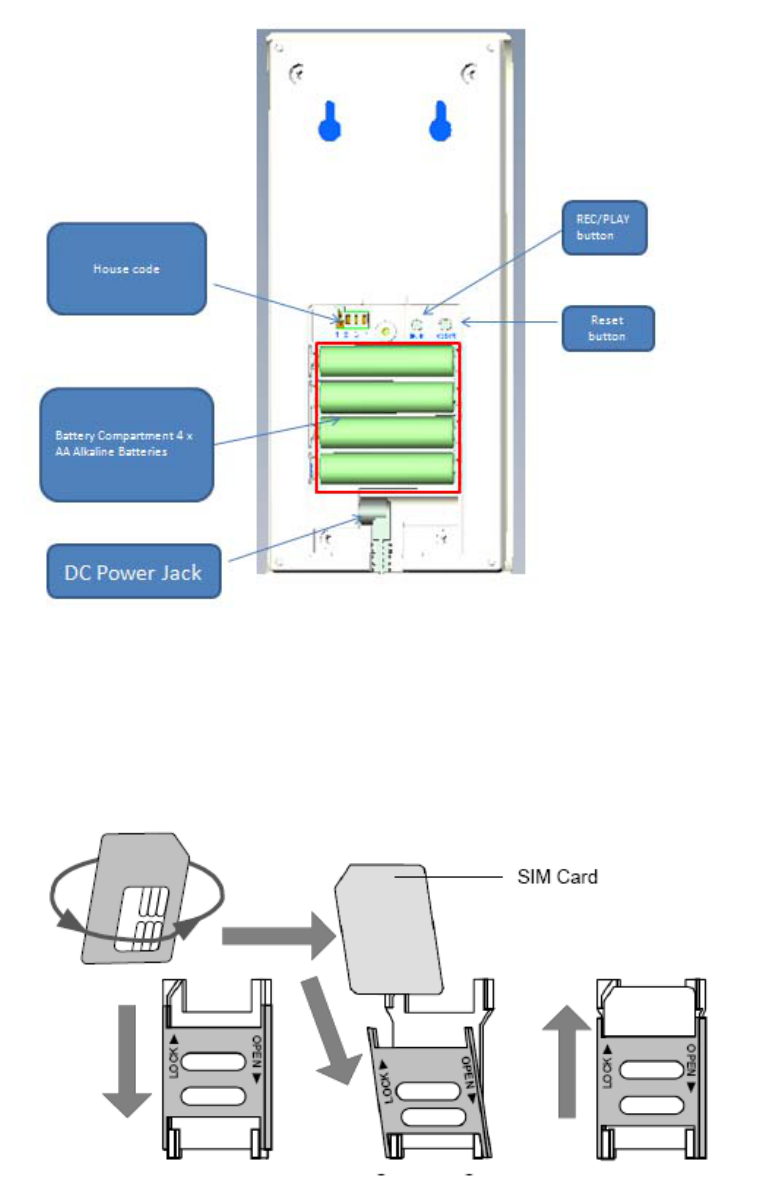
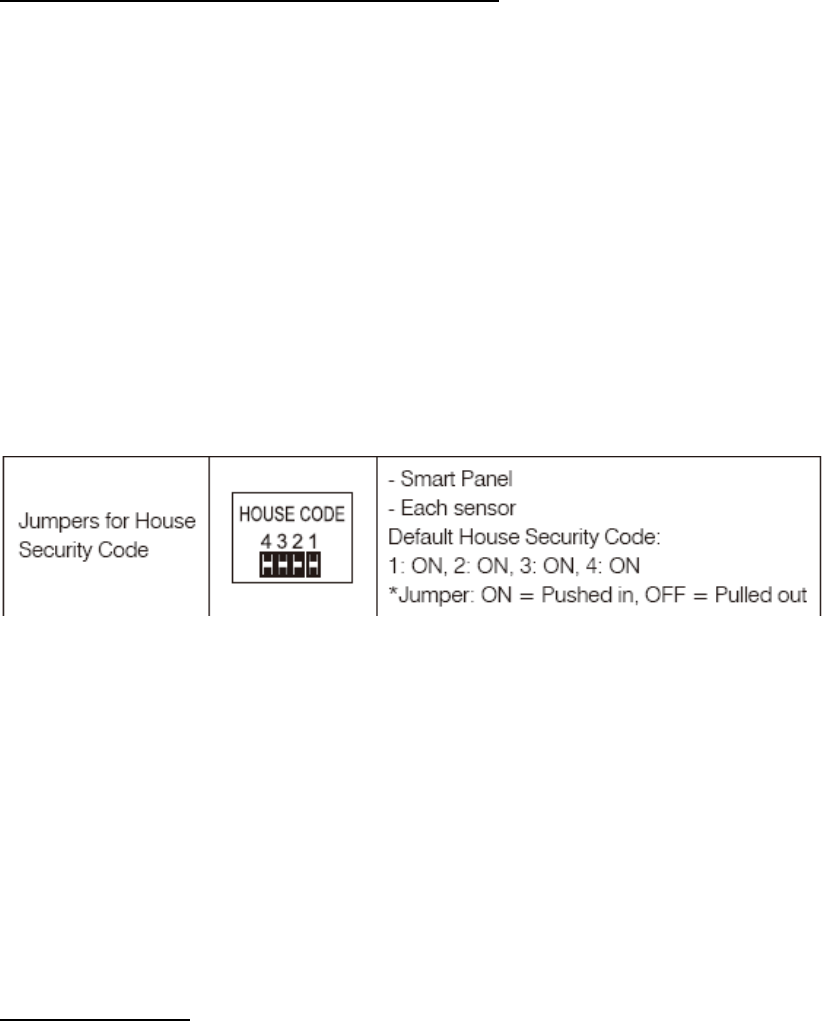
a. Remove the front covers of the GSM Smart Control
b. Push the SIM card holder backwards as illustrated and then unfold the slot forwards.
c. Insert the SIM card. Push the SIM card holder back again upwards.
d. Replace and secure both covers.
e. Insert batteries ensuring that they are correctly oriented and connect the AC adaptor.
f. The Battery LED & Signal LED lights will light up.
g. After a while they will both go out indicating that the GSM Smart Control has connected with the GSM network.
The signal LED light will light up every 10 seconds to indicate the GSM Smart Control is linked to the GSM
network.
h. Enroll GSM Smart Control with a Smart Panel. Please refer to section 3.2 for enrolling the GSM Smart
Control into a Smart Panel.
i. Replace and secure cover for the battery compartment.
j. Mount at intended location.
3.2 Enrolling GSM Smart Control with the Smart Panel
In order to use the GSM Smart Control with the Smart Panel you will need to enroll the components. This will
allow the Smart Panel to recognize and interact with the GSM Smart Control.
The enrolling procedure must be completed in order for the GSM Smart Control to work properly. If the
procedure is not completed then the GSM Smart Control will not respond to system input.
IMPORTANT:
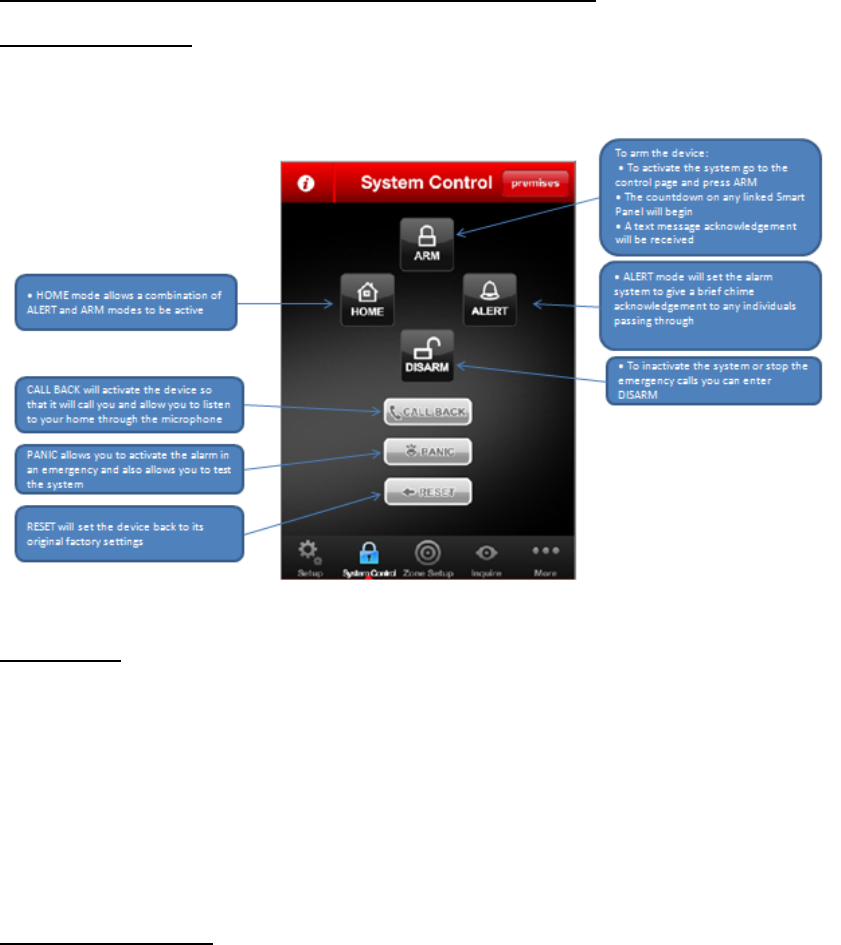
In most cases the factory settings of the House security Code will NOT need to be changed. However if the
Smart Panel and sensors activate intermittently or are unresponsive this may be due to interference with other
radio frequency systems. You may wish to change the house codes ensuring that they are identically arranged
in both the Smart panel and Smart Control.
There are 4 jumpers/dip-switches on each device. They can be found when you remove the battery
compartment cover. When the jumpers are present the circuit is ‘ON’. If absent the circuit is ‘OFF’. Ensure that
these settings are identical if you need to make modifications to the panel, sensors and any remote control
device.
a. Enter the 4 digit pin on the Smart Panel and press the SETTING button and ‘2’ (Enrollment mode).
b. Simultaneously hold down the RECORD and RESET button on the back of the GSM Smart Control for two
seconds
c. Several beeps from the Smart Panel will indicate that the enrollment is successful
d. Press ENTER on the Smart Panel to exit the enrollment mode
3.3. Voice messages

The user is able to pre-record a voice message up to 20 seconds long. The device has an integrated
microphone and loudspeaker for recording and playing voice messages. Messages should be recorded so that
they reflect the circumstances and provides key details.
IMPORTANT:
We recommend adding a note at the end of the message to remind the owner of the system to disarm the
system. Otherwise, the next programmed telephone number is dialed until the dialing cycle is finished. After the
last number has been dialed the Smart Control will then proceed to call the first recipient and proceed as before.
The GSM Smart Control houses a sensitive microphone. This allows the user to record a short message
intended for specific individuals or the emergency services. To record a message:
• Hold (RECORD/PLAY) left button on the rear until BATTERY LED is continuously lit
• Release (RECORD/PLAY) button
• Speak into the microphone for up to 20 seconds
• Press the (RECORD/PLAY) button to cut the recording if less than 20 seconds
• Press the same (RECORD/PLAY) button for playback
4. Factory settings reset
In order to ensure that all existing settings are deleted, a factory settings reset is recommended after a new
installation.
Press and hold the “RESET” button for 5 seconds. It will restore the factory default settings.
5.Setting up your Smart Control using Smart Phone Application (App)
Use of the Smart Phone allows the user a convenient and readily accessible means to remotely interact with
their Red Shield Security system across long distances. Searchfor‘RedShield’tofindtheapponyourApple®
AppstoreorAndroid®GooglePlaytodownloadtheapptoyouriPhone,orotherapplicabledevice.
After installation of the application (App.) you will need to set it up as follows:
a.) On the first time after installation determine your personalized 4-digit PIN and key this in. This PIN is to
protect unauthorized personnel from accessing this application.
b.) Re-enter your personalized 4-digit PIN to access this app.
d.) Go to the setup page.
e.) Select the premises which you would like to set up. You can manage up to 3 premises.
e) Country - Select which country the system is installed in.
f) GSM Phone - Enter the phone number of the SIM card in the GSM Smart Control
g) GSM password – input the GSM Smart Control’s security PIN. You must enter the default PIN “1234” on the
first time you access this device. An “edit” button will appear after you have set your password. Press the “edit”
button and enter a personalized 4 digit PIN.
h) Program the telephone numbers that you wish the Smart GSM console to call when your system is triggered.
The GSM Smart Control can call up to 8 phone numbers.
I) Finally, select dialing cycles. This ranges from 1 to 9 cycles, the default cycle being 3. This is the number of
times you would like your GSM Smart Control console to attempt to call each phone number.
J) After you confirmed the above setup information by pressing this button, you will receive a confirmation text
message on the above settings from your GSM Smart Control in a few seconds.
K) You will now be able to manage settings using the smart phone
*All authorized users must be using the same security password after this has been initially set. If you forget this,
hold RESET to restore the Smart Control into its default. If multiple Smart phones are being used the most
recent one to change the settings will have their programming entered into the system.
6. Controlling your system using Smart Phone Application (App)
System control page
Every instruction is sent via a text message. A text message acknowledgement corresponding to every
instruction will be sent in response. For a detailed description of the keys press ‘i’.
Inquire page
• You can check the settings of your GSM Smart Control and ensure that everything is in order by pressing
CHECK SETUP on the INQUIRE page. A text message response will list telephone numbers, dialing cycles as
well as the power status of any associated Smart Panel.
• After every CHECK SETUP command the associated device will enter HOME mode which allows for a
combination of ARM and ALERT pre-assigned zones. You may need to send a command for the desired
operating mode of your system after the inquiry.
Activation of the Alarm
Upon activation of the alarm the Smart Control will send a text message followed by a call to the first two
recipients. When a recipient picks up they will hear the recording and will then be able to listen in through the
microphone. If nobody picks up the Smart Control may make repeated attempts corresponding to the number of
dialing cycles set. After all attempts have been made the next recipient will be dialed. After the last recipient is
called the Smart Control will resume with the first recipient until the system is deactivated. This can only be
achieved by the user sending an SMS to the Smart Control or by disconnecting all power sources from the
Smart Control.

FCC Statement
This equipment has been tested and found to comply with the limits for a Class B digital device, pursuant to part
15 of the FCC rules. These limits are designed to provide reasonable protection against harmful interference in a
residential installation. This equipment generates, uses and can radiate radio frequency energy and, if not
installed and used in accordance with the instructions, may cause harmful interference to radio communications.
However, there is no guarantee that interference will not occur in a particular installation. If this equipment does
cause harmful interference
to radio or television reception, which can be determined by turning the equipment off and on, the user is
encouraged to try to correct the interference by one or more of the following measures:
-Reorient or relocate the receiving antenna.
-Increase the separation between the equipment and receiver.
-Connect the equipment into an outlet on a circuit different from that to which the receiver is connected.
-Consult the dealer or an experienced radio/TV technician for help.
To assure continued compliance, any changes or modifications not expressly approved by the party responsible
for compliance could void the user’s authority to operate this equipment. (Example- use only shielded interface
cables when connecting to computer or peripheral devices).
FCC Radiation Exposure Statement
This equipment complies with FCC RF radiation exposure limits set forth for an uncontrolled environment. This
transmitter must not be co-located or operating in conjunction with any other antenna or transmitter. This
equipment should be installed and operated with a minimum distance of 20 centimeters between the radiator
and your body.
This device complies with Part 15 of the FCC Rules. Operation is subject to the following two conditions: (1)
this device may not cause harmful interference, and (2) this device must accept any interference received,
including interference that may cause undesired operation.
Caution
Any changes or modifications not expressly approved by the party responsible for compliance could void the
user's authority to operate the equipment.
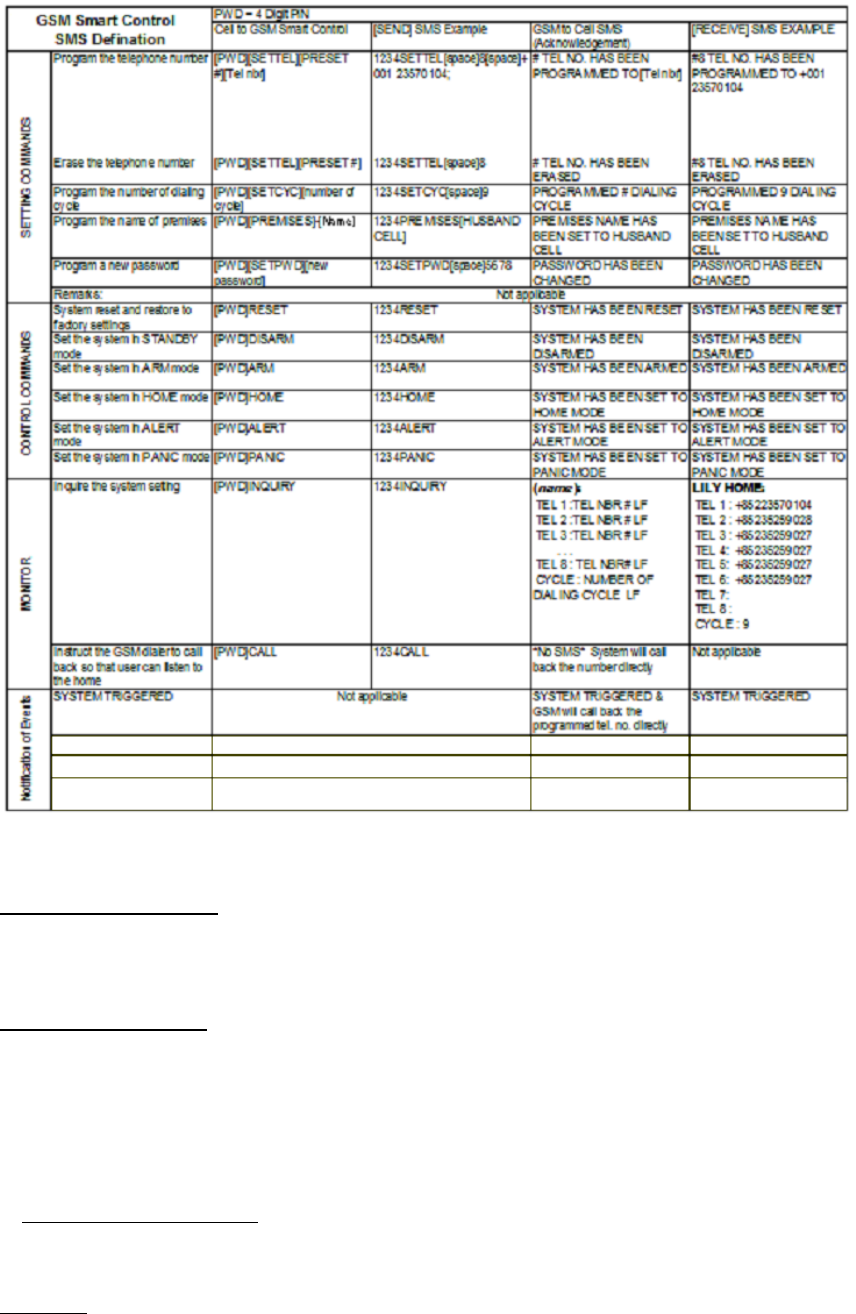
7. Controlling your system using handhelddevices via SMS
As an alternative if you are unable to use the Smart Phone app the Smart Control can be controlled by precise
SMS text instructions. These are listed below:
8. General Maintenance
Regular maintenance and inspection is encouraged. In order to ensure that all components are at optimal
performance please test all components on a regular basis and replace batteries at suitable intervals.
9. General information
The GSM Smart Control allows greater control in terms of remote management of the Red Shield Security
system. Also its automated functions can direct a short message to specific individuals or the emergency
services and thus allow a more direct response to any intrusion.
Red Shield is working to expand its range of sensory devices and is the leading developer of easy to install,
expandable home security systems. For more information on other Red Shield products please visit our website
at www.redshieldsecurity.com.
10. Q & A

What if I have forgotten my password?
If you forget the GSM Smart Control password you may need to reset the Smart Control so that the device is
able to respond to the new password. To reset the password hold down the reset button for 5 seconds. You will
have to set a new password via the app Setup page.
Is this compatible with emergency lines?
Many emergency lines direct the caller to an automated reception which cannot interact with the Smart Control.
We suggest you identify direct lines to relevant emergency service personnel before entering them into the
Smart Control setup.
What is the wireless range? What about walls and other signal obstructions?
In an open space the range is 150 metres. We suggest you test the system before fixing them so that the
optimal location can be established.
Can the system be dismantled and redeployed?
Red Shield Alarm systems are designed to be easily installed, dismantled and relocated.
Can the signal be jammed or disrupted?
Red Shield products use a specific radio frequency. There may be a case of false activation by neighbours who
also use Red Shield products but your system can be modified to eliminate these by changing the House code.
Where can I buy other Red Shield Alarm systems and sensors?
Please contact any of our representatives who can assist you in contacting the local distributor.
What other Red Shield products are available?
Please visit our website at http://www.redshieldsecurity.com for more information on other components of the
Red Shield series.
I have some other issue I require assistance on.
Please feel free to contact one of our representatives at customer@redshieldsecurity.com. We would be happy to
provide whatever assistance we can.
11. Troubleshooting
Audio recording is poor
Please ensure that you speak clearly into the microphone and ensure that there is minimal background noise.
AC Power Failure
Check all connections and see whether your mains are still operational. The Backup battery should keep the
device working for another 6 hours
System Battery failure
If the backup battery is running low a battery symbol will flash on the display. This should be replaced as soon
as the battery low symbol appears

Sensor failure
Check that the house settings code settings are identical in the Smart Panel and in the sensor.
Bulgarian
Български
Cнастоящето,SmartTechnologies&InvestmentLtd.декларира,четовабезжично
устройствоевсъответствиесъссъщественитеизискванияидругитеприложими
разпоредбинаДиректива1999/5/EC.
Czech
Česky
SmartTechnologies&InvestmentLtd.tímtoprohlašuje,žetentoRadioLANdevicejeveshodě
sezákladnímipožadavkyadalšímipříslušnýmiustanovenímisměrnice1999/5/ES.
Danish
Dansk
UndertegnedeSmartTechnologies&InvestmentLtd.erklærerherved,atfølgendeudstyrRadio
LANdeviceoverholderdevæsentligekravogøvrigerelevantekravidirektiv1999/5/EF
Dutch
Nederlands
HierbijverklaartSmartTechnologies&InvestmentLtd.dathettoestelRadioLANdevicein
overeenstemmingismetdeessentiëleeisenendeandererelevantebepalingenvanrichtlijn
1999/5/EG
BijdezeSmartTechnologies&InvestmentLtd.datdezeRadioLANdevicevoldoetaande
essentiëleeisenenaandeoverigerelevantebepalingenvanRichtlijn1999/5/EC.
EnglishHereby,SmartTechnologies&InvestmentLtd.,declaresthatthisRadioLANdeviceisin
compliancewiththeessentialrequirementsandotherrelevantprovisionsofDirective
1999/5/EC.
Estonian
Eesti
KäesolevagakinnitabSmartTechnologies&InvestmentLtd.seadmeRadioLANdevice
vastavustdirektiivi1999/5/EÜpõhinõuetelejanimetatuddirektiivisttulenevateleteistele
asjakohastelesätetele.
Finnish
Suomi
ValmistajaSmartTechnologies&InvestmentLtd.vakuuttaatätenettäRadioLANdevice
tyyppinenlaiteondirektiivin1999/5/EYoleellistenvaatimustenjasitäkoskeviendirektiivin
muidenehtojenmukainen.
French
Français
ParlaprésenteSmartTechnologies&InvestmentLtd.déclarequel'appareilRadioLANdevice
estconformeauxexigencesessentiellesetauxautresdispositionspertinentesdeladirective
1999/5/CE
German
Deutsch
HiermiterklärtSmartTechnologies&InvestmentLtd.,dasssichdieser/diese/diesesRadioLAN
deviceinÜbereinstimmungmitdengrundlegendenAnforderungenunddenanderen
relevantenVorschriftenderRichtlinie1999/5/EGbefindet".(BMWi)
HiermiterklärtSmartTechnologies&InvestmentLtd.dieÜbereinstimmungdesGerätesRadio
LANdevicemitdengrundlegendenAnforderungenunddenanderenrelevantenFestlegungen

derRichtlinie1999/5/EG.(Wien)
Greek
Ελληνική
μετηνπαρουσαSmartTechnologies&InvestmentLtd.δηλωνειοτιradioLANdevice
συμμορφωνεταιπροστισουσιωδεισαπαιτησεισκαιτισλοιπεσσχετικεσδιαταξειστησ
οδηγιασ1999/5/εκ.
Hungarian
Magyar
Alulírott,SmartTechnologies&InvestmentLtd.nyilatkozom,hogyaRadioLANdevicemegfelel
avonatkozóalapvetõkövetelményeknekésaz1999/5/ECirányelvegyébelõírásainak.
Italian
Italiano
ConlapresenteSmartTechnologies&InvestmentLtd.dichiarachequestoRadioLANdeviceè
conformeairequisitiessenzialiedallealtredisposizionipertinentistabilitedalladirettiva
1999/5/CE.
Latvian
Latviski
AršoSmartTechnologies&InvestmentLtd.deklarē,kaRadioLANdeviceatbilstDirektīvas
1999/5/EKbūtiskajāmprasībāmuncitiemartosaistītajiemnoteikumiem.
Lithuanian
Lietuvių
ŠiuoSmartTechnologies&InvestmentLtd.deklaruoja,kadšisRadioLANdeviceatitinka
esminiusreikalavimusirkitas1999/5/EBDirektyvosnuostatas.
Maltese
Malti
Hawnhekk,SmartTechnologies&InvestmentLtd.,jiddikjaralidanRadioLANdevice
jikkonformamal‐ħtiġijietessenzjaliumaprovvedimentioħrajnrelevantilihemmfid‐Dirrettiva
1999/5/EC.
Polish
Polski
NiniejszymSmartTechnologies&InvestmentLtd.oświadcza,żeRadioLANdevicejestzgodnyz
zasadniczymiwymogamiorazpozostałymistosownymipostanowieniamiDyrektywy1999/5/EC.
Portuguese
Português
SmartTechnologies&InvestmentLtd.declaraqueesteRadioLANdeviceestáconformecom
osrequisitosessenciaiseoutrasdisposiçõesdaDirectiva1999/5/CE.
Romanian
Romană
SmartTechnologies&InvestmentLtd.declarăcăacestdispozitivfărăfirrespectăcerințele
esențialeprecumşialtedispozițiirelevantealeDirectivei1999/5/EC.
Slovak
Slovensky
SmartTechnologies&InvestmentLtd.týmtovyhlasuje,žeRadioLANdevicespĺňazákladné
požiadavkyavšetkypríslušnéustanoveniaSmernice1999/5/ES.
Slovenian
Slovensko
SmartTechnologies&InvestmentLtd.izjavlja,dajetaradioLANdevicevskladuzbistvenimi
zahtevamiinostalimirelevantnimidoločilidirektive1999/5/ES.
SpanishPormediodelapresenteSmartTechnologies&InvestmentLtd.declaraqueelRadioLAN
Españoldevicecumpleconlosrequisitosesencialesycualesquieraotrasdisposicionesaplicableso
exigiblesdelaDirectiva1999/5/CE
Swedish
Svenska
HärmedintygarSmartTechnologies&InvestmentLtd.attdennaRadioLANdevicestårI
överensstämmelsemeddeväsentligaegenskapskravochövrigarelevantabestämmelsersom
framgåravdirektiv1999/5/EG.
Turkish
Turk
SmartTechnologies&InvestmentLtd.bukablosuzcihazıntemelgereksinimlerive1999/5/EC
yonergesindekiilgilikoşullarıkarşıladığınıbeyaneder.