SmartLabs 28452 Door Sensor User Manual
SmartLabs, Inc. Door Sensor Users Manual
Users Manual
®
INSTEON Door Sensor 2845-x22
®
INSTEON Door Sensor 2845-x22
Contents
Getting Started
INSTEON Door Sensor 4
Device Overview
Tools Needed for Installation
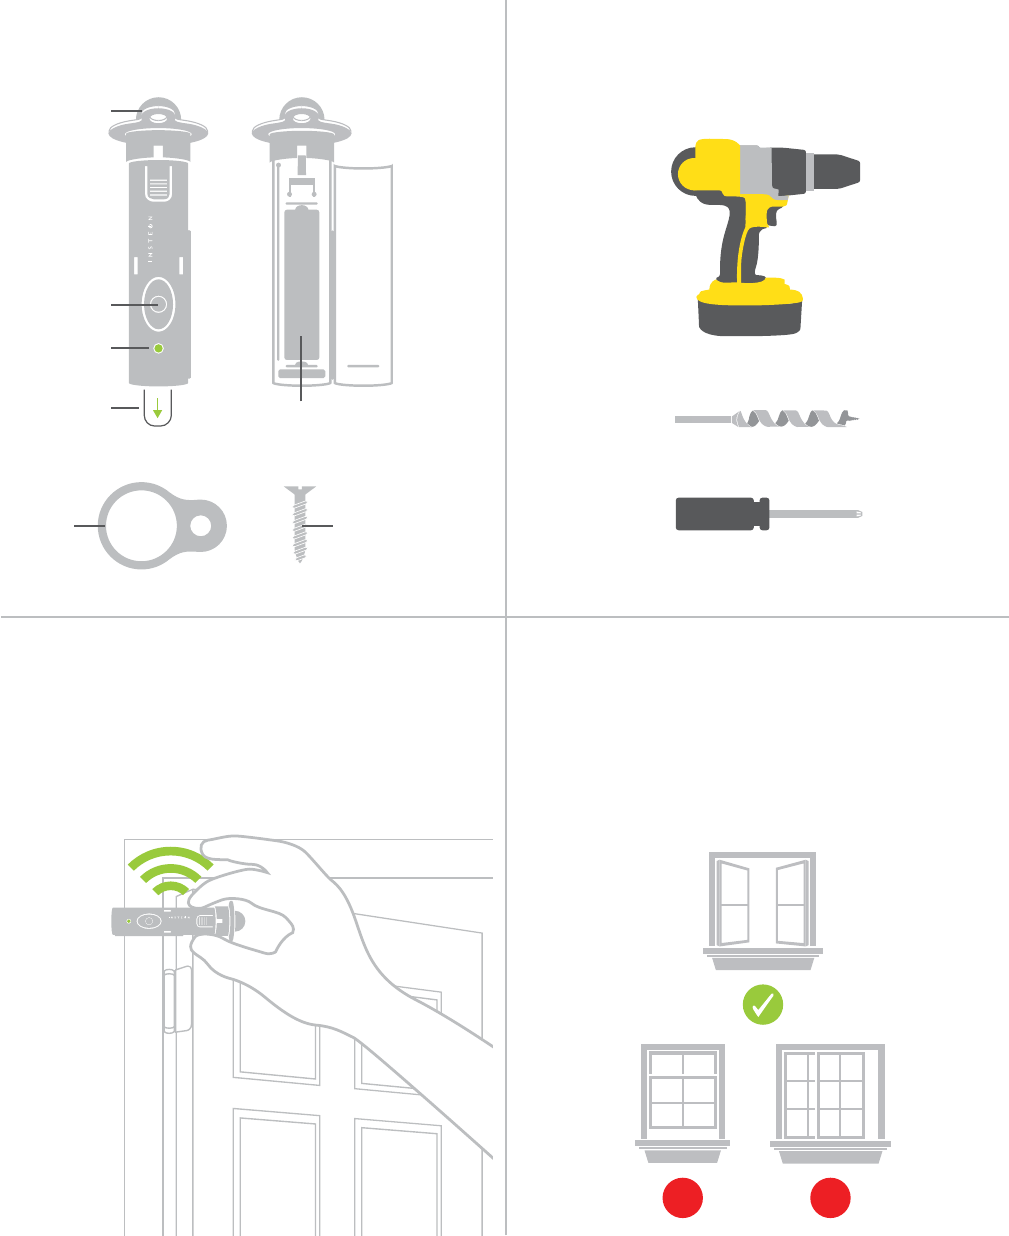
Test Your Location First
Install in a Window Frame
Installation
Link First 6
Locate the Hole
Drill the Hole
Test the Fit
Using the Spacer 7
INSTEON Links
Understanding Linking 9
Linking to the INSTEON Hub 11
Linking to Control Another Device 12
Five-Tap Linking to Control Another Device 13
Multi-Linking or Making a Scene 15
Unlinking a Device 16
Multi-Unlinking or Removing a Scene 17
Programming Wheel
About the Programming Wheel 20
Programming Wheel 21
Factory Reset
Factory Reset 23
Software-Only Features
Enable Group 1 & 2 Broadcast 25
Disable Local Programming
Disable LED and Beeper
Adjust Heartbeat Interval
Low Battery Warning 26
Appendix
29
Troubleshooting 32
33
Product Warranty 35

3
Everything you need to quickly get up and running.
Getting Started
Everything you need to quickly get up and running.
Getting Started
4
®
Door Sensor
Model: 2845-222
Device Overview Tools Needed for Installation
INSTEON Door Sensor
Door Sensor in it’s intended location and try
add a Range Extender.
Power Drill
3/4-inch Auger Drill Bit
(Recommended)
®
Door Sensor
Model: 2845-222
X
X
Test Your Location First Install in a Window Frame
®
Door Sensor
Model: 2845-222
®
Door Sensor
Model: 2845-222
Set
Button
Status
LED
Spacer Spacer Screw
Plunger
AAA Battery
Phillips Screwdriver
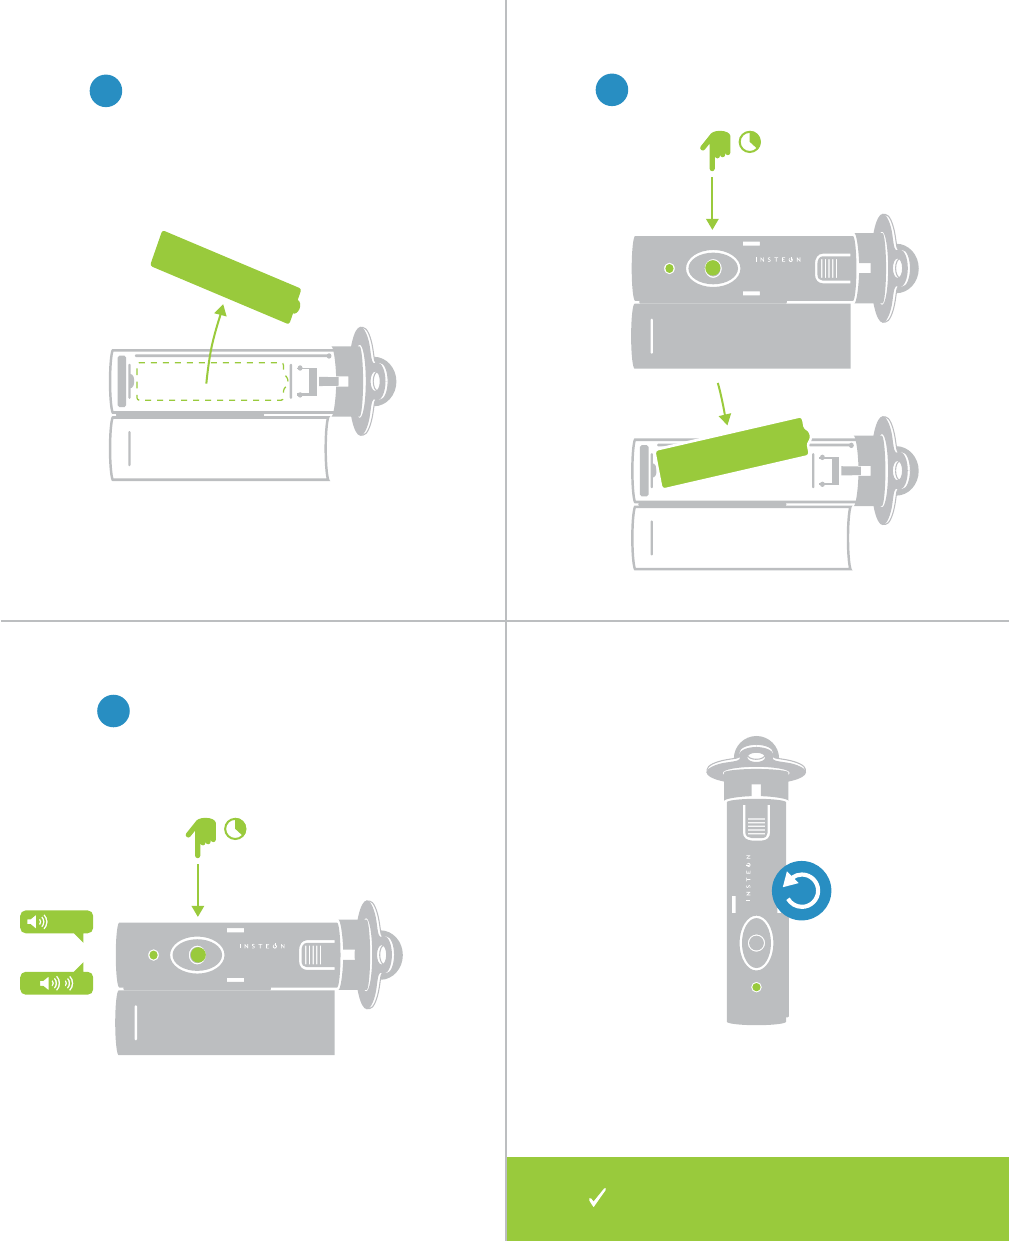
5
Installation
Test linking in the intended
location
Link with all devices you wish
to control
Drill a mounting hole and test
secure with a screw
device? See 5-Tap Linking.
Installation
Unbox and read instructions
Test linking in the intended
location
Link with all devices you wish
to control
Drill a mounting hole and test
Install Door Sensor and
secure with a screw
Oops. Forgot to link a
device? See 5-Tap Linking.
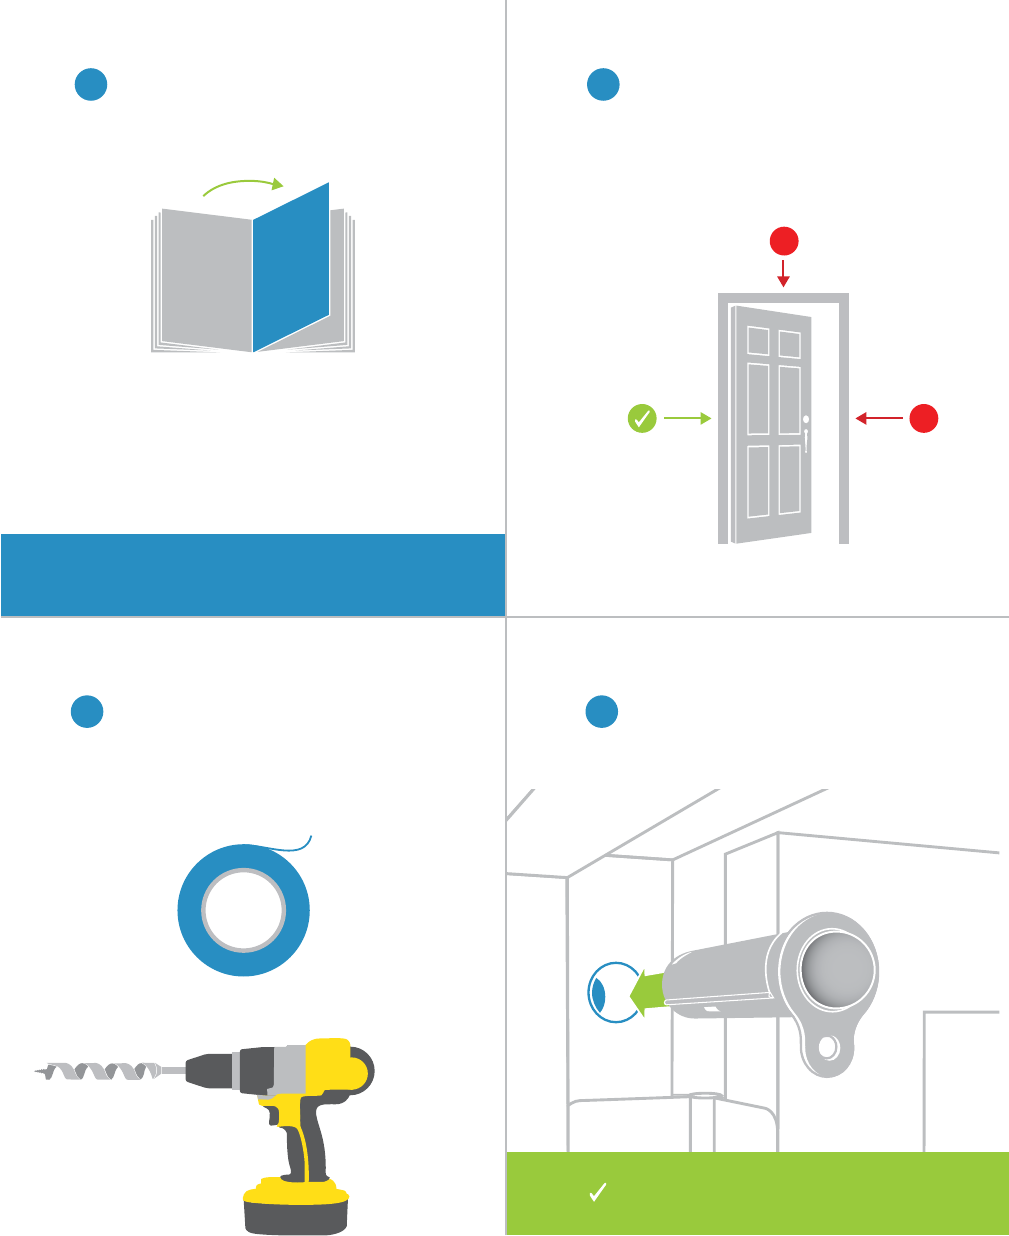
6
can link
Test the FitDrill the Hole
Link First Locate the Hole
Installation
low will still work.
assistant hold the door steady.
1 2
43
?
X
X
now complete.
7
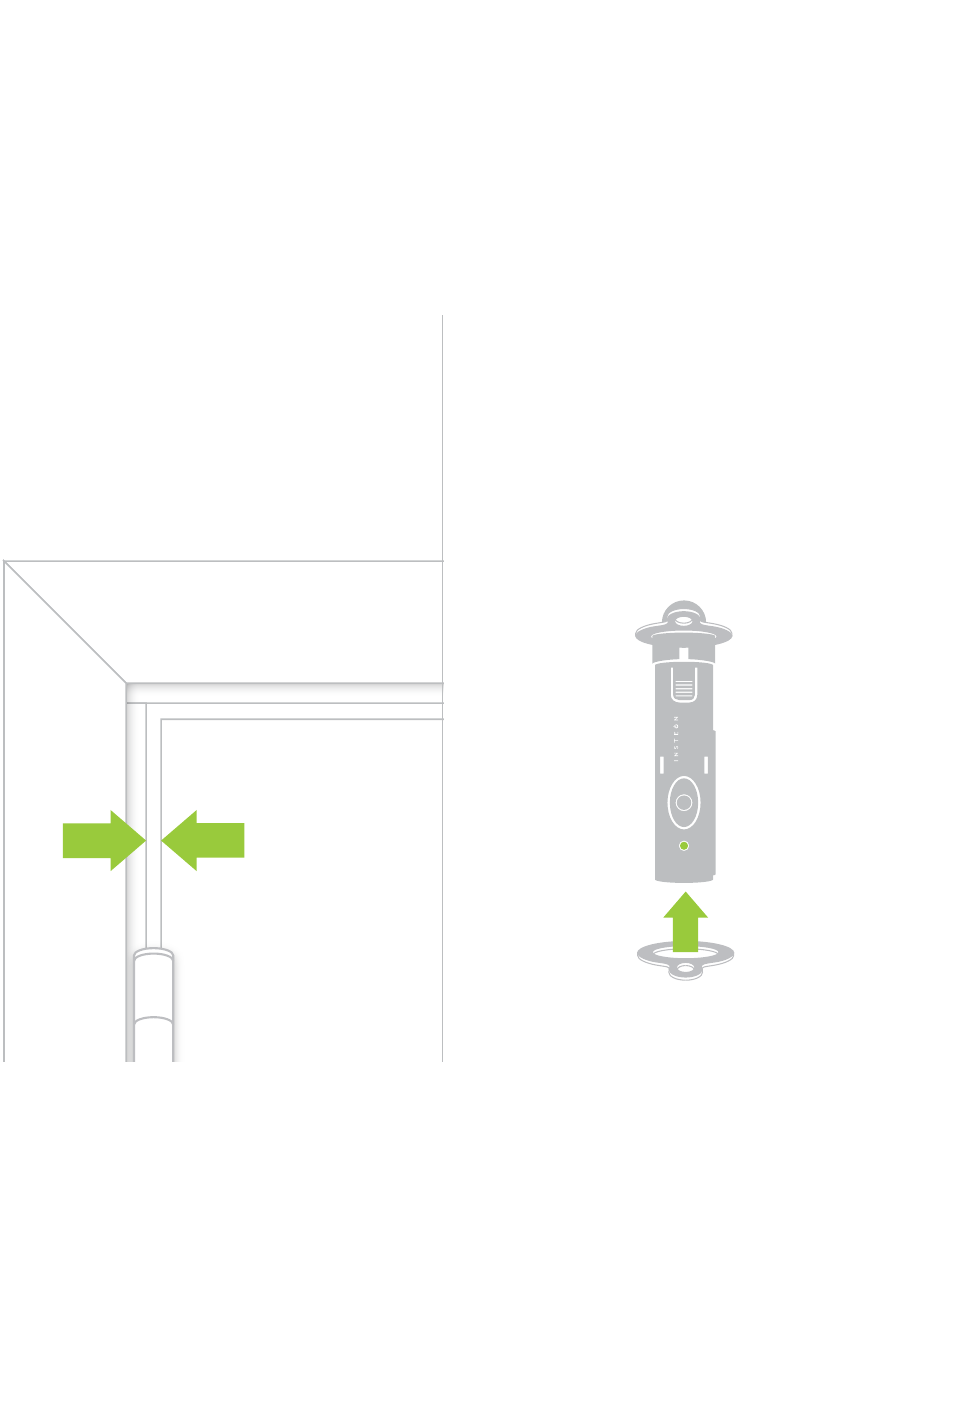
Using the Spacer
Slide the spacer over Door Sensor to
with the screw provided.
®
Door Sensor
Model: 2845-222

8
INSTEON Links
INSTEON devices can stand alone and function as a local switch or
dimmer, but their real power comes when they are connected together to
form a control system. Most INSTEON devices can control one another
and be the recipient of control. The process of associating multiple
INSTEON devices to one another is called Linking.
INSTEON Links
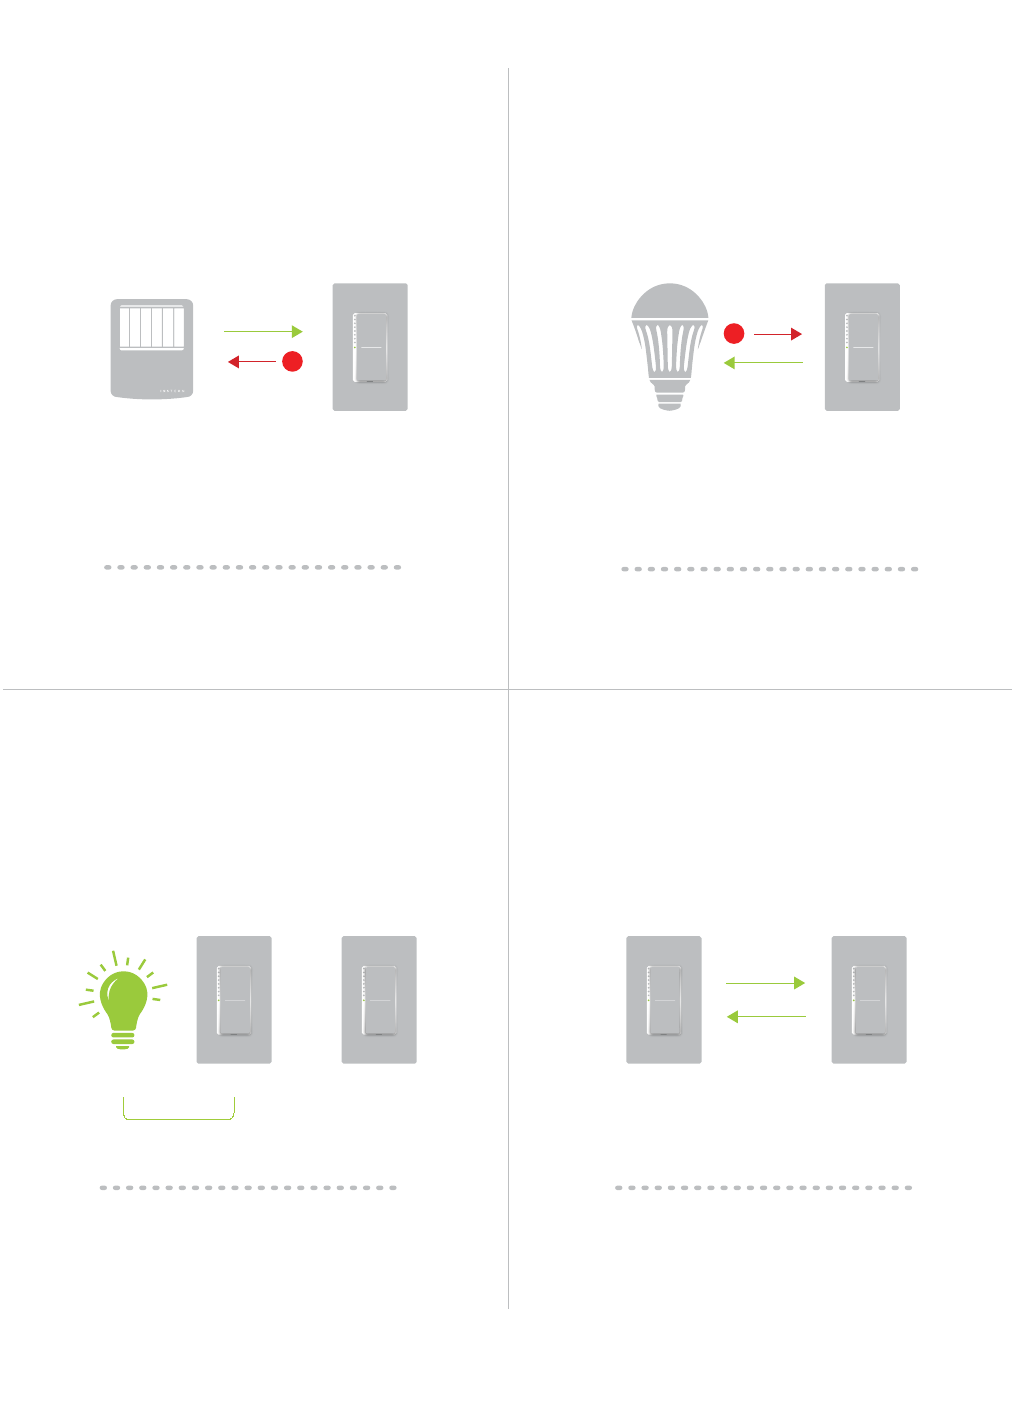
9
are created are one-way.
The switch will turn on the Lamp Dimmer to
A SwitchB Lamp Dimmer
®
75%
controller are called responders.
®
®
Neutral
On
Off
Set
N
N
Load L1
Line L
RespondersControllers
Links Remember a Device’s StateLinks are One-Way
Understanding Linking
®
®
®
Door Sensor
Model: 2845-222
10
Controller-Only
other devices.
Sensor.
Responder-Only
Some devices cannot control other devices;
Some devices can only link as
responders to devices and scenes.
LED Bulb Dimmer Switch
X
Understanding Linking
Grouping Devices Use Cross Linking
You may want to group together two
each direction.
To mirror Switch A and B so that they each
control one another and the connected
Link Switch A to Switch B and repeat to link
Switch B to Switch A.
A BLoad
Motion Sensor
®
X
Dimmer Switch
A B
11
®
Door Sensor
Model: 2845-222
Linking to the INSTEON Hub
2
1
3 4
devices.
Rooms
All Devices Check-In Favorites
Bathroom Bedroom Hallway
Kitchen Living Room Outside
72º
Add Device
LED Bulb Thermostat
Door Sensor Open/Close
Sensor
All Devices
Back Door Bathroom Bedroom
Font Door Garage Door Garage Light
Motion Sensor Outside Lights
72º
Add
3
Status may
not report
properly during
Preview
For Hardware Preview
Your Door Sensor is now added
12
®
Door Sensor
Model: 2845-222
®
Door Sensor
Model: 2845-222
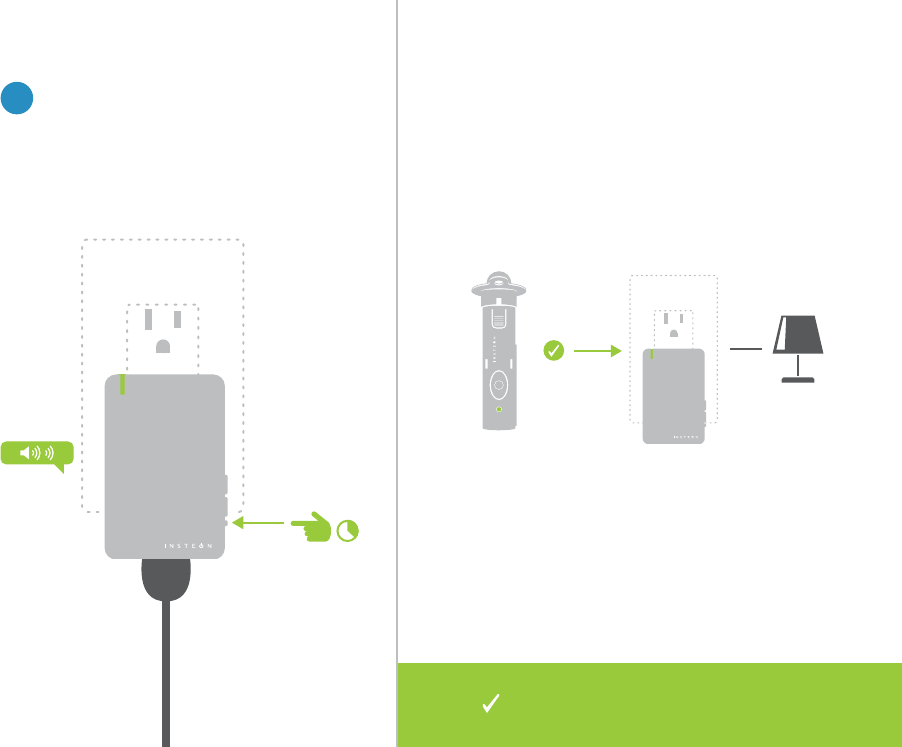
Linking to Control Another Device
2Adjust your responder to the desired
1
®
®
13
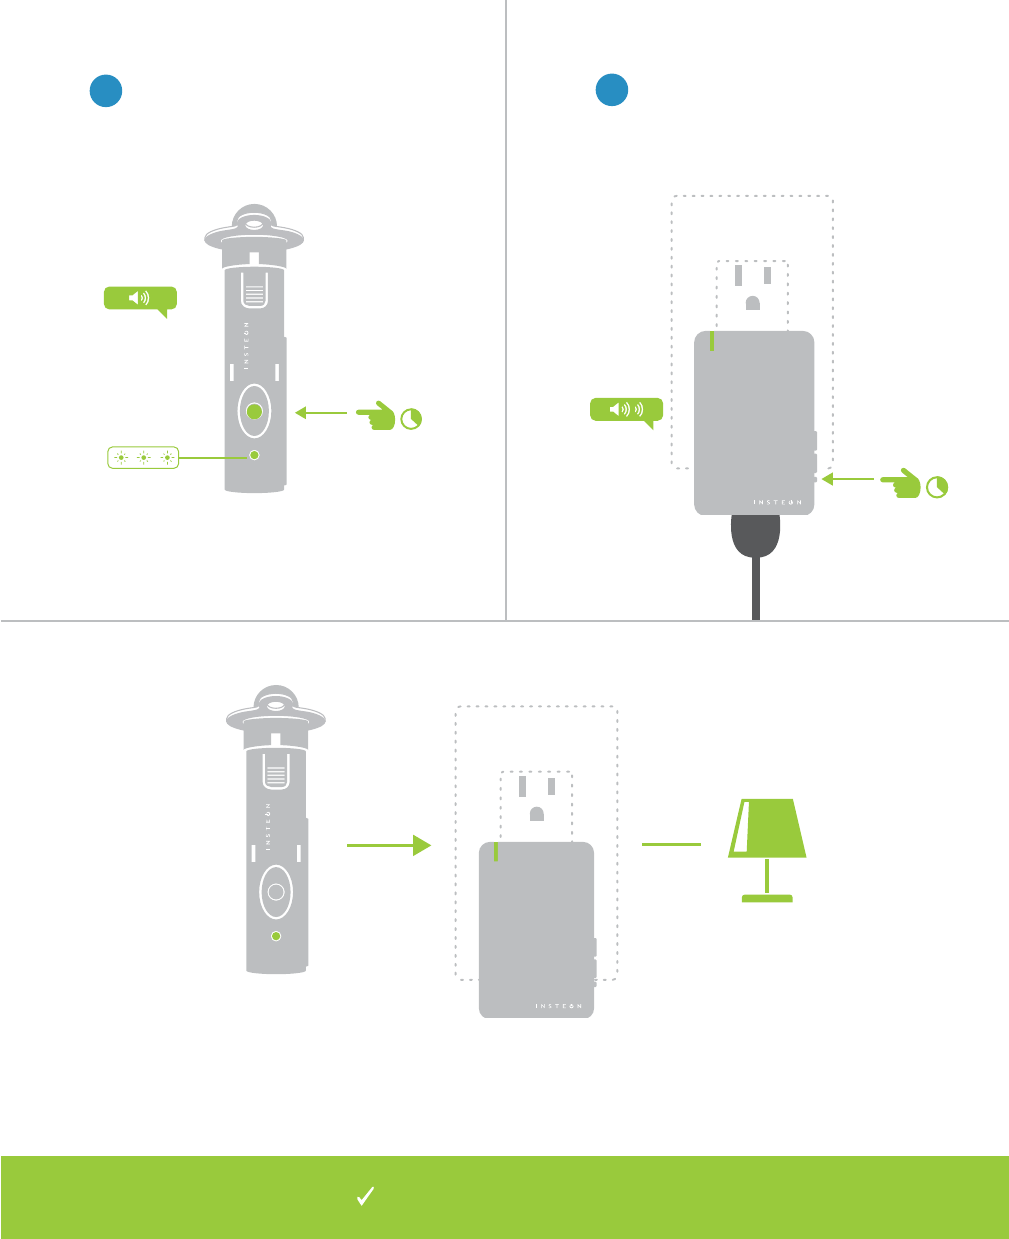
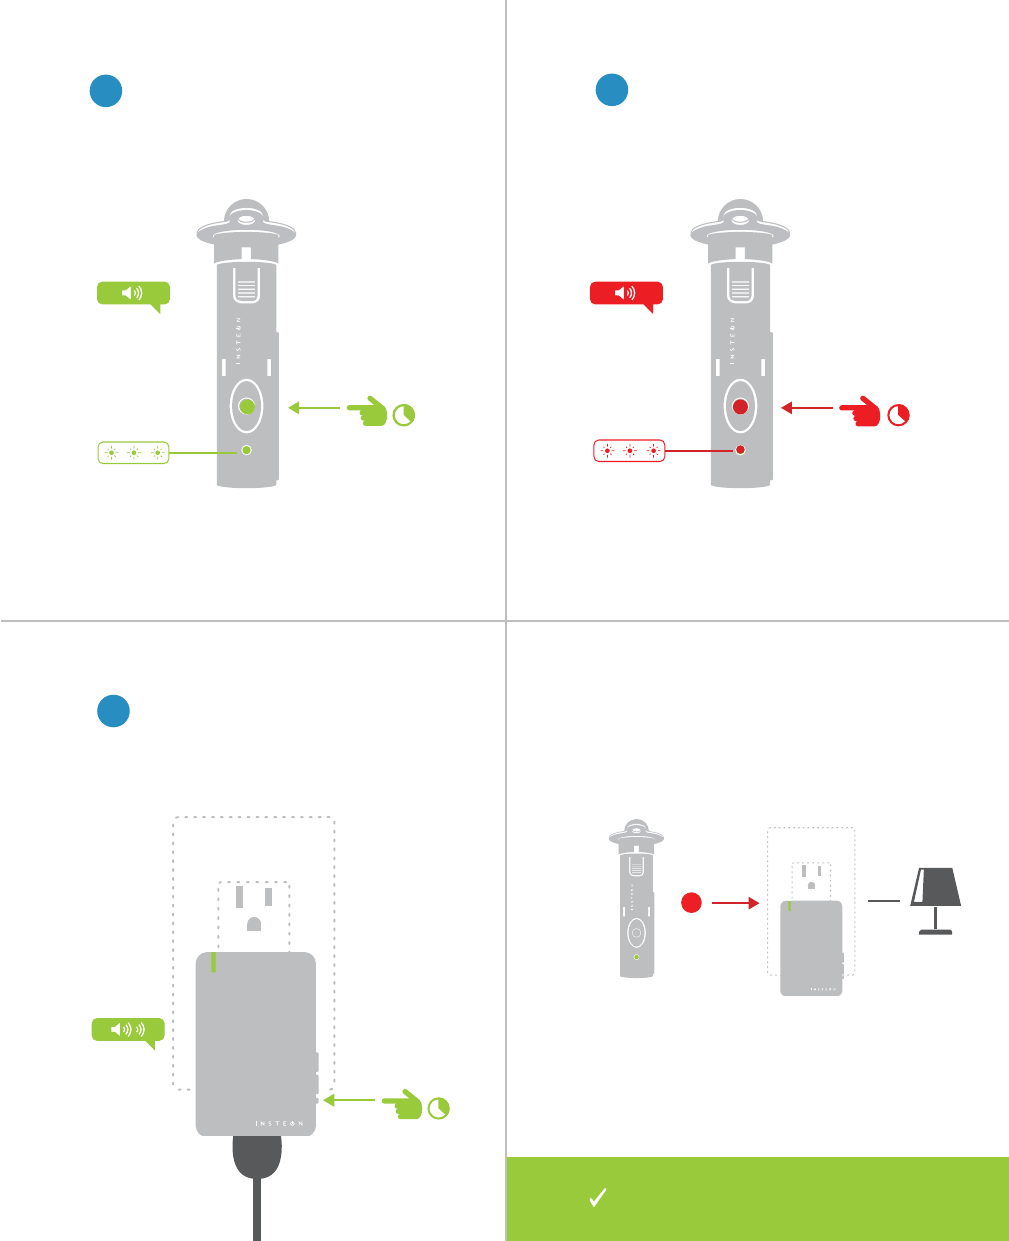
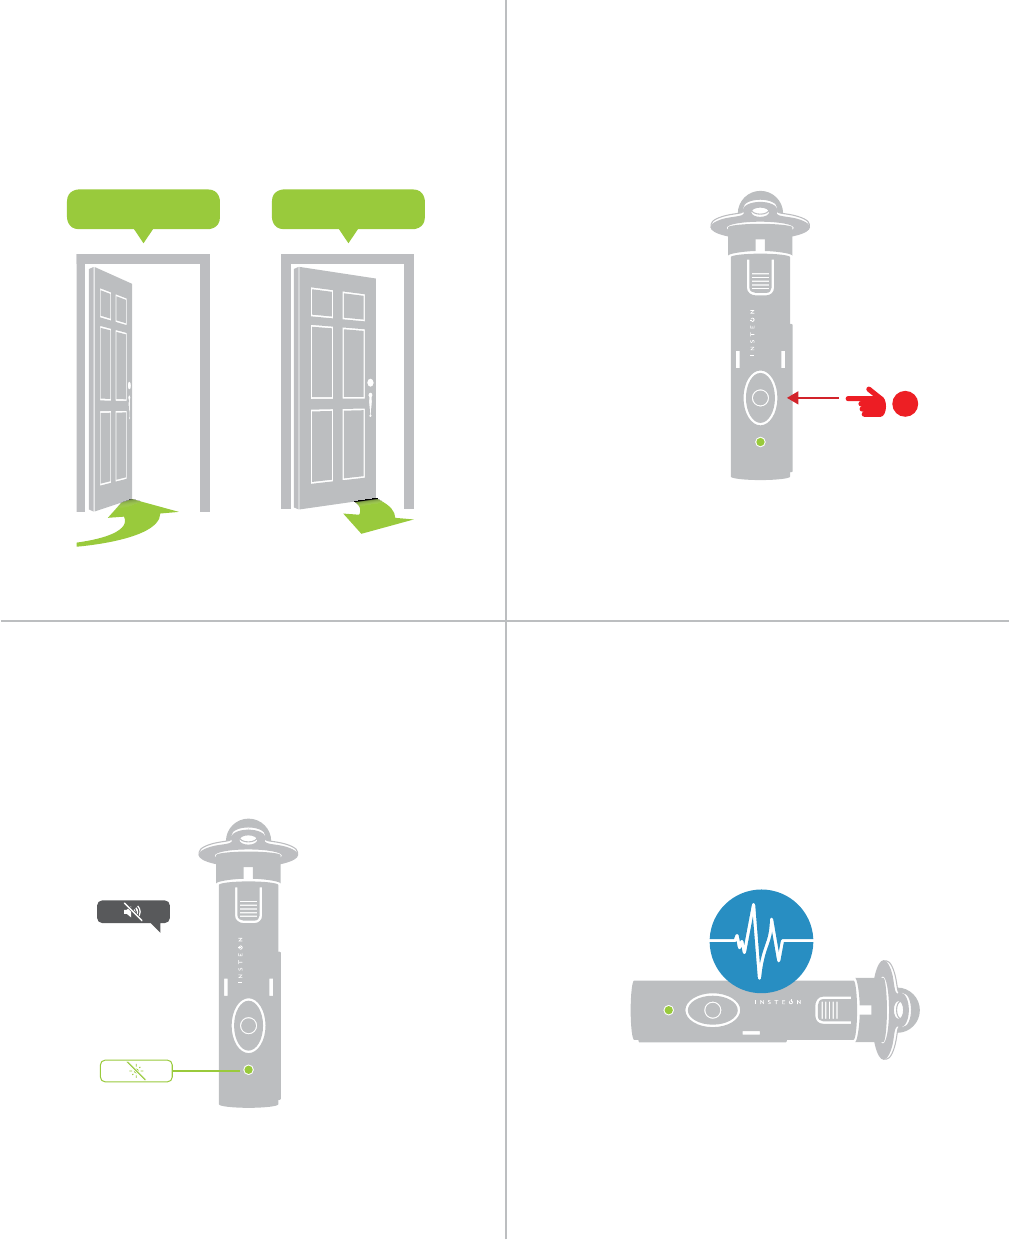
Five-Tap Linking to Control Another Device
If Your Door Is Already Open If Your Door Is Closed
??
1
OR
or close the door without exiting
linking mode.
Linking process.
Press and release Door Sensor’s contact
plunger twice then hold the contact
Hold
Linking
Unlinking
Exit
®
Door Sensor
Model: 2845-222
®
Door Sensor
Model: 2845-222
®
Door Sensor
Model: 2845-222
®
Door Sensor
Model: 2845-222
®
Door Sensor
Model: 2845-222
®
Door Sensor
Model: 2845-222
®
Door Sensor
Model: 2845-222
®
Door Sensor
Model: 2845-222
®
Door Sensor
Model: 2845-222
14
Five-Tap Linking to Control Another Device
2Adjust your responder to the desired
®
®
®
Door Sensor
Model: 2845-222
15
®
Door Sensor
Model: 2845-222
®
Door Sensor
Model: 2845-222
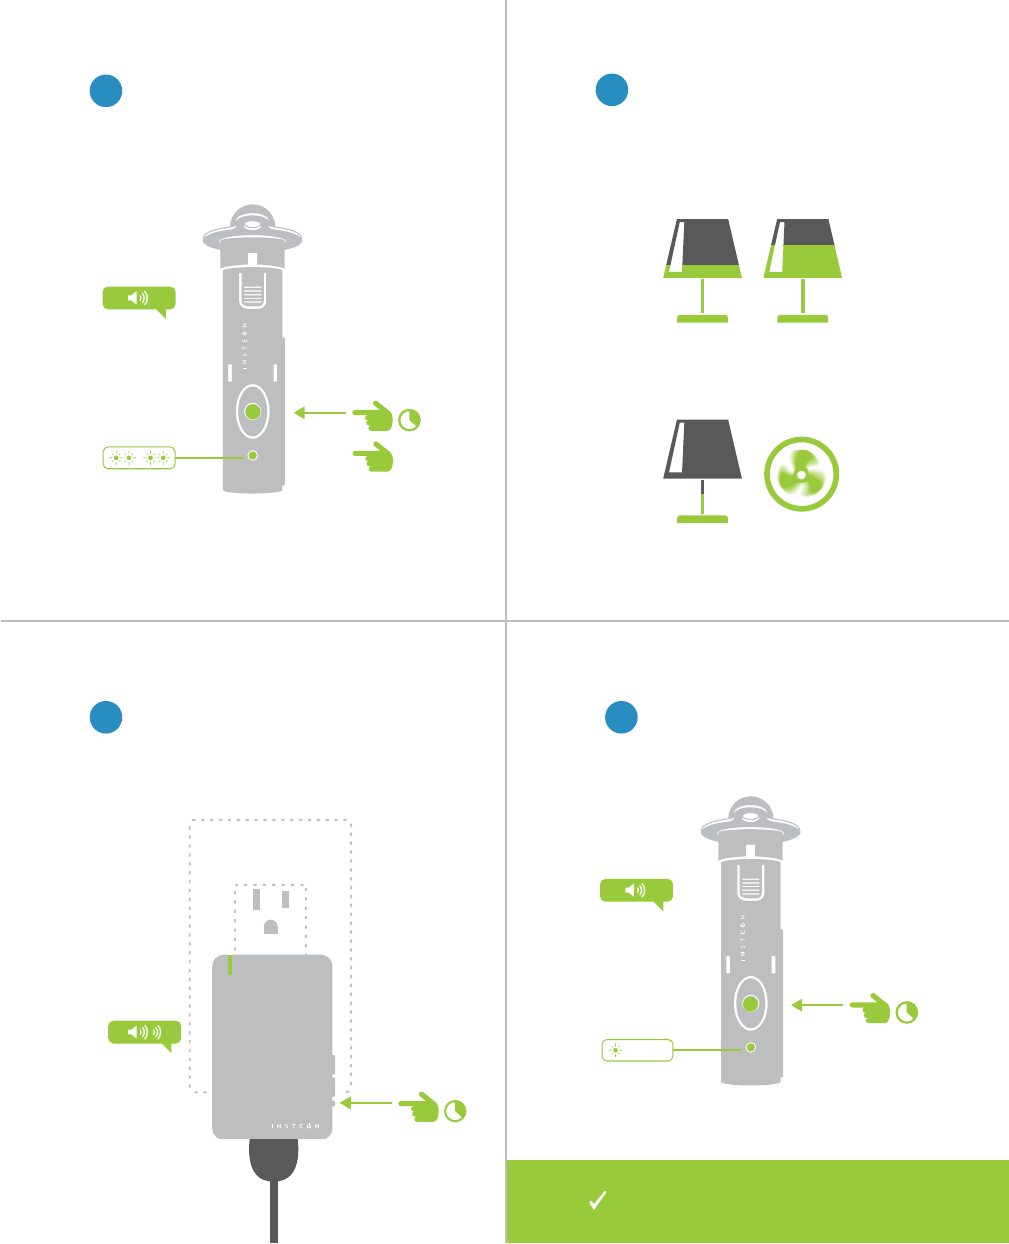
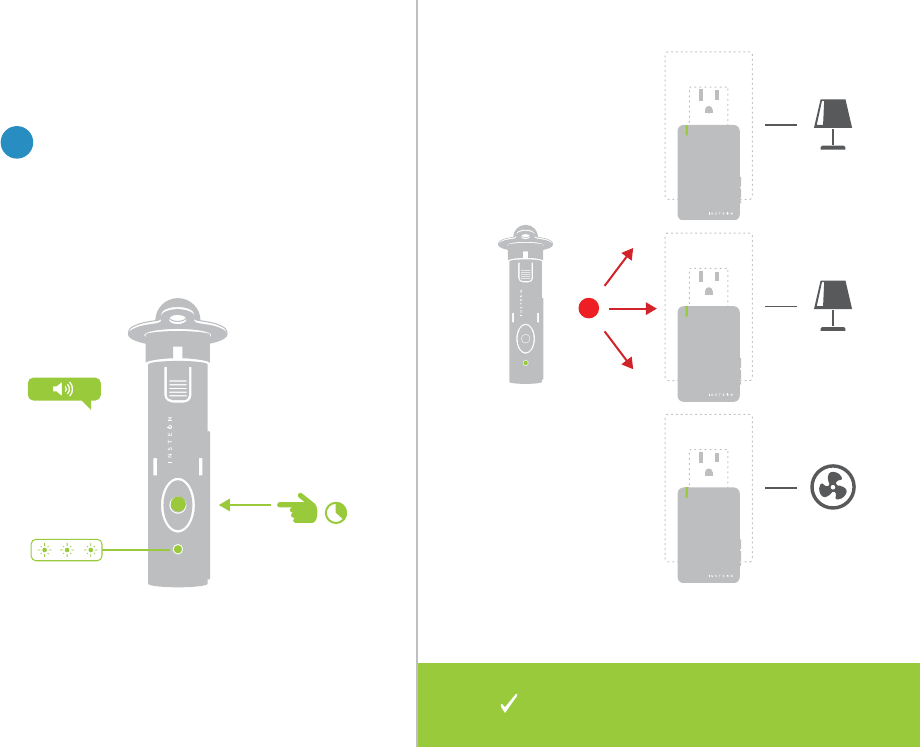
Multi-Linking or Making a Scene
2
3 4
Lamp 1
Lamp 3
Lamp 2
Appliance
1
50% 72%
30% ON
®
A
B
ONCE
Your Door Sensor will now control
your scene.
16
®
Door Sensor
Model: 2845-222
®
Door Sensor
Model: 2845-222
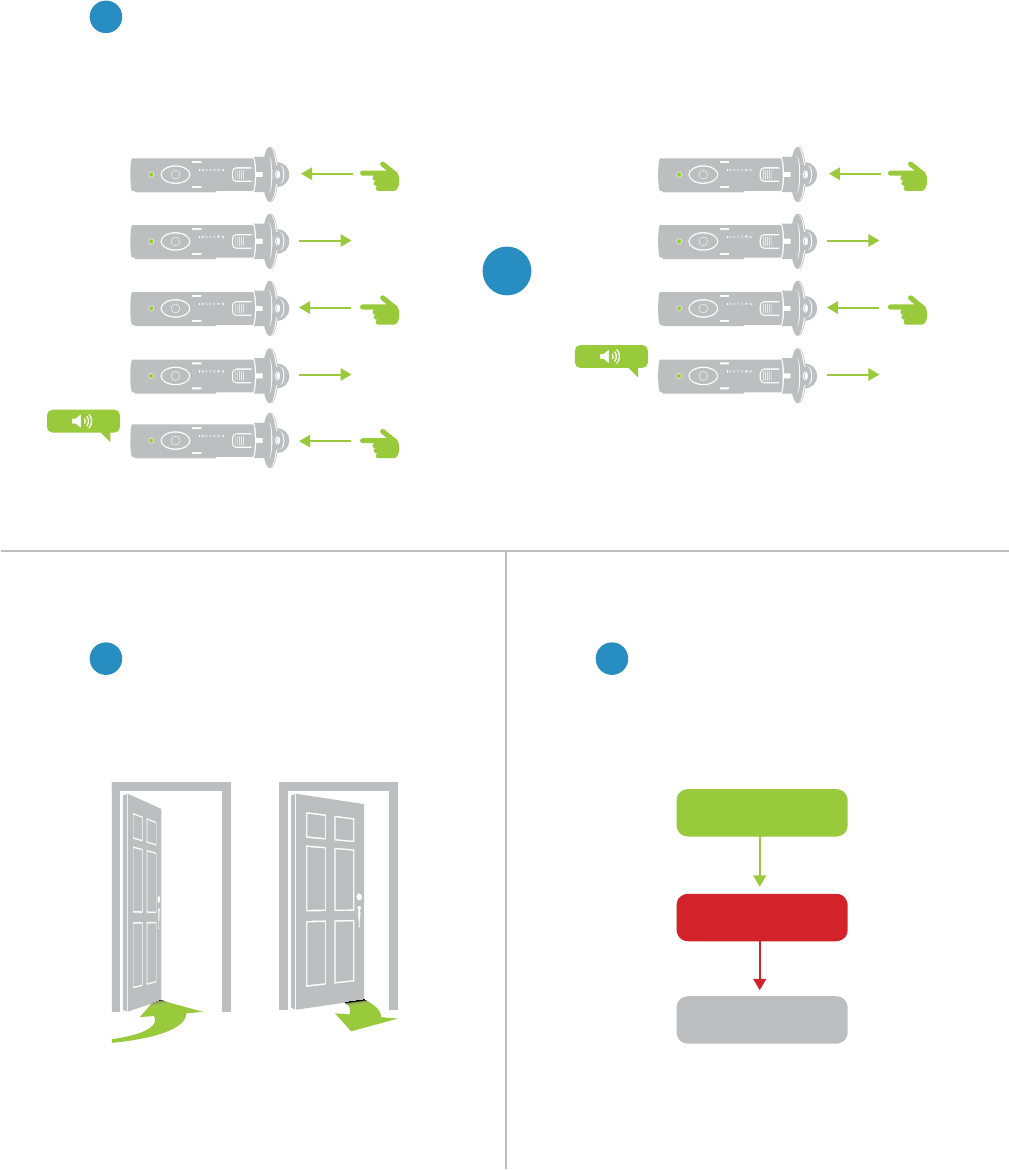
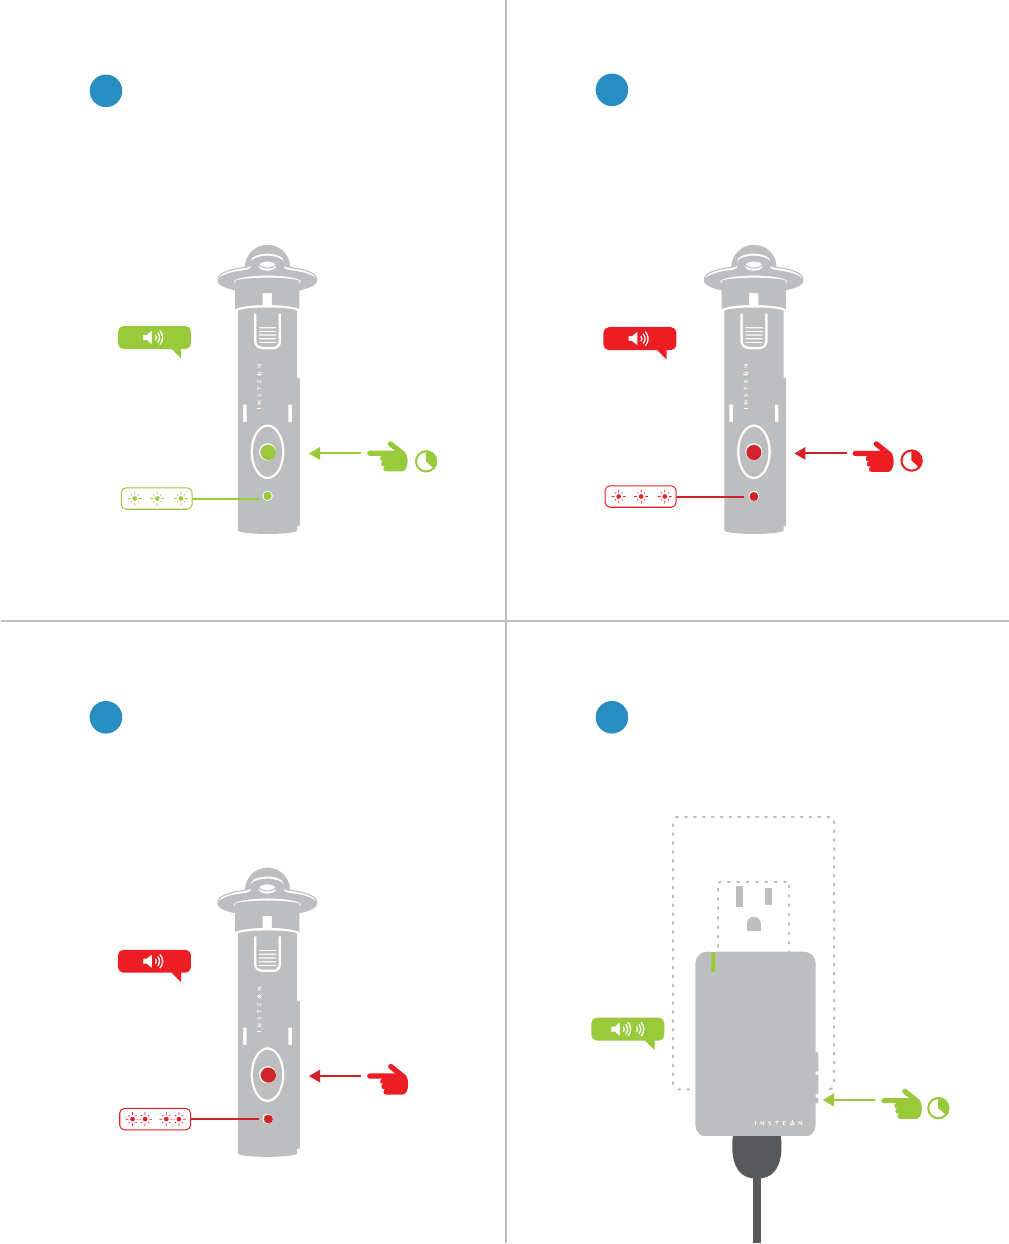
Unlinking a Device
1
2
3Press and hold the controlled
®
®
X
Your Door Sensor will no longer
®
Door Sensor
Model: 2845-222
17
®
Door Sensor
Model: 2845-222
®
Door Sensor
Model: 2845-222
®
Door Sensor
Model: 2845-222
Multi-Unlinking or Removing a Scene
2
3 4
Press and hold the controlled
1
®
18
®
Door Sensor
Model: 2845-222
®
Door Sensor
Model: 2845-222
Multi-Unlinking or Removing a Scene
5
mode.
®
®
®
X
Your Door Sensor will no longer

19
Programming Wheel
Encompassing all on-device programming options, use the Programming
Wheel to set local properties. For the best experience, use software for
managing device properties.
Programming Wheel
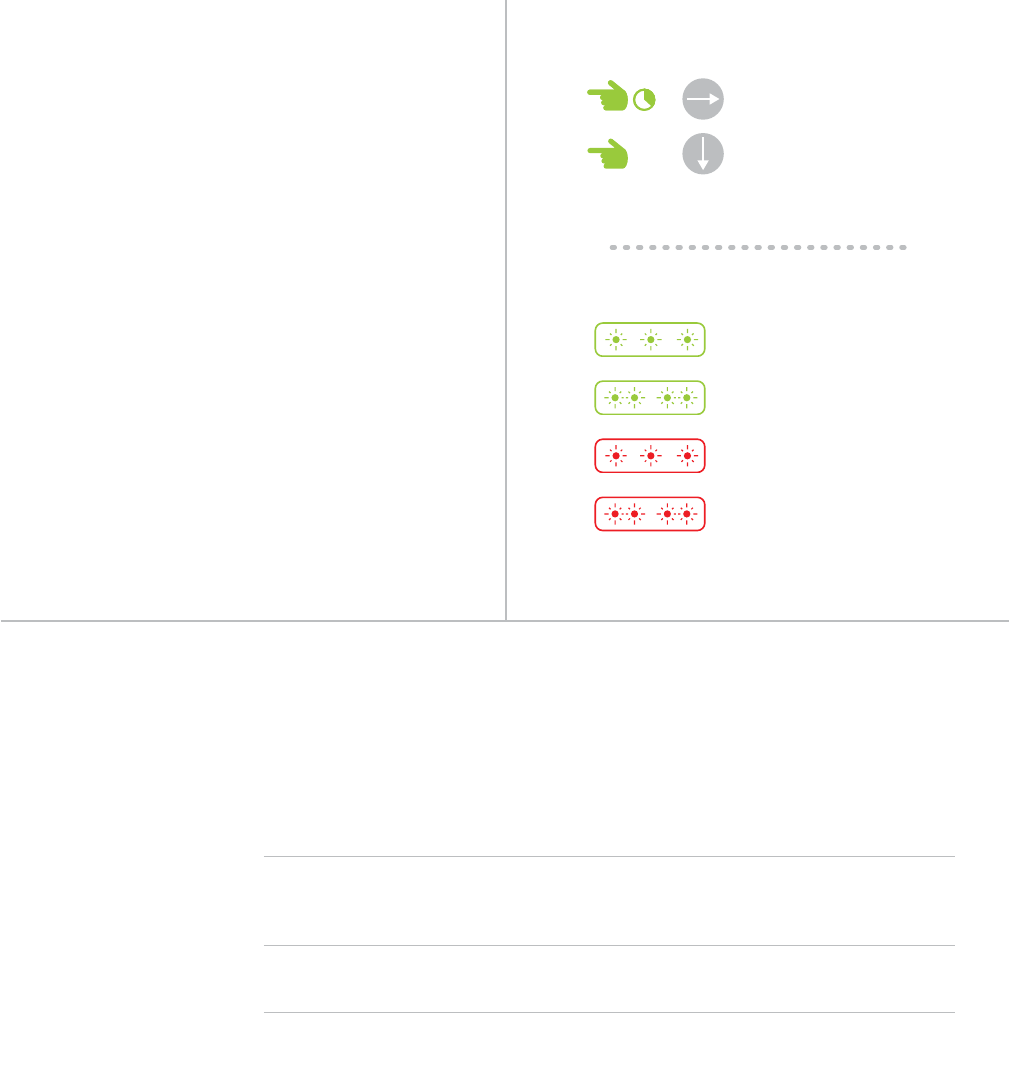
20
About the Programming Wheel
Programming Wheel Features
device.
green
red
programming wheel presents even the most
Navigating the WheelAbout the Wheel
NEW
X

21
Programming Wheel
Navigating the Wheel
Unlinking
Mode
Multi-
Unlinking
Mode
Select
Linking Mode
Multi-Linking
Mode
Select
®
Door Sensor
Model: 2845-222

22
any customized properties.
Factory Reset
A factory reset will erase all links stored in the device’s database as well as
any customized properties.
Factory Reset
23
®
Door Sensor
Model: 2845-222
®
Door Sensor
Model: 2845-222
®
Door Sensor
Model: 2845-222
®
Door Sensor
Model: 2845-222
®
Door Sensor
Model: 2845-222
Factory Reset
1
2
3
go and Door Sensor will emit a
LONG

24
Software-Only Features
Most INSTEON devices contain features that can only be enabled,
Software-Only Features
25
®
Door Sensor
Model: 2845-222
®
Door Sensor
Model: 2845-222
®
Door Sensor
Model: 2845-222
Software-Only Features
Enable Group 1 & 2 Broadcast Disable Local Programming
Disable LED and Beeper Adjust Heartbeat Interval
When enabled, Door Sensor will send a
separate On for opening and for closing.
Useful if you want a device to turn on when
the door closes, like a bathroom fan.
Prevents changing any settings using the set
button or tap-and-hold programming.
The status LED will not blink when the
sensor is triggered and the beeper will not
respond to button presses.
Customize the duration of time between
sensor check-ins; by default, the sensor will
broadcast it’s state once every 24 hours.
X
Group 1 ON Group 2 ON

26
Software-Only Features
Low Battery Warning
Enable or disable a low battery broadcast
that can trigger events with software.

27
Appendix
Everything else you might need to know about your INSTEON product.
Appendix

28
INSTEON Glossary
Responder
Blinking
Dual-Band
Ramp Rate
Link
Linking
Unlinking
/ Unlinking
Load
Retry
Scene
thermostat adjusts to 72º.
Set Button
Simulcast
nodes can join the network without any installation procedure.
X10

29
General
Brand
SPB28452
5202A-28452
2845-222 US
2845-422 EU
Patent
patents)
813922013092 US
813922013603 EU
Operation
Audio Alert
Direct contact with contact plunger required
Status LED
INSTEON Features
400
0x10
0x11 US
0x14 EU
1
417
Yes
2

30
1
Yes
Yes
Phase Detect Beacon
Responder
Yes
Mechanical
Switch Type
Dimensions
Plastic
Set Button
Storage Temperature Range
0.64 oz
20g

31
Electrical
Battery Type AAA
6 months
Supply Voltage
X10 Features (Powerline Only)
X10 Support
32
Troubleshooting
Door Sensor won’t link to other INSTEON Devices
Try this:
•
•
coverage.
Try this:
•
•
Try this:
•

33
de licence. L’exploitation est autorise aux deux conditions suivantes: (1) l’appareil ne doit pas produire de
warranty.
compliance could void the user’s authority to operate the equipment.
34
potential negative consequences to the environment and human health.
Product category: general consumer (category 3).
35
Product Warranty
Limited Warranty
Limitations
Rev 09.26.13