User manual

User Operating Manual
PCSGOB10MVA-Series

Contents
Contents ....................................................................................................................................... - 2 -
1Introduction ................................................................................................................................ 1
1.1Acknowledgements .......................................................................................................... 1
1.2Safety Notice .................................................................................................................... 1
1.3Abbreviation/term ............................................................................................................ 2
2Brief introduction for MID product ........................................................................................... 3
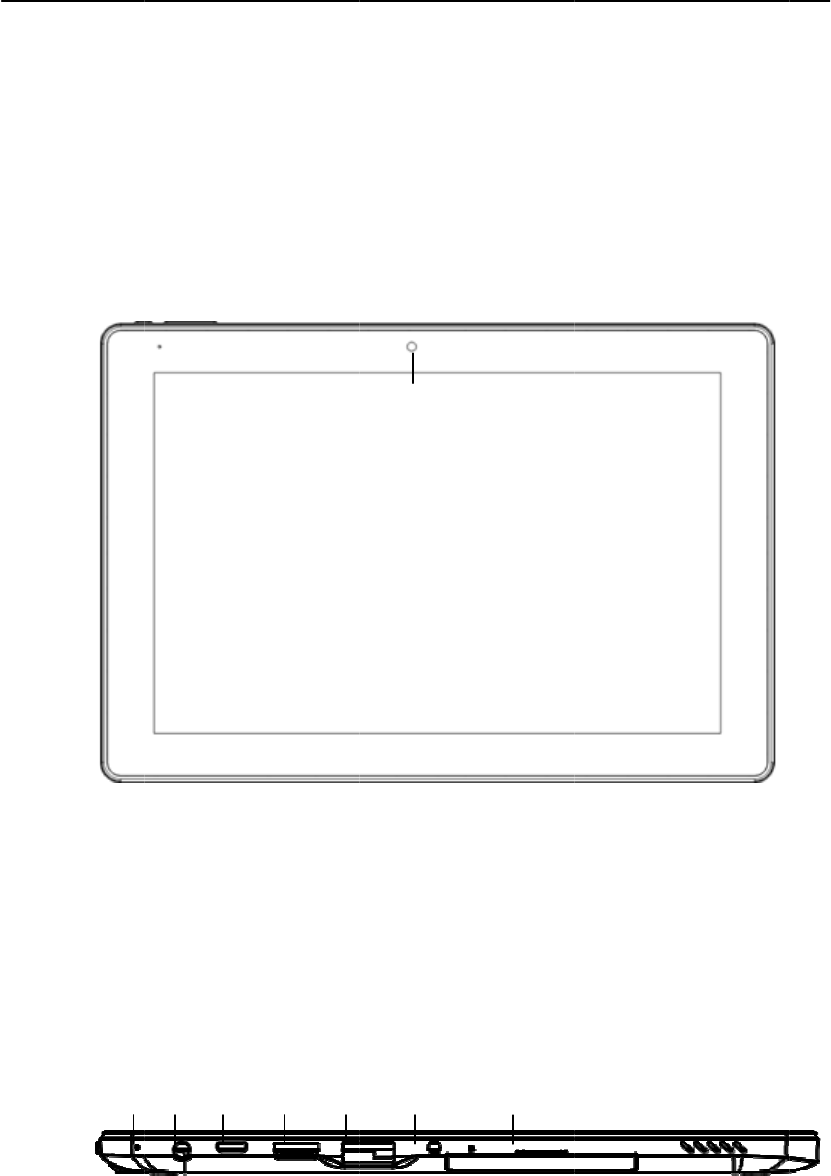
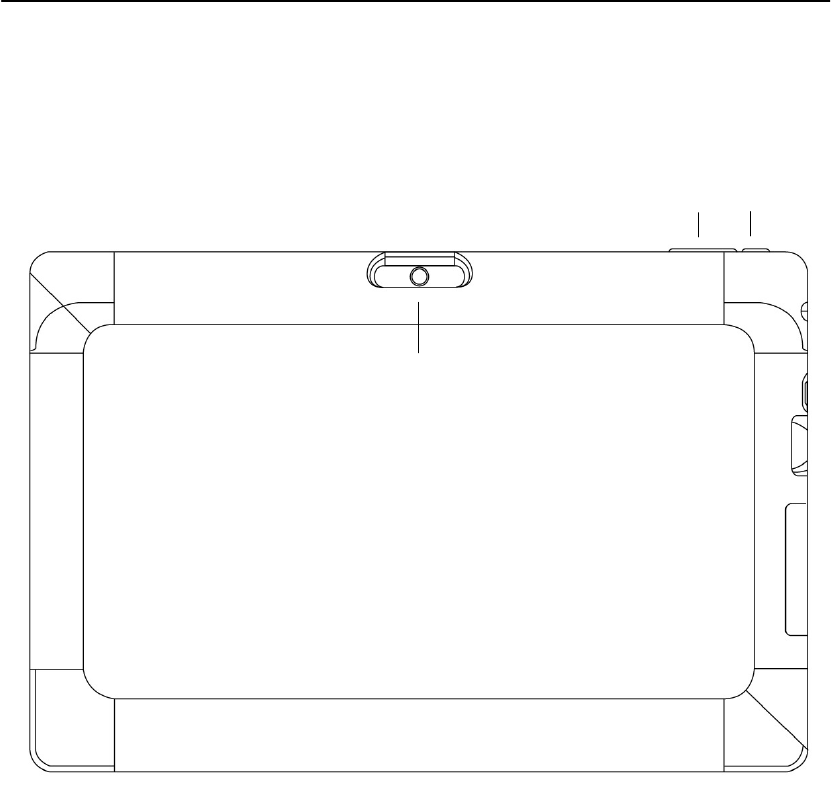
2.1Diagram for MID complete machine ............................................................................... 3
2.2Introduction to accessories of MID .................................................................................. 5
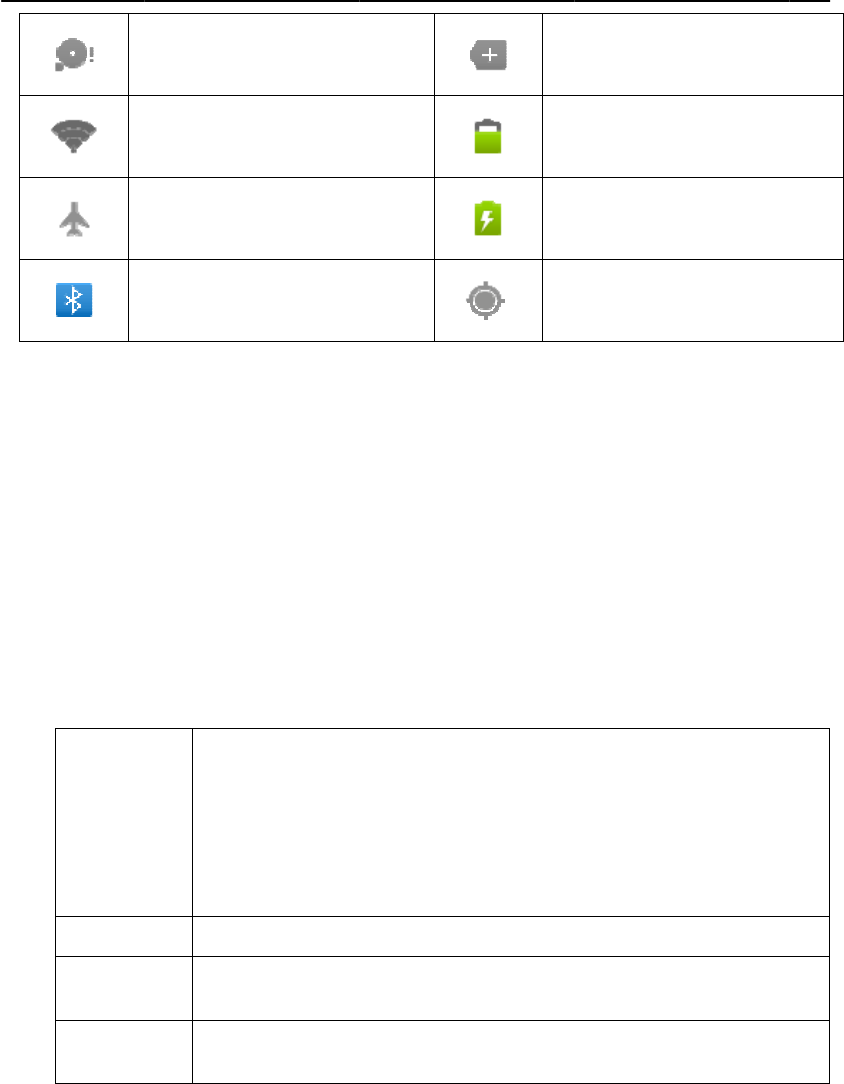
2.3MID state and notice ........................................................................................................ 5
3Quick start .................................................................................................................................. 6
3.1Key function..................................................................................................................... 6
3.2Starting up and turning off ............................................................................................... 6
3.3Unlocking and closing of the screen ................................................................................ 7
3.4Use of touch screen .......................................................................................................... 8
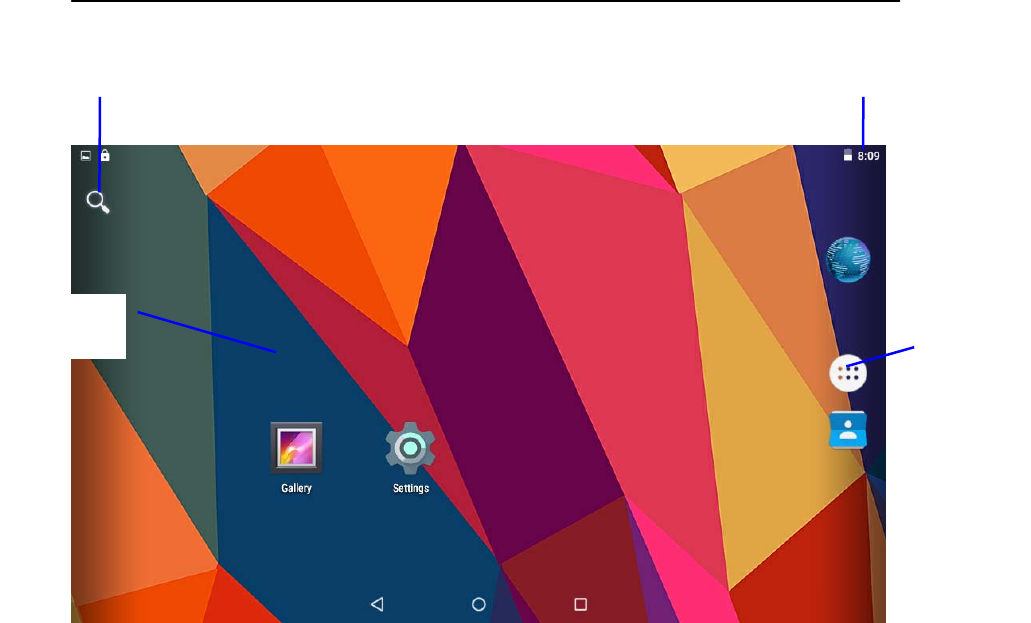
3.5Homepage interface ......................................................................................................... 8
3.6USB connection ............................................................................................................. 10
3.7Memory card .................................................................................................................. 12
4Connection Establishment ........................................................................................................ 12
4.1WIFI Connection ........................................................................................................... 12
4.2Bluetooth Connection .................................................................................................... 13
5Communication ........................................................................................................................ 14
5.1Camera ........................................................................................................................... 14
5.2HDMI ............................................................................................................................. 16
6Other Applications ................................................................................................................... 16
6.1File Management ........................................................................................................... 16
7 Caution………………………………………………………………………………………...1

1
1 Introduction
1.1 Acknowledgements
Many thanks for you choosing this product. The product belongs to MID(Mobile Internet
Device), which is a kind of mobile internet device, delicate, small and exquisite, and
also portable. It is also equipped with a piece of touch LCD of high definition, which
can be used to watch vedios and pictures of high definition. It supports installation of
multiple application programs on office and entertainment. The fantastic operation
interface will give you a brand-new user experience.
This manual systematically introduces diversified functions, using skills and matters needing
attention of this MID, please read this manual carefully before using it.
1.2 Safety Notice
Before using MID, please read information in this section, and make your children learn
about the information. About more detailed information, please refer to safety instructions
and matters needing attention.
Please don’t use MID when you are driving, for fear of hindering safe driving.
In medical places, please observe relevant stipulations and regulations. And in regions
near the medical devices, please shut down MID.
Please shut down MID or enable the airplane mode when boarding, so that the wireless
signals will not interfere control signal of the airplane.
Please shut down MID neighboring electronic equipments with high accuracy, otherwise,
breakdown of electronic equipments may be brought about.
Please don’t dismantle the MID and its accessories on yourself, and only the authorized
agency can maintain this MID.

2
Please keep MID far away from magnetic equipment, radiation from MID will erase
information stored on the magnetic equipment.
Please don’t use MID in places with high temperature and inflammable gas (such as
nearby gas station).
Please put MID and its accessories in places beyond children’s touch, please don’t let
children use MID without supervision.
During using of this MID, please observe related laws and regulations, respect privacy
and legitimate rights of others.
Please strictly abide by relevant explanations in this manual when using USB data line,
otherwise, MID or personal computer may be damaged.
Please don’t use the MID in humid environment such as bathroom, etc., and the MID
being soaked or rinsed by liquid must be avoided.
1.3 Abbreviation/term
Abbreviation/term Full name Explanations
MID Mobile Internet Device Mobile internet terminal
WIFI Wireless Fidelity
Wireless Local Area Network
based on IEEE 802.11b
standard
TF Trans Flash
Alternate name Micro SD,
superminiature storage card
HDMI HighDefinition
Multimedia Interface
High definition multi-media
interface
2
Brief
i
2.1 Dia
g
PCSGOB1
0
PCSGOB1
0
MIC
i
ntrod
u
g
ram fo
r
0
MVA-Seri
e
0
MVA-Seri
e
Headphone
Micro USB
u
ction
r
MID
c
e
sfront view:
e
sside view;
HDMI
Full Size USB
3
for M
c
omplet
e
Figure 2-1
Figure 2-2
Front camera
DC
ID pr
o
e
machi
n
TF
o
duct
n
e
4
PCSGOB10MVA-Seriesunderside view
Figure 2-3
Rear camera
Power on/off
Volume key

2.2 Int
r
Packing lis
t
The followi
n
Compl
e
Power
a
USB c
o
Mini
U
4G TF
Earpho
n
User’s
m
Optica
l
USBke
y
2.3 MI
D
Iconograp
h
When a pro
m
on the scre
e
detailed inf
o
message wi
n
r
oductio
t
n
g articles ar
e
e
te machine
o
a
dapto
r
o
nnecting lin
e
U
SB tieline
card (selecti
v
n
e (selective
m
anual
l
disk (selecti
v
y
board (sele
c
D
state
a
h
for notifica
t
m
pt messag
e
e
n with your
o
rmation. T
h
n
dow. The fo
M
a
G
m
Comput
e
connected
Events w
a
Alarm
Pla
y
n to acc
e
e
included in
o
f MID
e
v
e pairing)
pairing)
v
e pairing)
c
tive pairing)
a
nd noti
c
t
ion
e
shows on y
o
finger to op
e
h
en you may
llowing are i
c
a
il notice
m
ail notice
e
r and MID
a
through US
B
a
iting to be
d
clock openin
y
ing music
5
e
ssories
your packin
g
c
e
o
ur notice p
a
e
n the notice
click the m
e
c
onography
f
a
re
B
line
d
one
g
of MID
g
box of MI
D
a
nel, please
c
list. Click o
p
e
ssage box
a
f
or icons in s
t
G
D
:
c
lick the col
u
p
tions needi
n
a
nd slide up
w
t
atus bar:
M
Witho
u
Uploading
/
Downloa
d
G
eneral noti
c
synchro
n
In data s
y
u
mn box and
n
g to check t
o
w
ards to clos
M
ute
u
t SD card
/
Downloadin
g
d
ing finished
c
e (for exam
p
n
ous error)
y
nchronis
m
slide
o
see
e the
g
p
le:
3
Quic
k
3.1 Ke
y
Descriptio
n
Power k
e
Menu ke
y
Return k
e
Homepa
g
key
3.2 Sta
r
Starting u
p
Press the p
o
started, the
indication o
f
Insufficien
t
WIFI ser
v
netwr
k
Air
p
Bluetooth i
s
k
start
y
functi
o
n
s for key fu
n
e
y
P
U
s
U
s
f
y
P
e
y
P
o
g
e
P
i
n
r
ting up
p
o
wer key for
machine e
n
f
sliding ico
n
t
space of S
D
v
ice is conne
c
k
is availabl
e
p
lane mode
s
already con
n
o
n
n
ction:
P
ress this ke
y
U
nder startin
s
hutdown opt
U
nder starti
n
s
tarting up st
a
f
or 7 seconds
P
ress this ke
y
P
ress this k
e
o
perating int
e
P
ress this k
e
n
terface
and tu
r
3 seconds,
y
n
ters into sc
r
n
on the inter
f
6
D
card
c
ted,
e
n
ected
y
for a long ti
m
g up state,
p
ion
n
g up state,
p
a
te or when
to make you
r
y
to open me
n
e
y to return
e
rface
e
y to return
r
ning of
f
y
ou can see
t
r
een lock st
a
f
ace.
m
e to start u
p
p
ress this ke
y
p
ress this k
e
breakdown
a
r
device ente
r
n
u of the curr
e
the last op
e
back main
f
f
t
he starting
u
a
te, please
u
M
Batter
y
Ch
a
G
p
y
for a long
e
y to close
t
a
ppears, pres
s
r
into shutdo
w
e
nt interface
e
rating step
f
unction int
e
u
p picture.
A
u
nlock acco
r
M
ore
y
symbol
a
rging
G
PS
time to pop
t
he screenU
n
s
the power
k
w
n state
or the previ
e
rface from
a
A
fter the syst
e
r
ding to dir
e
up
n
der
k
ey
ous
a
ny
e
m is
e
ction

7
Turning off
1. After pressing the power key for a long time, the shutdown option will pop up.
2. Click OK.
3.3 Unlocking and closing of the screen
The machine will close automatically when the screen is left unused
1.After the screen being left unused for a period of time, the machine will close screen
automatically, so as to save battery power.
2.Under screen on state, press the power key, the screen will close immediatey.
Prompt: if you want to inquire how to set turn-off time of screen, please refer to chapter 9.1.
Turninng on under screen off state
If the screen is in off state, you can unlock the screen by pressing power key for a short time
or the return key for a long time. After opening, the screen will enter lock state, press “lock”
icon by your finger and slide upward, the screen will be unlocked, slide on the camera icon,
you can enter the camera function.
Figure 3-1

8
3.4 Use of touch screen
Operating mode in MID
There are various ways to skim the main screen, menu and application program, etc. on your
MID.
Click to select
When you want to use screen keyboard entry, and you want to select items on the homepage
interface such as aplication program, you only use your finger to click.
Press on
If you want to unlock the available option of a certain item (such as textbox or interlinkage in
the webpage), or move shortcut on the homepage interface and menu of main program, only
press the item.
Slide quickly or slide
Quick sliding or sliding means doing rapid vertical or horizontal drag movement by using
finger on the picture.
Drag
Before you starting to drag, you must press it with your finger and impose a certain pressure,
and don’t loosen the finger before draging to the wanted position.
Rotate
Aiming at most of pictures, only turn the MID in side direction, the screen direction can be
shifted from cross direction to vertical direction. For example, when you input characters,
watch cinema, etc.
3.5 Homepage interface
All application programs on the machine will be displayed on the main menu screen. You
may use application program, shortcut and user-defined mode to set wallpape of your
homepage interface
9
Figure 3-2
Skill: in any application programs, you can press homepage key to return homepage
interface.
Custom homepage interface
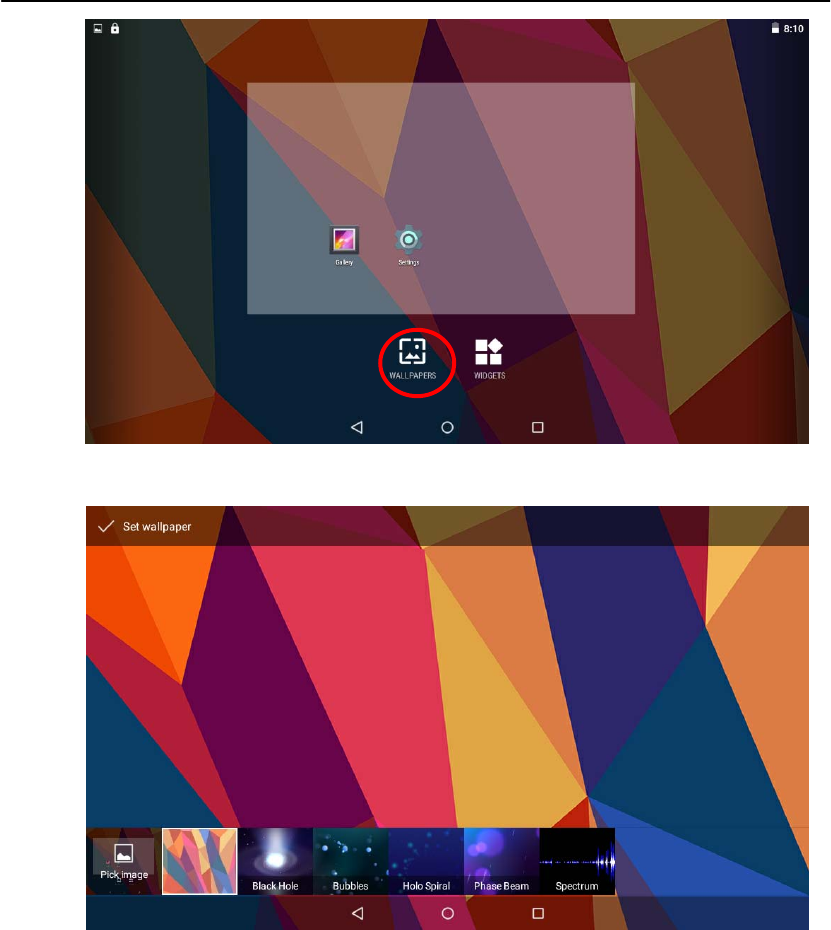
Change desktop wallpaper
1. Press blank region on the homepage interface to pop up the menu.
2. When the menu popping up, choose source of homepage interface wallpaper you want to
change.
3. After clicking source of wallpaper, click picture you want, and then select “setting
wallpaper”.
Time
Applicati
on
Wallpaper
Search
10
Figure 3-3
Figure 3-4
3.6 USBconnection
Storage setting of MID
Before transmitting document, you must set storage mode for your MID firstly:
1. Connect MID with computer by using USB transmission line. Notice bar will show the
notice prompt.
2. Click status bar, options of status bar show.
3. Among options of status, click to choose USB connected, then click to open USB
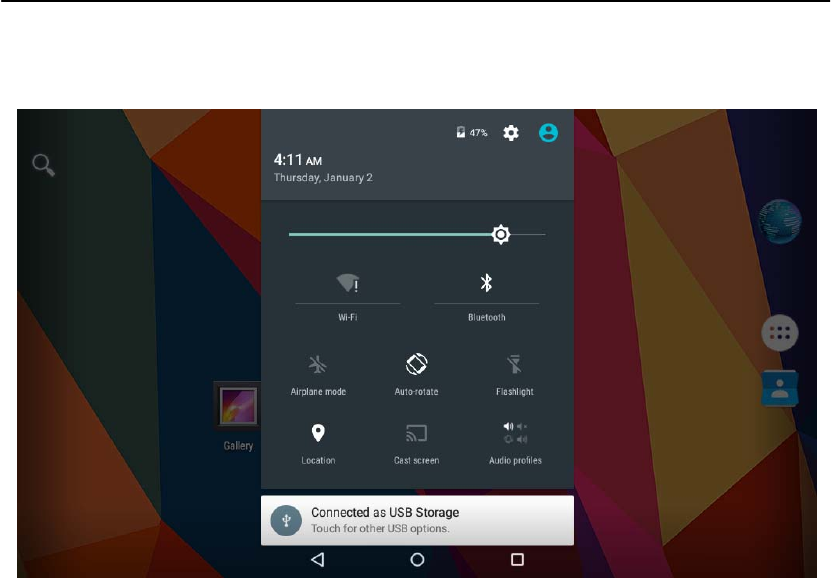
11
storage device.
4. At this time, USB has already been connected.
Figure 3-5
Copy the document to storage card
1. Connect MID and computer together with USB cable.
2. After setting according to storage of MID, connect with computer successfully.
3. Open your computer, in my computer, examine content in “removable disk (x)”.
4. Find the document you want to copy, copy it to “removable disk(x)”.
5. After completion of copying, click “safely remove hardware” in taskbar of your
computer to unload.
Content of MID storage device
1. NAND FLASH storage device, space for MID to store document itself.
2. TF removable memory card.
3. The two above-mentioned storage devices both can be visited through connection with
your computer with USB.
Attention: when your MID is connected with USB cable, if you start up USB storage
device, you will cannot visit the memory card through MID, if you want to
visit memory card in MID, only disconnect USB cable.

12
3.7 Memory card
Copy the document to storage card
You can transmit document between MID and computer, such as music and picture, etc. If
you want to see documents in MID, only click the file browser to look through content in the
SD card.
Delete documents on the storage card of MID
1. Find document you want to delete.
2. Press the document name you need to delete, a file menu will pop up.
3. Click delete.
Removing storage card when the MID is in starting up state
If need to remove storage card under starting up state of MID, you must unload the storage
card firstly, for fear of failure or damage of the storage card.
1. In the homepage interface, press the mennu key, then click setting.
2. Pull the setting menu downwards, then click storage.
3. Click SD card setting.
4. Click touninstall the SD card.
4 Connection Establishment
4.1 WIFI Connection
Your MID can be connected onto Wi-Fi network to connect the operation:
1. On the homepage interface, click and select the meun key and pop up the meun setting;
2. Click and select the System Setting;
3. Click Wi-Fi and open wi-fi switch;
4. After openingWi-Fi, the searched Wi-Fi network can be scanned automatically from the
equipment in the windows on the right.
5. Select the Wi-Fi network required to be connected, if the password is added, pop up the
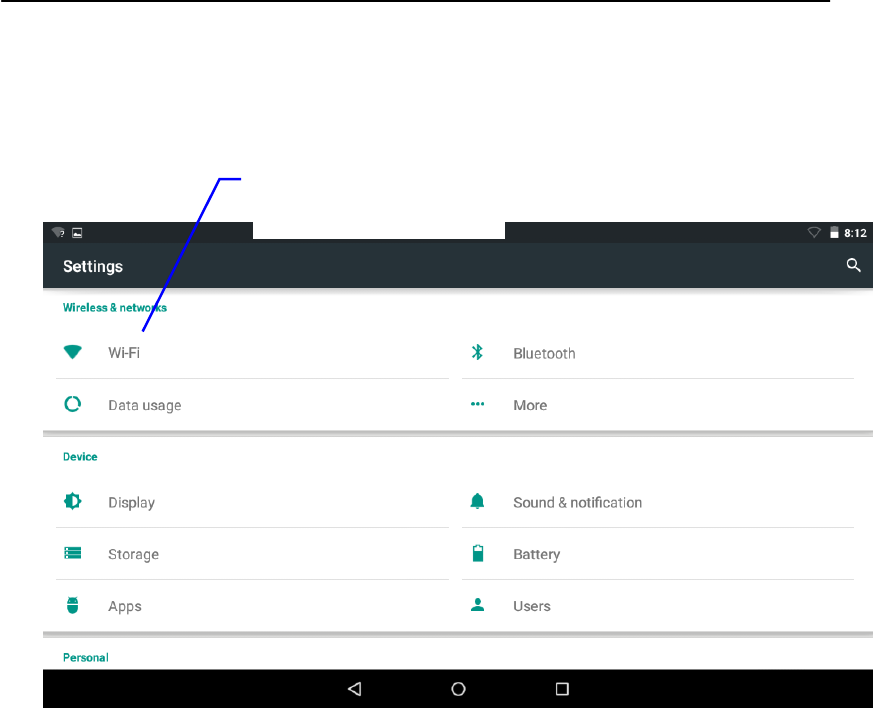
13
password input windows and input the corresponding password.
6. Click the Connection
Figure 4-1
4.2 Bluetooth Connection
Functions of bluetooth:
1. You can exchange the files betwwen two blueteeth. You can exchange the files with
other computers, mobile phones and pda.
2. You can synchronously exchange pims data with mobile phones, pda and laptop to
support the bluetooth ( data of outlook E-mail address).
3. You can You can exchange the electronic name card with mobile phones, pda and laptop
to support the bluetooth.
4. You can connect the keyboard, mouse and joystick to support the bluetooth.
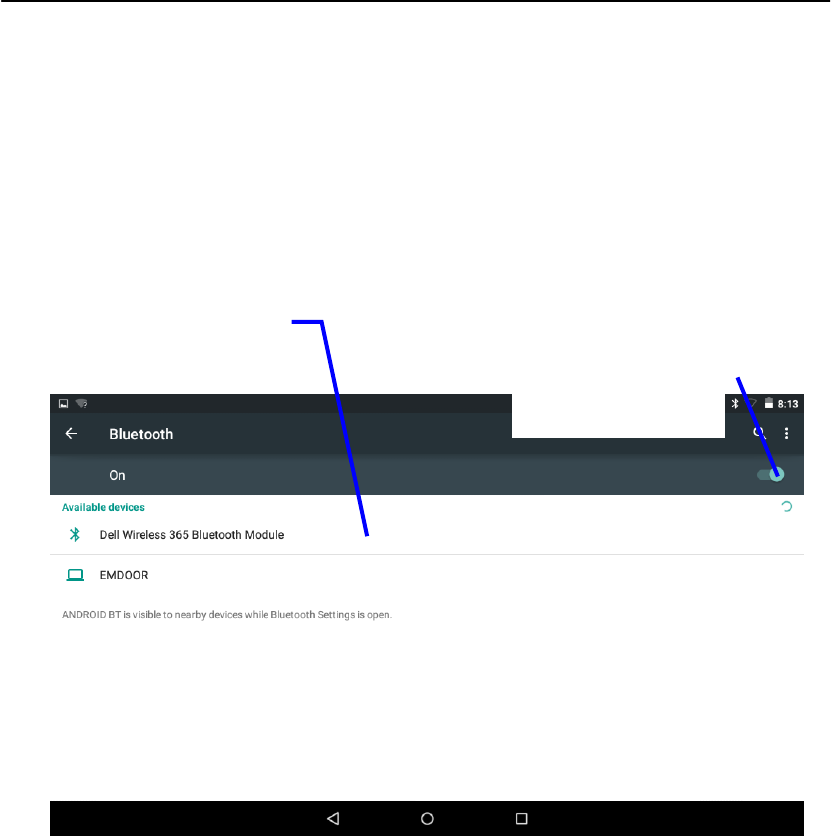
Application of bluetooth (Figure 4-3)
1. Setting procedure of entering into bluetooth: set -> bluetooth set, open the bluetooth
equipment
2. Name of equipment: you can randomly change the name of bluetooth for your MID by
Click here and select
WIFI network
14
pressing Menu key.
3. Detectability: open this function by clicking the place for name of bluetooth, which
indicates that your MID bluetooth can be searched by other bluetooth equipments, this
default time for this opening is of 120 seconds.
4. Scan and look for equipment: you can detect the equipment desired to be connected by
utilizing this function.
5. Bluetooth: after employing the scan to look for the equipment, all bluetooth equipments
searched by your MID can display under this function.
Figure 4-3
5 Communication
5.1 Camera
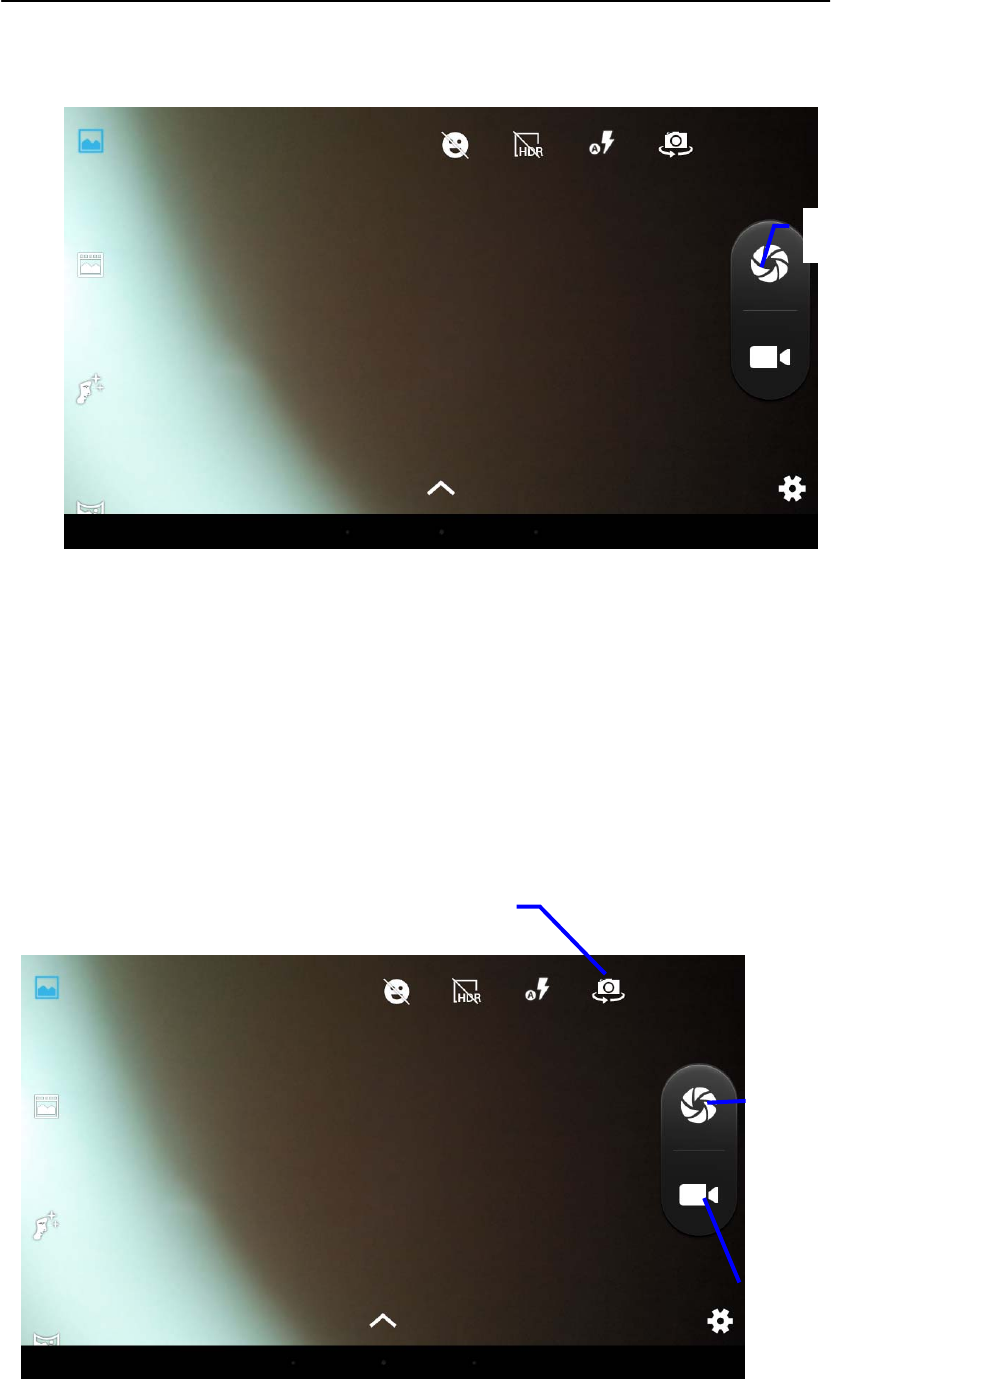
Camera functions
1. Click and select the camera;
2. The system enters into the camera interface;
3. Click and select the Photo button and easily take the photos;
4. Set such functions as photo sixe, storage location, white balance and focal length
Click this scan to search
for the equipment
Click this and open the
detectability function
15
regulating;
5. After completion of taking photo, there is the display for previewed minimap.
Figure 6-2
Videotape function
1. Click the videotape icon and convert it as video recorder mode;
2. Click and select the red videotape button to take video ;
3. Set such setting functions as color effect, white balance and video quality;
4. Switch 720P and 480P high-definition videorecording.
5. Click and select the videorecording button, end the videorecording, and observe the
previewed video.
Photo function
Cut Front or Rear
start/stop key
Videotape function

16
Figure 6-3
5.2 HDMI
HDMI High-definition video interface
The MID and the high-definition television are connected by a standard HDMI cable. This
interface supports the picture with highest quality of 1080p resolution ratio.
1. MID is in the boot status.
2. The MID and the high-definition television are connected by a standard HDMI cable.
3. The system interface on MID is automatically synchronized with the high-definition TV
screen.
4. Click Display in the settings menu.
5. Click Output Select to switch HDMI mode.
6. Click Resolution to set the resolution ratio of HD TV.
6 Other Applications
6.1 File Management
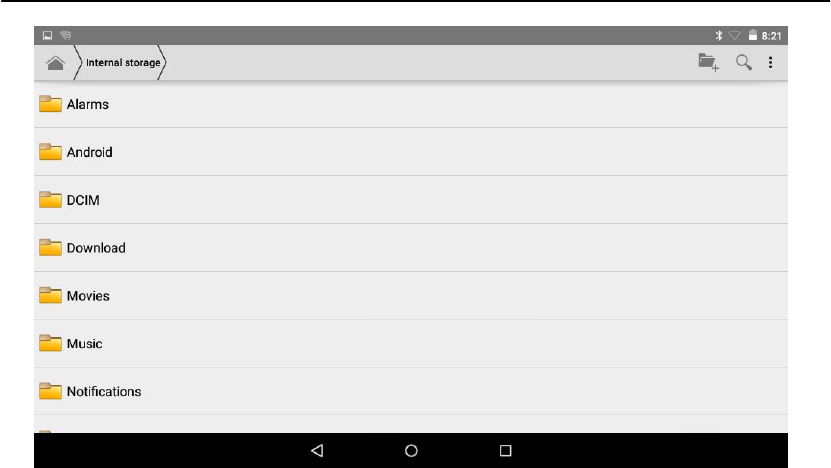
Browse files
Slide the desktop to locate the File browser.
You can use the file browser to manage, edit and delete the files and folders, or to create
sharing and FTP server to achieve resource sharing.
17
Fig. 8-4
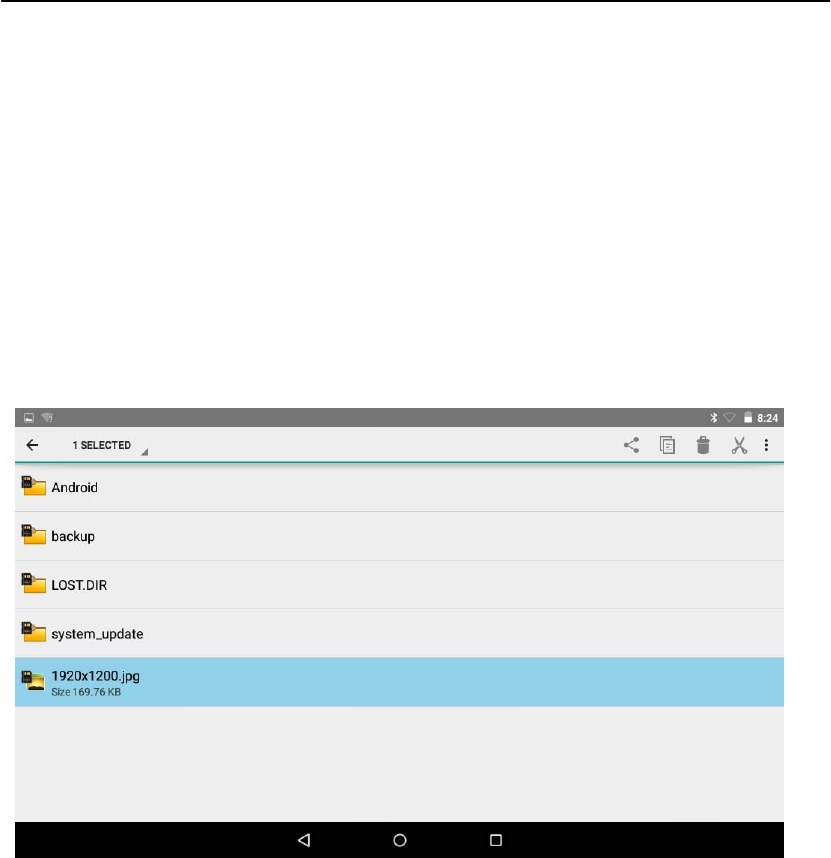
Cut and copy files
1. In the file browser, press and select the file you want to operate.
2. Pop up operating menus, including Cut, Copy, Delete, Rename, Move to, Copy to,
Play music, Select all, Set home directory and Attributes, etc.
3. Click Cut or Copy file or folder.
4. Click into the folder you want to paste, and pop up menu by pressing the Menu key.
5. Click Operate and then click Paste.
Delete files
1. In the file browser, press the file you want to delete.
2. ClickDelete.
3. Click OKto delete file.
Folder setup
1. In the file browser, pop up menu by pressing the Menu key.
2. Click Create.
3. Click Folder.
4. Click pop-up window and input the name of the new folder in the text box.
5. Click OK to create the folder.
Quick search
1. In the toolbar of the file browser
2. Click Search icon.
3. Pop up the search panel and enter the keywords you need to find.
4. ClickOKand the search progress bar will appear in the notification bar.
18
5. When the search is completed, pop up the dialog box to confirm whether to show the
results.
6. Click OK to show the search results.
Create sharing
1. Load ES file browser. (Fig. 8-5)
2. Click ‘Local’ at the upper left corner and select ‘Share’ in the pop-up window.
3. Click the menu bar ‘Create’, and select ‘Search’ in the pop-up window .
4. The system will automatically search all the computers within the LAN, and each drive
of your computer can be seen by clicking OK.
5. You can Copy, Delete, Rename here.
Fig. 8-5

19
7 Caution
This equipment has been tested and found to comply with the limits for a Class B
digital device, pursuant to part 15 of the FCC Rules. These limits are designed to
provide reasonable protection against harmful interference in a residential installation.
This equipment generates uses and can radiate radio frequency energy and, if not
installed and used in accordance with the instructions, may cause harmful interference
to radio communications. However, there is no guarantee that interference will not
occur in a particular installation. If this equipment does cause harmful interference to
radio or television reception, which can be determined by turning the equipment off
and on, the user is encouraged to try to correct the interference by one or more of the
following measures:
-Reorient or relocate the receiving antenna.
-Increase the separation between the equipment and receiver.
-Connect the equipment into an outlet on a circuit different from that to which the
receiver is connected.
-Consult the dealer or an experienced radio/TV technician for help.
This device complies with part 15 of the FCC Rules. Operation is subject to the
following two conditions: (1) This device may not cause harmful interference, and (2)
this device must accept any interference received, including interference that may cause
undesired operation.
Any Changes or modifications not expressly approved by the party responsible for
compliance could void the user's authority to operate the equipment.

20
Product Parameter
Type Details Descriptions
Basical
parameter
MID model PCSGOB10MVA-SERIES
CPU type MT8163 A/A, Quad Core Cortex-A53
CPU speed 1.5GHz
DDR 2GB DDR3
NAND
FLASH 64GB
Operating
system
version
Andriod 6.0
Network
connections
WIFI802.11b/g/n
3G USB dongle(not include in package of the tablet)
Micro USB switch to Ethernet Network
USB
interface Micro USB*1 OTG
HDMI
interface Mini HDMI 1.4a
battery Lithium-ion polymer battery, 8000mAH
Power
adapter Input: AC 100V-240V; output: DC 5V, 2.5A
External
memory card Support SDHC/SDXC
Product
appearance
Product form Straight plate
LCD 10.1 inch, 1280*800 IPS
Dimensions 259.4mm*173.6mm*12.25mm
Weight Tablet:597g
Application
Vedio Support MEPG,H.263/H.264,RMVB,MVC,etc. (UP TO 1080P)
Audio Support MP3,WMA,WAV,OGG,APE,DTS,etc. (need license)
Games Support to the third party programs
Input method Andriod keyboard
photos Support browsing BMP, JPG, GIF, PNG,etc.
Office
software Support reading and editing office files;Support browsing PDF