Smartfield 15010303-A Base Station User Manual Smartfield SC Base Station Installation013111
Smartfield, Inc. Base Station Smartfield SC Base Station Installation013111
User Manual

Revised: Version 5
Dated: January 31, 2011 1
SmartCrop® Base Station
Installation Guide
Only Smartfield™ trained and certified installers are authorized to install and maintain equipment.
Revised: Version 5
Dated: January 31, 2011 2
Copyright © 2010 SmartfieldTM, Inc. All rights reserved.
No part of this document may be reproduced or transmitted in any
form or by any means electronic or mechanical, for any purpose
without the express written permission of SmartfieldTM, Inc.
Information in this document is subject to change without prior
notice.
Certain names of program products and company names used in
this document might be registered trademarks or trademarks
owned by other entities.
SMARTFIELD, INC.
2601 SE Loop 289, Suite B
Lubbock, Texas 79404
http://www.smartfield.com/
For Sales Support:
2601 SE Loop 289, Suite B
Lubbock, Texas 79404
877-412-8940
sales@smartfield.com
For Technical Support:
mailto:support@smartfield.com
This guide is frequently updated to reflect changes in the product.
The latest version can always be found at
http://www.smartfield.com/
Instructions to the User
This equipment has been tested and found to comply with the
limits for a class B digital device, pursuant to part 15 of the FCC
Rules. These limits are designed to provide reasonable protection
against harmful interference in a residential installation. This
equipment generates, uses and can radiate radio frequency
energy and if not installed and used in accordance with the
instructions, may cause harmful interference to radio
communications. However, there is no guarantee that
interference will not occur in a particular installation. If this
equipment does cause harmful interference to radio or television
reception, which can be determined by turning the equipment off
and on, the user is encouraged to try to correct the interference by
one or more of the following measures:
• Reorient or relocate the receiving antenna.
• Increase the separation between the equipment and
receiver.
• Connect the equipment into an outlet on a circuit different
from that to which the receiver is connected.
• Consult the dealer or an experienced radio/TV technician
for help.
In order to maintain compliance with FCC regulations, shielded
cables must be used with this equipment. Operations with non-
approved equipment or unshielded cables are likely to result in
interference to radio and TV reception. The user is cautioned that
changes and modifications made to the equipment without the
approval of manufacturer could void the user’s authority to
operate this equipment.
Table of Contents
Page
Introduction 2
Guidebook Conventions 3
Important Safety Precautions 3
Contents/Tools Needed 3
Installation 3-4
Warranty 5
Introduction
Congratulations, you have just purchased the SmartCrop® Base
Station, one of the most advanced irrigation management tools
available.
Listen to your crop... It’s talking to you
Your crop is telling you when it is experiencing heat stress and
needs water. The SmartCrop® Sensor is smart technology that
uses infrared (IR) temperature sensing technology coupled with
patented USDA algorithms and methodology to determine when
your crop is experiencing heat stress brought on by lack of water.
SmartCrop® Sensor provides growers a simple “IRRIGATE /
DON’T IRRIGATE” signal that can be seen on the web or even on
your cell phone. In addition to irrigation signals, the SmartCrop®
Sensors provide temperature and other environmental data via the
CropInsight.com web site.
SmartCrop® Base Station
The Smartfield web server is the manager and it collects all of the
Sensor data, collects localized environmental data, and runs the
patented USDA algorithms to determine crop stress.
How it works
The SmartCrop® Base Station can collect a large amount of data.
This data is stored in the SmartCrop® Base Station’s on-board
flash memory and is downloaded via cell phone modem. This data
consists of ambient temperature readings and canopy
temperatures at each Sensor, humidity and ambient temperature,
and rainfall amounts at the SmartCrop® Base Station.
The setup of the SmartCrop® Base Station is performed by placing
the SmartCrop® Base Station in the learn mode and then placing
each Sensor that is to be “imprinted” into the learn mode as well.
While in the learn mode, the SmartCrop® Base Station is looking
for a specific signal that is only sent by Sensors also in the learn
mode. Once all of the appropriate Sensors have been learned, the
SmartCrop® Base Station is taken out of the learn mode and is
ready to collect data. During normal operation, the SmartCrop®
Base Station will notify the user if power is lost, if connection to a
Sensor is lost, or if a Sensor has low batteries. Connection to the
SmartCrop® Base Station can be achieved via cell phone modem.
Revised: Version 5
Dated: January 31, 2011 3
Guidebook Conventions
To highlight the most important points – we have used a set of
simple icons, which draw attention to key information and settings.
Key:
The Check Icon indicates a setting that we
recommend you use or enable.
The Info Icon highlights important facts and
information about SmartCrop® Base Station, to
help you make better use of the product.
The Hazard Icon highlights areas where potential
problems can arise.
Important Safety Precautions
Only Smartfield trained and certified installers are
authorized to install and maintain equipment; non-
certified installations void equipment warranty.
Important: DO NOT begin installation until all utility
lines have been located and marked by your local
utility company. Digging without knowing the location
of utility lines can result in a damaged system, injury
or death.
This manual contains important information about the
installation, operation and safe use of this product.
This information should be given to the owner and / or
operator of this equipment.
Warning: Before installing this product, read and
follow all warning notices and instructions, which are
included. Failure to follow safety warnings and
instructions can result in severe injury or property
damage.
CAUTION: To comply with FCC RF exposure
compliance requirements, a separation distance of 20
cm must be maintained between the antenna of this
device and all persons.
Contents – Box 1 Contents – Box 2
Base Station Extension Pole
Assembly
Eight (8) ¾ x 2 ¾ bolts
Assembly, Battery Box –
Battery NOT included
Two (2) ¾ x ½ bolts
Assembly, 10 W Solar Panel One (1) four arm knob
Base Station Pole Assembly Ten (10) ¾ locknut
SmartCrop® Installation
Instruction
One (1) post spade
Contents - Pallet
One (1) six foot (6’) inside pole
Tools & Materials Needed but Not Included
¾ inch open wrench Driver cap
¾ inch deep socket wrench GPS locator device
Dyke pliers 12 volt deep cycle battery
Post driver Zip ties
Post level Step stool - optional
I
Installation
The SmartCrop® Base Station box weighs
approximately 50 lbs. Please remember to
lift with your legs or get a friend to help.
After opening the box, remove the SmartCrop® Base Station and
gently set aside.
1. Assembling the spade pole
a. Get 6’ inside pole.
b. Bolt spade into holes 10 & 11 from the bottom with two (2)
¾ x ½ bolts and two (2) ¾ locknuts.
2. Driving posts
a. Select placement of the Base Station. Base Station
should be placed in a convenient and accessible location.
Note: Sensor should be at least 25’ from the Base
Station but no further than 1,000 to 1,200’.
Using the post level, make sure the post is
level and plumb; a slight slant in this could
affect the rain gauge and recorded rain
measurements.
b. Holding the 6’ inside pole with the spade of the pole-
facing north, place the provided driver cap on the top of
pole. Note: the driver cap will prevent pole from warping
while driving.
c. Using the post driver, drive the pole into the ground until
spade is completely underground.
3. Mounting SmartCrop® Base Station
a. Slide SmartCrop® Base Station pole, Tag 6, onto the
driven pole.
b. Select the preferred height of the Base Station by sliding
the mounting pole up or down on the driven pole. Note:
the SmartCrop® Base Station should be at a height that is
easily readable.
c. Secure the SmartCrop® Base Station at the preferred
height using two (2) ¾ x 2 ¾ bolts and two ¾ locknuts.
4. Mount Extension Pole
a. Locate the mounting bracket, Tag 2, on the top of the
Base Station extension assembly.
b. Position the mounting bracket at a 90-degree angle with
the top of the post and secure by tightening the black
knob.
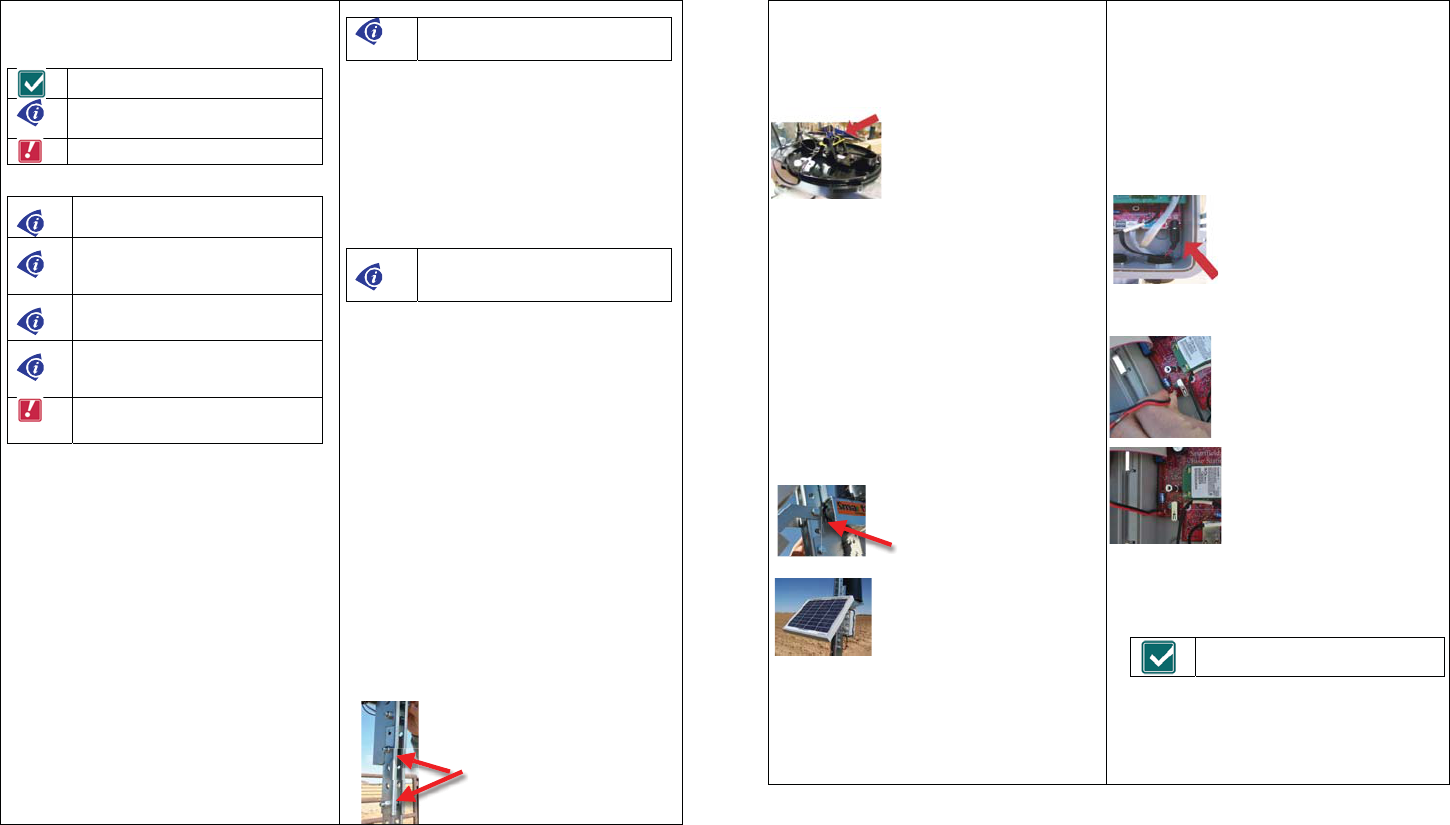
c. Place the RF Antenna, the antenna with the 3-meter long
cable, Tag 3 on top of the mounting bracket. Remove
the Tag 3 from antennae.
d. Insert the Extension Pole Assembly into the 3’ Base
Station pole (Tag 6).
e. On the 1st and 4th hole (bottom to top), secure with ¾ x 2
¾ bolt and 4-arm knob.
Figure 1: Showing holes 1 and 4 (bottom to
top) on mounted extension pole.
Revised: Version 5
Dated: January 31, 2011 4
I
Installation
5. Rain Gauge Bucket
a. Open the Rain Gauge Bucket by gently turning it
counter-clockwise and set aside. Clip and remove the
cable tie, Tag 4, from the rain gauge to allow the gauge
to operate. Re-attach the bucket by turning it clockwise.
Figure 2: Side view of inside of Rain
Gauge Bucket showing cable tie.
6. Cellular Antenna Placement
a. Place the Cellular Antenna, the antenna with the 1-meter
long cable, Tag 5, in front of the Rain Gauge Bucket.
Note: make sure to tighten the antennae to the
magnetic base.
7. Powering the SmartCrop® Base Station
a. The solar panel and battery box must be positioned to
face south.
i. If the battery box is not facing south, the bolts will be
too long when securing box.
b. Position the bottom of the battery box as close to the
ground as possible, secure with two (2) ¾ x 2 ¾ bolts
and two (2) ¾ locknuts.
c. Place a #24 Marine Deep Cycle 12-volt battery, which is
provided by the authorized dealer, into the battery box.
d. Position the Solar Panel up at a 45-degree angle to the
pole.
i. Position on the second hole above the Base Station
mounting bracket.
Figure 3: Displaying the Solar Panel
mounting location.
Figure 4: Solar Panel positioned at a
45-degree angle.
e. Attach the power cord to the battery FIRST. Connect the
red cable to the positive (+) terminal and the red/black
cable to the negative (-) terminal.
i. Secure the power cord by stringing through the post
and tie down with a zip tie or other securing devices.
Note: Feed any excess wiring into the battery box
through cable slot.
f. Place top of battery box over battery by sliding the edges
into the slits. If needed, secure or lock battery box.
g. Open the SmartCrop® Base Station door. Run the cord
through the opening at the bottom of the Base Station.
Plug into the correct power socket.
Figure 5: Inside of SmartCrop® Base
Station showing location of cord connecting
to power socket.
h. Connect 6-volt battery inside SmartCrop® Base Station
door to pins inside base station.
Figure 6: Inside Base Station, connecting
6-volt battery to pins.
Figure 7: Inside Base Station, 6-volt
battery connected to pins.
i. Before closing the SmartCrop® Base Station door, record
the serial number located on the inside of the base
station. This information will be needed to setup field in
CropInsight™.
j. The SmartCrop® Base Station should power on.
If needed, lock or secure to prevent tampering
or vandalism.

Revised: Version 5
Dated: January 31, 2011 5
S
Smartfield One (1) Year Limited Warranty
Smartfield’s warranty obligations for these hardware products are limited to the terms set forth
below: Smartfield, Inc. (“Smartfield”) warrants SmartCrop®, SmartRate™, SmartRate™ PRO,
SmartWeather™, PivotScout™, PivotScout™PRO, SmartProfile™, and other Smartfield-branded
hardware products against defects in materials and workmanship under normal use for a period of
ONE (1) YEAR from the date of retail purchase by the original end-user purchaser (“Warranty
Period”). If a hardware defect arises and a valid claim is received within the Warranty Period, at its
option and to the extent permitted by law, Smartfield will either (1) repair the hardware defect at
no charge, using new or refurbished replacement parts, (2) exchange the product with a product
that is new or which has been manufactured from new or serviceable used parts and is at least
functionally equivalent to the original product, or (3) refund the purchase price of the product.
Smartfield may request that you replace defective parts with new or refurbished user-installable
parts that Smartfield provides in fulfillment of its warranty obligation. A replacement product or
part, including a user-installable part that has been installed in accordance with instructions
provided by Smartfield, assumes the remaining warranty of the original product or ninety (90)
days from the date of replacement or repair, whichever provides longer coverage for you. When a
product or part is exchanged, any replacement item becomes your property and the replaced item
becomes Smartfield’s property. Parts provided by Smartfield in fulfillment of its warranty obligation
must be used in products for which warranty service is claimed. When a refund is given, the
product for which the refund is provided must be returned to Smartfield and becomes Smartfield’s
property.
E
EXCLU SIONS A ND L IMITA TI ON S
This Limited Warranty applies only to hardware products manufactured by or for Smartfield that
can be identified by the “Smartfield” trademark or “SmartCrop” trademark, trade name, or logo
affixed to them. The Limited Warranty does not apply to any non-Smartfield hardware products or
any software, even if packaged or sold with Smartfield hardware. Manufacturers, suppliers, or
publishers, other than Smartfield, may provide their own warranties to the end user purchaser, but
Smartfield, in so far as permitted by law, provides their products “as is”. Software distributed by
Smartfield with or without the Smartfield or SmartCrop brand name (including, but not limited to
system software) is not covered under this Limited Warranty. Refer to the licensing agreement
accompanying the software for details of your rights with respect to its use. Smartfield does not
warrant that the operation of the product will be uninterrupted or error-free. Smartfield is not
responsible for damage arising from failure to follow instructions relating to the product’s use.
This warranty does not apply: (a) to damage caused by use with non-Smartfield products; (b) to
damage caused by accident, abuse, misuse, flood, fire, earthquake or other external causes; (c) to
damage caused by operating the product outside the permitted or intended uses described by
Smartfield;
(d) to damage caused by service (including upgrades and expansions) performed by anyone who
is not a representative of Smartfield; (e) to a product or part that has been modified to alter
functionality or capability without the written permission of Smartfield; (f) to consumable parts,
such as batteries, unless damage has occurred due to a defect in materials or workmanship; (g)
to cosmetic damage, including but not limited to scratches, dents and broken plastic on ports; or
(h) if any Smartfield serial number has been removed or defaced.
THIS WARRANTY GIVES YOU SPECIFIC LEGAL RIGHTS, AND YOU MAY ALSO HAVE OTHER RIGHTS
WHICH VARY FROM STATE TO STATE. SMARTFIELD’S RESPONSIBILITY FOR HARDWARE DEFECTS IS
LIMITED TO REPAIR OR REPLACEMENT SERVICE AS DETERMINED BY SMARTFIELD IN ITS SOLE
DISCRETION. ALL EXPRESS AND IMPLIED WARRANTIES, INCLUDING BUT NOT LIMITED TO ANY
IMPLIED WARRANTIES AND CONDITIONS OF MERCHANTABILITY AND FITNESS FOR A PARTICULAR
PURPOSE, ARE LIMITED IN TIME TO THE TERM OF THIS LIMITED WARRANTY. NO WARRANTIES,
WHETHER EXPRESS OR IMPLIED, WILL APPLY AFTER THE EXPIRATION OF THE LIMITED WARRANTY
PERIOD. SOME STATES DO NOT ALLOW LIMITATIONS ON HOW LONG AN IMPLIED WARRANTY
LASTS, SO THIS LIMITATION MAY NOT APPLY
TO YOU. No Smartfield reseller, agent, or employee is authorized to make any modification,
extension, or addition to this warranty. If any term is held to be illegal or unenforceable, the
legality or enforceability of the remaining terms shall not be affected or impaired.
EXCEPT AS PROVIDED IN THIS WARRANTY AND TO THE EXTENT PERMITTED BY LAW, SMARTFIELD
IS NOT RESPONSIBLE FOR DIRECT, SPECIAL, INCIDENTAL OR CONSEQUENTIAL DAMAGES
RESULTING FROM ANY BREACH OF WARRANTY OR CONDITION, OR UNDER ANY OTHER LEGAL
THEORY, INCLUDING BUT NOT LIMITED TO LOSS OF USE; LOSS OF REVENUE; LOSS OF ACTUAL OR
ANTICIPATED PROFITS (INCLUDING LOSS OF PROFITS ON CONTRACTS); LOSS OF THE USE OF
MONEY; LOSS OF ANTICIPATED SAVINGS; LOSS OF BUSINESS; LOSS OF OPPORTUNITY; LOSS OF
GOODWILL; LOSS OF REPUTATION; LOSS OF, DAMAGE TO OR CORRUPTION OF DATA; OR ANY
INDIRECT OR CONSEQUENTIAL LOSS OR DAMAGE HOWSOEVER CAUSED INCLUDING THE
REPLACEMENT OF EQUIPMENT AND PROPERTY, ANY COSTS OF RECOVERING, PROGRAMMING, OR
REPRODUCING ANY PROGRAM OR DATA STORED OR USED WITH SMARTFIELD PRODUCTS AND ANY
FAILURE TO MAINTAIN THE CONFIDENTIALITY OF DATA STORED ON THE PRODUCT. THE
FOREGOING LIMITATION SHALL NOT APPLY TO DEATH OR PERSONAL INJURY CLAIMS, OR ANY
STATUTORY LIABILITY FOR INTENTIONAL AND GROSS NEGLIGENT ACTS AND/OR OMISSIONS. SOME
STATES DO NOT ALLOW THE EXCLUSION OR LIMITATION OF INCIDENTAL OR CONSEQUENTIAL
DAMAGES, SO THE ABOVE LIMITATION MAY NOT APPLY TO YOU.
O
OBTAI NI NG WARR AN TY SE RV IC E
Please access and review the online help resources referred to in the documentation accompanying
this hardware product before requesting warranty service. If the product is still not functioning
properly after making use of these resources, please contact the Smartfield representatives using
the information provided in the documentation. When contacting Smartfield via telephone, other
charges may apply depending on your location. When calling, a Smartfield representative will help
determine whether your product requires service and, if it does, will inform you how Smartfield will
provide it. You must assist in diagnosing issues with your product and follow Smartfield’s warranty
processes.
Smartfield may restrict service to the fifty states of the United States of America and the District of
Columbia, and provide warranty service (i) at a Smartfield repair service location, (ii) by sending you
prepaid way bills (and if you no longer have the original packaging, Smartfield may send you
packaging material) to enable you to ship the product to Smartfield’s repair service location for
service, or (iii) by sending you new or refurbished customer-installable replacement product or
parts to enable you to service or exchange your own product (“DIY Service”). Upon receipt of the
replacement product or part, the original product or part becomes the property of Smartfield and
you agree to follow instructions, including, if required, arranging the return of original product or
part to Smartfield in a timely manner. When providing DIY Service requiring the return of the original
product or part, Smartfield may require a credit card authorization as security for the retail price of
the replacement product or part and applicable shipping costs. If you follow instructions, Smartfield
will cancel the credit card authorization, so you will not be charged for the product or part and
shipping costs. If you fail to return the replaced product or part as instructed, Smartfield will charge
the credit card for the authorized amount.
Service options, parts availability and response times may vary. Service options are subject to
change at any time. In accordance with applicable law, Smartfield may require that you furnish proof
of purchase details and/or comply with registration requirements before receiving warranty service.
Please refer to the accompanying documentation for more details on this and other matters on
obtaining warranty service.
If your product is capable of storing software programs, data and other information, you should
protect its contents against possible operational failures. Before you deliver your product for
warranty service it is your responsibility to keep a separate backup copy of the contents and disable
any security passwords. THE CONTENTS OF YOUR PRODUCT WILL BE DELETED AND THE STORAGE
MEDIA REFORMATTED IN THE COURSE OF WARRANTY SERVICE. Your product will be returned to you
configured as originally purchased, subject to applicable updates. You will be responsible for
reinstalling all other software programs, data and passwords. Recovery and reinstallation of
software programs and user data are not covered under this Limited Warranty.
© 2008-2010 Smartfield, Inc. All rights are reserved. The SmartCrop®, SmartRate™, SmartRate™ PRO,
SmartWeather™, PivotScout™, PivotScout™PRO, SmartProfile™, and Smartfield logos are trademarks
of Smartfield, Inc. registered in the U.S. and other countries.