user manual rev 2
™Accessories
• Control4Power-Over-EthernetInjector
(AC-POE1-B),soldseparately
Specifications
Screen 7”16:9WXGAColorLCDModule
Resolution:800x480
Brightness:400nits(withoutTouch
Screen)
Wireless BuiltInIEEE802.11b/g/nWirelessLAN
IntegralAntenna(b/g/nsupported)
Authentication:WEP,WPA,WPA2
Dimensions 4.921in.(12.5cm)x7.44in.(18.9cm)x
.669in.(1.7cm)
Weight 1.75lbs.(.793kg)
Network WiFi(802.11b,g,orn)wirelessaccess
point(WAP)alreadyconguredto
communicatewithaControl4Controller
(e.g.,HC-300).
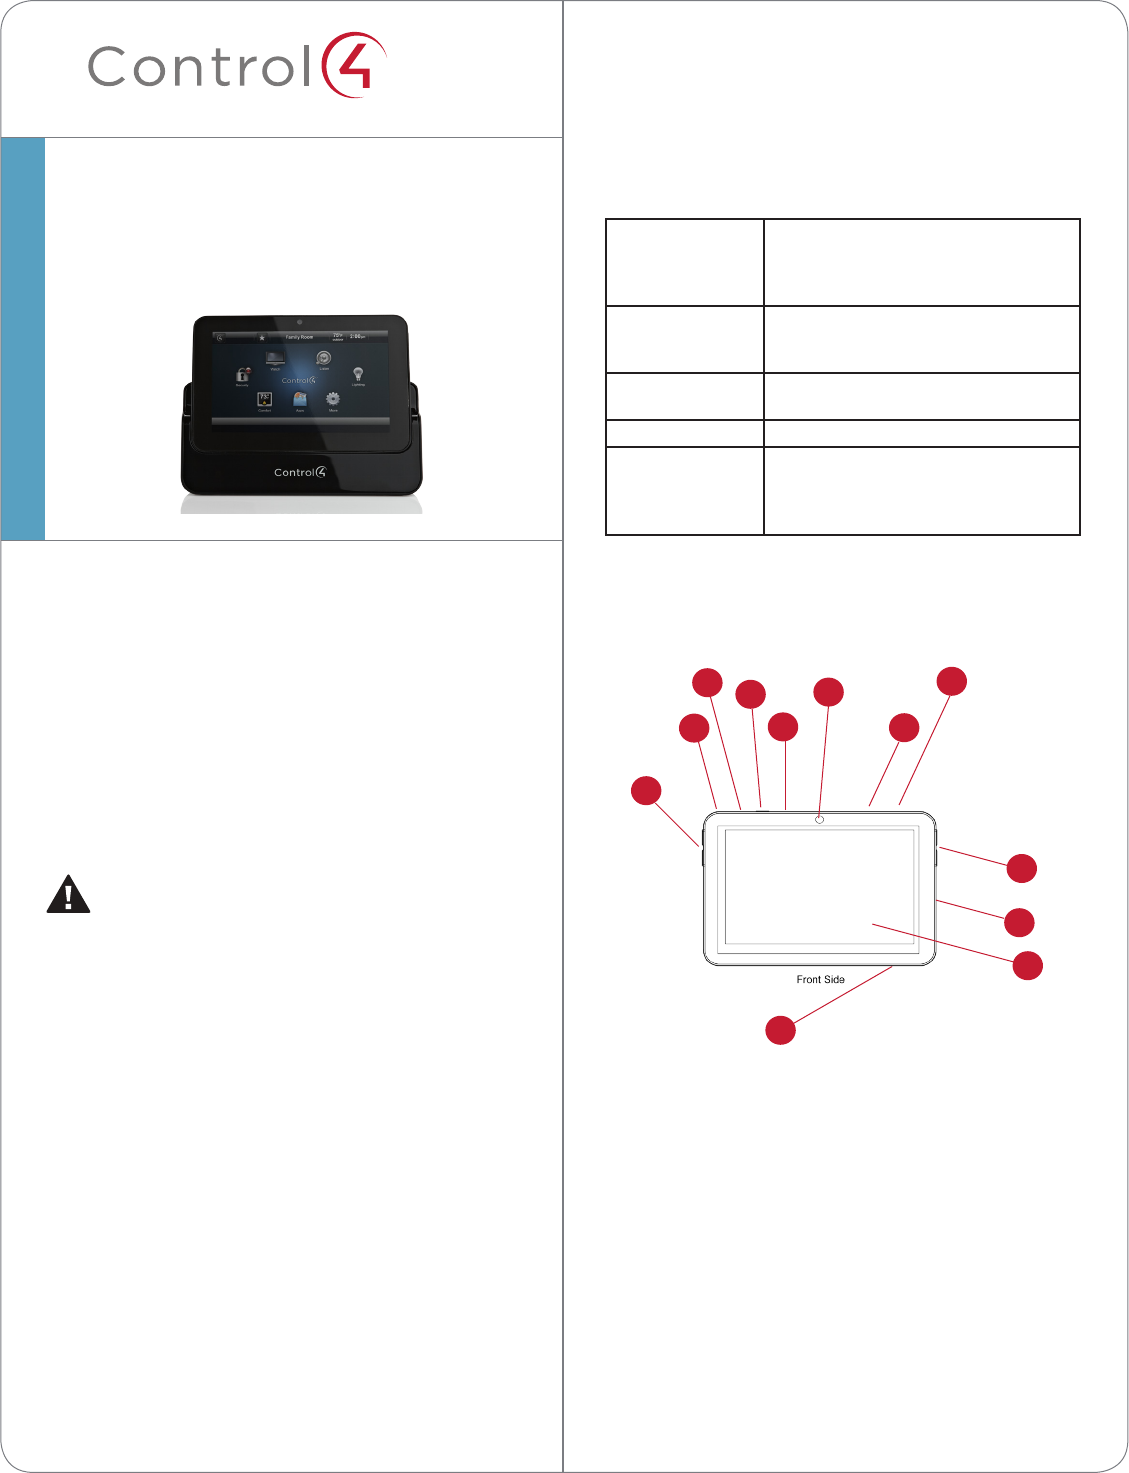
Front and Rear Panel Descriptions
Figure1.FrontView
1 Camera.Usedtoviewactivityonanother
compatibleControl4deviceinanotherroom.
2 Programmable Buttons (4).Usedtoprogram
varioushomeautomationactivitiesinComposer
programming.
3 Power Button.UsedtopowertheTouchScreen
onoro.Alsosee“TouchScreenModes.”
4 Touch Screen.ThefrontfaceoftheTouchScreen.
5 Reset/Restore Pinhole.Usedtoresetorrestore
thefactorydefaults.
6 Speaker.UsedforIntercompurposes.
7 Headphone Jack (3.5mm).Usedtoconnect
headphonesforIntercompurposes.
Supported Models
• C4-TSMC7-EN-BL7”PortableTouchScreen,
Black
Box Contents
CarefullyunpacktheControl4®7”PortableTouch
Screenandensurethefollowingitemsareincludedin
thebox.
CAUTION! Donotapplyexcessivepressure
totheTouchScreendisplayduringhandling.
Doingsocancrackthescreenanddamage
theTouchScreen.
• Control47”PortableTouchScreen
• Control47”PortableTouchScreenDock
• DCPowerAdapter(onlyusethepowersupply
provided)
• (Optional)Two(2)screwsforsecuringthedock
totheTouchScreen
• WarrantyCard
Requirements
• Phillipsheadscrewdriver
• Two(2)screws(included)tosecuretheTouch
Screentothedock
7”Portable
TouchScreen
SetupGuide
4
1
2
7
10
35
6
2
8
9
10
1

™
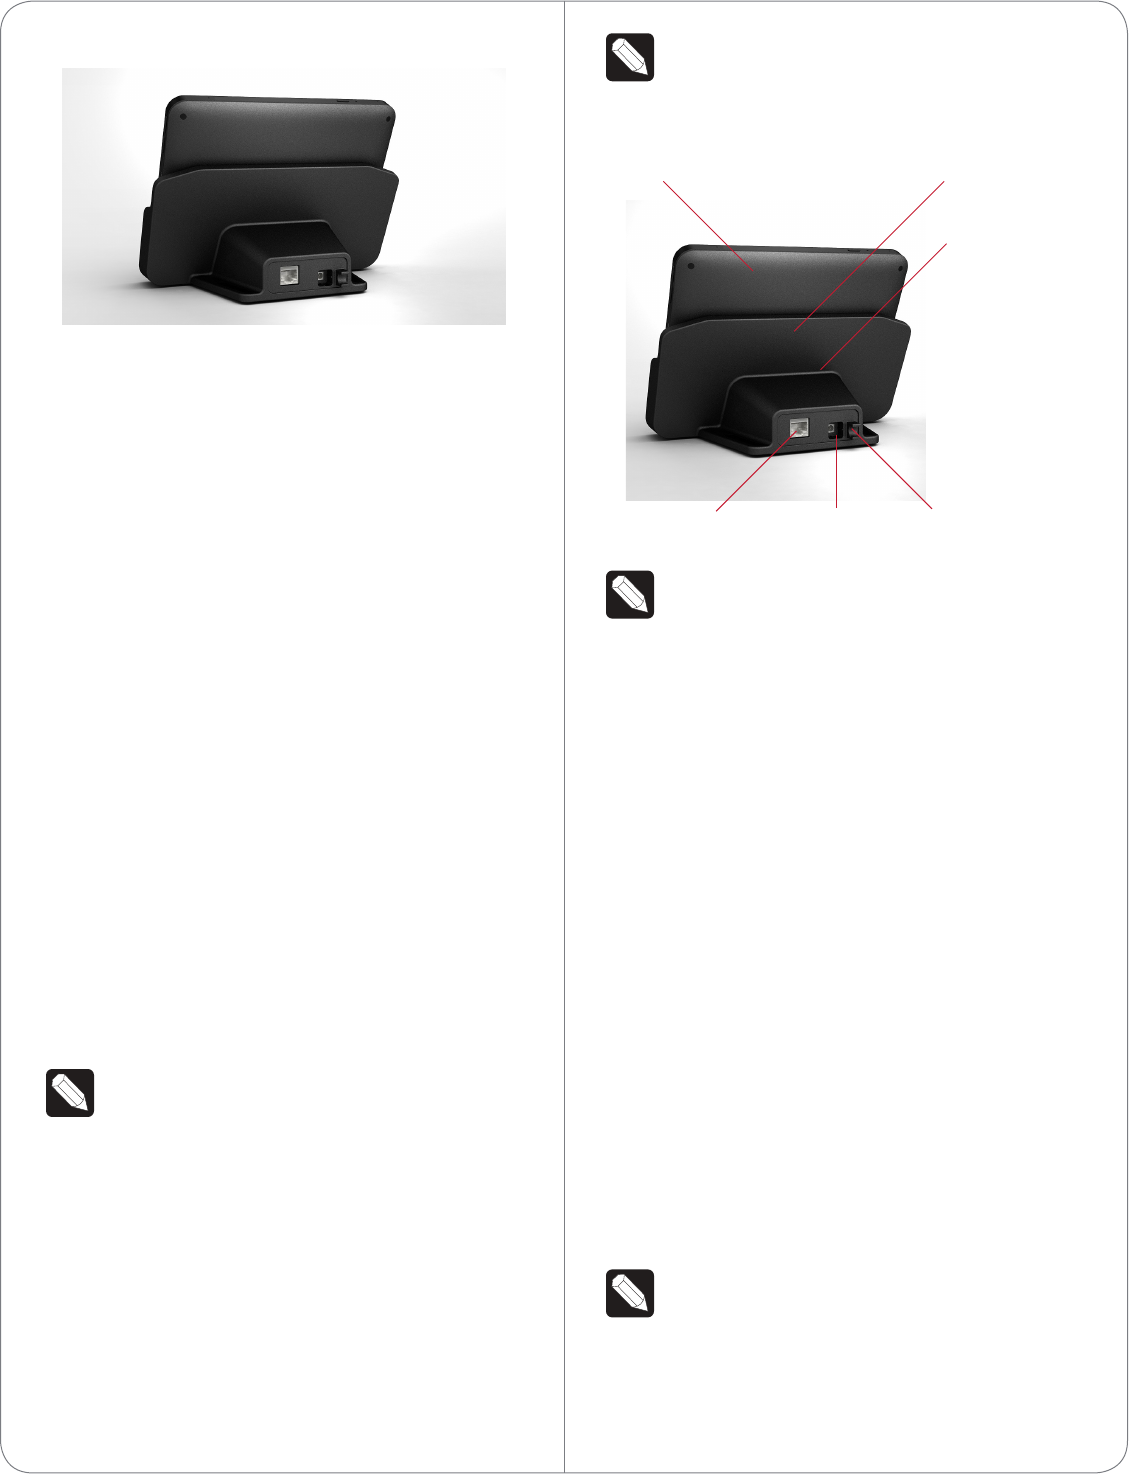
8 Camera LED Indicator.Indicatesifthecamerais
on.Greenindicatesthecameraison.
9 Power LED Indicator.Indicatesifthepowerison.
10 Microphones.UsedtospeakintotheTouch
Screen.
Power and Network Connections
BeforeyoubegintoinstallyourTouchScreen,you’ll
needtomakeafewdecisions:
1 WillyoubeusingtheTouchScreenasaportable
device(docknotattached)orwiththedock
attached?See“PortableorTabletopInstallation
Options”fordetails.
2 WillyoubeusingtheDCPowerAdapter
(included)orPower-Over-Ethernet(sold
separately)?See“PortableorTabletop
InstallationOptions”fordetails.
LED Indicators
TheLEDsontheTouchScreenindicatethestatusof
thepowersupply,batterycharge,booting,etc.,as
describedinthenexttable.
LED Color Touch Screen Status
O -Notcharging
-Screensavermode,blank
-Screensavermode,charging
Red -O,charging
Green -On,notcharging
-Suspend/asleep,notcharging
Green(blinking) -Booting,notcharging
Green(fastblinks) -Restoring,notcharging
Orange -On,charging
-Suspend/asleep,charging
Orange(blinking) -Bootingwhilecharging
7”Portable
TouchScreen
SetupGuide
LED Color Touch Screen Status
Orange(fast
blinks)
-Restoringwhilecharging
NOTES:(1)IfthedeviceisOFF,pressPower.
Ifthedeviceisasleep,pressanybuttonor
tapthescreen.(2)TheTouchScreenmustbe
connectedtoapowersupplyforatleastfour
(4)hourssothebatterycanfullycharge.(3)
Ifthebatterypoweriscriticallylow,youcan
stillturnonthedeviceaslongasthedockis
pluggedintothepoweradapterorPoE.
Figure2.TopView
Figure3.BottomView
Figure4.RightView
Headphone Jack
Programmable
Buttons
(on right and left sides)
Speaker
Power/Charging LED
Reset/Restore
Pinhole
Microphones
Camera LED
Power Button
2
NOTE:IfyouuseEthernetandundockthe
TouchScreen,youwillloseconnectivity
Figure6.BackViewwithPowerConnections
NOTE:Thepowercordanglestotherightand
isheldbytheretainingclip.Whenyouinsert
thepowercord,italsosnapsintotheretaining
clip.
3 InserttheTouchScreenintothedock’sslot.
4 WakeuptheTouchScreenbyeithertouchingthe
screenorbypressinganybutton.
Using the Touch Screen as a Tabletop Device
1 Placethe7”PortableTouchScreendockonaat
surface.
2 Power.Insertthepowercableintothepowerjack
slotonthebackofthedevice(seeFigure6),and
thenplugthepowercordintoawalloutlet.The
devicecanbepoweredusingeitheranEthernet
connectororaPoEconnector.TouseEthernet,
plugtheRJ-45connectorintothePoEconnector
andthenintotheEthernetjackonthebackof
theTouchScreendock(seeFigure6).
NowyoucanattachtheTouchScreentothe
dockusingthescrewsprovidedtopreventthe
TouchScreenfrombecomingdisconnectedand
nonfunctionaleverytimeitisremoved.
NOTE:PowerotheTouchScreenbefore
screwinginthescrews.
ToattachtheTouchScreentothedockingstation:
1 Removethetwo(2)rubberprotectorsfromthe
screwholesonthebottomoftheTouchScreen’s
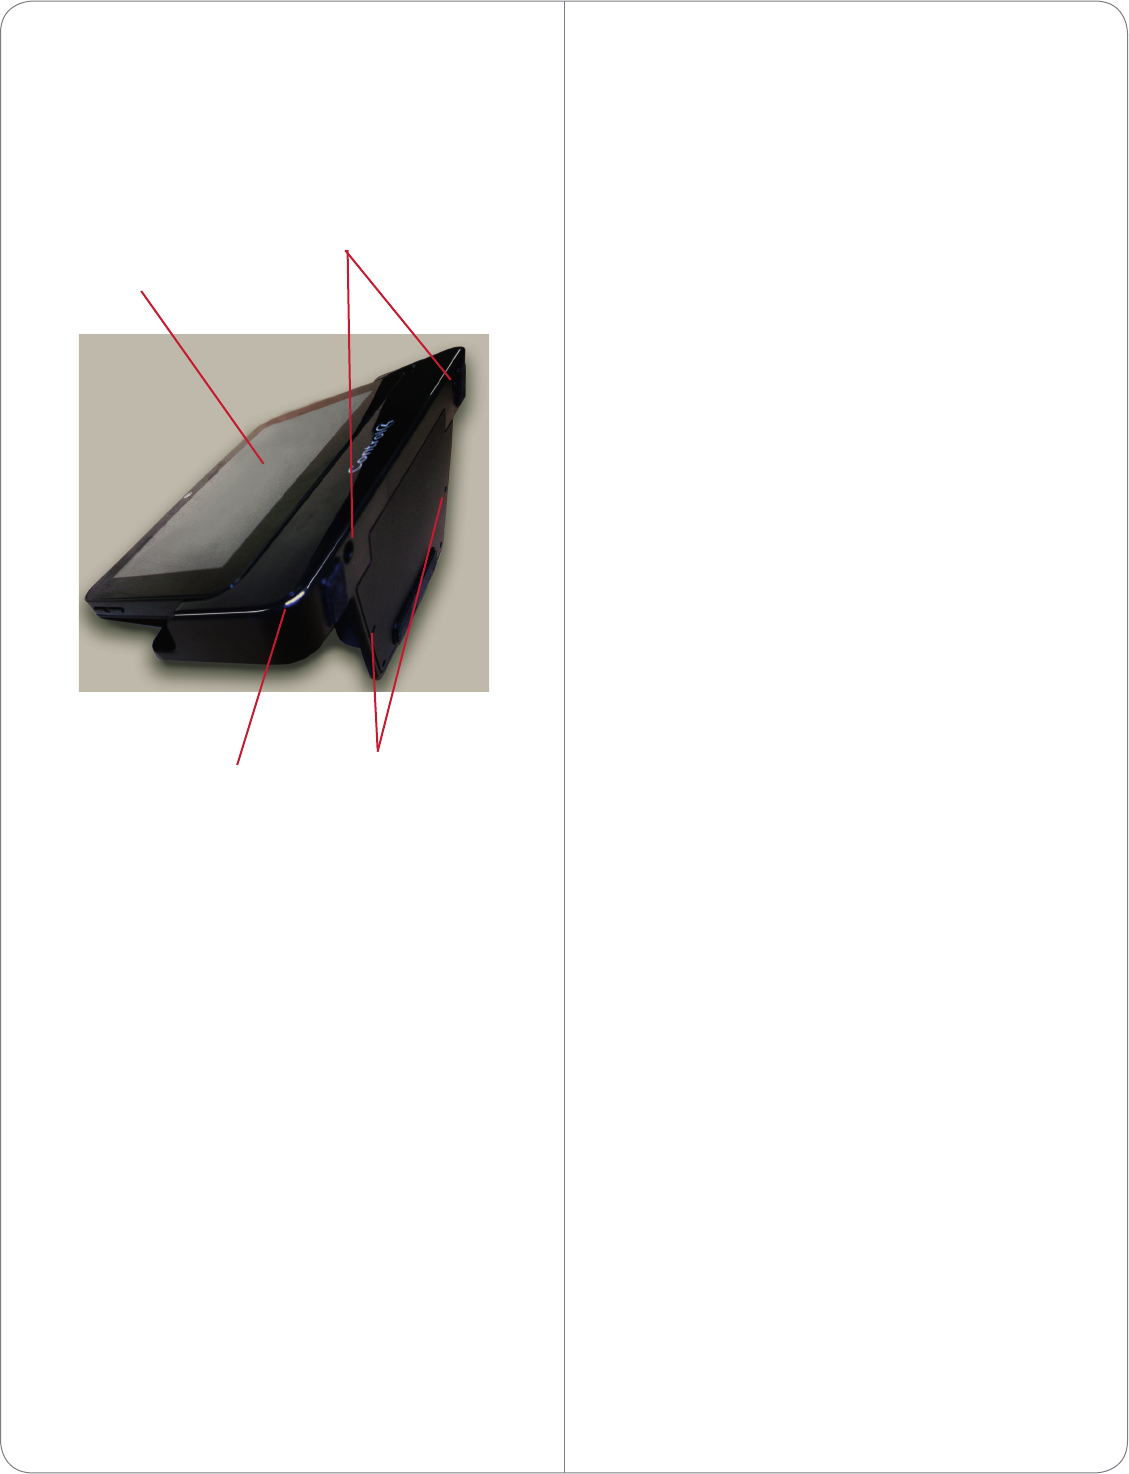
Figure5.BackViewwithDockandConnections
Portable or Tabletop Installation
Options
Youcanusethe7”PortableTouchScreenasa
portabledevicethatyoucarrywithyouasyoumove
aroundthehouse,oryoucanscrewtheTouchScreen
intothedock.
• IfyouintendtousethedeviceONLYasa
tabletop,youcanuseeitheranEthernetora
WiFiconnection.
• IfyouintendtousetheTouchScreenasa
portabledeviceandremovetheTouchScreen
fromitsdock,youmustuseaWiFiconnection.
TousetheTouchScreenasaportabledevice,follow
theinstructionsnext.TousetheTouchScreenasa
tabletopdevice,usingthetwo(2)screwsindicatedin
“Requirements,”followtheinstructionsin“Usingthe
TouchScreenasaTabletopDevice.”
Using the Touch Screen as a Portabie Device
Usethe7”PortableTouchScreendockasthe
dockingstationfortheTouchScreen(seeFigure6).
NOTE:YoumustuseWiFiiftheTouchScreen
willbeusedasaportabledevice.
1 Placethe7”PortableTouchScreendockonaat
surface.
2 Power.Insertthepowercableintothepowerjack
slotonthebackofthedevice(seeFigure7),and
thenplugthepowercordintoawalloutlet.The
devicecanbepoweredusingeitheranEthernet
connectororaPoEconnector.TouseEthernet,
plugtheRJ-45connectorintothePoEconnector
andthenintotheEthernetjackonthebackof
theTouchScreendock(seeFigure6).
Ethernet, PoE Power Jack Retaining Clip
Rubber Gasket
Touch Screen Touch Screen Dock
3
screensaver.ToforcethedeviceintoSleepmode,
pressandreleasethePowerbutton.
Configure the Network Settings
Youmustcongurethenetworksettingsonthis
TouchScreensoitcancommunicatewiththeother
devicesintheControl4system.
Tocongurethenetworksettingsforthisdevice:
1 Ifusingawirelessnetwork,ensurethattheWiFi
WAPisonthesamenetworkastheControl4
Controller.
2 Gatherthefollowingwirelessnetwork
informationfromyourWAP:
• SSID(ServiceSetIdentier).
• WEP/WPA/WPA2securitykey,ifenabled.
• IPAddressingRequirements:ThedefaultisDHCP
(withdynamicaddresses).Ifyouneedtouse
astaticIPaddressinstead,youmustprovidea
networkIPaddressforthisdevice.
3 OntheTouchScreen,tapMore>Settings>
Network.Ifyouwanttousewireless,under
Wireless,selectEnable;otherwise,skiptoStep4.
Followthesestepstocongureawirelesssetup:
a Ifyoudon’tseethenetworkyouwant,select
Other.
b AtNetworkName,selecttoaddtheSSID
ornameofthewirelessnetworkwhenthe
keyboardappears.
c AtSecurity,selectNone,WEP,orWPA.
d AtPassword,typethepasswordgivento
youbythepersonwhosetupthecustomer’s
wirelessnetwork(Control4Dealer).
e SelectConnect.NoticethattheIPsettings
change.
4 TheIPaddressissettoDHCPbydefault.Ifyou
needtosetastaticIPaddressinstead,complete
thefollowingsteps;otherwise,youarenished
withthesesteps.
a OntheNetworkpage,tapStatic (see Figure
8).
dock.
2 InserttheTouchScreenintoitsdock.
3 TurntheTouchScreenanddockupsidedown
andinsertthetwo(2)screws(included).
4 ScrewthedocktotheTouchScreen(Figure7).
Figure7.BottomViewwithDock
5 WakeuptheTouchScreenbyeithertouchingthe
screenorbypressinganybutton.
6 (Optional)YoucanpermanentlymounttheTouch
Screenanddocktoatabletopbyscrewingthe
baseontoaatsurface(screwsnotincluded).
SeeFigure7.
Touch Screen Modes
TheTouchScreenusesthefollowingmodes:
• O:Thescreen,theACPowerindicator,andthe
batteryindicatorarealldark(theTouchScreen
hasnopower).Topowerupthedevice,ensure
thatthebatteryischarged,orthedock’spower
cordisconnectedtothedockandtheTouch
Screenisproperlyseatedinthedock.
• Suspend:Thescreenisdark.butthePower
indicatorislit.Towakeupthedevice,pressany
buttonortaptheTouchScreen.
• Screensaver:Thescreensaverisrunning.Towake
upthedevice,tapthescreen.
• Wake:Thescreendisplaysanythingotherthana
Screw Holes to attach
Touch Screen to Dock
Touch Screen
Dock Screw Holes for
Permanent Mount
4
Figure8.StaticIPAddress
b Selecteachboxoneatatime,andtypethe
address:IPAddress,SubnetMask,Default
Gateway,PreferredDNS,andAlternateDNS.
c Whenthekeyboardappears,typethe
address,andthentapDone.
d TapOKtoreturntotheNetworkpage.
YoucannowconnecttoaControl4Directorrunning
onaControl4deviceonthenetwork.
Connect to Director from the Touch
Screen
NOTES:(1)TheTouchScreen’scontrolsare
auto-populatedbyaprojectontheController
towhichitconnects.Ifthesubsystembuttons
arenotlit,andnodefaultroomdisplayson
theTouchScreen,youarenotconnectedto
aController.(2)Ensurethatthedevicesare
addedtoComposerandidentiedinthe
project.See“CongureinComposer”for
details.
1 OntheHomepage,tapMore>Settings.
2 TapDirector.
3 IftheDirectorpagedoesnotdisplay,theDirector
viewhasprobablybeendisabled;youmust
provideapasswordtoenableit.
• Ifyouneedthepassword,contactyourControl4
Dealer.
• Ifyouhavethepassword,tapConfig>Disable
View,enterthepassword,andthentapDirector
todeselectit.TaptheDirectorbuttonagain,and
youshouldbeabletoviewtheDirectorpage.
4 IntheDirectorlistofIPaddresses,taponyour
Controller’sIPaddress.Thescreendisplaysyour
currentconnections(Figure9).
Figure9.ControllerAddress
5 VerifythattheName,IPAddress,anddefault
location(room)displayontheTouchScreen
toensurethatyouhaveallofthecorrect
connections.
Configure in Composer
UsingComposerPro,addthedriverforthe7”
PortableTouchScreentoyourproject.Ifthecorrect
driverdoesn’tappearforyoutoaddit,rightclicka
driverintheMyDriverstab,andthenselectRestore
Default Listtorefreshthelist.SeeComposer Pro
Getting Started fordetails.
1 StartComposerandconnecttoaDirector.
2 AddtheTouchScreenobjecttotheproject:
a IntheSystemDesignView(defaultview)
projecttree(leftpane),highlighttheroom
wheretheTouchScreenresides.
b UnderMyDrivers,double-click <7” Portable
Touch Screen>.
3 Identifythedevice:
a ClickConnections>Networktab.
b IntheIPNetworkConnectionslist(center
pane),highlightTouch Screen - 7” Portable,
andthenclickIdentify.
c Whenprompted,gototheTouchScreenand
pressthebottombuttonontherightside,as
indicatedontheIdentifyscreeninComposer,
toidentifythedevicetothenetwork.
d WhentheaddressdisplaysinComposer,click
Close.
Power O
TopowerotheTouchScreen,pressandholdthe
Powerbuttonforatleastve(5)seconds,andthen
5

waitafewmoresecondsforthedevicetoturno.
Battery Instructions
Shouldthebatteryeverneedtobereplaced,contact
yourControl4representative.
Battery Charging
Forsafetyreasons,thebatteryisshippedonly
partiallycharged.Whenyouarereadyforuse,fully
chargethebatteryinitsthedockforatleastfour(4)
hours.
IfyouremovetheTouchScreenfromthedockfor
longperiodsoftime,theTouchScreenturnso.In
thiscase,inserttheTouchScreenintothedockagain
torechargetheTouchScreen.AredororangeLED
indicatesthatit’scharging.See“LEDIndicators”for
moredetailsabouttheLEDs.
Cleaning the Touch Screen and Dock
1 Unplugthepowerjackfromthedock.
2 Useasoft,dampclothtowipeothesurface.
Troubleshooting
Ifyouexperienceoperationalproblemswiththe
TouchScreen,readthefollowingsectionsforsystem
troubleshooting.Ifproblemspersist,pleasecontact
yourControl4DealeroryourControl4representative.
Battery Operation Problems
Ifbatteryislow...
• Rechargethebatteryassoonaspossible.
• DocktheTouchScreen(ifusingasaportable),
andcontinuetousetheTouchScreeninitsdock
untilfullycharged.
IftheTouchScreenturnsoautomatically...
• Checkwhetherthebatterypowerislowor
completelydrained.
• CheckwhetherthesystemisinSuspendmode
(see“TouchScreenModes”).
• Tapthescreentocheckwhetherthedisplaywill
activate.
• PlugintheDCpoweradapterorPoEcableto
chargethebattery.
IftheTouchScreendoesn’tturnonwhenit’snot
connectedtothedock...
• Thebatterypowermaybetoolowtorunthe
TouchScreen.Tryconnectingittothedockto
rechargeit.
Display Problems
Ifthescreenappearsblank...
• Presstheany buttonortaptheTouchScreento
wakeitup.
System Operation Problems
IftheTouchScreenisnotresponding...
• AlwaystrytopowertheTouchScreenobefore
resettingtheTouchScreen.Resetthedeviceby
pressingtheReset/Restorepinholeonthetop
ofthescreen.Youmayneedtouseanunbent
papercliptopressthebutton.
CAUTION!Themicrophoneholeslooksimilar
totheReset/Restorepinhole.Insertinga
paperclipintothesepinholeswillpermanently
damagethemicrophones.SeeFigure2.
• Unplugthedockandplugitbackin.
• IfpressingtheReset/Restorepinholebutton
doesnotsolvetheproblem,asalastresort,
performafactoryrestore.Pressandholdthe
Reset/Restorepinholebutton(seeFigure2-Top
Viewforthelocation)untilthePowerLEDbegins
toblinkrapidly.Thiswillresetallcongurations.
Thefactoryrestoreprocessmaytake3-5minutes
tocomplete.
IftheTouchScreenisdamaged...
• ContacttheControl4DealerorResellerfrom
whichyoupurchasedtheTouchScreen.
Ifyouhavenetworkconnectionproblems...
• Viewthesystem’swirelessstatusbycheckingthe
WiFiindicatorontheTouchScreen’snavigator.
• Makesureyou’veprovidedtherequirednetwork
congurationinformationdescribedin“Congure
theNetworkSettings.”
• Ensurethatthesamekeyisbeingusedonthe
TouchScreenandattheWAP.
• MakesuretheWAPisconnectedtotheproper
networkjackwhileitisfunctioninginthenetwork
infrastructuremode.
6
Warnings
WARNING!Toavoidbodilyharm,understand
andfollowthesesafetyprecautionsbefore
operatingthisTouchScreen:
-Usingworn-outordamagedpowercords
mayresultinelectricshockorre.
-AlwayscontactanauthorizedControl4
serviceproviderforassistanceifanyrepairor
adjustmentisrequired.
Avertissement!Pouréviterdesdommages
physiques,comprenezetsuivezcesmesures
desécuritéavantd’actionnerl’écrantactile
Control4®sansl:
-Utilisantuséouendommagélescordonsde
secteurpeuventavoircommeconséquence
ladéchargeélectriqueoulefeu.
-Entrezencontactavectoujoursun
fournisseurdesservicesControl4®autorisé
pourl’aidesin’importequelleréparationou
ajustementestexigée.
Warnung!UmKörperverletzungzu
vermeiden,verstehenSieundfolgenSie
dieseSicherheitsanweisungenbevorSieden
drahtlosenControl4®TouchScreenbetreiben:
-UnterVerwendungabgedroschenen
oderbeschädigtkannNetzanschlusskabel
ElektroschockoderFeuerergeben.
-TretenSieimmermiteinemautorisierten
Control4®DiensterbringerfürUnterstützung
inVerbindung,wennirgendeineReparatur
oderJustageangefordertwird.
CAUTION!Toavoiddatalossorequipment
damage,understandandfollowthesesafety
precautionsbeforeoperatingthisTouch
Screen:
-DonotuseorplacetheTouchScreennear
sourcesofheatorexposeittodirectsunlight
foranextendedperiodoftime.Storeitina
coolanddryplace.
-Donotusepensorsharpobjectstowriteon
thescreen.
Attention!Pouréviterlapertededonnéesou
lesdommagesauxéquipments,comprenez
etsuivezcesmesuresdesécuritéavant
d’actionnerleControl4®7”;Écrantactiletenu
danslamain:
-Nelaissezpaslepaquetdebatterieentrer
encontactavecd’autresobjetsenmétal.
-N’utilisezpasouneplacezpasl’écrantactile
prèsdessourcesdechaleurounel’exposez
pasàlalumièredusoleildirectependantune
périodeprolongée.
-Stockez-ledansunendroitfraisetsec.
N’employezpaslesstylosoulesobjets
pointuspourécriresurl’écran.
Vorsicht!UmDatenverlustoder
Ausrüstungsschadenzuvermeiden,verstehen
SieundvordemBetriebdesControl4®7”
folgenSiedieseSicherheitsanweisungen;
TouchScreen:
-LassenSiedenBatteriesatzmitanderen
MetallgegenständennichtinVerbindung
treten.
-BenutzenSieodersetzenSiedenTouch
ScreennichtnaheQuellenderHitzeoder
setzenSieihndirektemTageslichtwährend
einesausgedehntenZeitabschnittsaus.
SpeichernSieesineinemkühlenund
trockenenPlatz.
-BenutzenSienichtFedernoderscharfe
Gegenstände,umaufdenSchirmzu
schreiben.
IMPORTANT!Donotusepensorsharpobjects
tonavigateormakeselectionsontheTouch
Screen.Toselectanitemorscrollthrougha
list,useyourngertip.
Important!N’employezpaslesstylosoules
objetspointuspourdirigeroupourfairedes
choixsurl’écran.Pourchoisirunarticleouun
rouleauparuneliste,employezvotreboutdu
doigt.
Wichtig!BenutzenSienichtFedernoder
scharfeGegenstände,umoderVorwähleren
aufdemSchirmzubildenzusteuern.Um
einEinzelteilodereineRolledurcheineListe
7
©2011 Control4. All rights reserved. Control4, the Control4 logo, the Control4 iQ logo and the Control4 certified logo are registered trademarks or trademarks of Control4 Corporation in
the United States and/or other countries. All other names and brands may be claimed as the property of their respective owners.
control4.com| ™
vorzuwählen,benutzenSieIhreFingerspitze.
IMPORTANT!Improperuseorinstallationcan
causeLOSS/DAMAGEOFPROPERTY.
Important!L’utilisationoul’installationinexacte
peutcauserLOSS/DAMAGEDEPROPRIÉTÉ.
Wichtig!UnsachgemäßerGebrauchoder
InstallationkönnenLOSS/DAMAGEDER
EIGENSCHAFTverursachen.
IMPORTANT!Usingthisproductinamanner
otherthanoutlinedinthisdocumentvoids
yourwarranty.Further,Control4isNOTliable
foranydamageincurredwiththemisuseof
thisproduct.See“Warranty.”
Important!Utilisantceproduitenquelque
sorteautrequedécritdanscedocumentvide
votregarantie.Deplus,Control4n’estpas
responsabled’aucundommageencouruavec
l’abusdeceproduit.Voyezque«Warranty.»
Wichtig!DasVerwendendiesesProduktesin
gewissemSinneandersalsumrissenindiesem
DokumenthebtIhreGarantieauf.Weiterist
Control4NICHTfürirgendeineBeschädigung
verantwortlich,diemitderFehlanwendung
diesesProduktesgenommenwird.SehenSie,
daß“Warranty.”
WARNING!Toreducetheriskofreor
electricalshock,donotexposethisapparatus
torainormoisture.
Avertissement!Pourréduirelerisquedufeuou
dechocélectrique,n’exposezpascetappareil
àlapluieouàl’humidité.
Warnung!UmdieGefahrdesFeuersoderdes
elektrischenSchlageszuverringern,setzenSie
diesenApparatnichtRegenoderFeuchtigkeit
aus.
Regulatory/Safety Information
ToreviewregulatoryinformationforyourparticularControl4
products,seetheinformationlocatedontheControl4websiteat:
http://www.control4.com/regulatory/.
Patent Information
ProtectedunderU.S.Patents7,335,845,7,106,261andlicensedunder
U.S.Patents5,905,442and5,982,103
Warranty
Limited2-yearWarranty.Refertohttp://www.control4.com/warranty.
About this Document
PartNumber:200-00238,RevA,11/01/2011,Draft7
8

Regulatory Compliance and Safety Information for Contol4 Model C4-TSMC7-EN-BL & C4-
TSTTC7-EN-BL.
Electrical Safety Advisory
Important Safety Information
Read all safety information before using this product.
1. Read these instructions.
2. Keep these instructions.
3. Heed all warnings.
4. Follow all instructions.
5. Do not use this apparatus near water.
6. Clean only with dry cloth.
7. Do not block any ventilation openings. Install in accordance with the manufacturer’s
instructions.
8. Do not install near any heat sources such as radiators, heat registers, stoves, or other
apparatus (including amplifiers) that produce heat.
9. Do not defeat the safety purpose of the polarized or grounding-type plug. A polarized
plug has two blades with one wider than the other. A grounding type plug has two blades
and a third grounding prong. The wide blade or the third prong is provided for your safety.
If the provided plug does not fit into your outlet, consult an electrician for replacement of
the obsolete outlet.
10. Protect the power cord from being walked on or pinched particularly at plugs,
convenience receptacles, and the point where they exit from the apparatus.
11. Only use attachments/accessories specified by the manufacturer.
12. Use only with the cart, stand, tripod, bracket, or table specified by the manufacturer, or
sold with the apparatus. When a cart is used, use caution when moving the
cart/apparatus combination to avoid injury from tip-over.
13. Unplug this apparatus during lightning storms or when unused for long periods of time.
This equipment uses AC power which can be subjected to electrical surges, typically
lightning transients which are very destructive to customer terminal equipment connected
to AC power sources. The warranty for this equipment does not cover damage caused
by electrical surge or lightning transients. To reduce the risk of this equipment becoming
damaged it is suggested that the customer consider installing a surge arrestor.
14. Refer all servicing to qualified service personnel. Servicing is required when the
apparatus has been damaged in any way, such as power-supply cord or plug is
damaged, liquid has been spilled or objects have fallen into the apparatus, the apparatus
has been exposed to rain or moisture, does not operate normally, or has been dropped.
15. Use the mains plug to disconnect the apparatus from the AC mains. The mains plug shall
remain readily operable.
16. To completely disconnect unit power from the AC mains, disconnect the unit’s power cord
from the mains socket. To reconnect power, plug the unit’s power cord into the mains
socket following all safety instructions and guidelines.
17. Caution: Danger of explosion if lithium battery is incorrectly displaced. Replace only with
the same or equivalent type. Battery should only be replaced by qualified personnel and
is not intended as a user serviceable part. Do not expose batteries or battery pack to
excessive heat such as prolonged sunlight, fire or other heat sources.
18. Never push objects of any kind into this product through cabinet slots as they may touch
dangerous voltage points or short out parts that could result in fire or electric shock.
19. This product can interfere with electrical equipment such as tape recorders, TV sets,
radios, computers and microwave ovens if placed in close proximity.
The lightning flash and arrow head within the triangle is a warning sign alerting
you of dangerous voltage inside the product
Caution: To reduce the risk of electric shock, do not remove cover (or back). No
user serviceable parts inside. Refer servicing to qualified service personnel.
The exclamation point within the triangle is a warning sign alerting you of
important instructions accompanying the product.
See marking on bottom / back of product
Warning!: To reduce the risk of electrical shock, do not expose this
apparatus to rain or moisture
AVERTISSEMENT! Pour réduire le risque de choc électrique,
n'exposez pas cet appareil à la pluie ou à l'humidité.
WARNUNG! Um das Risiko des elektrischen Schlages zu verringern,
setzen Sie diesen Apparat nicht Regen oder Feuchtigkeit aus.
Save these instructions
Compliance of this equipment is confirmed by the following label that is placed on the equipment:
USA & Canada Compliance
FCC Part 15, Subpart B / ICES-003Unintentional Emissions Interference Statement
This equipment has been tested and found to comply with the limits for a Class B digital device,
pursuant to Part 15 of the FCC rules and Industry Canada ICES-003. These limits are designed
to provide reasonable protection against harmful interference when the equipment is operated in
a residential installation. This equipment generates uses and can radiate radio frequency energy
and, if not installed and used in accordance with the instructions, may cause harmful interference
to radio communications. However, there is no guarantee that interference will not occur in a
particular installation. If this equipment does cause harmful interference to radio or television
reception, which can be determined by turning the equipment off and on, the user is encouraged
to try to correct the interference by one or more of the following measures:
Reorient or relocate the receiving antenna.

Increase the separation between the equipment and receiver.
Connect the equipment into an outlet on a circuit different from that to which the receiver
is connected.
Consult the dealer or an experienced radio/TV technician for help.
This device complies with part 15 of the FCC rules and Industry Canada ICES-003. Operation is
subject to the following two conditions: (1) This device may not cause harmful interference, and
(2) this device must accept any interference received, including interference that may cause
undesired operation.
Le présent appareil est conforme aux CNR d’Industrie Canada applicables aux appareils radio
exempts de licence. L’exploitation est autorisée aux deux conditions suivantes : (1) l’appareil ne
doit pas produire de brouillage, et (2) l’utilisateur de l’appareil doit accepter tout brouillage
radioélectrique subi, même si le brouillage est susceptible d’en compromettre le fonctionnement.
IMPORTANT! Any changes or modifications not expressly approved by the party responsible for
compliance could void the user’s authority to operate this equipment.
IMPORTANT! Tous les changements ou modifications pas expressément approuvés par la partie
responsable de la conformité ont pu vider l’autorité de l’utilisateur pour actionner cet équipement.
Compliance of this equipment is confirmed by the following label that is placed on the equipment:
FCC Part 15, Subpart C / RSS-210 Intentional Emissions Interference Statement
Compliance of this equipment is confirmed by the following certification numbers that are placed
on the equipment:
Notice: The term “FCC ID:” and “IC” before the certification number signifies that FCC and
Industry Canada technical specifications were met.
FCC ID: R33C4TSMC7
IC: 7874A-C4TSMC7
This equipment must be installed by qualified professionals or contractors in accordance with
FCC Part 15.203 & IC RSS-210, Antenna Requirements. Do not use any antenna other than the
one provided with the unit.
RF Radiation Exposure Statement
This equipment complies with the FCC/IC radiation exposure limits set fourth for portable
transmitting devices operation in an uncontrolled environment. End users must follow the specific
operating instructions to satisfy RF exposure compliance.
The equipment should only be used or installed at locations where there is normally at
least a 20cm separation between the antenna and all persons.
This transmitter must not be co-located or operation in conjunction with any other
antenna or transmitter.
Any changes or modifications not expressly approved by the party responsible for
compliance could void the user’s authority to operate this equipment.
RF exposure warning
This equipment must be installed and operated in accordance with provided
instructions and must not be co-located or operating in conjunction with any other
antenna or transmitter. End-users and installers must be providing with antenna
installation instructions and transmitter operating conditions for satisfying RF
exposure compliance.

Radio Frequency (RF) Exposure Information
The radiated output power of the Wireless Device is below the Industry Canada (IC) radio
frequency exposure limits. The Wireless Device should be used in such a manner such
that the potential for human contact during normal operation is minimized.
This device has been evaluated for and shown compliant with the IC Specific Absorption
Rate (“SAR”) limits in portable exposure conditions.
Canada’s REL (Radio Equipment List) can be found at the following web address:
http://www.ic.gc.ca/app/sitt/reltel/srch/nwRdSrch.do?lang=eng
Additional Canadian information on RF exposure also can be found at the following web
address: http://www.ic.gc.ca/eic/site/smt-gst.nsf/eng/sf08792.html
Informations concernant l'exposition aux fréquences radio (RF)
La puissance de sortie émise par l’appareil de sans fil est inférieure à la limite
d'exposition aux fréquences radio d'Industry Canada (IC). Utilisez l’appareil de sans fil de
façon à minimiser les contacts humains lors du fonctionnement normal.
Ce dispositif a été évalué et démontré conforme à la Specific Absorption Rate IC ("SAR")
des limites dans des conditions d'exposition portatifs.
Ce périphérique est homologué pour l'utilisation au Canada. Pour consulter l'entrée
correspondant à l’appareil dans la liste d'équipement radio (REL - Radio Equipment List)
d'Industry Canada rendez-vous sur:
http://www.ic.gc.ca/app/sitt/reltel/srch/nwRdSrch.do?lang=eng
Pour des informations supplémentaires concernant l'exposition aux RF au Canada
rendez-vous sur : http://www.ic.gc.ca/eic/site/smt-gst.nsf/eng/sf08792.html

European Compliance
Conformity of the equipment with the guidelines below is attested by the application of the CE
mark.
CE Declaration of Conformity
Manufacturer’s Name: CONTROL4 CORPORATION
Manufacturer’s Address: 11734 S. ELECTION ROAD SUITE 200
SALT LAKE CITY
UT 84020 USA
EU Representative Name: CONTROL4 EMEA LIMITED
EU Representative Address: UNIT3, GREEN PARK BUSINESS CENTRE
SULTON-ON-THE FOREST
YORK YO61 IET, UNITED KINGDOM
Product Name(s): Touch Screen Interface
Brand: Contol4
Model(s): C4-TSMC7-EN-BL & C4-TSTTC7-EN-BL
Product Standard(s) to which Conformity of the Council Directive(s) is declared:
EMC - 2004/108/EC “Electromagnetic Compatibility (EMC) Directive”:
(Emissions) EN 55022:2006, (Immunity) EN 55024:1998, EN 301 489-1:2008, EN 301 489-
17:2009, EN 61000-3-2:2004 & EN 61000-3-3:2002
Safety – 206/95/EC “Low Voltage Directive (LVD)”:
EN 60950-1:2006 (2nd Edition) .
Telecom & Radio - 1999/5/EC Radio equipment and Telecommunications Terminal
Equipment (R&TTE) Directive:
EN 300 328 V1.7.1 (2006-10)
RoHS - 2002/95/EC Restriction of the Use of certain Hazardous Substances in Electrical
and Electronic Equipment (EEE) & WEEE - 2002/96/EC Waste of Electrical and Electronic
Equipment (EEE).
We, the undersigned, hereby declare that the equipment specified above conforms to the above
directives and standards. Date of Issue: December 31, 2011
Legal Representative
Signature
Roger Midgley
Sr. Regulatory Compliance Engineer
National Restrictions
This product may be used in all EU countries (and other countries following the EU directive
1999/5/EC) without any limitation except for the countries mentioned below:
Ce produit peut être utilisé dans tous les pays de l'UE (et dans tous les pays ayant transposés la
directive 1999/5/CE) sans aucune limitation, excepté pour les pays mentionnés ci-dessous:
Questo prodotto è utilizzabile in tutte i paesi EU (ed in tutti gli altri paesi che seguono le direttive
EU 1999/5/EC) senza nessuna limitazione, eccetto per i paesii menzionati di seguito:
Das Produkt kann in allen EU Staaten ohne Einschränkungen eingesetzt werden (sowie in
anderen Staaten die der EU Direktive 1999/5/CE folgen) mit Außnahme der folgenden
aufgeführten Staaten:
France
In case the product is used outdoors, the output power is restricted in some parts of the band.
See Table 1 below or check http://www.arcep.fr/ for more details.
Dans la cas d'une utilisation en extérieur, la puissance de sortie est limitée pour certaines parties
de la bande. Voir la table ci-dessous ou visitez http://www.arcep.fr/ pour de plus amples details
Table 1 Applicable Power Levels in France
Location Frequency Range (MHz) Power (EIRP)
Indoor (No restrictions) 2400-2483.5 100 mW (20 dBm)
Outdoor 2400-2454
2454-2483.5 100 mW (20 dBm)
10 mW (10 dBm)
Recycling
Control4 understands that a commitment to the environment is essential for a health life and
sustainable growth for future generations. We are committed to supporting the environmental
standards, laws, and directives that have been put in place by various communities and countries
that deal with concerns for the environment. This commitment is represented by combining
technological innovation with sound environmental business decisions.
WEEE Compliance
Control4 is committed to meeting all requirements of the Waste Electrical and Electronic
Equipment (WEEE) directive (2002/96/EC). The WEEE directive requires the manufacturers of
electrical and electronic equipment who sell in EU countries: (1) label their equipment to notify
customers that it needs to be recycled, and (2) provide a way for their products to be
appropriately disposed of or recycled at the end of their product lifespan. For collection or
recycling of Control4 products, please contact your local Control4 representative or dealer.
Australia / New Zealand Compliance
Compliance of this equipment is confirmed by the following label that is placed on the equipment:
South Korea Compliance
해당무선설비기기는 운용
중 전파혼신가능성이 있음
English Translation: This radio device has the possibility of radio interference during operation.
2.4GHz RF Warning Message:
해당무선설비기기는 운용 중 전파혼신가능성이 있으므로 인명안전과 관련된 서비스는 할 수
없습니다
English Translation: This radio device is not allowed to be used for human safety since it has
the possibility of radio interference during operation.
EMC (Class B) Warning Message:
이 기기는 가정용(B급) 전자파 적합기기 로서 주로 가정에서 사용하는 것을 목적으로 하며, 모든
지역에서 사용할 수 있습니다.
English Translation: The equipment is for home use (Class B), and has acquired electromagnetic
conformity registration. So it can be used not only in residential area but also other areas.
About this Document
Part Number 200-00293 Rev A, 12/9/2011

Warranty/Regulatory Card
Control4® Corporation (“Control4”) warrants that at the time of first-consumer sale, this product will be free from defects in
material and manufacture. Control4 further warrants that for a period of 2 years (24 months) after initial consumer sale, the
product will function in accordance with its specification, provided that it is installed and maintained under normal and proper
use. This warranty extends only to products purchased directly from Control4 or an Authorized Control4 Reseller. If the product
proves to be defective in material or workmanship during the warranty period, it may be returned to the place of purchase
and Control4 will, at its sole option, repair or replace the product with a like product. This warranty provides the consumer
purchaser with specific legal rights, which may vary per state or country. For complete warranty information, including details
on consumer legal rights as well as warranty exclusions, visit www.control4.com/warranty.
Except as specifically provided above and to the maximum extent allowed by law, Control4 disclaims all warranties and
conditions whether express, implied, or statutory as to any matter whatsoever including, without limitation, title, non
infringement, condition, merchantability or fitness for any particular or intended purpose.
Except as expressly provided above and to the maximum extent allowed by law, Control4 shall not be liable for any special,
indirect or consequential damages (including without limitaton, loss of profit, loss of business, loss of information, financial loss,
personal injury, loss of privacy or negligence) which may be caused by or related to , directly or indirectly, the use of a product
or service, the inability to use a product or service, inadequacy of a product or service for any purpose or use thereof or by
any defect or deficiency therein even if Control4 or an authorized Control4 dealer has been advised of the possibility of such
damages or losses.
Warranty Information

GPL Source Code
Copyright © 2011 Control4. All rights reserved. Control4, the Control4 logo, the Control4 iQ logo and the Control4 certified logo are registered trademarks or
trademarks of Control4 Corporation in the United States and/or other countries. All other names and brands may be claimed as the property of their respective
owners. Pricing and specifications are subject to change without notice. Part Number: 200-00230, Rev. A 5/25/2011
To review regulatory information for your particular Control4 products, see the information located on the
Control4 website at: http://www.control4.com/regulatory.
Regulatory Information
The GPL source code in this product is available as a free download from http://www.control4/gpl/.
Product Documentation
To view or print product Installation, Setup, or User guides in PDF format, see the Documentation page on
the Control4 Dealer website at: http://www.control4.com/dealer/products/documentation/ (login required).