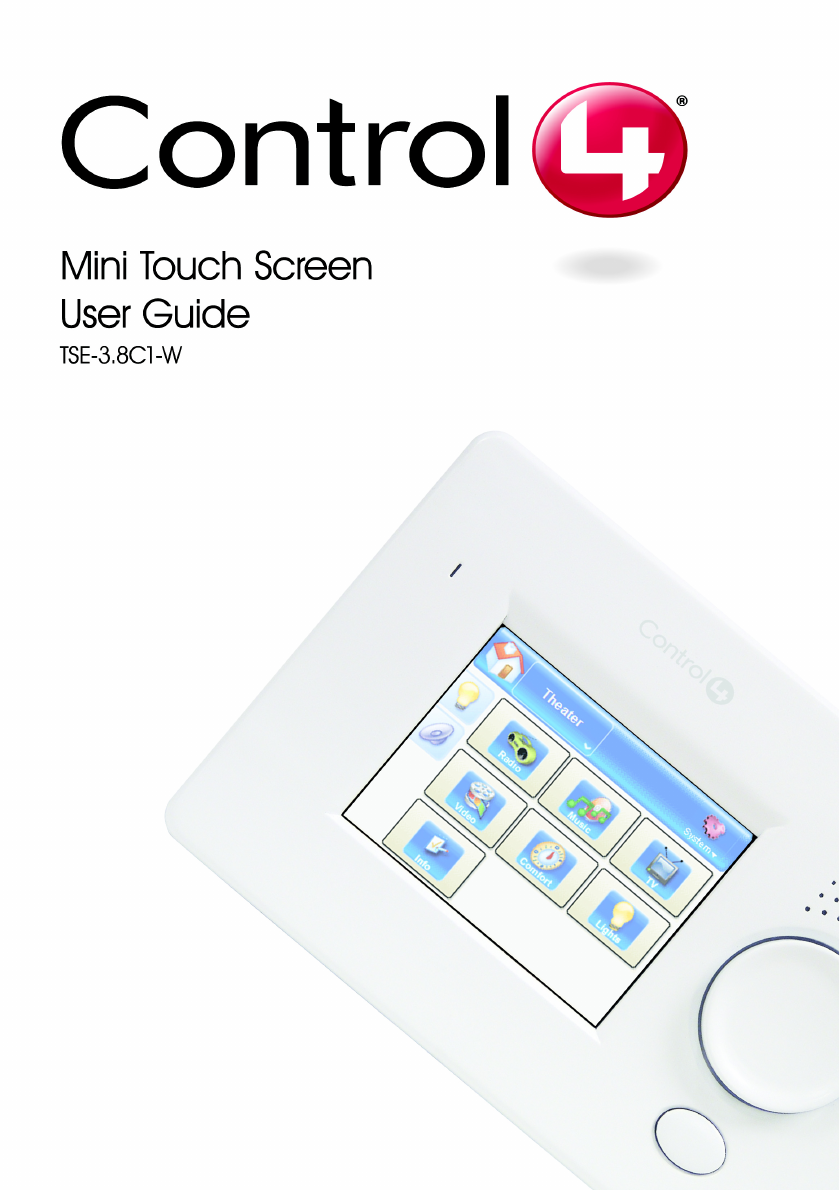
Snap One TSE38C11 MiniTouch Screen TSE-3.8C1-x User Manual MiniTouchScreen UserGuide
Control4 MiniTouch Screen TSE-3.8C1-x MiniTouchScreen UserGuide
Snap One >
Exhibit 8
Disclaimer, Trademarks, and Copyright Information
Disclaimer
Control4® makes no representations or warranties with respect
to the contents or use of this manual, and specifically disclaims
any express or implied warranties of merchantability or fitness for
any particular purpose. Control4 reserves the right to revise this
publication and to make changes to its content, at any time,
without obligation to notify any person or entity of such revisions
or changes.
Control4 makes no representations or warranties with respect to
any Control4 software, and specifically disclaims any express or
implied warranties of merchantability or fitness for any particular
purpose. Control4 reserves the right to make changes to any and
all parts of Control4 software, at any time, without any obligation
to notify any person or entity of such changes.
Trademarks
Control4 and the Control4 logo are registered trademarks of
Control4 Corporation.
Other product and company names mentioned in this document
may be the trademarks or registered trademarks of their
respective owners.
Legal Notice
Gracenote. Music recognition technology and related data are
provided by Gracenote. Gracenote is the industry standard in
music recognition technology and related content delivery. For
more information visit www.gracenote.com.
Copyright Copyright © 2004-2005 Control4 Corporation. All rights reserved.
No part of this publication may be reproduced, photocopied,
stored on a retrieval system, or transmitted without the express
written consent of the publisher.
Contact Information
Control4 Corporation
11734 S. Election Road, Suite 200
Salt Lake City, UT 84020 USA
http://www.control4.com
Mini Touch Screen User Guide
Part Number: 21-0124 Rev A Draft 7

iii
Contents
Preface About This Guide........................................... 1
Notes, Tips, Cautions, and Warnings .... 1
Safety Instructions ................................. 2
Additional Resources............................. 2
Chapter 1 Getting Started .............................................. 3
What You Can Do.................................. 3
Become Familiar with the Device ..........4
Start Mini Touch Screen ........................ 5
About the Home Page ........................... 6
Header Contents............................... 7
Display Area ..................................... 8
Quick-Control Tabs......................... 10
Subsystem Buttons......................... 11
Control Devices with Touch-Screen
Controls ............................................... 12
Chapter 2 Play the Radio ............................................. 15
Access the Radio Page ....................... 15
About the Radio Page.......................... 15
Play a Radio Station ............................ 16
Control the Radio................................. 16
Chapter 3 Play Music ................................................... 17
Access the Music Page ....................... 17
About the Music Page.......................... 17
Browse............................................ 18
Device Controls .............................. 19
Play Music Stored in the System ......... 19
Choose from the Entire Database .. 20
Sort or Filter the Database.............. 20
Create or Manage Playlists............. 20
Play Music Loaded in a Device............ 21

iv
Chapter 4 Watch TV..................................................... 23
Access the TV Page ............................ 23
About the TV Page .............................. 23
Broadcast Channels Page .............. 23
Video Device Pages ....................... 24
Choose a Channel (TV or other Video
Broadcast) ........................................... 25
Choose a Channel List Filter and Sort
Option .................................................. 25
Chapter 5 Watch a Video ............................................. 27
Access the Video Page........................ 27
About the Video Page.......................... 27
Browse............................................ 28
Cover Art......................................... 29
Device Controls .............................. 29
Play a Video Stored in the System ...... 30
Choose from the Entire Database .. 30
Sort or Filter the Database.............. 30
Play a Video Loaded in an Attached
Device .................................................. 30
Chapter 6 Control Comfort ........................................... 31
Access the Comfort Page .................... 31
About the Comfort Page ...................... 31
Change a Thermostat Setting.............. 32
Change Other Comfort Settings .......... 32
Set Wakeup Options............................ 33
Chapter 7 Control Lights .............................................. 35
Access the Lights Page ....................... 35
About the Lights Page ......................... 35
Change a Light Setting ........................ 36
Create a Lighting Scene ...................... 36
Change a Lighting Scene .................... 37
Activate a Lighting Scene .................... 38
Delete a Lighting Scene....................... 38

v
Chapter 8 View or Change Information ........................ 39
Access the Info Page........................... 39
About the Info Page ............................. 39
View Information “About” Mini Touch
Screen ................................................. 40
Connect to a Director........................... 41
View or Change Network Information .. 41
Set Screen Saver Options ................... 41
Change Skins ...................................... 42
Chapter 9 Warranty and FCC Information.................... 43
Warranty .............................................. 43
One-Year Limited Hardware
Warranty ......................................... 43
Software License Agreement and
Limited Warranty............................. 44
FCC Statement .................................... 49
Federal Communication Commission
Interference Statement ................... 49
FCC Caution ................................... 50
Appendix A Priority List for Media and Device Buttons... 51

vi
1
PREFACE
About This Guide
Notes, Tips, Cautions, and Warnings
Note, Tip, Caution, and Warning paragraphs draw your
attention to safe practices and additional information
which may help you avoid losing data or time.
NOTE: These contain notes on related information
about the current topic.
TIP: These provide tips that may save you time or
effort.
CAUTION! These provide specific cautions about
improper use of equipment or failure to follow safety
instructions that may cause bodily injury. DO NOT
IGNORE A CAUTION!
WARNING! These provide specific warnings about
improper use of equipment or failure to follow safety
instructions that may cause data loss or equipment
damage. DO NOT IGNORE A WARNING!
2
Safety Instructions
CAUTION! To avoid bodily harm, understand and
follow these saftey precautions before operating the
Control4 Mini Touch Screen:
"Using worn-out or damaged power cords may result
in electric shock or fire.
Avoid keeping a steady position when using the Mini
Touch Screen for prolonged period of time. Periodic
exercises and breaks are recommended to prevent
any physical discomfort.
Always contact an authorized Control4 service
provider for assistance if any repair or adjustment is
required.
CAUTION! To avoid data loss or equipment damage,
understand and follow these saftey procautions before
operating the Control4 Mini Touch Screen:
Do not use or place the Mini Touch Screen near
sources of heat or expose it to direct sunlight for an
extended period of time. Store it in a cool and dry
place.
Do not push or apply force to the TFT screen.
Do not use pens or sharp objects to write on the
screen. Always use your finger or a standard stylus**
to tap or draw on the TFT screen. (**A stylus is a
pointed-end drawing tool available where electronic
notepads or digital planners are sold.)
Additional Resources
For support, see your authorized Control4
representative or reseller, or visit the Control4 Web
Site: http://www.Control4.com/.

3
CHAPTER 1Getting Started
This chapter provides an orientation to the Control4 Mini
Touch Screen displays and tasks that you can perform
using the Mini Touch Screen. For all other navigation
options, refer to the documentation that shipped with your
device.
What You Can Do
Use Mini Touch Screen to navigate and control a Control4
system once it has been set up. (For setting up a Control4
system, refer to the documentation that shipped with your
Control4 controller (such as Media Controller
Installation and User Guide).
The general task you can accomplish using the Mini
Touch Screen are:
Choose a location to control
Play a radio station
Play stored music
Watch TV
Watch a video
Control comfort
Control lights
View or change system information
4
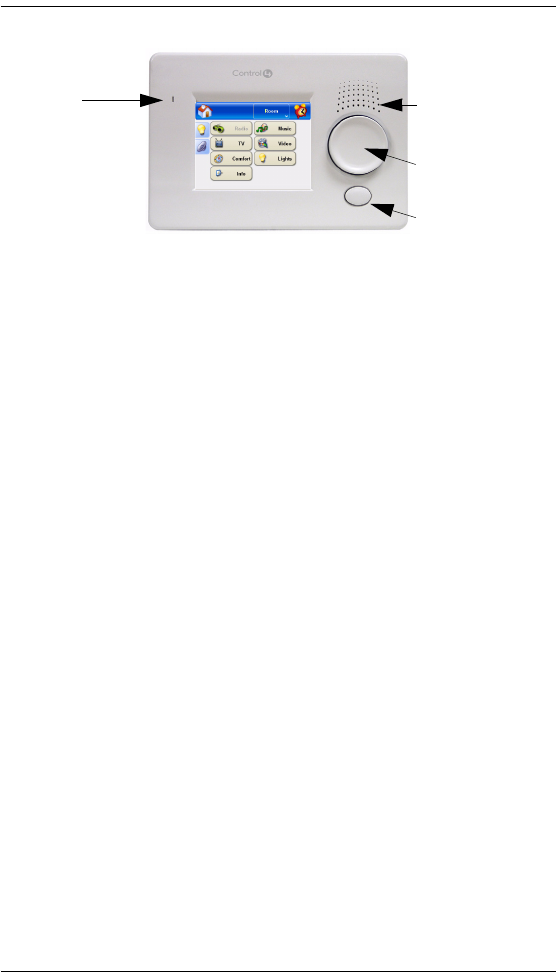
Become Familiar with the Device
1. Microphone: This microphone is in place in
anticipation of potential future features.
2. Speaker: The speaker is used for:
MP3 file playback (the music format to
which stored CDs are converted)
Intercom (a potential future feature)
3. Select Dial: This dial is used during and after
setup:
During setup: Press the select dial to have
Mini Touch Screen identify itself to the
system.
After setup: Rotate select dial to scroll
through displays. Press select dial to
choose currently highlighted item on the
screen.
4. Shortcut Button: This backlit button can be
programmed by your installer to perform any
action or sequence of actions supported by
the system.
12
3
4
5
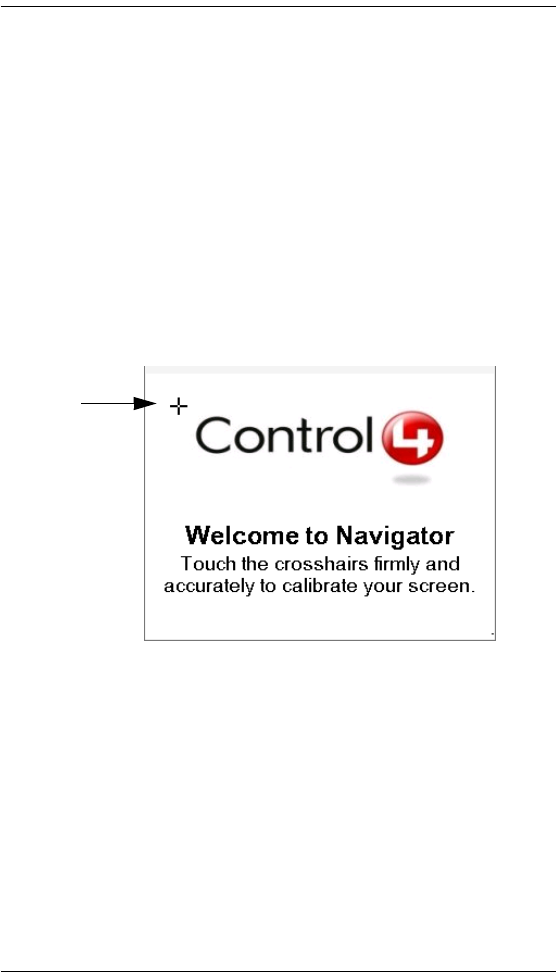
Start Mini Touch Screen
1. Power up the Mini Touch Screen (according to its
installation guide).
When you first power up the Mini Touch Screen and
the system is initializing, the Mini Touch Screen
displays “please wait” messages. Then you are
instructed to calibrate the Mini Touch Screen.
2. Calibrate the Mini Touch Screen when prompted by
the screen:
2a. Touch the screen firmly and accurately at
the point indicated by the crosshairs (see
the following sample screen).
2b. Repeat Step 2a for each of the 4
subsequent points indicated by the
crosshairs.
After initialization, the Home page displays (which
includes the Day, Date, and Time). Thereafter, the
last page accessed is displayed on the screen,
unless a screen saver has been set and is currently
running. If a screen saver has been set and is
currently running, touch the screen to once again
display the last page accessed.
6
3. From the Home page, choose a Director (the IP
address of the controller where Director resides). To
choose a Director, press System > Info > Director and
then pick a Director from the list. Thereafter, the Mini
Touch Screen assumes the same Director until you
choose to change it.
4. Choose the location (room) you want to control from
the drop-down list provided in the header. This is only
required once. Thereafter, the Mini Touch Screen
assumes the same location until you choose to
change it.
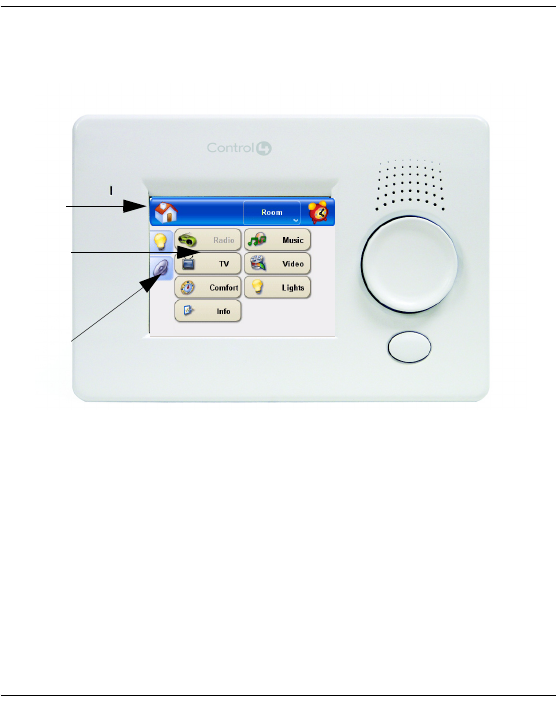
About the Home Page
The Mini Touch Screen home page can be broken down
into these parts:
1. Header Contents
2. Display Area
3. Quick-Control Tabs
1
2
3
7
NOTE: The instructions in this manual are based on the
default skin. When you apply a different skin, your
process steps will deviate from the ones documented in
this manual. We recommend strongly using the manual
to become familiar with the default user interface before
changing skins.
Header Contents
Home Button
When you press the Home button, the Home page
displays in the Display Area, which includes the Day,
Date, and Time, or any pertinent system message.
Blank Space (or Current Subsystem Button)
When the Home page displays, the header space next to
the System drop-down list is empty. When you choose a
subsystem button, the subsystem button “moves” to the
header and the subsystem’s default page is displayed.
The subsystem button in the header is useful when you
want to quickly jump to a new location within the
subsystem.
Location Button
Displays the room this device is currently associated with
for system navigation and control. If this device has not
yet been associated with a room, you will see a drop-
8
down arrow only (without a room name).The default room
for this device is set during system setup, but you can
choose a different room in the system at any time by
pressing this button and choosing a new room from the list
that is displayed in the Display Area.
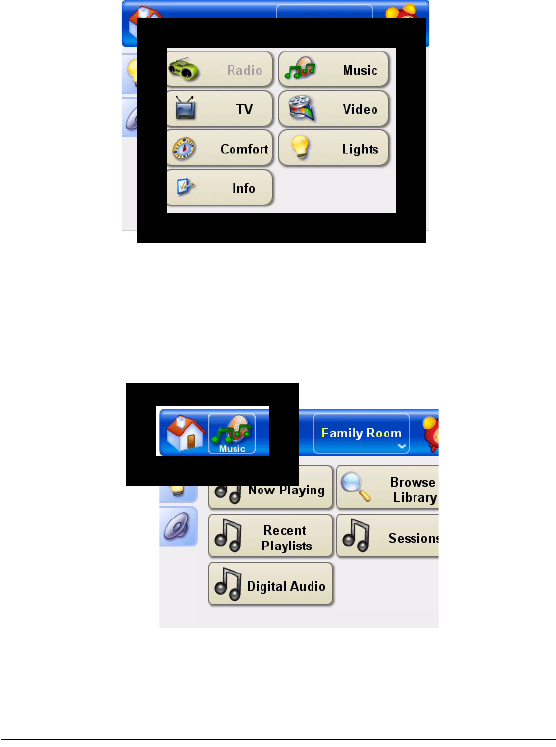
Display Area
When you press the Home button, the Display area shows
the subsystem buttons.
When you press a subsystem button (such as Music), the
subsystem button “moves” to the header (next to Home)
and the Display area shows all media and device buttons
available for that subsystem (see the following example).

9
Media Buttons and Device Buttons
Media Buttons: Where broadcast or stored media are
available, an applicable media button displays on the
subsystem page. For example, the Radio page provides a
Broadcast Stations button, which provides access to radio
stations; the Music page provides a Browse button, which
provides access to stored media. Where only device
controls are needed (such as with lighting), no media
button is displayed.
Device Buttons: Following the media buttons (where
applicable) is any applicable device button, which is
created automatically when the installer adds the device
to the system. The button provides access to touch-
screen controls for the device.
Your installer (or you) can name the device anything
meaningful to users, but some typical device names are:
TV, Satellite, DVD, VCR, Tuner, CD, and Tape. We
recommend your installer give each device a unique
name. For example, if the system has two DVD players,
the installer might name one DVD-Family and the other
DVD-Bedroom. When a device is renamed in the system,
the corresponding button is automatically updated as well.
If more buttons are present than the display area can
show, a page scroll bar is displayed to let you know there
are more choices.
Order of Buttons
Media and device buttons are displayed in a pre-
determined order according to a Control4-specified
priority list. (If you would like to view the priority list, see
“Priority List for Media and Device Buttons” on page 51.)

10
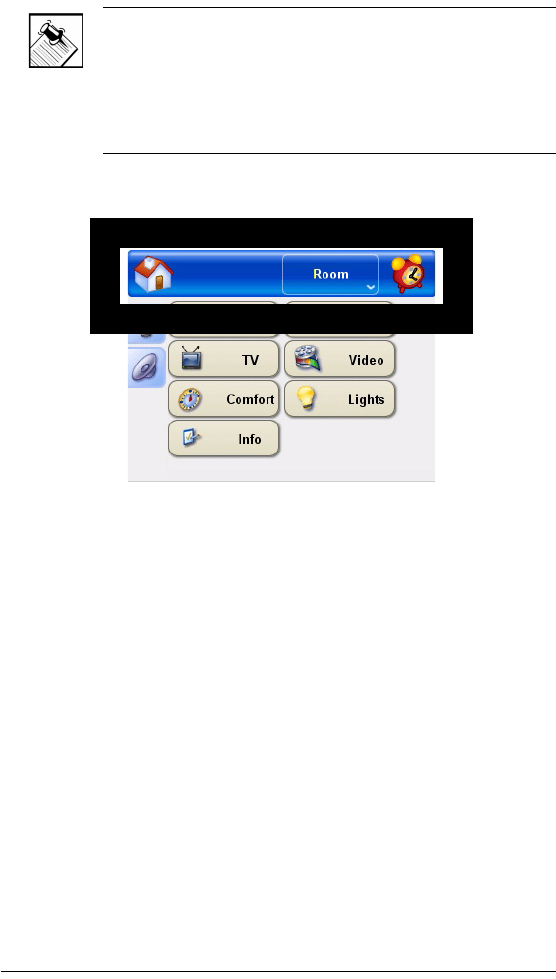
Quick-Control Tabs
Lights Tab
This tab displays an icon for each lighting load in the
current location.
To quickly change light settings:
1. Press the Lights tab.
The tab contents is displayed. (You may need to
scroll to see all of the items displayed.) All of the
settings on this tab apply to individual loads
(dimmers or switches) in the current location (or
room). They may be:
Sliders (% set specific level)
Push-and-Hold (Ramp up/down)
On and Off
2. Set individual load levels (touch, touch and drag, or
touch and hold as needed to change settings).
Volume Tab
This tab provides the user these audio options:
Up arrow to increase audio volume
Down arrow to decrease audio volume
Mute to silence audio
Off to turn audio off.
11
To quickly change the audio or video volume of a device
found in the specified location:
1. Press the Volume side tab.
The Volume page is displayed. The audio device
(such as a receiver or TV) that is associated with this
location are represented here with volume control
options.
2. Choose a Volume controller option: Up, Down,
Attenuate, Mute, or Off.
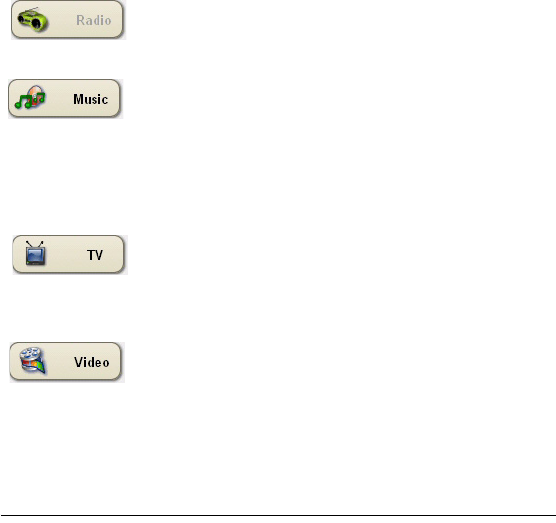
Subsystem Buttons
The complete collection of subsystem buttons are
displayed in the display area whenever you press the
System button in the header. Whenever you choose a
subsystem button, that button will display in the header
and serve as a shortcut button until you choose another
subsystem, or until you press the Home button.
Radio: Provides access to radio broadcast
stations for the current geographic location,
including: AM, FM, and XM channels.
Music: Provides access to all music stored in
the system (such as CDs that have been
imported into Media Controller or CDs stored
in a CD Changer) and provides control options
for any media player in the current location
(such as a CD player).
TV: Provides access to all available broadcast
channels for the current geographic location,
including local television, Satellite Network,
and cable.
Video: Provides access to all available movies
(video tapes or DVDs) for the selected
location, and it provides filter options, such as
only movies with a certain Actor, Director,
Rating, or Genre.

12
Comfort: Displays all comfort-related control
options for controllable devices (such as
thermostats, fans, motorized curtains and
blinds, or a fireplace).
Lights: Displays control options for all
controllable lighting features for the selected
zone, including lighting loads and scenes.
Info: Displays system information for this
device, including software versions, current
Director controller IP address), Network
addresses, and screensaver options.
Control Devices with Touch-Screen
Controls
Supported devices that are typically controlled with a
remote control can be controlled using the touch-screen
controls provided on the device control tab. When you
install a supported device, the associated hardware driver
populates the device-control page with Mini Touch Screen
controls.The following diagrams are sample Mini Touch
Screen controls.
Figure 1-1. Sample Audio Controls
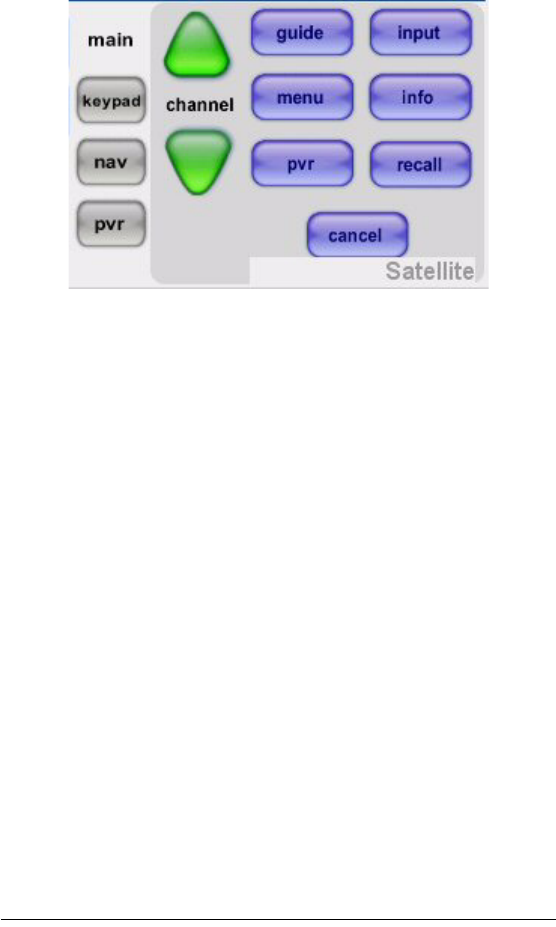
13
Figure 1-2. Sample Satellite Controls

14
15
CHAPTER 2Play the Radio
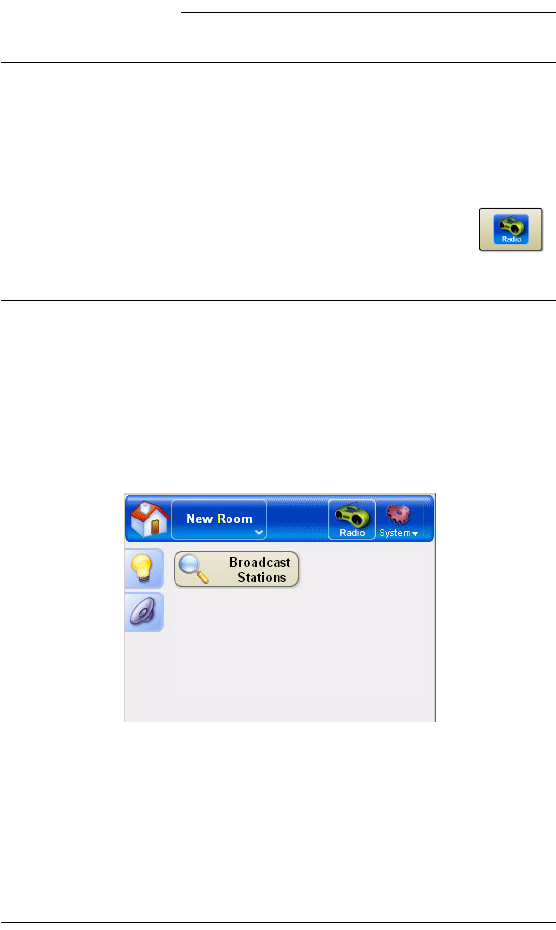
Access the Radio Page
To access a Radio station broadcast or control the radio
output, access the Radio page:
1. In the Mini Touch Screen header, press the System
button.
2. In the display area, press the Radio button .
The Radio page is displayed.
About the Radio Page
The Radio page provides a button for Broadcast Stations
(see Figure 2-1), which displays all available radio
broadcast stations for the selected location, and provides
a tuner device button to access on-screen controls for
AM, FM, XM, NET Radio, and Digital Cable.
Figure 2-1. Radio Page
16
Play a Radio Station
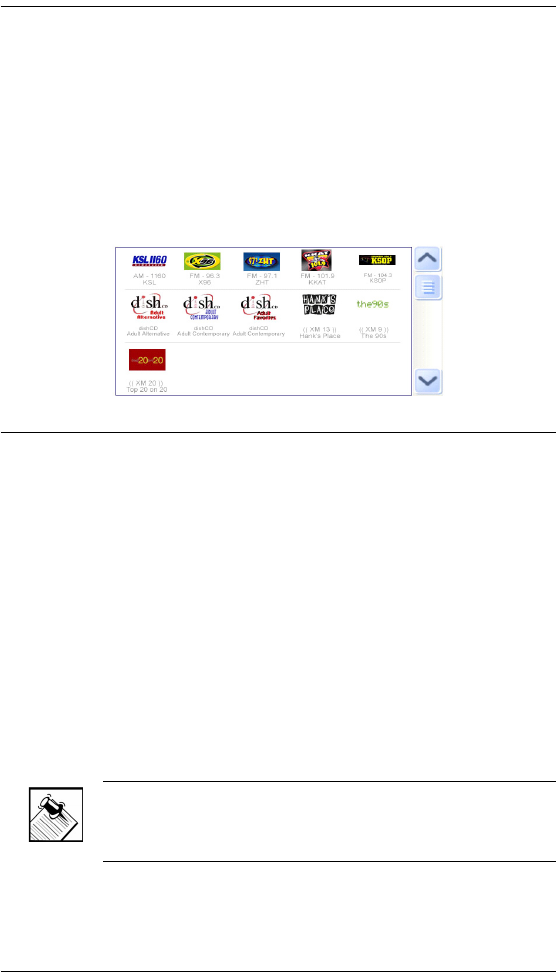
To play a radio station:
1. On the Radio page, press Broadcast Stations.
2. View the list of available stations (see Figure 2-2).
Use the dial to scroll through the list as needed.
3. Press a Station button to begin broadcasting that
station.
Figure 2-2. Broadcast Stations Page
Control the Radio
To control the radio:
1. On the Radio page, press the tuner device button.
When you press the device button, on-screen
controls for that tuner display in the display area. The
control options depend on what your tuner supports,
but may include:
Change sources: AM, FM, XM, or Digital Radio
stations
Scan all stations or choose a specific station
Control volume
2. Press an on-screen control option for this tuner.
NOTE: For quick access to volume controls. use the
Volume (speaker) side tab on the left of the screen. For
more information, see “Quick-Control Tabs” on page 10.
17
CHAPTER 3Play Music
Access the Music Page
To play stored or loaded music, or to manage the music
database, access the Music page:
1. In the Mini Touch Screen header, press the System
button.
2. In the display area, press the Music button .
The Music page is displayed.
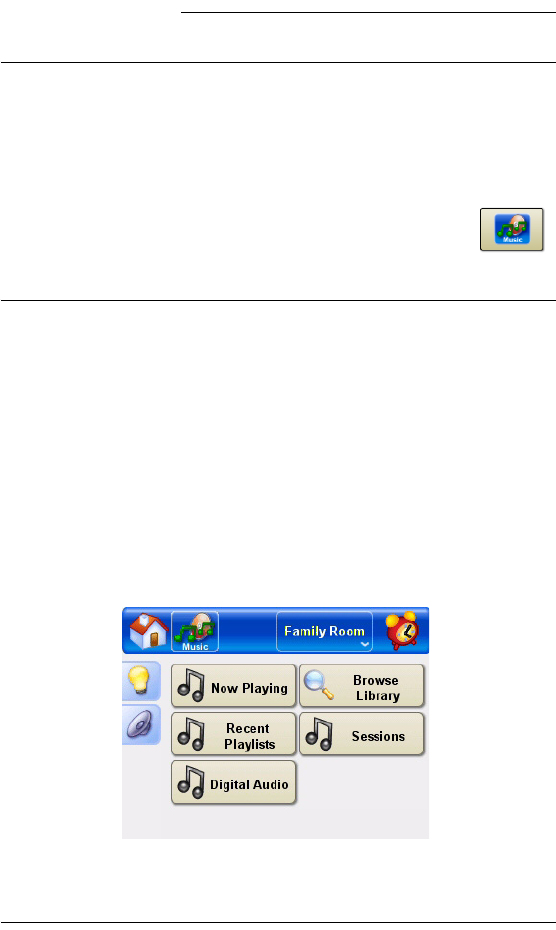
About the Music Page
The Music page allows you to browse or play all music
stored in the system (such as CDs that have been
imported into Media Controller or CDs stored in a CD
Changer) and provides control options for any media
player in the current location (such as a CD player). The
Music page provides access to these related pages:
Browse, Cover Art, and any audio player (device)
available from the current location (such as Audio Player
in Figure 3-1).
Figure 3-1. Music page
18
Browse
Playlist: Create or manage active playlist.
Active Playlist> Audio Player Controls
Other Active Playlists > Join or Back
Saved Playlists > Load, Rename, Delete, or
Back
Audio Controls > Prev Track, Next Track, Save,
Clear, Back, or Playlist Menu
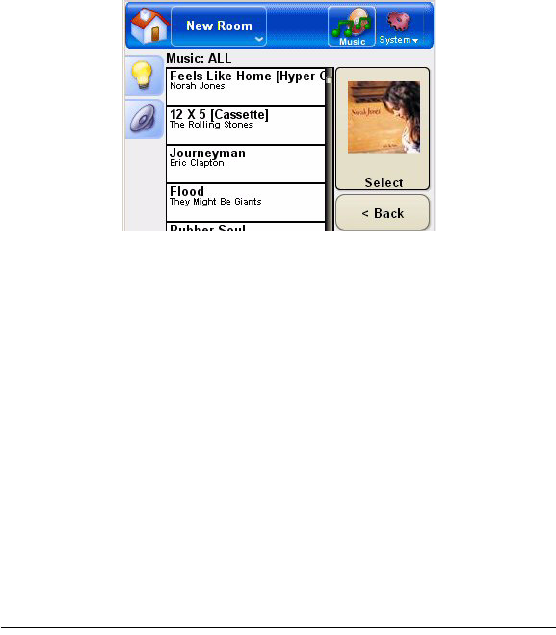
All Music: List of all music available, including any
information available on the highlighted item from your
music database service (see Figure 3-2).
Figure 3-2. Browse > All Music page
Genre: List of genres (or categories) from which to
choose, then view the resulting list enhanced wtih any
information available on the highlighted item from your
music database service.
Artist/Composer: List of artists and/or composers from
which to choose (see Figure 3-3), then view the resulting
list enhanced wtih any information available on the
highlighted item from your music database service.
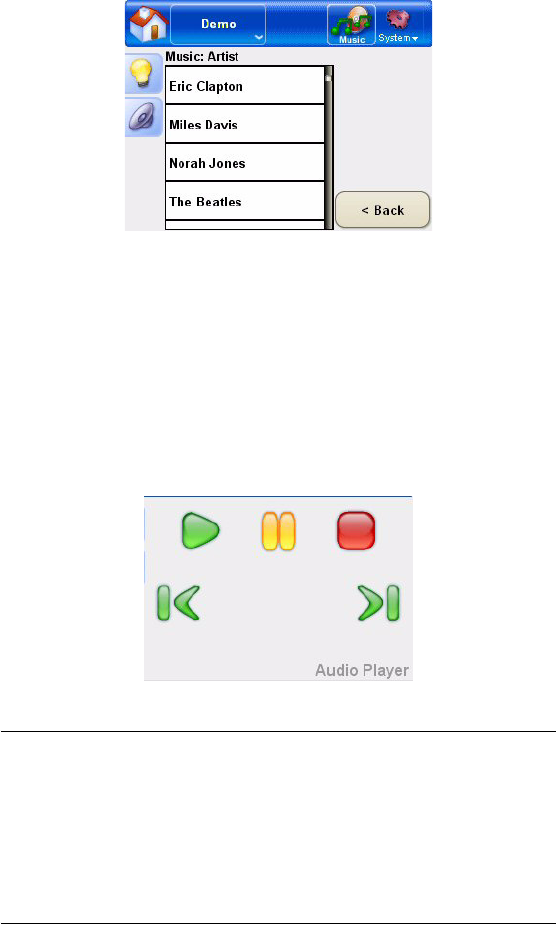
19
Figure 3-3. Browse > Artist/Composer page
Alpha: Alphabetical list of all music available.
Device Controls
On-screen controls for audio players, such as:
MP3 Players, CD Player/Changers, DVD Player/
Changers, or TVs with Digital Audio Channels (see
Figure 3-4 for a sample set of controls).
Figure 3-4. Sample Audio Player control page
Play Music Stored in the System
If you want to access music that has been included in the
system database, such as music that has been imported

20
into a Control4 controller, then choose the applicable
album, sort option, or playlist from the Music menus.
Choose from the Entire Database
To choose a music selection from the entire database,
choose one of these options:
Press Cover Art > the graphical display of an album >
Play (green arrow).
Press Browse > All Music > the text display of an
album > Play (green arrow).
Sort or Filter the Database
To sort or filter the music database to narrow your choices,
choose one of these options:
Genre: Press Browse > Genre > a genre.
Artist/Composer: Press Browse > Artist/
Composer and then scroll to and choose an artist or
composer name.
Alphabetical List of Titles: Press Browse >
Alpha and then scroll to and choose a letter.
Create or Manage Playlists
You can create user-specific playlists or perhaps a playlist
for different moods. To create or manage a playlist in the
music database, choose one of these options:
Manage Active Playlist: Press Browse > Playlist>
Playlist, then use the Audio Controls displayed to
manage the current playlist.
Start Another Playlist: Press Browse > Playlist>
Other Playlist, then choose another playlist and press
Join.
Manage Saved Playlist: Press Browse > Playlist>
Saved Playlists and then choose a playlist from the
list and press Load, Rename, or Delete.
Audio Controls: Press Browse > Playlist > Audio
Controls, then use the Audio Controls displayed to
Shuffle, Repeat, or otherwise control the playlist.
21
Play Music Loaded in a Device
If you loaded a music source (such as a CD) into an audio
device (such as a CD player), then choose the device
button located on the Music home page. When you press
the device button, on-screen controls for the chosen
device display in the Display Area.
NOTE: For quick access to volume controls. use the
Volume (speaker) side tab on the left of the screen. For
more information, see “Quick-Control Tabs” on page 10.

22
23
CHAPTER 4Watch TV
Access the TV Page
To access a TV channel broadcast or to control a Video
output device, access the TV page:
1. In the Mini Touch Screen header, press the System
button.
2. In the display area, press the TV button .
The TV page is displayed.
About the TV Page
The TV page includes buttons for Broadcast Channels
and any video devices you have added to this location in
the system, such as a television or satellite dish.
Figure 4-1. TV page
Broadcast Channels Page
This page displays all TV or other broadcast channels
available to the current room, such as those available
from a Dish network.
24
Figure 4-2. Broadcast Channels page
Video Device Pages
If the current location has one or more Video devices
included in it, a corresponding button on the TV page
provides access to each device page with on-screen
controls. For example, if you have a television and a
satellite network available at this location, you will have
two additional buttons available: one to access television
controls and one to access satellite network controls. See
the following sample on-screen controls.
Figure 4-3. Sample On-Screen Controls: Satellite Dish
25
NOTE: For quick access to volume controls. use the
Volume (speaker) side tab on the left of the screen. For
more information, see “Quick-Control Tabs” on page 10.
Choose a Channel (TV or other Video
Broadcast)
With the Broadcast Channels page selected, choose a
channel from the list. The channel you choose is
displayed on the default video device for the current room.
Choose a Channel List Filter and Sort
Option
With the Broadcast Channels page selected, choose a
filter option from the drop-down list provided (such as a
Category, like News or Sports, or a Favorites list). You can
also choose to sort your results in a variety of ways (see
the “Arranged By” drop-down list).

26
27
CHAPTER 5Watch a Video
Access the Video Page
To play a stored or loaded video or to manage the video
database, access the Video page:
1. In the Mini Touch Screen header, press the System
button.
2. In the display area, press the Video button .
The Video page is displayed.
About the Video Page
The Video page displays all available movies (video tapes
or DVDs) for the selected zone, and it provides filter
options. The interface includes: Browse, Cover Art, and
Video Player Controls (such as the Disc Changer in
Figure 5-1).
Figure 5-1. Video page
28
Browse
All Movies: List of all movies available, including any
information available on the highlighted item from your
media database service (see Figure 5-2).
Genre: List of genres (or categories) from which to
choose, then view the resulting list enhanced with any
information available on the highlighted item from your
media database service.
Director: List of directors from which to choose, then
view the resulting list enhanced with any information
available on the highlighted item from your media
database service.
Actor: List of actors from which to choose, then view the
resulting list enhanced with any information available on
the highlighted item from your media database service.
Rating: List of ratings from which to choose (G, PG, PG-
13, etc.), then view the resulting list enhanced with any
information available on the highlighted item from your
media database service.
Alpha: Alphabetical list of all movies available.
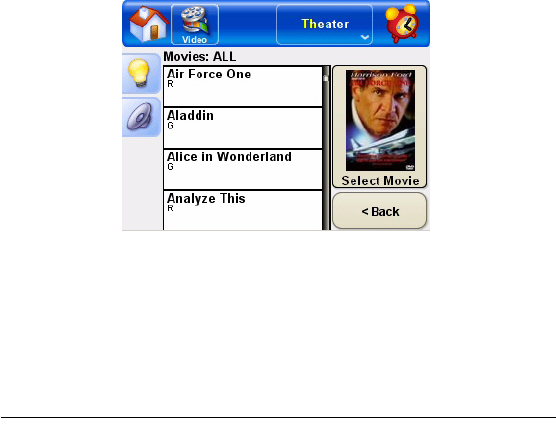
Figure 5-2. Browse > All Movies page

29
Cover Art
Graphical list of movies that has been enhanced with
content from your media database service (see
Figure 5-3).
Figure 5-3. Cover Art page
Device Controls
Source controls, such as: DVD Player/Changer or a VCR.
(See the sample control page in Figure 5-4.)
Figure 5-4. Sample Disc Changer Controls
NOTE: For quick access to volume controls. use the
Volume (speaker) side tab on the left of the screen. For
more information, see “Quick-Control Tabs” on page 10.

30
Play a Video Stored in the System
If you want to access a video source that has been
included in the system database, such as a DVD in a DVD
changer, simply choose the video source from the Video
menus.
Choose from the Entire Database
To choose a video selection from the entire database,
choose one of these options:
Press Cover Art > the graphical display of a video.
The video will begin playing when pressed.
Press Browse > All Movies > the text display of a
video. The video will begin playing when pressed.
Sort or Filter the Database
To sort or filter the media database to narrow your
choices, choose one of these options:
Genre: Press Browse > Genre > the chosen genre.
Director: Press Browse > Director, then scroll to and
choose a name.
Actor: Press Browse > Actor, then scroll to and
choose a name.
Rating: Press Browse > Rating > the chosen rating.
Alphanumeric List of Titles: Press Browse >
Alpha, then scroll to and choose a letter.
Play a Video Loaded in an Attached
Device
If you loaded a video source (such as a DVD) into a
system device (such as a DVD player), then choose the
device button located on the Video page. When you press
the device button, on-screen control for the chosen device
display in the Display Area.
31
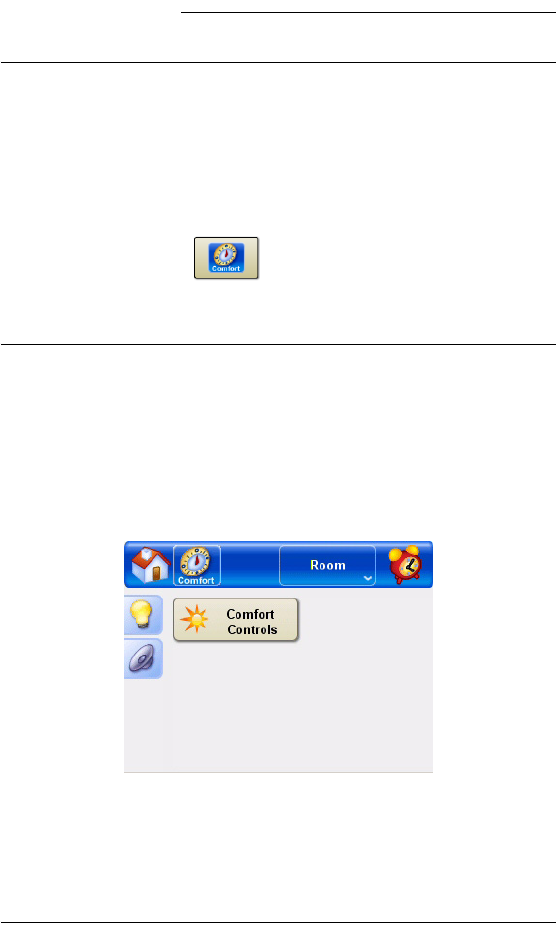
CHAPTER 6Control Comfort
Access the Comfort Page
To control comfort-related devices, access the Comfort
page:
1. In the Mini Touch Screen header, press the System
button.
2. In the display area, press the Comfort
button .
The Comfort page is displayed.
About the Comfort Page
The Comfort page displays all comfort-related control
options in the system that help to regulate the
temperature, such as the thermostat, a fireplace, fans, or
motorized blinds.
Figure 6-1. Comfort page

32
The Comfort Control button provides access to all
controllable devices other than the thermostat, such as
ceiling fans, motorized curtains and blinds, or a fireplace.
The Thermostat button, if available, provides access to
heating and air conditioning controls.
The Wakeup button provides access to the room-specific
“Wakeup” option controls.
Change a Thermostat Setting
To change a thermostat setting:
1. On the Comfort page, choose the Thermostat button.
The Thermostat page is displayed and includes
control options for:
Current temperature
Current set points for Heat and Cool
Press-and-hold buttons increase or
decrease set point
Toggle switches for Heat/Auto/Cool/Off,
and Fan On/Auto/Fan Off
--------------------------------------------------------------
Modes: Heat, Auto, Cool, and Off
Fan: On, Auto, and Off
Current Temp: (readout)
Heat: Up, (readout), Down
Cool: Up, (readout), Down
--------------------------------------------------------------
2. On the Thermostat page, press an on-screen control
button to change a setting.
Change Other Comfort Settings
To change a comfort setting other than the thermostat:
1. On the Comfort page, press the Comfort Controls
button. The Comfort Controls page is displayed,
33
which includes the appropriate control button for
each applicable device. For example:
Fireplace can be set according to the variations the
fireplace supports. The current status is represented
on the screen. If the fireplace has low, medium, and
high options, then those options are displayed on the
screen. If it only supports On and Off modes, then an
On/Off switch is displayed.
Motorized Blinds can be set according to the
variations the blinds supports. The current status is
represented on the screen: Up/Down or Open/
Closed.
2. On the Comfort Controls page, press an on-screen
control to change the current setting of a comfort-
related device.
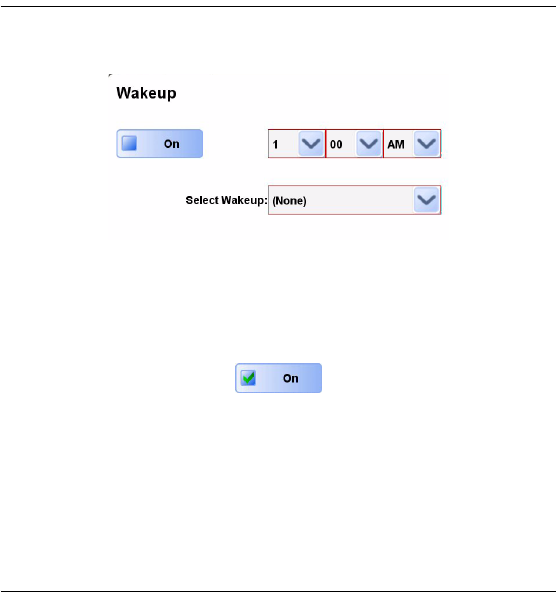
Set Wakeup Options
To set a Wakeup option:
1. On the Comfort page, press the Wakeup button.
2. Check the On box by pressing anywhere on the On
button.
3. Set the time by pressing the drop-down arrows.
4. Choose a Wakeup option by pressing the Select
Wakeup drop-down arrow.

34
35
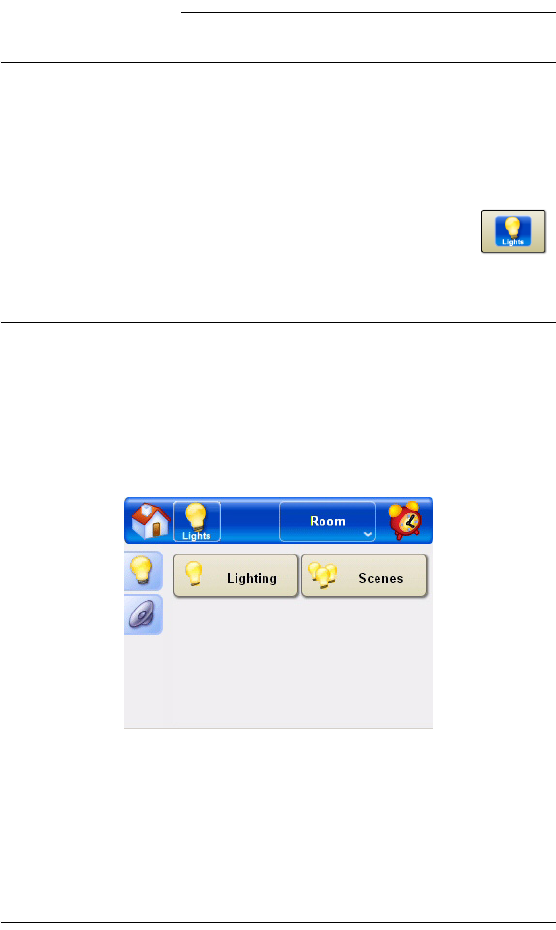
CHAPTER 7Control Lights
Access the Lights Page
To control lights and lighting features, access the Lights
page:
1. In the Mini Touch Screen header, press the System
button.
2. In the display area, press the Lights button .
The Light page is displayed.
About the Lights Page
The Lights page displays control options for all
controllable lighting features for the selected location,
including lighting loads and scenes.
Figure 7-1. Lights page
The interface includes access to these related pages:
The Lighting page provides access to control options for
each light or lighting load.
36
The Scenes page lists all available lighting scenes and
includes these scene-management options:
Execute Scene
Edit Scene
New Scene
Delete Scene
Scenes are a collection of preferred settings that can be
quickly recalled at a certain time of day (such as 6 PM) or
a certain activity (such as Bedtime).
NOTE: For quick access to lighting controls. use the
Light side tab on the left of the screen. For more
information, see “Quick-Control Tabs” on page 10.
Change a Light Setting
To change a Light setting:
1. On the Lights page, choose the Lighting button. The
Lighting page is displayed, which includes the
appropriate control button for each applicable device.
For example:
Dimmers or dimmable loads have a slider
control
Switches have an On/Off toggle.
2. Press an on-screen control to change the current
setting of a lighting device.
Create a Lighting Scene
The Lights subsystem can be used to create, view, or edit
lighting scenes for your system. You can choose to create
a scene for a room, a floor, or an entire house or site. Or
you can choose to make a global change to all lighting
scenes or change only a selected scene.
To create a lighting scene:

37
1. On the Lights page, press the Scenes button. The
Lighting Scenes page is displayed.
2. Press New Scene and create a scene using the
scene-building options provided:
2a. Select loads to include in this scene by
selecting the loads in the Available box and
then choosing the right-arrow to move
them to the Included box.
2b. Set individual load levels (touch, touch and
drag, or touch and hold as needed).
2c. Name the scene: Press in the text-entry
box and then use the on-screen keyboard
to enter a name for the scene.
2d. Choose Save and then choose Execute to
activate the scene.
Change a Lighting Scene
To change a lighting scene:
1. On the Lights page, press the Scenes button. The
Lighting Scenes page is displayed.
2. Highlight an existing scene and then press the Edit
Scene button. The chosen scene is displayed,
showing:
Loads currently included in the selected
scene with chosen setting
Text box with current name of scene
2a. Add or remove lighting loads from this
scene by highlighting a load and then
choosing the left or right arrow to move
them.
2b. Change individual load levels (touch, touch
and drag, or touch and hold as needed).

38
2c. To change the scene name, press in the
text-entry box and then use the on-screen
keyboard to enter the new name for the
scene.
2d. Choose Save and then choose Execute to
activate the scene.
Activate a Lighting Scene
To activate a lighting scene:
1. On the Lights page, press the Scenes button. The
Lighting Scenes page is displayed.
2. Highlight an existing scene and then press the
Execute Scene button. The chosen scene is
immediately activated.
Delete a Lighting Scene
To delete a lighting scene:
1. On the Lights page, press the Scenes button. The
Lighting Scenes page is displayed.
2. Highlight an existing scene and then press the Delete
Scene button. The chosen scene is deleted from the
list.
39
CHAPTER 8View or Change
Information
Access the Info Page
To view or change system information for this device,
access the Info page:
1. In the Mini Touch Screen header, press the System
button.
2. In the display area, press the Info button .
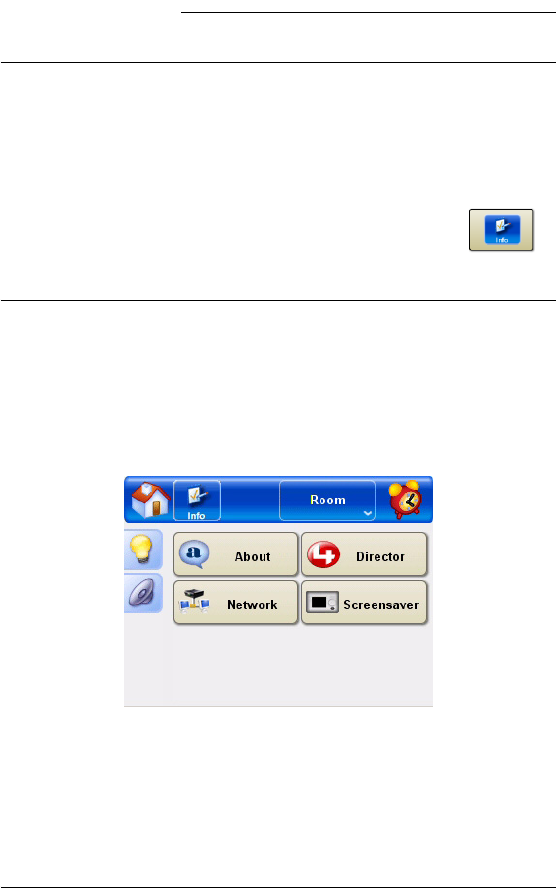
The Info page is displayed.
About the Info Page
The Info Page displays system information for this device,
including software versions, current Director controller IP
address), Network addresses, and screensaver options.
Figure 8-1. Info page
The Info property pages or “buttons” are About, Director,
Network, and Screensaver.
About provides a home for system information, such as
Network version, Director IP, and Director version. It also
40
displays log information as needed with a scroll bar to
review the entire log.
Director provides a list of all home network instances of
Director (the brain of each Control4 system that resides
on your controller). Here you must choose the IP address
for the controller (such as Media Controller). Your home
network may have just one controller or may have several
to choose from.
Network provides network information, such as the IP
address, the network parameters, and the DNS server.
Screensaver provides list of screensaver options for
this device.
Skins provides optional “look & feel” options you can
apply to your Mini Touch Screen interface. The concepts
and feature supports are consisitent from skin to skin, but
the procedure steps vary from those documented in this
manual.
NOTE: The instructions in this manual are based on the
default skin. When you apply a different skin, your
process steps will deviate from the ones documented in
this manual. We recommend strongly that you use this
manual to become familiar with the default user interface
before changing skins.
View Information “About” Mini Touch
Screen
To view Mini Touch Screen information:
1. On the Info page, press the About button. The About
page is displayed, including the current Navigator
version, Director’s IP address, Director version, and
any applicable media version.
2. To exit the About page, press the Info button in the
header.

41
Connect to a Director
To connect to a Director:
1. On the Info page, press the Director button. The
Connect to a Director page is displayed.
2. In the Connect to a Director list of IP addresses,
highlight your controller’s IP address.
3. Press Connect. A “Connecting…” message first
displays, then the address displays in the upper-right
corner of the Mini Touch Screen display area to
indicate your current connection.
View or Change Network Information
To view or change your network information:
1. On the Info page, press the Network button. The
Network page is displayed, including the current IP
address, MAC address, and DNS server.
2. To change the IP address setting, press the IP
Address button, make changes as needed, and then
press OK.
3. To change the DNS server, press the DNS Server
button, make changes as needed, and then press
OK.
4. To exit the Network page, press the Info button in the
header.
Set Screen Saver Options
To set screen saver options:
1. On the Info page, press the Screen Saver button. The
Screen Saver page is displayed, including a drop-
down list of available screen savers, a text box for
entering “Wait” minutes, and a Preview button.
2. Press the down arrow and choose a screen saver
from the list.
42
3. To preview the screen saver, press Preview. Then
press anywhere on the screen to return to the Screen
Saver setup page.
4. Press inside the “Wait” text box. An on-screen
keyboard is displayed.
5. Enter the number of minute the system should wait
before activating the screen saver, then press Done.
6. To exit the Network page, press the Info button in the
header.
Change Skins
NOTE: The instructions in this manual are based on the
default skin. When you apply a different skin, your
process steps will deviate from the ones documented in
this manual. We recommend strongly that you use this
manual to become familiar with the default user interface
before changing skins.
1. On the Info page, press the Skins tab. The Skins
page is displayed, which includes a drop-down list of
skins available and a Reload Skin button.
2. Choose a skin from the drop-down list, then press
Reload Skin.

43
CHAPTER 9Warranty and FCC
Information
Warranty
Important: Warranty terms may be different with the country of
purchase; contact Authorized Control4 Sales and Service office
for detailed product warranty information.
One-Year Limited Hardware
Warranty
Control4 warrants its Mini Touch Screen products to be free
from defects in material and workmanship during the warranty
period. If the Mini Touch Screen product proves to be defective
in material or workmanship during the warranty period, Control4
will, at its sole option, repair or replace the product with a like
product.
Should Control4 be unable to repair or replace the product
within a reasonable amount of time, the customer's alternate
exclusive remedy shall be a refund of the purchase price upon
return of the product.
How long the warranty is effective:
Control4 Mini Touch Screens are warranted for one (1) year
from the date of the first consumer purchase.
What the warranty does not cover:
Misuses; unauthorized modification; opening for any reason
except to perform an official upgrade using an proper tools/kit
Operation or storage outside the environmental specifications
for the product
The battery, or damage caused by this battery
In-transit damage and improper maintenance
44
Physical damage to the unit, such as a cracked or broken
screen or defect resulting from use of improper software,
accessories, media, supplies, consumables, or such items not
designed for use with the product.
Control4 makes no other express warranty, whether written or
oral, with respect to this product. Any implied warranty of
merchantability or fitness for a particular purpose is limited to
the one-year duration of this written warranty.
Some customers do not have limitations on how long an implied
warranty lasts, so the above limitation or exclusion may not
apply to you. This warranty gives your specific legal rights, and
you may also have other rights that vary from customer to
customer.
Software License Agreement and Limited Warranty
Control4's Mini Touch Screen products contain pre installed
software programs. Please read the following Control4 Software
Product License Agreement before proceeding.
NOTE: Carefully read this License Agreement and the
Limited Warranty statement before operating the
equipment. The rights to the software are licensed, not
sold. Control4 or its licensors continue to own all
intellectual property rights to the software, and you will be
granted certain rights to use the software upon your
acceptance of this license. Rights in the software are
offered only on the condition that you agree to all terms
and conditions of the License Agreement. Operating the
equipment indicates your acceptance of these terms and
conditions. If you do not agree to the terms and
conditions of the License Agreement, return the complete
package for a full refund now.
Control4 Software Product License Agreement
The Control4 Software Product License Agreement shall govern
the use of all software that is provided to you, the customer, as

45
part of this Control4 product - with the exception of Microsoft’s
software and products, which are licensed to you under the
Microsoft End User License Agreement (EULA) contained in the
Microsoft documentation. Any third party software supplier's
warranty terms that may be found online, or in any
documentation or other materials contained in the product
packaging, shall govern the use of that third party software.
License Terms that Govern the Use of the Software
Use
You may only use the software on a single computer. You
may not reverse, assemble, or decompile the software.
Transaction in European Union member states: The
prohibition against decompilation shall be subject to
Directive 91/250/EEC.
Copies and Adaptations
You may make copies or adaptations of the software (a)
for archival purposes, or (b) when copying or adaptation
is an essential step in the use of the software with a
computer so long as the copies and adaptations are used
in no other manner.
You have no other rights to copy unless you acquire an
appropriate license to reproduce which is available from
Control4 for some software.
You agree that no warranty, free installation or free
training is provided by Control4 for any copies or
adaptations made by you.
All copies and adaptations of the software must bear the
copyright notice(s) contained in or on the original.
Ownership
You agree that you do not have any title to or ownership
of the software, other than ownership of physical media.
You acknowledge and agree that the software is

46
copyrighted and protected under the copyright laws. You
acknowledge and agree that the software or part thereof
may have been developed by a third party software
supplier named in the copyright notice(s) included with the
software, who shall be authorized to hold you responsible
for any copyright infringement or violation of this or their
own License Agreement.
Transfer of Right in Software
You may transfer rights to the software to a third party only
as part of the transfer of all your rights and only if you
obtain the prior agreement of the third party to be bound
by the terms of this License Agreement. Upon such a
transfer, you agree that your rights to the software are
terminated and that you will either destroy all your copies
and adaptations or deliver them to the third party. Transfer
to a U.S. government department or agency or to a prime
or lower tier contractor in connection with a U.S.
government contract shall be made only upon prior written
agreement to terms required by Control4.
Sublicensing and Distribution
You may not lease, sublicense the software or distribute
copies or adaptations of the software to the public in
physical media, by telecommunication or at all without the
prior written consent of Control4.
Termination
Control4 may terminate this software license for failure to
comply with any of these terms, provided Control4 has
requested you to cure the failure and you have failed to do
so within thirty (30) days of such notice.
Updates and Upgrades
You agree that the software does not include updates and
upgrades that may be available from Control4 under a
separate support agreement.

47
Export Clause
You agree not to export or re-export the software or any
copy or adaptation in violation of the U.S. Export
Administration regulations or other applicable regulations.
U.S. Government Restricted Rights
The Software and Documentation have been developed
entirely at private expense. They are delivered and
licensed as "commercial computer software" as defined in
DFARS 252.227-7013 (Oct 1988), DFARS 252.211-7015
(May) or DFARS 252.227-19 (Jun 1987) (or any
equivalent agency regulation or contract clause),
whichever is applicable. You have only those rights
provided for such Software and Documentation by the
applicable FAR or DFARS clause or the Control4 standard
software agreement for the product involved.
Control4 Software Product Limited Warranty
Important: This Control4 Software Limited Warranty shall cover
all software that is provided to you, the customer, as part of the
Control4 product, including any operation system software. Any
third party software supplier's warranty terms that may be found
online or in any documentation or other materials contained in
the product packaging shall supersede the Control4 Software
Product Limited Warranty with regard to that third party
software.
Ninety-Day Limited Software Warranty
Control4 warrants for a period of 90 days from the date of
purchase that the software product will execute its
programming instructions when all files are properly
installed. Control4 does not warrant that the software will
be uninterrupted or error free. In the event that this
software product fails to execute its programming
instructions during the warranty period, your remedy shall
be replacement of refund only. Return the media to
Control4 for replacement. Should Control4 be unable to
replace the media within a reasonable amount of time,

48
Control4 shall refund the purchase price upon return of
the product and all copies.
Removable Media (If Supplied)
Control4 warrants the removable media, if supplied, upon
which this product is recorded to be free from defects in
material and workmanship under normal use for a period
of 90 days from the date of purchase. In the event the
media proves to be defective during the warranty period,
your remedy shall be replacement or refund only. Return
the media to Control4 for replacement. Should Control4
be unable to replace the media within a reasonable
amount of time, Control4 shall refund the purchase price
upon return of the product and destruction of all other non-
removable media copies of the software product.
Notice of Warranty Claims
You must notify Control4 in writing of any warranty claim
not later than 30 days after the expiration of the warranty
period.
Limitation of Warranty
Control4 makes no other express warranty, whether
written or oral, with respect to this product. Any implied
warranty of merchantability of fitness for a particular
purpose is limited to the 90-day duration of this written
warranty.
Limitation of Liability and Remedies
The Remedies provided above are your sole and
exclusive remedies. In no event shall Control4 be liable
for any direct, indirect, special, incidental, or
consequential damages (including lost profit), whether
based on warranty, contract, tort, or any other legal theory.
In no case shall Control4's liability exceed the purchase
price for the software and/or product. The limitations set
forth above will apply regardless of whether you accept
the software.

49
FCC Statement
Federal Communication Commission Interference
Statement
This device complies with Part 15 of the FCC Rules. Operation
is subject to the following two conditions: (1) This device may
not cause harmful interference, and (2) this device must accept
any interference received, including interference that may
cause undesired operation.
This equipment has been tested and found to comply with the
limits for a Class B digital device, pursuant to Part 15 of the FCC
Rules. These limits are designed to provide reasonable
protection against harmful interference in a residential
installation. This equipment generates uses and can radiate
radio frequency energy and, if not installed and used in
accordance with the instructions, may cause harmful
interference to radio communications. However, there is no
guarantee that interference will not occur in a particular
installation. If this equipment does cause harmful interference to
radio or television reception, which can be determined by
turning the equipment off and on, the user is encouraged to try
to correct the interference by one of the following measures:
Reorient or relocate the receiving antenna.
Increase the separation between the equipment and receiver.
Connect the equipment into an outlet on a circuit different from
that to which the receiver is connected.
Consult the dealer or an experienced radio/TV technician for
help.

50
FCC Caution
CAUTION! Any changes or modifications
not expressly approved by the party
responsible for compliance could void the
user's authority to operate this equipment.

51
APPENDIX APriority List for Media
and Device Buttons
All media and devices that have been included in your system
can be accessed in the Mini Touch Screen interface from either
a Media page or a Device page. These pages are represented
by buttons on the applicable subsystem page.
The media and device buttons display on the subsystem page
in the following prioritized order.
1. Media
1a. Audio
1. Stored
2. Broadcasted
1b. Video
1. Stored
2. Broadcasted
2. Video Devices
2a. TV
2b. Sat
2c. DVD
2d. DVR
2e. VCR
2f. Laser Disc
2g. Camera
2h. Game
3. Audio Devices
3a. Tuner
3b. CD
3c. DSS
3d. XM or Sirius
3e. Tape
3f. DVD
3g. Phono
3h. Game
3i. Aux

52