Snom technology M9HS1 DECT VOIP PHONE User Manual qsg m9 109 indd
Snom technology AG DECT VOIP PHONE qsg m9 109 indd
Users Manual
ENGLISH
DEUTSCH
FRANÇAIS
ITALIANO
ESPAÑOL
www.snom.com
www.snom.com
© 2010 snom technology AG
v1.09
Quick Start Guide
snom technology AG
Charlottenstr. 68-71
10117 Berlin, Deutschland
Tel. +49 30 39 83 3-0
Fax +49 30 39 83 31 11
info@snom.com, sales@snom.com
snom technology, Inc.
18 Commerce Way, Suite 6000
Woburn, MA 01801, USA
Tel. (781) 569-2044
Fax (781) 569-2045
infoUSA@snom.com
snom France SARL
6 Parc des fontenelles
78870 Bailly, France
Tel. +33 1 80 87 62 87
Fax +33 1 80 87 62 88
info@snom.com, sales@snom.com
snom technology SRL
Via A. Lusardi 10
20122 Milano, Italia
Tel +39 02 00611212
Fax +39 02 93661864
info@snom.com, sales@snom.com
Your specialist retailer - Ihr Fachhändler -
Votre distributeur - Su distribuidor - Il tuo rivenditore:

3
english
.................................................................................... 5
Safety Information & Warranty USA ..................... 23
Safety Information & Warranty Australia ..................... 37
Safety Information & Warranty New Zealand ............ 41
deutsch
.................................................................................... 45
français
.................................................................................... 65
italiano
.................................................................................... 85
español
.................................................................................... 105
appendix · anhang · annexe · apendice · anexo
GNU General Public Licence ............................................................ 124

4
snom m9 Quick Start Guide
E
N
G
L
I
S
H
5
snom m9 Quick Start Guide E
N
G
L
I
S
H
This is the Quick Start Guide to the installation, setup, and
operation of the base station and the phone. For further
information please refer to the manual at http://wiki.snom.com.
deliVerY content
Combo Kit Handset Kit
1. Base station 1 x -
2. Base station power adapter (5 V,
DC plug inner Ø 2.1 mm, outer Ø
5.5 mm)
1 x -
3. Network cable 1 x -
4. Handset 2 x 1 x
5. 3.7 V Lithium-Ion rechargeable
battery pack
2 x 1 x
6. Handset charger 2 x 1 x
7. Handset charger power adapter (5.9
V, DC plug inner Ø 1.35 mm, outer
Ø 3.5 mm)
2 x 1 x
8. Belt clip 2 x 1 x
You will also need:
Data received from your service provider or administrator:
1. Account (usually the phone number) (required)
2. Registrar (required)
3. Password, authentication name, outbound proxy (may be required,
mailbox account (if available)
4. If DHCP is not available for automatic initialization, you will also need
the IP address, the IP gateway and the DNS server. Press >
(Settings menu) > Network > enter PIN > select IP Gateway
and DNS Server, respectively, with OK.

6
snom m9 Quick Start Guide
E
N
G
L
I
S
H
copYright, tradeMarKs, gpl, legal disclaiMers
© 2010 snom technology Aktiengesellschaft
All Rights Reserved.
snom, the names of snom products, and snom logos are trademarks
owned by snom technology AG. All other product names and names of
enterprises are the property of their respective owners.
snom technology AG reserves the right to revise and change this document
at any time, without being obliged to announce such revisions or changes
beforehand or after the fact.
Texts, images, and illustrations and their arrangement in this document are
subject to the protection of copyrights and other legal rights worldwide.
Their use, reproduction, and transmittal to third parties without express
written permission may result in legal proceedings in the criminal courts
as well as civil courts.
When this document is made available on snom’s web page, snom
technology AG gives its permission to download and print copies of its
content for the intended purpose of using it as a manual. No parts of
this document may be altered, modified or used for commercial purposes
without the express written consent of snom technology AG.
Although due care has been taken in the compilation and presentation
of the information in this document, the data upon which it is based may
have changed in the meantime. snom therefore disclaims all warranties
and liability for the accurateness, completeness, and currentness of the
information published, except in the case of intention or gross negligence
on the part of snom or where liability arises due to binding legal provisions.
Our firmware includes some source code that may be used and modified
by anyone and everyone under the GNU Public License (GPL) (see
Appendix on page 124), provided they, in turn, make it available to everyone
else with the same licensing agreement. Please go to http://www.snom.
com/en/support/download/gpl-quellcode/ for the original GPL license
and the source code of components licensed under GPL and used in
snom products.

7
snom m9 Quick Start Guide E
N
G
L
I
S
H
Standards Conformance
This phone is CE and FCC-certified and meets European and
US health, safety, and environmental standards.
Unauthorized opening, changing, or modifying the phone will
cause the warranty to lapse and may also result in the lapse
of the CE and FCC certifications. In case of malfunction
contact authorized service personnel, your seller, or snom.
The snom m9 Base FCC ID is YDBM9BS1, and Handset
FCC ID is YDBM9HS1
8
snom m9 Quick Start Guide
E
N
G
L
I
S
H
safetY precautions
Please read these precautions and the instructions on how to set up and
use the base and the phone thoroughly before using the devices. Save
this Quick Start Guide and do not give the device to third parties without
it. See also separate general safety information and country-specific
safety and warranty information for the USA, Australia, and New Zealand.
Power supplies/adapters, rechargeable battery
• Use only the power converters (AC/DC adapters) delivered with
the base station and the phone or those power supplies expressly
recommended by snom. Other power power supplies may damage or
even destroy the device(s).
Elementech Power Adapters, Model No.
Base station Handset charger
Europe without UK AU1050507e AU1050607e
UK AU1050505b AU1050605b
USA & Canada AU1050507u AU1050607u
Australia AU1050505s AU1050605s
• Use only the rechargable battery pack delivered with the handset or
those rechargable battery packs expressly recommended by snom.
Placement of base, charger, cables, cords
• Avoid placing the devices' cables and cords where people may trip
over them. Avoid placing the cables and cords where they may be
exposed to mechanical pressure as this may damage them. If the
power supply cord or the plug is damaged, disconnect the device and
contact qualified service personnel.
• Base station, chargers, handsets, power adapters, and cables are
for indoor installation with a temperature range between +5°C and
+45°C. Not for outdoor installation!
• Do not install product in rooms with high humidity (for example, in
bathrooms, laundry rooms, damp basements). Do not immerse product
in water and do not spill or pour liquids of any kind onto or into any
parts of it.
• Do not install product in surroundings at risk for explosions and do
not use the handset in such surroundings (paint shops, for example).

9
snom m9 Quick Start Guide E
N
G
L
I
S
H
Do not use the phone if you smell gas or other potentially
explosive fumes!
• Medical devices might be adversely affected. Please consider the
technical ramifications when installing the devices in a doctor's office,
for example.
• FOR THE USA: Do not use near medical equipment or if you have a
pacemaker.
If you have an implanted pacemaker
• FOR THE USA: Do not use if you have a pacemaker.
• Do not use if you have an implanted pacemaker unless the pacemaker
manufacturer's directions expressly permit the use of devices emitting
pulsating radio frequency signals. Always follow the manufacturer's
directions!
• Recommended MINIMUM distance to the handset: 20 cm (7.9").
• Do not carry the handset in a breast pocket.
• Hold the handset to the ear opposite the medical device to minimize
the potential for interference.
• Turn the handset off immediately if there is any reason to suspect that
interference is taking place.
Other health risks
Do not hold the loudspeaker at the back of the handset against your ear
when the phone is ringing or when speakerphone is switched on. Danger
of serious, irreversible damage to your hearing!
If you are wearing a hearing aid
Please note that the handset may cause an annoying background noise.
additional safetY inforMation
Small children:
Your device and its enhancements may contain small parts. Keep them out
of the reach of small children.
Operating environment:
Remember to follow any special regulations in force in any area, and
always switch off your device when its use is prohibited or when it may
cause interference or danger. Use the device only in its normal operating

10
snom m9 Quick Start Guide
E
N
G
L
I
S
H
positions. Do not place credit cards or other magnetic storage media near
the device, because information stored on them may be erased.
Medical devices
Operation of any equipment emitting radio frequency signals may interfere
with the functionality of inadequately shielded medical devices. Consult a
physician or the manufacturer of the medical device to determine if they
are adequately shielded from external RF energy or if you have any other
questions concerning this topic. Switch off your device in health care
facilities when signs posted in these areas instruct you to do so. Hospitals
or health care facilities may be using equipment that could be sensitive to
external RF energy.
Implanted medical devices
Manufacturers of medical devices recommend that a minimum distance
of 20 centimeters (7.8 inches) should be maintained between a wireless
device and an implanted medical device, such as pacemakers or
cardioverter defibrillators, to avoid potential interference with the medical
device. Persons who have such devices should:
• Always keep the wireless device more than 20 centimeters (7.8 inches)
from the medical device when the wireless device is turned on.
• Not carry the wireless device in a breast pocket.
• Hold the wireless device to the ear opposite the medical device to
minimize the potential for inter-ference.
• Turn the wireless device off immediately if there is any reason to
suspect that interference is taking place.
• Read and follow the directions of the medical device‘s manufacturer.
If you have any questions about using your wireless device with an
implanted medical device, consult your health care provider.

11
snom m9 Quick Start Guide E
N
G
L
I
S
H
SELV (Safety Extra Low Voltage) Compliance
Safety status of Input/Output connections comply to SELV requirements.
Warning: To avoid electric shock, do not connect safety extra-
low voltage (SELV) circuits to telephone-network voltage (TNV)
circuits. LAN ports contain SELV circuits, and PSTN ports
contain TNV circuits. Some LAN and PSTN ports both use RJ-
45 (8P8C) connectors. Use caution when connecting cables.
Potentially explosive environments
Switch off your device when in any area with a potentially explosive
atmosphere and obey all signs and instructions. Sparks in such areas
could cause an explosion or fire resulting in bodily injury or even death.
Switch off the device at refuelling points such as near gas pumps at
service stations. Observe restrictions on the use of radio equipment in fuel
depots, storage, and distribution areas; chemical plants; or where blasting
operations are in progress. Areas with a potentially explosive atmosphere
are often but not always clearly marked. They include below deck on boats,
chemical transfer or storage facilities, vehicles using liquefied petroleum
gas, and areas where the air contains chemicals or particles such as grain,
dust, or metal powders.
Sensitive Electronic Equipment
The current state of research concludes that operational DECT phones
normally do not adversely affect electronic equipment. Nevertheless, you
should take some precautions if you want to operate DECT phones in the
immediate vicinity of such equipment like sensitive laboratory equipment.
Always keep a minimum distance of 10 cm (3.94") to the equipment even
when the phone is in standby.
Electrical Surges
We recommend the installment of an AC surge arrester in the AC outlet to
which this device is connected to avoid damage to the equipmen t caused
by local strikes of lightening or other electrical surges.

12
snom m9 Quick Start Guide
E
N
G
L
I
S
H
iMportant BatterY inforMation
This product uses a rechargeable Lithium-Ion battery 3.7V, 650mAh.
Only use batteries with “snom” brand and P/N: 60020438 or 60020438
that came with the handset or replacement batteries approved by snom
technology AG. Do not use any other type of battery, since this may
lead to leakage, fire, explosion, or other dangerous situations. In order
to replace or remove the battery, you must first remove the battery cover
of the handset. Never disassemble, alter, or short-circuit batteries or use
them for purposes other than the intended one. Charge battery only within
the snom m9 handset placed in the snom m9 charger that came with the
product.
Charging and discharging, storage
The handset is powered by a rechargeable battery. The full performance
of a new battery is achieved only after two or three complete charge and
discharge cycles.
The battery can be charged and discharged hundreds of times, but it will
eventually wear out. Use only snom technology AG approved batteries.
If left unused, a fully charged battery will lose its charge over time. If the
battery is completely discharged, it may take a few minutes before the
charging indicator appears on the display.
Use the battery only for its intended purpose. Do not short-circuit the
battery. Short-circuiting the terminals may damage the battery or the
connecting object. Do NOT use a damaged charger or battery. Using a
damaged battery may cause it to explode.
Do not place or store the battery, inside or outside the handset, in the
immediate vicinity of open fire or other heat sources. Leaving the battery
in hot or cold places will reduce its capacity and lifetime. Charge batteries
within an ambient temperature range of 0° C to 40° C (32° F to 104° F). A
device with a hot or cold battery may not work temporarily, even when the
battery is fully charged.
Avoid overcharging. Repeated overcharging can lead to deterioration in
battery performance. Never attempt charging the battery with reversed
polarity as this may cause the gas pressure inside the battery to rise and
lead to leakages. For short-term storage store batteries in a dry location
with low humidity, no corrosive gases, and at a temperature range of -20°
13
snom m9 Quick Start Guide E
N
G
L
I
S
H
C to 45° C (-4° F to 113° F). Long-term storage: Store at a temperature
ranges between +10° C and +30° C (50° F to 86° F).
Battery Disposal
Defective or exhausted batteries should never be disposed of as municipal
waste. Return old batteries to the battery supplier, a licensed battery
dealer or a designated collection facility. Do not incinerate batteries.
cleaning
Use an anti-static cloth. Please avoid water and liquid or solid cleaning
products as they might damage the surface or internal electronics of the
base, charger, and handset.
disposal
Disposal of phone
This product is subject to European Directive 2002/96/EC
and may not be disposed of with general household garbage.
If you do not know where you may dispose of the device at the
end of its lifespan, contact your municipality, your local waste
management provider, or your seller.
Battery disposal
This battery is subject to European Directive 2006/66/EC and
may not be disposed of with general household garbage.
If you do not know where you may dispose of the battery at the
end of its lifespan, contact your municipality, your local waste
management provider, or your seller.
For countries outside the European Union:
Disposal of electrical and electronic products in countries outside the
European Union should be done in line with local regulations. Please
contact local authorities for further information.
14
snom m9 Quick Start Guide
E
N
G
L
I
S
H
installation
Before first use, the handset battery should be charged
fully. This will take approximately 8 hours.
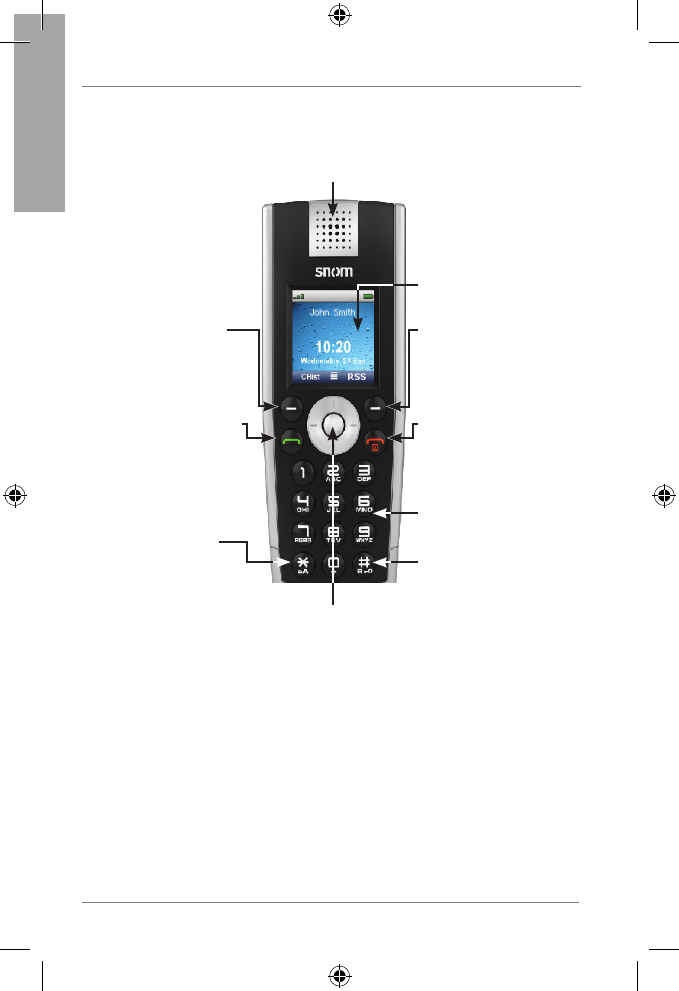
preparation of handset
1. Lift off the battery cover.
2. Insert the battery pack with the electrodes in the top left corner.
Replace the cover.
3. Connect the 5.9 V power supply of the charger to the wall outlet
first, then to the charger, and place the handset in the charger.
3.1. 2.
snom
rechargeable
Lithium-Ion
battery
Base station
Power LED
– lit when on
Call LED
– flashes during firmware update
– lit when call in progress
– blinks slowly when waiting for
handset registrations
Registration LED
– lit when the base
station is registered
Network LED
– flashes during boot,
indicating that the base
station has received an IP
address

15
snom m9 Quick Start Guide E
N
G
L
I
S
H
1. When the handset is ready for use, connect one end of the network
cable with the NET port on the back of the base station and the
other end to a LAN port in your network (switch, router, etc.).
2. Connect the 5 V power converter to the wall outlet first, THEN to
the base station.
NET
RESET 5V DC
NET
5V DC
Power
connector
Reset
button
Net port
3. The power indicator comes on and the base station begins to boot.
4. When the base station has booted up, the "Call" LED will start
to blink, indicating that the base station is waiting for handset
registration.
handset oVerVieW
Side view
Belt clip
Volume adjust key+-
Adjust volume
• of ringer when call is ringing
• of speaker when in call
Headset jack connector 2.5 mm
Speakerphone key (on/off)
Back view Loudspeaker
of
speakerphone
Battery cover
16
snom m9 Quick Start Guide
E
N
G
L
I
S
H
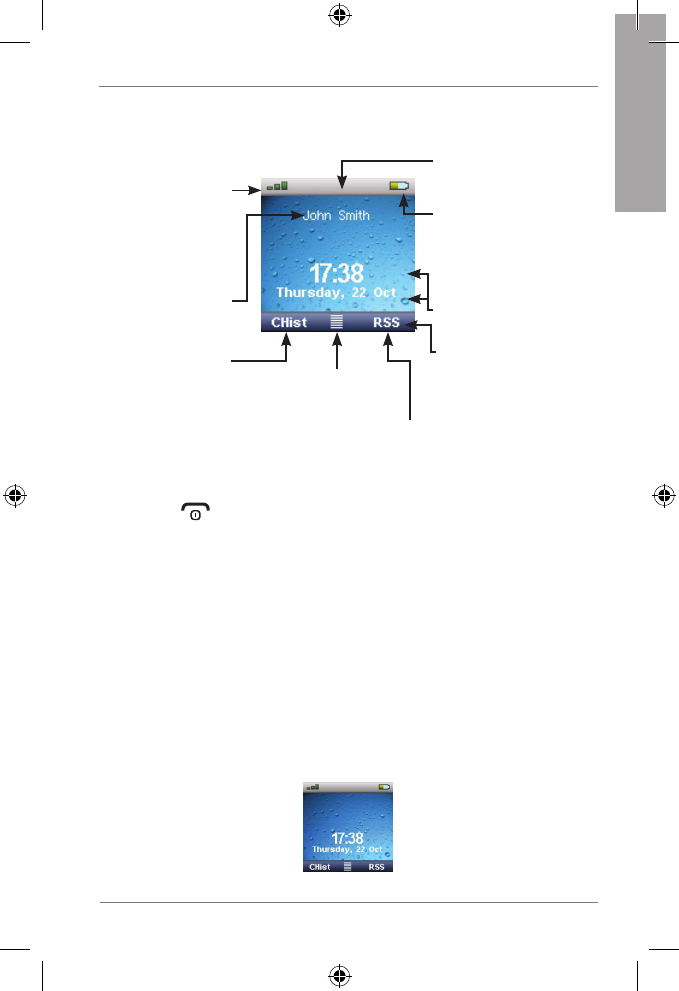
Front view
Navigation key
In idle mode, press top/bottom/right/left edge (depicted in this
guide by ///, respectively) or the button in the center ()
to open the following menus or functions:
Main menu
Directory
Intercom
Settings menu
Preferences menu
In other contexts press or to navigate in menus and lists.
Green phone key
Accept calls
Dial number
Confirm actions
Left function key
In idle mode:
Call lists
Right function key
In idle mode:
RSS Feed
Red phone key
Terminate calls
Cancel actions
Power on/off
Earpiece
Color display
Alphanumerical
keypad
R key
Lock/unlock keypad
Star key
Change input mode
(numbers, small/
capital letters)
17
snom m9 Quick Start Guide E
N
G
L
I
S
H
displaY laYout, idle screen
Battery charging
status
Red=critical
Yellow=under 50%
Green=over 50%
Preferences
Menu
Select RSS feeds
Function key line
with context-sensitive
symbols
Time and Date
Handset ID:
Call lists:
Missed
Received
Dialled
Signal strength:
High=green
Low=gray
Status line
Handset registration
1. Press (red phone key). The display will show: "Searching for
Base". Once the handset has found the base station, it will display
the PIN prompt.
2. Enter the default PIN "0000".
3. Press "OK".
Note: If the handset fails to register automatically, a manual
registration can also be performed. Press "->" to enter the
Settings menu. Enter the Handset menu and press "Register
Handset". Select "Base 1". Enter PIN and press "OK" to
register the handset.
4. Once the handset has registered with the base, the idle screen will
be displayed:
18
snom m9 Quick Start Guide
E
N
G
L
I
S
H
Configuration of a VoIP account
1. Press and on the navigation key and "OK" to show the
--Network-- page under Settings > System Info. The IP address of
the base station is displayed on the screen. Write it down.
2. Press on the navigation key (see page 16) to show --Handset--
page. Write down the Handset ID, for example: 00FEA101C0
(without the "h" at the end, if visible).
3. Open a browser window, type http://<IP address> in the address
bar, and press ENTER to open the base station's web interface.
Default user name: admin
Default password: password
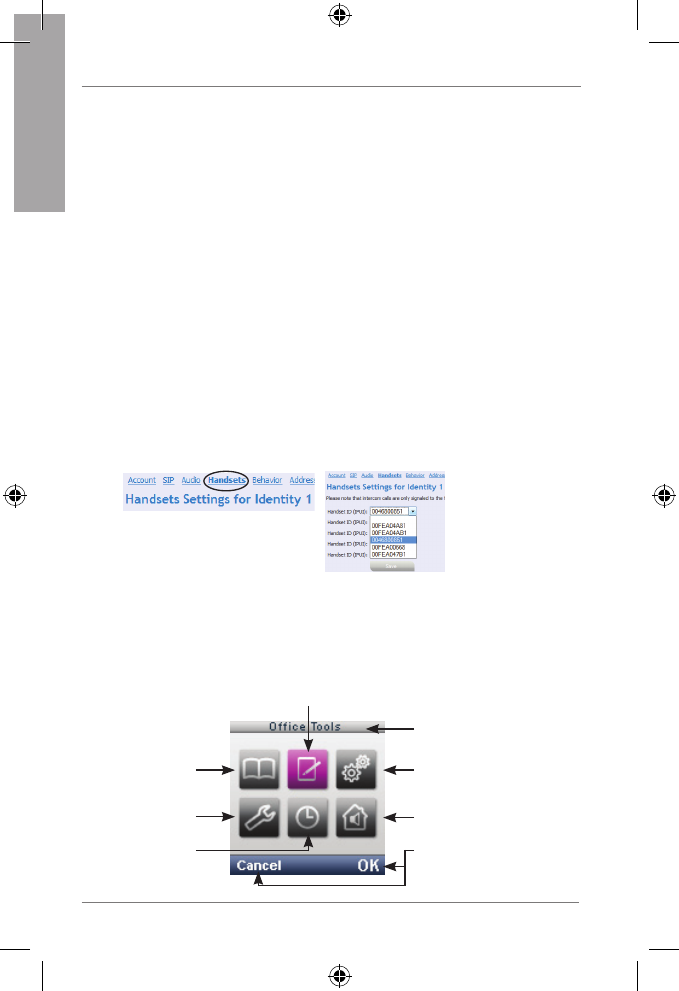
4. Click on "Identity 1" in the menu on the left.
5. Enter the SIP account information you received from your system
administrator or VoIP provider. The display name is freely
selectable.
6. Click on the "Handsets" tab. Select the handset ID from
the "Handset ID (IPUI)" drop-down list. Press "Save".
7. Your snom m9 is now ready for use.
phone Menus
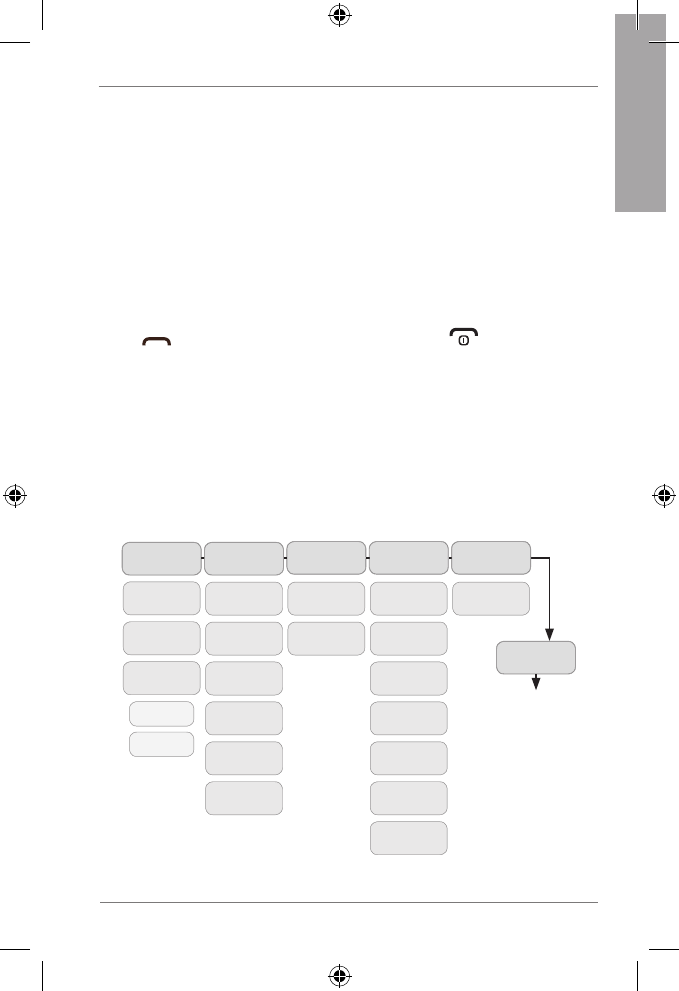
1. Press center of navigation key to open top-level menu.
Settings
Name of marked menu
item
Current function of
function key underneath
Directory
Preferences
Alarm Clock
Office Tools
Intercom
19
snom m9 Quick Start Guide E
N
G
L
I
S
H
2. Press top/bottom/right/left edge of navigation key (indicated in this
guide by ) to navigate on display.
3. Press function key "OK" to open submenu/function. Press function
key "Cancel" to return to idle screen.
directorY
Use to select existing entry or <New Item>.
New item: Follow the prompts to enter name and number and select
ringer. Press OK.
Press (green phone key) to dial number, press to Ieave
directory.
office tools
Stopwatch, Calculator, Notepad, Calendar, RSS Reader, Voicemail
settings Menu
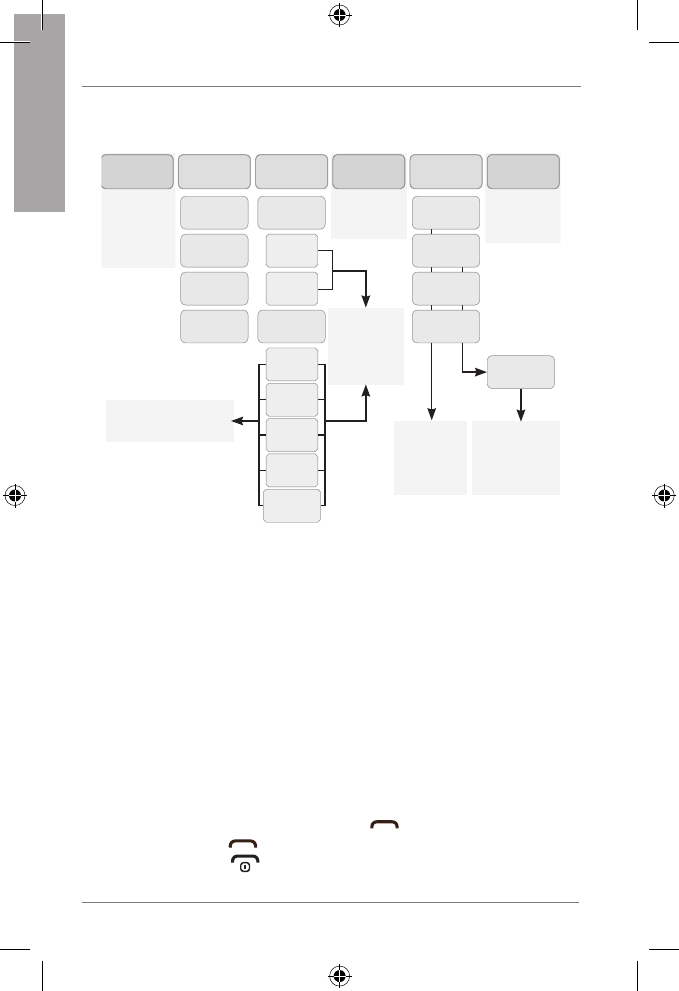
Network
VoIP
Display
Name
Account
Password
Mailbox
Registrar
Outbound
Proxy
Date/
Time Handset
Time Zone
Time Server
Format
Date
Format
Time
Format
VLAN
DHCP
Register
handset
Select
base
Deregister
handset
Reset
handset
FW
Update
Version
Reset
base
Change
PIN
System
Info
New PIN:
IP address,
MAC address,
firmware
version,
IDs of base
and handset
20
snom m9 Quick Start Guide
E
N
G
L
I
S
H
preferences Menu
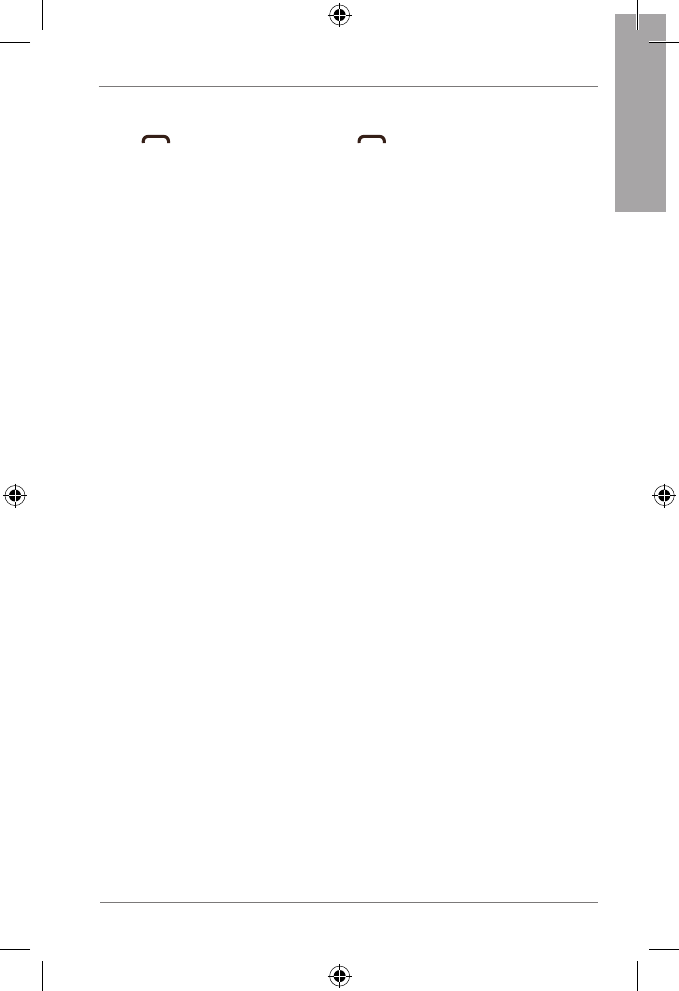
“OK” >
Select
language with
and press
“OK”
Language
Select with
and press
“OK”
Auto
Answer
Display
Screen
Saver
Wallpaper
Contrast
Backlight
Incoming
calls are not
announced
DND
Select event
when calls
are to be
forwarded and
press“OK”
Select target
phone number
for forwarding
calls and press
“OK”
Audio
Settings
Ringer
Settings
Internal*
calls
External
calls
Key
Tones
Charging
Tones
Low
Battery
MWI
Confirma-
tion Tone
Advisory
Tones Select ringto-
ne and volume
with and
press “OK”
Select “Activate” with
and press “OK”
* Internal calls: From
handsets registered at the
same base station
Always
Call
Forward
Never
When
busy
Timeout/
sec.
Fwd.
target
alarM clocK
Activate | Time | Alarm Ringer
intercoM
Page All | Handset: Page all handsets or selected handset registered
with same base station
phone operation
Make and answer calls
Make a call: Enter number > press OK or
Answer a call: Press
Terminate call: Press
21
snom m9 Quick Start Guide E
N
G
L
I
S
H
Redial
Press > select number > press or "OK"
Call forwarding
Preferences > Call forwarding > enter PIN > OK > select identity >
select event (always, busy, timeout) > select SIP address > enter target
phone number > press OK > on prompt press Yes to reboot phone
Turn off call forwarding: Preferences > Call forwarding > enter PIN >
OK > select identity > select event "never"
Hold and resume
Hold call: Press Options > Hold
Unhold call: Press Options > Unhold
Transfer call
With call on line, press Options > Transfer > enter number > press OK
Miscellaneous
Look up MAC address (= serial number) of base station
Press and on the navigation key and "OK" (Menu Settings > System
Info > Network)
Look up IP address of base station
Press and on the navigation key and "OK" (Menu Settings > System
Info > Network)
Open web interface of base station
Enter IP address in address bar of your web browser, press ENTER
Reset base station
Menu "Settings" > Handset > Reset base > "OK"
OR
Press "Reset" key on the back of the base station.
Reset handset
Menu "Settings" > Handset > Reset handset > "OK"

22
snom m9 Quick Start Guide
E
N
G
L
I
S
H

23
snom m9 Quick Start Guide E
N
G
L
I
S
H
safetY inforMation & WarrantY
usa
Intended Use
This telephone is designed for telephoning within the Internet. Any other
use is considered unintended use. Any modification or reconstruction not
described in the user manual is considered unintended use.
IMPORTANT SAFETY INFORMATION
Follow all instructions and warnings in the user manual, and on the equip-
ment to prevent accidents.
WARNING
Fire, electric shock, or other injury may result if you do not observe the
following safety precautions:
• Do not use in or near a bathtub, sink, swimming pool, wet basement,
or other water.
• Do not use this or any cordless telephone in the vicinity of a gas leak.
• Do not use in environments subject to explosion hazards, such as auto
paint shops.
• Do not use near medical equipment or if you have a pacemaker.
• Unplug from wall outlet before cleaning.
• To prevent overheating, do not block slots and openings in the cabinet
or the back or bottom of equipment. Do not place equipment on beds,
sofas, rugs, or other surfaces that generate fibers.
• To prevent overheating, do not place near or over a radiator or in a
cabinet without properventilation.
• To reduce the risk of fire, use only 26 AWG or larger UL-listed or CSA-
certified telecommunication line cord.
• Operate using the power source indicated on the marking label. If you
are unsure about the type of power supply to your home or business,
consult your power company.
• Do not place objects on the power cord. Do not step on the power
cord.

24
snom m9 Quick Start Guide
E
N
G
L
I
S
H
• To prevent exposure to dangerous voltage, do not push objects through
cabinet slots.
• To reduce the risk of electric shock, do not disassemble equipment or
open parts other than specified access doors. Opening or removing
parts may expose you to dangerous voltage or other risks. Incorrect
reassembly can cause electric shock when equipment is subsequently
used.
• Do not overload wall outlets and extension cords.
• Unplug equipment and contact qualified service if any of the following
has occurred:
1. Power supply cord or plug has been damaged or frayed.
2. Liquid has been spilled on or in the equipment.
3. Equipment has been exposed to rain or water.
4. Equipment does not work normally even when the operating
instructions are followed. Adjust only those controls referred to in
the operating instructions. Improper adjustment of other controls
may result in damage and may require extensive work by an
authorized service center.
5. Equipment has been dropped and damaged.
6. Equipment has exhibited a distinct change in performance.
• Do not put the handset of the telephone next to your ear when the
handset is not in normal talk mode.
• Radio signals transmitted between the handset and base may cause
interference with hearing aids.
WARNING
The cords contain lead, a chemical known to the State of California to
cause birth defects or other reproductive harm. Wash hands after hand-
ling.
CAUTION
To comply with the FCC’s RF exposure guidelines, place the base unit at
least 8 inches from persons.
Do not clean with liquid or aerosol cleaners, household polish, chemicals,
or cleaning agents. To avoid static shock, do not clean with a dry cloth.

25
snom m9 Quick Start Guide E
N
G
L
I
S
H
Clean with only a damp (not wet) cloth.
NOTICE
To avoid damage to the equipment, observe the following precautions:
• Do not expose to water, rain, or moisture.
• Place securely on a stable surface.
• To avoid damage during an electrical storm, equipment should be
plugged into a surge protector.
BatterY safetY precautions
WARNING
The snom m9 contains a Li-ion battery.
WARNING
Fire or injury may result if you do not observe the following safety precau-
tions:
• Use only the Li-ion battery pack (3.7V, 650mAh) specified in the
owner’s manual.
• Do not use other batteries or conventional alkaline batteries.
• To avoid explosion, do not dispose of battery pack in a fire.
• Review battery package insert for disposal instructions. Li-ion battery
must be disposed of properly and may need to be recycled. Contact
your local recycling center for proper disposal methods.
• Do not open or mutilate battery pack. Released electrolyte is corrosive
and may damage eyes and skin and may be toxic if swallowed.
• Battery may overheat and cause burns if placed into contact with
conducting materials such as rings, bracelets, and keys.
CAUTION
• Charge battery pack only in accordance with the instructions and
limitations specified in the user manual.
• Observe proper polarity orientation between battery pack and battery
charger.

26
snom m9 Quick Start Guide
E
N
G
L
I
S
H
• Remove battery pack if storing phone for more than 30 days.
• Disconnect and remove batteries before shipment. Any batteries
transported with the equipment must be separately secured and
cushioned with any exposed terminals covered to prevent breakage,
leakage, movement within packaging, or short circuits. Failure to follow
recommendations may be against U.S. Department of Transportation
(DOT), International Civil Aviation Administration (ICAO), International
Air Transport Association (IATA), or International Maritime Organization
(IMO) regulations.
• Rechargeable Li-ion Battery Must Be Recycled or Disposed of Properly.
At the end of its useful life, under various state and local laws it may be
illegal to dispose of a battery into the municipal waste stream. Check
with your local solid waste officials for details in your area for recycling
options or proper disposal.
• Please call 1-800-8BATTERY for information on how to recycle the
battery.
installation guidelines
1. Follow all warnings and instructions.
2. Do not install equipment near a bath tub, sink, or shower.
3. Operate the equipment using only the power source indicated on the
marking label. If you are unsure of the power supply to your home or
business, consult with your power company.
4. To avoid interference to nearby appliances, do not place base of the
phone on or near a television, VCR, or microwave oven.
5. Do not expose the equipment to direct sunlight.
6. Do not place equipment on an unstable cart, stand, or table.
7. Adjust only those controls referred to in the operating instructions.
Improper adjustment of other controls may result in damage and may
require extensive work to restore equipment to normal operation.
8. The equipment may get warm when batteries are being charged. To
avoid damage, it is recommended that the product not be placed on
antique or veneered wood.
9. The location of the base unit of the phone should be close to a phone
jack, a personal computer, and a continuous power outlet (an AC
outlet that does not have a switch to interrupt power).

27
snom m9 Quick Start Guide E
N
G
L
I
S
H
10. Keep base and handset away from sources of electrical noise such as
motors or fluorescent lighting.
fcc and other inforMation
This equipment complies with Parts 68 of the FCC rules and the requi-
rements adopted by the Administrative Council for Terminal Attachments
(ACTA).
This device complies with part 15 of the FCC rules. Operation is subject
to the following two conditions: (1) This device may not cause harmful
interference, and (2) This device must accept any interference received,
including interference that may cause undesired operation. Privacy of com-
munications may not be ensured when using this phone.
These limits are designed to provide reasonable protection against harmful
interference in a residential installation. This equipment generates, uses
and can radiate radio frequency energy and, if not installed and used in
accordance with the instructions, may cause harmful interference to radio
communications.
However, there is no guarantee that interference will not occur in a parti-
cular installation. If this equipment does cause harmful interference to radio
or television reception, which can be determined by turning the equipment
off and on, the user is encouraged to try and correct the interference by
one or more of the following measures:
• Reorient or relocate the receiving antenna.
• Increase the separation between the equipment and receiver.
• Connect the equipment into an outlet or on a circuit different from that
to which the receiver is connected.
• Consult the dealer or an experienced radio/TVtechnician for help.
FCC RF exposure warning
To insure the safety of users, the FCC has established criteria for the
amount of radio frequency energy various products may produce depen-
ding on their intended usage. This product has been tested and found to
comply with the FCC’s exposure criteria. For body worn operation, the
FCC RF exposure guidelines were also met when used with the accesso-
ries supplied or designed for this product. Use of other accessories may

28
snom m9 Quick Start Guide
E
N
G
L
I
S
H
not ensure compliance with FCC RF exposure guidelines and should be
avoided.
Caution: To maintain compliance with the FCC’s RF exposure guidelines,
the internal antennas used for this mobile transmitter (Base unit) must pro-
vide a separation distance of at least 20 cm from all persons. Base and
Handset must not be co-located or operating in conjunction with any other
antenna or transmitter.
Caution: Any changes or modifications not expressly approved by the
party responsible for compliance could void the user’s authority to operate
this device.
Hearing aid compatibility
This equipment is hearing aid compatible as defined by the FCC in 47
CFR Section 68.316.
Health and safety information FCC
Exposure to Radio Frequency (RF) Signals
Your wireless phone is a radio transmitter and receiver. It is designed and
manufactured not to exceed the emission limits for exposure to radio fre-
quency (RF) energy set by the Federal Communications Commission of
the U.S. Government. These limits are part of comprehensive guidelines
and establish permitted levels of RF energy for the general population. The
guidelines are based on the safety standards previously set by both U.S.
and international standards bodies:
This EUT has been shown to be capable of compliance for localized speci-
fic absorption rate (SAR) for uncontrolled environment/general population
exposure limits specified in ANSI/IEEE Std. C95.1-1992 and had been
tested in accordance with the measurement procedures specified in FCC/
OET Bulletin 65 Supplement C (2001) and IEEE Std. 1528-2003 De-
cember 2003).
The standards include a substantial safety margin designed to assure the
safety of all persons, regardless of age and health. The exposure stan-
dard forwireless mobile phones employs a unit of measurement known
as the Specific Absorption Rate, or SAR. The SAR limit set by the FCC
and Canada is 1.6W/kg averaged over one gram of tissue. The standard
incorporates a substantial margin of safety to give additional protection for

29
snom m9 Quick Start Guide E
N
G
L
I
S
H
the public and to account for any variations in.
RF exposure FCC
Tests for SAR are conducted using standard operating positions specified
by the FCC with the phone transmitting at its highest certified power le-
vel in all tested frequency bands. Although the SAR is determined at the
highest certified power level, the actual SAR level of the phone while ope-
ration can be well below the maximum value. This is because the phone is
designed to operate at multiple power levels so as to use only the power
required to reach the network. In general, the closer you are to a wireless
base station antenna, the lower the power output.
Before a phone model is available for sale to the public, it must be tested
and certified to the FCC that it does not exceed the limit established by the
government-adopted requirement for safe exposure. The tests are perfor-
med in positions and locations (e.g., at the ear and worn on the body) as
required by the FCC for each model. Body-worn measurements may differ
among phone models, depending upon available accessories and FCC
requirements. The highest SAR value for this phone when tested for use
at the ear is 0.043 W/kg, and when worn on the body is 0.015 W/kg for
1.5cm distance. Body worn measurements differ among phones depen-
ding upon available accessories and the FCC requirements. While there
may be differences between the SAR levels of various phones and at vari-
ous positions, they all meet the government requirement for safe exposure.
For body worn operation, to maintain compliance with FCC RF exposure
guidelines, use only accessories that contain no metallic components and
provide a separation distance of 15mm (0.6 inches) to the body. Use of
other accessories may violate FCC RF exposure guidelines and should
be avoided.
cordless telephone priVacY
Cordless telephones are radio devices. Communications between the
handset and base of your cordless telephone are accomplished by means
of radio waves which are broadcast over the open airways. Because of the
inherent physical properties of radio waves, your communications can be
received by radio receiving devices other than your own cordless telepho-
ne unit. Consequently, any communications using your cordless telephone
may not be private.

30
snom m9 Quick Start Guide
E
N
G
L
I
S
H
prograMMing and testing of eMergencY nuMBers
If this product has memory dialing locations, you may choose to store poli-
ce, fire department and emergency medical service telephone numbers in
these locations. If you do, please keep three things in mind:
1. It is recommend that you also write the telephone number on the
directory card, so that you can still dial the emergency number
manually if the memory dialing feature doesn’t work.
2. This feature is provided only as a convenience, and the manufacturer
assumes no responsibility for customer reliance upon the memory
feature.
3. Testing the emergency telephone numbers you have stored is not
recommended. However, if you do make a call to an emergency
number:
4. You must remain on the line and briefly explain the reason for the call
before hanging up.
5. Programming/testing of emergency numbers should be performed
during off-peak hours, such as in the early morning or late evening,
when the emergency services tend to be less busy.
Emergency calling service
(i.e., 911, 112, 999, etc.) with VoIP typically functions the same as that of
traditional phone service companies. However, you are strongly advised
to consult your VoIP provider to ensure that emergency service via VoIP
is available in your area. In addition, you will likely be asked to register
your physical address with your VoIP service provider to ensure that an
emergency response team is able to locate the origin of the emergency
call. Also note that it may take several days for the registration of your
address to take effect.
In order to better ensure your safety, please be aware of certain
circumstances in which emergency calling service may be either
unavailable or limited in comparison to traditional emergency calling
services.
During an electrical power outage, an internet service outage, or a
service disruption due to non-payment, your emergency calling service
may not function properly.

31
snom m9 Quick Start Guide E
N
G
L
I
S
H
If at any point in time your broadband phone or adapter fails, emergency
calling service may not function properly.
The relocation of your base station to a physical address other than that
provided upon signup, or the use of a number outside your normal area
code or exchange may cause incorrect emergency calling information to
be provided to your local emergency response center.
Please contact your VoIP service provider for more information.
one Year liMited WarrantY
SNOM TECHNOLOGY AG, (“snom”) extends the following limited war-
ranty for its product. snom’s warranty obligations are limited tothe specific
terms set forth below:
One Year Limited Warranty.
snom warrants to the original retail purchaser (“you”) that the product will
be free from defects in materials and workmanship for a period of one (1)
year from the date of your original purchase (the “Warranty Period”), sub-
ject to specific exclusions, identified below.
What Are The Limits Of snom’s Obligations And Liabilities under
this Warranty?
EXCEPT FOR THE EXPRESS LIMITED WARRANTY SNOM HAS PRO-
VIDED ABOVE, YOU TAKE THE PRODUCT “AS IS.” SNOM MAKES NO
OTHER WARRANTY OR REPRESENTATION CONCERNING THE PRO-
DUCT, AND EXPRESSLY DISCLAIMS ALL OTHER WARRANTIES AND
CONDITIONS, EXPRESS OR IMPLIED, STATUTORY OR OTHERWISE,
OF WHATEVER KIND OR NATURE, INCLUDING BUT NOT LIMITED TO
ANY AND ALL IMPLIED WARRANTIES, INCLUDING IMPLIED WAR-
RANTIES OF MERCHANTABILITY AND FITNESS FOR A PARTICULAR
PURPOSE. IF SNOM CANNOT LAWFULLY DISCLAIM OR EXCLUDE
IMPLIED WARRANTIES UNDER APPLICABLE LAW, THEN TO THE MA-
XIMUM EXTENT POSSIBLE THE DURATION OF SUCH IMPLIED WAR-
RANTIES SHALL EXPIRE ON EXPIRATION
OF THE WARRANTY PERIOD. THE REMEDIES SET OUT BELOW ARE
YOUR EXCLUSIVE REMEDIES, AND SNOM SHALL NOT BE LIABLE
FOR ANY DAMAGES OF ANY KIND, INCLUDING (i) INCIDENTAL,

32
snom m9 Quick Start Guide
E
N
G
L
I
S
H
SPECIAL, PUNITIVE, CONSEQUENTIAL, AND SIMILAR DAMAGES, (ii)
ANY LOSS OF ANTICIPATED PROFITS OR BENEFITS, (iii) DAMAGES
ARISING FROMANY TORT (INCLUDING NEGLIGENCE OR GROSS
NEGLIGENCE) OR FAULT COMMITTED BY SNOM, ITS AGENTS OR
EMPLOYEES, OR (iv) ANY OTHER DAMAGE, INCLUDING DAMAGE
RESULTING (a) FROM THE PURCHASE, USE, OR MISUSE OF THE
PRODUCT, (b) FROM ANY INABILITY TO USE THE PRODUCT OR
OTHER ASSOCIATED EQUIPMENT, (c) FROM LOSS OF DATA OR
DATA CONFIDENTIALITY ASSOCIATED WITH THE PRODUCT, OR (d)
FROM THE COST OF SUBSTITUTE EQUIPMENT. Some States do not
allow limitations on how long an implied warranty lasts, and do not allow
the exclusion or limitation of incidental or consequential damages, so the
above limitations or exclusions may not apply to you.
What specifically does this Warranty include, and what does it
exclude?
This limited warranty covers all materials and all workmanship embodied in
the product, with the exception of damage or defects in (i) the product’s
battery, (ii) the product’s antenna, (iii) data stored on the product that may
be lost or corrupted, or (iv) cosmetic damage to the product, that does
not affect the product’s functionality (the “Excluded Items”). snom will not
provide warranty service for Excluded Items.
This Limited Warranty also does not apply to hardware or software pro-
ducts that do not bear the “snom” brand, even if these non-snom products
are packaged or sold with the product. Please review documentation for
these non-snom products, as they may be covered by their own, separate
warranties.
Who enjoys the product Warranty?
snom extends this warranty only to you, the original retail purchaser of the
product. If you transfer ownership of the product to someone else, the
limitations set out above will continue to apply, but snom will not provide
warranty service to the new owner of the product.
What will snom do If the product presents a defect?
If a defect arises and you submit a valid claim to snom within the Warranty
Period, then snom, at its option, will either (1) repair the product at no
charge, using new or refurbished replacement parts, (2) exchange the pro-

33
snom m9 Quick Start Guide E
N
G
L
I
S
H
duct with a product that is new (or that has been manufactured from new
or serviceable used parts) and that is at least functionally equivalent to your
original product, or (3) refund to you the purchase price of your product.
Will this Warranty apply to replacement parts?
If snom repairs or replaces your product, snom warrants the replacement
products or parts against defects in materials and workmanship for that
period of time (a) commencing on the date of the replacement or repair
and (b) ending either ninety (90) days thereafter or on the expiration date
of the Warranty Period on the original product, whichever provides you
with longer warranty coverage. When snom replaces a product or part,
the replacement item becomes your property, while the replaced item be-
comes snom’s property. When a refund is given, your product becomes
snom’s property.
What steps should be taken to obtain Warranty service?
If, after following the instructions in the user’s manual you are certain that
the Product is defective, please take the following steps:
1. Contact snom at the number below (during the hours listed) to
receive a Return Merchandise Authorization number (RMA Number).
2. Disconnect the battery from the product.
3. Pack the product carefully (preferably in its original packaging), and
separately secure the battery in its own separate packaging within
the shipping carton.
4. Include in your shipping carton all parts, accessories, manuals, and
other materials originally packaged with the product.
5. Include in the shipping carton a copy of the original sales receipt or
other evidence of the date of original purchase.
6. Include in the shipping carton a note (i) that describes the defect that
has caused you to return the product, and (ii) that includes a day-time
phone number where you can be reached.
7. Clearly write the RMA Number you received on the outside of the
shipping carton.
8. At you option, either insure the shipment to snom, or accept the risk if
the product is lost or damaged in shipment.
9. Ship the carton containing the materials you have collected, freight

34
snom m9 Quick Start Guide
E
N
G
L
I
S
H
prepaid and by traceable means, to snom Certified Partner.
What about data stored on my product?
snom is not responsible for lost or corrupted data. Before you replace
parts or return your snom product for warranty service, make sure to retain
a copy of any data stored on the device. You should also remove any confi-
dential or sensitive information stored on the product. This Limited Warran-
ty does not cover the recovery, safeguarding, or reinstallation of programs,
data, ringtones, or other information you may store on your product.
If the Product is Damaged through Misuse, Will the Warranty Still Ap-
ply? snom’s Limited Warranty does not apply to damage that is caused:
(a) by accident, abuse, misuse, or misapplication of the product; (b) by
product installation or programming that does not comply with instruc-
tions provided in the owner’s manual; (c) by service performed by anyone
other than an authorized snom service center (acting in the course fulfilling
obligations under this Limited Warranty); (d) by use in conjunction with
equipment, parts, conversion kits, subassemblies, or systems not manu-
factured by, or not approved in writing by snom; or (d) where the product’s
warranty/quality stickers, product serial numbers, identification plates, or
electronic serial numbers have been removed, altered or rendered illegible.
Does this Warranty apply outside the United States?
This warranty is void outside the United States of America and Puerto
Rico.
Effect of Warranty.
This warranty gives you specific legal rights, and you may also have other
rights which vary from State to State.
No modifications.
No snom reseller, agent, or employee is authorized to make any modifica-
tion, extension, or addition to this Limited Warranty. If you receive retailer
advertising, statements, or other information that conflicts with this Limited
Warranty, whether oral or written, you should not rely on such statements.
Connection between product pricing and Limited Warranty.
This Limited Warranty allocates risk of product failure between snom and

35
snom m9 Quick Start Guide E
N
G
L
I
S
H
you, and snom’s pricing of the product reflects this allocation of risk and
the limitations of liability contained in this Limited Warranty.
Effect of headings.
snom has provided bolded headings in the provisions of this Limited War-
ranty for convenience only, and these headings shall have no legal effect.

36
snom m9 Quick Start Guide
E
N
G
L
I
S
H

37
snom m9 Quick Start Guide E
N
G
L
I
S
H
safetY inforMation & WarrantY
australia
Intended Use
This telephone is designed for telephoning within the Internet. Any
other use is considered unintended use. Unauthorised modifications or
reconstruction not described in this manual are not permitted.
SAFETY INFORMATION
General
• Only use the power supply included with the product. Using an
unauthorised power supply will invalidate the product guarantee and
may damage the telephone.
• For the snom m9 use only the Li-ion battery pack specified in the
owner’s manual (3.7V, 650mAh). Never use other batteries or
conventional alkaline batteries.
• Even when the key lock is switched on, it is still possible to make
emergency calls (see instructions for details).
• Do not open the handset (other than to change batteries) or base
station. This could expose you to high voltages or other risks.
• Radio signals transmitted between the handset and base may cause
interference with hearing aids.
• This product should not be used near emergency/intensive care medical
equipment and should not be used by people with pacemakers.
• Do not install the base in bathrooms or shower rooms. The handset and
base are not watertight.
• Do not use the telephone in environments subject to explosion hazard
(e.g. auto paint shops).
Cleaning
• Clean the handset and base station with a damp (not wet) cloth or an
anti-static wipe.
• Never use household polish, as this will damage the product.
• Never use a dry cloth as this may cause a static shock.

38
snom m9 Quick Start Guide
E
N
G
L
I
S
H
Environmental
• Do not expose the product to direct sunlight.
• The product may heat up when the batteries are being charged. This is
normal. However, we recommend that you do not place the product on
antique/veneered wood to avoid damage.
• Do not stand your product on carpets or other surfaces which generate
fibres, or place it in locations preventing the free flow of air over its
surface.
• Do not submerge any part of your product in water and do not use it in
damp or humid conditions, such as bathrooms.
• Do not expose your product to fire, explosive or other hazardous
conditions.
• There is a slight chance that your product could be damaged by a
thunder storm. We recommend that you unplug the power and
telephone line cord and switch off your computer during a thunder
storm.
liMited WarrantY
This limited warranty (hereinafter the Warranty) is valid for the products
snom m9 base station and cordless snom m9 handset and original
accessories thereof (hereinafter the Product). The Warranty is valid only in
the country in which the product was originally purchased.
• The Warranty covers only manufacturing defects, and only insofar
as the Product has been used and stored in accordance with the
instructions set out in the user guide.
• The Warranty is issued by the retailer from whom the Product was
originally purchased to the end purchaser of the Product (hereinafter
the Customer).
• In accordance with the Warranty, the Customer has a sole claim
to demand that the Product be repaired/replaced and may not in
accordance with the provisions of the Warranty assert further claims
against the manufacturer/retailer for indirect loss, including but not
limited to loss of data or loss of profit.
• The warranty period runs for 12 months from the day on which the
Customer originally purchased the Product from a retailer. Subsequent
changes of ownership do not extend the warranty period.

39
snom m9 Quick Start Guide E
N
G
L
I
S
H
• The Warranty is valid solely on the condition that the Product is taken
to a retailer within the warranty period. In the event of a fault or defect
in the Product, it must be taken to a retailer in the country in which
the Product was purchased. Products are repaired or exchanged at
the retailer’s own discretion. The warranty period is not extended for a
repaired or replaced Product. Exchanged parts are the property of the
retailer/manufacturer.
• The Warranty is valid solely on the condition that the original proof
of purchase issued to the original purchaser is presented with the
Product.
The Warranty is not valid
• if the Product has been opened or repair attempted by a person other
than a retailer,
• if the fault with the Product is due to general wear, incorrect use or
storage, including use or storage not conforming to the instructions
set out in the user guide or faults caused by poor maintenance of the
Product,
• if the fault is the result of the Product not being used for its intended
purpose,
• if the fault is due to external causes such as but not limited to rough
handling or misadventure,
• if the fault is caused by the use of accessories or other peripheral units
which are not original accessories intended for use with the Product,
• if the fault is due to a break in the network or power supply,
• if the fault is due to the fact that the battery has short circuited or has
been forced open or an attempt made to modify it, or the battery has
been used in equipment other than for which it is intended,
• if the software in the Product needs to be upgraded due to changes in
the network. In addition to his statutory rights and those set out above,
the Customer has no other basis for a claim.
Amendments or additions to the Warranty are only valid
with the written consent of the retailer.

40
snom m9 Quick Start Guide
E
N
G
L
I
S
H
WARNING
• Warning – This telephone will not operate during loss of mains power.
• Warning – Due to possibility of ignition hazard this telephone must
be switched off in areas of potentially explosive atmospheres, such as
chemical/fuel storage areas or blasting operations.
• Warning – Only use an A-tick approved headset with this device.

41
snom m9 Quick Start Guide E
N
G
L
I
S
H
safetY inforMation & WarrantY
neW Zealand
Intended Use
This telephone is designed for telephoning within the Internet. Any
other use is considered unintended use. Unauthorised modifications or
reconstruction not described in this manual are not permitted.
SAFETY INFORMATION
General
• Only use the power supply included with the product. Using an
unauthorised power supply will invalidate the product guarantee and
may damage the telephone.
• For the snom m9 use only the Li-ion battery pack specified in the
owner’s manual (3.7V, 650mAh). Never use other batteries or
conventional alkaline batteries.
• Even when the key lock is switched on, it is still possible to make
emergency calls (see instructions for details).
• Do not open the handset (other than to change batteries) or base
station. This could expose you to high voltages or other risks.
• Radio signals transmitted between the handset and base may cause
interference with hearing aids.
• This product should not be used near emergency/intensive care medical
equipment and should not be used by people with pacemakers.
• Do not install the base in bathrooms or shower rooms. The handset and
base are not watertight.
• Do not use the telephone in environments subject to explosion hazard
(e.g. auto paint shops).
Cleaning
• Clean the handset and base station with a damp (not wet) cloth or an
anti-static wipe.
• Never use household polish, as this will damage the product.
• Never use a dry cloth as this may cause a static shock.

42
snom m9 Quick Start Guide
E
N
G
L
I
S
H
Environmental
• Do not expose the product to direct sunlight.
• The product may heat up when the batteries are being charged. This is
normal. However, we recommend that you do not place the product on
antique/veneered wood to avoid damage.
• Do not stand your product on carpets or other surfaces which generate
fibres, or place it in locations preventing the free flow of air over its
surface.
• Do not submerge any part of your product in water and do not use it in
damp or humid conditions, such as bathrooms.
• Do not expose your product to fire, explosive or other hazardous
conditions.
• There is a slight chance that your product could be damaged by a
thunder storm. We recommend that you unplug the power and
telephone line cord and switch off your computer during a thunder
storm.
liMited WarrantY
This limited warranty (hereinafter the Warranty) is valid for the products
snom m9 base station and cordless snom m9 handset and original
accessories thereof (hereinafter the Product). The Warranty is valid only in
the country in which the product was originally purchased.
• The Warranty covers only manufacturing defects, and only insofar
as the Product has been used and stored in accordance with the
instructions set out in the user guide.
• The Warranty is issued by the retailer from whom the Product was
originally purchased to the end purchaser of the Product (hereinafter
the Customer).
• In accordance with the Warranty, the Customer has a sole claim
to demand that the Product be repaired/replaced and may not in
accordance with the provisions of the Warranty assert further claims
against the manufacturer/retailer for indirect loss, including but not
limited to loss of data or loss of profit.
• The warranty period runs for 24 months from the day on which the
Customer originally purchased the Product from a retailer. Subsequent
changes of ownership do not extend the warranty period.

43
snom m9 Quick Start Guide
D
E
U
T
S
C
H
• The Warranty is valid solely on the condition that the Product is taken
to a retailer within the warranty period. In the event of a fault or defect
in the Product, it must be taken to a retailer in the country in which
the Product was purchased. Products are repaired or exchanged at
the retailer’s own discretion. The warranty period is not extended for a
repaired or replaced Product. Exchanged parts are the property of the
retailer/manufacturer.
• The Warranty is valid solely on the condition that the original proof
of purchase issued to the original purchaser is presented with the
Product.
The Warranty is not valid
• if the Product has been opened or repair attempted by a person other
than a retailer,
• if the fault with the Product is due to general wear, incorrect use or
storage, including use or storage not conforming to the instructions
set out in the user guide or faults caused by poor maintenance of the
Product,
• if the fault is the result of the Product not being used for its intended
purpose,
• if the fault is due to external causes such as but not limited to rough
handling or misadventure,
• if the fault is caused by the use of accessories or other peripheral units
which are not original accessories intended for use with the Product,
• if the fault is due to a break in the network or power supply,
• if the fault is due to the fact that the battery has short circuited or has
been forced open or an attempt made to modify it, or the battery has
been used in equipment other than for which it is intended,
• if the software in the Product needs to be upgraded due to changes in
the network. In addition to his statutory rights and those set out above,
the Customer has no other basis for a claim.
Amendments or additions to the Warranty are only valid
with the written consent of the retailer.

44
snom m9 Quick Start Guide
D
E
U
T
S
C
H
45
snom m9 Quick Start Guide
D
E
U
T
S
C
H
Dies ist der Quick Start Guide zur Aufstellung, Einrichtung und
Inbetriebnahme der Basistation und des Mobilteils. Weitere
Informationen entnehmen Sie bitte der Bedienungsanleitung auf
http://wiki.snom.com.
lieferuMfang
Combo Kit Mobilteil Kit
1. Basisstation 1 x -
2. Netzteil Basisstation (5 V, Ste-
cker innerer Ø 2,1 mm, äußerer
Ø 5,5 mm)
1 x -
3. Netzwerkkabel 1 x -
4. Mobilteil 2 x 1 x
5. Wiederaufladbarer 3,7 V Lithium-
Ionen-Akku
2 x 1 x
6. Mobilteil-Ladeschale 2 x 1 x
7. Netzteil für Ladeschale (5,9 V,
Stecker innerer Ø 1,35 mm,
äußerer Ø 3,5 mm)
2 x 1 x
8. Gürtelclip 2 x 1 x
Sie benötigen außerdem:
die SIP-Kontoangaben (Anmelde-/Zugangsdaten), die Sie von Ihrem
VoIP-Service-Provider oder Ihrem Netzwerk-Administrator erhalten
haben:
1. Konto (erforderlich)
2. Registrar (erforderlich)
3. Kennwort, Authentifizierungs-Name, Outbound Proxy (falls
erforderlich), ggfls. Konto des Anrufbeantworters
4. Falls kein DHCP zur automatischen Initialisierung zur Verfügung
steht, benötigen Sie außerdem IP-Adresse, IP Gateway und DNS-
Server. Drücken Sie > (Menü Settings/Einstellungen) >
Network/Netzwerk > PIN eingeben > IP Gateway und DNS Server
jeweils mit "OK" auswählen.

46
snom m9 Quick Start Guide
D
E
U
T
S
C
H
Copyright, Markenrechte, GNU/GPL-Lizenz, Haftung
© 2010 snom technology Aktiengesellschaft
Alle Rechte vorbehalten. snom sowie die Namen der snom-Produkte und
die snom logos sind gesetzlich geschützte Marken der snom technology
AG. Alle anderen Produkt- und Firmennamen sind Marken der jeweiligen
Inhaber.
snom technology AG behält sich jederzeit das Recht auf Überarbeitung
und Änderung dieses Dokumentes vor, ohne verpflichtet zu sein, die
vorgenommenen Änderungen anzukündigen oder mitzuteilen.
Texte, Bilder, Grafiken und deren Anordnung in diesem Dokument
unterliegen weltweit dem Schutz des Urheberrechts und anderen
Schutzgesetzen. Ihre Verwendung, Reproduktion oder Weitergabe ohne
ausdrückliche schriftliche Zustimmung der snom technology AG können
sowohl straf- als auch zivilrechtlich verfolgt werden.
Insoweit dieses Dokument auf der Webseite der snom technology AG zum
Download bereitgestellt wird, erteilt die snom technology AG die Erlaubnis,
es für den vorgesehen Zweck der Benutzung als Bedienungsanleitung
herunterzuladen und auszudrucken. Kein Teil dieses Dokumentes darf ohne
snoms vorherige schriftliche Zustimmung verändert oder für kommerzielle
Zwecke verwendet werden.
Trotz der angewandten Sorgfalt bei der Zusammenstellung und
Präsentation der Informationen in diesem Dokument können sich Daten
zwischenzeitlich geändert haben. Daher übernimmt snom keine Gewähr für
die Richtigkeit, Vollständigkeit oder Aktualität der zur Verfügung gestellten
Informationen. Jegliche Haftung für Schäden ist ausgeschlossen, sofern
diese nicht auf Vorsatz oder grober Fahrlässigkeit auf seiten von snom
beruhen oder sofern keine Haftung aufgrund zwingender gesetzlicher
Bestimmungen eintritt.
Unsere Firmware enthält teilweise Quellcodes, die unter der GNU
Public License (GPL) (siehe Anhang auf Seite 124) von jedermann genutzt
und modifiziert werden dürfen, solange sie wiederum mit denselben
Lizenzbedingen zur allgemeinen Nutzung veröffentlicht werden. Die
Quellcodes der von snom genutzten und der GPL unterliegenden
Komponenten können Sie auf der Supportseite unserer Webseite auf
47
snom m9 Quick Start Guide
D
E
U
T
S
C
H
www.snom.com, den Wortlaut der GPL auf http://www.snom.com/de/
support/download/gpl-quellcode/ herunterladen.
norMKonforMitÄt
Dieses Gerät ist CE- und FCC-geprüft und entspricht den
geltenden europäischen und US-amerikanischen Richtlinien.
Die eigenmächtige Öffnung des Geräts sowie Änderungen
und Modifizierungen am Gerät führen zum Erlöschen
der Gewährleistungspflicht und können darüberhinaus
zum Erlöschen der Zulassung führen. Wenden Sie sich
bei Betriebsstörungen oder Defekten an authorisiertes
Servicepersonal, an Ihren Verkäufer oder an snom.
Die snom m9 Basis-Station FCC ID ist YDBM9BS1, und
die Handset FCC ID ist YDBM9HS1.
48
snom m9 Quick Start Guide
D
E
U
T
S
C
H
sicherheitshinWeise
Lesen Sie bitte vor Inbetriebnahme die Sicherheitshinweise und diese
Anleitung zu Aufstellung und Bedienung des Gerätes. Bewahren Sie diese
Anleitung auf und geben Sie das Gerät nicht ohne sie an Dritte weiter.
Beachten Sie bitte auch die Hinweise zur Entsorgung von Gerät und Akku.
Netzstecker, wiederaufladbarer Akku
• Verwenden Sie nur die mitgelieferten Ladeschalen und Netzteile
oder ausdrücklich von snom empfohlene Ersatzteile. Die Verwendung
anderer Netzteile können das Telefon beschädigen oder gar zerstören.
Elementech-Netzteile, Modell Nr.
Basisstation Ladegerät des Mobilteils
Europa ohne UK AU1050507e AU1050607e
UK AU1050505b AU1050605b
USA & Canada AU1050507u AU1050607u
Australia AU1050505s AU1050605s
• Verwenden Sie nur den mitgelieferten wiederaufladbaren Akku oder
ausdrücklich von snom empfohlene Ersatzakkus.
Aufstellung von Basisgerät und Ladeschale(n),
Platzierung von Zuleitungen
• Vermeiden Sie es, das Netz- und Stromkabel so zu legen, dass
Personen darüber stolpern könnten. Vermeiden Sie es, die Kabel so
zu legen, dass sie mechanischem Druck ausgesetzt und dadurch
beschädigt werden könnte. Falls die Kabel oder die Netzstecker
beschädigt sind, trennen Sie das Produkt von der Stromzufuhr und
wenden Sie sich an qualifiziertes Servicepersonal.
• Mobilteil, die Ladeschale, das Netzteil, das Gateway, das Stromkabel
und das Netzwerkkabel sind nur für den Gebrauch in Innenräumen bei
Temperaturen zwischen +5°C und +45°C bestimmt. NICHT FÜR DEN
AUSSENBETRIEB GEEIGNET!
• Stellen Sie das Produkt nicht in Räumen mit hoher Luftfeuchtigkeit wie
z.B. Badezimmern, Waschküchen, feuchten Kellerräumen auf. Tauchen
Sie das Produkt nicht in Wasser und gießen Sie keine Flüssigkeiten auf
oder in das Gerät.

49
snom m9 Quick Start Guide
D
E
U
T
S
C
H
• Stellen Sie das Gerät nicht in explosionsgefährdeten Umgebungen
(z.B. Lackiereien) auf. Benutzen Sie das Mobilteil nicht, wenn Sie Gas
oder andere möglicherweise explosionsgefährliche Dämpfe riechen.
• Der Betrieb von DECT-Telefonen kann unter Umständen die
Funktionalität von nicht ausreichend abgeschirmten medizinischen
Geräten stören. Beachten Sie bitte die technischen Konsequenzen,
wenn Sie das Gerät z.B. in einer Arztpraxis installieren möchten.
Implantierte medizinische Geräte
• Benutzen Sie das snom m9 nur, wenn die Herstelleranweisungen
des medizinischen Gerätes ausdrücklich die Benutzung von DECT-
Geräten erlaubt.
• Siehe auch die zusätzlichen Sicherheitsinweise „Implantierte
medizinische Geräte“ auf Seite 50.
Andere Gesundheitsrisiken
Halten Sie den Gehäuselautsprecher auf der Rückseite des Mobilteils nicht
an Ihr Ohr, wenn das Telefon läutet oder wenn das Gerät auf Freihand-
Lautsprechen geschaltet ist. Es drohen irreversible Gehörschäden!
Wenn Sie ein Hörgerät tragen
Bitte beachten Sie, dass das Mobilteil ein Brummen verursachen kann.
ZusÄtZliche sicherheitshinWeise
Kleinkinder
Das Gerät und sein Zubehör können Kleinteile enthalten. Halten Sie diese
außerhalb der Reichweite von kleinen Kindern.
Betriebsumgebung
Vergessen Sie nicht, die in bestimmten Bereichen gültigen besonderen
Vorschriften zu beachten und immer dann das Gerät auszuschalten, wenn
sein Einsatz verboten ist oder wenn es durch das Gerät zu Störungen
kommen oder Gefahr entstehen kann. Halten Sie das Gerät stets in seiner
vorgesehenen Bedienungsposition. Bringen Sie keine Kreditkarten oder
andere magnetische Datenträger in die Nähe des Geräts, da auf diesen
enthaltene Daten hierdurch gelöscht werden können.

50
snom m9 Quick Start Guide
D
E
U
T
S
C
H
Medizinische Geräte
Der Betrieb von Funkgeräten kann unter Umständen die Funktionalität von
nicht ausreichend abgeschirmten medizinischen Geräten stören. Wenden
Sie sich an einen Arzt oder den Hersteller des medizinischen Geräts, um
festzustellen, ob diese ausreichend gegen externe Hochfrequenzemissio-
nen abgeschirmt sind oder wenn Sie Fragen zu anderen Themen haben.
Schalten Sie Ihr Gerät in Gesundheitseinrichtungen aus, wenn Sie durch
in diesen Bereichen aufgestellte Vorschriften dazu aufgefordert werden.
Krankenhäuser oder Gesundheitseinrichtungen können unter Umständen
Geräte verwenden, die auf externe Hochfrequenzemissionen sensibel re-
agieren können.
Implantierte medizinische Geräte
Hersteller medizinsicher Geräte empfehlen einen Mindestabstand von
20 Zentimeter zwischen Funkgeräten und implantierten medizinischen
Geräten wie z. B. Herzschrittmachern oder implantierten Cardiovertern/
Defibrillatoren, um eine mögliche Störung des medizinischen Geräts zu
vermeiden. Personen, die Geräte dieser Art verwenden,
• müssen immer einen Abstand von 20 Zentimetern zwischen
medizinischem Gerät und Funkgerät einhalten, wenn das Funkgerät
eingeschaltet ist,
• dürfen das Funkgerät nicht in der Brusttasche aufbewahren,
• müssen das Gerät an das dem medizinischen Gerät entferntere Ohr
halten, um die Gefahr möglicher Störungen zu verringern,
• müssen ihr Funkgerät umgehend ausschalten, wenn sie Grund zu der
Vermutung haben, dass es zu einer Störung gekommen ist,
• müssen die Anweisungen des medizinischen Geräteherstellers lesen
und befolgen.
Wenn Sie Fragen hinsichtlich der Verwendung des Funkgeräts zusammen
mit einem implantierten medizinischen Gerät haben, wenden Sie sich an
Ihren Arzt.
SELV (Safety Extra Low Voltage)-Einhaltung
Die Eingangs-/Ausgangsverbindungen halten die SELV-Richtlinien für
Kleinspannungsgeräte ein.

51
snom m9 Quick Start Guide
D
E
U
T
S
C
H
Warnung: Um elektrische Schläge zu vermeiden, verbinden
Sie keine SELV-Geräte mit Geräten, die Telefon-/Netzwerk-
Spannung (TNV) führen. Nur an LAN-Ports anschließen!
Explosionsgefährdete Orte
Schalten Sie Ihr Gerät an Orten mit einer explosionsgefährdeten Atmo-
sphäre aus und handeln Sie entsprechend den Schildern und Anweisun-
gen. An solchen Orten kann ein Funke eine Explosion auslösen oder einen
Brand mit körperlichen Schäden oder Todesfolge auslösen. Schalten Sie
das Gerät an Tankstellen und in der Nähe von Benzinpumpen aus. Beach-
ten Sie die Einschränkungen in Bezug auf den Einsatz von Funkgeräten in
Kraftstoffdepots, -lagern und in Verkaufsbereichen, chemischen Anlagen
oder Sprenggebieten. Orte, an denen Explosionsgefahr besteht, sind zwar
häufig, aber nicht immer deutlich gekennzeichnet. Hierzu gehören bei-
spielsweise das Unterdeck auf Schiffen, Umgebungen von Leitungen und
Tanks, in denen sich Chemikalien befinden, Fahrzeuge, die mit Flüssiggas
betrieben werden, sowie Orte, an denen sich Chemikalien oder Partikel
wie Getreidestaub, Staub oder Metallpulver in der Luft befinden.
Empfindliche elektronische Geräte
Nach dem gegenwärtigen Stand der Forschung beeinträchtigen DECT-
Telefone elektronische Geräte nicht. Sie sollten trotzdem Vorsicht walten
lassen, wenn Sie DECT-Telefone in unmittelbarer Nähe socher Geräte
wie z.B. Laborausrüstungen betreiben wollen. Halten Sie immer, auch im
Standby-Betrieb, einen Mindestabstand von 10 cm ein.
Überspannungsschutz
Es wird empfohlen, ein Überspannungsschutzgerät zwischen Steckdose
und diesem Gerät zu schalten, um Schäden, die durch Blitzschlag oder
andere Arten von Überspannungen entstehen können, zu verhindern.
Batterie
Diese Produkt verwendet einen wiederaufladbaren Lithium-Ionen Akku
3,7V 650mAh. Es dürfen nur Akkus mit dem Firmenzeichen „snom“ und
den P/N: 60020438 oder 60020438 verwendet werden, die dem Set
beiliegen, sowie von der snom technology AG freigegebene Ersatztypen.
Benutzen Sie keine anderen Akku-Typen, da dies zum Auslaufen, Feuer,

52
snom m9 Quick Start Guide
D
E
U
T
S
C
H
Explosion oder zu anderen gefährlichen Situationen führen kann. Zum Er-
setzen oder zum Entfernen des Akkus muss die Batterieabdeckung ent-
fernt werden. Nehmen Sie den Akku niemals auseinander, nehmen Sie
keine Änderungen an ihm vor und schließen Sie ihn nicht kurz. Laden Sie
den Akku nur im snom m9 Mobilteil in der snom m9-Ladeschale mit dem
mitgelieferten Netzteil auf.
Laden und Entladen von Akkus, Aufbewahrung
Ein neuer Akku erreicht seine volle Leistung erst, nachdem er zwei- oder
dreimal vollständig ge- und entladen wurde. Der Akku kann mehrere
hundert Mal ge- und entladen werden, nutzt sich aber im Laufe der
Zeit ab. Verwenden Sie ausschließlich von der snom technology AG
freigegebene Akkus.
Bei Nichtgebrauch entlädt sich ein voll aufgeladener Akku mit der Zeit. Ist
der Akku vollständig entladen, dauert es möglicherweise einige Minuten,
bis die Ladeanzeige im Handgerät (Display) einge-blendet wird oder Sie
Anrufe tätigen können.
Benutzen Sie den Akku nur für den vorgesehenen Zweck. Benutzen Sie
keine beschädigten Ladegeräte oder Akkus. Schließen Sie den Akku nicht
kurz. Durch Kurzschließen der Pole können der Akku oder der verbindende
Gegenstand beschädigt werden. Beschädigte Akkus können explodieren!
Bewahren Sie den Akku niemals in unmittelbarer Nähe von Feuer oder
anderer Hitzequellen, in praller Sonne usw. auf.
Die Kapazität und Lebensdauer des Akkus wird verkürzt, wenn er an kal-
ten oder warmen Orten liegen gelassen wird. Laden Sie die Akkus nur
in einer Umgebungstemperatur von 0° C bis 40° C. Ein Gerät mit einem
kalten oder warmen Akku funktioniert unter Umständen vorübergehend
nicht, selbst wenn der Akku vollständig geladen ist. Einfaches und vor al-
lem mehrfaches
Vermeiden Sie eine Überladung des Akkus, da sie zu einer übermäßigen
Alterung führt. Laden Sie niemals den Akku mit verkehrter Polarität, da dies
zu Gasbildungen im Inneren des Akkus führen kann, welche wiederrum
Leckagen herbeiführen können. Für kurzfristige Lagerungen ist ein Ort mit
niedriger Luftfeuchtigkeit und ohne korrosive Gase bei einer Temperatur
von -20° C bis 45° C zu wählen.Für langfristige Lagerungen sind Tem-
peraturen zwischen 10° C und 30° C einzuhalten.
53
snom m9 Quick Start Guide
D
E
U
T
S
C
H
Informationen zur Batterieentsorgung
Dieser Akku unterliegt der europäischen Richtlinie 2006/66/EG und darf
nicht im Hausmüll entsorgt werden. Wenn Sie nicht wissen, wo Sie ihn
entsorgen können, wenden Sie sich bitte an Ihre Kommune, Ihren örtlichen
Müllentsorger oder Ihren Fachhändler.
Werfen oder legen Sie Akkus nicht ins Feuer, da Explosionsgefahr be-
steht!
reinigung
Benutzen Sie ein antistatisches Tuch. Benutzen Sie kein Wasser und keine
Reinigungsflüssigkeiten; sie könnten die Oberfläche oder die Elektronik
von Basistation, Ladegerät und Mobilteil beschädigen.
entsorgung
Entsorgung des Gerätes/der Gerätekomponenten
Dieses Gerät unterliegt der europäischen Richtlinie 2002/96/
EG und darf nicht im Hausmüll entsorgt werden.
Wenn Sie nicht wissen, wo Sie Ihr Altgerät entsorgen können,
wenden Sie sich bitte an Ihre Kommune, Ihren örtlichen
Müllentsorger oder Ihren Fachhändler.
Entsorgung von Batterien/Akkus
Der Akku unterliegt der europäischen Richtlinie 2006/66/EG
und darf nicht im Hausmüll entsorgt werden.
Wenn Sie nicht wissen, wo Sie den Akku entsorgen können,
wenden Sie sich bitte an Ihre Kommune, Ihren örtlichen
Müllentsorger oder Ihren Fachhändler.
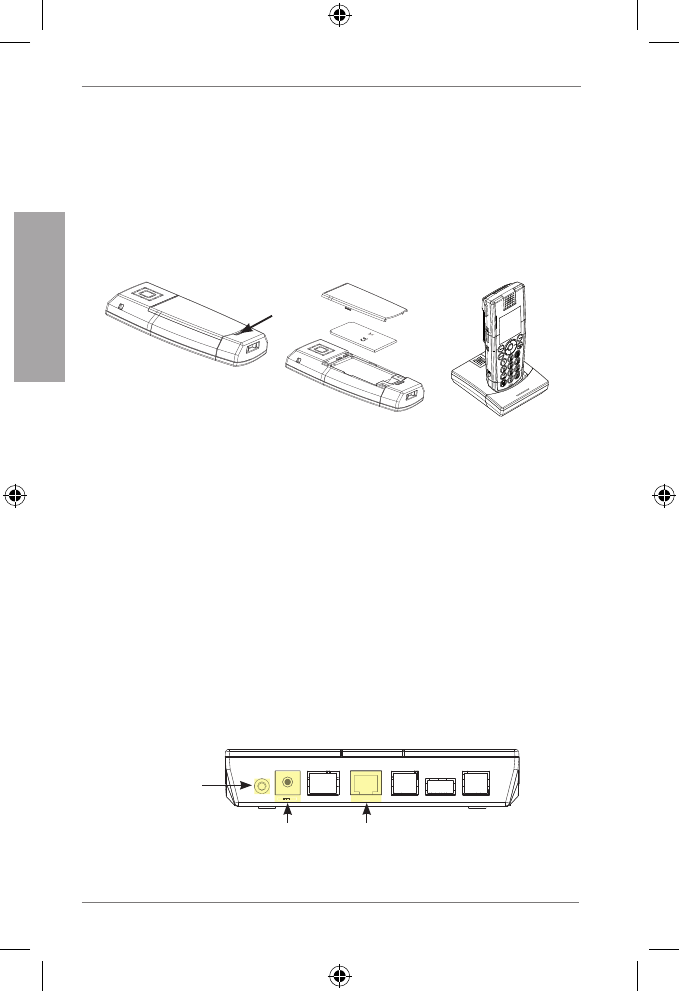
54
snom m9 Quick Start Guide
D
E
U
T
S
C
H
installation
Vor der ersten Inbetriebnahme sollte der Akku des
Mobilteils vollständig aufgeladen werden. Dauer dieser
ersten Aufladung: Ca. 8 Stunden.
VorBereitung des MoBilteils
3.1. 2.
snom
rechargeable
Lithium-Ion
battery
1. Nehmen Sie den Deckel des Batteriefachs ab.
2. Legen Sie den Akku ein. Setzen Sie den Deckel ein.
3. Verbinden Sie das 5,9 V-Netzteil der Ladeschale zuerst mit der
Steckdose, danach mit der Ladeschale. Stellen Sie das Mobilteil in
die Ladeschale.
Basisstation
1. Wenn das Mobilteil aufgeladen ist, verbinden Sie ein Ende des
Netzwerkkabels mit dem NET-Port an der Rückseite der Basisstation
und das andere Ende mit einem LAN-Port in Ihrem Netzwerk
(Switch, Router, usw.).
2. Verbinden Sie das 5V-Netzteil zuerst mit der Steckdose, danach
mit der Basisstation.
NET
RESET 5V DC
NET
5V DC
Strom-
anschluss
Neustart-
Knopf
Netzwerk-Port
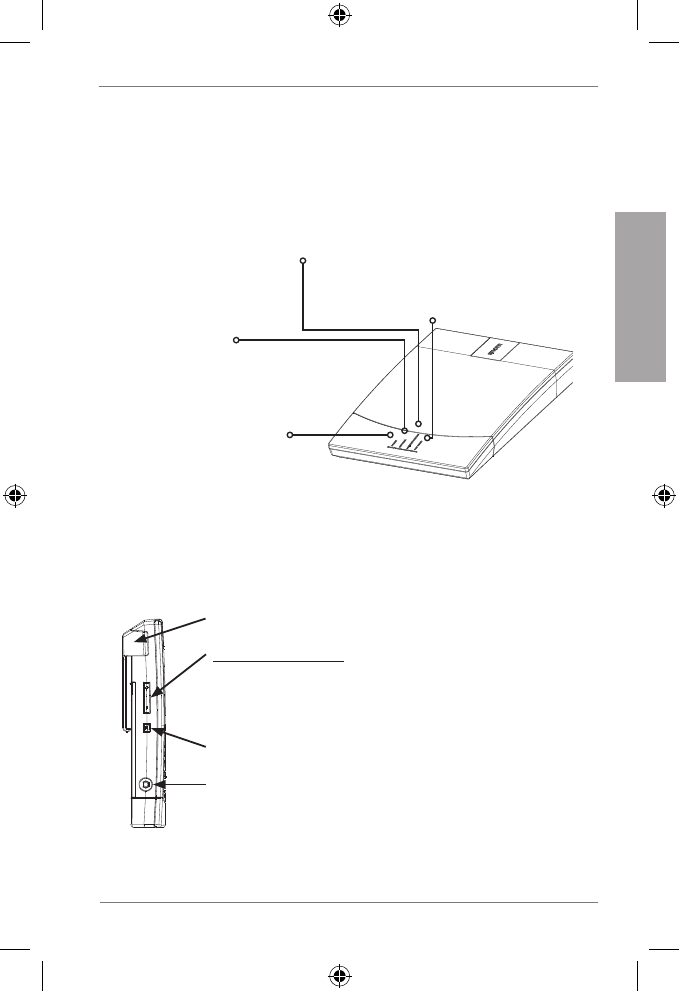
55
snom m9 Quick Start Guide
D
E
U
T
S
C
H
3. Die Betriebsanzeige-LED leuchtet auf und die Basisstation beginnt
zu booten (hochzufahren).
4. Sobald dieser Vorgang beendet ist, beginnt die Anruf-LED zu
blinken. Sie wartet jetzt auf die Registrierung des ersten Mobilteils.
Betriebsanzeige-LED
– Leuchtet, wenn die Basis-
station eingeschaltet ist
Anruf-LED
– Blinkt während Firmware-Update
– Leuchtet während Gesprächs
– Blinkt langsam während des
Wartens auf Mobilteil-Regist-
rierung
Registrierungs-LED
– Leuchtet, sobald die
Basisstation regist-
riert ist
Netzwerk-LED
– Blinken während des
Hochfahrens zeigt, dass die
Basisstation eine IP-Adres-
se erhalten hat
ÜBersicht MoBilteil
Seitenansicht
Gürtelclip
Lautstärketaste +-
Änderung der Lautstärke
• der Klingel, wenn ein Anruf läutet
• des Lautsprecher während eines Gesprächs
Headset-Buchse 2,5 mm
Taste Gehäuselautsprecher (an/aus)
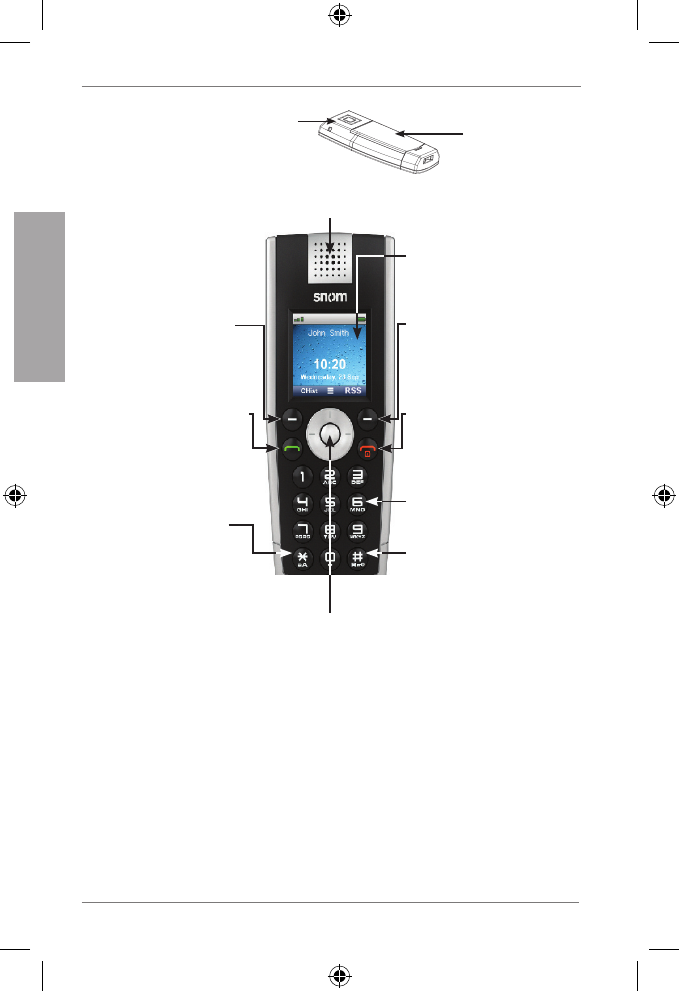
56
snom m9 Quick Start Guide
D
E
U
T
S
C
H
Rückseite Lautsprecher
Freisprech-
einrichtung
Deckel des
Batteriefachs
Vorderseite
Navigationtaste
Im Ruhemodus drücken Sie jeweils den oberen/unteren/
rechten/linken Rand (in dieser Anleitung dargestellt
durch ///) oder den Knopf in der Mitte (), um
folgende Menüs/Funktionen zu öffnen:
Eingangsmenü
Telefonbuch
Intercom
Einstellungen
Präferenzen
In anderen Kontexten drücken Sie auf oder , um in
Menüs und Listen zu navigieren.
Grüne Anruftaste
Anrufe annehmen;
Angezeigte Telefon-
nummer wählen
Aktionen bestätigen
Linke
Funktionstaste
Im Ruhemodus:
Anruflisten
Rechte
Funtionstaste
Im Ruhemodus:
RSS-Leser
Rote Anruftaste
Anruf beendenl
Aktion abbrechen;
Gerät ein/aus
Alfanumerische
Tastatur
Sterntaste
Eingabemodus
ändern
(Ziffern, Groß-/
Kleinbuchstaben
R-Taste
Tastatur sperren/
entsperren
Hörmuschel
Farbdisplay
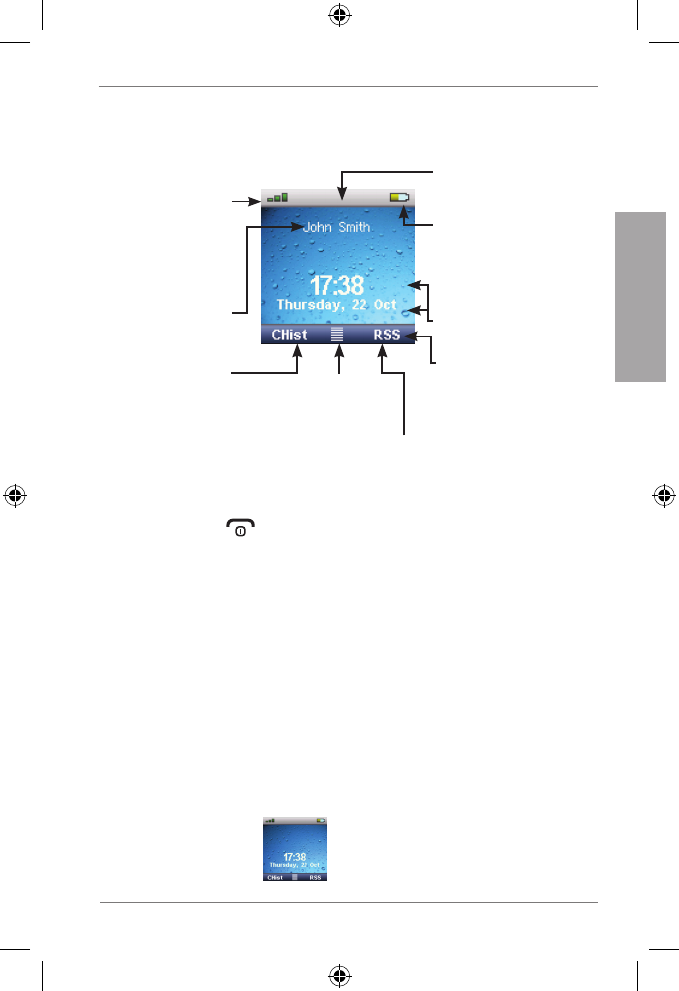
57
snom m9 Quick Start Guide
D
E
U
T
S
C
H
displaY-laYout, ruhedisplaY
Batterie-
Ladezustand:
Rot=kritisch
Gelb=unter 50%
Grün=über 50%
Menü
Präferenzen
RSS-Leser
Funktionstasten-
zeile mit kontext-
sensitiven Symbolen
Zeit und Datum
VoIP-Konto:
Anruflisten:
Verpasst
Angenommen
Gewählt
Signalstärke:
Hoch=grün
Niedrig=grau
Statuszeile
registrierung des MoBilteils
1. Drücken Sie (rote Anruftaste). Das Display zeigt den Text:
"Suche Basisstation". Sobald das Mobilteil die Basisstation
gefunden hat, erscheint der Text "PIN" auf dem Display.
2. Geben Sie die werkseitige Standard-PIN "0000" ein.
3. Drücken Sie "OK".
Hinweis: Falls die automatische Registrierung des Mobil-
teils fehlschlägt, können Sie es auch manuell registrieren.
Drücken Sie "->", um das Menü "Einstellungen" zu öffnen.
Wählen Sie mit der Navigationstaste "Mobilteil" , dann "Mo-
bilteil registrieren". Wählen Sie "Basis 1" aus. Geben Sie
die PIN ein und drücken Sie auf die Funktionstaste unter
"OK", um das Mobilteil an der Basisstation zu registrieren.
4. Sobald das Mobilteil registriert ist, sehen Sie den Ruhebildschirm
auf dem Display:
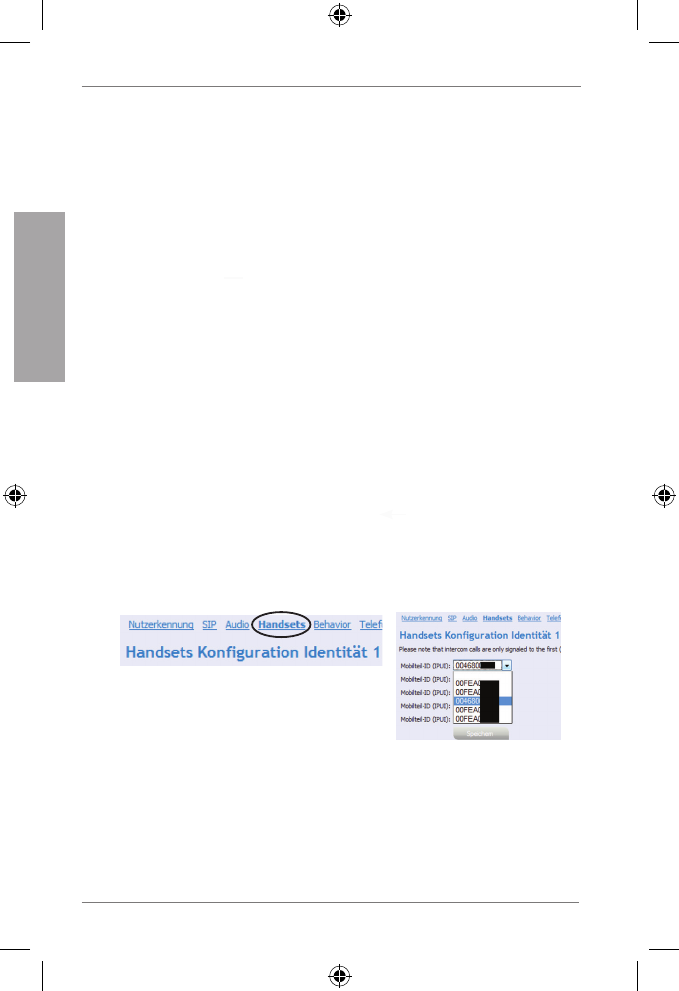
58
snom m9 Quick Start Guide
D
E
U
T
S
C
H
Konfigurierung eines Voip-Kontos
1. Drücken Sie und auf der Navigationstaste und "OK", um die
Seite --Network-- anzuzeigen. Dort finden Sie die IP-Adresse der
Basisstation. Schreiben Sie sie auf.
2. Drücken Sie auf die obere Kante der Navigationstaste, um
--Handset-- anzuzeigen und schreiben Sie die Handset ID auf, z.B.
00FEA101C0 (ohne das "h" am Ende, falls angezeigt).
3. Öffnen Sie auf Ihrem PC den Browser, geben Sie in der
Adresszeile http://<IP address> ein und drücken Sie die ENTER-
Taste, um das Web-Interface der Basisstation zu öffnen.
Username (Benutzername) (Voreinstellung): admin
Password (Kennwort) (Voreinstellung): password
4. Klicken Sie im linken Menü auf "Identity 1".
5. Geben Sie die SIP-Kontoangaben, die Sie von Ihrem
Systemadministrator oder Ihrem VoIP-Provider erhalten haben, ein:
Account = Konto
Password = Kennwort
Authentication Name = Authentifizierungsname
Mailbox = Konto des Anrufbeantworters
Display name = Frei wählbare/r Name/Nummer zur Anzeige auf
dem Display
6. Klicken Sie auf die Karteikarte "Handsets":
7. Wählen Sie aus dem Aufklappmenü von "Mobilteil-ID (IPUI)" die ID-
Nummer des Mobilteils aus. Klicken Sie auf "Speichern".
8. Ihr snom m9 ist jetzt betriebsbereit.
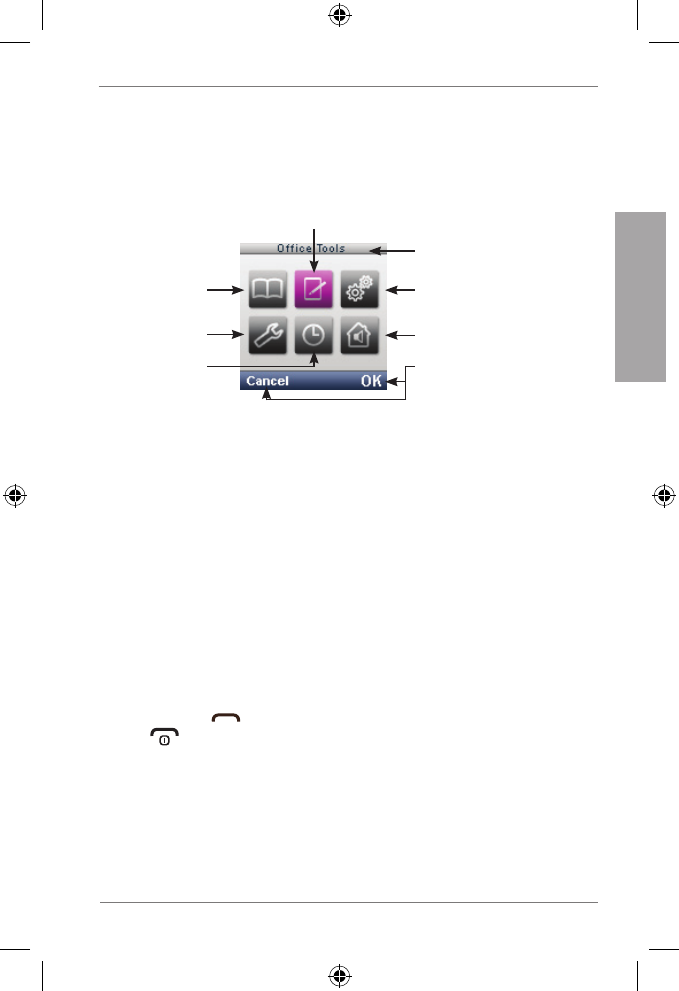
59
snom m9 Quick Start Guide
D
E
U
T
S
C
H
telefonMenÜs
1. Drücken Sie auf die Mitte der Navigationstaste, um das
Eingangsmenü zu öffnen.
Einstellungen
Name des markierten
Menüeintrags
Derzeitige Funktion
der darunterliegenden
Taste
Telefonbuch
Präferenzen
Wecker
Bürowerkzeuge
Intercom
2. Drücken Sie den oberen/unteren/rechten/linken Rand der
Navigationstaste (in dieser Anleitung durch dargestellt), um
auf dem Display zu navigieren.
3. Drücken Sie die Funktionstaste unter "OK", um Untermenüs zu
öffnen oder Funktion einzuleiten. Drücken Sie die Funktionstaste
unter "Abbr", um zum Ruhebildschirm zurückzukehren.
telefonBuch
Wählen Sie mit einen bestehenden Eintrag oder <Neuer Eintrag>
aus.
Neuer Eintrag: Geben Sie bei Aufforderung Name und Telefonnummer
ein und wählen Sie den Klingelton aus. Drücken Sie auf "OK".
Drücken Sie auf , um die Nummer des Eintrags zu wählen, drücken
Sie auf (rote Anruftaste), um das Telefonbuch zu schließen.
BÜroWerKZeuge
Stoppuhr, Taschenrechner, Notizen, Kalender, RSS-Leser, Anruf-
beantworter abhören
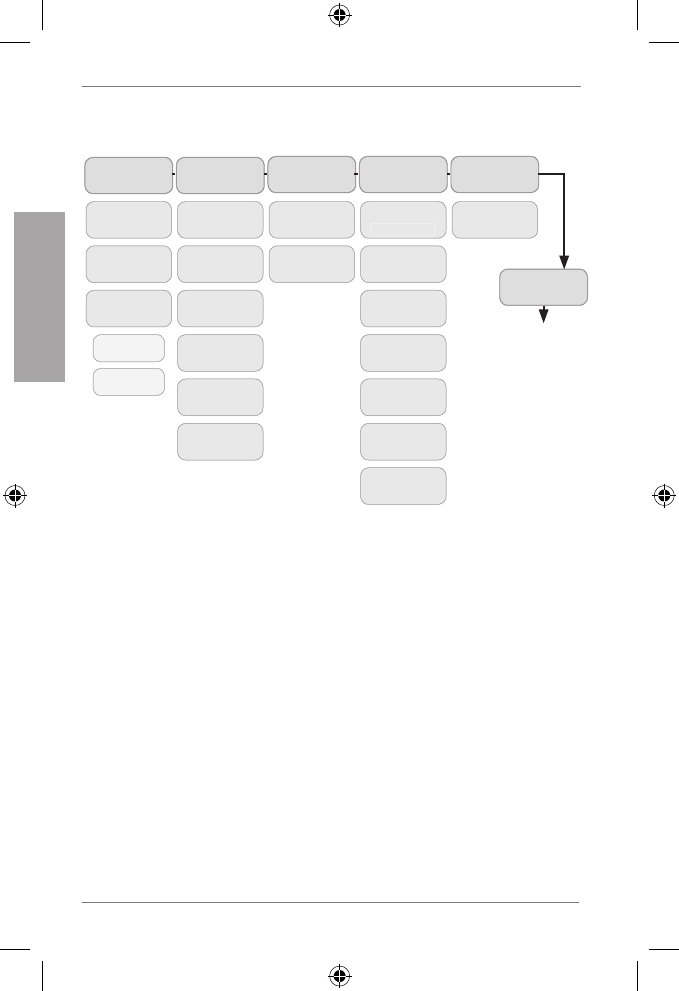
60
snom m9 Quick Start Guide
D
E
U
T
S
C
H
MenÜ einstellungen
VLAN
Datum/
Zeit Netz Mobilteil
Zeitzone
Zeitserver
Format
Format
Datum
Format
Zeit
DHCP
Mobilteil
registrieren
Basis
auswählen
Mobilteil de-
registrieren
Zurücks.
Mobilteil
FW-
Update
Version
Zurücks.
Basis
VoIP
Angez.
Name
Konto
Kennwort
Anruf-
beantworter
Registrar
Outbound
Proxy
PIN
ändern
Neue PIN:
System-
info
IP-Adresse,
MAC-Adresse,
Firmware-
Version,
Identifikationen
von Basis +
Mobilteil
intercoM
Alle anrufen: Alle an der Basisstation registrierten Mobilteile werden
gleichzeitig angerufen
Mobilteil-Nr.: Das ausgewählte Mobilteil wird angerufen
WecKer
Aktivieren | Zeit | Weckertöne
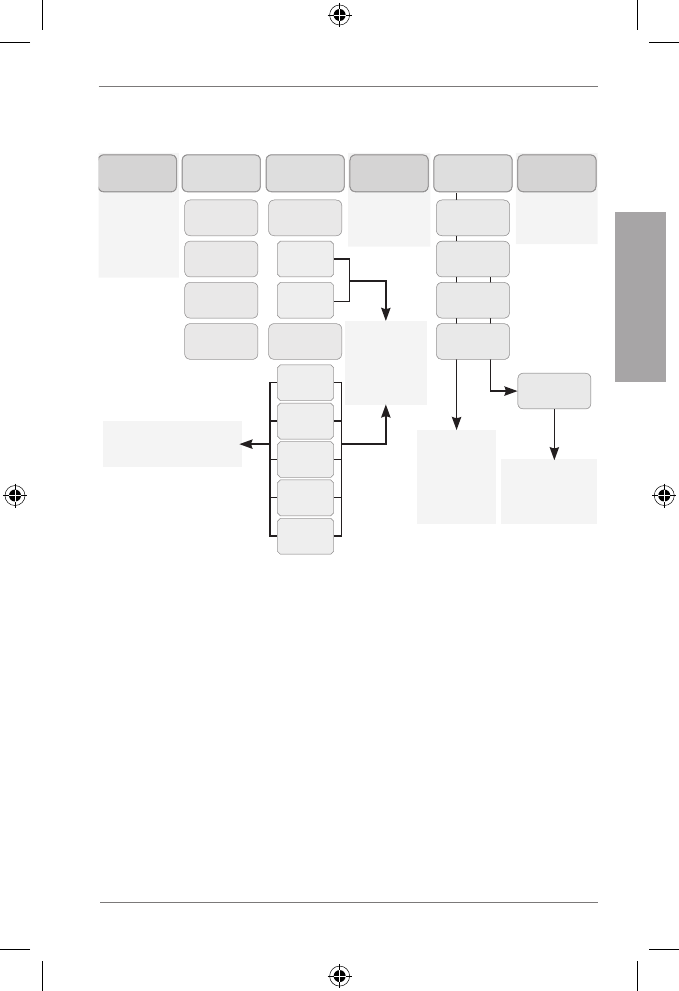
61
snom m9 Quick Start Guide
D
E
U
T
S
C
H
MenÜ prÄferenZen
“OK” > Mit
gewünschte
Sprache
markieren
> “OK”
Sprache
Mit mar-
kieren und
“OK” drücken
Autom.
Annahme
Display
Screen-
saver
Wallpaper
Kontrast
Beleuch-
tung
Eingehende
Anrufe
klingeln nicht
Nicht
stören
Bedingung
auswählen,
wann umge-
leitet werden
soll > “OK”
drücken
Umleitungsziel
(Telefonnummer)
eingeben >
“OK” drücken
Audio-
Einstell.
Klingel-
einstellung
Interne*
Anrufe
Externe
Anrufe
Tasten-
klick
Akku-Ton
Batterie
fast leer
Neue
Nachricht
Bestäti-
gungston
Hinweis-
töne
Klingelton +
Lautstärke
mit aus-
wählen und
“OK” drücken
Mit “Aktivieren” aus-
wählen > “OK” drücken
* Interne Anrufe: Von anderen,
an derselben Basisstation
registrierten Mobilteilen
Immer
Anrufum-
leitung
Nie
Bei
Besetzt
Nach
Zeit/Sek.
Umlei-
tungsziel
62
snom m9 Quick Start Guide
D
E
U
T
S
C
H
telefonieren Mit ihreM M9
Anrufe tätigen und annehmen
Anrufen: Nummer eingeben > "OK" oder drücken
Anruf annehmen: drücken
Anruf beenden: drücken
Erneut wählen
drücken > Nummer auswählen > oder "OK" drücken
Anrufumleitung
Menü Präferenzen öffnen > Anrufumleitung > PIN eingeben > mit
"OK" bestätigen > Identität auswählen > Umleitungsanlass auswählen
(immer, bei Besetzt, nach Zeit/Sek.) > SIP-Adresse auswählen >
Telefonnummer des Umleitungsziels eingeben > "OK" drücken > wenn
Frage nach Neustart auf Display erscheint: Mit "Ja" bestätigen
Anrufumleitung ausschalten: Präferenzen > Anrufumleitung >
PIN eingeben > mit "OK" bestätigen > Identität auswählen >
Umleitungsanlass "Nie" auswählen
Halten und Wiederaufnehmen
Anruf auf Halten setzen: "Optionen" drücken > Halten
Wiederaufnehmen: "Optionen" drücken > Aufnehmen
Anruf weiterleiten (durchstellen)
Drücken Sie während des Gesprächs auf "Optionen" > Transfer >
Nummer eingeben > "OK" drücken
Anrufbeantworter abhören
Menü Bürowerkzeuge > VoiceMail

63
snom m9 Quick Start Guide
D
E
U
T
S
C
H
Verschiedenes
MAC-Adresse (= Seriennummer) der Basisstation finden
Drücken Sie und auf der Navigationstaste und "OK" (Menü
Einstellungen > Systeminfo > Netz)
IP-Adresse der Basisstation finden
Drücken Sie und auf der Navigationstaste und "OK" (Menü
Einstellungen > Systeminfo > Netz)
Web-Interface der Basisstation öffnen
IP-Adresse in die Adresszeile im Browser Ihres PCs eingeben und
ENTER drücken
Neustart der Basisstation
Menü "Einstellungen" > Mobilteil > Neustart Basis > "OK"
ODER
Taste "Reset" an der Rückseite der Basisstation drücken
Neustart Mobilteil
Menü "Einstellungen" > Mobilteil > Neustart Mobilteil. > "OK"
64
snom m9 Quick Start Guide
F
R
A
N
Ç
A
I
S
65
snom m9 Quick Start Guide
F
R
A
N
Ç
A
I
S
Ceci est le Quick Start Guide (manuel abrégé) pour l'installation,
l'initialisation et la mise en service de votre station de base et
vos combinés. Consultez le manuel sur notre site web pour des
informations complémentaires: http://wiki.snom.com.
contenu de l'eMBallage
Combo Kit Kit Combiné
1. Station de base 1 x -
2. Alimentation station de base (5 V,
connecteur Ø intérieur 2,1 mm,
Ø extérieur 5,5 mm)
1 x -
3. Câble de réseau 1 x -
4. Combiné 2 x 1 x
5. Batterie rechargeable, 3,7 V
Lithium-Ion
2 x 1 x
6. Chargeur pour le combiné 2 x 1 x
7. Alimentation pour le chargeur (5,9
V, connecteur Ø intérieur 1,35
mm, Ø extérieur 3,5 mm)
2 x 1 x
8. BeltClip (fixation ceinture) 2 x 1 x
Vous devez également disposer des
données du compte SIP (abonnement, accès, login) que vous avez reçu
de votre administrateur réseau ou de votre fournisseur de VoIP:
1. Nom d'utilisateur (normalement le numero de téléphone) (si requis)
2. L'adresse IP du Registrar (requis)
3. Mot de passe, authentification du nom d'utilisateur, Outbound Proxy
(si requis), compte de la messagerie vocale (si applicable)
4. S'il n'est pas possible d'utiliser DHCP pour l'initialisation
automatique, vous avez également besoin des données de
l'adresse IP, de la Passerelle IP et du Serveur DNS. Pour les saisir,
appuyez sur > Paramètres > Réseau > saisir PIN >
sélectionner Passerelle IP et Serveur DNS l'un après l'autre avec
"OK" > saisir les données.
66
snom m9 Quick Start Guide
F
R
A
N
Ç
A
I
S
Copyright, Marques Déposées, GPL, Non Responsabilitée
© 2010 snom technology Aktiengesellschaft
Tous droits réservés. snom, les noms des produits snom et les logos
snom sont des marques déposées par snom technology AG. Tous les
autres noms de produits et noms d'entreprises sont les propriétés de leurs
détenteurs respectifs.
snom technology AG se réserve le droit de modifier et de changer ce
document à n'importe quel moment, sans devoir annoncer de telles
modifications ou changements avant ou après leur mise en place.
Les textes, images et illustrations ainsi que leur mise en page dans ce
document sont protégés par les copyrights et autres dispositions légales
internationales. Leur utilisation, leur reproduction et leur transmission à
des parties tierces sans accord express écrit peut induire des poursuites
devant les cours criminelles et civiles.
Lorsque ce document est mis à disposition sur la page web de snom,
snom technology AG autorise le téléchargement et l'impression de copies
de son contenu pour qu'il puisse être utilisé comme manuel. Aucune partie
de ce document ne peut être altérée, modifiée ou utilisée dans un but
commercial sans l'autorisation écrite de snom technology AG.
Bien que le plus grand soin ait été apporté à la compilation et à la
présentation des informations contenues dans ce document, les données
sur lesquelles elles sont basées peuvent entre-temps avoir été modifiées.
snom doit donc décliner toute garantie et toute responsabilité quand à
l'exactitude et à l'exhaustivité des informations publiées excepté en cas
de négligence flagrante de la part de snom ainsi que des les cas ou la
responsabilité de snom est engagée de par la loi.
Notre firmware inclus des éléments de code source qui peuvent être
utilisés et modifié par quiconque selon les termes des licences GPL
(cf. page 124), à condition qu'à leurs tours ils les rendent disponibles selon
les mêmes termes. Veuillez vous rendre sur http://www.snom.com/de/
support/download/gpl-quellcode/ pour consulter la licence GPL originelle
et le code source des composants couverts par la licence GPL qui sont
utilisé dans les produits snom.
67
snom m9 Quick Start Guide
F
R
A
N
Ç
A
I
S
conforMitÉ au standards
Ce téléphone est certifié CE et FCC et répond aux standards
environnementaux, de sécurité et de santé européens et
américains.
L'ouverture, la modification ou le remplacement sans autorisation
du téléphone annule la garantie et peut également annuler les
certifications CE et FCC. En cas de mauvais fonctionnement,
veuillez contacter le personnel d'entretien agrée, votre revendeur
ou bien snom.
L'ID de base snom m9 FCC est YDBM9BS1, et l'ID de la FCC
est combiné YDBM9HS1.
instructions sÉcuritÉ
Veuillez lire l'ensemble de ces instructions et des instructions sur la façon
de régler et d'utiliser la station d'accueil et le téléphone avant d'utiliser
les appareils. Conservez ce Guide de Démarrage Rapide et ne cédez
pas l'appareil à une tierce partie sans ce guide. Consultez également les
informations générales sur la sécurité et les informations sur la sécurité
et la garantie spécifiques aux USA, à l'Australie et à la Nouvelle-Zélande.
Alimentations/adaptateurs, batterie rechargeable
• N'utilisez que les convertisseurs de puissance (adaptateurs secteur)
fournis avec la station d'accueil et le téléphone ou les alimentations
spécifiquement recommandées par snom. Les autres alimentations
électriques risquent d'endommager ou même de détruire les appareils.
Elementech-Netzteile, Modell No.
Station de base Chargeur du combiné
Europa sans UK AU1050507e AU1050607e
UK AU1050505b AU1050605b
USA & Canada AU1050507u AU1050607u
Australia AU1050505s AU1050605s
• Utilisez uniquement l'accumulateur fourni avec le combiné ou bien les
accumulateurs expressément recommandés par snom.
68
snom m9 Quick Start Guide
F
R
A
N
Ç
A
I
S
Mise en place de la station de base, du chargeur, des
câbles et cordons
• Evitez de disposer les câbles et cordons des appareils là où il est
possible de trébucher dessus. Evitez également de disposer ces
câbles et cordons dans des lieux exposés à des pressions mécaniques
pour ne pas risquer de les endommager. Si le cordon d'alimentation ou
la fiche est endommagé, déconnectez l'appareil et contactez un service
d'entretien qualifié.
• La station de base, les chargeurs, combinés, adaptateurs et la
connectique sont destinés à une utilisation en intérieur à des
températures comprises entre +5°C et +45°C. NE PAS INSTALLER
EN EXTERIEURS!
• N'installez pas les équipements dans des pièces très humides (par
exemple dans des salles de bain, des buanderies, ou des sous-sols
humides). N'immergez pas l'appareil dans l'eau et ne reversez pas de
liquides dessus, ni sur aucun de ses éléments.
• N'installez pas l'appareil dans un environnement potentiellement
exposé à des explosions et n'utilisez pas le combiné dans un tel
environnement (par exemple dans un atelier de peinture). N'utilisez pas
le téléphone si vous percevez une odeur de gaz ou d'autres émanations
potentiellement explosives.
• Les équipements médicaux peuvent être perturbés par les téléphones
DECT. Veuillez tenir compte des conséquences techniques lorsque
vous installez l'appareil dans le cabinet d'un docteur ou un endroit
similaire.
Si vous portez un stimulateur cardiaque
• Ne pas utiliser si vous portez un stimulateur cardiaque à moins
que les recommandations du fabriquant du stimulateur permettent
expressément l'utilisation d'équipements émettant des signaux radio à
pulsations. Suivez toujours les recommandations du constructeur.
• Cf. les instructions supplementaires " Equipements médicaux
implantés" à la page 69.
Autres risques pour la santé
Ne tenez pas le haut-parleur situé au dos du combiné contre votre oreille
lorsque le téléphone est en train de sonner ou lorsque le mode haut-
parleur est activé. Il y a un risque de dommages irréversibles pour
votre audition!
69
snom m9 Quick Start Guide
F
R
A
N
Ç
A
I
S
Si vous portez une aide auditive
Veuillez noter que le combiné peut occasionner un bruit de fond gênant
inforMations sÉcuritÉ supplÉMentaires
Jeunes enfants
Votre appareil et ses extensions peuvent contenir de petits éléments. Con-
servez-les hors de portée des enfants.
Environnement d'utilisation
N'oubliez pas de suivre toutes les réglementations locales particulières et
éteignez toujours votre appareil lorsque son utilisation est interdite ou su-
sceptible de provoquer des interférences ou un danger. N'utilisez l'appareil
que dans sa configuration de fonctionnement normale. Ne placez pas de
cartes de crédit magnétiques ou d'autres supports de stockages à proxi-
mité de l'appareil. Les informations se trouvant dessus risqueraient d'être
effacées.
Equipements médicaux
L'utilisation de tout équipement générant des signaux radio peut interfé-
rer avec le fonctionnement d'équipements médicaux insuffisamment pro-
tégés. Consultez un docteur ou le constructeur de l'équipement médical
afin de déterminer si un équipement est suffisamment protégé des ondes
radio externes ou si vous avez d'autres questions à ce sujet. Eteignez votre
appareil dans les centres de soins lorsque les signes affichés vous de-
mandent de le faire. Les hôpitaux et les centres de soin sont susceptibles
d'utiliser des équipements sensibles aux ondes radio externes.
Equipements médicaux implantés
Les fabricants d'équipements médicaux recommandent de maintenir
une distance minimale de 20 centimètres entre un appareil sans fil et
un équipement médical implanté comme un stimulateur cardiaque ou un
défibrillateur – cardioverter pour éviter d'éventuelles interférences avec
l'équipement médical. Les personnes portant de tels appareils doiven:
• toujours maintenir l'appareil sans fil à plus de 20 centimètres de
l'appareil médical lorsque l'appareil sans fil est allumé,
70
snom m9 Quick Start Guide
F
R
A
N
Ç
A
I
S
• ne pas transporter l'appareil sans fil dans une poche située sur la
poitrine,
• portez l'appareil sans fil à l'oreille opposée à l'appareil médical afin de
minimiser les interférences potentielles,
• éteignez immédiatement l'appareil sans fil s'il y a une quelconque raison
de suspecter la présence d'interférences,
• lisez et suivez les instructions du constructeur de l'équipement médical.
Pour toute question concernant l'utilisation de votre appareil sans fil avec
un équipement médical implanté, consultez votre médecin.
Conforme à SELV (Safety Extra Low Voltage) - TBTS (Très Basse
Tension de Sécurité)
Le niveau de sécurité des connexions d'entré/sortie est conforme aux re-
commandations SELV /TBTS.
Avertissement : Pour éviter les électrocutions, ne connectez pas
les circuits de SELV / TBTS aux circuits sous tension du réseau
téléphonique (TNV). Les ports du réseau local (LAN) contiennent
des circuits TBTS et les ports RTCP contiennent des circuits
TNV. Certains ports LAN et RTCP utilisent des connecteurs
RJ-45 (8P8C). Soyez prudent lorsque vous reliez les câbles. Ne
connectez le câble NET/Ethernet qu'à un port LAN!
Environnements potentiellement explosifs
Eteignez votre appareil lorsque vous vous trouvez dans une zone à
l'atmosphère potentiellement explosive et suivez toutes les indications et
instructions. Les étincelles dans ces zones peuvent provoquer des explosi-
ons et des incendies et occasionner des blessures corporelles ou même la
mort. Eteignez l'appareil dans les lieux contenant du carburant, comme les
stations essences et les garages. Respectez les restrictions d'utilisation
des équipements radio dans les dépôts de carburant, les réservoirs et les
zones de distribution; les usines chimiques ou les endroits ou des explo-
sions se produisent. Les zones dont l'atmosphère est potentiellement très
explosive sont souvent, mais pas systématiquement, clairement indiquées.
Elles comprennent les zones sous le pont des navires, les installations de
transfert ou de stockage de produits chimiques, les véhicules utilisant du
71
snom m9 Quick Start Guide
F
R
A
N
Ç
A
I
S
gaz de pétrole liquéfié (GPL) et les zones ou l'air contient des produits chi-
miques ou des particules comme des poudres de grains, de la poussière
ou des particules métalliques.
Équipements Électroniques Sensibles
L'état actuel des recherches permet de conclure que les téléphones DECT
n'affectent normalement pas de façon nuisible les équipements électro-
niques. Vous devez toutefois prendre certaines précautions si vous désirez
utiliser des téléphones DECT à proximité immédiate de tels équipements,
comme par exemple d'équipements de laboratoires sensibles. Conservez
toujours une distance minimale de 10 cm de l'appareil, même lorsque le
téléphone est en veille.
Surtensions Électriques
Nous vous recommandons d'installer un parasurtenseur sur la prise
secteur à laquelle l'appareil est connecté afin d'éviter que la foudre ou des
sautes de tensions n'endommagent l'appareil.
BattÉrie
Cet appareil utilise une batterie rechargeable Lithium-Ion de 3,7V;
650mAh. N'utilisez que des batteries de la marque "snom" et de numéro
P/N 60020438 ou 60020438 fournie avec le combiné ou de batteries
de rechange approuvées par snom technology AG. N'utilisez aucun au-
tre type de batterie car il y a un risque de fuite, d'incendie, d'explosion
et d'autres situations dangereuses. Pour remplacer ou retirer la batterie,
il vous faut d'abord ôter le couvercle de la batterie du combiné. Ne dé-
montez, n'altérez et ne court-circuitez jamais les batteries et ne les utilisez
jamais dans un but pour lequel elles n'ont pas été prévues. Ne rechargez
la batterie qu'avec le combiné snom m9 placé sur le chargeur snom m9
livré avec l'appareil.
Chargement et déchargement, stockage de la batterie
Une batterie neuve n'offre ses meilleures performances qu'après deux ou
trois cycles de chargement et de déchargement complets. La batterie peut
être chargée et déchargée des centaines de fois mais finira par s'épuiser.
N'utilisez que des batteries approuvées par snom technology AG.
72
snom m9 Quick Start Guide
F
R
A
N
Ç
A
I
S
Une batterie complètement rechargée finira par perdre de sa charge avec
le temps si elle est laissée inutilisée. Si la batterie est complètement dé-
chargée, il se peut qu'il faille quelques minutes avant que l'indicateur de
charge n'apparaisse ne s'affiche.
N'utilisez la batterie que dans le but pour lequel elle a été conçue. Ne court-
circuitez pas la batterie. Le fait de court-circuiter les bornes de la batterie
peut endommager cette dernière ou l'appareil auquel elle est connectée.
N'utilisez PAS de batteries ou de chargeurs endommagés. L'utilisation
d'une batterie endommagée peut provoquer l'explosion de cette dernière!
Ne placez pas et ne stockez pas la batterie, que ce soit à l'intérieur ou à
l'extérieur du combiné, à proximité immédiate d'une flamme nue ou d'autres
sources de chaleur.
Laisser la batterie dans un endroit chaud ou froid réduira sa capacité et
sa durée de vie. Rechargez la batterie avec une température ambiante
comprise entre 0°C et 40°C. Un appareil dont la batterie est chaude ou
froide peut cesser temporairement de fonctionner, même si la batterie est
complètement rechargée.
Evitez les surcharges. Des surcharges répétées peuvent occasionner une
détérioration des performances de la batterie. Ne tentez jamais de rechar-
gez la batterie en inversant sa polarité car ceci pourrait provoquer une
augmentation de la pression du contenu de la batterie et occasionner des
fuites. Pour un stockage de courte durée, rangez la batterie dans un end-
roit sec et peu humide, à l'abri des gaz corrosifs et à une température com-
prise entre -20°C et 45°C. Pour un stockage de longue durée, conservez
la batterie à une température comprise entre +10°C et +30°C.
Mise au rébut des batteries
Ne jetez pas la batterie au feu ni dans un incinérateur. RISQUE
D'EXPLOSION!
nettoYage
Utilisez un tissu antistatique. N'utilisez pas de l'eau ou un produit de
nettoyage liquide ou solide. Ils peuvent endommager l'éléctronique ou les
sufaces de station de base, chargeurs et combinés.
73
snom m9 Quick Start Guide
F
R
A
N
Ç
A
I
S
Mise au rÉBut
Mise au Rébut du Produit
Ce téléphone est soumis à la Directive 2002/96/CE et ne peut
être mis au rebut avec les déchets ménagers normaux.
Si vous ne savez pas ou mettre au rebut oú faire recycler
l'appareil lorsqu'il arrive au terme de son existence, contactez
votre municipalité, la société locale en charge de la gestion des
déchets ou votre vendeur.
Mise au Rébut des Batteries
Les batteries sont soumises à la Directive 2006/66/CE et ne
peut être mis au rebut avec les déchets ménagers normaux..
Si vous ne savez pas ou mettre au rebut oú faire recycler
les batterie lorsqu'elles arrivent au terme de leur existence,
contactez votre municipalité, la société locale en charge de la
gestion des déchets ou votre vendeur
Pour les pays hors de l'Union Européenne :
La mise au rebut des équipements électriques et électronique dans les
pays hors de l'Union Européenne doit se faire en respect avec les régle-
mentations locales. Veuillez contacter les autorités locales pour d'avantage
d'informations.
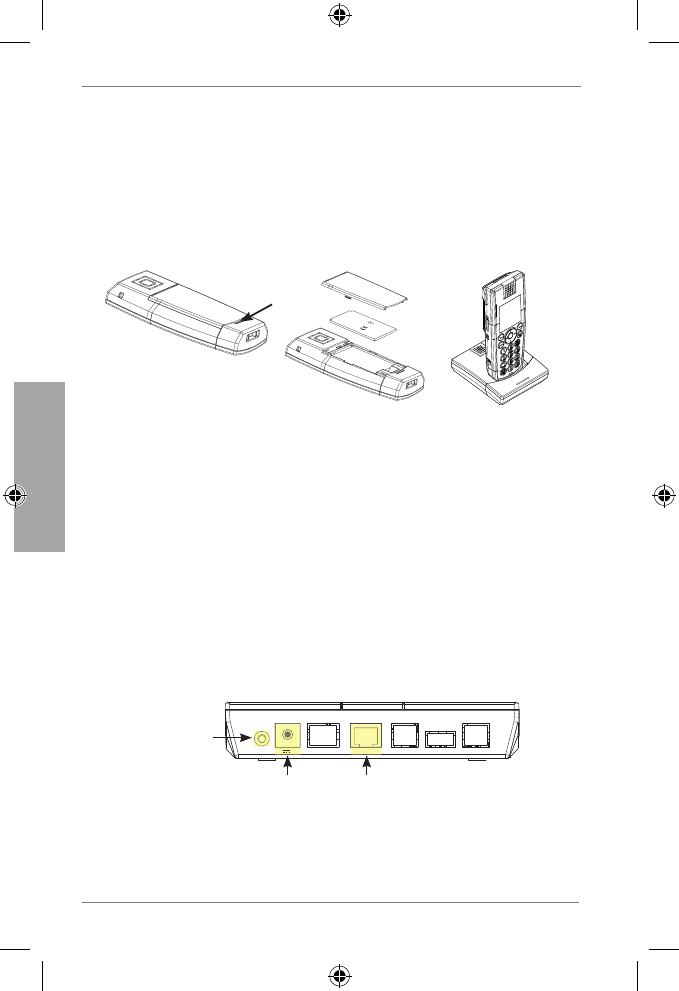
74
snom m9 Quick Start Guide
F
R
A
N
Ç
A
I
S
installation
Nous vous recommandons de charger complètement la
batterie avant la première utilisation. Cela prend environ
8 heures.
prÉparation du coMBinÉ
3.1. 2.
snom
rechargeable
Lithium-Ion
battery
1. Ouvrez le couvercle du compartiment à piles.
2. Inserez la battérie en vous assurant que les contacts soient bien en
place. Remettez le couvercle.
3. D'abord, connectez le connecteur (5,9 V) du chargeur à la prise de
courant, ensuite au chargeur. Placez le combiné sur le chargeur.
station de Base
1. Après que le combiné à été chargé complètement, connectez le
câble réseau (Ethernet) au port NET de la base, puis à un port LAN
sur votre réseau (switch, router, etc.).
2. D'abord, connectez le connecteur (5 V) de la base à la prise de
courant, ensuite à la base.
NET
RESET 5V DC
NET
5V DC
Connecteur
d‘alimentation
Bouton
redémarrage
Port
réseau
3. La LED d'alimentation s'allume et la station de base commence à
démarrer.
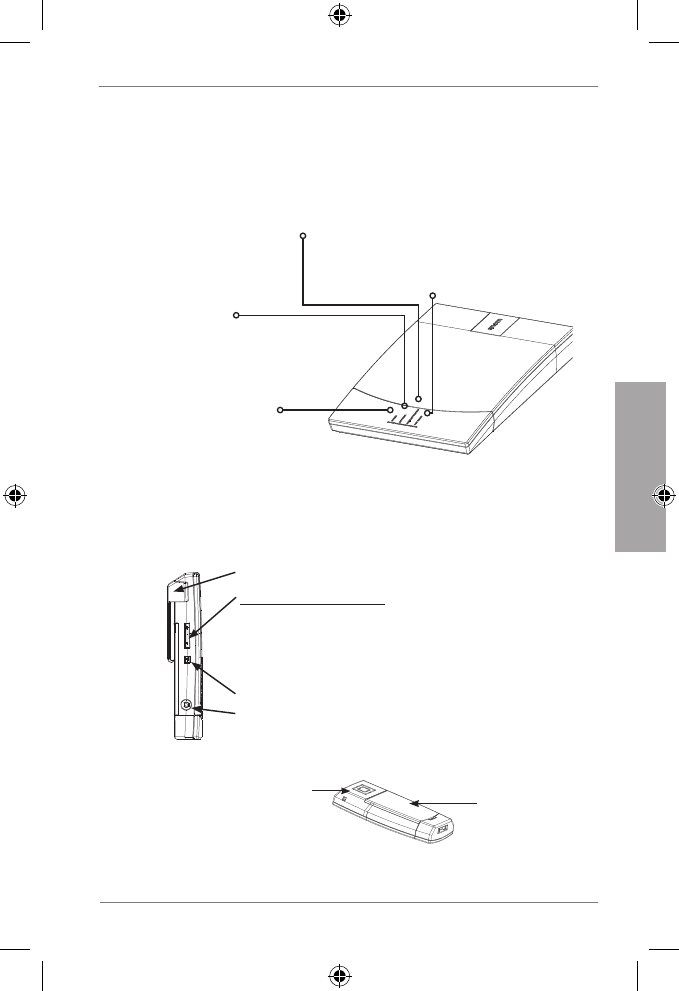
75
snom m9 Quick Start Guide
F
R
A
N
Ç
A
I
S
4. Sitôt que cette opération a été conclu, la LED appels commence
à clignoter. Ce clignotement indique que la station de base attend
l'enrégistration du premier combiné.
LED d‘alimentation
– allumée lorsque le base est
connecté a l‘alimentation
LED appels
– clignote pendant mise à jour du
logiciel
– allumée pendant appel en cours
–
clignote lentement pendant que la base
attend la régistration d‘un combiné
LED d‘enregistrement
allumée pour indiquer que
la base est enrégistrée (au
moins une fois)
LED Réseau
– clignote pendant le démar-
rage pour indiquer que la
base ait reçu une adresse
IP
le coMBinÉ
Vue de coté
BeltClip (fixation de ceinture)
Touche réglage volume+-
Régler le volume
• de la sonnerie lorsqu‘un appel sonne
• de l‘écouteur ou l‘haut-parleur lorsqu‘un
appel est en cours
Connecteur micro-casque (2,5 mm)
Touche mains-libres (haut-parleur actif/inactif)
Vue d'en bas Haut-parleur
mains-libres Couvercle de
la batterie
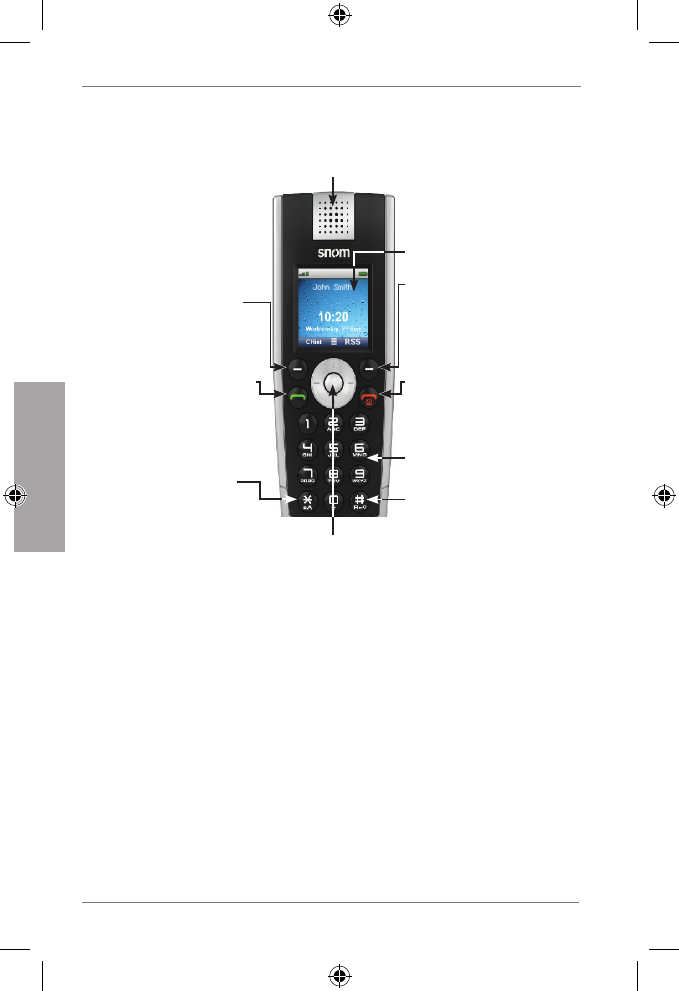
76
snom m9 Quick Start Guide
F
R
A
N
Ç
A
I
S
Vue de face
Touche de navigation
En mode inactif, appuyez sur le bord haut/bas/droit/gauche
(représenté dans ces pages par ///) ou le bouton au
centre () pour ouvrir les menus ou fonctions suivant(e)s:
Menu principal
Annuaire
Intercom
Menu Paramètres
Menu Préférences
Dans d‘autres contextes appuyez sur ou pour naviger au
menus et listes.
Touche téléphone
vert
Décrocher;
Initier des appels;
Confirmer des actions
Touche de
fonction gauche
Ecran inactif:
Listes des appels
Touche de fonction
droite
Ecran inactif:
Lecteur RSS
Touche rouge
Raccrocher;
Annuler des actions;
Allumer/éteindre le
combiné
Écouteur
Écran couleur
Clavier
alphanumérique
Touche R
Verouiller/déverouiller
clavier alphanum.
Touche étoile
Change input mode
(numbers, small/
capital letters
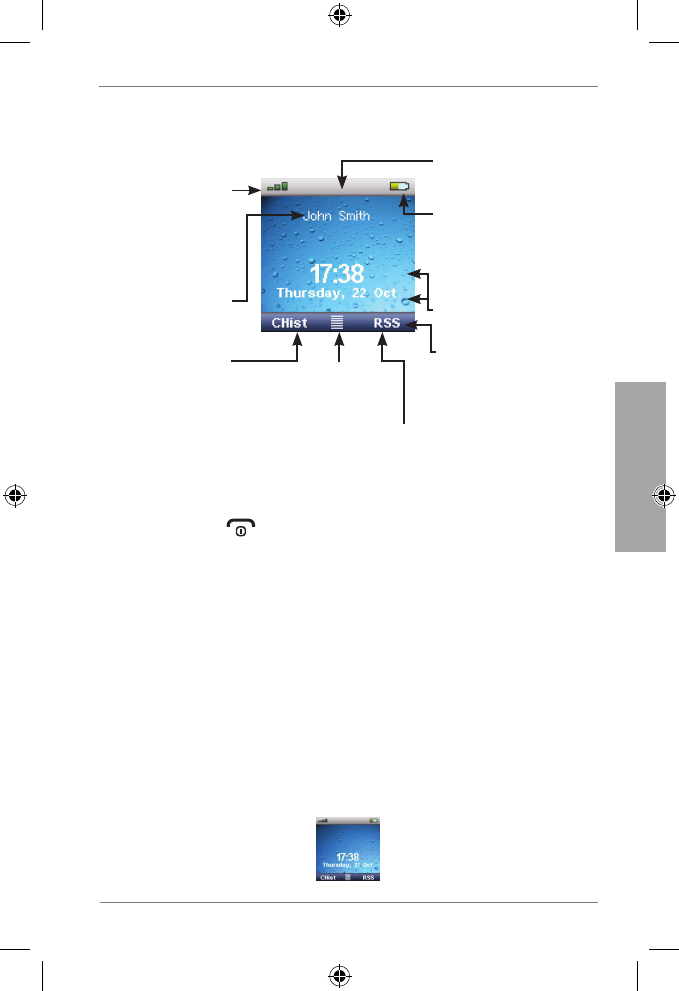
77
snom m9 Quick Start Guide
F
R
A
N
Ç
A
I
S
la Mise en page de l’Écran inactif
Etat de charge de la
batterie
Rouge=critique
Jaune=moins de 50%
Vert=plus de 50%
Menu
Préférences
Lecteur RSS
Ligne des touches
contextuelles
avec des symboles
dependant du contexte
Heure et date
Compte VoIP:
Listes des
appels:
Manqués
Reçus
Composés
Force du signal:
Haut=vert
Bas=gris
Ligne d‘état
l'enregistreMent du coMBinÉ
1. Appuyez sur (touche téléphone rouge). Le texte "Recherche
base en cours" est affiche à l'écran. Sitôt que le combine a trouvé
la base, le texte "PIN" est affiché à l'écran.
2. Saisissez le PIN d'usine par défaut "0000".
3. Appuyez sur "OK".
Attention: Si l'enrégistrement automatique du combiné
échoue, vous pouvez également l'enrégistrer manuelle-
ment. Appuyez sur "->" pour ouvrir le menu "Paramètres".
Utilisez la touche de navigation pour sélectionner "Com-
biné" et ensuite "Enrégistrer combiné". Sélectionnez "Base
1" et appuyez sur la touche de fonction au-dessous "OK"
pour enrégistrer le combiné chez la station de base.
4. Sitôt que le combine a été enrégistré, l'écran inactif s'affiche sur
l'écran:
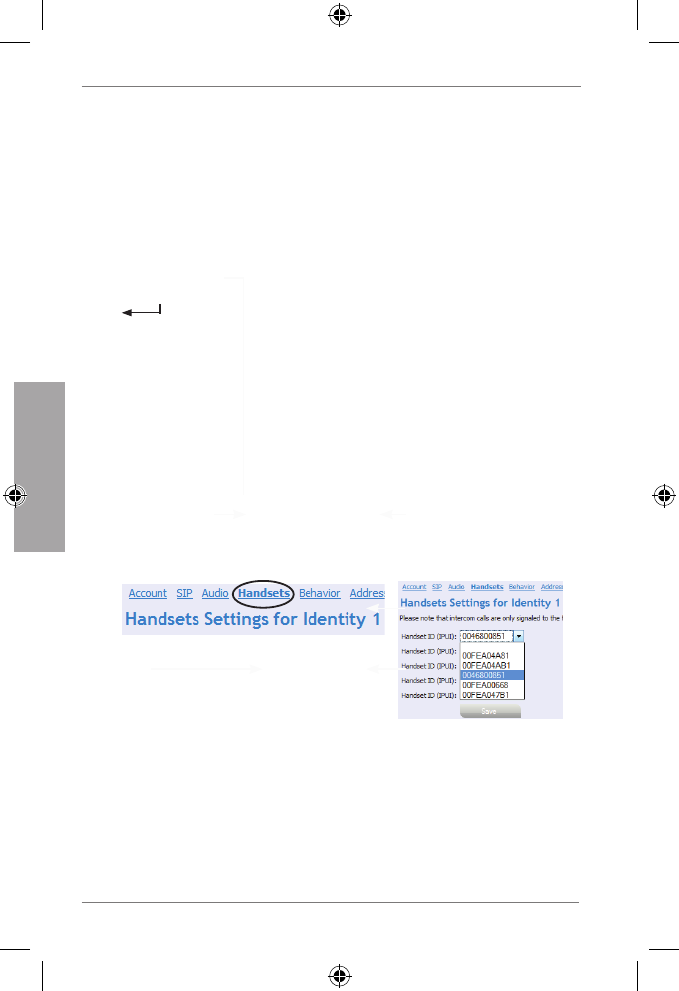
78
snom m9 Quick Start Guide
F
R
A
N
Ç
A
I
S
configurer un coMpte Voip
1. Appuyez sur et sur la touche de navigation et "OK". La page
--Handset-- avec l'dresse IP de la station de base est affiché à
l'écran. Notez-la.
2. Appuyez sur le bord haut de la touche de navigation (cf. page
75). --Handset-- est affiché à l'écran. Notez le "Handset ID", par
exemple: 00FEA101C0 (sans "h" à la fin, si visible).
3. Ouvrez le navigateur (browser) de votre ordinateur. Saisissez
http://<IP address> dans la barre d'adresse. Appuyez sur la touche
pour ouvrir l'interface web de la station de base.
Nom d'utilisateur (paramètre de défault): admin
Mot de passe (paramètre de défault): password
4. Cliquez sur "Identity 1" au menu à gauche.
5. Saisissez les données du compte SIP que vous avez reçu de votre
administrateur réseau ou de votre fournisseur de VoIP.
Account = compte
Password = mot de passe
Authentication Name = authentification du nom d'utilisateur
Mailbox = compte de la messagerie vocale
Display Name = nom/numéro d'affichage, peut être choisi
librement
6. Cliquez sur l'onglet "Handsets".
7. Sélectionnez le numéro du combiné (Handset ID) dans la liste
déroulante de "Handset ID (IPUI)". Cliquez sur "Save".
8. Maintenant votre snom m9 est prêt à l'emploi.
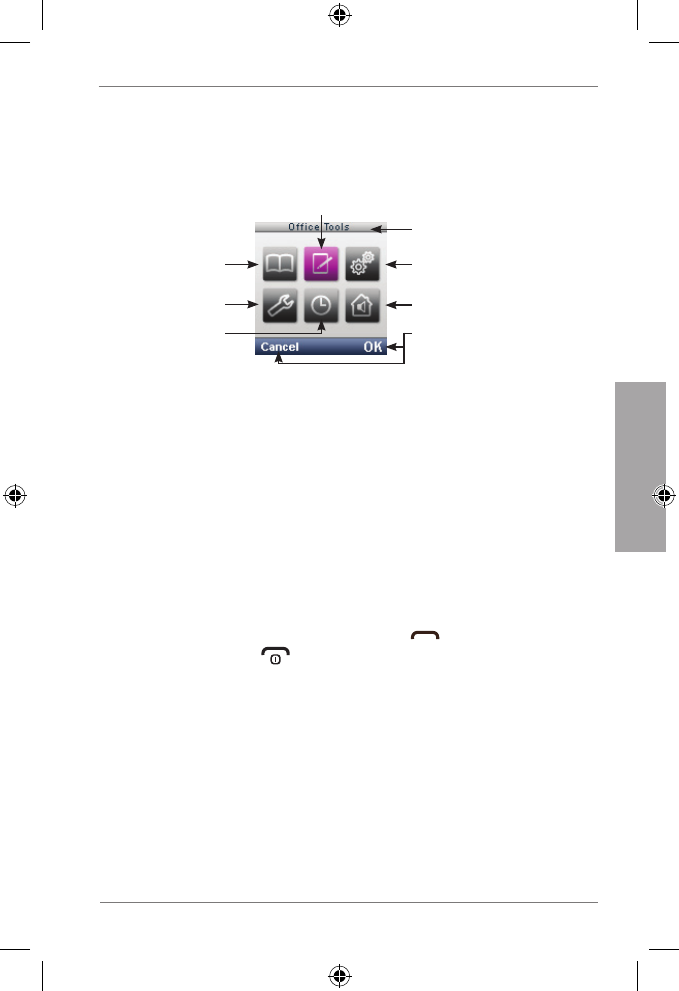
79
snom m9 Quick Start Guide
F
R
A
N
Ç
A
I
S
les Menus du tÉlÉphone
1. Appuyez sur le bouton au centre de la touche de navigation pour
ouvrir le menu principal.
Paramètres
Titre du menu / de la
fonction sélectionnée
Fonction actuelle de la
touche de fonction au-
dessous
Annuaire
Préférences
Réveil
Outils de Bureau
Intercom
2. Appuyez sur le bord haut/bas/droit/gauche de la touche de
navigation (représenté dans ce Quick Start Guide par ) pour
naviger sur l'écran.
3. Appuyez sur la touche de fonction au-dessous de "OK" pour ouvrir
des sous-menus ou pour initier une fonction. Appuyez sur la touche
de fonction au-dessous d'"Annul" pour revenir à l'écran inactif.
annuaire
Sélectionnez une entrée existante ou <Nouvelle Entrée> avec .
Nouvelle Entrée: Saisissez le nom et le numéro à l'invite de commandes
et sélectionnez une mélodie. Appuyez sur "OK".
Entrée/numéro affiché à l'écran: Appuyez sur pour appeler le
numéro ou appuyez sur pour quitter l'annuaire.
outils de Bureau
Chronomètre, Calculatrice, Bloc-notes, Calendrier, Lecteur RSS,
Messagerie vocale (écouter votre messages)
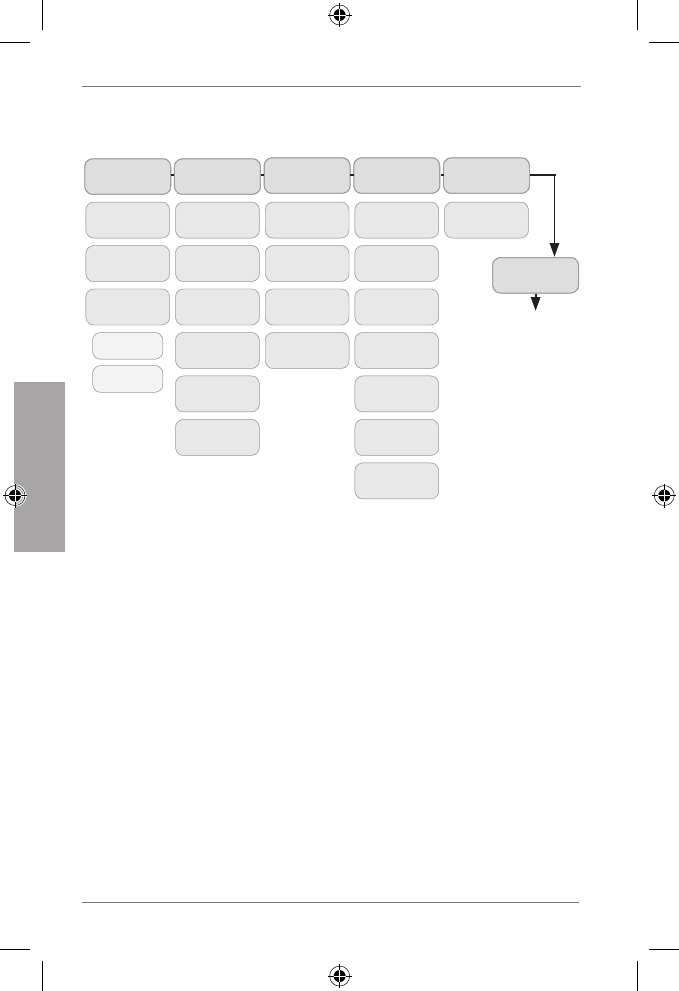
80
snom m9 Quick Start Guide
F
R
A
N
Ç
A
I
S
Menu paraMÈtres
Date/
Heure Réseau Combiné
Fuseau
horaire
Serveur
heure
Format
Format
date
Format
heure
VLAN
DHCP
Passerelle
IP
Serveur
DNS
Enregistrer
combiné
Sélection-
ner base
Désinscire
combiné
Redémarrage
combiné
Mise à jour
du logiciel
Version
Redémarrage
base
VoIP
Nom
d‘affichage
Compte
Mot de
passe
Messagerie
vocal
Registrar
Outbound
Proxy
Changer
Code PIN
Nouveau
PIN:
Info
Système
Adresse IP,
adresse MAC,
version
fi rmware,
l‘identifi cation
de la base et
du combiné
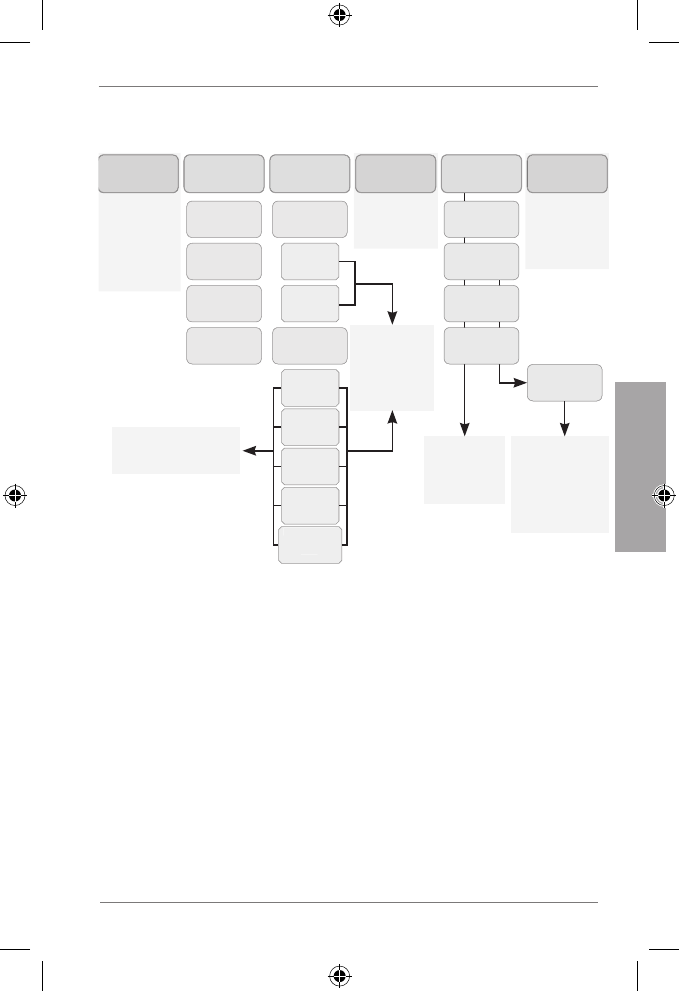
81
snom m9 Quick Start Guide
F
R
A
N
Ç
A
I
S
Menu prÉfÉrences
“OK” >
Sélectionner
une langue
avec
> appuyez sur
“OK”
Langue
Sélectionner
avec
> “OK”
Décrocher
automat.
Écran
Écran de
veille
Fond
d‘écran
Contraste
Rétro-
éclairage
Ne pas
déranger. Les
appels entrant
ne sonnent pas
NPD
Sélectionner
la condition et
appuyez
sur “OK”
Sélectionner
le numéro de
destination
pour les appels
renvoyés >
“OK”
Paramè-
tres Audio
Param.
Sonnerie
Appels
internes*
Appels
externes
Clic
clavier
Tonalité
de charge
Batterie
presque
vide
Nouveau
message
Tonalité de
confirma-
tion
Tonalité d‘
avertissem.
Sélectionner
mélodie + vo-
lume avec
et appuyez sur
“OK”
Sélectionner “Activer”
avec > “OK”
* Appels internes: Par autres
combinés enregistrés avec
la même station de base
Toujours
Renvoi
d‘appel
Jamais
Occupé
Après
délai/sec.
Numéro
destinat.
rÉVeil
Activer | Heure | Sonnerie réveil
intercoM
Appel général: Appeler tous les combinés enregistrés sur la même
station de base
Combiné No.: Appeler le combiné sélectionné.
82
snom m9 Quick Start Guide
F
R
A
N
Ç
A
I
S
utiliZer Votre M9
Passer et accepter des appels
Appeler: Saisir le numéro > appuyer sur "OK" ou
Décrocher: Appuyer sur
Raccrocher: Appuyer sur
Recomposer un numéro
Appuyer sur > Sélectionner le numéro > appuyer sur "OK" ou
Renvoi d'appel
Ouvrir le menu Préférences > Renvoi d'appel > saisir le PIN >
appuyer sur "OK" > sélectionner une identité > sélectionner la
condition (toujours, occupé, après délai (en secondes)) > sélectionner
l'adresse SIP > saisir le numéro de téléphone destinataire > appuyer
sur "OK" > Vous verrez la question " Redémarrer maintenant?" á l'écran.
Confirmer avec "Oui" (yes)
Désactiver le renvoi d'appel: Renvoi d'appel > saisir le PIN > appuyer
sur "OK" > sélectionner l'identité > sélectionner la condition "Jamais"
Appel en attente
Placer appel en attente: Appuyer sur "Options" > Attente
Reprendre l'appel en attente: Appuyer sur "Options" > Unhold
Passer l'appel en ligne
Appuyer sur "Options" > Transfer > saisir le numéro > appuyer
sur"OK"
83
snom m9 Quick Start Guide
F
R
A
N
Ç
A
I
S
diVers
Trouver l'adresse MAC (= numéro de série) de la station
de base
Appuyez sur et sur la touche de navigation et "OK" (menu
Paramètres > Info système > Réseau)
Trouver l'adresse IP de la station de base
Appuyez sur et sur la touche de navigation et "OK" (menu
Paramètres > Info système > Réseau)
Ouvrir l'interface Web de la station de base
Saisissez http://<IP address> dans la barre d'adresse et appuyez sur la
touche .
Redémarrage de la station de base
Menu "Paramètres" > Combiné > Redémarrage base > "OK"
OU
appuyez sur la touche "Reset" en bas de la station de base.
Redémarrage du combiné
Menu "Paramètres" > Combiné > Redémarrage combiné. > "OK"
84
snom m9 Quick Start Guide
F
R
A
N
Ç
A
I
S
85
snom m9 Quick Start Guide
I
T
A
L
I
A
N
O
Questa è la guida rapida per l'installazione, l'impostazione e
il funzionamento dello snom m9. Per ulteriori informazioni
consultare la nostra pagina web http://wiki.snom.com.
contenuto della confeZione
Combo Kit Handset Kit
(Kit Telefono)
1. Stazione di base 1 x -
2. Trasformatore per la base (5 V, spina
DC Ø interno 2,1 mm, Ø esterno
5,5 mm)
1 x -
3. Cavo di rete 1 x -
4. Telefono 2 x 1 x
5. Batteria ricaricabile 3,7 V Lithio-Ion 2 x 1 x
6. Caricabatteria per il telefono 2 x 1 x
7. Trasformatore per il caricabatteria
(5,9 V, spina DC inner Ø interno
1,35 mm, outer Ø esterno 3,5 mm)
2 x 1 x
8. Clip cintura 2 x 1 x
Sono necessari
i dati ricevuti da amministratore di rete o provider VoIP :
1. Utente (di solito corrisponde al numero di telefono) (obbligatorio)
2. Indirizzo IP (obbligatorio)
3. Password, autenticazione dell'utente, Outbound Proxy (potrebbe
essere obbligatorio), account/utente segreteria telefonica (se
disponibile)
4. Se DHCP non è disponibile, per l’inizializzazione automatica sono
necessari il indirizzo IP, il gateway IP e il server DNS. Premere
> (menu Impostazioni) > Rete > digita PIN > seleziona – in
successione - IP Gateway e DNS Server con "OK".

86
snom m9 Quick Start Guide
I
T
A
L
I
A
N
O
Copyright, marchi registrati, GPL, declinazione di
responsabilita
© 2010 snom technology Aktiengesellschaft
Tutti i diritti riservati. snom, i nomi dei prodotti snom, ed i loghi snom sono
marchi registrati di proprietà di snom technology AG. Tutti gli altri nomi di
prodotti e di imprese sono proprietà dei rispettivi proprietari
snom technology AG si riserva il diritto di modificare ed aggiornare questo
documento in qualsiasi momento, senza l’obbligo di avviso di tali modifiche
ed aggiornamenti nè prima nè dopo.
Testi, immagini ed illustrazioni ed il loro ordine in questo documento
sono soggetti a protezione del diritto d’autore ed altri diritti legali a
livello mondiale. Il loro utilizzo, riproduzione e trasmissione a terzi senza
il permesso scritto potrebbe dar luogo ad azioni legali, in sede penale e
civile.
Quando questo documento viene reso disponibile sulla pagina web di
snom, snom technology AG autorizza al download e alla stampa di copie
del contenuto allo scopo di utilizzarlo come manuale. Nessuna parte di
questo documento può essere alterata, modificata od utilizzata a scopo
commerciale senza l’esplicito consenso scritto di snom technology AG.
Sebbene sia stata prestata la massima attenzione nella stesura e
presentazione delle informazioni in questo documento, i dati sui quali
si basa potrebbe variare nel frattempo. snom pertanto declina ogni
responsabilità riguardo a tutte le garanzie ed affidabilità sull’accuratezza,
completezza e attualità delle informazioni pubblicate, tranne nel caso di
grossolana negligenza da parte di snom o laddove per legge è ritenuta
responsabile.
La nostra firmware include del codice sorgente che può essere utilizzato e
modificato da chiunque, e sotto la licenza pubblica GNU (GPL) (vd. pagina
124), possonorenderlo disponibile ad altri con lo stesso accordo di licenza.
Visitate http://www.snom.com/de/support/download/gpl-quellcode/ per
la licenza GPL originale e per i codici di sorgente di componenti sotto
licenza GPL ed utilizzati in prodotti snom.
87
snom m9 Quick Start Guide
I
T
A
L
I
A
N
O
conforMitÀ norMa
Il telefono è certificato CE e FCC e risponde agli standard
Europei e statunitensi di salute, sicurezza ed ambientali
Modifiche, cambiamenti, pertura del telefono non autorizzati
invalidano la garanzia e potrebbero annullare anche le
certificazioni CE e FCC. In caso di malfunzionamento contattare
il personale di assistenza autorizzato, il rivenditore, o snom.
L'ID m9 Base snom FCC è YDBM9BS1, e ID portatile FCC è
YDBM9HS1.
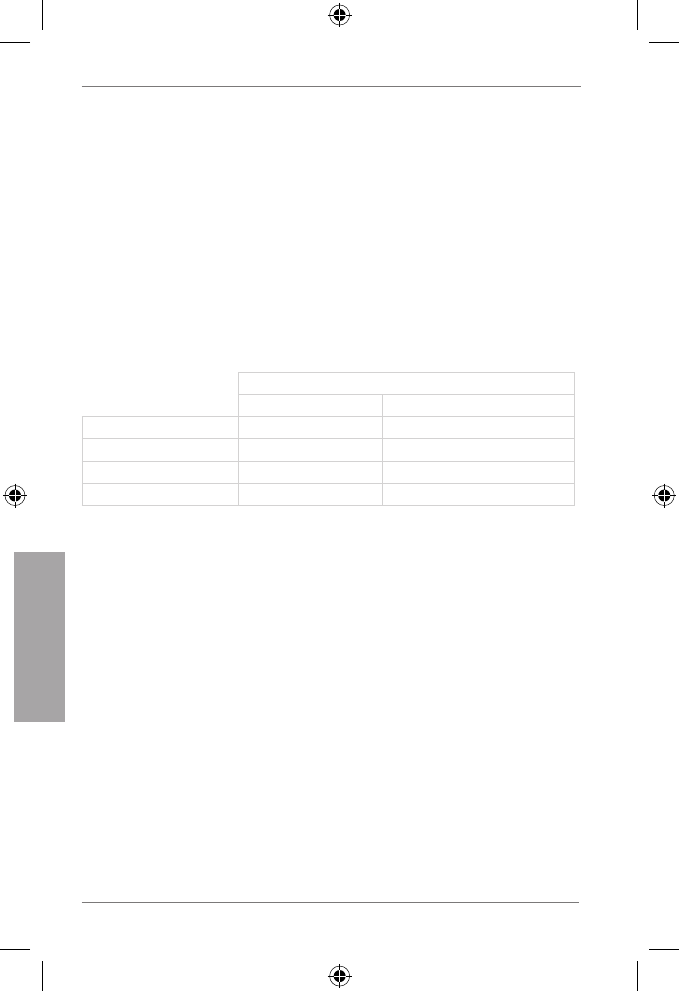
88
snom m9 Quick Start Guide
I
T
A
L
I
A
N
O
precauZioni di sicureZZa
Leggere le precauzioni e le istruzioni per l’installazione e l’utilizzo della
base e del telefono. Conservare la presente Guida rapida e non cedere il
dispositivo a terzi senza di essa. Consultare le informazioni generali per
la sicurezza, le informazioni specifiche per il paese e quelle generali sulla
sicurezza per USA, Australia e Nuova Zelanda.
Alimentatori/adattatori, batteria ricaricabile
• Utilizzare esclusivamente il trasformatore (adattatore AC/DC) fornito
con la base e il telefono oppure quelli espressamente raccomandati
da snom. Alimentatori elettrici diversi da quelli prescritti potrebbero
danneggiare anche permanentemente il dispositivo/i.
Adattatori Elementech, Modello No.
Stazione di base Caricabatteria telefono
Europe senza UK AU1050507e AU1050607e
UK AU1050505b AU1050605b
USA & Canada AU1050507u AU1050607u
Australia AU1050505s AU1050605s
• Utilizzare esclusivamente le batterie ricaricabili in dotazione con il
ricevitore oppure quelle espressamente raccomandate da snom.
Posizione di base, caricatore, fili, cavi
• Posizionare i cavi del dispositivo in maniera che nessuno possa
calpestarli o inciamparvi. Non sottoporre fili e cavi a pressioni
meccaniche che potrebbero danneggiarli. Se il cavo di alimentazione
è danneggiato scollegare il dispositivo e rivolgersi all’assistenza
autorizzata.
• Base, caricatori, ricevitori, trasformatori e cavi sono concepiti per uso
domestico e per funzionare ad una temperatura compresa tra n +5°C
d +45°C. NON INSTALLARE ALL’APERTO!
• Non installare il prodotto in ambienti molto umidi (ad esempio bagni,
lavanderie e sotterranei umidi). Non immergere in acqua e non versare
liquidi di nessun genere su nessun componente.
• Non installare la base e il ricevitore in luoghi a rischio di esplosione (ad
esempio negozi di vernici). Non utilizzare il telefono in presenza di gas
o altri fumi potenzialmente esplosivi!

89
snom m9 Quick Start Guide
I
T
A
L
I
A
N
O
• I dispositivi medici potrebbero subire interferenze. In caso di
installazione in studi medici, per esempio, considerare le ramificazioni
elettriche.
Se siete portatori di un pacemaker impiantato
• Non utilizzare se si è portatori di pacemaker salvo diversa indicazione
del produttore del pacemaker che approvi l’uso di dispositivi che
emettono segnali di frequenze radio. Attenersi sempre alle direttive
del produttore!
• Distanza MINIMA dal ricevitore: 20 cm (7.9").
• Non portare il ricevitore nelle tasche sul petto.
• Tenere il ricevitore nell’orecchio opposto rispetto al dispositivo medico
per ridurre le potenziali interferenze.
• Spegnere immediatamente il ricevitore in caso di sospetta interferenza.
Altri rischi per la salute
Non tenere vicino l’orecchio l’altoparlante sul retro del ricevitore quando il
telefono squilla o quando è attivo il vivavoce. Si rischiano danni gravi
e irreversibili all’udito!
Se siete portatori di protesi acustica
Il ricevitore potrebbe causare un fastidioso rumore di fondo.
inforMaZioni aggiuntiVe sulla sicureZZa
Bambini piccoli
Il dispositivo e i suoi accessori potrebbero contenere piccoli pezzi. Tenere
lontano dalla portata di bambini piccoli.
Ambiente operativo
Ricordate di attenervi alle norme speciali previste nel vostro paese e di
spegnere sempre il dispositivo se il suo uso non è consentito o quando
potrebbe provocare interferenze o danni. Utilizzate il dispositivo solo nelle
sue posizioni operative normali. Non mettere mai carte di credito o altri
dispositivi magnetici per la memorizzazione di dati vicino al dispositivo in
quanto le informazioni contenute potrebbero cancellarsi.

90
snom m9 Quick Start Guide
I
T
A
L
I
A
N
O
Dispositivi medici
Qualunque altro dispositivo che emette radiofrequenze potrebbe interferire
con il funzionamento dei dispositivi medici non adeguatamente schermati.
Rivolgetevi a un medico o al produttore del dispositivo medico per
stabilire se quest’ultimo è adeguatamente schermato dall’energia esterna
di in radiofrequenza o se avete altre domande a riguardo. Spegnete il
dispositivo all’interno di strutture sanitarie in cui non ne è ammesso l’uso.
Ospedali e cliniche utilizzano spesso apparecchiature sensibili a energia
esterna di in radiofrequenza.
Dispositivi medici impiantati
I produttori di dispositivi medici raccomandano di mantenere una distanza
minima di almeno 20 centimetri tra il dispositivo senza fili e il dispositivo
medico impiantato (ad esempio pacemaker o defibrillatore cardiaco
impiantabile) per evitarne potenziali interferenze. I portatori di questi tipi di
dispositivi medici dovranno:
• Tenere sempre a una distanza minima di 20 centimetri il dispositivo
medico quando il dispositivo senza fili è acceso.
• Non portare il dispositivo senza fili nelle tasche sul petto.
• Tenere il dispositivo senza fili sull’orecchio opposto rispetto alla
posizione del dispositivo medico per ridurre le potenziali interferenze.
• Spegnere immediatamente il ricevitore in caso di sospetta interferenza.
• Leggere e attenersi alle istruzioni del produttore del dispositivo medico
Se avete dubbi sull’uso di un dispositivo senza fili insieme a un dispositivo
medico impiantato rivolgetevi all’addetto sanitario.
Conforme al circuito SELV (bassissima tensione di
sicurezza)
Lo stato di sicurezza dei collegamenti in uscita e in entrata è conforme alle
disposizioni del circuito SELV.
Attenzione: Per evitare scosse elettriche non collegare i circuiti
SELV a quelli della rete telefonica (TNV). Le porte LAN hanno
circuiti SELV, le porte PSTN hanno circuiti TNV. Alcune porte
LAN e PSTN utilizzano connettori RJ-45 (8P8C). Collegare i cavi
con molta attenzione.

91
snom m9 Quick Start Guide
I
T
A
L
I
A
N
O
Ambienti potenzialmente esplosivi
Spegnere il dispositivo in ambienti a rischio di esplosione e attenersi
a eventuali cartelli e istruzioni. Una scintilla potrebbe provocare
un’esplosione, un incendio e conseguenti lesioni personali e persino la
morte. Spegnere il dispositivo nelle stazioni di servizio e vicino alle pompe
di benzina. Attenersi ai limiti imposti sull’uso di dispositivi radio all’interno
di depositi, magazzini e aree di erogazione di carburante; impianti chimici o
laddove sono in corso operazioni di brillamento. Le aree a rischio potenziale
di esplosione non sono sempre ben segnalate e includono la parte sotto
il ponte delle barche, trasporti di sostanze chimiche o magazzini, veicoli
che utilizzano GPL e ambienti in cui l’aria è satura di sostanze chimiche o
particelle come polveri di metallo.
Apparecchiature elettroniche sensibili
Allo stato attuale la ricerca stabilisce che i telefoni DECT normalmente non
interferiscono negativamente con altre apparecchiature elettroniche. Tut-
tavia consigliamo di seguire alcune precauzioni di base se si vuole azionare
un telefono DECT nelle immediate vicinanze di apparecchiature sensibili
come quelle di un laboratorio. Tenere sempre a una distanza minima di 10
cm dall’apparecchiatura anche quando il telefono è in standby.
Sovratensioni elettrici
Si consiglia di installare un protettore di sovratensione AC alla presa AC
a cui si collega il dispositivo per evitare danni provocati da fulmini o altre
sorgenti elettriche.
inforMaZioni iMportanti sulla Batteria
Questo prodotto utilizza batterie ricaricabili Lithium-Ion 3.7V, 650mAh.
Utilizzare esclusivamente batterie marcate “snom” e P/N: 60020438 o
60020438 in dotazione con il ricevitore o batterie conformi alla tecnologia
snom AG. Non utilizzate altri tipi di batteria in quanto potrebbero verificarsi
perdite, fiamme, esplosioni o altre situazioni rischiose. Prima di rimuovere
o sostituire la batteria è necessario rimuovere il coperchio della batteria
del ricevitore. Non separate, modificate o provocate il corto circuito delle
batterie e non utilizzatele per scopi diversi da quelli previsti. Per ricaricare
le batterie ponete il ricevitore sullo snom m9 in dotazione.

92
snom m9 Quick Start Guide
I
T
A
L
I
A
N
O
Ricaricare, scaricare e conservare
Il ricevitore è dotato di una batteria ricaricabile. Una nuova batteria
raggiunge la piena prestazione solo dopo che è stata scaricata e ricaricata
completamente per due o tre volte.
La batteria può essere ricaricata e scaricata centinaia di volte ma alla fine
il suo ciclo di vita si esaurisce. Utilizzare batterie conformi alla tecnologia
snom AG.
Se non utilizzata per molto tempo, la batteria carica potrebbe scaricarsi
da sola. Quando la batteria è completamente scarica, potrebbero volerci
alcuni minuti prima che l’indicatore di carica compaia sul display.
Utilizzare la batteria esclusivamente per l’uso previsto. Evitare il corto
circuito delle batterie. Il corto circuito dei terminali potrebbe danneggiare
la batteria e l’oggetto collegato. NON utilizzare batterie o caricatori
danneggiati. L’utilizzo di una batteria danneggiata potrebbe provocare
un’esplosione.
Non posizionate o conservate le batterie, all’interno o all’esterno del
ricevitore, nelle immediate vicinanze di fiamme libere o altre fonti di
calore. Lasciare le batterie in ambienti troppo freddi o caldi potrebbe
comprometterne la loro capacità e il ciclo di vita. Ricaricate le batterie
ad una temperatura compresa tra 0° C e 40° C. Una batteria troppo
calda o fredda potrebbe non funzionare temporaneamente anche se
completamente carica.
Evitare di caricare più del dovuto. Ciò potrebbe determinare nel tempo
la riduzione delle prestazioni della batteria. Non provare mai a ricaricare
la batteria con le polarità invertite. Ciò potrebbe provocare l’aumento di
pressione del gas contenuto nella batteria o perdite di liquido. Per brevi
periodi: conservate le batterie in ambienti secchi e con scarsa umidità, in
assenza di gas corrosivi e a una temperatura compresa tra -20° C e 45°
C. Per lunghi periodi: conservate le batterie a temperature comprese tra
+10° C e +30° C.
Smaltimento della batteria
Non smaltire le batterie nel fuoco o in un inceneritore. RISCHIO DI ESP-
LOSIONE!
Le batterie difettose o esaurite non devono essere smaltite insieme ai rifiuti
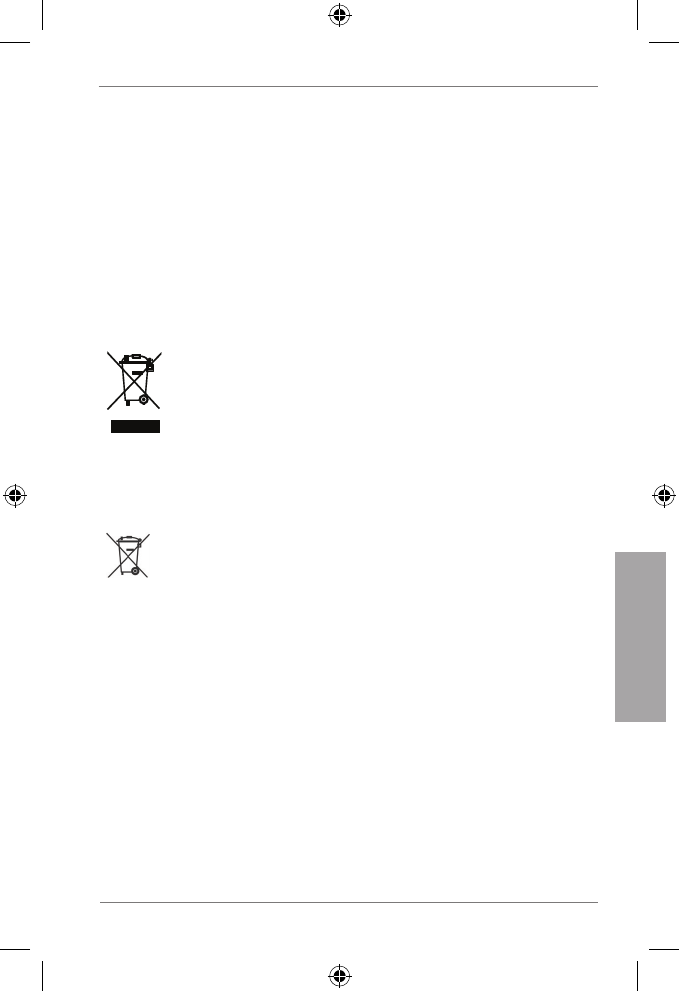
93
snom m9 Quick Start Guide
I
T
A
L
I
A
N
O
domestici. Riconsegnate le vecchie batterie al fornitore, un operatore
autorizzato allo smaltimento o un centro di raccolta specifico.
puliZia
Utilizzare un panno antistatico. Evitare acqua e altri liquidi o detergenti
solidi che potrebbero danneggiare la superficie o l’elettronica interna di
base, caricabatteria e portatile.
sMaltiMento
Smaltimento del telefono
Questo telefono è soggetto alla Direttiva Europea 2002/96/
EC e non può essere buttato tra i normali rifiuti domestici.
Se non sapete come smaltire l’apparecchio una volta
inutilizzabile, contattate il comune, la nettezza urbana locale, o
il vostro rivenditore.
Smaltimento della batteria
La batteria è soggetto alla Direttiva Europea 2006/66/EC e
non può essere buttato tra i normali rifiuti domestici.
Se non sapete come smaltire la batteria una volta inutilizzabile,
contattate il comune, la nettezza urbana locale, o il vostro
rivenditore.
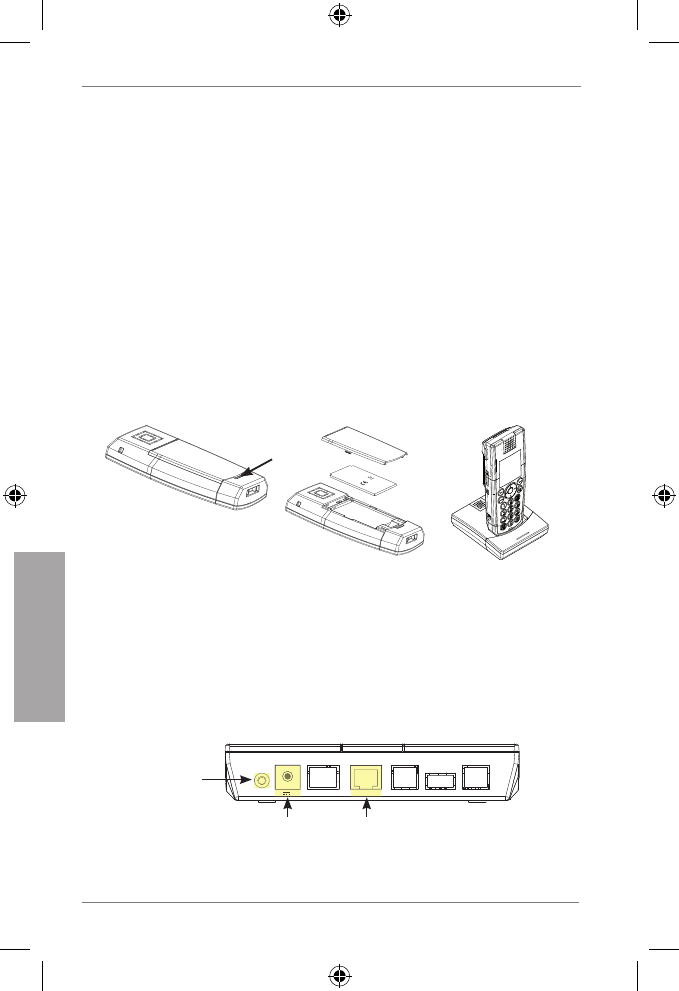
94
snom m9 Quick Start Guide
I
T
A
L
I
A
N
O
installaZione
Prima di utilizzare per la prima volta il telefono, le batterie
del portatile dovranno essere lasciate in carica per circa
8 ore.
predisposiZione del telefono
1. Sollevare il coperchio del vano batteria.
2. Inserire il pacco batteria con gli elettrodi nell’angolo in alto a
sinistra. Chiudere il coperchio.
3. Collegare il cavo di alimentazione (5,9 V) del caricabatteria, prima
alla presa a muro e poi al caricabatteria, e sistemare il telefono
nell’apposito alloggiamento.
3.1. 2.
snom
rechargeable
Lithium-Ion
battery
staZione Base
1. Quando il telefono è pronto per l’uso, collegare il cavo di rete da una
parte alla porta NET, sul retro della base, e dall’altra alla porta LAN
della rete (centralina, router, ecc.).
2. Collegare il trasformatore (5 V) prima alla presa a muro e DOPO
alla base.
NET
RESET 5V DC
NET
5V DC
Ingresso
corrente elettr.
Pulsante
riavviare
Port red
3. La spia di accensione si illumina e la base viene inizializzata.
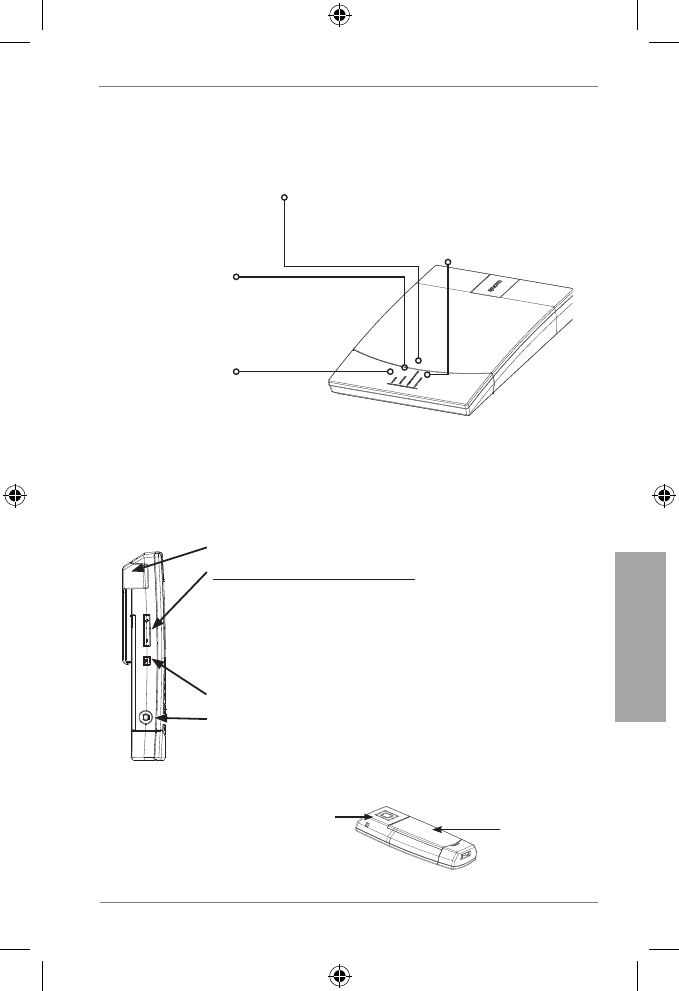
95
snom m9 Quick Start Guide
I
T
A
L
I
A
N
O
4. Al termine dell’inizializzazione, il LED chiamata inizia a lampeggiare
per indicare che la base è in attesa di registrare il telefono.
LED Corrente
– illuminato quando è
accendente
LED Chiamata
– lampeggia durante l’aggiornamento del
firmware
– si accende quando è in corso una
chiamata
– lampeggia lentamente in attesa della
registrazione del telefono
LED Registrazione
– si accende quando
la base è in fase di
registrazione
LED Rete
– lampeggia in fase di avvio per
indicare che il base ha ottenuto
un indirizzo IP
descriZione telefono
Vista laterale
Clip cintura
Tasto regolazione volume +-
Regola il volume
• della suoneria quando una chiamata è in
entrata
• del vivavoce durante la chiamata
Jack microfono-cuffia (headset) 2,5 mm
Tasto vivavoce (on/off)
Vista posteriore Altoparlante
vivavoce Coperchio
vano batteria
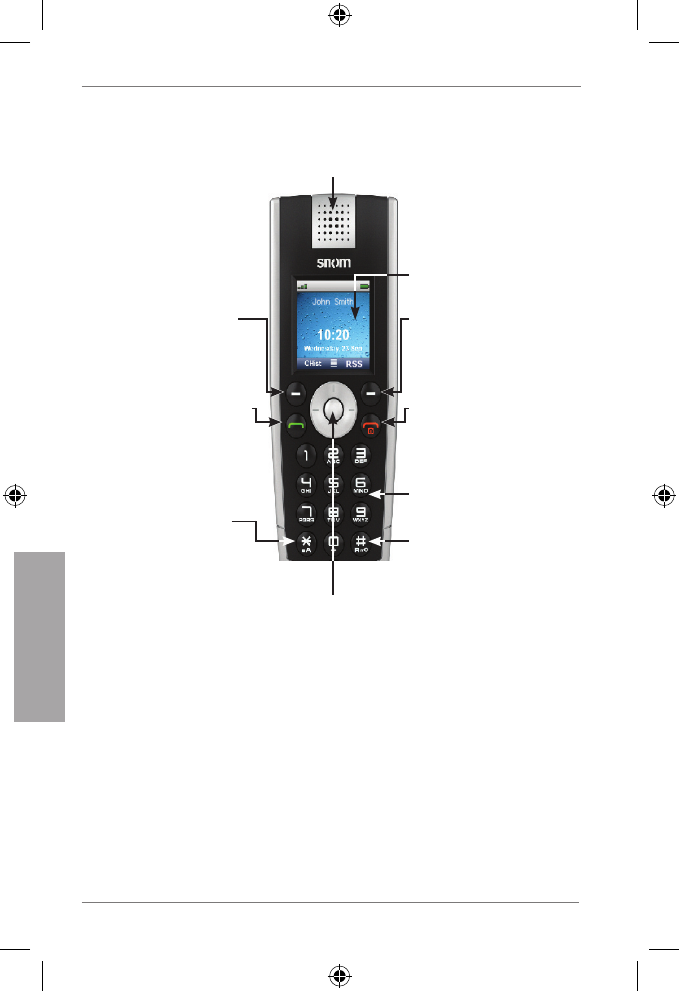
96
snom m9 Quick Start Guide
I
T
A
L
I
A
N
O
Vista frontale
Tasto navigazione
In modalità inattivo, premere il bordo superiore/inferiore/destro/
sinistro (raffigurante in questo manuale di ///) o til tasto al
centro () per accedere ai menu e alle funzioni qui di seguito:
Menu principale
Rubrica
Intercom
Menu Impostazione
Menu Preferenze
In altri contesti premere o per navigare tra menu ed elenchi.
Tasto verde
Accetta chiamate
Componi numero
Conferma
Tasto funzione
sinistra
Schermo inattivo:
elenco chiamate
Tasto funzione
destra
Schermo inattivo:
Lettore RSS
Tasto rosso
Termina chiamate
Annulla azione
Interrutore on/off
Auricolare
Display a colori
Tastiera
alfanumerica
Tasto R
Blocco + sblocco
tastiera
Tasto asterisco
Modifica modo
immissione (numeri,
piccoli + maiuscole)
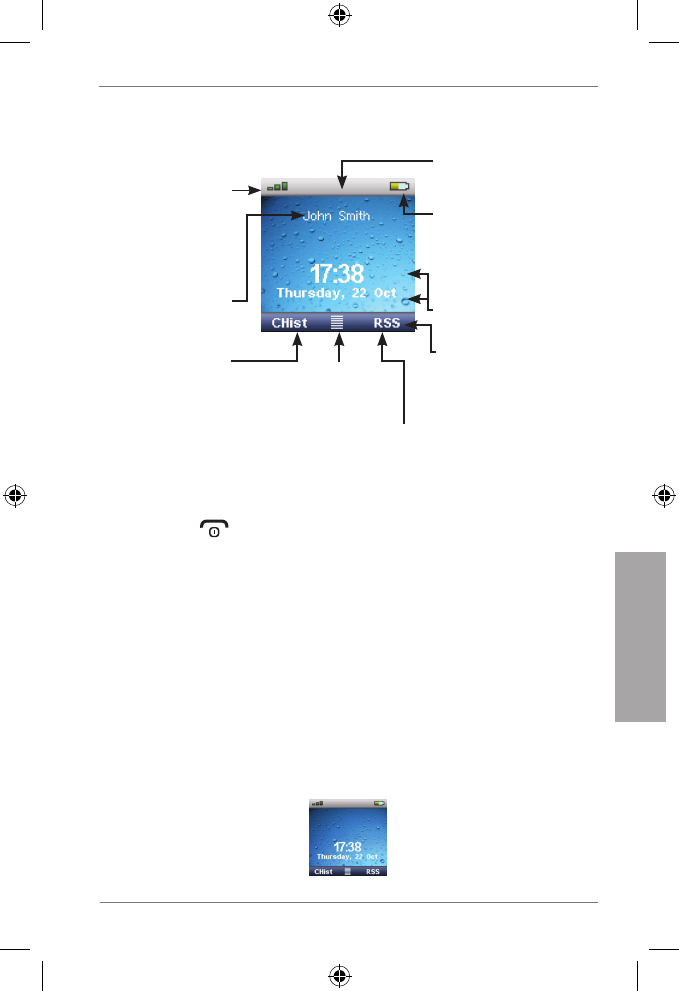
97
snom m9 Quick Start Guide
I
T
A
L
I
A
N
O
aspetto del displaY, displaY inattiVo
Livello della batteria
Rosso=scarica
Giallo=meno del 50%
Verde=oltre il 50%
Menù
Preferenze
Lettore RSS
Riga tasto funzione
con simboli sensibili al
contesto
Ora e data
Account VoIP:
Registro
chiamate:
Perse
Ricevute
Num.composti
Potenza
segnale:
Elevata=verde
Bassa=grigia
Linea stato
Registrazione telefono
1. Premere (tasto rosso sul telefono). Sul display compare la
scritta: "Ricerca stazione base". Dopo che il apparato ha trovato la
base, compare il messaggio per l’inserimento del PIN.
2. Digitare il PIN di default "0000".
3. Premere "OK".
Nota: Se la registrazione automatica del telefono non va a
buon fine, la registrazione potrà essere eseguita manualmente.
Premere "->" to enter the Settings menu. per accedere al
menu Impostazioni. Accedere nel menu "Telefono" e premere
"Registra telefono". Selezionare "Base 1". Digitare il PIN a
premere "OK" per registrare il telefono.
4. Se la registrazione è riuscita, il display visualizza la schermata
inattivo:
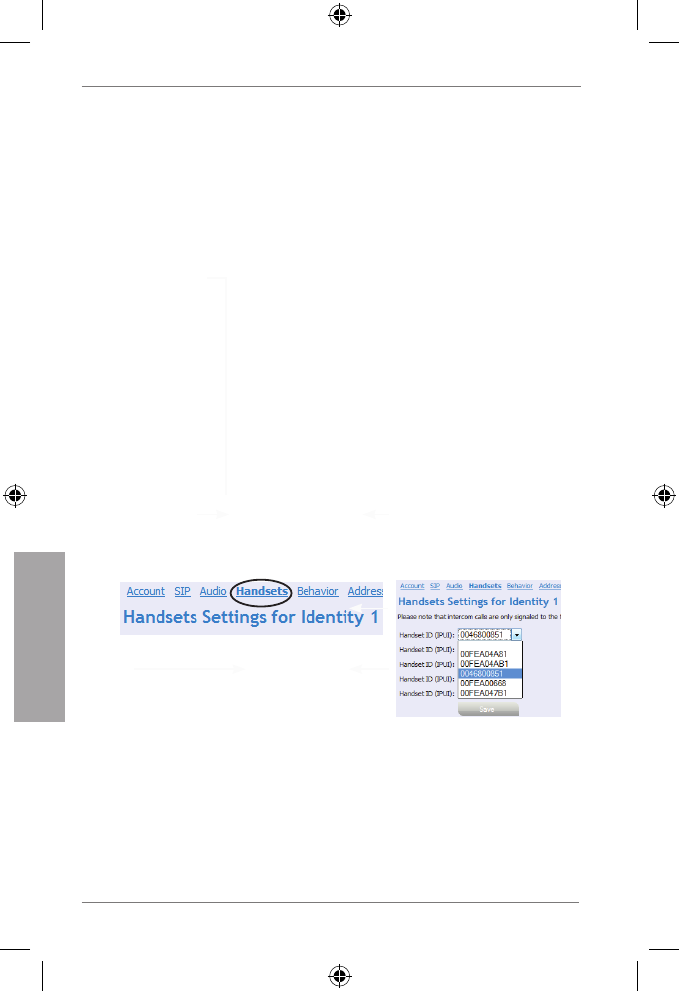
98
snom m9 Quick Start Guide
I
T
A
L
I
A
N
O
Configurazione di un account VoIP
1. Premere e sul tasto navigazione e "OK". La pagina
--Network-- con l’indirizzo IP della base viene visualizzato sul
display. Annotare il numero IP.
2. Premere il bordo superiore del tasto navigazione. La pagina
--Handset-- viene visualizzato sul display. Annotare il numero di
identificazione "Handset ID", per esemplo 00FEA101C0 (senza "h"
finale, se visibile).
3. Aprire il browser, digitare http://<IP address> nella barra di
esplorazione e premere ENTER per accedere all’interfaccia della
base sul web.
Username (nome utente) di default: admin
Password di default: password
4. Fare clic su "Identity 1" dal menu a sinistra.
5. Immettere i dati SIP dell’account ottenuti dall’amministratore di
sistema o dal provider VoIP.
Account = utente
Password = Password
Authentication Name = autenticazione dell'utente
Mailbox = utente segreteria telefonica
Display name: = nome visualizzato: liberamente selezionabile
6. Cliccare sulla scheda "Handsets".
7. Selezionare il numero di identificazione del telefono nella lista a
cascata di "Handset ID (PUI)". Premere "Save".
8. Vostro snom m9 è pronto per l’uso.
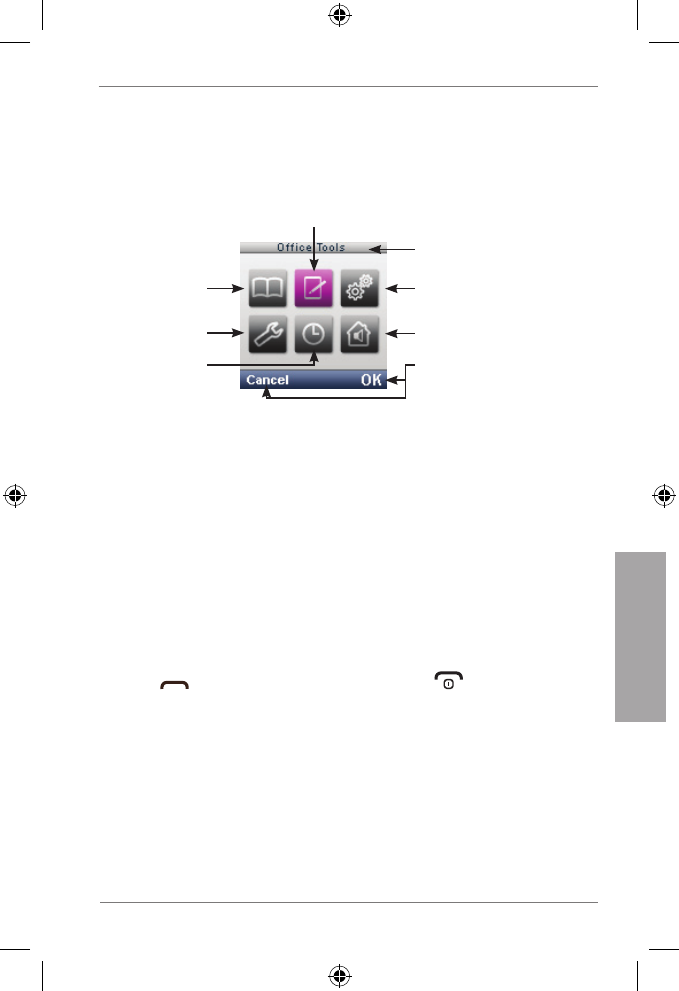
99
snom m9 Quick Start Guide
I
T
A
L
I
A
N
O
i Menu del telefono
1. Premere al centro del tasto di navigazione per accedere al menu
principale.
Impostazioni
Titolo della voce
evidenziata del menu
Funzione attuale del
tasto funzione
Rubrica
Preferenze
Sveglia
Strumenti
Intercom
2. Press il bordo superiore/inferiore/destro/sinistro (raffigurante in
questo manuale di ) del tasto di navigazione per navigare sul
display.
3. Premere il tasto funzione "OK" per accedere a sottomenu/funzioni.
Premere il tasto funzione "Cancel" per tornare allo display inattivo.
ruBrica
Selezionare una voce esistente o <Nuovo contatto> con .
Nuovo contatto: Seguire il messaggio per digitare nome e numero e
selezionare una suoneria. Premere "OK".
Premere per comporre un numero, premere (tasto rosso) per
uscire dall’elenco.
struMenti
Cronometro, Calcolatrice, Blocco note, Calendario, Lettore RSS,
Messaggio vocale (segretaria - ascoltare le chiamate)
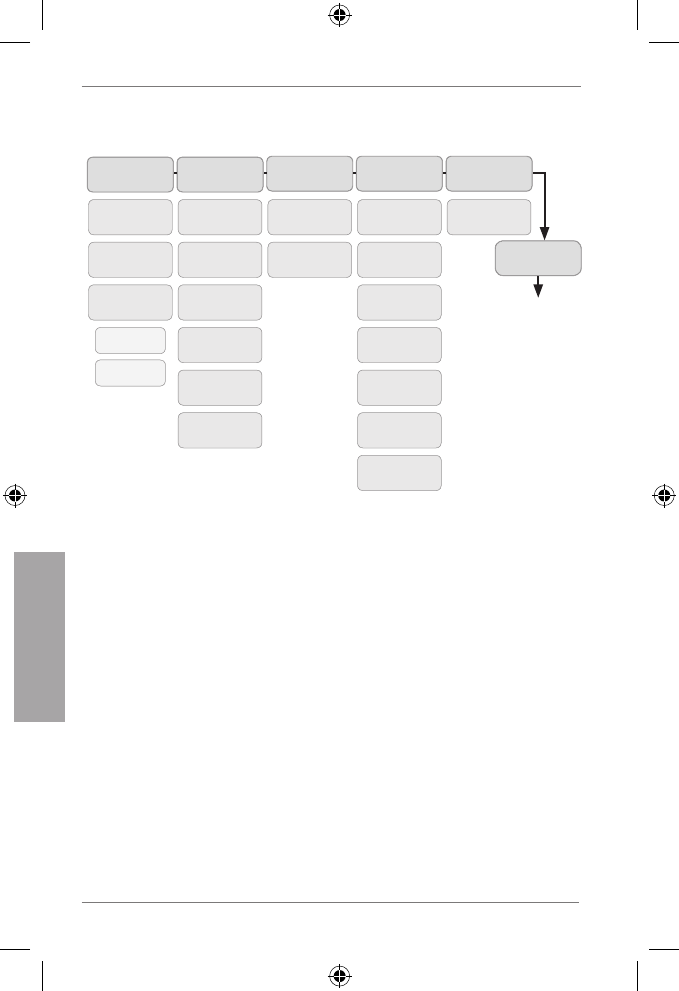
100
snom m9 Quick Start Guide
I
T
A
L
I
A
N
O
MenÙ configuraZione
Data/Ora Rete
Telefono
Fuso oraria
Server NTP
Formato
Formato
data
Formato
ora
VLAN
DHCP
Registrare
telefono
Selezionare
base
Cancellare
telefono
Riavviare
telefono
Aggiornam.
Firmware
Versione
Riavviare
base
VoIP
Nome
Display
Utente
Password
Segreteria
telefonica
Registrar
Outbound
Proxy
Cambia
PIN
Nuovo PIN:
Info
sistema
Indirizzo IP,
indirizzo
MAC
,
versione
firmware,
numeri di
identificazione
(telefono e
stazione base)
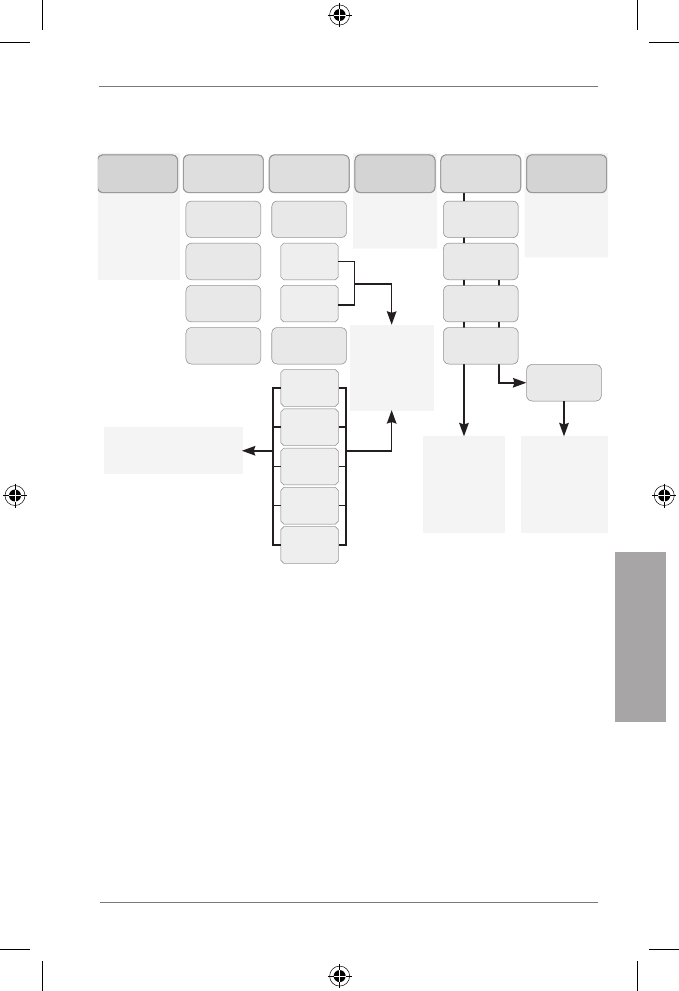
101
snom m9 Quick Start Guide
I
T
A
L
I
A
N
O
MenÙ preferenZe
“OK” >
Selezionare
lingua con
e premere il
tasto “OK”
Lingua
Selezionare
con
> “OK”
Risposta
automat.
Display
Screen-
saver
Colore
sfondo
Contrasto
Luminosità
Chiamate in
entrata non
suonano
Non dis-
turbare
Selezionare
la condizione
per trasferire
una chiamata
e premere
“OK”
Digitare il
numero desti-
natario delle
chiamate
trasferite e
premere “OK”
Impostaz.
Audio
Impostaz.
suoneria
Chiamate
interne*
Chiamate
externe
Toni
(tastiera)
Toni di
ricarica
Batteria
scarica
MWI
Tono di
conferma
Toni di
avviso
Selezionare
melodia e
volumen con
e
premere “OK”
Selezionare “Attiva” con
e premere“OK”
* Chiamate interne: Da altri
telefoni registrati sulla
stessa base
Sempre
Inoltra
chiamata
Mai
Se
Occupato
Dopo ritardo/
sec.
Indirizzo
SIP
sVeglia
Attivare | Ora | Suoneria allarme
intercoM
Chiama tutti: Cerca tutti telefoni registrati alla stessa base
ID Telefono: Cerca un telefono specifico registrati alla stessa base
102
snom m9 Quick Start Guide
I
T
A
L
I
A
N
O
funZionaMento telefono
Telefonare a qcn e rispondere a una chiamata
Telefonare a qcn: Digitare il numero > premere "OK" o
Rispondere a una chiamata: Premere
Terminare una chiamata: Premere
Ricomponi numero
Premere > s elezionare numero > premere o "OK"
Inoltra chiamata
Preferenze > Inoltra chiamata > digita PIN > OK > selezionare identità
> selezionare condizione (sempre, se occupato, dopo ritardo/sec.) >
digitare il numero destinatario SIP > premere OK > sul messaggio,
premere "Si" (Yes) per riavviare il telefono
Disattivare inoltra chiamata: Preferenze > selezionare condizione "mai"
Chiamata in attesa e recupero
Mettere una chiamata in attesa: Premere Opzioni > Hold
Recuperare una chiamata in attesa: Premere Opzioni > Unhold
Trasferimento chiamata
Da Chiamata in linea, premere Opzioni > Transfer > digita numero >
premere "OK"

103
snom m9 Quick Start Guide
I
T
A
L
I
A
N
O
Varie
Cerca indirizzo MAC (= numero di serie) della base
Premere e sul tasto navigazione e "OK" (Impostazioni > Info sistema
> Rete)
Cerca indirizzo IP della base
Premere e sul tasto navigazione e "OK" (Impostazioni > Info sistema
> Rete)
Accedere all’interfaccia web della base
Digitare l’indirizzo IP nella barra di esplorazione del browser e premere
ENTER
Riavviare estazione base
Menu "Impostazioni" > Telefono > Riavviare base > "OK"
o
premere il tasto "Reset" sul retro della base
Riavviare telefono
Menu "Impostazioni" > Telefono > Riavviare telefono > "OK"

104
snom m9 Quick Start Guide
E
S
P
A
Ñ
O
L
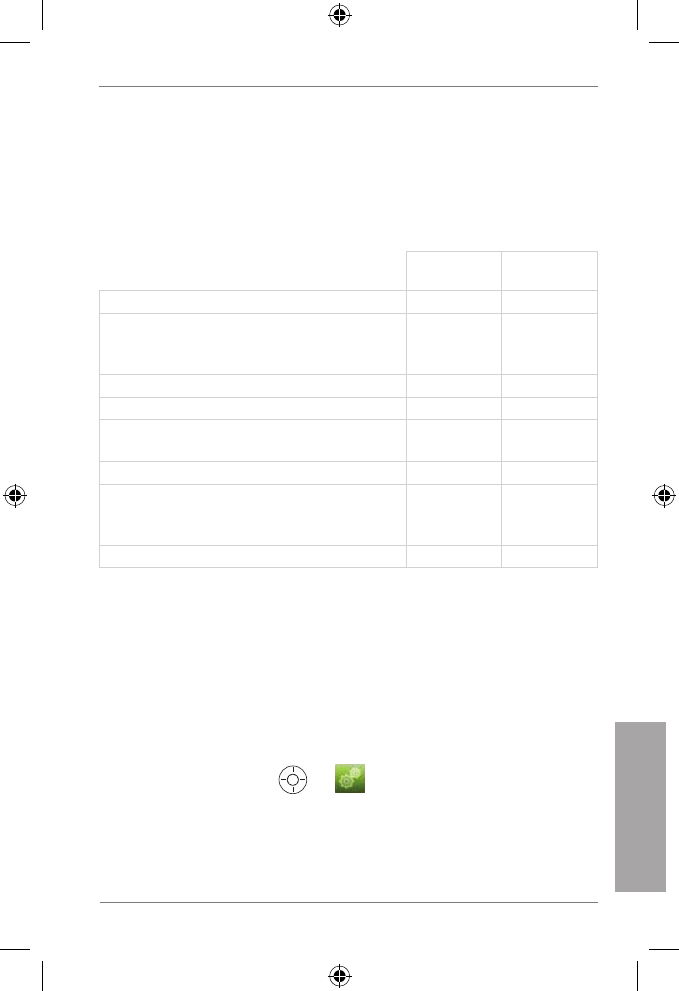
105
snom m9 Quick Start Guide
E
S
P
A
Ñ
O
L
Esta es la Guía de Inicio Rápido para la instalación, configuración
y uso de la estación base y el teléfono. Para más información,
consulte el manual en http://wiki.snom.com.
en la caJa
Combo Kit Handset Kit
(Kit Unidad)
1. Estación base 1 x -
2. Adaptador de alimentación de la
estación base (5 V, conexión interna
DC Ø 2,1 mm, externa Ø 5,5 mm)
1 x -
3. Cable de red 1 x -
4. Unidad 2 x 1 x
5. Batería recargable de litio-ión de
3,7V
2 x 1 x
6. Cargador de la unidad 2 x 1 x
7. Adaptador de alimentación de la
unidad (5,9 V, conexión DC interna
Ø 1,35 mm, externa Ø 3,5 mm)
2 x 1 x
8. Clip para cinturón 2 x 1 x
También necesita
los datos recibidos de su administrador de red o proveedor de servicio
VoIP:
1. Cuenta (normalmente, el número de teléfono) (obligatorio)
2. Registro (obligatorio)
3. Contraseña, nombre autenticación, Outbound Proxy (puede ser
obligatorio), cuenta de buzon de voz (si está disponible)
4. Si el DHCP no está disponible para la inicialización automática,
también necesitará la dirección IP, la puerta de enlace IP y el
servidor DNS. Pulse > (menú Ajustes/Settings) > Red/
Network > introducir PIN > seleccione – secuencialmente - IP puert
de enlace/IP Gateway y servidor de DNS/DNS server con "OK".

106
snom m9 Quick Start Guide
E
S
P
A
Ñ
O
L
Copyright, Marcas comerciales, GPL, Renuncia Legal
© 20010 snom technology Aktiengesellschaft
Todos los derechos reservados. snom, los nombres de los productos
snom, y los logos de snom son marcas comerciales propiedad de snom
technology AG. Los demás nombres de producto y empresas son
propiedad de sus respectivos propietarios.
snom technology AG se reserva el derecho de revisar y cambiar este
documento en cualquier momento, sin obligación de notificar estas
revisiones o cambios por adelantado o con posterioridad.
Los textos, imagines e ilustraciones, y su organización en este documento,
están sujetos a la protección de copyright y otros derechos legales
internacionales. Su uso, reproducción y transmisión a terceros sin permiso
expreso por escrito puede resultar en procesos legales en cortes penales
y civiles.
Cuando este documento se haga público en la página web de snom,
snom technology AG da permiso para descargar e imprimir copias de
su contenido para su uso expreso como manual. Ninguna parte de este
documento puede alterarse, modificarse o usarse con fines comerciales
sin el consentimiento expreso por escrito de snom technology AG.
Aunque se han tomado todas las precauciones posibles en la compilación
y presentación de la información de este documento, los datos en los
que se basa pueden haber cambiado con el tiempo. snom, por lo tanto,
renuncia a cualquier garantía y responsabilidad respecto a la precisión,
exhaustividad y actualidad de la información publicada, excepto en el
caso de intencionalidad o franca negligencia por parte de snom cuando
aparezcan responsabilidades según las provisiones legales vinculantes.
Nuestro firmware incluye código fuente que puede ser usado y modificado
por cualquier persona bajo la licencia pública GNU (GPL) (vease página
124), siempre que, a su vez, lo haga públicamente disponible con el mismo
acuerdo de licencia. Acceda a http://www.snom.com/de/support/
download/gpl-quellcode/ para obtener la licencia GPL original y el código
fuente de los componentes licenciados bajo GPL y usados en productos
snom.

107
snom m9 Quick Start Guide
E
S
P
A
Ñ
O
L
cuMpliMiento con la norMatiVa
Este teléfono tiene certificación CE y FCC, y cumple con los
estándares de salud, seguridad y medioambientales europeos
y de Estados Unidos.
La apertura, cambio, o modificación no autorizadas del teléfono
provocarán que la garantía se cancele, y también pueden
resultar en la cancelación de las certificaciones CE. y FCC. En
caso de avería, contacte con personal de servicio autorizado, su
vendedor, o snom.
El snom m9 ID de la base de la FCC es YDBM9BS1, y la
identificación auricular de la FCC es YDBM9HS1.
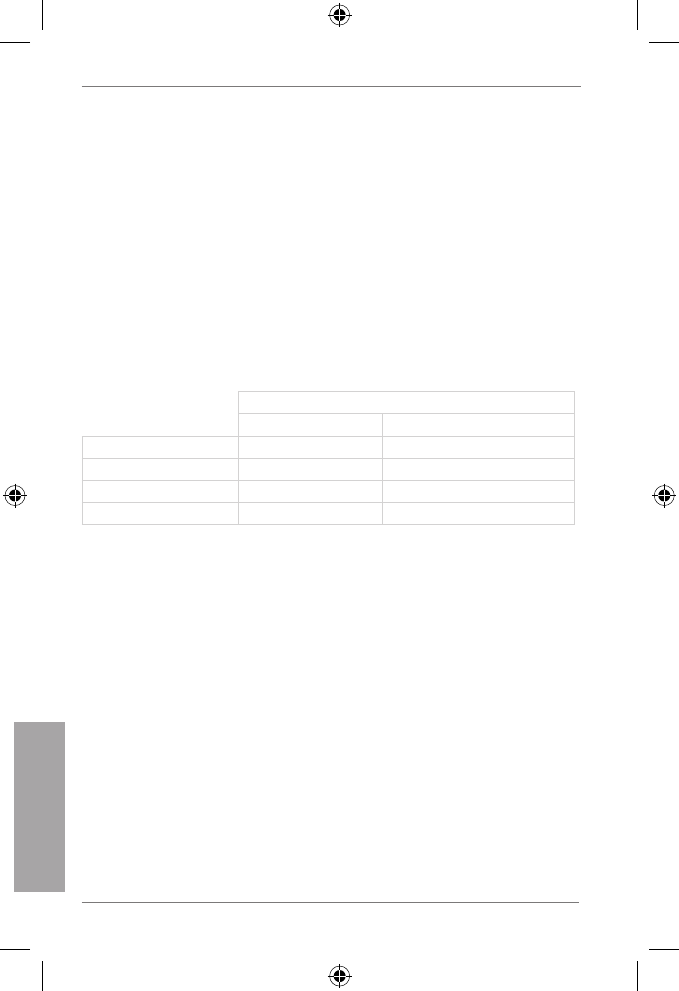
108
snom m9 Quick Start Guide
E
S
P
A
Ñ
O
L
precauciones de seguridad
Lea estas precauciones y las instrucciones de configuración y uso de la
base y el teléfono por completo antes de usar el dispositivo. Conserve
esta Guía de inicio rápido y no entregue el disposito a terceros sin
ella. Vea también la información general de seguridad separada y la
información de seguridad y garantía específicas para EE.UU., Australia y
nueva Zelanda.
Alimentaciones/adaptadores, batería recargable
• Use exclusivamente los conversores de alimentación (adaptadorea
CA/CC) incluidos con la estación base y el teléfono o las alimentación
recomendadas explícitamente por snom. Otras fuentes de alimentación
pueden dañar o incluso destruir los dispositivos.
Fuente di alimentación Elementech, Model No.
Base station Handset charger
Europe sin UK AU1050507e AU1050607e
UK AU1050505b AU1050605b
USA & Canada AU1050507u AU1050607u
Australia AU1050505s AU1050605s
• Use exclusivamente las baterías recargables entregadas con el teléfono
o baterías recargables recomendadas explícitamente por snom.
Colocación de la base, cargador, cables, conexiones
• Evite colocar los cables y conexiones de los dispositivos donde se
pueda tropezar con ellos. Evite colocar los cables y conexiones donde
puedan estar expuestos a presión mecánica, podrían dañarse. Si el
cable de alimentación o el enchufe están dañados, desconecte el
dispositivo y contacte con personal cualificado de servicio.
• La estación base, cargadores, teléfonos, adaptadores de alimentación
y cables son para instalación en interior con una temperatura entre
+5ºC y +45ºC. ¡NO ADECUADO PARA INSTALACIÓN EXTERIOR!
• No instale el producto en habitaciones con humedad elevado (por
ejemplo en baños, lavaderos o sótanos húmedos). No sumerja el
producto en agua ni derrame o vierta líquidos de ningún tipo sobre o
dentro de ninguna pieza del teléfono.
• No instale el producto en entornos con riesgo de explosiones ni use

109
snom m9 Quick Start Guide
E
S
P
A
Ñ
O
L
el teléfono en dichos entornos (talleres de pintura, por ejemplo). No
use el teléfono si huele a gas u otros gases potencialmente explosivos
• Los dispositivos médicos pueden verse afectados. Tenga encuenta las
implicaciones técnicas cuando instale, por ejemplo, los dispositivos en
la consulta de un médico.
Si tiene un marcapasos implantado
• No lo use si tiene un marcapasos implantado a menos que las
instrucciones del fabricante del marcapasos permiten explícitamente el
uso de dispositivos que emitan señales de radiofrecuencia por pulsos.
Siga siempre las instrucciones del fabricante!
• Distancia MÍNIMA recomendada con el teléfono: 20 cm (7.9").
• No lleve el dispositivo inalámbrico en el bolsillo de la camisa.
• Aguante el teléfono sobre el oído opuesto al dispositivo médico para
minimizar potenciales interferencias.
• Apague de inmediado el teléfono si tiene cualquier motivo para
sospechar que se están produciendo intereferencias.
Otros riesgos para la salud
No aguante el altavoz trasero del teléfono contra su oído cuando el
teléfono esté sonando o el altavoz esté activado. Peligro de daños graves
e irreversibles a su oído!
Si lleva audífono
Observe que el auricular puede provocar un molesto ruido de fondo.
inforMaciÓn adicional de seguridad
Niños pequeños
Su dispositivo y sus accesorios pueden contener piezas pequeñas.
Manténgalos fuera del alcance de los niños pequeños.
Entorno de funcionamiento
Recuerde seguir cualquier normativa aplicable de cualquier zona, y
apague siempre el aparato cuando el uso esté prohibido o cuando pueda
provocar interferencias o riesgos. Use el dispositivo solamente en sus
posiciones de funcionamiento habituales. No ponga tarjetas de crédito ni
otros medios de almacenamiento magnético cerca del dispositivo, podría

110
snom m9 Quick Start Guide
E
S
P
A
Ñ
O
L
borrarse la información guardada en ellos.
Dispositivos médicos
El uso de cualquier equipo que emita señales de radiofrecuencia puede
interferir con el funcionamiento de dispositivos médicos no aislados
correctamente. Consulte con un médico o con el fabricante del dispositivo
médico para determinar si están aislados correctamente de energía de RF
externa o si tiene dudas respecto a este asunto. Apague el dispositivo
en instalaciones clínicas cuando las señales colgadas en estas áreas se
lo indiquen. Los hospitales o instalaciones clínicas pueden usar equipos
sebsibles a energía de RF externa.
Dispositivos médicos implantados
Los fabricantes de dispositivos médicos recomiendan una distancia
mínima de 20 cm (7.9") entre dispositivos inalámbricos y un dispositivo
médico implantado, como marcapasos o desfibriladores cariovasculares,
para evitar potenciales interferencias con el dispositivo médico. Las
personas que tengan estos dispositivos deben:
• Mantenga siempre el dispositivo inalámbrico a más de 20 centímetros
(7.9") del dispositivo médico cuando el dispositivo inalámbrico esté
encendido.
• No lleve el dispositivo inalámbrico en el bolsillo de la camisa.
• Aguante el dispositivo inalámbrico sobre el oído opuesto al dispositivo
médico para minimizar potenciales interferencias.
• Apague de inmediato el dispositivo inalámbrico si tiene cualquier
motivo para sospechar que se están produciendo interferencias.
• Lea y obedezca las instrucciones del fabricante del dispositivo médico.
Si tiene dudas sobre el uso de su dispositivo inalámbrico con un dispositivo
médico implantado, consulte con su proveedor médico.
Cumplimiento SELV (Safety Extra Low Voltage -
Seguridad de Tensión Extra Baja)
Las condiciones de seguridad de las conexiones de entrada/salida cump-
len con los requisitos SELV.
Atención: Para evitar electrocuciones, no conecte circuitos de
seguridad de tensión extra baja (SELV) a circuitos de tensión

111
snom m9 Quick Start Guide
E
S
P
A
Ñ
O
L
de red telefónica (TNV), puertos LAN con circuitos SELV, y
puertos PSTN que contengan circuitos TNV. Algunos puertos
LAN y PSTN usan conectores RJ-45 (8P8C). Tenga cuidado al
conectar los cables.
Entornos potencialmente explosivos
Apague el dispositivo cuando esté en una zona con una atmósfera
potencialmente explosiva y obedezca todas las indicaciones e instrucciones.
Las chispas en estas zonas pueden provocar una explosión o incendio,
provocando heridas o incluso muerte. Apague el dispositivo en zonas de
repostado, como cerca de los surtidores de gasolina en estaciones de
servicio. Obedezca las restricciones sobre el uso de equipos de radio
en depósitos de carburante, zonas de almacenaje y distribución, plantas
químicas, o lugares en los que se produzcan operaciones de demolición.
Las zonas con una atmósfera potencialmente explosiva están a menudo,
pero no siempre, claramente marcadas. Incluyen cubiertas cerradas de
barcos, instalaciones de transferencia o almacenaje químico, vehículos
que usan gases de petróleo líquido, y zonas en las que el aire contenga
químicos o partículas como grano, polvo o virutas metálicas.
Equipos electrónicos delicados
El estado actual de las investigaciones concluye que los teléfonos DECT
operativos no afectan normalmente a equipos electrónicos. Sin embar-
go, debe tomar ciertas precauciones si desea usar teléfonos DETC cerca
de este tipo de equipos, como equipo de laboratorio delicado. Mantenga
siempre una distancia mínima de 10 cm del equipo incluso si el teléfono
está en espera.
Subidas de tensión
Recomendamos instalar un limitador de subidas de tensión CA en la toma
CA a la que se conecte este dispositivo para evitar daños al equipo, pro-
vocados por rayos locales u otras subidas de tensión eléctrica.
inforMaciÓn iMportante de BaterÍa
Este producto usa una batería de litio-ión recargable de 3.7V, 650mAh.
Use exclusivamente baterías de la marca “snom” y P/N: 60020438 o
60020438 que estuvieran incluidas con el teléfono o baterías de recambio
aprobadas por snom technology AG. No use otros tipos de batería, podrían

112
snom m9 Quick Start Guide
E
S
P
A
Ñ
O
L
provocar fugas, incendio, explosión, u otras situaciones peligrosas. Para
cambiar o retirar la batería, debe retirar primero la tapa de la batería del
teléfono. No desmonte, modifique ni cortocircuite las baterías, ni las use
para fines distintos al previsto. Cargue la batería exclusivamente con el
teléfono snom m9 colocado en el cargador snom m9 que se incluía con
el producto..
Carga y descarga, almacenaje
El teléfono se alimenta mediante una batería recargable. El rendimiento
completo de una batería nueva sólo se consigue después de dos o tres
ciclos de carga y descarga completos.
La batería puede cargarse y descargarse centenares de veces, pero even-
tualmente se descargará. Use exclusivamente baterías aprobadas por
snom technology AG.
Si se deja sin uso, una batería totalmente cargada perderá su carga con
el tiempo. Si la batería está totalmente descargada, pueden pasar unos
minutos hasta que el indicador de carga aparezca en la pantalla.
Use la batería solamente para su finalidad. No cortocircuite la batería.
Cortocircuitar los terminales puede dañar la batería o el objeto conectado.
NO use un cargador o batería dañados. Usar una batería dañada puede
hacer que explote.
No ponga ni guarde la batería, dentro o fuera del teléfono, cerca de llama
abierta ni otras fuentes de calor. Dejar la batería en lugares calientes
o fríos reducirá su capacidad y vida útil. Cargue las baterías con una
temperatura ambiente de entre 0ºC y 40ºC. Los dispositivos con baterías
en caliente o frío pueden dejar de funcionar temporalmente aunque la
batería esté totalmente cargada.
Evite sobrecargarlas. Sobrecargarlas repetidamente puede provocar un
deterioro en el rendimiento de la batería. No intente nunca cargar la batería
con la polaridad invertida, podría hacer que la presión del gas dentro de la
batería se hinche y provoque fugas. Para el almacenamiento a corto plazo,
guarde las baterías en un lugar con poca humedad, sin gases corrosivos
y con una temperatura de entre -20ºC y 45ºC. Almacenamiento a largo
plazo: Guardar a una temperatura entre +10ºC y +30ºC.
113
snom m9 Quick Start Guide
E
S
P
A
Ñ
O
L
Eliminación de las baterías
No ponga las baterías en el fuego ni en un incinerador. ¡RIESGO DE
EXPLOSIÓN!
Las baterías defectuosas o gastadas no deben desecharse nunca con
los residuos municipales. Devuelva las baterías viejas al proveedor de
las baterías, un vendedor de baterías autorizado o unas instalaciones de
recogida designadas. No incinere las baterías.
liMpieZa
Use una gamuza antiestática. Evite usar agua y productos de limpieza
líquidos o sólidos, podrían dañar la superficie o la electrónica interna de la
base, el cargador y el teléfono.
eliMinaciÓn
Eliminación del teléfono
Este teléfono está sujeto a la Directriz Europea 2002/96/
EC, y no puede ser eliminado con los residuos domésticos
generales.
Si no sabe dónde puede desechar el dispositivo al final de su
vida útil, contacte con su municipio, su proveedor de gestión
de residuos local, o su vendedor.
Eliminación del batería
La batería está sujeto a la Directriz Europea 2006/66/EC, y no
puede ser eliminado con los residuos domésticos generales
Si no sabe dónde puede desechar la batería al final de su vida
útil, contacte con su municipio, su proveedor de gestión de
residuos local, o su vendedor.
Para países fuera de la Unión Europea:
La eliminación de productos eléctricos y electrónicos en países fuera de
la Unión Europea debe realizarse de acuerdo con las normativas locales.
Contacte con su autoridad local para más información.
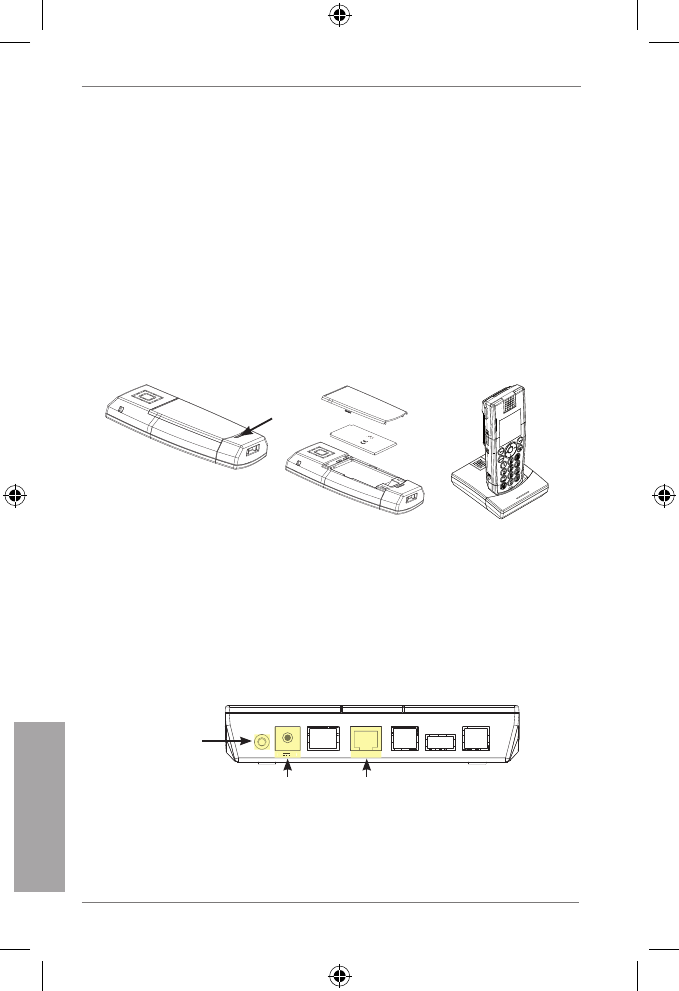
114
snom m9 Quick Start Guide
E
S
P
A
Ñ
O
L
instalaciÓn
Antes del primer uso debe cargarse totalmente la batería
del teléfono. Esto tomará aproximadamente 8 horas.
preparaciÓn del unidad
1. Levante la tapa de la batería.
2. Introduzca el paquete de baterías con los electrodos en la esquina
superior izquierda. Vuelva a colocar la tapa.
3. Conecte la alimentación (5,9 V) del cargador a la toma de corriente
y luego al cargador, y ponga el teléfono en el cargador.
3.1. 2.
snom
rechargeable
Lithium-Ion
battery
estaciÓn Base
1. Cuando el teléfono esté listo para el uso, conecte un extremo del
cable de red con el puerto NET de la parte posterior de la estación
base y el otro extremo a un puerto LAN de su red (switch, router,
etc.).
2. Conecte el convertidor de alimentación (5 V) a la toma de corriente
primero, y luego a la estación base.
NET
RESET 5V DC
NET
5V DC
Conexión dela
alimentación
Botón
reiniciar
Puerto
rete
3. El indicador de encendido se activará y la estación base comenzará
a arrancar.
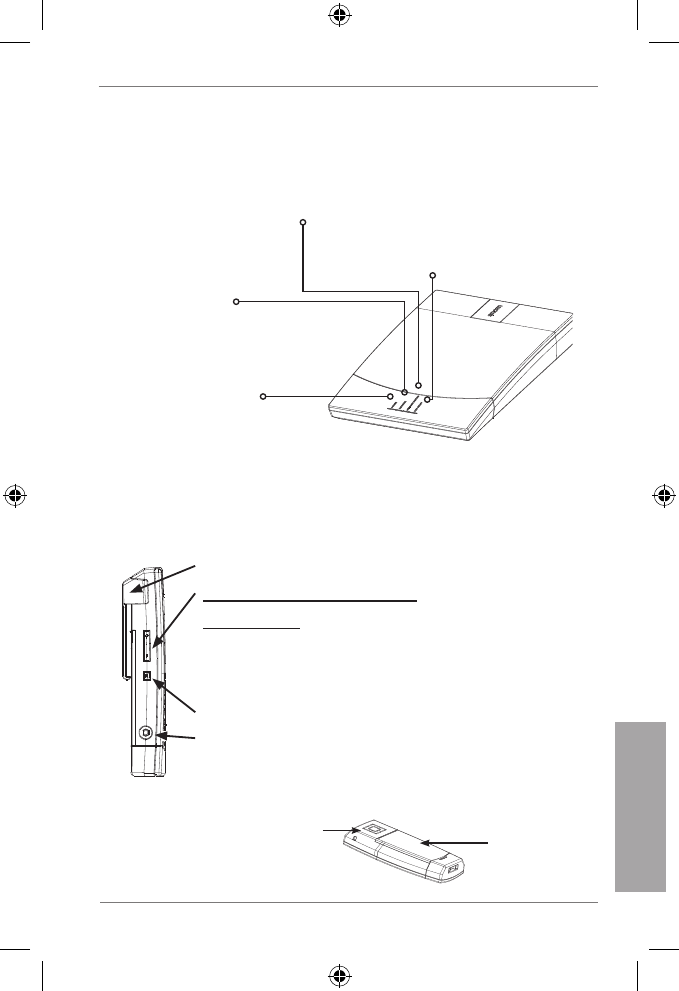
115
snom m9 Quick Start Guide
E
S
P
A
Ñ
O
L
4. Cuando haya arrancado la estación base, el LED “Llamada”
comenzará a parpadear, indicando que la estación base está
esperando al registro dela unidad.
LED de encendido
– se enciende cuando está
encendido
LED de llamada
– parpadea durante la actualización del
firmware
– se enciende con una llamada en curso
– parpadea lentamente cuando espera
a registros della unidad
LED de registro
– se enciende al
registrar la estación
base
LED de red
– parpadea durante el
arranque, indicando que la
estación base ha recibido
una dirección IP
resuMen dela unidad
Vista lateral
Clip para cinturón
Tecla de ajuste de volumen +-
Ajustar volumen
• del timbre al sonar una llamada
• del altavoz durante una llamada
Casquillo Headset 2,5 mm
Tecla de altavoz (encendido/apagado)
Vista trasera Altavoz dela
unidad Tapa de
batería
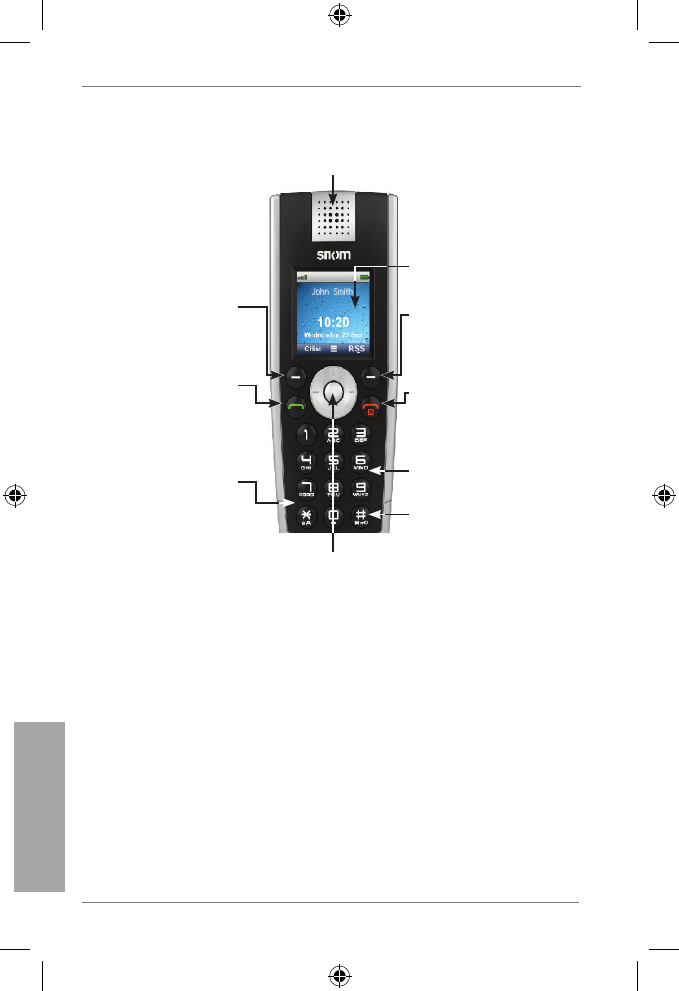
116
snom m9 Quick Start Guide
E
S
P
A
Ñ
O
L
Vista delantera
Tecla de navegación
El modo inactivo, pulse el borde superior/inferior/derecho/
izquierdo (indicado en la guía con ///) o el botón central
() para abrir los siguientes menús o funciones:
Menú principal
Directorio
Intercom
Menú Ajustes
Menú Preferencias
En otros contextos, pulse o tpara navegar pos los menús y
listas.
Tecla verde dela
unidad
Aceptar llamadas
Marcar número
Confirmar acciones
Tecla de función
izquierda
En modo inactivo:
Listas de llamadas
Tecla de función
derecha
En modo inactivo:
RSS Lector
Tecla roja dela
unidad
Terminar llamadas
Cancelar acciones
Alimentaciónon/off
Auricular
Pantalla a color
Teclado
alfanumérico
Tecla R
Bloquear +
desbloquear teclado
Tecla en estrella
Cambiar modo de
entrada (números,
minúsculas+
mayúsculas)
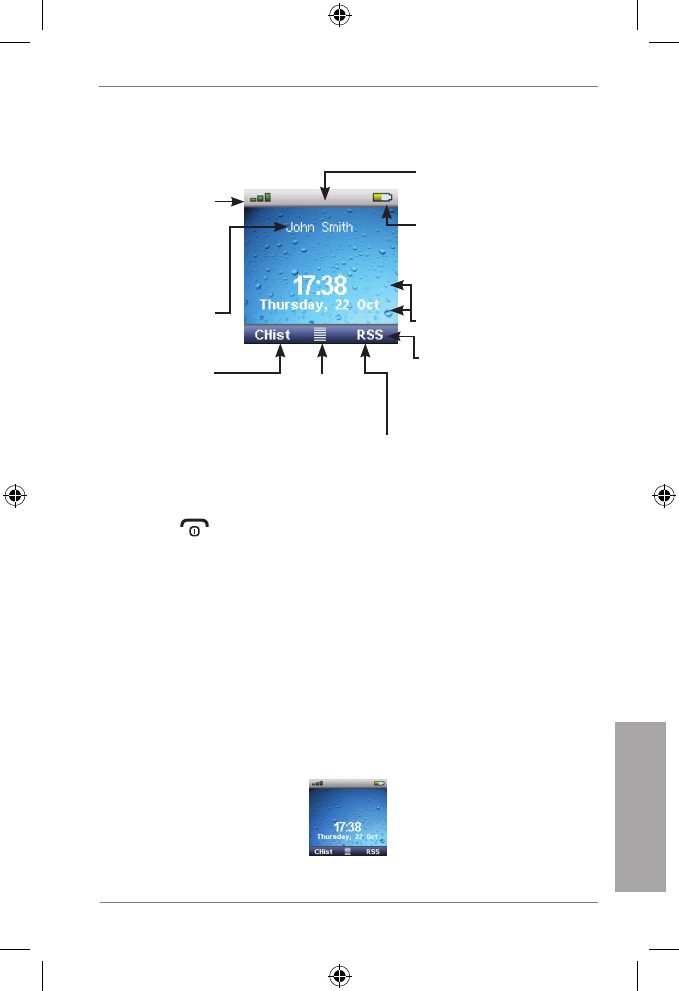
117
snom m9 Quick Start Guide
E
S
P
A
Ñ
O
L
estructura de pantalla, pantalla inactiVa
Estado de carga de
batería
Rojo=crítico
Amarillo=menos de 50%
Verde=sobre de 50%
Men
Ú
Preferencias
RSS Lector
Línea de teclas de
función
con símbolos
contextuales
Hora y fecha
Cuenta VoIP:
Listas de
llamadas:
Perdidas
Recibidas
Marcadas
Potencia de
señal:
Alta=verde
Baja=gris
Línea de estado
registro dela unidad
1. Pulse (tecla roja del teléfono). La pantalla mostrará:
“Buscando base". Cuando la unidad haya encontrado la estación
base, mostrará la indicación de PIN.
2. Introduzca el PIN por defecto "0000".
3. Pulse "OK".
Nota: Si la unidad no se registra automáticamente, puede
realizarse un registro manual. Pulse "->" para acceder al
menú Ajustes. Acceda al menú dela unidad y pulse "Register
Handset". Seleccione "Base 1". Introduzca el PIN y pulse "OK"
para registrar la unidad.
4. Cuando se haya registrado el teléfono con la base, la pantalla
mostrará:
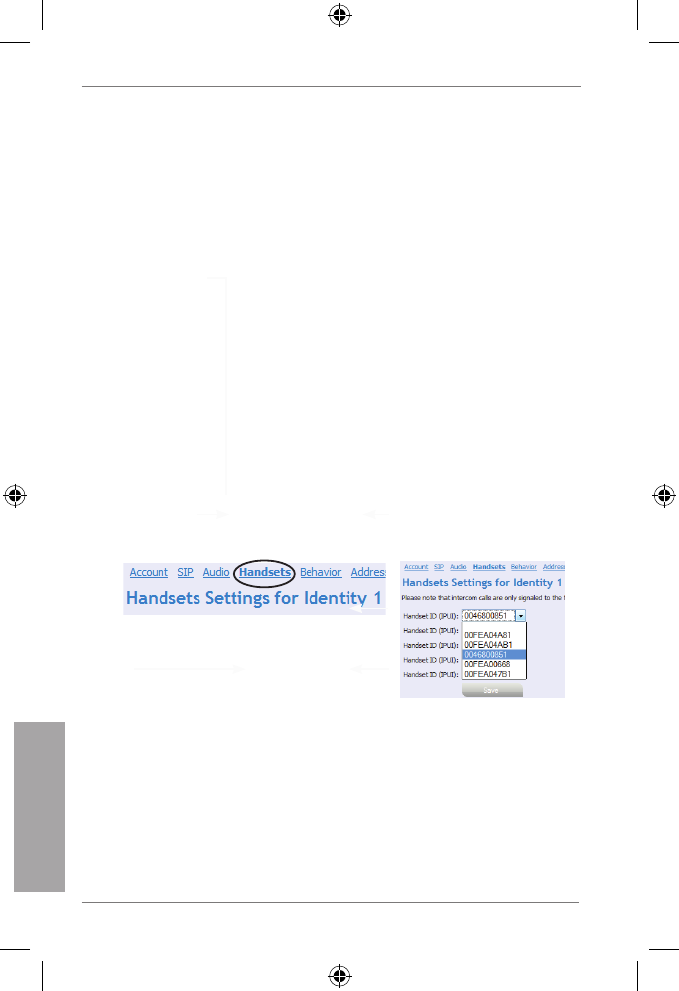
118
snom m9 Quick Start Guide
E
S
P
A
Ñ
O
L
Configuración de una cuenta VoIP
1. Pulse y en la tecla de navegación y "OK". La página
--Network-- con la dirección IP de la estación base se mostrará en
la pantalla. Apúntela.
2. Pulse en la tecla de navigación. La página --Handset-- se
mostrará en la pantalla. Anote il "Handset ID", por ejemplo
00FEA101C0 (sin "h" final, si presente).
3. Abra una ventana del navegador, teclee http://<IP address> en la
barra de dirección, y pulse ENTER para abrir la interfaz web de la
estación base.
Username (nombre de usuario) por defecto: admin
Password (contraseña) por defecto: password
4. Haga clic sobre "Identity 1" en el menú de la izquierda.
5. Introduzca la información de la cuenta SIP que recibió de su
administrador de sistema o proveedor de VoIP.
Account = cuenta
Password = contraseña
Authentication Name = nombre autenticación
Mailbox = cuenta de buzon de voz
Display name = Nombre o número de libre elección
6. Haga clic en la pestaña "Handsets".
7. Seleccione el número ID de la unidad en el menú desplegable de
"Handset ID (IPUI)". Haga clic sobre "Save".
8. Su snom m9 está listo para el uso.
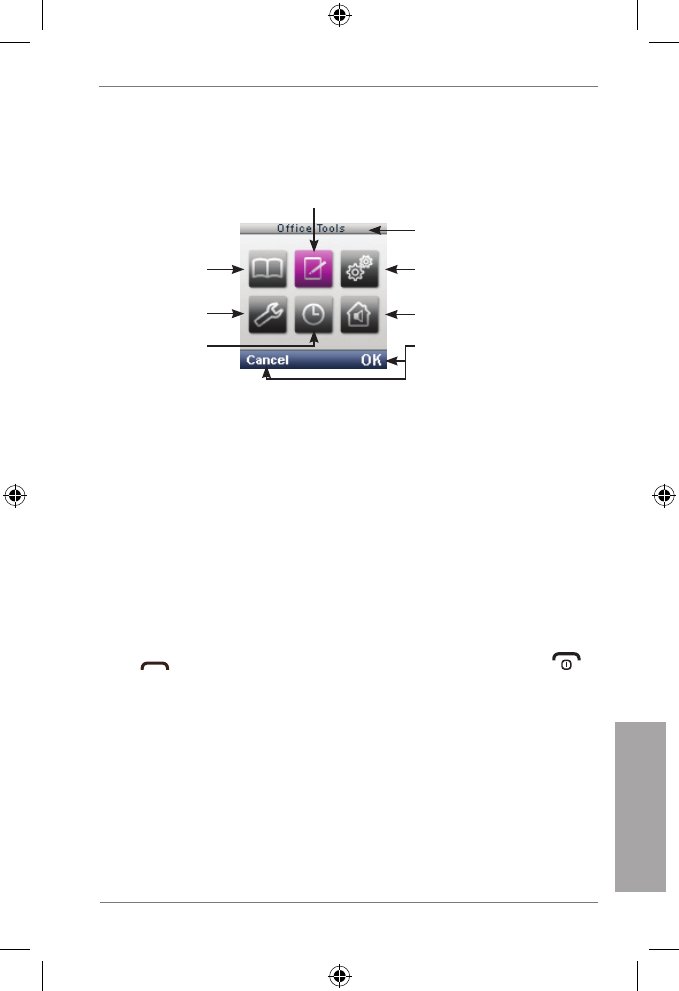
119
snom m9 Quick Start Guide
E
S
P
A
Ñ
O
L
los MenÚs del telÉfono
1. Pulse el centro dela tecla de navegación para abrir el menú superior.
Ajustes
Nombre del elemento
resaltado en el menú
Función actual de la
tecla de función debajo
Directorio
Preferencias
Alarma
Herramientas
Intercom
2. Pulse el borde superior/inferior/derecho/izquierdo dela tecla de
navegación (indicado en la guía por ) para navegar por
la pantalla.Pulse la tecla de función "OK" para abrir el submenú/
función. Pulse la tecla de función "Cancel" para volver a la pantalla
inactiva.
directorio
Use para seleccionar una entrada existente o <Nuovo Ingresso>.
Nuovo Ingresso: Siga las indicaciones para introducir el nombre y el
número y seleccione el timbre. Pulse "OK".
Pulse (tecla verde del teléfono) para marcar el número, pulse
para salir del directorio.
herraMientas
Cronómetro, Calculadora, Bloc de Notas, Calendario, RSS Lector,
Correo de voz (escuchar mensajes de su buzón de voz)
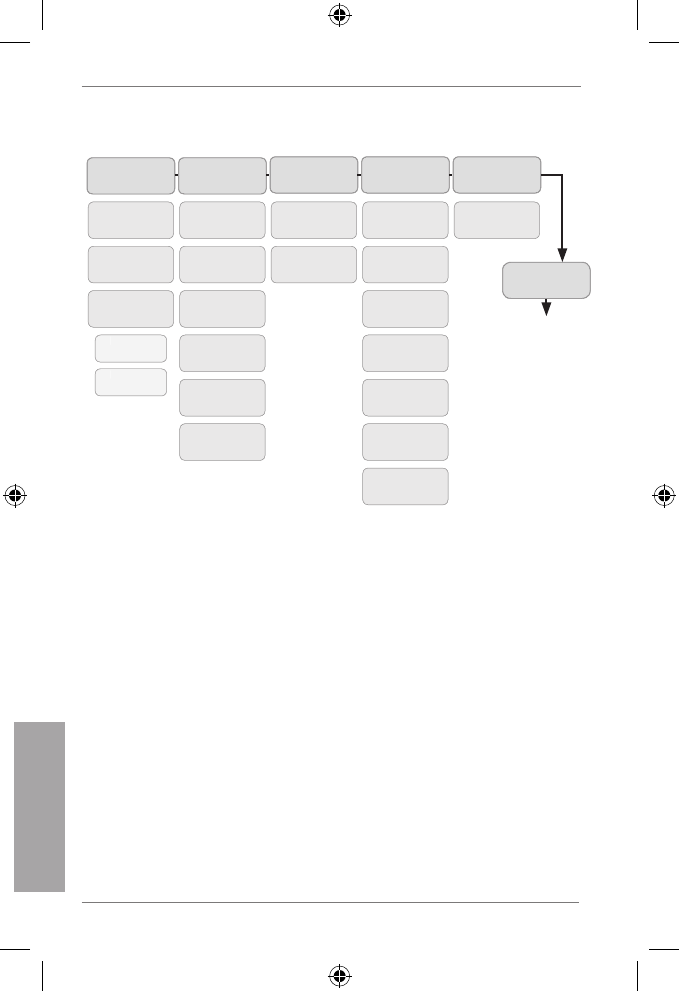
120
snom m9 Quick Start Guide
E
S
P
A
Ñ
O
L
MenÚ aJustes
Fecha/
Hora Red Unidad
Zona
horaria
Servidor de
hora
Formato
Formato
fecha
Formato
hora
VLAN
DHCP
Registrar
unidad
Seleccionar
base
Desregistrar
unidad
Reajustar
unidad
Actualización
FW
Versión
Reajustar
base
VoIP
Nombre
display
Cuenta
Contraseña
Buzón de
voz
Servidor
SIP
Outbound
Proxy
Cambio de
PIN
Nuevo PIN:
Estatus
de sistema
Dirección IP,
dirección MAC,
version
firmware,
identificación
de la base +
del unidad
alarMa
Activar | Hora | Melodía
intercoM
Llamar a todos: Llamar a todos unidades (registrados en la misma
estación base)
Llamar a unidad: Llamar a unidad seleccionada (registrados en la misma
estación base)
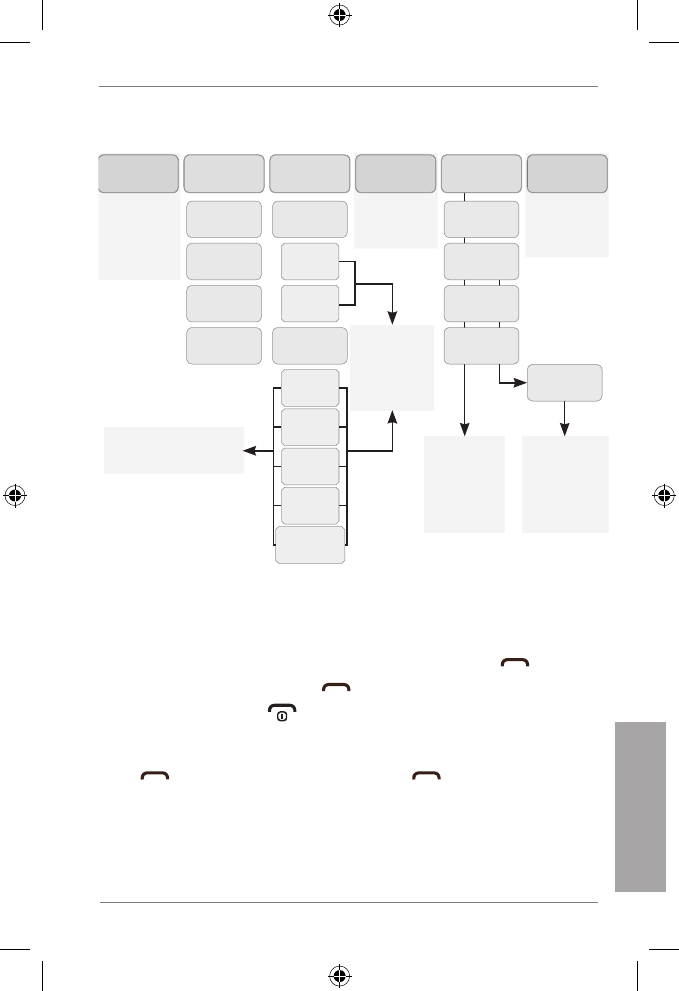
121
snom m9 Quick Start Guide
E
S
P
A
Ñ
O
L
MenÚ preferencias
“OK” > Selec-
cione idioma
con
y pulse “OK”
Idioma
Seleccione
con
y pulse “OK”
Auto con-
testado
Pantalla
Salva
pantalla
Tapiz
Contraste
Retro-
iluminación
Las llamadas
entrantes no
suenan
No
molestar
Seleccione
la condición
para la
reenvio de
llamadas y
pulse “OK”
Seleccione
el número de
teléfono de
destino y pulse
“OK”
Ajuste
audio
Ajustes
de timbrado
Llam.
internas*
Llam.
externas
Tonos
teclas
Tonos de
cargado
Batería
baja
Mensaje
nuevo
Tono de
confirmación
Tonos de
avviso Seleccione
melodía y volu-
men con y
pulse “OK”
Seleccione “Activar”
con y pulse “OK”
* Llamadas internas: De otros
teléfonos registrados en la
misma estación base
Siempre
Reenvio
de llamada
Nunca
Ocupado
Tiempo
adotado/sec.
Dirección
SIP
uso del telÉfono
Make and answer calls
Realizar una llamada: Introduzca el número > pulse "OK" o
Responder a una llamada: Pulse
Terminar llamada: Pulse
Remarcación
Pulse > seleccione el número > pulse o "OK"
Reenvio de llamadas
Preferencias > Reenvío de llamadas > teclear PIN > pulse OK >
seleccionar identidad > seleccionar condición (siempre, ocupado,

122
snom m9 Quick Start Guide
E
S
P
A
Ñ
O
L
tiempo agotado) > seleccionar dirección SIP > teclear número de
teléfono de destino > pulse OK > en la requerimiento pulse "Si" para
reiniciar el unidad
Apagar el reenvío de llamadas: Preferencias > Reenvío de llamadas
> teclear PIN > OK > seleccionar identidad > seleccionar condición
"Nunca"
Poner en espera y continuar
Poner llamada en espera: Pulse Opciones > En espera
Recuperar llamada: Pulsar Opciones > Recuperar
Transferir llamada
Con la llamada activa, pulse Opciones > Transferir > teclear número >
pulse OK
MiscelÁnea
Buscar dirección MAC (=número de serie) de la estación
base:
Pulse y en la tecla de navegación y "OK" (Ajustes > Estaus de
sistema > Red)
Buscar dirección IP de la estación base:
Pulse y en la tecla de navegación y "OK" (Ajustes > Estaus de
sistema > Red)
Abra la interfaz web de la estación base:
Teclar la dirección IP en la barra de dirección del navegador y pulse
ENTER
Reiniciar la estación base:
Menú “Ajustes” > Unidad > Reiniciar base > “OK”
o
Pulse la tecla “Reset” en la parte posterior de la estación base.

123
snom m9 Quick Start Guide
E
S
P
A
Ñ
O
L
Reiniciar unidad:
Menú “Ajustes” > Unidad > Reiniciar unidad > “OK”

A
APPENDIX · ANHANG · ANNEXE · APENDICE · ANEXO
124
COPYRIGHT NOTICE AND WARRANTY DISCLAIMER
I.
Das Produkt enthält Software, die unter der GNU General Public License,
Version 2, frei genutzt werden darf.
This Product contains Software applicable to GNU General Public
License, Version 2 which can be used freely.
II.
Im Verhältnis zu den Lizenzgebern der Software gilt der folgende
Haftungsausschluss:
This program is distributed in the hope that it will be useful, but
WITHOUT ANY WARRANTY; without even the implied warranty of
MERCHANTABILITY or FITNESS FOR A PARTICULAR PURPOSE.
See the GNU General Public License for more details.
Towards the licensor of this Software the following liability is disclaimed:
This program is distributed in the hope that it will be useful, but
WITHOUT ANY WARRANTY; without even the implied warranty of
MERCHANTABILITY or FITNESS FOR A PARTICULAR PURPOSE.
See the GNU General Public License for more details.
III.
Der Lizenztext der GPL lautet wie folgt:
The GNU General Public License is as follows:
A
snom m9 Quick Start Guide
125
gnu general puBlic license
Version 2, June 1991
Copyright (C) 1989, 1991
Free Software Foundation, Inc.
59 Temple Place, Suite 330
Boston, MA 02111-1307, USA
Everyone is permitted to copy and distribute verbatim copies of this license
document, but changing it is not allowed.
Preamble
The licenses for most software are designed to take away your freedom to
share and change it. By contrast, the GNU General Public License is intended
to guarantee your freedom to share and change free software--to make sure
the software is free for all its users. This General Public License applies to most
of the Free Software Foundation‘s software and to any other program whose
authors commit to using it. (Some other Free Software Foundation software is
covered by the GNU Library General Public License instead.) You can apply it
to your programs, too.
When we speak of free software, we are referring to freedom, not price. Our
General Public Licenses are designed to make sure that you have the freedom
to distribute copies of free software (and charge for this service if you wish),
that you receive source code or can get it if you want it, that you can change
the software or use pieces of it in new free programs; and that you know you
can do these things.
To protect your rights, we need to make restrictions that forbid anyone to deny
you these rights or to ask you to surrender the rights. These restrictions translate
to certain responsibilities for you if you distribute copies of the software, or if
you modify it. For example, if you distribute copies of such a program, whether
gratis or for a fee, you must give the recipients all the rights that you have. You
must make sure that they, too, receive or can get the source code. And you
must show them these terms so they know their rights.

A
APPENDIX · ANHANG · ANNEXE · APENDICE · ANEXO
126
We protect your rights with two steps: (1) copyright the software, and (2) offer
you this license which gives you legal permission to copy, distribute and/or
modify the software.
Also, for each author‘s protection and ours, we want to make certain that
everyone understands that there is no warranty for this free software. If the
software is modified by someone else and passed on, we want its recipients to
know that what they have is not the original, so that any problems introduced by
others will not reflect on the original authors‘ reputations.
Finally, any free program is threatened constantly by software patents. We wish
to avoid the danger that redistributors of a free program will individually obtain
patent licenses, in effect making the program proprietary. To prevent this, we
have made it clear that any patent must be licensed for everyone‘s free use or
not licensed at all.
The precise terms and conditions for copying, distribution and modification
follow.
GNU GENERAL PUBLIC LICENSE
TERMS AND CONDITIONS FOR COPYING, DISTRIBUTION AND
MODIFICATION
0. This License applies to any program or other work which contains a notice
placed by the copyright holder saying it may be distributed under the terms of
this General Public License. The „Program“, below, refers to any such program
or work, and a „work based on the Program“ means either the Program or
any derivative work under copyright law: that is to say, a work containing
the Program or a portion of it, either verbatim or with modifications and/or
translated into another language. (Hereinafter, translation is included without
limitation in the term „modification“.) Each licensee is addressed as „you“.
Activities other than copying, distribution and modification are not covered
by this License; they are outside its scope. The act of running the Program is
not restricted, and the output from the Program is covered only if its contents
constitute a work based on the Program (independent of having been made
by running the Program). Whether that is true depends on what the Program
does.
1.You may copy and distribute verbatim copies of the Program‘s source
code as you receive it, in any medium, provided that you conspicuously
A
snom m9 Quick Start Guide
127
and appropriately publish on each copy an appropriate copyright
notice and disclaimer of warranty; keep intact all the notices that refer
to this License and to the absence of any warranty; and give any other
recipients of the Program a copy of this License along with the Program.
You may charge a fee for the physical act of transferring a copy, and you may
at your option offer warranty protection in exchange for a fee.
2. You may modify your copy or copies of the Program or any portion of it,
thus forming a work based on the Program, and copy and distribute such
modifications or work under the terms of Section 1 above, provided that
you also meet all of these conditions:
a) You must cause the modified files to carry prominent notices stating that
you changed the files and the date of any change.
b) You must cause any work that you distribute or publish, that in whole or
in part contains or is derived from the Program or any part thereof, to be
licensed as a whole at no charge to all third parties under the terms of this
License.
c) If the modified program normally reads commands interactively when
run, you must cause it, when started running for such interactive use in
the most ordinary way, to print or display an announcement including an
appropriate copyright notice and a notice that there is no warranty (or
else, saying that you provide a warranty) and that users may redistribute
the program under these conditions, and telling the user how to view a
copy of this License. (Exception: if the Program itself is interactive but
does not normally print such an announcement, your work based on the
Program is not required to print an announcement.)
These requirements apply to the modified work as a whole. If identifi-
able sections of that work are not derived from the Program, and can be
reasonably considered independent and separate works in themselves,
then this License, and its terms, do not apply to those sections when
you distribute them as separate works. But when you distribute the same
sections as part of a whole which is a work based on the Program, the
distribution of the whole must be on the terms of this License, whose
permissions for other licensees extend to the entire whole, and thus to
each and every part regardless of who wrote it.
Thus, it is not the intent of this section to claim rights or contest your
rights to work written entirely by you; rather, the intent is to exercise the

A
APPENDIX · ANHANG · ANNEXE · APENDICE · ANEXO
128
right to control the distribution of derivative or collective works based on
the Program.
In addition, mere aggregation of another work not based on the Program
with the Program (or with a work based on the Program) on a volume of
a storage or distribution medium does not bring the other work under the
scope of this License.
3. You may copy and distribute the Program (or a work based on it, under Section
2) in object code or executable form under the terms of Sections 1 and 2 above
provided that you also do one of the following:
a) Accompany it with the complete corresponding machine-readable source
code, which must be distributed under the terms of Sections 1 and 2 above
on a medium customarily used for software interchange; or,
b) Accompany it with a written offer, valid for at least three years, to give any
third party, for a charge no more than your cost of physically performing
source distribution, a complete machine-readable copy of the
corresponding source code, to be distributed under the terms of Sections
1 and 2 above on a medium customarily used for software interchange; or,
c) Accompany it with the information you received as to the offer to
distribute corresponding source code. (This alternative is allowed only for
noncommercial distribution and only if you received the program in object
code or executable form with such an offer, in accord with Subsection b
above.)
The source code for a work means the preferred form of the work for
making modifications to it. For an executable work, complete source
code means all the source code for all modules it contains, plus any
associated interface definition files, plus the scripts used to control
compilation and installation of the executable. However, as a special
exception, the source code distributed need not include anything
that is normally distributed (in either source or binary form) with the
major components (compiler, kernel, and so on) of the operating
system on which the executable runs, unless that component itself
accompanies the executable.
If distribution of executable or object code is made by offering access
to copy from a designated place, then offering equivalent access to
copy the source code from the same place counts as distribution of
the source code, even though third parties are not compelled to copy
the source along with the object code.
4. You may not copy, modify, sublicense, or distribute the Program except
A
snom m9 Quick Start Guide
129
as expressly provided under this License. Any attempt otherwise to copy,
modify, sublicense or distribute the Program is void, and will automatically
terminate your rights under this License. However, parties who have received
copies, or rights, from you under this License will not have their licenses
terminated so long as such parties remain in full compliance.
5. You are not required to accept this License, since you have not signed it.
However, nothing else grants you permission to modify or distribute the
Program or its derivative works. These actions are prohibited by law if you do
not accept this License. Therefore, by modifying or distributing the Program
(or any work based on the Program), you indicate your acceptance of this
License to do so, and all its terms and conditions for copying, distributing or
modifying the Program or works based on it.
6. Each time you redistribute the Program (or any work based on the Program),
the recipient automatically receives a license from the original licensor to
copy, distribute or modify the Program subject to these terms and conditions.
You may not impose any further restrictions on the recipients‘ exercise of the
rights granted herein. You are not responsible for enforcing compliance by
third parties to this License.
7. If, as a consequence of a court judgment or allegation of patent infringement
or for any other reason (not limited to patent issues), conditions are imposed
on you (whether by court order, agreement or otherwise) that contradict the
conditions of this License, they do not excuse you from the conditions of
this License. If you cannot distribute so as to satisfy simultaneously your
obligations under this License and any other pertinent obligations, then as
a consequence you may not distribute the Program at all. For example, if a
patent license would not permit royalty-free redistribution of the Program by
all those who receive copies directly or indirectly through you, then the only
way you could satisfy both it and this License would be to refrain entirely from
distribution of the Program.
If any portion of this section is held invalid or unenforceable under any
particular circumstance, the balance of the section is intended to apply
and the section as a whole is intended to apply in other circumstances.
It is not the purpose of this section to induce you to infringe any patents
or other property right claims or to contest validity of any such claims;
this section has the sole purpose of protecting the integrity of the free
software distribution system, which is implemented by public license
practices. Many people have made generous contributions to the wide
range of software distributed through that system in reliance on consis-
tent application of that system; it is up to the author/donor to decide if
he or she is willing to distribute software through any other system and a

A
APPENDIX · ANHANG · ANNEXE · APENDICE · ANEXO
130
licensee cannot impose that choice.
This section is intended to make thoroughly clear what is believed to be
a consequence of the rest of this License.
8. If the distribution and/or use of the Program is restricted in certain countries
either by patents or by copyrighted interfaces, the original copyright holder
who places the Program under this License may add an explicit geographical
distribution limitation excluding those countries, so that distribution is
permitted only in or among countries not thus excluded. In such case, this
License incorporates the limitation as if written in the body of this License.
9. The Free Software Foundation may publish revised and/or new
versions of the General Public License from time to time. Such
new versions will be similar in spirit to the present version,
but may differ in detail to address new problems or concerns.
Each version is given a distinguishing version number. If the Program
specifies a version number of this License which applies to it and „any later
version“, you have the option of following the terms and conditions either of
that version or of any later version published by the Free Software Foundation.
If the Program does not specify a version number of this License, you may
choose any version ever published by the Free Software Foundation.
10. If you wish to incorporate parts of the Program into other free programs
whose distribution conditions are different, write to the author to ask for
permission. For software which is copyrighted by the Free Software
Foundation, write to the Free Software Foundation; we sometimes make
exceptions for this. Our decision will be guided by the two goals of preserving
the free status of all derivatives of our free software and of promoting the
sharing and reuse of software generally.
NO WARRANTY
11. BECAUSE THE PROGRAM IS LICENSED FREE OF CHARGE, THERE
IS NO WARRANTY FOR THE PROGRAM, TO THE EXTENT PERMITTED
BY APPLICABLE LAW. EXCEPT WHEN OTHERWISE STATED IN
WRITING THE COPYRIGHT HOLDERS AND/OR OTHER PARTIES
PROVIDE THE PROGRAM „AS IS“ WITHOUT WARRANTY OF ANY KIND,
EITHER EXPRESSED OR IMPLIED, INCLUDING, BUT NOT LIMITED TO,
THE IMPLIED WARRANTIES OF MERCHANTABILITY AND FITNESS FOR
A PARTICULAR PURPOSE. THE ENTIRE RISK AS TO THE QUALITY
AND PERFORMANCE OF THE PROGRAM IS WITH YOU. SHOULD
THE PROGRAM PROVE DEFECTIVE, YOU ASSUME THE COST OF ALL
NECESSARY SERVICING, REPAIR OR CORRECTION.
A
snom m9 Quick Start Guide
131
12. IN NO EVENT UNLESS REQUIRED BY APPLICABLE LAW OR AGREED
TO IN WRITING WILL ANY COPYRIGHT HOLDER, OR ANY OTHER
PARTY WHO MAY MODIFY AND/OR REDISTRIBUTE THE PROGRAM AS
PERMITTED ABOVE, BE LIABLE TO YOU FOR DAMAGES, INCLUDING
ANY GENERAL, SPECIAL, INCIDENTAL OR CONSEQUENTIAL
DAMAGES ARISING OUT OF THE USE OR INABILITY TO USE THE
PROGRAM (INCLUDING BUT NOT LIMITED TO LOSS OF DATA OR DATA
BEING RENDERED INACCURATE OR LOSSES SUSTAINED BY YOU OR
THIRD PARTIES OR A FAILURE OF THE PROGRAM TO OPERATE WITH
ANY OTHER PROGRAMS), EVEN IF SUCH HOLDER OR OTHER PARTY
HAS BEEN ADVISED OF THE POSSIBILITY OF SUCH DAMAGES.
END OF TERMS AND CONDITIONS
How to Apply These Terms to Your New Programs
If you develop a new program, and you want it to be of the greatest possible
use to the public, the best way to achieve this is to make it free software which
everyone can redistribute and change under these terms.
To do so, attach the following notices to the program. It is safest to attach
them to the start of each source file to most effectively convey the exclusion of
warranty; and each file should have at least the „copyright“ line and a pointer to
where the full notice is found.
<one line to give the program‘s name and a brief idea of what it
does>
Copyright (C) <year> <name of author>
This program is free software; you can redistribute it and/or modify it
under the terms of the GNU General Public License as published by
the Free Software Foundation; either version 2 of the License, or (at
your option) any later version.
This program is distributed in the hope that it will be useful, but
WITHOUT ANY WARRANTY; without even the implied warranty of
MERCHANTABILITY or FITNESS FOR A PARTICULAR PURPOSE.
See the GNU General Public License for more details.
You should have received a copy of the GNU General Public
License along with this program; if not, write to the Free Software
Foundation, Inc., 59 Temple Place, Suite 330, Boston, MA 02111-
1307 USA

A
APPENDIX · ANHANG · ANNEXE · APENDICE · ANEXO
132
IV.
Den vollständigen korrespondierenden Sourcecode der Software schickt
Ihnen die snom technology AG auf Nachfrage gerne auf einem üblichen
Datenträger gegen Erstattung der Herstellungskosten in Höhe von EUR 5,- zu.
Der vollständige korrespondierende Sourcecode kann auch über unsere
Website unter http://www.snom.com/gpl_.html?&L=0 herunter geladen werden.
If requested by you, the complete corresponding source code of the Software
can be sent by snom technology AG on a standard data storage medium
against the reimbursement of the manufacturing costs of EUR 5.- per unit.
The complete corresponding source code of the Software can also be
downloaded from our web site http://www.snom.com/gpl_.html?&L=0.
V.
Weitere Informationen finden Sie auch unter http://www.snom.com.
For further information see http://www.snom.com.

133
ENGLISH
DEUTSCH
FRANÇAIS
ITALIANO
ESPAÑOL
www.snom.com
www.snom.com
© 2010 snom technology AG
v1.09
Quick Start Guide
snom technology AG
Charlottenstr. 68-71
10117 Berlin, Deutschland
Tel. +49 30 39 83 3-0
Fax +49 30 39 83 31 11
info@snom.com, sales@snom.com
snom technology, Inc.
18 Commerce Way, Suite 6000
Woburn, MA 01801, USA
Tel. (781) 569-2044
Fax (781) 569-2045
infoUSA@snom.com
snom France SARL
6 Parc des fontenelles
78870 Bailly, France
Tel. +33 1 80 87 62 87
Fax +33 1 80 87 62 88
info@snom.com, sales@snom.com
snom technology SRL
Via A. Lusardi 10
20122 Milano, Italia
Tel +39 02 00611212
Fax +39 02 93661864
info@snom.com, sales@snom.com
Your specialist retailer - Ihr Fachhändler -
Votre distributeur - Su distribuidor - Il tuo rivenditore: