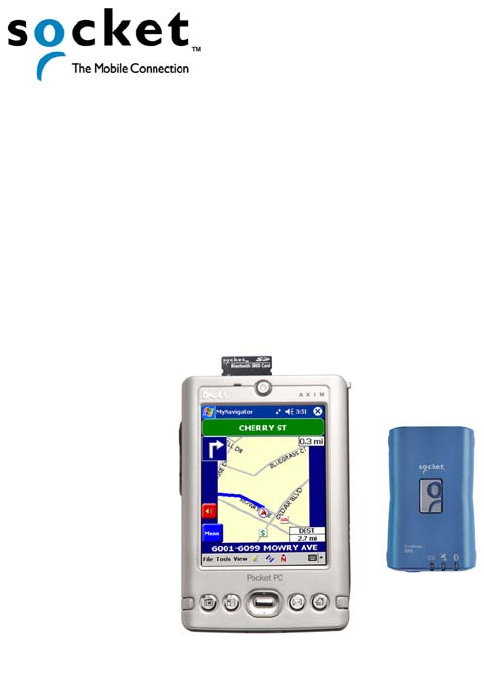
Socket Mobile GPS-2 Bluetooth Wireless GPS Nav Kit User Manual Manual
Socket Mobile, Inc. Bluetooth Wireless GPS Nav Kit Manual
Manual
s
Quick Start Guide
GPS Nav Kit with
Bluetooth® Wireless Technology
2
Introduction
If you’re constantly on the road but hate to
hassle with paper maps, let the Socket GPS
Nav Kit with Bluetooth Wireless
Technology steer you in the right direction.
It’s the ideal solution for in-car navigation
with a Pocket PC or notebook computer.
The in-car navigation software features
human voice prompts, including detailed
turn-by-turn directions. The software
automatically re-calculates your journey in
case you veer off course.
All you need is a Bluetooth enabled Pocket PC 2002/2003 or Windows
98SE/Me/2000/XP notebook computer. The included GPS Receiver allows
you to take advantage of your mobile computer’s Bluetooth capability to
wirelessly add GPS positioning technology. If your mobile computer does
not have Bluetooth functionality, it’s easy to add with Socket’s Connection
Kit with Bluetooth Wireless Technology (CompactFlash or SDIO card with
user-friendly software). There’s even a kit with a PC Card adapter and
software for adding Bluetooth capability to a notebook computer.
For software updates, please visit: www.socketcom.com/product/gps.asp
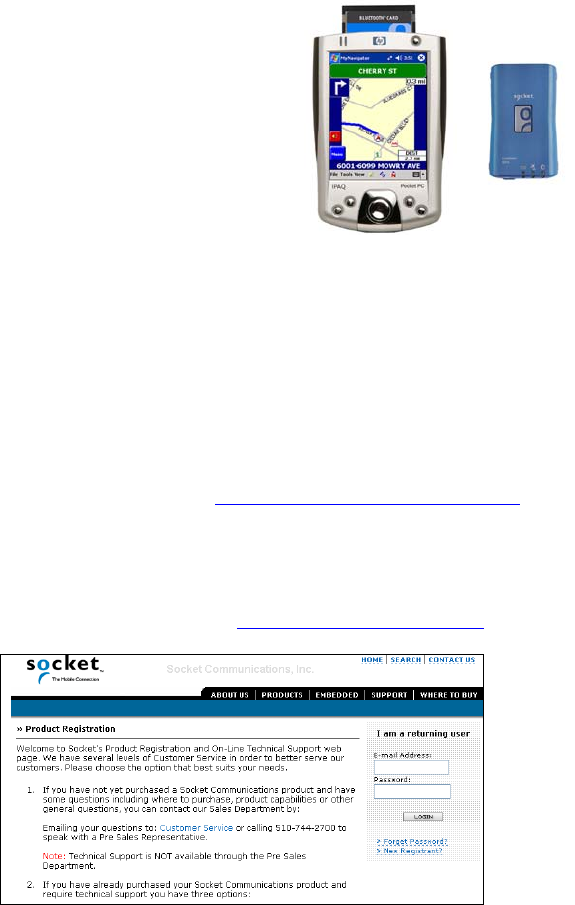
Product Registration
Socket highly recommends that all users register their product. Registered
users receive priority for technical support and may qualify for upgrades on
map data. You can register online at: www.socketcom.com/prodreg/
3
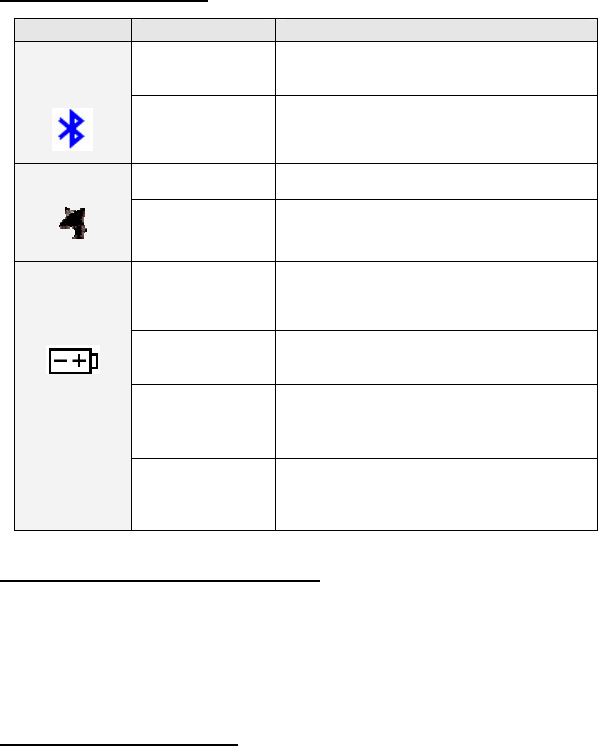
Hardware Features
Status Indicator LEDs
LED LED Activity Meaning
Solid Blue Bluetooth radio is on, but not
connected.
Bluetooth
Status
Blinking Blue Bluetooth radio is on, connection
established.
Off GPS fix has not been obtained.
GPS Status
Blinking Green GPS fix has been obtained.
Blinking Red
Running on battery power, with
battery less than 10% full. Charge
immediately.
Solid Amber Connected to power charger, with
battery less than 90% full.
Off when
connected to
power charger
Battery is more than 90% full.
Battery
Status
Off when not
connected to
power charger
Device is running on battery power,
with battery more than 10% full.
Battery, Power Jack, and Charger
Recharge the internal battery by inserting a DC or AC power charger into
the power jack. The adapter rating is 5V, 2A, positive pole center. A fully
charged battery should provide roughly 8 hours of operation. AC and DC
adapters of most recent Pocket PCs from Casio, Compaq, Dell, Fujitsu, HP
and Toshiba are also compatible.
Warning — Heat Damage
Do not expose the GPS Receiver to temperatures above 60° C (140° F),
such as in a car under direct sunlight. Exposure of the GPS Receiver to
high temperatures can shorten the electronic device’s life, melt or drape the
plastic housing, damage the internal battery, and increase the risk of
explosion.
4
Setup Instructions
This Quick Start Guide provides the most basic instructions for installing
and using the GPS Nav Kit to navigate to a destination with known address.
The MyNavigator software includes many options that are not covered in
this Quick Start Guide. For complete instructions, please refer to the User’s
Guide on the installation CD.
Setup Summary
STEP 1: Charge the battery.
STEP 2: Install the software.
STEP 3: Load maps onto the mobile computer.
STEP 4: Turn on receiver and wait for GPS fix.
STEP 4: Connect the receiver and mobile computer via Bluetooth.
STEP 6: Navigate to your destination.
STEP 1: Charge the Battery
1. Charge the GPS Receiver, using a DC or AC
adapter. Connect a DC charger to a vehicle
cigarette lighter, or connect an AC charger to an
electrical outlet. As the device charges, the Battery
Status LED will emit a solid amber light.
2. When the battery is more than 90% full, the LED
will turn off. Unplug the device and remove the
charger.
STEP 2: Install the Software
1. Pocket PCs only: Use ActiveSync and a serial/Ethernet/USB cable or
cradle to make an active connection between the mobile computer and
a host PC.
2. Insert Disk 1 into your CD-ROM drive.
3. Use My Computer or Windows Explorer to access the CD-ROM drive.
In the CD, click on SETUP.EXE.
4. Follow the instructions on your screen to install the software.
5. When prompted, select the type of mobile computer you want to install the
software onto.
6. Now you are ready to load maps. If you are using a Pocket PC, do not
disconnect it from your host PC.
5
STEP 3: Load Maps into the Mobile Computer
You can load maps into either the main memory of your mobile computer
or into a memory card. Please note that maps covering large areas can
require several megabytes of memory. Map Loader conveniently detects
and reports how much space is available. Depending on the amount of
available storage space, you can load maps for an entire region or just a
city.
Starting the Program
1. Pocket PCs only: Make sure you still have an active connection between
your Pocket PC and host PC (e.g., via ActiveSync).
2. After you install the software, the MyNavigator Map Loader will
automatically launch.
Note: To access Map Loader again, tap on the icon on
your desktop, or go to
Start | Programs | Socket Communications | MyNavigator | Map Loader.
3. A warning screen will appear, recommending different map loading
options depending on the memory resources available on your mobile
computer. Read the warning, then click OK.
4. Make sure the appropriate Socket CD is inserted into your host PC.
• If you are using the North America Nav Kit, insert Disk 1.
• If you are using the Western Europe version, insert Disk 1 for the
western half of Western Europe or Disk 2 for the eastern half of
Western Europe.
Loading Maps
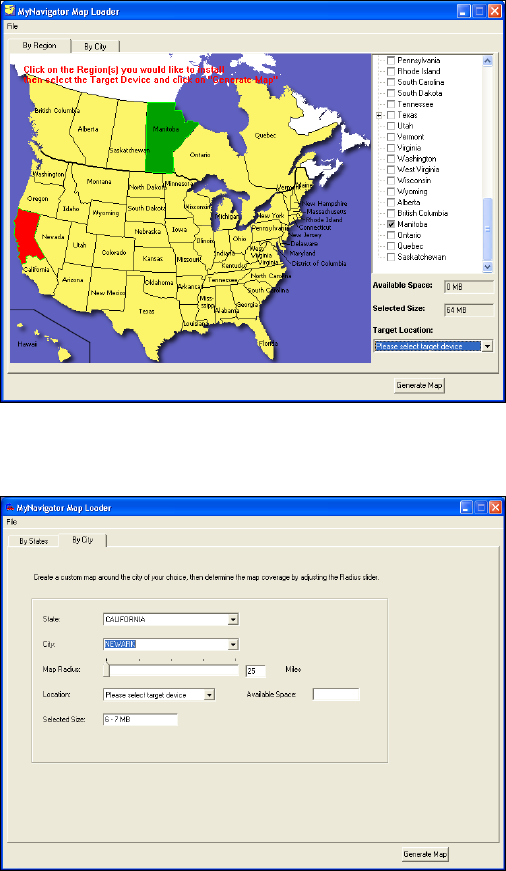
1. MapLoader will start with the By Region screen open. If you have less
than 64 MB of space available, click on the By City tab.
2. Select the area you wish to load maps for.
By Region: Select the region(s) you plan to travel through. You can
either click directly on the map or select from the list.
By City: Enter the following settings:
• Region: Select the region/state where the city is located.
• City: Select the city you wish to load maps for. Only cities in the
selected region will be listed. Scroll to select, or click in the field
and type the city name.
• Map Radius: Scroll to select the radius of the map. You can choose
between 25 and 125 miles, in 25-mile increments.
6
By Region
By City
3. The total file size for the maps you selected will appear in the
Selected Size field at the bottom of the screen.
7
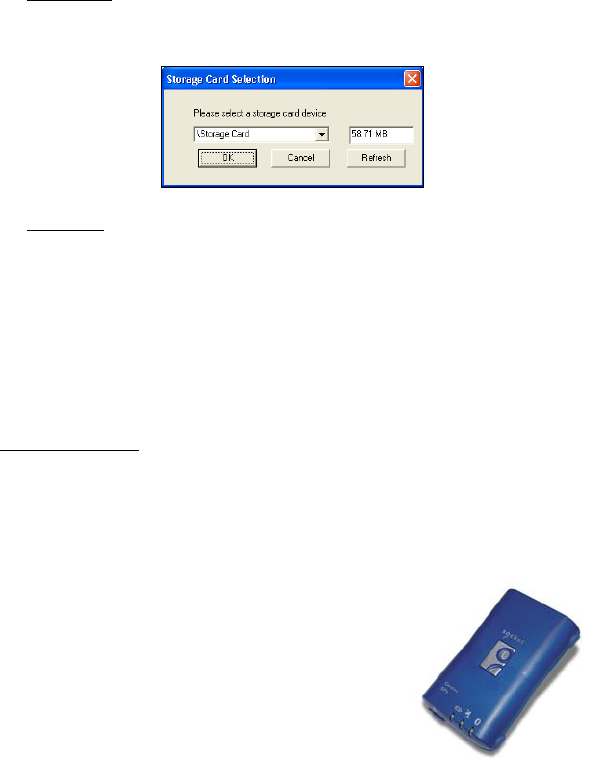
4. In the Location drop-down menu at the bottom of the screen, select the
appropriate file storage location:
a. Pocket PC; Select Pocket PC Storage Card. In the Storage Card
Selection screen, use the drop-down menu to select the storage card
you want to use. Click OK.
b. Notebook: select C:
5. The amount of memory available at the specified location will appear in
the Available Space field at the bottom of the screen. Make sure there is
enough available space for the selected maps. Click Generate Map.
6. The Generating Map screen will appear. Map files will begin to load.
Depending on the size of the files, the process may take several minutes.
7. When map installation is complete, click OK.
8. Pocket PCs only: After software installation, disconnect the Pocket PC
from the host PC. Soft reset the Pocket PC by pressing the reset button.
STEP 4: Turn on Receiver and Wait for GPS Fix
1. To obtain a GPS fix, you must be outdoors or in
a vehicle, and the GPS Receiver must have a
direct line of sight to the sky.
2. Turn on the GPS Receiver and wait for the GPS
Status LED to blink green, indicating that it has
obtained a GPS fix.
Note: Certain metals such as lead (e.g., in lead-
based paint) can block GPS signals from the receiver.
8
STEP 5: Connect the Receiver and Mobile
Computer via Bluetooth
Connection instructions vary depending on which Bluetooth hardware and
software you are using with your mobile computer. Follow the appropriate
instructions for your mobile computer.
Socket SDIO or CF Connection Kit for Windows Mobile
1. The Bluetooth Status LED should be emitting a solid blue light to
show that the Bluetooth radio is on but not connected.
2. Insert the Socket Connection Card into your mobile computer.
3. Tap on the Bluetooth icon. Tap Advanced Features | Bluetooth Devices.
4. Tap on the Device Discovery icon at the bottom of the screen.
Alternatively, tap Tools | Device Discovery.
5. Follow the Device Discovery Wizard to search for the GPS Receiver.
6. After you have completed the Device Discovery Wizard, the GPS
Receiver should appear in the Bluetooth Devices folder.
7. Tap and hold your stylus on the icon for the GPS Receiver. In the
pop-up menu, tap Bond. Alternatively, select the GPS Receiver and
tap on the Bond icon, or tap Device | Bond.
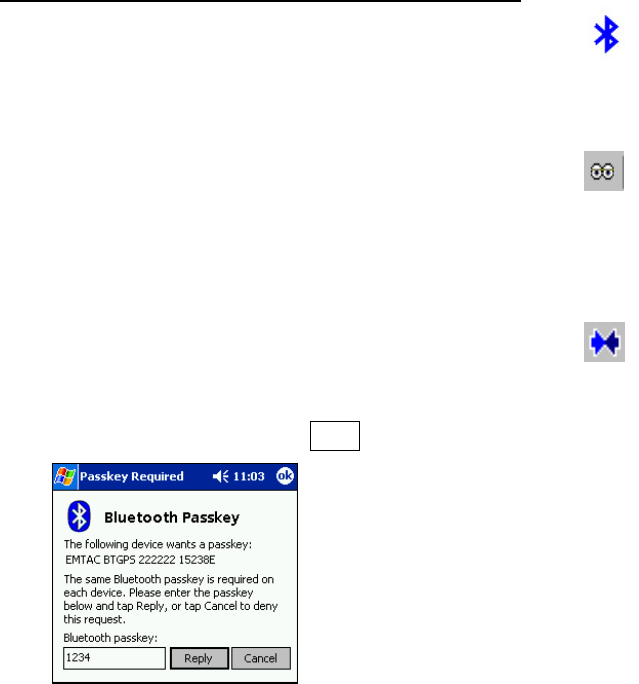
8. Follow the Device Bonding Wizard to bond with the GPS Receiver.
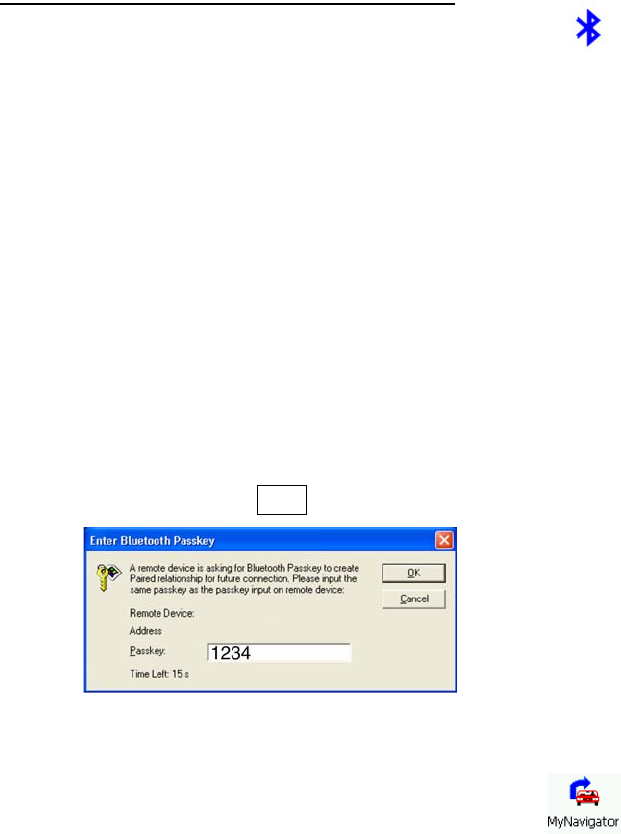
When prompted, enter the passkey 1234.
9. After you have successfully bonded with the GPS Receiver, set the GPS
Receiver as your Favorite COM Port. In the Bluetooth Devices folder,
tap Tools | My Favorites | COM Port and select BTGPS.
10. Start MyNavigator. Tap Start | Programs | My Navigator
11. A warning screen will appear. Read the warning, then tap OK.
N
ote: You only need
to discover, bond
with, and pair with
the GPS Receiver
the first time you use
it with MyNavigator.
9
Socket Connection Kit For Windows Notebooks
1. The Bluetooth Status LED should be emitting a solid blue light
to show that the Bluetooth radio is on but not connected.
2. Insert the Socket Connection Card into your computer, using a CF-to-
PC Card adapter.
3. Start BlueSoleil. Click on the BlueSoleil icon on your desktop, or go to
Start | Programs | Socket | BlueSoleil.
4. In the Main Window, double-click on the red ball to start a device
search. Alternatively, you can click My Bluetooth | My Device Inquiry or
View | Refresh Devices or press F5.
5. After the device search, an icon for the GPS Receiver should appear.
Double-click on the icon. After a few seconds, the Serial Port Service
icon should be highlighted at the top of the Main Window.
6. Double-click on the Serial Port Service icon. Alternatively, right-click
on the icon for the GPS Receiver. In the pop-up menu, click Connect |
Serial Port Profile.
7. Your computer will begin to connect to the GPS Receiver. When
prompted, enter the passkey 1234.
You only need to discover, bond with, and pair with the GPS Receiver
the first time you use it with MyNavigator.
8. Start MyNavigator. Click on the icon on your desktop.
Alternatively, click Start | Programs | Socket | My Navigator.
9. A warning screen will appear. Read the warning, then tap OK.
10. Find out which COM port your computer uses for outbound Bluetooth
serial communications. Click Tools | Configurations | Connect With.
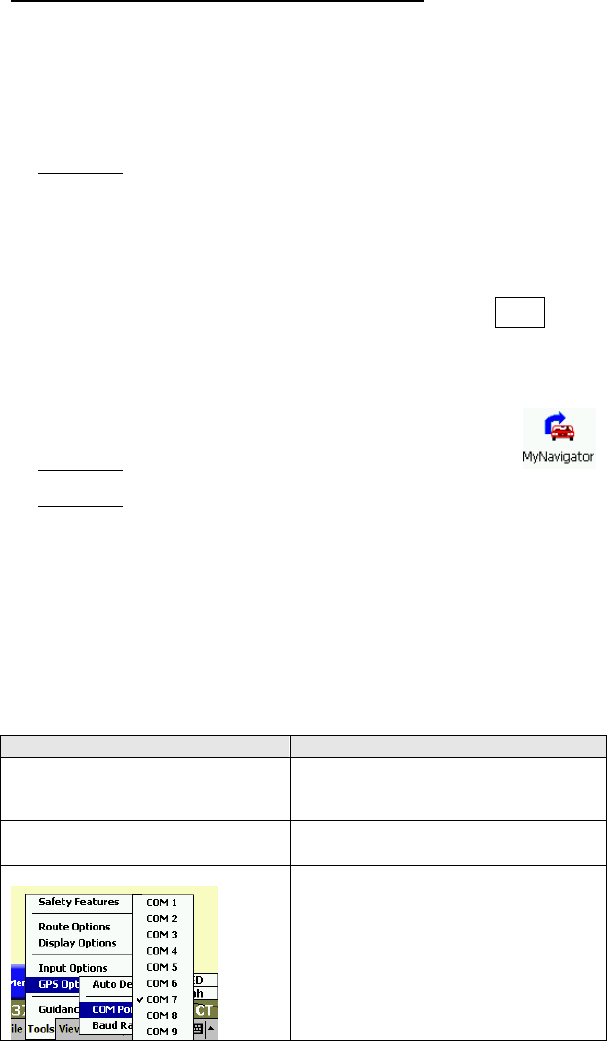
11. In MyNavigator, tap Tools | GPS | COM Port and select the COM Port.
Note: The baud rate must be set to 4800 to work with the GPS Receiver.
This is the default baud rate and needs no modification.
10
All Other Bluetooth Hardware and Software
These are generic instructions for connecting the GPS Receiver to your
Bluetooth enabled mobile computer. For specific connection instructions,
refer to the user documentation for your Bluetooth hardware and software.
1. The Bluetooth Status LED should be emitting a solid blue light to show
that the Bluetooth radio is on but not connected.
2. Notebooks: Install and/or identify your Bluetooth hardware’s outgoing
client serial port (attached to the serial port profile).
3. Perform a Bluetooth device discovery on your mobile computer to find
the GPS Receiver. Refer to the user documentation for your Bluetooth
enabled mobile compute for instructions.
4. If required, pair and bond the devices. Enter the passkey 1234.
Note: You only need to discover, bond with, and pair with the GPS
Receiver the first time you use it with MyNavigator.
5. Start the MyNavigator program on your mobile computer.
Pocket PC: Tap Start | Programs | My Navigator.
Notebooks: Click on the My Navigator icon on your desktop.
Alternatively, click Start | Programs | Socket | My Navigator.
6. A warning screen will appear. Read the warning, then tap OK.
7. The Bluetooth connection for MyNavigator must be set to the correct
COM port. Depending on the your Bluetooth hardware, you may or may
not need to modify the COM port setting.
Note: The baud rate must be set to 4800 to work with the GPS Receiver.
This is the default baud rate and needs no modification.
Bluetooth Hardware COM Port Setting Requirements
HP iPAQ series 1900, 2200,
3870, 3970, 5150, 5450, and
5550 with integrated Bluetooth
No modifications are needed. The
MyNavigator default is COM8, the
same port used by these iPAQ’s.
HP iPAQ series 4100, 4300 with
integrated Bluetooth
In MyNavigator, tap Tools | GPS | COM
Port and select COM 6.
All Others
Determine which COM port your
Bluetooth enabled mobile computer
is using for outbound serial
communication. Refer to the user
documentation for your Bluetooth
software. In MyNavigator, tap Tools |
GPS | COM Port and select the correct
COM port.
11
STEP 6: Navigate to Your Destination
Note: The MyNavigator software offers many options for entering your
destination. This Quick Start Guide only covers how to enter your
destination by address. For instructions on using other options (e.g.,
choosing a point of interest), please refer to the User’s Guide.
If you are using a notebook, wherever the instructions say “tap”, please
substitute with “click.”
1. Start MyNavigator. Tap Start | Programs | My Navigator. A warning
screen will appear. Read it, then tap OK.
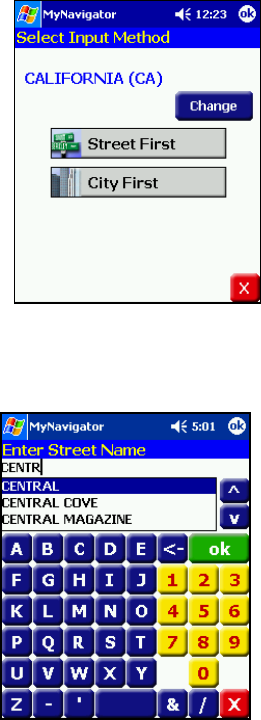
2. Tap Menu | Destinations | Address.
3. The Select Input Method screen will
appear. At the top of the screen, the
state/region of your destination will
appear.
• To change the state/region, click on
the Change button.
• If the correct state/region appears,
you can enter your destination by
tapping either Street First or City
First.
• For help, tap File | Help.
4. Screens will appear for you to enter address information. Tap on the
keyboard to enter information. To enter a city or street, you can also
scroll through the list. The list will change with each letter you enter to
show possible matches.
• After you enter the correct
information, tap ok. To return to
the previous screen, tap X.
• To help you quickly enter
information, the software will only
list valid streets for the city you
select (if you choose to enter City
First), and it will only list valid
building numbers for the street you
select.
12
5. After you enter the address information, the Select Address screen will
appear, listing all addresses that match your criteria. Select the correct
address. Tap on the Nav button or tap ok.
6. The mobile computer will look for a GPS signal and calculate
directions. After several seconds, a map will appear. Navigation
instructions will begin both on-screen and via voice commands. Follow
the navigation instructions to travel to your destination.
Note: After you have successfully bonded your mobile computer with the
GPS Receiver and set MyNavigator for the correct COM port, some
Bluetooth software will allow the devices to automatically connect
whenever MyNavigator looks for a GPS signal. Check the user
documentation for your Bluetooth software to see if it supports
automatic connections.
13
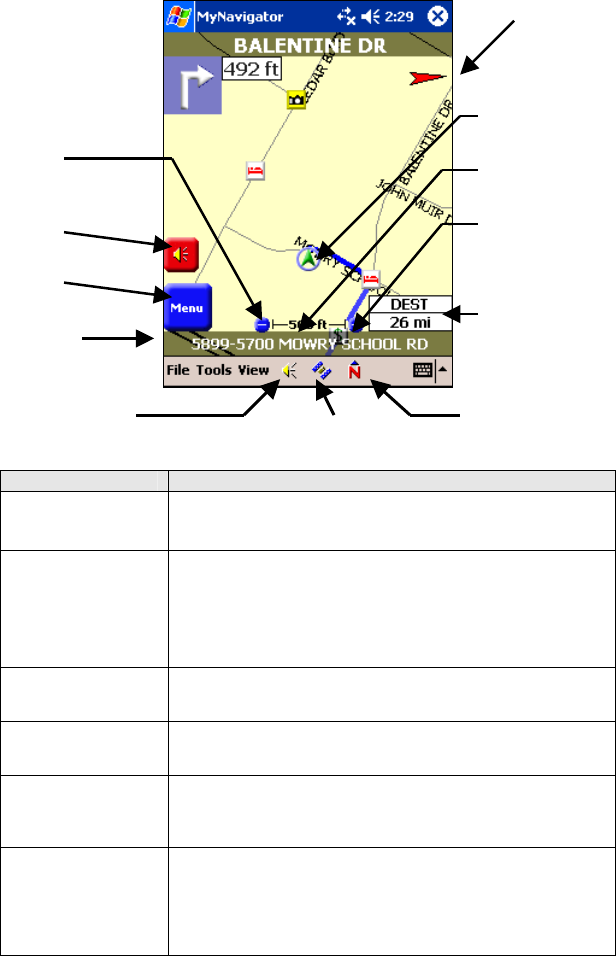
Map Screen
This is the primary navigation screen. Information about an upcoming turn
appears only after you enter a destination and a route is calculated.
Action Method
Switch between
different screens
Use the left/right hardware buttons to switch between
Map Screen, Guidance View, and Route List.
Zoom in and
zoom out
There are three methods of zooming in/out. You can
only zoom on the Map Screen.
(1) Use the up/down hardware buttons,
(2) Tap on the zoom in/zoom out buttons, and
(3) Tap View | Zoom +/-.
Pan around the
map
Tap and drag the map screen. To return to the Map
Screen with your current location, tap X.
View GPS status
via car cursor
Green indicates strong GPS signal. Yellow indicates
insufficient signal. Red indicates no signal.
Toggle between
North arrow and
direction arrow
Tap on arrow. Alternatively, you can tap on the Map
Orientation icon at the bottom of your screen.
Toggle trip
information
display
If no destination is entered, the Trip Information box
will only show Speed. After entering a destination, tap
on the box to toggle between Speed, ETA (estimated
time of arrival), REM (remaining time), and DIST
(distance to destination).
{
Street name,
direction, and
distance until
next turn
Menu
Button
Current
Location
Zoom
Out
Direction Arrow
Car Cursor
(Color
indicates GPS
status)
Trip
Information
(Tap to
change)
Map Scale
Zoom In
Guidance
Volume Icon GPS Info Icon
Map Orientation
Icon (Tap for
map with North
on top)
Mute
14
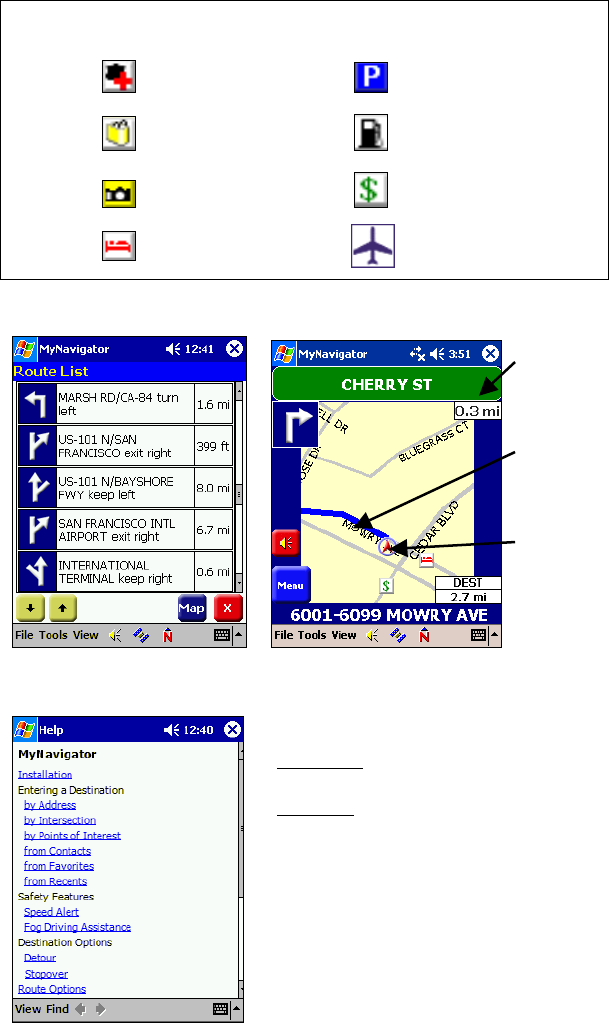
POI Icons
Emergency Parking
Shopping Gas Station
Sightseeing Bank/ATM
Hotel/Motel Airport
Route List Guidance View
Help Files
Distance
to next
turn
Car
Cursor
(Color
indicates
GPS
Status)
Route
indicated
in blue
To access Help files:
P
ocket P
C
: Tap File | Help.
N
oteboo
k
: Click on the MyNavigator
Help icon on the desktop.
15
Limited Warranty
Socket Communications Incorporated (Socket) warrants this product against defects
in material and workmanship, under normal use and service, for the following period
from the date of purchase:
GPS Receiver with Bluetooth Wireless Technology: 3 years
Incompatibility is not a defect covered by Socket’s warranty. During the warranty
period, Socket will, at its option, repair or replace the defective product at no charge
when furnished with proof of retail purchase, provided that you deliver the product to
Socket or to an authorized Socket Service Center.
The returned product must be accompanied by a return material authorization (RMA)
number issued by Socket or an authorized Socket Service Center. If you ship the
product, you must use the original container or equivalent and you must pay the
shipping charges to Socket. Socket will pay shipping charges back to any location in
the contiguous United States. This warranty applies only to the original retail
purchaser and is not transferable.
Socket may, at its option, replace or repair the product with new or reconditioned
parts and the returned product becomes Socket's property. Socket warrants the
repaired or replaced products to be free from defects in material or workmanship for
ninety (90) days after the return shipping date, or for the duration of the original
warranty period, whichever is greater.
This warranty does not cover the replacement of products damaged by abuse,
accident, misuse or misapplication, nor as a result of service or modification other
than by Socket.
SOCKET IS NOT RESPONSIBLE FOR INCIDENTAL OR CONSEQUENTIAL
DAMAGES RESULTING FROM BREACH OF ANY EXPRESS OR IMPLIED
WARRANTY, INCLUDING DAMAGE TO PROPERTY AND, TO THE EXTENT
PERMITTED BY LAW, DAMAGES FOR PERSONAL INJURY. THIS
WARRANTY IS IN LIEU OF ALL OTHER WARRANTIES INCLUDING
IMPLIED WARRANTIES OF MERCHANTABILITY AND FITNESS FOR A
PARTICULAR PURPOSE.
Some states do not allow limitation of implied warranties, or the exclusion or
limitation of incidental or consequential damages, so that the above limitations or
exclusions may not apply to you. This warranty gives you specific legal rights and
you may also have other rights which vary from state to state.
This product may contain fully tested, recycled parts, warranted as if new.
For warranty information, phone (510) 744-2700.
16
Limited Software Warranty
LIMITED WARRANTY. SOCKET warrants that the original disk or CD ROM is
free from defects for 90 days from the date of delivery of the SOFTWARE.
CUSTOMER REMEDIES. SOCKET’S entire liability and your exclusive remedy
shall be, at SOCKET’S option, either (a) return of the price paid or (b) replacement
of the SOFTWARE which does not meet SOCKET’S Limited Warranty and which is
returned to SOCKET with a copy of your receipt. Any replacement SOFTWARE will
be warranted for the remainder of the original warranty period or 30 days, whichever
is longer. THESE REMEDIES ARE NOT AVAILABLE OUTSIDE OF THE
UNITED STATES OF AMERICA.
NO OTHER WARRANTIES. SOCKET disclaims all other warranties, either express
or implied, including but not limited to implied warranties of merchantability and
fitness for a particular purpose, with respect to the SOFTWARE and the
accompanying written materials. This limited warranty gives you specific legal
rights. You may have others which vary from state to state.
NO LIABILITY FOR CONSEQUENTIAL DAMAGES. In no event shall SOCKET
or its suppliers be liable for any damages whatsoever (including, without limitation,
damages for loss of business profits, business interruption, loss of business
information, or other pecuniary loss) arising out of the use of or inability to use the
SOFTWARE, even if SOCKET has been advised of the possibility of such damages.
Because some states do not allow the exclusion or limitation of liability for
consequential or incidental damages, the above limitation may not apply to you.
EXPORT LAW ASSURANCES. You may not use or otherwise export or reexport
the SOFTWARE except as authorized by United States law and laws of the
jurisdiction in which the SOFTWARE was obtained. In particular, but without
limitation, none of the SOFTWARE may be used or otherwise exported or reexported
(a) into (or to a national or resident of) a United States embargoed country or (b) to
anyone on the U.S. Treasury Department’s list of Specially Designated Nationals or
the U.S. Department of Commerce’s Table of Denial Orders. By using the
SOFTWARE, you represent and warrant that you are not located in, under control of,
or a national or resident of any such country or on any such list.
GOVERNMENT END USERS. If the SOFTWARE is supplied to the U. S.
Government, the SOFTWARE is classified as “restricted computer software” as
defined in clause 52.227-19 of the FAR. The U. S. Government ‘s rights to the
SOFTWARE are as provided in clause 52.227-19 of the FAR.
CONTROLLING LAW AND SEVERABILITY. This License shall be governed by
the laws of the United States and the State of California. If for any reason a court of
competent jurisdiction finds any provision, or portion thereof, to be unenforceable,
the remainder of this License shall continue in full force and effect.

17
April 2004 Document # 6430-00203 D
Copyright Notice
Copyright © 2004 Socket Communications, Inc. All rights reserved.
Socket, the Socket logo and Battery Friendly are registered trademarks of
Socket Communications, Inc. GPS Nav Kit with Bluetooth Wireless
Technology and GPS Receiver with Bluetooth Wireless Technology are
trademarks of Socket Communications, Inc. The Bluetooth word mark and
logo are owned by the Bluetooth SIG, Inc. and any use of such marks by
Socket Communicaitons, Inc. is under license. All other brand and product
names are trademarks of their respective holders.
Reproduction of the contents of this manual without the permission of
Socket Communications is expressly prohibited. Please be aware that the
products described in this manual may change without notice.
Feel free to contact SOCKET COMMUNICATIONS at:
Socket Communications, Inc.
37400 Central Court
Newark, CA 94560
Phone: (510) 744-2700
Fax: (510) 744-2727
Other than the above, Socket Communications can assume no responsibility
for anything resulting from the application of information contained in this
manual.
Please refrain from any applications of the Socket product that are not
described in this manual. Socket Communications also requests that you
refrain from disassembling the card. Disassembly of this device will void
the product warranty.
You can track new product releases, software updates and technical
bulletins by visiting Socket’s web page at: www.socketcom.com.

18
Regulatory Compliance
The Socket GPS Receiver is designed to be compliant with the rules and regulations
in locations where they are sold and will be labeled as required. This product is type
approved — users are not required to obtain license or authorization before using.
This product has been certified as conforming to technological standards. Therefore,
the following actions are punishable by law:
• Disassembly or modification of this product
• Removal of identification labels on the back of the product
The frequency used by this product is also used by industrial, scientific and medical
devices, such as microwave ovens, as well as wireless detectors for motion
detectors, such as those requiring licenses used on manufacturing lines or similar
radio transmitters (all of these wireless devices will be called “other wireless
transmitters” below). Most modern electronic equipment, (e.g., in hospitals and
cars), is shielded from RF energy. However certain electronic equipment is not.
1. Please ensure that all medical devices used in proximity to this device meet
appropriate susceptibility specifications for this type of RF energy.
2. In the unlikely event that there is electronic interference between this system
and other wireless transmitters, quickly change the location of operation or stop
operating the unit (cease signal transmission).
3. If other electrical interference or related problems occur, contact Socket
technical support at +1-510-744-2720.
Radio Frequency Interference Requirements
This device complies with part 15 of the FCC rules and Industry Canada RSS 210.
Operation is subject to the following conditions: (1) This device may not cause
harmful interference, and (2) this device must accept any interference received,
including interference that may cause undesired operation.
CAUTION: Change or modification not expressly approved by the party responsible
for compliance could void the user’s authority to operate this equipment.
This equipment is ETS 300 328-2, ETS 301 489-1 and ETS EN301 489-17
compliant. These limits are designed to provide reasonable protection against
harmful interference when the equipment is operated in a commercial environment.
This equipment generates, uses, and can radiate radio frequency energy and, if not
installed and used in accordance with the instruction manual, may cause harmful
interference to radio communications. Operation of this equipment in a residential
area is likely to cause harmful interference, in which case the user will be required
to correct the interference at his or her own expense.
In order for this device to comply with FCC rules, under the provision of Part
15.247(b)(c), it must operate in a manner that ensures that the public is not exposed
to radio frequency levels in excess of the Maximum Permissible Exposure (MPE)
limits.

19
To comply with Industry Canada RF exposure compliance requirements, the
following antenna installation and device operating configurations must be satisfied:
“The installer of this radio equipment must ensure that the antenna is located or
pointed such that it does not emit RF field in excess of Health Canada limits for the
general population; consult Safety Code 6, obtainable from Health Canada’s
website: www.hc-sc.gc.ca/ehp/ehd/catalogue/rpb.htm
If this equipment does cause harmful interference to radio or television reception,
which can be determined by turning the equipment off and on, the user may try to
correct the interference by one or more of the following:
• Reorient or relocate the receiving antenna of the radio or television.
• Increase the distance separating the equipment and the receiver.
• Connect the equipment to an outlet on a different branch circuit than that of the
receiver.
• Consult the dealer or an experienced radio/TV technician for help.
The user may find the following booklet helpful: How to Identify and Resolve
Radio-TV Interference Problems. This booklet is available from the U.S.
Government Printing Office, Washington, D.C. 20402.
Radio Frequency Interference Requirements – Canada
This Class B digital apparatus meets the requirements of the Canadian Interference-
Causing Equipment Regulations. Cet appareil numérique de la Classe B respecte
toutes les exigencies du Reglement sur le Matériel Brouilleur du Canada.
NOTE: To comply with FCC and Industry Canada exposure requirements, this
device is approved for operations in a user’s hand when there is a distance of 20 cm
or more between the device antenna and the user’s body.
CE Marking & European Union Compliance
Products intended for sale within the European Union are marked with a CE Mark,
which indicates compliance to applicable Directives and European Normes (EN), as
follows. Amendments to these Directives or ENs are included: Normes (EN), as
follows:
Applicable Directives:
• R&TTE Directive 1999/5/EC
• Low Voltage Directive 73/23/EEC
Applicable Standards:
• EN 55 022 – Limits and Methods of Measurement of Radio Interference
Characteristics of Information Technology Equipment.
• EN 50 082-1 – Electromagnetic Compatibility – General Immunity Standard, Part
1: Residential, Commercial, Light Industry.
• IEC 801.2 – Electromagnetic Compatibility for Industrial Process Measurement
and Control Equipment, Part 2: Electrostatic Discharge Requirements.
• IEC 801.3 – Electromagnetic Compatibility for Industrial Process Measurement
and Control Equipment, Part 3: Radiated Electromagnetc Field Requirements

© Socket Communications, Inc. April 2004 Printed in U.S.A.
• IEC 801.4 - Electromagnetic Compatibility for Industrial Process Measurement
and Control Equipment, Part 4: Electrical Fast Transients Requirements.
• EN 60 950 + Amd 1 + Amd 2 – Safety of Information Technology Equipment
Including Business Equipment
Note that the radio frequency band used by this equipment has not been harmonized
in all the EU. Applicable area (nation): Austria, Belgium, Denmark, Finland,
France, Germany, Greece, Iceland, Ireland, Italy, Luxembourg, Norway, Portugal,
Spain, Sweden, Switzerland, The Netherlands, United Kingdom
Battery Recycling
Your device contains a rechargeable lithium ion battery. Do not dispose of
your device’s battery in a fire or with normal household waste. Battery cells
may explode. Contact your local waste disposal agency for disposal
instructions. Dispose of a spent of damaged battery promptly.
Technical Support
If you have trouble installing or using the GPS Nav Kit with Bluetooth
Wireless Technology, Socket has two technical support resources to help
you. Please note that technical support is available in English only.
1. Socket On-Demand Support (SOS)
Socket On-Demand Support is an interactive technical
support program that focuses in on your specific
problem to provide the answers you need. SOS
provides immediate service and is the best place to start for technical
support. To access SOS, visit: www.socketcom.com/support. Click on
the SOS icon.
If SOS cannot solve your problem, end the session by submitting an
email inquiry to a Socket technical support engineer as prompted. Your
interactive session will be saved for reference.
2. Live Technical Support
IMPORTANT! To obtain live technical support, you must first register
your product online at www.socketcom.com/prodreg.
Immediately after product registration, you will be given the option to
submit a problem. Click on this option to submit an email inquiry to a
technical support engineer. If we cannot resolve your inquiry via email,
we can arrange for a support engineer to call you at a specific time.