SofaWare Technologies SBXW-166LHGE-4 Wireless Broadband Router User Manual Internet Security Appliance
SofaWare Technologies Ltd. Wireless Broadband Router Internet Security Appliance
Contents
- 1. DoC Revised
- 2. Users Manual Part 1
- 3. Users Manual Part 2
Users Manual Part 1
Check Point Safe@Office
Internet Security Appliance
User Guide
Version 4.6
Part No: 700797, June 2004
COPYRIGHT & TRADEMARKS
Copyright © 2004 SofaWare, All Rights
Reserved. No part of this document may be
reproduced in any form or by any means
without written permission from SofaWare.
Information in this document is subject to
change without notice and does not represent a
commitment on part of SofaWare Technologies
Ltd.
SofaWare, Safe@Home and Safe@Office are
trademarks, service marks, or registered
trademarks of SofaWare Technologies Ltd.
Check Point, the Check Point logo, FireWall-1,
FireWall-1 SecureServer, FireWall-1
SmallOffice, FloodGate-1, INSPECT, IQ
Engine, Meta IP, MultiGate, Open Security
Extension, OPSEC, Provider-1,
SecureKnowledge, SecureUpdate,
SiteManager-1, SVN, UAM, User-to-Address
Mapping, UserAuthority, Visual Policy Editor,
VPN-1, VPN-1 Accelerator Card, VPN-1
Gateway, VPN-1 SecureClient, VPN-1
SecuRemote, VPN-1 SecureServer, and VPN-1
Edge are trademarks, service marks, or
registered trademarks of Check Point Software
Technologies Ltd. or its affiliates.
All other product names mentioned herein are
trademarks or registered trademarks of their
respective owners.
The products described in this document are
protected by U.S. Patent No. 5,606,668 and
5,835,726 and may be protected by other U.S.
Patents, foreign patents, or pending
applications.
SAFETY PRECAUTIONS
Carefully read the Safety Instructions the
Installation and Operating Procedures provided
in this User's Guide before attempting to install
or operate the appliance. Failure to follow these
instructions may result in damage to equipment
and/or personal injuries.
Before cleaning the appliance, unplug the
power cord. Use only a soft cloth dampened
with water for cleaning.
Any changes or modifications to this
product not explicitly approved by the
manufacturer could void any assurances of
Safety or Performance and could result in
violation of Part 15 of the FCC Rules.
When installing the appliance, ensure that
the vents are not blocked.
Do not use the appliance outdoors.
Do not expose the appliance to liquid or
moisture.
Do not expose the appliance to extreme
high or low temperatures.
Do not drop, throw, or bend the appliance
since rough treatment could damage it.
Do not use any accessories other than those
approved by Check Point. Failure to do so
may result in loss of performance, damage
to the product, fire, electric shock or injury,
and will void the warranty.
Do not disassemble or open the appliance.
Failure to comply will void the warranty.
Do not route the cables in a walkway or in a
location that will crimp the cables.
POWER ADAPTER
The appliance should only be used with the
power adapter provided. The power adapter
should be plugged into a surge protected
power source. In addition, be careful not to
overload the wall outlets, extension cords,
etc. used to power this unit.
Connect the power adapter only to power
sources as marked on the product.
To reduce risk of damage to the electric
cord, remove it from the outlet by holding
the power adapter rather than the cord.
SECURITY DISCLAIMER
The appliance provides your office network
with the highest level of security. However, no
product can provide you with absolute
protection against a determined effort to break
into your system. We recommend using
additional security measures to secure highly
valuable or sensitive information.
Federal Communication Commission Interference Statement
This equipment has been tested and found to comply with the limits for a
Class B digital device, pursuant to Part 15 of the FCC Rules. These limits
are designed to provide reasonable protection against harmful interference in
a residential installation. This equipment generates, uses and can radiate
radio frequency energy and, if not installed and used in accordance with the
instructions, may cause harmful interference to radio communications.
However, there is no guarantee that interference will not occur in a particular
installation. If this equipment does cause harmful interference to radio or
television reception, which can be determined by turning the equipment off
and on, the user is encouraged to try to correct the interference by one of the
following measures:
- Reorient or relocate the receiving antenna.
- Increase the separation between the equipment and receiver.
- Connect the equipment into an outlet on a circuit different from that
to which the receiver is connected.
- Consult the dealer or an experienced radio/TV technician for help.
This device complies with Part 15 of the FCC Rules. Operation is subject to
the following two conditions: (1) This device may not cause harmful
interference, and (2) this device must accept any interference received,
including interference that may cause undesired operation.
FCC Caution: Any changes or modifications not expressly approved by the
party responsible for compliance could void the user's authority to operate this
equipment.
IMPORTANT NOTE:
FCC Radiation Exposure Statement:
This equipment complies with FCC radiation exposure limits set forth for an
uncontrolled environment. This equipment should be installed and operated
with minimum distance 20cm between the radiator & your body.
This transmitter must not be co-located or operating in conjunction with any
other antenna or transmitter.

Contents
Contents i
Contents
Chapter 1: Introduction...................................................................................1
About Your Check Point Safe@Office Appliance .........................................1
Safe@Office Products ....................................................................................2
Safe@Office 105 ........................................................................................2
Safe@Office 110 ........................................................................................2
Safe@Office 225 ........................................................................................3
Safe@Office 225U .....................................................................................3
Safe@Office 300 ........................................................................................4
Safe@Office 300W ....................................................................................4
Safe@Office Features and Compatibility.......................................................4
Connectivity................................................................................................4
Firewall.......................................................................................................6
VPN............................................................................................................8
Management ...............................................................................................9
Optional Security Services .......................................................................10
Package Contents......................................................................................11
Network Requirements.............................................................................13
Getting to Know Your Safe@Office 100 Series...........................................14
Rear Panel.................................................................................................14
Front Panel................................................................................................15
Getting to Know Your Safe@Office 200 Series...........................................17
Rear Panel.................................................................................................17
Front Panel................................................................................................19
Getting to Know Your Safe@Office 300 Series Appliance .........................20

Contents
ii Check Point Safe@Office User Guide
Rear Panel.................................................................................................20
Front Panel................................................................................................22
About This Guide .........................................................................................24
Contacting Technical Support ......................................................................24
Chapter 2: Installing and Setting up the Safe@Office Appliance..............25
Before You Install the Safe@Office Appliance............................................25
Windows 2000/XP....................................................................................26
Windows 98/Millennium..........................................................................31
Mac OS.....................................................................................................37
Wall Mounting the Appliance.......................................................................38
Network Installation .....................................................................................40
Setting Up the Safe@Office Appliance........................................................41
Chapter 3: Getting Started ............................................................................45
Initial Login to the Safe@Office Portal........................................................45
Logging on to the Safe@Office Portal .........................................................47
Accessing the Safe@Office Portal Remotely ...............................................49
Using the Safe@Office Portal ......................................................................50
Main Menu ...............................................................................................52
Main Frame...............................................................................................53
Status Bar..................................................................................................53
Logging off...................................................................................................56
Chapter 4: Configuring the Internet Connection ........................................57
Overview ......................................................................................................57
Using the Internet Wizard.............................................................................58
Using a Direct LAN Connection ..............................................................60
Using a Cable Modem Connection...........................................................61

Contents
Contents iii
Using a PPTP or PPPoE Dialer Connection .............................................62
Using PPPoE.............................................................................................63
Using PPTP ..............................................................................................64
Using Internet Setup .....................................................................................66
Using a LAN Connection .........................................................................68
Using a Cable Modem Connection...........................................................70
Using a PPPoE Connection ......................................................................71
Using a PPTP Connection ........................................................................73
Using a Telstra (BPA) Connection...........................................................75
Using a Dialup Connection.......................................................................77
Using No Connection ...............................................................................79
Setting Up a Dialup Modem.........................................................................84
Cloning a MAC Address...............................................................................86
Viewing Internet Connection Information....................................................88
Enabling/Disabling the Internet Connection.................................................89
Using Quick Internet Connection/Disconnection .........................................90
Configuring a Backup Internet Connection ..................................................91
Setting Up a LAN or Broadband Backup Connection..............................91
Setting Up a Dialup Backup Connection..................................................92
Chapter 5: Managing Your Network............................................................93
Configuring Network Settings......................................................................93
Configuring a DHCP Server.....................................................................94
Changing IP Addresses...........................................................................100
Enabling/Disabling Hide NAT ...............................................................101
Configuring a DMZ Network.................................................................102
Configuring a WLAN Network..............................................................104

Contents
iv Check Point Safe@Office User Guide
Configuring High Availability....................................................................117
Using Traffic Shaper...................................................................................120
Adding and Editing a Class ....................................................................122
Deleting Classes .....................................................................................127
Restoring Traffic Shaper Defaults ..........................................................128
Using Network Objects...............................................................................129
Adding and Editing Network Objects.....................................................130
Viewing and Deleting Network Objects.................................................136
Using Static Routes.....................................................................................137
Adding a Static Route.............................................................................137
Viewing and Editing Static Routes.........................................................139
Deleting a Static Route...........................................................................140
Chapter 6: Viewing Reports ........................................................................141
Viewing the Event Log...............................................................................141
Viewing Computers....................................................................................144
Viewing Connections..................................................................................147
Chapter 7: Setting Your Security Policy ....................................................149
Setting the Firewall Security Level.............................................................149
Configuring Servers....................................................................................152
Using Rules.................................................................................................154
Adding and Editing Rules.......................................................................157
Deleting Rules ........................................................................................163
Defining an Exposed Host..........................................................................163
Chapter 8: Using Subscription Services .....................................................165
Connecting to a Service Center...................................................................165
Viewing Services Information....................................................................169

Contents
Contents v
Refreshing Your Service Center Connection..............................................171
Configuring Your Account.........................................................................171
Disconnecting from Your Service Center...................................................172
Web Filtering..............................................................................................172
Enabling/Disabling Web Filtering..........................................................173
Selecting Categories for Blocking..........................................................174
Temporarily Disabling Web Filtering.....................................................174
Virus Scanning............................................................................................175
Enabling/Disabling Email Antivirus.......................................................176
Selecting Protocols for Scanning............................................................177
Temporarily Disabling Email Antivirus .................................................177
Automatic and Manual Updates .................................................................179
Checking for Software Updates when Locally Managed .......................179
Checking for Software Updates When Remotely Managed ...................180
Chapter 9: Using SecureDesk......................................................................183
Installing McAfee VirusScan ASaP............................................................184
Updating McAfee VirusScan ASaP on All Computers ..............................186
Setting the SecureDesk Security Level.......................................................186
Checking Antivirus Compliancy ................................................................189
Overriding SecureDesk...............................................................................195
Viewing SecureDesk Reports .....................................................................196
Chapter 10: Working With VPNs...............................................................199
Overview ....................................................................................................199
Site-to-Site VPNs ...................................................................................201
Remote Access VPNs.............................................................................203
Setting Up Your Safe@Office Appliance as a Remote Access VPN Server204

Contents
vi Check Point Safe@Office User Guide
Adding and Editing VPN Sites using Safe@Office 110 and 225...............206
Configuring a Remote Access VPN Site ................................................208
Configuring a Site-to-Site VPN Gateway...............................................219
Creating a PPPoE Tunnel .......................................................................228
Deleting a VPN Site....................................................................................231
Enabling/Disabling a VPN Site ..................................................................232
Logging on to a VPN Site...........................................................................233
Logging on through the Safe@Office Portal..........................................233
Logging on through the my.vpn page.....................................................235
Logging off a VPN Site ..............................................................................236
Installing a Certificate.................................................................................237
Uninstalling a Certificate............................................................................240
Viewing VPN Tunnels................................................................................241
Chapter 11: Managing Users.......................................................................245
Changing Your Password ...........................................................................245
Using Safe@Office 105..........................................................................245
Using Safe@Office 110 and 225............................................................246
Adding Users..............................................................................................248
Viewing and Editing Users.........................................................................248
Deleting Users ............................................................................................251
Setting Up Remote VPN Access for Users.................................................252
Using RADIUS Authentication ..................................................................252
Chapter 12: Maintenance.............................................................................255
Viewing Firmware Status ...........................................................................255
Updating the Firmware...............................................................................257
Upgrading Your Software Product .............................................................258

Contents
Contents vii
Registering Your Safe@Office Appliance .................................................262
Configuring Syslog Logging ......................................................................263
Configuring HTTPS....................................................................................265
Setting the Time on the Appliance..............................................................267
Controlling the Appliance via the Command Line .....................................271
Using Diagnostic Tools ..............................................................................272
Backing Up the Safe@Office Appliance Configuration.............................274
Exporting the Safe@Office Appliance Configuration............................274
Importing the Safe@Office Appliance Configuration............................276
Resetting the Safe@Office Appliance to Defaults......................................277
Running Diagnostics...................................................................................279
Rebooting the Safe@Office Appliance.......................................................280
Chapter 13: Troubleshooting.......................................................................283
Connectivity................................................................................................283
Service Center and Upgrades......................................................................288
Other Problems...........................................................................................288
Chapter 14: Specifications ...........................................................................291
Technical Specifications.............................................................................291
CE Declaration of Conformity....................................................................295
Federal Communications Commission Radio Frequency Interference
Statement ....................................................................................................297
Glossary of Terms.........................................................................................299
Index ..............................................................................................................307

About Your Check Point Safe@Office Appliance
Chapter 1: Introduction 1
Chapter 1
This chapter introduces the Check Point Safe@Office appliance and this
guide.
Introduction
This chapter includes the following topics:
About Your Check Point Safe@Office Appliance .................................1
Safe@Office Products............................................................................2
Safe@Office Features and Compatibility...............................................4
Getting to Know Your Safe@Office 100 Series...................................14
Getting to Know Your Safe@Office 200 Series...................................17
Getting to Know Your Safe@Office 300 Series Appliance .................20
About This Guide .................................................................................24
Contacting Technical Support ..............................................................24
About Your Check Point Safe@Office
Appliance
The Check Point Safe@Office appliance is an advanced Internet security
appliance that enables secure high-speed Internet access from the office.
Developed and supported by SofaWare Technologies, an affiliate of Check
Point Software Technologies, the worldwide leader in securing the Internet,
the Safe@Office appliance incorporates the 100, 200, and 300 product
families. The Safe@Office firewall, based on the world-leading Check Point
Embedded NG Stateful Inspection technology, inspects and filters all
incoming and outgoing traffic, blocking all unauthorized traffic.
The Safe@Office appliance also allows sharing your Internet connection
among several PCs or other network devices, enabling advanced office
networking and saving the cost of purchasing static IP addresses.
With the Safe@Office appliance, you can subscribe to additional security
services available from select service providers, including firewall security

Safe@Office Products
2 Check Point Safe@Office User Guide
updates, Web filtering, and dynamic DNS. Business users can use the
Safe@Office appliance to securely connect to the office network.
Safe@Office Products
The Safe@Office appliance is available with the following hardware:
• Safe@Office 100 series
• Safe@Office 200 series
• Safe@Office 300 series
All three series provide a Web-based management interface, which enables
you to manage and configure the Safe@Office appliance operation and
options. However, the 200 series and 300 series provide higher firewall and
VPN throughput and have a dedicated DMZ port and a serial port. The 300
series also provides two USB ports enabling printer server functionality, and
the 300W functions as an access point for a wireless network.
The 100 series includes models Safe@Office 105 and Safe@Office 110. The
200 series includes models Safe@Office 225 and Safe@Office 225U. The
300 series includes models Safe@Office 300 and Safe@Office 300W.
Your 100 and 200 series Safe@Office appliance can be upgraded to a more
advanced model within its hardware series, without replacing the hardware.
Contact your reseller for more details.
Safe@Office 105
Safe@Office 105 protects your home or small business network from hostile
Internet activity. It can also act as a Remote Access VPN Server which
allows a single user to securely access resources protected by the
Safe@Office appliance from home or while traveling. It is intended for home
or small business users and can be used by up to five computers.
Safe@Office 110
In addition to all the benefits of Safe@Office 105, Safe@Office 110 provides
expanded VPN functionality: it acts not only as a Remote Access VPN
Server but as a Remote Access VPN Client, enabling employees working

Safe@Office Products
Chapter 1: Introduction 3
from home to securely connect to the office network. Safe@Office 110 can
also be configured as a Site-to-Site VPN Gateway, which allows permanent
bi-directional connections between two gateways, such as two company
offices.
Safe@Office 110 is intended for small and medium businesses with one or
more branch offices, and for their employees working from home. It can be
used by up to ten computers.
Safe@Office 225
Safe@Office 225 provides all the benefits of Safe@Office 110, along with
support for High Availability and Traffic Shaper. High Availability enables
you to install a second Safe@Office appliance on your network and configure
that appliance as a backup to the first Safe@Office appliance, thereby
ensuring that your network is consistently protected and connected to the
Internet. Traffic Shaper allows you to control the flow of communication so
that important traffic takes precedence over less important traffic; this
enables your business to function with minimum disruption, even when the
network is congested.
Safe@Office 225 includes a hardware DMZ port and offers higher VPN and
firewall performance than the 100 series. It also supports the use of a dialup
modem.
Like Safe@Office 110, Safe@Office 225 is intended for small to medium-
sized businesses with extended networks. Safe@Office 225 supports 25
computers.
Safe@Office 225U
Safe@Office 225U provides the same functionality as Safe@Office 225 but
supports an unlimited number of computers.
All references to Safe@Office 225 in this guide are also relevant to
Safe@Office 225U.

Safe@Office Features and Compatibility
4 Check Point Safe@Office User Guide
Safe@Office 300
Safe@Office 300 provides all the benefits of Safe@Office 225, along with
two USB ports for printer server functionality.
Safe@Office 300 is intended for small to medium-sized businesses with
extended networks. It can be used by up to 25 computers.
Safe@Office 300W
Safe@Office 300W provides the same functionality as Safe@Office 300, but
can function as an access point for a wireless network.
All references to Safe@Office 300 in this guide are also relevant to
Safe@Office 300W.
Safe@Office Features and Compatibility
Connectivity
Feature Safe@
Office 105
Safe@
Office
110
Safe@
Office
225/225U
Safe@
Office
300/300W
Concurrent
firewall
connections
2,000 2,000 8,000 8,000
LAN Ports 4-ports 10/100 Mbps Fast Ethernet switch
WAN Port 10/100 Mbps
Fast Ethernet
10/100 Mbps
Fast Ethernet
10/100 Mbps
Fast Ethernet
10/100 Mbps
Fast Ethernet
DMZ/WAN2
Port
10/100 Mbps
Fast Ethernet
10/100 Mbps
Fast Ethernet

Safe@Office Features and Compatibility
Chapter 1: Introduction 5
Feature Safe@
Office 105
Safe@
Office
110
Safe@
Office
225/225U
Safe@
Office
300/300W
WLAN
Antennas
300W only
USB Ports
Serial Console
Port
Ethernet cable
type
recognition
Users (nodes) 5 10 25 or
Unlimited 25 or Unlimited
Supported
Internet
connection
methods
Static IP, DHCP Client, Cable Modem, PPTP Client,
PPPoE Client, Telstra BPA login
DHCP Server
DHCP relay
MAC Cloning
Backup
Internet
connection
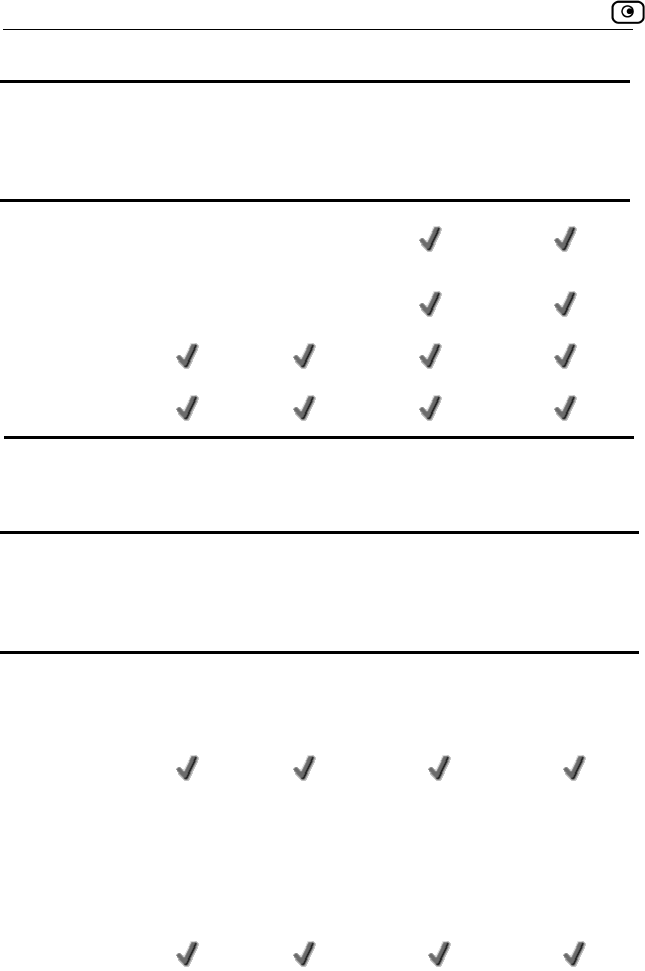
Safe@Office Features and Compatibility
6 Check Point Safe@Office User Guide
Feature Safe@
Office 105
Safe@
Office
110
Safe@
Office
225/225U
Safe@
Office
300/300W
High
Availability
Traffic Shaper
Static NAT
Static Routes
Firewall
Feature
Safe@
Office
105
Safe@
Office
110
Safe@
Office
225/225U
Safe@
Office
300/300W
Firewall Type Check Point Firewall-1 Embedded NG
Network
Address
Translation
(NAT)
INSPECT
Policy Rules Unlimited Unlimited Unlimited Unlimited
User-defined
rules
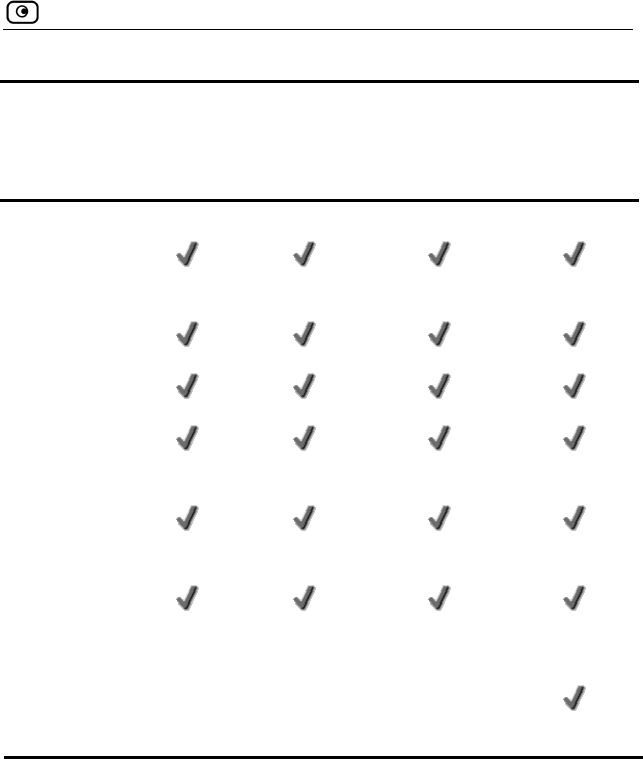
Safe@Office Features and Compatibility
Chapter 1: Introduction 7
Feature
Safe@
Office
105
Safe@
Office
110
Safe@
Office
225/225U
Safe@
Office
300/300W
Three levels
preset security
policies
DoS Protection
Anti-spoofing
Attack Logging
Voice over IP
(H.323)
Support
Exposed Host
DMZ Network Logical Physical Physical
WLAN Network
300W only
Safe@Office Features and Compatibility
8 Check Point Safe@Office User Guide
VPN
Feature
Safe@
Office
105
Safe@
Office
110
Safe@
Office
225/225U
Safe@
Office
300/300W
VPN Type Check Point VPN-1 Embedded NG
IPSEC VPN
mode
Remote
Access
Server
Remote
Access Client
Remote
Access Server
Site-to-Site
Remote
Access Client
Remote
Access Server
Site-to-Site
Remote
Access Client
Remote
Access Server
Site-to-Site
IPSEC VPN
pass-through
Encryption AES/3DES/
DES
AES/3DES/
DES
AES/3DES/
DES
AES/3DES/
DES
Authentication SHA1/MD5 SHA1/MD5 SHA1/MD5 SHA1/MD5
X.509 Digital
Certificates
RADIUS client
Hardware
Acceleration
Safe@Office Features and Compatibility
Chapter 1: Introduction 9
Feature
Safe@
Office
105
Safe@
Office
110
Safe@
Office
225/225U
Safe@
Office
300/300W
Hardware
Random
Number
Generator
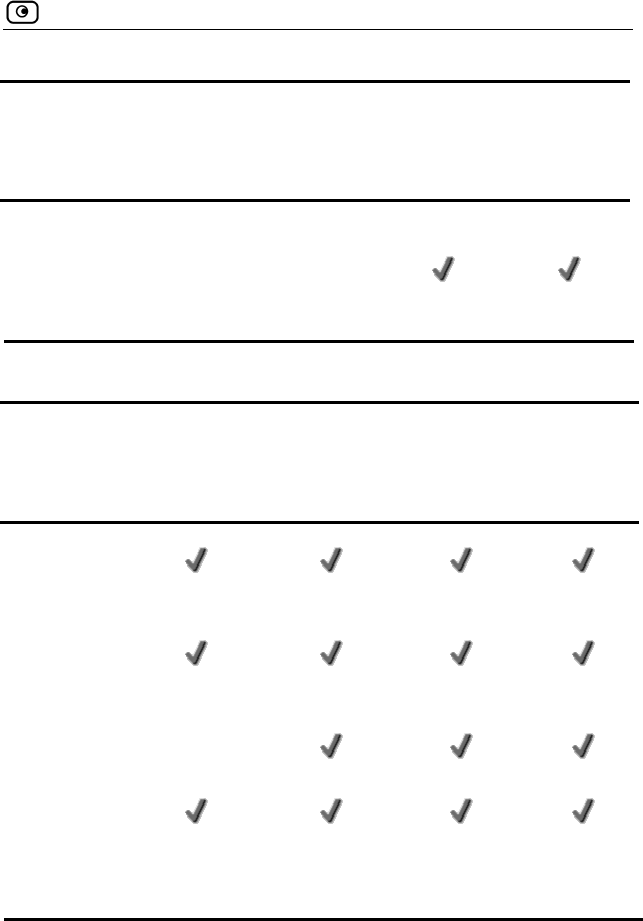
Management
Feature Safe@
Office 105
Safe@
Office
110
Safe@
Office
225/225U
Safe@
Office
300/300W
Web
Management
HTTPS
Access (local
and remote)
Multiple
Administrators
CLI
Management
Systems SofaWare SMP SofaWare
SMP
SofaWare
SMP
SofaWare
SMP
Safe@Office Features and Compatibility
10 Check Point Safe@Office User Guide
Optional Security Services
Feature Safe@
Office 105
Safe@
Office
110
Safe@
Office
225/225U
Safe@
Office
300/300W
Firewall
security and
software
updates
Web Filtering
*
Email
Antivirus
protection *
Dynamic DNS
Service *
SecureDesk
Antivirus
Compliance
Checking *
VPN
Management
Safe@Office Features and Compatibility
Chapter 1: Introduction 11
Feature Safe@
Office 105
Safe@
Office
110
Safe@
Office
225/225U
Safe@
Office
300/300W
Firewall
security and
software
updates
Centralized
Logging and
Intrusion
Detection
* When managed by SofaWare Security Management Portal (SMP).
Package Contents
Item
Safe@Office
105, 100,
225/225U
Safe@Office
300
Safe@Office
300W
Safe@Office
Internet Security
Appliance
Power adapter
CAT5 Straight-
through
Ethernet cable
Safe@Office Features and Compatibility
12 Check Point Safe@Office User Guide
Item
Safe@Office
105, 100,
225/225U
Safe@Office
300
Safe@Office
300W
USB cable
Two antennas
Two plastic
conical anchors
Two cross-head
screws
Getting Started
Guide
This Users
Guide
Safe@Office Features and Compatibility
Chapter 1: Introduction 13
Network Requirements
• A broadband Internet connection via cable or DSL modem with
Ethernet interface (RJ-45)
• 10BaseT or 100BaseT Network Interface Card installed on each
computer
• TCP/IP network protocol installed on each computer
• Internet Explorer 5.0 or higher, or Netscape Navigator 4.7 and
higher
• CAT 5 STP (Category 5 Shielded Twisted Pair) Straight Through
Ethernet cable for each attached device
Note: To cascade an additional hub or switch to the Safe@Office 100
appliance, you must use a crossed Ethernet cable instead. The
Safe@Office 200 series automatically detects the cable type, so you
can use either a straight-through or crossed cable.
Note: For optimal results, it is highly recommended to use either
Microsoft Internet Explorer 5.5 or higher, or Netscape Navigator 6.2 or
higher.
• When using Safe@Office 300W, a wireless card installed on each
wireless client
Getting to Know Your Safe@Office 100 Series
14 Check Point Safe@Office User Guide
Getting to Know Your Safe@Office 100
Series
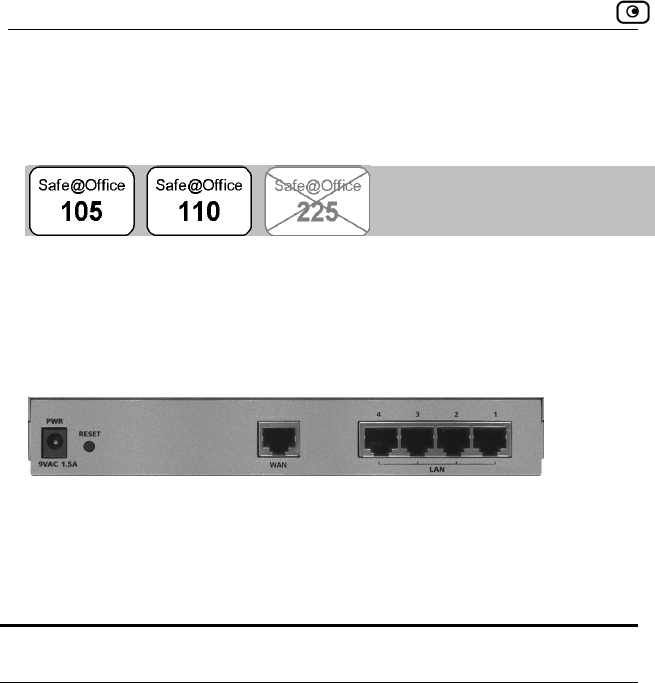
Rear Panel
The following figure shows the Safe@Office 100 series appliance's rear
panel. All physical connections (network and power) to the Safe@Office
appliance are made via the rear panel of your Safe@Office appliance.
Figure 1: Safe@Office Appliance 100 Rear Panel Items
The following table lists the Safe@Office appliance's rear panel elements.
Table 1: Safe@Office Appliance 100 Rear Panel Elements
Label Description
PWR A power jack used for supplying power to the unit. Connect
the supplied power adapter to this jack.
Getting to Know Your Safe@Office 100 Series
Chapter 1: Introduction 15
Label Description
RESET A button used for rebooting the Safe@Office appliance or
resetting the Safe@Office appliance to its factory defaults.
You need to use a pointed object to press this button.
• Short press. Reboots the Safe@Office appliance
• Long press (7 seconds). Resets the Safe@Office
appliance to its factory defaults, and resets your
firmware to the version that shipped with the
Safe@Office appliance. This results in the loss
of all security services and passwords and
reverting to the factory default firmware. You will
have to re-configure your Safe@Office
appliance.
Do not reset the unit without consulting your system
administrator.
WAN Wide Area Network: An Ethernet port (RJ-45) used for
connecting your cable or xDSL modem
LAN 1-4 Local Area Network switch: Four Ethernet ports (RJ-45) used
for connecting computers or other network devices
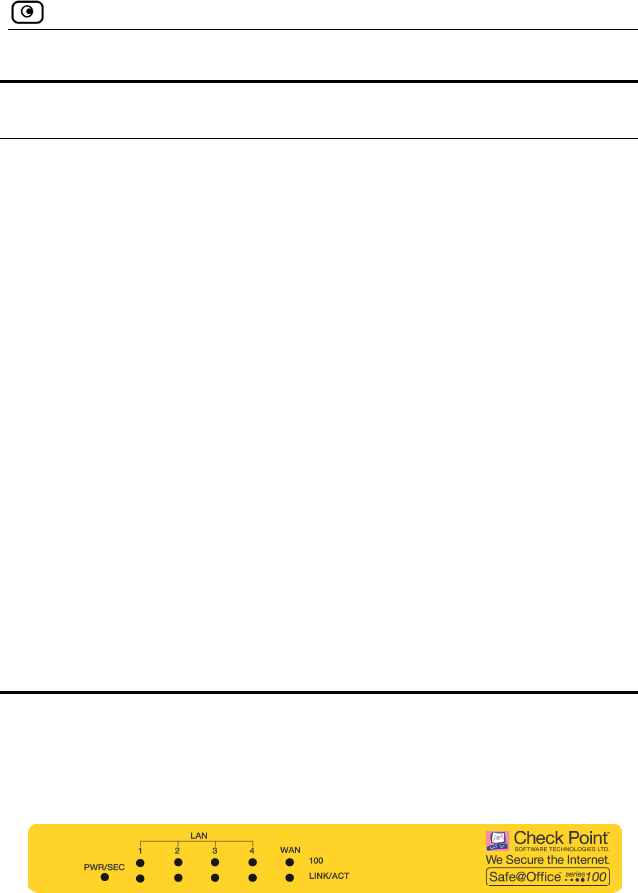
Front Panel
The Safe@Office 100 appliance includes several status LEDs that enable you
to monitor the appliance’s operation.
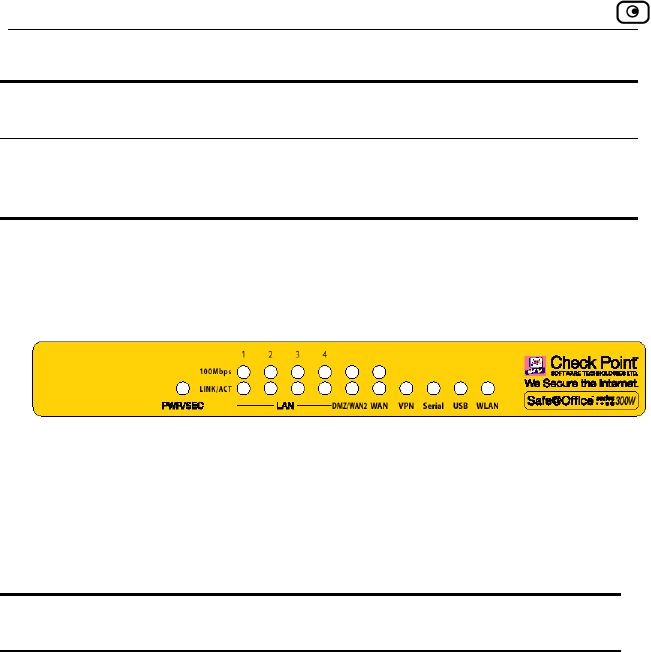
Figure 2: Safe@Office 100 Appliance Front Panel
For an explanation of the Safe@Office 100 appliance’s status LEDs, see the
table below.

Getting to Know Your Safe@Office 100 Series
16 Check Point Safe@Office User Guide
Table 2: Safe@Office 100 Appliance Status LEDs
LED State Explanation
PWR/SEC Off Power off
Flashing quickly (Green) System boot-up
Flashing slowly (Green) Establishing Internet
connection
On (Green) Normal operation
Flashing (Red) Hacker attack blocked
On (Red) Error
LAN 1-
4/WAN
LINK/ACT Off, 100 Off Link is down
LINK/ACT On, 100 Off 10 Mbps link established
for the corresponding
port
LINK/ACT On, 100 On 100 Mbps link
established for the
corresponding port
LNK/ACT Flashing Data is being
transmitted/received

Getting to Know Your Safe@Office 200 Series
Chapter 1: Introduction 17
Getting to Know Your Safe@Office 200
Series
Rear Panel
The following figure shows the Safe@Office 200 series appliance's rear
panel. All physical connections (network and power) to the Safe@Office
appliance are made via the rear panel of your Safe@Office appliance.
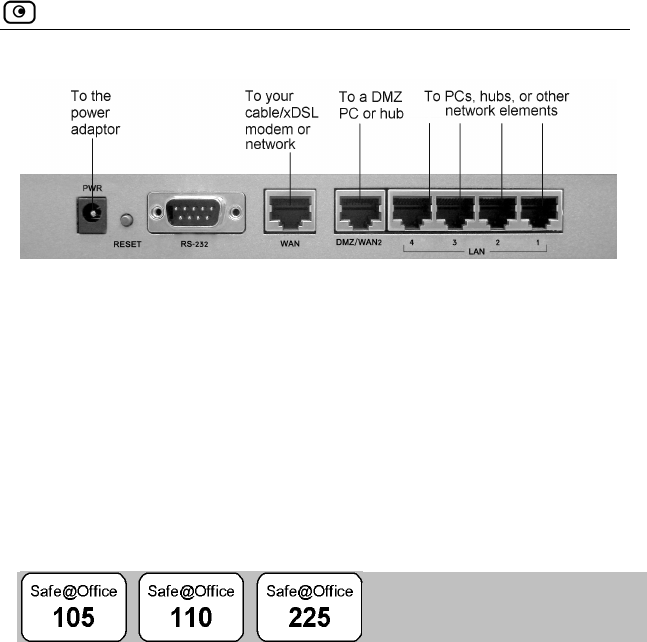
Figure 3: Safe@Office 200 Appliance Rear Panel Items
The following table lists the Safe@Office 200 appliance's rear panel
: Saf Appliance Rear Panel Elements
elements.
Table 3 e@Office 200
Label Description
PWR A power jack used for supplying power to the unit. Connect
the supplied power adapter to this jack.

Getting to Know Your Safe@Office 200 Series
18 Check Point Safe@Office User Guide
Label Description
RESET A button used for rebooting the Safe@Office appliance or
resetting the Safe@Office appliance to its factory defaults.
You need to use a pointed object to press this button.
• Short press. Reboots the Safe@Office appliance
• Long press (7 seconds). Resets the Safe@Office
appliance to its factory defaults, and resets your
firmware to the version that shipped with the
Safe@Office appliance. This results in the loss
of all security services and passwords and
reverting to the factory default firmware. You will
have to re-configure your Safe@Office
appliance.
Do not reset the unit without consulting your system
administrator.
RS-232 A serial port
WAN Wide Area Network: An Ethernet port (RJ-45) used for
connecting your cable or xDSL modem, or for connecting a
hub when setting up more than one Internet connection
DMZ/WAN
2
A dedicated Ethernet port (RJ-45) used for a DMZ computer,
or for a hub when connecting a DMZ network
LAN 1-4 Local Area Network switch: Four Ethernet ports (RJ-45) used
for connecting computers or other network devices
Getting to Know Your Safe@Office 200 Series
Chapter 1: Introduction 19
Front Panel
The Safe@Office 200 appliances includes several status LEDs that enable
you to monitor the appliance’s operation.
Figure 4: Safe@Office 200 Appliance Front Panel
For an explanation of the Safe@Office 200 appliance’s status LEDs, see the
4: Safe@ 200 Appliance Statu
e on
table below.
Table Office s LEDs
LED Stat Explanati
PWR/SEC Off Power off
Flashing quickly (Green) System boot-up
Establishing
Flashing slowly (Green) Internet
ed) r attack blocked
MZ/WAN2
LINK/ACT Off, 100 Off Link is down
connection
On (Green) Normal operation
Flashing (R Hacke
LAN 1-
4/WAN/
On (Red) Error
D
Getting to Know Your Safe@Office 300 Series Appliance
20 Check Point Safe@Office User Guide
LED State Explanation
LINK/ACT On, 100 Off 10 Mbps link es
for the correspondin
port
tablished
g
LINK/ACT On, 100 On
corresponding port
LNK/ACT Flashing Data is being
d
Serial port in use
100 Mbps link
established for the
transmitted/receive
VPN Flashing (Green) VPN port in use
Serial Flashing (Green)
Getting to Know Your Safe@Office 300
S
R
All physical connections (network and power) to the Safe@Office appliance
The following table lists the Safe@Office 300 appliance's rear panel
nts.
eries Appliance
ear Panel
are made via the rear panel of your Safe@Office appliance.
eleme

Getting to Know Your Safe@Office 300 Series Appliance
Chapter 1: Introduction 21
Table 5: Safe@Office 300 Appliance Rear Panel Elements
Label Description
PWR A power jack used for supplying power to the unit. Connect
the supplied power adapter to this jack.
RESET A t or
re t ults.
You n
•
•
ets your
the version that shipped with the
Safe@Office appliance. This results in the loss
to the factory default firmware. You will
have to re-configure your Safe@Office
Do not reset the unit without consulting your system
.
COM1
onnecting a
hub when setting up more than one Internet connection
DMZ omputer,
or for a hub when connecting a DMZ network
Local Area Network switch: Four Ethernet ports (RJ-45) used
for connecting computers or other network devices
bu ton used for rebooting the Safe@Office appliance
se ting the Safe@Office appliance to its factory defa
eed to use a pointed object to press this button.
Short press. Reboots the Safe@Office appliance
Long press (7 seconds). Resets the Safe@Office
appliance to its factory defaults, and res
firmware to
of all security services and passwords and
reverting
appliance.
administrator
USB A USB port
A serial port
WAN Wide Area Network: An Ethernet port (RJ-45) used for
connecting your cable or xDSL modem, or for c
A dedicated Ethernet port (RJ-45) used for a DMZ c
LAN 1-4
Getting to Know Your Safe@Office 300 Series Appliance
22 Check Point Safe@Office User Guide
Label Description
A
ANT
fice 300W only) NT 1/ Antenna connectors (Safe@Of
2
F
r the appliance’s operation.
ront Panel
The Safe@Office 300 appliances includes several status LEDs that enable
you to monito
Figure 5: Sa ffice 300 Appliance Fr
For an explanation of the Safe@Office 300 appliance’s status LEDs, see the
table below.
Table 6: Safe@O
ED
fe@O ont Panel
ffice 300 Appliance Status LEDs
L State Explanation
PWR/SEC Off Power off
Flashing quickly (Green) boot-up
n) nternet
connection
On (Green) Normal operation
On (Red)
System
Flashing slowly (Gree Establishing I
Flashing (Red) Hacker attack blocked
Error

Getting to Know Your Safe@Office 300 Series Appliance
Chapter 1: Introduction 23
LED State Explanation
LAN 1-
4/WAN/
DMZ/WAN2
LINK/ACT Off, 100 Off Link is down
LINK/ACT On, 100 Off stablished
port
LINK/ACT On, 100 On 100 Mbps link
rt
transmitted/received
VPN Flashing (Green) VPN port in use
Serial port in use
U SB port in use
W
(300W only)
use
10 Mbps link e
for the corresponding
established for the
corresponding po
LNK/ACT Flashing Data is being
Serial Flashing (Green)
SB Flashing (Green) U
LAN Flashing (Green) WLAN in

About This Guide
24 Check Point Safe@Office User Guide
A
n
tton names.
bout This Guide
To make finding information in this manual easier, some types of informatio
are marked with special symbols or formatting.
Boldface type is used for command and bu
Note: Notes are denoted by indented text and preceded by the Note
icon.
Warning: Warnings are denoted by indented text and preceded b
Warning icon.
y the
ts
lar
, that product is crossed out. For example, the product bar below
nnot
erform this task with Safe@Office 105.
Each task is marked with a product bar indicating the Safe@Office produc
required to perform the task. If you cannot perform the task using a particu
product
indicates a task that requires Safe@Office 110, 225, or 225U. You ca
p
Contacting Technical Support
If there is a problem with your Safe@Office appliance, surf to
http://www.sofaware.com/support and fill out a technical support request
form.
You can also download the latest version of this guide from the site.

Before You Install the Safe@Office Appliance
Chapter 2: Installing and Setting up the Safe@Office Appliance 25
Chapter 2
This chapter describes how to properly set up and install your Safe@Office
appliance in your networking environment.
Installing and Setting up the
Safe@Office Appliance
This chapter includes the following topics:
Before You Install the Safe@Office Appliance ...................................25
Wall Mounting the Appliance ..............................................................38
Network Installation .............................................................................40
Setting Up the Safe@Office Appliance................................................41
Before You Install the Safe@Office
Appliance
Prior to connecting and setting up your Safe@Office appliance for operation,
you must do the following:
• Check if TCP/IP Protocol is installed on your computer.
• Check your computer’s TCP/IP settings to make sure it obtains its
IP address automatically.
Refer to the relevant section in this guide in accordance with the operating
system that runs on your computer. The sections below will guide you
through the TCP/IP setup and installation process.
Before You Install the Safe@Office Appliance
26 Check Point Safe@Office User Guide
Windows 2000/XP
Note: While Windows XP has an "Internet Connection Firewall" option, it
is recommended to disable it if you are using a Safe@Office
appliance, since the Safe@Office appliance offers better protection.
If you want to subscribe to SecureDesk, you must disable the Windows
XP firewall before you install the antivirus software. For information on
SecureDesk, see Using SecureDesk on page 183.
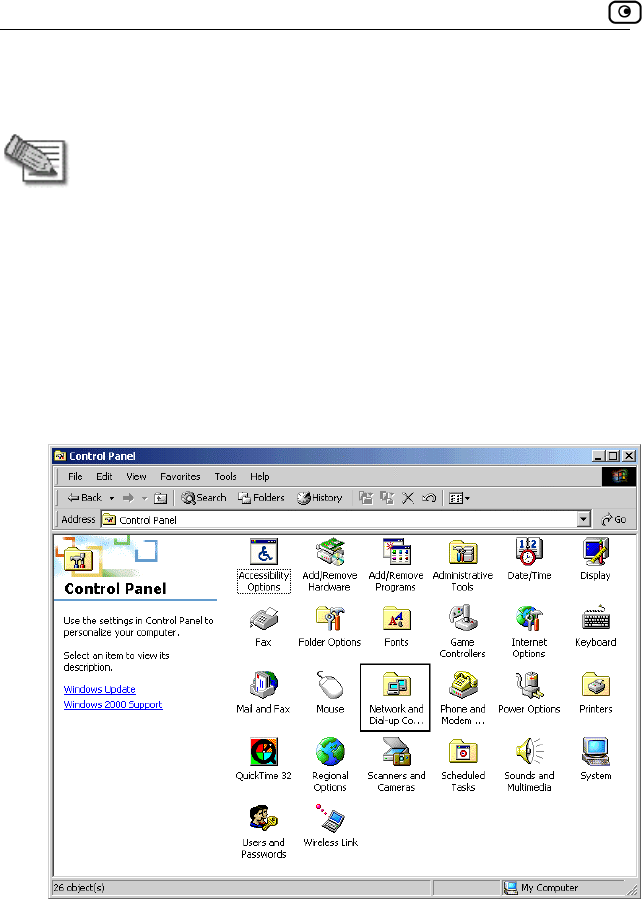
Checking the TCP/IP Installation
1. Click Start > Settings > Control Panel.
The Control Panel window appears.
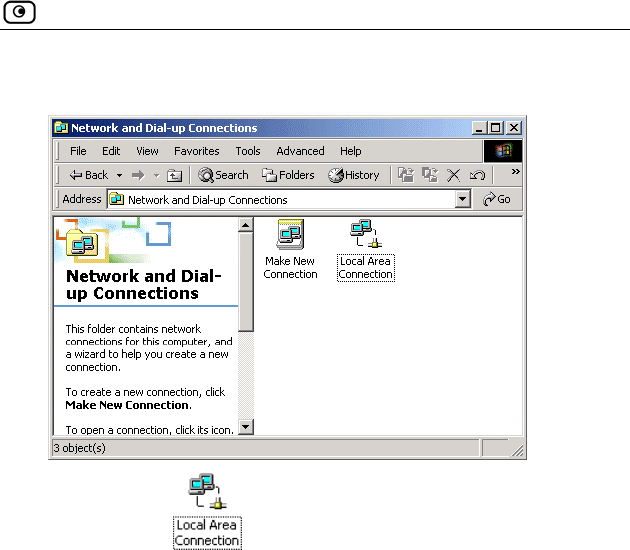
2. Double-click the Network and Dial-up Connections icon.
Before You Install the Safe@Office Appliance
Chapter 2: Installing and Setting up the Safe@Office Appliance 27
The Network and Dial-up Connections window appears.
3. Right-click the icon and select Properties from the pop-up
menu that opens.
Before You Install the Safe@Office Appliance
28 Check Point Safe@Office User Guide
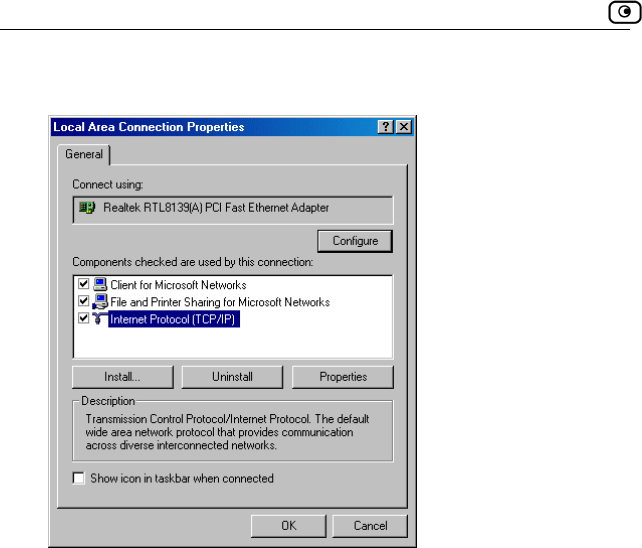
The Local Area Connection Properties window appears.
4. n the components list
an properly configured with the Ethernet card, installed on
mponents list,
.
In the above window, check if TCP/IP appears i
d if it is
your computer. If TCP/IP does not appear in the Co
you must install it as described in the next section

Before You Install the Safe@Office Appliance
Chapter 2: Installing and Setting up the Safe@Office Appliance 29
Installing TCP/IP Protocol
1. In the Local Area Connection Properties window click Install….
The Select Network Component Type window appears.
2. Choose Protocol and click Add.
The Select Network Protocol window appears.
3. C
TCP/IP protocol is installed on your computer.
hoose Internet Protocol (TCP/IP) and click OK.
Before You Install the Safe@Office Appliance
30 Check Point Safe@Office User Guide
s window double-click the
ect it and click
window opens.
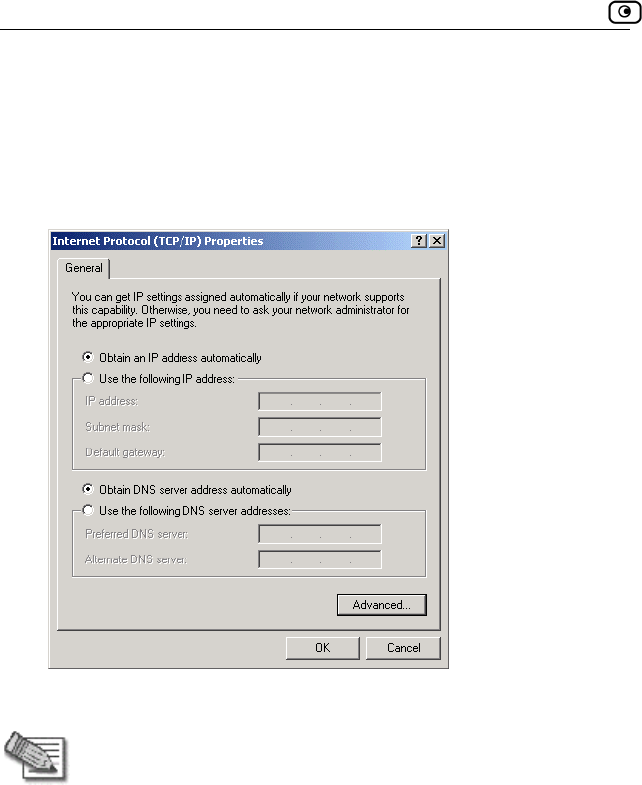
TCP/IP Settings
1. In the Local Area Connection Propertie
Internet Protocol (TCP/IP) component, or sel
Properties.
The Internet Protocol (TCP/IP) Properties
2. Click the Obtain an IP address automatically radio button.
Note: Normally, it is not recommended to assign a static IP address to
your PC but rather to obtain an IP address automatically. If for some
reason you need to assign a static IP address, select Specify an IP
address, type in an IP address in the range of 192.168.10.129-254, enter
255.255.255.0 in the Subnet Mask field, and click OK to save the new
settings.
(Note that 192.168.10 is the default value, and it may vary if you
changed it in the My Network page.)
3. Click the Obtain DNS server address automatically radio button.
Before You Install the Safe@Office Appliance
Chapter 2: Installing and Setting up the Safe@Office Appliance 31
4. gs.
Your computer is now ready to access your Safe@Office appliance.
Windows 98/Millennium
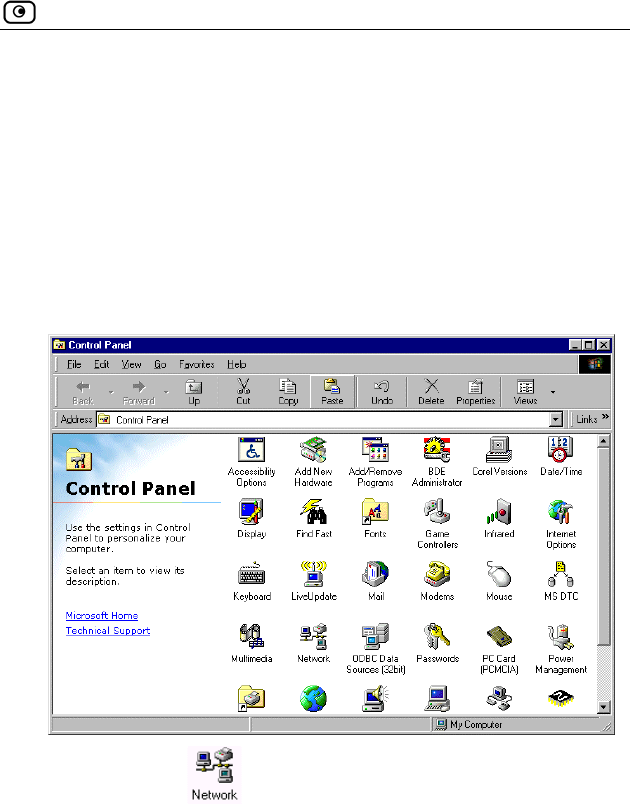
Checking the TCP/IP Installation
1. Click Start > Settings > Control Panel.
The Control Panel window appears.
Click OK to save the new settin
2. Double-click the icon.
Before You Install the Safe@Office Appliance
32 Check Point Safe@Office User Guide
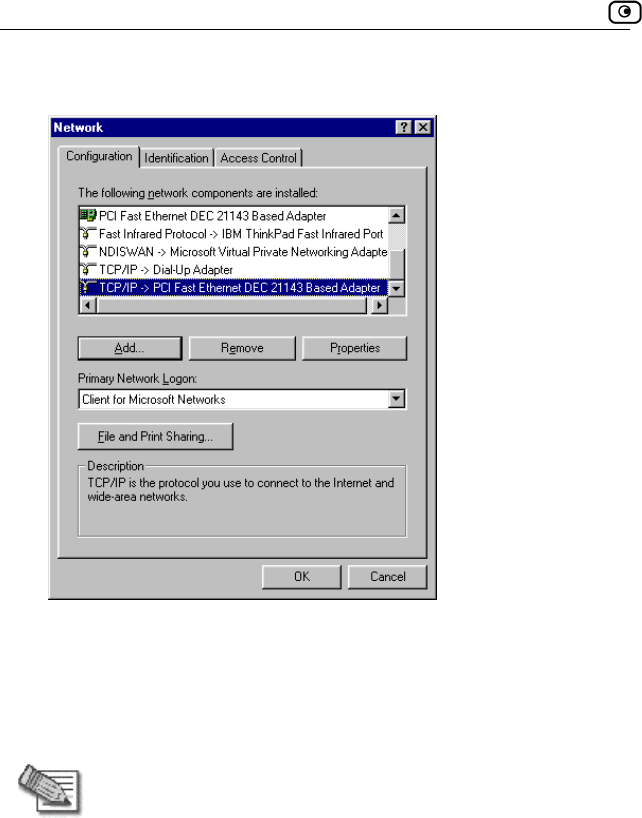
The Network window appears.
3. In the Network window, check if TCP/IP appears in the network
components list and if it is already configured with the Ethernet
ur computer.
Installing
card, installed on yo
TCP/IP Protocol
Note: If TCP/IP is already installed and configured on your computer skip
this section and move directly to TCP/IP Settings.
1. In the Network window, click Add.
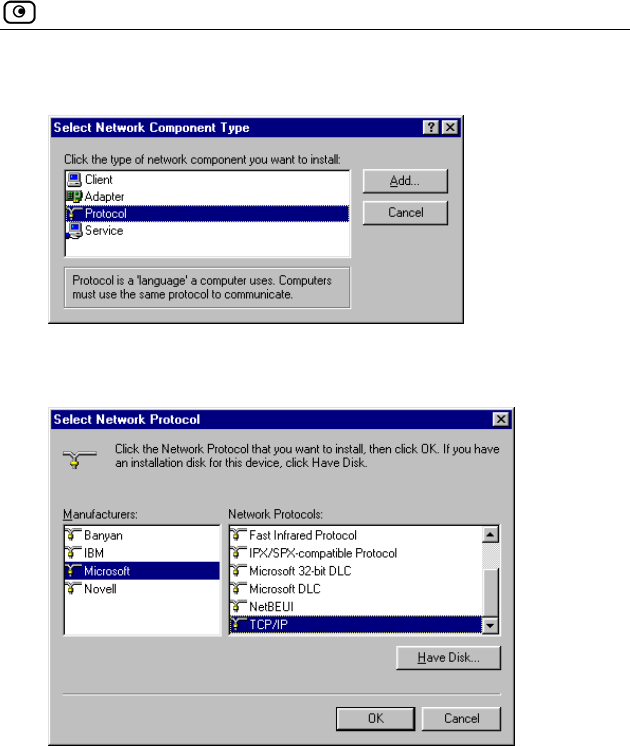
Before You Install the Safe@Office Appliance
Chapter 2: Installing and Setting up the Safe@Office Appliance 33
The Select Network Component Type window appears.
2. Choose Protocol and click Add.
The Select Network Protocol window appears.
3. In he Manufacturers list choose Microsoft, and in the Network
Protocols list choose TCP/IP.
4. Click OK.
If Windows asks for original Windows installation files, provide the
installation CD and relevant path when required (e.g. D:\win98)
5. Restart your computer if prompted.
t
Before You Install the Safe@Office Appliance
34 Check Point Safe@Office User Guide
TCP/IP Settings
Note: If you are connecting your Safe@Office appliance to an existing
LAN, consult your network manager for the correct configurations.
1. In the Network window, double-click the TCP/IP service for the
Ethernet card, which has been installed on your computer
(e.g. ).
The TCP/IP Properties window opens.
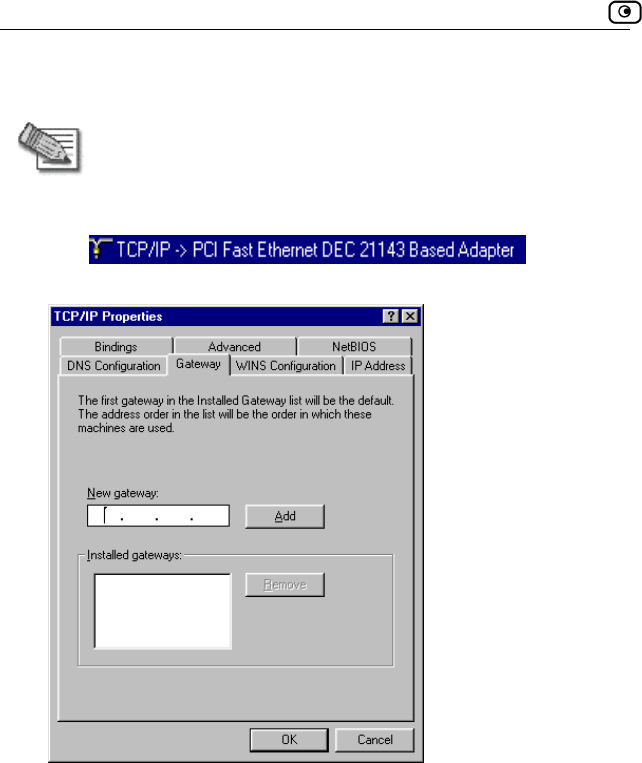
2. Click the Gateway tab, and remove any installed gateways.

Before You Install the Safe@Office Appliance
Chapter 2: Installing and Setting up the Safe@Office Appliance 35
DNS Configuration tab, and click the Disable DNS radio 3. Click the
button.
Before You Install the Safe@Office Appliance
36 Check Point Safe@Office User Guide
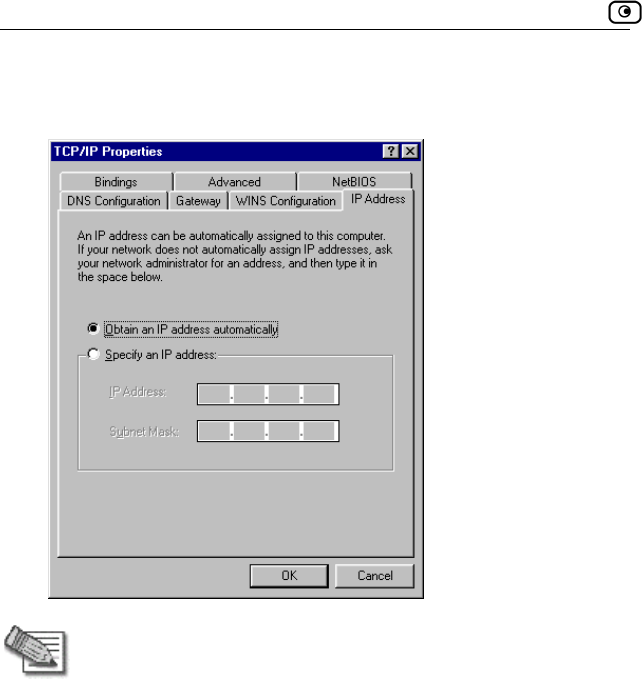
4. Click the IP Address tab, and click the Obtain an IP address
automatically radio button.
Note: Normally, it is not recommended to assign a static IP address to
your PC but rather to obtain an IP address automatically. If for some
reason you need to assign a static IP address, select Specify an IP
address, type in an IP address in the range of 192.168.10.129-254, enter
255.255.255.0 in the Subnet Mask field, and click OK to save the new
settings.
(Note that 192.168.10 is the default value, and it may vary if you
changed it in the My Network page.)
5. Click Yes when prompted for “Do you want to restart your
computer?”.
Your computer restarts, and the new settings to take effect.
Your computer is now ready to access your Safe@Office appliance.
Before You Install the Safe@Office Appliance
Chapter 2: Installing and Setting up the Safe@Office Appliance 37
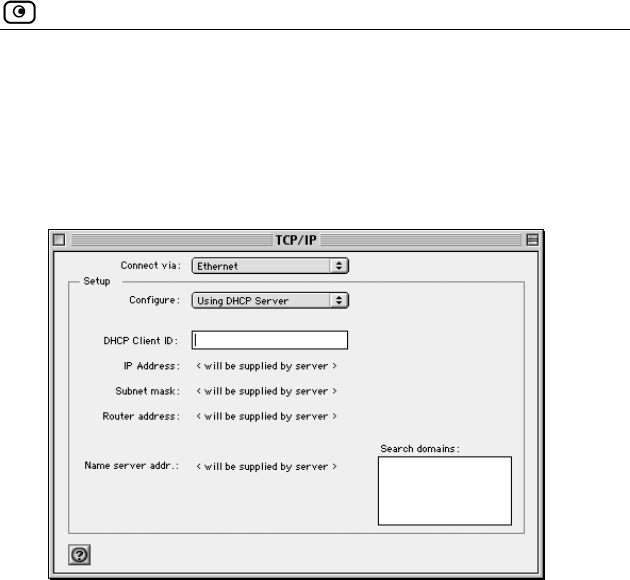
M
Use the following procedure for setting up the TCP/IP Protocol.
1. Choose Apple Menus -> Control Panels -> TCP/IP.
The TCP/IP window appears.
ac OS
2. Click the Connect via drop-down list and select Ethernet.
3. Click the Configure drop-down list and select Using DHCP Server.
4. Close the window and save the setup.
Wall Mounting the Appliance
38 Check Point Safe@Office User Guide
Wa
ffice 300 series appliance on the wall.
the wall
1. nce.
rientation.
ht.
ll Mounting the Appliance
If desired, you can mount your Safe@O
To mount the Safe@Office appliance on
Decide where you want to mount your Safe@Office applia
2. Decide on the mounting o
You can mount the appliance on the wall facing up, down, left, or rig
Note: Facing downwards is not recommended, as dust might accumulate
in unused ports.
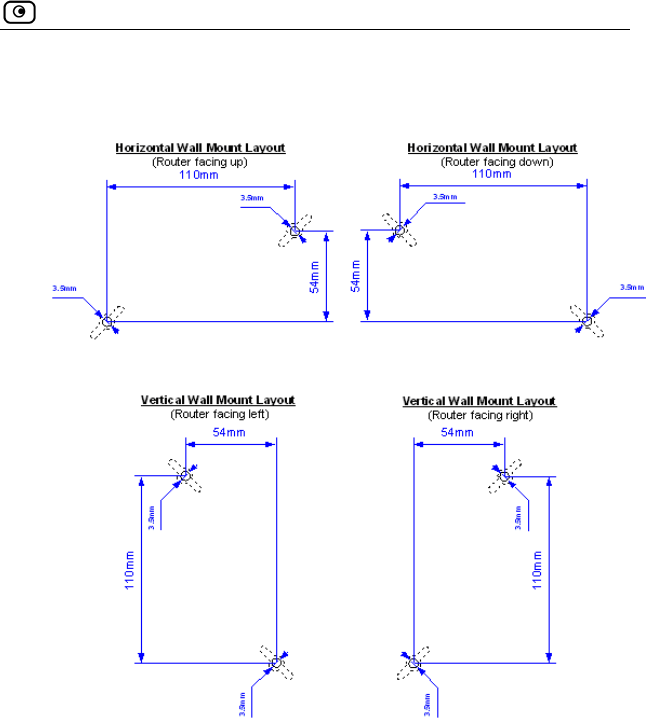
Wall Mounting the Appliance
Chapter 2: Installing and Setting up the Safe@Office Appliance 39
3. Mark two drill holes on the wall, in accordance with the following
sketch:
4. Drill two 3.5 mm diameter holes, approximately 25 mm deep.
5. Insert the two plastic conical anchors you received with your
Safe@Office appliance into the holes.
6. Insert the two screws you received with your Safe@Office
appliance into the plastic conical anchors, and turn them until they
protrude approximately 5 mm from the wall.
7. Align the holes on the Safe@Office appliance's underside with the
screws on the wall, then push the appliance in and down.

Network Installation
40 Check Point Safe@Office User Guide
Your Safe@Office appliance is all mounted. You can now connect it to
your
Network Installation
1. Verify that you have the correct cable type.
For informa 13.
2. Connect the LAN cable:
• Connect one end of the Ethernet cable to one of the LAN ports at
the back of the unit.
• Con devices.
3. Conne
• Connect one end of the Ethernet cable to the WAN port at the back
of the unit.
• Connect the other end of the cable to a Cable Modem, xDSL
modem or office net
4. Conne WR, at the
back of the Safe@Office appliance. Plug in the AC power adapter to
the wall electrical outlet.
w
computer. See Network Installation on page 40.
tion, see Network Requirements on page
nect the other end to PCs, hubs, or other network
ct the WAN cable:
work.
ct the power adapter to the power socket, labeled P
Warning: The Safe@Office applia ce AC adapter is compatible with
eithe y that the wall
ur power
supply. Failure to observe this warning may result in injuries or damage
to equipment.
n
r 100, 120 or 230 VAC input power. Please verif
outlet voltage is compatible with the voltage specified on yo
Setting Up the Safe@Office Appliance
Chapter 2: Installing and Setting up the Safe@Office Appliance 41
Figure 6: Typical Connection Diagram
5. In Safe@Office appliance 300W, prepare the Safe@Office appliance for
a wireless connection:
a. Connect the antennas that came with your Safe@Office
appliance to the ANT1 and ANT2 antenna connectors in the
appliance's rear panel.
b. Bend the antennas at the hinges, so that they point upwards.
Setting Up the Safe@Office Appliance
After you have installed the Safe@Office appliance, you must set it up using
the steps shown below.
When setting up your Safe@Office appliance for the first time after
installation, these steps follow each other automatically. After you have
logged on and set up your password, the Safe@Office Setup Wizard
automatically opens and displays the dialog boxes for configuring your
Internet connection. After you have configured your Internet connection, the
Setup Wizard automatically displays the dialog boxes for registering your
Safe@Office appliance. If desired, you can exit the Setup Wizard and
perform each of these steps separately.
Setting Up the Safe@Office Appliance
42 Check Point Safe@Office User Guide
Logging on to the Safe@Office Portal and setting up
your password
Initial Login to the Safe@Office Portal on page 45
Configuring an Internet connection
Using the Internet Wizard on page 58
Setting the Time on your Safe@Office appliance
(200 series only)
Setting the Time on the Appliance on page 267
Installing the Product Key
Upgrading Your Software Product on page 258
Registering your Safe@Office Appliance
Registering Your Safe@Office Appliance on page
262
Setting up subscription services
Connecting to a Service Center on page 165
Setting Up the Safe@Office Appliance
Chapter 2: Installing and Setting up the Safe@Office Appliance 43
You can access the Setup Wizard at any time after initial setup, using the
pro
To access the Setup Wizard
cedure below.
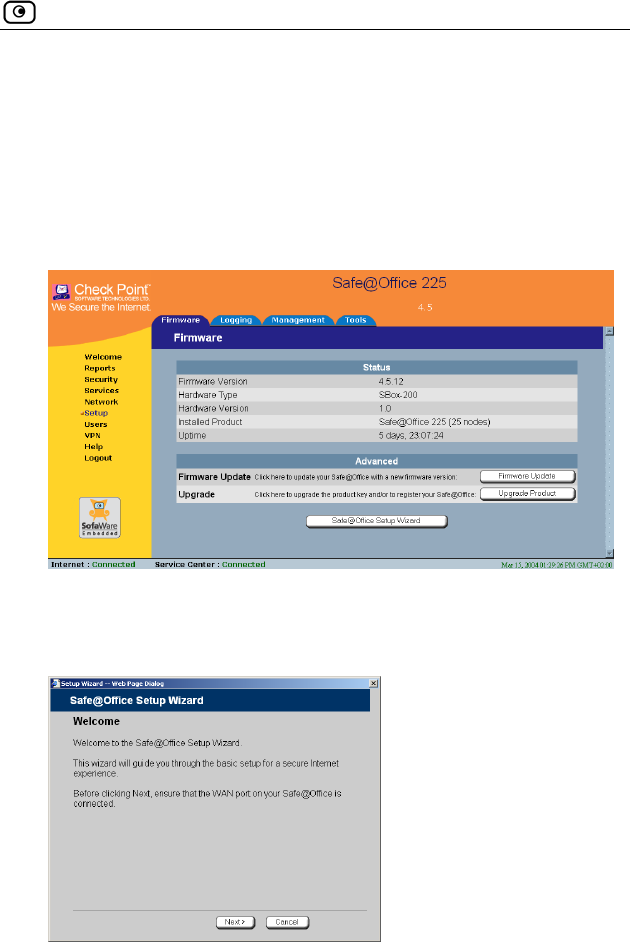
1. Click Setup in the main menu, and click the Firmware tab.
The Firmware page appears.
2. Click Safe@Office Setup Wizard.
d.
3. The Safe@Office Setup Wizard opens with the Welcome page
displaye

Initial Login to the Safe@Office Portal
Chapter 3: Getting Started 45
Ch
This ch er to get started
Initial Login to the Safe@Office Portal................................................45
Logging on to the Safe@Office Portal .................................................47
Accessing the Safe@Office Portal Rem tely.......................................49
Using the Safe@Office Portal ..............................................................50
..................................................56
Initial Login to the Safe@Office Portal
apter 3
apter contains all the information you need in ord
using your Safe@Office appliance.
This chapter includes the following topics:
o
Logging off.........................................
The he Safe@Office Portal, you must set up your
pas
To log on to the Safe@Office Portal for the first time
1. Browse to http://my.firewall.
Getting Started
first time you log on to t
sword.
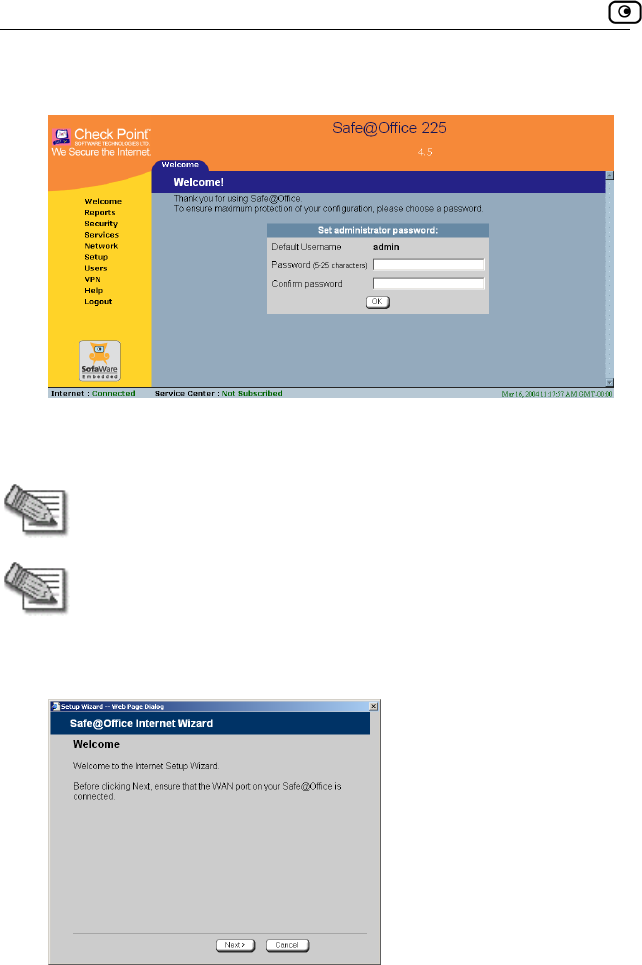
Initial Login to the Safe@Office Portal
46 Check Point Safe@Office User Guide
The initial login page appears.
2. Type a password both in the Password and the Confirm Password
fields.
Note: The password must be five to 25 characters (letters or numbers).
Note: You can change your password at any time. For further
information, see Changing Your Password on page 245.
3. Click O
The Safe@Office Setup Wizard opens, with the Welcome screen displayed.
K.
Logging on to the Safe@Office Portal
Chapter 3: Getting Started 47
part of the Setup Wizard, and it takes
you through basic Internet connection setup, step by step. For
ernet
rd, the Setup Wizard
For more information,
page 41.
wo Internet ncel
Logging on to the Safe@Office Portal
4. Configure your Internet connection using one of the following
ways:
• Internet Wizard
The Internet Wizard is the first
information on using the Internet Wizard, see Using the Int
Wizard on page 58.
After you have completed the Internet Wiza
continues to guide you through appliance setup.
see Setting Up the Safe@Office Appliance on
• Internet Setup
Internet Setup offers advanced setup options. For example, if you are
using Safe@Office 110 or 225, you can configure t
connections using Internet Setup. To use Internet Setup, click Ca
and refer to Using Internet Setup on page 66.
To log on to the Safe@Office Portal
1. llowing:
://my.firewall.
hrough HTTPS (locally or remotely), follow the
the Safe@Office Portal Remotely on page
Do one of the fo
• Browse to http
Or
• To log on t
procedure Accessing
49.
Logging on to the Safe@Office Portal
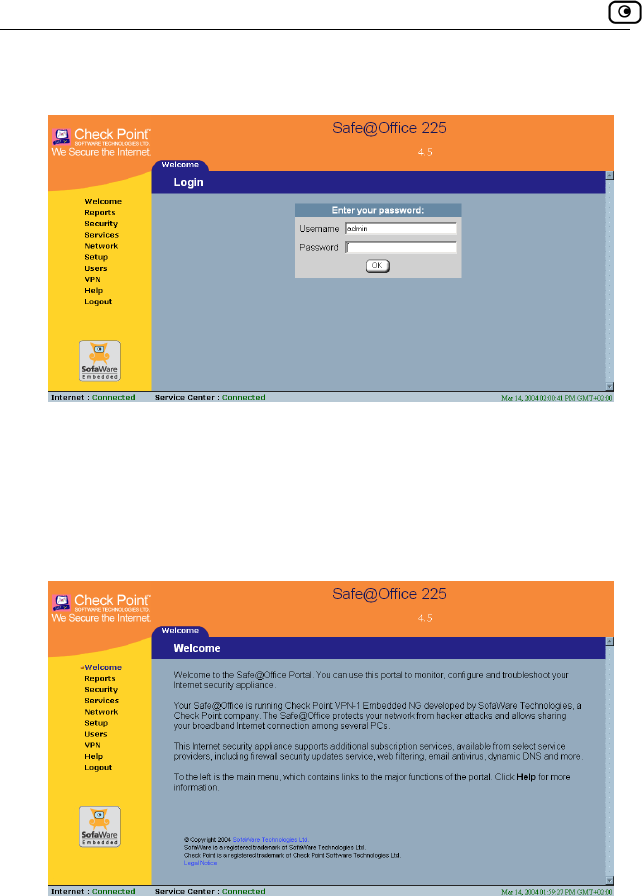
48 Check Point Safe@Office User Guide
The login page appears.
If you are usin ars without the Username
2. Type in your
3. Click OK.
The Welcome
g Safe@Office 105, the page appe
field.
username and password.
page appears.
Accessing the Safe@Office Portal Remotely
Chapter 3: Getting Started 49
Accessing the Safe@Office Portal
Remotely
You can access the Safe@Office Portal remotely (from the Internet) through
HTTPS. HTTPS is a protocol for accessing a secure Web server. It is used to
transfer confidential user information, since it encrypts data and utilizes a
secure port. If desired, you can also use HTTPS to access the Safe@Office
Portal from your internal network.
do the following:
Note: In order to access the Safe@Office Portal remotely, you must first
Configure your password, using HTTP. See Initial Login to the
Safe@Office Portal on page 45.
Configure HTTPS. See Configuring HTTPS on page 265.
Note: Your browser must support 128 bit cipher strength. To check your
browser's cipher strength, open Internet Explorer and click Help > About
Internet Explorer.
To access the Safe@Office Portal from your internal network
• Browse to https://my.firewall.
(Note that the URL starts with “https”, not “http”.)
The Safe@Office Portal appears.
To access the Safe@Office Portal from the Internet
• Browse to https://<firewall_IP_address>:981.
(Note that the URL starts with “https”, not “http”.)
The following things happen in the order below:

Using the Safe@Office Portal
50 Check Point Safe@Office User Guide
mpt to access the Safe@Office Portal through
Safe@Office appliance is not yet known to
ears.
To avoid seeing this dialog box again, install the certificate of the
If you are using Internet Explorer 5,
View C
ertificate dialog box appears, with the General tab displayed.
lick Install
The Certificate Import Wizard
c. Click Next.
d. Click Next.
Finish.
f. Click Yes.
g. Click OK.
The Security
h. Click Yes.
The Safe
g the S
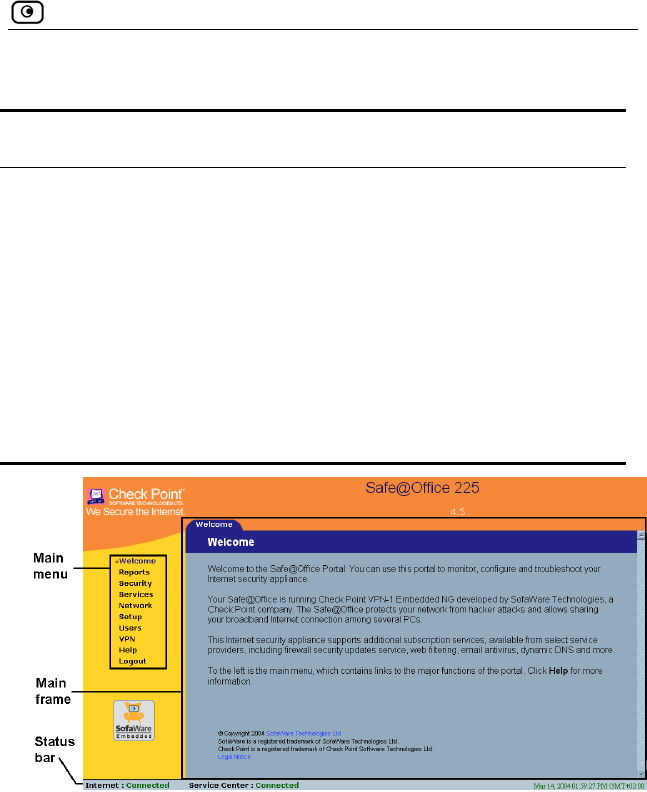
The Safe@Office P ables
you to manage and
options.
The Safe@Office Portal consists of three major elements.
If this is your first atte
HTTPS, the certificate in the
the browser, so the Security Alert dialog box app
destination Safe@Office appliance.
do the following:
a. Click
The C
ertificate.
b. C Certificate.
opens.
e. Click
Alert dialog box reappears.
@Office Portal appears.
Usin afe@Office Portal
ortal is a web-based management interface, which en
configure the Safe@Office appliance operation and
Using the Safe@Office Portal
Chapter 3: Getting Started 51
Table 7: Safe@Office Portal Elements
Element Description
Main menu U
as Reports, Security, and Setup).
sed for navigating between the various topics (such
Main frame Di mation and controls related to the
selected topic. The main frame may also contain tabs
th
selected topic.
Status bar Sh
st
splays infor
at allow you to view different pages related to the
ows your Internet connection and managed services
atus.
Figure 7: Safe@Office Portal

Using the Safe@Office Portal
52 Check Point Safe@Office User Guide
Main Menu
nu ng submenus.
n Menu Sub
This
submenu…
Does this…
The main me includes the followi
Table 8: Mai menus
Welcome Displays the welcome information.
Reports P vent
l tive
c
Security P ecurity
o e network.
Services
Network
Setup for managing your
Safe@Office appliance. Allows you to upgrade your
product key and firmware and to configure HTTPS
access to your Safe@Office appliance.
Password Allows you to set your password.
This submenu only appears in Safe@Office 105.
rovides reporting capabilities in terms of e
acogging, established connections, and
omputers.
rovides controls and options for setting the s
f any computer in th
Allows you to control your subscription to
subscription services.
Allows you to manage and configure your network
settings and Internet connections.
Provides a set of tools
Using the Safe@Office Portal
Chapter 3: Getting Started 53
This
submenu…
Does this…
Users Allows you to manage Safe@Office appliance users.
This submenu only appears in Safe@Office 110 and
225.
VPN PN
T 110 and
2
Help P
Logout A tal.
Allows you to manage, configure, and log on to V
sites.
his submenu only appears in Safe@Office
25.
rovides context-sensitive help.
llows you to log off of the Safe@Office Por
Main Frame
The main frame displays the relevant data and controls pertaining to the
menu and tab you select. These elements sometimes differ depending on
what model you are using. The differences are described throughout this
guide.
Status Bar
The status bar, located at the bottom of each page, displays the fields below.
In the Safe@Office 200 series, the status bar also displays the date and time.

Using the Safe@Office Portal
54 Check Point Safe@Office User Guide
Table 9: Status Bar Fields
ys this… This field… Displa
Internet Your Internet connection status.
on is
ing Connection. The Safe@Office
appliance is connecting to the Internet.
appliance is trying to contact the Internet
ay.
ection has been
manually disabled.
ction.
When both connections are configured, the Status bar
displays both statuses. For example “Internet [Primary]:
Connected”. For information on configuring a secondary
Internet connection, see Configuring the Internet
Connection on page 57.
The connection status may be one of the following:
• Connected. The Safe@Office appliance is
connected to the Internet.
• Not Connected. The Internet connecti
down.
• Establish
• Contacting Gateway. The Safe@Office
default gatew
• Disabled. The Internet conn
Note: Using Safe@Office 110 and 225, you can configure
both a primary and a secondary Internet conne
Using the Safe@Office Portal
Chapter 3: Getting Started 55
This lays this… field… Disp
Service
Center
Di
Your Service Center may offer va
services. These include the firewa
us may be one of the
Center, and security services are active.
splays your subscription services status.
rious subscription
ll service and optional
services such as Web Filtering and Email Antivirus.
Your subscription services stat
following:
• Not Subscribed. You are not subscribed to
security services.
• Connection Failed. The Safe@Office
appliance failed to connect to the Service
Center.
• Connecting. The Safe@Office appliance is
connecting to the Service Center.
• Connected. You are connected to the Service
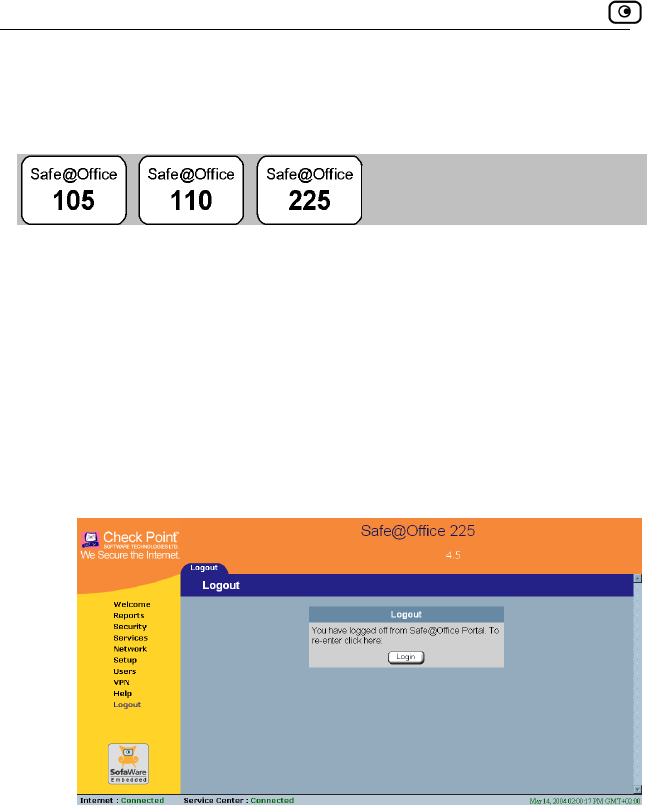
Logging off
56 Check Point Safe@Office User Guide
Logging off
g off tLoggin erminates your administration session. Any subsequent attempt
to conn tering of the
admini
To log off of
If you are connected through HTTP, click Logout in the main
menu.
The Logout page appears.
ect to the Safe@Office Portal will require re-en
stration password.
the Safe@Office Portal
• Do one of the following:
•
• If you are connected through HTTPS, the Logout option does not
appear in the main menu. Close the browser window.

Overview
Chapter 4: Configuring the Internet Connection 57
Chapter 4
This chapter describes how to configure and work with an Safe@Office
Internet connection.
This chapter includes the following topics:
Overview ..............................................................................................57
Using the Internet Wizard.....................................................................58
Using Internet Setup.............................................................................66
Setting Up a Dialup Modem.................................................................84
Cloning a MAC Address ......................................................................86
Viewing Internet Connection Informati n............................................88
....................89
90
ternet Connection..........................................91
Overview
You must configure your Internet connection before you can access the
Internet through the Safe@Office appliance. You can configure your Internet
connection using any of the following setup tools:
• Setup Wizard. Guides you through the Safe@Office appliance setup
step by step. The first part of the Setup Wizard is the Internet
Wizard. For further information on the Setup Wizard, see Setting
Up the Safe@Office Appliance on page 41.
• Internet Wizard. Guides you through the Internet connection
configuration process step by step.
Configuring the Internet
Connection
o
Enabling/Disabling the Internet Connection.....................
Using Quick Internet Connection/Disconnection.................................
Configuring a Backup In

Using the Internet Wizard
58 Check Point Safe@Office User Guide
u are using
• Enable Traffic Shaper for traffic flowing through the connection.
For information on Traffic Shaper, see Using Traffic Shaper on page
120.
• Configure a dialup Internet connection.
Before configuring the connection, you must first set up the modem.
For information, see Setting Up a Dialup Modem on page 84.
Using the Internet Wizard
• Internet Setup. Offers advanced setup options. If yo
Safe@Office 110 or 225, you can configure two Internet
connections. In Safe@Office 225, you can also do the following:
The igure your Safe@Office appliance for
Int hrough its user-friendly interface. It
lets tion
Direct LAN Connection
Internet Wizard allows you to conf
ernet connection quickly and easily t
you to choose between the following three types of broadband connec
methods:
•
• Cable Modem
• PPTP or PPPoE dialer
you should skip to step 2 in the procedure below.
set up the Internet c
Note: The first time you log on to the Safe@Office Portal, the Internet
Wizard starts automatically as part of the Setup Wizard. In this case,
To onnection using the Internet Wizard
1. ternet tab.
2.
Click Network in the main menu, and click the In
The Internet page appears
Click Internet Wizard.

Using the Internet Wizard
Chapter 4: Configuring the Internet Connection 59
The Internet Wizard opens with the Welcome page displayed.
3. Click Next.
The Internet Connection Method dialog box appears.
4. Select the Internet connection method you want to use for
connecting to the Internet.
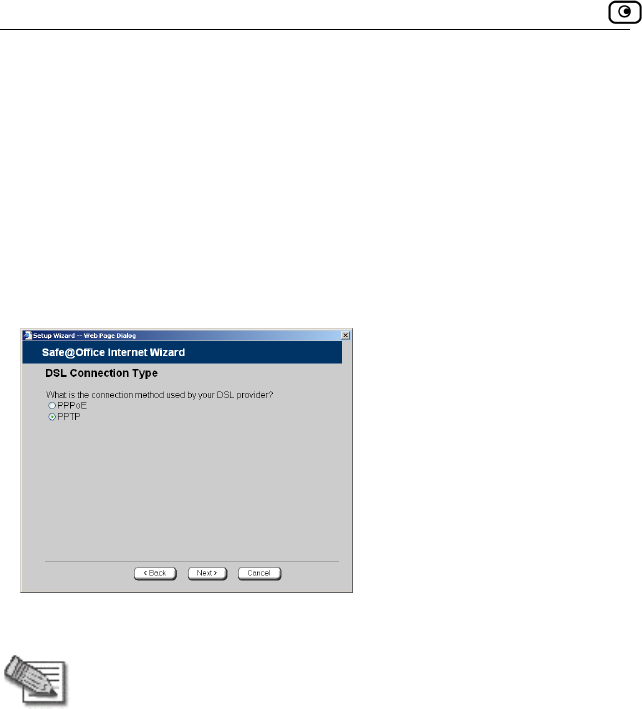
Note: If you selected PPTP or PPPoE dialer, do not use your dial-up
software to connect to the Internet.
5. Click Next.
Using the Internet Wizard
60 Check Point Safe@Office User Guide
Using a
No further ork)
Confirmation screen appears.
Direct LAN Connection
settings are required for a direct LAN (Local Area Netw
connection. The
1. Click Next.
The system attempts to connect to the Internet via the selected connection.
The Connecting… screen appears.
.
At the end of the connection process the Connected screen appears
2. Click Finish.
Using the Internet Wizard
Chapter 4: Configuring the Internet Connection 61
nnection
the Cabl nection method, the Identification dialog
Using a Cable Modem Co
If you selected
box appears. e Modem con
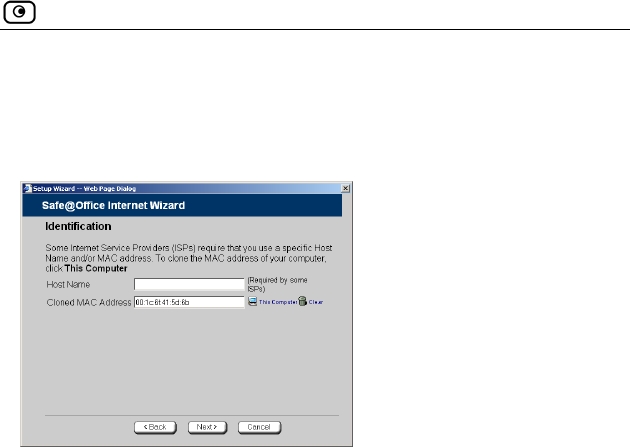
1. If your ISP requires a specific hostname for authentication, enter it
in the Host Name field. The ISP will supply you with the proper
hostname, if required.
Most ISPs do not require a specific hostname.
ork
ur ISP restricts connections to specific, recognized
ou to enter the MAC address.
d blank.
quires the MAC address, do either of the following:
ly "clone" the MAC address of
ce appliance.
quires authentication using the MAC address of a
different computer, enter the MAC address in the MAC cloning
field.
3. Click Next.
The Confirmation screen appears.
4. Click Next.
2. A MAC address is a 12-digit identifier assigned to every netw
device. If yo
MAC addresses, they will instruct y
Otherwise, you may leave this fiel
If your ISP re
• Click This Comp to automatical
your computer to the Safe@Offi
uter
Or
• If the ISP re
Using the Internet Wizard
62 Check Point Safe@Office User Guide
e Internet.
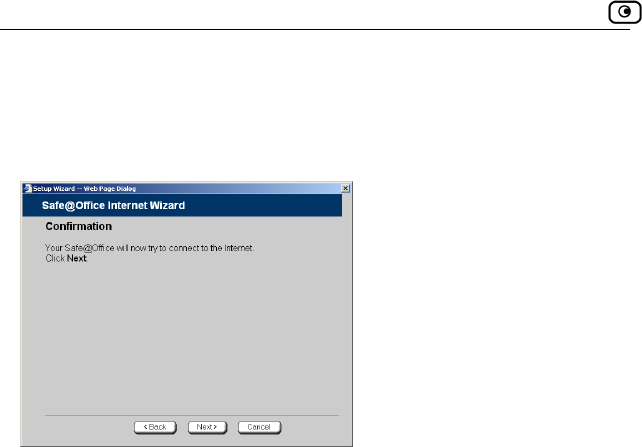
ting… sc At the end of the connection process
ed screen
Finish.
a PPTP o ler Connection
e PPTP ection method, the DSL
dialog b
The system attempts to connect to th
The Connec
the Connect reen appears.
appears.
5. Click
Using r PPPoE Dia
If you selected th
Connection Type or PPPoE dialer conn
ox appears.
1. Select the connection method used by your DSL provider.
Note: Most xDSL providers use PPPoE. If you are uncertain regarding
which connection method to use contact your xDSL provider.
2. Click Next.
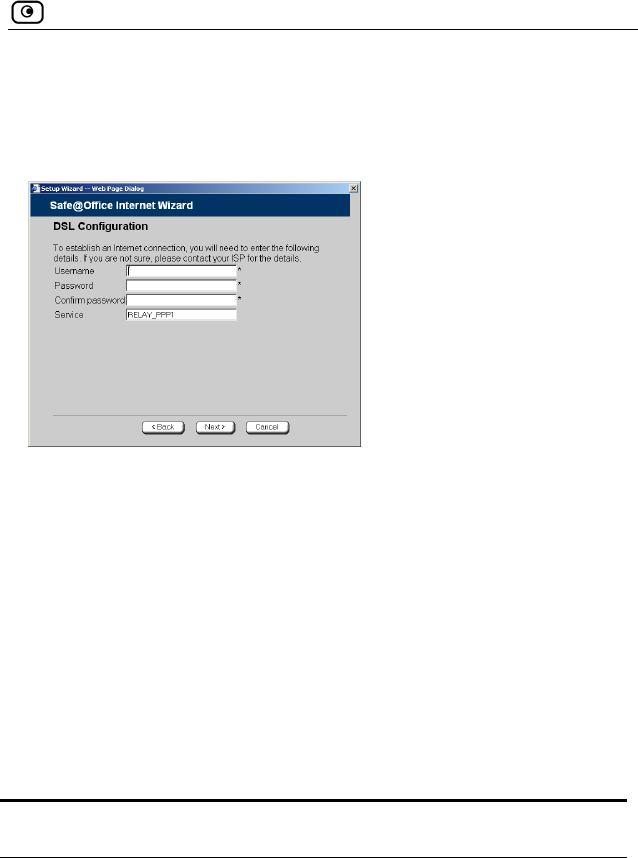
Using the Internet Wizard
Chapter 4: Configuring the Internet Connection 63
Using PPPoE
ethod, the DSL Configuration dialog
box appears.
If you selected the PPPoE connection m
1. Complete the fields using the information in the table below.
2. Click Next.
The Confirmation screen appears.
3. Click Next.
The system attempts to connect to the Internet via the DSL connection.
The Connecting… screen appears.
4. ish.
Tabl
In
At the end of the connection process the Connected screen appears.
Click Fin
e 10: PPPoE Connection Fields
this field… Do this…
Usern name. ame Type your user
P
Confirm p
assword Type your password.
assword Type your password.
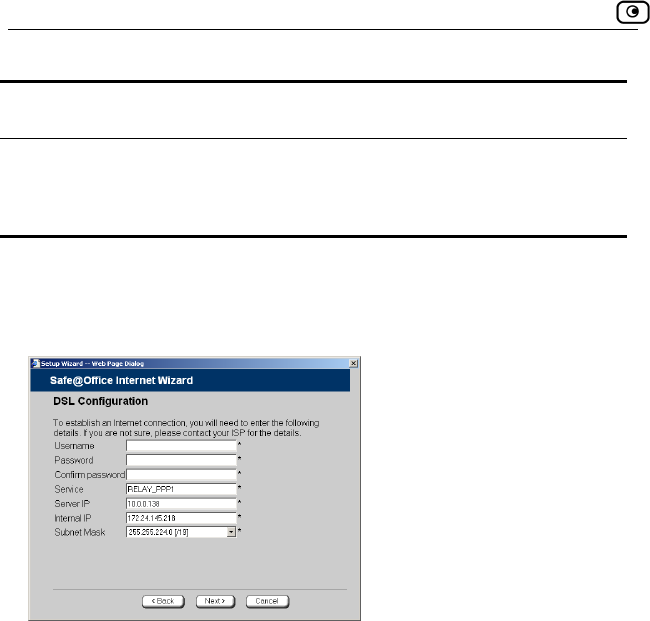
Using the Internet Wizard
64 Check Point Safe@Office User Guide
In this field… Do this…
S Type your service name.
ft blank.
ervice
This field can be le
Using PPTP
If you selected the PPTP connection method, the DSL Configuration dialog
box appears.
1. Complete the fields using the information in the table below.
Click Next. 2.
The Confirmation screen appears.
3. Click Next.
The system attempts to connect to the Internet via the DSL connection.
The Connecting… screen appears.
At the end of the connection process the Connected screen appears.
4. Click Finish.
Using the Internet Wizard
Chapter 4: Configuring the Internet Connection 65
Tabl
In this field… Do this…
e 11: PPTP Connection Fields
Username Type your user name.
Password Type your password.
Confirm password Type your password.
Service Type your service name.
Server IP Type the IP address of the PPTP modem.
Internal IP Type the local IP address required for accessing
the PPTP modem.
Subnet Mask Type the subnet mask of the PPTP modem.
Using Internet Setup
66 Check Point Safe@Office User Guide
Using Internet Setup
Internet Setup allows you to manually configure your Internet connection.
To configure the Internet connection using Internet Setup
1. Click Network in the main menu, and click the Internet tab.
If you are using Safe@Office 105, the secondary connection does not
appear.
C address using the procedure Cloning a
MAC Address on page 86.
3. Next to the Internet connection, click Edit.
2. If your ISP restricts connections to specific, recognized MAC
addresses, clone a MA
Using Internet Setup
Chapter 4: Configuring the Internet Connection 67
The Internet Setup page appears.
4. From the Connection Type drop-down list, select the Internet
connection type you are using/intend to use.
The di changes according to the connection type y selected.
eps should be performed in accordance with the connection
typ
splay
The following st
ou
e you have chosen.
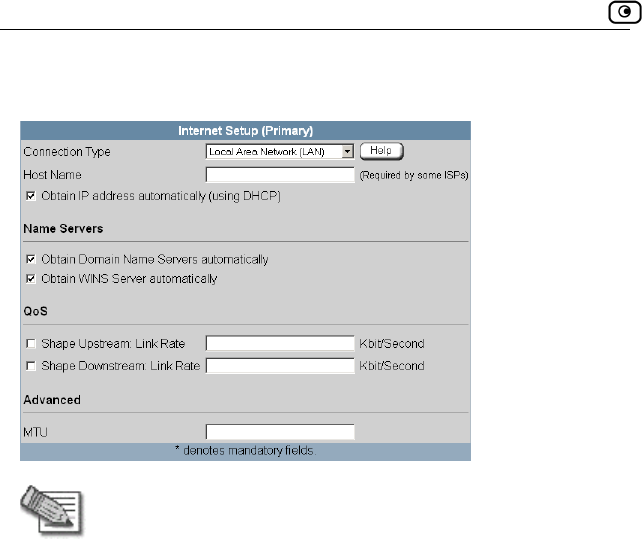
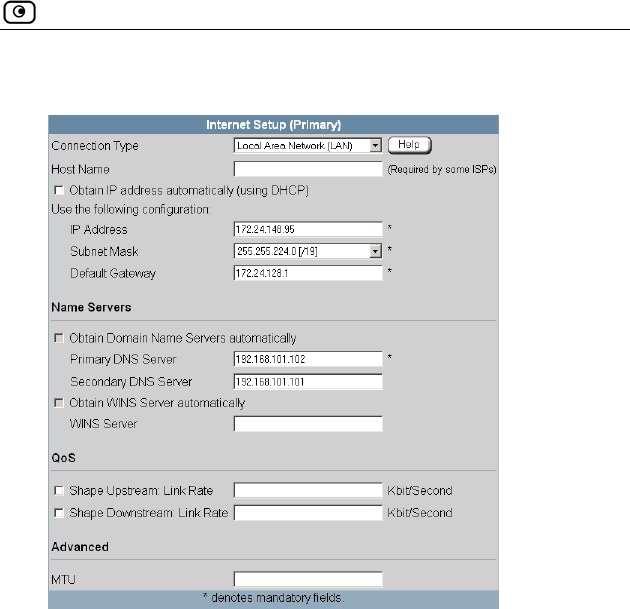
Using Internet Setup
Chapter 4: Configuring the Internet Connection 69
lected. New fields appear, depending on the check boxes you se
2. Click Apply.
The Safe@Office appliance attempts to connect to the Internet, and the
Status Bar displays the Internet status “Connecting”. This may take
several seconds.
ection is made, the Status Bar displays the Internet status
Once the conn
“Connected”.
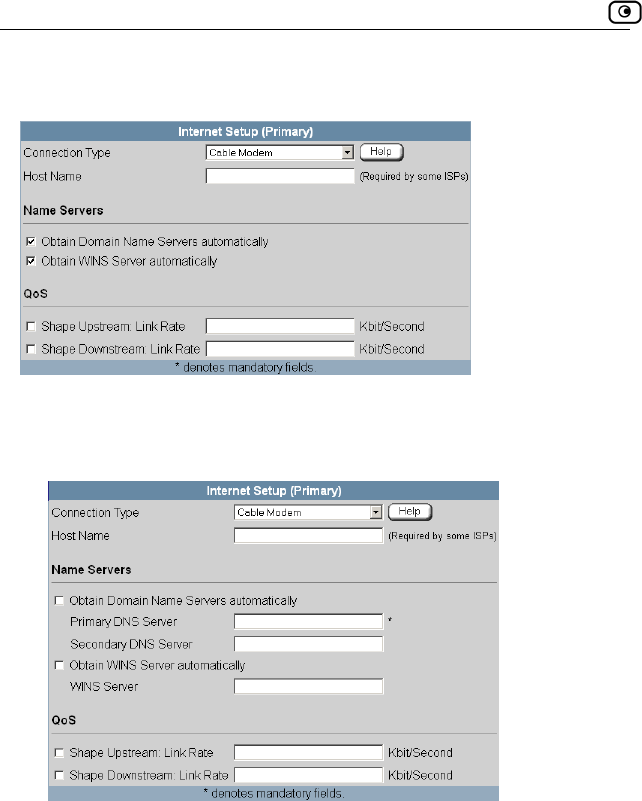
Using Internet Setup
70 Check Point Safe@Office User Guide
ection Using a Cable Modem Conn
1. Complete the fields using the relevant information in Internet Setup
Fields on page 79.
New fields appear, depending on the check boxes you selected.
2. Click Apply.
The Safe@Office appliance attempts to connect to the Internet, and the
Status Bar displays the Internet status “Connecting”. This may take
s.
Once the connection is made, the Status Bar displays the Internet status
“Connected”.
several second
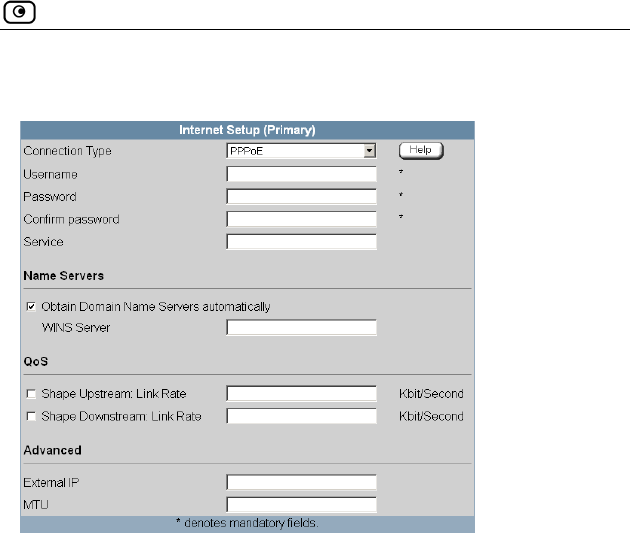
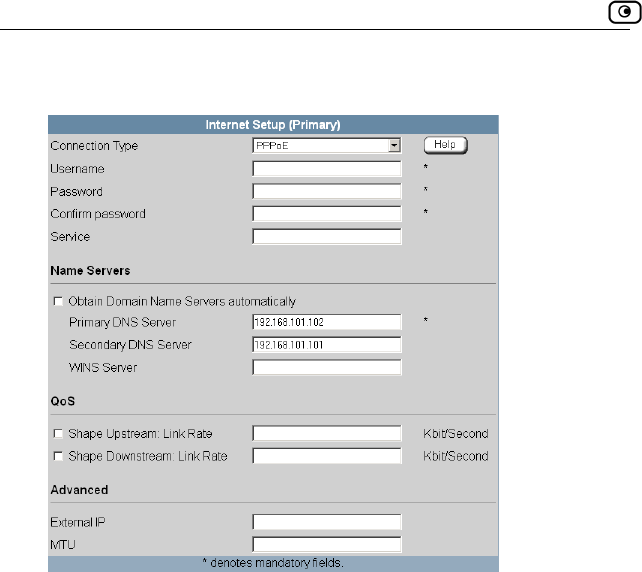
Using Internet Setup
72 Check Point Safe@Office User Guide
New fields appear, depending on the check boxes you selected.
2. Click Apply.
The Safe@Offic et, and the
Status Bar displ y take
several seconds.
Once the connection is made, the Status Bar displays the Internet status
“Connected”.
e appliance attempts to connect to the Intern
ays the Internet status “Connecting”. This ma
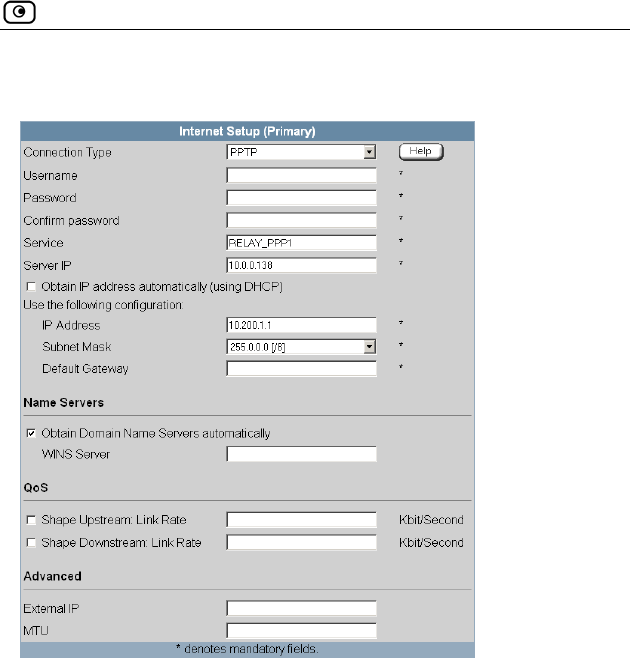
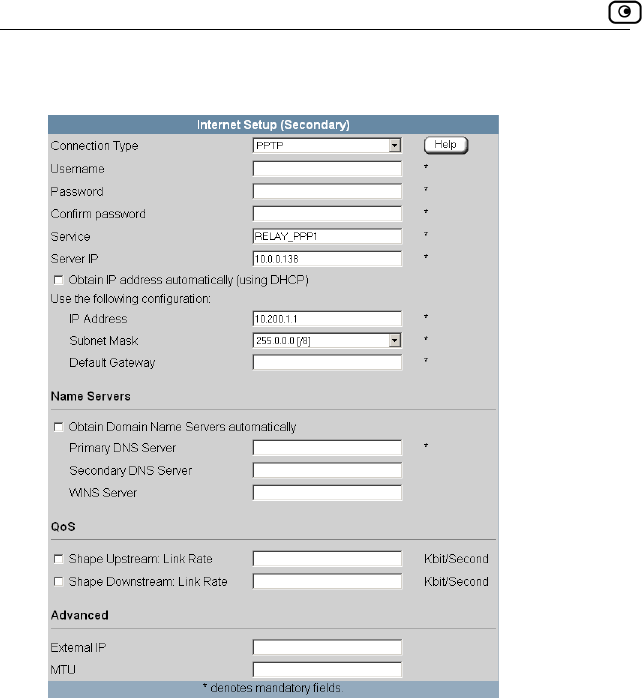
Using Internet Setup
74 Check Point Safe@Office User Guide
New fields appear, depending on the check boxes you selected.
2. Click Apply
Th
.
e Safe@Office appliance attempts to connect to the Internet, and the
Status Bar displays the Internet status “Connecting”. This may take
econds.
Once the connection is made, the Status Bar displays the Internet status
“Connected”.
several s
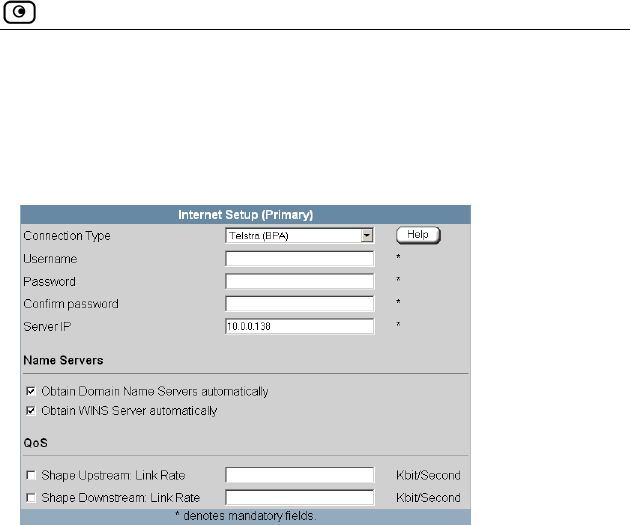
Using Internet Setup
Chapter 4: Configuring the Internet Connection 75
Using a Telstra (BPA) Connection
Use this Internet connection type only if you are subscribed to Telstra®
net poration
BigPond™ Inter
Limited. . Telstra BigPond is a trademark of Telstra Cor
1. Complete the fields using the relevant information in Internet Setup
Fields on page 79.
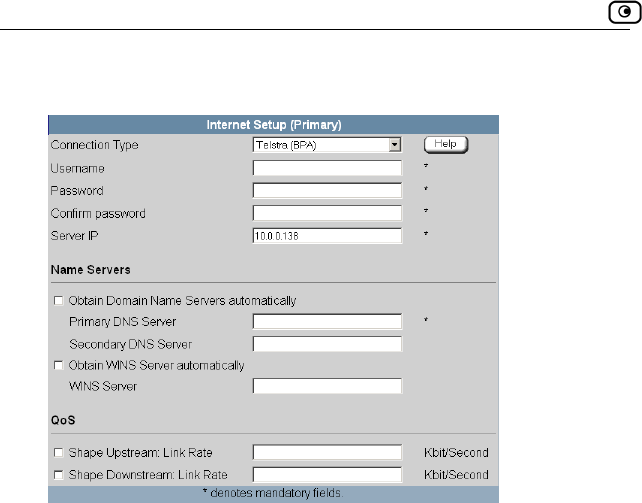
Using Internet Setup
76 Check Point Safe@Office User Guide
New fields appear, depending on the check boxes you selected.
e appliance attempts to connect to the Internet, a
ays the Internet status “Connecting”. This may ta
2. Click Apply.
The Safe@Offic nd the
Status Bar displ ke
several seconds.
Once the connection is made, the Status Bar displays the Internet status
“Connected”.
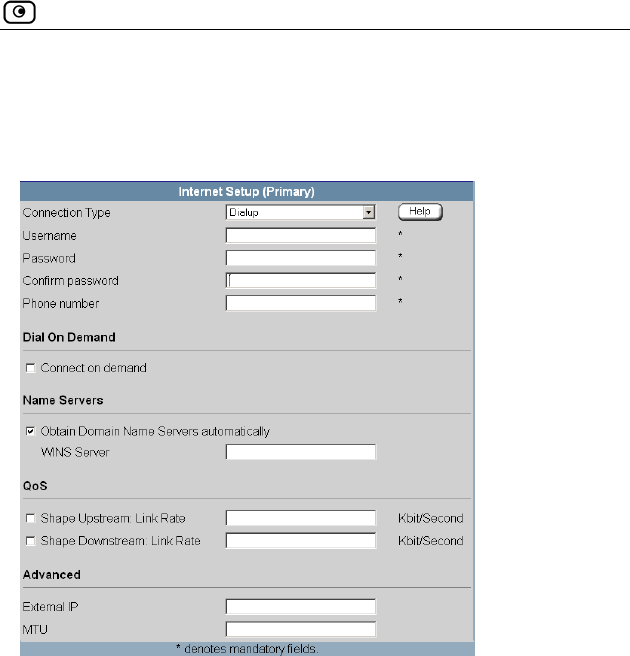
Using Internet Setup
Chapter 4: Configuring the Internet Connection 77
Using a Dialup Connection
To use this connection type, you must first set up the dialup modem. For
rmation, see Seinfo tting Up a Dialup Modem on page 84.
1. Complete the fields using the relevant information in Internet Setup
Fields on page 79.
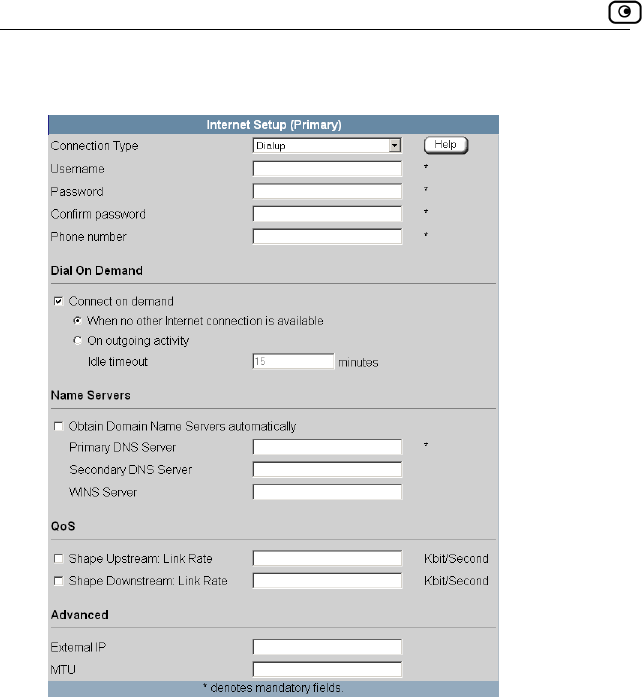
Using Internet Setup
78 Check Point Safe@Office User Guide
ing on the check boxes you selected. New fields appear, depend
2. Click .
@Offic onnect to the Internet, and the
Status Bar displays the Internet status “Connecting”.
several seconds.
Once the connectio tus
“Connected”.
Apply
The Safe e appliance attempts to c This may take
n is made, the Status Bar displays the Internet sta
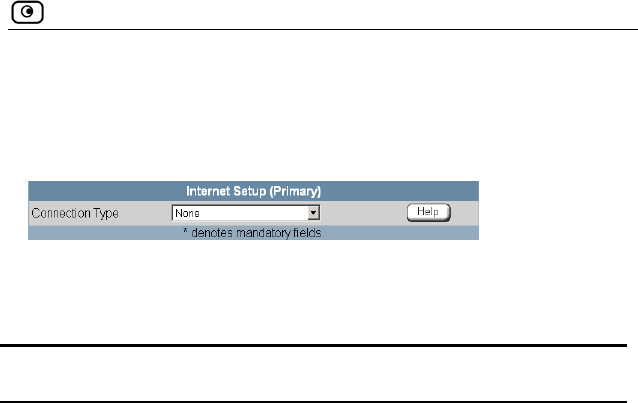
Using Internet Setup
Chapter 4: Configuring the Internet Connection 79
Using No Connection
If you are using Safe@Office 110 or 225, and you do not have a secondary
nInternet connectio , set the connection type to None.
• Click Apply.
Internet
…
Table 12: Setup Fields
In this field Do this…
Host Name Type the hostname for authentication.
If your ISP has not provided you with a host name,
leave this field blank. Most ISPs do not require a
specific hostname.
U
Password Type your password.
Confirm p sword.
Servi ervice name.
you with a service
field empty.
Server IP If you selected PPTP, type the IP address of the
ver as given by your ISP.
n by Telstra.
sername Type your user name.
ass Type your pasword
ce Type your s
If your ISP has not provided
name, leave this
PPTP ser
If you selected Telstra (BPA), type the IP address of
the Telstra authentication server as give

Using Internet Setup
80 Check Point Safe@Office User Guide
In this field… Do this…
P If you selected Dialup, type the phone number that
the modem should dial, as given by your ISP.
hone Number
Dial O
Connect on
demand
Select this option if you do not want the dialup
modem to be constantly connected to the Internet.
The modem will dial a connection only under certain
conditions.
This option is useful when configuring a dialup
backup connection. For information, see Setting Up
a Dialup Backup Connection on page 92.
When no other
Internet
connection is
available
Select this option to specify that the dialup modem
should only dial a connection if no other connection
exists, and the Safe@Office appliance is not acting
as a Backup appliance.
If another connection opens, or if the Safe@Office
appliance becomes a Backup appliance, the dialup
modem will disconnect.
For information on configuring the appliance as a
Backup or Master, see Configuring High
Availability on page 117.
n Demand

Using Internet Setup
Chapter 4: Configuring the Internet Connection 81
In this field… Do this…
On outgoing
activity
Select this option to specify that the dialup modem
should only dial a connection if no other connection
exists, and there is outgo g activity (that is, packets
If another connection opens, or if the connection
will disconnect.
in
need to be transmitted to the Internet).
times out, the dialup modem
Id e
can remain idle. Once this period of time
N
automatically
HCP)
n if you do not want the Safe@Office
appliance to obtain an IP address automatically
omain
ers
ally
fe@Office
Obtain WINS
Server
automatically
you want the Safe@Office
btain an IP address automatically
using DHCP, but not to automatically configure the
address of your Safe@Office
appliance.
le timeout Type the amount of time (in minutes) that th
connection
has elapsed, the dialup modem will disconnect.
ame Servers
Obtain IP address Clear this optio
(using D using DHCP.
Obtain D
Name Serv
automatic
Clear this option if you want the Sa
appliance to obtain an IP address automatically
using DHCP, but not to automatically configure DNS
servers.
Clear this option if
appliance to o
WINS server.
IP Address Type the static IP

Using Internet Setup
82 Check Point Safe@Office User Guide
In this field… Do this…
Subnet Mask
address of your Safe@Office appliance.
Select the subnet mask that applies to the static IP
Default Gateway efault gateway.
S rver IP address.
WINS Server IP address.
Shape Upstream: Select this option to enable Traffic Shaper for
ond)
your Internet connection's
maximum measured upstream speed in the field
s recommended to try different rates in order to
termine which one provides the best results.
For information on using Traffic Shaper, see Using
Traffic Shaper on page 120.
Type the IP address of your ISP’s d
Primary DNS
Server
Type the Primary DNS server IP address.
Secondary DN
Server
Type the Secondary DNS se
Type the WINS server
QoS
Link Rate outgoing traffic. Then type a rate (in kilobits/sec
slightly lower than
provided.
It i
de

Using Internet Setup
Chapter 4: Configuring the Internet Connection 83
In this field… Do this…
Shap
D
Rate
option to enable Traffic Shaper for
ts/second)
slightly lower than your Internet connection's
d nstream speed in the field
different rates in order to
w s.
cannot control the number or
he Internet; it can
raffic by dropping
received packets. This makes the shaping of
inbound traffic less accurate than the shaping of
outbound traffic. It is therefore recommended to
n on using Traffic Shaper, see Using
e Select this
ownstream: Link incoming traffic. Then type a rate (in kilobi
maximum measured ow
provided.
It is recommended to try
determine hich one provides the best result
Note: Traffic Shaper
type of packets it receives from t
only affect the rate of incoming t
enable traffic shaping for incoming traffic only if
necessary.
For informatio
Traffic Shaper on page 120.
A
E selected PPTP, type the IP address of the
PPTP client as given by your ISP.
If you selected PPPoE, this field is optional, and you
do not have to fill it in unless your ISP has instructed
you to do so.
dvanced
xternal IP If you
Setting Up a Dialup Modem
84 Check Point Safe@Office User Guide
In this field… Do this…
MTU This field allows you to control the maximum
e default
r
transmission unit size.
As a general recommendation you should leave this
field empty. If however you wish to modify th
MTU, it is recommended that you consult with you
ISP first and use MTU values between 1300 and
1500.
Setting Up a Dialup Modem
You can use a dialup modem as a primary or secondary Internet connection
method. This is useful in locations where broadband Internet access is
ally
dis d when not in use. For information on setting up a dialup backup
connection, see Setting Up a Dialup Backup Connection on page 92.
dem to your Safe@Office
For information on locating the serial port, see Rear Panel on page 17.
2. Click Networ
unavailable.
When used as a backup Internet connection, the modem can be automatic
connecte
To set up a dialup modem
1. Connect a regular or ISDN dialup mo
appliance's serial port.
k in the main menu, and click the Dialup tab.
Setting Up a Dialup Modem
Chapter 4: Configuring the Internet Connection 85
The Dialup page appears.
3. Complete the fields using the information in the table below.
4.
, click Test.
the test succeeded.
. Configure a Dialup Internet connection using the information in
Using Internet Setup on page 66.
Table 13: Dialup Fields
In this field… Do this…
Click Apply.
5. To check that that the values you entered are correct
The Dialup page displays a message indicating whether
6
Modem Type Select the modem type.
If you selected Custom, the Installation String field is
enabled. Otherwise, it is filled in with the correct
installation string for the modem type.
Cloning a MAC Address
86 Check Point Safe@Office User Guide
In this field… Do this…
Initialization String Type the installation string for the custom modem
type.
Is you selected a standard modem type, this field is
read-only.
Dial Mode Select the dial mode the modem uses.
Port Speed Select the modem's port speed (in bits per second).
Cloning a MAC Address
A MAC address is a 12-digit identifier assigned to every network device. If
your ISP restricts connections to specific, recognized MAC addresses, you
must clone a MAC address.
To clone a MAC address
1. Click Network in the main menu, and click the Internet tab.
The Internet page appears.
2. In the Cloned MAC address field, click Edit.
Cloning a MAC Address
Chapter 4: Configuring the Internet Connection 87
The MAC Cloning page appears.
3. Do one of the following:
• Click This Computer to automatically "clone" the MAC address of
• If th
diff s in the MAC cloning
field.
4. Click A
5. Click B
The Inte your computer’s MAC address
displayed.
your computer to the Safe@Office appliance.
Or
e ISP requires authentication using the MAC address of a
erent computer, enter the MAC addres
pply.
ack.
rnet page reappears with
Viewing Internet Connection Information
88 Check Point Safe@Office User Guide
on Information
Viewing Internet Connecti
You can view information on your Internet connection(s) in terms of status
duration, and activity. ,
To view Inter
1. Click Ne
The Inter
For an ex
2. To refres resh.
T
F
net connection information
twork in the main menu, and click the Internet tab.
net page appears.
planation of the fields on this page, see the table below.
h the information on this page, click Ref
able 14: Internet Page Fields
ield Description
Status Indicates the connection’s status.
Duration Indicates the connection duration, if active. The
duration is given in the format hh:mm:ss, where:
ss=seconds
IP Address Your IP address.
hh=hours
mm=minutes
Enabling/Disabling the Internet Connection
Chapter 4: Configuring the Internet Connection 89
Field Description
Enabled Indicates whether or not onnection is enabled.
Disabling the
the c
For further information, see Enabling/
Internet Connection on page 89
WAN
Address
ce appliance’s MAC address.
Cloned MAC
Address
The cloned MAC address.
For further information, see Cloning a MAC
Address on page 86.
Received Packets The number of data packets received in the active
connection.
Sent Packets The number of data packets sent in the active
connection.
MAC The Safe@Offi
E nternet
Co
nabling/Disabling the I
nnection
You can temporarily disable an Internet connection. This is useful if, for
exa n and do not want to leave your computer
e Internet. If you are using Safe@Office 110 or 225 and have
nnections, you can force the Safe@Office appliance to use a
part ng the other connection.
The Internet connection’s Enabled/Disabled status is persistent through
Safe@Office appliance reboots.
mple, you are going on vacatio
connected to th
two Internet co
icular connection, by disabli
Using Quick Internet Connection/Disconnection
90 Check Point Safe@Office User Guide
1.
2. tion, do one of the following:
To enable/disable an Internet connection
Click Network in the main menu, and click the Internet tab.
The Internet page appears.
Next to the Internet connec
• To enable the connection, click .
The button changes to and the connection is enabled.
• To disable the connection, click .
The button changes to and the connection is disabled.
U
Csing Quick Internet
onnection/Disconnection
By clicking the Connect or Disconnect button (depending on the connection
sta establish a quick Internet connection
usi tion type. In the same manner, you can
Th /Not Connected status until the
e Safe@Office appliance then
n is enabled. For information on
ena ling the Internet
Connection on page 89.
tus) on the Internet page, you can
ng the currently-selected connec
terminate the active connection.
e Internet connection retains its Connected
Safe@Office appliance is rebooted. Th
connects to the Internet if the connectio
bling an Internet connection, see Enabling/Disab
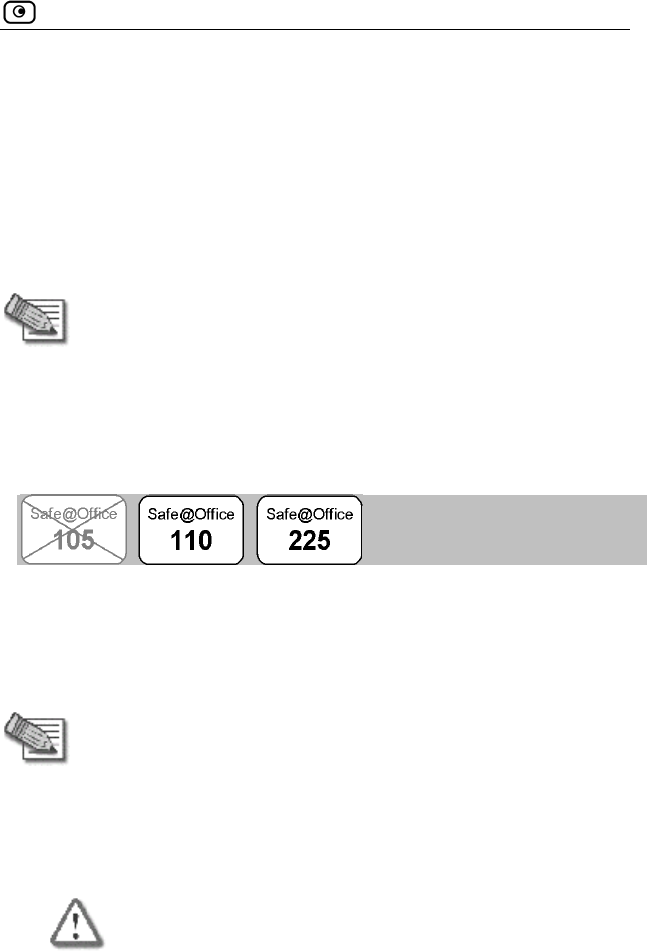
Configuring a Backup Internet Connection
Chapter 4: Configuring the Internet Connection 91
Configuring a Backup Internet
Connection
You can configure both a primary and a secondary Internet connection. The
secondary connection acts as a backup, so that if the primary connection fails,
the Safe@Office appliance remains connected to the Internet.
Note: You can configure different DNS servers for the primary and
secondary connections. The Safe@Office appliance acts as a DNS
relay and routes requests from computers within the network to the
appropriate DNS server for the active Internet connection.
Setting Up a LAN or Broadband Backup
Connection
To set up a LAN or broadband backup Internet connection
1. e WAN port on your appliance's rear
Connect a hub or switch to th
panel.
Note: Do not connect to the DMZ port.
2. Connect your two modems or routers to the hub/switch.
3. Configure two Internet connections.
For instructions, see Using Internet Setup on page 66.
Important: The two connections can be of different types. However, they
cannot both be LAN DHCP connections.
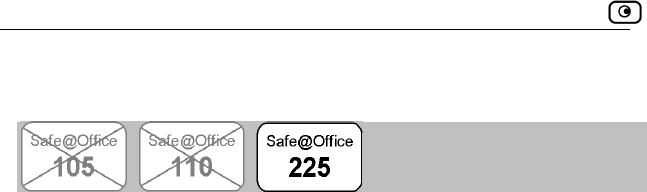
Configuring a Backup Internet Connection
92 Check Point Safe@Office User Guide
Setting Up a Dialup Backup Connection
If desired, you can use a dialup modem as the secondary Internet connection
liance automatically dials the modem if the
To rnet connection
Modem on page 84.
Internet connection.
3. a Dialup secondary Internet connection.
For instructions, see Using Internet Setup on page 66.
method. The Safe@Office app
primary In nnection fails. ternet co
set up a dialup backup Inte
1. Setup a dialup modem.
For instructions, see Setting Up a Dialup
2. Configure a LAN or broadband primary
For instructions, see Using Internet Setup on page 66.
Configure
Configuring Network Settings
Chapter 5: Managing Your Network 93
Chapter 5
This chapter describes how to manage and configure your network
connection and settings.
This chapter includes the following topics:
Configuring Network Settings..............................................................93
Configuring High Availability............................................................117
Using Traffic Shaper ..............
............................................................120
Using Network Objects ......................................................................129
.....................................................................137
Configuring Network Settings
Using Static Routes .......
Warning: These are advanced settings.
necessary and you are qualified to do so.
Do not change them unless it is
unable to correct the error, you can reset the Safe@Office appli
its default sett
Note: If you change the network settings to incorrect values and are
ance to
ings. See Resetting the Safe@Office appliance to
Defaults on page 277.
Managing Your Network
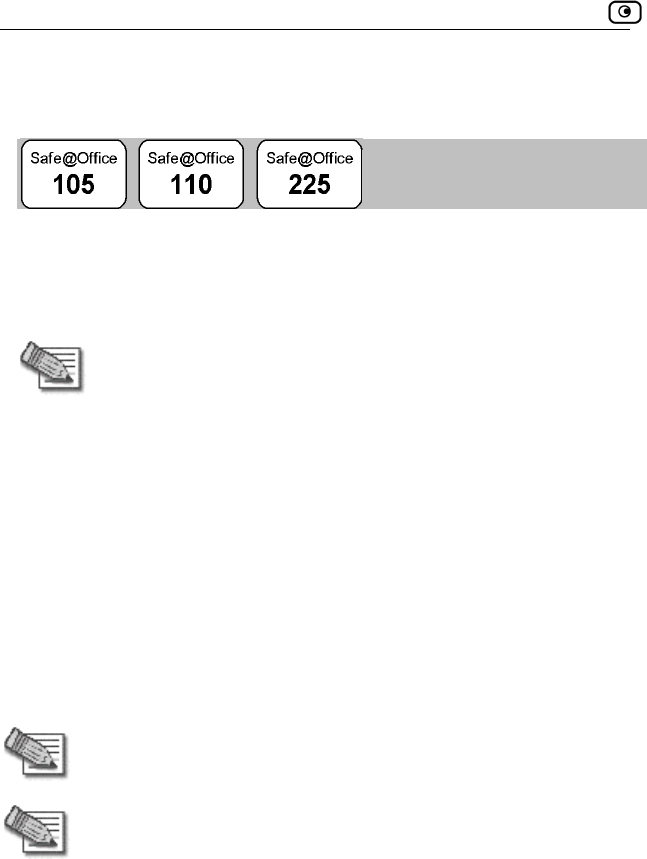
Configuring Network Settings
94 Check Point Safe@Office User Guide
Configuring a DHCP Server
By default, the Safe@Office appliance operates as a DHCP (Dynamic Host
Co g ppliance to
auto heir network
config
nfi uration Protocol) server. This allows the Safe@Office a
matically configure all the devices on your network with t
uration details.
obtain an IP address automatically. If a computer is not co
Note: The DHCP server only serves computers that are configured to
nfigured to
an IP
IP
network, and you want to
u must disable the
Safe@Office DHCP server, since you cannot have two DHCP servers or
relays on the same network segment.
f the
on your network.
obtain an IP address automatically, it is recommended to assign it
address outside of the DHCP address range. If you do assign it an
address within the DHCP address range, the DHCP server will not
assign this IP address to another computer.
If you already have a DHCP server in your internal
use it instead of the Safe@Office DHCP server, yo
If you want to use a DHCP server on the Internet or via a VPN, instead o
Safe@Office DHCP server, you can configure DHCP relay. When in DHCP
relay mode, the Safe@Office appliance relays information from the desired
DHCP server to the devices
Note: When using a Safe@Office 200 series appliance, you can
configure a DHCP server for a DMZ network.
Note: You can perform DHCP reservation using network objects. For
information, see Using Network Objects on page 129.
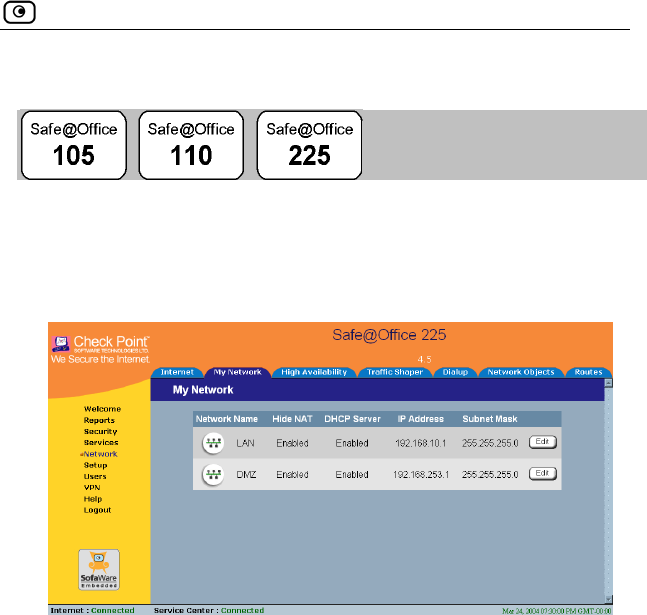
Configuring Network Settings
Chapter 5: Managing Your Network 95
ffice DHCP Server Enabling/Disabling the Safe@O
To Office DHCP server
ork in the main menu, and click the My Network tab.
enable/disable the Safe@
1. Click Netw
The My Network page appears.
If you are using Safe@Office 105, the page appears without the DMZ area.
2. In the desired network's row, click Edit.
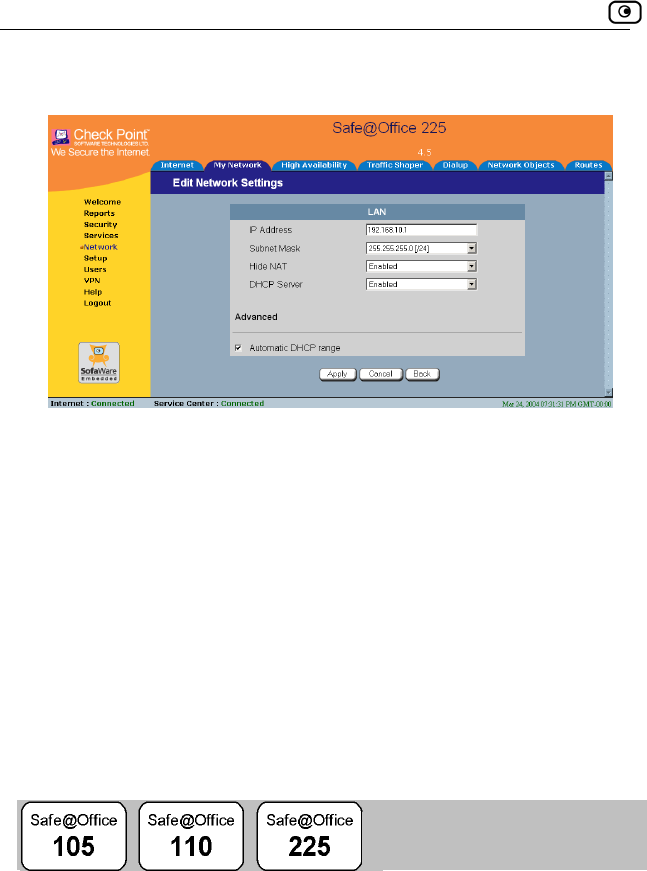
Configuring Network Settings
96 Check Point Safe@Office User Guide
The Edit Network Settings page appears.
3. From the DHCP Server list, select Enabled or Disabled.
4. i
war
5. Cli
A s
6. If y
(usi ), and either the Safe@Office DHCP server or another
, your computer obtains an IP address in
Configuring the DHCP Address Range
Cl ck Apply.
A ning message appears.
ck OK.
uccess message appears
our computer is configured to obtain its IP address automatically
ng DHCP
DHCP server is enabled, restart your computer.
If you enabled the DHCP server
the DHCP address range.
By d ly sets the DHCP
add addresses that the
IP addresses outside of the
DHCP address d computers.
efault, the Safe@Office DHCP server automatical
ress range. The DHCP address range is the range of IP
DHCP server can assign to network devices.
range are reserved for statically addresse
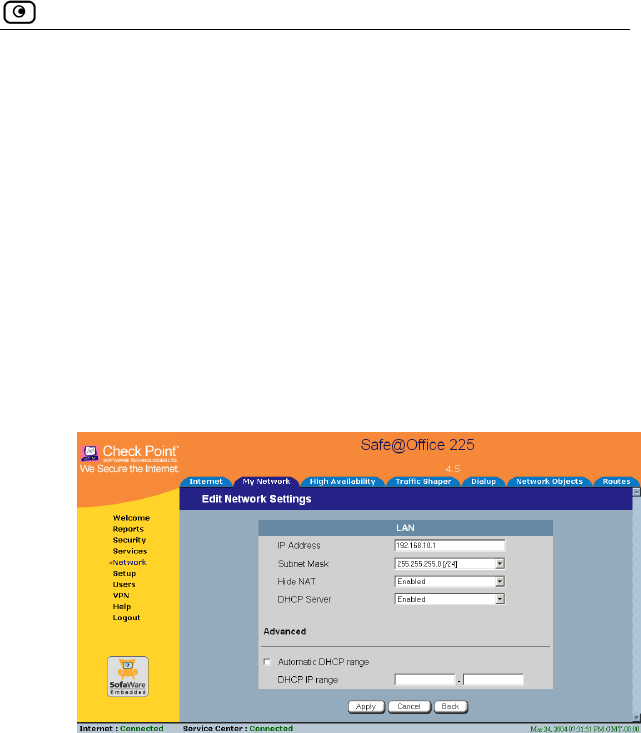
Configuring Network Settings
Chapter 5: Managing Your Network 97
To configure the DHCP address range
1. Cl ck Network in the main menu, and click the My Network tab.
network's row, click Edit.
e appears.
HCP range manually:
range check box.
If desired, you can set the Safe@Office DHCP range manually.
i
The My Network page appears.
2. In the desired
The Edit Network Settings pag
3. To set the D
a. Clear the Automatic DHCP
The DHCP IP range fields appear.
b. In the DHCP IP range fields, type the desired DHCP range.
To allow the DH4. CP server to set the IP address range, select the
5. C
Automatic DHCP range check box.
lick Apply.
A warning message appears.
6. Click OK.
A success message appears

Configuring Network Settings
98 Check Point Safe@Office User Guide
7. o obtain its IP address automatically
e DHCP server or another
puter.
e new DHCP address range.
If your computer is configured t
(using DHCP), and either the Safe@Offic
DHCP server is enabled, restart your com
Your computer obtains an IP address in th
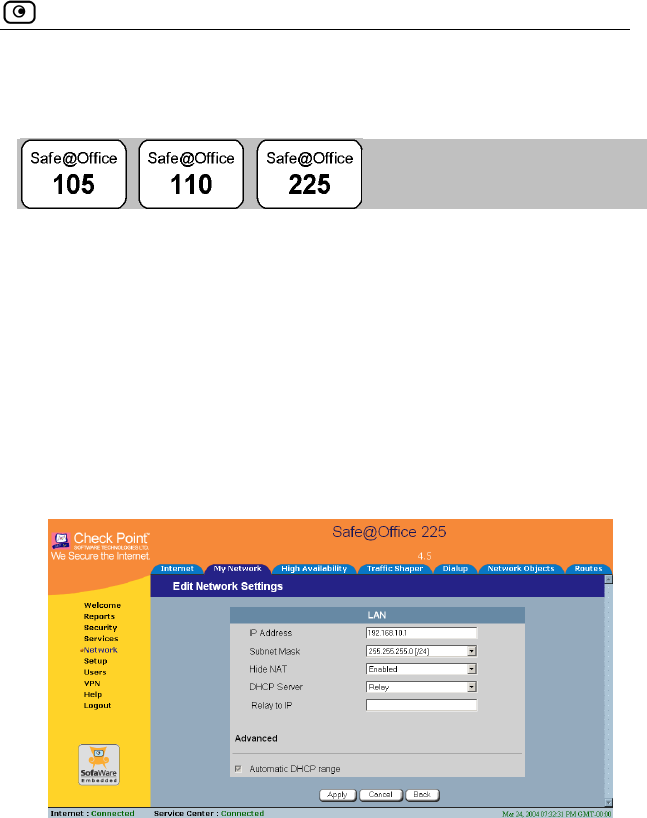
Configuring Network Settings
Chapter 5: Managing Your Network 99
Configuring DHCP Relay
To configure DHCP relay
1. Click Network in the main menu, and click the My Network tab.
The My Network page appears.
2. In the desired network's row, click Edit.
The Edit Network Settings page appears.
3. In the DHCP Server list, select Relay.
The Automatic DHCP range check box is disabled, and the Relay to IP field
appears.
4. e IP address of the desired DHCP
5. i
A w .
6. Cli
In the Relay to IP field, type th
server.
Cl ck Apply.
arning message appears
ck OK.
Configuring Network Settings
100 Check Point Safe@Office User Guide
s
7. If y onfigured to obtain its IP address automatically
DH start your computer.
h
A uccess message appears
our computer is c
(using DHCP), and either the Safe@Office DHCP server or another
CP server is enabled, re
Your computer obtains an IP address in the DHCP address range.
C anging IP Addresses
If desired, you can change your Safe@Office appliance’s internal IP address.
Using Safe
addresses if,
for ex mpl g
network an hange that network’s IP address range, or if you
are using a DHCP server other than the Safe@Office appliance, that assigns
addresses within a different range.
To change IP addresses
1. Click Network in the main menu, and click the My Network tab.
The My Network page appears.
2. In the LAN network's row, click Edit.
The Edit Network Settings page appears.
3. To change the Safe@Office appliance’s internal IP address, enter
the new IP address in the IP Address field.
4. To change the internal network range, enter a new value in the
Subnet Mask field.
@Office 110 or 225, you can also change the entire range of IP
in your internal network. You may want to perform these tasks
e, you are adding the Safe@Office appliance to a large existin
d don't want to c
a
Configuring Network Settings
Chapter 5: Managing Your Network 101
Note: The internal network ra
appli
nge is defined both by the Safe@Office
anc ddress and by the subnet mask.
For exam
192.168.
network’ range will be 192.168.100.1 – 192.168.100.254.
The defa
5. Click Apply.
g mes
• The Safe@Office appliance's internal IP address and/or the
l netw
A success m
7. Do one of the f
• If your com to obtain its IP address
automatically
(using DHC abled,
restart your computer.
Your comput
• Otherwise, manually reconfigure your computer to use the new
address range using the TCP/IP settings. For information on
configuring TCP/IP, see TCP/IP Settings on page 34, on page 30.
Enabling/Disabling Hide NAT
e’s internal IP a
ple, if the Safe@Office appliance’s internal IP address is
100.7, and you set the subnet mask to 255.255.255.0, the
s IP address
ult internal network range is 192.168.10.*.
A warnin sage appears.
6. Click OK.
interna
•
ork range are changed.
essage appears.
ollowing:
puter is configured
P), and the Safe@Office DHCP server is en
er obtains an IP address in the new range.
Hide Network Address Translation (NAT) enables you to share a single
public Internet IP address among several computers, by “hiding” the private
IP addresses of the internal computers behind the Safe@Office appliance’s
single Internet IP address.

Configuring Network Settings
102 Check Point Safe@Office User Guide
Note: If Hide NAT is disabled, you must obtain a range of Internet IP
addresses from your ISP. Hide NAT is enabled by default.
Note: Static NAT n be used together.
To enable/disable id
1. Click Network in the
The My Network p
2. In the desired networ
The Edit Network Set appears.
3. From the Hide N
4. Click Apply.
A warning message a
5. Click OK.
• If you chose e Hide NAT, it is disabled.
• If you chose
Configuring a DMZ Network
and Hide NAT ca
H e NAT
main menu, and click the My Network tab.
age appears.
k's row, click Edit.
tings page
AT list, select Enabled or Disabled.
ppears.
to disabl
to enable Hide NAT, it is enabled.
In addition to the LAN network, you can define a second internal network
called a DMZ (demilitarized zone) network, when using Safe@Office 110
and 225. Safe@Office 110 does not have a dedicated DMZ port, so the DMZ
is a logical second network behind the Safe@Office appliance, and you must
connect DMZ computers to LAN ports. Safe@Office 225 has a dedicated
DMZ port to which you must connect all DMZ computers.
By default, all traffic is allowed from the LAN network to the DMZ network,
and no traffic is allowed from the DMZ network to the LAN and WLAN
Configuring Network Settings
Chapter 5: Managing Your Network 103
networks. You can easily customize this behavior by creating firewall user
rules. For further information, see Using Rules on page 154.
mple, you c
twork and
accounting departm able to connect to all company computers,
while the rest of the e p ensitive
information on the acc then create
firewall rules that allow r’s
computer) to connect t artment.
For exa
LAN ne ould assign your company’s accounting department to the
the rest of the company to the DMZ network. The
ent would be
m loyees would not be able to access any s
ounting department computers. You could
specific DMZ computers (such a manage
to he LAN network and the accounting dep
Note: If you are u 5, you can enable the DHCP server
for the DM
If you are ot
obtain IP c
IP addres
30.
sing Safe@Office 22
Z network.
using Safe@Office 110, computers in the DMZ network cann
addresses using DHCP, and therefore must be assigned stati
s. For instructions, see TCP/IP Settings on page 34, on page
Note: The default gateway for the DMZ computers should be specified as
the Safe@Office DMZ IP address.
To configure a DMZ network
1. Connect the DMZ computer(s) as follows:
• If you are using Safe@Office 110, connect the DMZ computers to
any of the appliance's LAN ports.
• If you are using Safe@Office 225, connect the DMZ computer to
the DMZ port.
If you have more than one computer in the DMZ network, connect a
hub or switch to the DMZ port, and connect the DMZ computers to
the hub.
2. Click Network in the main menu, and click the My Network tab.
The My Network page appears.
3. In the DMZ network's row, click Edit.
Configuring Network Settings
104 Check Point Safe@Office User Guide
The Edit Network Settings page appears.
4. In the Mode drop-down list, select Enabled.
fields are e
5. If desired, enable d
See Enabling/Disabl
6. If desired, configure erver.
See Configuring
7. In the IP Address fiel k's
default gateway.
The nabled.
or isable Hide NAT.
ing Hide NAT on page 101.
a DHCP s
a DHCP Server on page 94.
d, type the IP address of the DMZ networ
Note: The DMZ
8. In the Subnet Mask fi e.
9. Click Apply.
A warning message a
10. Click OK.
A success message a
Configuring a W
In addition to the LAN a eless internal
network called a WLAN fe@Office
300W.
By default, all traffic is allowed from the LAN network to the WLAN
network, and no traffic is allowed from the WLAN network to the LAN or
DMZ networks. You can easily customize this behavior by creating firewall
user rules. For further information, see Using Rules on page 154.
By default, access from the WLAN network to Safe@Office Portal
(my.firewall and my.vpn) is not allowed. You can enable access from the
WLAN to the Safe@Office Portal in either of the following ways:
network must not overlap the LAN network.
eld, type the DMZ’s internal network rang
ppears.
ppears.
LAN Network
nd DMZ networks, you can define a wir
(wireless LAN) network, when using Sa
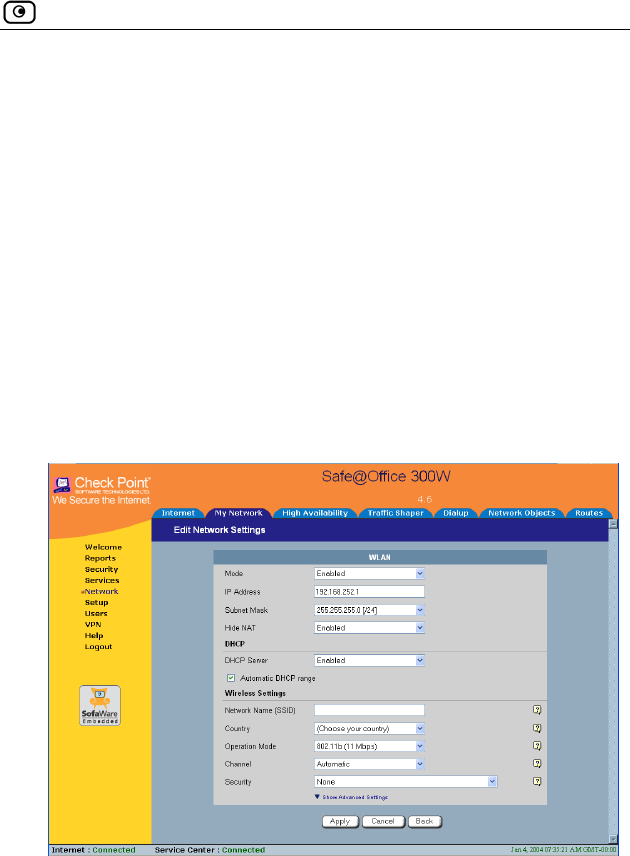
Configuring Network Settings
Chapter 5: Managing Your Network 105
• In the Management page, select ANY in either the SSH or HTTPS
drop-down list.
• Create a custom f w rom
the WLAN, or from a
To configure a WLAN
1. Prepare the appliance d in
Network Installation
2. Click Network in the .
The My Network page
3. In the WLAN networ
The Edit Network Set
ire all rule to allow the desired protocols f
n IP address in the WLAN.
network
for a wireless connection as describe
on page 40.
main menu, and click the My Network tab
appears.
k's row, click Edit.
tings page appears.
4. In the Mode drop-down list, select Enabled.
The fields are e
5. If desired, enab e Hide NAT.
See Enabling/Disabling Hide NAT on page 101.
nabled.
le or disabl
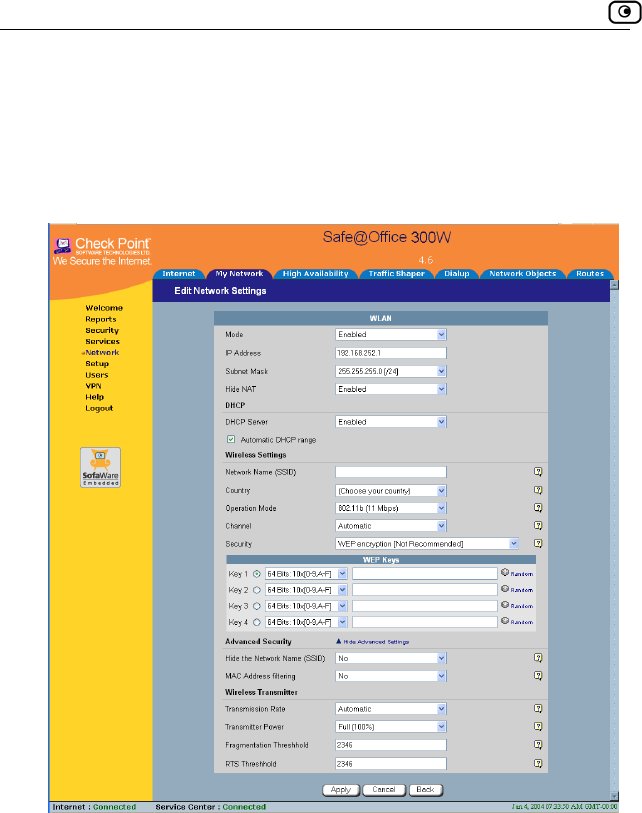
Configuring Network Settings
106 Check Point Safe@Office User Guide
6. If desired, configure a DHCP server.
See Configuring a DHCP Server on page 94.
plete the fields using the information in the table below. 7. Com
New fields appear depending on the options you selected.
8. Click Apply.
A warning message appears.
9. Click OK.
A success message appears.
10. Prepare the wireless clients by doing one of the following:
Configuring Network Settings
Chapter 5: Managing Your Network 107
• If you selected the 802.1X or WPA security mode, configure
RADIUS servers.
g R DIUS Authentication on page 252.
• If you selected the WEP security mode, give the WEP key to the
lie
selec give the passphrase
to the wireless i
11. The wireless clients' ireless
clients and connect th
Refer to the wirel
See Usin A
wireless c
• If you
nts.
ted the WPA-PSK security mode,
cl ents.
administrators should configure the w
em to the WLAN.
ess cards' documentation for details.
Note: Some wire c" modes.
These modes a
Choose the "Infr
less cards have "Infrastructure" and "Ad-ho
re also called "Access Point" and "Peer to Peer".
astructure" or "Access Point" mode.
Note: The
must bot
purchase ct
technical
wireless cards' region and the Safe@Office appliance's region
h match the region of the world where you are located. If you
d your Safe@Office appliance in a different region, conta
support.

Configuring Network Settings
108 Check Point Safe@Office User Guide
Table 15: WLAN Settings Fields
In this field… Do this…
IP Address s default
ga w
Note:
netwo
Type the IP address of the WLAN network'
te ay.
The WLAN network must not overlap the LAN
rk.
Subnet Mask Type
Wireless Settings
Network Name
(SSID)
phanumeric characters long and is
are located.
Warni sult in
the vi government regulations.
the WLAN’s internal network range.
Type the network name (SSID) that identifies your
wireless network.
It can be up to 32 al
case-sensitive.
Country Select the country where you
ng: Choosing an incorrect country may re
olation of

Configuring Network Settings
Chapter 5: Managing Your Network 109
In this field… Do this…
Operation Mode
nge and offers a rate of 11 Mbps
(in theory).
tes a wireless protocol
(such as Turbo G), followed by the maximum
s is dependent on the selected
country.
Select an operation mode:
• 802.11b (11Mbps) - Operates in the 2.4
GHz ra
• 802.11g (54 Mbps) - Operates in the 2.4
GHz range, and offers a rate of 54 Mbps
(in theory). Compatible with 802.11b.
• Turbo G (108 Mbps) - Operates in the 2.4
GHz range, and offers a rate of 54 Mbps
(in theory). Compatible with 802.11b and
802.11g.
Each operation mode indica
bandwidth (such as 108 Mbps).
The list of mode
Note: The actual data transfer speed is usually
significantly lower than the maximum bandwidth.
Important: The client wireless cards must support the
selected operation mode.

Configuring Network Settings
110 Check Point Safe@Office User Guide
In this field… Do this…
Channel Select the radio frequency to use for the wireless
dependent on the selected country and
connection:
• Automatic - The Safe@Office appliance
automatically selects a channel. This is
the default.
• A specific channel - The list of channels is
operation mode.
Note: If there is another wireless network in the vicinity,
the two networks may interfere with one another. To
avoid this problem, the networks should be assigned
channels that are at least 25 MHz (5 channels) apart.

Configuring Network Settings
Chapter 5: Managing Your Network 111
In this field… Do this…
Security Select the security protocol to use:
your
network.
This option is not recommended, due to
known security flaws.
this option, the WEP Keys
and you must configure at
ents
must be configured with this key as well.
cation, no encryption
ess point
in
To use this security method, you must
servers. See Using
RADIUS Authentication. on page 252
• None - No security method is used. This
option is not recommended, because it
allows unauthorized users to access
• WEP encryption - In the WEP (Wired
Equivalent Privacy) encryption security
method, wireless clients must use a pre-
shared key to connect to your network.
If you select
area opens,
least one WEP key. The wireless cli
• 802.1X: RADIUS authenti
- In the 802.1x security method, wireless
clients (supplicants) attempting to
connect to the acc
(authenticator) must first be authenticated
by RADIUS servers (authentication
servers). All messages are passed
EAP (Extensible Authentication Protocol).
configure RADIUS

Configuring Network Settings
112 Check Point Safe@Office User Guide
In this field… Do this…
tion, encryption -
Access)
egrity Protocol) to enhance data
, based on a central
ust
ing
RADIUS Authentication. on page 252
authentication,
require an authentication server. WPA-
called rekeying.
well.
• WPA: RADIUS authentica
The WPA (Wi-Fi Protected
security method uses MIC (message
integrity check) to ensure the integrity of
messages, and TKIP (Temporal Key
Int
encryption.
Furthermore, WPA includes 802.1x and
EAP authentication
RADIUS authentication server.
To use this security method, you m
configure RADIUS servers. See Us
• WPA-PSK: password
encryption - The WPA-PSK security mode
is a variation of WPA that does not
PSK periodically changes and
authenticates encryption keys. This is
If you select this option, the Passphrase
field appears. The wireless clients must
be configured with this passphrase as
Passphra rase for accessing the network.
n 8 and 63 characters. It can
pecial characters, and is case-
sensitive.
Show/Hide
A
Click to show/hide advanced WLAN settings.
se Type the passph
This must be betwee
contain spaces and s
dvanced Settings The Advanced Security and Wireless Transmitter areas are
displayed.

Configuring Network Settings
Chapter 5: Managing Your Network 113
In this field… Do this…
WEP Keys
K
bu
64
F]
key length is 32 characters.
K
bo
ey 1, 2, 3, 4 radio
tton
Click the radio button next to the desired WEP key.
Bits:10x[0-9, A-
Select the WEP key length from the drop-down list.
The possible key lengths are:
• 64 Bits - The key length is 10 characters.
• 128 Bits - The key length is 26 characters.
• 152 Bits - The
Note: Some wireless card vendors call these lengths
40/104/128, respectively.
ey 1, 2, 3, 4 text
x
Type the WEP key, or click Random to randomly
generate a key matching the selected length. The key
is composed of characters 0-9 and A-F, and is not
case-sensitive.

Configuring Network Settings
114 Check Point Safe@Office User Guide
In this field… Do this…
Advanced Security
H
N
ide
ame
Specify whether you want to hide your network's SSID,
k.
.
Any device within within range can detect
products, such as Microsoft Windows XP,
and attempt to connect to your network.
e discovered using
ch as wireless sniffers.
Therefore, it is not recommended to rely on this setting
alone for security.
the Network
(SSID) by selecting one of the following:
• Yes - Hide the SSID.
Only devices to which your SSID is
known can connect to your networ
• No - Do not hide the SSID
your network name using the wireless
network discovery features of some
This is the default.
Note: Hiding the SSID does not provide strong security,
because your SSID can still b
specialized test equipment su

Configuring Network Settings
Chapter 5: Managing Your Network 115
In this field… Do this…
MAC Address
filtering
Specify whether you want to enable MAC address
filtering, by selecting one of the following:
• Yes - Enable MAC address filtering.
Only MAC addresses that you added as
network objects can connect to your
network.
For information on network objects, see
Using Network Objects on page 129.
• No - Disable MAC address filtering. This
is the default.
Note: MAC address filtering does not provide strong
security, therefore it is not recommended to rely on this
setting alone for security.
Wirele
Transmission Rate Select the transmission rate:
• Automatic - The Safe@Office appliance
the
default.
• A specific rate
Transmitter Power Select the transmitter power.
Setting a higher transmitter power increases the
access point's range. A lower power reduces
interference with other access points in the vicinity.
The default value is Full, providing a maximum range of
300m, under ideal outdoo conditions. It is not
other
access points in the vicinity.
ss Transmitter
automatically selects a rate. This is
r
necessary to change this value, unless there are

Configuring Network Settings
116 Check Point Safe@Office User Guide
In this field… Do this…
Fragmentation
T
Type the smallest IP packet size (in bytes) that
t the IP packet be split into smaller
ference,
set the threshold to a low value (around 1000), to
ghput.
et the threshold to a high value (around
e overhead.
lue is 2346.
hreshold requires tha
fragments.
If you are experiencing significant radio inter
reduce error penalty and increase overall throu
Otherwise, s
2000), to reduc
The default va
RTS Threshold Type the smallest IP packet size for which a clie
must send an RTS (Request To Send)
nt
before sending
d
by
collisions and failures. RTS ensures that
nd the users are distant
from one another, set the RTS threshold to a low value
(around 500).
Setting a value equal to the fragmentation threshold
effectively disables RTS.
The default value is 2346.
the IP packet.
If multiple wireless clients are in range of the access
point, but not in range of each other, they might sen
data to the access point simultaneously, there
causing data
the channel is clear before the each packet is sent.
If your network is congested, a
Configuring High Availability
Chapter 5: Managing Your Network 117
Configuring High Availability
You can install two Safe@Office appliances on your network, one acting as
the “Master”, the de uted,
and one acting as th ally
and transparently ta t your
network is consistent ed
to the Internet.
The Master and Bac have separate IP addresses within the local
network. In addition ress,
which is the default
address is used by t eway, which sends periodic signals, or
“heartbeats”, to the net rtbeat
has stopped (indicat er of
the virtual IP addre e Master
gateway is running sumes
its roles.
Before configuring ust be
met:
• You must have t
• The Safe@Offic ons
and firewall rule
• The Safe@Offic
addresses, and t me subnet. For
information on configuring LAN and DMZ addresses, see
Configuring Network Settings on page 93.
• The LAN ports of the two Safe@Office appliances must be
connected via a hub or a switch.
You can configure both the LAN network and the DMZ network for High
Availability.
fault gateway through which all network traffic is ro
e “Backup”. If the Master fails, the Backup automatic
kes over all the roles of the Master. This ensures tha
ly protected by a Safe@Office appliance and connect
kup each
, the Master and Backup share a single virtual IP add
gateway address for the local network. The virtual IP
he Master gat
work. If the Backup gateway detects that the hea
ing that the Master gateway has failed), it takes ov
ss and all of the Master gateway’s roles. When th
once again, it reclaims the virtual IP address and re
High Availability, the following requirements m
wo identical Safe@Office appliances.
e appliances must have identical firmware versi
s.
e appliances must have different LAN and DMZ IP
hey must be located on the sa
Configuring High Availability
118 Check Point Safe@Office User Guide
The procedure below explains how to configure High Availability for the
LAN network, but can be used to configure High Availability for the DMZ
network as well.
Note: You in both Safe@Office appliances.
The Backup gate will start answering DHCP
requests onl
can enable the DHCP server
way’s DHCP server
y if the Master gateway fails.
Note: You can fo Office appliance.
You may want to lity is
working pro eeds repairs.
To force a fail-ov t from the
LAN network.
To configure High Availability
1. In the Master Sa
a. Set the appli
For further i 0.
b. Configure th
rther i
Netwo
Availability ta
rce a fail-over to the Backup Safe@
do this in order to verify that High Availabi
perly, or if the Master Safe@Office appliance n
er, switch off the primary box or disconnect i
fe@Office appliance, do the following:
ance’s internal IP address.
nformation, see Changing IP Addresses on page 10
e LAN network range.
For fu
c. Click
nformation, see Changing IP Addresses on page 100.
rk in the main menu, and click the High
b.
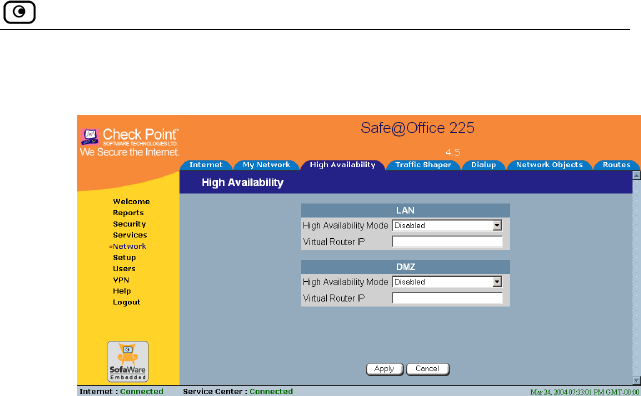
Configuring High Availability
Chapter 5: Managing Your Network 119
The High Availability page appears.
d. In the LAN a
select Maste
field, type the default gateway IP
This can be any unused IP address in the LAN network, and must be
the same for both gateways.
2. In the Backup appliance, do the following:
ddress.
0.
nge to the same range you
d in the Master appliance.
ation, see Changing IP Addresses on page 100.
c. Click in the main menu, and click the High
Availability tab.
The High Availability page appears.
rea, in the High Availability Mode drop-down list,
r.
e. In the Virtual Router IP
address.
f. Click Apply.
A success message appears.
a. Set the appliance’s internal IP a
For further information, see Changing IP Addresses on page 10
The internal IP address must differ from the Master appliance’s
internal IP address.
b. Configure the LAN network ra
configure
For further inform
Network
Using Traffic Shaper
120 Check Point Safe@Office User Guide
own list,
e. In the Virtual Router IP field, type the default gateway IP
address.
dress you
f. Click Apply.
Using T
d. In the LAN area, in the High Availability Mode drop-d
select Backup.
This address must be identical to the Virtual Router IP ad
specified when configuring the Master gateway.
A success message appears.
raffic Shaper
er is a bandwTraffic Shap idth management solution that allows you to set
bandwidth policies to control the flow of communication. Traffic Shaper
dence over less important traffic, so
n with minimum disruption, despite
Tra y to access and analyze data
on layers. This data is used to classify traffic in
ality of Service (QoS) classes. Traffic Shaper
div e classes according to weight. For
Web traffic is deemed three times as important as FTP
e services are assigned weights of 30 and 10 respectively. If
the lines are congested, Traffic Shaper will maintain the ratio of bandwidth
1.
dth, the leftover bandwidth is
divided among the remaining classes, in accordance with their relative
weights. In the example above, if only one Web and one FTP connection are
activ they are competing, the Web connection will receive 75% (30/40)
)
ction
.
ensures that important traffic takes prece
that your business can continue to functio
network congestion.
ffic Shaper uses Stateful Inspection technolog
derived from all communicati
up to eight user-defined Qu
ides available bandwidth among th
example, suppose
traffic, and thes
allocated to Web traffic and FTP traffic at 3:
If a specific class is not using all of its bandwi
e and
of the leftover bandwidth, and the FTP connection will receive 25% (10/40
of the leftover bandwidth. If the Web connection closes, the FTP conne
will receive 100% of the bandwidth

Using Traffic Shaper
Chapter 5: Managing Your Network 121
lass's
n nt of bandwidth that connections
le a class has reached its
ban
furt
you
spe
to a g whether
con
con
Tra
Dif
Th
their class.
o use T
1. Enable
Y
See Us
2. Define
Alterna
3.
c, and you
Traffic Shaper allows you to give a class a bandwidth limit. A c
ba dwidth limit is the maximum amou
be onging to that class may use together. Onc
dwidth limit, connections belonging to that class will not be allocated
her bandwidth, even if there is unused bandwidth available. For example,
can limit all traffic used by Peer-To-Peer file-sharing applications to a
cific rate, such as 512 kilobit per second. Traffic Shaper also allows you
ssign a “Delay Sensitivity” value to a class, indicatin
nections belonging to the class should be given precedence over
nections belonging to other classes.
ffic Shaper supports DiffServ (Differentiated Services) Packet Marking.
fServ marks packets as belonging to a certain Quality of Service class.
ese packets are then granted priority on the public network according to
T raffic Shaper
Traffic Shaper for the Internet connection.
n enable Traffic Shaper for incoming or outgoing connections.
ing Internet Setup on page 66.
QoS classes that reflect your communication needs.
tively, use the four built-in QoS classes.
ou ca
See Adding and Editing a Class on page 122.
Use Allow rules to assign different types of connections to QoS
classes.
For example, if Traffic Shaper is enabled for outgoing traffi
create an Allow rule associating all outgoing VPN traffic with the Urgent
QoS class, then Traffic Shaper will handle outgoing VPN traffic as
specified in the bandwidth policy for the Urgent class.
See Adding and Editing Rules on page 157.
in the rule.
Note: Traffic Shaper must be enabled for the direction of traffic specified
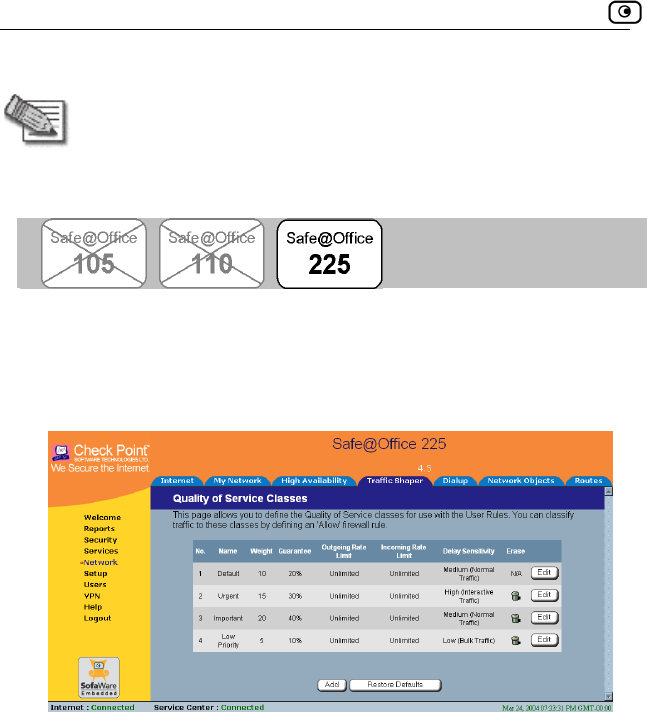
Using Traffic Shaper
122 Check Point Safe@Office User Guide
ding and Editing a Class
Note: If you do not assign a connection type to a class, Traffic Shaper
automatically assigns the connection type to the built-in "Default" class.
Ad
s To add or edit a QoS clas
1. Click Network in the main menu, and click the Traffic Shaper tab.
The Quality of Service Classes page appears.
2. Click Add.
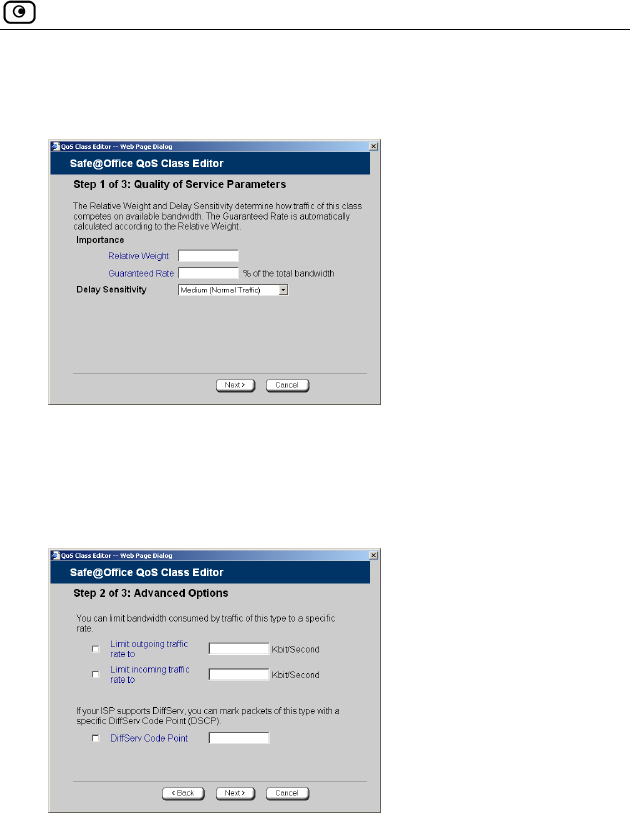
Using Traffic Shaper
Chapter 5: Managing Your Network 123
f 3:
Quality of Service Parameters dialog box displayed.
The Safe@Office QoS Class Editor wizard opens, with the Step 1 o
3. Complete the fields using the relevant information in the table
l
4. i
Th Options dialog box appears.
be ow.
Cl ck Next.
e Step 2 of 3: Advanced
5. Complete the fields using the relevant information in the table
below.
6. Click Next.
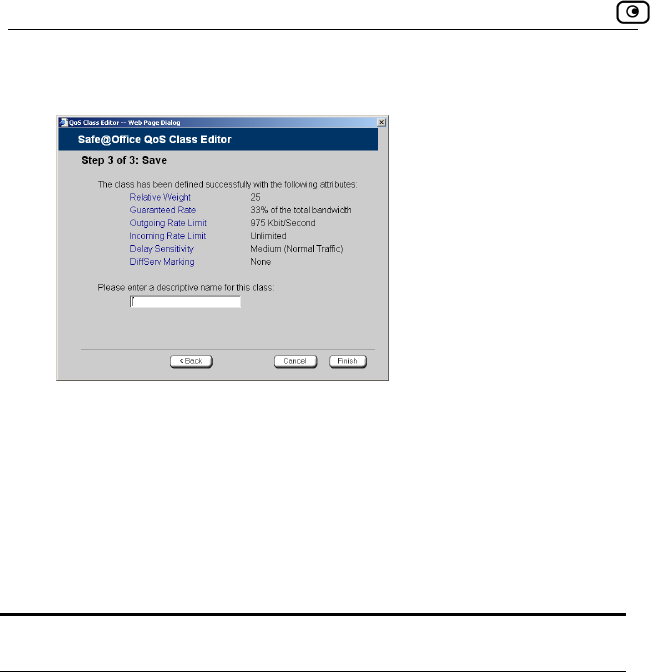
Using Traffic Shaper
124 Check Point Safe@Office User Guide
The Step 3 of 3: Save dialog box appears with a summary of the class.
7. Type a name for the class.
connections, you can name the class "High Priority Web".
ss appears in the Quality of Service Classes page.
Table 16: QoS Class Fields
In this field… Do this…
For example, if you are creating a class for high priority Web
8. Click Finish.
The new cla
Relative Weight Type a value indicating the class's importance
relative to the other defined classes.
For example, if you assign one class a weight of
100, and you assign another class a weight of 50,
the first class will be allocated twice the amount of
es are
When you complete this field, the Guaranteed Rate
field is filled in automatically.
bandwidth as the second hen the lin
congested.
w

Using Traffic Shaper
Chapter 5: Managing Your Network 125
In this field… Do this…
Guar ndwidth that the class is
guaranteed, out of the total amount of bandwidth.
s guaranteed rate will
nd the second class's guaranteed rate will
accurately as for outgoing traffic. This is because
enable traffic shaping for incoming traffic only if
necessary. For information on enabling Traffic
fic, see Using
Internet Setup on page 66.
anteed Rate The percentage of ba
For example, if there are only two classes, and you
assign one class a weight of 100 and the other class
a weight of 50, the first class'
be 66% a
be 33%.
This field is read-only and is shown for informational
purposes.
Note: Traffic Shaper may not enforce guaranteed
rates and relative weights for incoming traffic as
Traffic Shaper cannot control the number or type of
packets it receives from the Internet; it can only
affect the rate of incoming traffic by dropping
received packets. It is therefore recommended to
Shaper for incoming and outgoing traf

Using Traffic Shaper
126 Check Point Safe@Office User Guide
Do In this field… this…
Delay Sensitivity Sele
the
• Low (Bulk Traffic) - Traffic that is not
•
•
highly sensitive to delay. For example,
ick
Traf ith a
lower latency. That is, Traffic Shaper attempts to
sen
befo
ow
ct the degree of precedence to give this class in
transmission queue:
sensitive to long delays. For example,
SMTP traffic (outgoing email).
Medium (Normal Traffic) - Normal traffic
High (Interactive Traffic) - Traffic that is
IP telephony, videoconferencing, and
interactive protocols that require qu
user response, such as telnet.
fic Shaper serves delay-sensitive traffic w
d packets with a "High (Interactive Traffic)" level
re packets with a "Medium (Normal Traffic)" or
"L (Bulk Traffic)" level.
Limit outgoing
traffic rate to
Sele to limit the rate of outgoing traffic
belo ate
(in k ovided.
ximum rate
(in k ) in the field provided.
ct this option
nging to this class. Then type the maximum r
ilobits/second) in the field pr
Limit incoming
traffic rate to
Select this option to limit the rate of incoming traffic
belonging to this class. Then type the ma
ilobits/second

Using Traffic Shaper
Chapter 5: Managing Your Network 127
In this field… Do this…
DiffServ Code
Point
Sele this
clas
inte hen type the DSCP in
the field provided.
The marked packets will be given priority on the
pub
To use this option, your ISP or private WAN must
sup
valu r ISP or private WAN administrator.
ct this option to mark packets belonging to
s with a DiffServ Code Point (DSCP), which is an
ger between 0 and 63. T
lic network according to their DSCP.
port DiffServ. You can obtain the correct DSCP
e from you
Deleting Classes
You cannot delete a class that is currently used by a rule. You can determine
whether a class is in use or not, by viewing the Rules page.
To delete an existing QoS class
1. Click Network in the main menu, and click the Traffic Shaper tab.
The Quality of Service Classes page appears.
2. Click the icon of the class you wish to delete.
3. Cli
Th
A confirmation message appears.
ck OK.
e class is deleted.
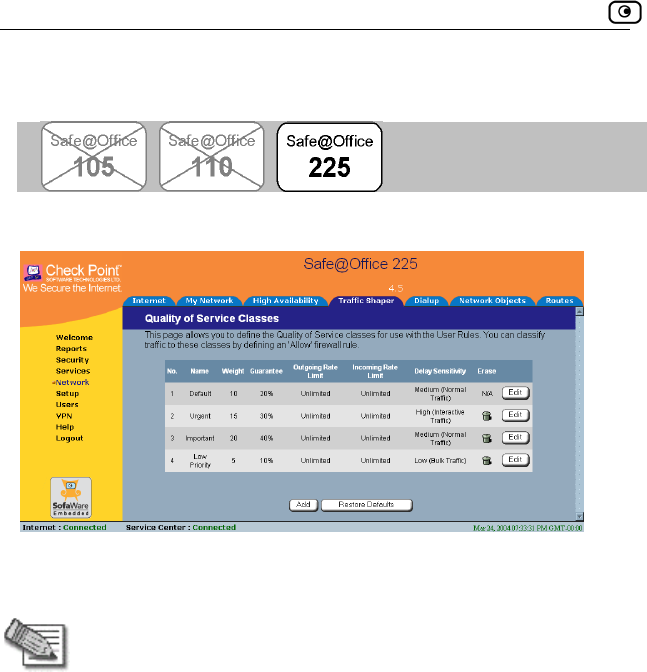
Using Traffic Shaper
128 Check Point Safe@Office User Guide
Restoring Traffic Shaper Defaults
The Safe@Office appliance provides four built-in QoS classes:
If desired, you can reset the Traffic Shaper bandwidth policy to use these
classes, and restore the classes to their default settings (shown above).
Note: This will d
If one of the additional classes is currently used by a rule,
elete any additional classes u defined in
lt class.
you cannot reset Traffic Shaper to defaults. You can
ine whether a class is in use or not, by viewing the
ge.
To restore Traffic Shaper defaults
1. Click Network in the main menu, and click the Traffic Shaper tab.
The Quality of Service Classes page appears.
2. Click Restore Defaults.
A confirmation message appears.
3. Click OK.
yo
Traffic Shaper and reset all rules to use the Defau
determ
Rules pa
Using Network Objects
Chapter 5: Managing Your Network 129
Using Network Objects
You can add individual computers or networks as network objects. This
enables you to configure various settings for the computer or network
represented by the network object.
You can configure the following settings for a network object:
• Static NAT (or One-to-One NAT)
ranges
omputer
e network to have its own Internet IP address. For example,
a Web server in your network, you can
rnet IP address.
rity rules. To allow incoming
ned Static NAT, you must create an
Allow rule. When specifying firewall rules for such hosts, use the host’s
ddress, a ternet IP address to which the internal
IP address is mapped. For further information, see Using Rules on page
Static NAT allows the mapping of Internet IP addresses or address
to hosts inside the internal network. This is useful if you want a c
in your privat
if you have both a mail server and
map each one to a separate Inte
Static NAT rules do not imply any secu
traffic to a host for which you defi
internal IP a nd not the In
154.
Note: Static NAT and Hide NAT can be used together.
Note: Safe@Of on
Protocol). Whe
a computer, th ppliance automatically replies to ARP
queries with its ow y enabling communication. As
a result, the Static NAT Internet IP addresses appear to external
sources to be real computers connected to the WAN interface.
fice appliance supports Proxy ARP (Address Resoluti
n an external source attempts to communicate with such
e Safe@Office a
n MAC address, thereb
Using Network Objects
130 Check Point Safe@Office User Guide
• network obj ess to a MAC address
e Safe@ P server consistently assigns the same IP
dress to a specific @Office DHCP
r runs out of IP a down, then the DHCP
server may reassign
If you want to guara ains
constant, you can re ress for use by the computer's MAC
address only. This is called vation, and it is useful if you are
nt
If you are subscribed to SecureDesk, you can choose to disable
SecureDesk for a specific computer or network. For example, you might
want to disable SecureDesk for a printer with an IP address, or for a
ing system that VirusScan does not support.
rewall will
her the l
Assign the
Normally, th
ect's IP addr
Office DHC
ad
serve computer. However, if the Safe
ddresses and the computer is
the IP address to a different computer.
ntee that a particular computer's IP address rem
serve the IP add
DHCP reser
hosting a public Internet server on your network.
• Exclude the network object from SecureDesk enforceme
computer with an operat
If you disable SecureDesk for a computer or network, the fi
allow access from that computer or network, regardless of whet
installed antivirus software complies with the SecureDesk security leve
conditions.
Note: To disable SecureDesk f
Off. For instructions on setting the security level, see Setting th
SecureDesk Security Level on page 186.
or all computers, set the security level to
e
183.
Adding and Editing Network Objects
For information on SecureDesk, see Using SecureDesk on page
You can add or edit network objects via:
• The Network Objects page
This page puters and networks. enables you to add both individual com
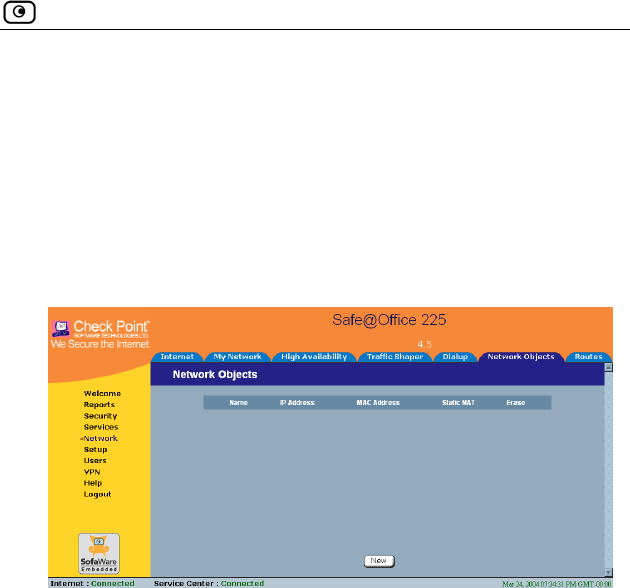
Using Network Objects
Chapter 5: Managing Your Network 131
age
network
Objects page
1. nd click the Network Objects tab.
rk Objects page appears with a list of network objects.
• The Active Computers p
This page enables you to add only individual computers as
objects. The computer's details are filled in automatically in the wizard.
To add or edit a network object via the Network
Click Network in the main menu, a
The Netwo
2. Do one of the following:
• To add a network object, click New.
• To edit an existing network object, click Edit next to the desired
computer in the list.
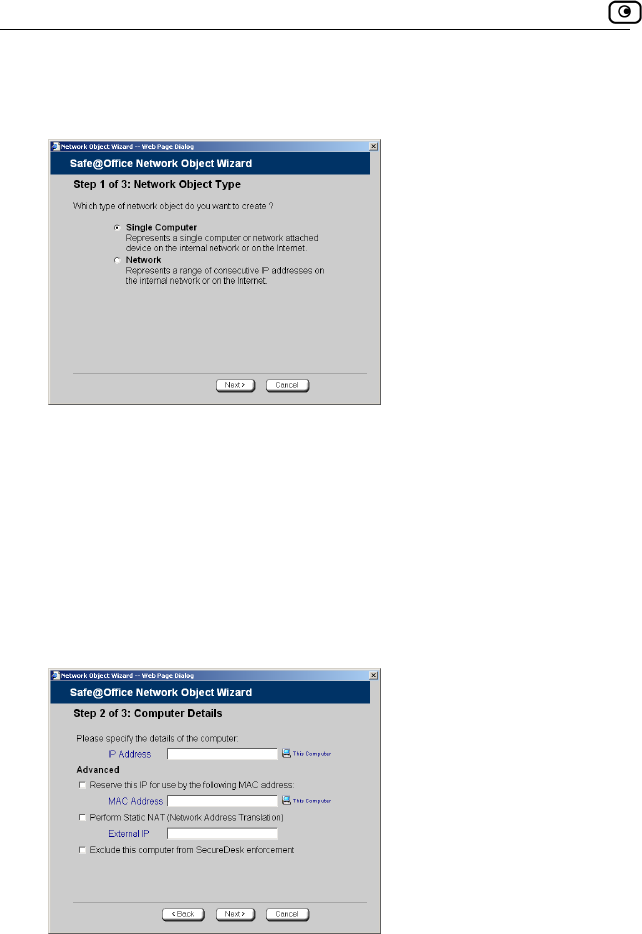
Using Network Objects
132 Check Point Safe@Office User Guide
The Safe@Office Network Object Wizard opens, with the Step 1: Network
Object Type dialog box displayed.
3. Do one of the following:
• To specify that the network object should represent a single
computer or device, click Single Computer.
• To specify that the network object should represent a network,
click Network.
4. Click Next.
The Step 2: Computer Details dialog box appears. If you chose Single
Computer, the dialog box includes the Perform Static NAT option.
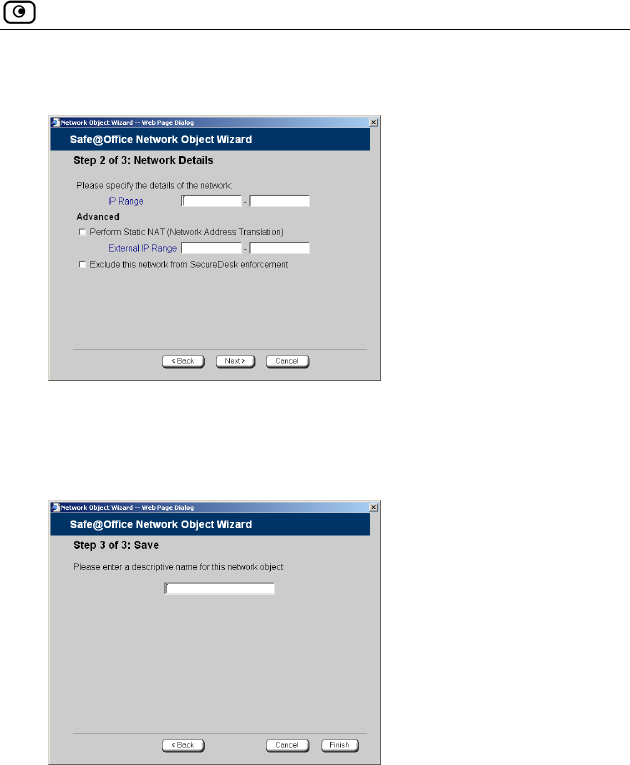
Using Network Objects
Chapter 5: Managing Your Network 133
If you chose Network, the dialog box does not include this option.
5. Complete the fields using the information in the tables below.
The Step 3: Save dialog box appears.
6. Click Next.
network object in the field. 7. Type a name for the
8. Click Finish.
it a netw e
1. Click Reports in the main menu, and click the Active Computers tab.
To add or ed ork object via the Active Computers pag
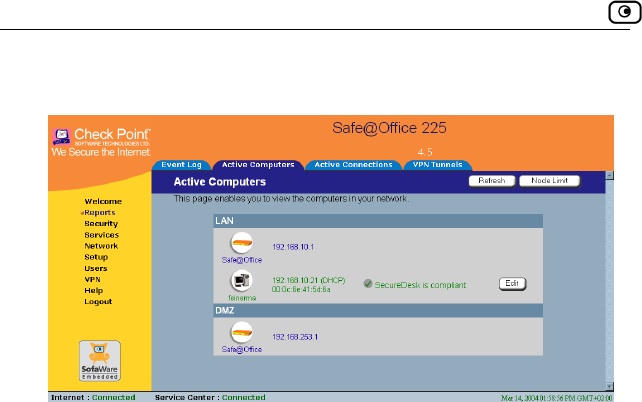
Using Network Objects
134 Check Point Safe@Office User Guide
The Active Computers page appears.
If a computer has not yet been added as a network object, the Add button
appears next to it. If a computer has already been added as a network
object, the Edit button appears next to it.
2. Do one
• To
• To edit a network object, click Edit next to the desired computer.
The Safe@Office Network Object Wizard opens, with the Step 2: Computer
Details dialog box displayed.
The computer's IP address and MAC address are automatically filled in.
3. Complete the fields using the information in the tables below.
4. Click Next.
The Step 3: Save dialog box appears with the network object's name. If
you are adding a new network object, this name is the computer's name.
5. To change the network object name, type the desired name in the
field.
6. Click Finish.
The new object appears in the Network Objects page.
of the following:
add a network object, click Add next to the desired computer.

Using Network Objects
Chapter 5: Managing Your Network 135
T t Fields for a Single Computer
In this field…
able 17: Network Objec
Do this…
IP Address Type the IP address of the local computer, or
click This Computer to specify your computer.
Reserve this IP for use
by the following MAC
address
Select this option to assign the network object's
IP address to a MAC address.
MAC Address Type the MAC address you want to assign to the
network object's IP address, or click This Computer
to specify your computer's MAC address.
Perform Static NAT
(Netw
Translation)
Select this option to map the local computer's IP
Internet IP address.
field.
Exter ss to which you want to
Exclude
from Sec
enforcem
ecureDesk for the
k on page 183.
ork Address address to an
You must then fill in the External IP
nal IP Type the Internet IP addre
map the local computer's IP address.
this computer Select this option to disable S
ureDesk
ent
computer.
For information on SecureDesk, see Using
SecureDes
Using Network Objects
136 Check Point Safe@Office User Guide
Table 18: Network Object Fields for a Network
In this field… Do this…
IP Range Type the range of local computer IP addresses in
the network.
P
(N
Tr of the same size.
en fill in the External IP Range field.
External IP Ra e to which you
etwork's IP address range.
Exclu
from
enfor
he
twork.
SecureDesk on page 183.
erform Static NAT
etwork Address
anslation)
Select this option to map the network's IP
address range to a range of Internet IP addresses
You must th
nge Type the Internet IP address rang
want to map the n
de this network
SecureDesk
Select this option to disable SecureDesk for t
ne
cement For information on SecureDesk, see Using
Viewing and Deleting Network Objects
To vie t
1. Cli
Th
2. To llowing:
a.
w or delete a network objec
ck Network in the main menu, and click the Network Objects tab.
e Network Objects page appears with a list of network objects.
delete a network object, do the fo
In the desired network object's row, click the Delete
icon.
Using Static Routes
Chapter 5: Managing Your Network 137
b.
Using Static Routes
A confirmation message appears.
Click OK.
The network object is deleted.
A s
des
any
To Connection on page 68.
Th
ind
d
tatic route is a setting that explicitly specifies the route for packets
tined for a certain subnet. Packets with a destination that does not match
defined static route will be routed to the default gateway.
modify the default gateway, see Using a LAN
e Static Routes page lists all existing routes, including the default, and
icates whether each route is currently "Up", or reachable, or not.
ding a Static Route A
To add a
1. C k N the Routes tab.
static route
etwork in the main menu, and clicklic
Using Static Routes
138 Check Point Safe@Office User Guide
The Static Routes page appears, with a listing of existing static routes.
2. Click New Route.
The Edit Route page appears.
3. Complete the fields using the information in the table below.
4.
Click Apply.
The new static route is saved.
Using Static Routes
Chapter 5: Managing Your Network 139
Table 1
In this
9: Edit Route Page Fields
field… Do this…
Destination Network Type the network address of the destination
network.
Subnet Mask Select the subnet mask.
Gateway IP Type the IP address of the gateway (next hop
router) to which to route the packets destined for
this network.
Metric Type the static route's metric.
The gateway sends a packet to the route that
matches the packet's destination and has the
lowest metric.
Viewing and Editing Static Routes
To edit a static route
1. Click Network in the main menu, and click the Routes tab.
The Static Routes page appears, with a listing of existing static routes.
2. To edit the route details, do the following:
a. In the desired route row, click Edit.
The Edit Route page appears displaying the destination network,
subnet mask, and gateway IP of the selected route.
b. Edit the fields using Edit Route Page Fields on page 139.