Solutionbee HM Beehive Monitoring System User Manual Installation Guide
Solutionbee LLC Beehive Monitoring System Installation Guide
Contents
- 1. User Manual IOs
- 2. User Manual Andriod
User Manual Andriod
INSTALLATION GUIDE
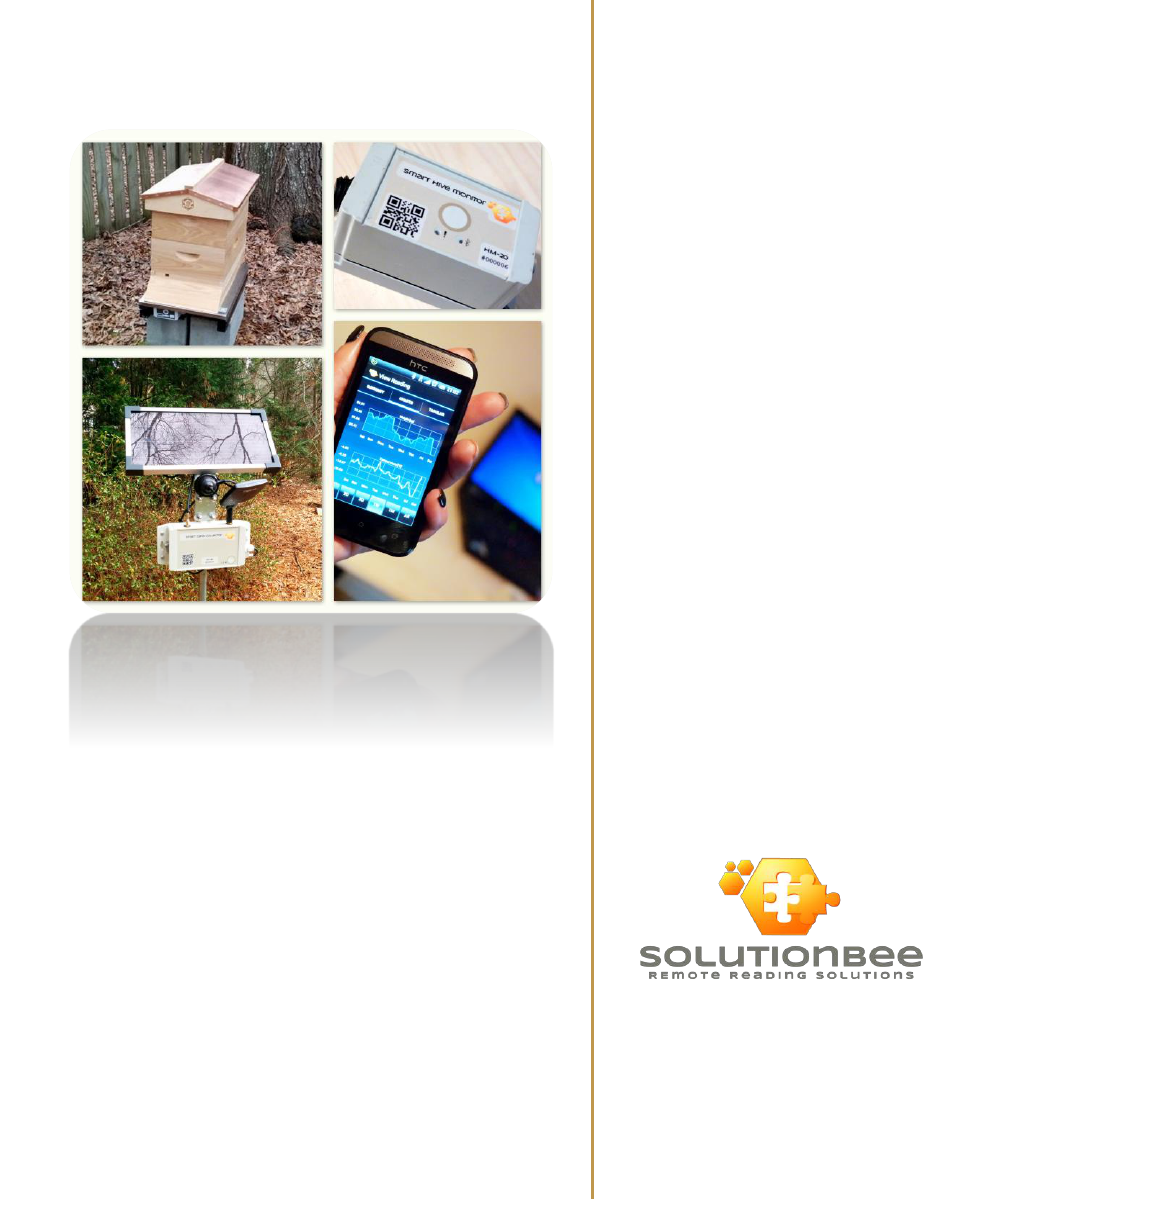
Smart Hive Monitor HM-20
B-Ware Phone App PA-1
B-Ware Web App
September 2014
BEEHIVE MONITORING SYSTEM
Reliable, technical and user-friendly solutions are
Solutionbee’s specialty. Solutionbee’s dedicated
customer technical support assists distributors
and end-users to set-up and maintain their hive
monitoring equipment.
Solutionbee Team

Solutionbee
Page 1
Installation Guide
Table of Contents
1 Introduction ......................................................................................................... 3
2 Installation Checklist ............................................................................................. 4
3 Downloading the Phone App .................................................................................. 5
3.1 About the Phone App ..................................................................................................... 5
3.2 Downloading and Installing the Phone App ..................................................................... 5
4 Smart Hive Monitor Buttons And Functions Explained .............................................. 7
5 Unpacking and Setting up your Smart Hive Monitor ................................................. 8
5.1 Unpacking the Smart Hive Monitor ................................................................................. 8
5.2 Setting up your Smart Hive Monitor................................................................................ 9
6 Using the Phone App with your Smart Hive Monitor .............................................. 12
6.1 Open the Phone App .................................................................................................... 12
6.2 Log In (optional*).......................................................................................................... 12
6.3 Discover Devices ........................................................................................................... 13
6.4 Read Data ..................................................................................................................... 14
6.5 Application Features ..................................................................................................... 15
7 Registering as a B-Ware User on the Web App ...................................................... 17
7.1 Registering ................................................................................................................... 17
7.1.1 Registration steps ..................................................................................................... 17
7.2 Signing In ...................................................................................................................... 18
7.2.1 How to sign in ........................................................................................................... 18
7.2.2 Forgot your password? ............................................................................................. 18
8 Using the Web App with your Smart Hive Monitor ................................................. 20
8.1 About Solutionbee Web App......................................................................................... 20
8.2 Features ....................................................................................................................... 20
8.2.1 Applications .............................................................................................................. 20
8.2.2 Using the Web App to generate detailed graphs and reports .................................... 21
9 Troubleshooting and Maintenance ....................................................................... 23
10 Appendix A - Register to Bee Informed Partnership Program .................................. 24
11 Appendix B - Battery Removal/Insertion Procedure ................................................ 28
12 Appendix C - FCC and Industry Canada Compliance ................................................ 33
12.1 User Information (Part 15.105) ..................................................................................... 33
12.2 Compliance Statement (Part 15.19) .............................................................................. 33
12.3 Compliance Statements (Industry Canada).................................................................... 33
12.4 Warning (Part 15.21) .................................................................................................... 34

Solutionbee
Page 2
Installation Guide
COPYRIGHT NOTICE
Copyright ©2014 by Solutionbee LLC. All rights are reserved.
No part of this document may be reproduced, transmitted, processed, or recorded by any means or form,
translated to another language, or be released to any third-party without the express written consent of
Solutionbee LLC.
Printed in the United States of America.
NOTICE
The information contained in this document is subject to change without notice.
Solutionbee LLC shall not be liable for any errors contained herein or for incidental or consequential damages
in connection with the furnishing, performance or use of this material.
Solutionbee expressly disclaims all responsibility and liability for the installation, use, performance,
maintenance and support of third party products. Customers are advised to make their own independent
evaluation of such products.

Solutionbee
Page 3
Installation Guide
1 INTRODUCTION
Thank you for purchasing a Solutionbee B-Ware Smart Hive Monitor. We are certain that
this equipment will provide years of precise monitoring of your beehive.
Please read this Install Guide carefully and in sequence so that you can be monitoring your
beehive as soon as possible.
This Guide is divided into roughly three sections:
1. Unpacking and Installing your Smart Hive Monitor under your hive
2. Using the Phone App to read your Monitor
3. Registering as a B-Ware user on the Web App
B-Ware is feature-rich and there are many options for customizing your equipment and
software. For simplicity and brevity, this Guide will only demonstrate the basic features in
order to get started. Additional cool features can be found in the on-line B-Ware User
Guide and on-line training videos.
Thank you again for trusting Solutionbee with your beehive monitoring needs.
Your Solutionbee Team.

Solutionbee
Page 4
Installation Guide
2 INSTALLATION CHECKLIST
Installation Steps
Comments
Manual
Reference
1. Download and Install the
B-Ware Phone App from
Google Play
Open Google Play from your phone and search for
the “B-Ware” application. Select Install.
3.2
2. Unpack the Smart Hive
Monitor (SHM)
Open the box, carefully remove the SHM, cut and
discard the shipping band.
5.1
3. Place the SHM
Remove the hive. Place the SHM on the base. Turn
ON the ON/OFF Switch. Zero the scale.
5.2
4. Place the beehive
Place the beehive centered on top of the SHM.
Make sure the ON/OFF switch remains in the ON
position.
5.2
5. Open the Phone App
On your smartphone go to the Application menu
and open B-Ware.
6.1
6. Press the SHM Button
Press the SHM Button shortly (<5 seconds) and the
Bluetooth module is turned on (the blue LED will
begin to blink).
6.3
7. Discover device
Press the Discover Devices button in your B-Ware
Phone App. You phone Bluetooth will be
automatically turned ON. Confirm if necessary.
6.3
8. Read data
Select the new discovered monitor in your B-Ware
Phone App and press the Read Full Data button.
6.4
9. Pair the devices
The SHM and your phone will try automatically to
pair at first attempt to read data. Confirm the
pairing.
6.4
10. Get a Solutionbee account
Register as a new user on the Web App.
7.1
11. Upload data
In your B-Ware Phone App select the Upload Data
option.*
6.2
12. Open Web App and have
fun!
Open link and log in to browse the features and
view your data.
8
Solutionbee
Page 5
Installation Guide
3 DOWNLOADING THE PHONE APP
3.1 ABOUT THE PHONE APP
The B-Ware™ Phone App is a crucial tool in operating your B-Ware Monitoring System. The
app will connect your smartphone or other handheld device to your Smart Hive Monitors
with reliable Bluetooth communications and give you access to the monitor data.
It can also upload your monitor data to the Internet so that you can use the Web App to
view it.
3.2 DOWNLOADING AND INSTALLING THE PHONE APP
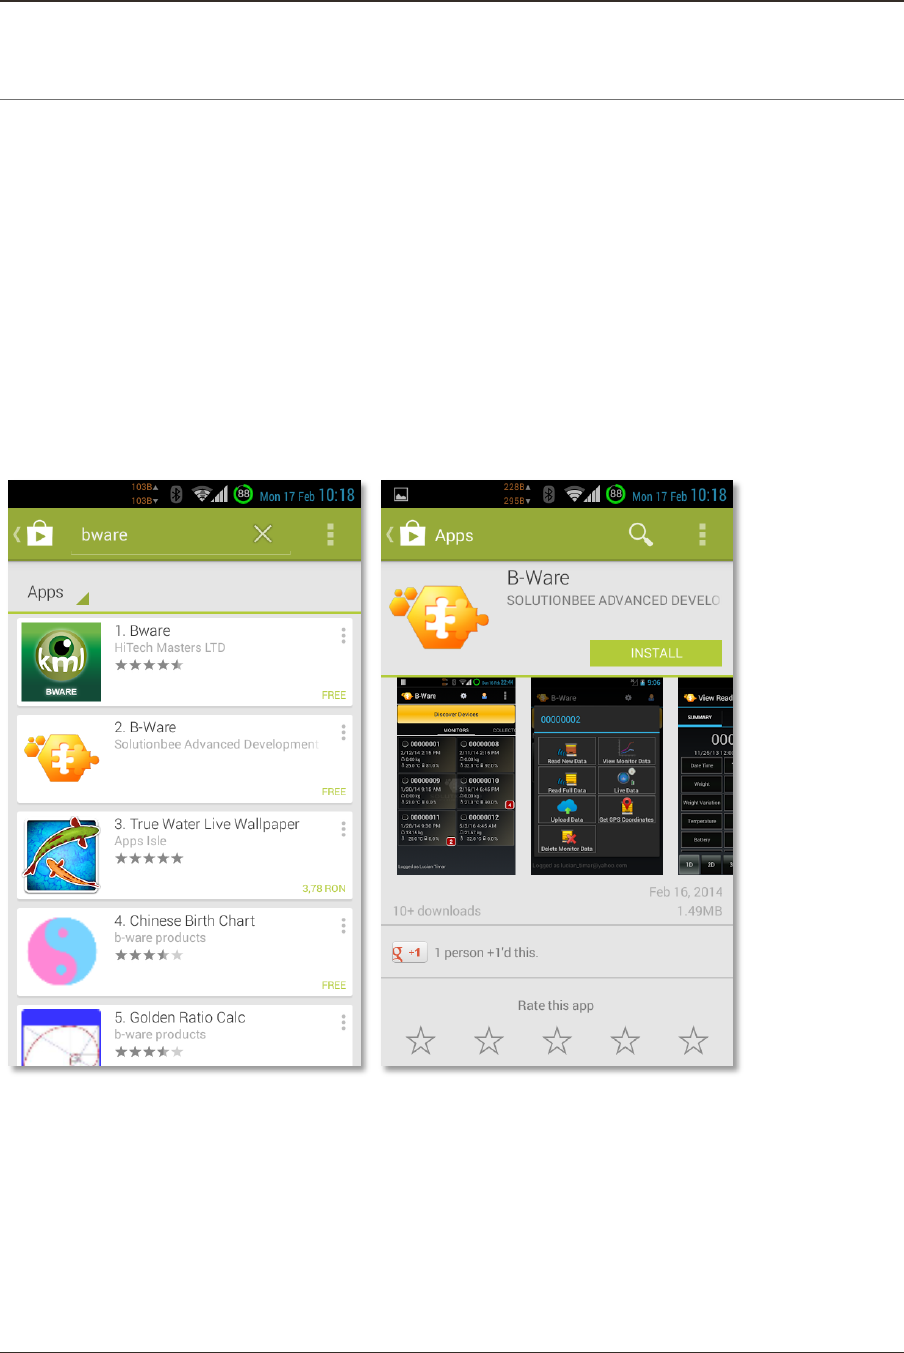
To download and install the B-Ware Phone App follow a few simple steps described below:
1. Open the Google Play Store application from your phone.
2. Type and search B-Ware.
3. Select Solutionbee B-Ware application from the list.
4. Touch Install to start the installation.
Solutionbee
Page 6
Installation Guide
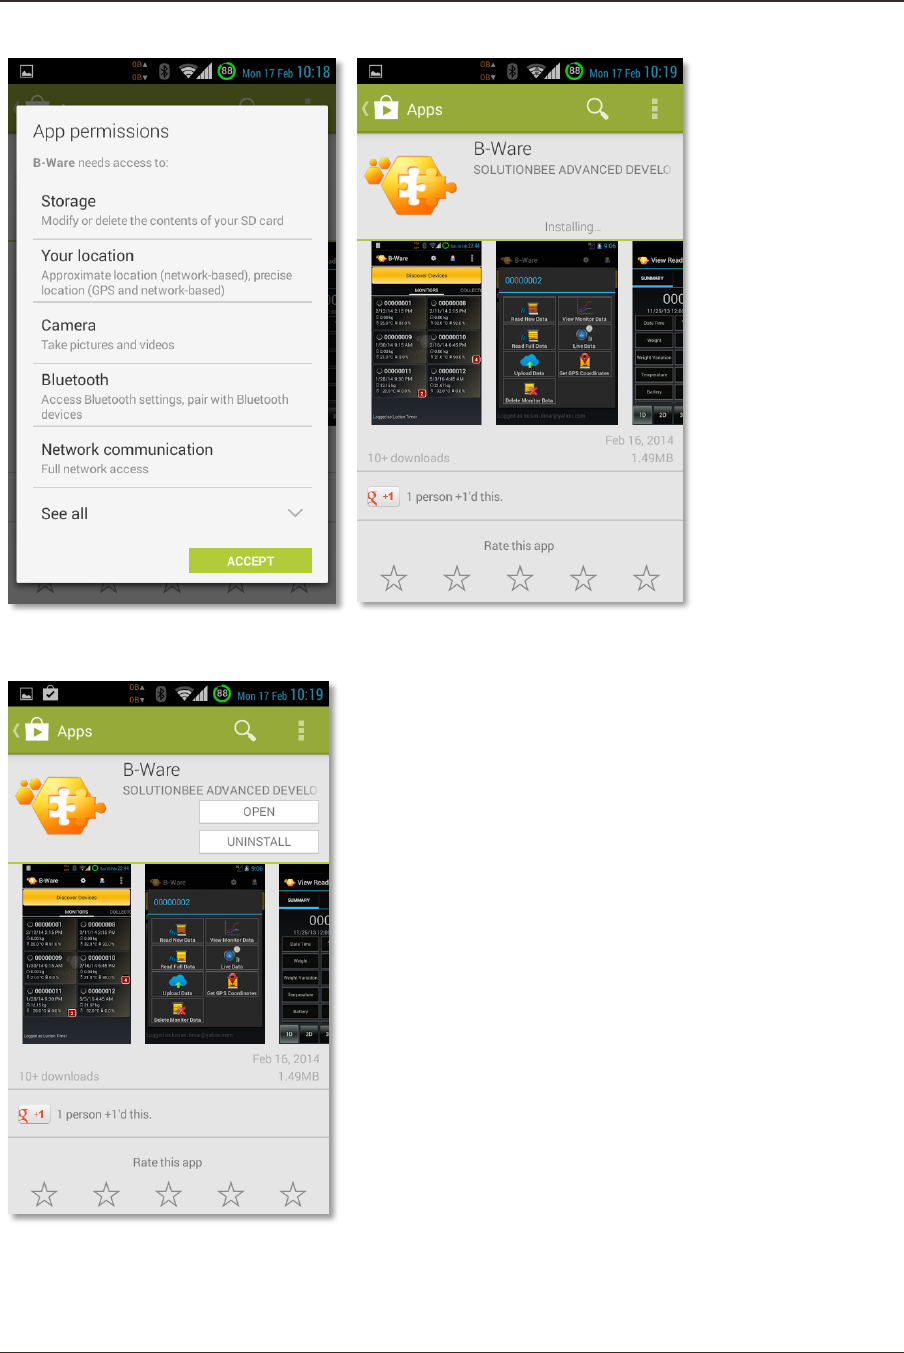
5. To continue tap Accept after reviewing the app's permissions.
6. Wait for the application to install
7. Installation is done. Tap Open to start the application.
Solutionbee
Page 7
Installation Guide
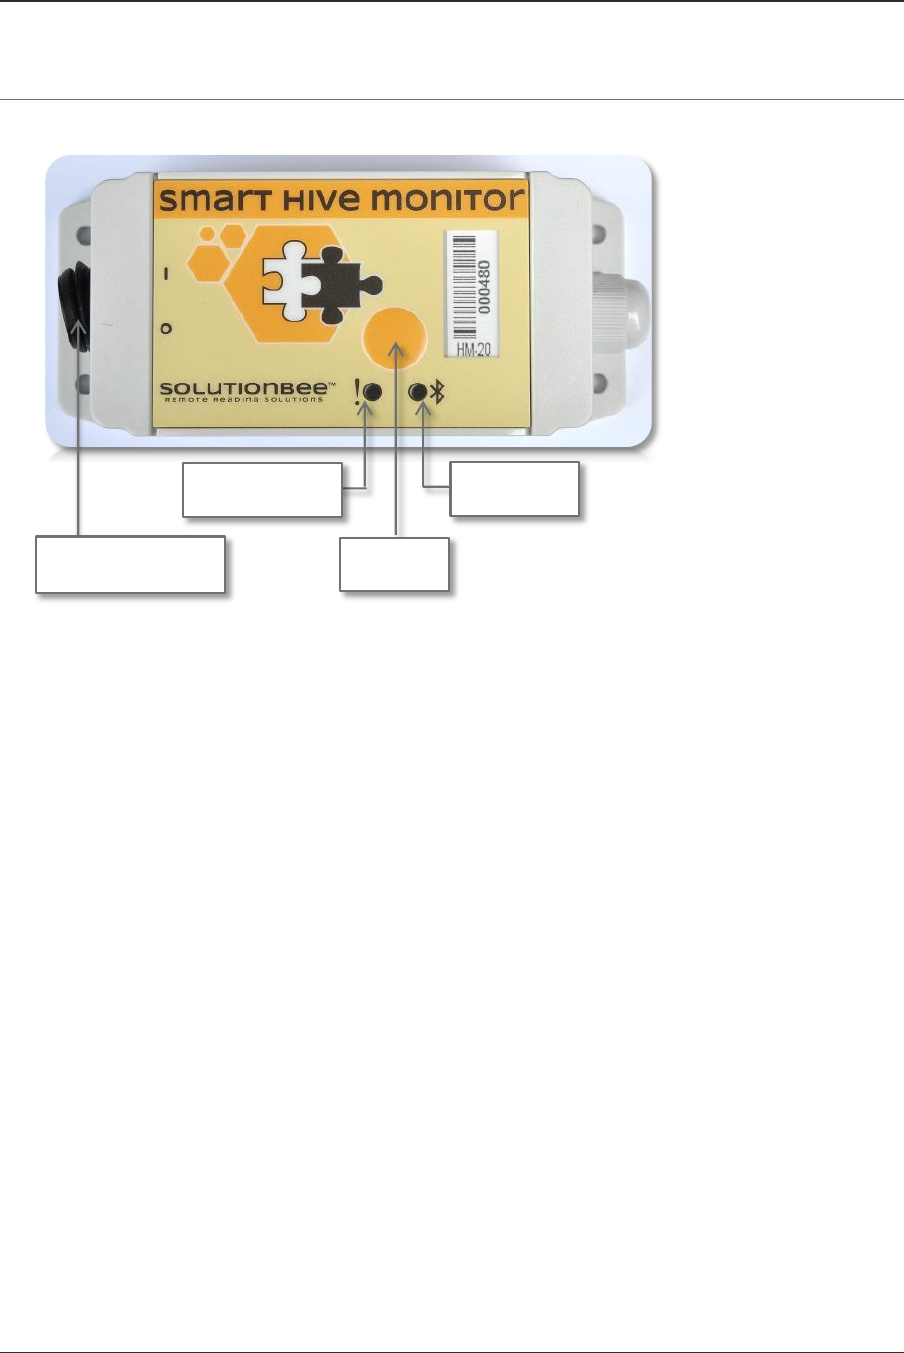
4 SMART HIVE MONITOR BUTTONS AND FUNCTIONS EXPLAINED
ON/OFF switch
OFF: power the device off
ON: power the device on
Orange LED
After the device is powered on, if the operating conditions (battery, temperature) are
met, the orange LED will blink fast 5 times.
If the operating conditions (battery, temperature) are NOT met, the orange LED will
blink once every 10 seconds. The device is not recording at this time.
Button dependent (see Button section)
Blue LED
ON: the Bluetooth modem is being initialized.
Slow blink (every second): awaiting connections.
Fast blink (5 times a second): communicating with a Bluetooth device.
OFF: the Bluetooth modem is turned off.
Button
Short press (<5 seconds): the Bluetooth module is turned on (the blue LED will begin to
blink - see Blue LED)
Double click: if the monitor is configured to work with a collector, it will attempt to find
and (re)join the collector and transmit its data. The orange LED will blink fast as long as
the monitor is attempting to communicate with the collector.
Long press (>5 seconds): the scale monitor will be tarred to 0. The orange LED will blink
5 times, once a second.
ON/OFF Switch
Button
Blue LED
Orange LED
Solutionbee
Page 8
Installation Guide
5 UNPACKING AND SETTING UP YOUR SMART HIVE MONITOR
This chapter covers everything from unpacking the system, placing it under your hive, and
turning it on. We want your installation to be a success!
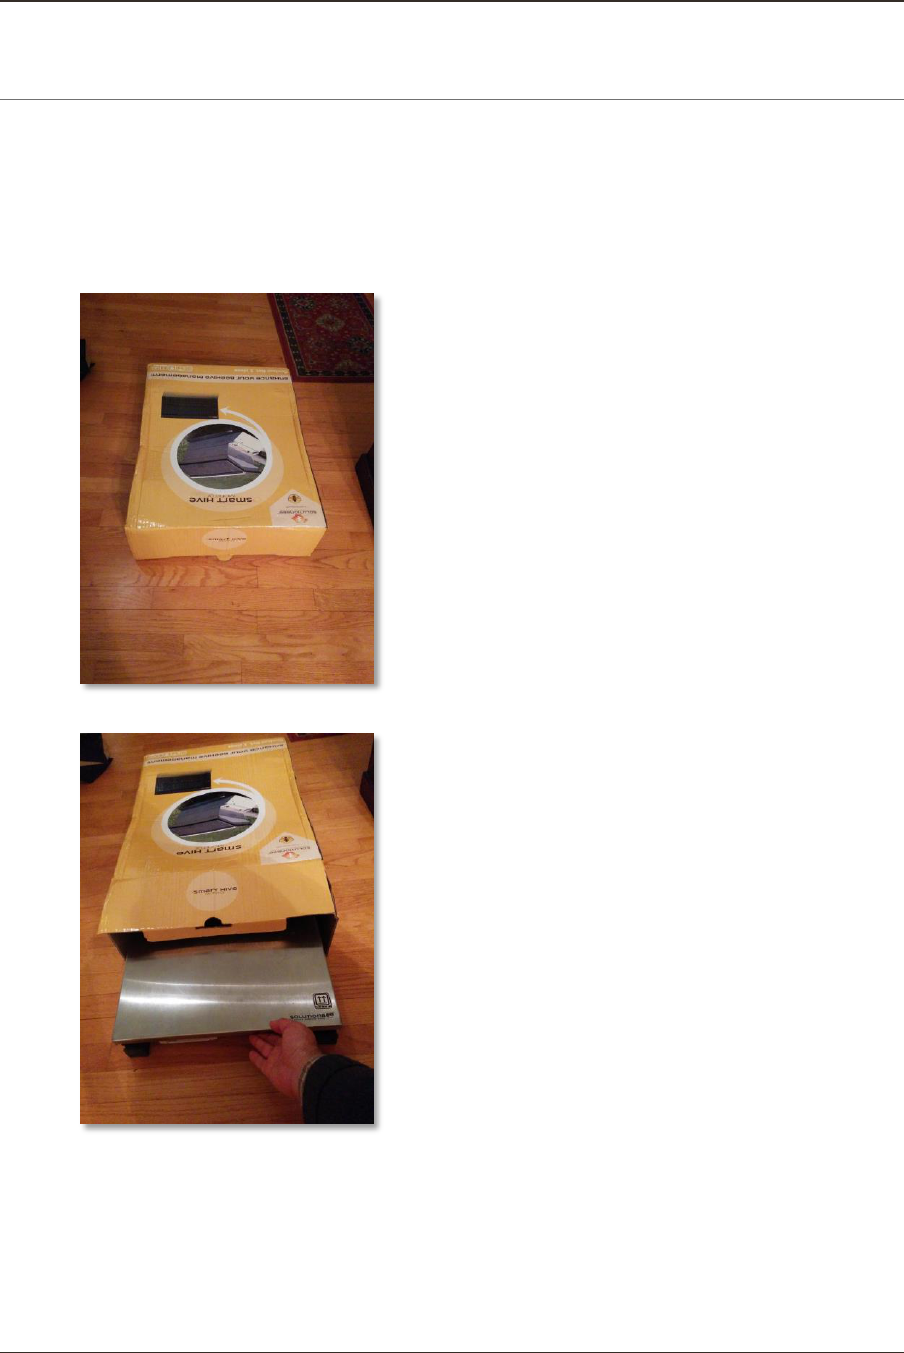
5.1 UNPACKING THE SMART HIVE MONITOR
1. Carefully lay the Smart Hive Monitor box flat on the ground. Open the cardboard
box from the top.
2. Carefully remove the SHM from the box.
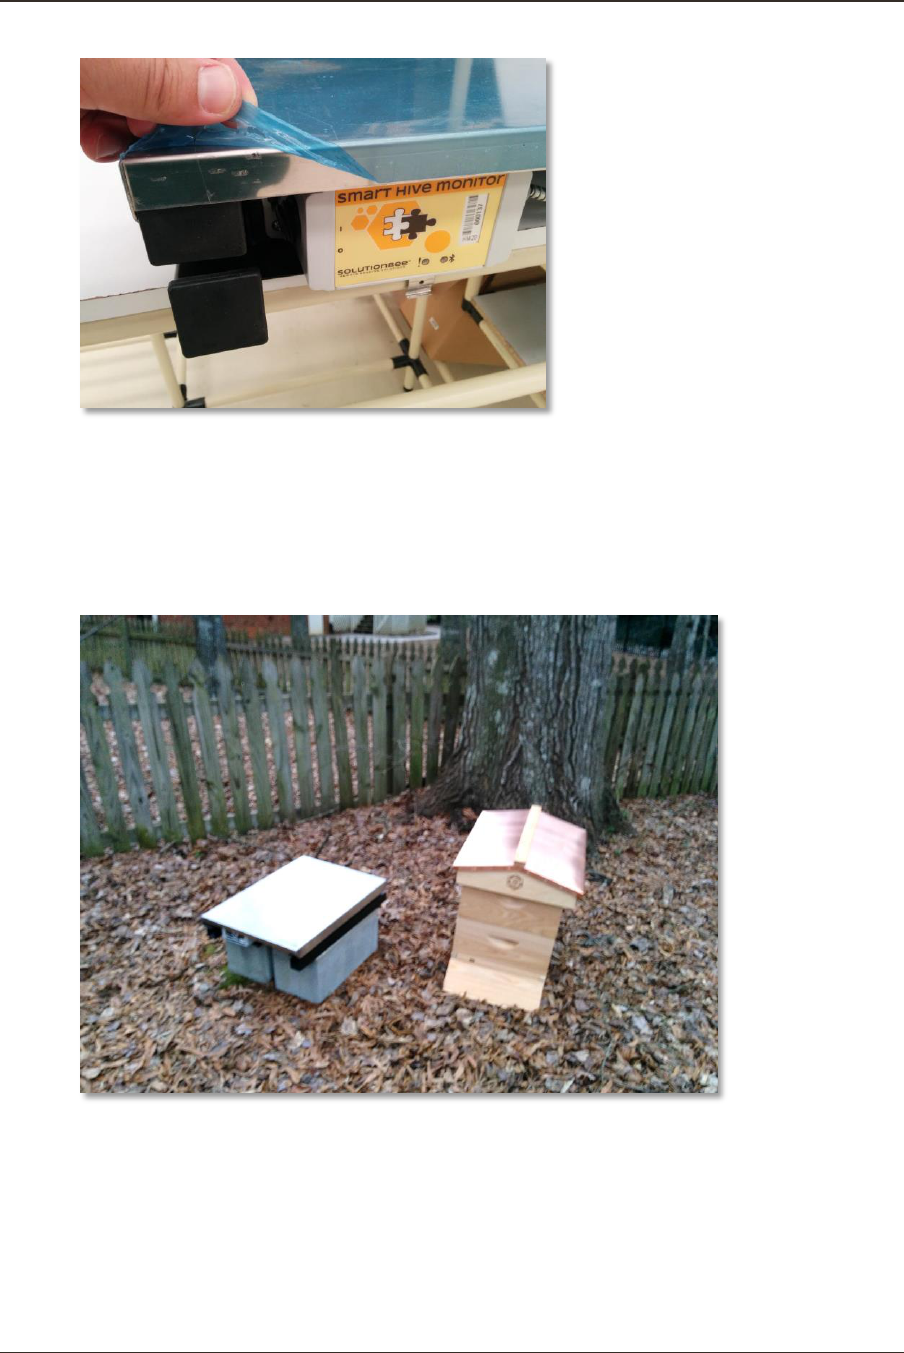
3. Remove plastic coating from the hive monitor top plate.
Solutionbee
Page 9
Installation Guide
5.2 SETTING UP YOUR SMART HIVE MONITOR
1. Identify the beehive that will be monitored. Temporarily move the beehive aside
and place the monitor on a horizontal and firm base such as a pallet, cinderblock or
other structure to elevate the monitor from ground level in order to avoid standing
water from damaging your monitor.
2. A battery will already be pre-installed in the SHM module. Turn the ON/OFF switch
to the ON position.

Solutionbee
Page 10
Installation Guide
3. Zeroing the scale: Without the hive on top of the monitor, zero out the scale by
pressing the orange button for between 5 and 20 seconds. The yellow warning light
will blink for two seconds indicating that zeroing was successful.
If the blue light blinks it means the button was not pressed long enough. Try
again keeping the button pressed down for at least 5 seconds.

Solutionbee
Page 11
Installation Guide
4. Place the beehive centered on top of the SHM. Make sure the ON/OFF switch
remains in the ON position.
You have successfully installed and set-up your Smart Hive Monitor!
Solutionbee
Page 12
Installation Guide
6 USING THE PHONE APP WITH YOUR SMART HIVE MONITOR
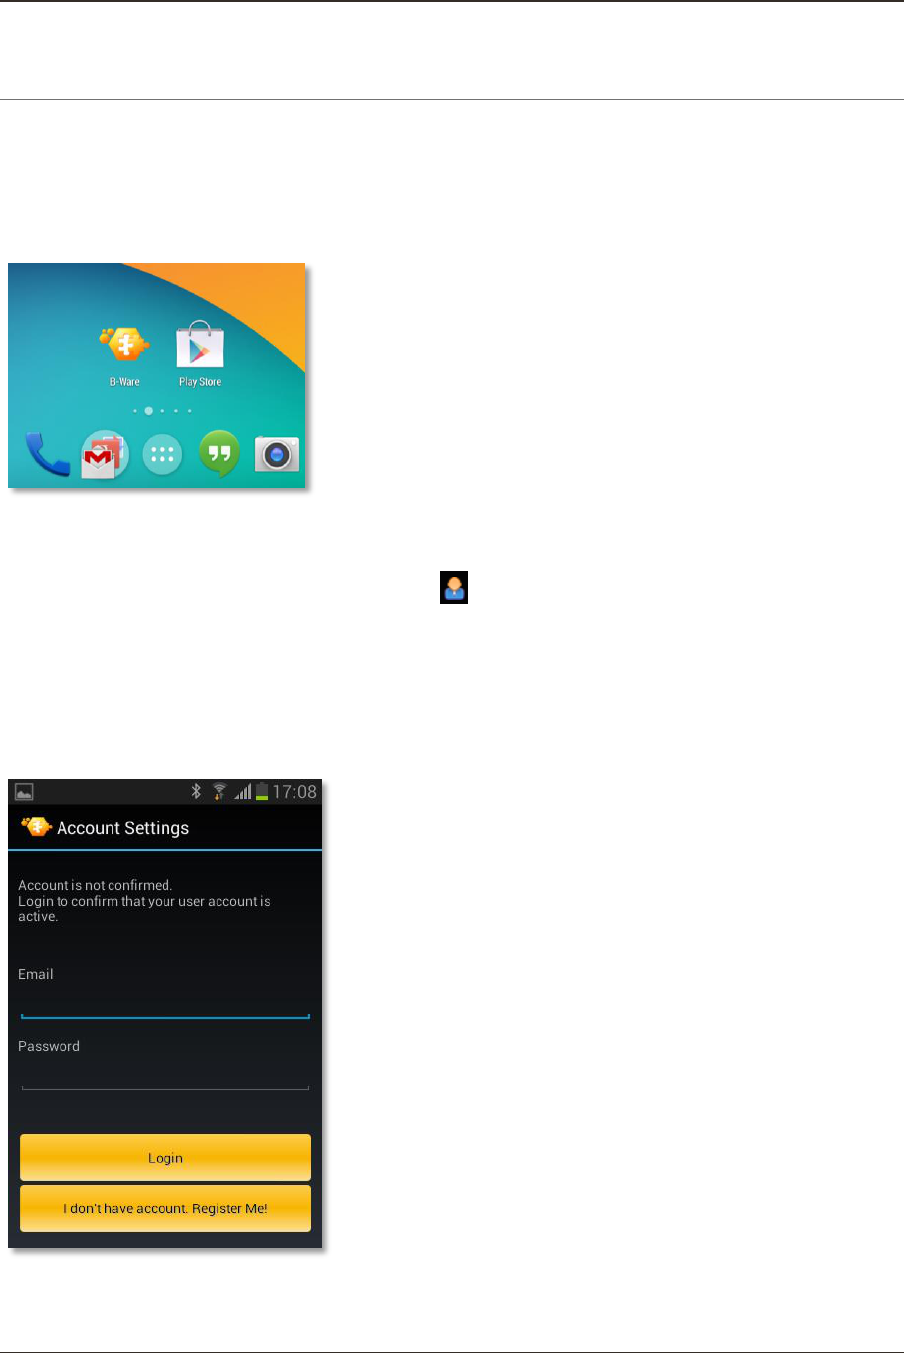
6.1 OPEN THE PHONE APP
Depending on your phone or handheld device used the application location may vary.
Usually it is displayed under Applications and you may customize it dragging the icon on the
main screen.
6.2 LOG IN (OPTIONAL*)
Open the application. Log in by touching the icon from the top of the screen.
Type your email and password and press Login if you have an account.
*This step is necessary only if you want to upload your data to the internet
for further analysis with the Web App. For details about setting up an
account and using the Web App, please read Chapter 7 and Chapter 8 in this
manual.
When the applications starts the phone’s Bluetooth on your smartphone automatically
turns on.
Solutionbee
Page 13
Installation Guide
Note: Verify that the Bluetooth communication has been set to ON.
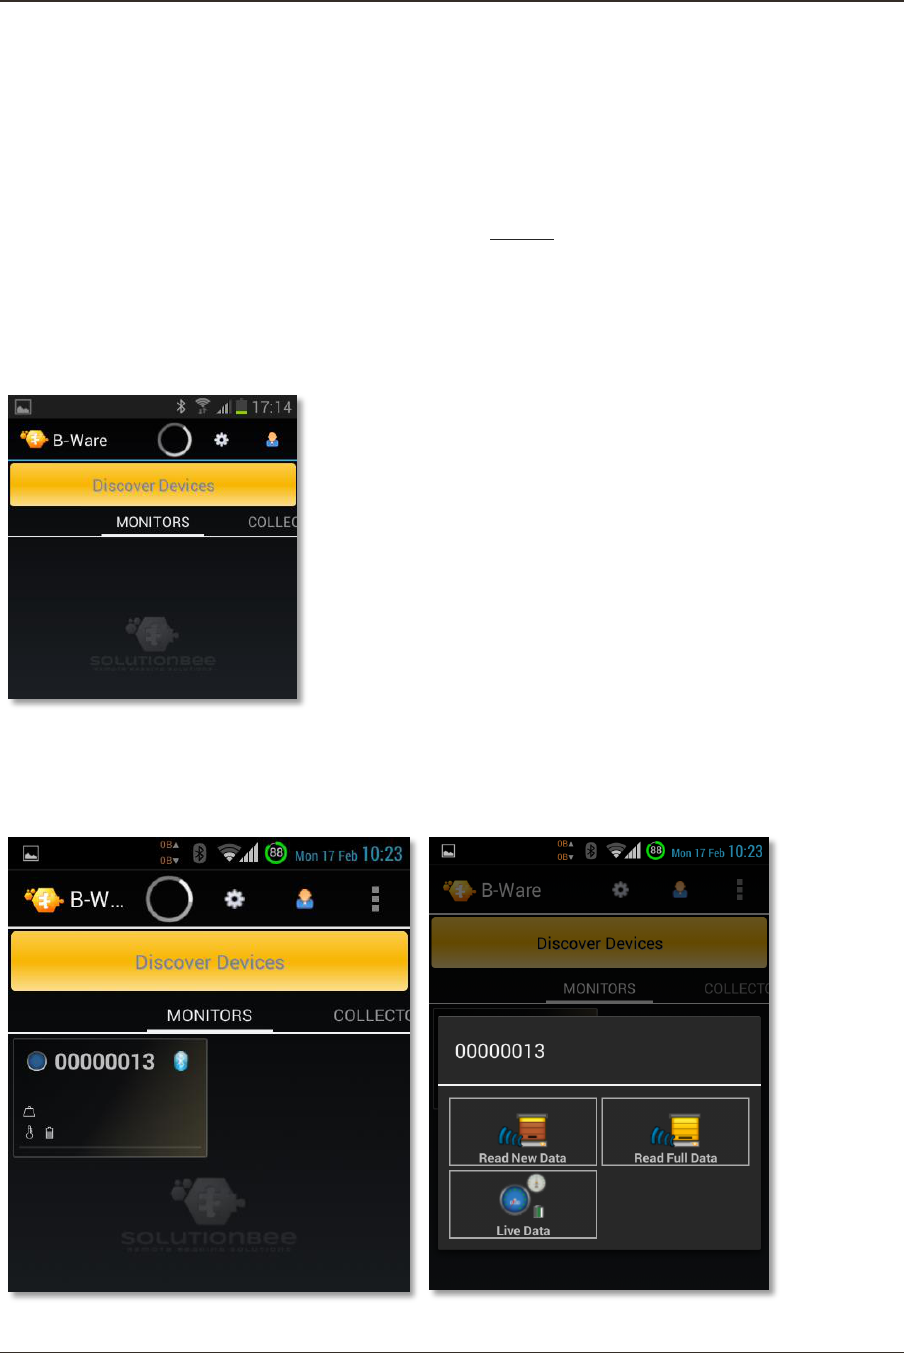
6.3 DISCOVER DEVICES
Important!
Press the SHM Button shortly (<5 seconds) before touching the Discover
Devices button. The SHM’s Bluetooth module is turned on (the blue LED will
begin to blink).
After the first start of the application no devices are displayed under the Monitors menu.
Touch Discover Devices button in order to discover and automatically add your SHM to the
list.
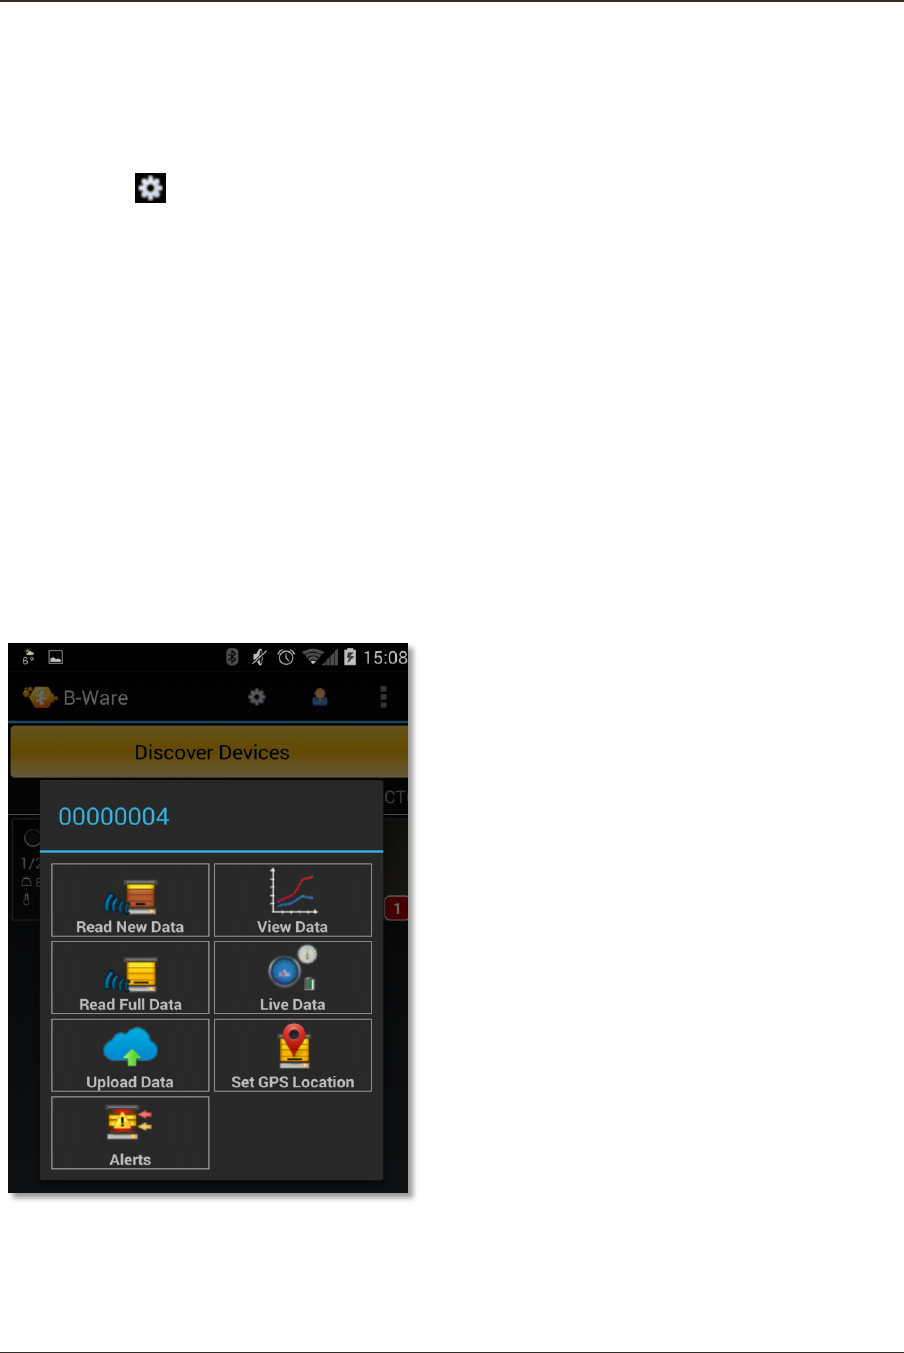
Your monitor is added under Monitors list.
You will see your monitor added to the list after the process of discovering and pairing
devices is over. By touching the monitor widget the menu associated with your device will
appear and the following options will be displayed:

Solutionbee
Page 14
Installation Guide
Read New Data
Read Full Data
Live Data
6.4 READ DATA
For the first reading it is recommended that you choose Read Full Data menu option.
The B-Ware Phone App will request a pairing between your phone and SHM. The
notification may vary depending on the phone model.
In most cases a popup messages will request the permission to pair devices and in other
cases an information icon appears on the top menu of your phone.
Accept the pairing whatever the notification form is.
After the reading is over you can choose to:
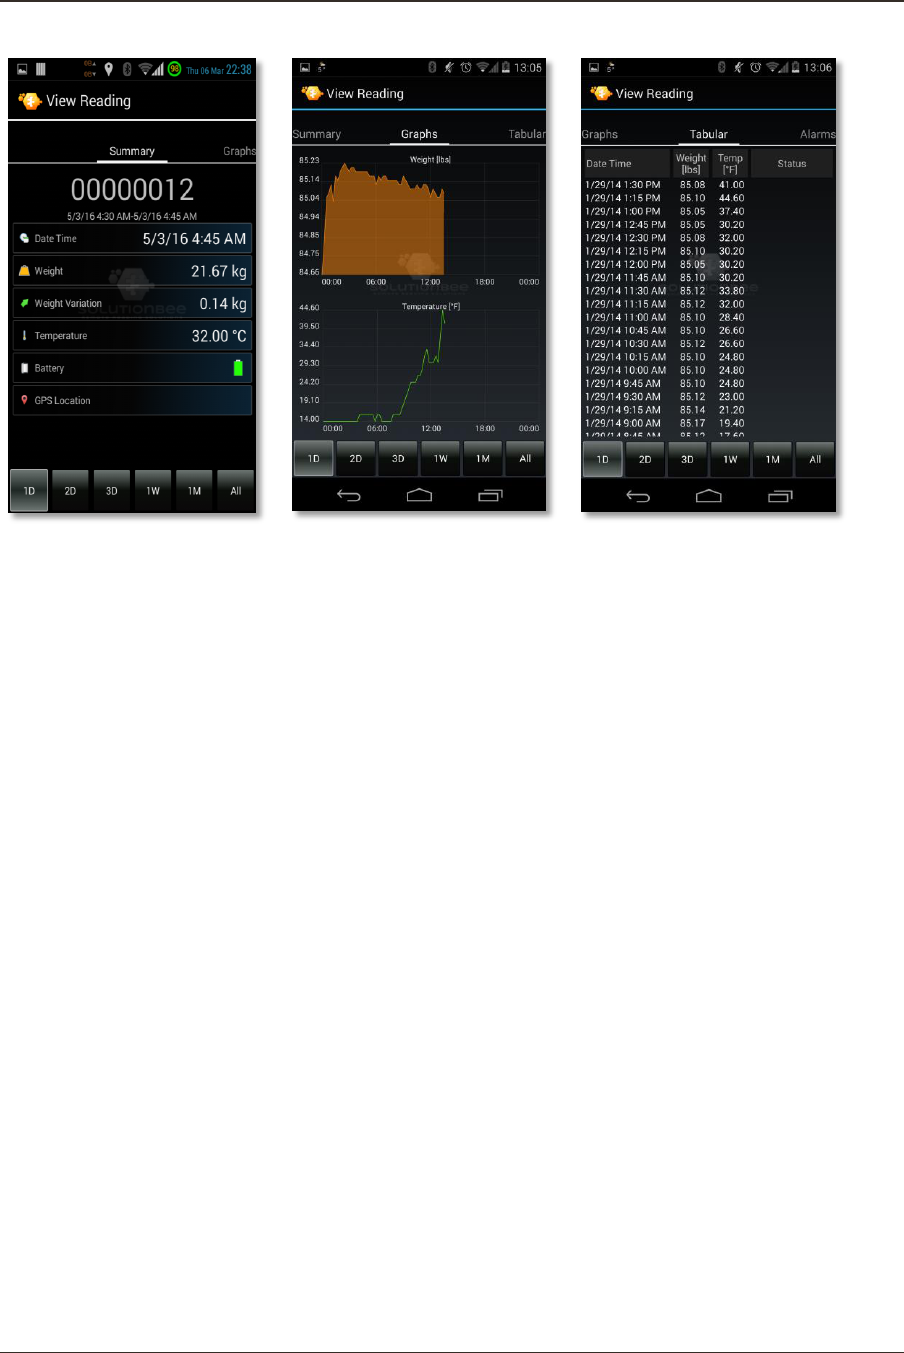
View Data: display readings
Solutionbee
Page 15
Installation Guide
Upload Data: to the Internet
In order to upload data you have to be logged in.
By checking the Automatically Upload Data option in the Phone App Settings
menu your data will be uploaded automatically after each reading
performed.
6.5 APPLICATION FEATURES
After uploading the monitor data to your smartphone, the app can upload the same data to
the Internet, if it is within cell tower range or do so on a delayed basis once it enters cell
tower range. This multifunctional app has the following features:
Live Data: See the real-time weight of your hive and ambient temperature.
View Data: View your weight and temperature data on interactive graphs after
uploading your monitor data.
Read New Data: Read new weight and temperature data since the last reading.
Upload Data: Upload your monitor data to the Internet so that it is viewable through
your favorite browser.
Set GPS Location: Set the GPS location of your monitored hives.
Alerts: Set Alarm upper and lower weight and temperature limits.
Example of read data: as a short summary, in a graphical and a tabular format.
Solutionbee
Page 16
Installation Guide

Solutionbee
Page 17
Installation Guide
7 REGISTERING AS A B-WARE USER ON THE WEB APP
Learn how to get a new account by registering.
7.1 REGISTERING
7.1.1 Registration steps
To register, open your browser and go to the Solutionbee web page:
www.solutionbee.com. Select Customer Login from the top menu bar.
The Sign In window will appear.
For a new account press Need to Register? link. The registration window will appear.
1. Enter your information.
You'll be asked to enter your name, email address, registration code and to choose a
password.
User Full Name
A user name is the unique name you use to identify yourself on Solutionbee Web
Application and is not seen by other Solutionbee users. Your user name is displayed on the
top right corner when you open the web application. You can change this name or update
your personal information anytime later.
Email Address
Type your email address and make sure it is a valid one. You will receive a confirmation
email and a link at that address to complete the registration process.
Password
Create a strong and secure password that's difficult for others to guess but still easy for you
to remember. Your password must be at least 6 characters. If the password isn't valid or too
weak the registration process cannot continue.
Registration Code
Type the registration code provided by Solutionbee. The registration code is found in
Solutionbee welcome package.
After completing the required fields click Register.

Solutionbee
Page 18
Installation Guide
Wait until the registration process is completed. An information window will be displayed.
2. Review your confirmation.
Open your email and you'll find a confirmation message. To complete the registration
process click on the link provided.
You're registered! We may need to ask you for a few more pieces of information as you
start to buy additional devices and accessories.
7.2 SIGNING IN
7.2.1 How to sign in
After you register with Solutionbee, you can sign in with the email address associated with
your account, and your password.
To sign in:
Open www.solutionbee.com and go to Customer Login. This will lead you to the Sign In
page.
Enter your email address, and password.
Check the Remember me on this computer option in order to stay signed in and avoid
entering the email address and password every time you want to log in to your Solutionbee
account.
If you're on a public or shared computer, we recommend you clear the
Remember me on this computer check box.
Click the Login in button.
7.2.2 Forgot your password?
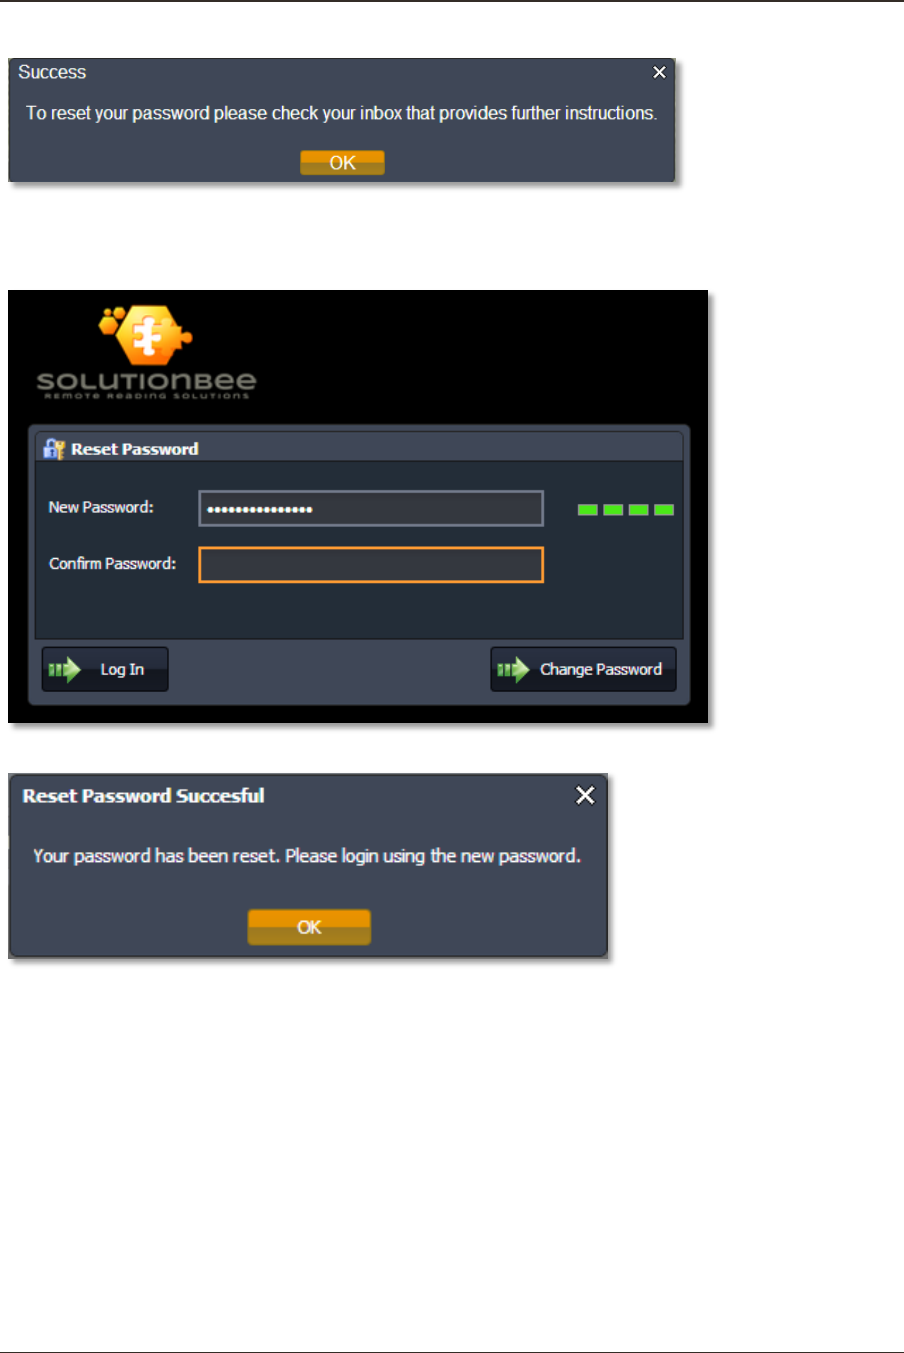
If you forgot your password, we can help you reset it quickly and easily.
Reset your password
In the Sign In window go to the Forgot your password? page and enter your email address.
Press Request Password button.
Solutionbee
Page 19
Installation Guide
We'll send you an email (immediately in most cases) with a link you can click to reset your
password. Follow the link and in the Reset Password window enter and confirm a new
password.
Press the Change Password button.
The password was changed and now you can login with the new password in the Sign In
window.
Solutionbee
Page 20
Installation Guide
8 USING THE WEB APP WITH YOUR SMART HIVE MONITOR
8.1 ABOUT SOLUTIONBEE WEB APP
The analysis tools available from Solutionbee use a web based user interface to provide a
user friendly environment for accessing your data and various system functions.
Cloud-based Information Management - easy “in the cloud” access.
Daily, monthly, yearly reports based on weight data available for a hive or groups of
hives.
Alarm and error reporting.
Individual hive localization in Google Maps.
Dashboard for quick view of hive status and alarms.
8.2 FEATURES
8.2.1 Applications
GPS positioning, weight readings of individual monitors and all the hive data gathered using
the B-WareTM Phone App can be uploaded to a web server on the Internet. The Web App
uses a web based user interface to provide a user friendly environment for accessing your
data and various system functions.
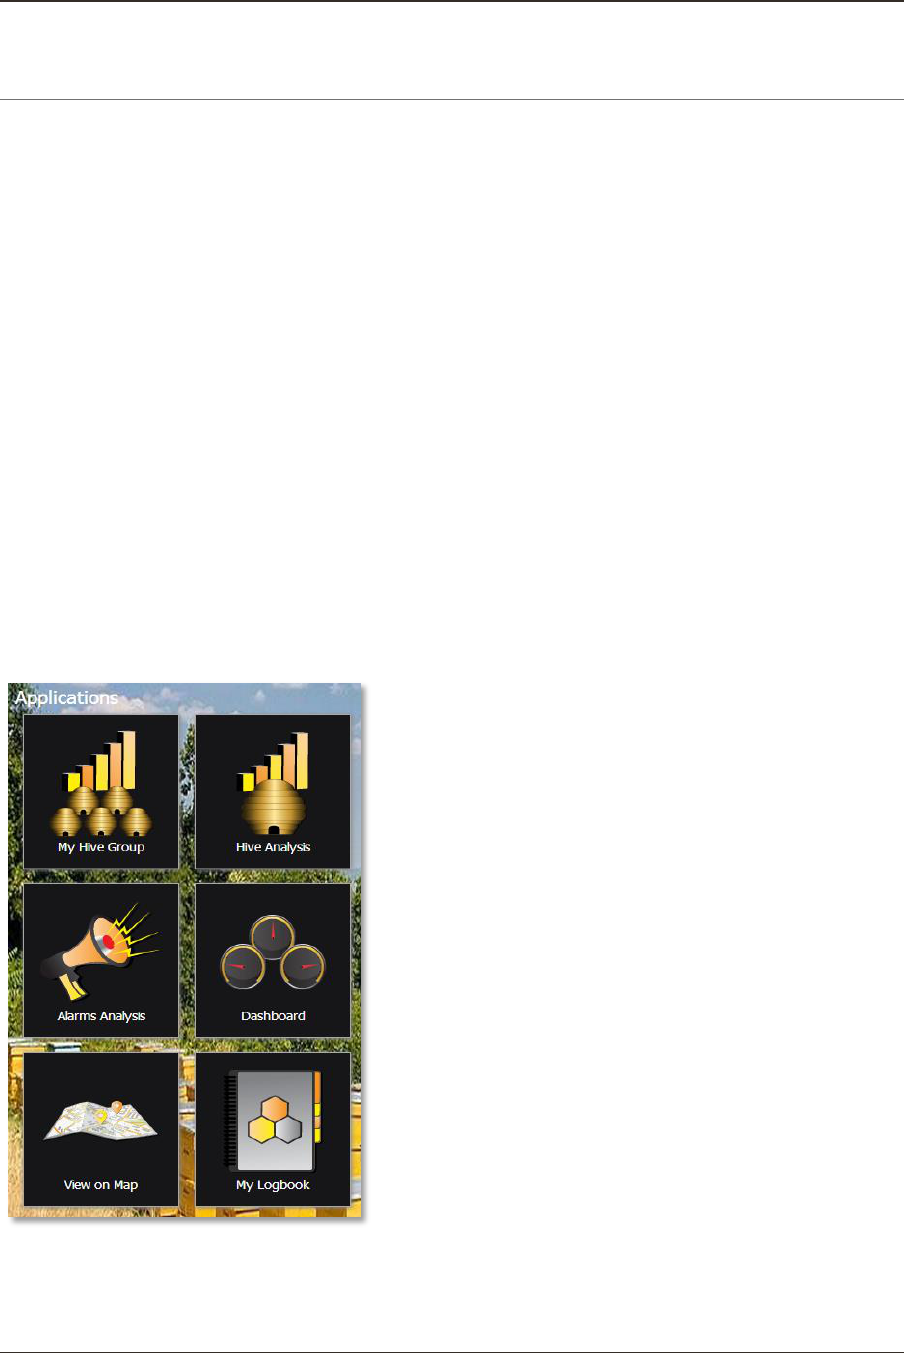
Solutionbee web applications are design to ensure the best apiary and hives management.
My Hive Group: provides tabular and graphical reports displaying the weigh variation in
your apiary during a selected period of time. You can determine which hives are
accumulating high levels of nectar and where the nectar flows are strongest.

Solutionbee
Page 21
Installation Guide
Hive Analysis: using this application you can monitor and view data of a particular selected
hive in apiary.
Alarms Analysis: indicates the weigh variation and reports errors.
Dashboard: provides a quick view of hive status and alarms.
View on map: displays individual hive localization in Google Maps.
My Logbook: using this feature you can keep track of your beehives by generating a
convenient logbook of all your beekeeping activity.
8.2.2 Using the Web App to generate detailed graphs and reports
After uploading the data from your phone or handheld device to the internet you can log in
to the Web App and use the features as well as generate reports.
For example to generate reports for one hive from your group, follow the steps below:
1. Upload the data to the internet (explained in Chapter 6 - Using the Phone App with
your Smart Hive Monitor)
2. Log In to the Web App
3. Select Hive Analysis
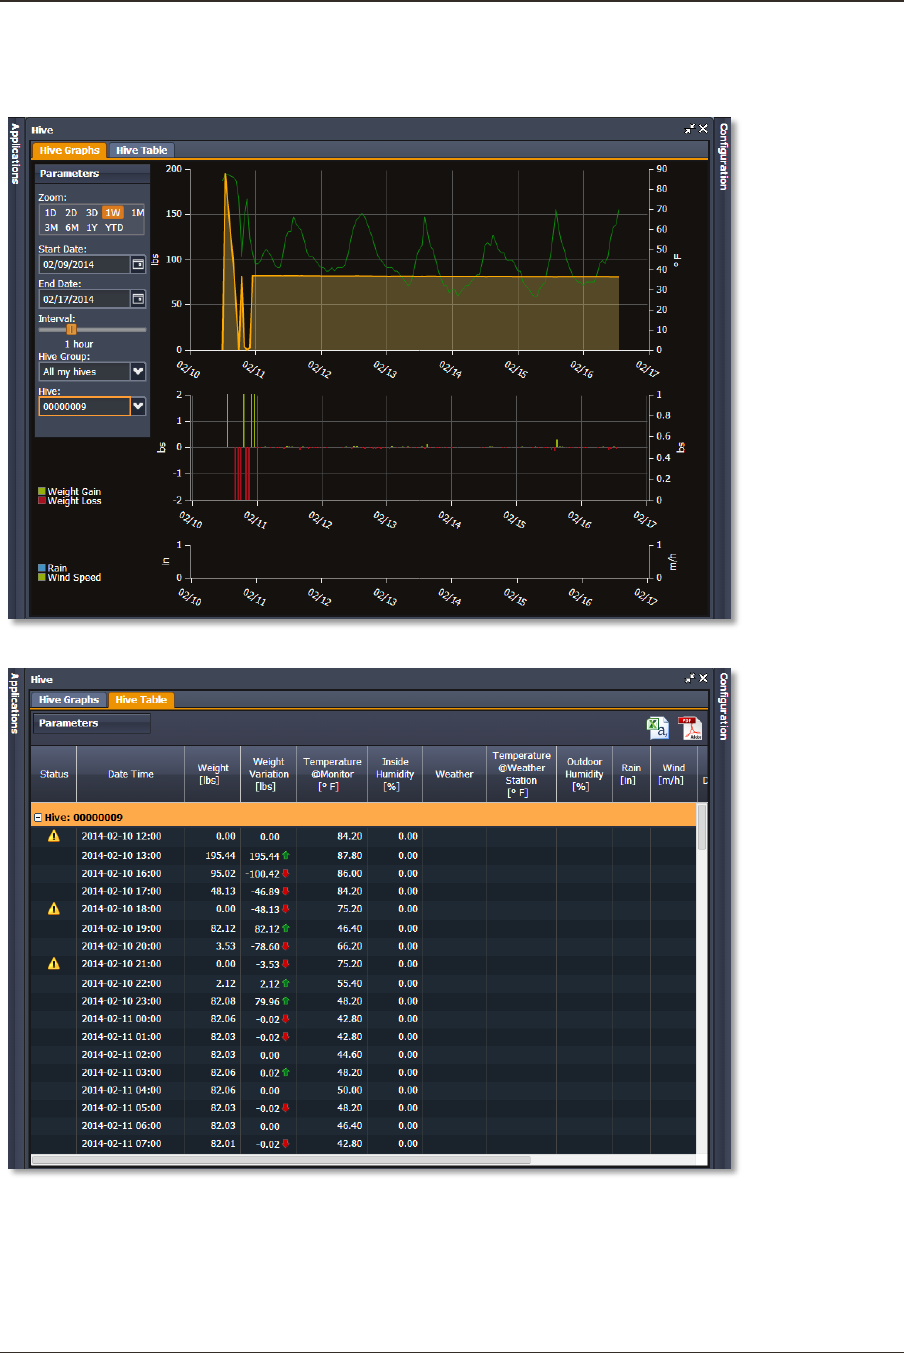
4. In the left upper corner select the parameters:
a. Zoom level of the graph
b. The start and the end date for the analysis
c. Interval: data resolution
d. Select the hive group
e. Select the hive from the drop down list
5. The report will be automatically generated
6. Select the format you want: graphical or tabular by switching the tabs Hive Graphs
or Hive Table
7. Export your analysis results information in a *csv or *xlsx file for further process of
the information, by pressing the icons from the top right corner of the Hive
Analysis – tabular format.
Solutionbee
Page 22
Installation Guide
Examples:
Hive Analysis – graphical format:
Hive Analysis – tabular format:

Solutionbee
Page 23
Installation Guide
9 TROUBLESHOOTING AND MAINTENANCE
1. The monitor is not recording.
If the operating conditions (battery, temperature) are NOT met, the orange LED will blink
once every 10 seconds. The device is not recording data in this condition.
2. The communication is not working.
Your phone Bluetooth may not be turned ON. Please verify that Bluetooth is turned on in
your smartphone’s setup option.
3. The data is not uploaded.
Your Wi-Fi or data connection may not be turned ON. Please make sure your smartphone is
connected to your Wi-Fi or cellular service provider.
4. Low battery alarm.
Change the battery.

Solutionbee
Page 24
Installation Guide
10 APPENDIX A - REGISTER TO BEE INFORMED PARTNERSHIP PROGRAM
Solutionbee strongly supports the efforts and goals of the Bee Informed Partnership.
“The Bee Informed Partnership is an extension project that endeavors to decrease
the number of honey bee colonies that die over the winter. Managed honey bees are
important to our agricultural security because many fruits, nuts, vegetables, and other crops
require bees to pollinate them to ensure production of quality produce. Unfortunately, the
rate of mortality suffered by overwintering colonies over the last 4 years has been
unsustainably high, threatening the livelihoods of not only the beekeepers who manage
bees, but those who rely on bees for pollination.
The project proposes to help beekeepers keep colonies alive by initiating several
levels of surveys. These surveys will document which management practices beekeepers use
and the degree of loss suffered by those beekeepers. Using methods developed by human
epidemiologists, we will compare the effectiveness of different management practices by
calculating and comparing the losses suffered by those that did or did not use a particular
management practice. In recognition of the fact that the most appropriate management
practices for a beekeeper in one region are not necessarily the same for beekeepers in other
regions, we will develop web- and app-based tools that will enable beekeepers to interact
with the survey data to permit them to compare management practices among groups of
beekeepers that share their geography, purpose (e.g., honey production, pollination), and/or
management philosophy (e.g., minimal pesticide use). To facilitate this level of engagement,
we will develop a honey bee health database that will act as a repository for all honey bee
health data collected from this and other bee health surveillance projects.
This project is motivated by the conviction that beekeepers, when presented with
beekeeper-derived data that objectively show which management practices worked and
which did not, will adopt the more successful practices. This, in turn, will reduce colony losses
and increase the availability of pollinating units overall.”
Solutionbee supports the affiliation to this program and allows you to transmit your own
recorded hives data.
Follow step by step the instructions described below if you allow Solutionbee to send hive
data to Bee Informed Partnership Program:
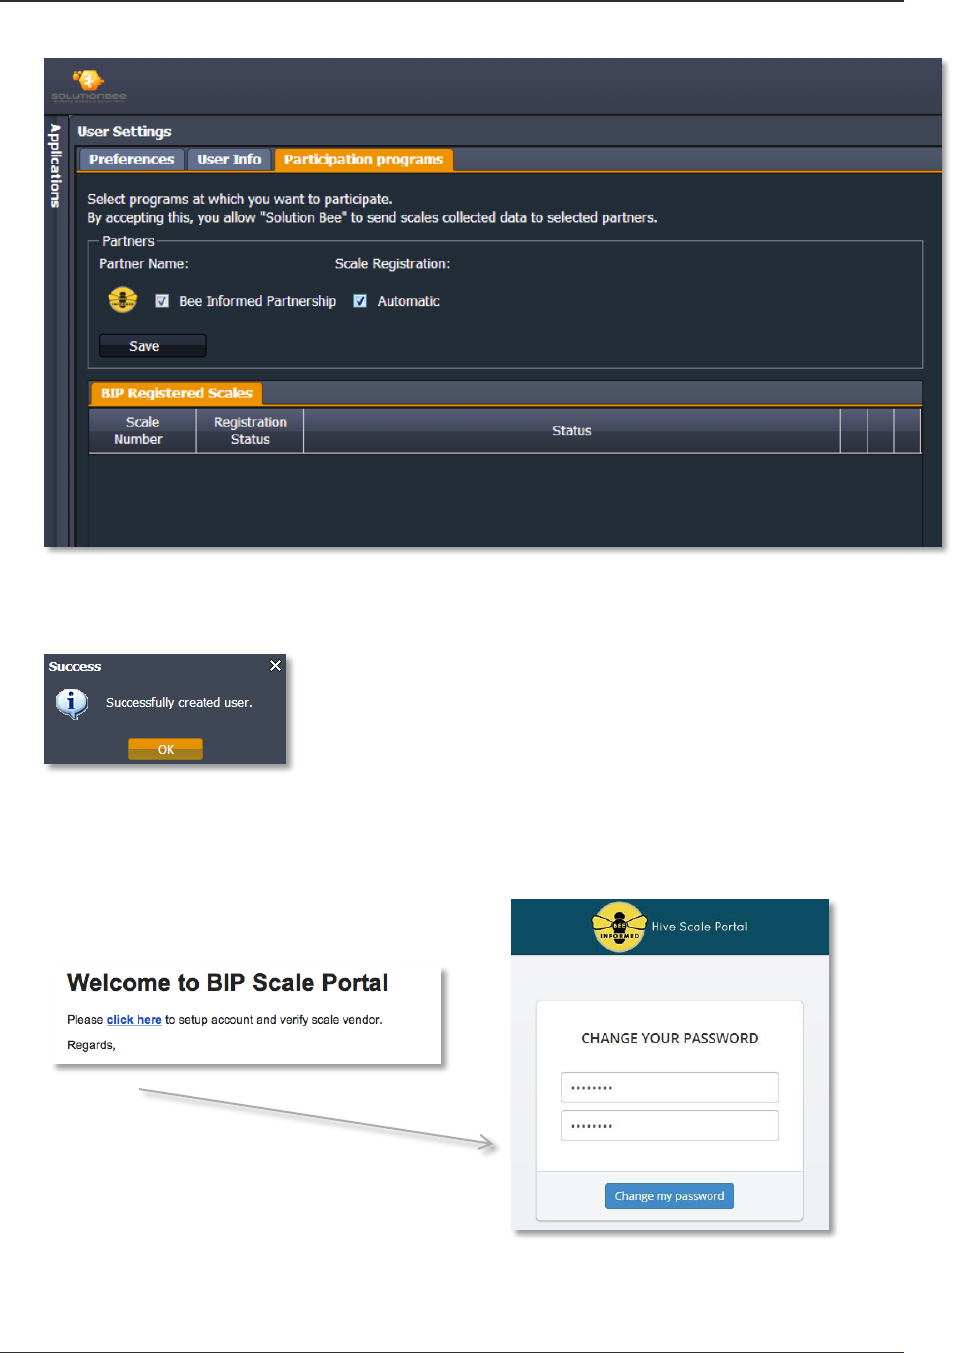
1. Open Solutionbee Web App and log in.
Go to Configuration>User Settings>Participation Programs.
Solutionbee
Page 25
Installation Guide
2. Check Bee Informed Partnership and Automatic checkbox and press Save button.
A user with your Solutionbee Web App login email will be created automatically on
BIP Scale Portal.
In a few minutes you will receive an information email from BIP Scale Portal with
further instructions.
3. Follow the “click here” link.
Provide and confirm a new password.
Press the Change my password button.
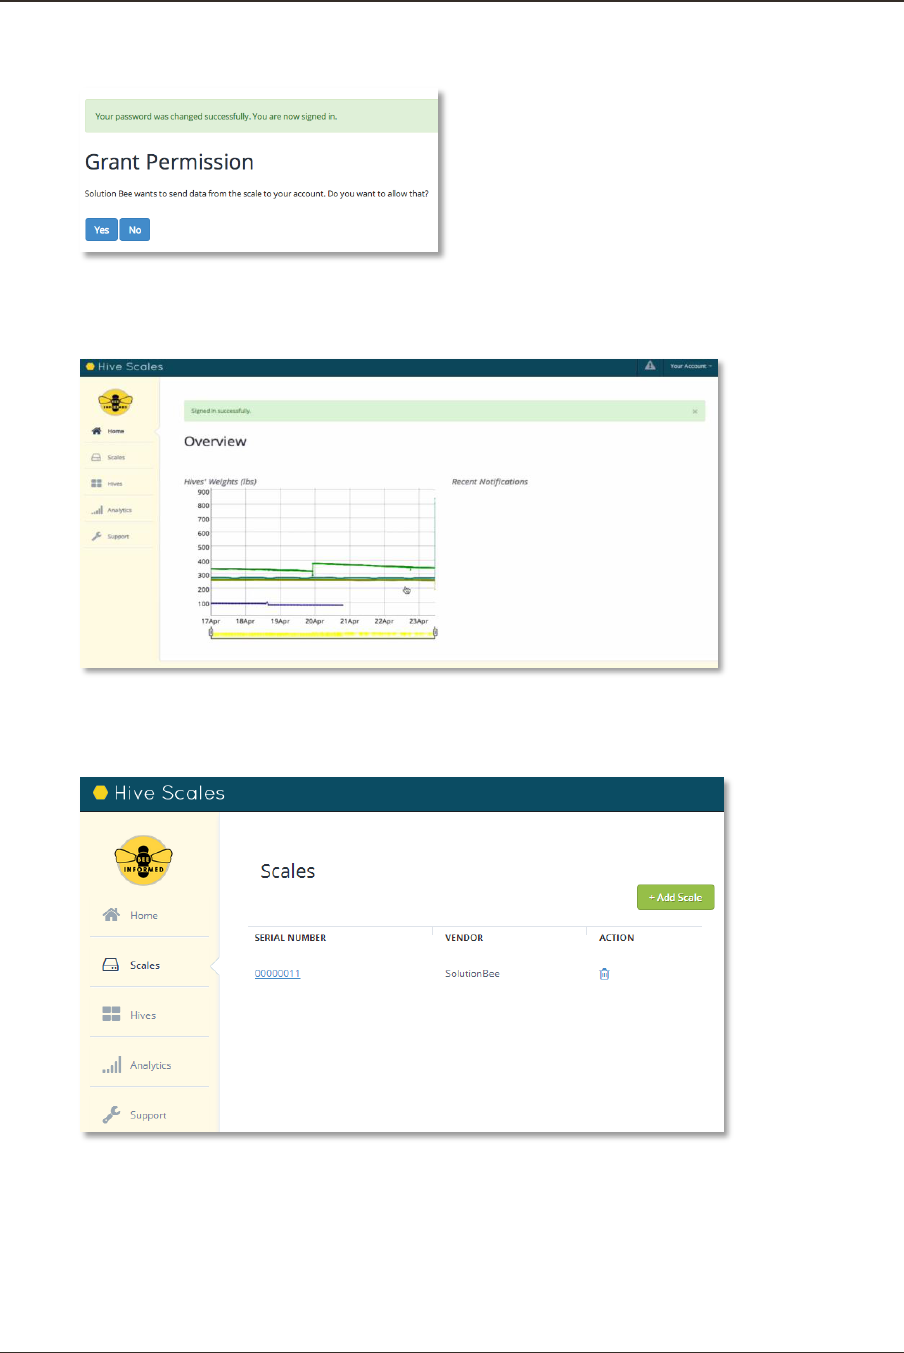
You will be logged in and automatically redirected to the Grant permission page.
Solutionbee
Page 26
Installation Guide
4. Grant permission.
Clicks Yes and you will be redirected to the main page with a successfully verified
message.
5. Go to the scales menu.
You will see your scale listed under the Scales menu.
A new hive is automatically created and associated with the newly registered scale.
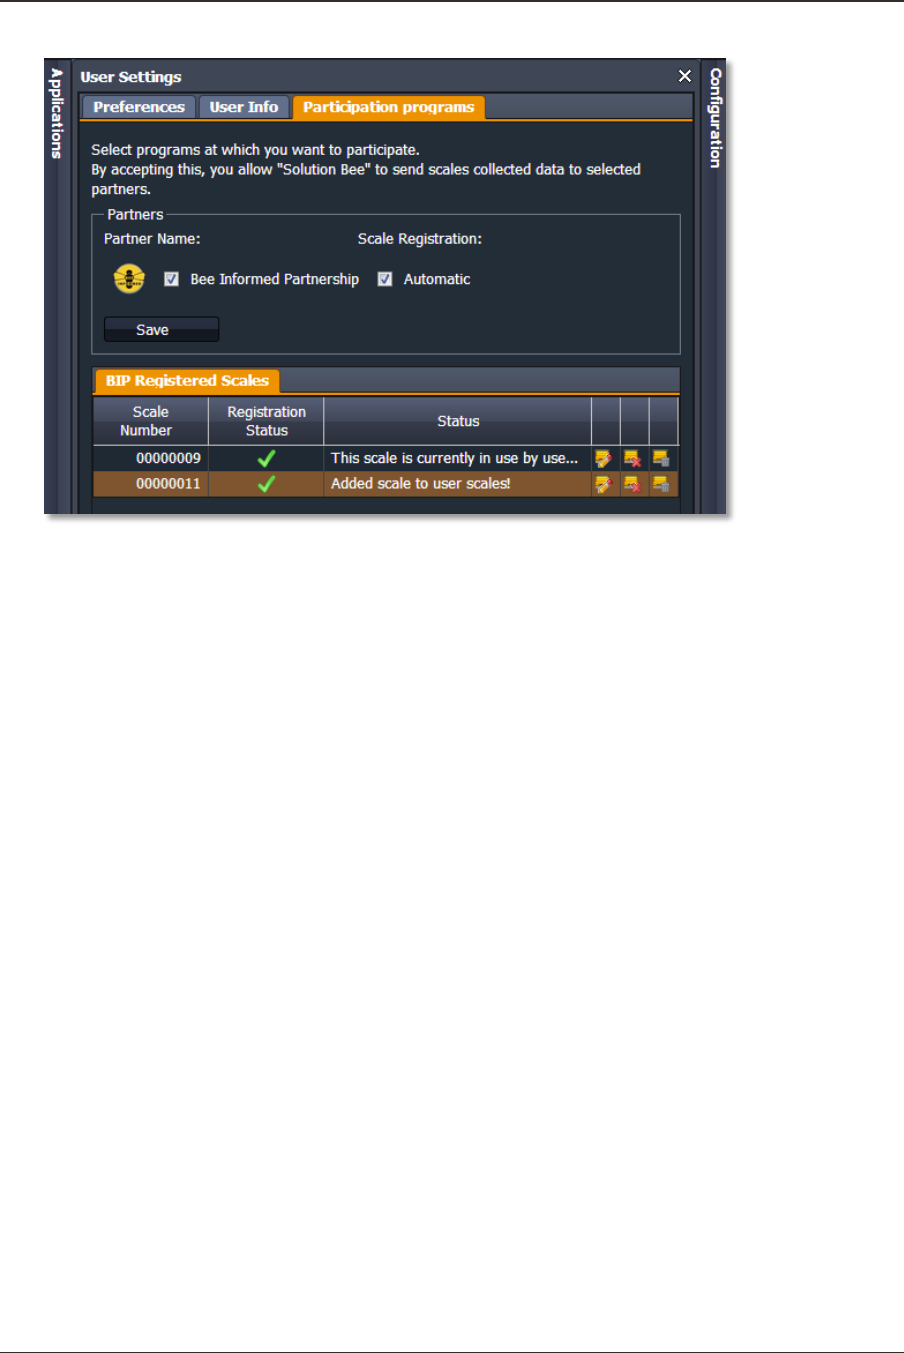
6. Return to Solutionbee Web App and open Configuration>User Settings>Participation
Programs.
Solutionbee
Page 27
Installation Guide
Registration Status will be marked with the green check icon.
Solutionbee
Page 28
Installation Guide
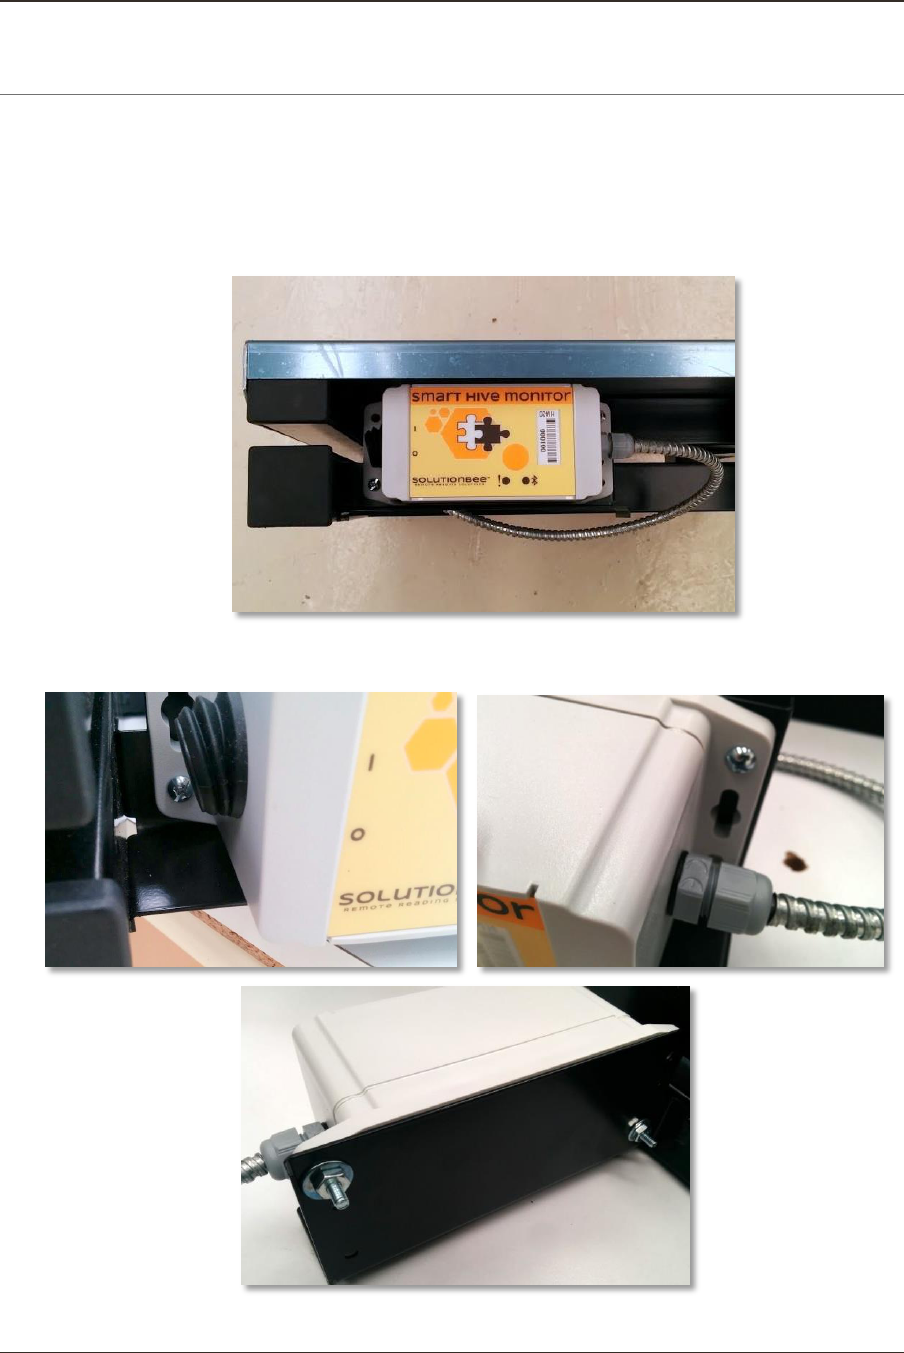
11 APPENDIX B - BATTERY REMOVAL/INSERTION PROCEDURE
Follow the step by step instructions described below to insert or remove batteries in/from
your Smart Hive Monitor device.
1. Prepare the Smart Hive Monitor for battery removal/insertion. Make sure the power
switch is in the OFF – “0” position.
2. Remove the top plate. Identify the two screws (and washers and nuts) that attach
the electronic module to the frame bracket.
Solutionbee
Page 29
Installation Guide
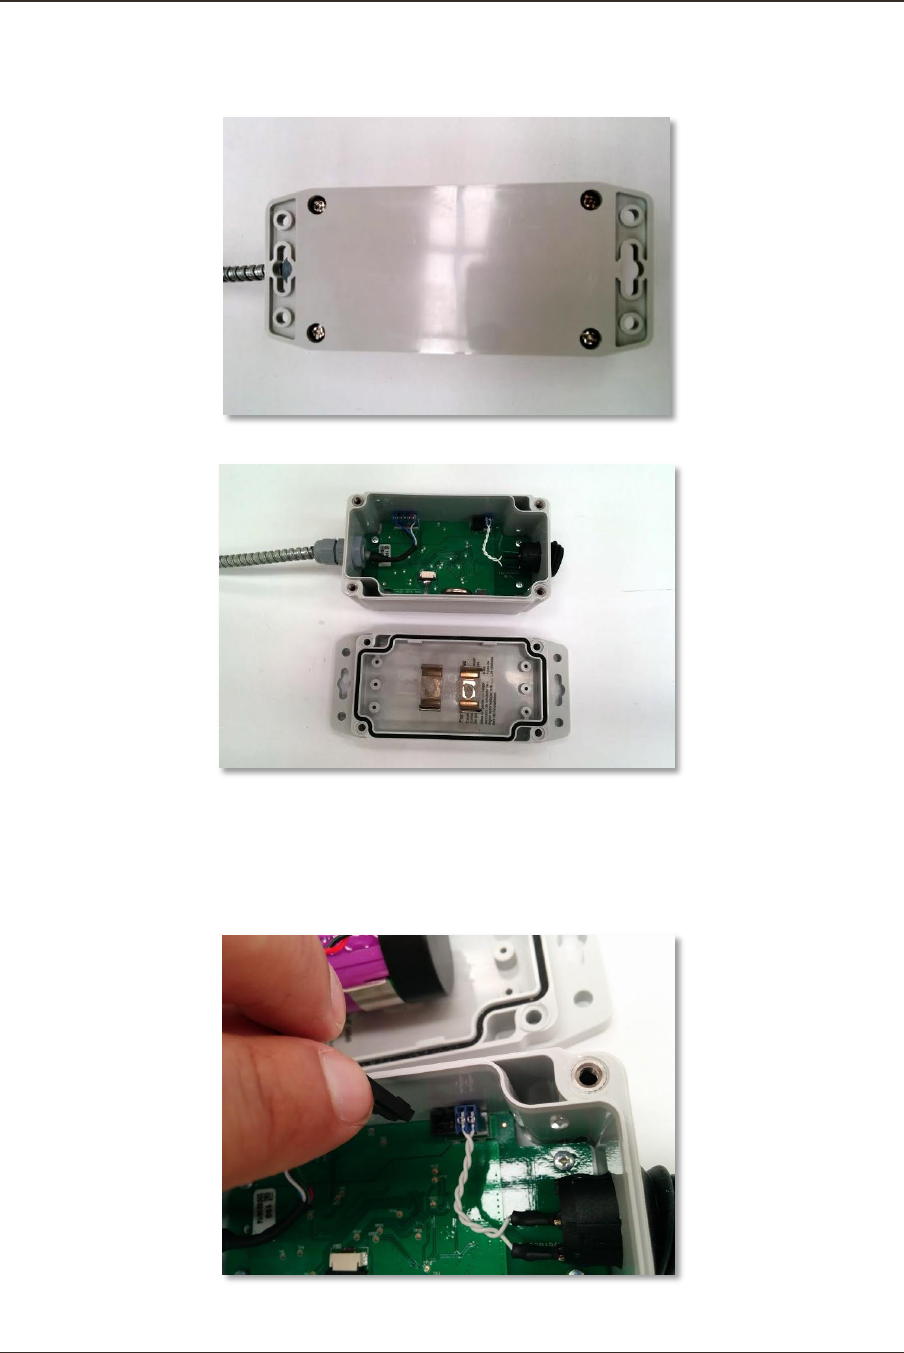
3. Remove the two bracket screws. The electronic module will now be free from the
scale frame. Identify the four screws that hold the module together.
4. Remove the four module screws. Carefully open the module.
5. If you are replacing a battery, there will already be a battery in the module. In this
case, the battery is connected to the printed circuit board with a lock connector.
Pinch/press the connector to pull the male connector loose from the female
connector on the printed circuit board. This operation may take some wiggling of
the connector to remove it.
Solutionbee
Page 30
Installation Guide
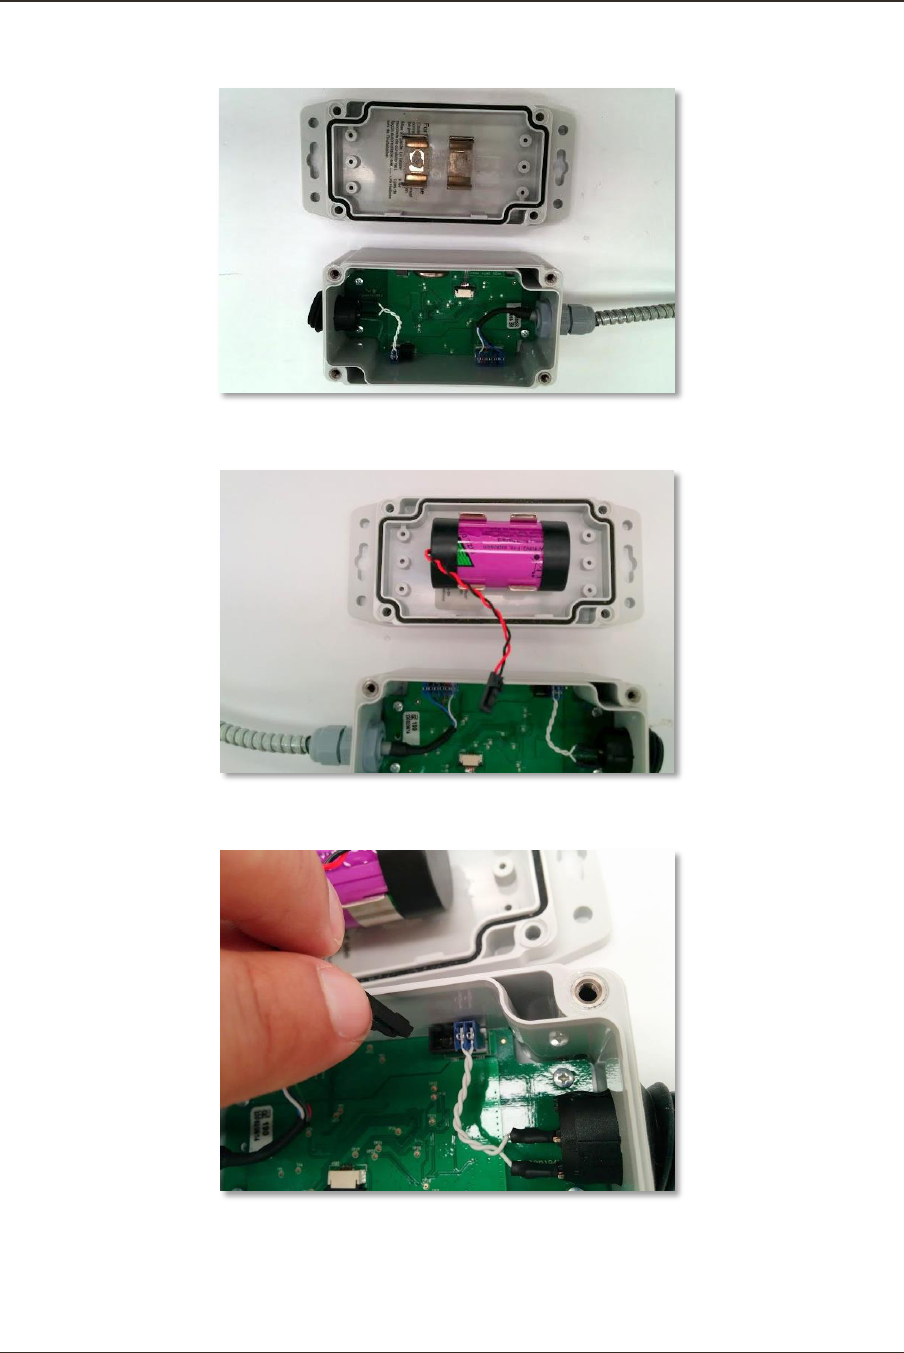
6. If you are simply inserting a battery, there won't be a battery in the module.
7. Place a battery between the two clips on the bottom portion. Make sure that the
leads exiting the battery are in the 12 o'clock position.
8. Insert the battery lead male connector into to mating female connector on the
printed circuit board.
9. Review your work. The assembly should look like in the following picture:

Solutionbee
Page 31
Installation Guide
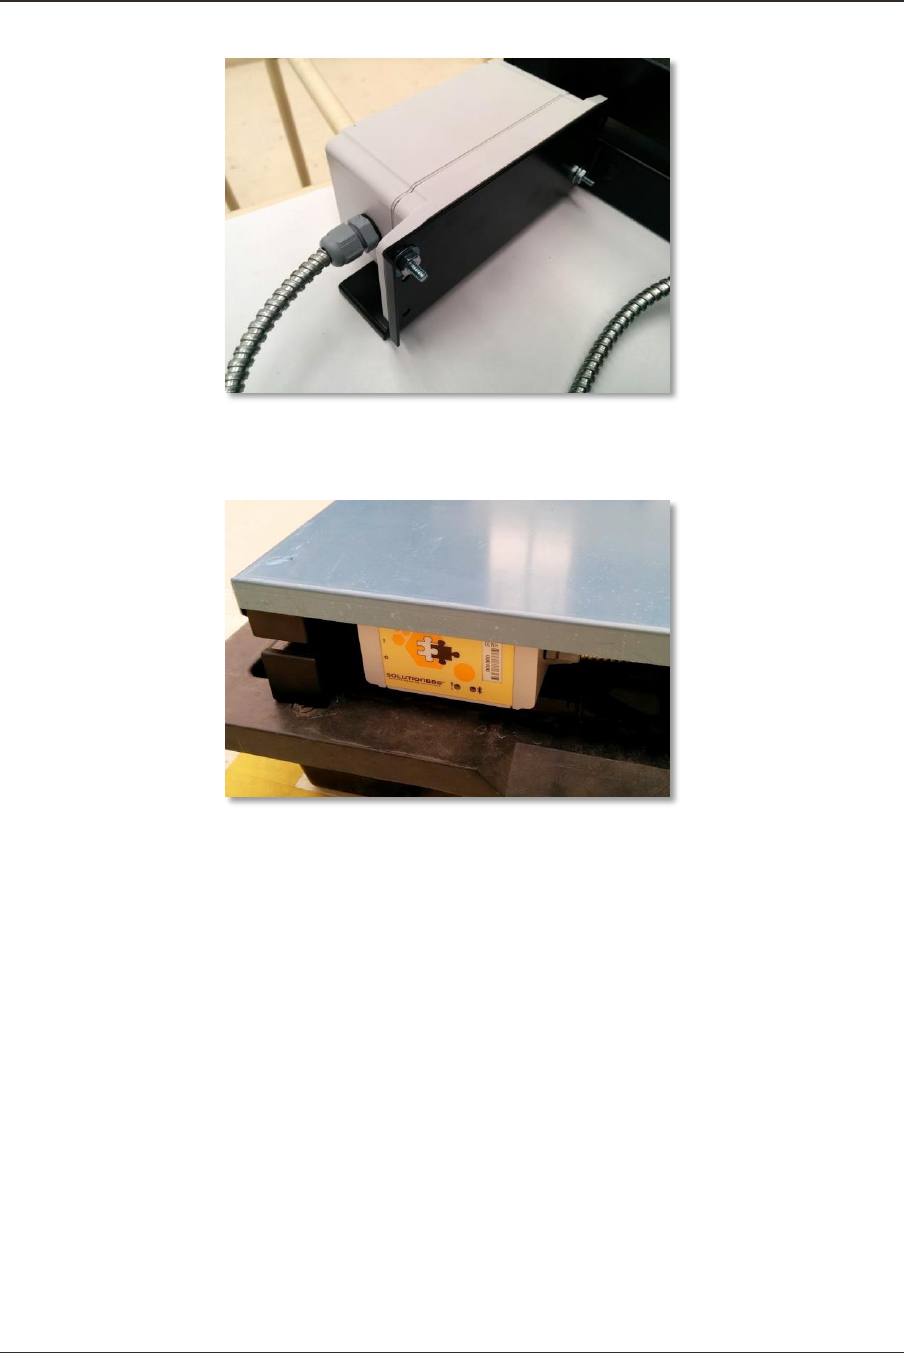
10. Close the module by lifting and then turning the printed circuit board portion of the
module on top of the battery portion of the module. This will avoid the insulation O-
ring from falling out of its groove.
11. Reinsert the four electronic module screws.
12. Reattach the electronic module to the scale frame bracket.
Solutionbee
Page 32
Installation Guide
13. Reattach the top cover. You are done. Turn the power switch to the on – “I”
position. Try to communicate with the module with a smartphone as per the
Installation Guide.

Solutionbee
Page 33
Installation Guide
12 APPENDIX C - FCC AND INDUSTRY CANADA COMPLIANCE
12.1 USER INFORMATION (PART 15.105)
This equipment has been tested and found to comply with the limits for a Class B digital
device, pursuant to part 15 of the FCC Rules. These limits are designed to provide
reasonable protection against harmful interference in a residential installation. This
equipment generates, uses and can radiate radio frequency energy and, if not installed and
used in accordance with the instructions, may cause harmful interference to radio
communications. However, there is no guarantee that interference will not occur in a
particular installation. If this equipment does cause harmful interference to radio or
television reception, which can be determined by turning the equipment off and on, the
user is encouraged to try to correct the interference by one or more of the following
measures:
reorient or relocate the receiving antenna
increase the separation between the equipment and the receiver
connect the equipment into an outlet on a circuit different from that to which the
receiver is connected
consult the dealer or an experienced radio/TV technician for help
12.2 COMPLIANCE STATEMENT (PART 15.19)
This device complies with part 15 of the FCC Rules. Operation is subject to the following
two conditions: (1) This device may not cause harmful interference, and (2) this device
must accept any interference received, including interference that may cause undesired
operation.
12.3 COMPLIANCE STATEMENTS (INDUSTRY CANADA)
This device complies with Industry Canada licence-exempt RSS standard(s). Operation is
subject to the following two conditions: (1) this device may not cause interference, and (2)
this device must accept any interference, including interference that may cause undesired
operation of the device.
Le présent appareil est conforme aux CNR d'Industrie Canada applicables aux appareils
radio exempts de licence. L'exploitation est autorisée aux deux conditions suivantes : (1)
l'appareil ne doit pas produire de brouillage, et (2) l'utilisateur de l'appareil doit accepter
tout brouillage radioélectrique subi, même si le brouillage est susceptible d'en
compromettre le fonctionnement.

Solutionbee
Page 34
Installation Guide
Under Industry Canada regulations, this radio transmitter may only operate using an
antenna of a type and maximum (or lesser) gain approved for the transmitter by Industry
Canada.
To reduce potential radio interference to other users, the antenna type and its gain should
be so chosen that the equivalent isotropically radiated power (e.i.r.p.) is not more than that
necessary for successful communication.
Conformément à la réglementation d'Industrie Canada, le présent émetteur radio peut
fonctionner avec une antenne d'un type et d'un gain maximal (ou inférieur) approuvé pour
l'émetteur par Industrie Canada.
Dans le but de réduire les risques de brouillage radioélectrique à l'intention des autres
utilisateurs, il faut choisir le type d'antenne et son gain de sorte que la puissance isotrope
rayonnée équivalente (p.i.r.e.) ne dépasse pas l'intensité nécessaire à l'établissement d'une
communication satisfaisante.
12.4 MPE/SAR/RF EXPOSURE INFORMATION
This device was verified for RF exposure and found to comply with Council
Recommendation 1999/519/EC and FCC OET-65 RF exposure requirements. This equipment
complies with FCC radiation exposure limits set forth for an uncontrolled environment.
WARNING: While this device is in operation, a separation distance of at least 20 cm
(8 inches) must be maintained between the radiating antenna inside the EUT and the
bodies of all persons exposed to the transmitter in order to meet the FCC RF exposure
guidelines. Making changes to the antenna or the device is not permitted.
Doing so may result in the installed system exceeding RF exposure requirements.
Cet appareil répond aux directives d'exposition RSS-102 4e édition sur la limitation
d'exposition du public général aux champs électromagnétiques.
MISE AN GARDE: Pour satisfaire aux exigences de la FCC et IC concernant l'exposition aux
radiofréquences, une séparation de 20 cm ou plus doit être maintenue entre cet appareil et
des personnes lors de fonctionnement du dispositif. Pour assurer la conformité, des
opérations au plus près que cette distance n'est pas recommandée.
12.5 WARNING (PART 15.21)
Changes or modifications not expressly approved by Solutionbee could void the user’s
authority to operate the equipment.