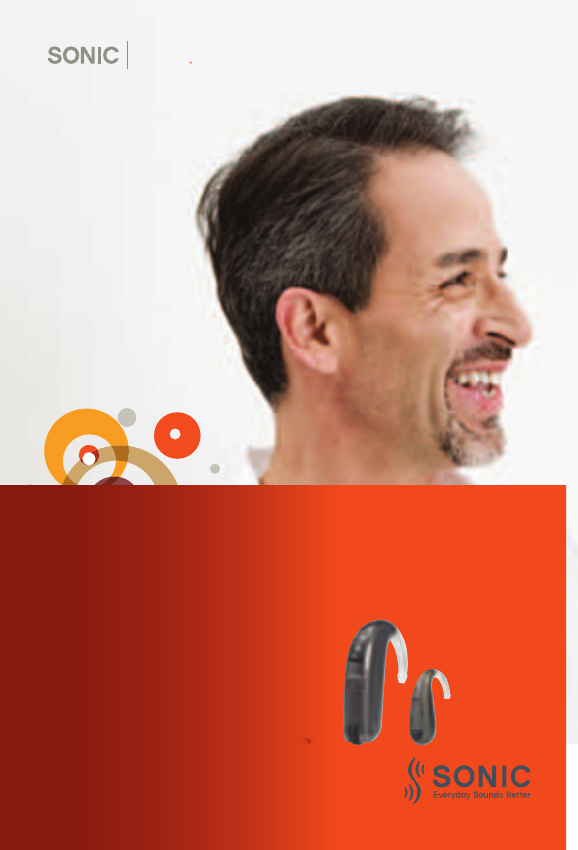
Sonic Innovations BTE01 Hearing Aid User Manual User Guide BL100 BTE BL80 BTE
Sonic Innovations, Inc. Hearing Aid User Guide BL100 BTE BL80 BTE
Contents
- 1. User Guide CH60 BTE
- 2. User_Guide BL100 BTE, BL80 BTE
User_Guide BL100 BTE, BL80 BTE
Bliss BTE and miniBTE
User Guide
bliss
bliss

02 sonic · BLiss
Hearing Instrument Style:
r BTE r miniBTE
Hearing Instrument Serial Number:
Left Right
Hearing Instrument Model:
Left Right
Battery Size: 13A
Listening Program # Listening Environment
1
2
3
4
Right/Left Instruments Synchronized:
r Active r Inactive
Program Button: Program Button Mute:
r Active r Inactive r Active r Inactive
Preferred Telephone Ear:
r Right r Left r Both
Non-Telephone Ear Control
r No change
r Softer when telephone is in use
r Mutes when telephone is in use
BTE Volume Control: BTE Telecoil:
r Active r Inactive r Active r Inactive
03
BLISS · USER GUIDE BTE AND miniBTE
The following hearing instruments are covered
in this User Guide:
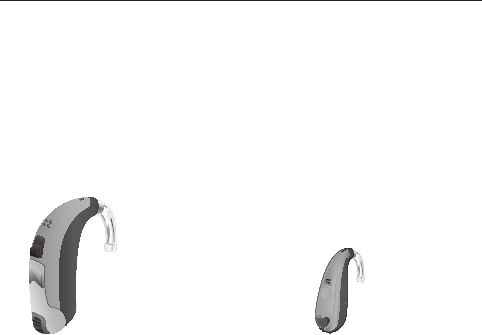
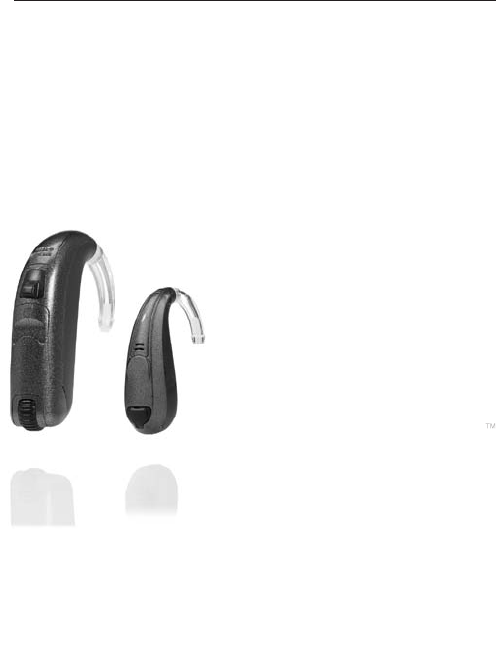
Bliss BTE Bliss miniBTE
BL100 BTE BL100 MN
BL80 BTE BL80 MN
BL_ILLU_miniBTE_WithEarhook_BW_HI
3
BL_ILLU_BTE_WithEarhook_BW_HI
3

04 sonic · BLiss

05
BLISS · USER GUIDE BTE AND miniBTE
Table of Contents
Congratulations on your purchase! 09
General Warnings and Safety Guidelines 10
Hearing Expectations 15
Your Bliss BTE Hearing Instrument – with Earhook 18
Your Bliss BTE Hearing Instrument – with Thin Tube 19
Your Bliss miniBTE Hearing Instrument –
with Thin Tube 20
Your Bliss miniBTE Hearing Instrument –
with Earhook and Earmold 21
Turning Your Hearing Instrument OFF and ON 22
Putting On Your Hearing Instrument – Thin Tube 24
Taking Off Your Hearing Instrument – Thin Tube 25
Putting On Your Hearing Instrument – Earhook 26
Taking Off Your Hearing Instrument – Earhook 27
Changing the Programs 28
Changing the Volume 30
Using the Telephone 32
Using the Telecoil 36
Changing the Battery 37

06 sonic · BLiss

07
BLISS · USER GUIDE BTE AND miniBTE
Audible Indicators 43
Safety Lock 44
Data Logging and Learning 46
Direct Audio Input and FM 47
Caring for Your Hearing Instruments 50
Operating Your Hearing Instrument
with the RC-P Remote Control 56
Operating Your Hearing Instrument
with the SoundGate Communication Device 57
Environmental Protection 58
Product Approval, Markings and Compliance 60
Cell Phone and Hearing Instrument Compatibility 62
Warranty and Repairs 64
Accessories 65
Common Problems and Solutions 66
Information for the Hearing Care Provider 70
Compliance with Requirements for Europe 72
Compliance with Radio Communications
Requirements for the USA and Canada 73
Information and Explanation of Symbols 76
Service 78
08 sonic · BLiss
bliss

09
BLISS · USER GUIDE BTE AND miniBTE
Congratulations on your purchase!
With a little practice, you will soon be on your
way to better hearing. The amplification of
sound provided by your hearing instruments
was adjusted by your hearing care provider
to the needs of your individual hearing loss.
Please read the entire contents of this booklet before
using your hearing instruments. It contains instructions
and important information about the use and handling
of your hearing instruments and batteries. With proper
use and care, your hearing instruments will improve
your connection with the world around you.
10 sonic · BLiss
General Warnings and Safety Guidelines
Hearing instruments and batteries can be dangerous
if swallowed or improperly used. Such actions
can result in severe injury, permanent hearing loss
or even fatality.
Familiarize yourself completely with the following
general warnings and safety guidelines before using
your hearing instruments.
Hazard warnings
Never allow others to wear your hearing
instruments. They are adjusted for your
hearing requirements and may permanently
damage another person’s hearing.
Avoid wearing your hearing instrument while
playing contact sports (e.g., rugby, football, etc.),
since a strike to the ear could be harmful.
Hearing instruments, their parts and batteries
should be kept out of reach of infants, children,
and anyone who might swallow these items
or otherwise cause themselves injury.
Take care when changing and discarding
batteries to keep them out of reach of infants,
children, persons of mental incapacity or pets.
11
BLISS · USER GUIDE BTE AND miniBTE
Clean your hearing instruments and their
parts on a regular basis as recommended.
Micro-organisms from unclean instruments
may cause skin irritations.
Be careful with leaking battery liquid, as it is
a hazardous substance.
Never attempt to recharge non-rechargeable
batteries.
Be aware of the possibility that your hearing
instruments may stop functioning without notice.
Keep this in mind while you circulate in traffic
or otherwise depend on warning sounds.
Remove your instruments before applying
aftershave, hairspray, oils, perfume, mosquito
repellent, lotions, etc. Allow the product
to dry before wearing your instruments.
Traffic or other warning sounds may be reduced
in level by a directional microphone when
these sounds are coming from behind you.

12 sonic · BLiss
Warnings to hearing care provider and patient
Special care should be taken when fitting and
using a hearing instrument with maximum
sound pressure capability in excess of 132 dB SPL
(IEC 60318-4) since there may be a risk of
impairing the remaining hearing of the patient.
When the DAI is connected to AC-powered
equipment, this equipment must comply with
IEC-60601-1 or equivalent safety standards.

13
BLISS · USER GUIDE BTE AND miniBTE
Safety information
·Hearing instruments should be used only as directed
and adjusted by your trained hearing care provider.
Misuse or improper adjustments can result in sudden
and permanent hearing loss.
·Never put your hearing instrument or batteries
in your mouth, as they could easily be swallowed
·Keep batteries away from medications, since they
can easily be mistaken for pills
·In the event that a battery or hearing instrument
is swallowed, see a doctor immediately
·Be aware that use of a hearing instrument may cause
excess earwax to build up in the ear canal which may
require removal by a trained medical professional
·Consult your physician if excessive earwax, skin
irritation, or a foreign object prevents you from
wearing your hearing instrument
·An Earmold is a custom-made product. If you
experience discomfort or irritation of your ear,
please see your hearing care provider immediately
for modification of the Earmold.
·In rare cases, a hearing instrument or Earmold may
cause a discharge from the ear or allergic reaction.
See a physician immediately if these conditions occur.

14 sonic · BLiss
·Never insert cleaning tools into the microphone inlet
or deeply into the sound outlet. This could damage
the hearing instruments.
·Do not expose hearing instruments to extreme
heat by leaving them in the car, near a radiator, etc.
·Avoid exposing your instruments to water and
moisture i.e., steambaths, showers, heavy rain, etc.
·Do not wear your hearing instrument while
swimming, snorkeling or diving, as it is not designed
for such activities
·Do not immerse your hearing instrument in water
or other liquids
·Never attempt to dry your instruments with
a hair dryer, microwave oven, etc.
·It is recommended to remove your hearing
instruments before sleeping
·Protect your instruments by keeping them in the case
when you are not wearing them

15
BLISS · USER GUIDE BTE AND miniBTE
Hearing Expectations
Set appropriate expectations
It is important that you have the right expectations
regarding your hearing instruments. Hearing
instruments can help you hear and understand better,
but they are not a cure for hearing loss.
People whose expectations are too high (“I thought
they would make my hearing normal”) are likely to be
disappointed and may give up.
Hearing instruments can:
·Help you hear and understand better in most
situations
·Allow you to participate more in group situations
and meetings
Hearing instruments cannot:
·Give you normal hearing
Hearing instruments may not:
·Let you hear very soft sounds
·Block ALL background noises – especially in noisy
situations. Even people without hearing loss
may have difficulty hearing in the presence of
background noise.

16 sonic · BLiss
Be patient
Unlike with eyeglasses which correct your vision
as soon as you first put them on, with hearing
instruments you will need some time to adjust.
It may take several weeks or months to completely
adjust to your hearing instruments, so try to be patient.
Initially, try different listening situations, such as
one-on-one conversations with family and friends,
and conversations with two or three people at home
or in quiet settings. Also, try having conversations
in noisier places like parties, restaurants, meetings,
and outdoors.
Do not forget that some situations are simply too noisy
in general – even for people without hearing loss.
So, do not get discouraged.

17
BLISS · USER GUIDE BTE AND miniBTE
Consistent use of your hearing instrument is strongly
recommended. In most cases, infrequent use does
not allow you to obtain the full benefit from your device.
The use of a hearing instrument is only a part
of total hearing rehabilitation, and may need to be
supplemented by auditory training and instruction
in lipreading.
18 sonic · BLiss
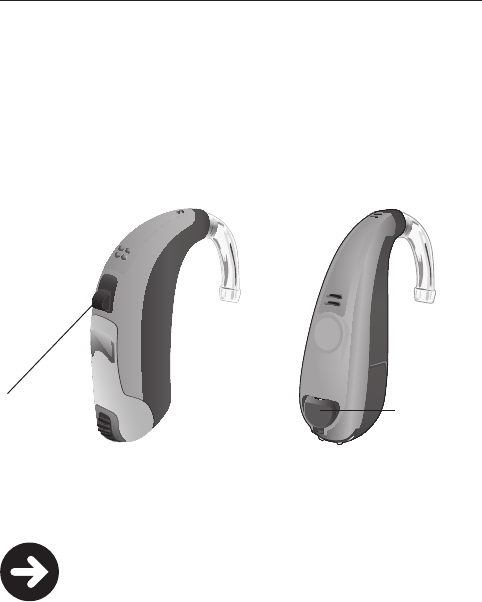
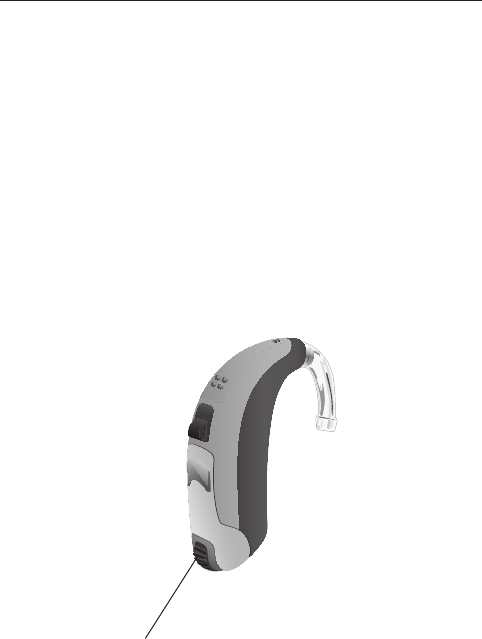
Your Bliss BTE Hearing Instrument –
with Earhook
1 Front microphone
2 Rear microphone
3 Program Button
4 Battery door grip
5 Battery door
6 Volume Control
7 Earmold
8 Earmold tubing
9 Earhook
Right and left instrument
markers
A color indicator can help
you distinguish right
and left instruments.
BL_ILLU_BTE_Insert_Left_Right_Marking4_CMYK_Hi
13.4
BL_ILLU_BTE_WithEarhookAndEarmold_BW_HI
2
2
3
1
5
4
7
8
9
6
Red = right
Blue = left
19
BLISS · USER GUIDE BTE AND miniBTE
BL_ILLU_BTE_WithThinTube_BW_HI
1
Your Bliss BTE Hearing Instrument –
with Thin Tube
1 Front microphone
2 Rear microphone
3 Program Button
4 Battery door grip
5 Battery door
6 Volume Control
7 Retention lock
8 Dome
9 Sound outlet
10 Thin Tube
11 Thin Tube Adapter
2
310
9
8
7
Serial number
BL_ILLU_BTE_SerialNumber_BW_HI
4
1
5
4
6
11
20 sonic · BLiss
Your Bliss miniBTE Hearing Instrument –
with Thin Tube
1 Front microphone
2 Rear microphone
3 Program Button
4 Retention lock
5 Dome
6 Sound outlet
7 Battery door
8 Thin Tube
9 Thin Tube Adapter
Right and left instrument
markers
A color indicator can help
you distinguish right and
left instruments.
Red = right
Blue = left
BL_ILLU_miniBTE_LeftRightMarking_BW_HI
4
BL_ILLU_miniBTE_WithSpeaker_BW_HI
1
2
5
6
4
3
7
8
9
1

21
BLISS · USER GUIDE BTE AND miniBTE
BL_ILLU_miniBTE_WithEarhookAndEarmold_BW_HI
2
Your Bliss miniBTE Hearing Instrument –
with Earhook and Earmold
1 Front microphone
2 Rear microphone
3 Program Button
4 Earmold
5 Battery door
6 Earmold tubing
7 Earhook
2
3
7
6
5
4
Serial number
1
22 sonic · BLiss
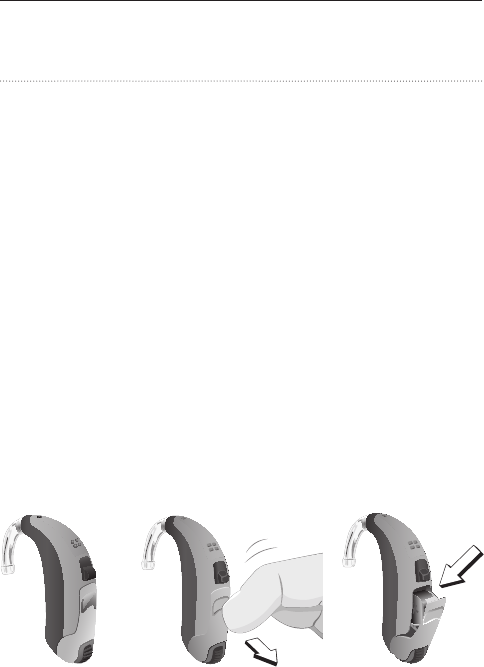
Turning Your Hearing Instrument
OFF and ON
To prolong battery life, turn off your hearing instrument
when not in use. Before turning your hearing
instrument off, wipe away any moisture with a soft
cloth.
Bliss BTE
To turn your BTE hearing instrument off, put your
fingernail into the battery door grip and open the
battery door slightly until you feel a firm stopping
point. Only a small portion of the battery is visible,
which keeps the battery from falling out completely.
To turn the hearing instrument back on, fully close
the battery door.
ON OFF
BL_ILLU_BTE_WithEarhook_BW_HI
3
BL_ILLU_BTE_InstrumentOnOff1_BW_HI
5.1
BL_ILLU_BTE_InstrumentOnOff2_BW_HI
5.2
23
BLISS · USER GUIDE BTE AND miniBTE
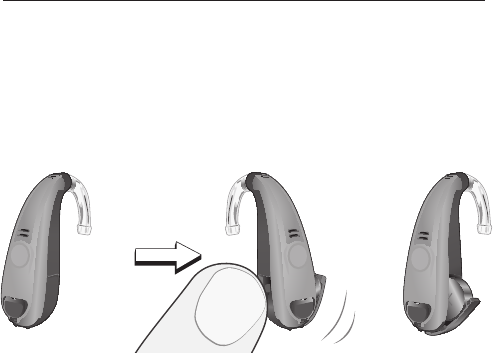
Bliss miniBTE
To turn your miniBTE hearing instrument off, open
the battery door slightly by pushing on the edge
of the seam. To turn it back on, fully close the battery
door.
ON OFF
BL_ILLU_miniBTE_WithEarhook_BW_HI
3
BL_ILLU_miniBTE_InstrumentOnOff1_BW_HI
6.1
BL_ILLU_miniBTE_InstrumentOnOff2_BW_HI
6.2
Your hearing instrument may be programmed to alert
you with a beep when it is turned on. Your hearing
care provider will tell you if this feature is enabled.
Your hearing instrument may also have a “power on”
delay. This allows you to insert the device before it
is fully active.
24 sonic · BLiss
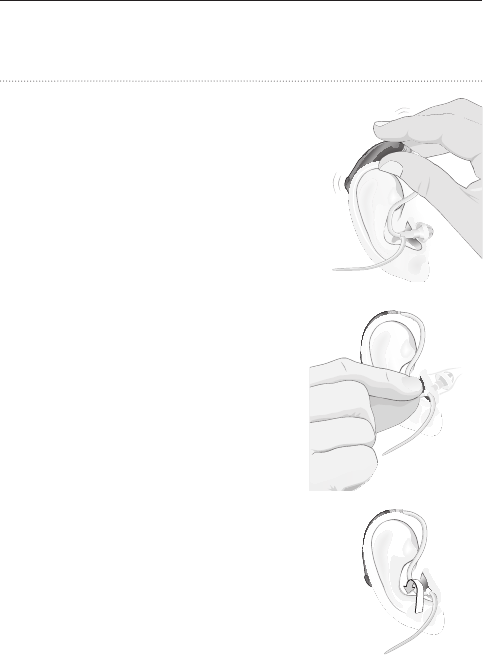
Putting On Your Hearing Instrument –
Thin Tube
·First, position the hearing instrument
over the top of your ear
·Grasp the bend of the Thin
Tube and gently push the Dome
into your ear canal until
the tube rests against the side
of your head. When the Dome
is placed appropriately,
you should not be able to see
the Thin Tube sticking out
when you look directly into
a mirror. If the Thin Tube
is sticking out from your ear,
insert the Dome further.
·Use your finger to push
the retention lock comfortably
into the bowl of your ear
BL_ILLU_miniBTE_PuttingOnInstrumentThinTube1_BW_HI
7.1
BL_ILLU_miniBTE_PuttingOnInstrumentThinTube2_BW_HI
7.2
BL_ILLU_miniBTE_PuttingOnInstrumentThinTube3_BW_HI
7.3

25
BLISS · USER GUIDE BTE AND miniBTE
Taking Off Your Hearing Instrument –
Thin Tube
·To remove your hearing instrument, hold
the Thin Tube and gently pull the Dome out of
your ear canal
·Lift the hearing instrument case from behind your ear
·Open the battery compartment to turn off the device
Note!
Do not remove the instrument by pulling
on the hearing instrument case. This might
disconnect the device from the Thin Tube.
Should the Dome become separated from the Thin
Tube and remain lodged in your ear canal after
removal of the hearing instrument, do not attempt
to remove the Dome yourself. Seek immediate
care from your hearing care provider or physician.
26 sonic · BLiss
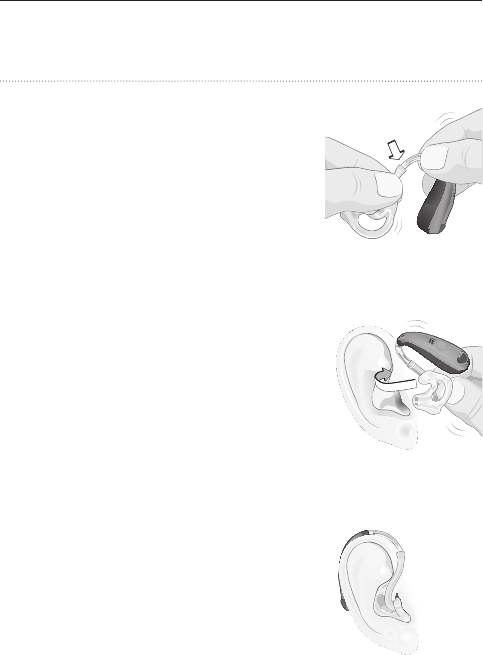
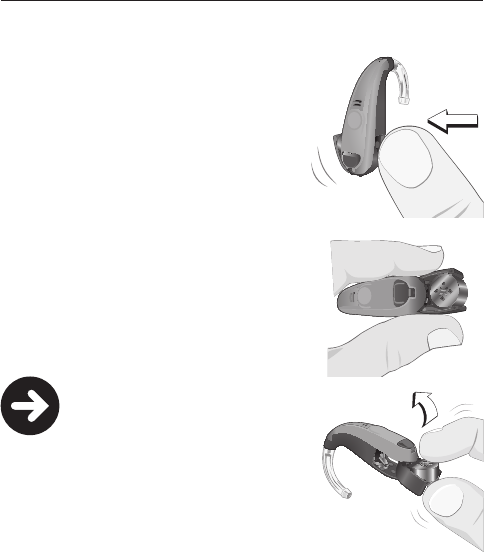
Putting On Your Hearing Instrument –
Earhook
·Start with the hearing instrument
and Earmold for your right ear.
Connect the Earmold to
the hearing instrument by
pushing the hearing instrument's
Earhook into the tube
on the Earmold.
·Once the two are connected,
hold the Earmold with your thumb
and first finger. Gently guide
it into your ear canal.
·Gently pulling down on your ear
lobe with your other hand may help.
A slight twist may be needed
to fit the Earmold in your ear.
·When the Earmold is in your ear,
place the hearing instrument
behind the top part of your ear.
Do the same with the left hearing
instrument and Earmold.
BL_ILLU_miniBTE_PuttingOnInstrumentEarhook1_BW_HI
8.1
BL_ILLU_miniBTE_PuttingOnInstrumentEarhook2_BW_HI
8.2
BL_ILLU_miniBTE_PuttingOnInstrumentEarhook3_BW_HI
8.3

27
BLISS · USER GUIDE BTE AND miniBTE
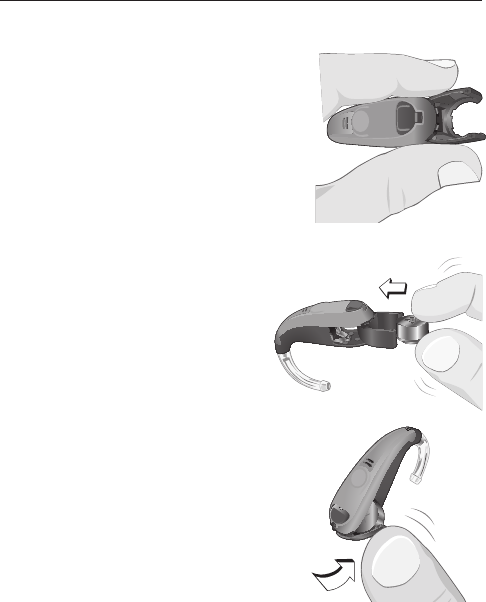
Taking Off Your Hearing Instrument –
Earhook
To take your hearing instrument off, hold the Earmold
with your thumb and first finger. Gently pull it out of
your ear canal.
A slight twist may be needed to remove it. Do not
pull on the tube, as it may come out of the Earmold.
Once the Earmold is out of your ear, remove
the hearing instrument from behind your ear.
Note!
Even though they look the same, hearing
instruments are programmed to fit a specific
ear (right or left). Make sure the correct
hearing instrument is used with the correct
Earmold. Refer to the right and left instrument
markers on pages 18 and 20.

28 sonic · BLiss
Changing the Programs
Your hearing instrument can be configured with
multiple listening programs. Please see inside
the front cover of this User Guide to find out which
program(s) have been configured by your hearing
care provider. You can change programs as follows:
Program Button
A short press (about 2 seconds) on the Program Button
will cause the listening program to change. You will
hear the same number of beeps as the program
you are in each time you push the button. When you
turn the hearing instrument off and then on, it will
automatically return to your default listening program
(program 1).
RC-P Remote Control or SoundGate
(Optional accessories)
The listening program can be changed with either
of these devices. Please see pages 56 and 57 for
instructions.
29
BLISS · USER GUIDE BTE AND miniBTE
Program Button Mute
A longer press (about 5 seconds) on the Program
Button will cause the hearing instrument to mute,
no matter which program you are in. Press the button
again to un-mute the device.
BL_ILLU_miniBTE_WithEarhook_BW_HI
3
Program
Button
Bliss BTE Bliss miniBTE
BL_ILLU_BTE_WithEarhook_BW_HI
3
Note!
Your hearing care provider can customize
the behavior of the Program Button.
Please see inside the front cover to find out
how your Program Button may have been
configured.
Program
Button

30 sonic · BLiss
Changing the Volume
Your hearing instruments are programmed to be
at a comfortable volume level for your hearing loss.
They are designed to automatically adjust to changes
in the sound environment. You should only need
to make small volume changes to get natural and
comfortable sound.
If you have purchased an optional RC-P Remote Control
or SoundGate accessory, you can use it to make
small volume changes to get a natural and comfortable
sound. Please see pages 56 and 57 for further
instructions.
Note!
If the default volume of your hearing
instrument is too loud or soft, your hearing
care provider may need to make changes
to your listening program.
Note!
Your hearing instruments automatically return
to a pre-set loudness level when they are
powered on, when the battery is low, or when
the program is changed. If you find that you
frequently need to turn the volume up or down,
your hearing care provider may need to adjust
your settings.
31
BLISS · USER GUIDE BTE AND miniBTE
Bliss BTE only
Bliss BTE has a Volume Control that allows you to
adjust the volume as needed. Rotate the Volume
Control up to turn up the volume. If you need to lower
the volume, slowly turn the Volume Control down.
Your hearing instrument may play a series of beeps
when you have reached the maximum or minimum
volume. You may also hear soft clicks as you turn
the Volume Control, indicating small changes in your
instrument’s volume settings.
BL_ILLU_BTE_WithEarhook_BW_HI
3
Volume Control

32 sonic · BLiss
Using the Telephone
Your hearing instrument may be programmed with
a dedicated Telephone Program. Your hearing care
provider can configure your hearing instruments
to allow answering the phone on both ears or on your
preferred ear. Please see inside the front cover
to find out if this was configured.
Auto Telephone
Additionally, your hearing instrument has an optional
Auto Telephone feature. When the hearing instrument
is close to a telephone receiver, the Auto Telephone
will activate your Telephone Program. When you
end your conversation, the hearing instrument will
automatically return to the previous listening program.
If you have a preferred ear, the hearing instrument
on the opposite side can be programmed to sound
softer or mute. Ask your hearing care provider if this
option has been selected for you.
33
BLISS · USER GUIDE BTE AND miniBTE
Note!
Some telephones may need a special magnet
added to help engage the Auto Telephone
feature. To mount the magnet onto your
telephone, please follow the instructions
included in the magnet’s packaging
or contact your hearing care provider.

34 sonic · BLiss
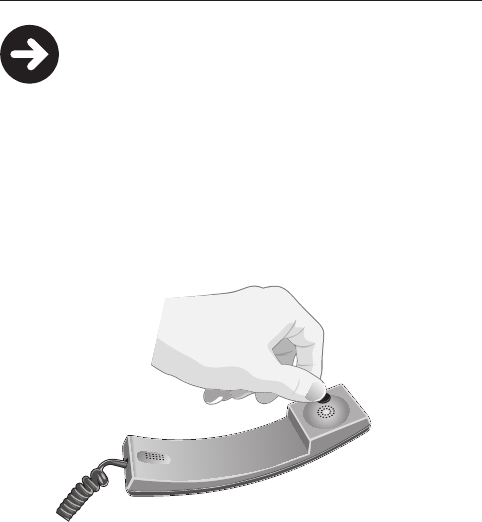
Phone usage tips
·Hold the receiver close to the microphone opening
of your hearing instrument. If this causes whistling,
move the receiver away a small distance.
·Before purchasing a mobile phone, test it with
your hearing instrument
·People with a greater degree of hearing loss
may need a Volume Control on the telephone
Note!
If your hearing instrument has been configured
without these options, select the program
that is best for you when using the telephone.
Then position the phone lightly against your
ear as described above.

35
BLISS · USER GUIDE BTE AND miniBTE
Magnet warnings
·Keep magnets out of reach of children and pets
·If a magnet is swallowed, see a doctor immediately
·Do not place the magnet in a shirt pocket and keep
it 1 ft (30 cm) away from pacemakers and other active
implants
·Use the magnet on the opposite side from active
implantable devices
·Keep the magnet 1 ft (30 cm) away from credit cards
or other magnetically sensitive items

36 sonic · BLiss
Using the Telecoil
(Bliss BTE only)
The telecoil helps you hear better when using
a telephone or in buildings where inductive loop
systems are installed (places of worship, halls,
theater, etc.).
When the telecoil is active, you hear directly through
the telephone or inductive loop. To access the telecoil,
go to the Telephone Program.
Please refer to the inside cover to see if this option
has been configured for your device.
This symbol or a similar sign should be
displayed wherever a permanent loop
has been installed.
Note!
Not all telephones are compatible with hearing
instruments.

37
BLISS · USER GUIDE BTE AND miniBTE
Changing the Battery
When the battery power level is low, your hearing
instrument will beep at regular intervals. You should
be prepared to replace the battery. The time until
the hearing instrument stops working depends on
the battery type and manufacturer. Mercury-free
batteries generally cause earlier warning beeps.
Change batteries regularly
When your battery needs to be changed, you will hear
three beeps: a low tone, followed by a high tone and
another low tone. The exact battery life you experience
may vary, but you should expect approximately
200 hours of total hearing instrument use per battery.
Battery type
Stainless steel zinc-air batteries are recommended.
Your hearing instrument uses a #13A battery.
Note!
Never force the battery door open or closed.
38 sonic · BLiss
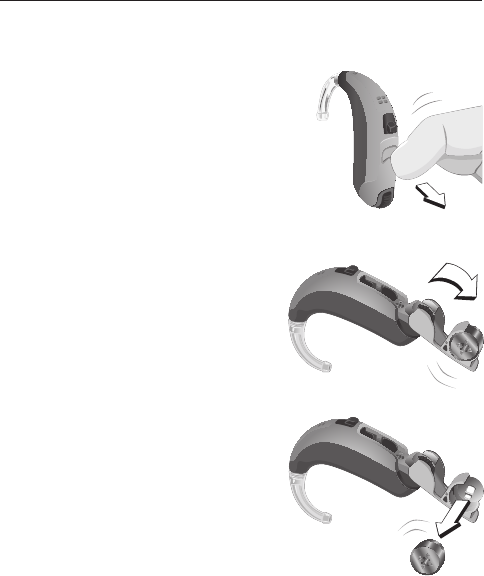
Remove the old battery from your Bliss BTE:
·Insert your fingernail
into the battery door grip
and pull on the battery door
·Open the battery door fully
until the entire battery
is visible
·Remove the battery
by lifting the exposed edge
of the battery out
of the retaining ring
BL_ILLU_BTE_RemoveBattery1_BW_HI
6.1
BL_ILLU_BTE_RemoveBattery2_BW_HI
6.2
BL_ILLU_BTE_RemoveBattery3_BW_HI
6.3

39
BLISS · USER GUIDE BTE AND miniBTE
Insert a new battery into your Bliss BTE:
·Remove the colored tab
from the battery
before putting it in
the hearing instrument
·Insert the battery so
the “+” sign on the battery
is flush with the opening
of the battery door
·Close the battery door fully
·Cup your hand around
the hearing instrument.
A whistling or squealing
sound means the battery
is working.
BL_ILLU_BTE_InsertBattery1_BW_HI
7.1
BL_ILLU_BTE_InsertBattery2_BW_HI
7.2
40 sonic · BLiss
Remove the old battery from your Bliss miniBTE:
·Open the battery door by pushing
either side of the compartment
with your fingernail
·Rotate the compartment until
the opening in the battery
retaining ring points directly
away from the body of
the hearing instrument
·Remove the battery by lifting
the exposed edge of the battery
out of the retaining ring
Note!
The battery may spring out
of the retaining ring.
Be careful not to lose it.
BL_ILLU_miniBTE_RemoveBattery1_BW_HI
9.1
BL_ILLU_miniBTE_RemoveBattery2_BW_HI
9.2
BL_ILLU_miniBTE_RemoveBattery3_BW_HI
9.3
41
BLISS · USER GUIDE BTE AND miniBTE
Insert a new battery into your Bliss miniBTE:
·Grasp the hearing instrument
with your thumb and forefinger
on either side of the open
battery door to keep
the compartment from
moving
·Insert a new battery by pushing
it securely into the opening
of the retaining ring, keeping
the "+" sign flush with
the opening of the battery
door
·Once the battery snaps
firmly in the retaining ring,
rotate the retaining ring back
into the battery compartment
·Cup your hand around
the hearing instrument.
A whistling or squealing
sound means the battery
is working.
BL_ILLU_miniBTE_InsertBattery2_BW_HI
10.2
BL_ILLU_miniBTE_InsertBattery3_BW_HI
10.3
BL_ILLU_miniBTE_InsertBattery1_BW_HI
10.1

42 sonic · BLiss
Important battery information
·Battery life will vary with conditions of use
(for example, batteries will run down faster in noisy
environments)
·Always keep spare batteries on hand
·A used battery should be replaced immediately
·If you are not going to use your hearing instruments
for a few days, remove the batteries
·Any moisture found on a battery should be wiped
off immediately with a soft cloth
·Always remove zinc-air batteries before drying
your hearing instrument with a drying kit.
Drying out zinc-air batteries shortens their lifetime.
·Used batteries should be returned to your battery
supplier or hearing care provider for safe disposal
·Never dispose of batteries by burning them.
They may explode and cause injury.
·Never dispose of batteries with household waste.
They cause environmental pollution.
·Batteries can be harmful if swallowed. Keep batteries
out of the reach of pets and small children. In case
of ingestion, contact your physician immediately.

43
BLISS · USER GUIDE BTE AND miniBTE
Audible Indicators
Event Tone description
Start-up delay Configurable short,
medium or long delay before
amplification starts
Power on A sustained beep when
amplification starts
Listening
program change*
One to four single beeps;
Number of beeps matches
listening program position
Low battery Three warning beeps in
a low-high-low pitch sequence
Power down;
Dying battery
A fast sequence of beeps
descending in pitch
Audible indicators with BTE and/or
optional SoundGate/RC-P
Volume
Control click*
Brief click to indicate volume
is turning up or down
Volume
Control limit*
Rapid double beep at both
maximum and minimum levels
SoundGate
incoming call*
Telephone ringing signal
* Audible indicators can be heard in the opposite hearing instrument if
the Binaural Volume & Program Change is activated in the fitting
software. Refer to the Owner Information in the inside cover to see
how your devices are configured.
44 sonic · BLiss
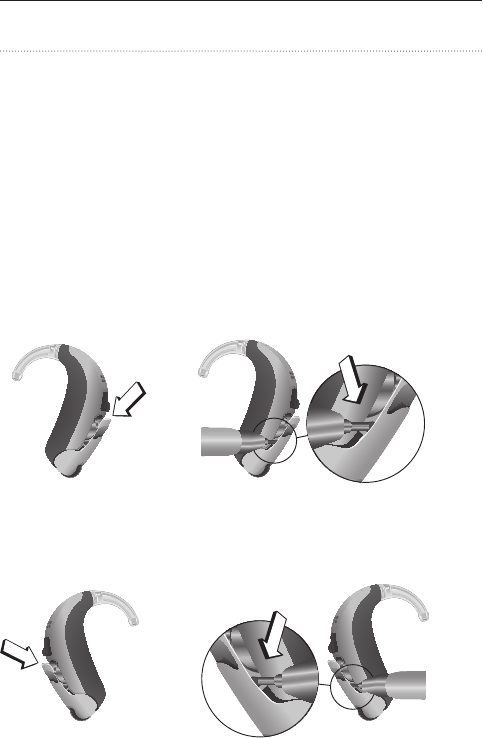
Safety Lock
As an added safety feature, your battery door has been
designed with a locking mechanism to deter children
from accessing the battery.
Bliss BTE
To lock the door, place your BTE on a flat surface
with Earhook facing left. Partially open the battery
door. Firmly press the locking bolt down with a thin,
hard device such as a pair of tweezers. This will
prevent the battery door from completely opening
and exposing the battery.
BL_ILLU_BTE_SafetyLock1_BW_HI
8.1
BL_ILLU_BTE_SafetyLock2_BW_HI
8.2
To unlock, simply flip the hearing aid over with
the Earhook facing right. Press down on the bolt,
moving it back to the open position.
BL_ILLU_BTE_SafetyLock3_BW_HI
8.3
BL_ILLU_BTE_SafetyLock4_BW_HI
8.4
45
BLISS · USER GUIDE BTE AND miniBTE
BL_ILLU_miniBTE_SafetyLock1_BW_HI
11.1
BL_ILLU_miniBTE_SafetyLock2_BW_HI
11.2
Bliss miniBTE
With the battery door fully closed, use a small
screwdriver or similar tool to slide the lock up into
the slot. This will prevent the battery door from
opening until you slide it back down again.

46 sonic · BLiss
Data Logging and Learning
Data Logging
The data log automatically stores information about
your use of your hearing instruments such as program
changes, hours of wear, etc. This information can be
used by your hearing care provider to adjust your
hearing instruments. If you do not want this feature
to be active, please ask your hearing care provider
to turn it off.
Data Learning (Bliss 100)
If you have a Volume Control on your instrument,
or have purchased a remote control or a SoundGate,
your hearing care provider may have activated
Data Learning. When Data Learning is operating,
the hearing instrument keeps track of how often
and how much you adjust the volume and “learns”
your preferred setting. This new setting can be made
permanent during your follow-up visit.
47
BLISS · USER GUIDE BTE AND miniBTE
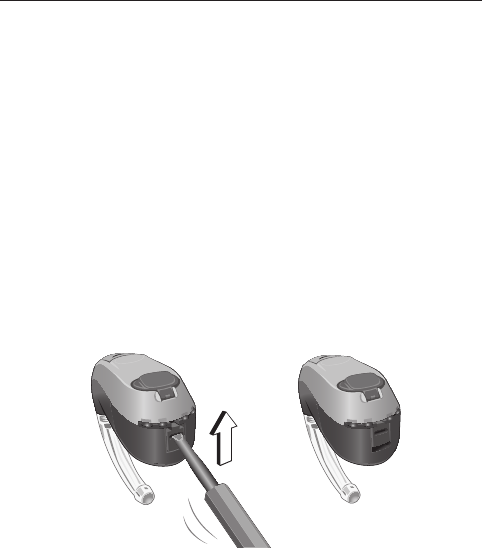
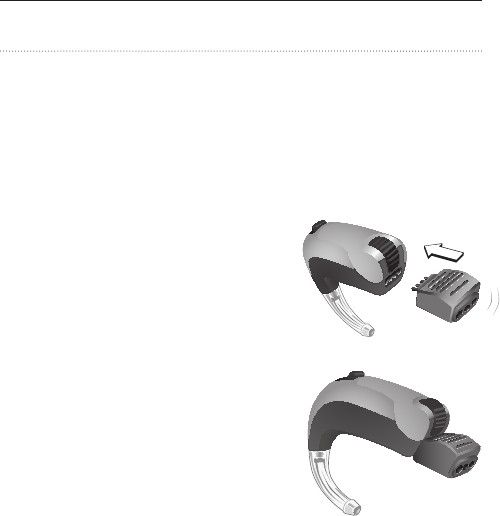
Direct Audio Input and FM
A Direct Audio Input (DAI) Adapter allows your hearing
instrument to receive signals directly from external
sources such as TV, personal stereos, etc. An FM
Receiver allows your instrument to receive signals
directly from an external wireless FM Transmitter.
Bliss BTE
·The DAI pins are located
at the bottom of
the hearing instrument
·Insert the DAI boot into
the bottom of the instrument
as shown here
·Insert the DAI/Euro Plug or
FM Receiver of the assistive
listening device into the boot
BL_ILLU_BTE_AttachingDAIBoot2_BW_HI
15
BL_ILLU_BTE_AttachingDAIBoot3_BW_HI
16
48 sonic · BLiss
Bliss miniBTE
Attaching the DAI Boot
·Slip the DAI Boot over
your miniBTE, as shown.
When it is fully seated,
you will feel it click into
place.
·Insert the DAI/Euro Plug
or FM Receiver of
the assistive listening
device into the DAI Boot
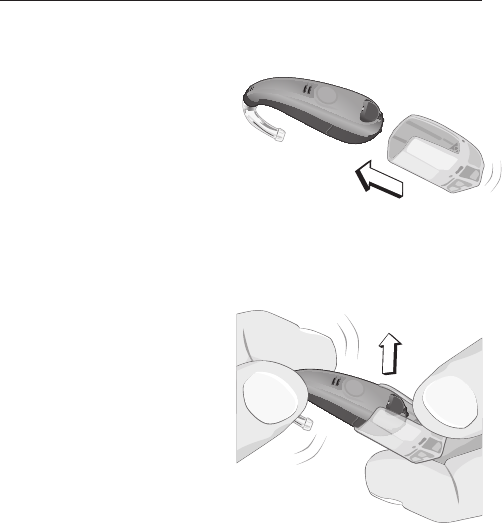
Removing the DAI Boot
·Disconnect the DAI/Euro
Plug or FM Receiver
of the assistive listening
device from the DAI Boot
·Grasp the DAI Boot
as shown. Pull the hearing
instrument up and
out of the boot with your
other hand. A slight
twisting motion will help
free the DAI Boot from
the miniBTE.
BL_ILLU_miniBTE_RemoveDAIBoot_BW_HI
13
BL_ILLU_miniBTE_AttachingDAIBoot1_BW_HI
12.1

49
BLISS · USER GUIDE BTE AND miniBTE
Direct Audio Input/FM Program
Your hearing instrument has dedicated listening
programs designed to work with a DAI Boot or FM
Receiver. When either is attached, the hearing
instrument will automatically switch into this dedicated
set of programs. Refer to the chart below to see
how the DAI/FM Programs are organized:
Program Beeps Function
1 1 Instrument microphone
2 2 DAI/FM + Mic*
3 3 DAI/FM only
*Starting program

50 sonic · BLiss
Caring for Your Hearing Instruments
Healthy ears produce cerumen, a waxy substance
that can clog your hearing instruments. Please follow
these cleaning instructions to prevent wax build-up
and ensure optimal performance.
Every night
·Check your hearing instruments for earwax
and wipe them clean with a cloth or tissue
·Use the cleaning tool provided to remove
wax that may have accumulated in the Dome,
sound outlet or vent opening if you have a
Custom Mold
·Open the battery door fully to allow air to circulate
·A dry-instrument pack is recommended
to remove any moisture that may have accumulated
in the hearing instrument

51
BLISS · USER GUIDE BTE AND miniBTE
If your hearing instrument comes in contact
with water
Should your hearing instrument come in contact
with water and stop working, please follow these
guidelines:
·Gently wipe off any water on the outside of the hearing
instrument
·Open the battery door and remove the battery
·Gently wipe off any water in the battery door
·Let the hearing instrument dry with the battery door
open for approximately 30 minutes
·Insert a new fresh battery (see pages 39 and 41)
and close the battery door. Your hearing instrument
should work normally again.
Note!
If your hearing instrument does not work
properly, consult your hearing care provider.
52 sonic · BLiss
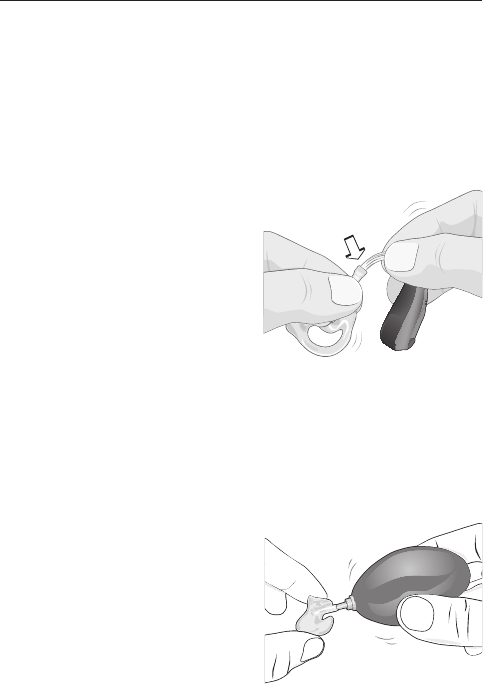
If you have an Earmold
You should wash your Earmolds regularly. The hearing
instrument itself must never be washed or allowed
to get wet!
·Handle your instruments over a soft surface
to avoid damage in case you drop them
·Disconnect the Earmold
from the hearing instrument
by grasping the end of
the Earhook firmly with
one hand and grasping
the tubing firmly with
the other hand
·Pull the tubing away
from the Earhook
·Gently clean the Earmold
in warm soapy water
·Rinse the Earmold and allow
it to dry completely
·Use an air puffer to remove
any remaining moisture
in the tubing
·When re-attaching
the Earmold to
the instrument, it is
important to position
it correctly
BL_ILLU_miniBTE_PuttingOnInstrumentEarhook1_BW_HI
8.1
53
BLISS · USER GUIDE BTE AND miniBTE
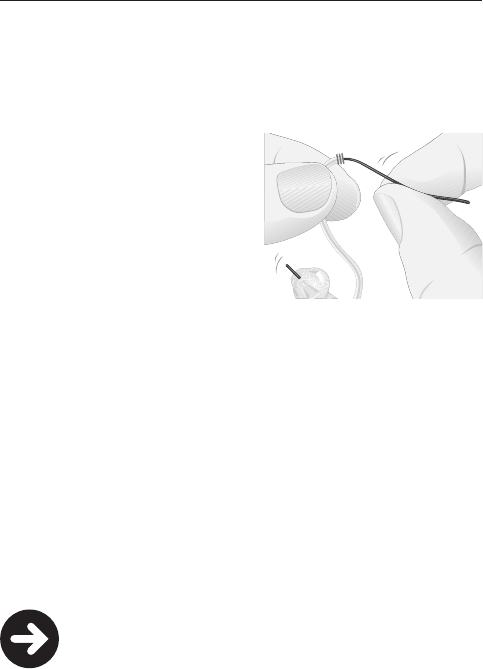
Cleaning the Thin Tube system
If you have the Thin Tube system, make sure that
the Thin Tube and Dome are kept free of earwax
at all times.
·Grasp the Thin Tube Adapter
firmly and disconnect
the Thin Tube from
the instrument by pulling
it off. Please see page 25
for further instructions.
·Use a soft dry cloth or
tissue to clean the outside
of the Thin Tube and Dome
·To remove wax from the Thin Tube, insert the cleaning
wire at the connector end. Push the wire all
the way into the Thin Tube until it comes out through
the Dome.
·Pull the cleaning wire out through the Dome
and discard it
·Reattach the Thin Tube connector to the Thin Tube
Adapter
Note!
To avoid blocking the Thin Tube, do not use
water to clean it.

54 sonic · BLiss
Exchanging the Dome
The Dome should be changed regularly. The frequency
of Dome changes will depend on how fast earwax
builds up on the Dome. Spare Domes can be obtained
from your hearing care provider.
·Remove the old Dome by pulling it off the end
of the Thin Tube
·With clean fingers, push a new Dome as far
as possible onto the Thin Tube. When attached
correctly, the Dome should touch the plastic
ring around the Thin Tube.
Note!
If the Dome is not securely attached to
the Thin Tube, it could fall off in your ear canal.
If this happens, please see your medical
provider.
55
BLISS · USER GUIDE BTE AND miniBTE
Exchanging the Thin Tube system
If the Thin Tube becomes discolored, stiff or brittle,
it should be replaced.
·Hold the instrument by the Thin Tube Adapter
and grasp the Thin Tube close to the connector
·Pull firmly to remove the old Thin Tube
·Attach the new Thin Tube by pushing it firmly into
the connector
BL_ILLU_miniBTE_ExchangeThinTube_BW_HI
14
56 sonic · BLiss
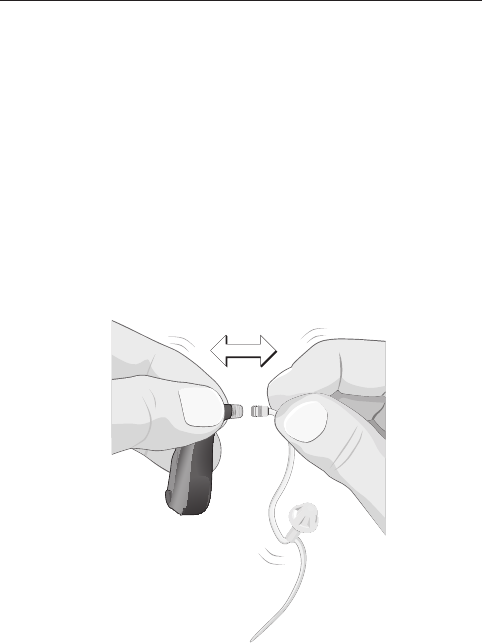
Operating Your Hearing Instrument
with the RC-P Remote Control
Optional accessory
If you have purchased a remote control, you can use
it to change listening programs, adjust the volume level
up and down, or mute the hearing instruments.
For complete operating instructions, please read
the separate RC-P Remote Control User Guide.
3
2
1
4
5
1 Program Button
2 Volume Control
3 Mute button
4 Status light
5 Key lock
57
BLISS · USER GUIDE BTE AND miniBTE
Operating Your Hearing Instrument
with the SoundGate Communication Device
Optional accessory
If you have purchased a SoundGate, you may use
it to perform basic functions such as changing
the listening programs, adjusting the volume level
up and down, or muting the hearing instruments.
In addition, SoundGate serves as a link between
your hearing instruments and external sources such
as music players, mobile phones, computers, etc.
For complete operating instructions, please read
the separate SoundGate User Guide.
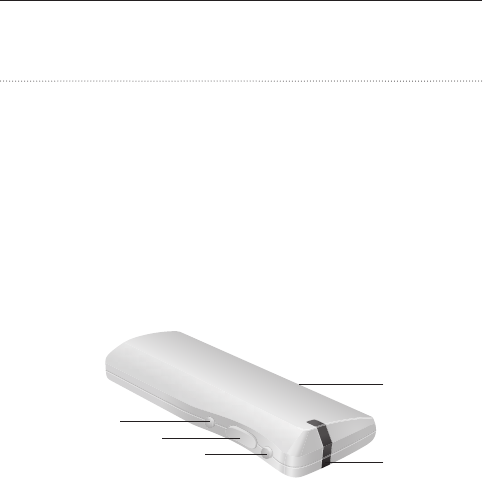
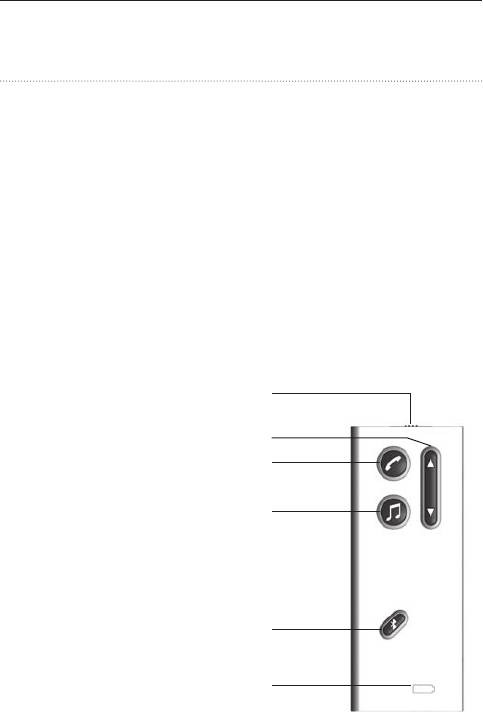
1 Volume Control
and program change
2 Phone
3 Music/Audio key
(e.g. MP3)
4 Bluetooth® key
5 Battery indicator
6 Key lock
1
2
3
4
6
5
58 sonic · BLiss
Environmental Protection
Your hearing instruments contain electronic
components subject to the Directive 2002/96/EC on
waste electrical and electronic equipment (WEEE).
Help to protect the environment by not disposing
of your hearing instruments or batteries with
your unsorted household waste. Please recycle
your hearing instruments and batteries according
to your local regulations or return them to your
hearing care provider for disposal.

59
BLISS · USER GUIDE BTE AND miniBTE
Notes

60 sonic · BLiss
Product Approval, Markings
and Compliance
All Sonic hearing instruments comply with international
standards concerning electromagnetic compatibility.
Due to the limited space available on the hearing
instruments, all relevant approval markings are found
in this document.
Electromagnetic interference
Your hearing instrument has been thoroughly tested
for electromagnetic interference. However, some
products may emit electromagnetic energy causing
unforeseen interference with hearing instruments.
Examples include induction cooking appliances,
shop alarm systems, mobile phones, fax machines,
personal computers, X-rays, CT scans, etc.
Even though your hearing instruments are designed
to comply with the most stringent international
standards of electromagnetic compatibility, they
may emit electromagnetic energy that can cause
interference with other devices.
Your hearing instruments contain a radio transmitter
using short range magnetic induction technology
working at 3.84 MHz. The magnetic field strength
of the transmitter is < -42 dBμA /m @ 10 m.

61
BLISS · USER GUIDE BTE AND miniBTE
The electromagnetic emission from the radio system
is well below international limits for human exposure.
By comparison, the electromagnetic energy of the
hearing instruments is lower than that generated
by household items such as halogen lamps, computer
monitors, dishwashers etc.
Protection against harmful ingress of water
and particulate matter
The enclosures of the device fulfill the requirements
of class IP57 according to EN 60529:1991/A1:2000.

62 sonic · BLiss
Cell Phone and Hearing Instrument
Compatibility
Some hearing instrument users have reported
a buzzing sound in their devices when they are
using cell phones, indicating that the cell phone
and hearing instrument may not be compatible.
The compatibility of a particular hearing instrument
and cell phone can be predicted by adding the rating
for the hearing instrument immunity to the rating
for the cell phone emissions (ANSI C63.19-2006
American National Standard Methods of Measurement
of Compatibility between Wireless Communication
Devices and Hearing Aids).
For example, the sum of a hearing instrument with
a rating of 2 (M2/T2) and a telephone with a rating
of 3 (M3/T3) would result in a combined rating of
5. According to the standard, any combined rating
that equals at least 5 would provide “normal use”;
a combined rating of 6 or greater would indicate
“excellent performance.”

63
BLISS · USER GUIDE BTE AND miniBTE
The immunity of your Bliss hearing instrument is at
least M2 and M2/T2 for miniBTE and BTE respectively.
The equipment performance measurements,
categories and system classifications are based
upon the best information available but Sonic
cannot guarantee that all users will be satisfied.
Note!
The performance of individual hearing
instruments may vary with individual
cell phones. Please try this hearing
instrument with your cell phone or, if you
are purchasing a new phone, be sure
to try it with your hearing instrument prior
to purchase. For additional guidance,
please ask your cell phone provider
for the booklet entitled “Hearing Aid
Compatibility with Digital Wireless Cell
Phones.“

64 sonic · BLiss
Warranty and Repairs
Your hearing instruments have a limited warranty,
covering defects in materials and workmanship.
This warranty covers the hearing instruments
themselves, but not accessories such as batteries,
tubing, Domes, Earmolds, etc.
This warranty is void if a defect is the result
of misuse or mistreatment. The warranty is also void
if the hearing instruments have been repaired
by non-authorized service personnel.
Please review the warranty with your hearing care
provider and make sure that your warranty card is
completed correctly.
Note!
Your hearing care provider may charge
a service fee for processing warranty repairs.

65
BLISS · USER GUIDE BTE AND miniBTE
Accessories
Sonic offers a wide range of optional accessories
that may be purchased to enhance your hearing
system. Depending on hearing instrument type
and local regulations, the following accessories
are available:
·RC-P Remote Control
·SoundGate communication device (for wireless
connection to mobile phones, music players, etc.)
·TV Adapter (for wireless connection to your
television via the SoundGate)
·Phone Adapter (for wireless connection
to your landline phone via the SoundGate)
For further information on accessories, please contact
your hearing care provider.

66 sonic · BLiss
Problem Possible cause Solution
Instrument
whistles
or squeals
Instrument not inserted correctly Re-insert instrument
Earwax accumulation in ear canal Consult your hearing care provider or physician
Instrument may be too loose Consult your hearing care provider
No volume, level
too soft or
humming noise
Instrument may not be turned ON Check that the battery door is closed completely
Battery may be dead
or inserted wrong way
Insert a fresh battery
Volume level too soft Increase the volume level with the Volume Control
on the instrument, or with the RC-P or SoundGate
(if available)
Instrument may be in telecoil
position
Check to make sure you are in the intended program
Earwax accumulation
in ear canal
Consult your hearing care provider or physician
Battery contacts may be dirty
or corroded
Open and close the battery door several times or
clean the battery contacts carefully with a dry Q-tip
Sound outlet may be blocked
or corroded
Check the sound outlet and change the filter
if you can see that it is clogged
Microphone opening may be
blocked
Consult your hearing care provider, do not try
to clean this yourself
Your hearing loss may have
increased
Consult your hearing care provider
Common Problems and Solutions

67
BLISS · USER GUIDE BTE AND miniBTE
Problem Possible cause Solution
Instrument
whistles
or squeals
Instrument not inserted correctly Re-insert instrument
Earwax accumulation in ear canal Consult your hearing care provider or physician
Instrument may be too loose Consult your hearing care provider
No volume, level
too soft or
humming noise
Instrument may not be turned ON Check that the battery door is closed completely
Battery may be dead
or inserted wrong way
Insert a fresh battery
Volume level too soft Increase the volume level with the Volume Control
on the instrument, or with the RC-P or SoundGate
(if available)
Instrument may be in telecoil
position
Check to make sure you are in the intended program
Earwax accumulation
in ear canal
Consult your hearing care provider or physician
Battery contacts may be dirty
or corroded
Open and close the battery door several times or
clean the battery contacts carefully with a dry Q-tip
Sound outlet may be blocked
or corroded
Check the sound outlet and change the filter
if you can see that it is clogged
Microphone opening may be
blocked
Consult your hearing care provider, do not try
to clean this yourself
Your hearing loss may have
increased
Consult your hearing care provider

68 sonic · BLiss
Problem Possible cause Solution
Whirring noise,
fading, weak
or motor-boating
sounds
Battery contacts may be dirty
or corroded
Open and close the battery door several times
or clean the battery contacts with a dry Q-tip
Moisture in hearing instrument Place hearing instrument in dry-instrument pack.
Remove battery first. Consult your hearing care
provider.
Low battery Insert a fresh battery
Instrument
switches from
ON to OFF
periodically
Low battery Insert a fresh battery

69
BLISS · USER GUIDE BTE AND miniBTE
Problem Possible cause Solution
Whirring noise,
fading, weak
or motor-boating
sounds
Battery contacts may be dirty
or corroded
Open and close the battery door several times
or clean the battery contacts with a dry Q-tip
Moisture in hearing instrument Place hearing instrument in dry-instrument pack.
Remove battery first. Consult your hearing care
provider.
Low battery Insert a fresh battery
Instrument
switches from
ON to OFF
periodically
Low battery Insert a fresh battery

70 sonic · BLiss
Information for the Hearing Care Provider
A hearing care provider should advise a prospective
hearing instrument user to consult with a licensed
physician (preferably an ear specialist) promptly,
before dispensing a hearing instrument, if the hearing
care provider determines through inquiry, actual
observation or review of any other available
information concerning the prospective user, that
the prospective user has any of the following
conditions:
·Visible congenital or traumatic deformity
of the external or middle ear
·History of active drainage from the ear within
the previous 90 days
·History of sudden or rapidly progressive hearing
loss within the previous 90 days
·Acute or chronic dizziness or vertigo
·Unilateral hearing loss of a sudden or recent
onset within the previous 90 days
·Audiometric air-bone gap equal to or greater than
15 decibels at 500 hertz (Hz), 1000 Hz, and 2000 Hz
·Visible evidence of significant cerumen accumulation
or a foreign body in the ear canal
·Pain or discomfort in the ear

71
BLISS · USER GUIDE BTE AND miniBTE
Warning to hearing care provider and patient
Special care should be exercised in selecting
and fitting a hearing instrument whose maximum
sound pressure level exceeds 132 decibels due
to the fact that there may be risk of impairing the
remaining hearing of the hearing instrument user.
Children with hearing loss
A child with a hearing loss should be directed
to a physician for medical evaluation and to other
professionals for evaluation and rehabilitation since
hearing loss may cause problems with language
development and the educational and social growth
of a child.

72 sonic · BLiss
Compliance with Requirements for Europe
This device is in conformance with the requirements
of the Directive 93/42/EEC of the Council of the
European Communities concerning medical devices,
MDD. This is certified by applying this marking.
This device also complies with the essential
requirements of the Directive 1999/5/EC of
the European Parliament on radio equipment
and telecommunications terminal equipment,
R&TTE. It operates as an inductive application
in a harmonized frequency band according to
the Commission Decision 2008/432/EC and
may be used in all member states of the EU and
EFTA. This is certified by applying this marking.
Declarations of conformity are available at:
Sonic Innovations, Inc.
2501 Cottontail Lane
Somerset, NJ 08873

73
BLISS · USER GUIDE BTE AND miniBTE
Compliance with Radio Communications
Requirements for the USA and Canada
Sonic Innovations, Inc.
Bliss hearing instrument models BL100 BTE; BL80
BTE; BL100 MN; BL80 MN
BTE miniBTE
FCC ID ZTOBTE01 ZTOMBTE1
IC: 9799A-BTE01 9799A-MBTE1
This device complies with part 15 of the FCC Rules
and RSS-210 of Industry Canada. Operation is subject
to the following two conditions:
(1) This device may not cause harmful interference,
and
(2) This device must accept any interference received,
including interference that may cause undesired
operation.
This Class B digital apparatus complies
with Canadian ICES-003.
Note!
This equipment has been tested and found
to comply with the limits for a Class B digital
device, pursuant to part 15 of the FCC Rules.

74 sonic · BLiss
These limits are designed to provide reasonable
protection against harmful interference in a residential
installation.
This equipment generates, uses, and can radiate radio
frequency energy and, if not installed and used in
accordance with the instructions, may cause harmful
interference to radio communications. However,
there is no guarantee that interference will not occur
in a particular installation.
If this equipment does cause harmful interference
to radio or television reception, which can be
determined by turning the equipment off and on,
the user is encouraged to try to correct
the interference by one or more of the following
measures:
·Reorient or relocate the receiving antenna
·Increase the separation between the equipment
and receiver
·Connect the equipment into an outlet on a circuit
different from that to which the receiver is connected
·Consult the dealer or an experienced radio/TV
technician for help

75
BLISS · USER GUIDE BTE AND miniBTE
Note!
Changes or modifications not expressly
approved by Sonic could void the user’s
authority to operate the equipment
76 sonic · BLiss
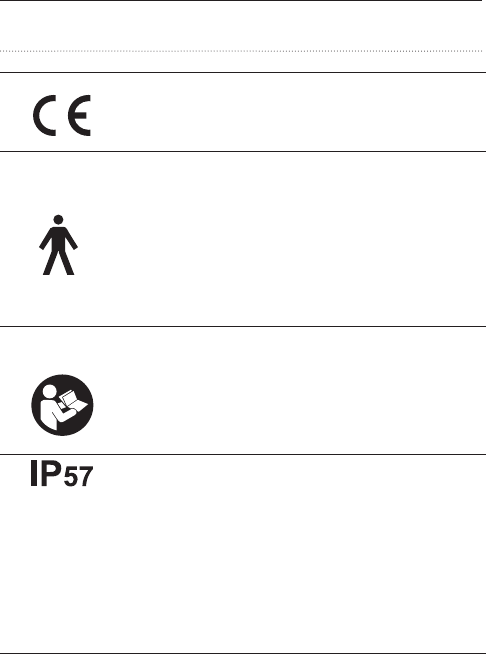
Information and Explanation of Symbols
The CE conformity marking indicates
conformance to all applicable
European Directives
This symbol indicates that the
products described in these
instructions for use adhere to the
requirements for an applied
part of Type B of EN 60601-1.
The surface of the hearing instrument
is specified as applied part of Type B.
This symbol indicates that it is
important for the user to read
and take into account the relevant
information in these instructions
for use
This symbol indicates that class of
protections against harmful ingress
of water and particulate matter
according to EN 60529.
IP5X indicates dust protection.
IPX7 indicates the protection against
the effects of temporary immersion
in water.
77
BLISS · USER GUIDE BTE AND miniBTE
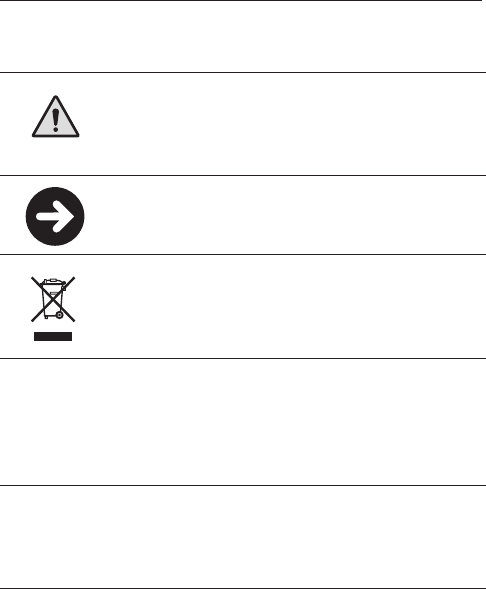
This sign indicates important safety
information that must be observed
to minimize risks or to avoid
hazardous situations
Important information for handling
and product safety
The crossed-out wheeled bin
indicates that the European Directive
on waste of electronic equipment
applies
Operating
conditions
The product is designed such
that it functions without problem
or restrictions if used as intended,
unless otherwise noted in these
instructions for use
Transport
and storage
conditions
During transport or storage,
the temperature should not exceed
the limit value of –13°/140° Fahrenheit
(–25°/60° Celsius)

78 sonic · BLiss
Service
If none of the actions listed in the previous pages
correct a problem you may have with your hearing
instrument, contact your authorized Sonic service
representative. Do not attempt to service your hearing
instruments yourself or your warranty may be voided.
Place stamp with dispenser name and address here:
135506 | UK
www.sonici.com
05.13 | 135506 | UK
Canada
Sonic Innovations Canada Ltd.
2885-B le Corbusier Blvd
Laval, Québec H7L 4J5
+ 1 800 667 7664
Australia
Sonic Australia
1/10 Dorsey Street
Milton, QLD 4064, Australia
Tel: + 61 7 3368 4044
Free call (Australia only)
1800 639 263
International
Sonic AG
Morgenstrasse 131B
3018 Bern, Switzerland
+ 41 31 560 21 21
World Headquarters
Sonic Innovations, Inc.
2501 Cottontail Lane
Somerset, NJ 08873 USA
+ 1 888 423 7834