Sonicwall 02C SonicPoint User Manual 232 000512 00 SonicPoint
Sonicwall, Inc. SonicPoint 232 000512 00 SonicPoint
Users Manual
Page 1
SonicWALL SonicPoint - Model APL13-02C
FCC Part 15 Class A Notice
NOTE: This equipment was tested and found to comply with the limits for a Class A digital
device, pursuant to Part 15 of the FCC Rules. These limits are designed to provide reasonable
protection against harmful interference when the equipment is operated in a commercial
environment. This equipment generates, uses, and can radiate radio frequency energy. And if
not installed and used in accordance with the instruction manual, the device may cause harmful
interference to radio communications. Operation of this equipment in a residential area is likely
to cause harmful interference in which case the user is required to correct the interference at
his own expense.
Complies with EN 55022 Class A and CISPR22 Class A.
*Refer to the label on the bottom of the unit for device information including Class A or Class
B FCC information.
Caution: Modifying this equipment or using this equipment for purposes not shown in this
manual without the written consent of SonicWALL, Inc. could void the user’s authority to
operate this equipment.
BSMI Statement
VCCI Statement
Page 2
Canadian Radio Frequency Emissions Statement
This Class A digital apparatus complies with Canadian ICES-003.
Cet appareil numérique de la classe A est conforme à toutes la norme NMB-003 du Canada.
CISPR 22 (En 55022) Class A
Warning: This is a class A product. In a domestic environment, this product may cause radio
interference in which case the user may be required to take adequate measures.
FCC RF Radiation Exposure Statement
This equipment complies with FCC RF radiation exposure limits set forth for an uncontrolled
environment. This equipment should be installed and operated with a minimum distance of 20
centimetres (7.9 inches) between the radiator (antenna) and your body.
This transmitter must not be co-located or operating in conjunction with any other antenna or
transmitter.
For more information regarding the above statement, please contact SonicWALL, Inc. at 1143
Borregas Avenue, Sunnyvale, CA 94089-1306 or 1-408-745-9600.
Cable Connections
All Ethernet and RS232 (Console) cables are designed for intra-building connection to other
equipment. Do not connect these ports directly to communication wiring or other wiring that
exits the building where the SonicWALL is located.
Power Supply Information
If the power supply is missing from your SonicWALL product package, please contact
SonicWALL Technical Support at 408-752-7819 for a replacement. This product should only be
used with a UL listed power supply marked “Class 2” or “LPS”, with an output rated 5 VDC,
minimum 1.66 A.
Declaration of Conformity
Application of council Directive Directive 89/336/EEC (EMC) and
72/23/EEC (LVD)
Directive 1999/5/EC (R&TTE) and standards
EN 301 489-1/-17 and EN 300 328-1/-2
Standards to which conformity is declared EN 55022 (1998) Class A
EN 55024 (1998)
EN 61000-3-2 (1995) + A1, A2, A14
EN 61000-3-3 (1994)
EN 60950 (1992) + A1, A2, A4, A11
National Deviations: AT, AU, BE, CH, CN, CZ,
DE, DK, FI, FR, GB, GR, HU, IE, IL, IN, IT, JP,
KR, NL, NO, PL, SE, SG, SI
Federal Communication Commission Interference Statement
This equipment has been tested and found to comply with the limits for
a Class B digital device, pursuant to Part 15 of the FCC Rules. These
limits are designed to provide reasonable protection against harmful
interference in a residential installation. This equipment generates,
uses and can radiate radio frequency energy and, if not installed and
used in accordance with the instructions, may cause harmful
interference to radio communications. However, there is no guarantee
that interference will not occur in a particular installation. If this
equipment does cause harmful interference to radio or television
reception, which can be determined by turning the equipment off and
on, the user is encouraged to try to correct the interference by one of
the following measures:
- Reorient or relocate the receiving antenna.
- Increase the separation between the equipment and receiver.
- Connect the equipment into an outlet on a circuit different from that
to which the receiver is connected.
- Consult the dealer or an experienced radio/TV technician for help.
This device complies with Part 15 of the FCC Rules. Operation is
subject to the following two conditions: (1) This device may not cause
harmful interference, and (2) this device must accept any interference
received, including interference that may cause undesired operation.
FCC Caution: Any changes or modifications not expressly approved by
the party responsible for compliance could void the user's authority to
operate this equipment.
Canada (IC):
To prevent radio interference to the licensed service, this device is intended to be
operated indoors and away from windows to provide maximum shielding. Equipment
(or its transmit antenna) that is installed outdoors is subject to licensing.
Canada (IC):
To prevent radio interference to the licensed service (i.e. co-channel Mobile Satellite
systems) this device is intended to be operated indoors and away from windows to
provide maximum shielding. Equipment (or its transmit antenna) that is installed
outdoors is subject to licensing.
Page 3
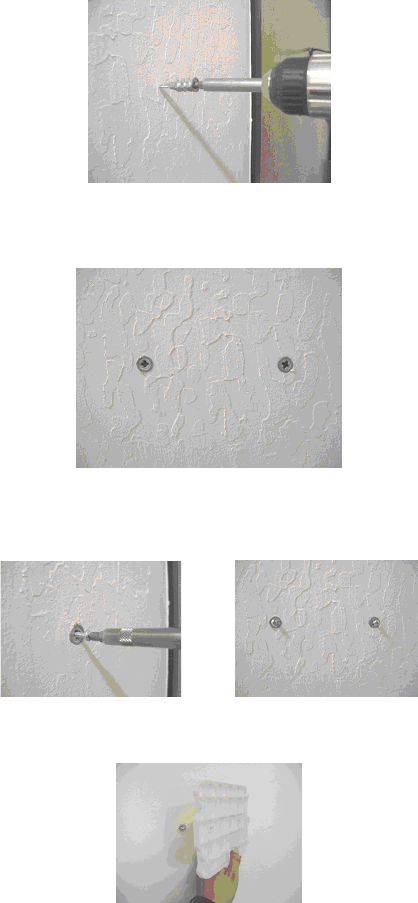
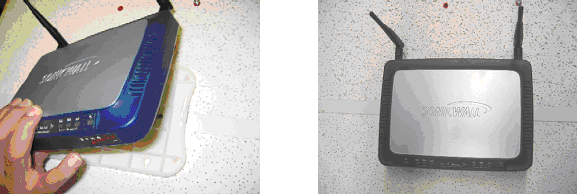
Wall Mounting the SonicWALL SonicPoint
Follow the instructions below to mount the SonicPoint on the wall.
1. Using the mounting plate as a template, mark the places to insert the mounting anchors.
2. Using a #2 Phillips screw driver, press the tip of the anchor into the marked places on the
hollow wall.
3. Turn the screwdriver clockwise until the anchor is flush with the wall. Repeat for the second
anchor.
4. Insert a #6 x 11/4” pan head Phillips self-tapping screw into each anchor leaving a gap for
the mounting plate.
5. Hang the mounting plate on the screws. Use the middle row of mounting holes.
Page 4
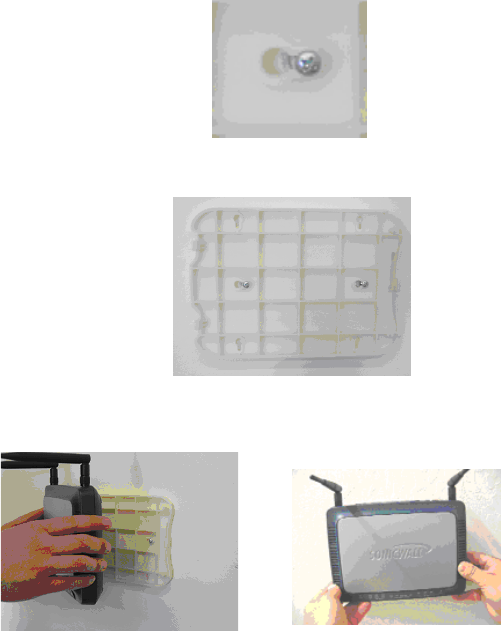
6. Slide the plate down to the narrowest part of the keyhole so that the mounting plate rests
on the screws.
7. Tighten the mounting screws to secure the mounting plate.
8. Snap the SonicPoint onto the mounting plate.
Page 5
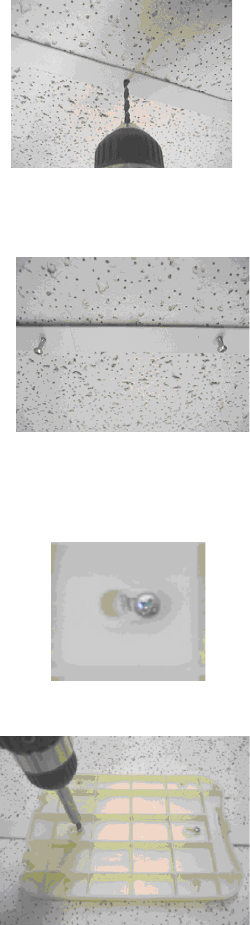
Mounting the SonicWALL SonicPoint on the Ceiling
1. Locate a metal support to hang the SonicPoint.
2. Using the mounting plate as a template, mark the places to insert the mounting anchors.
3. Drill two holes for #6 x 1-1/4” screws in the marked location.
4. Install the #6 x 1-1/4” self-tapping screws leaving a slight gap for the mounting plate.
5. Hang the mounting plate on the screws.
6. Slide the plate down to the narrowest part of the keyhole so that the mounting plate rests
on the screws.
7. Tighten the mounting screws to secure the mounting plate.
Page 6
8. Snap the SonicPoint onto the mounting plate.
Other Considerations for Mounting the SonicWALL SonicPoint
• Mount in a location away from direct sunlight and sources of heat. A maximum ambient
temperature of 104º F (40º C) is recommended.
• Route cables away from power lines, fluorescent lighting fixtures, and sources of noise
such as radios, transmitters, and broadband amplifiers
• Ensure that no water or excessive moisture can enter the unit.
• Allow unrestricted airflow around the unit and through the vents on the side of the unit. A
minimum of 1 inch (25.44mm) clearance is recommended.
Page 7
SonicWALL, Inc.
1143 Borregas Drive
Sunnyvale, CA 94089
Tel: (408) 745-9600
Fax: (408) 745-9300
E-mail: info@sonicwall.com
Web: www.sonicwall.com
P/N 232-000512-00
Rev A. 04/04