Sonida Digital Technology S12 WIFI smart socket User Manual 15 S12 UserMan
Shenzhen Sonida Digital Technology Co.,Ltd WIFI smart socket 15 S12 UserMan
15_S12 UserMan
Smart Wi-Fi Plug
User’s Manual
START YOUR SMART LIFE
Socket indicator
1.When the indicator light is on, it means
the socket has been connected.
2.When the indicator light goes out, it
means the socket has been disconnected.
3.When the indicator light flashes, it
means the socket is connecting.
Technical parameters of socket
1.Maximum current:16A
2.Rated voltage:100~250V
3.Power frequency:50~60HZ
4.Built-in safety circuit
5. Support Android and iOS system to
remote control
6. Support manually, timing, countdown to
control
7. Support amazon echo and Google Home
to voice control
Register and login
Users can search for the App “Smart Life”
on Google Play or App store or scan the
following QR code to download and
install. After the installation is completed,
register and login.
Add device
●Connect to the network with the default
Mode:
Open the App, click on the “+” icon on
the upper right corner of the home page to
enter the Add Device List, select socket to
enter the Add Device Interface, and power
on the Socket, long press the power
button for more than 5 seconds until
indicator light flashes quickly, according
to the App interface prompt, confirm
indicator rapidly blink, enter the input
WIFI interface, input WIFI password,
enter the connection interface.
As the following picture shows:
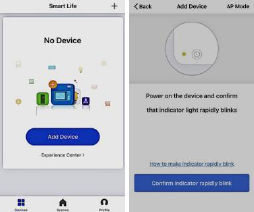
●Connect to the network with AP mode:
If the connection in the default mode is
not successful, you can try the AP mode
on the upper right corner of the Add
Device page. The steps are the same as
the default mode.
Connection
When “successfully added a device”
Appears, the connection is successful.
Then enter the interface of the control
socket, you can control the socket
anytime and anywhere, you can also share
the device with your family or friends.
Tips: This WiFi socket supports 2.4G
WiFi band pairing connection. Please
connect the mobile WiFi source to the
2.4G band for pairing before connecting.
Socket control
1.Remote control switch: The mobile
phone and smart socket need to connect
network at the same time, do not need to
be in the same wireless network.
2.Time switch: The time for opening and
closing of the socket can be set through
the “Timer” icon at the bottom of the App
interface.
3.Countdown switch: Click the “count
-down” icon under the App to enter the
“countdown switch settings” interface; if
the socket is in off state at this time, then
countdown to perform the “open” action,
for example: The socket is off, then set a
countdown time of 30 minutes,30 minutes
later, the socket will automatically turn
on.
4.Manually control: In the absence of any
network, the mechanical buttons on the
socket, you can manually control the
opening and closing of the socket.

Using amazon echo quick guide:
How to control your device via Echo
Step 1: Add device
Make sure there’s at least one device that
supports Amazon Echo in device list.
Step 2: Modify device name
Make device name that Echo could easily
recognize. Such as: living room light,
bedroom light.
Step 3: Set up Echo
Use Alexa App or computer
(http://alexa.amazon.com).
Set up Echo from “settings”.
Step 4: Add Skill
Add “Skill” in alexa App. Enable “Smart
Life”, then fill in the correct login into
your App account to finish the account
linking.
Step 5: Control Device
Ask Alexa to discover devices. After 20
seconds discovery, Alexa will tell you “I
found x devices”. Then you can control
your devices through Echo.
The following voice commands are
supported:
Alexa, turn on the plug.
Alexa, set the bedroom light to 35%.
Alexa, brighten the bedroom light.
Alexa, set the kitchen light to green.
Alexa, set the air conditioner to 65℉.

Using Google Home quick guide:
How to control your device via Google Home
Step 1: Add device
Make sure there’s at least one device that
support Google Home in device list.
Step 2: Modify device name
Change device name to a easily
recognized one. Such as: living room light,
bedroom light.
Step 3: Set up Google Home
Make sure phone system language is
English. Then use Home App to set up
Google Home.
Step 4: Add Home Control Action
Add device in Home Control of the Home
App. Select “Smart Life”, then fill in the
correct login info of your App account to
finish the account linking. Your device
should be listed in Home Control device
list now.
Step 5: Control device
Now you can control devices through
Google Home. The following voice
commands are supported:
Ok Google, turn on the plug.
Ok Google, set bedroom light to 35%.
Ok Google, brighten bedroom light.
Ok Google, kitchen light to green.
Find “Smart Life” in the list. In the new
window, select your Smart Life account
region, type your Smart Life account and
password, then tap “Link Now”. After you
assign rooms for devices, your devices
will be listed in the Home Control page.
Frequent questions
Failed to add device:
1.Ensure that the device is powered on
and turned on.
2.Make sure that the device, mobile phone
and the router are close, the password is
correct, and the mobile phone network is
unblocked.
The device offline:
1.Check whether the network where the
device is located is stable and confirm,
whether the home network is normal.
2.Try restarting and wait for three minutes
to observe the device status.
How to cancel the countdown setting:
Please set the countdown time to 0 hour
and 0 minute to cancel the countdown.
Notes
1.If the smart socket is used for a long
time, the wireless router must not be
turned off, otherwise remote connection
cannot be reached.
2.The charged socket wiring board and
the like products shall be placed in the
positions where infants cannot reach so as
to avoid accidents.
3.The operational environment of the
smart socket shall be water-proof,
moisture-proof and sun-proof.
4.In order to prevent the risk of electric
shock, non-professionals shall not
disassemble and repair this product.
S12 20180625
NOTE: This equipment has been tested and found to comply with the limits for a
Class B digital device, pursuant to part 15 of the FCC Rules. These limits are
designed to provide reasonable protection against harmful interference in a
residential installation. This equipment generates uses and can radiate radio
frequency energy and, if not installed and used in accordance with the instructions,
may cause harmful interference to radio communications. However, there is no
guarantee that interference will not occur in a particular installation. If this
equipment does cause harmful interference to radio or television reception, which
can be determined by turning the equipment off and on, the user is encouraged to
try to correct the interference by one or more of the following measures:
- Reorient or relocate the receiving antenna.
- Increase the separation between the equipment and receiver.
-Connect the equipment into an outlet on a circuit different from that to which the
receiver is connected.
-Consult the dealer or an experienced radio/TV technician for help
Changes or modifications not expressly approved by the party responsible for compliance
could void the user's authority to operate the equipment.
This device complies with Part 15 of the FCC Rules. Operation is subject to the following two
conditions:
(1) this device may not cause harmful interference, and
(2) this device must accept any interference received, including interference that may
cause undesired operation.
This device is acting as slave and operating in the 2.4 GHz (2412 ~2462 MHz) band. Ad Hoc function
is supported but not able to operate on non-US frequencies.
FCC Radio Frequency Exposure Statement
The device has been evaluated to meet general RF exposure requirements. The device can be used in
fixed/mobile exposure conditions. The min separation distance is 20cm.