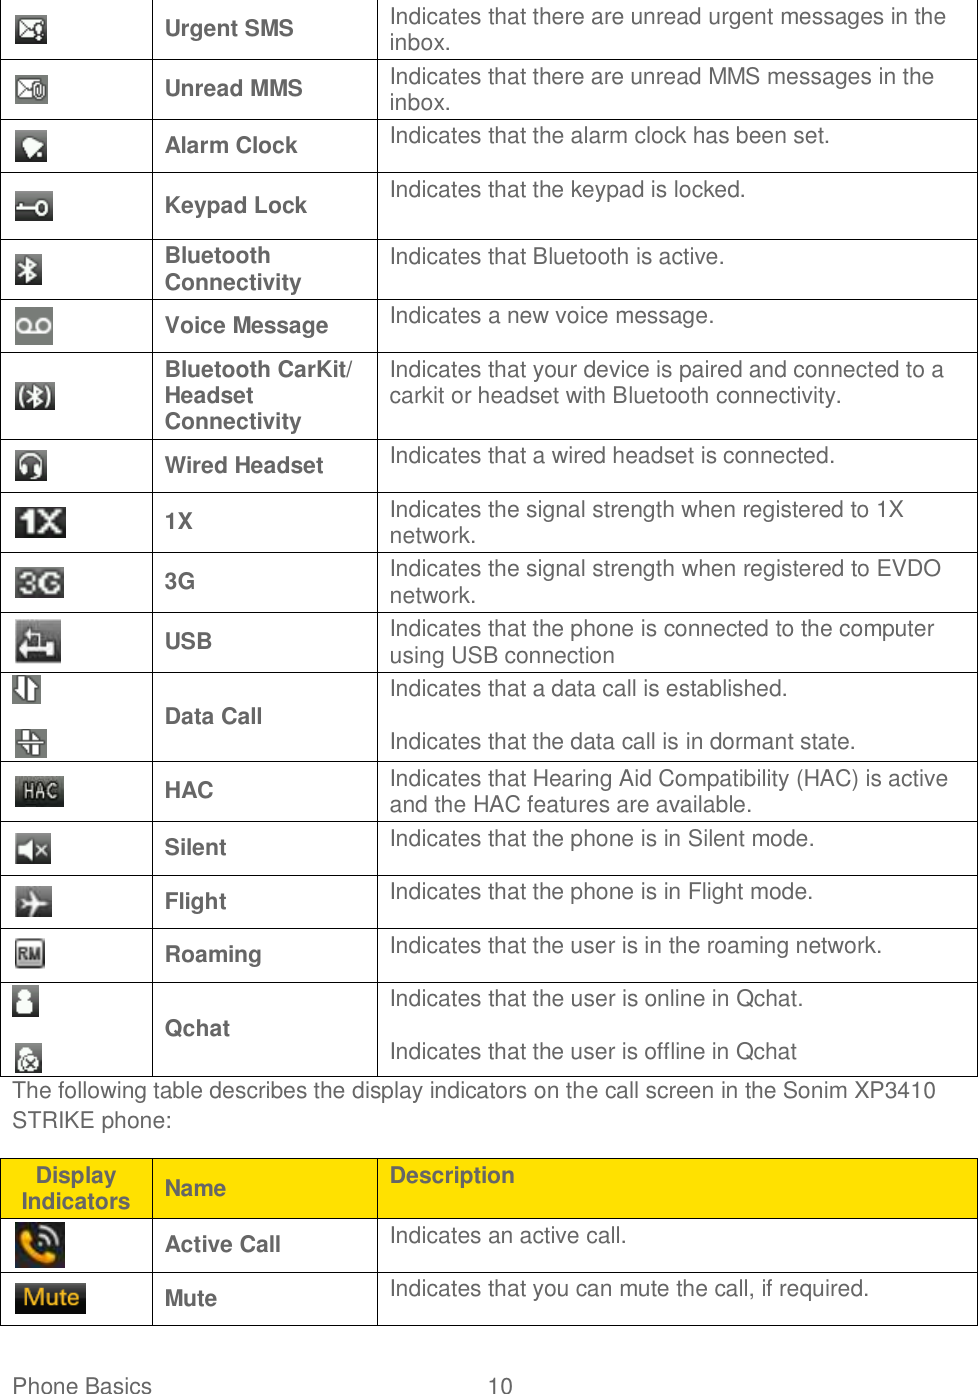
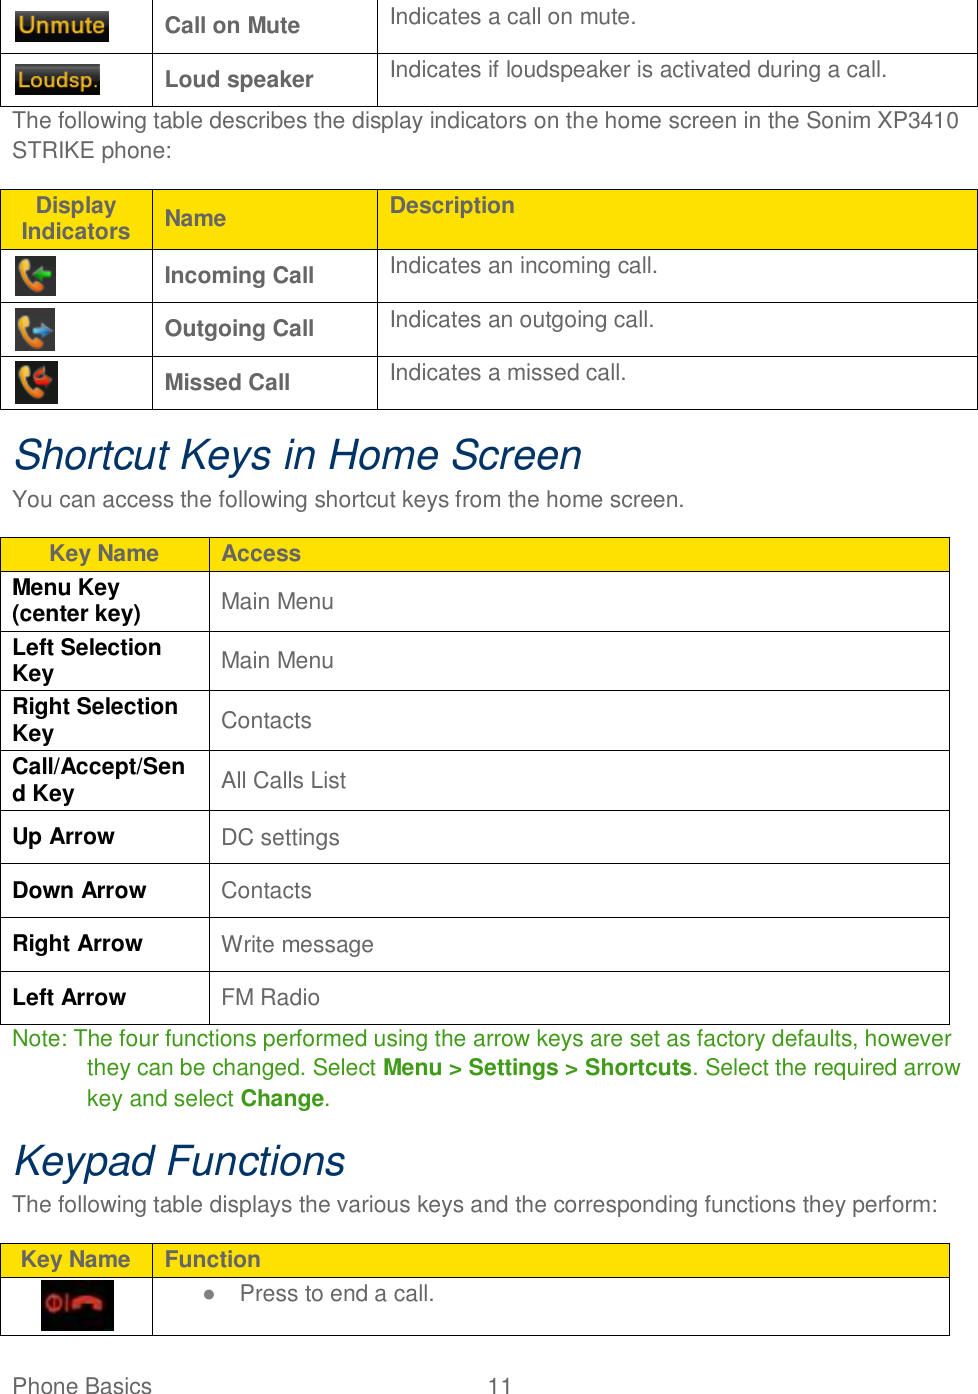
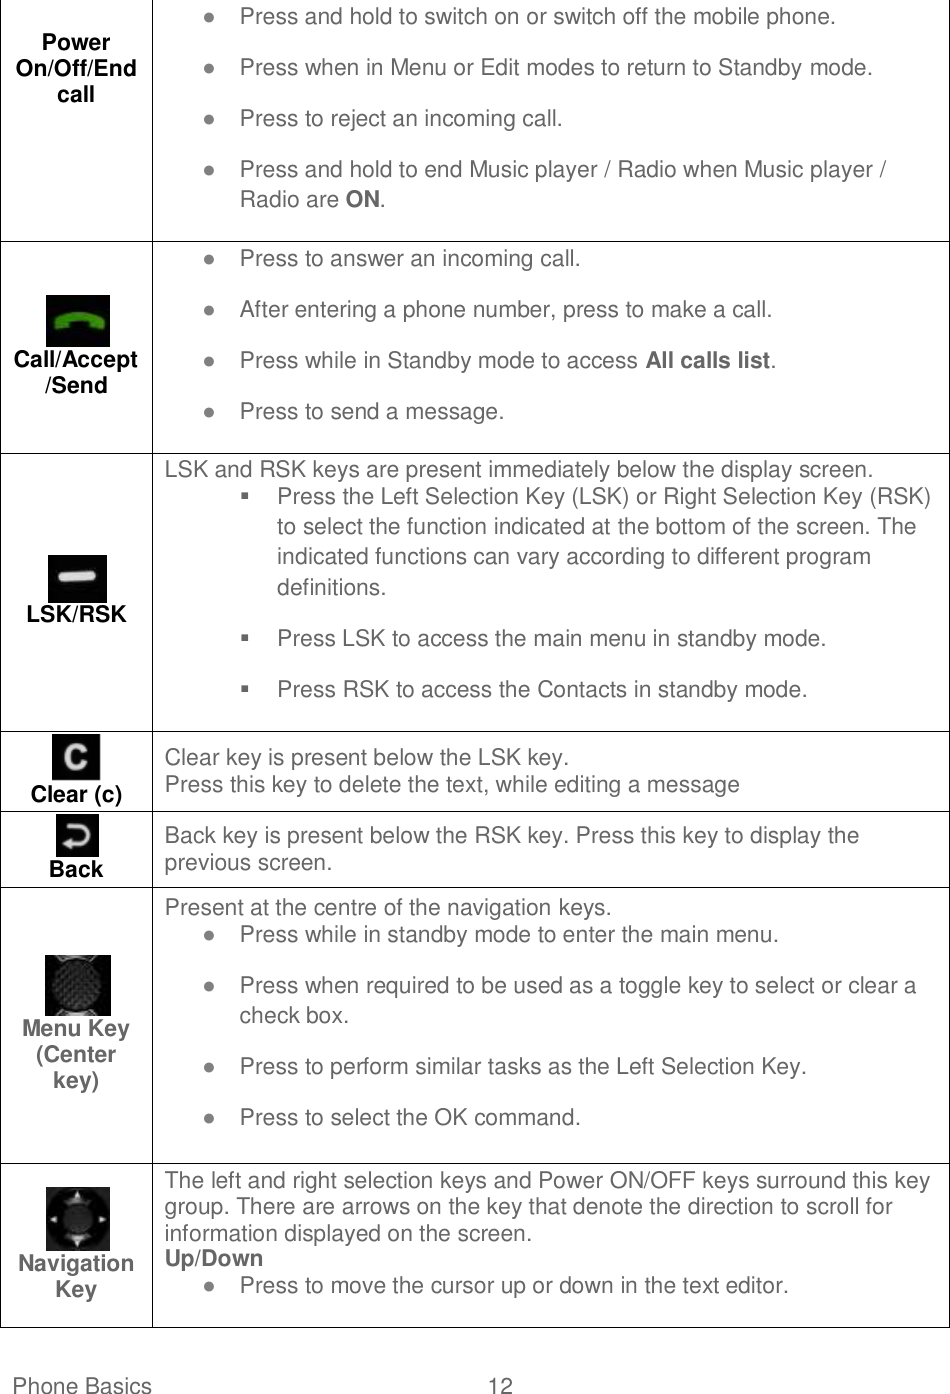
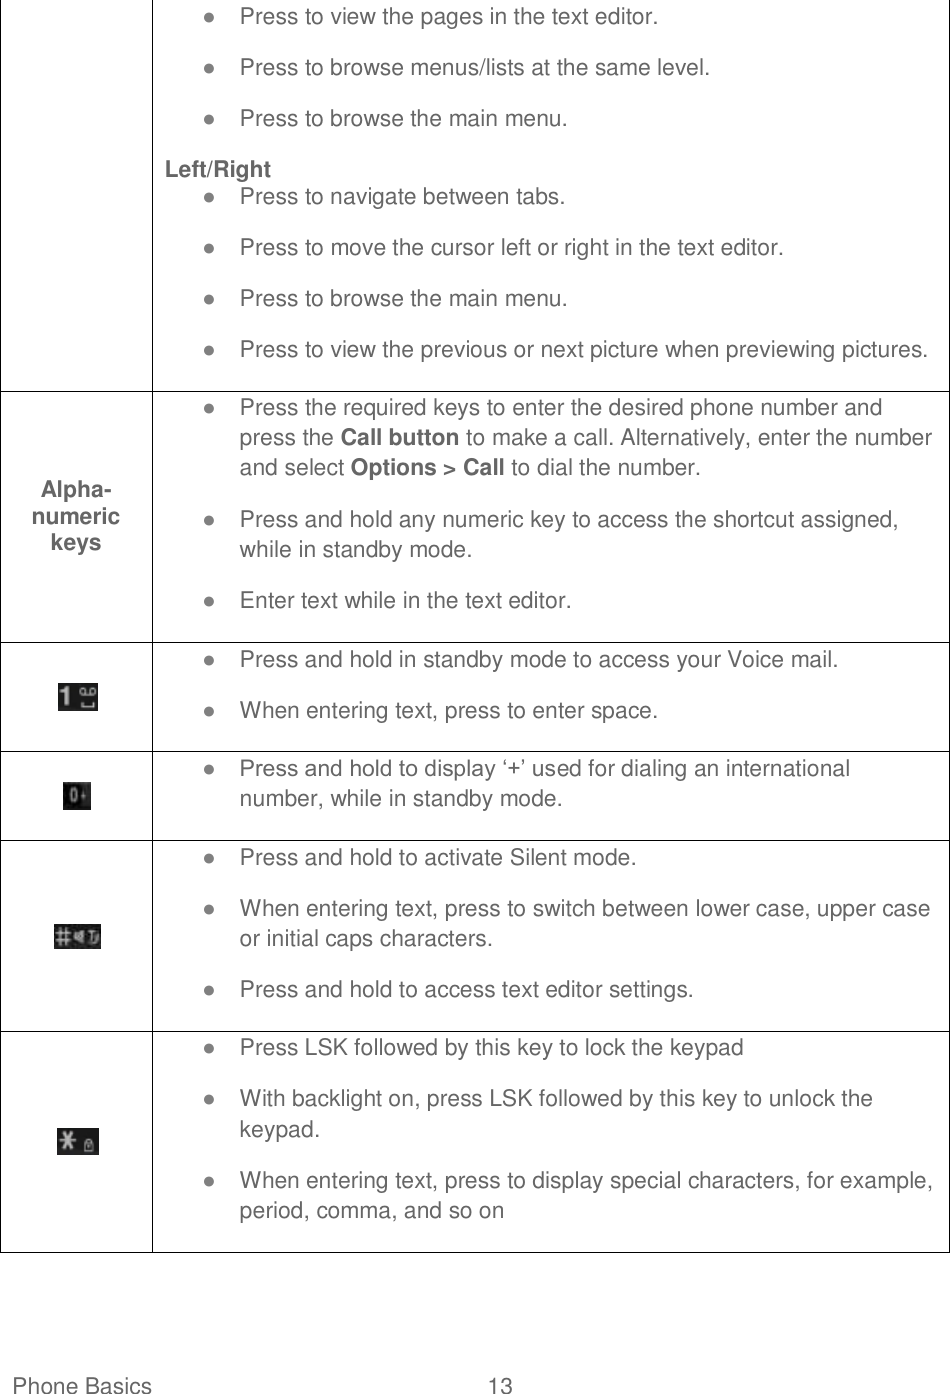
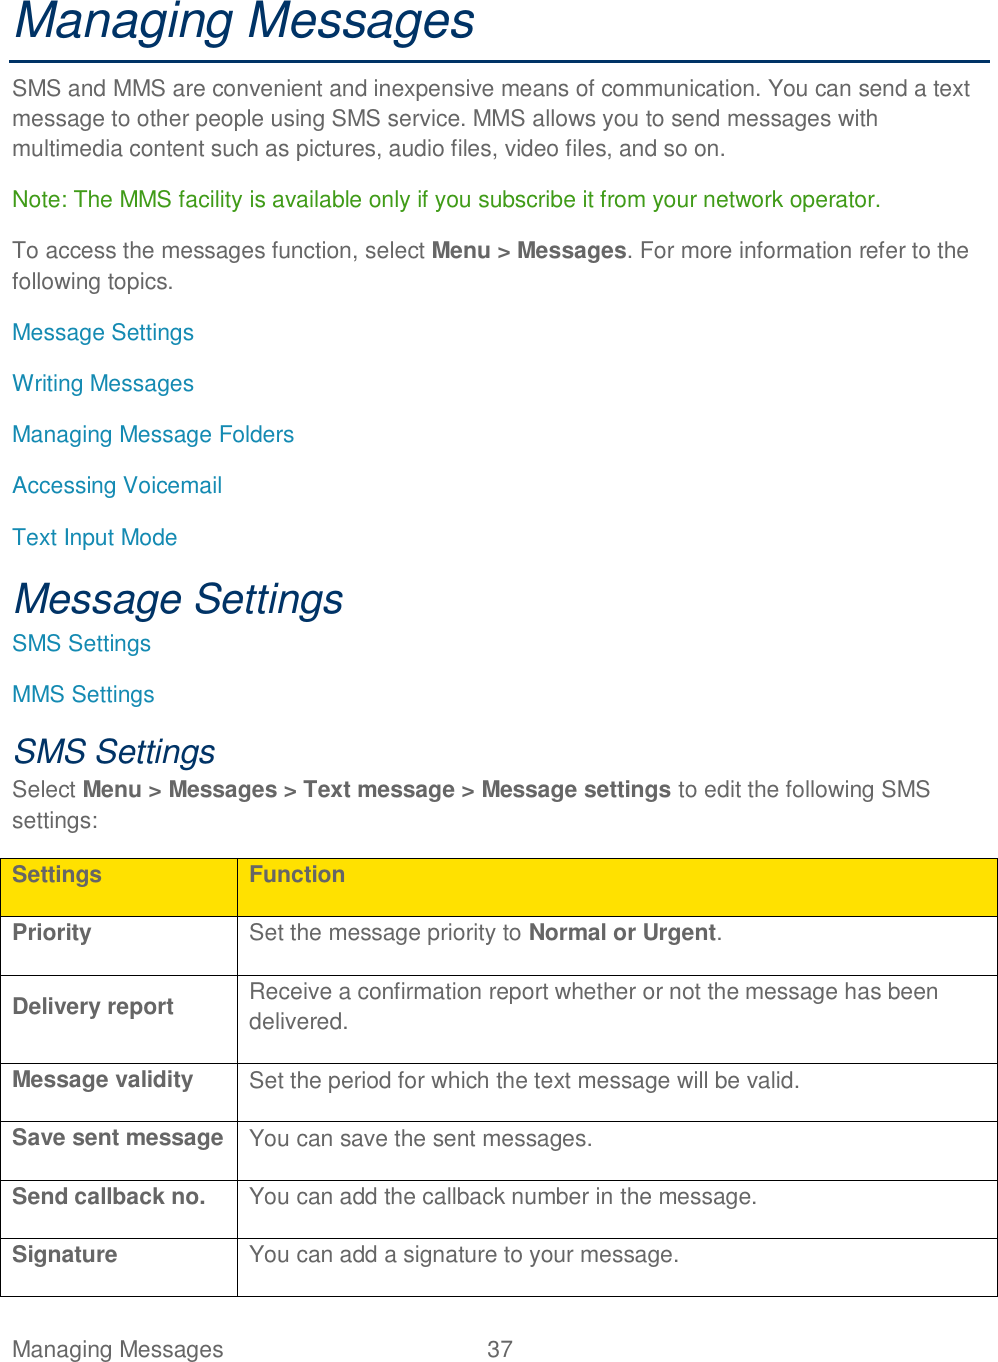
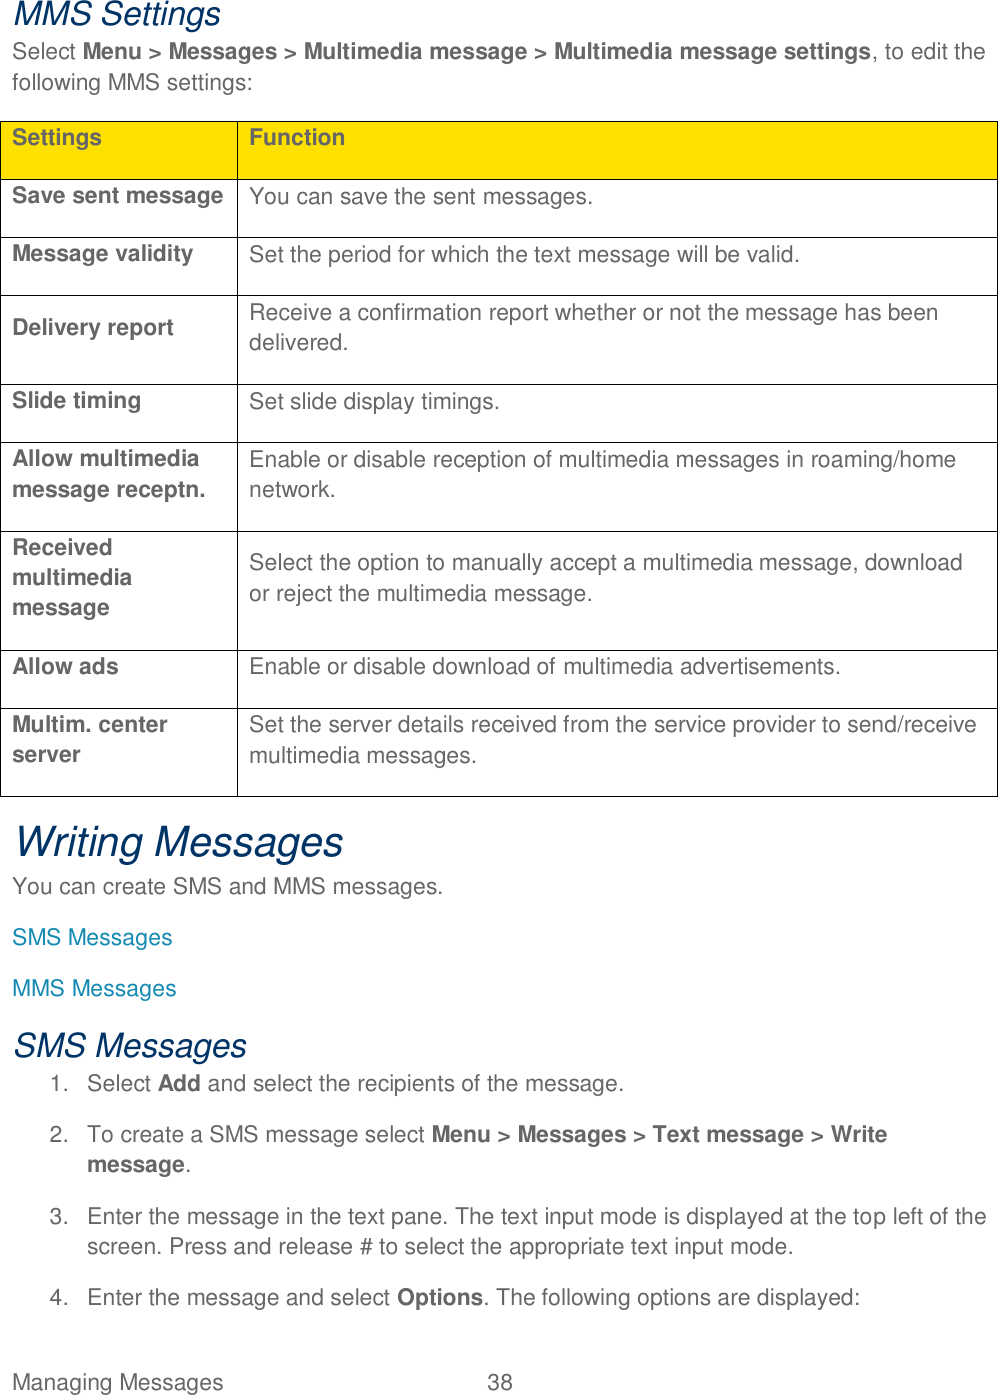
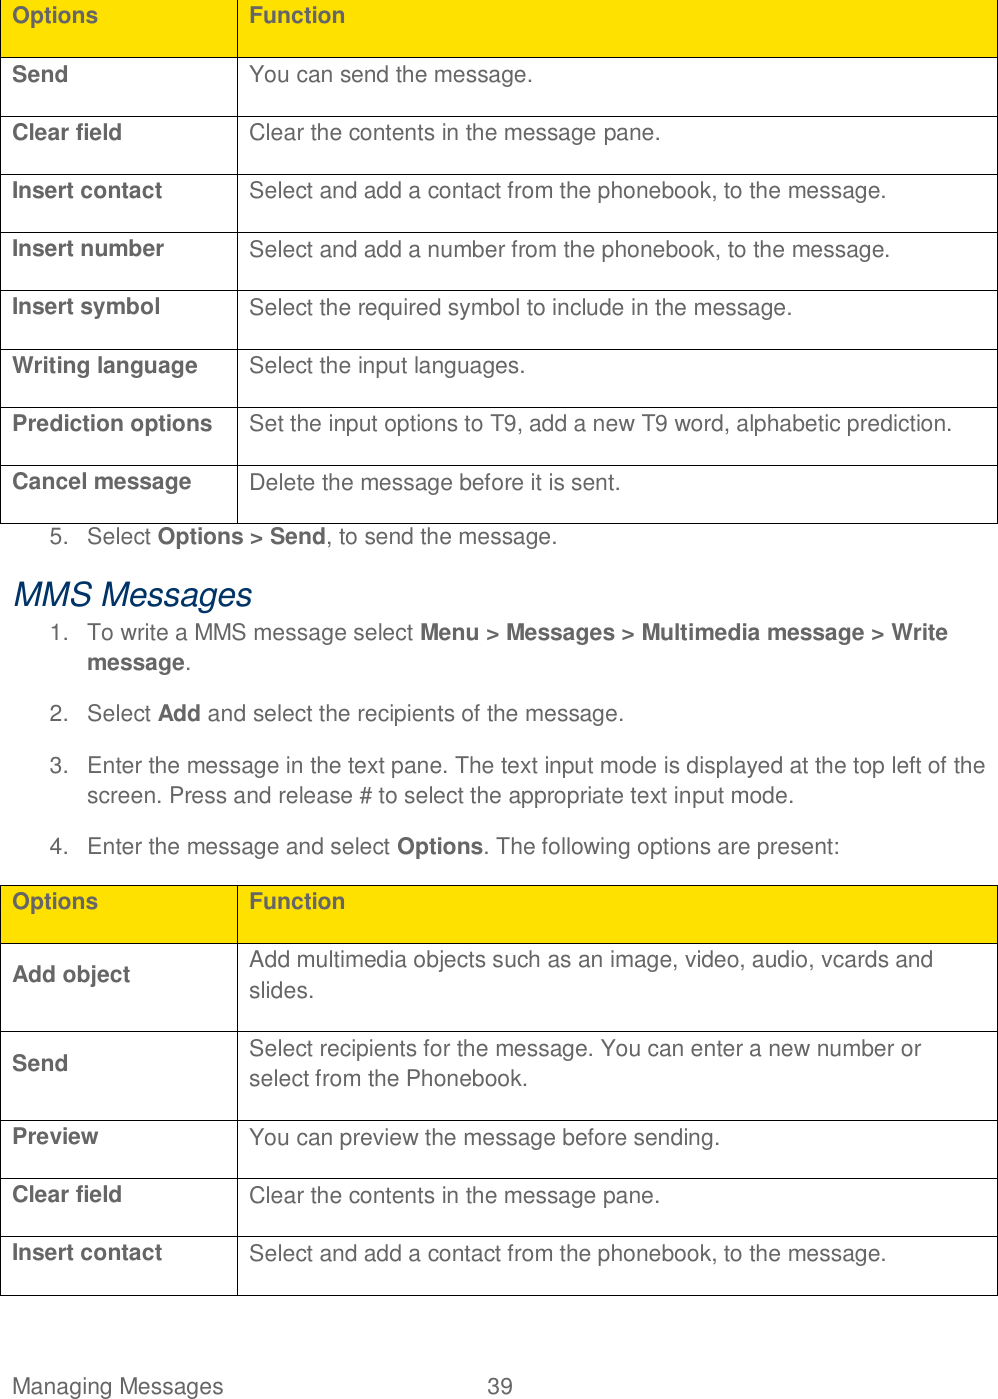
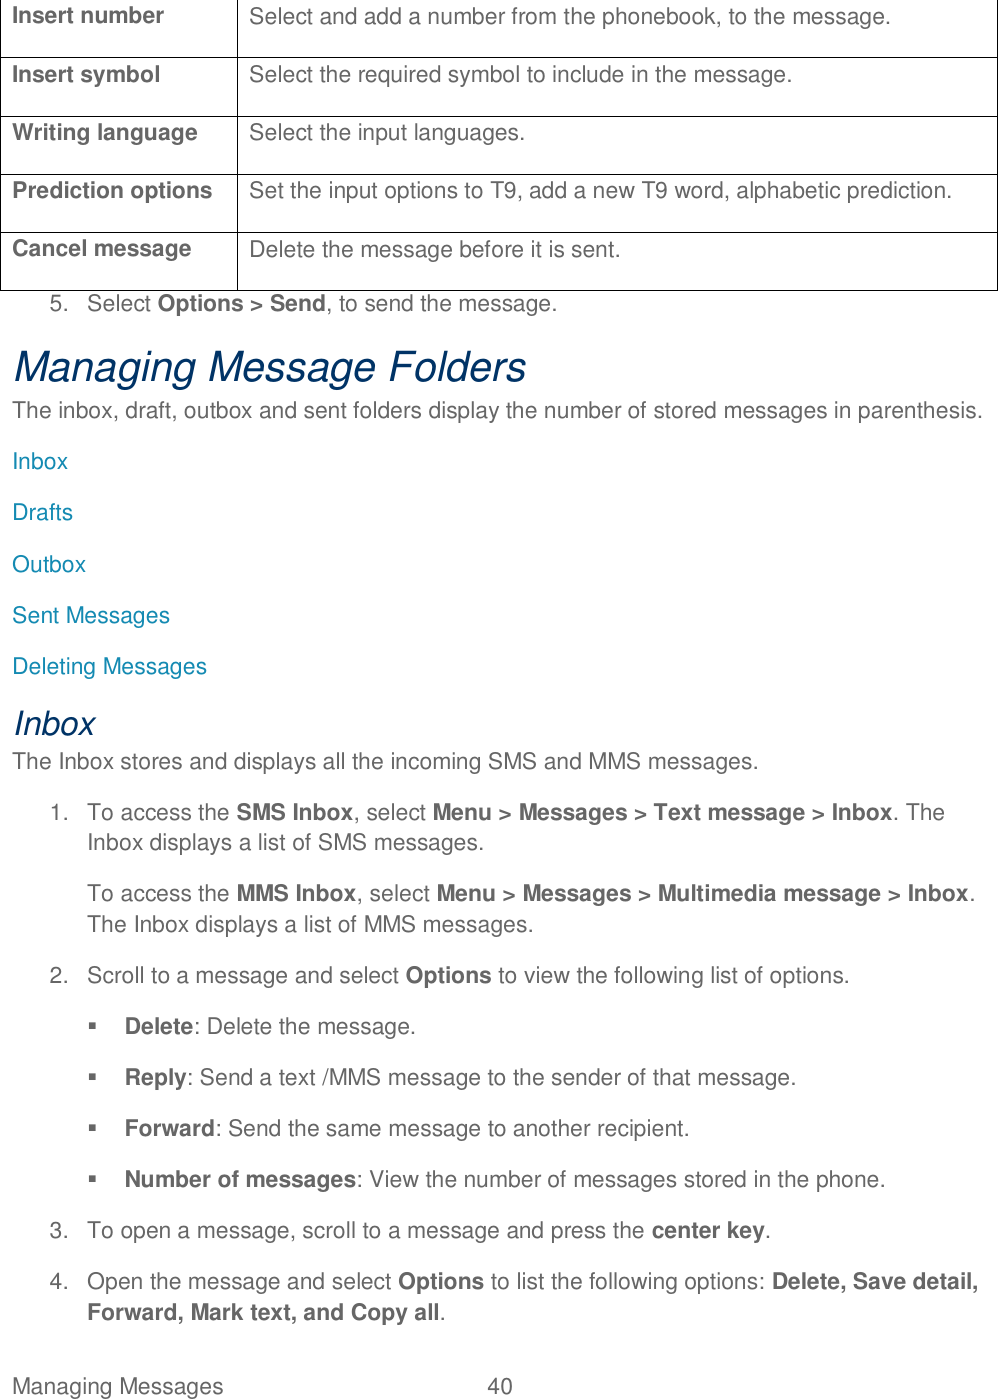
Sonim Technologies C21F010AA Cellular/PCS CDMA/EvDO Phone with Bluetooth User Manual TempConfidential XP3410 UG draft 29 08 FCC

Sonim Technologies, Inc. Cellular/PCS CDMA/EvDO Phone with Bluetooth TempConfidential XP3410 UG draft 29 08 FCC

TempConfidential_XP3410_UG_draft_29_08_FCC

Sonim XP STRIKE User Guide     ©2012 Sprint. Sprint and the logo are trademarks of Sprint. Other marks are trademarks of their respective owners. Copyright © 2012 Sonim Technologies, Inc.
SONIM and the Sonim logo are trademarks of Sonim Technologies, Inc. Other company and product names may be trademarks or registered trademarks of the respective owners with whom they are associated. Disposal of Old Electrical and Electronic Equipment   The symbol of the crossed-out wheeled bin indicates that within the countries in the European Union, this product, and any enhancements marked with this symbol, cannot be disposed as unsorted waste but must be taken to separate collection at their end- of-life.  Disposal of Battery   Please check local regulations for disposal of batteries. The battery should never be placed in municipal waste. Use a battery disposal facility if available.  Guideline for Headphone and Earphone   To prevent possible hearing damage, please do not listen at high volume levels for long periods.
TOC  i   Table of Contents General Information ....................................................................................................................2 Phone Models Covered .......................................................................................................2 Network Services .................................................................................................................2 Sonim Support Information ..................................................................................................2 Safety Guidelines .................................................................................................................3 Usage Instructions ........................................................................................................3 Precautions to Use the Battery ............................................................................................3 Battery Replacement ....................................................................................................4 Avoid Short Circuit ........................................................................................................4 Avoid High Temperatures .............................................................................................5 Battery Disposal ...........................................................................................................5 Personal Medical Devices ....................................................................................................5 Child Safety .........................................................................................................................5 Emergency Calls ..................................................................................................................5 SAR Information ..................................................................................................................6 SAR Data Information for residents in the United States and Canada. ..........................6 Getting Started ............................................................................................................................1 Box Contents .......................................................................................................................1 Setting Up Your Phone ........................................................................................................1 Battery usage ...............................................................................................................1 Inserting the Battery ......................................................................................................2 Removing the Battery ...................................................................................................2 Charging the Battery .....................................................................................................3 Activating Your Phone .........................................................................................................4 Activating an Existing Number using a New Phone .......................................................4 Setting Up Voicemail Box.....................................................................................................5 Phone Basics ..............................................................................................................................6 Sonim XP STRIKE Layout ............................................................................................6 Switching ON your Phone ....................................................................................................9 Sonim XP3410 STRIKE Home Screen.................................................................................9
TOC  ii   Home Screen Indicators ......................................................................................................9 Shortcut Keys in Home Screen ..........................................................................................11 Keypad Functions ..............................................................................................................11 Main Menu Icons ...............................................................................................................14 Managing Your Phone ..............................................................................................................15 DC Settings .......................................................................................................................15 User Status .................................................................................................................16 Permissions ................................................................................................................16 Group Call Options .....................................................................................................16 Headset Mode ............................................................................................................16 One Touch DC Setting ................................................................................................16 Update DC ..................................................................................................................17 Profile Settings ...................................................................................................................17 Display Settings .................................................................................................................17 Display Settings Options .............................................................................................17 Tone Settings.....................................................................................................................17 Date and Time Settings .....................................................................................................18 Shortcut Settings ...............................................................................................................18 Call Settings.......................................................................................................................18 Phone Settings ..................................................................................................................18 Language Settings ......................................................................................................19 Memory Status ...........................................................................................................19 Automatic Keyguard Setting .......................................................................................19 DTMF Tones Setting ...................................................................................................19 Startup Tone Setting ...................................................................................................19 Switch Off Tone Setting ..............................................................................................19 Welcome Note Setting ................................................................................................19 HAC Rating.................................................................................................................20 Hearing Aid Compatibility (HAC) Settings ...................................................................21 Data Charge Alert Settings .........................................................................................21 Data Guard Alert .........................................................................................................21 GPS Switch Settings ...................................................................................................21 Bluetooth Settings ..............................................................................................................21
TOC  iii   Security Settings ................................................................................................................21 Change Lock Code .....................................................................................................22 Call Restrictions ..........................................................................................................22 Phone lock ..................................................................................................................22 Voice Privacy ..............................................................................................................22 Network Settings ................................................................................................................23 Network Service Settings ...................................................................................................23 Restore Factory Settings....................................................................................................23 Speed Dial .........................................................................................................................23 Phone Details ....................................................................................................................24 Managing Calls .........................................................................................................................25 Make a Call ........................................................................................................................25 Dial a Local Number ...................................................................................................25 Dial an International Number ......................................................................................26 Dial a Number via Contacts ........................................................................................26 Dial a Number via the Call History .....................................................................................26 Receive a Call ....................................................................................................................26 Managing Call History ........................................................................................................26 Call History Options ....................................................................................................27 Any key Answer .................................................................................................................28 Auto Redial ........................................................................................................................28 1-touch Dialing ...................................................................................................................28 Auto-Service Update ..........................................................................................................28 Default International Prefix .................................................................................................28 Data Calls ..........................................................................................................................28 Call Summary ....................................................................................................................29 In-Call Timer ......................................................................................................................29 Message Response ...........................................................................................................29 Managing Contacts ...................................................................................................................30 Add New Contact ...............................................................................................................30 View Contact Details ..........................................................................................................30 Searching Contacts............................................................................................................31 Sending Message to Contacts ...........................................................................................31
TOC  iv   Sending SMS ..............................................................................................................31 Sending MMS .............................................................................................................31 Sending DC Alerts to Contacts...........................................................................................31 Dialing a Number from Contacts ........................................................................................32 Edit Contact Details ...........................................................................................................32 Delete Contact ...................................................................................................................32 Sending Contact Details ....................................................................................................32 By SMS ......................................................................................................................32 By MMS ......................................................................................................................32 By Bluetooth ...............................................................................................................33 Selecting Multiple Contacts ................................................................................................33 DC Groups .........................................................................................................................33 Phonebook Settings ...........................................................................................................34 Delete All Contacts ............................................................................................................34 Searching Contact .............................................................................................................34 Managing Alerts ........................................................................................................................35 Missed Calls ......................................................................................................................35 Missed DC Calls ................................................................................................................35 Missed DC Alerts ...............................................................................................................36 Managing Messages .................................................................................................................37 Message Settings ..............................................................................................................37 SMS Settings ..............................................................................................................37 MMS Settings .............................................................................................................38 Writing Messages ..............................................................................................................38 SMS Messages ..........................................................................................................38 MMS Messages ..........................................................................................................39 Managing Message Folders ...............................................................................................40 Inbox...........................................................................................................................40 Drafts ..........................................................................................................................41 Outbox ........................................................................................................................41 Sent Messages ...........................................................................................................41 Deleting Messages .....................................................................................................42 Accessing Voicemail ..........................................................................................................42
TOC  v   Emergency Alerts ..............................................................................................................42 Inbox...........................................................................................................................42 Settings ......................................................................................................................42 Text Input Mode .................................................................................................................43 Managing Profiles .....................................................................................................................44 Tools .........................................................................................................................................45 Alarm .................................................................................................................................45 Calendar ............................................................................................................................46 Notes .................................................................................................................................46 To-do List ...........................................................................................................................46 Calculator ..........................................................................................................................47 Stopwatch ..........................................................................................................................47 World Clock .......................................................................................................................47 Unit Converter ....................................................................................................................48 Update Phone ....................................................................................................................48 Update Profile ....................................................................................................................48 Mobile Sync .......................................................................................................................48 My Files .............................................................................................................................48 Managing Your Files .................................................................................................................49 Managing Calendar ...................................................................................................................52 Edit Events .................................................................................................................52 My Stuff.....................................................................................................................................54 Application Manager ..........................................................................................................54 Ringback Tones .................................................................................................................54 Games ...............................................................................................................................54 Ringtones ..........................................................................................................................54 Screen Savers ...................................................................................................................54 Applications .......................................................................................................................54 Managing Browser ....................................................................................................................55 Browser Options ................................................................................................................55 Browser Settings ................................................................................................................56 Managing Connectivity ..............................................................................................................58 Setting Up Bluetooth Connectivity ......................................................................................58
TOC  vi   Activate Bluetooth .......................................................................................................58 Deactivate Bluetooth ...................................................................................................59 Active Devices ............................................................................................................59 Pairing Devices ...........................................................................................................59 Connecting a Bluetooth Headset ................................................................................59 Rename Paired Device ...............................................................................................60 Delete Paired Device ..................................................................................................60 Setting Bluetooth Device Name ..................................................................................60 Sending Data via Bluetooth ........................................................................................60 Receiving Data via Bluetooth ......................................................................................61 Accessing Using USB Function..........................................................................................61 Maps .........................................................................................................................................62 Entertainment............................................................................................................................63 Voice Recorder ..................................................................................................................63 Video Recorder ..................................................................................................................63 FM Radio ...........................................................................................................................64 Music Player ......................................................................................................................65 Playlists ......................................................................................................................65 Camera ..............................................................................................................................65 Using the Camera .......................................................................................................66 Camera Settings .........................................................................................................66 Using Micro SD Card ................................................................................................................68 Inserting Micro SD Card into the Phone .............................................................................68 Using PC-Tools Application.......................................................................................................69 Installing PC-Tools .............................................................................................................69 Using PC-Tools with Phone ...............................................................................................69 End User License Agreement ...................................................................................................70 Comprehensive 3 Year Warranty .......................................................................................70 Our Warranty .....................................................................................................................70 What We Will Do ................................................................................................................70 Phone Care .......................................................................................................................71 Conditions ..........................................................................................................................71 FCC Statement .........................................................................................................................73
3-Year Warranty  1    ● Make sure to register within 30 days from date of purchase to activate and take advantage of this Comprehensive Product Warranty. Sonim reserves the right to refuse warranty service otherwise. ● Refer to www.sonimtech.com/support for further details.
General Information  2   General Information Congratulations on the purchase of a Sonim XP STRIKE mobile phone. This phone is a CDMA and EVDO REV-A enabled handset with quad-band capabilities and has an intuitive, feature-rich user interface, which allows you to make the best use of the offered functions. The following topics in this chapter will provide the general information related to the Sonim XP STRIKE phone. Phone models covered Network services Sonim support information Safety Guidelines Precautions to Use the Battery  Personal Medical Devices Child Safety Emergency Calls SAR Information Phone Models Covered This user guide covers Sonim XP™ STRIKE phone model: Sonim XP3410-A-R1. This model utilizes the following RF bands: CDMA 800/1900 MHz bands.  The phone model name can be read on the phone label under the battery. Network Services These are additional services that you can avail through Sprint. To make the best of these services, you must subscribe to them through Sprint and obtain instructions for their use from them. Sonim Support Information If your phone needs product support, please contact Sprint support (1-888-211-4727). For online support information, visit www.sprint.com.
General Information  3   Safety Guidelines Please read and understand the following safety guidelines before you use the phone. These guidelines provide details to enable you to operate your phone safely and conform to any legal requirements regarding the use of cellular phones. Usage Instructions  Do not to use the phone at a refueling point. Observe restrictions when using radio equipment at fuel depots, chemical plants or where blasting operations are in progress.  Electrical interference may obstruct the use of your phone. Observe restrictions in hospitals and near medical equipment.  Switch off your cellular phone when in an aircraft. Wireless phones can cause interference or danger to an aircraft. In an aircraft, the phone can be used in flight mode.  Do not expose the battery to high temperatures (in excess of 60°C).  Adhere to road safety laws. Do not hold/use a phone while you are driving; find a safe place to stop first. Do not speak into a hands-free microphone while you are driving  Avoid using the phone in close proximity to personal medical devices, such as pacemakers and hearing aids.  Use only Sonim XP STRIKE approved charging equipment to charge your phone and avoid damage to your phone.  This product, and any enhancements marked with this symbol, cannot be disposed as unsorted waste but must be taken to separate collection at their end-of-life.  Only qualified personnel should install or repair your phone. Precautions to Use the Battery A rechargeable battery powers your device. Use the battery only for its intended purpose. Never use any charger or battery that is damaged. If the battery is completely discharged, it may take a few minutes before the charging indicator appears on the display or before any calls can be made. The full performance of a new battery is achieved only after three to four complete charge and discharge cycles. You can charge the battery several times but it will eventually wear out. Unplug the charger from the electrical plug and the device when not in use. Ensure
General Information  4   that you do not leave the fully charged battery connected to a charger. If left unused, a fully charged battery will lose its charge over time. Ensure to follow the following precautions related to battery usage: 1.  Do not disassemble or open crush, bend or deform, puncture or shred. 2.  Do not modify or remanufacture, attempt to insert foreign objects into the battery, immerse or expose to water or other liquids, expose to fire, explosion or other hazard. 3.  Only use the battery with a charging system that has been qualified with the system per this standard. Use of an unqualified battery or charger may present a risk of fire, explosion, leakage, or other hazard. 4.  Do not short circuit a battery or allow metallic conductive objects to contact battery terminals. 5.  Replace the battery only with another battery that has been qualified with the system per this standard, IEEE-Std-1725-200x. Use of an unqualified battery may present a risk of fire, explosion, leakage or other hazard. 6.   Promptly dispose of used batteries in accordance with local regulations. 7.  Battery usage by children should be supervised. 8.  Avoid dropping the phone or battery. If the phone or battery is dropped, especially on a hard surface, and the user suspects damage, take it to a service center for inspection. 9.  Improper battery use may result in a fire, explosion or other hazard. 10. For those host devices that utilize a USB port as a charging source, the host device's user manual shall include a statement that the phone shall only be connected to CTIA certified adapters, products that bear the USB-IF logo or have completed the USB-IF compliance program. Battery Replacement When the talk and standby times are noticeably shorter than normal, replace the battery with an original Sonim battery. If a replacement battery is being used for the first time or if the battery has not been used for a prolonged period, it may be necessary to connect the charger and then disconnect and reconnect it to begin charging the battery. Avoid Short Circuit Do not short-circuit the battery. An accidental short-circuit can occur when a metallic object such as a coin, clip, or pen causes direct connection of the positive (+) and negative (-) terminals of the battery. (These look like metal strips on the battery.) This might happen, for example, when you carry a spare battery in your pocket or purse. A short-circuit at the terminals may damage the battery or the connecting object.
General Information  5   Avoid High Temperatures If you leave the battery in hot or cold places, such as in a closed car in summer or winter conditions, it will reduce the capacity and lifetime of the battery. For best results, try to keep the battery between -20°C and +55°C (-4°F and 131°F). A device with a hot or cold battery may not work temporarily, even when the battery is fully charged. Battery performance is particularly limited in temperatures well below freezing. Battery Disposal Do not dispose the batteries in a fire as they may explode. Batteries may also explode if damaged. Dispose of batteries according to local regulations and recycle when possible. Do not dispose as household waste. Do not dismantle, open or shred cells or batteries. In the event of a battery leak, do not allow the liquid to come in contact with the skin or eyes. In the event of leak or a hazard seek medical help immediately. Personal Medical Devices Mobile phones may affect the operation of cardiac pacemakers and other implanted equipment. Please avoid placing the mobile phone over the pacemaker, for example in your breast pocket. When using the mobile phone, place it at the ear opposite the pacemaker. If a minimum distance of 15 cm (6 inches) is kept between the mobile phone and the pacemaker, the risk of interference is limited. If you suspect that interference is taking place, immediately turn off your mobile phone. Contact your cardiologist for more information. For other medical devices, consult your physician and the manufacturer of the device. Comply with instructions to switch off the device or deactivate the RF transmitter when required, especially when posted in hospitals and airplanes. Equipment used in these places may be sensitive to radio waves emitted from the device and adversely affect their operation. Also, observe restrictions at gas stations or other areas with flammable atmosphere or when close to electro-explosive devices. Child Safety Do not allow children to play with your mobile phone or its accessories. Keep it out of their reach. They could hurt themselves or others, or could accidentally damage the mobile phone or accessories. Your mobile phone and its accessories may contain small parts, which could be detached and create a choking hazard. Emergency Calls Mobile phones operate using radio signals, which cannot guarantee connection under all conditions. Therefore you should never rely solely upon any mobile phone for essential communications (e.g. medical emergencies). Emergency calls may not be possible in all areas, on all cellular networks, or when certain network services and/or mobile phone features are in use. Check with your local service provider.
General Information  6   SAR Information The Sonim XP STRIKE has been certified in compliance with the Government‟s requirements for exposure to Radio Waves. When communicating over the wireless network, the mobile phone emits via the radio frequency waves low levels of radio energy. The Specific Absorption Rate, or SAR, is the amount of RF energy absorbed by the body while using the phone and is expressed in watts/kilogram (W/kg). Governments around the world have adopted comprehensive international safety guidelines, developed by scientific organizations, for example, ICNIRP (International Commission on Non-Ionizing Radiation Protection) and IEEE (The Institute of Electrical and Electronics Engineers Inc.). These guidelines establish permitted levels of radio wave exposure for the general population. Tests for SAR are conducted using standardized methods with the phone transmitting at its highest certified power level in all used frequency bands. SAR Data Information for residents in the United States and Canada. In the United States and Canada, the SAR limit for mobile phones used by the public is 1.6 watts/kilogram averaged over one gram of tissue. The standard incorporates a margin of safety to give additional protection for the public and to account for any variations in measurements. Before a phone model is available for sale to the public in the US, it must be tested and certified by the Federal Communications Commission (FCC) that it does not exceed the limit established by the government-adopted requirement for safe exposure. The tests are performed in positions and locations (that is, by the ear and worn on the body) as required by the FCC for each model. The highest SAR value for the Sonim XP3410-A-R1 phone when tested by Sonim for use: ● By the head is 1.39 W/kg (1 g). ● Worn on the body is: 0.499 W/kg (1 g). For body-worn operation, this phone meets FCC RF exposure guidelines provided that it is used with a non-metallic accessory with the handset at least 2.5 cm from the body. Use of other accessories may not ensure compliance with FCC RF exposure guidelines.
Getting Started  1   Getting Started This section provides information on using your Sonim XP STRIKE phone. Box Contents Setting Up Your Phone Activating Your Phone Setting Up Voicemail Box Box Contents The list of items in the Sonim XP STRIKE phone box is: ● Sonim 3 Year Warranty Flyer ● Quick Start Guide ● Registration Card ● Welcome Letter ● Screwdriver ● USB Cable ● USB adapter Setting Up Your Phone To setup the phone, insert and charge the battery. Battery usage ● Use only a Sonim certified battery that is designed for this phone model. The use of other batteries may void the warranty terms of your phone and cause damage. ● Protect the phone battery from extreme temperature environments and moisture. ● Please keep the battery out of the reach of children.
Getting Started  2   Inserting the Battery 11. Rotate both the battery cover screws in counter clockwise direction (as shown in the figure). Use the screwdriver provided to open the screws. Sometimes, the battery cover may be tight and extra effort is required to open it.   12. Lift the back cover to view the battery slot.  13. Insert the battery and push into the battery slot such that the three metallic contacts at the top of the battery are aligned with the metallic contacts within the battery compartment.  14. Close the battery cover. Rotate the battery cover screws in clockwise direction. You can use the screwdriver provided to tighten the screws. Ensure not to over tighten the screws. Removing the Battery 1.  Rotate both the battery cover screws in counter clockwise direction (as shown in the figure). Use the screwdriver provided to open the screws. Sometimes, the battery cover may be tight and some extra effort is required to open it.
Getting Started  3   2.  Lift the back cover to view the battery slot.  3.  Raise the upper end of the battery from the slot and remove the battery. 4.  Close the battery cover. Rotate the battery cover screws in clockwise direction. You can use the screwdriver provided to tighten the screws. Ensure not to over tighten the screws. Charging the Battery The battery provided with your mobile phone is not fully charged. We recommend that you charge the mobile for 5 hours before you use your mobile phone for the first time. Note: The phone with a fully charged battery can remain in the standby mode for up to 800 hours. If the battery is completely out of charge, the charging icon appears only after several minutes, when the charger is connected. Please do not use an incorrect battery type as it might cause explosion. Complete the following steps to charge the phone battery. 1.  Insert the charger plug into a power outlet.  2.  The charger port is located on the left side of the phone. To access the charger port, lift the cover with the USB sign. Insert the 3.5mm jack/connector of the charger to the port.   Alternatively, you can use the standard USB cable and adaptor to charge the phone battery. Insert the adaptor to the charger port of the phone. Connect one end of the standard USB cable to the adaptor and the other end of the USB cable to the PC.
Getting Started  4   3.  If the battery is being charged when the phone is switched off, only the battery icon is displayed (as shown in the adjacent figure).  If the battery is being charged while the phone is switched on, you will notice that the bars in the battery charge icon (visible on the home screen) show movement indicating that the battery is being charged. After the phone is fully charged, the battery bars on the display stop scrolling. You can disconnect the charger from the phone.  Activating Your Phone ● If you purchased your phone at a Sprint Store, it is probably activated and ready to use. ● If you received your phone in the mail and it is for a new Sprint account or a new line of service, it is designed to activate automatically.   When you turn the phone on for the first time, Hands Free Activation screen is displayed. Complete the onscreen instructions to activate the phone.   If required, PRL Update and Firmware Update screens are displayed. Complete the onscreen instruction to update your phone. ● If you received your phone in the mail and you are activating a new phone for an existing number on your account (you‟re swapping phones), you can activate on your computer online or directly on your phone. Activating an Existing Number using a New Phone Note: Switch OFF the old phone before you switch ON the new phone. •  Turn on your new phone. Your phone will automatically attempt Hands-Free Activation. •  Select Activate to override auto-activation and start the manual activation wizard. •  Follow the onscreen instructions to complete the activation. ● To confirm activation, make a phone call. If your phone is still not activated or you do not have access to the Internet, contact Sprint Customer Service at 1-888-211-4727 for assistance. Tip:   Do not press the Power button while the phone is being activated. Pressing the Power button cancels the activation.
Getting Started  5   Note:   For more information about phone activation, contact Sprint Customer Service by calling 1-888-211-4727 from any other phone. Setting Up Voicemail Box When you activate your voicemail box, unanswered incoming calls will be forwarded to your voice mail. Callers will be prompted to leave a message for you. This feature requires you to enter a voice mail number provided by your service provider. You should set up your Sprint Voicemail and personal greeting as soon as your phone is activated. Always use a password to protect against unauthorized access. Your phone automatically transfers all unanswered calls to your voicemail, even if your phone is in use or turned off. To set up the voice mail box, select Menu > Messages > Voice mail. Enter the number provided by your service provider and select Save. This number should be used when you want to listen to your stored voice mail messages. You can also press and hold the voicemail key ( ), to setup and configure your voicemail box. Note:  Voicemail Password – It is recommended that you create a password when setting up your voicemail to protect against unauthorized access. Without a password, anyone who has access to your phone is able to access your voicemail messages.
Phone Basics  6   Phone Basics Your phone is packed with features that simplify your life and expand your ability to stay connected to the people and information that are important to you. The topics in this section will introduce the basic functions and features of your phone. Sonim XP STRIKE layout Switching On your phone Your home screen Home screen Indicators Shortcut keys in home screen Keypad Functions Main Menu Icons Sonim XP STRIKE Layout This model is a bar type phone with a single LCD screen. The graphic field of the screen is 240 (W) and 320 (H) pixels. The TFT technology used displays 262K colors. The Sonim XP STRIKE keypad has 11 function keys and 12 alphanumeric keys. The left side of the phone has one key and the right side of the phone has three keys. The torch, camera, battery and the speaker are located in the back side of the phone. For more information refer to the following figures. Sonim XP STRIKE Front Layout Sonim XP STRIKE Back Layout
Phone Basics  7   Sonim XP STRIKE Front Layout
Phone Basics  8   Sonim XP STRIKE Back Layout
Phone Basics  9   Switching ON your Phone Press and hold the Power ON/OFF key for 2 seconds to Power On the phone. When the phone is switched on, it tries to register with the network. After successful registration, the name of the service provider is displayed in the home screen. Sonim XP3410 STRIKE Home Screen  Home Screen Indicators The home screen indicators are visible in the status bar, when the phone is in standby mode. Some icons indicate the status of certain functionalities of the phone, for example, the battery charge indicator, the network status indicator, the date and time etc. Some icons are displayed only if the specific service is activated. The following table describes the display indicators on the top bar of the home screen in the Sonim XP3410 STRIKE phone. Display Indicators Name Description  Battery Three clear bars indicate maximum battery charge. Opaque bars indicate decline in battery charge.  Vibration Indicates that Vibration is On.  Emergency alerts Indicates that there is an emergency alert issued by Federal US agencies  Unread Message Indicates that there are unread messages in the inbox.
Phone Basics  10    Urgent SMS Indicates that there are unread urgent messages in the inbox.  Unread MMS Indicates that there are unread MMS messages in the inbox.  Alarm Clock Indicates that the alarm clock has been set.  Keypad Lock Indicates that the keypad is locked.  Bluetooth Connectivity Indicates that Bluetooth is active.  Voice Message Indicates a new voice message.  Bluetooth CarKit/ Headset Connectivity Indicates that your device is paired and connected to a carkit or headset with Bluetooth connectivity.  Wired Headset Indicates that a wired headset is connected.  1X Indicates the signal strength when registered to 1X network.  3G Indicates the signal strength when registered to EVDO network.  USB Indicates that the phone is connected to the computer using USB connection    Data Call Indicates that a data call is established.  Indicates that the data call is in dormant state.  HAC Indicates that Hearing Aid Compatibility (HAC) is active and the HAC features are available.  Silent Indicates that the phone is in Silent mode.  Flight Indicates that the phone is in Flight mode.  Roaming Indicates that the user is in the roaming network.    Qchat Indicates that the user is online in Qchat.  Indicates that the user is offline in Qchat The following table describes the display indicators on the call screen in the Sonim XP3410 STRIKE phone: Display Indicators Name Description  Active Call Indicates an active call.  Mute Indicates that you can mute the call, if required.
Phone Basics  11    Call on Mute Indicates a call on mute.  Loud speaker Indicates if loudspeaker is activated during a call. The following table describes the display indicators on the home screen in the Sonim XP3410 STRIKE phone: Display Indicators Name Description  Incoming Call Indicates an incoming call.  Outgoing Call Indicates an outgoing call.  Missed Call Indicates a missed call. Shortcut Keys in Home Screen You can access the following shortcut keys from the home screen. Key Name Access Menu Key (center key) Main Menu Left Selection Key Main Menu Right Selection Key Contacts Call/Accept/Send Key All Calls List Up Arrow DC settings Down Arrow Contacts Right Arrow Write message Left Arrow FM Radio Note: The four functions performed using the arrow keys are set as factory defaults, however they can be changed. Select Menu > Settings > Shortcuts. Select the required arrow key and select Change. Keypad Functions The following table displays the various keys and the corresponding functions they perform: Key Name Function  ● Press to end a call.
Phone Basics  12    Power On/Off/End call ● Press and hold to switch on or switch off the mobile phone. ● Press when in Menu or Edit modes to return to Standby mode. ● Press to reject an incoming call. ● Press and hold to end Music player / Radio when Music player / Radio are ON.  Call/Accept/Send ● Press to answer an incoming call. ● After entering a phone number, press to make a call. ● Press while in Standby mode to access All calls list. ● Press to send a message.  LSK/RSK LSK and RSK keys are present immediately below the display screen.   Press the Left Selection Key (LSK) or Right Selection Key (RSK) to select the function indicated at the bottom of the screen. The indicated functions can vary according to different program definitions.   Press LSK to access the main menu in standby mode.   Press RSK to access the Contacts in standby mode.  Clear (c) Clear key is present below the LSK key. Press this key to delete the text, while editing a message  Back Back key is present below the RSK key. Press this key to display the previous screen.  Menu Key (Center key) Present at the centre of the navigation keys. ● Press while in standby mode to enter the main menu. ● Press when required to be used as a toggle key to select or clear a check box. ● Press to perform similar tasks as the Left Selection Key. ● Press to select the OK command.  Navigation Key The left and right selection keys and Power ON/OFF keys surround this key group. There are arrows on the key that denote the direction to scroll for information displayed on the screen. Up/Down ● Press to move the cursor up or down in the text editor.
Phone Basics  13   ● Press to view the pages in the text editor. ● Press to browse menus/lists at the same level. ● Press to browse the main menu. Left/Right ● Press to navigate between tabs. ● Press to move the cursor left or right in the text editor. ● Press to browse the main menu. ● Press to view the previous or next picture when previewing pictures. Alpha-numeric keys ● Press the required keys to enter the desired phone number and press the Call button to make a call. Alternatively, enter the number and select Options > Call to dial the number. ● Press and hold any numeric key to access the shortcut assigned, while in standby mode. ● Enter text while in the text editor.  ● Press and hold in standby mode to access your Voice mail. ● When entering text, press to enter space.  ● Press and hold to display „+‟ used for dialing an international number, while in standby mode.  ● Press and hold to activate Silent mode. ● When entering text, press to switch between lower case, upper case or initial caps characters. ● Press and hold to access text editor settings.  ● Press LSK followed by this key to lock the keypad ● With backlight on, press LSK followed by this key to unlock the keypad.  ● When entering text, press to display special characters, for example, period, comma, and so on
Phone Basics  14   Main Menu Icons  To access the phone menu, press the Menu key. The main menu which comprises the following 12 items is displayed. Icon Description  History – view Qchat and voice call history details.  Settings- view and modify settings related to Qchat, security, network, phone, display, profiles, and tone.  My stuff –access application manager, ringback tones, games, ringtones, screen savers and applications  Contacts – view and manage contacts and Qchat groups stored in the phonebook.  Missed alerts – view and manage missed calls, missed DC calls and DC alerts.  Messaging – view and manage text messages, multimedia messages and voicemail and emergency alerts.  Tools – Access tools such as alarm, calendar, notes, to-do list, calculator, stopwatch, world clock, and my files. You can also update the phone and the profile and also sync your phone   Entertainment – access voice recorder, video, radio, music player and camera  Maps – access Sprint navigation application  Shopping – access shopping applications  Browser – access internal browser that allows you to browse contents of various Websites on the Internet.  My Account – access and manage your Sprint account details, related to your phone.
Managing Your Phone  15   Managing Your Phone This section provides the information for personalizing and setting up your phone. The following topics in this chapter will provide more information about various phone settings. DC Settings Profile Settings Display Settings Tone Settings Date and Time Settings Shortcut Settings Call Settings Phone Settings Bluetooth Settings Security Settings Network Settings Network Service Settings Restore Factory Settings Speed Dial Phone Details DC Settings To view and modify the Direct Connect (DC settings), select Menu > Settings > DC settings. Refer to the following topics for more information. User Status Permissions Group Call Options Headset Mode
Managing Your Phone  16   One Touch DC Setting Update DC Add Member Restart Details Online Info My Qchat Address User Status You can set the DC user status to Available or Offline. If the user is offline they cannot receive DC alerts and calls. Permissions View and add the list of phone numbers to the Restrict Incoming list. You will not receive DC calls from these numbers. Group Call Options View and edit the DC group call settings. You can set to   Allow the call to continue – If the DC group call initiator ends the call, the other members can continue the call.  End call for everyone - If the DC group call initiator ends the call, the group call will be stopped. Headset Mode In headset mode you can press the headset button to activate one of the following:  Headset button starts voice calls – initiates voice calls  Headset button starts DC calls – initiates DC calls. One Touch DC Setting Press the Qchat button on the left hand side to activate one of the following functions:  Launch DC contacts list -  displays Qchat contacts list  Launch DC call log list – displays Qchat call log list  DC selected contact – displays the selected Qchat contact. You can select a single Qchat contact for easy access.   DC most recent numbers – displays the recently called DC numbers.
Managing Your Phone  17   Update DC You can check and update the Qchat application to the latest version. Profile Settings To edit and activate various profiles, select Menu > Settings > Profiles. You can set your phone to one of the following profiles – General, Home, Meeting, Outdoor, Silent and Flight.  For more information about profiles, refer Managing Profiles. Display Settings To activate and modify the display settings, select Menu > Settings > Display. Modify the required options.  Display Settings Options ● Wallpaper: Set the background screen display using the embedded pictures available in your phone or from your own pictures that you have downloaded on to your phone or Micro SD card. The selected wallpaper is displayed on the home screen.  ● Screen saver: Activate the screen saver to appear on the idle screen. User can select the screensaver image. ● Screen save mode: Set the phone idle time to activate Screen Saver if the phone is idle for specific time. ● Backlight level: Select the brightness level for the backlight of the screen. ● Backlight time-out: The screen display is active for the set time period. Tone Settings To set the tone for incoming calls, messages, and keypad, select Menu > Settings > Tone settings. Modify the required options. ● Incoming call alert: You can set the alert type for incoming calls. You can select OFF ringing, ascending, ring once or beep once. ● Ring tone: You can set the tone for incoming calls. Note: You can download and store ring tones over Bluetooth or WAP. These ring tones will be stored in My files or My stuff. The supported ringtone formats are MIDI, MP3, WAV, AAC and AMR. ● Ring volume: You can set the volume for ringtone. ● Vibrating alert: You can enable or disable vibrating alerts for incoming calls.
Managing Your Phone  18   ● Message alert tone: You can set the alert type to pre-defined alert tone, or tones from My Stuff folder or silent, for incoming messages. ● Keypad tones: You can set the volume of the keypad tone. ● Application tones: You can enable or disable audible tones when applications are running. Date and Time Settings You can set and display the date and time on the phone. You can also select the display format.  To set the Date and Time, select Menu > Settings > Date and time > Date & time settings. Note: The date and time cannot be manually changed if Auto-update is enabled. To set the Date and Time format, select Menu > Settings > Date and time > Date and time format.  Note: The date formats supported are DD-MM-YYYY, DD-MM-YY, MM-DD-YYYY, MM-DD-YY, YYYY-MM-DD, and YY-MM-DD. You can use, /, - or blank space separators. The time formats supported are 24 Hr and 12 Hr. Auto-update of time: This feature allows the phone to automatically synchronize the time to the network time.  Note: This feature has should be supported by the network. Shortcut Settings Shortcuts are the navigation keys that can be set for specific functions. To assign specific function to the keys, select Menu > Settings > Shortcuts > Select a key > Change. You can also change the specific function previously assigned to the key. Call Settings To set the various call options, select Menu > Settings > Call settings. For more information, refer Managing Calls. Phone Settings You can set or view the following general phone settings for easy access. Language Settings Memory Status Automatic Keyguard Setting DTMF Tones Setting
Managing Your Phone  19   Startup Tone Setting Switch Off Tone Setting Welcome Note Setting Hearing Aid Compatibility Settings Data Charge Alert Settings Data Guard Alert GPS Switch Settings Language Settings You can change the phone‟s interaction language by selecting your preferred language. For example, select Menu > Settings > Phone settings > Language > English to display all menu items, user feedback messages and text entry language in English. Memory Status You can view the memory used for storing my files, messages, application and tools. Select Menu > Settings > Phone settings > Memory status. The memory usage of phone memory and SD card is displayed. Automatic Keyguard Setting To enable or disable Automatic Keypad lock, select Menu > Settings > Phone settings > Automatic keyguard.  DTMF Tones Setting You can set the DTMF Tone Type and Tone length. Select Menu > Settings > Phone settings > DTMF Tones. Startup Tone Setting You can enable or disable the pre-defined startup tone. Select Menu > Settings > Phone settings > Start-up tone. Switch Off Tone Setting You can enable or disable the pre-defined power off tone. Select Menu > Settings > Phone settings > Switch off tone. Welcome Note Setting You can display customized welcome note whenever the phone is powered ON. Select Menu > Settings > Phone settings > Welcome note.
Managing Your Phone  20   HAC Rating The FCC has created a rating system for cellular phones regarding their HAC-related performance. This rating helps consumers with hearing disabilities to find phones that will work well with their hearing aid devices. The HAC rating and measurement procedure are described in the American National Standards Institute (ANSI) C63.19:2007.  ANSI C63.19 contains two rating standards: an “M” rating from 1 to 4 for hearing aids operating in microphone mode, and a “T” rating from 1 to 4 for hearing aids operating in telecoil mode. M-Rating stands for Microphone rating and indicates the amount of reduction of RF interference between the telephone and the hearing aid in acoustic coupling mode (also called microphone mode).  Phones rated M3 or M4 meet FCC requirements and generate less interference to hearing devices set in microphone mode. T-Rating stands for telecoil rating and represents inductive coupling with hearing aids that are operating in telecoil mode. A telecoil is a small piece of tightly wrapped wire, built into some hearing aids. While the microphone of a hearing aid picks up all sounds, the telecoil will only pick up an electromagnetic signal from the telephone. Thus, users of telecoil-equipped hearing aids are able to communicate over the telephone without the amplification of unwanted background noise. Phones rated T3 or T4 meet FCC requirements and generate less interference to hearing devices set in telecoil mode.  A combination of M-rating and T-rating defines the final HAC rating and is a deciding factor in selecting cellular phones for people with hearing problems. A HAC compliant phone could be rated:  ● M3/T3  ● M3/T4 ● M4/T3 ● M4/T4  These ratings assist hearing device users to find phones that are compatible with their hearing devices. Ratings are shown on the phone‟s box or label. The ratings are not guaranteed for suitability. The results vary depending on the individual‟s hearing loss and the immunity characteristics of the used hearing device, i.e. its resistance to interference. The best way to evaluate the suitability of the phone is to try it with the intended hearing aid device. Sonim XP3410-A-R1 has been tested for hearing aid device compatibility and complies with the Federal Communications Commission (FCC) requirements. Sonim XP3410-A-R1 is rated M4/T3.
Managing Your Phone  21   Hearing Aid Compatibility (HAC) Settings To enable coupling with a hearing aid device operating in telecoil/microphone mode, select Menu > Settings > Phone settings > Hearing aid > ON. Once HAC is enabled, the HAC symbol is displayed in the indicator bar. Select OFF to disable this feature. Note : While using the mobile phone for voice calls with hearing aid, slightly adjust the position of the phone against the ear to reduce the interference and to give better voice quality. Data Charge Alert Settings To enable airtime charge alerts during Web browsing, select Menu > Settings > Phone settings > Data charge alert > Enable. Select Disable to disable this alert. Data Guard Alert To enable data guard alert, select Menu > Settings > Phone settings > Data guard alert > Enable. Select Disable to disable this alert. This alerts the user when any application or feature requires Internet data access. GPS Switch Settings To activate GPS navigation switch, select Menu > Settings > Phone settings > GPS switch > ON. To deactivate GPS navigation switch, select Menu > Settings > Phone settings > GPS switch > OFF. Bluetooth Settings You can use Bluetooth to transfer data to any other Bluetooth enabled device. For more information about activating and using Bluetooth, refer to Setting Up Bluetooth Connectivity. Security Settings To prevent unauthorized use of your phone, you can enable the following security settings. Change Lock Code Call Restrictions Phone lock Voice Privacy To change the security settings, select Menu > Settings > Security. Enter the lock code and select OK. Note: The default lock code is last 4 digits of your phone number.
Managing Your Phone  22   Change Lock Code This function enables you to change the phone lock code, Select Menu > Settings > Security > Change lock code. Enter the new lock code and select OK. The default lock code is the last 4 digits of the MDN number.  Call Restrictions This function enables you to avoid receiving unnecessary calls. To configure call restrictions, Select Menu > Settings > Security > Call restrictions. Select Restrict sent Calls to block outgoing calls to the numbers added to the blocked Numbers, or to enable outgoing calls only to the numbers included in the allowed Numbers. Select Restrict received Calls to block incoming calls from the numbers added to the blocked Numbers, or to enable incoming calls only to the numbers included in the allowed Numbers. Phone lock In the phone lock mode, the phone can be unlocked only by entering a password.  The default lock code is the last 4 digits of the MDN number. To enable phone lock password,  Select Menu > Settings > Security > Phone lock.  Select one of the following Options: Options Description Off Disables phone lock Lock now Locks the phone immediately On power-up Locks the phone when the phone is powered On. Voice Privacy This function enables you to encrypt voice channel. To configure voice privacy, Select Menu > Settings > Security > Voice privacy.  Select ON/OFF to enable or disable voice privacy.
Managing Your Phone  23   Network Settings This function enables you to select the network roaming options.  You can set the roaming access mode and select one of the following Set mode options: Options Description Home only Can receive calls and messages only in your home network Automatic Can receive calls and messages in both home and roaming networks. The network is set automatically. Roaming only Can receive calls and messages only in roaming network. You can also set a different ring tone for roaming calls using Roam call tone option. Network Service Settings This function enables you to forward your incoming calls to a number in the Contacts or a new number, provided your network operator supports this service. To access call forward settings, select Menu > Settings > Network serv. >Call forwarding > All voice calls > Activate. Restore Factory Settings To restore factory settings, select Restore settings only. To restore factory settings and delete personal data present in your phone, select Restore all. Enter the lock code and select OK. The default lock code is the last 4 digits of the MDN number.  Note: If you select Restore all, you cannot retrieve the personal data and the phone will restart automatically. Speed Dial Speed dial enables you to dial a number quickly via a shortcut. 4.  Select Menu > Settings > 1-touch dialing. 5.  To add a new contact, select Menu > Phonebook > 1-touch dialing. Select the number key (from 2 to 9) to which you want to assign the speed dial, and select Set. Select the contact from the phonebook and save. The Speed dial is set.
Managing Your Phone  24   6.  To make a call, press and hold the shortcut designated number key for Speed dial from home screen. Phone Details Select to view the user information such as phone number and mobile identification number, and software and hardware version details. .
Managing Calls    25 Managing Calls This section provides information on managing calls and call settings. The following topics in this chapter will provide the more information about managing phone calls. Make a Call Receive a Call Managing Call History Any key Answer Auto Redial Auto-Service Update Default International Prefix Data Calls Call Summary In-Call Timer Message Response Make a Call You can call a local/international number from your phonebook, call history and also dial a number directly. For more information refer to the following topics. Dial a Local Number Dial an International Number Dial a Number via Contacts Dial a Number via the Call History Dial a Local Number Use the numeric keys to enter the number and press the Green button (Call button). Alternatively, you can enter the desired phone number and select Options > Call.
Managing Calls    26 Dial an International Number 1.  Press and hold the numeric key 0 till the + symbol is displayed. 2.  Enter the Country code, Area code (without preceding 0) and the phone number  3.  Press the Green button (Call button) or select Options > Call. Dial a Number via Contacts You can dial a number directly from the Contacts. 1.  On the home screen, select Contacts. Scroll to the phone number. 2.  Press to dial the number OR press Center key to make a call.  3.  Press the Red button (End call button) or select Options > End call to disconnect. Dial a Number via the Call History The Call history comprises separate lists for Call log, Missed calls, Dialed and Received calls. To access the Call history: 1.  Press Green button (Call button) or select Menu > Call history. All the available call history is displayed. 2.  Select a list, scroll to the number and press Green button (Call button) to dial the number. 3.  Press the Red button (End call button) or select Options > End call to disconnect. Receive a Call To receive a call, press the Green button (Call button) or press Left Selection key. Select Accept. To reject a call press the Red button (End call button) or Left Selection key. Select Reject. Managing Call History  You can view the call and alert logs related to, ● Dialed calls – view the list of outgoing calls ● Received calls – view the list of incoming calls ● Missed calls – view the list of unanswered calls ● Call log – view the complete list of outgoing, incoming and unanswered calls ● Clear log – delete all the call log entries
Managing Calls    27 ● Alert history – view the Qchat alert history. ● Data calls – view the size of data transferred (in KB) related to    Last sent data   Last received data   All sent data   All received data   Duration of last data call   Duration of all calls Select Clear all data logs, to clear the data call history. Call History Options You can view the details related to a specific call or perform tasks, based on the following options: Options Description Time of call You can view the details of the call such as the number, call time and date, and call timer. Send message You can send an SMS or MMS to the number. Enter the SMS or MMS and select Options to view the SMS options and send it accordingly. Edit number You can edit the number before dialing. You can also save the number to the phonebook. Save You can save the number in phonebook (if it is not saved). This option is displayed only if the number is not saved. Add to contact You can add the number to an existing contact in the phonebook. This option is displayed only if the number is not saved. Delete You can delete the number from the Call history. Call You can call the selected contact.
Managing Calls    28 Any key Answer When Any key answer is enabled, you can press any key except the Red button (End call button) to answer a call. To activate this feature, select Menu > Settings > Call settings > Any key Answer > ON. Note: Long pressing (press and hold) the Power on/off key during a call will switch off the phone. Auto Redial When auto redial is enabled, your phone will automatically redial within a set interval, if a call does not connect. 1.  To enable this function select Menu > Settings > Call settings > Automatic redial > ON. 2.  If the attempt to call is not successful, you will be prompted with the message Auto redial? Select OK to redial. Select Back to return to home screen. 1-touch Dialing 1-touch dialing enables you to dial a number quickly via a shortcut. 1.  Select Menu > Settings > 1-touch dialing. 2.  To add a new contact, select Menu > Phonebook > 1-touch dialing. Select the number key (from 2 to 9) to which you want to assign the speed dial, and select Set. Select the contact from the phonebook and save. The Speed dial is set. 3.  To make a call, press and hold the shortcut designated number key for Speed dial from home screen. Auto-Service Update Select Menu > Settings > Call settings > Auto-service update > On to receive automatic service updates from the service provider. Default International Prefix You can select Menu > Settings > Call settings > International prefix and enter the default ISD code to be prefixed when dialing international calls. Data Calls Select Menu > Settings > Call settings > Data calls > Data rate display > Graphic to view the data transfer rate. Select OFF to disable this feature.
Managing Calls    29 Call Summary You can select Menu > Settings > Call settings > Call Summary > On to view the call summary. In-Call Timer You can select Menu > Settings > Call settings > In-call timer > ON to activate the call time display. Message Response You can select Menu > Settings > Call settings > Message response to send automatic SMS response when you are unable to answer a call. You can edit the default response.
Managing Contacts  30   Managing Contacts You can use the phonebook to maintain phone numbers of your contacts. You can also add, delete, dial phone numbers, and send SMS and MMS messages, to contacts in the phonebook. To access the contacts, select Contacts from the home screen or select Menu > Contacts. The contacts stored in the phonebook are displayed. The following topics in this chapter will provide more information about managing contacts. Add New Contact View Contact Details Sending Message from Contacts Dialing a Number from Contacts Edit Contact Details Delete Contact Sending Contact Details Selecting Multiple Contacts Caller Groups Phonebook Settings Delete All Contacts Searching Contact Add New Contact To add a new contact, select Contacts > All contacts >Add (if the phonebook is empty) or Options > Add new contact. Enter the name and phone number and select Save. You can also add a contact from Call history menu and Write message menu. The new number is updated in the Contacts list. View Contact Details On the home screen, select Contacts. Select the contact and press the Center key to view the details.
Managing Contacts  31   Searching Contacts You can search and locate a particular contact from you contacts list. Select Contacts > All contacts >Find. Enter the contact name and select search Sending Message to Contacts You can send SMS and MMS messages to the contacts.  Note: Unsent messages will be saved to Drafts, automatically. Sending SMS 1.  On the home screen, select Contacts > All contacts. 2.  Select the contact.  3.  Press the Center Key to view the Details. 4.  Select the number and select Options > Send message > Text message. 5.  Enter the message and select Send or select Add > Insert contact/number, to select additional recipients. 6.  Select Send, to send the message. Sending MMS 1.  On the home screen, select Contacts. 2.  Select the contact.  3.  Press the Center Key to view the Details. 4.  Select the number and select Options > Send message > Multimedia message. 5.  Select Options > Add object, to add an attachment. 6.  Enter the message and select Send or select Add > Insert contact/number, to select additional recipients. 7.  Select Send, to send the message. Sending DC Alerts to Contacts You can send DC alerts to individual DC contacts.  1.  On the home screen, select Contacts > All contacts.  2.  Select a contact. Select Options > Send alert with msg.
Managing Contacts  32   3.  Enter the alert message and select Send. Dialing a Number from Contacts On the home screen, select Contacts and do one of the following:  Select the Green button (Call button), to call the default number assigned for that contact. Select the contact and press the center key to view the details. Select the number to call and press the Green button (Call button) or the Center key to call. Edit Contact Details You can enter or update the contact details. On the home screen, select Contacts. Select the contact. Select Options > Edit contact. Delete Contact To delete a contact‟s phone number, select Contacts, in the home screen. Select the contact and select Options > Delete > Delete number. A message Delete <phone number>? is displayed. Select Yes to delete. To delete a contact, select Contacts, in the home screen. Select the contact and select Options > Delete >Delete contact. A message appears Delete all details? Select Yes to delete. Sending Contact Details You can send contact information by SMS, MMS or Bluetooth. By SMS By MMS By Bluetooth By SMS 1.  In the home screen, select Contacts. Select the contact and press the center key to view the details. 2.  Select Options > Send business card > Via text message. 3.  Select the recipients from the Phonebook. 4.  Select Send, to send the contact information. By MMS 1.  In the home screen, select Contacts. Select the contact and press the center key to view the details.
Managing Contacts  33   2.  Select Options > Send business card > Via multimedia message.  3.  Select the Details to be send. 4.  Select the recipients from the Phonebook. 5.  Select Send, to send the contact information. By Bluetooth If Bluetooth is not turned ON, a message is displayed to turn it ON. 6.  In the home screen, select Contacts. Select the contact. 7.  Select Options > Send business card > Via Bluetooth. 8.  Select the device from Devices found list. 9.  When the other device accepts the contact, Business card sent message will be displayed. Selecting Multiple Contacts To select specific contacts, scroll to the required contacts and do one of the following: ● Select Options > Mark. ● Select Options > Mark all to select all the contacts in the phone book. Once the contacts are marked, the following options are displayed: Options Function Delete marked You can delete all the selected contacts. Mark all You can select all the contacts in the phonebook. This option is displayed only if all the contacts are not selected. Unmark all You can unmark all the selected contacts. DC Groups You can create a new group, add a new contact to the group, and manage the groups.  ● To create a new group, select Menu > Contacts > Team DC Group > Add (if there are no groups). You can assign a name.  ● To manage a group, select Menu > Contacts > Team DC Group. Select a group and then select Options. The following options are displayed.
Managing Contacts  34   Options Function New group Create a new group. Get Team DC Group  Group details View and modify the group name. Invite Invite all the group members for a call. Delete group You can delete the group. Phonebook Settings To view or define settings for your phonebook, select Menu > Contacts > Settings. ● Name display: Configure the contact‟s first name or last name to be displayed first. ● Memory status: View the number of contacts stored in the mobile phone.  Delete All Contacts You can delete all the contact records stored in the phone memory. Searching Contact 1.  In the home screen, select Contacts > Options > Find.  2.  Enter the contact name. The contact will be displayed.
Managing Messages  35   Managing Alerts You can use missed alerts to view missed calls, missed DC calls and DC alerts.  The following topics in this chapter will provide more information about missed alerts. Missed Calls Missed DC Calls Missed DC Alerts Missed Calls You can view the list of missed incoming calls. Select Options to manage missed calls  Options Function Dismiss Delete the selected number from the missed calls list Send message Send SMS or MMS to the selected number Save Save the selected number to Contacts. Call Call the selected number. Missed DC Calls You can view the list of missed incoming DC calls. Select Options to manage missed calls  Options Function Time of call Delete the selected number from the missed calls list Query status View the status of the call initiator Query call right Save the selected number to DC Contacts. Delete Delete the selected from the missed call list. Send alert with message Send a DC alert.
Managing Messages  36   Missed DC Alerts You can view the list of missed DC alerts. Select Options to manage missed calls \ Options Function Time of call Delete the selected number from the missed calls list Query status View the status of the call initiator Query call right Save the selected number to DC Contacts. Delete Delete the selected from the missed call list. Send alert with message Send a DC alert.
Managing Messages  37   Managing Messages SMS and MMS are convenient and inexpensive means of communication. You can send a text message to other people using SMS service. MMS allows you to send messages with multimedia content such as pictures, audio files, video files, and so on. Note: The MMS facility is available only if you subscribe it from your network operator. To access the messages function, select Menu > Messages. For more information refer to the following topics. Message Settings Writing Messages Managing Message Folders Accessing Voicemail Text Input Mode Message Settings SMS Settings MMS Settings SMS Settings Select Menu > Messages > Text message > Message settings to edit the following SMS settings: Settings Function Priority Set the message priority to Normal or Urgent. Delivery report Receive a confirmation report whether or not the message has been delivered. Message validity Set the period for which the text message will be valid. Save sent message You can save the sent messages. Send callback no. You can add the callback number in the message. Signature You can add a signature to your message.
Managing Messages  38   MMS Settings Select Menu > Messages > Multimedia message > Multimedia message settings, to edit the following MMS settings: Settings Function Save sent message You can save the sent messages. Message validity Set the period for which the text message will be valid. Delivery report Receive a confirmation report whether or not the message has been delivered. Slide timing Set slide display timings. Allow multimedia message receptn. Enable or disable reception of multimedia messages in roaming/home network. Received multimedia message Select the option to manually accept a multimedia message, download or reject the multimedia message. Allow ads Enable or disable download of multimedia advertisements. Multim. center server Set the server details received from the service provider to send/receive multimedia messages. Writing Messages You can create SMS and MMS messages. SMS Messages MMS Messages SMS Messages 1.  Select Add and select the recipients of the message. 2.  To create a SMS message select Menu > Messages > Text message > Write message.  3.  Enter the message in the text pane. The text input mode is displayed at the top left of the screen. Press and release # to select the appropriate text input mode. 4.  Enter the message and select Options. The following options are displayed:
Managing Messages  39   Options Function Send You can send the message. Clear field Clear the contents in the message pane. Insert contact Select and add a contact from the phonebook, to the message. Insert number Select and add a number from the phonebook, to the message. Insert symbol Select the required symbol to include in the message. Writing language Select the input languages. Prediction options Set the input options to T9, add a new T9 word, alphabetic prediction. Cancel message Delete the message before it is sent. 5.  Select Options > Send, to send the message. MMS Messages   1.  To write a MMS message select Menu > Messages > Multimedia message > Write message.  2.  Select Add and select the recipients of the message. 3.  Enter the message in the text pane. The text input mode is displayed at the top left of the screen. Press and release # to select the appropriate text input mode. 4.  Enter the message and select Options. The following options are present: Options Function Add object Add multimedia objects such as an image, video, audio, vcards and slides. Send Select recipients for the message. You can enter a new number or select from the Phonebook. Preview You can preview the message before sending. Clear field Clear the contents in the message pane. Insert contact Select and add a contact from the phonebook, to the message.
Managing Messages  40   Insert number Select and add a number from the phonebook, to the message. Insert symbol Select the required symbol to include in the message. Writing language Select the input languages. Prediction options Set the input options to T9, add a new T9 word, alphabetic prediction. Cancel message Delete the message before it is sent. 5.  Select Options > Send, to send the message. Managing Message Folders The inbox, draft, outbox and sent folders display the number of stored messages in parenthesis. Inbox Drafts Outbox Sent Messages Deleting Messages Inbox The Inbox stores and displays all the incoming SMS and MMS messages. 1.  To access the SMS Inbox, select Menu > Messages > Text message > Inbox. The Inbox displays a list of SMS messages. To access the MMS Inbox, select Menu > Messages > Multimedia message > Inbox. The Inbox displays a list of MMS messages. 2.  Scroll to a message and select Options to view the following list of options.  Delete: Delete the message.  Reply: Send a text /MMS message to the sender of that message.  Forward: Send the same message to another recipient.  Number of messages: View the number of messages stored in the phone. 3.  To open a message, scroll to a message and press the center key. 4.  Open the message and select Options to list the following options: Delete, Save detail, Forward, Mark text, and Copy all.
Managing Messages  41   Drafts Messages that have been saved to be sent later are stored in Drafts. 1.  To access unsent SMS messages, select Menu > Messages > Text message > Drafts. To access unsent MMS messages, select Menu > Messages > Multimedia message > Drafts. 2.  Select Options to view the following list of options.  Edit text: Edit the message and send it.  Delete: Delete the message. 3.  Press the center key to view the message. 4.  Open the message and select Options to list the following options: Delete, Mark text, and Copy all. Outbox Messages that were undelivered to the recipient due to some reason are stored in Outbox. 1.  To access undelivered SMS messages, select Menu > Messages > Text message > Outbox. To access undelivered MMS messages, select Menu > Messages > Multimedia message > Outbox. 2.  Select Options to view the following list of options.  Delete: You can delete the message.   Message status: You can view the sending status of the message. 3.  Press the center key to view the message.  4.  Open the message and select Options to list the following options: Delete, Message status, Save detail, Forward, Mark text, and Copy all. Sent Messages Messages that have been sent and delivered are stored in Sent. 1.  To access sent SMS messages, select Menu > Messages > Text message > Sent. To access sent MMS messages, select Menu > Messages > Multimedia message > Sent. 2.  Select Options to view the following list of options.
Managing Messages  42    Delete: You can delete the message.  Message status: You can view the sending status of the message.  Resend: You can resend the message.  Forward: You can send the message to another recipient. 3.  Press the center key to view the message. 4.  Open the message and select Options to list the following options: Edit message, Message status, Resend, Forward, Save detail, Mark text, and Copy all. Note: The messages are saved in Sent, only if it is activated in Menu > Messages. Deleting Messages To delete messages select Menu > Messages > select one of the message types > Delete message. Accessing Voicemail Your incoming calls can be forwarded to your voice mail. Callers will be prompted to leave a message for you. This feature requires you to enter a voice mail number which is provided by your service provider. To set voice mail number, select Menu > Messages > Voice mail. Enter the number provided by your service provider. Select Save. This number should be used when you want to listen to your stored voice mail messages. When you need to listen to your incoming voice mail messages, select Menu > Messages > Voice mail > Listen to voice msgs. You are connected to your mailbox where you can hear the stored voice mails messages.  You can also select Menu > Messages > Voice mail > Voice mailbox no. to edit the voice mail name and number.   Note: For quick access to voice mail, press and hold 1. Emergency Alerts Emergency alerts store and displays emergency messages received from Federal US agencies. Inbox View and delete the emergency messages. Settings Receive Settings You can enable or disable reception of extreme, severe, amber and test alert messages.
Managing Messages  43   Display Settings You can set the font size to view the emergency alert messages. Text Input Mode When you enter text for messages and notes, the input mode is displayed at the top left of the screen. Press and release the # key to view the different text input modes (Abc/ABC/abc). In conventional mode, you can enter a letter by repeatedly pressing a key until the letter you want appears. Numeric mode is used to input numbers. In T9 mode, when you press a key, the alphabets or letters are displayed. Scroll to the alphabet or letter and press the center key to select. 1.  To switch between upper case (ABC), lower case (abc) or sentence case (Abc), use key #. When the sentence case is used, the letter which comes immediately after the characters full stop (.), exclamation mark (!) and question mark (?) automatically becomes capital. 2.  To enter a character, press the numeric key repeatedly until the desired character appears on the screen. For example, to enter GOOD, in the text mode, press 4 once to display G, press 6 thrice to display O, and again press 6 thrice to display O and press 3 once to display D. If you are in T9 mode, press 4 once. Press 6 twice. Press 3 once and the word GOOD appears. To accept, press 1. 3.  To insert a space between characters or words when editing text, press 1. 4.  To erase a character select Clear. To insert special characters, press * to display the special characters. Press the navigation keys to scroll through the special characters. Select the character to appear in the text.  Press and hold # to display the text input in different languages. Press the center key to select the language. Select Done to change the text input language.
Managing Profiles  44   Managing Profiles You can activate and modify various settings on your Sonim XP STRIKE phone using Profiles.  On the home screen, select Menu > Settings > Profiles to display the profile list. You can customize the profiles to use features such as incoming call alert, ring tone, ring volume, vibrating alert, message alert tone, keypad tones, application tones and alert for settings. The environment profiles present in this phone are: General - default profile, Home, Meeting, Outdoor, Silent, and Flight mode.   Note: You cannot change the parameters for the Silent mode and flight mode. ● General: This is the default profile where all sounds are enabled. Parameters in this mode can be changed. Select Menu > Settings > Profiles > General > Edit, to open the Customize screen. You can use this screen to choose tone settings, ring volume, alert type, and ring type. Select Menu > Profiles > General > Activate to activate this profile. ● Home: Select Menu > Settings > Profiles > Home > Edit, to open the Customize screen. You can use this screen to choose tone settings, ring volume, alert type, and ring type. Select Menu > Profiles > Home > Activate to activate this profile. ● Meeting: The default ring tone is beep. Parameters in this mode can be changed. Select Menu > Profiles > Meeting > Edit, to open the Customize screen. You can use this screen to choose tone settings, ring volume, alert type, and ring type. Select Menu > Profiles > Meeting > Activate to activate this profile.  ● Outdoor: Here both vibrate and ring modes are enabled. Parameters in this mode can be changed. Select Menu > Settings > Profiles > Outdoor > Edit, to open the Customize screen. You can use this screen to choose tone settings, ring volume, alert type, and ring type. Select Menu > Profiles > Outdoor > Activate to activate this profile. ● Silent: Here all sounds are kept in mute. Select Menu > Profiles > Silent > Activate to activate this profile. You can also press and hold the # key to activate the silent mode. Note: Alarm tone will be played even in Silent profile. ● Flight: Select Menu > Profiles > Flight to open the Flight mode screen. Select Flight to activate this profile. In this mode, you cannot make or receive calls but can play Media player. You can deactivate the flight mode only by selecting Menu > Profiles > Flight > Normal or by activating other mode.
Tools  45   Tools This chapter provides details about the following tools supported by Sonim XP STRIKE. Alarm Calendar Notes To-do List Calculator Stopwatch World Clock Unit Converter Update Phone Update Profile Mobile Sync My Files Alarm You can set alarm for a particular time. Select Menu > Tools > Alarm. 1.  To set a simple alarm, set the alarm time and select Repeat > Off. Select Save. 2.  To set a recurrent alarm set the alarm time and select Repeat > On. Select Repeat Days and select Save. 3.  To set snooze time, set the alarm time in minutes and select Save. 4.  To set the alarm tone, select Menu > Tools > Alarm > Alarm tone. Select the alarm tone. Note: The alarm will work even if the phone is in Silent mode.   Note: The alarm will work even if the phone is switched off.
Tools  46   Calendar The calendar enables you to set appointments, schedule reminders when required, set alerts and repeat specific settings. Tasks can be viewed on daily and monthly basis. For more information, refer Managing Calendar. Notes Select Menu > Tools > Notes to store the required information. Use Options to add, edit or delete notes. To-do List Select Menu > Tools > To-do list to store the required information. Click Options to perform the following tasks: Options Descriptions Add Add a new To-do note. Delete Delete the selected note Mark note as done Mark the selected note as completed Save detail Use the phone number, e-mail address or the URL present in the note to  ● add to contacts ● call the contact ● send e-mail or message ● send the details to another number ● access the Website Sort by deadline Sort the list based on priority or deadline. Send Send the selected note to another contact as SMS or using Bluetooth. Delete notes Delete multiple notes till the current date or all the notes. Go to Calendar Access the calendar to view saved schedules. Save to Calendar Mark the selected task in the calendar
Tools  47   Calculator The calculator in this phone is designed to perform simple mathematical calculations. 1.  Select Menu > Tools > Calculator. 2.  To enter the numbers, press the numeric keys. 3.  To use mathematical operators use the navigation keys. Navigation Key Function Up + (Addition) Down - (Subtraction) Left * (Multiplication) Right / (Division) * key Decimal point # key Toggle between +/- sign to enter negative numbers 4.  After performing the calculations, press the Center key for the final result. Note: This phone accepts numbers up to a maximum of 10 digits per entry. Stopwatch  Select Menu > Tools > Typical stopwatch to start and stop the timer, as required. World Clock You can view the time of major cities in different time zones using this function.  Select Options to modify the following settings: Options Description Active Cities Set the active cities to be displayed in the World clock. Select Details to view the details about the specific city. Select Replace to change the city. Current Time Zone Set the current time Zone. Time format Set the time format to 12 Hr or 24 Hr clock.
Tools  48   DST set Set the daylight saving time for the selected city to  ● 0 (Wintertime) - no daylight saving. ● +1 hour - add an hour to DST. ● +2 hours - add 2 hours to DST. Unit Converter You can convert one type of physical units to another type. Select Menu > Tools > Unit converter. 1.  Select Options > Set conversion, to set the conversion unit. 2.  Select Options > Reverse conversion, to swap the conversion units. 3.  Select Options > Configure, to add new conversion units or edit the conversion values for existing units. Update Phone You can update your phone with the latest firmware or PRL. Select Menu > Tools > Update phone. Select one of the following options:  Update firmware – Update your phone with the latest firmware  Update PRL – update your phone with the latest PRL from the operator. Update Profile You can update your phone with the latest network parameters and server settings, when the operator changes them. Select Menu > Tools > Update profile. Mobile Sync You can back up all your contacts in the Sprint server. These details can be retrieved to your new phone, when you change the phone. Menu > Tools > Mobile Sync. My Files You can store and manage audio files, and image files. Select Menu > Tools > My files. For more information, refer Managing Your Files.  .
Managing Your files  49   Managing Your Files  Using the My files menu, you can store and manage audio files, and image files. You can preview the files, view their details and delete files. The internal storage capacity is approximately 170 MB. 1.  To view your files select Menu > Tools> My files. 2.  Scroll to a folder and select Open, to open the folder. The listed folders are:  SD Card (Optional) - stores images and music files. This option will be displayed only if SD card is inserted in the phone.  Images - stores the images captured using built-in camera   Videos - stores the Videos captured using built-in camera  Music - stores downloaded music files  Graphics - stores downloaded image files  Audio - stores ring tones and alert tones  Sounds - stores audio files recorded using built-in voice recorder  Others - stores the files transferred using Bluetooth and MMS message. 3.  For pictures, select the images that you would have saved. For sounds, select the audio files that you would have saved. Scroll to the folder and select Options to display further options. The following Options are provided for managing the folders. Options Function Delete folder Delete the folder. Move folder Move the folder to a different location. Rename folder Rename the folder. Details View the creation date, size, and copyright details of the file. Format view Set the format to view the images as list, list with details or grid.
Managing Your files  50   Sort Sort the images by name, date, format, and size. Add folder Create a new folder. Memory status View the memory used and free memory in MB. Mark Select the images one by one and select Options to delete, send, move or copy the marked images. Mark all Select all the images and select Options to delete, send, move or copy the marked images. 4.  Scroll to file from the displayed list and select Options to display further options. The following options are provided, for an image file. Options Function Use image Use the image as wallpaper, screen saver, and caller picture. Delete Delete the image. Send Send the image to any phone as a multimedia message, e-mail message or via Bluetooth. Move Move a file to different folder. Copy Copy a file to different folder. Rename Rename the image. Format view Set the format to view the images as list, list with details or grid. Sort Sort the images by name, date, format, and size. Add folder Create a new folder. Memory status View the memory used and free memory in MB. Mark Select the images one by one and select Options to delete, send, move or copy the marked images. Mark all Select all the images and select Options to delete, send, move or copy the marked images. The following options are present, for an audio file.
Managing Your files  51   Options Function Use tone Set the audio file as ringtone, alarm, calendar or contact tone. Delete Delete the audio file. Send Send the audio file to any phone as multimedia message, as an e-mail, or via Bluetooth. Move Move a file to different folder. Copy Copy a file to different folder. Rename Rename the audio file. Details View the name, size, created date, format, length and copyright of the file. Format view Set the format to view the images as list, list with details or grid. Sort Sort the images by name, date, format, and size. Add folder Create a new folder. Memory status View the memory used and free memory in MB. Mark Select the images one by one and select Options to delete, send, move or copy the marked images. Mark all Select all the images and select Options to delete, send, move or copy the marked images.
Applications  52   Managing Calendar The calendar enables you to set appointments, schedule reminders when required, set alerts and repeat specific settings. Tasks can be viewed on daily and monthly basis. 1.  To access the Organizer and its associated functions, select Menu > Tools > Calendar. The calendar for the current month/date is displayed. Use the navigation keys to navigate across months/dates. 2.  Select Options to view the list of options available.  Make a note: Add a new note for a specific date.  Go to date: You can go to a particular date and view the events for that date.  Go to today: You can access the current date.  Delete event: You can delete events based on following options: All until today, All in time period, and Delete all.  Settings: Edit the following calendar settings: Settings Function Date & time settings Set the date and time format. You cannot modify this setting if auto-update of time is On. Default view Set the default view to month or day view. Week starts Set the starting day of the week. Calendar tone Set the alert for calendar events. Edit Events Select Menu > Calendar > View. Select the event. Select View > Edit. Make the changes. Select Save. Select Options to view the list of available options: ● Make a note: Add a new note for a specific date. ● Delete: Delete the specific event. ● Edit: Edit the specific event ● Save Detail: Use the details such as phone number, URL and E-mail address.
Applications  53   ● Send note: Send the note via SMS or Bluetooth. ● Month view: View the calendar in month format. ● Go to date: You can go to a particular date and view the events for that date. ● Go to today: You can access the current date. ● Delete event: You can delete events based on following options: All until today, All in time period, and Delete all. ● Settings: Edit the calendar settings.
Applications  54   My Stuff Sonim XP STRIKE includes an application manager and a content manager to download and use Java applications. For more information refer to the following topics. Application Manager Ringback Tones Games Ringtones Screen Savers Applications Application Manager You can use application manager to download Java applications, and store it to your phone or SD card. Ringback Tones You can set the ring back tones for incoming calls, through WAP. Games You can download and store games using WAP, to your phone or SD card. Ringtones You can set the ringtones for incoming calls, through WAP. Screen Savers You can download and store screen savers using WAP, to your phone or SD card. Applications You can install the applications downloaded using application manager, to your phone or SD card.
Managing Browser  55   Managing Browser Sonim XP STRIKE his mobile phone has an internal browser that allows you to browse contents of various Websites on the Internet. This facility is made available only if you subscribe to a data service from your network operator for Internet access. You need to consult your local operator for more details. Some browser settings have already been set to a specific network operator. If you utilize the services of the same network operator you can directly use the data service with the available configuration. Note: If you are unable to view WAP web pages because of change in parameters or change in web address or contents, please consult your network operator and Internet Content Provider (ICP) for updates. ● To access the internal browser, select Menu > Browser. The home page is displayed.  ● To navigate to a specific Web page, select Navigation. Enter the Web address and press the Center key. Select Options to view the following text entry options:    Text mode – set the text entry mode to Abc/abc ABC/123.  Symbols – select the symbol to be entered in the Web address.  Web shortcuts – select one of the shortcuts to be included in the Web address. ● Use the navigation keys ( ) to access the pages displayed in the browser.  ● Select Close to return to the home page. Browser Options Select Menu to view and modify the following browser settings. Options Description Add this page to bookmarks Add the current Web page to the bookmarks View all bookmarks View all the stored bookmarks View browsing history View the browsing history. Select Sort to sort the history by name or date. Select a specific page and select Delete to delete it from history.
Managing Browser  56   Send this page to a friend Send the current Web page link as a SMS or MMS message to a selected contact.  Browser Settings View and modify browser settings. For more information, refer Exit Browser Exit the browser. Browser Settings To view and modify the following browser settings, select Menu > Browser > Menu > Browser settings. Settings Description Startup page Set the home page to one of the following: ● Use blank page  ● Use last page I visited ● Use my homepage To change the current homepage, select Change and enter the new home page address. Select Confirm to save the changes. Default zoom size Set the default zoom size to one of the following: ● Use fit to screen ● Use automatic zooming ● Use custom value You can set the custom value as a percentage of the default zoom level. The default setting is 100% Select Confirm to save the changes. Show/Do not show images You can show or hide the images displayed in the Web pages. Show/Do not show icon row
Managing Browser  57   Virtual mouse pointer Set the speed of the browser pointer to slow/normal/fast. Select OFF to disable the browser pointer Popups You can enable or disable pop-ups. Select one of the following options: ● Block all popups – always blocks the popups ● Allow until browser closes – allows popups only for the current session ● Always allow – always allows popups. Clear private data Deletes the private information such as cookies, cache, browsing history, passwords, and auto-complete data. Auto-complete Enable or disable auto complete of Web address and form information. You can also enable or disable the passwords. Key guide View the browser shortcut keys. Advanced You can view or modify the following settings: ● Page information ● Browser information ● Enable/disable Java script ● Send/Do not send referrer header ● Turn OFF./ON redirect prompt for Web pages ● Root certificate ● Reset browser
Managing Connectivity  58   Managing Connectivity You can access the phone using Bluetooth and USB. For more information, refer to the following topics. Setting Up Bluetooth Connectivity Accessing Using USB Function Setting Up Bluetooth Connectivity Bluetooth is a wireless connection that enables devices to exchange information. Devices within a range of 10 meters can be connected using Bluetooth technology. The Sonim XP STRIKE is compliant with Bluetooth specification 2.0 supporting the following profiles: Headset profile: HFP, HSP, GAVDP, AVRCP, OPP, IOPT, FTP, and A2DP. This device can send images and audio files using Bluetooth connection. Note: There may be restrictions on using Bluetooth technology in some locations. Check with your local authorities or service providers. For more information about using Bluetooth, refer to the following topics. Activate Bluetooth Deactivate Bluetooth Active Devices Pairing Devices Connecting a Bluetooth Headset Rename Paired Device Delete Paired Device Setting Bluetooth Device Name Receiving Data via Bluetooth Activate Bluetooth Select Menu > Settings > Bluetooth > Bluetooth > On. Use the center key to toggle between on and off. When Bluetooth is activated, the Bluetooth icon is displayed on the home screen.
Managing Connectivity  59   Deactivate Bluetooth Select Menu > Settings > Bluetooth > Bluetooth > Off. Use the center key to toggle between on and off. Active Devices Select Menu > Settings > Bluetooth > Active device, to view the list of Bluetooth car kits and headsets, connected to your phone. Pairing Devices Phones paired with your Sonim XP STRIKE will be displayed under Paired Devices.  To connect a phone: 1.  Select Menu > Settings > Bluetooth > Paired devices > New or Options > Pair new -device. 2.  Select the device of your choice. Select Pair. 3.  Enter the pass code (for example, 0000) in the Enter pass code screen. The same pass code must be entered for the other device also. 4.  Select Yes. When the other device accepts your request the message Pairing done is displayed on the screen. When the other device rejects your request the message Pairing failed is displayed on the screen. Note: Prior to pairing the devices, ensure that the visibility settings for the pairing devices are activated. To activate the visibility settings, select Menu > Settings > Bluetooth > Visibility > On. Note: Do not pair with an unknown device for security reasons. Connecting a Bluetooth Headset You can connect a Bluetooth headset after pairing it with your phone. 1.  Select Menu > Settings > Bluetooth > Search audio enhanc.. 2.  Select Select. 3.  Select Options > Connect. Note: For more details, refer the user manual of the Bluetooth headset.
Managing Connectivity  60   Rename Paired Device 1.  Select Menu > Settings > Bluetooth > Paired devices. 2.  Select the paired device. 3.  Select Options > Settings >Rename. 4.  Enter the new name. 5.  Select OK. Delete Paired Device 1.  Select Menu > Settings > Bluetooth > Paired devices. 2.  Select the paired device. 3.  Select Options > Delete. Note: If you cancel the pairing with a device that is connected, pairing is removed and the connection is switched off immediately. Setting Bluetooth Device Name 1.  Select Menu > Settings > Bluetooth > My phone’s name. 2.  Enter the new name. 3.  Select OK. Sending Data via Bluetooth You can transfer files to another compatible device. 1.  Select Menu > My files. 2.  Select the folder containing the file to be transferred. 3.  Select the file. 4.  Select Options > Send > Via Bluetooth. 5.  Select the paired device to which you want to send the file. 6. When the other device accepts your file, the message “N item(s) sent” is displayed on the screen. 7.  When the other device rejects the file, the message Bluetooth connection failed is displayed on the screen.
Managing Connectivity  61   Receiving Data via Bluetooth To receive data using Bluetooth, your device should be Bluetooth activated and must be visible to other devices. 1.  When you receive a data, you are asked if you want to accept it. 2.  Select Accept to receive data or select Reject to refuse the data. 3.  If you accept, the data will be stored in Others. Accessing Using USB Function The phone can be used as a mass storage device, when it connected to the computer via a USB cable and SD is inserted in the phone. The following two options are displayed: Data storage: Select this to use the USB cable as mass storage device to transfer and synchronize data between the Sonim XP STRIKE phone and your computer. Modem mode: Select this to use the phone as a modem. Note: The phone starts charging whenever the phone is connected to the computer, using USB cable. Note: Ensure that SD card is inserted in the phone, before connecting it to the computer. Else, phone will display No memory card found message.
Maps  62   Maps Maps is a navigational application that uses internal GPS. This provides turn by turn navigations to the user. To access this application,  1.  Select Menu > Maps >Sprint Navigation.  2.  Accept the license agreement. 3.  Enter the login information and select Go.  The GPS navigator home page is displayed.   For more details about this application, refer to the respective product manual.
Entertainment  63   Entertainment Sonim XP STRIKE phone provides the following entertainment features: Voice Recorder Video Recorder FM Radio Music Player Camera Voice Recorder ● To record an audio file, select Menu > Entertainment > Voice recorder. ● To record an audio file, select   and select the center key.  ● To temporarily stop the recording, select   and select the center key. ● To continue with the recording, select the center key. ● To end the recording, select   . The recorded audio file is stored under My files > Sounds. ● Select Options to access the following voice recorder options: Options Function Play last recorded Play the last recorded file. Send last recorded Send the last recorded file via multimedia message, Bluetooth or e-mail Recording list View the list of recordings stored in the Sounds folder Select memory Set the default memory to phone memory/ memory card/ other folders in My Files. Video Recorder ● To record a video file, Select Menu > Entertainment > Video. ● To record video file, select Record.
Entertainment  64   ● To temporarily stop the recording, select Pause. ● To continue with the recording, select the center key. ● To end the recording, select Stop. The recorded video file is stored under My files.  Select Options to access the following video recorder options: Options Function Delete Play the last recorded file. New video Record another video Send Send the last recorded file via multimedia message, Bluetooth or e-mail Rename Rename the recorded file. Open my files Open My files to view other videos. FM Radio The FM radio is built-in and offers instant and easy access to FM radio channels in your phone. A wired headset must be attached to the phone, as the wire works as an antenna for the radio. To connect the headset to the phone, lift the cover with the headset sign located on the left side of the phone. You can then listen to the radio via the wired headset.  Note: You should connect only 3.5 mm stereo headset to use the FM radio. Using FM Radio Select Menu > Entertainment > Radio. The radio starts playing. You can use the navigation keys to play, and search the required channel. You can search automatically for available Radio Stations. The detected stations are saved. Select Options to display the following options. ● Radio Off: Switch Off the radio. ● Stations: View the channels that have already been saved. Select a Station and press the center key to play. ● Search all stations: Search and save the radio channels, automatically.
Entertainment  65   ● Set frequency: Enter the frequency to play a channel, manually. ● Loudspeaker: Select Loudspeaker to play FM radio in the phone speaker. Music Player Use the built-in media player to play the audio files. To access media player, select Menu > Music player. You can play .mp3, .wav, .amr, and .aac audio files. To shuffle the songs, repeat the songs and set the equalizer, select Menu > Music player > Settings. To connect to a Bluetooth headset, select Menu > Music player > Play via Bluetooth. Playlists Select Menu > Music player > Options > Go to music menu > Playlists. You can view all the stored playlists. Select Playlists to display the following options: ● Create play list: Add a new playlist. ● Now playing: View the list of songs that are played. ● Most played songs: View the list of songs most played. ● Recently added: View the list of songs added to the list. ● Recently played: View the list of songs that are recently played. You can create a playlist, highlight it and select Options. The following options are displayed: Options Function Open  Open the audio file Add to playlist Include a new file to the playlist. Delete Remove a file from the playlist. Rename Rename the playlist. Playlist details  View the playlist name, song number, duration and location. Camera The Sonim XP STRIKE has a 2 MP (megapixel) camera for taking pictures. The pictures can then be saved in your phone. Using the Camera
Entertainment  66   Camera Settings Using the Camera 1.  Select Menu > Camera OR press the camera key. The camera is switched on. 2.  Press the center key or the camera key to shoot the picture. The picture is automatically saved in Menu > My files > Images. 3.  After clicking the picture, select Options to display the following options:  New image: Capture another picture.  Send: Forward the picture to another phone as multimedia message, e-mail or via Bluetooth.  Add to contact: Use the image as caller ID for a specific contact.  Rename: Rename the picture.  Open My Files: Open My files to view other pictures. Select Discard, to delete the captured image. Camera Settings To view the camera options, select Menu > Camera > Press LSK. The following options are displayed: ● Video/Picture: Use this option to switch to Video recorder mode or Camera mode, to shoot a video or take photographs. Note: The following options will be displayed depending on the selected camera mode. ● Mute: Capture video without background sounds. ● Brightness: Set the brightness to capture the image. ● Flash: Enable or disable automatic flash. ● Red eye: Enable or disable to reduce the red eye effect. ● Contrast: Set the contrast for picture clarity. ● Exposure: Set the exposure to Auto, Day or Night mode, depending on the external light. ● Night mode: Enable or disable Night mode for the image shot at night. ● Self-timer: Enable the self-time and set it to 3, 5 or 10 seconds. The picture will be shot only after the set time, after pressing the center key.
Entertainment  67   ● Effects: Select the required color effects for the image to be taken. ● White balance: Select the required white background color balance.  ● Open My Files: Open My files to view other pictures ● Settings:  Image size: Select the picture size from the following options: 1600X1200, 1280X960, 640X480 and 320X240.  Video resolution: Set the video resolution from the following options : 176X144 and 128X96.  Default title: Select the default title or set a new title.  Image/video storage: Set the default storage location for pictures. Geo –tagging: Enable or disable to tag the locations in the images.
Using Micro SD Card  68   Using Micro SD Card In Sonim XP STRIKE phone, you can insert a removable Micro SD Card to increase the storage capacity. This card is inserted into the slot inside the phone. You can access your SD card from Menu > My files. You can perform the following functions on the SD card. ● Formatting of the SD card. ● Viewing memory details such as free space and total space. ● Access media files stored in the SD card and manage them in folders. Note: The maximum capacity supported is up to 8 GB. Inserting Micro SD Card into the Phone 1.  Ensure the phone is switched off. 2.  Lift the battery cover and remove the battery.  3.  Slide and lift the silver clip over the designated slot located below the battery. 4.  Place the SD card in the designated slot and close the silver clip. 5.  Replace the battery and the cover. Turn the battery cover screws clockwise to lock the battery cover. Note: When the Sonim XP STRIKE phone is connected to a computer using USB, the Micro SD card is displayed as a separate drive in the computer.
Using PC-Tools Application  69   Using PC-Tools Application Sonim XP STRIKE PC Tools application provides synchronization of contacts, and media files between your computer and Sonim XP STRIKE phone to ensure that both media have complete up-to-date data at the same time. You can also easily exchange/synchronize between a computer and a Sonim XP STRIKE phone. You can also use PC-tools for establishing dial-up connection, using the phone as MODEM. Installing PC-Tools You can download the Mobile Phone PC Tools Installer from http://www.sonimtech.com/support/downloads.php and install as follows: 1.  Connect to http://www.sonimtech.com/support/downloads.php.  2.  Select the appropriate phone model. 3.  Click Accept to accept the terms of the disclaimer and to continue downloading. 4.  Select the destination folder in your computer to save the zipped file. 5.  Navigate to the destination folder and click the Sonim PC Tool.exe file to install the PC-Tools on your computer. Using PC-Tools with Phone To use the PC-Tools with your SONIM XP STRIKE Phone, do the following: 1.  Click the Sonim PC Tool icon (   ) on your computer desktop.  2.  Connect the SONIM XP STRIKE phone to the USB port of the computer using a USB cable. 3.  Once the USB cable is connected, the USB config screen is displayed on the phone. Select COM port and click OK. 4.  Use PC Sync application to synchronize data including contacts, between your computer and mobile phone to ensure both media have complete up-to-date data. Note: For complete information on PC-Tools installation procedures and using the PC-Tools, refer SONIM XP STRIKE PC-Tools Installation and User Guide (English).
End User License Agreement  70   End User License Agreement This wireless device, (the “Device”) contains software owned by Sonim Technologies, Inc. (“Sonim”) and its third party suppliers and licensors (collectively, the “Software”). As user of this Device, Sonim grants you a non-exclusive, non-transferable, non-assignable license to use the software solely in conjunction with the Device on which it is installed and/or delivered with. Nothing herein shall be construed as a sale of the Software to a user of this Device. You shall not reproduce, modify, distribute, reverse engineer, decompile, otherwise alter or use any other means to discover the source code of the Software or any component of the Software. For avoidance of doubt, you  are at all times entitled to transfer all rights and obligations to the Software to a third party, solely together with the Device with which you received the Software, provided always that such third party agrees in writing to be bound by these rules. You are granted this license for a term of the useful life of this Device. You can terminate this license by transferring all your rights to the Device on which you have received the Software to a third party in writing. If you fail to comply with any of the terms and conditions set out in this license, it will terminate with immediate effect Sonim and its third party suppliers and licensors are the sole and exclusive owner of and retain all rights, title and interest in and to the Software. Sonim, and, to the extent that the Software contains material or code of a third party, such third party, shall be entitled third party beneficiaries of these terms. The validity, construction and performance of this license shall be governed by the laws of Delaware, United States. Comprehensive 3 Year Warranty Sonim provides this Comprehensive three year warranty for your mobile phone (hereinafter referred to as Product”). To activate the three year comprehensive warranty, register your phone within 30 days at www.sonimtech.com/register. Should your Product need service, please contact your local Sonim Customer Service Center. The online support and country specific contact information can be found at: www.sonimtech.com/support. Our Warranty Subject to the conditions of this Comprehensive 3 year Warranty Sonim warrants this product to be free from major defects in design, material and workmanship at the time of its original purchase by a consumer, and for a subsequent period of Three (3) years. What We Will Do If during the guarantee period, this product fails to operate under normal use and service, due to defects in design, material or workmanship, Sonim‟s authorized distributors or service partners,
End User License Agreement  71   in the country/region where you purchased the product, will repair or replace at the sole discretion of Sonim, with the same or better model in the same or better condition. Sonim and its service partners reserve the right to charge a handling fee if a returned product is found not to be under warranty according to the conditions below. Please note that some of your personal settings, downloads or other information may be lost when your Sonim Product is repaired or replaced. Sonim does not take any responsibility for any lost information of any kind and will not reimburse you for any such loss. You should always make backup copies of all the information stored on your Sonim Product such as downloads, calendar and contacts before handing in your Sonim Product for repair or replacement. Phone Care The Sonim XP STRIKE is designated class IP68 for dust and water protection, according to the IEC Ingress Protection (IP) Standard 60529. This means that the phone is dust protected and can be submerged into 2m deep water for up to 30 minutes. Immersion in deeper water can damage it and must be avoided.  The Sonim XP STRIKE is solid and built for heavy duty use. Its design protects against disassembly or mechanical damage when subjected to forces equal to free fall from the height of 2 meters. Subjecting the phone to stronger impact and forces can damage it and must be avoided. Conditions 1.  The warranty is valid only if the product has been registered within 30 days of date of purchase, and sonim reserves the right to refuse warranty service otherwise. 2.  Should the phone not be registered, the warranty is valid only if the original proof of purchase issued to the original purchaser by a Sonim authorized dealer, specifying the date of purchase and serial number for this Product, is presented with the Product to be repaired or replaced. Sonim reserves the right to refuse warranty service if this information has been removed or changed after the original purchase of the Product from the dealer. 3.  If Sonim repairs or replaces the Product, the repaired or replaced Product shall be warranted for the remaining time of the original warranty period or for ninety (90) days from the date of repair, whichever is longer. Repair or replacement may involve the use of functionally equivalent reconditioned units. Replaced parts or components will become the property of Sonim. 4.  This warranty does not cover any failure of the Product due to normal wear and tear, or due to misuse or abuse, including but not limited to use in other than the normal and customary manner, in accordance with the Sonim instructions for use and maintenance of the Product. Nor does this warranty cover any failure of the Product due to software or
End User License Agreement  72   hardware modification or adjustment, acts of God or damage resulting from liquid interacting with the product beyond what is described as acceptable in the user guide for the product. A rechargeable battery can be charged and discharged hundreds of times. However, it will eventually wear out - this is not a defect. When the talk-time or standby time is noticeably shorter, it is time to replace your battery. Sonim recommends that you use only batteries and chargers approved by Sonim. Minor variations in display brightness and color may occur between phones. There may be tiny bright or dark dots on the display. These are called defective pixels and occur when individual dots have malfunctioned and cannot be adjusted. Several defective pixels are deemed acceptable. 5.  This warranty does not cover Product failures caused by installations, modifications, or repair or opening of the Product performed by a non-Sonim authorized person. Tampering with any of the seals on the Product will void the warranty. 6.  The warranty does not cover Product failures which have been caused by use of accessories or other peripheral devices which are not Sonim branded original accessories intended for use with the Product. 7.  The 3 year warranty does not cover battery, accessories or any 3rd party SW applications, which are instead covered to the extent provided by the original vendor guarantee for these products. 8.  THERE ARE NO EXPRESS WARRANTIES, WHETHER WRITTEN OR ORAL, OTHER THAN THIS PRINTED LIMITED WARRANTY. ALL IMPLIED WARRANTIES, INCLUDING WITHOUT LIMITATION THE IMPLIED WARRANTIES OF MERCHANTABILITY OR FITNESS FOR A PARTICULAR PURPOSE, ARE LIMITED TO THE DURATION OF THIS LIMITED WARRANTY. IN NO EVENT SHALL SONIM OR ITS LICENSORS BE LIABLE FOR INCIDENTAL OR CONSEQUENTIAL DAMAGES OF ANY NATURE WHATSOEVER, INCLUDING BUT NOT LIMITED TO LOST PROFITS OR COMMERCIAL LOSS; TO THE FULL EXTENT THOSE DAMAGES CAN BE DISCLAIMED BY LAW. DURATION OF THIS LIMITED WARRANTY. IN NO EVENT SHALL SONIM OR ITS LICENSORS BE LIABLE FOR INCIDENTAL OR CONSEQUENTIAL DAMAGES OF ANY NATURE WHATSOEVER, INCLUDING BUT NOT LIMITED TO LOST PROFITS OR COMMERCIAL LOSS; TO THE FULL EXTENT THOSE DAMAGES CAN BE DISCLAIMED BY LAW.
FCC Statement  73   FCC Statement WARNING: Changes or modifications made to this equipment not expressly approved by Sonim Technologies, Inc. for compliance could void the user‟s authority to operate the equipment. The XP3410-A-R1 device complies with Part 15 of the FCC rules. Operation is subject to the following two conditions: This device may not cause harmful interference. This device must accept any interference received, including interference that may cause undesired operation. This equipment has been tested and found to comply with the limits for a Class B digital device, pursuant to part 15 of the FCC Rules. These limits are designed to provide reasonable protection against harmful interference in a residential installation. This equipment generates uses and can radiate radio frequency energy and, if not installed and used in accordance with the instructions, may cause harmful interference to radio communications. However, there is no guarantee that interference will not occur in a particular installation. If this equipment does cause harmful interference to radio or television reception, which can be determined by turning the equipment off and on, the user is encouraged to try to correct the interference by one or more of the following measures: ● Reorient or relocate the receiving antenna. ● Increase the separation between the equipment and receiver. ● Connect the equipment into an outlet on a circuit different from that to which the receiver is connected. ● Consult the dealer or an experienced radio/TV technician for help. .
Index  74   Index Activating your phone, 4 Computer activation, 4 Phone activation, 4 Battery usage, 1 Charging the battery, 3 Inserting battery, 2 Removing battery, 2 Phone Models, 2 Phone usage instructions, 3 SAR Information, 5 Setting up Voicemail box, 5 Sonim XP STRIKE layout, 6 Back layout, 8 Front layout, 7

Navigation menu