Sonim Technologies PC4000 Mobile Phone User Manual
Sonim Technologies, Inc. Mobile Phone
Contents
- 1. User Manual
- 2. User manual
User manual

1
USER
GUIDE
SONIM XP8
English
2
Copyright © 2017 Sonim Technologies, Inc.
SONIM and the Sonim logo are trademarks of Sonim
Technologies, Inc. Other company and product names
may be trademarks or registered trade-marks of the
respective owners with whom they are associated.
Third Party Trademarks
Google, Android, Google Play and other marks are
trademarks of Google LLC.
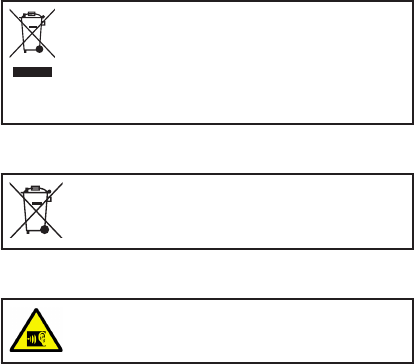
Disposal of Old Electrical and Electronic Equipment
The symbol of the crossed-out wheeled
bin indicates that within the countries in
the European Union, this product, and any
enhancements marked with this symbol,
can not be disposed as unsorted waste
but must be taken to separate collection at
their end- of-life.
Disposal of Battery
Please check local regulations for disposal
of batteries. The battery should never be
placed in municipal waste. Use a battery
disposal facility if available.
Guideline for Headphone and Earphone
To prevent possible hearing damage,
please do not listen at high volume levels
for long periods.

3
Contents
General Information———————— 7
Phone Models Covered
Sonim Support Information
Use the Guide Effectively
Safety Guidelines———————— 8
Hearing Aid Compatibility (HAC) regulations for Mobile
phones
Avoid High Temperatures
Personal Medical Devices
Child Safety
Emergency Calls
Hazardous Location Usage Warning—————— 12
Battery Safety Warning for IEEE1725
Charging Safety Warning
Battery Usage Guidelines———————— 14
Battery Usage
Inserting the Battery
Charging the Battery
Verifying and Optimizing Battery Usage
Extend the life of your battery
Getting Started———————— 16
What Is In the Box ?
Phone Specications
Your Sonim XP8———————— 18
Switching On the Phone
Setting Up Your Phone
Need for a Google Account
Home Screen
Key Description
Home Screen Indicators
Phone Operations Without SIM Card
Setting up and Using Lock Screen
Changing the Wallpaper
Taking a Screenshot
Voice Input for Text Entry
Time and Date Settings
Managing Phone Settings———————— 25
Using Glove Mode
Language Settings
Mouse/Trackpad
Display Settings
Connecting to a PC Through USB
Viewing Device Details
Managing Memory Utilized by Applications
Optimizing Memory Usage
Using the Torch
Managing Wireless and Network Settings———— 29
Connecting to Wi-Fi Network
Connecting to Bluetooth Devices
Optimizing Data Usage
Activating Airplane Mode
NFC Function
Setting Up Tethering & Portable Hotspot
Setting Up Wi-Fi Hotspot
Activating Bluetooth Tethering
Setting Up VPN Connection
Managing Mobile Network
Managing Security Settings———————— 34
About Android Security
Managing Security Settings
Locking Your Screen
Protecting Your Phone
Encrypting Your Phone
Locking Your SIM Card
Changing Your SIM PIN
Making Password Visible
Device Administrator Settings
Managing Credential Certicates
Protecting Your Phone from Harmful Applications

4
Managing Personal, Account and System
Settings———————— 37
Location Access
Apps Accessing Your Location
Backup & Reset Options
Managing Accounts
Account Sync Options
Managing Contacts———————— 39
Adding a New Contact
View the Contact Details
Sending a Message from Contacts
Dialing a Number from Contacts
Editing the Contact Details
Importing SIM Card Contacts to Phone
Exporting Phone Contacts to SIM Card
Importing from Storage
Exporting Phone Contacts to Storage
Sharing Contacts Via MMS, Bluetooth, Drive and
E-mail
Managing Contact Settings
Managing Phonebook Settings
Searching Contacts
Deleting a Contact
Managing Calls———————— 42
Making a Call
Calling a Number Via People
Answering an Incoming Call
Adding a Contact From Phone Screen
Viewing All Contacts from Phone Screen
Viewing Call History
Deleting Call History
Managing Call Settings
Settings
Setting the Volume
Activating Vibrate Mode
Setting Up Your Voicemail
Dial Pad Touch Tones
Editing Quick Responses
Turn on Proximity Sensor
Settings TTY Mode
DTMF Tones
Other Call Settings
Call Forwarding
Dual Prole Switch
Internet Call Settings
SIP Accounts
IMS Account
Sending Messages and E-mails———————— 47
Sending SMS/MMS Message
Managing Message Settings
Deleting Messages
Setting Up E-mail Accounts
Sending an E-mail from POP3/IMAP Account
Reading an E-mail
Using the Keyboard———————— 50
Enter and Edit Text
Gesture Typing
Keyboard Dictionaries
Using Android Applications———————— 51
Downloading Android Applications and Media Files
Accessing Gmail
Camera
Multimedia Player
Google Calendar
Alarm
Clock
Calculator
Sound Recorder
Google Search and Google Now———————— 54
About Google Search and Google Now
Activate Google Now
Contents

5
Voice Search and Action
Voice Actions
End User License Agreement———————— 55
License
Warranty
What We Will Do
Phone Care
Conditions
Accessories
Federal Communication Commission Interference
(FCC) Statement———————— 59
FCC Regulations
RF Exposure Information (SAR)
Industry Canada Statement (IC: 8090A-PC4000)
Intrinsically Safe (IS)
Index———————— 64
Contents

6
Please register your phone at www.sonimtech.com/register, to receive product information and updates.
Sonim devices are covered by a 3-Year comprehensive warranty. The embedded battery is covered by a
1-Year limited warranty.

7
Congratulations on the purchase of a Sonim XP8 mobile
phone. This phone is a 1x/EVDO Rev-A and LTE enabled
smartphone with an intuitive feature-rich user interface,
which allows you to make the best use of offered
functions.
Sonim XP8800 supports the following bands:
• LTE: 1/2/3/4/5/7/8/12/13/14/20/25/26/27/28/29/30/
38/39/40/41/66
• UMTS: 1,2,4,5,8
• GSM: Quad Bands
• CDMA: BC0/BC1/BC10
Phone Models Covered
This user guide covers Sonim XP8 phone with the model
number XP8800. The model name can be seen on the
backside of the phone.
Sonim Support Information
For additional product and support information, visit
www.sonimtech.com.
Use the Guide Effectively
Familiarize yourself with the terminology and symbols
used in the guide to help you use your phone effectively.
HOME
SCREEN This is the screen displayed when the
phone is in standby mode.
TOUCH &
HOLD Touch and hold an item on the screen
by touching it and not lifting your nger
until an action occurs.
DRAG Touch and hold an item for a moment
and then, without lifting your nger,
move your nger on the screen until
you reach the target position.
SWIPE OR
SLIDE Quickly move your nger across the
surface of the screen, without pausing
when you rst touch. For example, you
can slide a home screen left or right to
view the other home screens.
DOUBLE TAP Tap quickly twice on a webpage, map
or other screen to zoom. For example,
double-tap a webpage in Browser to
zoom in, and double-tap again to zoom
out.
PINCH In some applications, you can zoom
in and out by placing two ngers on
the screen at once and pinching them
together or spreading them apart.
General Information
8
Please read and understand the following safety guidelines before you use the phone. These guidelines provide details
to enable you to operate your phone safely and conform to any legal requirements regarding the use of cellular phones.
Do not to use the phone at a refuelling point. Observe restrictions when using radio equipment at
fuel depots, chemical plants or where blasting operations are in progress.
Electrical interference may obstruct the use of your phone. Observe restrictions in hospitals and
near medical equipment.
Switch off your cellular phone when in an aircraft. Wireless phones can cause interference or danger
to an aircraft. In an aircraft, the phone can be used in flight mode.
Do not expose the device to high temperatures (in excess of 55°C).
Adhere to road safety laws. Do not hold/use a phone while you are driving; find a safe place to stop
first. Use hands-free microphone while you are driving.
Avoid using the phone in close proximity to personal medical devices, such as pacemakers and
hearing aids.
Use only Sonim XP8 approved charging equipment to charge your phone and avoid damage to your
phone.
The symbol of the crossed-out wheeled bin indicates that this product, and any enhancements
marked with this symbol, can not be disposed as unsorted waste but must be taken to separate
collection at their end-of-life.
Safety Guidelines
9
Ensure that only qualied personnel install or repair your phone.
The Sonim XP8 is water-proof and can be submerged to 2 metres for 30 minutes.
• Ensure to close the audio connector and SIM slot properly. This will prevent the deposit of
water droplets on the connectors, when the phone is immersed in water.
• Water droplets may condense under the display cover if the phone is immersed in water
with signicant drop in temperature. This does not indicate water leakage. The droplets will
disappear at room temperature.
The Sonim XP8 is dust-resistant, rugged and shock-resistant. However, it is not dust-proof or
unbreakable if subjected to overwhelming impact. For best results and long product life, one
should protect the Sonim XP8 from salt water, dust and strong impacts.
Safety Guidelines

10
Hearing Aid Compatibility (HAC) regulations for Mobile phones
In 2003, the FCC adopted rules to make digital wireless
telephones compatible with hearing aids and cochlear
implants. Although analog wireless phones do not usually
cause interference with hearing aids or cochlear implants,
digital wireless phones sometimes do because of
electromagnetic energy emitted by the phone's antenna,
backlight, or other components. Your phone is compliant
with FCC HAC regulations (ANSI C63.19- 2011). While
some wireless phones are used near some hearing
devices (hearing aids and cochlear implants), users may
detect a buzzing, humming, or whining noise. Some
hearing devices are more immune than others to this
interference noise and phones also vary in the amount
of interference they generate. The wireless telephone
industry has developed a rating system for wireless
phones to assist hearing device users in nding phones
that may be compatible with their hearing devices. Not
all phones have been rated. Phones that are rated have
the rating on their box or a label located on the box. The
ratings are not guarantees. Results will vary depending
on the user's hearing device and hearing loss. If your
hearing device happens to be vulnerable to interference,
you may not be able to use a rated phone successfully.
Trying out the phone with your hearing device is the best
way to evaluate it for your personal needs.
This phone has been tested and rated for use with
hearing aids for some of the wireless technologies that
it uses. However, there may be some newer wireless
technologies used in this phone that have not been
tested yet for use with hearing aids. It is important to
try the different features of this phone thoroughly and
in different locations, using your hearing aid or cochlear
implant, to determine if you hear any interfering noise.
Consult your service provider or the manufacturer of
this phone for information on hearing aid compatibility.
If you have questions about return or exchange policies,
consult your service provider or phone retailer.
• M-Ratings: Phones rated M3 or M4 meet FCC
requirements and are likely to generate less
interference to hearing devices than phones that
are not labeled. M4 is the better/higher of the two
ratings.
• T-Ratings: Phones rated T3 or T4 meet FCC
requirements and are likely to be more usable with
a hearing device’s telecoil (“T Switch” or “Telephone
Switch”) than unrated phones. T4 is the better/
higher of the two ratings. (Note that not all hearing
devices have telecoils in them.)
Your phone meets the M4/T4 level rating.
Hearing devices may also be rated. Your hearing device
manufacturer or hearing health professional may help you
nd this rating. For more information about FCC Hearing
Aid Compatibility, please go to http://www.fcc.gov/cgb/
dro.
This phone has been tested and rated for use with
hearing aids for some of the wireless technologies that
it uses. However, there may be some newer wireless
technologies used in this phone that have not been
tested yet for use with hearing aids. It is important to
try the different features of this phone thoroughly and
in different locations, using your hearing aid or cochlear
implant, to determine if you hear any interfering noise.
Consult your service provider or the manufacturer of
this phone for information on hearing aid compatibility.
If you have questions about return or exchange policies,
consult your service provider or phone retailer.
Safety Guidelines

11
Safety Guidelines
Avoid High Temperatures
Leaving the device in hot or cold places, such as in a
closed car in summer or winter conditions, reduces the
capacity and lifetime of the battery. For the best results,
try to use the device between -20°C and +55°C (-4°F
and 131°F). A device with a hot or cold battery may not
work temporarily, even when the battery is fully charged.
Battery performance is particularly limited in temperatures
well below freezing.
Personal Medical Devices
Mobile phones may affect the operation of cardiac
pacemakers and other implanted equipment. Please
avoid placing the mobile phone over the pacemaker, for
example in your breast pocket. When using the mobile
phone, place it at the ear opposite the pacemaker. If a
minimum distance of 15 cm (6 inches) is kept between
the mobile phone and the pacemaker, the risk of
interference is limited. If you suspect that interference
is taking place, immediately turn off your mobile phone.
Contact your cardiologist for more information. For
other medical devices, consult your physician and the
manufacturer of the device. Comply with instructions to
switch off the device or deactivate the RF transmitter
when required, especially when posted in hospitals and
aeroplanes. Equipment used in these places may be
sensitive to radio waves emitted from the device and
adversely affect their operation. Also, observe restrictions
at gas stations or other areas with ammable atmosphere
or when close to electro-explosive devices.
Child Safety
Do not allow children to play with your mobile phone or
its accessories. Keep it out of their reach. They could
hurt themselves or others, or could accidentally damage
the mobile phone or accessories. Your mobile phone and
its accessories may contain small parts, which could be
detached and create a choking hazard.
Emergency Calls
Mobile phones operate using radio signals, which cannot
guarantee connection under all conditions. Therefore
you should never rely solely upon any mobile phone for
essential communications (e.g. medical emergencies).
Emergency calls may not be possible in all areas, on all
cellular networks, or when certain network services and/
or mobile phone features are in use. Check with your
local service provider.
12
Battery Safety Warning for IEEE1725
Do not disassemble or open crush, bend or
deform, puncture or shred.
Do not modify or remanufacture, attempt to
insert foreign objects into the battery, immerse
or expose to water or other liquids, expose to
re, explosion or other hazard.
Only use the battery for the system for which it
is specied.
Only use the battery with a charging system
that has been qualied with the system per
CTIA Certication Requirements for Battery
System Compliance to IEEE 1725. Use of an
unqualied battery or charger may present a
risk of re, explosion, leakage, or other hazard.
Do not short circuit a battery or allow metallic
conductive objects to contact battery terminals.
Promptly dispose of used batteries in
accordance with local regulations.
Replace the battery only with another battery
that has been qualied with the system per this
standard, IEEE-Std-1725. Use of an unqualied
battery may present a risk of re, explosion,
leakage or other hazard. Only authorized
service providers shall replace battery. (If the
battery is non-user replaceable).
Battery usage by children should be
supervised.
Avoid dropping the phone or battery. If the
phone or battery is dropped, especially on a
hard surface, and the user suspects damage,
take it to a service center for inspection.
Improper battery use may result in a re,
explosion or other hazard.
Hazardous Location Usage Warning
13
Charging Safety Warning
The equipment shall only be charged when
in the non-hazardous area using a charger
specically supplied for use with the unit
USB cable and AC charger S42A02(US plug)/
S42A00(EU plug)/ S42A01(UK plug).
DC5 V/2A pin recommend to use charger with
SELV function.
Hazardous Location Usage Warning
14
Battery Usage Guidelines
Battery Usage
Sonim XP8 phone comes with a built-in battery. For any
battery related queries, contact Sonim customer support.
Inserting the Battery
Sonim XP8 phone comes with a removable battery. For
any battery related queries, contact Sonim customer
support.
• Battery cannot be changed in Hazardous
Locations.
• The battery cover must crewed tight with
at least 5Nm.
1 Unscrew the back cover
To open the battery cover, rotate the battery cover
screw in a counter clockwise direction. Sometimes,
the battery cover may be tight and some extra
effort is required to open it. You can use the
screwdriver provided to open the screw.
2 Lift the cover
Lift the back cover to
reveal the battery slot.
3 Insert the Battery
Insert the battery and ush into the battery slot
such that the three metallic contacts at the top of
the battery are aligned with the metallic contacts
within the battery compartment.
4 Close the cover
Close the battery cover. Rotate the battery cover
screws in clockwise direction. You can use the
screwdriver provided to tighten the screws.
Ensure not to overtighten the screws.
Charging the Battery
The battery delivered with your mobile phone is not fully
charged. We recommend that you charge your mobile for
4 hours before you use your mobile phone for the rst
time.
1 Insert Charger
Insert the charger plug into a power outlet
2 Connect to Phone
The charging port is located at the bottom of the
phone, below the back cover. Insert the charging
connector to the charging port.
15
Battery Usage Guidelines
3 Charging Animation/Icon
• If the battery is being charged when the
phone is switched off, a battery charging
animation with the battery level is displayed.
• If the battery is being charged while the
phone is switched on, the battery charge
icon on the status bar shows the animation
indicating that the battery is being charged.
• After the phone is fully charged the charging
animation stops and you can disconnect the
charger from the phone.
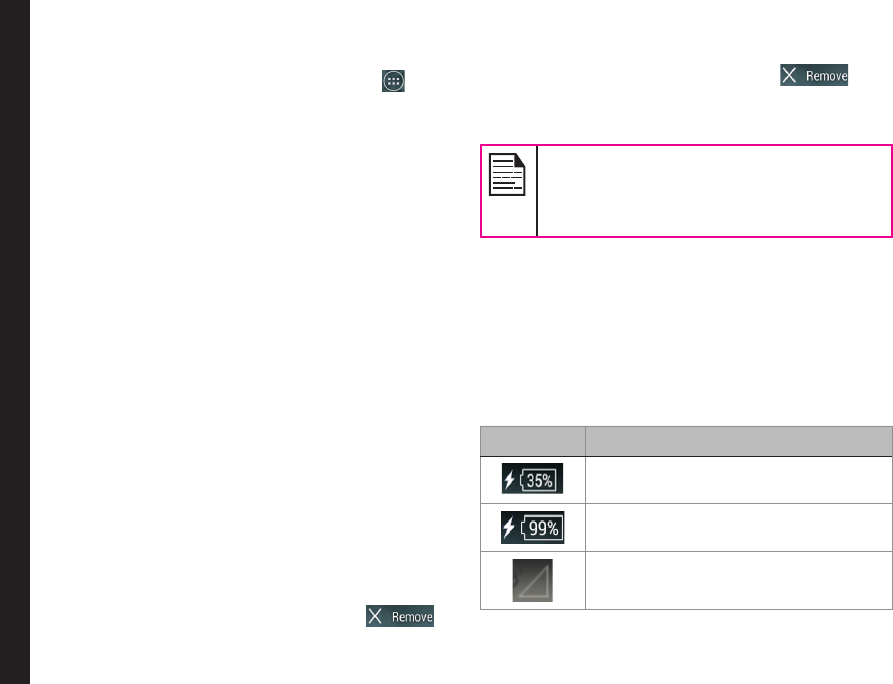
Verifying and Optimizing Battery Usage
You can check the battery usage status and also close
some applications to save battery power. In the home
screen, select Settings ( ) > Device > Battery ( ).
The current battery level (charging or not charging) is
displayed on the top of the screen. The discharge graph
on the top of the screen shows the battery level over
time since you last charged the device, and how long you
have been running on battery power.
The list at the bottom of the screen shows the breakdown
of battery usage for individual apps and services. Touch
any listed items for more details. The details screen for
some apps includes buttons that allow you to adjust
settings affecting power usage, or stop the application
completely.
If you stop some apps or services, your device
may not work correctly.
Extend the life of your battery
Follow these tips to extend your phone’s battery life.
• If you are not using Wi-Fi, Bluetooth, or GPS, use
the Settings to turn them off. The GPS setting is
located in Settings > Personal > Location.
• Set screen brightness to Auto and set a shorter
Sleep time-out (15seconds). The display settings are
located in Settings > Device > Display.
• If you are travelling and do not have access to use
mobile data or Wi-Fi network, switch to Airplane
mode: Press and hold the power key until the Phone
options dialog appears. Then touch to enable
Airplane Mode.

16
What Is In the Box ?
The list of items in the Sonim XP8 phone box are:
• Sonim XP8 phone with rechargeable built-in battery
• Quick Start Guide
• USB Cable
• Multi-tool
• Magnetic USB Adaptor
• Wall Charger
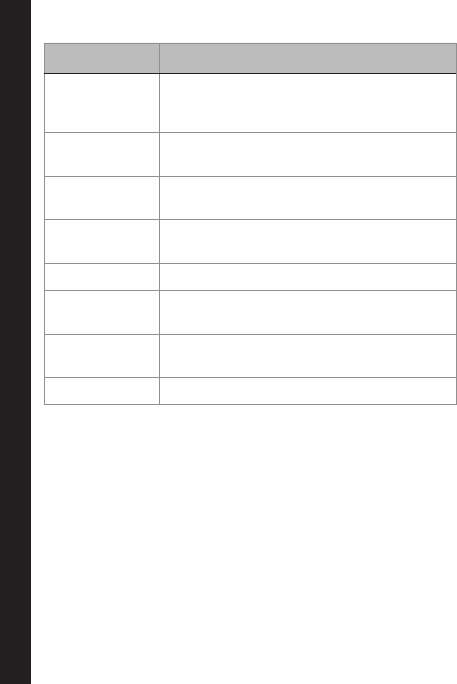
Phone Specifications
Feature Description
Speaker Dual front facing speaker, loudness up
to 105dB at 10cm
Noise
Suppression Triple microphones noise cancellation
Camera • Front camera - 1MP (Fixed focus)
• Main camera - 8MP (Auto focus)
Bands LTE: 1/2/3/4/5/7/8/12/13/14/20/25/26/
27/28/29/30/38/39/40/41/66
UMTS: 1,2,4,5,8
GSM: Quad Bands
CDMA: BC0/BC1/BC10
Carrier
Aggregation 3x bands CA Downlink
Feature Description
LTE service LTE Cat-9, MFBI, IMS, RCS , VoLTE/
SRVCC, VoWiFi, ViLTE, eMBMS
Chipset Qualcomm SDM630, Octa-core
2.0GHz
SIM card Dual Nano SIM (4FF), DSDS (DSSS
for SL)
Operating
system Android 7.0 (Nougat)
Memory 64GB eMMC+4GB LPDDR4
SD Card Yes, up to 128GB SD card
Display/
Touch 5"1080p with outdoor visibility & low
power consumption
Glove touch, Corning Gorilla 3rd glass
Camera 12MP AF Rear cam with OIS, 8MP FF
front camera
Torch light Reuse with camera ash LED
Wi-Fi 802.11 a/b/g/n/ac/r/e/k, 2.4GHz/5GHz,
WiFi direct(Miracast)
Bluetooth/FM BT5 with BLE
LBS GPS/ GLONASS/BDS
NFC Yes, embedded Secure element, HW
ready for supporting secure payment
Getting Started
17
Feature Description
Sensors ar Accelerometer, Proximity, Ambient
light, Compass, Gyro, Barometer,
Gesture
Battery 4900mAh, 2-shifts with GPS ON,
removable
I/O USB3.1 Type C, 12-pin Xpand, 10-pin
Side connector for audio
Charging Fast charging (QC4.0), USB and 2
exposed dedicated pins for charging
Side keys Power, PTT, Volume, Red alarm, Yellow
Secure Biometric Recognition (Fingerprint);
Secure boot, FIPS 140-2 level 1
RPS
requirement IP68/x9, 2m drop
Warranty 3-years
Getting Started
18
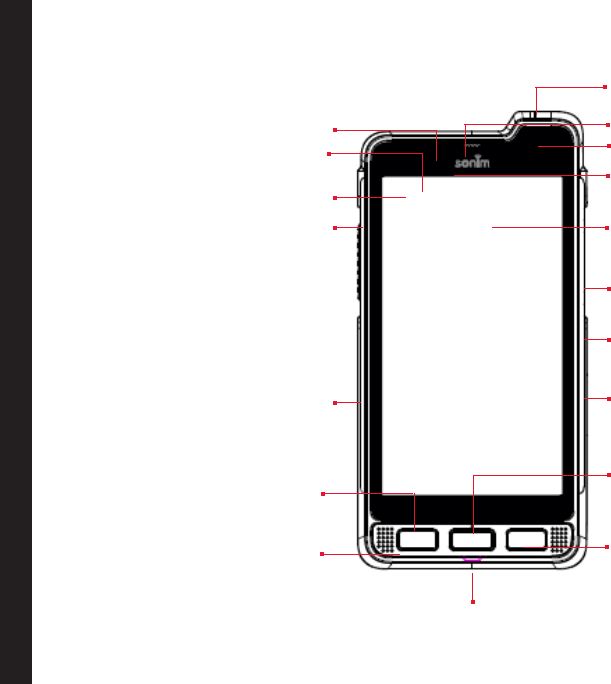
Sonim XP8 Phone
Your Sonim XP8
Loudspeaker
Display screen
Lock/Power ON key
Charger/USB port
Microphone
Headset port
SIM card slot
Receiver
Camera Key
Return key`
Volume Up Key
Home key
Proximity sensor
Front camera
Volume Down Key
Notication LED
Recent key
Single press recent key, displays the
recent apps list.
Double-press recent key, launches menu
options of any applications.
Sonim Protect® Alarm Key
This key will be activated when the
service is available.
19
Your Sonim XP8
Switching On the Phone
Press and Hold the Power/Lock key for 2 seconds to
Power ON the phone.
When the phone is switched on, it tries to register with
the network. After successful registration, the name of the
service provider is displayed on the Notication panel.
Ensure that a valid SIM card is inserted in your
phone.
Setting Up Your Phone
For instructions on using your phone’s buttons, charger,
battery, and other hardware features, check the printed
Quick Start Guide provided along with your phone.
When you power ON the phone for the rst time,
Welcome screen is displayed.
• To choose the language, touch the Menu.
• To set up your phone, touch Start and follow the
instructions.
A series of screens take you through the setup process. If
you already have Gmail account, use your Gmail address
and password or else, please create a Gmail account.
If you need, you can skip some of the setup steps such
as Wi-Fi conguration during this setup process.
Need for a Google Account
Your Google Account lets you organize and access
your personal information from any computer or mobile
device:
• When you sign in to your phone with your Google
Account, all the contacts you associate with that
account in the People app are automatically backed
up. As a result, they are always accessible through
your Google Account from any computer. The
contacts are also not lost.
• Synchronize and back up your e-mails, multimedia
les, contact details and events created in your
phone to your Google Account. You can use the
downloaded and backed up information to any other
computer or mobile device when you login to the
same Google Account from that device.
• Protect your personal information as Google
Account are secure, accessible and password
protected.
• You can use all the Google services such as Google
Maps, Google Play, Google Now, and Chrome with a
single sign-on user name and password.
Home Screen
After you complete the phone setup, the home screen
is displayed. The home screen is the beginning point to
access all the device’s features. The home screen can
have multiple panels. Swipe to move between the home
panels.
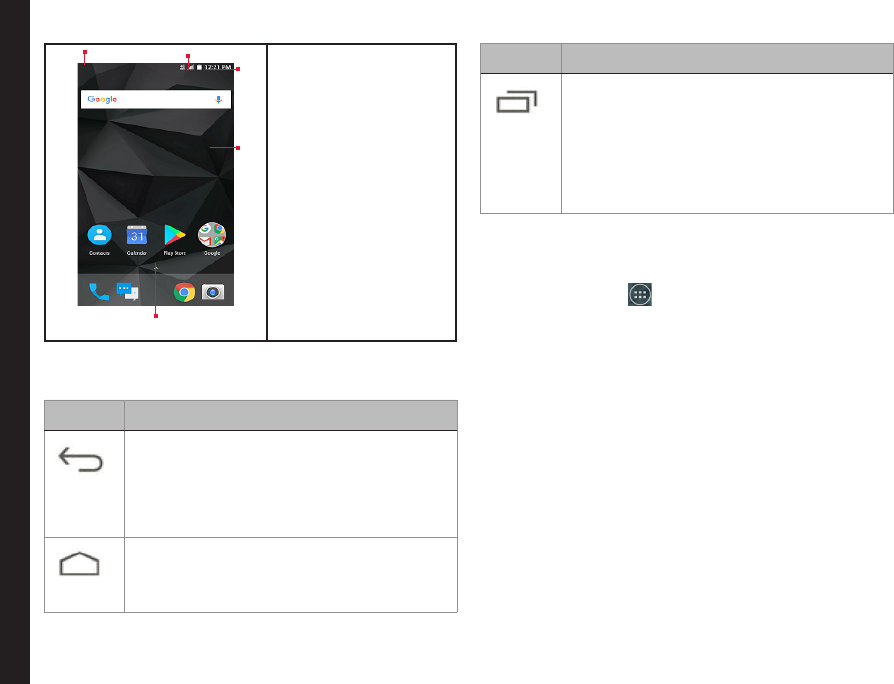
20
1. Message/Alert
Notifications
2. Service Indicator
and Signal
Strength bar
3. Battery charge
indicator and
time
4. Home screen
5. Application Grid
or Menu
Key Description
Keys Description
Back -
Opens the previous screens in the working
sequence till the home scre en is displayed.
Once the home screen is displayed it will
remain there even when you press the back
key.
Home -
Short press on any app: Shows the home
screen.
Long press: Google Now
Keys Description
Recent -
Short Press:
Displays the applications that you have
worked on recently. To remove any
application from this list, swipe the
application to left or right.
Double press: Launches the menu options
for any application.
The Application Menu is always positioned in the centre
of the favorites tray. Touch it to view all the installed
applications and widgets.
The Favorites tray ( ) is located above the hard key
panel on the home screen. The app icons you keep in the
tray remain visible on every Home screen panel.
The Alert notication area in the status bar on the top
of the display screen provides details about various
notications such as missed call, new messages, alarms,
events and software updates.
• To view the notications, swipe your nger down
from the top of the screen.
The System icons on the right side of display shows
the current device status such as wireless and network
connection strength, battery level and time.
The Google Search bar is just below the status bar and
lets you search the items in your phone or the Internet.
Touch Google Search bar to type your search terms, or
to speak and give a voice input.
You can add shortcuts for applications and add widgets
on your home screen panel.
1
4
Your Sonim XP8
5
3
2
21
Your Sonim XP8
Adding an Application Icon to Home Screen
1. On the home screen, tap on Apps Menu ( ).
2. Swipe left or right to locate the application for which
you require a shortcut on the home screen.
3. Touch and hold the application icon and drag it to
the home screen.
4. To open an app, tap on its shortcut on the home
screen.
Creating a Folder on the Home Screen
Folder helps you to keep the icons in an organized
fashion. To create folders,
1. Touch and hold an icon on the home screen or
Applications.
2. Drag and position it on another icon that should be
included in the same folder.
3. Hold for about 2 seconds. Both the icons are
grouped together in an unnamed folder.
4. Tap on the folder. Tap on the name area and give a
suitable name.
Moving an Icon/Folder from the Home Screen
1. Touch and hold the application icon and drag it to
the new location.
2. To move it to another home screen, drag it to the
side of the screen.
Removing an Icon/Folder from the Home Screen
1. Touch and hold the application icon. A ( )
text is displayed on the top of the home screen.
2. Drag the icon and position it on the ( ) text
till it turns red.
3. Drop the icon and it will be deleted from the home
screen.
Deleting a downloaded application icon from
the home screen will not delete the application.
You must go to Settings > Devices > Apps >
Downloaded, select a particular application
and uninstall it.
Home Screen Indicators
The icons displayed at the top of the screen provides
information about the status of the device. The details
such as time, battery level, data service, and Wi-Fi
connectivity and network status are displayed when
the phone is in standby mode. Other indicators such as
Bluetooth connectivity status, airplane mode, alarm and
call forward are displayed, if the feature is activated.
Icons Description
Battery level indicator
Battery charging in progress
No signal
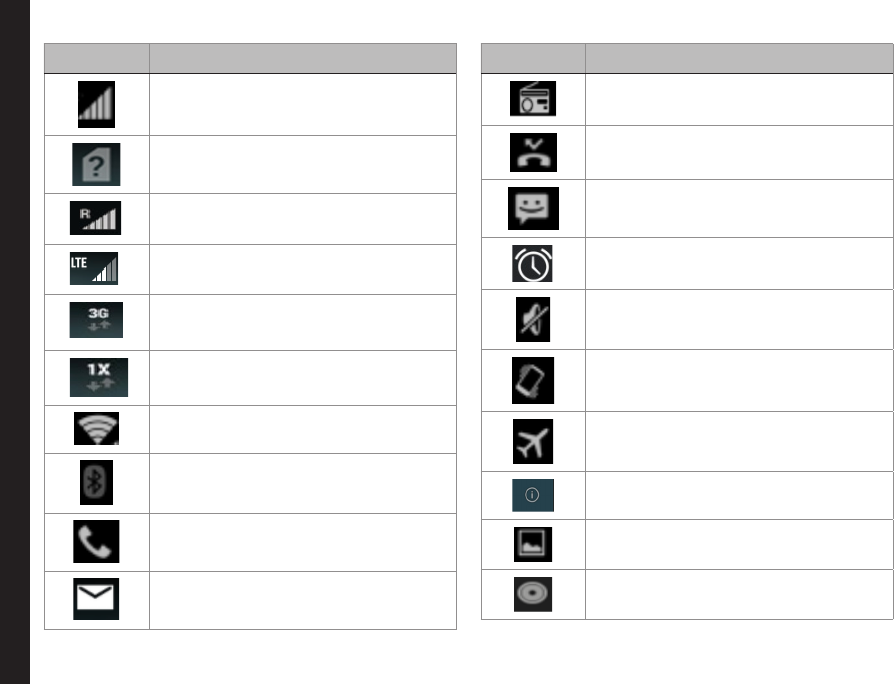
22
Your Sonim XP8
Icons Description
Signal strength
No SIM card
Roaming
LTE network connected
1X/EVDO network is connected
1X network is connected
Wi-Fi connected
Bluetooth activated
Call in progress
New E-mail
Icons Description
FM Radio
Missed call
New SMS or MMS
Alarm activated
Silent mode activated
Vibration mode activated
Flight mode activated
Error/information notication - attention
required
Screenshot captured
Music is played
23
Your Sonim XP8
Icons Description
Device storage space is running out
Phone Operations Without SIM Card
You can perform the following operations without
inserting a SIM card in your phone.
• Make an emergency call.
• View and modify all settings except few data usage
and mobile network related settings.
• Activate and share les through Bluetooth.
• Activate and access the Internet, and all your
synced accounts using Wi-Fi connectivity.
• Access your phonebook, les, and applications.
Setting up and Using Lock Screen
You must lock your phone screen to protect it from
unauthorized access.
1. From the Home screen or Apps Menu, tap on
Settings ( ).
2. Scroll down and tap on Security ( ), located
under Personal settings.
3. Tap on Screen lock and select one of the following
options to congure lock screen:
• None: Disables the screen lock.
• Slide: When the screen is locked with the slide,
slide your nger across the screen to unlock it.
• PIN: Provide your PIN value (minimum four
numbers) to set up PIN lock. When the screen
is locked with PIN, provide your correct PIN
value to unlock the screen.
• Pattern: Draw your pattern to setup the pattern
lock. When the screen is locked with pattern,
provide the correct pattern to unlock it.
• Password: Provide your password to setup the
password lock. When the screen is locked with
password, provide your correct password to
unlock the screen.
• Face Unlock: You will be asked to set a back-
up pin or pattern screen lock after you setup
face unlock. Once it is set up, you can unlock
your device just by looking at it.
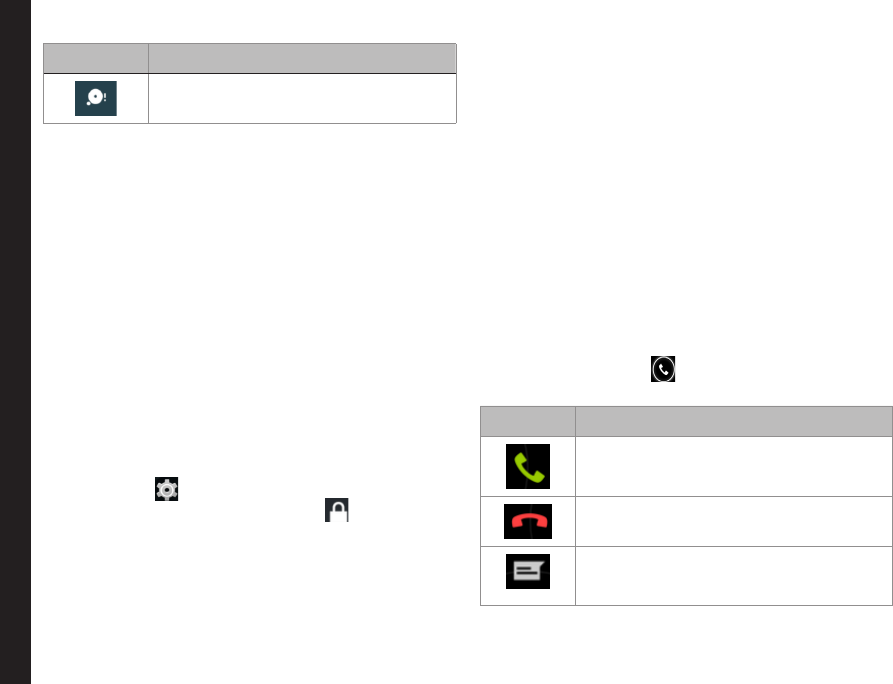
When the phone screen is locked, you can answer an
incoming call, without unlocking the screen.
Touch the center icon ( ) and slide over one of these
icons:
Icons Description
Answer the call.
Disconnect the call.
Disconnect the call and respond with
a default text message from a list of
response text messages.
24
Changing the Wallpaper
You can set an image or a photo stored in your phone as
your home screen wallpaper. To change the wallpaper,
1. Tap and hold on the Home screen. Choose
Wallpapers option.
2. Select from one of the following Wallpaper
collections:
• Gallery: includes the photos taken using
camera, screenshots and downloaded photos.
• Live Wallpapers: includes animated
wallpapers.
• Photos: includes photos saved in Google
account like Picasa web Album.
• Wallpapers: includes images that are pre-
bundled with the phone.
Taking a Screenshot
You can take the screenshot of the current screen and it
is stored in your phone’s gallery. To take a screenshot:
1. Open the screen which has to be captured.
2. Press the Power button and Volume down button
simultaneously. The screenshot is captured and
stored in the gallery.
3. A screenshot capture icon ( ) is also displayed
in the home screen status bar.
The screenshot is saved automatically in the Gallery.
Voice Input for Text Entry
You can use voice input to enter text by speaking. This
feature uses Google speech-recognition service. It is
necessary to have data connection on a mobile or Wi-Fi
network to use it.
Time and Date Settings
You can set and display the date and time on the phone.
You can also select the display format.
1. From the Home screen or Apps Menu, tap on
Settings ( ).
2. Scroll down and tap on Date & Time ( ), located
under System settings.
3. Select one of the following options to congure
Date & Time:
• To synchronize the date and time with the
network provided time, enable Automatic date
and time.
• To synchronize the time zone with the network
provided time zone, enable Automatic time
zone.
• To set the date manually, tap on Set date.
Scroll and select the day, month and year. Tap
on Done.
• To set the time manually, tap on Set time.
Scroll and select the hour and minute. Tap on
Done.
• To set the time zone, tap on Select time zone.
Scroll and select your time zone.
• To set the clock to 24-hour format, enable Use
24-hour format.
• To set your preferred date format, tap on
Choose date format. The date formats
Your Sonim XP8
25
supported are Regional (the standard format
supported by that country or region, MM DD
YYYY, DD MM YYYY, YYYY MM DD with / as
the date separator.
Using Glove Mode
The XP8 phone is equipped with a glove touch screen. In
order to be able to use the glove mode, enable the glove
mode on the device.
1. From the Home or Apps Menu screen, tap Settings
( ).
2. Scroll down and tap Accessibility ( ) located
under
System
.
3. Go to Glove mode and check the box.
The glove mode is enabled and you can use the
touch screen with the gloves.
Language Settings
You can set the phone’s language to any of the languages
displayed in the language list.
1. From the Home screen or Apps Menu, tap on
Settings ( ).
2. Scroll down and tap Language & input ( ) ,
located under Personal settings.
3. Go to Language and select any language from the
list as your preferred language.
The following languages can be set as a preferred
language:
• English
• Espanol
All the menu items and user feedback messages will get
displayed in the set language.
Spell Checker
Allow the user to select from potential corrections on the
misspelled word while typing the text.
Speech Settings
• The Speech engine is set to Google Text-to-
speech. To change the Google Text-to-speech
engine settings and install new language packs, tap
on Settings icon ( ) provided next to the engine.
• Tap on Speech rate to set the speed at which the
text to be spoken.
• Tap on Listen to an example to verify the set
speech rate.
• Displays the languge set for speech output.
Mouse/Trackpad
Tap on Pointer speed to set your phone’s touch pointer
sensitivity minimize or maximize the pointer speed as per
comfort level.
Display Settings
1. From the Home screen or Apps Menu, tap on
Settings ( ).
2. You can activate and modify the display settings.
Select Device > Display.
3. Set one of the following options to congure your
Managing Phone Settings
26
Managing Phone Settings
phone’s display:
• Brightness: Set the brightness of the phone display.
It is recommended to set to Auto so that the display
brightness is adjusted automatically based on
the brightness of the surroundings. This will also
optimize the battery power consumed.
• Wallpaper: Set the wallpaper for your home screen.
You can select from one of the following Wallpaper
collections:
• Gallery: includes the photos taken using
camera, screenshots and downloaded photos.
• Live Wallpapers: includes animated
wallpapers.
• Photos: includes photos taken from phone
camera, downloaded, and the photos synced
from Google account.
• Wallpapers: includes images that are pre-
bundled with the phone.
• Auto-rotate screen: Allows you to rotate the screen
automatically.
• Sleep: Set the sleep time so that the backlight turns
off after specified time of phone inactivity. This
setting will also help you to optimize the battery
power.
• Daydream: Enable this option to activate to
daydream while docked, charging or either after
specied time of phone inactivity. You can set the
screen saver to one of the following options.
Tap on the Settings icon ( ) next to each option,
to customize the screen saver.
• Clock: Displays the current system clock.
• Colors: Displays the seven colors of spectrum
with various transition effects.
• Photo Frame: Displays the photos present
in the gallery and screenshots as full screen
images.
• Photo Table: Displays the photos present
in the gallery and screenshots as assorted
images.
• Google Photos: Displays a photo collage of
Google + account.
• Font size: Set the font size of the text displayed in
the screen.
4. Lighten Up Display: When the phone display is off
or in sleep mode, you can activate the display by
pressing the home key.
The LED light on the top of the phone
blinks for all the notifications.
Connecting to a PC Through USB
When the phone is connected to the computer via an
USB cable, Connected as a media device is displayed
by default in the status bar.
When the user taps on that notication, the following two
options are displayed:
• Media Device (MTP): Select this to use the phone
to transfer media les on Windows, or using
Android le transfer on MAC. The audio les can be
transferred or synced using Windows Media Player.
27
• Camera (PTP): Lets you transfer photos using
camera software, and transfer any les that don't
support MTP.
USB Tethering:
To perform USB Tethering,
Select Settings > More > Tethering and Portable
hotspot > Enable USB Tethering.
The user should activate the mobile data or get
connected to Wi-Fi network.
When the phone is connected to the computer
via USB cable in Media device (MTP) mode,
the phone memory is displayed as a drive in
the computer.
When the phone is connected to the computer
as a media device, you can access File
Explorer in the phone.
Viewing Device Details
To view the device details such as system updates,
status, model number, Android version, Kernel and
baseband versions.
1. From the Home screen or Apps Menu, tap on
Settings ( ).
2. Scroll down and tap on About phone ( ) located
under System settings.
Managing Memory Utilized by Applications
The Apps screen allows you to optimize memory usage
for all the applications To view these settings,
1. From the Home screen or Apps Menu, tap on
Settings ( ).
2. Scroll down and tap on Apps, located under Device
settings. The following tabs are displayed.
• Downloaded: Displays apps you have
downloaded from Google Play or other
sources.
• Running: Displays all apps, processes, and
services that are currently running or that have
cached processes, and how much RAM utilized
by each application. The graph at the bottom
of the Running tab shows the total RAM in use
and the available RAM to use.
• Touch SHOW CACHED PROCESSES or
SHOW RUNNING SERVICES to switch back
and forth.
• All: Displays all applications that are pre-
bundled with Android and downloaded on
Google Play or other sources.
Optimizing Memory Usage
You can optimize your phone’s memory by performing
the following tasks.
• Uninstall apps that are not required.
• Delete unwanted les that are downloaded or
created.
• Transfer les to your computer that would be
required for later use.
• Delete ofine content on Google Play and stream it
via a Wi-Fi or mobile network.
Managing Phone Settings
28
Managing Phone Settings
Using the Torch
You can enable the Torch in 2 different ways:
From Home Screen:
1. Add the LED ashlight widget to the homescreen.
2. Tap on the Torch icon ( ) to turn on the torch.
3. Torch can be turned off by tapping on Torch icon.
From Lock Screen:
• Tap on the Torch icon ( ) to enable or disable the
torch.
If Torch is turned ON from Home screen,
it can be turned OFF from Lock screen
by tapping on Torch icon present in lock
screen and vice versa.
29
Managing Wireless and Network Settings
Connecting to Wi-Fi Network
Wi-Fi is a wireless network technology that can provide
Internet access at distance upto 100 feet, depending on
the Wi-Fi router and surroundings.
You can access Internet when you connect your XP8 to a
Wi-Fi network. To connect your phone to a Wi-Fi network,
1. From the Home screen or Apps Menu, tap on
Settings ( ).
2. Enable Wi-Fi , located under Wireless & Networks
settings.
3. Tap on Wi-Fi. A list of Wi-Fi routers present within
your phone’s accessible range are displayed.
4. Tap on your preferred network. Enter the password
(if it is a secured network) and tap on Connect.
To verify the password before connecting, enable
Show password.
It is always recommended to make your Wi-Fi
router secure and also to connect your phone
to a secure network.
Adding a New Network
To add a new Wi-Fi network,
1. In the Wi-Fi settings screen, touch Add network
button ( ).
2. Enter the following details:
• Network SSID: The wireless network ID.
• Security: Set the security type to None, WEP,
WPA/WPA2 PSK, 802.1x EAP.
3. Enable Show Advanced Options to set the Proxy
details and IP settings.
Editing a Network
1. Touch and hold the connected network.
2. Select Modify Network. The network setting details
such as connection status, signal strength, Link
speed, security type, IP address and password are
displayed.
3. Tap on Save to Save the settings or Cancel to exit
to the previous screen.
Forgetting a Network
1. Touch and hold the connected network.
2. Select Forget Network.
The device will be disconnected from the selected
network.
Enabling WPS For your Router
To setup a secure Wi-Fi network,
Tap WPS Push button ( ) in the Wi-Fi network
settings and press the WPS button in your router, when
prompted.
Connecting to Bluetooth Devices
Bluetooth is a short-range wireless communication
technology used to communicate between the devices
over a distance of about 8 meters.
You can perform the following tasks using Bluetooth
paired devices:
30
Managing Wireless and Network Settings
• Transfer media les and contacts between mobile
devices connected using Bluetooth.
• Access Internet through a Bluetooth device.
• Use Bluetooth headphones for playing media le.
Pairing a Bluetooth Device
To activate Bluetooth and pair your XP8 phone with other
Bluetooth devices:
1. From the Home screen or Apps Menu, tap on
Settings ( ).
2. Enable Bluetooth, located under Wireless &
Networking settings.
Ensure XP8800 is visible to all near by Bluetooth
devices.
3. Tap on Bluetooth to search and add other Bluetooth
enabled devices.
4. Tap on Search for devices. A list of accessible
Bluetooth devices are displayed.
Ensure that Bluetooth is activated in the other device
too.
5. Tap on your preferred device.
6. Conrm the pass key in the other device and tap on
Pair in your phone. The device is displayed in the
Paired devices list.
Editing Paired Bluetooth Device Settings
1. Tap on Settings icon ( ) located next to the
preferred paired Bluetooth device.
2. Tap on Rename to rename the display of the device
name.
3. Tap on Unpair to remove the device from your
paired list.
4. Enable Media audio to connect the Bluetooth
device for listening to media les.
5. Enable Internet access to use the paired Bluetooth
device to access the Internet.
Optimizing Data Usage
Data usage refers to the amount of data used by your
phone during internet access. The data usage charges
are dependent on the plan provided by your service
provider.
To monitor your data usage, adjust your data usage
settings.
1. From the Home screen or Apps Menu, tap on
Settings ( ).
2. Tap on Data Usage, which is located under Data
usage ( ) settings.
3. Enable Mobile Data to access Internet using your
mobile network.
4. Enable Set mobile data limit to preset your data
usage limit and to set an alert before reaching the
preset limit.
5. Drag the red bar to set the Data usage limit.
Mobile data access is disconnected automatically
as soon as you reach this limit. You will not be able
to access the Internet and related phone features do
not work. You receive a notication once you reach
the set data usage limit.

31
Managing Wireless and Network Settings
6. Drag the orange bar to set data usage warning so
that you will get an alert before reaching your set
data usage limit.
Activating Airplane Mode
When your phone is set to airplane mode, you will not
have network connectivity or mobile data connectivity.
But you can access your camera, media les and other
features that do not require mobile data connectivity.
To activate the airplane mode.
1. From the Home screen or Apps Menu, tap on
Settings ( ).
2. Tap on More located under Wireless & Networks
settings.
3. Enable Airplane mode.
NFC Function
To enable NFC,
1. From the Home screen or Apps Menu, tap on
Settings ( ).
2. Tap on More located under Wireless & Networks
settings.
3. Enable NFC to allow data exchange when the phone
touches another device.
Setting Up Tethering & Portable Hotspot
Using tethering and portable hotspot, you can share your
device’s Internet connection with a computer or with
other devices.
1. From the Home screen or Apps Menu, tap on
Settings ( ).
2. Tap on More located under Wireless & Networks
Settings.
3. Tap on Tethering & Portable hotspot.
4. Connect your device to computer via USB Cable.
5. Enable USB tethering.
Setting Up Wi-Fi Hotspot
When you setup your phone as a Wi-Fi hotspot you can
connect other devices to this phone through Wi-Fi and
access Internet.
1. Tap on More located under Wireless & Networks
settings.
2. Tap on Tethering & Portable hotspot.
3. Tap on Set up Wi-Fi Hotspot.
4. Enter Network SSID, security details and
password and tap on Save.
Activating Wi-Fi Hotspot
1. From the Home screen or Apps Menu, tap on
Settings ( ).
2. Tap on More located under Wireless & Networks
settings.
3. Tap on Tethering & Portable hotspot.
4. Enable Portable Wi-Fi hotspot.

32
Managing Wireless and Networking Settings
Activating Bluetooth Tethering
When you activate Bluetooth tethering, you can share
your phone’s Internet connection with other Bluetooth
paired devices.
1. Tap on More located under Wireless & Networks
settings.
2. Tap on Tethering & Portable hotspot.
3. Enable Bluetooth Tethering.
Setting Up VPN Connection
Using a Virtual private network (VPN) connection, you can
access websites and other resources within a secured
local network, even when you are outside of that network.
To setup a VPN connection,
1. From the Home screen or Apps Menu, tap on
Settings ( ).
2. Tap on More located under Wireless & Networks
settings.
3. Tap on VPN.
Ensure lock screen PIN or password is set.
4. Tap on Add network icon ( ). Edit VPN prole
screen is displayed.
5. Enter the following details:
• Name: VPN connection name.
• Type: Select the connection type.
• Server address: Address of the secure server
for connection.
• PPP encryption: Enable to perform a secure
point-to-point encryption between your device
and the VPN server.
• Select Advanced to enter DNS server details.
Connecting to a VPN Network
• Tap on the required VPN name from the list of VPN
networks congured.
• Enter the required credentials.
• Tap on Connect.
When the phone is connected to the VPN network,
the icon is displayed on the notication bar.
Editing VPN Network Details
• Touch and hold the required VPN prole to be
edited, from the list of VPN networks congured.
• Tap on Edit prole.
• Modify the required information.
• Tap on Save to save the changes.
Deleting a VPN Network
To delete a VPN prole from the VPN screen,
1. Touch and hold the VPN prole to be deleted from
the list of VPN networks congured.
2. Tap on Delete prole.

33
Managing Wireless and Network Settings
Managing Mobile Network
To view and modify your mobile network settings,
1. From the Home screen or Apps Menu, tap on
Settings ( ).
2. Tap on More located under Wireless & Networks
settings.
3. Tap on Mobile network settings.
4. Enable Data enabled to access the Internet using
your mobile network.
5. Enable Data roaming to have network connectivity
when you are in a roaming network.
6. Prefered network types listed in the phone are, LTE,
CDMA and Global.
7. Select the Preferred network type. You can set it to
LTE, CDMA, and Global.
8. Tap on Access Point Names to view, add and edit
the network access points.
9. Tap on Add network icon ( ) to add a new
access point.
10. Tap on Network operators to choose the network
operator.
34
Managing Security Settings
About Android Security
Android takes a multi-layered approach to the security.
• Prevent: Apps on Google Play are scanned
continuously to block harmful apps and policy
violators. You can also choose to have apps
installed from other sources veried.
• Control: App sandboxes keep apps from accessing
other parts of your device’s operating system,
or each other, unless you give permission at
installation. Screen lock and encryption helps to
prevent an unauthorized access to the entire device.
• Defend: Once identied, dangerous apps can be
removed remotely.
Managing Security Settings
You can activate and protect your phone from
unauthorized access by conguring the security settings.
1. From the Home screen or Apps Menu, tap on
Settings ( ).
2. Tap on Security located under Personal settings.
Enable the required settings to preferred security
settings from the below options.
Locking Your Screen
1. From the Home screen or Apps Menu, tap on
Settings ( ).
2. Tap on Security > Screen Security > Screen Lock
and select one of the following options to congure
lock screen:
• None: Disables the screen lock.
• Slide: When the screen is locked with the slide,
slide your nger across the screen to unlock it.
• Face Unlock: You will be asked to set a back-
up pin or pattern screen lock after you setup
face unlock. Once it is set up, you can unlock
your device just by looking at it.
• Pattern: Draw your pattern to setup the pattern
lock. When the screen is locked with pattern,
provide the correct pattern to unlock it.
• PIN: Provide your PIN value (minimum four
numbers) to set up PIN lock. When the screen
is locked with PIN, provide your correct PIN
value to unlock the screen.
• Password: Provide your password to setup the
password lock. When the screen is locked with
password, provide your correct password to
unlock the screen.
When the screen is locked, you can answer an
incoming call, without unlocking the screen.
Touch the center icon ( ) and slide over one of
these icons:
Icons Description
Answer the call.
Disconnect the call.

35
Managing Security Settings
Disconnect the call and respond with a
default text message from a list of quick
response text messages.
3. The screen gets locked automatically as per
Automatically lock option set.
4. Enable Power button instantly Locks option to
lock the screen when immediately you press the
power button.
5. Check Enable Widgets to add and view widgets on
the lock screen.
6. Enable Show Owner Info on lock screen in Owner
Info option to display owner info on the lock screen.
You can modify this detail whenever required.
Protecting Your Phone
You can protect your phone from modifying key features
without your permission.
1. From the Home screen or Apps Menu, tap on
Settings ( ).
2. Tap on Security > Protect Your Phone > Select
Lock and select one of the following option:
• None: Disables the screen lock.
• PIN: Provide your PIN value (minimum four
numbers) to set up PIN lock. When the screen
is locked with PIN, provide your correct PIN
value to unlock the screen.
• Password: Provide your password to setup the
password lock. When the screen is locked with
password, provide your correct password to
unlock the screen.
Encrypting Your Phone
You can encrypt your accounts, settings downloaded
apps and their data, media and other les.
1. From the Home screen or Apps Menu, tap on
Settings ( ).
2. Tap on Security > Encryption > Encrypt phone to
encrypt your phone. Once you encrypt your phone,
you need to type a numeric PIN or Password to
decrypt it each time you power it on.
Encryption takes an hour or more .You must
start with a charged battery and keep your
phone plugged in untill encryption is complete.
If you interrupt the encryption process, you will
loose some or all of your data.
Locking Your SIM Card
You can set SIM lock for your SIM card.
1. Tap on Setup SIM/RUIM card lock.
2. Tap on Lock SIM card.
3. Enter SIM PIN and tap OK.
To disable this option you must enter your SIM lock
PIN.
Changing Your SIM PIN
1. Tap on Change SIM PIN. Enter the old SIM PIN and
and tap OK.

36
2. Enter the new SIM PIN and re-enter the same value
when asked. Tap OK.
Making Password Visible
Enable the Make passwords visible option to view the
password while entering.
Device Administrator Settings
To activate device administrator, tap on Device
Administrators > enable Launcher.
You can enable device administrators and allow the App
launcher to perform the following tasks:
• Erase the phone's data without warning by
performing factory data reset.
• Change the screen unlock password.
• Set specic password rules.
• Monitor the screen-unlock attempts.
Managing Credential Certificates
You can view, install, verify and manage the certicates
installed in your phone.
• Tap on Storage type and by default, the storage
type is Hardware-backed.
• Tap on Trusted Credentials to view the veried
system and user certicates.
• Tap on Install from Storage to install the certicates
from storage.
Protecting Your Phone from Harmful Applications
Some applications can harm your device. It is
recommended to verify apps in order to help prevent
harmful software from being installed on your device To
prevent installation of application from unknown sources,
disable the option Unknown sources.
If you want to install applications from unknown sources,
enable Verify apps under Settings > Security, to verify if
the application is safe for installation.
Managing Security Settings
37
Location Access
You can let your device access GPS, Wi-Fi networks, and
mobile networks to estimate your location.
1. From the Home screen or Apps Menu, tap on
Settings ( ).
2. Tap on Location located under Personal settings.
3. Turn on Location.
4. Set one of the following modes:
• High accuracy: High accuracy mode uses
GPS, Wi-Fi, and mobile networks to get the
highest-accuracy location for your device. It
uses assistance data to help estimate your
location faster and more accurately.
• Batter saving: Battery saving mode allows
your device to estimate your location using
low battery-intensive location sources, such as
Wi-Fi and mobile networks. It uses assistance
data to help estimate your location faster and
more accurately.
• Device only: Device only mode allows your
device to estimate your location using GPS
only. It uses assistance data to help estimate
your location faster and more accurately. This
mode may use more battery power and take
longer to determine your location.
When the location information is turned OFF, your device
location is not shared with any apps.
Apps Accessing Your Location
You can view and force stop the apps that are accessing
or have recently accessed your location.
1. In the Location screen, view the list of applications
that are accessing or recently accessed the
location data of your phone, under Recent location
requests.
2. Tap an application to view the application info. You
can stop, disable or uninstall it.
• High battery use: Apps which are tagged under
high battery use, receives location information from
sources that may use more battery power.
• Low battery use: Apps which are tagged under low
battery use, receives location information from only
low battery-intensive sources.
Selecting an app brings you to its App info page, where
you can view app permissions and uninstall an app.
Backup & Reset Options
You can backup your data and connect to one or more of
your Google accounts using Android backup services. If
you have to replace your device or erase the data in the
phone, later you can restore the data for any account that
was previously backed up.
To backup your data:
1. From the Home screen or Apps Menu, tap Settings
( ).
2. Tap on Backup & reset located under Personal
settings.
3. Enable the option Back up my data.
If you do not have a backup account on your
device, you can touch Backup account to add
an account.
Managing Personal, Account and System Settings

38
Managing Accounts
You can link an existing Google Account to your phone to
organize and access your personal information from any
computer or mobile device.
Adding an Account
1. From the Home screen or Apps Menu, tap on
Settings ( ).
2. Tap on Accounts located under Account settings.
Tap Add account.
3. Select the type of account as Google.
4. Complete the on-screen instructions.
The Google account will be displayed in the path:
Settings > Accounts > Google.
Deleting an Account
You can remove any account and all information
associated with it from your device, including e-mail,
contacts, settings, and other data backed up in that
account.
1. To remove a Google Account, tap Settings on home
page > Accounts > Google > Accounts > Select
the account to be deleted.
2. Tap on Menu > Remove account.
To remove any other type of account, tap Settings >
Accounts > Account-type (POP3/IMAP) > Account
name, and tap on the menu option and select Remove
Account.
Account Sync Options
To view and modify sync settings for Google Account, tap
on Settings > Accounts > Google > Account name.
Congure Auto-Sync for all Apps
To control auto-sync for all apps that use it, open
Settings > Wireless & Networks > Data usage > Menu
and check or uncheck Auto-sync data.
If this option is not checked, you can sync the data
manually.
Leaving auto-sync off can help extend your battery life,
but will prevent you from receiving notications when
updates occur.
Congure Google Account Sync Settings
To adjust a single Google Account’s sync settings:
1. Go to Settings > Accounts > Google.
2. Tap the account whose sync settings has to be
changed.
3. If your account is set to auto-sync, you can check or
uncheck items as needed. If auto-sync is off which
is located under Settings > Data Usage > Options
> Auto-sync data, touch an item to manually sync
its data.
Sync a Google Account Manually
1. Go to Settings > Accounts > Google.
2. Tap on the account whose data has to be synced.
3. Tap on Menu > Sync now.
You can use the phonebook to maintain your contacts. It
Managing Personal, Account and System Settings
39
enables you to make a call, send SMS and MMS etc.
To access the contacts,
From home screen or Apps Menu, tap People ( ) .The
contacts saved in the phonebook are displayed.
You can touch and drag the scroll bar on your
phone screen to scroll through the contacts.
Adding a New Contact
• To add a new contact, tap on People > Add new
contact ( ). Enter the contact details and tap on
Done to save the contact.
• You can also enter a number using the dial pad and
tap on Add to contacts to add a new contact.
View the Contact Details
1. From Home screen or Apps Menu, tap People (
).
2. Scroll to the required contact and tap the contact, to
view the contact details.
Sending a Message from Contacts
You can send SMS and MMS messages to the contacts.
Sending SMS/MMS
1. From Home screen or Apps Menu, tap on People
( ).
2. Scroll to the required contact and tap on the contact
and then tap on Message icon ( ), to open the
message screen.
3. Type the message or tap an Attachment ( ) to
attach a multimedia le.
4. Tap on Send ( ).
Dialing a Number from Contacts
1. From Home screen or Apps Menu, tap on People
( ).
2. Scroll to the required contact and tap the contact to
view the contact details.
3. Tap on the required phone number to dial the
contact.
Editing the Contact Details
1. From Home screen or Apps Menu, tap on People
( ).
2. Scroll to the required contact and tap the contact to
view the contact details.
3. Tap on Options and select Edit.
4. Edit the required details and tap on Done.
Importing SIM Card Contacts to Phone
1. From Home screen or Apps Menu, tap on People
( ).
2. Tap on Options and select Import/Export.
3. Tap on Manage SIM card contacts.
The list of contacts stored in your SIM card is
displayed.
Managing Contacts
40
Managing Contacts
4. Tap on the contact to be moved to the phone.
The contact is imported to the phone address
book.
Exporting Phone Contacts to SIM Card
1. From Home screen or Apps Menu, tap on People
( ).
2. Tap on Options and select Import/Export.
3. Tap on Export to SIM card.
The list of contacts stored in your phone address
book is displayed.
4. Check the contacts to be exported to the SIM.
5. Tap OK.
The contacts are exported to the SIM card.
Importing from Storage
1. From Home screen or Apps Menu, tap on People
( ).
2. Tap on Options and select Import/Export.
3. Tap on Import from Storage.
All the contacts are imported to your storage as
.VCF le.
Exporting Phone Contacts to Storage
1. From Home screen or Apps Menu, tap on People
( ).
2. Tap on Options and select Import/Export.
3. Tap Export to storage.
4. Tap OK.
All the contacts are exported to your storage as
.VCF le.
Sharing Contacts Via MMS, Bluetooth, Drive and E-mail
You can send contact information by MMS, e-mail or
Bluetooth.
1. From Home screen or Apps Menu, tap on People
( ).
2. Tap on Options and select Import/Export.
3. Tap Share visible contacts.
4. Select one of the following options to share the
contacts and tap Just Once to select the transfer
mode each time or Always to send the contact using
the same method:
• Bluetooth: Send the contacts to a Bluetooth
device paired with your phone.
• E-mail: Send the contacts via an e-mail.
• Messaging: Send the contacts via
Messaging(as MMS).
• Gmail: Send the contacts via Gmail using your
Google account.
• Drive: Save and share the contact via drive.
You can also share a single contact.
1. Scroll to the required contact and tap the contact to
view the contact details.
2. Tap on Options and select Share.
41
3. Select the sharing options like Bluetooth, Drive,
E-mail, Gmail or Messaging and share the contact.
Managing Contact Settings
You can set ringtone, enable voice mail, and place the
contact on homescreen.
1. From Home screen or Apps Menu, tap on People
( ).
2. Scroll to the required contact and tap the contact to
view the contact details.
3. Tap on Options and select one of the following
options:
• Set ringtone to set a specic ringtone for that
contact.
• Enable All calls to voicemail to forward
all incoming calls from that contact to your
voicemail box.
• Select Place on Home screen to place the
contact on Home screen for quick access.
Managing Phonebook Settings
You can sort the contacts to be displayed.
1. From Home screen or Apps Menu, tap on People
( ).
2. Tap on Options > Settings and select one of the
following options:
• Sort list by: Sort the contact names by rst
name or last name.
• View contact names: You can choose whether
the rst name has to be displayed rst or the
last name.
Searching Contacts
1. From Home screen or Apps Menu, tap on People
( ).
2. Tap Search ( ) and enter the rst few letters/
numbers of the contact name/phone number to be
searched.
All the contacts containing the searched text are
displayed.
Deleting a Contact
1. From Home screen or Apps Menu, tap on People
( ).
1. Scroll to the required contact and tap the contact to
view the contact details.
2. Tap on Options and select Delete.
3. Tap on OK to delete the contact.
Managing Contacts
42
Making a Call
1. From Home screen or Apps Menu, tap on the
Phone ( ).
The phone screen with frequently called contacts,
call history ( ), dial pad ( ), and the call
options ( ) are displayed.
To dial a number use one of the following options:
• Call history: Tap on the call History icon ( ). Tap
on the phone icon beside the contact or tap on the
contact, and tap on the number.
• Dial pad: Tap on the dial pad. The numeric touch
keypad is displayed. Enter the phone number and
tap the phone icon to make a call.
To dial an international number, prex the phone
number with the respective country code.
• Frequently called contacts/numbers: Tap the
specic contact/number from the frequently called
numbers list to make a call.
Calling a Number Via People
1. From Home screen or Apps Menu, tap on People
( ).
2. Scroll to the contact and tap the contact. The
contact details are displayed.
3. Tap the required phone number to call the contact.
Answering an Incoming Call
To answer/reject an incoming call, touch the white phone
icon ( ) and slide over one of these icons:
Icons Description
Answer the call.
Disconnect the call.
Disconnect the call and respond with
a default text message from a list of
response text messages.
Adding a Contact From Phone Screen
1. From Home screen or Apps Menu, tap on the
Phone ( ).
2. Tap on Call options ( ).
3. Tap on New contact.
4. Enter the contact details and tap on Done.
Viewing All Contacts from Phone Screen
1. From Home screen or Apps Menu, tap on the
Phone ( ).
2. Tap on Call options ( ).
3. Tap on All contacts.
Viewing Call History
1. From Home screen or Apps Menu, tap on the
Phone ( ).
Managing Calls
43
Managing Calls
2. Tap on the call History icon ( ).
3. Tap on All to view all the incoming, outgoing, and
missed calls.
4. Tap on Missed to view only the missed calls.
Deleting Call History
1. From Home screen or Apps Menu, tap on the
Phone ( ).
2. Tap the call History icon ( ).
3. Tap on Options ( ).
4. Tap on Clear call log to delete the call history.
Managing Call Settings
You can change the incoming call ring tone, set phone
to vibrate while ringing and also activate voicemail, and
other settings in Call settings screen.
To view and modify call settings,
1. From Home screen or Apps Menu, tap on the
Phone ( ).
2. Tap on Call options ( ).
3. Tap on Settings.
Settings
Your phone uses sounds and vibrations to communicate
with you, including ringtones, notications, alarms, and
navigation feedback. You can customize any of these
sounds, as well as controlling their volume and the
volume for music, videos, games, and other media.
To change the phone ringtone,
1. From the Home screen Apps Menu, tap on Settings
( ).
2. Tap on Sound located under Device settings.
3. Tap on Phone ringtone located under CALL
RINGTONE & VIBRATE and select the required
ringtone from the list. Tap OK to set the ringtone.
Setting the Volume
Tap on Volumes to set the master volume separately
for music, ringtones, notications, and alarms.
You can also use the physical volume control on
the phone to raise or lower the volume of whatever
sound is currently playing.
Activating Vibrate Mode
• To set the phone to vibrate while ringing, enable
Vibrate when ringing which is located under Call
Settings > Ringtone & Vibrate.
• Disable Vibrate when ringing option if you want
your phone not to vibrate while ringing.
Setting Up Your Voicemail
1. From Home screen or Apps Menu, tap on the
Phone ( ). tap Options > Settings.
2. Tap on Voicemail located under Other Call
Settings.
3. View or enter the following details:
• Service: Service from the voicemail is sent.

44
• Setup: Enter your voicemail number.
• Sound: Set alert tone for voicemail message.
• Vibrate: Enable this option to receive a
vibrating alert for voicemail messages.
Dial Pad Touch Tones
1. From Home screen or Apps Menu, tap on Settings
( ).
2. Tap on Sound.
3. Enable Dial pad touch tones.
These tones are played while entering a number in
dialpad.
Editing Quick Responses
The quick responses are the messages that can be used
to reject the call with a message.
1. From the Home screen or Apps Menu, tap on the
Phone ( ), tap Options > Settings.
2. Tap on Quick responses located under Other Call
settings.
The list of quick responses are displayed.
3. Tap on the required quick responses from the list to
edit that particular message and tap on OK to save
the message to the list.
4. While an incoming call arrives, to reject the call with
a message, tap on the white phone icon and select
the required quick response from the list and the
same response is sent to the caller.
Turn on Proximity Sensor
You can save battery power by switching off the display
when you are in a call. Enable Turn on proximity sensor to
switch off the display, when you answer a call.
1. From the Home screen or Apps Menu, tap on the
Phone ( ).
2. Tap Options > Settings.
3. Scroll down to select Turn on proximity sensor
located under Other call Settings.
Settings TTY Mode
If you enable TTY mode, hearing-impaired individuals can
send and receive phone calls as text over the phone.
1. In the call settings screen, tap TTY mode to view
and modify TTY mode settings.
2. Set one of the following options:
• TTY Off: disables TTY mode.
• TTY Full: enables TTY mode for both incoming
and outgoing calls.
• TTY HCO: enables TTY mode only for
incoming calls.
• TTY VCO: enables TTY mode only for outgoing
calls.
DTMF Tones
In the call settings screen, tap on DTMF tones under
Other call Settings to set the DTMF tone length to
Normal or Long.
Managing Calls
45
Other Call Settings
1. From the Home screen or Apps Menu, tap on the
Phone ( ).
2. Tap Options > Settings.
3. Scroll down to locate Other Call Settings.
4. Under Other Call Settings, select Additional
settings. This option is used to display caller ID.
Call Forwarding
You can forward your incoming calls to a number in
the contacts or a new number, provided your network
operator supports this service. The device can be set to
send incoming calls to a specied number.
1. To access call forwarding settings, in the call
settings screen under Other Call Settings, tap Call
forwarding.
2. Select one of the following call forwarding options
as you preferred. Enter a specic number and tap
on Enable.
Option Function
Always
forward
Forward all incoming calls to a
predesignated number.
Forward when
busy
Forward calls when your phone is
busy.
Forward when
unanswered
Forward calls when you do not
answer incoming calls.
Forward when
unreachable
Forward calls when your phone is
switched off or is out of coverage
area.
Dual Profile Switch
The user can switch the current prole to another prole
using Dual Prole Switch.
1. From the Home screen or Apps Menu, select Swap
Prole ( ).
2. There are three options to select the prole:
• Pri to Sec: You can swicth to secondary prole
from primary prole.
• Sec to Pri: You can switch to primary prole
from secondary prole.
• Dual Prole Check: You can check whether
the SIM supports dual prole or not.
Internet Call Settings
You can make calls and receive calls over Internet when
connected to Wi-Fi network, rather than over your mobile
network. To place a call over Internet, phone must be
congured to use an Internet calling account.
After you set up the account, placing an Internet call is
not different than placing any other call. However, you
must be connected to a Wi-Fi network. When you are
making an Internet call, the phone displays Internet Call
near the top of the screen.
Use Internet Calling
1. From the Home screen or Apps Menu, tap on the
Managing Calls

46
Phone ( ).
2. Open the contact list and tap on Options >
Settings.
3. Scroll down to select Use Internet Calling located
under Internet call Settings.
4. A dialog is open with the following options:
• For all calls when data network is available:
If this option is selected and when the phone is
connected to Wi-Fi network or mobile Internet,
each dialed call becomes an Internet call.
• Only for Internet calls: If this option is
selected, only Internet call can be dialed.
• Ask for each call: If this option is selected,
when a number is selected to dial, a dialog is
displayed to select either Cell phone call or
Internet call.
SIP Accounts
Internet calling is based on the Session Initiation
Protocol (SIP) for voice calls on Internet Protocol (IP)
network.
To add a SIP account and congure your incoming and
outgoing preferences:
1. From the Home screen or Apps Tray, tap on the
Phone( ).
2. Tap on Options > Settings.
3. Scroll down to select SIP Accounts located under
Internet call Settings.
4. Tap Add Account to create a new SIP account.
Enter the required information and tap Save to
create a new account.
5. Enable Receive Incoming Calls to receive an
incoming call from Internet.
IMS Account
1. From the Home screen or Apps Tray, tap on the
Phone( ).
2. Tap on Options > Settings
3. Scroll down to select IMS Account located under
Internet call Settings.
4. The following two options are displayed:
• Enable/Disable IMS Service Capability:
• MO (Mobile Orginated) Call Type: The two different
types are:
• Voice - Voice LTE call is initiated.
• CSVoice - Voice call is initiated over a CDMA
network.
5. Select the required option and tap on Save to save
the account.
Managing Calls
47
Sending Messages and E-mails
SMS and MMS are convenient and inexpensive means
of communication. You can send a text message to
other people via SMS service. MMS allows you to send
messages by including multimedia content such as
pictures, audio les, video les.
You can use the Messaging in your phone to send an
SMS and MMS message to other mobile phones or any
other equipment that can receive SMS and MMS.
The MMS feature is available only if you
subscribe it from your network operator.
To access the message function, from the home screen
or All applications screen, tap on Messaging ( ).
Sending SMS/MMS Message
You can send SMS and MMS messages to contacts in
your phonebook and to new numbers that are not present
in the phonebook.
1. To create a SMS message, from the home screen or
Apps Menu, tap on Messaging ( ).
2. Tap on New message ( ).
3. Enter the contact name or the phone number in the
To eld.
If you enter an alphabet, all the contact names
starting with that alphabet is displayed as a list.
Scroll down to select the contact.
4. Enter the message and tap on Send ( ).
When you add an attachment, the message is
automatically converted to a multimedia message.
MMS charges will apply, based on the operator.
5. To add an attachment, tap on Attach ( ). Select
the attachment type from the following options.
Browse the operation type from the below list and select
multimedia le to be attached.
Attachment
Type Description
Pictures Attach a photo from the phone
memory.
Capture picture Take a new photo using the mobile
camera and attach.
Videos Attach a video from the phone
memory.
Capture video Record a new video using the
camcorder and attach.
Audio Attach an audio le from the phone
memory.
Record audio Record a new audio using the
sound recorder and attach.
VCard Attach a contact.
Slideshow Add new slide or edit the existing
slides and attach.
48
Managing Message Settings
You can customize the way you want to view and lter
the messages. You can also set the default messaging
application.
To view and modify the message settings,
1. To edit message settings, from the home screen or
All applications screen, tap on Messaging ( ).
2. Tap on Message options ( ) > Settings.
3. View and edit the following settings:
Settings Description
SMS enabled Set the default messaging
application.
Delete old
messages
Delete the old messages
automatically when the storage limit
is reached.
Text message
limit
Set maximum messages per
conversation.
Multimedia
message limit
Set the maximum MMS messages
per conversation.
Delivery
reports for
SMS/MMS
Enable this option to request a
delivery report for each message you
send.
Message
template
Create, view or edit quick response
messages.
Read reports Enable this option to request a read
report for each sent message.
Auto retrieve Enable this option to retrieve the
messages automatically.
Roaming
auto-retrieve
Enable this option to retrieve the
messages automatically, while you
are in a roaming network.
Notication Enable notication alert for incoming
messages.
Sound Set the alert tone for incoming
messages.
Vibrate Enable vibrate alert for incoming
messages.
Manage
SIM card
messages
Manages the text messages (SMS)
stored in the SIM card.
Priority For sending high, normal, and low
priority messages.
Convert
notication
By checking the check box for this
option, user gets the notication for
message charges according to the
plan.
Deleting Messages
To delete all the messages,
1. From the home screen or Apps Menu, tap on
Messaging ( ).
2. Tap on Message options ( ).
3. Tap Delete all threads. The complete message
thread is deleted after the conrmation.
Sending Messages and E-mails
49
Sending Messages and E-mails
4. You can delete the selected conversation.
Tap on a single message and can delete the
thread for the perticular sender.
Setting Up E-mail Accounts
You have to congure your e-mail account to access your
e-mail box and e-mail services.
1. To create an E-mail account, from the home screen
or Apps Menu, tap on Settings ( ).
2. Tap on Add account ( ) which is located under
Accounts.
3. Select the type of account: POP3, IMAP and
Exchange.
4. Enter the e-mail address and password. After that,
follow on-screen instructions to complete the setup.
Also, a new Google account can be created.
5. To setup another e-mail account, follow the same
procedure.
Sending an E-mail from POP3/IMAP Account
1. Enter the mail recipient in To eld and subject in the
subject line in the Compose screen.
2. Enter the message and tap on Send ( ).
3. To use this function, tap Options. The following are
the options:
Option Description
Attach picture Attach a photo from the phone
memory.
Attach video Attach a video from the phone
memory.
Add Cc/Bcc Add the recipients in Cc/Bcc.
Save draft Save the composed mail as a draft.
Discard Delete the mail.
Settings Set the general settings.
Insert quick
response
Send the required quick responses
from the list.
Reading an E-mail
1. Select an e-mail account and tap on the E-mail to
retrieve.
2. To manually retrieve a new e-mail, select Settings
> Accounts > select a particular account, go to
Options and tap on Sync now icon ( ).
3. Tap a message to read. The following options are
available when a message is opened:
• Reply or Reply All to the message
• Forward the message
• Delete the message
• Open attachment
50
Using the Keyboard
Enter and Edit Text
You can use the virtual Keyboard to enter text quickly
and easily. Type faster and more accurately on your
device with Keyboard’s word recognition and next-word
predictions.
The key features are:
• Personalized suggestions, corrections, and
completions
• Gesture Typing with dynamic oating preview
• Advanced keyboard layouts
Gesture Typing
1. Tap on the phone screen where you want to type to
open the keyboard.
2. Slide your nger slowly across the letters of the
word you want to input.
3. Release your nger when the word you want is
displayed in the oating preview or in the middle of
the suggestion strip. To select one of the words in
the suggestion strip, tap on it.
Use Gesture Typing without the space bar
When you use Gesture Typing, there’s no need to use the
space bar—just continue to slide your nger across the
letters you want to input, then lift your nger to start the
next word.
Keyboard Dictionaries
To manage keyboard dictionaries,
1. From the Home screen or Apps Menu, tap on
Settings ( ).
2. Tap Language & Input located under Personal
settings.
Personal Dictionary
You can add your own words to your personal dictionary
so that your device remembers them.
To add a word or phrase, including an optional shortcut,
1. Tap on Language & Input located under Personal
settings.
2. Tap on Personal dictionary and then Add ( )
icon.
3. Add a required word and respective shortcut which
is optional.
Add-on Dictionary
1. From the Home screen or Apps Menu, tap on
Settings ( ).
2. Tap on Language & Input located under Personal
settings.
3. Tap on Settings ( ) icon next to Google
Keyboard.
4. Tap on Add-on dictionaries.
The dictionaries for other languages that you can
download to your device are displayed.
51
Using Android Applications
Downloading Android Applications and Media Files
You can download and install/view your Android
applications/media les, when your phone is connected
to the Internet through Wi-Fi or mobile data connection.
You can also download les from Gmail or other sources.
To manage application downloads, tap the Downloads
icon ( ) located on the Apps Menu.
Downloaded movies and other media les are listed in
the Downloads screen.
Use the Downloads screen to view, reopen, or delete the
downloaded les.
From the Downloads apps,
1. Touch an item to open it.
2. Touch headings for earlier downloads to view them.
3. Check items you want to share. Then touch the
Share icon and choose a sharing method from the
list.
4. Check items you want to delete. Then touch the
Trash icon.
5. At the top of the screen, touch the 3 horizontal lines
to sort your downloads by name, by date modied,
or by size.
Accessing Gmail
Gmail application is used to access your Gmail services.
Gmail account can be used to sign in to all Google
applications and services which includes;
• Google now - for getting the right information at the
right time
• Calendar
• People - for keeping track of your accounts
• Google Drive- for working with documents
While reading a message, user can perform Archive,
Delete, Label, Move and other operations.
Camera
The Sonim XP8 has main camera with 8MP (mega pixel)
auto focus and a front camera with 1MP (mega pixel)
xed focus for taking pictures. These pictures are saved
in Gallery ( ) of your phone memory.
You can access Gallery from Apps Menu.
• To take a picture, press the Camera button (yellow
button located on the left side of your phone) or tap
the Camera icon ( ) present in the Apps Menu.
The camera screen with touch controls ( ) is
displayed.
• Tap on Camera mode ( ), to set one of the
following modes:
• Normal - ( ): To capture a picture in normal
mode, tap the Capture icon ( ) to capture
the picture. Touch to zoom in and out using the
pinch gestures.
• Video ( ): To shoot a video, tap the Record
icon ( ) to shoot the video. Tap the Stop icon
( ) to end the recording. You cannot pause
the recording in the middle.
• Panoramic ( ): To shoot a picture in
panoramic view, tap the Capture icon ( )
to capture the picture. Start from the left most
edge of the image and move towards the right
52
Using Android Applications
most edge to capture the complete panaromic
image.
To change camera settings ( ) such as ash, exposure,
and others, touch the circle to the right of the shutter.
Multimedia Player
You can play music les and voice memos stored in your
phone using the music application.
To play music les, tap on Music ( ) or tap Play Music
( ) to play the music located in Apps Menu.
Google Calendar
The Google Calendar enables you to set appointments,
schedule reminders when required, set alerts and repeat
specic settings. Tasks can be viewed on daily and
weekly basis.
1. Tap Apps Menu ( ) on home screen.
2. Tap on Google Calendar icon ( ) on the Apps
screen.
3. To change the Google Calendar view, choose Day,
Week, Month, Agenda from the top of the screen in
a drop-down list.
4. Select Options to view the list of available options:
• New event: When Google Calendar is synced
with your Google account, new event can be
generated using the Google account.
• Refresh: Refresh the calendar for the updates.
• Search: You can search for a particular event.
• Calendar to display: Displays the calendar
which is synced with your Google account.
• Settings: Displays the General settings of the
Google Calendar.
From any of the calendar views,
• Read or edit event details: Tap on the event to view
the details.
• Manage events and Google Calendar: Touch icons
across the top of the screen or the menu to search
or create events, return to today, or adjust settings.
Alarm
You can set an alarm for a particular time.
1. Tap on Apps Menu ( ) on home screen.
2. Tap on the Clock icon ( ) located under Apps.
3. Tap on the Alarm activation icon ( ) on the top of
the screen.
4. To set a simple alarm, tap on Add Alarm ( ) icon.
Enter the time and tap Done.
5. To set a reoccurring alarm,
• Enable the checkbox Repeat.
• Its selects every day of the week.
• Unselect the day in a week by tapping that
particular day for which you don’t want a
reoccurring alarm.
6. To set the alarm tone, tap on Ringtone list, select
ringtone and tap OK.
The alarm works even if the phone is in silent
mode.
53
Using Android Applications
Clock
You can view the time of major cities in different time
zones. You also have the option to use Daylight Saving
Time (DST).
The local time is displayed in the upper half of the screen.
1. Tap on Apps Menu ( ) on home screen.
2. Tap on the Clock icon ( ) located under Apps.
3. Tap on the world icon ( ) to view the list of cities
and the current time.
The city names are listed in an alphabetical order.
4. To set the home city, select city from the list. It will
get added to the Selected Cities list. The same city
name and the current time is displayed on the Clock
main screen.
Calculator
The calculator in this phone is designed to perform
simple mathematical calculations.
1. Tap on Apps Menu ( ) on home screen.
2. Tap on Calculator ( ) on the Apps screen.
3. To enter the numbers, tap the numeric keys.
4. To use mathematical operators, touch the respective
operation keys on the keypad.
5. After performing the calculations, tap = for the nal
result.
6. To get the advanced functions, tap on Option >
Advanced panel.
Sound Recorder
You can record voice memos using the sound recorder.
To access the sound recorder, tap on the Sound
Recorder ( ) located in Apps Menu screen.
1. To record an audio, tap Record ( ).
2. To stop recording, tap Stop ( ).
3. To save the voice memo, tap Save ( ) .
4. To exit without saving, tap Discard ( ).
5. To play the recorded play instantly, tap Play ( ).
Audio Playback
The user can do instant playback of the recorded audio
within the sound recorder.
To listen to a recorded audio le, tap on Menu > APPS >
File Explorer ( ) > Internal Storage > Audio > Sound
Recorder ( ).
54
Google Search and Google Now
About Google Search and Google Now
Google Now gives you the right information at the right
time. Google Now do not require any elaborate setting.
The information is at your ngertips.
Get updates on weather and trafc before you leave
home.
When Google Now is activated, it also activates the
Location reporting and Location history.
• Location Reporting: allows Google to periodically
store and use your device’s most recent location
data in connection with your Google Account.
Location Reporting is a per-device setting.
• Location History: allows Google to store a history
of your location data from all devices where you are
logged into your Google Account and have enabled
location reporting.
Activate Google Now
Google Now can be setup on your phone when you
switch ON the phone for the rst time. You can turn it ON
and OFF at any time.
1. Tap on the Google Search bar on a home screen.
2. Touch Get Google Now if you do not have already.
To access menu for the next step, perform a Google
search.
3. Select Options > Settings to turn off Google Now.
Use Google Now
To use Google Now, press and hold the Home button.
Voice Search and Action
You can speak to your phone to search, get directions,
send messages and perform other tasks.
To initiate the voice search or voice action, on the Google
home screen, tap on the microphone ( ) icon.
After you touch the Microphone icon, Google listens as
you speak and initiates the search or action you describe.
If voice search do not understand you, it lists some
suggestions. Select the one you want from the list.
Spoken answers are supported for English
language only.
Voice Actions
Voice Actions are supported only in English, French,
German, Spanish, and Italian languages.
You can use Voice Actions to perform common tasks,
such as sending an e-mail or opening an application.
After touching the ( ) Microphone icon, speak the
voice action you want to use.

55
End User License Agreement
License
This wireless device, (the “Device”) contains software
owned by Sonim Technologies, Inc. (“Sonim”) and its
third party suppliers and licensors (collectively, the
“Software”). As user of this Device, Sonim grants you a
non-exclusive, non-transferable, non-assignable license
to use the software solely in conjunction with the Device
on which it is installed and/or delivered with. Nothing
herein shall be construed as a sale of the Software to a
user of this Device.
You shall not reproduce, modify, distribute, reverse
engineer, decompile, otherwise alter or use any other
means to discover the source code of the Software
or any component of the Software. For avoidance of
doubt, you are at all times entitled to transfer all rights
and obligations to the Software to a third party, solely
together with the Device with which you received the
Software, provided always that such third party agrees in
writing to be bound by these rules.
You are granted this license for a term of the useful life of
this Device. You can terminate this license by transferring
all your rights to the Device on which you have received
the Software to a third party in writing. If you fail to
comply with any of the terms and conditions set out in
this license, it will terminate with immediate effect Sonim
and its third party suppliers and licensors are the sole and
exclusive owner of and retain all rights, title and interest
in and to the Software. Sonim, and, to the extent that the
Software contains material or code of a third party, such
third party, shall be entitled third party beneciaries of
these terms. The laws of Delaware, United States shall
govern the validity, construction and performance of this
license.
Warranty
• Phones and/or accompanying in-box accessories
("Equipment") purchased from Southern Linc or an
Authorized Dealer may be covered by a product
warranty. Go to www.southernlinc.com for warranty
details.
What We Will Do
If during the guarantee period, this product fails to
operate under normal use and service, due to defects
in design, material or workmanship, Sonim’s authorized
distributors or service partners, in the country/region
where you purchased the product, will repair or replace
at the sole discretion of Sonim, with the same or better
model in the same or better condition.
Sonim and its service partners reserve the right to charge
a handling fee if a returned product is found not to be
under warranty according to the conditions below.
Please note that some of your personal settings,
downloads or other information may be lost when your
Sonim Product is repaired or replaced. Sonim does not
take any responsibility for any lost information of any kind
and will not reimburse you for any such loss.
You should always make backup copies of all the
information stored on your Sonim Product such as
downloads, pictures, video’s, music, calendar and
contacts before handing in your Sonim Product for repair
or replacement.
You should always remove SIM cards and MicroSD
cards before handing in your Sonim Product for repair or
replacement. Depending on local law and legislations we
will, in order to protect your data and privacy, destroy any
received SIM cards and MicroSD cards.

56
End User License Agreement
Phone Care
Each Sonim Phone has a designated IP class for dust
and water protection, according to the IEC Ingress
Protection (IP) Standard 60529. This means that the
phone is dust protected and can be submerged into 6.5
feet/2 m deep water for up to 30 minutes. Immersion in
deeper water can damage it and must be avoided.
Sonim phones are built for heavy duty use. Its design
protects against disassembly or mechanical damage
when subjected to forces equal to free fall from the height
of 6.5 feet/2 meters. Subjecting the phone to stronger
impact and forces can damage it and must be avoided.
Conditions
1. The warranty is valid whether or not the product has
been registered.
2. The warranty is valid only if the original proof of
purchase issued to the original purchaser by an
authorized service provider, specifying the date
of purchase and serial number for this Product,
is presented with the Product to be repaired or
replaced. Sonim reserves the right to refuse warranty
service if the device is found to be out of warranty
under the conditions as set forth herein.
3. If Sonim repairs or replaces the Product, the repaired
or replaced Product shall be warranted for the
remaining time of the original warranty period or for
ninety (90) days from the date of repair, whichever is
longer. Repair or replacement may involve the use of
functionally equivalent reconditioned units. Replaced
parts or components will become the property of
Sonim.
4. This warranty does not cover any failure of the
Product due to misuse or abuse, including but
not limited to use in other than the normal and
customary manner, in accordance with the Sonim
device specications and instructions for use and
maintenance of the Product. Nor does this warranty
cover any failure of the Product due to software
or hardware modication or adjustment or acts of
God. A rechargeable battery can be charged and
discharged hundreds of times. However, it will
eventually wear out - this is not a defect. When the
talk-time or standby time is noticeably shorter, it is
time to replace your battery. Sonim recommends
that you use only batteries and chargers approved
by Sonim. Minor variations in display brightness and
color may occur between phones. There may be tiny
bright or dark dots on the display. These are called
defective pixels and occur when individual dots have
malfunctioned and cannot be adjusted. Up to three
defective pixels are deemed acceptable.
5. This warranty does not cover Product failures
caused by installations, modications, or repair or
opening of the Product performed by a any person
other than a Sonim-authorized person. Tampering
with any of the seals on the Product will void the
warranty.
6. The warranty does not cover Product failures which
have been caused by use of accessories or other
peripheral devices which are not Sonim-branded
original accessories intended for use with the
Product.
7. The 3-year warranty does not cover 3rd party
accessories or any 3rd party software applications,
which are instead covered to the extent provided by
the original vendor guarantee for these products.
8. THERE ARE NO EXPRESS WARRANTIES,

57
End User License Agreement
WHETHER WRITTEN OR ORAL, OTHER THAN
THIS PRINTED LIMITED WARRANTY. ALL
IMPLIED WARRANTIES, INCLUDING WITHOUT
LIMITATION THE IMPLIED WARRANTIES OF
MERCHANTABILITY OR FITNESS FOR A
PARTICULAR PURPOSE, ARE LIMITED TO THE
DURATION OF THIS LIMITED WARRANTY. IN NO
EVENT SHALL SONIM OR ITS LICENSORS BE
LIABLE FOR INCIDENTAL OR CONSEQUENTIAL
DAMAGES OF ANY NATURE WHATSOEVER,
INCLUDING BUT NOT LIMITED TO LOST PROFITS
OR COMMERCIAL LOSS; TO THE FULL EXTENT
THOSE DAMAGES CAN BE DISCLAIMED BY LAW.
Accessories
Sonim accessories are warranted as follows:
Sonim Branded
• All Sonim branded accessories, in-box as well as
optional, are warrantied for a period of one (1) year
under Sonim’s 1-Year limited warranty.
• For a detailed list of Sonim branded accessories,
please go to: www.sonimtech.com/accessories.
Battery
All device batteries both embedded and removable are
warrantied for a period of one (1) year under Sonim’s
1-Year limited warranty.

58
1-Year limited warranty
Sonim provides a limited 1-year warranty for this
accessory (hereinafter referred to as “Product”). Subject
to the conditions of this limited 1-year Warranty Sonim
warrants this product to be free from major defects in
design, material and workmanship at the time of its
original purchase by a consumer, and for a original
purchase by a consumer, and for a subsequent period of
one (1) year.
Conditions:
1. This warranty does not cover any failure of the
Product due to normal wear and tear, or due to
misuse or abuse, including but not limited to use
in other than the normal and customary manner, in
accordance with the Sonim Product specifications
and instructions for use and maintenance of
the Product. Nor does this warranty cover any
failure of the Product due to software or hardware
modification or adjustment, acts of good or damage
resulting from liquid interacting with the Product
beyond what is described as acceptable in the user
guide for the Product.
2. This warranty does not cover Product failures
caused by installations, modifications, or repair or
opening of the Product performed by any person
other than a Sonim-authorized person. Tampering
with any of the seals on the Product will void the
warranty.
3. The warranty does not cover Product failures,
which have been caused by use of other peripheral
devices, which are not Sonim certified and intended
for use with the Product.
4. THERE ARE NO EXPRESS WARRANTIES,
WHETHER WRITTEN OR ORAL, OTHER THAN
THIS PRINTED LIMITED WARRANTY. ALL
IMPLIED WARRANTIES, INCLUDING WITHOUT
LIMITATION THE IMPLIED WARRANTIES OF
MERCHANTABILITY OR FITNESS FOR A
PARTICULAR PURPOSE, ARE LIMITED TO THE
DURATION OF THIS LIMITED WARRANTY. IN NO
EVENT SHALL SONIM OR ITS LICENSORS BE
LIABLE FOR INCIDENTAL OR CONSEQUENTIAL
DAMAGES OF ANY NATURE WHATSOEVER,
INCLUDING BUT NOT LIMITED TO LOST PROFITS
OR COMMERCIAL LOSS; TO THE FULL EXTENT
THOSE DAMAGES CAN BE DISCLAIMED BY LAW.
Sonim XPand
• All Sonim branded accessories, in-box as well
as optional, are warrantied for a period of three
(3) years under Sonim’s 3-Year comprehensive
warranty.
• For a detailed list of Sonim XPand accessories,
please go to: www.sonimtech.com/accessories.
End User License Agreement

59
FCC Regulations
• This mobile phone complies with part 15 of the FCC
Rules. Operation is subject to the following two
conditions:
• This device may not cause harmful
interference.
• This device must accept any interference
received, including interference that may cause
undesired operation.
• This mobile phone has been tested and found to
comply with the limits for a Class B digital device,
pursuant to Part 15 of the FCC Rules. These limits
are designed to provide reasonable protection
against harmful interference in a residential
installation. This equipment generates, uses and can
radiated radio frequency energy and, if not installed
and used in accordance with the instructions, may
cause harmful interference to radio communications.
However, there is no guarantee that interference
will not occur in a particular installation If this
equipment does cause harmful interference to radio
or television reception, which can be determined
by turning the equipment off and on, the user is
encouraged to try to correct the interference by one
or more of the following measures:
• Reorient or relocate the receiving antenna.
• Increase the separation between the equipment
and receiver.
• Connect the equipment into an outlet on a
circuit different from that to which the receiver
is connected.
• Consult the dealer or an experienced radio/TV
technician for help.
FCC Caution
• Any Changes or modications not expressly
approved by the party responsible for compliance
could void the user‘s authority to operate the
equipment.
• The antenna(s) used for this transmitter must not
be co-located or operating in conjunction with any
other antenna or transmitter.
• The country code selection is for non-US model
only and is not available to all US model. Per FCC
regulation, all WiFi product marketed in US must
xed to US operation channels only.
• Operations in the 5.15-5.25GHz band are restricted
to indoor usage only.
RF Exposure Information (SAR)
This device meets the government’s requirements
for exposure to radio waves. This device is designed
and manufactured not to exceed the emission limits
for exposure to radio frequency (RF) energy set by
the Federal Communications Commission of the U.S.
Government.
The exposure standard for wireless device employs a
unit of measurement known as the Specic Absorption
Rate, or SAR. The SAR limit set by the FCC is 1.6W/
kg. *Tests for SAR are conducted using standard
operating positions accepted by the FCC with the device
transmitting at its highest certied power level in all
tested frequency bands. Although the SAR is determined
at the highest certied power level, the actual SAR level
of the device while operating can be well below the
maximum value. This is because the device is designed
Federal Communication Commission Interference (FCC) Statement

60
to operate at multiple power levels so as to use only
the poser required to reach the network. In general, the
closer you are to a wireless base station antenna, the
lower the power output.
The highest SAR value for the model device as reported
to the FCC when tested for use at the ear is 1.37 W/
kg and when worn on the body, as described in this
user guide, is 1.43 W/kg (Body-worn measurements
differ among device models, depending upon available
accessories and FCC requirements.)
While there may be differences between the SAR levels
of various devices and at various positions, they all meet
the government requirement.
The FCC has granted an Equipment Authorization for
this model device with all reported SAR levels evaluated
as in compliance with the FCC RF exposure guidelines.
SAR information on this model device is on le with the
FCC and can be found under the Display Grant section
of www.fcc.gov/oet/ea/fccid after searching on FCC ID:
WYPPC4000.
For body worn operation, this device has been tested
and meets the FCC RF exposure guidelines for use with
an accessory that contains no metal and be positioned a
minimum of 1cm from the body. Use of other accessories
may not ensure compliance with FCC RF exposure
guidelines. If you do not use a body-worn accessory and
are not holding the device at the ear, position the handset
a minimum of 0cm from your body when the device is
switched on.
Industry Canada Statement (IC: 8090A-PC4000)
This device complies with Industry Canada license-
exempt RSS standard(s). Operation is subject to the
following two conditions:
• This device may not cause interference, and
• This device must accept any interference, including
interference that may cause undesired operation of
the device.
Le présent appareil est conforme aux CNR d'Industrie
Canada applicables aux appareils radio exempts de
licence. L'exploitation est autorisée aux deux conditions
suivantes:
• l'appareil ne doit pas produire de brouillage, et
• l'utilisateur de l'appareil doit accepter tout brouillage
radioélectrique subi, même si le brouillage est
susceptible d'en compromettre le fonctionnement.
• This Class B digital apparatus complies with
Canadian ICES-003.
Cet appareil numérique de la classe B est conforme
à la norme NMB-003 du Canada.
• This device complies with RSS-310 of Industry
Canada. Operation is subject to the condition that
this device does not cause harmful interference.
Cet appareil est conforme à la norme RSS-310
d'Industrie Canada. L'opération est soumise à la
condition que cet appareil ne provoque aucune
interférence nuisible.
• This device and its antenna(s) must not be co-
located or operating in conjunction with any other
antenna or transmitter, except tested built-in radios.
Federal Communication Commission Interference (FCC) Statement

61
Cet appareil et son antenne ne doivent pas être
situés ou fonctionner en conjonction avec une autre
antenne ou un autre émetteur, exception faites des
radios intégrées qui ont été testées.
• The County Code Selection feature is disabled for
products marketed in the US/ Canada.
La fonction de sélection de l'indicatif du pays est
désactivée pour les produits commercialisés aux
États-Unis et au Canada.
Radiation Exposure Statement
The product comply with the Canada portable RF
exposure limit set forth for an uncontrolled environment
and are safe for intended operation as described in
this manual. The further RF exposure reduction can be
achieved if the product can be kept as far as possible
from the user body or set the device to lower output
power if such function is available.
Additional Statement for Phones:
• This device has been tested for compliance with
IC SAR values at a typical operating near the
body. To ensure that RF exposure levels below the
levels tested, use accessories with this equipment
to maintain a minimum separation distance of 1
cm between the body of the user and the device.
These accessories should not contain metallic
components. It is possible that the accessories
used close to the body that do not meet these
requirements are not consistent with the SAR limits
and it is advisable to avoid using them.
• Ce dispositif a été testé pour la conformité avec les
valeurs SAR à un fonctionnement typique près du
corps . Pour assurer que les niveaux d'exposition
aux radiofréquences en deçà des niveaux testés ,
utiliser des accessoires avec cet équipement pour
maintenir une distance de séparation minimale de
1 cm entre le corps de l'utilisateur et l'appareil.
Ces accessoires ne doivent pas contenir des
composants métalliques . Il est possible que les
accessoires utilisés près du corps qui ne répondent
pas à ces exigences ne sont pas compatibles avec
les limites SAR et il est conseillé d'éviter de les
utiliser.
Déclaration d'exposition aux radiations:
Le produit est conforme aux limites d'exposition pour les
appareils portables RF pour les Etats-Unis et le Canada
établies pour un environnement non contrôlé.
Le produit est sûr pour un fonctionnement tel que décrit
dans ce manuel. La réduction aux expositions RF peut
être augmentée si l'appareil peut être conservé aussi loin
que possible du corps de l'utilisateur ou que le dispositif
est réglé sur la puissance de sortie la plus faible si une
telle fonction est disponible.
Caution:
1. The device for operation in the band 5150-5250
MHz is only for indoor use to reduce the potential for
harmful interference to co-channel mobile satellite
systems;
2. The maximum antenna gain permitted for devices
in the bands 5250-5350 MHz and 5470-5725 MHz
shall comply with the e.i.r.p. limit; and
3. The maximum antenna gain permitted for devices
in the band 5725-5825 MHz shall comply with the
e.i.r.p. limits specied for point-to-point and non
point-to-point operation as appropriate.
4. The worst-case tilt angle(s) necessary to remain
Federal Communication Commission Interference (FCC) Statement

62
compliant with the e.i.r.p. elevation mask
requirement set forth in Section 6.2.2(3) shall be
clearly indicated.
5. Users should also be advised that high-power
radars are allocated as primary users (i.e. priority
users) of the bands 5250-5350 MHz and 5650-5850
MHz and that these radars could cause interference
and/or damage to LE-LAN devices.
Avertissement:
1. les dispositifs fonctionnant dans la bande 5150-
5250 MHz sont réservés uniquement pour une
utilisation à l’intérieur an de réduire les risques de
brouillage préjudiciable aux systèmes de satellites
mobiles utilisant les mêmes canaux;
2. le gain maximal d’antenne permis pour les
dispositifs utilisant les bandes 5250-5350 MHz et
5470-5725 MHz doit se conformer à la limite de
p.i.r.e.;
3. le gain maximal d’antenne permis (pour les
dispositifs utilisant la bande 5725-5825 MHz) doit
se conformer à la limite de p.i.r.e. spéciée pour
l’exploitation point à point et non point à point, selon
le cas.
4. les pires angles d’inclinaison nécessaires pour rester
conforme à l’exigence de la p.i.r.e. applicable au
masque d’élévation, et énoncée à la section 6.2.2 3),
doivent être clairement indiqués.
5. De plus, les utilisateurs devraient aussi être avisés
que les utilisateurs de radars de haute puissance
sont désignés utilisateurs principaux (c.-à-d., qu’ils
ont la priorité) pour les bandes 5250-5350 MHz et
5650-5850 MHz et que ces radars pourraient causer
du brouillage et/ou des dommages aux dispositifs
LAN-EL.
Intrinsically Safe (IS)
Part I: Ex Marking
ATEX Sira 17 ATEX 2364X
II 3 G Ex ic IIC T4 Gc IP64
II 3 D Ex ic IIIC T135 Dc IP64
IECEx IECEx SIR 17.0084X
Ex ic IIC T4 Gc IP64
Ex ic IIIC T135 Dc IP64
cCSAus CSA certicate No.70166117
Class I Division 2 Group A, B, C, D
Class 2 Division 2 Group F, G
Part II: Appliable Enverionment
• The equipment may be used in zones 2 with
ammable gases and vapours with apparatus
groups IIC and with temperature classes T4.
• The equipment may be used in zones 22 with
ammable dusts, bres and yings in groups IIIC,
with a layer auto-ignition temperature of not less
than 75 K above the maximum surface temperature
marked in the dust coding.
Federal Communication Commission Interference (FCC) Statement

63
Part III: Special conditions of use
• If the equipment is likely to come into contact with
aggressive substances, e.g. acidic liquids or gases
that may attack metals or solvents that may affect
polymeric materials, then it is the responsibility of
the user to take suitable precautions that prevent it
from being adversely affected thus ensuring that the
type of protection is not compromised.
• The certicate number has an ‘X’ sufx which
indicates that special conditions of installation
and use apply. Those installing or inspecting this
equipment must have access to the contents of
the certicate or these instructions. The conditions
listed in the certicate are reproduced below:
• No precautions against electrostatic discharge
are necessary for portable equipment that
has an enclosure made of plastic, metal or
a combination of the two, except where a
signicant static-generating mechanism has
been identied. Activities such as placing
the item in a pocket or on a belt, operating
a keypad or cleaning with a damp cloth, do
not present a signicant electrostatic risk.
However, where a static-generating mechanism
is identied, such as repeated brushing against
clothing, then suitable precautions shall be
taken, e.g. the use of anti-static footwear.
• The equipment shall only be charged when
in the non-hazardous area using a charger
specically supplied for use with the unit.
• Using the equipment shall prevent expose to
the daylight or light.
• XP8800 was tested in accordance low risk of
mechanical danger, hence to avoid mechanical
impact in normal use.
Federal Communication Commission Interference (FCC) Statement

64
Index
A
Accessories 55
Account Sync 36
Adding a New Contact 37
Airplane Mode 29
Android Applications 49
Android Security 32
B
Backup 35
Battery
Charging indicator 12
Battery usage
Charging 12
Improving battery life 13
Optimize power 12
Bluetooth Devices 27
Pairing Bluetooth 27
Bluetooth Tethering 30
C
Calculator 51
Calendar 50
Call Forwarding 43
Call Waiting 43
Camera 49
Clock 51
Credential Certicates 34
D
Data Usage 28
Deleting a Contact 39
Device Administrator 34
Display Settings 23
DTMF Tones 42
E
Encrypt 33
F
FCC 57
G
Gesture Typing 48
Gmail 49
Google Account 36
Google Now 52
Google Search 52
H
Harmful Applications 34
Home Screen Indicators 19
K
Keyboard Dictionaries 48
L
Location Access 35
M
Memory Usage 25
Mobile Network 31
Multimedia Player 50
N
NFC 29
P
Personal Dictionary 48
Phone Models Covered 7
Phone specications 14
Power Optimization 12
Proximity Sensor 42
Q
Quick Responses 42
R
Reset 35
S

65
Index
SAR 57
Security Settings 32
SMS/MMS Message 45
Sonim Protect 16
Sound Recorder
Audio Playback 51
Speech Settings 23
Spell checker 23
T
Taking a Screenshot 22
Tethering & Portable Hotspot 29
Time and Date Settings 22
TTY Mode 42
U
Using Lock Screen
Face Unlock 21
V
Vibrate Mode 41
Voice Actions 52
Voice Input 22
Voicemail 41
Voice Search 52
VPN Connection
Editing VPN 30
W
Wallpaper 22
Warranty 53
Wi-Fi 29
Wi-Fi Network 27