102741 11K IN
102741-11K-In 102741-11K-IN 102741-11K-IN 1654 file instruction uploads sonnax-dev
102741-11K-In 102741-11K-IN 102741-11K-IN 3769 instructions part uploads sonnax-dev
102741-11K-In 102741-11K-IN 102741-11K-IN 3768 instructions part uploads sonnax-dev
2014-10-16
: Sonnax 102741-11K-In 102741-11K-IN 1655 file instruction uploads
Open the PDF directly: View PDF ![]() .
.
Page Count: 1
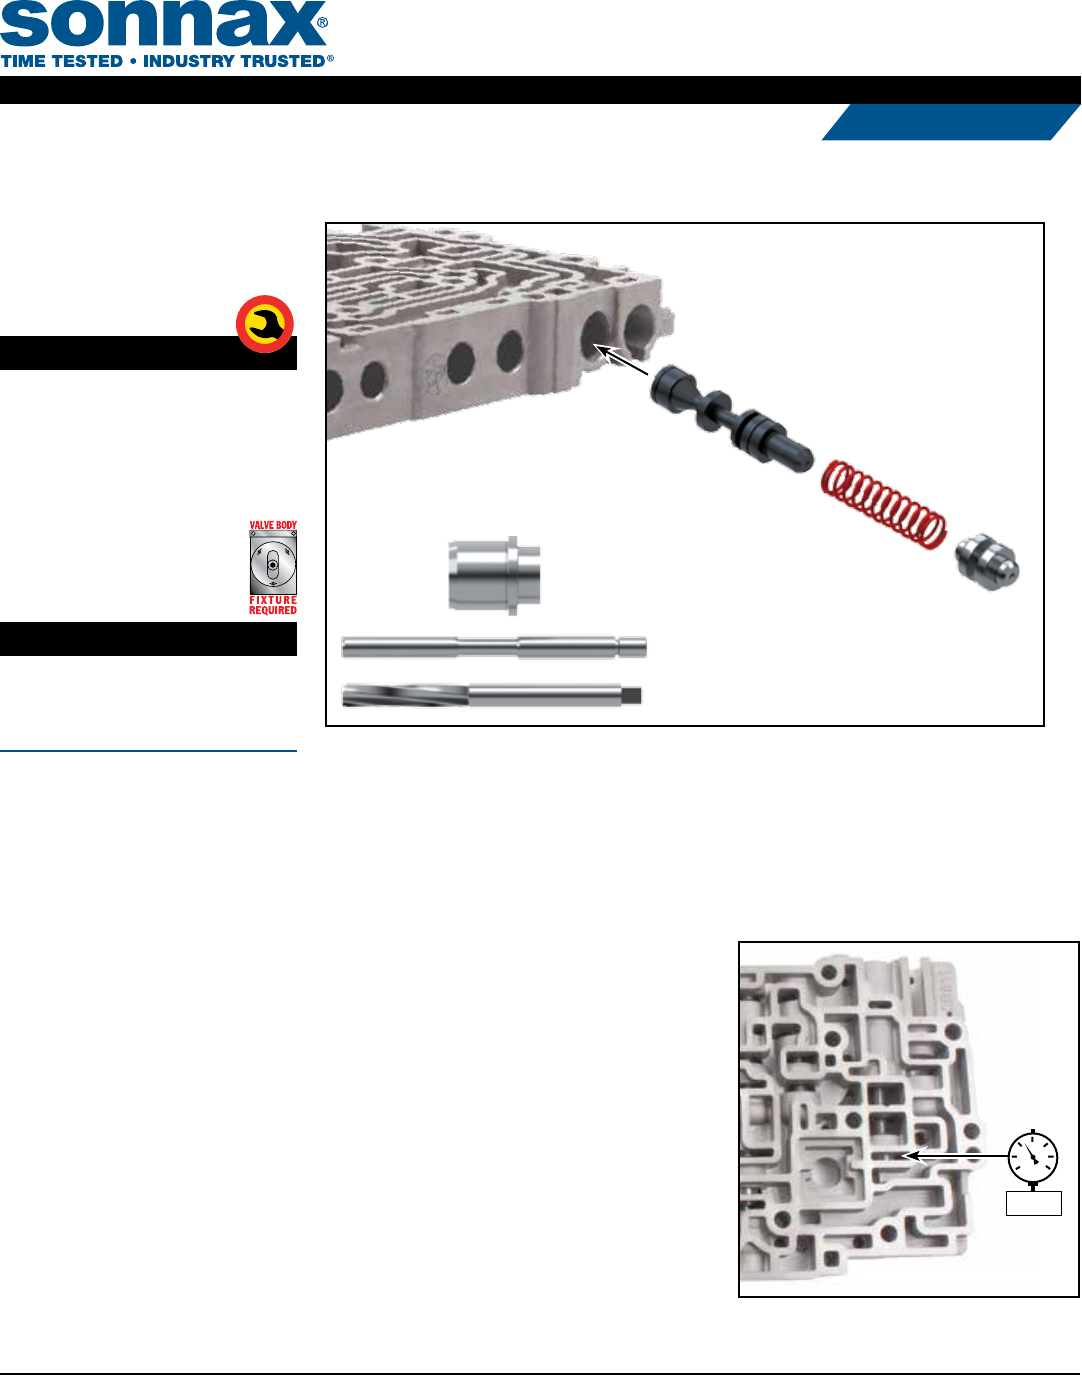
Hyundai/Kia A6GF1, A6LF1/2/3, A6MF1/2
1. Disassembly
a. Remove and save OE end plug retainer.
b. Remove and discard OE end plug, spring and valve.
2. Bore Reaming
Ream TCC control valve bore (for reaming instructions/reamer care, please visit
www.sonnax.com). Sonnax reaming tool kit F-102741-TL11 and VB-FIX are required
for this operation.
3. Installation & Assembly
a. Be certain all debris has been removed from
valve bore and body.
b. Install Sonnax valve, followed by Sonnax
spring and end plug. Ensure spring is seated
fully over spring guides on both valve and
end plug.
d. Reinstall OE end plug retainer.
4. Final Testing
Vacuum testing at the port(s) indicated holds
the recommended minimum 18 in-Hg.
Oversized TCC
Control Valve Kit
Part No.
102741-11K
• Valve
• Spring
• End Plug
Tool Kit
Part No.
F-102741-TL11
• Reamer
• Reamer Jig
• Guide Pin
NOTE: Sonnax “F-Tool” kits designed to
service a specic bore require the VB-FIX,
a self-aligning valve body reaming xture.
More information and instructions can be
found online at www.sonnax.com.
R
E
Q
U
I
R
E
D
T
O
O
L
R
E
Q
U
I
R
E
D
T
O
O
L
Spring
A6MF2 Middle
Valve Body
Valve
End Plug
Tool
Kit
©2014 Sonnax Industries, Inc. 102741-11K-IN 10-13-14
800-843-2600 • 802-463-9722 • F: 802-463-4059 • www.sonnax.com
TRANSMISSION PARTS
Instructions
A6MF2 Middle Valve Body
18"-Hg
20
25
15
0
10
5
30
VACUUM
TEST
