6T40 GEN2 ZIP IN
2017-05-25
: Sonnax 6T40-Gen2-Zip-In 6T40-GEN2-ZIP-IN 4515 instructions part uploads
Open the PDF directly: View PDF ![]() .
.
Page Count: 10
PART NUMBER 6T40-GEN2-ZIP QUICK GUIDE
©2017 Sonnax Industries, Inc. 6T40-GEN2-ZIP_Guide 05-11-17
800-843-2600 • 802-463-9722 • F: 802-463-4059 • www.sonnax.com Page 1
GM 6T30, 6T40 (GEN. 2), 6T45 (GEN. 2),
6T50 (GEN. 2) ZIP KIT®
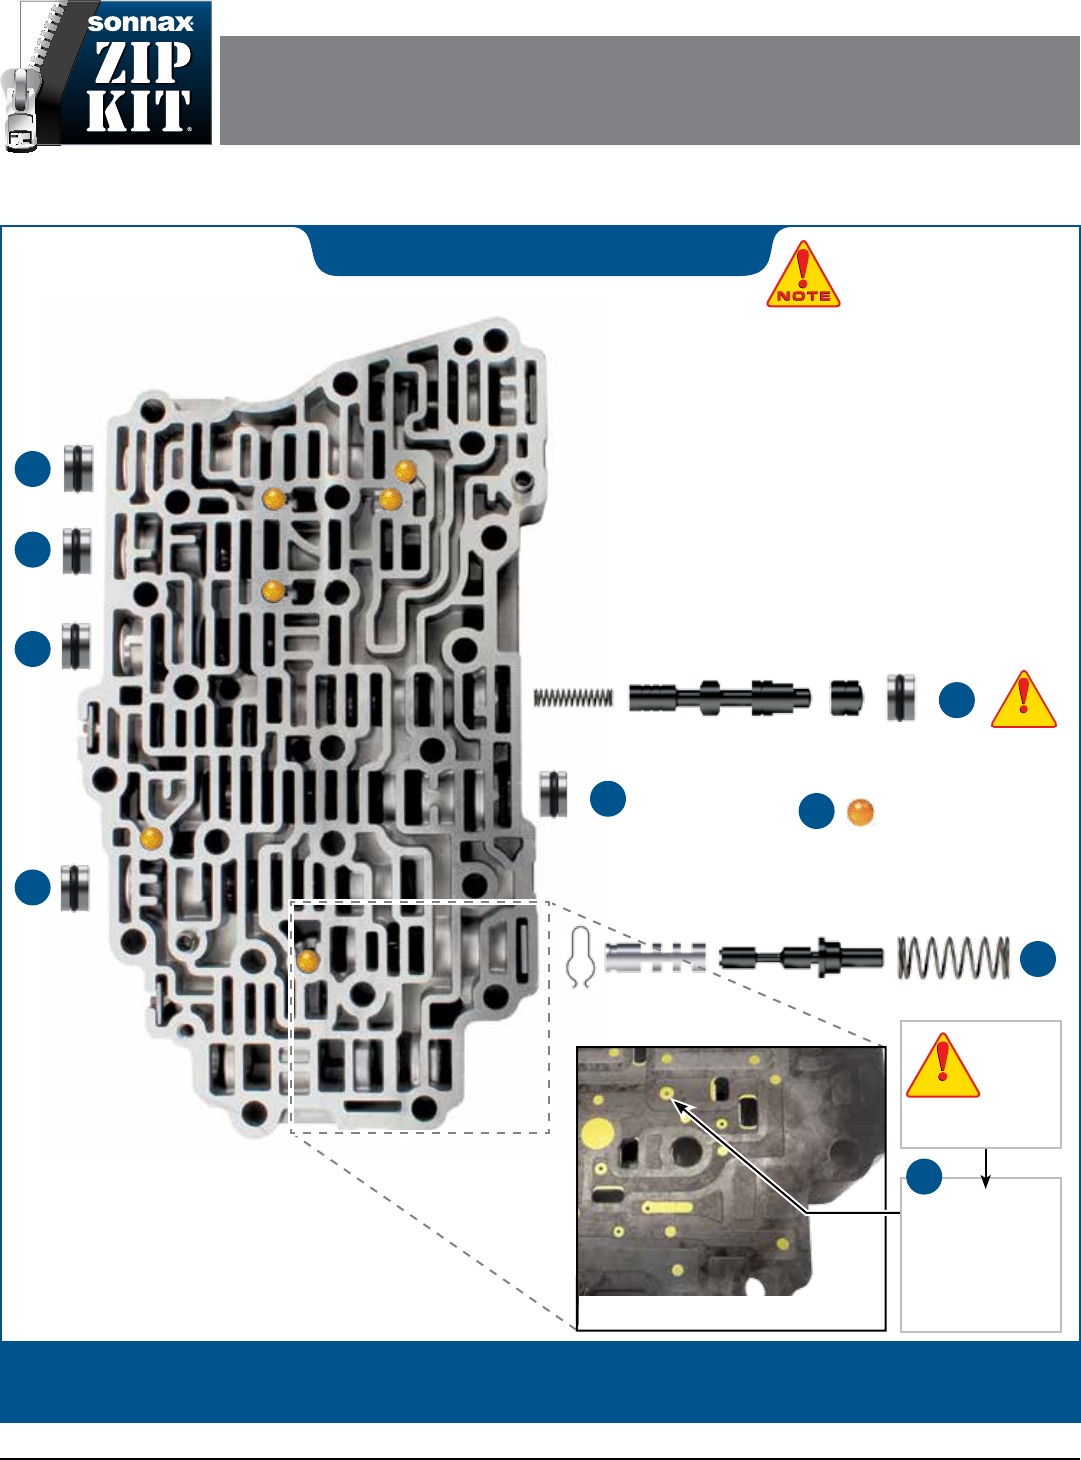
Parts are labeled here in order of installation. See other side of sheet for details on Zip Kit contents.
installation Diagram
In addition to general rebuilding tips and technical information, the technical booklet included in this kit contains vacuum
testing and additional repair options for higher mileage units or for repairing specic complaints which are beyond the
scope of this kit.
2
4
1
1
1
1
1
6T40 (Gen. 2)
Control
Valve Body
5
Plastic Checkballs
NOTE: All components of this kit
install into the mechatronic unit,
and not the pump. Removal of
the pump is not required for
this kit, unless vacuum testing is to
be performed.
CAUTIONCAUTION
CAUTIONCAUTION
Separator Plate on Valve Body
Block AFL balance
port by drilling and
plugging separator
plate where indicated
using drill bit and
aluminum plug
provided (not shown).
3
CAUTION:
Failure to
block
orice
will result in no
movement of vehicle.
CAUTIONCAUTION
CAUTIONCAUTION
GM 6T30, 6T40 (Gen. 2), 6T45 (Gen. 2), 6T50 (Gen. 2) ZIP KIT® Quick Guide
Step Replace 5 OE End Plugs
Place O-ring in groove, lubricate with Sonnax Slippery Stick O-LUBE
and roll on bench to size.
Packaging Pocket 1
• End Plugs (5)
• O-Rings (7) 2 extra
Step Replace TCC Regulator
Apply Valve Bore Lineup
Remove and discard all OE components except the retainer clip. Save
retainer clip for reuse.
CAUTION: The small shuttle valve should be positioned with the
rounded end face outboard, and the blind bore inboard.
Packaging Pocket 2
• Spring
• Valve
• Shuttle Valve
• End Plug
• O-Rings (2) 1 extra
Step Block AFL Balance Port
Drill indicated separator plate orice with included .062" dia. drill bit.
Remove any burrs. Insert .062" dia. aluminum plug into drilled hole and
peen in place on both sides of plate. Ensure plate will still t ush on
both castings.
CAUTION: Failure to block orice will result in no movement of vehicle.
Packaging Pocket 3
• Drill Bit, .062" dia.
• Aluminum Plugs, .062" dia. (2) 1 extra
CAUTION: Use care when modifying the balance orice.
Gaskets are bonded to the plates and damage could occur.
1
2
CAUTIONCAUTION
CAUTIONCAUTION
3
CAUTIONCAUTION
CAUTIONCAUTION
CAUTIONCAUTION
CAUTIONCAUTION
Step Replace OE Actuator Feed
Limit (AFL) Valve Lineup
Remove and discard OE valve and spring. Save outboard retainer clip
for reuse. Install Sonnax sleeve and valve as illustrated. Secure sleeve
into bore by installing included clip into sleeve groove at inboard port.
Install included spring and secure all into bore with OE retainer.
CAUTION: Ensure supplied retainer clip is fully seated in AFL
sleeve groove after installation.
Packaging Pocket 4
• Sleeve
• Valve
• Spring
• Retainer Clip
Step Replace OE Checkballs
Packaging Pocket 5
Checkballs, .250" dia. (6)
4
CAUTIONCAUTION
CAUTIONCAUTION
5
Zip Kit Contents & Installation Steps
©2017 Sonnax Industries, Inc. 6T40-GEN2-ZIP_Guide 05-11-17
800-843-2600 • 802-463-9722 • F: 802-463-4059 • www.sonnax.com Page 2
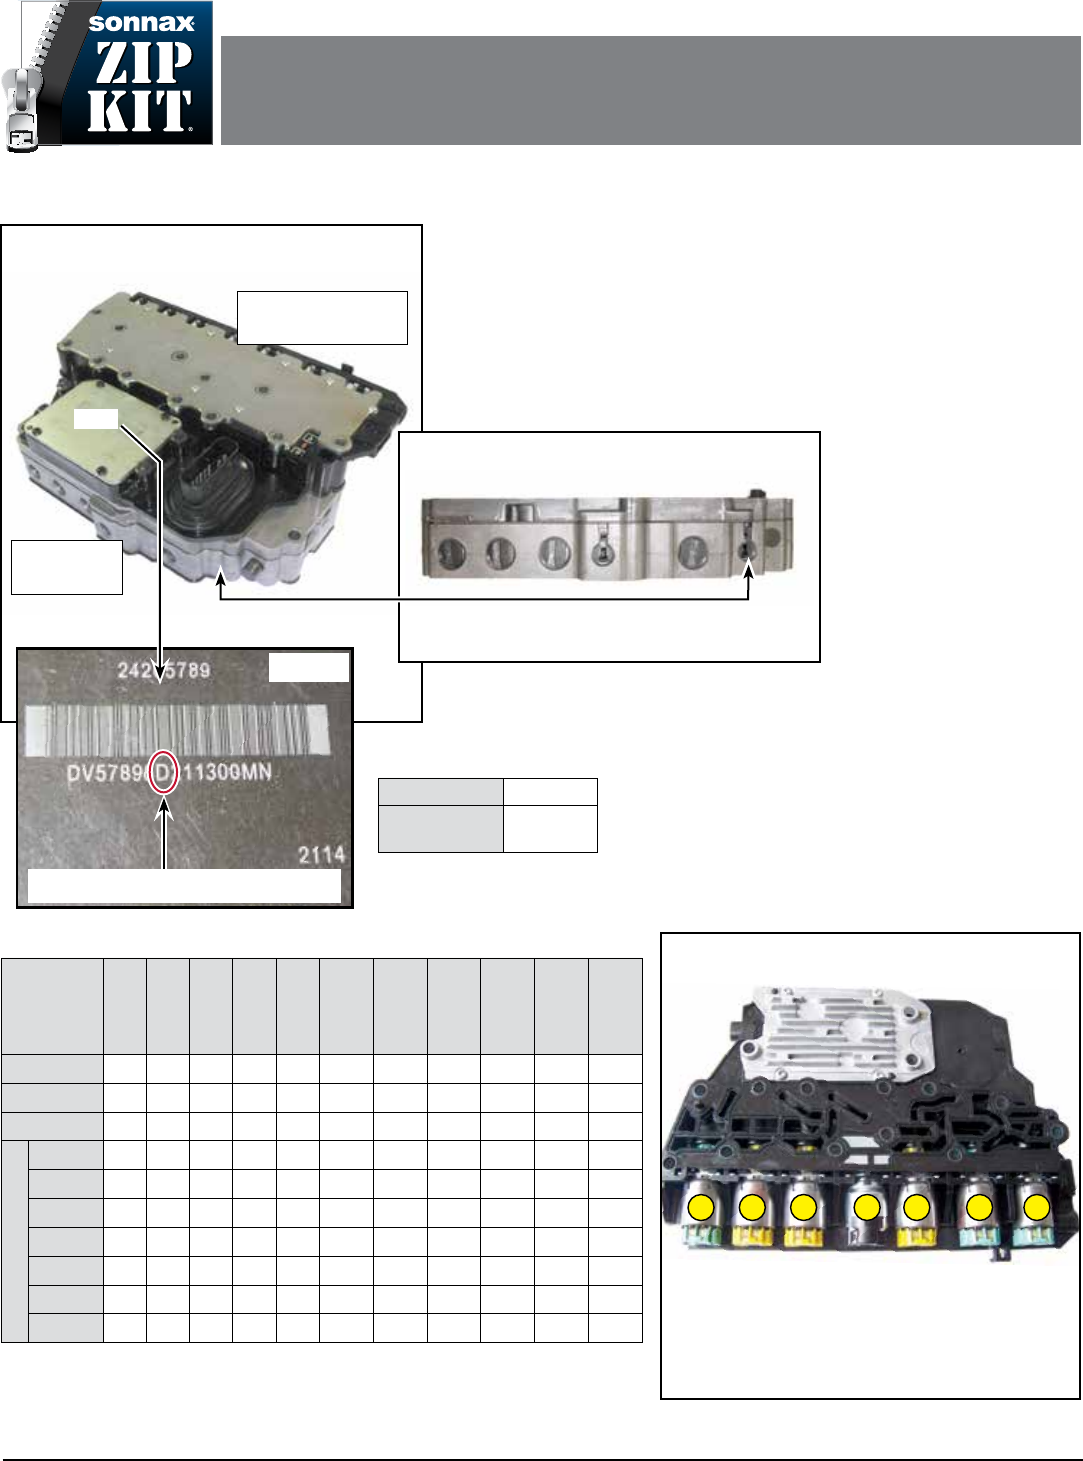
Figure 1
6T40 Generation 1 Transmission
Electro-Hydraulic Control Module
(TEHCM)
TCM
Upper section is control
solenoid (w/body & TCM)
valve assembly
Lower section
is control valve
body assembly
Valve Body Identication
Conrm Generation
is Zip Kit works in 6T30 and Generation 2 6T40 series valve bodies. To identify
core as Generation 1 versus Generation 2, check for presence of 4-5-6 clutch boost
valve in the control valve body assembly (Figures 1 & 2). e 6T30 is similar to the
Generation 2 6T40 series valve bodies, in that it has a 4-5-6 clutch boost valve, no
pressure switches, and has a letter as the TCM identier 8th digit.
Also check the Transmission
Control Module (TCM) identi-
er (Figures 3 & 4). e control
valve body assembly and TCM
must be of the same generation.
Adaptive Learning
e 6T30, 6T40, 6T45 and
6T50 are equipped with sever-
al adaptive learning strategies.
After valve body service the
existing adaptive values will need to be erased. en, a
“Fast Learn” process should be performed. Reference GM
material for the proper “Fast Learn” process.
Solenoids
e 6T30 and Generation 2 6T40, 6T45 and 6T50 sole-
noids are a mix of normaly-high and normaly-low type.
ese are calibrated at the factory and switching solenoids
between locations in the control solenoid (w/body and
TCM) valve assembly should be avoided.
Figure 6
6T40 Generation 2
Solenoid Locations
1. Line PCS
2. 2-6 PCS
3. 3-5 Reverse PCS
4. Shift Solenoid
5. TCC PCS
6. 1-2-3-4 PCS
7. L/R 4-5-6 PCS
2
3
4
5
6
7
• Pressure Control Solenoid (PCS) 3-5 ohms at 70F
• Shift Solenoid 16-20 ohms at 70F
1
Solenoid & Clutch Apply Chart
Range/Gear
Shift Solenoid
1-2-3-4 CL
PC Sol N.H.
2-6 CL
PC Sol N.L.
3-5 Rev. CL
PC Sol N.L.
Low Rev. 4-5-6
CL PC Sol N.H.
4-5-6
Clutch
3-5 Reverse
Clutch
2-6 Clutch
Low & Rev. CL
(OWC)
Low & Rev.
Clutch
1-2-3-4 Clutch
Park On On Off Off Off Applied*
Reverse On On Off On Off Applied Applied
Neutral On On Off Off Off Applied*
Drive
1st Braking
On Off Off Off Off Holding†Applied Applied
1st
Off Off Off Off On Holding Applied
2nd
Off Off On Off On Applied Applied
3rd
Off Off Off On On Applied Applied
4th
Off Off Off Off Off Applied Applied
5th
Off On Off On Off Applied Applied
6th
Off On On Off Off Applied Applied
Figure 5
NOTE: For shift solenoids, "ON" = solenoid energized (pressurized), "OFF" = solenoid de-energized (no
pressure).
For pressure control (PC) solenoids, "ON" = pressurized, "OFF" = no pressure. *Applied with
no load. †Holding but ineffective.
Generation 1 - No 4-5-6 clutch boost valve
Generation 2 - Has 4-5-6 clutch boost valve
Figure 2
6T40 Generation 2
Control Valve Body Assembly
Figure 3
TCM Identier is 8th digit from left.
TCM Identier Figure 4
Generation 1 1 or 2 or 3
Generation 2 B or C
or D
GM 6T30, 6T40 (GEN. 2), 6T45 (GEN. 2),
6T50 (GEN. 2) ZIP KIT®
PART NUMBER 6T40-GEN2-ZIP INSTALLATION & TESTING BOOKLET
©2017 Sonnax Industries, Inc. 6T40-GEN2-ZIP_Booklet 05-11-17
800-843-2600 • 802-463-9722 • F: 802-463-4059 • www.sonnax.com Page 1
GM 6T30, 6T40 (Gen. 2), 6T45 (Gen. 2), 6T50 (Gen. 2) ZIP KIT
®
05-11-17 6T40-GEN2-ZIP_Booklet ©2017 Sonnax Industries, Inc.
Page 2 800-843-2600 • 802-463-9722 • F: 802-463-4059 • www.sonnax.com
TIME TESTED • INDUSTRY TRUSTED
Installation &
Testing Booklet
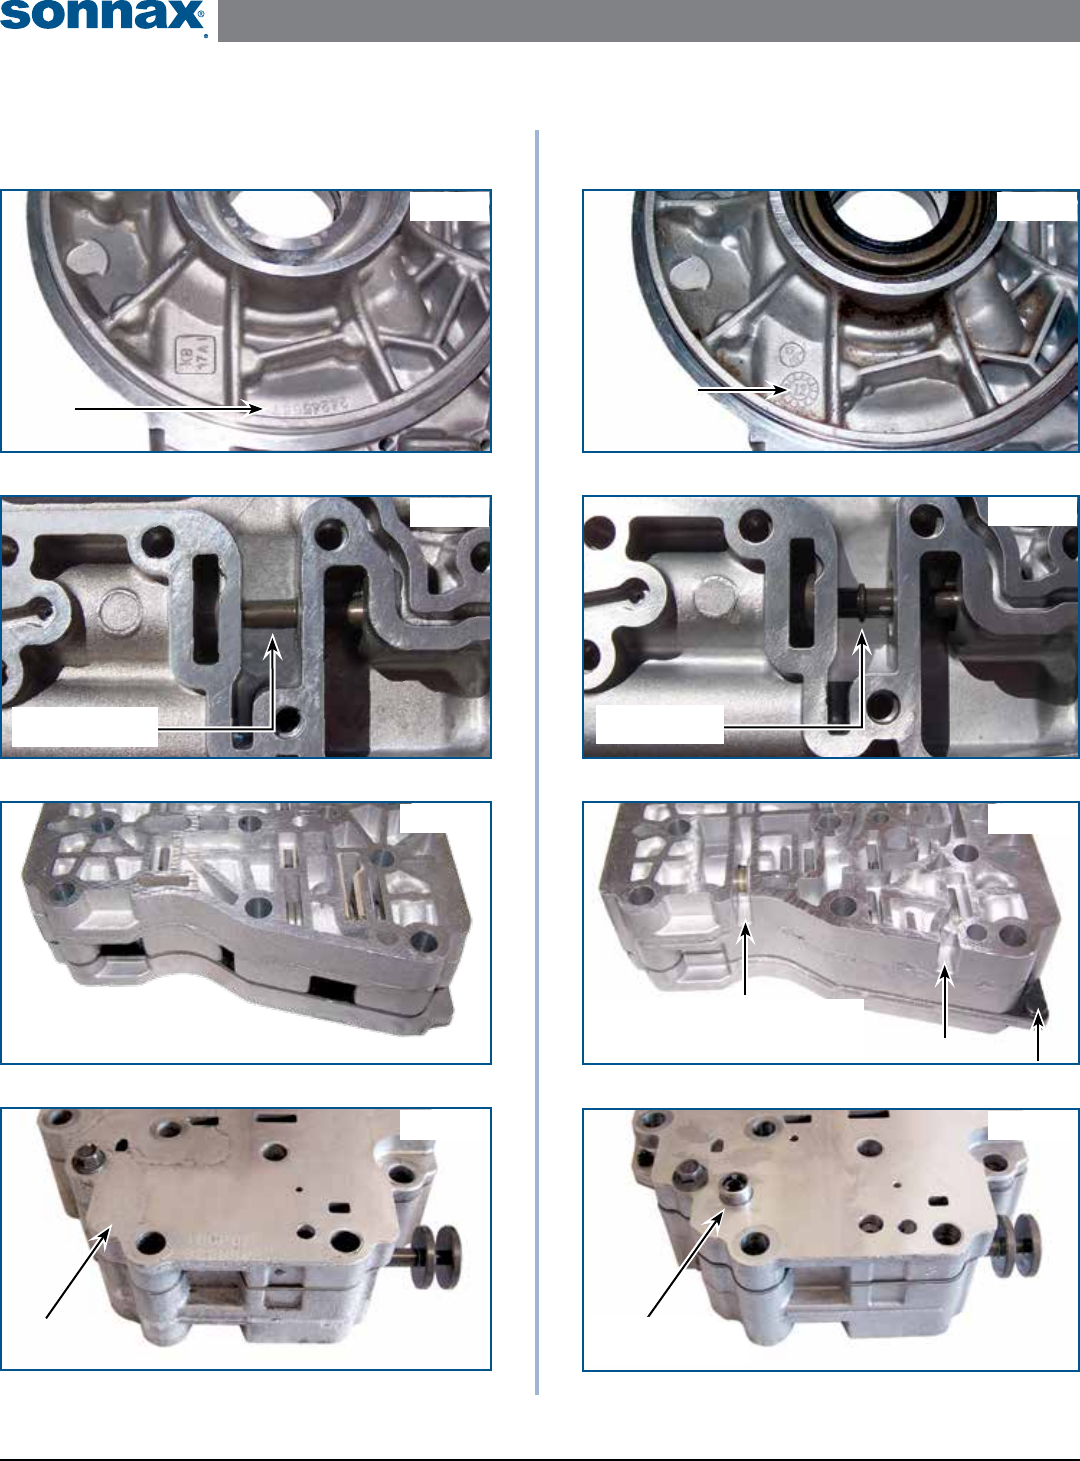
Additional Identication Information
Generation 1 Generation 2
Number "12"
in casting circle
is the ID-year
Pump
casting
ID number
No rib on pressure
regulator valve
Rib on pressure
regulator valve
Generation 2
Control Valve Body Assembly,
Case Side
Generation 1
Control Valve Body Assembly,
Case Side
Generation 1
Valve Channel Plate
Figure 7 Figure 8
Figure 9 Figure 10
Figure 11 Figure 12
Figure 13 Figure 14
Generation 2
Valve Channel Plate

©2017 Sonnax Industries, Inc. 6T40-GEN2-ZIP_Booklet 05-11-17
800-843-2600 • 802-463-9722 • F: 802-463-4059 • www.sonnax.com Page 3
TIME TESTED • INDUSTRY TRUSTED
GM 6T30, 6T40 (Gen. 2), 6T45 (Gen. 2), 6T50 (Gen. 2) ZIP KIT
®
Installation &
Testing Booklet
Additional Identication Information
Generation 1 Generation 2
Generation 1, Control Solenoid (w/body and TCM) Valve Assembly Generation 2, Control Solenoid (w/body and TCM) Valve Assembly:
Beaded gasket and screen changed, solenoid caps changed color.
Generation 2 Control Solenoid (w/body and TCM) Valve Assembly:
No Pressure Switches
Generation 1 Control Solenoid (w/body and TCM) Valve Assembly:
4 Pressure Switches
Generation 2 TCM Identication Number:
Middle number under bar code starts with B, C or D.
Generation 1 TCM Identication Number:
Middle number under bar code starts with 1, 2 or 3.
Figure 15 Figure 16
Figure 17 Figure 18
Figure 19 Figure 20
GM 6T30, 6T40 (Gen. 2), 6T45 (Gen. 2), 6T50 (Gen. 2) ZIP KIT
®
05-11-17 6T40-GEN2-ZIP_Booklet ©2017 Sonnax Industries, Inc.
Page 4 800-843-2600 • 802-463-9722 • F: 802-463-4059 • www.sonnax.com
TIME TESTED • INDUSTRY TRUSTED
Installation &
Testing Booklet
Zip Kit Instructions
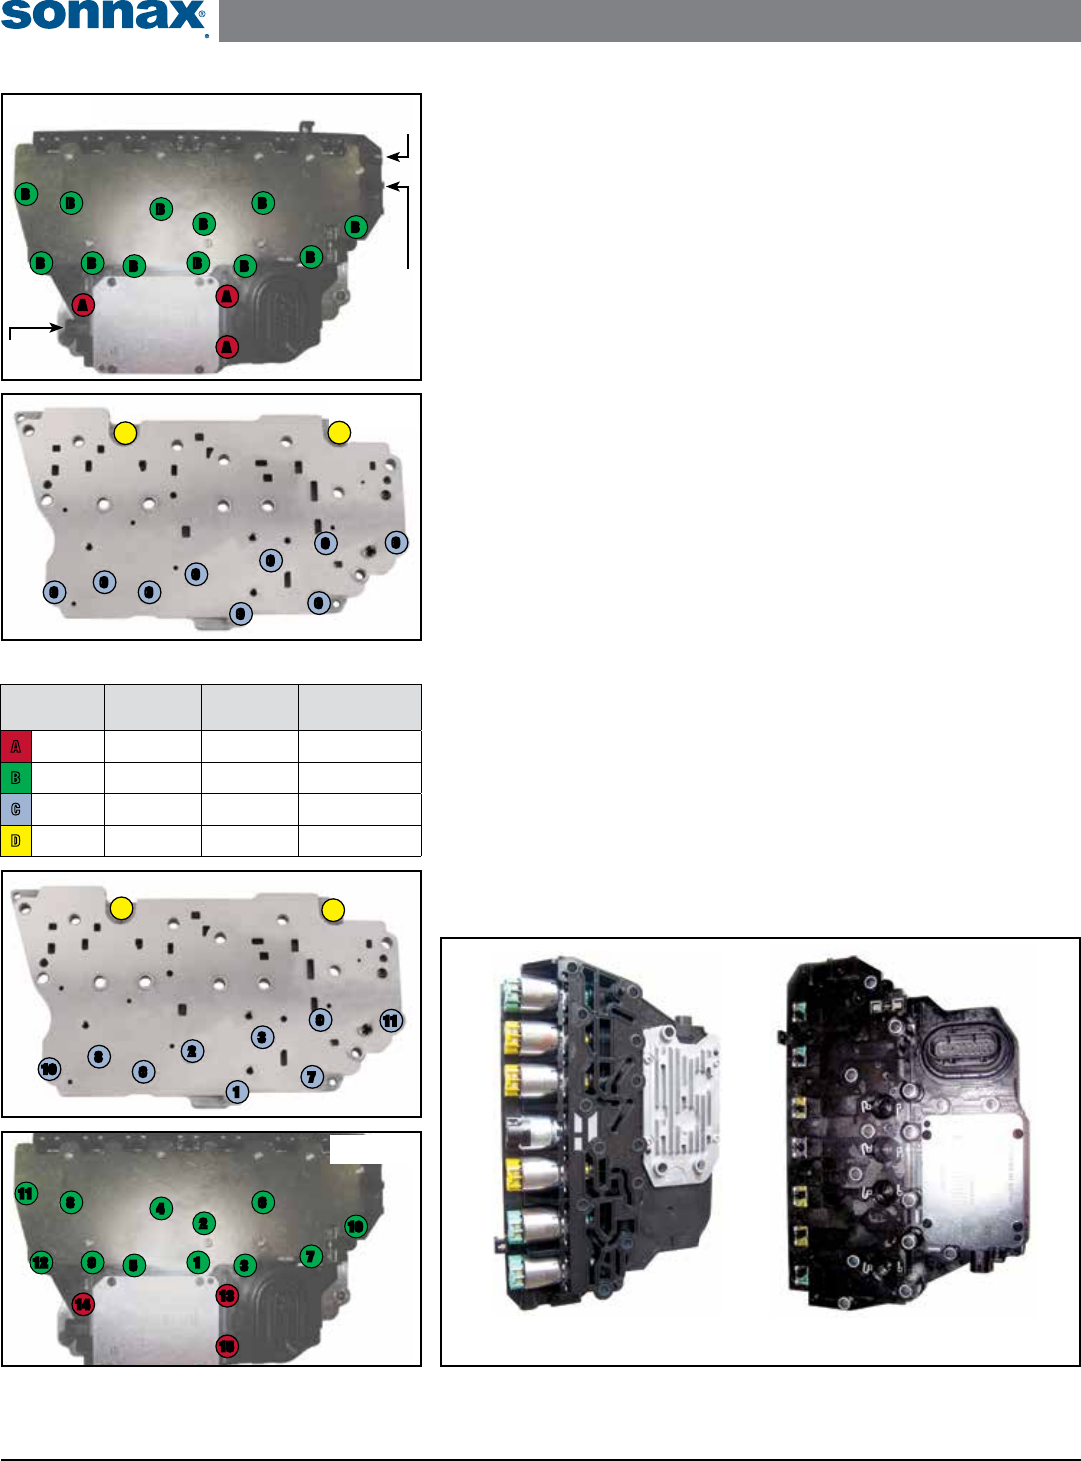
1. TEHCM Removal from Case
a. Disconnect the input speed sensor, output speed sensor and shift position
switch connectors from valve body.
b. Remove the three control solenoid (w/body and TCM) valve assembly bolts,
40.5mm long (Figure 21 & 23).
c. Remove the 12 control solenoid (w/body and TCM) valve assembly bolts,
30mm long (Figure 21 & 23).
d. Remove the control solenoid (w/body and TCM) valve assembly from control
valve body assembly.
e. Remove the nine control valve body assembly bolts, 60mm long (Figure 22 & 23).
f. Remove the two control valve body assembly bolts, 53mm long (Figure 22 & 23).
g. Remove the control valve body assembly from the case.
2. Installation
Install Zip Kit parts as shown on diagram of separate quick guide sheet included in
this Zip Kit. Sonnax recommends vacuum testing critical wear areas not covered
by this kit to determine whether additional Sonnax parts are required (see page 3).
3. TEHCM Reinstall into Case
a. Install control valve body assembly into case and secure with (2) 53mm and
(9) 60mm bolts until nger-tight (Figure 22).
b. Tighten to 97 in-lbs of torque in the indicated sequence (Figure 24).
c. Install control solenoid (w/body and TCM) valve assembly to control valve
body assembly with (12) 30mm and (3) 40.5mm bolts until nger-tight
(Figure 21).
d. Tighten (12) 30mm bolts to 106 in-lb of torque in the indicated sequence
(Figure 25).
e. Tighten the (3) 40.5mm bolts to 71 in-lb torque in the indicated sequence.
f. Reconnect the input speed sensor, output speed sensor and shift position
switch connectors (Figure 21).
B
B
A
BB
B B
BB
BB
B
B
Figure 21 OSS
Connection
A
A
Shift
Position
Switch
Connection
ISS
Connection
Removal Bolts
Bolt Color
Code
Bolt
Length Quantity Torque
Specication
ARed 40.5mm 3 71 in-lb
BGreen 30mm 12 106 in-lb
CBlue 60mm 9 97 in-lb
DYellow 53mm 2 97 in-lb
Figure 23
Figure 24
4
5
10
8
6
2
1
3
9
7
11
11
2
14
12 3
8 6
97
51
4
10
Figure 25
13
15
NOTE: Control solenoid (w/body and TCM) valve assembly shown is a Gen. 2
(TCM identier barcode, Figure 4).
Figure 26
D
C
C
C
C
C
C
C
C
C
Figure 22
D
©2017 Sonnax Industries, Inc. 6T40-GEN2-ZIP_Booklet 05-11-17
800-843-2600 • 802-463-9722 • F: 802-463-4059 • www.sonnax.com Page 5
TIME TESTED • INDUSTRY TRUSTED
GM 6T30, 6T40 (Gen. 2), 6T45 (Gen. 2), 6T50 (Gen. 2) ZIP KIT
®
Installation &
Testing Booklet
Critical Wear Areas & Vacuum Test Locations
NOTE: OE valves are shown in rest position and should be tested in rest position unless otherwise indicated. Test locations are pointed to with an arrow.
Springs are not shown for visual clarity. Low vacuum reading indicates wear and Sonnax parts noted for replacement.
Control Valve Body Assembly – Front • Gen. 2 6T40 Shown
O-Ringed End Plugs
• Burnt clutches/brakes • Various shift complaints
NOTE: Vacuum test end plugs at outboard port
while sealing bore opening with thumb.
Replace with Sonnax Part No.
144510-14K* NOTE: Several Locations =
* Part numbers with an asterisk (*)
are included in this Zip Kit.
3-5 Reverse Clutch
Regulator Valve
• Burnt 3-5 Reverse clutch
• Delayed Reverse
• 3rd & 5th Shift complaints
• 2-3 & 4-5 Shift are
2-6 Clutch
Regulator Valve
• Burnt 2-6 clutch
• 2nd & 6th Shift complaints
• 1-2 & 5-6 Shift are
1-2-3-4 Clutch
Regulator Valve
• Burnt 1-2-3-4 clutch
• Delayed Forward
• 1-2-3-4 Shift complaints
1-2-3-4 Clutch
Boost Valve
• Burnt 1-2-3-4 clutch
• Delayed Forward
• 1-2-3-4 Shift complaints
Clutch Select Valve
• Various shift complaints
• Shift related trouble codes
Low Reverse
4-5-6 Clutch
Regulator Valve
• Burnt Low Reverse &
4-5-6 clutch
• Delayed Reverse
• 4-5-6 Shift complaints
• 3-4 Shift are
Low Reverse 4-5-6
Boost Valve
• Burnt Low Reverse & 4-5-6 clutch
• Delayed Reverse
• 4-5-6 Shift complaints
• 3-4 Shift are
Actuator Feed
Limit Valve
• Harsh shifts
• No/Slipping shifts
• Low clutch pressure
Replace with Sonnax Part No.
144740-01 Requires 144740-TL
TCC Regulator
Apply Valve
• No lockup
• TCC slip
• Harsh/Soft TCC apply
Replace with Sonnax Part No.
144740-16K
Requires F-144740-TL16 & VB-FIX
Default Override
Valve
• Engagement concerns in
Reverse when in failsafe
or default.
NOTE: Look in bore for
visual wear.
GM 6T30, 6T40 (Gen. 2), 6T45 (Gen. 2), 6T50 (Gen. 2) ZIP KIT
®
05-11-17 6T40-GEN2-ZIP_Booklet ©2017 Sonnax Industries, Inc.
Page 6 800-843-2600 • 802-463-9722 • F: 802-463-4059 • www.sonnax.com
TIME TESTED • INDUSTRY TRUSTED
Installation &
Testing Booklet
Critical Wear Areas & Vacuum Test Locations
NOTE: OE valves are shown in rest position and should be tested in rest position unless otherwise indicated. Test locations are pointed to with an arrow.
Springs are not shown for visual clarity. Low vacuum reading indicates wear and Sonnax parts noted for replacement.
Pump Body • Gen. 2 6T40 Shown
Pressure
Regulator Valve
• Harsh/Soft shifts
• High/Low line pressure
• Burnt clutches
TCC Control Valve
• Incorrect TCC apply/release
• Inadequate lube & cooling
• Transmission overheat
• Converter codes
Replace with Sonnax Part No.
144510-05K
Requires F-144510-TL5C & VB-FIX
©2017 Sonnax Industries, Inc. 6T40-GEN2-ZIP_Booklet 05-11-17
800-843-2600 • 802-463-9722 • F: 802-463-4059 • www.sonnax.com Page 7
TIME TESTED • INDUSTRY TRUSTED
GM 6T30, 6T40 (Gen. 2), 6T45 (Gen. 2), 6T50 (Gen. 2) ZIP KIT
®
Installation &
Testing Booklet
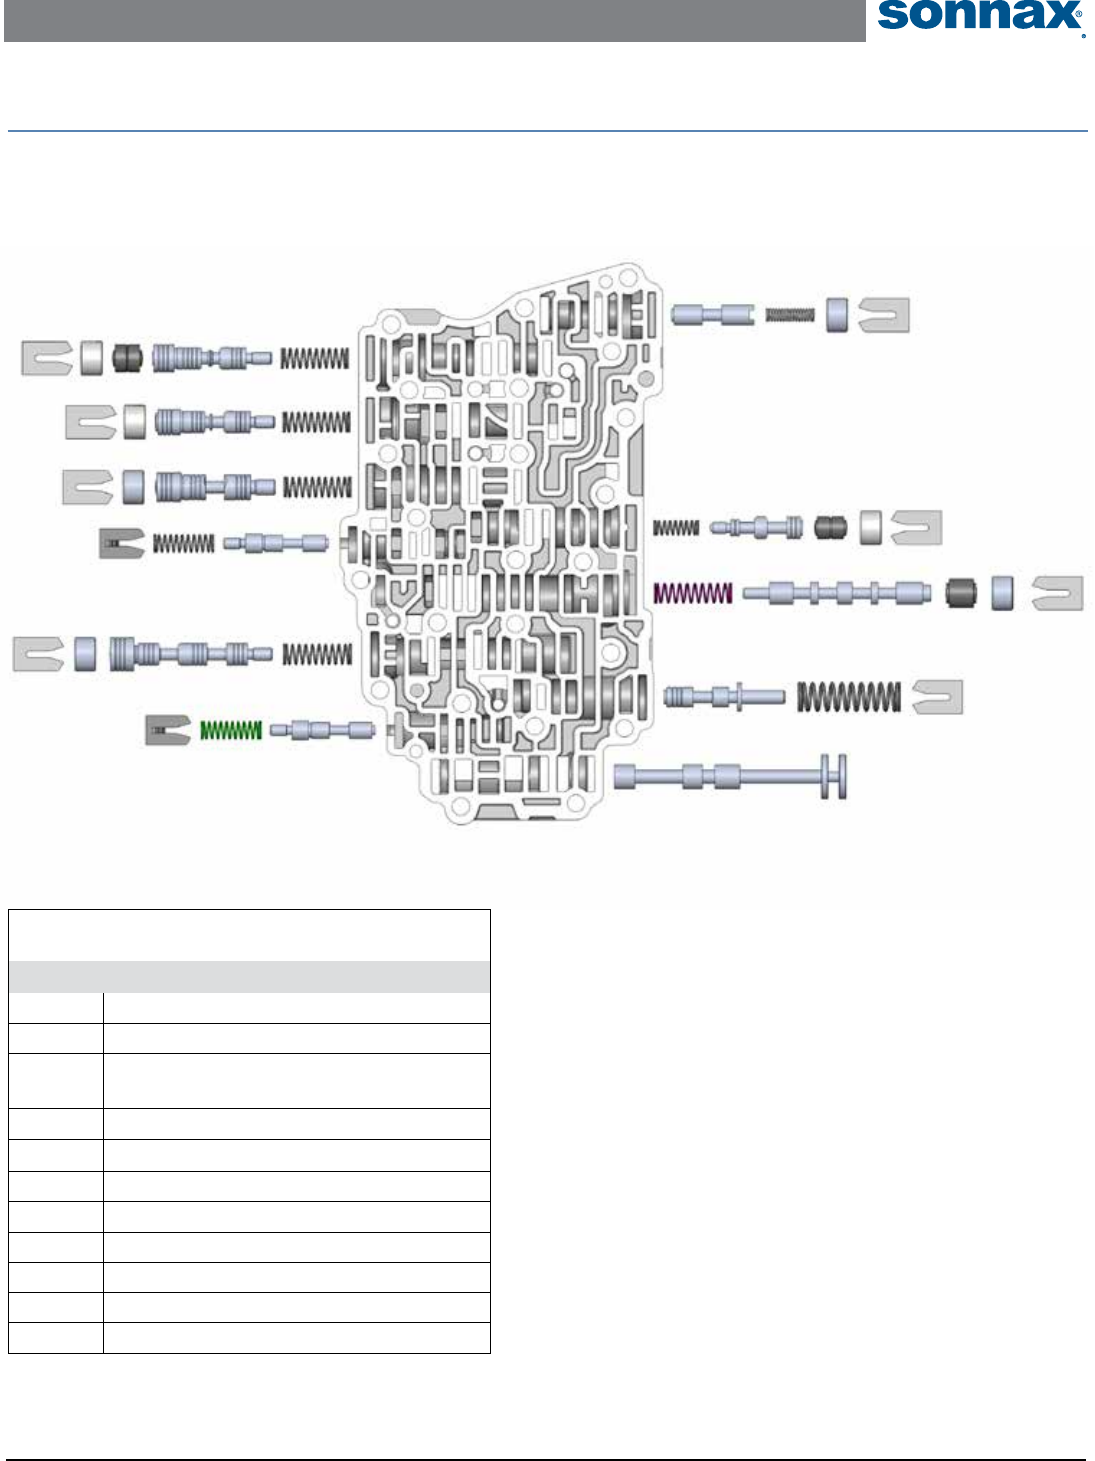
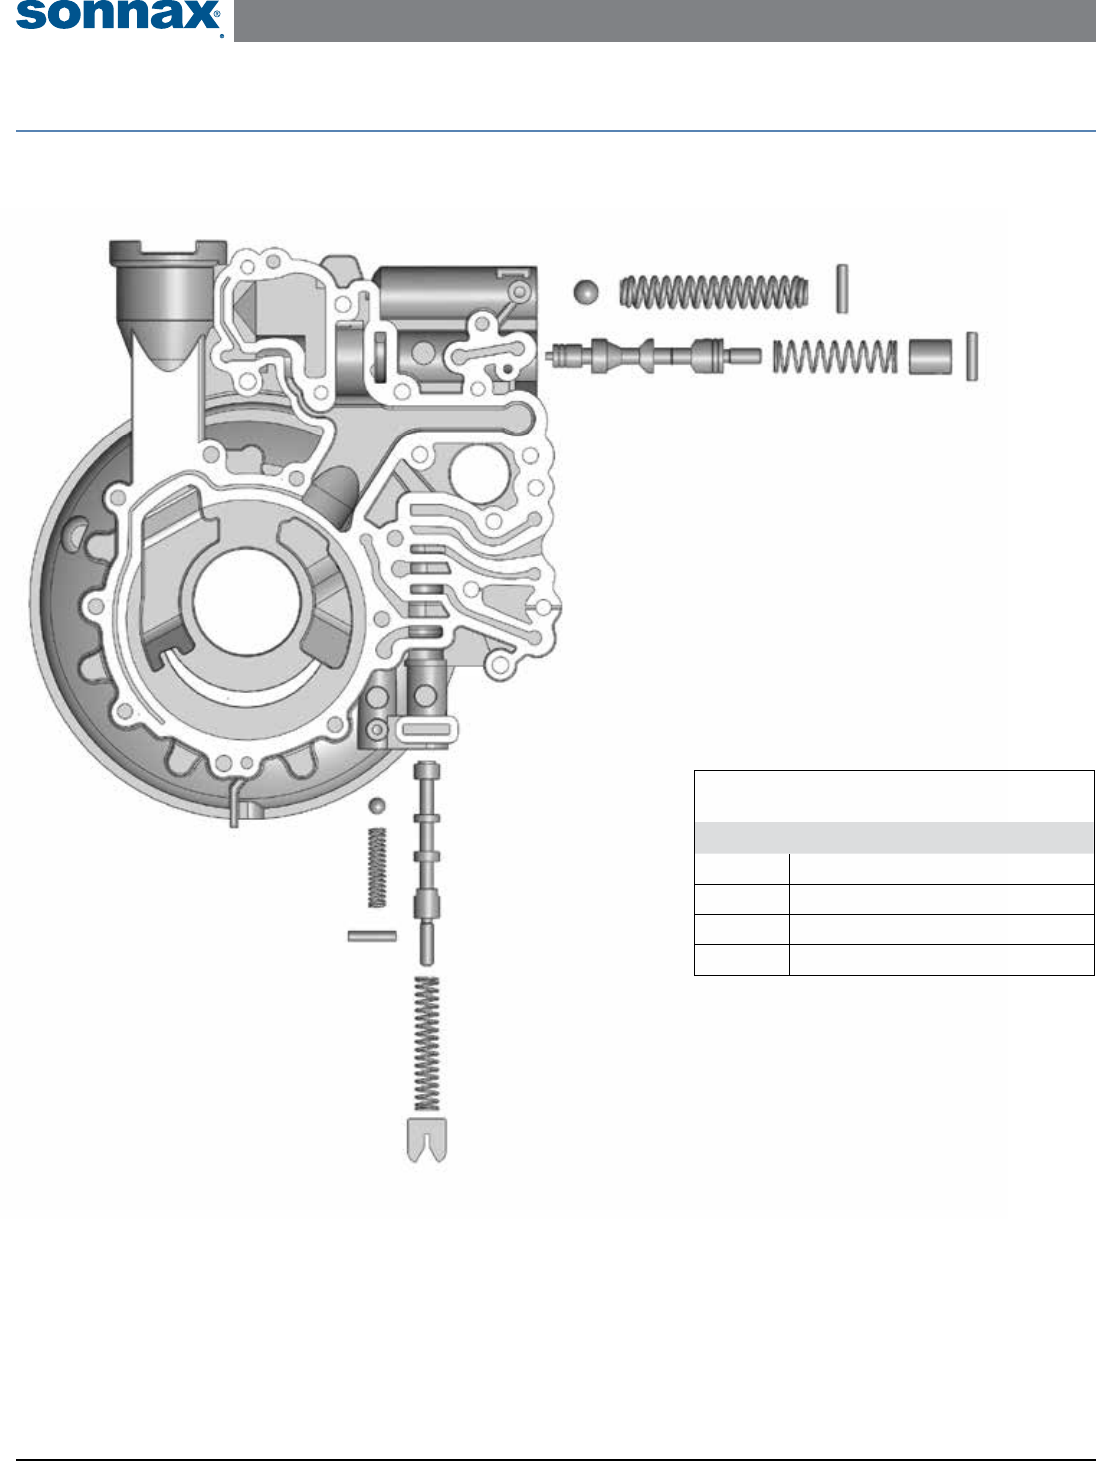
OE Exploded View
Control Valve Body Assembly • Gen. 2 6T40 Shown
NOTE: Depending upon vehicle application, the OE springs shown may not be present.
Control Valve Body Assembly Descriptions
I.D. No. Description
101 Default Override Valve
102 TCC Regulator Apply Valve
103 Clutch Select Valve (inboard)
Shuttle Valve (outboard)
104 Actuator Feed Limit Valve
105 Manual Valve
106 Low Reverse 4-5-6 Boost Valve
107 Reverse & 4-5-6 Clutch Regulator Valve
108 1-2-3-4 Clutch Boost Valve
109 1-2-3-4 Clutch Regulator Valve
110 2-6 Clutch Regulator Valve
111 3-5 Reverse Clutch Regulator Valve
101
102
103
104
105
107
108
111
109
110
106
GM 6T30, 6T40 (Gen. 2), 6T45 (Gen. 2), 6T50 (Gen. 2) ZIP KIT
®
05-11-17 6T40-GEN2-ZIP_Booklet ©2017 Sonnax Industries, Inc.
Page 8 800-843-2600 • 802-463-9722 • F: 802-463-4059 • www.sonnax.com
TIME TESTED • INDUSTRY TRUSTED
Installation &
Testing Booklet
Pump Body Descriptions
I.D. No. Description
201 Line Pressure Relief Ball
202 Pressure Regulator Valve
203 TCC Control Valve
204 TCC Relief Ball
201
202
203
204
OE Exploded View
Pump Body • Gen. 2 6T40 Shown
NOTE: Depending upon vehicle application, the OE springs shown may not be present.
