Sonos RM009 802.11a/b/g/n 2X2 HT20, DFS client device User Manual PLAY1 Guide
Sonos, Inc. 802.11a/b/g/n 2X2 HT20, DFS client device PLAY1 Guide
UserManual.wiki
>
Sonos
>
RM009 User Manual
>
User manual 1 of 2
Contents
1.
User manual 1 of 2
2.
User manual 2 of 2
User manual 1 of 2
Navigation menu
Upload a User Manual
Namespaces
Wiki Guide
HTML
PDF
Info
Views
User Manual
Discussion / Help
Navigation

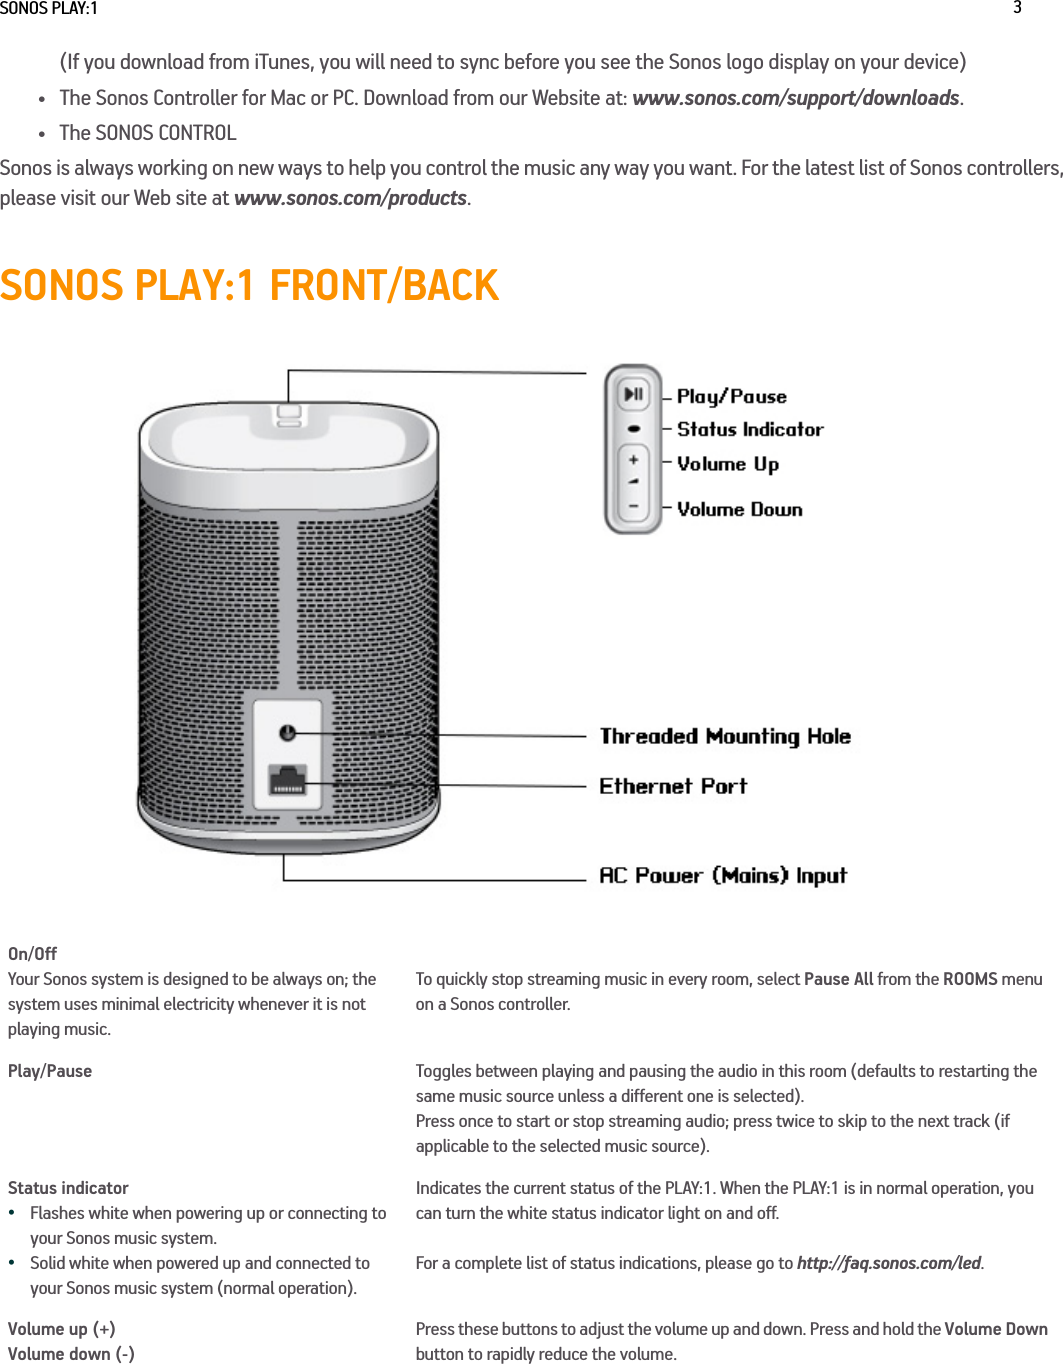
![SONOS PLAY:1 9Playing MusicYou can use any SONOS controller to select music— simply touch to select from the Music menu on a handheld controller, or click to select from the MUSIC pane within the Sonos Controller for Mac or PC.RadioSonos includes a radio guide that provides immediate access to thousands of free Internet radio stations and broadcast programs. You can easily find Internet radio stations from all over the world— music, news, and variety programming, including archived shows and podcasts. To select an Internet radio station, simply select Radio and choose a station.Music servicesA music service is an online music store or online service that sells audio on a per-song, per audiobook, or subscription basis. Sonos is compatible with several music services - you can visit our Web site at www.sonos.com/howitworks/music/partners for the latest list. (Some music services may not be available in your country. Please check the individual music service’s Web site for more information.) If you are currently subscribed to a music service that’s compatible with Sonos, simply add your music service user name and password information to Sonos as needed and you’ll have instant access to the music service from your Sonos system. 1.To add a music service, touch More Music from the Music menu on your handheld controller.2.Select the Sonos-compatible music service you would like to add. 3.Select I already have an account. Type your music service user name and password, and then touch OK. Your user name and password will be verified with the music service. As soon as your credentials have been verified, the music service displays on the Music menu.Free music service trials are available in some countries. (Please check the individual music service’s Web site for more information.) If there is a music service trial visible on your More Music menu, simply touch it to select. Touch I’m new to [music service], and then follow the prompts to activate the music trial. After the trial period is up, you will need to subscribe to the music service to keep the music playing.Local music libraryThe Sonos system can play music from any computer or network-attached storage (NAS) device on your home network where you have shared music folders. During the setup process, you are guided through the process of accessing your local music library (such as your iTunes library). Over time, you may wish to add or remove folders from this list.To make changes to your local music library, select the Settings menu from a handheld Sonos controller and then choose one of the following options:• To add a new music folder to Sonos, select Manage Music Library -> Music Library Setup -> Add New Share.• To remove a music folder, select Manage Music Library -> Music Library Setup. Touch the share you wish to remove and then select Remove Share.](https://usermanual.wiki/Sonos/RM009.User-manual-1-of-2/User-Guide-2357174-Page-11.png)