Sonova USA COMPILOT1 Streamer and Remote Control for Hearing Aids User Manual ComPilot GB 28 Juli indd
Phonak Inc Streamer and Remote Control for Hearing Aids ComPilot GB 28 Juli indd
Contents
- 1. User Manual part 1
- 2. User Manual part 2
User Manual part 1

Manufacturer:
Phonak AG
Laubisrütistrasse 28
CH-8712 Stäfa
Switzerland
EU Representative:
Phonak GmbH
Max-Eyth-Strasse 20
D-70736 Fellbach-Oeffi ngen
Germany
www.phonak.com
029-1067-02/V1.00/2011-09/A+W/FO Printed in Switzerland
©Phonak AG All rights reserved
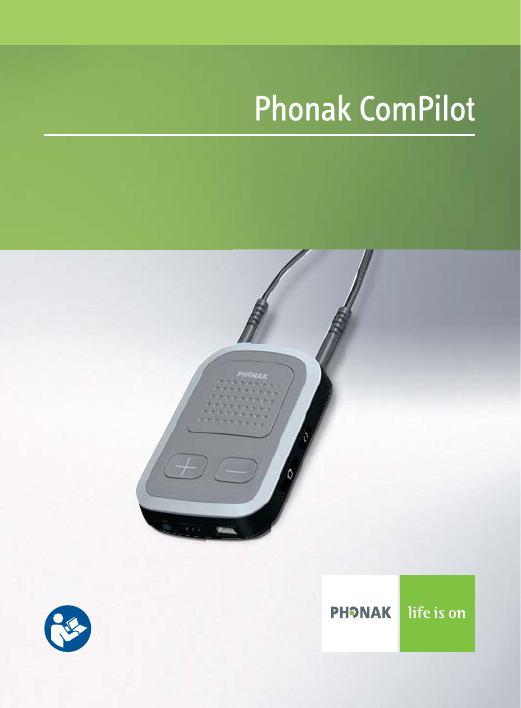
Streamer and remote control
User Guide

2
1. Welcome 5
2. Getting to know your ComPilot 6
2.1 Legend 7
2.2 Accessories 8
3. Getting started 9
3.1 Setting up the power supply 9
3.2 Charging the ComPilot battery 10
3.3 Turning the ComPilot ON and OFF 11
3.4 ComPilot Bluetooth pairing introduction 13
3.5 Wearing the ComPilot correctly 14
3.6 Testing sound via the ComPilot 15
4. Using the ComPilot as an audio streamer 16
4.1 Streaming music via a cable 16
4.2 Streaming music via Bluetooth 17
4.3 Watching TV 19
4.4 Adjusting the volume 20
Contents

3
5. Using the ComPilot for phone calls 21
5.1 Introduction 21
5.2 Incoming calls 25
5.3 Making phone calls 28
5.4 Ending a call 29
5.5 Advanced phone options 30
5.6 Using the external microphone 32
6. Using the ComPilot as a remote control 34
7. Using the ComPilot with FM 38
8. More detailed information 40
8.1 Wearing the ComPilot in different ways 41
8.2 Managing multiple inputs to the ComPilot 42
8.3 Resetting your ComPilot 47
8.4 Summary of indicator lights 48
8.5 Introduction to Bluetooth 51
8.6 Setting up Bluetooth 56
8.7 Caller identifi cation: spoken caller names 62
8.8 VoiceAlerts: spoken ComPilot status 63

4
Contents
9. Troubleshooting ComPilot 65
10. Important safety information 73
10.1 Hazard warnings 73
10.2 Information on product safety 75
10.3 Other important information 78
11. Service and warranty 79
12. Compliance information 80
13. Information and explanation of symbols 83

5
1. Welcome
Your new ComPilot is a Swiss premium-quality product
developed by Phonak, one of the world‘s leading
companies in hearing technology.
The ComPilot provides remote control functions to
adjust your hearing aid for increased listening comfort.
It also connects your hearing aids wirelessly to other
communication and audio devices.
Please read the user instructions thoroughly in order to
benefi t from all the possibilities your hearing system
offers.
If you have any questions, please consult your hearing
care professional.
Phonak – life is on www.phonak.com

6
The Phonak ComPilot connects all Phonak wireless
hearing aids wirelessly to Bluetooth®-enabled phones
and devices or MP3 players for speech or stereo
music. The ComPilot is also compatible with Phonak’s
range of FM receivers via Europlug input.
The remote control gives you access to important
control elements for most of the Phonak wireless hearing
instruments. A list of compatible hearing aids can be
found at http://www.phonak.com/compilot
Please note that your hearing care professional
must confi gure your ComPilot before it can be used
as a remote control for your hearing aids. Audio
streaming however is possible at any time.
* Bluetooth® is a registered trademark owned by the
Bluetooth SIG, Inc.
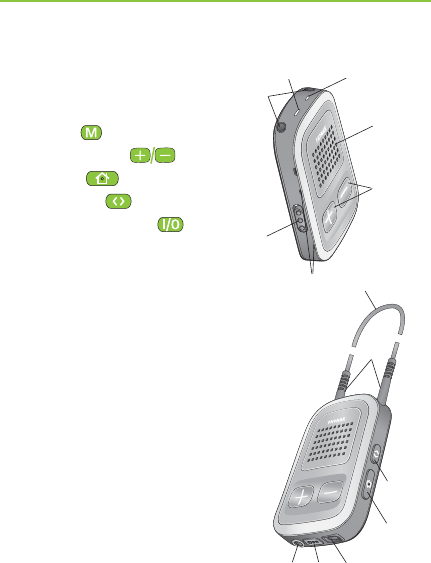
2. Getting to know your ComPilot
7
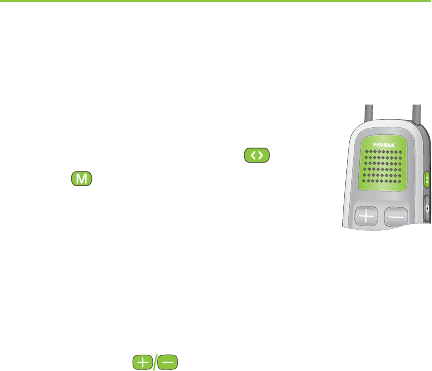
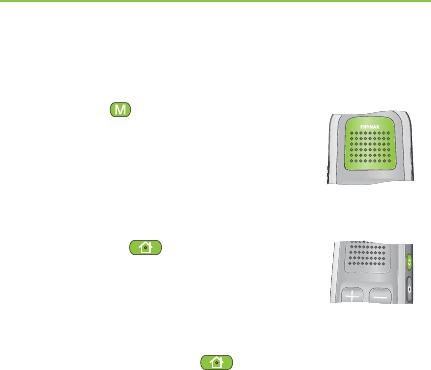
2.1 Legend
Buttons
ቢ Main ( )
ባ Volume +/- ( )
ቤ Home ( )
ብ Connect ( )
ቦ ON/OFF switch ( )
Inputs
ቧ Microphone openings
ቨ Audio input (3.5 mm jack)
ቩ FM input (Europlug)
ቪ Charging input (mini-USB)
Indicators
ቫ Audio indicator
ቭ Power indicator
Neckloop
ቮ Neckloop sockets
ቯ Neckloop (with antenna)
ተ Neckloop plugs
ቧ
power
audio
ቢ
ባ
ቤ
ቦ
ቫቭ
ቮ
ተ
ብ
ቯ
ቨቩቪ
8
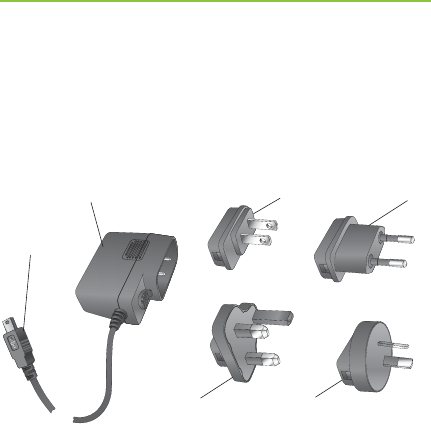
2.2 Accessories
(content may vary depending on the country)
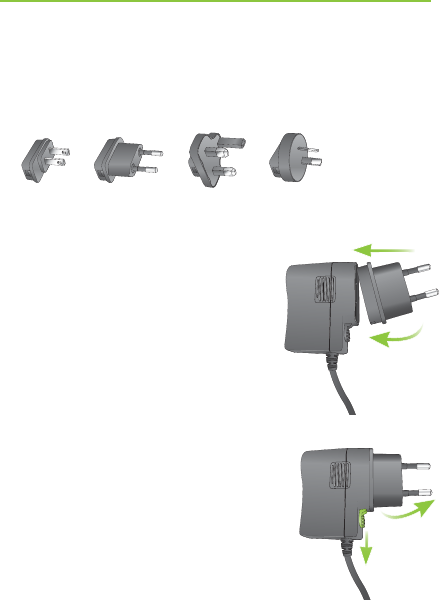
ቱ/ቲ Universal power supply with mini-USB plug
ታ–ቶ US, EU, UK, AUS adapter
Other optional accessories
½ External lapel microphone “MC1”
½ Short neckloop (51cm)
½ Phonak TVLink S basestation
(Phonak Bluetooth transmitter for TV use)
½ Audio cable, 1.5m / 5ft.
½ USB cable, 3m / 10ft.
2. Getting to know your ComPilot
ቱ
ቲታቴ
ቶት
9
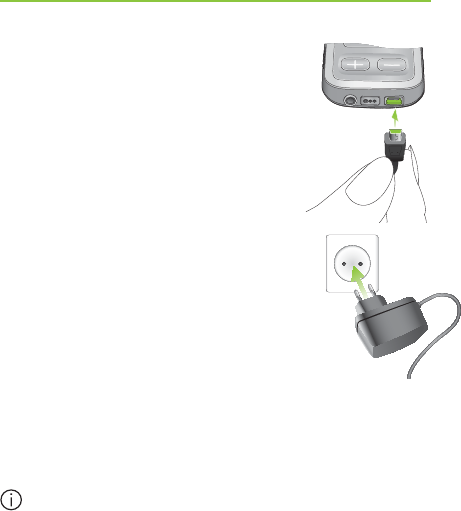
3.1 Setting up the power supply
1. Select the adapter that corresponds to your country.
US EU UK AUS
2. Insert the round corner of the
adapter to the round corner of
the universal power supply
until it is completely inserted.
3. Click the tail of the adapter in
to lock it into place. Make sure
the adapter is securely locked.
To remove the power adapter:
a. Pull back the tab on the universal
power supply and hold.
b. Gently pull the adapter upwards
to remove it from receptacle.
c. Then start over with step 1 (above).
3. Getting started
2.
a. b.
3.
10
3. Getting started
3.2 Charging the ComPilot battery
Your ComPilot has a non-removable
rechargeable battery.
To charge it:
1. Plug the mini-USB plug into the
mini-USB port on the ComPilot.
2. Plug the power supply into a power
outlet.
Power indicator
½ Solid red: Charging, typically 90 minutes.
½ Solid green: Battery fully charged.
It is safe to leave the ComPilot connected to the
charger overnight.
When charging your ComPilot for the fi rst time,
leave it charging for at least three hours, even if
the battery indicator is not lit or turns green
earlier.
11
A new battery’s full performance is achieved only
after two to three complete charge and discharge
cycles.
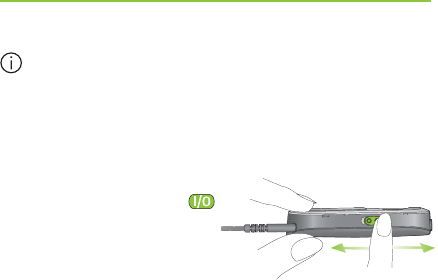
3.3 Turning the ComPilot ON and OFF
Slide the Power switch ( )
as shown to turn the
ComPilot ON or OFF.
OFF ON
Switch the ComPilot OFF when not in use or if in storage
or during transportation.
For operational use switch the ComPilot ON.
12
3. Getting started
Battery status information
The Power indicator shows the following:
Green for 2 seconds
Blink red then solid
for 2 seconds
Slow blink green
Short blink red
No blinking just after
switching ON
If the neckloop was removed for more than
2 minutes, the Power indicator is only lit as long
as a button is pressed.
Switching ON
Switching OFF
Normal operation
<20% battery left.
Please charge
Charge for at least
2 hours
13
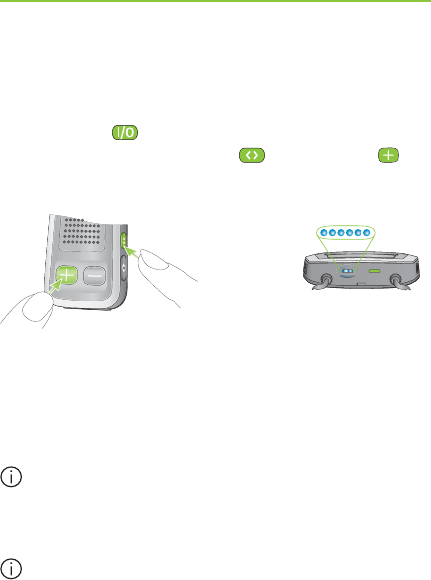
3.4 ComPilot Bluetooth pairing introduction
Find more details on page 56.
1. Switch ON ( ) the ComPilot.
2. Press and hold the Connect ( ) and Volume ( )
button simultaneously for 2 seconds until the Audio
indicator starts to rapidly blink blue.
2 sec
3. Start the pairing process on the Bluetooth device
(e.g., phone) within 1 minute according to the devices
user guide and use code “0000” when prompted.
4. After successful pairing, the Audio indicator will stop
rapidly blinking blue.
The pairing process does not require the neckloop
to be plugged in. For streaming and Bluetooth
connection the neckloop is mandatory.
When pairing to a cellular phone we recommend
disabling the phone key tones and SMS alerts.
poweraudio
au
au
au
au
au
au
au
au
au
au
au
au
au
di
di
di
di
di
i
di
di
di
di
di
i
di
o
o
o
o
o
o
o
o
o
o
o
o
au
au
au
au
u
u
u
au
au
au
a
di
di
di
di
di
i
di
di
di
di
di
di
di
di
di
o
o
o
o
o
o
o
o
di
di
di
di
14
3. Getting started
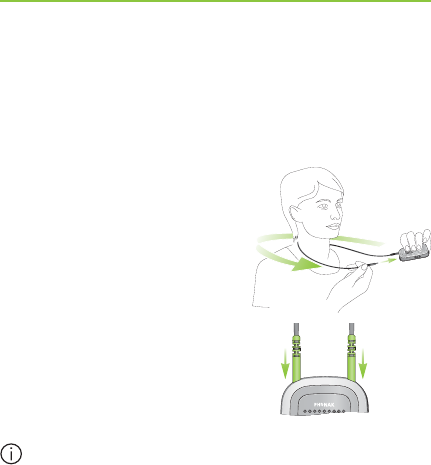
3.5 Wearing the ComPilot correctly
Before any phone, music or TV streaming can take
place, the ComPilot must be switched ON and worn
correctly as shown below:
1. Put the neckloop around
your neck (easily done when
unplugging one neckloop
plug).
2. Make sure both plugs are
well connected in the neckloop
sockets.
3. Switch the ComPilot ON.
For streaming the neckloop must always be plugged
in. When unplugged, the ComPilot will go into
sleep mode after two minutes. The Power and Audio
indicators will stop blinking and all active Bluetooth
connections are terminated to save power. Plug
the neckloop in again to activate the streaming.
15
3.6 Testing sound via the ComPilot
1. Wear the ComPilot correctly and
switch it ON.
2. Press and hold the Connect ( ) and
Main ( ) buttons simultaneously
for 2 seconds until the Audio indicator
turns violet.
The hearing aids will switch to the streaming mode
and you will hear the ComPilot theme sound demo for
30 seconds.
Use the Volume ( ) buttons to adjust the volume.
After 30 seconds or pressing any other key the sound
demo will stop.
If you cannot hear the demo sound:
½ Make sure your hearing aids are inserted correctly.
½ Make sure the ComPilot neckloop is properly plugged
in on both ends and worn around your neck.
½ Make sure the ComPilot is charged and switched ON.
½ Make sure you are not on a phone call connected
through the ComPilot.

16
4.1 Streaming music via a cable
The ComPilot must be switched ON and worn correctly
around your neck.
1. Insert the audio cable into the headphones socket
on your audio player and start the player.
2. Insert the other end of the audio cable into the Audio
input on your ComPilot. The audio streaming is
automatically activated and the Audio indicator will
change to orange.
AUDIO
4. Using ComPilot as an audio
streamer

17
Briefl y press the Main ( ) button to stop and restart
streaming.
The programs of your hearing aids cannot be changed
via the ComPilot Main ( ) button when the audio
cable is plugged in.
ComPilot will confi rm streaming via cable when
activated (speech messages (VoiceAlerts) or beeps,
according to the ComPilot confi guration).
4.2 Streaming music via Bluetooth
If you have an audio source equipped with Bluetooth
functionality (e.g., MP3 player), you can stream audio
wirelessly to your hearing aids.
In order to use your ComPilot with a Bluetooth enabled
audio device or transmitter, you must first pair the
devices. Please refer to page 56 for further details.
To start Bluetooth streaming:
1. ComPilot must be switched ON and worn correctly.
2. Switch ON the other Bluetooth device.

18
4. Using ComPilot as an audio streamer
3. For some Bluetooth devices it may be necessary to
press “Play” on the device.
4. If the devices were paired and connected correctly
streaming will start automatically and the Audio
indicator will turn solid blue.
Use the Main ( ) button to stop and restart Bluetooth
streaming.
To stop Bluetooth streaming completely, switch the
other Bluetooth device OFF or disable its Bluetooth
feature.
The ComPilot will confi rm that Bluetooth streaming
is activated (speech messages (VoiceAlerts) or
beeps, depending on the ComPilot confi guration).
The hearing aid programs cannot be changed via
the ComPilot Main ( ) button when the Bluetooth
device is streaming. Find more details about the
remote control on page 34.
19
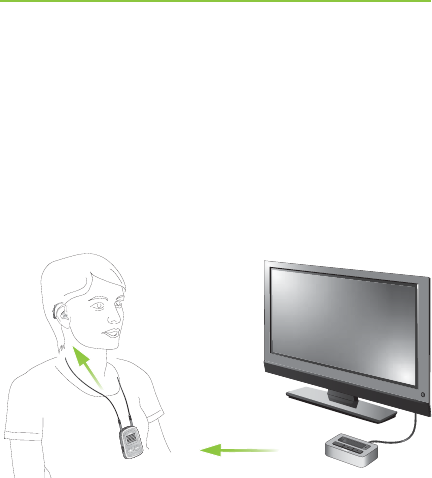
4.3 Watching TV
We recommend using the dedicated and optimized
Phonak TVLink S basestation for watching TV.
It ensures low latency wireless transmission for up to
30 meters (90 ft.), offers a built-in volume control and
acts as a charging cradle for the ComPilot.
power
audio
20
4.4 Adjusting the volume
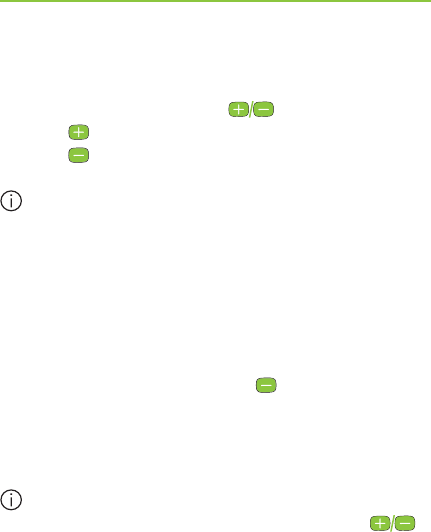
Press the ComPilot Volume () buttons to adjust:
½ Press ( ) to increase the volume
½ Press ( ) to decrease the volume
Adjusting the volume on the ComPilot will have the
same effect as adjusting the volume of the hearing
aids.
You can also change the volume of the streaming
audio signal only by using the volume controls of
the audio device (e.g., cellular phone, MP3 player,
TVLink S basestation).
This gives you the ability to decrease the hearing
aid volume using the Minus ( ) button during a
phone call in a noisy environment, and increase the
phone volume at the same time by using the volume
up button on the phone.
If your ComPilot was not grouped with your hearing
aids by your hearing care professional, the ( )
Volume buttons will only change the streaming audio
but not the hearing aid volumes.
4. Using ComPilot as an audio streamer
21
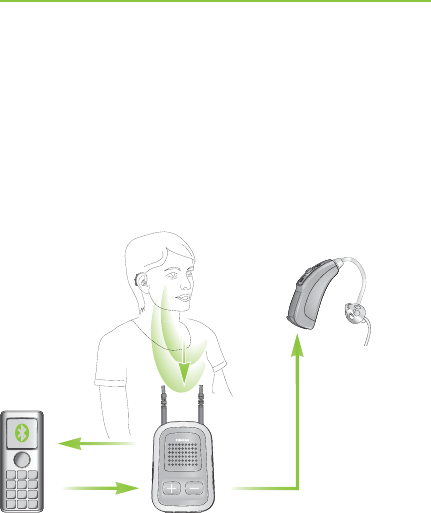
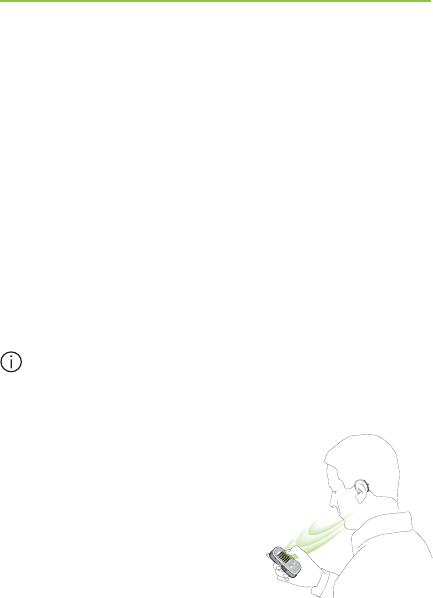
5. Using ComPilot for phone calls
5.1 Introduction
Before you can use your ComPilot with your phone,
you need to make sure the phone is Bluetooth enabled
and complete the pairing and connection procedures
(details on page 56).
Your voice
Caller’s voice
Bluetooth Wireless signal
Caller’s voice
audible here

22
The Main ( ) button offers multi-operation
functionality:
½ It accepts and ends a phone call.
½ It pauses and resumes the streaming from an audio
device.
½ It operates as a remote control (ComPilot must be
confi gured as a remote control by your hearing care
professional).
Some phones are confi gured to play key-press tones,
SMS announcements and confi rmation beeps to the
ComPilot.
If this is set:
½ You will hear these tones interrupting any active
audio streaming through your hearing aids.
½ Your hearing aids may shortly switch to streaming
mode which may be unwanted.
Please refer to your phone user guide for information
about disabling these sounds.
5. Making phone calls

23
Phone calls via Bluetooth will always take priority
over other audio sources on your ComPilot.
It is not possible to change hearing aid programs
during a phone call.
You will hear the caller’s voice through both
hearing aids.
24
5. Making phone calls
Use of ComPilot during phone calls
The Bluetooth range (maximum distance between
ComPilot and the phone) is 5–10 meters (15–30ft).
Outside this range the connection will be lost or you
will encounter intermittency during a call.
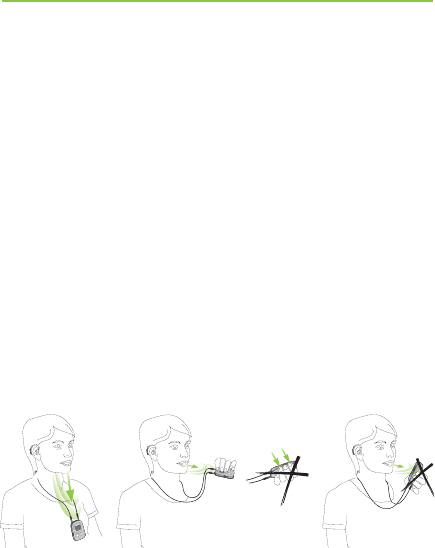
When engaged in a phone call, wear the ComPilot
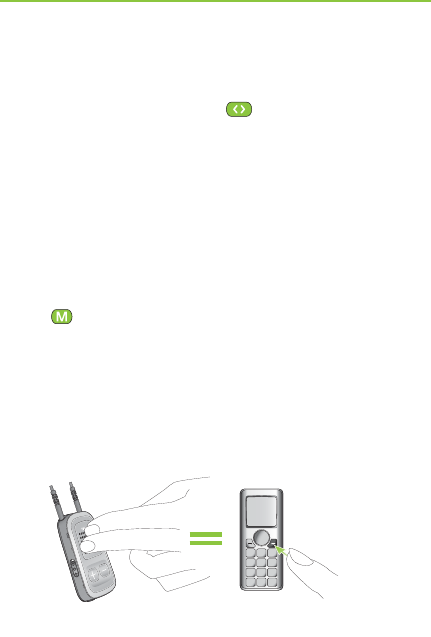
normally as shown in fi gure ቢ below.
½ In very noisy environments, you may move the
ComPilot closer to your mouth (fi gure ባ).
½ Avoid covering the small microphone openings on
the side with your fi ngers or clothes (fi gure ቤ) and
do not speak from the front (fi gure ብ).
power
audio
ቢ ባ ብቤ

25
5.2 Incoming calls
The ComPilot must be switched ON, paired to the
phone and worn correctly.
When a call is received on your phone, the ComPilot
Audio indicator will show a solid blue light, and
you will hear the ringtone signal through your hearing
aids.
Different ringtones of the ComPilot
The phone ringtone depends on the ComPilot
confi guration and your phone capabilities.
The ringtone is assigned automatically during the
initial phone pairing process and cannot be confi gured.
When pairing more than one phone, the second
and third paired phone will have a different ringtone.
A total of 3 different ringtones are automatically
assigned.

26
The ComPilot will also announce the caller name as
shown on the phone display (Caller identifi cation using
text-to-speech technology). The name is taken from
your phone’s directory.
Please note that this feature must be supported by
your phone. Please consult the phone user guide or
the phone supplier for more information.
The default language setting of a new ComPilot is
US English. Your hearing care professional may
confi gure the appropriate language setting for proper
pronunciation of the names.
Your hearing care professional may switch the
Caller identifi cation off upon your request.
Accepting incoming calls
To accept an incoming call, briefl y press the Main ( )
button on your ComPilot once you hear the ringtone
through your hearing aids.
Speak into the ComPilot – not into the phone – when
the call is in progress.
5. Making phone calls
27
“click”
It will take about 5 seconds before you hear the
ringtone through your hearing aids.
For your safety, the hearing aid microphones will
remain on at reduced level during phone calls and
audio streaming.
Only one phone call at a time is possible. A second
ringing phone is ignored while phoning.
28
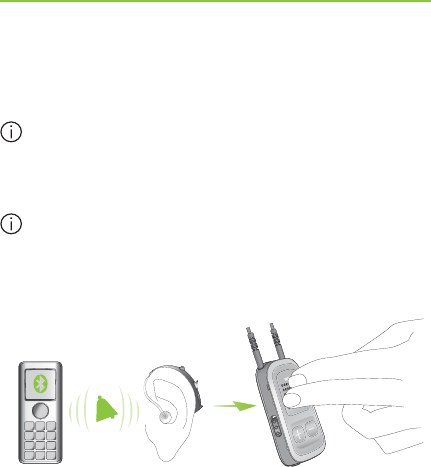
5.3 Making phone calls
Make sure the ComPilot and
your phone are connected
through Bluetooth as described
on page 56.
Use the phone keypad to
enter the number and press
the phone dialing button.
When connected, you will hear the dialing tone
through your hearing aid after approximately 3 seconds.
Using cordless phones (DECT) or older phones with
Headset profi le only
If your phone only supports the Headset profile (HSP),
the connection must be initiated manually for outgoing
calls. This often applies to cordless home phones (DECT
standard).
For these phones, the Audio indicator might not
blink blue even if the phone was paired before.
5. Making phone calls
power
audio
29
1. Type the number you want to dial on your phone,
or select it from the phone book.
2. Briefl y press the Connect ( ) button then wait
5 seconds.
3. The dialing process will automatically start and the
Audio indicator will turn solid blue. You may hear a
confi rmation beep through your hearing aids.
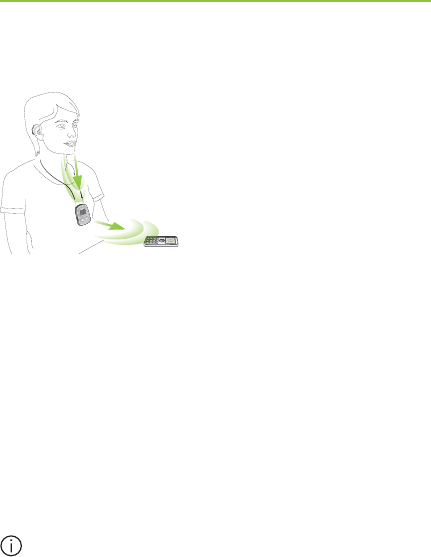
5.4 Ending a call
To end a phone call via your ComPilot, briefl y press the
Main ( ) button. The call will terminate and your
hearing aids will return to the previously-active program
or audio source (such as the audio jack input).
You can also end a call by operating your phone
instead of your ComPilot.
30
5.5 Advanced phone options
Rejecting a call
If you prefer not to answer an incoming call, press and
hold the Main ( ) button on your ComPilot for about
two seconds until the ringtone stops. Using your phone
to reject the call will have the same effect.
Pressing the Home ( ) button will terminate the call
and the hearing aids will switch to the startup program.
Your hearing care professional may confi gure the
following additional features on ComPilot. They will be
assigned to a long press (2 seconds) of the Main
()- or the Connect ( )-button:
Your phone must support these features. Please
consult the phone user manual for details.
1. Redial last number
A long press of the assigned button will redial the
last dialed number.
5. Making phone calls

31
2. Voice dial
A long press of the assigned button will start the
voice dial which allows you to speak the person’s
name instead of typing the number.
When using two phones at the same time (Multi
Point) only the last paired phone can be used for
voice dial.
3. Hold call
While in a phone conversation, a long press of the
assigned button will put the call on hold. The caller
stays on the line but there is no audio transfer
and the hearing aids switch to the previous hearing
program. Use this mode to have a side conversation
with a person next to you without transmitting the
conversation to the person on the phone.
4. Transfer call
A long press of the assigned button will transfer the
call to the phone. This allows you to hand your
phone to another person. Your hearing aids will
switch back to the previous hearing program.
32
5. Making phone calls
After holding or transferring a call, another long press
of the respective button transfers the call back to the
ComPilot and the call is resumed through your hearing
aids.
As long as the call is on hold or transferred, you
may use the Main ( ) button to change your
hearing aid programs again.
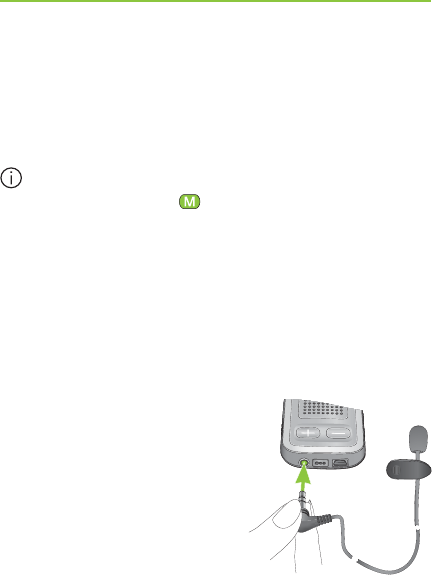
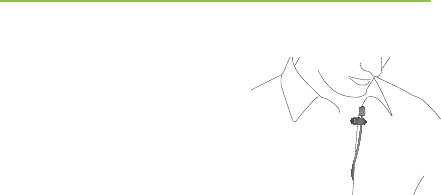
5.6 Using the external microphone
Use the optional external lapel microphone “MC1” if
you wear the ComPilot underneath clothing during a
phone call.
1. Plug the 3.5mm microphone
plug into the audio input of
the ComPilot.
Hereby, the internal ComPilot
microphones are completely
disabled.
33
2. Use the clip to place the
omnidirectional microphone
as close to your mouth as
possible.
3. Put the neckloop around your
neck and switch the ComPilot ON.
Jackets, etc., will not negatively infl uence the wireless
link to your hearing aids.

34
Important: The remote control functionality of the
ComPilot is only available for wireless Spice Generation
and Spice+ hearing aids.
The streaming functionality is available for all wireless
hearing aids. Please ask your hearing care professional
for more information.
Before the remote control functionality can be
used, your hearing care professional must enable
the remote control. It is not possible to use the
ComPilot as a remote control with different pairs
of hearing aids.
There are two ways to use the ComPilot as remote control
½ The neckloop is plugged in with both
ends and the ComPilot must be worn
around your neck. The remote control
function is available as long as you
are not streaming audio.
6. Using ComPilot as a remote control

35
½ The neckloop is completely un-plugged
and ComPilot is operated at arm’s
length.
No streaming is possible in this
confi guration.
Make sure the ComPilot is switched ON.
Volume change/FlexControl (optional)
FlexControl helps you optimize clarity and comfort for
different listening situations (optional on selected
hearing aids). Press the ( ) volume button on the
ComPilot to adjust:
½ Press ( ) to increase
½ Press ( ) to decrease
36
Program change
Use the Main ( ) button to change
hearing aid listening programs.
Changing hearing aid programs is
only possible if no streaming is
in progress.
Push the Home ( ) button to
return to the startup hearing aid
program and volume levels of
your hearing aids.
Press and hold the Home ( ) button
(>2 sec) to select a favorite program
(confi gured by the hearing care
professional).
The fi rst program sent after switching ON the ComPilot
is the fi rst program after the startup program.
6. Using ComPilot as a remote control
37
More remote control information:
½ Your hearing aids may beep to confi rm that your
selection was applied.
½ Both hearing aids are controlled at the same time.
½ Please ask your hearing care professional to print
your personal ComPilot report.
½ The available hearing aid programs and volume
levels are set by your hearing care professional.
½ The Power indicator is lit as long as you press a
ComPilot button. Green confi rms a good ComPilot
battery state, red indicates that you need to
charge the ComPilot battery.
2 minutes after unplugging the neckloop both
indicator lights will switch off and the ComPilot
disconnects Bluetooth to save power.
Operating distance
If ComPilot is used as a handheld
remote control (without neckloop)
½ Max. distance 80cm / 32’’
½ Hold ComPilot as shown

38
ComPilot can be used together with Phonak FM
equipment.
1. Place the FM transmitter
near the sound source and
turn it ON.
2. Turn the FM receiver ON if
required.
3. ComPilot must be switched
ON and worn correctly.
4. Attach your FM receiver to
the ComPilot via the FM
input as shown in the picture.
When FM is detected, you will hear the FM notifi cation
tone for streaming through your hearing aids. The
FM notification tone is similar to a phone ringtone.
Options for handling the FM signal during the FM
notification tone:
½ Accept: Briefly press the Main ( ) button.
½ Put on hold: Press the Main ( ) button for 2 seconds.
½ Ignore the FM notification tone: After 20 seconds
the FM will be put on hold automatically.
7. Using ComPilot with FM

39
Briefl y press the Main ( ) button to pause the FM
streaming.
The FM input that is paused is automatically kept in
the background and can be restarted as long as a
FM signal is present by briefl y pressing the Main ( )
button.
As long as an FM signal is received the hearing aid
programs cannot be changed via the Main ( )
button.
The ComPilot will play a confi rmation sound each time
the streaming via FM is activated and the Audio indicator
will turn orange.
½ The ComPilot will send a short alert signal during
FM streaming if there is no FM signal for 45 seconds,
and then every 15 minutes.
½ If there was no FM signal for more than 15 minutes,
the notifi cation tone restarts as soon as the FM signal
is detected again.
To deactivate FM completely, unplug the FM receiver
from the ComPilot.

40
This section gives more insight in the following topics:
8.1. Wearing the ComPilot in different ways
8.2. Managing multiple inputs to the ComPilot
8.3. Resetting your ComPilot
8.4. Summary of indicator lights
8.5. Introduction to Bluetooth
8.6. Setting up Bluetooth
8.7. Caller identifi cation: spoken caller names
8.8. VoiceAlerts: spoken ComPilot status
8. More detailed information
41
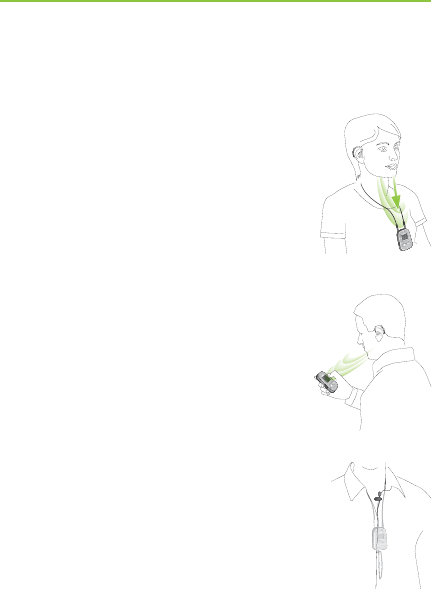
8.1 Wearing the ComPilot in different ways
Standard
To benefi t from the streamer and
remote control function, we
recommend wearing the ComPilot
around the neck.
During calls your voice can only be
picked up if the ComPilot is not
covered by clothes.
Handheld remote control
To use the ComPilot as a remote
control only, it can be held and
operated in the hand. The neckloop
must be removed in this case.
Under clothing
If you wear the ComPilot under clothing
during phone calls, the external Phonak
microphone “MC1” is needed (optional
acccessory).
power
audio

42
8.2 Managing multiple inputs to the ComPilot
When an audio source is connected via the ComPilot,
your hearing aids will automatically switch to special
programs.
Up to 4 automatic programs can be fi ne-tuned by your
hearing care professional.
It is possible to have multiple audio sources connected
and in operation with the ComPilot:
½ Two Bluetooth devices
(e.g., phone and TVLink S basestation).
½ One audio input (3.5mm audio plug).
½ One FM receiver.
Speech messages (VoiceAlerts) and the Audio indicator
light inform you about the different inputs. For a
summary of the Audio indicator color during streaming
please see page 50.
8. More detailed information