Sonova USA ICUBE2 Fitting Interface User Manual
Phonak Inc Fitting Interface
User Manual
User Guide
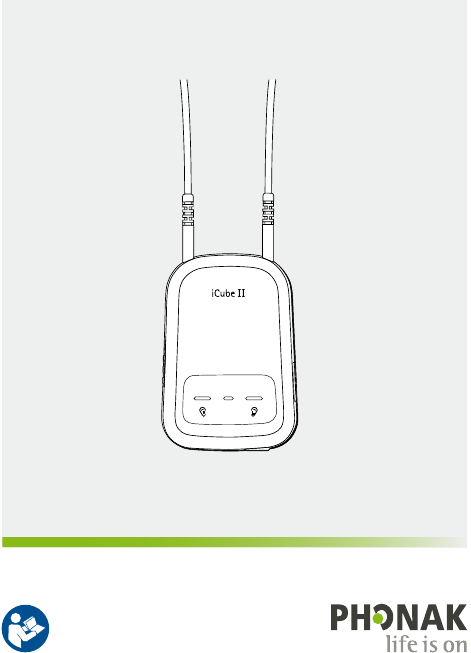
iCube II

2
1. Welcome 4
2. Description 5
3. iCube II accessories 6
4. Getting started 7
4.1 Set up the power supply 7
4.2 Battery and Charging 8
4.3 Operating time 10
4.4 Switching iCube II On and O 10
4.5 Target tting software requirements 10
5. Connecting iCube II to your computer 11
5.1 Wireless connection setup 11
5.2 Connecting via USB cable 12
6. Using iCube II 13
6.1 Wearing iCube II 13
6.2 Detecting and programming
hearing instruments 14
6.3 Programming hearing instruments
outside of ears 16
Contents

3
7. Indicator lights 17
7.1 Charging indication 17
7.2 On / o indication 17
7.3 Battery status indicaton 18
7.4 Fitting status indication 18
7.5 Pairing 19
7.6 Firmware update indication 19
7.7 Malfunction indication 19
8. Troubleshooting 20
9. Declaration of conformity 22
10. Service and Warranty 23
10.1 International warranty 23
10.2 Warranty limitation 23
11. Compliance information 24
12. Information and explanation of symbols 27

4
iCube II is designed specically for use by the hearing
care professional and enables the wireless transfer
of tting data from the PC to the client’s hearing
instruments.
Please read this user guide carefully to benet from all
the features of the iCube II.
For further information, please visit the Phonak website
www.phonakpro.com
Phonak – life is on www.phonak.com
1. Welcome
5
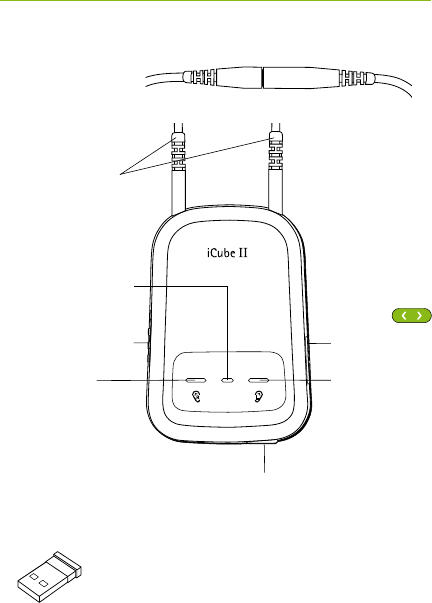
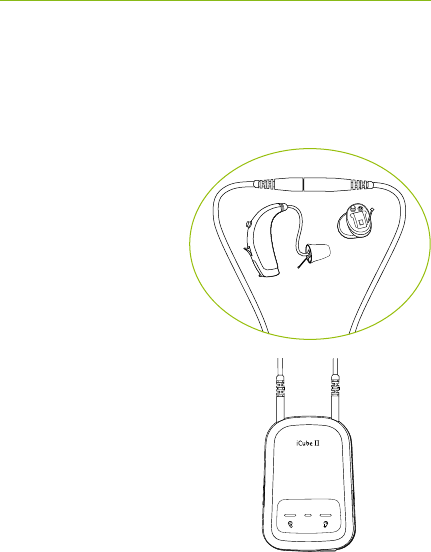
iCube II USB adapter
2. Description
On / O
Pairing
button
Neckloop plugs
Alternative rear
neckloop opening
Mini USB
charging input
Right tting
indicator light
Middle indicator
light (battery and
PC activity)
Left tting
indicator
light

6
3. iCube II accessories
*
J USB cable, 3 m (10 ft.)
J iCube II desktop charger
J USB hub
Contents may vary depending on country.
*available as an option
1.
1. 2.
2.
7
4. Getting started
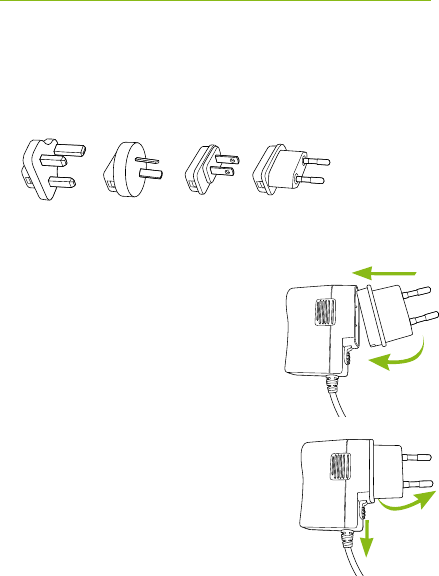
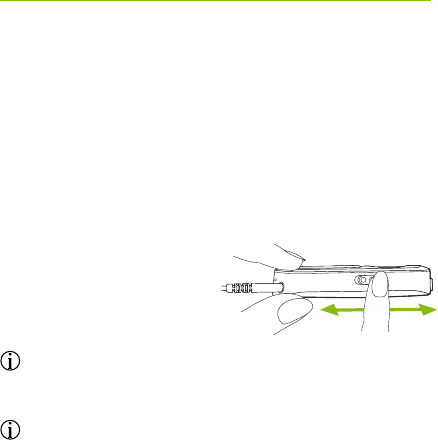
4.1 Set up the power supply
Select the adapter that corresponds to your country.
UK AUS US EU
J Insert the top round end of the
adapter into the round corner
of the power supply.
J Click the tail of the adapter in
to lock it into place.
J To remove, pull back the tab on
the power supply.
J Pull the adapter upwards to
remove it.
8
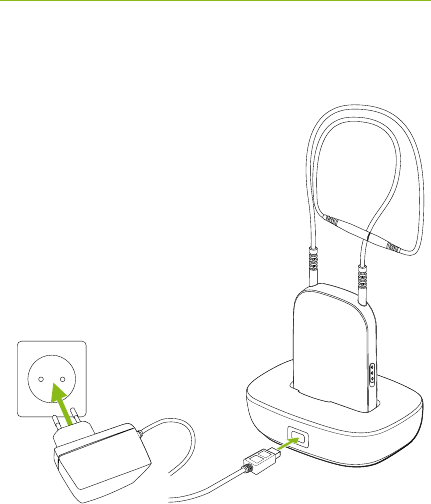
4.2 Battery and Charging
Before using iCube II, the internal
battery charged. To do so, connect
iCube II with your fitting PC using a
USB cable.
If you use the iCube II charging
station, install it by plugging the
power supply into a power outlet.
Place iCube II into the charging
station as shown.
It is recommended that you charge iCube II whenever it
is not in use. This way it will be sufficiently charged and
ready for the next fitting session.
4. Getting started

9
iCube II charging station is available as an option
Battery notes
When charging your iCube II for the rst time, leave
it to charge for at least three hours (even if the
battery indicator light changes to green color earlier).
Charging an empty battery will take approx. 2 hours.
It is safe to leave iCube II connected overnight.
A new battery’s full performance is achieved only
after two or three complete charge and discharge
cycles.
The iCube II battery can be charged several hundred
times. If the operating time of your iCube II reduces
substantially, please contact your local Phonak
representative.
For safety reasons, recharge the battery only with
chargers supplied by Phonak.
10
4. Getting started
4.3 Operating time
The operating time of iCube II greatly depends on the
usage of the device. Heavy use will reduce the operating
time of your iCube II between battery recharges. Fully
charged, your iCube II will operate for up to twelve hours.
4.4 Switching iCube II On and O
Slide the switch as
shown to switch iCube II
on or o.
Once iCube II is fully operational, the middle
indicator light will ash slowly.
Switch iCube II o when not in use. The battery
indicator light will turn o.
4.5 Target tting software requirements
Before using iCube II, ensure that Target 4.0 or a later
version is installed on the tting PC.
O On
11
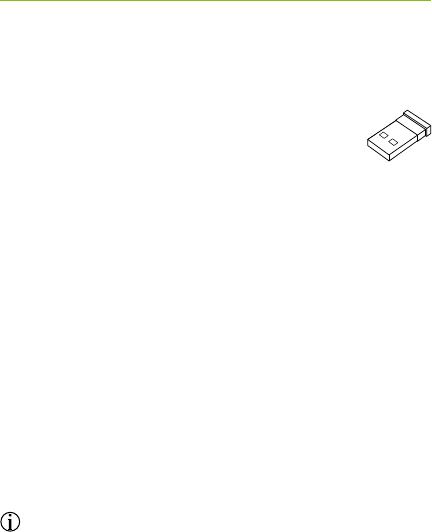
iCube II is shipped with a USB adapter that
is pre-paired and will ensure a quick and easy
set-up of the wireless connection with your
tting PC.
Alternatively, iCube II can also be connected with any
Bluetooth capable PC. It may also be connected via USB
cable if it is not allowed to use a wireless connection.
5.1 Wireless connection setup
Automatic connection
To connect iCube II with the tting PC make sure that
Phonak Target 4.0 or a higher version is installed.
Plug the USB adapter in a free USB port on your tting
PC. Switch iCube II on and the connection will be
established automatically.
The USB adapter is pre-paired with iCube II. After
replacement of either the adapter or iCube II,
a manual pairing is required as described below.
5. Connecting iCube II to your
computer
12
5. Connecting iCube II to your computer
Manual Connection
For a manual pairing with a bluetooth capable PC,
switch iCube II on and press the pairing button
for 2 seconds to enable the pairing mode.
To indicate the pairing mode, all indicators are rapidly
blinking back and forth. Follow the instructions of
the Bluetooth application on the PC to establish the
connection.
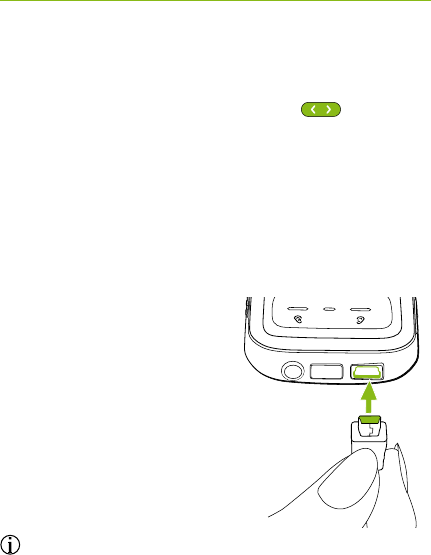
5.2 Connecting via USB cable
To connect iCube II via
USB cable, insert the
mini-USB plug into iCube II
and the other end to a free
USB port on the tting PC.
Phonak Target will automatically
detect iCube II and it can be
selected as tting device.
Use an optional USB hub accessory if there is no
free USB plug on your computer.
Right PC Left
13
6. Using iCube II
Before using iCube II, make sure the battery is
suciently charged. If the battery indicator light is
orange, please charge iCube II rst.
Make sure that iCube II is also selected and shown as
the tting device in the dashboard of Phonak Target.
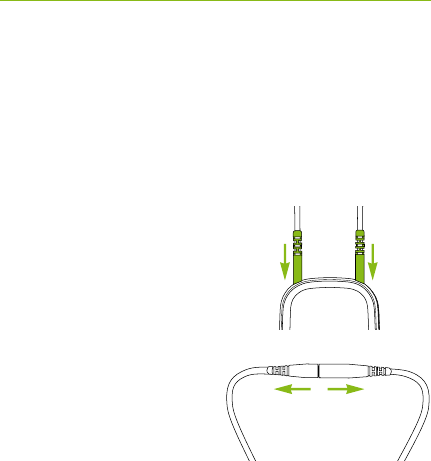
6.1 Wearing iCube II
Make sure both ends of
the neckloop are plugged in
the iCube II.
Open the neckloop by
unplugging the connector
built-in the middle of
the neckloop and place
iCube II around your
client’s neck.
Close the neckloop to allow the built-in antenna to
operate correctly.

14
6. Using iCube II
6.2 Detecting and programming hearing instruments
For a wireless tting, the assignment of the left/right
hearing aid is done in Phonak Target. Click the
“Connect” button which is located on the dashboard.
((insert new screenshot))
Follow the instructions on the screen to assign
(or reassign) each hearing instrument to the desired
side (left or right).
((insert new screenshot))

15
Choose either the settings from the hearing instruments
("HI") or create a new tting.
((insert new screenshot))
16
6. Using iCube II
6.3 Programming hearing instruments outside of ears
If you need to program hearing instruments outside
of the client’s ears (e.g. to prepare the hearing
instuments before a tting
session), make sure the
hearing instruments are
within the range of
iCube II.
Place the hearing
instruments and iCube II
as shown in the picture.
17
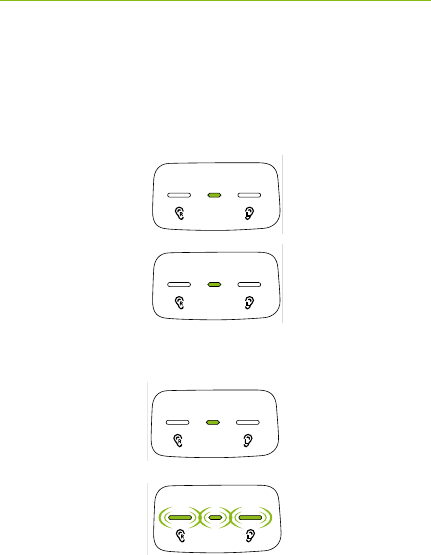
There are 3 indicator lights on iCube II for an easy
indication of the battery and tting status.
7.1 Charging indication
Middle indicator
lit solid orange
Middle indicator
lit solid green
7.2 On / o indication
Middle indicator
lit solid green
for 2 s
All three indicators
ashing slowly
3 times
7. Indicator lights
iCube II is
charging
iCube II
switches on
Charging is
complete
iCube II
switches o
Right PC Left
18
7. Indicator lights
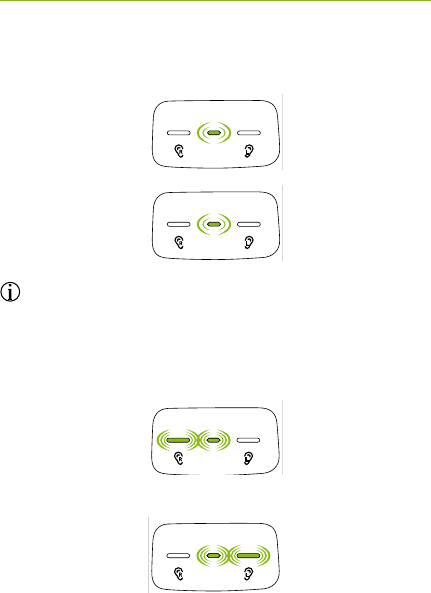
7.3 Battery status indicaton
Middle indicator
ashing slowly
green
Middle indicator
ashing slowly
orange
Make sure to charge iCube II after the tting session
if the battery indicator light turns orange.
7.4 Fitting status indication
Right tting
indicator and
middle indicator
ashing rapidly
Left tting
indicator and
middle indicator
ashing rapidly
Battery full
iCube II is
programming
right hearing
instrument
Battery low
iCube II is
programming
left hearing
instrument
19
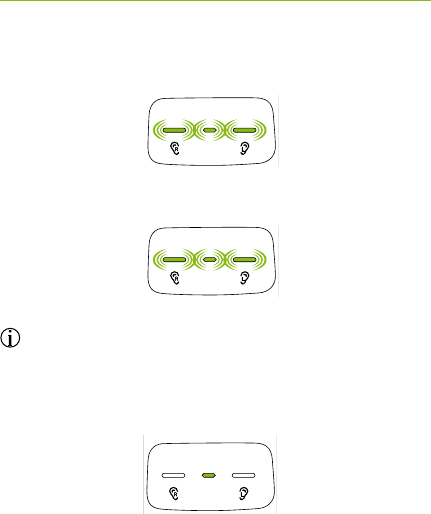
7.5 Pairing indication
All 3 indicators
rapidly blinking
back and forth
7.6 Firmware update indication
All three indicators
ashing rapidly
Phonak Target will display a notication when a new
rmware version for iCube II is available.
7.7 Malfunction indication
Middle indicator
lit solid red
Pairing mode is
enabled
iCube II rmware
is updated
Malfunction,
please refer to
troubleshooting
section

20
8. Troubleshooting
Most probable cause Remedy
iCube II is no longer recognized by the computer to which it was
previously paired.
J The iCube II USB adapter is
disconnected from the tting
computer.
J iCube II is out of range.
iCube II turns o.
J The battery is empty.
iCube II is unresponsive and the middle indicator is lit solid red.
J This may indicate a
malfunction.
J Plug in iCube II USB
adapter.
J Move iCube II closer to your
computer.
J Charge iCube II.
J Switch iCube II o and back
on after 20seconds to reboot
it.
J If iCube II is connected to the
tting PC via cable, disconnect
it from the cable and perform
reboot as described above.

21
Most probable cause Remedy
A second or dierent iCube II cannot be connected to the
tting PC.
J Only one iCube II can be
paired with the tting PC.
J If you use the USB receiver,
press the pairing button on
iCube II to connect it with
your computer.
J If you do not use the USB
receiver, make sure your
bluetooth device is switched
on and in pairing mode to
establish the connection.

22
Phonak AG, Laubisrütistrasse 28, CH-8712 Stäfa,
Switzerland declares under its sole responsibility
that the iCube II is in conformity with the following
standards or other standardizing documents:
Radio:
EN 300-330
EN 300 328
EMC:
EN 60601-1-2
Safety:
EN/IEC 60601-1
Implementing the provisions of the MDD 93/42/EEC
(Medical Device Directive), R&TTE Directive 1999/5/EC
(Radio and Telecommunications Terminal Equipment),
EMC Directive 2004/108/EC (Electromagnetic
Compatibility) and LVD 2006/95/EC (Low Voltage
Directive).
9. Declaration of conformity

23
10. Service and Warranty
10.1 International warranty
Phonak offers a one year limited international warranty,
valid as of the date of purchase. This limited warranty
covers manufacturing and material defects. The warranty
only comes into force if proof of purchase is shown.
The international warranty does not affect any legal
rights that you might have under applicable national
legislation governing sale of consumer goods.
10.2 Warranty limitation
This warranty does not cover damage from improper
handling or care, exposure to chemicals, immersion in
water or undue stress. Damage caused by third parties
or non-authorized service centers renders the warranty
null and void.
Serial number:
Date of purchase:

24
Declaration of conformity
Hereby Phonak AG declares that this Phonak product is
in compliance with the essential requirements of the
Medical Devices Directive 93/42/EEC as well as the Radio
and Telecommunications Terminal Equipment Directive
1999/5/EC. The full text of the Declaration of Conformity
can be obtained from the manufacturer or the local
Phonak representative whose address can be taken from
the list on http://www.phonak.com (worldwide locations).
Notice 1:
This instrument is certied under:
FCC ID: KWC-iCUBE2
IC: 2262A-iCUBE2
This device complies with Part 15 of the FCC Rules and
with RSS-210 of Industry Canada. Operation is subject to
the following two conditions:
1) this device may not cause harmful interference, and
2) this device must accept any interference received,
including interference that may cause undesired
operation.
11. Compliance information

25
Notice 2:
Changes or modications made to this device not
expressly approved by Phonak may void the FCC
authorization to operate this device.
Notice 3:
This device has been tested and found to comply with the
limits for a Class B digital device, pursuant to Part 15
of the FCC Rules and ICES-003 of Industry Canada. These
limits are designed to provide reasonable protection
against harmful interference in a residential installation.
This device generates, uses and can radiate radio
frequency energy and, if not installed and used in
accordance with the instructions, may cause harmful
interference to radio communications.
However, there is no guarantee that interference will not
occur in a particular installation. If this device does
cause harmful interference to radio or television reception,
which can be determined by turning the equipment
o and on, the user is encouraged to try to correct the
interference by one or more of the following measures:
J Reorient or relocate the receiving antenna.
J Increase the separation between the device and
receiver.

26
J Connect the device into an outlet on a circuit
dierent from that to which the receiver is
connected.
J Consult the dealer or an experienced radio / TV
technician for help.
Notice 4:
Japanese Radio Law and Japanese Telecommunications
Business Law Compliance. This device is granted pursuant
to the Japanese Radio Law (電波法) and the Japanese
Telecommunications Business Law (電気通信事業法).
This device should not be modied (otherwise the granted
designation number will become invalid).
11. Compliance information
27
7. Information and explanation of
symbols
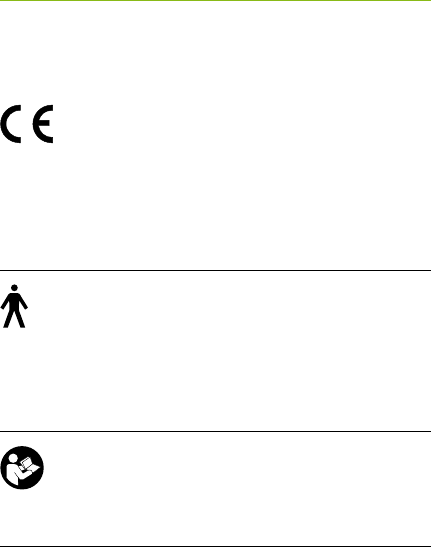
With the CE symbol, Phonak AG
conrms that this Phonak product
meets the requirements of the
Medical Devices Directive 93/42/EEC as
well as the R&TTE Directive 1999/5/EC
on radio and telecommunications
equipment. CE mark applied 2014.
This symbol indicates that the products
described in these user instructions
adhere to the requirements for an
application part of Type B of
EN 60601-1. The surface of the device
is specied as an applied part of Type B.
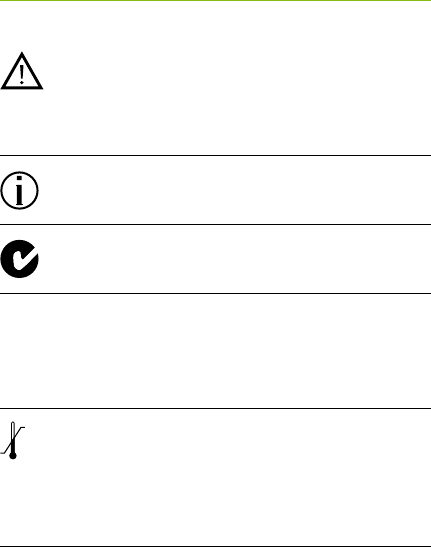
This symbol indicates that it is
important for the user to read and
take into account the relevant
information in this user guide.
28
The device is designed such that
it functions without problems or
restrictions if used as intended, unless
otherwise noted in these user guides.
Operating
conditions
Important information for handling
and product safety.
This symbol indicates that it is
important for the user to pay attention
to the relevant warning notices in
these user guides.
EMC and radio communications
compliance label Australia.
Temperature transport and storage:
–20° to +60° Celsius (–4° to +140°
Fahrenheit).
Temperature operation: 0° to
40° Celsius (+32° to +104° Fahrenheit)
7. Information and explanation of symbols
29
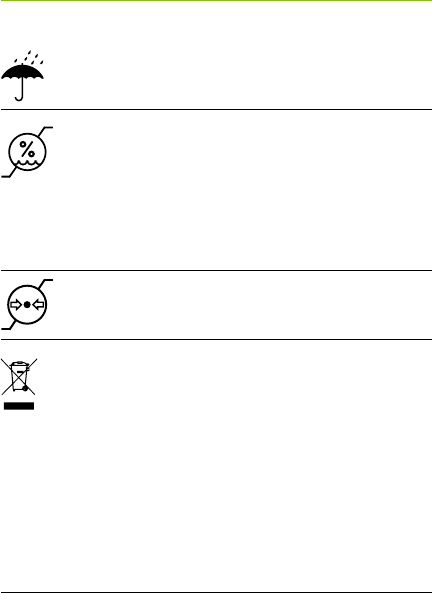
Keep dry
Atmospheric pressure: 200 hPA to
1500 hPA.
The symbol with the crossed-out
garbage bin is to make you aware
that this device may not be thrown
away as normal household waste.
Please dispose of old or unused device,
at waste disposal sites intended for
electronic waste, or return it to your
group company for disposal. Proper
disposal protects the environment and
health.
Humidity transportation: up to 90%
(non-condensing).
Humidity storage: 0% to 70%, if not
in use.
Humidity operation: <95% (non
condensing)

30
7. Information and explanation of symbols
The Bluetooth® word mark and logos
are registered trademarks owned
by Bluetooth SIG, Inc. and any use
of such marks by Phonak is under
license. Other trademarks and trade
names are those of their respective
owners.
www.phonak.com
Manufacturer:
Phonak AG
Laubisrütistrasse 28
CH-8712 Stäfa
Switzerland
EU Representative:
Phonak GmbH
Max-Eyth-Strasse 20
DE-70736 Fellbach-Oengen
Germany
029-0310-02/2014-03/A+W © Phonak AG All rights reserved