Sonova USA TVLINK1 Phonak TVLink basestation User Manual manual
Phonak Inc Phonak TVLink basestation manual
manual

029-1013-02/V1.00/2010-04/A+W/FO Printed in Switzerland
©Phonak AG All rights reserved
EU Representative:
Phonak GmbH
D-70736 Fellbach-Oeffingen
Germany
!
0678
1
Phonak TVLink basestation
The TVLink basestation is connected to your TV (or any
other audio source) and wirelessly sends audio signals
from your TV to an A2DP Headset within a range of up
to 30 meters (100 ft).
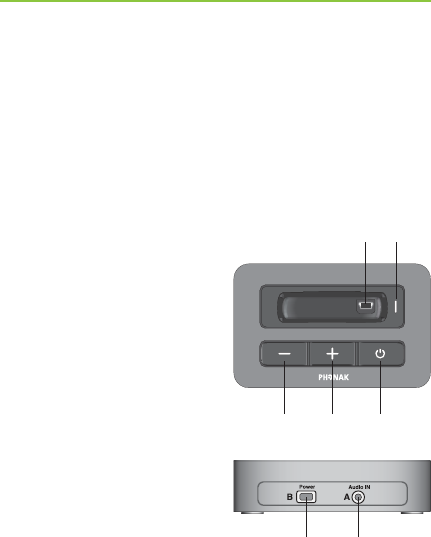
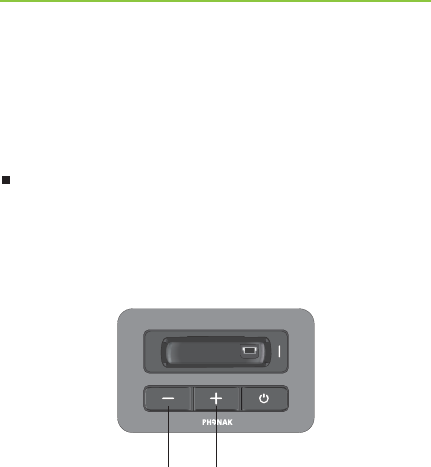
Buttons
(a) ON/OFF button
(b) Volume control (up)
(c) Volume control (down)
Inputs
(d) Power input (mini-USB)
(e) Audio input (3.5 mm jack)
(f) Charging slot
(g) Status light
1. Device description
(b)(c)
(f) (g)
(d) (e)
(a)
TVLink basestation
2
TVLink basestation
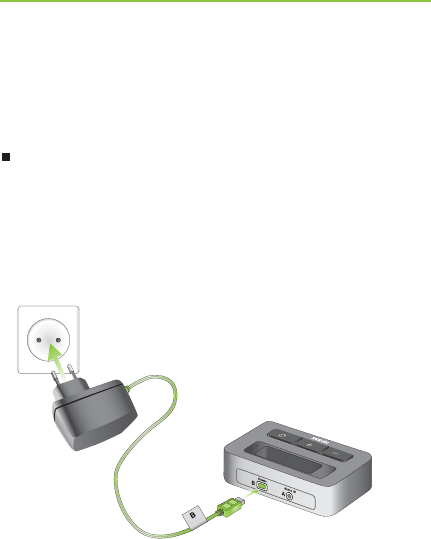
Step 1: Connecting the TVLink basestation
To connect the power supply (h):
Place the TVLink basestation next to your TV.
Connect the mini-USB plug of the power supply to
the Power input (“Power”) of the TVLink basestation.
Plug the power supply into the wall socket.
2. Installing the Phonak TVLink
(d)
(h)
3
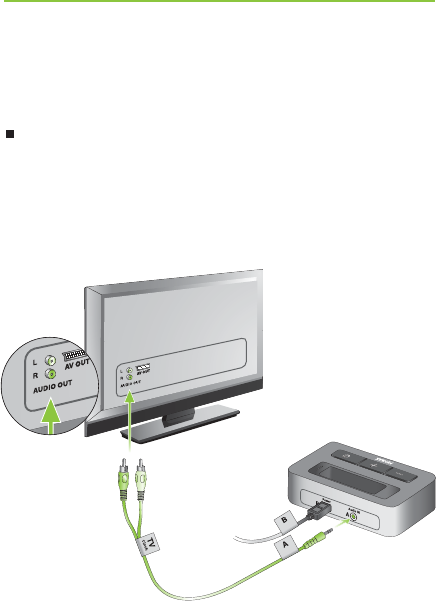
Use the RCA/Cinch cable (i) to connect the TVLink
basestation to the TV:
Connect the 3.5 mm stereo plug to the audio input
(“Audio IN”) of the TVLink basestation. Connect the
red and white RCA/Cinch plugs to the matching
red and white RCA/Cinch output sockets on your TV.
(e)
(i)
2. Installing the Phonak TVLink
4
2. Installing the Phonak TVLink
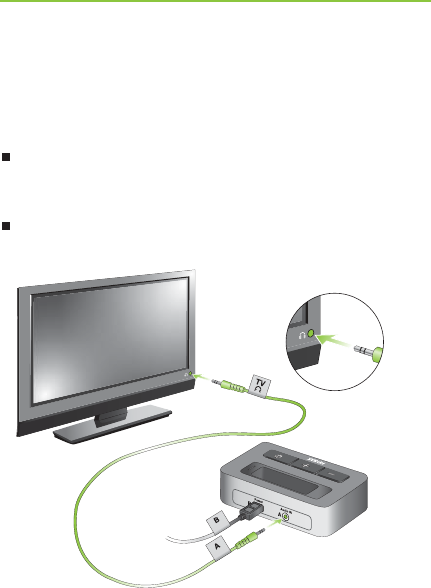
You can also connect your TVLink basestation to the
3.5 mm headset socket of your TV, using the 3.5 mm
audio cable (k):
Connect the 3.5 mm stereo plug to the audio input
of the TVLink basestation (“Audio IN”).
Plug the other end into the headset output socket
of your TV.
(e)
(k)

5
When connecting the TVLink basestation to the
3.5 mm headset socket of your TV you are able to
adjust the volume via your TV remote control.
Many TVs will switch off their loudspeakers when
plugging the 3.5 mm jack into the headset socket –
the TV will not be audible for other people. In such
a case use the Cinch/RCA or SCART socket as
described above. For further information on volume
adjustment please refer to step 6 below. The Phonak
TVLink basestation can also be connected to any
other audio source such as an MP3 player, PC or
home sound system using the stereo plug cable (k).
2. Installing the Phonak TVLink
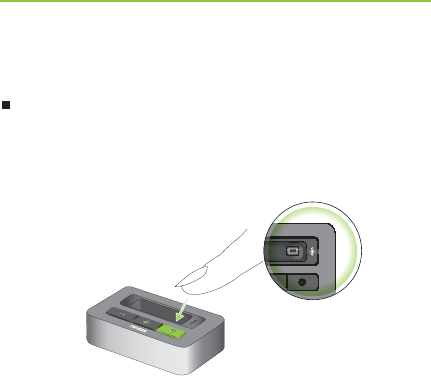
6
Switch on the TVLink basestation by a short press
of the ON/OFF button (a) as shown in fig. 1. The
status light (g) will illuminate green initially and
may switch to blue later.
(a)
(g)
Fig. 1
Step 2: Switching on
2. Installing the Phonak TVLink

7
Step 3: Pairing the TVLink basestation and a headset
Before starting to use the TVLink system, the TVLink
basestation and the headset need to be paired. The
pairing procedure controls which Bluetooth devices
are permitted to communicate with each other.
Pairing needs to be completed only once for each
device you wish to use.
2. Installing the Phonak TVLink

If the TVLink basestation status light (g) is not
flashing blue already, press the ON/OFF button (a)
for 5 seconds until the Bluetooth indicator (g) is
fast flashing blue.
Wait until the Bluetooth indicator light (g) turns
solid blue. This can take up to 2 minutes but
typically is done within a few seconds.
2. Installing the Phonak TVLink
8
Initiate the pairing process on your headset as
stated in its manual.

9
Step 4: Listening to your TV
You will hear the sound of your TV directly in your
Headset.
If you cannot hear the sound of your TV through
TVLink please repeat steps 1 to 4 on pages 2 to 9.
The TVLink system supports Bluetooth operation up
to a range of 30 m (100 ft). Line-of-sight between your
Headset and the TVLink basestation is not required.
However, interference in the environment by walls or
furniture may reduce the operating range.
3. Daily usage of the Phonak TVLink

10
If the headset moves out of range of the TVLink basesta-
tion the wireless audio transmission will be terminated.
If the headset is then moved back into range of the
TVLink basestation, it will automatically resume.
It may take up to 10 seconds until the streaming
resumes. The streaming light indicator (g) should
be solid blue during streaming.
If the TVLink basestation status light (g)
– is green, make sure TV sound and Headset are
switched on.
– blinks blue, you are in paused mode. Press the
Headset main button (b) to resume streaming.
3. Daily usage of the Phonak TVLink
11
(b)(c)
Step 5: Adjusting the volume of the TV signal
First, set the volume of the TV speakers at the level to
suit other viewers.
If the TVLink basestation is connected to your TV
with the RCA/Cinch cable (i), adjust the volume via
the TVLink basestation volume control (b) and (c).
3. Daily usage of the Phonak TVLink

12
If your TVLink basestation is connected to the
headphone socket of your TV, you may also use your
TV remote control to adjust volume via the TV
directly. Please refer to the TV user guide for more
details on setting the TV volume.
If your TV is connected to a satellite receiver or
a set-top box, make sure the volumes of these
additional devices are set to a medium level for
best audio quality results.
3. Daily usage of the Phonak TVLink
13
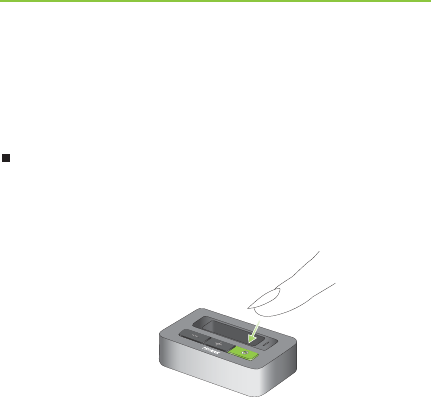
Step 6: Switching off TVLink basestation
To switch off the devices:
To end the transmission of the TV audio signal,
switch off the TVLink basestation by pressing the
ON/OFF button (a) as shown in fig. 2.
(a)
Fig. 2
3. Daily usage of the Phonak TVLink

14
4. Declaration of conformity
Hereby Phonak AG declares that this Phonak TVLink
basestation meets the requirements of the Radio and
Telecommunications Terminal Equipment Directive
1999/5/EC. The full text of the Declaration of Conformity
can be obtained from the addresses below.
EU Representative:
Phonak GmbH
Max-Eyth-Strasse 20
DE-70736 Fellbach-Oeffingen
Germany

15
4. Declaration of conformity
This equipment has been tested and found to comply with the limits for a
Class B digital device, pursuant to part 15 of the FCC and ICES-003
rules. These limits are designed to provide reasonable protection against
harmful interference in a residential installation. This equipment
generates, uses and can radiate radio frequency energy and, if not
installed and used in accordance with the instructions, may cause
harmful interference to radio communications. However, there is no
guarantee that interference will not occur in a particular installation. If this
equipment does cause harmful interference to radio or television
reception, which can be determined by turning the equipment off and on,
the user is encouraged to try to correct the interference by one or more
of the following measures:
-Reorient or relocate the receiving antenna.
-Increase the separation between the equipment and receiver.
-Connect the equipment into an outlet on a circuit different from
that to which the receiver is connected.
-Consult the dealer or an experienced radio/TV technician for help.
FCC/IC RF Radiation Exposure Statement
This equipment complies with FCC/IC radiation exposure limits set
forth for an uncontrolled environment. End users must follow the
specific operating instructions for satisfying RF exposure compliance.
This transmitter must not be co-located or operating in conjunction
with any other antenna or transmitter.
This device complies with Part 15 of the FCC Rules and with
RSS-210 of Industry Canada. Operation is subject to the
following two conditions:
1) this device may not cause harmful interference, and
2) this device must accept any interference received,
including interference that may cause undesired operation.
Changes or modifications made to this device not expressly
approved by Phonak may void the FCC authorization to operate
this device.

16
5. Information and explanation
of symbols
The CE symbol is confirmation by
Phonak AG that this Phonak product
meets the requirements of the R&TTE
Directive 1999/5/EC on Radio and
Telecommunication Terminal Equip-
ment.
The numbers after the CE symbol are
the numbers of consulted certified
bodies under the above mentioned
directives. The alert sign means that
potential restrictions on its use are
applicable in one or more EU Member
States.
This device is a class 2 device and
can be operated in the EU member
states without restrictions for indoor
use, but must not operated outdoors
in France.
0678 !
17
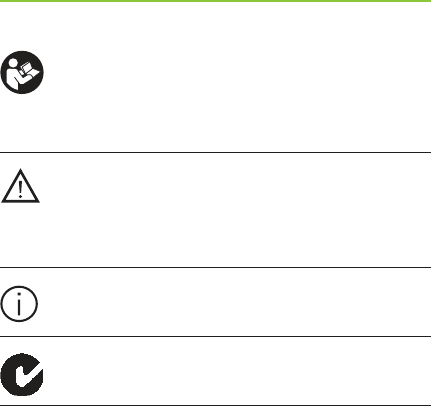
This symbol indicates that it is
important for the user to read and
take into account the relevant
information in these user guides.
This symbol indicates that it is import-
ant for the user to pay attention to
the relevant warning notices in these
user guides.
Important information for handling
and product safety.
Australian EMC and Radiocommunic-
ations compliance label.
This device is designed such that
it functions without problems or
restrictions if used as intended, unless
otherwise noted in these user guides.
–10°/55° Celsius and relative
humidity of <95% (non condensing)
5. Information and explanation of symbols
Operating
conditions

18
Transport
and storage
conditions
During transport or storage, the
temperature should not exceed the
limit values of –20°/60° Celsius
and relative humidity of 90% for a
long period of time. The air pressure
between 500 and 1100 hPa is
appropriate.
The symbol with the crossed-out
garbage bin is to make you aware
that this device may not be thrown
away as normal household waste.
Please dispose old or unused device,
at waste disposal sites intended
for electronic waste, or give your
device to your retailer for disposal.
Proper disposal protects the environ-
ment and health.
5. Information and explanation of symbols