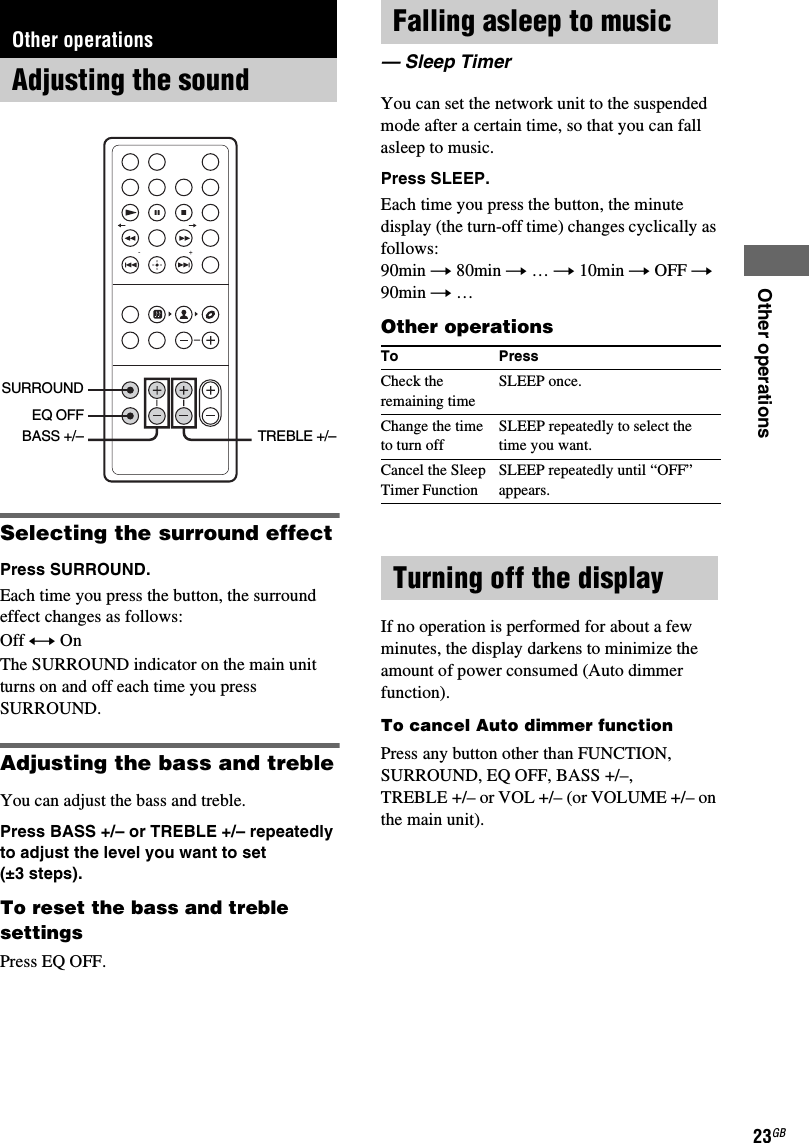
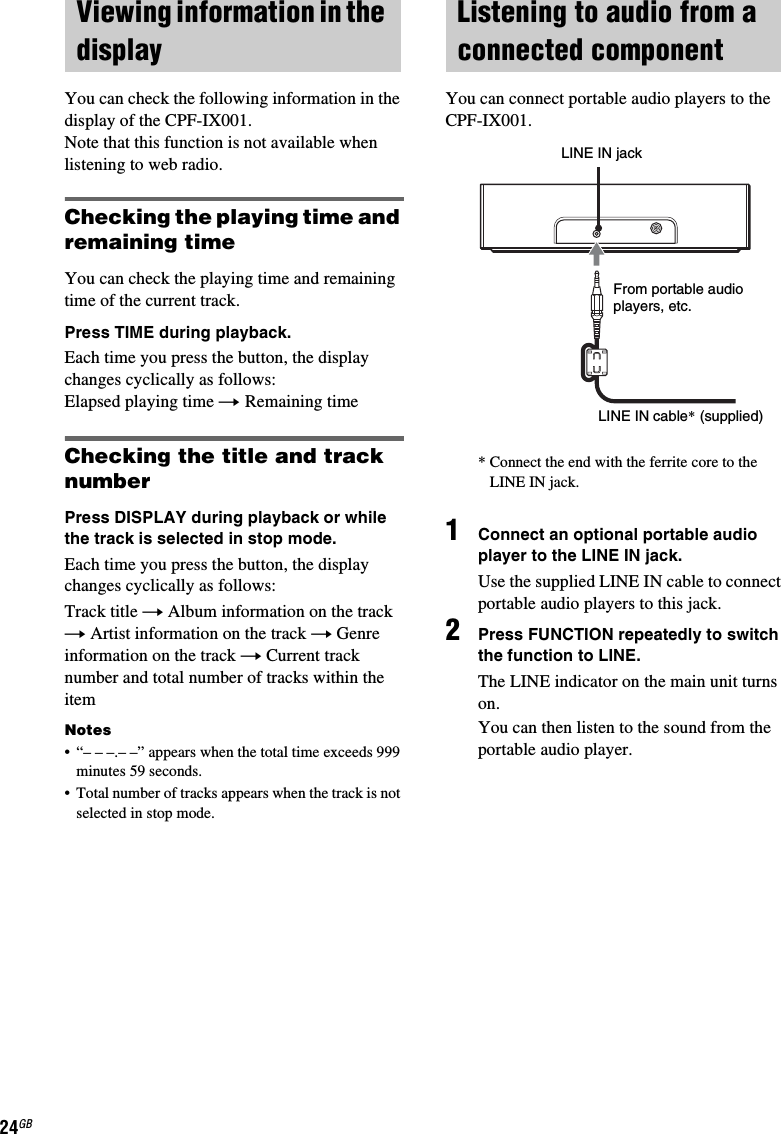
Sony Group 14798211X Wireless Network Audio System Module User Manual 010COV
Sony Corporation Wireless Network Audio System Module 010COV
UserManual.wiki
>
Sony Group
>
14798211X User Manual
Example End Product Manual
Navigation menu
Upload a User Manual
Namespaces
Wiki Guide
HTML
PDF
Info
Views
User Manual
Discussion / Help
Navigation

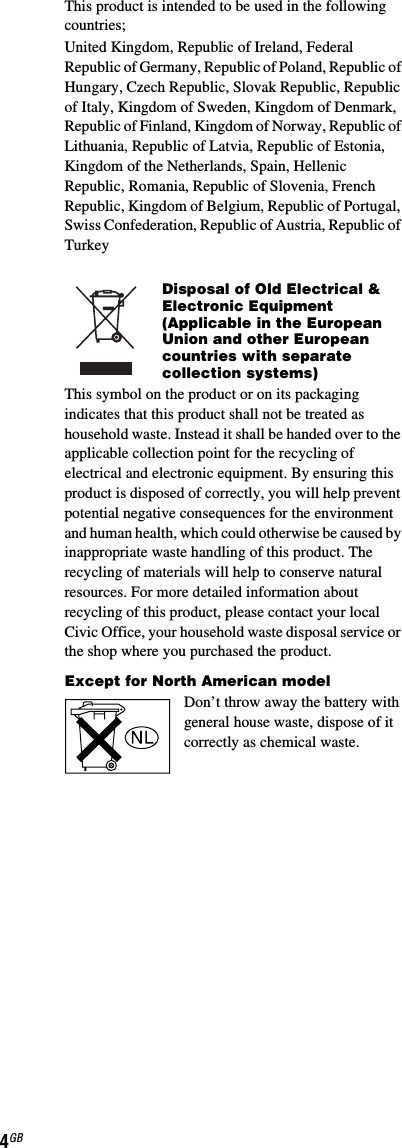


![22GBWhen the CPF-IX001 is connected to your computer after installing the M-crew Server Ver. 2.0 software, the CPF-IX001 is registered automatically on your computer.Register the CPF-IX001 on your computer manually for higher security.1Select “REGISTER?” in the network menu (page 20), then press ENTER.The count down display appears in the display of the CPF-IX001.2Click [Start] – [All programs] – [M-crew Server] – [TOOLS] – [EQUIPMENT LIST] in that order to display the screen on the M-crew Server Ver. 2.0.For details, see the “M-crew Server Ver. 2.0” Install Manual included on the supplied CD-ROM.3During displaying the count down display, set “Equipment selection mode” to “Manual”, and then click [Add] on your computer.The registration starts.“Complete!” appears in the display of the CPF-IX001 when the registration is completed.Notes• When the registration is incomplete, “Incomplete!” appears in the display of the CPF-IX001.• Step 3 must be performed within 5 minutes after performing step 1.1Select “NET INFO?” in the network menu (page 20), then press ENTER.2Press . or > repeatedly to select the item that you want to check, then press ENTER.Each time you press ENTER, the display changes cyclically as follows:NET TYPE? t AUTO* t IP ADDRESS? t IP address* t SUBNET MASK? t Subnet mask* t GATEWAY? t Default Gateway* t MAC ADDRESS? t MAC address t SERVER NAME? t Connected server* t MY NAME? t Name assigned by M-crew Server Ver. 2.0**The display may differ depending on the settings.Registering the CPF-IX001 on your computer manuallyChecking network settings](https://usermanual.wiki/Sony-Group/14798211X/User-Guide-691466-Page-22.png)
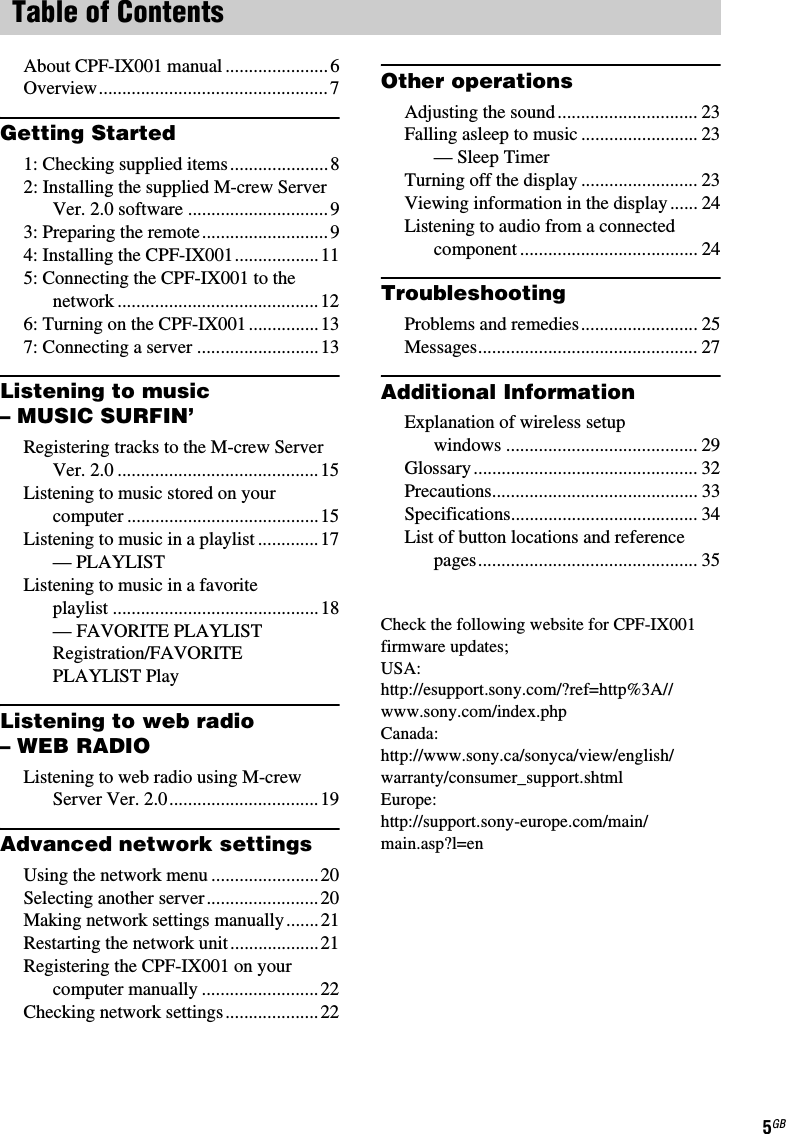
![Troubleshooting27GBIf a message appears while using the CPF-IX001, follow the procedures below to correct the problem.NetworkCannot Play• Start up M-crew Server Ver. 2.0 and click the [ERROR LOG] button in the LAUNCHER window, or right-click the M-crew Server task tray icon* and select “ERROR LOG VIEWER”, then check the error log.• The track cannot be played in the following cases:– Sampling rate is other than 32 kHz, 44.1 kHz, 48 kHz.– The track is not being streamed by linear PCM.– The track is other than one channel or two channel.– The track sampling bits are other than 16 bits.– The server status is busy.Check Net• Check that the network cable between the CPF-IX001 and the hub or router is firmly connected.• Check that the hub or router is turned on.• Set the wireless LAN router channel to any channel from CH1 to CH11. For details, refer to the operation manual of your wireless LAN router.IP Conflict• Set the IP addresses of the CPF-IX001 and other devices on the network so that there is no duplication (page 21).No Item• Register the track as instructed by the operation manual of the connected server.• Follow the procedure below and reconnect to the server.1. Press MENU.2. Select “SERVER?” in the network menu (page 20), then press ENTER.3. Press ./> repeatedly to select the desired media server, then press ENTER.No Server/No response• Restart the computer.• Check the WIRELESS/WIRED selector on the network unit.• Start up the server. M-crew Server Ver. 2.0 can be started up by the following method:Right-click the M-crew Server task tray icon*, then click “Start Music Service” in the menu.• M-crew Server Ver. 2.0 may not be recognizing the CPF-IX001. Follow the procedure below and check whether M-crew Server Ver. 2.0 is recognizing the CPF-IX001:1. Click [Start] – [All Programs] – [M-crew Server] – [TOOLS] – [EQUIPMENT LIST] in that order.2. If the CPF-IX001 is not present in the list that appears in step 1, device registration must be performed. For details, see the “M-crew Server Ver. 2.0” Help or “M-crew Server Ver. 2.0” Install manual within M-crew Server Ver. 2.0.• When setting a firewall other than that provided with the OS, refer to Troubleshooting in the “M-crew Server Ver. 2.0” Install manual included on the supplied CD-ROM.• Perform the TCP/IP settings and wireless settings correctly for the CPF-IX001 and the computer (page 21).Press MENU• Follow the procedure below and reconnect to the server.1. Press MENU.2. Select “SERVER?” in the network menu (page 20), then press ENTER.3. Press ./> repeatedly to select the desired media server, then press ENTER.Server Err• Follow the procedure below and reconnect to the server.1. Press MENU.2. Select “SERVER?” in the network menu (page 20), then press ENTER.3. Press ./> repeatedly to select the desired media server, then press ENTER.Server Close• Start up the server. M-crew Server Ver. 2.0 can be started up by the following method:Right-click the M-crew Server task tray icon*, then click “Start Music Service” in the menu.• When you want to change the computer’s network settings, restart the server on your computer. This message disappears after a short time.Messagescontinued](https://usermanual.wiki/Sony-Group/14798211X/User-Guide-691466-Page-27.png)
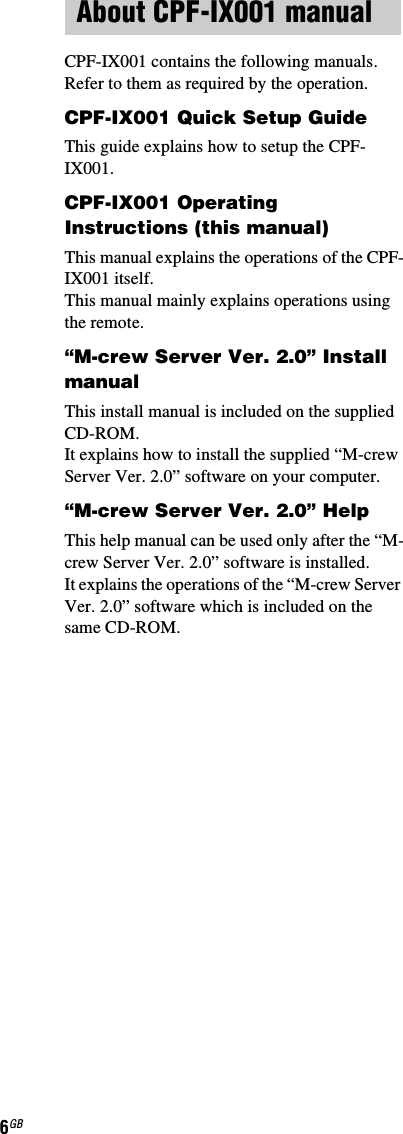
![Additional Information29GBConfigure the CPF-IX001 to communicate on your wireless LAN network.For how to display the wireless setup windows, refer to the “Quick Setup Guide” supplied with the CPF-IX001.Basic setup windowYou can make the basic network settings here.1Select an IP address acquisition method from the pull-down menu.To acquire it from the DHCP server automatically, select [Auto (DHCP)]. To enter it manually, select [Manual (Static IP)].TipIf your wireless LAN router supports DHCP, select [Auto (DHCP)].2When you select [Auto (DHCP)] in 1, setup is automatically completed.When you select [Manual (Static IP)], you need to enter appropriate values by yourself.Tips• When you select [Auto (DHCP)], you cannot change the assigned values.• When you select [Manual (Static IP)], see the operating instructions for the values to be entered.• Enter decimal numbers from 0 to 255 for an IP address.3The MAC address of your CPF-IX001 is displayed.4Cancel the settings.5Click the button to confirm the set values.If any of the set values is incorrect, a dialog box appears.Click [Setup] to show the set values. Correct them if necessary.Wireless LAN setup windowYou can make wireless LAN settings here.1Enter the network name (SSID) of the wireless LAN router.Be sure to enter the one used for your wireless LAN router.“SSID” is an ID used to identify a wireless network.2From the pull-down menu, select the security mode for your wireless LAN router.Select one of the following;No securityWEP 64bitsWEP 128bitsWPA (TKIP)WPA (AES)WPA2 (TKIP)WPA2 (AES)3Enter a security key when you select [WEP 64bits] or [WEP 128bits] in 2.Select the security key number and enter the security key for your wireless LAN router.Enter either characters or hexadecimal numbers for the security key.The security keys should be arbitrary characters and numbers.The length of the security keys differs depending on the security mode you select. See the table below.Additional InformationExplanation of wireless setup windowscontinued](https://usermanual.wiki/Sony-Group/14798211X/User-Guide-691466-Page-29.png)
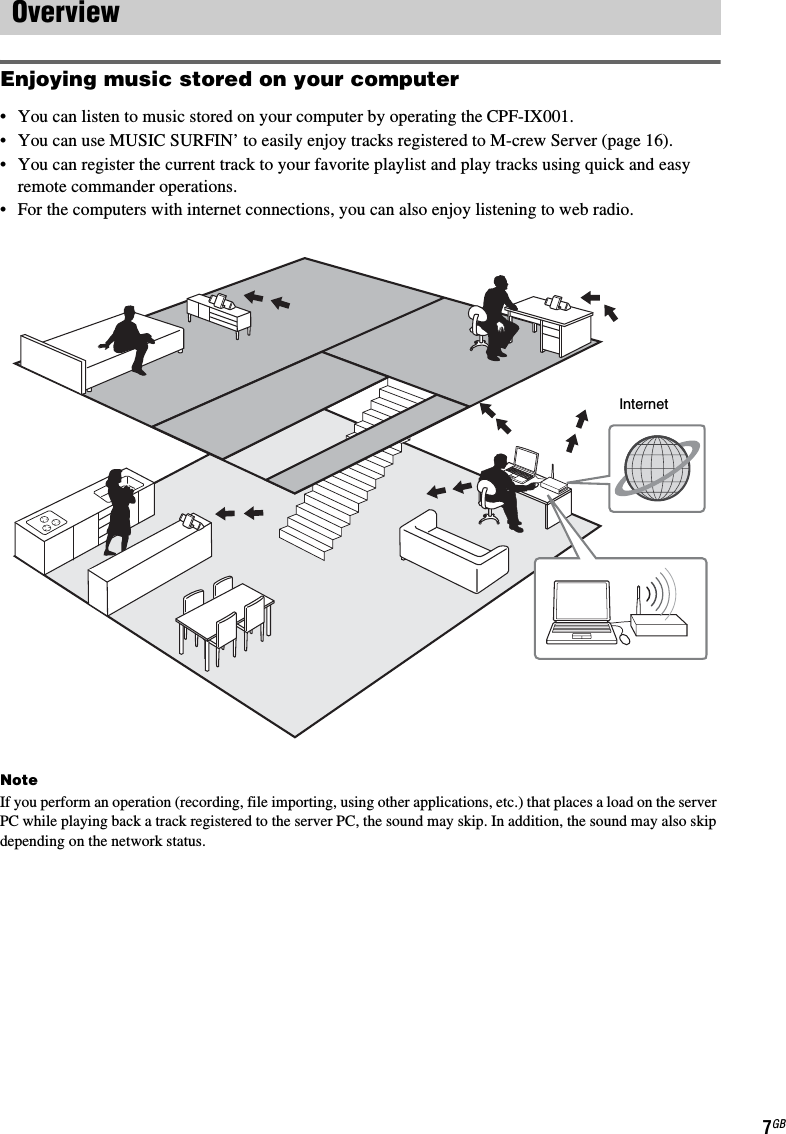
![30GBInput method/Number of the characters for security key4Enter a pre-shared key when you select [WPA(TKIP)], [WPA(AES)], [WPA2(TKIP)], or [WPA2(AES)] in 2.Enter the pre-shared key for your wireless LAN router.The length of the key should be 8 to 64 characters.If you input 64 characters, enter hexadecimal numbers (0 to 9, A to F, a to f).Input method/Number of the characters for pre-shared key5Cancel the settings.6Click the button to confirm the set values.If any of the set values is incorrect, a dialog box appears.Click [Setup] to show the set values. Correct them if necessary.Notes• Use a security key or a pre-shared key that cannot be easily guessed.• Periodically change the security key and the pre-shared key to ensure the network security.Firmware update windowUpdate the firmware for the CPF-IX001.1The version of the current firmware is displayed.2Select the firmware file you want to update.Click [Browse] to show the dialog for selecting the firmware.3Click the button to update.When you click the button, the firmware confirmation window appears.If you select the right firmware, updating starts. The CPF-IX001 reboots automatically when the update is completed.If you select an incorrect firmware, click [Retry] and select the correct one.Notes• Do not reboot the CPF-IX001, set it to the suspended mode, or turn off the power while updating the firmware.• Check the following website for CPF-IX001 firmware updates;USA:http://esupport.sony.com/?ref=http%3A//www.sony.com/index.phpCanada:http://www.sony.ca/sonyca/view/english/warranty/consumer_support.shtmlEurope:http://support.sony-europe.com/main/main.asp?l=enWEP 64bits WEP 128bitsCharacters 5 (one-byte alphanumerics and/or symbols)13 (one-byte alphanumerics and/or symbols)Hexadecimal numbers10 (0 to 9, A to F, a to f)26 (0 to 9, A to F, a to f)Characters 8 to 63 (one-byte alphanumerics and symbols)Hexadecimal numbers64 (0 to 9, A to F, a to f)](https://usermanual.wiki/Sony-Group/14798211X/User-Guide-691466-Page-30.png)
![Additional Information31GBAdministrator setup windowSet a user name and a password, or change the password you previously set.1Enter a user name.The maximum length of the user name should be 16 characters.2Enter the current password.For security reasons, do not use the same password as one you use for important items.The maximum length of the password should be 16 characters.3Enter a new password.Enter the new password again to confirm.The maximum length of the new password should be 16 characters.4Cancel the settings.5Click the button to confirm the set values.If any of the set values is incorrect, a dialog box appears.Click [Setup] to show the set values. Correct the values if necessary.Restart audio client windowReboot the CPF-IX001 to apply your settings.TipThe settings will not become effective unless you reboot the CPF-IX001.](https://usermanual.wiki/Sony-Group/14798211X/User-Guide-691466-Page-31.png)