Sony Group COM1 Personal Communicator User Manual 01Book 1 indb
Sony Corporation Personal Communicator 01Book 1 indb
Users manual

Ú3ONY#ORPORATION

COM-1.US.2-668-392-11(2)
2
Owner’s Record
The serial number is located inside battery compartment. Record the serial
number in the space provided below. Refer to these numbers whenever you
call upon your Sony dealer regarding this product.
Model No. COM-1
Serial No. _______________________
WARNING
You are cautioned that any changes or modifications not expressly approved
in this manual could void your authority to operate this equipment.
This equipment has been tested and found to comply with the limits for a
Class B digital device, pursuant to Part 15 of the FCC Rules. These limits
are designed to provide reasonable protection against harmful interference
in a residential installation. This equipment generates, uses, and can radiate
radio frequency energy and, if not installed and used in accordance with
the instructions, may cause harmful interference to radio communications.
However, there is no guarantee that interference will not occur in a particular
installation. If this equipment does cause harmful interference to radio or
television reception, which can be determined by turning the equipment off
and on, the user is encouraged to try to correct the interference by one or
more of the following measures:
– Reorient or relocate the receiving antenna.
– Increase the separation between the equipment and receiver.
– Connect the equipment into an outlet on a circuit different from that to
which the receiver is connected.
– Consult the dealer or an experienced radio/TV technician for help
This transmitter must not be co-located or operated in conjunction with any
other antenna or transmitter.
This equipment complies with FCC radiation exposure limits set forth for
uncontrolled equipment and meets the FCC radio frequency (RF) Exposure
Guidelines in Supplement C to OET65. This equipment has very low levels of
RF energy that it is deemed to comply without testing of specific absorption
ratio (SAR).

COM-1.US.2-668-392-11(2)
3
This device complies with Part 15 of the FCC Rules. Operation is subject
to the following two conditions: (1) this device may not cause harmful
interference, and (2) this device must accept any interference received,
including interference that may cause undesired operation.
If you have any questions about this product:
Visit:
http://www.sony.com/mylo
Contact:
Sony Customer Information Services Center at 1-(888)-476-6972
Write:
Sony Customer Information Services Center
12451 Gateway Blvd.,
Ft. Myers, FL 33913
Model COM-1
Declaration of Conformity
Trade Name: SONY
Model No.: COM-1
Responsible Party: Sony Electronics Inc.
Address: 16530 Via Esprillo
San Diego, CA 92127
USA
Telephone No.: 858-942-2230
RECYCLING LITHIUM-ION BATTERIES
Lithium-ion batteries are recyclable.
You can help preserve our environment by returning your
used rechargeable batteries to the collection and recycling
location nearest you.
For more information regarding recycling of rechargeable batteries, call
toll free 1-800-822-8837, or visit http:// www.rbrc.org/ .
Caution: Do not handle damaged or leaking Lithium-ion batteries.
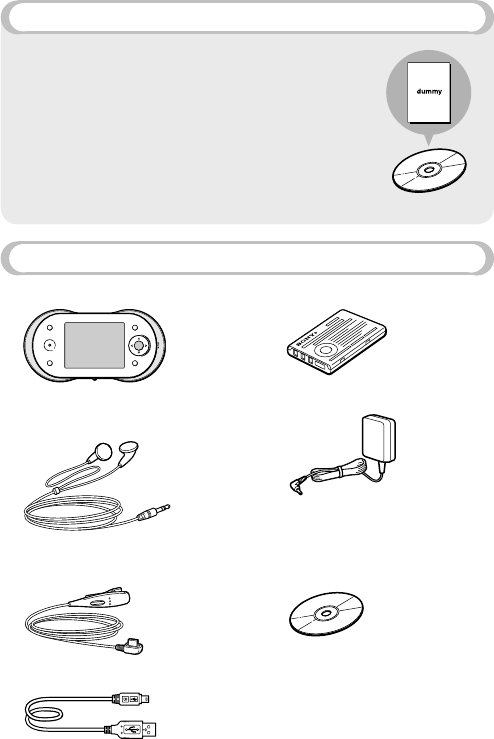
7HATSINTHE"OX
s 0ERSONALCOMMUNICATOR
s (EADSET
n(EADPHONES
n/NETOUCHANSWERREMOTE
CONTROLLER
s 53"CABLE
s 2ECHARGEABLEBATTERY
s !#POWERADAPTOR
s #$2/-
CONTAININGTHE/PERATING
)NSTRUCTIONS0$&lLEANDTHE
SUPPLIEDSOFTWARE
s "ATTERYCASE
s 3TARTUP'UIDETHISBOOK
s #ARRYINGCASE
4HISh3TARTUP'UIDEvPROVIDESSTEPSFORSETTINGUP
YOUR#/-0ERSONAL#OMMUNICATORANDAQUICK
OVERVIEWOFHOWTOOPERATETHEUNIT&ORMOREDETAILED
INFORMATIONABOUTYOURUNITINCLUDINGTROUBLESHOOTING
INFORMATIONREFERTOTHE/PERATING)NSTRUCTIONS
AVAILABLEASA0$&lLEONTHESUPPLIED#$2/-
PAGE
4HECOVERPAGEOFTHE/PERATING)NSTRUCTIONS0$&lLE
ISSHOWNONTHERIGHT
&OR$ETAILED)NFORMATION

5
COM-1.US.2-668-392-11(2)
Table of Contents
For Detailed Information ..............4
What’s in the Box .........................4
Overview ......................................6
Preparation
The Parts of Your Personal
Communicator ..........................7
The status bar ......................... 10
Using the keyboard ................ 12
Step 1: Preparing a Power
Source ....................................13
Installing the supplied battery ...13
Charging the battery ............... 14
Step 2: Setting up Your Personal
Communicator ........................16
Turning on your unit ................. 16
Entering your information ........ 17
Wireless LAN Settings
— Infrastructure Mode ............18
Connecting to wireless LAN
in infrastructure mode ............. 19
Registering an access point ... 20
Selecting a connection
method ................................... 20
Wireless LAN Settings
— Ad Hoc Mode .....................21
Connecting to wireless LAN
in Ad Hoc mode ..................... 22
Adding users to your Ad Hoc
Contact list ............................. 22
Basic Operations
The Home Menu ........................24
The Context Menu .....................25
What’s Up Screen ......................25
Info Screen ................................26
Things to Do With Your
Personal Communicator
Communication — Skype ..........27
Communication
— Google Talk ........................28
Communication
— Yahoo! Messenger ..............29
Communication
— Ad Hoc Application .............30
Communication
— Address Book .....................31
Web ...........................................32
Music .........................................33
Photo .........................................34
Video .........................................35
Game .........................................36
Text ............................................36
Tools ..........................................37
For More Information
File Structures ...........................38
Folder structure of the internal
memory ................................... 38
Folder structure of “Memory
Stick Duo” ............................... 40
Supplied CD-ROM .....................42
About the Operating
Instructions PDF file ................ 42
About the supplied software ... 42
System requirements ............... 43
Installing the PDF file and the
supplied software ................... 44
On Copyrights ............................45
Index ..........................................47
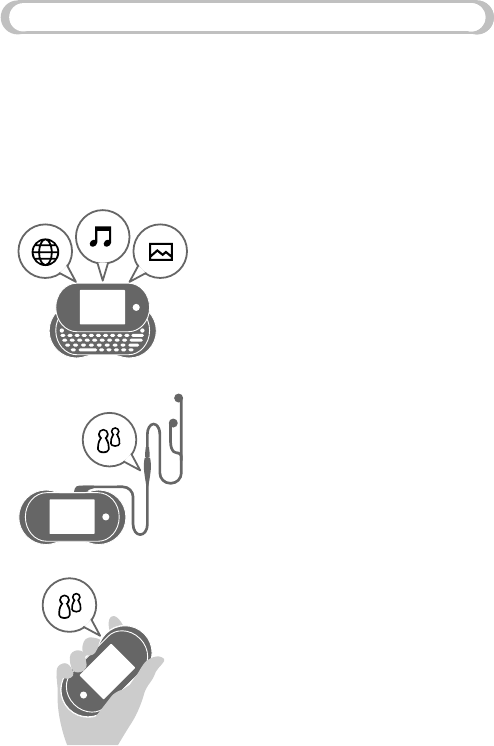
/VERVIEW
4HISEXPLAINSSOMEOFTHEMAINFEATURESOFYOUR0ERSONAL#OMMUNICATORSUCH
ASMAKINGCALLSWITH3KYPEANDPLAYINGMUSIC
&ORDETAILEDINFORMATIONABOUTEACHFEATURESEETHE/PERATING
)NSTRUCTIONSAVAILABLEASA0$&lLEONTHESUPPLIED#$2/-
4HEFEATURESDESCRIBEDBELOWAREONLYAFEWOFYOURUNITSCAPABILITIES
%XPLORETHEUNITANDTHE/PERATING)NSTRUCTIONS0$&lLETOlNDTHEFEATURES
MOSTINTERESTINGTOYOU
7ITHYOUR0ERSONAL#OMMUNICATOR
YOUCANCHATWITHFRIENDSBROWSE
WEBSITESONTHE)NTERNETLISTENTO
MUSICANDVIEWPHOTOS
9OUCANRECEIVE)NTERNETPHONE
CALLSSUCHAS3KYPECALLSUSINGTHE
SUPPLIEDHEADSETANDOPERATETHE
UNITFROMTHEREMOTECONTROLLER
9OUCANTALKONA3KYPECALLUSING
THESPEAKERANDMICROPHONEONTHE
UNITINSTEADOFUSINGTHEHEADSET

7
COM-1.US.2-668-392-11(2)
Preparation
Preparation
The Parts of Your Personal Communicator
Front
(USB) connector ( page 00)
Connects your unit to a computer.
WIRELESS LAN switch/
indicator (
page 00)
Connects your unit to the
wireless LAN. When it is
connected to the wireless LAN,
the indicator lights up.
“Memory Stick Duo” indicator
( page 00)
When a “Memory Stick Duo” is
inserted, the indicator lights up.
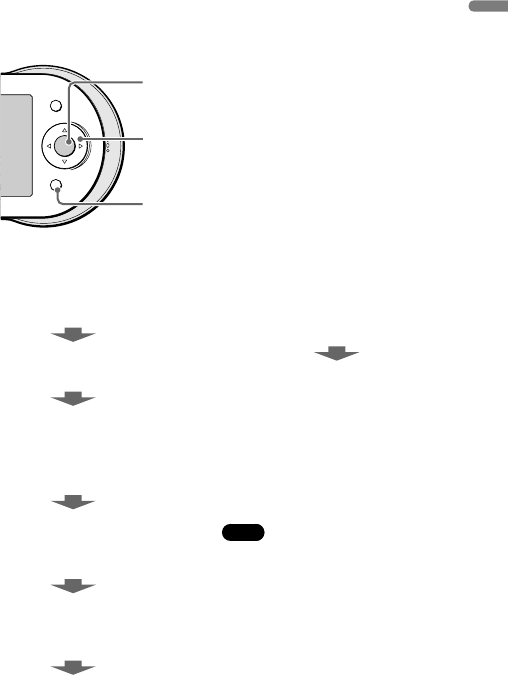
INFO button (
page 00)
Displays detailed information
about outstanding notifications
and key information for
applications active on the device.
For example, you can quickly
find notifications of unread IM
messages you have received or
easily view the title of the music
track currently playing on your
device.
Speaker (
page 00)
Outputs the other user’s voice
during Internet phone calls.
POWER switch/indicator
(
page 00)
Turns your unit on and off.
When the unit is turned on, the
indicator lights up.
CHARGE indicator
(
page 00)
While the unit is charging, the
indicator lights up.
HOME button ( pages 00, 00)
Pressing and releasing
displays
the Home menu. Pressing and
holding displays the What’s Up
screen.
(headset) jack (
page 00)
Connects to the supplied headset.
Continued
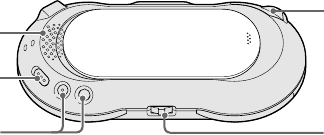
$#).6JACK
PAGE
#ONNECTSTOTHESUPPLIED!#
POWERADAPTOR
3TATUSINDICATOR
PAGE
,IGHTSUPBLUEWHENTHEUNITIS
CONNECTINGTOTHEWIRELESS,!.
ININFRASTRUCTUREMODE,IGHTSUP
ORANGEFOR!D(OCMODE
/04)/.BUTTON
PAGE
$ISPLAYSAMENUOFOPTIONS
RELATINGTOWHATYOUARE
CURRENTLYDOING
-ICROPHONE
PAGE
0ICKSUPYOURVOICEFOR
APPLICATIONSREQUIRINGVOICE
INPUT
#ENTERBUTTON
!CTIVATESTHESELECTEDITEMOR
CONlRMSANENTRY
WAYBUTTON
-OVESTHEHIGHLIGHTORCURSOR
"!#+BUTTON
2ETURNSTOTHEPREVIOUSSCREEN
$ISPLAY
2EMOVETHEPROTECTIVESHEET
FROMTHEDISPLAYBEFOREUSING
THEUNIT
"ACK
2INGERSPEAKER
/UTPUTSAUDIOFROMNONVOICE
FEATURESSUCHASMUSICAND
VIDEOPLAYBACKANDRINGING
ALERTSFOR)NTERNETPHONECALLS
(/,$SWITCH
,OCKSTHECONTROLSONTHEUNIT
6/,VOLUMEnBUTTONS
!DJUSTSTHEVOLUME
h-EMORY3TICK$UOvSLOT
PAGE
/PENTHECOVERTOINSERTOR
REMOVEAh-EMORY3TICK$UOv
*OGLEVER
3TARTSANDSTOPSPLAYBACK
&INDSTHEBEGINNINGOFTHE
CURRENTPREVIOUSNEXTTRACKS
'OESFORWARDBACKWARDQUICKLY
!DJUSTSTHESPEAKERVOLUME
DURINGCALLS
9
COM-1.US.2-668-392-11(2)
Preparation
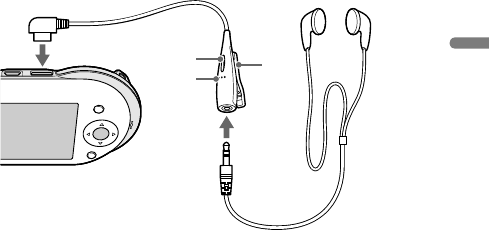
To connect the supplied headset
To (headset) jack
Receive button
Answers or ends a call.
Microphone
Picks up your voice during
Skype calls.
Clip
Holds the remote controller to
your clothes.
Continued
COM-1.US.2-668-392-11(2)
10
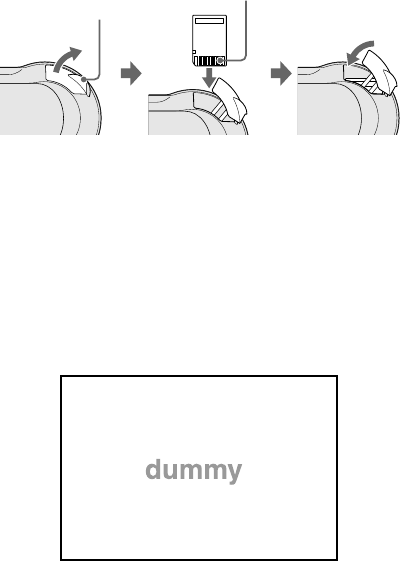
To insert and remove a “Memory Stick Duo”
Insert a “Memory Stick Duo” as illustrated below. When the “Memory Stick
Duo” is inserted into the unit, the “Memory Stick Duo” indicator lights up.
Insert the “Memory Stick
Duo” in the direction
indicated by the arrow on
the unit, and gently push
until it clicks into place.
Terminal side
Grip the groove with
your finger, and gently
pull in the direction
indicated by the arrow.
To remove the “Memory Stick Duo,” push and release the “Memory Stick
Duo” to make it pop out.
The status bar
The status bar at the bottom of the display shows a variety of icons that provide
constant information about how your unit is operating. For more detailed
information about status bar icons, refer to the Operating Instructions PDF file.

0REPARATION
2EMAININGBATTERYPOWER
4HENUMBEROFILLUMINATED
SEGMENTSINDICATESHOWMUCH
BATTERYPOWERREMAINS!STHE
BATTERYRUNSDOWNTHESEGMENTS
OFTHEINDICATORDISAPPEAR
3IGNALSTRENGTHOFTHE
CONNECTEDWIRELESS,!.ACCESS
POINT
4HEMORECIRCLESDISPLAYED
AROUNDTHEANTENNATHESTRONGER
THESIGNALFROMTHEACCESSPOINT
7IRELESS,!.STATUS
$ISPLAYSICONSINDICATINGWHETHER
YOURUNITISCONNECTEDTOTHE
WIRELESS,!.ININFRASTRUCTURE
MODEOR!D(OCMODE
3KYPESTATUS
9AHOO-ESSENGERSTATUS
'OOGLE4ALKSTATUS
6OLUMEBAR
!D(OC!PPLICATIONSTATUS
$URING-USIC3TREAMINGDISPLAYS
THE-USIC3TREAMINGICONANDTHE
NAMEOFTHEUSERWHOSEUNITYOUR
UNITISCONNECTEDTO
(/,$STATUS
$ISPLAYSANICONWHENYOUVE
LOCKEDYOURUNITSCONTROLSBY
TURNINGONTHE(/,$FEATURE
3HIFT.UM3YM&NKEYSTATUS
)NDICATESTHECURRENTLYACTIVE
KEYBOARDMODIlERKEYSIFANY
SUCHAS.UM.UMBER3YM
3YMBOL&N&UNCTIONOR
3HIFT
#LOCK
-USICINFORMATION
$ISPLAYSINFORMATIONABOUT
THECURRENTLYPLAYINGMUSIC
)TAPPEARSFORAPPROXIMATELY
THREESECONDSAFTERTHELASTUSER
PLAYBACKOPERATIONOFTHEUNIT
SUCHASPLAYINGFASTFORWARDING
ORREWINDING!LSOAPPEARS
WHENTHEUNITCHANGESFROMONE
MUSICTRACKTOANOTHER/NSOME
SCREENSMUSICINFORMATIONMAY
NOTBEDISPLAYEDBECAUSEOF
DISPLAYAREALIMITATIONS
#ONTINUED
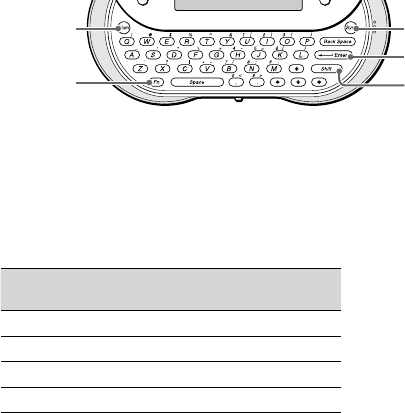
5SINGTHEKEYBOARD
3LIDETHEFRONTPANELOFTHEUNITUPWARDTOUSETHEKEYBOARD
.UMKEY 3YMKEY
%NTERKEY
3HIFTKEY
&NKEY
4OENTERCAPITALLETTERSNUMBERSANDSYMBOLS
0RESSTHEMODIlERKEY3HIFT.UM3YMOR&NlRSTANDTHENPRESSANOTHER
KEY&ORTHEKEYARRANGEMENTREFERTOTHECHARTONPAGEOFTHE/PERATING
)NSTRUCTIONS0$&lLE
!FTERMODIlERKEYSAREPRESSEDTHEFOLLOWINGICONSAPPEARONTHESTATUSBAROF
THEDISPLAYPAGE
4OLOCKAMODIlERKEYPRESSITTWICE4OUNLOCKITPRESSANYMODIlERKEY
-ODIlERKEY )CONAFTER
PRESSINGITONCE
)CONAFTER
PRESSINGITTWICE
3HIFT h3HIFT/Nv h3HIFT,OCKEDv
.UM h.UM/Nv h.UM,OCKEDv
3YM h3YM/Nv h3YM,OCKEDv
&N h&N/Nv h&N,OCKEDv
Preparation
COM-1.US.2-668-392-11(2)
13
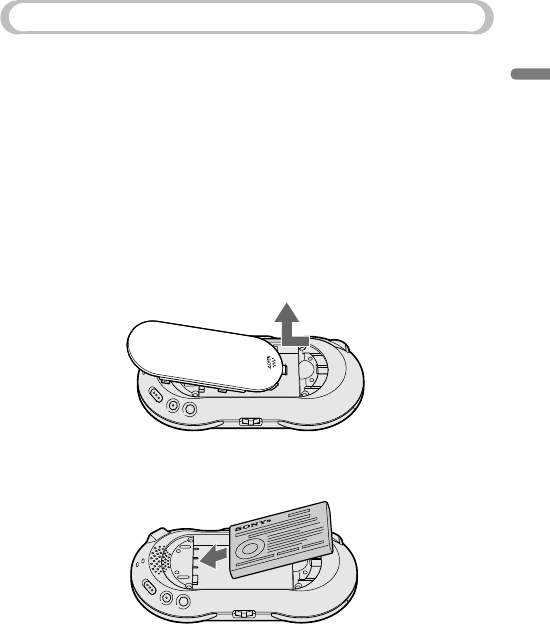
Step 1: Preparing a Power Source
Installing the supplied battery
Make sure that the battery is inserted before using the unit. Using the unit
powered by the AC adapter or by your computer without the rechargeable
battery may lead to the following undesirable conditions:
– When the AC power cord or the USB cable is disconnected, and the unit is
not powered for more than ten seconds, the built-in clock may be unable to
keep correct time, causing the unit to fail to play scheduled content.
– When the AC power cord or the USB cable is disconnected, the unit may
freeze.
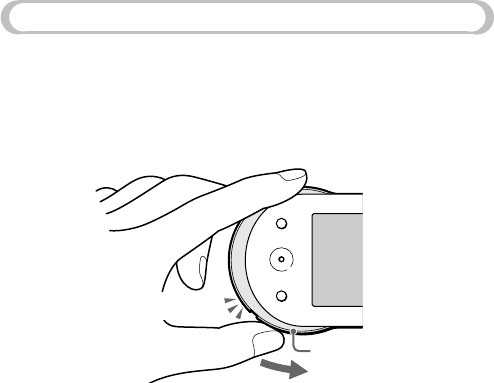
1 Open the battery compartment cover by placing your thumb or finger on
the word “Open” on one end of the cover and pressing towards the other
end of the cover.
2 Insert the battery, label side up, aligning the metal contacts on the battery
with the contacts inside the battery compartment.
Continued
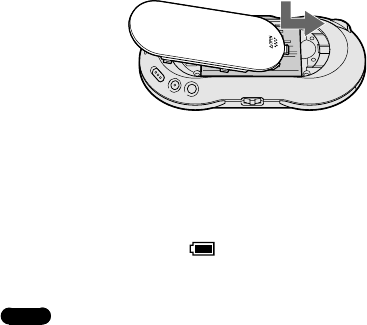
3LIDETHEBATTERYCOMPARTMENTCOVERBACKONTOTHEBACKOFTHEUNITUNTILIT
CLICKSINTOTHEPLACE
#HARGINGTHEBATTERY
#HARGETHEBATTERYUSINGEITHERTHESUPPLIED!#POWERADAPTORORTHESUPPLIED
53"CABLE#ONNECTYOURUNITANDPOWERSOURCEASSHOWNINTHEFOLLOWING
ILLUSTRATION
/NCECHARGINGSTARTSTHE#(!2'%AND0/7%2INDICATORSLIGHTUPAND
THEBATTERYINDICATORSECTIONS APPEARINTHEDISPLAYINSUCCESSIONAS
CHARGINGPROGRESSES
!COMPLETECHARGEREQUIRESAPPROXIMATELYHOURS
.OTES
s )FYOURUNITISCONNECTEDTOYOURCOMPUTERVIATHEINCLUDED53"CABLEANDTHECOMPUTER
ENTERSAPOWERSAVINGMODESUCHASSYSTEMSUSPENDSLEEPORHIBERNATIONTHENYOUR
UNITSBATTERYWILLBEGINDISCHARGING
s $ONOTLEAVETHEUNITCONNECTEDFOREXTENDEDPERIODSTOANOTEBOOKCOMPUTERTHATISNOT
CONNECTEDTO!#POWERBECAUSETHEUNITMAYDISCHARGETHECOMPUTERSBATTERY
s )FTHEUNITISNOTTURNEDONWHENCHARGINGSTARTSUSINGTHE53"CABLEWAITAFEW
MINUTESANDTHENTURNONTHEUNITBYSLIDINGTHE0/7%2SWITCHDOWNPAGE
s #ONNECTINGTHEUNITVIAA53"HUBMAYNOTWORKANDISNOTSUPPORTED#ONNECTTHE
53"CABLEDIRECTLYTOTHECOMPUTER

0REPARATION
#ONNECTIONUSINGTHESUPPLIED!#POWERADAPTOR
4HEUNITAUTOMATICALLYTURNSONWHENTHEUNITISCONNECTEDTOTHE!#POWER
ADAPTOR
4OWALLOUTLET
4O$#).6JACK
!#POWERADAPTORSUPPLIED
#ONNECTIONUSINGTHESUPPLIED53"CABLE
4O53"
CONNECTOR
53"CABLESUPPLIED
#ONTINUED
COM-1.US.2-668-392-11(2)
16
Step 2: Setting up Your Personal Communicator
Turning on your unit
Slide and hold down the POWER switch until the POWER indicator lights up
green. Wait until the start-up screen disappears. When you use your Personal
Communicator for the first time, the initial set-up wizard appears. Once the
initial set-up is completed, the set-up wizard will no longer appear when the
unit is turned on.
POWER switch
POWER indicator
To turn it off
Slide down and hold the POWER switch again. Your unit turns off, and the
POWER indicator turns off.
17
COM-1.US.2-668-392-11(2)
Preparation
Time Zone
Select your current time zone.
Date & Time
Set the current date and time.
My Profile — Nickname 1)
Enter a nickname of up to 64
characters. Entry of this item is
required.
My Profile — About Me 1)
Enter your comments up to 256
characters.
My Profile — My Color 1)
Select a background color for the
Music Player’s Now Playing screen.
My Profile — My Picture 1)
Select a face icon from among the
pre-installed images.
My Profile — Birthdate 2)
1) Information can be viewed by all Ad
Hoc users.
2) Information can be viewed only
by users registered in your Ad Hoc
Contact List to ensure the protection
of personal information.
Note
• The only item you must enter is
Nickname. If you do not enter your
own settings, default values are used for
Time Zone, Date & Time, My Color,
and My Picture.
Entering your information
Follow the on-screen instructions to enter information about yourself and your
location.
Entering “My Profile” items creates your user profile, visible to other users
connected via the Ad Hoc Application ( page 00).
Use the following buttons and the keyboard ( page 00) to fill in the items.
4-way button (///)
Moves the highlight or cursor.
Center button
Activates the selected item or
confirms an entry.
BACK button
Returns to the previous screen.
7IRELESS,!.3ETTINGS)NFRASTRUCTURE-ODE
7ARNING
4URNOFFTHE7)2%,%33,!.SWITCHWHENINCROWDEDPLACESSUCHASIN
ACROWDEDTRAIN)FAPERSONNEARBYISUSINGAPACEMAKERITISPOSSIBLETHAT
THERADIOWAVESCOULDAFFECTTHEPACEMAKER
7HENCONNECTEDTOTHEWIRELESS,!.ININFRASTRUCTUREMODEYOURUNIT
SUPPORTSTHEFOLLOWINGCOMMUNICATIONFEATURES
n)NSTANT-ESSENGER
n6O)06OICEOVER)0PHONECALLS
n'OOGLE4ALKCHAT
n7EBBROWSINGONTHE)NTERNETINCLUDING7EBMAILACCESS
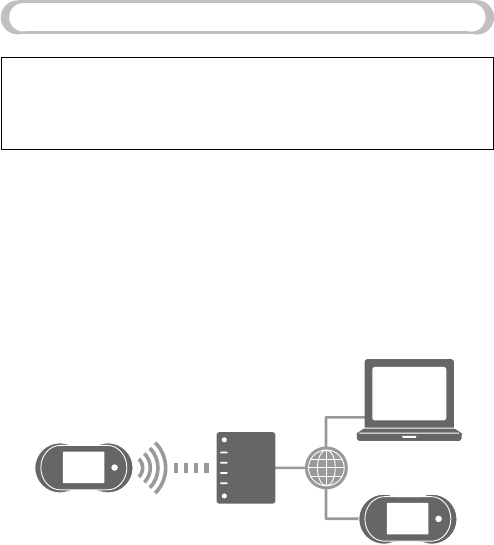
)NFRASTRUCTUREMODEENABLESYOURUNITTOCONNECTTOTHE)NTERNETVIAAWIRELESS
,!.ACCESSPOINTNEARYOU
9OURUNIT
!CCESSPOINT
)NTERNET
0REPARATION
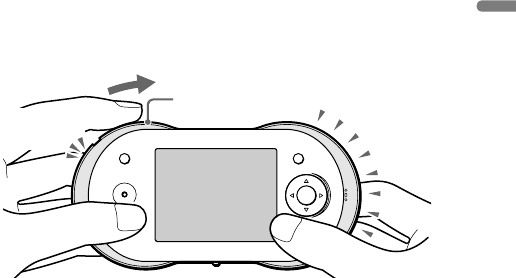
#ONNECTINGTOWIRELESS,!.ININFRASTRUCTUREMODE
7HENYOUSELECTANYAPPLICATIONTHATUSES7I&I)NSTANT-ESSENGER6O)0
OR7EBONTHE#OMMUNICATIONMENUTHEUNITAUTOMATICALLYCONNECTSTO
THEWIRELESS,!.ININFRASTRUCTUREMODE4HE7)2%,%33,!.INDICATOR
LIGHTSUPGREENANDTHESTATUSINDICATORLIGHTSUPBLUE9OUCANALSOMANUALLY
CONNECTTHEUNITTOTHEWIRELESS,!.BYSLIDINGTHE7)2%,%33,!.SWITCH
UPWARDASSHOWNBELOW
7)2%,%33,!.
INDICATOR
7)2%,%33,!.
SWITCH 3TATUSINDICATOR
4ODISCONNECTFROMWIRELESS,!.
3LIDETHE7)2%,%33,!.SWITCHUPWARD9OURUNITDISCONNECTSFROM
WIRELESS,!.THE7)2%,%33,!.INDICATORANDTHE3TATUSINDICATORTURN
OFF
#ONTINUED

COM-1.US.2-668-392-11(2)
20
Registering an access point
If you regularly connect to particular access points, register them with your
device, and configure your unit to automatically connect to them when they
are detected. You can even specify the order in which the unit will try to
connect to them.
When your unit connects in infrastructure mode for the first time, the
Connection Dialog appears.
Select the access point you want to register as an automatic access point, and
follow the instructions on the display to register it. If you register an access
point, the unit will automatically attempt to connect to it when it is detected.
Selecting a connection method
You can select a connection method in “Auto Connect” in Network Settings on
the Tools menu.
“ON” (default setting): The unit automatically attempts to connect to the pre-
registered access points in the selected order.
“OFF”: The Connection Dialog screen appears when you connect the unit
to the wireless LAN in infrastructure mode, allowing you to select the access
point manually each time.

Preparation
COM-1.US.2-668-392-11(2)
21
Wireless LAN Settings — Ad Hoc Mode
Warning
Turn off the WIRELESS LAN switch when in crowded places, such as in
a crowded train, If a person nearby is using a pacemaker, it is possible that
the radio waves could affect the pacemaker.
The unit’s Ad Hoc Application enables you to communicate with a nearby user
without connecting to the Internet. Add a user to your Ad Hoc Contact List
before using this feature.
When connected to the wireless LAN in Ad Hoc mode, your unit supports the
Ad Hoc Application, with features such as the Music Streaming (streaming
music between units).
In Ad Hoc mode, your unit connects one-on-one with another unit.
Your unit A friend’s unit
Continued
COM-1.US.2-668-392-11(2)
22
Connecting to wireless LAN in Ad Hoc mode
When you select the Ad Hoc application on the Communication menu, the unit
automatically connects to the wireless LAN in Ad Hoc mode. The WIRELESS
LAN indicator lights up green, and the status indicator lights up orange.
WIRELESS LAN
indicator
WIRELESS LAN
switch Status indicator
To disconnect from wireless LAN
Slide the WIRELESS LAN switch upward. Your unit disconnects from
wireless LAN, the WIRELESS LAN indicator, and the Status indicator turn
off.
Adding users to your Ad Hoc Contact list
When your unit connects to the wireless LAN in Ad Hoc mode, a list of
nearby users whose Personal Communicators are in Ad Hoc mode appears.

Preparation
COM-1.US.2-668-392-11(2)
23
Select a user you want to add to your Contact List. A message is sent to the
selected user, asking for permission to add the user to your Contact List. If
the user agrees to be added, his or her profile information is registered in your
Ad Hoc Contact List and your profile information is registered in his or her
Contact List.
Registered user
(When the user is not
connects to the wireless
LAN in Ad Hoc mode,
the Offline icon is
displayed.)
You can add a friend at any time by performing this procedure. Adding
a friend is possible whenever the friend is within range of the wireless
connection and has his or her unit in Ad Hoc mode.
24
COM-1.US.2-668-392-11(2)
Basic Operations
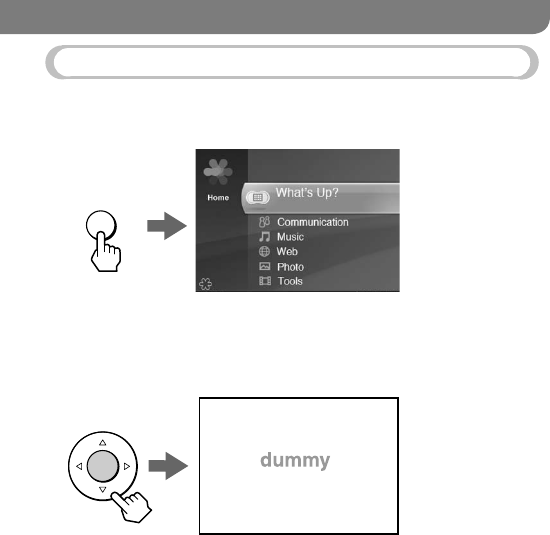
The Home Menu
The Home menu is the starting point to access the various applications and
features of your unit.
To display the Home menu, press the HOME button.
HOME
To start an application from the Home menu
Press / to select an item, and press the center button to start the selected
application.
Example: Selecting “Music”
COM-1.US.2-668-392-11(2)
25
Basic Operations
The Context Menu
On most screens, you can display a list of operations called the Context menu.
To display the Context menu, press the OPTION button. The options vary
depending upon the screen you are viewing.
Context menu
OPTION
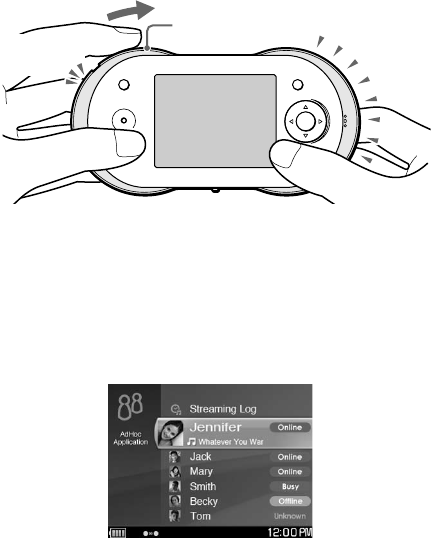
What’s Up Screen
The What’s Up Screen shows the status of nearby contacts. It also shows
music information, the clock, and so on.
When the unit is connected to the wireless LAN in infrastructure mode,
designated contacts from your IM (Instant Messenger) Contact Lists are
displayed. When the unit is connected to the wireless LAN in Ad Hoc mode,
designated users in your Ad Hoc Contact List are displayed.
To display the What’s Up screen, press and hold the HOME button.
Contact List
Clock
Jacket picture or
user photo
Music information
HOME
For more detailed information about the What’s Up screen, refer to the
“What’s Up” section of the Operating Instructions, available as a PDF file on
the supplied CD-ROM.

COM-1.US.2-668-392-11(2)
26
Info Screen
When an event occurs, such as a new message being received or a chat
invitation arriving, an event icon appears on the status bar of the display. When
this happens, press INFO to view detailed information about the event.
To see information about the currently music when viewing another
application window, press INFO twice.
New event
INFO
Press INFO once.
Jacket picture
Track title
Artist name
Album/playlist title
Playing status
Play mode
Data format, bit rate,
and data capacity
INFO
Press INFO twice.

4HINGSTO$O7ITH9OUR0ERSONAL#OMMUNICATOR
#OMMUNICATION3KYPE
3KYPEISAN)NTERNETCOMMUNICATIONTOOLTHATINCLUDESVOICECALLFEATURESUSING
A6OICEOVER)NTERNET0ROTOCOL6O)0NETWORK)TOFFERSTHEFOLLOWINGFEATURES
s 4ALKINGWITHOTHER3KYPEUSERS
s 4EXTCHATWITHOTHER3KYPEUSERS
s #ALLINGTRADITIONALTELEPHONENUMBERS3KYPE/UT
s 2ECEIVINGCALLSFROMTRADITIONALPHONES3KYPE)N
s 3ENDINGlLESTOOTHER3KYPEUSERS
!DDITIONALCHARGESAPPLYFOR3KYPE/UTAND3KYPE)N
"EFORESTARTING3KYPE
2EGISTERFORA3KYPE)$
)FYOUHAVENOTYETSIGNEDUPFOR3KYPESELECTh#REATEA.EW3KYPE!CCOUNTv
ONTHELOGINSCREENINSTEPBELOW
)FYOUALREADYHAVEA3KYPEACCOUNTYOUCANUSEYOUREXISTING)$ONYOUR
UNIT
4OSTART3KYPE
3ELECTh3KYPEvFROMh#OMMUNICATIONvONTHE(OMEMENU
4HEUNITAUTOMATICALLYCONNECTSTOTHEWIRELESS,!.ININFRASTRUCTURE
MODEANDTHE3KYPE,OGINSCREENAPPEARS
,OGINTO3KYPEANDENJOYTHE3KYPECOMMUNICATIONFEATURES
&ORMOREDETAILEDINFORMATIONABOUTTHEFEATURESREFERTOTHE
h#OMMUNICATION3KYPEvSECTIONOFTHE/PERATING)NSTRUCTIONS
AVAILABLEASA0$&lLEONTHESUPPLIED#$2/-
.OTE
s )FYOUARECONNECTINGTOAPUBLICWIRELESS,!.ACCESSPOINTHOTSPOTYOUMAYBE
REQUIREDTOLOGINUSINGTHEWEBBROWSERAFTERTHEWIRELESS,!.ISCONNECTED
4HINGSTO$O7ITH9OUR0ERSONAL#OMMUNICATOR

#OMMUNICATION'OOGLE4ALK
'OOGLE4ALKISAN)NTERNETCOMMUNICATIONTOOLFROM'OOGLE)TOFFERSTHE
FOLLOWINGFEATURES
s 4EXTCHATWITHOTHER'OOGLE4ALKUSERS
s 3ENDING'OOGLEEMAILS
"EFORESTARTING'OOGLE4ALK
2EGISTERFORA'OOGLE4ALK)$
)FYOUHAVENOTYETSIGNEDUPFOR'OOGLE4ALKSELECTh'ETA.EW'MAIL
!CCOUNTvONTHELOGINSCREENINSTEPBELOW
)FYOUALREADYHAVEA'OOGLE4ALKACCOUNTYOUCANUSEYOUREXISTING)$ON
YOURUNIT
4OSTART'OOGLE4ALK
3ELECTh'OOGLE4ALKvFROMh#OMMUNICATIONvONTHE(OMEMENU
4HEUNITAUTOMATICALLYCONNECTSTOTHEWIRELESS,!.ININFRASTRUCTURE
MODEANDTHE'OOGLE4ALK,OGINSCREENAPPEARS
,OGINTO'OOGLE4ALKANDENJOYTHE'OOGLE4ALKCOMMUNICATIONFEATURES
&ORMOREDETAILEDINFORMATIONABOUTTHEFEATURESREFERTOTHE
h#OMMUNICATION'OOGLE4ALKvSECTIONOFTHE/PERATING)NSTRUCTIONS
AVAILABLEASA0$&lLEONTHESUPPLIED#$2/-
.OTE
s )FYOUARECONNECTINGTOAPUBLICWIRELESS,!.ACCESSPOINTHOTSPOTYOUMAYBE
REQUIREDTOLOGINUSINGTHEWEBBROWSERAFTERTHEWIRELESS,!.ISCONNECTED

COM-1.US.2-668-392-11(2)
29
Things to Do With Your Personal Communicator
Communication — Yahoo! Messenger
Yahoo! Messenger is an Internet communication tool from Yahoo!, It offers the
following features:
• Text conversation with other Yahoo! Messenger users
• Sending Yahoo e-mails
Before starting Yahoo! Messenger
Register for a Yahoo! Messenger ID.
If you have not yet signed up for Yahoo! Messenger, select “Get a New Yahoo!
ID” on the login screen in step 1 below.
If you already have a Yahoo! Messenger account, you can use your existing ID
on your unit.
To start Yahoo! Messenger
1 Select “Yahoo! Messenger” from “Communication” on the Home menu.
The unit automatically connects to the wireless LAN in infrastructure
mode, and the Yahoo! Messenger Login screen appears.
2 Log in to Yahoo! Messenger, and enjoy the Yahoo! Messenger
communication features.
For more detailed information about the features, refer to the
“Communication — Yahoo! Messenger” section of the Operating
Instructions, available as a PDF file on the supplied CD-ROM.
Note
• If you are connecting to a public wireless LAN access point (hotspot), you may be
required to log in using the web browser after the wireless LAN is connected.

COM-1.US.2-668-392-11(2)
30
Communication — Ad Hoc Application
Ad Hoc communications allows COM-1 users to interact with each other one
on one. With an Ad Hoc connection, you can enjoy such features as Music
Streaming, where you stream music between your device and a friend’s COM-
1 Personal Communicator.
1 Select “Ad Hoc Application” from “Communication” on the Home menu.
The unit automatically connects to the wireless LAN in Ad Hoc mode, and
the Ad Hoc Application User List appears.
2 Select the user you want to communicate with, and enjoy the Ad Hoc
communication features.
For more detailed information about the features, refer to the
“Communication — Ad Hoc Application” section of the Operating
Instructions, available as a PDF file on the supplied CD-ROM.

COM-1.US.2-668-392-11(2)
31
Things to Do With Your Personal Communicator
Communication — Address Book
If you have friends with IDs on the contact lists of multiple programs, you can
gather each friend’s various IDs into a single registration in the Address Book.
The Address Book is always conveniently available on the What’s Up screen
( page 00).
1 Select “Address Book” from “Communication” on the Home menu.
The Address Book appears.
2 Select the user ID you want to integrate, and then register the ID in the
integrated ID.
For more detailed information about the features, refer to the
“Communication — Address Book” section of the Operating Instructions,
available as a PDF file on the supplied CD-ROM.

COM-1.US.2-668-392-11(2)
32
Web
When the unit is connected to the Internet via a wireless access point, you can
browse websites.
1 Select “Web” from the Home menu.
The unit automatically connects to the wireless LAN in infrastructure
mode, and the Web browser menu appears.
2 Browse websites as you would on a computer.
For more detailed information about the Web browsing features, refer to
the “Web” section of the Operating Instructions, available as a PDF file on
the supplied CD-ROM.
Note
• If you are connecting to a public wireless LAN access point (hotspot), you may be
required to log in using the web browser after the wireless LAN is connected.

COM-1.US.2-668-392-11(2)
33
Things to Do With Your Personal Communicator
Music
Your unit is a music player, able to play music files stored on the unit or on
other COM-1 units nearby. See the Operating Instructions (available as a PDF
file on the supplied CD-ROM) or the File Structures section of this document
( page 00) for more details about the relationships between programs, file
formats, and USB modes.
1 Connect your unit to a computer using the supplied USB cable, and
transfer music files from the computer to the unit.
Use the one of the following software programs and music file formats.
Available
software
programs
• SonicStage Ver.3.5 (supplied)
• Windows Media Player 10
• Windows Media Player 9
• Windows Explorer (Drag and drop to the “MUSIC”
folder at the top level of the unit’s file system.)
Available music
file formats
• ATRAC format: “.oma” or “.aa3” files (SonicStage only)
• MP3 format: “.mp3” files
• Windows Media Audio format: “.wma” files
2 Select “Music” on the Home menu.
The Music menu appears.
3 Play your desired music.
For more detailed information about the music player features, refer to the
“Music” section of the Operating Instructions, available as a PDF file on
the supplied CD-ROM.
COM-1.US.2-668-392-11(2)
34
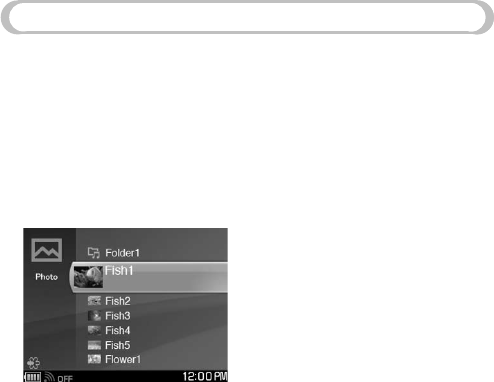
Photo
Your unit can display photos on the built-in display.
You can get photos onto your device in a variety of ways, including
transferring them from a computer via the transfer software on the supplied
CD-ROM, transferring them from a computer by dragging and dropping with
Windows Explorer, and transferring them by way of a “Memory Stick Duo.”
1 Transfer photo files to your unit or insert a “Memory Stick Duo”
containing photos.
2 Select “Photo” from the Home menu.
A list of photo files and folders appears.
3 Select and view your photos.
For more detailed information about the Photo viewer features, refer to the
“Photo” section of the Operating Instructions, available as a PDF file on
the supplied CD-ROM.

4HINGSTO$O7ITH9OUR0ERSONAL#OMMUNICATOR
6IDEO
9OURUNITCANPLAYVIDEOlLES
9OUCANGETVIDEOSONTOYOURDEVICEINAVARIETYOFWAYSINCLUDING
TRANSFERRINGTHEMFROMACOMPUTERBYDRAGGINGANDDROPPINGWITH7INDOWS
%XPLORERTRANSFERRINGTHEMBYWAYOFAh-EMORY3TICK$UOvEXCHANGING
VIDEOSTHROUGHTHElLETRANSFERFEATURESIN3KYPEORTRANSFERRINGTHEMFROMA
COMPUTERVIAAlLETRANSFERAPPLICATIONNOTSUPPLIED
4RANSFERVIDEOlLESTOYOURUNITFROMACOMPUTER
6IDEOSIN-0%'FORMATARESUPPORTED
3ELECTh6IDEOvFROMTHE(OMEMENU
!LISTOFVIDEOlLESANDFOLDERSAPPEARS
0LAYYOURDESIREDVIDEO
&ORMOREDETAILEDINFORMATIONABOUTTHEVIDEOPLAYERFEATURESREFERTOTHE
h6IDEOvSECTIONOFTHE/PERATING)NSTRUCTIONSAVAILABLEASA0$&lLEON
THESUPPLIED#$2/-

'AME
'AMESSUCHAS3OLITAIRE4ETRISAND-INE3WEEPERAREBUILTINTOTHEUNIT
3ELECTh'AMEvFROMTHE(OMEMENU
!LISTOFINSTALLEDGAMESAPPEARS
3ELECTTHEGAMEYOUWANTTOSTART
&ORMOREDETAILEDINFORMATIONABOUTTHE'AMEFEATURESREFERTOTHE
h'AMEvSECTIONOFTHE/PERATING)NSTRUCTIONSAVAILABLEASA0$&lLEON
THESUPPLIED#$2/-
4EXT
9OUCANGETTEXTlLESONTOYOURDEVICEINAVARIETYOFWAYSINCLUDING
TRANSFERRINGTHEMFROMACOMPUTERBYDRAGGINGANDDROPPINGWITH7INDOWS
%XPLORERTRANSFERRINGTHEMBYWAYOFAh-EMORY3TICK$UOvOREXCHANGING
TEXTlLESTHROUGHTHElLETRANSFERFEATURESIN3KYPE
3ELECTh4EXTvFROMTHE(OMEMENU
!LISTOFTEXTlLESAPPEARS
#REATEANEWNOTEORVIEWANEXISTINGTEXTlLE
&ORMOREDETAILEDINFORMATIONABOUTTHE4EXTlLEFEATURESREFERTOTHE
h4EXTvSECTIONOFTHE/PERATING)NSTRUCTIONSAVAILABLEASA0$&lLEONTHE
SUPPLIED#$2/-

COM-1.US.2-668-392-11(2)
37
Things to Do With Your Personal Communicator
Tools
The Tools menu includes the following administrative features:
• “Settings”: Adjust a variety of settings for the unit.
• “Connection Manager”: Manage the list of wireless LAN access points.
• “File Manager”: Display the folders and files stored in the unit’s memory
and “Memory Stick Duo.”
• “Hotspot Database”: Search for the hotspots near you by using the Hotspot
Database.
• “Drop Box”: View a list of the files transferred wirelessly from other units.
• “System Update”: Update your unit’s operating software.
• “System Information”: Display the MAC address and the firmware version
of the unit.
1 Select “Tools” from the Home menu.
The Tools menu appears.
2 Select your desired Tools feature.
For more detailed information about the features, refer to the “Tools”
section of the Operating Instructions, available as a PDF file on the
supplied CD-ROM.
38
COM-1.US.2-668-392-11(2)
For More Information
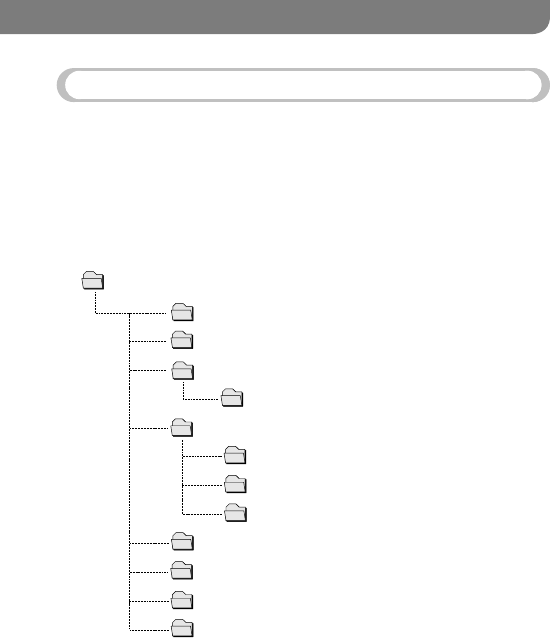
File Structures
The folder structures of the unit’s internal memory and of a “Memory Stick
Duo” are described below.
Folder structure of the internal memory
Depending on the file category or the software program or feature used to
transfer files to the unit, the files are stored in different folders, as shown in the
following table.
ROOT
OMGAUDIO
DROP BOX
MP_ROOT
TOOLS
MUSIC
PICTURE
DOCUMENT
WEBPAGE
101MNV01
SETTINGS
HOTSPOTDB
MUSICDB

&OR-ORE)NFORMATION
&ILECATEGORYAPPLICATIONSOFTWAREORFUNCTION &OLDER
!UDIOlLESTRANSFERREDUSING3ONIC3TAGE h/-'!5$)/vFOLDER
!UDIOlLESTRANSFERREDUSING
s7INDOWS-EDIA0LAYER
s7INDOWS%XPLORERDRAGANDDROP
h-53)#vFOLDER
0HOTOlLESTRANSFERREDUSINGEITHERTHE)MAGE
4RANSFERPROGRAMSUPPLIEDOR7INDOWS%XPLORER
DRAGANDDROP
h0)#452%vFOLDER
6IDEOlLESTRANSFERREDUSINGEITHERTHE)MAGE
#ONVERTERPROGRAMNOTSUPPLIEDOR7INDOWS
%XPLORERDRAGANDDROP
h-.6vFOLDERIN
h-0?2//4vFOLDER
4EXTlLESONYOURUNIT h$/#5-%.4vFOLDER
&ILESTRANSFERREDUSINGTHElLETRANSFERFEATURESOF
APPLICATIONSSUCHAS3KYPE
h$2/0"/8vFOLDER
#ONTINUED
COM-1.US.2-668-392-11(2)
40
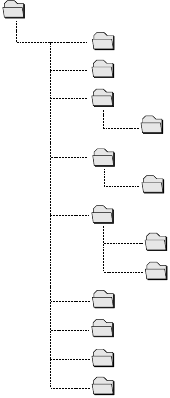
Folder structure of “Memory Stick Duo”
Depending on the file category or the software application or feature used to
store files to the “Memory Stick Duo,” the files are stored in different folders,
as described in the following table.
ROOT
OMGAUDIO
HIFI
MP_ROOT
PSP
MUSIC
PICTURE
DOCUMENT
WEBPAGE
101MNV01
MUSIC
PHOTO
DCIM
100MSDCF

&OR-ORE)NFORMATION
&ILECATEGORYAPPLICATIONSOFTWAREORFUNCTION &OLDER
!UDIOlLESTHATWERETRANSFERREDUSING3ONIC3TAGEWHEN
THEh-EMORY3TICK$UOvWASUSEDWITHANOTHERDEVICE
h/-'!5$)/vAND
h()&)vFOLDERS
!UDIOlLESTRANSFERREDUSING
s7INDOWS-EDIA0LAYER
s7INDOWS%XPLORERDRAGANDDROP
h-53)#vFOLDER
!UDIOlLESTHATWERESTOREDWHENTHEh-EMORY3TICK
$UOvWASUSEDWITHA0LAY3TATION0ORTABLE
h-53)#vFOLDERIN
h030vFOLDER
0HOTOlLESTRANSFERREDUSING7INDOWS%XPLORER
DRAGANDDROP
h0)#452%vFOLDER
0HOTOlLESTAKENWITHADIGITALSTILLCAMERAWHILE
THEh-EMORY3TICK$UOvWASINSERTEDINTOIT
h-3$#&vFOLDERIN
h$#)-vFOLDER
0HOTOlLESTHATWERESTOREDWHENTHEh-EMORY3TICK
$UOvWASUSEDWITHA0LAY3TATION0ORTABLE
h0(/4/vFOLDERIN
h030vFOLDER
6IDEOlLESTRANSFERREDUSINGEITHERTHE)MAGE
#ONVERTERPROGRAMNOTSUPPLIEDOR7INDOWS
%XPLORERDRAGANDDROP
h-.6vFOLDERIN
h-0?2//4vFOLDER
4EXTlLESONYOURUNIT h$/#5-%.4vFOLDER
3UPPLIED#$2/-
4HESUPPLIED#$2/-CONTAINSTHE/PERATING)NSTRUCTIONS0$&lLEANDTHE
SUPPLIEDSOFTWARE9OUCANINSTALLTHEFOLLOWINGSOFTWAREPROGRAMSFROMTHE
SUPPLIED#$2/-
!BOUTTHE/PERATING)NSTRUCTIONS0$&lLE
!N/PERATING)NSTRUCTIONSMANUALTHATCOVERSINDETAILALLASPECTSOFUSING
YOURUNITISSUPPLIEDWITHYOURUNITIN0$&FORMAT9OUCANINSTALLTHE
/PERATING)NSTRUCTIONS0$&lLEFROMTHESUPPLIED#$2/-
4OVIEWTHE0$&lLEYOUMUSTHAVE!DOBE!CROBAT2EADERINSTALLEDONYOUR
COMPUTER
!BOUTTHESUPPLIEDSOFTWARE
3ONIC3TAGE
3ONIC3TAGEALLOWSYOUTOIMPORTAUDIODATATOYOURCOMPUTERFROMMUSIC
SOURCESSUCHASAUDIO#$SANDTHE)NTERNETANDTHENTRANSFERTHEAUDIODATA
STOREDINYOURCOMPUTERTOTHEUNIT
)MAGE4RANSFER
)MAGE4RANSFERALLOWSYOUTOCONVERTPHOTOlLESSUCHASA*0%'IMAGEAN
AVATARORAWALLPAPERlLETOAlLEFORMATANDSIZETHATISCOMPATIBLEWITHYOUR
UNITANDTHENTRANSFERTHEPHOTOlLEFROMYOURCOMPUTERTOTHEUNIT

COM-1.US.2-668-392-11(2)
43
For More Information
Utility
With the “Utility,” you can:
• Update the software in your unit by downloading an update file from the
Web and applying the update to your unit.
• Back up the data on your unit to your computer and later restore your unit
with the saved backup data.
• Transfer unit settings managed on your computer, such as your user profile
and wireless LAN access point information, to the unit.
System requirements
• Computer: IBM PC/AT or Compatible (The software does not run on Macintosh.)
• CPU: Pentium III 450 MHz
• RAM: 128 MB or more
• Hard disk drive space: 200 MB or more (1.5 GB or more is recommended) (The amount
of necessary space depends on the Windows OS or the size of your audio files.)
• USB port
• CD-ROM drive (Digital Music CD playback capabilities by WDM)
When creating a music CD or an ATRAC CD, CD-R/RW, MP3 CD drive is required.
• Sound Board
• Operating System: Windows XP Media Center Edition 2005/Windows XP Media Center
Edition 2004/Windows XP Media Center Edition/Windows XP Professional/Windows
XP Home Edition/Windows 2000 Professional (Service Pack 3 or later)/Windows
Millennium Edition/Windows 98 Second Edition
This software is not supported by the following environments.
• Windows 95, Windows NT, or other version of Windows NT (such as Server)
• An environment that is an upgrade of the original manufacturer-installed operating
system, as in the following examples:
Windows 3.1/Windows 95/Windows 98 (or 98 Second Edition/Windows Millennium
Edition)
Windows Millennium Edition/Windows 2000 Professional/Windows XP-Multi-boot
environment with Windows 2000 (or Windows XP) and Windows 98 (or Windows 98
Second Edition/Windows Millennium Edition)
• Display: High (16bit) Color or higher, 800 × 600 dots or higher (1024× 768 dots or
higher is recommended)
• Others: Internet access for Web registration and EMD services. Microsoft Internet
Explorer 5.5 or later for EMD services.
• Windows Media Player (version 7.0 or higher) for playing WMA files
Continued

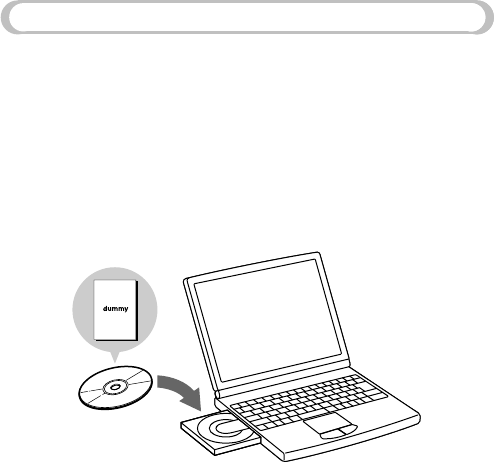
)NSTALLINGTHE0$&lLEANDTHESUPPLIEDSOFTWARE
5SETHEFOLLOWINGSTEPSTOINSTALLTHE/PERATING)NSTRUCTIONS0$&lLEANDTHE
SUPPLIEDSOFTWARE
4URNONYOURCOMPUTERANDINSERTTHESUPPLIED#$2/-INTOTHE#$
DRIVE
4HEINSTALLATIONMENUSCREENAPPEARS
#LICK;)NSTALL3ONIC3TAGEAND0#$APPLICATIONS=
2EADTHELICENSEAGREEMENTCAREFULLYANDTHENSELECTh9ESv
&OLLOWTHEONSCREENINSTRUCTIONSTOCOMPLETETHEINSTALLATION
4HE/PERATING)NSTRUCTIONS0$&lLEANDTHESUPPLIEDSOFTWAREARE
INSTALLED4HE/PERATING)NSTRUCTIONSICONAPPEARSONTHEDESKTOPOFYOUR
COMPUTER
4OINSTALLTHE/PERATING)NSTRUCTIONS0$&lLEONLY
#LICK;(ARDWARE/PERATING-ANUAL=INSTEPOFh)NSTALLINGTHE0$&lLEAND
THESUPPLIEDSOFTWAREv

COM-1.US.2-668-392-11(2)
45
For More Information
On Copyrights
• “MYLO” and “MYLO” logo are trademarks of Sony Corporation.
• “The following game applications are copyright © Trolltech AS.”
• Hotspot database content and the JiWire Wi-Fi Hotspot Locator Copyright © 2006 by
JiWire, Inc.
• The Yahoo Messenger application software on this product is developed partially using
Zipit ® Instant Messaging technology, and is copyrighted work of, and licensed from
Aeronix Inc. © Aeronix, Inc. 2003-2006. All Rights Reserved.
• This product includes SkypeTM Version 1.2
Copyright 2003-2006 Skype Limited
Patents Pending, Skype Limited
The Skype, Skype In, Skype Out, associated logos and the “S” symbol are trademarks
of Skype Limited.
Portions Copyright © 2001-2006 JoltidTM Limited. All rights reserved.
Patents Pending, Joltid Limited. www.joltid.com
This product features VeriCall EdgeTM technology from Trinity Convergence. Copyright
© 2004-2006 Trinity Convergence, Inc. All rights reserved. For more information,
please see www.trinityconvergence.com.
Warning: The Skype program is protected by copyright law and international treaties.
Unauthorised reproduction of distribution of this program, or any portions of it, may
result in severe civil and criminal penalties, and will be prosecuted to the maximum
extent possible under the law.
• THIS PRODUCT IS LICENSED UNDER THE MPEG-4 VISUAL PATENT
PORTFOLIO LICENSE FOR THE PERSONAL AND NON-COMMERCIAL USE OF
A CONSUMER FOR DECODING MPEG-4 VIDEO THAT WAS ENCODED BY A
CONSUMER ENGAGED IN A PERSONAL AND NON-COMMERCIAL ACTIVITY
AND/OR WAS OBTAINED FROM A VIDEO PROVIDER LICENSED BY MPEG LA
TO PROVIDE MPEG-4 VIDEO.
NO LICENSE IS GRANTED OR SHALL BE IMPLIED FOR ANY OTHER
USE. ADDITIONAL INFORMATION INCLUDING THAT RELATING TO
PROMOTIONAL, INTERNAL AND COMMERCIAL USES AND LICENSING MAY
BE OBTAINED FROM MPEG LA, LLC. SEE HTTP://WWW.MPEGLA.COM
• OpenSSL copywrite acknowledgement:
- “This product includes software developed by the OpenSSL Project for use in the
OpenSSL Toolkit (http://www.openssl.org/)”
OpenSSL licensing link
- http://www.openssl.org/source/license.html
COM-1.US.2-668-392-11(2)
46
• JPEG, developed by The Independent JPEG Group,
PNG, developed by The PNG Development Group, Glenn Randers-Pehrson,
Andreas Dilger, Guy Eric Schalnat and Group 42, Inc.
XML Parser, “expat”, developed by James Clark
Zlib, developed by Jean-loup Gailly and Mark Adler
SSLeay, developed by Eric Young
OpenSSL, developed by the OpenSSL project
http://www.openssl.org/
EMX, developed by Eberhard Mattes
http://archiv.leo.org/pub/comp/os/os2/leo/gnu/emx%2bgcc/
Regexp library, written by Henry Spencer
http://arglist.com/regex/
http://arglist.com/regex/COPYRIGHT
Doug Lea’s malloc (dlmalloc), written by Doug Lea
ftp://g.oswego.edu/pub/misc/malloc.c
http://gee.cs.oswego.edu/dl/html/malloc.html
• “This product is protected by certain intellectual property rights of Microsoft
Corporation. Use or distribution of such technology outside of this product is prohibited
without a license from Microsoft or an authorized Microsoft subsidiary.”
“Content providers are using the digital rights management technology for Windows
Media contained in this device (“WM-DRM”) to protect the integrity of their content
(“Secure Content”) so that their intellectual property, including copyright, in such
content is not misappropriated. This device uses “WM-DRM software to play Secure
Content (“WM-DRM Software”). If the security of the WM-DRM Software in this
device has been compromised, owners of Secure Content (“Secure Content Owners”)
may request that Microsoft revoke the WM-DRM Software’s right to acquire new
licenses to copy, display and/or play Secure Content. Revocation does not alter the
WM-DRM Software’s ability to play unprotected content. A list of revoked WM-DRM
Software is sent to your device whenever you download a license for Secure Content
from the Internet or from a PC. Microsoft may, in conjunction with such license, also
download revocation lists onto our device on behalf of Secure Content Owners.”

COM-1.US.2-668-392-11(2)
Index
TBD

COM-1.US.2-668-392-11(2)
Printed in Japan
Printed on 100% recycled paper using
VOC (Volatile Organic Compound)-
free vegetable oil based ink.
http://www.sony.com/mylo