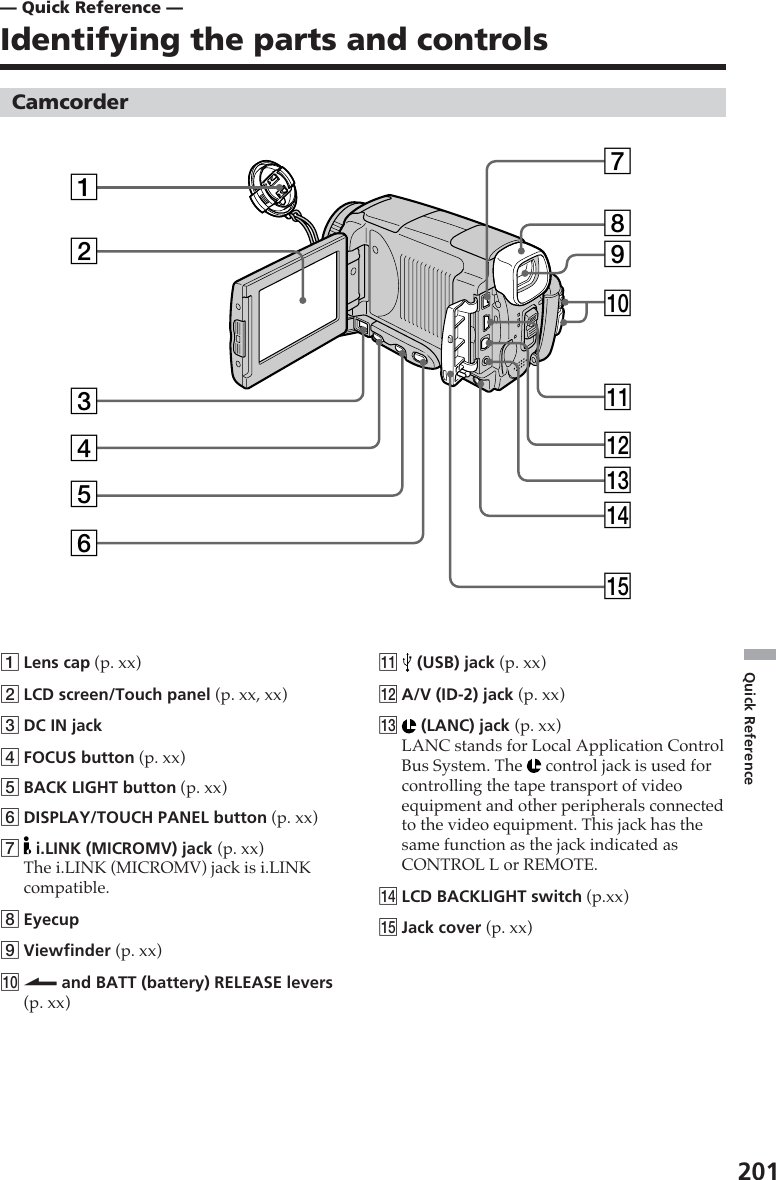
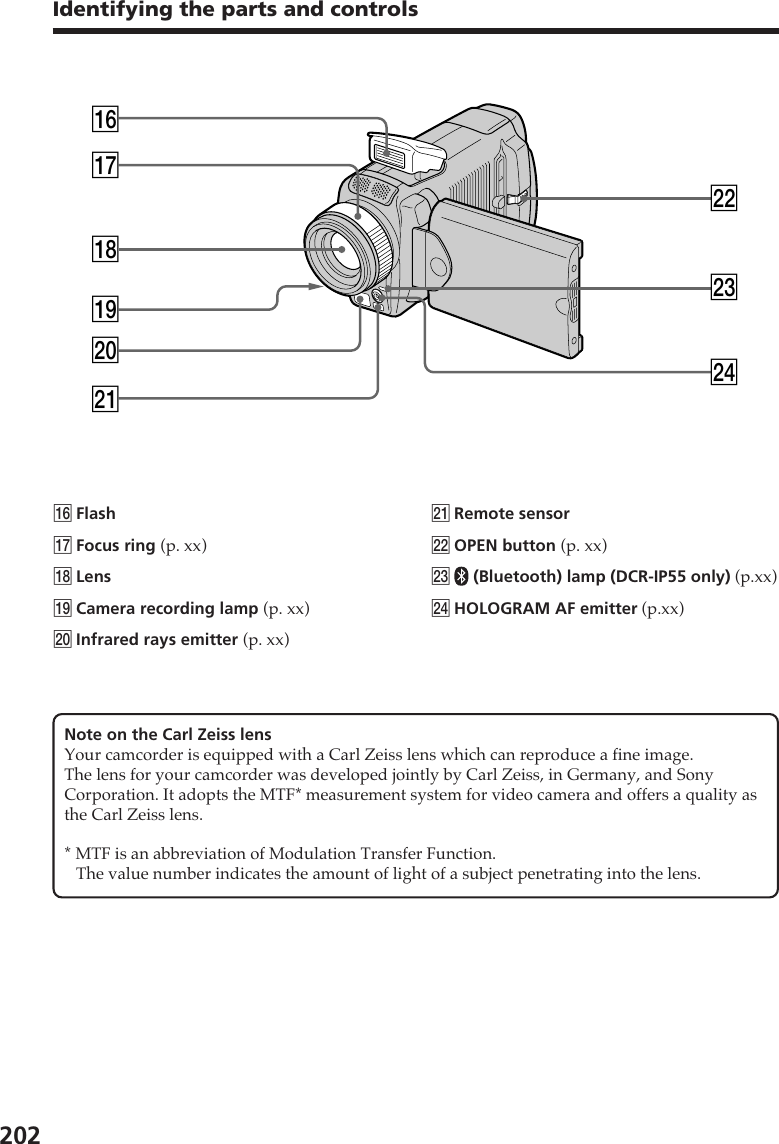
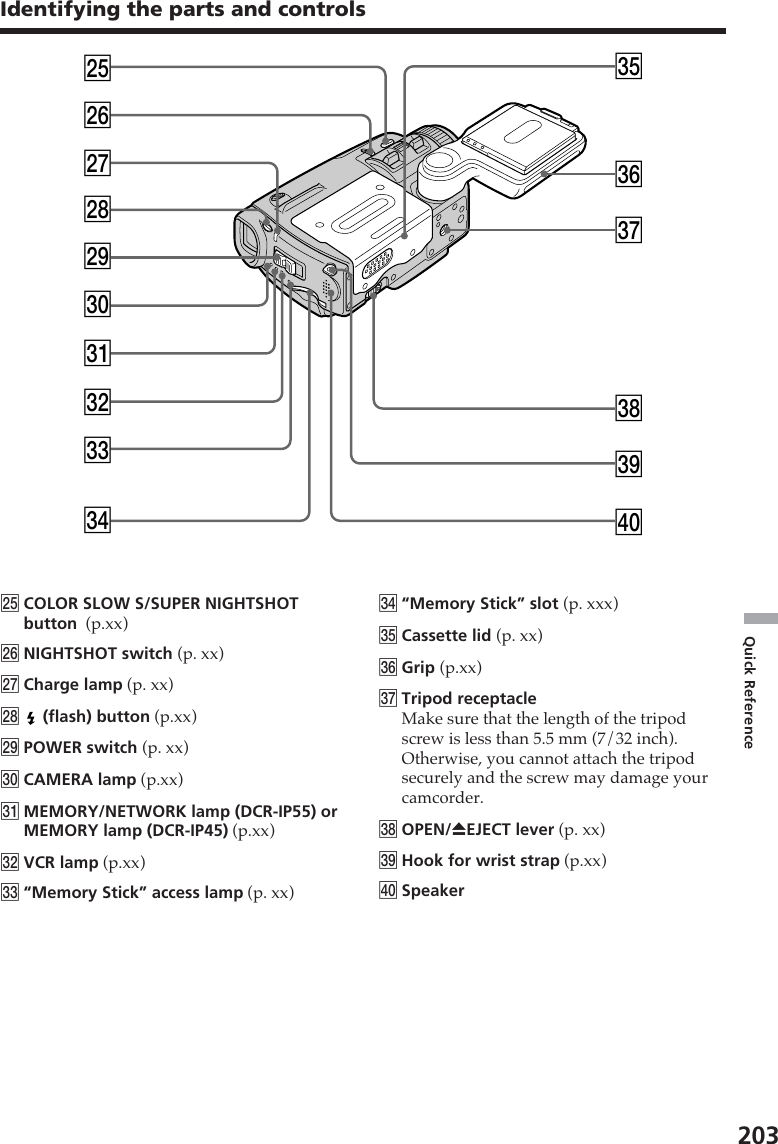
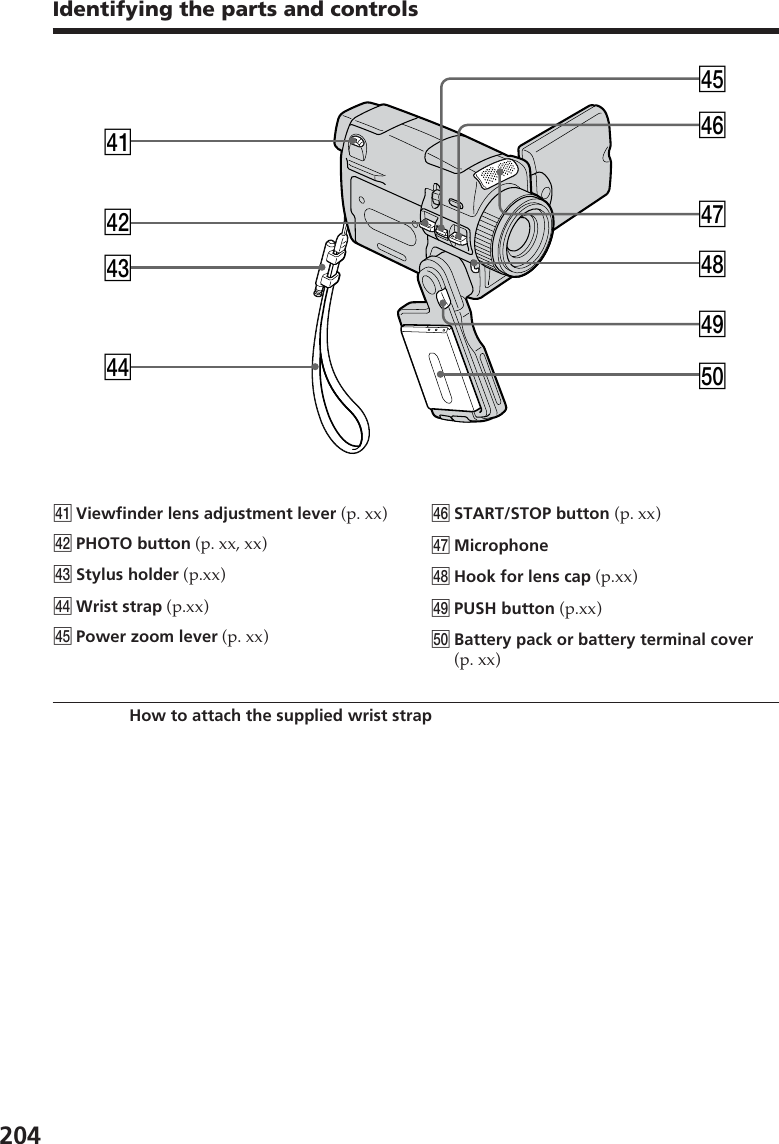
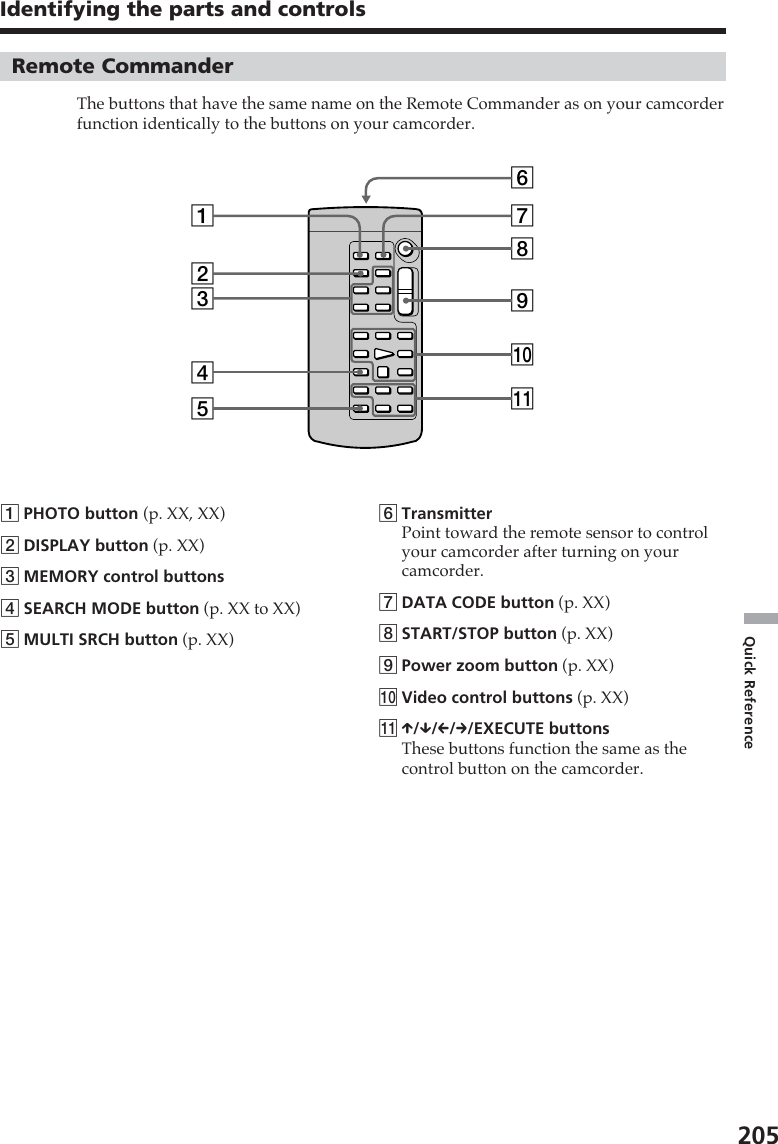
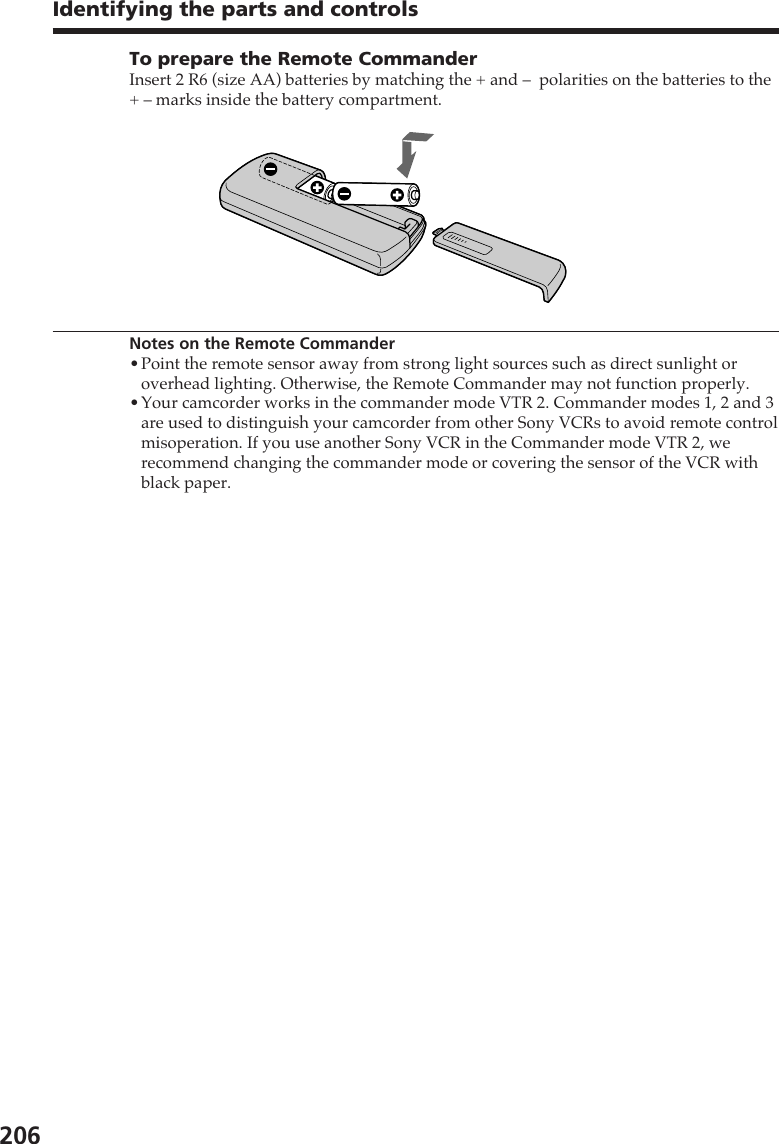
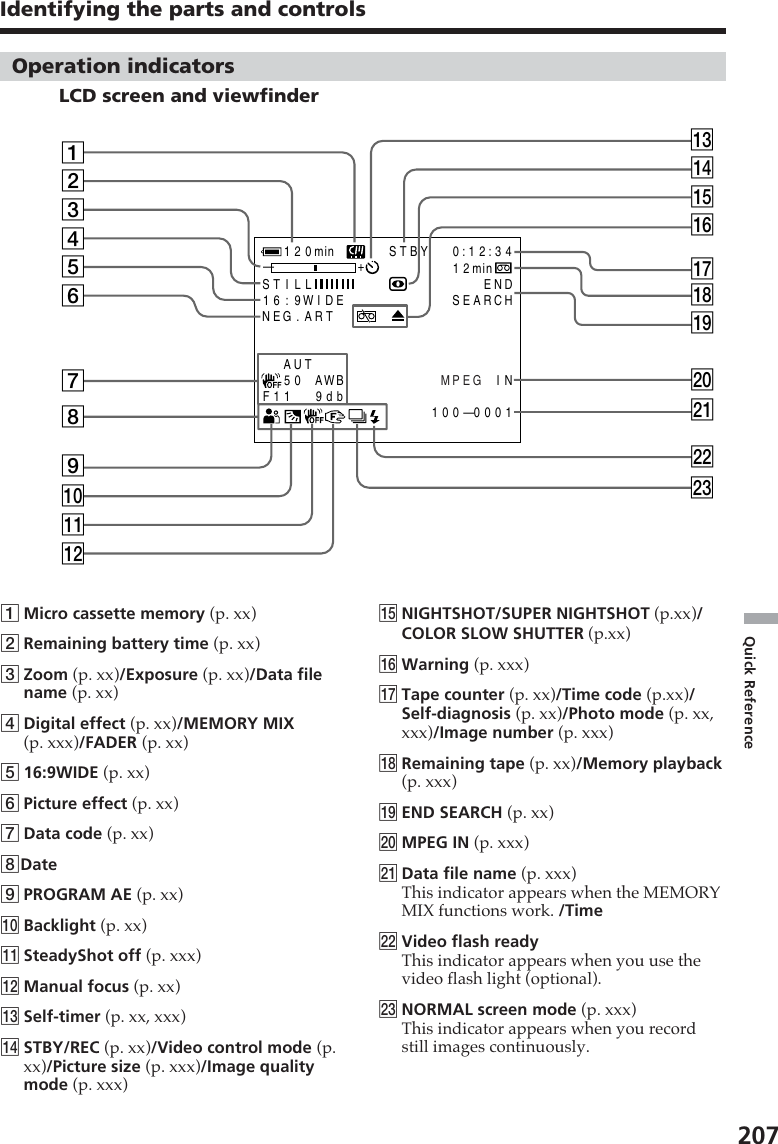
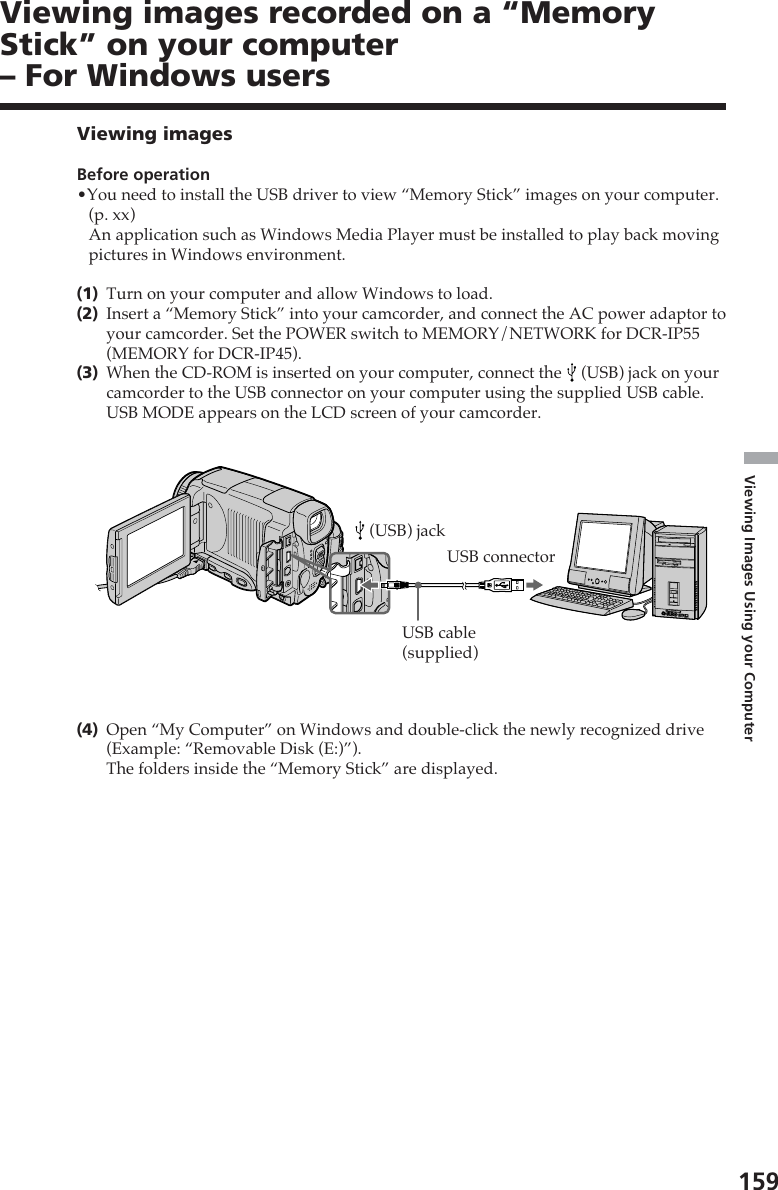
Sony Group DCRIP55 Digital Video Camera Recorder DCR-IP55 User Manual DCR IP45 IP55

Sony Corporation Digital Video Camera Recorder DCR-IP55 DCR IP45 IP55

manual

151Viewing Images Using your ComputerThere are the following ways of connecting the camcorder to a computer in order toview images saved on a “Memory Stick” or recorded on tape on your computer.To view images on a computer which has a “Memory Stick” slot, first remove the“Memory Stick” from the camcorder and then insert it into the computer’s “MemoryStick” slot.When connecting to a computer via the USB jack, complete installation of theUSB driver before connecting the camcorder to the computer. If you connectthe camcorder to the computer first, you will not be able to install the USBdriver correctly.For details about your computer’s connecters and editing software, contact thecomputer manufacturer.Viewing images recorded on a tapeWhen connecting to a computer via the USB jackFor more information, see page xxx.Camcorder Connection  Computer environmentConnection jack cable requirementsUSB jack USB cable USB connector,(supplied) editing softwareTape stills and i. LINK cable i. LINK (IEEE1394)movies MICROMV jack (DV connecting connectorcable ) (optional) editing software“Memory Stick” USB jack USB cable USB connector,stills and movies (supplied) editing software— Viewing Images Using your Computer —Viewing images on your computer– Introduction (USB) jackUSB connecterUSB cable (supplied)Push intothe end
152When connecting to a computer via the MICROMV jackYour computer must have a DV connector and editing software installed that can readvideo signals.Viewing images recorded on a “Memory Stick”When connecting to a computer via the USB jackSee page xxx when using Windows and page xxx when using Macintosh.You can also use a Memory Stick Reader/Writer (optional).When connecting to a computer without a USB jackUse an optional floppy disk adaptor for Memory Sticks or a PC card adaptor forMemory Sticks.When purchasing an accessory, check its catalog beforehand for the recommendedoperating environment.Viewing images on your computer – Introduction: Signal flowi.LINK cable (optional)i.LINK(MICROMV) is markedon this sideUSB cable (supplied) (USB) jack
153Viewing Images Using your ComputerViewing images on your computer – IntroductionNotes on using your computer“Memory Stick”•“Memory Stick” operations on your camcorder cannot be assured if a “Memory Stick”formatted on your computer is used on your camcorder, or if the “Memory Stick” inyour camcorder was formatted from your computer when the USB cable wasconnected.•Do not compress the data on the “Memory Stick.” Compressed files cannot be playedback on your camcorder.Software•Depending on your application software, the file size may increase when you open astill image file.•When you load an image modified using retouching software from your computer toyour camcorder or when you directly modify the image on your camcorder, the imageformat will differ so a file error indicator may appear and you may be unable to openthe file.Communications with your computerCommunications between your camcorder and your computer may not recover afterrecovering from Suspend, Resume, or Sleep.
154You can view or edit the images recorded on a tape using your computer. You canrecord images edited with the computer on the tape.To view images on your computer, the application software MovieShaker Ver. 3.1 forMICROMV (supplied) is required.NoteTo view images on your computer, you have to install the i.LINK driver and theapplication software into your computer. They are included in the supplied applicationsoftware MovieShaker Ver. 3.1 for MICROMV.Before installing the i.LINK driver and the application software into your computer, besure not to connect the camcorder to the computer. For details on installing and on ani.LINK connection, refer to the operating instructions supplied with MovieShaker Ver.3.1 for MICROMV.Recommended computer environmentRecommended Windows environmentOS: Microsoft Windows MillennuiumEdition, Windows 2000 Professional,Windows XP Home/Professional (support to be provided). Standardinstallation is required.Operation is not assured if the above environment is an upgraded OS.CPU: MMX Pentium III 600 MHz or faster (Required)MMX Pentium III 800 MHz or faster (Recommended)Main memory: 128 MB or larger (Required)256 MB or larger (Recommended)Display: 800 × 600 or larger screen size/1024 × 480 or larger screen size, 16-bitcolor or higherHard disk: 100 MB hard disk space (for installation), ATA66 or higher speed(required for capturing an image)The i.LINK (IEEE1394) connector must be provided as standard.NoteOperations are not guaranteed for all the recommended computer environmentsmentioned above.Connecting your camcorder to yourcomputer using the i.LINK jacki.LINK connectorComputeri.LINK cable i.LINK(MICROMV): Signal flow
155Viewing Images Using your ComputerConnecting your camcorder to your computerusing the USB cable – For Windows usersComplete installation of the USB driver before connecting the camcorder tothe computer. If you connect the camcorder to the computer first, you will notbe able to install the USB driver correctly.When connecting to a computer via the USB jackYou must install a USB driver onto your computer in order to connect the camcorder tothe computer’s USB connector. The USB driver can be found on the CD-ROM supplied,along with the application software required for viewing images.If you connect your camcorder and your computer using the USB cable, you can viewpictures live from your camcorder and pictures recorded on a tape on your computer(USB streaming function).Furthermore, if you download pictures from your camcorder to your computer, you canprocess or edit them in image processing software and append them to e-mail.You can view images recorded on a “Memory Stick” on your computer.Recommended computer usage environment when connectingvia USB cable and viewing tape images on the computerOS:Microsoft Windows 98SE, Windows Me, Windows 2000 Professional, Windows XPHome Edition or Windows XP Professional Standard installation is required.However, operation is not assured if the above environment is an upgraded OS.You cannot hear sound if your computer is running Windows 98, but you can read stillimages.CPU:MMX Pentium 500 MHz or faster (800 MHz or faster recommended)Application:DirectX 8.0a or laterSound system:16 bit stereo sound card and stereo speakersMemory:64 MB or moreHard disk:Available memory required for installation:at least 200MBAvailable hard disc memory recommended:at least 1GB (depending on the size of the image files edited)Display:4 MB VRAM video card, Minimum 800 × 600 dot Hi color (16 bit color, 65000 colors),Direct Draw display driver capability (At 800 × 600 dot or less, 256 colors and less, thisproduct will not operate correctly.)Others:This product is compatible with DirectX technology, so it is necessary to install DirectX.The USB connector must be provided as standard.You cannot use this function in the Macintosh environment.
156Connecting your camcorder to your computer using the USB cable– For Windows usersRecommended computer usage environment when connectingvia USB cable and viewing “Memory Stick” images on thecomputerRecommended Windows environmentOS:Microsoft Windows 98, Windows 98SE, Windows Me, Windows 2000 Professional,Windows XP Home Edition or Windows XP Professional standard installation isrequired.However, operation is not assured if the above environment is an upgraded OS.CPU:MMX Pentium 200 MHz or fasterThe USB connector must be provided as standard.Windows Media Player must be installed (to play back moving pictures).Notes•Operations are not guaranteed for the Windows environment if you connect two ormore USB equipment to a single computer at the same time, or when using a hub.•Some equipment may not operate depending on the type of USB equipment that isused simultaneously.•Operations are not guaranteed for all the recommended computer environmentsmentioned above.•Windows and Windows Media are trademarks or registered trademarks of MicrosoftCorporation in the United States and/or other countries.•Pentium is trademark or registered trademark of Intel Corporation.•All other product names mentioned herein may be the trademarks or registeredtrademarks of their respective companies. Furthermore, “TM” and “®” are notmentioned in each case in this manual.
157Viewing Images Using your ComputerInstalling the USB driverStart the following operation without connecting the USB cable to yourcomputer.Connect the USB cable according to “Making the computer recognize thecamcorder”.If you are using Windows 2000 Professional or Windows XP Home Edition/Professional, log in with permission of administrators.(1)Turn on your computer and allow Windows to load.(2)Insert the supplied CD-ROM in the CD-ROM drive of your computer. Theapplication software starts up and the title screen appears.(3)Move the cursor to USB Driver and click. This starts USB driver installation.(4)Follow the on-screen messages to install the USB driver.(5)Remove the CD-ROM and then restart the computer, in accordance with theinstructions on the screen.NoteIf you connect the USB cable before USB driver installation is complete, the USB driverwill not be properly registered. Carry out installation again in accordance with the stepson page xx.Connecting your camcorder to your computer using the USB cable– For Windows users
158Making the computer recognize the camcorderViewing images recorded on a tape on your computerRefer to page 181 for details on viewing “Memory Stick” images on your computer.You need to install PIXELA ImageMixer  to view images recorded on a tape on yourcomputer. Install it from the CD-ROM supplied with your camcorder.To install and use this software in Windows 2000 Professional, you must be authorizedas a Power Users or Administrators. For Windows XP, you must be authorized asAdministrators.(1)Turn on your computer and allow Windows to load.If you are using your computer, close all running applications.(2)Insert the supplied CD-ROM into the CD-ROM drive of your computer.The application software starts up and the title screen appears. If the title screendoes not appear, double-click “My Computer” and then “IMAGEMIXER” (CD-ROM Drive). The application software screen appears after a while.(3)Move the cursor to “PIXELA ImageMixer” and click.The Install Wizard program starts up and the “Select Settings Language” screenappears.(4)Select the language for installation.(5)Follow the on-screen messages.The installation screen disappears when installation is complete.(6)Click DirectX.Follow the on-screen messages to install DirectX.Restart your computer when the installation is completed.(7)Connect the AC power adaptor to your camcorder. Set the POWER switch to VCR.(8)Select USB STREAM to ON in   in the menu settings (p. xxx).(9)With the CD-ROM inserted, connect the USB jacks of the camcorder and computerusing the USB cable supplied with your camcorder.Your computer recognizes the camcorder, and the Windows Add HardwareWizard starts.(10) Follow the on-screen messages so that the Add Hardware Wizard recognizes thatthe USB drivers have been installed. The Add Hardware Wizard starts three timesbecause three different USB drivers are installed. Be sure to allow the installationto complete without interrupting it.For Windows 2000 Professional, Windows XP Home Edition/Professional users(11)After the “File Needed” screen appears.Open “Browse...” t “My Computer” t “ImageMixer” t “Sonyhcb.sys”, andclick “OK”.Connecting your camcorder to your computer using the USB cable– For Windows usersUSB connectorUSB cable(supplied) (USB) jack
159Viewing Images Using your ComputerUSB connectorUSB cable(supplied) (USB) jackViewing imagesBefore operation•You need to install the USB driver to view “Memory Stick” images on your computer.(p. xx)An application such as Windows Media Player must be installed to play back movingpictures in Windows environment.(1)Turn on your computer and allow Windows to load.(2)Insert a “Memory Stick” into your camcorder, and connect the AC power adaptor toyour camcorder. Set the POWER switch to MEMORY/NETWORK for DCR-IP55(MEMORY for DCR-IP45).(3)When the CD-ROM is inserted on your computer, connect the   (USB) jack on yourcamcorder to the USB connector on your computer using the supplied USB cable.USB MODE appears on the LCD screen of your camcorder.(4)Open “My Computer” on Windows and double-click the newly recognized drive(Example: “Removable Disk (E:)”).The folders inside the “Memory Stick” are displayed.Viewing images recorded on a “MemoryStick” on your computer– For Windows users
160Folder containing moving picture dataFolder containing still image dataViewing images recorded on a “Memory Stick” on your computer– For Windows users(5)Select and double-click the desired image file from the folder.For the detailed folder and file name, see “Image file storage destinations and imagefiles” (p. xx).Desired file type Double-click in this orderStill image “Dcim” folder t“100msdcf” folder tImage fileMoving picture* “Mssony” folder t“Moml0001” folder tImage file**Copying a file to the hard disk of your computer before viewing it is recommended. Ifyou play back the file directly from the “Memory Stick,” the image and sound maybreak off.Image file storage destinations and image filesImage files recorded with your camcorder are grouped in folders by recording mode.The meanings of the file names are as follows. ssss stands for any number withinthe range from 0001 to 9999.For Windows Me users(The drive recognizing your camcorder is [E:].)Folder File Meaning100MSDCF DSC0ssss.JPG Still image fileMOML0001 MOV0ssss.MPG Moving picture file
161Viewing Images Using your ComputerDisconnect the USB cable and remove the “Memory Stick” or setthe POWER switch to OFF(CHG).– For Windows 2000 Professional/Me, Windows XP Home Edition/ProfessionalusersTo unplug the USB cable, eject the “Memory Stick” or set the POWER switch toOFF(CHG), follow the procedure below.(1)Move the cursor to the “Unplug or Eject Hardware” icon on the Task Tray and clickto cancel the applicable drive.(2)After the “Safe to remove” message appears, disconnect the USB cable and removethe “Memory Stick” or set the POWER switch to OFF(CHG).Viewing images recorded on a “Memory Stick” on your computer– For Windows users
162Connecting your camcorder to yourcomputer using the USB cable– For Macintosh usersWhen connecting to a computer via the USB jackYou must install a USB driver on to your computer in order to connect the camcorderto the computer's USB connector. The USB driver can be found on the CD-ROMsupplied, along with the application software required for viewing images.Recommended Macintosh environmentMac OS 8.5.1/8.6/9.0/9.1/9.2 or Mac OS X (v10.0/v10.1) standard installation isrequired.However, note that the update to Mac OS 9.0/9.1 should be used for the followingmodels.•iMac with the Mac OS 8.6 standard installation and a slot loading type CD-ROM drive•iBook or Power Mac G4 with the Mac OS 8.6 standard installationThe USB connector must be provided as standard.QuickTime 3.0 or newer must be installed (to play back moving pictures).Notes•Operations are not guaranteed for the Macintosh environment if you connect two ormore USB equipment to a single computer at the same time, or when using a hub.•Some equipment may not operate depending on the type of USB equipment that isused simultaneously.•Operations are not guaranteed for all the recommended computer environmentsmentioned above.•Macintosh and Mac OS, QuickTime are trademarks of Apple Computer Inc.•All other product names mentioned herein may be the trademarks or registeredtrademarks of their respective companies. Furthermore, “TM” and “®” are notmentioned in each case in this manual.
163Viewing Images Using your ComputerInstalling the USB driverDo not connect the USB cable to your computer before installation of the USBdriver is completed.For Mac OS 8.5.1/8.6/9.0 users(1)Turn on your computer and allow the Mac OS to load.(2)Insert the supplied CD-ROM in the CD-ROM drive of your computer.The application software screen appears.(3)Click the “USB Driver” to open the folder containing the six files related to“Driver.”(4)Select the following two files, and drag and drop them into the System Folder.•Sony Camcorder USB Driver•Sony Camcorder USB Shim(5)When the message appears, click “OK.”The USB driver is installed on your computer.(6)Remove the CD-ROM from the computer.(7)Restart your computer.For Mac OS 9.1/9.2/Mac OS X (v10.0)The USB driver need not be installed. Your Mac is automatically recognized as a drivejust by connecting your Mac using the USB cable.Connecting your camcorder to your computer using the USB cable– For Macintosh users
164Viewing imagesBefore operationYou need to install the USB driver to view “Memory Stick” images on your computer.(p. xx)QuickTime 3.0 or newer must be installed to play back moving pictures.(1)Turn on your computer and allow Mac OS to load.(2)Insert a “Memory Stick” into your camcorder, and connect the AC power adaptor toyour camcorder.(3)Set the POWER switch to MEMORY/NETWORK for DCR-IP55 (MEMORY forDCR-IP45).(4)Connect the   (USB) jack on your camcorder with the USB connector on yourcomputer using the supplied USB cable.(5)Double-click the “Memory Stick” icon on the desktop.The folders inside the “Memory Stick” are displayed.(6)Select and double-click the desired image file from the folder.Desired file type Double-click in this orderStill image “Dcim” folder t“100msdcf” folder tImage fileMoving picture* “Mssony” folder t“Moml0001” folder tImage file**Copying a file to the hard disk of your computer before viewing it is recommended. Ifyou play back the file directly from the “Memory Stick,” the image and sound maybreak off.Disconnect the USB cable and remove the “Memory Stick” or setthe POWER switch to OFF(CHG)Follow the procedure below.(1)Close all running applications.Make sure that the access lamp of the hard disk is not lit.(2)Drag the “Memory Stick” icon into the “Trash”. Alternatively, select the “MemoryStick” icon by clicking on it, and then select “Eject disk” from the “Special” menu atthe top left of the screen.(3)Disconnect the USB cable and remove the “Memory Stick” or the POWER switch toOFF (CHG).For Mac OS X (v10.0) usersShut down your computer, then disconnect the USB cable and remove the “MemoryStick” or the POWER switch to OFF (CHG).Connecting your camcorder to your computer using the USB cable– For Macintosh users
Using the Network function165You can access the Internet using a Bluetooth equipped device that is complied to thecamcorder. Once the access is made, you can view a Web page, send/receive your e-mail, etc. This section describes only how to open the Network Menu.(1)Set the POWER switch to MEMORY/NETWORK.(2)Press [NETWORK]. (Bluetooth) lamp lights up and Network Menu appears.For the details, refer to the Network Function Operating Instructions supplied withyour camcorder.— Using the Network function —Accessing the network (DCR-IP55 only)1MEMORYNETWORKVCRCAMERA(CHG)POWEROFFONMODE(Bluetooth) lamp
166Accessing the networkHow to hold your camcorder when operating in NETWORK modeHold your camcorder with your hand through the wrist strap to keep from dropping it.The operation buttons needed in NETWORK mode are displayed on the LCD screen.Press the buttons with the stylus supplied.After using the stylusPut it back in the holder on the wrist strap. Hold the stylus correctly as shown in theillustration and insert it until it clicks.On trademarks•The Bluetooth trademarks are owned by their proprietor and used by SonyCorporation under license.•All other product names mentioned herein may be the trademarks or registeredtrademarks of their respective companies. Furthermore, “TM” and “®” are notmentioned in each case in this manual.NoteMake sure that your camcorder is in the standby with the POWER switch set toMEMORY/NETWORK.During using the network functionYou cannot use the optional printer.
167Customising Your Camcorder213456Rr RrRrRrRrrRrRrR— Customising Your Camcorder —Changing the menu settingsTo change the mode settings in the menu settings, select the menu items with r/R . Thedefault settings can be partially changed. First, select the icon, then the menu item andthe mode.(1)Set the POWER switch to CAMERA, VCR or MEMORY/NETWORK for DCR-IP55(MEMORY for DCR-IP45).(2)Press FN to display PAGE1.(3)Press MENU to display the menu.(4)Press r/R to select a desired icon, and press EXEC.(5)Press r/R to select a desired item, and press EXEC.(6)Press r/R to select a desired setting.(7)Repeat steps from 4 to 6 if you want to change other items. Press   RET. to returnto step 4.For details, see “Selecting the mode setting of each item” (p. xxx).To return to FNPress EXIT.
168Changing the menu settingsIcon/itemMANUAL SETPROGRAM AEP EFFECTFLASH LVL*WHT BALN.S. LIGHTAUTO SHTRMode————zNORMALHIGHLOW——zONOFFzONOFFMeaningTo suit your specific shooting requirement.To add special effects like those in films or on the TVto images (p. xx, xx).To use the normal setting.To make the flash level higher than normal.To make the flash level lower than normal.To adjust the white balance (p. xx).To use the NightShot Light function (p. xx).To cancel the NightShot Light function.To automatically activate the electronic shutter whenshooting in bright conditions.To not automatically activate the electronic shuttereven when shooting in bright conditions.POWERswitchCAMERAMEMORY/NETWORK*CAMERAVCRCAMERAMEMORY/NETWORK*CAMERAMEMORY/NETWORK*CAMERAMEMORY/NETWORK*CAMERA*For DCR-IP55, set the POWER switch to MEMORY/NETWORK. For DCR-IP45, setthe POWER switch to MEMORY.Note on FLASH LVLYou cannot adjust FLASH LVL if the external flash (optional) is not compatible with theflash level.Menu items are displayed as the following icons:MANUAL SETCAMERA SETVCR SETLCD/VF SETMEMORY SETCM SETTAPE SETSETUP MENUOTHERSSelecting the mode setting of each item z is the default setting.Menu items differ depending on the position of the POWER switch.The LCD screen shows only the items you can operate at the moment.
169Customising Your Camcorder*For DCR-IP55, set the POWER switch to MEMORY/NETWORK. For DCR-IP45, setthe POWER switch to MEMORY.Notes on the SteadyShot function•The SteadyShot function may not correct excessive camera-shake. Even if STEADYSHOT is set to ON.•Attachment of a conversion lens (optional) may influence the SteadyShot function.If you cancel the SteadyShot functionThe SteadyShot off indicator   appears. Your camcorder prevents excessivecompensation for camera-shake.Icon/itemCAMERA SETD ZOOM16:9WIDESTEADYSHOTHOLOGRAM AFVCR SETVIDEOINPUTModezOFF20×120×zOFFONzONOFFzAUTOOFFzVIDEOS VIDEOMeaningTo deactivate the digital zoom. Up to 10× zoom iscarried out.To activate the digital zoom. More than 10× to 20×zoom is performed digitally (p. xx).To activate the digital zoom. More than 10× to 120×zoom is performed digitally (p. xx).Not to record a 16:9 wide picture (p. xx).To record a 16:9 wide picture.To compensate for camera-shake.To cancel the SteadyShot function. Natural picturesare produced when shooting a stationary subjectwith a tripod.The HOLOGRAM AF emits when focusing onsubjects is difficult in dark places (p. xx)The HOLOGRAM AF does not emit.To use the video plug of the A/V connecting cablewhen recording from a player.To use the S video plug of the A/V connecting cablewhen recording from a player.POWERswitchCAMERACAMERACAMERAMEMORY/NETWORK*VCRChanging the menu settings
170Icon/itemLCD/VF SETLCD B.L.LCD COLORVF B.L.ModezBRT NORMALBRIGHT——zBRT NORMALBRIGHTMeaningTo set the brightness on the LCD screen normal.To brighten the LCD screen.To adjust the color on the LCD screen with –/+.To set the brightness on the viewfinder screen tonormal.To brighten the viewfinder screen.POWERswitchCAMERAMEMORY/NETWORK*VCRCAMERAMEMORY/NETWORK*VCRCAMERAMEMORY/NETWORK*VCRChanging the menu settings*For DCR-IP55, set the POWER switch to MEMORY/NETWORK. For DCR-IP45, setthe POWER switch to MEMORY.Note on NTSC PBWhen you play back a tape on a Multi System TV, select the best mode while viewingthe picture on the TV.Note on LCD B.L. and VF B.L.When you select BRIGHT, battery life is reduced by about 10 percent during recording.When you use the power source other than battery packLCD B.L. and VF B.L. are automatically selected to BRIGHT.Even if you adjust LCD B.L., LCD COLOR and/or VF B.L.The recorded picture will not be affected.Low intensity high intensity
171Customising Your CamcorderChanging the menu settingsIcon/itemMEMORY SETSTILL SETBURSTQUALITYIMAGESIZEMOVIE SETMOVIEMODEREMAINModezOFFNORMALEXP BRKTGMULTI SCRNzSUPER FINEFINESTANDARDz1152 × 864640 × 480zSUPER FINEFINESTANDARDLIGHTMODEzAUTOONMeaningNot to record continuously.To record from four to 13 images continuously (p. xx).To record three images contimuously withdifferent exposure.To record nine images continuously (p. xx).To record still images in the finest image qualitymode (p. xx).To record still images in the fine image qualitymode.To record still images in the standard imagequality mode.To record still images at 1152 × 864 size(p. xx).To record still images at 640 × 480 size.To record moving pictures with super fine imagequality.To record moving pictures with fine imagequality.To record moving pictures with standard imagequality.To record moving pictures to be used as an e-mail attachment.To display the remaining capacity of the“Memory Stick”  in the following cases:•for five seconds after inserting a “MemoryStick” into your camcorder.•when the capacity of the “Memory Stick” isless than one minute after the POWER switchis set to MEMORY/NETWORK.•for five seconds after completing recording.To always display the remaining capacity of the“Memory Stick”.POWERswitchMEMORY/NETWORK*MEMORY/NETWORK*VCRMEMORY/NETWORK*MEMORY/NETWORK*VCRMEMORY/NETWORK*VCR*For DCR-IP55, set the POWER switch to MEMORY/NETWORK. For DCR-IP45, setthe POWER switch to MEMORY.If you select QUALITYThe number of images you can shoot in the currently selected image quality appears onthe screen.
172Changing the menu settingsIcon/itemMEMORY SETSLIDE SHOWFILE NO.DELETE ALLFORMATMode——zSERIESRESET——zRETURNOKMeaningTo play back images in a continuous loop (p. xx).To assign numbers to file in sequence even if the“Memory Stick” is changed.To reset the file numbering each time the“Memory Stick” is changed.To delete all the unprotected images (p. xx).To cancel formatting.To format an inserted “Memory Stick.”Formatting erases all information on the“Memory Stick”.1. Press r/R to select FORMAT then press EXEC.2. Press r/R to select OK, then press EXEC.3. After “EXECUTE” appears, press EXEC.“FORMATTING” flashes during formatting.“COMPLETE” appears when formatting isfinished.POWERswitchMEMORY/NETWORK*MEMORY/NETWORK*VCRMEMORY/NETWORK*MEMORY/NETWORK**For DCR-IP55, set the POWER switch to MEMORY/NETWORK. For DCR-IP45, setthe POWER switch to MEMORY.Notes on formatting•The “Memory Stick” supplied with your camcorder has been formatted at factory.Formatting with your camcorder is not required.•Do not turn the POWER switch or press any button while “FORMATTING” isdisplayed.•You cannot format the “Memory Stick” if the write-protect tab on the “Memory Stick”is set to LOCK.•Format the “Memory Stick” if “  FORMAT ERROR”appears.•Formatting erases protected image data on the “Memory Stick”.
173Customising Your CamcorderChanging the menu settingsIcon/itemCM SETTITLEERASETITLE DSPLTAPE TITLEERASE ALLq INFODSPLTAPE SETqREMAINMode——zONOFF————zONOFFzAUTOONMeaningTo erase the title you have superimposed (p. xx).To display the title you have superimposed.Not to display the title.To label a cassette (p. xx).To erase all the data in cassette memory (p. xx).To display the cassette information of the tape.This is displayed for five seconds in thefollowing cases: (p. xx).•When turning on the power with a cassetteinserted or inserting a cassette.•When displaying the recorded data, datesearch does not work.To not display the cassette information of thetape.To display the remaining tape bar:•for about eight seconds after your camcorderis turned on and calculates the remainingamount of tape.•for about eight seconds after a cassette isinserted and your camcorder calculates theremaining amount of tape.•for about eight seconds after the playbackbutton   is pressed in VCR mode.•for about eight seconds after DISPLAY/TOUCH PANEL is pressed to display thescreen indicators.To always display the remaining tape indicator.POWERswitchCAMERAVCRVCRCAMERAVCRCAMERAVCRCAMERAVCRCAMERAVCR
174Changing the menu settingsIcon/itemSETUP MENUCLOCK SETUSB STREAMLANGUAGEDEMO MODEMeaningTo set the date or time (p. xx).To deactivate the USB streaming function.To activate the USB streaming function.To display the following information indicatorsin English: min, STBY, REC, CAPTURE, VOL,END SEARCH and START.To display the information indicators in French.To display the information indicators in Spanish.To display the information indicators in.Portuguese.To display the information indicators in German.To display the information indicators in Italian.To display the information indicators in Chinese(traditional).To display the information indicators in Chinese(simplified).To display the information indicators in Greek.To make the demonstration appear.To cancel the demonstration mode.POWERswitchCAMERAMEMORY/NETWORK*CAMERAVCRCAMERAVCRCAMERAMode——zOFFONzENGLISHFRANÇAISESPAÑOLPORTUGUÊSDEUTSCHITALIANO[COMP][SIMP]zONOFF*For DCR-IP55, set the POWER switch to MEMORY/NETWORK. For DCR-IP45, setthe POWER switch to MEMORY.Notes on DEMO MODE•You cannot select DEMO MODE when a cassette is inserted in your camcorder.•When NIGHTSHOT is set to ON, the “NIGHTSHOT” indicator appears on the screenand you cannot select DEMO MODE in the menu settings.•If you press the touch panel during the demonstration, the demonstration stops for awhile, then it starts again after about 10 minutes.•DEMO MODE is set to STBY (Standby) at the default setting and the demonstrationstarts about 10 minutes after you have set the POWER switch to CAMERA without acassette inserted.To cancel the demonstration, insert a cassette, set the POWER switch to other thanCAMERA, or set DEMO MODE to OFF. To set to STBY (Standby) again, leave theDEMO MODE at ON in the menu settings, turn the POWER switch OFF (CHG), andreturn the POWER switch to CAMERA.
175Customising Your CamcorderIcon/itemOTHERSDATA CODE(On the RemoteCommander)AREA SETDST SETBEEPCOMMANDERDISPLAYREC LAMPMeaningTo display date, time and various settings duringplayback. When you press the DATA CODEbutton on the Remote Commander.To display date and time during playback.To set your area temporarily, when using thecamcorder, in a new location (p. XX).To be used when your area is not in daylightsaving time.To be used when your area is in daylight savingtime.To output the melody when you start/stoprecording or when an unusual condition occurson your camcorder.To output the beep instead of the melody.To cancel melody and the beep sound.To activate the Remote Commander suppliedwith your camcorder.To deactivate the Remote Commander to avoidremote control misoperation caused by otherVCR’s remote control.To show the display on the LCD screen andviewfinder.To show the display on the TV screen, LCDscreen and viewfinder.To light up the camera recording lamp at thefront of your camcorder.To turn the camera recording lamp off so that thesubject is not aware of recording.POWERswitchMEMORY/NETWORK*VCRCAMERAMEMORY/NETWORK*CAMERAMEMORY/NETWORK*CAMERAMEMORY/NETWORK*VCRCAMERAMEMORY/NETWORK*VCRCAMERAMEMORY/NETWORK*VCRCAMERAMEMORY/NETWORK*ModezDATE/CAMDATE——zOFFONzMELODYNORMALOFFzONOFFzLCDV-OUT/LCDzONOFFChanging the menu settings*For DCR-IP55, set the POWER switch to MEMORY/NETWORK. For DCR-IP45, setthe POWER switch to MEMORY.NoteIf you press DISPLAY/TOUCH PANEL with DISPLAY set to V-OUT/LCD in the menusettings, the picture from a TV or VCR will not appear on the LCD screen even whenyour camcorder is connected to the output jacks on the TV or VCR.When recording a close subjectWhen REC LAMP is set to ON, the red camera recording lamp on the front of thecamcorder may reflect on the subject if it is close. In this case, we recommend you setREC LAMP to OFF.In more than five minutes after removing the power sourceThe PROGRAM AE, FLASH LVL, WHT BAL, HiFi SOUND and COMMANDER itemsreturn to their default settings.Other menu items are held in memory even when the battery is removed.
176If you run into any problem using your camcorder, use the following table totroubleshoot the problem. If the problem persists, disconnect the power source andcontact your Sony dealer. If “C:ss:ss” appears on the screen, the self-diagnosisdisplay function has activated. See page xxx.In the recording modeSymptom Cause and/or Corrective Actions•The POWER switch is not set to CAMERA.cSet it to CAMERA (p. xx).•The tape has run out.cRewind the tape or insert a new one (p. xx, xx).•The write-protect tab is set to expose the red mark.cUse a new cassette or slide the tab (p. xx).•The tape is stuck to the drum (moisture condensation).cRemove the cassette and leave your camcorder for atleast1 hour to acclimatize (p. xx).•While being operated in CAMERA mode, your camcorderhas been in the standby mode for more than five minutes.cSet the POWER switch to OFF (CHG) and then to ON(p. xx).•The battery pack is dead or nearly dead.cInstall a fully charged battery pack (p. xx).•The viewfinder lens is not adjusted correctly.cAdjust the viewfinder lens (p. xx).•STEADYSHOT is set to OFF in the menu settings.cSet it to ON in the menu settings (p. xx).•The setting is the manual focus mode.cPress FOCUS to set to the auto focus mode (p. xx).•Shooting conditions are not suitable for autofocus.cAdjust to focus manually (p. xxx).•The LCD panel is open.cClose the LCD panel (p. xx).•The contrast between the subject and background is toohigh. This is not a malfunction.•This is not a malfunction.•Super NightShot or Color Slow Shutter mode is activated.This is not a malfunction.START/STOP does not operate.The power goes off.— Troubleshooting —Types of trouble and how to correct troubleThe image on the viewfinder screenis not clear.The picture does not appear in theviewfinder.The autofocusing function does notwork.The SteadyShot function does notwork.A vertical band appears when youshoot a very bright subject.Some tiny white spots appear on thescreen.A vertical band appears when youshoot a subject such as lights or acandle flame against a darkbackground.
177TroubleshootingTypes of trouble and how to correct troubleSymptom Cause and/or Corrective Actions•If 10 minutes elapse after you set the POWER switch toCAMERA without a cassette inserted, your camcorderautomatically starts the demonstration.cInsert a cassette or press the LCD screen. Thedemonstration stops. You can also cancel DEMO MODE(p. xxx) in the menu settings.•NIGHTSHOT is set to ON.cSet it to OFF (p. xx).•NIGHTSHOT is set to ON in a bright place.cSet it to OFF (p. xx).•The backlight function is active.cSet it off (p. xx).•BEEP is set to OFF in the menu settings.cSet it to MELODY or NORMAL (p. xxx).•Set STEADYSHOT to OFF in the menu settings (p. xxx).•The power of the external flash is off or the power sourceis not installed.cTurn on the external flash or install the power source.•Two or more external flashes (optional) are attached.cOnly one external flash (optional) can be attached.(continued on the following page)Picture appears too bright, and thesubject does not appear on thescreen.The picture is recorded in incorrect orunnatural colors.The click of the shutter does notsound.A black band appears whenrecording a TV screen or computerscreen.An unknown picture is displayed onthe screen.An external flash (optional) does notwork.
178In the playback modeSymptom Cause and/or Corrective Actions•The tape has run out.cRewind the tape (p. xx).•The video head may be dirty.cClean the head using the cleaning cassette (optional)(p. xxx).•Volume is turned to minimum.cTurn up the volume (p. xx).•The tape has a blank portion in the beginning of the tapeor between record portion. (p. xxx).•There is no title in the tape.cSuperimpose the titles (p. xxx).•The tape has a blank portion in the beginning of the tapeor between record portion. (p. xxx).•TITLE DSPL is set to OFF in the menu settings.cSet it to ON in the menu settings (p. xxx).•VIDEOINPUT is not set correctly in the menu settings.cSet it to the appropriate position (p. xx).•When playing back a transition of recordings, theplayback picture freezes for about one second. This is not amalfunction.The title is not displayed.The multi-picture search, title searchor date search function does notwork.No sound or only a low sound isheard when playing back a tape.There are horizontal lines on thepicture or the playback picture is notclear or does not appear.Displaying the recorded data, datesearch does not work.Playback is not possible.Types of trouble and how to correct troubleDubbing cannot be made when usingthe A/V connecting cable.The playback picture freezes forabout one second.
179TroubleshootingIn the recording and playback modesSymptom Cause and/or Corrective Actions•The battery pack is not installed, or is dead or nearly dead.cInstall a charged battery pack (p. xx, xx).•The AC power adaptor is not connected to a wall outlet.cConnect the AC power adaptor to a wall socket (p. xx).•The temperature of the environment is too low.•The battery pack is not fully charged.cCharge the battery pack fully again (p. xx).•The battery pack is completely dead, and cannot berecharged.cReplace with a new battery pack (p. xx).•You have used the battery pack in an extremely hot orcold environmment for a long time.•The battery pack is completely dead, and cannot berecharged.cReplace with a new battery pack (p. xx).•The battery is not fully charged.cCharge the battery pack fully again (p. xx).•A deviation has occured in the remaining time.cCharge the battery pack fully again so that the indicationon the battery remaining indicator is correct (p. xx).•A deviation has occurred in the remaining battery time.cCharge the battery pack fully again so that the indicationon the battery remaining indicator is correct (p. xx).•The power source is disconnected.cConnect it firmly (p. xx, xx).•The battery is exhausted.cUse a charged battery pack (p. xx, xx).•Moisture condensation has occurred.cRemove the cassette and leave your camcorder for atleast one hour to acclimatize (p. xxx).•The q REMAIN is set to AUTO in the menu settings.cSet it to ON to always display the remaining tapeindicator (p. xxx).(continued on the following page)Types of trouble and how to correct troubleThe battery pack is quicklydischarged.The POWER switch does not turn on.The % and Z indicators flash and nofunctions except for cassette ejectionwork.The cassette cannot be removed fromthe holder.The battery remaining indicator doesnot indicate the correct time.Remaining tape indicator is notdisplayed.The power goes off although thebattery remaining indicator indicatesthat the battery pack has enoughpower to operate.
180Types of trouble and how to correct troubleWhen operating using the “Memory Stick”Symptom Cause and/or Corrective Actions•The POWER switch is not set to MEMORY/NETWORKfor DCR-IP55 (MEMORY for DCR-IP45).cSet it to MEMORY/NETWORK or MEMORY (p. xxx).•The “Memory Stick” is not inserted.cInsert a “Memory Stick” (p. xxx).•The “Memory Stick” has already been recorded to its fullcapacity.cDelete unnecessary images and record again (p. xx).•The “Memory Stick” formatted incorrectly is inserted.cFormat the “Memory Stick” using your camcorder oruse another “Memory Stick” (p. xxx).•The write-protect tab on the “Memory Stick” is set toLOCK.cRelease the lock (p. xxx).•The image is protected.cCancel image protection (p. xxx).•The write-protect tab on the “Memory Stick” is set toLOCK.cRelease the lock (p. xxx).•The write-protect tab on the “Memory Stick” is set toLOCK.cRelease the lock (p. xx).•The write-protect tab on the “Memory Stick” is set toLOCK.cRelease the lock (p. xxx).•The write-protect tab on the “Memory Stick” is set toLOCK.cRelease the lock (p. xxx).•The INDEX screen is not displayed.cPress INDEX to display the index screen then protect theimage (p. xxx).•The write-protect tab on the “Memory Stick” is set toLOCK.cRelease the lock (p. xxx).•The INDEX screen is not displayed.cThe print marks cannot be written to the single screen(p. xxx).•You are trying to write a print mark on a moving picture.cPrint marks cannot be written to moving picture.•You may not be able to play back images in actual sizewhen you try to play back images recorded by otherequipment.This is not a malfunction.•Your camcorder cannot play back some images processedwith a computer (The file name flashes on the LCDscreen).Recording does not function.The image cannot be deleted.You cannot format the “MemoryStick.”You cannot write a print mark on thestill image.You cannot protect the image.Deleting all the images cannot becarried out.The “Memory Stick” does notfunction.You cannot play back images inactual size.You cannot play back image data.
181TroubleshootingOthersSymptom Cause and/or Corrective Actions•20 titles have been recorded.cErase unnecessary title (p. xxx).•The cassette is set to prevent accidental erasure.cSlide the write-protect tab so that red portion is notvisible (p. xx).•The tape has a blank portion in the recorded portion.cSuperimpose the title to the recorded position (p. xxx).•The tape is set to prevent accidental erasure.cSlide the write-protect tab so that red portion is notvisible (p. xx).•COMMANDER is set to OFF in the menu settings.cSet it to ON (p. xxx).•Something is blocking the infrared rays.cRemove the obstacle.•The batteries are inserted in the battery holder with the + –polarities incorrectly matching the + – marks.cInsert the batteries with the correct polarity (p. xxx).•The batteries are dead.cInsert new ones (p. xxx).•DISPLAY is set to V-OUT/LCD in the menu settings.cSet it to LCD (p. xxx).•Moisture condensation has occurred.cRemove the cassette and leave your camcorder for atleast one hour to acclimatize (p. xxx).•Some troubles have occurred in your camcorder.cRemove the cassette and insert it again, then operateyour camcorder.•The POWER switch is not set to OFF (CHG).cSet it to OFF (CHG) (p.xx).•The battery pack is not properly installed.cInstall it properly (p.xx).•Something is wrong with the battery pack.cPlease contact your Sony dealer or local authorized Sonyservice facility.•Disconnect the AC power adaptor from a wall outlet orremove the battery, then reconnect it in about one minute.Turn the power on. If the functions still do not work, pressthe reset button using a sharp-pointed object. (If you pressthe reset button, all the settings (DCR-IP55: except theNETWORK mode settings) including the date and timereturn to the default) (p. xxx).(continued on the following page)The Remote Commander suppliedwith your camcorder does not work.Types of trouble and how to correct troubleA cassette label is not recorded.The picture from a TV or VCR doesnot appear even when yourcamcorder is connected to theoutputs on the TV or VCR.A title is not recorded.No function works though the poweris on.The melody or beep sounds forfive seconds.You cannot charge the battery pack.While charging the battery pack, noindicator appears,  or the indicatorflashes on the LCD screen.
182Types of trouble and how to correct troubleSymptom Cause and/or Corrective Actions•Charging is completed.•The battery pack is not properly installed.cInstall it properly (p. xx).•The POWER switch is not set to OFF (CHG).cSet it to OFF (CHG).•The battery pack is not properly installed.cInstall it properly (P. xx).•Something is wrong with the battery pack.cPlease contact your Sony dealer or local authorized Sonyservice facility.•This is because some functions use a linear mechanism.Your camcorder is not malfunctioning.•The DISPLAY/TOUCH PANEL button is pressed.cPress the LCD screen lightly.cPress DISPLAY/TOUCH PANEL on your camcorder orDISPLAY on the Remote Commander (p. xx).cAdjust the screen (CALIBRATION) (p. xxx).•The mirror mode is activated.This is not a malfunction.•The USB cable was connected before installation of theUSB driver was completed.cUninstall the incorrect USB driver and re-install theUSB driver (p. xxx).•Moisture condensation has started to condense in yourcamcorder (p. xxx).The buttons do not appear on thetouch panel.The buttons on the LCD screen donot work.The indicators appear mirror-reversed in the viewfinder.While charging the battery pack, theCHG lamp flashes.You cannot charge the battery pack.While charging the battery pack, theCHG lamp does not light up.Image data cannot be transferred bythe USB connection.A cassette cannot be removed even ifthe cassette lid is open.When you set the POWER switch toVCR or OFF (CHG), if you moveyour camcorder, you may hear aclattering sound from inside yourcamcorder.
183TroubleshootingC:21:00Self-diagnosis displayFive-digit display Cause and/or Corrective Actions•You are using a battery pack that is not an“InfoLITHIUM” battery pack.cUse an “InfoLITHIUM” battery pack.•Moisture condensation has occurred.cRemove the cassette and leave your camcorder for atleast 1 hour to acclimatize (p. xxx).•The video heads are dirty.cClean the heads using the cleaning cassette (optional)(p. xxx).•A malfunction other than the above that you can servicehas occurred.cRemove the cassette and insert it again, then operateyour camcorder.cDisconnect the mains lead of the AC adaptor or removethe battery pack. After reconnecting the power source,operate your camcorder.•A malfunction that you cannot service has occurred.cContact your Sony dealer or local authorized Sonyservice facility and inform them of the 5-digit code.(example: E:61:10)If you are unable to rectify the problem even if you try corrective actions a few times,contact your Sony dealer or local authorized Sony service facility.Your camcorder has a self-diagnosis displayfunction.This function displays the current condition ofyour camcorder as a five-digit code (a combinationof a letter and figures) on the screen. If a five-digitcode is displayed, check the following code chart.The last two digits (indicated by ss) will differdepending on the state of your camcorder.C:21:ssLCD screen or ViewfinderSelf-diagnosis display•C:ss:ssYou can service your camcorderyourself.•E:ss:ssContact your Sony dealer or localauthorized Sony facility.E:20:ssE:61:ssE:62:ssC:31:ssC:32:ssC:04:ssC:22:ss
184Warning indicators and messages100-0001 Warning indicator as to fileSlow flashing:•The file is corrupted.•The file is unreadable.•You are trying to carry out MEMORY MIXfunction on moving picture.C:21:00 Self-diagnosis display (p. xxx).EThe battery is dead or nearly deadSlow flashing:•The battery is nearly dead.Depending on operational, enviromental orbattery conditions the E indicator may flash,even if there are approximately five to 10minutes remaining.%Moisture condensation has occurredFast flashing:•Eject the cassette, turn off your camcorder,and leave it for about one hour with thecassette compartment open (p. xxx).Warning indicator as to Micro CassetteMemory*Slow flashing:•Eject the cassette, and insert it again. If eventhen the indicator flashes, the Micro CassetteMemory of the cassette may be faulty.Fast flashing:•The Micro Cassette Memory of thecamcorder may be faulty.Warning indicator as to “Memory Stick”Slow flashing:•No “Memory Stick” is inserted.•The write-protect tab on the “Memory Stick”is set to LOCK (p. xxx).Fast flashing:•The “Memory Stick” is not readable withyour camcorder (p. xxx).•The image cannot be recorded on “MemoryStick” (p. xxx, xxx).If indicators and messages appear on the screen, check the following:See the page in parentheses “( )” for more information.Warning indicatorsC:21:00100–0001Warning indicator as to “Memory Stick”formattingFast flashing:•The “Memory Stick” data is corrupted.• “Memory Stick” is not formatted correctly (p.xxx).QWarning indicator as to tapeSlow flashing:•The tape is near the end.•No cassette is inserted.*•The write-protect tab on the cassette is out(red) (p. xx).*Fast flashing:•The tape has run out.*ZYou need to eject the cassetteSlow flashing:•The write-protect tab on the cassette is out(red) (p. xx).Fast flashing:•Moisture condensation has occurred (p. xxx).•The tape has run out.•The self-diagnosis display function isactivated (p. xxx).-The image is protectedSlow flashing:•The image is protected (p. xxx).•The write-protect tab on the “Memory Stick”is set to LOCK (p. xxx).Warning indicator as to the flashSlow flashing:•During charging.Fast flashing:•The self-diagnosis display function isactivated (p.XX)•There is something wrong with the externalflash (optional).*You hear the melody or beep sound.
185TroubleshootingWarning messages•CLOCK SET Set the date and time (p. xx).•FOR “InfoLITHIUM” Use an “InfoLIHIUM” battery pack (p. xx).BATTERY ONLY• CLEANING CASSETTE2) The video heads are dirty (p. xxx).•COPY INHIBIT You tried to record a picture that has a copyrightcontrol signal(p. xxx).1)• FULL The micro cassette memory is full (p. xxx).1)• TAPE There is no recorded portion on the tape.1) Youcannot dub new sound (p. xxx).• “i.LINK” CABLE i.LINK cable is connected (p. xxx).1) You cannot dubnew sound.• FULL The “Memory Stick” is full (p. xxx).1)•  -The write-protect tab on the “Memory Stick” is set toLOCK (p.XX).• NO FILE No image is recorded on the “Memory Stick” (p.xxx).1)• NO MEMORY STICK No “Memory Stick” is inserted (p. xxx).1)• NO STILL IMAGE FILE 1)• AUDIO ERROR You are trying to record an image with sound thatcannot be recorded by your camcorder on  “MemoryStick” (p. xxx). 1)• MEMORY STICK ERROR The “Memroy Stick” data is corrupted (p. xxx).1)• FORMAT ERROR The “Memory Stick” is not recognized (p. xxx).1)Check the format.•  - DIRECTORY ERROR There is more than two same directories (p. xxx).1)• PLAY ERROR The image is distorted and cannot be played back.1)• REC ERROR Check the input signal, then record again.1)•Q Z TAPE END The tape has reached the end of the tape.1)•Q NO TAPE Insert a cassette.1)•DELETING You press PHOTO while deleting data in a “MemoryStick”.1)•FORMATTING You press PHOTO while formatting a “MemoryStick.”1)• NOW CHARGING Charging an external flash (optional) does not workcorrectly.1)•Q Z CLEANING END The cleaning is complete. Eject the cleaning cassette(p. xx).• TITLE FULL 20 titles have been recorded (p. xx).•INPUT ERROR A picture in an incompatible format (such as onerecorded with the DV format) is input (p. xx).•NO INPUT You tried to start recording when no signal is inputinto the camcorder (p. xx).Warning indicators and messages
186Warning indicators and messages• NOT REC You tried to mix a moving file image (p. xx).•CHANGE TO “CAM” or “VCR”A cleaning cassette cannot be used in MEMORY/NETWORK mode for DCR-IP55 (MEMORY mode forDCR-IP45) (p. xx).1) You hear the melody or beep sound.2) The x indicator and “  CLEANING CASSETTE“ message appear one after anotheron the screen.
187Additional Information— Additional Information —Usable cassettesSelecting cassette typesYou can use   cassette only. You cannot use any other   8 mm, Hi8,   Digital8,   VHS,   VHSC,   S-VHS,   S-VHSC, Betamax,   ED Betamax,   DV, or   mini DV cassettes.All of the MICROMV cassettes have Micro Cassette Memory. ,  , and   are trademarks of Sony Corporation.IC memory is mounted on this type of cassette. Your camcorder can read and writedata such as dates of recording or titles, etc. to this memory.The functions using the cassette memory require successive signals recorded on thetape. If the tape has a blank portion at the beginning or between recorded portions,titles may not be displayed properly or the search functions may not work properly.Perform the following to prevent a blank portion from being made on the tape.Press END SCH to go to the end of the recorded portion before you begin the nextrecording if you operate the following:–You have ejected the cassette while recording.–You have played back the tape.–You have used the edit search.If there is a blank portion or discontinuous signal on your tape, re-record from thebeginning to the end of the tape as described above.The same result may occur when you record using a digital video camera recorderwithout a cassette memory on a tape recorded by one with the cassette memory.Copyright signalWhen you play backIf the tape you play back on your camcorder contains copyright signals, you cannotcopy it with another video camera connected to your camcorder.When you recordYou cannot record software on your camcorder that contains copyright control signalsfor copyright protection of software.COPY INHIBIT appears on the LCD screen or on the TV screen if you try to record suchsoftware. Your camcorder does not record copyright control signals on the tape when itrecords.
188Usable cassettesNotes on the MICROMV cassetteWhen affixing a label on the MICROMV cassetteBe sure to affix a label only on the location illustrated below [a] so as not to causemalfunction of your camcorder.After using the MICROMV cassetteRewind the tape to the beginning, put the cassette in its case, and store it in an uprightposition.When the Micro Cassette Memory function does not workReinsert the cassette.[a]
189Additional InformationAbout the “InfoLITHIUM” battery packWhat is the “InfoLITHIUM” battery pack?The “InfoLITHIUM” battery pack is a lithium-ion battery pack that has functions forcommunicating information related to operating conditions between your camcorderand an optional AC adaptor/charger.The “InfoLITHIUM” battery pack calculates the power consumption according to theoperating conditions of your camcorder, and displays the remaining battery time inminutes.Charging the battery pack•Be sure to charge the battery pack before you start using your camcorder.•We recommend charging the battery pack in an ambient temperature of between 10°C to 30 °C (50 °F to 86 °F) until the CHG lamp goes off, indicating that the batterypack is fully charged. If you charge the battery outside of this temperature range, youmay not be able to efficiently charge the battery pack.•After charging is completed, either disconnect the cable from the DC IN jack on yourcamcorder or remove the battery pack.Effective use of the battery pack•Battery pack performance decreases in low-temperature surroundings. So, the timethat the battery pack can be used is shorter. We recommend the following to use thebattery pack longer:–Put the battery pack in a pocket to warm it up, and insert it in your camcorderimmediately before you start taking shots.–Use the large capacity battery pack (NP-FF70, optional).•Frequently using the LCD panel or frequently operating playback, fast forward orrewind wears out the battery pack faster. We recommend using the large capacitybattery pack (NP-FF70, optional).•Be certain to turn the POWER switch to OFF (CHG) when not taking shots or playingback on your camcorder. The battery pack is also consumed when your camcorder isin the standby mode or playback is paused.•Have spare battery packs handy for two or three times the expected recording time,and make trial recordings before taking the actual recording.• Do not expose the battery pack to water. The battery pack is not water resistant.Remaining battery time indicator•If the power goes off although the remaining battery time indicator indicates that thebattery pack has enough power to operate, charge the battery pack fully again so thatthe indication on the remaining battery time indicator is correct. Note, however, thatthe correct battery indication sometimes will not be restored if it is used in hightemperatures for a long time or left in a fully charged state, or the battery pack isfrequently used. Regard the remaining battery time indication as the approximateshooting time.•The E mark indicating little remaining battery time sometimes flashes depending onthe operating conditions or ambient temperature and environment even if theremaining battery time is about five to ten minutes.
190About the “InfoLITHIUM” battery packHow to store the battery pack•If the battery pack is not used for a long time, do the following procedure once peryear to maintain proper function.1. Fully charge the battery.2. Discharge on your electronic equipment.3. Remove the battery from the equipment and store it in a dry, cool place.•To use the battery pack up on your camcorder, leave your camcorder in the recordingmode until the power goes off without a cassette inserted.Battery life•The battery life is limited. Battery capacity drops little by little as you use it more andmore, and as time passes. When the available battery time is shortened considerably, aprobable cause is that the battery pack has reached the end of its life. Please buy a newbattery pack.•The battery life varies depending on how it is stored and operating conditions andenvironment for each battery pack.
191Additional InformationThe i.LINK (MICROMV) jack on this unit is an i.LINK-compliant MICROMV input/output jack. This section describes the i.LINK standard and its features.What is i.LINK?i.LINK is a digital serial interface for handling digital video, digital audio and otherdata in two directions between equipment having the i.LINK jack, and for controllingother equipment.i.LINK-compatible equipment can be connected by a single i.LINK cable. Possibleapplications are operations and data transactions with various digital AV equipment.When two or more i.LINK-compatible equipment are connected to this unit in a daisychain, operations and data transactions are possible with not only the equipment thatthis unit is connected to but also with other devices via the directly connectedequipment.Note, however, that the method of operation sometimes varies according to thecharacteristics and specifications of the equipment to be connected, and that operationsand data transactions are sometimes not possible on some connected equipment.NoteNormally, only one piece of equipment can be connected to this unit by the i.LINKcable. When connecting this unit to i.LINK-compatible equipment having two or morei.LINK jacks, refer to the instruction manual of the equipment to be connected.About the name “i.LINK”The maximum baud rate of the camcorder is “S400”.i.LINK is a more familiar term for IEEE 1394 data transport bus proposed by SONY,and is a trademark approved by many corporations.IEEE 1394 is an international standard standardized by the Institute of Electrical andElectronics Engineers.i.LINK baud ratei.LINK’s maximum baud rate varies according to the equipment. Three maximum baudrates are defined:S100 (approx. 100Mbps*)S200 (approx. 200Mbps)S400 (approx. 400Mbps)The baud rate is listed under “Specifications” in the instruction manual of eachequipment. It is also indicated near the i.LINK jack on some equipment.The maximum baud rate of equipment, except for this unit, on which it is not indicatedis “S100”.When units are connected to equipment having a different maximum baud rate, thebaud rate sometimes differs from the indicated baud rate.*What is Mbps?Mbps stands for megabits per second, or the amount of data that can be sent or receivedin one second. For example, a baud rate of 100Mbps means that 100 megabits of datacan be sent in one second.About i.LINK
192About i.LINKi.LINK functions on this unitFor details on how to dub when this unit is connected to other video equipment havingDV jacks, see page xx.This unit can also be connected to other i.LINK compatible equipment made by SONY(e.g. VAIO series personal computer) other than video equipment.Before connecting this unit to your computer, make sure that application softwaresupported by this unit is already installed on your computer.For details on precautions when connecting this unit, also refer to the instructionmanuals for the equipment to be connected.Required i.LINK CableUse the Sony i.LINK 4-pin-to-4-pin cable (during MPEG2 dubbing).i.LINK and   are trademarks.
193Additional InformationUsing your camcorder abroadCountries and areas where you can use network functions are restricted. For details,refer to the separate network function operating instructions (DCR-IP55 only).You can use your camcorder in any country or area with the AC adaptor supplied withyour camcorder within 100 V to 240 V AC, 50/60 Hz.When charging the battery pack, use a commercially available AC plug adaptor [a], ifnecessary, depending on the design of the wall outlet [b].Your camcorder is a NTSC system based camcorder. If you want to view the playbackpicture on a TV, it must be a NTSC system based TV with VIDEO/AUDIO input jack.The following shows TV color systems used overseas.NTSC systemBahama Islands, Bolivia, Canada, Central America, Chile, Colombia, Ecuador, Guyana,Jamaica, Japan, Korea, Mexico, Peru, Surinam, Taiwan, the Philippines, the U.S.A.,Venezuela, etc.PAL systemAustralia, Austria, Belgium, China, Czech Republic, Denmark, Finland, Germany,Holland, Hong Kong, Hungary, Italy, Kuwait, Malaysia, New Zealand, Norway,Poland, Portugal, Singapore, Slovak Republic, Spain, Sweden, Switzerland, Thailand,United Kingdom, etc.PAL-M systemBrazilPAL-N systemArgentina, Paraguay, UruguaySECAM systemBulgaria, France, Guiana, Iran, Iraq, Monaco, Russia, Ukraine, etc.Using your camcorder abroadAC-L20A[b][a]
194Maintenance information and precautionsMoisture condensationIf your camcorder is brought directly from a cold place to a warm place, moisture maycondense inside your camcorder, on the surface of the tape, or on the lens. In thiscondition, the tape may stick to the head drum and be damaged or your camcorder maynot operate correctly. If there is moisture inside your camcorder, the beep sounds andthe % indicator flashes. When theZ indicator flashes at the same time, the cassette is inserted in your camcorder. Ifmoisture condenses on the lens, the indicator will not appear.If moisture condensation occurredNone of the functions except cassette ejection will work. Eject the cassette, turn off yourcamcorder, and leave it for about one hour with the cassette compartment open. Yourcamcorder can be used again if the % indicator does not appear when the power isturned on again.If moisture starts to condense, your camcorder sometimes cannot detect condensation.If this happens, the cassette is sometimes not ejected for ten seconds after the cassettelid is opened. This is not a malfunction. Do not close the cassette lid until the cassette isejected.Note on moisture condensationMoisture may condense when you bring your camcorder from a cold place into a warmplace (or vice versa) or when you use your camcorder in a hot place as follows:– You bring your camcorder from a ski slope into a place warmed up by a heatingdevice– You bring your camcorder from anair-conditioned car or room into a hot place outside– You use your camcorder after a squall or a shower– You use your camcorder in a high temperature and humidity placeHow to prevent moisture condensationWhen you bring your camcorder from a cold place into a warm place, put yourcamcorder in a plastic bag and tightly seal it. Remove the bag when the air temperatureinside the plastic bag has reached the surrounding temperature (after about 1 hour).
195Additional InformationMaintenance information and precautions[a] [b] [c]Maintenance informationCleaning the video headTo ensure normal recording and clear pictures, clean the video head. The video headmay be dirty when:–mosaic-pattern noise appears on the playback picture.–playback pictures do not move.–playback pictures do not appear.–the x indicator and “  CLEANING CASSETTE” message appear one after anotheror the x indicator flashes on the screen during recording.If the above problem, [a], [b] or [c] occurs, clean the video heads for 10 seconds with theSony MGRCLD-12CLD cleaning cassette (optional). Check the picture and if the aboveproblem persists, repeat cleaning.If the video heads gets dirtier, the entire screen becomes blue [c].Cleaning the LCD screenIf fingerprints or dust make the LCD screen dirty, we recommend using a LCD cleaningcloth (supplied) to clean the LCD screen.Charging the built-in rechargeable batteryYour camcorder is supplied with a built-in rechargeable battery installed so as to retainthe date and time, etc., regardless of the setting of the POWER switch. The built-inrechargeable battery is always charged as long as you are using your camcorder. Thebattery, however, will get discharged gradually if you do not use your camcorder. Itwill be completely discharged in about three months if you do not use your camcorderat all. Even if the built-in rechargeable battery is not charged, it will not affect thecamcorder operation. To retain the date and time, etc., charge the battery if the batteryis discharged.Charging the built-in rechargeable battery•Connect your camcorder to the house current using the AC adaptor supplied withyour camcorder, and leave your camcorder with the POWER switch turned off formore than 24 hours.•Or install the fully charged battery pack in your camcorder, and leave your camcorderwith the POWER switch turned off for more than 24 hours.
196Maintenance information and precautionsCALIBRATE CALIBRATE CALIBRATEFNINDEXPBAjusting the LCD screen (CALIBRATION)The buttons on the touch panel may not work correctly. If this happens, follow theprocedure below.(1)Set the POWER switch to OFF (CHG).(2)Eject the tape from your camcorder, then disconnect any connecting cable fromyour camcorder.(3)Set the POWER switch to VCR while pressing DISPLAY/TOUCH PANEL on yourcamcorder, then keep pressing DISPLAY/TOUCH PANEL for about five seconds.(4)Follow the procedure below using the stylus supplied.1Touch   at the upper left corner.2Touch   at the lower right corner.3Touch   in the middle of the screen.NoteIf you do not press the right spot,   always returns to the position at the upper leftcorner. In this case, start from step 4 again.PrecautionsCamcorder operation•Operate your camcorder on 7.2 V (battery pack) or 8.4 V (AC adaptor).•For DC or AC operation, use the accessories recommended in this operatinginstructions.•If any solid object or liquid get inside the casing, unplug your camcorder and have itchecked by a Sony dealer before operating it any further.•Avoid rough handling or mechanical shock. Be particularly careful of the lens.•Keep the POWER switch set to OFF (CHG) when you are not using your camcorder.•Do not wrap your camcorder with a towel, for example, and operate it. Doing somight cause heat to build up inside.•Keep your camcorder away from strong magnetic fields or mechanical vibration.•Do not touch the LCD screen with a sharp object other than the stylus supplied. (DCR-IP55 only)•If your camcorder is used in a cold place, a residual image may appear on the LCDscreen. This is not a malfunction.•While using your camcorder, the back of the LCD screen may heat up. This is not amalfunction.•Do not use the network function in a medical institution or in an aircraft (DCR-IP55only).On handling tapes•Do not insert anything into the small holes on the rear of the cassette. These holes areused to sense the type and thickness of the tape and if the recording tab is in or out.•Do not open the tape protect cover or touch the tape.•Avoid touching or damaging the terminals. To remove dust, clean the terminals witha soft cloth.
197Additional InformationMaintenance information and precautionsCamcorder care•Remove the tape, and periodically turn on the power, operate the CAMERA and VCRsections and play back a tape for about three minutes when your camcorder is not tobe used for a long time.•Clean the lens with a soft brush to remove dust. If there are fingerprints on the lens,remove them with a soft cloth.•Clean the camcorder body with a dry soft cloth, or a soft cloth lightly moistened witha mild detergent solution. Do not use any type of solvent which may damage thefinish.•Do not let sand get into your camcorder. When you use your camcorder on a sandybeach or in a dusty place, protect it from the sand or dust.  Sand or dust may causeyour camcorder to malfunction, and sometimes this malfunction cannot be repaired.AC power adaptor•Unplug the unit from a wall outlet when you are not using the unit for a long time. Todisconnect the power cord, pull it out by the plug. Never pull the power cord itself.•Do not operate the unit with a damaged cord or if the unit has been dropped ordamaged.•Do not bend the power cord forcibly, or place a heavy object on it. This will damagethe cord and may cause fire or electrical shock.•Prevent metallic objects from coming into contact with the metal parts of theconnecting section. If this happens, a short may occur and the unit may be damaged.•Always keep metal contacts clean.•Do not disassemble the unit.•Do not apply mechanical shock or drop the unit.•While the unit is in use, particularly during charging, keep it away from AM receiversand video equipment. AM receivers and video equipment disturb AM reception andvideo operation.•The unit becomes warm during use. This is not a malfunction.•Do not place the unit in locations that are:– Extremely hot or cold– Dusty or dirty– Very humid– VibratingAbout care and storage of the lens•Wipe the surface of the lens clean with a soft cloth in the following instance:–When there are fingerprints on the lens surface–In hot or humid locations–When the lens is used in environments such as the seaside•Store the lens in a well-ventilated location subject to little dirt or dust.To prevent mold from occuring, periodically perform the above.We recommend turning on and operating the video camera recorder about once permonth to keep the video camera recorder in an optimum state for a long time.
198Maintenance information and precautionsBattery pack•Use only the specified charger or video equipment with the charging function.•To prevent an accident from a short circuit, do not allow metal objects to come intocontact with the battery terminals.•Keep the battery pack away from fire.•Never expose the battery pack to temperatures above 60 °C (140 °F), such as in a carparked in the sun or under direct sunlight.•Store the battery pack in a cool, dry place.•Do not expose the battery pack to any mechanical shock.•Do not disassemble nor modify the battery pack.•Attach the battery pack to the video equipment securely.•Charging while some capacity remains does not affect the original battery capacity.Notes on dry batteriesTo avoid possible damage from battery leakage or corrosion, observe the following:•Be sure to insert the batteries with the + – polarities matched to the + – marks.•Dry batteries are not rechargeable.•Do not use a combination of new and old batteries.•Do not use different types of batteries.•Current flows from batteries when you are not using them for a long time.•Do not use leaking batteries.If batteries are leaking•Wipe off the liquid in the battery compartment carefully before replacing the batteries.•If you touch the liquid, wash it off with water.•If the liquid get into your eyes, wash your eyes with a lot of water and then consult adoctor.If any problem occurs, unplug your camcorder and contact your nearest Sony dealer.
199Additional InformationSpecificationsVideo camerarecorderSystemVideo recording system2 rotary headsHelical scanning  systemAudio recording system2 rotary heads, PCM systemQuantization: 12 bits (Fs 32 kHz,stereo 1, stereo 2)Video signalNTSC color, EIA standardsUsable cassetteMICROMV cassette with the mark printedTape speedApprox. xxx mm/sRecording/playback time(using cassette MGR60)xxx hourFastforward/rewind time(using cassette MGR60)Approx. one min. and 30 secondsViewfinderElectric viewfinder (color)Image device3.8 mm (1/4.7 type) CCD(Charge Coupled Device)Approx. 1 000 000 pixels(Effective: 690 000 pixels)LensCarl ZeissCombined power zoom lensFilter diameter xx mm. (1 3/16 in.)10× (Optical), 120× (Digital)Focal length3.7 - 37 mm (5/32 - 1 1/2 in.)When converted to a 35 mm stillcameraCAMERA:50 - 500 mm (xxx - xxxx in.)MEMORY:42 - 420 mm (xxx - xxxx in.)Color temperatureAuto, HOLD (Hold), nIndoor(3 200K),  Outdoor (5 800K)Minimum illumination15 lx  (lux) (F 1.8)0 lx (lux) (in the NightShot mode)**Objects unable to be seen due tothe dark can be shot withinfrared lighting.Input/Output connectorsAudio/Video input/output10-pin connectorInput/output auto switchVideo signal: 1 Vp-p, 75 Ω (ohms),unbalanced, sync negativeLuminance signal: 1 Vp-p, 75 Ω(ohms), unbalancedChrominance signal: 0.286 Vp-p,75 Ω (ohms), unbalancedAudio signal: 327 mV, (at outputimpedance more than 47 kΩ(kilohms) )Input impedance with more than47 kΩ (kilohms)Output impedance with less than2.2 kΩ (kilohms)i. LINK (MICROMV) input/output4-pin connector S400LANC jackStereo mini-minijack (ø 2.5 mm)USB jackmini-BLCD screenPicture6.2 cm (2.5 type)xx × xx mm (xx × xxx in.)Total dot number:xxx xxx (xxx × xxx)Wireless  communication(DCR-IP55 only)Communication systemBluetooth specification Ver. 1.1Maximum communicationspeed 1) 2)Approx. 723 kbpsMaximum outputBluetooth specification PowerClass2Communication distance 2)Approx. 10 m (33 feet) (Openspace, when using a Sony BTA-NW1 Modem Adaptor withBluetooth Function)Compatible Bluetooth profiles 3)Generic Access ProfileDial-up Networking ProfileUsable frequency band2.4 GHz band(2.400 – 2.4835 GHz)1) The maximum rate defined byBluetooth specification Ver. 1.12) Depends on obstacles betweenthe Bluetooth devices, radiowave conditions, etc.3) Defined by Bluetoothspecification for intended usebetween the Bluetooth devicesGeneralPower requirementsxxx V (battery pack)xxx V (AC power adaptor)Average power consumption(when using the battery pack)During camera recording usingLCD: xxx WViewfinder: xxx WOperating temperature0 °C to 40 °C (32 °F to 104 °F)Storage temperature–20 °C to +60 °C (–4 °F to +140 °F)Dimensions (approx.)xx × xxx × xx mm(2 3/8 × 4 1/8 × 3 7/8 in.) (w/h/d)Mass (approx.)xxx g (xx lb xx oz)excluding the battery pack andcassettexxx g (x lb xx oz)including the battery pack,NP-FF50, cassette MGR60 and lenscapSupplied accessoriesSee page xx.AC power adaptorPower requirements100 - 240 V AC, 50/60 HzPower consumption23 WOutput voltageDC OUT: 8.4 V, 1.5 A in theoperating modeOperating temperature0 °C to 40 °C (32 °F to 104 °F)Storage temperature–20 °C to +60 °C (–4 °F to +140 °F)Dimensions (approx.)125 × 39 × 62 mm (5 × 1 9/16 ×2 1/2 in.) (w/h/d) excludingprojecting partsMass (approx.)280 g (9.8 oz)excluding power cord
200Battery packMaximum output voltageDC 8.4 VOutput voltageDC 7.2 VCapacity48 Wh (675 mAh)Operating temperature0°C to 40°C (32°F to 104°F)Dimensions (approx.)40.8 × 12.5 × 49.1 mm(1 5/8 × 1/2 × 1 15/16 in.)(w/h/d)Mass (approx.)45 g (1.6 oz)TypeLithium ion“Memory Stick”MemoryFlash memory8MB: MSA-8AOperating voltage2.7-3.6VPower consumptionApprox. 45mA in the operatingmodeApprox. 130µA in the standbymodeDimensions (approx.)50 × 2.8 × 21.5 mm(2 × 1/8 × 7/8  in.) (w/h/d)Mass (approx.)4 g (0.14 oz)Design and specifications aresubject to change without notice.Specifications
201Quick Reference12789q;qaqsqdqfqg3456— Quick Reference —Identifying the parts and controls1Lens cap (p. xx)2LCD screen/Touch panel (p. xx, xx)3DC IN jack4FOCUS button (p. xx)5BACK LIGHT button (p. xx)6DISPLAY/TOUCH PANEL button (p. xx)7 i.LINK (MICROMV) jack (p. xx)The i.LINK (MICROMV) jack is i.LINKcompatible.8Eyecup9Viewfinder (p. xx)q; > and BATT (battery) RELEASE levers(p. xx)Camcorderqa  (USB) jack (p. xx)qs A/V (ID-2) jack (p. xx)qd  (LANC) jack (p. xx)LANC stands for Local Application ControlBus System. The   control jack is used forcontrolling the tape transport of videoequipment and other peripherals connectedto the video equipment. This jack has thesame function as the jack indicated asCONTROL L or REMOTE.qf LCD BACKLIGHT switch (p.xx)qg Jack cover (p. xx)
202qh Flashqj Focus ring (p. xx)qk Lensql Camera recording lamp (p. xx)w; Infrared rays emitter (p. xx)Identifying the parts and controlsqhqjqkqlw;wawswdwfwa Remote sensorws OPEN button (p. xx)wd  (Bluetooth) lamp (DCR-IP55 only) (p.xx)wf HOLOGRAM AF emitter (p.xx)Note on the Carl Zeiss lensYour camcorder is equipped with a Carl Zeiss lens which can reproduce a fine image.The lens for your camcorder was developed jointly by Carl Zeiss, in Germany, and SonyCorporation. It adopts the MTF* measurement system for video camera and offers a quality asthe Carl Zeiss lens.*MTF is an abbreviation of Modulation Transfer Function.The value number indicates the amount of light of a subject penetrating into the lens.
203Quick ReferenceIdentifying the parts and controlswg egehejekelr;whwjwkwle;eaesedefwg COLOR SLOW S/SUPER NIGHTSHOTbutton  (p.xx)wh NIGHTSHOT switch (p. xx)wj Charge lamp (p. xx)wk  (flash) button (p.xx)wl POWER switch (p. xx)e; CAMERA lamp (p.xx)ea MEMORY/NETWORK lamp (DCR-IP55) orMEMORY lamp (DCR-IP45) (p.xx)es VCR lamp (p.xx)ed “Memory Stick” access lamp (p. xx)ef “Memory Stick” slot (p. xxx)eg Cassette lid (p. xx)eh Grip (p.xx)ej Tripod receptacleMake sure that the length of the tripodscrew is less than 5.5 mm (7/32 inch).Otherwise, you cannot attach the tripodsecurely and the screw may damage yourcamcorder.ek OPEN/ZEJECT lever (p. xx)el Hook for wrist strap (p.xx)r; Speaker
204Identifying the parts and controlsrargrhrjrkrlt;rsrdrfra Viewfinder lens adjustment lever (p. xx)rs PHOTO button (p. xx, xx)rd Stylus holder (p.xx)rf Wrist strap (p.xx)rg Power zoom lever (p. xx)rh START/STOP button (p. xx)rj Microphonerk Hook for lens cap (p.xx)rl PUSH button (p.xx)t; Battery pack or battery terminal cover(p. xx)How to attach the supplied wrist strap
205Quick ReferenceIdentifying the parts and controlsRemote CommanderThe buttons that have the same name on the Remote Commander as on your camcorderfunction identically to the buttons on your camcorder.qa43219q;87651PHOTO button (p. XX, XX)2DISPLAY button (p. XX)3MEMORY control buttons4SEARCH MODE button (p. XX to XX)5MULTI SRCH button (p. XX)6TransmitterPoint toward the remote sensor to controlyour camcorder after turning on yourcamcorder.7DATA CODE button (p. XX)8START/STOP button (p. XX)9Power zoom button (p. XX)0Video control buttons (p. XX)qa X/x/C/c/EXECUTE buttonsThese buttons function the same as thecontrol button on the camcorder.
206To prepare the Remote CommanderInsert 2 R6 (size AA) batteries by matching the + and –  polarities on the batteries to the+ – marks inside the battery compartment.Notes on the Remote Commander•Point the remote sensor away from strong light sources such as direct sunlight oroverhead lighting. Otherwise, the Remote Commander may not function properly.•Your camcorder works in the commander mode VTR 2. Commander modes 1, 2 and 3are used to distinguish your camcorder from other Sony VCRs to avoid remote controlmisoperation. If you use another Sony VCR in the Commander mode VTR 2, werecommend changing the commander mode or covering the sensor of the VCR withblack paper.Identifying the parts and controls
207Quick Reference120min STBY 0:12:34—+ 12minST I LL END16:9WIDE SEARCHNEG . ARTAUT  50 AWB  MPEG  INF11 9db100—000165432190qaqsw;qlqkqh78qfqgqdqjwawdwsOperation indicators1Micro cassette memory (p. xx)2Remaining battery time (p. xx)3Zoom (p. xx)/Exposure (p. xx)/Data filename (p. xx)4Digital effect (p. xx)/MEMORY MIX(p. xxx)/FADER (p. xx)516:9WIDE (p. xx)6Picture effect (p. xx)7Data code (p. xx)8Date9PROGRAM AE (p. xx)0Backlight (p. xx)qa SteadyShot off (p. xxx)qs Manual focus (p. xx)qd Self-timer (p. xx, xxx)qf STBY/REC (p. xx)/Video control mode (p.xx)/Picture size (p. xxx)/Image qualitymode (p. xxx)LCD screen and viewfinderIdentifying the parts and controlsqg NIGHTSHOT/SUPER NIGHTSHOT (p.xx)/COLOR SLOW SHUTTER (p.xx)qh Warning (p. xxx)qj Tape counter (p. xx)/Time code (p.xx)/Self-diagnosis (p. xx)/Photo mode (p. xx,xxx)/Image number (p. xxx)qk Remaining tape (p. xx)/Memory playback(p. xxx)ql END SEARCH (p. xx)w; MPEG IN (p. xxx)wa Data file name (p. xxx)This indicator appears when the MEMORYMIX functions work. /Timews Video flash readyThis indicator appears when you use thevideo flash light (optional).wd NORMAL screen mode (p. xxx)This indicator appears when you recordstill images continuously.
208IndexA, BAC power adaptor .................. xxAdjusting viewfinder ............. xxAudio dubbing ........................ xxAuto red-eye reduction .......... xxAUTO SHTR ............................ xxA/V connecting cable ............ xxBACK LIGHT .......................... xxBattery pack ............................. xxBEEP ......................................... xxBOUNCE .................................. xxC, DCALIBRATION ....................... xxCamera chromakey ................ xxCarl Zeiss lens ......................... xxCassette information .............. xxCassette memory .................... xxCharging battery ..................... xxCharging built-in rechargeablebattery ................................... xxCleaning cassetteClock set ................................... xxCOLOR SLOW SHUTTER .... xxContinuous photo recording . xxData code ................................. xxDate search .............................. xxDEMO MODE ......................... xxDIGITAL EFFECT .................. xxDISPLAY .................................. xxDubbing a tape ........................ xxEEND SEARCH ................... xx, xxEXP BRKTG ........................... xxxExposure .................................. xxF, G, HFader ......................................... xxFade in/out .............................. xxFlash .......................................... xxFLASH MOTION .................... xxFlexible Spot Meter ................. xxFOCUS ...................................... xxFormat ...................................... xxFull charge ............................... xxGrip ........................................... xxHeads ........................................ xxHOLOGRAM AF ................... XXI, J, K, Li.LINK ....................................... xxImage protection ..................... xxImage quality mode ............... xxImage size .............................. xxxIndex screen ............................. xx“InfoLITHIUM” battery ........ xxInfrared rays emitter .............. xxJPEG .......................................... xxLabelling a cassette ................. xx (LANC) jack ........................ xxLUMINANCEKEY ................. xxM, NManual focus ........................... xxMemory chromakey ............... xxMemory luminancekey .......... xxMEMORY MIX ........................ xxMemory overlap ..................... xxMemory PB ZOOM ................ xxMemory photo recording ...... xx“Memory Stick” ...................... xxMenu settings .......................... xxMicro cassette memoryMirror mode ............................ xxMoisture condensation .......... xxMONOTONE .......................... xxMOSC. FADER ........................ xxMPEG ....................................... xxMulti-picture search ............... xxMulti screen mode .................. xxNETWORK ............................. XXNIGHTSHOT .......................... xxNORM. FADER ...................... xxNTSC system ........................... xxO, P, QOLD MOVIE ............................ xxOperation indicators .............. xxPAL system .............................. xxPB ZOOM ................................ xxPICTURE EFFECT .................. xxPlayback pause ........................ xxPlayback time .......................... xxPower zoom ............................. xxPrint mark ................................ xxPROGRAM AE .......................  xxRRecording time ........................ xxRemaining battery timeindicator ................................ xxRemaining tape indicator ...... xxRemote commander ............... xxRemote sensor ......................... xxReset ......................................... xxSSelf-diagnosis display ............ xxSelf-timer recording ............... xxSlide show ................................ xxSPOT FOCUS .......................... xxSTEADYSHOT ........................ xxSTILL ........................................ xxStylus ....................................... XXSUPER NIGHTSHOT ............. xxS VIDEO jack ........................... xxT, U, VTape counter ............................ xxTape PB ZOOM ....................... xxTelephoto ................................. xxTime code ................................. xxTitle ........................................... xxTitle search ............................... xxTouch panel ............................. xxTRAIL ....................................... xxTransition ................................. xxTV color systems ..................... xxUSB jack ................................... xxUSB streaming ......................... xxW, X, Y, ZWarning indicators ................. xxWhite balance .......................... xxWide-angle .............................. xxWide mode .............................. xxWORLD TIME ......................... xxWrist strap ............................... xxWrite-protect tab ..................... xxZoom ........................................ xx
Sony Corporation    Printed in Japan *307461611*Printed using vegitable oil ink with less than1% VOC (Volatile Organic Compound).

Navigation menu