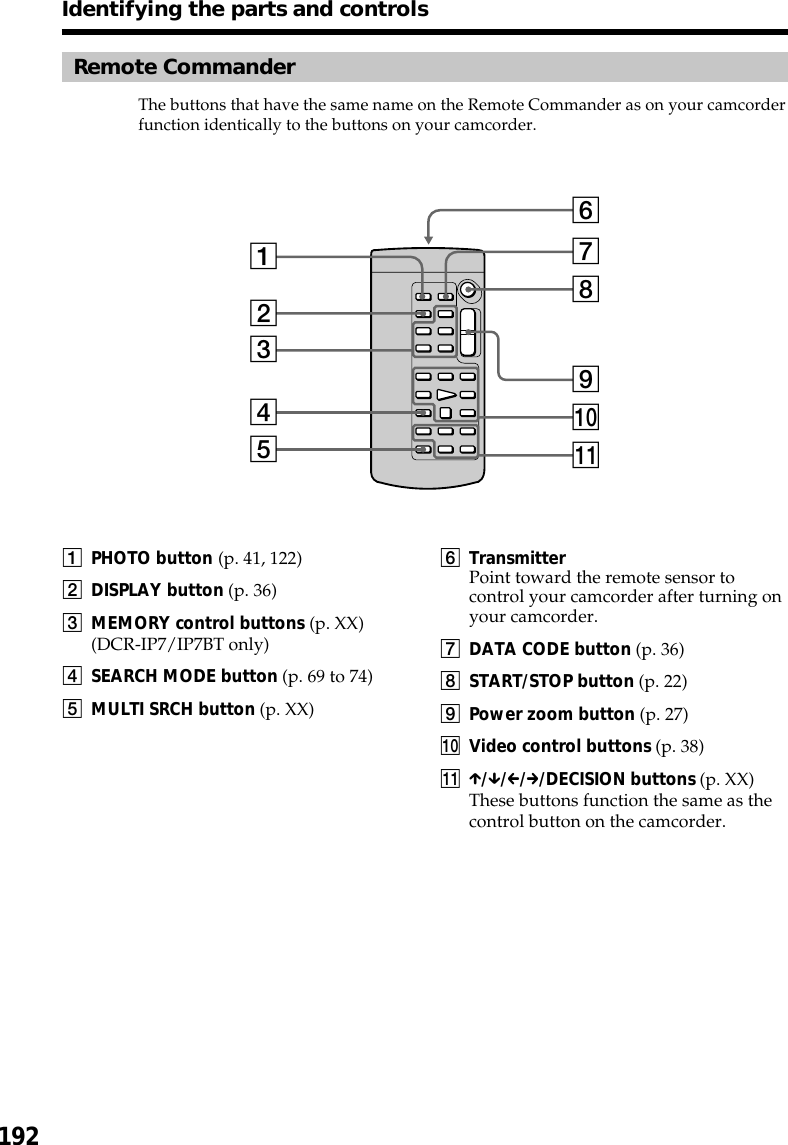
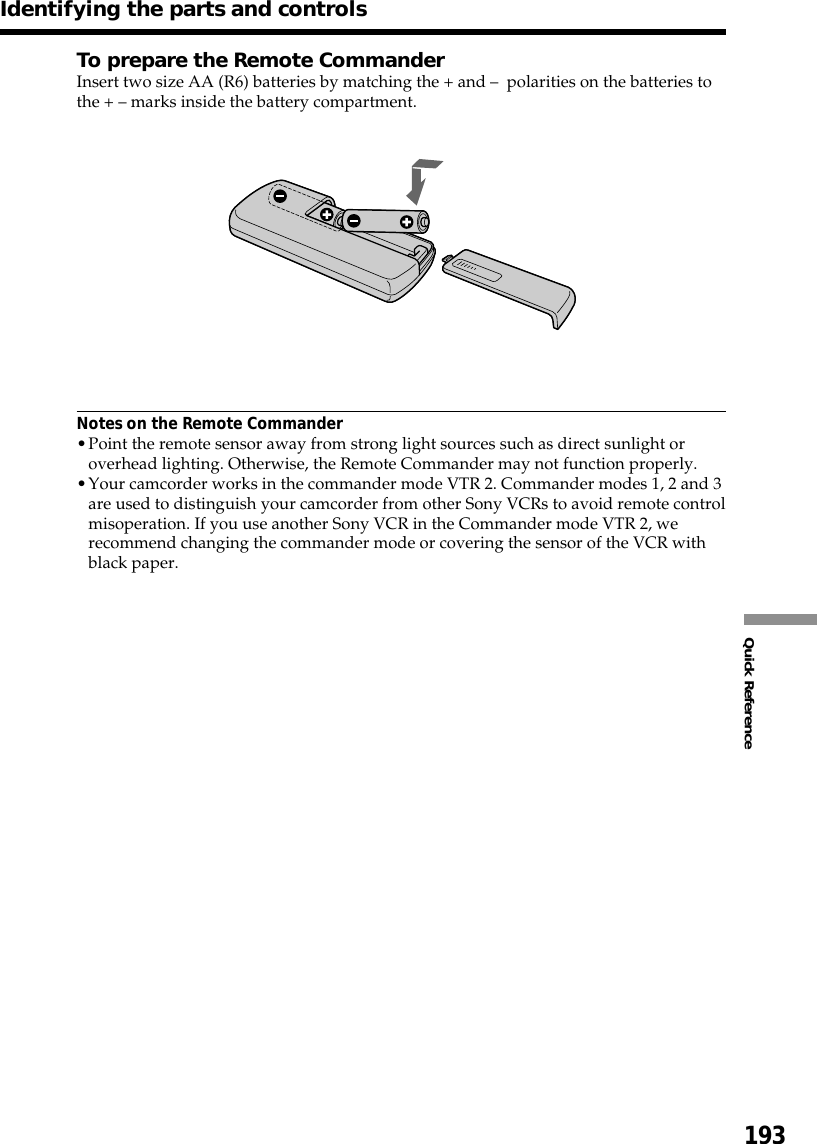
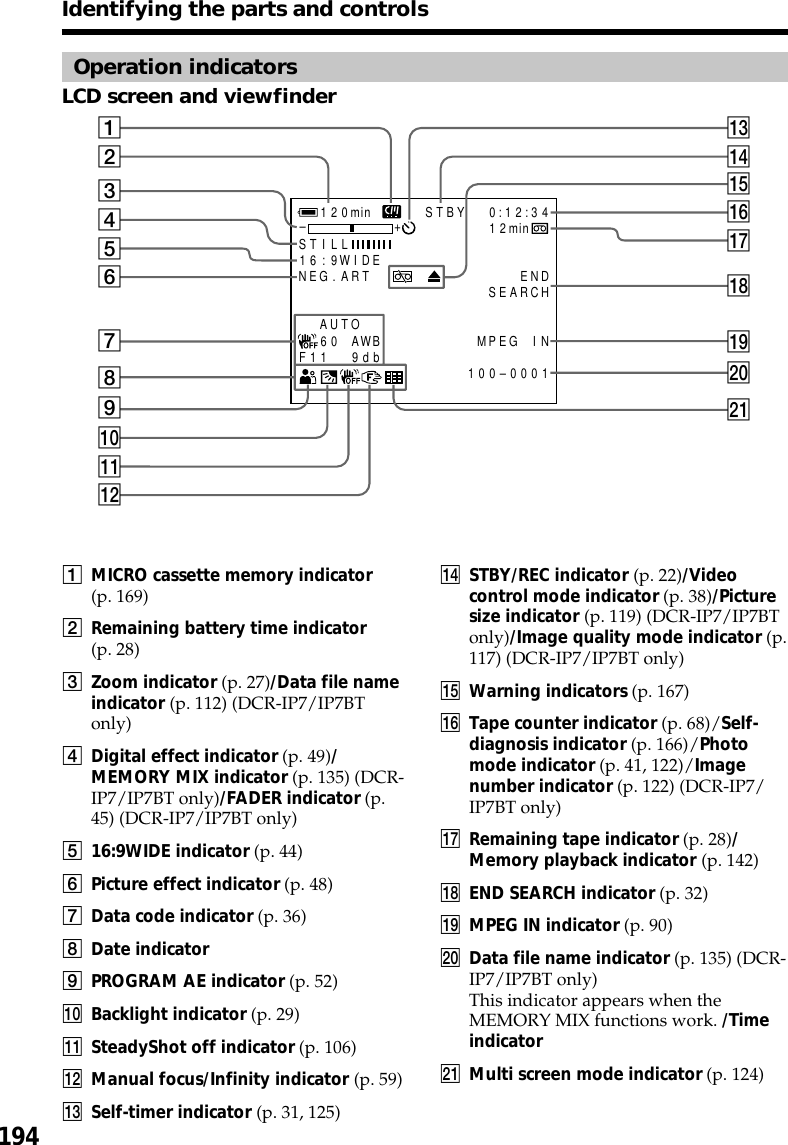
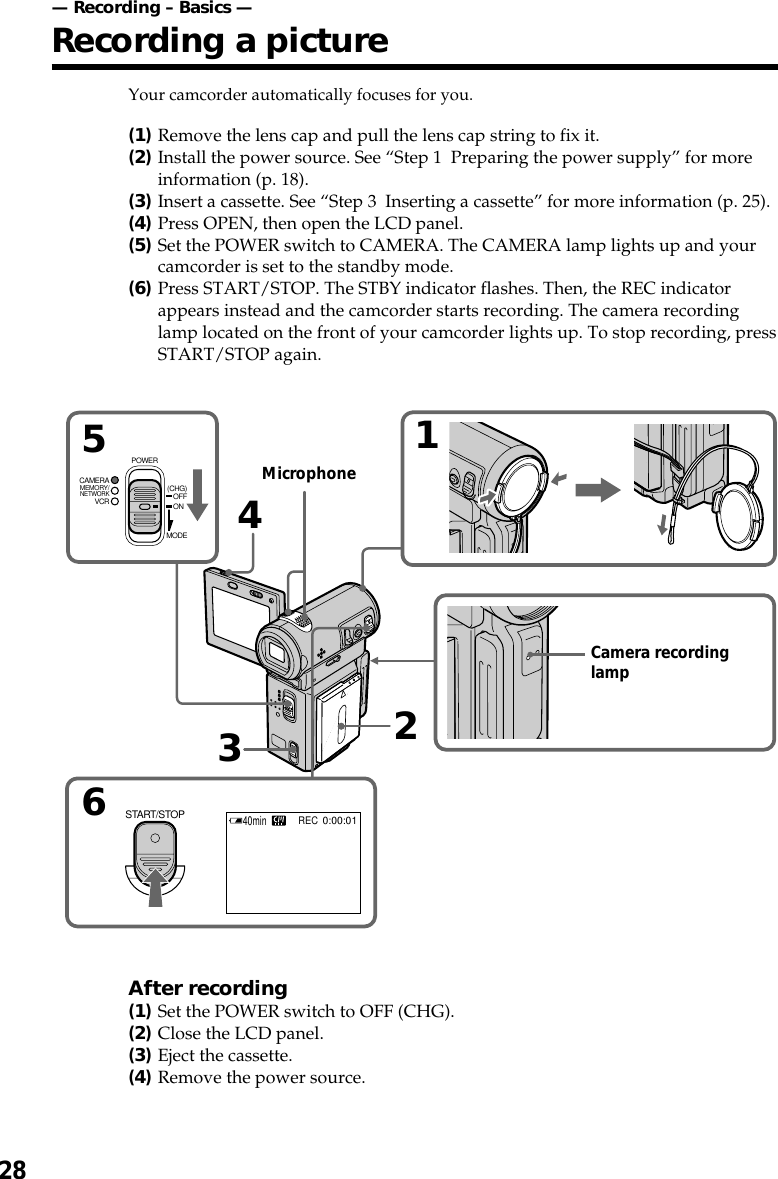
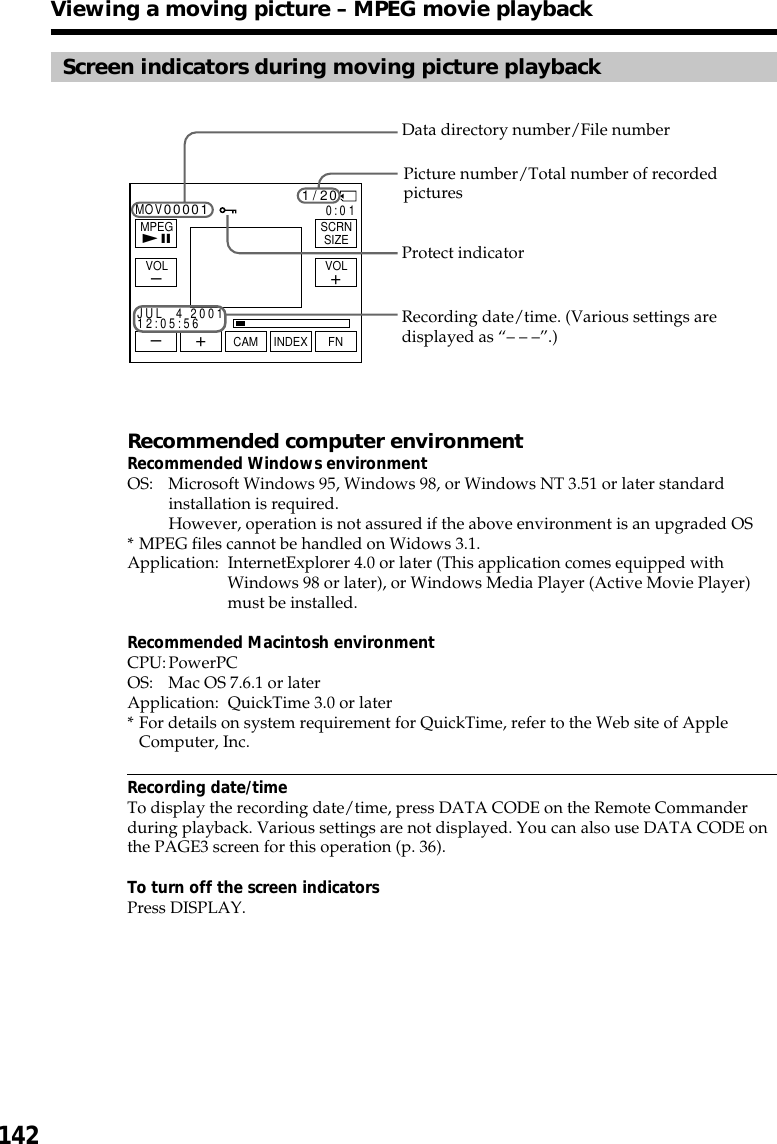
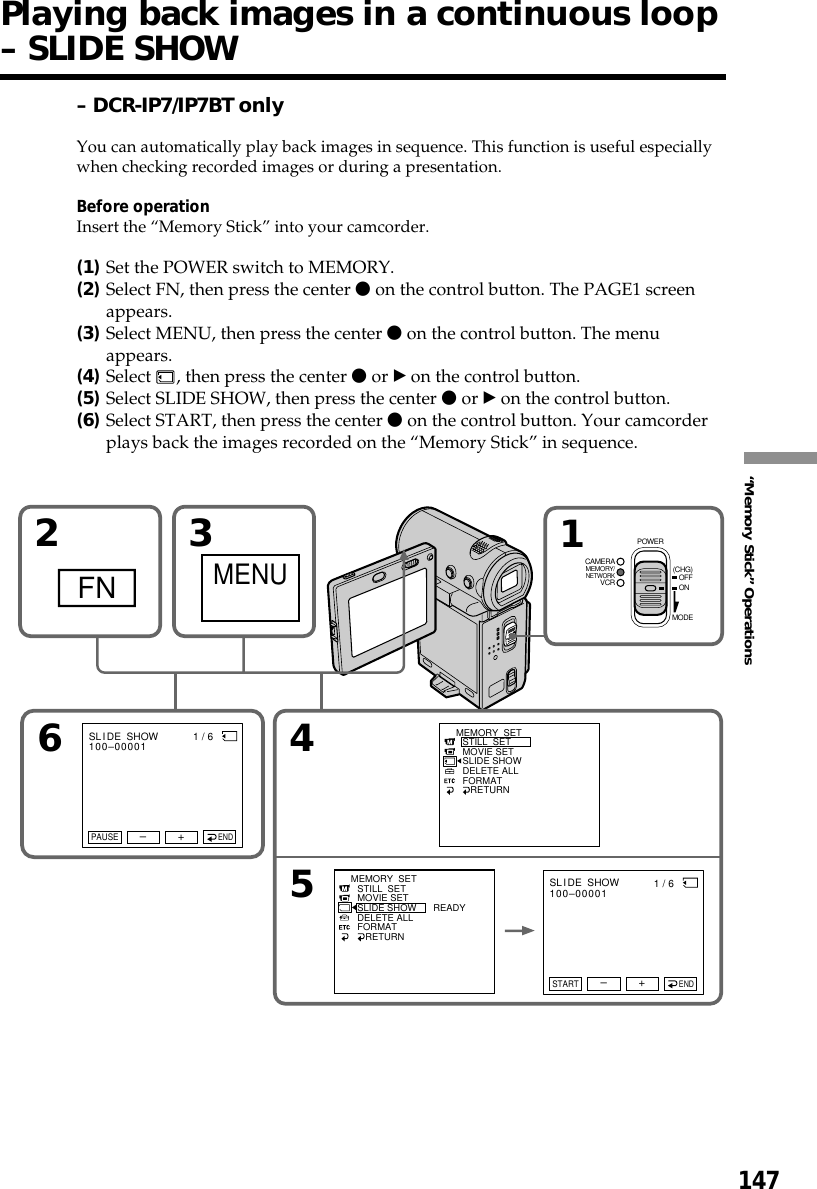
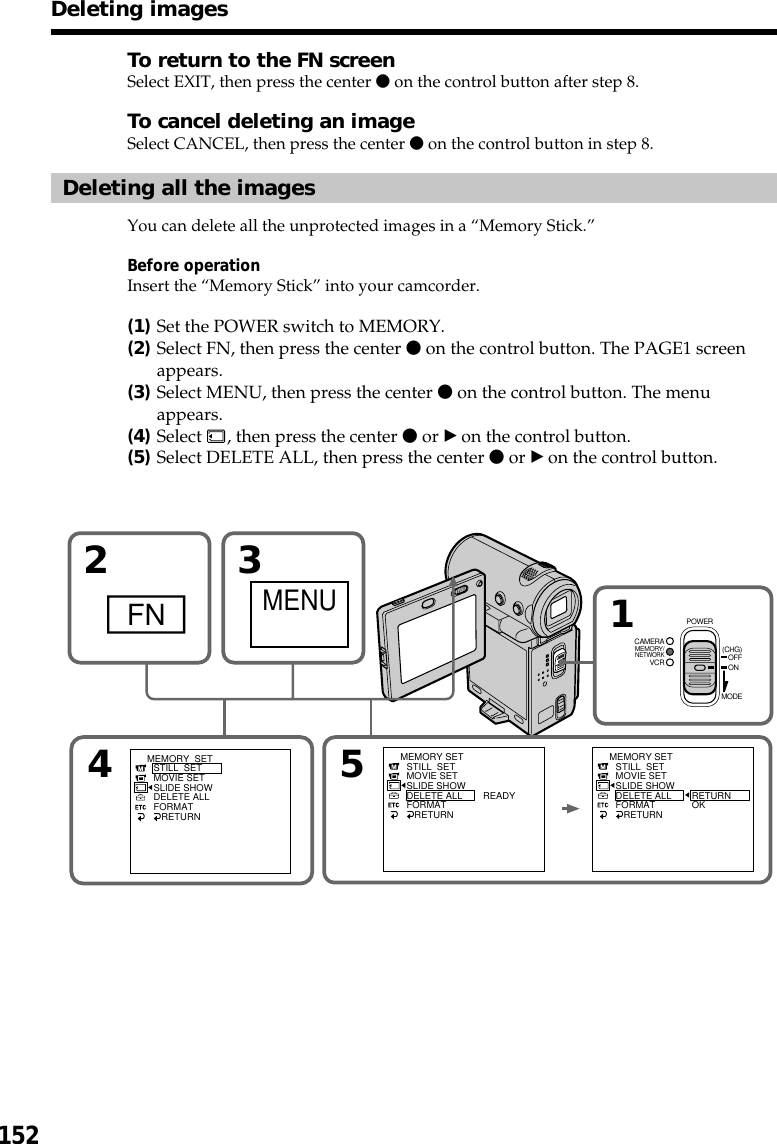
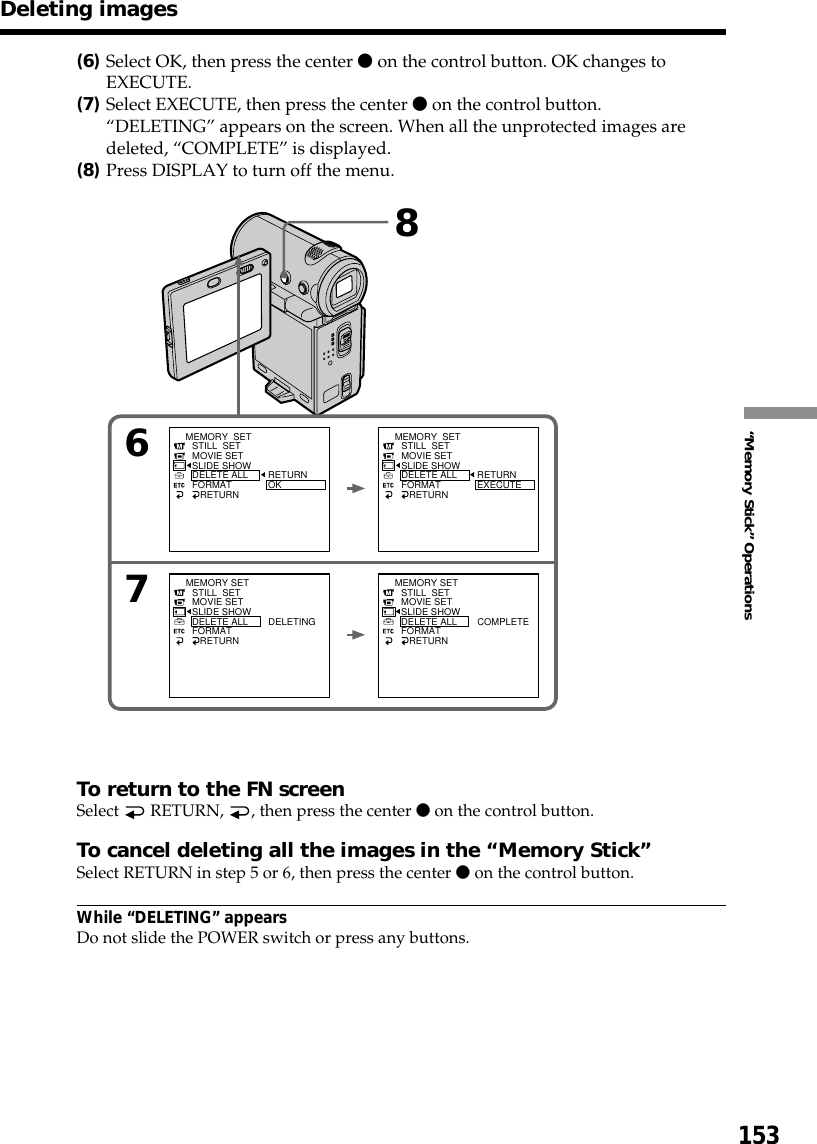
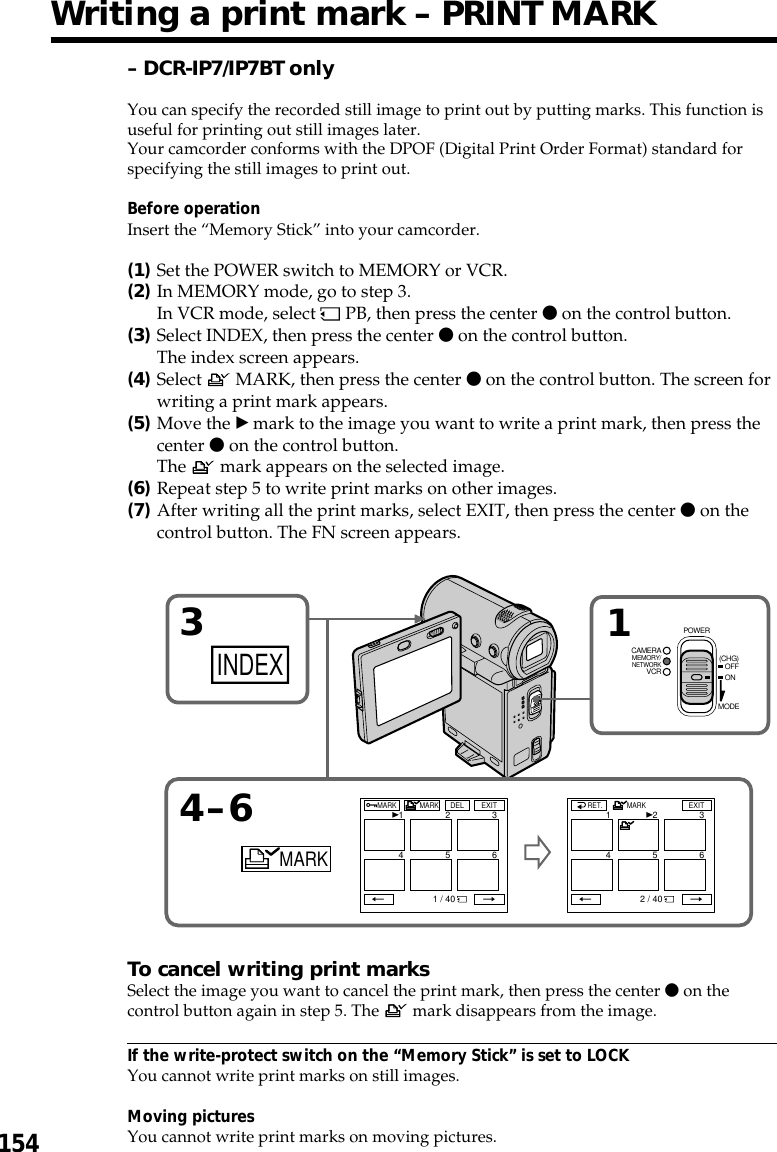
Sony Group DCRIP7 Digital Video Camera - Bluetooth User Manual users manual
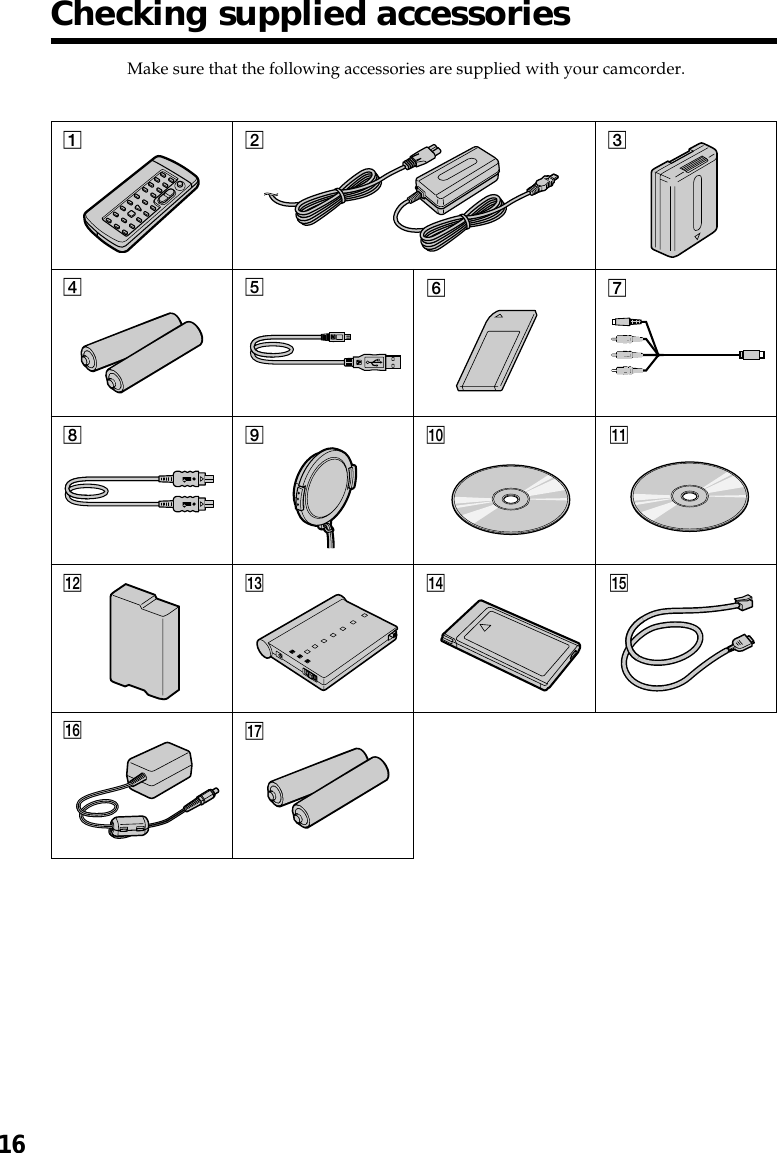
Sony Corporation Digital Video Camera - Bluetooth users manual
UserManual.wiki
>
Sony Group
>
DCRIP7 User Manual
>
users manual
Contents
1.
users manual
2.
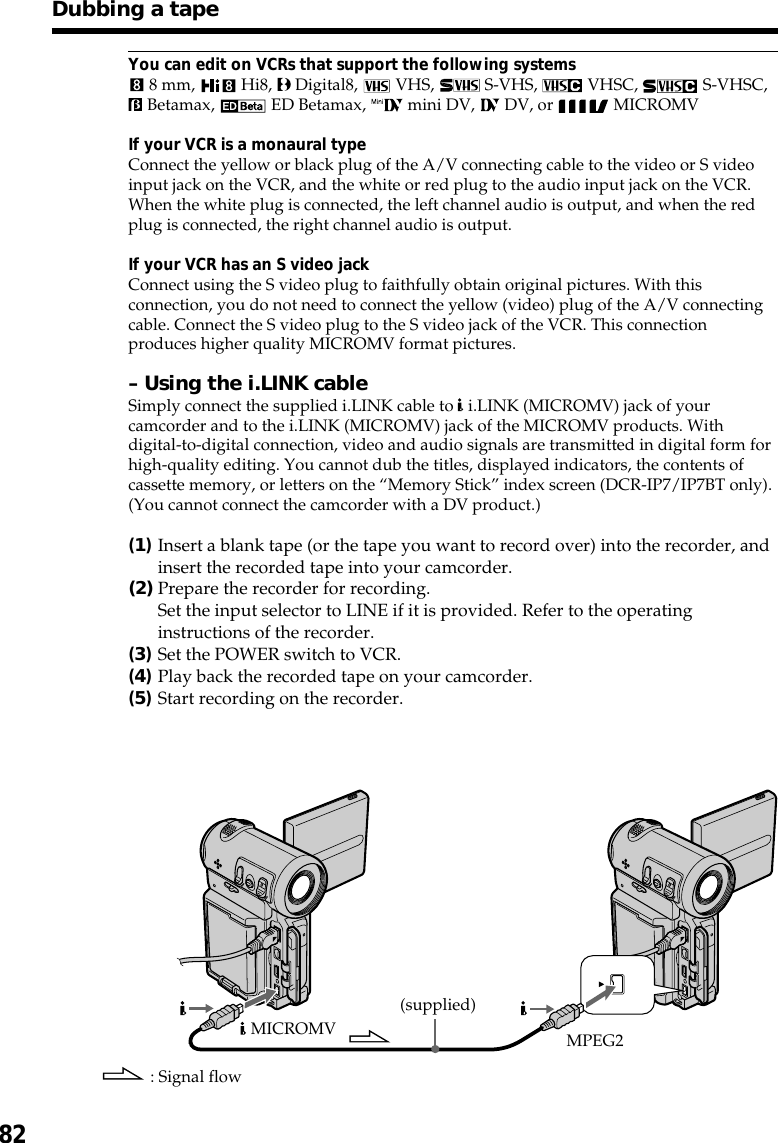
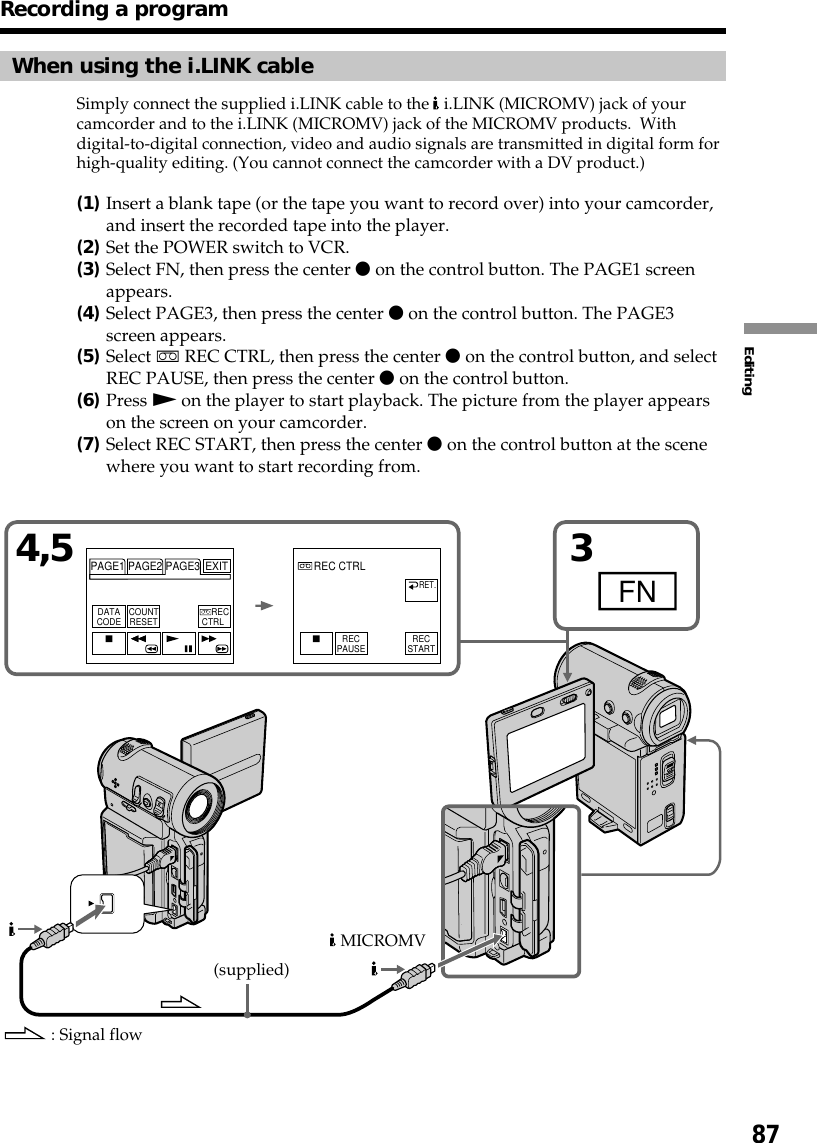
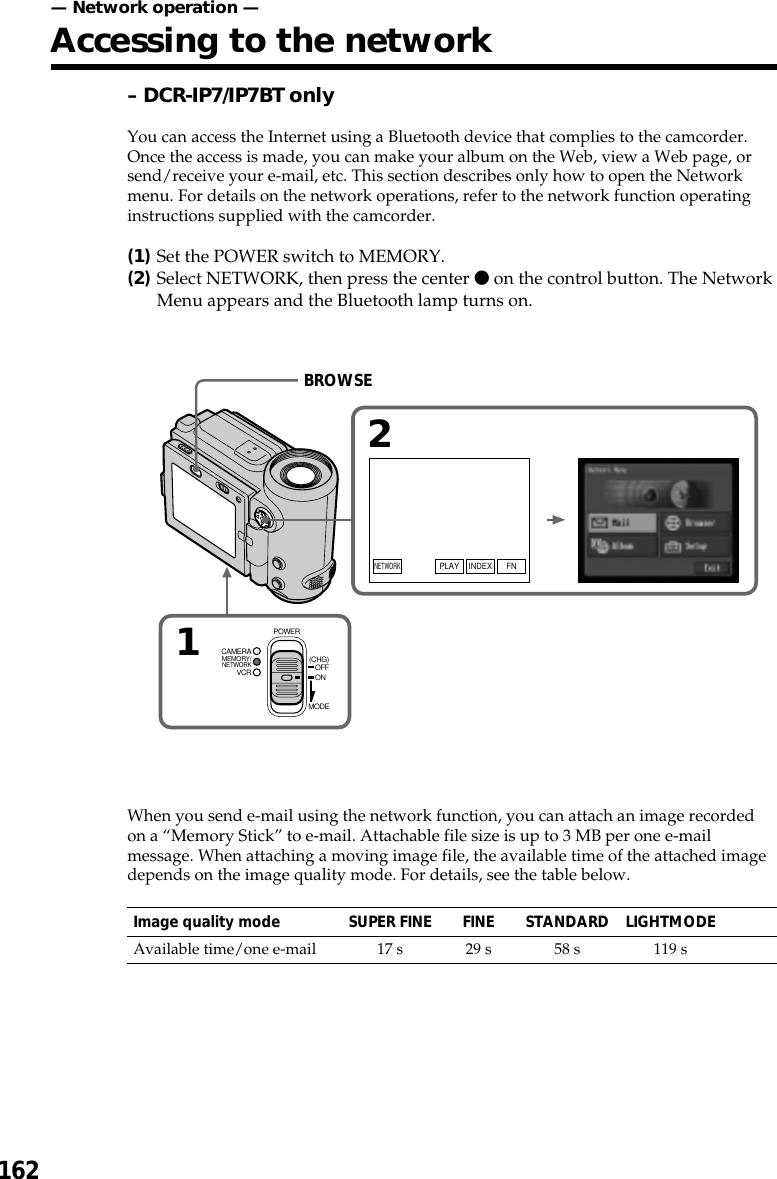
Network operating instructions
3.
model name explanation
users manual
Navigation menu
Upload a User Manual
Namespaces
Wiki Guide
HTML
PDF
Info
Views
User Manual
Discussion / Help
Navigation
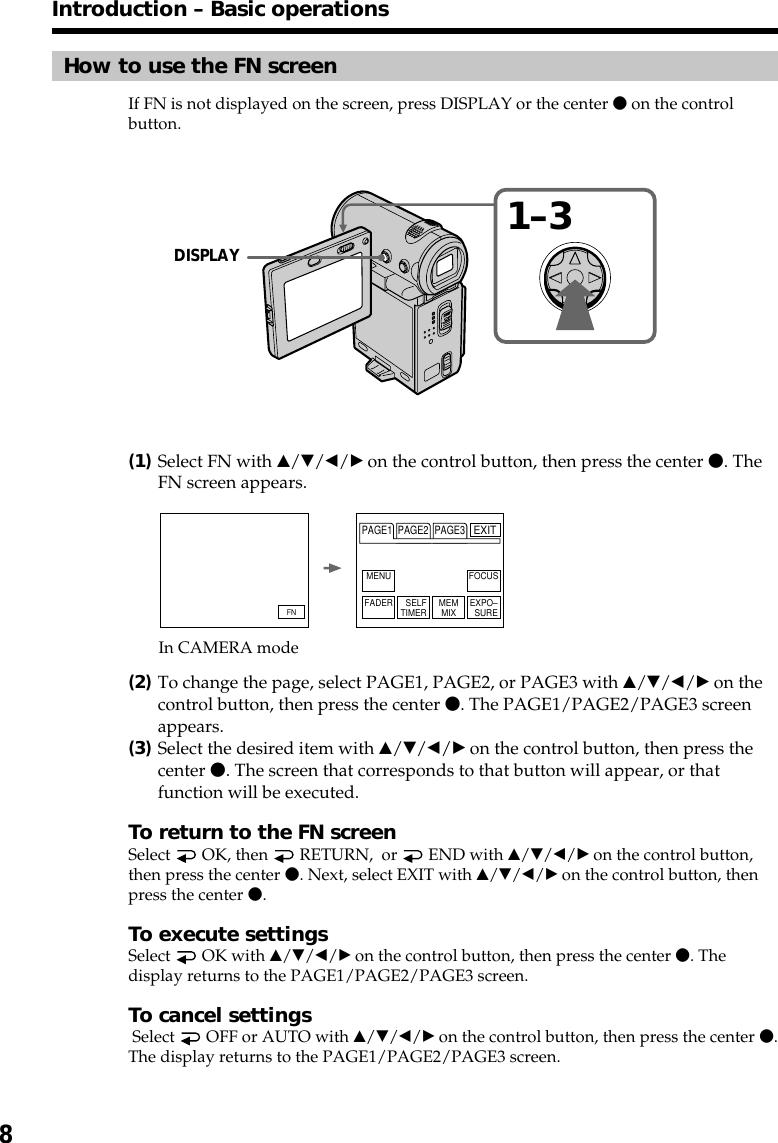
![Getting started712How to use the control buttonMost of the operations are carried out by the control button. Select a button displayedon the screen using the control button, then press the center z on the control button.(1)Press v/V/b/B on the control button repeatedly to select the desired buttondisplayed on the screen.The selected button turns orange.(2)Press the center z on the control button to enter the setting.Repeat steps 1 and 2 to execute the function.The procedure above is referred to as “Select [XXXX], then press the center z on thecontrol button ” in this operating instructions.When the item is selectedThe green bar appears above the item.If the items are not availableThe color of the items changes to gray.Introduction – Basic operationsPAGE1 PAGE2 PAGE3EXITLCDBRT VOL ENDSCH TITLELCD BRT–+OK](https://usermanual.wiki/Sony-Group/DCRIP7.users-manual/User-Guide-168995-Page-7.png)

![Getting started15Using this manual[a][b][c][d]Precautions on camcorder careLens and LCD screen/finder (on mounted models only)•The LCD screen and the finder are manufactured using extremely high-precisiontechnology, so over 99.99% of the pixels are operational for effective use.However, there may be some tiny black points and/or bright points (white, red,blue or green in color) that constantly appear on the LCD screen and the finder.These points are normal in the manufacturing process and do not affect therecording in any way.•Do not let your camcorder get wet. Keep your camcorder away from rain and seawater. Letting your camcorder get wet may cause your camcorder to malfunction.Sometimes this malfunction cannot be repaired [a].•Never leave your camcorder exposed to temperatures above 60°C (140°F), such as in acar parked in the sun or under direct sunlight [b].•Be careful when placing the camcorder near a window or outdoors. Exposing the LCDscreen, the finder or the lens to direct sunlight for long periods may causemalfunctions [c].•Do not directly shoot the sun. Doing so might cause your camcorder to malfunction.Take pictures of the sun in low light conditions such as dusk [d].](https://usermanual.wiki/Sony-Group/DCRIP7.users-manual/User-Guide-168995-Page-15.png)

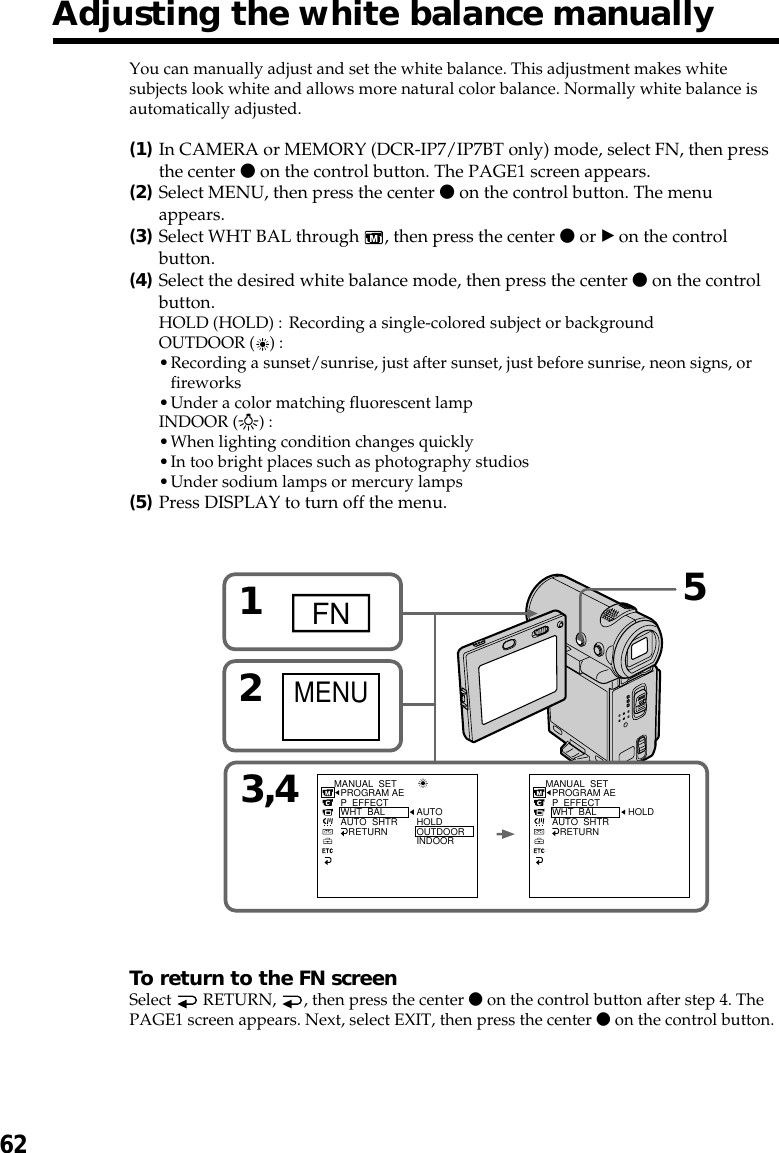
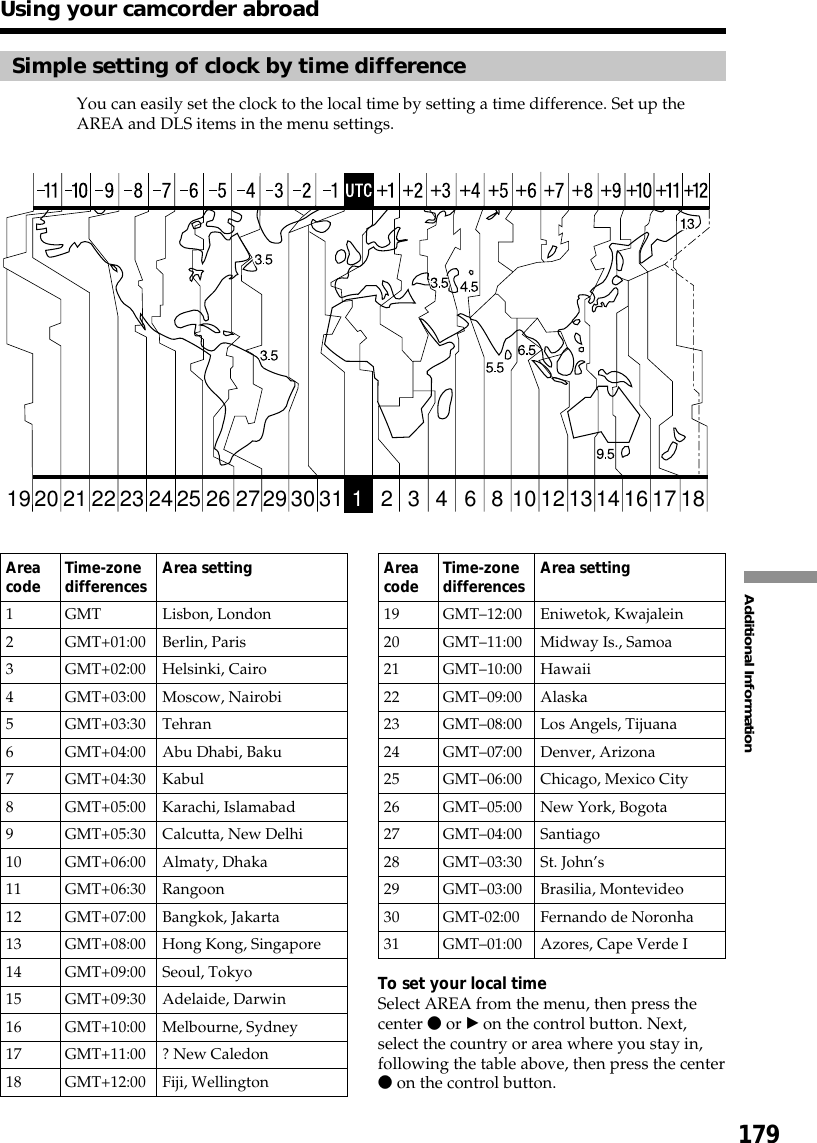
![23Getting startedStep 2 Setting the date and timeBe sure to set the date and time when you use your camcorder for the first time.“CLOCK SET” will be displayed each time you set the POWER switch to CAMERA orMEMORY (DCR-IP7/IP7BT only) unless you set the date and time.If you do not use your camcorder for about 3 months, the date and time settings may bereleased (bars may appear) because the built-in rechargeable battery installed in yourcamcorder will have been discharged (p. 177).First, set your area, then the daylight saving time, the year, the month, the day, the hourand then the minute.(1)Set the POWER switch to CAMERA or MEMORY (DCR-IP7/IP7BT only). TheCAMERA or MEMORY lamp (DCR-IP7/IP7BT only) lights up.(2)Select FN, then press the center z on the control button. The PAGE1 screenappears.(3)Select MENU, then press the center z on the control button. The menuappears.(4)Select , then press the center z or B on the control button.(5)Select CLOCK SET, then press the center z or B on the control button.4SETUP MENUCLOCK SETLTR SIZEDEMO MODE23SETUP MENUCLOCK SETLTR SIZEDEMO MODE RETURNFN––:––:––5CLOCK SETAREA 1SUMMERTIMEOFFLisbon, LondonDATE[EXEC] : NEXT ITEMY M D–––– ––– –– –– : ––GMT +0.0MENUThe illustration: In CAMERA mode](https://usermanual.wiki/Sony-Group/DCRIP7.users-manual/User-Guide-168995-Page-23.png)
![24Step 2 Setting the date and time(6)Select your area, then press the center z on the control button.(7)Select whether your area is in daylight saving time or not, then press thecenter z on the control button.When your area is in daylight saving time, select ON, when not in daylightsaving time, select OFF.(8)Select the year, then press the center z on the control button.(9)Set the month, day and hour with the same procedure as step 8.(10)Set the minute, and execute it by the time signal. The clock starts to move.(11)Press DISPLAY to turn off the menu. The clock setup is completed.The year changes as follows:To return to the FN screenSelect , , then press the center z on the control button after step 10. The PAGE1screen appears. Next, select EXIT, then press the center z on the control button.SETUP MENUCLOCK SETLTR SIZEDEMO MODE RETURN JUL 4 2001 5:30:00 PM2001 JAN 1 12 : 00AMCLOCK SETAREA 26SUMMERTIMEOFFNew York, BogotaDATE[EXEC] : NEXT ITEMY M DGMT –5.06,711 8,10CLOCK SETAREA 26SUMMERTIMEOFFONNew York, BogotaDATE[EXEC] : NEXT ITEMY M D–––– ––– –– –– : ––GTM –5.0 CLOCK SETAREA 26SUMMERTIMEOFFNew York, BogotaDATE[EXEC] : NEXT ITEMY M D2001 JAN 1 12 : 00AMGMT –5.0The illustration: In CAMERA mode2000 y 2001 T · · · · t 2079](https://usermanual.wiki/Sony-Group/DCRIP7.users-manual/User-Guide-168995-Page-24.png)

![27Getting startedNote on the labelThese may cause a malfunction of the camcorder. Therefore, be sure not to:•Stick any labels than the supplied one.•Stick the label onto any positions other than the labeling position [a].Step 3 Inserting a cassette[a]](https://usermanual.wiki/Sony-Group/DCRIP7.users-manual/User-Guide-168995-Page-27.png)
![41Playback – BasicsPlaying back a tapeDate/time Various settingsTo clear the data code display(1)Select OFF, then press the center z on the control button in step 4.(2)Select EXIT, then press the center z on the control button. The data codedisappears from the screen.When using the Remote CommanderPress DATA CODE on the Remote Commander in playback or playback pause mode.The display changes as follows:date/time t various settings (SteadyShot OFF, exposure, white balance, gain, shutterspeed, aperture value) t no indicatorTo not display various settings while operating with the Remote CommanderSet DATA CODE through to DATE in the menu settings (p. 105).The display changes as follows each time you press DATA CODE on the RemoteCommander: date/time y no indicator[a]SteadyShot OFF indicator[b]Exposure mode indicator[c]White balance indicator[d]Gain indicator[e]Shutter speed indicator[f]Aperture value indicatorVarious settingsVarious settings is your camcorder’s information when you recorded. In recordingmode, the various settings are not displayed.When you use the data code function, bars(-- -- --) appear if:–A blank portion of the tape is being played back.–The tape is unreadable due to tape damage or noise.–The tape was recorded by a camcorder without the date and time set.–In various playback modes.Data codeWhen you connect your camcorder to the TV, the data code also appears on the TVscreen.JUL 4 200112:05:56 PM40min0:00:23 60 AWBF1.8 9dB AUTO40min0:00:23 [a][b][c][d][e][f]](https://usermanual.wiki/Sony-Group/DCRIP7.users-manual/User-Guide-168995-Page-41.png)

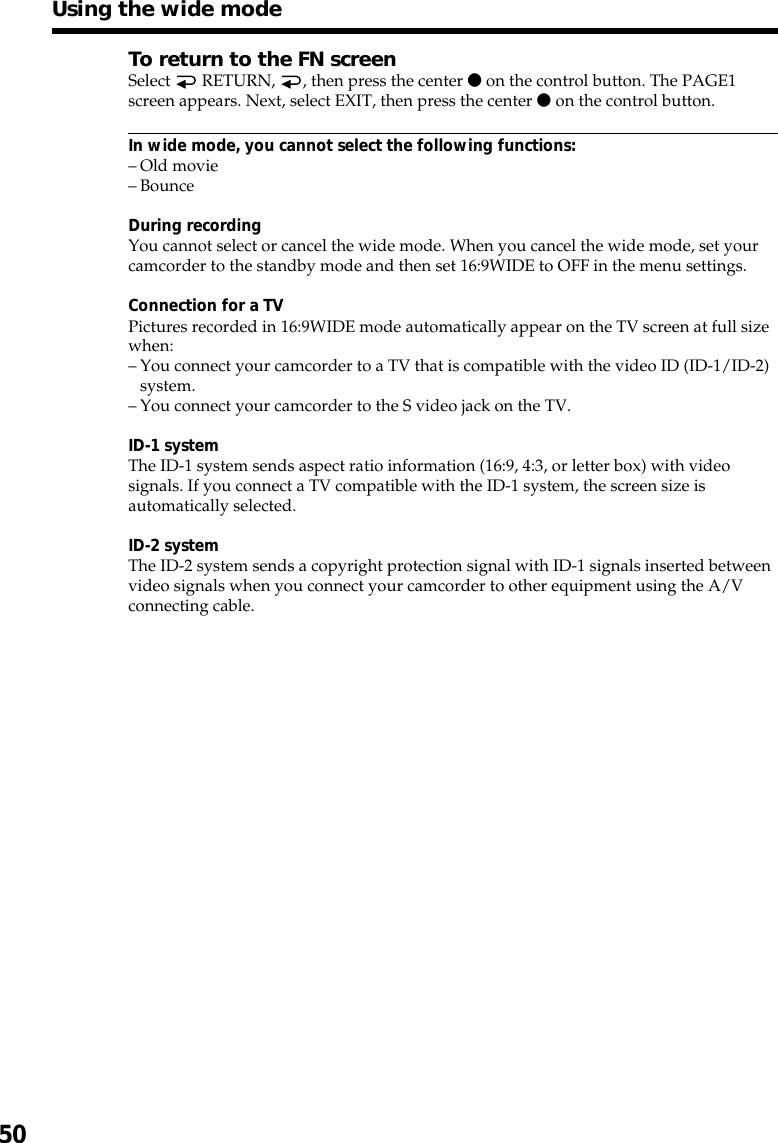
![49Advanced Recording OperationsUsing the wide modeYou can record a 16:9 wide picture to watch on the 16:9 wide-screen TV (16:9WIDE).Black bands appear on the screen during recording in 16:9WIDE mode [a]. The pictureduring playing back on a normal TV [b] or a wide -screen TV [c] are compressed in thewidthwise direction. If you set the screen mode of the wide-screen TV to the full mode,you can watch pictures of normal images [d].(1)In standby mode, select FN, then press the center z on the control button. ThePAGE1 screen appears.(2)Select MENU, then press the center z on the control button. The menuappears.(3)Select 16:9WIDE through , then press the center z or B on the controlbutton.(4)Select ON, then press the center z on the control button.(5)Press DISPLAY to turn off the menu.To cancel the wide modeSet 16:9WIDE to OFF in the menu settings.[a][c][b][d]16:9WIDE1FN23,45MENUCAMERA SETD ZOOM16:9 WIDESTEADY SHOT RETURNON](https://usermanual.wiki/Sony-Group/DCRIP7.users-manual/User-Guide-168995-Page-49.png)
![51Advanced Recording Operations[a]RECSTBYRECSTBY[b]You can fade in or out to give your recording a professional appearance.MONOTONEWhen fading in, the picture gradually changes from black-and-white to color.When fading out, the picture gradually changes from color to black-and-white.1) You can use the bounce function when D ZOOM is set to OFF in the menu settings.2) Fade in only.NORM. FADER(fader)MOSC. FADER(mosaic)Using the fader functionBOUNCE1) 2)](https://usermanual.wiki/Sony-Group/DCRIP7.users-manual/User-Guide-168995-Page-51.png)
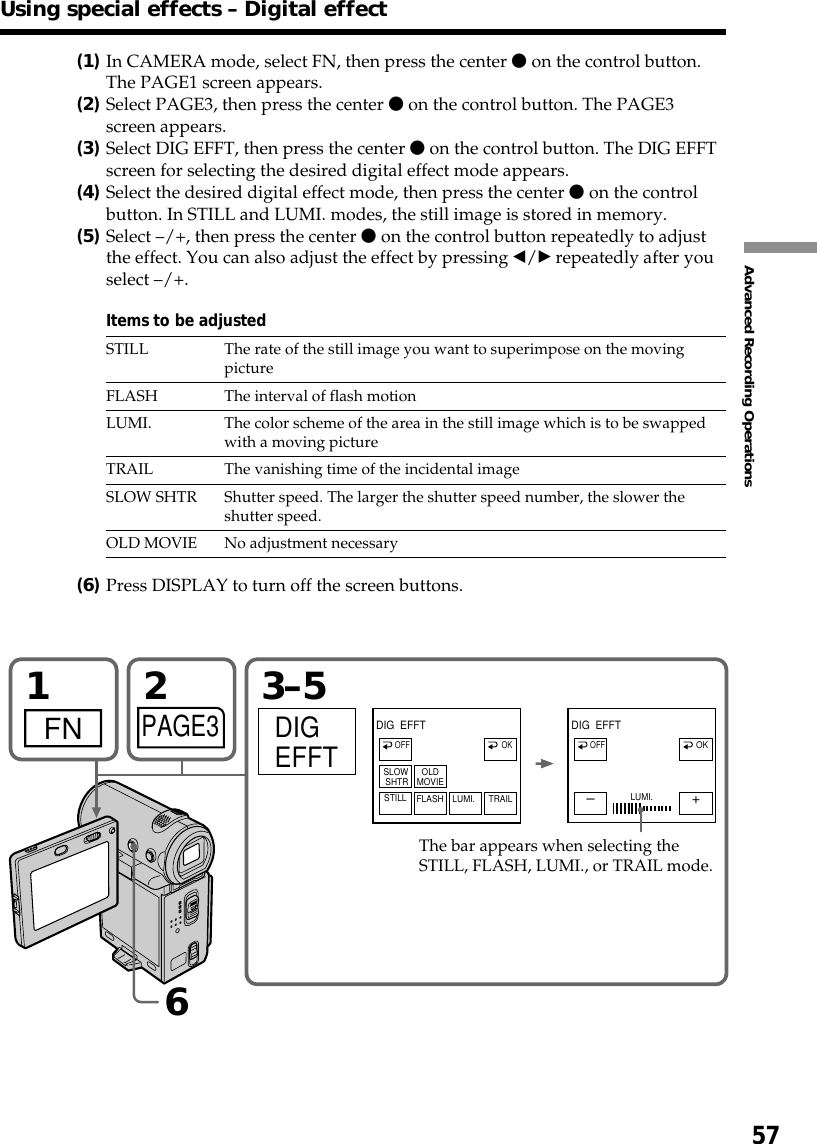
![52Using the fader function(1) When fading in [a]In standby mode, select FN, then press the center z on the control button. ThePAGE1 screen appears.When fading out [b]During recording, select FN, then press the center z on the control button. ThePAGE1 screen appears.(2)Select FADER, then press the center z on the control button. The FADERscreen for selecting the fader mode appears.(3)Select the desired fader mode, then press the center z on the control button.The top of the selected button is indicated with the green bar.(4)Press DISPLAY to turn off the screen buttons.(5)Press START/STOP. The fader indicator flashes, then lights up. After the fadein/out is carried out, your camcorder automatically returns to the normalmode.To return to the FN screenSelect OK, then press the center z on the control button after step 3. The PAGE1screen appears. Next, select EXIT, then press the center z on the control button.To cancel the fader functionBefore pressing START/STOP, select OFF, then press the center z on the controlbutton.NoteYou cannot use the following functions while using the fader function, and vice versa.–Digital effect–Tape Photo recording14FNFADEROFF OKNORM.FADER MONO–TONEBOUN–CE MOSC.FADER2,3FADER5](https://usermanual.wiki/Sony-Group/DCRIP7.users-manual/User-Guide-168995-Page-52.png)
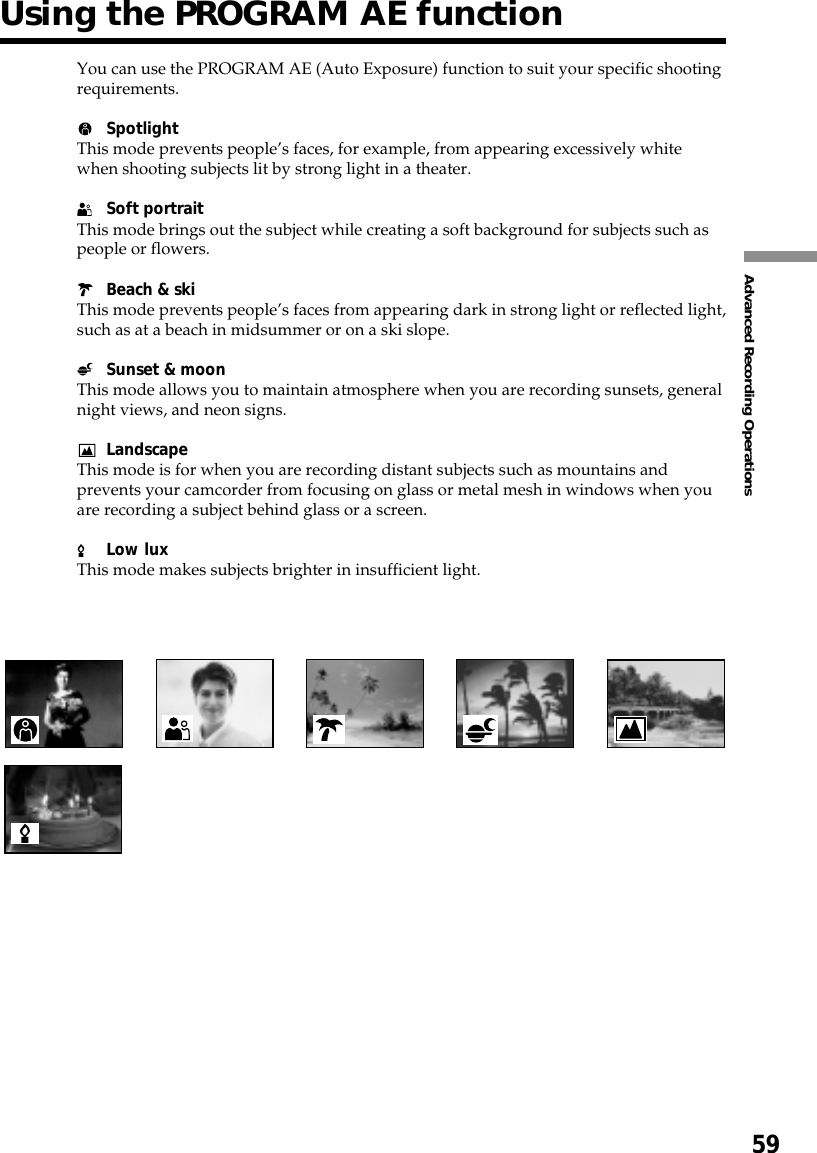
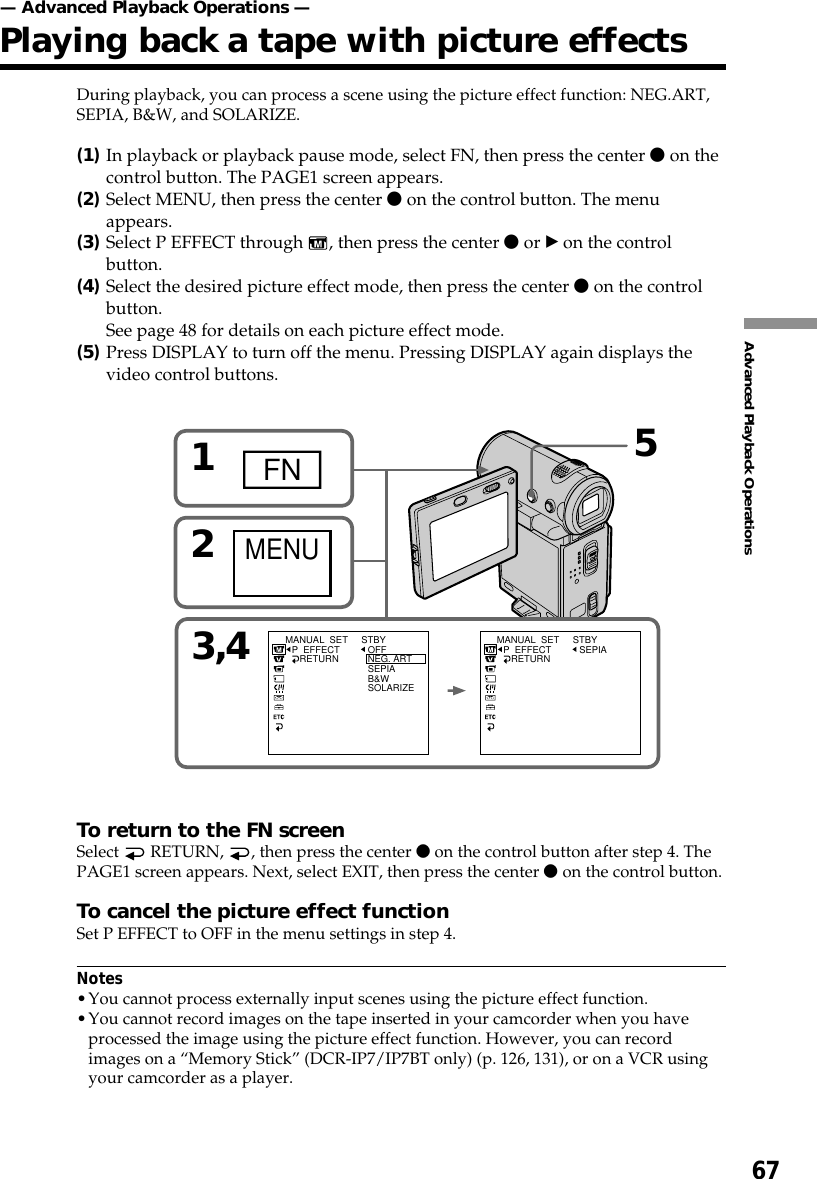
![54Using special effects – Picture effectYou can digitally process images to obtain special effects like those in films or on theTV.NEG. ART [a] : The color and brightness of the picture are reversed.SEPIA : The picture is sepia.B&W : The picture is monochrome (black-and-white).SOLARIZE [b] : The light intensity is clearer, and the picture looks like an illustration.SLIM [c] : The picture expands vertically.STRETCH [d] : The picture expands horizontally.PASTEL [e] : The contrast of the picture is emphasized, and the picture looks like ananimated cartoon.MOSAIC [f] : The picture is mosaic.(1)In CAMERA mode, select FN, then press the center z on the control button.The PAGE1 screen appears.(2)Select MENU, then press the center z on the control button. The menuappears.(3)Select P EFFECT through , then press the center z or B on the controlbutton.(4)Select the desired picture effect mode, then press the center z on the controlbutton.(5)Press DISPLAY to turn off the menu.[a] [b] [c] [d] [e] [f]3,4MANUAL SETPROGRAM AEP EFFECTWHT BALAUTO SHTR RETURNOFFNEG. ARTSEPIAB&WSOLARIZESLIMSTRETCHPASTELMOSAIC15FN2MENUMANUAL SETPROGRAM AEP EFFECTWHT BALAUTO SHTR RETURNNEG. ART](https://usermanual.wiki/Sony-Group/DCRIP7.users-manual/User-Guide-168995-Page-54.png)


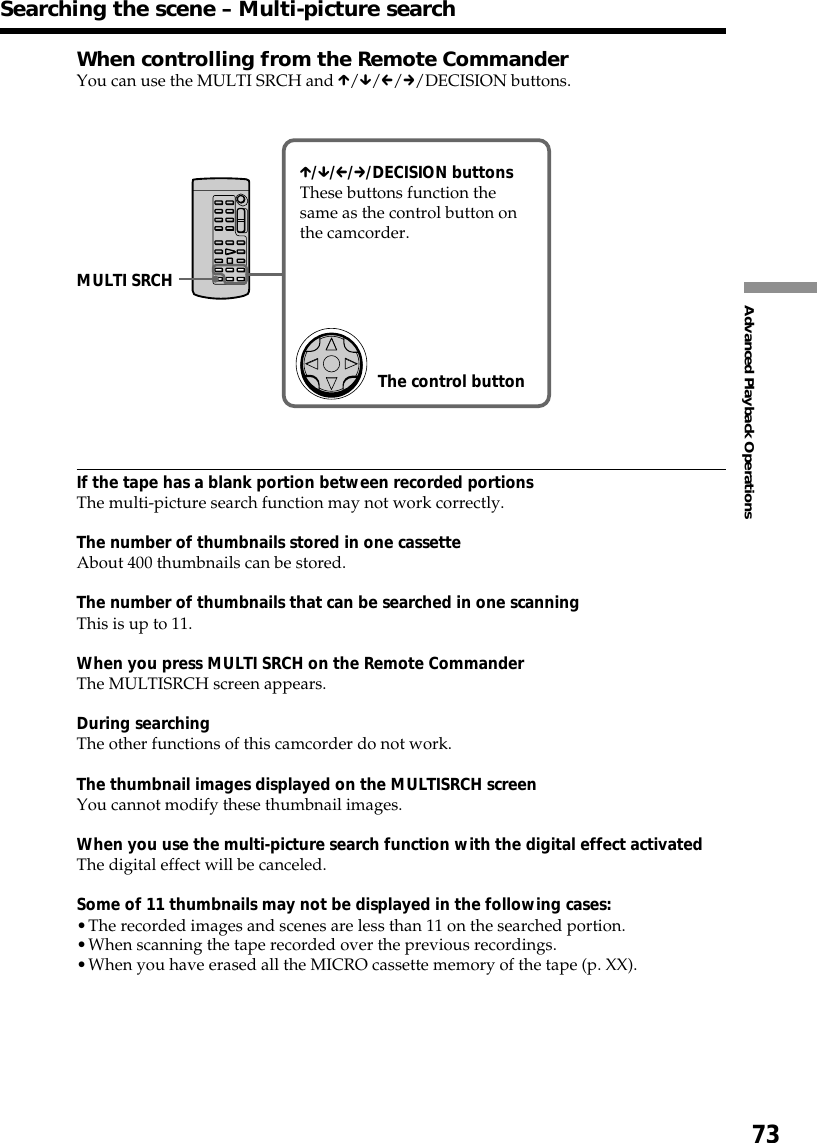
![71Advanced Playback OperationsSearching the scene – Multi-picturesearchUsing the multi-picture search function, you can display the thumbnails of all the topscenes of moving pictures and still images recorded in the tape onto the index screen.The recording date and title of each image or scene are also indicated. Select thethumbnail you want to play back, then press the center z on the control button, thecamcorder starts searching the image or scene and play it back automatically. You canalso control this function using the Remote Commander.(1)Set the POWER switch to VCR.(2)Select FN, then press the center z on the control button. The PAGE1 screenappears.(3)Select MULTI SRCH, then press the center z on the control button. TheMULTISRCH screen appears.(4)Select </,, then press the center z on the control button. The camcorderstarts scanning toward the selected direction. When you select ,, thethumbnails are displayed from the upper-left window, and when you select<, they are displayed from the lower-right window. After the scanning iscompleted, the upper-left window turns black and the thumbnails will bedisplayed on the index screen.[a]The picture being fast-forwarded or rewinded[b]The blue portion indicates the range of a scanning to display thumbnails13,42FNMULTI SRCH ENDSELECTDIRECTIONMEMORY/NETWORKVCRCAMERA (CHG)POWEROFFONMODEMULTI SRCH END[a][b]MULTI SRCH](https://usermanual.wiki/Sony-Group/DCRIP7.users-manual/User-Guide-168995-Page-71.png)
![72(5)Select the thumbnail you want to play back, then press the center z on thecontrol button. The camcorder starts searching the image or scene and play itback automatically. The blue portion of the bar indicates the scanning rangeand the white portion of the bar indicates the recorded portion.[c]Actual point you are trying to search for (yellow v mark)[d]Present point on the tape (yellow bar)[e]Title/date (The title turns to the date indication after 5 seconds.)To return to the MULTISRCH screen from playbackSelect RETURN, then press the center z on the control button.To stop searchingPress STOP on the Remote Commander.To end the multi-picture search functionSelect END, then press the center z on the control button.To end the multi-picture search function from the playbackscreenSelect EXIT, then press the center z on the control button.Searching the scene – Multi-picture search5MULTI SRCH END MULTI SRCHJUL 4 2001 12:05:56AMEND[c] [d] [e]](https://usermanual.wiki/Sony-Group/DCRIP7.users-manual/User-Guide-168995-Page-72.png)

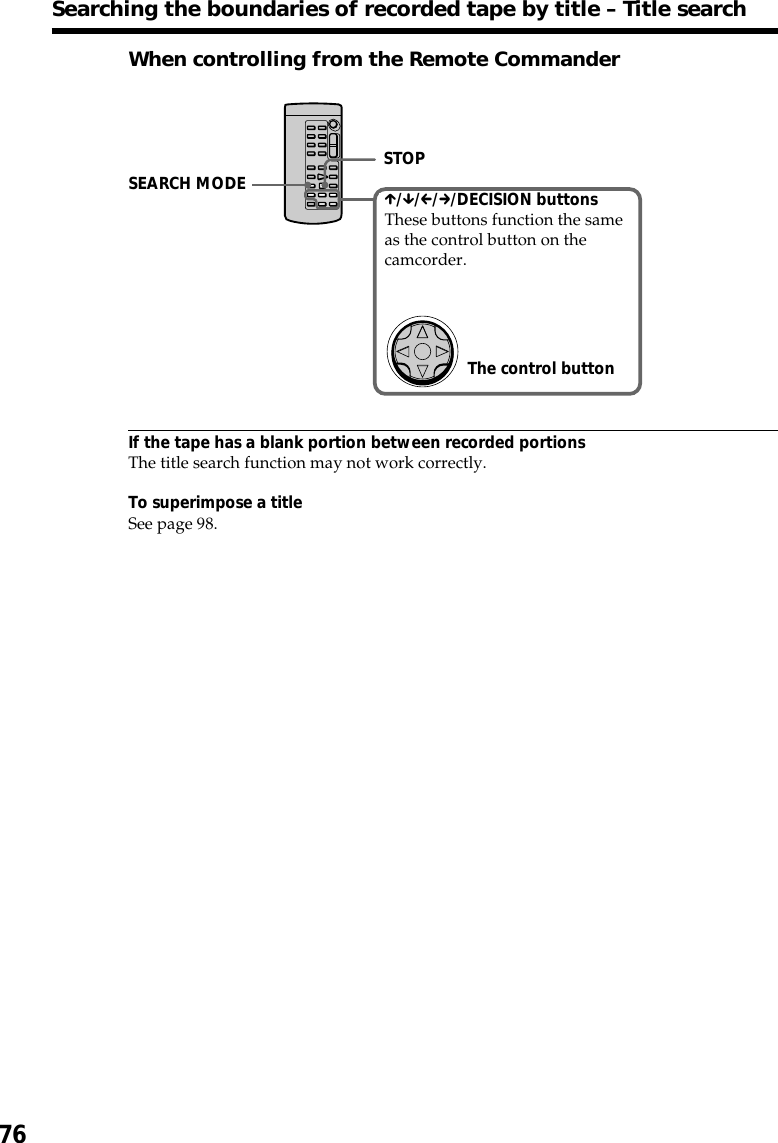
![75Advanced Playback OperationsSearching the boundaries of recordedtape by title – Title searchYou can search for the boundaries of recorded tape by title. You can only use thisfunction with the Remote Commander.(1)Set the POWER switch to VCR.(2)Press SEARCH MODE on the Remote Commander repeatedly until the TITLESEARCH indicator appears.The indicator changes as follows:TITLE SEARCH t DATE SEARCH t PHOTO SEARCH(no indicator)(3)Press X or x on the Remote Commander to select the title you want toplayback. Your camcorder automatically starts playback of the scene havingthe title that you selected.[a]Actual point you are trying to search for[b]Present point on the tapeTo stop searchingPress STOP on the Remote Commander.132SEARCHMODETITLE SEARCH1 HELLO!2 CONGRATULATIONS!3 HAPPY NEW YEAR!4 PRESENT5 GOOD MORNING6 WEDDINGTITLE SEARCH3 HAPPY NEW YEAR!4 PRESENT5 GOOD MORNING6 WEDDING7 NIGHT8 BASEBALL[b][a]MEMORY/NETWORKVCRCAMERA (CHG)POWEROFFONMODE](https://usermanual.wiki/Sony-Group/DCRIP7.users-manual/User-Guide-168995-Page-75.png)
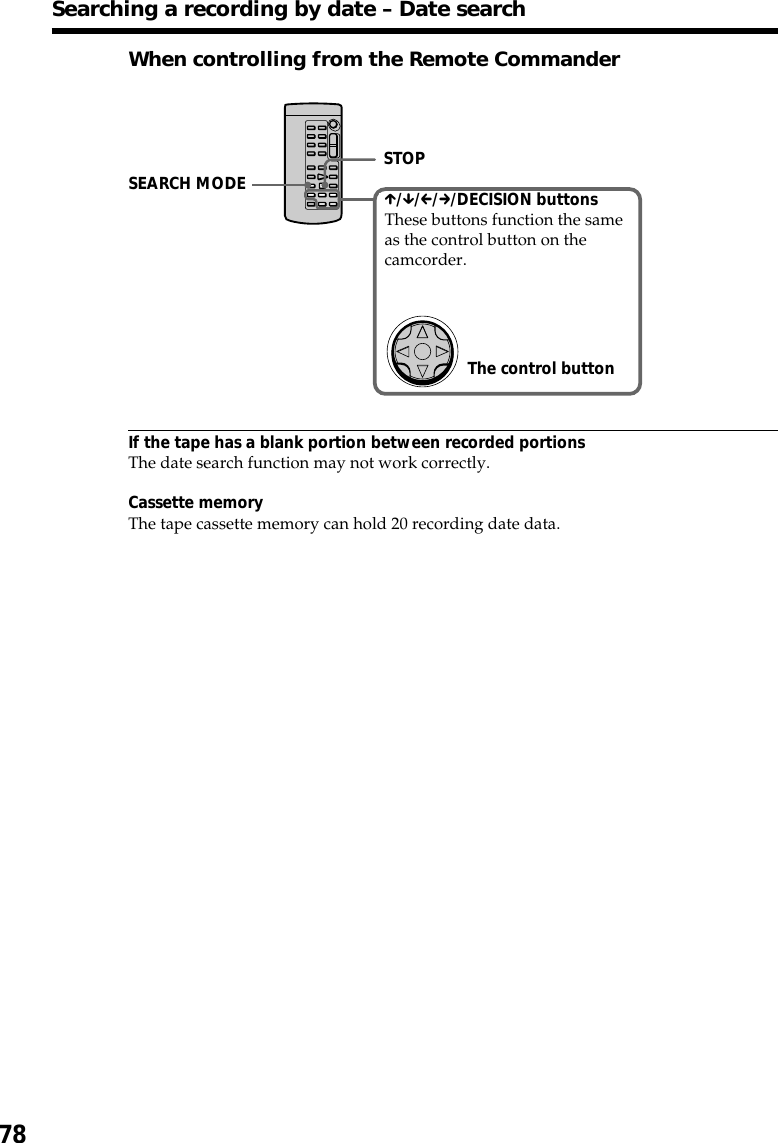
![77Advanced Playback OperationsSearching a recording by date– Date searchYou can automatically search for the point where the recording date changes and startplayback from that point. You can only use this function with the Remote Commander.Use this function to check where recording dates change or to edit the tape at eachrecording date.(1)Set the POWER switch to VCR.(2)Press SEARCH MODE on the Remote Commander repeatedly until the DATESEARCH indicator appears.The indicator changes as follows:TITLE SEARCH t DATE SEARCH t PHOTO SEARCH(no indicator)(3)Press X or x on the Remote Commander to select the date you want toplayback. Your camcorder automatically starts playback at the beginning ofthe selected date.[a]Actual point you are trying to search for[b]Present point on the tapeTo stop searchingPress STOP on the Remote Commander.132SEARCHMODE[b][a]DATE SEARCH1 SEP / 5 / 012 SEP / 6 / 013 DEC / 24 / 014 JAN / 1 / 025 FEB / 11 / 026 APR / 29 / 02DATE SEARCH1 SEP / 5 / 012 SEP / 6 / 013 DEC / 24 / 014 JAN / 1 / 025 FEB / 11 / 026 APR / 29 / 02MEMORY/NETWORKVCRCAMERA (CHG)POWEROFFONMODE](https://usermanual.wiki/Sony-Group/DCRIP7.users-manual/User-Guide-168995-Page-77.png)
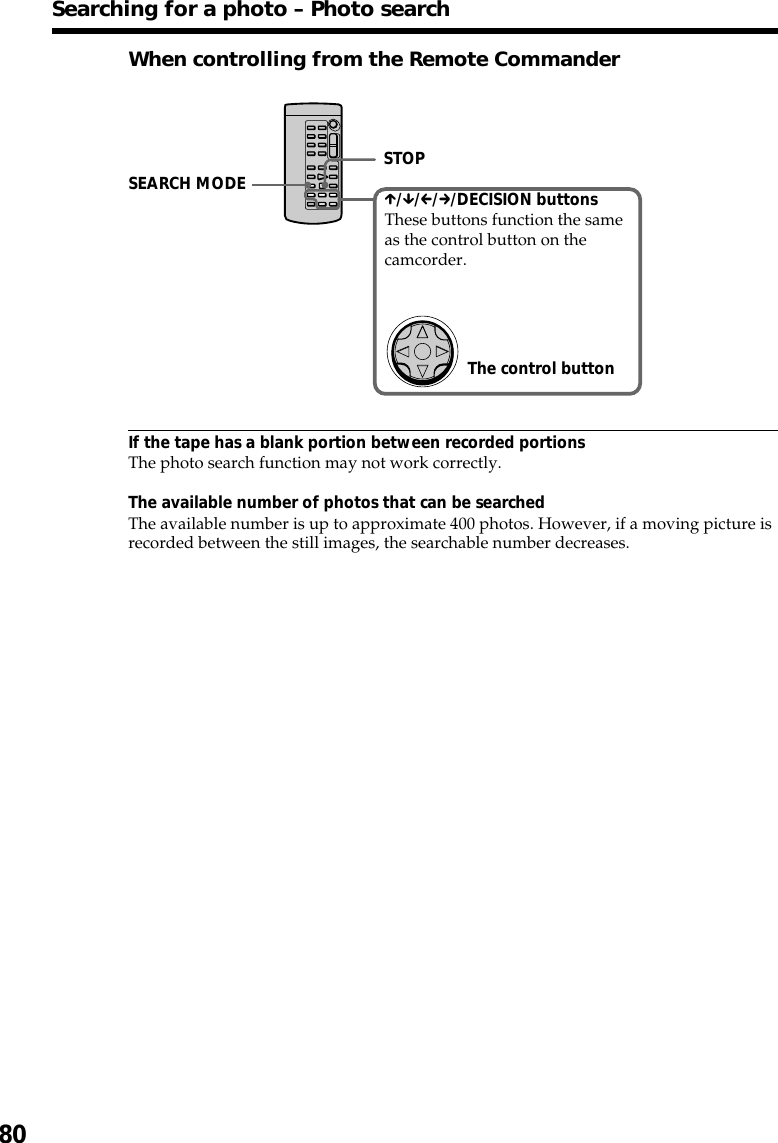
![79Advanced Playback OperationsSearching for a photo – Photo searchYou can search for a still image you have recorded on a tape.You can only use this function with the Remote Commander. Use this function to checkor edit still images.(1)Set the POWER switch to VCR.(2)Press SEARCH MODE on the Remote Commander repeatedly until thePHOTO SEARCH indicator appears.The indicator changes as follows:TITLE SEARCH t DATE SEARCH t PHOTO SEARCH(no indicator)(3)Press X or x on the Remote Commander to select the date you want toplayback. Your camcorder automatically starts playback of the photo havingthe date that you selected.[a]Actual point you are trying to search for[b]Present point on the tapeTo stop searchingPress STOP on the Remote Commander.132SEARCHMODE[b][a]PHOTO SEARCH1 SEP / 5 / 01 1 7 : 302 SEP / 6 / 01 8 : 503 DEC / 24 / 01 1 0 : 304 JAN / 1 / 02 23 : 255 FEB / 11 / 02 1 6 : 116 APR / 29 / 02 1 3 : 45PHOTO SEARCH1 SEP / 5 / 01 1 7 : 302 SEP / 6 / 01 8 : 503 DEC / 24 / 01 1 0 : 304 JAN / 1 / 02 23 : 255 FEB / 11 / 02 1 6 : 116 APR / 29 / 02 1 3 : 45MEMORY/NETWORKVCRCAMERA (CHG)POWEROFFONMODE](https://usermanual.wiki/Sony-Group/DCRIP7.users-manual/User-Guide-168995-Page-79.png)

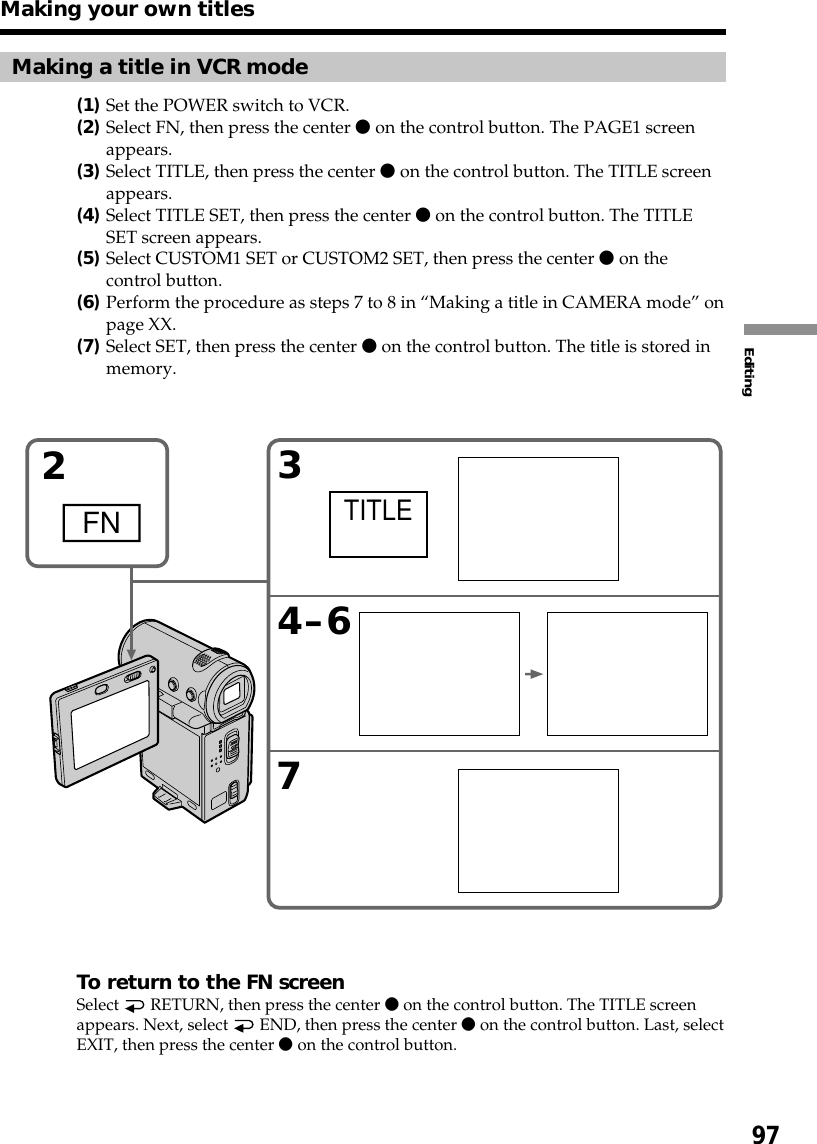
![95EditingMaking your own titlesYou can make up to two titles and store them in the memory of your camcorder. Eachtitle can have up to 20 characters.Making a title in CAMERA mode(1)Set the POWER switch to CAMERA.(2)Select FN, then press the center z on the control button. The PAGE1 screenappears.(3)Select PAGE2, then press the center z on the control button. The PAGE2screen appears.(4)Select TITLE, then press the center z on the control button. The TITLE SETscreen appears.(5)Select , then press the center z or B on the control button.(6)Select CUSTOM1 SET or CUSTOM2 SET, then press the center z on thecontrol button.(7)Select the desired character button and press z repeatedly to select the desiredcharacter on the button.(8)Select another character button, then press the center z on the control button.The cursor moves to the next character. Repeat the same procedure as step 6and 7 to complete your title.(9)Select SET, then press the center z on the control button. The title is stored inmemory.3657–9TITLE SETCUSTOM1 SETCUSTOM2 SETTITLE SETCUSTOM1 SETCUSTOM2 SET RETURNTITLE SETCUSTOM1 SETCUSTOM2 SET RETURN2FN&? !ABC DEFT t6789012345MNOJKLGH ISET’ . ,/–WXYZTUVPQRS[____________________]EXITTITLE SET&? !ABC DEFT t6789012345MNOJKLGH ISET’ . ,/–WXYZTUVPQRS[PARTY_______________]EXITTITLE SET&? !ABC DEFT t6789012345MNOJKLGH ISET’ . ,/–WXYZTUVPQRS[PAR_________________]EXITTITLE SETPAGE2](https://usermanual.wiki/Sony-Group/DCRIP7.users-manual/User-Guide-168995-Page-95.png)
![98The MICROMV cassette automatically records recording conditions and date. You canalso label a cassette. The label can consist of up to 16 characters and is stored in thecassette memory. When you insert the labeled cassette and set the POWER switch toCAMERA or VCR, the label is displayed for about 5 seconds.The cassette information[a]Unique number of each cassette. The camcorder automatically assign this number.[b]Cassette title set by the TAPE TITLE item in the menu settings (Cassette label).[c]First-recorded date in this cassette.[d]Last-recorded date in this cassette.[e]Recorded area is indicated with the white bar.The MICRO cassette memory](https://usermanual.wiki/Sony-Group/DCRIP7.users-manual/User-Guide-168995-Page-98.png)
![99EditingLabeling a cassette(1)Insert the cassette you want to label.(2)Set the POWER switch to CAMERA or VCR.(3)Select FN, then press the center z on the control button. The PAGE1 screenappears.(4)Select MENU, then press the center z on the control button. The menuappears.(5)Select TAPE TITLE through , then press the center z or B on the controlbutton.(6)Select the desired character button and press the center z on the controlbutton repeatedly to select the desired character on the button .(7)Select another character button, then press the center z on the control button.The cursor moves to the next character. Repeat the same procedure as step 6and 7 to complete the label.(8)Select SET, then press the center z on the control button. The label is stored inmemory.(9)Press DISPLAY to turn off the menu.53FN4MENUSETCM SETT I TLEERASET I TLE DSPLTAPE T I TLEERASE ALL INFODSPL6–8&? !ABC DEFT t6789012345MNOJKLGH ISET’ . ,/–WXYZTUVPQRS[GRADU_______________]EXITTAPE TITLE&? !ABC DEFT t6789012345MNOJKLGH ISET’ . ,/–WXYZTUVPQRS[GRADUATION__________]EXITTAPE TITLECM SET–––––––––T I TLEERASET I TLE DSPLTAPE T I TLEERASE ALL INFODSPL&? !ABC DEFT t6789012345MNOJKLGH ISET’ . ,/–WXYZTUVPQRS[____________________]EXITTAPE TITLE9The MICRO cassette memory](https://usermanual.wiki/Sony-Group/DCRIP7.users-manual/User-Guide-168995-Page-99.png)

![1262STD40REC0:03[45 ]minSECBBBFNINDEXPLAYNETWORKSTART/STOP1MEMORY/NETWORKVCRCAMERA (CHG)POWEROFFONMODERecordable time on the “Memory Stick.”This indicator is displayed for 5 seconds afterpressing START/STOP. This indicator is notrecorded.Recording moving pictures on “MemoryStick”s – MPEG movie recording– DCR-IP7/IP7BT onlyYou can record moving pictures with sound on “Memory Stick”s.Before operationInsert the “Memory Stick” into your camcorder.(1)Set the POWER switch to MEMORY.(2)Press START/STOP. Your camcorder starts recording. The camera recordinglamp located on the front of your camcorder lights up.The recordable time of a MPEG movieQuality mode recordable timeSUPER FINE Approx. 45 sFINE Approx. 1 min 10 sSTANDARD Approx. 2 min 20 sLIGHTMODE Approx. 4 min 40 sTo stop recordingPress START/STOP.](https://usermanual.wiki/Sony-Group/DCRIP7.users-manual/User-Guide-168995-Page-126.png)
![1283STD40REC[15 ]0:030:15:42minSECBBBNFN21START/STOPMEMORY/NETWORKVCRCAMERA (CHG)POWEROFFONMODEThis indicator is displayed for 5 seconds afterpressing START/STOP. This indicator is notrecorded.Recordable time on the “Memory Stick.”Recording a picture from a tape as amoving picture– DCR-IP7/IP7BT onlyYour camcorder can read moving picture data recorded on a tape and record it as amoving picture on a “Memory Stick.” Your camcorder can also take in moving picturedata through the input jack and record it as a moving picture on a “Memory Stick.”Before operation•Insert the recorded tape into your camcorder.•Insert the “Memory Stick” into your camcorder.(1)Set the POWER switch to VCR.(2)Select , then press the center z on the control button. The picture recordedon the tape is played back.(3)Press START/STOP at the scene where you want to start recording from. Yourcamcorder starts recording.The recordable time of a MPEG movieQuality mode recordable timeSUPER FINE Maximum 45 sFINE Maximum 1 min 10 sSTANDARD Maximum 2 min 20 sLIGHTMODE Maximum 4 min 40 s](https://usermanual.wiki/Sony-Group/DCRIP7.users-manual/User-Guide-168995-Page-128.png)

![145“Memory Stick” OperationsEnlarging still images recorded on“Memory Stick”s – Memory PB ZOOM– DCR-IP7/IP7BT onlyYou can enlarge still images recorded on a “Memory Stick.”Before operationInsert the “Memory Stick” into your camcorder.(1)In memory playback mode, select FN, then press the center z on the controlbutton. The PAGE1 screen appears.(2)Select PAGE2, then press the center z on the control button. The PAGE2screen appears.(3)Select PB ZOOM, then press the center z on the control button. The PB ZOOMscreen appears.(4)Push down ZOOM to enlarge the image. The zoom scaling can be selectedfrom 2×, 3×, 4×, and 5×.(5)Move the enlarged area.v: To view the upper portion of the original image.V: To view the lower portion of the original image.b: To view the left portion of the original image.B: To view the left portion of the original image.To cancel the Memory PB ZOOM functionPress the center z on the control button.MEMORY PLAY3/14PB ZOOM[EXEC]:END 100–0003243,51FNPBZOOMPAGE2WT](https://usermanual.wiki/Sony-Group/DCRIP7.users-manual/User-Guide-168995-Page-145.png)

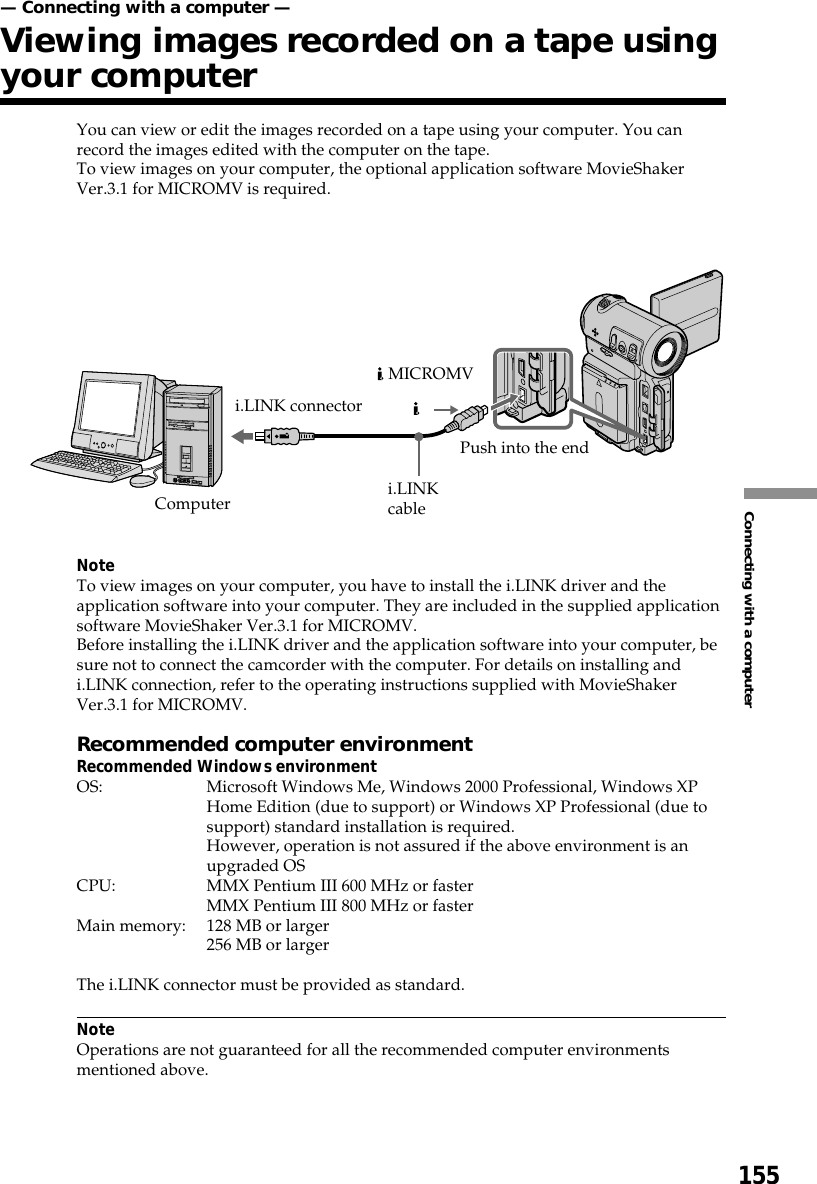
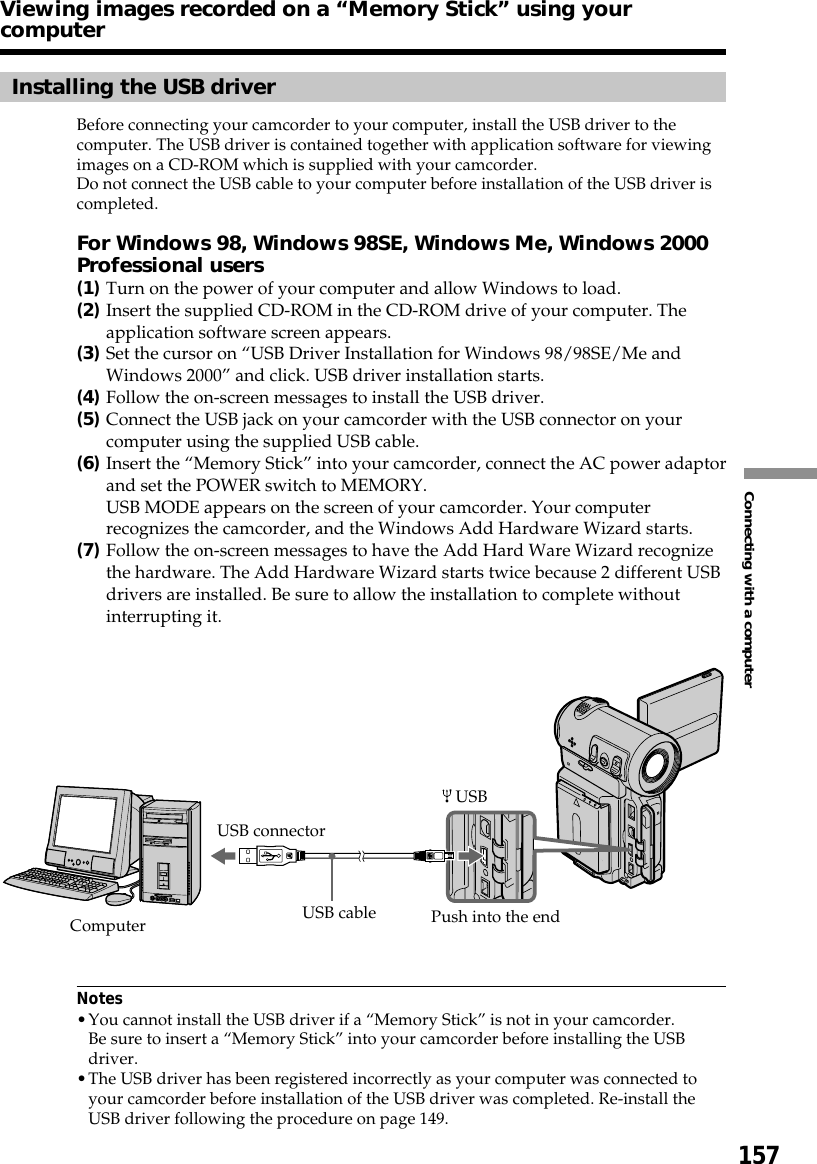
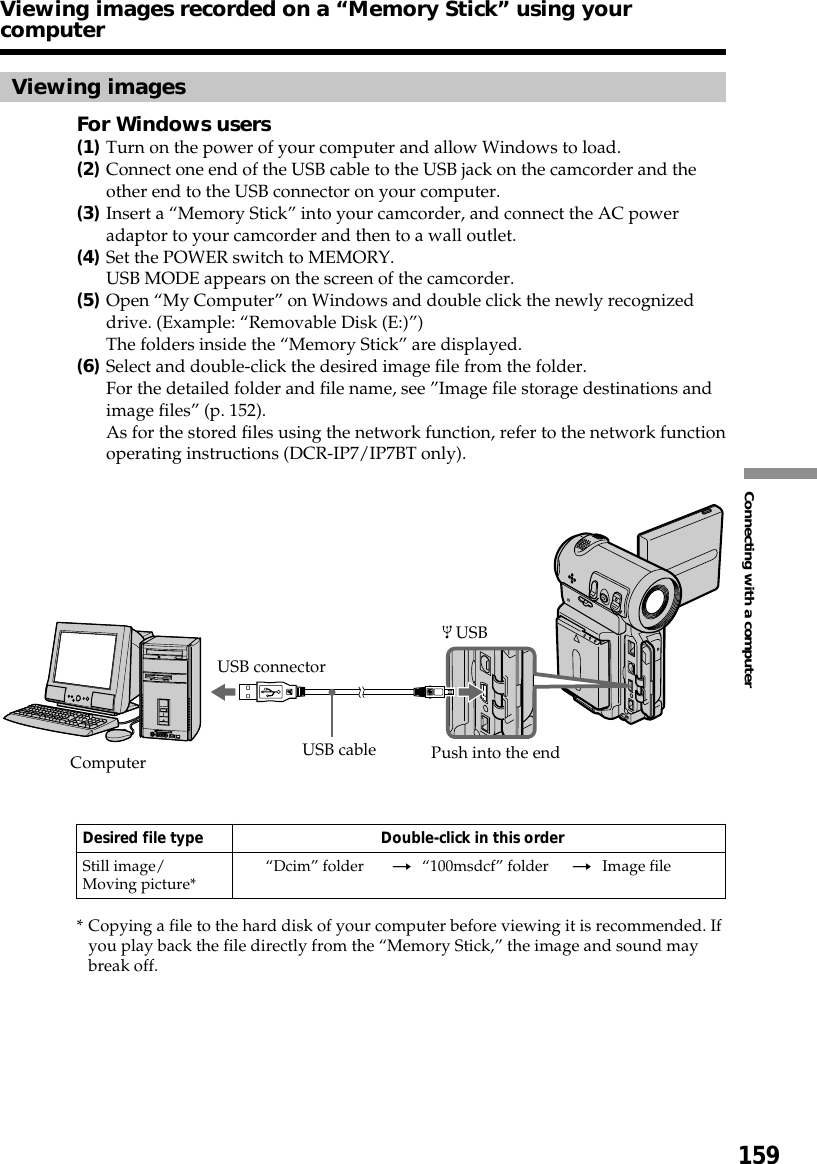
![161Connecting with a computerImage file storage destinations and image filesImage files recorded with your camcorder are grouped in folders by recording mode.The meanings of the file names are as follows. ssss stands for any number withinthe range from 0001 to 9999.For Windows Me users(The drive recognizing the camera is [E:])Folder File Meaning100msdcf DSC0ssss.jpg Still image fileMOV1ssss.mpg Moving picture fileFolder containing still image andmoving picture dataViewing images recorded on a “Memory Stick” using yourcomputer](https://usermanual.wiki/Sony-Group/DCRIP7.users-manual/User-Guide-168995-Page-161.png)
![173Additional Information— Additional Information —Usable cassettesSelecting cassette typesYou can use the MICROMV cassette only. You cannot use any other 8 mm, Hi8, Digital8, VHS, VHSC, S-VHS, S-VHSC, Betamax, ED Betamax, DV, or mini DV cassette.All of the MICROMV cassettes has cassette memory. This is the MICROMV mark. This is the MICRO Cassette Memory mark.These are trademarks.Copyright signalWhen you play backUsing any other video camera recorder, you cannot record on a tape that has recordedcopyright control signals for copyright protection of software which is played back onyour camcorder.When you recordYou cannot record software on your camcorder that contains copyright control signalsfor copyright protection of software.COPY INHIBIT appears on the LCD screen, in the viewfinder or on the TV screen if youtry to record such software. Your camcorder does not record copyright control signalson the tape when it records.Notes on the MICROMV cassetteWhen affixing a label on the MICROMV cassetteBe sure to affix a label only on the location as illustrated below [a] so as not to causemalfunction of your camcorder.After using the MICROMV cassetteRewind the tape to the beginning, put the cassette in its case, and store it in an uprightposition.When the cassette memory function does not workReinsert a cassette.[a]](https://usermanual.wiki/Sony-Group/DCRIP7.users-manual/User-Guide-168995-Page-173.png)
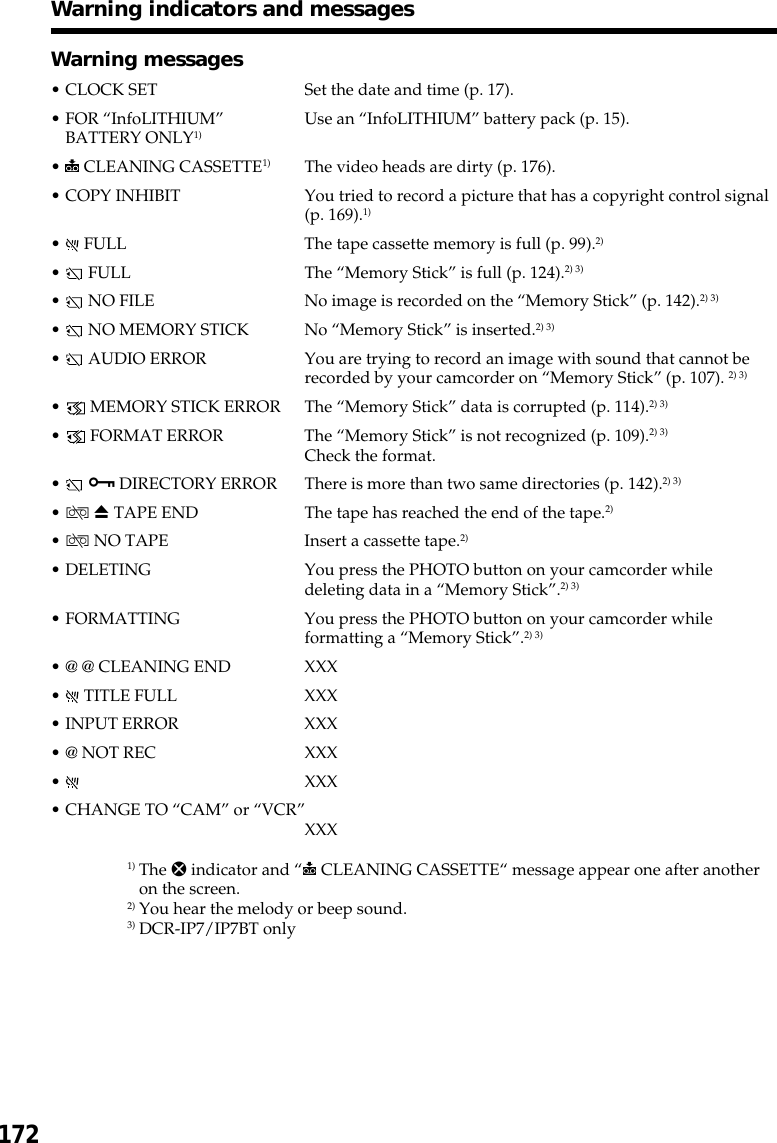
![181Additional Information[a] [b] [c]Maintenance information and precautionsMaintenance informationCleaning the video headTo ensure normal recording and clear pictures, clean the video head. The video headmay be dirty when:–mosaic-pattern noise appears on the playback picture.–playback pictures do not move.–playback pictures do not appear.–the x indicator and “ CLEANING CASSETTE” message appear one after another orthe x indicator flashes on the screen during recording.If the above problem, [a], [b] or [c] occurs, clean the video heads with the SonyMGRCLD cleaning cassette. Check the picture and if the above problem persists, repeatcleaning.If the video heads gets dirtier, the entire screen becomes blue [c].Playing back a cleaning cassette automaticallyThe camcorder is equipped with the cleaning cassette auto playback function. Followthe procedure below.(1)Set the POWER switch to CAMERA or VCR.(2)Insert the cleaning cassette.(3)Select XXX, then press the center z on the control button. The message “XXX”appears.After the cleaning is finished, the message “XXX” appears.(4)Eject the cleaning cassette.To cancel cleaningSelect CANCEL, then press the center z on the control button.The video headThe video head wears out if you use the camcorder for a long time. When use of thecleaning cassette does not make the picture clear, the video head may wear out. In suchcases, you must replace the video head. For details, consult your nearest Sony dealer.Notes•When cleaning the video head, do not use any equipment other than the cleaningcassette.•The cleaning cassette does not work in MEMORY mode (DCR-IP7/IP7BT only).](https://usermanual.wiki/Sony-Group/DCRIP7.users-manual/User-Guide-168995-Page-181.png)