Sony Group DKCC300X Digital Still Camera User Manual UPX C100
Sony Corporation Digital Still Camera UPX C100
UserManual.wiki
>
Sony Group
>
DKCC300X User Manual
User Manual
Navigation menu
Upload a User Manual
Namespaces
Wiki Guide
HTML
PDF
Info
Views
User Manual
Discussion / Help
Navigation

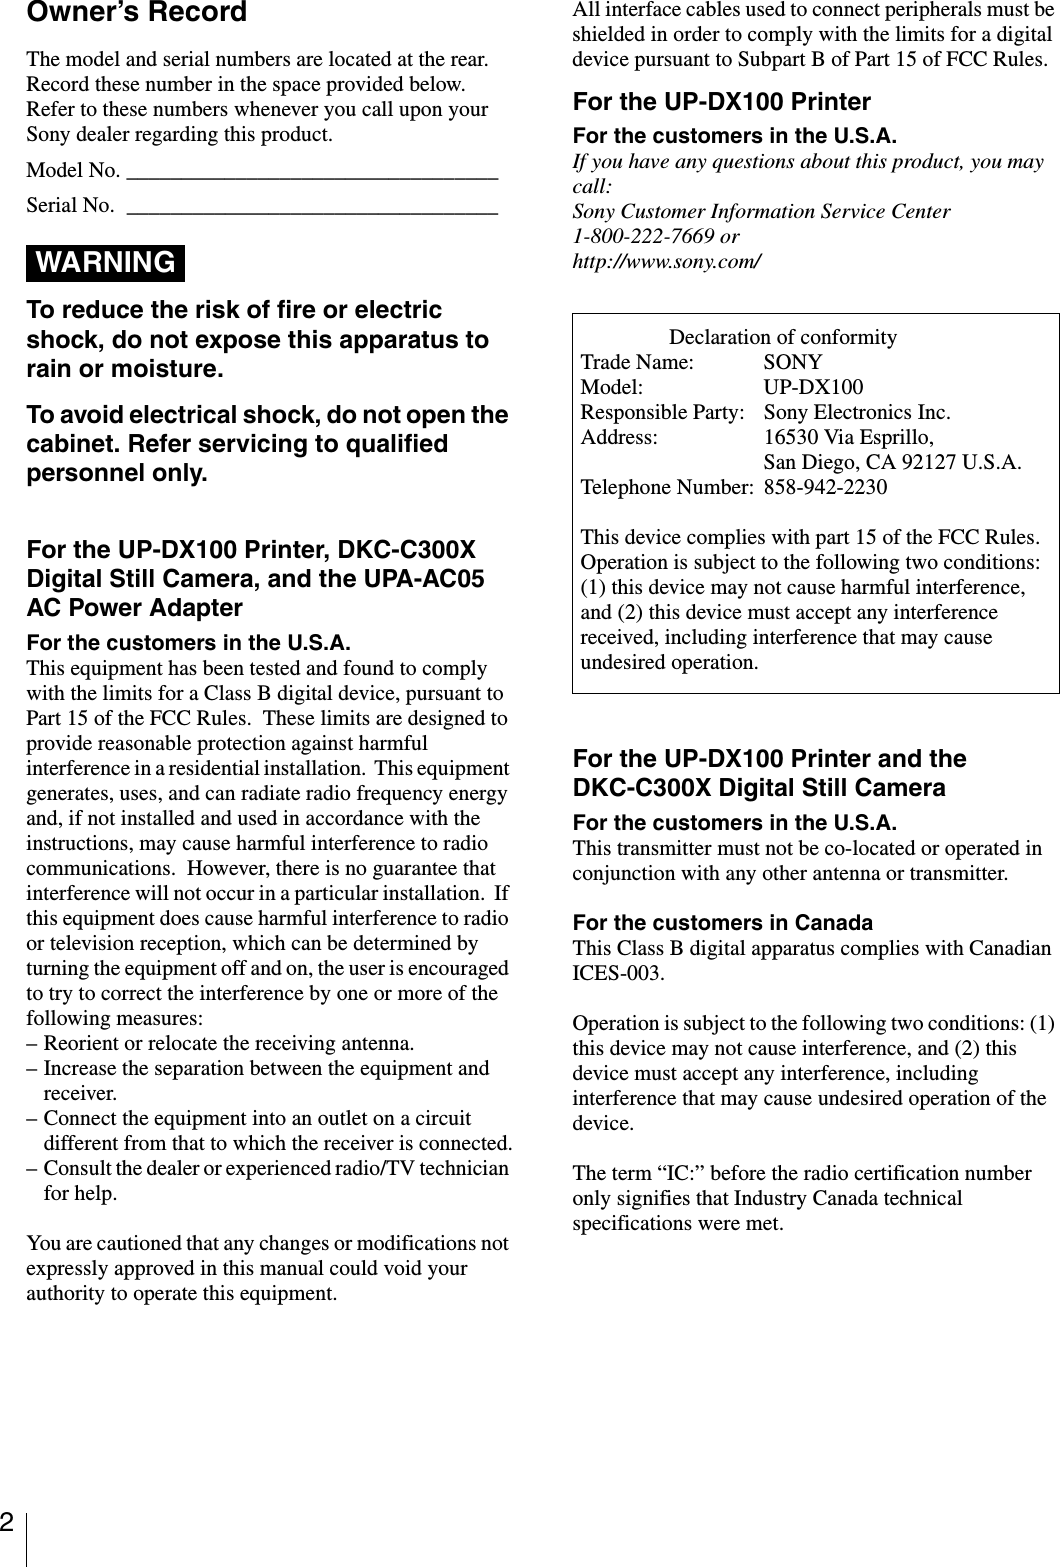
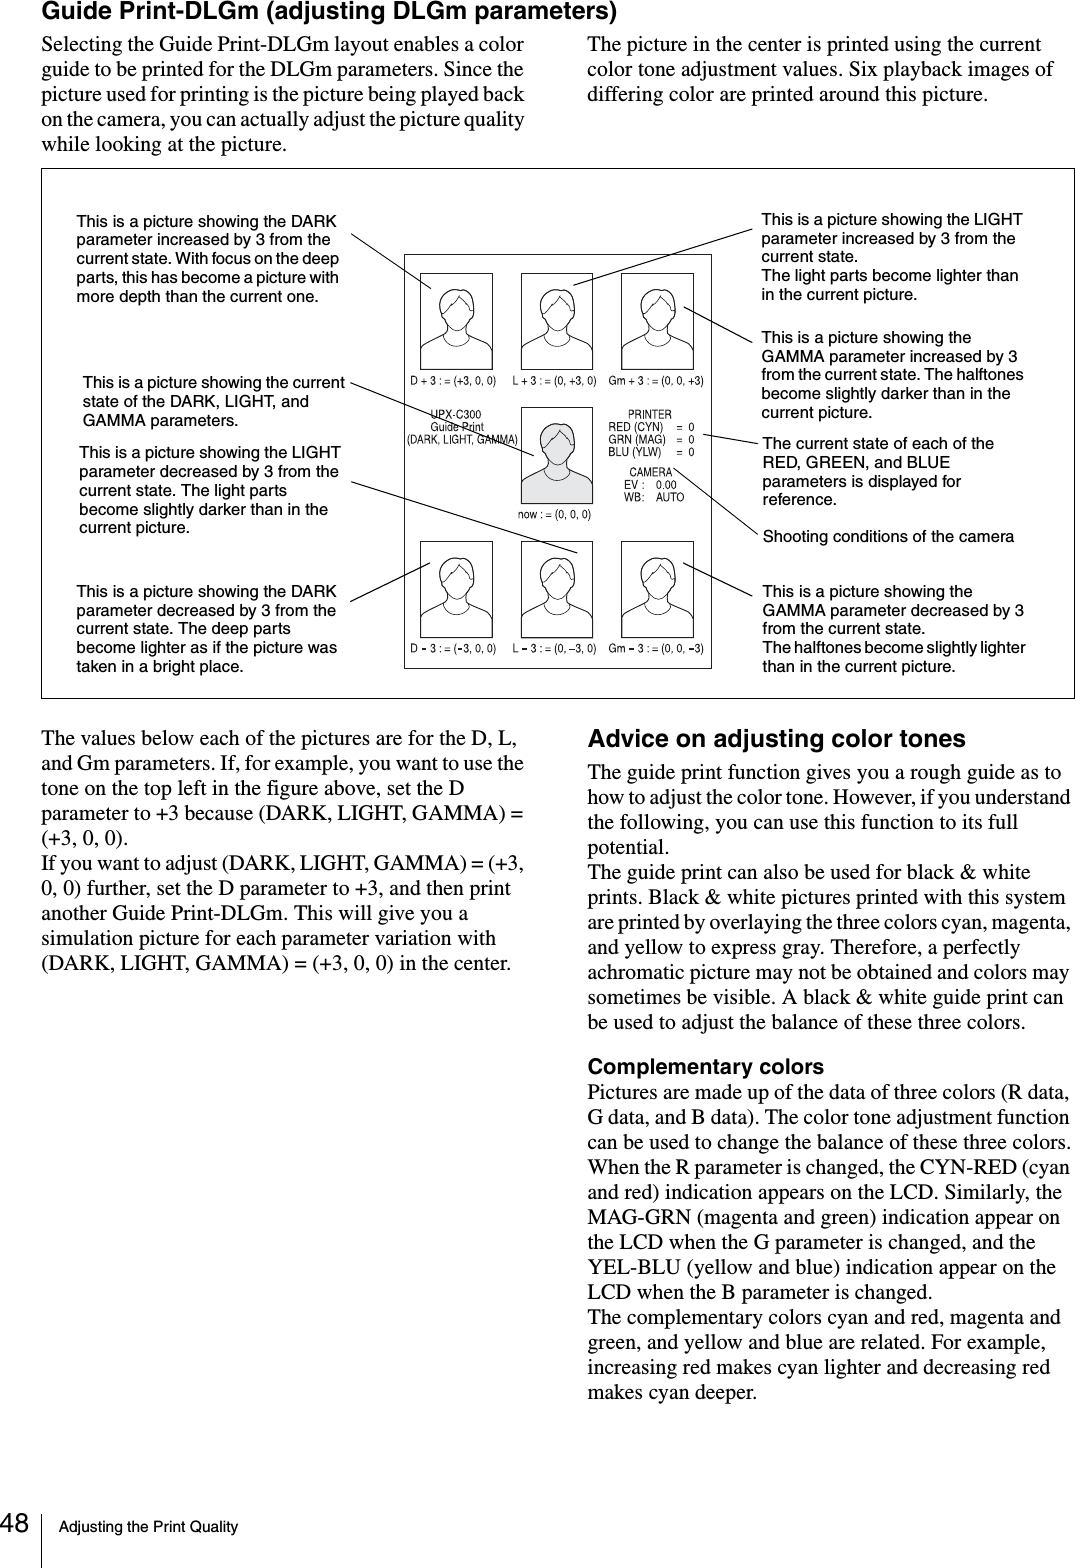
![System Overview8Flash Mode Setting ParametersThe flash mode is factory set to Program, but you can change the setting using the menus if necessary. The shooting conditions available for configuration differ depending on the flash mode setting, as shown in the table below. : Default settingEffects of the F value while shootingEven if the F value is changed through zoom operations, the flash intensity level and ISO sensitivity are automatically adjusted before shooting to ensure that the brightness of a captured image will not be affected.Flash Mode Flash Control Aperture Shutter Speed White Balance Exposure CompensationControlled Flash without pre-flashProgram with Zoom and EV Fixed(Open)Fixed(1/250)Program –2.0EV to 0EV to +2.0EV (in 1/4EV steps)Forced Flash without pre-flash7 steps(100/70/50/35/25/18/12%)without PreflashF4.7(F4.7 or F5.6)1/250(1/2 to 1/1000 [s])5500K(Program, 3000 to 7000K or OnePush)–1.0EV to 0EV to +2.0EV (in 1/4EV steps)Exhibit Flash No Lighting F4.7(F4.7 or F5.6)1/250(1/2 to 1/1000 [s])Auto(Program, 3000 to 7000K, OnePush)–1.0EV to 0EV to +2.0EV (in 1/4EV steps)](https://usermanual.wiki/Sony-Group/DKCC300X/User-Guide-936407-Page-8.png)


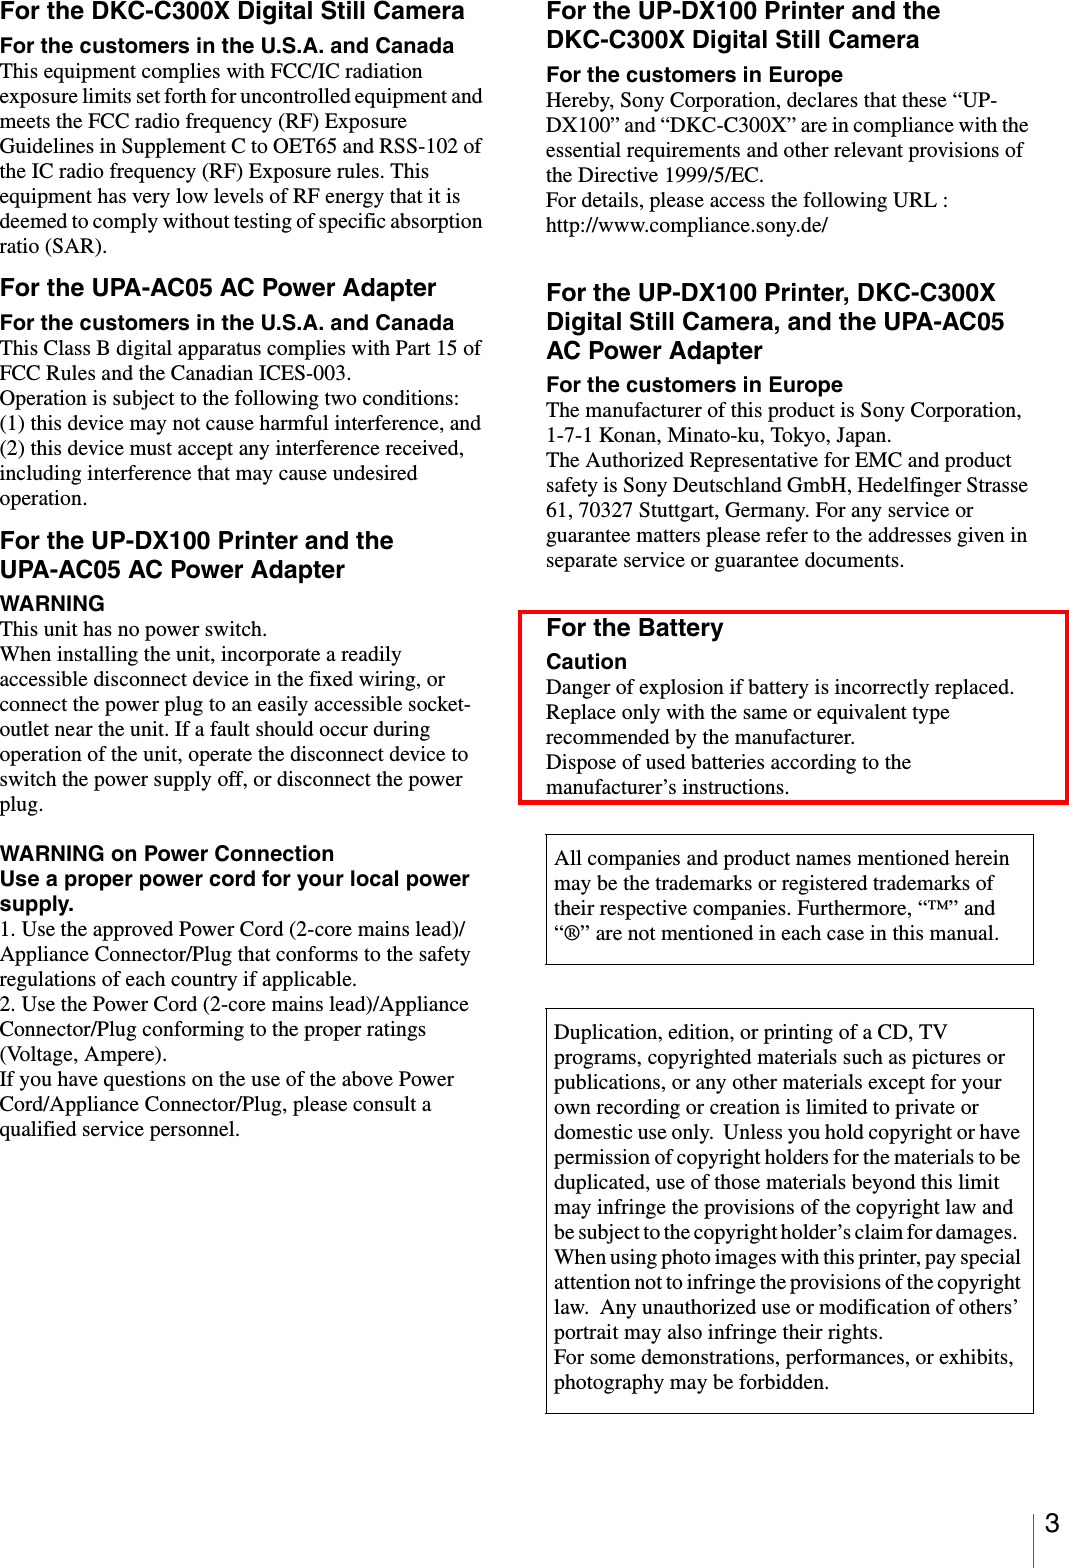
![Preparations 19• Do not touch the ink ribbon or place the print cartridge in a dusty location. Fingerprints or dust on the ink ribbon may lower the print quality.• Do not remove or insert print cartridges while printing is in progress.• Avoid storage in locations subject to high temperatures and humidity, excessive dust, or direct sunlight.• When removing a partially used print cartridge for storage, store it in its original packaging.To connect the printer to a power outletConnect the printer to a power outlet using the power cord.Turning On the Power1Turn on the printer.Check that Ready BT RSSI [- - - -] appears on the operation display.2Set the mode switch on the camera to .3Set the on/standby switch on the camera to ? (on).When turning on the camera for the first time, the default setting screen appears.For details on default settings, see “The first time you turn on the camera (default setting)” on page 20.The camera starts searching for the printer, and “DISCOVERING” appears on the LCD. When the camera finds the printer, “DISCOVERED” appears, and the printer name and Bluetooth address are displayed in black on the LCD. If the color of the printer name and Bluetooth address do not change to black but remain in gray, set the printer and camera to standby mode and perform steps 1 through 3 again. Notes on storagePrinterPower cordto power outletPUSH OPENPRINTEXECMENUALARMDIGITAL PHOTO PRINTER3421](https://usermanual.wiki/Sony-Group/DKCC300X/User-Guide-936407-Page-19.png)
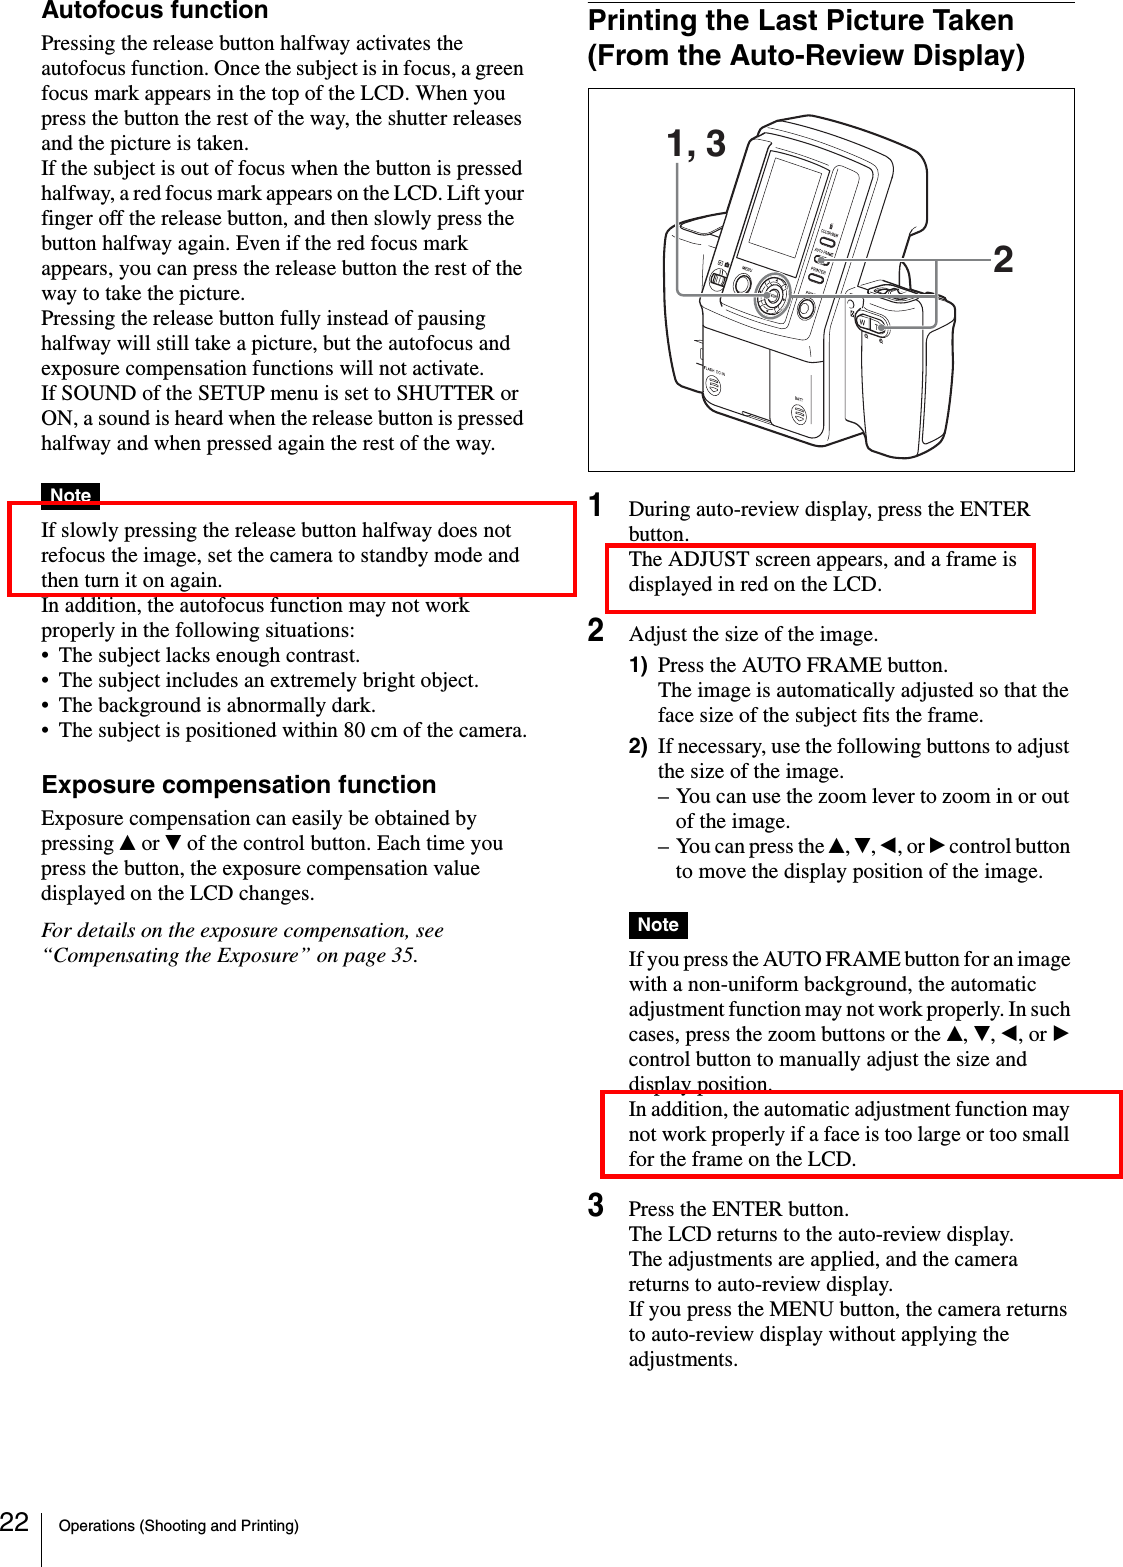
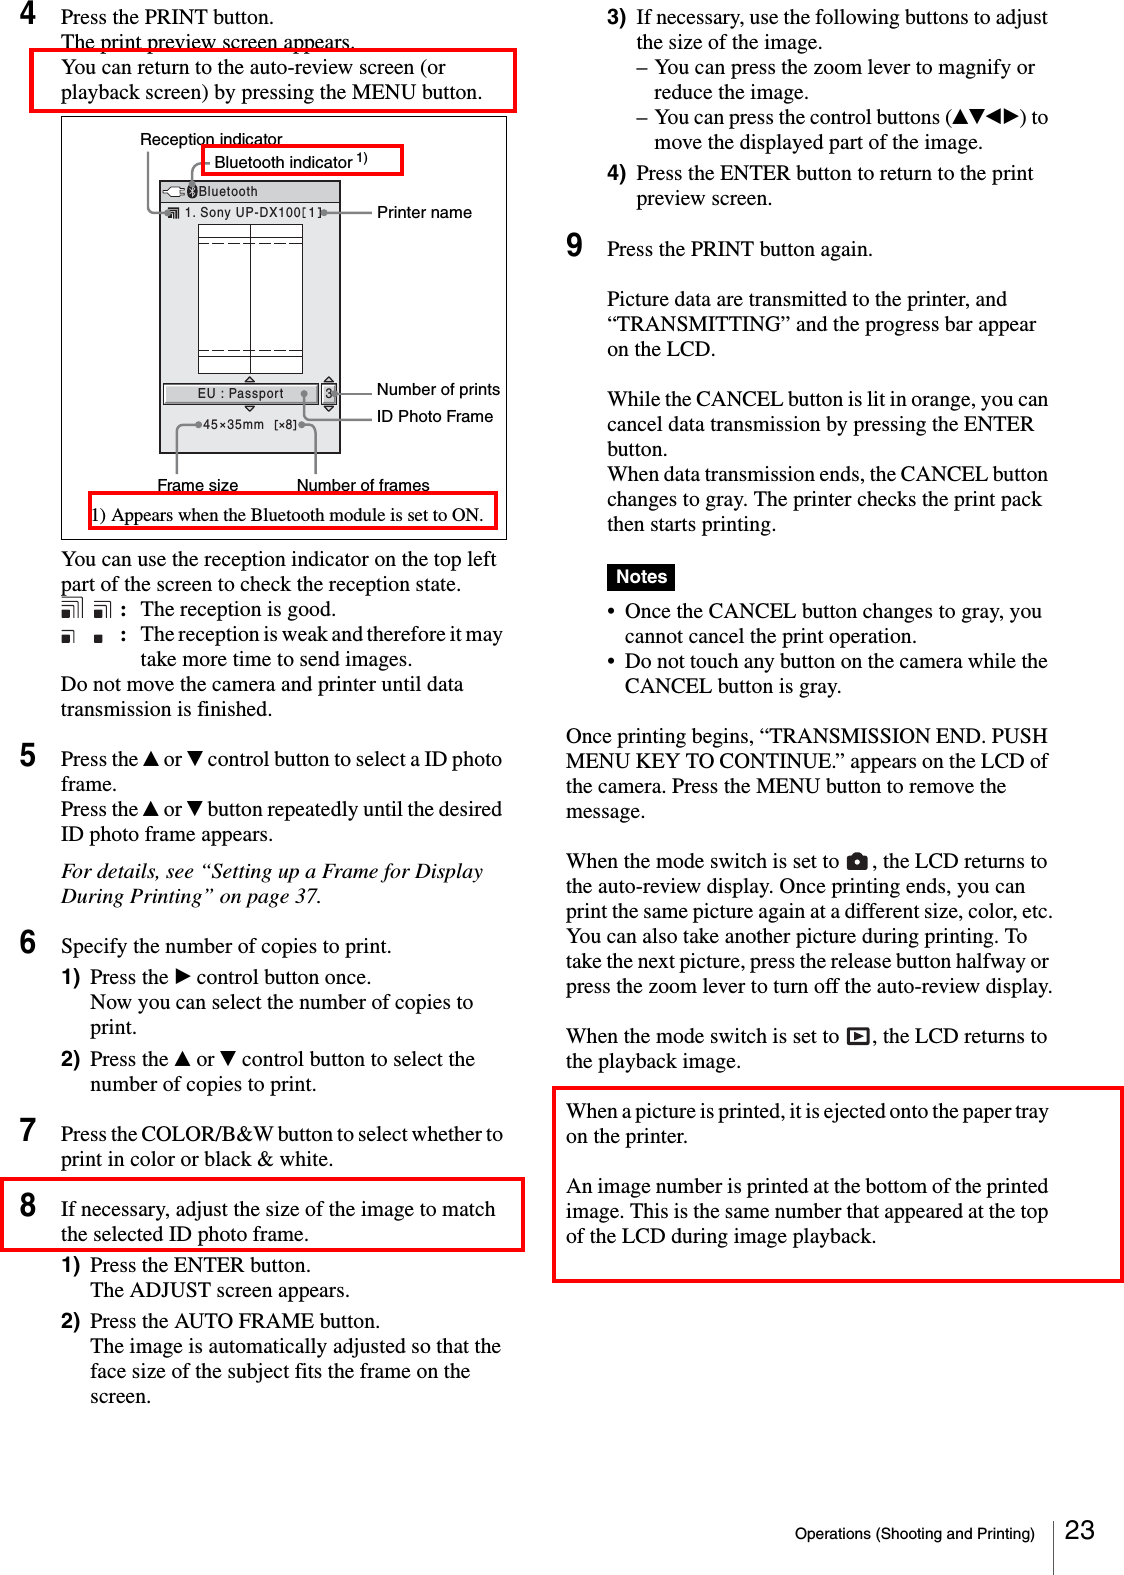
![Operations (Shooting and Printing)24To adjust the print qualityOn the camera, you can independently adjust the print quality for color pictures and black & white pictures and store the adjusted values. Once these values are stored, the camera automatically selects the appropriate adjusted value for color prints and black & white prints, respectively.For details on adjusting the print quality, see “Adjusting the Picture Quality” on page 44.To adjust black & white print qualityWhen you print a picture in black & white by selecting B&W, the picture is printed by overlaying yellow, magenta, and cyan, and therefore may not be perfectly achromatic. To adjust the black tone, you can use the print quality adjustment function on the printer.Printing a Picture Stored in the Camera’s Built-In MemoryWhen a picture is taken, its data is stored in the camera’s built-in memory. To print stored pictures, view them in Playback mode and select the picture you wish to print. Then perform the same steps as when printing a picture from the auto-review display (on page 22).For details on viewing pictures stored in memory, see “Viewing a Picture on the LCD” on page 24.Reprinting a Picture Stored in the Printer’s Memory (COPY PRINT)The data for the last picture that was printed is stored in the printer’s memory. You can reprint this picture.NoteIf you press the 1 button on the printer and set it to standby mode (so the lamp goes out), the data stored in the printer’s memory is deleted, and you cannot reprint the picture.1Press the MENU button.2Press V on the control button to display “COPY PRINT [>>].”3Press B on the control button.“COPY PRINT: 1 [1 – 9 PRINT: EXEC]” appears.4Set the number of sheets to be printed by press v or V on the control button.A value from 1 to 9 can be set.5Press the EXEC button.The number of pictures set in step 4 is printed.When printing completes, the READY screen reappears.Viewing a Picture on the LCD1Set the mode switch to .A picture stored in the camera’s memory appears on the LCD.2Select a picture to view by pressing the b or B control button.1325421](https://usermanual.wiki/Sony-Group/DKCC300X/User-Guide-936407-Page-24.png)

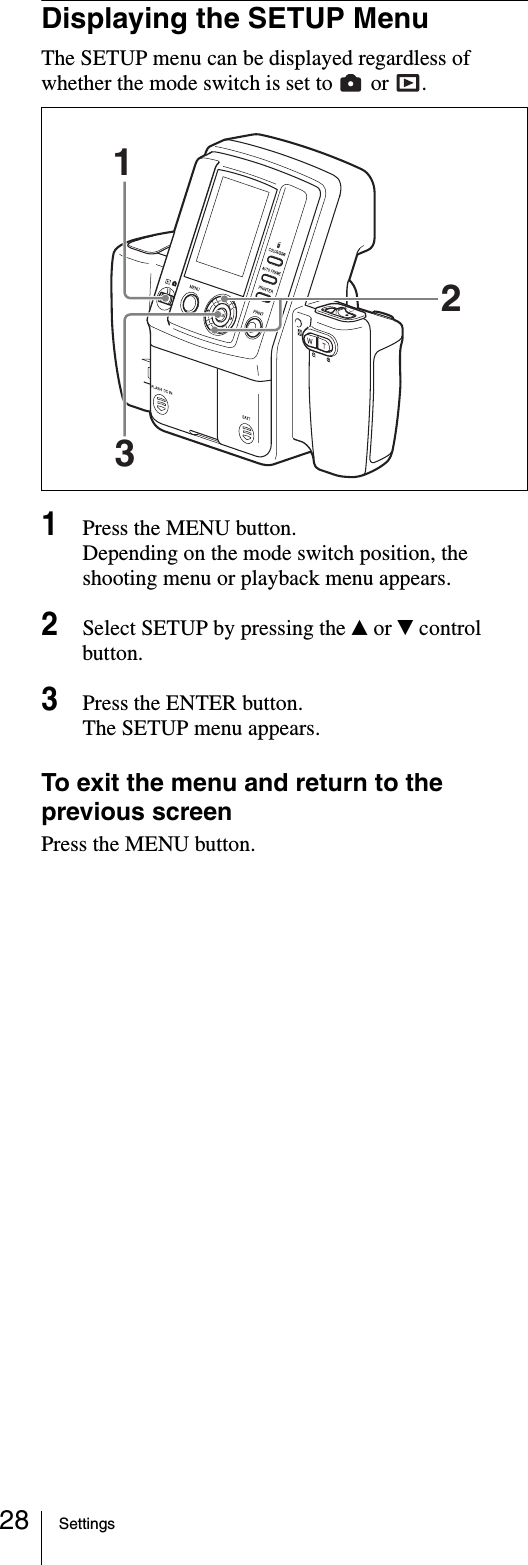
![Menu 29MenuFunctions of the Menu ItemsShooting menu : Default settingMENU Lock: Press and hold the MENU button to lock or unlock the menu.Menu Item Function SettingsEXIT Exits Menu mode. —RESOLUTION Selects the resolution for recording. HIGH (3264 × 2448)STD (1632 × 1224)AUTO ERASE Sets the auto erase mode. ONWhen memory becomes full, data is deleted in order from the oldest when new picture data is stored.OFFWhen memory becomes full, pictures can no longer be taken. FLASH MODE Selects the flash mode. Flash: AutoFlash: Forced (flash intensity level: 100/70/50/35/25/18/12%)Flash: OFF APERTURE Selects the aperture setting.Valid only when Flash Mode is set to or .F4.7F5.6SHUTTER Selects the shutter speed.Valid only when Flash Mode is set to or .1/2[s], 1/4[s], 1/8[s], 1/15[s], 1/30[s], 1/60[s], 1/100[s], 1/125[s], 1/250[s], 1/500[s], 1/750[s], 1/1000[s]W.B. Adjusts the white balance. Program: White balance is adjusted automatically.One Push: Allows you to capture any image to use as the reference value for white.3000K, 3500K, 4000K, 4500K, 5000K, 5500K, 6000K, 6500K, 7000K: White balance is adjusted for the selected color temperature.EXPOSURE Specify the exposure compensation. When the flash mode is : –2.0EV to 0EV to +2.0EV (in 1/4EV steps)When the flash mode is or : –1.0EV to 0EV to +2.0EV (in 1/4EV steps)SETUP To display the SETUP menu. (For details, see “SETUP menu” on page 30.)](https://usermanual.wiki/Sony-Group/DKCC300X/User-Guide-936407-Page-29.png)
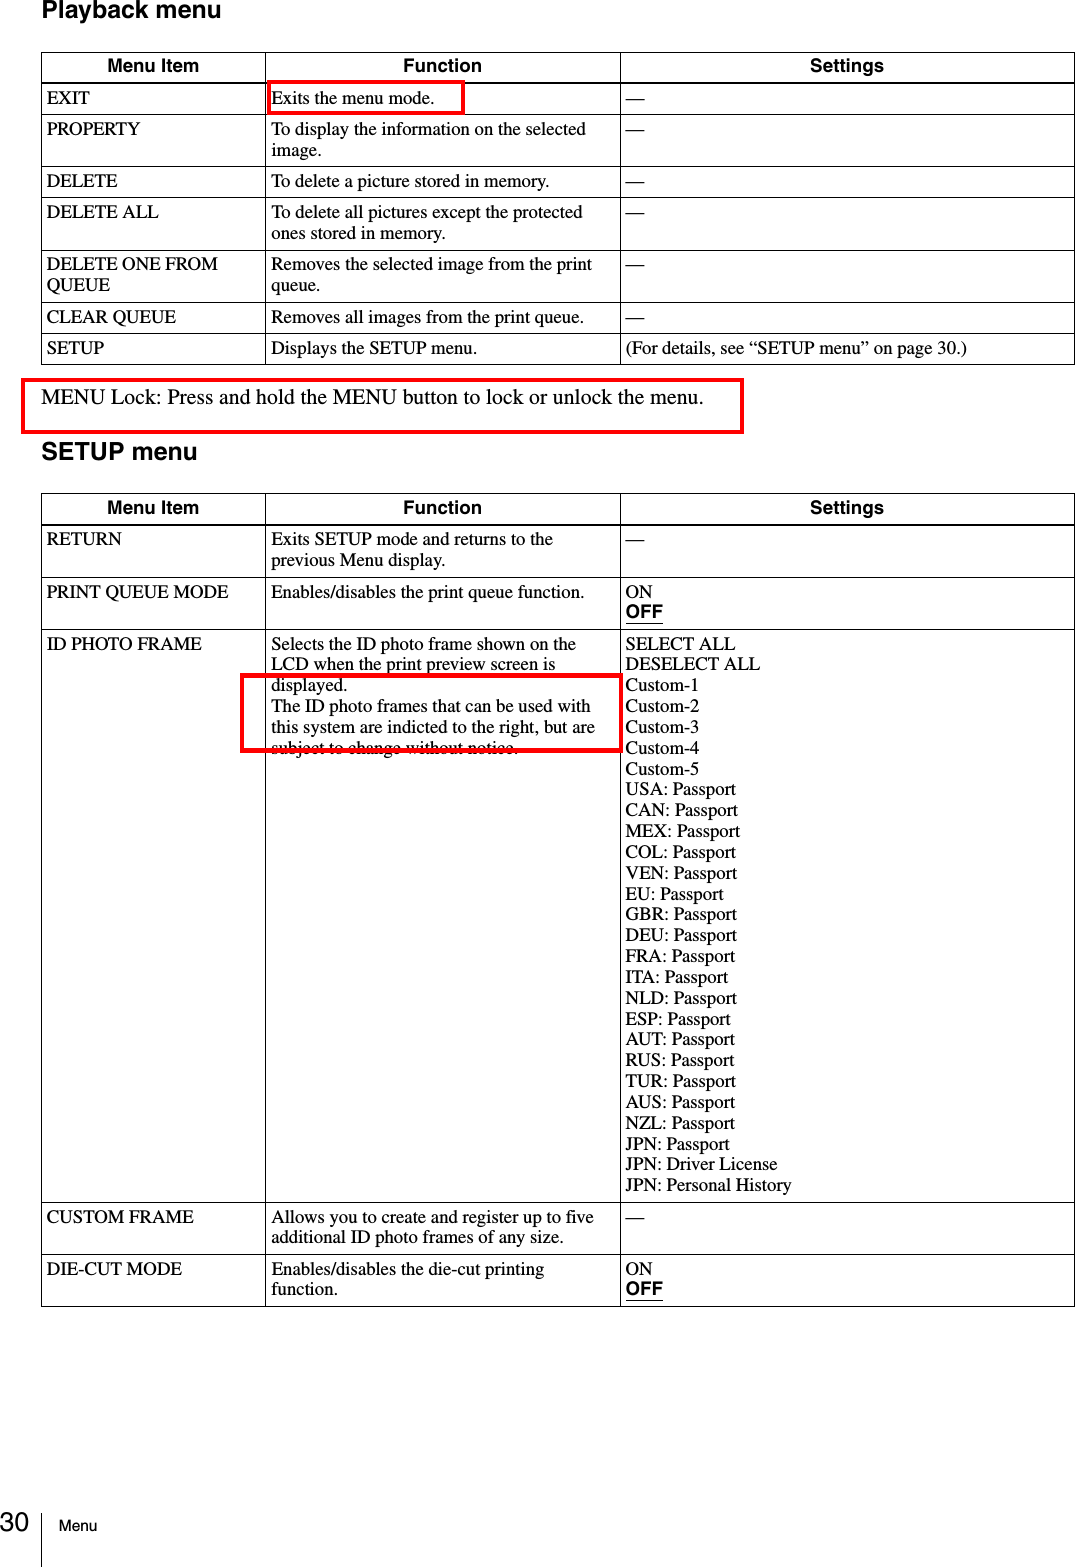
![Menu 31 : Default settingPrinterCOLOR ADJUST Adjusts the print quality for color pictures. CYN-RED: Adjusts cyan and red. (–7 to 0 to +7)MAG-GRN: Adjusts magenta and green. (–7 to 0 to +7)YEL-BLU: Adjusts yellow and blue. (–7 to 0 to +7)DARK: Adjusts the brightness of dark areas. (–7 to 0 to +7)LIGHT: Adjusts the brightness of light areas. (–7 to 0 to +7)SHARPNESS: Adjusts the sharpness of object contours. (–7 to 0 to +7)B&W ADJUST Adjusts the print quality for black & white pictures.AUTO POWER SAVE Allows you to set or disable the AUTO POWER SAVE function.: Sets the AUTO POWER SAVE function during AC power adapter use. (30 min/10 min/DISABLE): Sets the AUTO POWER SAVE function during battery use. (10 min/7 min/3 min)SOUND Turns the operation sound on or off. ONSHUTTEROFFLANGUAGE Selects the language. English/Deutsch/Français/Italiano/Español/Nederlands/Portugêus / /DEFAULT SETTING Returns camera settings to their default values.—FIRMWARE VERSION Displays the camera version. —Bluetooth To set for the Bluetooth functions. PROPERTY: Shows the camera’s address and passkey, and the list of the registered printers.CHANGE PASSKEY: For changing the passkey, from 0000 to 9999.ADD PRINTER: For registering optional printers up to three.REMOVE PRINTER: For removing a registered printer one by one.MODULE: For turning ON or OFF the power of the Bluetooth circuit.Menu item Function SettingsCOLOR ADJUST COLORAdjusts the print quality for color pictures. Not used with this system.COLOR ADJUST B&WAdjusts the print quality for black & white pictures.Not used with this system.Bluetooth SETTING You can make Bluetooth settings. Bluetooth ADDR: The Bluetooth address is displayed.PASSKEY INPUT: A passkey is set or changed.MY DEVICE NAME: The printer can be assigned a number.CONNECTION RECORD: The connection record is displayed.MODULE POWER: The power of the Bluetooth circuits is turned on or off.PRINT SETTING Fine tunes the printing position for the UPC-X46 series print paper.PRINT OFFSET (–2/–1/0/1/2)The printing position can be adjusted in units of 0.5 mm (1/32").PRINT TESTPrints a color pattern.COPY PRINT Reprints the last picture stored in memory. [1 – 9]Sets the number of sheets to reprint.TOTAL PRINTS Displays the total number of sheets printed. —Menu Item Function Settings](https://usermanual.wiki/Sony-Group/DKCC300X/User-Guide-936407-Page-31.png)


![Adjusting the Print Quality50Printing TimesPrint times differ depending on the print size and paper size used.Printing timesThe following are examples of the approximate time it takes from the moment the PRINT button is pressed on the camera to the moment the printer receives the picture data from the camera and prints one picture.Display during printing processWhen you print a picture, the operation that is being processed appears on the printer operation display as shown below.Adjusting the Print Position (PRINT OFFSET)When using the UPC-X46 series, you can adjust the print position in increments of 0.5 mm (1/32") so that the printed picture is correctly positioned on the print paper.1Turn on the printer.2Press the MENU button.3Press v or V on the control button to display “PRINT SETTING [>>]” on the operation display.4Press B on the control button.The PRINT OFFSET screen appears.5Select an offset value by pressing b or B on the control button.6Press the EXEC button.The offset value selected in step 5 is confirmed, and the PRINT SETTING screen reappears.Print a picture and check that the picture is printed in the correct position on the print paper. If further adjustment is needed, repeat the above steps.For details on printing a picture, see “Printing the Last Picture Taken (From the Auto-Review Display)” on page 22.To exit PRINT SETTINGPress the MENU button to return to the READY screen.NoteWhen you have finished making adjustments, be sure to press the MENU button to return to the READY screen. If you do not return to the READY screen, COMMUNICATION ERROR will appear on the LCD of the camera the next time printing is performed, and printing will fail.Print paperResolution Print size2 × 2 inches 45 × 35 mmUPC-X34 seriesSTD Approx. 83 sec Approx. 78 secHIGH Approx. 83 sec Approx. 78 secUPC-X46 seriesSTD Approx. 120 sec Approx. 120 secHIGH Approx. 120 sec Approx. 120 secReadyPROCESSING Processing received dataPRINTING[YELLOW]Printing yellowPRINTING[MAGENTA]Printing magentaPRINTING[CYAN]Printing cyanPRINTING[LAMI]LaminatingReceiving Image BT [ ]Receiving image dataPRINTING Finishing print process234651](https://usermanual.wiki/Sony-Group/DKCC300X/User-Guide-936407-Page-50.png)
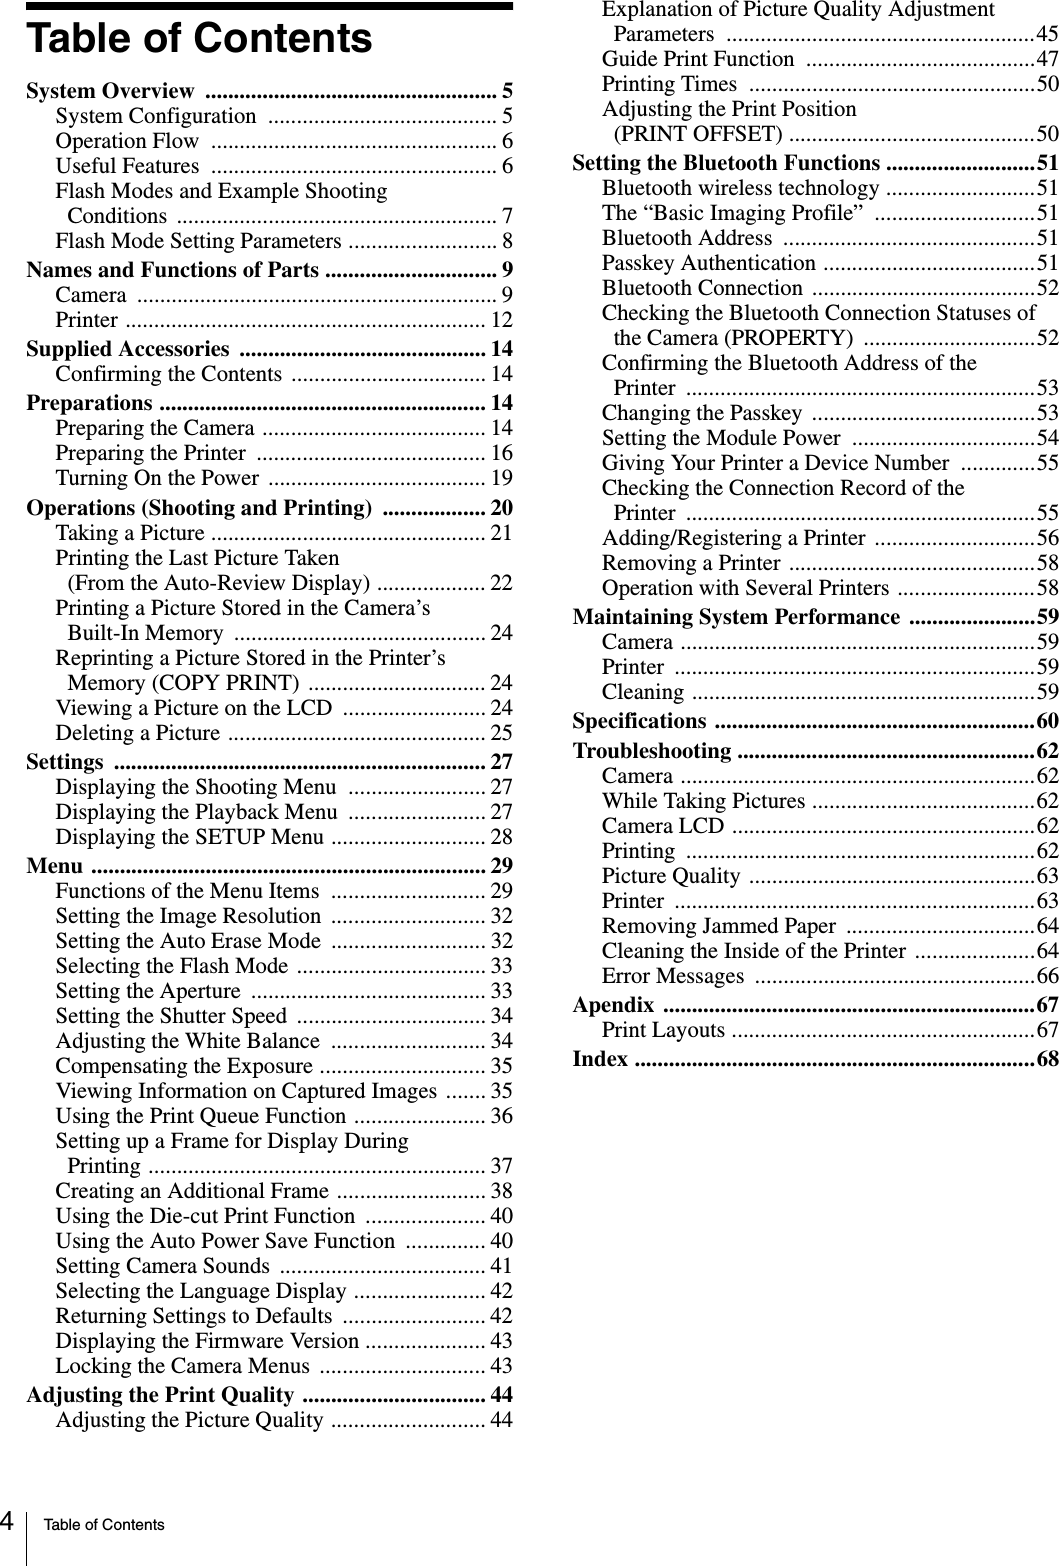
![Setting the Bluetooth Functions52Bluetooth ConnectionIn the UPX-C300 system, the printer and the camera are factory preset so that the camera automatically searches for the printer for connection when both the printer and the camera are turned on. Turn on the printer and the camera according to the following procedures:1Turn on the printer.Check that "Ready BT RSSI [----]" is displayed on the operation display.2Set the on/standby switch of the camera to ? (on).The camera starts searching for the printer, and “DISCOVERING” is displayed on the LCD of the camera. Upon establishment of connection between the camera and the printer, the message changes to “DISCOVERED,” and the name and the Bluetooth address of the connected printer are displayed in black.To interrupt searchingWhile “DISCOVERING” is displayed on the LCD of the camera, press the MENU button. “CANCELING” is displayed, and the search is interrupted. If several printers are connected, the search for the remaining printers is also interrupted.If the connection failsThe message “NOT DISCOVERED” is displayed on the LCD of the camera, and the printer name and the Bluetooth address remains displayed in gray. Even if the connection fails, shooting and playback can be performed on the camera.If the connection fails, before retrying to connect, check the following, then press the PRINT button. The message “Reconnecting” is displayed and the reconnection starts.• The printer is turned on.• The Bluetooth module of the camera and the printer is set to ON.• Between the camera and the printer, there is no obstacle that disturbs data transmission.For use with several printers connected, see “Operation with Several Printers” on page 58 as well.Checking the Bluetooth Connection Statuses of the Camera (PROPERTY)1Display the SETUP menu.For details, see “Displaying the SETUP Menu” on page 28.2Press v or V of the control button to select Bluetooth.3Press the ENTER button.The Bluetooth Menu display appears.4Press v or V of the control button to select PROPERTY.5Press the ENTER button.The Bluetooth information for the camera is displayed.You can scroll the printer list with v or V of the control button.When ENTER button is pressed, the display returns to Bluetooth Menu.PUSH OPENPRINTEXECMENUALARMDIGITAL PHOTO PRINTER21OKBluetoothSony DKC-C300XADDRESS: 00:13:E0:6F:4B:7FPASS KEY: 1234PRINTER LISTADDRESS 00:A0:96:12:24:E1ADDRESS --:--:--:--:--:--1. Sony UP-DX1002. . . . . . . . . .ADDRESS --:--:--:--:--:--3. . . . . . . . . .Bluetooth address of the cameraPasskeyList of the connected printers](https://usermanual.wiki/Sony-Group/DKCC300X/User-Guide-936407-Page-52.png)
![Setting the Bluetooth Functions 53Confirming the Bluetooth Address of the Printer1Turn on the printer.2Press the MENU button.3Press V of the control button to display "Bluetooth SETTING[>>]."4Press B of the control button.The Bluetooth address appears.To return to Ready, press the MENU button.Changing the PasskeyThe same passkey is set for all cameras and printers at the factory. If the passkey needs to be changed, set a new passkey, following the procedures below.Once a new passkey is set, remove the printer registration, and register it again. Then authentication of the new passkey will be valid.For details on removing a printer, see “Removing a Printer” on page 58, and on registering a printer, see “Adding/Registering a Printer” on page 56.Changing the passkey of the camera1Display the SETUP menu.For details, see “Displaying the SETUP Menu” on page 28.2Press v or V of the control button to select Bluetooth.3Press the ENTER button.The Bluetooth Menu display appears.4Press v or V of the control button to select CHANGE PASSKEY.5Press the ENTER button.The CHANGE PASSKEY display appears.6Press b or B of the control button to select a digit you wish to change.7Press v or V of the control button to set the value.A value 0 to 9 can be used.Repeat Steps 6 and 7 above to set a four-digit passkey.8Press B of the control button to select OK.9Press the ENTER button.A new passkey has been set, and the display returns to Bluetooth Menu.To cancel changing the passkey settingIn Step 8 above, select CANCEL instead of OK, then Press the ENTER button.Changing the passkey of the printer1Turn on the printer.“Ready BT RSSI [----]”appears on the operation display.2Press the MENU button.3Press V of the control button to display “Bluetooth SETTING [>>].”4Press B of the control button.“Bluetooth ADDR” appears.5Press V of the control button to display “PASSKEY INPUT [>>].”6Press B of the control button.“PASSKEY INPUT <1> [X:X:X:X]” appears.|| Current digit to be set PasskeyALARMPRINTMENUEXECDIGITAL PHOTO PRINTER11 2 3,4BluetoothCURRENT KEY : 1234NEW KEY :OKMOVE VALUECHANGE PASSKEYCANCEL1234](https://usermanual.wiki/Sony-Group/DKCC300X/User-Guide-936407-Page-53.png)
![Setting the Bluetooth Functions547Press b or B of the control button to select a digit of the passkey to be changed.This <1> shows the leftmost digit, and <4> shows the rightmost digit.8Press v or V of the control button to set the value of the passkey.A value from 0 to 9 can be used.Repeat Steps 7 and 8 until the four-digit passkey is set.9Press the EXEC button.“PASSKEY INPUT Saving...” appears, and your passkey setting is stored.10When the setting is completed, press the MENU button.Setting the Module PowerThe Bluetooth Module Power must be set to ON to connect the camera and the printer using the Bluetooth function. If it is set to OFF, Bluetooth connection between devices is not possible.Changing the setting for Module Power of the camera1Display the SETUP menu.For details, see “Displaying the SETUP Menu” on page 28.2Press v or V of the control button to select Bluetooth.3Press the ENTER button.The Bluetooth Menu display appears.4Press v or V of the control button to select MODULE.5Press the ENTER button.The BT MODULE POWER display appears.6Confirm that either ON or OFF is selected, then Press the ENTER button.The display returns to Bluetooth Menu.To cancel changing the settingIn Step 6, press b of the control button. The display returns to Bluetooth Menu.When the module power for the camera is set to ON, the (Bluetooth) icon appears at the top left of the LCD to the right of the power indicator.Changing the setting for Module Power of the printer1Turn on the printer.2Press the MENU button.3Press V of the control button to display "Bluetooth SETTING[>>]."4Press B of the control button."Bluetooth ADDR" appears.5Press V of the control button to display "MODULE POWER [>>]."6Press B of the control button.7Press b or B of the control button to select ON or OFF.8Press the EXEC button.“REBOOTING” is displayed. The printer restarts, and the setting of the Module Power is changed.If the Module Power setting of the printer is changed from ON to OFF, the Bluetooth lamp goes off, and "Ready BT RSSI [----]" is displayed on the operation display of the printer. The camera treats this printer in the same way as one whose printer name and Bluetooth address are displayed in gray.If the Module Power setting of the printer is changed from OFF to ON, the Bluetooth lamp lights. To establish connection between the camera and the printer, press the PRINT button of the camera for reconnection.](https://usermanual.wiki/Sony-Group/DKCC300X/User-Guide-936407-Page-54.png)
![Setting the Bluetooth Functions 55Giving Your Printer a Device NumberWhen two or more printers are used in a system, it is convenient that each printer have a device number (from 1 to 9).1Turn on the printer.“Ready BT RSSI [----]” appears on the operation display.2Press the MENU button.3Press V of the control button to display “Bluetooth SETTING [>>].”4Press B of the control button.5Press V of the control button to display “MY DEVICE NAME [>>].”6Press B of the control button.“Sony UP-DX100 [NONE-9: EXEC]” appears.7Press v or V of the control button to set the device number.8Press the EXEC button.“DEVICE NAME Saving. . .” appears, and the device number you have set is stored.9When the setting is completed, press the MENU button.Checking the Connection Record of the Printer1Turn on the printer.2Press the MENU button.3Press V of the control button to display "Bluetooth SETTING[>>]."4Press B of the control button.“Bluetooth ADDR” appears.5Press V of the control button to display “CONNECTION RECORD [>>].”6Press B of the control button.The name and Bluetooth address of the devices being connected with the printer are displayed.To scroll the display to check the information on other devices, press v or V of the control button.To return to the “CONNECTION RECORD [>>]” display, press the EXEC button.To return to the Ready display, press the MENU button.](https://usermanual.wiki/Sony-Group/DKCC300X/User-Guide-936407-Page-55.png)

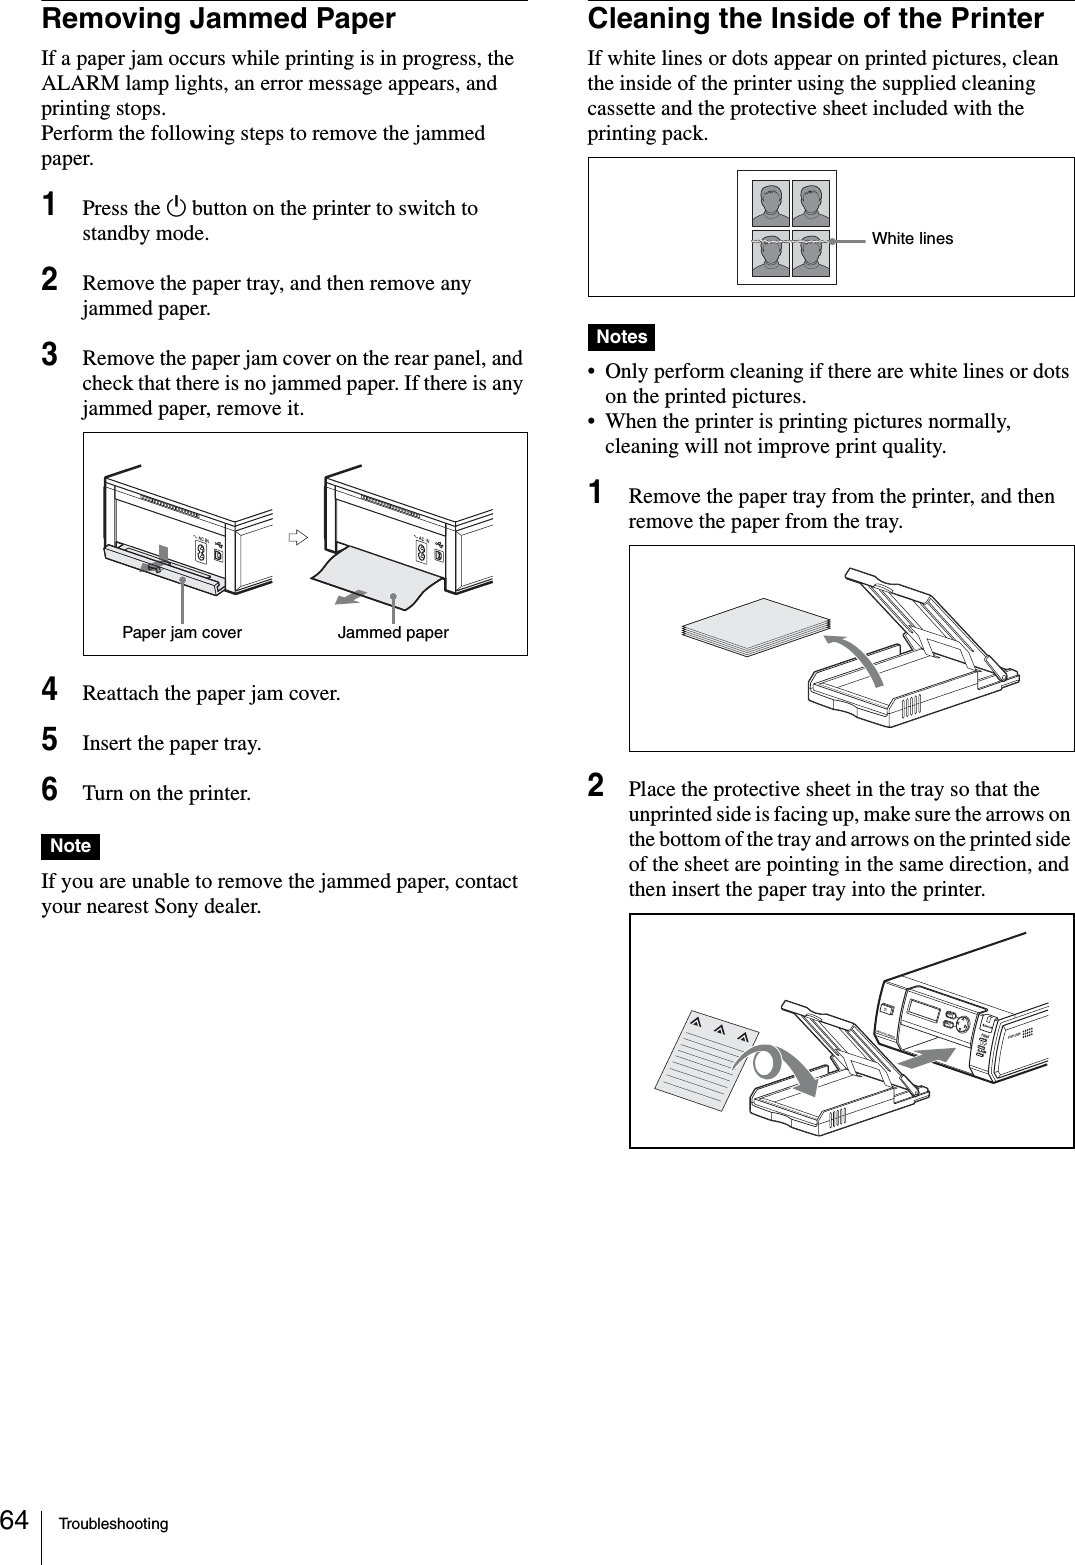
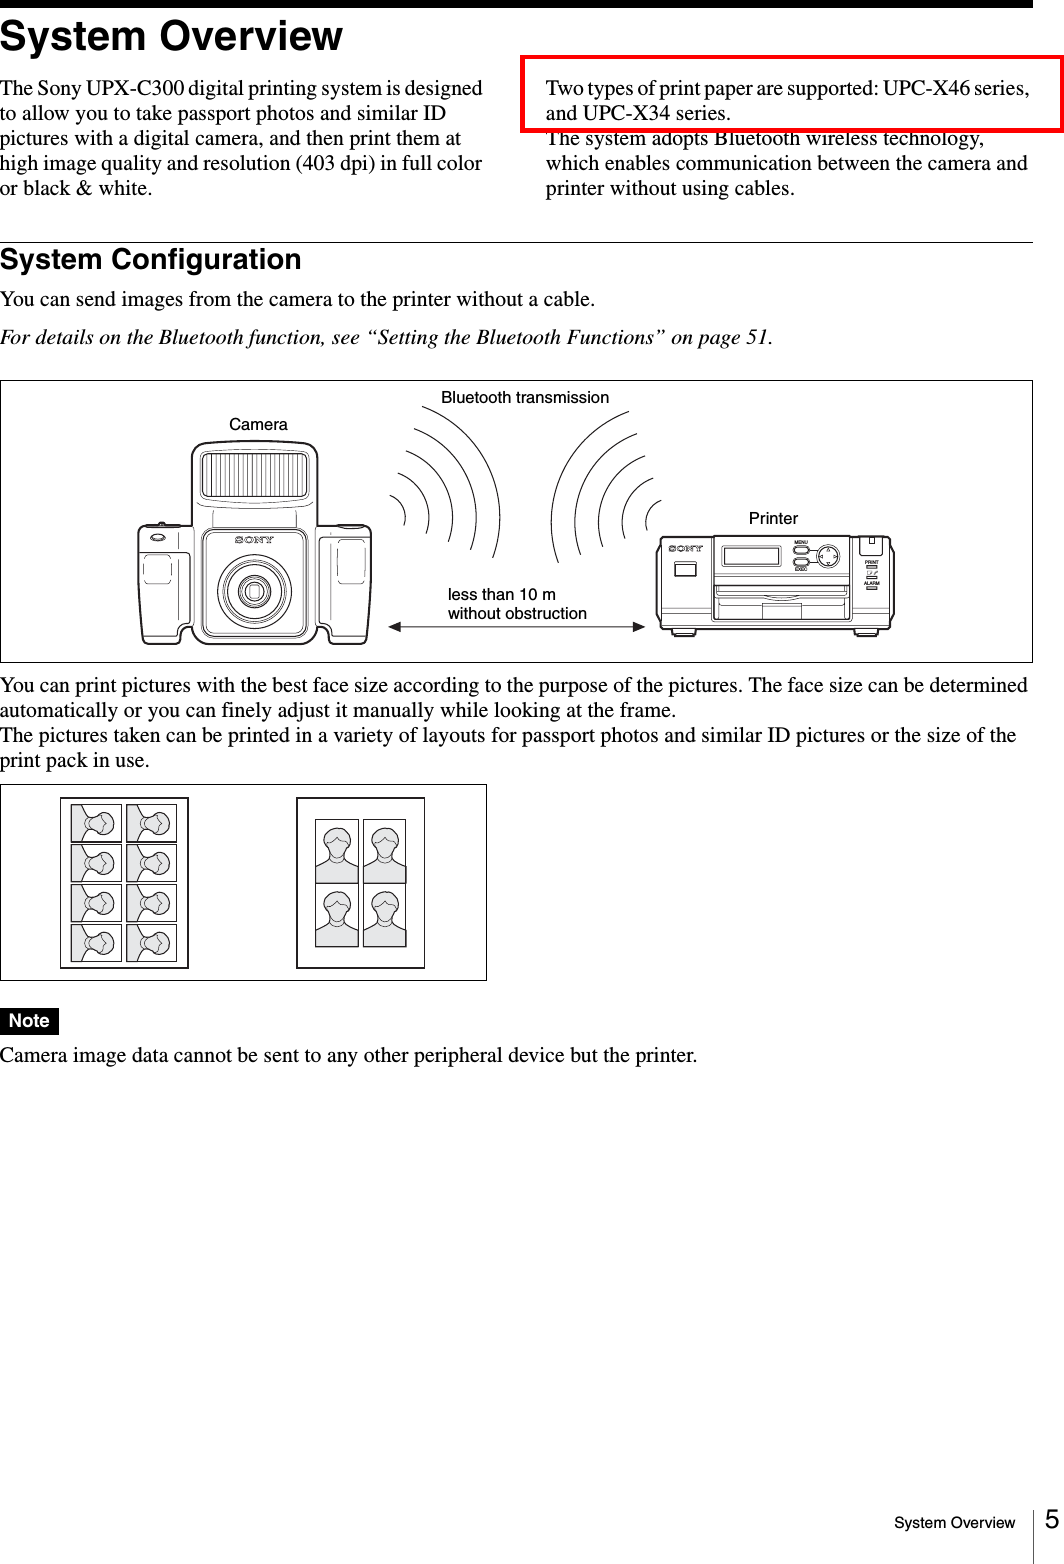
![Troubleshooting 653Open the print cartridge cover and remove the print cartridge.4Insert the supplied cleaning cassette and close the print cartridge cover.5Press the EXEC button.A buzzer sounds and “HEAD CLEANING/PUSH [EXEC]” appears.6Press the EXEC button again.The cleaning cassette and protective sheet clean the inside of the printer. After cleaning is finished, the protective sheet is automatically ejected.7Remove the cleaning cassette from the printer, and reinsert the print cartridge and paper tray.PRINTEXECMENUALARMDIGITAL PHOTO PRINTERPRINTEXECMENUALARMPUSH OPENPRINTEXECMENUALARMDIGITAL PHOTO PRINTER](https://usermanual.wiki/Sony-Group/DKCC300X/User-Guide-936407-Page-65.png)
![Troubleshooting66Error MessagesAfter performing the actions described above, press the MENU button to clear the error message on the camera.Camera Printer Cause/SolutionSET MEDIA SET NEW RIBBONPUSH [EXEC]• The print cartridge is not installed properly.tInstall the print cartridge properly, and press the EXEC button.• The print cartridge has run out.tReplace the print cartridge, and press the EXEC button.SET PAPERPUSH [EXEC]• The paper tray is not installed.tInstall the paper tray, and press the EXEC button.• The print paper has run out.tInsert print paper, and press the EXEC button.CHECK PRINTER MEDIA MISMATCHPUSH [EXEC]• The print paper and print cartridge do not match.tInsert the correct print paper and press the EXEC button.PAP ER JAMMINGREMOVE PRINTS• There is a print paper jam.tRemove the jammed paper, and try printing again. (See “Removing Jammed Paper” on page 64)REMOVE PRINTSPUSH [EXEC]• Print paper remains in the ejection slot.tRemove the paper tray, remove the print paper, and then press the EXEC button.BLUETOOTH ERRORSERVICE CALL• There is a problem with the Bluetooth function.tContact your nearest Sony dealer.PRINTER ERRORPLEASE RETRY• An error has occurred with the printer.tTry printing again.PRINTER ERRORSERVICE CALL• There is a problem with the printer.tContact your nearest Sony dealer.— • The menu is displayed in the operation display on the printer.tEnd the menu operation, and display the READY screen.— • The printer is not connected correctly.tRestart the camera and printer, and then try again.TRANSMISSION FAILED!— • Print data failed to transmit.tRestart the camera and printer, and then try the operation again.](https://usermanual.wiki/Sony-Group/DKCC300X/User-Guide-936407-Page-66.png)