Sony Group DSCHX30V Digital Still Camera User Manual 010GB1
Sony Corporation Digital Still Camera 010GB1
UserManual.wiki
>
Sony Group
>
DSCHX30V User Manual
User Manual
Navigation menu
Upload a User Manual
Namespaces
Wiki Guide
HTML
PDF
Info
Views
User Manual
Discussion / Help
Navigation

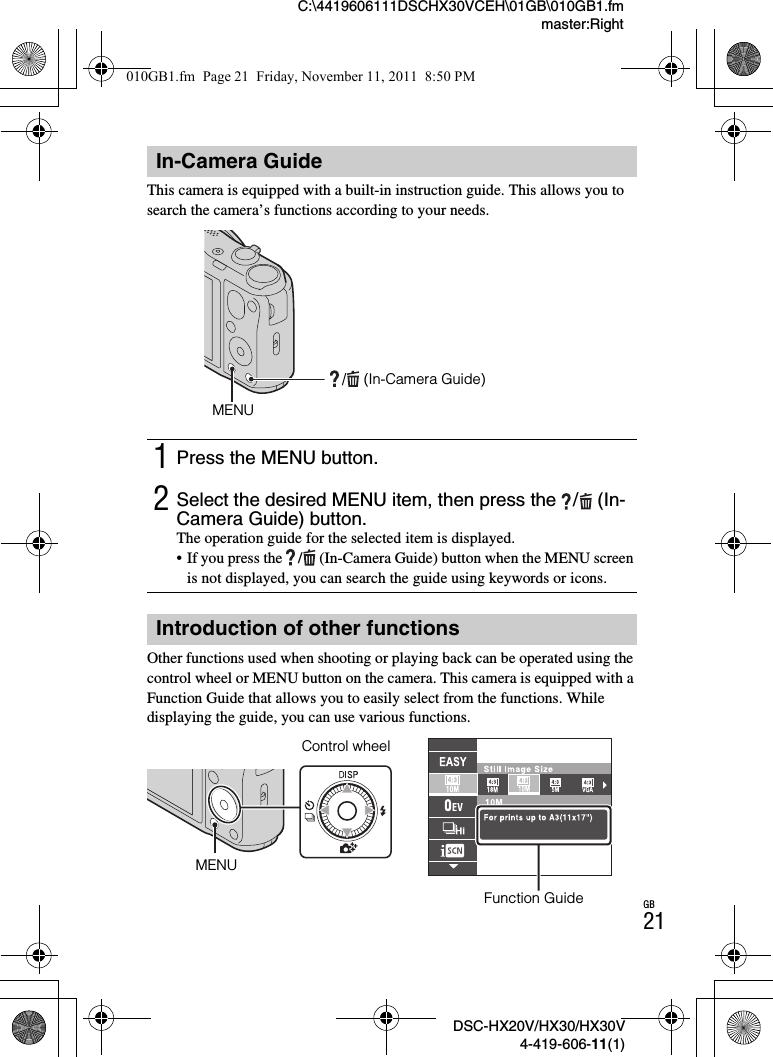
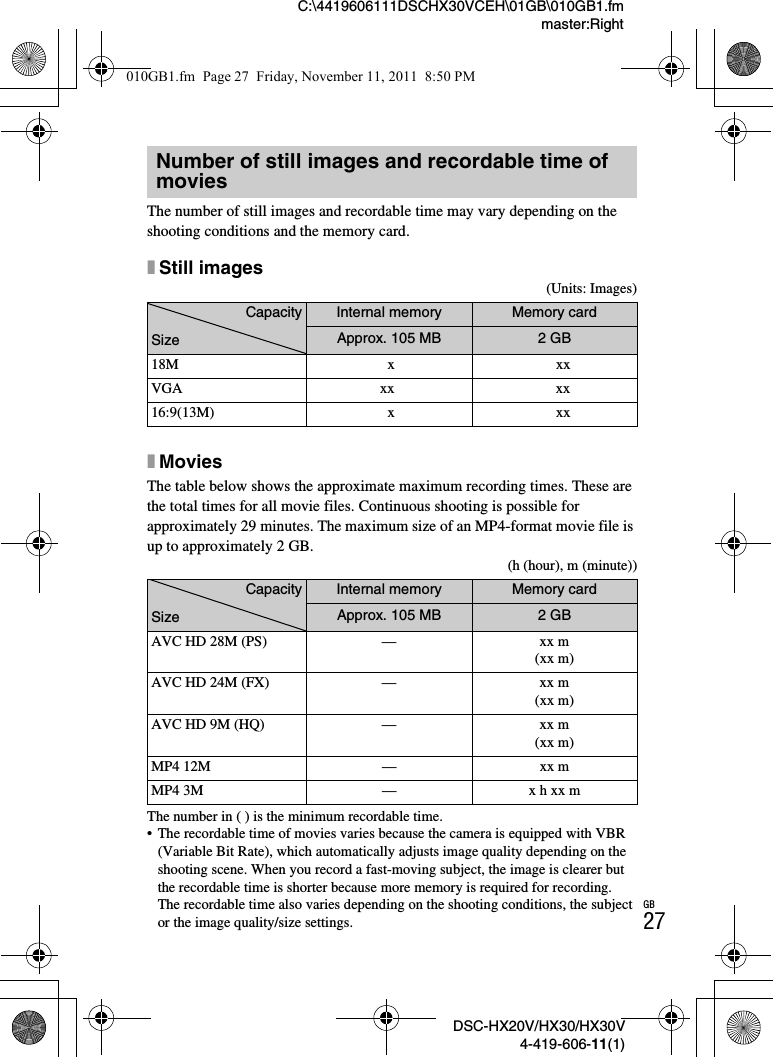
![DSC-HX20V/HX30/HX30V4-419-606-11(1)C:\4419606111DSCHX30VCEH\01GB\010GB1.fmmaster:RightGB15xBattery life and number of images that can be recorded and played back• The above number of images applies when the battery pack is fully charged. The number of images may decrease depending on the conditions of use.• The number of images that can be recorded is for shooting under the following conditions:– Using Sony “Memory Stick PRO Duo” (Mark2) media (sold separately)– The battery pack is used at an ambient temperature of 25°C (77°F).– [GPS setting] is set to [Off] (DSC-HX20V/HX30V only).• The number for “Shooting (still images)” is based on the CIPA standard, and is for shooting under the following conditions:(CIPA: Camera & Imaging Products Association)– DISP (Display Setting) is set to [ON].– Shooting once every 30 seconds.– The zoom is switched alternately between the W and T ends.– The flash strobes once every two times.– The power turns on and off once every ten times.• The battery life for movies applies shooting under the following conditions:– Movie quality: AVC HD HQ– When continuous shooting ends because of set limits (page 27), press the MOVIE (Movie) button again and continue shooting. Shooting functions such as the zoom do not operate.Battery life Number of imagesShooting (still images) Approx. xx min. Approx. xx imagesViewing (still images) Approx. xx min. Approx. xx imagesShooting (movies) Approx. xx min. —Notes010GB1.fm Page 15 Friday, November 11, 2011 8:50 PM](https://usermanual.wiki/Sony-Group/DSCHX30V/User-Guide-1647164-Page-15.png)
![DSC-HX20V/HX30/HX30V4-419-606-11(1)C:\4419606111DSCHX30VCEH\01GB\010GB1.fmmaster:LeftGB18Setting the clock1Press the ON/OFF (Power) button.Date & Time setting is displayed when you turn on the camera for the first time.• It may take time for the power to turn on and allow operation.2Select a desired language.3Select a desired geographic location by following the on-screen instructions, then press z on the control wheel.4Set [Date & Time Format], [Summer Time] and [Date & Time], then select [OK] t [OK].• Midnight is indicated as 12:00 AM, and noon as 12:00 PM.5Follow the instructions on the screen.• The battery pack will run out quickly when:– [GPS setting] is set to [On] (DSC-HX20V/HX30V only).– [Disp. Resolution] is set to [High].Control wheelON/OFF (Power)Power/Charge lamp (green)Select items: v/V/b/BSet the numeric value of date and time: /Set: z010GB1.fm Page 18 Friday, November 11, 2011 8:50 PM](https://usermanual.wiki/Sony-Group/DSCHX30V/User-Guide-1647164-Page-18.png)
![DSC-HX20V/HX30/HX30V4-419-606-11(1)C:\4419606111DSCHX30VCEH\01GB\010GB1.fmmaster:LeftGB20xSelecting next/previous imageSelect an image by pressing B (next)/b (previous) on the control wheel or by turning the control wheel. Press z in the center of the control wheel to view movies.xDeleting an image1Press / (Delete) button.2Select [This Image] with v on the control wheel, then press z.xReturning to shooting imagesPress the shutter button halfway down.Viewing images1Press the (Playback) button.• When images on a memory card recorded with other cameras are played back on this camera, the registration screen for the data file appears./ (Delete)Control wheel (Playback)W: zoom outT: zoom inSelect images: B (next)/b (previous) or turn the control wheelSet: z010GB1.fm Page 20 Friday, November 11, 2011 8:50 PM](https://usermanual.wiki/Sony-Group/DSCHX30V/User-Guide-1647164-Page-20.png)
![DSC-HX20V/HX30/HX30V4-419-606-11(1)C:\4419606111DSCHX30VCEH\01GB\010GB1.fmmaster:LeftGB22xControl wheelDISP (Display Setting): Allows you to change the screen display./ (Cont. Shooting/Self-Timer): Allows you to use the self-timer and burst shooting mode. (Photo Creativity): Allows you to change [Brightness], [Color], [Vividness] and [Picture Effect] when shooting mode is set to [Intelligent Auto] or [Superior Auto]. (Flash): Allows you to select a flash mode for still images.Center button (Tracking focus): The camera tracks the subject and adjusts focus automatically even when the subject is moving.xMenu ItemsShootingMovie shooting sceneSelect movie recording mode.3D Shooting Select the 3D image shooting mode.Scene Selection Select pre-set settings to match various scene conditions.Memory recall modeSelect a setting you want to recall when the mode dial is set to [Memory recall mode].Picture Effect Shoot a still image with an original texture according to the desired effect.Easy Mode Shoot still images using minimal functions.Defocus Effect Set the level of background defocus effect when shooting in Background Defocus mode.Still Image Size(Dual Rec)Set the still image size shot while recording a movie.Still Image Size/Panorama Image Size/Movie Size/Movie QualitySelect the image size and the quality for still images, panoramic images or movie files.HDR Painting effectWhen [HDR Painting] is selected in Picture Effect, sets the effect level.Area of emphasis When [Miniature] is selected in Picture Effect, sets the part to focus on.010GB1.fm Page 22 Friday, November 11, 2011 8:50 PM](https://usermanual.wiki/Sony-Group/DSCHX30V/User-Guide-1647164-Page-22.png)
![DSC-HX20V/HX30/HX30V4-419-606-11(1)C:\4419606111DSCHX30VCEH\01GB\010GB1.fmmaster:RightGB23Color hue When [Toy camera] is selected in Picture Effect, sets the color hue.Extracted Color When [Partial Color] is selected in Picture Effect, selects the color to extract.Watercolor Effect When [Watercolor] is selected in Picture Effect, sets the effect level. Illustration Effect When [Illustration] is selected in Picture Effect, sets the effect level. EV Adjust the exposure manually.ISO Adjust the luminous sensitivity.White Balance Adjust color tones of an image.White Balance ShiftAdjust color tones according to the adjusted value set based on the selected White Balance tone.Focus Select the focus method.Metering Mode Select the metering mode that sets which part of the subject to measure to determine the exposure.Cont. Shooting IntervalSelect the number of images taken per second for Burst shooting.Bracket Setting Set the type of the bracket shooting.Scene Recognition Set to automatically detect shooting conditions.Soft Skin Effect Set the Soft Skin Effect and the effect level.Smile Shutter Set to automatically release the shutter when a smile is detected.Smile Detection SensitivitySet the Smile Shutter function sensitivity for detecting smiles.Face Detection Select to detect faces and adjust various settings automatically.Color Mode Select the vividness of the image, accompanied by effects.Color Saturation Adjust the vividness of the image.Contrast Adjust the contrast of the image.Sharpness Adjust the sharpness of the image.010GB1.fm Page 23 Friday, November 11, 2011 8:50 PM](https://usermanual.wiki/Sony-Group/DSCHX30V/User-Guide-1647164-Page-23.png)
![DSC-HX20V/HX30/HX30V4-419-606-11(1)C:\4419606111DSCHX30VCEH\01GB\010GB1.fmmaster:LeftGB24*1 DSC-HX20V/HX30V only*2 DSC-HX30/HX30V onlyViewingAnti Blink Set to automatically shoot two images and select image in which the eyes are not blinking.Movie SteadyShotSet the strength of SteadyShot in movie mode. If you change the setting for [Movie SteadyShot], the angle of view will change.Position Information*1Check the GPS triangulating status and update the position information.GPS Log REC*1 Record the route taken while carrying the camera.Register Setting Register the desired modes or camera settings.Send to Computer*2Back up images by transferring them to a computer connected to a network.In-Camera Guide Search the camera’s functions according to your needs.Slideshow Select a method of continuous playback.View on Smartphone*Upload and transfer images to a smartphone.View on TV* View images on a network-enabled TV.Send to Computer*Back up images by transferring them to a computer connected to a network.Send by TransferJetTransfer data by closely aligning two products equipped with TransferJet.Delete Delete an image.Retouch Retouch an image using various effects.Picture Effect Add various texture on images.3D Viewing Set to play back images shot in 3D mode on a 3D TV.View Mode Select the display format for images.Display Cont. Shooting GroupSelect to display burst images in groups or display all images during playback.Protect Protect the images.Print (DPOF) Add a print order mark to a still image.010GB1.fm Page 24 Friday, November 11, 2011 8:50 PM](https://usermanual.wiki/Sony-Group/DSCHX30V/User-Guide-1647164-Page-24.png)
![DSC-HX20V/HX30/HX30V4-419-606-11(1)C:\4419606111DSCHX30VCEH\01GB\010GB1.fmmaster:RightGB25* DSC-HX30/HX30V onlyx Setting itemsIf you press the MENU button while shooting or during playback, (Settings) is provided as a final selection. You can change the default settings on the (Settings) screen.*1 DSC-HX20V/HX30V only*2 DSC-HX30/HX30V only*3 If a memory card is not inserted, (Internal Memory Tool) will be displayed and only [Format] can be selected.Rotate Rotate a still image to the left.In-Camera Guide Search the camera’s functions according to your needs. Shooting SettingsMovie format/AF Illuminator/Grid Line/Clear Image Zoom/Digital Zoom/Wind Noise Reduct./Micref Level/Red Eye Reduction/Blink Alert/Write Date/Expanded Focus/Custom Button/Disp. Resolution Main SettingsBeep/Panel Brightness/Language Setting/Display color/Demo Mode/Initialize/Function Guide/HDMI Resolution/CTRL FOR HDMI/Eco Mode/USB Connect Setting/USB Power Supply/LUN Setting/Download Music/Empty Music/Airplane Mode/GPS setting*1/GPS assist data*1/Dlt. GPS Log Data*1/TransferJet/Eye-Fi/Version Network Settings*2WPS Push/Access point settings/Edit Device Name/View on Smartphone/Disp MAC Address Memory Card Tool*3Format/Create REC.Folder/Change REC.Folder/Delete REC.Folder/Copy/File Number Clock SettingsArea Setting/Date & Time Setting/Auto Clock ADJ*1/Auto Area ADJ*1010GB1.fm Page 25 Friday, November 11, 2011 8:50 PM](https://usermanual.wiki/Sony-Group/DSCHX30V/User-Guide-1647164-Page-25.png)
![DSC-HX20V/HX30/HX30V4-419-606-11(1)C:\4419606111DSCHX30VCEH\01GB\010GB1.fmmaster:LeftGB26The built-in software “PlayMemories Home” allows you to import still images and movies to your computer and use them.You can shoot or play back images on this camera even if you do not install “PlayMemories Home”, however, “PlayMemories Home” is required to import AVCHD movies to your computer.• “PlayMemories Home” is not compatible to Mac OS. If you play back images on a Mac, use the applications that are installed on your Mac.For details, see http://www.sony.co.jp/imsoft/Mac/xFeatures of “PlayMemories Home”Below are examples of the functions available when you use “PlayMemories Home”. To take advantage of the various “PlayMemories Home” functions, connect to the Internet and install the “Expanded Feature”.• You can import images shot with the camera to a computer and display them.• You can display images stored on a computer by shooting date in a calendar display.• You can correct (Red Eye Correction, etc.) still images, print the images, send images by e-mail, and change the shooting date and time.• You can save and print images with the date.• You can create a disc from AVCHD movies imported to a computer. (Expanded Feature)Install PC application (Windows)1Connect the camera to a computer.2Windows 7: [Computer] t camera icon t media icon t Double-click [PMHOME.EXE]Windows XP/Vista: [Computer] (in Windows XP, [My Computer]) t [PMHOME] t Double-click [PMHOME.EXE]3Follow the instructions on the screen to complete the installation.Note010GB1.fm Page 26 Friday, November 11, 2011 8:50 PM](https://usermanual.wiki/Sony-Group/DSCHX30V/User-Guide-1647164-Page-26.png)
![DSC-HX20V/HX30/HX30V4-419-606-11(1)C:\4419606111DSCHX30VCEH\01GB\010GB1.fmmaster:LeftGB28Functions built into this camera• This manual describes each of the functions of TransferJet compatible/incompatible devices, 1080 60i-compatible devices and 1080 50i-compatible devices. – To determine whether your camera supports the GPS function, check the model name of your camera.GPS-compatible: DSC-HX20V/HX30VGPS-incompatible: DSC-HX30– To check if your camera supports the TransferJet function, and whether it is a 1080 60i-compatible device or 1080 50i-compatible device, check for the following marks on the bottom of the camera. TransferJet-compatible device: (TransferJet) 1080 60i-compatible device: 60i 1080 50i-compatible device: 50i• While aboard an airplane, set [Airplane Mode] to [On].• Do not watch 3D images shot with this camera for extended periods of time on 3D-compatible monitors.• When you view 3D images shot with this camera on a 3D-compatible monitor, you may experience discomfort in the form of eye strain, fatigue, or nausea. To prevent these symptoms, we recommend that you take regular breaks. However, you need to determine for yourself the length and frequency of breaks you require, as they vary according to the individual. If you experience any type of discomfort, stop viewing the 3D images until you feel better, and consult a physician as necessary. Also refer to the operating instructions supplied with the device or software you have connected or are using with this camera. Note that a child’s eyesight is still at the development stage (particularly children below the age of 6). Consult a pediatrician or ophthalmologist before letting your child view 3D images, and make sure he/she observes the above precautions when viewing such images.On GPS-compatible devices (DSC-HX20V/HX30V only)• Use GPS in accordance with regulations of countries and regions where you use it.• If you do not record the direction or location information, set [GPS setting] to [Off].On use and careAvoid rough handling, disassembling, modifying, physical shock, or impact such as hammering, dropping, or stepping on the product. Be particularly careful of the lens.Notes on using the camera010GB1.fm Page 28 Friday, November 11, 2011 8:50 PMThis camera is compatible with 1080 60p or 50p-format movies. Unlike standard recording modes up to now, which record in an interlacing method, this camera records using a progressive method. This increases the resolution, and provides a smoother, more realistic image. CX63370から流用](https://usermanual.wiki/Sony-Group/DSCHX30V/User-Guide-1647164-Page-28.png)

![DSC-HX20V/HX30/HX30V4-419-606-11(1)C:\4419606111DSCHX30VCEH\01GB\010GB1.fmmaster:Right_2 columnGB31Camera[System]Image device: 7.77 mm (1/2.3 type) Exmor R CMOS sensorTotal pixel number of camera: Approx. 16.8 MegapixelsEffective pixel number of camera: Approx. 16.2 MegapixelsLens: Sony G 10× zoom lensf = 4.5 mm – 22.5 mm (25 mm – 125 mm (35 mm film equivalent))F2.6 (W) – F6.3 (T)While shooting movies (16:9): 29 mm – 145 mm*While shooting movies (4:3): 36 mm – 180 mm** When [Movie SteadyShot] is set to [Standard]SteadyShot: OpticalExposure control: Automatic exposure, Manual exposure, Scene Selection (15 modes)White balance: Automatic, Daylight, Cloudy, Fluorescent 1/2/3, Incandescent, Flash, One PushSignal format: For 1080 50i: PAL color, CCIR standards HDTV 1080/50i specificationFor 1080 60i: NTSC color, EIA standards HDTV 1080/60i specificationFile format: Still images: JPEG (DCF, Exif, MPF Baseline) compliant, DPOF compatible3D still images: MPO (MPF Extended (Disparity Image)) compliantMovies (AVCHD format): AVCHD format Ver. 2.0 compatibleVideo: MPEG-4 AVC/H.264Audio: Dolby Digital 2ch, equipped with Dolby Digital Stereo Creator•Manufactured under license from Dolby Laboratories.Movies (MP4 format):Video: MPEG-4 AVC/H.264Audio: MPEG-4 AAC-LC 2chRecording media: Internal Memory (Approx. 105 MB), “Memory Stick Duo” media, SD cards, “Memory Stick Micro” media, microSD memory cardsFlash: Flash range (ISO sensitivity (Recommended Exposure Index) set to Auto): Approx. 0.2 m to 5.3 m(7 7/8 inches to 17 feet 4 3/4 inches) (W)Approx. 1.0 m to 2.2 m (3 feet 3 3/8 inches to 7 feet 2 5/8 inches) (T)Specifications010GB1.fm Page 31 Friday, November 11, 2011 8:50 PM](https://usermanual.wiki/Sony-Group/DSCHX30V/User-Guide-1647164-Page-31.png)
![DSC-HX20V/HX30/HX30V4-419-606-11(1)C:\4419606111DSCHX30VCEH\01GB\010GB1.fmmaster:Left_2 columnGB32[Input and Output connectors]HDMI connector: HDMI mini jackMicro USB connector: USB communicationUSB communication: Hi-Speed USB (USB 2.0)[Screen]LCD screen: 6.75 cm (2.7 type) TFT driveTotal number of dots: 460 800 dots[Power, general]Power: Rechargeable battery pack NP-BG1, 3.6 V NP-FG1 (sold separately), 3.6 V AC Adaptor AC-UB10/UB10B, 5VPower consumption (during shooting): 1.0 WOperating temperature: 0 °C to 40 °C (32 °F to 104 °F)Storage temperature: –20 °C to +60 °C (–4 °F to +140 °F)Dimensions (CIPA compliant): 92.2 mm × 52.0 mm × 19.1 mm (3 3/4 inches × 2 1/8 inches × 25/32 inches) (W/H/D)Mass (CIPA compliant) (including NP-BG1 battery pack, “Memory Stick Duo” media): Approx. 117 g (4.1 oz)Microphone: StereoSpeaker: MonauralExif Print: CompatiblePRINT Image Matching III: Compatible[Wireless LAN] (DSC-HX30/HX30V only)Supported format: IEFE 802.11 b/g/nAC Adaptor AC-UB10/UB10BPower requirements: AC 100 V to 240 V, 50 Hz/60 Hz, 70 mAOutput voltage: DC 5 V, 0.5 AOperating temperature: 0 °C to 40 °C (32 °F to 104 °F)Storage temperature: –20 °C to +60 °C (–4 °F to +140 °F)Dimensions: Approx. 50 mm × 22 mm × 54 mm (2 inches × 7/8 inches × 2 1/4 inches) (W/H/D)Mass: For the USA and Canada: Approx. 48 g (1.7 oz)For countries or regions other than the USA and Canada: Approx. 43 g (1.5 oz)Rechargeable battery pack NP-BG1Used battery: Lithium-ion batteryMaximum voltage: DC 4.2 VNominal voltage: DC 3.6 VMaximum charge voltage: DC 4.2 VMaximum charge current: 1.44 ACapacity: typical: 3.4 Wh (960 mAh)minimum: 3.3 Wh (910 mAh)Design and specifications are subject to change without notice.010GB1.fm Page 32 Friday, November 11, 2011 8:50 PM](https://usermanual.wiki/Sony-Group/DSCHX30V/User-Guide-1647164-Page-32.png)