Sony Group DSXM55BT FM/AM Digital Media Player User Manual DSX M55BT
Sony Corporation FM/AM Digital Media Player DSX M55BT
UserManual.wiki
>
Sony Group
>
DSXM55BT User Manual
(Short-Term Confidential) User Manual
Navigation menu
Upload a User Manual
Namespaces
Wiki Guide
HTML
PDF
Info
Views
User Manual
Discussion / Help
Navigation
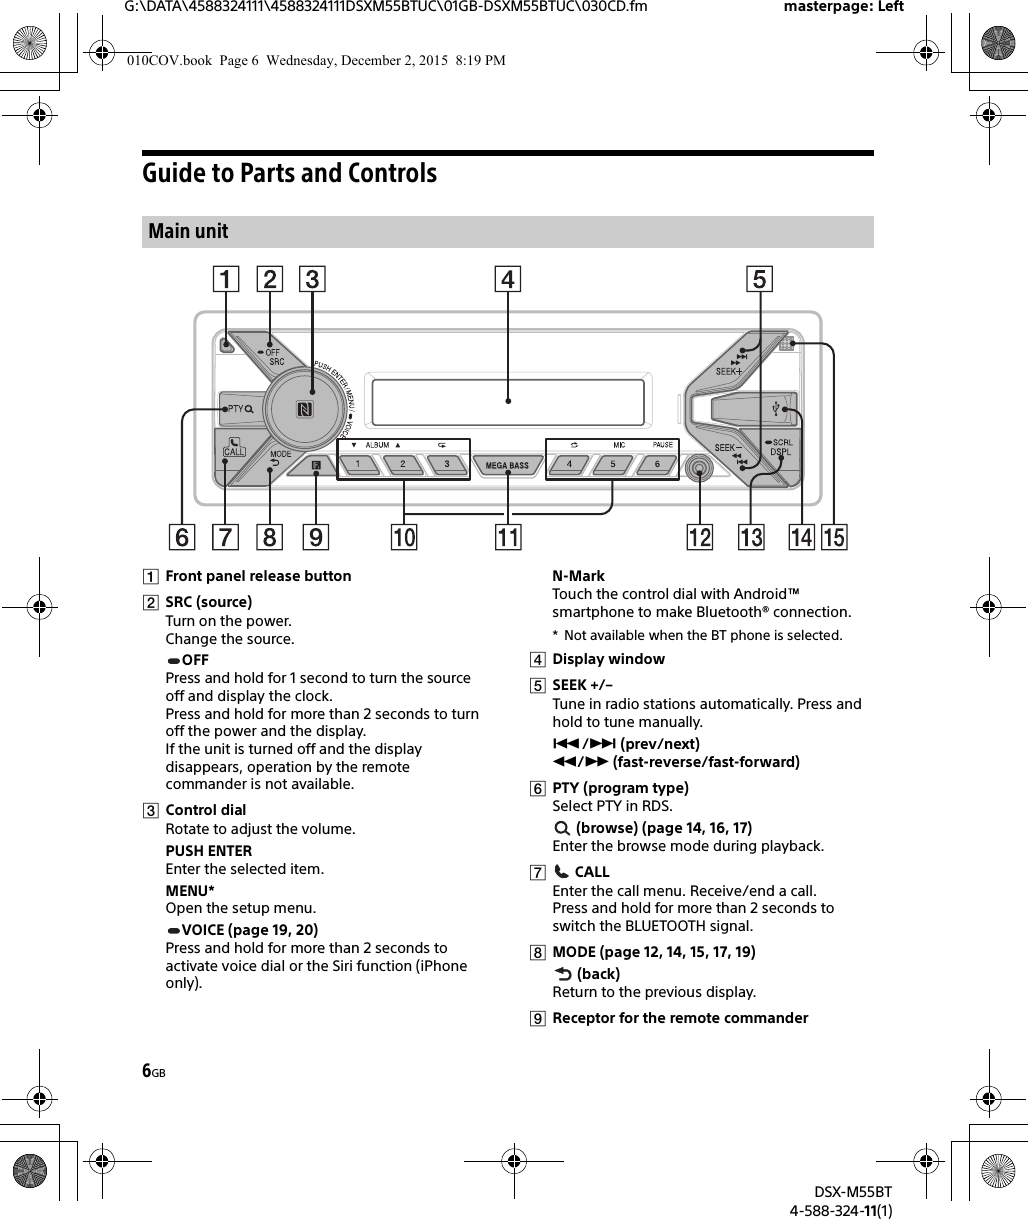
![7GBG:\DATA\4588324111\4588324111DSXM55BTUC\01GB-DSXM55BTUC\030CD.fm masterpage: RightDSX-M55BT4-588-324-11(1)Number buttons (1 to 6)Receive stored radio stations. Press and hold to store stations.Call a stored phone number. Press and hold to store a phone number.ALBUM /Skip an album for audio device. Press and hold to skip albums continuously.Press to thumbs up, or to thumbs down in Pandora® (page 17). (repeat) (shuffle)MIC (page 19)PAUSEMEGA BASSReinforces bass sound in synchronization with the volume level. Press to change the MEGA BASS setting: [1], [2], [OFF].AUX input jackDSPL (display)Press to change display items.SCRL (scroll)Press and hold to scroll a display item.USB portMicrophone (inner panel)In order for the handsfree function to work properly, do not cover the microphone with tape, etc.The VOL (volume) + button has a tactile dot.CALLEnter the call menu. Receive/end a call.SOUND*Open the SOUND menu directly.MENU*Press and hold to open the setup menu.* Not available when the BT phone is selected.///Select a setup item, etc.ENTEREnter the selected item./ (prev/next)+/– (album +/–)VOL (volume) +/–RM-X231 Remote commander010COV.book Page 7 Wednesday, December 2, 2015 8:19 PM](https://usermanual.wiki/Sony-Group/DSXM55BT/User-Guide-2900255-Page-7.png)
![9GBG:\DATA\4588324111\4588324111DSXM55BTUC\01GB-DSXM55BTUC\030CD.fm masterpage: RightDSX-M55BT4-588-324-11(1)Switching the FM/AM Tuning StepSet the FM/AM tuning step of your country. This setting appears only while the source is off and the clock is displayed.1Press MENU, rotate the control dial to select [SET GENERAL], then press it.2Rotate the control dial to select [SET TUNER-STP], then press it.3Rotate the control dial to select from [SET 50K/9K], [SET 100K/10K] or [SET 200K/10K], then press it.Setting the Clock1Press MENU, rotate the control dial to select [SET GENERAL], then press it.2Rotate the control dial to select [SET CLOCK-ADJ], then press it.The hour indication flashes.3Rotate the control dial to set the hour and minute.To move the digital indication, press SEEK +/–.4After setting the minute, press MENU.The setup is complete and the clock starts.To display the clockPress DSPL.Preparing a BLUETOOTH DeviceYou can enjoy music, or perform handsfree calling depending on the BLUETOOTH compatible device such as a smartphone, cellular phone and audio device (hereafter “BLUETOOTH device” if not otherwise specified). For details on connecting, refer to the operating instructions supplied with the device.Before connecting the device, turn down the volume of this unit; otherwise, loud sound may result.By touching the control dial on the unit with an NFC* compatible smartphone, the unit is paired and connected with the smartphone automatically.* NFC (Near Field Communication) is a technology enabling short-range wireless communication between various devices, such as mobile phones and IC tags. Thanks to the NFC function, data communication can be achieved easily just by touching the relevant symbol or designated location on NFC compatible devices.For a smartphone with Android OS 4.0 or lower installed, downloading the app “NFC Easy Connect” available at Google Play™ is required. The app may not be downloadable in some countries/regions.1Activate the NFC function on the smartphone.For details, refer to the operating instructions supplied with the smartphone.2Touch the N-Mark part of the unit with the N-Mark part of the smartphone.Make sure that lights up on the display of the unit.Connecting with a Smartphone by One touch (NFC)010COV.book Page 9 Wednesday, December 2, 2015 8:19 PM](https://usermanual.wiki/Sony-Group/DSXM55BT/User-Guide-2900255-Page-9.png)
![10GBG:\DATA\4588324111\4588324111DSXM55BTUC\01GB-DSXM55BTUC\030CD.fm masterpage: LeftDSX-M55BT4-588-324-11(1)To disconnect by One touchTouch the N-Mark part of the unit with the N-Mark part of the smartphone again.NotesWhen making the connection, handle the smartphone carefully to prevent scratches.One touch connection is not possible when the unit is already connected to another NFC compatible device. In this case, disconnect the other device, and make connection with the smartphone again.When connecting a BLUETOOTH device for the first time, mutual registration (called “pairing”) is required. Pairing enables this unit and other devices to recognize each other.1Place the BLUETOOTH device within 1 m (3 ft) of this unit.2Press CALL, rotate the control dial to select [SET PAIRING], then press it. flashes while the unit is in pairing standby mode.3Perform pairing on the BLUETOOTH device so it detects this unit.4Select [DSX-M55BT] shown in the display of the BLUETOOTH device.If your model name does not appear, repeat from step 2.5If passkey* input is required on the BLUETOOTH device, input [0000].* Passkey may be called “Passcode,” “PIN code,” “PIN number” or “Password,” etc., depending on the device.When pairing is made, stays lit.6Select this unit on the BLUETOOTH device to establish the BLUETOOTH connection. or lights up when the connection is made.NoteWhile connecting to a BLUETOOTH device, this unit cannot be detected from another device. To enable detection, enter the pairing mode and search for this unit from another device.To start playbackFor details, see “Playing a BLUETOOTH Device” (page 15).To cancel pairingPerform step 2 to cancel the pairing mode after this unit and the BLUETOOTH device are paired.To use a paired device, connection with this unit is required. Some paired devices will connect automatically.1Press CALL, rotate the control dial to select [SET BT SIGNL], then press it.Make sure that lights up.2Activate the BLUETOOTH function on the BLUETOOTH device.Pairing and connecting with a BLUETOOTH deviceConnecting with a paired BLUETOOTH device[0000]Input passkey010COV.book Page 10 Wednesday, December 2, 2015 8:19 PM](https://usermanual.wiki/Sony-Group/DSXM55BT/User-Guide-2900255-Page-10.png)
![11GBG:\DATA\4588324111\4588324111DSXM55BTUC\01GB-DSXM55BTUC\030CD.fm masterpage: RightDSX-M55BT4-588-324-11(1)3Operate the BLUETOOTH device to connect to this unit. or lights up.Icons in the display:To connect the last-connected device from this unitActivate the BLUETOOTH function on the BLUETOOTH device.Press SRC to select [BT PHONE] or [BT AUDIO].Press ENTER to connect with the cellular phone, or PAUSE to connect with the audio device.NoteWhile streaming BLUETOOTH audio, you cannot connect from this unit to the cellular phone. Connect from the cellular phone to this unit instead.TipWith BLUETOOTH signal on: when the ignition is turned to on, this unit reconnects automatically to the last-connected cellular phone.When an iPhone/iPod with iOS5 or later installed is connected to the USB port, the unit is paired and connected with the iPhone/iPod automatically.To enable BLUETOOTH Auto Pairing, make sure [AUTOPAIR] in [BT] is set to [ON] (page 23).1Activate the BLUETOOTH function on the iPhone/iPod.2Connect an iPhone/iPod to the USB port.Make sure that lights up on the display of the unit.NotesBLUETOOTH Auto Pairing is not possible if the unit is already connected to another BLUETOOTH device. In this case, disconnect the other device, then connect the iPhone/iPod again.If BLUETOOTH Auto Pairing is not established, see “Preparing a BLUETOOTH Device” for details (page 9).Connecting a USB Device1Turn down the volume on the unit.2Connect the USB device to the unit.To connect an iPod/iPhone, use the USB connection cable for iPod (not supplied).Lights up when handsfree calling is available by enabling the HFP (Handsfree Profile).Lights up when the audio device is playable by enabling the A2DP (Advanced Audio Distribution Profile).Connecting with an iPhone/iPod (BLUETOOTH Auto Pairing)010COV.book Page 11 Wednesday, December 2, 2015 8:19 PM](https://usermanual.wiki/Sony-Group/DSXM55BT/User-Guide-2900255-Page-11.png)
![12GBG:\DATA\4588324111\4588324111DSXM55BTUC\01GB-DSXM55BTUC\030CD.fm masterpage: LeftDSX-M55BT4-588-324-11(1)Connecting Other Portable Audio Device1Turn off the portable audio device.2Turn down the volume on the unit.3Connect the portable audio device to the AUX input jack (stereo mini jack) on the unit with a connecting cord (not supplied)*.* Be sure to use a straight type plug.4Press SRC to select [AUX].To match the volume level of the connected device to other sourcesStart playback of the portable audio device at a moderate volume, and set your usual listening volume on the unit.Press MENU, then select [SET SOUND] [SET AUX VOL] (page 22).Listening to the RadioTuning step setting is required (page 9).To listen to the radio, press SRC to select [TUNER].1Press MODE to change the band (FM1, FM2, FM3, AM1 or AM2).2Press MENU, rotate the control dial to select [SET GENERAL], then press it.3Rotate the control dial to select [SET BTM], then press it.The unit stores stations in order of frequency on the number buttons.1Press MODE to change the band (FM1, FM2, FM3, AM1 or AM2).2Perform tuning.To tune manuallyPress and hold SEEK +/– to locate the approximate frequency, then press SEEK +/– repeatedly to fine adjust to the desired frequency.To tune automaticallyPress SEEK +/–.Scanning stops when the unit receives a station.1While receiving the station that you want to store, press and hold a number button (1 to 6) until [MEM] appears.Listening to the RadioStoring automatically (BTM)TuningStoring manually010COV.book Page 12 Wednesday, December 2, 2015 8:19 PM](https://usermanual.wiki/Sony-Group/DSXM55BT/User-Guide-2900255-Page-12.png)
![13GBG:\DATA\4588324111\4588324111DSXM55BTUC\01GB-DSXM55BTUC\030CD.fm masterpage: RightDSX-M55BT4-588-324-11(1)1Select the band, then press a number button (1 to 6).Using Radio Data System (RDS)1Press PTY during FM reception.2Rotate the control dial until the desired program type appears, then press it.The unit starts to search for a station broadcasting the selected program type.Type of programs (tuner step: 200 kHz/10 kHz)Type of programs (tuner step: 100 kHz/10 kHz, 50 kHz/9 kHz)The CT data from the RDS transmission sets the clock.1Set [SET CT-ON] in [SET GENERAL] (page 21).Listening to the SiriusXM Radio (US/Canada only)Only SiriusXM brings you more of what you love to listen to, all in one place. Get over 140 channels, including commercial-free music plus the best sports, news, talk, comedy and entertainment. Welcome to the world of satellite radio. A SiriusXM Connect Vehicle Tuner and Subscription are required. For more information, visit www.siriusxm.comAfter installing your SiriusXM Connect Vehicle Tuner and antenna, press SRC to select [SIRIUSXM]. You should be able to hear the SiriusXM preview channel on Channel 1. After verifying that you can hear the preview channel, select Channel 0 to find Receiving the stored stationsSelecting program types (PTY)NEWS (News), INFORM (Information), SPORTS (Sports), TALK (Talk), ROCK (Rock), CLS ROCK (Classic Rock), ADLT HIT (Adult Hits), SOFT RCK (Soft Rock), TOP 40 (Top 40), COUNTRY (Country), OLDIES (Oldies), SOFT (Soft), NOSTALGA (Nostalgia), JAZZ (Jazz), CLASSICL (Classical), R & B (Rhythm and Blues), SOFT R&B (Soft Rhythm and Blues), LANGUAGE (Foreign Language), REL MUSC (Religious Music), REL TALK (Religious Talk), PERSNLTY (Personality), PUBLIC (Public), COLLEGE (College), HABL ESP (Spanish Talk), MUSC ESP (Spanish Music), HIP HOP (Hip-Hop), WEATHER (Weather)NEWS (News), AFFAIRS (Current Affairs), INFO (Information), SPORT (Sports), EDUCATE (Education), DRAMA (Drama), CULTURE (Culture), SCIENCE (Science), VARIED (Varied), POP M (Pop Music), ROCK M (Rock Music), EASY M (M.O.R. Music), LIGHT M (Light classical), CLASSICS (Serious classical), OTHER M (Other Music), WEATHER (Weather), FINANCE (Finance), CHILDREN (Children’s program), SOCIAL A (Social Affairs), RELIGION (Religion), PHONE IN (Phone In), TRAVEL (Travel), LEISURE (Leisure), JAZZ (Jazz Music), COUNTRY (Country Music), NATION M (National Music), OLDIES (Oldies Music), FOLK M (Folk Music), DOCUMENT (Documentary)Setting clock time (CT)Activating your SiriusXM Subscription010COV.book Page 13 Wednesday, December 2, 2015 8:19 PM](https://usermanual.wiki/Sony-Group/DSXM55BT/User-Guide-2900255-Page-13.png)
![14GBG:\DATA\4588324111\4588324111DSXM55BTUC\01GB-DSXM55BTUC\030CD.fm masterpage: LeftDSX-M55BT4-588-324-11(1)the Radio ID of your tuner. In addition, the Radio ID is located on the bottom of the SiriusXM Connect Vehicle Tuner and its packaging. You will need this number to activate your subscription. Write the number down for reference.In the USA, you can activate online or by calling SiriusXM Listener Care:Online: Visit www.siriusxm.com/activatenowPhone: Call 1-866-635-2349In Canada, you can activate online or by calling SiriusXM Listener Care:Online: Visit www.siriusxm.ca/activatexmPhone: Call 1-877-438-9677As part of the activation process, the SiriusXM satellites will send an activation message to your tuner. When your radio detects that the tuner has received the activation message, your radio will display: [SUBSCRIPTION UPDATED - ENTER TO CONTINUE]. Once subscribed, you can tune to channels in your subscription plan.NotesThe activation process usually takes 10 to 15 minutes, but may take up to an hour.Your radio will need to be turned on and receiving the SiriusXM signal to receive the activation message.1Press (browse).2Rotate the control dial to select[CATEGORY], then press it.3Rotate the control dial to select thedesired channel, then press it.To select channels from categories1Press (browse).2Rotate the control dial to select [CATEGORY], then press it.3Rotate the control dial to select the desiredcategory, then press it.To store channels1While receiving the channel that you want to store,press and hold a number button (1 to 6) until [MEM] appears.To receive the stored channel, press MODE to select [SXM1], [SXM2] or [SXM3], then press a number button (1 to 6).To set a parental controlThe parental control feature allows you to limit access to SiriusXM channels with mature content. When enabled, the parental control feature requires you to enter a passcode to tune to the locked channels. Information on setting up the passcode and locking channels can be found below.1Press MENU and rotate the control dial.2Select [SET GENERAL] [SET PARENTAL] [SET LOCK SEL] [SET LOCK-ON].3Enter the passcode by rotating the control dial on the unit or pressing / on the remote commander.To move the entry position, press SEEK +/– on the unit or / on the remote commander.The initial passcode is [0000].4After entering the passcode, press ENTER.To unlock the channels, select [SET LOCK-OFF].To change the passcode1Press MENU and rotate the control dial.2Select [SET GENERAL] [SET PARENTAL] [SET CODEEDIT].3Enter the current passcode on the current passcodeinput display, then press ENTER.The initial passcode is [0000].4Enter your new 4-digit passcode on the new passcode input display, then press ENTER.To change display itemsPress DSPL to change as follows:Channel Number (Default) Channel Name Artist Name Song Title Content Info Category Name ClockSelecting channels for SiriusXM010COV.book Page 14 Wednesday, December 2, 2015 8:19 PM](https://usermanual.wiki/Sony-Group/DSXM55BT/User-Guide-2900255-Page-14.png)
![15GBG:\DATA\4588324111\4588324111DSXM55BTUC\01GB-DSXM55BTUC\030CD.fm masterpage: RightDSX-M55BT4-588-324-11(1)Playing a USB DeviceIn these Operating Instructions, “iPod” is used as a general reference for the iPod functions on an iPod and iPhone, unless otherwise specified by the text or illustrations.For details on the compatibility of your iPod, see “About iPod” (page 24) or visit the support site on the back cover.MSC (Mass Storage Class) and MTP (Media Transfer Protocol) type USB devices (such as a USB flash drive, digital media player, Android smartphone) compliant with the USB standard can be used.Depending on the digital media player or Android smartphone, setting the USB connection mode to MTP is required.NotesFor details on the compatibility of your USB device, visit the support site on the back cover.Playback of the following files is not supported.MP3/WMA/FLAC:copyright-protected filesDRM (Digital Rights Management) filesMulti-channel audio filesMP3/WMA:lossless compression files1Connect a USB device to the USB port (page 11).Playback starts.If a device is already connected, to start playback, press SRC to select [USB] ([IPD] appears in the display when the iPod is recognized).2Adjust the volume on this unit.To stop playbackPress and hold OFF for 1 second.To remove the deviceStop playback, then remove the device.Caution for iPhoneWhen you connect an iPhone via USB, phone call volume is controlled by the iPhone, not the unit. Do not inadvertently increase the volume on the unit during a call, as a sudden loud sound may result when the call ends.1During playback, press and hold MODE until [MODE IPOD] appears.Operations of the iPod become available.Note that the volume can be adjusted only by the unit.To exit passenger controlPress and hold MODE until [MODE AUDIO] appears.Playing a BLUETOOTH DeviceYou can play contents on a connected device that supports BLUETOOTH A2DP (Advanced Audio Distribution Profile).1Make BLUETOOTH connection with the audio device (page 10).2Press SRC to select [BT AUDIO].3Operate the audio device to start playback.4Adjust the volume on this unit.NotesDepending on the audio device, information such as title, track number/time and playback status may not be displayed on this unit.Even if the source is changed on this unit, playback of the audio device does not stop.PlaybackOperating an iPod directly (Passenger control)010COV.book Page 15 Wednesday, December 2, 2015 8:19 PM](https://usermanual.wiki/Sony-Group/DSXM55BT/User-Guide-2900255-Page-15.png)
![16GBG:\DATA\4588324111\4588324111DSXM55BTUC\01GB-DSXM55BTUC\030CD.fm masterpage: LeftDSX-M55BT4-588-324-11(1)To match the volume level of the BLUETOOTH device to other sourcesStart playback of the BLUETOOTH audio device at a moderate volume, and set your usual listening volume on the unit.Press MENU, then select [SET SOUND] [SET BTA VOL] (page 22).Searching and Playing Tracks1During playback, press (repeat) or (shuffle) repeatedly to select the desired play mode.Playback in the selected play mode may take time to start.Available play modes differ depending on the selected sound source.1During USB playback, press (browse)* to display the list of search categories.When the track list appears, press (back) repeatedly to display the desired search category.* During USB playback, press (browse) for more than 2 seconds to directly return to the beginning of the category list.2Rotate the control dial to select the desired search category, then press it to confirm.3Repeat step 2 to search the desired track.Playback starts.To exit the Quick-BrowZer modePress (browse).1Press (browse).2Press SEEK +.3Rotate the control dial to select the item.The list is jumped in steps of 10% of the total number of items.4Press ENTER to return to the Quick-BrowZer mode.The selected item appears.5Rotate the control dial to select the desired item, then press it.Playback starts.Repeat play and shuffle playSearching a track by name (Quick-BrowZer™)Searching by skipping items (Jump mode)010COV.book Page 16 Wednesday, December 2, 2015 8:19 PM](https://usermanual.wiki/Sony-Group/DSXM55BT/User-Guide-2900255-Page-16.png)
![17GBG:\DATA\4588324111\4588324111DSXM55BTUC\01GB-DSXM55BTUC\030CD.fm masterpage: RightDSX-M55BT4-588-324-11(1)Pandora® is available to stream music through your iPhone and Android smartphone. You can control Pandora® on a USB-connected iPhone or BLUETOOTH-connected Android smartphone from this unit.Pandora® is only available in certain countries. Please visit http://www.pandora.com/legalfor more information.Setting up Pandora®1Check the compatibility of your mobile device by visiting the support site on the back cover.2Download the latest version of the Pandora® application from your smartphone’s app store. A list of compatible devices can be found atwww.pandora.com/everywhere/mobileStreaming Pandora®1Connect this unit with the mobile device.iPhone via USB (page 11)Android smartphone via BLUETOOTH function (page 10)2Press SRC to select [PANDORA USB] or [BT PANDORA].3Launch Pandora® application on your mobile device.4Press PAUSE to start playback.If the device number appearsMake sure that the same numbers are displayed (e.g., 123456) in this unit and the mobile device, then press ENTER on this unit and select [Yes] on the mobile device.When activating the BLUETOOTH functionYou can adjust the volume level.Press MENU, then select [SET SOUND] [SET BTA VOL] (page 22).Available Operations in Pandora®“Thumbs Up” or “Thumbs Down” feedback allows you to personalize stations.1During playback, press (Thumbs Up) or (Thumbs Down).The station list allows you to easily select a desired station.1During playback, press (browse).2Press SEEK + to select the sorting order [BY DATE] or [A TO Z].3Rotate the control dial to select the desired station, then press it.Playback starts.The track currently being played can be bookmarked and stored in your Pandora® account.1During playback, press MODE.Listening to Pandora®“Thumbs” feedbackUsing the station listBookmarking010COV.book Page 17 Wednesday, December 2, 2015 8:19 PM](https://usermanual.wiki/Sony-Group/DSXM55BT/User-Guide-2900255-Page-17.png)
![18GBG:\DATA\4588324111\4588324111DSXM55BTUC\01GB-DSXM55BTUC\030CD.fm masterpage: LeftDSX-M55BT4-588-324-11(1)To use a cellular phone, connect it with this unit. For details, see “Preparing a BLUETOOTH Device” (page 9).Receiving a Call1Press CALL when a call is received with a ringtone.The phone call starts.NoteThe ringtone and talker’s voice are output only from the front speakers.To reject the callPress and hold OFF for 1 second.To end the callPress CALL again.Making a CallYou can make a call from the phonebook or call history when a cellular phone supporting PBAP (Phone Book Access Profile) is connected.1Press CALL, rotate the control dial to select [PHONE BOOK], then press it.2Rotate the control dial to select an initial from the initial list, then press it.3Rotate the control dial to select a name from the name list, then press it.4Rotate the control dial to select a number from the number list, then press it.The phone call starts.1Press CALL, rotate the control dial to select [RECENT CALL], then press it.A list of the call history appears.2Rotate the control dial to select a name or phone number from the call history, then press it.The phone call starts.1Press CALL, rotate the control dial to select [DIAL NUMBER], then press it.2Rotate the control dial to enter the phone number, and lastly select [ ] (space), then press ENTER*.The phone call starts.* To move the digital indication, press SEEK +/–.Note[_] appears instead of [#] on the display.1Press CALL, rotate the control dial to select [REDIAL], then press it.The phone call starts.1Press SRC to select [BT PHONE].2Press a number button (1 to 6) to select the contact you want to call.3Press ENTER.The phone call starts.Handsfree Calling (via BLUETOOTH only)From the phonebookFrom the call historyBy phone number inputBy redialBy preset number010COV.book Page 18 Wednesday, December 2, 2015 8:19 PM](https://usermanual.wiki/Sony-Group/DSXM55BT/User-Guide-2900255-Page-18.png)
![19GBG:\DATA\4588324111\4588324111DSXM55BTUC\01GB-DSXM55BTUC\030CD.fm masterpage: RightDSX-M55BT4-588-324-11(1)Presetting phone numbersYou can store up to 6 contacts in the preset dial.1Select a phone number that you want to store in the preset dial, from the phonebook, call history or by inputting the phone number directly.The phone number appears in the display of this unit.2Press and hold a number button (1 to 6) until [MEM] appears.The contact is stored in the selected preset number.You can make a call by saying the voice tag stored in a connected cellular phone that has a voice dialing function.1Press CALL, rotate the control dial to select [VOICE DIAL], then press it.Alternatively, press and hold VOICE for more than 2 seconds.2Say the voice tag stored on the cellular phone.Your voice is recognized, and the call is made.To cancel voice dialingPress VOICE.Available Operations during CallTo adjust the ringtone volumeRotate the control dial while receiving a call.To adjust the talker’s voice volumeRotate the control dial during a call.To adjust the volume for the other party (Mic gain adjustment)Press MIC.Adjustable volume levels: [MIC-LOW], [MIC-MID], [MIC-HI].To reduce echo and noise (Echo Canceler/Noise Canceler Mode)Press and hold MIC.Settable mode: [EC/NC-1], [EC/NC-2].To switch between handsfree mode and handheld modeDuring a call, press MODE to switch the phone call audio between the unit and cellular phone.NoteDepending on the cellular phone, this operation may not be available.By voice tags010COV.book Page 19 Wednesday, December 2, 2015 8:19 PM](https://usermanual.wiki/Sony-Group/DSXM55BT/User-Guide-2900255-Page-19.png)
![21GBG:\DATA\4588324111\4588324111DSXM55BTUC\01GB-DSXM55BTUC\030CD.fm masterpage: RightDSX-M55BT4-588-324-11(1)Canceling the DEMO ModeYou can cancel the demonstration display which appears when the source is off and the clock is displayed.1Press MENU, rotate the control dial to select [SET GENERAL], then press it.2Rotate the control dial to select [SET DEMO], then press it.3Rotate the control dial to select [SET DEMO-OFF], then press it.The setting is complete.4Press (back) twice.The display returns to normal reception/play mode.Basic Setting OperationYou can set items in the following setup categories:General setup (GENERAL), Sound setup (SOUND), Display setup (DISPLAY), BLUETOOTH setup (BT)(Not available when the BT phone is selected.)1Press MENU.2Rotate the control dial to select the setup category, then press it.The items that can be set differ depending on the source and settings.3Rotate the control dial to select the options, then press it.To return to the previous displayPress (back).General Setup (GENERAL)DEMO (demonstration)Activates the demonstration: [ON], [OFF].CLOCK-ADJ (clock adjust) (page 9)TUNER-STP (tuner step) (page 9)(Available only while the source is off and the clock is displayed.)CAUT ALM (caution alarm)Activates the caution alarm: [ON], [OFF] (page 8). (Available only while the source is off and the clock is displayed.)BEEPActivates the beep sound: [ON], [OFF].AUTO OFFShuts off automatically after a desired time when the unit is turned off: [NO], [30S] (30 seconds), [30M] (30 minutes), [60M] (60 minutes).CT (clock time)Activates the CT function: [ON], [OFF].BTM (best tuning memory) (page 12)(Available only when the tuner is selected.)PARENTALSets the parental lock to [ON], [OFF], and edits the passcode (page 14).(Available only when SiriusXM is selected.)SXM RESET (SiriusXM reset)Initializes the SiriusXM Connect Vehicle Tuner settings (preset channels/parental lock): [YES], [NO]. (Available only when SiriusXM is selected.)Settings010COV.book Page 21 Wednesday, December 2, 2015 8:19 PM](https://usermanual.wiki/Sony-Group/DSXM55BT/User-Guide-2900255-Page-21.png)
![22GBG:\DATA\4588324111\4588324111DSXM55BTUC\01GB-DSXM55BTUC\030CD.fm masterpage: LeftDSX-M55BT4-588-324-11(1)Sound Setup (SOUND)This setup menu is available when any source except for the BT phone is selected.EQ5 PRESETSelects an equalizer curve from 10 equalizer curves or off: [OFF], [R&B], [ROCK], [POP], [DANCE], [HIP-HOP], [ELECTRONICA], [JAZZ], [SOUL], [COUNTRY], [CUSTOM].The equalizer curve setting can be memorized for each source.EQ5 SETTINGSets [CUSTOM] of EQ5.BASESelects a preset equalizer curve as a basis for further customizing: [BAND1] (low frequency), [BAND2] (mid-low frequency), [BAND3] (mid frequency), [BAND4] (mid-high frequency), [BAND5] (high frequency).The volume level is adjustable in 1 dB steps, from -10 dB to +10 dB.BALANCEAdjusts the sound balance: [RIGHT-15] – [CENTER] – [LEFT-15].FADERAdjusts the relative level: [FRONT-15] – [CENTER] – [REAR-15].S.WOOFER (subwoofer)SW LEVEL (subwoofer level)Adjusts the subwoofer volume level: [+6 dB] – [0 dB] – [-6 dB], [ATT].([ATT] is displayed at the lowest setting.)SW PHASE (subwoofer phase)Selects the subwoofer phase: [NORM], [REV].LPF FREQ (low pass filter frequency)Selects the subwoofer cut-off frequency: [80Hz], [100Hz], [120Hz].AUX VOL (AUX volume level)Adjusts the volume level for each connected auxiliary device: [+18 dB] – [0 dB] – [-8 dB].This setting negates the need to adjust the volume level between sources.BTA VOL (BLUETOOTH audio volume level)Adjusts the volume level for each connected BLUETOOTH device: [+6 dB] – [0 dB] – [-6 dB].This setting negates the need to adjust the volume level between sources.Display Setup (DISPLAY)DIMMERChanges the display brightness: [ON], [OFF].SND SYNC (sound synchronization)Activates the synchronization of the illumination with the sound: [ON], [OFF].AUTO SCR (auto scroll)Scrolls long items automatically: [ON], [OFF].(Not available when the AUX or tuner is selected.)BLUETOOTH Setup (BT)PAIRING (page 10)PHONE BOOK (page 18)REDIAL (page 18)RECENT CALL (page 18)VOICE DIAL (page 19)DIAL NUMBER (page 18)RINGTONESelects whether this unit or the connected cellular phone outputs the ringtone: [1] (this unit), [2] (cellular phone).AUTO ANS (auto answer)Sets this unit to answer an incoming call automatically: [OFF], [1] (about 3 seconds), [2] (about 10 seconds).010COV.book Page 22 Wednesday, December 2, 2015 8:19 PM](https://usermanual.wiki/Sony-Group/DSXM55BT/User-Guide-2900255-Page-22.png)
![23GBG:\DATA\4588324111\4588324111DSXM55BTUC\01GB-DSXM55BTUC\030CD.fm masterpage: RightDSX-M55BT4-588-324-11(1)AUTOPAIR (auto pairing)Start BLUETOOTH pairing automatically when iOS device version 5.0 or later is connected via USB: [ON], [OFF].BT SIGNL (BLUETOOTH signal) (page 10)Activates/deactivates the BLUETOOTH function.BT INIT (BLUETOOTH initialize)Initializes all the BLUETOOTH related settings (pairing information, preset number, device information, etc.): [YES], [NO].When disposing the unit, initialize all the settings. (Available only while the source is off and the clock is displayed.)PrecautionsCool off the unit beforehand if your boat has been moored in direct sunlight.Do not leave the front panel or audio devices brought in inside the boat, or it may cause malfunction due to high temperature in direct sunlight.Power antenna (aerial) extends automatically.To maintain high sound qualityDo not splash liquid onto the unit.Additional InformationPlayback order of audio filesFolder (album)Audio file (track)010COV.book Page 23 Wednesday, December 2, 2015 8:19 PM](https://usermanual.wiki/Sony-Group/DSXM55BT/User-Guide-2900255-Page-23.png)

![27GBG:\DATA\4588324111\4588324111DSXM55BTUC\01GB-DSXM55BTUC\030CD.fm masterpage: RightDSX-M55BT4-588-324-11(1)libFLACCopyright (C) 2000-2009 Josh CoalsonCopyright (C) 2011-2013 Xiph.Org FoundationRedistribution and use in source and binary forms, with or without modification, are permitted provided that the following conditions are met:Redistributions of source code must retain the above copyright notice, this list of conditions and the following disclaimer.Redistributions in binary form must reproduce the above copyright notice, this list of conditions and the following disclaimer in the documentation and/or other materials provided with the distribution.Neither the name of the Xiph.org Foundation nor the names of its contributors may be used to endorse or promote products derived from this software without specific prior written permission.THIS SOFTWARE IS PROVIDED BY THE COPYRIGHT HOLDERS AND CONTRIBUTORS “AS IS” AND ANY EXPRESS OR IMPLIED WARRANTIES, INCLUDING, BUT NOT LIMITED TO, THE IMPLIED WARRANTIES OF MERCHANTABILITY AND FITNESS FOR A PARTICULAR PURPOSE ARE DISCLAIMED. IN NO EVENT SHALL THE FOUNDATION OR CONTRIBUTORS BE LIABLE FOR ANY DIRECT, INDIRECT, INCIDENTAL, SPECIAL, EXEMPLARY, OR CONSEQUENTIAL DAMAGES (INCLUDING, BUT NOT LIMITED TO, PROCUREMENT OF SUBSTITUTE GOODS OR SERVICES; LOSS OF USE, DATA, OR PROFITS; OR BUSINESS INTERRUPTION) HOWEVER CAUSED AND ON ANY THEORY OF LIABILITY, WHETHER IN CONTRACT, STRICT LIABILITY, OR TORT (INCLUDING NEGLIGENCE OR OTHERWISE) ARISING IN ANY WAY OUT OF THE USE OF THIS SOFTWARE, EVEN IF ADVISED OF THE POSSIBILITY OF SUCH DAMAGE.TroubleshootingThe following checklist will help you remedy problems you may encounter with your unit.Before going through the checklist below, check the connection and operating procedures.For details on using the fuse and removing the unit from the dashboard, see “Connection/Installation” (page 33).If the problem is not solved, visit the support site on the back cover.GeneralNo power is being supplied to the unit.If the unit is turned off and the display disappears, the unit cannot be operated with the remote commander.Turn on the unit.No sound or the sound is very low.The position of the fader control [FADER] is not set for a 2-speaker system.The volume of the unit and/or connected device is very low.Increase the volume of the unit and connected device.No beep sound.An optional power amplifier is connected and you are not using the built-in amplifier.The contents of the memory have been erased.The power supply lead or battery has been disconnected or not connected properly.Stored stations and correct time are erased.The fuse has blown.Makes a noise when the position of the ignition is switched.The leads are not matched correctly with the boat’s accessory power connector.During playback or reception, the demonstration mode starts.If no operation is performed for 5 minutes with [DEMO-ON] set, the demonstration mode starts.Set [DEMO-OFF] (page 21).010COV.book Page 27 Wednesday, December 2, 2015 8:19 PM](https://usermanual.wiki/Sony-Group/DSXM55BT/User-Guide-2900255-Page-27.png)
![28GBG:\DATA\4588324111\4588324111DSXM55BTUC\01GB-DSXM55BTUC\030CD.fm masterpage: LeftDSX-M55BT4-588-324-11(1)The display disappears from/does not appear in the display window.The dimmer is set to [DIM-ON] (page 22).The display disappears if you press and hold OFF.Press OFF on the unit until the display appears.The connectors are dirty (page 24).The display/illumination flashes.The power supply is not sufficient.Check that the boat battery supplies enough power to the unit. (The power requirement is 12 V DC.)The operation buttons do not function.The connection is not correct.Check the connection of the unit.If the situation does not improve, press DSPL and (back)/MODE for more than 2 seconds to reset the unit.The contents stored in memory are erased.For your safety, do not reset the unit while you are driving.Radio receptionStations cannot be received.The sound is hampered by noises.The connection is not correct.If your boat has built-in radio antenna (aerial) in the rear/side glass, connect an REM OUT lead (blue/white striped) or accessory power supply lead (red) to the power supply lead of a boat’s antenna (aerial) booster.Check the connection of the boat antenna (aerial).If the auto antenna (aerial) will not extend, check the connection of the power antenna (aerial) control lead.The tuning step setting has been erased.Set the tuning step again (page 9).Preset tuning is not possible.The broadcast signal is too weak.RDSPTY displays [- - - - - - - -].The current station is not an RDS station.RDS data has not been received.The station does not specify the program type.USB device playbackYou cannot play items via a USB hub.This unit cannot recognize USB devices via a USB hub.A USB device takes longer to play.The USB device contains files with a complicated tree structure.The sound is intermittent.The sound may be intermittent at a high-bit-rate.DRM (Digital Rights Management) files may not be playable in some cases.Audio file cannot be played.USB device formatted with file systems other than FAT16 or FAT32 are unsupported.** This unit supports FAT16 and FAT32, but some USB device may not support all of these FAT. For details, refer to the operating instruction of each USB device or contact the manufacturer.NFC functionOne touch connection (NFC) is not possible.If the smartphone does not respond to the touching.Check that the NFC function of the smartphone is turned on.Move the N-Mark part of the smartphone closer to the N-Mark part on this unit.If the smartphone is in a case, remove it.NFC receiving sensitivity depends on the device.If One touch connection with the smartphone fails several times, make BLUETOOTH connection manually.010COV.book Page 28 Wednesday, December 2, 2015 8:19 PM](https://usermanual.wiki/Sony-Group/DSXM55BT/User-Guide-2900255-Page-28.png)
![29GBG:\DATA\4588324111\4588324111DSXM55BTUC\01GB-DSXM55BTUC\030CD.fm masterpage: RightDSX-M55BT4-588-324-11(1)BLUETOOTH functionThe connecting device cannot detect this unit.Before the pairing is made, set this unit to pairing standby mode.While connected to a BLUETOOTH device, this unit cannot be detected from another device.Disconnect the current connection and search for this unit from another device.When the device pairing is made, set the BLUETOOTH signal output to on (page 10).Connection is not possible.The connection is controlled from one side (this unit or BLUETOOTH device), but not both.Connect to this unit from a BLUETOOTH device or vice versa.The name of the detected device does not appear.Depending on the status of the other device, it may not be possible to obtain the name.No ringtone.Adjust the volume by rotating the control dial while receiving a call.Depending on the connecting device, the ringtone may not be sent properly.Set [RINGTONE] to [1] (page 22).The front speakers are not connected to the unit.Connect the front speakers to the unit. The ringtone is output only from the front speakers.The talker’s voice cannot be heard.The front speakers are not connected to the unit.Connect the front speakers to the unit. The talker’s voice is output only from the front speakers.A call partner says that the volume is too low or high.Adjust the volume accordingly using mic gain adjustment (page 19).Echo or noise occurs in phone call conversations.Lower the volume.Set EC/NC Mode to [EC/NC-1] or [EC/NC-2] (page 19).If the ambient noise other than the phone call sound is loud, try reducing this noise.E.g.: If a window is open and outside noise, etc., is loud, shut the window. If an air conditioner is loud, lower the air conditioner.The phone is not connected.When BLUETOOTH audio is played, the phone is not connected even if you press CALL.Connect from the phone.The phone sound quality is poor.Phone sound quality depends on reception conditions of cellular phone. Move your boat to a place where you can enhance the cellular phone’s signal if the reception is poor.The volume of the connected audio device is low (high).Volume level will differ depending on the audio device.Adjust the volume of the connected audio device or this unit.The sound skips during playback of a BLUETOOTH audio device.Reduce the distance between the unit and the BLUETOOTH audio device.If the BLUETOOTH audio device is stored in a case which interrupts the signal, remove the audio device from the case during use.Several BLUETOOTH devices or other devices which emit radio waves are in use nearby.Turn off the other devices.Increase the distance from the other devices.The playback sound stops momentarily when the connection between this unit and the cellular phone is being made. This is not a malfunction.The connected BLUETOOTH audio device cannot be controlled.Check that the connected BLUETOOTH audio device supports AVRCP.010COV.book Page 29 Wednesday, December 2, 2015 8:19 PM](https://usermanual.wiki/Sony-Group/DSXM55BT/User-Guide-2900255-Page-29.png)