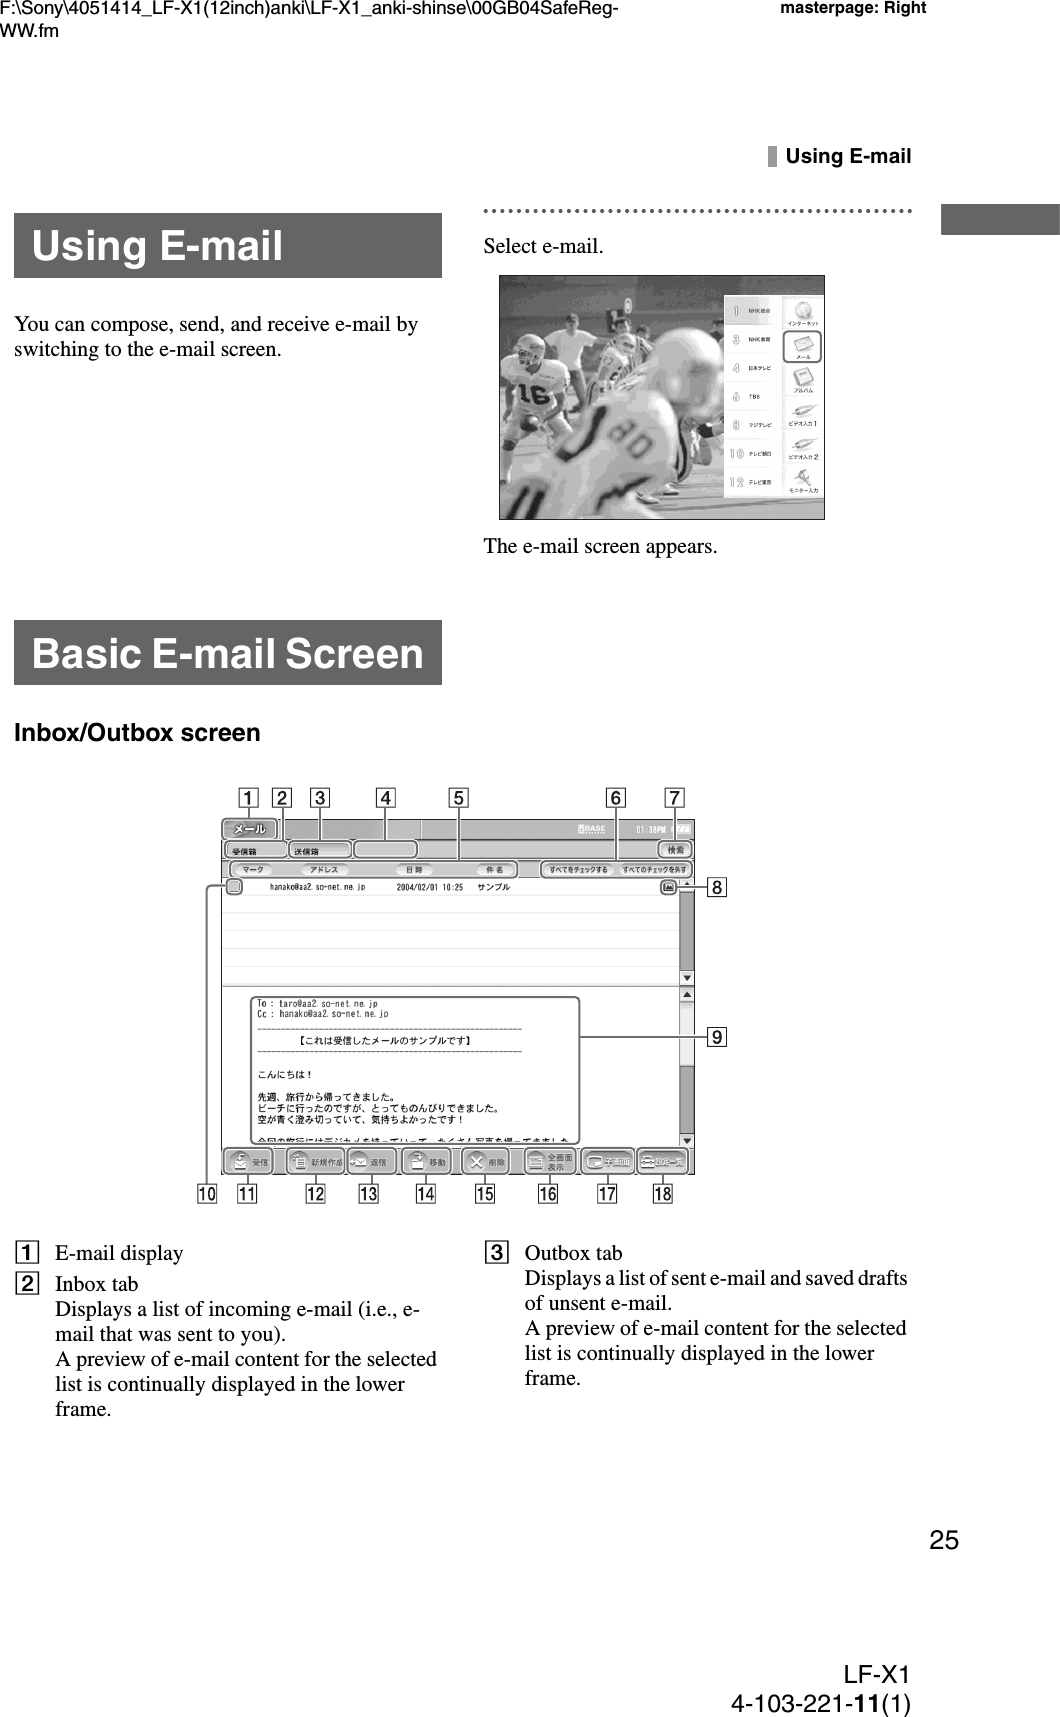
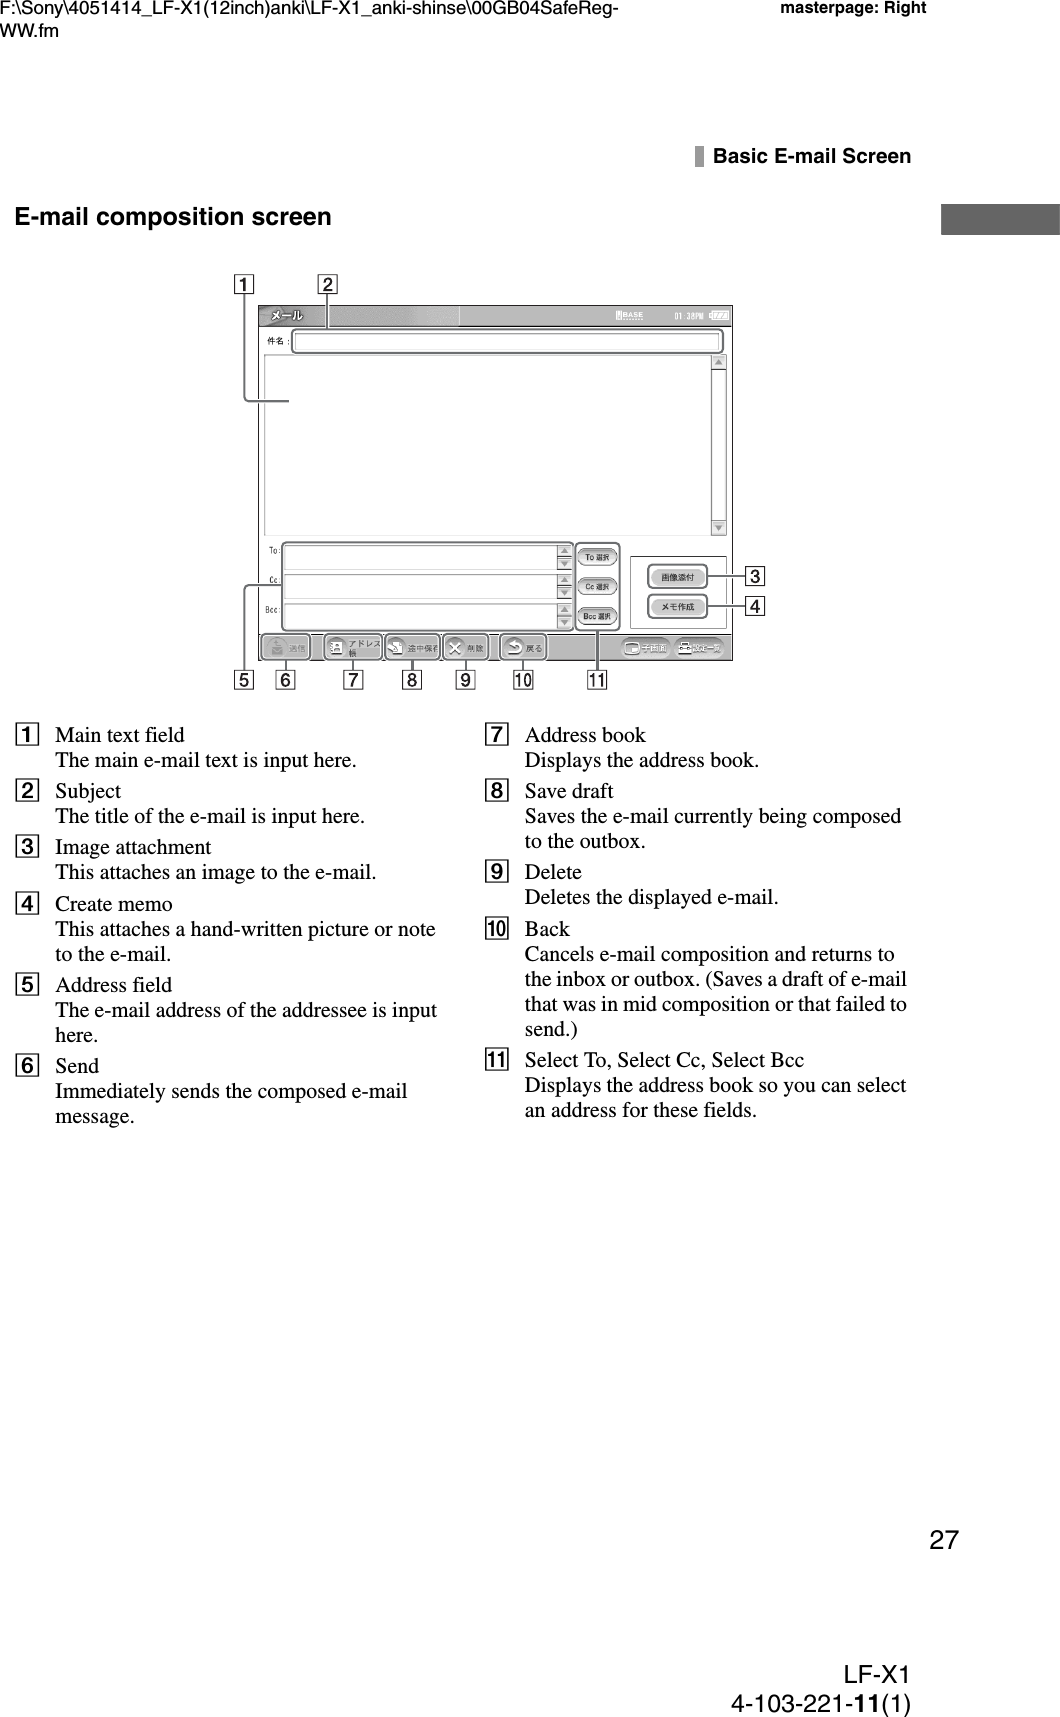
Sony Group IRF302U 2.4GHz/5GHz Band Wireless LAN Transceiver User Manual Manual for LFX1

Sony Corporation 2.4GHz/5GHz Band Wireless LAN Transceiver Manual for LFX1

Manual for LFX1

Operating Instructions4-103-221-11(1)LOCATION Free TVLF-X1© 2004 Sony CorporationLOCATION Free TV LF-X1F:\Sony\4051414_LF-X1(12inch)anki\LF-X1_anki-shinse\00GB01COV-WW.fm masterpage: RightLF-X14-103-221-11(1)
F:\Sony\4051414_LF-X1(12inch)anki\LF-X1_anki-shinse\00GB02SafeReg-WW.fmmasterpage: LeftLF-X14-103-221-11(1)2Important Safety Instructions1) Read these instructions.2) Keep these instructions.3) Heed all warnings.4) Follow all instructions.5) Do not use this apparatus near water.6) Clean only with dry cloth.7) Do not block any ventilation openings. Install in accordance with the manufacturer’s instructions.8) Do not install near any heat sources such as radiators, heat registers, stoves, or other apparatus (including amplifiers) that produce heat.9) Do not defeat the safety purpose of the polarized or grounding-type plug. A polarized plug has two blades with one wider than the other. A grounding type plug has two blades and a third grounding prong. The wide blade or the third prong are provided for your safety. If the provided plug does not fit into your outlet, consult an electrician for replacement of the obsolete outlet.10) Protect the power cord from being walked on or pinched particularly at plugs, convenience receptacles, and the point where they exit from the apparatus.11) Only use attachments/accessories specified by the manufacturer.12) Use only with the cart, stand, tripod, bracket, or table specified by the manufacturer, or sold with the apparatus. When a cart is used, use caution when moving the cart/apparatus combination to avoid injry from tip-over.13) Unplug this apparatus during lightning storms or when unused for long periods of time.14) Refer all servicing to qualified service personnel. Servicing is required when the apparatus has been damaged in any way, such as power-supply cord or plug is damaged, liquid has been spilled or objects have fallen into the apparatus, the apparatus has been exposed to rain or moisture, does not operate normally, or has been dropped.Owner’s RecordThe model and serial numbers are located at the bottom of the base station. Record the serial number in the space provided below. Refer to them whenever you call upon your Sony dealer regarding this product.Model No. LF-X1Serial No.____________________________Contacting SonyIf, after reading these operating instructions, you have additional questions related to the use of your Sony television, please call our Customer Information Services Center at 1-800-222-SONY (7669) (US residents only) or 1-877-899-SONY (7669) (Canadian residents only).
F:\Sony\4051414_LF-X1(12inch)anki\LF-X1_anki-shinse\00GB02SafeReg-WW.fmmasterpage: RightLF-X14-103-221-11(1)3WARNINGTo reduce the risk of fire or shock hazard, do not expose the TV to rain or moisture.This symbol is intended to alert the user to the presence of uninsulated “dangerous voltage” within the product’s enclosure that may be of sufficient magnitude to constitute a risk of electric shock to persons.This symbol is intended to alert the user to the presence of important operating and maintenance (servicing) instructions in the literature accompanying the appliance.This equipment must not be co-located or operating in conjunction with any other antenna or transmitter.FCC Radiation Exposure Statement:The available scientific evidence does not show that any health problems are associated with using low power wireless devices. There is no proof, however, that these low power wireless devices are absolutely safe. Low power Wireless devices emit low levels of radio frequency energy (RF) in the microwave range while being used. Whereas high levels of RF can produce health effects (by heating tissue), exposure to low level RF that does not produce heating effects causes no known adverse health effects. Many studies of low level RF exposures have not found any biological effects. Some studies have suggested that some biological effects might occur, but such findings have not been confirmed by additional research. The LF-X1 has been tested and found to comply with the Federal Communications Commission (FCC) guidelines on radio frequency energy (RF) exposures. The maximum SAR levels tested for the LF-X1 has been show to be 0.87 W/kg at Body.* This transmitter must not be co-located or operating in conjunction with any other antenna or transmitter.* When using the unit with 802.11a (5GHz), use in doors.CAUTIONDanger of explosion if battery is incorrectly replaced.Replace only with the same or equivalent type.This device complies with Part 15 of the FCC Rules.Operation is subject to the following two conditions: (1)This device may not cause harmful interference, and (2)this device must accept any interference received, including interference that may cause undesired operation.RISK OF ELECTRIC SHOCKDO NOT OPENRISQUE DE CHOC ELECTRIQUE, NE PAS OUVRIRATTENTIONCAUTIONPRECAUCIONRIESGO DE CHOQUE ELECTRICONO ABRIRCAUTION:  TO REDUCE THE RISK OF ELECTRIC SHOCK,DO NOT REMOVE COVER (OR BACK).NO USER-SERVICEABLE PARTS INSIDE.REFER SERVICING TO QUALIFIED SERVICE PERSONNEL.
F:\Sony\4051414_LF-X1(12inch)anki\LF-X1_anki-shinse\00GB02SafeReg-WW.fmmasterpage: LeftLF-X14-103-221-11(1)4NOTIFICATIONThis equipment has been tested and found to comply with the limits for a Class B digital device, pursuant to Part 15 of the FCC Rules. These limits are designed to provide reasonable protection against harmful interference in a residential installation. This equipment generates, uses, and can radiate radio frequency energy and, if not installed and used in accordance with the instructions, may cause harmful interference with radio communications. However, there is no guarantee that interference will not occur in a particular installation. If this equipment does cause harmful interference to radio or television reception, which can be determined by turning the equipment off and on, the user is encouraged to try to correct the interference by one or more of the following measures: Reorient or relocate the receiving antenna. Increase the separation between the equipment and receiver. Connect the equipment into an outlet on a circuit different from that to which the receiver is connected. Consult the dealer or an experienced radio/TV technician for help. FCC WARNINGYou are cautioned that any changes or modifications not expressly approved in this manual could void your authority to operate this equipment.For customers in the United StatesThis product contains mercury. Disposal of this product may be regulated if sold in the United States. For disposal or recycling information, please contact your local authorities or the Electronics Industries Alliance (http://eiae.org).Pour les clients résidant aux États-UnisCe produit contient du mercure. L’élimination de ce produit peut être soumise à réglementation s’il est vendu aux États-Unis. Pour obtenir des informations concernant l’élimination ou le recyclage, veuillez contacter les autorités locales ou l’Electronics Industries Alliance (http://www.eiae.org).
F:\Sony\4051414_LF-X1(12inch)anki\LF-X1_anki-shinse\00GB03SafeRegTOC.fmmasterpage: RightLF-X14-103-221-11(1)5Table of ContentsLocating the Components...................................................................................... 6Checking the Package Contents ............................................................................ 9Connecting a Cable or an Antenna...................................................................... 10Connecting Video/Audio Equipment .................................................................. 10Turning On the Power ......................................................................................... 13Connecting to the Internet ................................................................................... 15Configuring Network Settings............................................................................. 17Setting Up for Mail.............................................................................................. 20Watching TV and Video...................................................................................... 21Basic TV/Video Screen ....................................................................................... 22Viewing Web Pages............................................................................................. 23Basic Internet Screen........................................................................................... 24Using E-mail........................................................................................................ 25Basic E-mail Screen............................................................................................. 25Viewing Enlarged Images ................................................................................... 28Basic Digital Photo Album Screen...................................................................... 29Specifications....................................................................................................... 30
F:\Sony\4051414_LF-X1(12inch)anki\LF-X1_anki-shinse\00GB04SafeReg-WW.fmmasterpage: LeftLF-X14-103-221-11(1)6Locating the ComponentsMonitor1LCD (Liquid Crystal Display)2POWER indicatorLights green when the power is on.3WIRELESS indicatorIndicates the status of wireless communications.Lights blue:  Communications using the 5 GHz channel are in progress.Lights green:  Communications using the 2.4 GHz channel are in progress.Off: No radio waves are being output.4“Memory Stick” indicatorLights orange while the unit and the inserted “Memory Stick” are communicating.5“Memory Stick” slotInsert a “Memory Stick.”6USB connectorConnect a commercially available keyboard.7LAN connectorConnect a LAN cable.8Speakers9Mail Auto Receive indicatorLights red when new e-mail is received through periodical e-mail check.0e Charge indicatorIndicates the status of charging.Lights red: Charging the battery is in progress.Off: Charging finished.qa Infrared receiverqsi Headphones jack (stereo minijack)qdAV IN connector12345678Right sideLeft side90qaqsqd
F:\Sony\4051414_LF-X1(12inch)anki\LF-X1_anki-shinse\00GB04SafeReg-WW.fmmasterpage: RightLF-X14-103-221-11(1)7Locating the ComponentsqfStylus pen compartmentqgPOWER switchTurns on and off the power to the monitor.qhVOLUME +/– buttonsAdjusts the volume of the speakers.qjCAPTURE buttonSaves the currently displayed screen in an album as a still image.qkINDEX buttonDisplays the Index window.qlMonitor handlew;Monitor standwaBatterywsDC IN connectorConnect the AC power adaptor (supplied) for the monitor.qfqkqjqhqgTopqlw;wawsRear
F:\Sony\4051414_LF-X1(12inch)anki\LF-X1_anki-shinse\00GB04SafeReg-WW.fmmasterpage: LeftLF-X14-103-221-11(1)8FrontRearBase Station1234509876qfqdqsqa1WIRELESS indicatorIndicates the status of wireless communications.Lights blue: Communications using the 5 GHz channel are in progress.Lights green:Communications using the 2.4 GHz channel are in progress.2LINE indicatorIndicates the connection status to an external network such as the Internet.Blinks green: Connection is being made.Lights green: Connection has been made.Off: Connection has not been made.3NetAV indicatorIndicates the connection status when connection with the monitor has been made using the NetAV function.Lights green: Connection to the NetAV has been made.Off: Connection to the NetAV has not been made.4POWER indicatorLights green when the power to the base station is on.5POWER switchTurns on and off the power to the base station.6LAN connectorConnect a LAN cable.7USB connector8VHF/UHF connectorConnect an antenna connection cable.9VIDEO LINE OUTPUT (AUDIO/VIDEO) jacksOutput signals that are input to the video input 2 jack.Connect audio and video cables.0DC IN connectorConnect the AC power adaptor (supplied) for the base station.qaIR BLASTER connectorConnect the AV mouse (supplied).qsVIDEO LINE INPUT1 (S-VIDEO/AUDIO/VIDEO) jacksConnect S-video and audio cables; or connect audio and video cables.qdVIDEO LINE INPUT2 (AUDIO/VIDEO) jacksConnect audio and video cables.qfBASESTATION RESET buttonReturns all settings including line and wireless communications settings on the base station to the factory defaults.
F:\Sony\4051414_LF-X1(12inch)anki\LF-X1_anki-shinse\00GB04SafeReg-WW.fmmasterpage: RightLF-X14-103-221-11(1)9Checking the Package ContentsAfter unpacking, check that all the following items have been included:• Base station (× 1)• Monitor (× 1)•Stylus (×1)• BP-LX1A battery (× 1)• AC-LX1B AC power adapter for the base station (× 1)• AC-LX1M power adaptor for the monitor (× 1)•Power cord (×2)•AV mouse (×1)• Base station stand (× 1)Checking the Package Contents
F:\Sony\4051414_LF-X1(12inch)anki\LF-X1_anki-shinse\00GB04SafeReg-WW.fmmasterpage: LeftLF-X14-103-221-11(1)10When you have connected your TV to the CATV cable or antenna, use this hookup.With this hookup, set Cable to OFF in the Auto CH Program window of Settings TV/Video.1Turn off the power of your TV and remove the antenna or CATV cable from the antenna input of your TV.2Plug the OUT connector of the supplied antenna connector into the antenna input of your TV.3Plug the antenna or CATV cable removed from your TV in step 1 into the ANT connector of the supplied antenna connector.4Plug the output cord of the antenna connector into the VHF/UHF connector of the base station.* If the output cord of the supplied antenna connector is short, use the optional EAC-40 TV antenna connector.To connect the base station only to the antenna or CATV cable directlyUse the optional EAC-315 or equivalent antenna cable.Use this hookup if you subscribe to a cable TV system that uses scrambled or encoded signals requiring a cable box to view all channels.1Connect the coaxial connector from your cable service to the IN connector of the cable box.2Using a coaxial cable, connect the OUT connector of the cable box to the VHF/UHF connector of the base station.With this hookup, set Cable to ON in the Auto CH Program window of Settings TV/Video.CautionTo change channels using the cable box, set your Wireless Home Network TV to channel from 1 to 6, depending on the cable box channel output.Use this hookup if you have cable TV that does not require a cable box.1Disconnect all power sources.2Connect the CATV cable or antenna to the VHF/UHF IN connector of the VCR.3Using a coaxial cable, connect the VHF/UHF OUT connector of the VCR to the VHF/UHF connector of the base station.Connecting a Cable or an AntennaConnecting a TV and Cable/AntennaConnecting Video/Audio EquipmentConnecting a Cable BoxConnecting a VCR and Cable/Antenna
F:\Sony\4051414_LF-X1(12inch)anki\LF-X1_anki-shinse\00GB04SafeReg-WW.fmmasterpage: RightLF-X14-103-221-11(1)11Connecting Video/Audio Equipment4Using the audio/video cable, connect the audio and video OUT jacks of the VCR to the VIDEO LINE INPUT AUDIO and VIDEO jacks of the base station.Use this hookup if your cable TV company scrambles some channels, but not all of them (pay channels vs. regular cable channels) and you need to use a cable box.1Disconnect all power sources.2Connect the coaxial connector from your cable service to the VHF/UHF IN connector of the cable box.3Using a coaxial cable, connect the VHF/UHF OUT connector of the cable box to the VHF/ UHF IN connector of the VCR.4Using a coaxial cable, connect the VHF/UHF OUT connector of the VCR to the VHF/UHF connector of the base station.5Using the audio/video cable, connect the audio and video OUT jacks of the VCR to the VIDEO LINE INPUT AUDIO and VIDEO jacks of the base station.1Disconnect all power sources.2Connect the satellite antenna cable to the SATELLITE IN connector of the satellite receiver.3Using the audio/video cable, connect the audio and video OUT jacks of the satellite receiver to the VIDEO LINE INPUT AUDIO and VIDEO jacks of the base station.4Connect a coaxial cable from your cable or antenna to the VHF/UHF connector of the base station.1Disconnect all power sources.2Connect the satellite antenna cable to the SATELLITE IN connector of the satellite receiver.3Connect the CATV cable to the VHF/UHF IN connector of the VCR.4Using a coaxial cable, connect the OUT connector of the VCR to the VHF/UHF connector of the base station.5Using the audio/video cable, connect the audio and video OUT jacks of the satellite receiver to the audio/video IN jacks of the VCR.Connecting a VCR and Cable BoxConnecting a Satellite ReceiverConnecting a Satellite Receiver and a VCR
F:\Sony\4051414_LF-X1(12inch)anki\LF-X1_anki-shinse\00GB04SafeReg-WW.fmmasterpage: LeftLF-X14-103-221-11(1)126Using the audio/video cable, connect the audio/video OUT jacks of the VCR to the VIDEO LINE INPUT AUDIO and VIDEO jacks of the base station.1Disconnect all power sources.2Connect the satellite antenna cable to the SATELLITE IN connector of the satellite receiver.3Using a coaxial cable, connect the VHF/UHF OUT connector of the satellite receiver to the VHF/UHF connector of the base station. Set the RF OUT selector of the satellite receiver to 3 CH or 4 CH.4Using the audio/video cable, connect the audio and video OUT jacks of the DVD player to the VIDEO LINE INPUT AUDIO and VIDEO jacks of the base station.Connecting a Satellite Receiver and a DVD Player
F:\Sony\4051414_LF-X1(12inch)anki\LF-X1_anki-shinse\00GB04SafeReg-WW.fmmasterpage: RightLF-X14-103-221-11(1)13Turning On the PowerConnect the power cord after finishing all other connections.Connecting the power cord to the base stationConnecting the power cord to the monitorTurning On the PowerConnecting the Power CordCaution• Be sure to use the supplied AC-LX1B AC power adaptor for the base station. You cannot substitute with the AC-LX1M AC power adaptor for the monitor.• Do not bundle the AC power adaptor cord and the antenna connection cable together. Neglecting this can induce noise on television images if strong broadcasting signals cannot be received in your area.Connect the supplied AC power adaptor for the base station to the DC IN connector on the base station, and plug the supplied power cord into a wall outlet.Rear of the base stationWall outletPower cord (supplied)AC-LX1B AC power adaptor (supplied) for the base stationto DC INPOWER switchto DC INPower cord (supplied)AC-LX1M AC power adaptor (supplied) for the monitorWall outlet
F:\Sony\4051414_LF-X1(12inch)anki\LF-X1_anki-shinse\00GB04SafeReg-WW.fmmasterpage: LeftLF-X14-103-221-11(1)141Press POWER on the front of the base station to turn on the base station.The POWER indicator on the front of the base station lights green.2Press POWER on the top of the monitor to turn on the monitor.The POWER indicator on the top of the monitor lights green and the monitor shows pictures.To turn off the power, press POWER again.To charge the monitor battery, connect the supplied AC power adaptor for the monitor to the monitor. You can use the monitor even while it is being charged.During charging, the e (charge) indicator on the left panel of the monitor lights red. The indicator goes off when charging is finished.Battery charging timeBattery durationApproximate battery life using a fully charged battery (supplied) is:4 hours with the minimum screen brightness selected;3 hours with the medium screen brightness selected; and100 minutes with the maximum screen brightness selected.A warning message appears 1 to 15 minutes before the battery is exhausted.The battery indicator appears on the top of the screen.Turning On the PowerPOWER indicatorPOWER switchCharging the Monitor BatteryCharging methodMonitor powerOnMonitor powerOffUse the AC power adaptor for the monitor About 2.5 hours About 2 hoursAC-LX1M AC power adaptor (supplied) for the monitorPower cord (supplied) Wall outletto DC IN(Fully charged to  30% remains)(30% remains) (10% remains) (Cut off soon)
F:\Sony\4051414_LF-X1(12inch)anki\LF-X1_anki-shinse\00GB04SafeReg-WW.fmmasterpage: RightLF-X14-103-221-11(1)15Connecting to the InternetThis section offers examples and explanations of several common methods for connecting to the Internet. Because the best connection method for you will depend on the Internet service provider and connection devices you use, check with your Internet service provider or network administrator for more information.Connecting by LAN cableUsing a LAN cable (not supplied), connect the LAN port on the unit to your cable modem, ADSL modem, or dial-up router.Connect to the Ethernet port in the wall if you live in an Internet-ready residential complex.Caution• LAN cables come in two kinds: straight-wired and cross-wired. The type of cable you should use depends on what kind of cable modem or ADSL modem you have. See the user’s manual for your modem for more information.• For details on setting up the connection, cross-refer to the user’s manual for your cable modem or ADSL modem. If you are unclear on some point regarding your modem, contact your cable television company, ADSL network administrator, or Internet service provider.Connecting to the Internetz TipIn addition to “ETHER,” the Internet port on some cable and ADSL modems may also be marked “10Base-T,” “LAN,” “ENET,” etc.to the LAN portLAN cable (not supplied)Cable modem, ADSL modem, etc.To InternetFor this part of the connection, see the user’s manual for your cable or ADSL modem.: Signal flowRear of base station
F:\Sony\4051414_LF-X1(12inch)anki\LF-X1_anki-shinse\00GB04SafeReg-WW.fmmasterpage: LeftLF-X14-103-221-11(1)16Connecting several devices to a modem with a routerCaution• Depending on your Internet service contract, you may not be able to connect multiple devices, such as several computers and an Airboard. Check with your cable television company, ADSL network administrator, or Internet service provider.• To determine what kind of LAN cable to use, see the user’s manual for your router, cable modem, or ADSL modem.• For details on setting up the connection, cross-refer to the user’s manual for your router, cable modem, or ADSL modem.Configuring router settings• If the user’s manual for your router directs you to use a web browser (Internet Explorer or Netscape Navigator) to access the router’s settings screen, input the router’s IP address in the Airboard’s Internet address field to display the settings screen. See page 23 for more on how to input to the address field. You must also configure network settings for the Airboard. See page 17 for more on how to configure network settings.• For more information on configuring router settings, refer to the user’s manual for your device.• The settings for some routers cannot be configured from the Airboard’s Internet screen.* What is a router?A router is a piece of equipment that relays signals between networks.Using a router allows several devices to share one Internet connection.See page 17 for more on how to configure router settings.to the LAN portLAN cable (not supplied)Cable modem, ADSL modem, etc.To Internet: Signal flowRouter*LAN cable (not supplied)Computer Computer
F:\Sony\4051414_LF-X1(12inch)anki\LF-X1_anki-shinse\00GB04SafeReg-WW.fmmasterpage: RightLF-X14-103-221-11(1)17Configuring Network SettingsConfigure your network settings according to the documents provided by your Internet service provider.Before configuring network settingsCheck that:• The base station power is turned on.• The base station and monitor have established a wireless connection.• The LAN cable is connected to the base station, when connecting by LAN.• The telephone cord is connected to the base station, when connecting by analog phone line (USB-PSTN modem adapter UNA-PSTN: not supplied).With this type of Internet connection a DHCP server automatically assigns the “IP Address,” “Subnet mask,” and “Default gateway.” Depending on the DHCP server, “DNS” may also be automatically assigned.z TipFollow the steps below to connect to the Internet when using a router as well.1Press the [Index] button on the upper part of the monitor.The index screen appears.2Select [Internet] from the index screen.The Internet connection is established when the Airboard web page, which is set as the default homepage, appears.If the default homepage is not displayed and a connection error message appears saying the Airboard is unable to connect to the Internet server,go on to step 3 and verify the automatic connection (DHCP) settings.3Press [Settings] on the lower right of the screen.The [Settings] window appears.4Press [Internet connection].The [Internet connection] window appears.5Press [Base station].The [Base station] window appears.Caution[Base station] cannot be selected if the operating environment is such that the monitor and base station cannot establish a wireless connection.Configuring Network SettingsConnecting via LAN (DHCP)
F:\Sony\4051414_LF-X1(12inch)anki\LF-X1_anki-shinse\00GB04SafeReg-WW.fmmasterpage: LeftLF-X14-103-221-11(1)186Select [Settings] to the right of [LAN (DHCP/Manual IP address setting)].The [LAN (DHCP/Manual IP address setting)] window appears.Verify that values have been assigned for the IP address, etc.7Press [OK].1Perform steps 3 through 6 of “Connecting via LAN (DHCP)” on page 17 to display the [Base station] window.2Select [Settings] to the right of [LAN (DHCP/Manual IP address setting)].3Refer to the documents provided by your Internet service provider to input the proper values for “IP Address,” “Subnet mask,” “Default gateway,” “DNS 1,” “DNS 2,” and “Host name,” and then press [OK].4Select [LAN (DHCP/Manual IP address setting)].5Press [OK].This sets the “LAN (DHCP/Manual IP address setting).”6Press [Back].7Press [Settings] and then [End].Connecting via LAN (manually assigning an address)LAN (DHCP/Manual IP address setting)OKRemove this check mark.Input while referring to documents from your provider.LAN (DHCP/Manual IP address setting)
F:\Sony\4051414_LF-X1(12inch)anki\LF-X1_anki-shinse\00GB04SafeReg-WW.fmmasterpage: RightLF-X14-103-221-11(1)19Configuring Network Settings1Press [Settings] on the lower right of the screen.If the [Settings] window is not displayed on the lower right of the screen, touch the screen lightly and it will appear.2Press [Internet connection].3Press [Base station].4Press [Settings] to the right of [LAN (PPPoE)].5Input each item while referring to the documents provided by your Internet service provider, and then press [OK].1Input your service provider’s name.2Input your connection ID.3Input your password for connecting to the Internet.4Input values for DNS1 and DNS2.5Press [OK].6Press [LAN (PPPoE)].7Press [OK].This sets the “LAN (PPPoE)”.8Press [Back].9Press [Settings] and then [End].Connecting via LAN (PPPoE)LAN (PPPoE)
F:\Sony\4051414_LF-X1(12inch)anki\LF-X1_anki-shinse\00GB04SafeReg-WW.fmmasterpage: LeftLF-X14-103-221-11(1)20You cannot send and receive mail (e-mail) unless you program the unit with information about your Internet Service Provider (ISP). Program the necessary information according to the document supplied by the provider.1Press [Settings] at the bottom right of the screen.If [Settings] is not shown, touch anywhere on the screen to make it appear.2Press [e-mail].3Press [Send/Receive].4Enter into the individual fields, then press [OK].1Enter a name.2Enter a mail address.3Enter the mail account.4Enter the mail password specified by the provider.5Enter the POP3 server.6Enter the SMTP server.7Specify whether to leave received mail in the server.Normally, set so that received mails are not left in the server.8Specify the interval for checking if there is new mail, in the range from 0 to 999 minutes.9Select the size of characters for mail text on the screen.0Press [OK].5Press [Settings], then press [End].Setting Up for Mail
F:\Sony\4051414_LF-X1(12inch)anki\LF-X1_anki-shinse\00GB04SafeReg-WW.fmmasterpage: RightLF-X14-103-221-11(1)21Watching TV and VideoOpen the Index window, then select a desired channel.To adjust the volume, press VOL +/– on the top of the monitor.z Tips• You can turn on the monitor by pressing POWER on the remote control. You may directly press channel number buttons or [CH +/–] on the remote control to turn on the monitor and select a channel.• Pressing [VOL –] on the monitor for 2 seconds silences the sound quickly.To select a channel from the TV channel listTouch anywhere on the screen to display the TV channel list, then select a desired channel.The TV channel list disappears automatically 5 seconds after the screen is operated.Watching TV and VideoTV channel list
F:\Sony\4051414_LF-X1(12inch)anki\LF-X1_anki-shinse\00GB04SafeReg-WW.fmmasterpage: LeftLF-X14-103-221-11(1)22Parts and controls on the TV/Video screenATV/video mode indicationBTV channel numberCTV station nameDMulti-language mode indicationWhen a multi-language program is tuned in, [Main], [Sub], or [Main/Sub] is displayed. When a stereo program is tuned in, [Stereo] is displayed.EMute/volume level indicationFTV channel listThis appears when you touch anywhere on the screen showing a TV program and allows you to select a channel. The list disappears automatically 5 seconds after the screen is operated.GMulti-language mode buttonSwitches among the multi-language modes when a multi-language program is tuned in.HRate adjustment buttonOptimizes picture quality according to the ambient radio wave conditions.I[Settings]Displays the [Settings] window for various setups.Selecting [TV/Video] in the [Settings] window allows you to adjust the quality of picture and sound or manually set up channels, for example.About guide bar displayWhen a TV or video mode is selected, the guide bars appear for 5 seconds then disappear.Touching anywhere on the screen displays the top and bottom guide bars and a TV channel list.CautionThis monitor does not support non-interlace signals used for monitors such as personal computer screens.Basic TV/Video Screen
F:\Sony\4051414_LF-X1(12inch)anki\LF-X1_anki-shinse\00GB04SafeReg-WW.fmmasterpage: RightLF-X14-103-221-11(1)23Viewing Web PagesThis section explains how to open the Internet window and display web pages. Let us assume that you will access the Sony’s web site whose URL is http://www/sony.com/. 1Open the [Index] window, then press [WWW].The Internet window appears.2Press a new tab, then press the URL entry field.3Using the keyboard, enter http://www.sony.com/, then press [End].Viewing Web PagesURL entry fieldNew tab
F:\Sony\4051414_LF-X1(12inch)anki\LF-X1_anki-shinse\00GB04SafeReg-WW.fmmasterpage: LeftLF-X14-103-221-11(1)24Parts and Controls on the Internet ScreenAInternet iconMoves when a web page is being downloaded.BInternet indicationCURL entry fieldThe URL of a currently opened web page is displayed. To open another web page, press a new tab, then enter a URL.D(SSL) icon Appears when a web page handling SSL (Secure Socket Layer) is currently opened.E[Favorites]Displays the Favorites list panel for registering the address of the currently opened web page. It also displays the list of registered URLs.F[History]Displays the list of web pages that you have opened before.G[Save]Saves the currently opened web page. You can open saved web pages without accessing to the Internet.H[Close Tab]Closes the page of the currently displayed tab and the tab becomes blank again.ITabIf you select a link that opens using another window, the linked web page is opened under a new tab. Six tabs are available in total. Just after an Internet connection, all tabs other than the leftmost one are blank.Basic Internet Screen
F:\Sony\4051414_LF-X1(12inch)anki\LF-X1_anki-shinse\00GB04SafeReg-WW.fmmasterpage: RightLF-X14-103-221-11(1)25Using E-mailYou can compose, send, and receive e-mail by switching to the e-mail screen.Select e-mail.The e-mail screen appears.Inbox/Outbox screenAE-mail displayBInbox tabDisplays a list of incoming e-mail (i.e., e-mail that was sent to you).A preview of e-mail content for the selected list is continually displayed in the lower frame.COutbox tabDisplays a list of sent e-mail and saved drafts of unsent e-mail.A preview of e-mail content for the selected list is continually displayed in the lower frame.Using E-mailBasic E-mail Screen
F:\Sony\4051414_LF-X1(12inch)anki\LF-X1_anki-shinse\00GB04SafeReg-WW.fmmasterpage: LeftLF-X14-103-221-11(1)26DFiling cabinet tabAppears when a “Memory Stick” is inserted. Allows you to arrange the e-mail you have sent and received.ESort buttonAllows you to sort your e-mail by each attribute: address, date and time, or subject. With each touch of the sort button, e-mail is sorted in ascending or descending order.FCheck all/Uncheck all[Check all] places a check mark next to all e-mails in the displayed tab, and [Uncheck all] removes all check marks.GSearchAllows you to search for a designated tab by keyword.HAttached image iconAppears when an image file is attached to an e-mail. When a non-image file is attached, the paper clip icon appears.IPreview displayDisplays highlighted e-mail contents in the inbox, outbox, and filing cabinet tabs.JCheck boxA check mark is placed in or removed from this box each time it is pressed.KReceiveChecks for new incoming e-mail.LCompose NewCreates a new blank e-mail.MReply (Resend, Edit)Depending on the content of the e-mail displayed in the preview, [Reply], [Resend], and/or [Edit] will be displayed.Reply: Displays a screen for replying to e-mail.Resend: Displays an editing screen for resending sent e-mail.Edit: Displays a screen for editing e-mail content.NMove (move checked e-mail)Moves checked e-mail messages to a designated location, such as the filing cabinet.ODelete (delete checked e-mail)Deletes checked e-mail messages and any files attached to them.PFull-screen displayDisplays the main e-mail text at full-screen size.QSub-screenDisplays television or video in a sub screen.RSettingsDisplays the [Settings] window used to change settings.Selecting [E-mail] on the [Settings] window allows you to change on-screen font size and other settings.
F:\Sony\4051414_LF-X1(12inch)anki\LF-X1_anki-shinse\00GB04SafeReg-WW.fmmasterpage: RightLF-X14-103-221-11(1)27Basic E-mail ScreenE-mail composition screenAMain text fieldThe main e-mail text is input here.BSubjectThe title of the e-mail is input here.CImage attachmentThis attaches an image to the e-mail.DCreate memoThis attaches a hand-written picture or note to the e-mail.EAddress fieldThe e-mail address of the addressee is input here.FSendImmediately sends the composed e-mail message.GAddress bookDisplays the address book.HSave draftSaves the e-mail currently being composed to the outbox.IDeleteDeletes the displayed e-mail.JBackCancels e-mail composition and returns to the inbox or outbox. (Saves a draft of e-mail that was in mid composition or that failed to send.)KSelect To, Select Cc, Select BccDisplays the address book so you can select an address for these fields.
F:\Sony\4051414_LF-X1(12inch)anki\LF-X1_anki-shinse\00GB04SafeReg-WW.fmmasterpage: LeftLF-X14-103-221-11(1)281Directly press the image you want to enlarge.An enlarged view of the image appears.CautionIt may take several tens of seconds to enlarge some images. During this interval you cannot perform other operations.z TipYou can also enlarge an image by pressing it, pressing [Details], and then pressing [Enlarged display] on the [Image Details] screen that appears. Lightly pressing the enlarged image, in this case, returns you to the [Image Details] screen.2To quit the enlarged view, lightly press the image.This returns you to the [Image list] screen.z TipYou can also return to the [Image list] screen by pressing INDEX on the monitor.Viewing Enlarged ImagesPress an image (do not press the  .)Next imagePrevious imageGliding your finger from left to right over the screen will display the next image, and gliding it from right to left will display the previous
F:\Sony\4051414_LF-X1(12inch)anki\LF-X1_anki-shinse\00GB04SafeReg-WW.fmmasterpage: RightLF-X14-103-221-11(1)29Basic Digital Photo Album ScreenADigital photo album displayBStorage cabinet tabDisplays a list of images saved on the Airboard or a “Memory Stick”.CFiling cabinet tabAppears when a “Memory Stick” is inserted. Allows you to arrange the images you have saved.DCheck all/Uncheck all[Check all] places a check mark next to all e-mails in the displayed tab, and [Uncheck all] removes all check marks.EImagePressing an image directly will display an enlarged view. For movies, a direct press begins playback.FSort buttonImages can be sorted by name or date and time of modification. With each press of the sort button, images are sorted in ascending or descending order.GCheck boxA check mark is placed in or removed from this box each time it is selected.HSlideshowAutomatically displays in succession all images in the digital photo album or all selected images.IDrawingAllows you to draw pictures and write text by hand.JSendAttaches the selected images to e-mail.KDetailsAllows you to change the selected images’ names, switch to enlarged display (or movie display), and rotate images. Also displays image attributes, such as file size, date and time of creation, and date and time of modification.LCopyCopies the selected images to the Airboard or a “Memory Stick”.MDeleteDeletes the selected images.NSettingsDisplays the [Settings] window used to change settings.Selecting [Digital Photo Album] on the [Settings] window allows you to change the filing cabinet name and other settings.Basic Digital Photo Album Screen
F:\Sony\4051414_LF-X1(12inch)anki\LF-X1_anki-shinse\00GB04SafeReg-WW.fmmasterpage: LeftLF-X14-103-221-11(1)30SystemTelevision systemNTSCChannel coverageVHF: 2 - 13,UHF: 14 - 69,CATV: 1 - 125Tuning system PLL synthesizerScreen size 12.1 inches24.9 × 18.7 cm (9 7⁄8 × 7 3⁄8 inches), 31.1 cm (12 1⁄4 inches) (w/h, diagonal)Display Transparent TN LCD panelDrive system TFTActive matrix drive systemEffective picture element ratio99.99 %sEffective picture elementsHorizontal: 800 dotsVertical: 600 linesSpeaker 4 × 2.8 cm (1 5⁄8 × 1 1⁄8 inches) oval (2)Audio output 0.6 W × 2, 8 ohmsWeb browserHTML HTML 4.01, XHTML Basic 1.0 Frame, JavaScript, SSL (V2/3), TLS 1.0, JavaApplet (PJAE 1.2)Image file GIF, JPEG, PNGFlash Ver. 6E-mailTransmit protocolSMTPReceive protocolPOP3AlbumAlbum file GIF, JPEG, PNG, BMP, MPG (MPEG1 movie)Inputs/outputsBase stationVHF/UHF 75-ohm connectorVIDEO LINE INPUT1S-video: 4-pin mini DINY: 1 Vp-p, 75 ohms unbalanced, sync negativeC: 0.286 Vp-p (burst), 75 ohmsVideo: Phono jack, 1 Vp-p, 75 ohms unbalanced, sync negativeAudio: Phono jack, 2-channel, 500 mVrms, Impedance: 47 kohmsVIDEO LINE INPUT2Video: Phono jack, 1 Vp-p, 75 ohms unbalanced, sync negativeAudio: Phono jack, 2-channel, 500 mVrms, Impedance: 47 kohmsVIDEO LINE OUTPUTVideo: Phono jack, 1 Vp-p, 75 ohms unbalanced, sync negativeAudio: Phono jack, 2-channel, 500 mVrms, Impedance: less than 5 kohmsDC IN 12 V DCETHERNET 10BASE-T/100BASE-T connector (1)IR BLASTER Minijack (1)USB USB 1.1 (2)MonitorDC IN 16 V DCHeadphones Stereo minijackImpedance: 16 ohms or moreUSB USB 1.1 (1)ETHERNET 10BASE-T/100BASE-T connector (1)AV IN Minijack (1)Specifications
F:\Sony\4051414_LF-X1(12inch)anki\LF-X1_anki-shinse\00GB04SafeReg-WW.fmmasterpage: RightLF-X14-103-221-11(1)31SpecificationsAC power adaptorAC-LX1B (for the base station)Power requirements100 V - 240 V AC, 50/60 HzRated output DC OUT: 12 V DC, 3 AOperating temperature32 to 95 °F (0 to 35 °C) Storage temperature14 to 140 °F (–10 to +60 °C)Dimensions Approx. 99.5 × 42.5 × 25.5 mm (4 × 1 11⁄16 × 1 1⁄16 inches) (w/h/d, not including projecting parts)Mass 200 g (7 oz)AC-LX1M (for the monitor)Power requirements100 V - 240 V AC, 50/60 HzRated output DC OUT: 16 V DC, 3.75 AOperating temperature32 to 95 °F (0 to 35 °C)Storage temperature14 to 140 °F (–10 to +60 °C)Dimensions Approx. 125 × 30 × 60 mm (5 × 1 3⁄16 × 2 3⁄8 inches) (w/h/d, not including projecting parts)Mass 300 g (11 oz)Battery BP-LX1ARated voltage 10.8 V DCCapacity 4,400 mAhType Lithium ion batteryDimensionsApprox. 123.6 × 88.0 × 20.5 mm (4 7⁄8 × 3 1⁄2 × 13⁄16 inches) (w/h/d)Mass 310 g (11 oz)Operating temperature32 to 95 °F (0 to 35 °C)Storage temperature14 to 95 °F (–10 to +35 °C)GeneralPower consumptionBase Station: Approx. 12 W (watching TV)Approx. 0.6 W (power off, using AC power adaptor)Monitor: Approx. 50 W (watching TV, using AC power adaptor)Approx. 24 W (watching TV, using battery)Approx. 39 W (power off, charging battery)Operating temperature32 to 95 °F (0 to 35 °C)Storage temperature14 to 113 °F (–10 to +45 °C)DimensionsBase Station: 5.8 × 22.2 × 18.0 cm  (2 3⁄8 × 8 3⁄4 × 7 1⁄8 inches) (w/h/d, not including projecting parts)Monitor: 36.5 × 24.0 × 3.1 cm  (14 3⁄8 × 9 1⁄2 × 1 1⁄4 inches) (w/h/d, not including projecting parts) MassBase Station: Approx. 550 g (1 lbs 3 oz)Monitor: Approx. 2.4 kg (5 lbs 5 oz), including the batteryCommunication rangeIndoors: approx. 30 m (98 feet) (depending on the environments)Standards IEEE802.11 a/b/gFrequency range2.4 GHz, 5 GHzModulation Direct Sequence Spread Spectrum (DSSS)Orthogonal Frequency Division Multiplexing (OFDM)Power requirementsAC power adaptor: 100-240 V AC, 50/60 HzBattery:4,400 mAh
F:\Sony\4051414_LF-X1(12inch)anki\LF-X1_anki-shinse\00GB04SafeReg-WW.fmmasterpage: LeftLF-X14-103-221-11(1)32Battery duration Approx. 4 hours (with the minimum screen brightness)Approx. 3 hours (with the medium screen brightness)Approx. 100 minutes (with the maximum screen brightness)Battery charging timeApprox. 2.5 hours (monitor power on)Approx. 2 hours (monitor power off)Supplied accessoriesBP-LX1A battery (× 1)Stylus (× 1)AC-LX1B AC power adapter for the base station (× 1)AC-LX1M AC power adaptor for the monitor (× 1)Power cord (× 2)AV mouse (× 1)Base station stand (× 1)
F:\Sony\4051414_LF-X1(12inch)anki\LF-X1_anki-shinse\00GB99BCO-WW.fm masterpage: RightLF-X14-103-221-11(1)Sony Corporation

Navigation menu