Sony Group IRF303 2.4GHz/5GHz Band Wireless LAN Transceiver User Manual
Sony Corporation 2.4GHz/5GHz Band Wireless LAN Transceiver Users Manual
Contents
- 1. Manual
- 2. Users Installation Manual
- 3. Users Manual
Users Manual
F:\Sony\4051414_LF-X1(12inch)anki\LF-X1_anki-shinse\00GB02SafeReg-
WW.fm
masterpage: Left
LF-X1
4-103-221-11(1)
2
Important Safety Instructions
1) Read these instructions.
2) Keep these instructions.
3) Heed all warnings.
4) Follow all instructions.
5) Do not use this apparatus near water.
6) Clean only with dry cloth.
7) Do not block any ventilation openings. Install in
accordance with the manufacturer’s instructions.
8) Do not install near any heat sources such as radiators,
heat registers, stoves, or other apparatus (including
amplifiers) that produce heat.
9) Do not defeat the safety purpose of the polarized or
grounding-type plug. A polarized plug has two blades
with one wider than the other. A grounding type plug
has two blades and a third grounding prong. The wide
blade or the third prong are provided for your safety.
If the provided plug does not fit into your outlet,
consult an electrician for replacement of the obsolete
outlet.
10) Protect the power cord from being walked on or
pinched particularly at plugs, convenience
receptacles, and the point where they exit from the
apparatus.
11) Only use attachments/accessories specified by the
manufacturer.
12) Use only with the cart, stand, tripod, bracket, or table
specified by the manufacturer, or sold with the
apparatus. When a cart is used, use caution when
moving the cart/apparatus combination to avoid injry
from tip-over.
13) Unplug this apparatus during lightning storms or
when unused for long periods of time.
14) Refer all servicing to qualified service personnel.
Servicing is required when the apparatus has been
damaged in any way, such as power-supply cord or
plug is damaged, liquid has been spilled or objects
have fallen into the apparatus, the apparatus has been
exposed to rain or moisture, does not operate
normally, or has been dropped.
Owner’s Record
The model and serial numbers are located at the
bottom of the base station. Record the serial number
in the space provided below. Refer to them whenever
you call upon your Sony dealer regarding this
product.
Model No. LF-X11
Serial No.____________________________
Contacting Sony
If, after reading these operating instructions, you
have additional questions related to the use of your
Sony television, please call our Customer
Information Services Center at 1-800-222-SONY
(7669) (US residents only) or 1-877-899-SONY
(7669) (Canadian residents only).
F:\Sony\4051414_LF-X1(12inch)anki\LF-X1_anki-shinse\00GB02SafeReg-
WW.fm
masterpage: Right
LF-X1
4-103-221-11(1)
3
WARNING
To reduce the risk of fire or shock hazard, do not expose
the TV to rain or moisture.
This symbol is intended to alert the user to
the presence of uninsulated “dangerous
voltage” within the product’s enclosure
that may be of sufficient magnitude to
constitute a risk of electric shock to
persons.
This symbol is intended to alert the user to
the presence of important operating and
maintenance (servicing) instructions in the
literature accompanying the appliance.
This equipment must not be co-located or operating in
conjunction with any other antenna or transmitter.
FCC Radiation Exposure Statement:
The available scientific evidence does not show that any
health problems are associated with using low power
wireless devices. There is no proof, however, that these
low power wireless devices are absolutely safe. Low
power Wireless devices emit low levels of radio
frequency energy (RF) in the microwave range while
being used. Whereas high levels of RF can produce health
effects (by heating tissue), exposure to low level RF that
does not produce heating effects causes no known adverse
health effects. Many studies of low level RF exposures
have not found any biological effects. Some studies have
suggested that some biological effects might occur, but
such findings have not been confirmed by additional
research. The LF-X11 has been tested and found to comply
with the Federal Communications Commission (FCC)
guidelines on radio frequency energy (RF) exposures.
The maximum SAR levels tested for the LF-X11 has been
show to be "x.xx" W/kg at Body.
* This transmitter must not be co-located or operating in
conjunction with any other antenna or transmitter.
* When using the unit with 802.11a (5GHz), use in doors.
CAUTION
Danger of explosion if battery is incorrectly
replaced.
Replace only with the same or equivalent type.
This device complies with Part 15 of the FCC Rules.
Operation is subject to the following two conditions:
(1)This device may not cause harmful interference,
and
(2)this device must accept any interference received,
including interference that may cause undesired
operation.
RISK OF ELECTRIC SHOCK
DO NOT OPEN
RISQUE DE CHOC ELECTRIQUE,
NE PAS OUVRIR
ATTENTION
CAUTION
PRECAUCION
RIESGO DE CHOQUE ELECTRICO
NO ABRIR
CAUTION: TO REDUCE THE RISK OF ELECTRIC SHOCK,
DO NOT REMOVE COVER (OR BACK).
NO USER-SERVICEABLE PARTS INSIDE.
REFER SERVICING TO QUALIFIED SERVICE PERSONNEL.
When using the unit with 802.11 a (5.15-5.25GHz),
use in doors.
2.4GHz 1.42 W/kg,5.2GHz 0.445 W/kg at Body.
F:\Sony\4051414_LF-X1(12inch)anki\LF-X1_anki-shinse\00GB02SafeReg-
WW.fm
masterpage: Left
LF-X1
4-103-221-11(1)
4
NOTIFICATION
This equipment has been tested and found to comply with
the limits for a Class B digital device, pursuant to Part 15
of the FCC Rules. These limits are designed to provide
reasonable protection against harmful interference in a
residential installation. This equipment generates, uses,
and can radiate radio frequency energy and, if not
installed and used in accordance with the instructions,
may cause harmful interference with radio
communications. However, there is no guarantee that
interference will not occur in a particular installation. If
this equipment does cause harmful interference to radio or
television reception, which can be determined by turning
the equipment off and on, the user is encouraged to try to
correct the interference by one or more of the following
measures:
Reorient or relocate the receiving antenna.
Increase the separation between the equipment and
receiver.
Connect the equipment into an outlet on a circuit different
from that to which the receiver is connected.
Consult the dealer or an experienced radio/TV technician
for help.
FCC WARNING
You are cautioned that any changes or modifications not
expressly approved in this manual could void your
authority to operate this equipment.
For customers in the United States
This product contains mercury. Disposal of this product
may be regulated if sold in the United States. For disposal
or recycling information, please contact your local
authorities or the Electronics Industries Alliance
(http://eiae.org).
Pour les clients résidant aux États-Unis
Ce produit contient du mercure. L’élimination de ce
produit peut être soumise à réglementation s’il est vendu
aux États-Unis. Pour obtenir des informations concernant
l’élimination ou le recyclage, veuillez contacter les
autorités locales ou l’Electronics Industries Alliance
(http://www.eiae.org).

F:\Sony\4051414_LF-X1(12inch)anki\LF-X1_anki-
shinse\00GB03SafeRegTOC.fm
masterpage: Right
LF-X1
4-103-221-11(1)
5
Table of Contents
Locating the Components...................................................................................... 6
Checking the Package Contents ............................................................................ 9
Connecting a Cable or an Antenna...................................................................... 10
Connecting Video/Audio Equipment .................................................................. 10
Turning On the Power ......................................................................................... 13
Connecting to the Internet ................................................................................... 15
Configuring Network Settings............................................................................. 17
Setting Up for Mail.............................................................................................. 20
Watching TV and Video...................................................................................... 21
Basic TV/Video Screen ....................................................................................... 22
Viewing Web Pages............................................................................................. 23
Basic Internet Screen........................................................................................... 24
Using E-mail........................................................................................................ 25
Basic E-mail Screen............................................................................................. 25
Viewing Enlarged Images ................................................................................... 28
Basic Digital Photo Album Screen...................................................................... 29
Specifications....................................................................................................... 30
F:\Sony\4051414_LF-X1(12inch)anki\LF-X1_anki-shinse\00GB04SafeReg-
WW.fm
masterpage: Left
LF-X1
4-103-221-11(1)
6
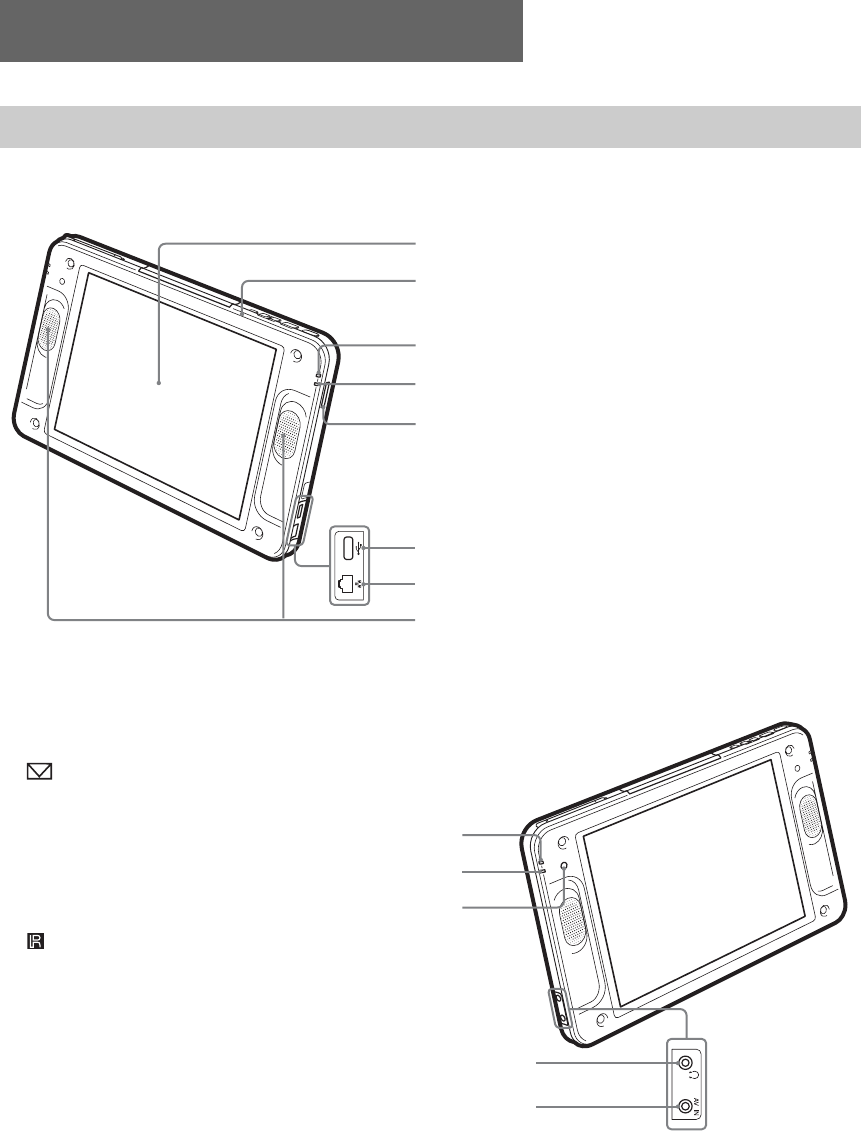
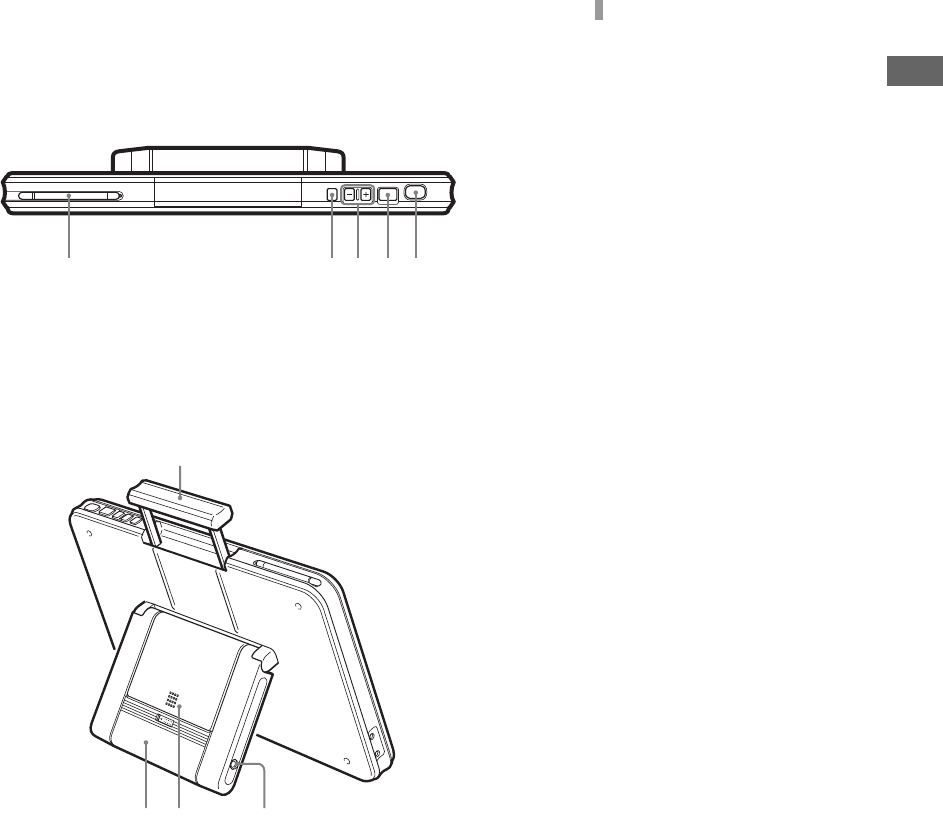
Locating the Components
Monitor
1LCD (Liquid Crystal Display)
2POWER indicator
Lights green when the power is on.
3WIRELESS indicator
Indicates the status of wireless communications.
Lights blue: Communications using the 5 GHz
channel are in progress.
Lights green: Communications using the 2.4 GHz
channel are in progress.
Off: No radio waves are being output.
4“Memory Stick” indicator
Lights orange while the unit and the inserted
“Memory Stick” are communicating.
5“Memory Stick” slot
Insert a “Memory Stick.”
6USB connector
Connect a commercially available keyboard.
7LAN connector
Connect a LAN cable.
8Speakers
9Mail Auto Receive indicator
Lights red when new e-mail is received through
periodical e-mail check.
0e Charge indicator
Indicates the status of charging.
Lights red: Charging the battery is in progress.
Off: Charging finished.
qa Infrared receiver
qsi Headphones jack (stereo minijack)
qdAV IN connector
1
2
3
4
5
6
7
8
Right side
Left side
9
0
qa
qs
qd
F:\Sony\4051414_LF-X1(12inch)anki\LF-X1_anki-shinse\00GB04SafeReg-
WW.fm
masterpage: Right
LF-X1
4-103-221-11(1)
7
Locating the Components
qfStylus pen compartment
qgPOWER switch
Turns on and off the power to the monitor.
qhVOLUME +/– buttons
Adjusts the volume of the speakers.
qjCAPTURE button
Saves the currently displayed screen in an
album as a still image.
qkINDEX button
Displays the Index window.
qlMonitor handle
w;Monitor stand
waBattery
wsDC IN connector
Connect the AC power adaptor (supplied) for
the monitor.
q
f
q
k
q
j
q
h
q
g
Top
q
l
w
;
w
a
w
s
R
ear
F:\Sony\4051414_LF-X1(12inch)anki\LF-X1_anki-shinse\00GB04SafeReg-
WW.fm
masterpage: Left
LF-X1
4-103-221-11(1)
8
Front
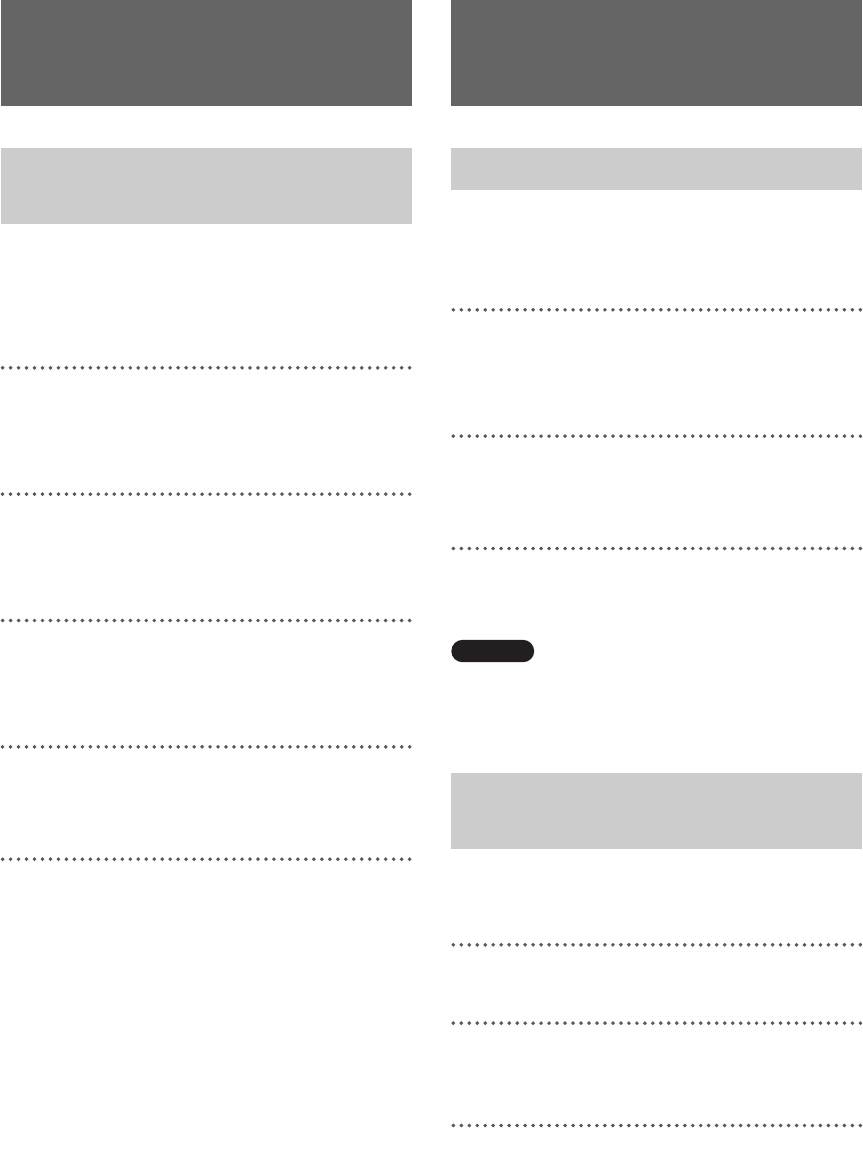
Rear
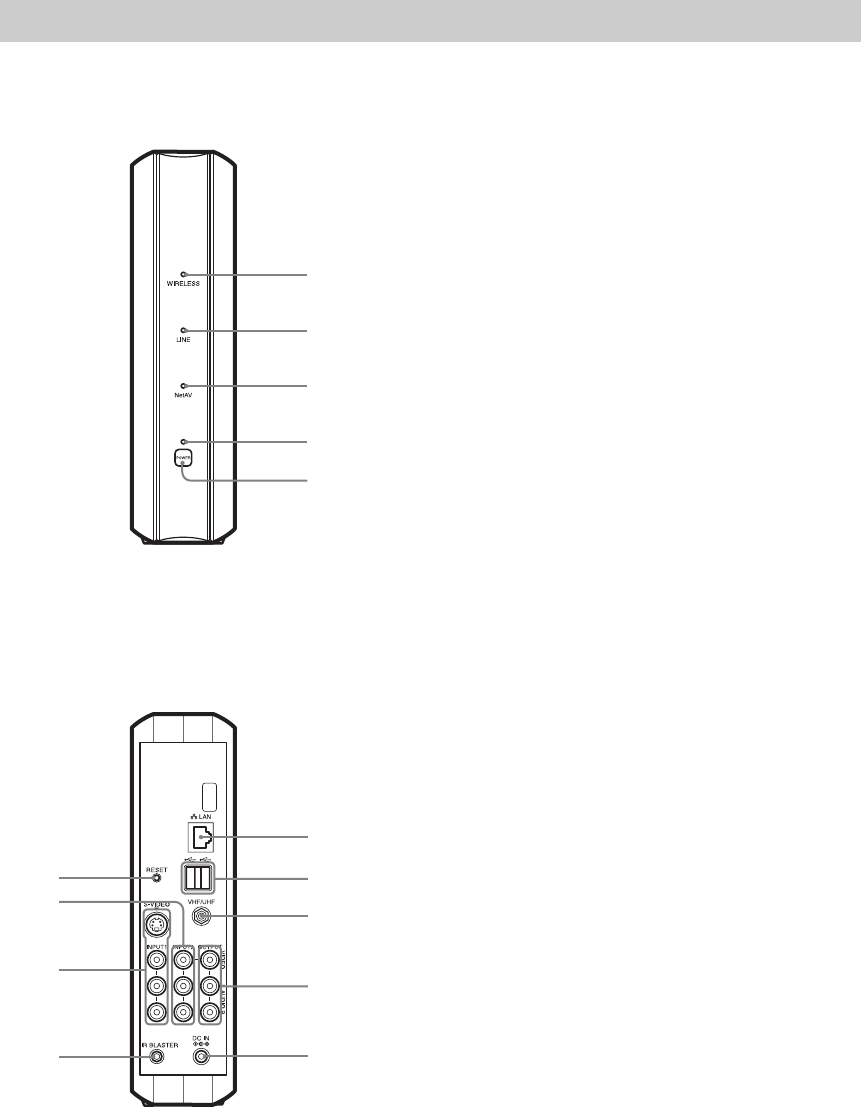
Base Station
1
2
3
4
5
0
9
8
7
6
qf
qd
qs
qa
1WIRELESS indicator
Indicates the status of wireless communications.
Lights blue: Communications using the 5 GHz channel are
in progress.
Lights green:Communications using the 2.4 GHz channel
are in progress.
2LINE indicator
Indicates the connection status to an external network such
as the Internet.
Blinks green: Connection is being made.
Lights green: Connection has been made.
Off: Connection has not been made.
3NetAV indicator
Indicates the connection status when connection with the
monitor has been made using the NetAV function.
Lights green: Connection to the NetAV has been made.
Off: Connection to the NetAV has not been made.
4POWER indicator
Lights green when the power to the base station is on.
5POWER switch
Turns on and off the power to the base station.
6LAN connector
Connect a LAN cable.
7USB connector
8VHF/UHF connector
Connect an antenna connection cable.
9VIDEO LINE OUTPUT (AUDIO/VIDEO) jacks
Output signals that are input to the video input 2 jack.
Connect audio and video cables.
0DC IN connector
Connect the AC power adaptor (supplied) for the base
station.
qaIR BLASTER connector
Connect the AV mouse (supplied).
qsVIDEO LINE INPUT1 (S-VIDEO/AUDIO/VIDEO) jacks
Connect S-video and audio cables; or connect audio and
video cables.
qdVIDEO LINE INPUT2 (AUDIO/VIDEO) jacks
Connect audio and video cables.
qfBASESTATION RESET button
Returns all settings including line and wireless
communications settings on the base station to the factory
defaults.

F:\Sony\4051414_LF-X1(12inch)anki\LF-X1_anki-shinse\00GB04SafeReg-
WW.fm
masterpage: Right
LF-X1
4-103-221-11(1)
9
Checking the Package Contents
After unpacking, check that all the following
items have been included:
• Base station (× 1)
• Monitor (× 1)
•Stylus (×1)
• BP-LX1A battery (× 1)
• AC-LX1B AC power adapter for the base
station (× 1)
• AC-LX1M power adaptor for the monitor (× 1)
•Power cord (×2)
•AV mouse (×1)
• Base station stand (× 1)
Checking the
Package Contents
F:\Sony\4051414_LF-X1(12inch)anki\LF-X1_anki-shinse\00GB04SafeReg-
WW.fm
masterpage: Left
LF-X1
4-103-221-11(1)
10
When you have connected your TV to the CATV
cable or antenna, use this hookup.
With this hookup, set Cable to OFF in the Auto
CH Program window of Settings TV/Video.
1
Turn off the power of your TV and remove
the antenna or CATV cable from the antenna
input of your TV.
2
Plug the OUT connector of the supplied
antenna connector into the antenna input of
your TV.
3
Plug the antenna or CATV cable removed
from your TV in step 1 into the ANT
connector of the supplied antenna connector.
4
Plug the output cord of the antenna
connector into the VHF/UHF connector of
the base station.
* If the output cord of the supplied antenna
connector is short, use the optional EAC-40 TV
antenna connector.
To connect the base station only to
the antenna or CATV cable directly
Use the optional EAC-315 or equivalent antenna
cable.
Use this hookup if you subscribe to a cable TV
system that uses scrambled or encoded signals
requiring a cable box to view all channels.
1
Connect the coaxial connector from your
cable service to the IN connector of the cable
box.
2
Using a coaxial cable, connect the OUT
connector of the cable box to the VHF/UHF
connector of the base station.
With this hookup, set Cable to ON in the Auto
CH Program window of Settings TV/Video.
Caution
To change channels using the cable box, set your
Wireless Home Network TV to channel from 1 to 6,
depending on the cable box channel output.
Use this hookup if you have cable TV that does
not require a cable box.
1
Disconnect all power sources.
2
Connect the CATV cable or antenna to the
VHF/UHF IN connector of the VCR.
3
Using a coaxial cable, connect the VHF/
UHF OUT connector of the VCR to the
VHF/UHF connector of the base station.
Connecting a Cable
or an Antenna
Connecting a TV and Cable/
Antenna
Connecting Video/
Audio Equipment
Connecting a Cable Box
Connecting a VCR and Cable/
Antenna
F:\Sony\4051414_LF-X1(12inch)anki\LF-X1_anki-shinse\00GB04SafeReg-
WW.fm
masterpage: Right
LF-X1
4-103-221-11(1)
11
Connecting Video/Audio Equipment
4
Using the audio/video cable, connect the
audio and video OUT jacks of the VCR to
the VIDEO LINE INPUT AUDIO and
VIDEO jacks of the base station.
Use this hookup if your cable TV company
scrambles some channels, but not all of them (pay
channels vs. regular cable channels) and you need
to use a cable box.
1
Disconnect all power sources.
2
Connect the coaxial connector from your
cable service to the VHF/UHF IN connector
of the cable box.
3
Using a coaxial cable, connect the VHF/
UHF OUT connector of the cable box to the
VHF/ UHF IN connector of the VCR.
4
Using a coaxial cable, connect the VHF/
UHF OUT connector of the VCR to the
VHF/UHF connector of the base station.
5
Using the audio/video cable, connect the
audio and video OUT jacks of the VCR to
the VIDEO LINE INPUT AUDIO and
VIDEO jacks of the base station.
1
Disconnect all power sources.
2
Connect the satellite antenna cable to the
SATELLITE IN connector of the satellite
receiver.
3
Using the audio/video cable, connect the
audio and video OUT jacks of the satellite
receiver to the VIDEO LINE INPUT
AUDIO and VIDEO jacks of the base
station.
4
Connect a coaxial cable from your cable or
antenna to the VHF/UHF connector of the
base station.
1
Disconnect all power sources.
2
Connect the satellite antenna cable to the
SATELLITE IN connector of the satellite
receiver.
3
Connect the CATV cable to the VHF/UHF
IN connector of the VCR.
4
Using a coaxial cable, connect the OUT
connector of the VCR to the VHF/UHF
connector of the base station.
5
Using the audio/video cable, connect the
audio and video OUT jacks of the satellite
receiver to the audio/video IN jacks of the
VCR.
Connecting a VCR and Cable
Box
Connecting a Satellite
Receiver
Connecting a Satellite
Receiver and a VCR
F:\Sony\4051414_LF-X1(12inch)anki\LF-X1_anki-shinse\00GB04SafeReg-
WW.fm
masterpage: Left
LF-X1
4-103-221-11(1)
12
6
Using the audio/video cable, connect the
audio/video OUT jacks of the VCR to the
VIDEO LINE INPUT AUDIO and VIDEO
jacks of the base station.
1
Disconnect all power sources.
2
Connect the satellite antenna cable to the
SATELLITE IN connector of the satellite
receiver.
3
Using a coaxial cable, connect the VHF/
UHF OUT connector of the satellite receiver
to the VHF/UHF connector of the base
station. Set the RF OUT selector of the
satellite receiver to 3 CH or 4 CH.
4
Using the audio/video cable, connect the
audio and video OUT jacks of the DVD
player to the VIDEO LINE INPUT AUDIO
and VIDEO jacks of the base station.
Connecting a Satellite
Receiver and a DVD Player
F:\Sony\4051414_LF-X1(12inch)anki\LF-X1_anki-shinse\00GB04SafeReg-
WW.fm
masterpage: Right
LF-X1
4-103-221-11(1)
13
Turning On the Power
Connect the power cord after finishing all other connections.
Connecting the power cord to the base station
Connecting the power cord to the monitor
Turning On the Power
Connecting the Power Cord
Caution
• Be sure to use the supplied AC-LX1B AC power
adaptor for the base station. You cannot substitute
with the AC-LX1M AC power adaptor for the
monitor.
• Do not bundle the AC power adaptor cord and the
antenna connection cable together. Neglecting this
can induce noise on television images if strong
broadcasting signals cannot be received in your
area.
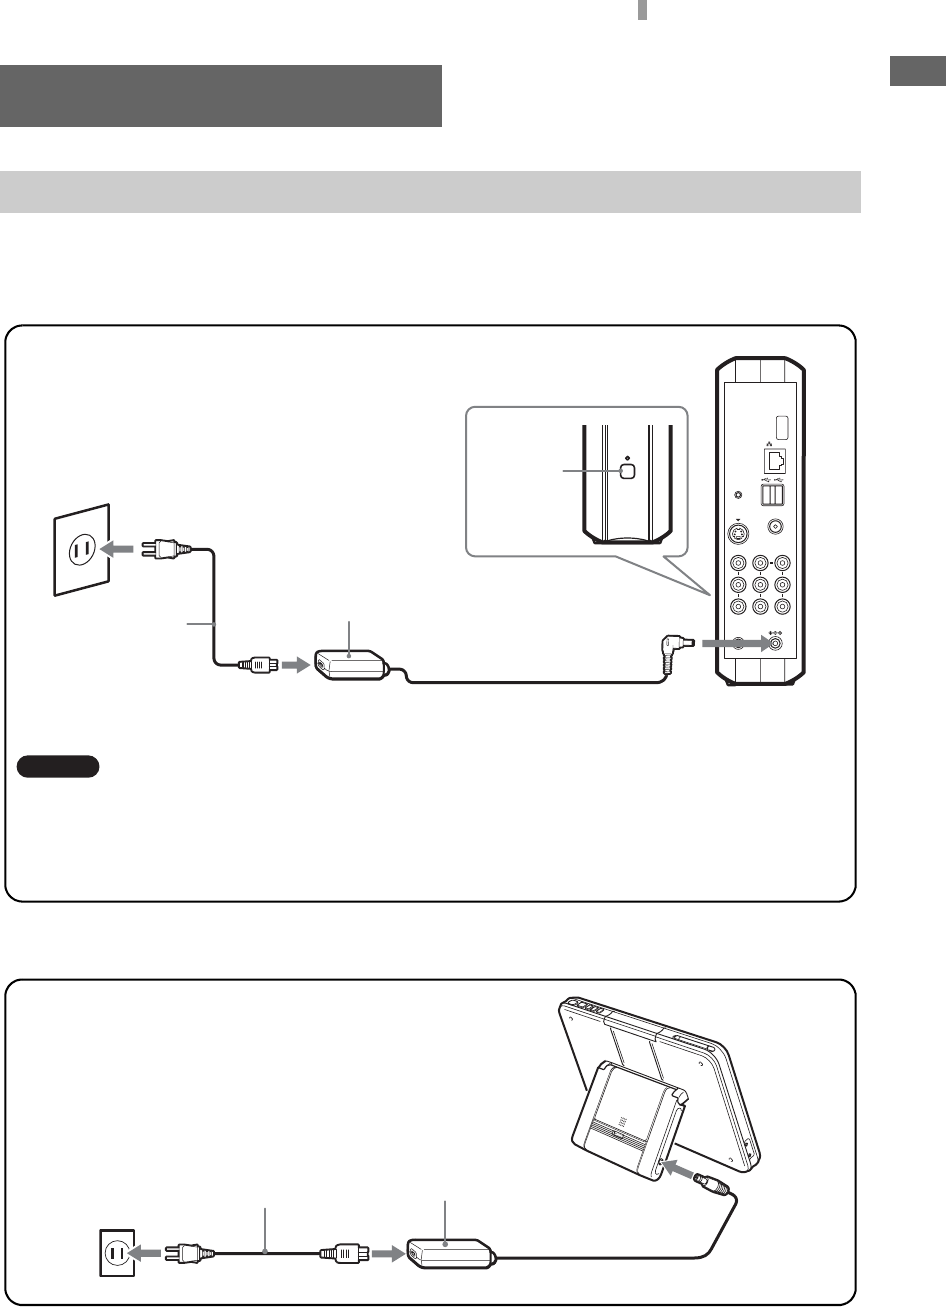
Connect the supplied AC power adaptor for the base station to the DC IN connector on the base
station, and plug the supplied power cord into a wall outlet.
Rear of the base station
Wall outlet
Power cord (supplied)
AC-LX1B AC power adaptor (supplied)
for the base station
to DC IN
POWER
switch
to DC IN
Power cord (supplied)
AC-LX1M AC power
adaptor (supplied) for
the monitor
Wall outlet
F:\Sony\4051414_LF-X1(12inch)anki\LF-X1_anki-shinse\00GB04SafeReg-
WW.fm
masterpage: Left
LF-X1
4-103-221-11(1)
14
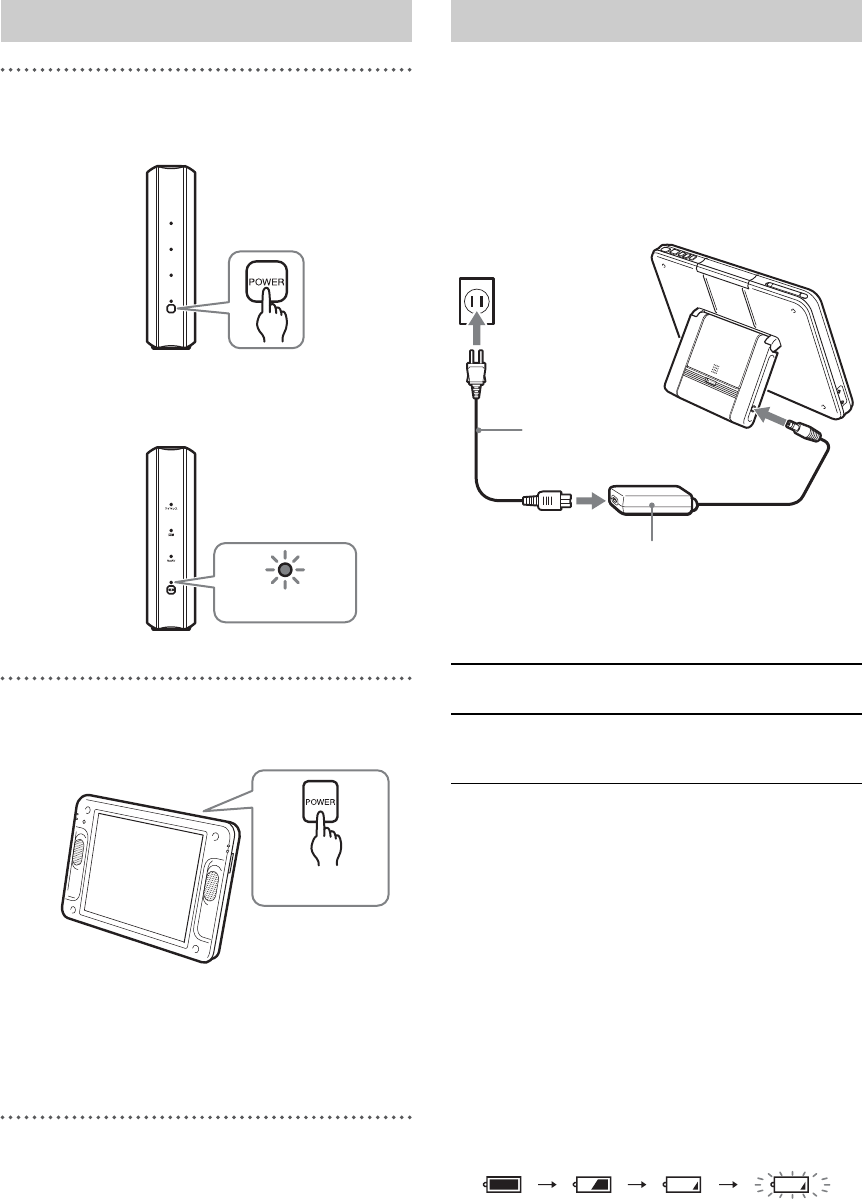
1
Press POWER on the front of the base
station to turn on the base station.
The POWER indicator on the front of the
base station lights green.
2
Press POWER on the top of the monitor to
turn on the monitor.
The POWER indicator on the top of the
monitor lights green and the monitor shows
pictures.
To turn off the power, press POWER again.
To charge the monitor battery, connect the
supplied AC power adaptor for the monitor to the
monitor. You can use the monitor even while it is
being charged.
During charging, the e (charge) indicator on
the left panel of the monitor lights red. The
indicator goes off when charging is finished.
Battery charging time
Battery duration
Approximate battery life using a fully charged
battery (supplied) is:
4 hours with the minimum screen brightness
selected;
3 hours with the medium screen brightness
selected; and
100 minutes with the maximum screen brightness
selected.
A warning message appears 1 to 15 minutes
before the battery is exhausted.
The battery indicator appears on the top of the
screen.
Turning On the Power
POWER indicator
POWER switch
Charging the Monitor Battery
Charging
method
Monitor power
On
Monitor power
Off
Use the AC
power adaptor
for the monitor About 2.5 hours About 2 hours
AC-LX1M AC power adaptor (supplied) for the monitor
Power cord
(supplied)
Wall outlet
to DC IN
(Fully charged to
30% remains) (30% remains) (10% remains) (Cut off soon)

F:\Sony\4051414_LF-X1(12inch)anki\LF-X1_anki-shinse\00GB04SafeReg-
WW.fm
masterpage: Right
LF-X1
4-103-221-11(1)
15
Connecting to the Internet
This section offers examples and explanations of several common methods for connecting to the
Internet. Because the best connection method for you will depend on the Internet service provider and
connection devices you use, check with your Internet service provider or network administrator for more
information.
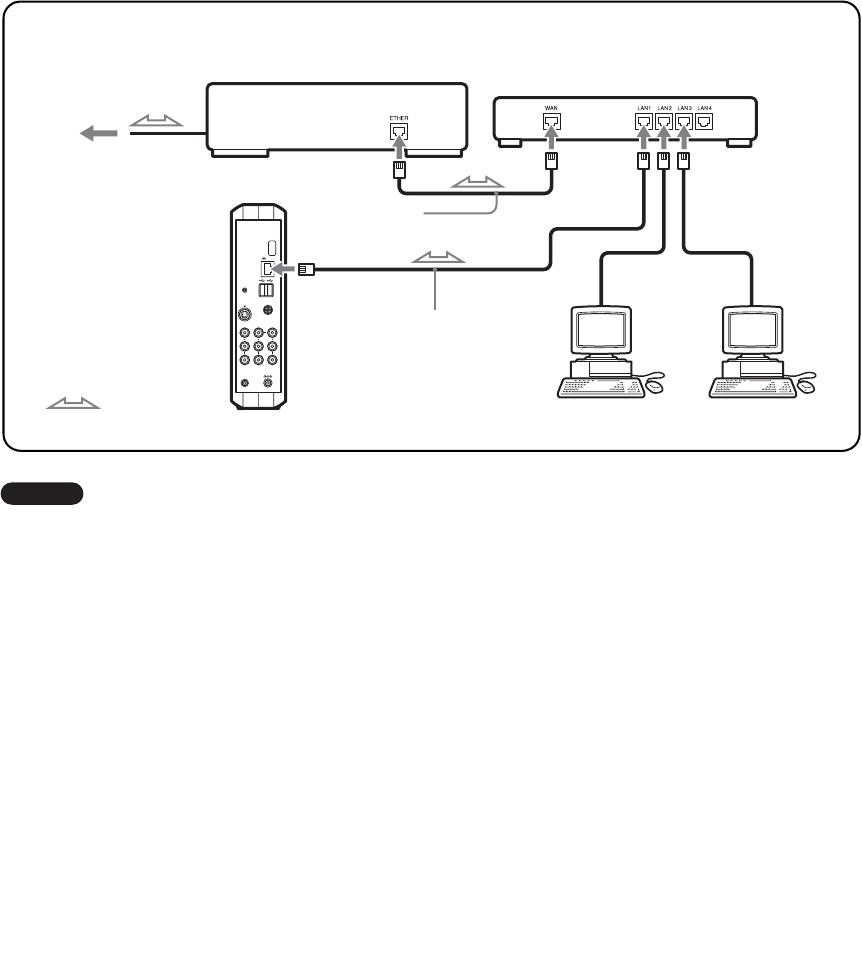
Connecting by LAN cable
Using a LAN cable (not supplied), connect the LAN port on the unit to your cable modem, ADSL
modem, or dial-up router.
Connect to the Ethernet port in the wall if you live in an Internet-ready residential complex.
Caution
• LAN cables come in two kinds: straight-wired and
cross-wired. The type of cable you should use
depends on what kind of cable modem or ADSL
modem you have. See the user’s manual for your
modem for more information.
• For details on setting up the connection, cross-refer
to the user’s manual for your cable modem or ADSL
modem. If you are unclear on some point regarding
your modem, contact your cable television company,
ADSL network administrator, or Internet service
provider.
Connecting to the Internet
z Tip
In addition to “ETHER,” the Internet port on some
cable and ADSL modems may also be marked
“10Base-T,” “LAN,” “ENET,” etc.
to the LAN port
LAN cable (not supplied)
Cable modem, ADSL
modem, etc.
To Internet
For this part of the connection, see the
user’s manual for your cable or ADSL
modem.
: Signal flow
Rear of base station
F:\Sony\4051414_LF-X1(12inch)anki\LF-X1_anki-shinse\00GB04SafeReg-
WW.fm
masterpage: Left
LF-X1
4-103-221-11(1)
16
Connecting several devices to a modem with a router
Caution
• Depending on your Internet service contract, you
may not be able to connect multiple devices, such as
several computers and an Airboard. Check with your
cable television company, ADSL network
administrator, or Internet service provider.
• To determine what kind of LAN cable to use, see the
user’s manual for your router, cable modem, or
ADSL modem.
• For details on setting up the connection, cross-refer
to the user’s manual for your router, cable modem, or
ADSL modem.
Configuring router settings
• If the user’s manual for your router directs you to use a web browser (Internet Explorer or Netscape
Navigator) to access the router’s settings screen, input the router’s IP address in the Airboard’s Internet
address field to display the settings screen. See page 23 for more on how to input to the address field.
You must also configure network settings for the Airboard. See page 17 for more on how to configure
network settings.
• For more information on configuring router settings, refer to the user’s manual for your device.
• The settings for some routers cannot be configured from the Airboard’s Internet screen.
* What is a router?
A router is a piece of equipment that relays signals between networks.
Using a router allows several devices to share one Internet connection.
See page 17 for more on how to configure router settings.
to the LAN port
LAN cable (not
supplied)
Cable modem, ADSL
modem, etc.
To Internet
: Signal flow
Router*
LAN cable (not
supplied)
Computer Computer
F:\Sony\4051414_LF-X1(12inch)anki\LF-X1_anki-shinse\00GB04SafeReg-
WW.fm
masterpage: Right
LF-X1
4-103-221-11(1)
17
Configuring Network Settings
Configure your network settings according to the
documents provided by your Internet service
provider.
Before configuring network settings
Check that:
• The base station power is turned on.
• The base station and monitor have established a
wireless connection.
• The LAN cable is connected to the base station,
when connecting by LAN.
• The telephone cord is connected to the base
station, when connecting by analog phone line
(USB-PSTN modem adapter UNA-PSTN: not
supplied).
With this type of Internet connection a DHCP
server automatically assigns the “IP Address,”
“Subnet mask,” and “Default gateway.”
Depending on the DHCP server, “DNS” may also
be automatically assigned.
z Tip
Follow the steps below to connect to the Internet when
using a router as well.
1
Press the [Index] button on the upper part of
the monitor.
The index screen appears.
2
Select [Internet] from the index screen.
The Internet connection is established when
the Airboard web page, which is set as the
default homepage, appears.
If the default homepage is not displayed
and a connection error message appears
saying the Airboard is unable to connect
to the Internet server,
go on to step 3 and verify the automatic
connection (DHCP) settings.
3
Press [Settings] on the lower right of the
screen.
The [Settings] window appears.
4
Press [Internet connection].
The [Internet connection] window appears.
5
Press [Base station].
The [Base station] window appears.
Caution
[Base station] cannot be selected if the operating
environment is such that the monitor and base
station cannot establish a wireless connection.
Configuring
Network Settings
Connecting via LAN (DHCP)

F:\Sony\4051414_LF-X1(12inch)anki\LF-X1_anki-shinse\00GB04SafeReg-
WW.fm
masterpage: Left
LF-X1
4-103-221-11(1)
18
6
Select [Settings] to the right of [LAN
(DHCP/Manual IP address setting)].
The [LAN (DHCP/Manual IP address
setting)] window appears.
Verify that values have been assigned for the
IP address, etc.
7
Press [OK].
1
Perform steps 3 through 6 of “Connecting
via LAN (DHCP)” on page 17 to display the
[Base station] window.
2
Select [Settings] to the right of [LAN
(DHCP/Manual IP address setting)].
3
Refer to the documents provided by your
Internet service provider to input the proper
values for “IP Address,” “Subnet mask,”
“Default gateway,” “DNS 1,” “DNS 2,” and
“Host name,” and then press [OK].
4
Select [LAN (DHCP/Manual IP address
setting)].
5
Press [OK].
This sets the “LAN (DHCP/Manual IP
address setting).”
6
Press [Back].
7
Press [Settings] and then [End].
Connecting via LAN
(manually assigning an
address)
LAN (DHCP/Manual IP address setting)
OK
Remove this check mark.
Input while referring to
documents from your provider.
LAN (DHCP/Manual IP address setting)
F:\Sony\4051414_LF-X1(12inch)anki\LF-X1_anki-shinse\00GB04SafeReg-
WW.fm
masterpage: Right
LF-X1
4-103-221-11(1)
19
Configuring Network Settings
1
Press [Settings] on the lower right of the
screen.
If the [Settings] window is not displayed on
the lower right of the screen, touch the
screen lightly and it will appear.
2
Press [Internet connection].
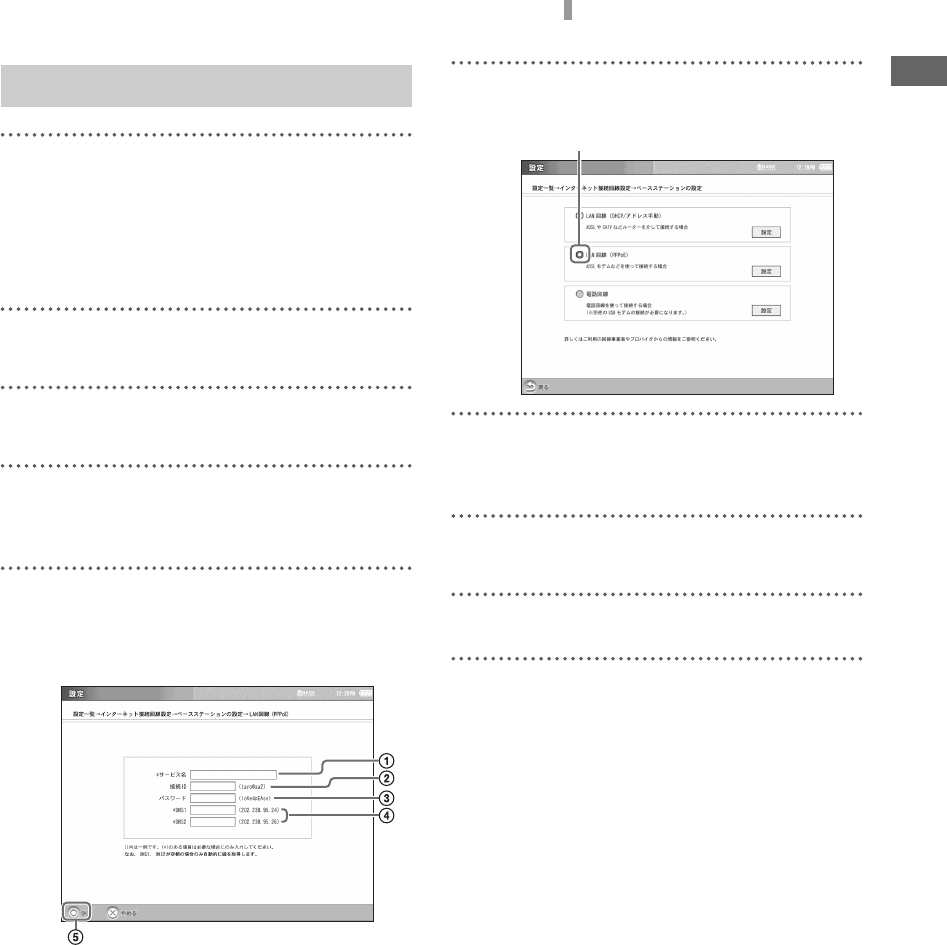
3
Press [Base station].
4
Press [Settings] to the right of [LAN
(PPPoE)].
5
Input each item while referring to the
documents provided by your Internet service
provider, and then press [OK].
1Input your service provider’s name.
2Input your connection ID.
3Input your password for connecting to
the Internet.
4Input values for DNS1 and DNS2.
5Press [OK].
6
Press [LAN (PPPoE)].
7
Press [OK].
This sets the “LAN (PPPoE)”.
8
Press [Back].
9
Press [Settings] and then [End].
Connecting via LAN (PPPoE)
LAN (PPPoE)
F:\Sony\4051414_LF-X1(12inch)anki\LF-X1_anki-shinse\00GB04SafeReg-
WW.fm
masterpage: Left
LF-X1
4-103-221-11(1)
20
You cannot send and receive mail (e-mail) unless
you program the unit with information about your
Internet Service Provider (ISP). Program the
necessary information according to the document
supplied by the provider.
1
Press [Settings] at the bottom right of the
screen.
If [Settings] is not shown, touch anywhere
on the screen to make it appear.
2
Press [e-mail].
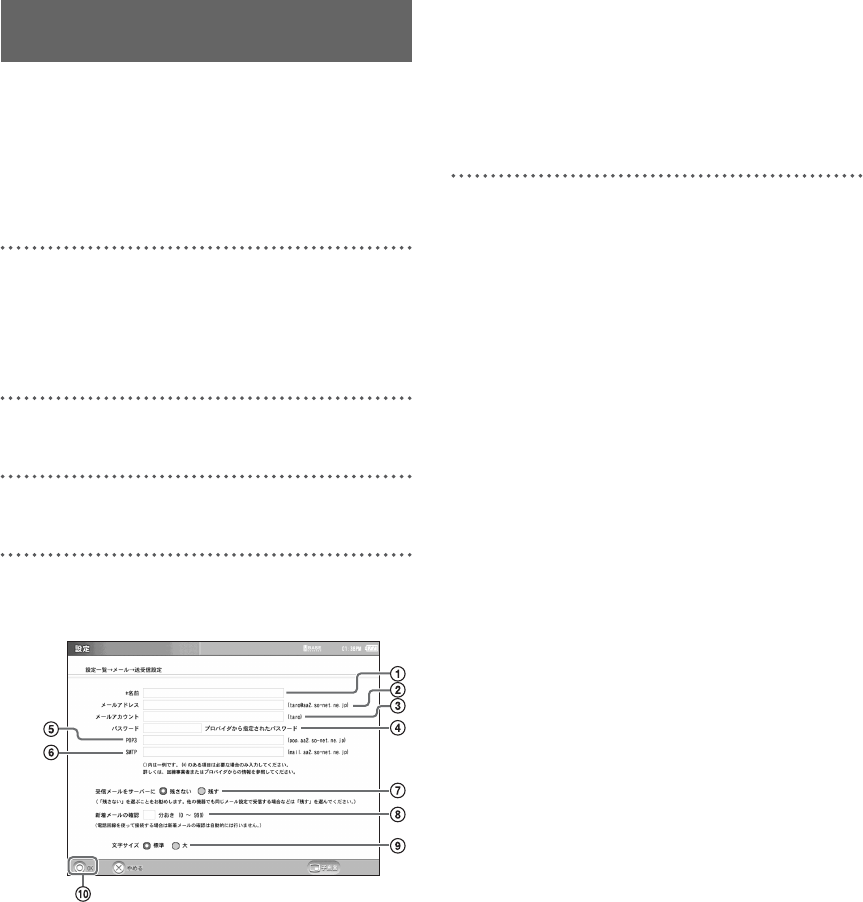
3
Press [Send/Receive].
4
Enter into the individual fields, then press
[OK].
1Enter a name.
2Enter a mail address.
3Enter the mail account.
4Enter the mail password specified by
the provider.
5Enter the POP3 server.
6Enter the SMTP server.
7Specify whether to leave received
mail in the server.
Normally, set so that received mails are not
left in the server.
8Specify the interval for checking if
there is new mail, in the range from 0
to 999 minutes.
9Select the size of characters for mail
text on the screen.
0Press [OK].
5
Press [Settings], then press [End].
Setting Up for Mail
F:\Sony\4051414_LF-X1(12inch)anki\LF-X1_anki-shinse\00GB04SafeReg-
WW.fm
masterpage: Right
LF-X1
4-103-221-11(1)
21
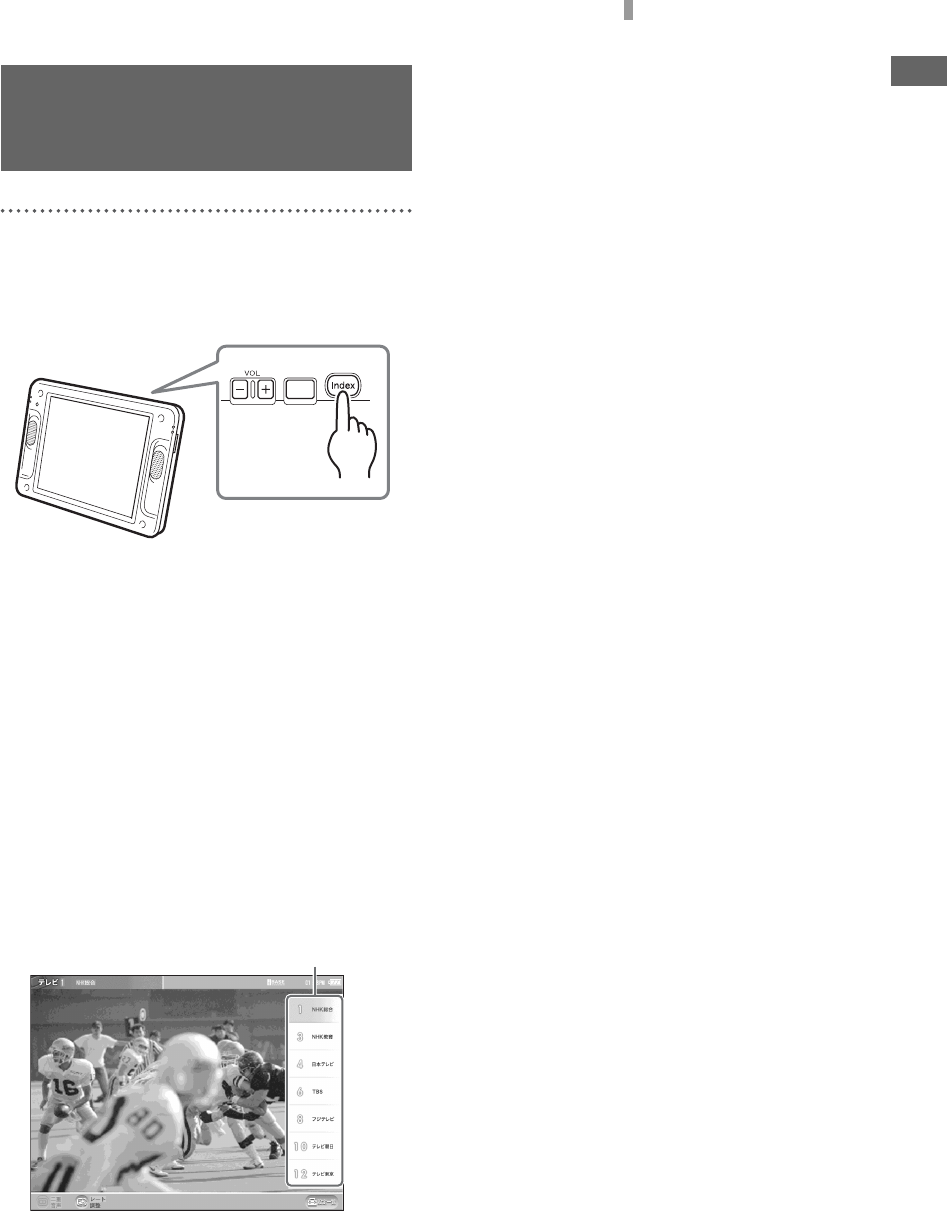
Watching TV and Video
Open the Index window, then select a desired
channel.
To adjust the volume, press VOL +/– on the top of
the monitor.
z Tips
• You can turn on the monitor by pressing POWER on
the remote control. You may directly press channel
number buttons or [CH +/–] on the remote control to
turn on the monitor and select a channel.
• Pressing [VOL –] on the monitor for 2 seconds
silences the sound quickly.
To select a channel from the TV
channel list
Touch anywhere on the screen to display the TV
channel list, then select a desired channel.
The TV channel list disappears automatically 5
seconds after the screen is operated.
Watching TV and
Video
TV channel list
F:\Sony\4051414_LF-X1(12inch)anki\LF-X1_anki-shinse\00GB04SafeReg-
WW.fm
masterpage: Left
LF-X1
4-103-221-11(1)
22
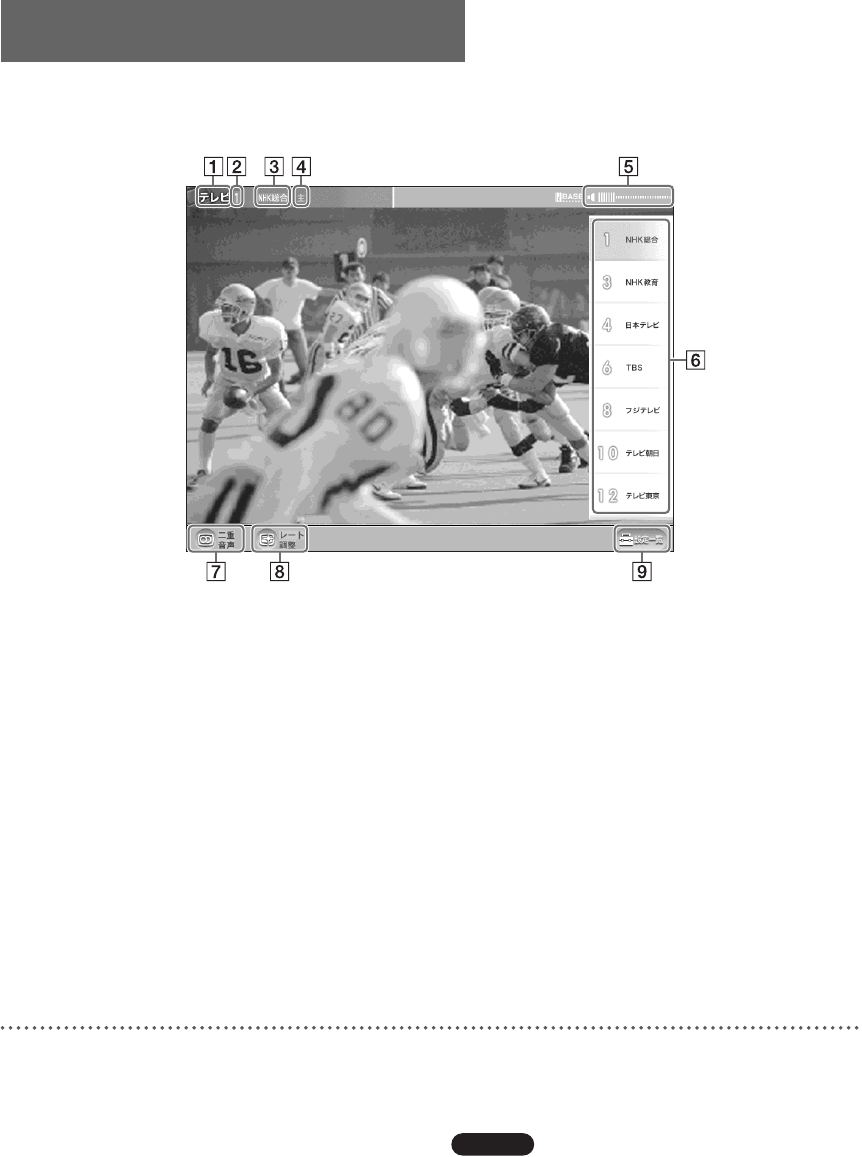
Parts and controls on the TV/Video screen
ATV/video mode indication
BTV channel number
CTV station name
DMulti-language mode indication
When a multi-language program is tuned in,
[Main], [Sub], or [Main/Sub] is displayed.
When a stereo program is tuned in, [Stereo]
is displayed.
EMute/volume level indication
FTV channel list
This appears when you touch anywhere on
the screen showing a TV program and allows
you to select a channel. The list disappears
automatically 5 seconds after the screen is
operated.
GMulti-language mode button
Switches among the multi-language modes
when a multi-language program is tuned in.
HRate adjustment button
Optimizes picture quality according to the
ambient radio wave conditions.
I[Settings]
Displays the [Settings] window for various
setups.
Selecting [TV/Video] in the [Settings]
window allows you to adjust the quality of
picture and sound or manually set up
channels, for example.
About guide bar display
When a TV or video mode is selected, the guide
bars appear for 5 seconds then disappear.
Touching anywhere on the screen displays the top
and bottom guide bars and a TV channel list.
Caution
This monitor does not support non-interlace signals
used for monitors such as personal computer screens.
Basic TV/Video Screen
F:\Sony\4051414_LF-X1(12inch)anki\LF-X1_anki-shinse\00GB04SafeReg-
WW.fm
masterpage: Right
LF-X1
4-103-221-11(1)
23
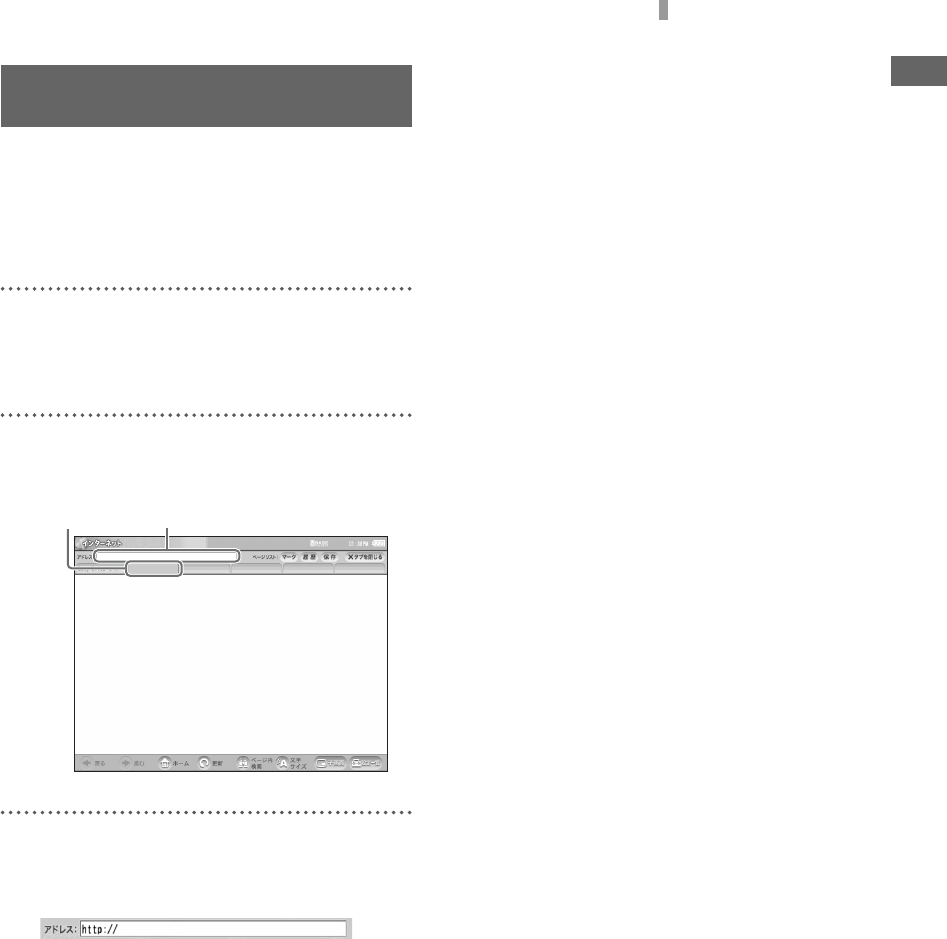
Viewing Web Pages
This section explains how to open the Internet
window and display web pages. Let us assume
that you will access the Sony’s web site whose
URL is http://www/sony.com/.
1
Open the [Index] window, then press
[WWW].
The Internet window appears.
2
Press a new tab, then press the URL entry
field.
3
Using the keyboard, enter http://
www.sony.com/, then press [End].
Viewing Web Pages
URL entry fieldNew tab
F:\Sony\4051414_LF-X1(12inch)anki\LF-X1_anki-shinse\00GB04SafeReg-
WW.fm
masterpage: Left
LF-X1
4-103-221-11(1)
24
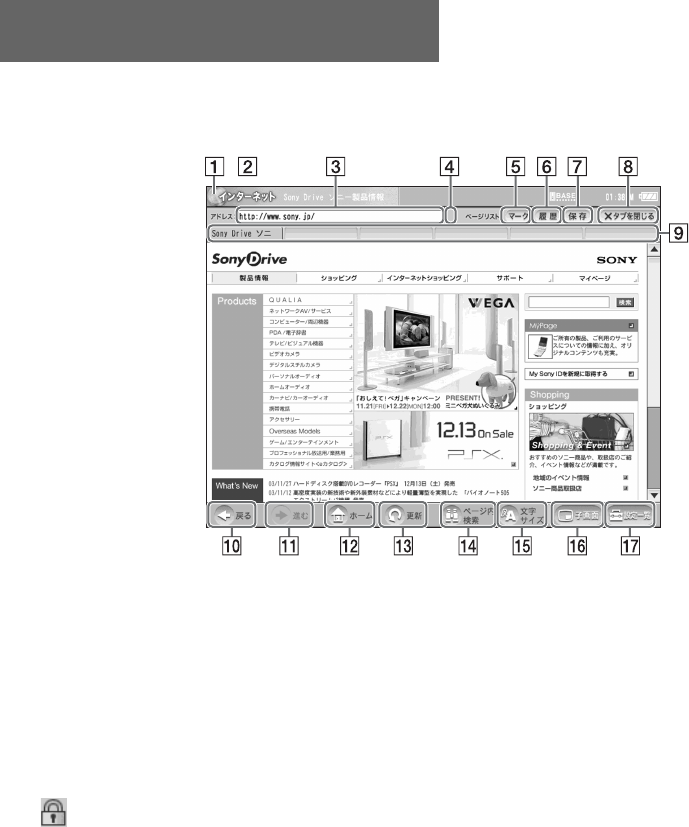
Parts and Controls on the Internet Screen
AInternet icon
Moves when a web page is being
downloaded.
BInternet indication
CURL entry field
The URL of a currently opened web page is
displayed. To open another web page, press
a new tab, then enter a URL.
D(SSL) icon
Appears when a web page handling SSL
(Secure Socket Layer) is currently opened.
E[Favorites]
Displays the Favorites list panel for
registering the address of the currently
opened web page. It also displays the list of
registered URLs.
F[History]
Displays the list of web pages that you have
opened before.
G[Save]
Saves the currently opened web page. You
can open saved web pages without accessing
to the Internet.
H[Close Tab]
Closes the page of the currently displayed
tab and the tab becomes blank again.
ITab
If you select a link that opens using another
window, the linked web page is opened
under a new tab. Six tabs are available in
total. Just after an Internet connection, all
tabs other than the leftmost one are blank.
Basic Internet Screen
F:\Sony\4051414_LF-X1(12inch)anki\LF-X1_anki-shinse\00GB04SafeReg-
WW.fm
masterpage: Right
LF-X1
4-103-221-11(1)
25
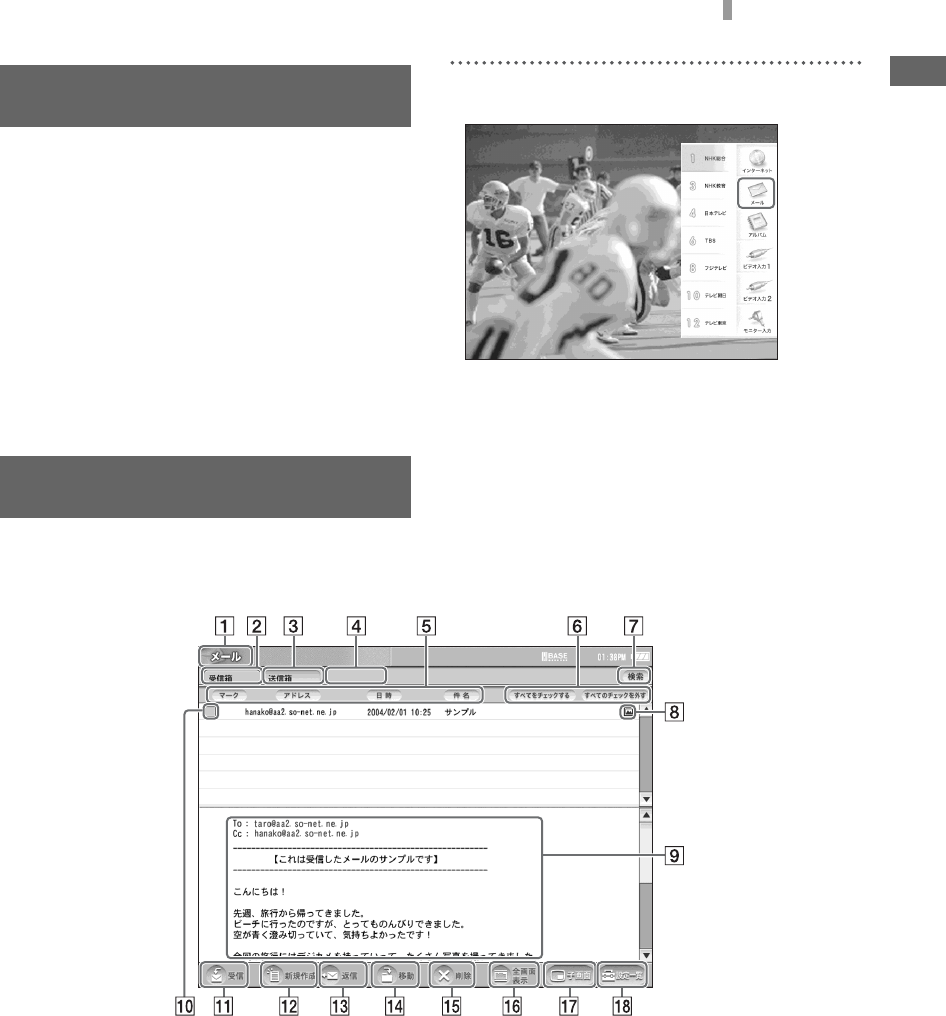
Using E-mail
You can compose, send, and receive e-mail by
switching to the e-mail screen.
Select e-mail.
The e-mail screen appears.
Inbox/Outbox screen
AE-mail display
BInbox tab
Displays a list of incoming e-mail (i.e., e-
mail that was sent to you).
A preview of e-mail content for the selected
list is continually displayed in the lower
frame.
COutbox tab
Displays a list of sent e-mail and saved drafts
of unsent e-mail.
A preview of e-mail content for the selected
list is continually displayed in the lower
frame.
Using E-mail
Basic E-mail Screen
F:\Sony\4051414_LF-X1(12inch)anki\LF-X1_anki-shinse\00GB04SafeReg-
WW.fm
masterpage: Left
LF-X1
4-103-221-11(1)
26
DFiling cabinet tab
Appears when a “Memory Stick” is inserted.
Allows you to arrange the e-mail you have
sent and received.
ESort button
Allows you to sort your e-mail by each
attribute: address, date and time, or subject.
With each touch of the sort button, e-mail is
sorted in ascending or descending order.
FCheck all/Uncheck all
[Check all] places a check mark next to all e-
mails in the displayed tab, and [Uncheck all]
removes all check marks.
GSearch
Allows you to search for a designated tab by
keyword.
HAttached image icon
Appears when an image file is attached to an
e-mail. When a non-image file is attached,
the paper clip icon appears.
IPreview display
Displays highlighted e-mail contents in the
inbox, outbox, and filing cabinet tabs.
JCheck box
A check mark is placed in or removed from
this box each time it is pressed.
KReceive
Checks for new incoming e-mail.
LCompose New
Creates a new blank e-mail.
MReply (Resend, Edit)
Depending on the content of the e-mail
displayed in the preview, [Reply], [Resend],
and/or [Edit] will be displayed.
Reply: Displays a screen for replying to e-
mail.
Resend: Displays an editing screen for
resending sent e-mail.
Edit: Displays a screen for editing e-mail
content.
NMove (move checked e-mail)
Moves checked e-mail messages to a
designated location, such as the filing
cabinet.
ODelete (delete checked e-mail)
Deletes checked e-mail messages and any
files attached to them.
PFull-screen display
Displays the main e-mail text at full-screen
size.
QSub-screen
Displays television or video in a sub screen.
RSettings
Displays the [Settings] window used to
change settings.
Selecting [E-mail] on the [Settings] window
allows you to change on-screen font size and
other settings.
F:\Sony\4051414_LF-X1(12inch)anki\LF-X1_anki-shinse\00GB04SafeReg-
WW.fm
masterpage: Right
LF-X1
4-103-221-11(1)
27
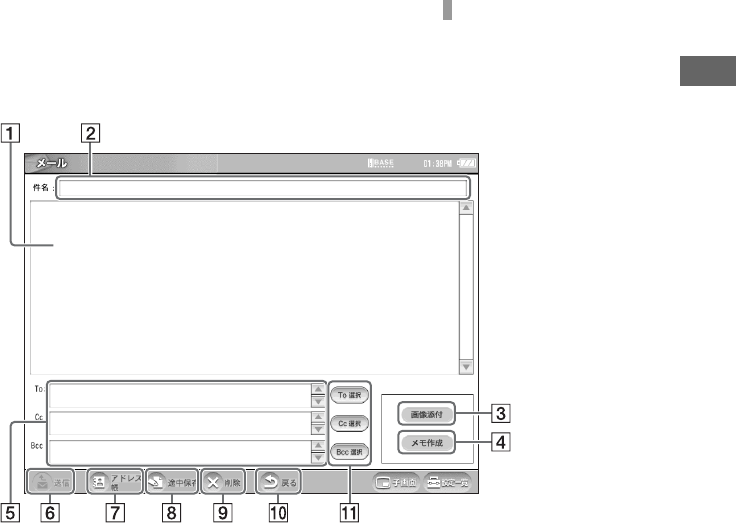
Basic E-mail Screen
E-mail composition screen
AMain text field
The main e-mail text is input here.
BSubject
The title of the e-mail is input here.
CImage attachment
This attaches an image to the e-mail.
DCreate memo
This attaches a hand-written picture or note
to the e-mail.
EAddress field
The e-mail address of the addressee is input
here.
FSend
Immediately sends the composed e-mail
message.
GAddress book
Displays the address book.
HSave draft
Saves the e-mail currently being composed
to the outbox.
IDelete
Deletes the displayed e-mail.
JBack
Cancels e-mail composition and returns to
the inbox or outbox. (Saves a draft of e-mail
that was in mid composition or that failed to
send.)
KSelect To, Select Cc, Select Bcc
Displays the address book so you can select
an address for these fields.
F:\Sony\4051414_LF-X1(12inch)anki\LF-X1_anki-shinse\00GB04SafeReg-
WW.fm
masterpage: Left
LF-X1
4-103-221-11(1)
28
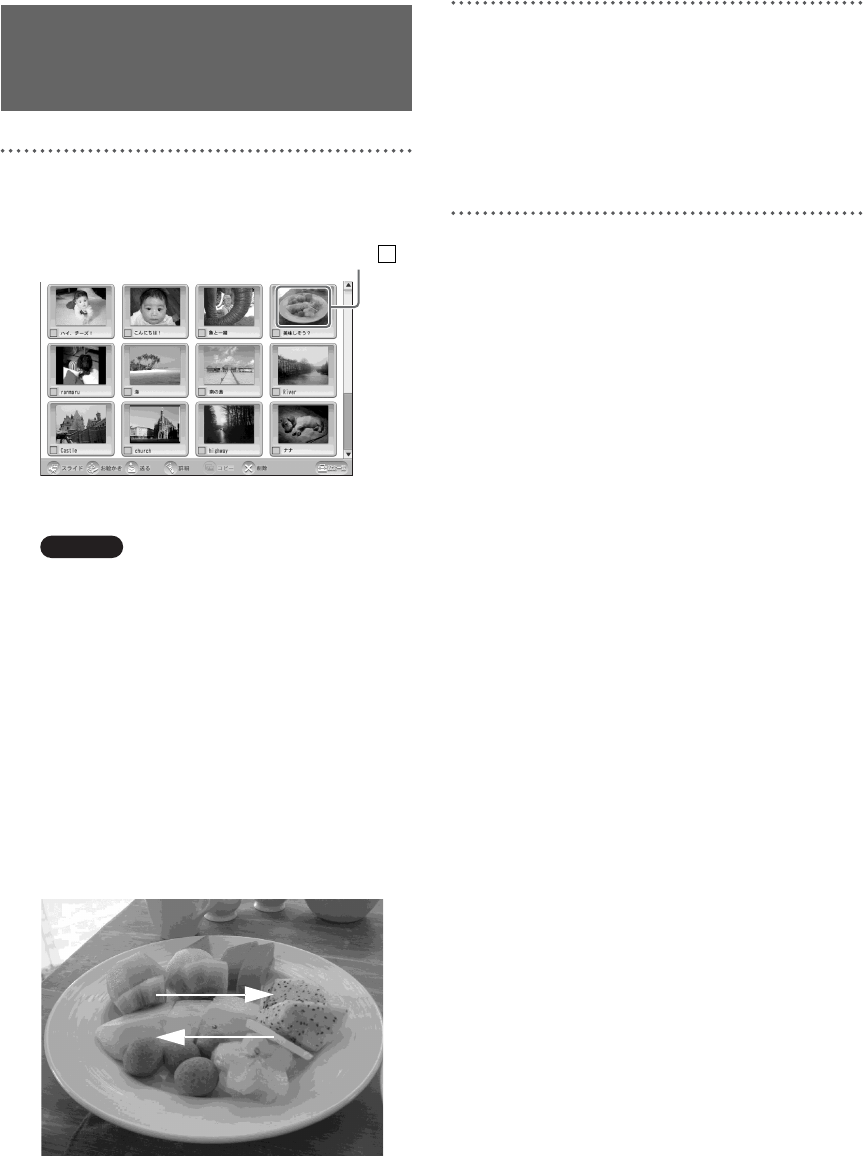
1
Directly press the image you want to
enlarge.
An enlarged view of the image appears.
Caution
It may take several tens of seconds to enlarge
some images. During this interval you cannot
perform other operations.
z Tip
You can also enlarge an image by pressing it,
pressing [Details], and then pressing [Enlarged
display] on the [Image Details] screen that
appears. Lightly pressing the enlarged image, in
this case, returns you to the [Image Details]
screen.
2
To quit the enlarged view, lightly press the
image.
This returns you to the [Image list] screen.
z Tip
You can also return to the [Image list] screen by
pressing INDEX on the monitor.
Viewing Enlarged
Images
Press an image (do not press the .)
Next image
Previous image
Gliding your finger from left to right over the
screen will display the next image, and gliding
it from right to left will display the previous
F:\Sony\4051414_LF-X1(12inch)anki\LF-X1_anki-shinse\00GB04SafeReg-
WW.fm
masterpage: Right
LF-X1
4-103-221-11(1)
29
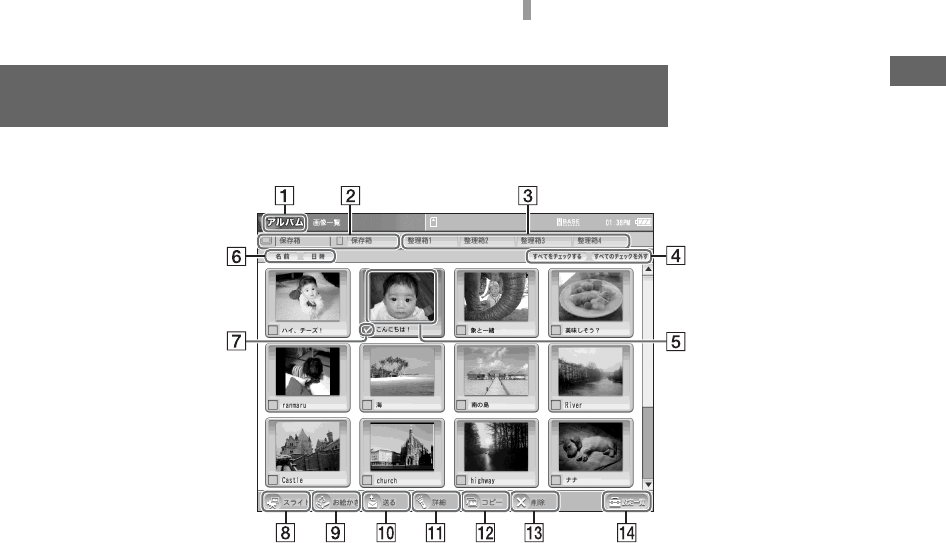
Basic Digital Photo Album Screen
ADigital photo album display
BStorage cabinet tab
Displays a list of images saved on the
Airboard or a “Memory Stick”.
CFiling cabinet tab
Appears when a “Memory Stick” is inserted.
Allows you to arrange the images you have
saved.
DCheck all/Uncheck all
[Check all] places a check mark next to all e-
mails in the displayed tab, and [Uncheck all]
removes all check marks.
EImage
Pressing an image directly will display an
enlarged view. For movies, a direct press
begins playback.
FSort button
Images can be sorted by name or date and
time of modification. With each press of the
sort button, images are sorted in ascending
or descending order.
GCheck box
A check mark is placed in or removed from
this box each time it is selected.
HSlideshow
Automatically displays in succession all
images in the digital photo album or all
selected images.
IDrawing
Allows you to draw pictures and write text
by hand.
JSend
Attaches the selected images to e-mail.
KDetails
Allows you to change the selected images’
names, switch to enlarged display (or movie
display), and rotate images. Also displays
image attributes, such as file size, date and
time of creation, and date and time of
modification.
LCopy
Copies the selected images to the Airboard
or a “Memory Stick”.
MDelete
Deletes the selected images.
NSettings
Displays the [Settings] window used to
change settings.
Selecting [Digital Photo Album] on the
[Settings] window allows you to change the
filing cabinet name and other settings.
Basic Digital Photo Album Screen

F:\Sony\4051414_LF-X1(12inch)anki\LF-X1_anki-shinse\00GB04SafeReg-
WW.fm
masterpage: Left
LF-X1
4-103-221-11(1)
30
System
Television system
NTSC
Channel coverage
VHF: 2 - 13,
UHF: 14 - 69,
CATV: 1 - 125
Tuning system PLL synthesizer
Screen size 12.1 inches
24.9 × 18.7 cm
(9 7⁄8 × 7 3⁄8 inches),
31.1 cm (12 1⁄4 inches)
(w/h, diagonal)
Display Transparent TN LCD panel
Drive system TFT
Active matrix drive system
Effective picture element ratio
99.99 %s
Effective picture elements
Horizontal: 800 dots
Vertical: 600 lines
Speaker 4 × 2.8 cm (1 5⁄8 × 1 1⁄8 inches)
oval (2)
Audio output 0.6 W × 2, 8 ohms
Web browser
HTML HTML 4.01, XHTML Basic 1.0
Frame, JavaScript, SSL (V2/3),
TLS 1.0, JavaApplet (PJAE 1.2)
Image file GIF, JPEG, PNG
Flash Ver. 6
E-mail
Transmit protocol
SMTP
Receive protocolPOP3
Album
Album file GIF, JPEG, PNG, BMP, MPG
(MPEG1 movie)
Inputs/outputs
Base station
VHF/UHF 75-ohm connector
VIDEO LINE INPUT1
S-video: 4-pin mini DIN
Y: 1 Vp-p, 75 ohms unbalanced,
sync negative
C: 0.286 Vp-p (burst), 75 ohms
Video: Phono jack, 1 Vp-p, 75 ohms
unbalanced, sync negative
Audio: Phono jack, 2-channel,
500 mVrms,
Impedance: 47 kohms
VIDEO LINE INPUT2
Video: Phono jack, 1 Vp-p, 75 ohms
unbalanced, sync negative
Audio: Phono jack, 2-channel,
500 mVrms,
Impedance: 47 kohms
VIDEO LINE OUTPUT
Video: Phono jack, 1 Vp-p, 75 ohms
unbalanced, sync negative
Audio: Phono jack, 2-channel,
500 mVrms,
Impedance: less than 5 kohms
DC IN 12 V DC
ETHERNET 10BASE-T/100BASE-T
connector (1)
IR BLASTER Minijack (1)
USB USB 1.1 (2)
Monitor
DC IN 16 V DC
Headphones Stereo minijack
Impedance: 16 ohms or more
USB USB 1.1 (1)
ETHERNET 10BASE-T/100BASE-T
connector (1)
AV IN Minijack (1)
Specifications

F:\Sony\4051414_LF-X1(12inch)anki\LF-X1_anki-shinse\00GB04SafeReg-
WW.fm
masterpage: Right
LF-X1
4-103-221-11(1)
31
Specifications
AC power adaptor
AC-LX1B (for the base station)
Power requirements
100 V - 240 V AC, 50/60 Hz
Rated output DC OUT: 12 V DC, 3 A
Operating temperature
32 to 95 °F (0 to 35 °C)
Storage temperature
14 to 140 °F (–10 to +60 °C)
Dimensions Approx. 99.5 × 42.5 × 25.5 mm
(4 × 1 11⁄16 × 1 1⁄16 inches)
(w/h/d, not including projecting
parts)
Mass 200 g (7 oz)
AC-LX1M (for the monitor)
Power requirements
100 V - 240 V AC, 50/60 Hz
Rated output DC OUT: 16 V DC, 3.75 A
Operating temperature
32 to 95 °F (0 to 35 °C)
Storage temperature
14 to 140 °F (–10 to +60 °C)
Dimensions Approx. 125 × 30 × 60 mm
(5 × 1 3⁄16 × 2 3⁄8 inches)
(w/h/d, not including projecting
parts)
Mass 300 g (11 oz)
Battery BP-LX1A
Rated voltage 10.8 V DC
Capacity 4,400 mAh
Type Lithium ion battery
Dimensions
Approx. 123.6 × 88.0 × 20.5 mm
(4 7⁄8 × 3 1⁄2 × 13⁄16 inches)
(w/h/d)
Mass 310 g (11 oz)
Operating temperature
32 to 95 °F (0 to 35 °C)
Storage temperature
14 to 95 °F (–10 to +35 °C)
General
Power consumption
Base Station: Approx. 12 W (watching TV)
Approx. 0.6 W (power off, using
AC power adaptor)
Monitor: Approx. 50 W
(watching TV, using AC power
adaptor)
Approx. 24 W
(watching TV, using battery)
Approx. 39 W
(power off, charging battery)
Operating temperature
32 to 95 °F (0 to 35 °C)
Storage temperature
14 to 113 °F (–10 to +45 °C)
Dimensions
Base Station: 4.6 × 18.2 × 12.8 cm
(1 3⁄4 × 7 1⁄8 × 5 1⁄8 inches)
(w/h/d, not including projecting
parts)
Monitor: 34.1 × 23.8 × 3.1 cm
(13 3⁄8 × 9 1⁄2 × 1 1⁄4 inches)
(w/h/d, not including projecting
parts)
Mass
Base Station: Approx. 440 g (1 lbs 3 oz)
Monitor: Approx. 2.2 kg (5 lbs 5 oz),
including the battery
Communication range
Indoors: approx. 30 m (98 feet)
(depending on the
environments)
Standards IEEE802.11 a/b/g
Frequency range2.4 GHz, 5 GHz
Modulation Direct Sequence Spread
Spectrum (DSSS)
Orthogonal Frequency Division
Multiplexing (OFDM)
Power requirements
AC power adaptor: 100-240 V
AC, 50/60 Hz
Battery:4,400 mAh
F:\Sony\4051414_LF-X1(12inch)anki\LF-X1_anki-shinse\00GB04SafeReg-
WW.fm
masterpage: Left
LF-X1
4-103-221-11(1)
32
Battery duration Approx. 4 hours
(with the minimum screen
brightness)
Approx. 3 hours
(with the medium screen
brightness)
Approx. 100 minutes
(with the maximum screen
brightness)
Battery charging time
Approx. 2.5 hours
(monitor power on)
Approx. 2 hours
(monitor power off)
Supplied accessories
BP-LX1A battery (× 1)
Stylus (× 1)
AC-LX1B AC power adapter
for the base station (× 1)
AC-LX1M AC power adaptor
for the monitor (× 1)
Power cord (× 2)
AV mouse (× 1)
Base station stand (× 1)
F:\Sony\4051414_LF-X1(12inch)anki\LF-X1_anki-shinse\00GB99BCO-WW.fm masterpage: Right
LF-X1
4-103-221-11(1)
Sony Corporation