Sony Group MEXBT5000 Vehicle Audio System with Bluetooth Transmitter User Manual Users manual
Sony Corporation Vehicle Audio System with Bluetooth Transmitter Users manual
Users manual
Operating Instructions
Mode d’emploi
masterpage:Right
2-693-038-21 (1)
E:\Working\2693038211\269303821MEXBT5000U\01US+00COV-U.fm
US
FR
MEX-BT5000
2-693-038-21 (1)
© 2006 Sony Corporation
Owner’s Record
The model and serial numbers are located on the bottom of the unit.
Record the serial number in the space provided below.
Refer to these numbers whenever you call upon your Sony dealer regarding this product.
Model No. MEX-BT5000 Serial No.
MEX-BT5000
To cancel the demonstration (Demo) display, see page 17.
Pour annuler l’affichage de démonstration (Demo), reportez-vous à la page 11.
Bluetooth™
Audio System
01US+00COV-U.book Page 1 Thursday, April 27, 2006 11:03 PM
2
E:\Working\2693038211\269303821MEXBT5000U\01US01INT-U.fm masterpage:Left
MEX-BT5000
2-693-038-21 (1)
Warning
The Bluetooth word mark and logos are owned
by the Bluetooth SIG, Inc. and any use of such
marks by Sony Corporation is under license.
Other trademarks and trade names are those of
their respective owners.
SonicStage and its logo are trademarks of Sony
Corporation.
ATRAC, ATRAC3, ATRAC3plus and their logos
are trademarks of Sony Corporation.
Be sure to install this unit in the dashboard of
the car for safety. For installation and
connections, see the supplied installation/
connections manual.
You are cautioned that any changes or
modifications not expressly approved in this
manual could void your authority to operate this
equipment.
This equipment has been tested and found to
comply with the limits for a Class B digital
device, pursuant to Part 15 of the FCC Rules
and RSS-Gen of IC Rules.
These limits are designed to provide reasonable
protection against harmful interference in a
residential installation. This equipment
generates, uses, and can radiate radio frequency
energy and, if not installed and used in
accordance with the instructions, may cause
harmful interference to radio communications.
However, there is no guarantee that interference
will not occur in a particular installation. If this
equipment does cause harmful interference to
radio or television reception, which can be
determined by turning the equipment off and on,
the user is encouraged to try to correct the
interference by one or more of the following
measures:
–
Reorient or relocate the receiving antenna.
–
Increase the separation between the equipment
and receiver.
–
Connect the equipment into an outlet on a
circuit different from that to which the receiver
is connected.
–
Consult the dealer or an experienced radio/TV
technician for help.
This transmitter must not be co-located or
operated in conjunction with any other antenna
or transmitter.
This equipment complies with FCC and IC
radiation exposure limits set forth for
uncontrolled equipment and meets the FCC
radio frequency (RF) Exposure Guidelines in
Supplement C to OET65 and RSS-102 of the
IC radio frequency (RF) Exposure rules. This
equipment has very low levels of RF energy
that it deemed to comply without maximum
permissive exposure evaluation (MPE). But it
is desirable that it should be installed and
operated with at least 20 cm and more between
the radiator and person's body (excluding
extremities: hands, wrists, feet and legs).
R
Manufactured under license
from BBE Sound, Inc.
The BBE MP process
improves digitally compressed sound, such as
MP3, by restoring and enhancing the higher
harmonics lost through compression. BBE MP
works by generating even-order harmonics from
the source material, effectively recovering
warmth, detail and nuance.
The “SAT Radio Ready”
logo indicates that this
product will control a
satellite radio tuner module
(sold separately). Please see your nearest
authorized Sony dealer for details on the
satellite radio tuner module.
“SAT Radio,” “SAT Radio Ready,” the SAT
Radio and SAT Radio Ready logos and all
related marks are trademarks of Sirius Satellite
Radio Inc. and XM Satellite Radio Inc.
Warning if your car’s ignition has no
ACC position
After turning the ignition off, be sure to press
and hold (OFF) on the unit until the display
disappears.
Otherwise, the display does not turn off and
this causes battery drain.
The use of optical instruments with this produc
t
will increase e
y
e hazard.
CAUTION
Microsoft, Windows Media,
and the Windows logo are
trademarks or registered
trademarks of Microsoft
Corporation in the United States and/or other
countries.
01US+00COV-U.book Page 2 Thursday, April 27, 2006 11:03 PM
3
E:\Working\2693038211\269303821MEXBT5000U\01US+00COV-UTOC.fm masterpage:Right
Table of Contents
MEX-BT5000
2-693-038-21 (1)
Welcome ! . . . . . . . . . . . . . . . . . . . . . . . . . . . . . 4
Getting Started
Resetting the unit . . . . . . . . . . . . . . . . . . . . . . . . 4
Setting the clock . . . . . . . . . . . . . . . . . . . . . . . . 4
Detaching the front panel . . . . . . . . . . . . . . . . . 5
Attaching the front panel . . . . . . . . . . . . . . . 5
Inserting the disc in the unit . . . . . . . . . . . . . . . 5
Ejecting the disc . . . . . . . . . . . . . . . . . . . . . . 5
Location of controls and basic
operations
Audio function . . . . . . . . . . . . . . . . . . . . . . . 6
Bluetooth function . . . . . . . . . . . . . . . . . . . . 8
CD
Display items . . . . . . . . . . . . . . . . . . . . . . . 10
Repeat and shuffle play. . . . . . . . . . . . . . . . 10
Radio
Storing and receiving stations . . . . . . . . . . . . . 10
Storing automatically — BTM . . . . . . . . . . 10
Storing manually. . . . . . . . . . . . . . . . . . . . . 10
Receiving the stored stations . . . . . . . . . . . 10
Tuning automatically . . . . . . . . . . . . . . . . . 10
Receiving a station through a list
— LIST . . . . . . . . . . . . . . . . . . . . . . . . . . . . 11
Bluetooth function
Before using the Bluetooth function . . . . . . . . 11
Menu operations of the Bluetooth
function . . . . . . . . . . . . . . . . . . . . . . . . . . . 11
Configuring Bluetooth Settings . . . . . . . . . 11
Pairing this unit with a Bluetooth
device . . . . . . . . . . . . . . . . . . . . . . . . . . . . . 12
Connecting to registered devices . . . . . . . . 13
Handsfree talking . . . . . . . . . . . . . . . . . . . . . . 13
Making calls . . . . . . . . . . . . . . . . . . . . . . . . 13
Receiving calls . . . . . . . . . . . . . . . . . . . . . . 14
Ending calls . . . . . . . . . . . . . . . . . . . . . . . . 14
Using the Phonebook . . . . . . . . . . . . . . . . . 14
Using the Preset Dial . . . . . . . . . . . . . . . . . 14
Music streaming . . . . . . . . . . . . . . . . . . . . . . . 15
Listening to music from an audio
device . . . . . . . . . . . . . . . . . . . . . . . . . . . . . 15
Operating an audio device with this
unit . . . . . . . . . . . . . . . . . . . . . . . . . . . . . . . 15
Other settings . . . . . . . . . . . . . . . . . . . . . . . . . 15
Setting a handsfree device . . . . . . . . . . . . . 15
Deleting the registration of a connected
device . . . . . . . . . . . . . . . . . . . . . . . . . . . . . 16
Auto connection function . . . . . . . . . . . . . . 16
Other functions
Adjusting menu items — MENU . . . . . . . . . . 16
Customizing the equalizer curve
— EQ3 Tune . . . . . . . . . . . . . . . . . . . . . . . 17
Using optional equipment. . . . . . . . . . . . . . . . 18
CD/MD changer . . . . . . . . . . . . . . . . . . . . . 18
Auxiliary audio equipment. . . . . . . . . . . . . 19
Rotary commander RM-X4S . . . . . . . . . . . 19
Additional Information
Precautions . . . . . . . . . . . . . . . . . . . . . . . . . . . 20
Notes on discs . . . . . . . . . . . . . . . . . . . . . . 20
About MP3/WMA files . . . . . . . . . . . . . . . 20
About ATRAC CD. . . . . . . . . . . . . . . . . . . 21
Maintenance . . . . . . . . . . . . . . . . . . . . . . . . . . 21
Removing the unit. . . . . . . . . . . . . . . . . . . . . . 22
Specifications . . . . . . . . . . . . . . . . . . . . . . . . . 23
Troubleshooting . . . . . . . . . . . . . . . . . . . . . . . 24
Error displays/Messages. . . . . . . . . . . . . . . 26
01US+00COV-U.book Page 3 Thursday, April 27, 2006 11:03 PM
4
E:\Working\2693038211\269303821MEXBT5000U\01US02CD-U.fm masterpage:Left
MEX-BT5000
2-693-038-21 (1)
Welcome !
Thank you for purchasing this Sony Bluetooth™
Audio System. You can enjoy your drive with the
following functions.
•CD playback
You can play CD-DA (also containing CD
TEXT*), CD-R/CD-RW (MP3/WMA files also
containing Multi Session (page 20)) and
ATRAC CD (ATRAC3 and ATRAC3plus
format (page 21)).
•Radio reception
– You can store up to 6 stations per band (FM1,
FM2, FM3, AM1 and AM2).
–BTM (Best Tuning Memory): the unit selects
strong signal stations and stores them.
•Bluetooth function
– Handsfree talking with your cellular phone in
the car.
– Address book transfer from your cellular
phone.
– Music streaming from your cellular phone or
portable audio device.
– HFP 1.0, A2DP, OPP and AVRCP profiles
supported.
•Sound adjustment
–EQ3 parametric: You can choose any one
of 7 preset equalizer curves, and adjust as
desired.
–DSO (Dynamic Soundstage Organizer):
creates a more ambient sound field, using
virtual speaker synthesis, to enhance the
sound of speakers, even if they are installed
low in the door.
–BBE MP: improves digitally compressed
sound such as MP3.
*A CD TEXT disc is a CD-DA that includes
information such as disc, artist and track name.
Getting Started
Resetting the unit
Before operating the unit for the first time, or
after replacing the car battery or changing the
connections, you must reset the unit.
Detach the front panel and press the RESET
button with a pointed object, such as a ball-point
pen.
Note
Pressing the RESET button will erase the clock setting
and some stored contents.
Setting the clock
The clock uses a 12-hour digital indication.
1Press (MENU).
2Push the joystick up/down until
“Setup” appears, then push it right.
3Push the joystick up/down until “Clock
Adjust” appears, then push it right.
4Push the joystick up/down to set the
hour and minutes.
To move the digital indication, push the
joystick left/right.
5After setting the clock, press the
joystick.
The clock starts.
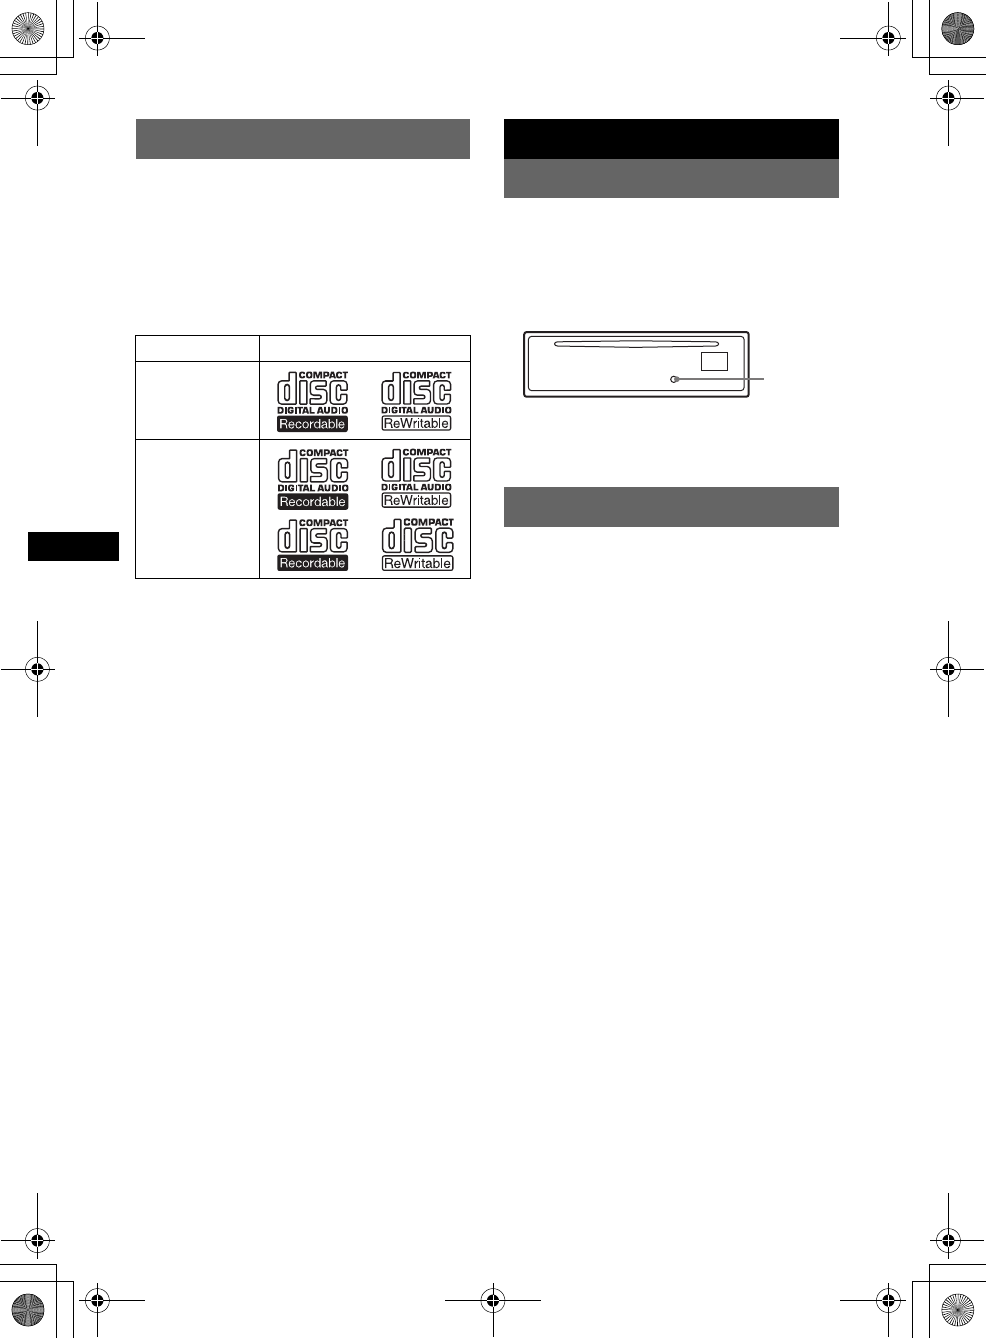
Type of discs Label on the disc
CD-DA
MP3
WMA
ATRAC CD
RESET
button
01US+00COV-U.book Page 4 Thursday, April 27, 2006 11:03 PM
5
MEX-BT5000
2-693-038-21 (1)
E:\Working\2693038211\269303821MEXBT5000U\01US02CD-U.fm masterpage:RightE:\Working\2693038211\269303821MEXBT5000U\01US02CD-U.fm masterpage:Right
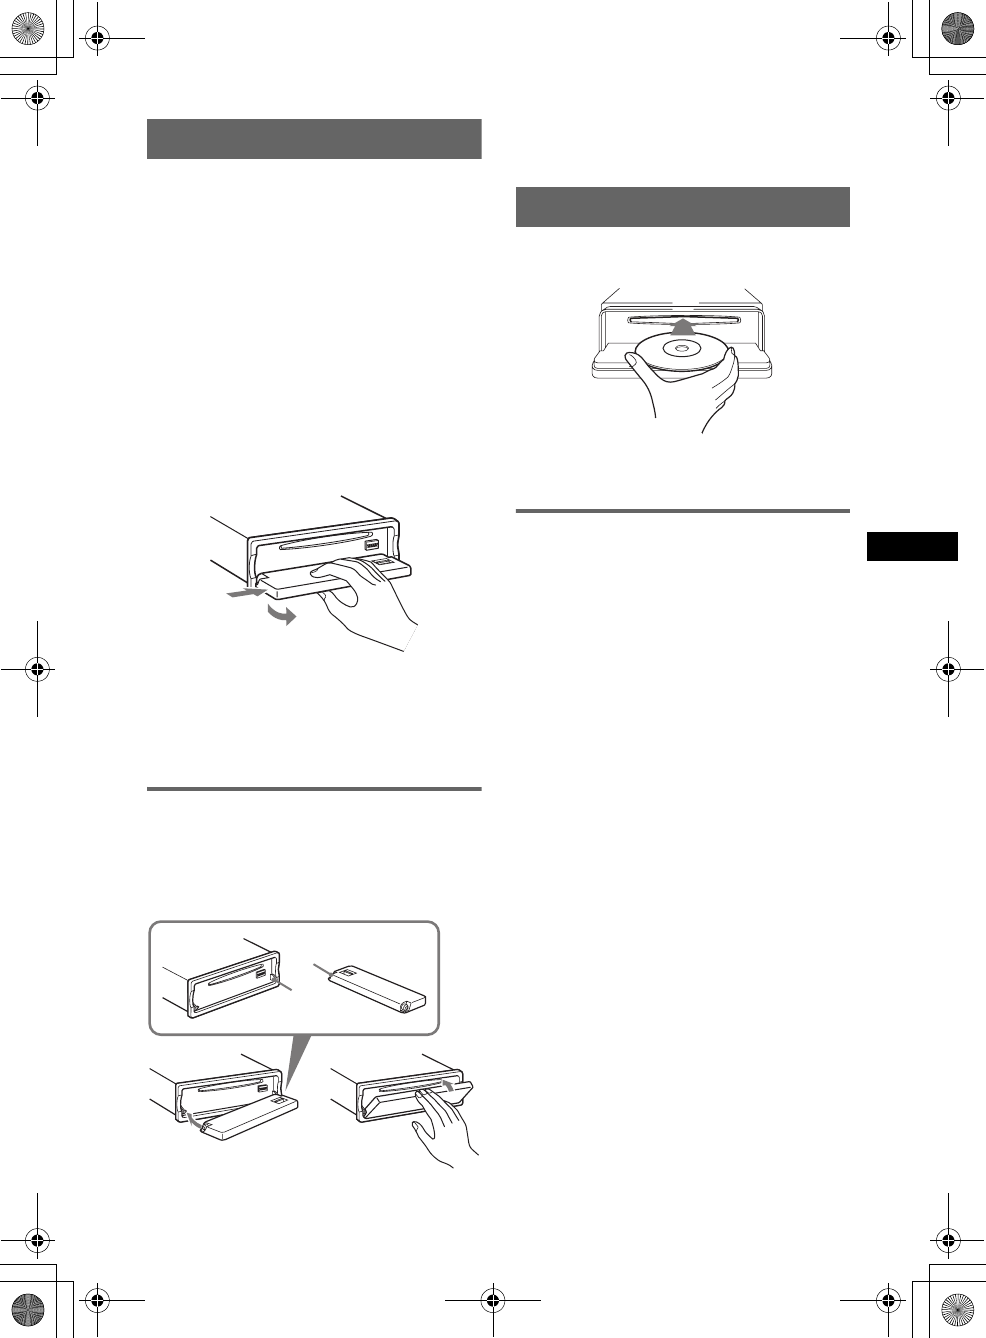
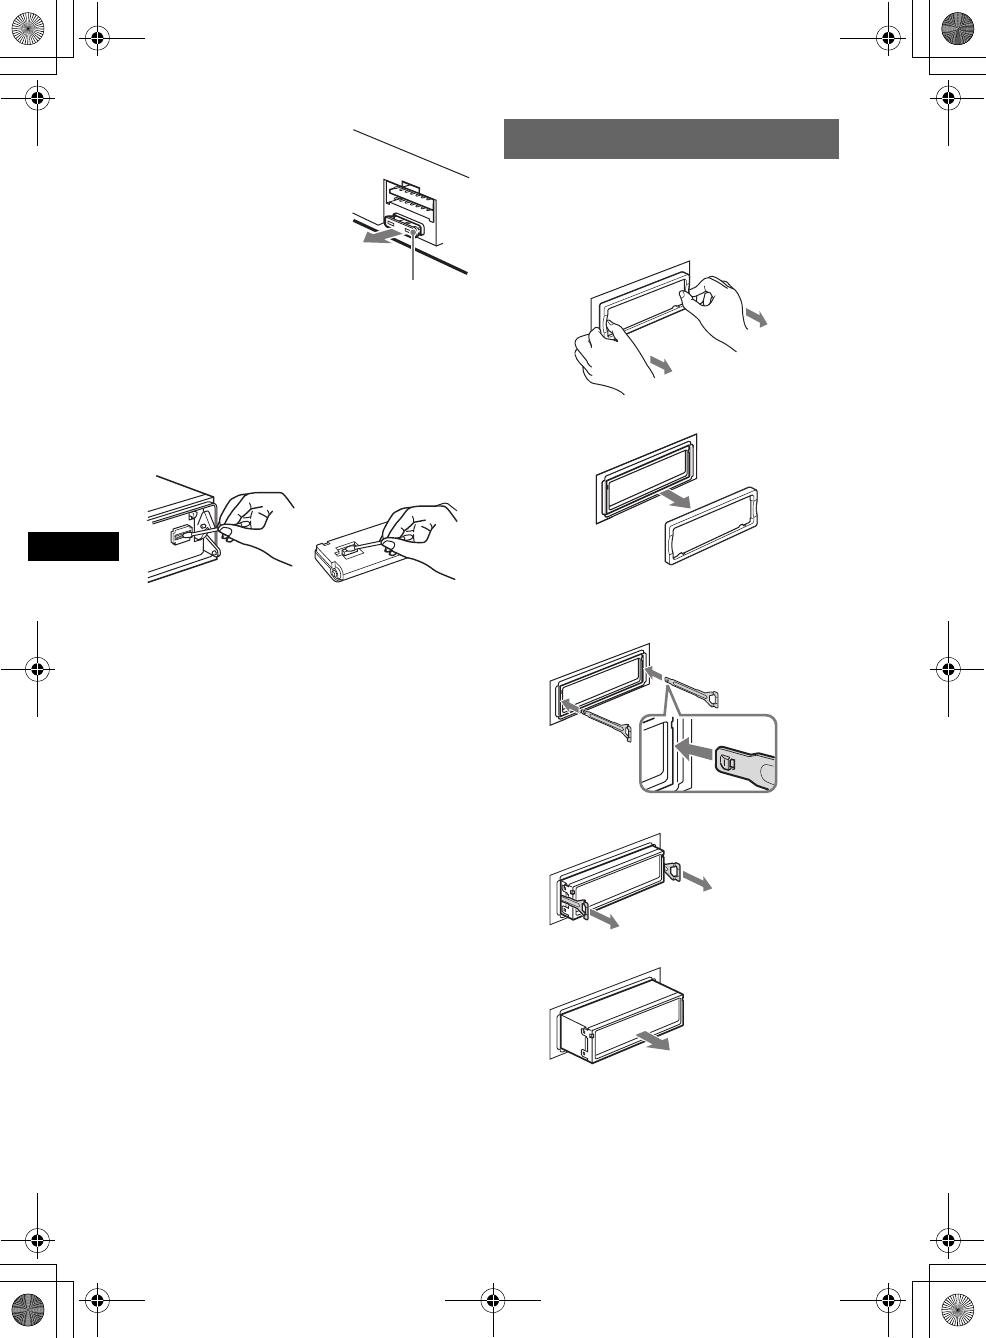
Detaching the front panel
You can detach the front panel of this unit to
prevent theft.
Caution alarm
If you turn the ignition switch to the OFF
position without detaching the front panel, the
caution alarm will sound for a few seconds.
The alarm will only sound if the built-in
amplifier is used.
1Press (OFF).
The unit is turned off.
2Press (OPEN).
The front panel is flipped down.
3Slide the front panel to the right, then
gently pull out the left end of the front
panel.
Notes
•Do not drop or put excessive pressure on the front
panel and display window.
•Do not subject the front panel to heat/high
temperature or moisture. Avoid leaving it in a parked
car or on a dashboard/rear tray.
Attaching the front panel
Place the hole A of the front panel onto the
spindle B on the unit, then lightly push the left
side in.
Press (SOURCE) on the unit (or insert a disc) to
operate the unit.
Note
Do not put anything on the inner surface of the front
panel.
Inserting the disc in the unit
1Press (OPEN).
2Insert the disc (label side up).
3Close the front panel.
Playback starts automatically.
Ejecting the disc
1Press (OPEN).
2Press Z.
The disc is ejected.
3Close the front panel.
1
2
c
A
B
01US+00COV-U.book Page 5 Thursday, April 27, 2006 11:03 PM

6
MEX-BT5000
2-693-038-21 (1)
E:\Working\2693038211\269303821MEXBT5000U\01US02CD-U.fm masterpage:Left
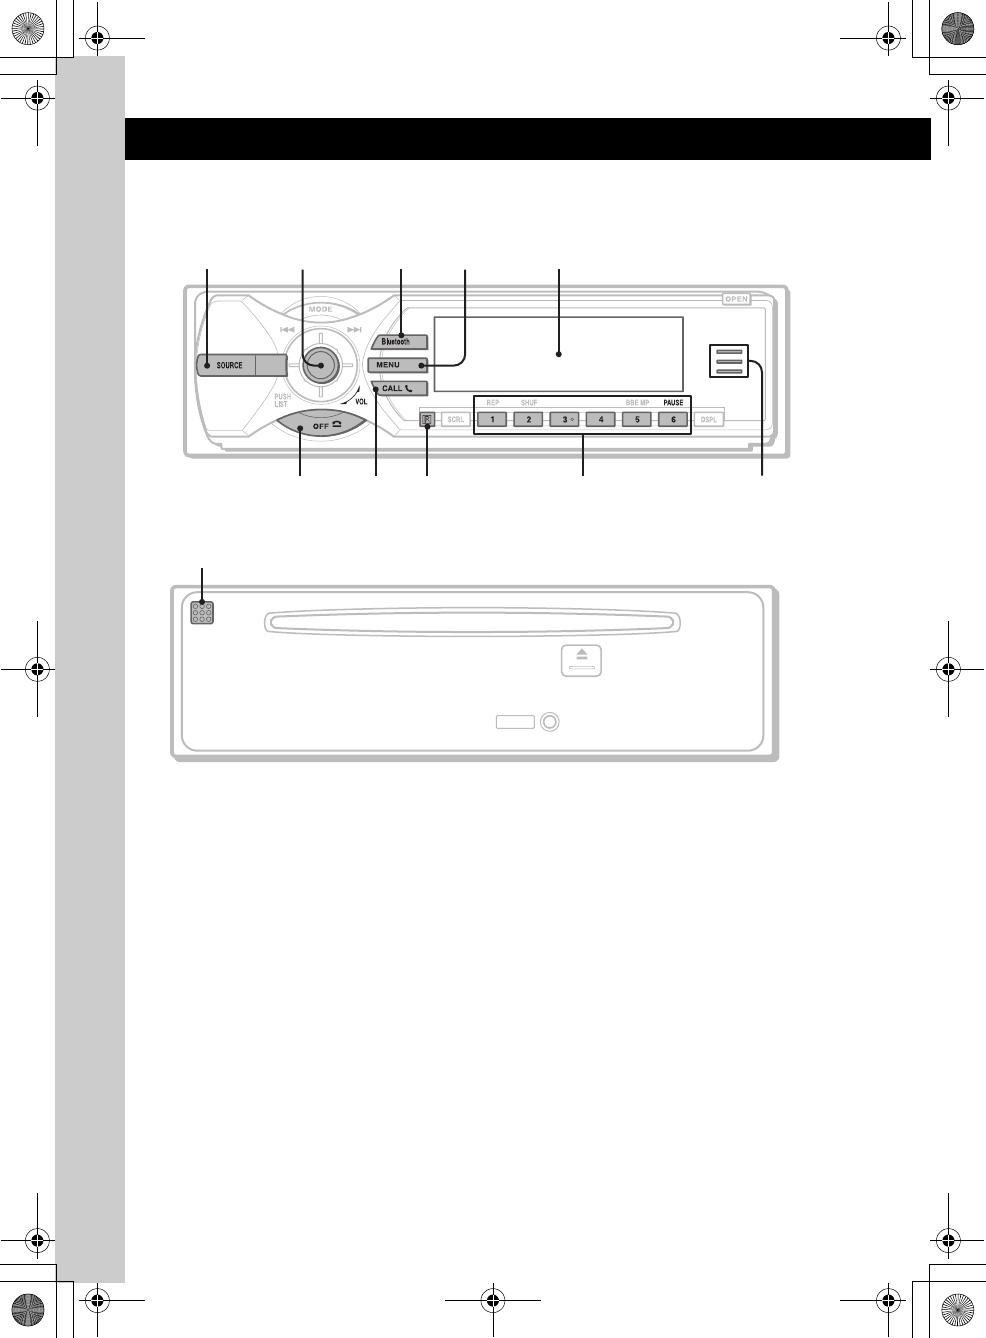
Location of controls and basic operations
Audio function
Main unit
Front panel removed
Refer to the pages listed for details. The
corresponding buttons on the card remote
commander control the same functions as those
on the unit.
ASOURCE button
To power on; change the source (Radio/CD/
MD*1/Bluetooth AUDIO/AUX/SAT*2).
BJoystick/LIST button 11, 18
Rotate to: Adjust the volume.
Push up/down/left/right to: Select a menu
item.
Press to: Apply a setting.
CD/MD*1:
Push up/down to*3:
– Skip groups*4/albums*5 (push).
– Skip groups*4/albums*5 continuously
(push and hold).
Push left/right to:
– Skip tracks (push).
– Skip tracks continuously (push, then push
again within about 2 seconds and hold).
– Reverse/fast-forward a track (push and
hold).
Radio:
Push up/down to:
– Receive stored station.
Push left/right to:
– Tune in stations automatically (push).
– Find a station manually (push and hold).
Press to:
– Display the list.
CMODE button 10, 18
To select the radio band (FM/AM)/select the
SAT tuner band (mode)*2/select the unit*6.
DMENU button
To enter menu.
EDisplay window
FOPEN button 5
GOFF button
To power off; stop the source.
HReceptor for the card remote
commander
MEX-BT5000
1
79 qa0
8
35624
RESET
qfqdqs
01US+00COV-U.book Page 6 Thursday, April 27, 2006 11:03 PM
7
E:\Working\2693038211\269303821MEXBT5000U\01US02CD-U.fm masterpage:RightE:\Working\2693038211\269303821MEXBT5000U\01US02CD-U.fm masterpage:Right
MEX-BT5000
2-693-038-21 (1)
Card remote commander RM-X301
ISCRL (scroll) button 10
To scroll the display item.
JNumber buttons
CD/MD*1:
(1): REP 10, 18
(2): SHUF 10, 18
(5): BBE MP*7 2
To activate the BBE MP function, set
“BBE MP on.” To cancel, set “BBE MP
off.”
(6): PAUSE *7
To pause playback. To cancel, press
again.
Radio:
To receive stored stations (press); store
stations (press and hold).
KDSPL (display) button 10
To change display items.
LDisc slot 5
To insert the disc.
MRESET button 4
NZ (eject) button 5
To eject the disc.
The following buttons on the card remote
commander have also different buttons/functions
from the unit.
qg ENTER button
To apply a setting.
qh LIST/CAT*2 button
To list up.
qj Number buttons
Buttons 1 to 6 share the same functions as
the number buttons on the unit.
qk M (+)/m (–) buttons
The same as pushing the joystick up/down.
ql < (.)/, (>) buttons
The same as pushing the joystick left/right.
w; SOUND button
To select sound items.
wa ATT (attenuate) button
To attenuate the sound. To cancel, press
again.
ws VOL (volume) +/– button
To adjust volume.
*1 When an MD changer is connected.
*2 When the SAT tuner is connected.
*3 If the changer is connected, the operation is
different, see page 18.
*4 When an ATRAC CD is played.
*5 When an MP3/WMA is played.
*6 When a CD/MD changer is connected.
*7 When playing back on this unit.
Note
If the unit is turned off and the display disappears, it
cannot be operated with the card remote commander
unless (SOURCE) on the unit is pressed, or a disc is
inserted to activate the unit first.
Tip
For details on how to replace the battery, see
“Replacing the lithium battery of the card remote
commander” on page 21.
7
ql
qk
9
wa
ws
w;
1
qg
3
4
qh
qa
qj
01US+00COV-U.book Page 7 Thursday, April 27, 2006 11:03 PM
8
MEX-BT5000
2-693-038-21 (1)
E:\Working\2693038211\269303821MEXBT5000U\01US02CD-U.fm masterpage:Left
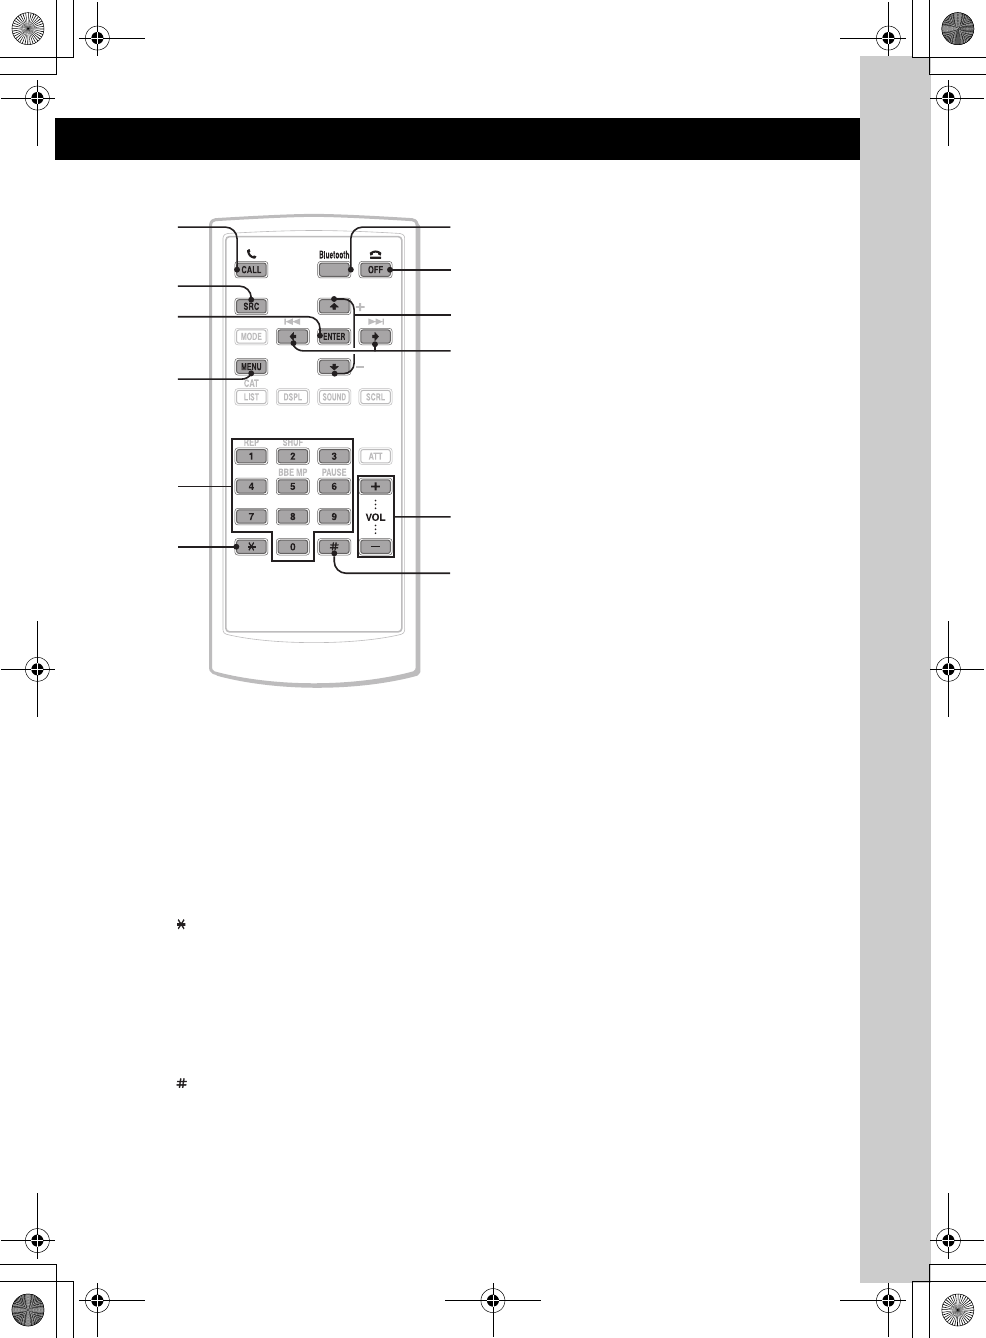
Bluetooth function
Main unit
Front panel removed
Refer to the pages listed for details. The
corresponding buttons on the card remote
commander control the same functions as those
on the unit.
ASOURCE button
To power on; change the source (Radio/CD/
MD*1/Bluetooth AUDIO/AUX/SAT*2).
BJoystick
Rotate to: Adjust the volume.
Push up/down/left/right to: Select a menu
item.
Press to: Apply a setting.
Bluetooth audio device*3:
Push left/right to:
– Skip tracks (push).
– Reverse/fast-forward a track (push and
hold).
CBluetooth button 11, 11, 12, 13, 14,
15, 16
To access the Bluetooth functions; receive a
call.
DMENU button 14
To enter menu; receive a call.
EDisplay window
FOFF button 14, 14
To power off; stop the source; end or reject a
call.
GCALL button 14
To access the telephone functions; receive a
call.
HReceptor for the card remote
commander
INumber buttons
To call stored dials.
Bluetooth audio device*3:
(6): PAU S E
To pause playback.
JBluetooth indicator
Lights up when the Bluetooth signal is input/
output. Goes off when the Bluetooth signal is
off.
KMicrophone 13
MEX-BT5000
1
6097
8
3524
RESET
qa
01US+00COV-U.book Page 8 Thursday, April 27, 2006 11:03 PM
9
E:\Working\2693038211\269303821MEXBT5000U\01US02CD-U.fm masterpage:RightE:\Working\2693038211\269303821MEXBT5000U\01US02CD-U.fm masterpage:Right
MEX-BT5000
2-693-038-21 (1)
Card remote commander RM-X301
The following buttons on the card remote
commander have also different buttons/functions
from the unit.
qs ENTER button
To apply a setting.
qd Number buttons 12, 13, 14
To input numbers (phone number, passcode,
etc.).
Buttons 1 to 6 share the same functions as
the number buttons on the unit.
qf button 14
qg M (+)/m (–) buttons
The same as pushing the joystick up/down.
qh < (.)/, (>) buttons
The same as pushing the joystick left/right.
qj VOL (volume) +/– button
To adjust volume.
qk button 14
*1 When an MD changer is connected.
*2 When the SAT tuner is connected.
*3 When a Bluetooth audio device (supports AVRCP
of Bluetooth technology) is connected. Depending
on the device, certain operations may not be
available.
Note
If the unit is turned off and the display disappears, it
cannot be operated with the card remote commander
unless (SOURCE) on the unit is pressed, or a disc is
inserted to activate the unit first.
Tip
For details on how to replace the battery, see
“Replacing the lithium battery of the card remote
commander” on page 21.
73
6
qh
qg
qj
qk
1
qs
4
qd
qf
01US+00COV-U.book Page 9 Thursday, April 27, 2006 11:03 PM
10
E:\Working\2693038211\269303821MEXBT5000U\01US02CD-U.fm masterpage:Left
MEX-BT5000
2-693-038-21 (1)
CD
For details on selecting a CD/MD changer, see
page 18.
Display items
Example: when you set Info (information) mode
to “All” (page 17).
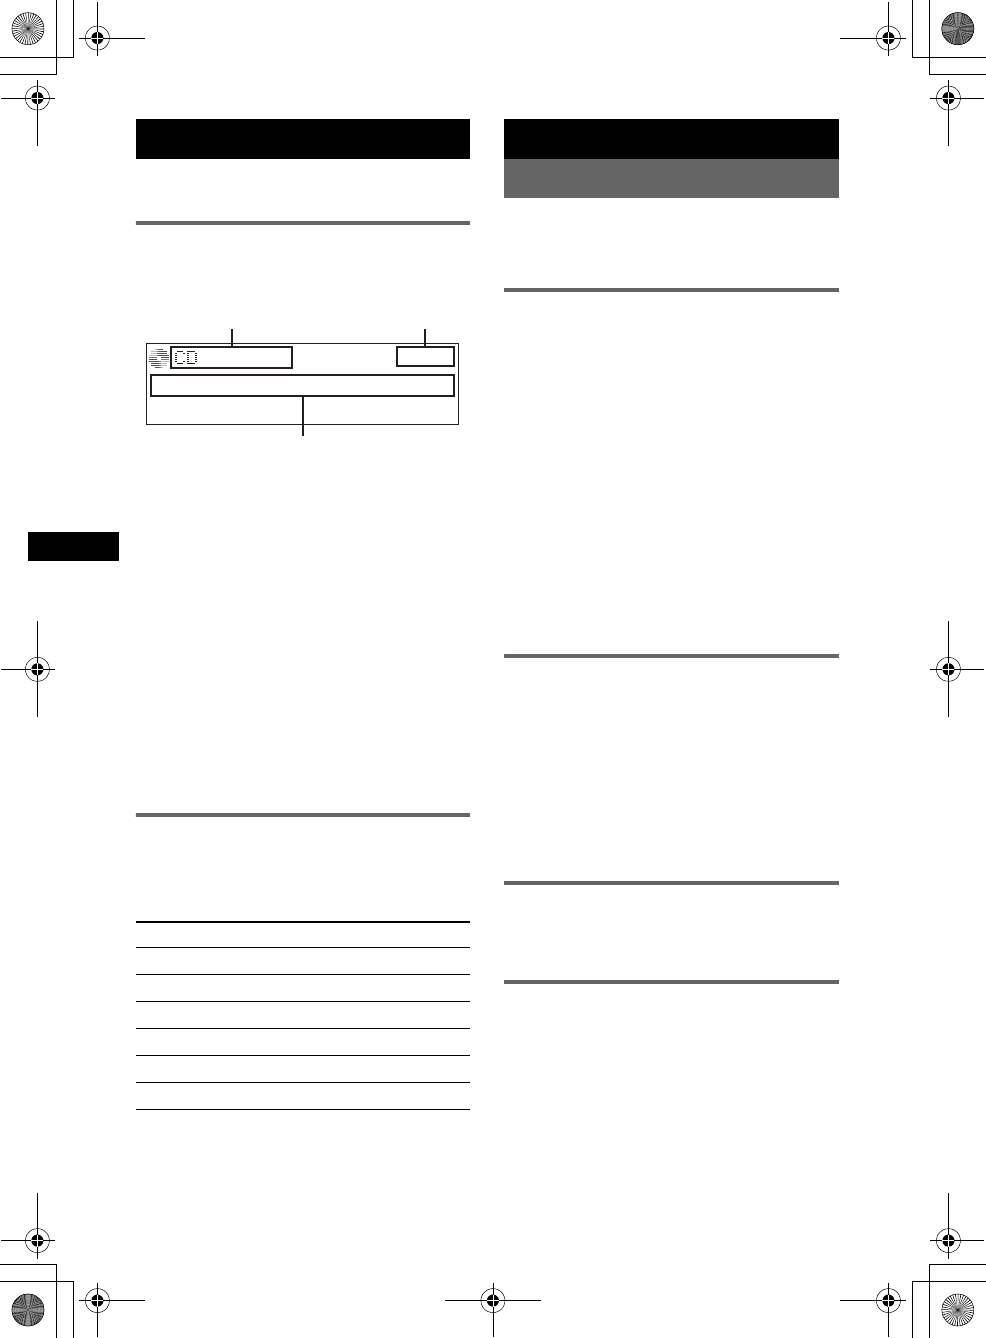
ASource/MP3/ATRAC/WMA indication
BClock
CTrack number/Elapsed playing time, Disc/
artist name, Album/group number*1, Album/
group name, Track name, Text information*2
*1 Album/group number is displayed only when the
album/group is changed.
*2 When playing an MP3, ID3 tag is displayed, when
playing ATRAC CD, text information written by
SonicStage, etc., is displayed, and when playing
WMA, WMA tag is displayed.
To change display items C, press (DSPL);
scroll display items C, press (SCRL) or set
“Auto Scroll on” (page 17).
Tip
Displayed items will differ, depending on the disc type,
recorded format and settings. For details on MP3/
WMA, see page 20; ATRAC CD, see page 21.
Repeat and shuffle play
1During playback, press (1) (REP) or
(2) (SHUF) repeatedly until the
desired setting appears.
*1 When an MP3/WMA is played.
*2 When an ATRAC CD is played.
To return to normal play mode, select “Repeat
off” or “Shuffle off.”
Radio
Storing and receiving stations
Caution
When tuning in stations while driving, use Best
Tuning Memory (BTM) to prevent an accident.
Storing automatically — BTM
1Press (SOURCE) repeatedly until
“TUNER” appears.
To change the band, press (MODE)
repeatedly. You can select from FM1, FM2,
FM3, AM1 or AM2.
2Press (MENU).
3Push the joystick up/down until
“Receive Mode” appears, then push it
right.
4Push the joystick up/down until “BTM”
appears.
5Press the joystick.
The unit stores stations in order of frequency
on the number buttons.
A beep sounds when the setting is stored.
Storing manually
1While receiving the station that you
want to store, press and hold a
number button ((1) to (6)) until
“MEM” appears.
The number button indication appears in the
display.
Note
If you try to store another station on the same number
button, the previously stored station will be replaced.
Receiving the stored stations
1Select the band, then press a number
button ((1) to (6)).
Tuning automatically
1Select the band, then push the joystick
left/right to search for the station.
Scanning stops when the unit receives a
station. Repeat this procedure until the
desired station is received.
Tip
If you know the frequency of the station you want to
listen to, push and hold the joystick left/right to locate
the approximate frequency, then push the joystick left/
right to fine adjust to the desired frequency (manual
tuning).
Select To play
Repeat Track track repeatedly.
Repeat Album*1album repeatedly.
Repeat Group*2group repeatedly.
Shuffle Album*1album in random order.
Shuffle Group*2group in random order.
Shuffle Disc disc in random order.
A B
C
01US+00COV-U.book Page 10 Thursday, April 27, 2006 11:03 PM
11
MEX-BT5000
2-693-038-21 (1)
E:\Working\2693038211\269303821MEXBT5000U\01US02CD-U.fm masterpage:RightE:\Working\2693038211\269303821MEXBT5000U\01US02CD-U.fm masterpage:Right
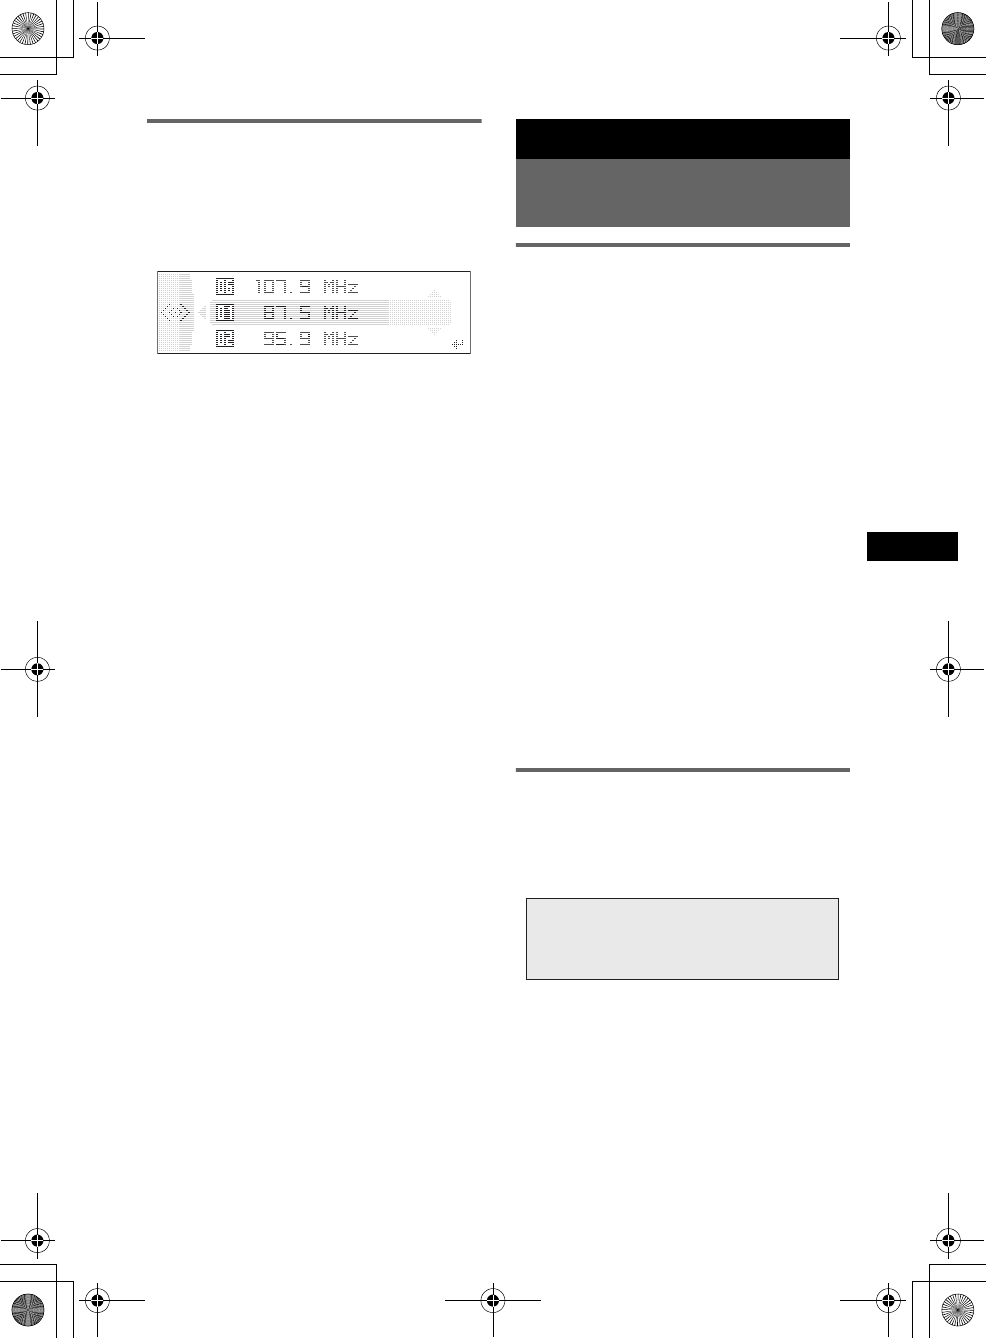
Receiving a station through a list
— LIST
You can list up the frequency.
1Select the band, then press the
joystick.
The frequency appears.
2Push the joystick up/down until the
desired station appears.
3Press the joystick to receive the
station.
The display returns to normal reception
mode.
Bluetooth function
Before using the Bluetooth
function
Menu operations of the Bluetooth
function
The Bluetooth settings can be configured from
the Bluetooth function menu or CALL menu.
Menu operations can generally be performed
using the joystick.
1Press (Bluetooth) or (CALL).
The Bluetooth function menu or CALL menu
appears.
2Push the joystick up/down until the
desired setting item appears, then
push it right.
The digital indication moves to the right
(setting selection) side.
3Push the joystick up/down to select
the setting, then press it.
The setting is complete.
4Press (Bluetooth) or (CALL).
The normal display appears.
To input a character
Push the joystick up/down to select a character,
and push left/right to move the cursor.
The characters that can be input are A – Z, a – z,
0 – 9 and a blank space.
Configuring Bluetooth Settings
Before connecting to a Bluetooth device,
configure the Bluetooth Settings on this unit.
1Press (Bluetooth).
The Bluetooth function menu appears.
2Select “Bluetooth Settings.”
3Select the desired menu.
4Select the setting.
5Press (Bluetooth).
continue to next page t
01US+00COV-U.book Page 11 Thursday, April 27, 2006 11:03 PM
12
E:\Working\2693038211\269303821MEXBT5000U\01US02CD-U.fm masterpage:Left
MEX-BT5000
2-693-038-21 (1)
Bluetooth Settings menu
“z” indicates the default settings.
Note
For details on the settings of other Bluetooth devices,
see their respective manuals.
Pairing this unit with a Bluetooth
device
When connecting Bluetooth devices for the first
time, mutual registration is required. This is
called “pairing.” This registration (pairing) is
required only for the first time, as this unit and
the other devices will recognize each other
automatically from the next time. (Depending on
the device, you may need to input a passcode for
each connection.)
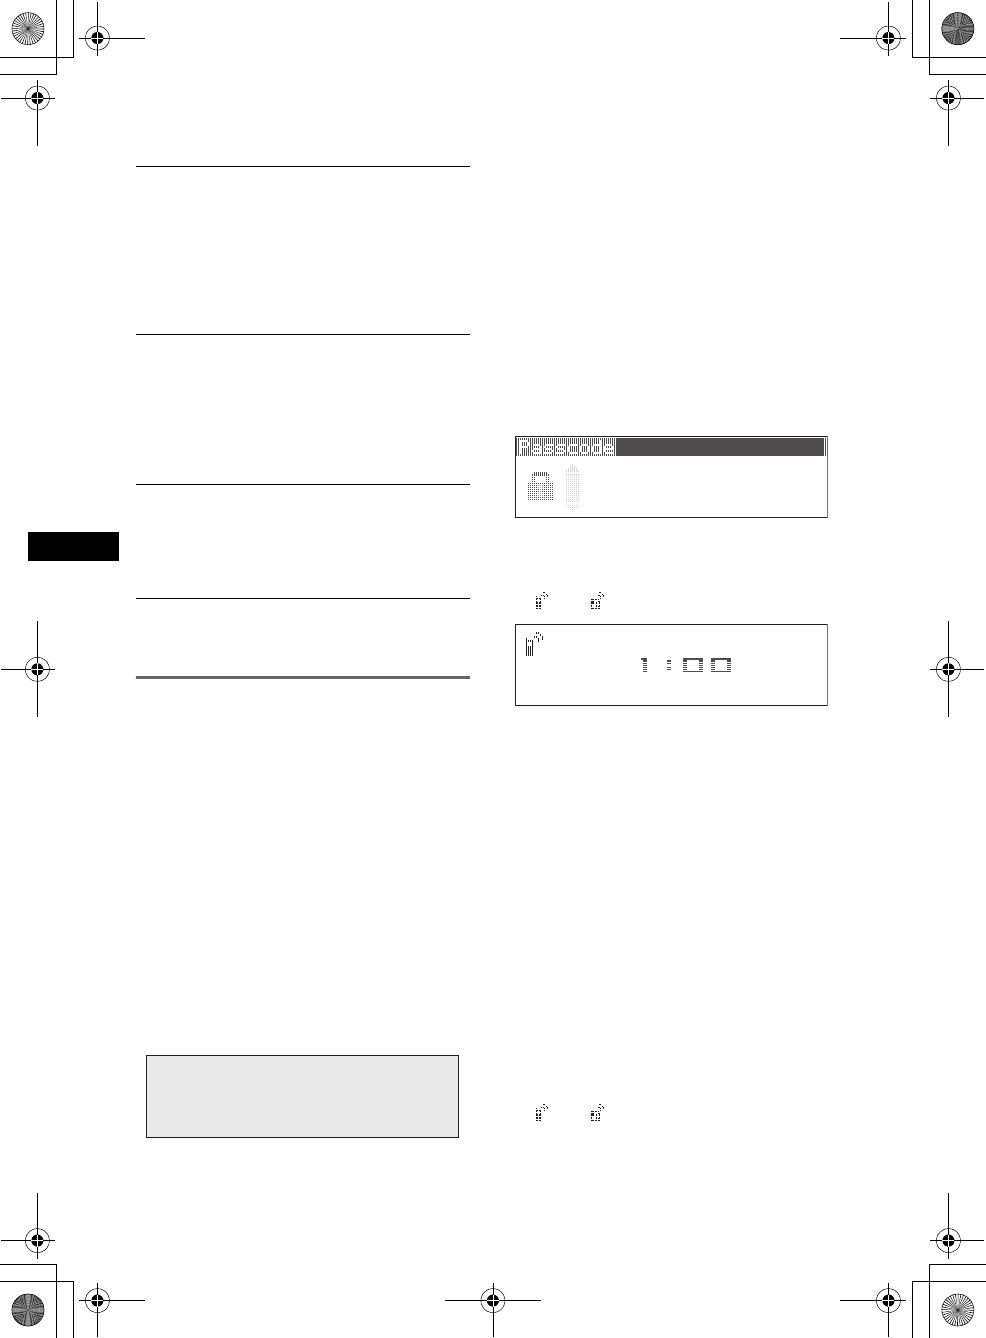
Searching for a Bluetooth device
from this unit
Check that the other Bluetooth device is set to
allow for searching (discoverable) beforehand.
1Press (Bluetooth).
The Bluetooth function menu appears.
2Select “Connectivity” c “Search.”
The process of searching for a connectable
device begins, then the detected device
name(s) appear in a list. If a device name
cannot be received, “Unknown” will be
displayed.
Search time varies depending on the number
of Bluetooth devices.
3Select the device to connect.
Pairing starts.
4Input a passcode*.
Input the same passcode for this unit and the
connecting device. The passcode can be
either your own selected number or the
number determined by the connecting device.
For details, see the manual of the connecting
device.
5Press the joystick to confirm.
“Connected” appears and connection is
complete.
“ ” or “ ” appears during connection.
*Passcode may be called “passkey,” “PIN code,” “PIN
number” or “Password,” etc., depending on the
device.
Searching for this unit from a
Bluetooth device
Check that “Visibility” in the Bluetooth Settings
menu is set to “Show” (page 12).
1Set the connecting device to search.
2When “Allow Connection?” appears
on this unit, select “yes.”
Connection starts.
Depending on the device, the passcode input
display appears.
3Input the passcode of the connecting
device.
4Press the joystick to confirm.
“Connected” appears and connection is
complete.
“ ” or “ ” appears during connection.
Tip
The passcode can also be input with the number
buttons of the card remote commander.
Signal
To switch the Bluetooth signal output of this
unit to “ON” or “OFF.”
– “ON”: to output the Bluetooth signal (RF 2.4
GHz).
– “OFF” (z): to not output the Bluetooth signal
(RF 2.4 GHz).
Be sure to set to “ON” when you connect to the
Bluetooth device.
Visibility
To allow other Bluetooth devices to search for
this unit.
– “Show”: to allow the other device to search.
–“Hide” (
z): to not allow the other device to
search.
Be sure to set to “Show” when you search for
this unit from a Bluetooth device.
Device Name
To change the name of this unit displayed on
connected device. (Default setting: “Xplod”)
Select “Rename” and input characters. Up to 12
characters can be input.
To restore “Xplod,” select “Default” c “yes.”
01US+00COV-U.book Page 12 Thursday, April 27, 2006 11:03 PM
13
MEX-BT5000
2-693-038-21 (1)
E:\Working\2693038211\269303821MEXBT5000U\01US02CD-U.fm masterpage:RightE:\Working\2693038211\269303821MEXBT5000U\01US02CD-U.fm masterpage:Right
Notes
•While connecting to a Bluetooth device, this unit
cannot be detected from another device. To be
detected, disconnect the current connection and
search for this unit from another device.
•Depending on the device, searching from this unit
may not be possible. In this case, search for this unit
from the connecting device.
•If you search for this unit and the connecting device
mutually at the same time, this unit will not recognize
the connecting device.
•It may take time to search or connect.
•Depending on the device, the confirmation display of
the connection appears before inputting the
passcode.
•The time limit for inputting the passcode differs
depending on the device.
•This unit can register up to 6 devices each for
handsfree and audio devices.
Connecting to registered devices
Devices are registered once paired and connected
with this unit. You can select the registered
device and connect it.
1Press (Bluetooth).
The Bluetooth function menu appears.
2Select “Connectivity” c “Handsfree
Devices” or “Audio Devices.”
The list of registered devices appears.
3Select the device to connect.
4Select “Connect.”
“Connected” appears and connection is
complete.
“ ” or “ ” appears during connection.
To stop the connection
Select “Disconnect” c “yes” in step 4.
Tip
Depending on the device, it may be possible to select
this unit from the device, and then connect.
Handsfree talking
Check that this unit and the cellular phone are
connected beforehand (page 12, 13).
Notes
•For details on operation when a cellular phone with
Bluetooth audio streaming function is connected as
an audio device, see “Listening to music from an
audio device” on page 15.
•The microphone of this unit is located on the rear of
the front panel (page 8). Do not mask the
microphone with tape, etc.
Making calls
You can make a call from the connected cellular
phone by operating this unit.
1Press (CALL).
The CALL menu appears.
2Select the items in the following order,
then press the joystick to start calling.
CALL menu
*If you set “Security” (page 16), “Security Locked”
appears and operation is not possible.
Dialed Calls*
Selects from the dialed call history. (Maximum
storable name and phone numbers: 10)
Name and phone number to call c “Call”
Select “Delete” to delete the name and phone
number, “Delete All” to clear the history.
Received Calls*
Selects from the received call history.
(Maximum storable name and phone
numbers:10)
Name and phone number to call c “Call”
Select “Delete” to delete the name and phone
number, “Delete All” to clear the history.
Phonebook*
Selects from the phonebook list. (Maximum
storable name and phone numbers: 50)
“Contact List” c Name to call c the name and
phone number
For details on how to store in the phonebook,
see “Using the Phonebook” on page 14 and
“Setting a handsfree device” on page 15.
Dial
Inputs the phone number.
Phone number can also be input with the
number buttons of the card remote commander.
To input “+,” press and hold the 0 button.
Preset Dial*
Selects the phone number stored in a number
button.
Preset number (P1 – P6) c “Call”
For details on how to store in the number
buttons, see “Using the Preset Dial” on page 14.
continue to next page t
01US+00COV-U.book Page 13 Thursday, April 27, 2006 11:03 PM
14
E:\Working\2693038211\269303821MEXBT5000U\01US02CD-U.fm masterpage:Left
MEX-BT5000
2-693-038-21 (1)
Tips
•Preset Dial also allows you to make a call by
pressing a number button twice after pressing
(CALL).
•On the “Dialed Calls,” “Received Calls” and “Preset
Dial” menus, you can make a call by pressing
(CALL) while the phone number is displayed.
Presetting the volume of ring tone
and talker’s voice
You can preset the volume level of the ring tone
and talker’s voice.
To adjust the ring tone:
Rotate the joystick while the phone is ringing.
“Ring Vol” appears and ring tone volume is set.
To adjust the talker’s voice:
Rotate the joystick during a call. “Talk Vol”
appears and the talker’s voice volume is set.
Sending DTMF (Dual Tone Multiple
Frequency) tones
You can send DTMF tones.
To send DTMF tones, use the joystick or press
the required number buttons (0 – 9, or ) on
the card remote commander during a call.
Receiving calls
When receiving a call, ring tone is output from
your car speakers.
For details on the settings for receiving a call and
during a call, see “Setting a handsfree device” on
page 15.
1When receiving a call, press (CALL),
(MENU) or (Bluetooth).
The phone call starts.
To reject a call
Press (OFF).
Tips
•If you set “Auto Answer” to on, the phone call is
automatically started in the set time (page 15).
•If (CALL) is pressed during a call, the handsfree
function is deactivated, and the microphone and
speaker of the cellular phone are activated. In this
case, the Bluetooth connection may become
disconnected depending on the cellular phone.
Ending calls
1Press (OFF).
If the other party ends the call, talk time
appears for a few seconds.
Note
Even if the call is ended, the Bluetooth connection is
not canceled.
Using the Phonebook
Receiving phonebook data from a
cellular phone
1Select “Phone Settings” from the Bluetooth
function menu.
2Select “Receive PB.”
“Waiting…” appears.
3Send the phonebook data by operating the
cellular phone.
“Data Receiving…” appears while receiving
the phonebook data.
“Complete” appears when receiving is
complete.
Storing the numbers from “Dialed
Calls” or “Received Call”
1Select “Dialed Calls” or “Received Call” from
the CALL menu.
2Select the phone number to store, then select
“PB Memory.”
The “Contact Name” display appears.
3Input a name.
Up to 20 characters can be input.
4Select “Save?” c “yes.”
Note
Up to 50 phone numbers can be stored in the
Phonebook. If you try to register more than 50
numbers, “Memory Full” appears.
Deleting from the phonebook
1Select “Phonebook” c “Contact List” from the
CALL menu.
2Select the phone number to delete.
3Select “Delete” c “yes.”
To clear all phonebook data, select “Delete All”
in step 1.
Changing a name in the phonebook
1Select “Phonebook” c “Contact List” from the
CALL menu.
2Select the name to change.
3Select “Edit Name,” then input a new name.
Using the Preset Dial
Storing the Preset Dial
You can store a phone number in the phonebook
to the Preset Dial.
(Bluetooth)
(MENU)
(CALL)
01US+00COV-U.book Page 14 Thursday, April 27, 2006 11:03 PM
15
MEX-BT5000
2-693-038-21 (1)
E:\Working\2693038211\269303821MEXBT5000U\01US02CD-U.fm masterpage:RightE:\Working\2693038211\269303821MEXBT5000U\01US02CD-U.fm masterpage:Right
1Select “Preset Dial” from the CALL menu.
2Select the preset number (P1 – P6) to store,
then select “Save.”
3Select the name to store.
4Select a phone number of the selected name.
5Select “yes” when “Save?” appears.
Note
To replace a registered preset number, delete the
existing registration first, then store the new phone
number.
Deleting the Preset Dial
1Select “Preset Dial” from the CALL menu.
2Select the preset number to delete.
3Select “Delete” c “yes.”
Music streaming
Listening to music from an audio
device
You can listen to music of an audio device on this
unit if the audio device supports A2DP
(Advanced Audio Distribution Profile) of
Bluetooth technology.
1Connect this unit and the Bluetooth
audio device (page 13).
“ ” appears during connection.
2Turn down the volume on this unit.
3Press (SOURCE) repeatedly until
“Bluetooth AUDIO” appears.
4Operate the audio device to start
playback.
5Adjust the volume on this unit.
Operating an audio device with this
unit
You can perform the following operations on this
unit if the audio device supports AVRCP (Audio
Video Remote Control Profile) of Bluetooth
technology. (The operation differs depending on
the audio device.)
*Depending on the device, it may be necessary to
press twice.
Operations other than the above should be
performed on the audio device.
Note
Even if the source is changed on this unit, playback of
the audio device does not stop.
Tip
You can connect a cellular phone as an audio device
and listen to music.
Other settings
Setting a handsfree device
You can set various functions when a cellular
phone compatible with the Bluetooth function is
connected as a handsfree device.
1Press (Bluetooth).
The Bluetooth function menu appears.
2Select “Phone Settings.”
3Select the desired menu.
4Select the setting.
5Press (Bluetooth).
Phone Settings menu
“z” indicates the default settings.
To Do this
Skip tracks Push the joystick left/right.
Reverse/fast-
forward a track
Push and hold the joystick left/
right.
Pause Press (6) (PAUSE)*.
Receive PB*1*2 (Receive Phonebook)
To receive and store the phonebook data from a
cellular phone (page 14).
Auto Answer
– “on”: to start a call automatically when
received. Set the time to start a call: “1 sec” –
“60 sec”
– “off” (z): to not start a call until (CALL),
(MENU) or (Bluetooth) is pressed.
Ringtone
To switch the ring tone.
–“Cellular*
3” (z): to output the ring tone set
with the cellular phone.
– “Default”: to output this unit’s ring tone.
EC/NC Mode*4 (Echo Canceller/Noise
Canceller Mode)
To reduce echo and noise in phone call
conversations.
“Mode 2” has a more pronounced effect than
“Mode 1” (z). “off” is normal sound.
continue to next page t
01US+00COV-U.book Page 15 Thursday, April 27, 2006 11:03 PM
16
E:\Working\2693038211\269303821MEXBT5000U\01US02CD-U.fm masterpage:Left
MEX-BT5000
2-693-038-21 (1)
*1 If “Security” is set, “Security Locked” appears and
operation is not possible.
*2 If a character that cannot be displayed on this unit
is used, it is not displayed correctly.
*3 Depending on the cellular phone, this unit’s ring
tone may be output even if set to “Cellular.”
*4 Configurable during a call.
Note
If you select “Initialize” in the Security setting, all
stored data is deleted (“Dialed Calls,” “Received Calls,”
“Phonebook” and “Preset Dial”).
Deleting the registration of a
connected device
1Press (Bluetooth).
The Bluetooth function menu appears.
2Select “Connectivity” c “Handsfree
Devices” or “Audio Devices.”
The list of registered devices appears.
3Select the device to delete.
4Select “Delete” c “yes.”
To clear all devices in the selection list, select
“Delete All” in step 4.
Auto connection function
If the ignition switch is set to the ACC position,
this unit reconnects automatically to the last
connected Bluetooth device.
Other functions
Adjusting menu items — MENU
1Press (MENU).
2Push the joystick up/down until the
desired menu item appears, then push
it right.
The items changes as follows:
Setup y Display y Receive Mode
y Sound
3Push the joystick up/down until the
desired setting item appears, then
push it right.
The digital indication moves to the right
(setting selection) side.
4Push the joystick up/down to select
the setting, then press it.
The setting is complete.
5Press (MENU).
The display returns to normal play/reception
mode.
Note
Displayed items will differ, depending on the source
and setting.
Tips
•You can go to the next menu level by pressing the
joystick.
•In step 5, push the joystick left until “EXIT” appears,
then press the joystick, instead of pressing (MENU).
•You can enter the Sound setting menu directly by
pressing (SOUND) on the card remote commander.
The following items can be set (follow the page
reference for details):
“z” indicates the default settings.
Setup
Speaker Sel*4 (Speaker Select)
To set the front speaker to output the ring tone,
dial-tone and other party’s voice.
–“FR-L” (
z): to output from the left channel of
front speakers.
– “FR-R”: to output from the right channel of
front speakers.
– “Front”: to output from both front speakers.
Security
To lock the personal information in the
following menus by setting a 4-digit password
(page 13).
“Dialed Calls,” “Received Calls,” “Phonebook,”
“Preset Dial,” “Receive PB”
If you set the security, “Security Locked”
appears when the above menus are operated.
To unlock the security, select “Unlock” and
input the password number.
Clock Adjust (page 4)
Beep
To set “on” (z) or “off.”
RM (Rotary Commander)
To change the operative direction of the rotary
commander controls.
–“NORM” (
z): to use the rotary commander in
the factory-set position.
– “REV”: when you mount the rotary
commander on the right side of the steering
column.
AUX Audio*1
To turn the AUX source display “on” (z) or
“off” (page 19).
Version
To display the unit’s firmware version.
01US+00COV-U.book Page 16 Thursday, April 27, 2006 11:03 PM
17
MEX-BT5000
2-693-038-21 (1)
E:\Working\2693038211\269303821MEXBT5000U\01US02CD-U.fm masterpage:RightE:\Working\2693038211\269303821MEXBT5000U\01US02CD-U.fm masterpage:Right
Display
Receive Mode
Sound
*1 When the unit is turned off.
*2 In such cases, some FM stereo broadcasts may
become monaural while in the stereo reception
mode.
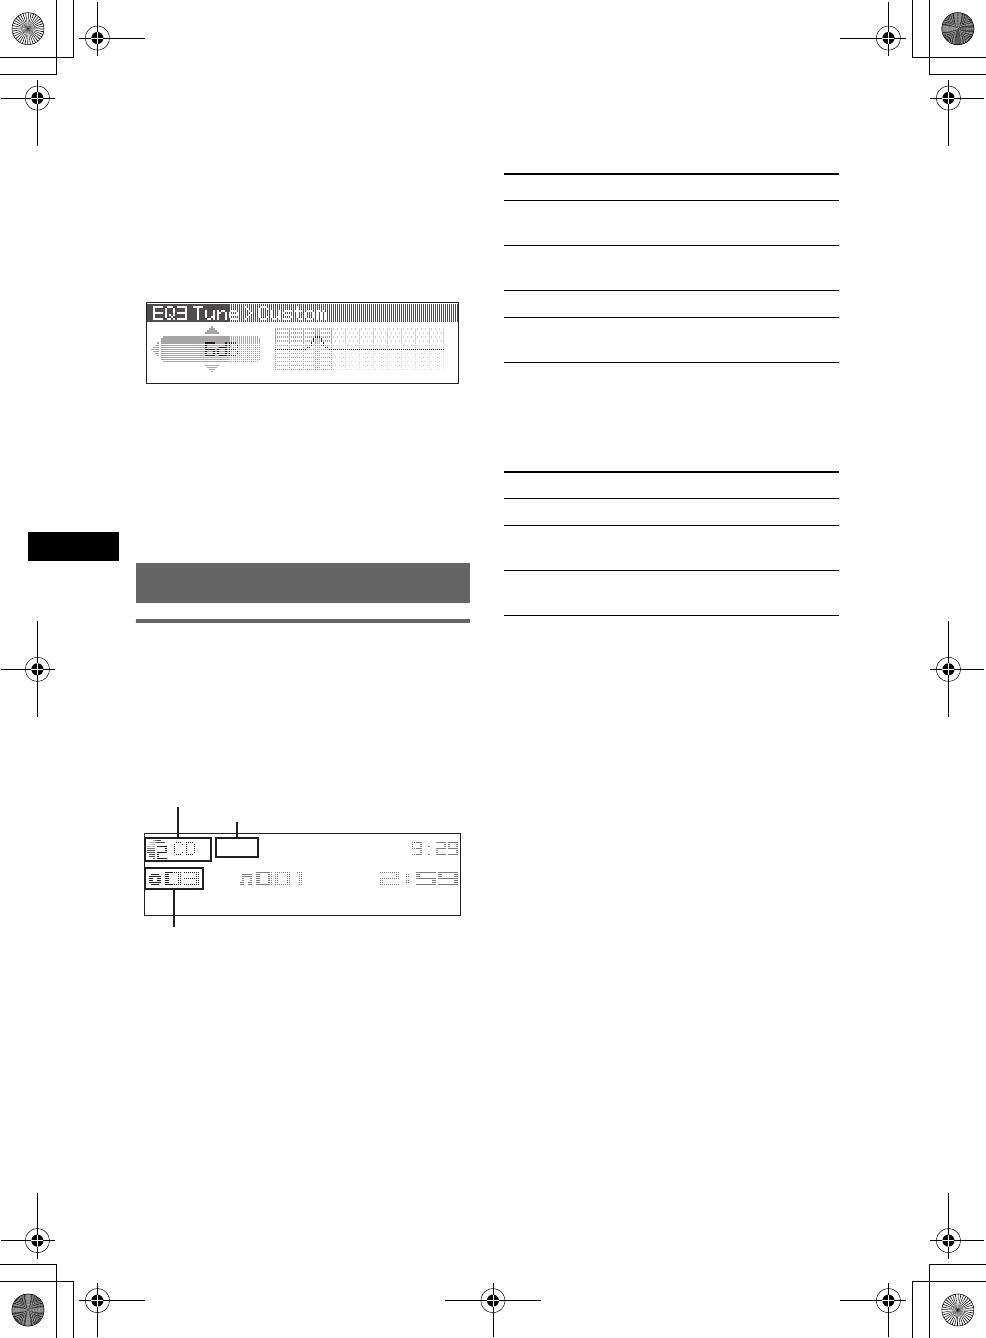
Customizing the equalizer curve
— EQ3 Tune
“Custom” of EQ3 allows you to make your own
equalizer settings.
1Select a source, then press (MENU).
2Select “Sound” c “EQ3 Preset” c
“Custom,” using the joystick.
3Select “EQ3 Tune” using the joystick.
4Select the desired frequency range
from “LOW,” “MID” and “HI.”
Image
To set various display images.
– “Space Producer” (z): to create animated on-
screen patterns in time with the music.
– “All”: to step repeatedly through the display
images in all display modes.
– “off”: to not display any image.
– “SA 1 – 5”: to display the Spectrum Analyzer.
– “Movie 1 – 3”: to display a movie.
– “Wallpaper 1 – 3”: to display a wallpaper.
– “SA All”/“Movie All”/“Wallpaper All”: to
step repeatedly through the display images of
each mode.
Info (Information)
To display the items (depending on the source,
etc.).
– “All”: to display all items.
– “Simple” (z): to not display any items.
– “Clear”: to have items automatically
disappear.
Demo*1
(Demonstration)
To set “on” (z) or “off.”
Dimmer
To change the brightness of the display.
–“Auto” (
z): to dim the display automatically
when you turn lights on.
– “on”: to dim the display.
– “off”: to deactivate the dimmer.
Auto Scroll
To scroll long displayed item automatically
when the disc/album/group/track is changed.
– “on”: to scroll.
–“off” (
z): to not scroll.
Local (Local seek mode)
–“off” (
z): to tune normal reception.
– “on”: to only tune into stations with stronger
signals.
Mono (Monaural mode)
To improve poor FM reception, select monaural
reception mode.
–“off” (
z): to hear stereo broadcast in stereo.
– “on”: to hear stereo broadcasts in monaural.
IF
–“Auto” (
z): to automatically narrow the
reception frequency to eliminate noise.
– “Wide”*2: to always hear FM stereo
broadcasts in stereo and with full frequency
reception.
BTM (page 10)
EQ3 Preset
To select an equalizer type: “Xplod,” “Vocal,”
“Edge,” “Cruise,” “Space,” “Gravity,” “Custom”
or “Off” (z).
EQ3 Tune
See “Customizing the equalizer curve” on
page 17.
DSO
To select the DSO mode: “1,” “2,” “3” or “off”
(z). The larger the number, the more enhanced
the effect.
Balance
To adjust the balance between the right and left
speakers: “R10” – “±0” (z) – “L10”
Fader
To adjust the balance between the front and rear
speakers: “F10” – “±0” (z) – “R10”
Subwoofer
To adjust the subwoofer volume: “+10” – “±0”
(z) – “-10”
(“- ∞” is displayed at the lowest setting.)
LPF (Low Pass Filter)
To select the subwoofer cut-off frequency: “off”
(z), “125Hz” or “78Hz.”
AUX Level
To adjust the volume level for each connected
auxiliary equipment. This setting negates the
need to adjust the volume level between sources
(page 19).
Adjustable level: “+6 dB” – “±0 dB” (z) –
“-6 dB”
continue to next page t
01US+00COV-U.book Page 17 Thursday, April 27, 2006 11:03 PM
18
E:\Working\2693038211\269303821MEXBT5000U\01US02CD-U.fm masterpage:Left
MEX-BT5000
2-693-038-21 (1)
5Select the frequency you wish to
adjust.
Adjustable frequency in each range:
LOW: 60 Hz or 100 Hz
MID: 500 Hz or 1.0 kHz
HI: 10.0 kHz or 12.5 kHz
6Adjust the equalizer curve.
The volume level is adjustable in 1 dB steps,
from –10 dB to +10 dB.
7Press the joystick.
Repeat steps 4 to 7 to adjust other
frequencies.
To restore the factory-set equalizer curve,
select “Initialize” c “Yes” in step 4.
Tip
Other equalizer types are also adjustable.
Using optional equipment
CD/MD changer
Selecting the changer
1Press (SOURCE) repeatedly until “CD” or
“MD” appears.
2Press (MODE) repeatedly until the desired
changer appears.
Playback starts.
*1 When an MP3 is played.
*2 When MDLP disc is played.
Skipping albums and discs
1During playback, push the joystick up/down.
Repeat and shuffle play
1During playback, press (1) (REP) or (2)
(SHUF) repeatedly until the desired setting
appears.
*1 When one or more CD/MD changers are
connected.
*2 When one or more CD changers, or two or more
MD changers are connected.
To return to normal play mode, select “Repeat
off” or “Shuffle off.”
Tip
“Shuffle All” will not shuffle tracks between CD units
and MD changers.
Locating a disc by name — LIST
You can select a disc from the list when a CD
changer with CD TEXT capability, or MD
changer is connected.
If you assign a name to a disc, the name appears
on the list.
1During playback, press the joystick.
The disc number or disc name appears.
2Push the joystick up/down until the desired
disc appears.
3Press the joystick to play the disc.
The display returns to normal play mode.
Disc/Album number
Unit number, MP3 indication*1
LP2/LP4 indication*2
To skip Push up/down
album and hold for a moment, then
release.
album
continuously
and hold within 2 seconds of
first releasing.
discs repeatedly.
discs
continuously
then push again within 2
seconds and hold.
Select To play
Repeat Disc*1disc repeatedly.
Shuffle
Changer*1
tracks in the changer in random
order.
Shuffle All*2tracks in all units in random
order.
01US+00COV-U.book Page 18 Thursday, April 27, 2006 11:03 PM
19
MEX-BT5000
2-693-038-21 (1)
E:\Working\2693038211\269303821MEXBT5000U\01US02CD-U.fm masterpage:RightE:\Working\2693038211\269303821MEXBT5000U\01US02CD-U.fm masterpage:Right
Auxiliary audio equipment
You can connect optional Sony portable devices
to the BUS AUDIO IN/AUX IN terminal on the
unit. If the changer or other device is not
connected to the terminal, the unit allows you to
listen to the portable device on your car speakers.
Note
When connecting a portable device, be sure BUS
CONTROL IN is not connected. If a device is
connected to BUS CONTROL IN, “AUX” cannot be
selected by (SOURCE).
Tip
When connecting both a portable device and a
changer, use the optional AUX-IN selector.
Selecting auxiliary equipment
1Press (SOURCE) repeatedly until “AUX”
appears.
Operate by the portable device itself.
Adjusting the volume level
Be sure to adjust the volume for each connected
audio device before playback.
1Turn down the volume on the unit.
2Press (SOURCE) repeatedly until “AUX”
appears.
3Start playback of the portable audio device at a
moderate volume.
4Set your usual listening volume on the unit.
5Adjust the volume level, following “Adjusting
menu items — MENU” on page 16. The input
level is adjustable from –6 dB to +6 dB.
Rotary commander RM-X4S
Attaching the label
Attach the indication label depending on how
you mount the rotary commander.
Location of controls
The corresponding buttons on the rotary
commander control the same functions as those
on this unit.
The following controls on the rotary commander
require a different operation from the unit.
•PRESET/DISC control
The same as pushing the joystick up/down on
the unit (push in and rotate).
•VOL (volume) control
The same as rotating the joystick on the unit
(rotate).
•SEEK/AMS control
The same as pushing the joystick left/right on
the unit (rotate, or rotate and hold).
*Not available for this unit.
Changing the operative direction
The operative direction of the controls is factory-
set as shown below.
If you need to mount the rotary commander on
the right hand side of the steering column, you
can reverse the operative direction.
1While pushing the VOL control, press and
hold (SOUND).
SOUND
DSPL
MODE
SOUND
DSPL
MODE
continue to next page t
OFF
ATT
SOUND*
SOURCE
DSPL
MODE
OFF
VOL SEEK/AMS
PRESET/
DISC
To increase
To decrease
01US+00COV-U.book Page 19 Thursday, April 27, 2006 11:03 PM
20
E:\Working\2693038211\269303821MEXBT5000U\01US02CD-U.fm masterpage:Left
MEX-BT5000
2-693-038-21 (1)
Additional Information
Precautions
• If your car has been parked in direct sunlight,
allow the unit to cool off before operating it.
• Power antenna will extend automatically while the
unit is operating.
Moisture condensation
On a rainy day or in a very damp area, moisture
condensation may occur inside the lenses and
display of the unit. Should this occur, the unit will
not operate properly. In such a case, remove the disc
and wait for about an hour until the moisture has
evaporated.
To maintain high sound quality
Be careful not to splash juice or other soft drinks
onto the unit or discs.
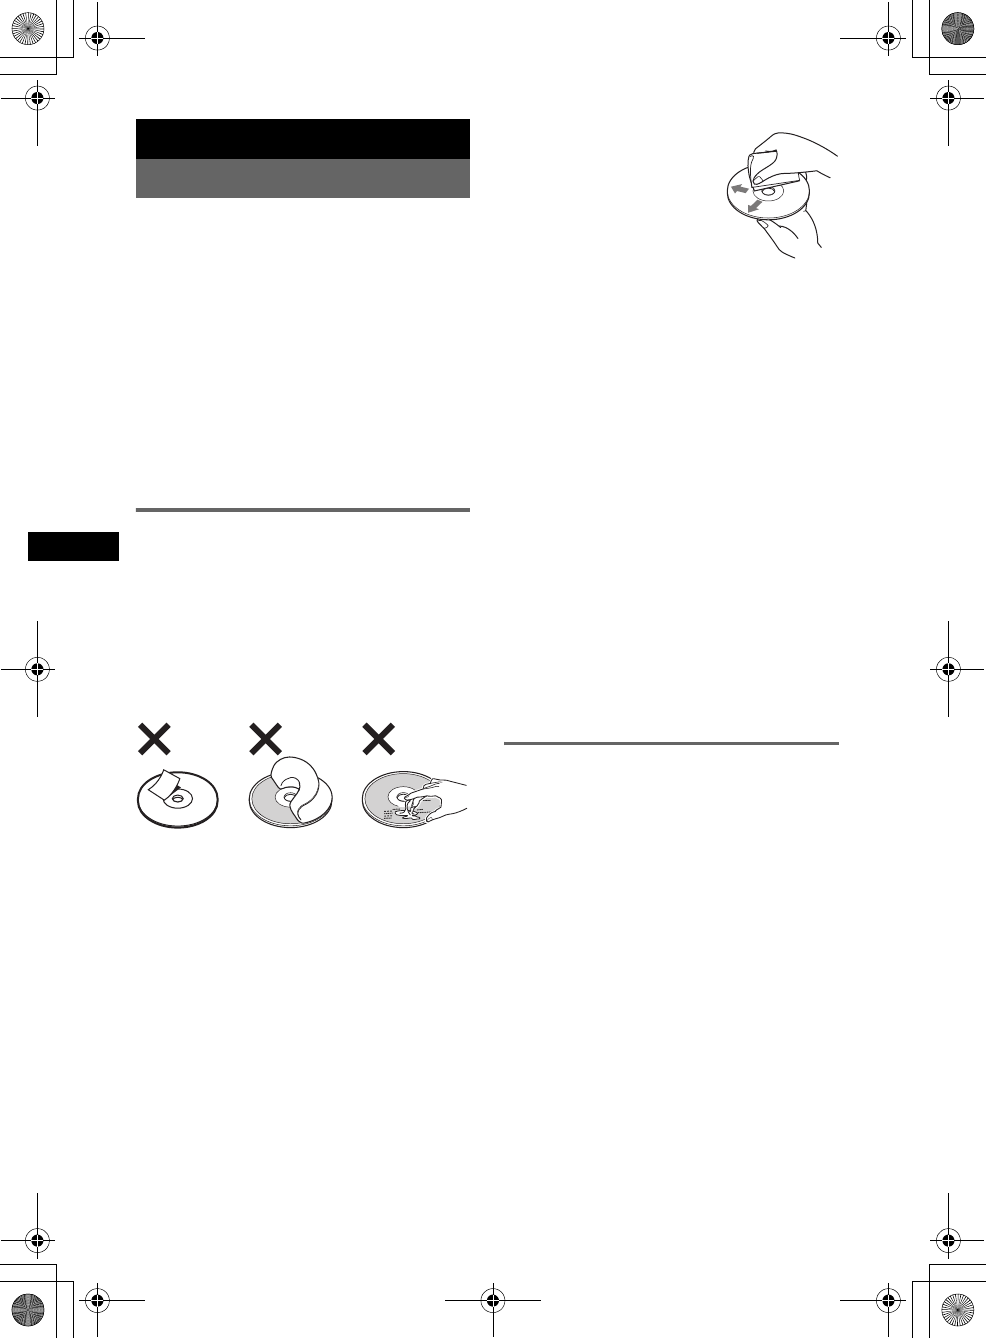
Notes on discs
• To keep a disc clean, do not touch its surface.
Handle the disc by its edge.
• Keep your discs in their cases or disc magazines
when not in use.
• Do not subject discs to heat/high temperature.
Avoid leaving them in a parked car or on a
dashboard/rear tray.
• Do not attach labels, or use discs with sticky ink/
residue. Such discs may stop spinning when used,
causing a malfunction, or may ruin the disc.
• Do not use any discs with labels or stickers
attached.
The following malfunctions may result from using
such discs:
– Inability to eject a disc (due to a label or sticker
peeling off and jamming the eject mechanism).
– Inability to read audio data correctly (e.g.,
playback skipping, or no playback) due to heat
shrinking of a sticker or label causing a disc to
warp.
• Discs with non-standard shapes (e.g., heart,
square, star) cannot be played on this unit.
Attempting to do so may damage the unit. Do not
use such discs.
• You cannot play 8 cm (3 1/4 in) CDs.
• Before playing, clean the discs
with a commercially available
cleaning cloth. Wipe each disc
from the center out. Do not use
solvents such as benzine,
thinner, commercially available
cleaners, or antistatic spray
intended for analogue discs.
Notes on CD-R/CD-RW discs
• Some CD-Rs/CD-RWs (depending on the
equipment used for its recording or the condition
of the disc) may not play on this unit.
• You cannot play a CD-R/a CD-RW that is not
finalized.
Music discs encoded with copyright
protection technologies
This product is designed to play back discs that
conform to the Compact Disc (CD) standard.
Recently, various music discs encoded with
copyright protection technologies are marketed by
some record companies. Please be aware that among
those discs, there are some that do not conform to
the CD standard and may not be playable by this
product.
About MP3/WMA files
MP3, which stands for MPEG-1 Audio Layer-3, is a
music file compression format standard. It
compresses audio CD data to approximately 1/10 of
its original size.
WMA, which stands for Windows Media Audio, is
another music file compression format standard. It
compresses audio CD data to approximately 1/22*
of its original size.
*only for 64 kbps
• The unit is compatible with the ISO 9660 level 1/
level 2 format, Joliet/Romeo in the expansion
format, and Multi Session.
• The maximum number of:
– folders (albums): 150 (including root and empty
folders).
– MP3/WMA files (tracks) and folders contained
in a disc: 300 (if a folder/file names contain
many characters, this number may become less
than 300).
– displayable characters for a folder/file name is
25 (Joliet), or 50 (Romeo).
• ID3 tag versions 1.0, 1.1, 2.2, 2.3 and 2.4 apply to
MP3 only. Displayable ID3 tag is 30 characters
(1.0 and 1.1), or 50 characters (2.2, 2.3 and 2.4).
Displayable WMA tag is 25 characters.
Note on DualDiscs
A DualDisc is a two sided disc product which
mates DVD recorded material on one side with
digital audio material on the other side. However,
since the audio material side does not conform to
the Compact Disc (CD) standard, playback on this
product is not guaranteed.
01US+00COV-U.book Page 20 Thursday, April 27, 2006 11:03 PM
21
MEX-BT5000
2-693-038-21 (1)
E:\Working\2693038211\269303821MEXBT5000U\01US02CD-U.fm masterpage:RightE:\Working\2693038211\269303821MEXBT5000U\01US02CD-U.fm masterpage:Right
Playback order of MP3/WMA files
Notes
•When naming an MP3 file/WMA file, be sure to add
the file extension “.mp3”/“.wma” to the file name.
•During playback of a VBR (variable bit rate) MP3/
WMA file or fast-forward/reverse, elapsed playing
time may not display accurately.
•When the disc is recorded in Multi Session, only the
first track of the first session format is recognized
and played (any other format is skipped). The
priority of the format is CD-DA, ATRAC CD and
MP3/WMA.
– When the first track is a CD-DA, only CD-DA of the
first session is played.
– When the first track is not a CD-DA, an ATRAC CD
or MP3/WMA session is played. If the disc has no
data in any of these formats, “NO Music” is
displayed.
Notes on MP3
•Be sure to finalize the disc before using on the unit.
•If you play a high-bit-rate MP3, such as 320 kbps,
sound may be intermittent.
Notes on WMA
•Files made with lossless compression are not
playable.
•Files protected by copyright are not playable.
About ATRAC CD
ATRAC3plus format
ATRAC3, which stands for Adaptive Transform
Acoustic Coding3, is audio compression
technology. It compresses audio CD data to
approximately 1/10 of its original size.
ATRAC3plus, which is an extended format of
ATRAC3, compresses the audio CD data to
approximately 1/20 of its original size. The unit
accepts both ATRAC3 and ATRAC3plus format.
ATRAC CD
ATRAC CD is recorded audio CD data which is
compressed to ATRAC3 or ATRAC3plus format
using authorized software, such as SonicStage 2.0 or
later, or SonicStage Simple Burner.
• The maximum number of:
– folders (groups): 255
– files (tracks): 999
• The characters for a folder/file name and text
information written by SonicStage are displayed.
For details on ATRAC CD, see the SonicStage or
SonicStage Simple Burner manual.
Note
Be sure to create the ATRAC CD using authorized
software, such as SonicStage 2.0 or later, or
SonicStage Simple Burner 1.0 or 1.1.
If you have any questions or problems concerning
your unit that are not covered in this manual, consult
your nearest Sony dealer.
Maintenance
Replacing the lithium battery of the
card remote commander
Under normal conditions, the battery will last
approximately 1 year. (The service life may be
shorter, depending on the conditions of use.)
When the battery becomes weak, the range of the
card remote commander becomes shorter. Replace
the battery with a new CR2025 lithium battery. Use
of any other battery may present a risk of fire or
explosion.
Notes on the lithium battery
•Keep the lithium battery out of the reach of children.
Should the battery be swallowed, immediately
consult a doctor.
•Wipe the battery with a dry cloth to assure a good
contact.
•Be sure to observe the correct polarity when
installing the battery.
•Do not hold the battery with metallic tweezers,
otherwise a short-circuit may occur.
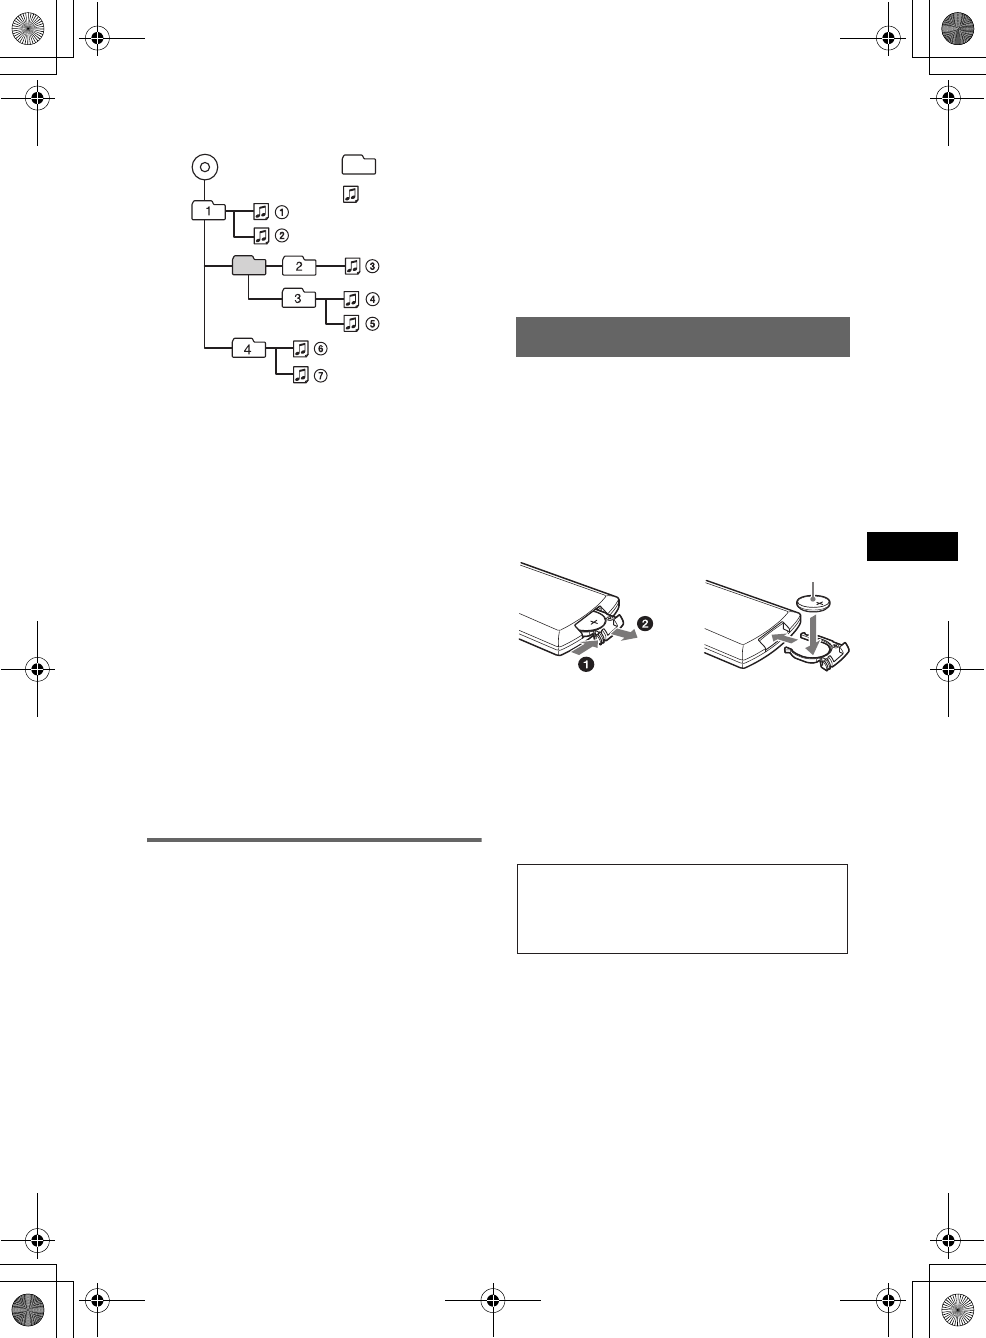
Folder
(album)
MP3/WMA file
(track)
MP3/WMA
continue to next page t
c
+ side up
WARNING
Battery may explode if mistreated.
Do not recharge, disassemble, or dispose of
in fire.
01US+00COV-U.book Page 21 Thursday, April 27, 2006 11:03 PM
22
E:\Working\2693038211\269303821MEXBT5000U\01US02CD-U.fm masterpage:Left
MEX-BT5000
2-693-038-21 (1)
Fuse replacement
When replacing the fuse, be
sure to use one matching the
amperage rating stated on the
original fuse. If the fuse blows,
check the power connection and
replace the fuse. If the fuse
blows again after replacement,
there may be an internal
malfunction. In such a case,
consult your nearest Sony
dealer.
Cleaning the connectors
The unit may not function properly if the connectors
between the unit and the front panel are not clean. In
order to prevent this, detach the front panel (page 5)
and clean the connectors with a cotton swab dipped
in alcohol. Do not apply too much force. Otherwise,
the connectors may be damaged.
Notes
•For safety, turn off the ignition before cleaning the
connectors, and remove the key from the ignition
switch.
•Never touch the connectors directly with your fingers
or with any metal device.
Removing the unit
1Remove the protection collar.
1Detach the front panel (page 5).
2Pinch both edges of the protection collar,
then pull it out.
2Remove the unit.
1Insert both release keys simultaneously
until they click.
2Pull the release keys to unseat the unit.
3Slide the unit out of the mounting.
Fuse (10A)
Main unit Back of the front
panel
x
Hook facing
inwards.
01US+00COV-U.book Page 22 Thursday, April 27, 2006 11:03 PM
23
MEX-BT5000
2-693-038-21 (1)
E:\Working\2693038211\269303821MEXBT5000U\01US02CD-U.fm masterpage:RightE:\Working\2693038211\269303821MEXBT5000U\01US02CD-U.fm masterpage:Right
Specifications
CD Player section
Signal-to-noise ratio: 120 dB
Frequency response: 10 – 20,000 Hz
Wow and flutter: Below measurable limit
Tuner section
FM
Tuning range: 87.5 – 107.9 MHz
Antenna terminal: External antenna connector
Intermediate frequency: 10.7 MHz/450 kHz
Usable sensitivity: 9 dBf
Selectivity: 75 dB at 400 kHz
Signal-to-noise ratio: 67 dB (stereo), 69 dB (mono)
Harmonic distortion at 1 kHz: 0.5 % (stereo),
0.3 % (mono)
Separation: 35 dB at 1 kHz
Frequency response: 30 – 15,000 Hz
AM
Tuning range: 530 – 1,710 kHz
Antenna terminal: External antenna connector
Intermediate frequency: 10.7 MHz/450 kHz
Sensitivity: 30 µV
Wireless Communication
Communication System:
Bluetooth Standard version 2.0
Output:
Bluetooth Standard Power Class 2 (Max. +4 dBm)
Maximum communication range:
Line of sight approx. 10 m (32.8 ft)*1
Frequency band:
2.4 GHz band (2.4000 – 2.4835 GHz)
Modulation method: FHSS
Compatible Bluetooth Profiles*2:
A2DP (Advanced Audio Distribution Profile)
AVRCP (Audio Video Remote Control Profile)
HFP (Handsfree Profile)
OPP (Object Push Profile)
*1 The actual range will vary depending on factors
such as obstacles between devices, magnetic
fields around a microwave oven, static electricity,
reception sensitivity, antenna's perfomance,
operating system, software application, etc.
*2 Bluetooth standard profiles indicate the purpose of
Bluetooth communication between devices.
Power amplifier section
Outputs: Speaker outputs (sure seal connectors)
Speaker impedance: 4 – 8 ohms
Maximum power output: 52 W × 4 (at 4 ohms)
General
Outputs:
Audio outputs terminal (front/rear)
Subwoofer output terminal (mono)
Power antenna relay control terminal
Power amplifier control terminal
Inputs:
Telephone ATT control terminal
Illumination control terminal
BUS control input terminal
BUS audio input/AUX IN terminal
Remote controller input terminal
Antenna input terminal
Tone controls:
Low: ±10 dB at 60 Hz or 100 Hz (XPLOD)
Mid: ±10 dB at 500 Hz or 1 kHz (XPLOD)
High: ±10 dB at 10 kHz or 12.5 kHz (XPLOD)
Power requirements: 12 V DC car battery
(negative ground)
Dimensions: Approx. 178 × 50 × 161.7 mm
(7 1/8 × 2 × 6 3/8 in) (w/h/d)
Mounting dimensions: Approx. 182 × 53 × 162 mm
(7 1/4 × 2 1/8 × 6 1/2 in) (w/h/d)
Mass: Approx. 1.2 kg (2 lb 11 oz)
Supplied accessories:
Card remote commander: RM-X301
Parts for installation and connections (1 set)
Optional accessories/equipment:
Rotary commander: RM-X4S
BUS cable (supplied with an RCA pin cord):
RC-61 (1 m), RC-62 (2 m)
CD changer (10 discs): CDX-757MX
CD changer (6 discs): CDX-T69
Source selector: XA-C30, XA-C40
AUX-IN selector: XA-300
Your dealer may not handle some of the above listed
accessories. Please ask the dealer for detailed
information.
Note
This unit cannot be connected to a digital preamplifier
or an equalizer which is Sony BUS system compatible.
Design and specifications are subject to change
without notice.
AUDIO POWER SPECIFICATIONS
POWER OUTPUT AND TOTAL HARMONIC
DISTORTION
23.2 watts per channel minimum continuous
average power into 4 ohms, 4 channels driven
from 20 Hz to 20 kHz with no more than 5% total
harmonic distortion.
CEA2006 Standard
Power Output: 17 Watts RMS × 4 at
4 Ohms < 1% THD+N
SN Ratio: 82 dBA
(reference: 1 Watt into 4 Ohms)
US and foreign patents licensed from Dolby
Laboratories.
MPEG Layer-3 audio coding technology and
patents licensed from Fraunhofer IIS and Thomson.
• Lead-free solder is used for soldering.
• Halogenated flame retardants are not used in the
certain printed wiring boards.
• Halogenated flame retardants are not used in
cabinets.
• Paper is used for the packaging cushions.
01US+00COV-U.book Page 23 Thursday, April 27, 2006 11:03 PM
24
E:\Working\2693038211\269303821MEXBT5000U\01US02CD-U.fm masterpage:Left
MEX-BT5000
2-693-038-21 (1)
Troubleshooting
The following checklist will help you remedy
problems you may encounter with your unit.
Before going through the checklist below, check the
connection and operating procedures.
General
No power is being supplied to the unit.
• Check the connection. If everything is in order, check
the fuse.
• If the unit is turned off and the display disappears, it
cannot be operated with the remote commander.
tTurn on the unit.
The power antenna does not extend.
The power antenna does not have a relay box.
No sound.
• The volume is too low.
• The ATT function is activated, or the Telephone ATT
function (when the interface cable of a car telephone
is connected to the ATT lead) is activated.
• The position of the fader control is not set for a 2-
speaker system.
• The CD changer is incompatible with the disc format
(MP3/WMA/ATRAC CD).
tPlay back with a Sony MP3 compatible CD
changer, or this unit.
No beep sound.
• The beep sound is canceled (page 16).
• An optional power amplifier is connected and you are
not using the built-in amplifier.
The contents of the memory have been erased.
• The RESET button has been pressed.
tStore again into the memory.
• The power connecting lead or battery has been
disconnected.
• The power connecting lead is not connected properly.
Stored stations and correct time are erased.
The fuse has blown.
Makes noise when the position of the ignition
key is switched.
The leads are not matched correctly with the car’s
accessory power connector.
The display disappears from/does not appear
in the display window.
• The dimmer is set “Dimmer on” (page 17).
• The display disappears if you press and hold (OFF).
tPress and hold (OFF) on the unit until the
display appears.
• The connectors are dirty (page 22).
DSO does not function.
Depending on the type of car interior or type of music,
DSO may not have a desirable effect.
Any display items do not display.
tSet to “Info All” (page 17).
CD/MD playback
The disc cannot be loaded.
• Another disc is already loaded.
• The disc has been forcibly inserted upside down or in
the wrong way.
The disc does not playback.
• Defective or dirty disc.
• The CD-Rs/CD-RWs are not for audio use (page 20).
MP3/WMA files cannot be played back.
The disc is incompatible with the MP3/WMA format
and version (page 20).
MP3/WMA files take longer to play back than
others.
The following discs take a longer time to start
playback.
– a disc recorded with a complicated tree structure.
– a disc recorded in Multi Session.
– a disc to which data can be added.
The ATRAC CD cannot play.
• The disc is not created by authorized software, such
as SonicStage or SonicStage Simple Burner.
• Tracks that are not included in the group cannot be
played.
The display items do not scroll.
• For discs with very many characters, those may not
scroll.
• “Auto Scroll” is set to “off.”
tSet “Auto Scroll on” (page 17) or press (SCRL).
The sound skips.
• Installation is not correct.
tInstall the unit at an angle of less than 45° in a
sturdy part of the car.
• Defective or dirty disc.
The operation buttons do not function.
The disc will not eject.
Press the RESET button (page 4).
Radio reception
The stations cannot be received.
The sound is hampered by noises.
• Connect a power antenna control lead (blue) or
accessory power supply lead (red) to the power
supply lead of a car’s antenna booster (only when
your car has built-in FM/AM antenna in the rear/side
glass).
• Check the connection of the car antenna.
• The auto antenna will not go up.
tCheck the connection of the power antenna
control lead.
• Check the frequency.
• When the DSO mode is on, the sound is sometimes
hampered by noises.
tSet the DSO mode to “off” (page 17).
Preset tuning is not possible.
• Store the correct frequency in the memory.
• The broadcast signal is too weak.
01US+00COV-U.book Page 24 Thursday, April 27, 2006 11:03 PM
25
MEX-BT5000
2-693-038-21 (1)
E:\Working\2693038211\269303821MEXBT5000U\01US02CD-U.fm masterpage:RightE:\Working\2693038211\269303821MEXBT5000U\01US02CD-U.fm masterpage:Right
Automatic tuning is not possible.
• The local seek mode is set to “on.”
tSet to “Local off” (page 17).
• The broadcast signal is too weak.
tPerform manual tuning.
During FM reception, the “ST” indication
flashes.
• Tune in the frequency accurately.
• The broadcast signal is too weak.
tSet to “Mono on” (page 17).
An FM program broadcast in stereo is heard in
monaural.
The unit is in monaural reception mode.
tSet to “Mono off” (page 17).
Bluetooth function
The connecting device cannot detect this unit.
• Set “Signal” to “ON” (page 12).
• Set “Visibility” to “Show” (page 12).
• While connecting to the other Bluetooth device, this
unit cannot be detected from another device.
Disconnect the current connection and search for this
unit from another device. The disconnected device
can be reconnected by selecting from the list of
registered devices.
This unit cannot detect the connecting device.
Check the Bluetooth setting of the connecting device.
Connection is not possible.
• Depending on the other device, searching from this
unit may not be possible.
tSearch for this unit from the other device.
• Depending on the status of the other device,
searching from this unit may not be possible.
tSearch for this unit from the other device.
• Check the pairing procedures referring to the manual
of the other device, etc., and perform the operation
again.
The name of the detected device does not
appear.
Depending on the status of the other device, it may not
be possible to obtain the name.
No ring tone.
• Adjust the volume in “Ring Vol” (page 14).
• Depending on the connecting device, the ring tone
may not be sent properly.
tSet “Ringtone” to “Default” (page 15).
The talker’s voice volume is low.
Adjust the volume in “Talk Vol” (page 14).
Echo or noise occurs in phone call
conversations.
• Lower the volume.
• “EC/NC Mode” is set to “off.”
tSet “EC/NC Mode” to “Mode 1” or “Mode 2”
(page 15).
• If the ambient noise other than the phone call sound
is loud, try reducing this noise.
E.g.: If a window is open and road noise, etc., is loud,
shut the window. If the air conditioner is loud, lower
the air conditioner.
The phone sound quality is poor.
Phone sound quality depends on reception conditions
of cellular phone.
tMove your car to a place where you can enhance
the cellular phone's signal if the reception is poor.
The sound skips during playback of a
Bluetooth audio device.
• Reduce the distance between the unit and the
Bluetooth audio device.
• If the Bluetooth audio device is stored in a case
which interrupts the signal, remove the audio device
from the case while using.
• Several Bluetooth devices or other devices which
emit radio waves are used nearby.
tTurn off the other devices.
tReduce the distance from the other devices.
The connected Bluetooth audio device cannot
be controlled.
Check that the connected Bluetooth audio device
supports AVRCP.
Some functions do not work.
Check that the connecting device supports the
functions in question.
The name of the other party does not appear
when a call is received.
• The other party is not stored in the phonebook.
tStore in the phonebook (page 14).
• The calling phone is not set to send the phone
number.
A call starts unintentionally.
• The connecting phone is set to start a call
automatically.
• “Auto Answer” of this unit is set to “on” (page 15).
Pairing failed in Time Over.
Depending on the connecting device, the time limit for
pairing may be short. Try completing the pairing
within the time by setting a single digit passcode.
The ring tone or other party's voice is output
only from one speaker.
“Speaker Sel” is set to “FR-L” or “FR-R.”
tSet “Speaker Sel” to “Front” (page 16).
continue to next page t
01US+00COV-U.book Page 25 Thursday, April 27, 2006 11:03 PM
26
E:\Working\2693038211\269303821MEXBT5000U\01US02CD-U.fm masterpage:Left
MEX-BT5000
2-693-038-21 (1)
Error displays/Messages
Audio function
Bluetooth function
Blank Disc
Tracks have not been recorded on the MD.
tPlay an MD with recorded tracks.
Error
• The disc is dirty or inserted upside down.
tClean or insert the disc correctly.
• The disc cannot play due to a problem.
tInsert another disc.
Failure (Illuminates until any button is pressed.)
The connection of speakers/amplifiers is incorrect.
tSee the installation guide manual of this model to
check the connection.
FAILURE (Illuminates for about 1 second.)
When the XM tuner is connected, storing an XM radio
channel into a preset failed.
tBe sure to receive the channel that you want to
store, then try it again.
Load
The changer is loading the disc.
tWait until loading is complete.
Local Seek +/–
The local seek mode is on during automatic tuning.
NO Disc
The disc is not inserted in the CD/MD changer.
tInsert discs in the changer.
NO Disc Name
A disc name is not written in the track.
NO Group Name
A group name is not written in the track on the ATRAC
CD.
NO ID3 Tag
ID3 tag information is not written in the MP3 file.
NO Information
Text information is not written in the ATRAC3/
ATRAC3plus or WMA file.
NO Magazine
The disc magazine is not inserted in the CD changer.
tInsert the magazine in the changer.
NO Music
The disc is not a music file.
tInsert a music CD in this unit or MP3 playable
changer.
NO Track Name
A track name is not written in the track.
Offset
There may be an internal malfunction.
tCheck the connection. If the error indication
remains on in the display, consult your nearest
Sony dealer.
Read
The unit is reading all track and group information on
the disc.
tWait until reading is complete and playback starts
automatically. Depending on the disc structure, it
may take more than a minute.
Push Reset
The CD unit and CD/MD changer cannot be operated
due to a problem.
tPress the RESET button (page 4).
“” or “”
During reverse or fast-forward, you have reached the
beginning or the end of the disc and you cannot go any
further.
“”
The character cannot be displayed with the unit.
Busy
The Bluetooth process is not complete.
tDiscontinue receiving the phonebook data.
tStop the current operation and wait for a while.
Connection Complete
The Bluetooth connection is complete.
Connection Failed
Cannot be connected to the device because the input
passcode is incorrect.
Disconnected
The Bluetooth signal is disconnected.
Empty
• There is no data in “Dialed Calls,” “Received Calls”
or “Phonebook” in the CALL menu.
• There is no data in the phonebook when storing to the
Preset Dial.
Error
The phonebook data cannot be received due to a
problem.
HF Device is not available
Handsfree device is not connected.
Invalid Code
The input security code is incorrect.
Memory Full
• The phonebook memory of this unit became full
while the phonebook data is received.
• The phonebook memory of this unit is full.
Not Available
The Bluetooth audio device cannot be used because the
Bluetooth signal is disconnected.
No Devices Found
• No connectable device is found after searching.
• The device is not registered in “Handsfree Devices”
or “Audio Devices.”
tRegister the device in “Handsfree Devices” or
“Audio Devices.”
Security Locked
Security is set.
Time Out
The time limit for connection has been exceeded.
Turn ON Bluetooth
The Bluetooth setting is off.
tSet the Bluetooth setting to on.
01US+00COV-U.book Page 26 Thursday, April 27, 2006 11:03 PM
27
MEX-BT5000
2-693-038-21 (1)
E:\Working\2693038211\269303821MEXBT5000U\01US02CD-U.fm masterpage:RightE:\Working\2693038211\269303821MEXBT5000U\01US02CD-U.fm masterpage:Right
If these solutions do not help improve the situation,
consult your nearest Sony dealer.
If you take the unit to be repaired because of CD
playback trouble, bring the disc that was used at the
time the problem began.
Caution
IN NO EVENT SHALL SONY BE LIABLE FOR
ANY INCIDENTAL, INDIRECT OR
CONSEQUENTIAL DAMAGES OR OTHER
DAMAGES INCLUDING, WITHOUT
LIMITATION, LOSS OF PROFITS, LOSS OF
REVENUE, LOSS OF DATA, LOSS OF USE OF
THE PRODUCT OR ANY ASSOCIATED
EQUIPMENT, DOWNTIME, AND
PURCHASER'S TIME RELATED TO OR
ARISING OUT OF THE USE OF THIS
PRODUCT, ITS HARDWARE AND/OR ITS
SOFTWARE.
IMPORTANT NOTICE!
Safe and efficient use
Changes or modifications to this Bluetooth car
handsfree not expressly approved by Sony may void
the user's authority to operate the equipment.
Please check for exceptions, due to national
requirement or limitations, in usage of Bluetooth
equipment before using this product.
Driving
Check for laws and regulations on the use of mobile
phones and handsfree equipment in the areas where
you drive.
Please check for exceptions, due to national
requirement or limitations, in usage of Bluetooth
equipment before using this product.
Connecting to other devices
When connecting to any other device, please read its
user guide for detailed safety instructions.
Radio frequency exposure
RF signals may affect improperly installed or
inadequately shielded electronic systems in motor
vehicles, such as electronic fuel injection systems,
electronic antiskid (antilock) braking systems,
electronic speed control systems or air bag systems.
For installation or service of this device, please
consult with the manufacturer or its representative
of your vehicle. Faulty installation or service may be
dangerous and may invalidate any warranty that
may apply to this device.
Check regularly that all wireless device equipment
in your vehicle is mounted and operating properly."
Emergency calls
This Bluetooth car handsfree and the electronic
device connected to the handsfree operate using
radio signals, cellular, and landline networks as well
as user-programmed function, which cannot
guarantee connection under all conditions.
Therefore do not rely solely upon any electronic
device for essential communications (such as
medical emergencies).
Remember, in order to make or receive calls, the
handfree and the electronic device connected to the
handsfree must be switched on in a service area with
adequate cellular signal strength.
Emergency calls may not be possible on all cellular
phone networks or when certain network services
and/or phone features are in use.
Check with your local service provider.
01US+00COV-U.book Page 27 Thursday, April 27, 2006 11:03 PM
01US+03BCO-U.fm masterpage:Right
MEX-BT5000
2-693-038-21 (1)
Sony Corporation Printed in Thailand
If you have any questions/problems
regarding this product, try the following:
1
Read Troubleshooting in these
Operating Instructions.
2
Reset the unit.
Note: Stored data may be erased.
3
Please contact (U.S.A. only);
Call
1-800-222-7669
URL
http://www.SONY.com
01US+00COV-U.book Page 28 Thursday, April 27, 2006 11:03 PM