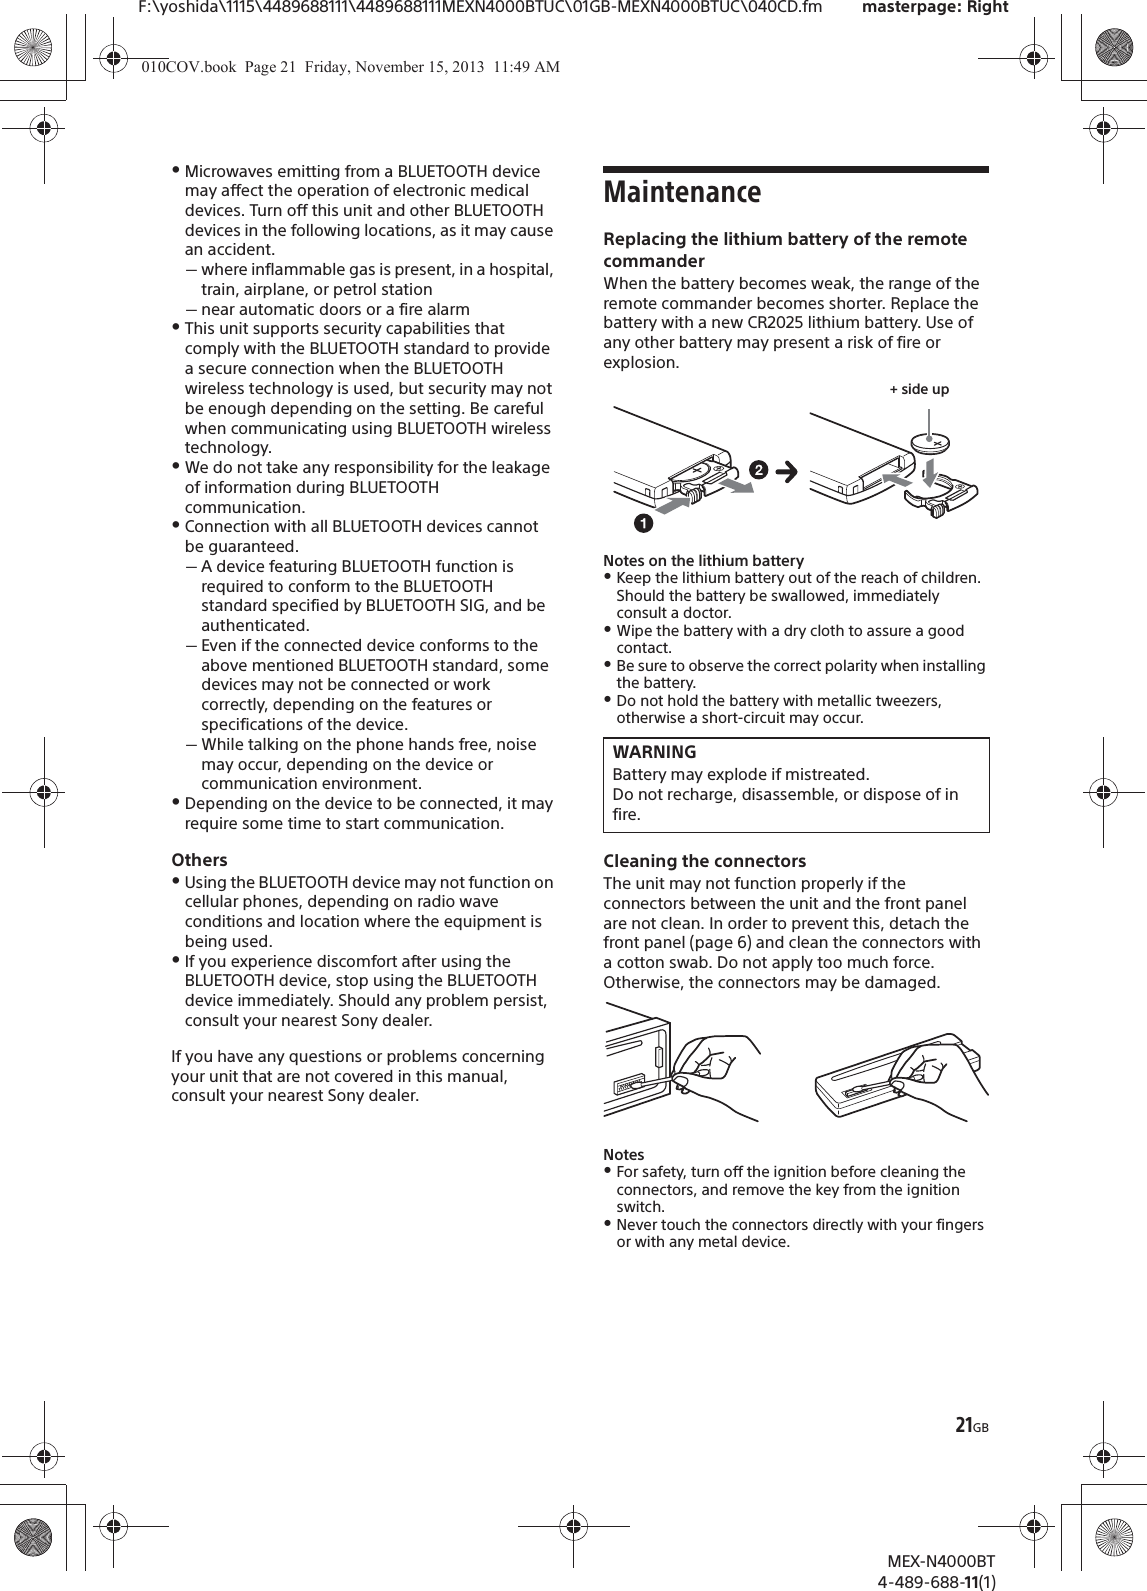
Sony Group MEXN4000BT Bluetooth Audio System User Manual MEX N4000BT
Sony Corporation Bluetooth Audio System MEX N4000BT
UserManual.wiki
>
Sony Group
>
MEXN4000BT User Manual
(Short term Confidential)Users Manual
Navigation menu
Upload a User Manual
Namespaces
Wiki Guide
HTML
PDF
Info
Views
User Manual
Discussion / Help
Navigation

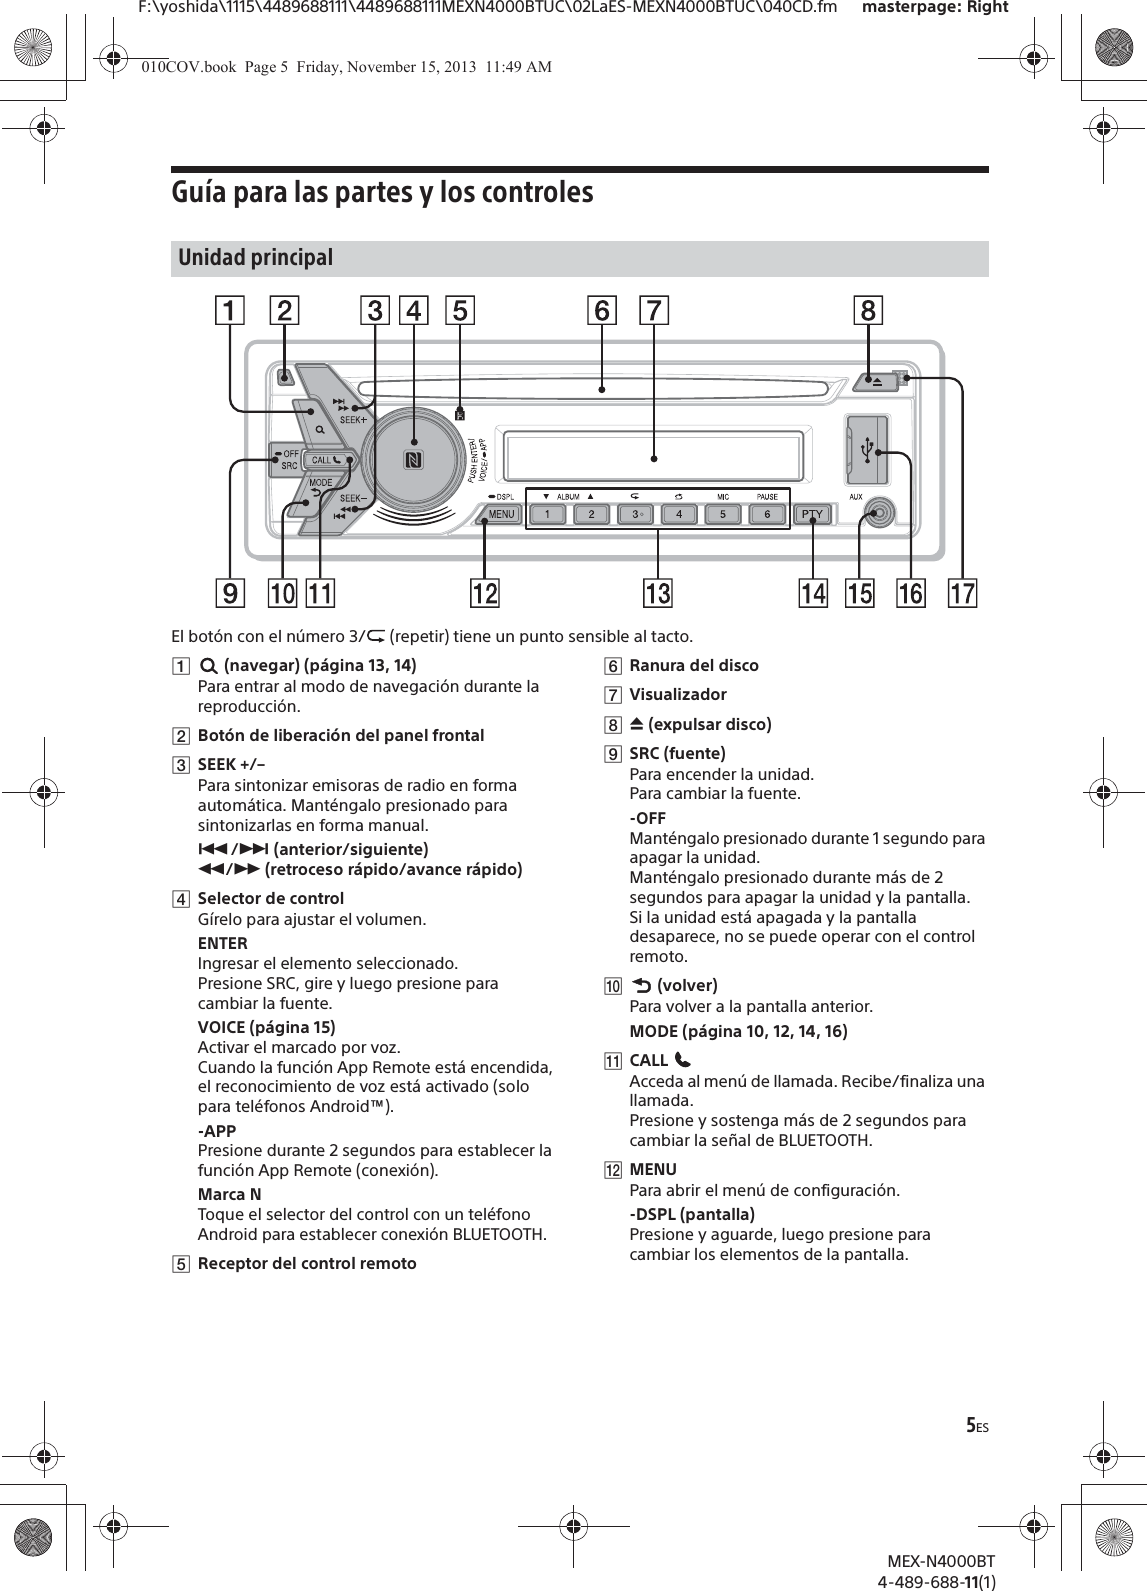
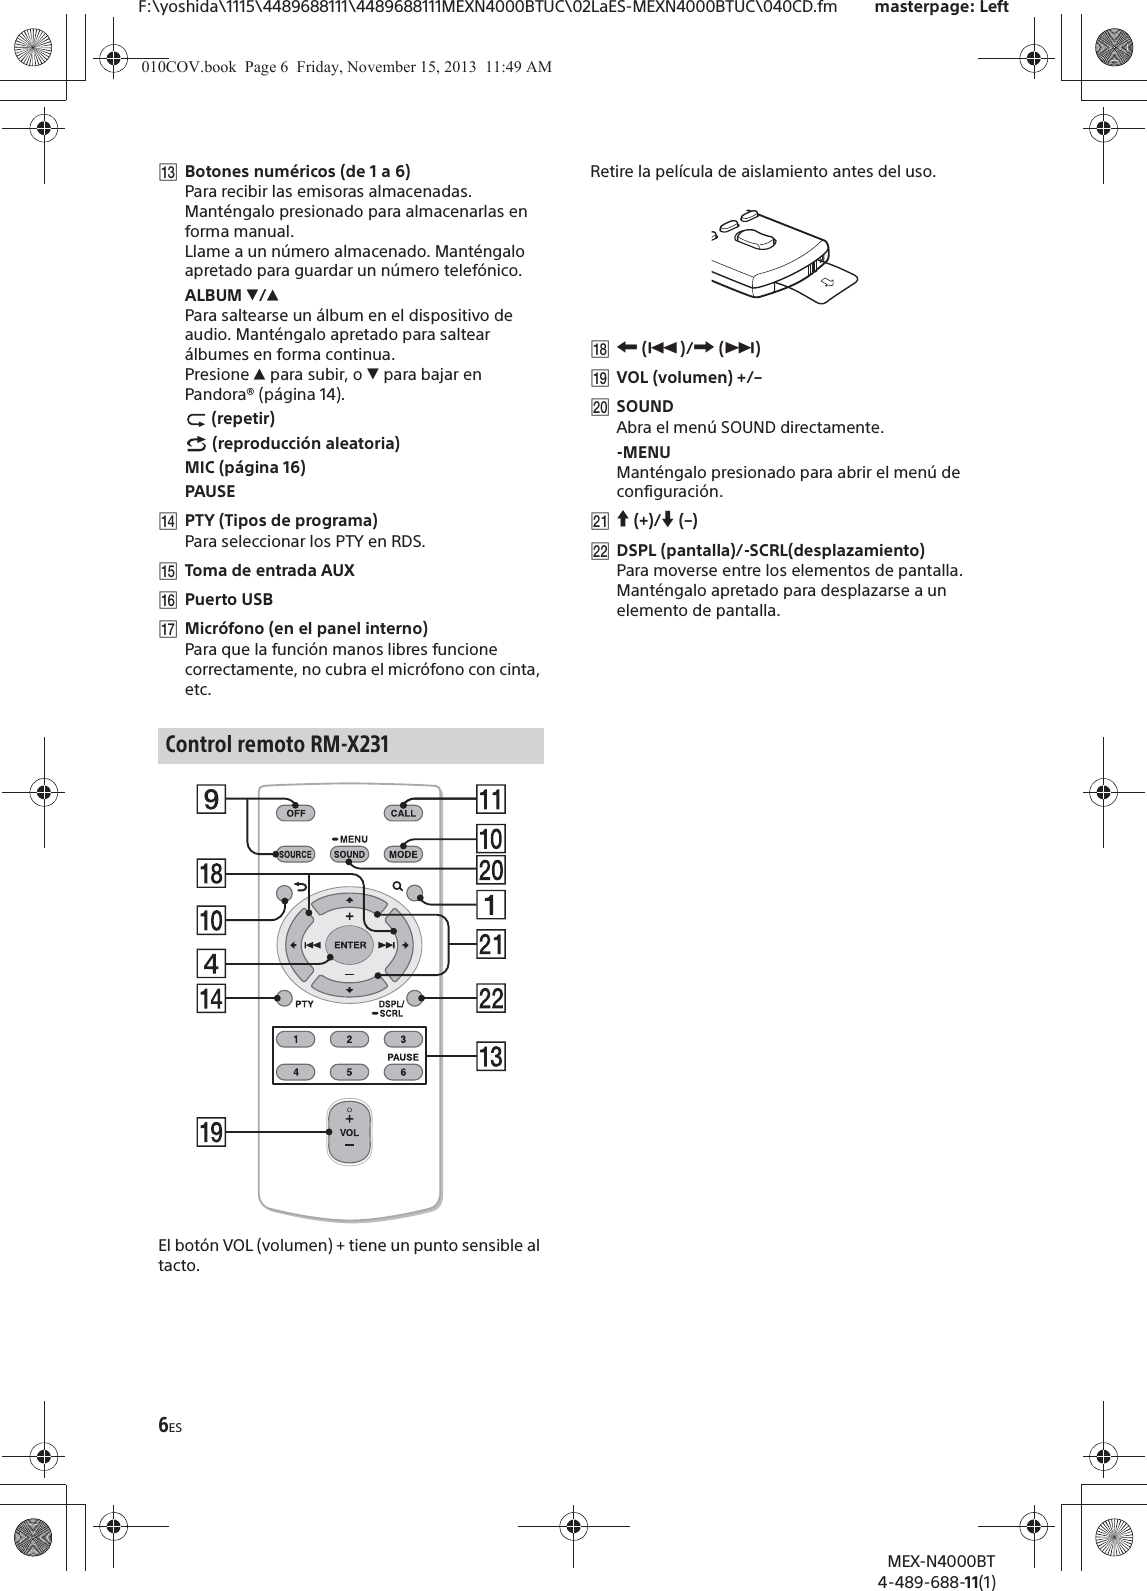
![6GBF:\yoshida\1115\4489688111\4489688111MEXN4000BTUC\01GB-MEXN4000BTUC\040CD.fm masterpage: LeftMEX-N4000BT4-489-688-11(1)PAUSEȶPTY (program type)Select PTY in RDS.ȷAUX input jackȸUSB portȹMicrophone (on inner panel)In order for the handsfree function to work properly, do not cover the microphone with tape, etc.The VOL (volume) + button has a tactile dot.Remove the insulation film before use.ȺR (Ã)/C (Ñ)ȻVOL (Volume) +/–ȼSOUNDOpen the SOUND menu directly.-MENUPress and hold to open the setup menu.Ƚa (+)/{ (–)ȾDSPL (display)/-SCRL(scroll)Change display items. Press and hold to scroll a display item.Detaching the Front PanelYou can detach the front panel of this unit to prevent theft.1Press and hold OFF ʓ.The unit is turned off.2Press the front panel release button ʔ, then remove the panel by pulling it towards you.Caution alarmIf you turn the ignition switch to the OFF position without detaching the front panel, the caution alarm will sound for a few seconds. The alarm will only sound if the built-in amplifier is used.Serial numbersMake sure the serial numbers on the bottom of the unit and the back of the front panel are matched correctly. Otherwise you cannot make BLUETOOTH pairing, connection and disconnection by NFC.Setting the Clock1Press MENU, rotate the control dial to select [GENERAL], then press it.2Rotate the control dial to select [CLOCK-ADJ], then press it.The hour indication flashes.RM-X231 RemoteGetting StartedAttaching the front panel010COV.book Page 6 Friday, November 15, 2013 11:49 AM](https://usermanual.wiki/Sony-Group/MEXN4000BT/User-Guide-2133132-Page-6.png)
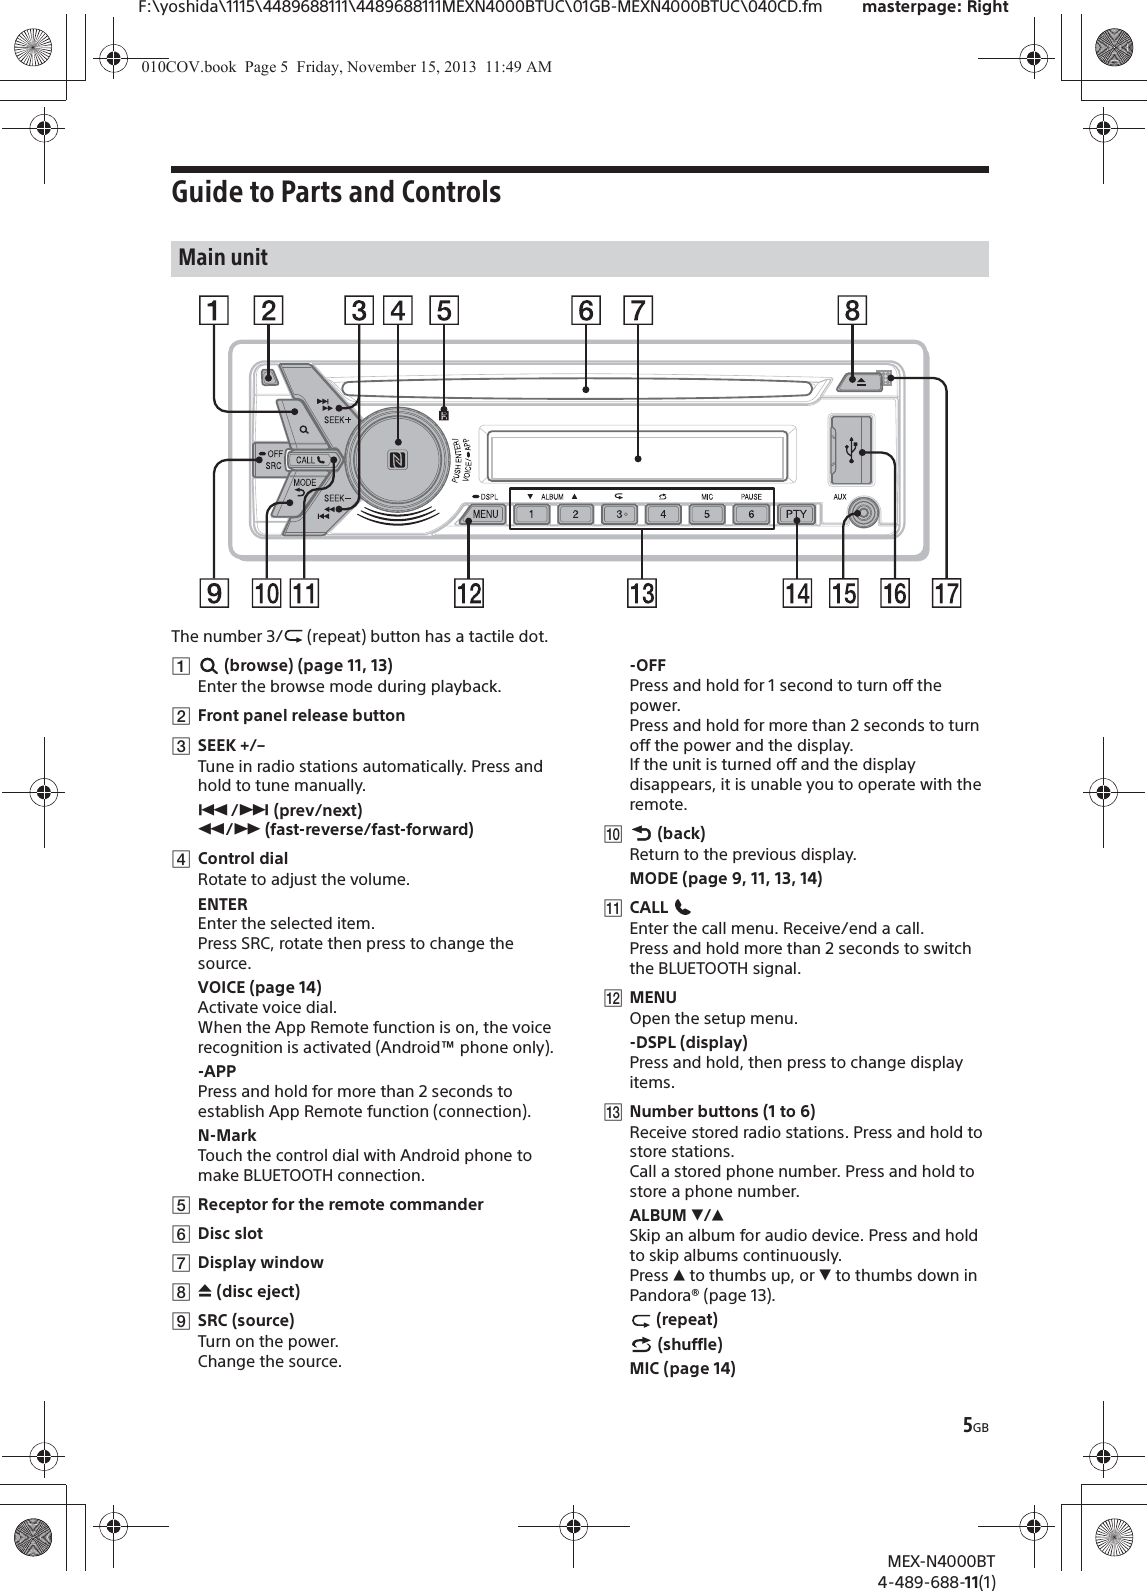
![7GBF:\yoshida\1115\4489688111\4489688111MEXN4000BTUC\01GB-MEXN4000BTUC\040CD.fm masterpage: RightMEX-N4000BT4-489-688-11(1)3Rotate the control dial to set the hour and minute.To move the digital indication, press SEEK +/–.4After setting the minute, press MENU.The setup is complete and the clock starts.To display the clock, press DSPL.Preparing a BLUETOOTH DeviceYou can enjoy music, or perform handsfree calling, by connecting a suitable BLUETOOTH device. For details on connecting, refer to the operating instructions supplied with the device.Before connecting the device, turn down the volume of this unit; otherwise, loud sound may result.When connecting a BLUETOOTH device (cellular phone, audio device, etc.) for the first time, mutual registration (called “pairing”) is required. Pairing enables this unit and other devices to recognize each other.1Place the BLUETOOTH device within 1 m (3 ft) of this unit.2Press CALL, rotate the control dial to select [PAIRING], then press it. flashes.The unit enters pairing standby mode.3Perform pairing on the BLUETOOTH device so it detects this unit.4Select [Sony Car Audio] shown in the display of the BLUETOOTH device.If [Sony Car Audio] does not appear, repeat from step 2.5If passkey* input is required on the BLUETOOTH device, input [0000].* Passkey may be called “Passcode,” “PIN code,” “PIN number” or “Password,” etc., depending on the device.When pairing is made, stays lit.6Select this unit on the BLUETOOTH device to establish the BLUETOOTH connection. or lights up when the connection is made.NoteWhile connecting to a BLUETOOTH device, this unit cannot be detected from another device. To enable detection, enter the pairing mode and search for this unit from another device.To cancel pairingPerform step 2 to cancel the pairing mode after this unit and the BLUETOOTH device are paired.To use a paired device, connection with this unit is required. Some paired devices will connect automatically.1Press CALL, rotate the control dial to select [BT SIGNL], then press it.Make sure that lights up.2Activate the BLUETOOTH function on the BLUETOOTH device.3Operate the BLUETOOTH device to connect to this unit. or lights up.Icons in the display:Pairing and connecting with a BLUETOOTH deviceConnecting with a paired BLUETOOTH deviceLights up when a cellular phone is connected to the unit.Lights up when an audio device is connected to the unit.Indicates the signal strength status of connected cellular phone.[0000]Input passkey010COV.book Page 7 Friday, November 15, 2013 11:49 AM](https://usermanual.wiki/Sony-Group/MEXN4000BT/User-Guide-2133132-Page-7.png)
![8GBF:\yoshida\1115\4489688111\4489688111MEXN4000BTUC\01GB-MEXN4000BTUC\040CD.fm masterpage: LeftMEX-N4000BT4-489-688-11(1)To connect the last-connected device from this unitActivate the BLUETOOTH function on the BLUETOOTH device.Press SRC.Select [BT PHONE] or [BT AUDIO].Press ENTER to connect with the cellular phone, or PAUSE to connect with the audio device.NoteWhile streaming BLUETOOTH audio, you cannot connect from this unit to the cellular phone. Connect from the cellular phone to this unit instead.TipWith BLUETOOTH signal on: when the ignition is turned to on, this unit reconnects automatically to the last-connected cellular phone.To install the microphoneInstalling the microphone (not supplied) will improve audio quality while talking through this unit. For details on how to connect the microphone, refer to the operating instructions supplied with the microphone.By touching the control dial on the unit with an NFC* compatible smartphone, the unit is paired and connected with the smartphone automatically.* NFC (Near Field Communication) is a technology enabling short-range wireless communication between various devices, such as mobile phones and IC tags. Thanks to the NFC function, data communication can be achieved easily just by touching the relevant symbol or designated location on NFC compatible devices.For a smartphone with Android OS 4.0 or lower installed, downloading the app “NFC Easy Connect” available at Google Play™ is required. The app may not be downloadable in some countries/regions.1Activate the NFC function on the smartphone.For details, refer to the operating instructions supplied with the smartphone.2Touch the N-Mark part of the unit with the N-Mark part of the smartphone.Make sure that lights up on the display of the unit.To disconnect by One touchTouch the N-Mark part of the unit with the N-Mark part of the smartphone again.NotesˎWhen making the connection, handle the smartphone carefully to prevent scratches.ˎOne touch connection is not possible when the unit is already connected to another NFC compatible device. In this case, disconnect the other device, and make connection with the smartphone again.When an iPhone/iPod with iOS5 or later installed is connected to the USB port, the unit is paired and connected with the iPhone/iPod automatically.To enable BLUETOOTH Auto Pairing, make sure [AUTO PAIRING] in BT setup is set to [ON] (page 18).1Activate the BLUETOOTH function on the iPhone/iPod.2Connect an iPhone/iPod to the USB port.Make sure that lights up on the display of the unit.NoteBLUETOOTH Auto Pairing is not possible if the unit is already connected to another BLUETOOTH device. In this case, disconnect the other device, then connect the iPhone/iPod again.Connecting an iPod/USB Device1Turn down the volume on the unit.2Connect the iPod/USB device to the unit.To connect an iPod/iPhone, use the USB connection cable for iPod (not supplied).Connecting with a Smartphone by One touch (NFC)Connecting with an iPhone/iPod (BLUETOOTH Auto Pairing)When connecting iPhone 5010COV.book Page 8 Friday, November 15, 2013 11:49 AM](https://usermanual.wiki/Sony-Group/MEXN4000BT/User-Guide-2133132-Page-8.png)
![9GBF:\yoshida\1115\4489688111\4489688111MEXN4000BTUC\01GB-MEXN4000BTUC\040CD.fm masterpage: RightMEX-N4000BT4-489-688-11(1)Connecting Other Portable Audio Device1Turn off the portable audio device.2Turn down the volume on the unit.3Connect the portable audio device to the AUX input jack (stereo mini jack) on the unit with a connecting cord (not supplied)*.* Be sure to use a straight type plug.4Press SRC to select [AUX].To match the volume level of the connected device to other sourcesStart playback of the portable audio device at a moderate volume, and set your usual listening volume on the unit.Press MENU and rotate the control dial.Select [SOUND] q [AUX VOL] (page 18).Listening to the RadioTo listen to the radio, press SRC to select [TUNER].1Press MODE to change the band (FM1, FM2, FM3, AM1 or AM2).2Press MENU, rotate the control dial to select [GENERAL], then press it.3Rotate the control dial to select [BTM], then press it.The unit stores stations in order of frequency on the number buttons.1Press MODE to change the band (FM1, FM2, FM3, AM1 or AM2).2Perform tuning.To tune manuallyPress and hold SEEK +/– to locate the approximate frequency, then press SEEK +/– repeatedly to fine adjust to the desired frequency.To tune automaticallyPress SEEK +/–.Scanning stops when the unit receives a station. Repeat this procedure until the desired station is received.1While receiving the station that you want to store, press and hold a number button (1 to 6) until [MEM] appears.1Select the band, then press a number button (1 to 6).Listening to the RadioStoring automatically (BTM)TuningStoring manuallyReceiving the stored stations010COV.book Page 9 Friday, November 15, 2013 11:49 AM](https://usermanual.wiki/Sony-Group/MEXN4000BT/User-Guide-2133132-Page-9.png)
![10GBF:\yoshida\1115\4489688111\4489688111MEXN4000BTUC\01GB-MEXN4000BTUC\040CD.fm masterpage: LeftMEX-N4000BT4-489-688-11(1)Using Radio Data System (RDS)Use PTY to display or search for a desired program type.1Press PTY during FM reception.2Rotate the control dial until the desired program type appears, then press it.The unit starts to search for a station broadcasting the selected program type.Type of programsThe CT data from the RDS transmission sets the clock.1Set [CT-ON] in GENERAL setup (page 17).Playing a Disc1Insert the disc (label side up).Playback starts automatically.Playing an iPod/USB DeviceIn these Operating Instructions, “iPod” is used as a general reference for the iPod functions on an iPod and iPhone, unless otherwise specified by the text or illustrations.For details on the compatibility of your iPod, see “About iPod” (page 20) or visit the support site on the back cover.MSC (Mass Storage Class)-type USB devices (such as a USB flash drive, digital media player, Android phone) compliant with the USB standard can be used.Depending on the digital media player or Android phone, setting the USB connection mode to MSC is required.NotesˎFor details on the compatibility of your USB device, visit the support site on the back cover.ˎPlayback of the following MP3/WMA/WAV files is not supported.ˋlossless compression filesˋcopyright-protected filesˋDRM (Digital Rights Management) filesˋMulti-channel audio files1Connect an iPod/USB device to the USB port (page 8).Playback starts.If a device is already connected, to start playback, press SRC to select [USB] ([IPD] appears in the display when the iPod is recognized).2Adjust the volume on this unit.To stop playbackPress and hold OFF for 1 second.Selecting program types (PTY)NEWS (News), INFORM (Information), SPORTS (Sports), TALK (Talk), ROCK (Rock), CLS ROCK (Classic Rock), ADLT HIT (Adult Hits), SOFT RCK (Soft Rock), TOP 40 (Top 40), COUNTRY (Country), OLDIES (Oldies), SOFT (Soft), NOSTALGA (Nostalgia), JAZZ (Jazz), CLASSICL (Classical), R AND B (Rhythm and Blues), SOFT R B (Soft Rhythm and Blues), LANGUAGE (Foreign Language), REL MUSC (Religious Music), REL TALK (Religious Talk), PERSNLTY (Personality), PUBLIC (Public), COLLEGE (College), WEATHER (Weather)Setting clock time (CT)Playback010COV.book Page 10 Friday, November 15, 2013 11:49 AM](https://usermanual.wiki/Sony-Group/MEXN4000BT/User-Guide-2133132-Page-10.png)
![11GBF:\yoshida\1115\4489688111\4489688111MEXN4000BTUC\01GB-MEXN4000BTUC\040CD.fm masterpage: RightMEX-N4000BT4-489-688-11(1)To remove the deviceStop playback, then remove the device.Caution for iPhoneWhen you connect an iPhone via USB, phone call volume is controlled by the iPhone, not the unit. Do not inadvertently increase the volume on the unit during a call, as sudden loud sound may result when the call ends.Press and hold MODE during playback until [MODE IPOD] appears to enable operation by the iPod directly.Note that the volume can be adjusted only by the unit.To exit passenger controlPress and hold MODE until [MODE AUDIO] appears.Playing a BLUETOOTH DeviceYou can play contents on a connected device that supports BLUETOOTH A2DP (Advanced Audio Distribution Profile).1Make BLUETOOTH connection with the audio device (page 7).2Press SRC to select [BT AUDIO].3Operate the audio device to start playback.4Adjust the volume on this unit.NotesˎDepending on the audio device, information such as title, track number/time and playback status may not be displayed on this unit.ˎEven if the source is changed on this unit, playback of the audio device does not stop.ˎ[BT AUDIO] does not appear in the display while running the “App Remote” application via the BLUETOOTH function.To match the volume level of the BLUETOOTH device to other sourcesStart playback of the BLUETOOTH audio device at a moderate volume, and set your usual listening volume on the unit.Press MENU and rotate the control dial.Select [SOUND] q [BTA VOL] (page 18).Searching and Playing Tracks1During playback, press (repeat) for Repeat play, or (shuffle) for Shuffle play.2Press (repeat) or (shuffle) repeatedly to select the desired play mode.Playback in selected play mode may take time to start.Available play modes differ depending on the selected sound source.1During CD, USB or BT audio device*1 playback, press (browse)*2 to display the list of search categories.When the track list appears, press (back) repeatedly to display the desired search category.*1 Available only for audio devices supporting AVRCP (Audio Video Remote Control Profile) 1.4 or above.*2 During USB playback, press (browse) for more than 2 seconds to directly return to the beginning of the category list.2Rotate the control dial to select the desired search category, then press it to confirm.3Repeat step 2 to search the desired track.Playback starts.To exit the Quick-BrowZer modePress (browse).1Press (browse).2Press SEEK +.3Rotate the control dial to select the item.The list is jumped in steps of 10% of the total number of items.4Press ENTER to return to the Quick-BrowZer mode.The selected item appears.Operating an iPod directly (Passenger control)Repeat play and shuffle playSearching a track by name (Quick-BrowZer™)Searching by skipping items (Jump mode)010COV.book Page 11 Friday, November 15, 2013 11:49 AM](https://usermanual.wiki/Sony-Group/MEXN4000BT/User-Guide-2133132-Page-11.png)
![12GBF:\yoshida\1115\4489688111\4489688111MEXN4000BTUC\01GB-MEXN4000BTUC\040CD.fm masterpage: LeftMEX-N4000BT4-489-688-11(1)5Rotate the control dial to select the desired item, then press it.Playback starts.Pandora® is available to stream music through your iPhone, Android™ and BlackBerry® phones. You can control Pandora® on a USB-connected iPhone or BLUETOOTH connected Android/BlackBerry phone from this unit.The Pandora® service is not available in some countries/regions.Preparing for Pandora®1To check for compatible devices, visit the support site on the back cover.2Download the latest version of the Pandora® application from your smartphone’s app store. A list of compatible devices can be found at www.pandora.com/everywhere/mobileFor Android phone onlyYou cannot control Pandora® via the BLUETOOTH function while running the “App Remote” application via BLUETOOTH.Streaming Pandora®1Connect this unit with the mobile device.ˎiPhone via USB (page 8)ˎAndroid/BlackBerry phone via BLUETOOTH function (page 7)2Press SRC to select [PANDORA USB] or [BT PANDORA].3Launch Pandora® application on the mobile device.4Press PAUSE to start playback.If the device number appearsMake sure that the same numbers are displayed (e.g., 123456) in this unit and the mobile device, then press ENTER on this unit and select [Yes] on the mobile device.When activating the BLUETOOTH functionYou can adjust the volume level.Press MENU and rotate the control dial. Select [SOUND] q [BTA VOL] (page 18).Listening to Pandora®010COV.book Page 12 Friday, November 15, 2013 11:49 AM](https://usermanual.wiki/Sony-Group/MEXN4000BT/User-Guide-2133132-Page-12.png)
![13GBF:\yoshida\1115\4489688111\4489688111MEXN4000BTUC\01GB-MEXN4000BTUC\040CD.fm masterpage: RightMEX-N4000BT4-489-688-11(1)Available Operations in the Pandora®“Thumbs Up” or “Thumbs Down” feedback allows you to personalize stations.Thumbs UpDuring playback, press Ă.Thumbs DownDuring playback, press è.The station list allows you to easily select a desired station.1During playback, press (browse).2Press SEEK + to select the sorting order [BY DATE] or [A TO Z].3Rotate the control dial to select the desired station, then press it.Playback starts.The track or artist currently being played can be bookmarked and stored in your Pandora® account.1During playback, press and hold MODE until [BOOKMARK] appears.2Rotate the control dial to select [TRK] (track) or [ART] (artist), then press it.To use a cellular phone, connect it with this unit. For details, see “Preparing a BLUETOOTH Device” (page 7).Receiving a Call1Press CALL when a call is received with a ringtone.The phone call starts.NoteThe ringtone and talker’s voice are output only from the front speakers.To reject the callPress and hold OFF for 1 second.To end the callPress CALL again.Making a CallYou can make a call from the phonebook or call history when a cellular phone supporting PBAP (Phone Book Access Profile) is connected.1Press CALL, rotate the control dial to select [PHONEBOOK], then press it.2Rotate the control dial to select an initial from the initial list, then press it.3Rotate the control dial to select a name from the name list, then press it.4Rotate the control dial to select a number from the number list, then press it.The phone call starts.1Press CALL, rotate the control dial to select [RECENT CALL], then press it.A list of the call history appears.“Thumbs” feedbackUsing the station listBookmarkingHandsfree CallingCalling from the phonebookCalling from the call history010COV.book Page 13 Friday, November 15, 2013 11:49 AM](https://usermanual.wiki/Sony-Group/MEXN4000BT/User-Guide-2133132-Page-13.png)
![14GBF:\yoshida\1115\4489688111\4489688111MEXN4000BTUC\01GB-MEXN4000BTUC\040CD.fm masterpage: LeftMEX-N4000BT4-489-688-11(1)2Rotate the control dial to select a name or phone number from the call history, then press it.The phone call starts.1Press CALL, rotate the control dial to select [DIAL NUMBER], then press it.2Rotate the control dial to enter the phone number, and lastly select [ ] (space), then press ENTER*.The phone call starts.* To move the digital indication, press SEEK +/–.Note[_] appears instead of [#] on the display.1Press CALL, rotate the control dial to select [REDIAL], then press it.The phone call starts.You can store up to 6 contacts in the preset dial.1Select a phone number that you want to store in the preset dial, from the phonebook, call history or by inputting the phone number directly.The phone number appears in the display of this unit.2Press and hold a number button (1 to 6) until [MEM] appears.The contact is stored in the selected preset number.1Press SRC, rotate the control dial to select [BT PHONE], then press it.2Press a number button (1 to 6) to select the contact you want to call.3Press ENTER.The phone call starts.You can make a call by saying the voice tag stored in a connected cellular phone that has a voice dialing function.1Press CALL, rotate the control dial to select [VOICE DIAL], then press it.Alternatively, press ENTER while the App Remote function is off.2Say the voice tag stored on the cellular phone.Your voice is recognized, and the call is made.To cancel voice dialingPress ENTER.Available Operations during CallTo preset the volume of the ringtone and talker’s voiceYou can preset the volume level of the ringtone and talker’s voice.Adjusting the ringtone volume:Rotate the control dial while receiving a call.Adjusting the talker’s voice volume:Rotate the control dial during a call.To adjust the volume for the other party (Mic gain adjustment)Press MIC.Adjustable volume levels: [MIC-LOW], [MIC-MID], [MIC-HI].To reduce echo and noise (Echo Canceler/Noise Canceler Mode)Press and hold MIC.Settable mode: [EC/NC-1], [EC/NC-2].To transfer a callIn order to activate/deactivate the appropriate device (this unit/cellular phone), press MODE or use your cellular phone.NoteDepending on the cellular phone, handsfree connection may be cut off when call transfer is attempted.To check the status of SMS/email* flashes when a new SMS/email is received, and stays lit when there are unread messages.* Available only for a cellular phone supporting MAP (Message Access Profile).Calling by phone number inputCalling by redialPresetting phone numbersCalling by preset numberCalling by voice tags010COV.book Page 14 Friday, November 15, 2013 11:49 AMuntil [MEM] appears.](https://usermanual.wiki/Sony-Group/MEXN4000BT/User-Guide-2133132-Page-14.png)
![15GBF:\yoshida\1115\4489688111\4489688111MEXN4000BTUC\01GB-MEXN4000BTUC\040CD.fm masterpage: RightMEX-N4000BT4-489-688-11(1)App Remote with iPhone/Android PhoneDownloading the “App Remote” application is required from App Store for iPhone or from Google Play for Android phone.Using the “App Remote” application, the following features are available:ˋOperate the unit to launch and control compatible applications on iPhone/Android phone.ˋOperate iPhone/Android phone with simple finger gestures to control the source of the unit.ˋLaunch an application/audio source or search the keyword on the application by saying a word or phrase into the microphone (Android phone only).ˋRead out incoming text messages, SMS, email, Twitter, Facebook, Calendar, etc., automatically, and the text messages, SMS and email can be replied (Android phone only).ˋAdjust the sound settings (EQ10, Balance/Fader, Listening Position) of the unit via iPhone/Android phone.NotesˎFor your safety, follow your local traffic laws and regulations, and do not operate the application while driving.ˎAvailable operations differ depending on the applications. For details on available applications, visit the support site on the back cover.ˎApp Remote ver. 2.0 via USB is compatible with iOS 5/iOS 6 installed iPhones. ˎApp Remote ver. 2.0 via BLUETOOTH is compatible with Android devices with Android 2.2, 2.3, 3.*, 4.0, 4.1 or 4.2 installed.ˎVoice recognition function does not work depending on your smartphone. In that case, go to [Settings] – select [Voice Recognition].ˎSMS/E-mail/Notification reading is available for Android devices with TTS engine installed.ˎThe “Smart Connect” application, provided by Sony Mobile Communications, is necessary for Twitter/Facebook/Calendar, etc., notification read out.1Connect iPhone to the USB port or Android phone with the BLUETOOTH function.2Launch the “App Remote” application.3Press and hold APP on the unit for more than 2 seconds.Connection to iPhone/Android phone starts.For details on the operations on iPhone/Android phone, see the help of the application.If the device number appearsMake sure that the same numbers are displayed (e.g., 123456) in this unit and the mobile device, then press ENTER on this unit and select [Yes] on the mobile device.To terminate connectionPress and hold APP.Selecting the source or applicationYou can operate the unit to select the desired source or application on your smartphone.1Rotate the control dial to select the desired source or application, then press it.To select another source or application, press SRC then rotate the control dial to select the desired source or application.Announcement of various information by voice guide (Android phone only)When SMS/E-mail, Twitter/Facebook/Calendar notifications, etc., are received, they are automatically announced through the car speakers.For details on settings, refer to the help of the application.Useful FunctionsEstablishing the App Remote connection010COV.book Page 15 Friday, November 15, 2013 11:49 AM](https://usermanual.wiki/Sony-Group/MEXN4000BT/User-Guide-2133132-Page-15.png)
![16GBF:\yoshida\1115\4489688111\4489688111MEXN4000BTUC\01GB-MEXN4000BTUC\040CD.fm masterpage: LeftMEX-N4000BT4-489-688-11(1)Activating voice recognition (Android phone only)By registering applications, you can control an application by voice command. For details, refer to the help of the application.To activate voice recognition1Press ENTER to activate voice recognition.2Say the desired voice command into the microphone when [Say Source or App] appears on the Android phone.NotesˎVoice recognition may not be available in some cases.ˎVoice recognition may not work properly depending on the performance of the connected Android phone.ˎOperate under conditions where noise such as engine sound is minimized during voice recognition.ˎUsing an external microphone (not supplied) will improve voice recognition.When a music or video application is selected*Press 1 or 2 to enter HID mode, and press SEEK +/– to select a playback item, then press ENTER to start playback.* Available only for an Android phone supporting HID (Human Interface Device Profile).Making sound settingsYou can adjust the settings for EQ, BAL/FAD/SW Level and Position via your smartphone.For details on settings, refer to the help of the application.Canceling the DEMO ModeYou can cancel the demonstration display which appears while this unit is turned off.1Press MENU, rotate the control dial to select [DISPLAY], then press it.2Rotate the control dial to select [DEMO], then press it.3Rotate the control dial to select [DEMO-OFF], then press it.The setting is complete.4Press (back) twice.The display returns to normal reception/play mode.Basic Setting OperationYou can set items in the menu to the following procedure.The following items can be set depending on the source and setting.1Press MENU.2Rotate the control dial to select the setup category, then press it.Setup categories are follows:ˎGENERAL setup (page 16)ˎSOUND setup (page 17)ˎDISPLAY setup (page 18)ˎBT (BLUETOOTH) setup (page 18)ˎAPP REM (App Remote) setup (page 19)3Rotate the control dial to select the options, then press it.To return to the previous displayPress (back).GENERAL SetupCLOCK-ADJ (clock adjust) (page 6)CAUT ALM (caution alarm) (page 6)Activates the caution alarm: [ON], [OFF]. (Available only when the unit is turned off.)BEEPActivates the beep sound: [ON], [OFF].Settings010COV.book Page 16 Friday, November 15, 2013 11:49 AM](https://usermanual.wiki/Sony-Group/MEXN4000BT/User-Guide-2133132-Page-16.png)
![17GBF:\yoshida\1115\4489688111\4489688111MEXN4000BTUC\01GB-MEXN4000BTUC\040CD.fm masterpage: RightMEX-N4000BT4-489-688-11(1)AUTO OFFShuts off automatically after a desired time when the unit is turned off: [NO], [30S] (30 seconds), [30M] (30 minutes), [60M] (60 minutes).AUX-A (AUX audio)Activates the AUX source display: [ON], [OFF]. (Available only when the unit is turned off.)REAR/SUBSwitches the audio output: [SUB-OUT] (subwoofer), [REAR-OUT] (power amplifier). (Available only when the unit is turned off.)CT (clock time) (page 10)Activates the CT function: [ON], [OFF].BTM (page 9)SOUND SetupC.AUDIO+ (clear audio+)Reproduces sound by optimizing the digital signal with the Sony recommended sound settings: [ON], [OFF]. (Automatically sets to [OFF] when [EQ10 PRESET] is changed).EQ10 PRESETSelects an equalizer curve from 10 equalizer curves or off: [R AND B], [ROCK], [POP], [DANCE], [HIP-HOP], [ELECTRONICA], [JAZZ], [SOUL], [COUNTRY], [CUSTOM], [OFF].The equalizer curve setting can be memorized for each source.EQ10 SETTINGSets [CUSTOM] of EQ10.BASESelects a preset equalizer curve as a basis for further customizing: [BAND1] 32 Hz, [BAND2] 63 Hz, [BAND3] 125 Hz, [BAND4] 250 Hz, [BAND5] 500 Hz, [BAND6] 1 kHz, [BAND7] 2 kHz, [BAND8] 4 kHz, [BAND9] 8 kHz, [BAND10] 16 kHz.The volume level is adjustable in 1 dB steps, from -6 dB to +6 dB.POSITION (listening position)SET F/R POS (set front/rear position)Simulates a natural sound field by delaying the sound output from front/rear speaker to suit your position.FRONT L (ɞ): Front leftFRONT R (ɟ): Front rightFRONT (ɠ): Center frontALL (ɡ): In the center of your carCUSTOM: Position set by App RemoteOFF: No position setADJ POSITION* (adjust position)Fine-tunes the listening position setting.Adjustable range: [+3] – [CENTER] – [-3].SET SW POS* (set subwoofer position)NEAR (ʭ): NearNORMAL (ʮ): NormalFAR (ʯ): FarBALANCEAdjusts the sound balance: [RIGHT-15] – [CENTER] – [LEFT-15].FADERAdjusts the relative level: [FRONT-15] – [CENTER] – [REAR-15].DSEE (digital sound enhancement engine)Improves digitally compressed sound by restoring high frequencies lost in the compression process.This setting can be memorized for each source other than the tuner.Selects the DSEE mode: [ON], [OFF].LOUDNESSReinforces bass and treble for clear sound at low volume levels: [ON], [OFF].AAV (advanced auto volume)Adjust the playback volume level of all playback sources to the optimum level: [ON], [OFF].010COV.book Page 17 Friday, November 15, 2013 11:49 AM](https://usermanual.wiki/Sony-Group/MEXN4000BT/User-Guide-2133132-Page-17.png)
![18GBF:\yoshida\1115\4489688111\4489688111MEXN4000BTUC\01GB-MEXN4000BTUC\040CD.fm masterpage: LeftMEX-N4000BT4-489-688-11(1)RB ENH (rear bass enhancer)Rear Bass Enhancer enhances the bass sound by applying a low pass filter setting to the rear speakers. This function allows the rear speakers to work as a subwoofer if one is not connected. (Available only when [SW DIREC] is set to [OFF].)RBE MODE (rear bass enhancer mode)Selects the rear bass enhancer mode: [1], [2], [3], [OFF].LPF FREQ (low pass filter frequency)Selects the subwoofer cut-off frequency: [50Hz], [60Hz], [80Hz], [100Hz], [120Hz].LPF SLOP (low pass filter slope)Selects the LPF slope: [1], [2], [3].SW DIREC (subwoofer direct connection)You can use the subwoofer without a power amplifier when it is connected to the rear speaker cord. (Available only when [RBE MODE] is set to [OFF].)Be sure to connect a 4 - 8 ohm subwoofer to either of the rear speaker cords. Do not connect a speaker to the other rear speaker cord.SW MODE (subwoofer mode) Selects the subwoofer mode: [1], [2], [3], [OFF].SW PHASE (subwoofer phase) Selects the subwoofer phase: [NORM], [REV].SW POS* (subwoofer position)Selects the subwoofer position: [NEAR], [NORMAL], [FAR].LPF FREQ (low pass filter frequency) Selects the subwoofer cut-off frequency: [50Hz], [60Hz], [80Hz], [100Hz], [120Hz].LPF SLOP (low pass filter slope) Selects the LPF slope: [1], [2], [3].S.WOOFER (subwoofer)SW LEVEL (subwoofer level)Adjusts the subwoofer volume level: [+10 dB] – [0 dB] – [-10 dB].([ATT] is displayed at the lowest setting.)SW PHASE (subwoofer phase)Selects the subwoofer phase: [NORM], [REV].SW POS* (subwoofer position)Selects the subwoofer position: [NEAR], [NORMAL], [FAR].LPF FREQ (low pass filter frequency)Selects the subwoofer cut-off frequency: [50Hz], [60Hz], [80Hz], [100Hz], [120Hz].LPF SLOP (low pass filter slope)Selects the LPF slope: [1], [2], [3].HPF (high pass filter)HPF FREQ (high pass filter frequency)Selects the front/rear speaker cut-off frequency: [OFF], [50Hz], [60Hz], [80Hz], [100Hz], [120Hz].HPF SLOP (high pass filter slope)Selects the HPF slope (effective only when [HPF FREQ] is set to other than [OFF]): [1], [2], [3].AUX VOL (AUX volume level)Adjusts the volume level for each connected auxiliary device: [+18 dB] – [0 dB] – [-8 dB].This setting negates the need to adjust the volume level between sources.BTA VOL (BLUETOOTH audio volume level)Adjusts the volume level for each connected BLUETOOTH device: [+6 dB] – [0 dB] – [-6 dB].This setting negates the need to adjust the volume level between sources.* Does not appear when [SET F/R POS] is set to [OFF].DISPLAY SetupDEMO (demonstration)Activates the demonstration: [ON], [OFF].DIMMERChanges the display brightness [ON], [OFF].ILLUM (Illumination)Changes the illumination color: [1], [2].AUTO SCR (auto scroll)Scrolls long items automatically: [ON], [OFF].BT (BLUETOOTH) SetupThis setup menu can be also opened by pressing CALL.PAIRING (page 7)PHONEBOOK (page 13)REDIAL (page 14)RECENT CALL (page 13)VOICE DIAL (page 14)DIAL NUMBER (page 14)RINGTONESelects whether this unit or the connected cellular phone outputs the ringtone: [1] (this unit), [2] (cellular phone).AUTO ANS (auto answer)Sets this unit to answer an incoming call automatically: [OFF], [1] (about 3 seconds), [2] (about 10 seconds).AUTO PAIRINGStart BLUETOOTH pairing automatically when iOS device version 5.0 or later is connected via USB: [ON], [OFF].010COV.book Page 18 Friday, November 15, 2013 11:49 AM](https://usermanual.wiki/Sony-Group/MEXN4000BT/User-Guide-2133132-Page-18.png)
![19GBF:\yoshida\1115\4489688111\4489688111MEXN4000BTUC\01GB-MEXN4000BTUC\040CD.fm masterpage: RightMEX-N4000BT4-489-688-11(1)BT SIGNL (BLUETOOTH signal) (page 7)Activates the BLUETOOTH function: [ON], [OFF].BT INIT (BLUETOOTH initialize)Initializes all the BLUETOOTH related settings (pairing information, preset number, device information, etc.).When disposing the unit, initialize all the settings.APP REM (App Remote) SetupEstablish and terminate App Remote function (connection).PrecautionsˎCool off the unit beforehand if your car has been parked in direct sunlight.ˎDo not leave the front panel or audio devices brought in inside the car, or it may cause malfunction due to high temperature in direct sunlight.ˎPower antenna (aerial) extends automatically.Moisture condensationShould moisture condensation occur inside the unit, remove the disc and wait for about an hour for it to dry out; otherwise the unit will not operate properly.To maintain high sound qualityDo not splash liquid onto the unit or discs.ˎDo not expose discs to direct sunlight or heat sources such as hot air ducts, nor leave it in a car parked in direct sunlight.ˎBefore playing, wipe the discs with a cleaning cloth from the center out. Do not use solvents such as benzine, thinner, commercially available cleaners.ˎThis unit is designed to play back discs that conform to the Compact Disc (CD) standard. DualDiscs and some of the music discs encoded with copyright protection technologies do not conform to the Compact Disc (CD) standard, therefore, these discs may not be playable by this unit.ˎDiscs that this unit CANNOT playˋDiscs with labels, stickers, or sticky tape or paper attached. Doing so may cause a malfunction, or may ruin the disc.ˋDiscs with non-standard shapes (e.g., heart, square, star). Attempting to do so may damage the unit.ˋ8 cm (3 1/4 in) discs.Notes on CD-R/CD-RW discsˎThe maximum number of: (CD-R/CD-RW only)ˋfolders (albums): 150 (including root folder)ˋfiles (tracks) and folders: 300 (may less than 300 if folder/file names contain many characters)ˋdisplayable characters for a folder/file name: 32 (Joliet)/64 (Romeo)Additional InformationNotes on discs010COV.book Page 19 Friday, November 15, 2013 11:49 AM](https://usermanual.wiki/Sony-Group/MEXN4000BT/User-Guide-2133132-Page-19.png)

![23GBF:\yoshida\1115\4489688111\4489688111MEXN4000BTUC\01GB-MEXN4000BTUC\040CD.fm masterpage: RightMEX-N4000BT4-489-688-11(1)The N-Mark is a trademark or registered trademark of NFC Forum, Inc. in the United States and in other countries. Windows Media is either a registered trademark or trademark of Microsoft Corporation in the United States and/or other countries.This product is protected by certain intellectual property rights of Microsoft Corporation. Use or distribution of such technology outside of this product is prohibited without a license from Microsoft or an authorized Microsoft subsidiary.iPhone, iPod, iPod classic, iPod nano, and iPod touch are trademarks of Apple Inc., registered in the U.S. and other countries. App Store is a service mark of Apple Inc.MPEG Layer-3 audio coding technology and patents licensed from Fraunhofer IIS and Thomson.Pandora, the Pandora logo, and the Pandora trade dress are trademarks or registered trademarks of Pandora Media, Inc., used with permission.Google, Google Play and Android are trademarks of Google Inc.BlackBerry® is the property of Research In Motion Limited and is registered and/or used in the U.S. and countries around the world. Used under license from Research In Motion Limited.TroubleshootingThe following checklist will help you remedy problems you may encounter with your unit.Before going through the checklist below, check the connection and operating procedures.For details on using the fuse and removing the unit from the dashboard, refer to the installation/connections manual supplied with this unit.If the problem is not solved, visit the support site on the back cover.GeneralNo power is being supplied to the unit.qIf the unit is turned off and the display disappears, the unit cannot be operated with the remote commander.ˋTurn on the unit.No sound.qThe position of the fader control [FADER] is not set for a 2-speaker system.No beep sound.qAn optional power amplifier is connected and you are not using the built-in amplifier.The contents of the memory have been erased.qThe power supply lead or battery has been disconnected or not connected properly.Stored stations and correct time are erased.The fuse has blown.Makes a noise when the position of the ignition is switched.qThe leads are not matched correctly with the car’s accessory power connector.During playback or reception, the demonstration mode starts.qIf no operation is performed for 5 minutes with [DEMO-ON] set, the demonstration mode starts.ˋSet [DEMO-OFF] (page 18).The display disappears from/does not appear in the display window.qThe dimmer is set to [DIM-ON] (page 18).qThe display disappears if you press and hold OFF.ˋPress OFF on the unit until the display appears.qThe connectors are dirty (page 21).The operation buttons do not function.The disc will not eject.qPress PTY and (back)/MODE for more than 2 seconds to reset the unit.The contents stored in memory are erased.For your safety, do not reset the unit while you are driving.010COV.book Page 23 Friday, November 15, 2013 11:49 AM](https://usermanual.wiki/Sony-Group/MEXN4000BT/User-Guide-2133132-Page-23.png)
![24GBF:\yoshida\1115\4489688111\4489688111MEXN4000BTUC\01GB-MEXN4000BTUC\040CD.fm masterpage: LeftMEX-N4000BT4-489-688-11(1)Radio receptionStations cannot be received.The sound is hampered by noises.qThe connection is not correct.ˋIf your car has built-in radio antenna (aerial) in the rear/side glass, connect an REM OUT lead (blue/white striped) or accessory power supply lead (red) to the power supply lead of a car’s antenna (aerial) booster.ˋCheck the connection of the car antenna (aerial).ˋIf the auto antenna (aerial) will not extend, check the connection of the power antenna (aerial) control lead.Preset tuning is not possible.qThe broadcast signal is too weak.RDSPTY displays [- - - - - - - -].qThe current station is not an RDS station.qRDS data has not been received.qThe station does not specify the program type.CD playbackThe disc does not play back.qDefective or dirty disc.qThe CD-R/CD-RW is not for audio use (page 19).MP3/WMA files cannot be played back.qThe disc is incompatible with the MP3/WMA format and version. For details on playable discs and formats, visit the support site.MP3/WMA files take longer to play back than others.qThe following discs take a longer time to start playback.ˋA disc recorded with a complicated tree structure.ˋA disc recorded in Multi Session.ˋA disc to which data can be added.The sound skips.qDefective or dirty disc.USB playbackYou cannot play back items via a USB hub.qThis unit cannot recognize USB devices via a USB hub.A USB device takes longer to play back.qThe USB device contains files with a complicated tree structure.The sound is intermittent.qThe sound may be intermittent at a high-bit-rate of more than 320 kbps.Pandora® connection is not possible.qShut down the Pandora® application on the mobile device, and then launch it again.Application name is mismatched with the actual application in App Remote.qLaunch the application again from the “App Remote” application.NFC functionOne touch connection (NFC) is not possible.qIf the smartphone does not respond to the touching.ˋCheck that the NFC function of the smartphone is turned on.ˋMove the N-Mark part of the smartphone closer to the N-Mark part on this unit.ˋIf the smartphone is in a case, remove it.qNFC receiving sensitivity depends on the device.If One touch connection with the smartphone fails several times, make BLUETOOTH connection manually.BLUETOOTH functionThe connecting device cannot detect this unit.qBefore the pairing is made, set this unit to pairing standby mode.qWhile connected to a BLUETOOTH device, this unit cannot be detected from another device.ˋDisconnect the current connection and search for this unit from another device.qWhen the device pairing is made, set the BLUETOOTH signal output to on (page 7).Connection is not possible.qThe connection is controlled from one side (this unit or BLUETOOTH device), but not both.ˋConnect to this unit from a BLUETOOTH device or vice versa.The name of the detected device does not appear.qDepending on the status of the other device, it may not be possible to obtain the name.No ringtone.qAdjust the volume by rotating the control dial while receiving a call.qDepending on the connecting device, the ringtone may not be sent properly.ˋSet [RINGTONE] to [1] (page 18).qThe front speakers are not connected to the unit.ˋConnect the front speakers to the unit. The ringtone is output only from the front speakers.010COV.book Page 24 Friday, November 15, 2013 11:49 AM](https://usermanual.wiki/Sony-Group/MEXN4000BT/User-Guide-2133132-Page-24.png)
![25GBF:\yoshida\1115\4489688111\4489688111MEXN4000BTUC\01GB-MEXN4000BTUC\040CD.fm masterpage: RightMEX-N4000BT4-489-688-11(1)The talker’s voice cannot be heard.qThe front speakers are not connected to the unit.ˋConnect the front speakers to the unit. The talker’s voice is output only from the front speakers.A call partner says that the volume is too low or high.qAdjust the volume accordingly using mic gain adjustment (page 14).Echo or noise occurs in phone call conversations.qLower the volume.qSet EC/NC Mode to [EC/NC-1] or [EC/NC-2] (page 14).qIf the ambient noise other than the phone call sound is loud, try reducing this noise.E.g.: If a window is open and road noise, etc., is loud, shut the window. If an air conditioner is loud, lower the air conditioner.The phone is not connected.qWhen BLUETOOTH audio is played, the phone is not connected even if you press CALL.ˋConnect from the phone.The phone sound quality is poor.qPhone sound quality depends on reception conditions of cellular phone. ˋMove your car to a place where you can enhance the cellular phone’s signal if the reception is poor.The volume of the connected audio device is low (high).qVolume level will differ depending on the audio device.ˋAdjust the volume of the connected audio device or this unit.The sound skips during playback of a BLUETOOTH audio device.qReduce the distance between the unit and the BLUETOOTH audio device.qIf the BLUETOOTH audio device is stored in a case which interrupts the signal, remove the audio device from the case during use.qSeveral BLUETOOTH devices or other devices which emit radio waves are in use nearby.ˋTurn off the other devices.ˋIncrease the distance from the other devices.qThe playback sound stops momentarily when the connection between this unit and the cellular phone is being made. This is not a malfunction.The connected BLUETOOTH audio device cannot be controlled.qCheck that the connected BLUETOOTH audio device supports AVRCP.Some functions do not work.qCheck if the connecting device supports the functions in question.A call is answered unintentionally.qThe connecting phone is set to answer a call automatically.Pairing failed due to time out.qDepending on the connecting device, the time limit for pairing may be short.ˋTry completing the pairing within the time.BLUETOOTH function cannot operate.qTurn off the unit by pressing OFF for more than 2 seconds, then turn the unit on again.No sound is output from the car speakers during handsfree call.qIf the sound is output from the cellular phone, set the cellular phone to output the sound from the car speakers.Pandora® connection is not possible.qShut down the Pandora® application on the mobile device, and then launch again.Application name is mismatched with the actual application in App Remote.qLaunch the application again from the “App Remote” application.While running the “App Remote” application via BLUETOOTH, the display automatically switches to [BT AUDIO].qThe “App Remote” application or BLUETOOTH function has failed.ˋRun the application again.Error displays/MessagesERRORqThe disc is dirty or inserted upside down.ˋClean or insert the disc correctly.qA blank disc has been inserted.qThe disc cannot play due to a problem.ˋInsert another disc.qUSB device was not automatically recognized.ˋConnect it again.qPress ì to remove the disc.HUB NO SUPRT (hubs not supported)qUSB hub is not supported on this unit.IPD STOP (iPod stop)qWhen repeat play is not set, playback of the last track in album finished.The music application in the iPod/iPhone is terminated.ˋPress PAUSE to start playback again.010COV.book Page 25 Friday, November 15, 2013 11:49 AM](https://usermanual.wiki/Sony-Group/MEXN4000BT/User-Guide-2133132-Page-25.png)
![26GBF:\yoshida\1115\4489688111\4489688111MEXN4000BTUC\01GB-MEXN4000BTUC\040CD.fm masterpage: LeftMEX-N4000BT4-489-688-11(1)NO DEV (no device)q[USB] is selected as source without a USB device connected. A USB device or a USB cable has been disconnected during playback.ˋBe sure to connect a USB device and USB cable.NO MUSICqThe disc or USB device does not contain a music file.ˋInsert a music CD.ˋConnect a USB device with a music file in it.OVERLOADqUSB device is overloaded.ˋDisconnect the USB device, then change the source by pressing SRC.ˋThe USB device has a fault, or an unsupported device is connected.PUSH EJT (push eject)qThe disc cannot be ejected.ˋPress ì (eject).READqThe unit is reading all track and album information on the disc.ˋWait until reading is complete and playback starts automatically. Depending on the disc structure, it may take more than a minute.USB NO SUPRT (USB not supported)qThe connected USB device is not supported.ˋFor details on the compatibility of your USB device, visit the support site.[] or []qDuring reverse or fast-forward, you have reached the beginning or the end of the disc and you cannot go any further.[]qThe character cannot be displayed.For BLUETOOTH function:BT BUSY (BLUETOOTH busy)qThe phonebook and the call history of the cellular phone are not accessible from this unit.ˋWait for a while, and then try again.ERRORqBT Initialize failed.qPhonebook access failed.qPhonebook content was changed while accessing the cellular phone.ˋAccess the phonebook in the cellular phone again.MEM FAILURE (memory failure)qThis unit failed to store the contact in the preset dial.ˋMake sure that the number you intend to store is correct (page 14).MEMORY BUSYqThis unit is storing data.ˋWait until storing has finished.NO DEV (no device)qBLUETOOTH audio source is selected without a BLUETOOTH audio device connected. A BLUETOOTH audio device has been disconnected during a call.ˋBe sure to connect a BLUETOOTH audio device.qBLUETOOTH phone source is selected without a cellular phone connected. A cellular phone has been disconnected during a call.ˋBe sure to connect a cellular phone.P EMPTY (preset number empty)qThe preset dial is empty.UNKNOWNqName or phone number cannot be displayed when browsing phonebook or call history.WITHHELDqPhone number is hidden by caller.For App Remote operation:APP -------- (application)qConnection with the application is not made.ˋEstablish iPhone connection again.APP DISCNCT (application disconnected)qApp Remote connection is not made.ˋEstablish the App Remote connection (page 15).APP MENU (application menu)qButton operation cannot be performed while a menu on iPhone/Android phone is open.ˋExit the menu on iPhone/Android phone.APP NO DEV (application no device)qThe device with the application installed is not connected.ˋConnect the device, then establish iPhone connection.APP SOUND (application sound)qButton operation cannot be performed while a sound menu on iPhone/Android phone is open.ˋExit the sound menu on iPhone/Android phone.010COV.book Page 26 Friday, November 15, 2013 11:49 AM](https://usermanual.wiki/Sony-Group/MEXN4000BT/User-Guide-2133132-Page-26.png)
![7ESF:\yoshida\1115\4489688111\4489688111MEXN4000BTUC\02LaES-MEXN4000BTUC\040CD.fm masterpage: RightMEX-N4000BT4-489-688-11(1)Extracción del panel frontalEs posible extraer el panel frontal de la unidad para evitar que la roben.1Mantenga presionado OFF ʓ.La unidad se apagará.2Presione el botón de liberación del panel frontal ʔ y, a continuación, extraiga el panel tirando de él hacia usted.Alarma de precauciónSi gira el interruptor de la llave de encendido hasta la posición OFF sin haber extraído el panel frontal, la alarma de precaución sonará durante unos segundos. La alarma sonará solamente si se utiliza el amplificador incorporado.Números de serieAsegúrese de que los números de serie al final de la unidad coincidan correctamente con los de la parte posterior del panel frontal. De lo contrario, no se podrá emparejar, conectarse o desconectarse a BLUETOOTH por NFC.Ajuste del reloj1Presione MENU, gire el selector de control para seleccionar [GENERAL] y, a continuación, presiónelo.2Gire el selector de control para seleccionar [CLOCK-ADJ] y, a continuación, presiónelo.La indicación de la hora parpadea.3Gire el selector de control para ajustar la hora y los minutos.Para mover la indicación digital, presione SEEK +/–.4Una vez ajustados los minutos, presione MENU.El ajuste se completa y el reloj se pone en funcionamiento.Presione DSPL para mostrar el reloj.Preparación del dispositivo BLUETOOTHSi conecta un dispositivo BLUETOOTH adecuado, puede escuchar música o realizar llamadas con manos libres. Para obtener más información acerca de la conexión, consulte las instrucciones de funcionamiento que se suministran con el dispositivo.Antes de conectar el dispositivo, apague el volumen de esta unidad; si no lo hace, puede oírse un sonido fuerte.Cuando conecte un dispositivo BLUETOOTH (teléfono celular, dispositivo de audio, etc.) por primera vez es necesario el registro de ambos dispositivos (denominado “emparejamiento”). El emparejamiento permite que la unidad y otros dispositivos se reconozcan entre sí.1Coloque el dispositivo BLUETOOTH dentro de 1 m de distancia respecto de la unidad.Procedimientos inicialesColocación del panel frontal Emparejamiento y conexión con otro dispositivo BLUETOOTH010COV.book Page 7 Friday, November 15, 2013 11:49 AM](https://usermanual.wiki/Sony-Group/MEXN4000BT/User-Guide-2133132-Page-33.png)
![8ESF:\yoshida\1115\4489688111\4489688111MEXN4000BTUC\02LaES-MEXN4000BTUC\040CD.fm masterpage: LeftMEX-N4000BT4-489-688-11(1)2Presione CALL, gire el selector de control para seleccionar [PAIRING] y, a continuación, presiónelo. parpadea.La unidad entrará en modo de espera de emparejamiento.3Realice el emparejamiento en el dispositivo BLUETOOTH para detectar esta unidad.4Seleccione [Sony Car Audio] que se muestra en la pantalla del dispositivo de BLUETOOTH.Si [Sony Car Audio] no aparece, repita desde el paso 2.5Si se requiere una clave* en el dispositivo BLUETOOTH, escriba [0000].* La clave de paso puede denominarse “clave de acceso”, “código PIN”, “número PIN” o “contraseña” etc. en función del dispositivo.Cuando se empareja, queda encendida.6Seleccione esta unidad en el dispositivo BLUETOOTH para establecer la conexión BLUETOOTH. o se enciende cuando la conexión está establecida.NotaMientras se conecta a un dispositivo BLUETOOTH, esta unidad no puede detectarse desde otro dispositivo. Para habilitar la detección, acceda al modo de emparejamiento y busque esta unidad desde otro dispositivo.Para cancelar el emparejamientoRealizar el paso 2 para cancelar el modo de emparejamiento luego de que esta unidad y el dispositivo BLUETOOTH estén emparejados.Para utilizar un dispositivo emparejado, es necesaria la conexión con esta unidad. Algunos dispositivos emparejados se conectarán automáticamente.1Presione CALL, gire el selector de control para seleccionar [BT SIGNL] y, a continuación, presiónelo.Asegúrese de que se encienda.2Active la función BLUETOOTH en el dispositivo BLUETOOTH.3Inicie el dispositivo BLUETOOTH para conectarlo a esta unidad. o se enciende.Iconos en la pantalla:Para conectar el dispositivo que se conectó por última vez en esta unidadActive la función BLUETOOTH en el dispositivo BLUETOOTH.Presione SRC.Seleccione [BT PHONE] o [BT AUDIO].Presione ENTER para conectar con el teléfono celular, o PAUSE para conectar con el dispositivo de audio.NotaMientras trasmite audio BLUETOOTH, no puede realizar la conexión de esta unidad al teléfono celular. Realice en cambio la conexión desde el teléfono celular a la unidad.SugerenciaCon la señal BLUETOOTH activada: si el encendido se ajusta en la posición ON, la unidad vuelve a conectarse automáticamente al último teléfono celular conectado.Para instalar el micrófonoLa instalación del micrófono (no suministrado) mejorará la calidad del audio mientras se habla por esta unidad. Para obtener más detalles sobre cómo conectar el micrófono, consulte el manual suministrado con el micrófono.[0000]Introduzca la claveConexión con un dispositivo BLUETOOTH emparejadoSe enciende cuando un teléfono celular se conecta a la unidad.Se enciende cuando un dispositivo de audio se conecta a la unidad.Indica la potencia de la señal del teléfono celular al que se conecta.010COV.book Page 8 Friday, November 15, 2013 11:49 AM](https://usermanual.wiki/Sony-Group/MEXN4000BT/User-Guide-2133132-Page-34.png)
![9ESF:\yoshida\1115\4489688111\4489688111MEXN4000BTUC\02LaES-MEXN4000BTUC\040CD.fm masterpage: RightMEX-N4000BT4-489-688-11(1)Al tocar el selector del control de la unidad con un smartphone compatible con NFC*, la unidad está emparejada y automáticamente conectada con el smartphone.* NFC (Transmisión de datos en proximidad) es una tecnología que permite la comunicación inalámbrica de corto rango entre varios dispositivos, como teléfonos móviles y etiquetas de IC. Gracias a la función de NFC, la comunicación de datos se puede alcanzar fácilmente con solo tocar el símbolo o ubicación señalados en dispositivos compatibles con tecnología NFC.Para un smartphone con Android OS 4.0 o inferior instalado, se requiere descargar la aplicación “NFC Easy Connect” disponibles en Google Play™. Es posible que la aplicación no esté disponible para su descarga en algunos países/regiones.1Activación de la función NFC en un smartphone.Para obtener más información, consulte las instrucciones de funcionamiento suministradas con el smartphone.2Toque la parte marca N de la unidad con la parte marca N del smartphone.Asegúrese que se encienda en la pantalla de la unidad.Para desconectar mediante One touchToque nuevamente la parte marca N de la unidad con la parte marca N del smartphone.NotasˎAl realizar la conexión, manipule el smartphone cuidadosamente para evitar raspaduras.ˎLa conexión One touch no es posible cuando la unidad ya está conectada a otro dispositivo compatible con tecnología NFC. En este caso, desconecte el dispositivo y haga conexión con el smartphone nuevo.Cuando un iPhone/iPod con iOS5 o posterior está conectado al puerto USB, la unidad se empareja y conecta con el iPhone/iPod automáticamente.Para habilitar el emparejamiento automático de BLUETOOTH, asegúrese de que [AUTO PAIRING] en la configuración BT esté marcado como [ON] (página 20).1Active la función BLUETOOTH en el iPhone/iPod.2Conecte un iPhone/iPod al puerto USB.Asegúrese de que se encienda en la pantalla de la unidad.NotaEl emparejamiento automático de BLUETOOTH no será posible si la unidad ya está conectada a otro equipo BLUETOOTH. En este caso, desconecte el otro equipo y luego vuelva a conectar el iPhone/iPod.Conexión de un dispositivo iPod/USB1Baje el volumen de la unidad.2Conecte el dispositivo iPod/USB a la unidad.Para conectar un iPod/iPhone, utilice el cable de conexión USB para iPod (no suministrado).Conectar con un Smartphone a través de One touch (NFC)Conexión de un dispositivo iPhone/iPod (emparejamiento automático BLUETOOTH)Al conectar un iPhone 5010COV.book Page 9 Friday, November 15, 2013 11:49 AM](https://usermanual.wiki/Sony-Group/MEXN4000BT/User-Guide-2133132-Page-35.png)
![10ESF:\yoshida\1115\4489688111\4489688111MEXN4000BTUC\02LaES-MEXN4000BTUC\040CD.fm masterpage: LeftMEX-N4000BT4-489-688-11(1)Conexión de otro dispositivo de audio portátil1Apague el dispositivo de audio portátil.2Baje el volumen de la unidad.3Conecte el dispositivo de audio portátil a la toma de entrada AUX (minitoma estéreo) en la unidad con un cable de conexión (no suministrado)*.* Asegúrese de utilizar una clavija recta.4Presione SRC para seleccionar [AUX].Coincidencia del nivel de volumen del dispositivo conectado con otras fuentesComience la reproducción del dispositivo de audio portátil en un nivel moderado y configure su nivel habitual de volumen en la unidad.Presione MENU y gire el selector de control.Seleccione [SOUND] q [AUX VOL] (página 20).Escuchar la radioPara escuchar una estación de radio, presione SRC para seleccionar [TUNER].1Presione MODE para cambiar la banda de radio (FM1, FM2, FM3, AM1 o AM2).2Presione MENU, gire el selector de control para seleccionar [GENERAL] y, a continuación, presiónelo.3Gire el selector de control para seleccionar [BTM] y, a continuación, presiónelo.La unidad almacena las emisoras en el orden de frecuencia en los botones numéricos.1Presione MODE para cambiar la banda de radio (FM1, FM2, FM3, AM1 o AM2).2Realice la sintonización.Para realizar la sintonización manualMantenga presionado SEEK +/– para ubicar la frecuencia aproximada y, a continuación, presiónelo repetidas veces para ajustar la frecuencia deseada con mayor precisión.Para realizar la sintonización automáticaPresione SEEK +/–.La búsqueda se detiene cuando la unidad recibe una emisora. Repita este procedimiento hasta recibir la emisora deseada.1Mientras recibe la emisora que desea almacenar, mantenga presionado un botón numérico (de 1 a 6) hasta que aparezca [MEM].1Seleccione la banda y, a continuación, presione un botón numérico (de 1 a 6).Escuchar la radioAlmacenamiento automático (BTM)SintonizaciónAlmacenamiento manualRecepción de las emisoras almacenadas010COV.book Page 10 Friday, November 15, 2013 11:49 AM](https://usermanual.wiki/Sony-Group/MEXN4000BT/User-Guide-2133132-Page-36.png)
![11ESF:\yoshida\1115\4489688111\4489688111MEXN4000BTUC\02LaES-MEXN4000BTUC\040CD.fm masterpage: RightMEX-N4000BT4-489-688-11(1)Usar el RDS (Sistema de datos de radio)Usar PTY para mostrar o buscar el tipo de programa deseado.1Presione PTY durante la recepción FM.2Gire el selector de control hasta que aparezca el tipo de programa deseado y, a continuación, presiónelo.La unidad comienza a buscar una estación que emita el tipo de programa seleccionado.Tipos de programasLos datos CT de la transmisión RDS ajustan el reloj.1Ajuste [CT-ON] en la configuración GENERAL (página 18).Reproducción de un disco1Inserte el disco (con la etiqueta orientada hacia arriba).La reproducción se inicia automáticamente.Reproducción de un dispositivo iPod/USBEn este Manual de instrucciones, “iPod” se utiliza como referencia general para las funciones del iPod en un iPod y un iPhone, a menos que se especifique lo contrario en el texto o en las ilustraciones.Para obtener más información acerca de la compatibilidad de su iPod, consulte “Acerca de iPod” (página 22) o visite el sitio web de soporte técnico que figura en la cubierta posterior.Es posible utilizar dispositivos USB de almacenamiento masivo (MSC), como unidades flash USB, reproductores multimedia y teléfonos Android, que cumplan con el estándar USB.Según el teléfono Android o reproductor multimedia, se requiere que se le ajuste el modo de conexión USB a MSC.NotasˎPara obtener más información acerca de la compatibilidad del dispositivo USB, visite el sitio web de soporte técnico que figura en la cubierta posterior.ˎNo es posible reproducir los archivos MP3/WMA/WAV que se indican a continuación.ˋarchivos con formato de compresión sin pérdida;ˋarchivos protegidos por derechos de autor;ˋarchivos DRM (Gestión de derechos digitales);ˋarchivos de audio de canales múltiples.Selección de tipos de programa (PTY)NEWS (Noticias), INFORM (Información), SPORTS (Deportes), TALK (Talk), ROCK (Rock), CLS ROCK (Classic Rock), ADLT HIT (Adult Hits), SOFT RCK (Soft Rock), TOP 40 (Top 40), COUNTRY (Country), OLDIES (Oldies), SOFT (Suave), NOSTALGA (Nostalgia), JAZZ (Jazz), CLASSICL (Clásica), R AND B (Rhythm and Blues), SOFT R B (Soft Rhythm and Blues), LANGUAGE (Foreign Language), REL MUSC (Religious Music), REL TALK (Religious Talk), PERSNLTY (Personality), PUBLIC (Public), COLLEGE (College), WEATHER (El tiempo)Ajuste de hora del reloj (CT)Reproducción010COV.book Page 11 Friday, November 15, 2013 11:49 AM](https://usermanual.wiki/Sony-Group/MEXN4000BT/User-Guide-2133132-Page-37.png)
![12ESF:\yoshida\1115\4489688111\4489688111MEXN4000BTUC\02LaES-MEXN4000BTUC\040CD.fm masterpage: LeftMEX-N4000BT4-489-688-11(1)1Conecte el dispositivo iPod/USB al puerto USB (página 9).Se inicia la reproducción.Si ya está conectado un dispositivo, para iniciar la reproducción pulse SRC para seleccionar [USB] ([IPD] aparece en la pantalla cuando se reconoce el iPod).2Ajuste el volumen de esta unidad.Para detener la reproducciónMantenga presionado OFF por un segundo.Para extraer el dispositivoDetenga la reproducción y extraiga el dispositivo.Precaución para iPhoneAl conectar un iPhone mediante USB, el volumen de las llamadas telefónicas es controlado por el iPhone, y no por la unidad. Trate de no subir el volumen de la unidad durante una llamada sin darse cuenta, ya que puede producirse un sonido fuerte y repentino al terminar la llamada.Mantenga presionado MODE durante la reproducción para que aparezca [MODE IPOD] y habilitar la operación directamente en el iPod.Tenga en cuenta que solamente es posible ajustar el volumen en la unidad.Para salir del modo de control de pasajeroMantenga presionado MODE para que aparezca [MODE AUDIO].Reproducción de un dispositivo BLUETOOTHPuede reproducir contenido en un dispositivo conectado que sea compatible con BLUETOOTH A2DP (Perfil de distribución de audio avanzado).1Haga una conexión BLUETOOTH con el dispositivo de audio (página 7).2Presione SRC para seleccionar [BT AUDIO].3Para comenzar la reproducción, utilice las funciones del dispositivo de audio.4Ajuste el volumen de esta unidad.NotasˎEn función del dispositivo de audio, es posible que no se muestre en esta unidad cierta información como, por ejemplo, el título, el número de pista y la duración y el estado de la reproducción.ˎIncluso si se cambia la fuente en la unidad, la reproducción de la señal del dispositivo de audio no se interrumpe.ˎ[BT AUDIO] no aparece en la pantalla mientras se ejecuta la aplicación “App Remote” mediante la función BLUETOOTH.Para hacer coincidir el nivel de volumen del dispositivo BLUETOOTH con otras fuentesComience la reproducción del dispositivo de audio portátil BLUETOOTH en un nivel moderado y configure su nivel habitual de volumen en la unidad.Presione MENU y gire el selector de control.Seleccione [SOUND] q [BTA VOL] (página 20).Búsqueda y reproducción de pistas1Durante la reproducción, presione (repetir), para seleccionar reproducción repetida, o (reproducción aleatoria) para reproducción aleatoria.2Presione (repetir) o (repetición aleatoria) varias veces para elegir el modo deseado.Es posible que la reproducción en el modo de reproducción seleccionado se demore en iniciar.Los modos de reproducción disponibles varían en función de la fuente de sonido seleccionada.Utilización directa del iPod (Control de pasajero) Reproducción repetida y aleatoria010COV.book Page 12 Friday, November 15, 2013 11:49 AM](https://usermanual.wiki/Sony-Group/MEXN4000BT/User-Guide-2133132-Page-38.png)
![13ESF:\yoshida\1115\4489688111\4489688111MEXN4000BTUC\02LaES-MEXN4000BTUC\040CD.fm masterpage: RightMEX-N4000BT4-489-688-11(1)1Durante la reproducción de equipos de audio de CD, USB o BT*1, presione (navegar)*2 para mostrar la lista de categorías de búsqueda.Cuando aparece la lista de pistas, presione (volver) repetidamente hasta que aparezca la categoría de búsqueda deseada.*1 Disponible solo para equipos de audio compatibles con AVRCP (Perfil de control remoto de audio y video) 1.4 o posteriores.*2 Durante la reproducción USB, presione (navegar) durante más de 2 segundos para volver directamente al inicio de la lista de categorías.2Gire el selector de control para seleccionar la categoría de búsqueda deseada y, a continuación, presiónelo para confirmarla.3Repetir el paso 2 para buscar la pista deseada.Se inicia la reproducción.Para salir del modo Quick-BrowZerPresione (navegar).1Presione (navegar).2Presione SEEK +.3Gire el selector de control para seleccionar el elemento.Se realizan omisiones en pasos del 10 % de la cantidad total de elementos presentes en la lista.4Presione ENTER para volver al modo Quick-BrowZer.Aparecerá el elemento seleccionado.5Gire el selector de control para seleccionar el elemento deseado y, a continuación, presiónelo.Se inicia la reproducción.Pandora® está disponible para reproducir música a través de su Android™, teléfonos BlackBerry® y iPhone. Podrá controlar Pandora® desde un iPhone conectado por USB o desde un teléfono Android/BlackBerry conectado por BLUETOOTH desde esta unidad.El servicio Pandora® no está disponible en algunos países/regiones.Preparación para Pandora®1Para verificar los dispositivos compatibles, visite el sitio de soporte técnico en la contratapa.2Descargue la última versión de la aplicación Pandora® desde la tienda de aplicaciones de su teléfono inteligente. Puede encontrar una lista de los dispositivos compatibles en www.pandora.com/everywhere/mobilePara teléfonos Android solamenteNo puede controlar Pandora® a través de la función BLUETOOTH mientras ejecuta la aplicación “App Remote” a través de BLUETOOTH.Transmisión de Pandora®1Conecte esta unidad con el dispositivo móvil.ˎiPhone a través de USB (página 9)ˎTeléfono Android/BlackBerry a través de la función BLUETOOTH (página 7)2Presione SRC para seleccionar [PANDORA USB] o [BT PANDORA].3Abra la aplicación Pandora® en el dispositivo móvil.4Presione PAUSE para comenzar la reproducción.Si aparece el número de dispositivoAsegúrese de que aparezcan los mismos números (por ejemplo, 123456) en esta unidad y en el dispositivo móvil, luego presione ENTER en esta unidad y seleccione [Sí] en el dispositivo móvil.Búsqueda de una pista por nombre (Quick-BrowZer™)Búsqueda por salteo de elementos (Modo de omisión)Escuchar a Pandora®010COV.book Page 13 Friday, November 15, 2013 11:49 AM](https://usermanual.wiki/Sony-Group/MEXN4000BT/User-Guide-2133132-Page-39.png)
![14ESF:\yoshida\1115\4489688111\4489688111MEXN4000BTUC\02LaES-MEXN4000BTUC\040CD.fm masterpage: LeftMEX-N4000BT4-489-688-11(1)Cuando activa la función BLUETOOTH Puede ajustar el nivel de volumen.Presione MENU y gire el selector de control. Seleccione [SOUND] q [BTA VOL] (página 20).Operaciones disponibles en Pandora®Los comentarios de “pulgares arriba” o “pulgares abajo” le permiten personalizar las emisoras.Pulgares arribaDurante la reproducción, toque Ă.Pulgares abajoDurante la reproducción, toque è.La lista de emisoras le permite elegir con facilidad la emisora deseada.1Durante la reproducción, presione (navegar).2Presione SEEK + para seleccionar el orden de clasificación [BY DATE] o [A TO Z].3Gire el selector de control para seleccionar la estación deseada, luego presiónelo.Comienza la reproducción.La pista o el artista que se esté reproduciendo en el momento puede ser seleccionado como favorito y almacenado en su cuenta Pandora®.1Durante la reproducción, mantenga presionado MODE hasta que aparezca [BOOKMARK].2Gire el selector de control para seleccionar [TRK] (pista) o [ART] (artista), luego presiónelo.Para usar un teléfono celular, conéctelo a esta unidad. Para obtener más información, consulte “Preparación del dispositivo BLUETOOTH” (página 7).Rechazo de llamadas1Presione CALL cuando reciba una llamada con un tono de llamada.Comienza la llamada telefónica.NotaEl tono de llamada y la voz del auricular solo salen de los altavoces frontales.Para rechazar la llamadaMantenga presionado OFF por un segundo.Para finalizar una llamadaPresione CALL nuevamente.Realización de llamadasPuede realizar una llamada desde la libreta de direcciones o desde el historial de llamadas cuando un teléfono celular que sea compatible con PBAP (Perfil de acceso a la agenda telefónica) esté conectado.1Presione CALL, gire el selector de control para seleccionar [PHONEBOOK] y, a continuación, presiónelo.2Gire el selector de control para seleccionar una inicial de la lista de iniciales y, a continuación, presiónelo.3Gire el selector de control para seleccionar un nombre de la lista de nombres y, a continuación, presiónelo.Comentarios de “pulgares”Uso de la lista de emisorasSelección de favoritosRealización de llamadas con manos libresRealización de llamadas desde la agenda telefónica010COV.book Page 14 Friday, November 15, 2013 11:49 AM](https://usermanual.wiki/Sony-Group/MEXN4000BT/User-Guide-2133132-Page-40.png)
![15ESF:\yoshida\1115\4489688111\4489688111MEXN4000BTUC\02LaES-MEXN4000BTUC\040CD.fm masterpage: RightMEX-N4000BT4-489-688-11(1)4Gire el selector de control para seleccionar un número de la lista de números y, a continuación, presiónelo.Comienza la llamada telefónica.1Presione CALL, gire el selector de control para seleccionar [RECENT CALL] y, a continuación, presiónelo.Aparece una lista del historial de llamadas.2Gire el selector de control para seleccionar un nombre o un número telefónico del historial de llamadas y, a continuación, presiónelo.Comienza la llamada telefónica.1Presione CALL, gire el selector de control para seleccionar [DIAL NUMBER] y, a continuación, presiónelo.2Gire el selector de control para ingresar el número de teléfono y finalmente seleccione [ ] (espacio), luego, presione el botón ENTER*.Comienza la llamada telefónica.* Para mover la indicación digital, presione SEEK +/–.NotaEn la pantalla aparecerá [_] en lugar de [#] .1Presione CALL, gire el selector de control para seleccionar [REDIAL] y, a continuación, presiónelo.Comienza la llamada telefónica.Es posible almacenar hasta 6 contactos en la marcación preajustada.1Seleccione un número de teléfono que desee almacenar en la marcación predefinida, de la agenda telefónica, el historial de llamadas o bien ingresando directamente el número.El número de teléfono aparecerá en la pantalla de esta unidad.2Mantenga presionado un botón de número (de 1 a 6) hasta que aparezca [MEM].El contacto se almacena en el número preajustado que seleccione.1Presione SRC, gire el selector de control para seleccionar [BT PHONE], y, a continuación, presiónelo.2Presione un botón numérico (1 a 6) para seleccionar el contacto al que desea llamar.3Presione ENTER.Comienza la llamada telefónica.Haga una llamada al decir la etiqueta de voz almacenada en un teléfono celular conectado que tenga una función de marcado por voz.1Presione CALL, gire el selector de control para seleccionar [VOICE DIAL] y, a continuación, presiónelo.Otra posibilidad es presionar ENTER mientras la función App Remote se encuentra apagada.2Mencione la etiqueta de voz almacenada en el teléfono celular.Se reconocerá su voz y se realizará la llamada.Para cancelar el marcado por vozPresione ENTER.Realización de llamadas desde el historial de llamadasRealización de llamadas mediante la introducción de un número de teléfonoRealización de llamadas mediante repetición de marcadoMarcación predefinida de números telefónicosRealización de llamadas mediante números preajustadosLlamada por etiquetas de voz010COV.book Page 15 Friday, November 15, 2013 11:49 AM](https://usermanual.wiki/Sony-Group/MEXN4000BT/User-Guide-2133132-Page-41.png)
![16ESF:\yoshida\1115\4489688111\4489688111MEXN4000BTUC\02LaES-MEXN4000BTUC\040CD.fm masterpage: LeftMEX-N4000BT4-489-688-11(1)Tareas disponibles durante la llamadaPara configurar previamente el volumen del tono de llamada y del auricularPuede configurar el volumen del tono de llamada y del auricular.Ajuste del volumen del tono de llamada:Gire el selector de control mientras recibe la llamada.Ajuste del volumen del auricular:Gire el selector de control durante una llamada.Para ajustar el volumen para otra persona (Ajuste de ganancia de micrófono)Presione MIC.Niveles de volumen ajustables: [MIC-LOW], [MIC-MID], [MIC-HI].Para reducir el eco y el ruido (Cancelador de ecos/Modo cancelador de ruidos)Mantenga presionado MIC.Modo ajustable: [EC/NC-1], [EC/NC-2].Para transferir una llamadaPara activar o desactivar el dispositivo correcto (esta unidad o el teléfono celular), presione MODE o use el teléfono celular.NotaEn función del teléfono celular, es posible que la conexión de manos libres se interrumpa al intentar transferir una llamada.Para revisar el estado de SMS y correo electrónico* parpadea cuando se recibe un nuevo mensaje SMS o correo electrónico, y permanece iluminado cuando hay mensajes no leídos.* Solo disponible para teléfonos celulares compatibles con MAP (Perfil de acceso a mensajes).App Remote con iPhone/teléfono con AndroidSe requiere la descarga de la aplicación “App Remote” desde App Store para el iPhone o desde Google Play para teléfonos Android.Mediante la aplicación “App Remote”, las siguientes características están disponibles:ˋOperar la unidad para iniciar y controlar aplicaciones compatibles en iPhone/teléfono con Android.ˋOperar el iPhone/teléfono con Android con señales simples de dedos para controlar la fuente de la unidad.ˋIniciar una aplicación/fuente de audio o buscar la palabra clave en la aplicación al decir una palabra o frase en el micrófono (solo teléfonos Android).ˋLeer mensajes de texto entrantes, SMS, correo electrónico, Twitter, Facebook, calendario, etc., y se pueden responder los mensajes de texto, SMS y correo electrónico automáticamente (solo teléfonos Android).ˋAjustar los parámetros del sonido (EQ10, Balance/Fader, posición de escucha) de la unidad a través de teléfonos iPhone/Android.NotasˎPor su seguridad, cumpla con las regulaciones y leyes de tráfico locales y no utilice la aplicación mientras maneja.ˎLas operaciones disponibles varían en función de la aplicación. Para obtener más información sobre las aplicaciones disponibles, visite el sitio web de servicio técnico que se indica en la cubierta posterior.ˎApp Remote ver. 2.0 mediante USB es compatible con iPhones con iOS 5/iOS 6 instalados. ˎApp Remote ver. 2.0 mediante BLUETOOTH es compatible con dispositivos con Android que tengan Android 2.2, 2.3, 3.*, 4.0, 4.1 o 4.2 instalados.ˎEs posible que la función de reconocimiento de voz no funcione dependiendo de su smartphone. En ese caso, vaya a [Configuración], seleccione [Reconocimiento de voz].ˎLa lectura de SMS/correo electrónico/notificaciones está disponible para dispositivos Android con motor TTS instalado.ˎLa aplicación “Smart Connect”, proporcionada por Sony Mobile Communications, es necesaria para la notificación de lectura de Twitter/Facebook/calendario, etc.Funciones útiles010COV.book Page 16 Friday, November 15, 2013 11:49 AM](https://usermanual.wiki/Sony-Group/MEXN4000BT/User-Guide-2133132-Page-42.png)
![17ESF:\yoshida\1115\4489688111\4489688111MEXN4000BTUC\02LaES-MEXN4000BTUC\040CD.fm masterpage: RightMEX-N4000BT4-489-688-11(1)1Conecte el iPhone al puerto USB o el teléfono Android con la función BLUETOOTH.2Inicie la aplicación “App Remote”.3Mantenga presionado APP en la unidad por más de 2 segundos.Comienza la conexión con su iPhone/teléfono con Android.Para obtener más detalles acerca del funcionamiento del iPhone/teléfono con Android, consulte la ayuda de la aplicación.Si aparece el número de dispositivoAsegúrese de que se muestran los mismos números (por ejemplo, 123456) en esta unidad y el dispositivo móvil, luego presione ENTER en esta unidad y seleccione [Sí] en el dispositivo móvil.Para finalizar la conexiónMantenga presionado APP.Seleccionar la fuente o aplicaciónPuede operar la unidad para seleccionar la fuente o aplicación deseada en el smartphone.1Gire el selector de control para seleccionar la fuente o aplicación deseada, luego presiónela.Para seleccionar otra fuente o aplicación, presione SRC luego gire el selector de control para seleccionar la fuente o aplicación deseada.Anuncio de información variada a través de guía de voz (solo para teléfono Android)Al recibir SMS/correo electrónico, notificaciones de Twitter/Facebook/Calendario, etc., éstas se anuncian automáticamente a través de los parlantes del vehículo.Para obtener más detalles acerca de las configuraciones, consulte la ayuda de la aplicación.Activar el reconocimiento de voz (solo para teléfonos Android)Al registrar las aplicaciones, puede controlarlas mediante el comando de voz. Para obtener más detalles, consulte la ayuda de la aplicación.Para activar el reconocimiento de voz1Presione ENTER para activar el reconocimiento de voz.2Cuando aparece [Say Source or App], en el teléfono con Android, diga el comando de voz deseado en el micrófono.NotasˎEl reconocimiento de voz puede no encontrarse disponible en algunos casos.ˎEl reconocimiento de voz puede funcionar incorrectamente según el rendimiento del teléfono Android conectado.ˎUtilizar en situaciones en las que ruido, como el de un motor, sea mínimo durante el reconocimiento de voz.ˎEl uso de un micrófono externo (no suministrado) mejorará el reconocimiento de voz.Al seleccionar una aplicación de música o video*Presione 1 o 2 para ingresar en modo HID, y presione SEEK +/– para seleccionar un elemento de reproducción, luego presione ENTER para comenzar la reproducción.* Solamente disponible para teléfono Android compatible con HID (Perfil de dispositivo de interfaz humana).Establecer parámetros de sonidoPuede ajustar los parámetros de EQ, BAL/FAD/SW Level y Position a través de su teléfono inteligente.Para obtener más detalles acerca de las configuraciones, consulte la ayuda de la aplicación.Establecer la conexión App Remote010COV.book Page 17 Friday, November 15, 2013 11:49 AM](https://usermanual.wiki/Sony-Group/MEXN4000BT/User-Guide-2133132-Page-43.png)
![18ESF:\yoshida\1115\4489688111\4489688111MEXN4000BTUC\02LaES-MEXN4000BTUC\040CD.fm masterpage: LeftMEX-N4000BT4-489-688-11(1)Cancelación del modo DEMOPuede cancelar la pantalla de demostración que aparece mientras la unidad está apagada.1Presione MENU, gire el selector de control para seleccionar [DISPLAY] y, a continuación, presiónelo.2Gire el selector de control para seleccionar [DEMO] y, a continuación, presiónelo.3Gire el selector de control para seleccionar [DEMO-OFF] y, a continuación, presiónelo.El ajuste finalizó.4Presione (volver) dos veces.La pantalla vuelve al modo de recepción/reproducción normal.Operación básica de ajustesPuede ajustar los elementos en el menú con el siguiente procedimiento.Los siguientes elementos pueden ajustarse en función de la fuente y de la configuración.1Presione MENU.2Gire el selector de control para seleccionar la categoría de configuración y, a continuación, presiónela.Las categorías de configuración son las siguientes:ˎConfiguración GENERAL (página 18)ˎConfiguración SOUND (página 18)ˎConfiguración DISPLAY (página 20)ˎConfiguración BT (BLUETOOTH) (página 20)ˎConfiguración APP REM (App Remote) (página 20)3Gire el selector de control para seleccionar las opciones y, a continuación, presiónelas.Para volver a la pantalla anteriorPresione (volver).Configuración GENERALCLOCK-ADJ (Ajuste del reloj) (página 7)CAUT ALM (Alarma de precaución) (página 7)Activa la alarma de precaución: [ON], [OFF]. (Solamente está disponible cuando la unidad está apagada.)BEEPActiva el sonido de los pitidos: [ON], [OFF].AUTO OFFPermite apagar la alimentación automáticamente una vez transcurrido un período deseado cuando la unidad está apagada: [NO], [30S] (30 segundos), [30M] (30 minutos), [60M] (60 minutos).AUX-A (Audio AUX)Activa la pantalla de fuente AUX: [ON], [OFF]. (Solamente está disponible cuando la unidad está apagada.)REAR/SUBPermite cambiar la salida de audio: [SUB-OUT] (altavoz potenciador de graves), [REAR-OUT] (amplificador de potencia). (Solamente está disponible cuando la unidad está apagada.)CT (Hora del reloj) (página 11)Activa la función CT: [ON], [OFF].BTM (página 10)Configuración SOUNDC.AUDIO+ (sonido nítido+)Reproduce el sonido al optimizar la señal digital con los ajustes de sonido recomendados por Sony: [ON], [OFF]. (Se cambia automáticamente a [OFF] cuando se modifica [EQ10 PRESET]).EQ10 PRESETSelecciona una curva ecualizadora de 10 curvas ecualizadoras o de: [R AND B], [ROCK], [POP], [DANCE], [HIP-HOP], [ELECTRONICA], [JAZZ], [SOUL], [COUNTRY], [CUSTOM], [OFF].El ajuste de la curva de ecualizador se puede memorizar para cada fuente.EQ10 SETTINGAjuste [CUSTOM] de EQ10.BASESelecciona una curva ecualizadora preestablecida como base para futuros ajustes: [BAND1] 32 Hz, [BAND2] 63 Hz, [BAND3] 125 Hz, [BAND4] 250 Hz, [BAND5] 500 Hz, [BAND6] 1 kHz, [BAND7] 2 kHz, [BAND8] 4 kHz, [BAND9] 8 kHz, [BAND10] 16 kHz.Ajustes010COV.book Page 18 Friday, November 15, 2013 11:49 AM](https://usermanual.wiki/Sony-Group/MEXN4000BT/User-Guide-2133132-Page-44.png)
![19ESF:\yoshida\1115\4489688111\4489688111MEXN4000BTUC\02LaES-MEXN4000BTUC\040CD.fm masterpage: RightMEX-N4000BT4-489-688-11(1)El nivel de volumen puede ajustarse en intervalos de 1 dB entre -6 dB y +6 dB.POSITION (posición de escucha)SET F/R POS (configurar la posición frontal/posterior)Simula un campo de sonido natural mediante el retardo de la salida de sonido desde los altavoces frontales/posteriores para adecuarse a su posición.FRONT L (ɞ): izquierda delanteraFRONT R (ɟ): derecha delanteraFRONT (ɠ): delantera centralALL (ɡ): en el centro del automóvilCUSTOM: Posición configurada por App RemoteOFF: sin configuración de posiciónADJ POSITION* (ajustar posición)Sintoniza con mayor precisión el ajuste de la posición de escucha.Rango ajustable: [+3] – [CENTER] – [-3].SET SW POS* (ajuste de la posición subwoofer)NEAR (ʭ): cercaNORMAL (ʮ): normalFAR (ʯ): lejosBALANCEPermite ajustar el balance de sonido: [RIGHT-15] – [CENTER] – [LEFT-15].FADERPermite ajustar el nivel relativo: [FRONT-15] – [CENTER] – [REAR-15].DSEE (motor potenciador de sonido digital)Mejora el sonido comprimido digitalmente, ya que restaura las altas frecuencias que se pierden en el proceso de compresión.Este ajuste se puede memorizar para cada fuente diferente al sintonizador.Selecciona el modo DSEE: [ON], [OFF].LOUDNESSRefuerza los graves y agudos para obtener un sonido claro a niveles de volumen bajos: [ON], [OFF].AAV (volumen automático avanzado)Ajuste el nivel de volumen de reproducción de todas las fuentes de reproducción al nivel óptimo: [ON], [OFF].RB ENH (Potenciador posterior de sonidos graves)El Potenciador de sonidos graves posteriores mejora los sonidos graves, ya que aplica el ajuste del filtro de paso bajo a los altavoces posteriores. Esta función permite que los altavoces posteriores funcionen como altavoces potenciadores de graves si uno de ellos no está conectado. (Disponible solo cuando [SW DIRECT] está configurado en [OFF]).RBE MODE (modo Potenciador posterior de sonidos graves)Selecciona el potenciador posterior de sonidos graves: [1], [2], [3], [OFF].LPF FREQ (Frecuencia de filtro de bajo paso)Selecciona la frecuencia de corte del altavoz potenciador de graves: [50Hz], [60Hz], [80Hz], [100Hz], [120Hz].LPF SLOP (Pendiente de filtro de bajo paso)Selecciona la pendiente LPF: [1], [2], [3].SW DIREC (Conexión directa al altavoz potenciador de graves)Puede utilizar el altavoz potenciador de graves sin un amplificador de potencia cuando está conectado al cable del altavoz posterior. (Disponible solo cuando [RBE MODE] está configurado en [OFF]).Asegúrese de conectar un altavoz potenciador de graves de 4 a 8 Ω a cualquiera de los cables del altavoz posterior. No conecte un altavoz al otro cable de altavoz posterior.SW MODE (Modo del altavoz potenciador de graves)Selecciona el modo del altavoz potenciador de graves: [1], [2], [3], [OFF].SW PHASE (Fase de altavoz potenciador de graves)Selecciona la fase del altavoz potenciador de graves: [NORM], [REV].SW POS* (Posición del altavoz potenciador de graves)Selecciona la posición del altavoz potenciador de graves: [NEAR], [NORMAL], [FAR].LPF FREQ (Frecuencia de filtro de bajo paso)Selecciona la frecuencia de corte del altavoz potenciador de graves: [50Hz], [60Hz], [80Hz], [100Hz], [120Hz].LPF SLOP (Pendiente de filtro de bajo paso)Selecciona la pendiente LPF: [1], [2], [3].S.WOOFER (altavoz potenciador de graves)SW LEVEL (Nivel del altavoz potenciador de graves)Permite ajustar el nivel de volumen del altavoz potenciador de graves: [+10 dB] – [0 dB] – [-10 dB].([ATT] aparece en pantalla con el ajuste más bajo).SW PHASE (Fase de altavoz potenciador de graves)Selecciona la fase del altavoz potenciador de graves: [NORM], [REV].010COV.book Page 19 Friday, November 15, 2013 11:49 AM](https://usermanual.wiki/Sony-Group/MEXN4000BT/User-Guide-2133132-Page-45.png)
![20ESF:\yoshida\1115\4489688111\4489688111MEXN4000BTUC\02LaES-MEXN4000BTUC\040CD.fm masterpage: LeftMEX-N4000BT4-489-688-11(1)SW POS* (Posición del altavoz potenciador de graves)Selecciona la posición del altavoz potenciador de graves: [NEAR], [NORMAL], [FAR].LPF FREQ (Frecuencia de filtro de bajo paso)Selecciona la frecuencia de corte del altavoz potenciador de graves: [50Hz], [60Hz], [80Hz], [100Hz], [120Hz].LPF SLOP (Pendiente de filtro de bajo paso)Selecciona la pendiente LPF: [1], [2], [3].HPF (Filtro de paso alto)HPF FREQ (Frecuencia de filtro de paso alto)Permite seleccionar la frecuencia de corte: [OFF], [50Hz], [60Hz], [80Hz], [100Hz], [120Hz].HPF SLOP (Pista del filtro de paso alto)Selecciona la pendiente HPF (efectivo solamente cuando [HPF FREQ] se ajusta en un valor diferente a [OFF]): [1], [2], [3].AUX VOL (Nivel de volumen AUX)Permite ajustar el nivel de volumen de cada dispositivo auxiliar conectado: [+18 dB] – [0 dB] – [-8 dB].Este ajuste elimina la necesidad de ajustar el nivel de volumen entre fuentes.BTA VOL (nivel de volumen de audio BLUETOOTH)Ajusta el nivel de volumen de cada equipo BLUETOOTH conectado: [+6 dB] – [0 dB] – [-6 dB].Este ajuste elimina la necesidad de ajustar el nivel de volumen entre fuentes.* No aparece cuando [SET F/R POS] se ajusta en [OFF].Configuración DISPLAYDEMO (Demostración)Activa la demostración: [ON], [OFF].DIMMERPermite cambiar el brillo de la pantalla: [ON], [OFF].ILLUM (Iluminación)Permite cambiar el color de la iluminación: [1], [2]. AUTO SCR (Desplazamiento automático)Permite desplazarse por los elementos de la pantalla automáticamente: [ON], [OFF].Configuración BT (BLUETOOTH)Esta configuración también se puede abrir presionando CALL.PAIRING (página 7)PHONEBOOK (página 14)REDIAL (página 15)RECENT CALL (página 15)VOICE DIAL (página 15)DIAL NUMBER (página 15)RINGTONESelecciona si esta unidad o el teléfono celular conectado emite el tono de llamadas: [1] (esta unidad), [2] (teléfono celular).AUTO ANS (respuesta automática)Ajusta la unidad para que responda automáticamente una llamada entrante: [OFF], [1] (aproximadamente 3 segundos), [2] (aproximadamente 10 segundos).AUTO PAIRINGEnciende el BLUETOOTH emparejándose automáticamente cuando el dispositivo iOS versión 5.0, o posterior, está conectado mediante USB: [ON], [OFF].BT SIGNL (Señal BLUETOOTH) (página 8)Activa la función BLUETOOTH: [ON], [OFF].BT INIT (Inicialización de la tecnología BLUETOOTH)Inicia todos los ajustes relacionados con BLUETOOTH (información de emparejamiento, número predefinido, información de dispositivo, etc.).Cuando se desecha la unidad, se inicializan todos los ajustes.Configuración APP REM (App Remote)Establece y termina la función App Remote (conexión).010COV.book Page 20 Friday, November 15, 2013 11:49 AM](https://usermanual.wiki/Sony-Group/MEXN4000BT/User-Guide-2133132-Page-46.png)
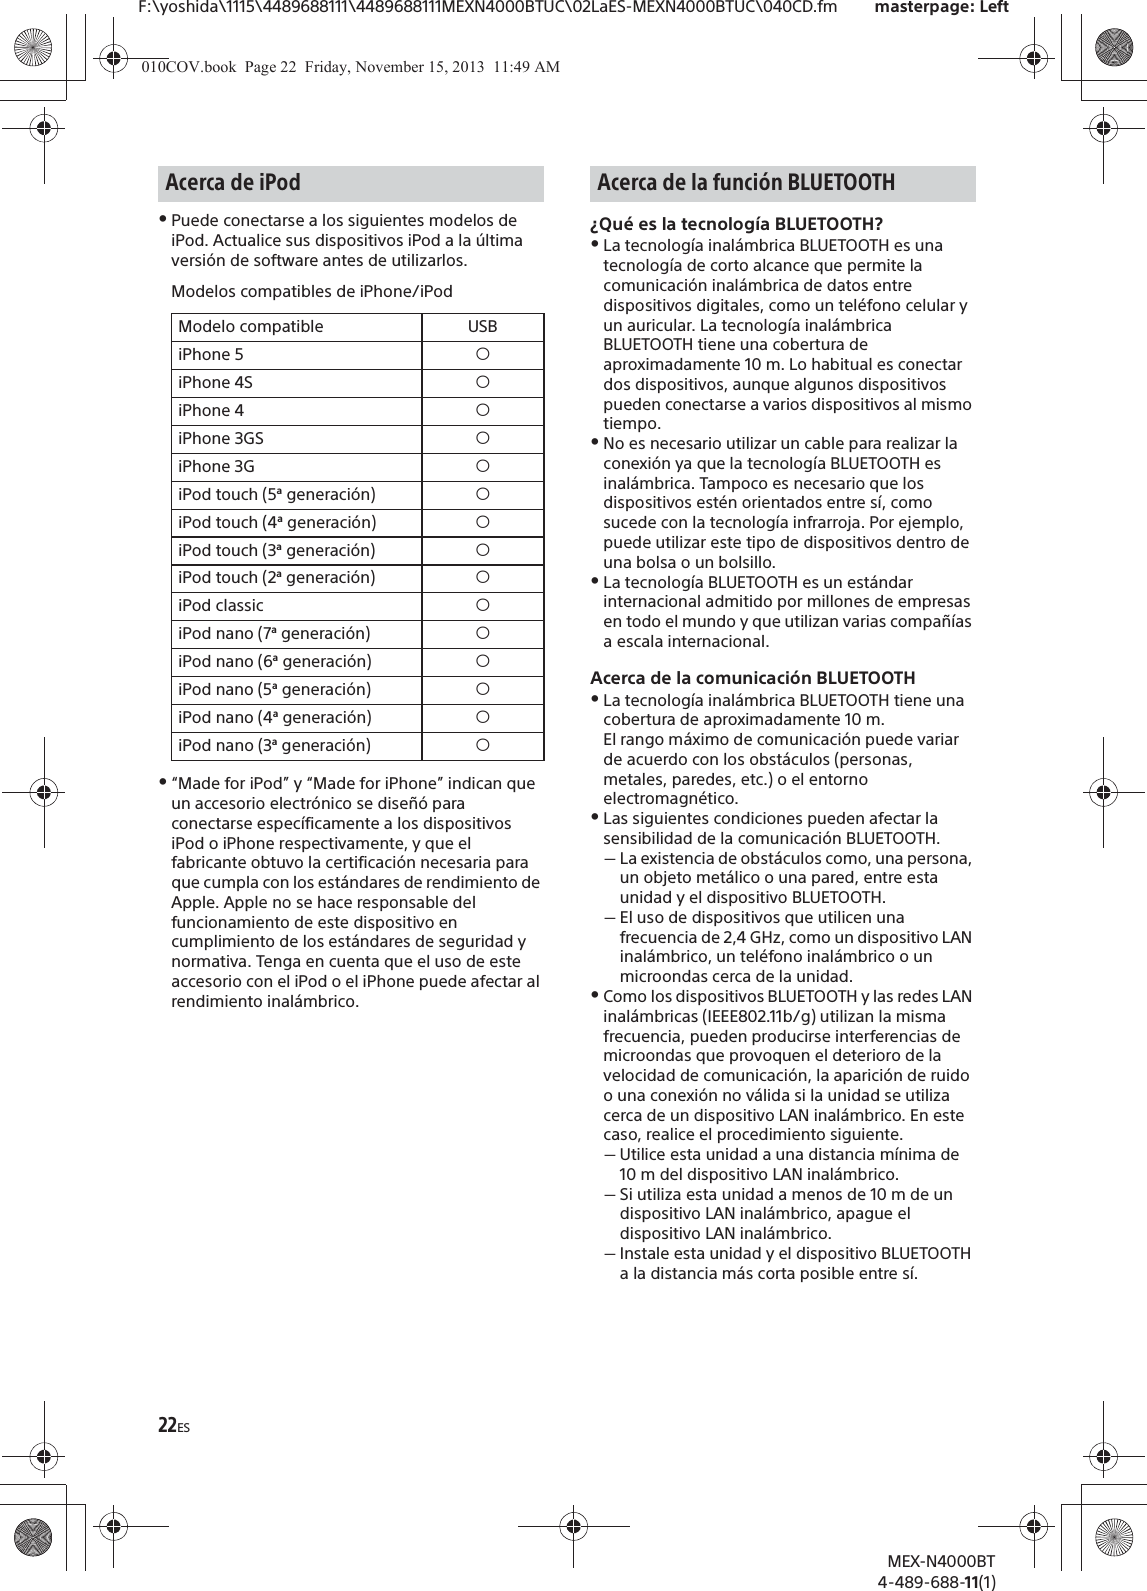
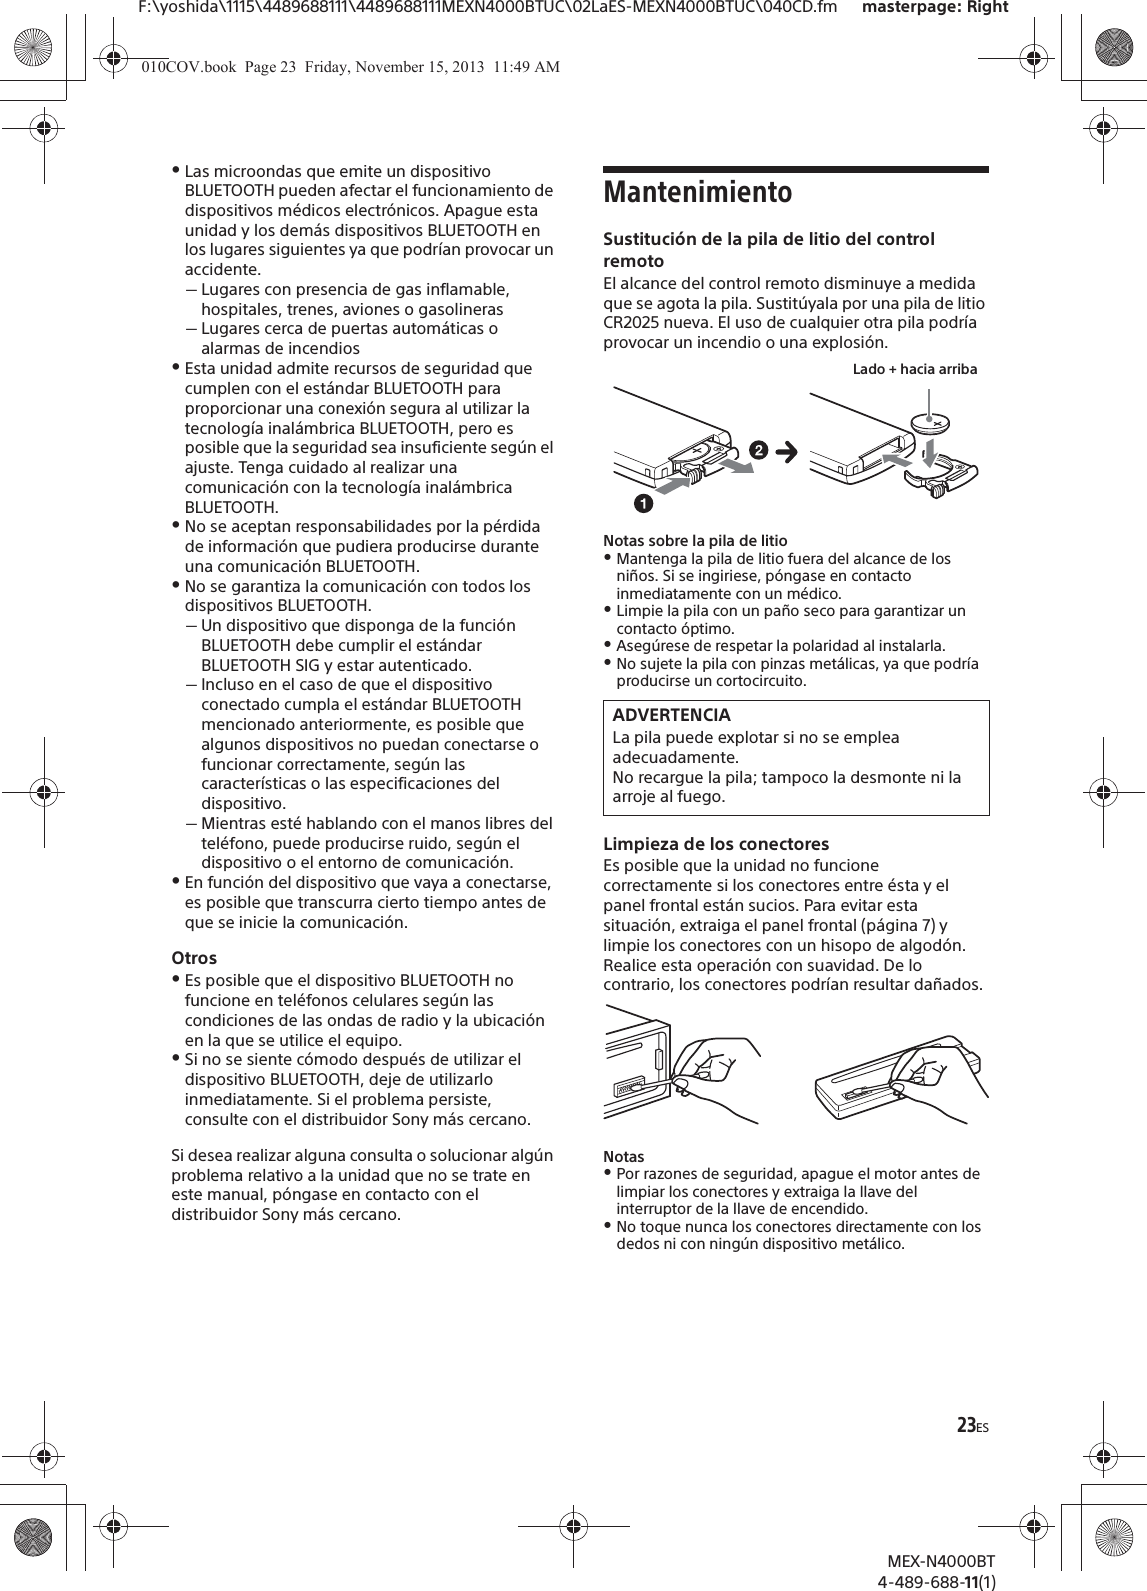
![24ESF:\yoshida\1115\4489688111\4489688111MEXN4000BTUC\02LaES-MEXN4000BTUC\040CD.fm masterpage: LeftMEX-N4000BT4-489-688-11(1)EspecificacionesSección del sintonizadorFMRango de sintonización: De 87,5 a 107,9 MHzTerminal de antena: Conector de antena externaFrecuencia intermedia: 25 kHzSensibilidad útil: 8 dBfSelectividad: de 75 dB a 400 kHzRelación señal-ruido: 80 dB (estéreo)Separación: de 50 dB a 1 kHzRespuesta de frecuencia: 20 – 15 000 HzAMRango de sintonización: De 530 a 1 710 kHzTerminal de antena: Conector de antena externaFrecuencia intermedia: 9 115 kHz o 9 125 kHz/5 kHzSensibilidad: 26 μVSección del reproductor de CDRelación señal-ruido: 120 dBRespuesta de frecuencia: 10 – 20 000 HzFluctuación y trémolo: inferior al límite medibleCódec correspondiente: MP3 (.mp3) y WMA (.wma)Sección del reproductor USBInterfaz: USB (alta velocidad)Corriente máxima: 1 ACantidad máxima de pistas reconocibles: 10 000Códices correspondientes: MP3 (.mp3), WMA (.wma) y WAV (.wav)Comunicación inalámbricaSistema de comunicación: BLUETOOTH versión estándar 3.1Salida: BLUETOOTH potencia estándar clase 2 (Máx. +4 dBm)Rango máximo de comunicación: Línea de visión aprox. 10 m*1Banda de frecuencia: Banda 2,4 GHz (2,4000 – 2,4835 GHz)Método de modulación: FHSSPerfiles compatibles con la tecnología BLUETOOTH*2:A2DP (Perfil de distribución de audio avanzado) 1.3AVRCP (Perfil de control remoto de audio y video) 1.5HFP (Perfil manos libres) 1.6PBAP (Perfil de acceso a la agenda telefónica)SPP (Perfil de puerto serie)MAP (Perfil de acceso a mensajes)HID (Perfil de dispositivo de interfaz humana)*1 El alcance real variará según factores, como los obstáculos entre los dispositivos, los campos magnéticos alrededor de un horno de microondas, la electricidad estática, la sensibilidad de recepción, el funcionamiento de la antena, el sistema operativo, la aplicación del software, etc.*2 Los perfiles estándar BLUETOOTH indican el propósito de la comunicación BLUETOOTH entre dispositivos.Sección del amplificador de potenciaSalida: salidas de altavozImpedancia de altavoz: 4 – 8 ΩSalida de potencia máxima: 55 W × 4 (a 4 Ω)GeneralesSalidas:Terminal de salidas de audio (frontal, intercambiable entre altavoz potenciador de graves y posterior)Antena de alimentación/Terminal de control del amplificador de potencia (REM OUT)Entradas:Terminal de entrada del control remotoTerminal de entrada de la antenaTerminal de entrada MICToma de entrada AUX (minitoma estéreo)Puerto USB Requisitos de alimentación: batería de automóvil de cc 12 V (masa negativa [tierra])Dimensiones: Aprox.: 178 mm × 50 mm × 177 mm (an./al./prf.)Dimensiones de montaje: Aprox.: 182 mm × 53 mm × 160 mm (an./al./prf.)Peso: aprox. 1,2 kgContenidos del paquete:Unidad principal (1)Control remoto (1): RM-X231Componentes de instalación y conexiones (1 juego)Equipo y accesorios opcionales: Micrófono: XA-MC10Es posible que su distribuidor no comercialice algunos de los accesorios que figuran en la lista anterior. Solicite información detallada.El diseño y las especificaciones están sujetos a cambios sin previo aviso.La marca de la palabra y logotipos Bluetooth® son marcas comerciales registradas y son propiedad de Bluetooth SIG, Inc., y Sony Corporation posee licencia para utilizar cualquiera de dichas marcas. Otras marcas registradas y nombres comerciales pertenecen a sus respectivos propietarios.Derechos de autor010COV.book Page 24 Friday, November 15, 2013 11:49 AM](https://usermanual.wiki/Sony-Group/MEXN4000BT/User-Guide-2133132-Page-50.png)
![25ESF:\yoshida\1115\4489688111\4489688111MEXN4000BTUC\02LaES-MEXN4000BTUC\040CD.fm masterpage: RightMEX-N4000BT4-489-688-11(1)La marca N es una marca comercial o marca registrada de NFC Forum, Inc. en los Estados Unidos y en otro países.Windows Media es una marca comercial registrada o una marca comercial de Microsoft Corporation en los EE. UU. y otros países.Este producto está protegido por los derechos de propiedad intelectual de Microsoft Corporation. Queda prohibido el uso o la distribución de esta tecnología fuera de este producto si no se dispone de una licencia de Microsoft o una división autorizada de Microsoft.iPhone, iPod, iPod classic, iPod nano, y iPod touch son marcas comerciales de Apple Inc., registradas en los Estados Unidos y otros países. App Store es una marca de servicio de Apple Inc.Tecnología de codificación de audio MPEG Layer-3 y patentes bajo licencia de Fraunhofer IIS y Thomson.Pandora, el logotipo de Pandora y la imagen de la marca Pandora son marcas comerciales o marcas comerciales registradas de Pandora Media, Inc., utilizadas con autorización.Google, Google Play y Android son marcas comerciales de Google Inc.BlackBerry® es propiedad de Research In Motion Limited y está registrada y/o se utiliza en los EE.UU. y en países de todo el mundo. Se utiliza bajo licencia de Research In Motion Limited.Solución de problemasLa siguiente lista de comprobación le ayudará a solucionar los problemas que puedan producirse con la unidad.Antes de consultarla, revise los procedimientos de conexión y de funcionamiento.Para obtener más detalles acerca de cómo utilizar el fusible y cómo retirar la unidad del tablero, consulte el manual de instalación y de conexiones suministrado con esta unidad.Si el problema no se resuelve, visite el sitio web de soporte técnico que figura en la cubierta posterior.GeneralesLa unidad no recibe alimentación.qSi la unidad está apagada y la pantalla desaparece, no se puede operar con el control remoto.ˋEncienda la unidad.No se emite el sonido.qLa posición del control de equilibrio [FADER] no está ajustada para un sistema de 2 altavoces.No se escuchan pitidos.qSe encuentra conectado un amplificador de potencia opcional y no está usando el amplificador integrado.El contenido de la memoria se borró.qSe desconectó la batería o el cable de fuente de alimentación, o no están conectados correctamente.Las emisoras almacenadas y la hora correcta se borraron.El fusible se fundió.Se escucha un ruido cuando se cambia la posición de la llave de encendido.qLos cables no se conectaron de forma correcta al conector de alimentación auxiliar del automóvil.Durante la reproducción o la recepción, el modo demostración se inicia.qSi no se realiza ninguna operación durante 5 minutos y la opción [DEMO-ON] está ajustada, se iniciará el modo de demostración.ˋAjuste [DEMO-OFF] (página 20).Las indicaciones desaparecen del visualizador o no aparecen en él.qEl atenuador está ajustado en [DIM-ON] (página 20).qLa pantalla se apaga si mantiene presionado OFF.ˋPresione OFF en la unidad hasta que se ilumine la pantalla.qLos conectores están sucios (página 23).010COV.book Page 25 Friday, November 15, 2013 11:49 AM](https://usermanual.wiki/Sony-Group/MEXN4000BT/User-Guide-2133132-Page-51.png)
![26ESF:\yoshida\1115\4489688111\4489688111MEXN4000BTUC\02LaES-MEXN4000BTUC\040CD.fm masterpage: LeftMEX-N4000BT4-489-688-11(1)Los botones de operación no funcionan.El disco no se expulsa.qPresionar PTY y (volver)/MODE por más de 2 segundos para realizar la restauración de la unidad.Los contenidos almacenados en la memoria son eliminados.Por su seguridad, no realice la restauración de la unidad mientras maneja.Recepción de radioNo es posible recibir emisoras.Hay ruidos que obstaculizan el sonido.qLa conexión no es correcta.ˋSi su automóvil cuenta con una antena de radio incluida en el vidrio lateral o posterior, conecte un cable REM OUT (con rayas azules y blancas) o un cable de fuente de alimentación accesorio (rojo) al cable de fuente de alimentación del amplificador de señal de la antena del automóvil.ˋCompruebe la conexión de la antena del automóvil.ˋSi la antena del automóvil no se extiende, compruebe la conexión del cable de control de la antena motorizada.No es posible utilizar la sintonización programada.qLa señal de emisión es demasiado débil.RDSPTY muestra [- - - - - - - -].qLa emisora actual no es una emisora RDS.qNo se recibieron datos RDS.qLa emisora no especifica el tipo de programa.Reproducción de CDNo se inicia la reproducción.qDisco defectuoso o sucio.qLos discos CD-R/CD-RW no son para audio (página 21).No es posible reproducir archivos MP3/WMA.qEl disco no es compatible con el formato y la versión de MP3/WMA. Para obtener más información acerca de los discos y formatos que se pueden reproducir, visite el sitio web de soporte técnico en línea.Los archivos MP3/WMA tardan más tiempo en reproducirse que los demás.qEl inicio de la reproducción de los siguientes discos tarda algo más de tiempo.ˋDisco grabado con una estructura de árbol complicada.ˋDisco grabado en Multi Session.ˋDisco al que es posible añadir datos.Se producen saltos de sonido.qDisco defectuoso o sucio.Reproducción USBNo es posible reproducir elementos a través de un concentrador USB.qEsta unidad no puede reconocer dispositivos USB a través de un concentrador USB.El dispositivo USB tarda en reproducirse.qEl dispositivo USB contiene archivos con una estructura de árbol compleja.El sonido es discontinuo.qEs posible que la discontinuidad del sonido se deba a una tasa alta de bits de más de 320 kbps.No es posible la conexión Pandora®.qCierre la aplicación Pandora® en el dispositivo móvil, y luego inicie nuevamente.El nombre de la aplicación no coincide con la aplicación real en App Remote.qInicie la aplicación nuevamente desde la aplicación “App Remote”.Función NFCLa conexión One touch (NFC) no es posible.qSi el smartphone no responde al tacto.ˋRevise que la función NFC del smartphone esté encendida.ˋMueva la parte marca N del smartphone de modo de acercarla a la parte marca N de esta unidad.ˋSi el smartphone se encuentra dentro de un estuche, quítelo.qLa sensibilidad de recepción NFC depende del dispositivo.Si la conexión One touch con el smartphone falla varias veces, haga la conexión a BLUETOOTH en forma manual.Función BLUETOOTHEl dispositivo de conexión no puede detectar esta unidad.qAntes de realizar el emparejamiento, configure esta unidad en el modo de espera del emparejamiento.qMientras se conecta al otro dispositivo BLUETOOTH, esta unidad no puede detectarse desde otro dispositivo.ˋDesconecte la conexión actual y busque esta unidad desde otro dispositivo.qUna vez realizado el emparejamiento del dispositivo, active la salida de señal de BLUETOOTH (página 8).010COV.book Page 26 Friday, November 15, 2013 11:49 AM](https://usermanual.wiki/Sony-Group/MEXN4000BT/User-Guide-2133132-Page-52.png)
![27ESF:\yoshida\1115\4489688111\4489688111MEXN4000BTUC\02LaES-MEXN4000BTUC\040CD.fm masterpage: RightMEX-N4000BT4-489-688-11(1)No es posible realizar la conexión.qLa conexión se controla de un solo lado (esta unidad o dispositivo BLUETOOTH) pero no de ambos lados.ˋConecte esta unidad a un dispositivo BLUETOOTH o viceversa.No aparece el nombre del dispositivo detectado.qSegún el estado del otro dispositivo, es posible que no se pueda obtener el nombre.No se emite ningún tono de llamada.qAjuste el volumen girando el selector de control mientras recibe una llamada.qSegún el dispositivo de conexión, es posible que el tono de llamada no se emita correctamente.ˋAjuste [RINGTONE] en [1] (página 20).qLos altavoces frontales no están conectados a la unidad.ˋConecte los altavoces frontales a la unidad. El tono de llamada suena solamente desde los altavoces frontales.No se puede ajustar el volumen de la voz de la persona que habla.qLos altavoces frontales no están conectados a la unidad.ˋConecte los altavoces frontales a la unidad. La voz del que habla y la voz del auricular solo salen de los altavoces frontales.El interlocutor de una llamada le notifica que el volumen es demasiado bajo o demasiado alto.qAjuste el volumen según corresponda mediante la ganancia de micrófono (página 16).Se producen ecos o ruidos durante las conversaciones telefónicas.qBaje el volumen.qAjuste el modo EC/NC en [EC/NC-1] o [EC/NC-2] (página 16).qSi el sonido ambiente que no sea el sonido de la llamada de teléfono es alto, intente reducir el ruido.Por ej.: si una ventana está abierta y se oye ruido de la calle, etc., fuerte, cierre la ventana. Si el aire acondicionado está alto, bájelo.El teléfono no está conectado.qDurante la reproducción de audio BLUETOOTH, el teléfono no está conectado aunque presione CALL.ˋRealice la conexión desde el teléfono.La calidad de sonido del teléfono es baja.qLa calidad del sonido del teléfono depende de las condiciones de recepción del teléfono celular. ˋMueva el automóvil a un lugar en el que pueda mejorar la señal del teléfono celular si la recepción es de mala calidad.El volumen del dispositivo de audio conectado es bajo (alto).qEl nivel de volumen cambiará dependiendo del dispositivo de audio.ˋAjuste el volumen del dispositivo de audio conectado o de esta unidad.El sonido salta durante la reproducción de un dispositivo de audio BLUETOOTH.qReduzca la distancia entre la unidad y el dispositivo de audio BLUETOOTH.qSi el dispositivo de audio BLUETOOTH está guardado en un estuche que interrumpe la señal, retírelo mientras lo utilice.qEn los alrededores se están utilizando varios dispositivos BLUETOOTH u otros dispositivos que emiten ondas de radio.ˋApague los otros dispositivos.ˋAumente la distancia entre la unidad y los otros dispositivos.qEl sonido de reproducción se detiene momentáneamente mientras se establece la conexión entre esta unidad y el teléfono celular. No se trata de una falla de funcionamiento.No es posible controlar el dispositivo de audio BLUETOOTH conectado.qCompruebe que el dispositivo de audio BLUETOOTH conectado sea compatible con AVRCP.Algunas funciones no están disponibles.qCompruebe que el dispositivo de conexión sea compatible con las funciones en cuestión.Se contesta una llamada accidentalmente.qEl teléfono conectado está configurado para responder una llamada automáticamente.El emparejamiento ha fallado porque se ha superado el tiempo establecido.qSegún el dispositivo de conexión, es posible que el tiempo para el emparejamiento sea escaso.ˋIntente completar el emparejamiento en el tiempo establecido.No es posible utilizar la función BLUETOOTH.qApague la unidad presionando OFF durante más de 2 segundos, luego vuelva a encender la unidad.Durante la llamada con manos libres, los altavoces del automóvil no emiten ningún sonido.qSi el sonido de salida viene del teléfono celular, ajuste el teléfono para que el sonido se emita por los altavoces del automóvil.No es posible la conexión Pandora®.qInicie la aplicación Pandora® en el dispositivo móvil, y luego inicie nuevamente.010COV.book Page 27 Friday, November 15, 2013 11:49 AM](https://usermanual.wiki/Sony-Group/MEXN4000BT/User-Guide-2133132-Page-53.png)
![28ESF:\yoshida\1115\4489688111\4489688111MEXN4000BTUC\02LaES-MEXN4000BTUC\040CD.fm masterpage: LeftMEX-N4000BT4-489-688-11(1)El nombre de la aplicación no coincide con la aplicación real en App Remote.qInicie la aplicación nuevamente desde la aplicación “App Remote”.Cuando ejecute la aplicación “App Remote” mediante BLUETOOTH, la pantalla cambia automáticamente a [BT AUDIO].qLa aplicación “App Remote” o la función BLUETOOTH han fallado.ˋEjecute la aplicación nuevamente.Mensajes/indicaciones de errorERRORqEl disco está sucio o se insertó al revés.ˋLímpielo o insértelo de forma correcta.qSe insertó un disco vacío.qNo es posible reproducir el disco debido a un problema.ˋInserte otro disco.qEl dispositivo USB no ha sido reconocido automáticamente.ˋConéctelo nuevamente.qPresione ì para extraer el disco.HUB NO SUPRT (No admite concentradores)qEl concentrador USB no es compatible con esta unidad.IPD STOP (Detener iPod)qCuando no se selecciona la reproducción repetida, la reproducción termina con la última pista del álbum.Se finaliza la aplicación de música del iPod/iPhone.ˋPresione PAUSE para volver a comenzar la reproducción.NO DEV (No hay dispositivo)q[USB] se selecciona como fuente sin que esté conectado un dispositivo USB. Se ha desconectado un dispositivo USB o un cable USB durante la reproducción.ˋAsegúrese de conectar un dispositivo USB y un cable USB.NO MUSICqEl disco o dispositivo USB no contiene ningún archivo de música.ˋInserte un CD de música.ˋConecte un dispositivo USB que contenga algún archivo de música.OVERLOADqEl dispositivo USB está sobrecargado.ˋDesconecte el dispositivo USB y, a continuación, presione SRC para cambiar la fuente.ˋEl dispositivo USB tiene una falla, o se ha conectado un dispositivo incompatible.PUSH EJT (Presione expulsar)qNo es posible expulsar el disco.ˋPresione ì (expulsar).READqLa unidad está leyendo toda la información de pistas y de álbumes del disco.ˋEspere hasta que finalice la lectura y se inicie la reproducción automáticamente. Es posible que demore más de un minuto en función de la estructura del disco.USB NO SUPRT (USB no compatible)qEl dispositivo USB conectado no es compatible.ˋPara obtener más información acerca de la compatibilidad del dispositivo USB, visite el sitio web de soporte técnico.[] o []qDurante la operación de avance o retroceso rápido, llegó al principio o al final del disco, por lo que no es posible continuar.[]qNo se puede mostrar el carácter.Acerca de la función BLUETOOTH:BT BUSY (BLUETOOTH no disponible)qLa agenda telefónica y el historial de llamadas del teléfono celular no son accesibles mediante esta unidad.ˋEspere un momento e inténtelo nuevamente.ERRORqFalló BT Initialize.qFalló el acceso a la agenda telefónica.qEl contenido de la agenda telefónica ha sido modificado durante el acceso al teléfono celular.ˋAcceda a la agenda telefónica nuevamente.MEM FAILURE (Error de memoria)qLa unidad no pudo almacenar el contacto en la marcación predefinida.ˋAsegúrese de que el número que desea almacenar sea correcto (página 15).MEMORY BUSYqEsta unidad está almacenando datos.ˋEspere a que termine el almacenamiento.NO DEV (No hay dispositivo)qLa fuente de audio BLUETOOTH se selecciona sin que esté conectado un dispositivo BLUETOOTH. El dispositivo de audio BLUETOOTH se ha desconectado durante una llamada.ˋAsegúrese de conectar un dispositivo de audio BLUETOOTH.010COV.book Page 28 Friday, November 15, 2013 11:49 AM](https://usermanual.wiki/Sony-Group/MEXN4000BT/User-Guide-2133132-Page-54.png)