Sony Group MHSTS55 MOBILE HD SNAP CAMERA User Manual MHS TS55
Sony Corporation MOBILE HD SNAP CAMERA MHS TS55
UserManual.wiki
>
Sony Group
>
MHSTS55 User Manual
Users Manual
Navigation menu
Upload a User Manual
Namespaces
Wiki Guide
HTML
PDF
Info
Views
User Manual
Discussion / Help
Navigation

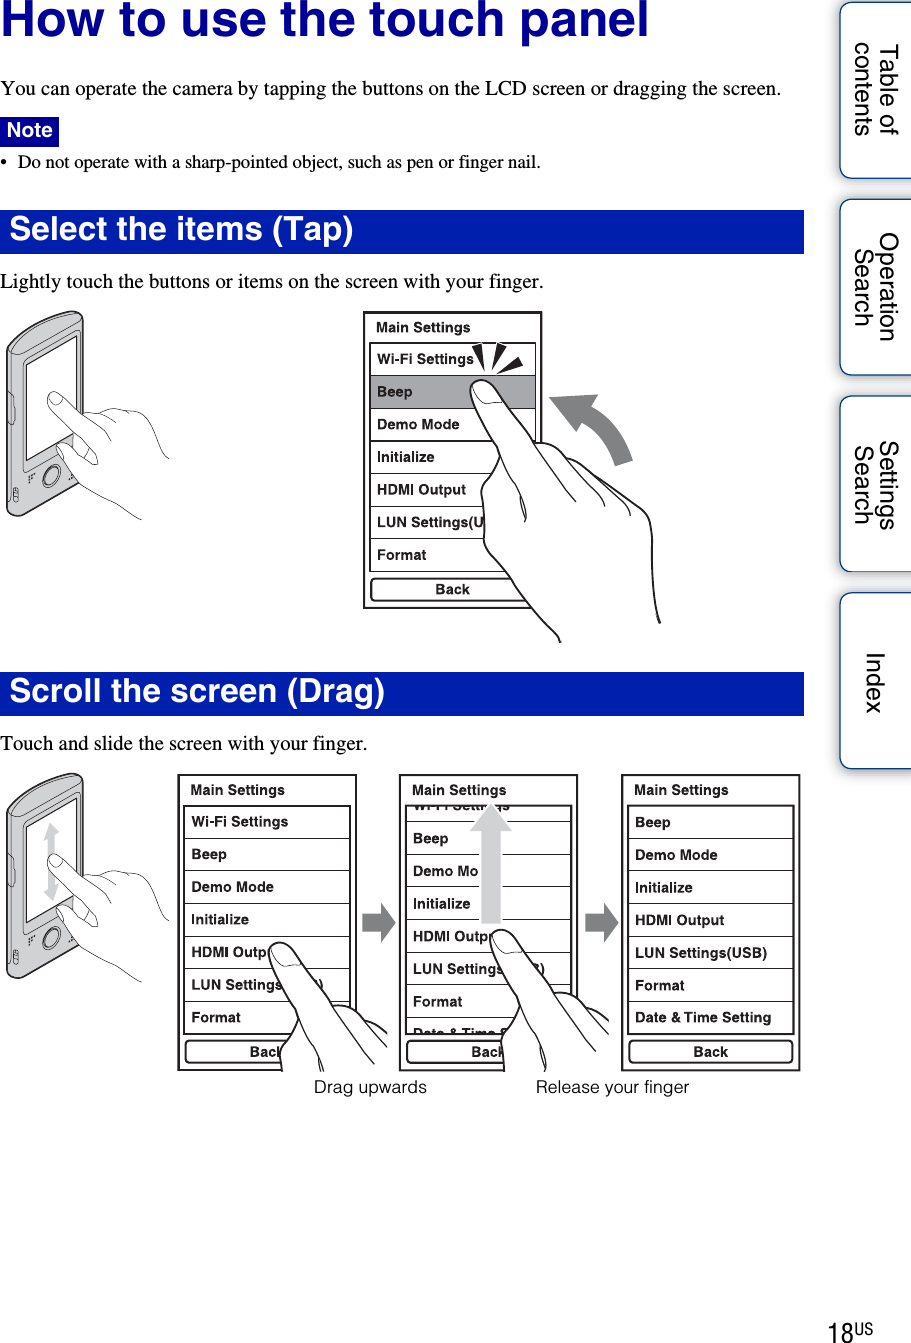
![11USTable of contentsOperation SearchSettings Search IndexSettings SearchAll settings can be changed in both shooting and playback mode.1Press the ON/OFF (Power) button.2Tap [MENU] t [Main Settings].Setting itemsItems Shooting/Playback modeWi-Fi SettingsBeepDemo ModeInitializeHDMI OutputLUN Settings(USB)FormatDate & Time SettingHow to set itemsON/OFF (Power) buttonContinued r](https://usermanual.wiki/Sony-Group/MHSTS55/User-Guide-1562232-Page-11.png)
![12USTable of contentsOperation SearchSettings Search Index3Tap the items.The displayed items scroll by dragging the LCD screen up and down with your finger.4Tap the desired mode.5Tap [Back].](https://usermanual.wiki/Sony-Group/MHSTS55/User-Guide-1562232-Page-12.png)

![22USTable of contentsOperation SearchSettings Search Index• While the camera is connected to a computer, you cannot operate the camera. Be sure to disconnect the camera before operation.• Do not apply force to the camera, when you connect the camera to a computer. This may cause damage to the camera or the computer.• When you connect the camera to a notebook computer that is not connected to an AC power source, the battery of the notebook computer may be depleted rapidly. Do not leave the camera connected to the computer for a long time.• Charging the battery or the connection with customized or hand-built computers is not guaranteed. Depending on the type of USB device used, charging may not function properly.• If you do not intend to use the camera for an extended period, charge the camera once every 6 to 12 months to maintain battery performance.Perform the procedures from step 1 to 3 below before:• Disconnecting the USB connection support cable.• Turning off the camera.1Double-click the disconnect icon on the tasktray.2Click (USB Mass Storage Device) t [Stop].3Confirm the device on the confirmation window, then click [OK].• Drag and drop the drive icon to the “Trash” icon beforehand when you use a Mac computer, and the camera is disconnected from the computer.NotesDeleting the USB connectionNoteWindows VistaDisconnect iconWindows XPzTo retract the USB jackPush the USB jack back in the direction of the arrow until it clicks.Continued r](https://usermanual.wiki/Sony-Group/MHSTS55/User-Guide-1562232-Page-22.png)
![23USTable of contentsOperation SearchSettings Search IndexzHow long does it take to charge the camera?Charging time• Time required to charge a fully depleted battery at a temperature of 25°C (77°F). Charging may take longer under certain circumstances or conditions.• You can rapid-charge the camera with a USB charger AC-UD20 (sold separately). To use, connect the USB charger to the USB jack of the supplied USB connection support cable, or directly to the USB jack of the camera.Full charge timeApprox. xx min.zHow long can I record or play back images?Standard battery life*1Recording time is the time when you set image size to [1280×720 30p].*2 Continuous recording time shows the approximate time available of a fully charged battery pack. Continuous recording of movies is possible for approximately 29 minutes. Also, recording stops automatically to prevent the file size from exceeding 2 GB.*3Typical recording time shows the approximate time available of a fully charged battery pack when you repeat recording start/stop, turning the power on/off and zooming.Recording time*1Continuous recording time*2Approx. xx min.Typical recording time*3Approx. xx min.Playback timeApprox. xx min.zChecking the remaining battery chargeA remaining charge indicator appears on the upper right of the LCD screen.• The displayed battery remaining indicator may not be correct under certain circumstances.• If the camera is running on battery power and you do not operate the camera for about 5 minutes, the camera turns off automatically to prevent wearing down the battery (Auto power off function).• The Clock Setting screen appears when the camera is turned on for the first time (page 25).• It takes about one minute until the correct battery remaining indicator appears.High Low](https://usermanual.wiki/Sony-Group/MHSTS55/User-Guide-1562232-Page-23.png)
![24USTable of contentsOperation SearchSettings Search IndexInstalling “PlayMemories Home (Limited version)” on a computerInstall the built-in software “PlayMemories Home” on a computer (Windows).You can import and view recorded images on a computer using “PlayMemories Home”.1Press the ON/OFF (Power) button to turn on the camera.2Connect the camera (turned on) to the computer (page 21).Windows 7: Device Stage appears.Windows XP/Windows Vista: AutoPlay Wizard appears.3Windows 7: click [xxxxx].Windows XP/Windows Vista: click [xxxxx].4Follow the instructions on the screen to complete the installation.After the installation is completed, “PlayMemories Home (camera built-in version)” will be launched.• When your computer is connected to the Internet, the installation guide for “Extension” will be displayed. Continue the installation following the instructions.• For details on “PlayMemories Home”, see page xx.• Log in with administrative right over the computer.• If Device Stage does not start when using Windows 7, click [Computer], then double-click the camera icon t media icon t [APPLICATION] t “xxxxx.exe”.• If the AutoPlay Wizard does not appear when using Windows XP/Windows Vista, double-click [Computer] (in Windows XP, [My Computer]) t [xxxxx] t “xxxxx.exe”.• “PlayMemories Home” is not supported by Mac. For details when using Mac, see page xx.NotesON/OFF (Power) button](https://usermanual.wiki/Sony-Group/MHSTS55/User-Guide-1562232-Page-24.png)
![25USTable of contentsOperation SearchSettings Search IndexSetting the clock1Press the ON/OFF (Power) button.The camera is turned on.The demonstration movie plays back when you turn on the camera for the first time.2Select the desired date display format, then tap [Next].3Select Daylight Savings [On]/[Off], then tap [Next].4Scroll each item up or down to set the desired date and time, and tap [OK].Midnight is indicated as 12:00 AM, and noon as 12:00 PM.ON/OFF (Power) buttonContinued r](https://usermanual.wiki/Sony-Group/MHSTS55/User-Guide-1562232-Page-25.png)
![26USTable of contentsOperation SearchSettings Search IndexzTo set the date and time againTap [MENU] t [Main Settings] t [Date & Time Setting] (page 59).](https://usermanual.wiki/Sony-Group/MHSTS55/User-Guide-1562232-Page-26.png)
![33USTable of contentsOperation SearchSettings Search IndexPhoto SizeThe photo size determines the size of the image file that is recorded when you take an image.The larger the photo size, the more detail will be reproduced when the image is printed on large-format paper. The smaller the photo size, the more images can be recorded.1Tap [MENU] t [Shooting Settings].Tap the LCD screen when the screen display is not shown.2Tap the desired size from [Photo Size]. • When you print still images recorded with 16:9 aspect ratio, both edges may be cut off.Photo Size Usage guidelines No. of imagesPrinting (4128×3096 4:3)For prints up to A3+ size (3840×2160 16:9)For viewing on a high-definition TV, and for prints up to A4 size (1920×1080 16:9)For viewing on a high-definition TVNoteLessMoreFineRoughzWhen you select (4128 × 3096 4:3)The aspect ratio switches to 4:3 when shooting images.Continued r](https://usermanual.wiki/Sony-Group/MHSTS55/User-Guide-1562232-Page-33.png)
![35USTable of contentsOperation SearchSettings Search IndexMovie SizeThe larger the movie size, the higher the movie quality.The movies shot with the camera will be recorded in MPEG-4 AVC/H.264 Main Profile, approximately 30 or 60 frames per second, Progressive, AAC LC, “MP4 format”.1 Tap [MENU] t [Shooting Settings].Tap the LCD screen when the screen display is not shown.2Tap the desired size from [Movie Size].Movie Size Usage guidelines (1920×1080 30p) Shoots HD (high definition) quality movies in sizes suited for display on computer or high definition TV (1280×720 60p) Shoots the rapidly moving action scenes such as sports smoothly with HD (high definition) quality (1280×720 30p) Shoots HD (high definition) quality movies in sizes suited for display on computerzProgressive playbackThe camera supports progressive mode*, which is used in computers, and therefore is suited for playing back images on computers.* The progressive mode is a type of movie recording method, which reads out all image pixels at once.](https://usermanual.wiki/Sony-Group/MHSTS55/User-Guide-1562232-Page-35.png)
![36USTable of contentsOperation SearchSettings Search IndexFlicker ReductionCurbs the flicker generated by fluorescent by using the electro-shutter.1Tap [MENU] t [Shooting Settings].Tap the LCD screen when the screen display is not shown.2Tap the desired mode from [Flicker Reduction].(On) Uses the Flicker Reduction.(Off) Does not use the Flicker Reduction.](https://usermanual.wiki/Sony-Group/MHSTS55/User-Guide-1562232-Page-36.png)
![37USTable of contentsOperation SearchSettings Search IndexSelf-Timer1Tap [MENU] t [Shooting Settings].Tap the LCD screen when the screen display is not shown.2Tap the desired mode from [Self-Timer]. (Off) Does not use the self-timer. (10sec) Sets the 10-second delay self-timer.When you press the (Shutter) button or the movie button, a self-timer icon flashes, and after rapid beep sounds are heard, the camera will shoot.](https://usermanual.wiki/Sony-Group/MHSTS55/User-Guide-1562232-Page-37.png)
![41USTable of contentsOperation SearchSettings Search IndexDeleteAllows you to select unwanted images for deletion.1Tap (Playback) to switch to playback mode.2Tap (Delete) on the index screen.3Tap images you want to delete.Repeat the above step until there are no more images to be deleted. Select an image with a mark again to release the mark.4Tap [OK] t [OK].zTo delete images during playbackTap (Delete) t [OK] in single-image mode.](https://usermanual.wiki/Sony-Group/MHSTS55/User-Guide-1562232-Page-41.png)

![44USTable of contentsOperation SearchSettings Search IndexSetting Wi-Fi1Press the ON/OFF (Power) button.2Tap [MENU] t [Main Settings] t [Wi-Fi Settings], and [Wi-Fi Connection] to show the mark.3Select an access point to connect.4Enter the password.• Network device connections and setting methods differ according to the device.• The following are needed to connect the camera to a network:– An Internet service provider (ISP) contract– ADSL modem or other network device– Access point or wireless router– Access point setting information (SSID)• If you do not know the settings to make, be sure to check with the person who set up the access point, administrator, or with your service provider.• When connected to a network, if you do not operate the camera for about xx minutes, the camera may disconnect from the network automatically to save battery power. In these cases establish the connection again.NoteszWhen using a hotspot (public Wireless LAN access point)When you use Wi-Fi to connect to a hotspot at a hotel or airport, tap [MENU] t [Wi-Fi Settings] t [Hotspot Login], and perform the authentication procedure.zWhen using a WPS-capable access point Tap [MENU] t [Wi-Fi Settings] t [WPS].For details, refer to the instruction manual of the access point.Continued r](https://usermanual.wiki/Sony-Group/MHSTS55/User-Guide-1562232-Page-44.png)

![46USTable of contentsOperation SearchSettings Search IndexLive Broadcast (Live Streaming)You can send images you are taking to family and friends in real time.Registration with the live streaming service is required in advance.1Press the ON/OFF (Power) button.2Register with a live streaming service for this purpose.• For details, see http://www.sony.net/xxx.3Tap [MENU] t [Live Streaming].4Establish the Wi-Fi connection.5Enter [Username] and [Password] on the login screen, then tap [OK].6Press the movie button.To finish live streaming, press the movie button again.• You can enter image titles using the keyboard.• You cannot shoot still images during live streaming.• Depending on the region, live streaming may not be possible.• To enable the Live Streaming function, you first need to establish your own service account. You will also need to set up real-time distribution from the web site.NotesMovie buttonzTo delete an image currently being uploadedTap on the REC review screen, then tap [OK].• Images are deleted from the live streaming service, but remain in the internal memory of the camera.zHow to use Wi-FiFor details on how to register and using live streaming, see http://www.xxxxxxxxx.](https://usermanual.wiki/Sony-Group/MHSTS55/User-Guide-1562232-Page-46.png)
![47USTable of contentsOperation SearchSettings Search IndexUploading images directly (Share)You can upload images to your favorite sharing site soon after recording.1Tap (Playback) to switch to playback mode.2Tap (Share) on the index screen.• You can also share images from the single-image mode.• You can also share images by tapping the share button on the screen displayed when shooting ends.3Tap images you want to upload, then tap [Next].4Select the sharing site to upload from the share list, then tap [OK].Wi-Fi connection is automatically established.To return to the index screen, tap [Next].• All the images you selected can be uploaded together to the sharing site later.5Tap [Login] at each service. Enter [Username] and [Password] after the Wi-Fi connection, and tap [OK] t [Upload].zWhat you can do with Share• Images that you stopped uploading can be uploaded later together by tapping [MENU] t [Post and Share], or by the application software.• You can select the upload destination from the application software.• Depending on the region or country, available services may differ.zHow to use Wi-FiFor details, see www.sony.net/startBloggiexxxxx.](https://usermanual.wiki/Sony-Group/MHSTS55/User-Guide-1562232-Page-47.png)
![48USTable of contentsOperation SearchSettings Search IndexUploading images to Personal Space (Save to PlayMemories online service)You can save all images recorded on the camera to Personal Space. By uploading images to Personal Space, you can also enjoy recorded images by accessing your contents from an Internet device, such as a computer, smartphone, tablet computer, or Bravia, anywhere and anytime. A Personal Space account is required in advance.1Tap [MENU] t [Save to PlayMemories online service].2Establish the Wi-Fi connection.3Enter [Username] and [Password] on the login screen, then tap [OK].4Tap [Sync-Up].Uploading starts.Only images which have not been uploaded from the camera are uploaded.The screen returns to the [Sync-Up] screen when uploading has finished.5Tap .• Depending on the region, Personal Space may not be available.• To use Personal Space, you need to establish your own account.NoteszHow to use Wi-FiFor details, see www.sony.net/startBloggiexxxxx.](https://usermanual.wiki/Sony-Group/MHSTS55/User-Guide-1562232-Page-48.png)
![49USTable of contentsOperation SearchSettings Search IndexCopying data to a smartphoneYou can copy recorded images to a smartphone or tablet computer. Installing a suitable application (PlayMemories Mobile) for this purpose to the smartphone or tablet computer is required in advance.1Tap [MENU] t [Send to Smartphone].2Tap [Connection information] and perform Wi-Fi setting on the smartphone, using the [SSID] and the [Password] shown.3Select and transfer the camera contents using the installed application on the smartphone.• Depending on their size, certain images transferred to a smartphone may not be playable.NotezHow to use Wi-FiFor details, see www.sony.net/startBloggiexxxxx.](https://usermanual.wiki/Sony-Group/MHSTS55/User-Guide-1562232-Page-49.png)
![52USTable of contentsOperation SearchSettings Search IndexUploading images to a network service1Select images and the sharing site to upload with the camera in advance (page 47).2Connect the camera to a computer in which the PlayMemories Home (pre-loaded on the internal memory) is already installed.PlayMemories Home starts automatically and the confirmation screen for uploading images appears.• Set [LUN Settings(USB)] to [Multi].• When uploading images over the Internet, the cache may remain in the computer being used depending on the service provider. This is also true when the camera is used for this purpose.In order to use PlayMemories Home to enjoy the benefits of the image uploading service or other services (the “services”) provided by these and other websites, you must consent to the following.• Some websites require registration procedures and/or fees to use their services. In using such services, you must comply with the terms and conditions established by the websites concerned.• Services may be terminated or changed in accordance with the convenience of the website operators. Sony will not be held responsible for any trouble occurring between the users and third parties or any inconvenience caused to users relating to the utilization of the services inclusive of the termination of or changes to such services.• To view a website, you will be redirected to it by the Sony server. There may be times when you cannot access the website because of server maintenance or for other reasons.• If the operation of the Sony server is to be terminated, you will be notified of the termination ahead of time on Sony’s website, etc.• The URLs to which you are redirected by the Sony server and other information may be recorded for the purposes of improving Sony’s future products and services. However, no personal data will be recorded on such occasions.NotesNotes on PlayMemories Home (pre-loaded on the internal memory)](https://usermanual.wiki/Sony-Group/MHSTS55/User-Guide-1562232-Page-52.png)
![53USTable of contentsOperation SearchSettings Search IndexBeepSets the sound for when you operate the camera.1Tap [MENU] t [Main Settings] t [Beep] t desired mode.On Turns on the beep sound when you press the (Shutter) button or movie button.Off Turns off the beep sound.](https://usermanual.wiki/Sony-Group/MHSTS55/User-Guide-1562232-Page-53.png)
![54USTable of contentsOperation SearchSettings Search IndexDemo ModePerforms a demonstration of the camera.1Tap [MENU] t [Main Settings] t [Demo Mode] t desired mode.• The demonstration stops when operating any of the following.– Touch LCD screen.– Press the (Shutter) button or movie button.– Turn off the power.On Performs a demonstration.Off Does not perform a demonstration.Note](https://usermanual.wiki/Sony-Group/MHSTS55/User-Guide-1562232-Page-54.png)
![55USTable of contentsOperation SearchSettings Search IndexInitializeInitializes the setting to the default setting.Even if you execute this function, the images are retained.1Tap [MENU] t [Main Settings] t [Initialize] t [OK].• Perform initialization after charging the camera to prevent the camera from turning off during the process.• The following Wi-Fi connection settings are also initialized:– Login information for each network service– Wi-Fi access point informationNotezWhen the camera does not work properlyPress and hold the ON/OFF (Power) button for at least 7 seconds, and force-quit the camera (page 13). Then turn the camera on again.](https://usermanual.wiki/Sony-Group/MHSTS55/User-Guide-1562232-Page-55.png)
![56USTable of contentsOperation SearchSettings Search IndexHDMI OutputSelects the type of signal to be output to a TV from the HDMI OUT jack. If images are not displayed on the TV clearly, changing the setting may improve the display.1Tap [MENU] t [Main Settings] t [HDMI Output] t desired mode.60Hz Outputs with 60Hz.50Hz Outputs with 50Hz.](https://usermanual.wiki/Sony-Group/MHSTS55/User-Guide-1562232-Page-56.png)
![57USTable of contentsOperation SearchSettings Search IndexLUN Settings(USB)Sets the display method for the recording media displayed on a computer screen or other monitor when the camera is connected with a computer or AV component using a USB connection.1Tap [MENU] t [Main Settings] t [LUN Settings(USB)] t desired mode.Multi Select this setting when you connect the camera to a computer.Single Select this setting in cases where the images are not displayed when the camera is connected to a device other than a computer.](https://usermanual.wiki/Sony-Group/MHSTS55/User-Guide-1562232-Page-57.png)
![58USTable of contentsOperation SearchSettings Search IndexFormatFormats the internal memory.1Tap [MENU] t [Main Settings] t [Format] t [OK].• Note that formatting permanently erases all data.Note](https://usermanual.wiki/Sony-Group/MHSTS55/User-Guide-1562232-Page-58.png)
![59USTable of contentsOperation SearchSettings Search IndexDate & Time SettingSets the date and time again.1Tap [MENU] t [Main Settings] t [Date & Time Setting].2Tap the items you want to set.Date & Time Format Selects the date and time display format.Daylight Savings Pushes forward an hour.Date & Time Sets the date and time (page 25).](https://usermanual.wiki/Sony-Group/MHSTS55/User-Guide-1562232-Page-59.png)
![61USTable of contentsOperation SearchSettings Search IndexIf you want to view images on a TV screen, you need a TV with an HDMI terminal and an HDMI cable (sold separately). The color system of the TV must match that of the camera. Check the following lists for the TV color system of the country or region where the camera is used, and set [HDMI Output] (page 56).NTSC systemBahama Islands, Bolivia, Canada, Central America, Chile, Colombia, Ecuador, Jamaica, Japan, Korea, Mexico, Peru, Surinam, Taiwan, the Philippines, the U.S.A., Venezuela, etc.PAL systemAustralia, Austria, Belgium, China, Croatia, Czech Republic, Denmark, Finland, Germany, Holland, Hong Kong, Hungary, Indonesia, Italy, Kuwait, Malaysia, New Zealand, Norway, Poland, Portugal, Rumania, Singapore, Slovak Republic, Spain, Sweden, Switzerland, Thailand, Turkey, United Kingdom, Viet Nam, etc.PAL-M systemBrazilPAL-N systemArgentina, Paraguay, UruguaySECAM systemBulgaria, France, Greece, Guiana, Iran, Iraq, Monaco, Russia, Ukraine, etc.On TV color systems](https://usermanual.wiki/Sony-Group/MHSTS55/User-Guide-1562232-Page-61.png)
![63USTable of contentsOperation SearchSettings Search IndexCannot charge the camera.• Turn off the camera and make the USB connection.• Disconnect the USB connection support cable, and then reconnect it.• Use the USB connection support cable (supplied).• Charge the battery in an ambient temperature of 10°C to 30°C (50°F to 86°F).• Turn on the computer and connect the camera.• Release the computer from sleep or hibernation status.• Connect the camera directly to a computer using the supplied USB connection support cable.• Connect the camera to a computer with the operating system that is supported by the camera.• After trying the remedies above, if the problem still persists, press and hold the ON/OFF (Power) button for at least 7 seconds, and force-quit the camera. Then reconnect it to the computer using the supplied USB connection support cable.The remaining charge indicator is incorrect.• This phenomenon occurs when you use the camera in an extremely hot or cold location.• A discrepancy arose between the remaining charge indicator and the actual remaining battery charge. Fully discharge the battery pack once, then charge it to correct the indication.• The battery pack is dead (page 70). Consult your nearest Sony dealer.Cannot record images.• Check the free capacity of the internal memory. If it is full, delete unnecessary images (page 41).The date and time are not displayed on the LCD screen.• While shooting, the date and time are not displayed. They are displayed only during playback.Cannot insert dates on images.• The camera does not have a feature for superimposing dates on images.Dots appear and remain on the screen.• This is not a malfunction. These dots are not recorded.Cannot play back images.• The folder/file name has been changed on your computer.• Playback on the camera cannot be guaranteed if files contain images processed on a computer, or images shot by another camera.• The camera is in USB mode. Delete the USB connection (page 22).The image appears rough right after playback starts.• This may happen due to image processing. This is not a malfunction.The image does not appear on the TV.• Set [HDMI Output] to [60Hz] in NTSC region, [50Hz] in PAL region (page 56).• Check whether the connection is correct (page 60).Shooting still images/moviesViewing images](https://usermanual.wiki/Sony-Group/MHSTS55/User-Guide-1562232-Page-63.png)
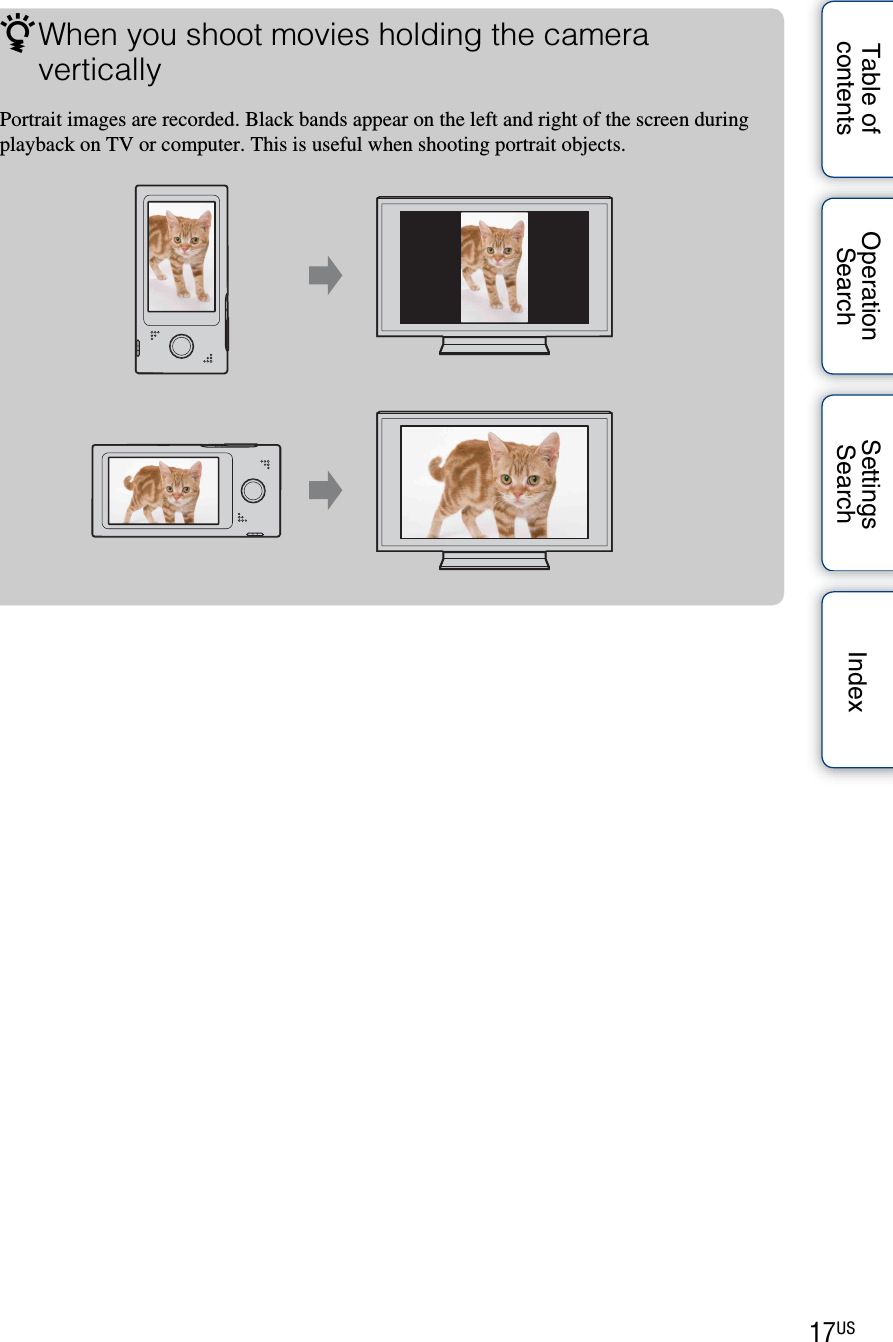
![64USTable of contentsOperation SearchSettings Search IndexThe top and bottom edges of images are trimmed slightly on a connected TV.• The LCD screen of the camera can display recording images across the entire screen (full pixel display). However, this may cause slight trimming of the top, bottom, right, and left edges of images when played back on a TV that is not compatible with full pixel display.Black bands appear on the left and right of the screen.• Black bands appear on the left and right of the screen when viewing movies recorded with the camera held in the vertical position on a TV or a computer. This is not a malfunction.Cannot delete an image.• Undo the protection on a computer.Your computer does not recognize the camera.• When the battery level is low, charge the camera.• Turn on the camera and connect to a computer.• Use the USB connection support cable (supplied).• Disconnect the USB connection support cable from both the computer and the camera, and connect it again firmly.• Disconnect all equipment other than the camera, the keyboard and the mouse from the USB connectors of your computer.• Connect the camera directly to your computer without passing through a USB hub or other device.• Set [LUN Settings(USB)] to [Multi] (page 57).Cannot import images.• Connect the camera and your computer correctly making a USB connection (page 50).• When you format the internal memory with a computer, you may not be able to import the images to a computer. Format the internal memory with the camera, and shoot (page 58).After making a USB connection, PlayMemories Home does not start automatically.• Install the PlayMemories Home to a computer, and make the USB connection after both the camera and a computer are turned on.Cannot play back images on your computer.• Consult the computer or software manufacturer.The image and sound are interrupted by noise when you view a movie on a computer.• You are playing back the movie directly from the internal memory. Import the movie to your computer using the PlayMemories Home and play it back.DeletingComputers](https://usermanual.wiki/Sony-Group/MHSTS55/User-Guide-1562232-Page-64.png)
![68USTable of contentsOperation SearchSettings Search IndexMaximum number of images already selected• Up to 100 files can be selected when using [Delete] and [Share].Operation cannot be executed in unsupported files• Playback zoom cannot be performed on movies.Invalid operation• This message appears if you perform an invalid operation.Login expired• The authentication information of the network service has expired. Login to the network service again.The upload place deleted• The upload destination, such as an album, is not found. Make sure that the correct destination is specified for the service.Connection error• An error has occurred during Wi-Fi connection. Re-establish the Wi-Fi connection.There is not enough usable space on the server• There is not enough available capacity on the destination server for the content you wish to upload.Unexpected error occurred• Turn the power off and then on again.Network error occurred• Reconnect the network service.User authentication failed• Logging in to the network service failed. Login to the network service again.](https://usermanual.wiki/Sony-Group/MHSTS55/User-Guide-1562232-Page-68.png)

![73USTable of contentsOperation SearchSettings Search IndexSpecificationsCamera[System]Image device: 7.22 mm (1/2.5 type) CMOS sensorTotal pixel number of camera:Approx. 13 011 000 pixelsEffective pixel number of camera:Approx. 8 294 000 pixels (still image, 16:9), Approx. 12 780 000 pixels (still image, 4:3), Approx. 2 073 000 pixels ([1920×1080 30p] movie)Lens: F2.8f = 5.3 mm (7/32 inches)When converted to a 35 mm still cameraFor movies: 37 mm (1 1/2 inches) (16:9)For still images: 32 mm (1 5/16 inches) (4:3)Exposure control: Automatic exposureFile format:Still images: JPEG (DCF Ver. 2.0, Exif Ver. 2.3, MPF Baseline) compliantMovies: MPEG-4 AVC/H.264 (MP4)Audio: MPEG AACRecording media: Internal Memory (approx. 8GB)• When measuring media capacity, 1 GB equals 1 billion bytes, a portion of which is used for system management and/or application files. Available user capacity is approximately 7.8 GB.[Input and Output connectors]HDMI OUT jack: HDMI mini connectorUSB jack: type A (built-in)USB communication: Hi-Speed USB (USB 2.0 compliant)[LCD screen]LCD screen: 7.6 cm 3.0 type (16:9) TFT driveTotal number of dots: 288 000 (720 × 400) dots[Power, general]Power:Built-in rechargeable battery packUSB charging (supplied from the computer by connecting with the supplied USB connection support cable)Charging time: Approx. xx mins. (when charging from the USB connector of the computer)Approx. xx mins. (when charging from the AC-UD20 USB charger (sold separately))Power consumption (during shooting): xx W (when the movie image size is [1280×720 30p])Wireless LAN: OFFOperating temperature: 0°C to 40°C (32°F to 104°F)Storage temperature: –20°C to +60°C (–4°F to +140°F)Dimensions: Approx. xx mm × xx mm × xx mm (xx inches × xx inches × xx inches) (W/H/D, excluding protrusions)Mass: Approx. xx g (xx oz)Microphone: StereoSpeaker: Monaural[Wireless LAN]Standards: IEEE802.11b/g/n compliantChannel: 1 to 11 (USA, Canada)1 to 13 (EU, Australia, U.K.)Design and specifications are subject to change without notice.](https://usermanual.wiki/Sony-Group/MHSTS55/User-Guide-1562232-Page-73.png)