Sony Group NACSV10I Network Audio Component/Server User Manual NAC SV10i
Sony Corporation Network Audio Component/Server NAC SV10i
UserManual.wiki
>
Sony Group
>
NACSV10I User Manual
User manual
Navigation menu
Upload a User Manual
Namespaces
Wiki Guide
HTML
PDF
Info
Views
User Manual
Discussion / Help
Navigation
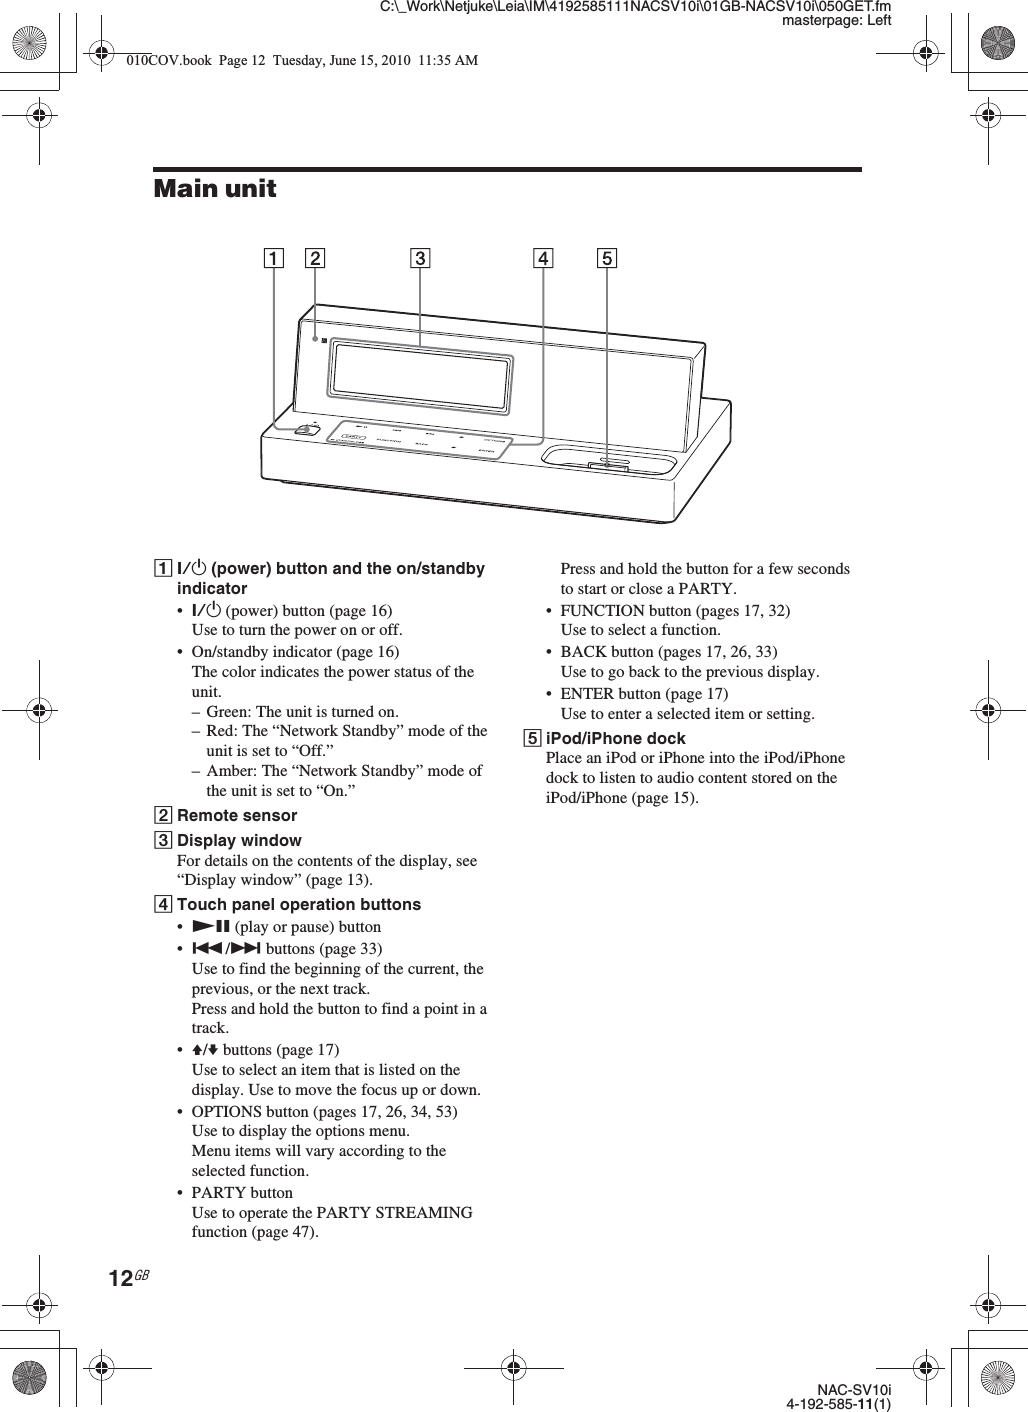
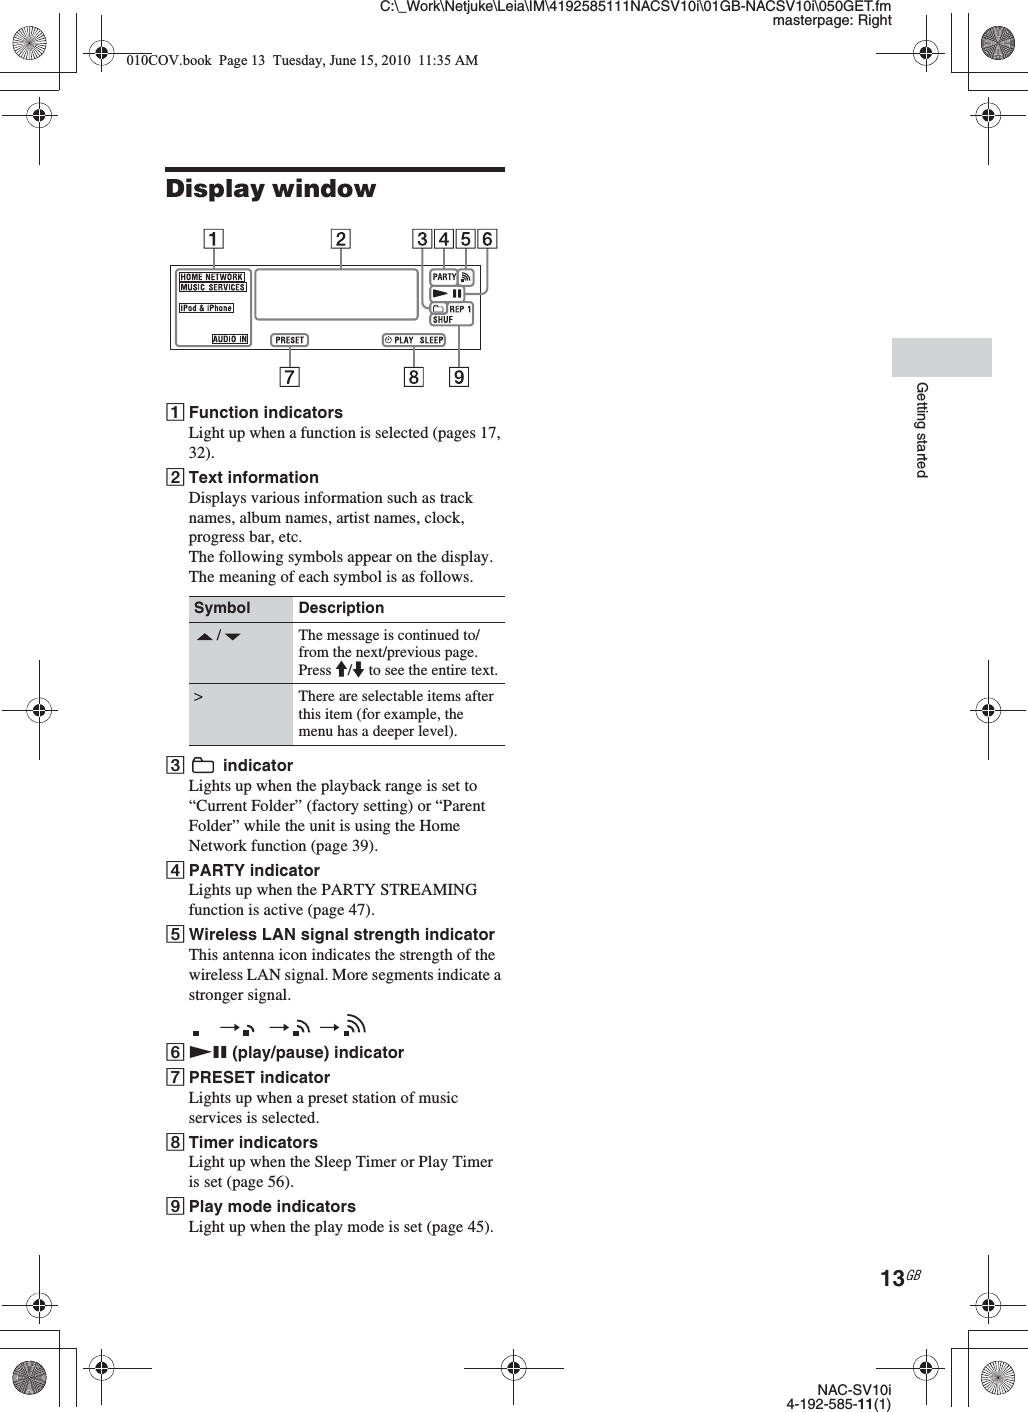
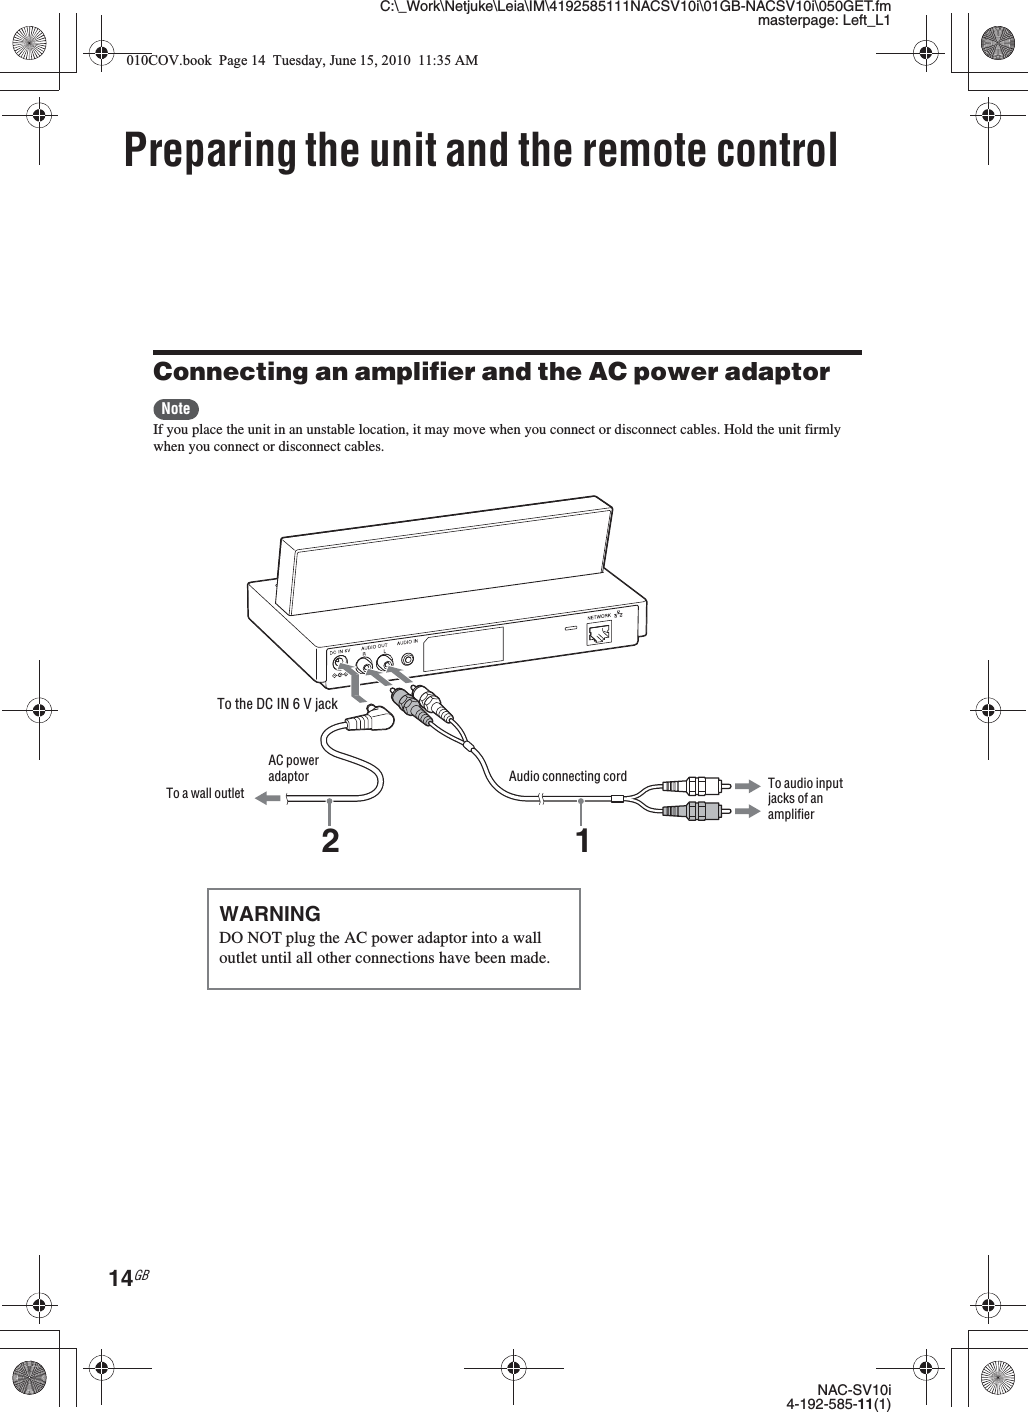
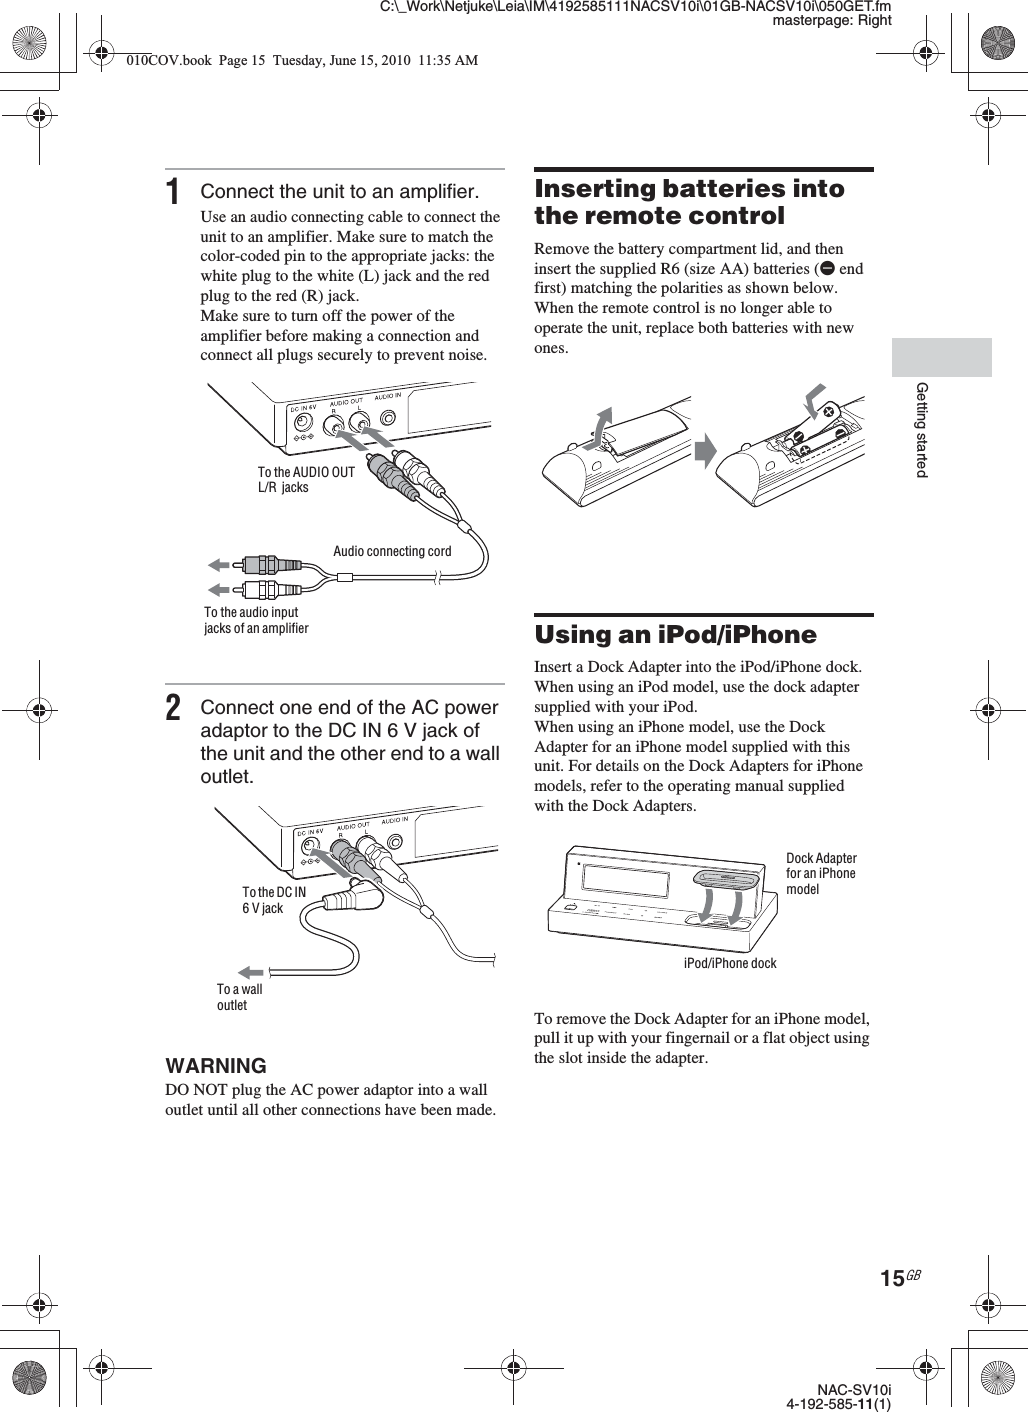
![C:\_Work\Netjuke\Leia\IM\4192585111NACSV10i\01GB-NACSV10i\050GET.fmmasterpage: RightNAC-SV10i4-192-585-11(1)19GBGetting startedTo enter punctuation marks (e.g., !, ?, etc.) or symbols (e.g., #, %, etc.)Press 1 or 0 of the numeric/text button repeatedly while the type of characters is set to “abc” or “ABC.”To enter a spacePress 0 of the numeric/text button repeatedly while the type of characters is set to “abc” or “ABC.”To delete a characterPress CLEAR.Characters that are assigned to each numeric/text buttonThe table below shows the characters and numbers that you can enter for each type (“abc,” “ABC,” or “123”). You can check the characters, numbers and symbols that are assigned to each numeric text button.Setting up the Sony amplifierYou can use the remote control to control the Sony amplifier (power on/off and volume).Press the corresponding numeric button (1 to 4) while pressing AMP ?/1 to select the Sony amplifier.( : Factory setting)NoteIt is possible to change the remote control code to make the remote control compatible with a multi channel amplifier or home theater system. If you do not know what your Sony amplifier type is, try selecting each of the four codes above to find out which one corresponds with your amplifier. This remote control may not be compatible with some Sony products.Numeric/text buttonabc ABC 1231 . , ! @ ´ ` : ; ( ) [ ] { } < > 1. , ! @ ´ ` : ; ( ) [ ] { } < > 112a b c 2A B C 223d e f 3D E F 334g h i 4G H I 445j k l 5J K L 556 m n o 6 M N O 6 67p q r s 7P Q R S 778 t u v 8 T U V 8 89 w x y z 9 W X Y Z 9 90 / \ | - ~ = _ + # $ % & ^ “ * ? (space) 0/ \ | - ~ = _ + # $ % & ^ “ * ? (space) 00Press Type of amplifierAMP ?/1 and 1 Sony stereo amplifier or receiverAMP ?/1 and 2 Sony Mini/Micro systemAMP ?/1 and 3 Sony AV receiver, multi channel amplifier, or home theater systemAMP ?/1 and 4 Sony home theater systemNumericbuttons (1-4)AMP ?/1010COV.book Page 19 Tuesday, June 15, 2010 11:35 AM](https://usermanual.wiki/Sony-Group/NACSV10I/User-Guide-1311647-Page-19.png)
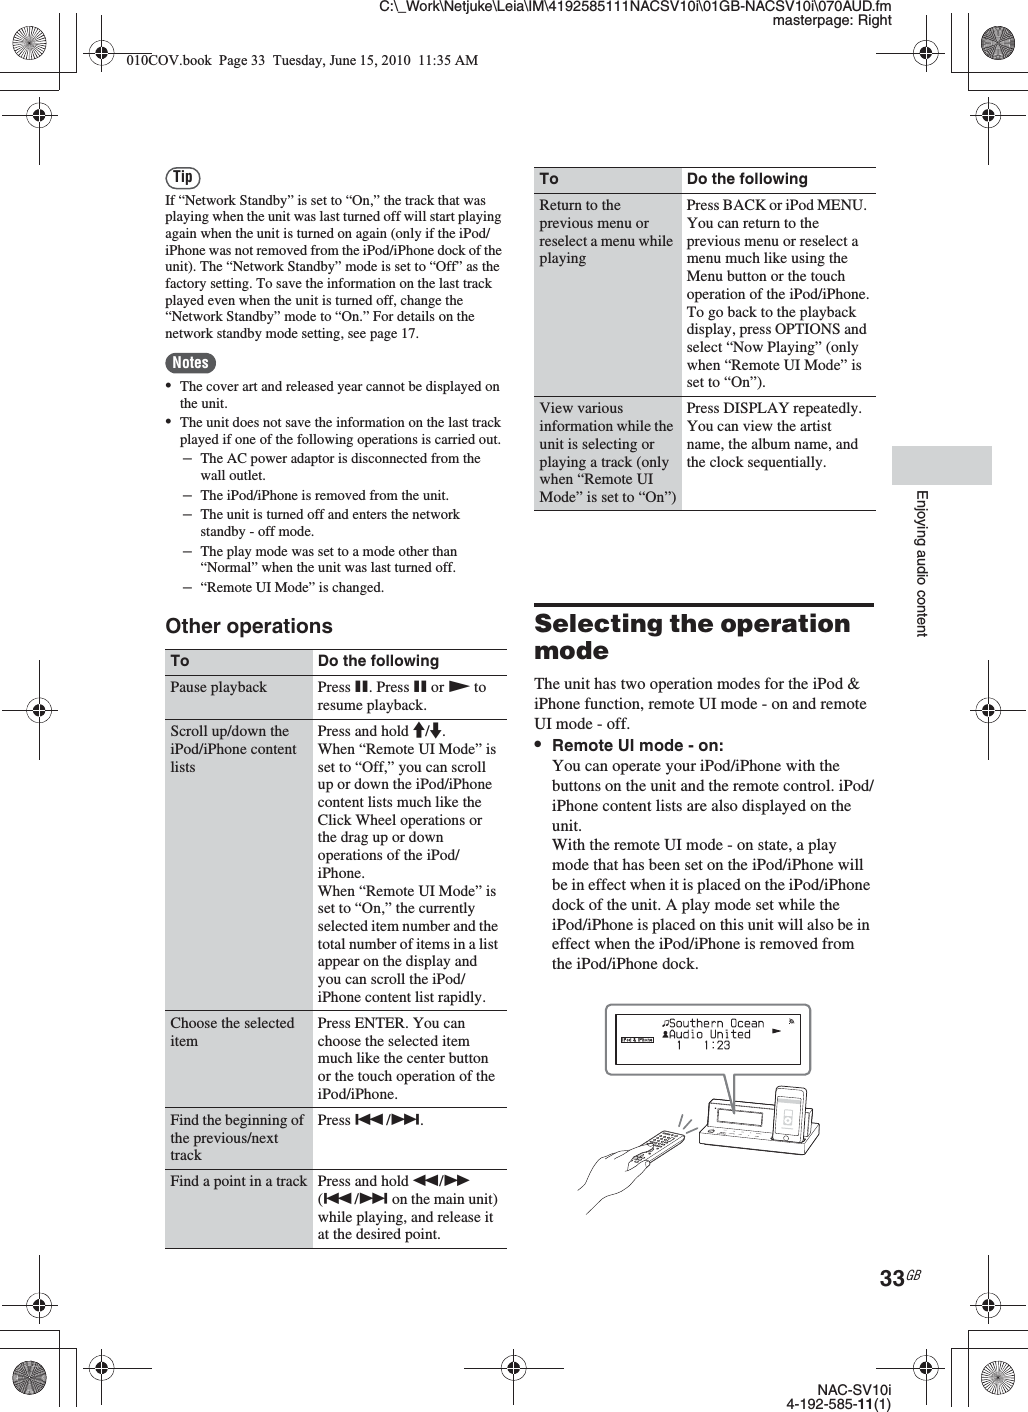
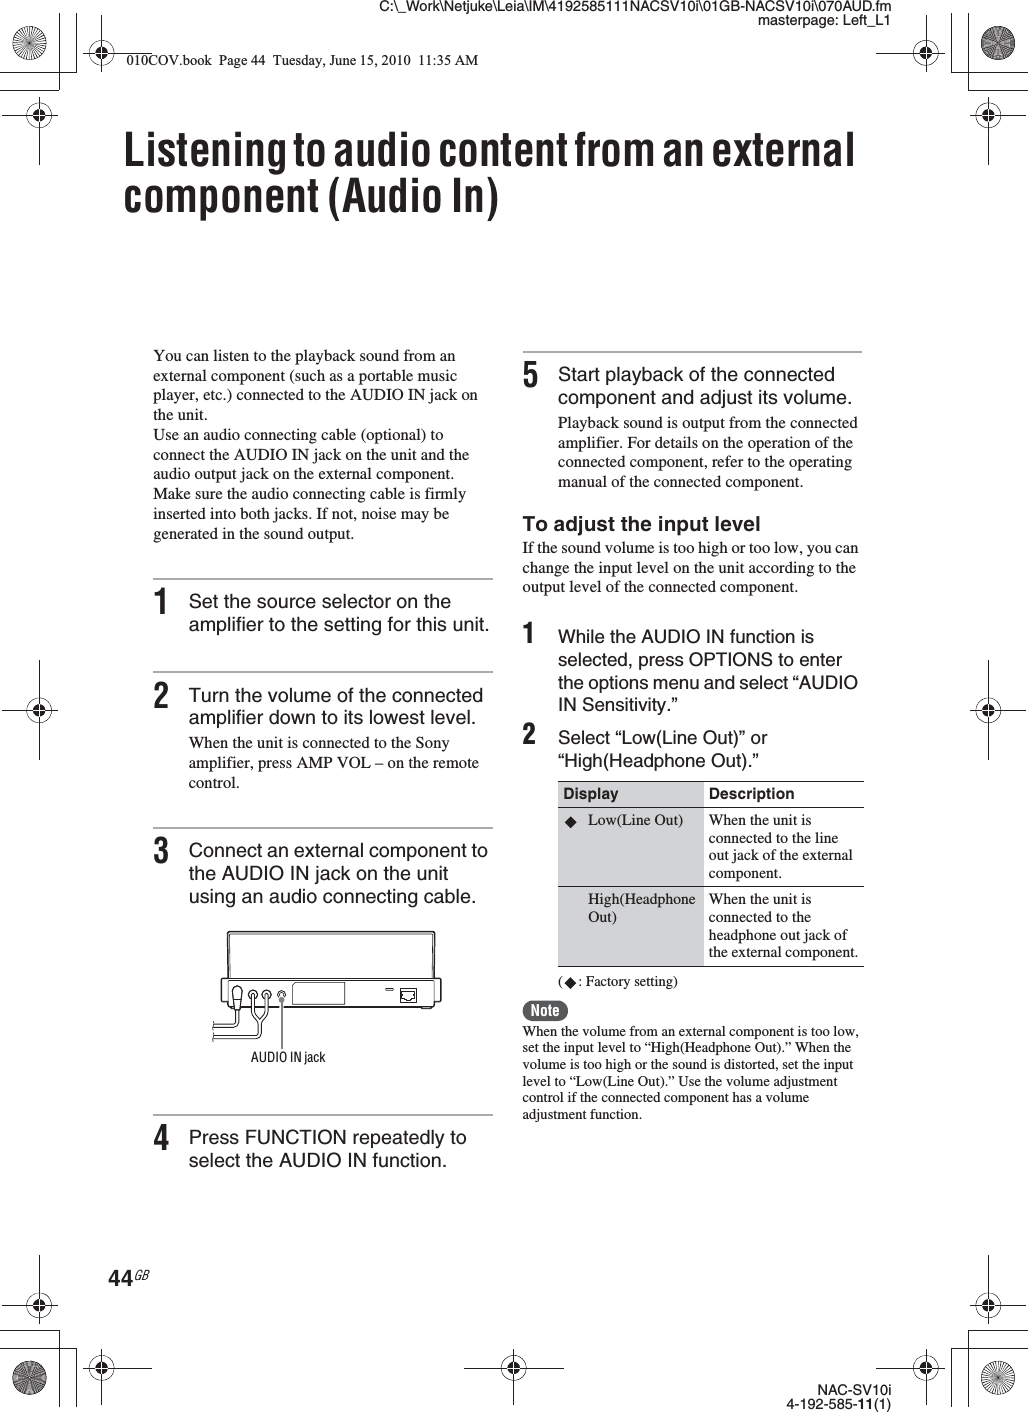
![C:\_Work\Netjuke\Leia\IM\4192585111NACSV10i\01GB-NACSV10i\070AUD.fmmasterpage: Left_L0NAC-SV10i4-192-585-11(1)32GBEnjoying audio contentListening to an iPod or iPhoneYou can operate your iPod/iPhone with the remote control and listen to audio content stored on your iPod/iPhone. See “iPod/iPhone models that are compatible with this unit” (page 70) for iPod/iPhone models that can be connected to this unit.1Set the source selector on the amplifier to the setting for this unit.2Place the iPod or iPhone on the iPod/iPhone dock.3Press FUNCTION repeatedly to select the iPod & iPhone function.4Select a track by browsing through the various iPod/iPhone content lists on either the display of the unit or of the iPod/iPhone.•When “Remote UI Mode” is set to “Off”:Operate the iPod/iPhone directly, browsing the items on the iPod/iPhone display.•When “Remote UI Mode” is set to “On”:Operate the iPod/iPhone with the remote control of the unit or the main unit, browsing the items on the display of the unit.For details on “Remote UI Mode,” see page 33.Example: Selecting a track from “Playlists” when “Remote UI Mode” is set to “On”1Press M/m to select [Playlists] from the iPod/iPhone content list, and then press ENTER.If the iPod/iPhone content list is not displayed, press BACK repeatedly until the first level of the iPod/iPhone content list tree is displayed, then select the item.2Press M/m to select the desired playlist, and then press ENTER.Tracks in the selected playlist appear.3Press M/m to select the desired track, and then press ENTER.The selected track starts playback.FUNCTIONM/m/ENTERTrack nameArtist nameElapsed timeTrack number010COV.book Page 32 Tuesday, June 15, 2010 11:35 AM](https://usermanual.wiki/Sony-Group/NACSV10I/User-Guide-1311647-Page-32.png)

![C:\_Work\Netjuke\Leia\IM\4192585111NACSV10i\01GB-NACSV10i\070AUD.fmmasterpage: LeftNAC-SV10i4-192-585-11(1)36GB1Go to [Start] - [Control Panel].2Select [View network status and tasks] under [Network and Internet].The [Network and Sharing Center] window appears.TipIf the desired item does not appear in the computer display, try to change the display type used by the Control Panel.3Select [Public network] under [View your active networks].If it shows other than [Public network], go to step 6.The [Set Network Location] window appears.4Select [Home network] or [Work network] according to the environment in which the unit is being used.5Follow the instructions that appear on the computer display according to the environment in which the unit is being used.When the settings have been completed, confirm that the item under [View your active networks] has been changed to [Home network] or [Work network] in the [Network and Sharing Center] window.6Select [Change advanced sharing settings].7Select [Choose media streaming options...] from [Media streaming].8If [Media streaming is not turned on] appears in the Media streaming options window, select [Turn on media streaming].9Select [Allow All].The [Allow All Media Devices] window opens. If all the devices in the local network are set to [Allowed], select [OK] and close the window.10Select [Allow all computers and media devices].010COV.book Page 36 Tuesday, June 15, 2010 11:35 AM](https://usermanual.wiki/Sony-Group/NACSV10I/User-Guide-1311647-Page-36.png)
![C:\_Work\Netjuke\Leia\IM\4192585111NACSV10i\01GB-NACSV10i\070AUD.fmmasterpage: RightNAC-SV10i4-192-585-11(1)37GBEnjoying audio content11Select [OK] to close the window.12Connect the unit to the server.After you finish setting up Windows Media Player 12, refresh the server list of the unit and select this server from the server list. For details on selecting a server, see “To refresh the server list” (page 40).xWhen using a computer equipped with Windows Vista/Windows XPThis section explains how to set up Windows Media Player 11 installed on Windows Vista/Windows XP*, as a server to connect with this unit.For details on how to operate Windows Media Player 11, refer to the help of Windows Media Player 11.* Windows Media Player 11 is not manufacturer-installed on Windows XP. Access the Microsoft web site, download the installer, and then install Windows Media Player 11 on your computer.1Go to [Start] - [All Programs].2Select [Windows Media Player].Windows Media Player 11 starts up.3Select [Media Sharing...] from the [Library] menu.If you are using Windows XP, go to step 9.4When is displayed, select [Networking...].The [Network and Sharing Center] window appears.5Select [Customize].The [Set Network Location] window appears.6Add a check mark to [Private] and select [Next].7Confirm that the [Location] has been changed to [Private] and select [Close].8Confirm that [(Private network)] is displayed in the [Network and Sharing Center] window and close the window.010COV.book Page 37 Tuesday, June 15, 2010 11:35 AM](https://usermanual.wiki/Sony-Group/NACSV10I/User-Guide-1311647-Page-37.png)
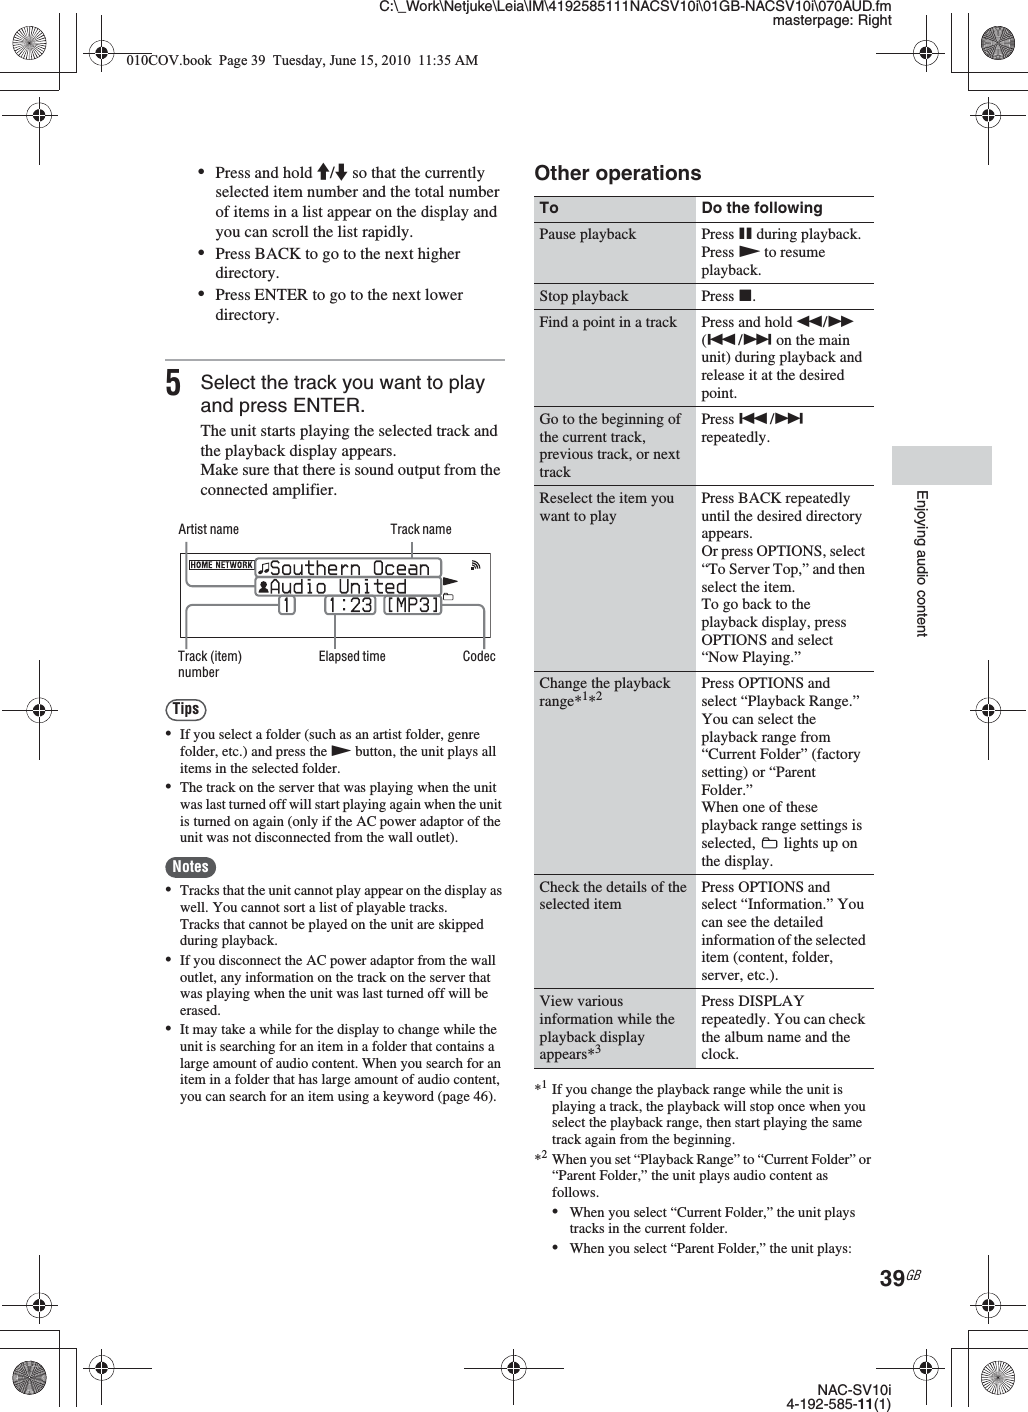
![C:\_Work\Netjuke\Leia\IM\4192585111NACSV10i\01GB-NACSV10i\070AUD.fmmasterpage: LeftNAC-SV10i4-192-585-11(1)38GB9If a check is not added next to [Share my media] in the [Media Sharing] window that is displayed in step 3, add a check mark to [Share my media], then select [OK].A list of connectable devices is displayed.10Select [Settings...] that appears beside [Share my media to...].11Add a check mark to [Allow new devices and computers automatically] and select [OK].NoteUncheck this item after you confirm that the unit can connect to the server and play audio data on the server in step 12.12Connect the unit to the server.After you finish setting up Windows Media Player 11, refresh the server list of the unit and select this server from the server list. For details on selecting a server, see “To refresh the server list” (page 40).Playing audio content stored on a serverThe unit can play audio content stored on the server in the MP3, LinearPCM, WMA, AAC* and HE-AAC formats. Audio content with copyright protection (Digital Rights Management) cannot be played by this unit.* The unit can play AAC files with the extension of “.m4a” only.1Set the source selector on the amplifier to the setting for this unit.2Press FUNCTION repeatedly to select the Home Network function.3Select the server to be connected.When the server list appears, press M/m to select the server.If the server list does not appear, follow the procedure outlined in “To refresh the server list” (page 40) to find the server.NoteEven if the power of the server device on the server list has been turned off, the unit turns the server on automatically if the server supports the Wake-on-LAN standard. If the server does not support the Wake-on-LAN standard, turn on the server in advance. For details on settings or operations of Wake-on-LAN of your server, refer to the operating manual or help of your server.4Select the item you want to play.The items that are displayed (tracks, artists, albums, genres, folder name, etc.) depend on the connected server.•Press M/m to select the item.FUNCTIONM/m/ENTERBACK010COV.book Page 38 Tuesday, June 15, 2010 11:35 AM](https://usermanual.wiki/Sony-Group/NACSV10I/User-Guide-1311647-Page-38.png)
![C:\_Work\Netjuke\Leia\IM\4192585111NACSV10i\01GB-NACSV10i\080MLT.fmmasterpage: RightNAC-SV10i4-192-585-11(1)51GBEnjoying Sony Multiple-Room ProductsPlaying audio content streamed from a server (such as a computer) using a controllerYou can use a DLNA controller to stream audio content stored on a server (such as a computer) to the unit.•Check that all devices are connected to your home network and set up correctly.•Check that the unit and the server are turned on or the unit and the server are in the network standby - on mode.•Check that the unit and the controller are allowed to access the server.•Check that the unit and the server have been recognized and registered with the controller.TipIf you use Windows 7 as a server, you can use the [Play To] function of Windows 7 to listen to the audio content stored on the computer.ControllerRenderer (network controlled player) (the unit)DeliverServerControlAccess010COV.book Page 51 Tuesday, June 15, 2010 11:35 AM](https://usermanual.wiki/Sony-Group/NACSV10I/User-Guide-1311647-Page-51.png)


![C:\_Work\Netjuke\Leia\IM\4192585111NACSV10i\01GB-NACSV10i\100TRB.fmmasterpage: RightNAC-SV10i4-192-585-11(1)65GBTroubleshooting,The bandwidth of your wireless LAN may be too low. Move the unit and the wireless LAN router/access point closer to each other, without any obstacles between them.,If the clock on the unit has not been set, you cannot set the Play Timer. Set the clock before setting the Play Timer (page 22).,The ending time for the Play Timer cannot be the same as the starting time.,A power failure occurred while the timer setting was in standby mode or the AC power adaptor was disconnected.,The unit is being subjected to shocks or vibration. Place the unit in a stable location.,The unit may be under the influence of static electricity or other factors. In this case, restart the unit. If the unit still works poorly, reset the unit (page 61).,If a warning message appears, follow the instructions given by the message.,The unit’s internal system may be malfunctioning, or the unit may be suffering from strong electrical noise caused by power supply abnormalities due to being dropped, excessive static electricity, or lightning. In this case, disconnect the AC power adaptor from the wall outlet, wait about 40 seconds, and then reconnect it.MessagesCommon messagesBrowse LimitYou tried to select the 11th level in a file tree while the unit can select down only to the 10th level.Cannot connect.[ Network settings ]The unit cannot connect to a network, or the unit cannot obtain the IP address because it cannot connect to the DHCP server for some reason (e.g., you input an incorrect WEP key). Check the network connection (page 31) or go to the network settings procedures and input the security key (WEP Key, WPA/WPA2 Key) again (page 24).[ Clock setting (Date&Time Settings) ]The unit cannot connect to the NTP server. Check that the NTP server address is correct.Cannot connect to server.The unit cannot connect to the server because the server may be turned off or the server may not be connected to a network. Turn on the power of the server or check if the server is connected to a network correctly.Cannot PlayYou tried to play audio content that the unit cannot play.Cannot Retrieve InfoThe unit cannot retrieve information from the server.The unit failed to obtain the registration code for the Music Services settings. Check the registration code again (page 43).Data ErrorThe selected audio content (data) has been damaged.No ContentThere is no content in the selected folder on the server.No ResultsThere is no item that corresponds to the keyword used to search for that item.Not AvailableThe operation that you performed is unavailable or invalid.The sound skips.Play Timer“Date&Time Error” appears.“Time Error” appears.Play Timer setting does not function when the starting time is reached. Play Timer setting does not end when the ending time is reached.OthersThe unit works poorly.The unit does not respond to any operations. The unit does not work correctly.010COV.book Page 65 Tuesday, June 15, 2010 11:35 AM](https://usermanual.wiki/Sony-Group/NACSV10I/User-Guide-1311647-Page-65.png)
![C:\_Work\Netjuke\Leia\IM\4192585111NACSV10i\01GB-NACSV10i\120LIC.fmmasterpage: LeftNAC-SV10i4-192-585-11(1)82GBLicense. Of course, the commands you use may be called something other than `show w’ and `show c’; they could even be mouse-clicks or menu items--whatever suits your program.You should also get your employer (if you work as a programmer) or your school, if any, to sign a “copyright disclaimer” for the program, if necessary. Here is a sample; alter the names:Yoyodyne, Inc., hereby disclaims all copyright interest in the program `Gnomovision’ (which makes passes at compilers) written by James Hacker.<signature of TyCoon>, 1 April 1989 Ty Coon, President of ViceThis General Public License does not permit incorporating your program into proprietary programs. If your program is a subroutine library, you may consider it more useful to permit linking proprietary applications with the library. If this is what you want to do, use the GNU Lesser General Public License instead of this License.GNU LESSER GENERAL PUBLIC LICENSE Version 2.1, February 1999 Copyright (C) 1991, 1999 Free Software Foundation, Inc. 51 Franklin Street, Fifth Floor, Boston, MA 02110-1301, USA Everyone is permitted to copy and distribute verbatim copies of this license document, but changing it is not allowed. [This is the first released version of the Lesser GPL. It also counts as the successor of the GNU Library Public License, version 2, hence the version number 2.1.] Preamble The licenses for most software are designed to take away your freedom to share and change it. By contrast, the GNU General Public Licenses are intended to guarantee your freedom to share and change free software--to make sure the software is free for all its users. This license, the Lesser General Public License, applies to some specially designated software packages--typically libraries--of the Free Software Foundation and other authors who decide to use it. You can use it too, but we suggest you first think carefully about whether this license or the ordinary General Public License is the better strategy to use in any particular case, based on the explanations below. When we speak of free software, we are referring to freedom of use, not price. Our General Public Licenses are designed to make sure that you have the freedom to distribute copies of free software (and charge for this service if you wish); that you receive source code or can get it if you want it; that you can change the software and use pieces of it in new free programs; and that you are informed that you can do these things. To protect your rights, we need to make restrictions that forbid distributors to deny you these rights or to ask you to surrender these rights. These restrictions translate to certain responsibilities for you if you distribute copies of the library or if you modify it. For example, if you distribute copies of the library, whether gratis or for a fee, you must give the recipients all the rights that we gave you. You must make sure that they, too, receive or can get the source code. If you link other code with the library, you must provide complete object files to the recipients, so that they can relink them with the library after making changes to the library and recompiling it. And you must show them these terms so they know their rights. We protect your rights with a two-step method: (1) we copyright the library, and (2) we offer you this license, which gives you legal permission to copy, distribute and/or modify the library.To protect each distributor, we want to make it very clear that there is no warranty for the free library. Also, if the library is modified by someone else and passed on, the 010COV.book Page 82 Tuesday, June 15, 2010 11:35 AM](https://usermanual.wiki/Sony-Group/NACSV10I/User-Guide-1311647-Page-82.png)