Sony Group NEX5R Interchangeable Lens Digital Camera User Manual NEX 5R
Sony Corporation Interchangeable Lens Digital Camera NEX 5R
Contents
- 1. User Manual& 65296;& 65297;
- 2. User Manual& 65296;& 65298;
User Manual& 65296;& 65298;
NEX-5R
4-437-511-11(1)
C:\01GB-NEX5RUC2\050REC.fm
master: Right
GB
51
Using the recording functions
x
Aperture Priority
You can adjust the range in focus, or defocuses the background.
1Select A (Aperture Priority) (page 47).
2Turn the control dial to select the desired value.
Or, touch / on the screen to select the desired
value.
• You can record a movie with a value adjusted with [Aperture Priority].
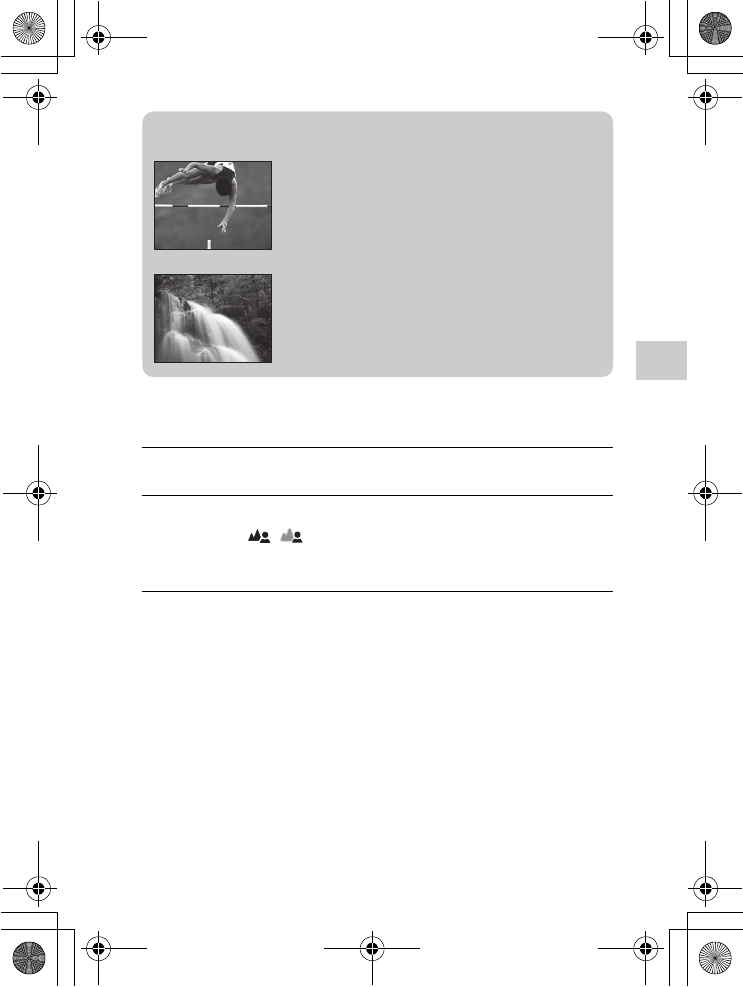
zShutter speed
When a faster shutter speed is used, a moving
subject such as a running person, cars, and sea
spray appears as if they are stopped.
When a slower shutter speed is used, a trailing
image of the movement of the subject is captured
to make more natural and dynamic image.
010COV.book Page 51 Monday, July 30, 2012 4:55 PM
NEX-5R
4-437-511-11(1)
C:\01GB-NEX5RUC2\050REC.fm
master: Left
GB
52
x
Program Auto/Superior Auto
In [Superior Auto] mode, the camera shoots with higher quality than
[Intelligent Auto] mode and perform composite shooting as necessary.
In [Program Auto] mode, you can shoot after adjusting various functions, such
as white balance, ISO, etc.
• In [Superior Auto] mode, the recording process takes longer, since the camera
must make a composite image.
1Select (Program Auto) or (Superior Auto)
(page 47).
2Point the camera to the subject, focus on the subject, and
then record an image.
Shooting mode Your purpose
(Intelligent Auto) • Select this mode to easily recognize the scene and
shoot continuous images.
(Program Auto)
• Select this mode to shoot with various functions other
than the exposure (shutter speed and aperture)
adjusted.
(Superior Auto)
• Select this mode to shoot scenes under difficult
circumstances, such as when you have dark scenes, or
back-lit subjects.
• Select this mode to shoot a higher quality image than
that offered by [Intelligent Auto].
Notes
010COV.book Page 52 Monday, July 30, 2012 4:55 PM
NEX-5R
4-437-511-11(1)
C:\01GB-NEX5RUC2\050REC.fm
master: Right
GB
53
Using the recording functions
Zooming
With the [Zoom] feature of the camera, you can increase the magnification to a
scale greater than that of the optical zoom scale of the lens.
When using a lens with a power zoom, operate the optical zoom of the lens and
then the camera shifts automatically to the [Zoom] feature of the camera.
When using a lens that is not equipped with a power zoom, follow the
instruction below after magnifying using the optical zoom.
1Select MENU t [Camera] t
[Zoom] t desired value.
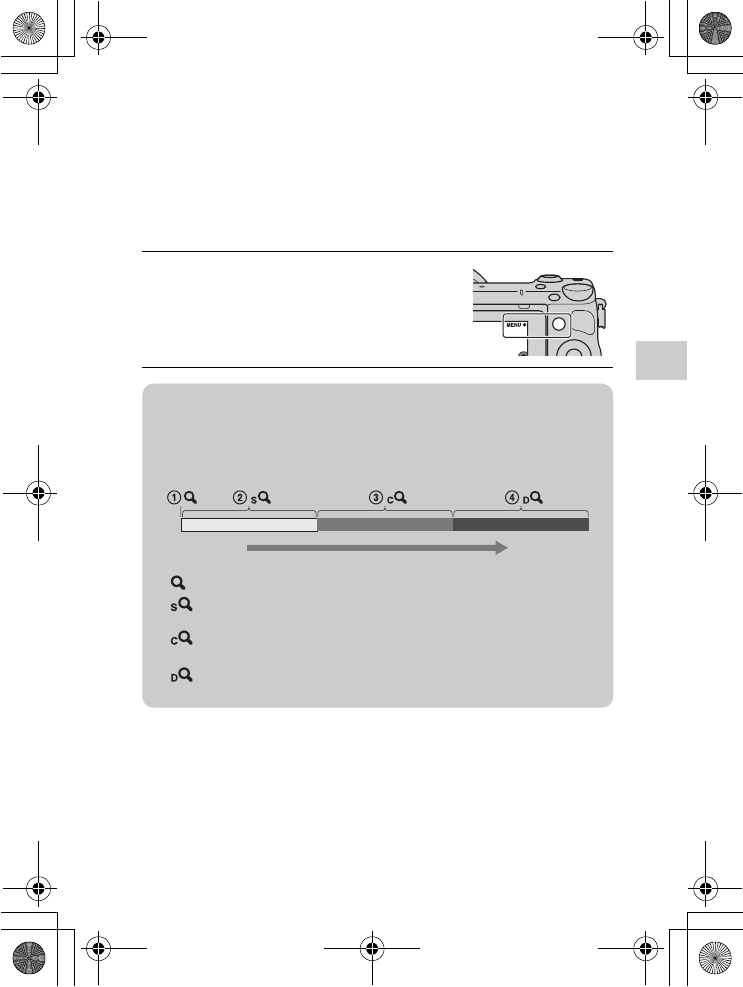
zThe [Zoom] features available with this camera
The [Zoom] feature of the camera provides higher magnification by combining
various zoom features. The icon displayed on the LCD screen changes as
follows, according to the selected zoom feature.
1 : The [Zoom] feature of the camera is not used. (×1.0 is indicated.)
2 Smart Zoom: You can magnify images by trimming them partially.
(Available only when [Image Size] is set to [M] or [S].)
3 Clear Image Zoom: You can magnify images using high-resolution
image processing.
4 Digital Zoom: You can magnify images using image processing.
(The default setting is [Off].)
Zoom scale
(low)
Zoom scale
(high)
010COV.book Page 53 Monday, July 30, 2012 4:55 PM
NEX-5R
4-437-511-11(1)
C:\01GB-NEX5RUC2\050REC.fm
master: Left
GB
54
Selecting the flash mode
• When the camera is charging the flash, blinks on the LCD screen. You cannot
press the shutter button when this icon is blinking.
1Attach the flash and raise it (page 26).
2Select MENU t [Camera] t
[Flash Mode].
3Turn the control wheel to select the desired mode, and
press the center.
Or, slide your finger across the screen upward or
downward to move the desired mode to the center of the
screen, then touch the desired mode.
(Flash Off): Does not fire even if the flash is raised.
(Autoflash): Fires in dark environments or when shooting towards
bright light.
(Fill-flash): Fires every time you trigger the shutter.
(Slow Sync.): Fires every time you trigger the shutter. Slow sync
shooting allows you to shoot a clear image of both the subject and the
background.
(Rear Sync.): Fires right before the exposure is completed every
time you trigger the shutter. A trailing image of the movement of the
subject is captured to make more natural image.
• The selectable items of the flash mode depends on the shooting mode
(page 70).
Notes
010COV.book Page 54 Monday, July 30, 2012 4:55 PM
NEX-5R
4-437-511-11(1)
C:\01GB-NEX5RUC2\050REC.fm
master: Right
GB
55
Using the recording functions
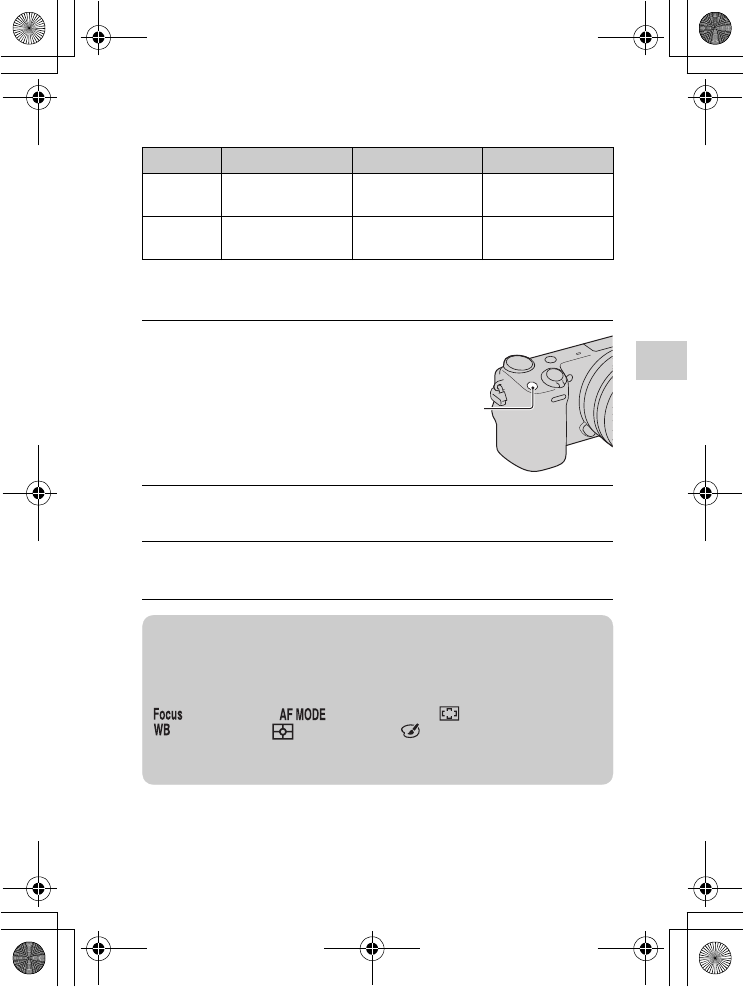
The flash range
The range of the flash depends on the ISO sensitivity and aperture value.
Setting using the Fn (Function) button
F2.8 F3.5 F5.6
ISO100 1 m – 2.5 m
(3.3 feet – 8.2 feet)
1 m – 2 m
(3.3 feet – 6.6 feet)
1 m – 1.25 m
(3.3 feet – 4.1 feet)
ISO3200 5.6 m – 14 m
(18.3 feet – 46 feet)
4.5 m – 11.2 m
(14.7 feet – 36.7 feet)
2.8 m – 7 m
(9.1 feet – 22.9 feet)
1Press the Fn (Function)
button.
2Select a desired function by pressing the right/left side of
the control wheel. Or, touch the desired setting.
3Turn the control wheel to select the desired settings.
Or, touch the desired function to change.
Fn (Function)
button
zHow to assign other functions to the Fn (Function)
button
The following functions are assigned to the Fn (Function) button by the default
settings.
(AF/MF Select)/ (Autofocus Mode)/ (Autofocus Area)/
(White Balance)/ (Metering Mode)/ (Picture Effect)
You can change the functions assigned to the Fn (Function) button by selecting
MENU t [Setup] t [Function Menu Settings].
010COV.book Page 55 Monday, July 30, 2012 4:55 PM
NEX-5R
4-437-511-11(1)
C:\01GB-NEX5RUC2\050REC.fm
master: Left
GB
56
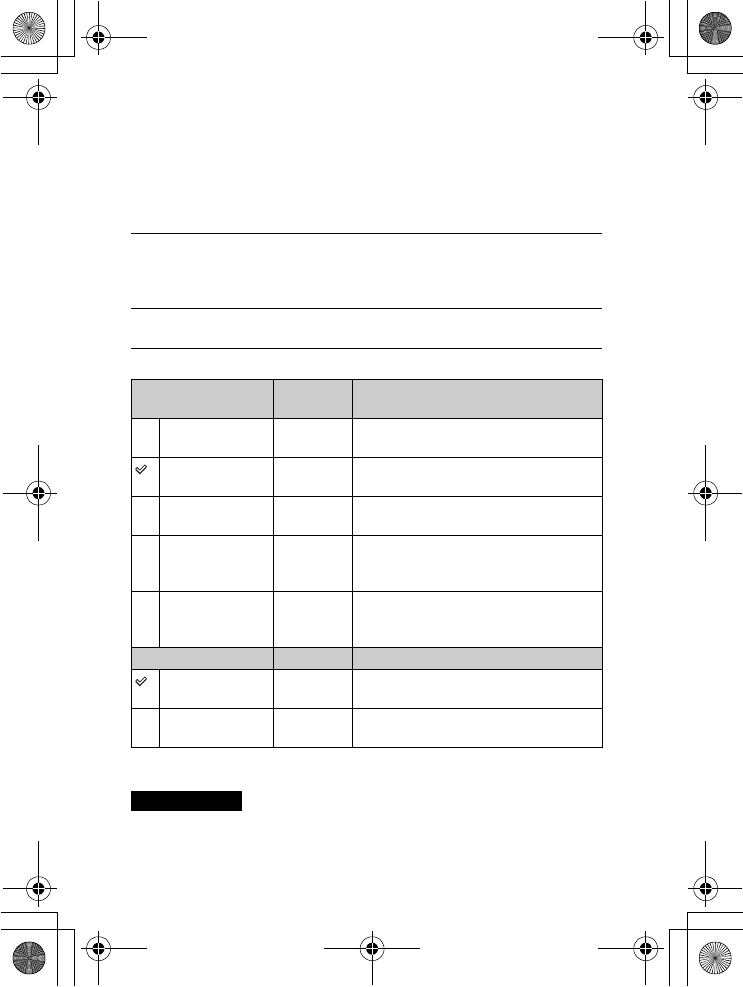
Selecting the image size/record setting
The image size determines the size of the image file that is recorded when you
take an image. The larger the image size, the more detail will be reproduced
when the image is printed on large format paper. The smaller the image size,
the more images can be recorded. In the case of movies, the larger the bit-rate,
the higher the image quality.
Movie
* 1080 60i-compatible device
** 1080 50i-compatible device
• When you print still images recorded with 16:9 aspect ratio, and panoramic
images, both edges may be cut off.
1Select MENU t [Image Size] t [Image Size]. For movie
recording, select MENU t [Image Size] t [Record
Setting].
2Select the desired mode.
[File Format]:
[AVCHD]
Bit-rate Recording
60i 24M(FX)*
50i 24M(FX)**
Maximum
24 Mbps
Records high image quality movies of
1920 × 1080 (60i/50i).
60i 17M(FH)*
50i 17M(FH)**
Average
17 Mbps
Records standard image quality movies of
1920 × 1080 (60i/50i).
60p 28M(PS)*
50p 28M(PS)**
Maximum
28 Mbps
Records highest image quality movies of
1920 × 1080 (60p/50p).
24p 24M(FX)*
25p 24M(FX)**
Maximum
24 Mbps
Records high image quality movies of
1920 × 1080 (24p/25p). This produces a
cinema-like atmosphere.
24p 17M(FH)*
25p 17M(FH)**
Average
17 Mbps
Records standard image quality movies of
1920 × 1080 (24p/25p). This produces a
cinema-like atmosphere.
[File Format]: [MP4] Bit-rate Recording
1440×1080 12M Average
12 Mbps
Records movies of 1440 × 1080.
VGA 3M Average
3 Mbps
Records movies of VGA size.
Notes
010COV.book Page 56 Monday, July 30, 2012 4:55 PM
NEX-5R
4-437-511-11(1)
C:\01GB-NEX5RUC2\060PLY.fm
master: Right
GB
57
Using the playback functions
Using the playback functions
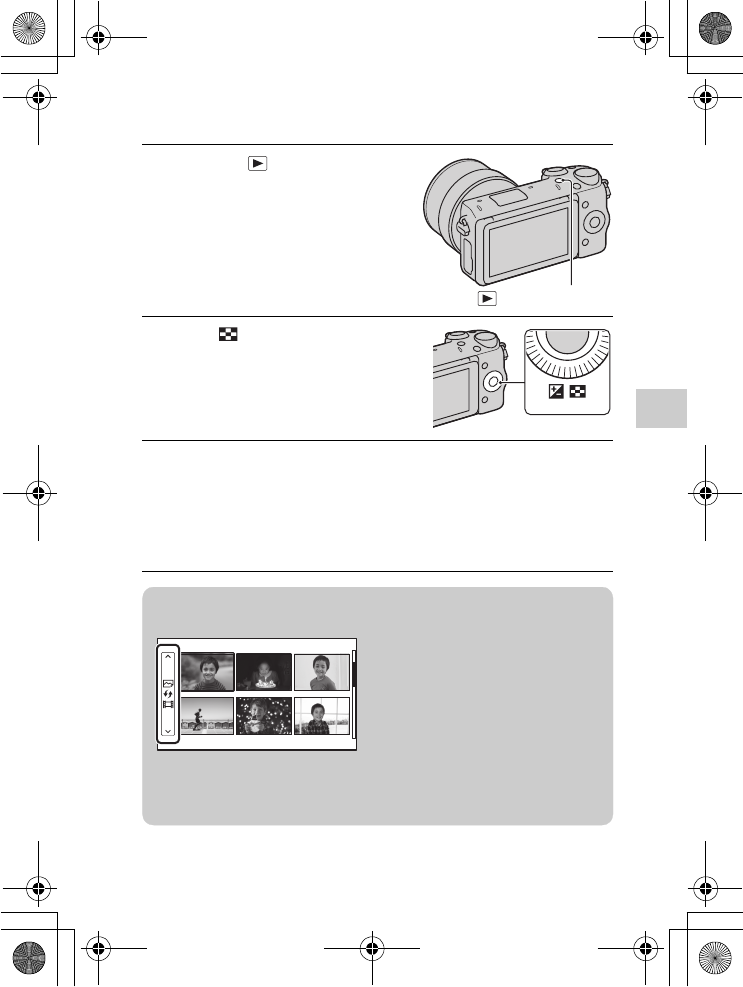
Displaying the image list
1Press the (Playback)
button to enter playback
mode.
(Playback) button
2Press (Image Index) on
the control wheel.
Six images are displayed at a time.
3Turn the control wheel to select an image.
Or, touch the desired image.
• To return to the single-image screen, select the desired image, and press
the center.
• You can browse images quickly by sliding your finger across the screen
upward and downward.
zDisplaying a desired folder
To select a desired folder, select the bar
on the left of the image index screen, and
then press the top/bottom parts of the
control wheel. You can switch between
still image playback and movie playback
by pressing the center of the control
wheel. You can also select a folder by
touching the bar on the left. You can
switch between still image playback and
movie playback by touching the center of
the bar.
010COV.book Page 57 Monday, July 30, 2012 4:55 PM
NEX-5R
4-437-511-11(1)
C:\01GB-NEX5RUC2\060PLY.fm
master: Left
GB
58
Viewing images on a TV
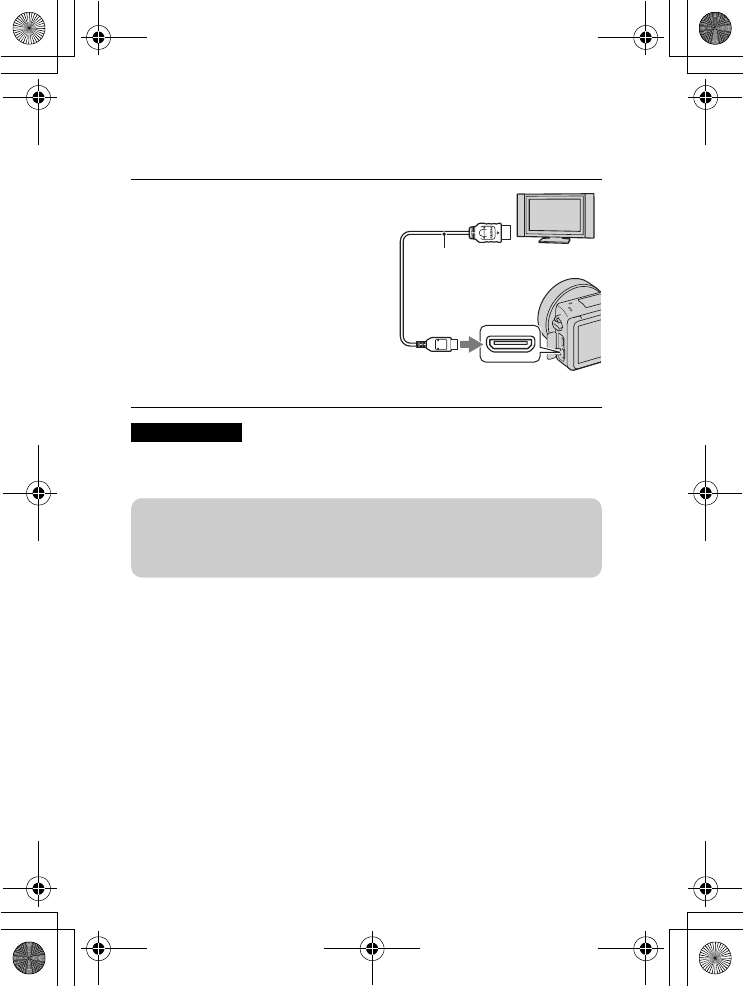
To view images on the camera using a TV, an HDMI cable (sold separately)
and an HD TV equipped with an HDMI connector are required.
• Use an HDMI mini connector on one end (for the camera), and a plug suitable for
connecting your TV on the other end.
1Connect the camera to the TV
with an HDMI cable (sold
separately).
Notes
To the HDMI
connector
HDMI cable
To the HDMI
terminal
zUsing your camera abroad
To view movies shot using this camera on a TV, the camera and TV must use
the same color television system.
010COV.book Page 58 Monday, July 30, 2012 4:55 PM
NEX-5R
4-437-511-11(1)
C:\01GB-NEX5RUC2\070CHK.fm
master: Right
GB
59
Checking the functions available
Checking the functions available
Menu list
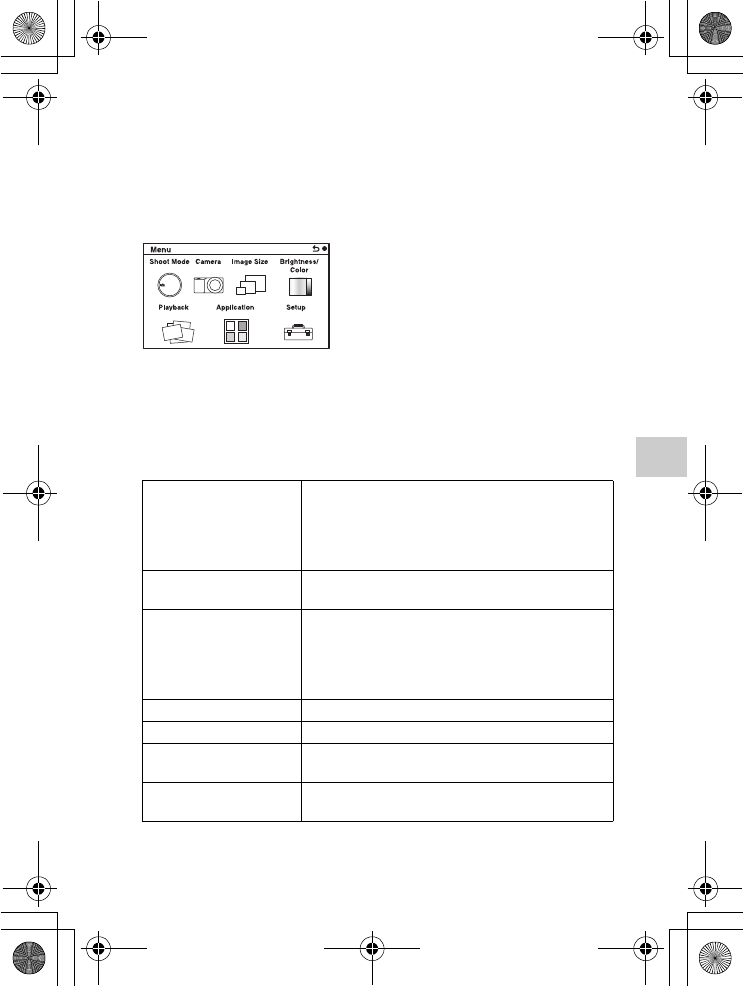
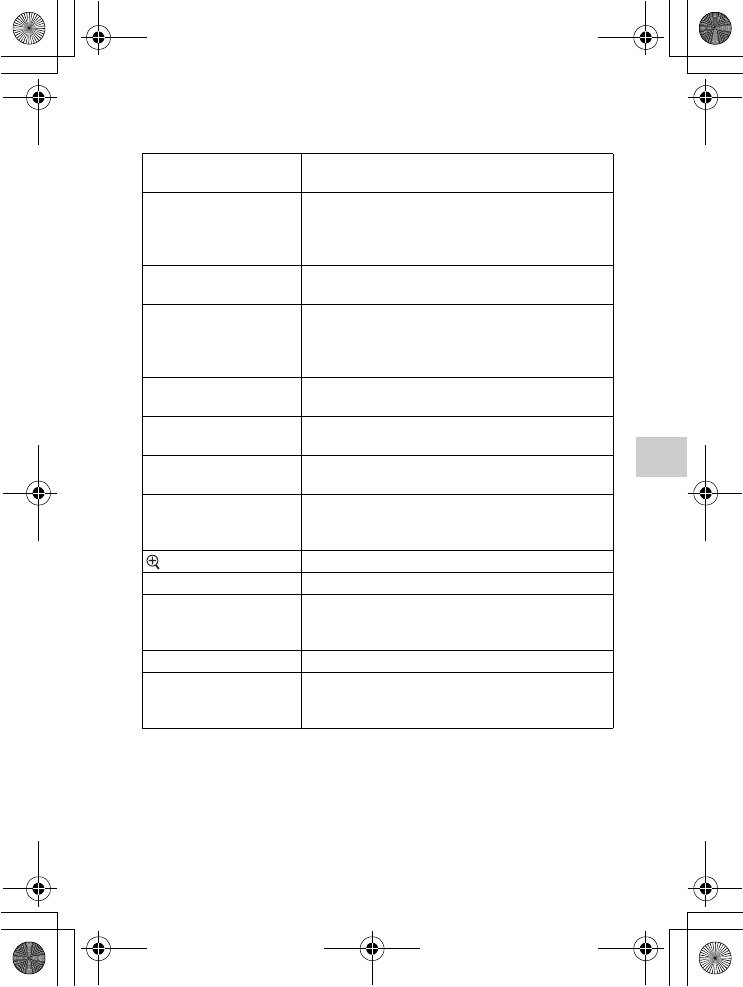
When you press MENU, the menu items [Shoot Mode], [Camera], [Image
Size], [Brightness/Color], [Playback], [Application]* and [Setup] appear on
the screen.
You can set various functions in each item. Items that cannot be set in the
context are displayed in gray.
* The application downloading function may not be available in some countries/
regions.
x
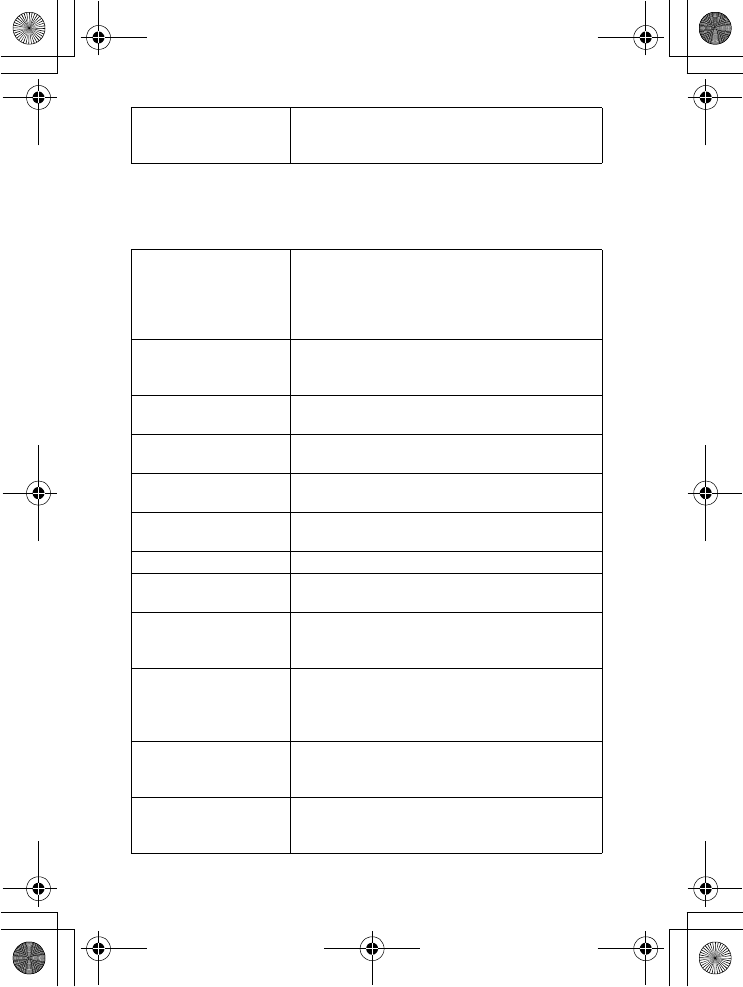
Shoot Mode
Allows you to select a shooting mode, such as exposure mode, panoramic,
Scene Selection.
Superior Auto Shoots images with a wider range of shooting
functions than those of Intelligent Auto shooting.
Recognizes and evaluates the shooting conditions
automatically, performs Auto HDR, and chooses the
best image.
Intelligent Auto The camera evaluates the subject and makes the
proper settings.
Scene Selection Shoots with preset settings according to the subject or
condition.
(Portrait/Landscape/Macro/Sports Action/Sunset/
Night Portrait/Night Scene/Hand-held Twilight/Anti
Motion Blur)
Sweep Panorama Shoots with panoramic size.
Manual Exposure Adjusts the aperture and shutter speed.
Shutter Priority Adjusts the shutter speed to express the movement of
the subject.
Aperture Priority Adjusts the range in focus, or defocuses the
background.
010COV.book Page 59 Monday, July 30, 2012 4:55 PM
NEX-5R
4-437-511-11(1)
C:\01GB-NEX5RUC2\070CHK.fm
master: Left
GB
60
x
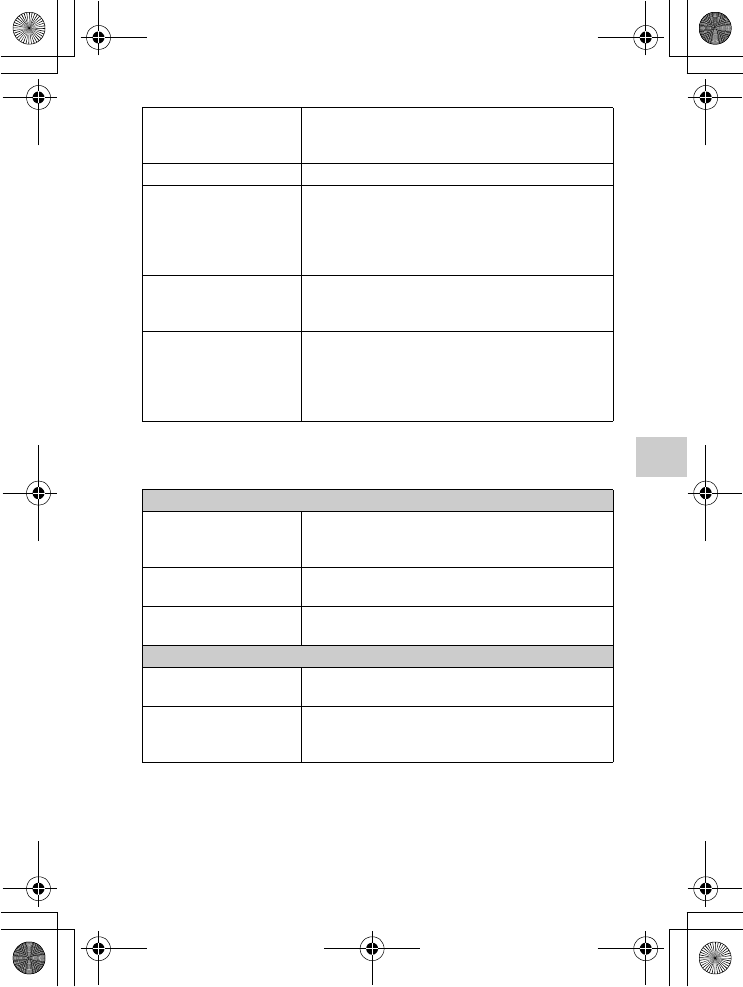
Camera
Allows you to set shooting functions, such as continuous shooting, self-timer,
and flash.
Program Auto Automatic shooting that allows you to customize
settings, except for the exposure (shutter speed and
aperture).
Drive Mode Selects the drive mode, such as continuous shooting,
self-timer, or bracket shooting.
(Single Shooting/Cont. Shooting/Spd Priority Cont./
Self-timer/Self-timer(Cont)/Bracket: Cont./Remote
Cdr.)
Flash Mode Selects the method used to fire the flash.
(Flash Off/Autoflash/Fill-flash/Slow Sync./Rear
Sync.)
AF/MF Select Selects auto focusing or manual focusing.
(Autofocus/DMF/Manual Focus)
Autofocus Area Selects the area to be focused on.
(Multi/Center/Flexible Spot)
Autofocus Mode Selects the autofocus method.
(Single-shot AF/Continuous AF)
Touch Shutter Sets whether to use the touch shutter function.
(On/Off)
Object Tracking Keeps the focus on a subject while tracking it.
Zoom Sets the zoom scale of the [Zoom] feature of the
camera.
Face Detection Detects people’s faces automatically, and adjusts
focus and exposure to suit the faces.
(On (Regist. Faces)/On/Off)
Face Registration Registers or changes the person to be given priority in
the focus.
(New Registration/Order Exchanging/Delete/Delete
All)
Smile Shutter Each time the camera detects a smile, the camera
releases the shutter automatically.
(Off/On)
Auto Port. Framing Analyzes the scene when capturing a face and saves
another image with a more impressive composition.
(Off/Auto)
010COV.book Page 60 Monday, July 30, 2012 4:55 PM
NEX-5R
4-437-511-11(1)
C:\01GB-NEX5RUC2\070CHK.fm
master: Right
GB
61
Checking the functions available
x
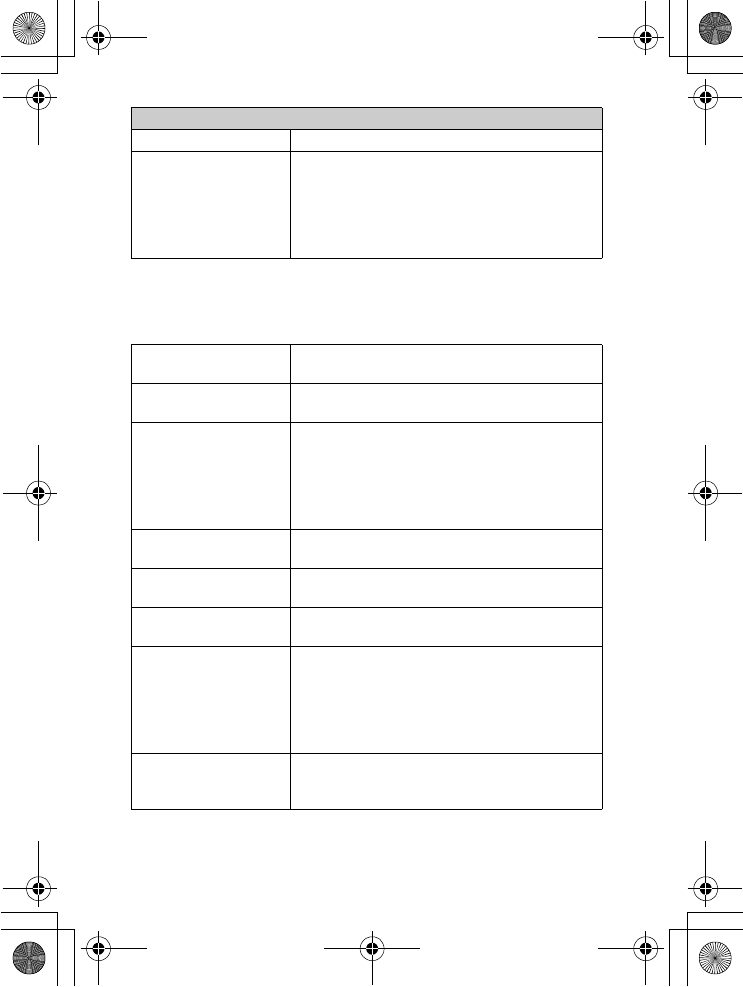
Image Size
Allows you to set the image size and aspect ratio, etc.
Soft Skin Effect Shoots the skin smoothly in the Face Detection
function.
(On/Off)
Shooting Tip List Allows you to access all shooting tips.
LCD Display (DISP) Switches the information to be displayed on the
shooting screen on the LCD screen.
(Graphic Display/Display All Info./Big Font Size
Disp./No Disp. Info./Level/Histogram/For
viewfinder)
Finder Display(DISP) Changes the information to be displayed on an
Electronic Viewfinder (sold separately).
(Disp. Basic Info/Level/Histogram)
DISP Button(Monitor) Sets the screen display modes to be displayed on the
LCD screen by pressing the DISP button.
(Graphic Display/Display All Info./Big Font Size
Disp./No Disp. Info./Level/Histogram/For
viewfinder)
Still
Image Size Selects the image size.
(3:2: L: 16M/ M: 8.4M/ S: 4.0M)
(16:9: L: 14M/ M: 7.1M/ S: 3.4M)
Aspect Ratio Selects the aspect ratio.
(3:2/16:9)
Quality Selects the compression format.
(RAW/RAW & JPEG/Fine/Standard)
Panorama
Image Size Selects the image size.
(Standard/Wide)
Panorama Direction Selects the direction to pan the camera when shooting
panoramic images.
(Right/Left/Up/Down)
010COV.book Page 61 Monday, July 30, 2012 4:55 PM
NEX-5R
4-437-511-11(1)
C:\01GB-NEX5RUC2\070CHK.fm
master: Left
GB
62
x
Brightness/Color
Allows you to make brightness settings such as metering mode, and color
settings such as white balance.
Movie
File Format Selects AVCHD or MP4.
Record Setting Selects the image size, frame rate, and image quality
of movies.
(AVCHD: 60i/50i 24M (FX) / 60i/50i 17M (FH) /
60p/50p 28M (PS) / 24p/25p 24M (FX) / 24p/25p
17M (FH))
(MP4: 1440×1080 12M/VGA 3M)
Exposure Comp. Compensates for the brightness of the entire image.
(–3.0EV to +3.0EV)
ISO Sets the ISO sensitivity.
(ISO AUTO/100 - 25600)
White Balance Adjusts the color tones according to the ambient light
conditions.
(Auto WB/Daylight/Shade/Cloudy/Incandescent/
Fluor.: Warm White/Fluor.: Cool White/Fluor.: Day
White/Fluor.: Daylight/Flash/C.Temp./Filter/Custom/
Custom Setup)
Metering Mode Selects the method used for measuring the brightness.
(Multi/Center/Spot)
Flash Comp. Adjusts the amount of flash light.
(–2.0EV to +2.0EV)
DRO/Auto HDR Corrects the brightness or contrast automatically.
(Off/D-Range Opt./Auto HDR)
Picture Effect Shoots with the desired effects to express a unique
atmosphere.
(Off/Toy Camera/Pop Color/Posterization/Retro
Photo/Soft High-key/Partial Color/High Contrast
Mono./Soft Focus/HDR Painting/Rich-tone Mono./
Miniature)
Creative Style Selects the image processing method.
(Standard/Vivid/Portrait/Landscape/Sunset/Black &
White)
010COV.book Page 62 Monday, July 30, 2012 4:55 PM
NEX-5R
4-437-511-11(1)
C:\01GB-NEX5RUC2\070CHK.fm
master: Right
GB
63
Checking the functions available
x
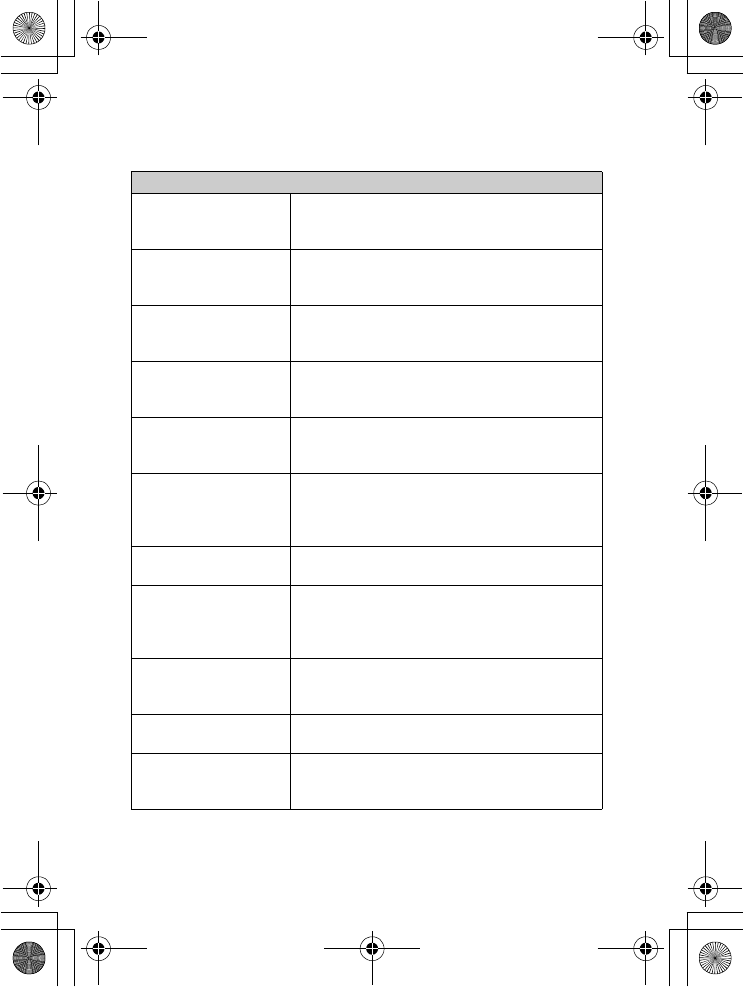
Playback
Allows you to set playback functions.
x
Application
You can add the desired functions to your camera by connecting to the
application downloading website “PlayMemories Camera Apps” via the
Internet.
Delete Deletes images.
(Multiple Img./All in Folder/All AVCHD view files)
Still/Movie Select Allows you to determine how to group the playback
images (View mode).
(Folder View(Still)/Folder View(MP4)/AVCHD
View)
Slide Show Plays back images automatically.
(Repeat/Interval/Image Type)
View on Smartphone Transfers the images to a Smartphone and displays
them.
(This Image/All Images on This Date/All Images in
The Device)
Send to Computer Transfers the images to a computer that is connected
to the network for backup.
View on TV Transfers the images to a TV that is connected to the
network for viewing.
Specify Printing Selects the images to print, or makes printing settings.
(DPOF Setup/Date Imprint)
Image Index Selects the number of images to be displayed on the
index screen.
(6 Images/12 Images)
Enlarge Image Enlarges the image.
Rotate Rotates images.
Protect Protects images, or cancels the protection.
(Multiple Img./Cancel All Images/Cancel All
Movies(MP4)/Cancel All AVCHD view files)
Volume Settings Sets the sound volume of movies.
Display Contents Switches the information to be displayed on the
playback screen.
(Display Info./Histogram/No Disp. Info.)
010COV.book Page 63 Monday, July 30, 2012 4:55 PM
NEX-5R
4-437-511-11(1)
C:\01GB-NEX5RUC2\070CHK.fm
master: Left
GB
64
x
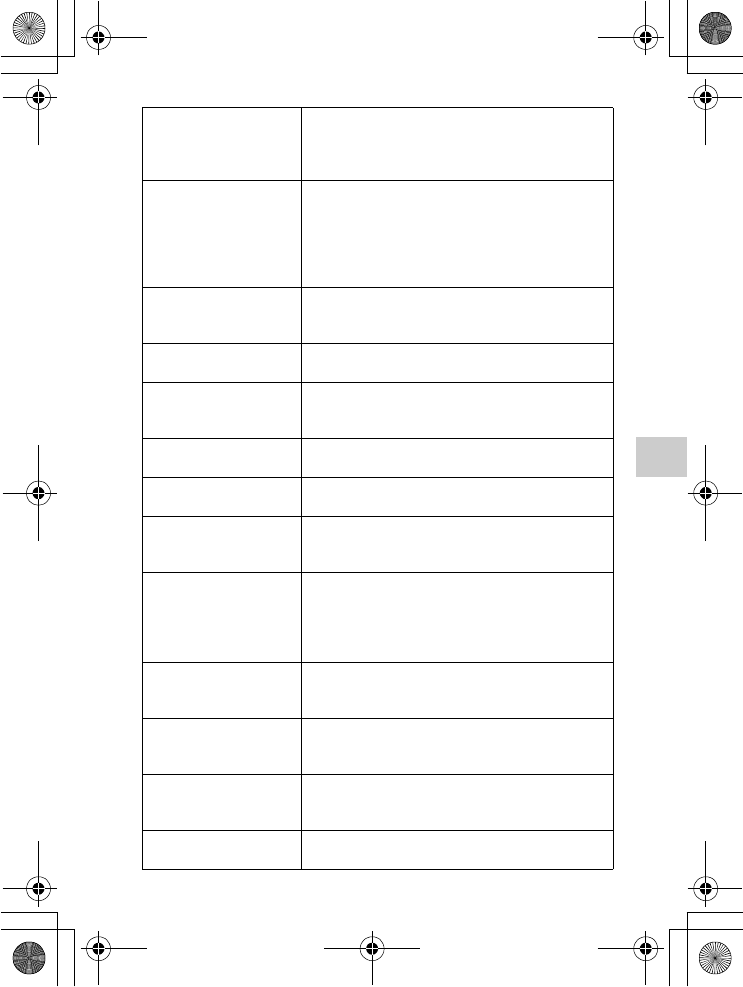
Setup
Allows you to make more detailed shooting settings, or change the camera
settings.
Shooting Settings
AEL w/ shutter Sets whether or not to fix the exposure when you press
the shutter button halfway down.
(On/Off)
AF Illuminator Sets the AF illuminator to assist auto-focusing in dim
places.
(Auto/Off)
Phase Detection AF
Area
Sets whether to display the Phase Detection AF
ranging points on the screen.
(On/Off)
Red Eye Reduction Provides pre-flash before shooting when using the
flash, to prevent eyes from being shot in red.
(On/Off)
FINDER/LCD Setting Sets how to switch between an Electronic Viewfinder
(sold separately) and the LCD screen.
(Auto/Viewfinder/Manual)
Live View Display Allows you to choose whether or not to show the
value of exposure compensation, etc. on the screen
display.
(Setting Effect ON/Setting Effect OFF)
Auto Review Sets the display time of the image right after shooting.
(10 Sec/5 Sec/2 Sec/Off)
Grid Line Turns on the grid line that helps you to adjust the
composition of images.
(Rule of 3rds Grid/Square Grid/Diag. + Square Grid/
Off)
Peaking Level Enhances the outline of in-focus ranges with a specific
color.
(High/Mid/Low/Off)
Peaking Color Sets the color used for the peaking function.
(White/Red/Yellow)
Clear Image Zoom Zooms an image with higher quality than Digital
Zoom.
(On/Off)
010COV.book Page 64 Monday, July 30, 2012 4:55 PM
NEX-5R
4-437-511-11(1)
C:\01GB-NEX5RUC2\070CHK.fm
master: Right
GB
65
Checking the functions available
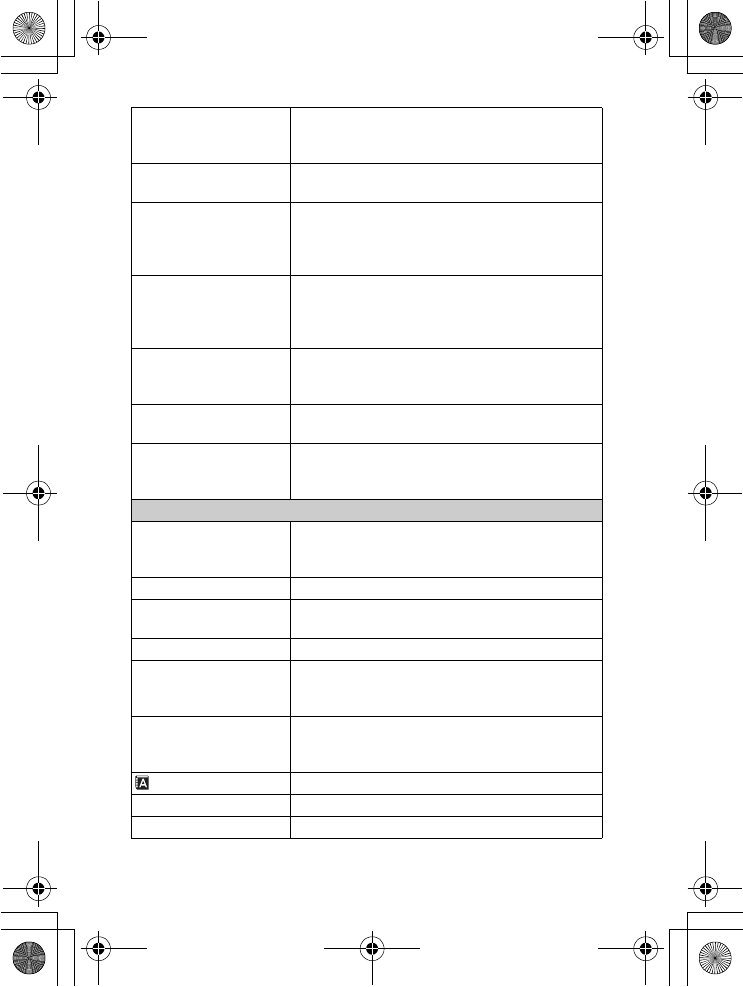
Digital Zoom Zooms an image with higher magnification than Clear
Image Zoom. This feature can be also available in
movie recording.
(On/Off)
Self-portrait Self-timer Sets the shooting mode when the LCD screen is tilted
upward about 180 degrees. When you set [Self-
portrait Self-timer] to [On], a 3-second delay self-
timer is activated, and you can reduce the camera-
shake when shooting self-portrait.
(On/Off)
S. Auto Image Extract. Sets whether or not to save all the images that were
shot continuously in Superior Auto mode.
(Auto/Off)
MF Assist Displays an enlarged image when focusing manually.
(On/Off)
MF Assist Time Sets the length of time the image will be shown in an
enlarged form.
(No Limit/5 Sec/2 Sec)
Color Space Changes the range of color reproduction.
(sRGB/AdobeRGB)
SteadyShot Sets camera-shake compensation.
(On/Off)
Release w/o Lens Sets whether or not to release the shutter when there is
no lens.
(Enable/Disable)
Eye-Start AF Sets whether or not to use autofocus when you look
through an Electronic Viewfinder (sold separately)
with the LA-EA2 Mount Adaptor attached (sold
separately).
(On/Off)
Front Curtain Shutter Sets whether or not to use the electronic front curtain
shutter function.
(On/Off)
Long Exposure NR Sets the noise reduction processing for long exposure
shootings.
(On/Off)
High ISO NR Sets the noise reduction processing for high ISO
sensitivity shootings.
(Normal/Low)
Lens Comp.: Shading Compensates for the shaded corners of the screen.
(Auto/Off)
010COV.book Page 65 Monday, July 30, 2012 4:55 PM
NEX-5R
4-437-511-11(1)
C:\01GB-NEX5RUC2\070CHK.fm
master: Left
GB
66
Lens Comp.: Chro.
Aber.
Reduces the color deviation at the corners of the
screen.
(Auto/Off)
Lens Comp.: Distortion Compensates for distortion on the screen.
(Auto/Off)
Face Priority Tracking Sets whether to preferentially-track a certain face or
not when the camera detects that face during object
tracking.
(On/Off)
Auto Slow Shutter Sets whether or not to adjust the shutter speed
automatically when recording movies if the subject is
dark.
(On/Off)
Movie Audio Rec Sets whether or not to record sound when recording a
movie.
(On/Off)
Wind Noise Reduct. Reduces wind noise during movie recording.
(On/Off)
AF Micro Adj. Finely adjusts the autofocused position, when using
the LA-EA2 Mount Adaptor (sold separately).
(AF Adjustment Setting/amount/Clear)
Main Settings
Menu start Selects a first-displayed menu from the top menu or
the last menu screen.
(Top/Previous)
Function Menu Settings Assigns functions to the Fn (Function) button.
MOVIE Button Sets whether or not to activate the MOVIE button.
(On/Off)
Custom Key Settings Assigns functions to the Soft keys.
Touch Operation Sets whether or not to operate the camera using the
touch panel.
(On/Off)
Beep Selects the sound produced when you operate the
camera.
(On/Off)
Language Selects the language used on the screen.
Date/Time Setup Sets the date and time.
Area Setting Selects the area where you are using the camera.
010COV.book Page 66 Monday, July 30, 2012 4:55 PM
NEX-5R
4-437-511-11(1)
C:\01GB-NEX5RUC2\070CHK.fm
master: Right
GB
67
Checking the functions available
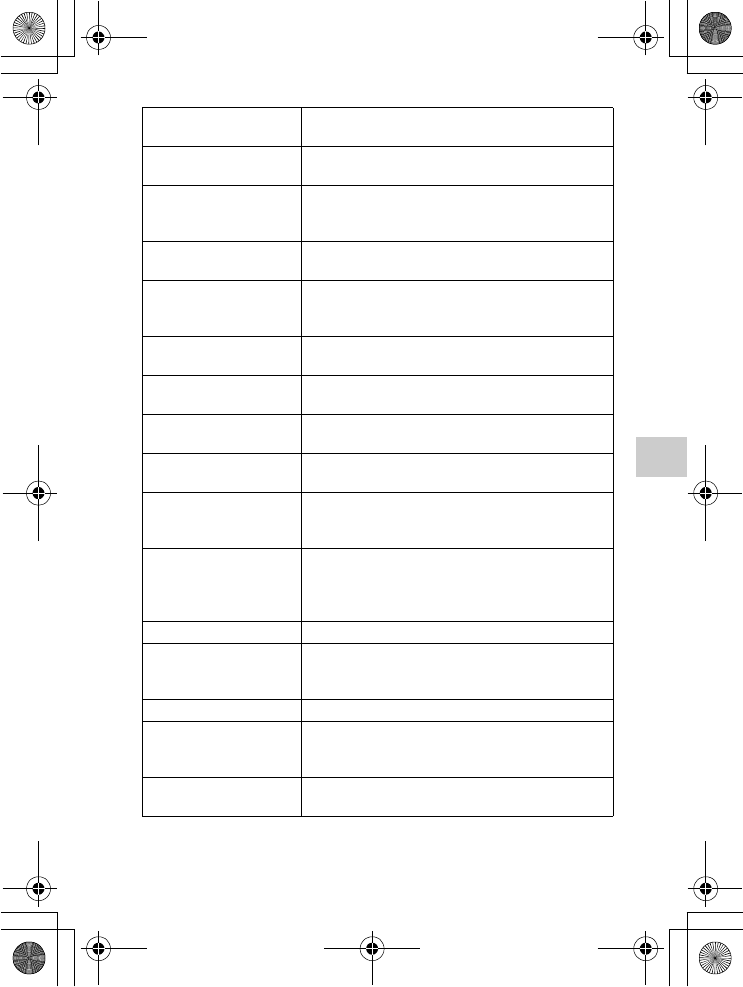
Help Guide Display Turns the Help Guide on or off.
(On/Off)
Power Save Sets the level of the power saving feature.
(Max/Standard)
Power Saving Start
Time
Sets the time to turn the camera to the power save
mode.
(30 Min/5 Min/1 Min/20 Sec/10 Sec)
LCD Brightness Sets the brightness of the LCD screen.
(Manual/Sunny Weather)
Viewfinder Bright. Sets the brightness of an Electronic Viewfinder (sold
separately).
(Auto/Manual)
Display Color Selects the color of the LCD screen.
(Black/White/Blue/Pink)
Wide Image Selects a method to display wide images.
(Full Screen/Normal)
Playback Display Selects the method used to play back portrait images.
(Auto Rotate/Manual Rotate)
HDMI Resolution Set resolution when connected to HDMI TV.
(Auto/1080p/1080i)
CTRL FOR HDMI Sets whether or not to operate the camera with a
“BRAVIA” Sync-compliant TV’s Remote Control.
(On/Off)
USB Connection Selects the appropriate USB connection method for
each computer or USB device connected to the
camera.
(Auto/Mass Storage/MTP)
Cleaning Mode Allows you to clean the image sensor.
Calibration Enables you to perform calibration when the touch
panel buttons do not react at the appropriate points
where you touch.
Version Displays the version of the camera and the lens.
Demo Mode Sets whether or not to display the demonstration with
movies.
(On/Off)
Initialize Resets the camera to the default settings.
(Reset Default/Factory Reset)
010COV.book Page 67 Monday, July 30, 2012 4:55 PM
NEX-5R
4-437-511-11(1)
C:\01GB-NEX5RUC2\070CHK.fm
master: Left
GB
68
* This setting appears when an Eye-Fi card is inserted in the camera. Do not use an
Eye-Fi card inserted in the camera on an airplane. If an Eye-Fi card is inserted in
the camera, set [Upload Settings] to [Off].
Eye-Fi cards can be used only in the countries/regions where they were
purchased. Use Eye-Fi cards in accordance with the law of the countries/regions
where you purchased the card.
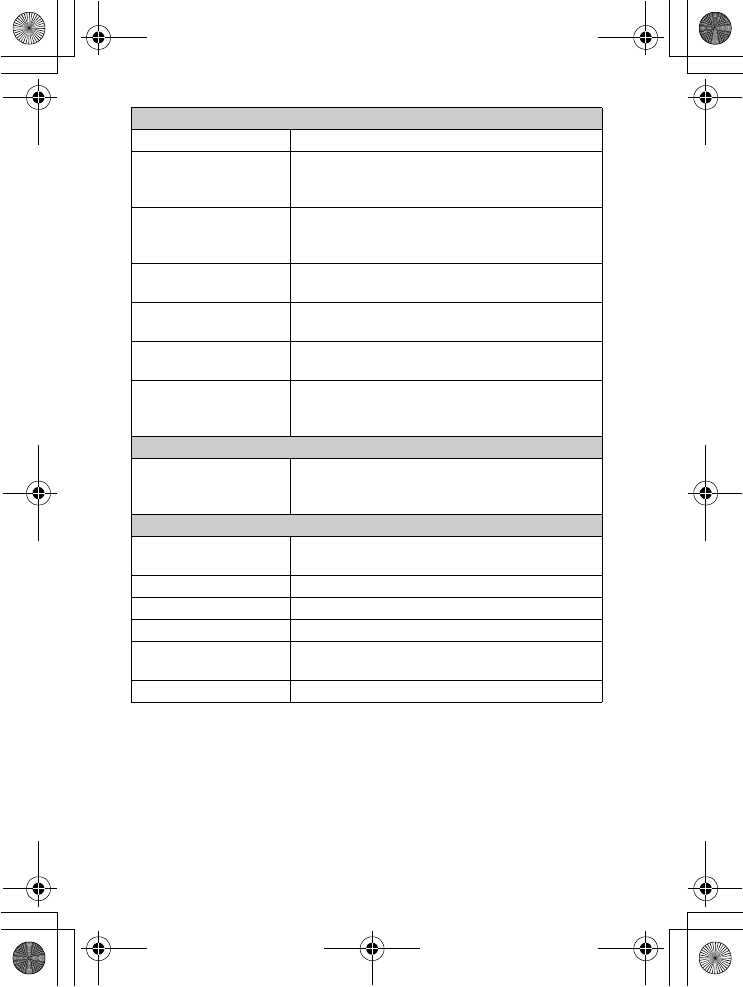
Memory Card Tool
Format Formats the memory card.
File Number Selects the method to use to assign file numbers to
still images and MP4 movies.
(Series/Reset)
Folder Name Selects the folder name format in which the still image
is stored.
(Standard Form/Date Form)
Select Shoot. Folder Selects the recording folder to which still images and
MP4 movies are recorded.
New Folder Creates a new folder to which still images and MP4
movies are recorded.
Recover Image DB Repairs the image database file when inconsistencies
are found.
Display Card Space Displays the remaining recording time of movies and
the recordable number of still images on the memory
card.
Eye-Fi Setup*
Upload Settings Sets whether to use the upload function of the camera
with an Eye-Fi card.
(On/Off)
Network Settings
WPS Push You can register the access point to the camera easily
by pushing the WPS button.
Access Point Settings You can register your access point manually.
Edit Device Name You can change the device name under Wi-Fi Direct.
Disp MAC Address Displays the MAC address of the camera.
Reset View on
Smartphone
Resets the connecting information for [View on
Smartphone].
Reset Network Settings Resets all the network settings to default settings.
010COV.book Page 68 Monday, July 30, 2012 4:55 PM
NEX-5R
4-437-511-11(1)
C:\01GB-NEX5RUC2\070CHK.fm
master: Right
GB
69
Checking the functions available
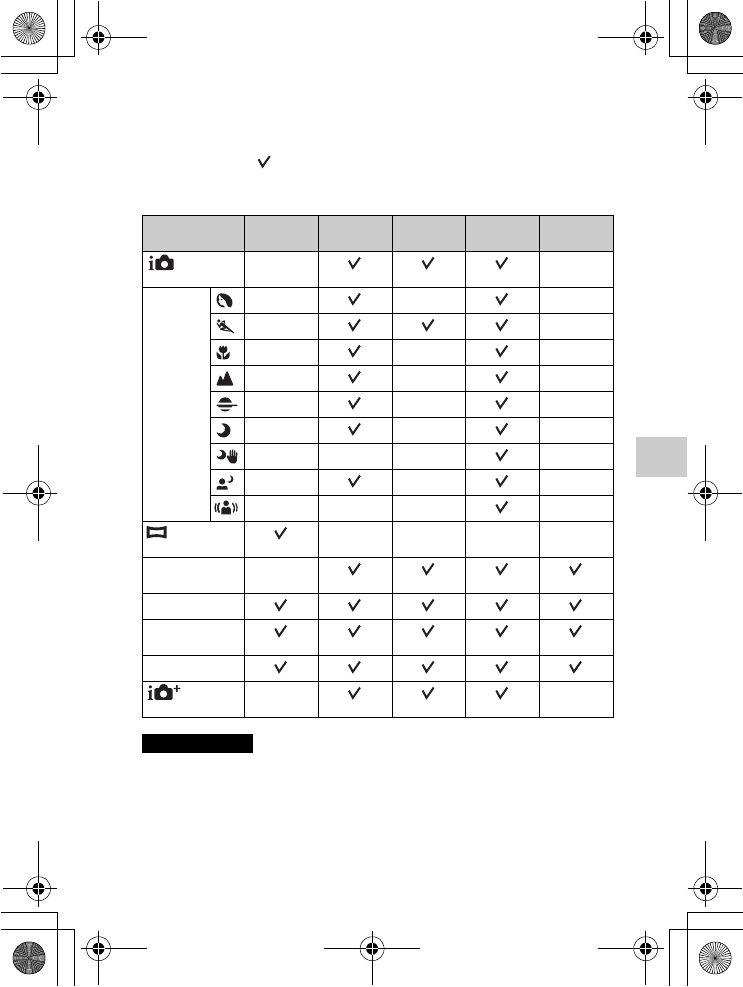
Functions available for each shooting mode
The functions you can use depend on the selected shooting mode.
In the table below, indicates the function is available, and a – indicates the
function is not available.
The functions you cannot use are displayed in gray on the screen.
• The functions available may be limited also by conditions other than the shooting
mode.
Shoot Mode Exposure
Comp.
Self-timer Cont.
Shooting
Face
Detection
Picture Effect
(Intelligent
Auto)
––
SCN
(Scene
Selection)
–––
––
–––
–––
–––
–––
––– –
–––
––– –
(Sweep
Panorama)
––––
M
(Manual
Exposure)
–
S
(Shutter Priority)
A
(Aperture
Priority)
P
(Program Auto)
(Superior
Auto)
––
Notes
010COV.book Page 69 Monday, July 30, 2012 4:55 PM
NEX-5R
4-437-511-11(1)
C:\01GB-NEX5RUC2\070CHK.fm
master: Left
GB
70
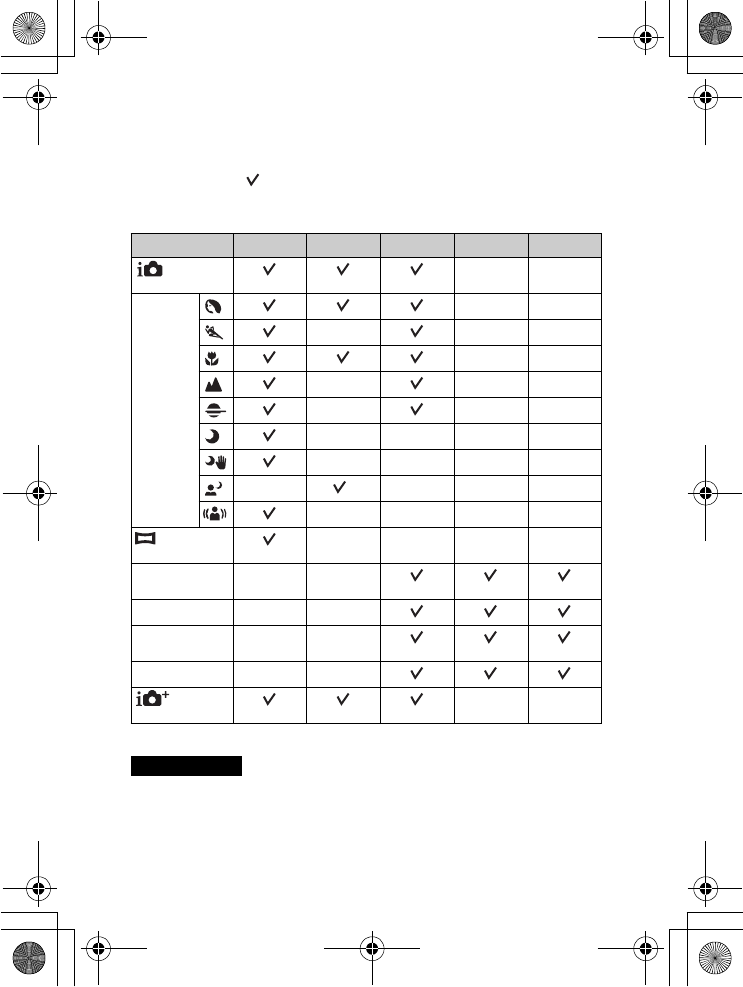
Flash modes available
The flash modes you can select depend on the shooting mode and functions
selected.
In the table below, indicates the function is available, and a – indicates the
function is not available.
The flash modes you cannot select are displayed in gray on the screen.
* The camera emits flash light in slow synchro mode if the flash is necessary.
• The flash modes may be limited also by conditions other than the shooting mode.
• Even if you select a workable flash mode, the flash does not fire unless it is raised.
Shoot Mode Flash Off Autoflash Fill-flash Slow Sync. Rear Sync.
(Intelligent
Auto)
––
SCN
(Scene
Selection)
––
–––
––
–––
–––
––––
––––
–*–––
––––
(Sweep
Panorama)
––––
M
(Manual
Exposure)
––
S
(Shutter Priority)
––
A
(Aperture
Priority)
––
P
(Program Auto)
––
(Superior
Auto)
––
Notes
010COV.book Page 70 Monday, July 30, 2012 4:55 PM
NEX-5R
4-437-511-11(1)
C:\01GB-NEX5RUC2\080SOF.fm
master: Right
GB
71
Importing images to the computer
Importing images to the computer
Installing the software
To utilize images recorded with the camera, the following software is provided
with CD-ROM (supplied):
• “Image Data Converter”
You can open RAW format image files.
• “PlayMemories Home” (Windows only)
You can import still images or movies recorded with the camera to your
computer so that you can view them, and use various convenient features to
enhance the images you have shot.
• Log on as Administrator.
• Use “Image Data Converter” to play back RAW images.
• If “PMB” (Picture Motion Browser) supplied with a camera that was purchased
before 2011 has already been installed on the computer, “PMB” will be
overwritten by “PlayMemories Home,” and you may be unable to use some
functions of “PMB” that were previously available.
• “PlayMemories Home” is not compatible with Mac computers. When you play
back images on Mac computers, use the appropriate application software supplied
with the Mac computer.
x
Windows
The following computer environment is recommended when using the
supplied software and importing images via a USB connection.
* 64-bit editions and Starter (Edition) are not supported. Windows Image
Mastering API (IMAPI) Ver. 2.0 or later is required to use the function for
creating discs.
** Starter (Edition) is not supported.
Notes
OS (pre-installed) Microsoft Windows XP* SP3/Windows Vista** SP2/
Windows 7 SP1
“PlayMemories
Home”
CPU: Intel Pentium III 800 MHz or faster
For playing/editing the High Definition movies: Intel Core
Duo 1.66 GHz or faster/Intel Core 2 Duo 1.66 GHz or
faster (Intel Core 2 Duo 2.26 GHz or faster (AVC HD (FX/
FH)), Intel Core 2 Duo 2.40 GHz or faster (AVC HD PS))
Memory: Windows XP 512 MB or more (1 GB or more is
recommended), Windows Vista/Windows 7 1 GB or more
Hard Disk: Disk space required for installation—
approximately 500 MB
Display: Screen resolution—1024 × 768 dots or more
“Image Data
Converter Ver.4”
CPU/Memory: Pentium 4 or faster/1 GB or more
Display: 1024 × 768 dots or more
010COV.book Page 71 Monday, July 30, 2012 4:55 PM
NEX-5R
4-437-511-11(1)
C:\01GB-NEX5RUC2\080SOF.fm
master: Left
GB
72
x
Mac
The following computer environment is recommended when using the
supplied software and importing images via a USB connection.
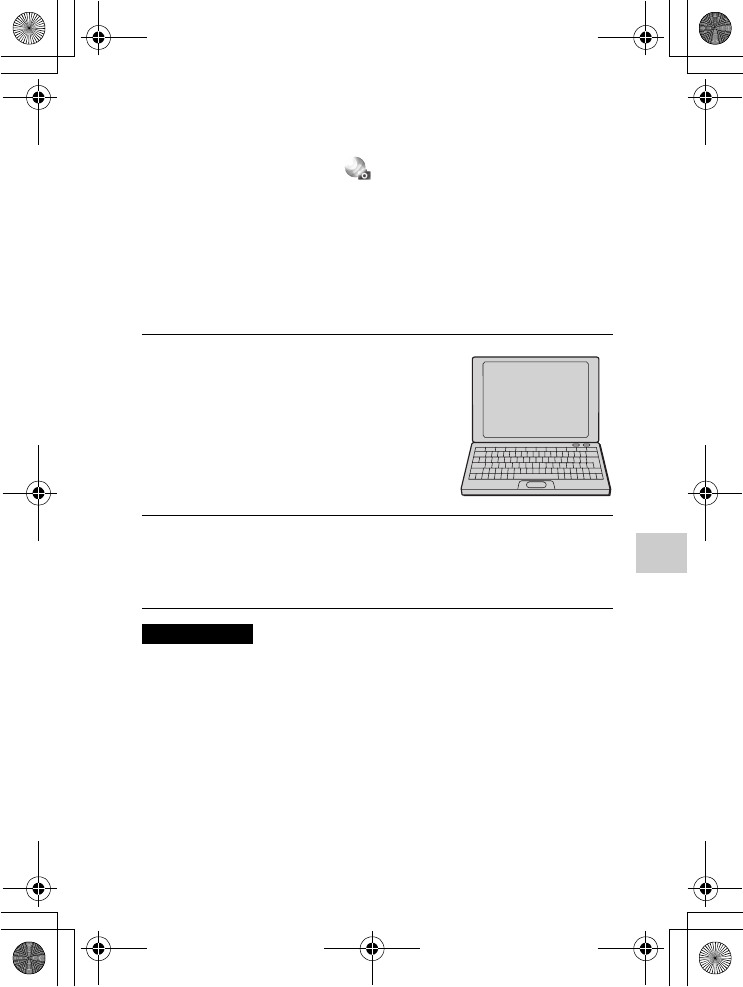
1Turn on your computer, and insert the CD-ROM (supplied)
into the CD-ROM drive.
The installation menu screen appears.
• If the installation menu does not appear, double-click [Computer] (For
Windows XP: [My Computer]) t (PMHOME) t [Install.exe].
• If the AutoPlay screen appears, select “Run Install.exe” and follow the
instructions that appear on the screen to proceed with the installation.
2Connect the camera to the computer.
3Click [Install].
• Make sure that both “Image Data Converter” and “PlayMemories
Home” are checked and follow the instructions on the screen.
• When the restarting confirmation message appears, restart the computer
following the instructions on the screen.
• DirectX may be installed depending on the system environment of your
computer.
4Remove the CD-ROM after the installation is complete.
The following software is installed and shortcut icons appear on the
desktop.
“Image Data Converter”
“PlayMemories Home”
“PlayMemories Home Help Guide”
OS (pre-installed) USB Connection: Mac OS X v10.3 to v10.8
“Image Data Converter”: Mac OS X v10.5 to v10.8
“Image Data
Converter Ver.4”
CPU: Intel processor, such as Intel Core Solo/Core Duo/
Core 2 Duo
Memory: 1 GB or more is recommended.
Display: 1024 × 768 dots or more
010COV.book Page 72 Monday, July 30, 2012 4:55 PM
NEX-5R
4-437-511-11(1)
C:\01GB-NEX5RUC2\080SOF.fm
master: Right
GB
73
Importing images to the computer
What you can do with the supplied software
x
“PlayMemories Home”
With “PlayMemories Home,” you can do the following:
• You can import images shot with the camera to your computer and display
them on the computer.
• You can trim and resize images.
• You can organize images on the computer on a calendar by shooting date to
view them.
• You can retouch (Red Eye Correction, etc.), print, send still images as e-mail
attachments and change the shooting date.
• You can print or save still images with the date.
• You can create a Blu-ray Disc, AVCHD disc or DVD disc from AVCHD
movies imported to a computer. (An internet connection environment is
required when a Blu-ray Disc/DVD disc is created for the first time.)
For details on “PlayMemories Home,” refer to “PlayMemories Home Help
Guide”.
Double-click the shortcut of (PlayMemories Home Help Guide) on the
desktop, or click [Start] t [All Programs] t [PlayMemories Home] t
[PlayMemories Home Help Guide].
“PlayMemories Home” support page (English only)
http://www.sony.co.jp/pmh-se/
1Turn on your Mac computer, and insert the CD-ROM
(supplied) into the CD-ROM drive.
2Double-click the CD-ROM icon.
3Copy the [IDC_INST.pkg] file in the [MAC] folder to the
hard disk icon.
4Double-click the [IDC_INST.pkg] file in the destination
folder.
• Follow the instructions on the screen to complete the installation.
010COV.book Page 73 Monday, July 30, 2012 4:55 PM
NEX-5R
4-437-511-11(1)
C:\01GB-NEX5RUC2\080SOF.fm
master: Left
GB
74
• “PlayMemories Home” is not compatible with Mac computers. When you play
back images on Mac computers, use the appropriate application software supplied
with the Mac computer.
• Movies recorded with the [60p 28M(PS)/50p 28M(PS)]/[60i 24M(FX)/50i
24M(FX)]/[24p 24M(FX)/25p 24M(FX)] setting in [Record Setting] are converted
by “PlayMemories Home” in order to create an AVCHD recording disc. This
conversion can take a long time. Also, you cannot create a disc in the original
image quality. If you want to keep the original image quality, store your movies on
a Blu-ray Disc.
x
“Image Data Converter”
With “Image Data Converter,” you can do the following:
• You can play back and edit images recorded in RAW format with various
corrections, such as tone curve and sharpness.
• You can adjust images with white balance, exposure, and [Creative Style],
etc.
• You can save the images displayed and edited on a computer.
You can either save the image as RAW format or save it in the general file
format.
• You can display and compare the RAW images and JPEG images recorded
by this camera.
• You can rank images in 5 grades.
• You can apply color labels, etc.
For details on “Image Data Converter,” refer to Help.
Click [Start] t [All Programs] t [Image Data Converter] t [Help] t
[Image Data Converter Ver.4].
“Image Data Converter” support page (English only)
http://www.sony.co.jp/ids-se/
Notes
010COV.book Page 74 Monday, July 30, 2012 4:55 PM
NEX-5R
4-437-511-11(1)
C:\01GB-NEX5RUC2\081APP.fm
master: Right
GB
75
Adding functions to the camera
Adding functions to the camera
Adding functions to the camera
You can add the desired functions to your camera by connecting to the
application downloading website (PlayMemories Camera Apps) via the
Internet.
For example, the following functions are available:
• You can control the camera using a Smartphone.
• You can use various effects for shooting images.
• You can upload images to network services directly from the camera.
Some applications may be fee-based.
x
Starting up downloading services
• The application downloading function may not be available in some countries and
regions. For details, refer to the application downloading website above.
1Access the application
downloading website.
http://www.sony.net/pmca
• Use Internet Explorer 8 or 9 for
Windows, and Safari 5 for Mac.
2Follow the instructions on the screen and acquire a service
account.
• Follow the instructions on the screen to download the desired
application to the camera.
Notes
010COV.book Page 75 Monday, July 30, 2012 4:55 PM
NEX-5R
4-437-511-11(1)
C:\01GB-NEX5RUC2\081APP.fm
master: Left
GB
76
x
Downloading the application
x
Launching the downloaded application
1Access the application downloading website.
http://www.sony.net/pmca
• Use Internet Explorer 8 or 9 for Windows, and Safari 5 for Mac.
2Select the desired application
and download the application
to the camera following the
instructions on the screen.
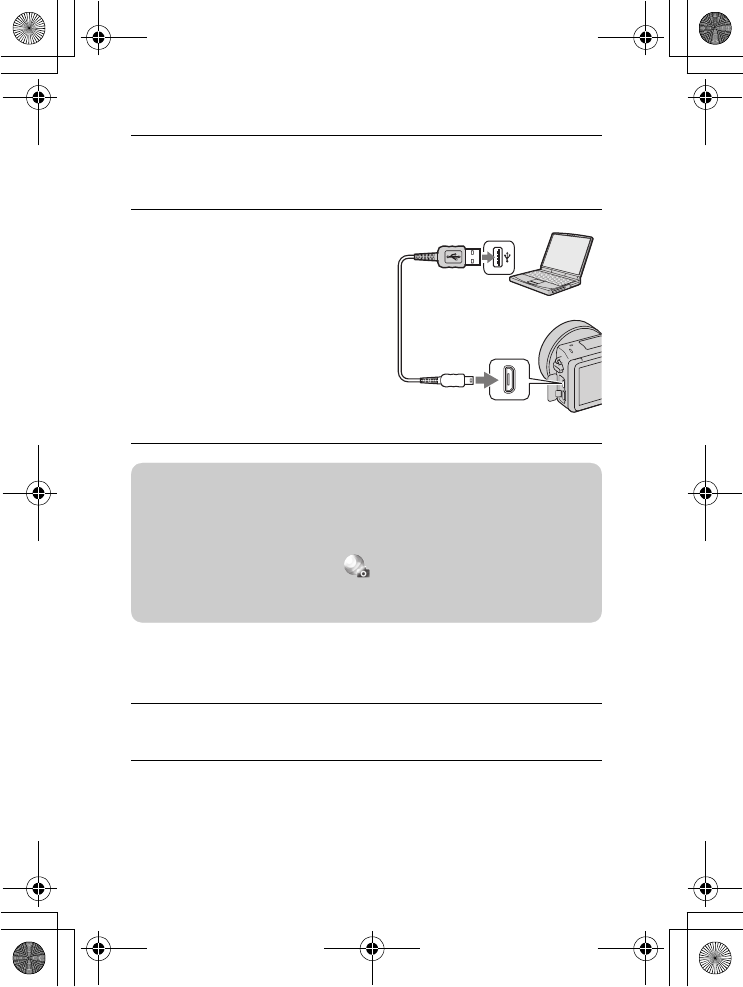
• Connect the computer and the
camera using the micro USB Cable
(supplied), following the
instructions on the screen.
1Select MENU t [Application] t desired application to
launch.
To the USB terminal
USB Cable
(supplied)
To the USB terminal
zHow to download applications directly using Wi-Fi
function of the camera
You can download applications using the Wi-Fi function without connecting to
a computer.
Select MENU t [Application] t (PlayMemories Camera Apps), then
follow the instructions on the screen to download applications.
Acquire a service account in advance (page 75).
010COV.book Page 76 Monday, July 30, 2012 4:55 PM
NEX-5R
4-437-511-11(1)
C:\01GB-NEX5RUC2\082NET.fm
master: Right
GB
77
Connecting the camera to a network
Connecting the camera to a network
Transferring images to a Smartphone
You can transfer still images to a Smartphone and view them. Download the
application “PlayMemories Mobile” to your Smartphone from the application
store.
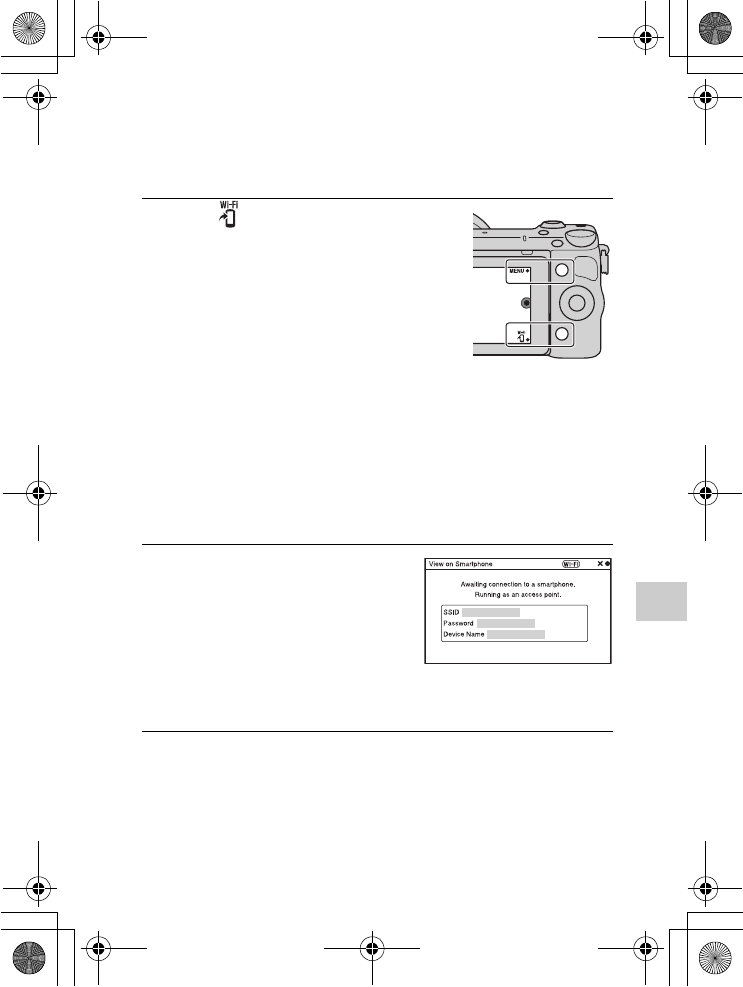
1Press (View on
Smartphone) and select the
desired mode.
• If another function is assigned to
soft key B, select MENU t
[Playback] t [View on
Smartphone].
This Image: Transfers the most
recently shot or played back image to
the Smartphone.
All Images on This Date:
Transfers all still images in the same
date range as the most recently shot
or played back image to the
Smartphone.
All Images in The Device:
Transfers all still images in the
camera to the Smartphone.
2If the camera is ready for the
transfer, the information
screen appears on the
camera. Connect the
Smartphone and the camera
using that information.
• For details on operation of the
Smartphone, refer to “α
Handbook.”
010COV.book Page 77 Monday, July 30, 2012 4:55 PM
NEX-5R
4-437-511-11(1)
C:\01GB-NEX5RUC2\082NET.fm
master: Left
GB
78
• Some images may not be displayed on the Smartphone, depending on the
recording format.
• The camera shares the connection information for [View on Smartphone] with a
device that has permission to connect. If you want to change the device that is
permitted to connect to the camera, reset the connection information by following
these steps. MENU t [Setup] t [Reset View on Smartphone]. After resetting
the connection information, you must register the Smartphone again.
• “PlayMemories Mobile” is not available in some countries/regions. [View on
Smartphone] is not available in some countries/regions that are not compatible
with “PlayMemories Mobile.”
Connecting to a network
You can transfer images on the camera via Wi-Fi network and view them on
other devices. The setting procedure differs depending on your LAN router or
wireless LAN access point.
• A computer or TV that is already connected to a network is required at your
home, etc.
• Be sure to set the network connection inside your wireless LAN access point
area (the accessible area).
Refer to the table below for how to register the access point.
x
WPS Push
Notes
Access point How to register
Your access point has the WPS button. Use [WPS Push].
Other than above. Use [Access Point Settings].
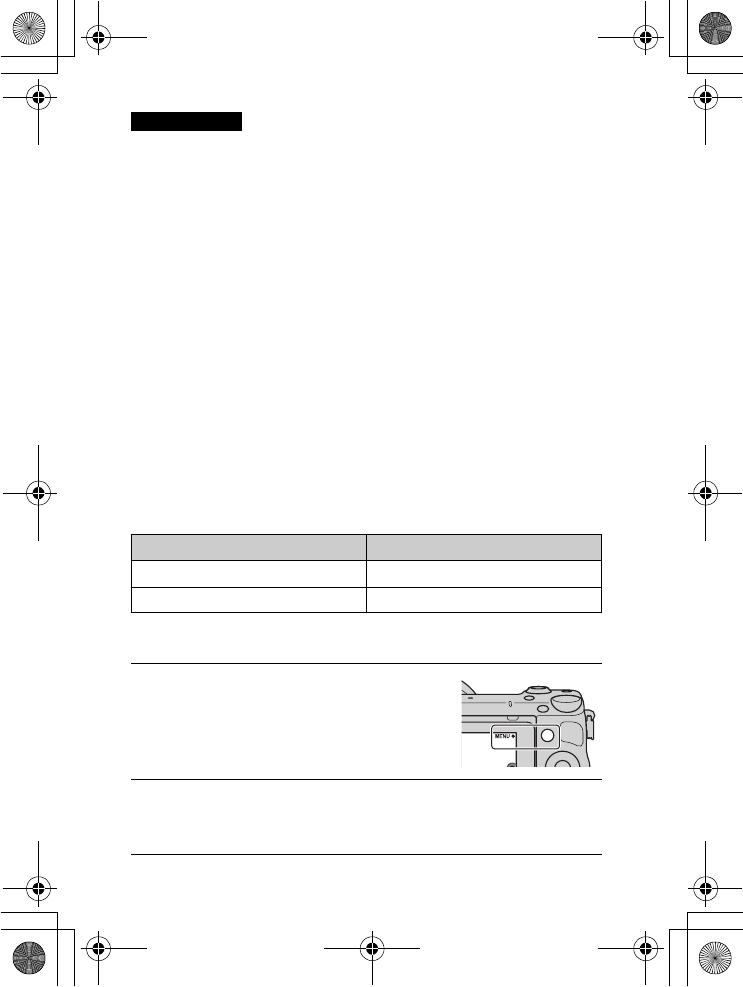
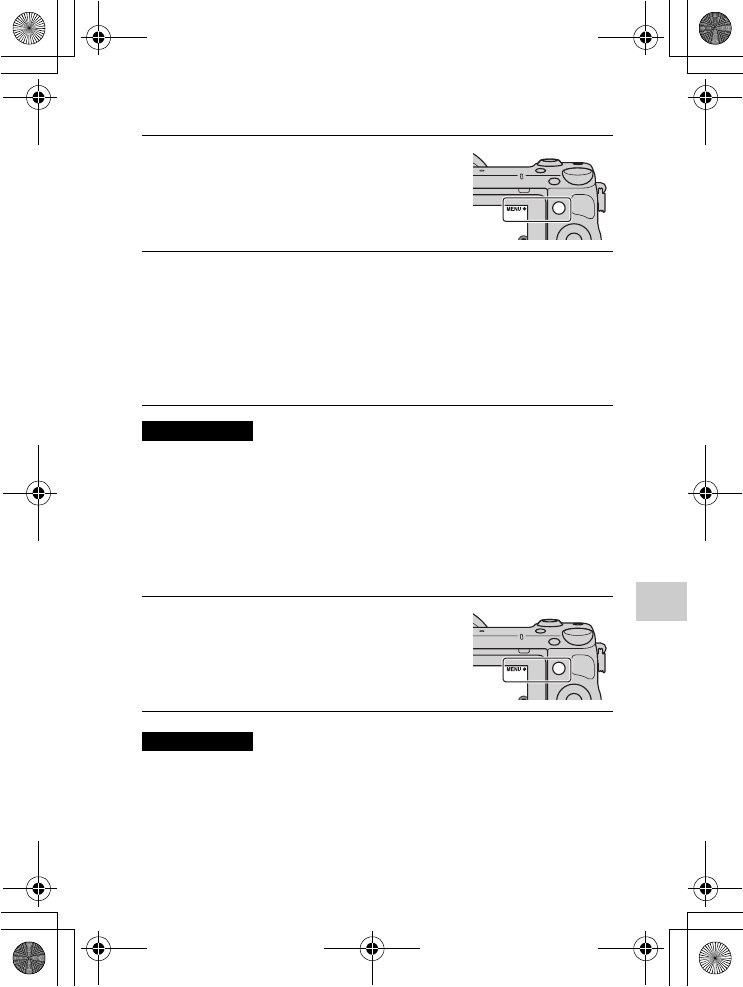
1Select MENU t [Setup] t
[WPS Push].
2Press the WPS button on the access point you want to
register.
The camera starts communicating with the access point.
010COV.book Page 78 Monday, July 30, 2012 4:55 PM
NEX-5R
4-437-511-11(1)
C:\01GB-NEX5RUC2\082NET.fm
master: Right
GB
79
Connecting the camera to a network
x
Access Point Settings
• When aboard an airplane, turn off the camera.
Saving images to a computer
You can save images on the camera to a computer that is connected to a
network. Before saving, install the software “PlayMemories Home” on your
computer, connect the computer and the camera using a USB cable, and
register the camera to “PlayMemories Home.”
• Depending on the application settings on your computer, the camera may turn off
automatically after the images have been saved.
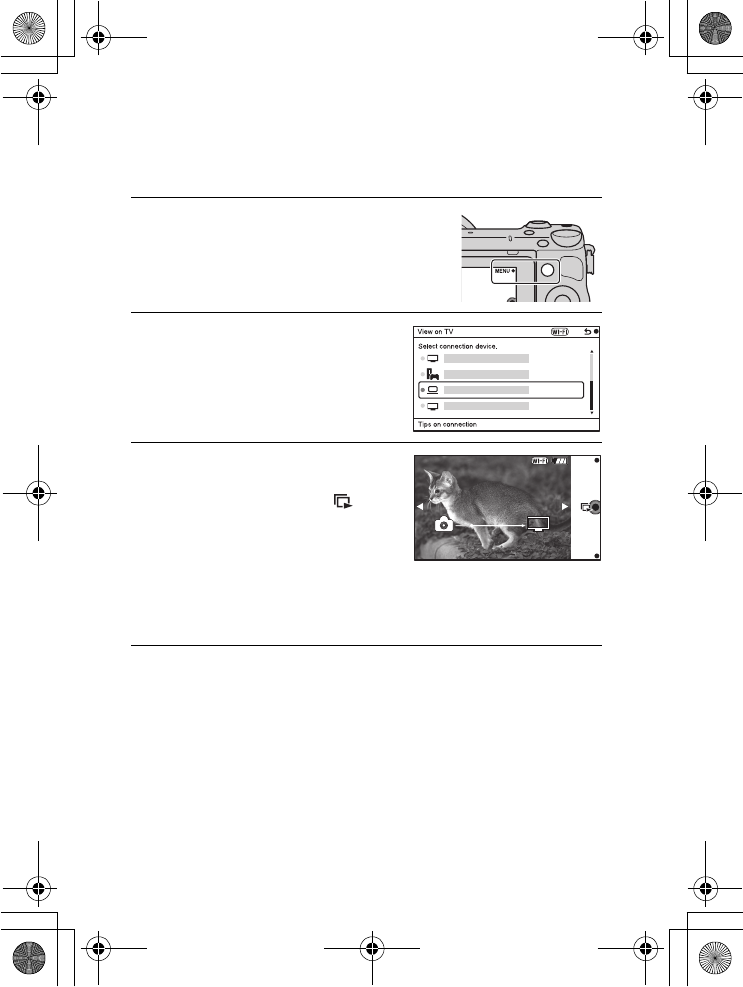
1Select MENU t [Setup] t
[Access Point Settings].
2Select the access point you want to register.
If the desired access point is displayed on the screen:
Select the access point.
If the desired access point is not displayed on the screen:
Select [Manual Setting] and set the access point following the instructions
on the screen.
• For details, refer to “α Handbook.”
Notes
1Select MENU t [Playback]
t [Send to Computer].
Notes
010COV.book Page 79 Monday, July 30, 2012 4:55 PM
NEX-5R
4-437-511-11(1)
C:\01GB-NEX5RUC2\082NET.fm
master: Left
GB
80
Viewing images on a TV
You can transfer images on the camera to a network-compatible TV without
connecting them using a cable. The transferred images can be played back on
the TV.
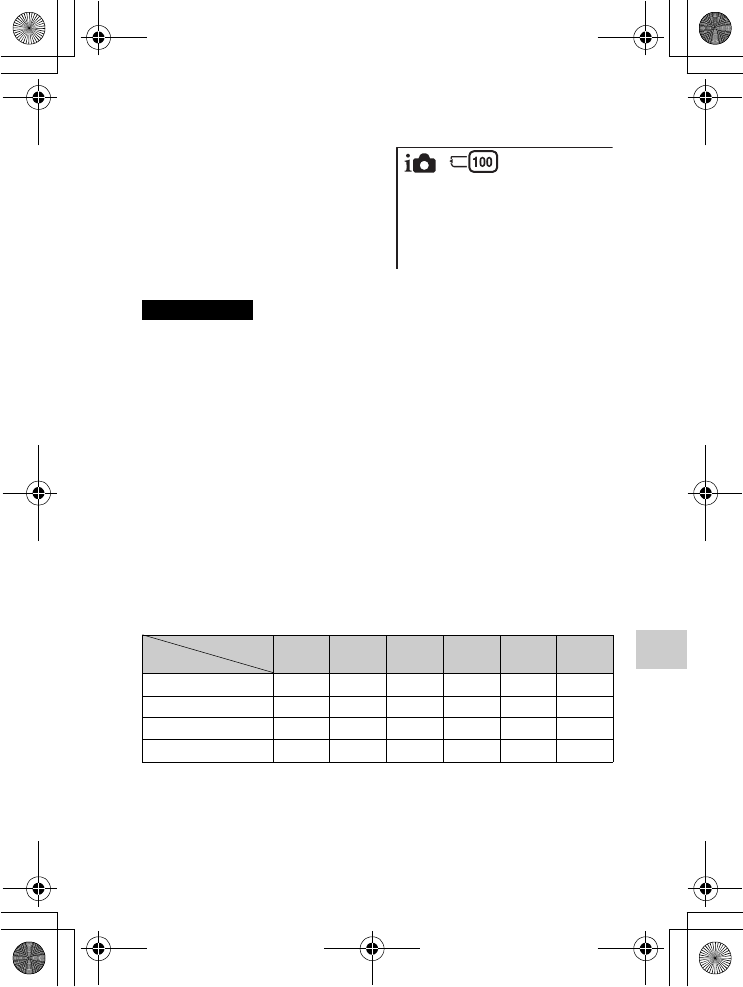
1Select MENU t [Playback]
t [View on TV].
2Select the device to be
connected to the camera.
3Press the center of the control
wheel to play back images as
a slideshow. Or, touch on
the screen.
• Press the right/left side of the
control wheel to move to the next/
previous image.
• Press or touch OPTION, and then
[Device list] to change the device to
be connected.
010COV.book Page 80 Monday, July 30, 2012 4:55 PM
NEX-5R
4-437-511-11(1)
C:\01GB-NEX5RUC2\090OTH.fm
master: Right
GB
81
Others
Others
Checking the number of recordable images
• When “0” (the number of recordable images) flashes in yellow, the memory card
is full. Replace the memory card with another one, or delete images in the current
memory card (page 35).
• When “NO CARD” (the number of recordable images) flashes in yellow, it means
no memory card has been inserted. Insert a memory card.
x
Number of still images and time of movies recordable
on a memory card
Still images
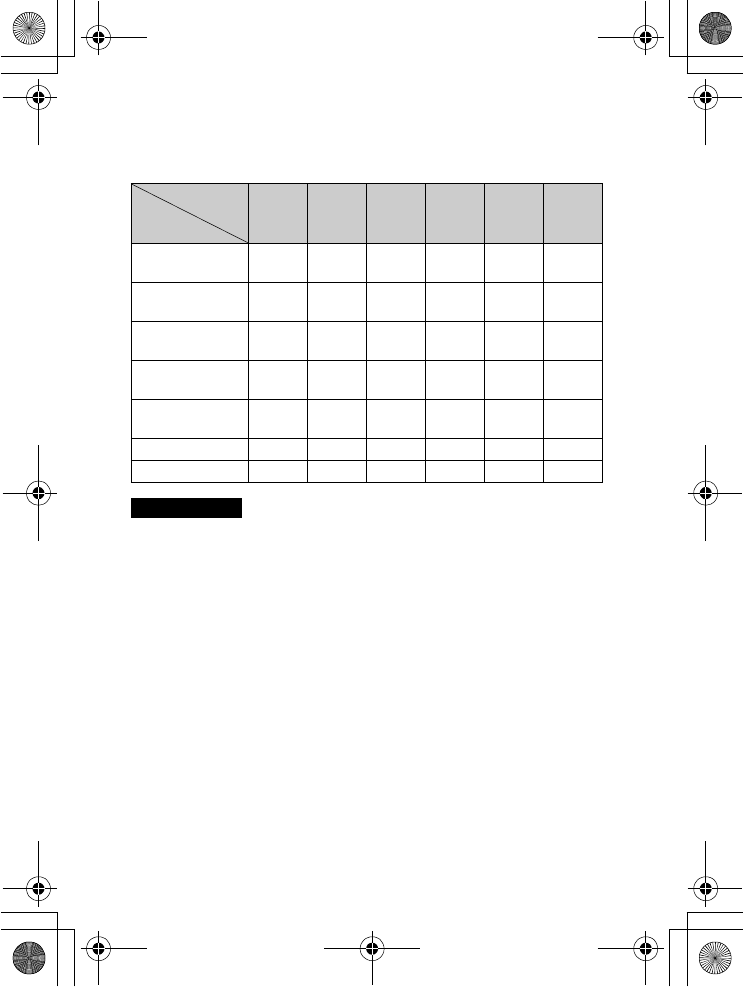
The following table shows the approximate number of still images that can be
recorded on a memory card formatted with this camera. The values are defined
using Sony standard memory cards for testing. The values may vary depending
on the shooting conditions.
Image size: L 16M
Aspect ratio: 3:2*
(Units: images)
* When [Aspect Ratio] is set to [16:9], you can record more images than the
numbers shown in the table above (except for [RAW]).
Once you insert a memory card into the
camera and set the power switch to ON,
the number of images that can be
recorded (should you continue to shoot
using the current settings) is displayed
on the LCD screen.
Notes
Capacity
Quality 2GB 4GB 8GB 16GB 32GB 64GB
Standard 410 820 1650 3350 6700 13000
Fine 290 590 1150 2400 4800 9600
RAW & JPEG 79 160 320 640 1300 2600
RAW 105 215 440 880 1750 3550
010COV.book Page 81 Monday, July 30, 2012 4:55 PM
NEX-5R
4-437-511-11(1)
C:\01GB-NEX5RUC2\090OTH.fm
master: Left
GB
82
Movies
The following table shows the approximate recording times available. These
are the total times for all movie files.
(h (hour), m (minute))
• The recording time of movies varies because the camera uses VBR (Variable Bit
Rate), an encoding method that automatically adjusts image quality according to
the shooting situation.
When you record a fast-moving subject, the image is clearer but the recording time
is shorter because much memory is used.
The recording time also vary depending on the shooting condition or your subject
or the setting of image quality/size.
• The duration of time available for movie recording varies with the temperature or
condition of the camera before you start recording. If you frequently recompose or
shoot still images after the power is turned on, the temperature inside the camera
rises and the recording time available will be shorter.
• If the camera stops movie recording due to the temperature, leave the camera for
several minutes with the power turned off. Restart recording after the temperature
inside the camera goes down.
• If you observe the following points, the recording time is longer.
– Keep the camera out of direct sunlight.
– Turn the camera off when it is not being used.
Capacity
Record Setting
2GB 4GB 8GB 16GB 32GB 64GB
60i 24M(FX)
50i 24M(FX)
10 m 20 m 40 m 1 h 30 m 3 h 6 h
60i 17M(FH)
50i 17M(FH)
10 m 30 m 1 h 2 h 4 h 5 m 8 h 15 m
60p 28M(PS)
50p 28M(PS)
9 m 15 m 35 m 1 h 15 m 2 h 30 m 5 h 5 m
24p 24M(FX)
25p 24M(FX)
10 m 20 m 40 m 1 h 30 m 3 h 6 h
24p 17M(FH)
25p 17M(FH)
10 m 30 m 1 h 2 h 4 h 5 m 8 h 15 m
1440×1080 12M 20 m 40 m 1 h 20 m 2 h 45 m 5 h 30 m 11 h 5 m
VGA 3M 1 h 10 m 2 h 25 m 4 h 55 m 10 h 20 h 5 m
40 h 15 m
Notes
010COV.book Page 82 Monday, July 30, 2012 4:55 PM
NEX-5R
4-437-511-11(1)
C:\01GB-NEX5RUC2\090OTH.fm
master: Right
GB
83
Others
• The maximum size of a movie file is about 2 GB. When the file size is about 2 GB,
the movie recording stops automatically when [File Format] is set to [MP4], and a
new movie file is created automatically when [File Format] is set to [AVCHD].
• The maximum continuous recording time is approximately 29 minutes.
x
Number of still images recordable with a single
charge of the battery pack
The approximate number of images that can be recorded is 330 images when
you use the camera with the battery pack (supplied) at full capacity.
Note that the actual numbers may be less depending on the conditions of use.
• The number of images is calculated using full charged battery pack under the
following conditions:
– At an ambient temperature of 25 °C (77 °F).
– An E PZ 16-50 mm F3.5-5.6 OSS lens is attached.
– [Quality] is set to [Fine].
– [Autofocus Mode] is set to [Single-shot AF].
– Shooting once every 30 seconds.
– The flash strobes once every two times.
– The power turns on and off once every ten times.
– Using the battery pack that is charged for an hour after the charge lamp goes out.
– Using Sony “Memory Stick PRO Duo” media (sold separately).
• The measurement method is based on the CIPA standard.
(CIPA: Camera & Imaging Products Association)
010COV.book Page 83 Monday, July 30, 2012 4:55 PM
NEX-5R
4-437-511-11(1)
C:\01GB-NEX5RUC2\090OTH.fm
master: Left_2 column
GB
84
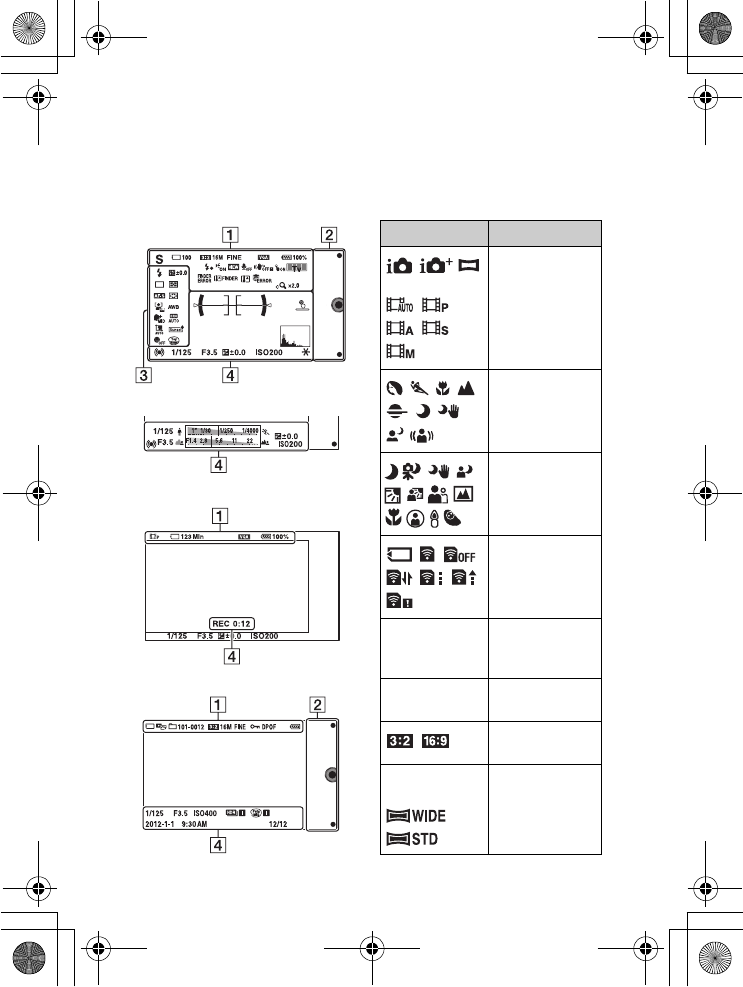
List of icons on the LCD screen
Icons are displayed on the screen to indicate the camera status.
You can change the screen display using DISP (Display Contents) on the
control wheel.
Shooting standby
Graphic display
Movie recording
Playback
A
Display Indication
P A S M
Shoot Mode
Scene Selection
Scene Recognition
icon
Memory card/
Upload
100 Number of
recordable still
images
123Min Recordable time
of movies
Aspect ratio of
still images
16M 14M 8.4M
7.1M 4M 3.4M
Image size of still
images
010COV.book Page 84 Monday, July 30, 2012 4:55 PM
NEX-5R
4-437-511-11(1)
C:\01GB-NEX5RUC2\090OTH.fm
master: Right_2 column
GB
85
Others
B
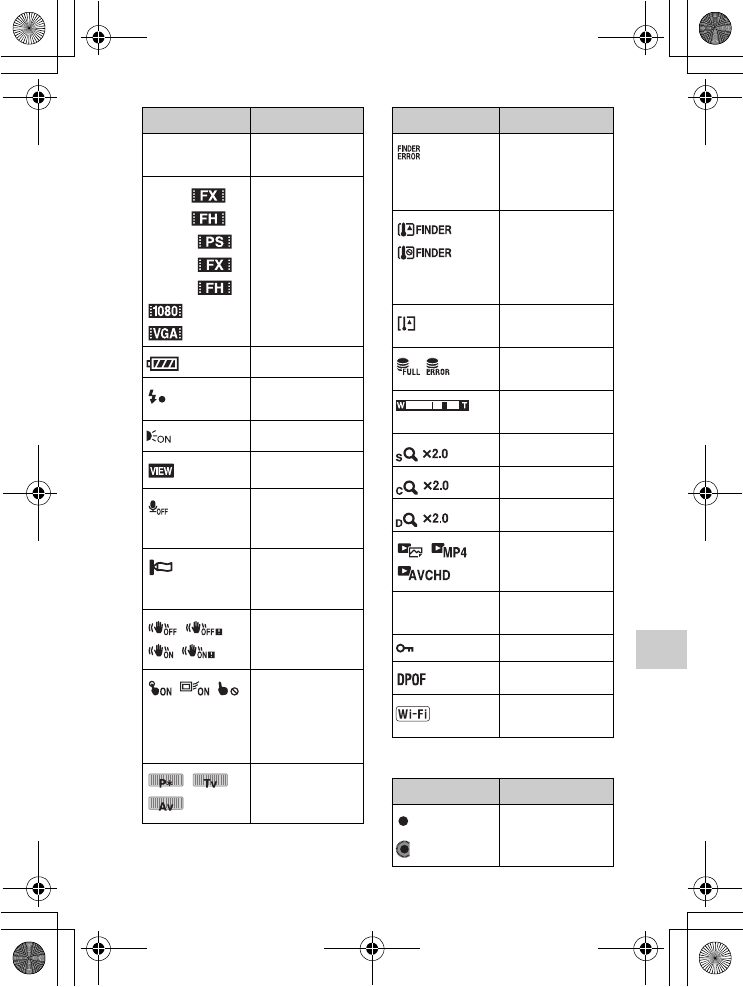
RAW RAW+J
FINE STD
Image quality of
still images
60i/50i
60i/50i
60p/50p
24p/25p
24p/25p
Recording mode
of movies
100% Remaining battery
Flash charge in
progress
AF illuminator
Live view
Does not record
sound during
movie recording
Wind noise
reduction is
activated
SteadyShot/
SteadyShot
warning
Touch operation
status (Touch
Shutter/Object
Tracking/Touch
operation off)
Control dial
Display Indication
Electronic
Viewfinder (sold
separately)
connection error
Electronic
Viewfinder (sold
separately)
overheating
warning
Overheating
warning
Database file full/
Database file error
Zoom
magnification
Smart Zoom
Clear Image Zoom
Digital Zoom
View mode
101-0012 Playback folder –
File number
Protect
Print order
Wi-Fi wave being
emitted
Display Indication
Soft keys
Display Indication
010COV.book Page 85 Monday, July 30, 2012 4:55 PM
NEX-5R
4-437-511-11(1)
C:\01GB-NEX5RUC2\090OTH.fm
master: Left_2 column
GB
86
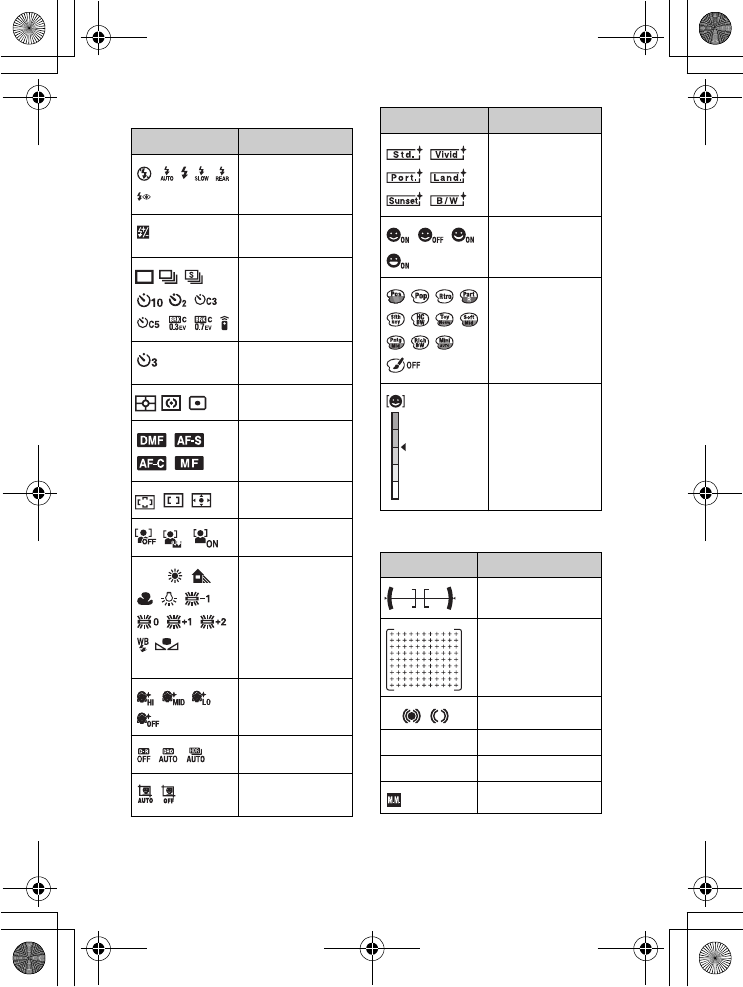
C
D
Display Indication
Flash Mode/Red
Eye Reduction
±0.0 Flash
compensation
Drive Mode
Self-portrait Self-
timer
Metering Mode
Focus mode
Focus area mode
Face Detection
AWB
7500K
A7 G7
White Balance
Soft Skin Effect
DRO/Auto HDR
Auto Port.
Framing
Creative Style
Smile Shutter
Picture Effect
Smile detection
sensitivity
indicator
Display Indication
Level
Phase Detection AF
ranging points
zFocus status
1/125 Shutter speed
F3.5 Aperture value
±0.0 Metered manual
Display Indication
010COV.book Page 86 Monday, July 30, 2012 4:55 PM
NEX-5R
4-437-511-11(1)
C:\01GB-NEX5RUC2\090OTH.fm
master: Right_2 column
GB
87
Others
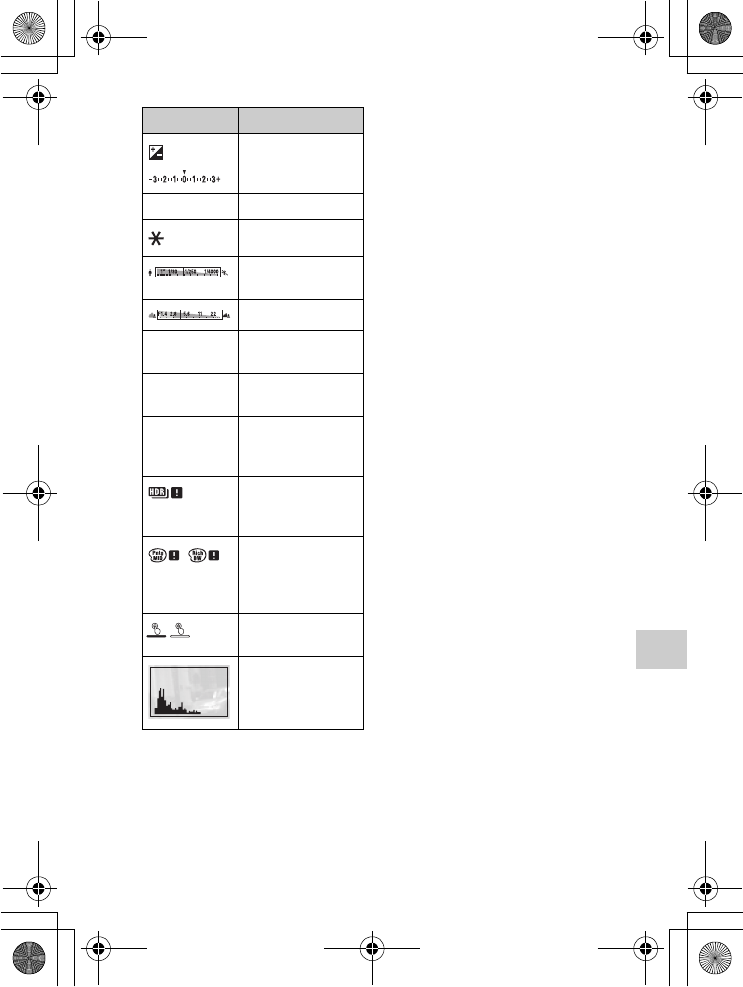
±0.0 Exposure
compensation
ISO400 ISO sensitivity
AE lock
Shutter speed
indicator
Aperture indicator
REC 0:12 Recording time of
the movie (m:s)
2012-1-1
9:30AM
Recorded date/time
of the image
12/12 Image number/
Number of images
in the view mode
Appears when HDR
did not work on the
image.
Appears when
[Picture Effect] did
not work on the
image.
Touch shutter ON/
OFF switch
Histogram
Display Indication
010COV.book Page 87 Monday, July 30, 2012 4:55 PM
NEX-5R
4-437-511-11(1)
C:\01GB-NEX5RUC2\090OTH.fm
master: Left
GB
88
Learning more about the camera (α
Handbook)
“α Handbook,” which explains how to use the camera in detail, is included on
the CD-ROM (supplied). Refer to “α Handbook” for in-depth instructions on
the many functions of the camera.
x
For Windows users
x
For Mac users
1Turn on your computer, and insert the CD-ROM (supplied)
into the CD-ROM drive.
2Click [Handbook].
3Click [Install].
4Start “α Handbook” from the shortcut on the desktop.
1Turn on your computer, and insert the CD-ROM (supplied)
into the CD-ROM drive.
2Select the [Handbook] folder and copy “Handbook.pdf”
stored in the [GB] folder to your computer.
3After copying is complete, double-click “Handbook.pdf.”
010COV.book Page 88 Monday, July 30, 2012 4:55 PM
NEX-5R
4-437-511-11(1)
C:\01GB-NEX5RUC2\090OTH.fm
master: Right
GB
89
Others
Troubleshooting
If you experience trouble with the camera, try the following solutions.
The battery pack cannot be installed.
• When you insert the battery pack, use the tip of the battery pack to push the
lock lever (page 17).
• You can use an NP-FW50 battery pack only. Make sure that the battery is
NP-FW50.
The remaining battery level indicator shows incorrect level or
power runs out quickly despite the indicator showing sufficient
battery level.
• This phenomenon occurs when you use the camera in an extremely hot or
cold location.
• The battery pack is discharged. Install a charged battery pack (page 17).
• The battery pack is dead. Replace the battery pack with a new one.
Cannot turn the camera on.
• Install the battery pack correctly (page 17).
• The battery pack is discharged. Install a charged battery pack (page 17).
• The battery pack is dead. Replace the battery pack with a new one.
1Check the items on pages 89 to 93. Also refer to “α
Handbook” (PDF).
2Remove the battery pack, wait for about one minute, re-
insert the battery pack, and then turn on the power.
3Reset the settings (page 67).
4Consult your Sony dealer or local authorized Sony service
facility.
Battery pack and power
010COV.book Page 89 Monday, July 30, 2012 4:55 PM
NEX-5R
4-437-511-11(1)
C:\01GB-NEX5RUC2\090OTH.fm
master: Left
GB
90
The power turns off suddenly.
• When the camera or battery pack is too warm, the camera displays a warning
message and turns off automatically to protect the camera.
• If you do not operate the camera for given period of time, the camera turns to
power saving mode. To cancel the power save, operate the camera by means
such as pressing the shutter button halfway down.
The charge lamp on the camera flashes when charging the battery
pack.
• You can only use an NP-FW50 battery pack. Make sure that the battery is
NP-FW50.
• If you charge a battery pack that has not been used for a long time, the charge
lamp may flash.
• The charge lamp flashes in two ways, fast (about 0.3-second intervals) or
slow (about 1.3-second intervals). If the charge lamp is flashing fast, remove
the battery pack and reattach the same battery pack securely, or disconnect
and reconnect the USB cable. If the charge lamp flashes fast again, it
suggests that there is something wrong with the battery pack, AC Adaptor
(supplied), or USB cable. Slow flashing indicates that charging is suspended
because the ambient temperature is outside the suitable range for charging
the battery pack. Charging will resume and the charge lamp will be lit when
the ambient temperature returns to within the suitable temperature. The
optimal temperature for charging the battery pack is between 10 °C and
30 °C (50 °F and 86 °F).
The battery has not been charged even if the charge lamp has
turned off.
• This phenomenon occurs when you use the camera in an extremely hot or
cold location. The optimal temperature for charging the battery pack is
between 10 °C and 30 °C (50 °F and 86 °F).
The battery pack is not charged.
• When the battery pack is not charged (the charge lamp does not light) even if
you follow the proper charging procedure, remove the battery pack and re-
insert the same battery pack securely, or disconnect and reconnect the USB
cable.
010COV.book Page 90 Monday, July 30, 2012 4:55 PM
NEX-5R
4-437-511-11(1)
C:\01GB-NEX5RUC2\090OTH.fm
master: Right
GB
91
Others
Nothing is displayed on the LCD screen when the power is turned
on.
• If you do not operate the camera for given period of time, the camera turns to
power saving mode. To cancel the power save, operate the camera, such as
pressing the shutter button halfway down.
The shutter does not release.
• You are using a memory card with a write-protect switch, and the switch is
set to the LOCK position. Set the switch to the recording position.
• Check the free capacity of the memory card.
• You cannot record images while charging the flash.
• The lens is not attached properly. Attach the lens properly (page 22).
Recording takes a long time.
• The noise reduction function is turned on. This is not a malfunction.
• You are shooting in the RAW mode. Since the RAW data file is large, the
RAW mode shooting may take time.
• The [Auto HDR] is processing an image.
The image is out of focus.
• The subject is too close. Check the minimum focal distance of the lens.
• You are shooting in manual focus mode. Set [AF/MF Select] to [Autofocus].
• Ambient light is insufficient.
• The subject may require special focusing. Use the [Flexible Spot] or manual
focus function.
The flash does not work.
• Raise the flash (page 26).
• The flash is not attached correctly. Reattach the flash (page 26).
• You cannot use a flash with the following shooting mode:
– [Bracket: Cont.]
– [Sweep Panorama]
– [Night Scene], [Hand-held Twilight] and [Anti Motion Blur] in [Scene
Selection]
– Movie recording
Fuzzy white circular spots appear on images shot using the flash.
• Particles (dust, pollen, etc.) in the air reflected the flash light and appeared on
the image. This is not a malfunction.
Shooting images
010COV.book Page 91 Monday, July 30, 2012 4:55 PM
NEX-5R
4-437-511-11(1)
C:\01GB-NEX5RUC2\090OTH.fm
master: Left
GB
92
The flash takes too long to recharge.
• The flash has been fired in succession in a short period. When the flash has
been fired in succession, the recharging process may take longer than usual
to avoid overheating of the flash.
The image taken with the flash is too dark.
• If the subject is beyond the flash range (the distance that the flash can reach),
the pictures will be dark because the flash light does not reach the subject. If
the ISO is changed, the flash range also changes with it (page 55).
The date and time are recorded incorrectly.
• Set the correct date and time (page 28).
• The area selected with [Area Setting] is different from the actual area. Set the
actual area by selecting MENU t [Setup] t [Area Setting].
The aperture value and/or shutter speed flashes.
• The subject is too bright or too dark, and the camera’s available range for the
aperture value and/or shutter speed is exceeded. Adjust the setting again.
The image is whitish (Flare).
Blurring of light appears on the image (Ghosting).
• The picture was taken under backlit conditions, and excessive light has
entered the lens. When using the zoom lens, attach a lens hood.
The corners of the picture are too dark.
• If any filter or hood is used, take it off and try shooting again. Depending on
the thickness of the filter and improper attachment of the hood, the filter or
the hood may partially appear on the image. The optical properties of some
lenses may cause the periphery of the image to appear too dark (insufficient
light). You may compensate for this phenomenon with [Lens Comp.:
Shading].
The eyes of the subject come out red.
• Activate the [Red Eye Reduction] function.
• Get close to the subject, and shoot the subject within the flash range
(page 55) using the flash.
Dots appear and remain on the LCD screen.
• This is not a malfunction. These dots are not recorded (page 94).
010COV.book Page 92 Monday, July 30, 2012 4:55 PM
NEX-5R
4-437-511-11(1)
C:\01GB-NEX5RUC2\090OTH.fm
master: Right
GB
93
Others
The image is blurred.
• The picture was taken in a dark location without the flash, resulting in
camera-shake. The use of a tripod or the flash is recommended (page 54).
[Hand-held Twilight] and [Anti Motion Blur] in [Scene Selection] (page 48)
are also effective in reducing blur.
The exposure value is flashing on the LCD screen or the
viewfinder.
• The subject is too bright or too dark for the metering range of the camera.
The self-timer lamp does not flash.
• When the LCD screen is tilted upward about 180 degrees with [Self-portrait
Self-timer] set to [On] and the camera is ready to take a self-portrait, the self-
timer lamp does not flash.
Images cannot be played back.
• The folder/file name has been changed on your computer.
• When an image file has been processed by a computer or when the image file
was recorded using a model other than that of your camera, playback on your
camera is not guaranteed.
• The camera is in USB mode. Disconnect the camera from the computer.
• Use “PlayMemories Home” to copy images stored on your computer to your
camera to play them back on your camera.
Viewing images
010COV.book Page 93 Monday, July 30, 2012 4:55 PM
NEX-5R
4-437-511-11(1)
C:\01GB-NEX5RUC2\090OTH.fm
master: Left_2 column
GB
94
Precautions
On the functions available
with the camera
• Your camera is 1080 60i-
compatible or 1080 50i-
compatible.
To check whether the camera is
1080 60i-compatible or 1080
50i-compatible, check for the
following marks on the bottom of
the camera.
1080 60i-compatible camera: 60i
1080 50i-compatible camera: 50i
• Your camera is compatible with
1080 60p/50p movies. Unlike
existing standard recording modes,
which record in an interlacing
method, this camera records using
a progressive method. This
increases the resolution, and
provides a smoother, more realistic
image.
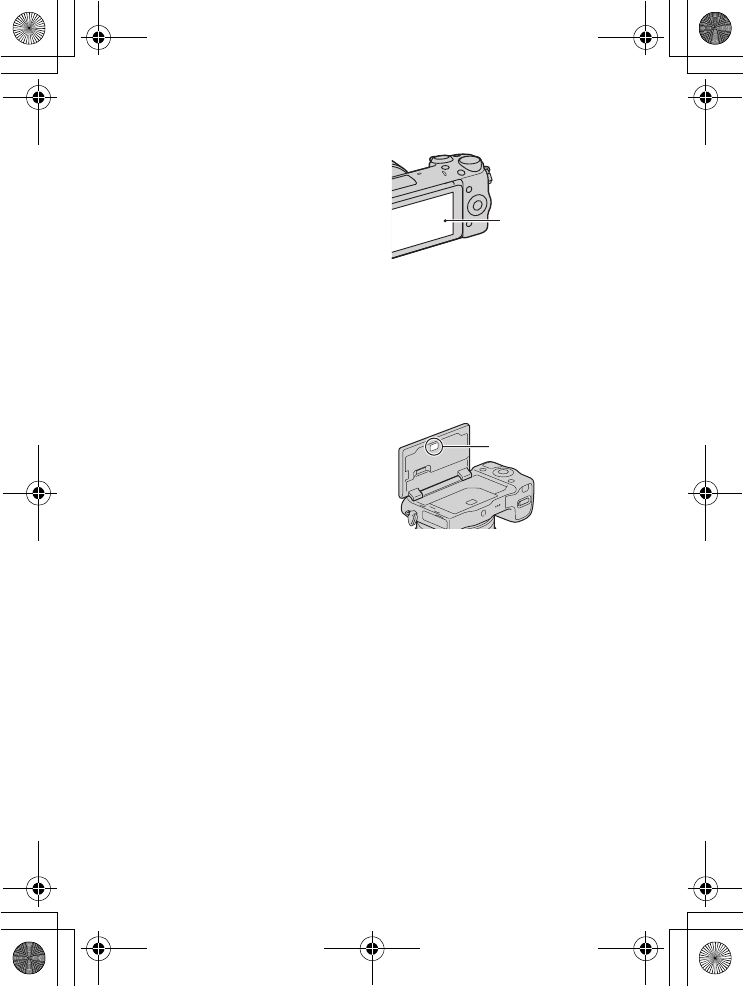
On the LCD screen and
lens
• The LCD screen is manufactured
using extremely high-precision
technology so over 99.99 % of the
pixels are operational for effective
use. However, there may be some
tiny black points and/or bright
points (white, red, blue or green in
color) that constantly appear on the
LCD screen. These points are
normal in the manufacturing
process and do not affect the
images in any way.
• Do not hold the camera by the
LCD screen.
• A magnet is attached to the back of
the LCD screen. Do not put objects
that are affected by magnetic
fields, such as a floppy disk or a
credit card, between the LCD
screen and the camera body.
• Images may trail across on the
LCD screen in a cold location.
This is not a malfunction. When
turning on the camera in a cold
location, the LCD screen may
become temporarily dark.
• Do not press against the LCD
screen. The monitor may be
discolored and that may cause a
malfunction.
• Do not expose the camera to direct
sunlight. If reflected sunlight is
focused on a nearby object, it may
cause a fire. When you must place
the camera under direct sunlight,
attach the front lens cap.
Black, white,
red, blue and
green points
Magnet
010COV.book Page 94 Monday, July 30, 2012 4:55 PM
NEX-5R
4-437-511-11(1)
C:\01GB-NEX5RUC2\090OTH.fm
master: Right_2 column
GB
95
Others
On using the lenses and
accessories
It is recommended that you use Sony
lenses/accessories designed to suit
the characteristics of this camera.
Using the products of other
manufacturers may cause the camera
not to operate to its capability, or
result in accidents and malfunctions
of the camera.
On the Smart Accessory
Terminal 2
Set the power switch of the camera
to OFF before you attach or remove
an accessory, such as the flash, to the
Smart Accessory Terminal 2. When
attaching an accessory, plug the
accessory into the Smart Accessory
Terminal 2 to the end and fasten the
screw. Make sure that the accessory
is attached to the camera securely.
Do not use/store the
camera in the following
places
• In an extremely hot, dry or humid
place
In places such as in a car parked in
the sun, the camera body may
become deformed and this may
cause a malfunction.
• Storing under direct sunlight or
near a heater
The camera body may become
discolored or deformed, and this
may cause a malfunction.
• In a location subject to rocking
vibration
• Near strong magnetic place
• In sandy or dusty places
Be careful not to let sand or dust
get into the camera. This may
cause the camera to malfunction,
and in some cases this malfunction
cannot be repaired.
On the grip
The grip is applied with a special
coating. The grip may be discolored
if it is rubbed with dark colored
cloth, leather, etc.
On storing
Be sure to attach the front lens cap
when not using the camera.
On the temperature of the
camera
Your camera and battery may get hot
due to continuous use, but it is not a
malfunction.
On operating temperatures
Your camera is designed for use
under the temperatures between 0 °C
and 40 °C (32 °F and 104 °F).
Shooting in extremely cold or hot
places that exceed this range is not
recommended.
On moisture condensation
If the camera is brought directly
from a cold to a warm location,
moisture may condense inside or
outside the camera. This moisture
condensation may cause a
malfunction of the camera.
010COV.book Page 95 Monday, July 30, 2012 4:55 PM
NEX-5R
4-437-511-11(1)
C:\01GB-NEX5RUC2\090OTH.fm
master: Left_2 column
GB
96
How to prevent moisture
condensation
When bringing the camera from a
cold place to a warm place, seal the
camera in a plastic bag and allow it
to adapt to conditions at the new
location over about an hour.
If moisture condensation occurs
Turn off the camera and wait about
an hour for the moisture to
evaporate. Note that if you attempt
to shoot with moisture remaining
inside the lens, you will be unable to
record clear images.
On the internal
rechargeable battery
This camera has an internal
rechargeable battery for maintaining
the date and time and other settings
regardless of whether the power is
on or off, or the battery is installed
or not. This rechargeable battery is
continually charged as long as you
are using the camera. However, if
you use the camera for only short
periods, it gradually discharges. If
you do not use the camera at all for
about three months it becomes
completely discharged. In this case,
be sure to charge this rechargeable
battery before using the camera.
However, even if this rechargeable
battery is not charged, you can still
use the camera as long as you do not
record the date and time. If the
camera resets to the default settings
each time you charge the battery, the
internal rechargeable battery may be
dead. Consult your Sony dealer or
local authorized Sony service
facility.
Charging method of the internal
rechargeable battery
Insert a charged battery pack into the
camera, or connect the camera to a
wall outlet (wall socket) using the
AC Adaptor (supplied), and leave
the camera for 24 hours or more with
the power off.
On memory cards
Do not attach a label, etc. on a
memory card or a card adaptor. This
may cause a malfunction.
On recording/playback
• When you use a memory card with
this camera for the first time, it is
recommended to format the card
using the camera for stable
performance of the memory card
before shooting. Note that
formatting permanently erases all
data on the memory card, and is
unrecoverable. Save precious data
on a computer, etc.
• If you repeatedly record/delete
images, fragmentation of data may
occur on the memory card. Movies
may not be able to be saved or
recorded. In such a case, save your
images to a computer or other
storage location, and then format
the memory card.
• The recorded contents cannot be
compensated for even if recording
or playback is not possible due to a
malfunction of the camera or
memory card, etc.
• To avoid the potential risk of data
loss, always copy (back up) data to
other media.
010COV.book Page 96 Monday, July 30, 2012 4:55 PM
NEX-5R
4-437-511-11(1)
C:\01GB-NEX5RUC2\090OTH.fm
master: Right_2 column
GB
97
Others
• Before you record one-time events,
make a trial recording to make sure
that the camera is working
correctly.
• This camera is neither dust-proof,
nor splash-proof, nor water-proof.
• Do not aim the camera at the sun
or other bright light. It may cause
the malfunction of the camera.
• Do not look at the sun or a strong
light through a removed lens. This
may cause irrecoverable damage to
your eyes. Or it may cause a
malfunction of the lens.
• Do not use the camera near a place
that generates strong radio waves
or emits radiation. The camera
may not be able to record or play
back properly.
• Using the camera in sandy or dusty
place may cause malfunctions.
• If moisture condensation occurs,
remove it before using the camera
(page 95).
• Do not shake or strike the camera.
In addition to malfunctions and an
inability to record images, this may
render the memory card unusable,
or cause image data breakdown,
damage or loss.
• Clean the flash surface with a soft
cloth. The heat of flash emission
may cause dirt to adhere on the
flash surface, resulting in smoking
or scorching.
• Keep the camera, supplied
accessories, etc., out of the reach
of children. A memory card, etc.,
may be swallowed. If such
problem occurs, consult a doctor
immediately.
Importing AVCHD movies
to a computer
When importing AVCHD movies to
a computer, for Windows, use the
software “PlayMemories Home” in
the CD-ROM (supplied).
On RAW images
To view RAW images recorded with
the camera, “Image Data Converter”
on the CD-ROM (supplied) is
required. If you do not intend to
modify the images you record, we
recommend that you shoot images
using the JPEG format.
Notes on playing movies
on other devices
• This camera uses MPEG-4 AVC/
H.264 High Profile for AVCHD
format recording. Movies recorded
in AVCHD format with this
camera cannot be played by the
following devices.
– Other devices compatible with
AVCHD format that does not
support High Profile
– Devices incompatible with the
AVCHD format
• This camera also uses MPEG-4
AVC/H.264 Main Profile for MP4
format recording. For this reason,
movies recorded in MP4 format
with this camera cannot be played
on devices other than those that
support MPEG-4 AVC/H.264.
010COV.book Page 97 Monday, July 30, 2012 4:55 PM
NEX-5R
4-437-511-11(1)
C:\01GB-NEX5RUC2\090OTH.fm
master: Left_2 column
GB
98
• Discs recorded with HD (high
definition) image quality can be
played back only on AVCHD
format-compatible devices. DVD-
based players or recorders cannot
play back HD image quality discs,
as they are incompatible with the
AVCHD format. Also, DVD-based
players or recorders may fail to
eject HD image quality discs.
• Movies recorded in 1080 60p/1080
50p format can be played back
only on 1080 60p/1080 50p-
supported devices.
Caution when flying
When aboard an airplane, turn off
the camera.
Warning on copyright
Television programs, films,
videotapes, and other materials may
be copyrighted. Unauthorized
recording of such materials may be
contrary to the provisions of the
copyright laws.
The pictures used in this
manual
The photographs used as examples
of pictures in this manual are
reproduced images, and are not
actual images shot using this
camera.
On the data specifications
described in this manual
The data on performance and
specifications are defined under the
following conditions, except as
described in this manual: at an
ordinary ambient temperature of
25 ºC (77 °F), and using a battery
pack that has been fully charged for
about an hour after the charge lamp
has turned off.
010COV.book Page 98 Monday, July 30, 2012 4:55 PM
NEX-5R
4-437-511-11(1)
C:\01GB-NEX5RUC2\090OTH.fm
master: Right_2 column
GB
99
Others
Specifications
Camera
[System]
Camera type: Interchangeable lens
digital camera
Lens: E-mount lens
[Image sensor]
Image sensor: APS-C format (23.5 mm
× 15.6 mm) CMOS image sensor
Total pixel number of image sensor:
Approx. 16 700 000 pixels
Effective pixel number of camera:
Approx. 16 100 000 pixels
[Anti-dust]
System: Charge protection coating on
Low-Pass Filter and ultrasonic
vibration mechanism
[Auto focus system]
System: Fast Hybrid AF (Phase
detection system/Contrast
detection system)
Sensitivity range: EV0 to EV20 (at ISO
100 equivalent, with F2.8 lens)
[Exposure control]
Metering method: 1 200-segment
metering by the image sensor
Metering range: EV0 to EV20 (at
ISO 100 equivalent, with F2.8
lens)
ISO sensitivity (Recommended
exposure index):
Still images: AUTO, ISO 100 –
25 600
Movies: AUTO, ISO 100 – 6 400
equivalent
Exposure compensation: ±3.0 EV
(1/3 EV step)
[Shutter]
Type: Electronically-controlled,
vertical-traverse, focal-plane type
Speed range:
Still images: 1/4 000 second to
30 seconds, BULB
Movies: 1/4 000 second to
1/4 second (1/3 EV step),
1080 60i-compatible device up to
1/60 second in AUTO mode (up to
1/30 second in [Auto Slow Shutter]
mode)
1080 50i-compatible device up to
1/50 second in AUTO mode (up to
1/25 second in [Auto Slow Shutter]
mode)
Flash sync speed: 1/160 second
[Recording media]
“Memory Stick PRO Duo” media,
SD card
[LCD screen]
LCD panel: Wide, 7.5 cm (3.0 type)
TFT drive
Total number of dots: 921 600 dots
[Input/output terminals]
USB: Micro USB type B
HDMI: HDMI type C minijack
[Power]
Used battery pack: Rechargeable
battery pack NP-FW50
[Power consumption]
When using an E PZ 16–50 mm
F3.5–5.6 OSS lens*
Approx. 2.7 W
* supplied with NEX-5RL/5RY
[Others]
Exif Print: Compatible
PRINT Image Matching III:
Compatible
010COV.book Page 99 Monday, July 30, 2012 4:55 PM
NEX-5R
4-437-511-11(1)
C:\01GB-NEX5RUC2\090OTH.fm
master: Left_2 column
GB
100
DPOF: Compatible
Dimensions (CIPA compliant):
Approx. 110.8 mm × 58.8 mm ×
38.9 mm (4 3/8 inches ×
2 3/8 inches × 1 9/16 inches)
(W/H/D)
Mass (CIPA compliant):
Approx. 276 g (9.7 oz)
(including battery and “Memory
Stick PRO Duo” media)
Approx. 218 g (7.7 oz)
(camera only)
Operating temperature: 0 °C to 40 °C
(32 °F to 104 °F)
File format:
Still image: JPEG (DCF Ver. 2.0,
Exif Ver. 2.3, MPF Baseline)
compliant, RAW (Sony ARW 2.3
Format)
Movie (AVCHD format): AVCHD
format Ver. 2.0 compatible
Video: MPEG-4 AVC/H.264
Audio: Dolby Digital 2ch
Dolby Digital Stereo Creator
• Manufactured under license from
Dolby Laboratories.
Movie (MP4 format):
Video: MPEG-4 AVC/H.264
Audio: MPEG-4 AAC-LC 2ch
USB communication: Hi-Speed USB
(USB 2.0)
[Wireless LAN]
Supported format: IEEE 802.11 b/g/n
Flash HVL-F7S
Flash guide number: GN 7 (in meters at
ISO 100)
Recycling time: Approx. 4 seconds
Flash coverage: Covering 16 mm lens
(focal length that the lens indicates)
Flash compensation: ±2.0 EV (1/3 EV
step)
Dimensions (CIPA compliant):
Approx. 35.9 mm × 23.8 mm ×
42.7 mm
(1 7/16 inches × 15/16 inches ×
1 11/16 inches)
(W/H/D)
Mass: Approx. 20.4 g (0.8 oz)
AC Adaptor AC-UB10/
UB10B/UB10C/UB10D
Power requirements: AC 100 V to
240 V, 50 Hz/60 Hz, 70 mA
Output voltage: DC 5 V, 0.5 A
Operating temperature: 0 °C to 40 °C
(32 °F to 104 °F)
Storage temperature: –20 °C to +60 °C
(–4 °F to +140 °F)
Dimensions:
Approx. 50 mm × 22 mm × 54 mm
(2 inches × 7/8 inches ×
2 1/4 inches) (W/H/D)
Mass:
For the USA and Canada: Approx.
48 g (1.7 oz)
For countries or regions other than
the USA and Canada: Approx. 43 g
(1.5 oz)
Rechargeable battery pack
NP-FW50
Used battery: Lithium-ion battery
Maximum voltage: DC 8.4 V
Nominal voltage: DC 7.2 V
Maximum charge voltage: DC 8.4 V
Maximum charge current: 1.02 A
Capacity: Typical 7.7 Wh (1 080 mAh)
Minimum 7.3 Wh (1 020 mAh)
Maximum dimensions:
Approx. 31.8 mm × 18.5 mm ×
45 mm (1 5/16 inches × 3/4 inches
× 1 13/16 inches) (W/H/D)
Mass: Approx. 57 g (2.1 oz)
010COV.book Page 100 Monday, July 30, 2012 4:55 PM
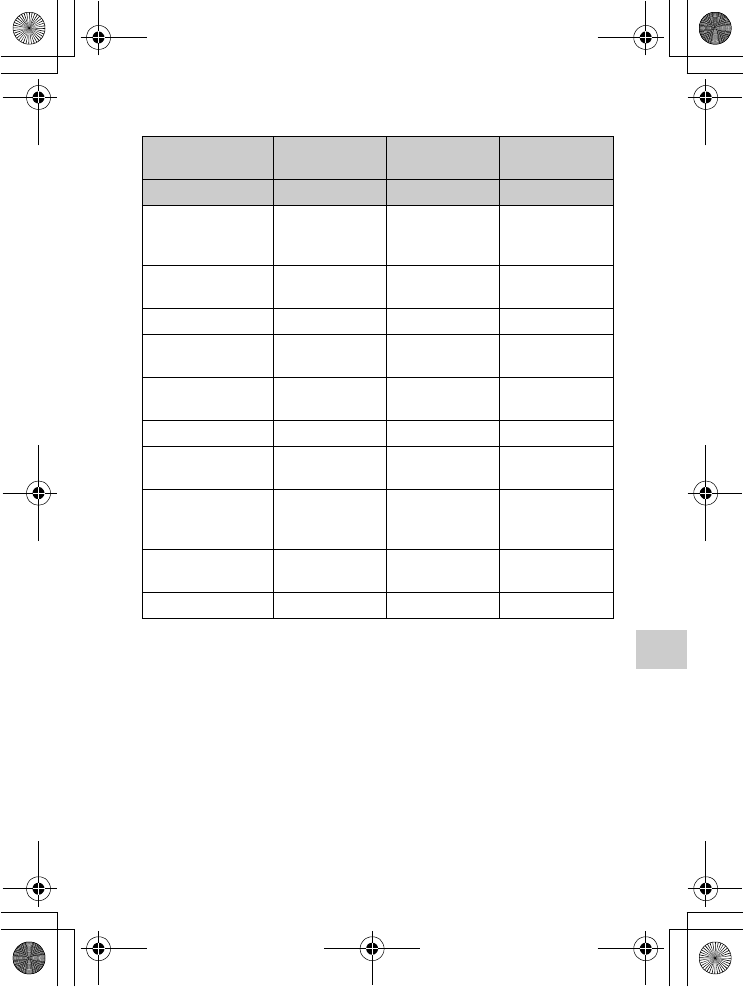
NEX-5R
4-437-511-11(1)
C:\01GB-NEX5RUC2\090OTH.fm
master: Right
GB
101
Others
Lens
1) Power zoom
2) The values for equivalent 35 mm-format focal length and angle of view are based
on digital cameras equipped with an APS-C sized image sensor.
3) Minimum focus is the shortest distance from the image sensor to the subject.
Design and specifications are subject to change without notice.
Lens E16 – 50 mm
zoom lens1)
E18 – 55 mm
zoom lens
E55 – 210 mm
zoom lens
Camera NEX-5RL/5RY NEX-5RK NEX-5RY
Equivalent
35 mm-format focal
length2) (mm)
24 – 75 27 – 82.5 82.5 – 315
Lens groups –
elements
8 – 9 9 – 11 9 – 13
Angle of view2) 83° – 32° 76° – 29° 28.2° – 7.8°
Minimum focus3)
(m (feet))
0.25 – 0.3
(0.82 – 1)
0.25 (0.82) 1.0 (3.28)
Maximum
magnification (×)
0.215 0.3 0.225
Minimum f-stop f/22 – f/36 f/22 – f/32 f/22 – f/32
Filter diameter
(mm)
40.5 49 49
Dimensions (max.
diameter × height)
(Approx. mm (in.))
64.7 × 29.9
(2 5/8 × 1 3/16)
62.0 × 60.0
(2 1/2 × 2 3/8)
63.8 × 10⁸
(2 5/8 × 4 3/8)
Mass (Approx. g
(oz.))
116 (4.1) 194 (6.8) 345 (12.2)
SteadyShot Available Available Available
010COV.book Page 101 Monday, July 30, 2012 4:55 PM
NEX-5R
4-437-511-11(1)
C:\01GB-NEX5RUC2\090OTH.fm
master: Left_2 column
GB
102
On focal length
The picture angle of this camera is
narrower than that of a 35 mm-format
camera. You can find the approximate
equivalent of the focal length of a
35 mm-format camera, and shoot with
the same picture angle, by increasing
the focal length of your lens by half.
For example, by using a 50 mm lens,
you can get the approximate equivalent
of a 75 mm lens of a 35 mm-format
camera.
On image data
compatibility
• This camera conforms with DCF
(Design rule for Camera File system)
universal standard established by
JEITA (Japan Electronics and
Information Technology Industries
Association).
• Playback of images recorded with
your camera on other equipment and
playback of images recorded or
edited with other equipment on your
camera are not guaranteed.
Trademarks
• is a trademark of Sony
Corporation.
• “Memory Stick,” , “Memory
Stick PRO,” ,
“Memory Stick Duo,”
, “Memory
Stick PRO Duo,”
, “Memory
Stick PRO-HG Duo,”
, “Memory
Stick Micro,” “MagicGate,” and
are trademarks of
Sony Corporation.
• “InfoLITHIUM” is a trademark of
Sony Corporation.
• “PlayMemories Camera Apps” is a
trademark of Sony Corporation.
• “PhotoTV HD” is a trademark of
Sony Corporation.
• Blu-ray Disc™ and Blu-ray™ are
trademarks of the Blu-ray Disc
Association.
• “AVCHD Progressive” and
“AVCHD Progressive” logotype are
trademarks of Panasonic Corporation
and Sony Corporation.
• Dolby and the double-D symbol are
trademarks of Dolby Laboratories.
• Microsoft, Windows, and Windows
Vista are either registered trademarks
or trademarks of Microsoft
Corporation in the United States and/
or other countries.
• HDMI, the HDMI logo and High-
Definition Multimedia Interface are
trademarks or registered trademarks
of HDMI Licensing LLC.
• Mac and Mac OS are trademarks or
registered trademarks of Apple Inc.
• iOS is a trademark or registered
trademark of Cisco Systems Inc.
• Intel, Intel Core, and Pentium are
trademarks or registered trademarks
of Intel Corporation.
• Android is a registered trademark of
Google Inc.
• DLNA and DLNA CERTIFIED are
trademarks of Digital Living
Network Alliance.
• SDXC logo is a trademark of SD-3C,
LLC.
• Eye-Fi is a trademark of Eye-Fi Inc.
• MultiMediaCard is a trademark of
MultiMediaCard Association.
• “ ” and “PlayStation” are registered
trademarks of Sony Computer
Entertainment Inc.
• Adobe is a registered trademark or a
trademark of Adobe Systems
Incorporated in the United States and/
or other countries.
010COV.book Page 102 Monday, July 30, 2012 4:55 PM
NEX-5R
4-437-511-11(1)
C:\01GB-NEX5RUC2\090OTH.fm
master: Right_2 column
GB
103
Others
• In addition, system and product
names used in this manual are, in
general, trademarks or registered
trademarks of their respective
developers or manufacturers.
However, the ™ or ® marks are not
used in all cases in this manual.
• Add further enjoyment with your
PlayStation 3 by downloading the
application for PlayStation 3 from
PlayStation Store (where available).
• The application for PlayStation 3
requires PlayStation Network
account and application download.
Accessible in areas where the
PlayStation Store is available.
010COV.book Page 103 Monday, July 30, 2012 4:55 PM
NEX-5R
4-437-511-11(1)
C:\01GB-NEX5RUC2\010COVIX.fm
master: Left_2 column
GB
104
Index
A
Access Point Settings................... 79
AEL w/ shutter............................. 64
AF Illuminator ............................. 64
AF Micro Adj. ............................. 66
AF/MF Select............................... 60
Anti Motion Blur ......................... 48
Aperture Priority.......................... 51
Application .................................. 63
Area Setting ................................. 66
Aspect Ratio................................. 61
Auto Port. Framing ...................... 60
Auto Review ................................ 64
Auto Slow Shutter........................ 66
Autofocus Area............................ 60
Autofocus Mode .......................... 60
B
Background Defocus Control ...... 42
Battery pack ................................. 17
Beep ............................................. 66
C
Calibration ................................... 67
Charging time .............................. 17
Cleaning Mode............................. 67
Clear Image Zoom ....................... 64
Color Space.................................. 65
Computer ..................................... 71
Cont. Shooting ............................. 45
Control dial .................................. 37
Control wheel............................... 36
Creative Style............................... 62
CTRL FOR HDMI....................... 67
Custom Key Settings ................... 66
D
Date/Time Setup.................... 29, 66
Delete .................................... 35, 63
Demo Mode................................. 67
Digital Zoom ............................... 65
DISP (Display Contents)............. 46
DISP Button(Monitor) ................ 61
Disp MAC Address..................... 68
Display Card Space..................... 68
Display Color .............................. 67
Display Contents ......................... 63
Downloading application ............ 75
Drive Mode ................................. 60
DRO/Auto HDR.......................... 62
E
Edit Device Name ....................... 68
Enlarge Image ............................. 63
Exposure compensation .............. 44
Eye-Fi.......................................... 68
Eye-Start AF................................ 65
F
Face Detection............................. 60
Face Priority Tracking................. 66
Face Registration......................... 60
File Format............................ 56, 62
File Number ................................ 68
Fill-flash ...................................... 54
Finder Display(DISP).................. 61
FINDER/LCD Setting................. 64
Flash Comp. ................................ 62
Flash Mode.................................. 54
Fn (Function) button ................... 55
Folder Name................................ 68
Format ......................................... 68
Front Curtain Shutter................... 65
Function Menu Settings .............. 66
010COV.book Page 104 Monday, July 30, 2012 4:55 PM
NEX-5R
4-437-511-11(1)
C:\01GB-NEX5RUC2\010COVIX.fm
master: Right_2 column
GB
105
Others
G
Grid Line...................................... 64
H
Handbook..................................... 88
Hand-held Twilight...................... 48
HDMI Resolution ........................ 67
Help Guide Display ..................... 67
Help Guides ................................. 40
High ISO NR ............................... 65
I
Icons............................................. 84
Image Data Converter.................. 74
Image Index ........................... 57, 63
Image Size ............................. 56, 61
Initialize ....................................... 67
Install ........................................... 71
Intelligent Auto............................ 47
ISO............................................... 62
L
Landscape .................................... 48
Language...................................... 66
LCD Brightness ........................... 67
LCD Display (DISP).................... 61
Lens.............................................. 22
Lens Comp.: Chro. Aber.............. 66
Lens Comp.: Distortion ............... 66
Lens Comp.: Shading................... 65
Level ............................................ 46
Live View Display....................... 64
Long Exposure NR ...................... 65
M
Mac .............................................. 72
Macro........................................... 48
Manual Exposure ......................... 47
Memory card................................ 24
Menu ............................................ 59
Menu start .................................... 66
Metering Mode ............................ 62
MF Assist .................................... 65
MF Assist Time........................... 65
Moisture condensation ................ 95
Movie .......................................... 32
Movie Audio Rec........................ 66
MOVIE Button............................ 66
N
New Folder.................................. 68
Night Portrait............................... 48
Night Scene ................................. 48
O
Object Tracking........................... 60
P
Panorama..................................... 49
Panorama Direction..................... 61
Peaking Color.............................. 64
Peaking Level.............................. 64
Phase Detection AF Area ............ 64
Photo Creativity .......................... 41
Picture Effect......................... 43, 62
Playback ...................................... 33
Playback Display......................... 67
PlayMemories Home................... 73
Portrait......................................... 48
Power Save.................................. 67
Power Saving Start Time ............ 67
Program Auto .............................. 52
Protect ......................................... 63
Q
Quality......................................... 61
010COV.book Page 105 Monday, July 30, 2012 4:55 PM
NEX-5R
4-437-511-11(1)
C:\01GB-NEX5RUC2\010COVIX.fm
master: Left_2 column
GB
106
R
Record Setting ............................. 62
Recover Image DB ...................... 68
Red Eye Reduction ...................... 64
Release w/o Lens ......................... 65
Reset Default ............................... 67
Reset Network Settings................ 68
Reset View on Smartphone ......... 68
Rotate........................................... 63
S
S. Auto Image Extract.................. 65
Scene Selection............................ 48
Scroll playback ............................ 50
Select Shoot. Folder..................... 68
Self-portrait Self-timer................. 65
Self-timer ..................................... 44
Self-timer(Cont)........................... 45
Send to Computer ........................ 79
Setting the clock .......................... 29
Setup ............................................ 64
Shoot Mode.................................. 47
Shooting (movies)........................ 32
Shooting (still images)................. 30
Shooting Tip List ......................... 61
Shooting tips ................................ 40
Shutter Priority............................. 50
Slide Show ................................... 63
Smile Shutter ............................... 60
Soft keys ...................................... 37
Soft Skin Effect............................ 61
Software....................................... 71
Spd Priority Cont. ........................ 46
Specifications............................... 99
Specify Printing ........................... 63
Sports Action ............................... 48
SteadyShot ................................... 65
Still/Movie Select ........................ 63
Sunset........................................... 48
Superior Auto............................... 52
Sweep Panorama.......................... 49
T
Touch Operation.................... 38, 66
Touch panel................................. 38
Touch Shutter........................ 31, 60
U
Upload Settings ........................... 68
USB Connection.......................... 67
V
Version ........................................ 67
View mode .................................. 63
View on Smartphone................... 77
View on TV (HDMI cable
compatible TV)....................... 58
View on TV (Network compatible
TV).......................................... 80
Viewfinder Bright. ...................... 67
Volume Settings .......................... 63
W
White Balance ............................. 62
Wide Image ................................. 67
Wi-Fi ........................................... 78
Wind Noise Reduct. .................... 66
Windows ..................................... 71
WPS Push.................................... 78
Z
Zoom ..................................... 53, 60
010COV.book Page 106 Monday, July 30, 2012 4:55 PM