Sony Group NEX5R Interchangeable Lens Digital Camera User Manual NEX 5R
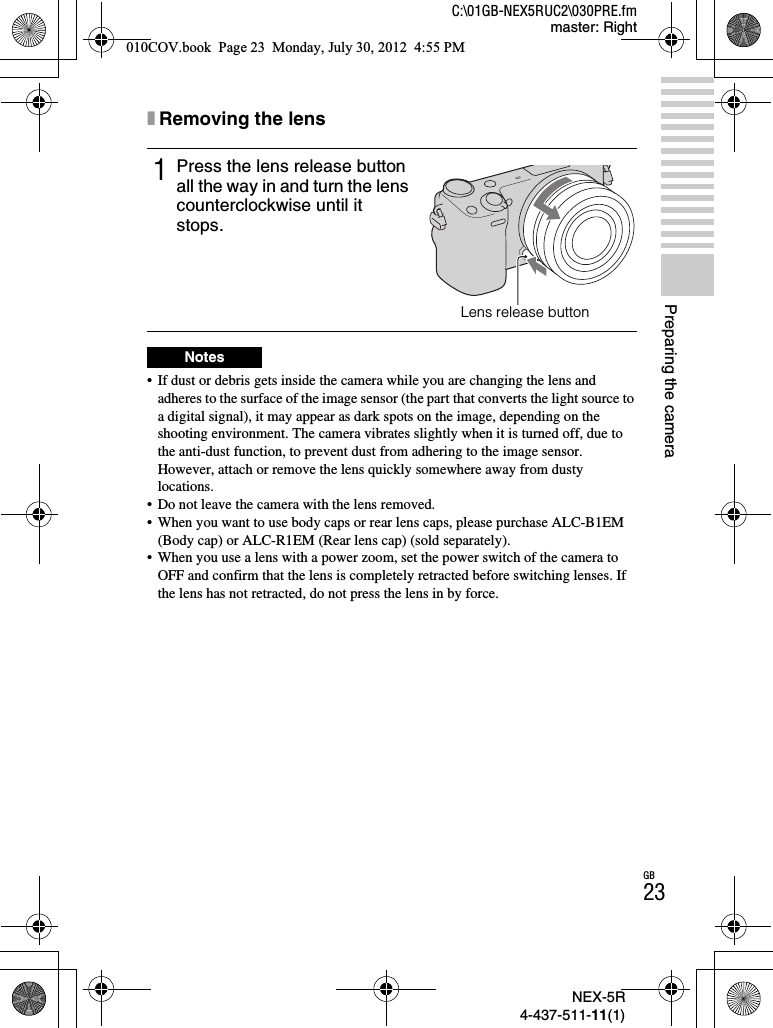
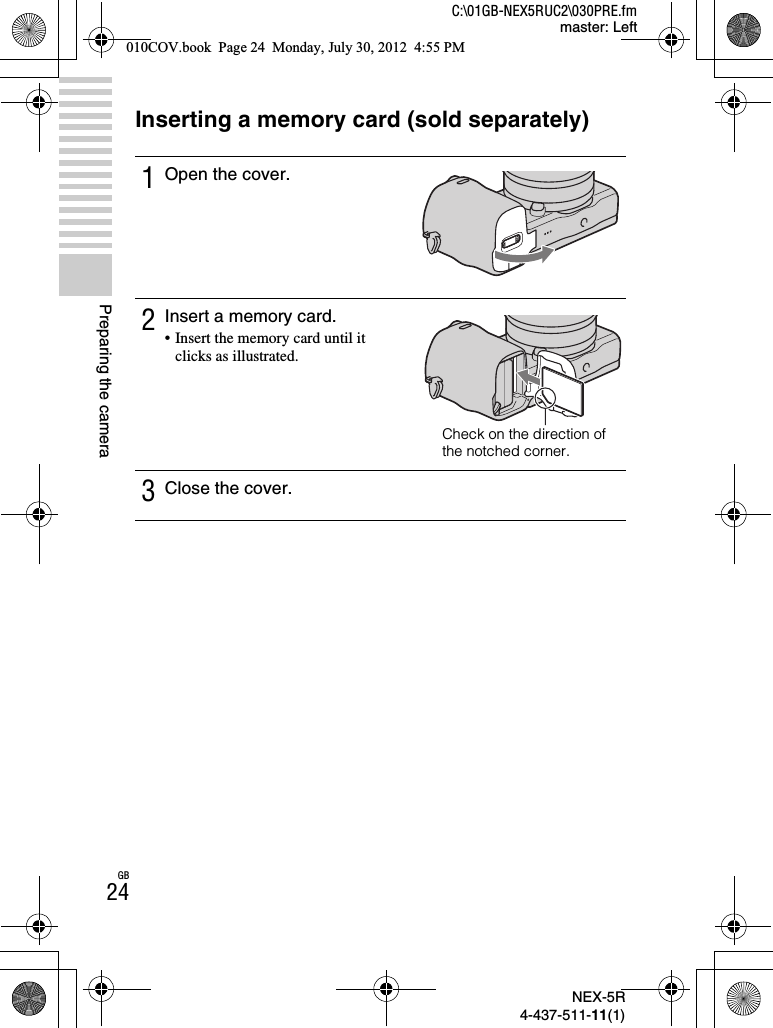
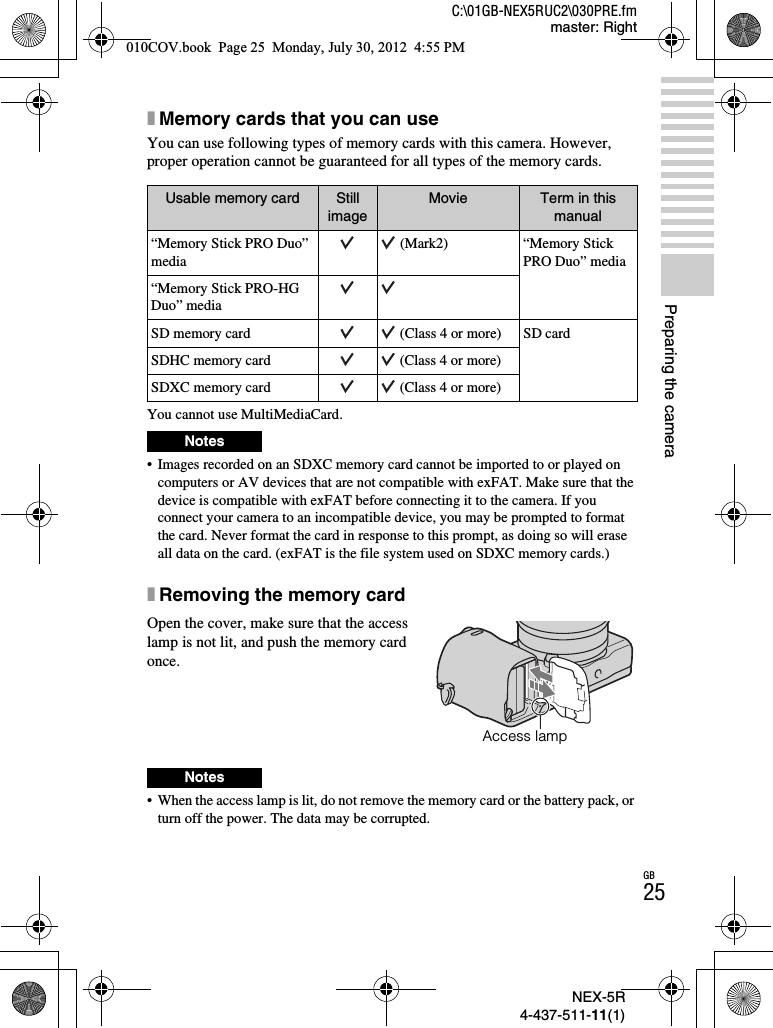
Sony Corporation Interchangeable Lens Digital Camera NEX 5R
UserManual.wiki
>
Sony Group
>
NEX5R User Manual
>
User Manual& 65296;& 65297;
Contents
1.
User Manual& 65296;& 65297;
2.
User Manual& 65296;& 65298;
User Manual& 65296;& 65297;
Navigation menu
Upload a User Manual
Namespaces
Wiki Guide
HTML
PDF
Info
Views
User Manual
Discussion / Help
Navigation

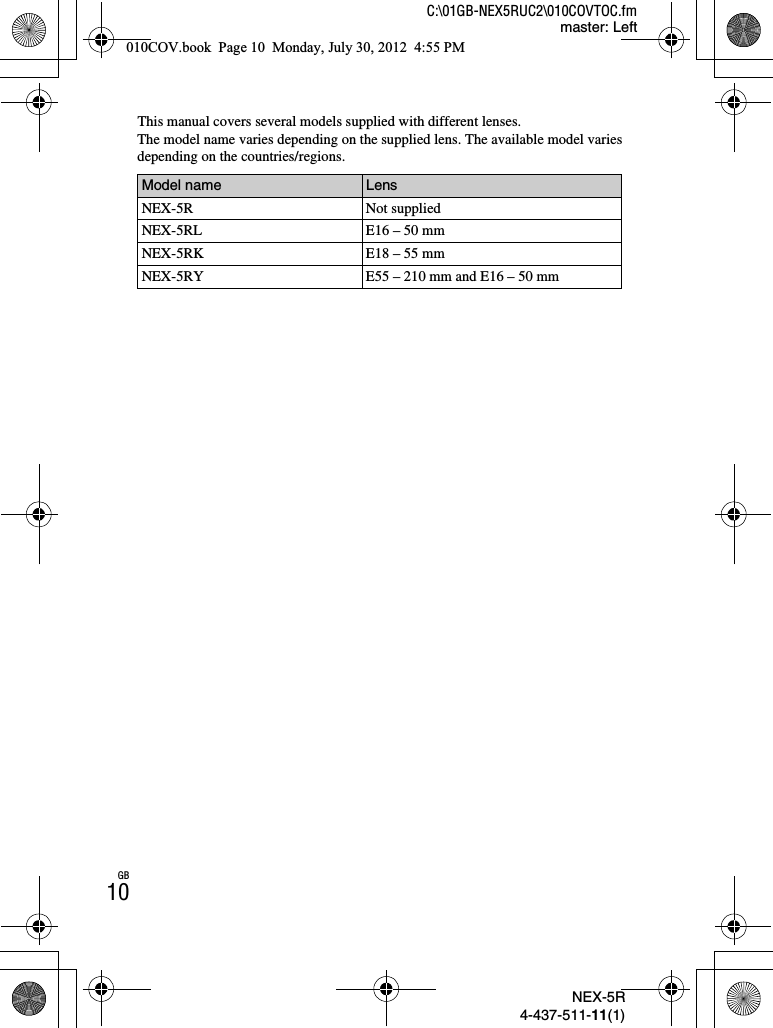
![NEX-5R4-437-511-11(1)C:\01GB-NEX5RUC2\010COVTOC.fmmaster: LeftGB8Table of contentsPreparing the cameraChecking the supplied items ............................................ 11Identifying parts ................................................................ 12Charging the battery pack ............................................... 17Attaching/removing the lens ............................................. 22Inserting a memory card (sold separately) ...................... 24Attaching the flash ............................................................ 26Setting the date and time ................................................. 28Mastering the basic operationShooting still images ........................................................ 30Recording movies ............................................................ 32Playing back images ........................................................ 33Deleting images ............................................................... 35Operating the camera ...................................................... 36Using the guide function of the camera ........................... 40Using the recording functionsSetting the function using [Photo Creativity] .................... 41Adjusting the brightness of still images (Exposure compensation).................................................................. 44Using the self-timer .......................................................... 44Shooting still images continuously ................................... 45Changing the screen display (DISP)................................ 46Shooting with various shooting modes............................. 47Zooming ........................................................................... 53Selecting the flash mode.................................................. 54Setting using the Fn (Function) button ............................. 55Selecting the image size/record setting........................... 56Using the playback functionsDisplaying the image list .................................................. 57Viewing images on a TV................................................... 58010COV.book Page 8 Monday, July 30, 2012 4:55 PM](https://usermanual.wiki/Sony-Group/NEX5R.User-Manual-65296-65297/User-Guide-1789959-Page-8.png)
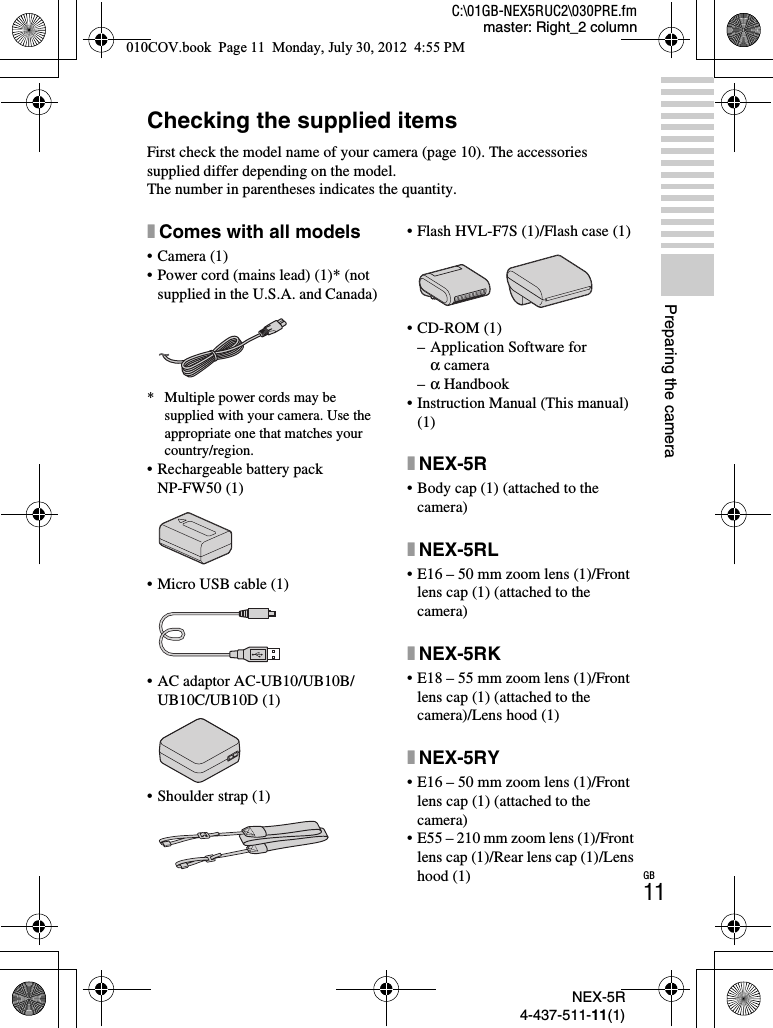
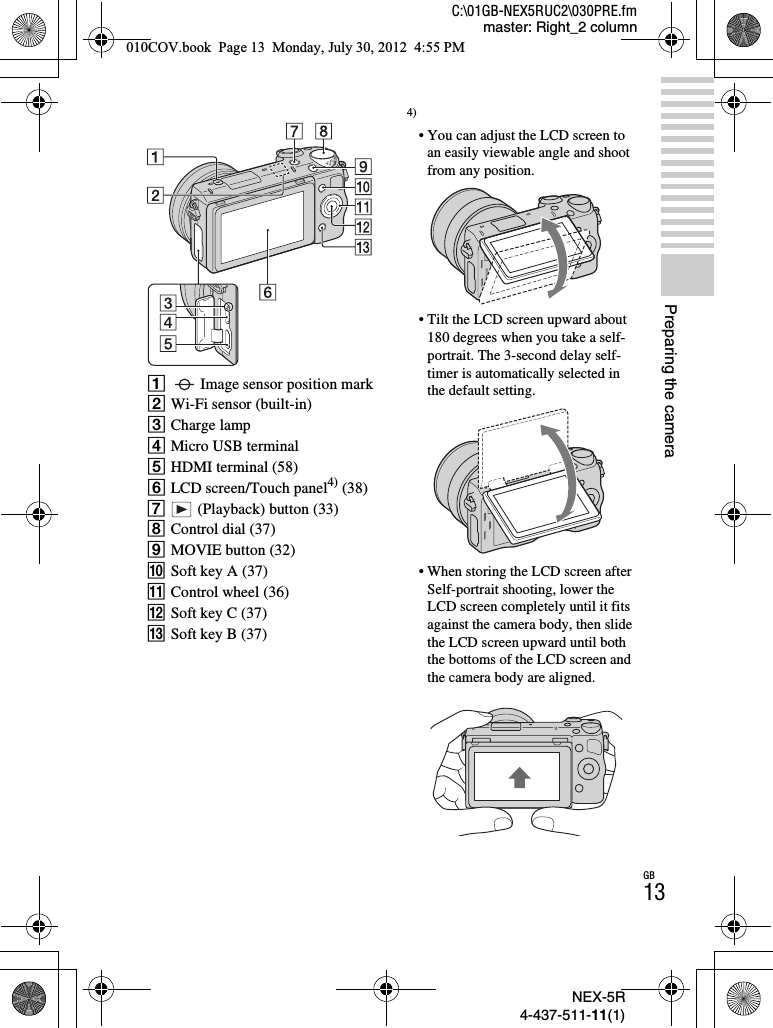
![NEX-5R4-437-511-11(1)C:\01GB-NEX5RUC2\030PRE.fmmaster: Left_2 columnGB12Preparing the cameraIdentifying partsSee the pages in parentheses for details on operation for the parts.When the lens is removedAShutter button (31)BHook for shoulder strapAttach the shoulder strap to prevent damage caused by dropping the camera.CFn (Function) button (55)DRemote sensorEON/OFF (Power) switch (28)FAF illuminator/Self-timer lamp/Smile Shutter lampGSmart Accessory Terminal 21)HMicrophone2)ILens (22)JLens release button (23)KMountLImage sensor3)MLens contacts3)1) Accessories for the Smart Accessory Terminal can also be attached.You cannot use the [Self-portrait Self-timer] function when a flash HVL-F7S (supplied) or accessories are attached to the Smart Accessory Terminal 2.2) Do not cover this part during movie recording.3) Do not touch this part directly.010COV.book Page 12 Monday, July 30, 2012 4:55 PM](https://usermanual.wiki/Sony-Group/NEX5R.User-Manual-65296-65297/User-Guide-1789959-Page-12.png)
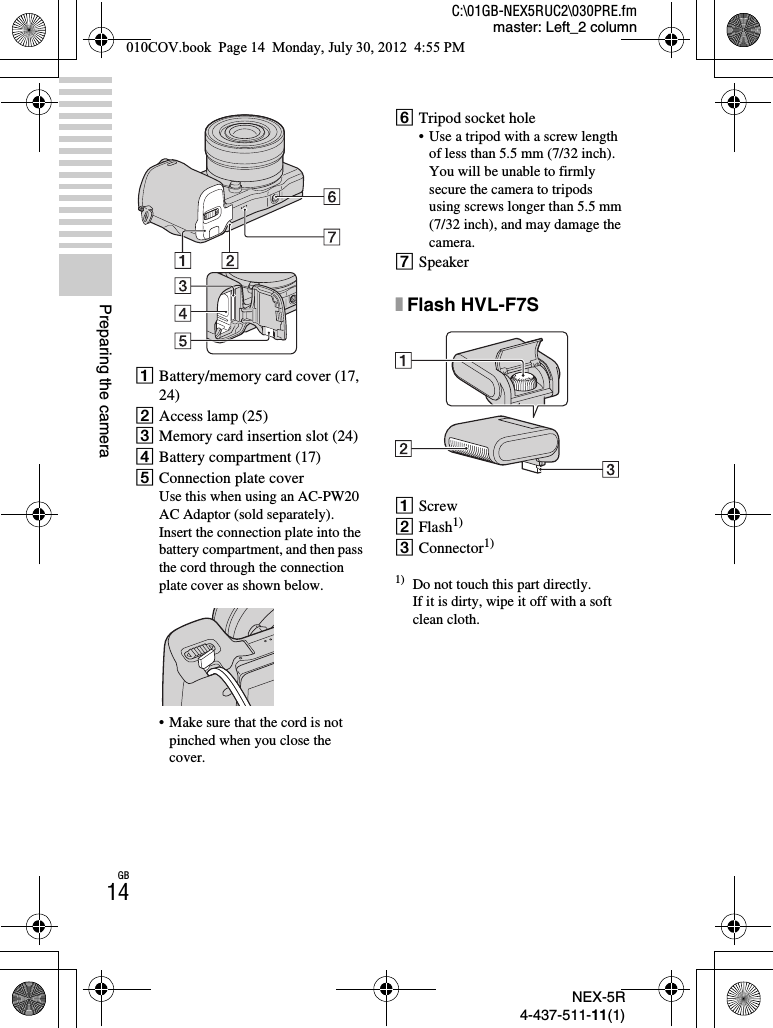
![NEX-5R4-437-511-11(1)C:\01GB-NEX5RUC2\030PRE.fmmaster: LeftGB26Preparing the cameraAttaching the flashWhen you want to use a flash during shooting, attach the flash device (supplied).The flash is enabled when it is raised, and disabled when lowered.Set the power switch of the camera to OFF before you attach or remove the flash.• The power for the flash is provided from the camera. When the camera is charging the flash, blinks on the LCD screen. You cannot press the shutter button when this icon is blinking.• Plug the flash fully into the Smart Accessory Terminal 2 of the camera, and fasten the screw securely. Make sure that the flash is attached to the camera securely.• You cannot use the [Self-portrait Self-timer] function when a flash is attached to the camera.1Attach the flash to the Smart Accessory Terminal 2 of the camera.2Fasten the screw to secure the flash.3Raise the flash first to fire the flash.• Lower the flash when you do not intend to use it.• The default setting is [Autoflash]. To change the setting, see page 54.Notes010COV.book Page 26 Monday, July 30, 2012 4:55 PM](https://usermanual.wiki/Sony-Group/NEX5R.User-Manual-65296-65297/User-Guide-1789959-Page-26.png)
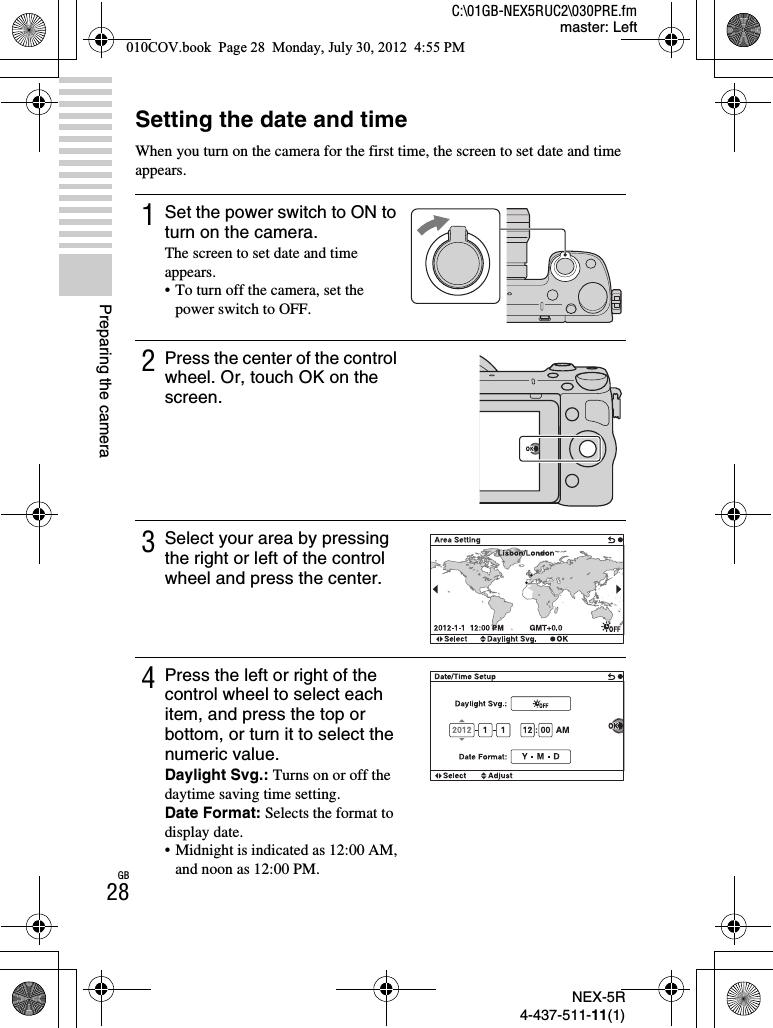
![NEX-5R4-437-511-11(1)C:\01GB-NEX5RUC2\030PRE.fmmaster: RightGB29Preparing the camera• You cannot set the date, time and area by touching the screen.• You cannot superimpose the date on images on this camera. Using “PlayMemories Home” stored on the CD-ROM (supplied), you can save or print images with date. Refer to “PlayMemories Home Help Guide” for more details (page 73).xResetting the date and time/Checking the current clock settingSelect MENU t [Setup] t [Date/Time Setup] (page 66).xMaintaining the date and time settingThis camera has an internal rechargeable battery for maintaining the date and time and other settings regardless of whether the power is on or off, or the battery is installed or not. For details, see page 96.5Repeat step 4 to set other items, and then press the center of the control wheel. Or, touch OK on the screen.Notes010COV.book Page 29 Monday, July 30, 2012 4:55 PM](https://usermanual.wiki/Sony-Group/NEX5R.User-Manual-65296-65297/User-Guide-1789959-Page-29.png)
![NEX-5R4-437-511-11(1)C:\01GB-NEX5RUC2\040BAS.fmmaster: LeftGB30Mastering the basic operationMastering the basic operationShooting still imagesIn the (Intelligent Auto) mode, the camera analyzes the subject, and allows you to shoot with appropriate settings.1Select MENU t [Shoot Mode] t (Intelligent Auto).2Point the camera to the subject.When the camera recognizes the scene, the Scene Recognition icon and guide appear on the LCD screen: (Night Scene), (Tripod Night Scene), (Night Portrait), (Backlight), (Backlight Portrait), (Portrait), (Landscape), (Macro), (Spotlight), (Low Brightness), or (Baby).Scene Recognition icon and guide3Adjust the zoom scale.Lens with zooming lever: Slide the zooming lever.Lens with zooming ring: Rotate the zooming ring.• Optical zooming is not available with a fixed focus lens.• When you operate the lens with power zoom, the camera shifts automatically to the [Zoom] feature of the camera when the magnification scale is greater than that of the optical zoom (page 53).Zooming ringZooming lever010COV.book Page 30 Monday, July 30, 2012 4:55 PM](https://usermanual.wiki/Sony-Group/NEX5R.User-Manual-65296-65297/User-Guide-1789959-Page-30.png)
![NEX-5R4-437-511-11(1)C:\01GB-NEX5RUC2\040BAS.fmmaster: RightGB31Mastering the basic operationxShooting still images using touch operation (Touch Shutter function)The camera adjusts the focus and releases the shutter automatically when you simply touch the subject that you want to focus on the screen. You can use the Touch Shutter function when [Touch Shutter] is set to [On] in the MENU.4Press the shutter button halfway down to focus.When the focus is confirmed, beeps sound and z lights up.Focus indicator5Press the shutter button fully down.When the camera detects and shoots a face with [Auto Port. Framing] set to [Auto], the captured image is automatically trimmed into a suitable composition. Both the original and the trimmed images are saved.1Touch on the screen.• The icon changes to and the touch shutter shooting becomes available.2Point the camera to the subject, then touch the subject on the screen that you want to focus.• The Auto Focus area is displayed on the screen where you touched it. When the focus is confirmed, the camera shoots an image automatically.010COV.book Page 31 Monday, July 30, 2012 4:55 PM](https://usermanual.wiki/Sony-Group/NEX5R.User-Manual-65296-65297/User-Guide-1789959-Page-31.png)
![NEX-5R4-437-511-11(1)C:\01GB-NEX5RUC2\040BAS.fmmaster: LeftGB32Mastering the basic operationRecording movies• The sound of the camera and the lens in operation might be recorded while recording a movie. You can disable the sound recording by selecting MENU t[Setup] t [Movie Audio Rec] t [Off] (page 66).• The continuous recording time of a movie depends on the ambient temperature or the condition of the camera.• When you are recording continuously for a long time, you may feel that the camera is warm. This is normal. Also, “Internal temp. high. Allow it to cool.” may appear. In such cases, turn the camera off and wait until the camera is ready to shoot again.3When you touch on the screen, touch shutter shooting is canceled.1Point the camera to the subject.2Press the MOVIE button to start recording.• Focus and brightness are adjusted automatically.• If you press the shutter button halfway down during recording, you will be able to focus more quickly. MOVIE button3Press the MOVIE button again to stop recording.Notes010COV.book Page 32 Monday, July 30, 2012 4:55 PM](https://usermanual.wiki/Sony-Group/NEX5R.User-Manual-65296-65297/User-Guide-1789959-Page-32.png)
![NEX-5R4-437-511-11(1)C:\01GB-NEX5RUC2\040BAS.fmmaster: RightGB33Mastering the basic operationPlaying back imagesxSelecting the imageTurn the control wheel. Or, slide your finger from left to right across the screen.xPlaying back movies1Press the (Playback) button.The last recorded image is displayed on the LCD screen.• Press the center of the control wheel to enlarge the displayed image.(Playback) button1Select MENU t [Playback] t [Still/Movie Select] t[Folder View(MP4)] or [AVCHD View].• To return to still image playback, select [Folder View(Still)].2Turn the control wheel to select the desired movie, and press the center. Or, touch the desired movie.010COV.book Page 33 Monday, July 30, 2012 4:55 PM](https://usermanual.wiki/Sony-Group/NEX5R.User-Manual-65296-65297/User-Guide-1789959-Page-33.png)

![NEX-5R4-437-511-11(1)C:\01GB-NEX5RUC2\040BAS.fmmaster: RightGB35Mastering the basic operationDeleting imagesYou can delete the image that is currently displayed.1Press (Delete). Or, touch on the screen.2Press the center of the control wheel. Or, touch OK on the screen.• Select to quit the operation.zDeleting several imagesSelect MENU t [Playback] t [Delete] to select and delete several images at the same time.010COV.book Page 35 Monday, July 30, 2012 4:55 PM](https://usermanual.wiki/Sony-Group/NEX5R.User-Manual-65296-65297/User-Guide-1789959-Page-35.png)

![NEX-5R4-437-511-11(1)C:\01GB-NEX5RUC2\040BAS.fmmaster: LeftGB40Mastering the basic operation• You can perform most operations using both the control wheel/soft keys and the touch panel. However, some operations can be performed only using one or the other.• Avoid the followings when using the touch panel:– Using a pointed object, such as a pencil, ball-point pen, or the tip of a finger nail.– Operating the touch panel while the hand holding the camera is also touching the screen elsewhere.Using the guide function of the cameraThe camera provides various “Help Guides” which explain the functions, and “Shooting tips” which introduce tips for better shooting. Use these guides to make better use of the camera.xHelp GuidesThe camera displays the Help Guides to explain the selected function, when you change the setting, etc.You can hide the Help Guides by selecting MENU t [Setup] t [Help Guide Display] t [Off].xShooting tipsYou can display shooting tips for better shooting from [Table of contents] by selecting MENU t [Camera] t [Shooting Tip List].You can also assign [Shoot. Tips] to the soft key B.Notes010COV.book Page 40 Monday, July 30, 2012 4:55 PM](https://usermanual.wiki/Sony-Group/NEX5R.User-Manual-65296-65297/User-Guide-1789959-Page-40.png)
![NEX-5R4-437-511-11(1)C:\01GB-NEX5RUC2\050REC.fmmaster: RightGB41Using the recording functionsUsing the recording functionsSetting the function using [Photo Creativity]You can operate the camera intuitively using [Photo Creativity], since the [Photo Creativity] screen is designed for more intuitive operations than a normal screen. You can shoot a subject with easy operations and obtain creative photos easily.1Select MENU t [Shoot Mode] t (Intelligent Auto) or (Superior Auto).2Press the bottom of the control wheel. Or, touch (Photo Creativity) on the screen.The [Photo Creativity] screen appears.3Select the item you want to adjust by touching the screen or by pressing the right/left of the control wheel. (Bkground Defocus): Adjusts the blurring of the background. (Brightness): Adjusts the brightness. (Color): Adjusts the color. (Vividness): Adjusts the vividness. (Picture Effect): Selects the desired effect filter for shooting.4Select the desired setting by turning the control wheel. Or, select the desired setting by touching the indicator or the item on the screen.• Repeat Steps 3 – 4 to combine the various functions.010COV.book Page 41 Monday, July 30, 2012 4:55 PM](https://usermanual.wiki/Sony-Group/NEX5R.User-Manual-65296-65297/User-Guide-1789959-Page-41.png)
![NEX-5R4-437-511-11(1)C:\01GB-NEX5RUC2\050REC.fmmaster: LeftGB42• [Photo Creativity] is only available when an E-mount lens is mounted.• [Photo Creativity] is only available when [Intelligent Auto] or [Superior Auto] is selected.xDefocusing the background easily (Background Defocus Control)• The defocusing effect may not be noticeable, depending on the distance from the subject or the lens used.Notes1Select (Bkground Defocus) (page 41).2Defocus the background by turning the control wheel. Or, slide your finger along the indicator on the screen.: You can focus on both the subject and the background.: You can defocus the background.• Select AUTO to restore the original status.• You can record a movie with a value adjusted with the defocusing effect.NoteszTips for a better result of Background Defocus• Move closer to the subject.• Lengthen the distance between the subject and the background.010COV.book Page 42 Monday, July 30, 2012 4:55 PM](https://usermanual.wiki/Sony-Group/NEX5R.User-Manual-65296-65297/User-Guide-1789959-Page-42.png)
![NEX-5R4-437-511-11(1)C:\01GB-NEX5RUC2\050REC.fmmaster: RightGB43Using the recording functionsxPicture Effect1Select (Picture Effect) (page 41).2Select the desired effect by turning the control wheel. Or, slide your finger across the screen upward or downward to select the desired effect. (Off): Disables the Picture Effect function. (Toy Camera): Creates the look of a Toy Camera photo with shaded corners and pronounced colors. (Pop Color): Creates a vivid look by emphasizing color tones. (Posterization: Color): Creates a high contrast, abstract look by heavily emphasizing primary colors. (Posterization: B/W): Creates a high contrast, abstract look in black and white. (Retro Photo): Creates the look of an aged photo with sepia color tones and faded contrast. (Soft High-key): Creates an image with the indicated atmosphere: bright, transparent, ethereal, tender, soft. (Partial Color): Creates an image which retains the specified color, but converts others to black and white. (High Contrast Mono.): Creates an image with high contrast in black and white.• You can use more picture effects. Select MENU t [Brightness/ Color] t [Picture Effect].010COV.book Page 43 Monday, July 30, 2012 4:55 PM](https://usermanual.wiki/Sony-Group/NEX5R.User-Manual-65296-65297/User-Guide-1789959-Page-43.png)
![NEX-5R4-437-511-11(1)C:\01GB-NEX5RUC2\050REC.fmmaster: LeftGB44Adjusting the brightness of still images (Exposure compensation)You can adjust the exposure in 1/3 EV steps in a range of –3.0 EV to +3.0 EV.Using the self-timer1Press (Exposure Comp.) on the control wheel.2Turn the control wheel or control dial to select the desired value, and press the center.Or, select the desired value by sliding your finger along the indicator on the screen.• When the image is too bright, set [Exposure Comp.] toward –.• When the image is too dark, set [Exposure Comp.] toward +.1Press (Drive Mode) on the control wheel.2Turn the control wheel to select (Self-timer).Or, slide your finger across the screen upward or downward to move (Self-timer) to the center of the screen.010COV.book Page 44 Monday, July 30, 2012 4:55 PM](https://usermanual.wiki/Sony-Group/NEX5R.User-Manual-65296-65297/User-Guide-1789959-Page-44.png)
![NEX-5R4-437-511-11(1)C:\01GB-NEX5RUC2\050REC.fmmaster: LeftGB46Changing the screen display (DISP)1Press DISP (Display Contents) on the control wheel.2Press DISP repeatedly to select the desired mode.During shootingGraphic Display: Shows basic shooting information. Graphically shows the shutter speed and aperture value, except for when [Shoot Mode] is set to [Sweep Panorama].Display All Info.: Shows recording information.Big Font Size Disp.: Shows only major items in a larger size.No Disp. Info.: Does not show recording information.Level: Displays an indicator guide showing the angle of inclination of the camera to the front, back, left or right side.Histogram: Displays the luminance distribution graphically.For viewfinder: Shows only shooting information on the screen (no image). Select this mode when you shoot using a viewfinder (sold separately).During playbackDisplay Info.: Shows recording information.Histogram: Displays the luminance distribution graphically, in addition to recording information.No Disp. Info.: Does not show recording information.zShooting continuously at a higher speedSelect (Spd Priority Cont.) from (Drive Mode) to shoot continuously at higher speed (max. 10 images per second).010COV.book Page 46 Monday, July 30, 2012 4:55 PM](https://usermanual.wiki/Sony-Group/NEX5R.User-Manual-65296-65297/User-Guide-1789959-Page-46.png)
![NEX-5R4-437-511-11(1)C:\01GB-NEX5RUC2\050REC.fmmaster: RightGB47Using the recording functionsShooting with various shooting modes1Select MENU t [Shoot Mode].2Turn the control wheel to select the desired mode, and press the center.Or, slide your finger across the screen upward or downward to move the desired mode to the center of the screen, then touch the desired mode. (Intelligent Auto): The camera evaluates the subject and makes the proper settings.SCN (Scene Selection): Shoots with preset settings according to the subject or condition. (Sweep Panorama): Shoots with panoramic size.M (Manual Exposure): Adjusts the aperture and shutter speed.S (Shutter Priority): Adjusts the shutter speed to express the movement of the subject.A (Aperture Priority): Adjusts the range in focus, or defocuses the background.P (Program Auto): Automatic shooting that allows you to customize settings, except for the exposure (shutter speed and aperture). (Superior Auto): Shoots images with a wider range of shooting functions than those of Intelligent Auto shooting. Recognizes and evaluates the shooting conditions automatically, performs Auto HDR, and chooses the best image.010COV.book Page 47 Monday, July 30, 2012 4:55 PM](https://usermanual.wiki/Sony-Group/NEX5R.User-Manual-65296-65297/User-Guide-1789959-Page-47.png)
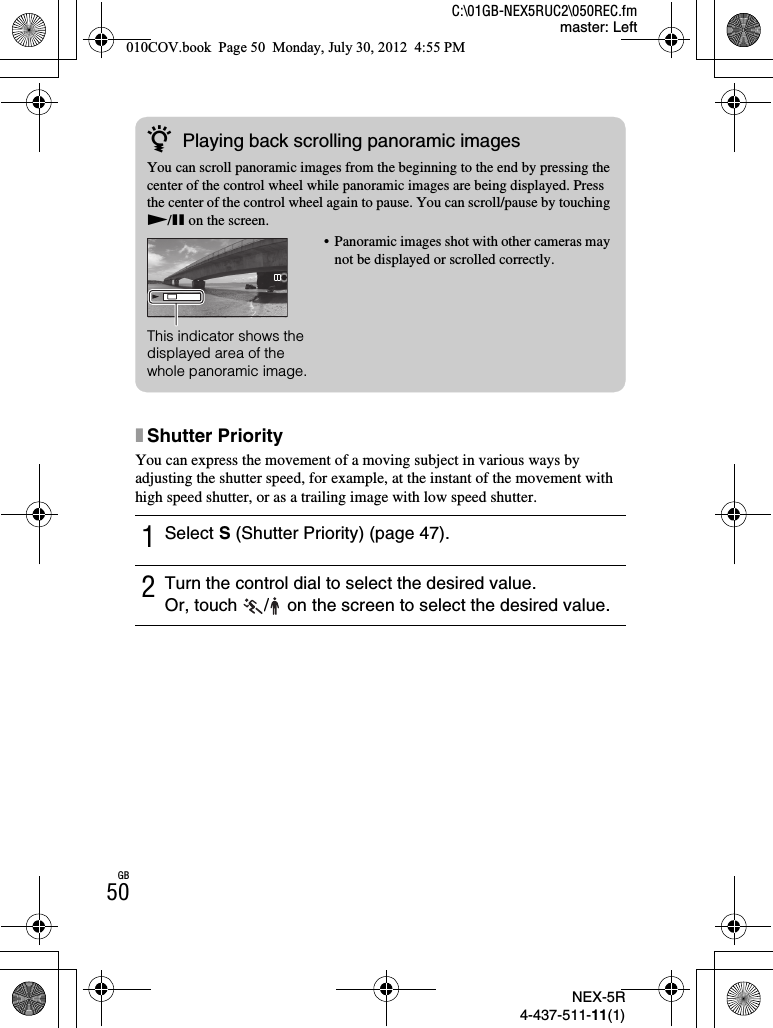
![NEX-5R4-437-511-11(1)C:\01GB-NEX5RUC2\050REC.fmmaster: RightGB49Using the recording functionsxSweep PanoramaWhile you pan the camera, the camera shoots several images and composes them into one panoramic image.• The camera shoots continuously during [Sweep Panorama] recording, and the shutter continues to click until shooting is finished.• You cannot record images when using touch shutter.1Set the shooting mode to (Sweep Panorama) (page 47).2Select the shooting direction by turning the control dial.3Point the camera at the subject for which you want to set the brightness and focus, and then press the shutter button halfway down.This part will not be taken.4Keep the shutter button pressed halfway down and point the camera at the edge of the subject, and then press the shutter button fully down.5Pan the camera to the end, following the guidance on the LCD screen.Guidance barNotes010COV.book Page 49 Monday, July 30, 2012 4:55 PM](https://usermanual.wiki/Sony-Group/NEX5R.User-Manual-65296-65297/User-Guide-1789959-Page-49.png)