Sony Group NEX6 Interchangeable Lens Digital Camera User Manual 010COV
Sony Corporation Interchangeable Lens Digital Camera 010COV
UserManual.wiki
>
Sony Group
>
NEX6 User Manual
User Manual
Navigation menu
Upload a User Manual
Namespaces
Wiki Guide
HTML
PDF
Info
Views
User Manual
Discussion / Help
Navigation

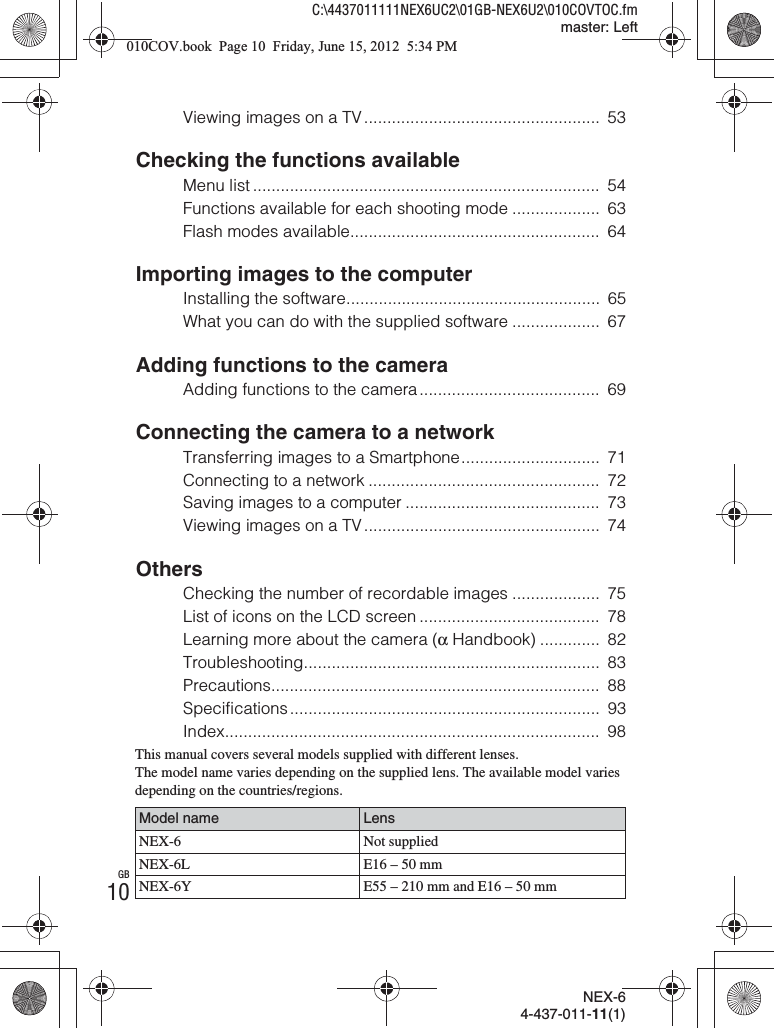
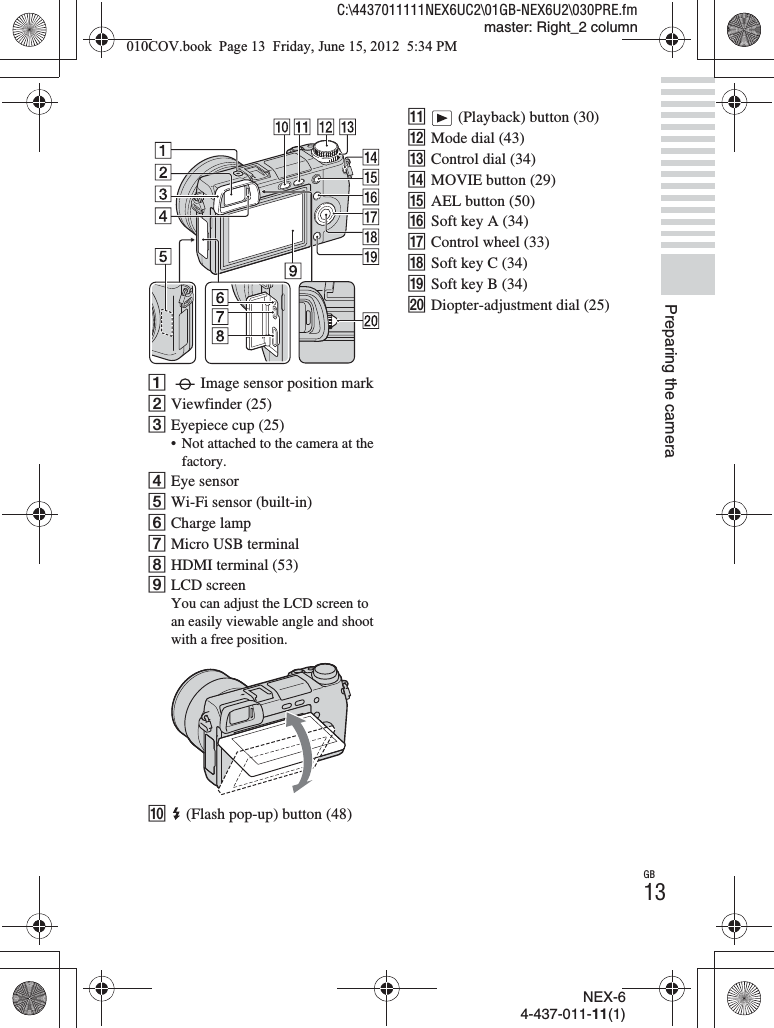
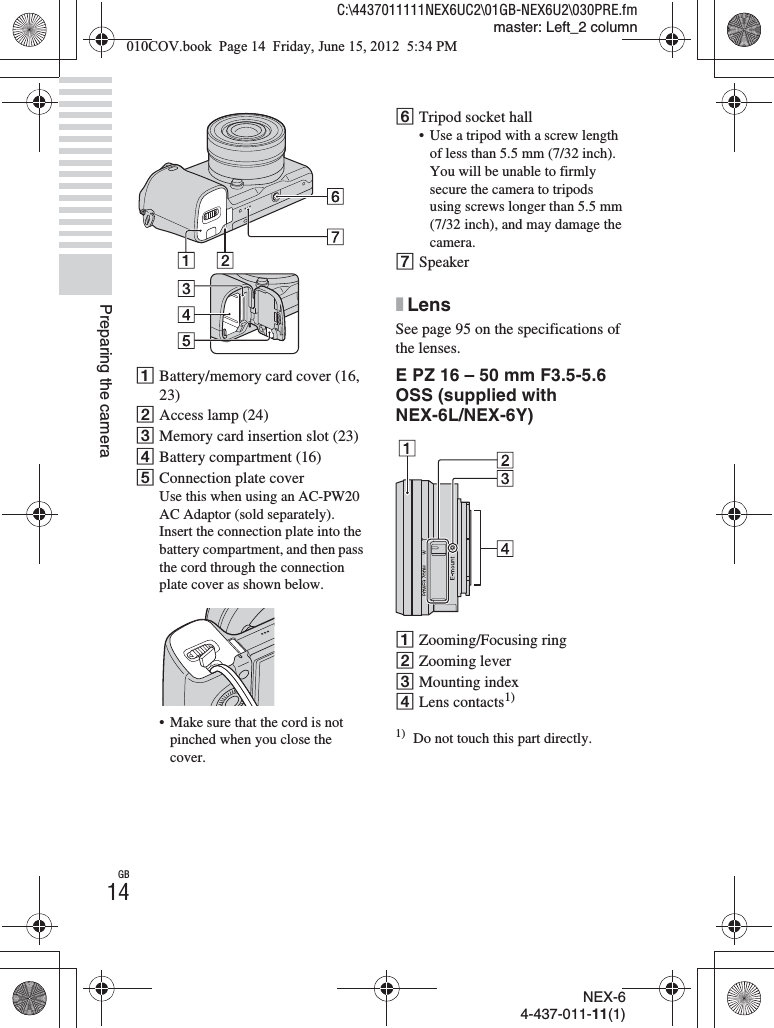
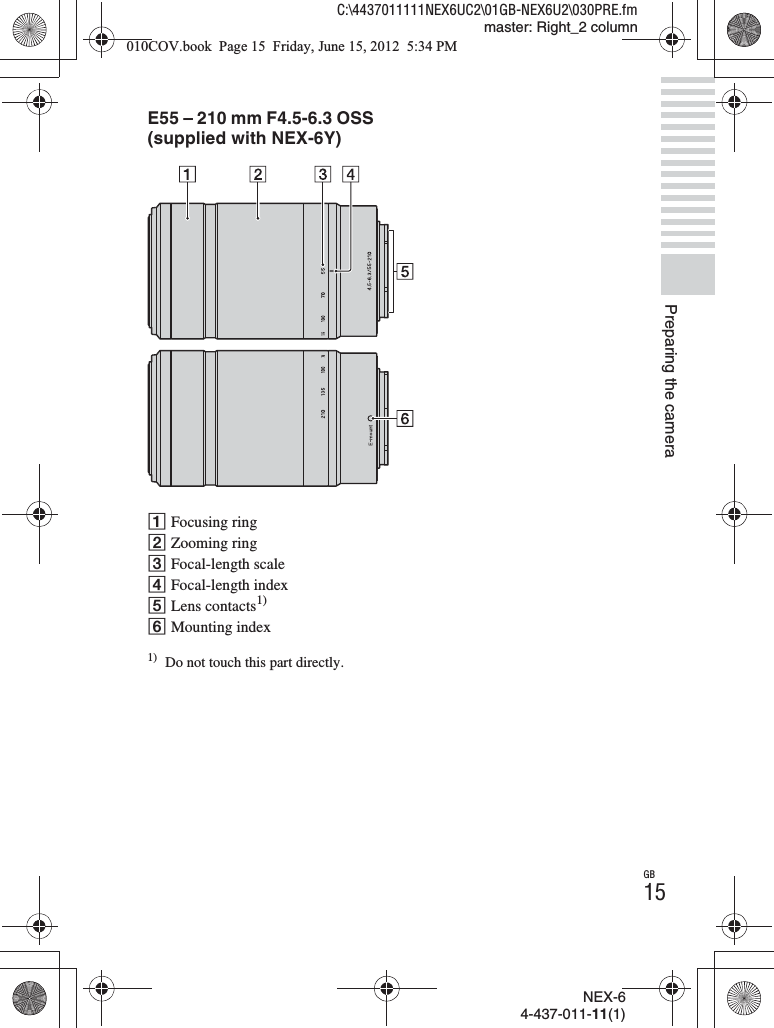
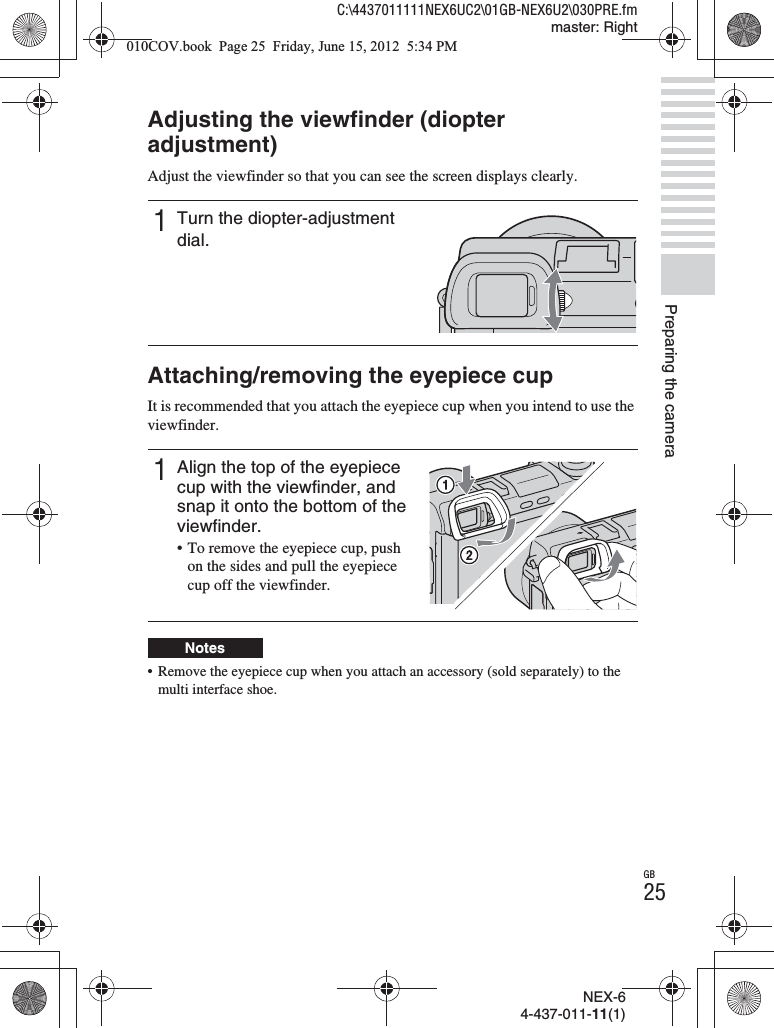
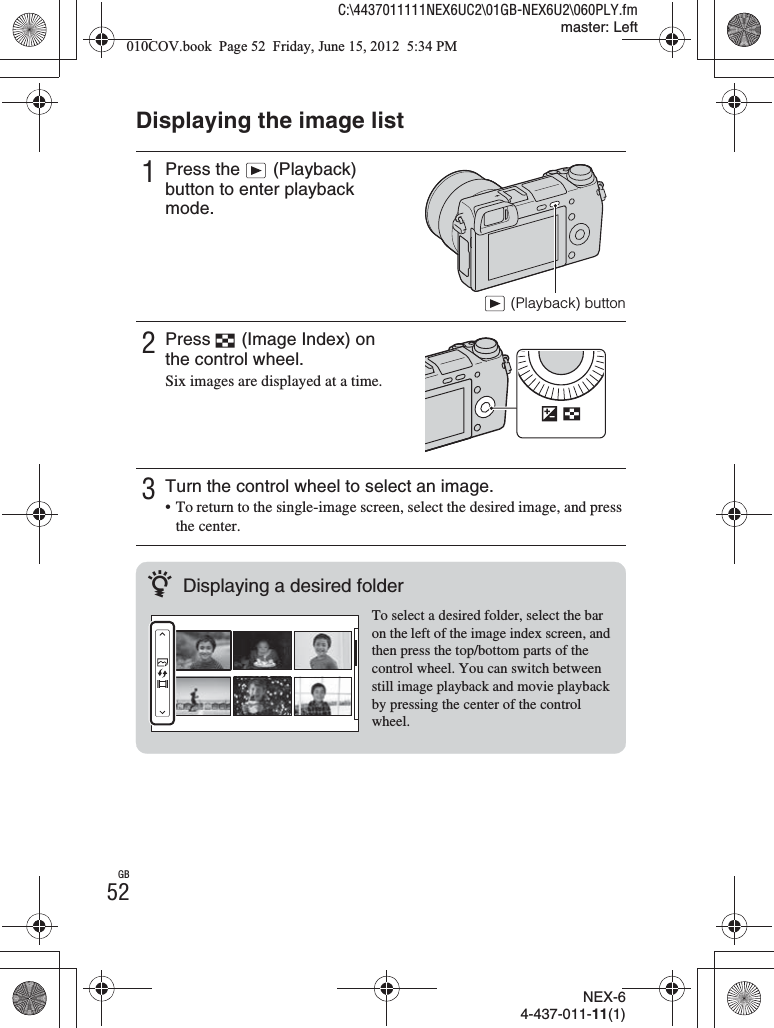
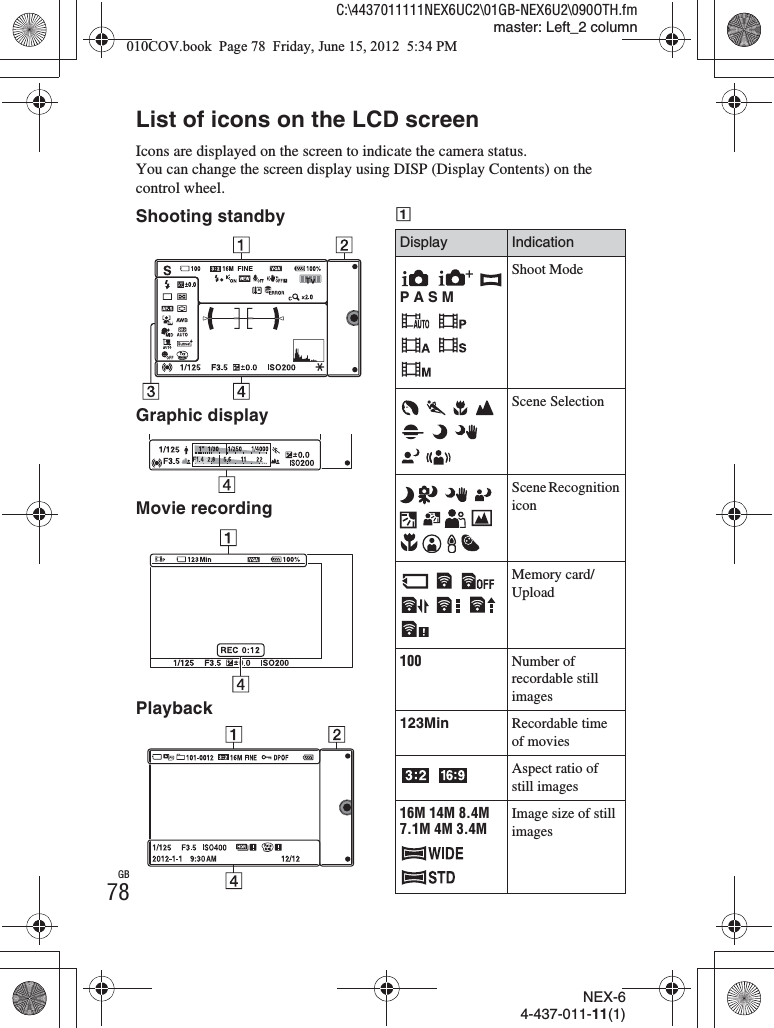
![NEX-64-437-011-11(1)C:\4437011111NEX6UC2\01GB-NEX6U2\010COVTOC.fmmaster: RightGB9Table of contentsPreparing the cameraChecking the supplied items ............................................11Identifying parts ................................................................12Charging the battery pack ................................................16Attaching/removing the lens .............................................21Inserting a memory card (sold separately) .......................23Adjusting the viewfinder (diopter adjustment) ..................25Attaching/removing the eyepiece cup ..............................25Setting the date and time ..................................................26Mastering the basic operationShooting still images .........................................................28Recording movies .............................................................29Playing back images ........................................................30Deleting images ................................................................32Operating the camera .......................................................33Using the guide function of the camera ...........................35Using the recording functionsZooming............................................................................ 36Setting the function using [Photo Creativity]..................... 37Adjusting the brightness of still images (Exposure compensation).................................................................. 40Using the self-timer........................................................... 40Shooting still images continuously.................................... 41Changing the screen display (DISP) ................................ 42Shooting with various shooting modes ............................. 43Selecting the flash mode .................................................. 48Setting using the Fn (Function) button.............................. 49Fixing the exposure using the AEL button........................ 50Selecting the image size/record setting ........................... 51Using the playback functionsDisplaying the image list................................................... 52010COV.book Page 9 Friday, June 15, 2012 5:34 PM](https://usermanual.wiki/Sony-Group/NEX6/User-Guide-1790086-Page-9.png)

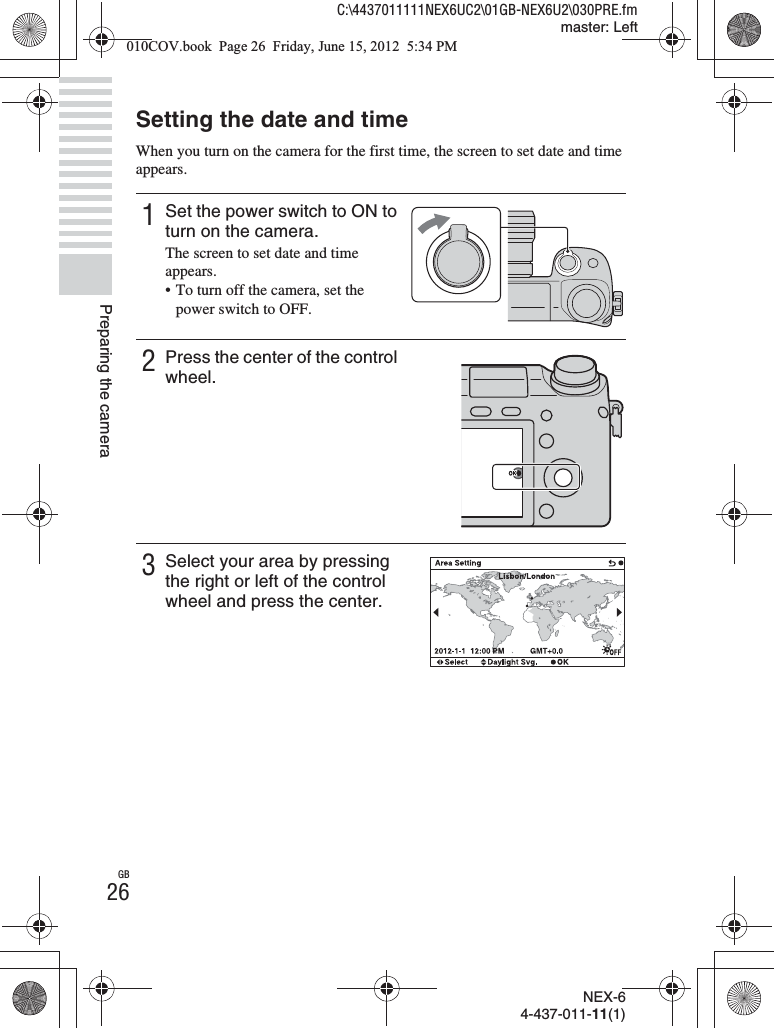
![NEX-64-437-011-11(1)C:\4437011111NEX6UC2\01GB-NEX6U2\030PRE.fmmaster: RightGB27Preparing the camera• You cannot superimpose the date on images on this camera. Using “PlayMemories Home” stored on the CD-ROM (supplied), you can save or print images with date. Refer to “PlayMemories Home Help Guide” for more details (page 67).xResetting the date and time/Checking the current clock settingSelect MENU t [Setup] t [Date/Time Setup] (page 60).xMaintaining the date and time settingThis camera has an internal rechargeable battery for maintaining the date and time and other settings regardless of whether the power is on or off, or the battery is installed or not. For details, see page 90.4Press the left or right of the control wheel to select each item, and press the top or bottom, or turn it to select the numeric value.Daylight Svg.: Turns on or off the daytime saving time setting.Date Format: Selects the format to display date.• Midnight is indicated as 12:00 AM, and noon as 12:00 PM.5Repeat step 4 to set other items, and then press the center of the control wheel.Notes010COV.book Page 27 Friday, June 15, 2012 5:34 PM](https://usermanual.wiki/Sony-Group/NEX6/User-Guide-1790086-Page-27.png)
![NEX-64-437-011-11(1)C:\4437011111NEX6UC2\01GB-NEX6U2\040BAS.fmmaster: RightGB29Mastering the basic operationRecording movies4Press the shutter button halfway down to focus.When the focus is confirmed, beeps sound and z lights up.Focus indicator5Press the shutter button fully down.When the camera detects and shoots a face with [Auto Port. Framing] set to [Auto], the captured image is automatically trimmed into a suitable composition. Both the original and the trimmed images are saved.1Point the camera to the subject.2Press the MOVIE button to start recording.• Focus and brightness are adjusted automatically.• If you press the shutter button halfway down during recording, you will be able to focus more quickly. MOVIE button3Press the MOVIE button again to stop recording.010COV.book Page 29 Friday, June 15, 2012 5:34 PM](https://usermanual.wiki/Sony-Group/NEX6/User-Guide-1790086-Page-29.png)
![NEX-64-437-011-11(1)C:\4437011111NEX6UC2\01GB-NEX6U2\040BAS.fmmaster: LeftGB30Mastering the basic operation• The sound of the camera and the lens in operation might be recorded while recording a movie. You can disable the sound recording by selecting MENU t [Setup] t [Movie Audio Rec] t [Off] (page 60).• The continuous recording time of a movie depends on the ambient temperature or the condition of the camera.• When you are recording continuously for a long time, you may feel that the camera is warm. This is normal. Also, “Internal temp. high. Allow it to cool.” may appear. In such cases, turn the camera off and wait until the camera is ready to shoot again.Playing back imagesxSelecting the imageTurn the control wheel.Notes1Press the (Playback) button.The last recorded image is displayed on the LCD screen.• Press the center of the control wheel to enlarge the displayed image.(Playback) button010COV.book Page 30 Friday, June 15, 2012 5:34 PM](https://usermanual.wiki/Sony-Group/NEX6/User-Guide-1790086-Page-30.png)
![NEX-64-437-011-11(1)C:\4437011111NEX6UC2\01GB-NEX6U2\040BAS.fmmaster: RightGB31Mastering the basic operationxPlaying back movies* The movie is played back frame-by-frame.1Select MENU t [Playback] t [Still/Movie Select] t [Folder View(MP4)] or [AVCHD View].• To return to still image playback, select [Folder View(Still)].2Turn the control wheel to select the desired movie, and press the center.During movie playback Control wheel operationPause/resume Press the center.Fast-forward Press the right, or turn the control wheel clockwise.Fast-rewind Press the left, or turn the control wheel counterclockwise.Forward slow playback Turn clockwise during pause.Reverse slow playback* Turn counterclockwise during pause.Adjust sound volume Press the bottom t top/bottom.010COV.book Page 31 Friday, June 15, 2012 5:34 PM](https://usermanual.wiki/Sony-Group/NEX6/User-Guide-1790086-Page-31.png)
![NEX-64-437-011-11(1)C:\4437011111NEX6UC2\01GB-NEX6U2\040BAS.fmmaster: LeftGB32Mastering the basic operationDeleting imagesYou can delete the image that is currently displayed.1Press (Delete).2Press the center of the control wheel.• Select to quit the operation.zDeleting several imagesSelect MENU t [Playback] t [Delete] to select and delete several images at the same time.010COV.book Page 32 Friday, June 15, 2012 5:34 PM](https://usermanual.wiki/Sony-Group/NEX6/User-Guide-1790086-Page-32.png)
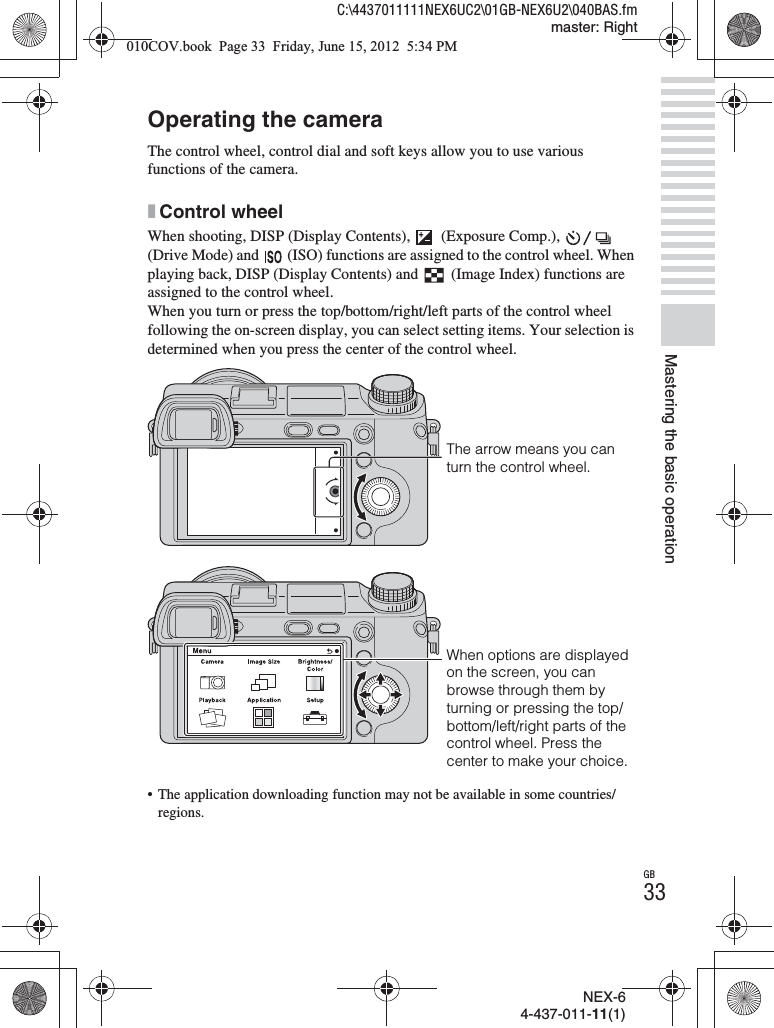
![NEX-64-437-011-11(1)C:\4437011111NEX6UC2\01GB-NEX6U2\040BAS.fmmaster: RightGB35Mastering the basic operationUsing the guide function of the cameraThe camera provides various “Help Guides” which explain the functions, and “Shooting tips” which introduce tips for better shooting. Use these guides to make better use of the camera.xHelp GuidesThe camera displays the Help Guides to explain the selected function, when you change the setting, etc.You can hide the Help Guides by selecting MENU t [Setup] t [Help Guide Display] t [Off].xShooting tipsYou can display shooting tips for better shooting from [Table of contents] by selecting MENU t [Camera] t [Shooting Tip List].You can also assign [Shoot. Tips] to the AEL button or soft key B.010COV.book Page 35 Friday, June 15, 2012 5:34 PM](https://usermanual.wiki/Sony-Group/NEX6/User-Guide-1790086-Page-35.png)
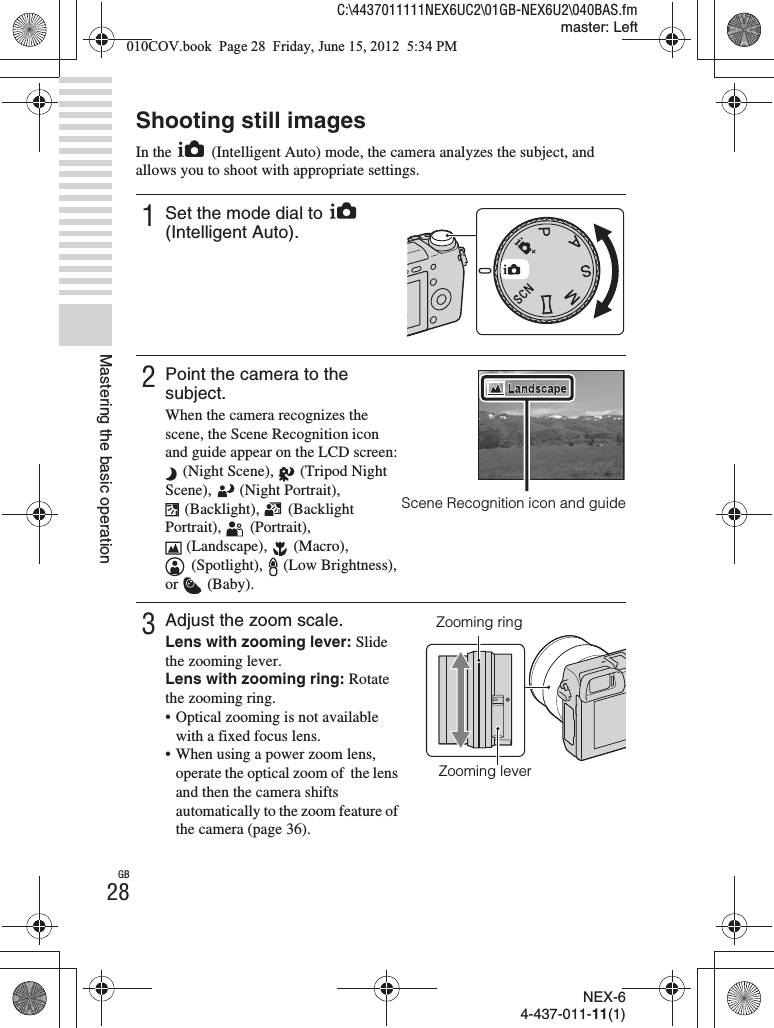
![NEX-64-437-011-11(1)C:\4437011111NEX6UC2\01GB-NEX6U2\050REC.fmmaster: LeftGB36Using the recording functionsZoomingWith the [Zoom] feature of the camera, you can increase the magnification to a scale greater than that of the optical zoom scale of the lens.When using a power zoom lens, operate the optical zoom of the lens and then camera shifts automatically to the [Zoom] feature of the camera. When using a lens which is not equipped with a power zoom, follow the instruction below after magnifying by using the optical zoom.1Select MENU t [Camera] t [Zoom] t desired value.zThe [Zoom] features available with this cameraThe [Zoom] feature of the camera provides higher magnification by combining various zoom features. The icon displayed on the LCD screen changes as follows, according to the selected zoom feature.1 : The [Zoom] feature of the camera is not used. (×1.0 is indicated.)2 Smart Zoom: You can magnify images by trimming them partially. (Available only when [Image Size] is set to [M] or [S].)3 Clear Image Zoom: You can magnify images using high-resolution image processing.4 Digital Zoom: You can magnify images using image processing. (The default setting is [Off].)Zoom scale (low) Zoom scale (high)010COV.book Page 36 Friday, June 15, 2012 5:34 PM](https://usermanual.wiki/Sony-Group/NEX6/User-Guide-1790086-Page-36.png)
![NEX-64-437-011-11(1)C:\4437011111NEX6UC2\01GB-NEX6U2\050REC.fmmaster: RightGB37Using the recording functionsSetting the function using [Photo Creativity]You can operate the camera intuitively using [Photo Creativity], since the [Photo Creativity] screen is designed for more intuitive operations than a normal screen. You can shoot a subject with easy operations and obtain creative photos easily.• [Photo Creativity] is only available when an E-mount lens is mounted.1Set the mode dial to (Intelligent Auto) or (Superior Auto).2Press the bottom of the control wheel.The [Photo Creativity] screen appears.3Select the item you want to adjust by pressing the right/left of the control wheel. (Bkground Defocus): Adjusts the blurring of the background. (Brightness): Adjusts the brightness. (Color): Adjusts the color. (Vividness): Adjusts the vividness. (Picture Effect): Selects the desired effect filter for shooting.4Select the desired setting by turning the control wheel.• Repeat Steps 2 – 4 to combine the various functions.Notes010COV.book Page 37 Friday, June 15, 2012 5:34 PM](https://usermanual.wiki/Sony-Group/NEX6/User-Guide-1790086-Page-37.png)
![NEX-64-437-011-11(1)C:\4437011111NEX6UC2\01GB-NEX6U2\050REC.fmmaster: LeftGB38• [Photo Creativity] is only available when [Intelligent Auto] or [Superior Auto] is selected.xDefocusing the background easily (Background Defocus Control)• The defocusing effect may not be noticeable, depending on the distance from the subject or the lens used.1Select (Bkground Defocus) (page 37).2Defocus the background by turning the control wheel.: You can focus on both the subject and the background.: You can defocus the background.• Select AUTO to restore the original status.• You can record a movie with a value adjusted with the defocusing effect.NoteszTips for a better result of Background Defocus• Move closer to the subject.• Lengthen the distance between the subject and the background.010COV.book Page 38 Friday, June 15, 2012 5:34 PM](https://usermanual.wiki/Sony-Group/NEX6/User-Guide-1790086-Page-38.png)
![NEX-64-437-011-11(1)C:\4437011111NEX6UC2\01GB-NEX6U2\050REC.fmmaster: RightGB39Using the recording functionsxPicture Effect1Select (Picture Effect) (page 37).2Select the desired effect by turning the control wheel. (Off): Disables the Picture Effect function. (Toy Camera): Creates the look of a Toy Camera photo with shaded corners and pronounced colors. (Pop Color): Creates a vivid look by emphasizing color tones. (Posterization: Color): Creates a high contrast, abstract look by heavily emphasizing primary colors. (Posterization: B/W): Creates a high contrast, abstract look in black and white. (Retro Photo): Creates the look of an aged photo with sepia color tones and faded contrast. (Soft High-key): Creates an image with the indicated atmosphere: bright, transparent, ethereal, tender, soft. (Partial Color): Creates an image which retains the specified color, but converts others to black and white. (High Contrast Mono.): Creates an image with high contrast in black and white.• You can use more picture effects. Select MENU t [Brightness/Color] t [Picture Effect].010COV.book Page 39 Friday, June 15, 2012 5:34 PM](https://usermanual.wiki/Sony-Group/NEX6/User-Guide-1790086-Page-39.png)
![NEX-64-437-011-11(1)C:\4437011111NEX6UC2\01GB-NEX6U2\050REC.fmmaster: LeftGB40Adjusting the brightness of still images (Exposure compensation)You can adjust the exposure in 1/3 EV steps in a range of –3.0 EV to +3.0 EV.Using the self-timer1Press (Exposure Comp.) on the control wheel.2Turn the control wheel or the control dial to select the desired value, and press the center.• When the image is too bright, set [Exposure Comp.] toward –.• When the image is too dark, set [Exposure Comp.] toward +.1Press (Drive Mode) on the control wheel.2Turn the control wheel to select (Self-timer).010COV.book Page 40 Friday, June 15, 2012 5:34 PM](https://usermanual.wiki/Sony-Group/NEX6/User-Guide-1790086-Page-40.png)
![NEX-64-437-011-11(1)C:\4437011111NEX6UC2\01GB-NEX6U2\050REC.fmmaster: LeftGB42Changing the screen display (DISP)1Press DISP (Display Contents) on the control wheel.2Press DISP repeatedly to select the desired mode.During shootingGraphic Display: Shows basic shooting information. Graphically shows the shutter speed and aperture value, except for when [Shoot Mode] is set to [Sweep Panorama].Display All Info.: Shows recording information.Big Font Size Disp.: Shows only major items in a larger size.No Disp. Info.: Does not show recording information.Level: Displays an indicator guide showing the angle ofinclination of the camera to the front, back, left or right side.Histogram: Displays the luminance distribution graphically.For viewfinder: Shows only shooting information on the screen (no image). Select this mode when you shoot using a viewfinder. Press the Fn (Function) button and select the function for which you want to change the setting. The setting screen for the selected function opens. (Quick Navi)During playbackDisplay Info.: Shows recording information.Histogram: Displays the luminance distribution graphically, in addition to recording information.No Disp. Info.: Does not show recording information.010COV.book Page 42 Friday, June 15, 2012 5:34 PM](https://usermanual.wiki/Sony-Group/NEX6/User-Guide-1790086-Page-42.png)
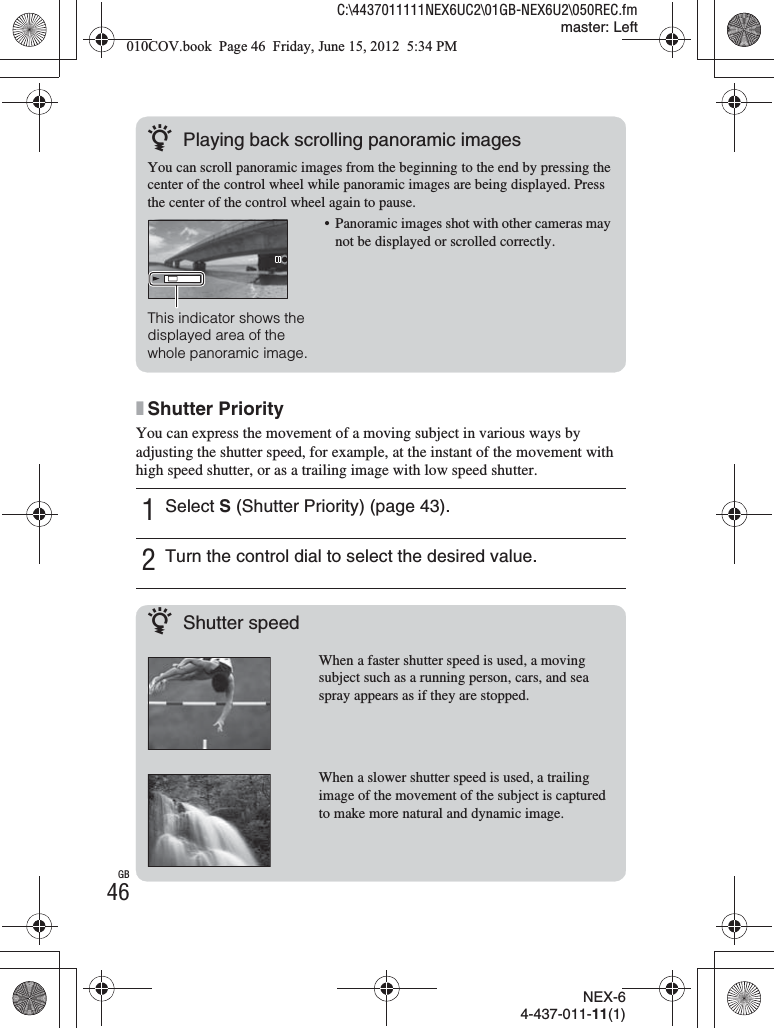
![NEX-64-437-011-11(1)C:\4437011111NEX6UC2\01GB-NEX6U2\050REC.fmmaster: RightGB45Using the recording functionsxSweep PanoramaWhile you pan the camera, the camera shoots several images and composes them into one panoramic image.• The camera shoots continuously during [Sweep Panorama] recording, and the shutter continues to click until shooting is finished.1Set the shooting mode to (Sweep Panorama) (page 43).2Select the shooting direction by turning the control dial.3Point the camera at the subject for which you want to set the brightness and focus, and then press the shutter button halfway down.This part will not be taken.4Keep the shutter button pressed halfway down and point the camera at the edge of the subject, and then press the shutter button fully down.5Pan the camera to the end, following the guidance on the LCD screen.Guidance barNotes010COV.book Page 45 Friday, June 15, 2012 5:34 PM](https://usermanual.wiki/Sony-Group/NEX6/User-Guide-1790086-Page-45.png)
![NEX-64-437-011-11(1)C:\4437011111NEX6UC2\01GB-NEX6U2\050REC.fmmaster: RightGB47Using the recording functionsx Aperture PriorityYou can adjust the range in focus, or defocuses the background.xProgram Auto/Superior AutoIn [Superior Auto] mode, the camera shoots with higher quality than [Intelligent Auto] mode and perform composite shooting as necessary.In [Program Auto] mode, you can shoot after adjusting various functions, such as white balance, ISO, etc.• In [Superior Auto] mode, the recording process takes longer, since the camera must make a composite image.1Select A (Aperture Priority) (page 43).2Turn the control dial to select the desired value.• You can record a movie with a value adjusted with [Aperture Priority].1Select (Program Auto) or (Superior Auto) (page 43).2Press the shutter button.Shooting mode Your purpose (Intelligent Auto) • Select this mode to easily recognize the scene and shoot continuous images. (Program Auto)• Select this mode to shoot with various functions other than the exposure (shutter speed and aperture) adjusted. (Superior Auto)• Select this mode to shoot scenes under difficult circumstances, such as when you have dark scenes, or back-lit subjects.• Select this mode to shoot a higher quality image than that offered by [Intelligent Auto].Notes010COV.book Page 47 Friday, June 15, 2012 5:34 PM](https://usermanual.wiki/Sony-Group/NEX6/User-Guide-1790086-Page-47.png)
![NEX-64-437-011-11(1)C:\4437011111NEX6UC2\01GB-NEX6U2\050REC.fmmaster: LeftGB48Selecting the flash mode• You cannot select [Fill-flash] with [Intelligent Auto], [Superior Auto].• When the camera is charging the flash, blinks on the LCD screen. You cannot press the shutter button when this icon is blinking.1When you want to fire the flash, press the (flash pop-up) button to pop up the flash.• When you do not intend to use the flash, push it back in place with your finger. (flash pop-up) button2Select MENU t [Camera] t [Flash Mode].3Turn the control wheel to select the desired mode, and press the center. (Flash Off): Does not fire even if the flash is raised. (Autoflash): Fires in dark environments or when shooting towards bright light. (Fill-flash): Fires every time you trigger the shutter. (Slow Sync.): Fires every time you trigger the shutter. Slow sync shooting allows you to shoot a clear image of both the subject and the background. (Rear Sync.): Fires right before the exposure is completed every time you trigger the shutter. A trailing image of the movement of the subject is captured to make more natural image. (Wireless): This mode is effective when you attach a remote control-compatible external flash (sold separately) to the camera, and shoot with a wireless flash (sold separately), placed away from the camera.• The selectable items of the flash mode depends on the shooting mode (page 64).Notes010COV.book Page 48 Friday, June 15, 2012 5:34 PM](https://usermanual.wiki/Sony-Group/NEX6/User-Guide-1790086-Page-48.png)
![NEX-64-437-011-11(1)C:\4437011111NEX6UC2\01GB-NEX6U2\050REC.fmmaster: RightGB49Using the recording functionsThe flash rangeThe range of the flash depends on the ISO sensitivity and aperture value.Setting using the Fn (Function) buttonF2.8 F3.5 F5.6ISO200 xx m – xx m(xx feet – xx feet)xx m – xx m(xx feet – xx feet)xx m – xx m(xx feet – xx feet)ISO3200 xx m – xx m(xx feet – xx feet)xx m – xx m(xx feet – xx feet)xx m – xx m(xx feet – xx feet)1Press the Fn (Function) button.2Select a desired function by pressing the right/left side of the control wheel.3Turn the control wheel to select the desired settings.Fn (Function) buttonzHow to assign other functions to the Fn (Function) buttonThe following functions are assigned to the Fn (Function) button by the default settings. (AF/MF Select)/ (Autofocus Mode)/ (Autofocus Area)/(White Balance)/ (Metering Mode)/ (Picture Effect)You can change the functions assigned to the Fn (Function) button by selecting MENU t [Setup] t [Function Settings].010COV.book Page 49 Friday, June 15, 2012 5:34 PM](https://usermanual.wiki/Sony-Group/NEX6/User-Guide-1790086-Page-49.png)
![NEX-64-437-011-11(1)C:\4437011111NEX6UC2\01GB-NEX6U2\050REC.fmmaster: LeftGB50Fixing the exposure using the AEL button1Focus on the spot for which you want to set the exposure.2Press the AEL button.The exposure value is fixed and the (AE lock) lights up.3Focus on your subject and shoot.AEL buttonzHow to keep the AE locked after you have released the AEL buttonSelect MENU t [Setup] t [Custom Key Settings] t [Func. of AEL button] t [AEL toggle].010COV.book Page 50 Friday, June 15, 2012 5:34 PM](https://usermanual.wiki/Sony-Group/NEX6/User-Guide-1790086-Page-50.png)
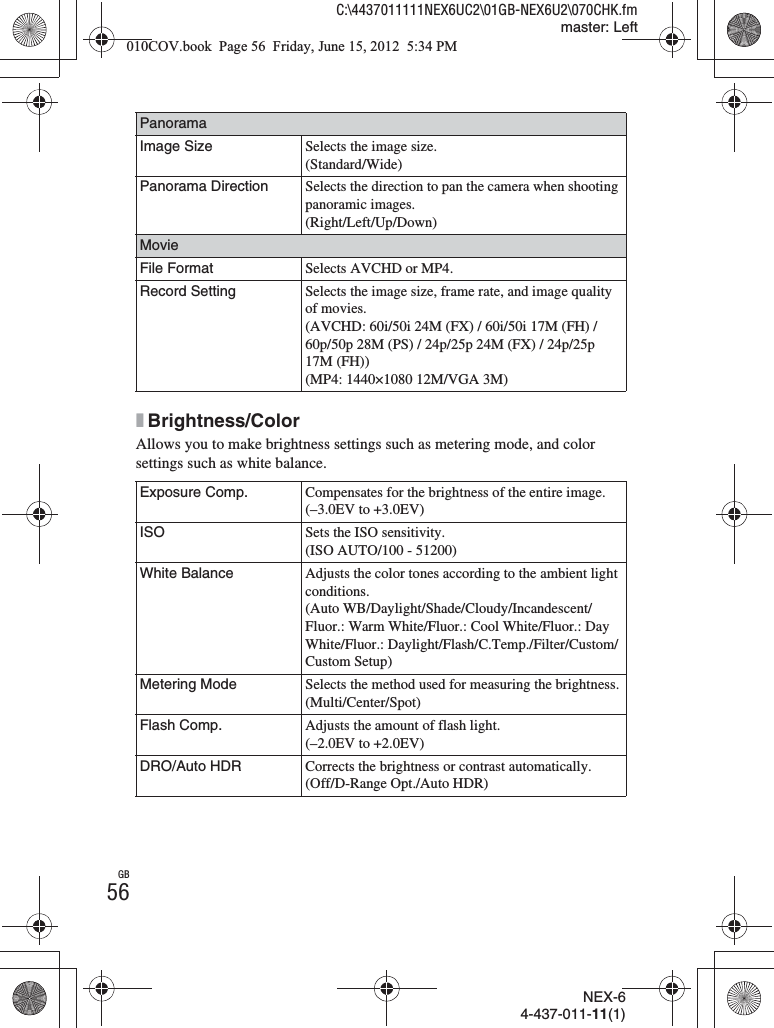
![NEX-64-437-011-11(1)C:\4437011111NEX6UC2\01GB-NEX6U2\050REC.fmmaster: RightGB51Using the recording functionsSelecting the image size/record settingThe image size determines the size of the image file that is recorded when you take an image. The larger the image size, the more detail will be reproduced when the image is printed on large format paper. The smaller the image size, the more images can be recorded.In the case of movies, the larger the bit-rate, the higher the image quality.Movie* 1080 60i-compatible device** 1080 50i-compatible device• When you print still images recorded with 16:9 aspect ratio, and panoramic images, both edges may be cut off.1Select MENU t [Image Size] t [Image Size].For movie recording, select MENU t [Image Size] t [Record Setting].2Select the desired mode.[File Format]: [AVCHD]Bit-rate Recording60i 24M(FX)*50i 24M(FX)**Maximum 24 MbpsRecords high image quality movies of 1920 × 1080 (60i/50i).60i 17M(FH)*50i 17M(FH)**Average 17 MbpsRecords standard image quality movies of 1920 × 1080 (60i/50i).60p 28M(PS)*50p 28M(PS)**Average 28 MbpsRecords highest image quality movies of 1920 × 1080 (60p/50p).24p 24M(FX)*25p 24M(FX)**Average 24 MbpsRecords high image quality moves of 1920 × 1080 (24p/25p). This produces a cinema-like atmosphere.24p 17M(FH)*25p 17M(FH)**Maximum 17 MbpsRecords standard image quality movies of 1920 × 1080 (24p/25p). This produces a cinema-like atmosphere.[File Format]: [MP4] Bit-rate Recording1440×1080 12MAverage 12 MbpsRecords movies of 1440×1080.VGA 3M Average 3 MbpsRecords movies of VGA size.Notes010COV.book Page 51 Friday, June 15, 2012 5:34 PM](https://usermanual.wiki/Sony-Group/NEX6/User-Guide-1790086-Page-51.png)
![NEX-64-437-011-11(1)C:\4437011111NEX6UC2\01GB-NEX6U2\070CHK.fmmaster: LeftGB54Checking the functions availableMenu listWhen you press MENU, the menu items; [Camera], [Image Size], [Brightness/Color], [Playback], [Application]* and [Setup] appear on the screen.You can set various functions in each item. Items that cannot be set in the context are displayed in gray.* The application downloading function may not be available in some countries/regions.xCameraAllows you to set shooting functions, such as continuous shooting, self-timer, and flash.Drive Mode Selects the drive mode, such as continuous shooting, self-timer, or bracket shooting.(Single Shooting/Cont. Shooting/Spd Priority Cont./Self-timer/Self-timer(Cont)/ Bracket: Cont./Remote Cdr.)Flash Mode Selects the method used to fire the flash.(Flash Off/Autoflash/Fill-flash/Slow Sync./Rear Sync./Wireless)AF/MF Select Selects auto focusing or manual focusing.(Autofocus/DMF/Manual Focus)Autofocus Area Selects the area to be focused on.(Multi/Center/Flexible Spot)Autofocus Mode Selects the autofocus method.(Single-shot AF/Continuous AF)Object Tracking Keeps the focus on a subject while tracking it.Zoom Sets the zoom scale of the [Zoom] feature of the camera.Face Detection Detects people’s faces automatically, and adjusts focus and exposure to suit the faces.(On (Regist. Faces)/On/Off)010COV.book Page 54 Friday, June 15, 2012 5:34 PM](https://usermanual.wiki/Sony-Group/NEX6/User-Guide-1790086-Page-54.png)
![NEX-64-437-011-11(1)C:\4437011111NEX6UC2\01GB-NEX6U2\070CHK.fmmaster: LeftGB58xApplicationYou can add the desired functions to your camera by connecting to the application downloading website “PlayMemories Camera Apps” via internet.xSetupAllows you to make more detailed shooting settings, or change the camera settings.Display Contents Switches the information to be displayed on the playback screen.(Display Info./Histogram/No Disp. Info.)Shooting SettingsAEL w/ shutter Sets whether or not to fix the exposure when you press the shutter button halfway down.(On/Off)AF Illuminator Sets the AF illuminator to assist auto-focusing in dim places.(Auto/Off)Phase Detection AF Sets whether or not to use [Phase Detection AF].(Auto (Display On)/Auto (Display Off)/Off)Red Eye Reduction Provides pre-flash before shooting when using the flash, to prevent eyes from being shot in red.(On/Off)FINDER/LCD Setting Sets how to switch between an Electronic Viewfinder and the LCD screen.(Auto/Viewfinder/LCD Monitor)Live View Display Allows you to choose whether or not to show the value of exposure compensation, etc. on the screen display.(Setting Effect ON/Setting Effect OFF)Auto Review Sets the display time of the image right after shooting.(10 Sec/5 Sec/2 Sec/Off)Grid Line Turns on the grid line that helps you to adjust the composition of images.(Rule of 3rds Grid/Square Grid/Diag. + Square Grid/Off)Peaking Level Enhances the outline of in-focus ranges with a specific color.(High/Mid/Low/Off)010COV.book Page 58 Friday, June 15, 2012 5:34 PM](https://usermanual.wiki/Sony-Group/NEX6/User-Guide-1790086-Page-58.png)
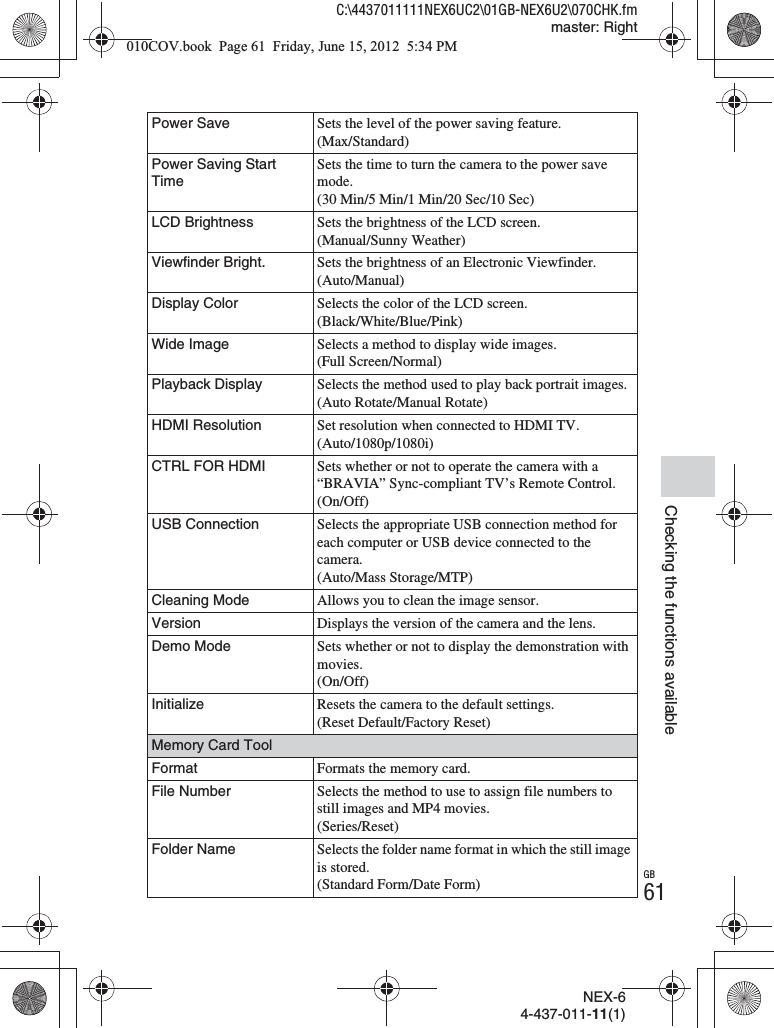
![NEX-64-437-011-11(1)C:\4437011111NEX6UC2\01GB-NEX6U2\070CHK.fmmaster: LeftGB62* This setting appears when an Eye-Fi card is inserted in the camera. Do not use an Eye-Fi card inserted in the camera on an airplane. If an Eye-Fi card is inserted in the camera, set [Upload Settings] to [Off].Eye-Fi cards can be used only in the countries/regions where they were purchased. Use Eye-Fi cards in accordance with the law of the countries/regions where you purchased the card.Select Shoot. Folder Selects the recording folder to which still images and MP4 movies are recorded.New Folder Creates a new folder to which still images and MP4 movies are recorded.Recover Image DB Repairs the image database file when inconsistencies are found.Display Card Space Displays the remaining recording time of movies and the recordable number of still images on the memory card.Eye-Fi Setup*Upload Settings Sets whether to use the upload function of the camera with an Eye-Fi card.(On/Off)Network SettingsWPS Push You can register the access point to the camera easily by pushing the WPS button.Access Point Settings You can register your access point manually.Edit Device Name You can change the device name under Wi-Fi Direct.Disp MAC Address Displays the MAC address of the camera.Reset View on SmartphoneResets the connecting information for [View on Smartphone].Reset Network Settings Resets all the network settings to default settings.010COV.book Page 62 Friday, June 15, 2012 5:34 PM](https://usermanual.wiki/Sony-Group/NEX6/User-Guide-1790086-Page-62.png)

![NEX-64-437-011-11(1)C:\4437011111NEX6UC2\01GB-NEX6U2\070CHK.fmmaster: LeftGB64Flash modes availableThe flash modes you can select depend on the shooting mode and functions selected.In the table below, indicates the function is available, and a – indicates the function is not available.The flash modes you cannot select are displayed in gray on the screen.* The camera emits flash light in slow synchro mode if the flash is necessary.** [Wireless] setting is invalid for the internal flash of the camera.• The flash modes may be limited also by conditions other than the shooting mode.• Even if you select a workable flash mode, the flash does not fire unless it is raised.Shoot Mode Flash Off Autoflash Fill-flash Slow Sync. Rear Sync. Wireless (Intelligent Auto)–––SCN (Scene Selection)–––– ––––––– –––– –––––––––––––– *––––––––– (Sweep Panorama)–––––M (Manual Exposure)–– **S (Shutter Priority)–– **A (Aperture Priority)–– **P (Program Auto)–– ** (Superior Auto)–––Notes010COV.book Page 64 Friday, June 15, 2012 5:34 PM](https://usermanual.wiki/Sony-Group/NEX6/User-Guide-1790086-Page-64.png)
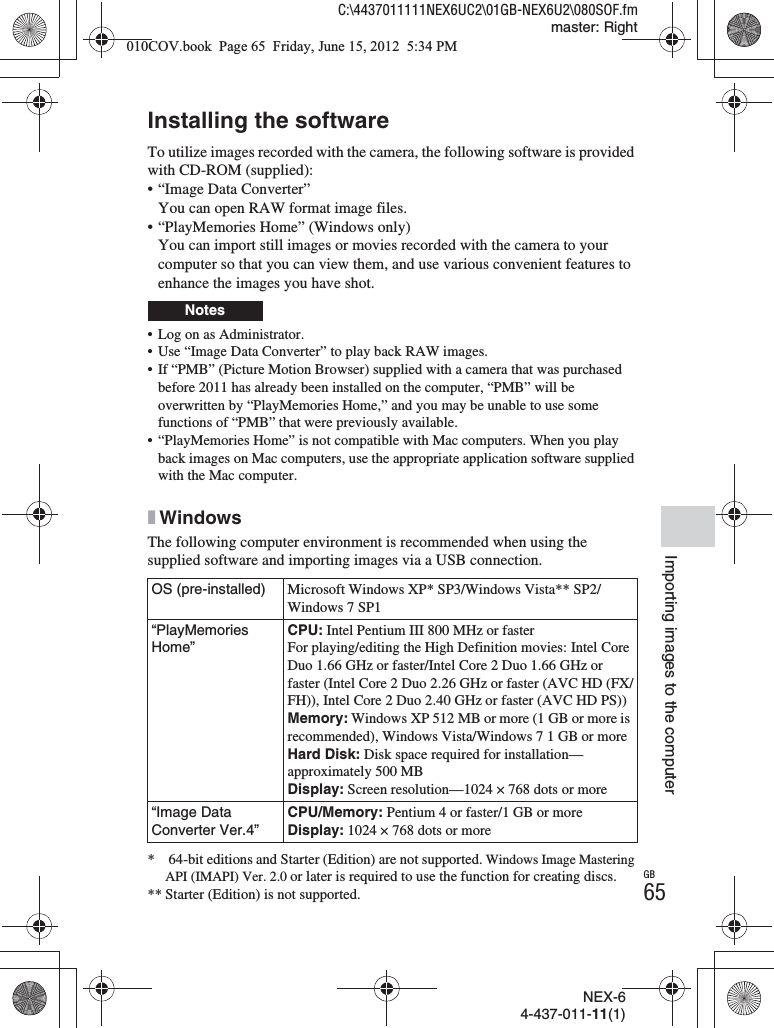
![NEX-64-437-011-11(1)C:\4437011111NEX6UC2\01GB-NEX6U2\080SOF.fmmaster: LeftGB66xMacThe following computer environment is recommended when using the supplied software and importing images via a USB connection.1Turn on your computer, and insert the CD-ROM (supplied) into the CD-ROM drive.The installation menu screen appears.• If the installation menu does not appear, double-click [Computer] (For Windows XP: [My Computer]) t (PMHOME) t [Install.exe].• If the AutoPlay screen appears, select “Run Install.exe” and follow the instructions that appear on the screen to proceed with the installation.2Connect the camera to the computer.3Click [Install].• Make sure that both “Image Data Converter” and “PlayMemories Home” are checked and follow the instructions on the screen.• When the restarting confirmation message appears, restart the computer following the instructions on the screen.• DirectX may be installed depending on the system environment of your computer.4Remove the CD-ROM after the installation is complete.The following software is installed and shortcut icons appear on the desktop.“Image Data Converter”“PlayMemories Home”“PlayMemories Home Help Guide”OS (pre-installed) USB Connection: Mac OS X v10.3 to v10.7“Image Data Converter”: Mac OS X v10.5/v10.6 (Snow Leopard)/v10.7 (Lion)“Image Data Converter Ver.4”CPU: Intel processors, such as Intel Core Solo/Core Duo/Core 2 DuoMemory: 1 GB or more is recommended.Display: 1024 × 768 dots or more010COV.book Page 66 Friday, June 15, 2012 5:34 PM](https://usermanual.wiki/Sony-Group/NEX6/User-Guide-1790086-Page-66.png)
![NEX-64-437-011-11(1)C:\4437011111NEX6UC2\01GB-NEX6U2\080SOF.fmmaster: RightGB67Importing images to the computerWhat you can do with the supplied softwarex“PlayMemories Home”With “PlayMemories Home,” you can do the following:• You can import images shot with the camera to your computer and display them on the computer.• You can trim and resize images.• You can organize images on the computer on a calendar by shooting date to view them.• You can retouch (Red Eye Correction, etc.), print, send still images as e-mail attachments and change the shooting date.• You can print or save still images with the date.• You can create a Blu-ray Disc, AVCHD disc or DVD disc from AVCHD movies imported to a computer. (An internet connection environment is required when a Blu-ray Disc/DVD disc is created for the first time.)For details on “PlayMemories Home,” refer to “PlayMemories Home Help Guide”.Double-click the shortcut of (PlayMemories Home Help Guide) on the desktop, or click [Start] t [All Programs] t [PlayMemories Home] t [PlayMemories Home Help Guide].“PlayMemories Home” support page (English only)http://www.sony.co.jp/pmh-se/1Turn on your Mac computer, and insert the CD-ROM (supplied) into the CD-ROM drive.2Double-click the CD-ROM icon.3Copy the [IDC_INST.pkg] file in the [MAC] folder to the hard disk icon.4Double-click the [IDC_INST.pkg] file in the destination folder.• Follow the instructions on the screen to complete the installation.010COV.book Page 67 Friday, June 15, 2012 5:34 PM](https://usermanual.wiki/Sony-Group/NEX6/User-Guide-1790086-Page-67.png)
![NEX-64-437-011-11(1)C:\4437011111NEX6UC2\01GB-NEX6U2\080SOF.fmmaster: LeftGB68• “PlayMemories Home” is not compatible with Mac computers. When you play back images on Mac computers, use the appropriate application software supplied with the Mac computer.• Movies recorded with the [60p 28M(PS)/50p 28M(PS)] [60i 24M(FX)/50i 24M(FX)]/[24p 24M(FX)/25p 24M(FX)] setting in [Record Setting] are converted by “PlayMemories Home” in order to create an AVCHD recording disc. This conversion can take a long time. Also, you cannot create a disc in the original image quality. If you want to keep the original image quality, store your movies on a Blu-ray Disc.x“Image Data Converter”With “Image Data Converter,” you can do the following:• You can play back and edit images recorded in RAW format with various corrections, such as tone curve and sharpness.• You can adjust images with white balance, exposure, and [Creative Style], etc.• You can save the images displayed and edited on a computer. You can either save the image as RAW format or save it in the general file format.• You can display and compare the RAW images and JPEG images recorded by this camera.• You can rank images in 5 grades.• You can apply color labels, etc.For details on “Image Data Converter,” refer to Help.Click [Start] t [All Programs] t [Image Data Converter] t [Help] t [Image Data Converter Ver.4].“Image Data Converter” support page (English only)http://www.sony.co.jp/ids-se/Notes010COV.book Page 68 Friday, June 15, 2012 5:34 PM](https://usermanual.wiki/Sony-Group/NEX6/User-Guide-1790086-Page-68.png)
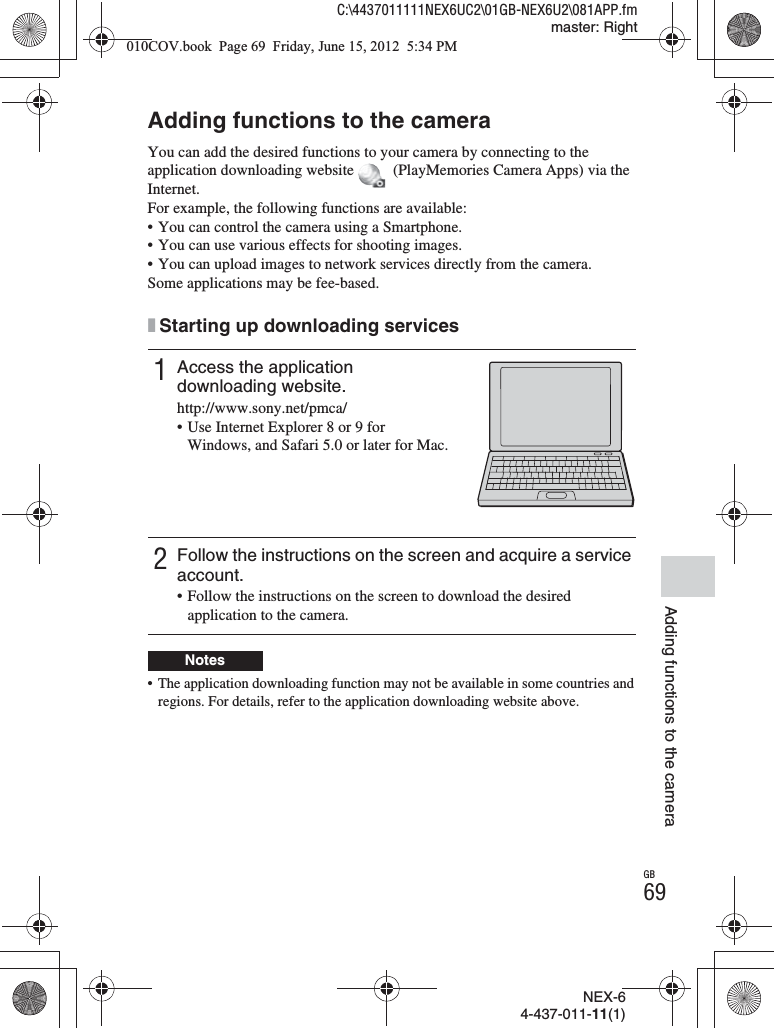
![NEX-64-437-011-11(1)C:\4437011111NEX6UC2\01GB-NEX6U2\081APP.fmmaster: LeftGB70xDownloading the applicationxLaunching the downloaded application1Access the application downloading website.http://www.sony.net/pmca/• Use Internet Explorer 8 or 9 for Windows, and Safari 5.0 or later for Mac.2Select the desired application and download the application to the camera following the instructions on the screen.• Connect the computer and the camera using the micro USB Cable (supplied), following the instructions on the screen.1Select MENU t [Application] t desired application to launch.To the USB terminalUSB Cable (supplied)To the USB terminalzHow to download applications directly using Wi-Fi function of the cameraYou can download applications using the Wi-Fi function without connecting to a computer.Select MENU t [Application] t (PlayMemories Camera Apps), then follow the instructions on the screen to download applications.Acquire a service account in advance (page 69).010COV.book Page 70 Friday, June 15, 2012 5:34 PM](https://usermanual.wiki/Sony-Group/NEX6/User-Guide-1790086-Page-70.png)
![NEX-64-437-011-11(1)C:\4437011111NEX6UC2\01GB-NEX6U2\082NET.fmmaster: RightGB71Connecting the camera to a networkConnecting the camera to a networkTransferring images to a SmartphoneYou can transfer still images to a Smartphone and view them. Download the application “PlayMemories Mobile” to your Smartphone from the application store.1Press (View on Smartphone) and select the desired mode.• If another function is assigned to soft key B, select MENU t [Playback] t [View on Smartphone].This Image: Transfers the most recently shot or played back images to the Smartphone.All Images on This Date: Transfers all still images in the same date range as the most recently shot or played back image to the Smartphone.All Images in The Device: Transfers all still images in the camera to the Smartphone.2If the camera is ready for the transfer, the information screen appears on the camera. Connect the Smartphone and the camera using that information.• For details on operation of the Smartphone, refer to “αHandbook.”010COV.book Page 71 Friday, June 15, 2012 5:34 PM](https://usermanual.wiki/Sony-Group/NEX6/User-Guide-1790086-Page-71.png)
![NEX-64-437-011-11(1)C:\4437011111NEX6UC2\01GB-NEX6U2\082NET.fmmaster: LeftGB72• Some images may not be displayed on the Smartphone, depending on the recording format.• The camera shares the connection information for [View on Smartphone] with a device that has permission to connect. If you want to change the device that is permitted to connect to the camera, reset the connection information by following these steps. MENU t [Setup] t [Reset View on Smartphone]. After resetting the connection information, you must register the Smartphone again.• “PlayMemories Mobile” is not available in some countries/regions. [View on Smartphone] is not available in some countries/regions that is not compatible with “PlayMemories Mobile.”Connecting to a networkYou can transfer images on the camera via Wi-Fi network and view them on other devices. The setting procedure differs depending on your LAN router or wireless LAN access point.• A computer or TV that is already connected to a network is required at your home, etc.• Be sure to set the network connection inside your wireless LAN access point area (the accessible area).Refer to the table below for how to register the access point.xWPS PushNotesAccess point How to registerYour access point has the WPS button. Use [WPS Push].Other than above. Use [Access Point Settings].1Select MENU t [Setup] t [WPS Push].2Press the WPS button on the access point you want to register.The camera starts communicating with the access point.010COV.book Page 72 Friday, June 15, 2012 5:34 PM](https://usermanual.wiki/Sony-Group/NEX6/User-Guide-1790086-Page-72.png)
![NEX-64-437-011-11(1)C:\4437011111NEX6UC2\01GB-NEX6U2\082NET.fmmaster: RightGB73Connecting the camera to a networkxAccess Point SettingsSaving images to a computerYou can save images on the camera to a computer that is connected to a network. Before saving, install the software “PlayMemories Home” on your computer, connect the computer and the camera using a USB cable, and register the camera to “PlayMemories Home.”• Depending on the application settings on your computer, the camera may turn off automatically after the images have been saved.1Select MENU t [Setup] t [Access Point Settings].2Select the access point you want to register.If the desired access point is displayed on the screen:Select the access point.If the desired access point is not displayed on the screen:Select [Manual Setting] and set the access point following the instructions on the screen.• For details, refer to “αHandbook.”1Select MENU t [Playback] t [Send to Computer].Notes010COV.book Page 73 Friday, June 15, 2012 5:34 PM](https://usermanual.wiki/Sony-Group/NEX6/User-Guide-1790086-Page-73.png)
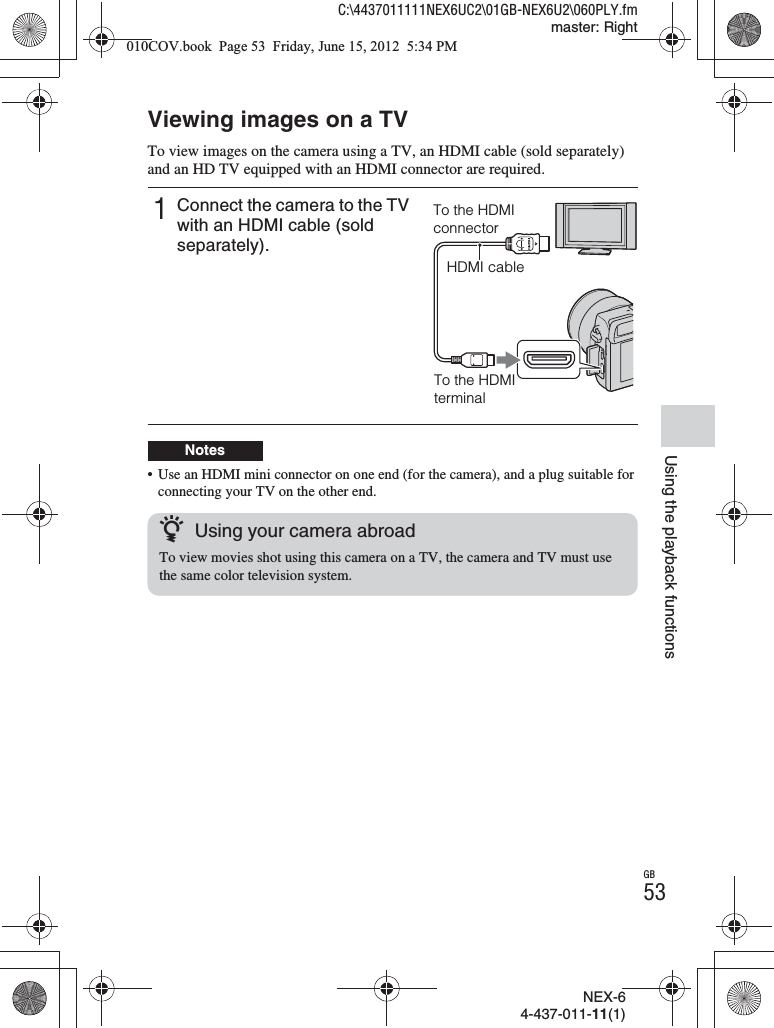
![NEX-64-437-011-11(1)C:\4437011111NEX6UC2\01GB-NEX6U2\082NET.fmmaster: LeftGB74Viewing images on a TVYou can transfer images on the camera to a network-compatible TV without connecting them using a cable. The transferred images can be played back on the TV.1Select MENU t [Playback] t [View on TV].2Select the device to be connected to the camera.3Press the center of the control wheel to play back images as a slideshow.• Press the right/left side of the control wheel to move to the next/previous image.• Press OPTION, and then [Device list] to change the device to be connected.010COV.book Page 74 Friday, June 15, 2012 5:34 PM](https://usermanual.wiki/Sony-Group/NEX6/User-Guide-1790086-Page-74.png)
![NEX-64-437-011-11(1)C:\4437011111NEX6UC2\01GB-NEX6U2\090OTH.fmmaster: RightGB75OthersOthersChecking the number of recordable images• When “0” (the number of recordable images) flashes in yellow, the memory card is full. Replace the memory card with another one, or delete images in the current memory card (page 32).• When “NO CARD” (the number of recordable images) flashes in yellow, it means no memory card has been inserted. Insert a memory card.xNumber of still images and time of movies recordable on a memory cardStill imagesThe following table shows the approximate number of still images that can be recorded on a memory card formatted with this camera. The values are defined using Sony standard memory cards for testing. The values may vary depending on the shooting conditions.Image size: L 16MAspect ratio: 3:2*(Units: images)* When [Aspect Ratio] is set to [16:9], you can record more images than the numbers shown in the table above (except for [RAW]).Once you insert a memory card into the camera and set the power switch to ON, the number of images that can be recorded (should you continue to shoot using the current settings) is displayed on the LCD screen.NotesCapacityQuality 2GB 4GB 8GB 16GB 32GB 64GBStandard xx xx xx xx xx xxFine xxxxxxxxxxxxRAW & JPEG xx xx xx xx xx xxRAW xxxxxxxxxxxx010COV.book Page 75 Friday, June 15, 2012 5:34 PM](https://usermanual.wiki/Sony-Group/NEX6/User-Guide-1790086-Page-75.png)
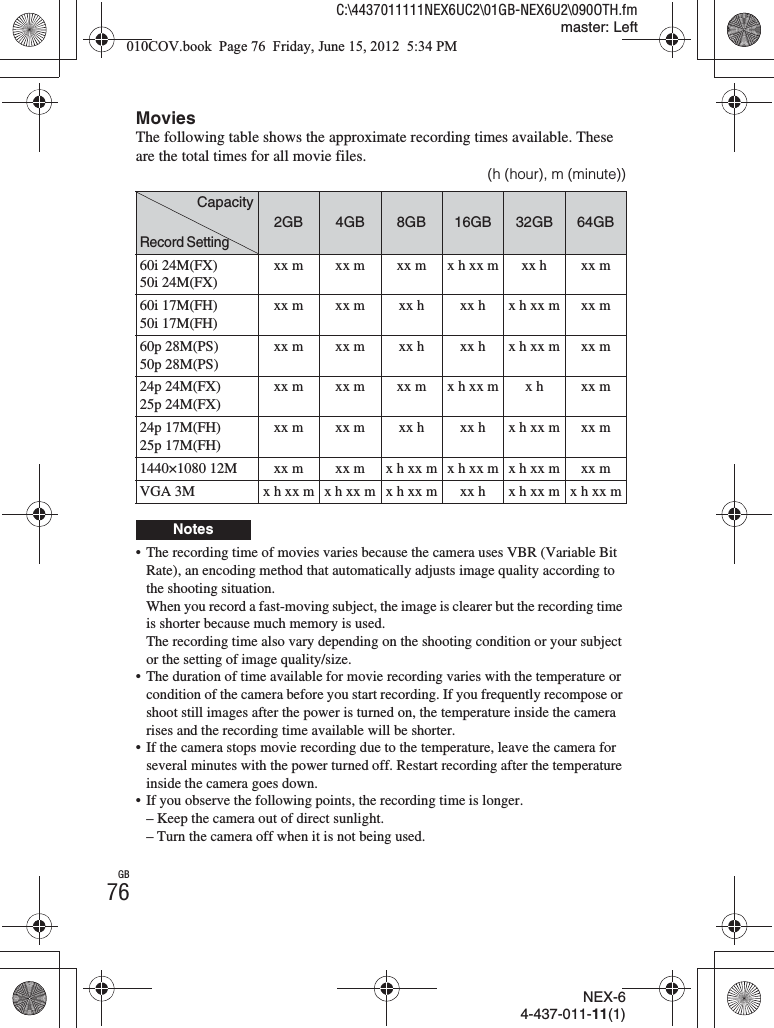
![NEX-64-437-011-11(1)C:\4437011111NEX6UC2\01GB-NEX6U2\090OTH.fmmaster: RightGB77Others• The maximum size of a movie file is about 2 GB. When the file size is about 2 GB, the movie recording stops automatically when [File Format] is set to [MP4], and a new movie file is created automatically when [File Format] is set to [AVCHD].• The maximum continuous recording time is 29 minutes.xNumber of still images recordable with a single charge of the battery packThe approximate number of images that can be recorded is xx images when you use the camera with the battery pack (supplied) at full capacity.Note that the actual numbers may be less depending on the conditions of use.• The number of images is calculated using full charged battery pack under the following conditions:– At an ambient temperature of 25 °C (77 °F).– An E PZ 16-50 mm F3.5-5.6 OSS lens is attached.– [Quality] is set to [Fine].– [Autofocus Mode] is set to [Single-shot AF].– Shooting once every 30 seconds.– The flash strobes once every two times.– The power turns on and off once every ten times.– Using the battery pack that is charged for an hour after the charge lamp goes out.– Using Sony “Memory Stick PRO Duo” media (sold separately).• The measurement method is based on the CIPA standard.(CIPA: Camera & Imaging Products Association)010COV.book Page 77 Friday, June 15, 2012 5:34 PM](https://usermanual.wiki/Sony-Group/NEX6/User-Guide-1790086-Page-77.png)

![NEX-64-437-011-11(1)C:\4437011111NEX6UC2\01GB-NEX6U2\090OTH.fmmaster: Right_2 columnGB81Others12/12 Image number/Number of images in the view modeAppears when HDR did not work on the image. Appears when [Picture Effect] did not work on the image.HistogramDisplay Indication010COV.book Page 81 Friday, June 15, 2012 5:34 PM](https://usermanual.wiki/Sony-Group/NEX6/User-Guide-1790086-Page-81.png)
![NEX-64-437-011-11(1)C:\4437011111NEX6UC2\01GB-NEX6U2\090OTH.fmmaster: LeftGB82Learning more about the camera (αHandbook)“αHandbook,” which explains how to use the camera in detail, is included on the CD-ROM (supplied). Refer to “αHandbook” for in-depth instructions on the many functions of the camera.xFor Windows usersxFor Mac users1Turn on your computer, and insert the CD-ROM (supplied) into the CD-ROM drive.2Click [Handbook].3Click [Install].4Start “αHandbook” from the shortcut on the desktop.1Turn on your computer, and insert the CD-ROM (supplied) into the CD-ROM drive.2Select the [Handbook] folder and copy “Handbook.pdf” stored in the [GB] folder to your computer.3After copying is complete, double-click “Handbook.pdf.”010COV.book Page 82 Friday, June 15, 2012 5:34 PM](https://usermanual.wiki/Sony-Group/NEX6/User-Guide-1790086-Page-82.png)

![NEX-64-437-011-11(1)C:\4437011111NEX6UC2\01GB-NEX6U2\090OTH.fmmaster: RightGB85OthersNothing is displayed on the LCD screen when the power is turned on.• If you do not operate the camera for given period of time, the camera turns to power saving mode. To cancel the power save, operate the camera, such as pressing the shutter button halfway down.The shutter does not release.• You are using a memory card with a write-protect switch, and the switch is set to the LOCK position. Set the switch to the recording position.• Check the free capacity of the memory card.• You cannot record images while charging the flash.• The lens is not attached properly. Attach the lens properly (page 21).Recording takes a long time.• The noise reduction function is turned on. This is not a malfunction.• You are shooting in the RAW mode. Since the RAW data file is large, the RAW mode shooting may take time.• The [Auto HDR] is processing an image.The image is out of focus.• The subject is too close. Check the minimum focal distance of the lens.• You are shooting in manual focus mode. Set [AF/MF Select] to [Autofocus].• Ambient light is insufficient.• The subject may require special focusing. Use the [Flexible Spot] or manual focus function.The flash does not work.• Press the (flash pop-up) button to pop up the flash (page 48).• You cannot use a flash with the following shooting mode:– [Bracket: Cont.]– [Sweep Panorama]– [Night Scene], [Hand-held Twilight] and [Anti Motion Blur] in [Scene Selection]– Movie recordingFuzzy white circular spots appear on images shot using the flash.• Particles (dust, pollen, etc.) in the air reflected the flash light and appeared on the image. This is not a malfunction.Shooting images010COV.book Page 85 Friday, June 15, 2012 5:34 PM](https://usermanual.wiki/Sony-Group/NEX6/User-Guide-1790086-Page-85.png)
![NEX-64-437-011-11(1)C:\4437011111NEX6UC2\01GB-NEX6U2\090OTH.fmmaster: LeftGB86The flash takes too long to recharge.• The flash has been fired in succession in a short period. When the flash has been fired in succession, the recharging process may take longer than usual to avoid overheating of the flash.The image taken with the flash is too dark.• If the subject is beyond the flash range (the distance that the flash can reach), the pictures will be dark because the flash light does not reach the subject. If the ISO is changed, the flash range also changes with it (page 49).The date and time are recorded incorrectly.• Set the correct date and time (page 26).• The area selected with [Area Setting] is different from the actual area. Set the actual area by selecting MENU t [Setup] t [Area Setting].The aperture value and/or shutter speed flashes.• The subject is too bright or too dark, and the camera’s available range for the aperture value and/or shutter speed is exceeded. Adjust the setting again.The image is whitish (Flare).Blurring of light appears on the image (Ghosting).• The picture was taken under backlit conditions, and excessive light has entered the lens. When using the zoom lens, attach a lens hood.The corners of the picture are too dark.• If any filter or hood is used, take it off and try shooting again. Depending on the thickness of the filter and improper attachment of the hood, the filter or the hood may partially appear on the image. The optical properties of some lenses may cause the periphery of the image to appear too dark (insufficient light). You may compensate for this phenomenon with [Lens Comp.: Shading].The eyes of the subject come out red.• Activate the [Red Eye Reduction] function.• Get close to the subject, and shoot the subject within the flash range (page 49) using the flash.Dots appear and remain on the LCD screen.• This is not a malfunction. These dots are not recorded (page 88).010COV.book Page 86 Friday, June 15, 2012 5:34 PM](https://usermanual.wiki/Sony-Group/NEX6/User-Guide-1790086-Page-86.png)
![NEX-64-437-011-11(1)C:\4437011111NEX6UC2\01GB-NEX6U2\090OTH.fmmaster: RightGB87OthersThe image is blurred.• The picture was taken in a dark location without the flash, resulting in camera-shake. The use of a tripod or the flash is recommended (page 48). [Hand-held Twilight] and [Anti Motion Blur] in [Scene Selection] (page 44) are also effective in reducing blur.The exposure value is flashing on the LCD screen or the viewfinder.• The subject is too bright or too dark for the metering range of the camera.Images cannot be played back.• The folder/file name has been changed on your computer.• When an image file has been processed by a computer or when the image file was recorded using a model other than that of your camera, playback on your camera is not guaranteed.• The camera is in USB mode. Disconnect the camera from the computer.• Use “PlayMemories Home” to copy images stored on your computer to your camera to play them back on your camera.Viewing images010COV.book Page 87 Friday, June 15, 2012 5:34 PM](https://usermanual.wiki/Sony-Group/NEX6/User-Guide-1790086-Page-87.png)

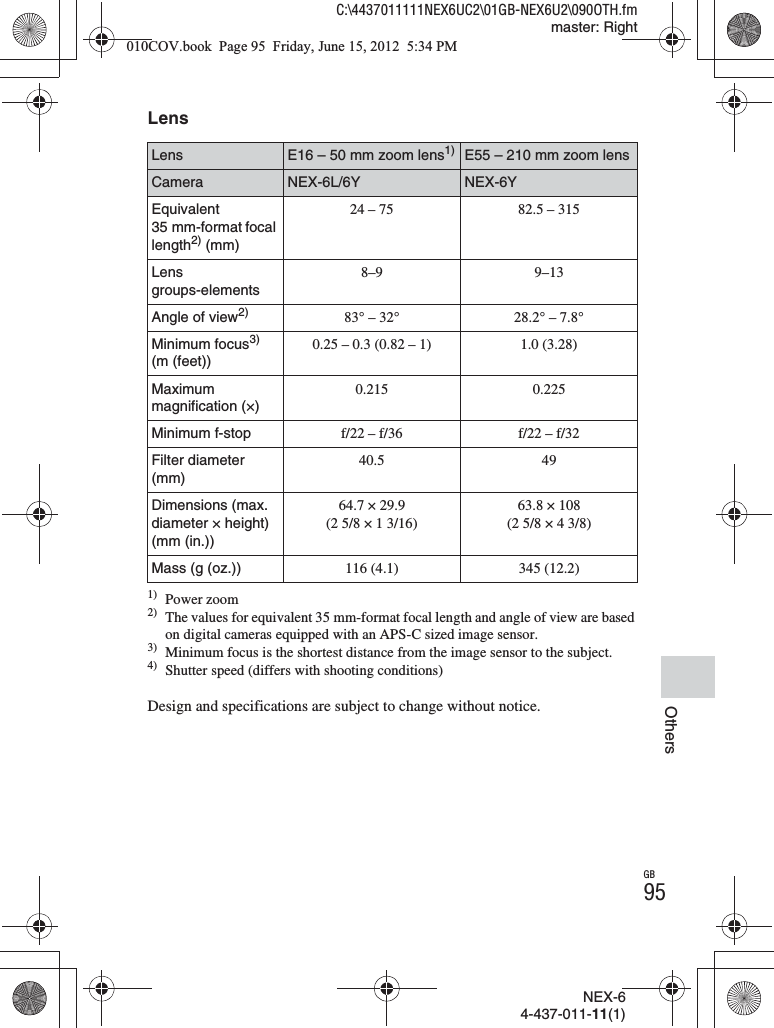
![NEX-64-437-011-11(1)C:\4437011111NEX6UC2\01GB-NEX6U2\090OTH.fmmaster: Right_2 columnGB93OthersSpecificationsCamera[System]Camera type: Interchangeable lens digital cameraLens: E-mount lens[Image sensor]Image sensor: APS-C format (23.5 mm × 15.6 mm) CMOS image sensorTotal pixel number of image sensor: Approx. 16 700 000 pixelsEffective pixel number of camera: Approx. 16 100 000 pixels[Anti-dust]System: Charge protection coating on Low-Pass Filter and ultrasonic vibration mechanism[Auto focus system]System: Contrast detection systemSensitivity range: EV0 to EV20 (at ISO 100 equivalent, with F2.8 lens)Format: Phase detection method, 99 points Luminance range detection: EVxx to EVxx (at ISO 100 equivalent, with F2.8 lens)[Exposure control]Metering method: 1 200-segment metering by the image sensorMetering range: EV0 to EV20 (at ISO 100 equivalent, with F2.8 lens)ISO sensitivity (Recommended exposure index): Still images: AUTO, ISO 100 – 51 200Movies: AUTO, ISO 100 – 3 200 equivalentExposure compensation: ±3.0 EV (1/3 EV step)[Shutter]Type: Electronically-controlled, vertical-traverse, focal-plane typeSpeed range: Still images: 1/4 000 second to 30 seconds (1/3 EV step), BULBMovies: x/x xxx second to 1/4 second, up to 1/30 second in AUTO mode (1/3 EV step)Flash sync speed: 1/160 second[Recording media]“Memory Stick PRO Duo” media, SD card[Electronic viewfinder]Type: Electronic viewfinderScreen size: 1.3 cm (0.5 type)Total number of dots: 2 359 296 dotsFrame coverage: Approx. 100%Magnification: 1.09 × with 50 mm lens at infinity, –1 m–1 (diopter)Eye point: Approx. 23 mm from the eyepiece, 21 mm from the eyepiece frame at –1 m–1Dioptor adjustment: –4.0 m–1 to +1.0 m–1 (diopter)[LCD screen]LCD panel: 7.5 cm (3.0 type) TFT driveTotal number of dots: 921 600 dots[Input/output terminals]USB: Micro USB type B connectorHDMI: HDMI type C minijack[Power]Used battery pack: Rechargeable battery pack NP-FW50Power consumption: When using an E PZ 16-50 mm F3.5-5.6 OSS lens* x.x W* supplied with NEX-6L/6Y010COV.book Page 93 Friday, June 15, 2012 5:34 PM](https://usermanual.wiki/Sony-Group/NEX6/User-Guide-1790086-Page-93.png)
![NEX-64-437-011-11(1)C:\4437011111NEX6UC2\01GB-NEX6U2\090OTH.fmmaster: Left_2 columnGB94[Others]Exif Print: CompatiblePRINT Image Matching III: CompatibleDPOF: CompatibleDimensions (CIPA compliant):Approx. xxx mm × xxx mm × xxx mm (x x/x inches × x x/x inches × x x/x inches)(W/H/D)Mass (CIPA compliant):Approx. xxx g (xx oz)(including battery and “Memory Stick PRO Duo” media)Approx. xx g (xx oz)(camera only)Operating temperature: 0 °C to 40 °C (32 °F to 104 °F)File format:Still image: JPEG (DCF Ver. 2.0, Exif Ver. 2.3, MPF Baseline) compliant, RAW (Sony ARW 2.3 Format)Movie (AVCHD format): AVCHD format Ver. 2.0 compatibleVideo: MPEG-4 AVC/H.264Audio: Dolby Digital 2chDolby Digital Stereo Creator• Manufactured under license from Dolby Laboratories.Movie (MP4 format):Video: MPEG-4 AVC/H.264Audio: MPEG-4 AAC-LC 2chUSB communication: Hi-Speed USB (USB 2.0)[Flash]Flash guide number: GN 6 (in meters at ISO 100)Recycling time: Approx. 4 secondsFlash coverage: Covering 16 mm lens (focal length that the lens indicates)Flash compensation: ±2.0 EV (1/3 EV step)[Wireless LAN]Supported format: IEEE 802.11 b/g/nAC Adaptor AC-UB10/UB10B/UB10C/UB10DPower requirements: AC 100 V to 240 V, 50 Hz/60 Hz, 70 mAOutput voltage: DC 5 V, 0.5 AOperating temperature: 0 °C to 40 °C (32 °F to 104 °F)Storage temperature: –20 °C to +60 °C (–4 °F to +140 °F)Dimensions: Approx. 50 mm × 22 mm × 54 mm (2 inches × 7/8 inches × 2 1/4 inches) (W/H/D)Mass: For the USA and Canada: Approx. 48 g (1.7 oz)For countries or regions other than the USA and Canada: Approx. 43 g (1.5 oz)Rechargeable battery pack NP-FW50Used battery: Lithium-ion batteryMaximum voltage: DC 8.4 VNominal voltage: DC 7.2 VMaximum charge voltage: DC 8.4 VMaximum charge current: 1.02 ACapacity: Typical 7.7 Wh (1 080 mAh)Minimum 7.3 Wh (1 020 mAh)Maximum dimensions:Approx. 31.8 mm × 18.5 mm × 45 mm (1 5/16 inches × 3/4 inches × 1 13/16 inches) (W/H/D)Mass: Approx. 57 g (2.1 oz)010COV.book Page 94 Friday, June 15, 2012 5:34 PM](https://usermanual.wiki/Sony-Group/NEX6/User-Guide-1790086-Page-94.png)