Sony Group PCG11311L Notebook Device User Manual
Sony Corporation Notebook Device Users Manual
Contents
- 1. [Short-Tern Confidential] Proteus_Safety(Paper)rev2
- 2. TempConfidential_[Short-Tern Confidential] Proteus_UserGuide(WWAN PDF)
- 3. Proteus_Safety(Paper)rev2
- 4. Proteus_UserGuide(WWAN PDF)
TempConfidential_[Short-Tern Confidential] Proteus_UserGuide(WWAN PDF)
![SearchVAIO User Guide VCC111 Series Back | Back to Top TroubleshootingHow to UseParts DescriptionSetupNetwork / InternetConnectionsSettingsOther OperationsNotificationsRead This FirstCongratulations on your purchase of this computer and welcome to the on-screen UserGuide.About your computer’s configurationTo find out about the configuration of your computer, visit the Sony online support website.<About configuration differences in your computerSome features, options, and supplied items may not be available on your computer.FeaturesAvailable features vary depending on the model or options you selected.Not all features described in this manual are available depending on your model.IllustrationsIllustrations, photos, or screenshots in this manual may look slightly different depending onthe model or options you selected.SoftwareThe preinstalled software may vary depending on the model or options you selected. Thesoftware described in this manual may not be preinstalled on your computer.Supplied manualsThe following manuals are supplied with your computer.On-screen documentationUser Guide - Introduction versionA preinstalled manual with limited information of your computer focused on support andinternet connection. The User Guide - Introduction version is replaced with a completeversion of the User Guide (this manual) after update. [Details]User Guide (this manual)General information and operation instruction about your computer including supportand troubleshooting informationPrinted documentationQuick Start GuideAn overview of components connection, set-up information, etc.Recovery, Backup and Troubleshooting GuideInformation on how to recover and back up your computer, as well as troubleshootinginformationSafety RegulationsRead carefully before activating the wireless functions such as the wireless LAN andBLUETOOTH technology.Other referencesHelp and SupportGeneral information and technical assistance for your computer.To access Help and Support, click (Start) and Help and Support.Choose from the following categories to find the answers you need.Get startedwith myVAIOGet help with Internet and wireless setup, security setup, personalizingyour VAIO computer, creating Recovery Media, and more.Use my VAIOGet assistance with your VAIO computer by accessing useful informationsuch as interactive VAIO tutorials, how-to articles, the VAIO technologypage, specifications, and system and software information. The availableinformation varies depending on the model you purchased.Searchundefined](https://usermanual.wiki/Sony-Group/PCG11311L.TempConfidential-Short-Tern-Confidential-Proteus-UserGuide-WWAN-PDF/User-Guide-1540461-Page-1.png)
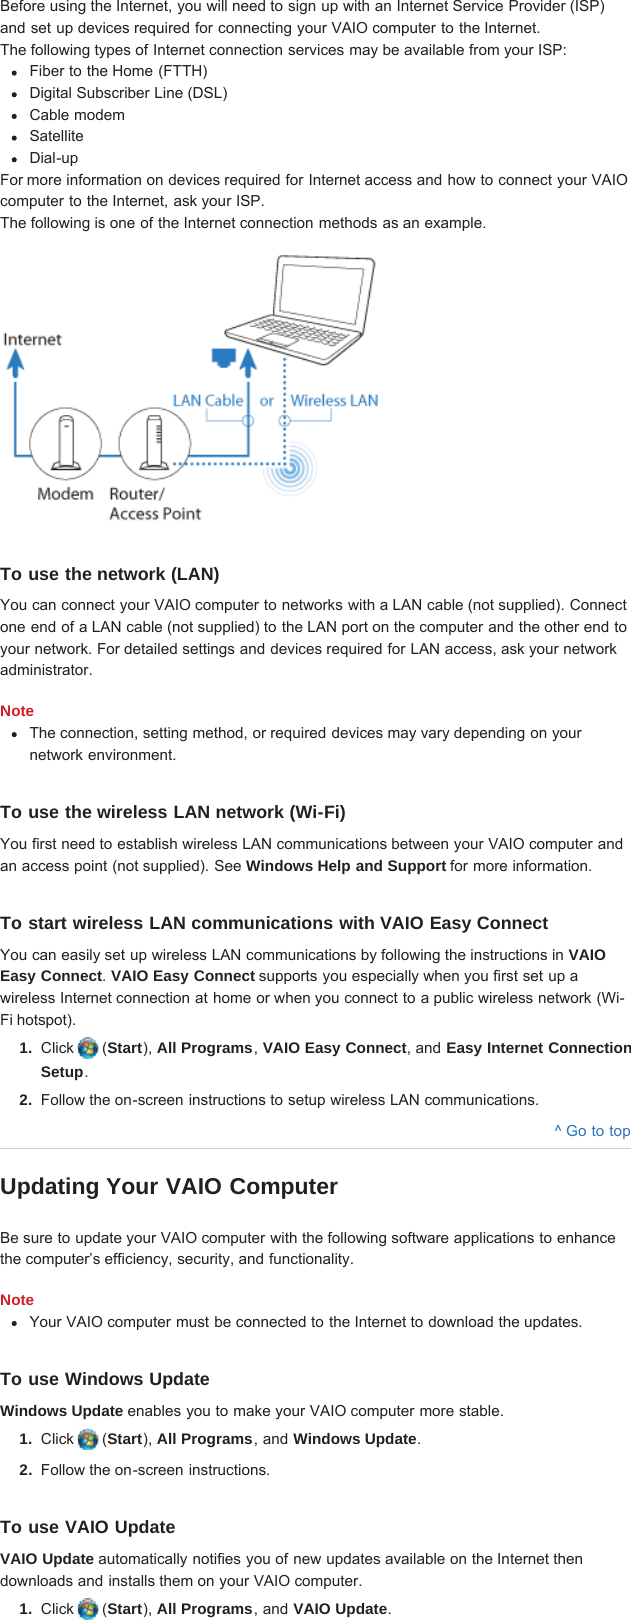
![SearchVAIO User Guide VCC111 Series Back | Back to Top TroubleshootingHow to UseParts DescriptionSetupNetwork / InternetConnectionsSettingsOther OperationsNotificationsWelcomeCongratulations on the purchase of this VAIO(R) computer.This User Guide - Introduction Version provides you with limited information about yourVAIO computer. To update this file to the complete version of the User Guide, see Updatingthe User Guide to the Latest Version [Details] for more information.Updating the User Guide to the Latest VersionConnecting to the InternetUpdating Your VAIO ComputerSolving Problems on Your VAIO Computer Using VAIO CareFinding Support InformationTrademarks^ Go to topUpdating the User Guide to the Latest VersionThe complete version of the User Guide is available online. Update this User Guide -Introduction Version to the complete version so that you can access it anytime even if youare offline.With the complete version of the User Guide you can view information about:Parts descriptionFeature and operating instructionsPrecautionsTroubleshooting informationNoteYou will need to connect your VAIO computer to the Internet before updating to thecomplete version of the User Guide. See Connecting to the Internet [Details] for moreinformation on connecting the computer to the Internet.To get the complete version of the User GuideBy updating this User Guide - Introduction Version, you can get the complete version ofthe User Guide with detailed information on your VAIO computer.1. Connect your VAIO computer to the Internet.2. Close this window, and then click (Start), All Programs, and VAIO Manual again.3. A window prompting you to update the manual appears. Follow the on-screeninstructions.This file will automatically update to the complete version of the User Guide.HintIt may take some time to complete the update.If the window prompting you to update the User Guide does not appear, make sure yourVAIO computer is connected to the Internet and repeat the above steps. If the updatewindow still does not appear, launch VAIO Update so you can find and download theUser Guide manually. See Updating Your VAIO Computer [Details] for moreinformation on VAIO Update.To view help files for Windows OS and software operationsWhen you have trouble operating your VAIO computer, try referring to Windows Help andSupport or help files included with your applications.To access Windows Help and Support, click (Start) and Help and Support.^ Go to topConnecting to the InternetYou will need to connect your VAIO computer to the Internet before updating to the completeversion of the User Guide.Before connecting to the InternetSearchundefined](https://usermanual.wiki/Sony-Group/PCG11311L.TempConfidential-Short-Tern-Confidential-Proteus-UserGuide-WWAN-PDF/User-Guide-1540461-Page-3.png)
![SearchVAIO User Guide VCC111 Series Back | Back to Top TroubleshootingHow to UseParts DescriptionSetupNetwork / InternetConnectionsSettingsOther OperationsNotificationsParts and Controls on the FrontDescribes the features on the front of the computer, such as buttons and indicator lights.1. Ambient light sensor 2. Built-in microphone (monaural)3. Built-in camera 4. Built-in camera indicator 5. LCD screen 6. Keyboard7. (power) key [Details]8. Touch pad [Details] (Left/right buttons [Details])9. Power indicator [Details]10. Charge indicator [Details]Related TopicParts and Controls on the SidesParts and Controls on the Bottom© 2011 Sony CorporationSearchundefined](https://usermanual.wiki/Sony-Group/PCG11311L.TempConfidential-Short-Tern-Confidential-Proteus-UserGuide-WWAN-PDF/User-Guide-1540461-Page-7.png)
![SearchVAIO User Guide VCC111 Series Back | Back to Top TroubleshootingHow to UseParts DescriptionSetupNetwork / InternetConnectionsSettingsOther OperationsNotificationsParts and Controls on the SidesDescribes the features on the sides of the computer, such as connection ports.1. DC IN port [Details]2. HDMI output port [Details]3. Microphone jack [Details]4. Headphones jack [Details]1. SD memory card slot [Details]2. SD memory card indicator [Details]3. USB ports [Details]4. Security slotRelated TopicParts and Controls on the SidesParts and Controls on the Bottom© 2011 Sony CorporationSearchundefined](https://usermanual.wiki/Sony-Group/PCG11311L.TempConfidential-Short-Tern-Confidential-Proteus-UserGuide-WWAN-PDF/User-Guide-1540461-Page-8.png)
![SearchVAIO User Guide VCC111 Series Back | Back to Top TroubleshootingHow to UseParts DescriptionSetupNetwork / InternetConnectionsSettingsOther OperationsNotificationsParts and Controls on the BottomDescribes the features on the bottom of the computer.1. Recovery button2. SIM card slot3. Battery connector [Details]Related TopicParts and Controls on the FrontParts and Controls on the Sides© 2011 Sony CorporationSearchundefined](https://usermanual.wiki/Sony-Group/PCG11311L.TempConfidential-Short-Tern-Confidential-Proteus-UserGuide-WWAN-PDF/User-Guide-1540461-Page-9.png)
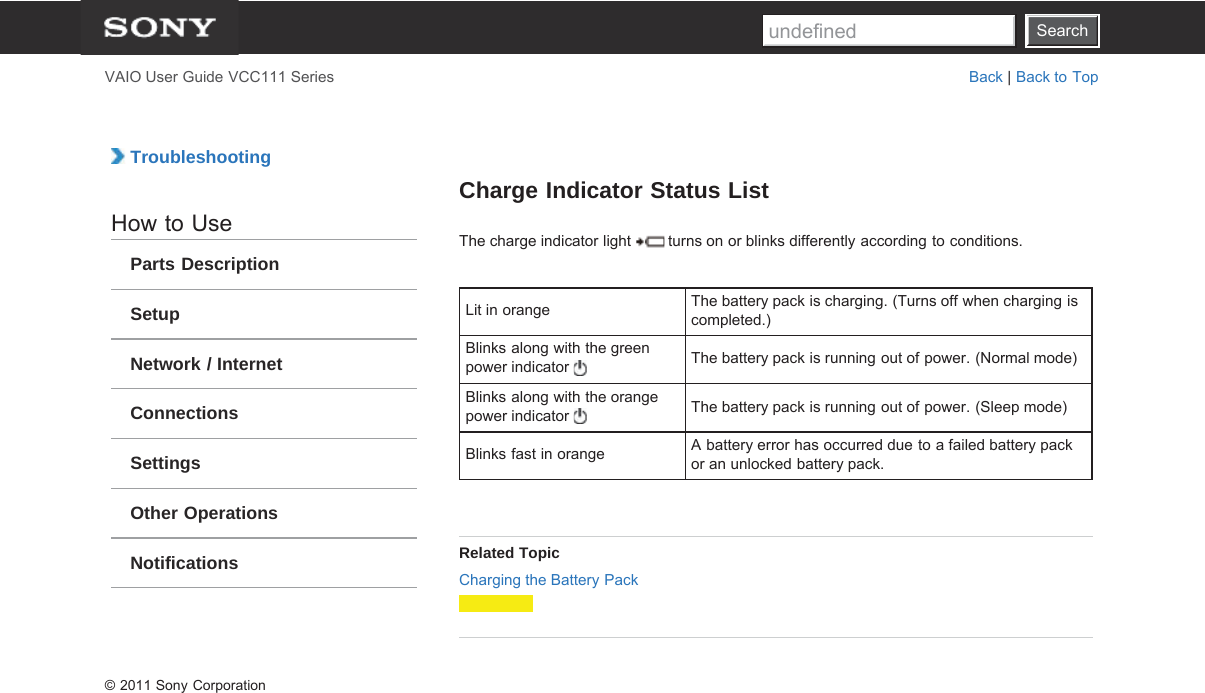
![SearchVAIO User Guide VCC111 Series Back | Back to Top TroubleshootingHow to UseParts DescriptionSetupNetwork / InternetConnectionsSettingsOther OperationsNotificationsCharging the Battery PackThe battery pack can be charged even while you are using your computer when thecomputer is connected to a power source. The charging time may vary depending onoperating conditions.1. Install the battery pack into your computer. [Details]2. Plug the computer into an AC outlet. [Details]HintThe charging time varies depending on ambient temperature.Note that at a low ambient temperature, it takes longer time to charge the battery pack.To check the battery status of your computer, click the battery icon, such as (onbattery) or (plugged in), in the desktop notification area.Related TopicCharge Indicator Status List<© 2011 Sony CorporationSearchundefined](https://usermanual.wiki/Sony-Group/PCG11311L.TempConfidential-Short-Tern-Confidential-Proteus-UserGuide-WWAN-PDF/User-Guide-1540461-Page-12.png)
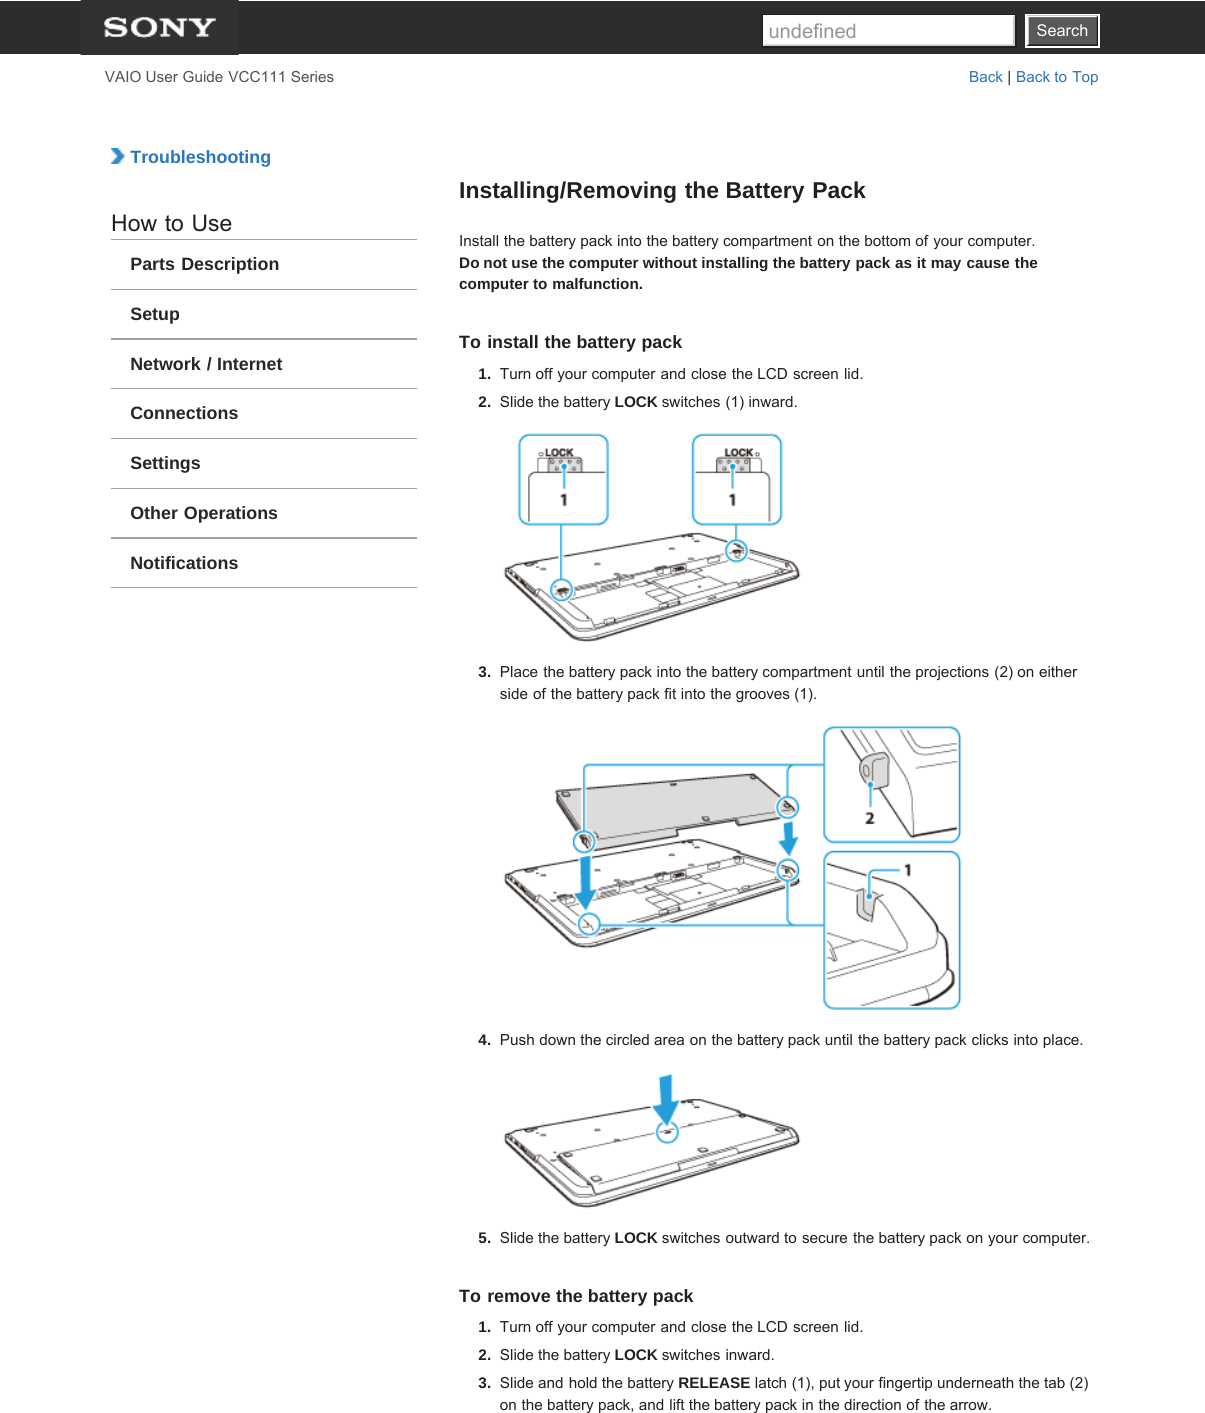
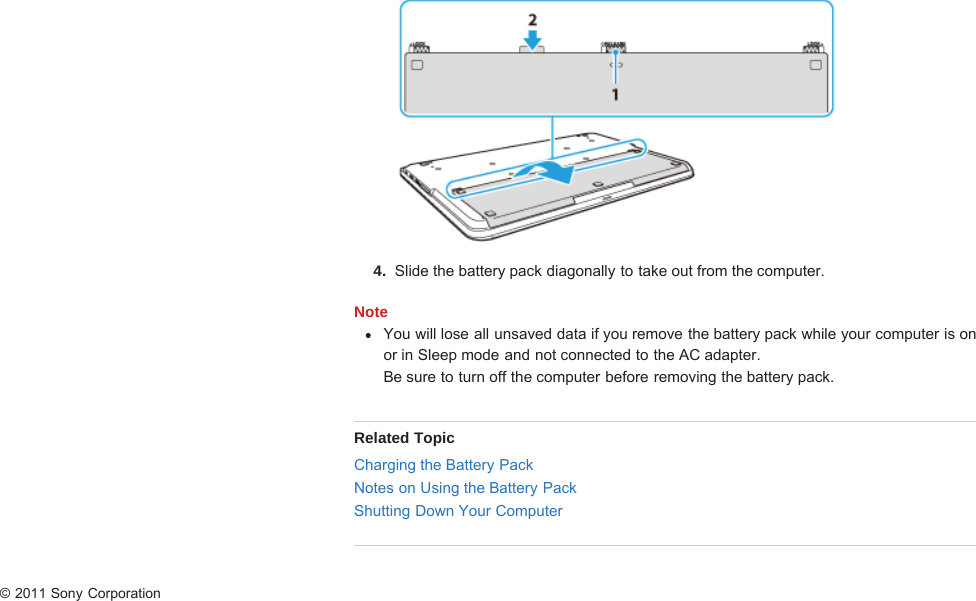
![SearchVAIO User Guide VCC111 Series Back | Back to Top TroubleshootingHow to UseParts DescriptionSetupNetwork / InternetConnectionsSettingsOther OperationsNotificationsConnecting a Power SourceConnect your computer to an AC power source. Carefully read the precautions in Notes onUsing the Power Source before connection. [Details]1. Plug one end of the power cord (1) into the AC adapter (3).2. Plug the other end of the power cord into an AC outlet (2).3. Plug the cable from the AC adapter (3) into the DC IN port (4) on your computer.NoteDo not plug more than one device into the same AC outlet.The shape of the AC adapter varies depending on the model you purchased.Make sure that the power plug is firmly plugged into your computer.HintYou can purchase a power strip with a surge protector to help prevent damage to yourcomputer caused by sudden power surges (in an electrical storm, for example).Related TopicInstalling/Removing the Battery PackCharging the Battery PackNotes on Using the Battery PackTurning on Your ComputerShutting Down Your ComputerNotes on Using the Power Source© 2011 Sony CorporationSearchundefined](https://usermanual.wiki/Sony-Group/PCG11311L.TempConfidential-Short-Tern-Confidential-Proteus-UserGuide-WWAN-PDF/User-Guide-1540461-Page-14.png)
![SearchVAIO User Guide VCC111 Series Back | Back to Top TroubleshootingHow to UseParts DescriptionSetupNetwork / InternetConnectionsSettingsOther OperationsNotificationsTurning on Your ComputerTurn on your computer to start Chrome OS.Carefully read the precautions in Notes on Using the Power Source before turning on.[Details]1. Install the battery pack on your computer [Details], and then connect to an AC outlet.[Details]2. Lift the LCD screen lid.The computer automatically turns on and Chrome OS starts.NotePressing the (power) key activates a screen saver.If, however, you press and hold down the power key for more than four seconds, yourcomputer will be turned off.Do not use your computer without installing the battery pack as it may cause thecomputer to malfunction.When opening the LCD screen lid, do not hold the built-in camera as it may cause yourcomputer to malfunction. (Built-in camera equipped models)HintBy default, your computer automatically enters Sleep mode after a certain period ofinactivity while the computer is connected to an AC outlet. Related TopicInstalling/Removing the Battery PackCharging the Battery PackNotes on Using the Battery PackConnecting a Power SourceShutting Down Your ComputerNotes on Using the Power Source© 2011 Sony CorporationSearchundefined](https://usermanual.wiki/Sony-Group/PCG11311L.TempConfidential-Short-Tern-Confidential-Proteus-UserGuide-WWAN-PDF/User-Guide-1540461-Page-15.png)


![SearchVAIO User Guide VCC111 Series Back | Back to Top TroubleshootingHow to UseParts DescriptionSetupNetwork / InternetConnectionsSettingsOther OperationsNotificationsConnecting a TV with an HDMI Input PortYou can connect a TV with an HDMI input port to your computer with an HDMI cable (notsupplied).Refer to the manual that came with your TV for more information on installation and use.1. Plug the power cord of your TV into an AC outlet.2. Connect one end of an HDMI cable to the HDMI output port [Details] on your computerand the other end to the TV.3. Set the TV input to the external input.The screen image of your computer is displayed on the TV.NoteIf a device driver other than the one provided by Sony is used, the image will not bedisplayed and audio will not be heard. Always use the device driver provided by Sonyfor updates.Related Topic© 2011 Sony CorporationSearchundefined](https://usermanual.wiki/Sony-Group/PCG11311L.TempConfidential-Short-Tern-Confidential-Proteus-UserGuide-WWAN-PDF/User-Guide-1540461-Page-21.png)
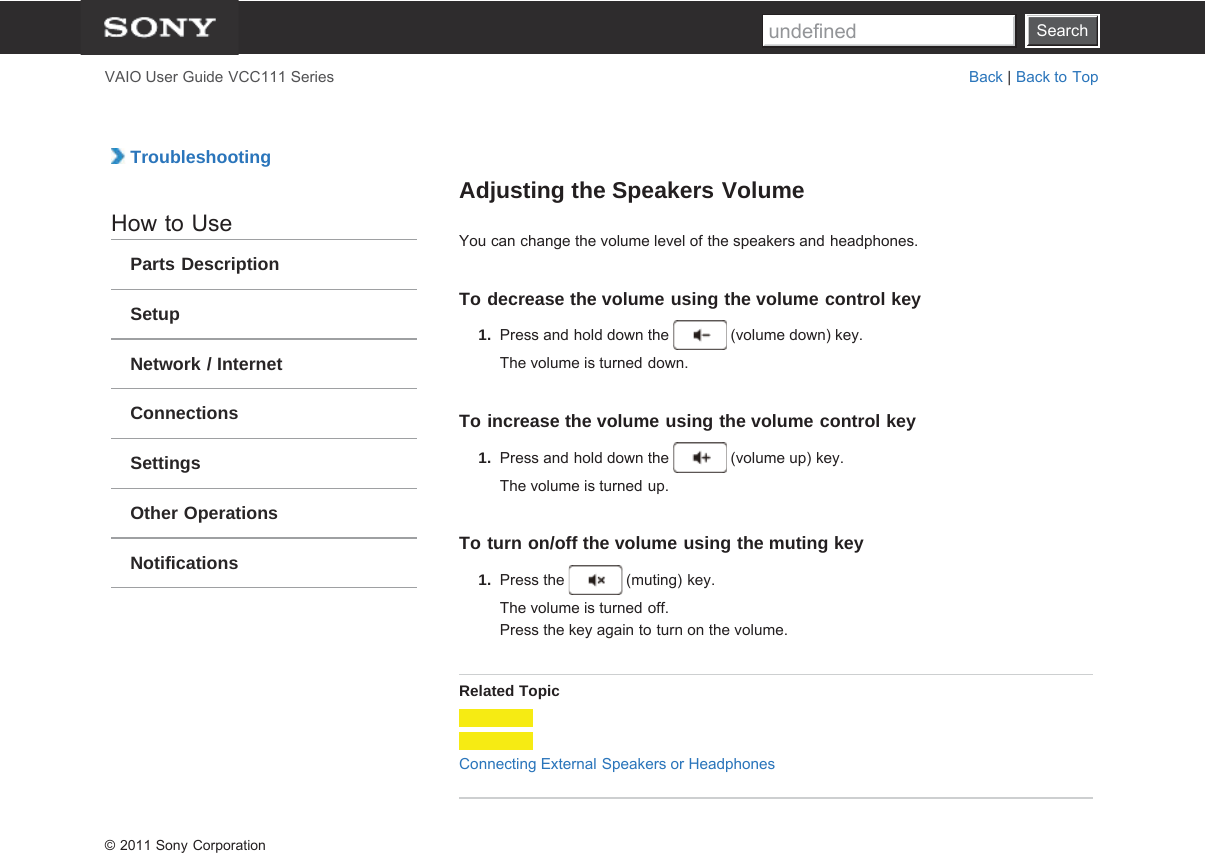
![SearchVAIO User Guide VCC111 Series Back | Back to Top TroubleshootingHow to UseParts DescriptionSetupNetwork / InternetConnectionsSettingsOther OperationsNotificationsConnecting External Speakers or HeadphonesYou can connect external sound output devices (such as speakers or headphones) to yourcomputer.1. Connect external speakers to the headphones jack [Details] with a speaker cable(not supplied).NoteTurn down the volume of the speakers before turning them on.HintRefer to the manual that came with your speakers or headphones.Related TopicAdjusting the Speakers VolumeConnecting an External Microphone© 2011 Sony CorporationSearchundefined](https://usermanual.wiki/Sony-Group/PCG11311L.TempConfidential-Short-Tern-Confidential-Proteus-UserGuide-WWAN-PDF/User-Guide-1540461-Page-23.png)
![SearchVAIO User Guide VCC111 Series Back | Back to Top TroubleshootingHow to UseParts DescriptionSetupNetwork / InternetConnectionsSettingsOther OperationsNotificationsConnecting an External MicrophoneYou can connect an external microphone to your computer and enjoy voice chat, etc.1. Plug the microphone cable into the microphone jack [Details].NoteIf you connect or disconnect the microphone to/from your computer while running voicerecording software, voice recording may fail or the software may exit.Connect the microphone and select it as the sound recording device for Windows beforestarting the software.HintUse a plug-in-power microphone.Refer to the manual that came with your microphone.If microphone feedback occurs, move the microphone away from your speakers.Related TopicConnecting External Speakers or Headphones© 2011 Sony CorporationSearchundefined](https://usermanual.wiki/Sony-Group/PCG11311L.TempConfidential-Short-Tern-Confidential-Proteus-UserGuide-WWAN-PDF/User-Guide-1540461-Page-24.png)