Sony Group PCG9W6L Laptop computer with GSM, WLAN and BT radios User Manual SmartWi Connection Utility Guide Final
Sony Corporation Laptop computer with GSM, WLAN and BT radios SmartWi Connection Utility Guide Final
User Guide

Personal Computer
VGN-BX500 Series
SmartWi Connection Utility
Guide

VAIO® Computer Wireless Information
2
Table of Contents
About your Computer........................................... 3
Contents .................................................................................... 3
About Wireless Connectivity.................................................... 4
About the SIM Card.................................................................. 4
About Wireless Connection Utility...................... 9
Starting SmartWi Connection Utility........................................ 9
About the Wireless Switching Window ............ 12
Using the Wireless Switching Window .................................. 12
Using SmartWi Connection Utility .................... 13
Using the Cingular WWAN connection ................................. 13
Using the Wireless LAN connection ...................................... 15
Using the Bluetooth® connection........................................... 20
General Functional Information ........................ 22
FAQ and Troubleshooting ................................. 23
Notice to Users ................................................... 33
About your Computer
3
About your Computer
Thank you for purchasing a VAIO® VGN-BX500 Series computer! Your
new machine combines state-of-the-art hardware and software to bring
you unparalleled wireless connectivity.
Contents
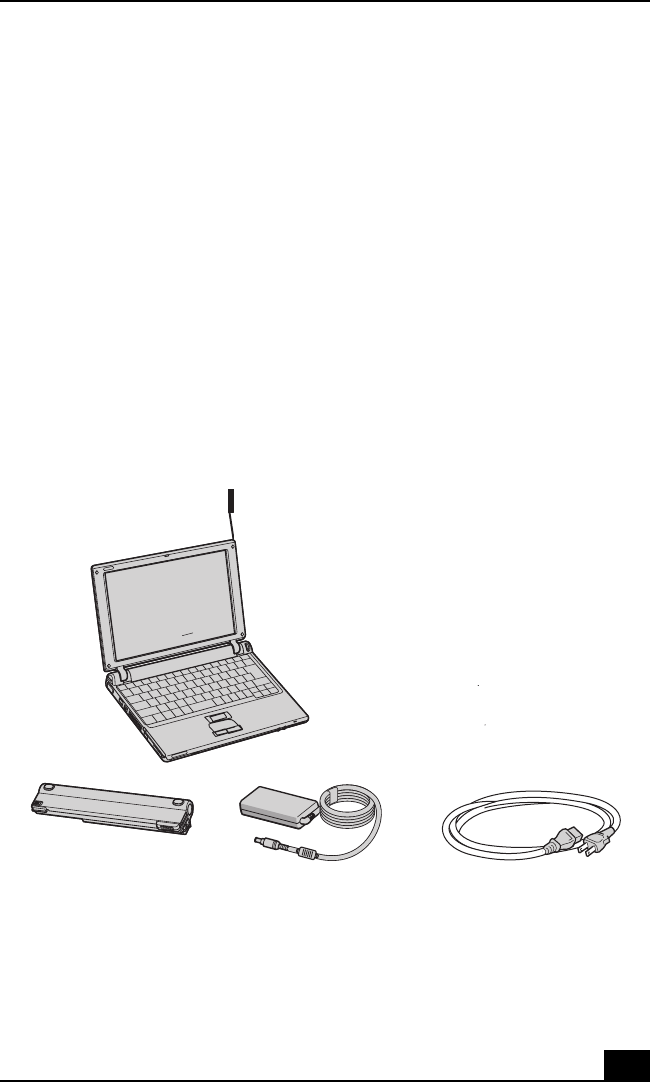
These hardware components are included.
* A Cingular SIM card is preinstalled in your computer.
** Keep antenna attached. You should fully extend antenna all the way out of
its housing to achieve the best reception and signal performance.
Carton Contents
Power cord
Battey
Antenna **
Computer *
AC Adapter

VAIO® Computer Wireless Information
4
About Wireless Connectivity
With built-in Wireless WAN capabilities, your computer is equipped to connect
wirelessly to your e-mail, the Internet, and any intranet networks with which you
may be associated.
To begin making use of wireless connectivity, you will need to insert a provided
Subscriber Identity Module (SIM) card into the computer before turning on your
computer.
About the Cingular SIM Card
The SIM card, provided by Cingular Wireless, is a small printed circuit board
that stores data identifying the user to the network service provider. It must be
inserted into the computer for you to make use of the wireless services.
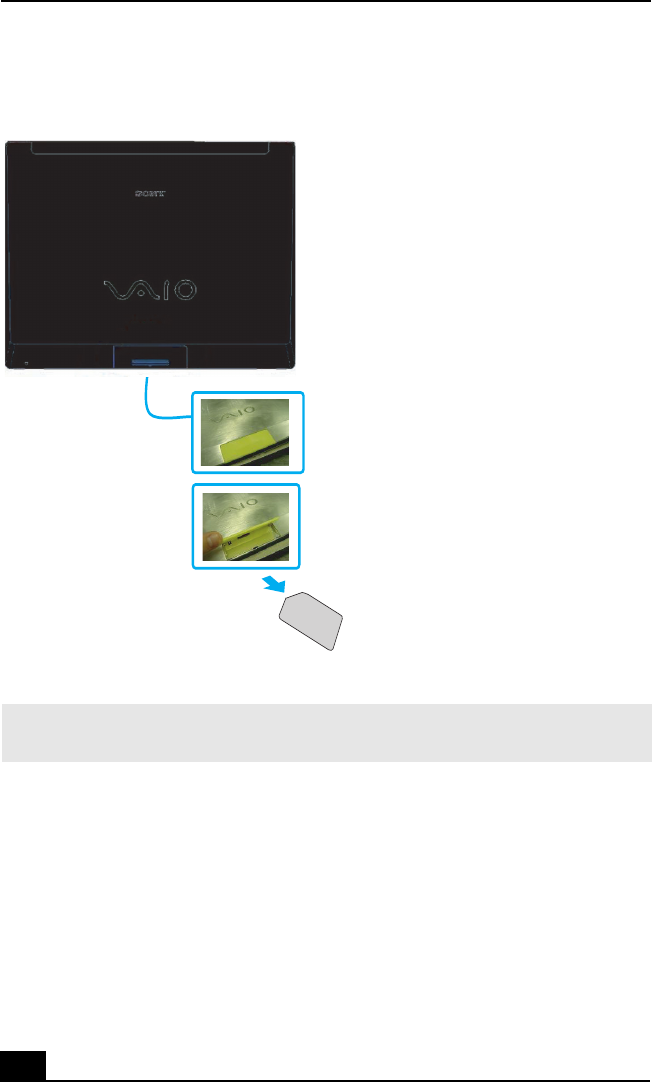
Inserting the Cingular SIM card
The Cingular SIM card should be preinstalled; you may follow these procedures
to verify that the SIM card is indeed installed in the SIM card slot at the rear of
your computer.
✍ Only the Cingular SIM card is supported. It is normally preinstalled in your computer.
Do not touch the SIM card connectors. As a precaution, always make sure
you have a firm hold of your computer before inserting or removing the SIM
card.
About the Cingular SIM Card
5
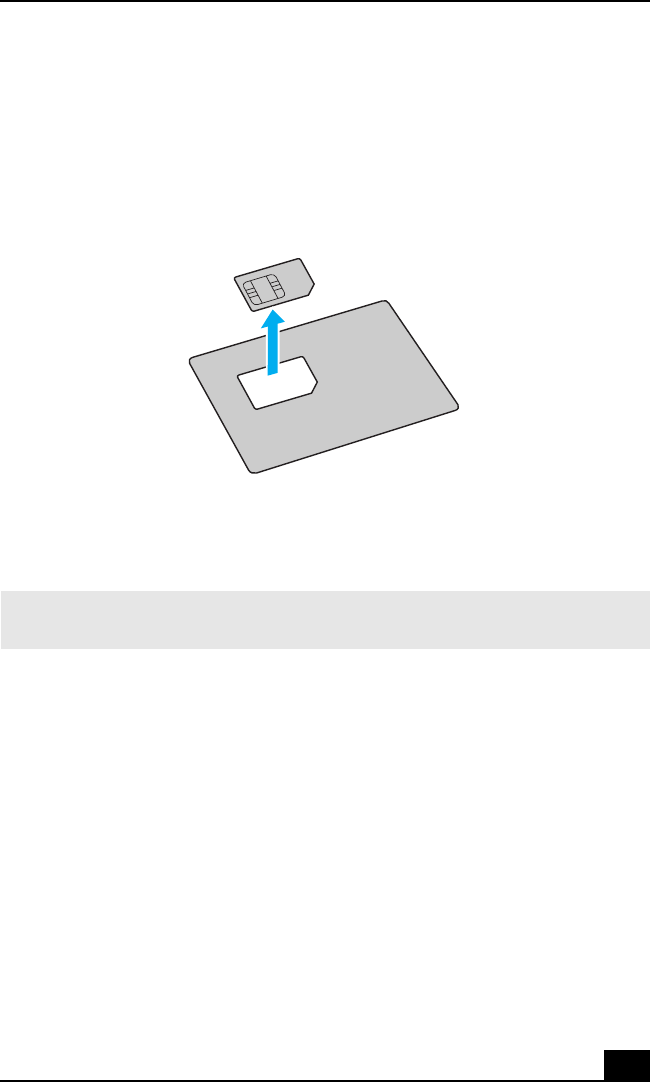
1Unless preinstalled, your SIM card is contained within a larger card, about
the size of a credit card. Remove the smaller SIM card by pushing it out
from the larger card.
2Next, orient your computer so you are facing its rear portion.
3Locate the SIM card slot in the back of the computer and with its printed
circuit side facing down, gently insert the SIM card into the slot. Check the
SIM card for directions on which way to orient the card into the slot.
Cingular SIM Card
✍Before inserting the SIM card into the computer, make sure your computer is turned
off and the battery is not attached.
VAIO® Computer Wireless Information
6
If your computer came with a preinstalled Cingular SIM card, verify that the card
is indeed in the SIM card slot.
If a SIM card can not be found in the unit, there are two ways to obtain the card:
1Contact Sony’s VAIO PC support line (888)-476-6972 and request a free
replacement SIM card. Please note that you must have the VAIO product
model number and serial number to receive the replacement SIM from Sony.
Subject to availability, the replacement SIM card will be shipped from Sony
to you without charge.
2Go to the local Cingular store and ask for SIM card for local service.
Additional cost would apply in this process.
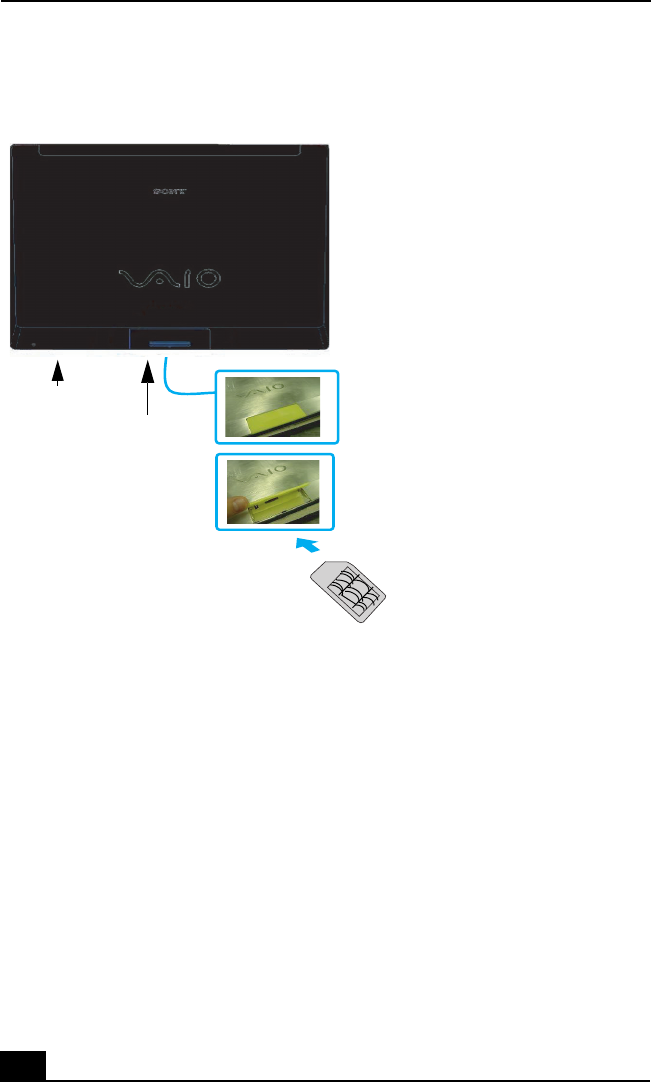
Inserting the SIM card
SIM card
slot
Back of
Unit
SIM card (printed circuit
side face up)
opened SIM
card slot
Cut-off corner
oriented right
Lift up SIM
card slot cover
About the Cingular SIM Card
7
✍To activate your Cingular account, call Sony customer support at 888-604-VAIO
(8246). When calling customer support, you may be asked for the SIM# (IMSI #) and
IMEI code. To determine these values, start the Cingular Connection Manager (CCM),
open Tools, and click Network Info. Alternatively, you can check the rear of your VAIO
computer. The IMEI # and SIM # (ICCID) should be printed on the back of your
computer.
Removing the SIM Card
To remove the SIM card, again orient your computer so you are facing its rear
portion. Make sure the computer is turned off.
1Locate the SIM card slot and open it.
2Gently push in the SIM card until you hear it click, then release the card
allowing the SIM card to eject. After the SIM card ejects, gently pull the
card out of the slot, away from the computer.
Do not touch the SIM card connectors. As a precaution, make sure you have
a firm hold of your computer before inserting or removing the SIM card.
VAIO® Computer Wireless Information
8
Removing the SIM Card
✍Take care not to damage the card in any way, either by bending or putting undue
pressure on the card.
2. Open SIM card slot cover
1. Locte SIM card slot
3. Extract SIM card
About SmartWi Connection Utility
9
About SmartWi Connection
Utility
The SmartWi Connection Utility functions largely as a switch manager between
the various forms of wireless connectivity: Bluetooth®, WLAN, and WWAN
using Cingular Wireless software.
By clicking on each of the three wireless options, the SmartWi Connection
Utility switches to the corresponding one.
Starting SmartWi Connection Utility
At initial startup, a pop-up prompt appears from the Task Tray. Selecting Yes on
the prompt launches the SmartWi Connection Utility, and then you are prompted
to activate your Cingular account.
If you close the program, however, and later wish to restart it, do the following:
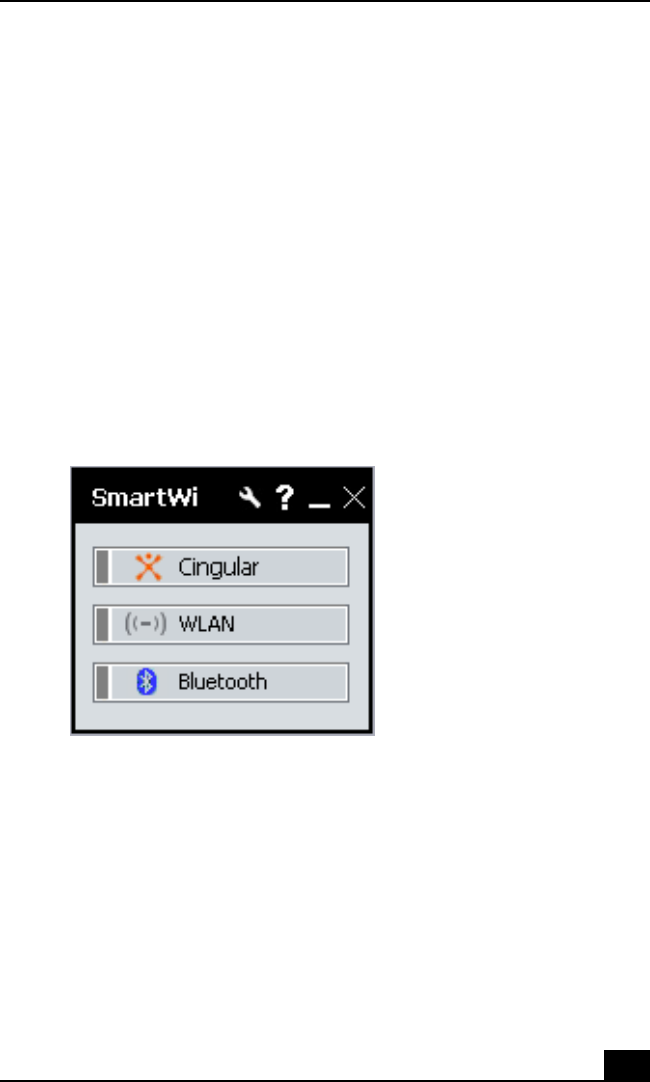
SmartWi Connection Utility main screen
VAIO® Computer Wireless Information
10
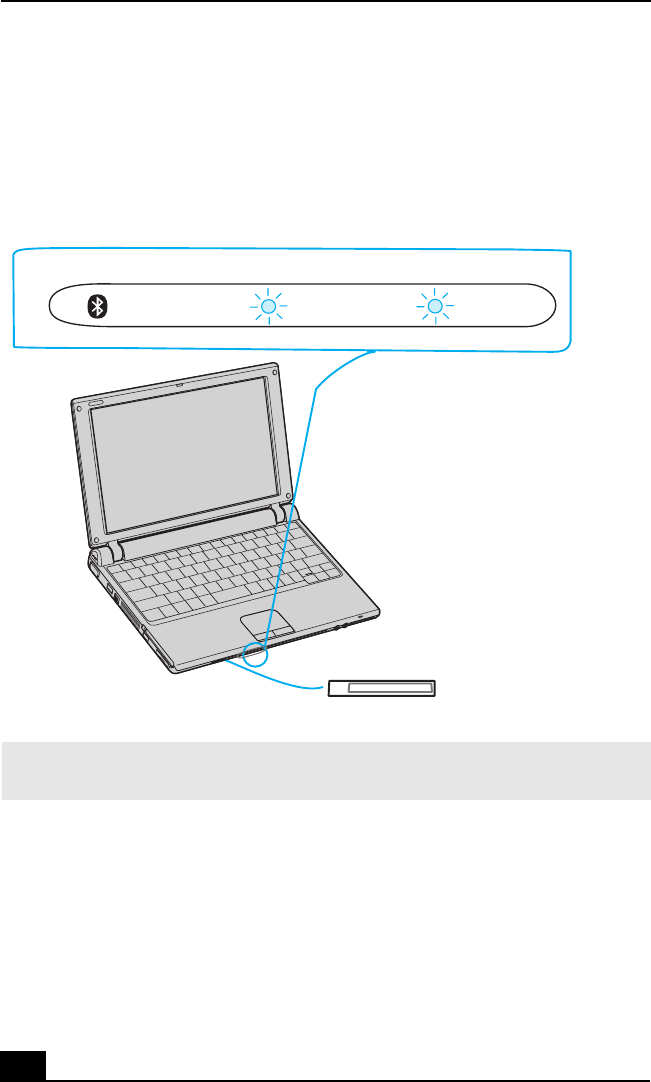
1First make sure your computer is turned on.
2Make sure the wireless switch is turned on. If it is not, locate the switch on
the front left portion of your computer and slide the switch to the right.
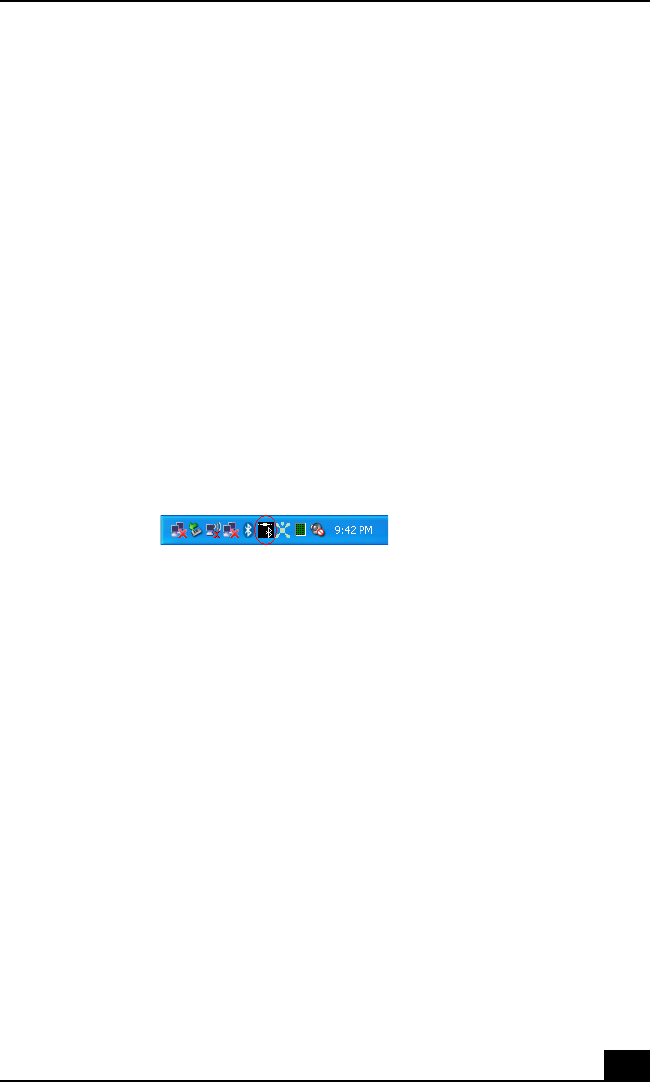
3You may also click the SmartWi Connection Utility icon in the taskbar
notification area. Depending on the wireless selection, one of six icons may
appear in the taskbar notification area.
Wireless switch and indicators
✍Once you turn on the wireless switch, the SmartWi Connection Utility window appears
automatically.
WWAN
Bluetooth WLAN
OFF
ON
WIRELESS
Starting SmartWi Connection Utility
11
4Alternately, press Start, select All Programs, select the VAI O S m a rt Wi
Connection Utility folder, and click VAIO SmartWi Connection Utility.
The SmartWi Connection Utility dialog box displays.
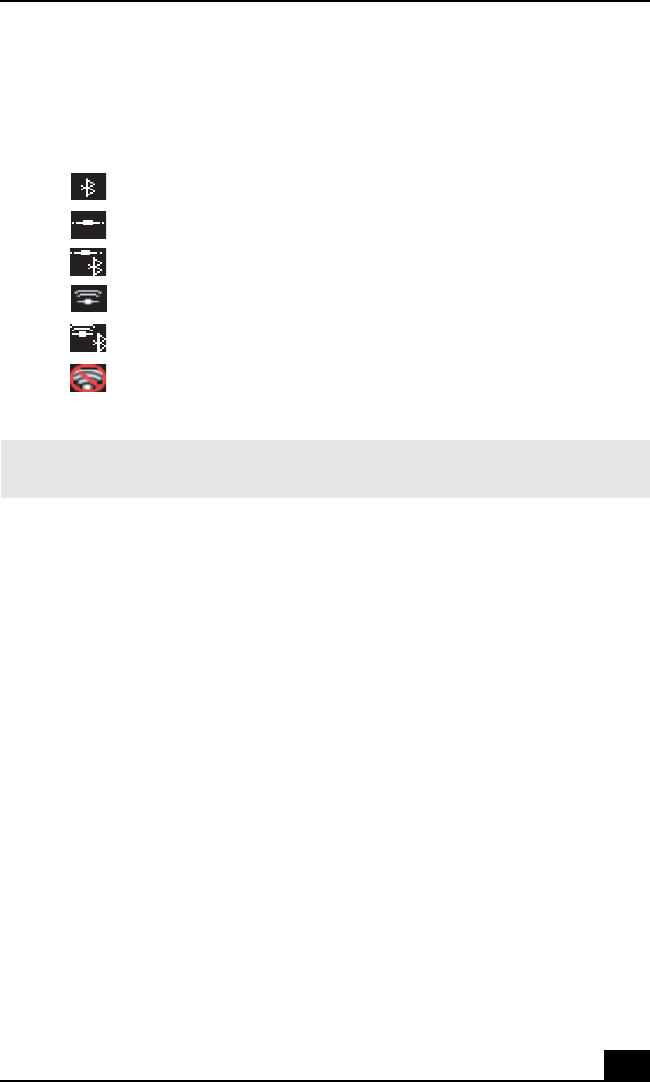
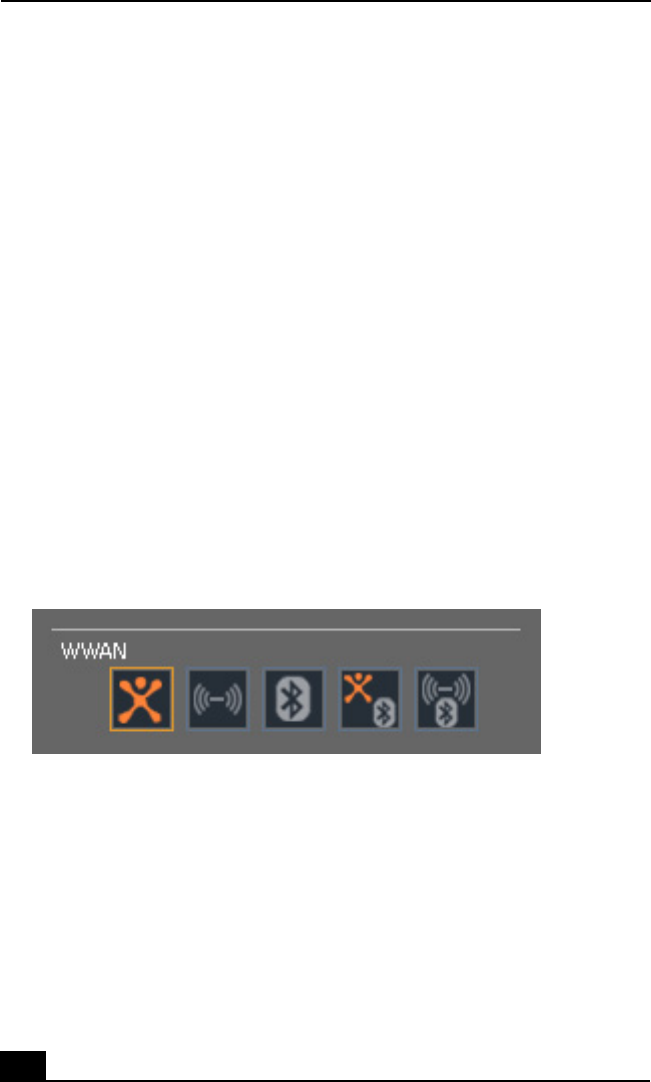
SmartWi Connection Utility icons
✍Note that WWAN and WLAN cannot coexist simultaneously. When one is selected, the
other is automatically deselected.
Bluetooth
Wireless device is turned off (no WWAN or WLAN)
WLAN
WWAN
WWAN and Bluetooth
WLAN and Bluetooth
VAIO® Computer Wireless Information
12
About the Wireless Switching
Window
The Wireless Switching Window is another utility that enables switching
between wireless modes. It promotes ease of use by allowing you to switch
between Bluetooth®, WLAN, and WWAN simply by pressing keyboard buttons
instead of using the touch pad (or a separately available USB mouse).
Using the Wireless Switching Window
To start the Wireless Switching Window in order to switch between wireless
modes, simply press Fn + F1 to bring up the window. Then hold the Fn key
down while pressing the F1 key to toggle between modes.
Wireless Switching Window
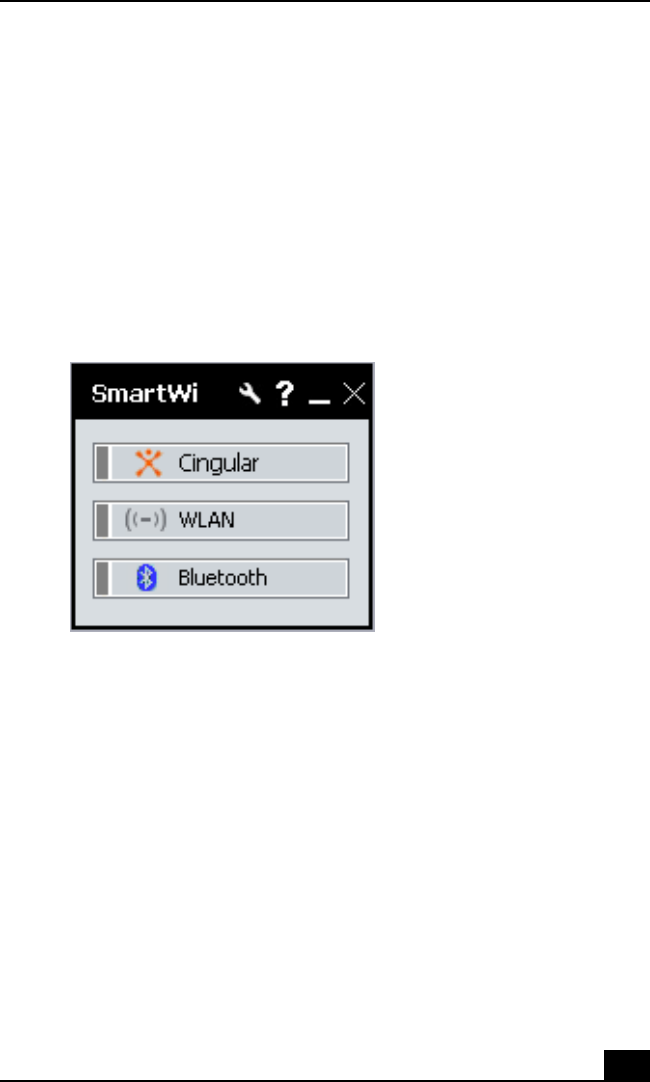
Using Wireless Connection Utility
13
Using Wireless Connection Utility
To use the wireless connectivity features and begin using e-mail or connecting to
the Internet, simply click the desired button: Cingular Wireless (for WAN
connectivity), WLAN, or Bluetooth®.
Wireless Connection Utility main screen
VAIO® Computer Wireless Information
14
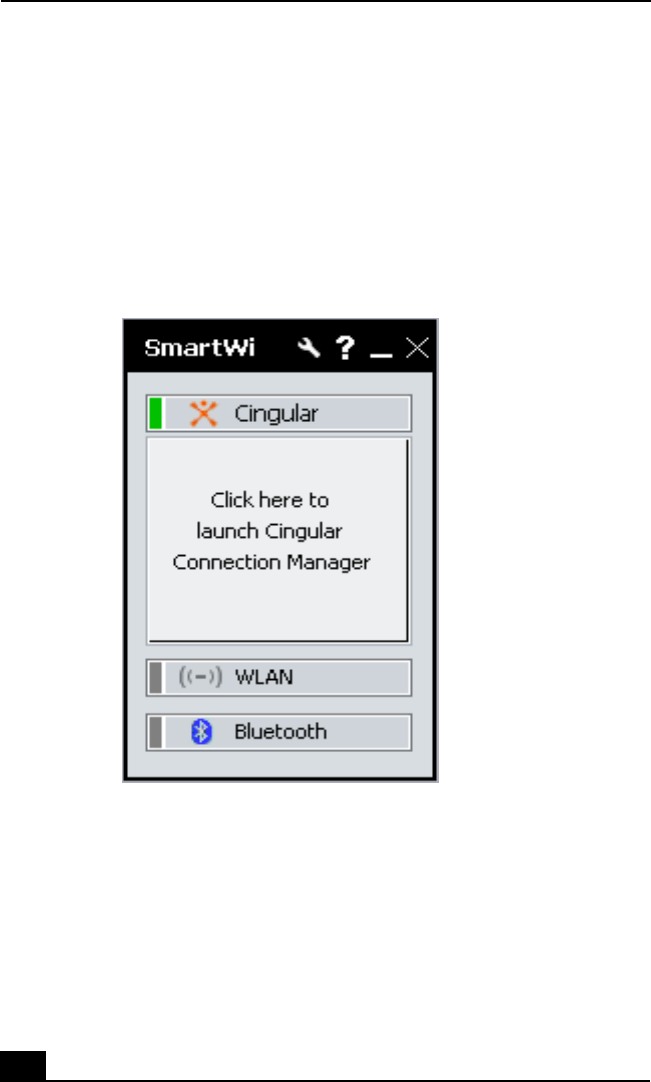
Using the Cingular Wireless WAN connection
To use Cingular WAN connectivity, do the following:
1Click the Cingular button on the SmartWi Connection Utility main screen.
A Cingular Connection Manager launch area display appears below the
button.
Cingular Connection Manager launch area
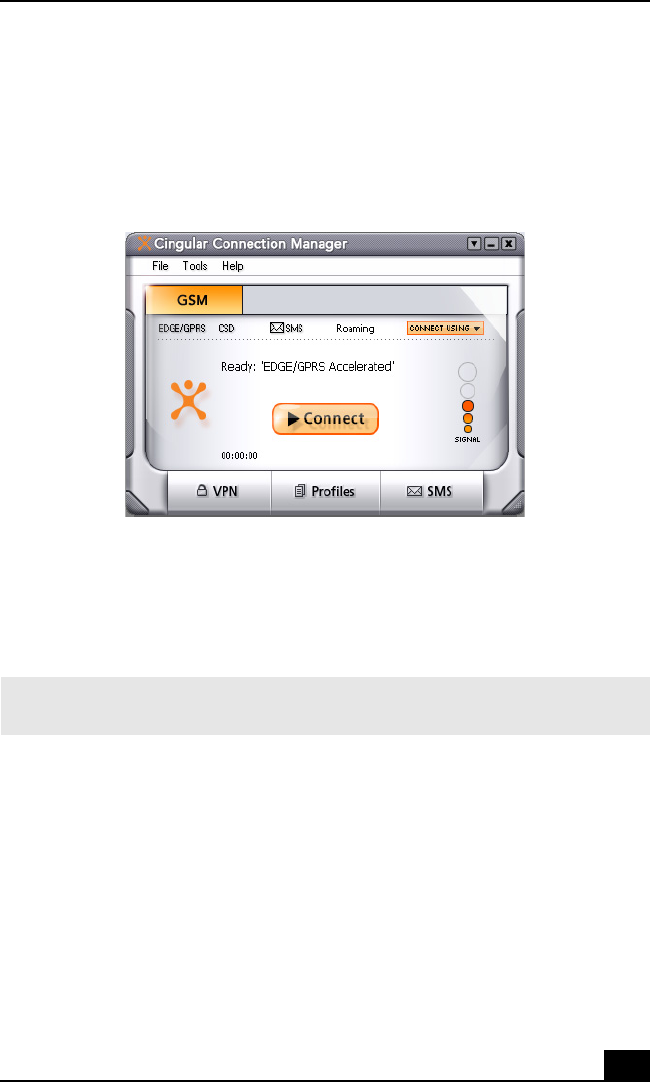
Using the Wireless LAN connection
15
3By default, your connection to Cingular service initiates.
4Follow any additional directions on the Cingular Connection Manager
window displays.
Using the Wireless LAN connection
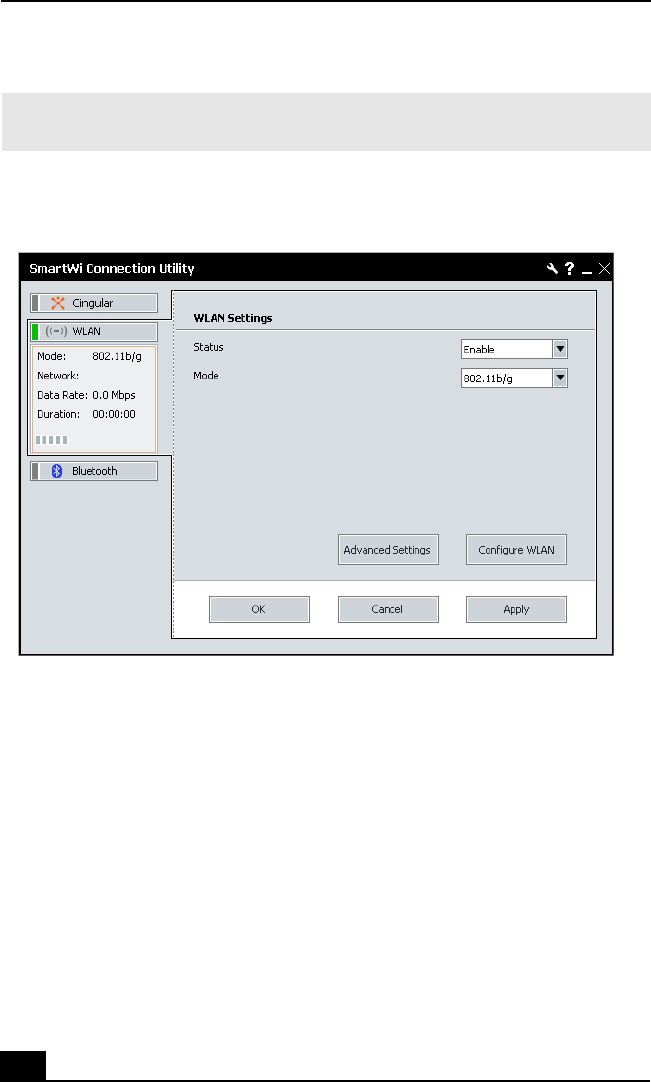
To use Wireless LAN (WLAN) connectivity, do the following:
1Click the WLAN button on the SmartWi Connection Utility main window.
A status display appears below the button.
2Next, click the status display below the WLAN button. The window
enlarges to display WLAN Settings.
2Click anywhere in the Cingular Connection Manager launch area.
The Cingular Connection Manager window displays.
Cingular Connection Manager main screen
✍For help, click the Help drop-down menu and click Help to display the Cingular
Connection Manager help file.
VAIO® Computer Wireless Information
16
To deactivate WLAN connectivity, select Disable for the Status field drop-down
box on the WLAN Settings dialog.
By default, WLAN uses theIEEE802.11b/g standard technology for WLAN
connectivity. The standard includes the Wired Equivalent Privacy (WEP) encryption
method, which is a security protocol and WiFi Protected Access.
To use IEEE802.11b or IEEE802.11g WLAN connectivity standard only, select
them from the Mode field drop-down box.
✍Wireless LAN devices using the IEEE802.11a standard and the ones using the
IEEE802.11b or g standard cannot communicate because the frequencies are different.
Wireless LAN devices using the IEEE802.11g standard can only communicate with a
✍If it is the first time connect with WLAN, the Wireless Help Utility will launch
automatically and guide you during initial setup.
WLAN Settings dialog box

Using the Wireless LAN connection
17
device using the IEEE802.11b standard, not with the IEEE802.11a standard.
✍IEEE802.11b: The standard speed is 11 Mbps, or about 30 to 100 times faster than a
standard dial up.
✍IEEE802.11g: The standard speed is 54 Mbps, or about 5 times faster than a Wireless
LAN device using the IEEE802.11b standard.
Configuring the WLAN connection
You can configure your computer to connect to a WLAN in one of two of the
following ways:
❑without an access point device (ad-hoc)
❑with an access point device
An ad-hoc network is a network in which a local network is created only by the
wireless devices themselves, with no other central controller or access point
device. Each device communicates directly with other devices in the network.
For example, you can set up an ad-hoc network easily at home to communicate
between two computers.
A computer communicating with an access point device is configured as part of
an infrastructure network. An infrastructure network is a network that extends an
existing wired local network to wireless devices by providing an Access Point,
for example the Sony Access Point. The Access Point bridges the wireless and
wired LAN and acts as a central controller for the Wireless LAN. The Access
Point coordinates transmission and reception from multiple wireless devices
within a specific range.
❑To configure your computer to communicate without an access point device
(ad-hoc), follow these steps:
1On the WLAN Settings dialog box, click the Configure WLAN button.
The Wireless Network Connection Properties window displays.
2If not automatically selected, select the Wireless Networks tab.
3Click the Add... button.
The Association tab opens in the Wireless network properties
window.
4Enter a Network name (SSID).
You can choose a 32-digit alphanumeric name. If you want to

VAIO® Computer Wireless Information
18
communicate between two or more computers, you need to configure all
these computers using the same network name.
5Select Open from the Network Authentication drop-down box.
6Select WEP from the Data Encryption drop-down box.
7Deselect the The key is provided for me automatically option button.
The Network key, Confirm network key, and Key index (advanced)
fields activate.
8Enter the Network key.
The network key should be 5 or 13 alphanumeric characters long. You
can choose whatever you want. If you want to communicate between
two or more computers, you need to configure all these computers using
the same network key.
9Enter exactly the same Network key again, for confirmation.
10 Select the check box This is a computer-to-computer (ad hoc)
network; wireless access points are not used.
11 Click OK.
Your Network name appears in the Preferred networks area in the
Wireless Networks tab display.
12 Click Advanced.
The Advanced window displays.
13 Select the Computer-to-computer (ad hoc) networks only option
button.
14 Click Close.
15 Click OK.
Your computer is ready to communicate with another computer.
To disconnect from a computer-to-computer (ad-hoc) network, click
Configure WLAN on the WLAN Settings dialog box, select the Network
Name in the Preferred networks area, click Remove, and then click OK.
❑To configure your computer to communicate with an access point device,
follow these steps:
✍Use the VAIO Wireless Utility to guide you through the set up process and provide you
with more detailed information about wireless connections.

Using the Wireless LAN connection
19
1Make sure an access point is set up. See the instructions that
accompanied the access point for more information.
2Click Start, point to All Programs, and click VAIO Wireless Utility.
The VAIO Wireless Utility displays.
3Follow the on-screen instructions.
Configuring Proxy and IP Settings for WLAN connections
You can configure Proxy and IP Settings for use in connecting to your WLAN
network. To do this:
1From the WLAN Settings dialog box, click Advanced Settings.
The Advanced Settings window displays.
2Select a network profile from the list that you want to configure, and then
click Edit.
❑To configure your Proxy, follow these steps:
1On the Proxy tab, select whether to use the Internet Explorer proxy
settings or not, or to use a proxy server of your choice for your WLAN
connection.
If you want to use a specified proxy server, you must identify its address
and port.
2Click Apply and proceed to configure IP Settings or click OK.
❑To configure your IP Settings:
1On the IP Settings tab, select whether to obtain IP and DNS server
address automatically or not. If you do not want to obtain IP
automatically, you must identify the IP address, subnet mask, and
default gateway addresses, and identify preferred and alternate DNS
servers.
Optionally, you can select to obtain IP automatically and choose to
specify preferred and alternate DNS servers.
2Click Apply and proceed to configure a Proxy, or click OK.
3Click Close to close the Advanced Settings window.
VAIO® Computer Wireless Information
20
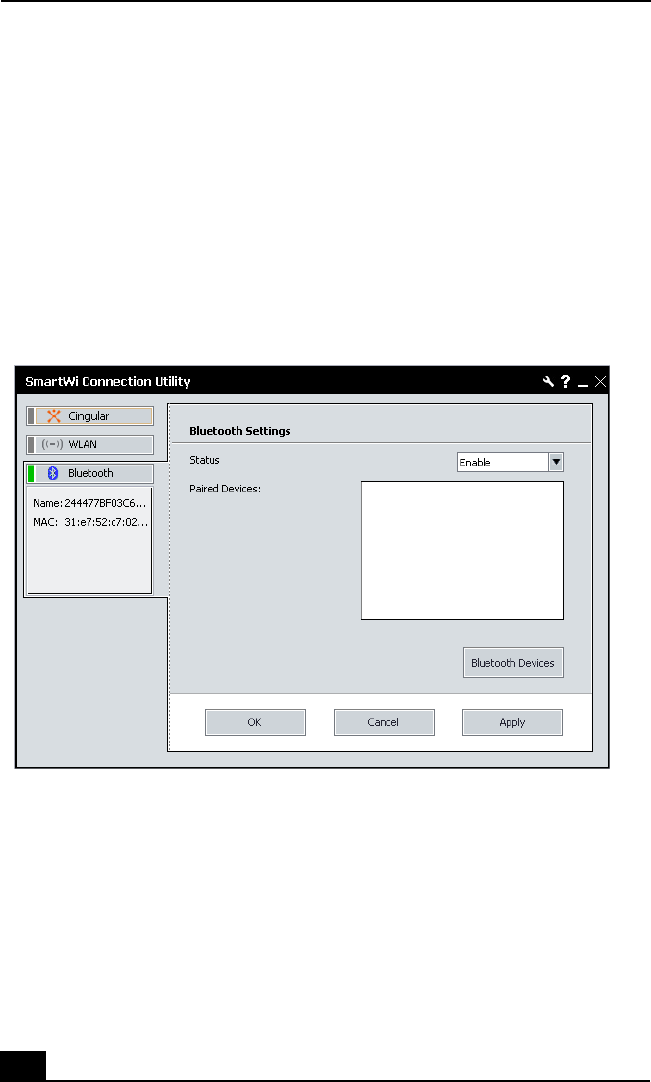
Using the Bluetooth® technology connection
To use Bluetooth® technology connectivity, do the following:
1Click the Bluetooth button on the Wireless Connection Utility dialog box.
This activates Bluetooth® technology, and a status display appears below
the button.
2Next, click the status display below the Bluetooth button. The window
enlarges to display Bluetooth Settings.
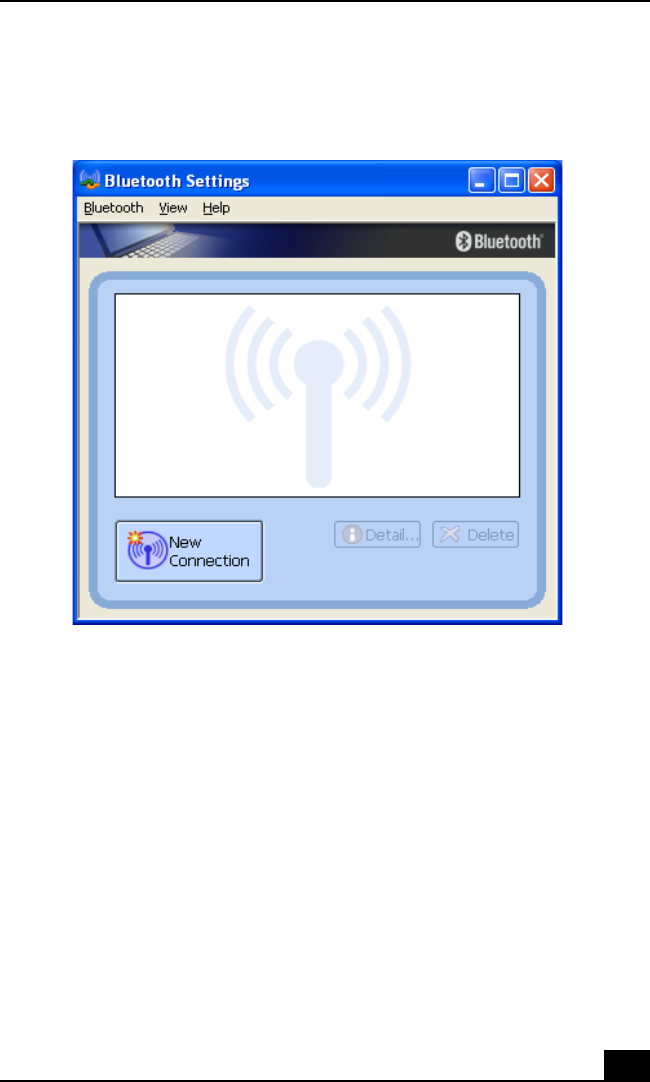
3Click the Bluetooth Devices button.
The Bluetooth Settings dialog box displays listing the Bluetooth devices
already configured.
If their are no previous Bluetooth devices configured or you are invoking the
Bluetooth function for the first time, the Add New Connection Wizard
displays for searching Bluetooth devices. Follow the on-screen instructions.
Bluetooth Settings dialog box
Using the Bluetooth® technology connection
21
4From the Bluetooth Settings dialog box, you can select the Bluetooth®
device displayed in the list to view details about the device, reconfigure, or
delete a device previously found.
Click New Connection to start the Add Bluetooth Device Wizard for
searching and locating additional Bluetooth® devices in the vicinity of your
computer. Follow the on-screen instructions.
When completed, click OK.
Bluetooth Settings dialog box

VAIO® Computer Wireless Information
22
General Functional Information
SmartWi Connetion Utility supports the following Wireless WAN-related
functionality:
❑Network Systems
GSM 850, 1800, and 1900
❑Network Services
GPRS/EDGE and SMS
Note: Speech services are not supported
❑SIM Card
Small plug-in card, XX-type with SIM lock
Note: The supplied Cingular SIM card is the only SIM card supported.
❑Speed
Maximum continuous speed and FTP download speeds to 160 kbytes or
more.
❑Interface Type
Internal USB
❑Connection Type
PPP connection across USB
❑Communication Port
Virtual communications on COM port 5
Software Upgrades
You can upgrade your PC Card firmware/software from the Internet website
http://esupport.sony.com.

FAQ and Troubleshooting
23
FAQ and Troubleshooting
This section provides answers to frequently asked questions (FAQ) and possible
operating workaround information for the SmartWi Connection Utility (SWCU).
In addition, this information can help to clarify issues encountered when using
the SmartWi, Cingular Connection Manager and its associated features.
Answers to Frequently Asked Questions
❑General
Question: What is the SmartWi Connection Utility?
Answer: SWCU is a wireless connection utility application that is designed
to switch and manage wireless connection modes between Bluetooth,
802.11, and Cingular GPRS/EDGE.
Question: Can I connect to two separate types of wireless connections
simultaneously (for example, GPRS and 802.11b/g)?
Answer: No. Connections are mutually exclusive, with the exception of
Bluetooth which will run concurrently with other wireless connections.
Bluetooth can be switched on and off via the software without causing
interference to the current connection (for example, GPRS or 802.11b/g).
The hardware indicator/switch for the wireless devices is located at the front
panel on the left side.
Question: Are 802.11a (5GHz) WLAN connections supported under
SWCU?
Answer: No, only 802.11b and 802.11g (2.4GHz) connection types are
supported. In the future, 802.11a may become available.
VAIO® Computer Wireless Information
24
❑SWCU Operation
Question: Why do I get a VAIO Wireless Help Utility prompt when
launching WLAN?
Answer: If there is not any WLAN profile configured previously (this is the
first time using WLAN), the VAIO Wireless Help Utility will be launched
automatically, or the VAIO Wireless Help Utility loads when it detects a
failure in interfacing with the driver. To remedy the problem, follow the
suggestions from the assist help section.
Question: I clicked the “Show All Prompts” button for the Reset all
messages feature, but nothing seemed to happen. What happened when I
clicked this button?
Answer: Clicking the Show All Prompts button for the Reset all messages
feature activates all the prompts (not options) that request the “Don’t ask me
again” action. Normally, when notifications appear from yes/no prompts you
can select if you do not want to be asked again for the notifications by
checking the “Don’t ask me again” check box. The “Reset all messages”
feature provides a way to clear all the checkboxes from all the prompts
simultaneously. As a result, the prompts will display again. The following
figure is an example of a prompt that would display after clicking the Show
All Prompts button.
Show All Prompts action example
Question: Why isn’t there support for “Hotkeys” to maneuver within
SWCU?
Answer: The hotkeys feature will be incorporated into future SWCU
versions.
Answers to Frequently Asked Questions
25
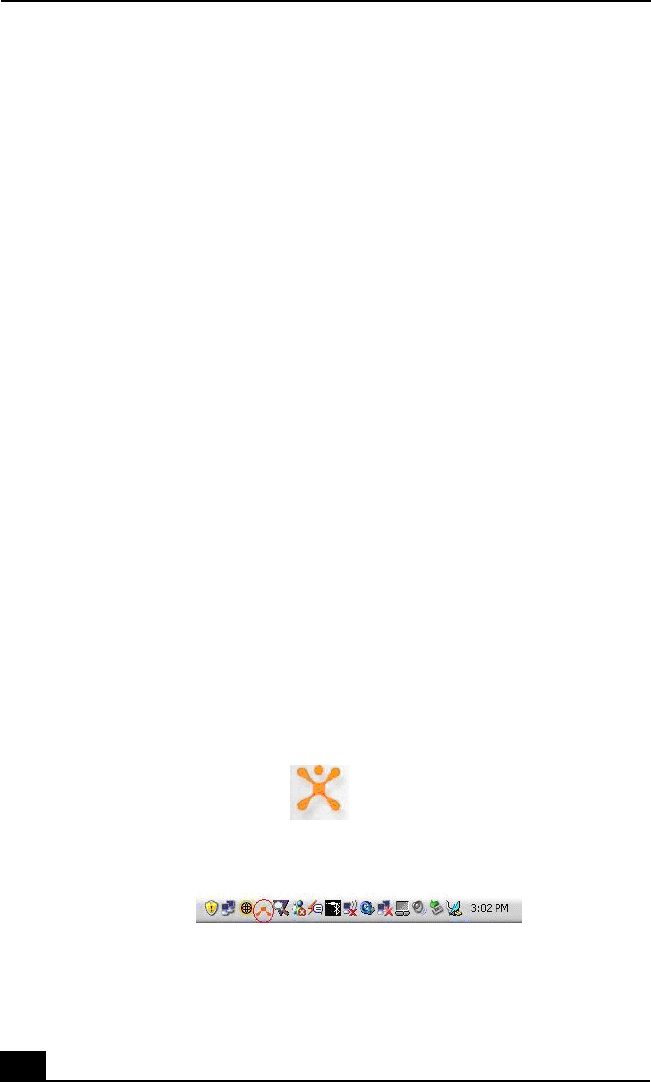
Question: I clicked on the SmartWi minimize option and noticed the
minimized icon was not in the taskbar. Where is the minimized application
and how do I bring back the application to the desktop?
Answer: The SmartWi application was minimized into the Task-tray, which
shows the “SWCU” icon and not into the “Taskbar”. Depending on the type
of connection and combination, if any, the SWCU icon will reflect the
current connection. For example, if the SmartWi connects simultaneously
with the Bluetooth device, the icon will reflect the connection type with a
Bluetooth emblem. Switching on and off the Bluetooth option does not
interfere with WiFi or WWAN connection.
To bring forward the SmartWi application to the desktop, click the SmartWi
icon from the task-tray once (see the following illustration) or navigate to
Start --> All Programs --> SmartWi Connection Utility, and then click the
SmartWi Connection Utility icon.
Minimized WWAN and Bluetooth connection icon
Question: Why do I not have an option to delete WLAN profiles from the
SmartWi WLAN profiles list in the Advanced Settings window?
Answer: Profiles can be managed and edited via SmartWi, but cannot be
deleted. Profiles can be deleted from Windows Wireless Network
Connection Properties window that displays when clicking Confugure
WLAN on the SmartWi WLAN Settings dialog box.
Question: I noticed that if I open a WLAN connection from SmartWi,
sometimes the WLAN profile in Windows Wireless Network Connection
window shows “Not connected”, but actually the connection is established.
Answer: Under the Windows Wireless Network Connection window, click
on the “Refresh network list” located under “Network Tasks”. This should
refresh Windows and provide an accurate overview of wireless status. If this
is not fixed the problem, then close the Windows Wireless Network
Connection window and re-launch it from Windows network connections.

VAIO® Computer Wireless Information
26
❑Cingular Connection Manager (CCM)
Question: What does it mean to “Restore” from the tool help bubble?
Answer: Clicking the “mini bar” option once, reduces the full details to a
“mini bar”. Click the “Restore” option to return to full details view.
Question: Why does the “Connection Log” not sort when clicking on the
columns title bar?
Answer: This feature will be available in future versions. Sorting by type,
technology, date/time, duration total bytes and description should be
available in future versions.
Question: Why do I see “Device not detected” in the Cingular Connection
Manager details window?
Answer: This is most likely to occur while switching from WWAN to
launching CCM. There is a slight timing degradation that occurs while
making the switch which causes this status. Turn off the WWAN and then
reconnect the WWAN to fix the problem.
Question: CCM sometimes fails to respond after resuming from Suspend
mode. What could be the problem?
Answer: If the “General” tab under the Edit Profile screen for GSM is left
open, this can often keep CCM from reopening upon resuming from suspend
mode. Make certain the “Edit Profile” screen has been closed after making
any changes. A reboot should correct the problem.
Question: When I try to connect through Cingular GPRS network, the
Connect/Disconnect button is greyed out, and there is no connection
available.
Answer: Click on the “Connect Using “tab in CCM, and check one of the
connection types from the drop down menu. Close out of CCM and reboot.
Question: I noticed an option to create a CSD Accelerated/Non-Accelerated
network profile. What is this?
Answer: CSD is Circuit Data Network. This is an older technology with
lower throughput which has been phased out. We recommend that
EDGE/GPRS Acelerated/NonAcelerated profile options be used instead.

Answers to Frequently Asked Questions
27
❑SMS
Question: What does “Load” do and why does it not prompt for options or
input?
Answer: The SMS help file indicates this is useful in case of accidental
deletion of messages. The “Load” feature would be a way to recover the
deleted messages, however, this option provides no notification that the task
completed successfully.
Question: What does “Save” do and why does it not prompt for options or
input?
Answer: The help file indicates this keeps the current state of all folders,
except the inbox. However, no notification is sent indicating the “Save”
completed.
Question: I copied a message to the “Outbox”. Why does it not prompt to
enter the recipient?
Answer: Although you can move or copy a message from one folder to
another, including the “Outbox”, the message must have a recipient before
the message can be sent. If the message is copied and/or moved to the
“Outbox”, the message still will not have a recipient, thus leaving the
message unable to be sent. This would be considered the same as a the
“Forward message” feature. The message would remain in the “Outbox”
indefinitely until a destination or destinations are provided. For working
around this, we recommend double-clicking on the message, enter a
recipient, and then click “Send”.
Question: I created an SMS message, but am not connected to GRPS. How
is it possible that the message can be sent?
Answer: Sending SMS does not need a GPRS data connection. As long as it
detects and attaches to the Cingular network, it will able to send SMS.
Question: What is, and what does the function button “Update Address
Book with Phone Book Contents” do?
Answer: When the SIM is installed, it contains a built-in phone book, which
when using this feature, allows the contents of the phone book to be
incorporated into the address book.
VAIO® Computer Wireless Information
28
Question: Why I am not alerted of transferring the contents of phone book
to the address book?
Answer: This is a feature that is still under development. A request for
further study to be conducted with this option has been applied.
Question: When I select a message from a folder, and then scroll right, the
all previously existing messages appear to be gone if I scroll back to the
original folder position.
Answer: Click out of the folder, and then back in to refresh the screen.
Question: I clicked on the Cingular Connection Manager minimize button
and noticed that the CCM icon was not in the taskbar. Where is the
minimize icon and how do I bring forth the application to the desktop?
Answer: The CCM minimizes into the Task-tray, which is represented by
the “Cingular” trademark cross icon and not into the “Taskbar” (see the
Cinguler logo illustration below). Depending on the strength of the GPRS
signal, the trademark will reflect this with a degree of graduations. In other
words, if the signal strength synchronizes to 3 bars (see the Task-tray
illustration below), the Cingular trademark cross will show approximately
half of trademark cross in the task tray. If the signal strength is one bar, the
trademark cross will appear to show a bottom portion of the trademark cross.
If the signal strength is at five bars, the entire Cingular trademark cross will
be fully indicated.
To bring forth the CCM to the desktop, click the Cingular trademark icon in
the task-tray or right-click the Cingular trademark cross and select “Show”.
Cingular logo trademark cross
Minimized Cingular logo trademark cross

Answers to Frequently Asked Questions
29
❑GPRS Network
Question: Why do I see a network connection speed rate of 214.4 Kbs, but
when I try to access a website that requires a minimum of 128 Kbs, I am told
that I do not have the required minimum rate.
Answer: The network speed indicator provides the capacity of the wireless
device is 214.4 Kbs but the actual speed depends on network throughput. To
work around this, try to change the network settings to optimize the
GPRS/EDGE value. This is done by accessing CCM --> Tools -->
Settings… --> Advanced Networking, and then selecting “Optimized
GPRS/EDGE value” option form the RWIN variables window.
Question: I am experiencing dropped connections, slowness, and other
difficulties while attempting to stream video over the Cingular GPRS
connection. What could be the problem?
Answer: Bandwidth over the Cingular GPRS network is somewhat
restricted as compared to wired or 802.11x wireless connection types. Due to
the demanding nature of streaming audio/video, it is not recommended that
GPRS be used for either streaming video, or very large data downloads.
Question: I am experiencing difficulty reconnecting to my web browser
when switching from the Cingular GPRS network to a WLAN connection.
What could be the problem?
Answer: The network behind the WLAN’s Access Point may be set up to
use a proxy server. If this is the case, proxy settings entered for Internet
Explorer over WLAN may prevent IE from connecting over a GPRS link.
To allow web browsing from either connection type:
1Correctly configure IE proxy settings for use over the WLAN
connection. Then, open the Cingular Connection Manager and right-
click the “GSM” tab. Select “profiles” and then click on the “Edit”
button.
2Under the “General” tab, make certain that the “Disable IE’s manual
proxy settings on connect” checkbox has been enabled. Close the “Edit”
screen and then close and reopen Internet Explorer. Remember to close
and reopen IE each time you switch connection types in order to refresh
proxy settings within Internet Explorer.

VAIO® Computer Wireless Information
30
3If you are still having trouble, contact your network administrator to
assist in obtaining the proxy settings.
Question: I am seeing a message in Windows taskbar stating; “GPRS a
Network Cable is Unplugged”. What does this mean?
Answer: Typically, this message appears if your VAIO PC is connected to
the Cingular GPRS network and is allowed to go into hibernation. Upon
resuming, Cingular has terminated the connection. However, Windows
information has not yet been updated to recognize this change and is
unaware that your GPRS connection does not require a cable. You may
either re-connect to Cingular, or simply cancel out of the message.
Question: Downloads sometimes appear to be slow when connecting to the
Internet via CCM. What type of download speeds should I expect?
Answer: Since CCM operates over a cellular network and is subject to the
same issues/conditions as cellular connections, bandwidth may vary greatly.
Common download speeds ranging from 18~64Kbps are possible with
30~36Kbps rates as typical. However, these are only estimates and your
actual experience will likely vary depending upon a number of
environmental factors.
Question: What is meant by “RWIN” from the CCM Tools settings
advanced networking section?
Answer: The TCP Receive Window size is the amount of ‘receive’ data (in
bytes) that can be buffered at one time on a connection. RWIN (TCP Receive
Window) can be changed using the method of setting up the variables to
optimize TCP. We recommend that this setting not be changed unless you are
an expert or you have explicit instructions from your network administrator.
Note: Changing the settings for this value also has an effect when using
WLAN device or any device that depends on TCP connection.
❑Sonic Stage/Music Store
Question: I am unable to stream audio from some web sites such as
Winamp©, Shoutcast©, etc. using Sonic Stage? Why is this the case?
Answer: Many of these web sites use proprietary players and use encoding
formats that are not supported by other players. You can download one of
these players if you wish, or try streaming from Sony Connect™ Music

Answers to Frequently Asked Questions
31
Store using Sonic Stage.
Question: Sonic stage appears to lock up indefinitely (displays a spinning
‘LOADING’ logo) when attempting selecting “Radio Connect” (streaming)
from Sony Connect™ site.
Answer: This is related to the issue of streaming audio over low bandwidth
connections as referenced above under “GPRS Networking”. Connecting to
Music Store over a wired or broadband connection will usually resolve this
issue.
❑Bluetooth® technology
Question: Why do I not see the Bluetooth device that is connected to the
computer from the BT connected device status box of the SmartWi
Connection Utility?
Answer: It is most likely no Bluetooth devices have been configured for the
system. Bluetooth devices are not configured automatically. To install or
configure Bluetooth devices, you will need assistance in setting up the
Bluetooth device on the computer. Follow steps from the help section of
installing the Bluetooth device. We recommend obtaining the latest
Bluetooth drivers.
Question: I can not connect to my Bluetooth keyboard (or other device).
What could be the problem?
Answer: You will need to make certain that you are using the most current
drivers available for your Bluetooth device. Try reinstalling under the
updated driver per the manufacturers instructions.
❑Uninstall, Reinstall and Repair
Question: How do I uninstall the SmartWi application and all its associated
modules?
Answer: There are several components that should be uninstalled when
removing the SmartWi application. The following steps should be observed
while uninstalling the SmartWi application
1Uninstall Wireless Switch Setting Utility
2Uninstall Sony Utilities DLL
When prompted, restart the computer.
3Uninstall VDC driver using the driver

VAIO® Computer Wireless Information
32
4Uninstall Sony Utilities
5Uninstall VAIO Wireless Utility
6Uninstall Cingular Connection Manager
7Uninstall SmartWi connection Utility
Question: I do not see a repair option for the SmartWi from the control
panel. How do I repair the SmartWi and its associated modules?
Answer: At this time there is no “Repair” option for the SmartWi and
associated modules. To work around this, we recommend to uninstall
SmartWi and the associated modules and then reinstall. You can restore
SmartWi and associated modules by running the VAIO Recovery Wizard
utility (or the RDVD recovery disk that is provided with some models). To
access the VAIO Recovery Wizard, click Start, All Programs, and then VAIO
Support Central. From VAIO Support Central menu, click VAIO Recovery
Wizard, and then select Wireless Connection Utility application from the
Reinstall Applications or Drivers option. If using the RDVD recovery disk,
load the disk and select Wireless Connection Utility application from the
Reinstall Applications or Drivers option.
Question: If I uninstall and then reinstall the Cingular Connection Manager
application, will the application lose the messages and phone book?
Answer: Uninstalling the Cingular Connection Manager application will not
remove your messages or the phone book. After reinstallation has been
completed, you are prompted to launch CCM and view the readme.html file.
Click OK to launch CCM. Load SMS and advance to messages. Observe
that the messages remain. Load the phone book, and notice that the contacts
remain.

Notice to Users
33
Notice to Users
© 2005 Sony Electronics Inc. Reproduction in whole or in part without written permission is prohibited. All rights
reserved. This manual and the software described herein, in whole or in part, may not be reproduced, translated, or
reduced to any machine-readable form without prior written approval.
SONY ELECTRONICS INC. PROVIDES NO WARRANTY WITH REGARD TO THIS MANUAL, THE
SOFTWARE, OR OTHER INFORMATION CONTAINED HEREIN AND HEREBY EXPRESSLY DISCLAIMS
ANY IMPLIED WARRANTIES OF MERCHANTABILITY OR FITNESS FOR ANY PARTICULAR PURPOSE
WITH REGARD TO THIS MANUAL, THE SOFTWARE, OR SUCH OTHER INFORMATION. IN NO EVENT
SHALL SONY ELECTRONICS INC. BE LIABLE FOR ANY INCIDENTAL, CONSEQUENTIAL, OR
SPECIAL DAMAGES, WHETHER BASED ON TORT, CONTRACT, OR OTHERWISE, ARISING OUT OF OR
IN CONNECTION WITH THIS MANUAL, THE SOFTWARE, OR OTHER INFORMATION CONTAINED
HEREIN OR THE USE THEREOF.
SONY CANNOT WARRANT THAT THE FUNCTIONS DESCRIBED IN THIS GUIDE WILL BE
UNINTERRUPTED OR ERROR-FREE. SONY ALSO ASSUMES NO RESPONSIBILITY, AND SHALL NOT
BE LIABLE FOR ANY DAMAGES TO, OR VIRUSES THAT MAY INFECT, YOUR COMPUTER
EQUIPMENT, OR OTHER PROPERTY ON ACCOUNT OF YOUR ACCESS TO, USE OF, OR BROWSING IN
ANY DESCRIBED WEB SITE, OR YOUR DOWNLOADING OF ANY MATERIALS, DATA, TEXT, IMAGES,
VIDEO, OR AUDIO FROM ANY DESCRIBED WEB SITE. WEB SITE INFORMATION IS OBTAINED FROM
VARIOUS SOURCES AND MAY BE INACCURATE. COPIES OF COPYRIGHTED INFORMATION MAY
ONLY BE MADE FOR LEGALLY PERMISSIBLE PURPOSES.
Sony Electronics Inc. reserves the right to make any modification to this manual or the information contained herein
at any time without notice. The software described herein is governed by the terms of a separate user license
agreement.
This product contains software owned by Sony and licensed by third parties. Use of such software is subject to the
terms and conditions of license agreements enclosed with this product. Some of the software may not be transported
or used outside the United States. Software specifications are subject to change without notice and may not
necessarily be identical to current retail versions.
Certain product(s) included with this computer may include features such as copy protection and content
management technology. USE OF THE SOFTWARE PRODUCT(S) REQUIRES AGREEMENT TO
APPLICABLE END USER AGREEMENTS AND FULL COMPLIANCE WITH APPLICABLE PRODUCT
ACTIVATION PROCEDURES. Product activation procedures and privacy policies will be detailed during initial
launch of the software product(s), or upon certain reinstallations of the software product(s), or reconfigurations of
the computer, and may be completed by Internet or telephone (toll charges may apply).
Updates and additions to software may require an additional charge. Subscriptions to online service providers may
require a fee and credit card information. Financial services may require prior arrangements with participating
financial institutions.
Important information for Canadian customers: Your new VAIO computer includes certain software versions or
upgrades, and Internet services or offers that are available to U.S. customers only.
Sony, VAIO, the VAIO logo, VAIO Digital Studio, VAIO Media, VAIO Media Music Server, VAIO Media Photo
Server, VAIO Media Video Server, Click to DVD, CLIÉ, DVgate Plus, Handycam, MagicGate, Memory Stick, the
Memory Stick logo, OpenMG, MICROMV, SonicStage, PictureGear, ImageStation, ATRAC3, and i.LINK are
trademarks or registered trademarks of Sony.
Intel and Pentium are trademarks or registered trademarks of the Intel Corporation. Microsoft, Windows, and the
Windows logo are trademarks or registered trademarks of the Microsoft Corporation. PS/2 is a registered trademark
of the IBM Corporation.
All other trademarks are trademarks or registered trademarks of their respective owners.

VAIO® Computer Wireless Information
34
Regulatory Information
Declaration of Conformity
FCC information
This equipment has been tested and found to comply with the limits for a Class B digital device, pursuant to Part 15
of the FCC Rules. These limits are designed to provide reasonable protection against harmful interference in a
residential installation. This equipment generates, uses, and can radiate radio frequency energy and, if not installed
and used in accordance with the instructions, may cause harmful interference to radio communications. However,
there is no guarantee that interference will not occur in a particular installation. If this equipment does cause harmful
interference to radio or television reception, which can be determined by turning the equipment off and on, the user
is encouraged to try to correct the interference by one or more of the following measures:
❑Reorient or relocate the receiving antenna.
❑Increase the separation between the equipment and the receiver.
❑Connect the equipment into an outlet on a circuit different from that to which the receiver is connected.
❑Consult the dealer or an experienced radio/TV technician for help.
You are cautioned that any changes or modifications not expressly approved in this manual could void your
authority to operate this equipment.
Only peripherals (computer input/output devices, terminals, printers, etc.) that comply with FCC Class B limits may
be attached to this computer product. Operation with noncompliant peripherals is likely to result in interference to
radio and television reception.
All cables used to connect peripherals must be shielded and grounded. Operation with cables, connected to
peripherals, that are not shielded and grounded, may result in interference to radio and television reception.
FCC Part 68
This equipment complies with Part 68 of the FCC rules and the requirements adopted by the ACTA. On the modem
card is a label that contains, among other information, a product identifier in the format US:AAAEQ##TXXXX. If
requested, this number must be provided to the telephone company.
This modem uses the USOC RJ-11 telephone jack.
A telephone plug and jack used to connect this equipment to the premises wiring and telephone network must
comply with the applicable FCC Part 68 rules and requirements adopted by the ACTA. The REN is used to
determine the quantity of devices which may be connected to the telephone line.
Excessive RENs on the telephone line may result in the devices not ringing in response to an incoming call. In most,
but not all areas, the sum of the RENs should not exceed five (5.0). To be certain of the number of devices that may
Trade Name: Sony
Model No.: PCG-9W6L
Responsible Party: Sony Electronics Inc.
Address: 16450 W. Bernardo Dr., San Diego, CA 92127, USA
Telephone:
(For FCC-related matters only.)
858-942-2230
This device complies with Part 15 of the FCC rules. Operation is subject to the following two conditions:
(1) This device may not cause harmful interference, and
(2) this device must accept any interference received, including interference that may cause undesired operation.

Notice to Users
35
be connected to the line, as determined by the total RENs, contact the telephone company. For products approved
after July 23, 2001, the REN for this product is part of the product identifier that has the format
US:AAAEQ##TXXXX. The digits represented by ## are the REN without a decimal point (e.g. 03 is a REN of 0.3).
For earlier products, the REN is separately shown on the label.
If this equipment causes harm to the telephone network, the telephone company will notify you in advance that
temporary discontinuance of service may be required. But if advance notice is not practical, the telephone company
will notify the customer as soon as possible. Also, you will be advised of your right to file a complaint with the FCC
if you believe it is necessary.
The telephone company may make changes in its facilities, equipment, operations or procedures that could affect the
operations of the equipment. If this happens, the telephone company will provide advance notice in order for you to
make the necessary modifications in order to maintain uninterrupted service.
If trouble is experienced with this equipment, for repair or warranty information, please contact the Sony Customer
Information Service Center at 1-888-4-SONY-PC (1-888-476-6972), or write to the Sony Customer Information
Center, 12451 Gateway Blvd., Fort Myers, FL 33913, USA, or find Sony Customer Service on the Web at
http://www.sony.com/pcsupport. If this equipment is causing harm to the telephone network, the telephone company
may request that you disconnect the equipment from the network until the problem is resolved.
Repair of this equipment should be made only by a Sony Service Center or Sony authorized agent. For the Sony
Service Center nearest you, call 1-888-4-SONY-PC (1-888-476-6972), or visit the Sony Online Support Web site at
http://www.sony.com/pcsupport.
Connection to Party Line Service is subject to state tariffs. Contact the state public utility commission, public service
commission, or corporation commission for information.
If your home has specially wired alarm equipment connected to the telephone line, ensure the installation of this
equipment does not disable your alarm equipment. If you have questions about what will disable alarm equipment,
consult your telephone company or a qualified installer.
Please use a surge arrestor against electrical surges.
FCC Radio Frequency Exposure (United States) and SAR
The available scientific evidence does not show that any health problems are associated with using low power
wireless devices. There is no proof, however, that these low power wireless devices are absolutely safe. Low power
wireless devices emit low levels of radio frequency energy (RF) in the microwave range while being used. Whereas
high levels of RF can produce health effects (by heating tissue), exposure to low level RF that does not produce
heating effects causes no known adverse health effects.
Governments around the world have adopted comprehensive international safety guidelines, developed by scientific
organizations, e.g ICNIRP (International Commission on Non-Ionizing Radiations Protection) and IEEE (The
Institute of Electrical and Electronics Engineering Inc.), through periodic and thorough evaluation of scientific
studies. These guidelines establish permitted levels of radio wave exposure of the general population. The levels
include a safety margin designed to assure the safety of all persons, regardless of age and health, and to account for
any variations in measurements.
Specific Absorption Rate (SAR) is the unit of measurement for the amount of radio frequency energy absorbed by
the body when using a transceiver. The SAR value is determined at the highest certified power level in laboratory
conditions, but the actual SAR level of the transceiver while operating can be well below this value. This is because
the transceiver is designed to use the minimum power required to reach the network.
Variations in SAR below the radio frequency exposure guidelines do not mean that there are variations in safety.
While there may be differences in SAR levels among mobile phones, VAIO PC is degined to meet radio frequency
exposure guidelines.
Before VAIO PC is available for sale to the public, it must be tested and certified to the FCC that is does not exceed
the limit established by government-adopted requirement for safe exposure. The test are performed in positions and
locations as required by the FCC for each model. For body worn operations, this PC has been tested and meets FCC
FR exposure guidelines for fixed and mobile use as normal PC use.
SONY has not measured and makes no representation about, the body worn SAR levels when any changes to the
original product.
(For PCG-9W6L models with wireless LAN and wireless WAN) The personal computer (PCG-9W6L) has been
tested and found far below the FCC limits. It is recommended to our users to ensure to keep 20 cm (8 inches) of
distance from the top of display.

VAIO® Computer Wireless Information
36
This device and its antenna(s) must not be co-located or operating with any other antenna or transmitter except
Grant condition. Users are not permitted to modify this transmitter device. Any unauthorized change made to this
device could void your authority to operate this device.
(Wireless WAN and Wireless LAN transmitter do not operate simultaneously.)
Personal Medical Devices
When Wireless WAN (EDGE module) power is on the transmitting, it may affect the operation of cardiac
pacemakers and other implanted equipment. If a minimum distance of 15 cm (6 inches) is kept between the PC and
the pacemaker, the risk of interference is limited. If you have any reason to suspect that interference is taking place,
immediately turn off WAN feature. Contact your cardiologist for more information.
For other medical devices, please consult the manufacture of the device.
Emergency Calls
EDGE module that is embedded to SONY VAIO do not support voice calls, hence their use for essential
communication is not possible.
Inserting and removing the SIM card – precautions against
electrostatic discharges (ESD)
Do not touch the SIM card connectors. As a precaution, always make sure that VAIO PC is in your hand before you
insert or remove the SIM card.
Telephone Consumer Protection Act of 1991 (United States)
The Telephone Consumer Protection Act of 1991 makes it unlawful for any person to use a computer or other
electronic device, including FAX machines, to send any message unless such message clearly contains, in a margin
at the top or bottom of each transmitted page or on the first page of the transmission, the date and time it is sent and
an identification of the business, other entity, or individual sending the message, and the telephone number of the
sending machine or such business, other entity, or individual. (The telephone number provided may not be a 900
number or any other number for which charges exceed local or long distance transmission charges.)
In order to program this information into your facsimile machine, see your fax software documentation.

VAIO Homepage
http://www.vaio.net
© 2005 Sony Electronics Inc.
For customer support information, go to:
http://www.sony.com/pcsupport