Sony Group PCH2001 PlayStation(R) Vita User Manual Basics PlayStationRVita User s Guide
Sony Corporation PlayStation(R) Vita Basics PlayStationRVita User s Guide
UserManual.wiki
>
Sony Group
>
PCH2001 User Manual
>
user guide
Contents
1.
user guide
2.
user manual
3.
users guide
4.
Safety Manual
5.
Instruction Manual
6.
Quick Guide
7.
Safety Guide
user guide
Navigation menu
Upload a User Manual
Namespaces
Wiki Guide
HTML
PDF
Info
Views
User Manual
Discussion / Help
Navigation
![A )B )C )To charge your PS Vita system, connect it to an electrical outlet as shown below using the included USB cable,AC adaptor and AC power cord.While your system is charging, the remaining battery charge is shown on the info bar as (Charging). Also,while the system is charging when the system is in standby mode or it is turned off completely, the PS buttonlights up orange. When charging is complete, the light in the PS button goes out.USB cableAC adaptorAC power cordPlug the power cord into the power outlet last, after making all of the other connections.Use an electrical outlet that is easily accessible, so the AC power cord can be unplugged quickly if theneed arises.Charge your system in an environment where the ambient temperature is between 10 °C and 30 °C (50°F and 86 °F). In environments outside of this range, charging can be inefficient and might lead todecreased battery life.When the PS button blinks orange during charging, the battery charge is too low to turn on your PS Vitasystem. Wait until the PS button stops blinking and lights up orange before turning on your system.You can also charge your system by connecting it to a USB device such as a computer using the USBcable. When charging your system using a USB device, turn off your system. You cannot charge yoursystem when it is in standby mode. To completely power off the system, press and hold the powerbutton for two seconds, and then tap [Power Off] on the screen that appears.Approximate charging timeThe following table gives the approximate charging time for your PS Vita system when the battery has noremaining charge.Charging using the AC adaptor Approximately 2 hours, 40 minutesCharging your PS Vita system while using it or while the system is in standby mode can increase thePlayStation®VitaUser's GuideTop > Basics > ChargingChargingCharging | PlayStation®Vita User's Guide http://manuals.playstation.net/document/en/psvita/basic/charge.html1 / 2 2013/08/27 15:04](https://usermanual.wiki/Sony-Group/PCH2001.user-guide/User-Guide-2072786-Page-6.png)
![Turning the power onPress the power button for two seconds. When the system is turned on, the PS button lights up blue.When turning on your PS Vita system for the first time, press and hold the power button for fiveseconds.If your system does not turn on even when you press and hold the power button, the battery chargemight be too low to turn on the system. Use the AC adaptor to charge your system, and then try turningon the system again.Putting your system into standby modeYou can put your system into standby mode by pressing the power button. When the power button is pressed,the screen (touchscreen) is turned off, the PS button blinks in blue, and the system enters standby mode.To exit standby mode, press the power button or the PS button.When your system is in standby mode, Wi-Fi and mobile networking remain enabled. The PS buttonblinks slowly in blue when there are new notifications, such as those generated when messages arrive.With the default setting, when your system is idle for three minutes, it automatically enters standbymode. However, your system does not enter standby mode automatically in some cases, depending onthe status of the application. For example, when you are viewing a slideshow or video, your systemdoes not enter standby mode.When your PS Vita system is in either of the following states while it is in standby mode, the PS buttoneither lights up blue or blinks in blue:Applications or features for which the auto-start setting is enabled have started automatically.Power is being supplied to the system by a USB device such as a computer.Turning the power off completelyPress and hold the power button for two seconds and then tap [Power Off] on the screen that appears.When your PS Vita system is not operating correctlyIf you cannot turn off your PS Vita system or the system is not operating correctly, you might be able to solve theproblem by using safe mode.Safe mode is a start-up mode for your PS Vita system, in which only a few system functions are available forsolving problems. To start your PS Vita system in safe mode, press and hold the power button until the safemode menu appears. In safe mode, use your PS Vita system's buttons to operate the menu.PlayStation®VitaUser's GuideTop > Basics > Turning your PS Vita system on and offTurning your PS Vita system on and offTurning your PS Vita system on and off | PlayStation®Vita User's Guide http://manuals.playstation.net/document/en/psvita/basic/power.html1 / 2 2013/08/27 15:04](https://usermanual.wiki/Sony-Group/PCH2001.user-guide/User-Guide-2072786-Page-8.png)
![A )B )C )Tap the icon for a game or other application on the home screen to open the application's LiveArea™ screen.You can open LiveArea™ screens for up to six applications at the same time, and go back and forthbetween the screens. When you open the LiveArea™ screen for a seventh application, the firstLiveArea™ screen that you opened is closed automatically.Home screenThe home screen displays icons for games and other applications. The home screen can have a maximum of10 pages. Move from page to page by flicking the home screen up and down.LiveArea™ screenThe LiveArea™ screen for an application presents a number of features that relate to the application. Tostart an application, tap [Start]. The application runs, using the full screen.You can go back and forth between the home screen and the open LiveArea™ screens by flicking thescreens right and left.Application screensPress the PS button to return to the LiveArea™ screen.Top > Basics > Basic operationsPlayStation®VitaUser's GuideTop > Basics > Basic operationsBasic operationsAbout this siteThis guide is for use with system software version 2.60 or later.© 2013 Sony Computer Entertainment Inc. All Rights Reserved.Basic operations | PlayStation®Vita User's Guide http://manuals.playstation.net/document/en/psvita/basic/basicoper...1 / 1 2013/08/27 15:06](https://usermanual.wiki/Sony-Group/PCH2001.user-guide/User-Guide-2072786-Page-12.png)
![In addition to touch operation, you can also control the system using the buttons on the PS Vita system.When you are on a screen that supports button control and you press a button, a cursor appears.You can disable button control under (Settings) > [Start] > [System] > [Control with Buttons on PSVita System].Button control examplesControllable features vary by application and the screen that is displayed.Directional buttons/LeftstickSelect an application or an item button Confirm the selected item button Cancel operation button (Press andHold)When the LiveArea™ screen is open, peel the LiveArea™ screen button Display the option menu or the control panelL button/R button When the LiveArea™ screen is open, switch between the home screen and theLiveArea™ screenThe cursor is hidden after a few seconds. Press any button to display the cursor again.Tap the screen to switch to touch operation. If you want to use the buttons on the PS Vita systemagain, press any button. A cursor will appear on the screen and button control will be enabled.You will not be able to control some features with buttons.PlayStation®VitaUser's GuideTop > Basics > Controlling with buttons on the systemControlling with buttons on the systemControlling with buttons on the system | PlayStation®Vita User's Guide http://manuals.playstation.net/document/en/psvita/basic/hwbutton...1 / 2 2013/08/27 15:07](https://usermanual.wiki/Sony-Group/PCH2001.user-guide/User-Guide-2072786-Page-13.png)
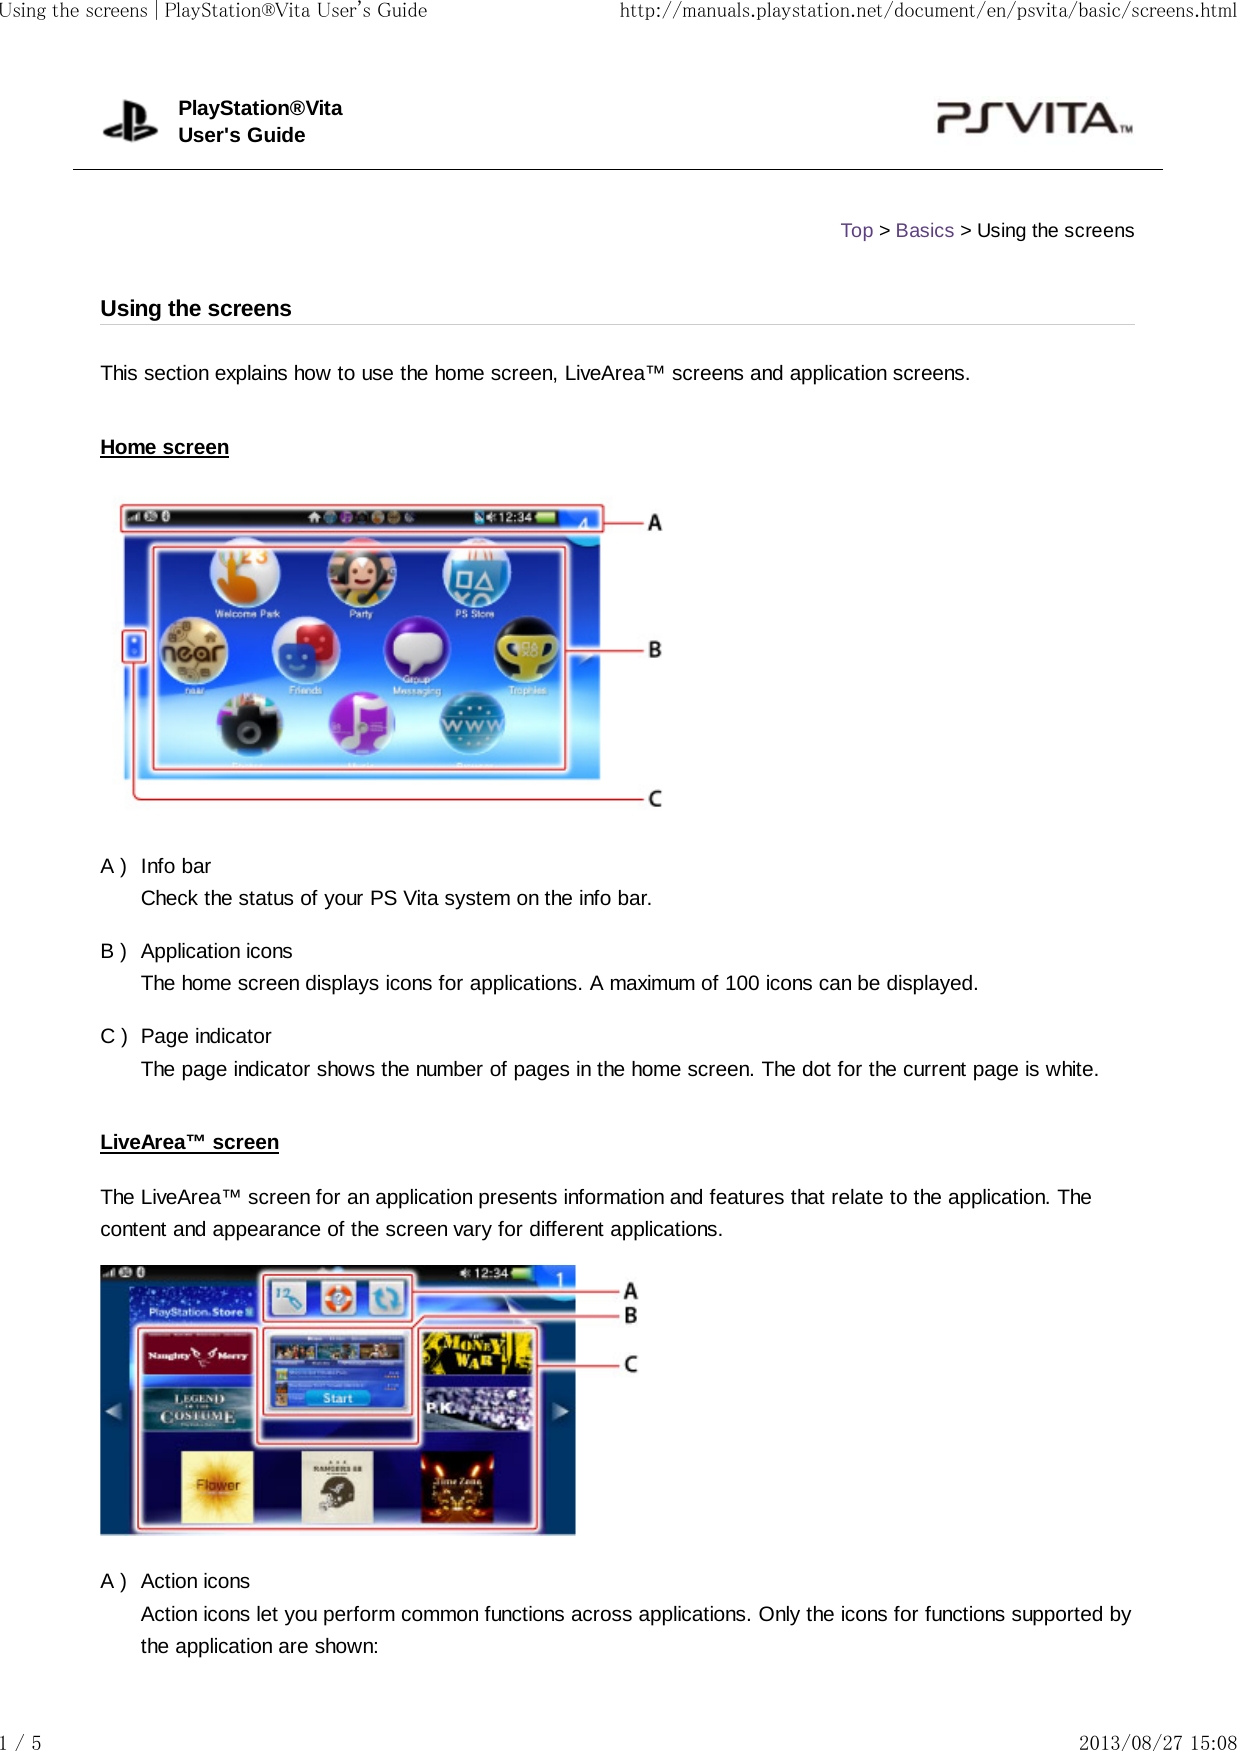
![B )C )A )B )Update Updates the applicationThis icon is only displayed when a newer version of theapplication is available for download.Internet Search Opens the (Browser) application and displays thekeyword search screenRedeem Codes Displays a screen for entering a code for a purchase fromPlayStation®StoreHelp Displays the user's guide for your PS Vita system (the firsticon) or the software manual for the application (the secondicon)Import Saved Data Imports saved dataThis icon is displayed only for games that support this feature.Refresh LiveArea™ Screen Refreshes the content displayed on the LiveArea™ screenPlayStation®Plus Accesses online storageAccess the PlayStation®Network server, so you can upload ordownload the saved data.GateTap the gate to start the application.Live itemsLive items display various information related to the application. The information varies by application.Application screensApplication screens are the screens where you operate the application. (Options)Tap the options button to display an options menu, which is a context-sensitive menu of options such as[Delete] and [Copy]. (Back)Tap the back button to go back to the previous screen.Checking the status of your PS Vita system (info bar)Using the screens | PlayStation®Vita User's Guide http://manuals.playstation.net/document/en/psvita/basic/screens.html2 / 5 2013/08/27 15:08](https://usermanual.wiki/Sony-Group/PCH2001.user-guide/User-Guide-2072786-Page-16.png)
![A )*Communication statusView information about network connections, signal strengths, and current communications. The icons thatare displayed will differ depending on the model of your PS Vita system.Mobile signal strength*Shows the signal strength by displaying "No Signal" or the number of bars (1-5).The (Limited Connectivity) icon is displayed when your connection islimited by your mobile network operator. For details, contact your mobilenetwork operator.If the temperature of your PS Vita system becomes too high, the (Temporary Suspension) icon appears. When this icon is visible, your systemcannot use the mobile network connection until the system cools down. Whenthe system cools down, the icon for the mobile signal strength re-appears.Roaming*Data transmission mode*Wi-Fi signal strengthShows the signal strength in four levels.Connected in ad hoc modeBluetooth® device in useNetwork activity indicatorCurrently transmitting and/or receiving data over the Wi-Fi or mobile network.Flight ModeCommunication status icons other than (Bluetooth®) disappear, and onlythe (Flight Mode) and (Bluetooth®) icons are displayed.When you are not using the Bluetooth® feature, the (Bluetooth®) icon isnot displayed.Only on 3G/Wi-Fi modelsIf you tap the [Mobile Network] checkbox under (Settings) > [Start] > [Network] > [Mobile NetworkSettings] to remove the checkmark, all the communication status icons will no longer be displayed.The SIM card status might appear on 3G/Wi-Fi models.No SIM No SIM card is inserted.If [No SIM] appears while a SIM card is inserted, turn off your PS Vita system,remove the SIM card, and insert the SIM card again with the correctorientation.Invalid SIM An unusable SIM card is inserted.For details, contact your mobile network operator.Using the screens | PlayStation®Vita User's Guide http://manuals.playstation.net/document/en/psvita/basic/screens.html3 / 5 2013/08/27 15:08](https://usermanual.wiki/Sony-Group/PCH2001.user-guide/User-Guide-2072786-Page-17.png)
![B )C )D )E )F )Locked SIM A locked SIM card is inserted.The [Lock SIM Card] setting under (Settings) > [Start] > [Network] >[Mobile Network Settings] > [SIM Card Settings] is enabled. You must enteryour PIN number every time your PS Vita system is turned on.Open LiveArea™ screensPS Vita cardThe icon appears when a PS Vita card is inserted.Audio output statusRemaining battery chargeThe remaining battery charge is shown in five levels. When charging, (Charging) is displayed.Notification indicatorWhen the user receives a new notification, a notification message appears on the upper right of the screen.The notification indicator displays the number of new notifications.Tap the notification indicator to display the notification list, from which you can view the download status ofcontent. From the notification list you can tap an item on the list to go to the relevant application.Depending on the type of notification, (Options) appears. Tap it to display an options menu,which is a context-sensitive menu of options.When a notification is generated while a video is being played or when the system is in standbymode, the PS button blinks slowly in blue.Index screenPress the PS button while on the home screen or a LiveArea™ screen to display the index screen, where you canview the list of open LiveArea™ screens.Tap an item on the index screen to display the LiveArea™ screen for the application. On the index screen, youcan display the home screen by pressing the PS button.Related articlesLiveArea™ screens for gamesFlight ModeUsing the screens | PlayStation®Vita User's Guide http://manuals.playstation.net/document/en/psvita/basic/screens.html4 / 5 2013/08/27 15:08](https://usermanual.wiki/Sony-Group/PCH2001.user-guide/User-Guide-2072786-Page-18.png)
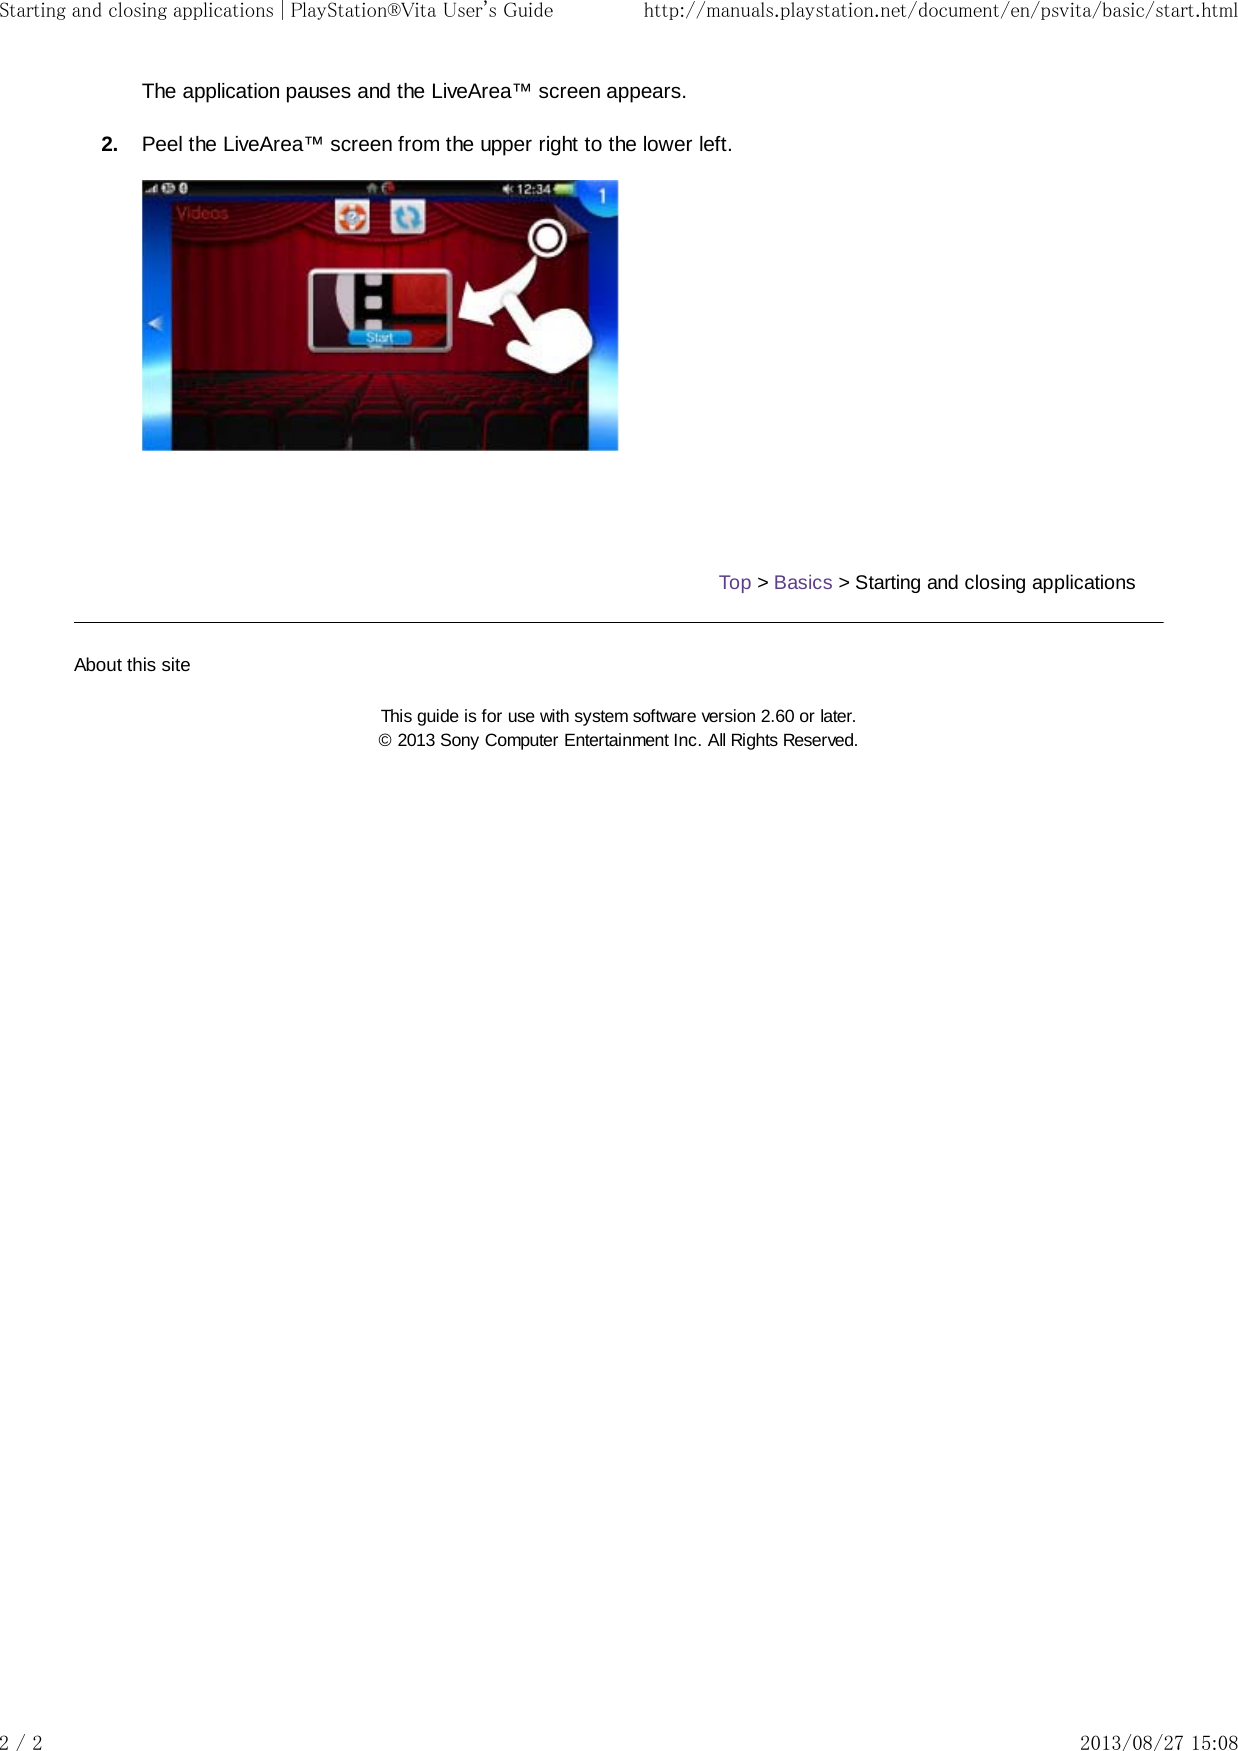
![1.2.1.Starting an applicationOn the home screen, tap the icon of the application you want to start.The LiveArea™ screen for the application appears.Tap [Start] on the gate.Pausing and resuming an applicationPress the PS button to pause the application and return to an application's LiveArea™ screen. Tap [Continue] onthe application's LiveArea™ screen to resume using an application.Closing an applicationPress the PS button.PlayStation®VitaUser's GuideTop > Basics > Starting and closing applicationsStarting and closing applicationsStarting and closing applications | PlayStation®Vita User's Guide http://manuals.playstation.net/document/en/psvita/basic/start.html1 / 2 2013/08/27 15:08](https://usermanual.wiki/Sony-Group/PCH2001.user-guide/User-Guide-2072786-Page-20.png)
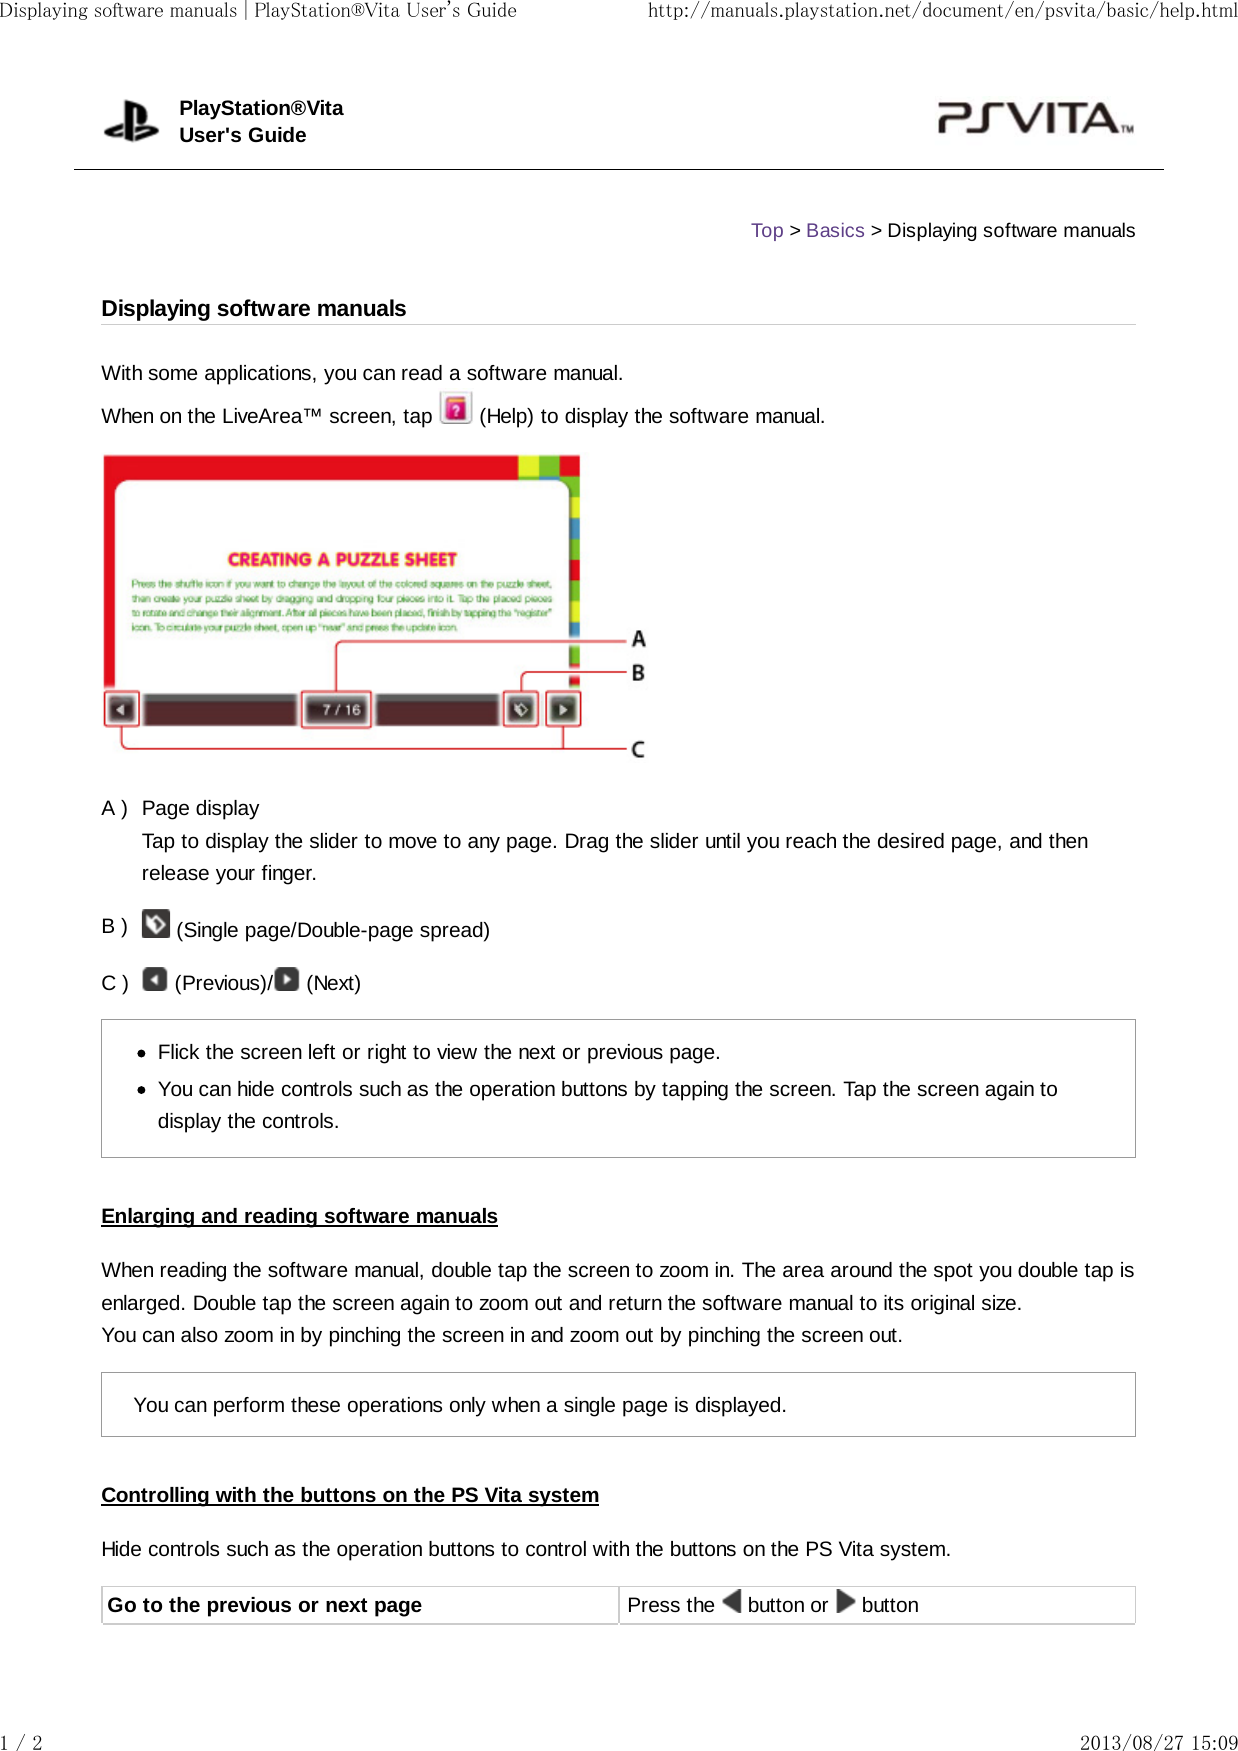
![Switch between the single page and double-pagespreadPress the buttonZoom in/Zoom out Move the right stick up and downSwitch between displaying/hiding the operationbuttonsPress the buttonFor operations controlled by the directional buttons, you can use the left stick instead.To enable operation with some buttons, you must tap (Settings) > [Start] > [System] > [Controlwith Buttons on PS Vita System] to set a checkmark.Related articlesControl with Buttons on PS Vita SystemTop > Basics > Displaying software manualsAbout this siteThis guide is for use with system software version 2.60 or later.© 2013 Sony Computer Entertainment Inc. All Rights Reserved.Displaying software manuals | PlayStation®Vita User's Guide http://manuals.playstation.net/document/en/psvita/basic/help.html2 / 2 2013/08/27 15:09](https://usermanual.wiki/Sony-Group/PCH2001.user-guide/User-Guide-2072786-Page-23.png)
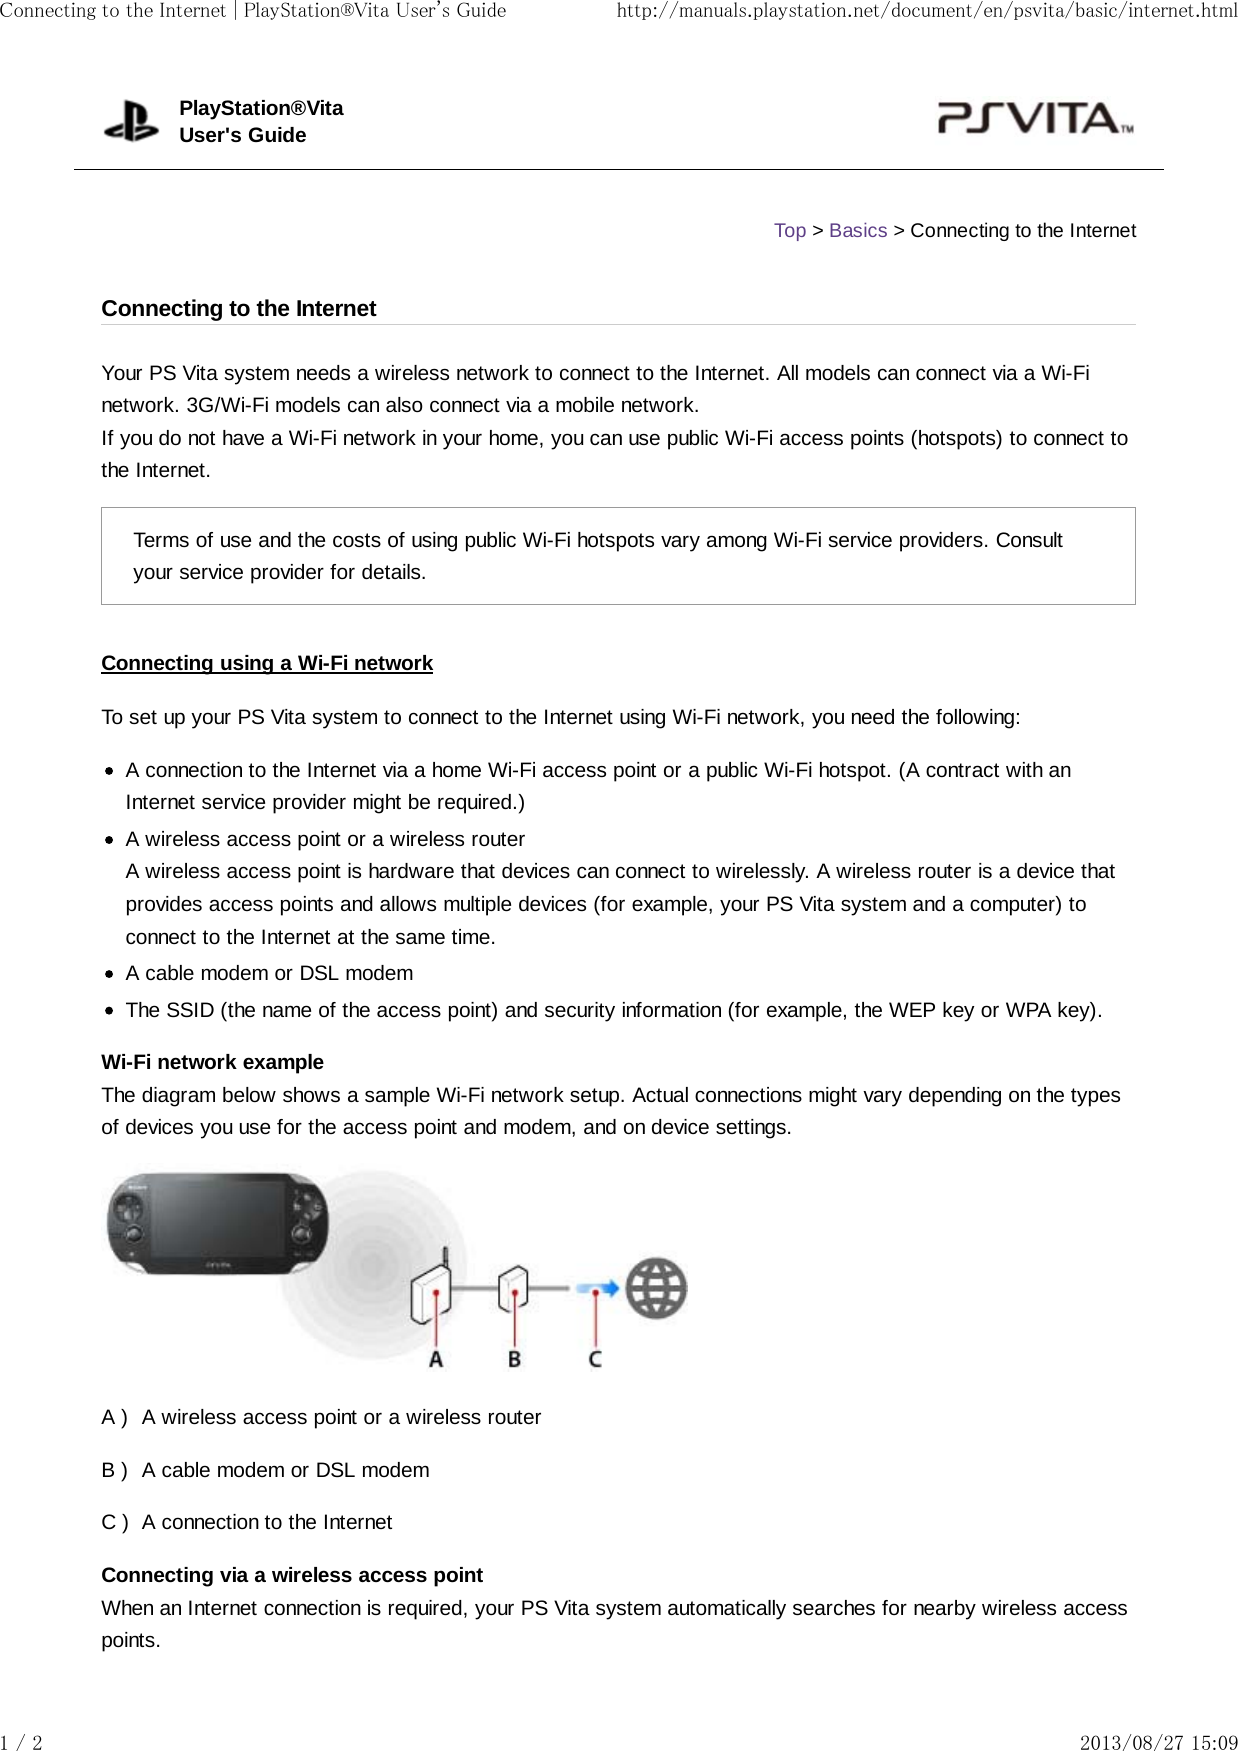
![To set up the connection with a wireless access point, go to a location with an access point that you can use, tap (Settings) > [Start] > [Network] > [Wi-Fi Settings], and then select the access point you use. You will needthe information to connect to the access point (the SSID and security information such as the WEP key or WPAkey).After your PS Vita system has connected to an access point one time, it will automatically connect to the accesspoint in the future.Connecting via a mobile network (only on 3G/Wi-Fi models)Setting up your PS Vita system to use a mobile network is done during initial setup of the system. It can also bedone later by tapping the (Network Operator) icon on the home screen.When an Internet connection is required and no saved access points are found, the Wi-Fi Settings screenappears. Tap (Close) in the upper left of the screen to close the dialog box and to connect your PS Vitasystem to the Internet using the mobile network.You can configure your PS Vita system to connect to the Internet using a mobile network withoutdisplaying the Wi-Fi settings screen when there are no saved access points nearby. Tap (Settings)> [Start] > [Network] > [Wi-Fi Settings] and remove the checkmark from the [Display Wi-Fi SettingsAutomatically] checkbox.The (Network Operator) icon on the home screen might differ, depending on the model of your PSVita system.Disabling all wireless network featuresWhen you are on an airplane or in a hospital or other location where using devices that emit radio waves isprohibited, tap (Settings) > [Start], and then tap the [Flight Mode] checkbox to set a checkmark.Related articlesWi-Fi SettingsMobile Network SettingsFlight ModeTop > Basics > Connecting to the InternetAbout this siteThis guide is for use with system software version 2.60 or later.© 2013 Sony Computer Entertainment Inc. All Rights Reserved.Connecting to the Internet | PlayStation®Vita User's Guide http://manuals.playstation.net/document/en/psvita/basic/internet.html2 / 2 2013/08/27 15:09](https://usermanual.wiki/Sony-Group/PCH2001.user-guide/User-Guide-2072786-Page-25.png)
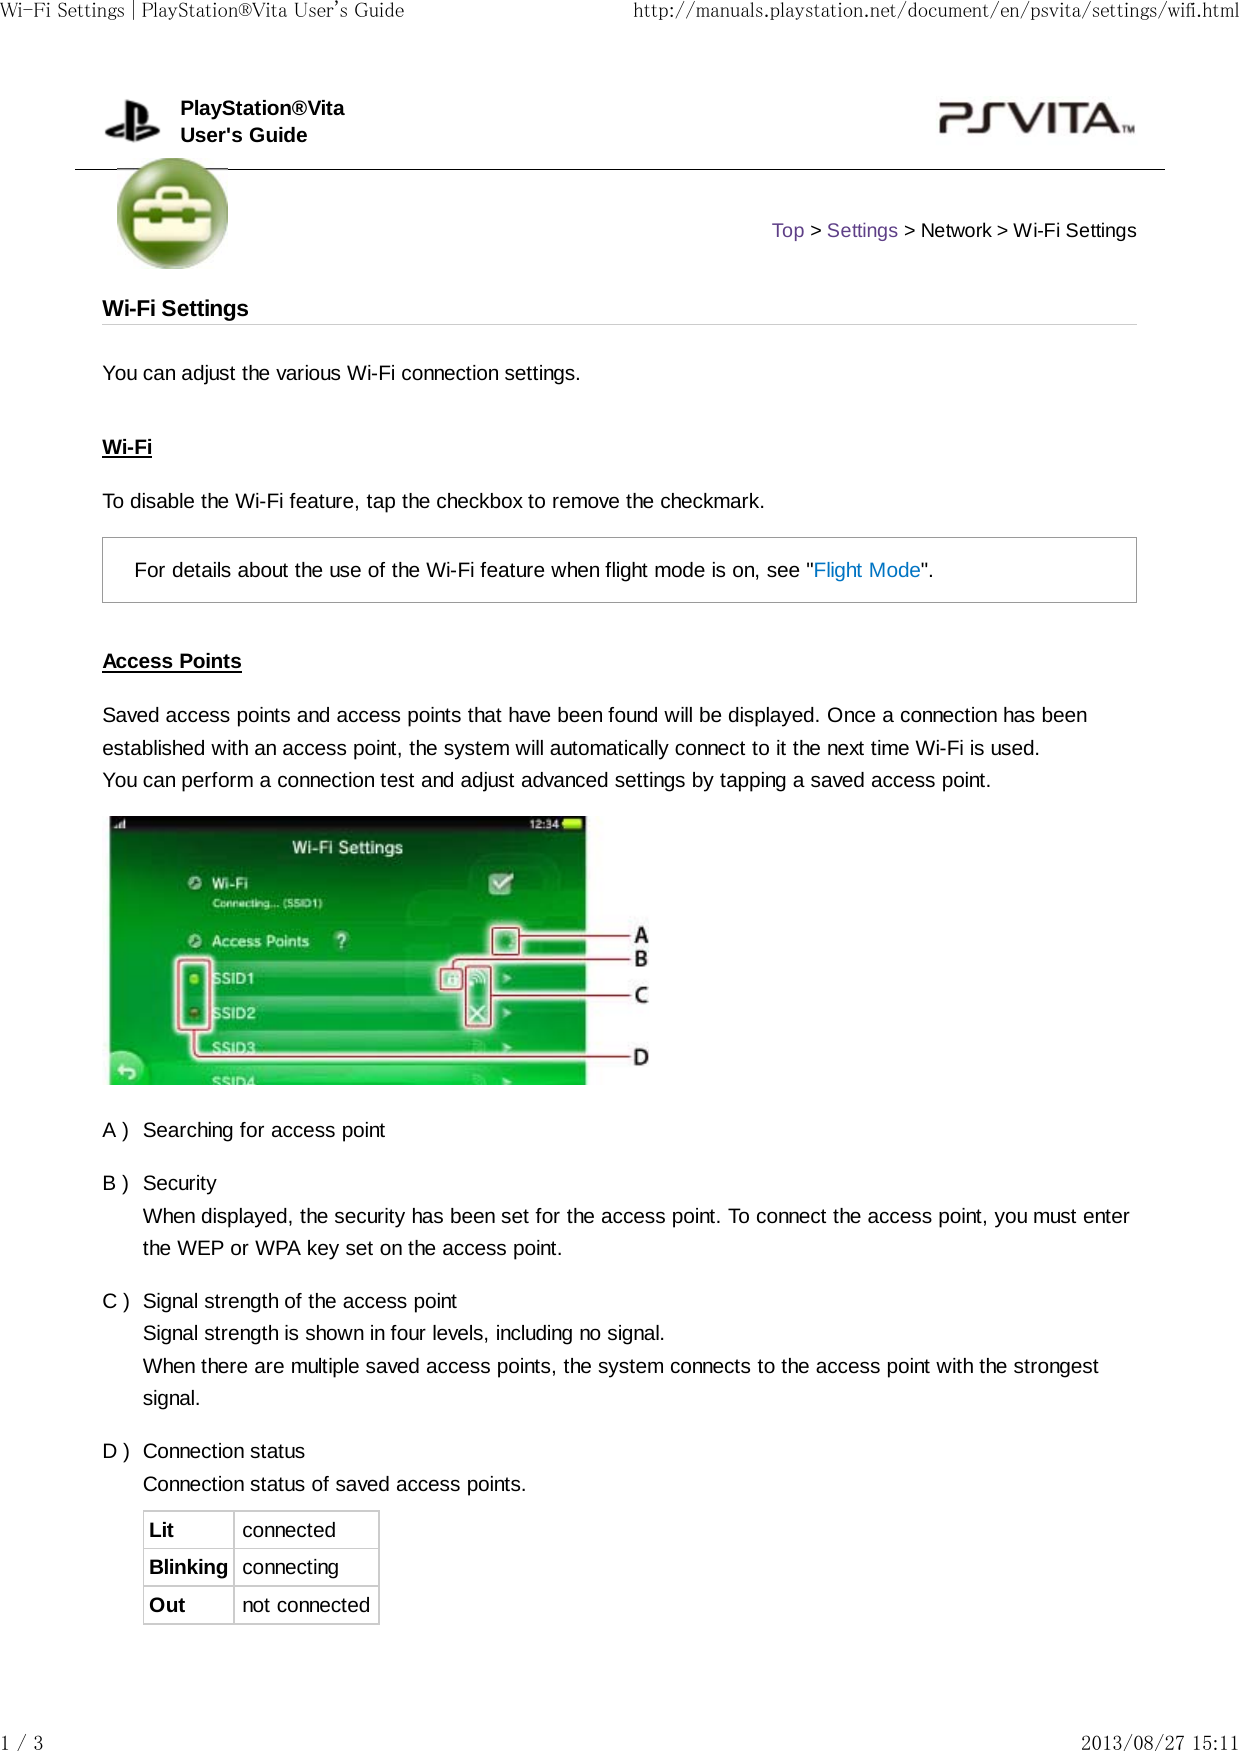
![1.2.1.2.1.2.3.Save Access Point AutomaticallyWhen you are using an access point that supports WPS, AOSS or Rakuraku WLAN Start®, you can save accesspoints in just a few easy steps. In addition to these instructions, also consult the access point instruction manual.When connecting using the WPS PIN method, adjust the settings by tapping [Save Access PointManually] > [Use WPS PIN Method].AOSS and Rakuraku WLAN Start® are only available in certain countries and regions.WPSTap [WPS].Press the access point's WPS button.AOSSTap [AOSS™].Press and hold the access point's AOSS button until the AOSS indicator starts to blink.Rakuraku WLAN Start®Tap [Rakuraku WLAN Start].Press and hold the access point's Rakuraku Start button until the power indicator of the access point startsto blink green.When a message is displayed on the PS Vita system, press and hold the access point's Rakuraku Startbutton until the power indicator of the access point lights up orange.Save Access Point ManuallyIn addition to these instructions, also refer to the access point instruction manual.Enter ManuallySet up the access point by entering the setting information (SSID and WEP key or WPA key) for the access pointyou are using.It is recommended that you use WPA-PSK or WPA2-PSK as the security method, because thesesecurity methods provide more robust encryption.If you tap the [Hide Password] checkbox to set a checkmark, the password that you enter appears asa series of asterisks.Wi-Fi Settings | PlayStation®Vita User's Guide http://manuals.playstation.net/document/en/psvita/settings/wifi.html2 / 3 2013/08/27 15:11](https://usermanual.wiki/Sony-Group/PCH2001.user-guide/User-Guide-2072786-Page-27.png)
![1.2.Use WPS PIN MethodTap [Use WPS PIN Method].Enter the PIN code that is displayed into the access point.Display Wi-Fi Settings AutomaticallyTo display the Wi-Fi settings screen automatically if you cannot connect to the saved access point, tap thischeckbox to set a checkmark.Ad Hoc Mode ChannelWhen connecting using ad hoc mode, your PS Vita system must be set to the same channel as the other devicesyou want to connect with.The default setting is [Automatic]. With this setting, the system will automatically select the optimum channel.Related articlesConnecting to the InternetTop > Settings > Network > Wi-Fi SettingsAbout this siteThis guide is for use with system software version 2.60 or later.© 2013 Sony Computer Entertainment Inc. All Rights Reserved.Wi-Fi Settings | PlayStation®Vita User's Guide http://manuals.playstation.net/document/en/psvita/settings/wifi.html3 / 3 2013/08/27 15:11](https://usermanual.wiki/Sony-Group/PCH2001.user-guide/User-Guide-2072786-Page-28.png)