Sony Group PCWAC150S Wireless LAN PCMCIA Radio Card User Manual PCWA C150S
Sony Corporation Wireless LAN PCMCIA Radio Card PCWA C150S
Contents
- 1. Users Manual Statements Revised 051602
- 2. Users Manual
Users Manual

Operating Instructions
Wireless LAN PC Card
PCWA-C150S
A-B6H-100-11(1)
© 2002 Sony Corporation

2
WARNING
To prevent fire or shock hazard, do not
expose the unit to rain or moisture.
Owner’s Record
The model and serial numbers are located on the
back of the unit. Record the serial number in the
space provided below. Refer to them whenever
you call upon your Sony dealer regarding this
product.
Model No. PCWA-C150S
Serial No.______________
CAUTION
Any changes or modifications not expressly
approved in this manual could void your warranty.
FCC ID: AK8PCWAC150S
Exposure to Radio Frequency Radiation.
The radiated output power of the Wireless LAN
PC Card is far below the FCC radio frequency
exposure limits.
Nevertheless, the Wireless LAN PC Card shall be
used in such a manner that the potential for human
contact during normal operation is minimized.
NOTE:
This equipment has been tested and found to
comply with the limits for a Class B digital
device, pursuant to Part 15 of the FCC Rules.
These limits are designed to provide reasonable
protection against harmful interference in a
residential installation. This equipment generates,
uses, and can radiate radio frequency energy and,
if not installed and used in accordance with the
instructions, may cause harmful interference to
radio or communications. However, there is no
guarantee that interference will not occur in a
particular installation. If this equipment does
cause harmful interference to television reception,
which can be determined by turning the equipment
off and on, the user is encouraged to try to correct
the interference by one or more of the following
measures:
– Reorient or relocate the receiving antenna.
– Increase the separation between the
equipment and receiver.
– Connect the equipment into an outlet on a
circuit different from that to which the
receiver is connected.
– Consult the dealer or an experienced radio/TV
technician for help.
You are cautioned that any changes or
modifications not expressly approved in this
manual could void your authority to operate this
equipment.
Only peripherals (computer input/output devices,
terminals, printers, etc.) that comply with FCC
Class B limits may be attached to this computer
product. Operation with non-compliant peripherals
is likely to result in interference to radio and
television reception.
All cables used to connect peripherals must be
shielded and grounded. Operation with cables,
connected to peripherals, that are not shielded and
grounded, may result in interference to radio and
television reception.
If you have questions about this product, call the
Sony Customer Information Service Center at
1-888-476-6972; or write to the Sony Customer
Information Service Center at 12451 Gateway
Boulevard, Fort Myers, FL 33913. The number
below is for FCC-related matters only.
Declaration of Conformity
Trade Name: Sony
Model No: PCWA-C150S
Responsible Party: Sony Electronics Inc.
Address: 680 Kinderkamack Road,
Oradell, NJ 07649 USA
Telephone: 201-930-6972
This phone number is for FCC-related matters
only.
This device complies with part 15 of the FCC
Rules.
Operation is subject to the following two
conditions:
(1) This device may not cause harmful
interference, and
(2) this device must accept any interference
received, including interference that may
cause undesired operation.
Safety Information
WARNING
•Opening the unit, for whatever reason, could
lead to damages that are not covered by the
warranty.
• Do not use this equipment on hospital premises.
Doing so may cause medical devices to
malfunction.
• If using the equipment near a pacemaker, make
sure it is at least 9 inches (22 cm) away from
the pacemaker.
• Do not use this equipment in an aircraft, as
doing so could cause the aircraft's equipment to
malfunction. Make sure you remove the
equipment from the PC card slot before
carrying your computer onto an aircraft.
• Do not use this equipment outdoors.
• Install and connect this product by following
descriptions in its Operating Instructions and
Quick Start Guide before using it.
• This equipment complies with FCC radiation
exposure limits set forth for an uncontrolled
environment.
This equipment should be installed and
operated with minimum distance 20 cm
between the radiator and body (excluding
extremities: hands, wrist and feet).
Users are not permitted to make changes or
modify the system in any way.
• Indoor use only.
• This device is made for use in the USA and
Canada only.
For the customs in Canada
• This class B digital apparatus complies with
Canadian ICES-003.
Operation is subject to the following two
conditions; (1) this device may not cause
interference, and (2) this device must accept
any interference, including interference that
may cause undesired operation of the device.
To prevent radio interference to the lisenced
service, this device is intended to be operated
indoors and away from windows to provide
maximum shielding. Equipment (or its transmit
antenna) that is installed outdoors is subject to
licensing.
・The term "IC" before the equipment certification
number only signifies that Industry Canada
technical specifications were met.
Pour les utilisateurs au Canada
• Cet appareil numérique de la classe B est
conforme à la norme NMB-003 du Canada.
L'utilisation de ce dispositif est autorisée
seulement aux conditions suivantes : (1) il ne
doit pas produire de brouillage et (2)
l'utilisateur du dispositif doit être prêt a
accepter tout brouillage radioélectrique reçu,
même si ce brouillage est susceptible de
compromettre le fonctionnement du dispositif.
Pour empêcher que cet appareil cause du
brouillage au service faisant l'objet d'une
licence, il doit être utilise a l’intérieur et devrait
être place loin des fenêtres afin de fournir un
écran de blindage maximal. Si le matériel (ou
son antenne d’émission) est installe a
l’extérieur, il doit faire l'objet d'une licence.
・ Le terme “IC” avant le numéro d’homologation
ne signifie seulement que les normes d’Industrie
Canada ont été respectées.
About the supplied software
THE SUPPLIED SOFTWARE IS SUPPLIED
PURSUANT TO THE APPLICABLE END-USER
LICENSE AGREEMENT.
• Copyright laws prohibit reproducing the
software or the software manual in whole or in
part, or renting the software without the
permission of the copyright holder.
• In no event will SONY be liable for any
financial damage or loss of profits, including
claims made by third parties, arising out of the
use of the software supplied with this product.
• In the event a problem occurs with this software
as a result of defective manufacturing, SONY
will replace it at SONY’s option or issue a
refund; however, SONY bears no other
responsibility.
• The software provided with this product cannot
be used with equipment other than that which is
designated for use with.
• Please note that, due to continued efforts to
improve quality, the software specifications
may be changed without notice.

4
Table of contents
Overview ............................................... 5
What you can do with your Wireless
LAN PC Card ............................ 5
About the supplied software.......... 7
System requirements ..................... 8
About this manual.................................. 9
Opening the Help files .................. 9
Getting started
Unpacking............................................ 10
Installing the software ......................... 11
Starting the software ................... 12
Uninstalling the software ............ 13
Installing the driver software ............... 16
Installing the driver software ...... 16
Verifying the installation............. 21
Uninstalling the Wireless LAN PC
Card driver ............................... 28
Inserting the Wireless LAN PC Card .. 32
To remove the Wireless LAN PC
Card ......................................... 33
Software setup
Setting up the connection environment ..
34
Windows Me or Windows 2000 ....
34
Windows XP ............................... 43
Checking the communication status .... 46
Checking the wireless signal
strength .................................... 46
Client Manager menus......................... 47
Precautions .......................................... 48
Specifications ...................................... 49
Getting help ......................................... 49
Additional information
Glossary ............................................... 51
Troubleshooting................................... 52
Program © 2002 Sony Corporation, Copyright
1998 by Carnegie Mellon University.
CMU DISCLAIMS ALL WARRANTIES WITH
REGARD TO THIS SOFTWARE, INCLUDING
ALL IMPLIED WARRANTIES OF
MERCHANTABILITY AND FITNESS, IN NO
EVENT SHALL CMU BE LIABLE FOR ANY
SPECIAL, INDIRECT OR CONSEQUENTIAL
DAMAGES OR ANY DAMAGES
WHATSOEVER RESULTING FROM LOSS OF
USE, DATA OR PROFITS,
WHETHER IN AN ACTION OF CONTRACT,
NEGLIGENCE OR OTHER TORTIOUS
ACTION, ARISING OUT OF OR IN
CONNECTION WITH THE USE OR
PERFORMANCE OF THIS SOFTWARE.
Documentation © 2002 Sony Corporation
Sony, VAIO, the VAIO logo, Memory Stick,
and the Memory Stick logo are trademarks of
Sony Corporation.
Microsoft, Windows, and Windows Me are
registered trademarks of Microsoft Corporation
in the United States of America and other
countries.
MMX and Pentium are registered trademarks of
Intel Corporation.
Adobe and Adobe Acrobat is trademarks of
Adobe Systems Incorporated.
All other trademarks are trademarks of their
respective owners.
Notes:
• The user interface of the Sony supplied
software may differ slightly from that shown
in this manual.
• This manual is written based on the
assumption that you are familiar with basic
operations of the Windows operating system.
For computer operations, refer to manuals that
come with your computer.
• In this manual, Microsoft® Windows® Me is
referred to as Windows Me.
• In this manual, Microsoft® Windows® 2000
Professional is referred to as Windows 2000.
• In this manual, Microsoft® Windows® XP
Professional and Microsoft® Windows® XP
Home Edition are referred to as Windows XP.

5
Overview
What you can do with your Wireless LAN PC Card
You can build a wireless LAN using the Wireless LAN PC Card PCWA-
C150S (subsequently referred to as “Wireless LAN PC Card”). Equipping
multiple computers with a Wireless LAN PC Card and installing the
supplied software enables the computers to communicate and exchange
data without needing any physical connection.
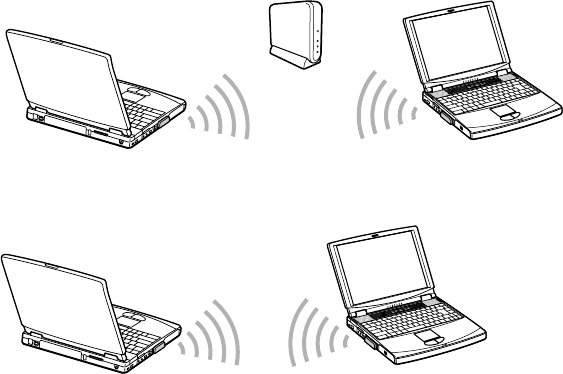
There are two basic configuration modes for a wireless LAN. In
“Infrastructure Mode”, communication is routed through a separately
available 2.4 GHz Wireless LAN Access Point (subsequently referred to as
“Access Point”). In “Peer-to-Peer Mode”, no Access Point is used and the
computers communicate directly with each other. When an Access Point
with an Internet connection is used, the computers in the wireless LAN can
gain access to the Internet.
Note
This product is a 2.4 GHz Wireless LAN PC Card conforming to the IEEE
802.11b standard. It is not compatible with products conforming to other
standards (such as the IEEE 802.11a standard for 5 GHz wireless LANs).
z Tips
- For details regarding functions and operation of the Access Point, please refer to its
documentation.
- For information about file and printer sharing in a network environment, see Windows
Help.
6
Communication through Access Point (Infrastructure Mode)
Direct communication between computers (Peer-to-Peer Mode)
z Tips
For details about peer-to-peer connections with Windows XP, see Windows XP Help.

7
About the supplied software
The Wireless LAN PC Card comes with the following software.
Client Manager
Utility software for displaying the communication status of the Wireless
LAN PC Card.
Normally, the software operates in the background and shows the
communication status using an icon in the system tray (notification area in
Windows XP). In operating systems other than Windows XP, the Client
Manager is also used to change network settings of the computer and
switch networks.
Basic procedures for using Client Manager are explained in this manual.
PCWA-C150S Wireless LAN PC Card Driver
This is required for operation of the Wireless LAN PC Card.
z Tip When using the Sony Wireless LAN Access Point PCWA-A200
The folder “A200Setup” on the supplied CD-ROM contains software for
making PCWA-A200 settings. For details, see the PDF file contained in the
folder “manual” under the “A200Setup” folder. To display PDF files,
Adobe Acrobat Reader is required.

8
System requirements
sA computer satisfying the following requirements
CPU: MMX Pentium 233 MHz and above
RAM: With Windows Me/Windows 2000: 64 MB or more
With Windows XP: 128 MB or more
CD-ROM drive
Default built-in PCMCIA Type II slot
sOperating system
Microsoft® Windows® Millennium Edition
Microsoft® Windows® 2000 Professional Edition
Microsoft® Windows® XP Home Edition
Microsoft® Windows® XP Professional Edition
Note
Correct operation in an OS upgrade environment is not assured, except for factory
provided Windows XP upgrade packages for Sony VAIO series computers.
sDisplay
High color (16 bit color) and above, 800 × 400 pixels and above
Notes
•We do not assure trouble-free operation for all computers satisfying the above system
requirements.
•For Internet access via the wireless LAN, an IEEE 802.11b compliant 2.4 GHz
Wireless LAN Access Point (available separately) is required.
•An Internet Service Provider (ISP) is required for Internet access.

9
About this manual
Note
When using an Access Point, first connect and configure the Access Point as explained in
its documentation.
This manual explains the operation of the Wireless LAN PC Card and the installation and
setup of the supplied Client Manager software. For details on using the Client Manager,
refer to the software’s Help files.
Opening the Help files
To use the Client Manager Help, proceed as follows.
1While Client Manager is running, right-click the Client
Manager icon in the system tray (notification area in
Windows XP).
z Tip
The appearance of the icon changes according to the wireless signal strength. For
details, see “Checking the communication status” on page 50.
2In the shortcut menu that appears, point to Help, then click
Contents.
Selecting a topic from the contents
From the contents list, click on the desired topic.
Searching using a Keyword
To search using a keyword, select the Index tab from the Help dialog box.
The keyword list appears.
Enter the keyword you want to apply, or scroll down the keyword list.
Select a topic, then click Display.
Topics related to the keyword appear.

10
Unpacking
Your Wireless LAN PC Card comes with the following items.
•Wireless LAN PC Card
•CD-ROM (Setup disc)
•Read This First
•Quick Start Guide
•Warranty card
•Other printed materials

11
Getting started
Installing the software
Before installing the software:
•Install and connect the Access Point.
•Quit all Windows programs.
Note
In Windows 2000 and Windows XP, only users with administrator privileges can install
software. If you have logged onto Windows 2000 with a user account not listed in
“Administrators” or onto Windows XP with a user account not defined as “computer
administrator”, you will be asked to input a user account name and password for an
account with administrator privileges when you attempt to install the software. In such a
case, enter the required information before proceeding.
1In Windows Explorer or My Computer, double-click the
installer file for Client Manager.
•If your computer has an internal CD-ROM drive or you can use an external CD-
ROM drive while the Wireless LAN PC Card is inserted:
Click on “Setup.exe” on the CD-ROM.
•If you copied the Wireless LAN folder from the supplied CD-ROM to your hard
disk as described on page 20:
Click Setup.exe in the folder on the hard disk.
Note
Depending on computer settings, Setup.exe may be displayed as just Setup. If
several files with the same name appear in the folder, double click the one with the
following icon.
2Click Next.
The License Agreement dialog box appears.
3Read the agreement and click Yes to accept.
The Choose Destination Location dialog box appears.

12
4Check that the displayed folder is the one where you want to
install the software and click Next.
Select Program Folder dialog box is displayed.
z Tip
If you want to install the software into another folder, click Browse and select the
folder or directly enter the folder name.
5Click Next.
z Tip
If you want to change the program folder, select the folder from the Existing Folders
list or directly enter the folder name into the Program Folder field.
6Without placing a check mark in the check box, click Finish.
Proceed to “Installing the driver software” (page 20).
Starting the software
Note
Do not start the Client Manager before having installed the driver.
From the Start menu, point to Programs (All Programs in
Windows XP), Wireless LAN, and then click Client Manager.
z Tip
The Client Manager is also included in the Startup folder, so that it will start
automatically when booting Windows.

13
Getting started
Uninstalling the software
Windows Me
1From the Start menu, point to Settings, then click Control
Panel.
Control Panel appears.
2Double-click the Add/Remove Programs icon.
The Add/Remove Programs Properties dialog box appears.
z Tip
If the Add/Remove Programs icon is not shown, select “View all Control Panel
options”.
3Select “Sony Wireless LAN Client Manager” from the list of
automatically removable software, then click Add/Remove.
The Confirm File Deletion dialog box appears.
4Click OK.
The software uninstall process is carried out.
5Click OK to close the Add/Remove Programs Properties
dialog box.
Control Panel is shown again.
6Click to close Control Panel.

14
Windows 2000
In Windows 2000, only users with administrator privileges can uninstall
software. If you have logged onto Windows 2000 with a user account not
listed in “Administrators”, you will be asked to input a user account name
and password for an account with administrator privileges when you
attempt to uninstall the software. In such a case, enter the required
information before proceeding.
1From the Start menu, click Settings — Control Panel.
Control Panel appears.
2Double-click the Add/Remove Programs icon.
The Add/Remove Programs dialog box appears.
3From the Currently installed programs list, select “Sony
Wireless LAN Client Manager”, then click Change/Remove.
The Confirm File Deletion dialog box appears.
4Click OK.
The software uninstall process is carried out.
5Click Close to close the Add/Remove Programs dialog box.
Control Panel is shown again.
6Click to close Control Panel.

15
Getting started
Windows XP
Note
In Windows XP, only users with administrator privileges can uninstall software. If you
have logged onto Windows XP with a user account not defined as “computer
administrator”, you will be asked to input a user account name and password for an
account with administrator privileges when you attempt to uninstall the software. In such
a case, enter the required information before proceeding.
1From the Start menu, point to Settings, then click Control
Panel.
Control Panel appears.
2Click Add or Remove Programs (double-click if the Control
Panel “Classic View” is selected).
The Add or Remove Programs dialog box appears.
3From the Currently installed programs list, select Sony
Wireless LAN Client Manager, then click Change/Remove.
The Confirm File Deletion dialog box appears.
4Click OK.
The software uninstall process is carried out.
5Click Close to close the Add or Remove Programs dialog
box.
Control Panel is shown again.
6Click to close Control Panel.
16
Installing the driver software
Note
Before installing the driver software, install the supplied utility software. For details on
installing the supplied utility software, see “Installing software” on page XX.
Installing the driver software
The installation procedure varies depending on the CD-ROM drive
availability when the Wireless LAN PC Card inserted.
Note
If your computer has only one PC card slot, and your CD-ROM drive must be
connected through it, copy the Wireless LAN folder from the supplied CD-ROM into
the hard disk before inserting the Wireless LAN PC Card. The following steps use the
Temp folder in the C drive as an example.
If you can use the CD-ROM drive while the Wireless LAN PC Card is inserted, the
following steps are not required. Begin installation starting from step 1 on page xx, xx
or xx.
1Connect the CD-ROM drive to the computer and insert the supplied CD-
ROM into the drive.
2Copy the Wireless LAN folder in the CD-ROM to the Temp folder in your
hard disk using Windows Explorer.
3Remove the CD-ROM drive from the PC card slot.
17
Getting started
Windows Me
1Insert the supplied CD-ROM into the CD-ROM drive.
Note
If your computer has two PC card slots and your CD-ROM drive must be connected
through one of them, connect the CD-ROM drive to the bottom slot.
2Insert the Wireless LAN PC Card into the PC card slot.
The Add New Hardware Wizard appears.
z Hint
See “Inserting the Wireless LAN PC Card” on page XX about how to insert the
Wireless LAN PC Card in your computer.
3Select Specify the location of the driver, then click Next.
4Select Specify a location, then click Browse.
5Select the folder containing the driver, then click OK.
• When installing from the supplied CD-ROM in a CD-ROM
drive connected to the computer:
Select the “1WinMe” folder on the CD-ROM.
• When installing after copying the contents of the supplied CD-
ROM to a hard disk:
Select the “1WinMe” folder under the folder into which you copied
the CD-ROM contents.
6Click Next to begin the search.
18
7Click Next to begin driver installation.
Wait for installation to complete. A new display screen appears when
installation is complete.
8Click Finish.
The Add/Edit Setup Profile dialog box appears.
9Click Cancel.
10
Restart the computer.
Windows 2000
Note
In Windows 2000, only users with administrator privileges can install drivers. Log onto
Windows 2000 with a user account listed in “Administrators”.
z Tip
For details on installing the Wireless LAN PC Card, see “Inserting the Wireless LAN PC
Card” on page 36.
1Insert the supplied CD-ROM into the CD-ROM drive.
Note
If your computer has two PC card slots and your CD-ROM drive must be connected
through one of them, connect the CD-ROM drive to the bottom slot.
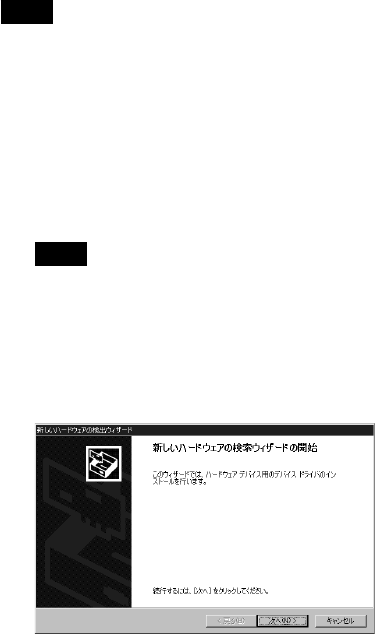
2Insert the Wireless LAN PC Card into the PC card slot.
The Found New Hardware Wizard appears.
3Click Next.

19
Getting started
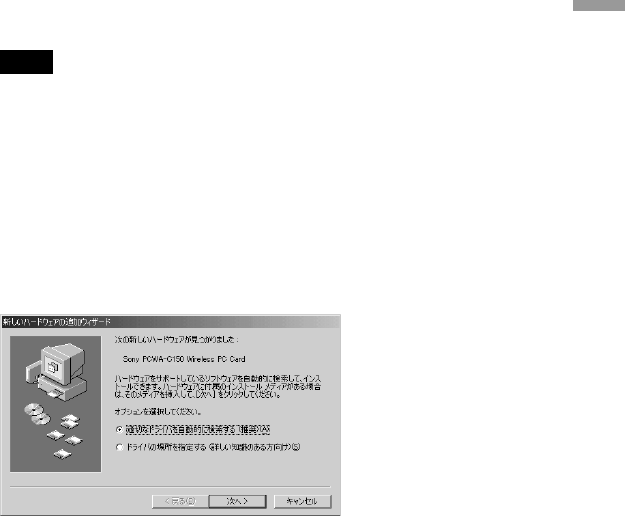
4Confirm that “Search for a suitable driver for my device” is
selected, then click Next.
5Select Specify a location, then click Next.
6Click Browse.
7Select the folder containing the driver, then click Open.
• When installing from the supplied CD-ROM in a CD-ROM
drive connected to the computer:
Select the “2Win2k” folder in the WirelessLAN folder on the CD-
ROM.
• When installing after copying the contents of the supplied CD-
ROM to a hard disk:
Select the “2Win2k” folder under the folder into which you copied
the CD-ROM contents.
8Click OK to begin search.
9Click Next to begin driver installation.
10
Click Finish.
The Add/Edit Configuration Profile dialog box appears.
11
Click Cancel.
12
Restart the computer.
20
Windows XP
Note
In Windows XP, only users with administrator privileges can install drivers. If you have
logged onto Windows XP with a user account not defined as “computer administrator”,
you will be asked to input a user account name and password for an account with
administrator privileges when you attempt to install the driver. In such a case, enter the
required information before proceeding.
1Insert the supplied CD-ROM into the CD-ROM drive.
Note
If your CD-ROM drive is connected to the computer via a PC Card slot and your
computer has two PC Card slots, use the bottom slot for the CD-ROM drive.
2Insert the Wireless LAN PC Card.
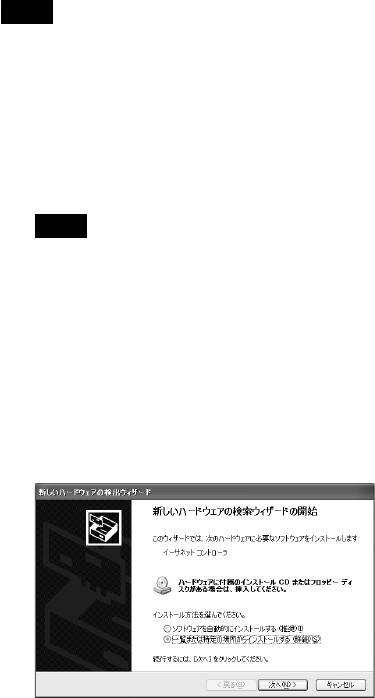
The “Find New Hardware Wizard” appears.
z Tip
For details on installing the Wireless LAN PC Card, see the section “Inserting the
Wireless LAN PC Card” (page 36).
3Select Install from a list or specific location (Advanced) and
click Next.
4Check Include this location in the search and click Browse.

21
Getting started
5Select the folder which contains the driver and click OK.
•When installing from the supplied CD-ROM in a CD-ROM
drive connected to the computer:
Select the “3WinXP” folder on the CD-ROM.
•When installing after copying the contents of the supplied CD-
ROM to a hard disk:
Select the “3WinXP” folder under the folder into which you copied
the CD-ROM contents.
6Click Next to begin the search.
7Click Finish.
Verifying the installation
To verify that the Wireless LAN PC Card driver has been installed, perform
the following steps.
Windows Me:
1From the Start menu, point to Settings, then click Control
Panel.
Control Panel appears.
2Double-click the “System” icon.
The System Properties dialog box appears.
z Hint
If System is not displayed, click “view all Control Panel options.”
3Click the Device Manager tab.
4Select View Devices by type.
5Double-click Network adapters.
22
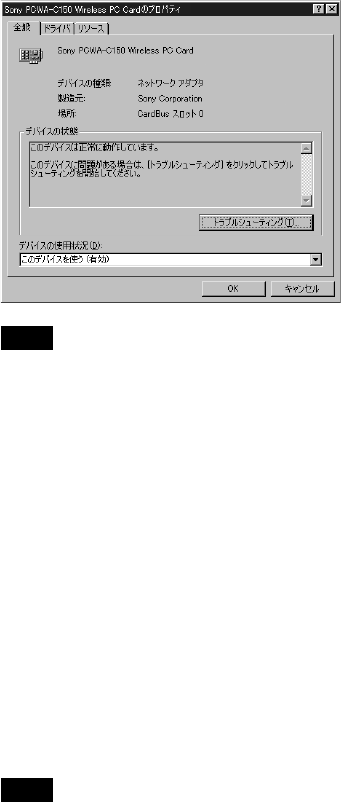
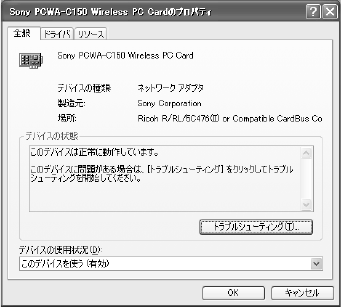
6Double-click Sony PCWA-C150 Wireless PC Card.
The Sony PCWA-C150 Wireless PC Card Properties dialog box
appears.
Note
The Wireless LAN PC Card is not working properly if the following occurs:
•The Sony PCWA-C150 Wireless PC Card is represented in the Device Manager
list by a yellow question mark or exclamation point.
cClick Sony PCWA-C150 Wireless PC Card, and click Remove to uninstall the
Wireless LAN PC Card driver. Then, reinstall the Wireless LAN PC Card
driver.
•Double-clicking Network adapters does not display the Sony PCWA-C150
Wireless PC Card.
cRemove the Wireless LAN PC Card from the computer, and reinsert it. Then,
reinstall the Wireless LAN PC Card driver.
•Double-clicking Other devices displays the Sony PCWA-C150 Wireless PC Card.
cClick Sony PCWA-C150 Wireless PC Card, and click Remove to uninstall the
Wireless LAN PC Card driver. Then, reinstall the Wireless LAN PC Card
driver.
7Confirm that the message “This device is working properly”
is displayed under Device status.
Note
If the message “This device is working properly” is not displayed, the Wireless LAN
PC Card is not working properly. In this case, repeat steps 1 to 5, and click Sony
PCWA-C150 Wireless PC Card. Then click Remove to uninstall the Wireless LAN
PC Card driver. Next, restart the computer, and reinstall the Wireless LAN PC Card
driver.
23
Getting started
8Click OK.
You are returned to the System Properties dialog box.
9Click OK.
You are returned to Control Panel.
10
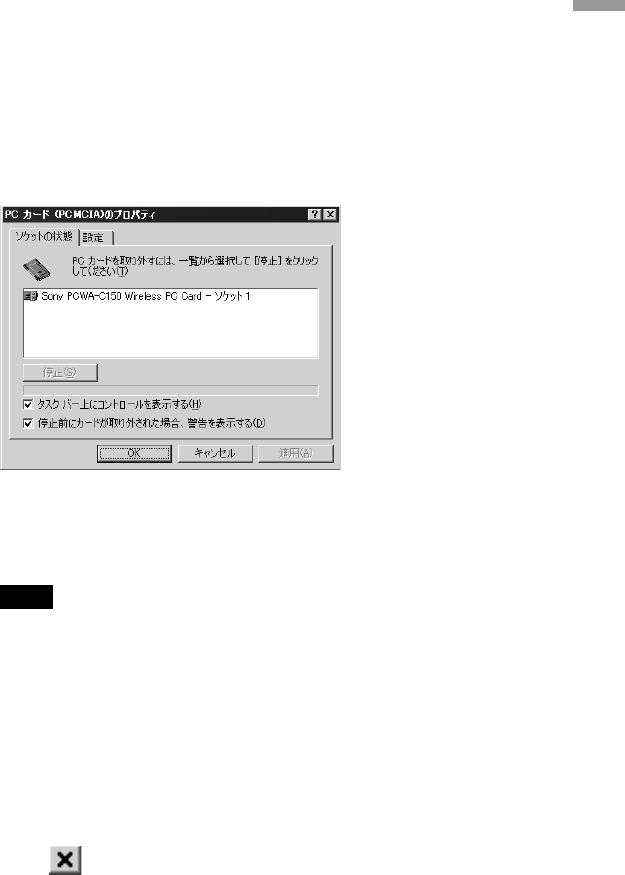
Double-click the “PC Card (PCMCIA)” icon.
The PC Card (PCMCIA) dialog box appears.
11
Confirm that Sony PCWA-C150 Wireless PC Card is
displayed under Socket Status.
Note
If Sony PCWA-C150 Wireless PC Card is not displayed in the PC Card (PCMCIA)
Properties dialog box, the Wireless LAN PC Card is not working properly. Repeat
steps 1 through 4. Click Sony PCWA-C150 Wireless PC Card then click Remove to
remove the driver. Click Yes to restart the computer. When the computer restarts,
repeat from step 2 in "Installing the driver software" on page XX.
12
Click OK.
The PC Card (PCMCIA) Properties dialog box closes.
13
Click .
Control Panel closes.
24
Windows 2000:
1From the Start menu, point to Settings, then click Control
Panel.
Control Panel appears.
2Double-click the “System” icon.
The System Properties dialog box appears.
3Click the Hardware tab, then click Device Manager.
The Device Manager window appears.
4From the View menu, click Devices by type.
5Double-click Network adapters.
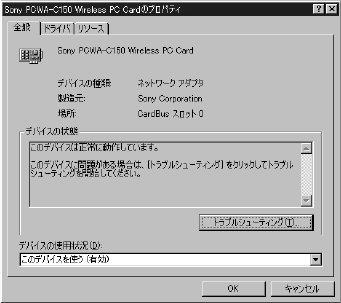
6Double-click Sony PCWA-C150 Wireless PC Card.
The Sony PCWA-C150 Wireless PC Card Properties dialog box
appears.

25
Getting started
Note
The Wireless LAN PC Card is not working properly if the following occurs:
•The Sony PCWA-C150 Wireless PC Card is represented in the Device Manager
list by a yellow question mark or exclamation point.
cRight-click Sony PCWA-C150 Wireless PC Card, and click Remove to
uninstall the Wireless LAN PC Card driver. Then, reinstall the Wireless LAN
PC Card driver.
•Double-clicking Network adapters does not display the Sony PCWA-C150
Wireless PC Card.
cRemove the Wireless LAN PC Card from the computer, and reinsert it. Then,
reinstall the Wireless LAN PC Card driver.
•Double-clicking Other devices displays the Sony PCWA-C150 Wireless PC Card.
cRight-click Sony PCWA-C150 Wireless PC Card, and click Remove to delete
the Wireless LAN PC Card driver. Then, reinstall the Wireless LAN PC Card
driver.
7Confirm that the message “This device is working properly”
is displayed under Device status.
Note
If the message “This device is working properly” is not displayed, the Wireless LAN
PC Card is not working properly. In this case, repeat steps 1 to 5, and right-click
Sony PCWA-C150 Wireless PC Card. Then click Remove to delete the Wireless
LAN PC Card driver. Next, restart the computer, and reinstall the Wireless LAN PC
Card driver.
8Click OK.
You are returned to the Device Manager window.
9Click .
You are returned to the System Properties dialog box.
10
Click OK.
You are returned to Control Panel.
11
Click .
Control Panel closes.
26
Windows XP:
1From the start menu, click Control Panel.
Control Panel appears.
2Double-click System.
The System Properties dialog box appears.
z Hint
If the System icon is not displayed, click “Switch to Classic View”.
3Click the Hardware tab, then click Device Manager.
The Device Manager window appears.
4From the View menu, click Devices by type.
5Double-click Network adapters.
6Double-click Sony PCWA-C150 Wireless PC Card.
The Sony PCWA-C150 Wireless PC Card Properties dialog box
appears.

27
Getting started
Note
The Wireless LAN PC Card is not working properly if the following occurs:
•The Sony PCWA-C150 Wireless PC Card is represented in the Device Manager
list by a yellow question mark or exclamation point.
cRight-click Sony PCWA-C150 Wireless PC Card, and click Uninstall to delete
the Wireless LAN PC Card driver. Then, reinstall the Wireless LAN PC Card
driver.
•Double-clicking Network adapters does not display the Sony PCWA-C150
Wireless PC Card.
cRemove the Wireless LAN PC Card from the computer, and reinsert it. Then,
reinstall the Wireless LAN PC Card driver.
•Double-clicking Other devices displays the Sony PCWA-C150 Wireless PC Card.
cRight-click Sony PCWA-C150 Wireless PC Card, and click Uninstall to delete
the Wireless LAN PC Card driver. Then, reinstall the Wireless LAN PC Card
driver.
7Confirm that the message “This device is working properly”
is displayed under Device status.
Note
If the message “This device is working properly” is not displayed, the Wireless LAN
PC Card is not working properly. In this case, repeat steps 1 to 5, and right-click
Sony PCWA-C150 Wireless PC Card. Then click Uninstall to delete the Wireless
LAN PC Card driver. Next, restart the computer, and reinstall the Wireless LAN PC
Card driver.
8Click OK.
You are returned to the Device Manager window.
9Click .
You are returned to the System Properties dialog box.
10
Click OK.
You are returned to Control Panel.
11
Click .
Control Panel closes.

28
Uninstalling the Wireless LAN PC Card driver
To uninstall the Wireless LAN PC Card driver, perform the following
steps.
z Hint
Refer to the Quick Start Guide for instructions on how to install the Wireless LAN PC
Card driver.
Windows Me:
1From the Start menu, point to Settings, then click Control
Panel.
Control Panel appears.
2Double-click the “System” icon.
The System Properties dialog box appears.
z Hint
If System is not displayed, click “view all Control Panel options”.
3Click the Device Manager tab.
4Select Devices by type.
5Double-click Network adapters, then click Sony PCWA-C150
Wireless PC Card, and click Remove.
The Confirm Device Removal dialog box appears.
6Click OK.
The message “To finish removing your hardware, you must restart
your computer. Do you want to restart your computer now?” appears.
7Remove the Wireless LAN PC Card from its slot, and click
Yes.
The system restarts. This completes removal of the driver.

29
Getting started
Windows 2000:
Note
Log on to Windows 2000 as one of the Administrators.
1From the Start menu, point to Settings, then click Control
Panel.
Control Panel appears.
2Double-click the “System” icon.
The System Properties dialog box appears.
3Click the Hardware tab, then click Device Manager.
The Device Manager window appears.
4From the View menu, click Devices by type.
5Double-click Network adapters.
6Double-click Sony PCWA-C150 Wireless PC Card.
The Sony PCWA-C150 Wireless PC Card Properties dialog box
appears.
7Click the Driver tab, then click Uninstall.
The Confirm Device Removal dialog box appears.
8Click OK.
You are returned to the Device Manager window.
9Click .
You are returned to the System Properties dialog box.
10
Click OK.
You are returned to Control Panel.
11
Click .
The Control Panel closes.

30
Windows XP:
Note
Log on to Windows XP using an account with computer administrator privileges.
1From the start menu, click Control Panel.
Control Panel appears.
2Double-click System.
The System Properties dialog box appears.
z Hint
If the System icon is not displayed, select “Switch to Classic View”.
3Click the Hardware tab, then click Device Manager.
The Device Manager window appears.
4From the View menu, click Devices by type.
5Double-click Network adapters.
6Double-click Sony PCWA-C150 Wireless PC Card.
The Sony PCWA-C150 Wireless PC Card Properties dialog box
appears.
7Click the Driver tab, then click Uninstall.
The Confirm Device Removal dialog box appears.
8Click OK.
You are returned to the Device Manager window.
9Click .
You are returned to the System Properties dialog box.
10
Click OK.
You are returned to the Control Panel.

31
Getting started
11
Click .
The Control Panel closes.
32
Inserting the Wireless LAN PC Card
This section explains how to insert the Wireless LAN PC Card in your
computer and how to remove it.
You do not need to turn off your computer when inserting the Wireless
LAN PC Card.
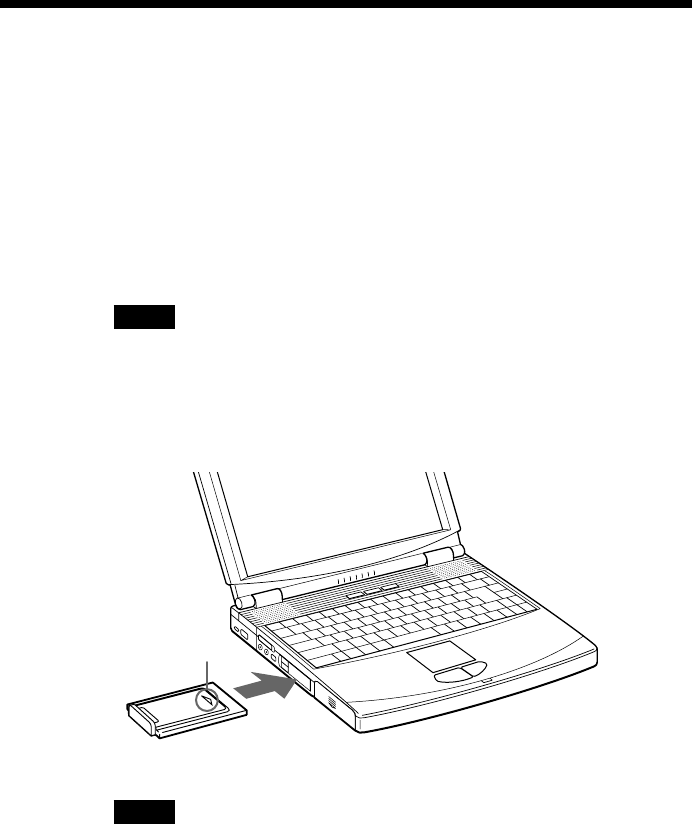
Insert the Wireless LAN PC Card into the PC Card slot of the computer.
Push the Wireless LAN PC Card into the slot until it is firmly seated.
Notes
•When inserting the Wireless LAN PC Card, grasp it at the antenna base or both sides. If
you hold the card by the protruding part of the antenna, the card may be damaged.
•If the card does not fit easily, do not force it in. Take the card out and try reinserting it.
•There may be some computers where the Wireless LAN PC Card cannot be inserted,
due to insufficient depth or irregular shape above the PC Card slot.
Notes
•If your computer has two PC Card slots, insert the Wireless LAN PC Card into the top
slot. If inserted into the bottom slot, the antenna of the Wireless LAN PC Card will
block the top slot.
•In some computer models, the Memory Stick slot may be blocked while the Wireless
LAN PC Card is inserted.
•Set up your computer so that it does not go into System Suspend mode or System
Hibernation mode while the Wireless LAN PC Card is used.
•If the Wireless LAN PC Card is removed in System Suspend mode or System
Hibernation mode, it may not be recognized properly when reinserted. Do not remove
or insert the Wireless LAN PC Card in System Suspend mode, System Hibernation
mode, or while the computer is in the idle state.
Insert in arrow direction
To PC Card slot
33
Getting started
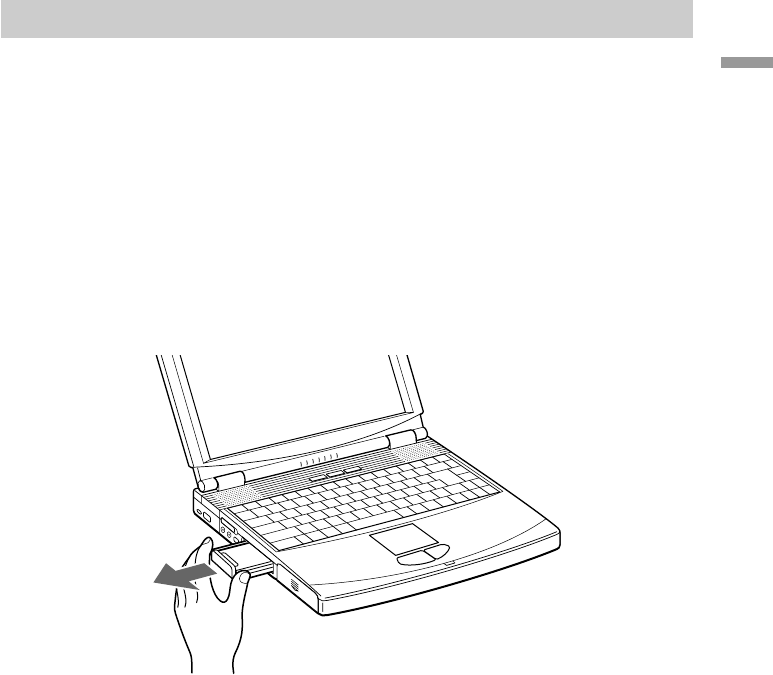
To remove the Wireless LAN PC Card
1Close the software that uses the wireless LAN (Client
Manager).
2Stop the Wireless LAN PC Card according to the
documentation of your computer.
3Remove the Wireless LAN PC Card according to the
documentation of your computer.
Grasp the card at both sides and carefully pull it out of the slot.
34
Setting up the connection environment
Windows Me or Windows 2000
Establishing communication with the Access Point
This section describes how to make settings for communication with an
Access Point. When not using an Access Point, see “Making
communication settings for Peer-to-Peer Mode” on page 44.
Before making the settings, the following tasks must be
completed:
•Wireless LAN PC Card must be inserted in the computer.
•The Access Point must be installed at a distance that will allow
communication with the computer where the Wireless LAN PC Card is
inserted, and the Access Point must be turned on. For details, see the
documentation of the Access Point.
•Check the Network Name (also called SSID) and the Data Security (also
called WEP or Encryption) settings at the Access Point. For details about
these settings, consult your network administrator. When using the
Access Point in the factory default condition, the settings are listed in the
documentation of the Access Point.
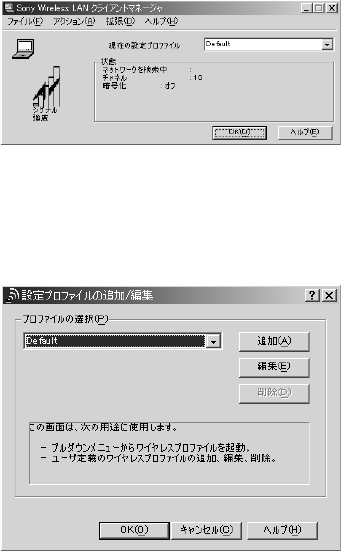
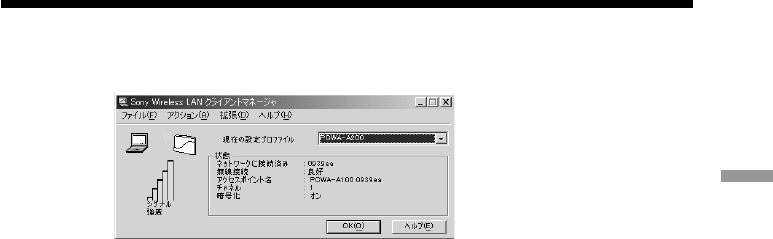
1 Click the Client Manager icon on the taskbar.
The Client Manager window appears.
35
Software setup
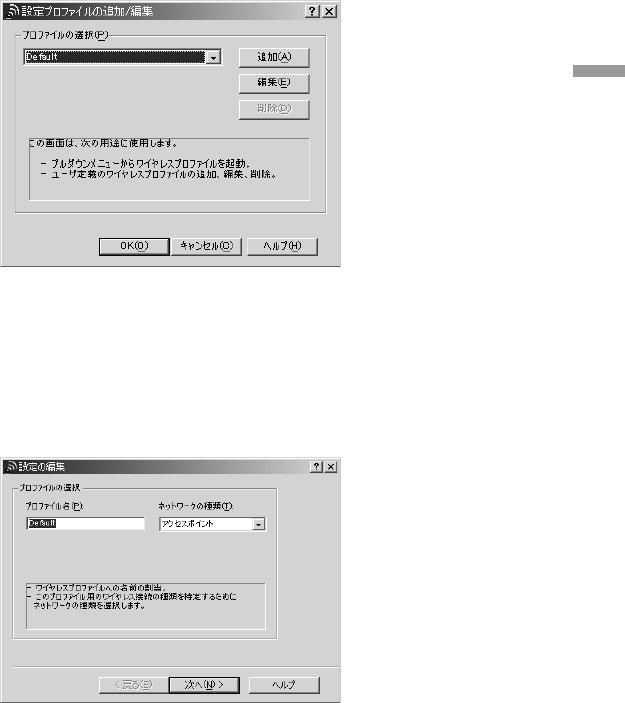
2From the Actions menu, select Add/Edit Configuration
Profile.
The Add/Edit Configuration Profile dialog box appears.
3Click Add Profile.
The Edit Configuration dialog box appears.
z Tip
To edit an existing profile, click Edit Profile.
36
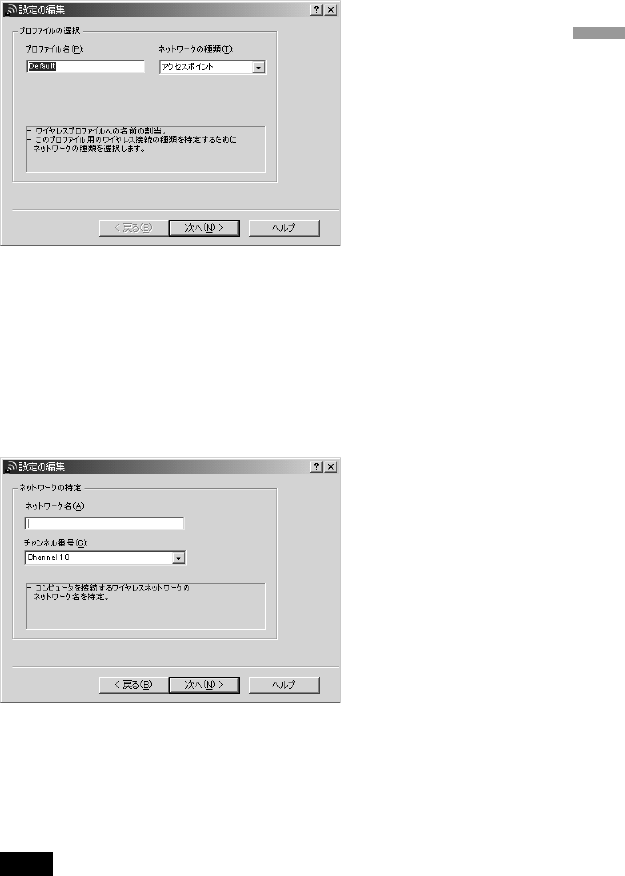
4Enter an alphanumeric name for the profile in the Profile
Name field (symbols are also allowed). Verify that Access
Point is selected in the list at right, and click Next.
The window shown below appears.
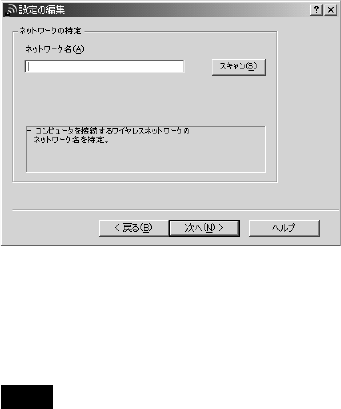
5In the Network Name field, enter the same Network Name
as set at the Access Point. You can also click Scan to
search for Access Points in the communication range.
Note
The Network Name is case sensitive. Be sure to use the same upper case/lower case
spelling as at the Access Point.
z Tip
•If you leave the Network Name field blank, the computer will attempt to connect
to an arbitrary Access Point within range. If you enter “ANY” (all in upper case)
in the Network Name field, the computer will attempt to connect to all Access
Points within range.
•If the Scan button is grayed out, Access Point search cannot be carried out. Enter
the Network Name set at the Access Point.
6From the Network Name Scan <??> dialog box, select the
Access Point to which you want to connect, and Click OK.
37
Software setup
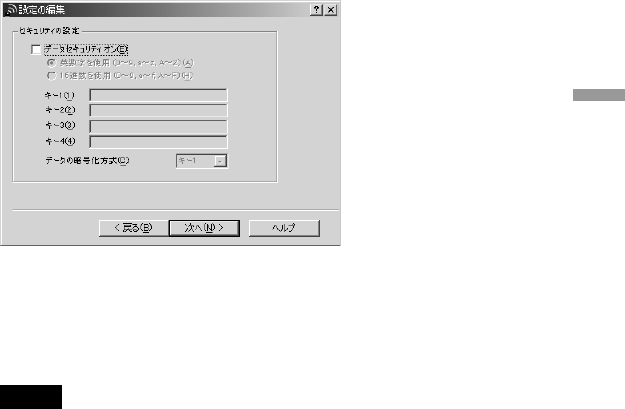
7Click Next.
The window shown below appears.
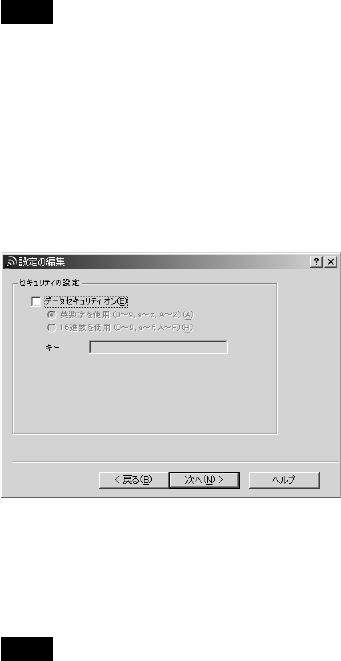
8If Data Security (also called WEP or Encryption) is enabled
at the Access Point, make matching settings for the Wireless
LAN PC Card, as described below.
Notes
•Input is case sensitive. Be sure to use the same upper case/lower case spelling as
at the Access Point.
•The Data Security function serves to prevent unauthorized access to the network.
If Data Security is not enabled at the Access Point, it is strongly recommended
that you enable it after having checked that communication can be established.
For details about changing the settings of the Access Point, see the documentation
of the Access Point. After changing the settings of the Access Point, use Client
Manager again to change the settings for the Wireless LAN PC Card accordingly.
z Tip
When using the Sony Wireless LAN Access Point PCWA-A200, refer to the folder
“manual” under the folder “A200Setup” on the supplied CD-ROM. This folder
contains a PDF file that explains how to make settings for the PCWA-A200. To
display PDF files, Adobe Acrobat Reader is required.
38
1. Place a check mark in Enable Data Security.
2. Select the input method for the key (password for connecting
to an Access Point with Data Security enabled): Use
Alphanumeric Characters (0 - 9, a - z, A - Z) or Use
Hexadecimal (0 - 9, a - f, A - F).
Note
If the Access Point still uses the factory default key, it is strongly recommended
that you change it after having checked that communication can be established.
After changing the settings of the Access Point, use Client Manager again to
change the settings for the Wireless LAN PC Card accordingly. For details about
changing the settings of the Access Point, see the documentationof your Access
Point.
3. In the field Key 1, Key 2, Key 3, or Key 4, input the encryption
key set at the Access Point, and select the field where you
have input the key from the Data Security Encryption <??>
drop-down list.
z Tip
Usually, Key 1 will be used. The PCWA-A200 also uses Key 1.
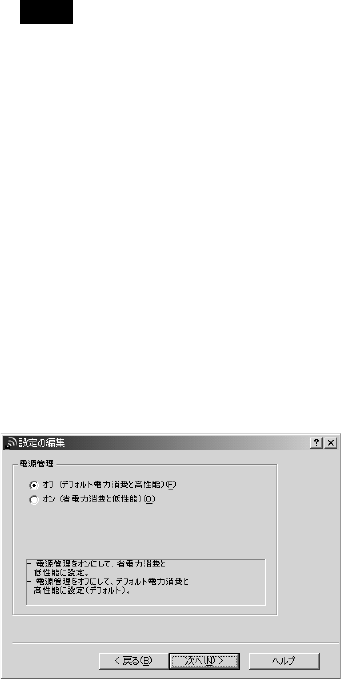
9Click Next.
The window shown below appears.
39
Software setup
10
Set Power Management to Off (Default power consumption
and high performance) <??> or On (Low power consumption
and reduced performance) <??>, and click Next.
The window shown below appears.
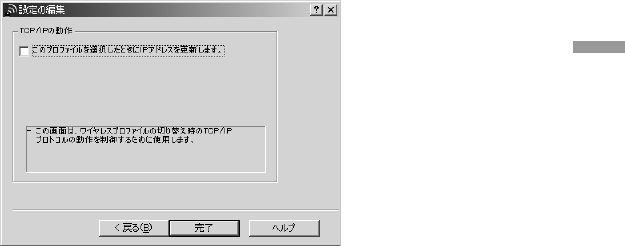
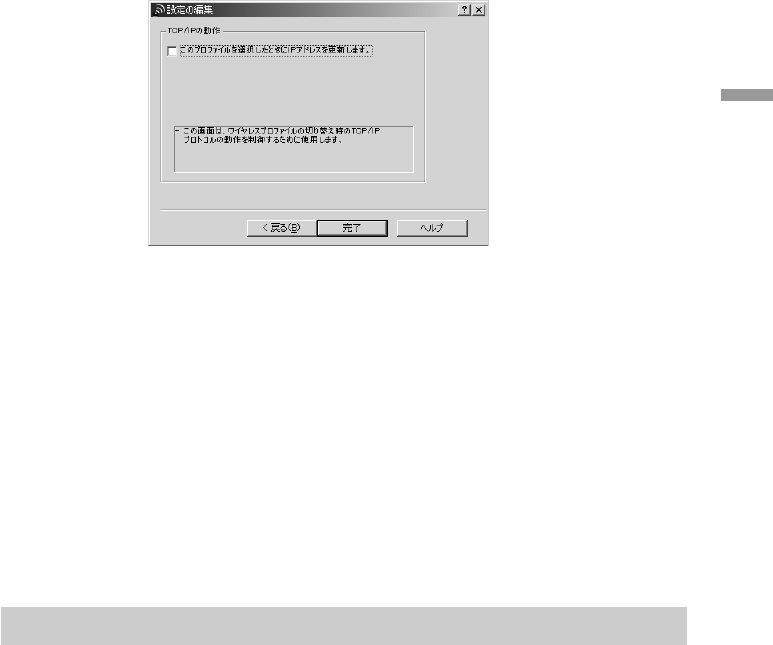
11
When using one Wireless LAN PC Card for multiple
networks (such as in the workplace and at home), place a
checkmark in Update IP address when this profile is
selected <??>, and click Finish.
The Add/Edit Configuration Profile dialog box reappears.
12
Click OK to close the Add/Edit Configuration Profile dialog
box.
The Client Manager window reappears.
13
Click OK to close the Client Manager window.
40
Making communication settings for Peer-to-Peer Mode
1Click the Client Manager icon on the taskbar.
The Client Manager window appears.
2From the Actions menu, select Add/Edit Configuration
Profile.
The Add/Edit Configuration Profile dialog box appears.
41
Software setup
3Click Add Profile.
The Edit Configuration dialog box appears.
z Tip
To edit an existing profile, click Edit Profile.
4Enter a desired alphanumeric name into the Profile Name
field (symbols are also allowed).
5In the drop-down list at right, select peer-to-peer, then click
Next.
The window shown below appears.
6To create a new network, enter a desired alphanumeric
name into the Network Name field (symbols are also
allowed). To connect to an existing network, enter the name
of that network.
Note
The Network Name is case sensitive. Be sure to use the correct upper case/lower
case spelling.
42
7Select the channel number from the Channel Number <??>
drop-down list.
Note
When creating a new network, you can select any channel number.
z Tip
When connecting to an existing network, the channel number is selected
automatically.
8Click Next.
The window shown below appears.
9When creating a new network, and when connecting to an
existing network where Data Security (also called WEP or
Encryption) is enabled, make the following settings.
Note
•Place a check mark in Enable Data Security.
•The Data Security function serves to prevent unauthorized access to the network.
If Data Security is not enabled, it is strongly recommended that you enable it.
1. Place a check mark in Enable Data Security.
2. Select the input method for the key (password for connecting
to a network with Data Security enabled): Use Alphanumeric
Characters (0 - 9, a - z, A - Z) or Use Hexadecimal (0 - 9, a -
f, A - F).
3. Enter the encryption key in the Key field.
43
Software setup
10
Click Next.
The window shown below appears.
11
When using one Wireless LAN PC Card for multiple
networks (such as in the workplace and at home), place a
checkmark in Update IP address when this profile is
selected <??>, and click Finish.
The Add/Edit Configuration Profile dialog box reappears.
12
Click OK to close the Add/Edit Configuration Profile dialog
box.
13
Click OK to close the Client Manager window.
Windows XP
Establishing communication with the Access Point
This section describes how to make settings for communication with an
Access Point. For information on settings when not using an Access Point,
see Windows XP Help.
Before making the settings, the following tasks must be
completed:
•Wireless LAN PC Card must be inserted in the computer.
•The Access Point must be installed at a distance that will allow
communication with the computer where the Wireless LAN PC
Card is inserted, and the Access Point must be turned on. For
details, see the documentation of the Access Point.

44
•Check the Network Name (also called SSID) and the Data
Security (also called WEP or Encryption) settings at the Access
Point. For details about these settings, consult your network
administrator. When using the Access Point in the factory default
condition, the settings are listed in the documentation of the
Access Point.
Note
Before configuring the Wireless LAN PC Card, perform the following steps to confirm
that the Use Windows to configure my wireless network settings check box is selected.
This option is selected as the default setting.
To confirm that the Use Windows to configure my wireless
network settings check box is selected:
1.From the Start menu, select Control Panel, then double-click
Network Connections.
2.Right-click Wireless Network Connection, and click Properties.
3.Click the Wireless Network tab.
4.Confirm that the Use Windows to configure my wireless network
settings check box is selected. If it is not selected, select the
checkbox.
1Right-click “Wireless Network Connection” in the notification
area of the taskbar. In the shortcut menu that appears,
select View Available Wireless Networks.
The Connect to Wireless Network dialog box appears.
2Click the Access Point to which you want to connect.

45
Software setup
3If Data Security (also called WEP or Encryption) is enabled
at the Access Point, enter the encryption key in the Network
key field.
Note
•Input is case sensitive. Be sure to use the same upper case/lower case spelling as
at the Access Point.
•The Data Security function serves to prevent unauthorized access to the network.
If Data Security is not enabled at the Access Point, it is strongly recommended
that you enable it after having checked that communication can be established.
For details about changing the settings of the Access Point, see the documentation
of the Access Point.
•After changing the settings of the Access Point, change the settings for the
Wireless LAN PC Card accordingly.
z Tip
When using the Sony Wireless LAN Access Point PCWA-A200, refer to the folder
“manual” under the folder “A200Setup” on the supplied CD-ROM. This folder
contains a PDF file that explains how to make settings for the PCWA-A200. To
display PDF files, Adobe Acrobat Reader is required.
4Click Connect.
The computer connects to the Access Point.
z Tip
For details on making the connection, see Windows XP Help.
46
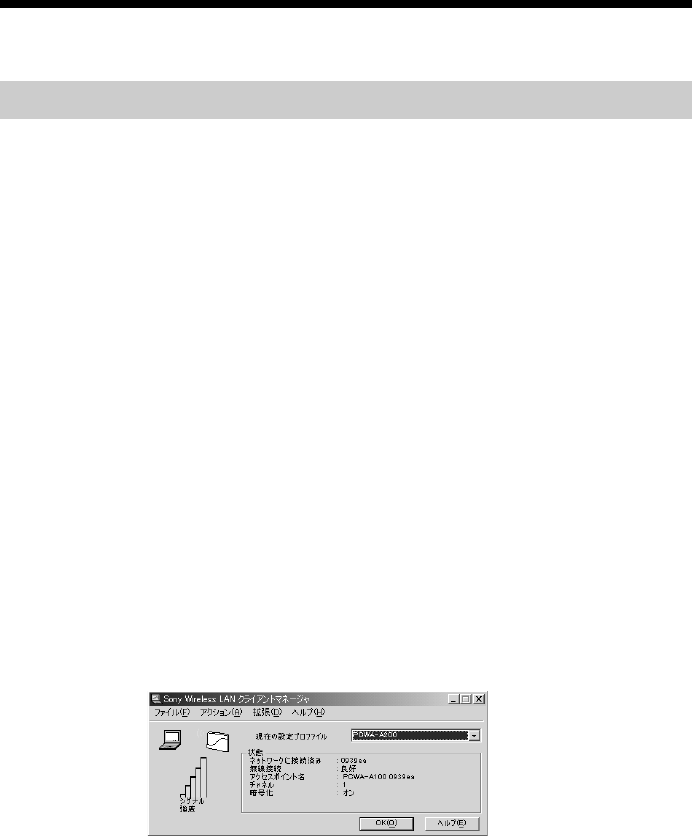
Checking the communication status
Checking the wireless signal strength
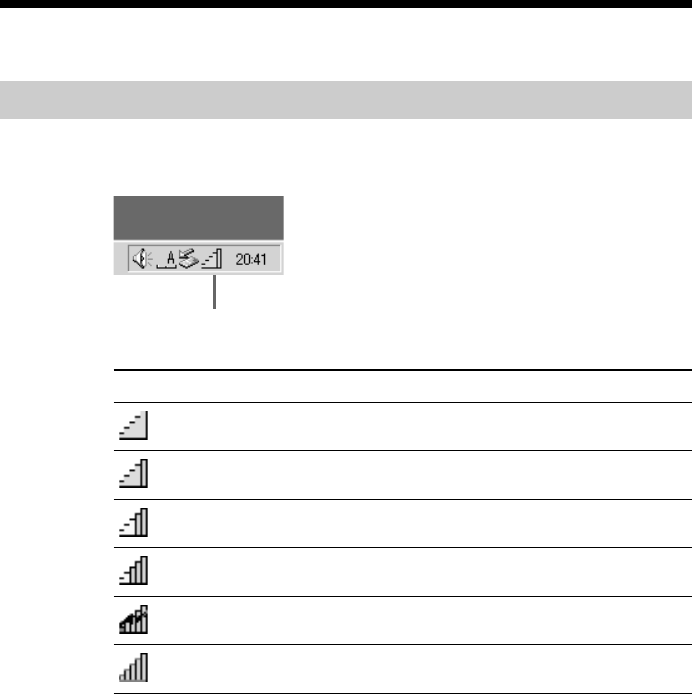
The communication status is shown by the Client Manager icon in the
system tray (notification area in Windows XP).
Client Manager icon
Meaning of icon appearance
(Green) = Excellent
(Green) = Good
(Yellow) = Fair
(Yellow) = Weak signal
(Red) = Out of range
(No color) = Operating in Peer-to-Peer Mode
47
Software setup
Client Manager menus
File menu
Enable Radio / Disable Radio
Enables or disables wireless communication.
Close Window
Closes the Client Manager window.
Actions menu
Add/Edit Configuration Profile
Serves for creating a new profile or editing an existing profile. In Windows
XP, the connection function built into Windows XP is used, and this
function is not available.
Select Configuration Profile
Serves for selecting an existing profile from a submenu. The selected
profile is indicated by a preceding (z). In Windows XP, the connection
function built into Windows XP is used, and this function is not available.
Advanced menu
Card Diagnostics
Performs a test of the software and hardware.
Link Test
Tests the communication status of the connected network. If the other link
components (Access Point or other computer in Peer-to-Peer Mode) do not
support this capability, the function is not available.
Site Monitor
Displays a site monitor screen which shows the communication status for
all networks within range.

48
Precautions
Safety
Do not drop or cause a mechanical shock
to the 5GHz Wireless LAN PC Card
PCWA-C500, as this may damage the
unit.
Installation
Do not expose the Wireless LAN PC Card
to the following conditions:
•Unstable surfaces
•High humidity or poor ventilation
•Excessive dust
•Direct sunlight or extreme heat
•Closed cars
•Magnetized location (near magnets,
speakers, or televisions)
•Locations exposed to frequent vibration
•Locations where the transmission of
radio waves may be obstructed by metal
plates or concrete walls
Operation
If the Wireless LAN PC Card is moved
directly from a cold location to a warm
locations, or if it is placed in a very damp
environment, moisture may condense on
the parts inside. The Wireless LAN PC
Card may not operate properly if moisture
condensation occurs.
Cleaning
Clean the casing with a soft cloth, lightly
moistened with water or a mild detergent
solution. Do not use any type of abrasive
pad, scouring powder, or solvent such as
alcohol or benzene as it may damage the
finish of the casing.

49
Software setup
Specifications
Protocol support
TCP/IP compliant
Standard
IEEE802.11a/IEEE802.11
Radio frequency
2.4 GHz
Modulation method
DS-SS (IEEE802.11 compliant)
General
Power requirements
3.3 V/5 V (supplied from the computer
through the PC card adapter)
Current
Peak current at transmission: 560 mA
Peak current at reception: 400 mA
Connector
PC Card Card Type-II
Dimensions
Approx. 2.12 × 0.2 × 3.54 inches
(Approx. 54 × 5 × 90 mm ) (w/h/d)
(Antenna height: 0.47 inches (Approx. 12 mm))
Mass
Approx. 1.23 oz (Approx. 35 g)
Operating temperature
41°F to 95°F (5°C to 35°C) (not condensed)
Environment temperature
-4°F to 140°F (-20°C to 60°C) (not
condensed)
Supplied accessories
See “Unpacking” on page xx.
Design and specifications are subject to change
without notice.
Getting help
This section describes how to get help and
support from Sony, as well as
troubleshooting tips for your Wireless
LAN PC Card.
About Sony’s Support Options
Sony provides several support options for
your Wireless LAN PC Card. When you
have questions about your Wireless LAN
PC Card and its related software, check
these options for answers:
❒This Operating Instructions
explains how to use your Wireless LAN
PC Card.
❒The Sony Wireless LAN PC Card
support Web site
http://www.sony.com/
wirelesslansupport/ provides the
latest information on your Wireless
LAN PC Card. On this Web site, you
will find:
•Answers to Frequently Asked
Questions (FAQs)
•An electronic version of the
Operating Instructions
•Help files
•Installation information
•Software upgrades
❒The Sony e-mail support service
answers your questions by electronic
mail. Just send your question in an e-
mail message and a customer service
representative will reply. To send a
question to Sony e-mail support, fill out
the e-mail form at
http://www.sony.com/
wirelesslansupport/
50
❒The Sony fax-back service provides
you with answers to commonly asked
questions. You can use this automated
service to request a list of available
topics then select the topics you want to
receive. To contact the Sony fax-back
service, call
1-877-760-7669.
❒The Sony Customer Information
Services Center offers information
about your Access Point, Wireless LAN
PC Card, and other Sony products that
work with your computer. To contact
the Sony Customer Information
Services Center, call 1-877-760-7669.
Open 24 hours/day, 7 days/week.
Getting Help

51
Additional information
Glossary
Channel number
The frequency used for wireless
communications. Wireless
communications are possible only among
client computers and Access Points that
use the same channel.
Data Security
IEEE 802.11 compliant security system
(also called WEP or Encryption). Using
the encryption key as the password, only
client computers and Access Points that
have the same key may log onto the same
wireless LAN.
Encryption key
See the explanation of Data Security
LAN (Local Area Network)
A network which is accessible only to its
members, unlike the Internet which is
open to an unlimited number of people. A
LAN may be built for different purposes.
For example, you can build an office LAN
that is accessible only to members of the
same department or a home LAN that is
accessible only to family members.
TCP/IP (Transmission Control
Protocol/Internet Protocol)
TCP is a connection-oriented protocol (a
set of specifications that define the
procedures for computers to follow when
transmitting and receiving data). Because
the Internet uses TCP/IP, a computer can
only connect to the Internet when the
TCP/IP protocol is installed on it.

52
Troubleshooting
If there is an apparent problem with the system, check the points listed
below. If you still cannot resolve the problem after performing these
checks, contact Sony Customer Information Services.
Symptom Cause/Remedy
Computer does not
detect the Wireless
LAN PC Card.
Other computers on
the wireless LAN are
not displayed.
Cannot access the
Internet.
Data transfer speed is
slow.
The Wireless LAN PC Card may not be properly inserted
into the PC Card slot of the computer.
cCheck that the Wireless LAN PC Card is inserted in the
proper direction, then push it in as far as it will go.
You did not enter the password when Windows started.
cEnter the user name and the password requested on
Windows startup, then log onto the LAN.
The Windows network environment is not properly set up.
cCheck the Windows network settings. For details, see
Windows Help.
No other computers are logged onto the wireless LAN.
The Access Point is not connected to the Internet.
cConnect the Access Point to the Internet, as described in
the documentation of the Access Point.
Wireless LAN PC Card is not inserted in the computer.
cInsert the card, as described in “Inserting the Wireless
LAN PC Card” on page 36.
Communication between the Access Point and the computer
is not established.
cUse Client Manager to check the communication status.
The Access Point is not properly configured.
cConfigure the Access Point according to its
documentation.
The Access Point and the computer are too far apart.
cReposition the computer within 100 m (330 feet) of the
Access Point, in direct line of sight.
There is radio interference with another Access Point.
cTry assigning another channel number to the Access
Point.
There are too many clients logging on to the Access Point.
cTry later.

53
Additional information
Symptom Cause/Remedy
Forgot the encryption
key.
Transfer rate is 11
Mbps, but MPEG2
data do not transfer
without interruption.
Communication fails
although the computer
is located within 100
m (330 feet) of the
Access Point.
Link test results in
many dropped
messages.
cReturn Access Point to factory default settings and then
configure it again. For details on how to do this, see the
documentation of the Access Point.
11 Mbps is a theoretical value. Under real-world conditions,
transfer rate will normally be in the range of 4 - 5 Mbps. This
is true for all IEEE 802.11b compliant systems. The
bandwidth available with wireless communications may not
be sufficient for high-volume streaming data such as
MPEG2.
The actual communication distance depends on various
factors such as installation site conditions, presence of
obstacles, etc.
cMove the computer closer to the Access Point.
The Access Point and the computer are too far apart.
cMove the computer closer to the Access Point.
File transfer is in progress on the network.
cDuring transfer of large files, performance may
temporarily drop. Repeat the test when the network is not
being used for file transfer.
There is radio interference.
cIf there is another wireless station nearby using the same
channel, try changing the channel number.
cIf a Bluetooth enabled wireless device is being used
nearby, stop using it at the same time.
A microwave oven is being used nearby.
cA microwave oven may also have an adverse effect on
communication performance. Do not use it at the same
time.
Notes
•When more than 2% messages are dropped,
communication performance will be seriously affected. At
5% and higher, most applications will have trouble
functioning.
•Perform the link test for at least 1 minute continuously
(minimum 200 messages) to ensure meaningful results.

54
Symptom Cause/Remedy
Cannot connect to the
network.
An error message
indicating a conflict
between network
components is
displayed.
The Access Point and the computer are too far apart.
cMove the computer closer to the Access Point.
Communication settings are incorrect.
cCheck the settings for Network Name, Data Security,
Profile, etc.
Check the versions of related software and hardware, and
obtain updates if required. To check the version, right-click
the Client Manager icon on the taskbar, and select Help —
Version Info from the submenu.

Printed in Japan
❒The Sony e-mail support service answers your questions
by electronic mail. Just send your question in an e-mail message
and a customer service representative will reply. To send a
question to Sony e-mail support, fill out the e-mail
form at
http://www.sony.com/wirelesslansupport/
❒The Sony fax-back service provides you with answers to
commonly asked questions. You can use this automated service
to request a list of available topics and then select the topics you
want to receive. To contact the Sony fax-back service, call
1-877-760-7669.
❒The Sony Customer Information Services Center offers
information about your Access Point, Wireless LAN PC Card,
and other Sony products that work with your computer. To
contact the Sony Customer Information Services Center, call
1-877-760-7669.
Open 24 hours/day, 7 days/week.