Sony Group PCWAC300S 2.4 GHz DSSS/OFDM WLAN PCMCIA Card User Manual PCWA C300S
Sony Corporation 2.4 GHz DSSS/OFDM WLAN PCMCIA Card PCWA C300S
Users Manual

Operating Instructions
Wireless LAN PC Card
(IEEE 802.11g: 2.4 GHz/54 Mbps)
PCWA-C300S
4-674-967-11(1)
© 2003 Sony Corporation

2
WARNING
To prevent fire or shock hazard, do not
expose the unit to rain or moisture.
Owner’s Record
The model and serial numbers are located on the
back of the unit. Record the serial number in the
space provided below. Refer to them whenever
you call upon your Sony dealer regarding this
product.
Model No. PCWA-C300S
Serial No.______________
CAUTION
Any changes or modifications not expressly
approved in this manual could void your warranty.
FCC ID: AK8PCWAC300S
Exposure to Radio Frequency Radiation.
The radiated output power of the Wireless LAN
PC Card is far below the FCC radio frequency
exposure limits.
Nevertheless, the Wireless LAN PC Card shall be
used in such a manner that the potential for human
contact during normal operation is minimized.
Note
This equipment has been tested and found to
comply with the limits for a Class B digital
device, pursuant to Part 15 of the FCC Rules.
These limits are designed to provide reasonable
protection against harmful interference in a
residential installation. This equipment generates,
uses, and can radiate radio frequency energy and,
if not installed and used in accordance with the
instructions, may cause harmful interference to
radio or communications. However, there is no
guarantee that interference will not occur in a
particular installation. If this equipment does
cause harmful interference to television reception,
which can be determined by turning the equipment
off and on, the user is encouraged to try to correct
the interference by one or more of the following
measures:
– Reorient or relocate the receiving antenna.
– Increase the separation between the equipment
and receiver.
– Connect the equipment into an outlet on a
circuit different from that to which the receiver
is connected.
– Consult the dealer or an experienced radio/TV
technician for help.
Declaration of Conformity
Trade Name: Sony
Model No: PCWA-C300S
Responsible Party: Sony Electronics Inc.
Address: 680 Kinderkamack Road,
Oradell, NJ 07649 USA
Telephone: 201-930-6972
This phone number is for FCC-related matters
only.
This device complies with part 15 of the FCC
Rules.
Operation is subject to the following two
conditions:
(1) This equipment may not cause harmful
interference, and
(2) this equipment must accept any
interference received, including interference
that may cause undesired operation.
You are cautioned that any changes or
modifications not expressly approved in this
manual could void your authority to operate this
equipment.
Safety Information
WARNING
• Opening the product, for whatever reason,
could lead to damages that are not covered by
the warranty.
• Do not use this product on hospital premises.
Doing so may cause medical devices to
malfunction.
• If using the product near a pacemaker, make
sure it is at least 9 inches (22 cm) away from
the pacemaker.
• Do not use this product in an aircraft, as doing
so could cause the aircraft's equipment to
malfunction. Make sure you remove the
equipment from the PC card slot before
carrying your computer onto an aircraft.
• Do not apply unnecessary physical strain on the
product when it is inserted in your computer as
this could damage the product and/or your
computer.
• This product is meant for use in the USA and
Canada only.

3
FCC RF Exposure
Install and connect this product by following
descriptions in its Operating Instructions before
using it.
This equipment generates and radiates radio
frequency energy.
SAR (Specific Absorption Rate) for this device
was measured in accordance with
FCC OET Bulletin 65. Supplement C and
guidelines established in IEEE C95.1-1991.
In order to comply with FCC RF exposure limits
please maintain at least 4 mm spacing between
the user and the antenna of this device while
it is in use.
This product can only be used with desktop
computers and laptop (notebook) computers with
side mounted PCMCIA slots.
This device cannot be used with other types of
host devices, such as PDAs.
Users are not permitted to make changes or
modify the system in any way.
For customers in Canada
• This class B digital apparatus complies with
Canadian ICES-003.
• Operation is subject to the following two
conditions; (1) this device may not cause
interference, and (2) this device must accept
any interference, including interference that
may cause undesired operation of the device.
• To prevent radio interference to the licensed
service, this device is intended to be operated
indoors and away from windows to provide
maximum shielding. Equipment (or its transmit
antenna) that is installed outdoors is subject to
licensing.
• The term “IC” before the equipment
certification number only signifies that Industry
Canada technical specifications were met.
Pour les utilisateurs au Canada
• Cet appareil numérique de la classe B est
conforme à la norme NMB-003 du Canada.
• L’utilisation de ce dispositif est autorisée
seulement aux conditions suivantes : (1) il ne
doit pas produire de brouillage et (2)
l'utilisateur du dispositif doit être prêt à
accepter tout brouillage radioélectrique reçu,
même si ce brouillage est susceptible de
compromettre le fonctionnement du dispositif.
• Pour empêcher que cet appareil cause du
brouillage au service faisant l'objet d'une
licence, il doit être utilisé à l’intérieur et devrait
être placé loin des fenêtres afin de fournir un
écran de blindage maximal. Si le matériel (ou
son antenne d’émission) est installé à
l’extérieur, il doit faire l'objet d'une licence.
• Le terme “IC” avant le muméro d’homologation
ne signifie seulement que les normes d’Industrie
du Canada ont été respectées.
About the supplied software
THE SUPPLIED SOFTWARE IS SUPPLIED
PURSUANT TO THE APPLICABLE END-
USER LICENSE AGREEMENT.
• Copyright laws prohibit reproducing the
software or the software manual in whole or in
part, or renting the software without the
permission of the copyright holder.
• In no event will SONY be liable for any
financial damage or loss of profits, including
claims made by third parties, arising out of the
use of the software supplied with this product.
• In the event a problem occurs with this software
as a result of defective manufacturing, SONY
will replace it at SONY’s option or issue a
refund; however, SONY bears no other
responsibility.
• The software provided with this product cannot
be used with equipment other than that which is
designated for use with.
• Please note that, due to continued efforts to
improve quality, the software specifications
may be changed without notice.
Program © 2001, 2002, 2003 Sony Corporation,
© 2000-2003 Atheros Communications, Inc., All
Rights Reserved
Documentation © 2003 Sony Corporation
Sony, VAIO, , and are
trademarks of Sony Corporation.
Microsoft and Windows are registered trademarks
of Microsoft Corporation in the United States of
America and/or other countries.
MMX and Pentium are registered trademarks of
Intel Corporation.
Ehternet is a registered trademark of Xerox Co.,
Ltd.
All other trademarks are trademarks of their
respective owners.

4
Table of contents
Overview ................................................ 5
Capabilities..................................... 5
System requirements ...................... 8
Documentation and Help file................ 10
Getting started
Unpacking............................................. 12
Supplied software ......................... 12
Installing the supplied software ............ 13
Making Access Point Connection
Settings ............................................ 20
Windows Me or Windows 2000 .. 20
Windows XP ................................ 24
Removing the Wireless LAN PC Card and
Precautions When Inserting it.......... 28
To remove the Wireless LAN PC
Card .......................................... 28
If your computer has two PC Card
slots ........................................... 28
Wireless LAN connection
Checking the communication status ..... 29
Checking the wireless signal
strength ..................................... 29
Checking network information .... 29
Using the Wireless Panel ...................... 30
Opening the Wireless Panel ......... 30
Additional information
Manually installing, verifying, and
removing the supplied software ....... 31
Installing the Wireless LAN PC Card
driver manually......................... 31
Installing the Wireless Panel
manually ................................... 39
Connecting to the Access Point with
Wireless Panel
(Windows Me/2000) ................. 41
Verifying Wireless LAN PC Card
driver installation ...................... 42
Uninstalling the Wireless LAN PC
Card driver ................................ 50
Uninstalling the Wireless Panel ... 53
Precautions ........................................... 56
Specifications ....................................... 57
Getting help .......................................... 57
Glossary ................................................ 58
Troubleshooting.................................... 60
• In this manual, Microsoft® Windows® Millennium Edition is referred to as Windows Me.
• In this manual, Microsoft® Windows® 2000 Professional is referred to as Windows 2000.
• In this manual, Microsoft® Windows® XP Professional and Microsoft® Windows® XP Home Edition are
referred to as Windows XP.
Notes
• The user interface of the Sony supplied software may differ slightly from that shown in this manual.
• This manual is written based on the assumption that you are familiar with basic operations of the
Windows operating system. For computer operations, refer to manuals that come with your computer.
5
Overview
Capabilities
The Wireless LAN PC Card (IEEE 802.11g: 2.4 GHz/54 Mbps) PCWA-
C300S is a PC Card type wireless network card. With this card, you can
build a wireless LAN, allowing multiple computers to communicate and
exchange data without needing any physical connection. The supplied
Wireless Panel software lets you easily configure the card for multiple
networks. For example, you can store different settings required for
networking at the office and at home, or quickly switch between Access
Point (Infrastructure) Network connection mode and Peer to Peer (Ad-Hoc)
Network connection mode. This greatly facilitates use of the card in various
environments and for a range of applications.
z Hints
•The network mode can easily be switched using the supplied Wireless Panel software.
•To use the card in Access Point Network connection mode, an IEEE 802.11g or IEEE
802.11b compliant Wireless LAN Access Point* (available separately) is necessary.
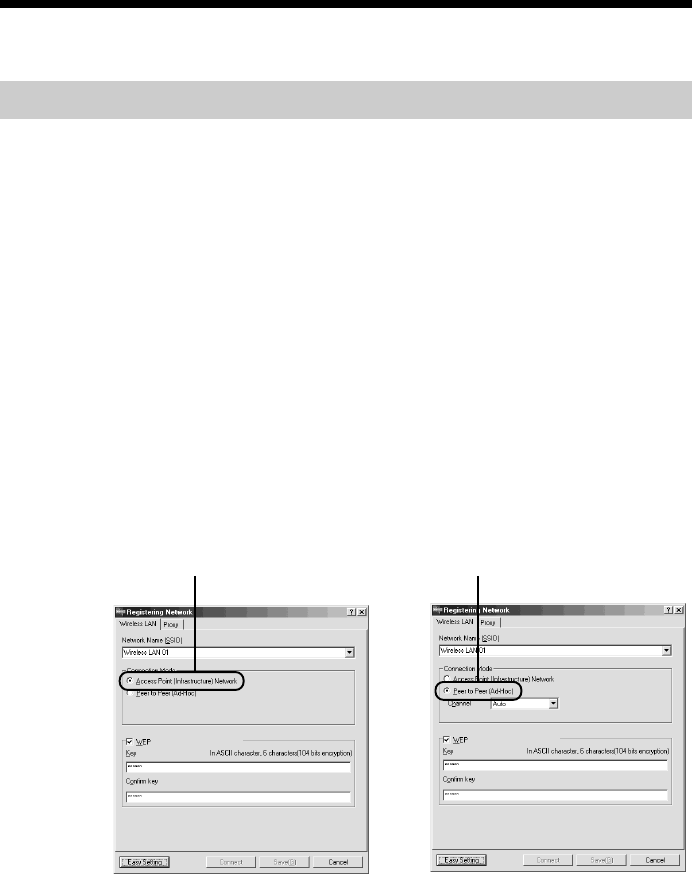
With Windows Me or Windows 2000:
*If using the separately available Wireless LAN Access Point PCWA-A320, also refer to
the documentation supplied with the unit.
Peer to Peer (Ad-Hoc) Network
connection mode
Access Point (Infrastructure) Network
connection mode
6
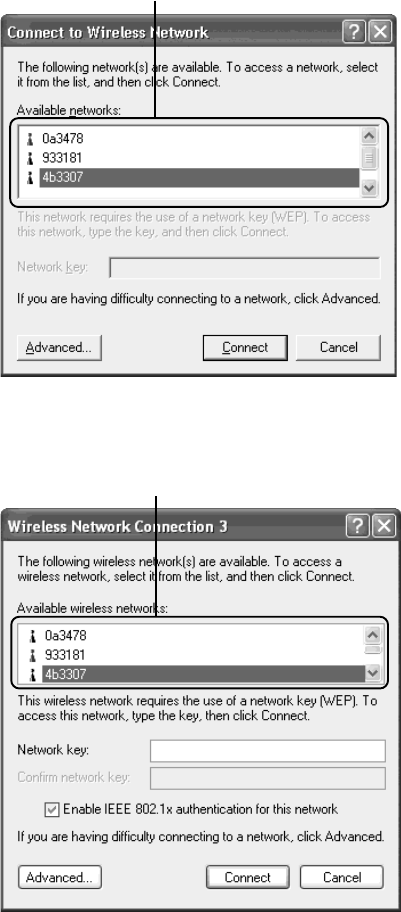
With Windows XP:
Windows XP Service Pack 1:
Available Wireless Networks
Available Wireless Networks
7
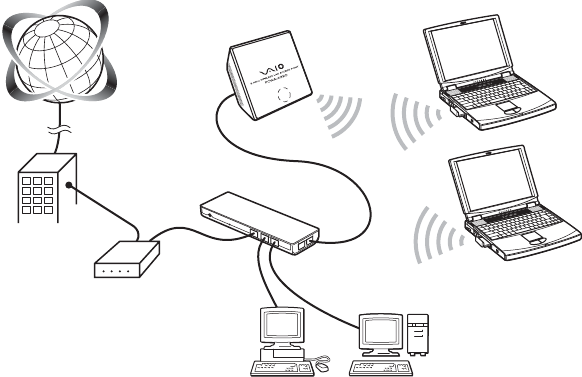
Accessing the Internet from various points within your
home (Access Point Network connection mode)
With a separately available Access Point you can easily build a wireless
network. By connecting a DSL modem, cable modem, or ISDN router to
the Access Point, you can access the Internet from the living room,
bedroom, or any other convenient location in the house. Equipping multiple
computers with a Wireless LAN PC Card also allows you to exchange files
between the computers via the Access Point.
z Hint
The illustration above gives an example of a system configuration using the Access Point
Network connection mode. Two computers equipped with Wireless LAN PC Cards
establish communications with the Wireless Broadband Router PCWA-AR300. The
Wireless Broadband Router is connected to the ADSL modem, therefore it is possible to
access the Internet through this wireless connection.
ADSL modem
etc.
8
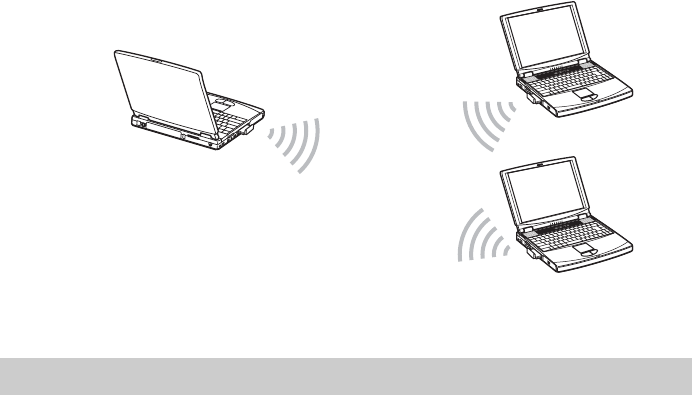
Direct communication between computers
(Peer to Peer Network connection mode)
The Peer to Peer Network connection mode enables computers equipped
with Wireless LAN PC Cards to communicate directly. This allows file
sharing in locations where the Wireless LAN Access Point is not present.
System requirements
To use the supplied software, the following system requirements must be
met:
❑Windows PC:
– 128 MB RAM or more
– Card Bus compliant PC Card slot
– CD-ROM drive (for software installation)
❑Operating system:
–Microsoft® Windows® Millennium Edition
–Microsoft® Windows® 2000 Professional
–Microsoft® Windows® XP Home Edition
–Microsoft® Windows® XP Professional
❑Display:
High color (16 bit color) or higher, 800 × 480 pixels or higher
9
Notes
•Correct operation is not assured for all computers, even if satisfying the above system
requirements.
•Correct operation in an OS upgrade environment is not assured, except for factory
provided Windows XP upgrade packages for Sony VAIO series computers.
•For Internet access via the wireless LAN, an IEEE 802.11g or IEEE 802.11b compliant
Wireless LAN Access Point (available separately) is necessary.
•An Internet Service Provider (ISP) is required for Internet access.
Precaution when using the PCWA-C300S
Because of the particular shape of the PCWA-C300S, it may not be possible to insert
it into all computers.
1The PCWA-C300S has an antenna
protruding up 0.4 in. (9 mm). If
obstructions 0.6 in. (15 mm) in length or
more come in contact with it when you
insert the PCWA-C300S into the PC card
slot, you cannot fully insert the wireless
LAN PC card into the slot.
2If the PC card slot of your computer is
more than 3.3 in. (85 mm) in length, you
cannot fully insert the PCWA-C300S into
the slot.
For details, visit
http://www.sony.com/wirelesslansupport
Computer
Wireless LAN PC Card PCWA-C300S
The antenna is obstructed. The
PCWA-C300S cannot be inserted.
The PC card slot is longer than
3.3 in. (85 mm). The PCWA-C300S
cannot be inserted.
Computer
Wireless LAN PC Card PCWA-C300S
10
Documentation and Help file
This product comes with the following documentation and help files.
❑Operating Instructions (this document)
Explains how to install the Wireless LAN PC Card and how to configure
all settings of the card.
❑Quick Start Guide
This document explains how to install software required to use the
Wireless LAN PC Card (IEEE 802.11g: 2.4 GHz/54 Mbps) PCWA-
C300S. The document also contains answers to frequently asked
questions and common problems.
❑Wireless Panel Online Help
This is the Online Help of the supplied Wireless Panel software. Refer to
it for instructions on how to use the software.
Access the Wireless Panel Online Help as follows.
■Access from the Easy Installation Wizard
1On the main menu of the Easy Installation Wizard, click
“Documents”.
11
2On the screen that opens, click “Wireless Panel Online Help”.
■Access from Wireless Panel
1Install the Wireless Panel software, following the instructions in this
manual.
2Start the Wireless Panel.
3Right-click the Wireless Panel icon on the taskbar and click Help on
the shortcut menu.
z Hint
You can also access Help by clicking on the Wireless Panel title bar.
12
Unpacking
Your Wireless LAN PC Card comes with the following items:
•Wireless LAN PC Card •CD-ROM (Setup disc)
•Quick Start Guide
•Operating Instructions
•Warranty card
Supplied software
The supplied CD-ROM contains the following software.
❑Wireless LAN PC Card driver
This device driver is necessary to the operation of the Wireless LAN PC
Card.
❑Wireless Panel
Wireless Panel is a utility software that lets you configure the computer
for the wireless LAN and monitor the communication status. The
software is also used to switch between networks.
Normally, the Wireless Panel appears as an icon in the taskbar, which
shows the communication status.
When using the card for the first time, see page 13 for
information on how to install the Wireless LAN PC Card driver
and the Wireless Panel.

13
Getting started
Installing the supplied software
This section explains how to use the supplied CD-ROM to install the
Wireless LAN PC Card device driver and Wireless Panel. You must insert
the Wireless LAN PC Card into your computer before installing the device
driver and Wireless Panel.
The installation procedures are performed with an easy-to-use wizard.
Before you start, verify the following.
•The wizard located on the CD-ROM supplied with the Wireless LAN PC
Card. Make sure that your CD-ROM drive is ready for use.
•When using the Wireless LAN PC Card in Access Point Network
Connection mode, you must install the Access Point and make the
necessary settings before proceeding. For details about these procedures,
refer to your Access Point user’s guide.
Notes
•To install the supplied software on a computer running Windows 2000, log on with a
user account listed in “Administrators”. To install the supplied software on a computer
running Windows XP, log on with a user account with administrator access privileges.
You cannot install the software or modify settings when logged on with any other
account.
•To change any of the Wireless Panel settings on a computer running Windows 2000,
log on with a user account listed in “Administrators”. You cannot modify settings when
logged on with any other account.
•Exit all other Windows programs.

14
Important
Computer Firewall Functions
When using Windows XP’s “Internet Connection Firewall”
Enabling the Windows XP “Internet Connection Firewall” may prevent you from
being able to access your computer through wireless communication. (This function
is inactive under Windows XP default settings.) Because of this function, you may
not be able to connect to your network when you change your Access Point settings.
If this happens, deactivate the “Internet Connection Firewall” function, connect to
the network, and then reactivate the function. For details, refer to Windows XP
Help.
Note
Network security is an important issue. You are urged to consider carefully how best to protect your
computer.
When using a personal firewall function provided by virus scanning
or network security software
Virus scanning and network security software sometimes includes a function called
a “personal firewall” that is designed to prevent illegal access by outside entities.
Depending on the software, the security level of this function may be initially set to
a high level. If this high security level setting is left in effect, it may be impossible
for an outside entity to access your computer. This can cause problems such as not
being able to connect to the network when changing the Access Point’s settings. In
this event, lower the security level in order to permit the network connection. For
details, refer to the manuals provided with your software.
Notes
•Pay special attention to security issues.
•For questions regarding firewall functions, please contact your firewall software manufacturer.
15
Getting started
1When using the Wireless LAN PC Card in Access Point
Network Connection mode, turn on the Access Point.
2Insert the supplied CD-ROM into the CD-ROM drive of your
computer.
The Easy Installation Wizard starts automatically.
z Hint
If the Easy Installation Wizard does not appear when you insert the supplied
CD-ROM into your CD-ROM drive, double-click “Setup.exe” ( ) on the
CD-ROM. Depending on the settings of your computer, the file name may be
“Setup”.
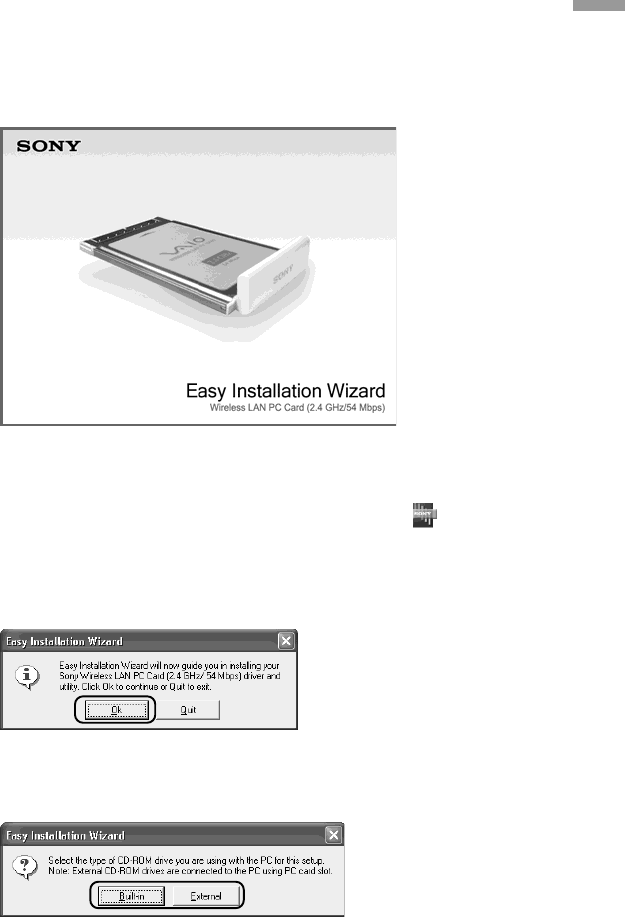
3When the following message appears, click “OK”.
4Click the button that corresponds to your type of CD-ROM
drive.
16
If you are using an external CD-ROM drive, follow the instructions on
the screen and copy the contents of the CD-ROM to your hard disk.
When the copy is complete, click “Main Menu”.
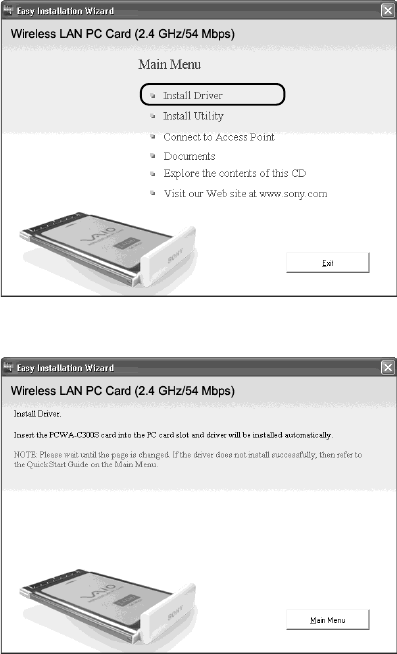
The Main Menu of the Easy Installation Wizard appears.
5Click “Install Driver”.
The following screen appears.
Insert the Wireless LAN PC Card and follow the instructions on the
screen to install the device driver.
17
Getting started
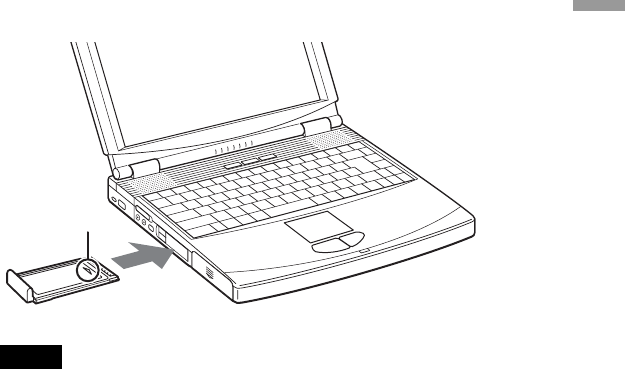
6Insert the Wireless LAN PC Card in the PC card slot.
You do not need to turn off your computer when you insert the
Wireless LAN PC Card.
Notes
•If your computer has two PC Card slots, insert the Wireless LAN PC Card into the
top slot. If inserted into the bottom slot, the antenna of the Wireless LAN PC Card
will block the top slot. See section “If your computer has two PC Card slots” on
page 28.
•Depending on the depth and configuration of PC card slots on your computer, you
may not be able to insert the Wireless LAN PC Card.
Push the Wireless LAN PC Card into the slot until it is firmly seated. If
the card does not fit easily, do not force it in. Take the card out and try
reinserting it.
When you insert the Wireless LAN PC Card, the device driver installed
automatically. When installation is complete, proceed to step 7.
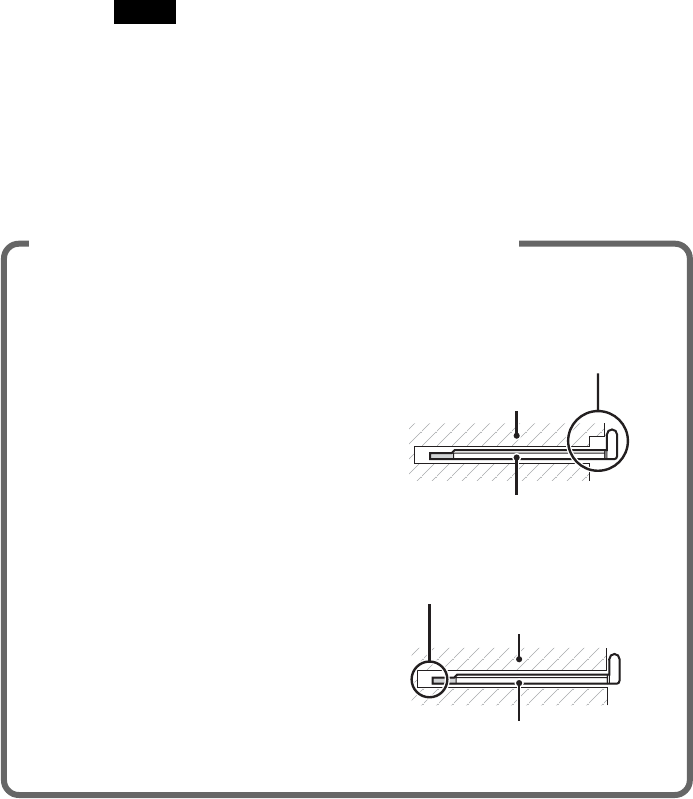
To PC Card slot
Insert in arrow
direction
18
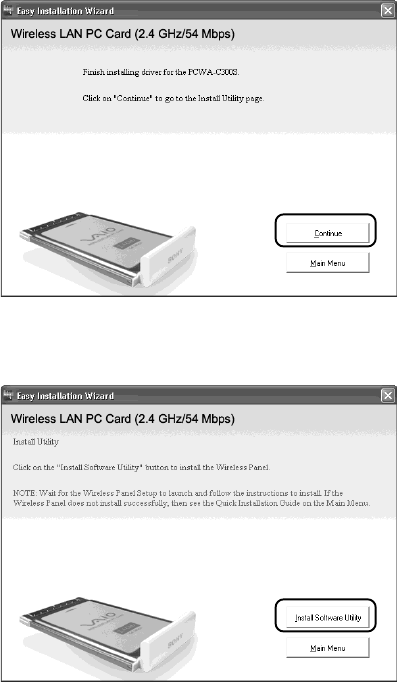
7When installation is complete, the following screen appears.
Click “Continue”.
8Click “Install Software Utility”.
The utility installation starts.
19
Getting started
9Follow the instructions on the screen to complete the
installation.
This completes the installation of the software.
Once Wireless Panel is installed, appears on the Windows taskbar.
What to do next
Make Access Point connection settings.
When using Windows Me or Windows 2000, proceed to page 20.
When using Windows XP, proceed to page 24.
z Hint
When using Windows XP, click “Main Menu” as necessary to return to the first screen of
the wizard, or click to close the Easy Installation Wizard.
20
Making Access Point Connection Settings
After installing the necessary software, you must make the necessary
settings to establish a connection with the Access Point.
If you want to establish a connection in Peer to Peer Network connection
mode, refer to the Wireless Panel Help for details about the necessary
settings.
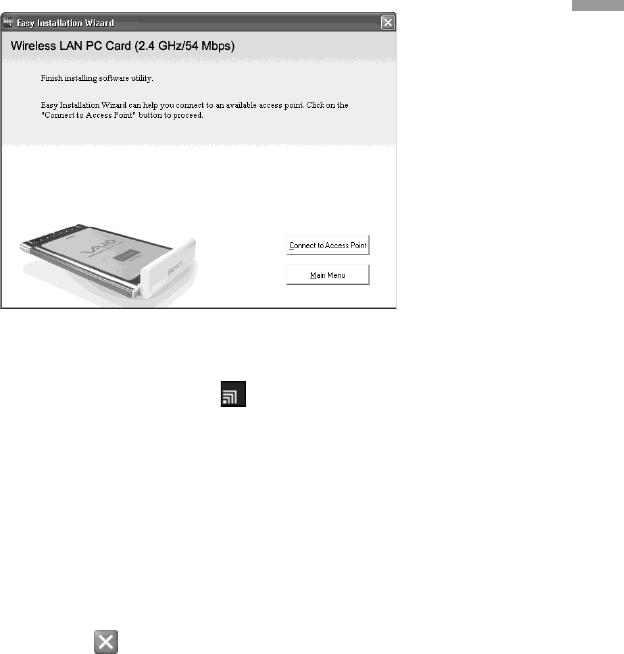
Windows Me or Windows 2000
1Click “Connect to Access Point”.
The following screen appears.
2Make the appropriate settings.
2
1

21
Getting started
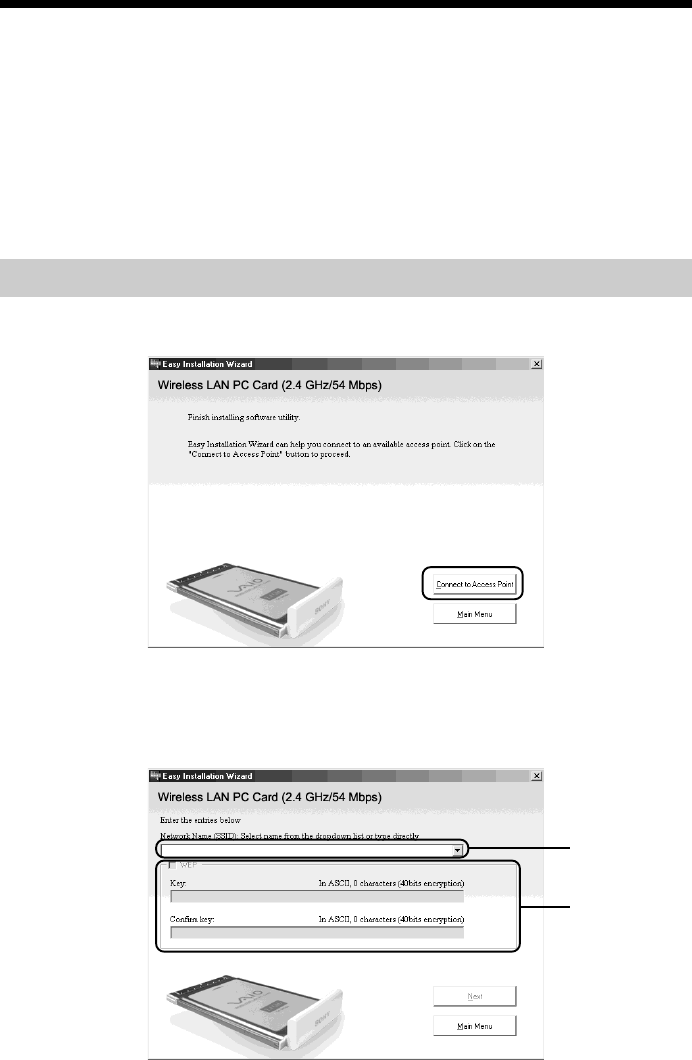
1Network Name (SSID)
This is a unique ID used to identify wireless networks. The setting
can be made individually for Access Point Network connection
mode and Peer to Peer Network connection mode. When connecting
to an existing network, consult your network administrator
regarding the proper settings. When changing an existing Network
Name, you can use up to 32 alphanumeric characters (including
symbols).
z Hints
•Opening the “Network Name” drop-down list will show the Network Names
of any Access Points within range. You can then select a Network Name from
the list.
•When using the Wireless LAN Access Point PCWA-A320, the default
Network Name (SSID) of the Access Point is shown on the ID label of the
Access Point. For details on the position of the label and other information,
refer to the manuals provided with the Access Point.
2WEP
If Data Encryption (WEP) is enabled for the Access Point to which
you connect, check this item. When this item is checked, you also
need to enter the encryption key (WEP key) in the “Key” and
“Confirm key” fields.
The data encryption function serves to prevent unauthorized access
to the network. For security reasons, it is strongly recommended
that you enable this feature. The setting can be configured
individually for Access Point Network connection mode and Peer to
Peer Network connection mode. When connecting to an existing
network, consult your network administrator regarding the proper
settings. For information on how to control this setting at the Access
Point, refer to the manuals of the Access Point.
22
Key
If data encryption (WEP) is enabled for the Access Point, enter the
encryption key (WEP key) here. Because this key functions as a
password that enables communication with the network, the key
entered here must be exactly the same as that set for the Access
Point. Only computers for which the key has been configured
correctly can join the network. The number of characters depends
on the “ASCII/Hex” and “Length” settings (see table below).
ASCII Hexadecimal
Permissible characters Alphanumeric characters 0 to 9, A to F, a to f
Maximum number 5 or 13 characters 10 or 26 characters
of characters
Confirm key
Re-enter the encryption key that you entered in the “Key” box.
z Hint
This product supports a function called “roaming” which allows the creation of a
wireless network with multiple Access Points for wider coverage. When using
this function, configure all Access Points to the same Network Name (SSID) and
Data Encryption (WEP) settings.
3When you are done, click “Next”.
The following screen appears.
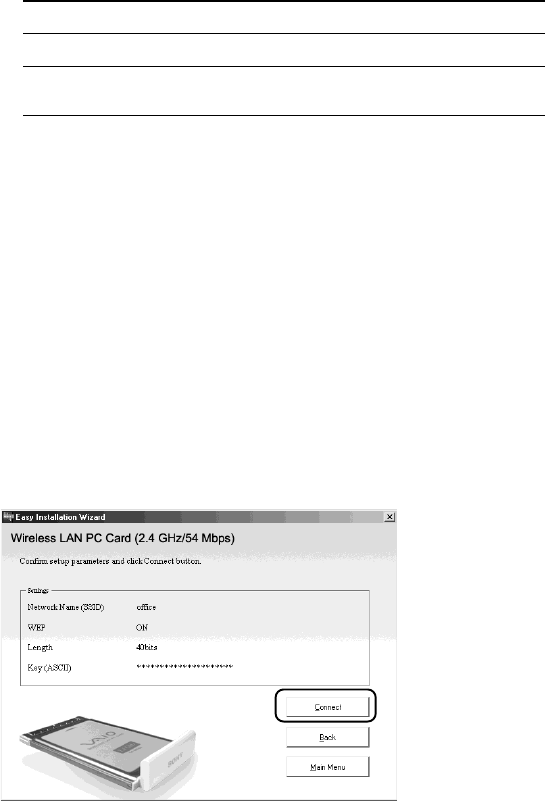
4Make sure that the settings are correct, and then click
“Connect”.
23
Getting started
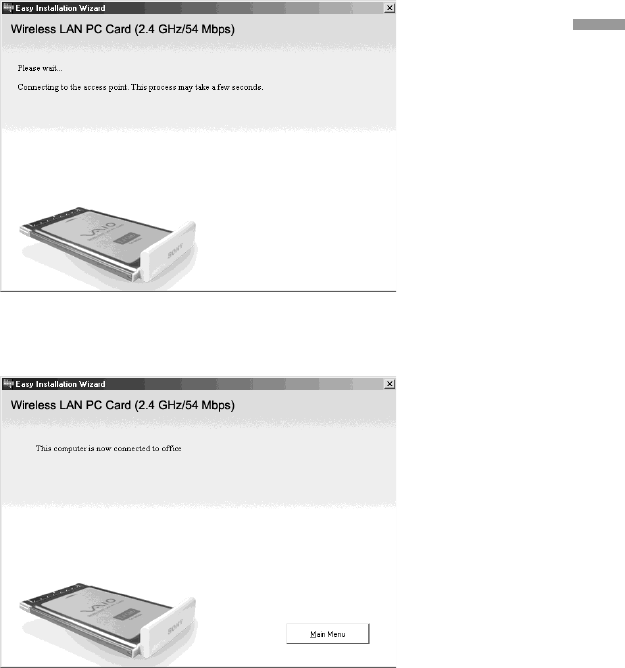
Wait until the Wireless LAN PC Card connects to the Access Point.
When the Wireless LAN PC Card establishes the connection with the
Access Point, the following screen appears.
This completes the Access Point connection settings procedure.
z Hint
You can change the connection settings and network connection mode from
Wireless Panel. For details about how to use Wireless Panel, refer to the Wireless
Panel Help.

24
Windows XP
After installing the necessary software, you must make the necessary
settings to establish a connection with the Access Point.
If you want to establish a connection in Peer to Peer Network connection
mode, refer to the Wireless Panel Help for details about the necessary
settings.
Note
Before configuring the Wireless LAN PC Card
Perform the following steps to confirm that the “Use Windows to configure my wireless
network settings” check box is selected. This option is selected by default.
1Click “Start”, “Control Panel”, and double-click “Network
Connections”.
zHint
If “Network Connections” is not displayed, click “Switch to Classic View”.
2Right-click “Wireless Network Connection *” (“*” is a
number that differs according to the computer settings),
and select “Properties” from the shortcut menu.
3Click the “Wireless Network” tab.
4Confirm that the box “Use Windows to configure my
wireless network settings” is checked. If not, place a check
mark in the box.
1Click “Start”, point to “Connect To”, and click “Show all
connections”.
The “Network Connections” window appears.
2Right-click “Wireless Network Connection *” (“*” is a number
that differs according to the computer settings), and select
“View Available Wireless Networks” from the shortcut menu.
The “Connect to Wireless Network” dialog box appears.
25
Getting started
z Hints
• If the computer is not connected to a wireless network, an “x” is shown for the
“Wireless Network Connection *” icon in the “Network Connections” window.
•If you have installed Windows XP Service Pack 1, see page 26.
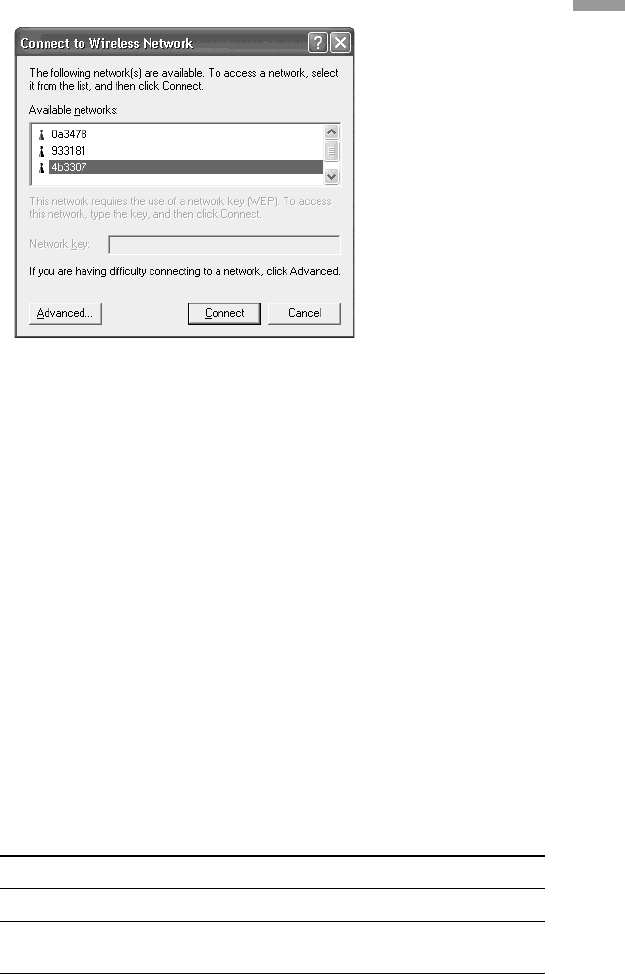
3From the “Available Wireless Networks” list in the “Connect
to Wireless Network” dialog box, select the Access Point to
which you want to connect.
z Hint
The “Available Wireless Networks” list shows the names of Access Points within
communication range of the computer. When using the Wireless LAN Access Point
PCWA-A320, the default Network Name (SSID) of the Access Point is shown on
the ID label of the card. For details on the position of the label and other
information, refer to the manuals of the Access Point. Because the Network Name of
an Access Point may have been changed, consult your network administrator if you
are not sure.
4If Data Encryption (WEP) is enabled for the Access Point,
enter the encryption key (WEP key) in the “Network key”
field.
The key entered here must be exactly the same as that set for the
Access Point. Permissible characters and their maximum number are
detailed below.
ASCII Hexadecimal
Permissible characters Alphanumeric characters 0 to 9, A to F, a to f
Maximum number 5 or 13 characters 10 or 26 characters
of characters
26
z Hints
•ASCII and hexadecimal characters are automatically identified.
•The data encryption (WEP) function serves to prevent unauthorized access to the
network. When the function is enabled, only computers configured with the
correct encryption key (WEP key) can join the network. For security reasons, it is
strongly recommended that you enable this feature. The setting can be made
individually for Access Point Network connection mode and Peer to Peer Network
connection mode. When connecting to an existing network, consult your network
administrator regarding the proper settings. For information on how to control this
setting at the Access Point, refer to the manuals of the Access Point.
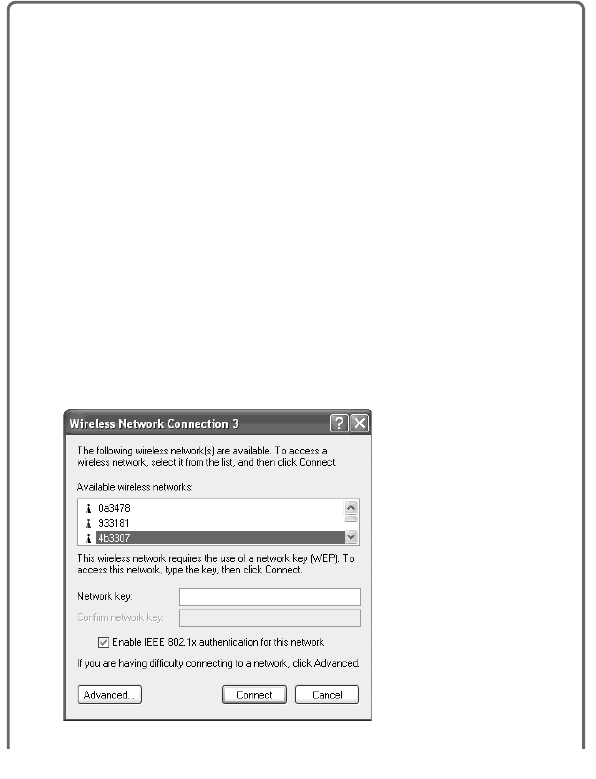
❑When using Service Pack 1
If you have installed Windows XP Service Pack 1, steps 3 and 4 must
be performed as follows.
3From the “Available Wireless Networks” list in the
“Connect to Wireless Network” dialog box, select the
Access Point to which you want to connect.
4Depending on the Data Encryption (WEP) settings of the
Access Point, proceed as follows.
• Data Encryption (WEP) at selected Access Point is
enabled
Enter the encryption key (WEP key) in the “Network key” field.
(The input is shown only as asterisks.) For verification, the same
string must be entered once more in the “Confirm network key”
field.
27
Getting started
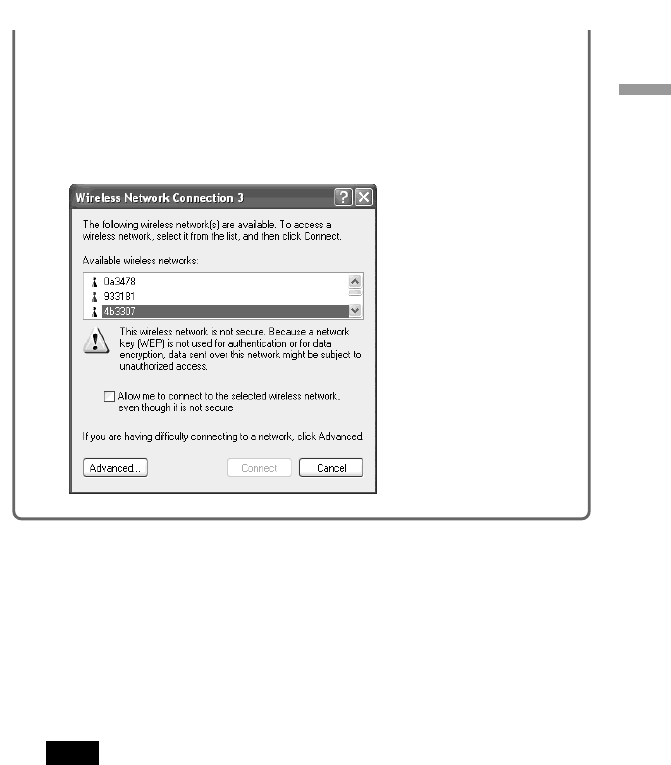
• Data Encryption (WEP) at selected Access Point is
disabled
Select “Allow me to connect to the selected wireless network, even
though it is not secure” check box. (For security reasons, enabling
data encryption is recommended.)
5Click “Connect”.
Connection to the Access Point is established.
If the Access Point has already been configured, the setup procedure is
now complete.
If you want to change the Access Point settings, refer to the manuals of
the Access Point for information on how to proceed.
Note
To use an Access Point to connect to the Internet, you must change the Access Point
default settings.
z Hint
For additional information on the wireless network capabilities of Windows XP,
refer to Windows XP “Help and Support”. (Click “Start”, and click “Help and
Support”, enter “wireless” into the Search field, and click the green arrow icon.)
You may also wish to consult the Windows XP documentation.
28
Removing the Wireless LAN PC Card
and Precautions When Inserting it
This section explains how to remove the Wireless LAN PC Card and
outlines precautions when inserting the card in a computer with two card
slots arranged one above the other.
z Hint
You do not need to turn off your computer when you insert or remove the Wireless LAN
PC Card.
To remove the Wireless LAN PC Card
1Quit any software accessing the wireless LAN (e.g. Internet
Explorer).
2Click on the Windows taskbar.
3Click “Safely remove Sony 802.11g Wireless LAN Adapter”
or “Stop Sony 802.11g Wireless LAN Adapter” on the
shortcut menu that appears.
If your computer has two PC Card slots
Notes
•When using a computer which has two PC Card slots arranged vertically (one above the
other), insert the Wireless LAN PC Card into the top slot. If inserted into the bottom
slot, the antenna of the Wireless LAN PC Card will block the top slot.
•If you insert the Wireless LAN PC Card into a slot other than the one you usually use,
the computer treats the card as a new device and automatically begins installing device
drivers for it. Completing the driver installation makes it possible to use the Wireless
LAN PC Card in that slot. Installation is performed automatically by the installation
wizard. (For instructions on how to uninstall the Wireless LAN PC Card driver, see
page 50.)
z Hint
If you are using Windows Me or Windows 2000, you can register up to 32 networks for
each PC card slot. However, you have to register each network individually. You cannot
share the settings across slots.
29
Wireless LAN connection
Checking the communication status
Checking the wireless signal strength
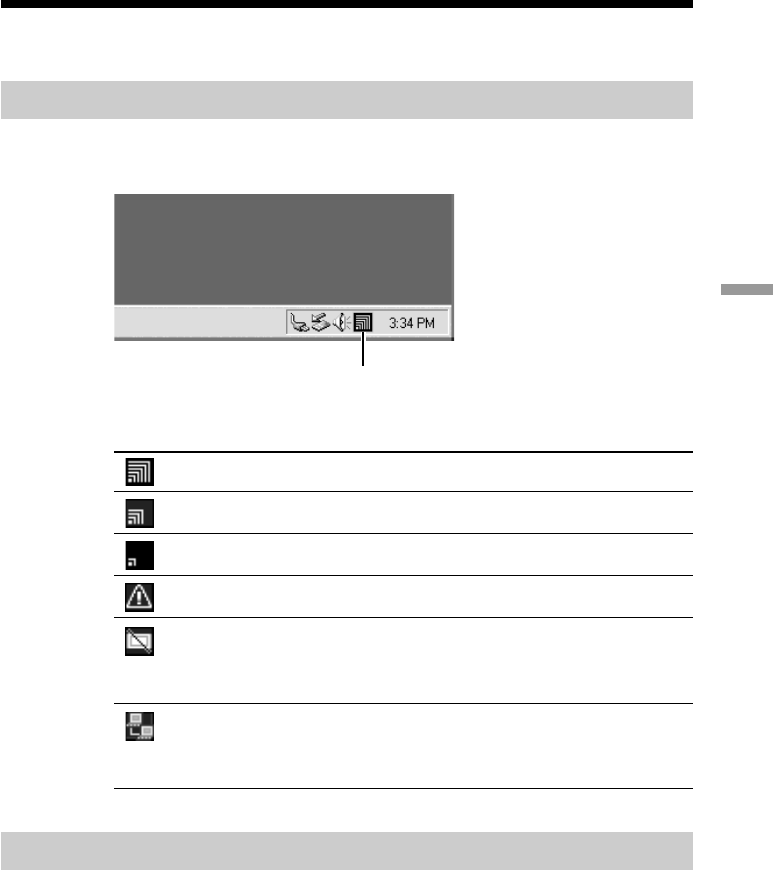
The communication status is shown by the signal level indicator in the
taskbar.
Signal level indicator
Meaning of indicator appearance
Excellent
Good
Poor
Out of range
Card not inserted
(Wireless LAN PC Card is not inserted or not
recognized correctly)
Peer to Peer
(Communicating in Peer to Peer Network connection
mode)
Checking network information
To obtain information about the network to which you are connected,
proceed as follows.
Double-click the signal level indicator in the taskbar.
The Wireless Panel main screen appears, and information about the
network connection is shown. For details, refer to the Wireless Panel Help.

30
Using the Wireless Panel
The Wireless Panel is a software application that shows information about
the communication status of the computer connected to the wireless
network. Normally, the Wireless Panel runs in the background and only
shows the radio signal condition by means of the signal level indicator in
the taskbar. The main screen of the Wireless Panel contains more detailed
information. When running under operating systems other than Windows
XP, communication setup and network switching are also performed using
the Wireless Panel.
Notes
•To use the Wireless Panel under Windows 2000 for modifying communication settings,
log on with a user account listed in “Administrators”. You cannot modify settings when
logged on with any other account.
•On a computer running Windows XP, communication setup and network switching are
not performed with the Wireless Panel but with built-in functions of Windows XP.
However, the Wireless Panel can be used to check the communication status.
Opening the Wireless Panel
To open the Wireless Panel, proceed as follows.
Double-click the signal level indicator in the taskbar.
The Wireless Panel appears.
z Hints
•For information on the signal level indicator, see “Checking the wireless signal
strength” on page 29.
•When you move the mouse pointer over an item in the Wireless Panel screen, a short
description of that item appears.
•For details about how to use Wireless Panel, refer to the Wireless Panel Help. For
details about how to access Help, see page 10.

31
Additional information
Manually installing, verifying, and
removing the supplied software
Installing the Wireless LAN PC Card driver manually
Notes
•To install the supplied software on a computer running Windows 2000, log on with a
user account listed in “Administrators”. To install the supplied software on a computer
running Windows XP, log on with a user account with administrator access privileges.
You cannot install the software or modify settings when logged on with any other
account.
•Exit all other Windows programs.
1Insert the supplied CD-ROM into the CD-ROM drive of your
computer.
2In the Easy Installation Wizard dialog box, click “Exit”.
3If your computer has only one PC card slot and it is currently
used, copy the “Driver” folder from the supplied CD-ROM to
the hard disk of your computer before inserting the Wireless
LAN PC Card.
The following explanation assumes that a folder called “temp” was
created on drive C and that the data was copied to this folder.
4Insert the Wireless LAN PC Card into the PC Card slot of the
computer.
5Install the Wireless LAN PC Card driver.
The actual procedure differs slightly, depending on whether you are
using Windows Me, Windows 2000, or Windows XP. See the section
specific to your operating system.

32
Windows Me:
1Select “Specify the location of the driver” and click “Next”.
2Check the box “Specify a location”.
33
Additional information
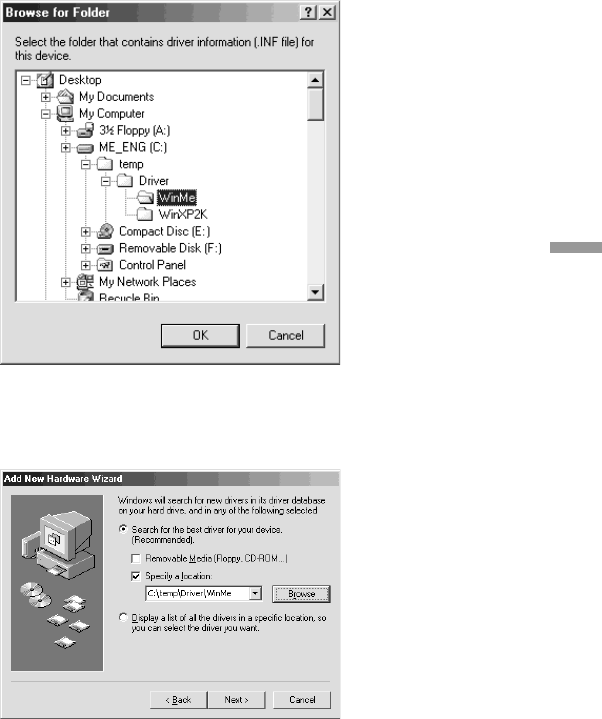
3Click “Browse” and specify the location of the driver in the
dialog box that appears.
z Hint
If the “Driver” folder from the CD-ROM has been copied to the “temp” folder on
drive C, enter “C:\temp\Driver\WinMe”.
4Click “OK”.
5Click “Next”.
34
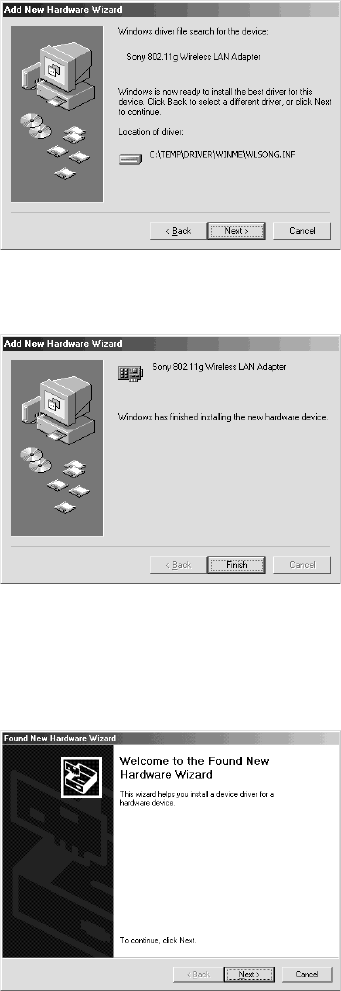
6Click “Next”.
The driver is installed.
7Click “Finish”.
Restart the computer.
Windows 2000:
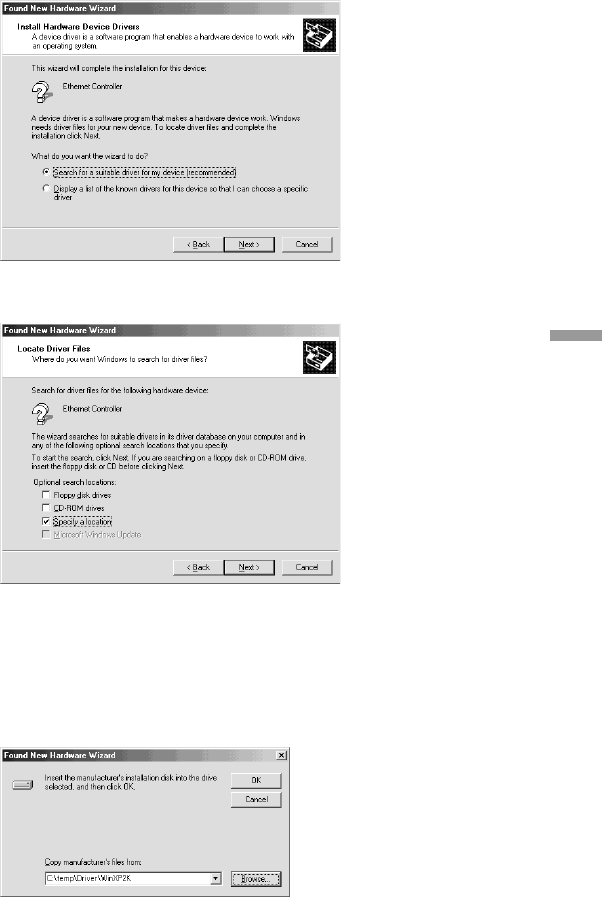
1Click “Next”.
35
Additional information
2Select “Search for a suitable driver for my device” and click
“Next”.
3Check the box “Specify a location” and click “Next”.
4Click “Browse” and specify the location of the driver in the
dialog box.
z Hint
If the “Driver” folder from the CD-ROM has been copied to the “temp” folder on
drive C, enter “C:\temp\Driver\WinXP2K”.
5Click “OK”.
36
6Click “Next”.
The driver is installed.
7Click “Finish”.
37
Additional information
Windows XP:
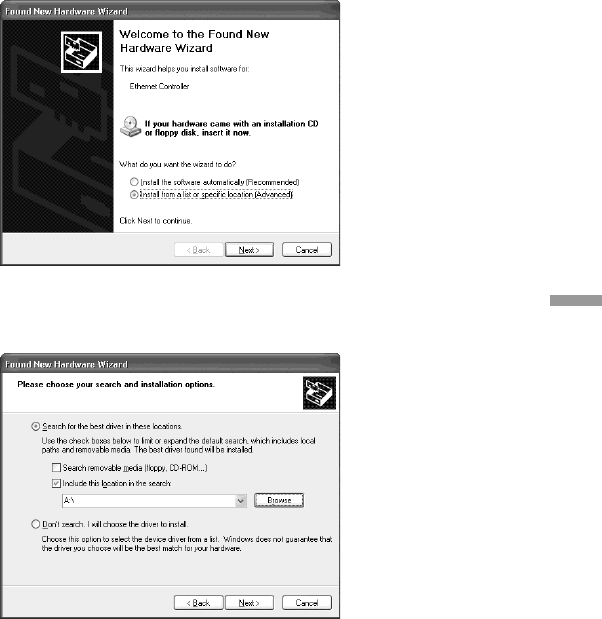
1Select “Install from a list or specific location” and click
“Next”.
2Check the box “Include this location in the search” and
click “Browse”.

38
3In the dialog box that appears, select the folder that
contains the driver and click “OK”.
z Hint
If the “Driver” folder from the CD-ROM has been copied to the “temp” folder on
drive C, select “C:temp\Driver\WinXP2K”.
4Click “OK”.
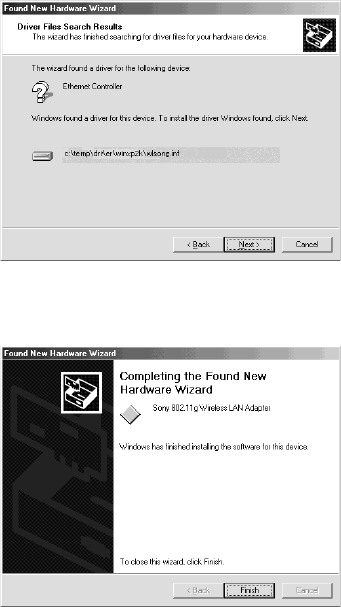
5Click “Next”.
39
Additional information
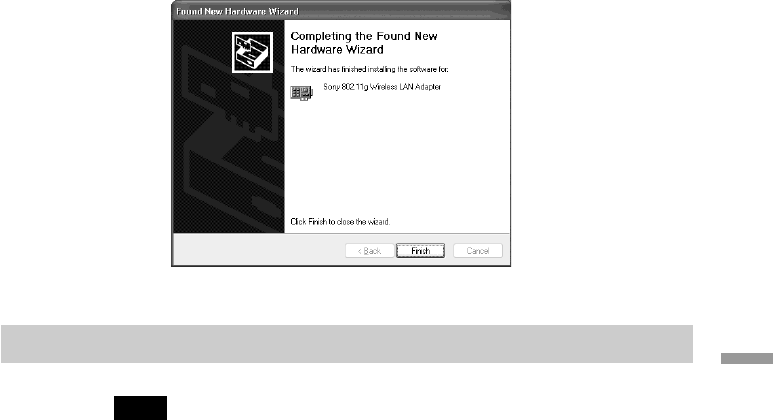
6Click “Finish”.
Installing the Wireless Panel manually
Note
When using Windows 2000, log on with a user account listed in “Administrators”. When
using Windows XP, log on with a user account with administrator access privileges.
Before installation
•Install the Access Point and connect it to a power outlet when using the
Access Point Network connection mode.
•Complete installation of the Wireless LAN PC Card driver. (See page 31)
•Exit all other Windows programs.
1Insert the supplied CD-ROM into the CD-ROM drive of your
computer.
2In the Easy Installation Wizard dialog box, click “Exit”.
3If your computer has only one PC card slot and it is currently
used, copy the “WPanel” folder from the supplied CD-ROM
to the hard disk of your computer before inserting the
Wireless LAN PC Card.
The following explanation assumes that a folder called “temp” was
created on drive C and that the data was copied to this folder.

40
4Go to the “WPanel” folder copied from the CD-ROM and
double-click “Setup.exe”.
Depending on your computer’s settings, the file name “Setup.exe” may
be displayed as “Setup”. If there are multiple files named “Setup” in
the same folder, double-click the one with the following icon.
5Click “Next”.
6The “License Agreement” dialog box appears. Click “Yes” to
accept.
The “Choose Destination Location” dialog box appears.
7Click “Next”.
The Wireless Panel software is installed.
8Click “Finish”.
Once Wireless Panel is installed, appears on the Windows taskbar.
If you installed Wireless Panel manually, see the following for details about
how to connect to the Access Point.
•With Windows Me and Windows 2000, see “Connecting to the Access
Point with Wireless Panel (Windows Me/2000)” on page 41.
•With Windows XP, see “Making Access Point Connection Settings” on
page 20.
41
Additional information
Connecting to the Access Point with Wireless Panel
(Windows Me/2000)
1Double-click in the taskbar.
The Wireless Panel screen appears.
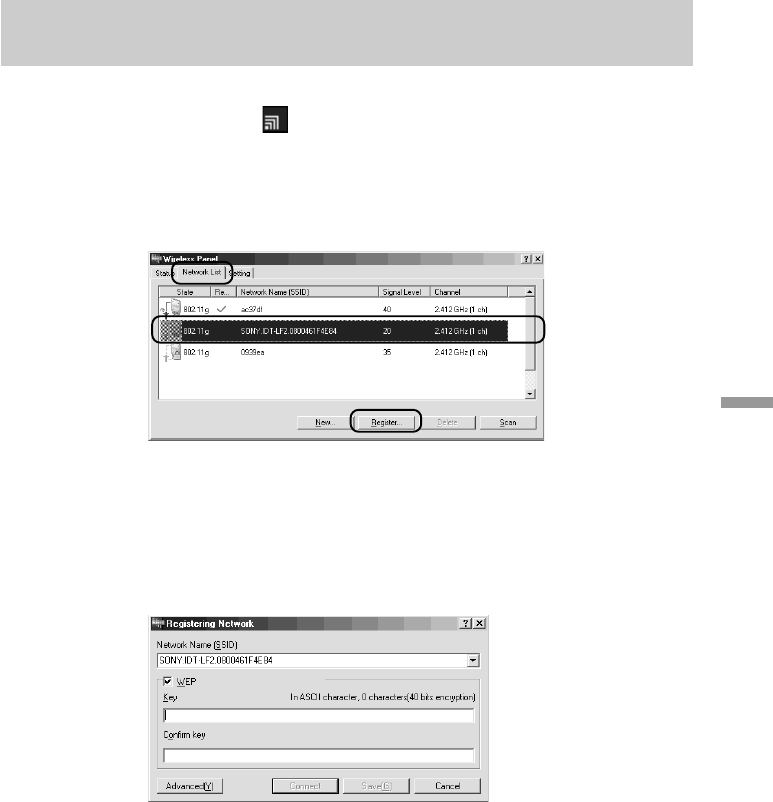
2Click the “Network List” tab, select a wireless network from
the list, and click “Register”.
The “Registering Network” dialog box appears.
3If data encryption (WEP) is enabled for the Access Point,
select the “WEP” check box, enter the encryption key in the
“Key” box, and then confirm it by entering it again in the
“Confirm key” box.
4Click “Connect”.
The Wireless LAN PC Card connects to the Access Point.

42
Verifying Wireless LAN PC Card driver installation
To verify that the Wireless LAN PC Card driver has been installed
properly, perform the following steps.
Windows Me:
1Click “Start”, point to “Settings”, and click “Control Panel”.
Control Panel appears.
2Double-click the “System” icon.
z Hint
If the “System” icon is not shown, select “View all Control Panel options”.
3Click the “Device Manager” tab.
4Click “View devices by type”.
5Double-click “Network adapters”.
43
Additional information
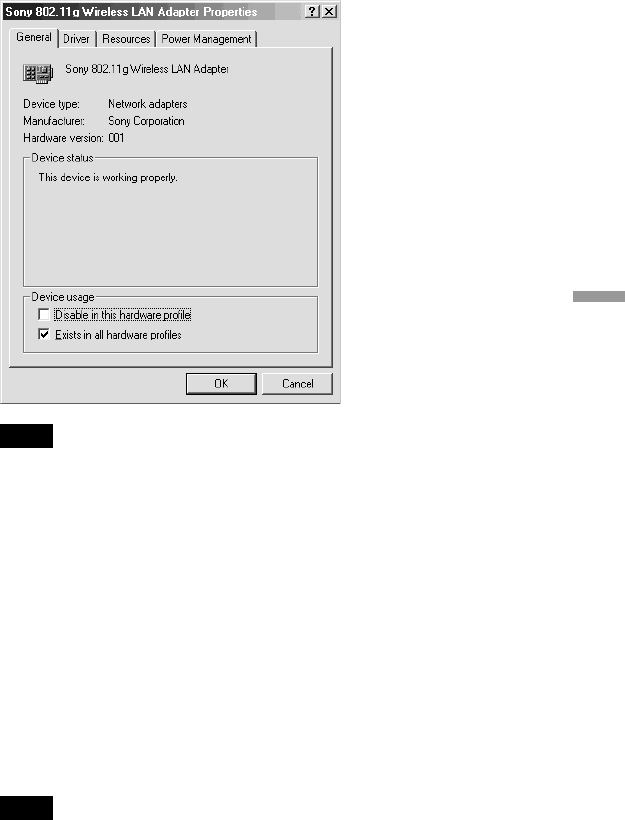
6Double-click “Sony 802.11g Wireless LAN Adapter”.
The “Sony 802.11g Wireless LAN Adapter Properties” dialog box
appears.
Note
The Wireless LAN PC Card is not working properly in the following cases:
•“Sony 802.11g Wireless LAN Adapter” is shown with an “X” or “!” symbol.
cClick “Sony 802.11g Wireless LAN Adapter” and click “Remove” to uninstall
the driver. Then repeat the installation process.
•Double-clicking “Network Adapters” does not display “Sony 802.11g Wireless
LAN Adapter”.
cRemove the Wireless LAN PC Card. Then repeat the installation process.
•Double-clicking “Other devices” displays “Ethernet Controller”.
cClick “Ethernet Controller”, then click “Remove” to uninstall the driver. Repeat
the installation process.
7Confirm that the message “This device is working properly.”
is displayed under “Device status”.
Note
If “This device is working properly.” is not shown, the Wireless LAN PC Card is not
working correctly. Perform steps 1 - 5, click “Sony 802.11g Wireless LAN
Adapter”, then click “Remove” to uninstall the driver. After uninstalling, restart the
computer and repeat the installation process.

44
8Click “OK” to close the “Sony 802.11g Wireless LAN Adapter
Properties” dialog box.
The “System Properties” dialog box appears.
9Click “OK” to close the “System Properties” dialog box.
Control Panel appears.
10
Click to close Control Panel.
If the computer you are using incorporates another Ethernet interface
besides the Wireless LAN PC Card, disable the other interface as follows.
1Click “Start”, point to “Settings”, and click “Control Panel”.
Control Panel appears.
2Double-click the “System” icon.
z Hint
If the “System” icon is not shown, select “View all Control Panel options”.
3Click the “Device Manager” tab and double-click “Network
adapters”.
4Double-click the network adapter to disable.
5Click the “General” tab, then select the “Disable in this
hardware profile” check box.
6Click “OK” to close the Properties dialog box for the network
adapter to disable.
The “System Properties” dialog box appears.
7Click “OK” to close the “System Properties” dialog box.
Control Panel appears.
8Click to close Control Panel.
45
Additional information
Windows 2000:
1Click “Start”, point to “Settings”, and click “Control Panel”.
Control Panel appears.
2Double-click the “System” icon.
The “System Properties” dialog box appears.
3Click the “Hardware” tab, then click “Device Manager”.
The “Device Manager” window appears.
4In the “View” menu, click “Devices by type”.
5Double-click “Network adapters”.
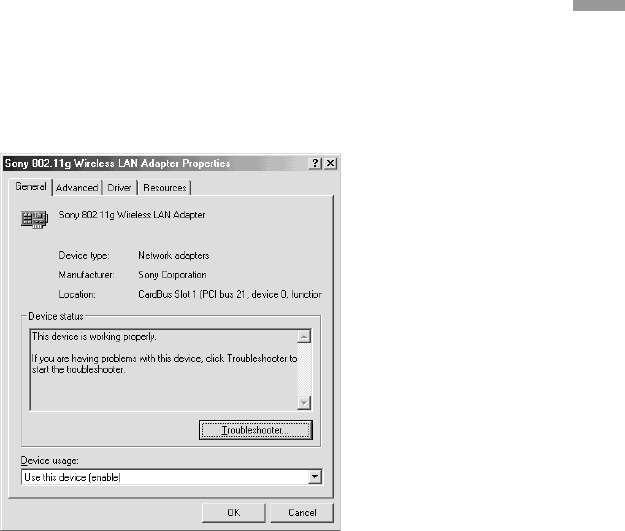
6Double-click “Sony 802.11g Wireless LAN Adapter”.
The “Sony 802.11g Wireless LAN Adapter Properties” dialog box
appears.

46
Note
The Wireless LAN PC Card is not working properly in the following cases:
•“Sony 802.11g Wireless LAN Adapter” is shown with an “X” or “!” symbol.
cRight-click “Sony 802.11g Wireless LAN Adapter” and click “Remove” to
uninstall the driver. Then repeat the installation process.
•Double-clicking “Network Adapters” does not display “Sony 802.11g Wireless
LAN Adapter”.
cRemove the Wireless LAN PC Card. Then repeat the installation process.
•Double-clicking “Other devices” displays “Ethernet Controller”.
cRight-click “Ethernet Controller”, then click “Remove” to uninstall the driver.
Repeat the installation process.
7Confirm that the message “This device is working properly.”
is displayed under “Device status”.
Note
If “This device is working properly.” is not shown, the Wireless LAN PC Card is not
working correctly. Perform steps 1 - 5, right-click “Sony 802.11g Wireless LAN
Adapter”, then click “Remove” to uninstall the driver. After uninstalling, restart the
computer and repeat the installation process.
8Click “OK” to close the “Sony 802.11g Wireless LAN Adapter
Properties” dialog box.
The “Device Manager” window appears.
9Click to close the “Device Manager” window.
The “System Properties” dialog box appears.
10
Click “OK” to close the “System Properties” dialog box.
Control Panel appears.
11
Click to close Control Panel.

47
Additional information
If the computer you are using incorporates another Ethernet interface
besides the Wireless LAN PC Card, disable the other interface as follows.
1Click “Start”, point to “Settings”, and click “Network and Dial-
up Connections”.
The “Network and Dial-up Connections” window appears.
2Select the network adapter to disable.
3On the “File” menu, click “Disable”.
4Click to close the “Network and Dial-up Connections”
window.
Windows XP:
1Click “Start” and click “Control Panel”.
Control Panel appears.
2Double-click the “System” icon.
The “System Properties” dialog box appears.
z Hint
If the “System” icon is not displayed, click “Switch to Classic View”.
3Click the “Hardware” tab, then click “Device Manager”.
The “Device Manager” window appears.
4On the “View” menu, click “Devices by type”.
5Double-click “Network adapters”.

48
6Double-click “Sony 802.11g Wireless LAN Adapter”.
The “Sony 802.11g Wireless LAN Adapter Properties” dialog box
appears.
Note
The Wireless LAN PC Card is not working properly in the following cases:
•“Sony 802.11g Wireless LAN Adapter” is shown with an “X” or “!” symbol.
cRight-click “Sony 802.11g Wireless LAN Adapter” and click “Remove” to
uninstall the driver. Then repeat the installation process.
•Double-clicking “Network Adapters” does not display “Sony 802.11g Wireless
LAN Adapter”.
cRemove the Wireless LAN PC Card. Then repeat the installation process.
•Double-clicking “Other devices” displays “Ethernet Controller”.
cRight-click “Ethernet Controller”, then click “Remove” to uninstall the driver.
Repeat the installation process.
7Confirm that the message “This device is working properly.”
is displayed under “Device status”.
Note
If “This device is working properly.” is not shown, the Wireless LAN PC Card is not
working correctly. Perform steps 1 - 5, right-click “Sony 802.11g Wireless LAN
Adapter”, then click “Remove” to uninstall the driver. After uninstalling, restart the
computer and repeat the installation process.

49
Additional information
8Click “OK” to close the “Sony 802.11g Wireless LAN Adapter
Properties” dialog box.
The “Device Manager” window appears.
9Click to close the “Device Manager” window.
The “System Properties” dialog box appears.
10
Click “OK” to close the “System Properties” dialog box.
Control Panel appears.
11
Click to close Control Panel.
If the computer you are using incorporates another Ethernet interface
besides the Wireless LAN PC Card, disable the other interface as follows.
1On the “Start” menu, click “Control Panel”, and double-click
“Network Connections”.
The “Network Connections” window appears.
Note
If “Network Connections” is not displayed, click “Switch to Classic View” on the
left of Control Panel.
2From “LAN or high-speed Internet”, select the network
adapter to disable.
3On the “File” menu, click “Disable”.
4Click to close the “Network Connections” window.

50
Uninstalling the Wireless LAN PC Card driver
To uninstall the Wireless LAN PC Card driver, proceed as follows.
z Hint
For information on how to install the Wireless LAN PC Card driver, see page 31.
Windows Me:
1Click “Start”, point to “Settings”, and click “Control Panel”.
Control Panel appears.
2Double-click the “System” icon.
The “System Properties” dialog box appears.
z Hint
If the “System” icon is not shown, select “View all Control Panel options”.
3Click the “Device Manager” tab.
4Click “View devices by type”.
5Double-click “Network adapters”.
6Click “Sony 802.11g Wireless LAN Adapter”, then click
“Remove”.
The “Confirm Device Removal” dialog box appears.
7Click “OK” to uninstall.
The message “To finish removing your hardware, you must restart
your computer. Do you want to restart your computer now?” appears.

51
Additional information
8Remove the Wireless LAN PC Card from its slot, then click
“Yes”.
The computer restarts. This completes uninstallation of the driver.
Windows 2000:
Notes
•In Windows 2000, only users with administrator access privileges can uninstall drivers.
Log onto Windows 2000 with a user account listed in “Administrators”.
•Exit all programs before running the uninstall process.
1Click “Start”, point to “Settings”, and click “Control Panel”.
Control Panel appears.
2Double-click the “System” icon.
The “System Properties” dialog box appears.
3Click the “Hardware” tab, then click “Device Manager”.
The “Device Manager” window appears.
4On the “View” menu, click “Devices by type”.
5Double-click “Network adapters”, and double-click “Sony
802.11g Wireless LAN Adapter”.
The “Sony 802.11g Wireless LAN Adapter Properties” dialog box
appears.
6Click the “Driver” tab, then click “Uninstall”.
The “Confirm Device Removal” dialog box appears.
7Click “OK”.
The Device Manager window appears.
8Click to close the “Device Manager” window.
The “System Properties” dialog box appears.

52
9Click “OK” to close the “System Properties” dialog box.
Control Panel appears.
10
Click to close Control Panel.
Windows XP:
Notes
•In Windows XP, only users with administrator access privileges can uninstall drivers.
Log onto Windows XP with a user account with administrator access privileges.
•Exit all programs before running the uninstall process.
1Click “Start” and click “Control Panel”.
Control Panel appears.
2Double-click the “System” icon.
The “System Properties” dialog box appears.
z Hint
If the “System” icon is not displayed, click “Switch to Classic View”.
3Click the “Hardware” tab, then click “Device Manager”.
The “Device Manager” window appears.
4On the “View” menu, click “Devices by type”.
5Double-click “Network adapters”, and Double-click “Sony
802.11g Wireless LAN Adapter”.
The “Sony 802.11g Wireless LAN Adapter Properties” dialog box
appears.
6Click the “Driver” tab, then click “Uninstall”.
The “Confirm Device Removal” dialog box appears.
7Click “OK”.
The Device Manager window appears.

53
Additional information
8Click to close the Device Manager window.
The “System Properties” dialog box appears.
9Click “OK” to close the “System Properties” dialog box.
Control Panel appears.
10
Click to close Control Panel.
Uninstalling the Wireless Panel
To uninstall the Wireless Panel, proceed as follows.
Note
Exit the Wireless Panel with the icon in the taskbar before proceeding.
z Hint
For information on how to install the Wireless Panel, see page 39.
Windows Me:
Note
Exit all programs before running the uninstall process.
1Click “Start”, point to “Settings”, and click “Control Panel”.
Control Panel appears.
2Double-click the “Add/Remove Programs” icon.
The “Add/Remove Programs Properties” dialog box appears.
3Select “Wireless Panel” and click “Add/Remove”.
The “Confirm File Deletion” dialog box appears.
4Click “OK”.
The software uninstall process is carried out.
5Click “Finish”.
The uninstall process is complete.

54
Windows 2000:
Notes
•In Windows 2000, only users with administrator access privileges can uninstall
software. Log onto Windows 2000 with a user account listed in “Administrators”.
•Exit all programs before running the uninstall process.
1Click “Start”, point to “Settings”, and click “Control Panel”.
Control Panel appears.
2Double-click the “Add/Remove Programs” icon.
The “Add/Remove Programs” dialog box appears.
3Select “Wireless Panel” and click “Change/Remove”.
The “Confirm File Deletion” dialog box appears.
4Click “OK”.
The software uninstall process is carried out, and then the InstallShield
completion dialog box appears.
5Click “Finish”.
The uninstall process is complete.

55
Additional information
Windows XP:
Notes
•In Windows XP, only users with administrator access privileges can uninstall software.
Log onto Windows XP with a user account with administrator access privileges.
•Exit all programs before running the uninstall process.
1Click “Start” and click “Control Panel”.
Control Panel appears.
2Double-click the “Add or Remove Programs” icon.
The “Add or Remove Programs” window appears.
z Hint
If the “Add or Remove Programs” icon is not displayed, click “Switch to Classic
View”.
3Select “Wireless Panel” and click “Change/Remove”.
The “Confirm File Deletion” dialog box appears.
4Click “OK”.
The software uninstall process is carried out, and then the maintenance
completion dialog box appears.
5Click “Finish”.
The uninstall process is complete.

56
Precautions
Safety
Do not drop or cause a mechanical shock
to the Wireless LAN PC Card, as this may
damage the unit.
Installation
Do not expose the Wireless LAN PC Card
to the following conditions:
•Unstable surfaces
•High humidity or poor ventilation
•Excessive dust
•Direct sunlight or extreme heat
•Closed cars
•Magnetized location (near magnets,
speakers, or televisions)
•Locations exposed to frequent vibration
•Locations where the transmission of
radio waves may be obstructed by metal
plates or concrete walls
Operation
If the Wireless LAN PC Card is moved
directly from a cold location to a warm
locations, or if it is placed in a very damp
environment, moisture may condense on
the parts inside. The Wireless LAN PC
Card may not operate properly if moisture
condensation occurs.
Cleaning
Clean the casing with a soft cloth, lightly
moistened with water or a mild detergent
solution. Do not use any type of abrasive
pad, scouring powder, or solvent such as
alcohol or benzene as it may damage the
finish of the casing.

57
Additional information
Specifications
Protocol support
TCP/IP compliant
Standard compliance
IEEE 802.11b
IEEE 802.11g
Radio frequency
2.4 GHz wireless network:
2.4 to 2.4835 GHz (ISM band)
Modulation
DS-SS
OFDM
General
Power requirements
3.3 V DC (supplied from the computer
through the PC card adapter)
Current
Peak current at transmission: 700 mA
Peak current at reception: 370 mA
Connector
PC Card Card Type II (Card Bus)
Dimensions
Approx. 2.2 × 0.2 × 3.6 inches
(Approx. 54 × 5 × 91 mm) (W × H × D)
(Antenna height: 0.55 inches (Approx. 14 mm))
Mass
Approx. 1.5 oz. (Approx. 40 g)
Operating temperature
41°F to 95°F (5°C to 35°C) (not condensed)
Environment temperature
–4°F to 140°F (–20°C to 60°C) (not condensed)
Supplied accessories
See “Unpacking” on page 12.
Design and specifications are subject to change
without notice.
Getting help
This section describes how to get help and
support from Sony, as well as
troubleshooting tips for your Wireless
LAN PC Card.
About Sony’s Support Options
Sony provides several support options for
your Wireless LAN PC Card.
❒Operating Instructions explains
how to use your Wireless LAN PC
Card.
❒Quick Start Guide explains how to
install software required to use the
Wireless LAN PC Card (IEEE 802.11g:
2.4 GHz/54 Mbps) PCWA-C300S. The
document also contains answers to
frequently asked questions and common
problems.
❒Wireless Panel Online Help is the
Online Help of the supplied Wireless
Panel utility software. Refer to it for
instructions on how to use the software.
❒The Sony Wireless LAN products
support Web site
http://www.sony.com/
wirelesslansupport provides the
latest information on your Wireless
LAN products.
❒The Sony e-mail support service
answers your questions by electronic
mail. Just send your question in an e-
mail message and a customer service
representative will reply. To send a
question to Sony e-mail support, fill out
the e-mail form at
http://www.ita.sel.sony.com/
support/pc/email.html

58
❒The Sony fax-back service provides
you with answers to commonly asked
questions. You can use this automated
service to request a list of available
topics then select the topics you want to
receive. To contact the Sony fax-back
service, call 1-877-760-7669.
❒The Sony Customer Information
Services Center offers information
about your Wireless LAN products and
other Sony products that work with your
computer. To contact the Sony
Customer Information Services Center,
call 1-877-760-7669.
Open 24 hours/day, 7 days/week.
Glossary
Access Point (Infrastructure)
Network mode
A method of building a wireless network
using one or more Access Points. For
details, see “Capabilities” on page 5.
Channel
A part of the frequency spectrum to be
used for wireless communication.
Only client computers and Access Points
set to the same channel can communicate
with each other.
Client
A computer connected to a LAN (Local
Area Network). Also may be called a
client computer.
DHCP (Dynamic Host
Configuration Protocol)
DHCP lets network administrators centrally
manage and automate assignment of client
computer IP addresses.
DNS (Domain Name System)
A system that translates host names into
IP addresses.
Networks that use the TCP/IP protocol,
such as the Internet, use a set of numbers
like 192.168.0.1 (IP address) to identify a
computer. However, since the IP address
is hard to memorize, DNS was developed
to allow a name like “www.sony.com” to
identify a computer for convenience. DNS
servers manage these translations from
host names into IP addresses.

59
Additional information
LAN (Local Area Network)
A network which is accessible only to its
members, unlike the Internet which is
open to an unlimited number of people. A
LAN may be built for different purposes.
For example, you can build an office LAN
that is accessible only to members of the
same department or a home LAN that is
accessible only to family members.
Network Name (SSID)
A wireless LAN group identifier
according to the IEEE 802.11 standard.
SSID stands for “Service Set ID”. The
Network Name can be set individually for
each Access Point and Peer to Peer
Network to connect to. When roaming
among multiple Access Points is used, all
Access Points must be configured for the
same Network Name (SSID) and WEP
encryption key.
TCP/IP (Transmission Control
Protocol/Internet Protocol)
TCP/IP is the network communications
protocol that is used to communicate over
the Internet. TCP is a connection-oriented
protocol for establishing reliable,
sequenced data transfer. TCP ensures that
data reaches its destination.
IP assembles and addresses data packets
for transmission to their network
destinations.
WAN (Wide Area Network)
A network that interconnects remote
LANs through the Internet or telephone
lines.

60
Troubleshooting
Read the Troubleshooting section of this guide before calling Sony
Customer Information Services. If you still cannot resolve your issue after
reading this section, call Sony Customer Information Services.
Symptom Cause/Remedy
My computer does not
detect the Wireless
LAN PC Card.
I cannot see other
computers.
I cannot access the
Internet.
The Wireless LAN PC Card may not be properly inserted
into the PC card slot of your computer.
cCheck that the Wireless LAN PC Card is inserted in the
proper direction, then push it in as far as it will go.
You did not enter a password when starting Windows.
cMake sure that you enter a user name and appropriate
password when you log on to Windows.
Windows settings are incorrect.
cCheck the Windows network settings.
If there are no other computers on the network to which you
are connected, no other computer is displayed.
The Access Point is not connected.
cFollow the instructions in the Access Point Operating
Instructions to connect it properly.
The Wireless LAN PC Card may not be inserted into your
computer.
cSee the instructions on page 17 of this manual to insert it
properly.
Communication between the Access Point and your
computer are not established.
cCheck the communication status using the Wireless Panel.
For details on how to check the status, see “Checking the
communication status” (page 29).
The Access Point is not properly configured.
cConfigure the Access Point with the connection method of
your choice.
Distance between computer and Access Point is too great.
The maximum allowable distance is about 150 feet in line of
sight, but this will vary depending on usage conditions.
cCheck the signal level indicator in the taskbar. If the level
is low, bring the computer and Access Point closer
together.

61
Additional information
Symptom Cause/Remedy
Data transfer speed is
slow
I cannot remember the
WEP Key.
There is interference with other Access Points.
cTry changing the Access Point channel setting.
The network is handling a large amount of simultaneous
traffic.
cTry again when the network load is lower.
Communication distance is long.
cReduce the communication distance.
There are obstacles (objects blocking radio transmission)
within the communication range.
cRemove the obstacles or change the installation location.
cWhen using an Access Point, reset the Access Point to its
defaults. For further information about how to reset the
Access Point, see the Access Point Operating Instructions.
cWhen using a Wireless LAN PC Card in Peer to Peer
Network connection mode, delete the network settings
registered on each computer connected to the network, then
reconfigure the computer’s wireless network settings.

Printed in Japan
❒The Sony Wireless LAN products support Web site
http://www.sony.com/wirelesslansupport provides the
latest information on your Wireless LAN products.
❒The Sony e-mail support service answers your questions
by electronic mail. Just send your question in an e-mail message
and a customer service representative will reply. To send a
question to Sony e-mail support, fill out the e-mail
form at
http://www.ita.sel.sony.com/support/pc/email.html
❒The Sony fax-back service provides you with answers to
commonly asked questions. You can use this automated service
to request a list of available topics and then select the topics you
want to receive. To contact the Sony fax-back service, call
1-877-760-7669.
❒The Sony Customer Information Services Center offers
information about your Wireless LAN products and other Sony
products that work with your computer. To contact the Sony
Customer Information Services Center, call
1-877-760-7669.
Open 24 hours/day, 7 days/week.
Printed on chlorine-free 100% recycled paper using
VOC (Volatile Organic Compound)-free vegetable oil
based ink.