Sony Group PEGACC5 Car Cradle User Manual PEGA CC5
Sony Corporation Car Cradle PEGA CC5
Manual revised
Operating Instructions
3-256-433-11 (2)
Owner’s Record
The model number and serial number are located on the back of the product. Record the model
number and the serial number in the space provided below. Refer to them whenever you call
upon your Sony dealer regarding this product.
Model No. PEGA-CC5 Serial No.
PEGA-CC5
For installation and connections, see the supplied installation/connections manual.
For details about the StreetFinder® C3 Travel Navigation Software, see the supplied
StreetFinder® C3 Travel Navigation Software User’s Guide.
© 2003 Sony Corporation
Car Cradle

2
CAUTION
You are cautioned that any changes or
modifications not expressly approved in this
manual could void your authority to operate this
equipment.
Note:
This equipment has been tested and found to
comply with the limits for a Class B digital device,
pursuant to Part 15 of the FCC Rules. These limits
are designed to provide reasonable protection
against harmful interference in a residential
installation. This equipment generates, uses, and
can radiate radio frequency energy and, if not
installed and used in accordance with the
instructions, may cause harmful interference to
radio communications. However, there is no
guarantee that interference will not occur in a
particular installation. If this equipment does
cause harmful interference to radio or television
reception, which can be determined by turning the
equipment off and on, the user is encouraged to try
to correct the interference by one or more of the
following measures:
– Reorient or relocate the receiving antenna.
– Increase the separation between the equipment
and receiver.
– Connect the equipment into an outlet on a circuit
different from that to which the receiver is
connected.
– Consult the dealer or an experienced radio/TV
technician for help.
The car cradle is only for use in the U.S.A.
Table of Contents
Before use . . . . . . . . . . . . . . . . . . . 7
What you can do with CLIÉ™
handheld during in-vehicle
mode. . . . . . . . . . . . . . . . . .8
Introducing applications . . . . . . . . . . 8
Location of controls . . . . . .11
Front panel. . . . . . . . . . . . . . . . . . 11
Side panel . . . . . . . . . . . . . . . . . . 12
Wireless card remote
commander. . . . . . . . . . . . . . . . . . . 13
Getting started . . . . . . . . . .15
Initial setup of your CLIÉ™
handheld. . . . . . . . . . . . . . . . . . 15
Installing software for
the car cradle . . . . . . . . . . . . . . 15
Setting up your CLIÉ™ handheld for the
car cradle . . . . . . . . . . . . . . . . . 19
Mounting your CLIÉ™ handheld in the
car cradle . . . . . . . . . . . . . . . . . 20
Charging your CLIÉ handheld . . . . . 22
Various in-vehicle mode systems/
functions. . . . . . . . . . . . . . . . . . 23
About in-vehicle mode. . . . . . . . . . . 23
About Sleep mode. . . . . . . . . . . . . . 26
About HOLD mode . . . . . . . . . . . . . 26
About the caution alarm . . . . . . . . . 27
Basic operations. . . . . . . . .28
Operating the touch panel. . . . . . . . 28
Using Car Launcher . . . . . . . . . . . . 28
Display items. . . . . . . . . . . . . . . . . . 29
About Screensaver . . . . . . . . . . . . . 30
WARNING
This device complies with part 15 of the FCC
Rules.
Operation is subject to the following two
conditions:
(1) This device may not cause harmful
interference, and
(2) This device must accept any
interference received, including
interference that may cause undesired
operation.

3
Using applications . . . . . . . 31
Starting an application. . . . . . . . . . .31
Mail (Text-to-voice application). . . . .33
Reading out mail . . . . . . . . . . . . . . . 33
Display items . . . . . . . . . . . . . . . . . . 34
About filtering. . . . . . . . . . . . . . . . . . 36
Schedule
(Text-to-voice application). . . . . . .38
Reading out a schedule/event. . . . . . 38
Various reading out modes . . . . . . . 38
Display items . . . . . . . . . . . . . . . . . . 40
Today (Text-to-voice application). . . .43
Music . . . . . . . . . . . . . . . . . . . . . .45
Using the built-in FM transmitter . . . 46
Using the SONY-BUS connection
adapter (optional). . . . . . . . . . . . . . . 47
Using a cassette adapter
(optional) . . . . . . . . . . . . . . . . . . . . . 48
Display items . . . . . . . . . . . . . . . . . . 49
StreetFinder® C3 Travel Navigation
Software. . . . . . . . . . . . . . . . . . .51
Photo. . . . . . . . . . . . . . . . . . . . . . .52
GPS Meter . . . . . . . . . . . . . . . . . . .53
Display items . . . . . . . . . . . . . . . . . . 53
Monitor . . . . . . . . . . . . . . . . . . . . .54
Display items . . . . . . . . . . . . . . . . . . 55
Other functions . . . . . . . . . 59
Car Setting . . . . . . . . . . . . . . . . . . .59
Uninstalling the Car Cradle basic
software on your CLIÉ handheld. . . . 61
Setting Sounds. . . . . . . . . . . . . . . . . 62
Setting the Display Order . . . . . . . . . 63
Assigning Applications to Application
Buttons. . . . . . . . . . . . . . . . . . . . . . . 64
Setting Screensaver . . . . . . . . . . . . . 65
Setting Miscellaneous . . . . . . . . . . . 67
Setting the voice pitch, speed and
animation for reading out
(Text-to-voice function). . . . . . . . . . .69
Configuring the Mail settings . . . . . .70
Configuring the Music settings . . . . .72
Configuring the Photo settings . . . . .73
Configuring the Schedule settings. . .74
Additional information . . . . 75
Maintenance . . . . . . . . . . . . . . . . .75
Troubleshooting . . . . . . . . . . . . . . .77
Specifications . . . . . . . . . . . . . . . .81
Computer system requirements . . . .82
INDEX. . . . . . . . . . . . . . . . 83
Continued on next page
• • • • • • • • • • • • • • • • • • • • • • • • • • •
4
Notes on this manual
• The illustrations in this manual depict the short screen type of CLIÉ™ handheld.
• Depending on your CLIÉ handheld, the screen may differ.
• Screen images in this manual may be different from the actual displays in the supplied
software.
• Contents of this manual are written for users with knowledge of using CLIÉ handheld
and the Microsoft® Windows® operating system. For details about CLIÉ handheld,
refer to the manuals supplied with CLIÉ handheld. For details about computer
operation, refer to the manual for the computer.
No guarantee for lost data or damaged data
Sony does not provide any guarantee for lost or damaged data.

5
To avoid the risk of injury or accident, read the
following warning before installing and operating
the unit.
On safety
• Comply with your local traffic laws and
regulations.
• For your safety, do not operate equipment,
mount or remove your CLIÉ handheld from
the car cradle while driving.
• Do not watch the CLIÉ handheld while
driving. It is dangerous and may cause a
traffic accident.
• For your safety, when your CLIÉ handheld
enters in-vehicle mode, the Warning message
is displayed. To cancel the Warning message,
tap the screen or press any button on the
wireless card remote commander.
• For safe driving, the car cradle system
restricts certain applications on your CLIÉ
handheld while driving. To use applications
other than in-vehicle mode, park your car in a
safe place and detach your CLIÉ handheld
from the car cradle to operate.
• When mounting your CLIÉ handheld in the
car cradle, remove any supplied/optional
accessories, such as headphones, cover,
adapter, etc., from your CLIÉ handheld. They
may fall or their cables may interfere with
driving, causing a traffic accident or injury.
• When your CLIÉ handheld is mounted in the
car cradle, be sure not to insert or remove the
“Memory Stick” media.
• Be sure to take your CLIÉ handheld out of the
car when leaving your car to prevent theft or
high temperature damage inside the car.
• When the car battery adapter is not in use,
disconnect it from the cigarette lighter
socket. If battery power is not turned off
when the ignition key is in the OFF position,
battery drain may result.
• Do not place anything other than the
specified CLIÉ handheld in the car cradle.
• Do not allow any liquid or foreign objects to
enter the unit.
• Do not disassemble or modify the unit.
• This unit is designed for 12 V DC negative
ground operation only.
On installation
• Before installing the unit, please check your
local traffic laws and regulations.
• Make sure to install the unit properly
according to the installation manual.
Improper installation may result in a fire or
an electric shock.
• Before installation, be sure to turn the
ignition switch to the OFF position or take
out the key out. Installing the unit with the
ignition on may cause battery drain or a short
circuit.
• For information about the polarity, battery
voltage and location of the airbag of your car,
please consult your car dealer.
• Do not damage any pipes, tubes, the fuel tank
or electric wiring when installing the unit, as
a fire or accident may result. If you drill a
hole in car panels, make sure that any hidden
car parts will not be damaged.
• Do not use any nuts or bolts for critical
devices such as steering linkage, fuel supply
or braking systems. This can cause a fire or
an accident.
• Take care to prevent the cords and wires from
getting tangled or crimped in the moving
portion of a seat rail.
• Do not use any car battery adapter other than
the one supplied.
Installing location
• Do not install the car cradle where:
– It will obstruct the driver’s view when the
car cradle is mounted in the car, or your
CLIÉ handheld is in the car cradle.
– It will obstruct the operation of the airbag
system.
– It will obstruct the operation of the
vehicle, especially the steering wheel,
shift lever, or brake pedal.
– It will be subjected to heat/high
temperature (on a dashboard etc.).
• Please consult qualified technician or service
personnel if you cannot attach the car cradle
to the car securely.
Replacing the fuse
• When replacing the fuse, be sure to use only
a fuse of the same rating (ampere rating).
• Using a different fuse or bridging the
contacts with a wire is highly dangerous and
can lead to serious damage.
WARNING
Continued on next page
• • • • • • • • • • • • • • • • • • • • • • • • • • •
6
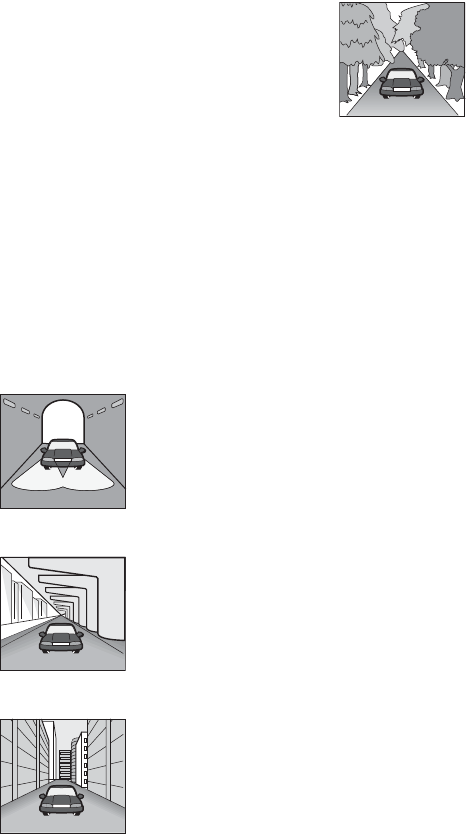
About GPS
GPS (Global Positioning System) satellites
continuously emit signals for positioning on
the Earth. As a GPS antenna receives these
signals, users can be informed of their
location (latitude, longitude and altitude)
anywhere on the Earth. Information must be
received from three satellites in order to
obtain two-dimensional fixes (altitude and
longitude), and four satellites are required for
three-dimensional positioning (latitude,
longitude and altitude). As GPS satellites are
controlled by the U.S. Department of
Defense, a deliberate margin of error
between a few feet (a few meters) and 30 feet
(10 meters) exists. As a result, the GPS
navigation system may include an error of
between 30 feet (10 meters) and about 700
feet (200 meters), depending on the
circumstances.
As GPS information is obtained using signal
from satellites, it may be impossible or
difficult to obtain the information when using
the system in the following locations:
Tunnel or underground
Under a highway
Between high buildings
Between tall trees with dense
foliage
7
Before use
Caution
IN NO EVENT SHALL SONY BE LIABLE FOR
ANY INCIDENTAL, INDIRECT OR
CONSEQUENTIAL DAMAGES OR OTHER
DAMAGES INCLUDING WITHOUT
LIMITATION LOSS OF PROFITS, LOSS OF
REVENUE, LOSS OF DATA, LOSS OF USE
OF THE PRODUCT OR ANY ASSOCIATED
EQUIPMENT, DOWNTIME, AND
PURCHASER’S TIME RELATED TO OR
ARISING OUT OF THE USE OF THIS
PRODUCT, ITS HARDWARE AND/OR ITS
SOFTWARE.
On the supplied software
• Copyright laws prohibit reproducing the
software or the software manual in whole or
in part or renting the software without the
permission of the copyright holder.
• In no event will SONY be liable for any
financial damage or loss of profits, including
claims made by third parties, arising out of
the use of the software supplied with this
product.
• In the event a problem occurs with this
software as a result of defective
manufacturing, SONY will replace it at
SONY’s option or issue a refund. However,
SONY bears no other responsibility.
• The software provided with this product
cannot be used with equipment other than
that which it is designated for use with.
• Please note that, due to continued efforts to
improve quality, the software specifications
may be changed without notice.
• The software library incorporated in the
CLIÉ handheld is based in part on the work of
the Independent JPEG Group.
NOTES
• Sony does not support third party add-on
applications. If you are having a problem
with a third party application, please contact
the developer or publisher of that software.
• The illustrations in this manual may differ
from the actual software.
• Explanations in this manual assume that you
are familiar with basic operations of
Windows®. For how to use your computer
and operating system, please refer to their
respective manuals.
Program © 2003 Sony Corporation, © 2003 Palm,
Inc., or its subsidiaries. All rights reserved.
Documentation © 2003 Sony Corporation
CAUTION
Please contact your nearest Sony dealer regarding
any problems you have with your Sony product.
On the trademarks
Sony, CLIÉ, “Memory Stick”, “Memory Stick
Duo”, “Memory Stick PRO”, “MagicGate
Memory Stick”, Jog Dial, PictureGear Studio and
their logos are trademarks of Sony Corporation.
Palm OS, Graffiti, HotSync and the HotSync logo
are registered trademarks of Palm, Inc. and its
subsidiaries, and Palm, Palm Powered, Palm
Desktop, the Palm logo, the Palm Powered logo
and Palm OS5 logo are trademarks of Palm, Inc
and its subsidiaries.
Microsoft and Windows are registered trademarks
of Microsoft Corporation.
Pentium is registered trademarks of Intel
Corporation.
StreetFinder C3 software © 2003, Rand McNally
& Company. All right reserved. StreetFinder and
Rand McNally are registered trademarks of Rand
McNally & Company.
“StreetFinder® C3 Travel Navigation Software” is
referred to as “StreetFinder” in the following
pages.
Bluetooth is a trademark that is owned by the
proprietor and used by Sony under license.
Adobe and Adobe Acrobat Reader are trademarks
of Adobe Systems Incorporated.
All other trademarks are trademarks of their
respective owners.
8
What you can do with CLIÉ™
handheld during in-vehicle
mode
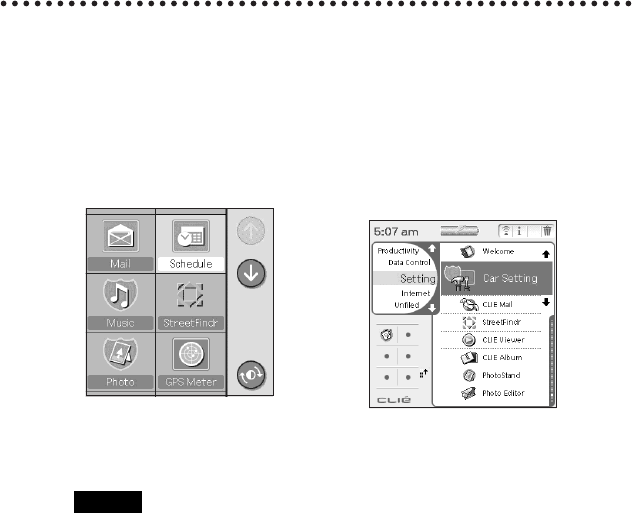
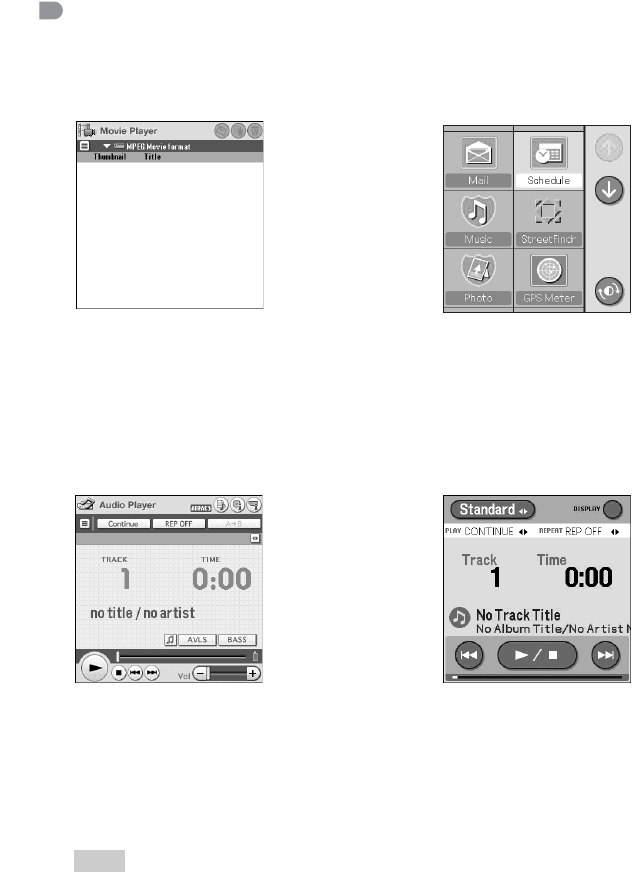
Introducing applications
Car Launcher
This application uses large icons to allow you to finger tap
the screen (without using the stylus) for quick access to
desired applications. During in-vehicle mode, tapping/
pressing the Home button (short screen) or the Home
icon (long screen) returns you to the Car Launcher
screen. Applications for in-vehicle mode are listed
automatically on the Car Launcher screen.
Mail
This application allows you to listen to mails stored in the
CLIE Mail™ application, by having your CLIÉ handheld
read them out to you, using the Text-to-voice function.
Schedule
This application allows you to listen to your schedules/
events stored in the Date Book application, by having
your CLIÉ handheld read them out to you, using the Text-
to-voice function.
9
Today
When you place your CLIÉ handheld in the car cradle for
the first time that morning and again that afternoon, the
Today application activates automatically and reads out
today’s date, your current/next schedule and number of
unread mails.
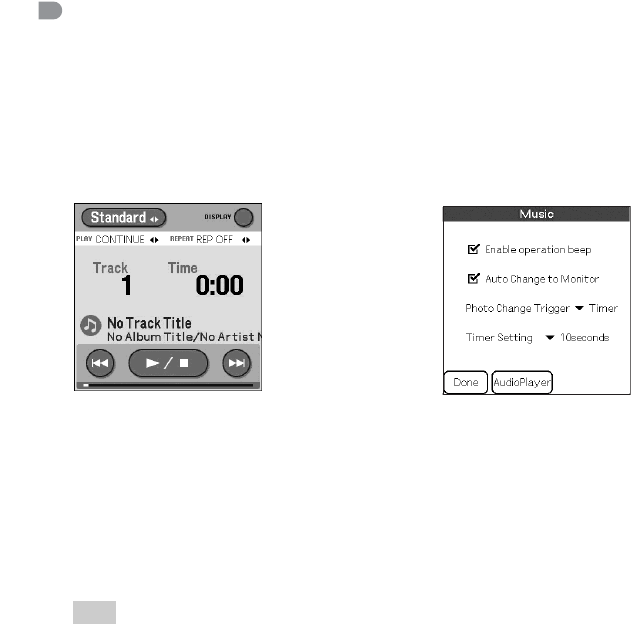
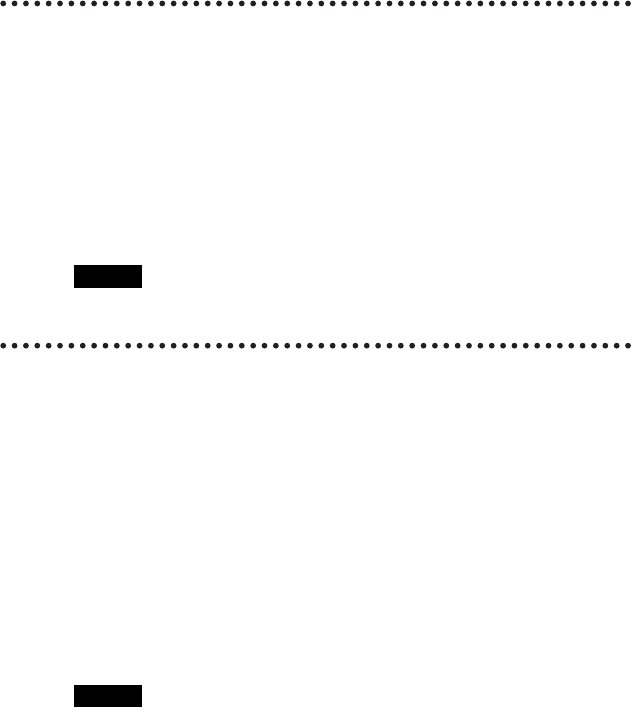
Music
This application allows you to play music data, such as
MP3/ATRAC3 files. You can listen to music via your car
audio speakers if you are in your car.
StreetFinder
This application allows you to view maps on your CLIÉ
handheld. By using the built-in GPS function of the car
cradle, your current location can be monitored on-screen. If
the route* has been downloaded to your CLIÉ handheld or
“Memory Stick” media by performing a HotSync®
operation before traveling, the Text-to-voice function will
provide voice guidance.
* Internet connection and PC required for initial Route setup
Photo
This application shows you full-screen images stored on
your CLIÉ handheld/“Memory Stick” media. Use it as an
in-car photo stand, or even for showing your family photos
of the holiday you have just taken during the return journey.
Continued on next page
• • • • • • • • • • • • • • • • • • • • • • • • • • •
10
GPS Meter
This application allows you to view GPS signal reception
conditions.
Monitor
This application displays the playing/receiving information
of a Sony car audio when connected to the optional SONY-
BUS connection adapter (XA-CC1).
11
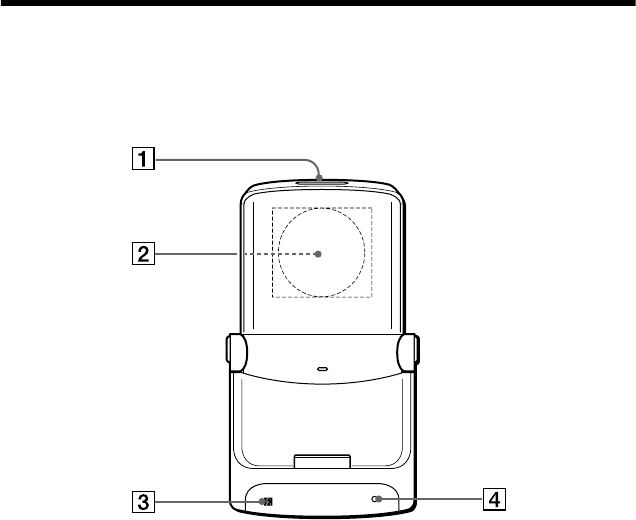
Location of controls
Front panel
AAuto dimmer eye
Receptor for the dimmer.
BBuilt-in speaker for the Text-
to-voice function (located at the
back of the car cradle)
• While your CLIÉ™ handheld is
mounted in the car cradle, the
speaker of your CLIÉ handheld
will be disabled.
• This speaker is only for the Text-
to-voice application; music is not
produced by this speaker.
CReceptor for the card remote
commander
DPower indicator LED
Lights green when the power is on.
(It also lights during the in-vehicle
sleep mode and HOLD mode.)
12
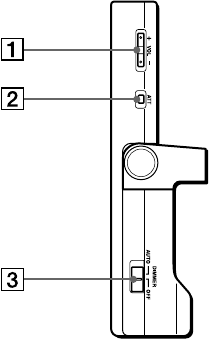
Side panel
AVOL +/– buttons for the
built-in speaker
• These buttons control only the
built-in speaker of the car cradle.
• The volume indicator appears only
while you adjust the volume level.
Shortly after you finished adjusting
the volume, the volume indicator
disappears.
• You can adjust the volume level
only when the Text-to-voice
application is being used.
BATT button for the built-in
speaker
• The ATT function quickly lowers
the volume level.
• Press to lower.
– “ATT On” appears on the screen.
• Press again, or press the VOL +
button.
– “ATT Off” appears on the screen
and attenuation is canceled.
• You can adjust the volume level
only when the Text-to-voice
application is used.
CDimmer AUTO/OFF switch
• The Auto dimmer function adjust
the brightness of the screen
automatically, adapting to the
surrounding brightness.
For example, when driving through
a tunnel or at nighttime.
• The brightness default setting is
maximum.
– select AUTO to dim the screen
automatically.
– select OFF to deactivate the
Dimmer.
13
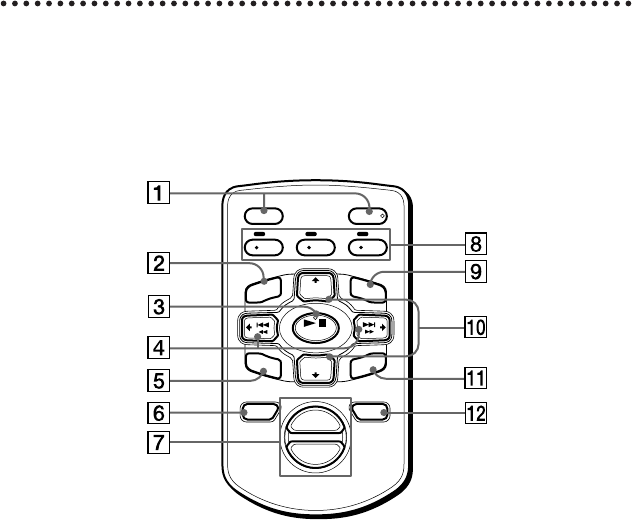
Wireless card remote commander
Refer to the pages listed for details.
bFor details about the StreetFinder® application, refer to the StreetFinder User’s
Guide.
bFor details about replacing the batteries, refer to “Replacing the lithium battery” on
page 76.
AVOL +/– buttons for the built-
in speaker
• These buttons control only the
built-in speaker of the car cradle.
• The volume indicator appears only
while you adjust the volume level.
Shortly after you finished adjusting
the volume, the volume indicator
disappears.
• You can adjust the volume level
only when the Text-to-voice
application is being used.
BScreen button
• To change the screen mode for the
Music/Monitor application. 49,
55, 56, 57
• To switch between the map and the
text instruction screens
(StreetFinder application).
CENTER/N/x button
• To activate an application. 31
• To start/stop music playback, mail
and schedule/event read out. 35,
41, 50
• To select the map on the context
menu (StreetFinder application).
DAY
–
HOME HERE
VOL
–
VOL
+
S2
ENTER
DAY
+
OUT
ZOOM
IN
REP
GUIDE
SCREEN
DSPL
S3S1
S4 S5 S6
Continued on next page
• • • • • • • • • • • • • • • • • • • • • • • • • • •

14
D< (./m)/, (M/>)
buttons
Press to:
– move the cursor left/right on the
Car Launcher screen. 31
– go to the previous/next track. 50
– go to the previous/next mail/
schedule. 36, 42
– move the map left/right, back/
forward on the text instruction
screen (StreetFinder®
application).
Hold down to:
– go backwards/forwards through
tracks. 50
– go backwards/forwards through
mails/schedules. 36, 42
EREP button
To switch the repeat mode for the
Music application. 50
FHome button
To display Car Launcher. 28
GZOOM OUT/IN buttons
To zoom the map out and in or pages
back and forth in the text instructions
(StreetFinder application).
HS1 to S3 (S4 to S6) buttons
S1 to S3:
– Press to activate an application.
S4 to S6:
– Hold down to activate an
application.
Tip
You can assign your favorite applications
to these buttons (page 64).
IDSPL button
• To change the display items for the
Music application. 50
• To change the image on Photo/
Screensaver. 30, 52
• To open the Display menu when
your car is stopped (StreetFinder
application).
JDAY v/V (+/–) buttons
• To move the cursor down/up on the
Car Launcher screen. 29
• To move the listed item down/up on
the List screen of the Music
application. 49
• To switch the folder for Mail. 35
• To go to the previous/next day for
Schedule. 40
• To move the map down/up, and the
cursor down/up on the map
selection screen (StreetFinder
application).
KGUIDE button
To repeat last audio instruction
(StreetFinder application).
LHERE button
To re-center the current GPS location
on the map or return to the current text
instruction (StreetFinder
application).

15
Getting started
Initial setup of your CLIÉ™ handheld
Follow the procedure below prior to using your CLIÉ handheld with the car
cradle.
Step 1: Installing software for the car cradle
Before using your CLIÉ™ handheld with the car cradle, you have to install
software for the car cradle on your CLIÉ handheld.
Install the Car Cradle basic software from the supplied Installation CD-ROM.
When you use the StreetFinder® application, install the StreetFinder® C3
Travel Navigation Software, too.
bFor details about installing the StreetFinder® C3 Travel Navigation Software, refer to
the StreetFinder User’s Guide.
bFor details of the required computer specifications, refer to “Computer system
requirements” on page 82.
Installing the Car Cradle basic software
Note
Before installing the Car Cradle basic software, install the Palm™ Desktop for CLIÉ
software. If the Palm™ Desktop for CLIÉ is not installed on your computer, you will not
be able to complete the car cradle software installation.
bFor details about the Palm™ Desktop for CLIÉ, refer to the manuals supplied with
your CLIÉ handheld.
Step 1: Installing software for the car cradle
Step 2: Setting up your CLIÉ™ handheld for the car cradle
Step 3: Mounting your CLIÉ™ handheld in the car cradle
Continued on next page
• • • • • • • • • • • • • • • • • • • • • • • • • • •

16
1Quit all applications running in the Windows® operating
system.
2Insert the supplied Installation CD-ROM into the CD-ROM
drive of your computer.
The Installation Launcher window is displayed.
Note
If the CD-ROM is not activated automatically, activate the CD-ROM manually.
3Click the INSTALL button for the Car Cradle basic
software.
The setup program starts and the InstallShield Wizard window is
displayed.
4Click Next.
The Select Features window is displayed.
5Select the feature you want to install on your CLIÉ
handheld with the car cradle.
Basic Applications: The basic applications for the car cradle.
Audio Monitor: The application for a Sony car audio via the SONY-BUS
connection adapter (optional) (page 54).
6Click Next.
The Start Copying Files window is displayed.
Confirm the settings.
7Click Next.
The Install Tool window is displayed.
bFor details about installing sample pictures, refer to page 17.
Note
When performing the HotSync® operation, make sure Destination of files is set to
Handheld. Do not select Memory Stick as the Destination.
Tip
If there are two or more user names stored in Palm™ Desktop for CLIÉ, the window
to select a user name is displayed. Select a user name then click OK.

17
Installation of the Car Cradle basic software on your CLIÉ
handheld is completed.
bFor details about additional installation, refer to the manuals supplied with your CLIÉ
handheld.
Note
After performing a hard reset on your CLIÉ handheld, you need to reinstall the Car
Cradle basic software.
Installing sample pictures
You can install sample pictures stored on the Installation CD-ROM for the
Photo, Screensaver and Music applications.
8Click Done.
Installation of the Car Cradle basic software on your computer is
completed.
The Information dialog box is displayed.
9Click OK.
10 Click Finish.
Tip
If you want to install sample pictures, follow the procedure in “Installing sample
pictures” (page 17).
11 To install the Car Cradle basic software on your CLIÉ
handheld, press the HotSync® button on the cradle.
The HotSync® operation starts and the selected software is downloaded to
your CLIÉ handheld.
bFor details about the HotSync® operation, refer to the manuals supplied with your
CLIÉ handheld.
12 After HotSync® operation is completed, display the CLIE
Launcher screen on your CLIÉ handheld then tap the Car
Installer icon.
The information screen is displayed. Tap Reset.
After resetting, the Car Installer icon disappears, the Car Setting icon
appears.
1Click the Picture button after performing steps 1 and 2 on
page 16.
Continued on next page
• • • • • • • • • • • • • • • • • • • • • • • • • • •

18
bFor details about installing sample pictures to “Memory Stick” media, refer to the
manuals supplied with your CLIÉ handheld.
bFor details about additional installation or more, refer to the manuals supplied with
your CLIÉ handheld.
2Click the INSTALL button.
The setup program starts and the InstallShield Wizard window is
displayed.
3Click Next.
4Select Long Screen Type or Short Screen Type of your
CLIÉ handheld.
5Click Next.
6Select Nature/Sports/Others.
7Click Next.
The Start Copying Files is displayed.
Confirm the settings.
8Click Next.
The Install Tool window is displayed.
Tip
If there are two or more user names stored in Palm™ Desktop for CLIÉ, the window
to select a user is displayed. Select a user then click OK.
9Click Done.
10 Click Finish.
11 To install the selected pictures on your CLIÉ handheld,
press the HotSync® button on the cradle.
The HotSync® operation starts and the selected pictures are downloaded to
your CLIÉ handheld.
bFor details about the HotSync® operation, refer to the manuals supplied with your
CLIÉ handheld.
19
Step 2: Setting up your CLIÉ™ handheld for
the car cradle
Follow the setup procedure according to your CLIÉ handheld type.
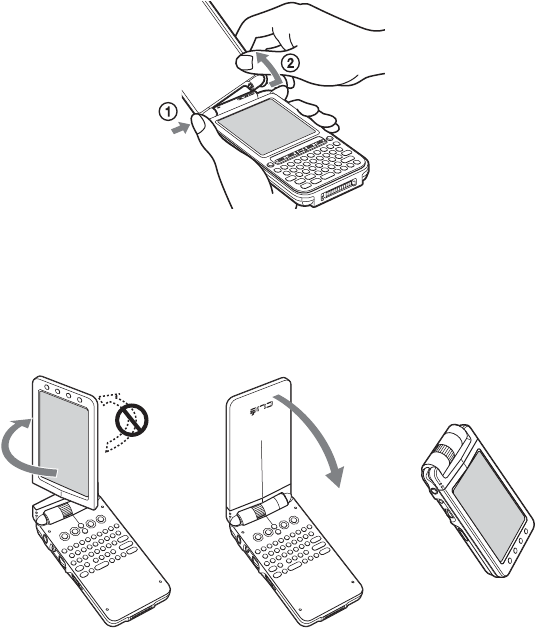
Removing the protection cover (short screen type)
Before mounting and using your CLIÉ handheld in the car cradle, you need to
remove the protection cover.
Whenever you use your CLIÉ handheld with the car cradle, remove the
protection cover.
bFor details about attaching the cover, refer to the manual supplied with your CLIÉ
handheld.
Changing the operating style (long screen type)
Before mounting, you need to change the operating style.
Set your CLIÉ handheld to the “turned style.”
bFor details about closing the display panel, refer to the manual supplied with your
CLIÉ handheld.
Push 1 with
your left hand.
Remove the cover in
the direction 2 pulling
the other side of 1.
Open the display and
rotate it as indicated by
the arrow until it clicks into
place.
Fold the display
over the keyboard.
bb
Continued on next page
• • • • • • • • • • • • • • • • • • • • • • • • • • •
20
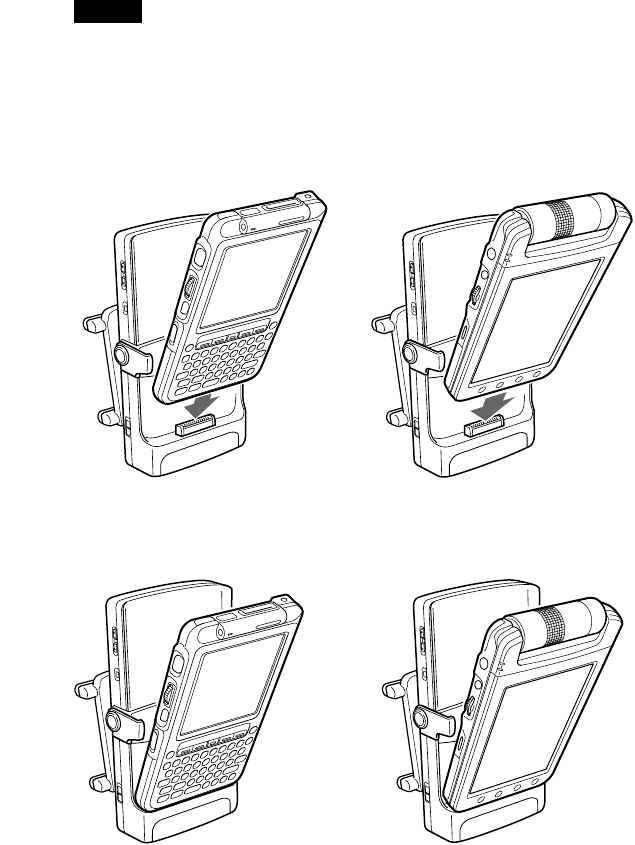
Step 3: Mounting your CLIÉ™ handheld in
the car cradle
To operate applications/functions during in-vehicle mode, mount your CLIÉ
handheld in the car cradle.
Notes
• Do not mount or remove your CLIÉ handheld while driving.
• When you operate Car Setting, detach your CLIÉ handheld from the car cradle.
During in-vehicle mode, Car Setting is not displayed.
• Use the correct holding arm for your CLIÉ handheld screen type.
c
c
1Mount your CLIÉ handheld on the connector of the car cradle.
Short screen type Long screen type
21
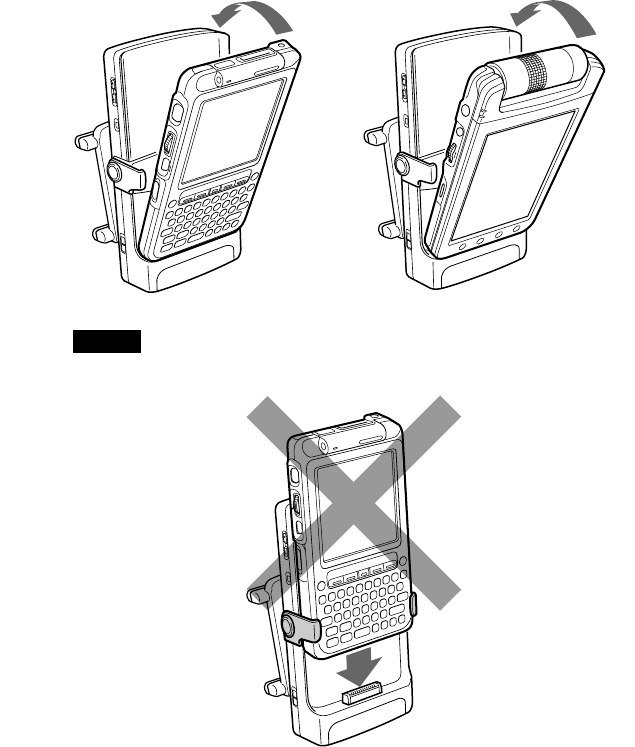
Note
Do not mount your CLIÉ handheld on the connector of the car cradle vertically.
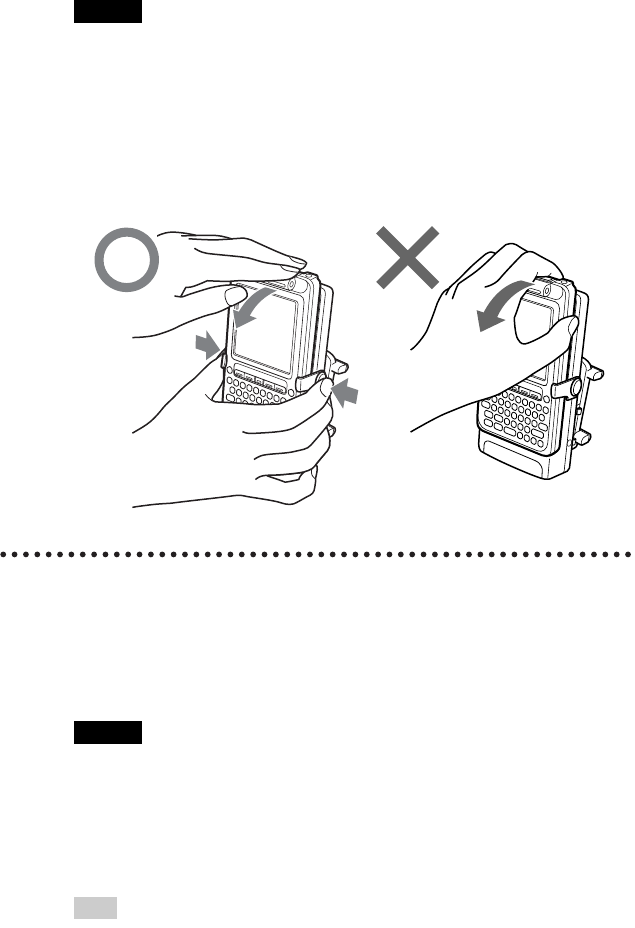
Detaching your CLIÉ handheld from the car cradle/
turning off the car cradle
The car cradle turns on when your CLIÉ handheld is mounted in the car cradle.
When the car cradle is not in use, detach your CLIÉ handheld from the car
cradle following the instructions below to turn off the car cradle. When you
leave the car, take your CLIÉ handheld with you.
2Tilt back your CLIÉ handheld to rest in the car cradle.
Continued on next page
• • • • • • • • • • • • • • • • • • • • • • • • • • •
22
Notes
• If battery power is not turned off when the ignition key is in the OFF position, detach
your CLIÉ handheld from the car cradle as battery drain may result.
• Do not detach your CLIÉ handheld from the car cradle with one hand. It may cause a
malfunction.
Charging your CLIÉ handheld
Your CLIÉ handheld battery is continuously being charged during in-vehicle
mode. When the ignition switch is in the OFF position, power from the
cigarette lighter socket terminates is stopped, the car cradle is turned off and
battery charge stops.
Notes
• If your CLIÉ handheld battery is low, you cannot use the CLIÉ handheld in the car
cradle. Be sure to charge the CLIÉ handheld before using with the car cradle.
• If battery power is not turned off when the ignition key is in the OFF position, detach
your CLIÉ handheld from the car cradle. The car cradle will not be turned off when
the ignition key is in the OFF position. Therefore, if your CLIÉ handheld is in the car
cradle, battery drain may result.
Tip
If your CLIÉ handheld is turned off in the car cradle (in-vehicle sleep mode) during
in-vehicle mode, battery charge continues.
1Squeeze both RELEASE buttons simultaneously with one hand.
2Pull out the CLIÉ handheld towards you from the top with your other
hand.
23
Various in-vehicle mode systems/functions
For your safety, when your CLIÉ™ handheld enters in-vehicle mode, a
Warning message is displayed. To cancel the Warning message, tap the screen
or press any button on the wireless card remote commander.
During in-vehicle mode, the car cradle system restricts certain applications/
functions on your CLIÉ handheld.
About in-vehicle mode
When you use your CLIÉ handheld with the car cradle, your CLIÉ handheld
enters in-vehicle mode.
Note
The Palm OS® standard screen is not available during in-vehicle mode.
Notes on unusable functions during in-vehicle mode
The following applications/functions cannot be used during in-vehicle mode.
• CLIE Launcher™ /Palm OS® standard screen
•Beaming
• Bluetooth™ function
• To display the alarm dialog of schedule
• Automatic power-off
bFor details, refer to each application/function in this manual.
Car Launcher home screen CLIE Launcher home screen
bFor details about Car Launcher,
refer to “Using Car Launcher” on
page 28.
You can use the Car launcher
during in-vehicle mode.
You cannot use CLIE
Launcher™ during in-vehicle
mode.
Continued on next page
• • • • • • • • • • • • • • • • • • • • • • • • • • •
24
Normal CLIÉ mode b In-vehicle mode
When your CLIÉ handheld is mounted in the car cradle, it enters in-vehicle
mode. If the car cradle is off, the CLIÉ handheld remains in normal CLIÉ mode.
If the current application is not compatible with in-vehicle mode.
* The Warning message will always displayed first, tap the screen to cancel the Warning
message (page 23).
If the current application is compatible with in-vehicle mode.
* The Warning message will always displayed first, tap the screen to cancel the Warning
message (page 23).
Tips
• If the current application is Audio Player, the application switches to Music in-
vehicle mode. Playback continues only when the background play is enabled. Enable
background play from Preferences of Audio Player in normal CLIÉ mode.
• If the current application is CLIE Mail or Date Book, Mail or Schedule is displayed
automatically, respectively, when your CLIÉ handheld enters in-vehicle mode.
• When your CLIÉ handheld enters in-vehicle mode, Today is activated automatically
for the first time in the morning or afternoon of the day (page 43).
Applications
incompatible with
in-vehicle mode.
b
Car Launcher appears.
When your CLIÉ
handheld is mounted
in the car cradle...*
Audio Player/CLIE Mail™/
Date Book/Car Setting for
each application/
StreetFinder
b
The application switches
to in-vehicle mode.
When your CLIÉ
handheld is mounted
in the car cradle...*
25
In-vehicle mode b Normal CLIÉ mode
• When your CLIÉ handheld is detached from the car cradle, the CLIÉ
handheld enters the normal CLIÉ mode.
• If the car cradle is turned off while your CLIÉ handheld is mounted in it, the
CLIÉ handheld enters the normal CLIÉ mode. After 5 seconds, a caution
alarm will sound. In this case, detach your CLIÉ handheld from the car
cradle to turn off the alarm.
bFor details about the caution alarm, refer to “About the caution alarm” on page 27.
*1 If the current application is Music, Mail, Schedule or Photo, they switch to their
respective setting screens.
*2 If the application is not usable in normal CLIÉ mode, CLIE Launcher appears.
Tip
If the current application is Music or Monitor, the application switches to Audio
Player (normal CLIÉ mode) only when the background play is enabled. Enable
background play from Preferences of Audio Player in normal CLIÉ mode.
• Car Launcher
• Applications during in-
vehicle mode
b
•CLIE Launcher™
•Car Setting for each
application*1/
Applications in normal
CLIÉ mode*2
When your CLIÉ
handheld is detached
from the car cradle...
26
About Sleep mode
If your CLIÉ handheld is turned off during in-vehicle mode, it enters in-vehicle
sleep mode.
To exit in-vehicle sleep mode
• Switch to in-vehicle mode:
– turn on your CLIÉ handheld.
• Switch to normal CLIÉ mode:
– detach your CLIÉ handheld from the car cradle.
Note
Your CLIÉ handheld battery is continuously charged during in-vehicle sleep mode.
About HOLD mode
If you set your CLIÉ handheld to HOLD mode and mount your CLIÉ handheld
in the car cradle, HOLD mode continues and your CLIÉ handheld enters in-
vehicle mode.
– The screen is turned off after the Warning message is displayed and touch
panel/button operation is not available.
– The wireless card remote commander of the car cradle is available.
– Car audio operation is available only when the SONY-BUS connection
adapter is connected.
– The caution alarm is available.
bFor details about HOLD mode, refer to the manuals supplied with your CLIÉ
handheld.
Note
Before turning off the HOLD mode, park your car in a safe place and detach your CLIÉ
handheld from the car cradle, then turn off the HOLD mode.

27
About the caution alarm
The caution alarm alerts you to not to leave your CLIÉ handheld in the car.
After 5 seconds the car cradle is turned off during in-vehicle mode, the caution
alarm sounds and the screen flashes.
To stop the caution alarm, do any of the following
– Detach your CLIÉ handheld from the car cradle.
– Turn on the car cradle (in-vehicle mode).
– Turn off your CLIÉ handheld.
Note
If battery power is not turned off when the ignition key is in the OFF position, the caution
alarm does not sound, even if your CLIÉ handheld is in the car cradle and the ignition
key is in the OFF position.
Tip
When automatic powered off is performed, the caution alarm will stop.
28
Basic operations
Operating the touch panel
During in-vehicle mode, it is recommended to tap the screen with your finger.
Notes
• Do not tap with excessive force.
• Be careful not to lose or damage the stylus if you use it in the car.
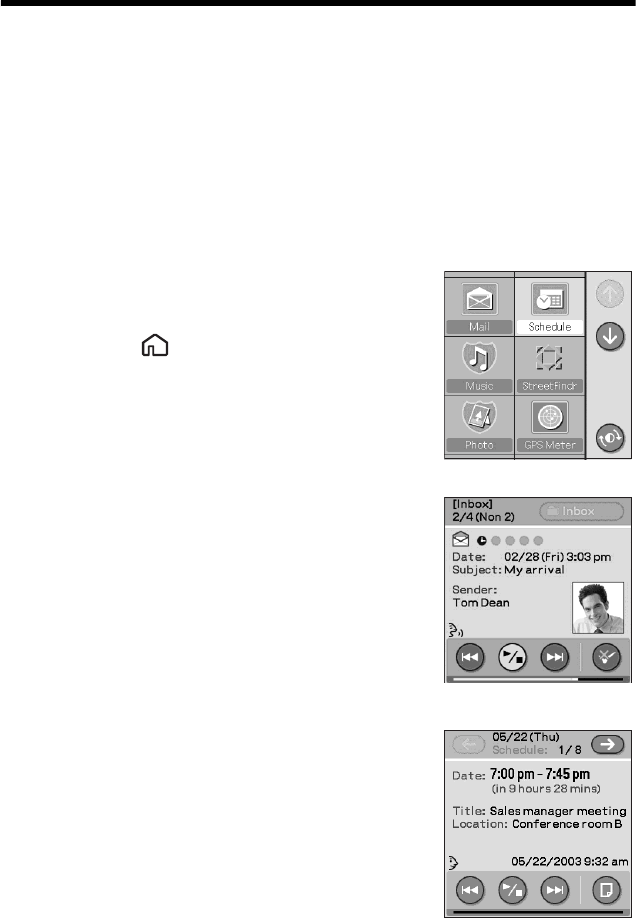
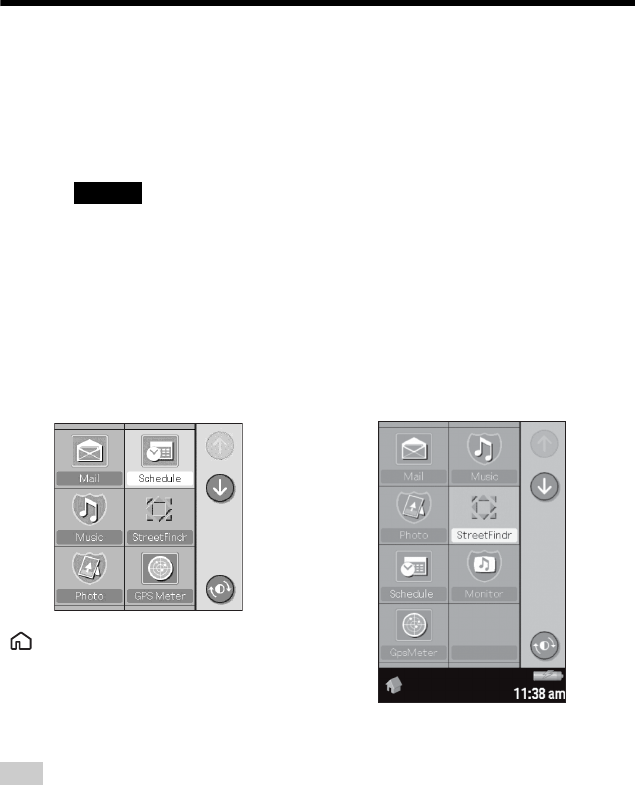
Using Car Launcher
Car Launcher shows applications only for in-vehicle mode.
Car Launcher home screen
(Short screen type)
Car Launcher home screen
(Long screen type)
Tip
You can also display Car Launcher by pressing the HOME button on the wireless card remote
commander.
To display Car Launcher, press the Home
button on your CLIÉ handheld.
To display Car Launcher, tap the Home
Icon.
29
Display items
AApplication icons
Tap any icon to start an application.
BArrow X/x icons
Tap to display either the previous/ next
page.
Available only when previous/next
page exists.
CColor mode switch icon
Tap to change day/night mode.
bFor details, refer to “Setting color
changing” on page 67.
DInfo Area
Only for the long screen type.
AHome icon
Tap to display Car Launcher.
BGPS information
Tap this area to change the GPS
information.
– Speed graphic
– Latitude and Longitude
– Compass and Altitude
– Speed machine (for the
entertainment only)
If you hit the jackpot (three
matching symbols), you will
hear fanfare.
CTime indicator
Displays the current time. The time
on your CLIÉ handheld is updated
automatically by GPS.
DBattery indicator
Displays when the battery is being
charged.
bFor details about the time indicator and
battery indicator, refer to the manual
supplied with your CLIÉ handheld.
Short screen type Long screen type
Continued on next page
• • • • • • • • • • • • • • • • • • • • • • • • • • •

30
Notes
• Depending on the screen type of your CLIÉ handheld, the Car Launcher screen items are
different. 4 is only for the long screen type of your CLIÉ handheld. If your CLIÉ handheld is
the short screen type, 4 is not displayed.
• When your CLIÉ handheld is mounted in the car cradle, only the Home button (for the short
screen type) can be used. Other buttons, including the Jog Dial™ navigator, etc., cannot be used.
• GPS information (4-B) is displayed based on GPS data. When the GPS signal is not received
or GPS signal reception conditions are poor, incorrect GPS information could be displayed.
About Screensaver
If there is no operation on the Car Launcher screen for a certain period of
time, the screensaver is activated. The default setting of the screensaver is off.
Required formats
• JPEG on “Memory Stick” media or your CLIÉ™ handheld
• PictureGearPocket file on “Memory Stick” media or your CLIÉ handheld
Tips
• Images are automatically scaled to fit the screen.
• If no images are set in the screensaver it will not be activated.
To switch the images
Press the DSPL button on the wireless card remote commander.
To exit the screensaver
Tap the screen or press any button other than the DSPL button on the wireless
card remote commander.

31
Using applications
Before using your CLIÉ™ handheld with the car cradle, you have to install
software for the car cradle on your CLIÉ handheld.
Install the Car Cradle basic software from the supplied Installation CD-ROM.
When you use the StreetFinder® application, install the StreetFinder® C3
Travel Navigation Software, too.
bFor details about installing the Car Cradle basic software, refer to “Installing software
for the car cradle” on page 15.
bFor details about installing the StreetFinder® C3 Travel Navigation Software, refer to
the StreetFinder User’s Guide.
Starting an application
Another way to start an application (by the wireless card
remote commander)
1Mount your CLIÉ handheld in the car cradle.
The Warning message is displayed.
2Tap the screen to cancel the Warning message (page 23).
The Car Launcher screen in displayed.
3Tap an application icon on the Car Launcher screen.
The application screen is displayed.
1Mount your CLIÉ handheld in the car cradle.
The Warning message is displayed.
2Press any button on the remote commander to cancel the
Warning message.
The Car Launcher screen is displayed.
Tip
If an application screen is displayed, press the HOME button to display the Car
Launcher screen.
3Press the B/b or V/v button to select the desired
application on the Car Launcher screen.
4Press the ENTER button.
The application screen is displayed.
Continued on next page
• • • • • • • • • • • • • • • • • • • • • • • • • • •

32
bFor details, refer to the listed pages.
Applications Details
Mail 33 This application reads out mails on the CLIE
Mail™ application.
Schedule 38 This application reads out schedules/events on the
Date Book application.
Today 43 This application reads out current information.
Music 45 This application allows you to enjoy music on the
“Memory Stick” media inserted in your CLIÉ
handheld by the car audio.
StreetFinder® 51 This application allows you to view maps on your
CLIÉ handheld. By using the built-in GPS function
of the car cradle, your current location can be
monitored on-screen. If the route* has been
downloaded to your CLIÉ handheld or “Memory
Stick” media by performing a HotSync® operation
before traveling, the Text-to-voice function will
provide voice guidance.
* Internet connection and PC required for initial Route
setup
Photo 52 This application displays images on your CLIÉ
handheld/“Memory Stick” media.
GPS Meter 53 This application allows you to view GPS signal
reception conditions.
Monitor 54 This application allows you to view you the Sony
car audio information on the CLIÉ handheld
screen.

33
Mail (Text-to-voice application)
The Mail application reads out the mail stored in the CLIE Mail™ application.
The body of mail text is not displayed. The Mail application restricts certain
functions on the CLIE Mail application.
bFor details about the CLIE Mail application, refer to the manuals supplied with your
CLIÉ™ handheld.
Notes
• You cannot send/receive/edit mail.
• Some characters cannot be read out.
Reading out mail
Note
If there is no mail in the current folder, “NO MAIL” is displayed. Only the folder switch
icon for the Mail application is available.
To stop reading out
Tap N/x.
To adjust the volume
Press the VOL +/– buttons.
To lower the volume quickly
Press the ATT button on the side of the car cradle (page 12).
To configure the Mail settings
bFor details, refer to “Configuring the Mail settings” on page 70.
1Tap the Mail icon on the Car Launcher screen.
The Mail screen (the first unread mail) is displayed. The selected folder
name and the number of unread mails are read out.
2Tap the N/x icon on the Mail screen.
Reading out starts from the currently displayed mail.
At the beginning of the mail/reply message and at the end of the reply
message, a chime sound will be heard.
bFor details about reply messages, refer to “About filtering” on page 36.

34
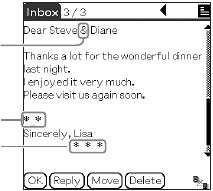
Display items
Notes
• If a name consists of many characters, the end is displayed as “…”
• If there is no mail in the current folder, “NO MAIL” is displayed. Only the folder
switch icon for the Mail application is available.
AFolder name
Displays the folder name. The folder
name is given on the CLIE Mail
application.
bFor details about folder name, refer to
the manuals supplied with your CLIÉ
handheld.
BNumber of mails in the
folder
current mail number/total number of
mails (number of unread mails)
CRead/unread icon
: read icon
: unread icon
DSubject of mail
ESender of mail
• If there is a sender name, it is
displayed.
• If there is only the mail address of
the sender, the name of the sender
is searched for by Address Book
and displayed. If there is no name
in the Address Book, the mail
address is displayed.
bFor details about Address Book,
refer to the manuals supplied with
your CLIÉ handheld.
FReading out animation
(Voice animation)
bFor details about Voice animation
setting, refer to page 69.
35
G./> icons
For details, refer to page 36.
Tip
You cannot go to the previous/next mail
from the first/last one.
HN/x icon
To start/stop reading out the mail.
IFolder switch icon
When the folder switches, current
read out stops and then the folder
name and the number of unread mails
is read out and the unread mail is
displayed. (If there are no unread
mails, the first read mail is displayed.)
Tip
If there is only one folder, the folder
switch icon will not be available.
JLength of mail body
The number of symbols increases
according to the mail length. The
attached file is not included.
KDate of mail
Displays the date of a mail by month/
day (day of the week) and hour/
minute.
LImage of sender
If an image of the sender is in
Address Book, the image is
displayed on the screen.
bFor details about Address Book,
refer to the manuals supplied with your
CLIÉ handheld.
M/ icons
: unread skip icon
• If the ‘Mark a message as read’
setting of Mail settings is ‘when
starting’/‘never’ (page 70) :
– changes a read mail to unread,
and skips to the next mail.
– keeps an unread mail unread,
and skips to the next mail.
: read skip icon
• If the ‘Mark a message as read’
setting of Mail settings is ‘when
finished’ (page 70) :
– changes an unread mail to
read, and skips to the next
mail.
– keeps a read mail read, and
skips to the next mail.
Tip
If you tap the or icon while the mail
is being read out, the current reading out
stops and switches to the next mail, which
is then read out.
While read out is stopped, you cannot start
read out of the next mail by tapping the
or icon.
NProgress bar
The progress bar shows you the mail
read out status.
Continued on next page
• • • • • • • • • • • • • • • • • • • • • • • • • • •

36
G./> icons
About filtering
Filtering is to filter the contents of the mail to prevent the read out of a specific
letter string when the body of the mail is read.
bFor details about filtering setting, refer to “Configuring the Mail settings” on page 70.
Content
Text from an original mail, such as a reply, will also be read out.
If the first character of a line matches a character stored in the filter (page 71),
a chime sound will be heard at the beginning and end of a reply message when
the mail is read out.
Characters stored in the filter are not read out.
Signature
Letter strings corresponding to the signature are not read out. You need to store
a signature beforehand (page 71).
Go to the beginning of the
current mail
Tap . after reading out the header.
Go to the beginning of the
previous mail
•Tap .. (While the header is reading out.)
•Tap . twice. (While the body of mail is
reading out.)
Go to the previous mail Tap . repeatedly.
Go to the beginning of the next
mail
Tap >.
Go to the beginning of a
following mail
Tap > repeatedly.
Go backwards Press and hold ..
Go forwards Press and hold >.
37
Symbol
Symbols are special characters in your mail (such as “&,” “ *,” “ _,” etc.). Only
blocks of contiguous symbols containing fewer symbols than the number set in
the Symbol filter (page 71) will be read out.
Example: If you select “4 or more” on the Use Symbol filter setting
(page 71).
Symbols more than 4 are not read out.
Symbols less than 4 are read out.
Symbols less than 4 are read out.

38
Schedule (Text-to-voice application)
The Schedule application reads out the schedules/events stored in the Date
Book application on your CLIÉ™ handheld.
bFor details about Date Book, refer to the manuals supplied with your CLIÉ handheld.
Notes
• You cannot edit the schedule/event.
• Some characters cannot be read out.
• The current schedule/event is updated automatically.
If there is no schedule/event of the current day, the following schedule/event within
the ‘Search next schedule’ (page 74) is displayed.
• All past schedules/events are ignored.
Reading out a schedule/event
To stop reading out
Tap N/x.
To adjust the volume
Press the VOL +/– buttons.
To lower the volume quickly
Press the ATT button on the side of the car cradle (page 12).
To configure the Schedule settings
bFor details, refer to “Configuring the Schedule settings” on page 74.
Various reading out modes
Normal reading out mode
The schedule/event continues to be read out from the beginning to the end of
the current day.
Tip
You can set whether or not to read out the event (page 74).
Tap the Schedule icon on the Car Launcher screen.
The Schedule screen is displayed and the current/next schedule starts to
read out.

39
Start time reading out mode
The schedule starts to read out automatically when the start time of the
schedule is reached.
Tips
• This mode starts automatically even if Schedule is not activated.
• An event is read out only during Normal reading out mode.
Alarm reading out mode
The schedule starts to read out automatically when the alarm time is reached.
bFor details about setting the alarm, refer to the manuals supplied with your CLIÉ
handheld.
Tips
• This mode starts automatically even if Schedule is not activated.
• An event is read out only during Normal reading out mode.
• If the next alarm time is reached during Alarm reading out mode, after reading out the
current schedule, the next schedule is read out.
Continued on next page
• • • • • • • • • • • • • • • • • • • • • • • • • • •
40
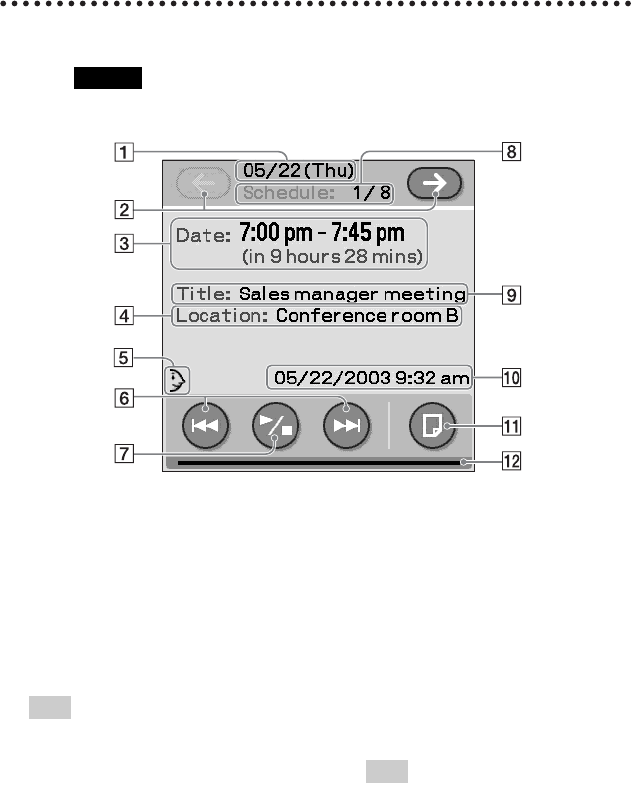
Display items
Note
If a name consists of many characters, the end is displayed as “…”
ADate of the schedule/event
Displays the date of a schedule/event
by month/day/day of the week.
If the date is current day, the C icon is
not available.
BC/c icons
To go to the previous/next day.
Tip
You cannot go to a previous day from the
present day.
CTime of schedule
• The remaining time (hour/minute)
before the start of a schedule is
shown in parentheses. It is updated
automatically.
• In the case of event, “event” is
displayed. If the starting/ending
day is stored on event, they are
displayed.
• If the current schedule is in
progress, “now on schedule” is
displayed.
DLocation of schedule/event
Any text input placed in the
parentheses of the title of the event/
schedule is interpreted to be the
location.
bFor details about the location setting,
refer to page 74.
Tip
If schedule/event location is not stored, it
is not read out/displayed.
EReading out animation
(Voice animation)
bFor details about the Voice animation
setting, refer to page 69.
41
F./> icons
For details, refer to page 42.
Tips
• The schedule/event cannot go to the
previous one:
– If the current schedule/event is the
first one of today.
– If the current schedule/event is in
progress.
• The schedule/event proceeds into the
next day.
– If the current schedule/event is the
last one of the day.
GN/x icon
To start/stop reading out a schedule/
event.
Tips
• If you tap the N/x icon, all current/
following schedules of the same day
will be read out.
• Reading out of a schedule/event again
will always starts from the beginning.
• If there is no schedule/event, “NONE”
is displayed.
– If you tap N/x, “no schedule” is
read out.
HNumber of schedules/events
on the current day
The current schedule number/total
number of schedules of the current
day
ITitle of schedule/event
Displays the schedule/event title.
Tip
If a schedule/event title is not stored,
nothing is read out/displayed.
JPresent time
Displays the present date by month/
day/year/hour/minute.
KNote icon
To read out the note attached to an
event/schedule.
• If there is no note, is not
available.
• If you tap while reading out is
stopped, only note starts to read
out.
• If you enable ‘Read notes’
(page 74), is not usable while
reading out.
• If you do not enable ‘Read notes’
(page 74), when you tap , the
note is read out after the schedule/
event has been read out.
LProgress bar
The progress bar shows you the
schedule/event read out status.
Continued on next page
• • • • • • • • • • • • • • • • • • • • • • • • • • •

42
F./> icons
Go to the beginning of the
current schedule/event
Tap .. (While reading out the current
schedule/event.)
Go to the beginning of the
previous schedule/event
Tap ..
Go to the previous schedule/
event
Tap . repeatedly.
Go to the beginning of the next
schedule/event
Tap >.
Go to the beginning of a
following schedule/event
Tap > repeatedly.
Go backwards Press and hold ..
Go forwards Press and hold >.
43
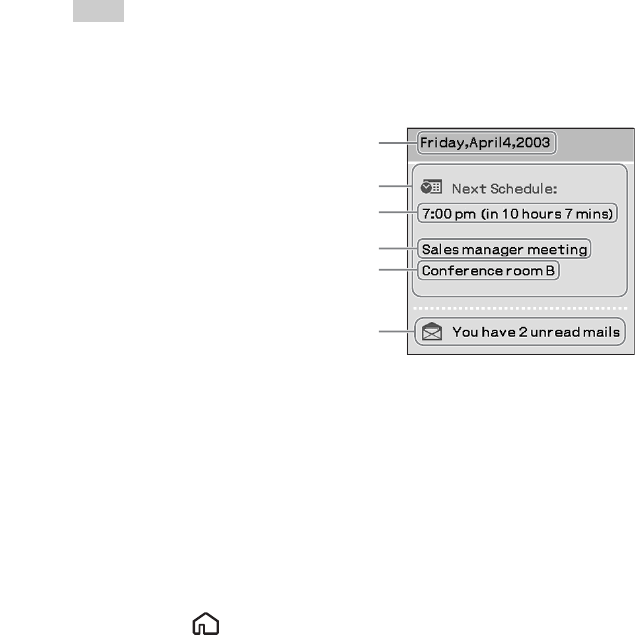
Today (Text-to-voice application)
When your CLIÉ™ handheld enters in-vehicle mode for the first time in the
morning or afternoon of the day, Today activates automatically and starts to
read out today’s date, current/next schedule and number of unread mails. After
reading out, Car Launcher or the previous application is displayed
automatically.
This function is linked to the CLIE Mail™ and Date Book application of the
normal CLIÉ mode.
Tips
•Today appears only when it is enabled (page 67).
• Some characters cannot be read out.
Display items
*1 If there is no schedule, no display items appear, and “no schedule” is read out.
*2 If the current schedule is in progress, “end time of schedule (now on schedule)” is
read out/displayed.
*3 If there are no unread mails, no display item appear and “no unread mail” is read out.
To adjust the volume
Press the VOL +/– buttons.
To lower the volume quickly
Press the ATT button on the side of the car cradle (page 12).
To stop Today
Press the Home button (short screen type), the Home icon (long screen
type) or any button (other than the VOL +/– button) on the wireless card remote
commander.
Reading out is stopped and returns to Car Launcher or the previous
application.
Today’s date
start time of schedule (remaining time)*2
Number of unread mails*3
Next schedule*1
title
location
Continued on next page
• • • • • • • • • • • • • • • • • • • • • • • • • • •

44
Tips
• You can activate the Schedule or Mail application by tapping on the screen area of
each application on the Today screen.
•If Today is assigned to any of the S1 to S6 buttons (page 64) and you press the button,
Today is activated. This is the only way to activate Today manually since there is no
icon available on the Car Launcher screen.

45
Music
Using the Music application, you can listen to music on the “Memory Stick”
media inserted in your CLIÉ™ handheld by a car audio.
To listen to music, do any of the following.
• Using the built-in FM transmitter (page 46)
– The car cradle has a built-in FM transmitter. By tuning the car audio radio
frequency to that of the FM transmitter, you can listen to music in your
CLIÉ handheld via the car audio speakers.
• Connecting the car cradle to a Sony car audio via the SONY-BUS
connection adapter (optional) (page 47)
• Using a cassette adapter (optional) (page 48)
– If your car audio has a cassette player, a cassette adapter can be used.
Listening to music
To adjust the volume
Use the volume control of the car audio to adjust the volume level.
To configure the Music settings
bFor details, refer to “Configuring the Music settings” on page 72.
Note
Playback stops if PROGRAM play is set to a different mode during in-vehicle mode.
1Complete each setting, refer to the instructions on the
following pages.
2Tap the Music icon on the Car Launcher screen.
The Music screen is displayed.
3Tap N/x on the Music screen.
Music from your CLIÉ handheld is heard through the car audio speakers.
Continued on next page
• • • • • • • • • • • • • • • • • • • • • • • • • • •

46
Tips
• Background play is always enabled during in-vehicle mode. Playback continues if
another application is selected.
• If background play is enabled, playback continues when your CLIÉ handheld enters
in-vehicle mode. (Enable background play from Preferences of Audio Player in
normal CLIÉ mode.)
• The system sound depends on the Music setting. Only when the System Sound
(page 62) is enabled, the system sound of Music will be heard. To adjust the volume
level of the system sound, refer to page 62.
• A-B repeat function is not available in-vehicle mode. When your CLIÉ handheld
returns to normal CLIÉ mode, A-B repeat function is reinstated.
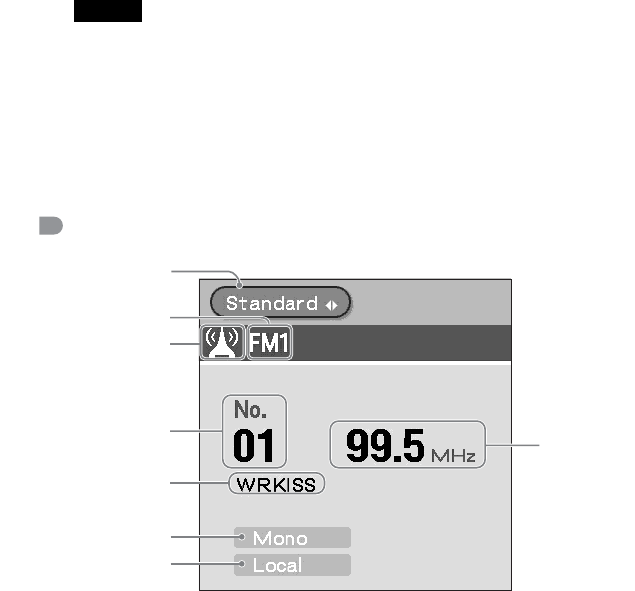
Using the built-in FM transmitter
• The built-in FM transmitter of the car cradle modulates the audio signal into
an RF (Radio Frequency) signal so it can be received by the FM tuner of your
car audio. You can enjoy music in your CLIÉ handheld with your car audio
even if it does not have input terminals for other devices, or if the SONY-
BUS connection adapter (optional) is not connected.
• If interference noise occurs during audio playback, change the frequency of
the transmitter.
To adjust the volume
Use the volume control of the car audio to adjust the volume level.
Note
Music data information is not displayed on the car audio display.
1Enable and set the FM Transmitter in the Sound
configuration of Car Setting (page 62).
2Mount your CLIÉ handheld in the car cradle.
3Select Tuner as the source on the car audio.
4Tune the frequency of the car audio to that which you set
in Car Setting.
5Tap the Music icon on the Car Launcher screen.
The Music screen is displayed.
6Tap N/x on the Music screen.
Music from your CLIÉ handheld is heard through the car audio speakers.

47
Using the SONY-BUS connection adapter
(optional)
You can operate the Music application with a Sony car audio by connecting
the SONY-BUS connection adapter. The track number and elapsed playing
time is displayed on the Sony car audio display.
bFor details about the SONY-BUS connection adapter, refer to the manual supplied
with the SONY-BUS connection adapter.
Car Cradle Ready Sony car audio units are;
(1) Units with CD/MD Changer Control from 2003 forward
(2) Following units
MEX-5DI, CDX-MP70, CDX-MP30, CDX-M730, CDX-M630,
CDX-CA900X, CDX-CA720X, CDX-CA700X, CDX-CA705M,
XR-CA630X, XR-CA430X
To select PDA (your CLIÉ handheld) as a source on the
Sony car audio
The Sony car audio recognizes your CLIÉ handheld as an MD unit.
When you want to play your CLIÉ handheld, press the SOURCE button to
select “PDA” or “MD.” If “PDA” appears in the source display, your CLIÉ
handheld starts to play. If “MD” appears in the source display, press the MODE
button to select your CLIÉ handheld to start playback.
To adjust the volume
Use the volume control of the car audio to adjust the volume level.
1Connect the SONY-BUS connection adapter to a Sony car
audio and the car cradle.
bFor details about connection, refer to the Installation/Connections manual of the
car cradle and the SONY-BUS connection adapter.
2Tap the Music icon on the Car Launcher screen.
The Music screen is displayed.
3Tap N/x on the Music screen.
Music from your CLIÉ handheld is heard through the car audio speakers.
“PDA” or “MD” is displayed on the Sony car audio.
Continued on next page
• • • • • • • • • • • • • • • • • • • • • • • • • • •

48
Notes
• When playback stops, the clock (OFF) display appears on the Sony car audio display.
• The Music screen switches to the Monitor screen depending on the setting (page 73).
• LINE OUT is turned off and the built-in FM transmitter is deactivated when the
SONY-BUS connection adapter is connected.
Using a cassette adapter (optional)
A cassette adapter enables you to listen to music on your CLIÉ handheld by the
car audio cassette player.
bFor details about the cassette adapter, refer to the manual supplied with the cassette
adapter.
To adjust the volume
Use the volume control of the car audio to adjust the volume level.
Notes
• Music information is not displayed on the car audio display. Music on your CLIÉ
handheld is recognized as a cassette tape.
• The output level of LINE OUT is set as cassette adapter input level.
1Connect the stereo mini plug of the cassette adapter to
the LINE OUT of the car cradle.
2Insert the cassette adapter into the cassette player of the
car audio.
3Select TAPE as the source on the car audio.
4Tap the Music icon on the Car Launcher screen.
The Music screen is displayed.
5Tap N/x on the Music screen.
Music from your CLIÉ handheld is heard through the car audio speakers.
49
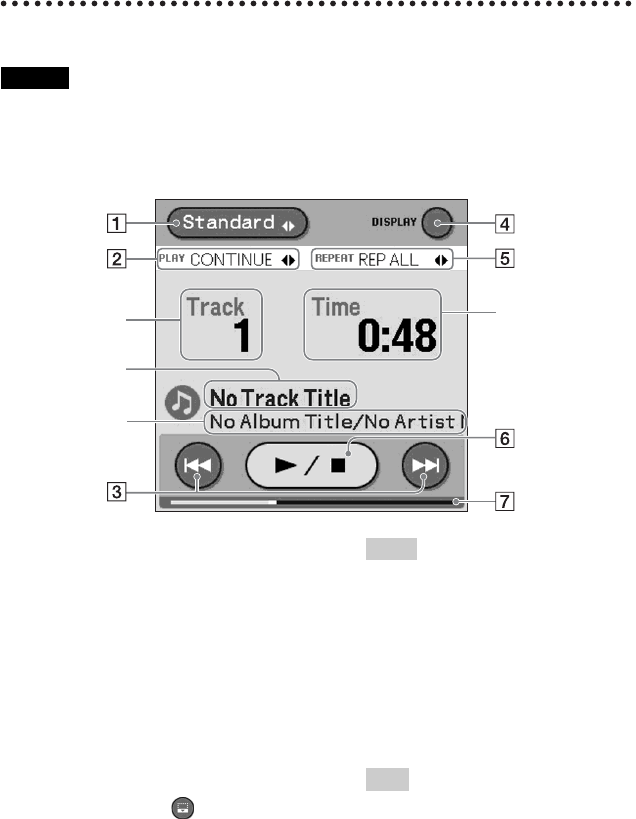
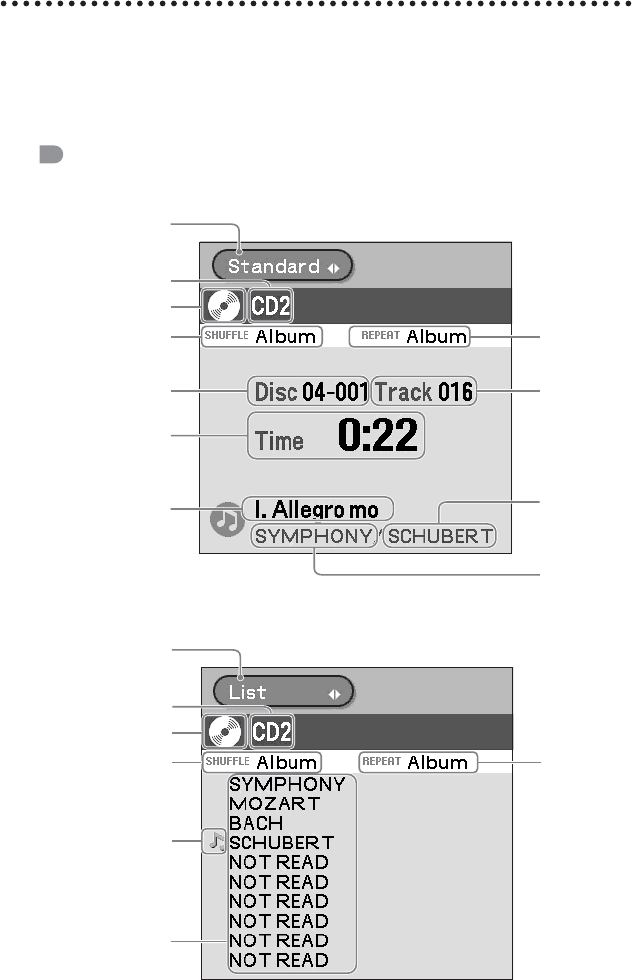
Display items
Notes
• “No Music Data” indicates there is no music data in the “Memory Stick” media inserted in your
CLIÉ handheld.
• “No Memory Stick” indicates there are no “Memory Stick” media and no music data in your CLIÉ
handheld.
AScreen mode icon
To select the Standard/List/Photo/
Effect screen.
•List screen:
– To show another list page, tap
the arrow x/X.
– To switch the Title/Album/
Artist/Genre list, tap the
DISPLAY icon.
•Photo screen:
– To display a photo image in full
screen, tap the icon on the
photo screen. To return to the
normal photo screen, tap
anywhere on the full screen.
Tips
• To set the photo change trigger, refer to
page 73.
• The same set of images selected in
Screensaver (page 66) is displayed.
•Effect screen:
– To switch the effect pattern
(5 types are stored), tap the
DISPLAY icon.
Tip
Depending on the effect pattern, the album
title/artist name is not displayed.
Track number
Track title/
ID3 tag
Elapsed playback
time/Remaining
playback time
Album title/
Artist name
Continued on next page
• • • • • • • • • • • • • • • • • • • • • • • • • • •

50
BPlay mode icon
To select CONTINUE/SHUFFLE/
REVERSE/PROGRAM*.
*PROGRAM is available when your
CLIÉ enters in-vehicle mode only if
Program Play is selected and
background play is enabled. (Enable
background play from Preferences of
Audio Player in normal CLIÉ mode.)
If you select another play mode, you
cannot select PROGRAM again.
bFor details about the Play mode, refer to
the manuals supplied with your CLIÉ
handheld.
Notes
• When the play mode changes from
PROGRAM mode to CONTINUE
mode, Program Play play list is
canceled, the default play list is
activated and playback stops. When
your CLIÉ handheld returns to the
normal CLIÉ mode, Program Play is
reinstated.
• The play mode selected during in-
vehicle mode is returned to the normal
CLIÉ mode setting when your CLIÉ
handheld returns to normal CLIÉ mode.
C./> icons
• Tap to go to the previous/next
track.
• Press and hold to go backwards/
forwards through tracks.
bFor details, refer to the manuals
supplied with your CLIÉ handheld.
Tip
These functions can be operated by the car
audio only when the SONY-BUS
connection adapter is connected.
DDISPLAY icon
• To switch between elapsed and
remaining playback time on the
Standard screen.
• To switch the listed item of Title/
Album/Artist/Genre on the List
screen.
• To switch the effect pattern on the
Effect screen.
EREPEAT icon
To switch REP OFF*/REP ALL/
REP 1.
* If you connect the SONY-BUS
connection adapter, REP-OFF is not
available.
Notes
• The repeat mode selected during in-
vehicle mode is returned to the normal
CLIÉ mode setting when your CLIÉ
handheld returns to normal CLIÉ mode.
• A-B repeat function is not available
during in-vehicle mode.
FN/x icon
To play/stop the track.
GProgress bar
The progress bar shows you track
playback status.
51
StreetFinder® C3 Travel Navigation Software
This application allows you to view maps on your CLIÉ handheld. By using the
built-in GPS function of the car cradle, your current location can be monitored
on-screen. If the route* has been downloaded to your CLIÉ handheld or
“Memory Stick” media by performing a HotSync® operation before traveling,
the Text-to-voice function will provide voice guidance.
* Internet connection and PC required for initial Route setup
StreetFinder® C3 Travel Navigation Software is owned by Rand McNally &
Company.
bFor details, refer to the StreetFinder User’s Guide.
Preparing
• Installing the StreetFinder® C3 Travel Navigation software on your CLIÉ™
handheld after installing the Car Cradle basic software.
bFor details, refer to the StreetFinder User’s Guide.
• Installing and connecting the supplied GPS antenna.
bFor details, refer to the Installation/Connections manual of the car cradle.
To start the StreetFinder application
Tap the StreetFinder icon on the Car Launcher screen.
The StreetFinder screen is displayed.

52
Photo
The Photo application displays the images on your CLIÉ™ handheld/
“Memory Stick” media.
• All images on your CLIÉ handheld and “Memory Stick” media are
displayed.
• Images edited by your CLIÉ handheld can be displayed.
bFor details about organizing images, refer to the manuals supplied with your CLIÉ
handheld.
Required formats
• JPEG on “Memory Stick” media or your CLIÉ handheld
• PictureGearPocket file on “Memory Stick” media or your CLIÉ handheld
To start the Photo application
To switch the images
• Press the DSPL button on the wireless card remote commander.
• The images are switched at the specified time set in Photo configuration of
Car Setting (page 73).
To exit the Photo application
Tap the Photo screen or press any button other than the DSPL button on the
wireless card remote commander.
To configure the Photo settings
bRefer to “Configuring the Photo settings” on page 73.
Note
If stored images are numerous or require considerable data, display time may be delayed.
Tips
• Images are automatically scaled to fit the screen.
• If no images are stored or are not available, “No data to be displayed. Tap the screen
to quit.” is displayed.
Tap the Photo icon on the Car Launcher screen.
The image is displayed.
53
GPS Meter
This application allows you to view GPS signal reception conditions.
To start the GPS Meter application
To exit the GPS Meter screen.
Press the Home button on your CLIÉ™ handheld (short screen type), tap
the Home icon (long screen type) or press HOME on the wireless card remote
commander.
Display items
Tap the GPS Meter icon on the Car Launcher screen.
The GPS Meter screen is displayed.
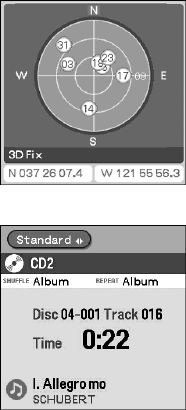
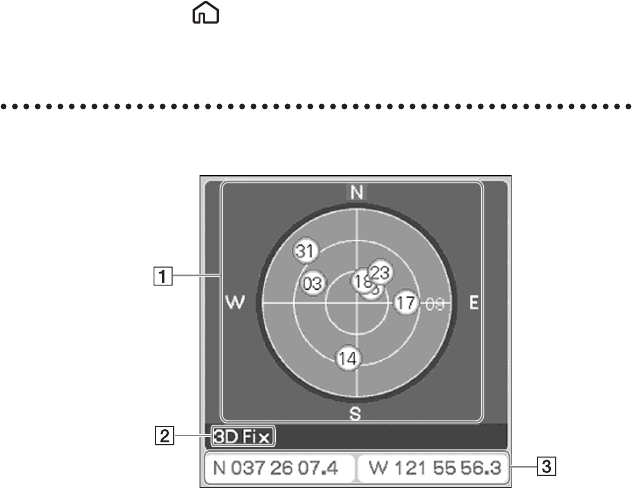
AGPS satellite Sky position
The satellite position is displayed as
an altitude from 0º to 90º.
• Solid satellite ball: Locked
• Satellite number only: Unlocked
BGPS State
Displays current GPS status and GPS
fix status.
•GPS Off: GPS is off.
•Searching…: Searching for a
receivable satellite.
•2D Fix: Current location
positioning available.
•3D Fix: 3D (three dimensional)
positioning (including altitude)
available.
CLatitude and Longitude
Displays your current latitude and
longitude.

54
Monitor
The Monitor application shows you playing/receiving information (title list of
the disc in the CD/MD changer, title list of the FM station memo) on a Sony
car audio.
Displaying the playing/receiving information on the
Sony car audio on the screen of your CLIÉ™
handheld
To use the Monitor application, the SONY-BUS connection adapter (optional)
and installation of the Audio Monitor software are necessary.
bFor details about compatible Sony car audio units, refer to page 47.
bFor details about the SONY-BUS connection adapter, refer to the manual supplied
with the SONY-BUS connection adapter.
bFor details about installing the Audio Monitor software, refer to step 5 on page 16.
1Connect the SONY-BUS connection adapter between a
Sony car audio and the car cradle.
bFor details about connection, refer to the Installation/Connections manual of the
car cradle and the SONY-BUS connection adapter.
2Tap the Monitor icon on the Car Launcher screen.
The Monitor screen is displayed.
3Select a source on the car audio.
The playing/receiving information is displayed on the Monitor screen.
Notes
• If you select “PDA” as the source, the Monitor screen changes to the Music
screen automatically.
• Nothing is displayed on the Monitor screen, if the SONY-BUS connection
adapter (optional) is not connected between a Sony car audio and the car cradle.
If you do not connect the SONY-BUS connection adapter, it is recommended not
to install the Monitor application (Audio Monitor software, page 16), to save
the memory of your CLIÉ handheld.
55
Display items
You can switch the Standard and List screen on the Monitor screen by using
the Standard/List switch icon.
bFor details about display items, refer to the manual supplied with the Sony car audio.
CD/MD
Standard screen
List screen
Elapsed
playing
time
Track
name*6/
ID3 tag*6
Disc*7/
Album*6
name
REPEAT
icon*3
Track
number
Disc*4/
Group*5
Album*6
number
SHUFFLE
icon*3
CD/MD unit
number*2
CD/MD icon
Standard/List
switch icon*1
Group*5/
Artist*8
name
Disc names
REPEAT
icon*3
SHUFFLE
icon*3
CD/MD unit
number*2
CD/MD icon
Standard/List
switch icon*1
Current
disc icon
Continued on next page
• • • • • • • • • • • • • • • • • • • • • • • • • • •
56
*1 Available only when one or more optional CD/MD changers are connected. To
display the List screen, tap the Standard/List switch icon. If there is no list, “PUSH
LIST BUTTON ON HEAD UNIT” is displayed. In this case, press the LIST button
of the Sony car audio.
*2 Available only when two or more optional CD/MD units are connected.
*3 For details about SHUFFLE/REPEAT play, refer to the manual supplied with the
Sony car audio.
*4 Available only when an optional CD/MD changer is connected.
*5 Available only when an MD containing groups is inserted in the Sony car audio and
played.
*6 Available only when an MP3 file is played or CD TEXT disc contains displayable
information.
*7 If the disc has been labeled by the Sony car audio using the CUSTOM FILE function,
Disc Memo is displayed accordingly.
*8 Only for CD TEXT discs with the artist name.
Notes
• Depending on the connected unit (Sony car audio), the display item may differ.
• If a name consists of many characters, the end is displayed as “…”
• Some characters cannot be displayed. Characters and signs which cannot be displayed
appear as “ *.”
• Display items are not scrolled.
• The Sony car audio recognizes your CLIÉ handheld as an MD unit. When “PDA” is
selected as a source, “MD” is displayed on the Monitor screen and the screen
automatically changes to the Music screen.
Tuner
Standard/List
switch icon*1
Radio band
Preset
number
Station
memo*2
Stereo/Mono
Local
Frequency*3/
SEEK/BTM
Tuner icon
57
List screen
*1 To display the List screen, tap the Standard/List switch icon. If there is no list,
“PUSH LIST BUTTON ON HEAD UNIT” is displayed. In this case, press the LIST
button of the car audio (depending on the Sony car audio, the List screen may not
display when you press the LIST button on the Sony car audio).
*2 Available only when a station memo is stored.
*3 “--ch” is displayed when a TV signal is received.
Cassette Tape
* The icon does not apply.
Tuner icon
Standard/List
switch icon*1
Station
memo*2/
Frequency
Radio band
Current
station/
frequency icon
Blank skip
icon
Dolby icon
Play/FF/
REW/AMS
icon
Metal/
A.Metal icon
Switch icon*
Tape icon
Intro icon
Repeat icon
Continued on next page
• • • • • • • • • • • • • • • • • • • • • • • • • • •

58
Others
• When the Clock (OFF) display is displayed on the Sony car audio, the
current date and the clock is displayed on the Monitor screen. The time is
controlled by the CLIÉ handheld. Indicated time may differ from that of the
Sony car audio.
• When AUX is selected, “AUX” is displayed.
• When an undefined unit is selected, source name and some information are
displayed.

59
Other functions
Car Setting
Car Setting enables you to customize the setting options on your CLIÉ™
handheld for in-vehicle mode.
Displaying the Car Setting screen for each menu
Notes
• When you operate Car Setting, detach your CLIÉ handheld from the car cradle.
During in-vehicle mode, Car Setting is not displayed.
• After parking your car in a safe place, detach your CLIÉ handheld from the car cradle
and operate.
1Detach your CLIÉ handheld from the car cradle.
2Tap the Car Setting icon on the CLIE Launcher screen.
The Car Setting screen is displayed.
3Tap the arrow V in the top right-hand corner of the
screen and select the Car Setting menu you want to
configure.
Continued on next page
• • • • • • • • • • • • • • • • • • • • • • • • • • •

60
Car Setting menu items
Setting options may be added by installing new applications or software for
peripheral devices.
bFor details, refer to the listed pages.
Settings Details
Uninstall 61 Uninstalls the Car Cradle basic software and Audio
Monitor software on your CLIÉ handheld.
Sound 62 Configures the settings for the Sound function.
(System Sound/Lower audio volume during voice
playback/FM Transmitter/Delay time to Sony Car
Audio)
Display Order 63 Customizes the display order for Car Launcher.
App Buttons 64 Customizes applications assigned to application
buttons on the wireless card remote commander.
Screensaver 65 Configures the settings for the Screensaver
function.
(Enable screen saver/Activation time/Display
interval/Selection of images/Sort by)
Miscellaneous 67 Configures the settings for Miscellaneous.
(Attach and Detach alert/Today popup/Color
changing)
Voice Parameters 69 Sets the voice pitch, speed and animation for the
Text-to-voice application.
Mail 70 Configures the settings for the Mail application.
Music 72 Configures the settings for the Music application.
Photo 73 Configures the settings for the Photo application.
Schedule 74 Configures the settings for the Schedule
application.

61
Uninstalling the Car Cradle basic software
on your CLIÉ handheld
If you uninstall, you will not be able to use any applications/functions for the
car cradle. When you mount your CLIÉ handheld in the car cradle after
uninstallation, your CLIÉ handheld remains in normal CLIÉ mode.
1Tap the arrow V in the top right-hand corner of the Car
Setting screen and select Uninstall.
The Uninstall setting dialog box is displayed.
2Tap Yes or No.
–Yes: The Car Cradle basic software is uninstalled.
The confirmation dialog box is displayed. Tap Reset.
–No: To cancel the uninstallation.
Note
When using the Car Cradle basic software again, you need to reinstall it.
bFor details about reinstallation, refer to “Installing software for the car cradle” on
page 15.

62
Setting Sounds
You can configure various sound settings.
Displaying the Sound screen
Setting the System Sound
You can adjust the volume level of the system sounds.
Setting Lower audio volume during voice playback
You can select whether or not to lower music volume when the Text-to-voice
application is used.
Setting the FM Transmitter
bFor details about the FM transmitter, refer to page 46.
Tap the arrow V in the top right-hand corner of the Car
Setting screen and select Sound.
The Sound setting screen is displayed.
Tap the arrow V next to System Sound and select the
desired volume level or Off.
Tap the Lower audio volume during voice playback check
box.
When the check box is checked, music volume is lowered.
1Tap the FM Transmitter check box if you use the FM
transmitter.
Frequency is displayed.
2Tap the arrow V or v next to Frequency and select the
desired frequency.
You can select a frequency from 95.9 MHz to 101.9 MHz.
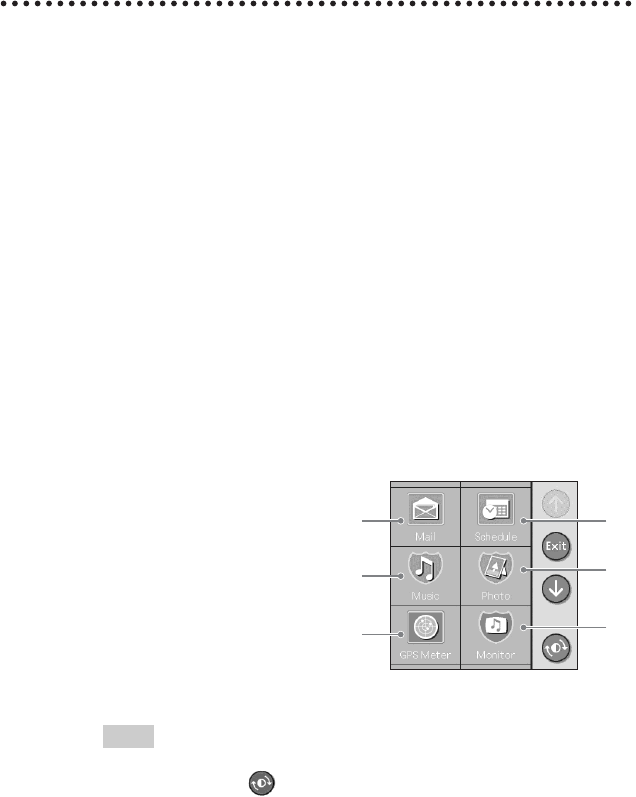
63
Setting the Delay time to Sony Car Audio
You can set playback start time to provide time for the Sony car audio to
recognize your CLIÉ handheld. This setting prevents the beginning of a track
being cut off.
Setting the Display Order
You can customize the display order for Car Launcher.
Tap the arrow V next to Delay time to Sony Car Audio
and select the desired delay time.
1Tap the arrow V in the top right-hand corner of the Car
Setting screen and select Display Order.
The Display Order setting screen is displayed.
2Tap an application you want to move, and then tap Move
Up or Move Down.
Applications for the car cradle are listed.
–Move Up: To move the selected application up.
–Move Down: To move the selected application down.
3Tap Preview.
The Car Launcher preview screen is displayed.
You can preview the display order.
1Tap the arrow x/X to go to the previous/next screen.
2Tap Exit to return to the Display Order setting screen.
Tips
• The application icons are not available.
• The color changing icon is available.
1
3 4
5
2
6
Display order
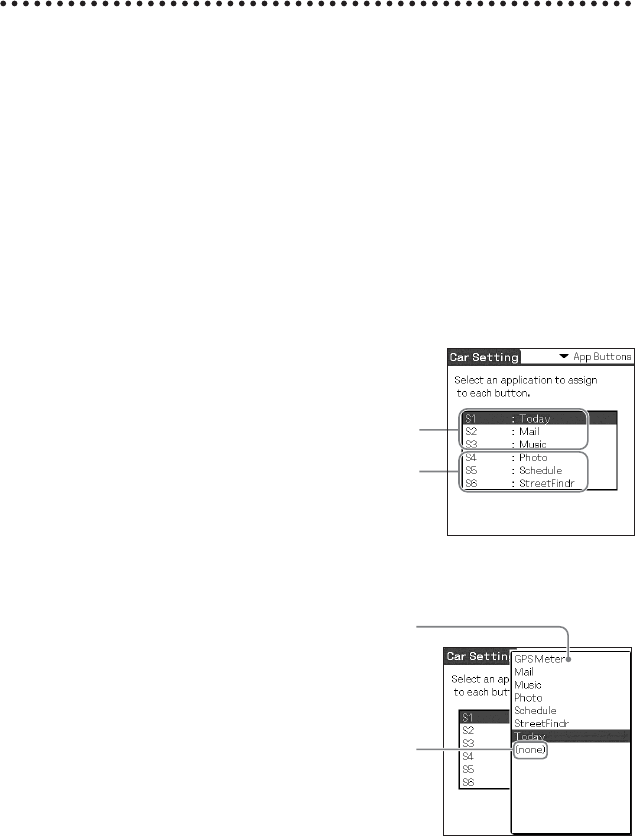
64
Assigning Applications to Application
Buttons
You can assign your favorite applications to the application buttons (S1 to S6)
on the wireless card remote commander for quick access to them and display
them on the Car Launcher screen.
• The default setting is:
S1 = Today
The others = appear in alphabetical order.
1Tap the arrow V in the top right-hand corner of the Car
Setting screen and select App Buttons.
The App Buttons setting screen is displayed.
2Tap S1 to S6, then tap a listed application you want to
assign.
S4 to S6: To assign applications to the S4 to
S6 buttons by holding down the S1 to S3
buttons on the wireless card remote
commander.
S1 to S3: To assign applications to the S1 to
S3 buttons on the wireless card remote
commander.
Applications for the car cradle are listed.
No assignation.
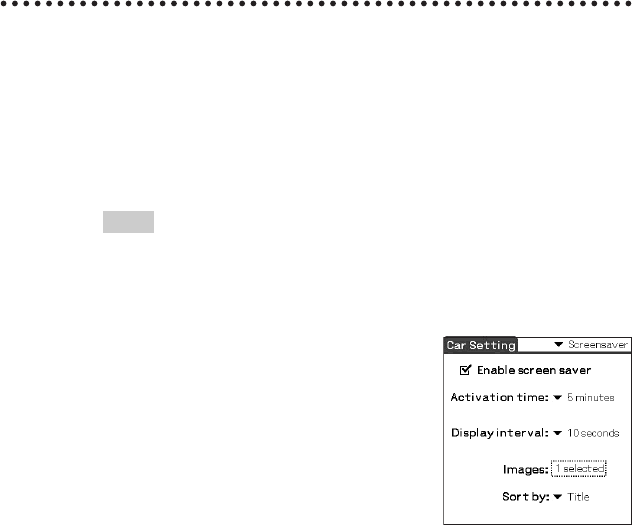
65
Setting Screensaver
1Tap the arrow V in the top right-hand corner of the Car
Setting screen and select Screensaver.
The Screensaver setting screen is displayed.
2Tap the Enable screen saver check box.
Tips
• When the check box is cleared, the items shown below Enable screen saver
do not appear.
• Images set to screensaver are used for the Photo screen of the Music
application. The Photo screen is not affected, regardless of the check box setting.
3Tap the arrow V next to Activation time and select the
desired time.
4Tap the arrow V next to Display interval and select the
desired display interval.
Continued on next page
• • • • • • • • • • • • • • • • • • • • • • • • • • •
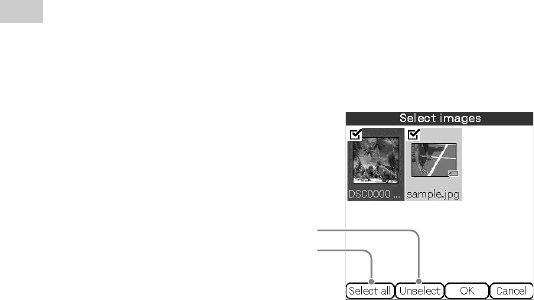
66
5Tap the box next to Images and select images.
The Select images screen is displayed.
Tip
If there are no images, “No data to select” is displayed. Store images in your CLIÉ
handheld or a “Memory Stick” media.
1Tap the check box to select images.
2Tap OK.
The number of selected images are displayed in the box next to
Images.
6Tap the arrow V next to Sort by and select the desired
sort.
Title: file name
Date: date of file
Random: random order
Select all: To select all images on “Memory
Stick” media or your CLIÉ handheld.
Unselect: To cancel the selection of all
images.
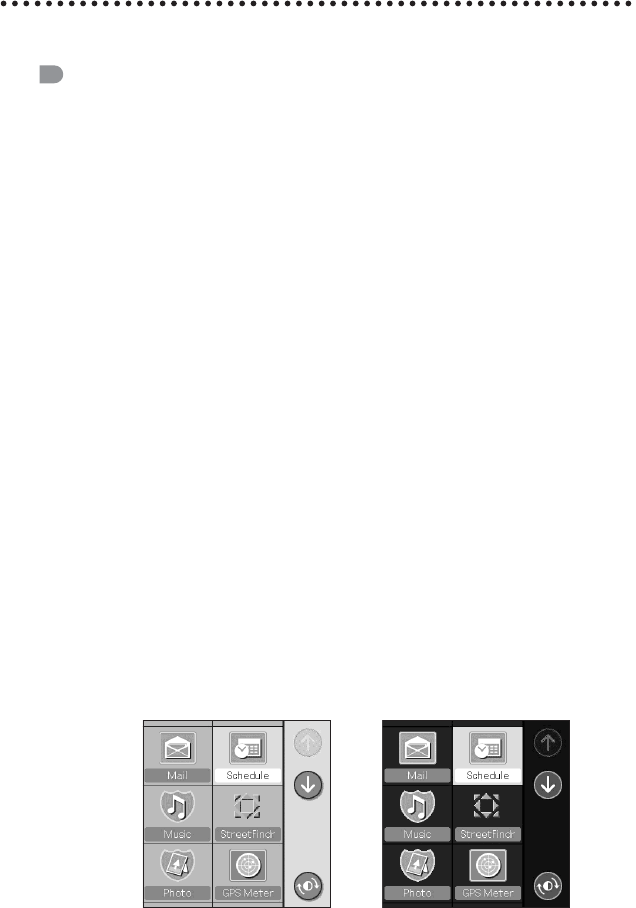
67
Setting Miscellaneous
Displaying the Miscellaneous screen
Setting attach/detach alert
You can select whether or not to enable the alert when your CLIÉ handheld
changes between in-vehicle mode and normal CLIÉ mode.
Setting the Today popup
You can select whether or not to enable the activation of Today application
automatically.
bFor details about the Today application, refer to page 43.
Setting color changing
You can set the screen color mode, day mode or night mode.
All applications have both modes, which automatically change at the specified
time set by you.
Tap the arrow V in the top right-hand corner of the Car
Setting screen and select Miscellaneous.
The Miscellaneous setting screen is displayed.
Tap the Enable Attach/Detach alert check box.
When the check box is checked, the alert is enabled.
Tap the Enable Today popup check box.
When the check box is checked, Today is enabled.
n
Day mode Night mode
Continued on next page
• • • • • • • • • • • • • • • • • • • • • • • • • • •
68
To manually change the screen color
Tap the icon on the Car Launcher screen.
The color changes regardless of any setting.
1Tap the Enable color changing check box.
When the check box is checked, the color changes automatically at the
specified time set by you.
Tips
• When the check box is cleared, the items in the following steps do not appear.
• To disable the automatic screen color change, you need to clear the check box.
The color changes only when you tap the icon on the Car Launcher screen.
2Tap the box next to Sunrise.
The Sunrise time screen is displayed.
1Tap each box to set the hour and minute.
Note
If you set the Sunrise time later than Sunset time, an error message appears.
2Tap OK.
3Tap the box next to Sunset.
The Sunset time screen is displayed.
1Tap each box to set the hour and minute.
Note
If you set the Sunset time earlier than Sunrise time, an error message appears.
2Tap OK.

69
Setting the voice pitch, speed and
animation for reading out (Text-to-voice
function)
You can set the voice pitch, speed and animation of reading out (Text-to-voice
function).
This setting applies to all Text-to-voice applications.
1Tap the arrow V in the top right-hand corner of the Car
Setting screen and select Voice Parameters.
The Voice Parameters setting screen is displayed.
2Tap the arrow V/v or the slider next to Pitch and select
the desired pitch.
You can select the pitch from 0 (Lowest) to 10 (Highest).
The default setting is 5.
3Tap the arrow V/v or the slider next to Speed and select
the desired speed.
You can select the speed from 0 (Slowest) to 10 (Fastest).
The default setting is 5.
4Tap the Enable Voice Animation check box.
When the check box is checked, the animation is enabled.
5Tap Done.
70
Configuring the Mail settings
You can configure the settings for the Mail application.
Tip
When you tap the CLIE Mail icon at the bottom of the Mail setting screen, the CLIE
Mail application (normal CLIÉ mode) is activated.
To go to the previous/next page.
Tap <</>>.
There are 4 pages.
1Tap the arrow V in the top right-hand corner of the Car
Setting screen and select Mail.
The Mail setting screen is displayed.
2Tap the check box next to each option to select it. Refer
to the explanation below for details about each option.
3Tap Done.
Read: Date/Subject/
Sender
• The order of selected items is fixed.
Date b Subject b Sender
• You have to check at least one box in this group.
Mark a message as
read
•when starting: after reading out the header
•when finished: after reading out all
•never: do not change
Read The target to read out:
–all mail: all read mail and unread mail
–unread mail only: read out only unread mail
Mail folders to open • One or more folders can be selected.
• The folder names which are stored on the CLIE
Mail application are displayed.
bFor details about the folder, refer to the manuals
supplied with your CLIÉ handheld.
• If no folder is stored, only the Inbox is
displayed.

71
Configuring Signature filter setting
If no mail is stored, you cannot store the signature.
Filter settings •Use Content filter:
Text from an original mail, such as a reply, will
also be read out. If the first character of a line
matches a character stored in the filter, a chime
sound will be heard at the beginning and end of
a reply message when the mail is read out.
Characters stored in the filter are not read out.
You can store up to 5 characters.
Tap the Use Content filter check box then
enter the desired character in each field.
•Use Signature filter:
bFor details, see below.
•Use Symbol filter:
Tap the arrow V and select the desired number.
If you want to be read the first symbol only,
check the Read first symbol only check box.
1Tap ‘Signature Manager’.
The Signature Manager screen is displayed.
2Tap Mail.
The subject is displayed in the list on the left.
Tap Mail again. The sender is displayed in the list on the left.
3Tap the subject/sender in the list on the left.
The body is displayed in the list on the right.
4Tap the signature in the list on the right.
5Tap Add to store the sentence as a signature.
The signature is displayed in the list on the left.
Left list Right list
While displaying the subject/
sender, Mail switches to Mail
(Subject)/Mail (Sender).
Continued on next page
• • • • • • • • • • • • • • • • • • • • • • • • • • •

72
To remove the stored signature
Tap the desired signature in the list on the left and then tap Remove.
To complete/exit the Signature Manager screen
Tap Return.
Note
If the body/subject/sender/signature consists of many characters, the end is displayed as
“…”
Configuring the Music settings
You can configure the setting for the Music application.
Tip
When you tap the AudioPlayer icon at the bottom of the Music setting screen, the
Audio Player application (normal CLIÉ mode) is activated.
6Tap the stored signature in the list on the left to confirm
it.
The signature is displayed in the list on the right.
1Tap the arrow V in the top right-hand corner of the Car
Setting screen and select Music.
The Music setting screen is displayed.
2Tap the check box next to each option to select it. Refer
to the explanation below for details about each option.
3Tap Done.
Enable operation beep If you want the beep to sound when you use
controls, tap to select the check box.

73
Configuring the Photo settings
You can configure the settings for the Photo application.
Auto Change to
Monitor
• Check this box if you want to change the Music
screen to the Monitor screen automatically.
• The screen switches to Monitor: when you
change the source of a Sony car audio while the
Music application is selected.
Tip
The screen does not switch to Monitor when “PDA” is
selected as a source for a Sony car audio. This setting
appears only when the Monitor application is installed
and the SONY-BUS connection adapter is connected.
Photo Change Trigger To set the trigger to change the photo.
•Manual: to change the photo manually.
•Track: to change the photo when a new track is
played.
•Timer: to change the photo at a set time.
– If you select Timer, the Timer Setting
item is displayed.
Tap the arrow V next to Timer Setting, and
then select the desired time.
1Tap the arrow V in the top right-hand corner of the Car
Setting screen and select Photo.
The Photo setting screen is displayed.
2Tap the arrow V and select the desired setting.
3Tap Done.
Display interval To select the interval between images.
Sort by To select the sorting method by Title/Date/
Random.
74
Configuring the Schedule settings
You can configure the settings for the Schedule application.
Tip
When you tap the DateBook icon at the bottom of the Schedule setting screen, the
Data Book application (normal CLIÉ mode) is activated.
To go to the previous/next page.
Tap <</>>.
There are 2 pages.
1Tap the arrow V in the top right-hand corner of the Car
Setting screen and select Schedule.
The Schedule setting screen is displayed.
2Tap the check box next to each option to select it. Refer
to the explanation below for details about each option.
3Tap Done.
Read private items To always play a private item. When a private item
is read, the password check is not given.
Read Events To always play an event during the Normal reading
out mode.
Read notes To always play a note.
Tip
Reading out a note is not available during Start time
reading out mode or Alarm reading out mode.
Search next schedule
within [ ] day(s) from
today.
To set the period in which the next schedule is
searched.
Tap the arrow V or v to select the period of days
(0 to 31 days).
Apply 'location' To interpret text input in parentheses of the
schedule/event title as location.
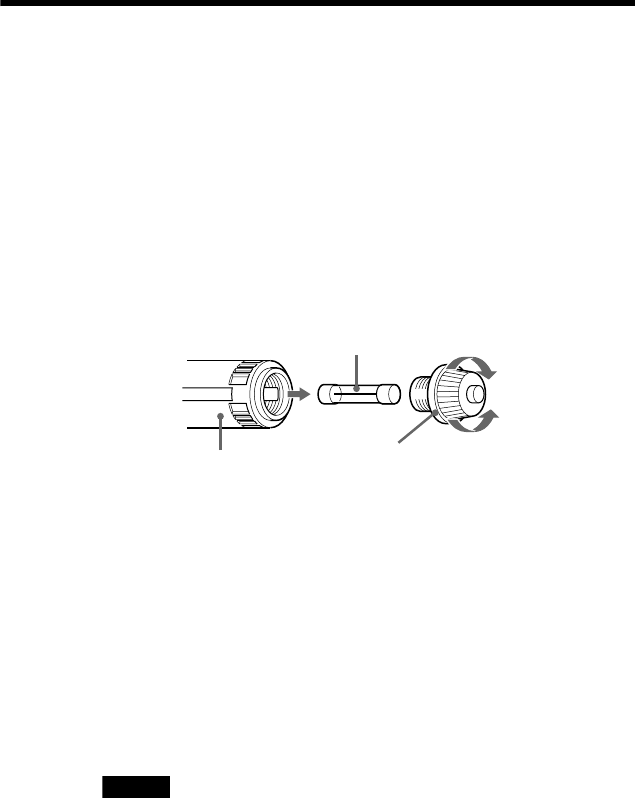
75
Additional information
This section describes how to solve common problems you may encounter when using
your CLIÉ™ handheld with the car cradle.
Maintenance
Fuse replacement
If the car cradle does not function correctly when connected to the car battery
adapter, make sure that the fuse in the car battery adapter has not burned out.
If it has burned out, replace the fuse by the following procedures.
1Pull the car battery adapter out of the cigarette lighter
socket.
2Detach the end of the plug by turning it
counterclockwise.
3Replace the fuse with a new (identical rating) one.
4Reattach the end of the plug by firmly turning it
clockwise.
Notes
• When replacing the fuse, use one of the correct amperage, as stated on the fuse
case. (2.5 A, 125 V DC, approx. 30 mm)
• Do not replace the fuse with a wire.
• If the replaced fuse immediately burns out again, consult your car dealer.
Fuse
Cigarette lighter plug End of
the plug
to remove
to tighten
Continued on next page
• • • • • • • • • • • • • • • • • • • • • • • • • • •
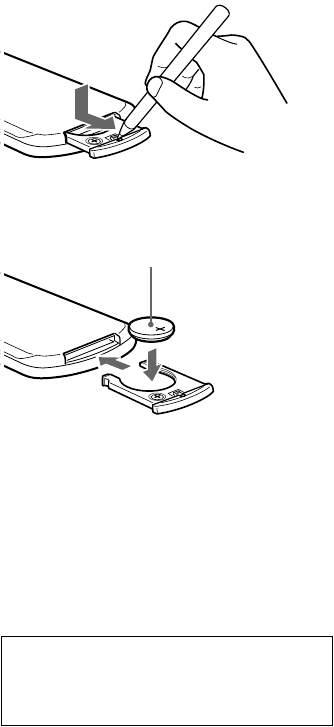
76
Replacing the lithium battery
Under normal conditions, battery will last approximately 1 year. (The service
life may be shorter, depending on the conditions of use.) When the battery
becomes weak, the range of the wireless card remote commander becomes
shorter. Replace the battery with a new CR2025 lithium battery. Use of any
other battery may present a risk of fire or explosion.
Notes on lithium battery
• Keep the lithium battery out of the reach of children. Should the battery be
swallowed, immediately consult a doctor.
• Wipe the battery with a dry cloth to assure a good contact.
• Be sure to observe the correct polarity when installing the battery.
• Do not hold the battery with metallic tweezers, otherwise a short-circuit may
occur.
x
+ side up
WARNING
Battery may explode if mistreated.
Do not recharge, disassemble, or dispose of
in fire.

77
Troubleshooting
The following checklist and the manuals supplied with your CLIÉ™ handheld will help
you remedy problems you may encounter with your unit. Before going through the
checklist below, check the connection and operating procedures.
Sony recommends that you make a note of displayed messages or alerts for future
references.
General
My CLIÉ handheld is not held by holding arm.
tCheck the size of the holding arm when use the supplied holding arm for your
CLIÉ handheld. Do not use your CLIÉ handheld if it is not compatible with the car
cradle.
tCheck if you are using the correct holding arm for your CLIÉ handheld. There are
two holding arms supplied.
Power
The Power LED does not turn on when my CLIÉ handheld is mounted in
the car cradle.
• Verify the ignition switch is in the ON position.
• Verify if your CLIÉ handheld is compatible with the car cradle.
• Check the connection of the car battery adapter to the cigarette lighter socket.
• Check the connection between the car cradle and the car battery adapter.
• Check the fuse in the car battery adapter.
• Check the battery level of your CLIÉ handheld.
The battery cannot be charged.
• If the battery of your CLIÉ handheld is low, the battery cannot be charged because
the CLIÉ handheld cannot activate.
• If the temperature around the battery exceeds a certain temperature, the battery
cannot be charged to protect the battery.
tStop charging the battery until the temperature around the battery drops.
Continued on next page
• • • • • • • • • • • • • • • • • • • • • • • • • • •
78
Operation
The Car Installer is not performed properly.
tYou cannot install the Car Cradle basic software on “Memory Stick” media. Be
sure to download the Car Cradle basic software to your CLIÉ handheld by the
HotSync® operation, then perform Car Installer.
I cannot operate normal CLIÉ applications.
While your CLIÉ handheld in-vehicle mode, the car cradle system restricts certain
applications/functions on your CLIÉ handheld for safety purposes. You cannot
operate normal CLIÉ applications/functions during in-vehicle mode.
The HotSync® screen is activated when my CLIÉ handheld is mounted in
the car cradle.
tCancel the HotSync® operation by tapping the cancel icon on the HotSync®
screen after detaching your CLIÉ handheld from the car cradle, then remount the
CLIÉ handheld in the car cradle.
• Are the connectors clean?
tClean the connectors with a cloth, etc., if they are not clean.
The Car Launcher screen is not activated.
• Is the Car Cradle basic software installed?
• Are the connectors clean?
tClean the connectors with a cloth, etc., if they are not clean.
• Is the POWER/HOLD switch of your CLIÉ handheld in the HOLD mode?
I cannot return to the Car Launcher screen from an application (on short
screen type).
The Home icon is not on the screen.
tPress the HOME button on the wireless card remote commander or the Home
button on your CLIÉ handheld.
The time on the time indicator has changed suddenly.
The time on your CLIÉ handheld is updated automatically by GPS data.
The CLIÉ application does not switch to in-vehicle mode screen although I
mounted the CLIÉ handheld in the car cradle.
Depending on the running application, the application cannot be switched.
tDetach your CLIÉ handheld from the car cradle and quit the application, then
remount the CLIÉ handheld in the car cradle.
The screen switches with no operation.
Is the color changing mode, screensaver or the Today application activated?
tDisable the color changing mode (page 67), the screensaver (page 65) and the
Today application (page 67).

79
GPS
GPS signal cannot be received.
• The system cannot receive GPS signals due to an obstruction.
tMove your car somewhere clear.
• GPS signal reception is low.
tActivate the GPS Meter application and check the GPS signal values.
• The GPS antenna is incorrectly installed.
tInstall the GPS antenna where the signal is not interrupted by the body of the car,
and install the antenna horizontally on the roof.
For details, refer to the Installation/Connections manual.
• The GPS antenna is not properly connected to the car cradle.
tInsert the connector of the antenna cable until it clicks into the GPS ANT port of
car cradle.
For details, refer to the Installation/Connections manual.
The map of my current GPS location does not match the current road when
using the StreetFinder application.
The error margin of the signal from the GPS satellites is too large. An error margin of
a few hundred meters can exist in the worst case.
Function
The built-in speaker does not work for the Text-to-voice function.
Is the volume too low? Is the ATT on?
The volume adjustment and ATT button does not work.
You can adjust the volume level only while the Text-to-voice application is being used
or read out.
The FM transmitter output does not function.
• Is the FM transmitter disabled?
Check the FM Transmitter check box on the Sound setting (page 62). If
interference noise during audio playback occurs, change the frequency of the
transmitter.
• Is the FM transmitter frequency properly set?
tTune the car audio radio frequency to that set for the FM transmitter.
When the SONY-BUS connection adapter is connected between Sony car audio
and the car cradle, the FM transmitter is disabled.
The LINE-OUT output does not function.
When the SONY-BUS connection adapter is connected between Sony car audio and
the car cradle, the LINE-OUT output does not function.
Music is not being heard from the built-in speaker.
The built-in speaker is only for Text-to-voice applications, not for music.
Continued on next page
• • • • • • • • • • • • • • • • • • • • • • • • • • •

80
Error displays/Messages
When error displays/messages appear in the screen, follow the instructions on error
message.
If these solutions do not help improve the situation, perform a reset of your CLIÉ
handheld.
bFor details about performing a reset, refer to the manuals supplied with your CLIÉ handheld.
The wireless card remote commander does not function.
When the battery becomes weak, the range of the wireless card remote commander
becomes shorter (page 76). Buttons may not function depending on the operating
situation.
The dimmer does not function.
tMake sure the dimmer position is AUTO (page 12).
When the ignition switch is in the OFF position, an alarm sounds and the
screen flashes.
This is the caution alarm function. When the ignition switch is in the OFF position, no
power is being supplied to the car cradle since it uses power from the cigarette lighter
socket.
tTo stop the caution alarm, refer to page 27.
81
Specifications
ALL
Operating temperature 5 ºC to 35 ºC
(41 ºF to 95 ºF)
Cradle (Body)
Storage temperature – 40 ºC to 80 ºC
(– 40 ºF to 170 ºF)
Dimensions (W/H/D) Approx.
78.2 × 138.5 × 37.4 mm
(3 1/8 × 5 1/2 × 1 1/2 in)
Mass Approx. 155 g (6 oz)
Connection terminal DC power adapter
(5.2 V)
CLIÉ I/F
LINE-OUT
GPS Antenna
Connection adapter
Audio Specifications
Frequency response 20 Hz to 20,000 Hz
Built-in Speaker
Maximum power output 1 W
Car Battery Adapter
Input 19 W
Output 5.2 V DC, 3,000 mA
Operating temperature 5 ºC to 35 ºC
(41 ºF to 95 ºF )
Dimensions (W/H/D)
Approx. 112
×
48
×
38 mm
(4 1/2 × 1 15/16 × 1 1/2 in)
Mass Approx. 105 g (3 oz)
Cord length Approx. 1.5 m (59 1/8 in)
GPS Receiver
Location method All in view method
Maximum number of tracking satellite
8 satellites
Revive sensitivity Less than –130 dBm
Receive frequency 1575.42 MHz
GPS Antenna
Micro strip planer antenna
FM Transmitter
Transmission range 2.4 m to 3.0 m
(8 ft to 10 ft)
Frequency response 95.9 MHz to 101.9 MHz
Power Supply
Requirement 12 V DC car battery
(negative ground)
Input 19 W
Output 5.2 V DC, 3000 mA
Fitting Kit
Dimensions (W/H/D)
Approx. 40
×
88
×
59
mm
(1 5/8 × 3 1/2 × 2 3/8 in)
Mass Approx.75 g (3 oz)
Supplied Accessories
Car battery adapter XA-DC5
Wireless card remote commander
RM-X136
GPS antenna VCA-36
Installation CD-ROM
StreetFinder® C3 Travel Navigation
Software CD-ROM
Parts for installation and connections
StreetFinder® C3 Travel Navigation
Software User’s Guide
Design and specifications are subject to change
without notice.
Continued on next page
• • • • • • • • • • • • • • • • • • • • • • • • • • •

82
Computer system
requirements
You need one of the following
systems installed on your computer to
be able to use the Palm™ Desktop for
CLIÉ software and software supplied
on the installation CD-ROM:
• OS: Microsoft Windows 98 Second
Edition, Windows Millennium
Edition, Windows 2000
Professional, Windows XP Home
Edition, Windows XP Professional
• CPU: Pentium II 400MHz or more
(Pentium III 500MHz or more is
recommended)
• RAM: 96MB or more (128MB or
more is recommended, 256MB or
more is recommended for Windows
XP)
• Hard drive space: 200MB (350MB
or more is recommended)
• Display: High Color or more,
800 ×600 dots or more is
recommended
•CD-ROM drive
•USB port
• Pointing device such as a mouse or
touchpad
For details about StreetFinder®, refer
to the StreetFinder User's Guide.
Design and specifications are subject
to change without notice.

83
INDEX
A
Alarm reading out mode. . . . . . . . . . 39
App Buttons . . . . . . . . . . . . . . . . . . . 64
Applications . . . . . . . . . . . . . . . . . . . 31
ATT . . . . . . . . . . . . . . . . . . . . . . . . . . 12
Attach/detach alert. . . . . . . . . . . . . . 67
Audio Monitor software . . . . . . . 16, 54
B
Built-in speaker. . . . . . . . . . . . . . . . . 11
C
Car Cradle basic software. . . . . . . . . 15
Car Installer . . . . . . . . . . . . . . . . . . . 17
Car Launcher . . . . . . . . . . . . . . . . 8, 28
Car Setting . . . . . . . . . . . . . . . . . 17, 59
Cassette adapter. . . . . . . . . . . . . 45, 48
Caution alarm. . . . . . . . . . . . . . . . . . 27
Color mode
(day/night time mode) . . . . . . . . 29, 67
Content filter . . . . . . . . . . . . . . . 36, 71
D
Delay time to Sony Car Audio. . . . . . 63
Dimmer. . . . . . . . . . . . . . . . . . . . . . . 12
Display Order . . . . . . . . . . . . . . . . . . 63
F
Filtering . . . . . . . . . . . . . . . . . . . . . . 36
FM transmitter . . . . . . . . . . . 45, 46, 62
Fuse . . . . . . . . . . . . . . . . . . . . . . . . . 75
G
GPS. . . . . . . . . . . . . . . . . . . . . . . . . .53
GPS Meter (application) . . . . . . . 10, 53
H
HOLD mode. . . . . . . . . . . . . . . . . . . .26
I
In-vehicle mode . . . . . . . . . . . . . . . .23
L
LINE OUT . . . . . . . . . . . . . . . . . . . . .48
Lithium battery . . . . . . . . . . . . . . . . .76
Long screen type. . . . . . . . . . 20, 28, 29
Lower audio volume during voice
playback . . . . . . . . . . . . . . . . . . . . . . 62
M
Mail (application) . . . . . . . . . . 8, 33, 70
Miscellaneous . . . . . . . . . . . . . . . . . .67
Monitor (application) . . . . . . . . . 10, 54
Music (application) . . . . . . . . . 9, 45, 72
N
Normal reading out mode. . . . . . . . . 38
P
PDA. . . . . . . . . . . . . . . . . . . . . . . . . . 47
Photo (application) . . . . . . . . . 9, 52, 73
Play mode. . . . . . . . . . . . . . . . . . . . .50
Continued on next page
• • • • • • • • • • • • • • • • • • • • • • • • • • •
For the latest support information, check our
official Sony CLIÉ Web site
Customers in USA
http://www.ita.sel.sony.com/support/clie/access/
R
REP (Repeat). . . . . . . . . . . . . . . . . . . 50
S
Schedule (application) . . . . . . 8, 38, 74
Screensaver . . . . . . . . . . . . . . . . 30, 65
Short screen type . . . . . . . . . 20, 28, 29
Signature . . . . . . . . . . . . . . . . . . 36, 71
Sleep mode. . . . . . . . . . . . . . . . . . . . 26
SONY-BUS connection
adapter. . . . . . . . . . . . . . . . . 45, 47, 54
Sound . . . . . . . . . . . . . . . . . . . . . . . . 62
Start time reading out mode. . . . . . . 39
StreetFinder (application) . . . . . . . 9, 51
StreetFinder® C3 Travel Navigation
Software . . . . . . . . . . . . . . . . . . . . . . 15
Symbol . . . . . . . . . . . . . . . . . . . . 37, 71
System Sound . . . . . . . . . . . . . . . . . . 62
T
Text-to-voice
(application/function) . . . 33, 38, 43, 69
Today (application). . . . . . . . . 9, 43, 67
Touch panel . . . . . . . . . . . . . . . . . . . 28
U
Uninstall . . . . . . . . . . . . . . . . . . . . . . 61
V
Voice Animation . . . . . . . . . . 34, 40, 69
Voice Parameters . . . . . . . . . . . . . . . 69
W
Warning message . . . . . . . . . . . . . . . 23
Wireless card remote commander. . . 13
Contents of this manual are printed on chlorine-free
paper using VOC (Volatile Organic Compound)-free
vegetable-oil-based ink.
Sony Corporation Printed in Japan
Customer Support