Sony Group PEGAWL110 Compact Flash Wireless LAN Card User Manual PEGA WL110
Sony Corporation Compact Flash Wireless LAN Card PEGA WL110
UserManual.wiki
>
Sony Group
>
PEGAWL110 User Manual
Manual
Navigation menu
Upload a User Manual
Namespaces
Wiki Guide
HTML
PDF
Info
Views
User Manual
Discussion / Help
Navigation
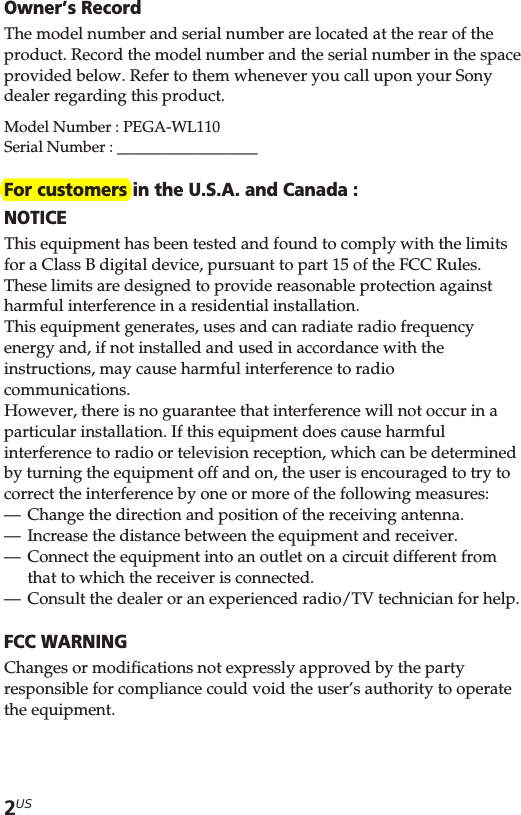

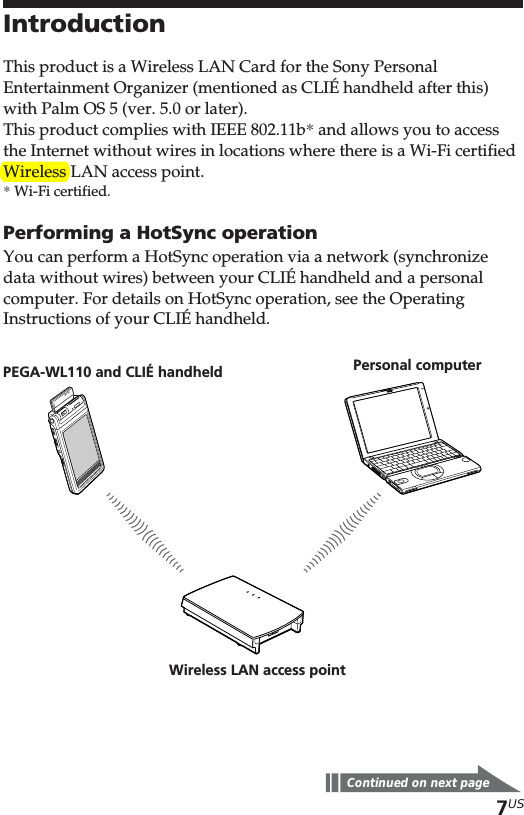
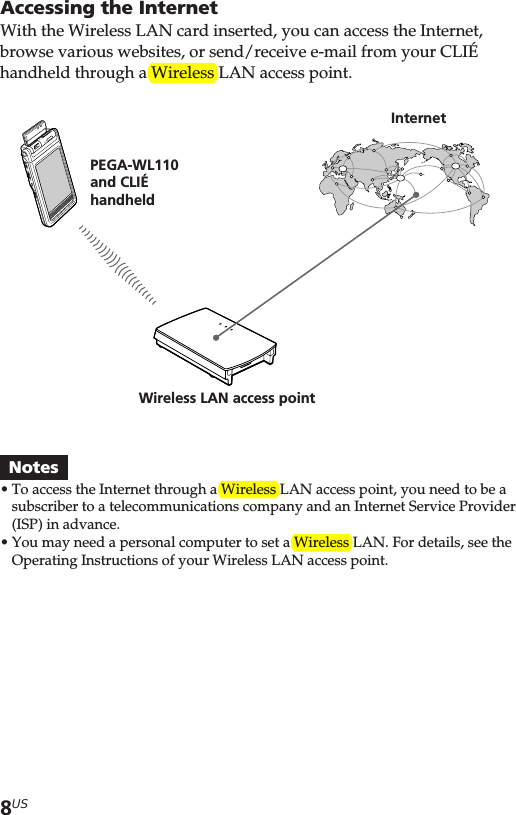
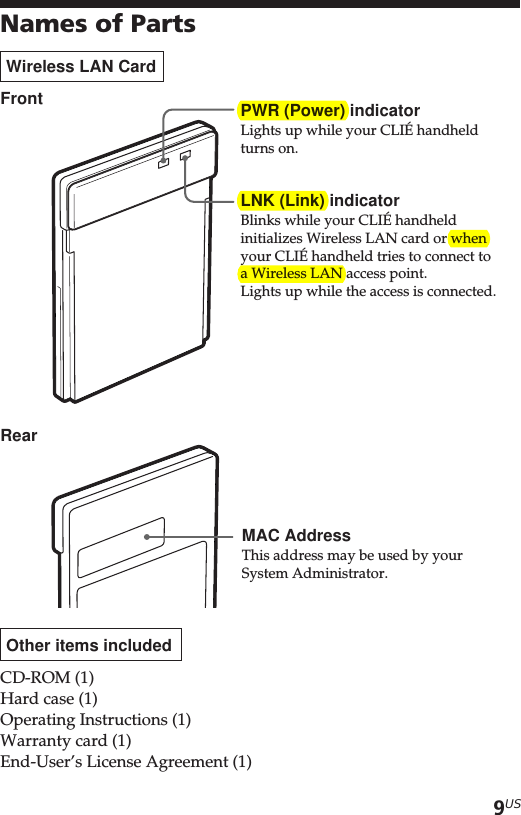
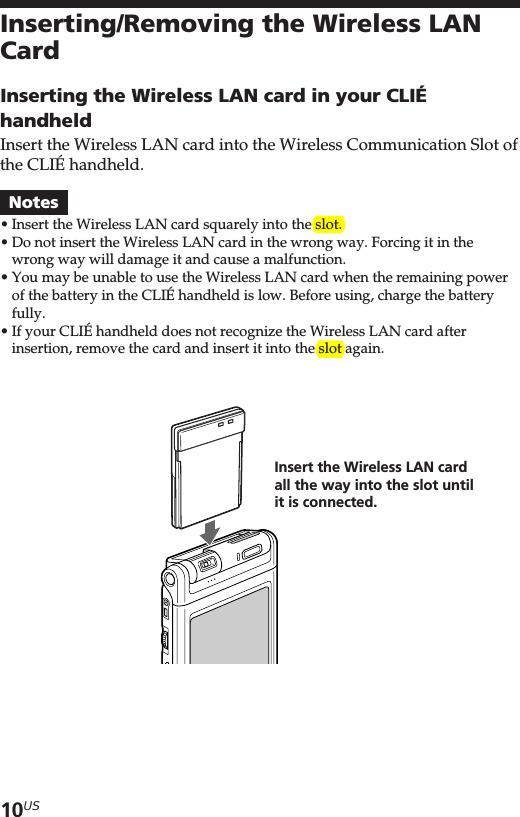
![12USInstalling the SoftwareWhen you try to perform Wireless LAN communications for the firsttime after inserting the Wireless LAN card in your CLIÉ handheld,you need to install the Wireless LAN utility on your CLIÉ handheld.You can install the Wireless LAN utility by using the supplied CD-ROM.TipThe Wireless LAN utility supplied with your Wireless LAN card (PEGA-WL110)can be used with both PEGA-WL100 and PEGA-WL110.If you use PEGA-WL100, also install the Wireless LAN utility by using thesupplied CD-ROM with your Wireless LAN card (PEGA-WL110).NoteBefore installation, it is necessary to have Palm Desktop for CLIÉ installed andto perform a HotSync operation. Connect the CLIÉ handheld to a Windowscomputer, using a cradle, etc. For details on how to connect the CLIÉ handheldto the computer, see the Operating Instructions of your CLIÉ handheld.1Perform a soft reset on your CLIÉ handheld.For details on how to perform a soft reset, see the OperatingInstructions of your CLIÉ handheld.2Insert the supplied CD-ROM in the CD-ROM drive ofyour Windows computer.The installer starts and the initial screen appears.TipIf the installer does not start automatically, double-click [setup] (setup.exe)which can be found on the CD-ROM.3Proceed with the installation, following the installer’sinstructions.On the user name selection screen, select a user’s name.NoteIf you want to use more than one CLIÉ handheld, you need to install thisutility on each CLIÉ handheld.](https://usermanual.wiki/Sony-Group/PEGAWL110/User-Guide-313254-Page-12.png)
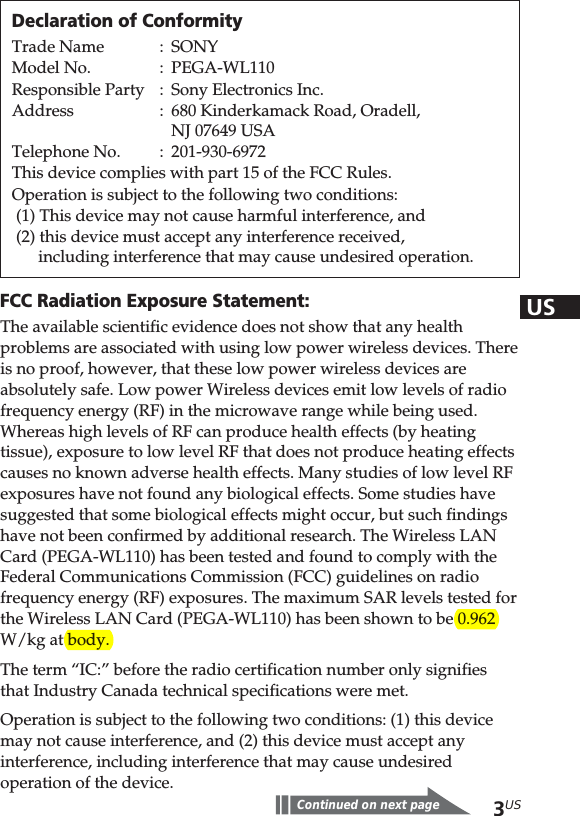
![13US4Click [Done] in Install Tool window.Your computer is ready to install the Wireless LAN utility on yourCLIÉ handheld. In the next step, you will perform a HotSyncoperation to carry out the installation.5Click the icon in the task tray (Notification area)that is located in the bottom right-hand corner of theWindows display on your computer.The [Local USB] check box should be selected in the shortcutmenu on the display.TipIf you cannot find the icon in the task tray (Notification area) , click[Programs] ([All Programs] in Windows® XP), [Sony Handheld], and then[HotSync Manager] to start up the HotSync manager, from the [Start]menu.6Execute a local HotSync operation on your CLIÉhandheld.The Wireless LAN utility is installed on your CLIÉ handheld.NotePart of this software application extends into the system of CLIÉ handheld.Therefore, it cannot be uninstalled.After you perform a hard resetMake sure you reinstall this utility.After a hard reset, normally, the backup data on a personal computeris automatically restored to your CLIÉ handheld through a HotSyncoperation. However, this utility restores only the setting file when aHotSync operation is performed, and it does not restore the utilityitself. Therefore, it is necessary to reinstall this utility after a hardreset.](https://usermanual.wiki/Sony-Group/PEGAWL110/User-Guide-313254-Page-13.png)
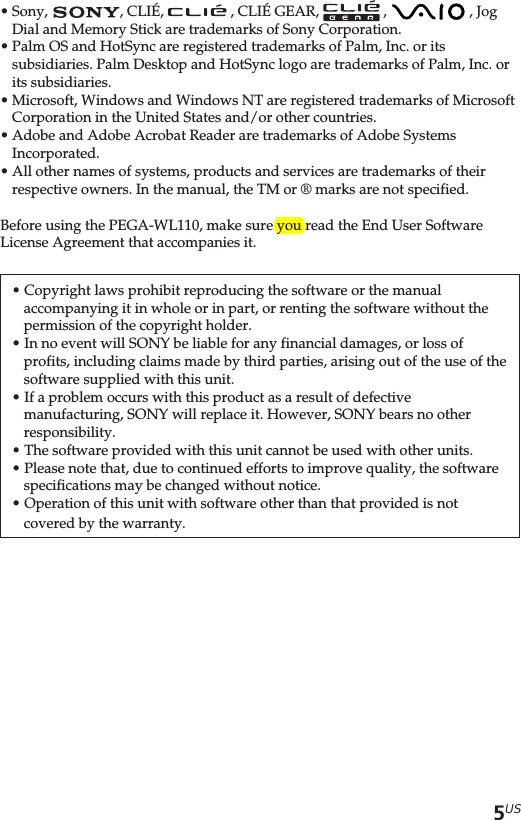
![14USPerforming Communications via aWireless LAN access point(Infrastructure Mode)You can wirelessly access the Internet or perform communicationswith another communication device through a Wireless LAN accesspoint.Basic SettingsBefore settingYou first need to input a couple of values to set the Wireless LAN access pointyou use. Check the following values in advance.[NetworkID (SSID)]: It is also called ESS-ID or Network Name.[WEP (Wired Equivalent Privacy)]: It is also called Encryption.For details, ask your System Administrator. If you have a Wireless LAN accesspoint for your personal use, refer to the operating instructions of the WirelessLAN access point.NoteThe Wireless LAN card uses a channel between 1ch. and 11ch.(2.4 GHzfrequency band). If your Wireless LAN access point uses a channel between12ch. and 14ch., it is impossible to perform communications using the WirelessLAN card.1Insert the Wireless LAN card in the WirelessCommunication Slot of your CLIÉ handheld.2Tap the [Prefs] icon on the home screen of your CLIÉhandheld.The [Preferences] screen appears.3Tap V in the top right-hand corner of the screen, andselect [Network].The [Network] screen appears.](https://usermanual.wiki/Sony-Group/PEGAWL110/User-Guide-313254-Page-14.png)
![15US4Tap V next to [Service], and select [Wireless LAN].5Tap [Details...] in the bottom left-hand corner of the screen.The [Wireless LAN Setup] screen appears.6Tap [Create].A new input screen of [Wireless LAN Setup] appears.Check that [Infrastructure] is selected (highlighted) in[ConnectMode]. If it is not selected, tap [Infrastructure].Continued on next page](https://usermanual.wiki/Sony-Group/PEGAWL110/User-Guide-313254-Page-15.png)
![16USTipTapping the mark in the top right-hand corner of the screen shows abrief explanation of the settings.7Enter a profile name in [ProfileName].Specify a name freely according to the name of the othercommunication device, Wireless LAN access point, etc.8Enter a network ID in [NetworkID (SSID)].Network ID (SSID) depends on the Wireless LAN access pointyou are using. Make sure you enter the network ID (SSID) that isspecified by your Wireless LAN access point.NoteThe Network ID is case-sensitive. Be careful when entering a Network ID.](https://usermanual.wiki/Sony-Group/PEGAWL110/User-Guide-313254-Page-16.png)
![17US9Select the encryption level in [WEP].WEP (encryption level) is fixed depending on the Wireless LANaccess point you use. Be sure to select the encryption that is usedby your Wireless LAN access point.TipWhen you select [None] in [WEP], you do not need to enter a WEP key. Inthis case, skip the next step, and go to Step 11.10Enter a WEP key.The WEP key is fixed, depending on the Wireless LAN accesspoint you use. Make sure you enter the WEP key that is specifiedby your Wireless LAN access point.Continued on next pageb](https://usermanual.wiki/Sony-Group/PEGAWL110/User-Guide-313254-Page-17.png)
![18USWhen you select 40/64bit: alphanumeric string (5 characters)Enter a 5-digit password using alphabetical characters (a-z, A-Z),numbers (0-9) and symbols.When you select 40/64bit: hexadecimal notation (10 figures(Hex))Enter a 10-digit password using alphabetical characters (a-f, A-F)and numbers (0-9).When you select 104/128bit: alphanumeric string (13 characters)Enter a 13-digit password using alphabetical characters (a-z, A-Z),numbers (0-9) and symbols.When you select 104/128bit: hexadecimal notation (26 figures(Hex))Enter a 26-digit password using alphabetical characters (a-f, A-F)and numbers (0-9).NoteThe WEP key is case-sensitive when entering in ASCII. Be careful whenentering a WEP key.Tips•WEP key is the function that encrypts data that are to be sent by radiowaves.•Depending on the manufacturer, the above WEP keys might havedifferent names.11Tap [OK].The basic settings are completed for the profile name you set inStep 7.12Tap the Home icon on your CLIÉ handheld.The home screen appears.](https://usermanual.wiki/Sony-Group/PEGAWL110/User-Guide-313254-Page-18.png)
![19USModifying the settings1Tap the [Prefs] icon on the home screen of your CLIÉ handheld.The [Preferences] screen appears.2 Tap V in the top right-hand corner of the screen, and select[Network].The [Network] screen appears.3 Tap V next to [Service], and select [Wireless LAN].4Tap [Details...] in the bottom left-hand corner of the screen.The [Wireless LAN Setup] screen appears.5 Tap V below [ProfileName], and select the profile name youwant to modify.6Tap [Edit] at the bottom of the screen.The [Wireless LAN Setup] input screen appears.7Modify the settings.8Tap [OK].9Tap the Home icon.The home screen appears.Deleting the profile you have set1In Step 6 of “Modifying the settings” above, tap [Delete] at thebottom of the screen.The selected profile is deleted.2Tap [OK].3Tap the Home icon.The home screen appears.NoteDo not modify the settings while the Wireless LAN card is being connected tothe Wireless LAN access point.](https://usermanual.wiki/Sony-Group/PEGAWL110/User-Guide-313254-Page-19.png)
![20USAdvanced SettingsSetting a network manuallyWhen it is necessary to set a network IP address or DNS address,follow the procedure below.1Tap [Advanced Setup] in the bottom right-hand cornerof the [Wireless LAN Setup] input screen.2Tap the [Auto] check box in [IP Address] or [DNSAddress]. The check mark disappears.The IP Address input screen or the DNS Address input screen appears.3Enter necessary addresses.4Tap [OK] when you complete the setting.Disabling the power saving mode1Tap [Advanced Setup] in the bottom right-hand corner of the[Wireless LAN Setup] input screen.2Tap the [Enable] check box in [PowerSaveMode]. The checkmark disappears.The power saving mode is disabled.TipWhen the communication conditions are not good, you can disable thepower saving mode to maximize the battery power and achieve bettercommunications. However, it will make the battery life shorter.Normally, the power saving mode is recommended.](https://usermanual.wiki/Sony-Group/PEGAWL110/User-Guide-313254-Page-20.png)
![21USConnecting your CLIÉ Handheld to a Wireless LAN1Insert the Wireless LAN card in the WirelessCommunication Slot of your CLIÉ handheld.2Tap the [Prefs] icon on the home screen of your CLIÉhandheld.The [Preferences] screen appears.3Tap V in the top right-hand corner of the screen, andselect [Network].The [Network] screen appears.4Tap V next to [Service], and select [Wireless LAN].TipIf you have set only one profile, go to Step 8.Continued on next page](https://usermanual.wiki/Sony-Group/PEGAWL110/User-Guide-313254-Page-21.png)
![22US5Tap [Details...] in the bottom left-hand corner of the screen.The [Wireless LAN Setup] screen appears.6Tap V below [Profile Name], and select the profilename you want to use.7Tap [OK].The [Preferences] screen appears again.8Tap [Connect] at the bottom of the screen.Your CLIÉ handheld begins to connect to a Wireless LAN.When a connection is established, start up the application youlike.](https://usermanual.wiki/Sony-Group/PEGAWL110/User-Guide-313254-Page-22.png)
![23USPerforming Communications Directlybetween your CLIÉ Handheld andAnother Device on a Wireless LAN(Ad-Hoc Mode)Your CLIÉ handheld can communicate directly with another deviceon a wireless LAN without using a Wireless LAN access point.The Ad-hoc mode settings and communications require network knowledge.Basic Settings1Insert the Wireless LAN card in the WirelessCommunication Slot of your CLIÉ handheld.2Tap the [Prefs] icon on the home screen of your CLIÉhandheld.The [Preferences] screen appears.3Tap V in the top right-hand corner of the screen, andselect [Network].The [Network] screen appears.4Tap V next to [Service], and select [Wireless LAN].Continued on next page](https://usermanual.wiki/Sony-Group/PEGAWL110/User-Guide-313254-Page-23.png)
![24US5Tap [Details...] in the bottom left-hand corner of the screen.The [Wireless LAN Setup] screen appears.6Tap [Create].A new input screen of [Wireless LAN Setup] appears.TipTapping the mark in the top right-hand corner of the screen shows abrief explanation of the setting.7Enter a profile name in [ProfileName].Specify a name freely according to the name of the othercommunication device, Wireless LAN access point, etc.](https://usermanual.wiki/Sony-Group/PEGAWL110/User-Guide-313254-Page-24.png)
![25US8Enter a network ID in [NetworkID (SSID)].Enter an alphanumeric string of your choice. The same networkID (SSID) needs to be entered in both your CLIÉ handheld and theother communication device.9Select the encryption level in [WEP].Make sure you select the same encryption level for both yourCLIÉ handheld and the other communication device.TipWhen you select [None] in [WEP], you do not need to enter a WEP key. Inthis case, skip the next step, and go to Step 11.Continued on next page](https://usermanual.wiki/Sony-Group/PEGAWL110/User-Guide-313254-Page-25.png)
![26US10Enter a WEP key.Be sure to enter the same WEP key in both your CLIÉ handheldand the other communication device.For details on WEP key, see pages 17-18.11Tap [Adhoc] in [ConnectMode].The Ad-hoc mode is selected as the connection type.b](https://usermanual.wiki/Sony-Group/PEGAWL110/User-Guide-313254-Page-26.png)
![27US12Tap V next to [ch] below [Adhoc], and select a channel.Make sure to select the same channel for both your CLIÉhandheld and the other communication device. Select a channelfrom 1 to 11.13Tap [Advanced Setup] in the bottom right-hand cornerof the screen.14Tap the [Auto] check box in [IP Address]. The checkmark disappears.The IP address input screen appears.NoteAd-hoc mode may not be established if “Auto” is selected.Auto IP is only possible when a PC has DHCP and shares an Internetconnection. Most of the time, the user has to enter a static IP on the CLIÉhandheld for the Ad-hoc mode.Continued on next page](https://usermanual.wiki/Sony-Group/PEGAWL110/User-Guide-313254-Page-27.png)
![28US15Enter an IP address and a sub-netmask.Enter different IP addresses on your CLIÉ handheld and the othercommunication device.Enter the same Subnet mask on your CLIÉ handheld and the othercommunication device.(e.g.)IP address CLIÉ handheld: 192.168.0.1Other device: 192.168.0.2Subnet mask CLIÉ handheld/other device:255.255.255.0TipEnter a gateway address if necessary. When it is necessary to enter a DNSaddress, tap and tick the checkbox of [Auto] in [DNS Address] beforeentering the DNS address.16Tap [OK].The [Wireless LAN Setup] screen appears.17Tap [OK].The settings are completed in the profile name you set in Step 7.18Tap the Home icon on your CLIÉ handheld.The home screen appears.NoteThe user has to find the Subnet mask fromthe PC that he/she wants to connect to.Proceed as follows to find a Subnet mask onyour PC.Windows 98 and Windows ME:From [Start] c [Run...] c type in ‘winipcfg’ cthe [IP configuration] dialog box appears ccheck the IP address and Subnet mask.Windows 2000 and Windows XP:From [Start] c [Run...] c type in ‘cmd’ c type‘ipconfig/all’ c check the IP address andSubnet mask.](https://usermanual.wiki/Sony-Group/PEGAWL110/User-Guide-313254-Page-28.png)
![29USModifying the settings1Tap the [Prefs] icon on the home screen of your CLIÉ handheld.The [Preferences] screen appears.2 Tap V in the top right-hand corner of the screen, and select[Network].The [Network] screen appears.3 Tap V next to [Service], and select [Wireless LAN].4Tap [Details...] in the bottom left-hand corner of the screen.The [Wireless LAN Setup] screen appears.5 Tap V below [ProfileName], and select the profile name youwant to modify.6Tap [Edit] at the bottom of the screen.The [Wireless LAN Setup] input screen appears.7Modify the settings.8Tap [OK].9Tap the Home icon.The home screen appears.Deleting the profile you have set1In Step 6 of “Modifying the settings” above, tap [Delete] at thebottom of the screen.The [Delete Profile] confirmation dialog window appears.2Tap [OK] to confirm deletion or [Cancel] to cancel the deletion.3Tap the Home icon.The home screen appears.NoteDo not modify the settings while the Wireless LAN card is being connected tothe Wireless LAN access point.Continued on next page](https://usermanual.wiki/Sony-Group/PEGAWL110/User-Guide-313254-Page-29.png)
![30USConnecting your CLIÉ Handheld to Another Deviceon a Wireless LAN1Insert the Wireless LAN card in the WirelessCommunication Slot of your compatible CLIÉ handheld.2Tap the [Prefs] icon on the home screen of your CLIÉhandheld.The [Preferences] screen appears.3Tap V in the top right-hand corner of the screen, andselect [Network].4Tap V next to [Service], and select [Wireless LAN].TipIf you have set only one profile, go to Step 8.](https://usermanual.wiki/Sony-Group/PEGAWL110/User-Guide-313254-Page-30.png)
![31US5Tap [Details...] in the bottom left-hand corner of the screen.The [Wireless LAN Setup] screen appears.6Tap V below [Profile Name], and select the profilename you want to use.7Tap [OK].The [Preferences] screen appears again.8Tap [Connect] at the bottom of the screen.Your CLIÉ handheld begins to connect to a Wireless LAN.When a connection is established, start up the application you like.NoteIn the Ad-hoc mode, your CLIÉ handheld waits for a reaction from the selecteddevice. If the selected device is out of connectable range, or a setting above iswrong (e.g. the setting for IP Address, SSID, or WEP is wrong), [Connected] isdisplayed on the screen of your CLIÉ handheld.](https://usermanual.wiki/Sony-Group/PEGAWL110/User-Guide-313254-Page-31.png)
![32USPerforming a HotSync Operation via aNetwork with a Wireless LAN CardThis Wireless LAN card can be used in various ways. For example,you can perform a HotSync operation with a Windows computer via aWireless LAN. Follow the procedures below.Preparing your computer1Click the icon in the Windows task tray (Notification area) inbottom right-hand corner of the taskbar and select [Network]from the shortcut menu.2Click the icon in the Windows task tray (Notification area)again and select [Setup] from the shortcut menu.The [Setup] screen is displayed.3Click the [Network] tab, then click the check box next to theuser name for HotSync.4Click [TCP/IP Settings], and enter a Subnet Mask.5Click [OK].6Connect your CLIÉ handheld to your computer, and perform alocal USB HotSync operation.The computer information is transferred to your CLIÉ handheld.When you perform a HotSync operation via a Wireless LAN, yourCLIÉ handheld identifies the computer based on the informationtransferred.Preparing your CLIÉ handheldFollow the steps below to set up your CLIÉ handheld for a HotSyncoperation via a Wireless LAN.1Select [Wireless LAN] in [Service] on the [Network] screen of[Preferences], and select a profile name for a HotSync operationon the [Wireless LAN details] screen.For details, see the Steps 1 to 6 of “Connecting your CLIÉ Handheldto a Wireless LAN” on pages 21 and 22.](https://usermanual.wiki/Sony-Group/PEGAWL110/User-Guide-313254-Page-32.png)
![33US2Rotate the Jog Dial navigator to select HotSync and press theJog Dial navigator on the Application Launcher screen.The [HotSync] screen is displayed.You can also tap the [HotSync] icon to display the HotSync screen.3Tap the Menu icon, and tap [Primary PC Setup] from the[Option] menu.4Check that correct data is entered in [Primary PC Address] and[Subnet Mask(optional)], and tap [OK].5Tap the Menu icon, and tap [Modem Sync Prefs] from the[Option] menu.6Tap [Network], and tap [OK].7When the HotSync screen appears, tap [Modem], and then tap[Select Service].8 Tap V next to [Service], select [Wireless LAN], and tap [Done].TipYou do not have to enter a telephone number in [Enter phone #].NoteIt is also necessary to select [Wireless LAN] in [Service] on the [Network] screenof the [Preferences] that can be started from the home screen.Performing a HotSync operationWhen you have finished preparing your CLIÉ handheld and yourcomputer, tap the [HotSync] icon on the [HotSync] screen.Your CLIÉ handheld automatically connects to the network andbegins a HotSync operation.When communication is not possibleIn Step 3 above, erase the [Primary PC Name].](https://usermanual.wiki/Sony-Group/PEGAWL110/User-Guide-313254-Page-33.png)
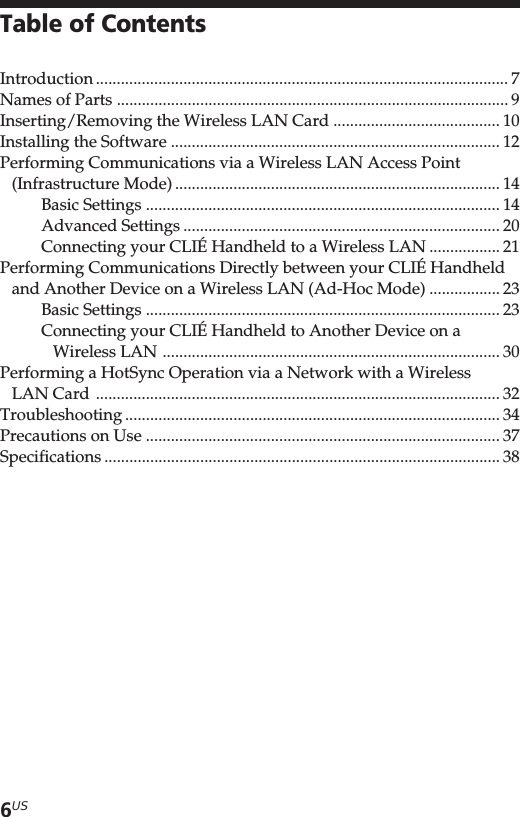
![34USTroubleshootingIf any problem occurs, for example, if communication is not possible,or if the unit does not operate normally, please check the points listedin this troubleshooting guide.Visit Sony CLIÉ support website:Customers in the U.S.A. and Canada:http://www.ita.sel.sony.com/support/clie/access/Customers in Europe:http://www.clie-link.com/Customers in Asia-Pacific and Mexico:http://vaio-online.sony.com/clie/If the problem persists, contact the Sony dealer where you purchasedthis product or a Sony service representative serving your area.SymptomYour CLIÉ handhelddoes not recognize thisWireless LAN card.(Although your CLIÉhandheld starts toconnect, the LEDindicator on theWireless LAN carddoes not blink.)You cannot connectyour CLIÉ handheld toan Wireless LAN accesspoint.Cause/RemedypTap the [CF Utility] icon on the homescreen of your CLIÉ handheld, then checkwhether Card Info is correct, taking thefollowing steps.•Remove the Wireless LAN card from your CLIÉhandheld, then insert the Wireless LAN cardinto the slot again.•Wireless LAN utility for this Wireless LANcard (PEGA-WL110) is not installed. Install theWireless LAN utility for this card (PEGA-WL110) by using the supplied CD-ROM. Fordetails, see “Installing the Software” on page12.The Wireless LAN access point switches off.pTurn the Wireless LAN access point on.A service other than [Wireless LAN] isselected in [Network] of [Preferences].pSelect [Wireless LAN] in [Service].The settings for Profile are not correct.pCorrect the settings of Network ID(SSID),WEP key, etc. Check the setting forWireless LAN access point also.](https://usermanual.wiki/Sony-Group/PEGAWL110/User-Guide-313254-Page-34.png)
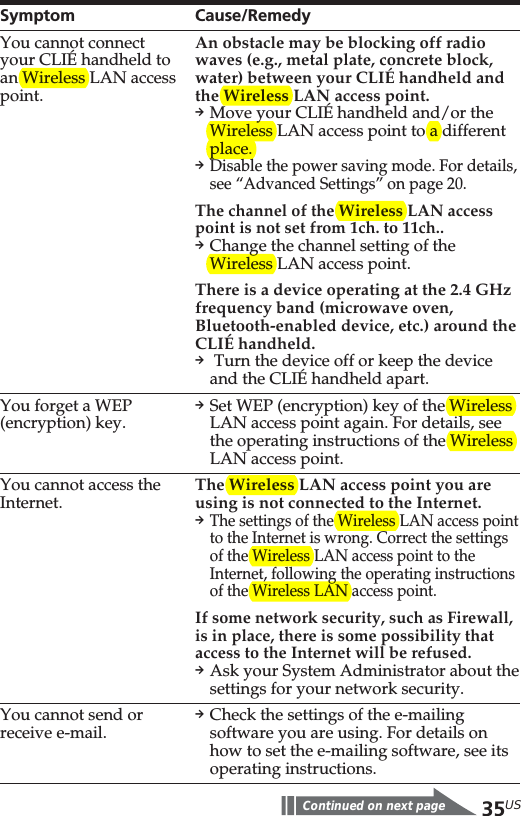
![36USSymptomYou cannot browsehomepages.The data transfer rate isslow.You cannot perform aHotSync operation.TipYou can view communication preferences (e.g. IP Address you are using, IPAddress of DNS server, etc) while performing communications using your CLIÉhandheld in which this Wireless LAN card is inserted, show the [Network]screen of [Preferences]. Select [Option] on the menu, then select [View Log].Cause/RemedypCheck the settings of the web browseryou are using.For details on how to set the webbrowser, see its operating instructions.Some other Wireless LAN access pointsare interfering with the communication.pChange the channel number of theWireless LAN access point you are using.For details on how to change the setting,see the Operating Instructions of yourWireless LAN access point.The Wireless LAN access point is beingheavily used.pWait a while and try to Wireless LANaccess it again.An obstacle may be blocking off radiowaves (e.g., metal plate, concrete blockwater) between your CLIÉ handheld andthe Wireless LAN access point.pMove your CLIÉ handheld and/or theWireless LAN access point to differentplaces.pDisable the power saving mode. For details,see “Advanced Settings” on page 20.pCheck the settings of HotSync.For details on how to set HotSync, see theoperating instructions supplied with yourCLIÉ handheld.Also, if your computer has a Firewall,Hotsync operation may not functioncorrectly.](https://usermanual.wiki/Sony-Group/PEGAWL110/User-Guide-313254-Page-36.png)
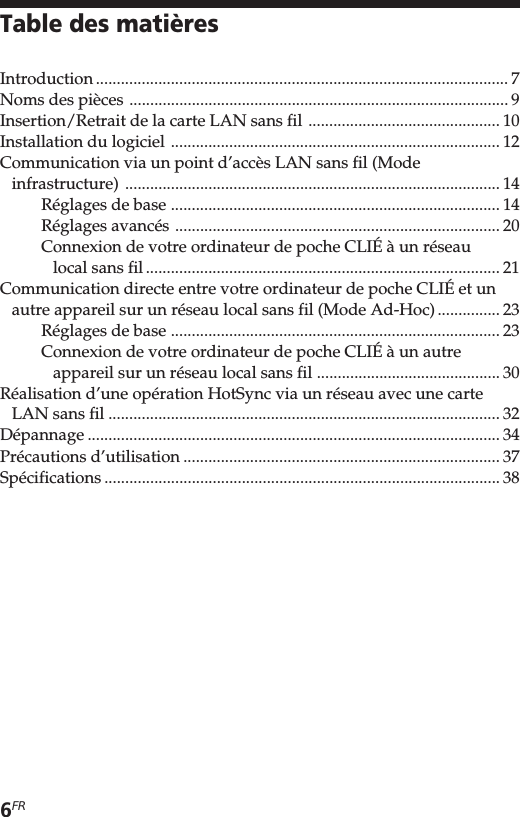
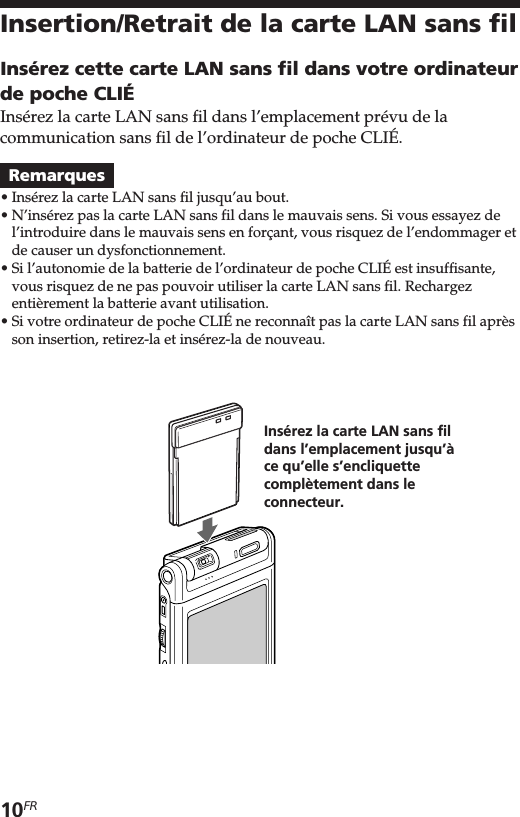
![12FRInstallation du logicielAvant d’essayer d’établir des communications LAN sans fil pour lapremière fois après avoir inséré la carte LAN sans fil dans votreordinateur de poche CLIÉ, vous devez installer l’utilitaire LAN sansfil sur votre ordinateur de poche CLIÉ. Vous pouvez l’installer à l’aidedu CD-ROM fourni.AstuceL’utilitaire LAN sans fil fourni avec votre carte LAN sans fil (PEGA-WL110)peut également être utilisé avec les modèles PEGA-WL100 et PEGA-WL110.Si vous utilisez le modèle PEGA-WL100, installez également l’utilitaire LANsans fil à l’aide du CD-ROM fourni avec votre carte LAN sans fil (PEGA-WL110).RemarqueAvant l’installation, Palm™ Desktop pour CLIÉ doit être installé et uneopération HotSync doit être effectuée. Connectez l’ordinateur de poche CLIÉ àun ordinateur Windows, à l’aide d’un socle, etc. Pour plus d’informations sur lemode de connexion de l’ordinateur de poche CLIÉ à l’ordinateur, reportez-vousau mode d’emploi de votre ordinateur de poche CLIÉ.1Procédez à un redémarrage à chaud de votreordinateur de poche CLIÉ.Pour obtenir des informations sur le redémarrage à chaud,reportez-vous au mode d’emploi de votre ordinateur de pocheCLIÉ.2Insérez le CD-ROM fourni dans le lecteur de CD-ROMde votre ordinateur Windows.Le logiciel d’installation démarre et l’écran initial apparaît.AstuceSi le logiciel d’installation ne démarre pas automatiquement, cliquez deuxfois sur [setup] (setup.exe) sur le CD-ROM.3Procédez à l’installation en suivant les instructions duprogramme d’installation.Sur l’écran de sélection du nom de l’utilisateur, sélectionnez unnom d’utilisateur.RemarqueSi vous souhaitez utiliser plusieurs ordinateurs de poche CLIÉ, vous devezinstaller cet utilitaire sur chaque ordinateur de poche CLIÉ.](https://usermanual.wiki/Sony-Group/PEGAWL110/User-Guide-313254-Page-50.png)
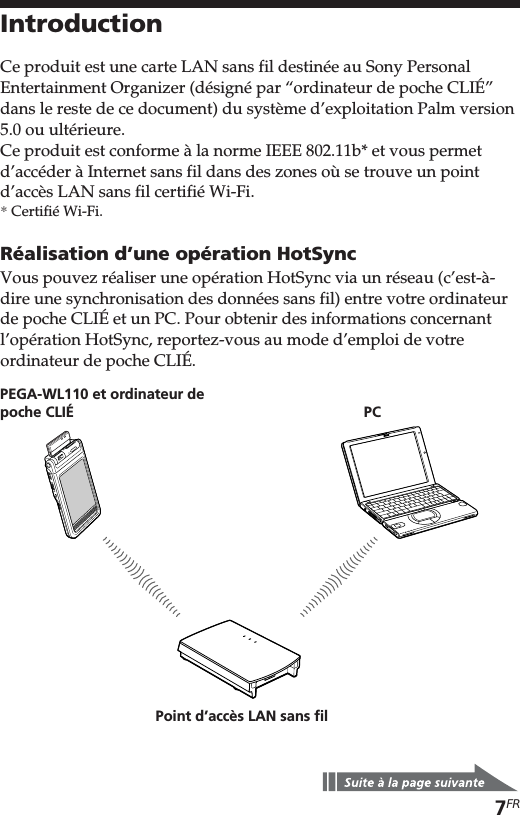
![13FR4Ciquez sur [Done] dans la fenêtre d’installation.Votre ordinateur est prêt pour l’installation de l’utilitaire LANsans fil sur votre ordinateur de poche CLIÉ. Au cours de l’étapesuivante, vous effectuerez une opération HotSync pour procéder àl’installation.5Cliquez sur l’icône de la barre des tâches (zoned’avertissement) située dans le coin inférieur droit del’écran Windows de votre ordinateur.Vérifiez que [Local USB] est coché dans le menu contextuelaffiché.AstuceSi vous ne trouvez pas l’icône dans la barre des tâches (zoned’avertissement), sélectionnez [Programs] ([All Programs] sous Windows®XP), [Sony Handheld], puis [HotSync Manager] dans le menu [Start] pourlancer le gestionnaire HotSync.6Exécutez une opération HotSync locale sur votreordinateur de poche CLIÉ.L’utilitaire LAN sans fil est installé sur votre ordinateur de pocheCLIÉ.RemarqueUne partie de cette application logicielle se déploie dans le système del’ordinateur de poche CLIÉ. Elle ne peut par conséquent pas être désinstallée.Après avoir exécuté un redémarrage à froidAssurez-vous de réinstaller cet utilitaire.Après un redémarrage à froid, les données de sauvegarde du PC sontgénéralement automatiquement restaurées sur votre ordinateur depoche CLIÉ via l’opération HotSync. Cependant, cet utilitaire restaureuniquement le fichier de définition lorsqu’une opération HotSync estréalisée et il ne restaure pas l’utilitaire lui-même. Par conséquent, il estnécessaire de réinstaller cet utilitaire après un redémarrage à froid.](https://usermanual.wiki/Sony-Group/PEGAWL110/User-Guide-313254-Page-51.png)
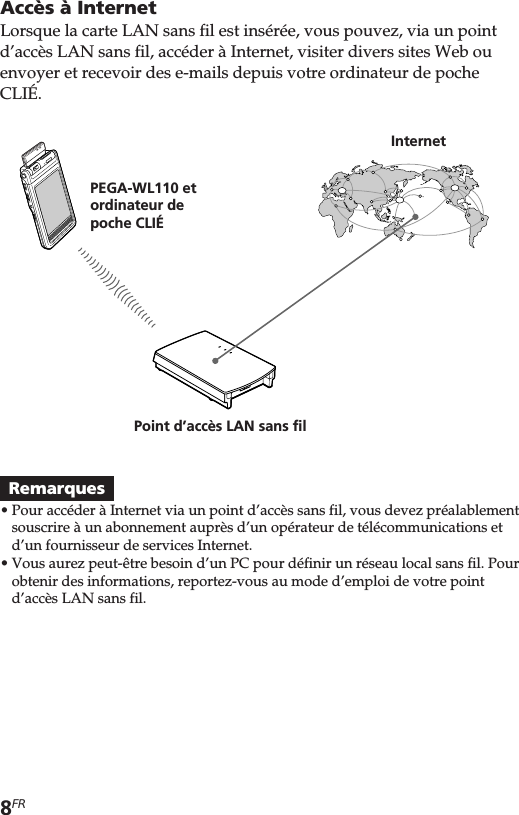
![14FRCommunication via un point d’accèsLAN sans fil (Mode infrastructure)Vous pouvez accéder à Internet via la technologie sans fil ou établirune connexion avec un autre appareil de communication grâce à unpoint d’accès LAN sans fil.Réglages de baseAvant le réglageVous devez tout d’abord saisir deux valeurs pour définir le point d’accès LANsans fil utilisé. Vérifiez au préalable les valeurs suivantes.[NetworkID (SSID)]: également appelé ESS-ID ou nom de réseau.[WEP (Wired Equivalent Privacy)]: également appelé cryptage.Pour plus d’informations, renseignez-vous auprès de votre administrateursystème. Si vous disposez d’un point d’accès LAN sans fil pour votre utilisationpersonnelle, reportez-vous au mode d’emploi du point d’accès LAN sans fil.RemarqueLa carte LAN sans fil utilise les canaux 1 à 11 (bande de fréquences 2,4 GHz). Sivotre point d’accès LAN sans fil utilise les canaux 12 à 14, il est impossibled’établir une communication à l’aide de la carte LAN sans fil.1Insérez la carte LAN sans fil dans l’emplacement prévupour la communication sans fil de votre ordinateur depoche CLIÉ.2Appuyez l’icône [Prefs] de l’écran d’accueil de votreordinateur de poche CLIÉ.L’écran [Preferences] apparaît.3Appuyez V dans le coin supérieur droit de l’écran, puissélectionnez [Network].L’écran [Network] apparaît.](https://usermanual.wiki/Sony-Group/PEGAWL110/User-Guide-313254-Page-52.png)
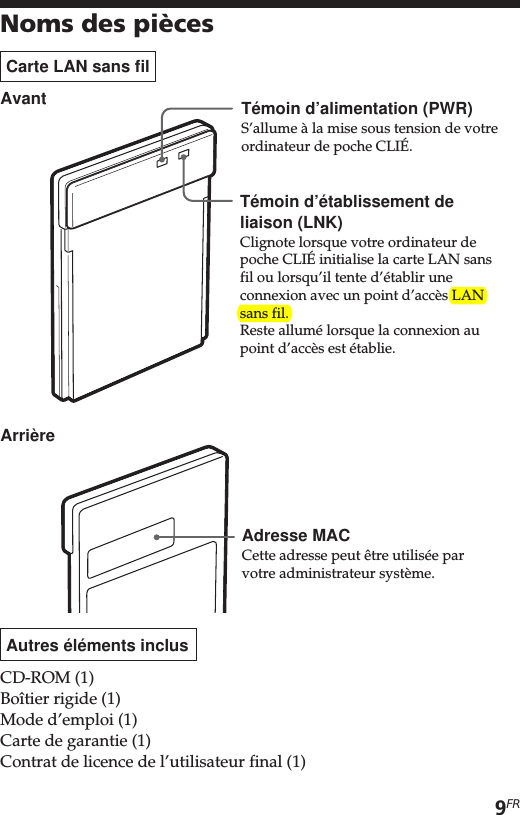
![15FR4Appuyez V dans [Service] et sélectionnez [WirelessLAN].5Appuyez [Details...] dans le coin inférieur gauche del’écran.L’écran [Wireless LAN Setup] apparaît.6Appuyez [Create].Un nouvel écran de saisie [Wireless LAN Setup] apparaît.Vérifiez que [Infrastructure] est sélectionné (mis en surbrillance)dans [ConnectMode]. S’il ne l’est pas, appuyez [Infrastructure]pour le sélectionner.](https://usermanual.wiki/Sony-Group/PEGAWL110/User-Guide-313254-Page-53.png)
![16FRAstuceEffleurer la marque dans le coin supérieur droit de l’écran permetd’afficher une explication brève des réglages.7Saisissez un nom de profil dans [ProfileName].Spécifiez le nom de votre choix en fonction du nom de l’autreappareil de communication, du point d’accès LAN sans fil, etc.8Saisissez un ID réseau dans [NetworkID (SSID)].L’ID de réseau (SSID) dépend du point d'accès LAN sans filutilisé. Veillez à saisir l’ID de réseau (SSID) spécifiée par votrepoint d’accès LAN sans fil.RemarqueL’ID réseau est sensible à la casse. Pensez-y lorsque vous saisissez un ID réseau.](https://usermanual.wiki/Sony-Group/PEGAWL110/User-Guide-313254-Page-54.png)
![17FR9Sélectionnez le niveau de cryptage dans [WEP].WEP (niveau de cryptage) est défini en fonction du point d’accèsLAN sans fil que vous utilisez. Assurez-vous de sélectionner lecryptage utilisé par votre point d’accès LAN sans fil.AstuceSi vous sélectionnez [None] dans [WEP], il n’est pas nécessaire de saisir unetouche WEP. Dans ce cas, passez directement à l’étape 11.10Saisissez une touche WEP.La clé WEP est définie en fonction du point d’accès LAN sans filque vous utilisez. Veillez à saisir la clé WEP spécifiée par votrepoint d’accès LAN sans fil.b](https://usermanual.wiki/Sony-Group/PEGAWL110/User-Guide-313254-Page-55.png)
![18FRSi vous sélectionnez 40/64 bit : chaîne alphanumérique (5caractères)Saisissez un mot de passe à 5 caractères composé de lettres (a-z,A-Z), de chiffres (0-9) et de symboles.Si vous sélectionnez 40/64 bit : notation hexadécimale (10chiffres (Hex))Saisissez un mot de passe à 10 caractères composé de lettres (a-f,A-F) et de chiffres (0-9).Si vous sélectionnez 104/128 bit : chaîne alphanumérique (13caractères)Saisissez un mot de passe à 13 caractères composé de lettres(a-z, A-Z), de chiffres (0-9) et de symboles.Si vous sélectionnez 104/128 bit : notation hexadécimale (26caractères (Hex))Saisissez un mot de passe à 26 caractères composé de lettres (a-f,A-F) et de chiffres (0-9).RemarqueLors de la saisie en code ASCII, la touche WEP est sensible à la casse.Pensez-y lorsque vous saisissez une touche WEP.Astuces•La touche WEP est la fonction qui permet de crypter les données quidoivent être envoyées par ondes radio.•Selon le fabricant, un nom différent peut être affecté aux touches WEP ci-dessus.11Appuyez [OK].Les réglages de base sont terminés pour le nom du profil défini àl’étape 7.12Appuyez l’icône Home de votre ordinateur depoche CLIÉ.L’écran d’accueil apparaît.](https://usermanual.wiki/Sony-Group/PEGAWL110/User-Guide-313254-Page-56.png)
![19FRModification des réglages1Appuyez l‘icône [Prefs]de l‘écran d‘accueil de votre ordinateurde poche CLIÉ.L’écran [Preferences] apparaît.2 Appuyez V dans le coin supérieur droit de l’écran, puissélectionnez [Network].L’écran [Network] apparaît.3 Appuyez V dans [Service] et sélectionnez [Wireless LAN].4Appuyez [Details...] dans le coin inférieur gauche de l’écran.L’écran [Wireless LAN Setup] apparaît.5 Appuyez V sous [ProfileName] et sélectionnez le nom de profilque vous souhaitez modifier.6 Appuyez [Edit] en bas de l’écran.L’écran de saisie [Wireless LAN Setup] apparaît.7Modifiez les réglages.8Appuyez [OK].9Appuyez l’icône Home.L’écran d’accueil apparaît.Suppression du profil défini1A l’étape 6 “Modification des réglages” ci-dessus, appuyez[Delete] en bas de l’écran.Le profil sélectionné est supprimé.2Appuyez [OK].3Appuyez l’icône Home.L’écran d’accueil apparaît.RemarqueNe modifiez pas les réglages lorsque la carte LAN sans fil est connectée au pointd’accès LAN sans fil.](https://usermanual.wiki/Sony-Group/PEGAWL110/User-Guide-313254-Page-57.png)
![20FRRéglages avancésRéglage manuel d’un réseauS’il est nécessaire de définir une adresse IP réseau ou une adresseDNS, suivez la procédure ci-dessous.1Appuyez [Advanced Setup] dans le coin inférieur droitde l’écran de saisie [Wireless LAN Setup].2Appuyez la case [Auto] dans [IP Address] ou [DNSAddress] et décochez-la.L’écran de saisie de l’adresse IP ou de l’adresse DNS apparaît.3Saisissez les adresses nécessaires.4Appuyez [OK] lorsque vous avez terminé le réglage.Désactivation de la mise en veille1Appuyez [Advanced Setup] dans le coin inférieur droit del’écran de saisie [Wireless LAN Setup].2Appuyez la case [Enable] dans [PowerSaveMode] et décochez-la.La mise en veille est désactivée.AstuceLorsque les conditions de communication sont mauvaises, vous pouvezdésactiver le mode de mise en veille pour optimiser l’alimentation de labatterie et obtenir une meilleure communication. Cependant, la durée devie de la batterie s’en trouvera écourtée.En général, le mode de mise en veille est recommandé.](https://usermanual.wiki/Sony-Group/PEGAWL110/User-Guide-313254-Page-58.png)
![21FRConnexion de votre ordinateur de poche CLIÉ à unréseau local sans fil1Insérez la carte LAN sans fil dans l’emplacement prévupour la communication sans fil de votre ordinateur depoche CLIÉ.2Appuyez l’icône [Prefs] de l’écran d’accueil de votreordinateur de poche CLIÉ.L’écran [Preferences] apparaît.3Appuyez V dans le coin supérieur droit de l’écran, puissélectionnez [Network].L’écran [Network] apparaît.4Appuyez V de [Service] et sélectionnez [Wireless LAN].AstuceSi vous n’avez sélectionné qu’un seul profil, passez à l’étape 8.](https://usermanual.wiki/Sony-Group/PEGAWL110/User-Guide-313254-Page-59.png)
![22FR5Appuyez [Details...] dans le coin inférieur gauche del’écran.L’écran [Wireless LAN Setup] apparaît.6Appuyez V sous [Profile Name] et sélectionnez le nomde profil que vous souhaitez utiliser.7Appuyez [OK].L’écran [Preferences] apparaît à nouveau.8Appuyez [Connect] en bas de l’écran.Votre ordinateur de poche CLIÉ se connecte à un réseau local sansfil.Une fois la connexion établie, lancez l’application souhaitée.](https://usermanual.wiki/Sony-Group/PEGAWL110/User-Guide-313254-Page-60.png)
![23FRCommunication directe entre votreordinateur de poche CLIÉ et un autreappareil sur un réseau local sans fil(Mode Ad-Hoc)Votre ordinateur de poche CLIÉ peut communiquer directement avecun autre appareil sur un réseau local sans fil sans utiliser de pointd’accès LAN sans fil.Les réglages du mode Ad-hoc et de ses communications requièrent une bonneconnaissance du réseau.Réglages de base1Insérez la carte LAN sans fil dans l’emplacement prévupour la communication sans fil de votre ordinateur depoche CLIÉ.2Appuyez l’icône [Prefs] de l’écran d’accueil de votreordinateur de poche CLIÉ.L’écran [Preferences] apparaît.3Appuyez V dans le coin supérieur droit de l’écran, puissélectionnez [Network].L’écran [Network] apparaît.4Appuyez V de [Service] et sélectionnez [Wireless LAN].](https://usermanual.wiki/Sony-Group/PEGAWL110/User-Guide-313254-Page-61.png)
![24FR5Appuyez [Details...] dans le coin inférieur gauche del’écran.L’écran [Wireless LAN Setup] apparaît.6Appuyez [Create].Un nouvel écran de saisie [Wireless LAN Setup] apparaît.AstuceLa marque dans le coin supérieur droit de l’écran permet d’afficher uneexplication brève des réglages.7Saisissez un nom de profil dans [ProfileName].Spécifiez le nom de votre choix en fonction du nom de l’autreappareil de communication, du point d’accès LAN sans fil, etc.](https://usermanual.wiki/Sony-Group/PEGAWL110/User-Guide-313254-Page-62.png)
![25FR8Saisissez un ID réseau dans [NetworkID (SSID)].Entrez la chaîne alphanumérique de votre choix. Le même IDréseau (SSID) doit être saisi sur votre ordinateur de poche CLIÉ etsur l’autre appareil de communication.9Sélectionnez le niveau de cryptage dans [WEP].Veillez à sélectionner le même niveau de cryptage pour votreordinateur de poche CLIÉ et l’autre appareil de communication.AstuceSi vous sélectionnez [None] dans [WEP], il n’est pas nécessaire de saisir unetouche WEP. Dans ce cas, passez directement à l’étape 11.](https://usermanual.wiki/Sony-Group/PEGAWL110/User-Guide-313254-Page-63.png)
![26FR10Saisissez une touche WEP.Assurez-vous de saisir la même touche WEP sur votre ordinateurde poche CLIÉ et sur l’autre appareil de communication.Pour plus d’informations sur la touche WEP, reportez-vous auxpages 17-18.11Appuyez [Adhoc] dans [ConnectMode].Le mode Ad-hoc est sélectionné.b](https://usermanual.wiki/Sony-Group/PEGAWL110/User-Guide-313254-Page-64.png)
![27FR12Appuyez V dans [ch] sous [Adhoc], puis sélectionnez uncanal.Assurez-vous de sélectionner le même canal pour votreordinateur de poche CLIÉ et l’autre appareil de communication.Sélectionnez un canal compris entre 1 et 11.13Appuyez [Advanced Setup] dans le coin inférieur droitde l’écran.14Appuyez la case [Auto] dans [IP Address] et décochez-la.L’écran de saisie de l’adresse IP apparaît.RemarqueLe mode Ad-hoc peut ne pas être établi si “Auto” est coché.La configuration automatique d’une adresse IP est possible uniquement sile PC dispose du protocole DHCP et partage une connexion Internet. Laplupart du temps, l’utilisateur doit saisir une adresse IP statique surl’ordinateur de poche CLIÉ pour le mode Ad-hoc.](https://usermanual.wiki/Sony-Group/PEGAWL110/User-Guide-313254-Page-65.png)
![28FR15Saisissez une adresse IP et un masque de sous-réseau.Saisissez des adresses IP différentes pour votre ordinateur depoche CLIÉ et l’autre appareil de communication.Saisissez le même masque de sous-réseau pour votre ordinateurde poche CLIÉ et l’autre appareil de communication.(Exemple)Adresse IP Ordinateur de poche CLIÉ: 192.168.0.1Autre appareil : 192.168.0.2Masque de sous-réseau Ordinateur de poche CLIÉ/autreappareil : 255.255.255.0AstuceSaisissez une adresse passerelle si nécessaire. S’il est nécessaire de saisir uneadresse DNS, appuyez et cochez la case [Auto] dans [DNS Address] avantde saisir l’adresse DNS.16Appuyez [OK].L’écran [Wireless LAN Setup] apparaît.17Appuyez [OK].Les réglages sont terminés pour le nom du profil défini à l’étape 7.18Appuyez l’icône Home sur votre ordinateur depoche CLIÉ.L’écran d’accueil apparaît.RemarqueL’utilisateur doit trouver le masque de sous-réseau du PC auquel il souhaite se connecter.Procédez comme suit pour trouver unmasque de sous-réseau sur votre PC.Windows 98 et Windows ME :Dans [Start] c [Run...] c saisissez ‘winipcfg’ c la boîte de dialogue [IP configuration]apparaît c vérifiez l’adresse IP et le masquede sous-réseau.Windows 2000 et Windows XP :Dans [Start] c [Run...] c saisissez ‘cmd’ csaisissez ‘ipconfig/all’ c vérifiez l’adresse IPet le masque de sous-réseau.](https://usermanual.wiki/Sony-Group/PEGAWL110/User-Guide-313254-Page-66.png)
![29FRModification des réglages1Appuyez l’icône [Prefs] de l’écran d’accueil de votre ordinateurde poche CLIÉ.L’écran [Preferences] apparaît.2 Appuyez V dans le coin supérieur droit de l’écran, puissélectionnez [Network].L’écran [Network] apparaît.3 Appuyez V dans de [Service] et sélectionnez [Wireless LAN].4Appuyez [Details...] dans le coin inférieur gauche de l’écran.L’écran [Wireless LAN Setup] apparaît.5 Appuyez V sous [ProfileName] et sélectionnez le nom de profilque vous souhaitez modifier.6 Appuyez [Edit] en bas de l’écran.L’écran de saisie [Wireless LAN Setup] apparaît.7Modifiez les réglages.8Appuyez [OK].9Appuyez l’icône Home.L’écran d’accueil apparaît.Suppression du profil défini1A l’étape 6 “Modification des réglages” ci-dessus, appuyez[Delete] en bas de l’écran.La fenêtre de dialogue de confirmation [Delete Profile] apparaît.2Appuyez [OK] pour confirmer la suppression ou [Cancel] pourl’annuler.3Appuyez l’icône Home.L’écran d’accueil apparaît.RemarqueNe modifiez pas les réglages lorsque la carte LAN sans fil est connectée au pointd’accès LAN sans fil.](https://usermanual.wiki/Sony-Group/PEGAWL110/User-Guide-313254-Page-67.png)
![30FRConnexion de votre ordinateur de poche CLIÉ à unautre appareil sur un réseau local sans fil1Insérez la carte LAN sans fil dans l’emplacement prévupour la communication sans fil de votre ordinateur depoche CLIÉ compatible.2Appuyez l’icône [Prefs] de l’écran d’accueil de votreordinateur de poche CLIÉ.L’écran [Preferences] apparaît.3Appuyez V dans le coin supérieur droit de l’écran, puissélectionnez [Network].4Appuyez V dans [Service] et sélectionnez [WirelessLAN].AstuceSi vous n’avez sélectionné qu’un seul profil, passez à l’étape 8.](https://usermanual.wiki/Sony-Group/PEGAWL110/User-Guide-313254-Page-68.png)
![31FR5Appuyez [Details...] dans le coin inférieur gauche del’écran.L’écran [Wireless LAN Setup] apparaît.6Appuyez V sous [Profile Name] et sélectionnez le nomde profil que vous souhaitez utiliser.7Appuyez [OK].L’écran [Preferences] apparaît à nouveau.8Appuyez [Connect] en bas de l’écran.Votre ordinateur de poche CLIÉ se connecte à un réseau local sansfil.Une fois la connexion établie, lancez l’application souhaitée.RemarqueEn mode Ad-hoc, votre ordinateur de poche CLIÉ attend une réaction de la partde l’appareil sélectionné. Si l’appareil sélectionné se trouve hors de la zone deconnexion ou si l’un des réglages ci-dessus est incorrect (par exemple, laconfiguration de l’adresse IP, de l’ID de réseau (SSID) ou WEP), [Connected]apparaît sur l’écran de votre ordinateur de poche CLIÉ.](https://usermanual.wiki/Sony-Group/PEGAWL110/User-Guide-313254-Page-69.png)
![32FRRéalisation d’une opération HotSync viaun réseau avec une carte LAN sans filCette carte LAN sans fil peut être utilisée de plusieurs façons. Parexemple, vous pouvez réaliser une opération HotSync avec unordinateur Windows via un réseau local sans fil. Suivez lesprocédures ci-dessous.Préparation de votre ordinateur1Cliquez sur l’icône dans le coin inférieur droit de la barre destâches Windows (zone d’avertissement), puis sélectionnez[Network] dans le menu raccourci.2Cliquez de nouveau sur l’icône de la barre des tâchesWindows (zone d’avertissement), puis sélectionnez [Setup]dans le menu de raccourci.L’écran [Setup] apparaît.3Cliquez sur l’onglet [Réseau], puis cochez la case située à côtédu nom d’utilisateur pour HotSync.4Cliquez sur [paramètres TCP/IP], puis saisissez un masque desous-réseau.5Cliquez sur [OK].6Connectez votre ordinateur de poche CLIÉ à votre ordinateur etréalisez une opération HotSync USB locale.Les informations de l’ordinateur sont transférées sur votreordinateur de poche CLIÉ.Lorsque vous réalisez une opération HotSync via un réseau localsans fil, votre ordinateur de poche CLIÉ identifie l’ordinateur enfonction des informations transférées.Préparation de votre ordinateur de poche CLIÉExécutez les étapes ci-dessous pour configurer votre ordinateur depoche CLIÉ pour une opération HotSync via un réseau local sans fil.1Sélectionnez [Wireless LAN] dans [Service] sur l’écran [Network]de [Preferences], puis sélectionnez un nom de profil pour uneopération HotSync sur l’écran [Wireless LAN details].Pour plus d’informations, reportez-vous aux étapes 1 à 6 de lasection “Connexion de votre ordinateur de poche CLIÉ à un réseaulocal sans fil” pages 21 et 22.](https://usermanual.wiki/Sony-Group/PEGAWL110/User-Guide-313254-Page-70.png)
![33FR2Faites tourner le navigateur Jog Dial™ pour sélectionnerHotSync et appuyez sur le navigateur Jog Dial™ dans l’écranApplication Launcher.L’écran [HotSync] apparaît.Vous pouvez également appuyer l’icône [HotSync] pour afficherl’écran HotSync.3Appuyez l’icône du menu et appuyez [Primary PC Setup]dans le menu [Option].4Vérifiez que les données saisies dans [Primary PC Address] et[Subnet Mask(optional)] sont correctes, puis appuyez [OK].5Appuyez l’icône du menu , puis [Modem Sync Prefs] dans lemenu [Option].6Appuyez [Network], puis [OK].7Lorsque l’écran HotSync apparaît, appuyez [Modem], puis[Select Service].8 Appuyez V dans [Service], sélectionnez [Wireless LAN], puisappuyez [Done].AstuceIl n’est pas nécessaire de saisir un numéro de téléphone dans [Enter phone #].RemarqueIl est également nécessaire de sélectionner [Wireless LAN] dans [Service] surl’écran [Network] de [Preferences] qui peut être lancé à partir de l’écrand’accueil.Réalisation d’une opération HotSyncUne fois la préparation de votre ordinateur de poche CLIÉ et de votreordinateur terminée, effleurez l’icône [HotSync] sur l’écran [HotSync].Votre ordinateur de poche CLIÉ se connecte automatiquement auréseau et démarre une opération HotSync.Lorsque la communication est impossibleLors de l’exécution de l’étape 3 ci-dessus, effacez [Primary PC Name].](https://usermanual.wiki/Sony-Group/PEGAWL110/User-Guide-313254-Page-71.png)
![34FRDépannageEn cas de problème, par exemple, si la communication est impossibleou si l’appareil ne fonctionne pas normalement, procédez à lavérification des points indiqués dans ce guide de dépannage.Visitez le site Internet d’assistance de Sony CLIÉ:Clients aux Etats-Unis et au Canada :http://www.ita.sel.sony.com/support/clie/access/Clients en Europe :http://www.clie-link.com/Clients de la zone Asie-Pacifique et du Mexique :http://vaio-online.sony.com/clie/Si le problème persiste, contactez le revendeur Sony auprès duquelvous avez acheté ce produit ou un représentant Sony de votre région.SymptômeVotre ordinateur depoche CLIÉ ne reconnaîtpas cette carte LAN sansfil.(Même si votreordinateur de pocheCLIÉ a établi laconnexion, le témoin dela carte LAN sans fil neclignote pas.)Vous ne pouvez pasconnecter votreordinateur de pocheCLIÉ à un point d’accèsLAN sans fil.Cause/remèdepAppuyez sur l’icône [CF Utility] sur l’écrand’accueil de votre ordinateur de poche CLIÉ,puis vérifiez si les informations relatives à lacarte sont correctes et procédez comme suit.•Retirez la carte LAN sans fil de votreordinateur de poche CLIÉ, puis insérez-la denouveau.•L’utilitaire LAN sans fil de cette carte(PEGA-WL110) n’est pas installé. Installez-leà l’aide du CD-ROM fourni. Pour obtenirdavantage d’informations, consultez lasection “Installation du logiciel ” à lapage 12.Le point d’accès LAN sans fil se déconnecte.pMettez le point d’accès LAN sans fil soustension.Un service autre que le service LAN sans filest sélectionné dans les préférences réseau.pSélectionnez [Wireless LAN] dans [Service].Les réglages du profil sont incorrects.pCorrigez les réglages de l’ID réseau (SSID),de la clé WEP, etc. Vérifiez également lesréglages du point d’accès LAN sans fil.](https://usermanual.wiki/Sony-Group/PEGAWL110/User-Guide-313254-Page-72.png)
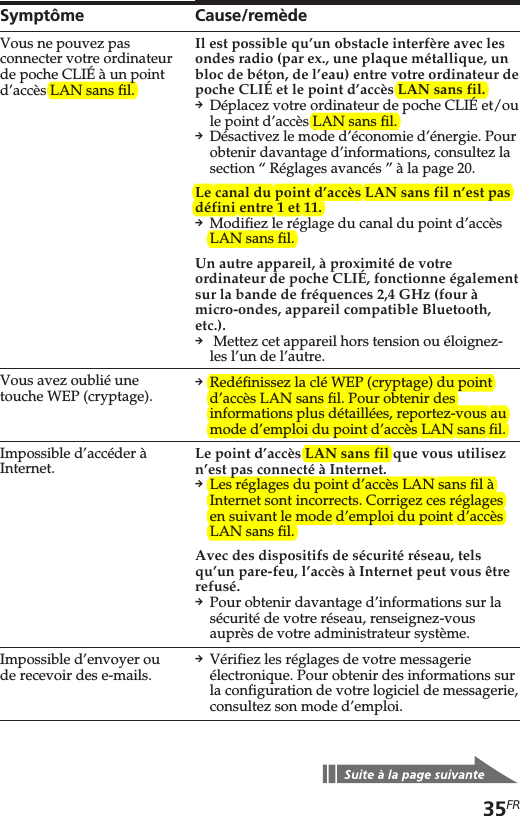
![36FRAstuceLors d’une communication à l’aide de votre ordinateur de poche CLIÉ équipéde sa carte LAN sans fil, vous pouvez visualiser les préférences réseau (par ex.,l’adresse IP utilisée, l’adresse IP du serveur DNS, etc.). Cliquez sur [Network]dans l’écran [Preferences], puis sélectionnez [Option] et [View Log] dans lemenu.SymptômeImpossible de parcourirdes pages d’accueil.Le transfert de donnéesest lent.Impossible de réaliserune opération HotSync.Cause/remèdepVérifiez les réglages de votre navigateurWeb.Pour obtenir des informations sur laconfiguration de votre navigateur Web,consultez son mode d’emploi.D’autres points d’accès LAN sans filinterfèrent avec la communication.pModifiez le numéro du canal du pointd’accès LAN sans fil que vous utilisez. Pourobtenir des informations plus détaillées surla modification de ce réglage, reportez-vousau mode d’emploi du point d’accès LANsans fil.Le point d’accès LAN sans fil est trèssollicité.pPatientez quelques instants et essayez ànouveau d’y accéder.Il est possible qu’un obstacle interfère avecles ondes radio (par ex., une plaquemétallique, un bloc de béton, de l’eau) entrevotre ordinateur de poche CLIÉ et le pointd’accès LAN sans fil.pDéplacez votre ordinateur de poche CLIÉet/ou le point d’accès LAN sans fil.pDésactivez le mode d’économie d’énergie.Pour obtenir davantage d’informations,consultez la section “Réglages avancés” à lapage 20.pVérifiez les réglages HotSync.Pour obtenir davantage d’informations surla modification de ce réglage, reportez-vousau mode d’emploi fourni avec votreordinateur de poche CLIÉ.En outre, si votre ordinateur est équipé d’unpare-feu, il est possible que l’opérationHotSync ne fonctionne pas correctement.](https://usermanual.wiki/Sony-Group/PEGAWL110/User-Guide-313254-Page-74.png)