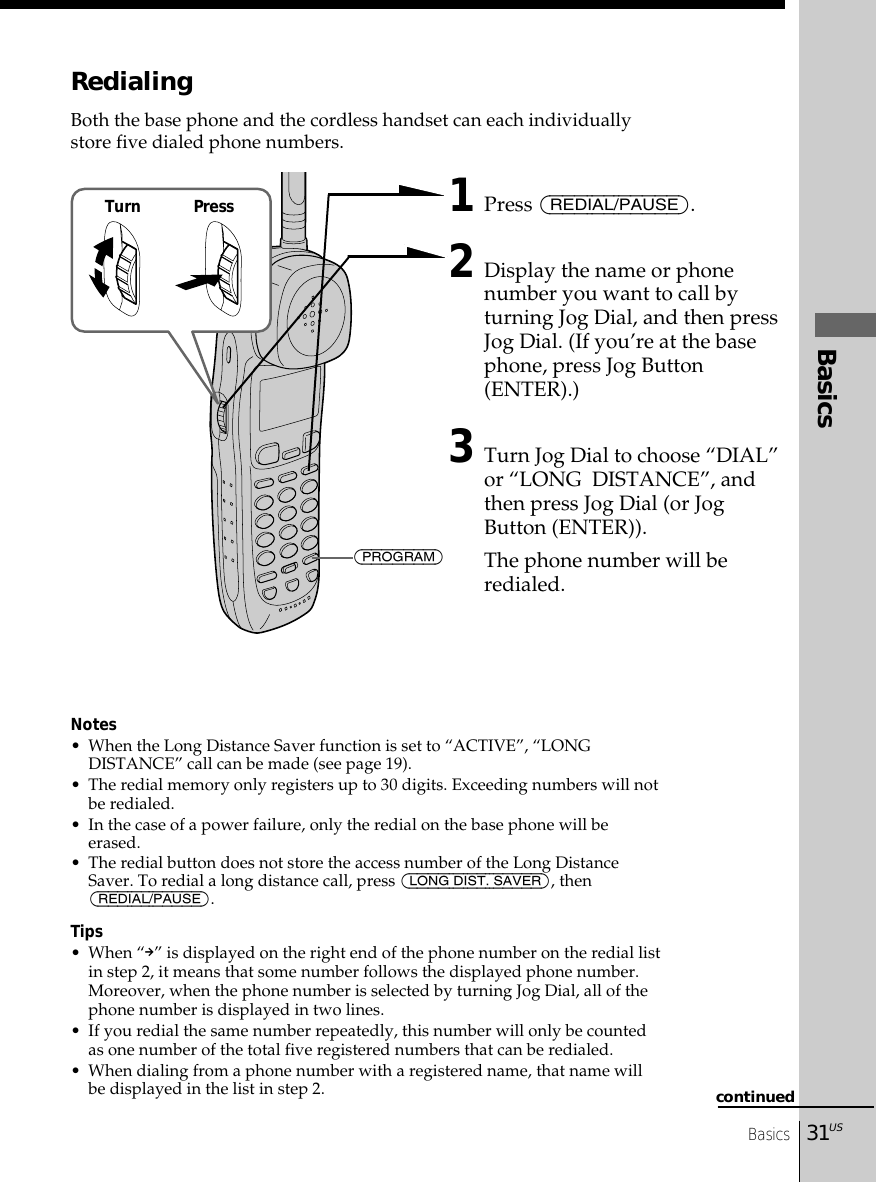
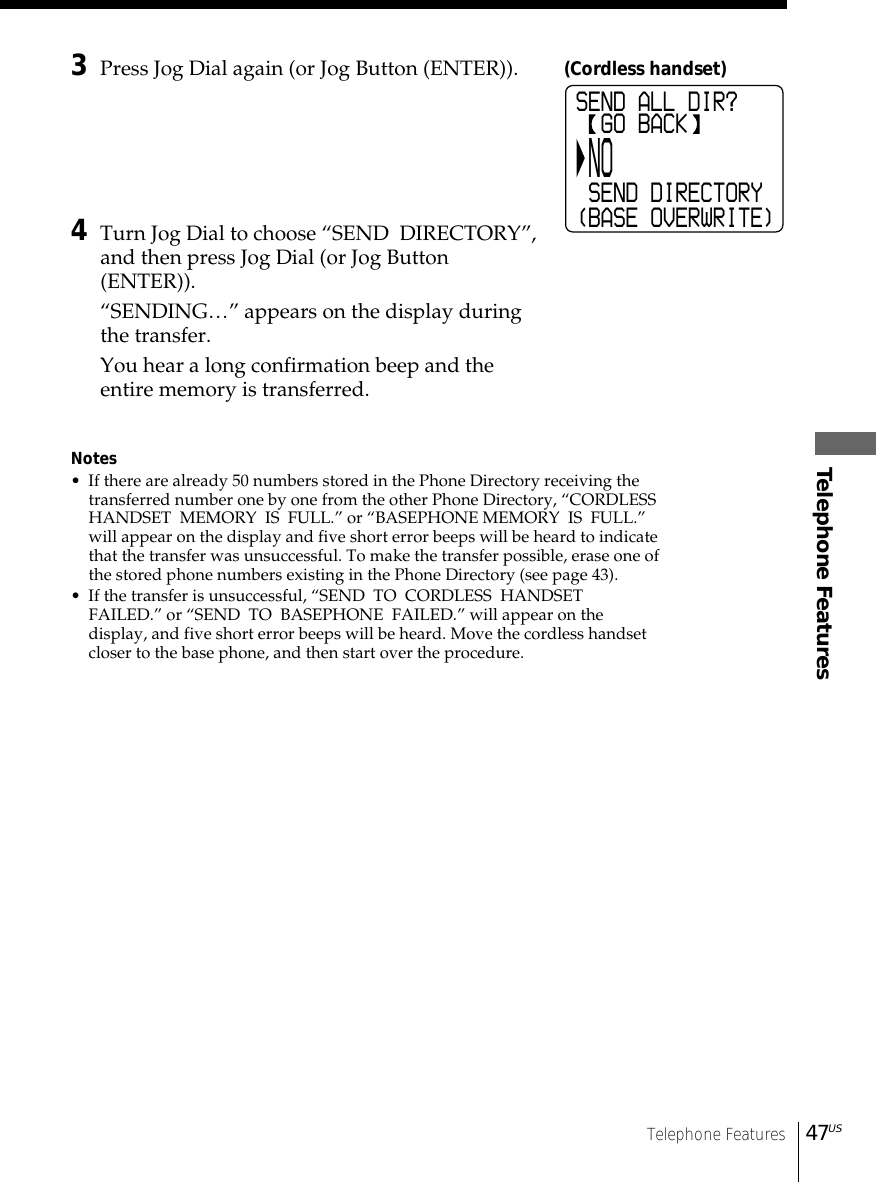
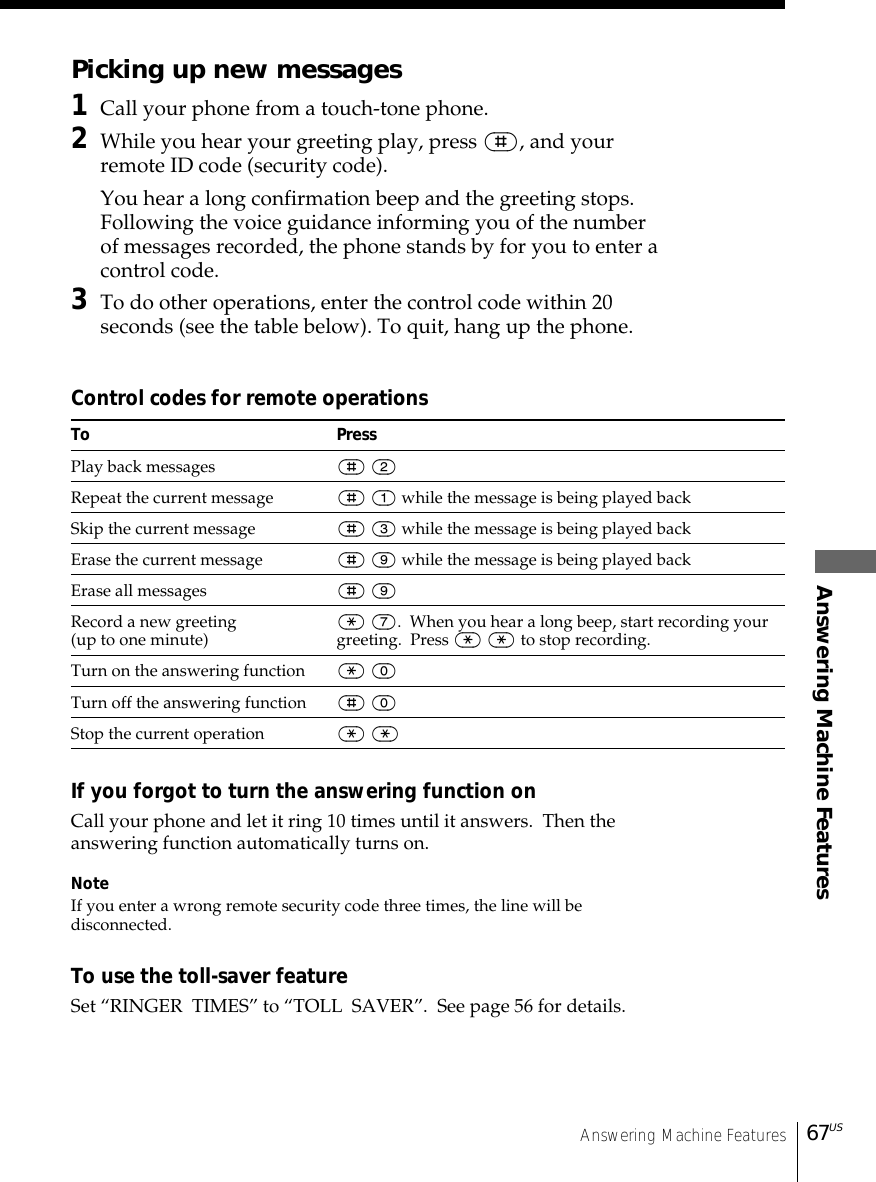
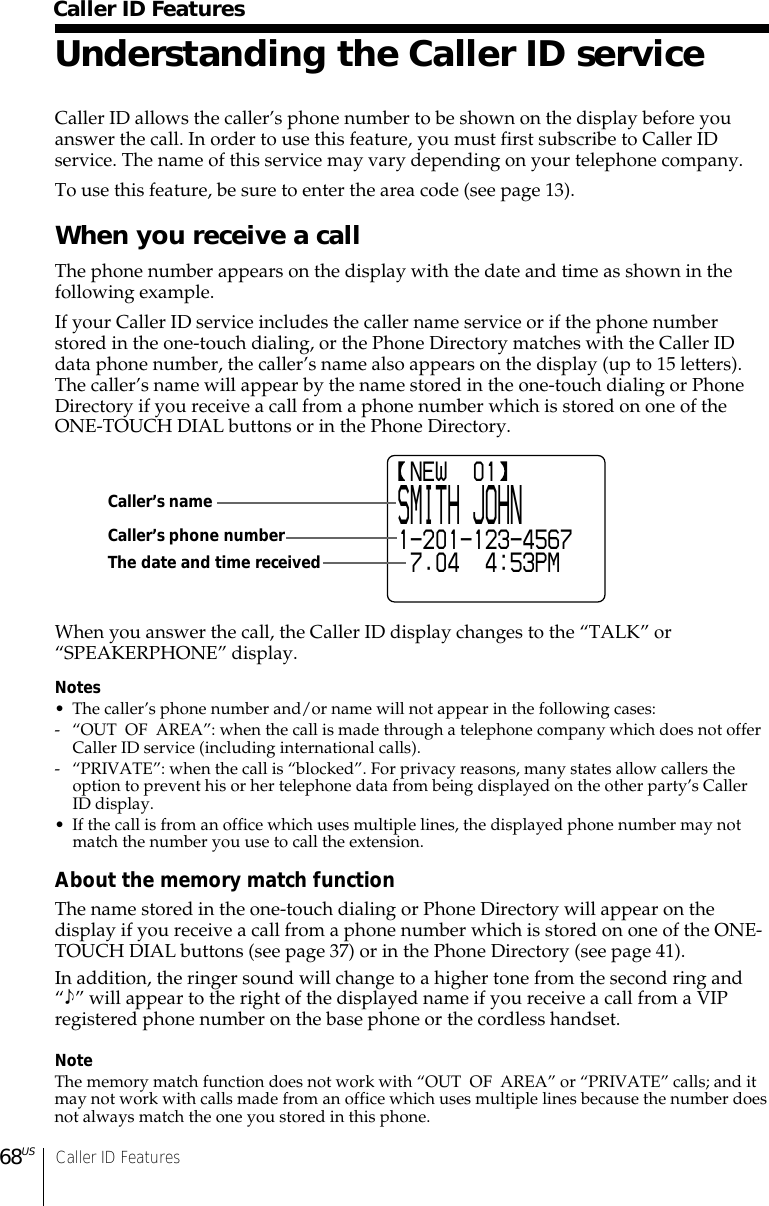
Sony Group SPPA2480 Cordless Phone User Manual SPP A2480
Sony Corporation Cordless Phone SPP A2480
UserManual.wiki
>
Sony Group
>
SPPA2480 User Manual
Users
Navigation menu
Upload a User Manual
Namespaces
Wiki Guide
HTML
PDF
Info
Views
User Manual
Discussion / Help
Navigation

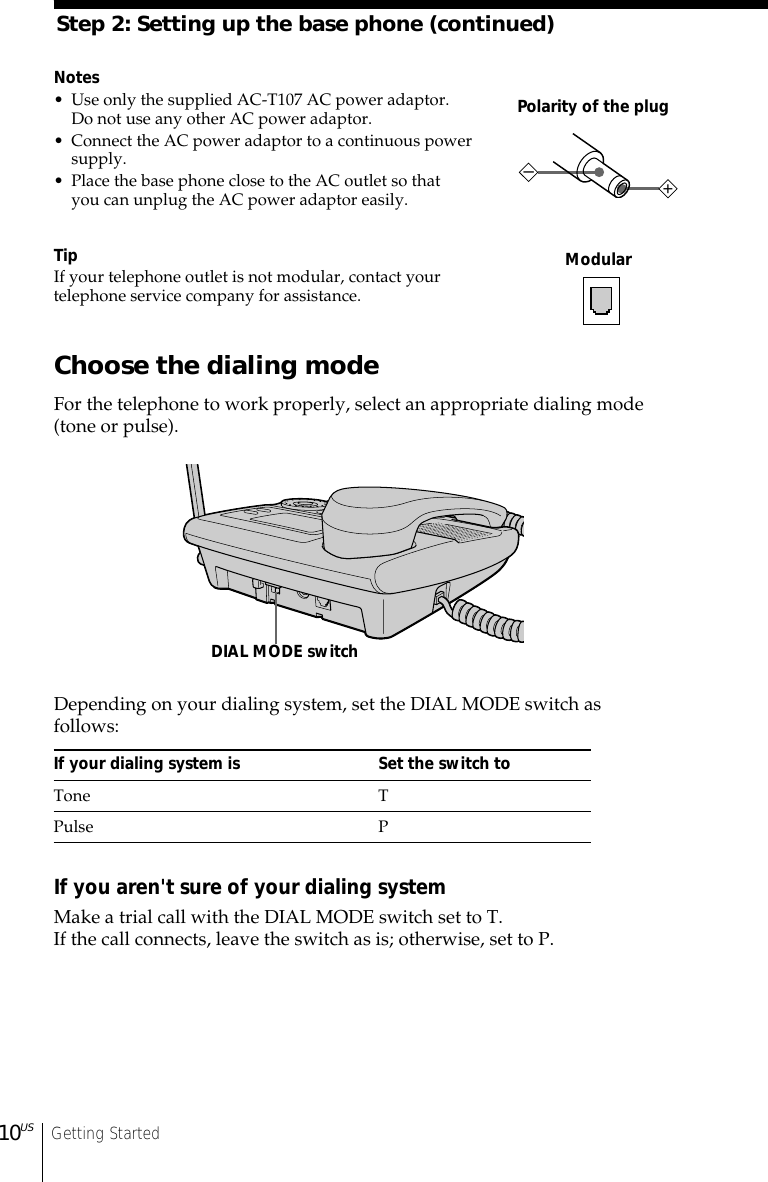
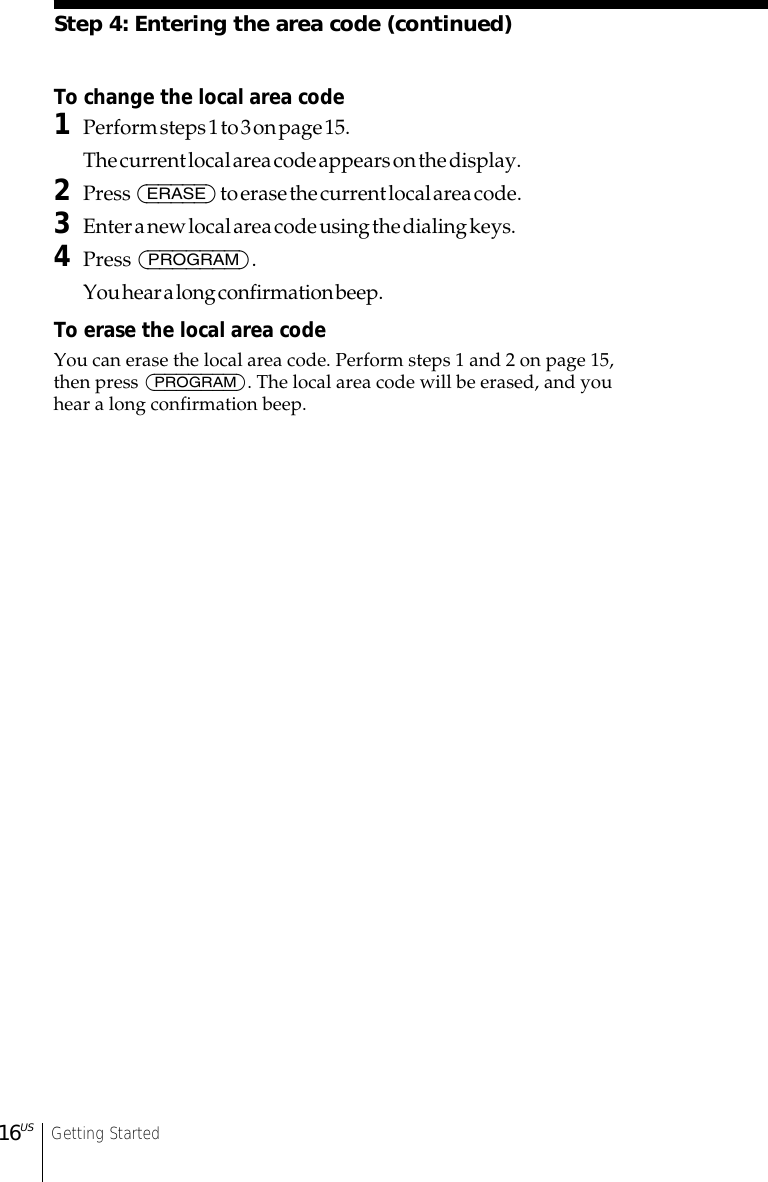
![Getting Started14USStep 4: Entering the area code (continued)4Press Jog Button (ENTER) again.“ENTER HOME AREA CODE.” appears onthe display.5Enter the three digits of your home area codeusing the dialing keys.6Press (PROGRAM).You hear a long confirmation beep.Notes• If the home area code is already entered, it appears on the display in step 3.To enter a different home area code, see “To change the home area code”below.• Do not allow more than 20 seconds to elapse during the operation procedure.• If the area code has not been entered, calling back from the Caller ID list andstoring the Caller ID data into the Phone Directory cannot be performed.• If the home area code is not correctly entered, “SEND TO CORDLESSHANDSET FAILED.” will appear on the display and five short error beepswill be heard after (PROGRAM) is pressed in step 6. Move the cordlesshandset closer to the base phone, and then start over the procedure.Tips• When you select “[GO BACK]”, you can return to the previous set display bypressing Jog Button (ENTER).• You may press Jog Button (ENTER) instead of (PROGRAM) in step 6.• To check the current home area code, perform steps 1 to 3. The home areacode appears on the display for about 20 seconds.To change the home area code1Perform steps 1 to 4 on pages 13 to 14.The current home area code appears on the display.2Press (ERASE) to erase the current home area code.3Enter a new home area code using the dialing keys.4Press (PROGRAM).You hear a long confirmation beep.To erase the home area codeYou can erase the home area code. Perform steps 1 and 2 above, thenpress (PROGRAM).The home area code will be erased, and you hear a long confirmationbeep.ENTER HOME AREA CODE._](https://usermanual.wiki/Sony-Group/SPPA2480/User-Guide-125331-Page-14.png)
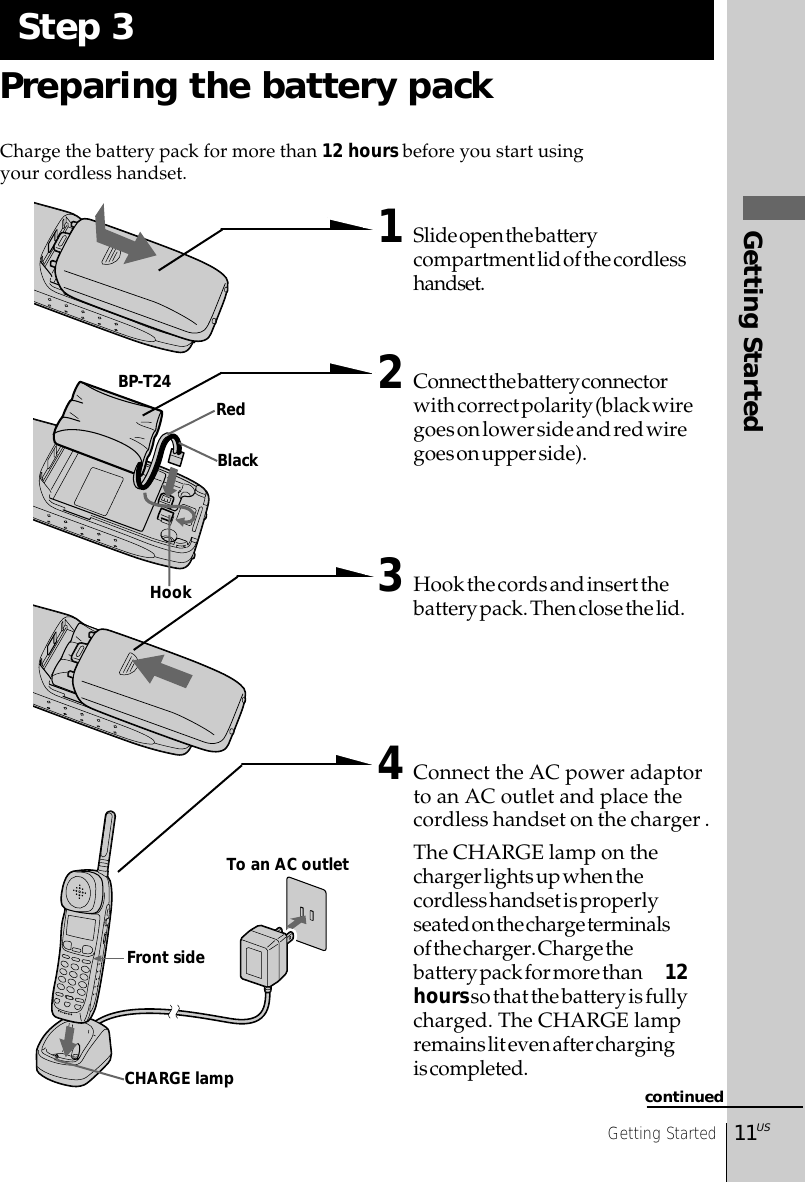
![Getting Started15USGetting StartedTo enter the local area code (For 10 digitsphone numbers users)If a call matches one of the local area codes you entered, the phonenumber will be registered with 10 digits in the Caller ID list (area code+ number). If a call does not match one of the local area codes youentered, the phone number will be registered with 11 digits in theCaller ID list (1 + area code + number). Some regions of the countryallow you to have more than one local area code. (Up to five local areacodes can be entered in this phone.)1Perform steps 1 to 3 on page 13.2Select the number (“LOCAL 1” to “LOCAL 5”)to enter the local area code by turning Jog Dial.3Press Jog Button (ENTER).“ENTER LOCAL AREA CODE 1.” appears onthe display when you select “LOCAL 1” in step2.4Enter the three digits of the local area code usingthe dialing keys.5Press (PROGRAM).You hear a long confirmation beep.Notes• If the local area code is already entered, it appears on the display in step 2. Toenter a different local area code, see “To change the local area code” on page16.• Do not allow more than 20 seconds to elapse during the operation procedure.• If the local area code is not correctly entered, “SEND TO CORDLESSHANDSET FAILED.” will appear on the display and five short error beepswill be heard after (PROGRAM) is pressed in step 5. Move the cordlesshandset closer to the base phone, and then start over the procedure.Tips• When you select “[GO BACK]”, you can return to the previous set display bypressing Jog Button (ENTER).• You may press Jog Button (ENTER) instead of (PROGRAM) in step 5.• To check the current local area code, perform steps 1 and 2. The local areacode appears on the display for about 20 seconds.continuedAREA CODE HOME : LOCAL 1: LOCAL 2: LOCAL 3:](https://usermanual.wiki/Sony-Group/SPPA2480/User-Guide-125331-Page-15.png)
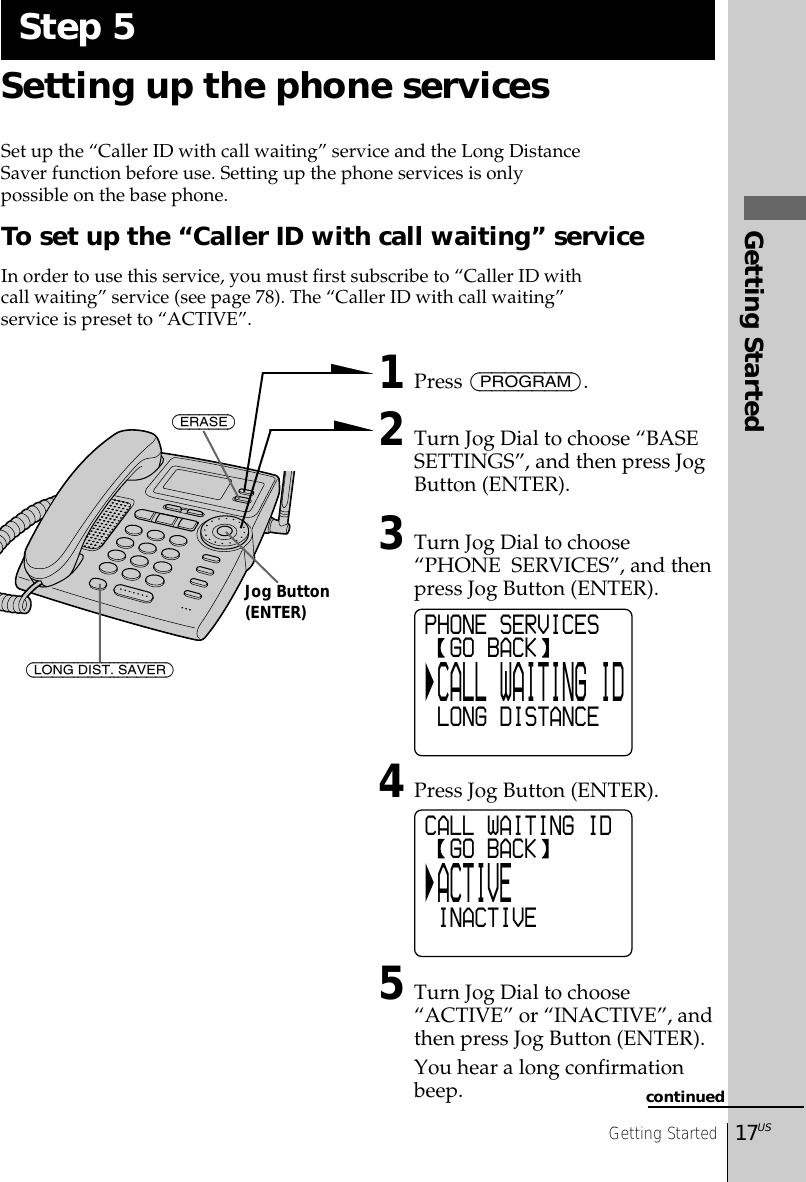
![Getting Started18USNoteDo not allow more than 20 seconds to elapse during the operation procedure.TipWhen you select “[GO BACK]”, you can return to the previous set display bypressing Jog Button (ENTER).To set up the Long Distance Saver functionMany telephone companies and service providers nowadays offer low-rate long distance calls separate from your standard long distanceprovider. Such services are usually initiated by dialing an accessnumber prior to the long distance call itself.The Long Distance Saver function enables you to dial the accessnumber of these special long distance service companies by pressingjust (LONG DIST. SAVER). After setting up the access number andactivating the button function in the menu, you only need to press(LONG DIST. SAVER) for dialing the access number of your special longdistance carrier.In order to use this function, you must first activate the button functionby memorizing the access number of your choice in the menu and bysetting the long distance menu function to “ACTIVE”The long distance menu is preset to “INACTIVE”, no preset accessnumber is registered.To set up the access number1Perform steps 1 and 3 on page 17.2Turn Jog Dial to choose “LONG DISTANCE”, and thenpress Jog Button (ENTER).3Turn Jog Dial to choose “ACCESS NUMBER”, and thenpress Jog Button (ENTER).4Enter the access number using the dialing keys.5Press (PROGRAM).6Turn Jog Dial to choose “YES” to activate(LONG DIST. SAVER), and then press Jog Button (ENTER).You hear a long confirmation beep.Step 5: Setting up the phone services (continued)](https://usermanual.wiki/Sony-Group/SPPA2480/User-Guide-125331-Page-18.png)
![Getting Started19USGetting StartedNotes•DO NOT USE (LONG DIST. SAVER) to dial EMERGENCY services, customerservice numbers, your local telephone company, local numbers or tollfree numbers.• If you press (LONG DIST. SAVER) twice, the dialing of the registered accessnumber is cancelled and “[LONG DISTANCE]” disappears from the display.• If the access number is not correctly set, “SEND TO CORDLESS HANDSETFAILED.” will appear on the display and five short error beeps will be heardafter Jog Button (ENTER) is pressed in step 6. Move the cordless handsetcloser to the base phone, and then start over the procedure.• You can register up to 24 digits as an access number.To change the access number1Perform steps 1 and 3 on page 18.The current access number appears on the display.2Press (ERASE) to erase the current access number.3Enter a new access number using the dialing keys.4Press (PROGRAM).5Turn Jog Dial to choose “YES” to activate(LONG DIST. SAVER), and then press Jog Button (ENTER).You hear a long confirmation beep.To activate/deactivate the Long Distance Saver function1Perform steps 1 to 3 on page 17.2Turn Jog Dial to choose “LONG DISTANCE”, and thenpress Jog Button (ENTER).3Turn Jog Dial to choose “ACTIVE” or “INACTIVE”(todeactivate), and then press Jog Button (ENTER).You hear a long confirmation beep.Notes• If you choose “INACTIVE” in step 3, (LONG DIST. SAVER) will be deactivatedand you cannot use (LONG DIST. SAVER) even with a registered accessnumber until the function is activated again.• Some Long Distance services may not be available in your state. Prices andconditions may vary. For details, contact your telephone company or yourlong distance provider. Some long distance call programs require asubscription with the carrier company before usage.• If it is not correctly set in “ACTIVE” or “INACTIVE”, “SEND TOCORDLESS HANDSET FAILED.” will appear on the display and five shorterror beeps will be heard after Jog Button (ENTER) is pressed in step 3. Movethe cordless handset closer to the base phone, and then start over theprocedure.](https://usermanual.wiki/Sony-Group/SPPA2480/User-Guide-125331-Page-19.png)
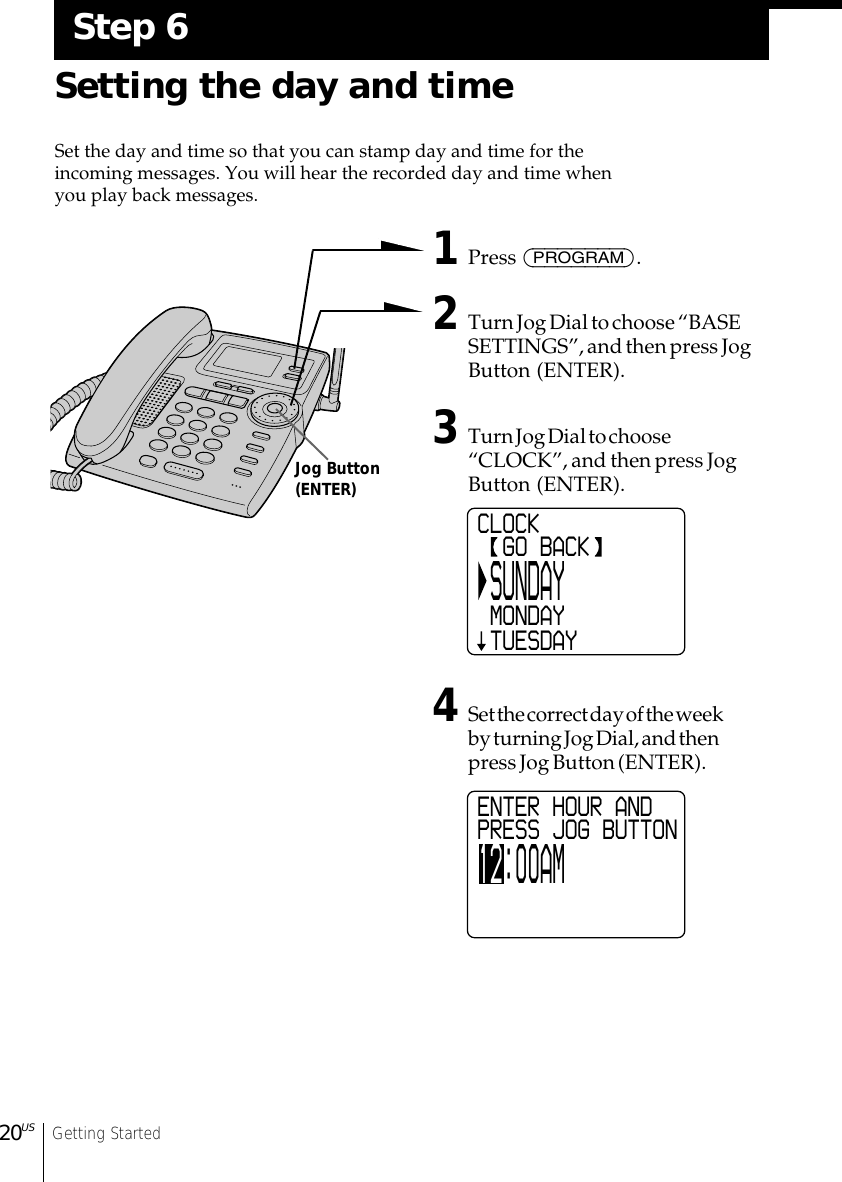
![Getting Started21USGetting Started5Set the hour (1 to 12) by turning Jog Dial, andthen press Jog Button (ENTER).6Set the minute (00 to 59) by turning Jog Dial,and then press Jog Button (ENTER).7Choose “AM” or “PM” by turning Jog Dial, andthen press Jog Button (ENTER).You hear a long confirmation beep and the dayand time you just entered is announced. Thenthe phone starts counting time.Notes• Do not allow more than 60 seconds to elapse during the operation procedure.• “SUN 12:00AM” on the display of the base phone flashes when the day andtime is cleared due to a power interruption, or when you connect the basephone to the AC outlet for the first time.• If the current day and time are not set, you will not hear a time stamp whenyou play back recorded messages.TipWhen you select “[GO BACK]”, you can return to the previous set display bypressing Jog Button (ENTER).ENTER AM/PM ANDPRESS JOG BUTTON12:00AMENTER MINUTE ANDPRESS JOG BUTTON12:00AM](https://usermanual.wiki/Sony-Group/SPPA2480/User-Guide-125331-Page-21.png)

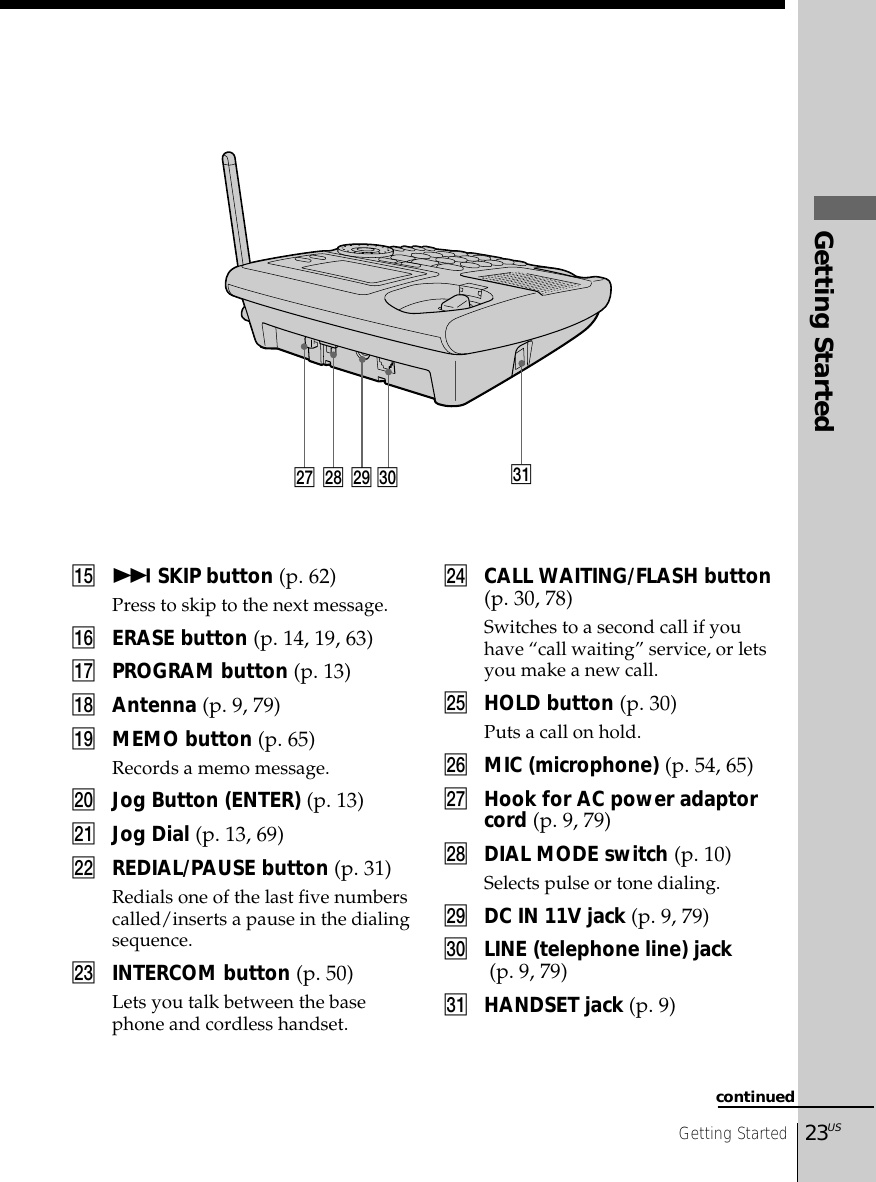
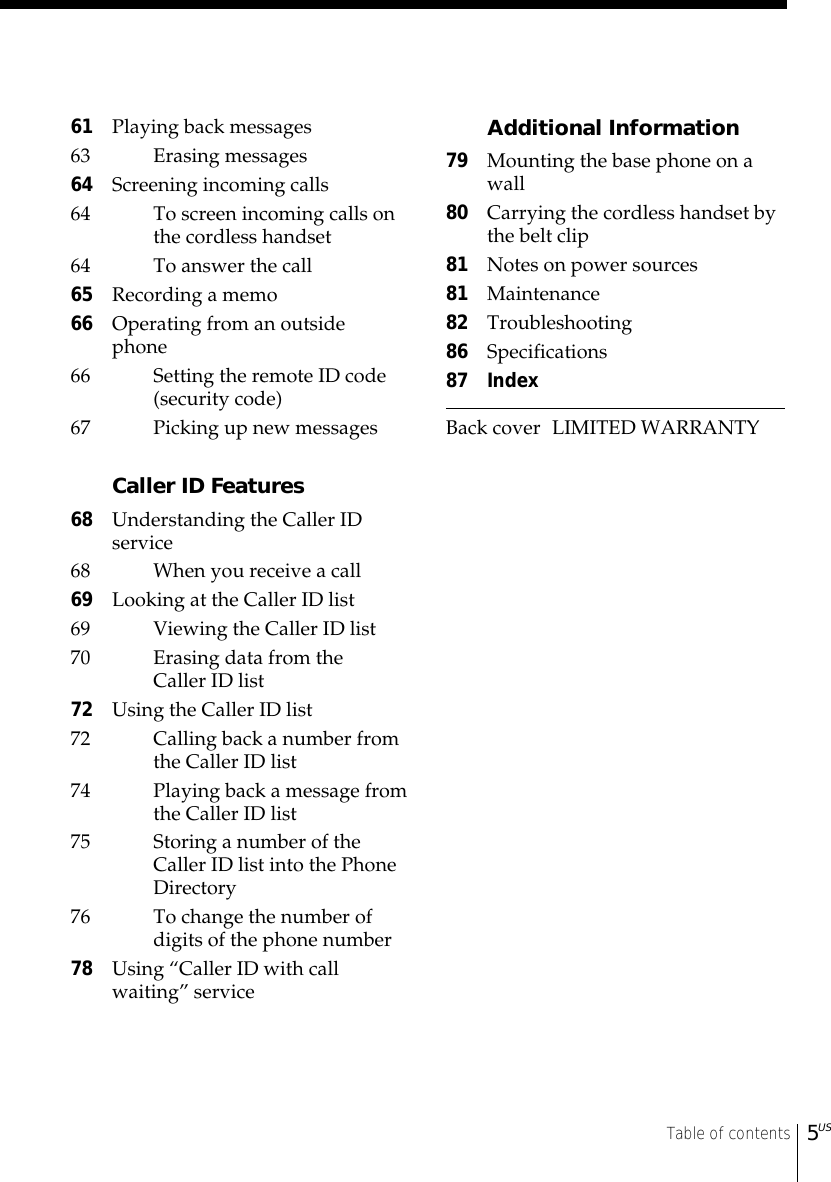
![Getting Started24US321456780qhwaw;qlqgqjqkwswdwfqaqfqsqd9Identifying the parts (continued)1Antenna2Speaker [EZfit] (p. 28)3Display window (p. 26, 68)4Jog Dial (p. 37, 69)5TALK button (p. 26)Lets you make or receive a call.6INTERCOM button (p. 49)Lets you talk between the basephone and the cordless handset.7LONG DIST. SAVER button(p. 18, 27)Lets you make a long distance callwith the registered access number.8. REPEAT button (p. 62)Press once to repeat the currentmessage or twice to go back to theprevious message.Cordless handset9REVIEW button (p. 62)Keep the button pressed for aplayback review of the currentmessage.0Dialing keys (p. 26)qa Battery compartment (p. 11)qs TONE button (p. 27)Allows you to switch temporarily totone dialing.qd HOLD/PLAY BACK button(p. 27, 61, 64)Puts a call on hold/plays backrecorded messages.qf RING switch (p. 34)Switches the ringer to on/off.](https://usermanual.wiki/Sony-Group/SPPA2480/User-Guide-125331-Page-24.png)
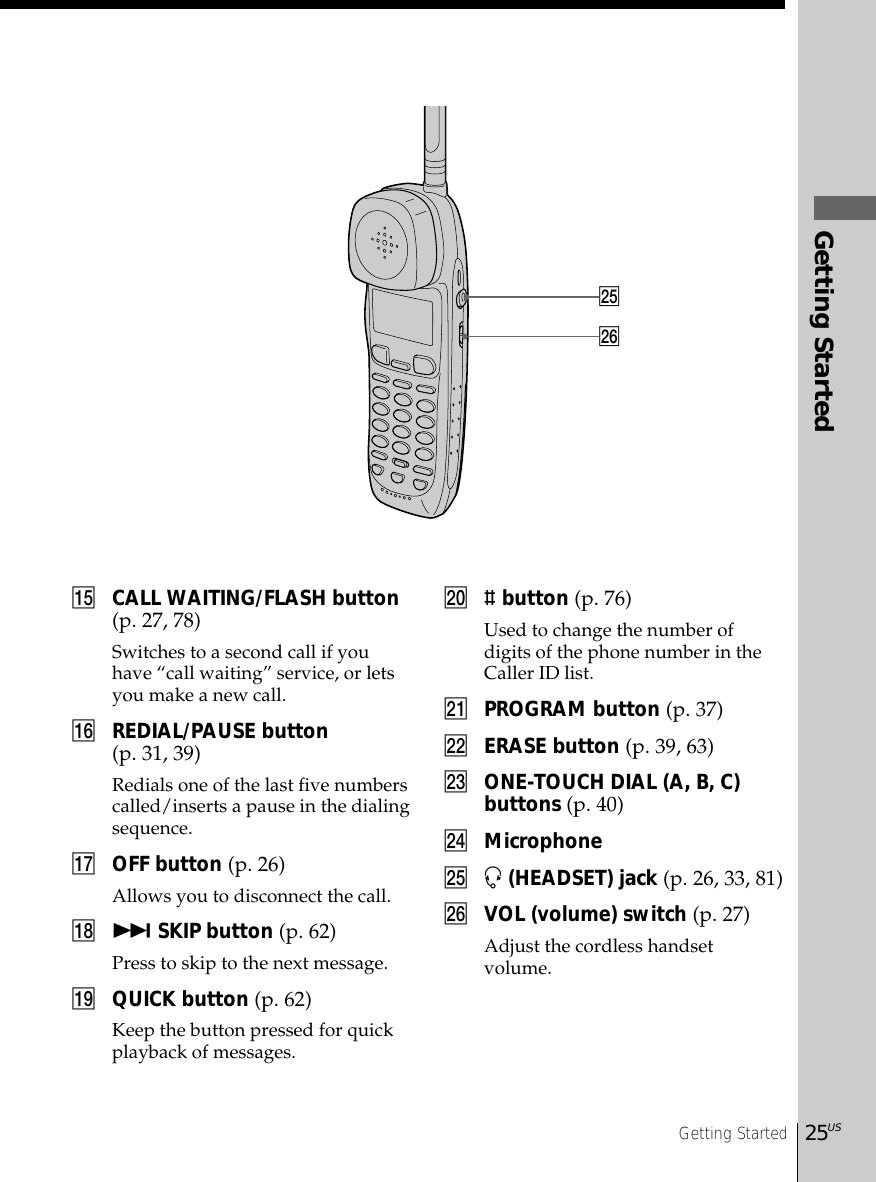
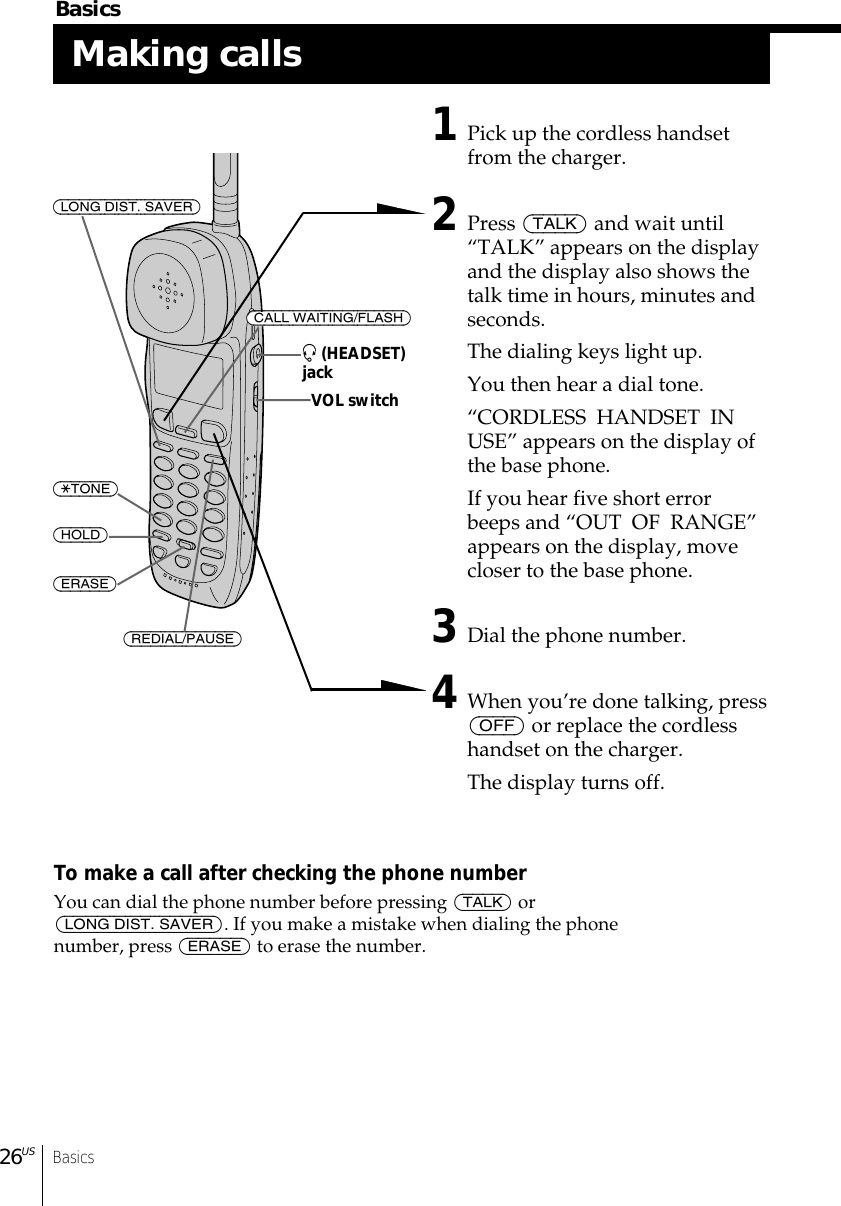
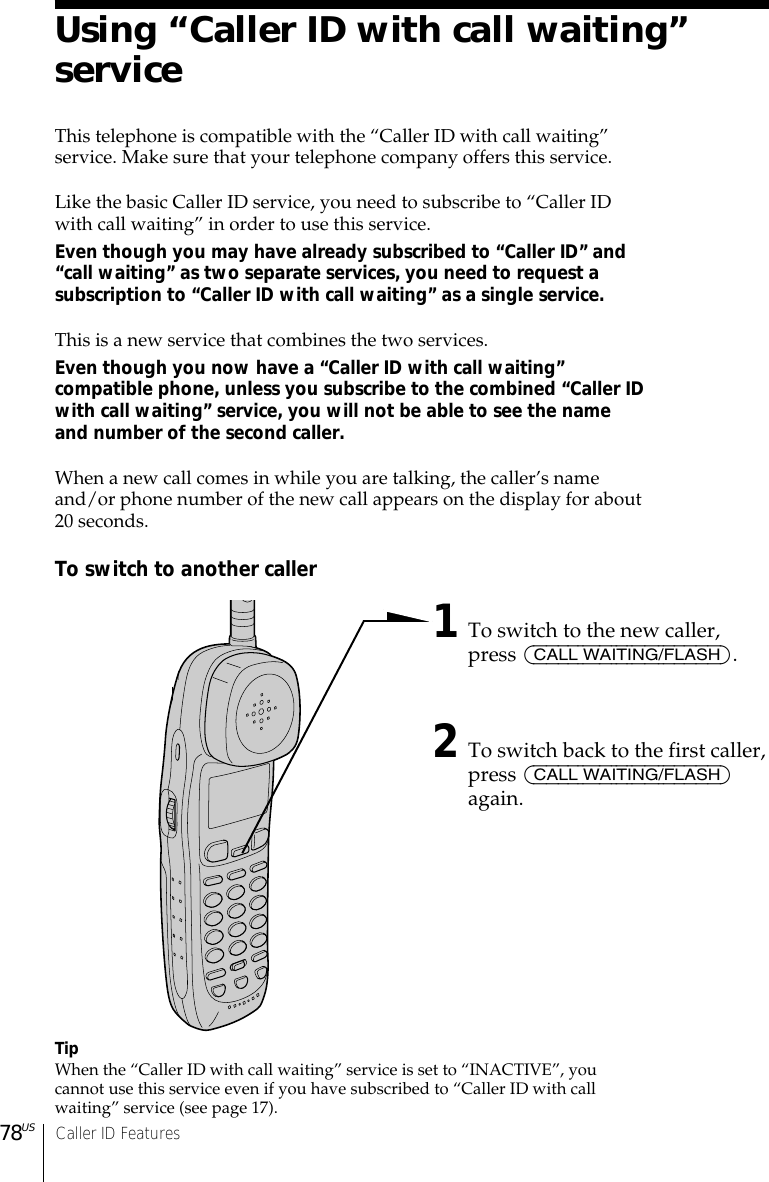
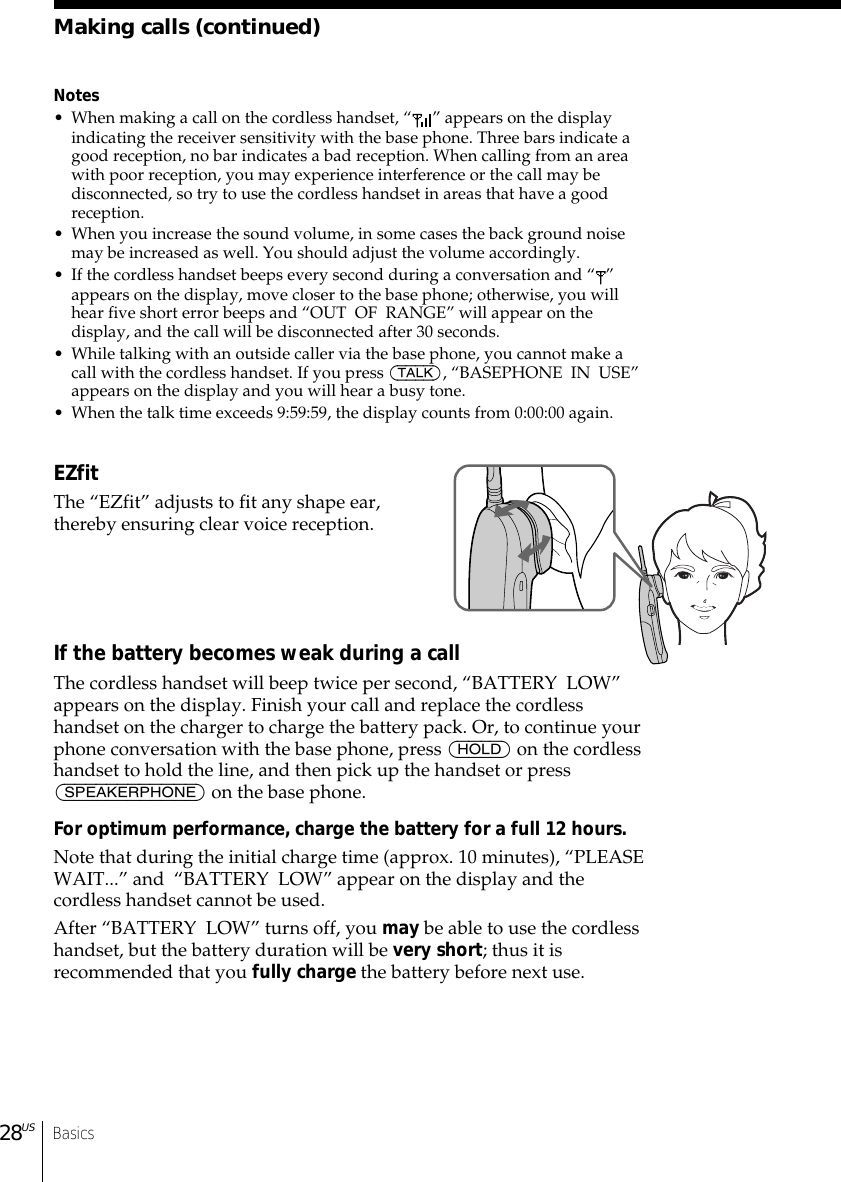
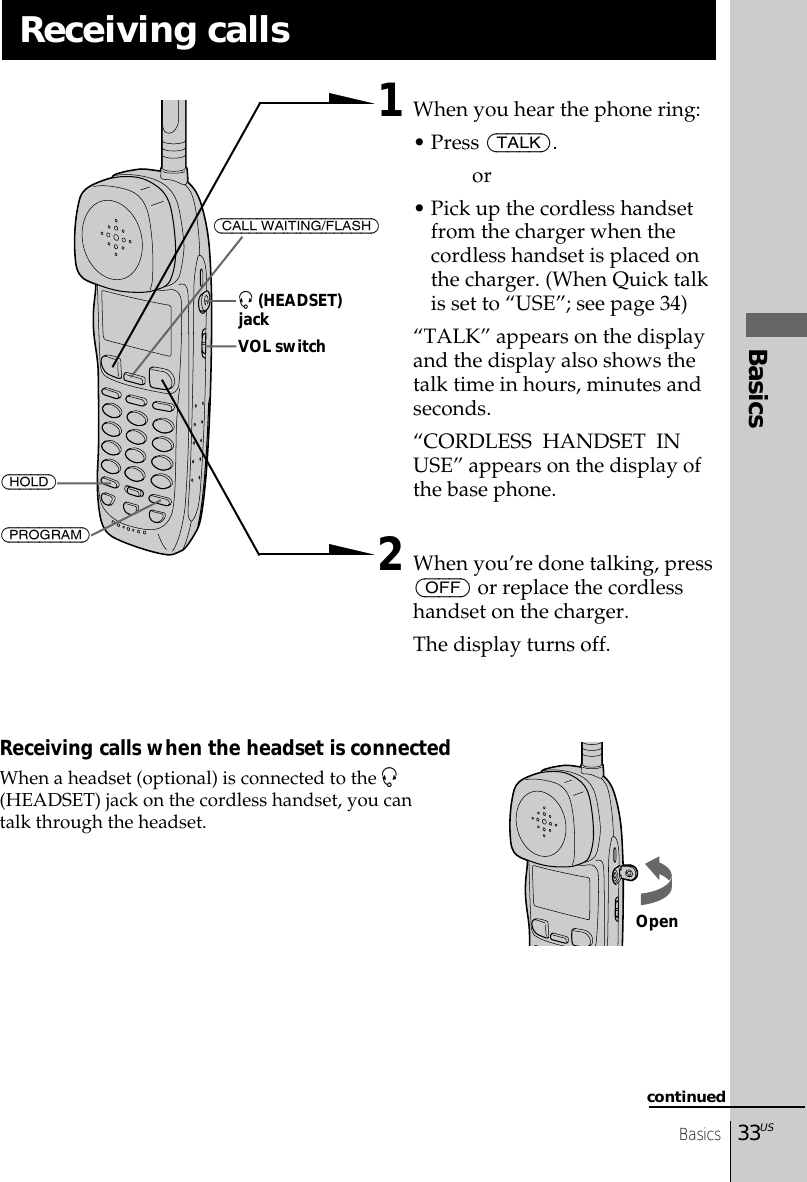
![Basics 27USBasicsMaking calls when the headset is connectedWhen a headset (optional) is connected to the I(HEADSET) jack on the cordless handset, you cantalk through the headset.Making calls using the Long Distance Saver functionSet the menu for the Long Distance Saver function to “ACTIVE”. See“To set up the Long Distance Saver function” on page 19.1Pick up the cordless handset from the charger.2Press (LONG DIST. SAVER).“[LONG DISTANCE]” appears on the display.To cancel this function, press (LONG DIST. SAVER) again orpress (TALK).3Dial the long distance phone number (e.g., 1-201-123-4567,or 011-...).4When you’re done talking, press (OFF) or replace thecordless handset on the charger.To make a call via Private Branch Exchange (PBX)Before pressing (LONG DIST. SAVER) in step 2 above, enter the outsideline access digit (e.g., 9).ToAdjust the cordlesshandset volumePut a call on holdSwitch to tone dialingtemporarilySwitch to another call(“call waiting” service*)* You need to subscribe to this service from your telephone company.Do thisSet the VOL switch to H (high), M (middle) or L (low).Press (HOLD). “HOLD” appears on the display.Press (HOLD) again or pick up the cordless handsetfrom the charger (When Quick talk is set to “USE”; seepage 34) to resume the conversation.Press (*TONE) after you’re connected.The line will remain in tone dialing until disconnected.Press (CALL WAITING/FLASH).Press (CALL WAITING/FLASH) again to return to the firstcaller.Additional taskscontinuedOpen](https://usermanual.wiki/Sony-Group/SPPA2480/User-Guide-125331-Page-27.png)
![Basics 29USBasicsMaking calls with the base phonePick up the handset or press(SPEAKERPHONE) on the base phone.“TALK” or “SPEAKERPHONE” appearson the display and the display also showsthe talk time in hours, minutes andseconds.Dial the phone number.When you’re done talking, replace thehandset in the cradle or press(SPEAKERPHONE) again.To make a call after checking the phone numberYou can dial the phone number before picking up the handset orbefore pressing (SPEAKERPHONE). If you make a mistake whendialing the phone number, press (ERASE) to erase the number.Making calls using the Long Distance Saver functionSet the menu for the Long Distance Saver function to “ACTIVE”. See“To set up the Long Distance Saver function” on page 19.1Pick up the handset or press (SPEAKERPHONE) on the basephone.2Press (LONG DIST. SAVER).“[LONG DISTANCE]” appears on the display.To cancel this function, press (LONG DIST. SAVER) again.3Dial the long distance phone number (e.g., 1-201-123-4567,or 011-...).4When you’re done talking, replace the handset in the cradleor press (SPEAKERPHONE) again.To make a call via Private Branch Exchange (PBX)Before pressing (LONG DIST. SAVER) in step 2 above, enter the outsideline access digit (e.g., 9).continued(SPEAKERPHONE)(VOLUME)(LONG DIST. SAVER) (HOLD)(*TONE)(REDIAL/PAUSE)(ERASE)(CALL WAITING/ FLASH)(PROGRAM)Jog DialJogButton(ENTER)](https://usermanual.wiki/Sony-Group/SPPA2480/User-Guide-125331-Page-29.png)
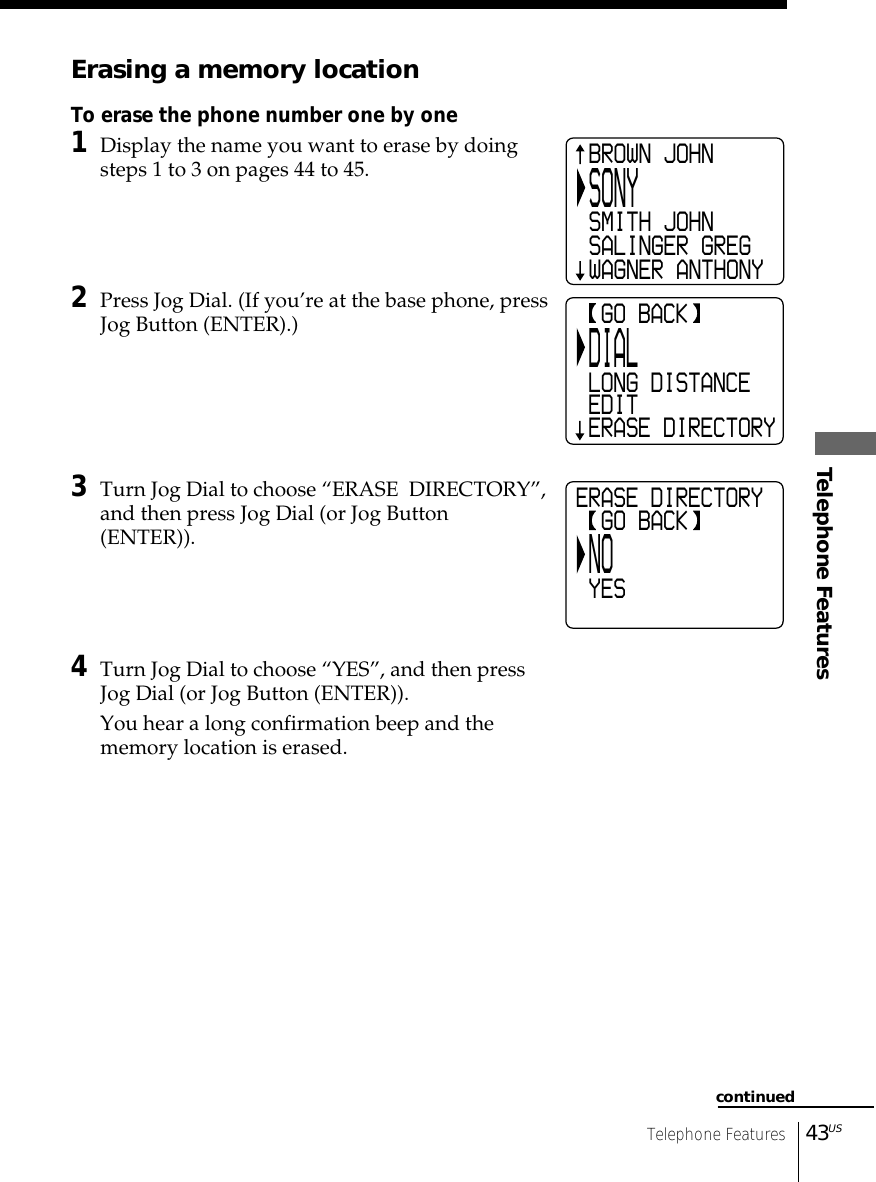
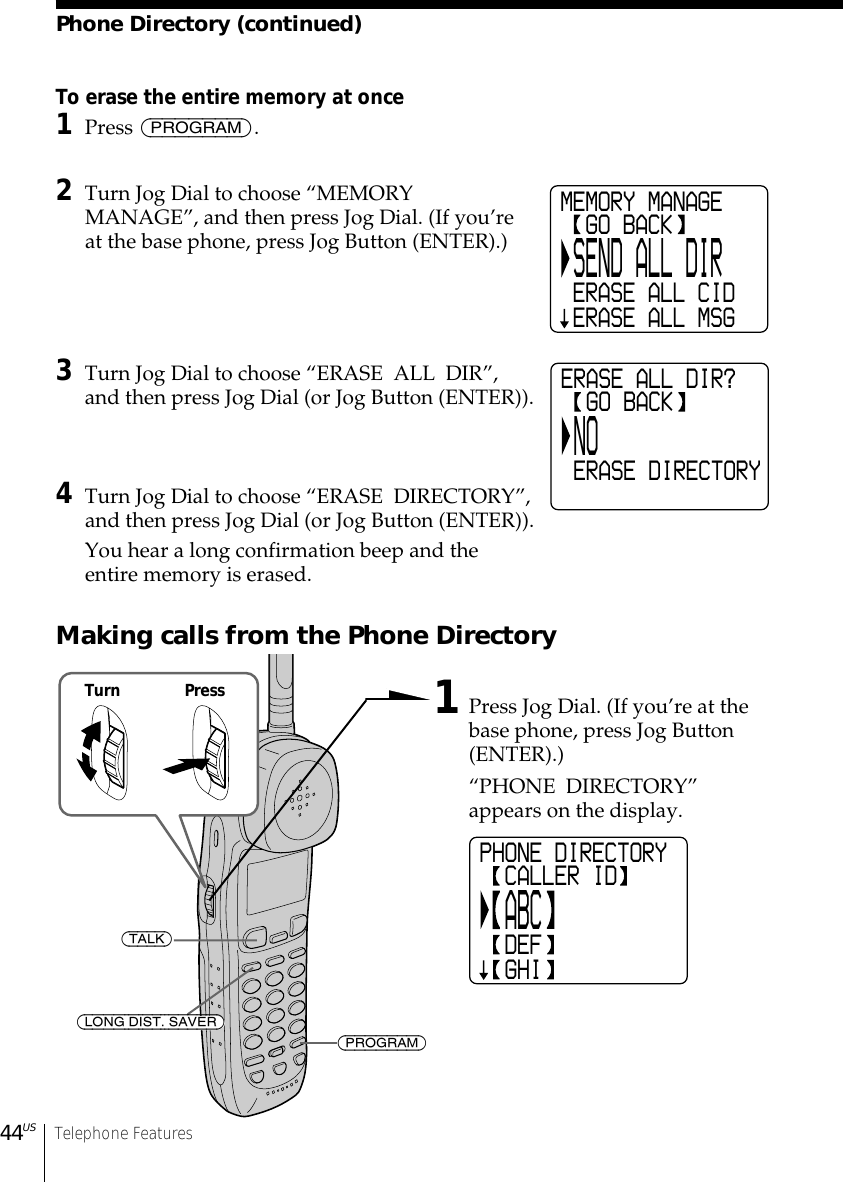
![Basics32USMaking calls (continued)To store the dialed phone number into the Phone Directory1Display the name or phone number you want to store bydoing steps 1 and 2 on page 31.2Turn Jog Dial to choose “PROGRAM”, and then press JogDial. (If you’re at the base phone, press Jog Button (ENTER).)3Enter the name by doing steps 4 and 5 on page 38.4Turn Jog Dial to choose “[PGM]”, and then press Jog Dial (orJog Button (ENTER)).You hear a long confirmation beep, and the name and thenumber are stored.NoteThe dialed phone numbers of up to 20 digits can be stored in the PhoneDirectory.To erase the dialed phone number one by one1Display the name or phone number you want to erase bydoing steps 1 and 2 on page 31.2Turn Jog Dial to choose “ERASE REDIAL”, and then pressJog Dial. (If you’re at the base phone, press Jog Button(ENTER).)3Turn Jog Dial to choose “YES”, and then press Jog Dial (orJog Button (ENTER)).You hear a long confirmation beep, and the number iserased.To erase the entire dialed phone numbers at once1Press (PROGRAM).2Turn Jog Dial to choose “MEMORY MANAGE”, and thenpress Jog Dial. (If you’re at the base phone, press Jog Button(ENTER).)3Turn Jog Dial to choose “ERASE ALL RDL”, and then pressJog Dial (or Jog Button (ENTER)).4Turn Jog Dial to choose “ERASE REDIAL”, and then pressJog Dial (or Jog Button (ENTER)).You hear a long confirmation beep, and the entire numberare erased.](https://usermanual.wiki/Sony-Group/SPPA2480/User-Guide-125331-Page-32.png)
![Basics34USToAdjust the cordless handsetvolumePut a call on holdSwitch to another call(“call waiting” service*)Receive a call by only pickingup the cordless handset fromthe charger, without pressing(TALK)(Quick talk)* You need to subscribe to this service from your telephone company.Additional tasksNoteIf there is an incoming call during intercom conversation, intercom call will bedisconnected, and both the base phone and the cordless handset will ring.TipTo inform you of an incoming call, the display shows “** RINGING **” evenwhen you set the RING switch on the cordless handset to OFF.If you have subscribed to the Caller ID service;• the caller’s number and/or name appears on the display when you receive acall (see page 68) or when another call comes in by “call waiting” service.• the name stored in the one-touch dialing or Phone Directory appears on thedisplay if the call matches the number stored on ONE-TOUCH DIAL buttonsor in the Phone Directory (memory match function; see page 68).• the ringer sound changes to a higher tone if the call matches the number VIPstored on ONE-TOUCH DIAL buttons or in the Phone Directory (memorymatch function; see page 68).To turn the ringer offSet the RING switch on the bottom to OFF.“[RINGER OFF]” appears on the display.The cordless handset won’t ring. You can still makecalls, and also receive calls if another telephoneconnected to the same line rings to inform you onincoming calls. You can also receive an intercom call.Do thisSet the VOL switch to H (high), M (middle) or L(low).Press (HOLD). “HOLD” appears on the display.Press (HOLD) again or pick up the cordlesshandset from the charger (When Quick talk isset to “USE”; see below) to resume theconversation.Press (CALL WAITING/FLASH).Press (CALL WAITING/FLASH) again to return tothe first caller.Press (PROGRAM). Turn Jog Dial to choose“QUICK TALK”, then press Jog Dial.Turn Jog Dial to choose “USE”, then press JogDial.Receiving calls (continued)RING switch](https://usermanual.wiki/Sony-Group/SPPA2480/User-Guide-125331-Page-34.png)
![Basics 35USBasicsReceiving calls with the base phoneWhen you hear the phone ring, pick upthe handset or press (SPEAKERPHONE) onthe base phone.“TALK” or “SPEAKERPHONE” appearson the display and the display also showsthe talk time in hours, minutes andseconds.When you’re done talking, replace thehandset in the cradle or press(SPEAKERPHONE) again.To obtain the best speakerphoneperformance, see page 30.continuedToAdjust the handset orspeakerphone volumePut a call on holdSwitch to another call(“call waiting” service*)Adjust the ringer volumeof the base phone* You need to subscribe to the service from your telephone company.Do thisDuring phone conversation, press (VOLUME)(+)or (-).There are 3 steps for the handset volume level, and7 steps for the speakerphone volume level.Press (HOLD). “HOLD” appears on the display.Press (HOLD), (SPEAKERPHONE), or pick up thehandset from the base phone to resume theconversation.Press (CALL WAITING/ FLASH).Press (CALL WAITING/ FLASH) again to return to thefirst caller.Press (VOLUME)(+) or (-). The ringer volume canbe adjusted to three different levels: high, low, and“OFF”. If the ringer is set to “OFF”, “[RINGEROFF]” will appear on the display.Additional tasks(SPEAKERPHONE)(VOLUME)(HOLD)(CALL WAITING/ FLASH)](https://usermanual.wiki/Sony-Group/SPPA2480/User-Guide-125331-Page-35.png)
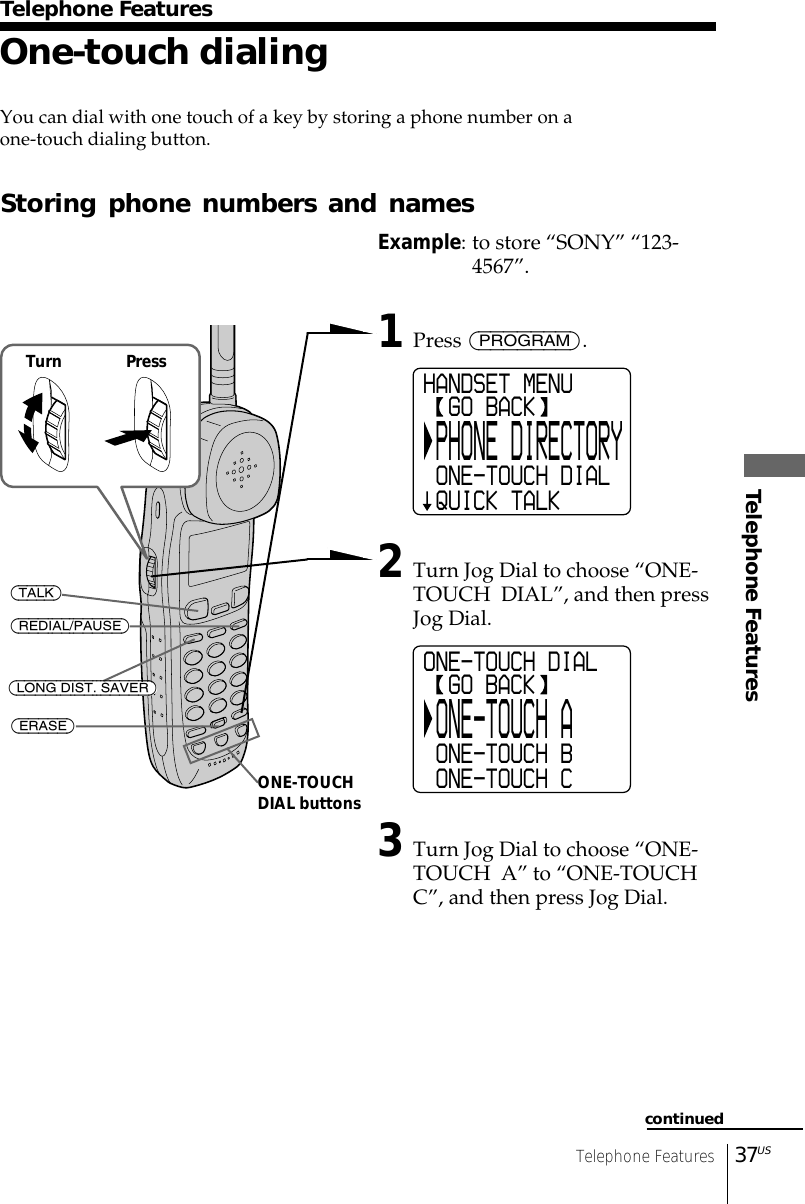
![38US Telephone FeaturesOne-touch dialing (continued)4Enter the name by turning Jog Dial.You can enter up to 15 characters.Turn Jog Dial until the desired character isselected, and then press Jog Dial.Each press of Jog Dial after choosing “[SWITCH]” switches the charactersfrom upper case letters t lower case letters t numbers and symbols.Enter successive characters in the same way.To enter a “space”, turn Jog Dial to choose“[p]”, and then press Jog Dial.5Turn Jog Dial to choose “[NUMBER]”, and thenpress Jog Dial.“ENTER NUMBERS” appears on the display.6Enter the phone number by turning Jog Dial.You can enter up to 20 digits, including a toneand a pause, each of which is counted as onedigit.Turn Jog Dial until the desired number isselected, and then press Jog Dial. Icon Meaning[F] Flash can be entered.[P] Pause can be entered.[VIP] If [VIP] has been selected, “9” will appearto the right of the displayed name. Thering type will change when calls arereceived from VIP registered numbers, andthe number of calls from VIP numbers arelisted separately from other messages.ENTER NAMESONY_ABCDEFGHIJKLMNOPQRSTUVWXYZ SWITCH NUMBERENTER NAME_ABCDEFGHIJKLMNOPQRSTUVWXYZ SWITCH NUMBERENTER NAME_abcdefghijklmnopqrstuvwxyz SWITCH NUMBERENTER NAME_0123456789"#$&'()*+,-./:; SWITCH NUMBERSONY1234567_0123456789*# F P VIP PGMSONY1234567_0123456789*# F P VIP PGMSONYENTER NUMBERS_0123456789*# F P VIP PGM](https://usermanual.wiki/Sony-Group/SPPA2480/User-Guide-125331-Page-38.png)
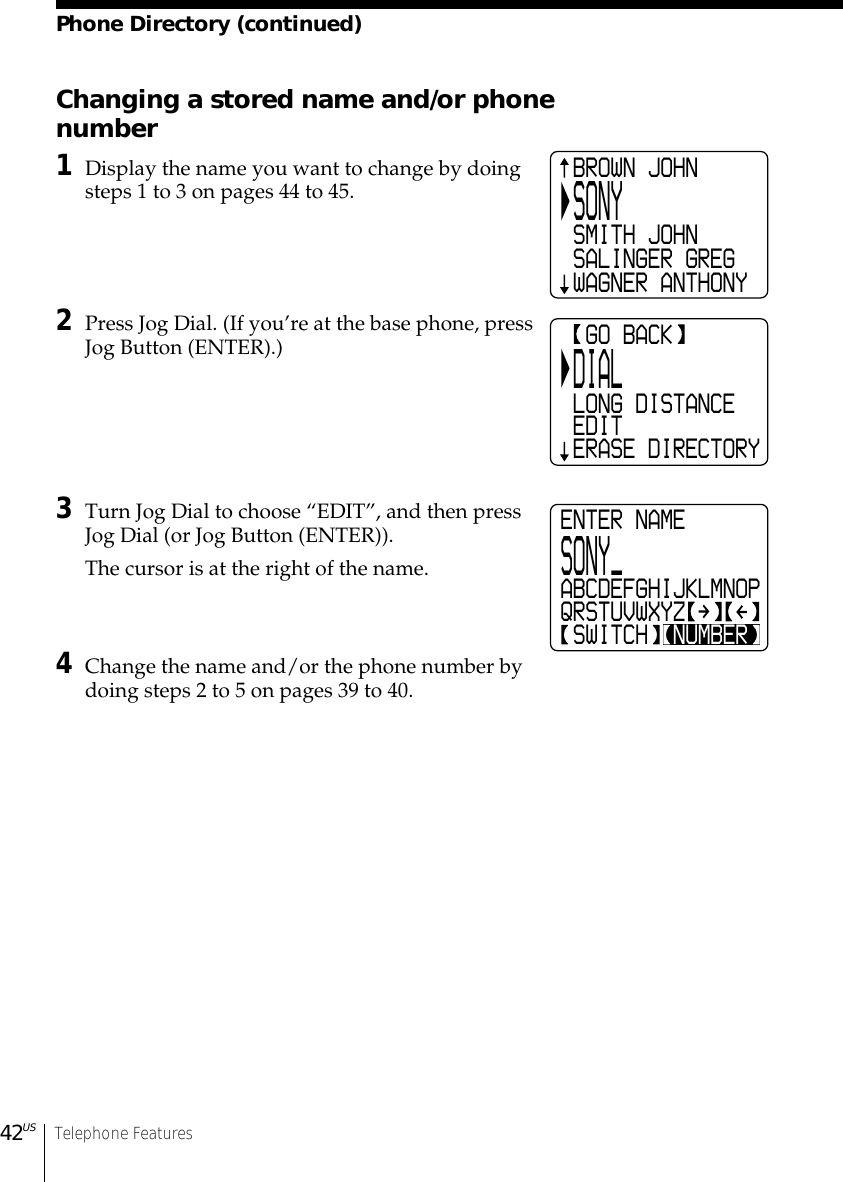
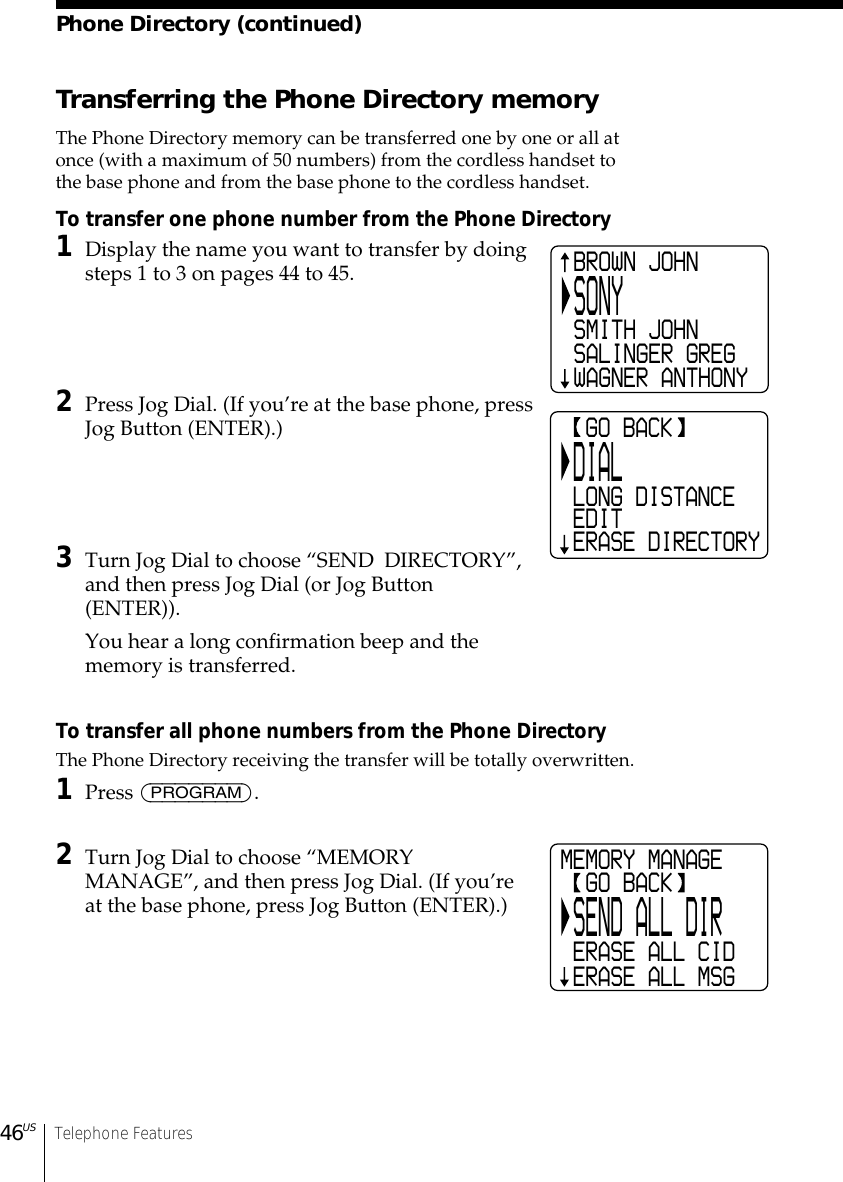
![39USTelephone FeaturesTelephone FeaturesENTER NAMESONY_ABCDEFGHIJKLMNOPQRSTUVWXYZ SWITCH NUMBERSONY123456789012345612_0123456789*# F P VIP PGMEnter successive numbers in the same way.When the phone number of 16 digits or morehas been entered, the phone number appears intwo lines.7Turn Jog Dial to choose “[PGM]”, and thenpress Jog Dial.You hear a long confirmation beep, and thename and the number are stored.The display goes off.Notes• Names cannot be entered using the dialing keys.• Do not allow more than 20 seconds to elapse during the operation procedure.Tips• When you select “[GO BACK]”, you can return to the previous set display bypressing Jog Dial.• If you have entered a wrong name or number in step 4 or 6, turn Jog Dial tochoose “[P]” then press Jog Dial or press (ERASE) to erase it. Then enter thecorrect name or number.• You may press (PROGRAM) instead of doing steps 5 and 7.• Phone numbers can be entered using the dialing keys in step 6.To store a number to be dialed via Private Branch Exchange(PBX)Before entering a phone number in step 6 on page 38, do as follows:1Enter the outside line access digit (e.g., 9).2Turn Jog Dial to choose “[P]” and then press Jog Dial, orpress (REDIAL/PAUSE).Changing a stored name and/or phone number1Display the name you want to change by doingsteps 1 to 3 on page 37.The cursor is at the right of the name.2Turn Jog Dial to choose “[P]”, then press JogDial to erase the characters, and enter the newname.If you want to change only the number, skip thisstep.continued](https://usermanual.wiki/Sony-Group/SPPA2480/User-Guide-125331-Page-39.png)
![40US Telephone Features3Turn Jog Dial to choose “[NUMBER]”, and thenpress Jog Dial.The cursor is at the right of the phone number.4Turn Jog Dial to choose “[P]”, then press JogDial to erase the number, and enter the newnumber.If you don’t want to change the number, skipthis step.5Turn Jog Dial to choose “[PGM]”, and thenpress Jog Dial.You hear a long confirmation beep and thename and/or the number is changed.NoteThe stored record with name and number can be replaced with a new name andnumber but it is not possible to erase the whole entry at one time.Tips• Single character and number can be erased by pressing (ERASE) in steps 2and 4.• You may press (PROGRAM) instead of doing steps 3 and 5.Making calls with one-touch dialing1Press (TALK) or (LONG DIST. SAVER) and wait until “TALK”appears on the display.2Press one of the ONE-TOUCH DIAL buttons ((A) to (C)).The phone number stored on the one-touch dialing buttonwill appear on the display and will be dialed.To check the phone number before one-touch dialingWhile the cordless handset is not in use, press one of the ONE-TOUCHDIAL buttons ((A) to (C)).The number stored on the button appears on the display for 20seconds. To dial the number, press (TALK) while the number isdisplayed.One-touch dialing (continued)SONY1234567_0123456789*# F P VIP PGM](https://usermanual.wiki/Sony-Group/SPPA2480/User-Guide-125331-Page-40.png)

![45USTelephone FeaturesTelephone Features2Turn Jog Dial to select an alphabet group([ABC], [DEF]...) which includes the initialcharacter of the name you want to search for,and then press Jog Dial (or Jog Button(ENTER)).If a numbers or a symbol is the initial character,select the “[etc]” group.3Select the name you want to call by turning JogDial.4Press Jog Dial (or Jog Button (ENTER)).5Turn Jog Dial to choose “DIAL” or “LONGDISTANCE”, and then press Jog Dial (or JogButton (ENTER)).The phone number will be dialed.NoteWhen the Long Distance Saver function is set to “ACTIVE”, “LONGDISTANCE” can be selected in step 4 (see page 19).Tips• When you select “[GO BACK]”, you can return to the previous set display bypressing Jog Dial. (If you’re at the base phone, press Jog Button (ENTER).)• When you select “[CALLER ID]” in step 1, you can switch to display theCaller ID list (see page 69).• If there is no data recorded in the selected alphabet group in step 2, the datamemory of the next following group will be displayed.• You may press (TALK) or (LONG DIST. SAVER) on the cordless handset (Ifyou’re at the base phone, pick up the handset from the base phone or press(SPEAKERPHONE) or (LONG DIST. SAVER)) to make a call instead of doingsteps 4 and 5.continuedPHONE DIRECTORY PQRS TUV WXYZ etc BROWN JOHN SONY SMITH JOHN SALINGER GREG WAGNER ANTHONY GO BACK DIAL LONG DISTANCE EDIT ERASE DIRECTORY](https://usermanual.wiki/Sony-Group/SPPA2480/User-Guide-125331-Page-45.png)

![Answering Machine FeaturesAnswering Machine Features 53USPreparing the answering machineAnswer settings can only be made on the base phone.Note that you cannot operate the base phone while the cordlesshandset is in use.Adjusting the answering volume of the basephoneThere are 7 steps for the answering volume level. The answeringvolume level is preset to 7 (MAX).1Press (PROGRAM).2Turn Jog Dial to choose“ANSWER SETTINGS”, andthen press Jog Button (ENTER).3Press Jog Button (ENTER) again.4Turn Jog Dial to adjust theanswering volume, and thenpress Jog Button (ENTER).You hear a long confirmationbeep.Notes• Do not allow more than 20 seconds to elapse during the operation procedure.• If the answering volume is set to minimum, you cannot screen the calls onthe base phone.TipWhen you select “[GO BACK]”, you can return to the previous set display bypressing Jog Button (ENTER).continuedAnswering Machine FeaturesJog Button(ENTER)ANSWER SETTINGS GO BACK ANSWERING VOL. ANSWERING MODE AUDIBLE INDI.](https://usermanual.wiki/Sony-Group/SPPA2480/User-Guide-125331-Page-53.png)
![Answering Machine FeaturesAnswering Machine Features 55UScontinued6Press Jog Button (ENTER) to stop recording.The phone automatically replays the recordedgreeting.Notes• Do not allow more than 20 seconds to elapse during the operation procedure.• If recording did not succeed, you hear five short error beeps. Start over theprocedure.• If a call comes in while recording a greeting, recording is cancelled. Startover the procedure.• If you hear five short error beeps while recording, the recording area may befull. In this case, erase unnecessary messages (see page 63).• If you want to cancel recording, turn Jog Dial to choose “CANCEL (STOP)”,then press Jog Button (ENTER) in step 5.Tips• When you select “[GO BACK]”, you can return to the previous set display bypressing Jog Button (ENTER).• If one minute have passed in step 5, recording stops automatically.• To record the greeting from a touch-tone phone, see page 67.Prerecorded greetingNormal mode: “Hello, I’m unable to answer your call right now.Please leave your name, number and message afterthe tone.”Announcement only mode: “Hello, I’m unable to answer your call right now.Please call again. Thank you.”Tips• If you wish to record your own “announcement only” greeting, follow theabove sequence after setting “ANSWERING MODE” to “ANNOUNCEONLY” (page 58). Otherwise, the “normal” greeting will be recorded.• You have to change the message each time you change the mode.To check the greetingPerform steps 1 to 3 on page 54, then press Jog Button (ENTER).To change the greetingRecord a new greeting. The new greeting replaces the old one.To erase the greetingPerform steps 1 to 3 on page 54, and turn Jog Dial to choose “ERASEGREETING” then press Jog Button (ENTER).To go back to the factory preset greetingErase your own greeting by doing step above. This will bring back theoriginal greeting.](https://usermanual.wiki/Sony-Group/SPPA2480/User-Guide-125331-Page-55.png)
![Answering Machine Features56USPreparing the answering machine (continued)Selecting the ring timeYou can select the number of rings before the answering machinestarts to play back the greeting and records incoming messages. Thereare 5 options of ring time. The ring time is preset to “TOLL SAVER”.1Press (PROGRAM).2Turn Jog Dial to choose “ANSWERSETTINGS”, and then press JogButton (ENTER).3Turn Jog Dial to choose “RINGERTIMES”, and then press Jog Button(ENTER).4Turn Jog Dial to select a ringduration, and then press Jog Button(ENTER). (See the table for details.)You hear a long confirmation beep.Set “RINGER TIMES” to Mode“TOLL SAVER” If new messages have been recorded, the phoneanswers at the second ring and records incomingmessages; if no new messages are recorded, itanswers at the fifth ring. When you call from anoutside phone and hear three rings, you know thatthere are no new messages. If you hang up at thispoint before the phone answers, you can save thetoll for the call.“1 TIME” to “4 TIMES” The phone always answers at the set ring times andrecords incoming messages.NoteDo not allow more than 20 seconds to elapse during the operation procedure.TipWhen you select “[GO BACK]”, you can return to the previous set display bypressing Jog Button (ENTER).Jog Button(ENTER)RINGER TIMES GO BACK 1 TIME 2 TIMES 3 TIMES](https://usermanual.wiki/Sony-Group/SPPA2480/User-Guide-125331-Page-56.png)
![Answering Machine FeaturesAnswering Machine Features 57UScontinuedSelecting the recording qualityFor the user who does not utilize the maximum recording capacity(about 20 minutes), you can select a higher recording grade and enjoysuperior sound quality and clarity compared to the standard (NORM)grade. As higher sound quality uses up more memory capacity, themaximum recording time changes accordingly.1Press (PROGRAM).2Turn Jog Dial to choose“ANSWER SETTINGS”, andthen press Jog Button (ENTER).3Turn Jog Dial to choose“RECORD QUALITY”, andthen press Jog Button (ENTER).4Turn Jog Dial to choose “HI(SHORT PLAY)”, “MID” or“NORM (LONG PLAY)”, andthen press Jog Button (ENTER).You hear a long confirmationbeep.Notes• Do not allow more than 20 seconds to elapse during the operation procedure.• The approx. length of the three recording grades are:“HI (SHORT PLAY)”– 8 minutes“MID”– 15 minutes“NORM (LONG PLAY)”– 20 minutesActual recording time may vary.TipWhen you select “[GO BACK]”, you can return to the previous set display bypressing Jog Button (ENTER).Jog Button(ENTER)RECORD QUALITY GO BACK HI(SHORT PLAY) MID NORM(LONG PLAY)](https://usermanual.wiki/Sony-Group/SPPA2480/User-Guide-125331-Page-57.png)
![Answering Machine FeaturesAnswering Machine Features 59USNotes• Do not allow more than 20 seconds to elapse during the operation procedure.• The same greeting is used regardless of the answering mode. Therefore, ifyou decide to change the mode, make sure that you record a new greeting tomatch the answering mode.Tips• When the phone is in announcement only mode, “ANNOUNCE ONLY” willappear on the standby mode display.• When you select “[GO BACK]”, you can return to the previous set display bypressing Jog Button (ENTER).When the memory is fullThe recording area of this phone’s memory is about 20 minutes*(including the greeting, messages, and memo). If the remainingrecording area becomes less than one minute, the phone automaticallyswitches to announcement only mode, which does not recordmessages, and the greeting will be switched to the pre-recordedgreeting. Confirm the available time left for recording in the standbymode display.* Available time for recording at “NORM (LONG PLAY)” sound quality.If you wish to record more messages, erase the existing messages (seepage 63). You can also erase the messages from an outside phone (seepage 67).Setting the audible message indicatorYou have the option of having a beep to tell you if you have receivedany new messages. The audible message indicator is preset to “ON”.1Press (PROGRAM).2Turn Jog Dial to choose “ANSWER SETTINGS”, and thenpress Jog Button (ENTER).3Turn Jog Dial to choose “AUDIBLE INDI.”, and then pressJog Button (ENTER).4Turn Jog Dial to choose “ON” or “OFF”, and then press JogButton (ENTER).You hear a long confirmation beep.continued](https://usermanual.wiki/Sony-Group/SPPA2480/User-Guide-125331-Page-59.png)

![Answering Machine Features66USOperating from an outside phoneYou can call from a touch-tone phone and pick up new messagesrecorded on the phone. First, you just set the remote ID code (securitycode) and turn on the answering function before going out.The remote ID code (security code) setting can only be made on thebase phone.Setting the remote ID code (security code)1Press (PROGRAM).2Turn Jog Dial to choose“ANSWER SETTINGS”, andthen press Jog Button (ENTER).3Turn Jog Dial to choose“SECURITY CODE”, and thenpress Jog Button (ENTER).4Enter four digits of remote IDcode (security code) between0000 and 9999 using the dialingkeys.5Press (PROGRAM).The remote ID code (securitycode) is set, and you hear a longconfirmation beep.NoteDo not allow more than 20 seconds to elapse during the operation procedure.Tips• When you select “[GO BACK]”, you can return to the previous set display bypressing Jog Button (ENTER).• You may press Jog Button (ENTER) instead of (PROGRAM) in step 5.To change the remote ID code (security code)Enter a new remote ID code (security code). The new code will replacethe old one.Jog Button(ENTER)](https://usermanual.wiki/Sony-Group/SPPA2480/User-Guide-125331-Page-66.png)
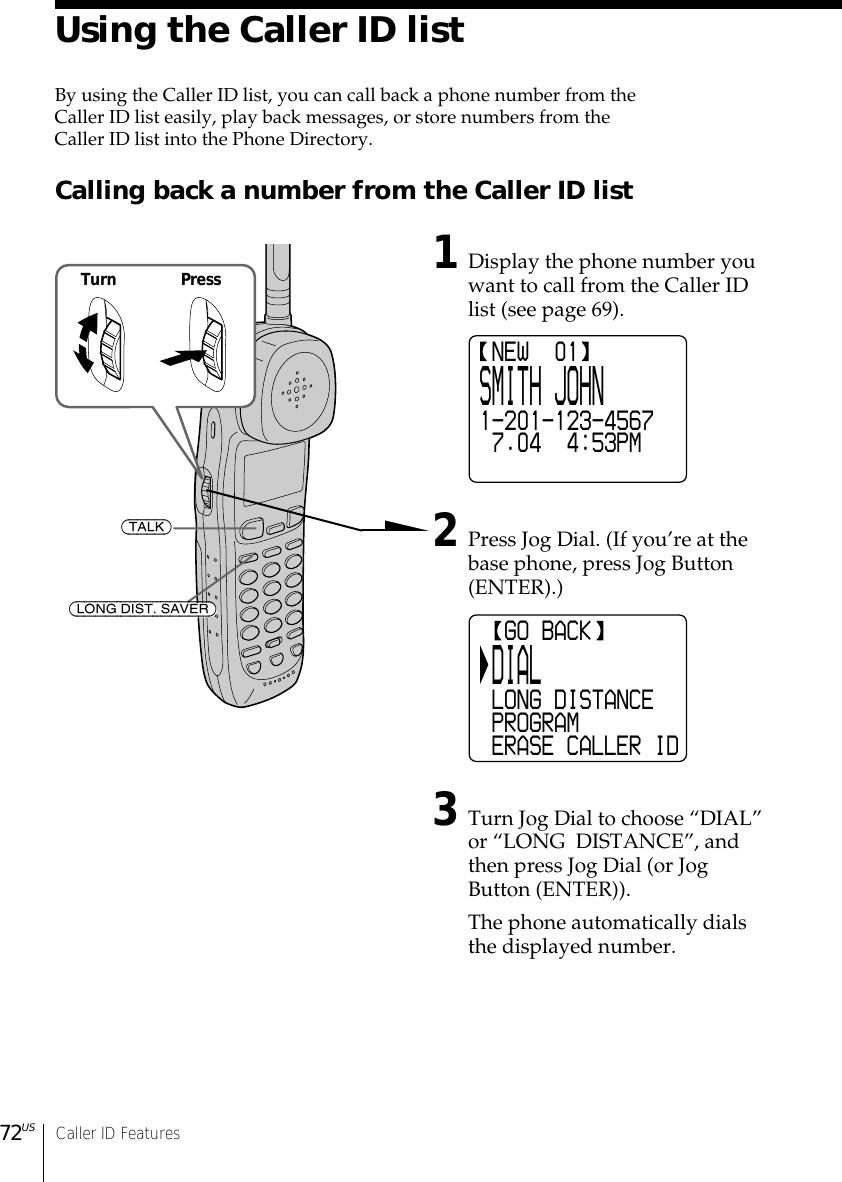
![Caller ID FeaturesCaller ID Features69USLooking at the Caller ID listThe phone stores the data of the last 100 calls received including “OUTOF AREA” and “PRIVATE” calls. It keeps track of all calls received;even if they were not answered.Viewing the Caller ID listYou can look through the Caller ID list on both the base phone and thecordless handset to check the phone number and/or name of the callsreceived.1Turn Jog Dial.The display shows the numberof “NEW CALLS” (calls whichyou have not viewed) and“OLD CALLS” (calls which youhave viewed) calls.2Turn Jog Dial down to displayolder data or up to displaynewer data.Notes• If a 101st call is received, the oldest data is automatically erased.• When you have checked all data, “END OF LIST” appears.Tips• The number of “NEW CALLS” can be confirmed with the standby modedisplay of the base phone. In addition, after playing back messages, a voiceguidance will provide notice in regards to new calls.• When there are messages in the displayed Caller ID data, “[MESSAGE]” willappear at the very bottom of the display. See “Playing back a message fromthe Caller ID list” on page 74.continuedTurn PressCALLER ID NEW CALLS 08 OLD CALLS 12](https://usermanual.wiki/Sony-Group/SPPA2480/User-Guide-125331-Page-69.png)
![70US Caller ID FeaturesLooking at the Caller ID list (continued)Erasing data from the Caller ID listOld data will be erased automatically when a 101st call comes in, butyou can also manually erase unnecessary data one by one or erase theentire list.To erase the phone number one by one1Display the phone number you want to erasefrom the Caller ID list (see page 69).2Press Jog Dial. (If you’re at the base phone, pressJog Button (ENTER).)3Turn Jog Dial to choose “ERASE CALLER ID”,and then press Jog Dial (or Jog Button(ENTER)).4Turn Jog Dial to choose “YES”, and then pressJog Dial (or Jog Button (ENTER)).You hear a long confirmation beep and the datais erased.NoteDo not allow more than 20 seconds to elapse during the operation procedure.TipWhen you select “[GO BACK]”, you can return to the previous set display bypressing Jog Dial. (If you’re at the base phone, press Jog Button (ENTER).)ERASE CALLER ID GO BACK NO YES GO BACK DIAL LONG DISTANCE PROGRAM ERASE CALLER ID NEW 01SMITH JOHN1-201-123-4567 7.04 4:53PM](https://usermanual.wiki/Sony-Group/SPPA2480/User-Guide-125331-Page-70.png)
![Caller ID FeaturesCaller ID Features71USTo erase the entire list at onceEntire Caller ID list deletion can only be made on the base phone.Note that Caller ID data in the list that has not been viewed will alsobe erased.1Press (PROGRAM).2Turn Jog Dial to choose “MEMORYMANAGE”, and then press Jog Button(ENTER).3Turn Jog Dial to choose “ERASE ALL CID”,and then press Jog Button (ENTER).4Turn Jog Dial to choose “ERASE CALLER ID”,and then press Jog Button (ENTER).You hear a long confirmation beep and theentire list is erased.NoteDo not allow more than 20 seconds to elapse during the operation procedure.TipWhen you select “[GO BACK]”, you can return to the previous set display bypressing Jog Button (ENTER).ERASE ALL CID? GO BACK NO ERASE CALLER IDMEMORY MANAGE GO BACK SEND ALL DIR ERASE ALL CID ERASE ALL MSG](https://usermanual.wiki/Sony-Group/SPPA2480/User-Guide-125331-Page-71.png)
![Caller ID FeaturesCaller ID Features73UScontinuedNotes• When the Long Distance Saver function is set to “ACTIVE”, “LONGDISTANCE” can be selected in step 2 (see page 19).• If the area code is not entered, “PLEASE ENTER AREA CODE” will appearon the display, and you will not be able to call back. Enter the area code (seepage 13).• Do not allow more than 20 seconds to elapse during the operation procedure.• If the number displayed in step 1 is not the one you should call back, you canchange the number of digits of the phone number as described on page 76.• If the phone is connected to a Private Branch Exchange (PBX), you may notbe able to call back from the Caller ID list because an outside line access digitis necessary.Tips• You may press (TALK) or (LONG DIST. SAVER) on the cordless handset (Ifyou’re at the base phone, pick up the handset from the base phone or press(SPEAKERPHONE) or (LONG DIST. SAVER)) to make a call instead of doingsteps 2 and 3.• When you select “[GO BACK]”, you can return to the previous set display bypressing Jog Dial. (If you’re at the base phone, press Jog Button (ENTER).)](https://usermanual.wiki/Sony-Group/SPPA2480/User-Guide-125331-Page-73.png)
![74US Caller ID Features GO BACK DIAL LONG DISTANCE PLAY BACK PROGRAMUsing the Caller ID list (continued)Playing back a message from the Caller ID listWhen there is a message in the received Caller ID data, you can playback the message while continuing to display the Caller ID list.1Display the phone number youwant to play back a messagefrom the Caller ID list (see page69).“[MESSAGE]” appears on thedisplay.2Press Jog Dial. (If you’re at thebase phone, press Jog Button(ENTER).)3Turn Jog Dial to choose “PLAYBACK”, and then press Jog Dial(or Jog Button (ENTER)).The message is played back.NoteDo not allow more than 20 seconds to elapse during the operation procedure.Tips• When you select “[GO BACK]”, you can return to the previous set display bypressing Jog Dial. (If you’re at the base phone, press Jog Button (ENTER).)• Messages can be played back by pressing (PLAY/STOP) on the base phone or(HOLD/PLAY BACK) on the cordless handset in step 1.Turn Press(HOLD/PLAY BACK) NEW 01SMITH JOHN1-201-123-4567 7.04 4:53PM MESSAGE](https://usermanual.wiki/Sony-Group/SPPA2480/User-Guide-125331-Page-74.png)
![Caller ID FeaturesCaller ID Features75USStoring a number of the Caller ID list intothe Phone Directory1Display the name and phone number you wantto store from the Caller ID list (see page 69).2Confirm the number and press Jog Dial. (Ifyou’re at the base phone, press Jog Button(ENTER).)3Turn Jog Dial to choose “PROGRAM”, and thenpress Jog Dial (or Jog Button (ENTER)).The cursor is at the right of the name.Enter or change the name, if necessary (see page39).4Turn Jog Dial to choose “[NUMBER]”, and thenpress Jog Dial (or Jog Button (ENTER)).The cursor is at the right of the phone number.Enter or change the phone number, if necessary(see page 40).5Turn Jog Dial to choose “[PGM]”, and thenpress Jog Dial (or Jog Button (ENTER)).You hear a long confirmation beep and thename and number are stored.continuedSMITH JOHN12011234567_0123456789*# F P VIP PGMENTER NAMESMITH JOHN_ABCDEFGHIJKLMNOPQRSTUVWXYZ SWITCH NUMBER GO BACK DIAL LONG DISTANCE PROGRAM ERASE CALLER ID NEW 01SMITH JOHN1-201-123-4567 7.04 4:53PM](https://usermanual.wiki/Sony-Group/SPPA2480/User-Guide-125331-Page-75.png)
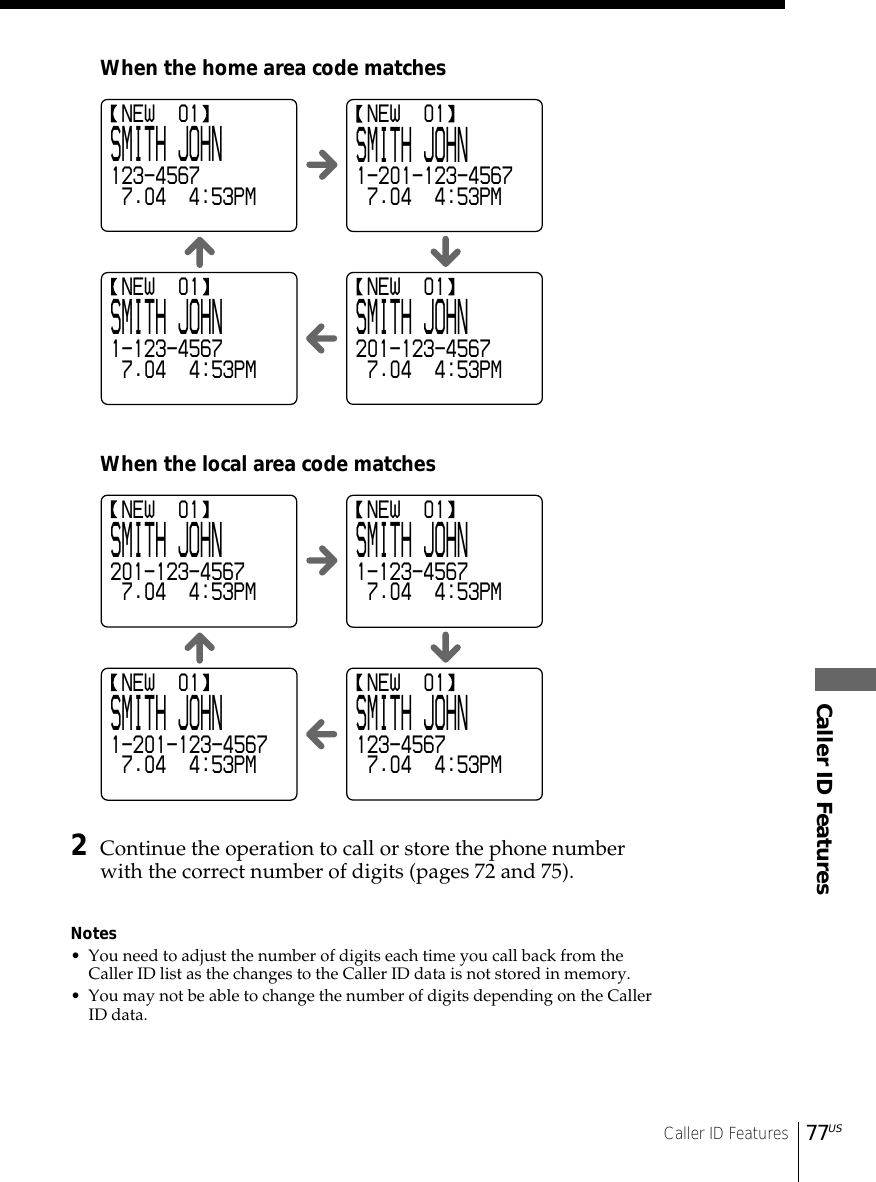
![76US Caller ID Features NEW 01SMITH JOHN1-201-123-4567 7.04 4:53PM NEW 01SMITH JOHN201-123-4567 7.04 4:53PM NEW 01SMITH JOHN123-4567 7.04 4:53PM NEW 01SMITH JOHN1-123-4567 7.04 4:53PMNotes• If the area code is not entered, “PLEASE ENTER AREA CODE” will appearon the display, and you will not be able to store into the Phone Directory.Enter the area code (see page 13).• Do not allow more than 20 seconds to elapse during the operation procedure.• If the number displayed in step 1 is not the one you should store, you canchange the number of digits of the phone number as described below.• If the phone is connected to a Private Branch Exchange (PBX), you may needto add an outside line access digit.Tips• When you select “[GO BACK]”, you can return to the previous set display bypressing Jog Dial. (If you’re at the base phone, press Jog Button (ENTER).)• You may press (PROGRAM) instead of doing steps 4 and 5.To change the number of digits of the phonenumberIf the number of digits of the phone number in the Caller ID list isdifferent from the actual phone number, you need to adjust thenumber of digits of the phone number to call back or store into thePhone Directory.1While the phone number from the Caller ID list is displayed,press (#) repeatedly until the phone number with thecorrect number of digits appears on the display.Each time you press (#), the number of digits changes asfollows:When the home area code and the local area code donot matchUsing the Caller ID list (continued)](https://usermanual.wiki/Sony-Group/SPPA2480/User-Guide-125331-Page-76.png)