Sony Group TMR4000 Digital Stereo Transmitter User Manual US1LaES indd
Sony Corporation Digital Stereo Transmitter US1LaES indd
User Manual
SONY MDR-RF4000K_U8 [US,ES] 4-170-882-52(1)
Notes on the transmitter with stand and
installation surface
The stand should not be placed on a surface that is cloth-
covered, textured, dirty or dusty.
Peel off the protection films (transparent) on the adhesive
sheets (4 corners) of the stand. The stand cannot be
installed with the protection films on the adhesive sheets.
When placing the transmitter, press it down softly to
steady the stand.
If the power of the adhesive sheets becomes
weak
Use a soft cloth slightly moistened to remove dust. A soft
cloth with mild detergent solution may be used to remove
finger marks or grease. The power of the adhesive sheets will
be restored for repeated use.
To change the installation place
Move the stand slowly with your fingers on the edge of the
stand. The adhesive sheets will not be detached with a sharp
move.
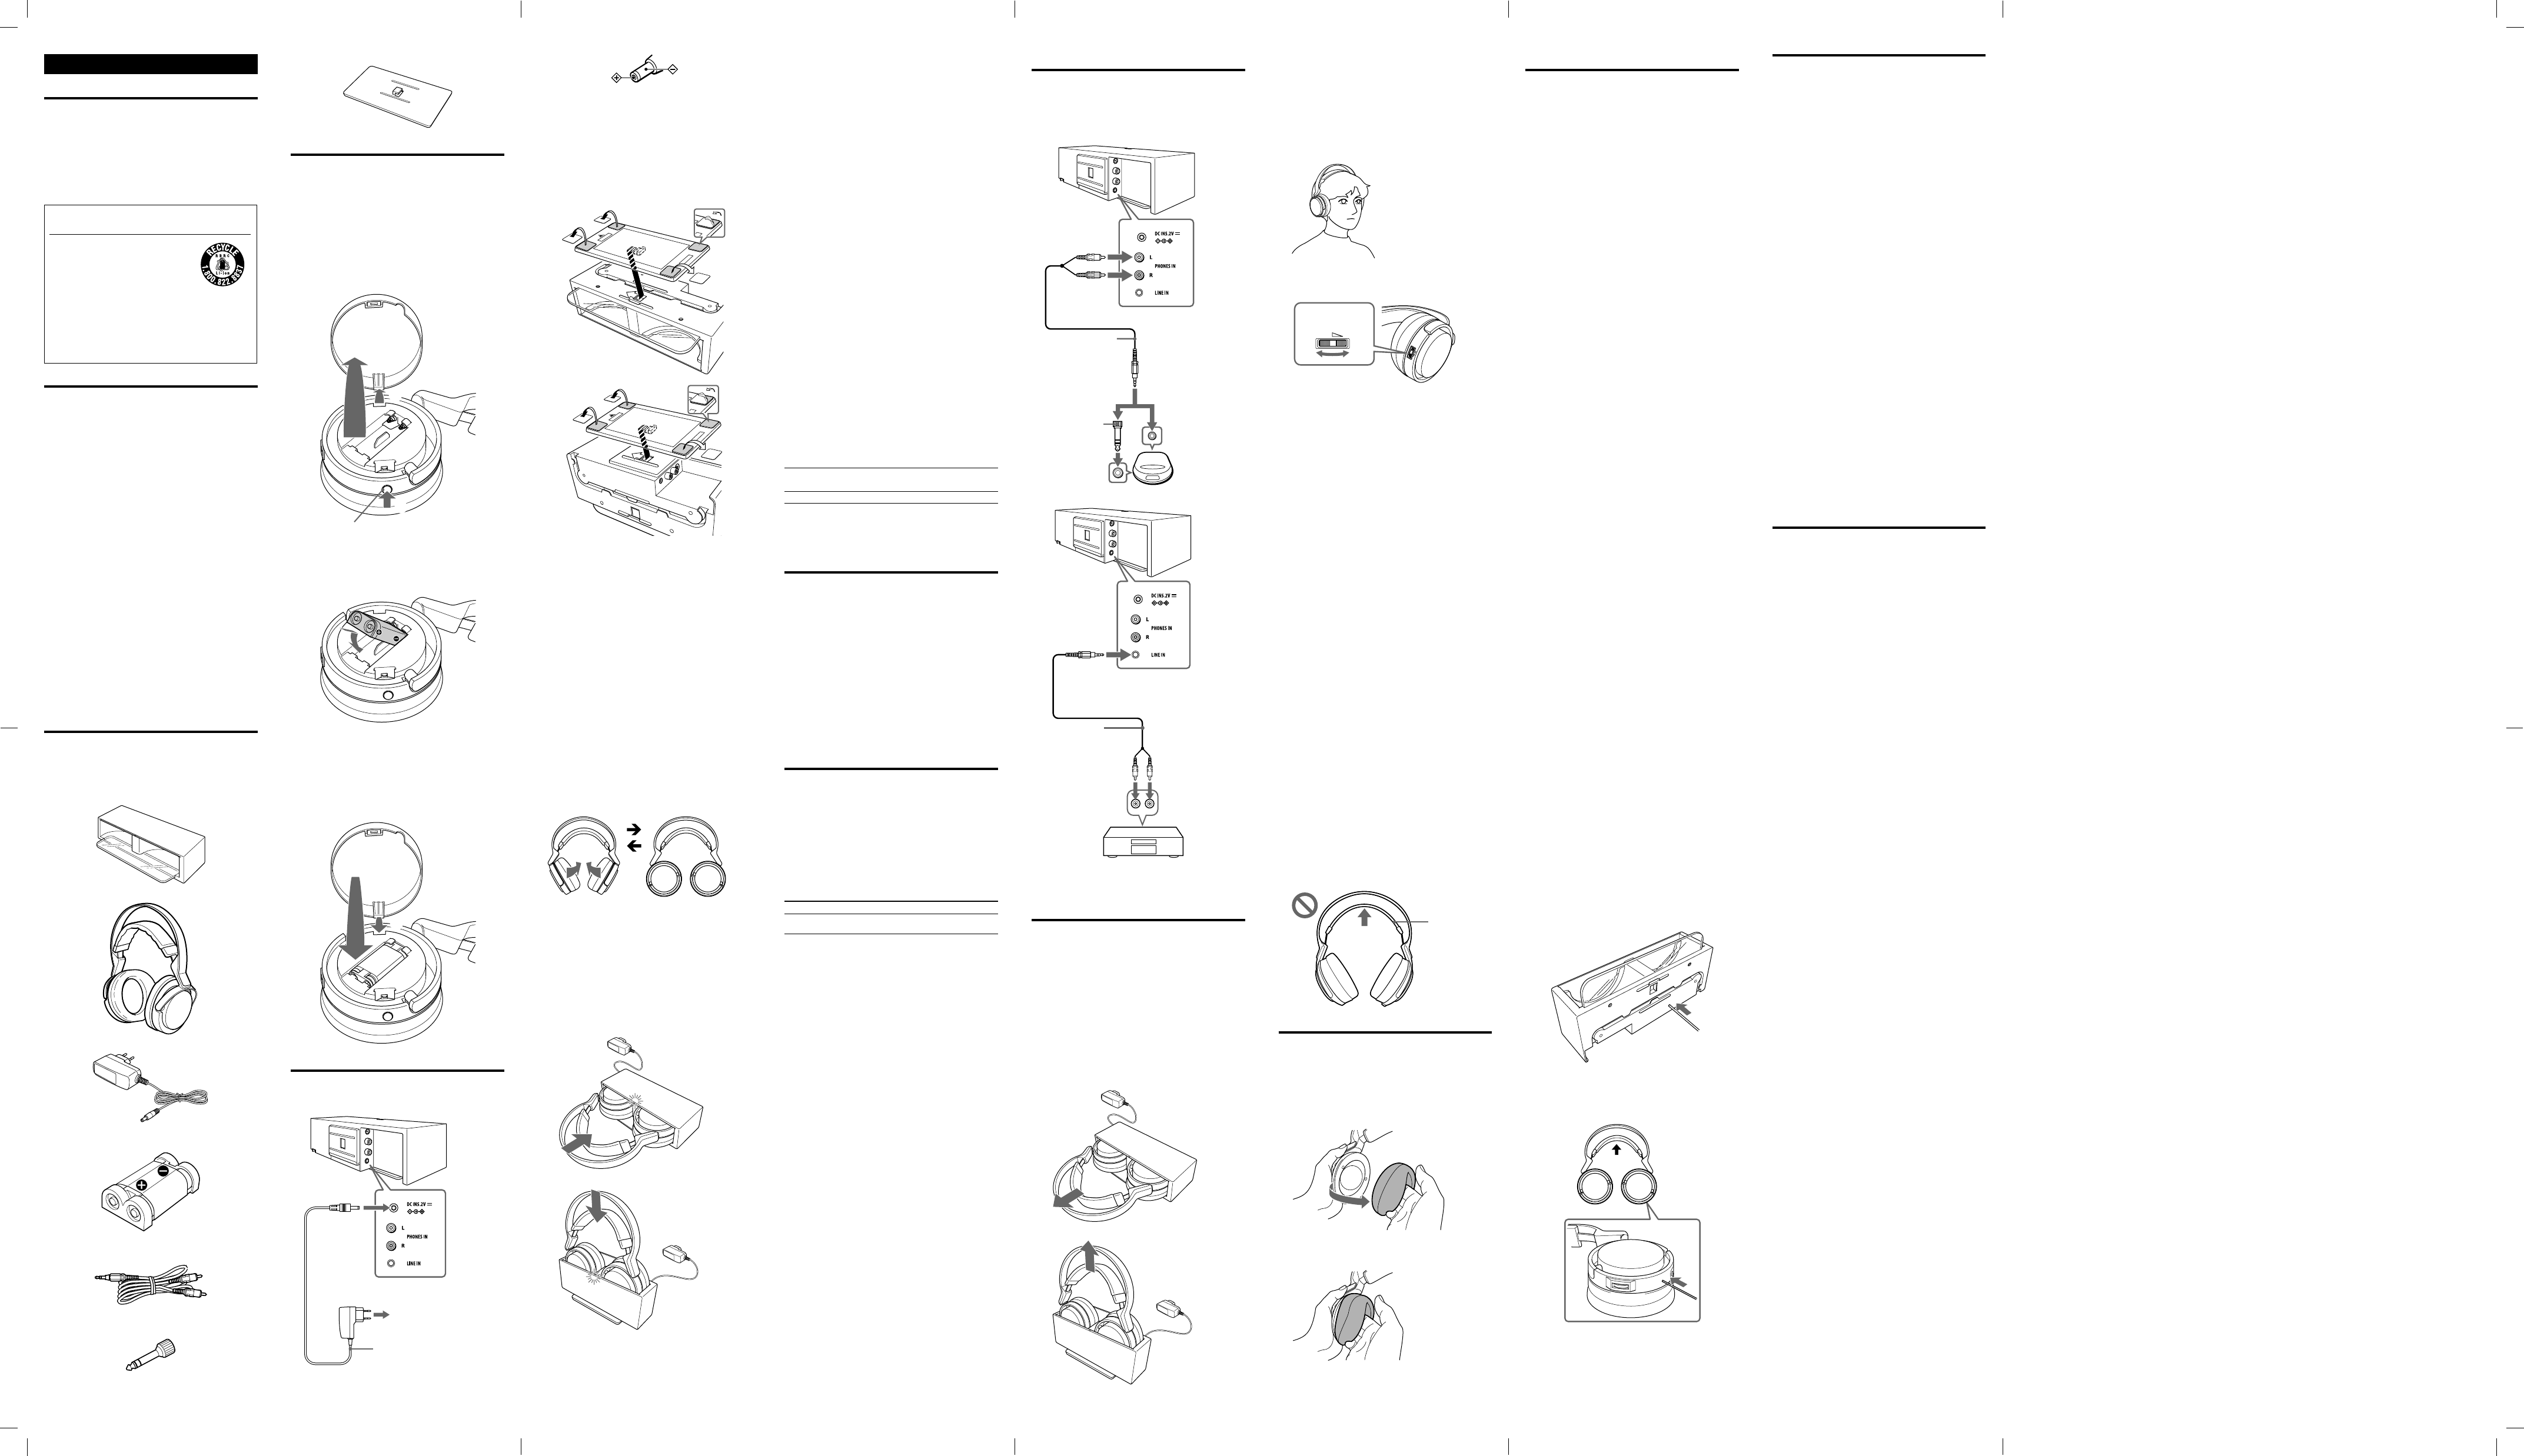
3 Turn the left and right headphones so as to be flat.
3-3-
4 Insert the headphones in the transmitter so that
the headphones’ contact point meets the
transmitter’s contact pin, and make sure that the
CHG indicator lights up.
It takes approximate 16 hours to fully charge the battery
(the CHG indicator goes off when charging is complete).
When placing the headphones on the transmitter, be
sure to insert the left and right housings completely.
When the transmitter’s contact pin meets the
headphones’ contact point, the CHG indicator lights up
in red.
-
-
If the CHG indicator is not lit
Be sure to close the battery compartment lid. The battery
charge function is not activated when the lid is not fully
closed.
Check that the left and right headphones are inserted in
the transmitter correctly.
The indicator will not light up if the headphones’ contact
point does not meet the transmitter’s contact pin. In this
case, remove the headphones and insert them in the
transmitter again so that the indicator lights up.
Make sure that the supplied rechargeable nickel-metal
hydride battery is installed in the battery compartment.
You cannot charge any rechargeable battery or dry-cell
battery other than the supplied battery.
To recharge the headphone battery after use
Place the headphones on the transmitter after use. The CHG
indicator lights up, and then charging starts.
Since the built-in timer recognizes when charging is
complete, there is no need to remove the headphones from
the transmitter after charging has completed.
Notes
The transmitter automatically turns off while charging the battery.
This system is designed to charge only the supplied rechargeable
battery, type BP-HP550-11, for safety. Note that other types of
rechargeable battery cannot be charged with this system.
You cannot charge any rechargeable battery or dry-cell battery
other than the supplied battery.
Do not attempt to use the supplied BP-HP550-11 rechargeable
battery with other components. It is for use with this system only.
Charge in an environmental temperature of between 0 °C and 40 °C
(between 32 °F and 104 °F). Otherwise, the battery may not be fully
charged.
Do not touch the contact pin of the transmitter. If a contact pin
becomes dirty, charging may not be possible.
Charging may not be completed if the transmitter’s contact pin and
headphones’ contact point are dusty. Wipe them with a cotton bud,
etc.
Charging and usage time
Approx. charging time Approx. usage time*1
16 hours*27 hours*3
*1 at 1 kHz, 1 mW + 1 mW output
*2 hours required to fully charge an empty battery
*3 Time may vary, depending on the temperature or conditions of
use.
This equipment has been tested and found to comply with the limits
for a Class B digital device, pursuant to Part 15 of the FCC Rules.
These limits are designed to provide reasonable protection against
harmful interference in a residential installation. This equipment
generates, uses and can radiate radio frequency energy and, if not
installed and used in accordance with the instructions, may cause
harmful interference to radio communications. However, there is no
guarantee that interference will not occur in a particular installation.
If this equipment does cause harmful interference to radio or
television reception, which can be determined by turning the
equipment off and on, the user is encouraged to try to correct the
interference by one or more of the following measures:
– Reorient or relocate the receiving antenna.
– Increase the separation between the equipment and receiver.
– Connect the equipment into an outlet on a circuit different from
that to which the receiver is connected.
– Consult the dealer or an experienced radio/TV technician for help.
You are cautioned that any changes or modifications not
expressly approved in this manual could void your authority
to operate this equipment.
For the customers in the USA
RECYCLING NICKEL METAL HYDRIDE
BATTERIES
Nickel Metal Hydride batteries are
recyclable.
You can help preserve our environment
by returning your used rechargeable
batteries to the collection and recycling
location nearest you.
For more information regarding recycling of
rechargeable batteries, call toll free
1-800-822-8837, or visit http://www.rbrc.org/
Caution: Do not handle damaged or leaking Nickel
Metal Hydride batteries.
Welcome!
Thank you for purchasing the Sony MDR-RF4000K Wireless
Stereo Headphone System. Before operating the unit, please
read this manual thoroughly and retain it for future
reference.
Some features are:
Wireless stereo headphone system for music and movies
2.4 GHz digital transmission with high quality sound
Impressive sound reproduction with 40 mm driver unit
equipped high quality closed type headphones
2 way transmitter design for convenient setting
Easy battery charging system
Lightweight headphones for long time listening comfort
Real-time automatic tuning on headphones for best
reception of signal
Up to 100 feet reception range*
7 hours playback with supplied Ni-MH rechargeable
battery
Wireless Stereo
Headphone System
Operation
Listening to a programme
Before listening
To reduce the risk of hearing damage, first lower the volume.
1 Turn on the AV component connected to the
transmitter.
If the transmitter is connected to the headphone jack, set
the volume control of the audio source component as
high possible but not so high that the audio signal
becomes distorted.
2 Remove the headphones from the transmitter.
The transmitter’s POWER indicator lights up in green.
-
-
3 Put on the headphones.
When you put on the headphones, the headphones’
power turns on automatically.
The POWER indicator on the right housing lights up. Be
sure to put the right housing on your right ear and
the left housing on your left ear. Wear the
headphones vertically on your head so that auto power
on function is properly activated.
4 Adjust the volume.
3
VOL
Volume control
Notes
When watching films, be careful not to raise the volume too
high in quiet scenes. You may hurt your ears when a loud scene
is played.
You may hear some noise when you disconnect the AC power
adaptor from the transmitter before removing the headphones.
RF signal transmission area
The approximate RF signal transmission area from the
transmitter is up to 100 ft (30 m).
The transmitter detects the optimum frequency
automatically when the headphones are removed from the
transmitter. The sound may be interrupted if the
headphones are out of RF signal transmission area or
reception conditions deteriorate. In this case, move closer to
the transmitter.
Notes
Because this system transmits signals at 2.4 GHz, sound may be
interrupted if interference occurs. This is due to radio frequency
characteristics, and is not a malfunction.
Any noise you hear through the headphones may vary depending
on the transmitter position and room conditions. It is
recommended that you place the transmitter in a location that
produces the clearest sound.
Sound may be interrupted if the transmitter is used with other
wireless apparatus using 2.4 GHz frequency, or a microwave oven.
If an audio signal is not input for 10 minutes
RF signal transmission from the transmitter automatically
stops when an audio signal is not input for 10 minutes.
When the transmitter stops, the transmitter’s POWER
indicator blinks in green for 30 seconds and then turns off.
The RF signals are automatically transmitted when an audio
signal is input again. RF signal transmission may stop when
an extremely low sound is input for about 10 minutes. If this
happens, raise the volume of the connected AV component
and lower the volume of the headphones. If signal noise is
output from a component connected to the PHONES IN
jacks, RF signal transmission may not stop.
The headphones automatically turn off when
they are removed
— Auto Power On/Off function
Do not pull up the self-adjusting band when not in use, as
this will consume the battery power.
Self-adjusting
band
©2010 Sony Corporation Printed in China
MDR-RF4000K
4-170-882-52(1) Easy connection with TV/DVD/audio equipment with
supplied audio cable
Automatic On/Off function on headphones to preserve
battery life
Free adjustable headband for precise and comfortable fit
Volume control function on the headphones
* Transmission distance varies depending on conditions of use.
Preparation
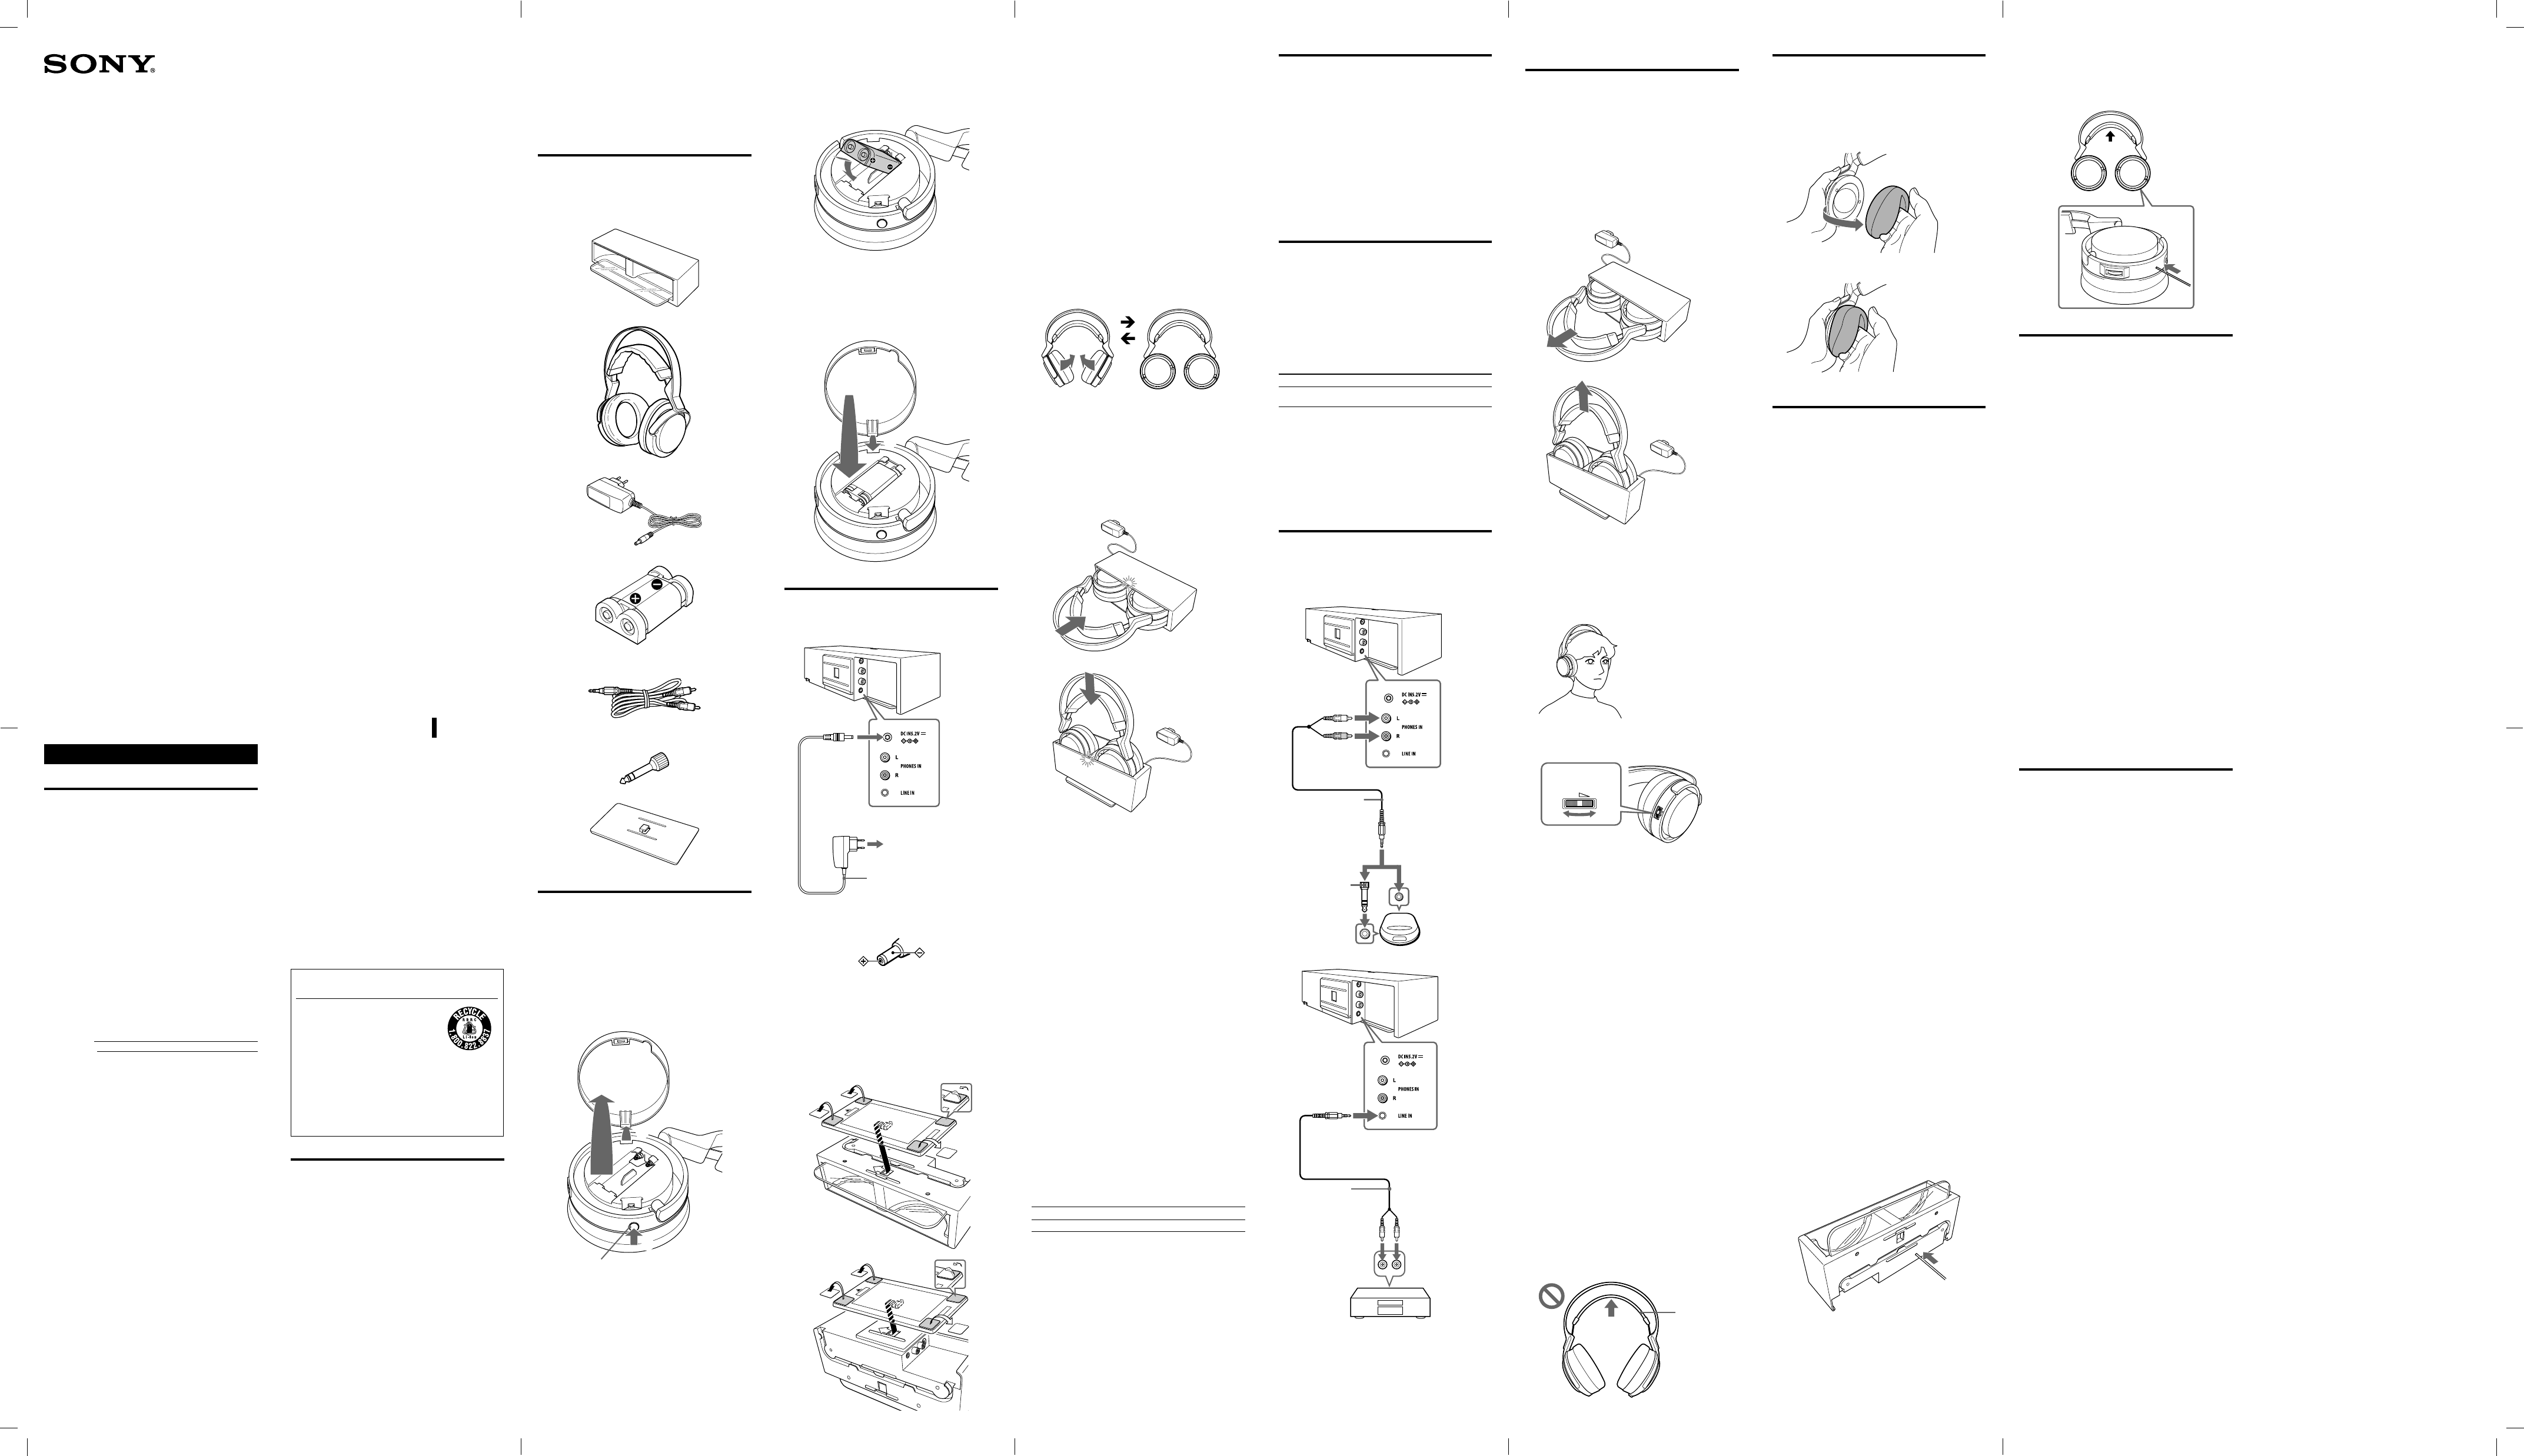
Checking the components and
accessories
Before setting up the system, check that all of the
components are included.
Transmitter TMR-RF4000 (1)
Wireless stereo headphones MDR-RF4000 (1)
AC power adaptor (1)
Rechargeable nickel-metal hydride battery BP-HP550-11 (1)
Connecting cable (stereo mini plug pin plug × 2),
1 m (39 3/8 in) (1)
Unimatch plug adaptor (stereo mini jack stereo phone
plug) (1)
Stand (1)
Inserting the supplied
rechargeable nickel-metal
hydride battery
The supplied rechargeable nickel-metal hydride battery is
not charged from the first time you use it. Be sure to charge
it before use.
To charge the headphones, place them on the transmitter.
1 Press the PUSH button of the left housing to open
the battery compartment lid.
The battery compartment lid comes off.
-
PUSH button
English
WARNING
To reduce the risk of fire or electric shock, do not
expose this apparatus to rain or moisture.
To avoid electrical shock, do not open the cabinet. Refer
servicing to qualified personnel only.
For the customers in the USA
Owner’s Record
The model number is located at the bottom of the
transmitter and the left inner side of the headband.
The serial number is located at the bottom of the transmitter
and the inner side of the battery compartment.
Record these numbers in the spaces provided below. Refer to
them whenever you call upon your Sony dealer regarding
this product.
Model No. MDR-RF4000K
Transmitter TMR-RF4000
Headphones MDR-RF4000
Serial No.
Transmitter
Headphones
NOTE
The Transmitter and Wireless stereo headphones must not be co-
located or operated in conjunction with any other antenna or
transmitter.
This Transmitter complies with FCC radiation exposure limits set
forth for uncontrolled equipment and meets the FCC radio frequency
(RF) Exposure Guidelines in Supplement C to OET65. This
Transmitter has very low levels of RF energy that it deemed to comply
without maximum permissive exposure evaluation (MPE). This
Transmitter is desirable that it should be installed and operated with
at least 20 cm and more between the radiator and person’s body
(excluding extremities: hands, wrists, feet and ankles).
The Wireless stereo headphones comply with FCC radiation exposure
limits set forth for uncontrolled equipment and meets the FCC radio
frequency (RF) Exposure Guidelines in Supplement C to OET65. The
Wireless stereo headphones have very low levels of RF energy that it is
deemed to comply without testing of specific absorption ratio (SAR).
NOTICE FOR THE CUSTOMERS IN THE U.S.A.
NOTE
This device complies with Part 15 of the FCC Rules.
Operation is subject to the following two conditions: (1)this
device may not cause harmful interference, and (2)this
device must accept any interference received, including
interference that may cause undesired operation.
Checking the remaining
battery power
Pull up the self-adjusting band and check the POWER
indicator located on the right housing. The battery is still
serviceable when the indicator lights in red.
Charge the rechargeable battery or install new dry-cell
batteries if the POWER indicator light dims, flashes, or the
sound becomes distorted or noisy.
Note
The rechargeable nickel-metal hydride battery should be replaced
with a new one when it lasts only half the expected time, after a full
charge has been performed. The rechargeable battery, type BP-
HP550-11, is not commercially available. You can order the battery
from the store where you purchased this system, or at your nearest
Sony dealer.
Using the headphones with
alkaline batteries (sold
separately)
Commercially available (size AAA) alkaline batteries can
also be used to power the headphones. Install the batteries
in the same manner as described in “Inserting the supplied
rechargeable nickel-metal hydride battery.”
When dry-cell batteries are installed, the battery charge
function is not activated.
Battery life
Battery Approx. hours*1
Sony alkaline batteries
LR03/AM-4(N)
10 hours*2
*1 at 1 kHz, 1 mW + 1 mW output
*2 Time may vary, depending on the temperature or conditions of
use.
Notes on Batteries
Do not charge a dry-cell battery.
Do not carry a dry-cell battery together with coins or other metallic
objects. Heat can be generated by the battery if its positive and
negative terminals are accidentally shorted.
If you are not going to use the unit for a long time, remove the
batteries to avoid damage from battery leakage or corrosion.
Connection
Setting up the transmitter
1 Connect the transmitter to an AV component.
Select one of the hookups below depending on the jack
type:
To connect to a headphones jack
Transmitter
Left channel
(white)
Right channel
(red)
To PHONES IN
jacks
Connecting cord
(supplied)
Unimatch plug
adaptor (supplied)
To headphones
jack (Stereo
phone jack)
To headphones jack
(Stereo mini jack)
WALKMAN®*,
TV, etc.
To connect to LINE OUT or REC OUT jack
Transmitter
To LINE IN jack
Right channel (red)
Connecting cord
(supplied)
Stereo system,
VCR, etc.
To LINE OUT or
REC OUT jacks
Left channel (white)
* “WALKMAN” and “WALKMAN” logo are registered trademarks
of Sony Corporation.
2 Insert the supplied rechargeable nickel-metal
hydride battery into the battery compartment,
matching terminal on the battery to the mark
in the compartment.
Do not attempt to charge any other kind of battery with
this unit.
-
Note
The battery compartment has a tab on the side which holds the
rechargeable battery in place. Insert the terminal first when
installing the rechargeable battery.
3 Close the battery compartment lid.
Insert the tab in the hole at the top left.
Close the lid until it clicks.
-
Charging
1 Connect the supplied AC power adaptor to the
transmitter.
Transmitter
AC power adaptor
(supplied)
To an AC outlet
To DC IN
5.2 V jack
Notes
Be sure to use the supplied AC power adaptor. Using AC
adaptors with different plug polarity or other characteristics
can cause product failure.
Unified polarity plug
Be sure to always use the supplied AC power adaptor. Even AC
power adaptors having the same voltage and plug polarity can
damage this product due to the current capacity or other
factors.
Connect the AC power adaptor to an easily accessible AC
outlet. Should you notice an abnormality in the AC power
adaptor, disconnect it from the AC outlet immediately.
2 Put the stand to the transmitter.
You can place the transmitter horizontally or vertically,
using the stand.
Replacing the earpads
The earpads are replaceable. If the earpads become dirty or
worn out, replace them as illustrated below. The earpads are
not commercially available. You can order replacements
from the store where you purchased this system, or at your
nearest Sony dealer.
1 Remove the old earpad by pulling it off.
2 Place the new earpad around the housing.
Additional information
Troubleshooting
If you run into any problems using this headphone system,
use the following checklist. Should any problem persist,
consult your nearest Sony dealer.
No sound
Check the connection between the transmitter and the AV
component.
Check that the connected AV component's optical digital output
is set to “ON” when selecting digital input.
Turn on the AV component connected to the transmitter, and
start the playback.
If you connect the transmitter to an AV component using the
headphone jack, raise the volume level on the connected AV
component.
Make sure you are wearing the headphones correctly.
Raise the headphone volume.
The headphones’ POWER indicator goes off.
Charge the rechargeable battery if it is weak, or replace alkaline
batteries with new ones. If the POWER indicator is still off
after charging the battery, take the headphones to a Sony
dealer.
Distorted or intermittent sound
(sometimes with noise)
Charge the rechargeable battery if it is weak, or replace alkaline
batteries with new ones. If the POWER indicator is still off after
charging the battery, take the headphones to a Sony dealer.
Check if there is any wireless apparatus using 2.4 GHz frequency,
or a microwave oven in the vicinity.
Change the position of the transmitter.
If you connect the transmitter to an AV component using the
headphone jack, lower the volume level on the connected AV
component.
Low sound
If you connect the transmitter to an AV component using the
headphone jack, raise the volume level on the connected AV
component.
Raise the headphone volume.
Loud background noise
Check if there is any wireless apparatus using 2.4 GHz frequency,
or a microwave oven in the vicinity.
If you connect the transmitter to an AV component using the
headphone jack, raise the volume level on the connected AV
component.
Charge the rechargeable battery if it is weak, or replace alkaline
batteries with new ones. If the POWER indicator is still off after
charging the battery, take the headphones to a Sony dealer.
The sound cuts off.
The transmitter stops transmitting if no signal is input for 10
minutes.
If you connect the transmitter to an AV component using the
headphone jack, raise the volume level on the connected AV
component.
The battery cannot be charged.
Check if the CHG indicator turns on. If not, put the headphones
on the transmitter correctly so that the CHG indicator turns on.
Dry batteries are installed.
Insert the supplied rechargeable nickel-metal hydride battery.
Rechargeable batteries other than the supplied are installed.
Insert the supplied rechargeable nickel-metal hydride battery.
The transmitter’s contact pin and headphones’ contact point are
dusty.
Wipe them with a cotton bud, etc.
A repeated beep sounds.
The headphones cannot receive the signal from the transmitter.
Move within the RF signal transmission area.
Check the connection of the transmitter, AC power adaptor,
and AC outlet.
Check if there is any wireless apparatus using 2.4 GHz
frequency, or a microwave oven around the transmitter and
headphones.
Change the position of the transmitter.
There is no audio signal input for about 10 minutes and RF
signals are not transmitted.
Input the audio signal to the transmitter.
The unit does not operate properly.
Reset the system.
Push a small pin, etc., into the hole of the transmitter until you
feel a click.
The POWER indicator on top starts blinking in green.
Once the POWER indicator starts blinking, pull up and hold
the self-adjusting band to turn on the headphones, and push a
small pin, etc., into the hole of the right headphone until you
feel a click.
The POWER indicator of the transmitter stops blinking and
stays lit in green.
3-
Precautions
On safety
Do not drop, hit, or otherwise expose the headphones to
strong shock of any kind. This could damage the product.
Do not disassemble or attempt to open any parts of the
system.
On power sources and placement
If you are not going to use the system for a long time,
unplug the AC power adaptor from the AC outlet. When
removing the plug, grip the AC power adaptor.
Do not pull on the cord.
Do not place the system in any of the following locations.
– Location exposed to direct sunlight, near a heater, or
other extremely high-temperature location
– Dusty location
– On an unsteady or inclined surface
– Location exposed to large amounts of vibration
– Bathroom or other high-humidity locations
On headphones
Act considerately
When the volume is too high, the sound leaks outside the
headphones. Be careful not to raise the volume so high that
it bothers people around you.
There is a tendency to raise the volume when using in noisy
places. However, for reasons of safety, it is advised to keep
the volume at a level whereby you can still hear sounds
around you.
On cleaning
Use a soft cloth slightly moistened with mild detergent
solution. Do not use solvents such as thinner, benzene or
alcohol as these may damage the surface.
When the product breaks
When the product breaks, or if a foreign object gets inside
the unit, immediately turn off the power and consult your
nearest Sony dealer.
When taking the system to a Sony dealer, be sure to take
both the headphones and transmitter.
Specifications
Wireless stereo transmitter (TMR-RF4000)
Modulation System
GFSK
Carrier wave frequency
2.404 GHz - 2.476 GHz
Transmission distance
Approx. 100 ft (30 m) of longest
Frequency response
10 Hz - 22,000 Hz
Distortion rate
1% or less (1 kHz)
Audio inputs
Phono jacks (left/right)
Stereo mini jack
Power requirements
DC 5.2 V (from the supplied AC power adaptor)
Dimensions
Approx. 246 mm × 62 mm × 129 mm
(9 3/4 in × 2 1/2 in × 5 1/8 in) (w/h/d)
Mass Approx. 430 g (15.2 oz)
Wireless stereo headphones (MDR-RF4000)
Playback frequency range
12 Hz – 22,000 Hz
Power requirements
Rechargeable nickel-metal hydride battery
(supplied) or commercially available (size AAA)
alkaline batteries
Mass Approx. 300 g (10.6 oz) (including the supplied
rechargeable nickel-metal hydride battery)
Supplied accessories
AC power adaptor (5.2 V) (1)
Rechargeable nickel-metal hydride battery
BP-HP550-11 (550 mAh) (1)
Connecting cable (stereo mini plug pin plug
× 2), 1 m (39 3/8 in) (1)
Unimatch plug adaptor (stereo mini jack
stereo phone plug) (1)
Stand (1)
Card warranty (1)
Operating Instructions (this manual) (1)
Recommended accessories
Optical digital connecting cable POC-15AB
(1.5 m, 59 1/8 in) (mini-plug rectangular plug)
Design and specifications are subject to change without
notice.
Operating Instructions
Manual de instrucciones
SONY MDR-RF4000K_U8 [US,ES] 4-170-882-52(1)
Conexión
Instalación del transmisor
1 Conecte el transmisor a un componente de AV.
Seleccione una de las siguientes conexiones en función
del tipo de toma:
Para conectar a una toma de auriculares
Transmisor
Canal izquierdo
(blanco)
Canal derecho
(rojo)
A las tomas
PHONES IN
Cable de conexión
(incluido)
Adaptador de
conector Unimatch
(incluido)
A la toma de
auriculares (conector
fonográfico estéreo)
A la toma de
auriculares (minitoma
estéreo)
WALKMAN®*,
televisor, etc.
Para conectar a toma LINE OUT o REC OUT
Transmisor
A la toma
LINE IN
Canal derecho (rojo)
Cable de conexión
(incluido)
Sistema estéreo,
vídeo, etc.
A las tomas LINE
OUT o REC OUT
Canal izquierdo (blanco)
* “WALKMAN” y el logotipo de “WALKMAN” son marcas
registradas de Sony Corporation.
Funcionamiento
Recepción de un programa
Antes de la recepción
Para prevenir lesiones en los oídos, primero baje el volumen.
1 Encienda el componente de AV conectado al
transmisor.
Si el transmisor está conectado a una toma de
auriculares, ajuste el control de volumen del componente
de la fuente de audio tan alto como sea posible sin llegar
a distorsionar la señal de audio.
2 Retire los auriculares del transmisor.
El indicador de POWER del transmisor emitirá una luz
verde.
-
-
Soporte (1)
Cómo colocar la batería
recargable de hidruro de
níquel-metal incluida
La batería recargable de hidruro de níquel-metal incluida no
estará cargada la primera vez que la utilice. Asegúrese de
cargarla antes de usarla.
Para cargar los auriculares, colóquelos en el transmisor.
1 Presione el botón PUSH del receptáculo izquierdo
para abrir la tapa del compartimiento de la batería.
La tapa del compartimiento de la batería se desprenderá.
-
Botón PUSH
2 Coloque la batería recargable de hidruro de níquel-
metal en el compartimiento de la batería de modo
que el terminal de la batería coincida con la
marca del compartimiento.
No intente utilizar otro tipo de batería en esta unidad.
-
Nota
El compartimiento de la batería tiene una lengüeta del lado que
mantiene a la batería recargable en su lugar. Al colocar por primera
vez la batería recargable, inserte el terminal en primer lugar.
3 Cierre la tapa del compartimiento de la batería.
Introduzca la lengüeta en la ranura ubicada en la
parte superior izquierda.
Cierre la tapa hasta oír un clic.
-
Carga
1 Conecte el adaptador de CA incluido al transmisor.
Transmisor
Adaptador de CA
(incluido)
Conexión a un
tomacorriente de CA
Conexión
a la toma
DC IN
5.2 V
Notas
Asegúrese de utilizar el adaptador de CA incluido. El producto
puede dañarse si utiliza adaptadores de CA con una polaridad
de conexión distinta u otras características.
Información adicional
Resolución de problemas
Si se presenta algún problema al usar el sistema de
auriculares, utilice la siguiente lista de comprobación. Si el
problema persiste, póngase en contacto con el distribuidor
Sony más cercano.
No se oye el sonido
Compruebe la conexión entre el transmisor y el componente de
AV.
Al seleccionar la entrada digital, compruebe que la salida digital
óptica del componente de AV se encuentre en la posición “ON”.
Encienda el componente de AV conectado al transmisor e inicie
la reproducción.
Si conecta el transmisor al componente de AV mediante la toma
de auriculares, suba el volumen en el componente de AV
conectado.
Asegúrese de haberse colocado correctamente los auriculares.
Suba el volumen de los auriculares.
El indicador de POWER de los auriculares se apaga.
Cargue la batería recargable si está a punto de agotarse o
reemplace las baterías alcalinas por baterías nuevas. Si el
indicador de POWER continúa apagado después de cargar la
batería, lleve los auriculares a un distribuidor Sony.
Sonido distorsionado o intermitente
(a veces con ruido)
Cargue la batería recargable si está a punto de agotarse o
reemplace las baterías alcalinas por baterías nuevas. Si el
indicador de POWER continúa apagado después de cargar la
batería, lleve los auriculares a un distribuidor Sony.
Compruebe que no haya ningún otro aparato inalámbrico que
utilice la frecuencia de 2,4 GHz o que no haya un horno
microondas cerca.
Modifique la posición del transmisor.
Si conecta el transmisor al componente de AV mediante la toma
de auriculares, baje el volumen en el componente de AV
conectado.
Sonido bajo
Si conecta el transmisor al componente de AV mediante la toma
de auriculares, suba el volumen en el componente de AV
conectado.
Suba el volumen de los auriculares.
Ruido de fondo alto
Compruebe que no haya ningún otro aparato inalámbrico que
utilice la frecuencia de 2,4 GHz o que no haya un horno
microondas cerca.
Si conecta el transmisor al componente de AV mediante la toma
de auriculares, suba el volumen en el componente de AV
conectado.
Cargue la batería recargable si está a punto de agotarse o
reemplace las baterías alcalinas por baterías nuevas. Si el
indicador de POWER continúa apagado después de cargar la
batería, lleve los auriculares a un distribuidor Sony.
El sonido se corta
El transmisor detiene la transmisión si transcurren 10 minutos
sin recibir una señal.
Si conecta el transmisor al componente de AV mediante la
toma de auriculares, suba el volumen en el componente de AV
conectado.
La batería no puede cargarse
Compruebe que el indicador de CHG se encienda. Si esto no
ocurre, coloque los auriculares en la posición correcta en el
transmisor de modo que el indicador de CHG se encienda.
Se han colocado baterías secas.
Introduzca la batería recargable de hidruro de níquel-metal
incluida.
Se han colocado otras baterías recargables en lugar de la incluida.
Introduzca la batería recargable de hidruro de níquel-metal
incluida.
El pin de contacto del transmisor y el punto de contacto de los
auriculares están sucios.
Límpielos con un hisopo de algodón o un elemento similar.
Se oye un pitido reiterado.
Los auriculares no pueden recibir la señal del transmisor.
Muévase dentro del área de transmisión de la señal de
radiofrecuencia.
Compruebe las conexiones del transmisor, del adaptador de
CA y del tomacorriente de CA.
Compruebe que no haya ningún otro aparato inalámbrico que
utilice la frecuencia de 2,4 GHz o que no haya un horno
microondas cerca del transmisor y de los auriculares.
Modifique la posición del transmisor.
No se reciben señales de audio durante alrededor de 10 minutos y
no se transmiten señales de radiofrecuencia.
Reciba la señal de audio mediante el transmisor.
La unidad no funciona correctamente.
Reinicie el sistema.
Introduzca un pequeño elemento con punta en el orificio del
transmisor y presione hasta oír un clic.
Dejará de parpadear la luz verde del indicador de POWER de
la parte superior.
Una vez que el indicador de POWER deje de parpadear, tire de
la cinta autoajustable para encender los auriculares e
introduzca un pequeño elemento con punta en el orificio del
auricular derecho y presione hasta oír un clic.
El indicador de POWER del transmisor deja de parpadear y
queda encendida la luz verde.
3-
Conector de polaridad unificada
Asegúrese de utilizar siempre el adaptador de CA incluido.
Incluso aquellos adaptadores de CA con el mismo voltaje y la
misma polaridad de conexión pueden dañar el producto
debido a la capacidad de corriente u otros factores.
Conecte el adaptador de CA a un tomacorriente de CA de fácil
acceso. Si observa alguna anomalía en el funcionamiento del
adaptador de CA, desconéctelo inmediatamente del
tomacorriente de CA.
2 Coloque el transmisor en el soporte.
Puede colocar el transmisor en posición horizontal o
vertical mediante el soporte.
Notas sobre el transmisor con soporte y la
superficie de instalación
El soporte no debe colocarse en una superficie porosa,
sucia, polvorienta o cubierta por una tela.
Quite la película de protección (transparente) de las hojas
adhesivas (en las 4 esquinas) del soporte. El soporte no
puede instalarse sin antes quitar la película de protección
de las hojas adhesivas.
Al ubicar el transmisor, presiónelo suavemente hacia
abajo en el soporte.
Pérdida de adhesividad de las hojas
Utilice un paño suave ligeramente humedecido para
eliminar el polvo. También puede utilizar un paño suave con
una solución de detergente suave para eliminar grasa o
marcas de dedos. La adhesividad de las hojas se recuperará y
podrá volver a utilizarlas.
Modificación del lugar de instalación
Coloque los dedos en el borde del soporte y muévalo
lentamente. Las hojas adhesivas no se desprenderán con un
movimiento brusco.
3 Gire los auriculares izquierdo y derecho para que
queden planos.
3-3-
4 Coloque los auriculares en el transmisor de modo
tal que el punto de contacto de los auriculares
coincida con el pin de contacto del transmisor y
asegúrese de que se encienda el indicador de CHG.
Para que la batería se cargue por completo, deben
transcurrir alrededor de 16 horas (el indicador de CHG
se apaga cuando la carga finaliza). Al colocar los
auriculares en el transmisor, asegúrese de introducir
completamente los receptáculos izquierdo y derecho.
Cuando el pin de contacto del transmisor se conecta con
el punto de contacto de los auriculares, una luz roja se
enciende en el indicador de CHG.
-
-
El indicador de CHG no se enciende
Asegúrese de cerrar la tapa del compartimiento de la
batería. La función de carga de la batería no se activa
hasta que la tapa del compartimiento esté completamente
cerrada.
Español
ADVERTENCIA
Para reducir el riesgo de incendio o electrocución, no
exponga el aparato a la lluvia o a la humedad.
Para evitar descargas eléctricas, no abra la unidad. En caso
de avería, solicite los servicios de personal cualificado.
Para clientes en EE UU
RECICLADO DE BATERÍAS DE NÍQUEL-
HIDRURO METALICO
Las baterías de níquel-hidruro metalico
son reciclables.
Usted podrá ayudar a conservar el medio
ambiente devolviendo las baterías usadas
al punto de reciclaje mas cercano.
Para más información sobre el reciclado de baterías,
llame al número gratuito 1-800-822-8837, o visite
http://www.rbrc.org/
Precaución: No utilice baterías de níquel-hidruro
metalico dañadas o con fugas.
Bienvenido
Gracias por adquirir el sistema de auriculares estéreo
inalámbricos Sony MDR-RF4000K. Antes de utilizar la
unidad, lea detenidamente este manual y consérvelo para
consultas futuras.
Algunas de las características de esta unidad son:
Sistema de auriculares estéreo inalámbricos para música y
películas
Transmisión digital de 2,4 GHz con sonido de alta calidad
Impresionante reproducción de sonido con unidad de
control de 40 mm equipada con auriculares de tipo
cerrado de alta calidad
Diseño de transmisor de 2 vías para una configuración
cómoda
Sistema simple para la carga de las baterías
Auriculares livianos que brindan comodidad durante el
uso prolongado
Sintonización automática en tiempo real en los auriculares
para una mejor recepción de la señal
Recepción de hasta 100 pies de alcance*
7 horas de reproducción con la batería recargable Ni-MH
incluida
Fácil conexión con un equipo de TV/DVD/audio
mediante el cable de audio incluido
Función de encendido/apagado automático de los
auriculares para prolongar la duración de las baterías
Banda adaptable para la cabeza para un ajuste cómodo y
preciso
Función de control de volumen de los auriculares
* La distancia de transmisión varía según las condiciones de uso.
Preparación
Verificación de componentes y
accesorios
Antes de configurar el sistema, verifique que no falte ningún
componente.
Transmisor TMR-RF4000 (1)
Auriculares estéreo inalámbricos MDR-RF4000 (1)
Adaptador de CA (1)
Batería recargable de hidruro de níquel-metal BP-HP550-11
(1)
Cable de conexión (mini conector estéreo conector de
pin × 2), 1 m (1)
Adaptador de conector Unimatch (minitoma estéreo
conector fonográfico estéreo) (1)
3 Colóquese los auriculares.
Cuando se coloca los auriculares, éstos se encienden
automáticamente.
La luz del indicador de POWER en el receptáculo
derecho se enciende. Asegúrese de colocar el receptáculo
derecho en su oído derecho y el receptáculo
izquierdo en su oído izquierdo. Colóquese los
auriculares de manera vertical sobre la cabeza a fin de
que la función de encendido automático se active
adecuadamente.
4 Ajuste el volumen.
3
VOL
Control de volumen
Notas
Al mirar películas, evite subir demasiado el volumen en
escenas de volumen bajo. Sus oídos pueden dañarse al
presentarse escenas de volumen alto.
Es posible que oiga ruidos al desconectar el adaptador de CA
del transmisor antes de quitarse los auriculares.
Área de transmisión de la señal de
radiofrecuencia
El área de transmisión de la señal de radiofrecuencia desde
el transmisor es de hasta 100 pies (30 m) aproximadamente.
El transmisor detecta la frecuencia óptima automáticamente
cuando los auriculares se retiran del transmisor. El sonido
puede interrumpirse si los auriculares están fuera del área de
transmisión de la señal de radiofrecuencia o si las
condiciones de recepción se deterioran. En ese caso,
acérquese al transmisor.
Notas
Dado que este sistema transmite señales a 2,4 GHz, es posible que
el sonido se interrumpa si hay interferencia. Esto se debe a
características de la radiofrecuencia y no indica un mal
funcionamiento.
Los sonidos que escucha mediante los auriculares pueden variar en
función de la posición del transmisor y las condiciones de la
habitación. Se recomienda colocar el transmisor en la ubicación
que proporcione el sonido más claro.
El sonido se puede interrumpir si el transmisor se utiliza con otro
aparato inalámbrico de 2,4 GHz de frecuencia o un horno
microondas.
Si no se recibe señal de audio por 10 minutos
La transmisión de la señal de radiofrecuencia del transmisor
se detiene automáticamente si no se ha recibido señal de
audio por 10 minutos. Cuando el transmisor se detiene, el
indicador de POWER del transmisor parpadea con una luz
verde por 30 segundos y, a continuación, se apaga. Las
señales de radiofrecuencia se transmiten automáticamente
cuando se vuelve a recibir una señal de audio. Es posible que
la transmisión de la señal de radiofrecuencia se detenga si ha
recibido un sonido extremadamente bajo por 10 minutos. Si
sucede esto, suba el volumen del componente de AV
conectado y baje el volumen de los auriculares. Si el ruido de
la señal se emite desde un componente conectado a las
tomas PHONES IN, es posible que la transmisión de la señal
de radiofrecuencia no se detenga.
Los auriculares se apagan automáticamente
cuando se los quita
— función de encendido y apagado automático
No tire hacia arriba de la cinta autoajustable cuando no esté
utilizando el equipo, ya que esto consumirá la carga de la
batería.
Cinta
autoajustable
Sustitución de las almohadillas
Las almohadillas de los auriculares pueden sustituirse. Si se
ensucian o se deterioran, reemplácelas como se muestra a
continuación. Las almohadillas no se comercializan. Puede
solicitar recambios en el establecimiento donde compró el
sistema o bien solicitarla al distribuidor Sony más cercano.
1 Tire de la almohadilla vieja para extraerla.
2 Coloque la nueva almohadilla alrededor del
receptáculo.
Verifique que los auriculares derecho e izquierdo se hayan
introducido correctamente en el transmisor.
El indicador no se encenderá si el punto de contacto de
los auriculares no coincide con el pin de contacto del
transmisor. Si esto ocurre, extraiga los auriculares e
introdúzcalos nuevamente en el transmisor para que se
encienda el indicador.
Asegúrese de que la batería recargable de hidruro de
níquel-metal incluida esté colocada en el compartimiento
de la batería.
Solamente puede cargar la batería incluida en la unidad.
No puede cargar ninguna otra batería recargable o
baterías secas.
Recarga de la batería de los auriculares después
de utilizarlos
Coloque los auriculares en el transmisor después de
utilizarlos. El indicador de CHG se encenderá y la carga
comenzará.
Debido a que el temporizador incorporado detecta cuándo
finaliza la carga, no es necesario quitar los auriculares del
transmisor una vez que la carga se completa.
Notas
El transmisor se apaga automáticamente mientras se carga la
batería.
Por razones de seguridad, este sistema está diseñado para cargar
solamente la batería recargable BP-HP550-11. Tenga en cuenta que
no se pueden cargar con este sistema otros tipos de baterías
recargables.
Solamente puede cargar la batería incluida en la unidad. No puede
cargar ninguna otra batería recargable o baterías secas.
No intente utilizar la batería recargable BP-HP550-11 en otros
dispositivos. Está diseñada únicamente para este sistema.
Realice la carga a una temperatura ambiente que oscile entre 0 °C y
40 °C. En caso contrario, la batería tal vez no se cargue por
completo.
No toque el pin de contacto del transmisor. Si el pin se ensucia, tal
vez no pueda realizar la carga.
Es posible que la carga no finalice si el pin de contacto del
transmisor y el punto de contacto de los auriculares están sucios.
Límpielos con un hisopo de algodón o un elemento similar.
Tiempo de carga y uso
Tiempo de carga
aproximado
Tiempo de uso
aproximado*1
16 horas*27 horas*3
*1 a 1 kHz, con salida de 1 mW + 1 mW
*2 horas necesarias para cargar completamente una batería
descargada
*3 El tiempo puede variar en función de la temperatura o las
condiciones de uso.
Control de la carga restante de
la batería
Tire hacia arriba la cinta autoajustable y controle el
indicador de POWER ubicado en el receptáculo derecho. La
batería todavía puede utilizarse si el indicador emite una luz
roja.
Cargue la batería recargable o coloque baterías secas nuevas
si la luz del indicador de POWER se atenúa o parpadea, o el
sonido se distorsiona o se vuelve ruidoso.
Nota
Si la duración de la batería recargable de hidruro de níquel-metal se
reduce a la mitad de la duración esperada después de realizar una
carga completa, se la debe reemplazar por otra nueva. La batería
recargable BP-HP550-11 no se comercializa. Puede pedirla en el
establecimiento donde compró el sistema o bien solicitarla al
distribuidor Sony más cercano.
Uso de los auriculares con
baterías alcalinas (vendidas
por separado)
Las baterías alcalinas comerciales (tipo AAA) también
pueden emplearse para los auriculares. Coloque las baterías
de la misma manera como se describe en “Cómo colocar la
batería recargable de hidruro de níquel-metal incluida”.
Cuando se colocan baterías secas, la función de carga de la
batería se desactiva.
Duración de las baterías
Batería Horas aproximadas*1
Baterías alcalinas LR03/AM-4(N)
de Sony
10 horas*2
*1 a 1 kHz, con salida de 1 mW + 1 mW
*2 El tiempo puede variar en función de la temperatura o las
condiciones de uso.
Notas sobre las baterías
No cargue las baterías secas.
No lleve una batería seca junto con monedas u otros objetos
metálicos. La batería puede generar calor si los terminales positivo
y negativo de la batería hacen cortocircuito accidentalmente.
Si planea no utilizar la unidad por un período prolongado, extraiga
las baterías para evitar daños por fugas o corrosión.
Precauciones
Seguridad
No deje caer, golpee ni exponga el transmisor o los
auriculares a golpes fuertes de ningún tipo, ya que esto
puede dañar el producto.
No lo desarme ni intente abrir ninguna pieza del sistema.
Fuentes de alimentación y ubicación
Si no va a utilizar el sistema por un tiempo prolongado,
desconecte el adaptador de CA del tomacorriente de CA.
Para hacerlo, sujete el adaptador de CA.
No tire del cable.
No ubique el sistema en ninguno de los siguientes lugares:
– Lugares expuestos a luz solar directa, cerca de sistemas
de calefacción o lugares con temperaturas
extremadamente altas
– Lugares polvorientos
– Superficies inestables o inclinadas
– Lugares expuestos a muchas vibraciones
– En el baño o lugares sometidos a niveles de humedad
similares
Auriculares
Respete a los demás
Cuando el volumen es muy alto, el sonido se oye fuera de los
auriculares. Tenga cuidado de no subir demasiado el
volumen, ya que puede molestar a las personas cerca de
usted.
Es habitual subir el volumen en lugares ruidosos. No
obstante, por razones de seguridad, se recomienda mantener
el volumen a un nivel que le permita oír los sonidos a su
alrededor.
Limpieza
Utilice un paño suave ligeramente humedecido con una
solución de detergente suave. No utilice solventes como
diluyentes, bencina o alcohol, ya que pueden dañar la
superficie.
Si el producto se rompe
Si el producto se rompe o un objeto extraño entra en la
unidad, apague el producto inmediatamente y póngase en
contacto con el distribuidor Sony más cercano.
Al llevar el equipo a un distribuidor Sony, asegúrese de
llevar los auriculares y el transmisor.
Especificaciones técnicas
Transmisor estéreo inalámbrico (TMR-RF4000)
Sistema de modulación
GFSK
Transportador de frecuencia de ondas
2,404 GHz - 2,476 GHz
Distancia de transmisión
Aprox. 100 pies (30 m) de longitud máxima
Respuesta de frecuencia
10 Hz - 22.000 Hz
Índice de distorsión
1% o inferior (1 kHz)
Entradas de audio
Tomas fonográficos (izquierdo y derecho)
Minitoma estéreo
Requisitos de alimentación
CC de 5,2 V (del adaptador de CA incluido)
Dimensiones
Aprox. 246 mm × 62 mm × 129 mm
(an./alt./prof.)
Masa Aprox. 430 g
Auriculares estéreo inalámbricos (MDR-RF4000)
Rango de frecuencia de reproducción
12 Hz - 22.000 Hz
Requisitos de energía
Batería recargable de hidruro de níquel-metal
(incluida) o baterías alcalinas (tipo AAA)
disponibles comercialmente
Masa Aprox. 300 g (con la batería recargable de hidruro
de níquel-metal incluida)
Accesorios incluidos
Adaptador de CA (5,2 V) (1)
Batería recargable de hidruro de níquel-metal
BP-HP550-11 (550 mAh) (1)
Cable de conexión (mini conector estéreo
conector de pin × 2), 1 m (1)
Adaptador de conector Unimatch (minitoma
estéreo conector fonográfico estéreo) (1)
Soporte (1)
Tarjeta de garantía (1)
Manual de instrucciones (este manual) (1)
Accesorios recomendados
Cable de conexión digital óptico POC-15AB
(1,5 m) (mini conector conector rectangular)
El diseño y las especificaciones están sujetos a cambios sin
aviso previo.