Sony Group XAV612BT AV Center User Manual XAV 712BT XAV 612BT XAV 602BT
Sony Corporation AV Center XAV 712BT XAV 612BT XAV 602BT
Contents
- 1. (Short-Term Confidential) User Manual_1
- 2. (Short-Term Confidential) User Manual_2
(Short-Term Confidential) User Manual_1
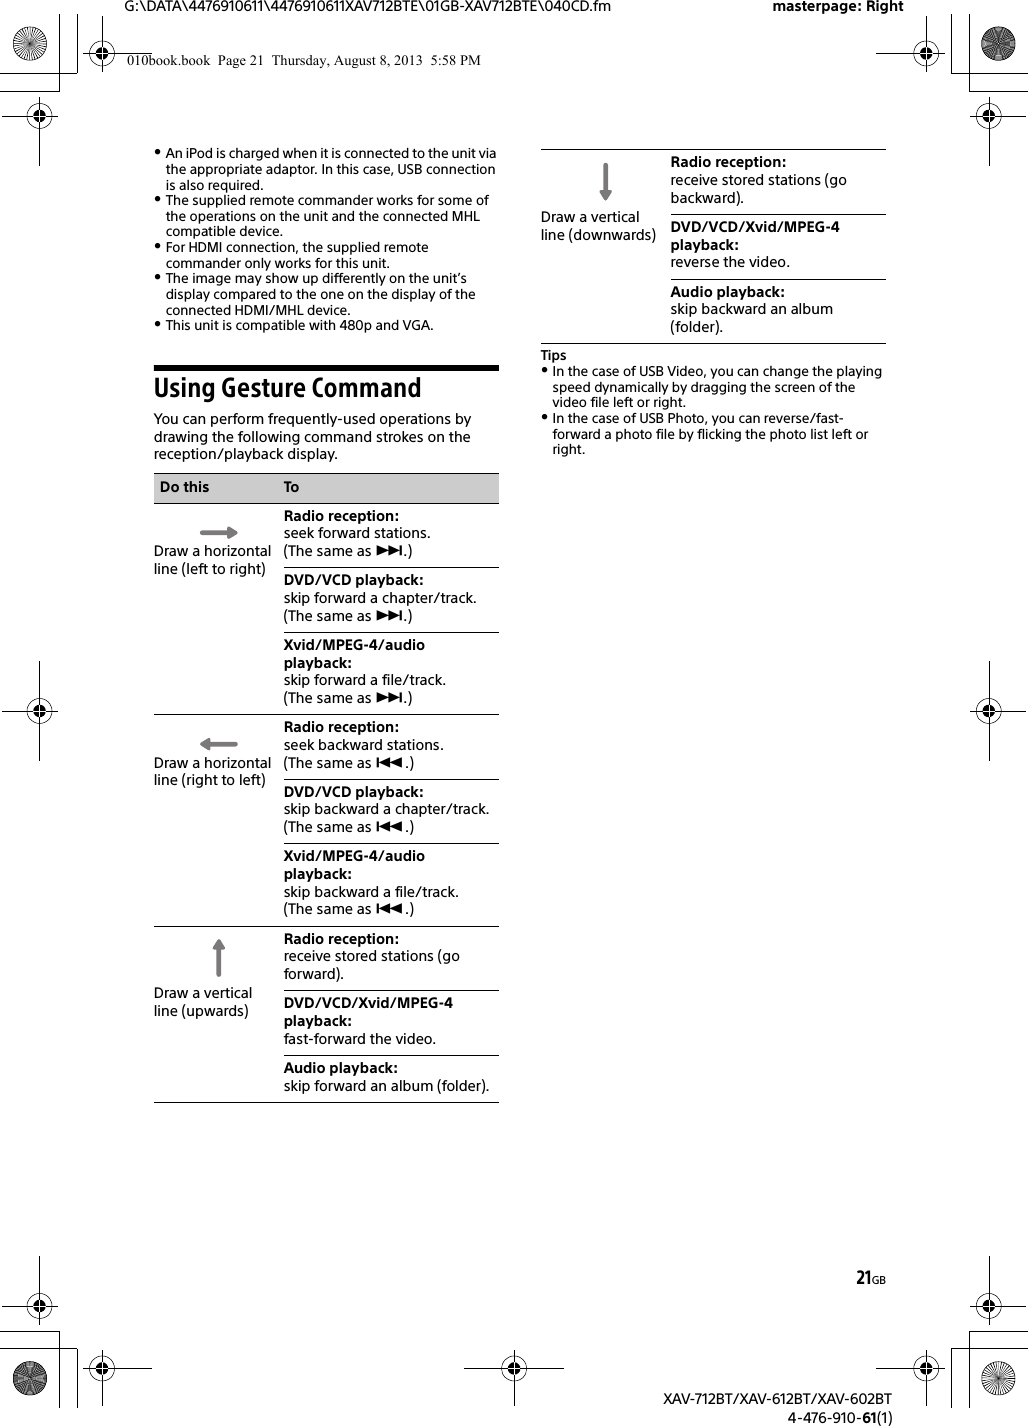
![4GBG:\DATA\4476910611\4476910611XAV712BTE\01GB-XAV712BTE\030TOC.fm masterpage: LeftXAV-712BT/XAV-612BT/XAV-602BT4-476-910-61(1)Table of ContentsWarning . . . . . . . . . . . . . . . . . . . . . . . . . . . . . . . . . . . 2Guide to Parts and Controls . . . . . . . . . . . . . . . . . . . 5Getting StartedResetting the Unit . . . . . . . . . . . . . . . . . . . . . . . . . . . 8Performing Initial Settings . . . . . . . . . . . . . . . . . . . . 8Setting the Clock . . . . . . . . . . . . . . . . . . . . . . . . . . . . 8Preparing a BLUETOOTH Device. . . . . . . . . . . . . . . . 8Detaching the front panel (XAV-612BT/602BT only). . . . . . . . . . . . . . . . . . . 9Listening to the RadioListening to the Radio. . . . . . . . . . . . . . . . . . . . . . . 10Storing and Receiving Stations . . . . . . . . . . . . . . . 10Using Radio Data System (RDS) . . . . . . . . . . . . . . . 11PlaybackPlaying a Disc . . . . . . . . . . . . . . . . . . . . . . . . . . . . . 12Playing an iPod/USB Device. . . . . . . . . . . . . . . . . . 13Playing a BLUETOOTH Device. . . . . . . . . . . . . . . . . 13Searching and Playing Tracks. . . . . . . . . . . . . . . . . 14Enjoying Music According to Your Mood (SensMe™). . . . . . . . . . . . . . . . . . . . . . . . . . . . . 15Available Options . . . . . . . . . . . . . . . . . . . . . . . . . . 15[DVD Audio Level] . . . . . . . . . . . . . . . . . . . . . . . 16[CSO (Center Speaker Organizer)] . . . . . . . . . . 16Handsfree CallingReceiving a Call . . . . . . . . . . . . . . . . . . . . . . . . . . . . 17Making a Call . . . . . . . . . . . . . . . . . . . . . . . . . . . . . . 17Available Operations During a Call . . . . . . . . . . . . 18Phonebook Management . . . . . . . . . . . . . . . . . . . 18Call Data Management . . . . . . . . . . . . . . . . . . . . . . 18Phone Option Menu . . . . . . . . . . . . . . . . . . . . . . . . 19Useful FunctionsApp Remote with iPhone/Android Phone . . . . . . 19Duplicating the Smartphone’s Display (MirrorLink™) . . . . . . . . . . . . . . . . . . . . . . . . . . . 20Enjoying Different Sources in Front and Rear (Zone × Zone) . . . . . . . . . . . . . . . . . . . . . . . . . . 20Enjoying high quality image (XAV-712BT/612BT only) . . . . . . . . . . . . . . . . . . 20Using Gesture Command . . . . . . . . . . . . . . . . . . . . 21SettingsGeneral Settings . . . . . . . . . . . . . . . . . . . . . . . . . . . 22Touch Panel Adjust . . . . . . . . . . . . . . . . . . . . . . 23Bluetooth Reset. . . . . . . . . . . . . . . . . . . . . . . . . 24USB Battery Charge Mode . . . . . . . . . . . . . . . . 24Sound Settings . . . . . . . . . . . . . . . . . . . . . . . . . . . . 24EQ7 / Subwoofer Level Adjust. . . . . . . . . . . . . 24Balance / Fader Level Adjust . . . . . . . . . . . . . . 24RBE (Rear Bass Enhancer) . . . . . . . . . . . . . . . . 254.1ch Speaker Level . . . . . . . . . . . . . . . . . . . . . 25Visual Settings . . . . . . . . . . . . . . . . . . . . . . . . . . . . 25Picture EQ . . . . . . . . . . . . . . . . . . . . . . . . . . . . . 25Aspect . . . . . . . . . . . . . . . . . . . . . . . . . . . . . . . . 26Source Settings . . . . . . . . . . . . . . . . . . . . . . . . . . . . 26Auto Input Change(MHL) (XAV-712BT/612BT only) . . . . . . . . . . . . . . . . . . 28Additional InformationAuxiliary Audio/Video Equipment . . . . . . . . . . . . 28Rear View Camera . . . . . . . . . . . . . . . . . . . . . . . . . 29Updating the Firmware . . . . . . . . . . . . . . . . . . . . . 29Precautions . . . . . . . . . . . . . . . . . . . . . . . . . . . . . . . 29Maintenance . . . . . . . . . . . . . . . . . . . . . . . . . . . . . . 34Specifications . . . . . . . . . . . . . . . . . . . . . . . . . . . . . 35Troubleshooting . . . . . . . . . . . . . . . . . . . . . . . . . . . 38Language Code List . . . . . . . . . . . . . . . . . . . . . . . . 44For details on smartphone connectivity and battery charge capability, see “Summary of Useful Functions for Smartphone” on the pages at the end of these operating instructions.010book.book Page 4 Thursday, August 8, 2013 5:58 PM](https://usermanual.wiki/Sony-Group/XAV612BT.Short-Term-Confidential-User-Manual-1/User-Guide-2090582-Page-4.png)
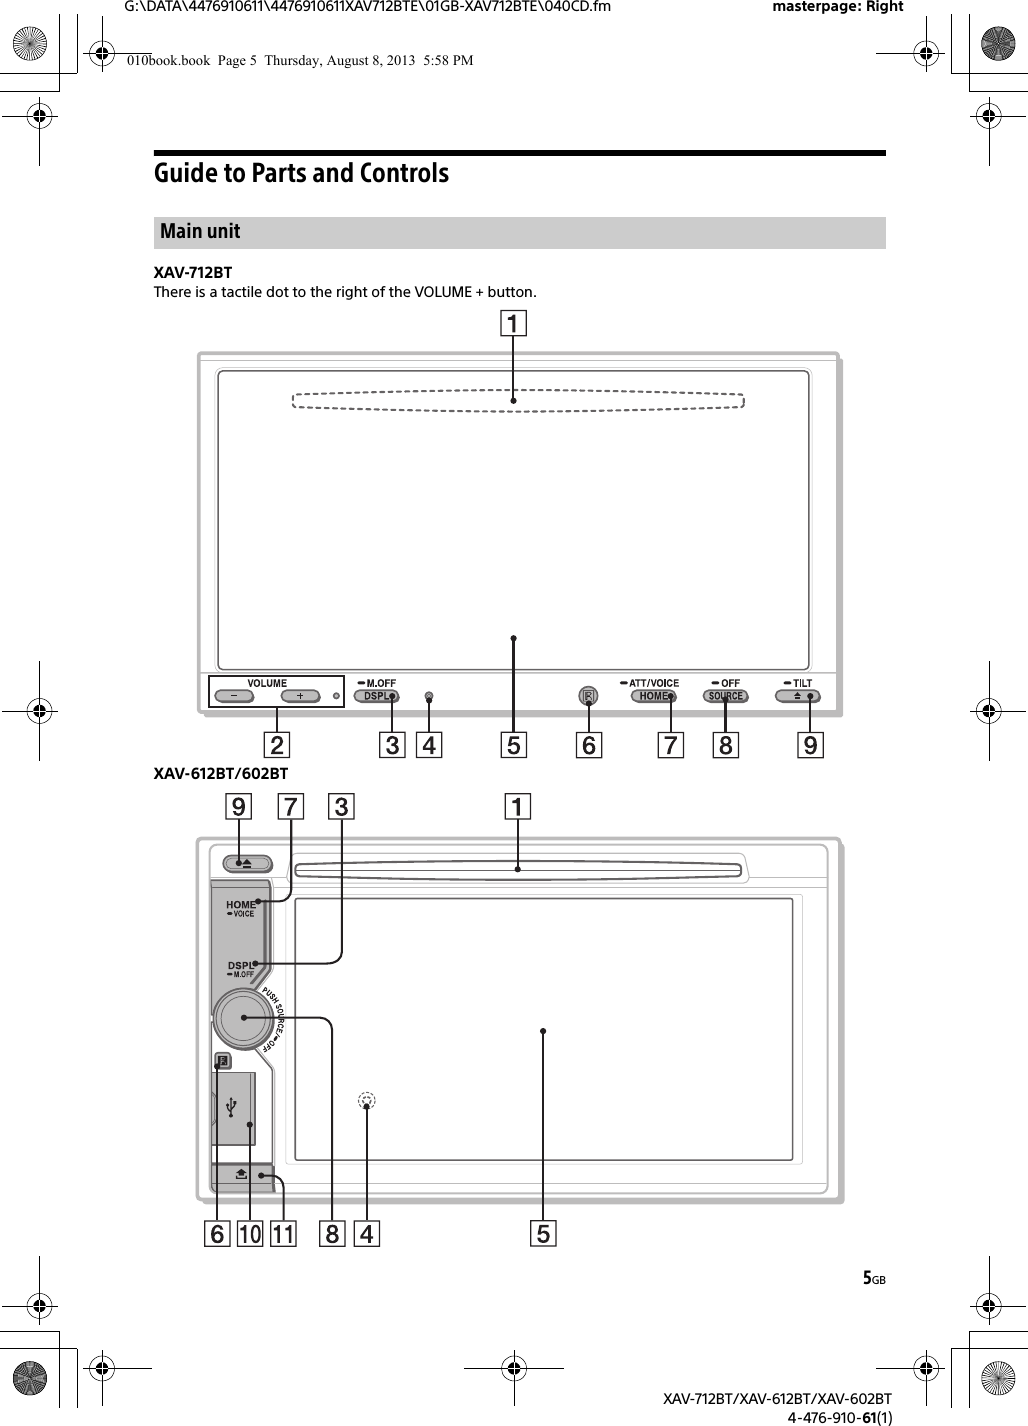
![6GBG:\DATA\4476910611\4476910611XAV712BTE\01GB-XAV712BTE\040CD.fm masterpage: LeftXAV-712BT/XAV-612BT/XAV-602BT4-476-910-61(1)Disc slot(XAV-712BT: located behind the front panel)VOLUME –/+DSPL (display)Change the display items.-M.OFF (monitor off)Press and hold to turn off the monitor and the button illumination. Touch anywhere on the display to turn back on.Reset button(XAV-612BT/602BT: located behind the front panel)Display/touch panelReceptor for the remote commanderHOMEOpen the HOME menu.-VOICEPress and hold for more than 2 seconds to activate the voice command function. When the App Remote function is on, voice recognition (Android phone only) and voice dial is activated. When the App Remote function is off, only voice dial is available.-ATT (attenuate) (XAV-712BT only)Press and hold for more than 2 seconds to attenuate the sound. To assign the ATT function to the HOME button, select [ATT ON/OFF] in [HOME Key Function (hold 2sec push)] (page 22).SOURCETurn on the power.Change the source. Each press displays a selectable source in a popup on the current display.-OFFPress and hold for 1 second to exit the source.Press and hold for more than 2 seconds to turn off the unit. When the unit is turned off, remote commander operation is not available.Volume control dial (XAV-612BT/602BT only)Rotate to adjust the volume. (disc eject)-TILT (XAV-712BT only)Press and hold to adjust the monitor angle.USB port (XAV-612BT/602BT only)Open the cover to connect a USB device.Front panel release button (XAV-612BT/602BT only)The remote commander can be used to operate the audio controls. For menu operations, use the touch panel. Remove the insulation film before use.POSITIONSwitch the listening position. (return)Return to the previous display/return to the menu on a Video CD (VCD).EQ (equalizer)Select an equalizer curve.Number buttons (0 - 9)CLEARZ×Z (Zone × Zone) (page 20) (play/pause)/ (previous/next)DVD playback setting buttonsZAP (zappin) (page 14)/// (cursor)/ENTERMODESelect the radio band/auxiliary device.RM-X271 remote commander010book.book Page 6 Thursday, August 8, 2013 5:58 PM](https://usermanual.wiki/Sony-Group/XAV612BT.Short-Term-Confidential-User-Manual-1/User-Guide-2090582-Page-6.png)
![7GBG:\DATA\4476910611\4476910611XAV712BTE\01GB-XAV712BTE\040CD.fm masterpage: RightXAV-712BT/XAV-612BT/XAV-602BT4-476-910-61(1)Status bar:Notification panel:Tap on the status bar to open the notification panel.Home screen:IndicationsBLUETOOTH status indicationsApplication specific areaDisplay playback controls/indications or show the unit’s status. Displayed items differ depending on the source.Common areaSwitch from the HOME screen to the playback screen.(option)Open the HOME option menu.Press HOME, then touch .To return to the home screen, touch .Source select keysChange the source.Screen displaysLights up when the sound is attenuated.Lights up when the Zone × Zone function is on.Lights up when the App Remote function is on.Lights up when the BLUETOOTH signal is on.Lights up when a device is connected to the unit for audio streaming.Flashes when the connection is in progress.Lights up when a cellular phone is connected to the unit for handsfree calling.Flashes when the connection is in progress.Indicates the signal strength status of the connected cellular phone.Indicates the remaining battery status of the connected cellular phone.Lights up when a connected cellular phone has unread SMS message(s).Accesses the EQ7/subwoofer settings menu directly (page 24).Activates the voice command function.[Icon Priority]Changes the order of icons.[Background Theme]Changes the wallpaper.[Icon View]Switches between 2D and 3D icon display.You can also switch the icon view by touching and holding anywhere on the display.[Touch Effect]Displays a light trail where you have touched the display.010book.book Page 7 Thursday, August 8, 2013 5:58 PM](https://usermanual.wiki/Sony-Group/XAV612BT.Short-Term-Confidential-User-Manual-1/User-Guide-2090582-Page-7.png)
![8GBG:\DATA\4476910611\4476910611XAV712BTE\01GB-XAV712BTE\040CD.fm masterpage: LeftXAV-712BT/XAV-612BT/XAV-602BT4-476-910-61(1)Resetting the UnitBefore operating the unit for the first time, or after replacing the car battery or changing connections, you must reset the unit.1Press the reset button on the unit.Use a pointed object, such as a ballpoint pen.NotePressing the reset button will erase the clock setting and some stored contents.Performing Initial SettingsAfter resetting, the initial setting display appears.1Touch [No] on the demo setting display.2Touch [Idioma] to set the display language.Move the scrollbar up and down, then select the desired language.3Touch [Subwoofer] to set the subwoofer connection status.Set to [ON] if a subwoofer is connected, or [OFF] if not.4Touch [Listening Position] to set the listening position.Set to [Front L] if your listening position is front left, or [Front R] if front right.To return to the initial setting display, touch .5Touch [OK].The setting is complete.This setting can then be further configured in the setting menu (page 22).Setting the Clock1Press HOME, then touch [Settings].2Touch , then touch [Date & Time].3Touch [Select Time Zone].The setting display appears.To return to the [Date & Time] display, touch .4Touch [Set Date], then set the year, month and day.5Touch [Set Time], then set the hour and minute.6Touch [AM] or [PM].7Touch [OK].The setting is complete.To delete an entered number, touch [Clear].To activate/deactivate the CT function (page 11), touch [CT] in step 4.Preparing a BLUETOOTH DeviceYou can enjoy music, or perform handsfree calling, by connecting a suitable BLUETOOTH device (cellular phone, audio device, etc.). For details on connecting a BLUETOOTH device, refer to the operating instructions supplied with the device.Before connecting, turn down the volume of this unit; otherwise, loud sound may result.When connecting a BLUETOOTH device for the first time, mutual registration (called “pairing”) is required. Pairing enables this unit and other devices to recognize each other.1Press HOME, then touch [Settings].2Touch , and move the scrollbar up and down.3Touch [Bluetooth Connection], then set the signal to [ON].The BLUETOOTH signal of this unit is activated and appears on the status bar.4Touch [Pairing >].The unit enters pairing standby mode.5Perform the pairing procedure on the BLUETOOTH device to detect this unit.Getting StartedPairing and connecting with a BLUETOOTH device010book.book Page 8 Thursday, August 8, 2013 5:58 PM](https://usermanual.wiki/Sony-Group/XAV612BT.Short-Term-Confidential-User-Manual-1/User-Guide-2090582-Page-8.png)
![9GBG:\DATA\4476910611\4476910611XAV712BTE\01GB-XAV712BTE\040CD.fm masterpage: RightXAV-712BT/XAV-612BT/XAV-602BT4-476-910-61(1)6Select [Sony Car Audio] shown in the display of the BLUETOOTH device.7If passkey* input is required on the BLUETOOTH device, input [0000].* Passkey may be called “passcode,” “PIN code,” “PIN number,” “password,” etc., depending on the BLUETOOTH device. 8Select this unit on the BLUETOOTH device to establish the BLUETOOTH connection. or lights up when the connection is made.NoteWhile connecting to a BLUETOOTH device, this unit cannot be detected by another device. To enable detection, terminate the current connection.This chapter explains how to connect manually to registered BLUETOOTH devices.1Make sure that the BLUETOOTH signals both on this unit (page 24) and the BLUETOOTH device are activated. on the status bar indicates that the BLUETOOTH signal on this unit is on.2Operate the BLUETOOTH device to connect to this unit. or appears.When the ignition is turned to on with the BLUETOOTH signal activated, this unit searches for the last-connected BLUETOOTH device, and connection is made automatically if possible.NoteIf this unit cannot detect the last-connected BLUETOOTH device, touch [Reconnect] to search for the last-paired device again.If the problem is not solved, follow the pairing procedure.To install the microphoneTo capture your voice during handsfree calling, you need to install the microphone (supplied).For details on how to connect the microphone, refer to the supplied “Installation/Connections” guide.Detaching the front panel (XAV-612BT/602BT only)You can detach the front panel of this unit to prevent theft.Caution alarmIf you turn the ignition switch to the off position without detaching the front panel, the caution alarm will sound for a few seconds. The alarm will only sound if the built-in amplifier is used.To deactivate the caution alarm, set [Front Panel Caution Alarm] to [OFF] (page 23).1Press and hold OFF for more than 2 seconds to turn off the unit.2Press .3 Lift the left side of the front panel. Pull it off towards you.NoteDo not drop or put excessive pressure on the front panel and display window.Engage part of the front panel with part of the unit, as illustrated, and push the left side into position until it clicks.NoteDo not put anything on the inner surface of the front panel.Connecting with a paired BLUETOOTH deviceAttaching the front panel010book.book Page 9 Thursday, August 8, 2013 5:58 PM](https://usermanual.wiki/Sony-Group/XAV612BT.Short-Term-Confidential-User-Manual-1/User-Guide-2090582-Page-9.png)
![10GBG:\DATA\4476910611\4476910611XAV712BTE\01GB-XAV712BTE\040CD.fm masterpage: LeftXAV-712BT/XAV-612BT/XAV-602BT4-476-910-61(1)Listening to the RadioTo listen to the radio, press HOME then touch [Tuner].Reception controls ( to )Reception indications ( and )Current source iconFrequency/statusStoring and Receiving StationsCautionWhen tuning to stations while driving, use Best Tuning Memory (BTM) to prevent an accident.1Select the desired band ([FM1], [FM2], [FM3], [AM1], or [AM2]).2Touch .3Touch [BTM].The unit stores the first six available stations in presets ([1] to [6]).To return to the playback screen, touch .1Touch the current band.The band list appears.2Touch the desired band ([FM1], [FM2], [FM3], [AM1], or [AM2]).3Perform tuning.To tune automaticallyTouch / .Scanning stops when the unit receives a station. Repeat this procedure until the desired station is received.To tune manuallyTouch / repeatedly until the desired frequency is received.To skip frequencies continuously, touch and hold / .1While receiving the station that you want to store, touch , then touch the desired preset number ([1] to [6]).To return to the playback screen, touch .1Select the band.2Touch the desired preset number ([1] to [6]).Listening to the RadioReception controls/indicationsCurrent band iconOpens the band list.[PTY] (Program Types) (FM only)Opens the PTY list (page 11).Registers the current band as a preset item.Changes the pattern of the visualizer./Tunes in automatically./Tunes in manually.Touch and hold to continuously skip frequencies.[1] to [6]Selects a preset station.Touch and hold to store the currently displayed frequency in that preset.Storing automatically (BTM)TuningStoring manuallyReceiving stored stations010book.book Page 10 Thursday, August 8, 2013 5:58 PM](https://usermanual.wiki/Sony-Group/XAV612BT.Short-Term-Confidential-User-Manual-1/User-Guide-2090582-Page-10.png)
![11GBG:\DATA\4476910611\4476910611XAV712BTE\01GB-XAV712BTE\040CD.fm masterpage: RightXAV-712BT/XAV-612BT/XAV-602BT4-476-910-61(1)Using Radio Data System (RDS)Display itemsBand name, RDS*Program service name, frequencyPreset number* During RDS reception.RDS servicesThis unit automatically provides RDS services as follows:PTY (Program Types)Displays the currently received program type.Also searches for a designated program type.CT (Clock Time)The CT data from the RDS transmission sets the clock.1During FM reception, touch [PTY].To scroll the list, move the scrollbar up and down.2Touch the desired program type.The unit searches for a station broadcasting the selected program type.To close the PTY list, touch .Type of programsNoteYou cannot use this function in countries/regions where no PTY data is available.Selecting program types (PTY)News (News), Current Affairs (Current Affairs), Information (Information), Sport (Sports), Education (Education), Drama (Drama), Cultures (Culture), Science (Science), Varied Speech (Varied), Pop Music (Pop Music), Rock Music (Rock Music), Easy Listening (M.O.R. Music), Light Classics M (Light classical), Serious Classics (Serious classical), Other Music (Other Music), Weather & Metr (Weather), Finance (Finance), Children’s Progs (Children’s program), Social Affairs (Social Affairs), Religion (Religion), Phone In (Phone In), Travel & Touring (Travel), Leisure & Hobby (Leisure), Jazz Music (Jazz Music), Country Music (Country Music), National Music (National Music), Oldies Music (Oldies Music), Folk Music (Folk Music), Documentary (Documentary)010book.book Page 11 Thursday, August 8, 2013 5:58 PM](https://usermanual.wiki/Sony-Group/XAV612BT.Short-Term-Confidential-User-Manual-1/User-Guide-2090582-Page-11.png)
![12GBG:\DATA\4476910611\4476910611XAV712BTE\01GB-XAV712BTE\040CD.fm masterpage: LeftXAV-712BT/XAV-612BT/XAV-602BT4-476-910-61(1)For playable discs or file types, see page 30.Playing a DiscDepending on the disc, some operations may be different or restricted.Refer to the operating instructions supplied with the disc.XAV-712BT1Press on the unit to open the front panel.2Insert the disc (label side up), then playback starts.XAV-612BT/602BT1Insert the disc (label side up), then playback starts.If a DVD menu appearsTouch the desired item in the DVD menu.You can also use the menu control panel, which can be displayed by touching the screen anywhere except the DVD menu items. Touch /// to move the cursor, then touch [ENTER] to confirm.If the menu control panel does not appear by touching the display, use the remote commander.Example of playback indications (DVD)Current source icon, format, chapter/title number, audio formatPlayback status, elapsed playback timeTouch the display if the indications are not displayed.For audio discs, some indications are always displayed during playback.To change the visualizer settings, touch .The PBC menu interactively assists with operations while a PBC-compatible VCD is played.1Start playing a PBC-compatible VCD.The PBC menu appears.2Press the number buttons on the remote commander to select the desired item, then press ENTER.3Follow the instructions in the menu for interactive operations.To return to the previous display, press on the remote commander.To deactivate PBC functions, set [Video CD PBC] to [OFF] (page 27).NotesDuring PBC playback, the track number, playback item, etc., do not appear on the playback display.Resume playback is unavailable during playback with PBC.To change the audio language/formatThe audio language can be changed if the disc is recorded with multilingual tracks. You can also change the audio format when playing a disc recorded in multiple audio formats (e.g., Dolby Digital).During playback, touch the screen and then .Touch repeatedly until the desired audio language/format appears.* The format name and channel numbers appear as follows:If the same language is displayed two or more times, the disc is recorded in multiple audio formats.PlaybackUsing PBC (playback control) functionsConfiguring audio settingsExample: Dolby Digital 5.1 chFront channel × 2 + Center channel × 1Rear channel × 2Audio languageAudio format/channel numbers*010book.book Page 12 Thursday, August 8, 2013 5:58 PM](https://usermanual.wiki/Sony-Group/XAV612BT.Short-Term-Confidential-User-Manual-1/User-Guide-2090582-Page-12.png)
![13GBG:\DATA\4476910611\4476910611XAV712BTE\01GB-XAV712BTE\040CD.fm masterpage: RightXAV-712BT/XAV-612BT/XAV-602BT4-476-910-61(1)To change the audio channelWhen playing a VCD, you can listen to both left and right channels, right channel only or left channel only, via both right and left speakers.During playback, touch repeatedly until the desired audio channel appears.The options are indicated below.[Stereo]: Standard stereo sound (default)[1/Left]: Left channel sound (monaural)[2/Right]: Right channel sound (monaural)Playing an iPod/USB DeviceIn these Operating Instructions, “iPod” is used as a general reference for the iPod functions on the iPod and iPhone, unless otherwise specified by the text or illustrations.For details on the compatibility of your iPod, see “About iPod” (page 33) or visit the support site on the back cover.MSC (Mass Storage Class)-type USB devices (such as a USB flash drive, digital media player, Android phone) compliant with the USB standard can be used.Depending on the digital media player or Android phone, setting the USB connection mode to MSC is required.1Reduce the volume on this unit.If the device is turned off, turn it on.2Connect the iPod or the USB device to the USB port.3Press HOME, then touch [USB Music], [USB Video], [USB Photo] or [iPod].In the case of [USB Music], [USB Video] or [iPod], playback starts.In the case of [USB Photo], touch [All pictures] or [Folders], then select the picture or folder to start photo file playback.To stop playbackPress and hold OFF for 1 second.To remove the deviceStop playback, then disconnect.Do not disconnect during playback, as data in the device may be damaged.NotesIf you connect an iPod or MSC device to a USB port while the same type of device is already connected to the other USB port, the unit will not recognize the latest device.The signal of USB Video or USB Photo playback is not output from the video output terminal (rear).The signal of iPod video playback is not output from the video output terminal (rear).Caution for iPhoneWhen you connect an iPhone via USB, telephone volume is controlled by the iPhone itself. In order to avoid sudden loud sound after a call, do not increase the volume on the unit during a call.About resuming modeWhen the iPod currently playing is connected to the dock connector, the mode of this unit changes to resuming mode and playback starts in the mode set by the iPod.In resuming mode, repeat/shuffle play are not available.1During playback, touch .To deactivate Passenger App ControlDuring [Passenger App Control], touch screen and then [Cancel].The play mode changes to resuming mode.NotesApp image and video can only be displayed on this unit while the parking brake is applied.Apps compatible with Passenger App Control are limited.The volume can be adjusted only by this unit.The repeat and shuffle settings will be off if the Passenger App Control mode is canceled.Playing a BLUETOOTH DeviceYou can play contents on a connected device that supports BLUETOOTH A2DP (Advanced Audio Distribution Profile).1Make BLUETOOTH connection with the audio device (page 9).2Reduce the volume on this unit.3Press HOME, then touch [BT Audio].4Operate the audio device to start playback.5Adjust the volume on this unit.Listen and watch contents with direct operation of iPod (Passenger App Control)010book.book Page 13 Thursday, August 8, 2013 5:58 PM](https://usermanual.wiki/Sony-Group/XAV612BT.Short-Term-Confidential-User-Manual-1/User-Guide-2090582-Page-13.png)
![14GBG:\DATA\4476910611\4476910611XAV712BTE\01GB-XAV712BTE\040CD.fm masterpage: LeftXAV-712BT/XAV-612BT/XAV-602BT4-476-910-61(1)Playback controlsIf the BLUETOOTH device supports AVRCP (Audio Video Remote Control Profile), you can control playback via this unit in the same way as disc playback.To match the volume level of the BLUETOOTH device to other sourcesYou can reduce the volume level differences between this unit and the BLUETOOTH device.During playback, touch .Select a level from –8 to +18.Searching and Playing Tracks1During playback, touch (repeat) or (shuffle) repeatedly until the desired option appears.Repeat or shuffle play starts.Available play modes differ depending on the selected sound source.NoteShuffle play is not available for the following discs:DVD-R/DVD-R DL/DVD-RW in VR mode.version 2.0 VCD with PBC function.1During playback, press the number buttons on the remote commander to enter an item (track, chapter, etc.) number, then press ENTER.Playback starts from the beginning of the selected point.NoteDuring VCD playback, this function is available only when playing a VCD without PBC functions.ZAPPIN helps you to find desired song by playing back only the main chorus part of that song in a playlist of the iPod/USB device. The playback time can be adjusted in the option menu (page 16).This function is convenient, for example, when searching for a track in shuffle or shuffle repeat mode.NotesThe tracks in the USB device need to be analyzed by 12 TONE ANALYSIS. The tracks in the iPod are played back from 1 minute into each song.1During audio playback, touch [ZAP].In the case of USB Music, ZAP mode starts from the currently playing track.In the case of iPod, ZAP mode starts from a passage in the next track.2Touch [ZAP] when a track you want to listen to is played.In the case of USB Music, playback returns to normal from the current position until the end of the track.In the case of iPod, the selected track plays from the beginning.To search for a track via the ZAPPIN mode again, repeat steps 1 and 2.1During playback, touch .The list screen from the currently played item appears.Furthermore, touch or to list up by the file type (audio/video).2Touch the desired item.Playback starts.In the case of the USB photo file, touch to start the slideshow.To change the display format for video/photo filesWhile the list screen appears, touch then select the desired option.Using repeat play and shuffle playUsing direct search playSearching for a track by the main chorus part (ZAPPIN™)Searching for a file from the list screen: Grid viewDisplays the files as a grid.: List viewDisplays the files as a list.: Cover art viewDisplays the files as angled graphics.: Date view (all pictures only)Displays the photo files in order of date.010book.book Page 14 Thursday, August 8, 2013 5:58 PM](https://usermanual.wiki/Sony-Group/XAV612BT.Short-Term-Confidential-User-Manual-1/User-Guide-2090582-Page-14.png)
![15GBG:\DATA\4476910611\4476910611XAV712BTE\01GB-XAV712BTE\040CD.fm masterpage: RightXAV-712BT/XAV-612BT/XAV-602BT4-476-910-61(1)1While the list screen appears, touch .The menu list appears.2Select the desired category.The selected list appears.3Touch the desired track.Playback starts.1While the list screen appears, touch .2Touch the cover art of the album you want to play.Playback starts.Enjoying Music According to Your Mood (SensMe™)Sony’s unique “SensMe™ channels” feature automatically group tracks by channel or mood, and allow you to enjoy music intuitively.Software (“Media Go”) is required to enable the SensMe™ function on this unit.1Download “Media Go” software from the support site on the back cover.2Follow the on-screen instructions to complete the installation.To enable the SensMe™ function on this unit, tracks need to be analyzed and transferred to a registered USB device using “Media Go.”1Connect the registered USB device to your computer.For “WALKMAN,” connect via MTP mode.For USB devices other than “WALKMAN,” connect via MSC mode.“Media Go” starts automatically.If a message appears, follow the on-screen instructions to proceed.2Drag and drop tracks from Windows Explorer or iTunes, etc., to “Media Go.”The analysis and transfer of tracks starts.For details on operations, refer to the help of “Media Go.”“SensMe™ channels” automatically group tracks into channels by their tunes. You can select and play a channel that fits your mood, activity, etc.1Connect a USB device set up for the SensMe™ function.2Press HOME, then touch [USB Music].3Touch , then .4Flick the channel list left or right.Playback of the first track in the current channel starts from the track’s most melodic or rhythmical section*.* May not be detected correctly.5Touch the desired channel.Playback of tracks in the selected channel starts.Channel listBasic channelsPlays tracks according to the music type.RecommendedShuffle AllPlays all analyzed tracks in random order.Available OptionsVarious settings are available in each source by touching . The available items differ depending on the situation.: Expanded view (folders only)Displays the photo folders, below which are displayed subfolders, and any photo file images that are contained.Selecting songs from the librarySelecting an album by cover artInstalling “Media Go” on your computerTransferring tracks to a USB device using “Media Go”Playing tracks in channels (SensMe™ channels)[Energetic], [Emotional], [Lounge], [Dance], [Extreme], [Upbeat], [Relax], [Mellow][Morning], [Daytime], [Evening], [Night], [Midnight]010book.book Page 15 Thursday, August 8, 2013 5:58 PM](https://usermanual.wiki/Sony-Group/XAV612BT.Short-Term-Confidential-User-Manual-1/User-Guide-2090582-Page-15.png)
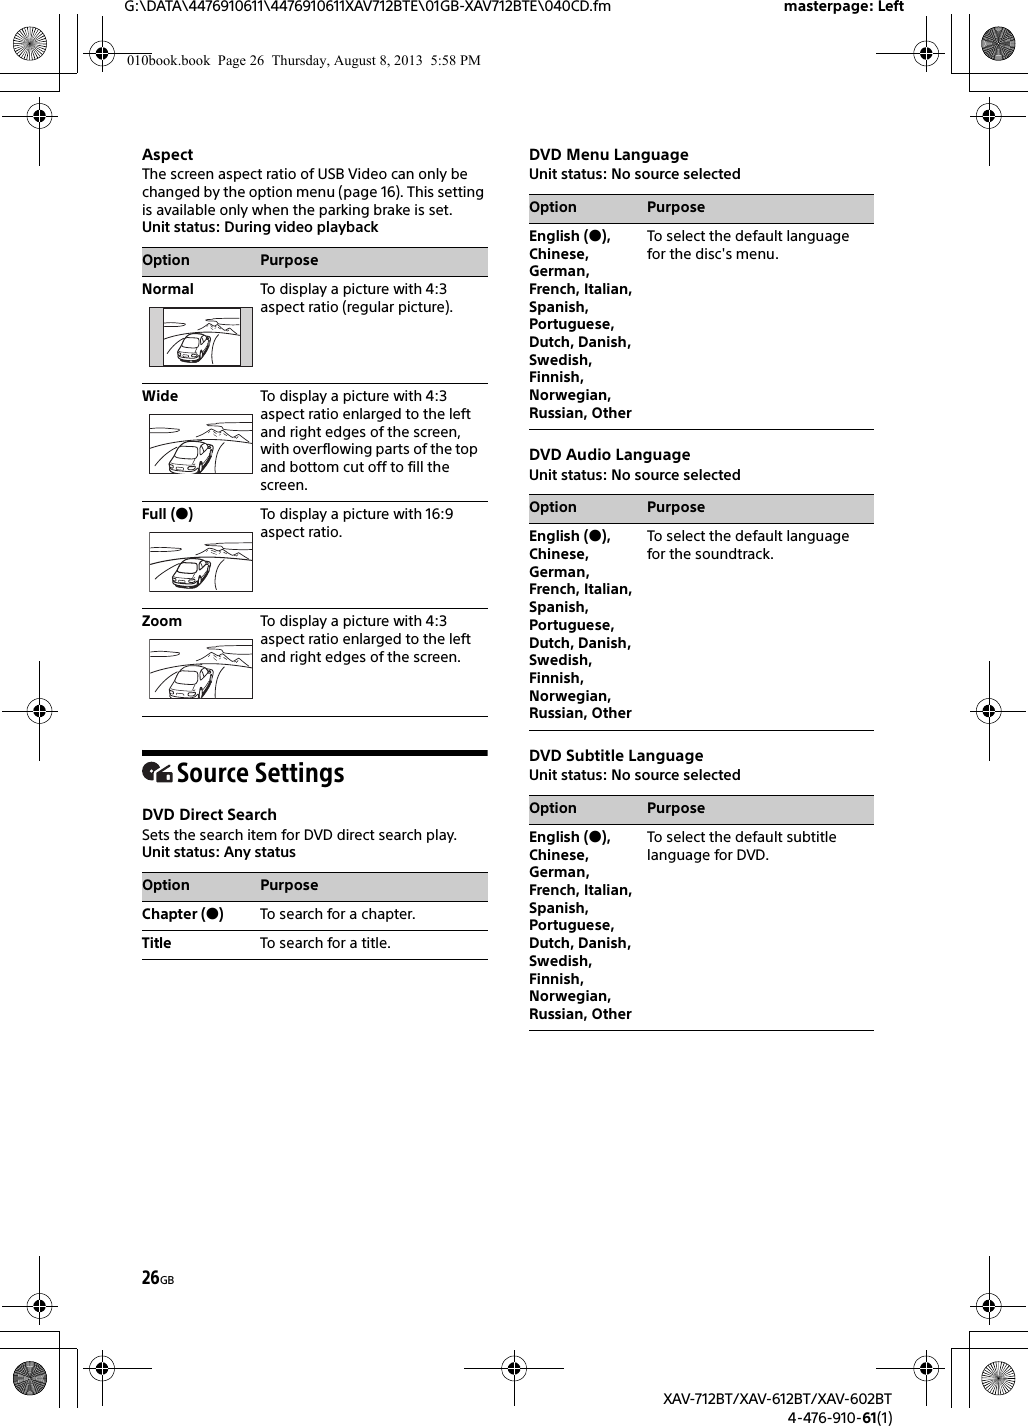
![16GBG:\DATA\4476910611\4476910611XAV712BTE\01GB-XAV712BTE\040CD.fm masterpage: LeftXAV-712BT/XAV-612BT/XAV-602BT4-476-910-61(1)iPodUSB MusicUSB VideoUSB PhotoDiscOptions Details[ZAPPIN Time]- Selects the playback time for the ZAPPIN function: [6 sec], [15 sec], [30 sec]Options Details[ZAPPIN Time] Selects the playback time for the ZAPPIN function: [6 sec], [15 sec], [30 sec][Update database]Searches for music files and adds them to the database.[About Music player]Displays the application version.[List view], [Grid view]Changes the album display format while selecting [Albums] in library.[Sort by album], [Sort by artist]Changes the cover art sort order.[Gate], [Balloon], [Glow], [Animal], [Albums], [Graffiti], [Ink], [Random]Changes the visualizer settings.Options Details[Zoom settings] Adjusts the video display: [Normal mode], [Full mode], [Off][Update database]Searches for video files and adds them to the database.[About Video player]Displays the application version.– Displays the audio option menus.– Displays detailed information.– Deletes the file.[Oldest first], [Newest first], [A to Z], [Z to A]Changes the video list sort order.Options Details[Slideshow interval settings]Adjusts the time interval: [0.5 sec.] –[20.0 sec.].[Play continuously]Sets continuous playback (slideshow).[Update database]Searches for picture files and adds them to the database.[About Photo viewer]Displays the application version.–Plays a slideshow.– Sets a photo file as wallpaper.– Displays detailed information.– Deletes the file.[Oldest first], [Newest first], [A to Z], [Z to A]Changes the photo list order.Options Details[DVD Audio Level]– Adjusts the audio output level between –10 and +10 for a DVD recorded in Dolby Digital format, to balance the volume level between discs.[CSO (Center Speaker Organizer)]–Creates a virtual center speaker even though a real center speaker is not connected. Select from [CSO1], [CSO2] or [CSO3]. This function is effective only when [Multi Channel Output] is set to [Multi] in Source Settings (page 27).010book.book Page 16 Thursday, August 8, 2013 5:58 PM](https://usermanual.wiki/Sony-Group/XAV612BT.Short-Term-Confidential-User-Manual-1/User-Guide-2090582-Page-16.png)
![17GBG:\DATA\4476910611\4476910611XAV712BTE\01GB-XAV712BTE\040CD.fm masterpage: RightXAV-712BT/XAV-612BT/XAV-602BT4-476-910-61(1)Before handsfree calling, make sure that and are in the display. If the indications do not appear, perform the BLUETOOTH connection procedure (page 8).Receiving a Call1Touch when a call is received.The phone call starts.NotesYou cannot receive a call when the unit enters the MirrorLink™ mode.The ringtone and talker’s voice are output only from the front speakers.To adjust the ringtone volumeThe level of ringtone volume will be stored into memory, independently from the regular volume level.XAV-712BTPress VOLUME +/– while receiving a call.XAV-612BT/602BTRotate the volume control dial while receiving a call.To reject/end a callTouch .Making a Call1Press HOME, then touch [Phone].2Touch one of the icons on the BLUETOOTH phone display.*1 The cellular phone needs to support PBAP (Phone Book Access Profile).*2 Do not use the voice dial function on the cellular phone while it is connected to this unit.*3 Voice dial may not work depending on the recognition specification of the cellular phone. For details, visit the support site on the back cover.3Touch .The call is made and the calling display appears until the other party answers.Handsfree Calling (call history)*1 Select a contact from the call history list. The unit stores the last 20 calls. (redial)Make a call automatically to the last contact you made. (phonebook)*1Select a contact from the name list/number list in the phonebook. To search the desired contact by alphabetical order in the name list, touch . For details on how to manage the phonebook data, see “Phonebook Management” (page 18). (voice dial)*2*3Say a voice tag stored on the cellular phone. (phone number input)Enter the phone number.Preset numberTouch a preset number ([1] to [6]). The unit stores up to 6 contacts in the list. For details on how to store, see “Presetting phone numbers” (page 18).010book.book Page 17 Thursday, August 8, 2013 5:58 PM](https://usermanual.wiki/Sony-Group/XAV612BT.Short-Term-Confidential-User-Manual-1/User-Guide-2090582-Page-17.png)
![18GBG:\DATA\4476910611\4476910611XAV712BTE\01GB-XAV712BTE\040CD.fm masterpage: LeftXAV-712BT/XAV-612BT/XAV-602BT4-476-910-61(1)Available Operations During a CallTo adjust the talker’s voice volumeThe level of the talker’s voice volume will be stored into memory, independently from the regular volume level.XAV-712BTPress VOLUME +/– during a call.XAV-612BT/602BTRotate the volume control dial during a call.To send DTMF (Dual Tone Multiple Frequency) tonesTouch , then the required number keys.To transfer the current call to the cellular phoneTouch .To transfer back to handsfree calling, touch again.Available optionsDuring a handsfree call, press .Phonebook ManagementNotePrior to disposal or changing ownership of your car with this unit still installed, be sure to erase all the phonebook data in this unit to prevent possible unauthorized access, by doing any of the following:Delete the phonebook data by initializing (page 24).Press the reset button.Disconnect the power supply lead.You can access the phonebook data of a cellular phone or this unit’s internal data to make a call.1Press HOME, then touch [Phone].The BLUETOOTH phone display appears.2Touch , then [Phonebook Select].3Touch the desired item.To store phonebook data (When [Internal] has been selected from [Phonebook Select])You can send phonebook data from the connected cellular phone to this unit.Press HOME, then touch [Phone] [Receive Phonebook]. The unit is ready to receive the phonebook data.Send the phonebook data by operating the connected cellular phone.If data is stored successfully, the BLUETOOTH device name appears on the display of the unit.1Press HOME, then touch [Phone].The BLUETOOTH phone display appears.2Touch .The phonebook appears.3Touch .The confirmation display appears.4Touch [OK].All phonebook data on this unit is deleted.To delete an individual contact from the phonebookFollow steps 1 to 2 above, then select the contact.To search the desired contact by alphabetical order, touch then select alphabet.Touch [OK].Call Data Management1Press HOME, then touch [Phone].The BLUETOOTH phone display appears.2Touch .The call history list appears.3Touch .The confirmation display appears.4Touch [OK].All items in the call history are deleted.1Press HOME, then touch [Phone].[Speech Quality] Reduces echo and noise during a call. For normal use, set to [Mode 1]. If the outgoing sound quality is unsatisfactory, set to [Mode 2].[MIC Gain] Adjusts the microphone volume for the other party: [Low], [Middle], [High].Selecting phonebook dataDeleting phonebook dataDeleting call historyPresetting phone numbers010book.book Page 18 Thursday, August 8, 2013 5:58 PM](https://usermanual.wiki/Sony-Group/XAV612BT.Short-Term-Confidential-User-Manual-1/User-Guide-2090582-Page-18.png)
![19GBG:\DATA\4476910611\4476910611XAV712BTE\01GB-XAV712BTE\040CD.fm masterpage: RightXAV-712BT/XAV-612BT/XAV-602BT4-476-910-61(1)The BLUETOOTH phone display appears.2Touch .The phonebook appears.3Select the contact to store in the preset dial.In the name list, touch the name of the contact.To search the desired contact by alphabetical order, touch , then select alphabet.In the number list, touch the phone number.The contact confirmation display appears.4Touch [Preset], then the desired preset number ([1] to [6]).The contact is stored to the selected preset number.To change the registration of the preset dialFollow the procedure above and overwrite a registered preset dial.Phone Option Menu1Press HOME, then touch [Phone].2Touch . The phone option menu appears.For details on smartphone connectivity with the following operations and battery charge capability, see “Summary of Useful Functions for Smartphone” on the pages at the end of these operating instructions.App Remote with iPhone/Android PhoneDownloading the App Remote application is required from App StoreSM for an iPhone, or from Google Play for Android phone.The App Remote function provides the following features:Operate the unit to launch and control compatible applications on an iPhone/Android phone.Operate iPhone/Android phone with simple finger gestures to control the source of the unit.Read out incoming text messages/SMS/reminders. (Android phone only)Launch an application/audio source or search the keyword on the web by saying a word or phrase into the microphone. (Android phone only)Adjust the sound settings (EQ7, Balance/Fader, Listening Position) of the unit via a mobile device.Available operations differ depending on the application. For details on available applications, visit the support site on the back cover.NotesFor your safety, follow your local traffic laws and regulations, and do not operate the application while driving.The App Remote application on the smartphone needs to be Version 2 or higher.The App Remote function via USB is only available for iPhones with iOS 5 installed.The App Remote function via the BLUETOOTH function is only available for Android phones with Android 2.1, 2.2, 2.3 or 4.0 installed.Automatic reading of the SMS function is only available for Android phones with TTS Engine installed.The following functions disable the App Remote function.BT Audio (Android phone only)MirrorLink™HDMI/MHL (XAV-712BT/612BT only)The App Remote function is not available when [Receiver Audio Playback during MirrorLink™] is set to [ON].[Ringtone]Uses the ringtone of this unit or the connected cellular phone: [Internal], [Cellular].[Auto Answer]Answers an incoming call automatically.[OFF]: to not answer automatically.[3 sec]: to answer automatically after 3 seconds.[10 sec]: to answer automatically after 10 seconds.[Phonebook Select]Browses the phonebook data on this unit or cellular phone: [Internal], [Cellular].[Receive Phonebook]Receives phonebook data from the connected cellular phone.When receiving is complete, BLUETOOTH device name appears.[Background Visualizer]Sets background visualizer: [ON], [OFF].Useful Functions010book.book Page 19 Thursday, August 8, 2013 5:58 PM](https://usermanual.wiki/Sony-Group/XAV612BT.Short-Term-Confidential-User-Manual-1/User-Guide-2090582-Page-19.png)
![20GBG:\DATA\4476910611\4476910611XAV712BTE\01GB-XAV712BTE\040CD.fm masterpage: LeftXAV-712BT/XAV-612BT/XAV-602BT4-476-910-61(1)1Connect the iPhone to the USB port, or Android phone via the BLUETOOTH function.2Launch the App Remote application.3Press HOME, then touch [App Remote].Connection to the iPhone/Android phone starts.For details on operation of the iPhone/Android phone, see the help of the application.If the device number appearsMake sure that the same numbers are displayed (e.g., 123456) in this unit and the mobile device, then press MENU on this unit and select Yes on the mobile device.To terminate connectionTouch in the upper right of the display.Duplicating the Smartphone’s Display (MirrorLink™)MirrorLink™ compatibility depends on smartphones and its application.For details on compatible models, refer to the compatible list on the support site on the back cover.Notes on using the MirrorLink™ functionYour smartphone needs to support the MirrorLink™ function.Depending on the smartphone, you may need to download an application to use the MirrorLink™ function.Available operations differ depending on the smartphone. Refer to the manual supplied with the smartphone, or consult the manufacturer of the smartphone for details.1Connect your smartphone to the USB port.2Press HOME, then touch [MirrorLink™].The smartphone’s display appears on the display of the unit.Touch and control the applications in the same way as you do on your smartphone.TipSetting [Receiver Audio Playback during MirrorLink™] to [ON] allow the unit to playback an audio source under the MirrorLink™ function (page 22). This setting is useful when you use a navigation application on your smartphone via the MirrorLink™ function.NoteFor your safety, when the parking brake is not engaged, some smartphone screen content may not be displayed on the unit.Enjoying Different Sources in Front and Rear (Zone × Zone)You can simultaneously enjoy different sources in the front and rear of the car.Selectable sources for this unit (front) and the rear monitor (rear) are indicated below.Front: Any source.Rear: Disc inserted in this unit.1Press HOME, then touch [Settings].2Touch , then touch [Zone × Zone].3Touch [ON].To operate the source in the front, use the touch panel and buttons on the unit.To operate the source in the rear, use the remote commander.To deactivate Zone × ZonePress OFF on the unit/remote commander or select [OFF] in step 3 above.NotesThe Zone × Zone function disables remote commander operation of the source in the front.The following buttons on the remote commander become inactive under the Zone × Zone function: SRC, MODE, ATT, VOL +/–, CLEAR, number buttons.The following settings become inactive under the Zone × Zone function:EQ7 / Subwoofer Level Adjust (page 24)Balance / Fader Level Adjust (page 24)Listening Position (page 25)CSO (page 16)HPF, LPF (page 25)Rear Bass Enhancer (page 25)Enjoying high quality image (XAV-712BT/612BT only)The unit automatically selects the HDMI in/MHL in as the source when the MHL device is connected to the unit, and [Auto Input Change(MHL)] is set to [ON] (page 28).1Connect a device via the supplied HDMI or MHL connection cable.Use the appropriate cable for your device.NotesDo not disconnect the device during playback.The MHL connection cable can be used as a power source for recharging the connected device’s battery when the ignition switch is turned to the accessory position.To connect an iPod via the HDMI connection cable, Apple Digital AV Adapter or Lightning Digital AV Adapter is required.010book.book Page 20 Thursday, August 8, 2013 5:58 PM](https://usermanual.wiki/Sony-Group/XAV612BT.Short-Term-Confidential-User-Manual-1/User-Guide-2090582-Page-20.png)
![22GBG:\DATA\4476910611\4476910611XAV712BTE\01GB-XAV712BTE\040CD.fm masterpage: LeftXAV-712BT/XAV-612BT/XAV-602BT4-476-910-61(1)Select [Settings] in the HOME menu when you need to change the settings of the unit.“” in the table below indicates the default setting.1Press HOME, then touch [Settings].2Touch one of the setup category icons.: General Settings (page 22): Sound Settings (page 24): Visual Settings (page 25): Source Settings (page 26)3Move the scrollbar up and down to select the desired item.To return to the previous display, touch .To switch from the HOME screen to the playback screen, touch .General SettingsMirrorLink™ Full ScreenUnit status: Any statusReceiver Audio Playback during MirrorLink™Unit status: Any statusHOME Key Function (hold 2sec push)(XAV-712BT only)Unit status: Any statusZone × ZoneUnit status: Any statusDate & TimeUnit status: Any statusLanguageUnit status: Any statusName CharactersUnit status: Any statusSettingsOption PurposeON (), OFF To duplicate the smartphone’s display on the display of the unit, in full screen mode.Option PurposeON, OFF ()To enable playback of an audio source under the MirrorLink™ function. In this mode, [MirrorLink™] can be selected by pressing the DSPL button.The following sources are not selectable when the function is set to [ON].-BT Audio-App RemoteOption PurposeVoice Command (), ATT ON/OFFTo assign the voice command function or the ATT function to the HOME button.Option PurposeON, OFF ()To activate the Zone × Zone function.Option PurposeSelect Time Zone, Set Date, Set TimeTo set time zone, date and time.Option PurposeEnglish, Français,Español (),Português, Русский,Nederlands,Deutsch,Italiano, , , , To select the display language.Option PurposeLatin Characters (), Russian Characters, Simplified Chinese, Traditional Chinese, Korean Characters, Thai CharactersTo select character encoding. Some characters may not be displayed correctly, depending on the encoding method.010book.book Page 22 Thursday, August 8, 2013 5:58 PM](https://usermanual.wiki/Sony-Group/XAV612BT.Short-Term-Confidential-User-Manual-1/User-Guide-2090582-Page-22.png)
![23GBG:\DATA\4476910611\4476910611XAV712BTE\01GB-XAV712BTE\040CD.fm masterpage: RightXAV-712BT/XAV-612BT/XAV-602BT4-476-910-61(1)Auto OFFShuts off automatically after a desired time when no source is selected.Unit status: Any statusDemoUnit status: Any statusBeepUnit status: Any statusFront Panel Caution Alarm(XAV-612BT/602BT only)Unit status: Any statusRotary CommanderChanges the operative direction of rotary commander controls.Unit status: Any statusKey IlluminationUnit status: Any statusTouch Panel AdjustUnit status: Any statusCamera InputUnit status: Any statusRear View Camera SettingDisplays setting items on the picture from the rear view camera to assist driving.This setting is available only when:[Camera Input] is set to [Normal] or [Reverse].the parking brake is applied.Unit status: Any statusOutput Color SystemUnit status: No source selectedBluetooth ConnectionUnit status: Any statusOption PurposeOFF (), 30 sec, 30 min, 60 minTo select the desired time to shut off the unit or deactivate the Auto OFF function.Option PurposeON (), OFF To activate the demonstration.Option PurposeON (), OFF To activate the operation sound.Option PurposeON (), OFF To activate the caution alarm.Option PurposeDefault ()To use in the factory-set position.Reverse To use on the right side of the steering column.Option PurposeRainbow ()(12 preset colors, customized color and 5 preset patterns)To change the color of the buttons on the unit to match the car’s interior.Option Purpose–To adjust the touch panel calibration if the touching position does not correspond with the proper item.Option PurposeOFF To deactivate the input.Normal ()To display the picture from the rear view camera.Reverse To flip the picture from the rear view camera horizontally.Option PurposeTo display the marker lines. Touch again to hide the marker lines.To adjust the length and/or position of the marker lines.Option PurposeNTSC (), PAL To change the color system according to the connected monitor. (SECAM is not supported.)Option PurposeON, OFF ()To activate the BLUETOOTH signal.010book.book Page 23 Thursday, August 8, 2013 5:58 PM](https://usermanual.wiki/Sony-Group/XAV612BT.Short-Term-Confidential-User-Manual-1/User-Guide-2090582-Page-23.png)
![24GBG:\DATA\4476910611\4476910611XAV712BTE\01GB-XAV712BTE\040CD.fm masterpage: LeftXAV-712BT/XAV-612BT/XAV-602BT4-476-910-61(1)Bluetooth ResetUnit status: Any statusUSB Battery Charge ModeUnit status: Any statusFirmware VersionUnit status: Any statusOpen Source LicensesUnit status: Any statusSound SettingsThe following settings are not available during USB Video playback.EQ7 / Subwoofer Level AdjustUnit status: During reception/playbackBalance / Fader Level AdjustUnit status: During reception/ playbackOption Purpose–To initialize all BLUETOOTH-related settings such as pairing information, phonebook data, call history, preset dial, history of connected BLUETOOTH devices, etc.Option PurposeHigh (), StandardTo switch the current (mA) capacity of the USB rear cable labeled “HIGH CHARGE”.Set to [Standard] if the connected device is not to be recharged.Option Purpose–To update the Firmware version.Option Purpose–To display the software licenses.Option PurposeOFF (), R&B, Pop, Rock, Hip-Hop, Dance, Regueton, CustomTo select the equalizer curve; customize the equalizer curve.Subwoofer:(–6 - +6): 0To adjust the volume level of the subwoofer. (Available only when [Subwoofer] is set to [ON].)Option PurposeBalance : (–15 - +15): 0To adjust the sound balance between left and right speakers.Fader :(–15 - +15): 0To adjust the sound balance between front and rear speakers.010book.book Page 24 Thursday, August 8, 2013 5:58 PM](https://usermanual.wiki/Sony-Group/XAV612BT.Short-Term-Confidential-User-Manual-1/User-Guide-2090582-Page-24.png)
![25GBG:\DATA\4476910611\4476910611XAV712BTE\01GB-XAV712BTE\040CD.fm masterpage: RightXAV-712BT/XAV-612BT/XAV-602BT4-476-910-61(1)Listening PositionSets the listening position and subwoofer position.Unit status: Any statusRBE (Rear Bass Enhancer)Unit status: During reception/ playbackCrossover FilterUnit status: During reception/ playbackSubwooferUnit status: No source selected4.1ch Speaker LevelUnit status: No source selectedVisual SettingsDimmerUnit status: Any statusDimmer LevelUnit status: Any statusPicture EQAdjusts the picture to suit the interior brightness of the car. This setting is available only when the parking brake is set.Unit status: During video playback except USB Video():():():():Front leftFront rightCenter frontIn the center of your carOption PurposeFront L ()To set to front left.Front R To set to front right.Front To set to center front.All To set to the center of your car.OFF To not set the listening position.Subwoofer:Near, Normal (), FarTo select the subwoofer position. (Available only when [Subwoofer] is set to [ON], and the listening position is set to [Front L], [Front R], [Front], or [All].)Custom To precisely calibrate the listening position. Before starting, measure the distance between your listening position and each speaker.Option PurposeOFF (), RBE1, RBE2, RBE3To select the mode to use the rear speakers as subwoofers.Option PurposeLPF: 50 Hz, 60 Hz, 80 Hz, 100 Hz (), 120 HzTo select the cut-off frequency of the subwoofer. (Available only when [Subwoofer] is set to [ON].)HPF: OFF (), 50 Hz, 60 Hz, 80 Hz, 100 Hz, 120 HzTo select the cut-off frequency of the front/rear speakers.Subwoofer Phase:Normal (), ReverseTo select the subwoofer phase. (Available only when [Subwoofer] is set to [ON].)Option PurposeON (), OFF To set the subwoofer connection status.Option Purpose–To adjust the volume level of each connected speaker.Option PurposeOFF To deactivate the dimmer.Auto ()To dim the display automatically when you turn lights on. (Available only when the illumination control lead is connected.)ON To dim the display.Option Purpose(–5 - +5): 0To select the brightness level when the dimmer is activated.Option PurposeDynamic (),Standard, Theater, SepiaTo select the picture quality.Custom 1, Custom 2To customize the picture quality.010book.book Page 25 Thursday, August 8, 2013 5:58 PM](https://usermanual.wiki/Sony-Group/XAV612BT.Short-Term-Confidential-User-Manual-1/User-Guide-2090582-Page-25.png)
![27GBG:\DATA\4476910611\4476910611XAV712BTE\01GB-XAV712BTE\040CD.fm masterpage: RightXAV-712BT/XAV-612BT/XAV-602BT4-476-910-61(1)Audio DRCMakes the sound clear when the volume is low. Only for a DVD* conforming to Audio DRC (Dynamic Range Control).* Excluding DVD-R/DVD-R DL/DVD-RW in VR mode.Unit status: No source selectedMulti Channel OutputSwitches the method of outputting multi channel sources.Unit status: Any statusMonitor TypeSelects an aspect ratio suitable for the connected monitor.(The screen aspect ratio of this unit also changes.)Depending on the disc, [4:3 Letter Box] may be selected automatically instead of [4:3 Pan Scan], and vice versa.Unit status: No source selectedDVD Playlist Play(For DVD-R/DVD-R DL/DVD-RW in VR mode only)Unit status: No source selectedVideo CD PBCUnit status: No source selectedMulti Disc ResumeUnit status: Any statusFM Tuning IntervalUnit Status: No source selectedSource SkipUnit status: Any statusOption PurposeStandard ()To select the standard setting.Wide To obtain the feeling of being at a live performance.Option PurposeMulti ()To output in 4.1 channels.Stereo To downmix to 2 channels.Option Purpose16:9 ()To display a wide picture.Suitable when connecting to a wide-screen monitor or a monitor with a wide mode function.4:3 Letter Box To display a wide picture with bands on the upper and lower positions of the screen.Suitable when connecting to a 4:3 screen monitor.4:3 Pan Scan To display a wide picture on the entire screen and automatically cut off the portions that do not fit.Option PurposeOriginal ()To play titles as they were originally recorded.Playlist To play an edited playlist.Option PurposeON (), OFF To play a VCD with PBC functions.Option PurposeON ()To store the resume settings in memory for up to 5 video* discs.* DVD VIDEO/VCD/Xvid/MPEG-4 only.OFF To not store the resume settings in memory.Resume playback is available only for the current disc in the unit.Option Purpose100 kHz, 200 kHz ()To change the unit of FM frequency.Option Purpose–To reduce the number of presses required to change sources (page 6). Check any unused sources in the Source skip screen.010book.book Page 27 Thursday, August 8, 2013 5:58 PM](https://usermanual.wiki/Sony-Group/XAV612BT.Short-Term-Confidential-User-Manual-1/User-Guide-2090582-Page-27.png)
![28GBG:\DATA\4476910611\4476910611XAV712BTE\01GB-XAV712BTE\040CD.fm masterpage: LeftXAV-712BT/XAV-612BT/XAV-602BT4-476-910-61(1)Auto Input Change(MHL) (XAV-712BT/612BT only)Unit status: Any StatusAuxiliary Audio/Video EquipmentYou can connect up to 2 optional devices, such as a portable media player, game console, etc., to the AUX1 IN and AUX2 IN terminals on the unit.1Press HOME, then touch [AUX].The AUX playback display appears.2Touch [AUX1] or [AUX2] to select the device.Operate via the portable device itself.Be sure to adjust the volume for each connected device before playback.The volume level is common to [AUX1] and [AUX2].1Reduce the volume on the unit.2Press HOME, then touch [AUX].The AUX playback display appears.3Touch to open the menu, then touch [Adjust Input Level].4Set your usual listening volume on the unit.5Touch –/+ repeatedly to adjust the level.The level is adjustable in single steps, between –8 and +18.By setting the type (video or audio) of each connected device, the background screen can be switched accordingly.1Press HOME, then touch [AUX].2Touch to open the menu, then touch [AUX1 Input] or [AUX2 Input].3Touch [Audio], [Video] or [Auto switching].The default setting is [Auto switching].To return to the previous display, touch .Option PurposeON, OFF ()To select HDMI in/MHL in as the source automatically when the MHL connection cable is connected to the unit. (Depending on the smartphone, this setting may not work.)Additional InformationSelecting an auxiliary deviceAdjusting the volume levelSetting the type of device010book.book Page 28 Thursday, August 8, 2013 5:58 PM](https://usermanual.wiki/Sony-Group/XAV612BT.Short-Term-Confidential-User-Manual-1/User-Guide-2090582-Page-28.png)
![29GBG:\DATA\4476910611\4476910611XAV712BTE\01GB-XAV712BTE\040CD.fm masterpage: RightXAV-712BT/XAV-612BT/XAV-602BT4-476-910-61(1)Rear View CameraBy connecting the optional rear view camera to the CAMERA terminal, you can display the picture from the rear view camera.The picture from the rear view camera appears when:the back lamp lights up (or the shift lever is set to the R (reverse) position).you press HOME then touch [Rear Camera].you press DSPL repeatedly.For details on the settings of the rear view camera, see page 23.Updating the FirmwareYou can update the firmware of this unit from the following support site:Customers in Latin America:http://esupport.sony.com/ES/LA/Customers in Pan Asia:http://www.sony-asia.com/section/supporthttp://www.sony-asia.com/caraudio/To update the firmware, visit the support site, then follow the online instructions.PrecautionsCool off the unit beforehand if your car has been parked in direct sunlight.Power antenna (aerial) extends automatically.Do not leave the front panel or audio devices brought in inside the car, or it may cause damage or malfunction due to high temperature in direct sunlight (XAV-612BT/602BT only).Moisture condensationShould moisture condensation occur inside the unit, remove the disc and wait for about an hour for it to dry out; otherwise the unit will not operate properly.To maintain high sound qualityDo not splash liquid onto the unit or discs.Notes on safetyComply with your local traffic rules, laws and regulations.While drivingDo not watch or operate the unit, as it may lead to distraction and cause an accident. Park your car in a safe place to watch or operate the unit.Do not use the setup feature or any other function which could divert your attention from the road.When backing up your car, be sure to look back and watch the surroundings carefully for your safety, even if the rear view camera is connected. Do not depend on the rear view camera exclusively.While operatingDo not insert your hands, fingers or foreign object into the unit, as it may cause injury or damage to the unit.Keep small articles out of the reach of children.Be sure to fasten seatbelts to avoid injury in the event of a sudden movement of the car.Notes on installationWe recommend this unit should be installed by a qualified technician or service personnel.If you try to install this unit by yourself, refer to the supplied “Installation/Connections” guide and install the unit properly.Improper installation may cause battery drain or a short circuit.If the unit does not work properly, check the connections first, referring to the supplied “Installation/Connections” guide. If everything is in order, check the fuse.Protect the unit surface from damage.Do not expose the unit surface to chemicals, such as insecticide, hair spray, insect repellent, etc.Do not leave rubber or plastic materials in contact with the unit for a long time. Otherwise, the finish of the unit may be impaired, or deformation may occur.When installing, be sure to fix securely.When installing, be sure to turn the ignition off. Installing the unit with the ignition on may cause battery drain or a short circuit.When installing, be sure not to damage any car parts such as pipes, tubes, fuel tank or wiring by using a drill, as it may cause a fire or an accident.Preventing an accidentPictures appear only after you park the car and set the parking brake.If the car starts moving during video playback, the picture is automatically switched to the background screen after displaying the caution below.[Video blocked for your safety.]The monitor connected to the REAR OUT is active while the car is in motion.The picture on the display is switched to the background screen, but audio source can be heard.Do not operate the unit or watch the monitor while driving.010book.book Page 29 Thursday, August 8, 2013 5:58 PM](https://usermanual.wiki/Sony-Group/XAV612BT.Short-Term-Confidential-User-Manual-1/User-Guide-2090582-Page-29.png)
![36GBG:\DATA\4476910611\4476910611XAV712BTE\01GB-XAV712BTE\040CD.fm masterpage: LeftXAV-712BT/XAV-612BT/XAV-602BT4-476-910-61(1)around a microwave oven, static electricity, reception sensitivity, antenna’s performance, operating system, software application, etc.*3 BLUETOOTH standard profiles indicate the purpose of BLUETOOTH communication between devices.Power amplifier sectionOutputs: Speaker outputsSpeaker impedance: 4 – 8 ohmsMaximum power output: 52 W × 4 (at 4 ohms)GeneralOutputs: Video output terminal (rear)Audio output terminals (front/rear)Audio output terminal (Z×Z)Subwoofer output terminalPower antenna (aerial)/Power amplifier control terminal (REM OUT)Inputs: Illumination control terminalRemote controller input terminalAntenna (aerial) input terminalParking brake control terminalMicrophone input terminalReverse input terminalCamera input terminalAUX audio input terminalsAUX video input terminalsUSB portsHDMI in / MHL in port (XAV-712BT/612BT only)Power requirements: 12 V DC car battery (negative ground (earth))Dimensions: XAV-712BT: Approx. 178 mm × 100 mm × 185 mm (7 1/8 × 4 × 7 3/8 in) (w/h/d)XAV-612BT/602BT: Approx. 178 mm × 100 mm × 173 mm (7 1/8 × 4 × 6 7/8 in) (w/h/d)Mounting dimensions: Approx. 182 mm × 111 mm × 160 mm (7 1/4 × 4 3/8 × 6 3/8 in) (w/h/d)Mass: XAV-712BT: Approx. 2.4 kg (5 lb 5 oz)XAV-612BT/602BT: Approx. 2.0 kg (4 lb 7 oz)Package contents: Main unit (1)Parts for installation and connections (1 set)Microphone (1)Remote Commander (1): RM-X271HDMI connection cable (1): RC-400VH (XAV-712BT/612BT only)MHL connection cable (1): RC-500VM (XAV-712BT/612BT only)Panel Case (1) (XAV-612BT/602BT only)Optional accessories/equipment:Mobile monitor: XVM-B62Your dealer may not handle some of the above listed accessories. Please ask the dealer for detailed information.Design and specifications are subject to change without notice.Region codeThe region system is used to protect software copyrights.The region code is located on the bottom of the unit, and only DVDs labeled with an identical region code can be played on this unit.DVDs labeled can also be played.If you try to play any other DVD, the message [Disc playback prohibited by region code.] will appear on the monitor screen. Depending on the DVD, no region code may be labeled even though playing the DVD is prohibited by area restrictions.US and foreign patents licensed from Dolby Laboratories. MPEG Layer-3 audio coding technology and patents licensed from Fraunhofer IIS and Thomson.Manufactured under license from Dolby Laboratories. Dolby and the double-D symbol are trademarks of Dolby Laboratories.Microsoft, Windows, Windows Vista and Windows Media and logos are trademarks or registered trademarks of Microsoft Corporation in the United States and/or other countries.This product is protected by certain intellectual property rights of Microsoft Corporation. Use or distribution of such technology outside of this product is prohibited without a license from Microsoft or an authorized Microsoft subsidiary.“DVD VIDEO,” “DVD-R,” “DVD-RW,” “DVD+R,” and “DVD+RW” are trademarks.The Bluetooth® word mark and logos are owned by the Bluetooth SIG, Inc. and any use of such marks by Sony Corporation is under license. Other trademarks and trade names are those of their respective owners.ZAPPIN is a trademark of Sony Corporation.12 TONE ANALYSIS and its logo are trademarks of Sony Corporation.Copyrights010book.book Page 36 Thursday, August 8, 2013 5:58 PM](https://usermanual.wiki/Sony-Group/XAV612BT.Short-Term-Confidential-User-Manual-1/User-Guide-2090582-Page-36.png)
![38GBG:\DATA\4476910611\4476910611XAV712BTE\01GB-XAV712BTE\040CD.fm masterpage: LeftXAV-712BT/XAV-612BT/XAV-602BT4-476-910-61(1)TroubleshootingIf there are any problems with your unit/mobile device, make sure your car is parked in a safe place before examining any issues.The following checklist will help you remedy problems you may encounter with your unit.Before going through the checklist below, check the connection and operating procedures.For details on using the fuse and removing the unit from the dashboard, refer to the installation/connections manual supplied with this unit.If the problem is not solved, visit the support site on the back cover.GeneralNo power is being supplied to the unit.Check the fuse.The connection is not correct.Connect the yellow and red power supply leads.There is no beep sound.An optional power amplifier is connected and you are not using the built-in amplifier.The contents of the memory have been erased.The power supply lead or battery has been disconnected or it is not connected properly.Stored stations and correct time are erased.The fuse has blown.The unit makes a noise when the position of the ignition is switched.The leads are not matched correctly with the car’s accessory power connector.The display disappears from/does not appear on the monitor.The dimmer is set to [ON] (page 25).The display disappears if you press and hold OFF.Press OFF on the unit until the display appears.The monitor off function is activated (page 6).Touch anywhere on the display to turn the display back on.The display does not respond to your touch correctly.Touch one part of the display at a time. If two or more parts are touched simultaneously, the display will not operate correctly.Calibrate the touch panel of the display (page 23).Touch the pressure sensitive panel firmly.The Auto OFF function does not operate.The Auto OFF function activates when no source is selected.Exit the source.Menu items cannot be selected.Unavailable menu items are displayed in gray.USB Music, USB Video, AUX and BT Audio cannot be selected as the source.Remove the check mark from the source item you cannot select (page 27).(XAV-712BT only)The monitor angle cannot be adjusted.The monitor was opened while the unit was being reset.Be sure to close the front panel before you reset the unit.The notification panel does not appear.The notification panel is not available when the unit is;at the initial settings.displaying the source in a popup.under the voice command function.playing back USB Video.The playback controls does not appear in the notification panel.The playback controls are not available when the unit is playing back content from the following sources;AUXUSB VideoHDMI in/MHL in (XAV-712BT/612BT only)application on a smartphone via the App Remote functionRadio receptionThe stations cannot be received.The sound is hampered by noises.The connection is not correct.Connect the REM OUT lead (blue/white striped) or accessory power supply lead (red) to the power supply lead of a car’s antenna (aerial) booster (only when your car has built-in radio antenna (aerial) in the rear/side glass).Check the connection of the car antenna (aerial).If the auto antenna (aerial) will not extend, check the connection of the power antenna (aerial) control lead.Preset tuning is not possible.The broadcast signal is too weak.RDSPTY displays [PTY not found.].The current station is not an RDS station.RDS data has not been received.The station does not specify the program type.010book.book Page 38 Thursday, August 8, 2013 5:58 PM](https://usermanual.wiki/Sony-Group/XAV612BT.Short-Term-Confidential-User-Manual-1/User-Guide-2090582-Page-38.png)
![39GBG:\DATA\4476910611\4476910611XAV712BTE\01GB-XAV712BTE\040CD.fm masterpage: RightXAV-712BT/XAV-612BT/XAV-602BT4-476-910-61(1)PictureThere is no picture/picture noise occurs.A connection has not been made correctly.Check the connection between this unit and other equipment, and set the input selector of the equipment to the source corresponding to this unit.The disc is defective or dirty.Installation is not correct.Install the unit at an angle of less than 45° in a sturdy part of the car.The parking cord (light green) is not connected to the parking brake switch cord, or the parking brake is not applied.Activate the video output of the iPod.The picture does not fit in the screen.The aspect ratio is fixed on the DVD.There is no picture/picture noise occurs in the rear monitor.A source/mode which is not connected is selected. If there is no input, no picture appears in the rear monitor.The color system setting is incorrect.Set the color system to [PAL] or [NTSC] according to the connected monitor (page 23).The picture of the rear view camera is displayed on this unit.No picture appears in the rear monitor if the picture of the rear view camera is displayed on this unit.SoundThere is no sound/sound skips/sound cracks.A connection has not been made correctly.Check the connection between this unit and the connected equipment, and set the input selector of the equipment to the source corresponding to this unit.The disc is defective or dirty.Installation is not correct.Install the unit at an angle of less than 45° in a sturdy part of the car.The MP3 file sampling rate is not 32, 44.1, or 48 kHz.The WMA file sampling rate is not 32, 44.1, or 48 kHz.The AAC file sampling rate is not 44.1 or 48 kHz.The MP3 file bit rate is not 48 to 192 kbps.The WMA file bit rate is not 64 to 192 kbps.The AAC file bit rate is not 40 to 320 kbps.The unit is in pause/reverse/fast-forward mode.The settings for the outputs are not made correctly.The DVD output level is too low (page 16).The volume is too low.The ATT function is activated.The format is not supported (such as DTS).Check if the format is supported by this unit (page 30).Sound is noisy.Keep cords and cables away from each other.Disc operationThe disc does not play.The disc is defective or dirty.The disc is not playable.The DVD is not playable due to the region code.The disc is not finalized (page 31).The disc format and file version are incompatible with this unit (page 30, 31).Press to remove the disc.MP3/WMA/AAC/Xvid/MPEG-4 files do not play.Recording was not performed according to the ISO 9660 level 1 or level 2 format or the Joliet or Romeo expansion format (DATA CD), or the UDF Bridge format (DATA DVD) (page 31).The file extension is incorrect (page 31).Files are not stored in MP3/WMA/AAC/Xvid/MPEG-4 format.If the disc contains multiple file types, only the selected file type (audio/video) can be played.Select the appropriate file type using the list (page 14).MP3/WMA/AAC/Xvid/MPEG-4 files take longer to play than others.The following discs take a longer time to start playback.a disc recorded with a complicated tree structure.a disc recorded in Multi Session/Multi Border.a disc to which data can be added.The disc does not start playing from the beginning.Resume playback or multi-disc resume playback (page 27) has taken effect.Certain functions cannot be performed.Depending on the disc, you may not be able to perform operations such as stop, search, or repeat/shuffle play. For details, refer to the manual supplied with the disc.The soundtrack/subtitle language or angle cannot be changed.Use the DVD menu instead of the direct selection button on the remote commander (page 12).Multilingual tracks, multilingual subtitles, or multi-angles are not recorded on the DVD.The DVD prohibits changing.The operation buttons do not function.The disc will not eject.Press the reset button (page 6).010book.book Page 39 Thursday, August 8, 2013 5:58 PM](https://usermanual.wiki/Sony-Group/XAV612BT.Short-Term-Confidential-User-Manual-1/User-Guide-2090582-Page-39.png)
![40GBG:\DATA\4476910611\4476910611XAV712BTE\01GB-XAV712BTE\040CD.fm masterpage: LeftXAV-712BT/XAV-612BT/XAV-602BT4-476-910-61(1)USB playbackItems cannot be played via a USB hub.Connect iPod/USB devices to this unit without USB hub.Items cannot be played.Reconnect the USB device.The USB device takes longer to play.The USB device contains large-sized files or files with a complicated tree structure.The sound is intermittent.The sound may be intermittent at a high bit rate of more than 320 kbps.This is not a malfunction. This phenomenon occurs during USB Video playback, when;the HOME button is pressed.the system setting is launched.USB photo/navigation function is ongoing.BLUETOOTH functionThe other BLUETOOTH device cannot detect this unit.Set [Signal] to [ON] (page 23).While connecting to a BLUETOOTH device, this unit cannot be detected by another device. Terminate the current connection and search for this unit from the other device. The disconnected device can be reconnected by selecting from the list of registered devices.Connection is not possible.Check the pairing and connection procedures in the manual of the other device, etc., and perform the operation again.The name of the detected device does not appear.Depending on the status of the other device, it may not be possible to obtain the name.There is no ringtone.Raise the volume while receiving a call.Depending on the connecting device, the ringtone may not be sent properly.Set [Ringtone] to [Internal] (page 19).The talker’s voice volume is low.Raise the volume during a call.The other party says that the volume is too low or high.Adjust the [MIC Gain] level (page 18).Echo or noise occurs during call conversations.Reduce the volume.[Speech Quality] is set to [Mode 1].Set [Speech Quality] to [Mode 2] (page 18).If ambient noise other than the phone call sound is loud, try reducing this noise.Shut the window if road noise is loud.Lower the air conditioner if the air conditioner is loud.The phone sound quality is poor.Phone sound quality depends on reception conditions of the cellular phone. Move your car to a place where you can enhance the cellular phone’s signal if the reception is poor.The volume of the connected BLUETOOTH device is low or high.Volume level will differ depending on the BLUETOOTH device.Reduce the volume level differences between this unit and the BLUETOOTH device (page 14).The sound skips during audio streaming.Reduce the distance between the unit and the BLUETOOTH device.If the BLUETOOTH device is stored in a case which interrupts the signal, remove the case while using the device.Several BLUETOOTH devices or other devices which emit radio waves are used nearby.Turn off the other devices.Increase the distance between the unit and other devices.Playback sound stops momentarily when this unit is connecting to a cellular phone. This is not a malfunction.You cannot control the connected BLUETOOTH device during audio streaming.Check that the connected BLUETOOTH device supports AVRCP.Some functions do not work.Check that the connecting device supports the functions in question.The name of the other party does not appear when a call is received.The other party is not stored in the phonebook.Add the other party to the phonebook (page 18).A call is answered unintentionally.The connecting phone is set to start a call automatically.[Auto Answer] of this unit is set to [3 sec] or [10 sec] (page 19).Pairing failed due to time out.Depending on the connecting device, the time limit for pairing may be short. Try completing the pairing within the time by setting a single digit passkey.010book.book Page 40 Thursday, August 8, 2013 5:58 PM](https://usermanual.wiki/Sony-Group/XAV612BT.Short-Term-Confidential-User-Manual-1/User-Guide-2090582-Page-40.png)
![41GBG:\DATA\4476910611\4476910611XAV712BTE\01GB-XAV712BTE\040CD.fm masterpage: RightXAV-712BT/XAV-612BT/XAV-602BT4-476-910-61(1)The BLUETOOTH function cannot be operated.Exit the source by pressing and holding SOURCE for 1 second, then turn on the unit.No sound is output from the car speakers during a handsfree call.If the sound is output from the cellular phone, set the cellular phone to output the sound from the car speakers.MirrorLink™ functionPlayback of an audio source is interrupted under the MirrorLink™ function by a click sound each time you tap on the smartphone.Disable the click sound of your smartphone.App Remote functionThe smartphone’s display does not appear on the unit.The application in the smartphone cannot operat by the unit.The App Remote function does not show the display of your smartphone on the unit’s display.You cannot control applications installed to your smartphone by the unit.Control the application by your smartphone.HDMI/MHL connection (XAV-712BT/612BT only)There is no picture and/or sound.Make sure that the connected device is compatible with the HDMI/MHL connection.Restart the connected device.Playback does not start automatically when the HDMI/MHL connection cable is connected to the device even though [Auto Input Change(MHL)] is set to [ON].Change the source by pressing the SOURCE button.The remote commander does not work on the connected device.The remote commander works only for an MHL device. The available operation depends on the connected device.Error displays/messagesAn error occurred. You will be returned to the playback screen.Visualizer is not operating due to an internal error.Change to another source, then select [USB Music].Bluetooth Connection ErrorAn error has occurred between this unit and the BLUETOOTH phone.Check the BLUETOOTH signal is set to on for this unit or the BLUETOOTH phone.Try pairing again.Reconnect the BLUETOOTH phone.Bluetooth device is not found.The unit cannot detect a connectable BLUETOOTH device.Check the BLUETOOTH setting of the connecting device.No device is in the list of registered BLUETOOTH devices.Perform pairing with a BLUETOOTH device (page 8).Busy now… Please try again.The unit is busy.Wait for a moment and try again.Call Data ErrorAn error has occurred while accessing phonebook data via PBAP or call history from the BLUETOOTH phone.Reconnect the BLUETOOTH phone.Cannot display folders beyond this level. Place songs no more than eight folders deep.While browsing contents, a level beyond eight was selected.This unit can display folders a maximum of eight folders deep. Transfer contents beyond this level.Cannot read.The unit cannot read the data due to some problem.The data is damaged or corrupted.The disc is corrupted.The disc is incompatible with this unit.The disc is not finalized.Database error encountered.A database error was encountered due to a problem.Change to another source, then select [USB Music].Database update couldn’t be completed.Database update was canceled due to a problem.Try to update the database again.Data Listing ErrorAn error has occurred while displaying phonebook data via PBAP or call history from the BLUETOOTH phone.Reconnect the BLUETOOTH phone.010book.book Page 41 Thursday, August 8, 2013 5:58 PM](https://usermanual.wiki/Sony-Group/XAV612BT.Short-Term-Confidential-User-Manual-1/User-Guide-2090582-Page-41.png)
![42GBG:\DATA\4476910611\4476910611XAV712BTE\01GB-XAV712BTE\040CD.fm masterpage: LeftXAV-712BT/XAV-612BT/XAV-602BT4-476-910-61(1)Delete failed.Video contents cannot be deleted due to a problem.Try to delete it again. Otherwise, delete it using a PC, etc.Disc ErrorThe disc is dirty or inserted upside down.Clean or insert the disc correctly.A blank disc has been inserted.The disc cannot play due to a problem.Insert another disc.The disc is not compatible with this unit.Insert a compatible disc.Press to remove the disc.Disc playback prohibited by region code.The DVD’s region code differs from the unit’s region code.Error - Please select ‘Bluetooth Reset’ from the General Settings menu.A memory error has occurred.Initialize the BLUETOOTH setting (page 24).Handsfree device is not available.A cellular phone is not connected.Connect a cellular phone (page 8).High Temperature ErrorAn error has occurred due to high temperature.Lower the temperature.iPod video cable reconnected. Reconnect the USB cable.Connect the USB cable to the unit properly.New firmware not found.There is no firmware update available in the USB memory.Try to update to the latest version of firmware.The firmware file is damaged or corrupted.Rewrite the file in the USB memory.No DeviceiPod is selected as the source without an iPod connected. A USB cable with iPod connected has been removed during playback.Be sure to connect the USB cable and an iPod securely.No Playable DataThe disc does not contain playable data.The iPod has no playable data.Load music or video data/files into the iPod.Internal MalfunctionThere may be an internal malfunction.Check the connection. If the error indication remains on the display, consult your nearest Sony dealer.Check Audio Output Wiring(Displays until any button is pressed.)The connection of speakers/amplifiers is incorrect.See the supplied “Installation/Connections” guide to check the connection.Overcurrent caution on USB.The USB device is overloaded.Disconnect the USB device, then change the source by pressing the SOURCE button.Indicates that the USB device is out of order, or an unsupported device is connected.Playback has stopped because an error occurred. Playback of video contents stopped due to a problem.Select another source, then select [USB Video].Remove failed.Photo contents cannot be deleted due to a problem.Try to delete it again. Otherwise delete it by using PC, etc.Set wallpaper failed.The file is damaged or corrupted.Select another photo.The file size is too large.Minimize the size of the picture, then try again.The application will quit because an error occurred. An internal error has occurred.Change to another source, then select [USB Music].The playback list is empty.The playlist contains unplayable files.Check if any contents in the USB application are playable.The sound in DTS format is not audible.Discs in DTS format are not supported. Sound is not output if the DTS format is selected.DTS formatted discs are not playable on this unit. Use a compatible disc format (page 30).USB device not supportedFor details on the compatibility of your USB device, visit the support site on the back cover.USB hub not supportedUSB hubs are not supported on this unit.The character cannot be displayed with the unit.010book.book Page 42 Thursday, August 8, 2013 5:58 PM](https://usermanual.wiki/Sony-Group/XAV612BT.Short-Term-Confidential-User-Manual-1/User-Guide-2090582-Page-42.png)
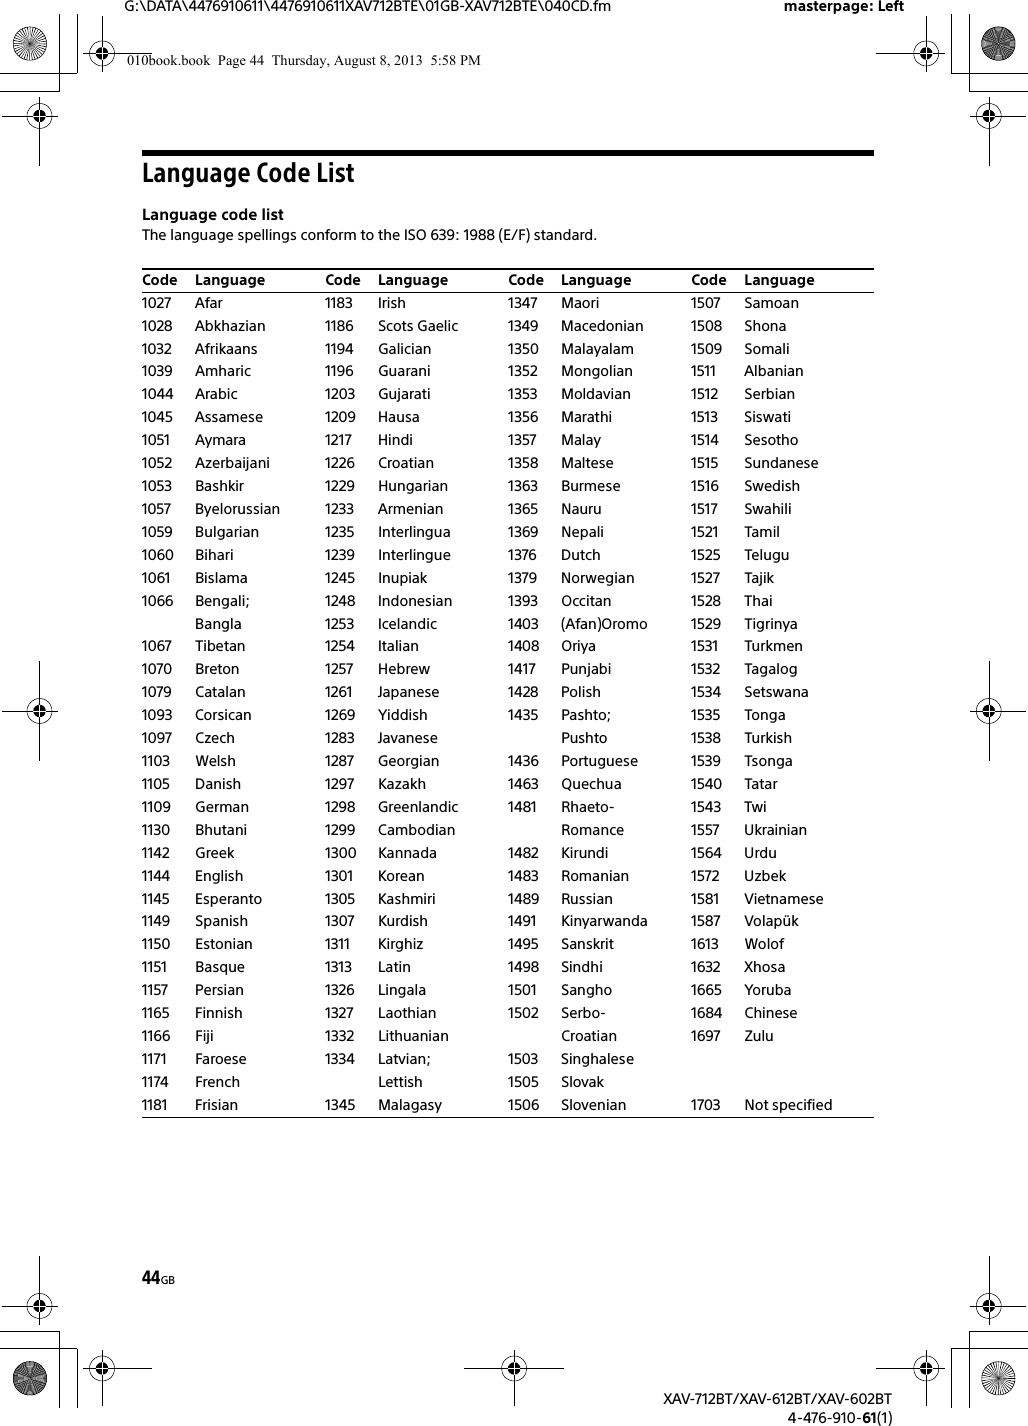

![4ESM:\003\Win 7 ML\4476910611_XAV-712BT-612BT-602BT_LaES(10.0 600dpi)\4476910611_XAV-712BT-612BT-602BT_LaES\01LaES-XAV712BTE\030TOC.fmmasterpage: LeftXAV-712BT/XAV-612BT/XAV-602BT4-476-910-61(1)Tabla de contenidosAdvertencia . . . . . . . . . . . . . . . . . . . . . . . . . . . . . . . . 2Guía de piezas y controles . . . . . . . . . . . . . . . . . . . . 5Procedimientos inicialesRestauración de la unidad . . . . . . . . . . . . . . . . . . . . 8Realización de los ajustes iniciales . . . . . . . . . . . . . 8Ajuste del reloj. . . . . . . . . . . . . . . . . . . . . . . . . . . . . . 9Preparación de un dispositivo BLUETOOTH . . . . . . 9Extracción del panel frontal (XAV-612BT/602BT solamente) . . . . . . . . . . . . 10Escuchar la radioEscuchar la radio . . . . . . . . . . . . . . . . . . . . . . . . . . . 11Almacenamiento y recepción de estaciones . . . . 11Uso del sistema de datos de radio (RDS) . . . . . . . 12ReproducciónReproducción de un disco . . . . . . . . . . . . . . . . . . . 13Reproducción de un iPod/dispositivo USB . . . . . . 14Reproducción de un dispositivo BLUETOOTH. . . . 15Búsqueda y reproducción de pistas . . . . . . . . . . . 15Cómo disfrutar la música de acuerdo con su estado de ánimo (SensMe™) . . . . . . . . . . . . . . . . . . . . 16Opciones disponibles . . . . . . . . . . . . . . . . . . . . . . . 17[Nivel audio DVD] . . . . . . . . . . . . . . . . . . . . . . . 18[CSO (Organizador del altavoz central)] . . . . . 19Llamada de manos libresRecibir una llamada . . . . . . . . . . . . . . . . . . . . . . . . 19Realizar una llamada . . . . . . . . . . . . . . . . . . . . . . . 19Operaciones disponibles durante una llamada . . . . . . . . . . . . . . . . . . . . . . . . . . . . . . . 20Administración de la agenda telefónica . . . . . . . . 20Administración de datos de llamada . . . . . . . . . . 21Menú de opciones del teléfono. . . . . . . . . . . . . . . 22Funciones útilesApp Remote con teléfono iPhone/Android . . . . . 22Duplicar la pantalla del Smartphone (MirrorLink™). . . . . . . . . . . . . . . . . . . . . . . . . . . 23Disfrutar de fuentes diferentes en las partes delantera y trasera (Zone × Zone) . . . . . . . . . . 23Disfrute la imagen de alta calidad (XAV-712BT/612BT solamente) . . . . . . . . . . . . . 24Uso del comando por gestos . . . . . . . . . . . . . . . . . 24AjustesAjustes generales . . . . . . . . . . . . . . . . . . . . . . . . . . 25Ajuste del panel táctil . . . . . . . . . . . . . . . . . . . 26Restablecer Bluetooth . . . . . . . . . . . . . . . . . . . 27Modo carga de batería USB. . . . . . . . . . . . . . . 27Ajustes de sonido . . . . . . . . . . . . . . . . . . . . . . . . . . 27Ajuste nivel EQ7 / Altavoz de subgraves . . . . 27Ajuste nivel Balance / Equilibrio . . . . . . . . . . . 27RBE (Potenciador de graves posterior) . . . . . . 28Nivel del altavoz 4.1ch . . . . . . . . . . . . . . . . . . . 28Ajustes visuales . . . . . . . . . . . . . . . . . . . . . . . . . . . 28Picture EQ . . . . . . . . . . . . . . . . . . . . . . . . . . . . . 28Aspecto . . . . . . . . . . . . . . . . . . . . . . . . . . . . . . . 29Ajustes de fuente . . . . . . . . . . . . . . . . . . . . . . . . . . 29Cambio automático de entrada (MHL)(XAV-712BT/612BT solamente). . . . . . . . . . . . . 31Información complementariaEquipo auxiliar de audio/video. . . . . . . . . . . . . . . 31Vista de cámara posterior . . . . . . . . . . . . . . . . . . . 32Actualización del firmware . . . . . . . . . . . . . . . . . . 32Precauciones. . . . . . . . . . . . . . . . . . . . . . . . . . . . . . 32Mantenimiento . . . . . . . . . . . . . . . . . . . . . . . . . . . . 38Especificaciones . . . . . . . . . . . . . . . . . . . . . . . . . . . 39Solución de problemas . . . . . . . . . . . . . . . . . . . . . 41Lista de códigos de idiomas . . . . . . . . . . . . . . . . . 48Para obtener información detallada sobre la conectividad y la capacidad de carga de la batería de smartphones, consulte “Resumen de funciones útiles de smartphone” en las páginas al final de este manual de instrucciones.ML.book Page 4 Friday, August 9, 2013 5:29 PM](https://usermanual.wiki/Sony-Group/XAV612BT.Short-Term-Confidential-User-Manual-1/User-Guide-2090582-Page-48.png)
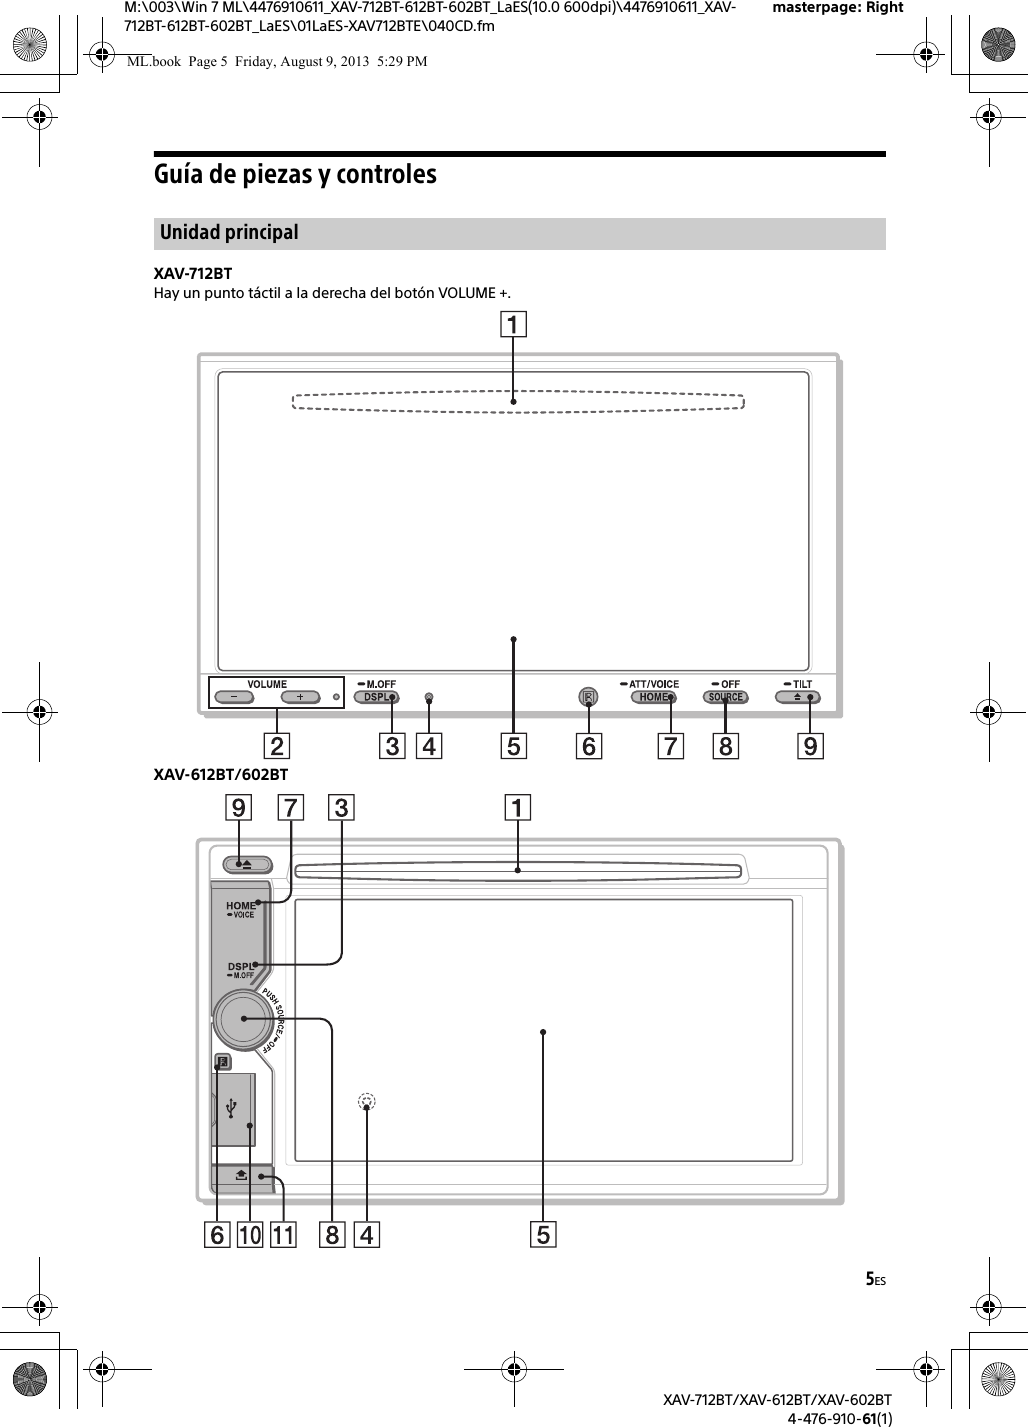
![6ESM:\003\Win 7 ML\4476910611_XAV-712BT-612BT-602BT_LaES(10.0 600dpi)\4476910611_XAV-712BT-612BT-602BT_LaES\01LaES-XAV712BTE\040CD.fmmasterpage: LeftXAV-712BT/XAV-612BT/XAV-602BT4-476-910-61(1)Ranura del disco(XAV-712BT: ubicada detrás del panel frontal)VOLUME –/+DSPL (pantalla)Cambia la intensidad del brillo de la pantalla.-M.OFF (monitor apagado)Mantenga presionado para apagar el monitor y la iluminación del botón. Toque cualquier parte de la pantalla para volver a encenderla.Botón de reinicio(XAV-612BT/602BT: ubicado detrás del panel frontal)Panel de visualización/táctilReceptor para el control remotoHOMEAbrir el menú HOME.-VOICEMantenga presionado durante más de 2 segundos para activar la función comando de voz. Cuando la función App Remote está activada, también se activa el reconocimiento de voz (solamente teléfono Android) y el marcado por voz. Cuando la función App Remote está apagada, solamente la función de marcado por voz está disponible.-ATT (atenuar) (XAV-712BT solamente)Mantenga presionado durante más de 2 segundos para atenuar el sonido. Para asignar la función ATT al botón HOME, seleccione [ATT ACTIVAR / DESACTIVAR] en [HOME Tecla de Función (Presionar 2seg)] (página 25).SOURCEEncienda el suministro de energía.Cambie la fuente. Cada vez que presiona, cambia a una fuente seleccionable en una ventana emergente en la pantalla actual.-OFFMantenga presionado durante 1 segundo para salir de la fuente.Mantenga presionado el interruptor durante más de 2 segundos para apagar la unidad. Cuando la unidad se apaga, la operación del comando remoto no está disponible.Dial de control de volumen (solamente para XAV-612BT/602BT)Gire para ajustar el volumen. (expulsar disco)-TILT (XAV-712BT solamente)Mantenga presionado para ajustar el ángulo del monitor.Puerto USB (XAV-612BT/602BT solamente)Abra la tapa para conectar un dispositivo USB.Botón pulsador del panel frontal (XAV-612BT/602BT solamente)El control remoto puede utilizarse para operar los controles de audio. Para operaciones de menú, use el panel táctil. Quite la envoltura aislante antes de usarlo.POSITIONCambie la posición de escucha. (atrás)Presione para regresar a la pantalla anterior/volver al menú en un CD video (VCD).EQ (ecualizador)Seleccione una curva de ecualizador.Botones numéricos (0 - 9)CLEARZ×Z (Zone × Zone) (página 23) (reproducción/pausa)/ (anterior/siguiente)Botones de configuración de la reproducción del DVDZAP (zappin) (página 15)/// (cursor)/ENTERRM-X271 Control remotoML.book Page 6 Friday, August 9, 2013 5:29 PM](https://usermanual.wiki/Sony-Group/XAV612BT.Short-Term-Confidential-User-Manual-1/User-Guide-2090582-Page-50.png)